

Page 1

MANUAL INSTRUCTION
ИНСТРУКЦИЯ ПО ЭКСПЛУАТАЦИИ
AIR CONDITIONER (SPLITSYSTEM)
КОНДИЦИОНЕР (СПЛИТСИСТЕМА)
МОДЕЛЬ VT2108
МОДЕЛЬ VT2109
МОДЕЛЬ VT2112
˚ Ł conder.qxd 20.02.03 18:12 Page 2
Page 2
OPERATION MANUAL
I. PERFORMANCE AND COMPONENTS OF THE AIR CONDITIONER
1. PERFORMANCE
(1) Fully automatic operation: The computer program fully automatically controls the operation and
selects an appropriate function mode and make the temperature and humidify of room suitable.
(2) Circulation of airflow: Selecting a mode from among the following four airflow modes: high,
medium, low and automatic speeds.
(3) Simulation of natural wind: Simulating the indoor natural wind with the blades at the airflow out#
let.
(4) Sleep mode: Automatically adjusting the temperature after sleeping to the most comfortable
extent based on the physiological rhythm.
(5) Dehumidifying: Controlling the room humidity effectively and keeping the room air dry and fresh
without changing the room temperature.
(6) Cross flow fan of big diameter: Ensuring sufficient air volume and minimizing noise during the
running of the motor.
(7) Fan motor of high performance: Employing the advance plastic sealed motor and making it
possible to save energy and run in ultra#quietness.
(8) 24#hour timing on/off switch: Setting the desired start/stop time whenever necessary.
(9) Fully automatic computer stored modes: Automatically memorizing the set mode and recover#
ing it when restarting the machine to avoid setting modes repeatedly. Pressing the "operation/stop
key" if you want to use the mode set last time.
(10) Sophisticated appearance: Adopting the current popular design of appearance and colour to
achieve attractive appearance soft and harmonious colours.
(11) Leading in comfort: Air becomes even fresher with the latest air fresh purifying system and
double filtering.
Hoping you will be satisfied with the air conditioner!
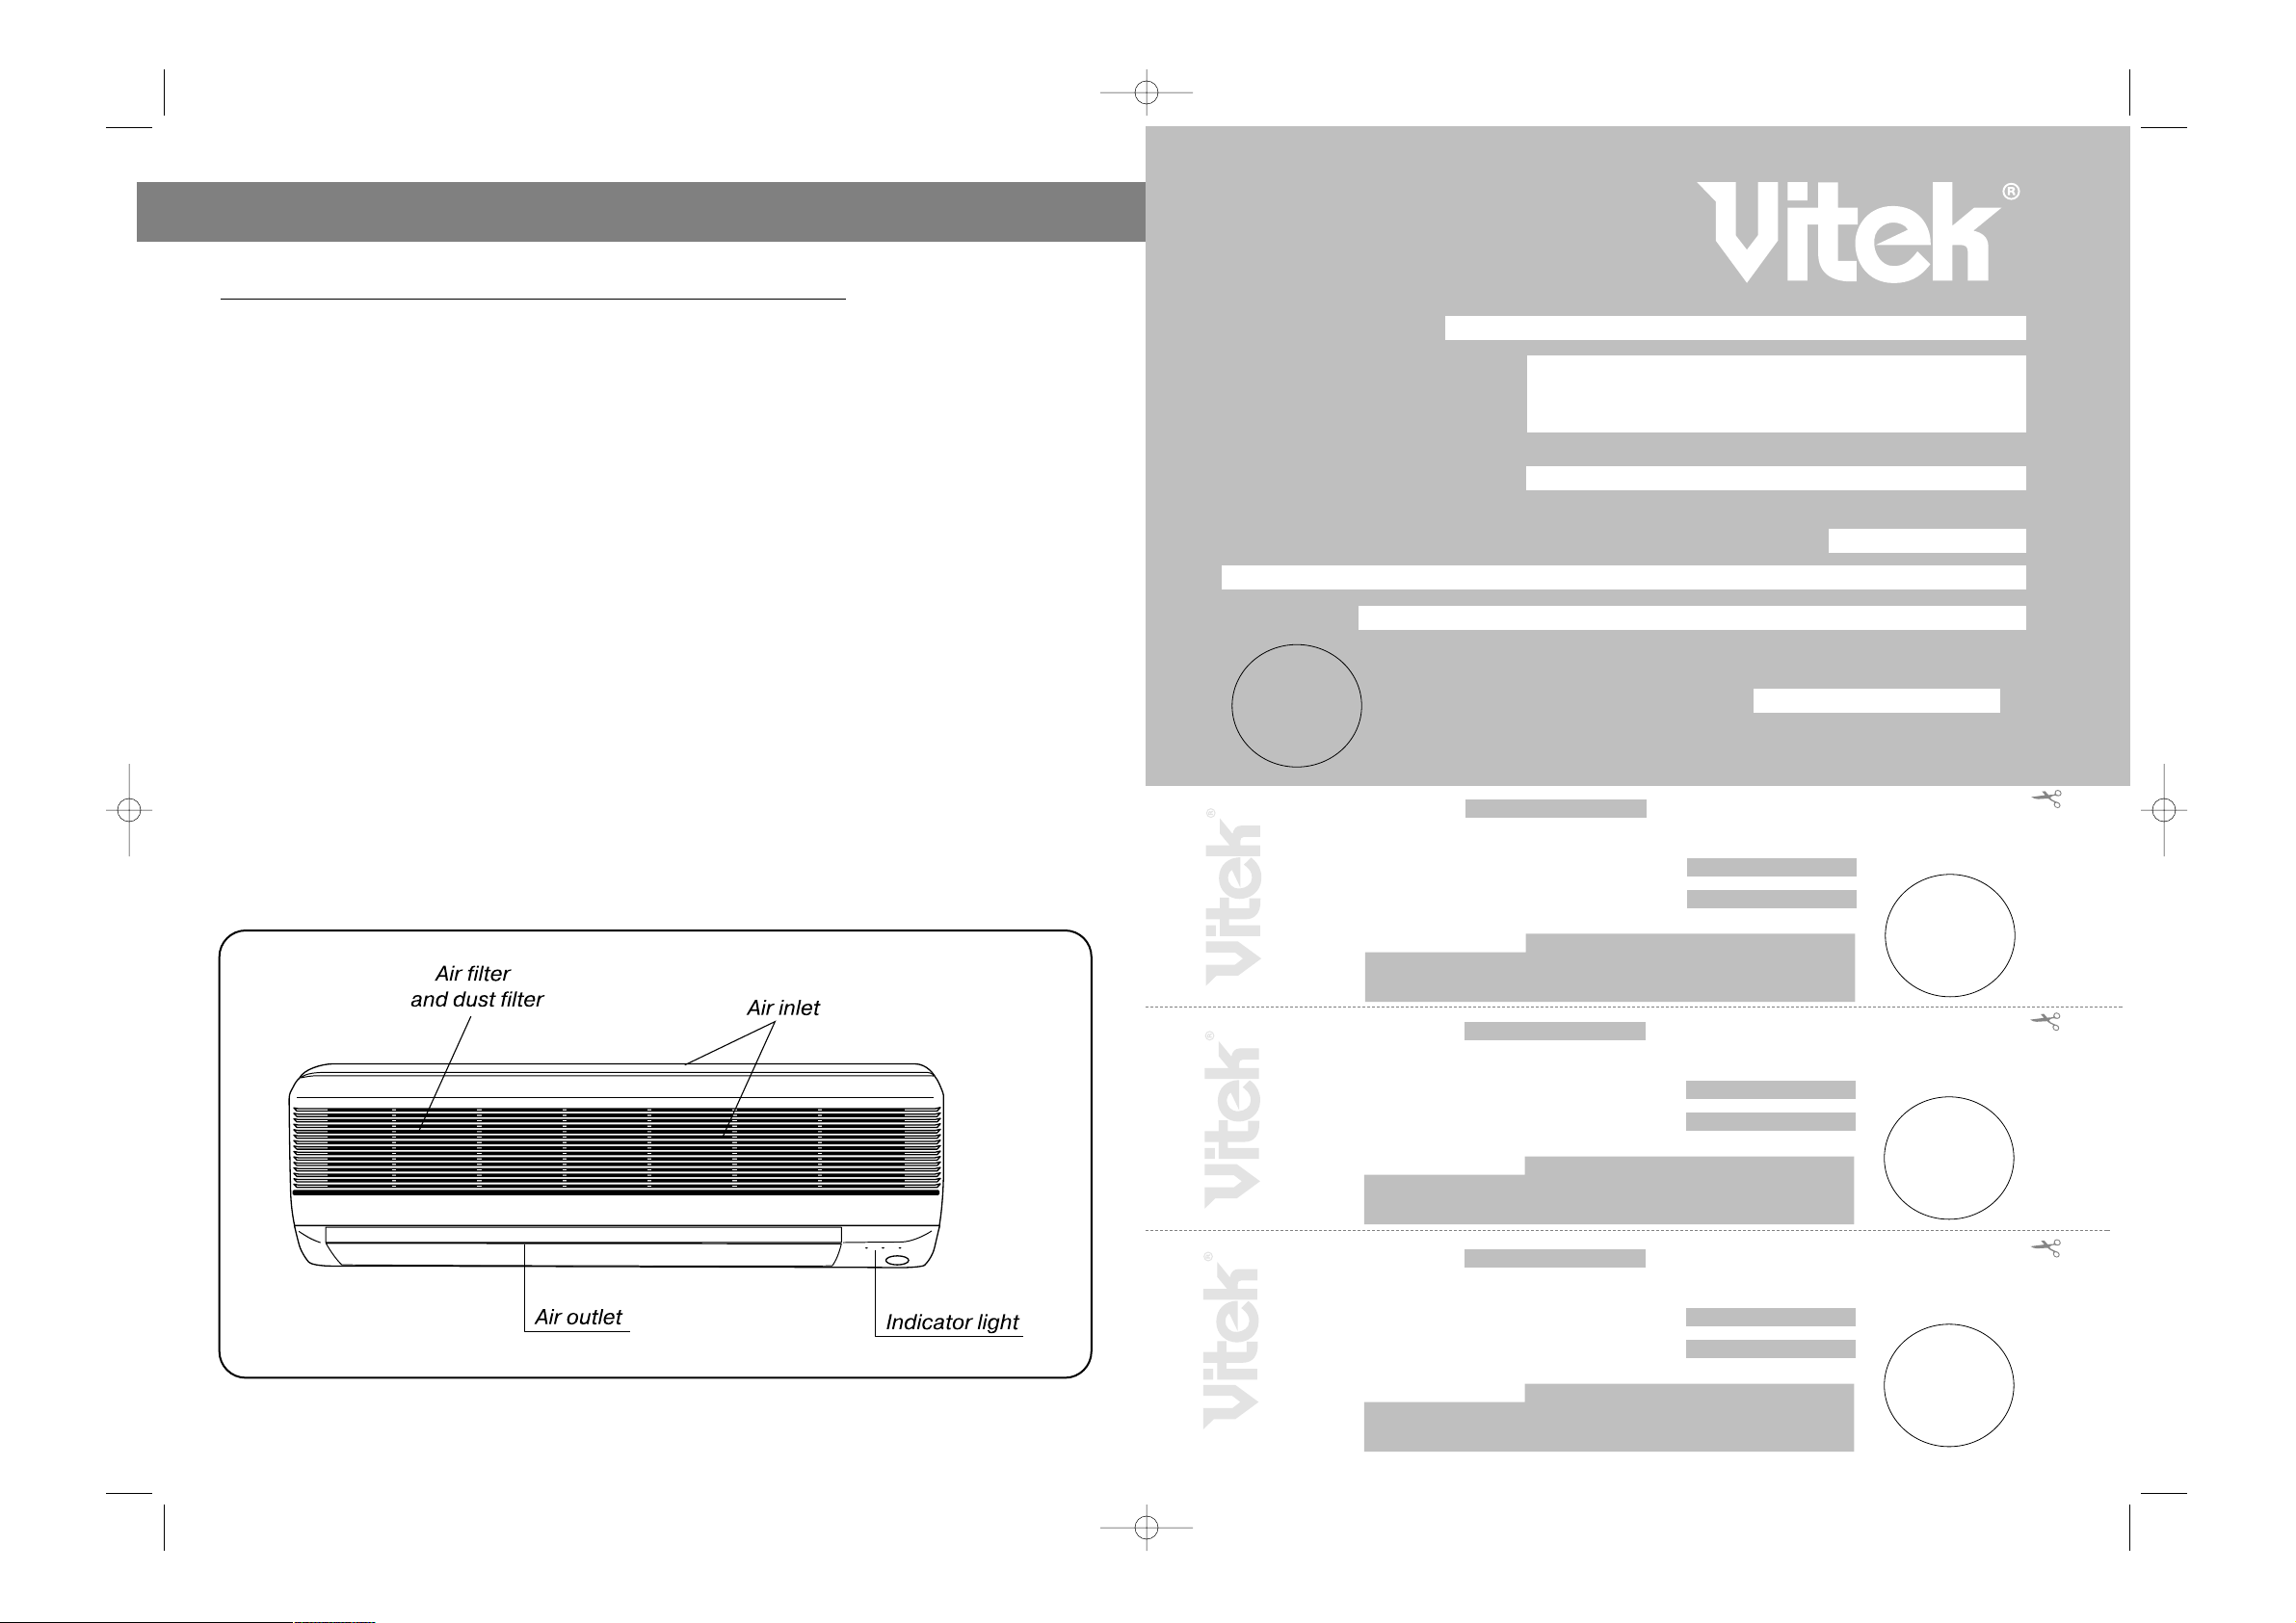
2. INDOOR UNIT
ENGLISH
2
Гарантийный талон
Сведения о покупке
Модель:
Серийный №:
Дата покупки:
Сведения о продавце
Название и адрес продающей организации
Телефон:
Подтверждаю получение исправного изделия, с условиями
гарантии ознакомлен
Подпись покупателя
Внимание!
Гарантийный талон действителен только при наличии печати
продающей организации
М.П.
Купон №3
М.П.
Модель: Серийный №:
Дата поступления в ремонт:
Дата выполнения ремонта:
Вид ремонта:
Купон №2
CDR 210800000
CDR 210800000
CDR 211200000
CDR 210800000
CDR 210800000
CDR 211200000
Купон №1
М.П.
Модель: Серийный №:
Дата поступления в ремонт:
Дата выполнения ремонта:
Вид ремонта:
CDR 210800000
CDR 210800000
CDR 211200000
М.П.
Модель: Серийный №:
Дата поступления в ремонт:
Дата выполнения ремонта:
Вид ремонта:
CDR 210800000
CDR 210800000
CDR 211200000
˚ Ł conder.qxd 20.02.03 18:12 Page 4
Page 3
3. OUTDOOR UNIT
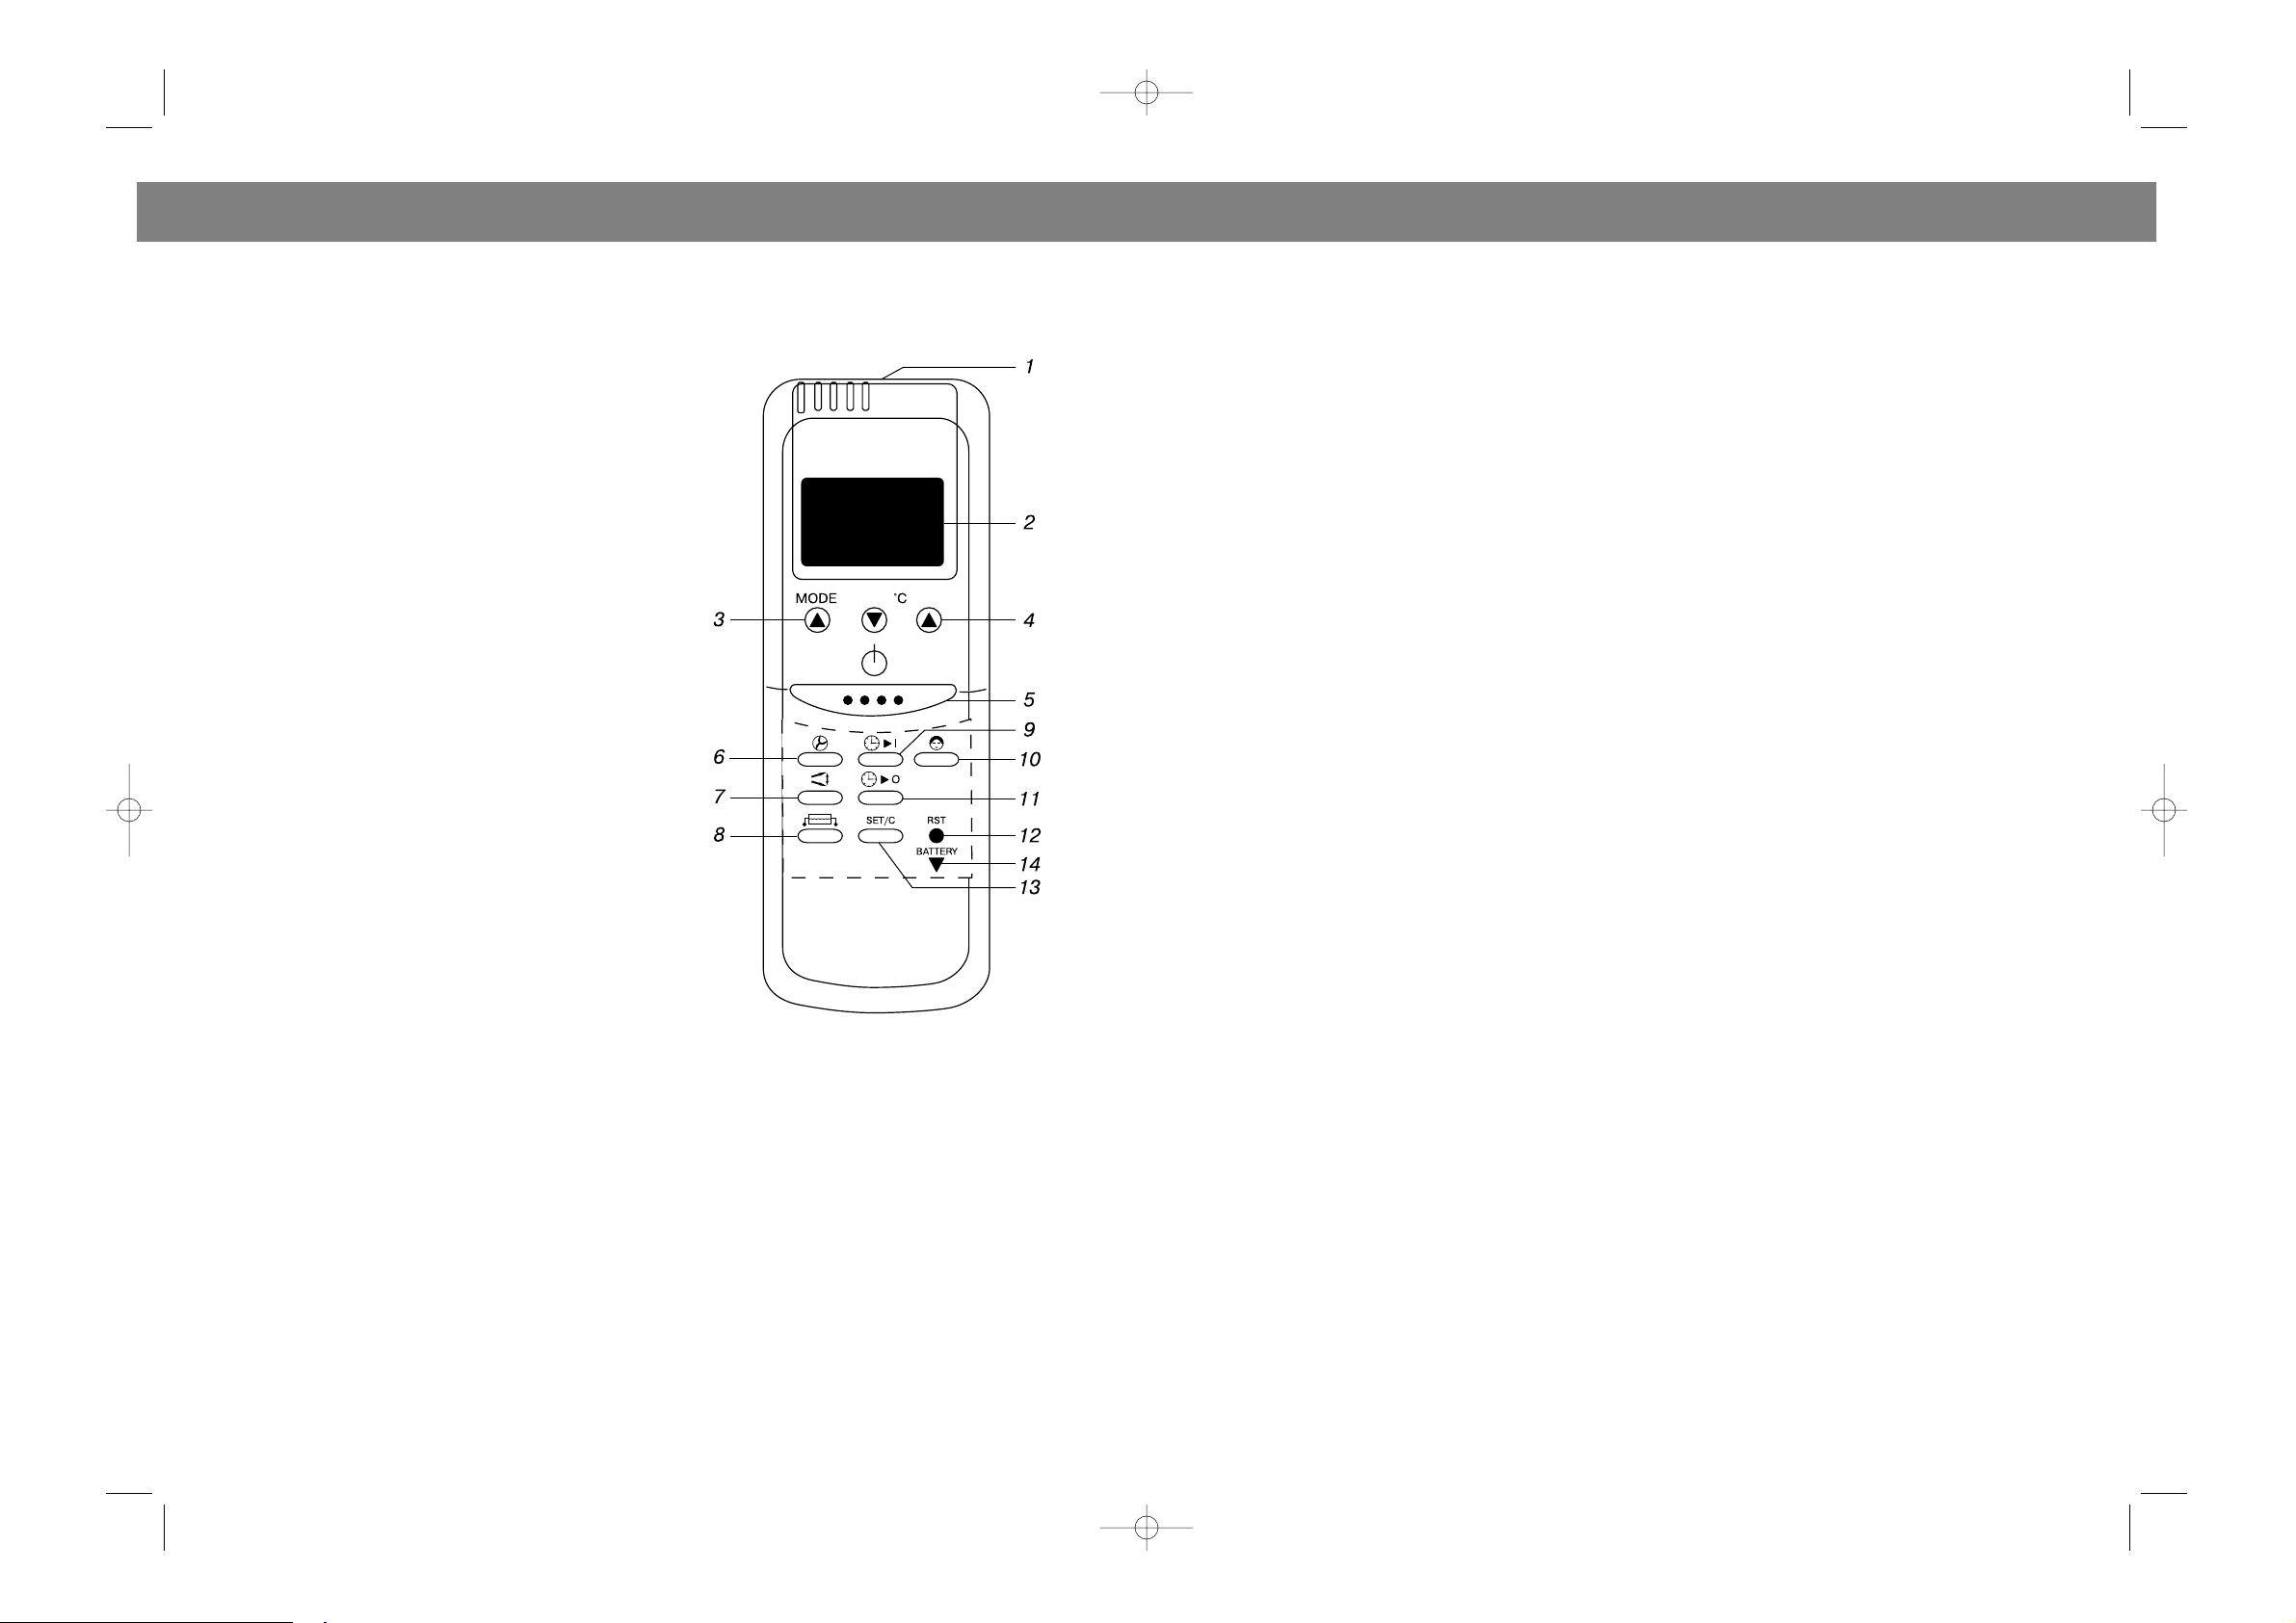
4. USE OF THE REMOTE CONTROL
Description of the liquid crystal display:
ENGLISH
3
Page 4
УСЛОВИЯ ГАРАНТИЙНОГО ОБСЛУЖИВАНИЯ
Уважаемый покупатель!
Фирма VITEK выражает благодарность за Ваш выбор и гарантирует высокое
качество и безупречное функционирование приобретенного Вами изделия при
соблюдении правил его эксплуатации.
Срок гарантии на все изделия - 12 месяцев со дня покупки. Данным гарантийным
талоном VITEK подтверждает исправность данного изделия и берет на себя
обязательство по бесплатному устранению всех неисправностей, возникших по вине
производителя.
Гарантийный ремонт может быть произведен в авторизированном сервис-центре
на территории России.
Условия гарантии:
1. Настоящая гарантия имеет силу при соблюдении следующих условий:
- правильное и четкое заполнение гарантийного талона с указанием наименования
модели, ее серийного номера, даты продажи и печати фирмы-продавца в
гарантийном талоне и отрывных купонах;
- наличие оригинала квитанции (чека), содержащего дату покупки.
2. VITEK оставляет за собой право на отказ в гарантийном обслуживании в случае
непредоставления вышеуказанных документов, или если информация в них будет
неполной, неразборчивой, противоречивой.
3. Гарантия не включает в себя периодическое обслуживание, установку, настройку
изделия на дому у владельца, чистку аудио-видео головок.
4. Не подлежат гарантийному ремонту изделия с дефектами, возникшими
вследствие:
- механических повреждений;
- несоблюдении условий эксплуатации или ошибочных действий владельца;
- неправильной установки, транспортировки;
- стихийных бедствий (молния, пожар, наводнение и т. п.), а также других причин,
находящихся вне контроля продавца и изготовителя;
- попадания внутрь изделия посторонних предметов, жидкостей, насекомых;
- ремонта или внесения конструктивных изменений неуполномоченными лицами;
- использования аппаратуры в профессиональных целях;
- отклонений от Государственных Технических Стандартов питающих,
телекоммуникационных и кабельных сетей;
- при выходе из строя деталей, обладающих ограниченным сроком службы.
5. Настоящая гарантия не ущемляет законных прав потребителя, предоставленных
ему действующим законодательством.
РУССКИЙ
33
Instructions for operating keys:
When a remote control signal is transmitted, a transmission icon on the display flashes once indi#
cating the signal has beed transmitted.
1. Transmission window
2. Liquid crystal display
3. Mode select key (LCD): Selecting from among
the following five functions: Automatic model,
Cooling, Dehumidifying, fan and heating. The fast
key function indicating the above operating modes
in a cycle when pressed without being released.
However, the transmission icon will not appear
until the key is released and the confirmed mode
is transmitted.
4. Setting keys of room temperature (time): The
set temperature (time) will rise by 1°C (or 1 hour)
when the ! key is pressed once and the set tem#
perature (time) will fall by 1°C when the " key is
pressed once. Both of them have the fast key
function and can make the set temperature rise or
fall continuously when the key is pressed without
release.(the time range from 1~24 hours)
5. Operation / Stop key: When this key is pressed,
the memorized modes and other information
about temperature, speed, direction of airflow and
sleep, etc. in the remote control will be transmitted
to the unit and it will operate correspondingly.
When this key is pressed again, the main unit will
stop immediately.
6. Switching key of air volume: Selecting from
among the following four functions: automatic
mode, high speed , low speed , weak speed . The
fast key function indicating the above operating
modes in a cycle when pressed without being
released. However, the transmission icon will not
appear until the key is released and the confirmed
mode is transmitted.
7. Automatic control key of airflow direction: It is used to automatically control the airflow direction.
8. Electric%heat key: It is used to select assistance electric#heat mode. When heating. Press it once
and the electric#heat function will start. Press it again and the function air will stop. The function is
optional for heat#pump model.
9. Setting the ON Timer key: It is used to start the machine at the set time. You can set the desired
stop time by pressing it and then the 4th key (the interval is one hour).
10. Manual control key of airflow direction: it is used to set the desired airflow direction manually.
11. Setting the OFF Timer key: It is used to stop the machine at the set time. Also you can set the
desired stop time by pressing it (the interval is one hour).
12. Reset key: When the remote control fails to work normally, press it can make remote control
normally.
13. Confirmation of Timer key: It is valid only after the setting of the OFF or ON Timer key. When the
time setting is finished, press it and the timing icon will stop blinking and timer counting will start.
14. The battery box: Pull out the active cover, you can change the battery.
ENGLISH
4
˚ Ł conder.qxd 20.02.03 18:12 Page 8
Page 5

5. PREPARATION BEFORE OPERATION
(1). Connection power supply
(2). Preparation for the remote control
Important!
• Never confuse between positive (+) and negative
(#).
• Always use 2 ordinary or alkaline batteries of the
same type.
• Never use rechargeable batteries.
• When the remote control is not used for a long
time, the batteries should be taken out.
(3). Points for attention in using the remote con#
trol:
• The effective distance of the signal from the
remote control is not over 8 meters.
• Ensure that there are no obstacles between the
remote control and the signal receiver.
• Never put the remote control at the place of high
temperature or near the heat sources.
• It will make the beep sound when the indoor unit
receives a signal.
II. USE OF THE AIR CONDITIONER.
1. AUTOMATIC FUNCTIONS. COOLING, DEHUMIDIFYING, FAN, HEATING.
(1) Press the "operation/stop key" to turn on the liquid crystal display.
(2) Press the "mode select key" to set the automatic mode and the automatic operation icon
appears, the air conditioner will automatically select one of the following modes:
Note: For some Heating pump type air conditioners, there are assistance electric#heat function
(3) Method of setting temperature.
Press "Setting keys of temperature" ",! to set temperature. The range covers 16~30°C.
(4) Method of change Fan.
Press "Fan" to select one from among the following modes: automatic, low, medium and high
speeds.
(5) Method of change airflow direction
Press "Airflow direction" to adjustment of airflow direction.
(6) When adjust to the last function, please point the transmission window of the remote controller
towards the receiver of the air conditioner, it will make the beep sound when it receives a signal.
(7) Stop the air conditioner.
Press again the "Operation/stop key" to stop the air conditioner.
Note:
• In order to protect the compressor, the unit is equipped with protection design of automatic 3#min#
utes. When restarting the air conditioner, the compressor will not be in operation unless three min#
utes has passed since its stopping. In cooling mode when the room temperature is lower than the
setting temperature the compressor will stop and only the indoor fan will be in operation;. When
the room temperature is higher than the setting temperature the compressor will restart the cool
ing (It is not a failure but an energy#saving function).
5
ПО ЗАВЕРШЕНИИ УСТАНОВКИ КОНДИЦИОНЕРА ПРОВЕРЬТЕ СЛЕДУЮЩЕЕ
РУССКИЙ
32
Что необходимо проверить
Надежно ли закреплен кондиционер?
Проверили ли вы кондиционер на утечку
хладагента?
Достаточна ли термоизоляция?
Надежно ли работает дренаж?
Соответствует ли требуемому номинальное
напряжение в питающей сети?
Правильно ли установлены соединительные
трубки и электропроводка между блоками?
Установлен ли провод заземления и надежно
ли он соединен?
Соответствует ли техническим требованиям
электрический провод питающей сети?
Не мешают ли циркуляции воздуха через
окна воздухозаборника и воздухоотвода
посторонние предметы?
Возможная неисправность
Блок может упасть, вибрировать при работе,
являться источником шума.
Утечка хладагента влечет к снижению
эффективности работы кондиционера с
последующей его поломкой
Плохая термоизоляция может привести к
образованию конденсата и отеканию воды.
Плохой дренаж является причиной
образования конденсата.
Несоответствие номинального напряжения
может повлечь отказ в работе и даже
поломку кондиционера.
Неправильное соединение может повлечь
отказ в работе или поломку кондиционера.
Это может вызвать поражение
электротоком.
Несоответствие может привести к отказу в
работе или поломке.
Это может привести к снижению
эффективности в режиме охлаждения.
ENGLISH
˚ Ł conder.qxd 20.02.03 18:12 Page 10
Page 6
3. Налейте воды на панель внутреннего блока и убедитесь в том, что она выльется через
систему дренажа.
Установка дренажа
Установите муфту в отверстие, диаметром 25мм, имеющееся в основании нижней панели
внешнего блока и подсоедините к ней дренажный шланг. Теперь конденсат будет удаляться
из внешнего блока в надлежащее место.
По завершении установки
1. Сложите вместе и обмотайте входящей в комплект поставки лентой соединительные
трубки и электропроводку.
2. Обработайте шпатлевкой отверстие в стене.
Пробное включение
Откройте лицевую панель внутреннего блока и увидите кнопку испытательного прогона
(АВАРИЯ).
Нажмите эту кнопку, и кондиционер включится. Используйте ПДУ.
РУССКИЙ
31
• In dehumidifying mode. When the room temperature is higher than the setting temperature, the air
conditioner will be in cooling operation at low fan. When the room temperature dose to the setting
temperature, the machine will automatically transfer to the independent dehumidifying process. It
is a moderate cooling mode will effective removal of humidity while without decreasing of the room
temperature.
• In fan mode, the compressor does not work, only the fan operates and the power consumption is
only a few scores of watts. The drop of the room temperature is not evident in this mode.
• In heating mode only about 20 seconds after the compressor starts the air indoor fan starts. This
avoid discharging cold air when the air conditioner restarts after stopping.
• In heating mode*, when the room temperature is higher than the setting temperature the com#
pressor will stop and only the fan will continue for 2 minutes, until the compressor restarts. When
the room temperature is lower than the setting temperature, the compressor will restart to resume
the heating process.
In heating mode*, when the outdoor temperature is low, heating will lead to frost on the outdoor
coil. Frosting will result in the decline of the heating capacity. The machine is equipped with an
auto#defrosting device. It takes about 5#12 minutes to finish defrosting and during this period the
indoor unit will stop temporarily.
• The heating should be in operation when the outdoor temperature falls in the range between #8C
to 25°C. The air conditioner may be in malfunction if it is used out of this range.
2. SLEEP FUNCTION
Operation steps:
(1) Press the "Operation / stop key" to turn on the liquid crystal display.
(2) Press the "Function switching key" to set the operating mode. You can set one of the following
modes according to your needs: automatic, cooling, dehumidify, fan and heating modes (only
heat#pump mode) and the corresponding operating icon appears.
(3) Press "sleep" key, the unit will operate in sleep mode.
3. METHOD OF SETTING TEMPERATURE
Operating steps:
(1) In the automatic mode, the automatic temperature icon doesn't display 0 (the standard temper#
ature).
Pressing the " key once, the setting temperature rises by "TC. Pressing the ! key once, the set#
ting temperature decreases by 1°C.
(2) In the non#automatic mode, the set temperature range covers 16°C#30°C. If the " key is
pressed once, the set temperature will rise by 1°C and if the ! key is pressed once, the set tem#
perature will decrease by 1°C. The set temperature will rise or decrease progressively until the cor#
responding key is released.
Note: In the automatic mode the standard temperature is the one internally set by the air condition#
er to be comfortable to human bodies.
4. ADJUSTMENT OF AIRFLOW DIRECTION
Upanddown adjustment of the airflow direction:
(1) If the "automatic control key of airflow direction" is pressed, the louvers at the air outlet will
swing up#and#down. Press one again the louvrs will fix the setting position.
Left Right adjustment of the airflow direction:
Manually move the "left#to#right airflow direction louvers" to regulate the direction of the airflow.
5. METHOD OF TIME SETTING
(1) Open the remote control cover. Press the "On timer key", the set time will appear, the ON Timer
icon begin blinking, indicating entry into the ON timer mode.
6
ENGLISH
˚ Ł conder.qxd 20.02.03 18:12 Page 12
Page 7

Таблица моментов затяжки
Диаметр б%гранной гайки Момент затяжки (М.т)
06 15#20
09.5 31#35
012 50#55
Внимание!
Приложение большего вращательного момента может привести к разрушению конусной
соединительной поверхности трубки.
Продувка воздухом и проверка на утечку
1. Снимите медные заглушки с отсечных вентелей внешнего блока.
2. Совместите центр подключаемой соединительной трубки и штуцера соответствующего
вентиля и заверните соединительную гайку рукой на 3#4 оборота.
3. Затяните конусную гайку с помощью динаметрического и гаечного ключей.
4. Снимите резьбовые заглушки с газового и жидкостного сервисных вентилей.
5. Ослабьте перекрывающее устройство жидкостного вентиля с помощью шестигранного
ключа.
6. Нажмите на сердечник ниппеля газового вентиля с тем, чтобы удалить воздух и влагу,
остающиеся в системе охлаждения.
7. Отпустите сердечник газового вентилей, как только хладагент станет выходить из
системы, затем установите заглушку на сервисный вентиль.
8. Полностью откройте жидкостной и газовый вентили.
9. Затяните заглушки клапанов и проверьте все стыки внутреннего и внешнего блоков на
возможную утечку хладагента с помощью мыльной пены или галогенового течеискателя.
10. При возможности, удаляйте воздух и влагу из системы охлаждения с помощью
вакуумного насоса.
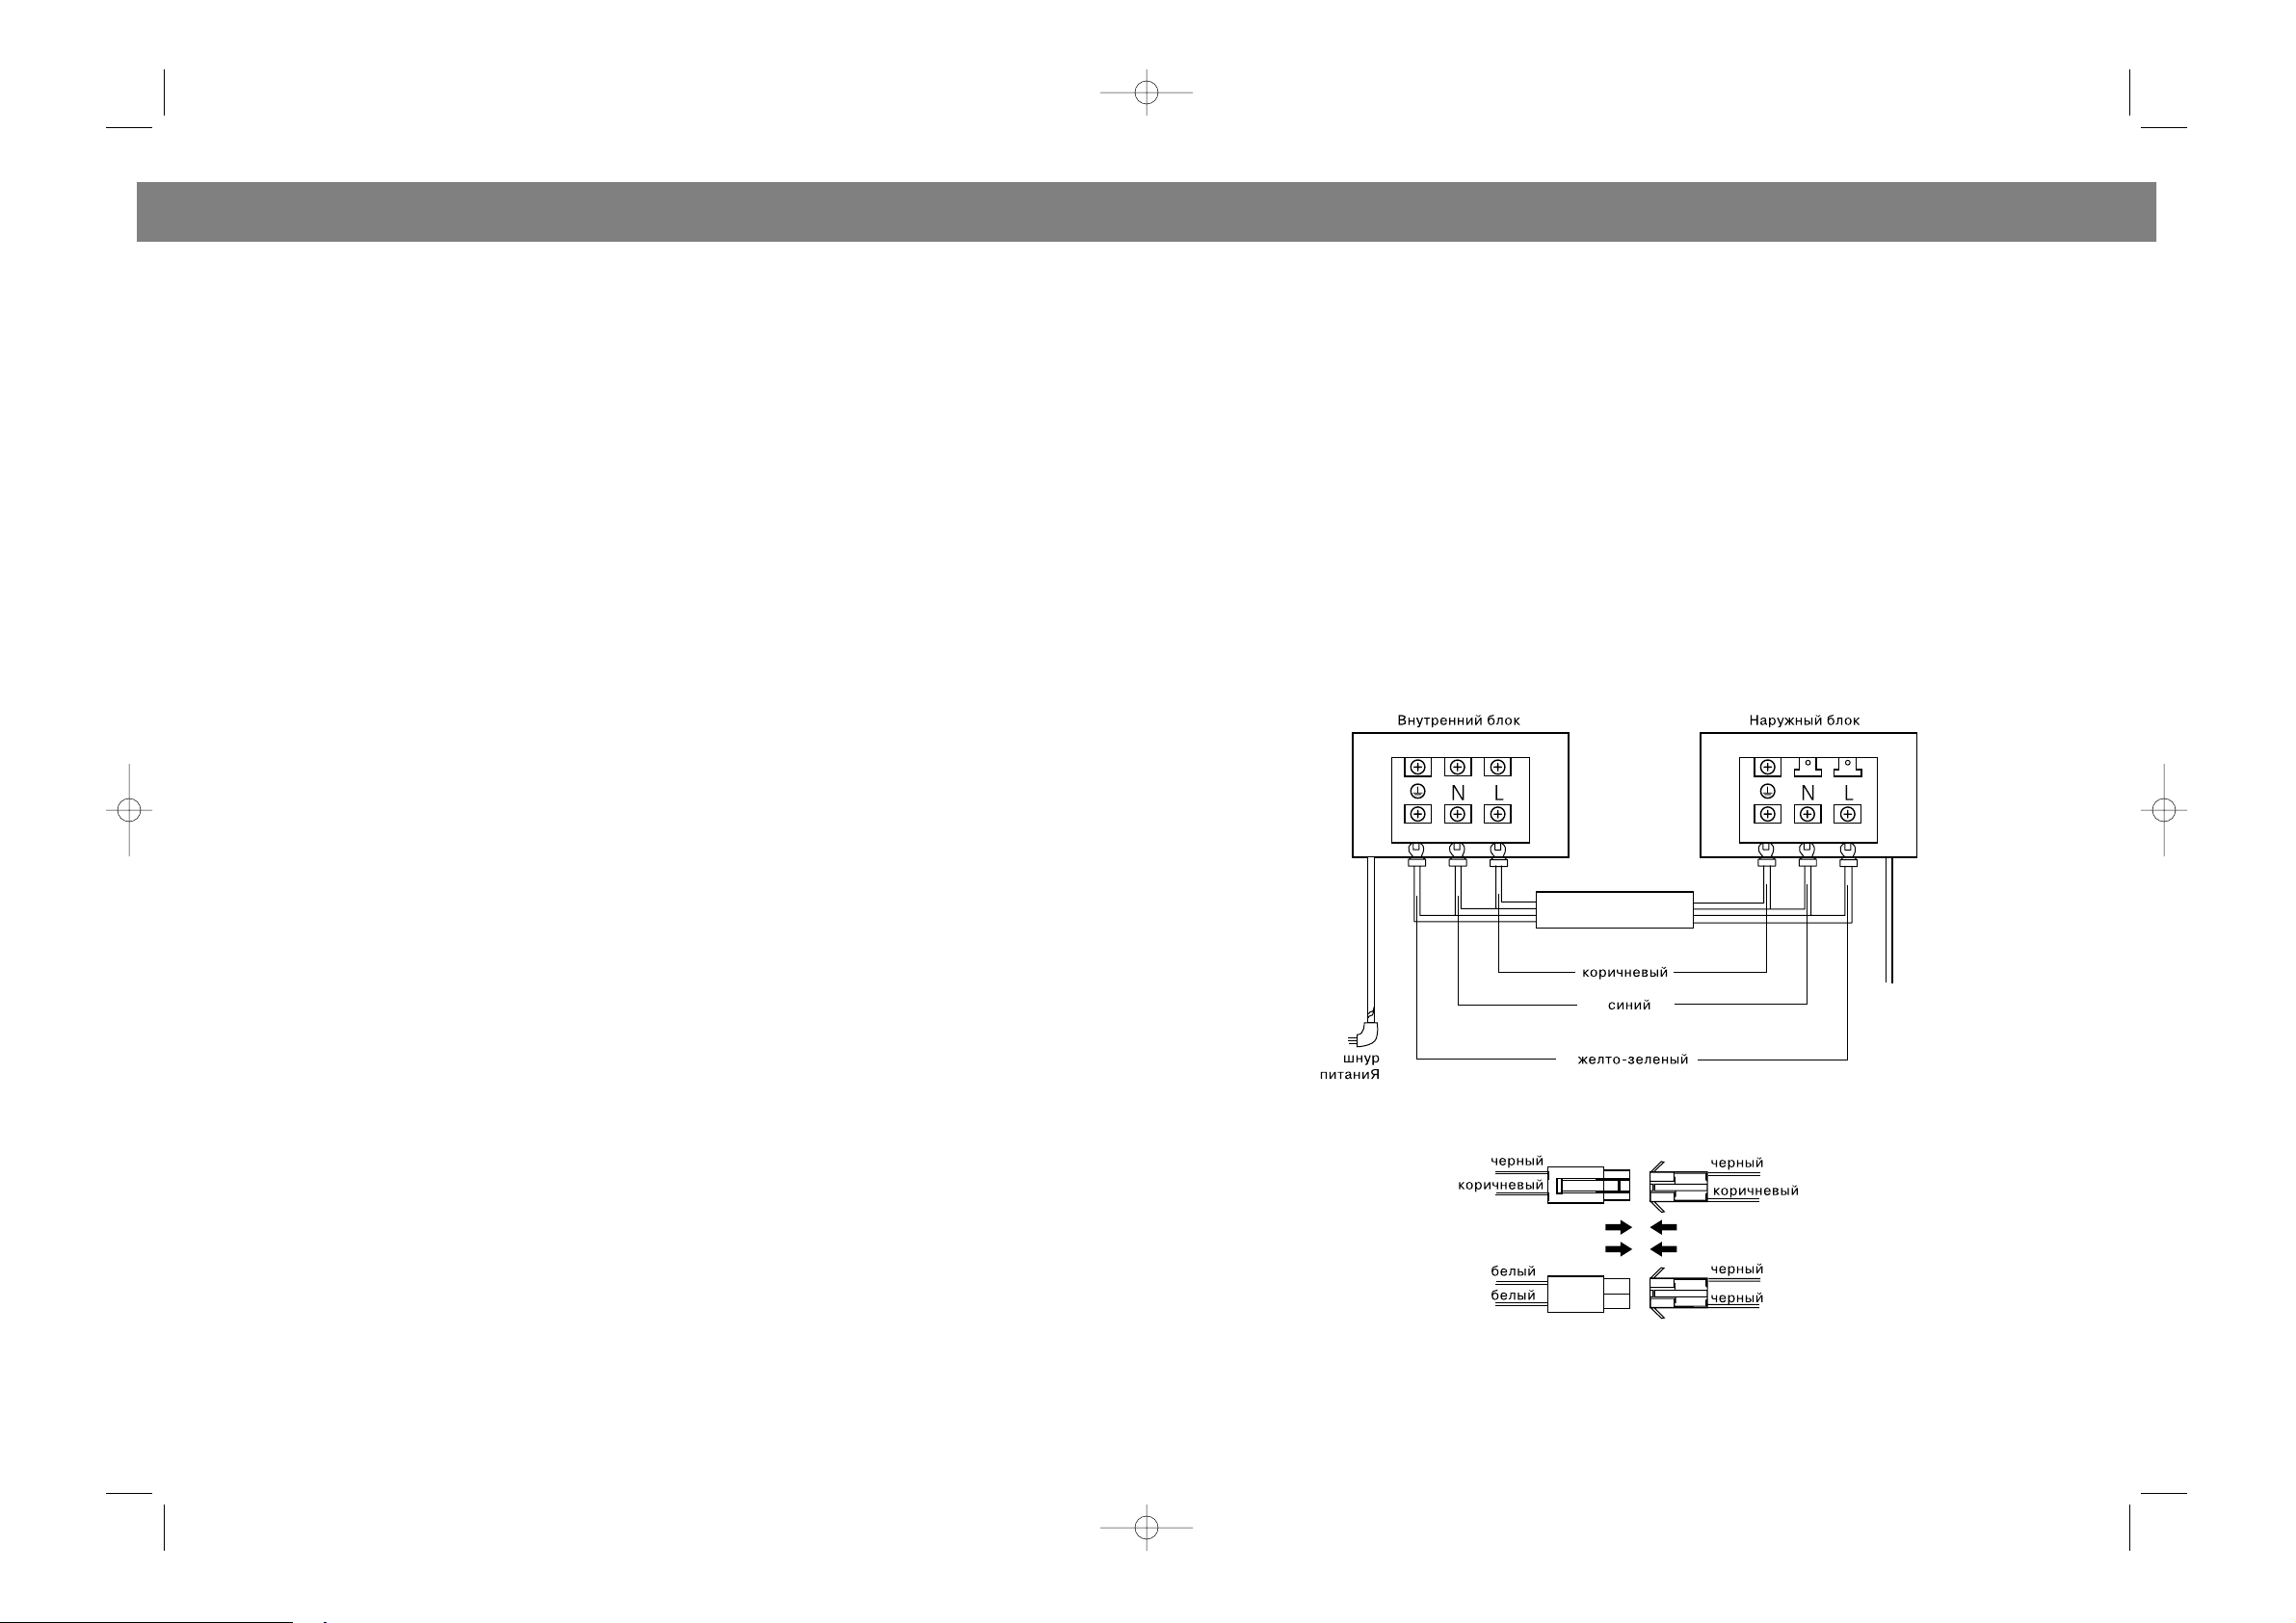
Подключение межблочной проводки
1. Снимите защитную крышку с ручкой.
2. Снимите фиксатор провода и закрепите электрические провода на соответствующих
контактах соединительной колодки. Убедитесь в соответствии соединяемых проводов с
контактами внутреннего блока.
3. Закрепите провода с помощью имеющегося фиксатора и соедините соответствующие
разъемы.
4. Убедитесь в надежности соединений проводки.
5. Установите на место защитную крышку.
6. Если силовой провод питающей сети не имеет специального разъема, то при закреплении
каждого провода на клемме необходимо обеспечить наличие расстояния не менее 3 мм
между контактами.
Дренаж конденсата, образуемого во внешнем блоке
В процессе работы кондиционера в режимах обогрева или удаления инея на
теплообменнике внешнего блока образуется конденсат, который необходимо удалять через
дренаж.
Установка дренажной трубки
1. Установите дренажную трубку.
2. После того, как дренажная трубка установлена, обмотайте соединение
термоизоляционной лентой.
РУССКИЙ
(2) Press the "Time Adjusting keys". Press the " key to increase set time while press the key ! to
decrease set time. Ten minutes will be increased when the corresponding key is pressed. They are
both fast keys as well.
(3) When time adjustment is finished, press the "Confirmation of Timer key" again to end it. Then
the icon will stop blinking and the indoor unit will make the beep sound and the time indicator will
light at the same time, indicating time counting to start. Then the ON Timer setting is completed.
Notes: As soon as the time for the ON Timer arrives, the air conditioner will operate according to
the mode set at previous time or at present. If you want to cancel this mode, press the "ON Timer
key" to make the icon blinking and then press the "Timer Cancel key" (key name "set/c")
Method of OFF Timer setting:
(1) Open the remote control cover. Press the "OFF Timer key" the set time will appears and the OFF
Timer icon begin blinking, indicating entry into the OFF Timer mode.
(2) Press the "Time Adjusting keys". Press the " key to increase set time while press the !key to
decrease set time. The minutes will be increased or decreased when the corresponding key is
pressed. They are both fast keys as well.
(3) When time adjustment is finished, press the "confirmation of Timer key" to end it. Then the icon
will stop blinking and the indoor unit will make the beep sound and the time indicator will light at the
same time, indicating time counting to start. Then the OFF Timer setting is completed.
Notes: If you want to cancel this mode, press the "OFF" Timer key" to make the icon blinking and
then press the "Timer Cancel key".
6. FORCED OPERATION
Open the front cover, press the "EMERGENCY" button once, the air conditioner will enter into the
fully automatic operation mode. Press it again, and the machine will stop.
7. MODE INDICATORS
(1) Operation indicator:
It displays red (power) or green (operation) on the receiver panel. It displays red when the machine
is connected to the power supply and turns to green when the compressor operates and turns to
red again when the compressor stops.
(2) Timer indicator:
The yellow one is the timer indicator. The indicator lights when timer is set, and the indicator turns
off when the timer is canceled. In the heating mode (heat#pump model) when the indoor tempera#
ture is low, the indoor unit will not operate to prevent the cold air leaving from the fan and the yellow
indicator lights. It will blink every 0.5 seconds when the temperature of the indoor unit is abnormal
and it will blink every 2 seconds when the machine is in the defrosting mode.
(3) Sleep indicator:
The orange one on the receiver panel is sleep indicator. The indicator lights in the sleep mode and
turns off when the mode is canceled. In the heating mode (heat#pump mode), when the outdoor
unit frosts, the electric defrosting control will operate automatically to defrosting the while the
indoor unit will stop temporarily and the sleep indicator will blink to remind the user.
III. POINTS OF A
TTENTION
Pay attention:
1. You should turn off the air conditioner, cut off the power supply, and inform the service center in
case the following conditions occur:
• The switch fails to work normally.
• Something has dropped into the air conditioner.
730
ENGLISH
˚ Ł conder.qxd 20.02.03 18:12 Page 14
Page 8

3. Согните трубки, придав им необходимый для подключения угол.
4. С помощью кусачек удалите из отверстия с наиболее приемлемой для установки стороны
панели крепления предохранительную заглушку.
Дополнительные работы по установке трубок во внутреннем блоке
Если трубки были установлены с правой стороны блока, то следуйте приводимым ниже
рекомендациям и схеме.
1. Снимите с тыльной стороны внутреннего блока монтажную панель, удалите заглушку из
отверстия для ввода трубок с правой стороны и протяните дренажную трубку сквозь
отверстие.
2. Отсоедините панель, фиксирующую трубки и осторожно согните трубки, придав им
необходимые углы и радиусы, как показано на рисунке. Будьте осторожны, не допускайте
замятия трубок.
3. Выпрямите трубки и протяните их сквозь отверстие. Проверьте их на возможные опасные
деформации.
4. Проверьте состояние изгиба (точка Н) трубок на предмет возможных деформаций.
Подсоединение трубок
Трубки должны быть чистыми внутри. Недопустимо попадание внутрь мусора или леска, а
также стружки после отрезания трубки.
1. Совместите центры соединяемых деталей и от руки заверните коническую гайку.
2. С помощью динамометрического ключа затяните гайки, с моментом затяжки в
соответствии с прилагаемой таблицей.
Внимание!
Чрезмерное усилие при затяжке конических гаек может привести к повреждению нитей
резьбы и, как следствие, повлечь утечку хладагента.
3. Оберните теплоизоляционной лентой соединительные трубки.
Таблица моментов затяжки
Диаметр гайки (мм) Момент затяжки (М%м)
6,35 14#18
9,25 34#41
12,7 49#54
Крепление корпуса внутреннего блока
1. Надежно закрепите внутренний блок на замках монтажной панели.
2. Проверьте качество крепления покачиваниями блока вправо#влево.
УСТ
АНОВКА НАРУЖНОГО БЛОКА
Установка блока на рамный кронштейн
Внимание! Рамный кронштейн должен быть надежно закреплен винтами с гайками, чтобы
блок стоял строго горизонтально и устойчиво.
Подключение соединительных трубок
1. Подсоедините трубки к резьбовым соединениям 2# и 3#ходового клапанов и заверните
гайки вручную на несколько оборотов.
2. С помощью динамометрического и гаечного ключей затяни те конические гайки с
усилием, указанным в приводимой ниже таблице.
РУССКИЙ
29
• The air conditioner appears abnormal.
2. There must be a special cable and a special socket to install the air conditioner. It is not permit#
ted for the machine to use the same power socket with other appliances. If the power voltage is
lower or higher than that, the air conditioner will fail to start well or maintain normal operation. Only
the fuse of rated capacity should be employed and never use a wire to replace the fuse.
3. When the air conditioner operates, do not stuff a foreign object into the air intake or air outlet to
avoid damaging the machine or injuring human bodies.
4. Do not splash water on the air conditioner when cleaning it. Do not put on the machine a con#
tainer filled with water.
5. Do not let the airflow blow directly to human bodies, especially children, old and sick persons.
6. If you do not use the air conditioner for a long time, disconnect the plug of the main power sup#
ply, and take out battery from remote control.
7. Do not put a heating or heat source device in the vicinity, because its heat will deform the front
panel or the filter screen.
8. Do not hang clothes or other things at the air outlet, because that will cause poor performance
or malfunction.
9. Do not let the discharged airflow, especially that discharged from the outdoor unit, point directly
at animals or plants.
IV
. BE GOOD AT THE USE OF THE AIR CONDITIONER
Keep the following matters in mind to reduce noise and power consumption.
1. Clean the air filter screen frequently.
The blocked air filter screen will result in less airflow volume and poor cooling. In a dusty environ#
ment, it should be cleaned more frequently.
2.Keep the room temperature evenly distributed.
Be sure there is no blocking at the air outlet or hindering the smooth flow of the cooling in the room
to keep an even distribution of the indoor temperature.
3.The air in a closed room will become stuffy.
After the running of an air conditioner for a certain period of time, the room should be thoroughly
ventilated to keep the indoor air fresh.
4.Avoid heat accumulation during cooling operation
When the sunlight directly shines the inside of the room, you should draw the curtain. During cool#
ing, do not open the door or window unless you think it as a must.
5.At the start of cooling
At the of cooling, the air volume should be set at "high" so that the desired temperature can be
achieved soon. Then set it at "medium" or "low" to make less noise.
6.Set an appropriate room temperature
It is most comfortable to set the temperature difference between the inside and outside or the
room at 4~5°c.lf the set temperature rises by 1°c, more energy will be saved.
V
. Care and Maintenance
Be sure to disconnect the main power supply before care and maintenance.
(1) Maintenance of the air filter screen
Disassembly
Hold the flanks of the cover and open the front cover as shown by the arrows. Then take out the air
filter screen.
Cleaning
Slightly pat the air filter screen or use a vacuum cleaner to remove the dust and dirt. If it is very
dirty, clean it up with the warm solvent of a neutral detergent, flush the detergent away and dry it
out.
8
ENGLISH
˚ Ł conder.qxd 20.02.03 18:12 Page 16
Page 9

ПОРЯДОК УСТАНОВКИ КОНДИЦИОНЕРА
Перед началом установки кондиционера внимательно ознакомьтесь с данной инструкцией.
В процессе установки следуйте указаниям данной инструкции.
При возникновении связанных с данным условием вопросов просим обращаться в
сервисный центр.
Упаковка и дополнительные принадлежности для внутреннего блока:
№№ Описание Кол%во
1 Панель крепления кондиционера на стене 1
2 Руководство по эксплуатации кондиционера 1
3 Пульт дистанционного управления (ПДУ) 1
4 Элементы питания тип ААА для ПДУ 2
5 Межблочная электропроводка 1
6 Провод термодатчика (для кондиционеров с тепловой помпой) 1
7 Электростатический фильтр с пропиткой активированным углем 1
УСТ
АНОВКА ВНУТРЕННЕГО БЛОКА
Установка панели крепления внутреннего блока
1. С помощью отвеса проверьте правильность уровня панели крепления и отметьте места
установки 6 крепежных винтов.
2. Просверлите 6 отверстий под крепежные винты (6,4мм х 30мм).
3. Установите в отверстия 6 пластмассовых дюбелей.
4. Вверните 6 крепежных винтов, надежно затяните их.
Отверстия в стене и установка рукава
1. Определите местонахождение отверстия в стене.
2. Проделайте в стене отверстие диаметром 65 мм с легким наклоном в сторону внешней
плоскости стены (около 10#15 мм).
3. Электропроводка вместе с соединительными трубками пропускается сквозь отверстие в
стене.
4. Откройте лицевую панель внутреннего блока и снимите крышку электроотсека.
5. Подсоедините с помощью имеющихся разъемов межблочную проводку. Завершив
подключение, зафиксируйте электропроводку с помощью хомута.
Монтаж соединительных трубок
Подготовительные работы
1. Протяните соединительные трубки и дренажную трубку через тыльную часть внутреннего
блока.
2. Зафиксируйте с помощью неклейкой ленты дренажную и соединительные трубки.
РУССКИЙ
Assembly
Open the front cover. Put the air filter screen to the original position as shown by the arrows.
Slightly press down the front cover until the sound of a "click" is heard, indicating the correct
mounting.
Note:
Never dry the air filter under direct sunlight or with a blazing fire, because it will be deformed.
Cleaning it in hot water (above 50°c) will result in its deformation as well.
(2) Clean the air conditioner
Frequently clean the air conditioner with dry cloth or a vacuum cleaner. If you use wet cloth to do
cleaning, first wring it and then wipe the machine with dry cloth.
Notes:
• Gasoline, paints, chemically treated cloth, detergents, etc will damage this product. Do not use
them to clean it.
• Sprinkling water on the machine will cause malfunction.
• Do not directly use spray insecticide to clean the air conditioner.
(3) The season to begin the use of the air conditioner
• Check that there is no blocking at the air intake or outlet of the indoor and outdoor units. In case
too much dust is accumulated, it should be wiped off.
• The air conditioner operating without filter screen will cause malfunction because of dust or dirt. It
is therefore necessary to fix it.
• Check that the water drain pipe is not distorted or blocked.
(4) The season to end the use of the air conditioner
• Select fan ventilation in a sunny day, and the indoor fan in the indoor unit will operate about half
day to dry the interior of the machine.
• Clean the filter screen and replace the air freshener.
• Disconnect the power supply.
• Take out the batteries in the remote control.
VI. BEFORE CALLING THE SERVICEMAN
Check the following items and you may find ways to shoot troubles for cost saving.
(1) Failing to operate
• Check if the machine is connected to the power, the plug is inserted into the socket and the power
switch is closed.
• Check if the fuse is blown out.
• Check if the selector has been turned to the position of "operation", (some modes)
• Check if the batteries in the remote control are weakened.
(2) In the cooling mode, the room temperature fails to fall down.
• Check if the temperature setting is right.
• Do not let the sunlight shine the inside of the room directly.
• Neither open the door or the windows nor open the curtain.
• Do not block the air intake or the air outlet of the indoor and outdoor units.
• Do not put sources in the room, such as electric dryer, electric oven, etc.
• Check if the air filter screen is blocked.
• Check if there are many people in the room.
3) In the heating mode, the room temperature fails to rise.
• Check if the temperature setting is wrong.
928
Внутренний блок
1. Проверка уровня, установка панели
крепления блока на винты и скобы.
2. Сверление отверстия в стене и установка
соединительных и трубок
3. Подключение проводки
4. Монтаж соединительных трубок
5. Установка внутреннего блока.
Наружный блок
1. Установка наружного блока.
2. Подключение соединительных
межблочных трубок
3 .Удаление воздуха из магистрали и
проверка на утечку хладагента.
4. Подключение межблочной
электропроводки.
5. Подсоединение дренажной трубки.
ENGLISH
˚ Ł conder.qxd 20.02.03 18:12 Page 18
Page 10

провод заземления. Если заземление отсутствует, обратитесь за помощью в сервисный
центр.
ВЫБОР МЕСТ
А ДЛЯ УСТАНОВКИ КОНДИЦИОНЕРА
Внутренний блок
1. Окна воздухозаборника и воздухоотвода не должны быть закрыты посторонними
предметами или располагаться рядом с препятствующими воздухоотводу поверхностями
стен с тем, чтобы кондиционируемый поток воздуха распространялся по всему.
2. Устанавливать внутренний блок следует в месте его наиболее удобного соединения с
внешним блоком.
3. При выборе места расположения внутреннего блока следует учитывать необходимость
удобного расположения дренажа.
4. Избегайте расположения внутреннего блока близко от источников тепла, повышенной
влажности или воспламеняемых газов.
5. Располагать внутренний блок следует в месте, которое надежно выдержит его вес и
вибрацию в процессе работы.
6. Убедитесь в соответствии выбранного места размерам, приводимым на чертеже.
7. При выборе места для установки внутреннего блока убедитесь в наличии достаточного
пространства для его последующего технического обслуживания. Устанавливать внутренний
блок следует на высоте 2.3 м от пола.
8. Устанавливать внутренний блок следует не ближе 1 м от других электроприборов, таких
как телевизор, аудиоцентр и т.п.
9. Выберите такое место для установки внутреннего блока, которое обеспечивало бы легкий
доступ к его воздушным фильтрам.
10. Не устанавливайте внутренний блок кондиционера в непосредственной близости от
прачечной, душа, ванной комнаты или плавательного бассейна.
Наружный блок
1. Для установки внешнего блока следует выбрать такое место, чтобы шум работающего
аппарата и выходящий из блока горячий воздух не раздражали соседей.
2. Выберите хорошо вентилируемое место.
3. Окна воздухозаборника и воздухоотвода не должны быть закрыты посторонними
предметами или располагаться близко к стенам здания.
4. Выбранное место крепления внешнего блока должно надежно выдерживать его вес и
вибрацию при работе.
5. Вблизи от места установки внешнего блока не должно быть источников легко
воспламеняемых, либо вызывающих коррозию металлов газов.
6. Убедитесь в соответствии выбранного для установки внешнего блока места размерам,
указанным на чертеже.
7. Если длина соединительных трубок между блоками превышает 5 метров, необходимо
добавить хладагент П22 из расчета 15 г на каждый последующий метр.
Внимание!
Установка кондиционера в указанных местах может привести к его неправильной работе:
# места интенсивного использования масел (в том числе машинных);
# в местах с большим содержанием соли в воздухе (например, на островах);
# вблизи термальных источников, насыщающих воздух большим содержанием серы;
# в местах распространения высокочастотных волн, работающих сварочных аппаратов,
медицинского оборудования; и т.п.
Если же иного подходящего места выбрать не удается, обратитесь за помощью в сервисный
центр.
РУССКИЙ
27
• Neither open the door or the windows nor open the curtain.
• Check if the outdoor temperature is too low (below 0°c).
• Check if the air conditioner is defrosting.
(4) The following phenomena are not failures
• When the humidity in the room is continuously above 80% and the air conditioner is running in the
mode of cooling for a long time, it will frost at air outlet and drip.
• When it has just started or stopped, the machine sizzles softly. During its operation, the machine
makes the sound similar to that of flowing water. That is the sound of the circulation of the refrig#
erant.
• On the start or stop of cooling mode, sometimes the sound of a click is heard, which is made by
the expansion or contraction of the front panel and is not a problem of the machine.
• The compressor has the function of 3#minute delayed start. When the air conditioner restarts, the
compressor will not start within three minutes.
• When it is used in the unsteady power voltage or strong outside interference, the machine may
automatically stop. It is necessary to protect the machine and keep safe operation instead of a fail#
ure. You can restart the equipment with the remote control.
Only if you follow the correct operation process, the air conditioner will perform a satisfac
tory operation. In case a problem arises, the power supply should be cut off before con
tacting the local service center. In addition, the air conditioner is continuously improved.
Any change will made without notice. Please contact the local service center if you have
any questions. We apologize for the Inconvenient caused.
VII. ADDITIONAL REMARKS
This series of product is split#type room air conditioner. The single cooling type is suitable for the
ambient temperature of 18~43°c and the heat pump type for the ambient temperature of #8~43°C.
Both of them have the performance of automatic cooling/heating, dehumidifying, and fan mode to
make the life of people more comfortable.
It is necessary to make some additional remarks as follows:
1. The fill volume of the refrigerant for this series of product is suitable for the connecting pipe of
3~5m. It is recommended that R22 should be increased at the rate of 15g/m for the excessive part
exceeding 5m. The length of the connecting pipe should not exceed 10m. If the connecting pipe is
shorter than 3m, the machine will discharge a small amount of R22 when installation.
2.The greatest rated power of the machine is the power under the greatest load according to the
International Standard. The over#voltage values of the high/low voltage are the high/low voltage
values when the protector of the compressor opens.
3.The nominal noise value is the result achieved in the noise laboratory after the machine is assem#
bled, which is different from that during the test run after installation.
4.The connection of the power supply of the machine is X type and the connection of signal line is
M type. The rated current of the fuse is 2.5~3 times that of cooling of the corresponding model
machine.
5.The cooling and heating capacity shown on the name plate are tested in the rated conditions.
When the outdoor temperature is higher than 38°c, the cooling capacity will decrease obviously and
when the outdoor temperature is lower than 3°c, the heating capacity will decrease obviously as
well. Especially when the outdoor temperature is below 0°c, the temperature at the air outlet will be
below 35°c, and when the outdoor is below temperature #8°C, the temperature at the air outlet will
be below 20°c. Do not let the airflow blow directly to human body, they will feel it like a cold wind.
When the ambient temperature is below 0°c, it is recommended that auxiliary heating device should
be started (some models can be available).
6. During the operation of the air conditioner, never touch the running parts of the indoor or out#
door unit to avoid injuries.
10
ENGLISH
˚ Ł conder.qxd 20.02.03 18:12 Page 20
Page 11

• часто перегорает предохранитель или срабатывает аварийный выключатель;
• в случае попадания воды или посторонних предметов внутрь кондиционера;
• электрические провода и штепсельный разъем шнура питания сильно нагреваются;
• во время работы кондиционера появляется сильный запах.
ИНСТРУКЦИЯ ПО УСТАНОВКЕ КОНДИЦИОНЕРА
Чтобы открыть лицевую панель возьмитесь руками за
нижние углы лицевой панели в точках "А", потяните их
вверх и откройте панель.
Чтобы закрыть лицевую панель надавите на панель в
точках "В" и в центре (точка "С"), как показано на рисунке.
Убедитесь в том, что панель полностью закрыта.
Внимание!
Установку кондиционера рекомендуется производить силами квалифицированного
персонала.
С целью избежания сбоев в работе устанавливаемого кондиционера как результата его
неквалифицированной установки обратитесь за помощью в сервисный центр;
Все перемещения блоков кондиционера рекомендуется производить под руководством
квалифицированного персонала. Кондиционер должен иметь правильно установленный
РУССКИЙ
7. Please refer to the name plate for the performance indicator and the rated parameter.
INSTALLATION MANUAL
I. INST
ALLATION PROCEDURE
Read this manual before installation.
You have to follow this manual during installation.
The manufacturer reserves the right to make any changes to the machine or components of this
model deemed necessary for technical and/or commercial reason without informing the public.
However, you can contact their centre.
Packing and accessories for indoor unit
No. Description Quantity
1 Wall hanging panel 1
2 Operation manual 1
3 Remote controller 1
4 No.7 dry battery 2
5 Screws for fixing wall hanging panel 8
6 Connection wire for internal and external units 1
7 Sensor wire (only for heating pump type) 1
8 Plastic screw sleeve 8
9 Active carbon electrostatic filter 1
10 Low temperature catalyst 1
Selection of Installation
Place Indoor unit
1) Such a place from where cool air can be distributed throughout the room.
2) Place, where a distance marked is available as illustrated and the filter can be easily taken out.
3) Place where the distance of more than 1 m from television, videos, and fluorescent lamps.
4) Place not causing vibration, where the body can be supported sufficiently.
Outdoor unit
1) Place, where is less affected by rain or direct sunlight and is sufficiently ventilated.
2) Place, where a distance marked is available as illustrated.
3) If the one#way refrigerant piping exceed 5 m, change the refrigerant additionally for 15g per 1 m
(note: Pipes should be shorter than 7 m).
4) Check that the location of the unit is strong enough to support the weight of the unit, If not, rein#
force the location with a board or beam, and then start the installation work. If the foundation is not
strong enough, there may be excessive vibration and noise.
5) Place, where blow#out air and noises will not annoy the neighborhood.
6) Keep space necessary for installation service. Keep space from obstacles as shown in the right
figure to prevent short circuit. (Keep 1m or more for the upper space.)
7) It is not recommended to install in the environment of grease, very high humidity and corrosive
gas.
11
Indoor unit
1) Checking the levels, fix a mounting plate on
stud and cleat.
2) Making hole in wall and fitting of piping.
3) Cable connection.
4) Installation of pipes.
5) Installing the indoor unit
Outdoor unit
1) Installing of outdoor unit.
2) Connection of pipes.
3) Air ejecting & leak checking.
4) Connection of inside and outside cable.
5) Connection of drain pipe.
26
ТЕХНИЧЕСКИЕ ХАРАКТЕРИСТИКИ
Модель VT2108 VT2109 VT2112
Режимы работы Охлаждение/ Охлаждение/ Охлаждение/
обогрев обогрев обогрев
Дополнительная Очистка воздуха Очистка воздуха Очистка воздуха
функция
Холодопроизводительность 2300 Вт 2600 Вт 3500 Вт
Теплопроизводительность 2300 Вт 2600 Вт 3200 Вт
Напряжение питающей сети 230 В 230 В 230 В
Частота тока 50 Гц 50 Гц 50 Гц
Номинальный ток в режимах 3,85/4,12 А 4,3/4,84 А 5,7/5,6 А
охлаждения/обогрева
Максимальная длина трубок 15 м 15 м 15 м
Номинальная мощность 835/890 Вт 933/1053 Вт 1240/1214 Вт
в режимах
охлаждения/обогрева
Объемный расход 380 м
3
/час 380 м3/час 480 м3/час
обрабатываемого воздуха
Хладагент R 22 R 22 R 22
Класс защиты от влаги IPX 4 IPX 4 IPX 4
Уровень шума (внутреннего/ 38/52 дБ(А) 38/52 дБ(А) 40/52 дБ(А)
внешнего блоков)
Климатическое исполнение А А А
Класс электробезопасности I I I
Масса внутреннего/ 7/32 кг 7/32 кг 8/35 кг
внешнего блоков
Габаритные размеры (ШхГхВ) 760х240х190/ 760х240х190/ 760х240х190/
внутр./наружный блок 848х320х540 мм 848х320х540 мм 848х320х540 мм
ENGLISH
˚ Ł conder.qxd 20.02.03 18:12 Page 22
Page 12

В следующих ситуациях необходимо немедленно выключить кондиционер,
отсоединить его от питающей сети и обратиться за помощью в сервисный центр:
• в процессе работы кондиционера слышится необычный звук;
РУССКИЙ
25
Проявления неисправности
Внутренний блок не начинает работать сразу
после повторного включения кондиционера.
В процессе работы кондиционера
появляется необычный запах из окна
воздухоотвода.
Слышен звук капели.
При работе в режиме охлаждения
появляется туман
При включении или выключении
кондиционера появляется потрескивание.
Кондиционер не включается.
Эффективность охлаждения (обогрева)
недостаточна.
Не работает пульт ДУ.
Устранение неисправности
Если кондиционер выключался, а затем
вновь был включен, с целью его защиты от
перегрузки после повторного включения он
не будет работать в течение 3 минут.
Это может быть наличием запахов в
помещении до включения кондиционера.
Звук вызван циркуляцией хладагента внутри
блока.
Охлаждение кондиционируемого комнатного
воздуха осуществляется очень интенсивно и
это выглядит как появление тумана.
Источником скрипящих звуков являются
пластмассовые детали корпуса внутреннего
блока, деформирующиеся при изменении
температуры.
Проверьте:
• наличие напряжения в питающей сети;
• вставлен ли шнур питания в розетку;
• включен ли выключатель защиты от токовой
утечки;
• возможно, напряжение питающей сети
превышает 253 В или ниже 195 В;
• не включен ли таймер.
• проверьте значение установленной
температуры;
• не перекрыты ли окна воздухозаборника
или воздухоотвода;
• не загрязнены ли воздушные фильтры;
• не включен ли вентилятор внутреннего
блока на минимальную скорость вращения;
• не включен ли в комнате еще какой#либо
источник тепла.
• более 10 метров между пультом ДУ и
кондиционером;
• элементы питания пульта ДУ требуют
замены;
• имеется препятствие между
кондиционером и пультом ДУ.
II. INSTALLATION OF INDOOR AND OUTDOOR UNITS
DIAGRAM
How to open the front panel
1) Grasp the niches on each side of the bottom “A” of the front
panel open the inlet grille by pulling upwards.
2) You have to follow this manual during installation.
How to close the front panel
By pushing both sides “B” and the centre “C” as shown on the
fig. Be sure that the front panel is completely closed.
Handling the wireless remote controller.
1) When operating, point the signal sending head toward the
signal receiver of the indoor unit.
2) A digital beeping sound will be heard when signal from the
wireless remote controller is received.
3) The distance that signal can be received is not more 8m.
III. INDOOR UNIT INST
ALLATION
A. Fix the mounting plate
1) Make sure once more the proper level of the plate, by hanging a thread with a weight from the
top of the centre of the plate and mark the positions of the six screws.
2) Drill 6 holes of 6.4 mm & 30 mm depth holes for screw.
3) Using the provide plastic screw sleeve.
4) Fasten securely the plate with the provided self tapping screw.
B. Making hole on the wall and fitting the piping hole sleeve
1) Position the wall hole as shown on the below diag.
2) Make a hole of 65 mm in diameter, slightly descending to outside the wall about 10#15 mm.
Attention: In order to protect the wire through the wall, the provided piping hole sleeve should be
used.
C. Cable connection
1) The wire cable and the refrigerant pipe are winded together passing through the wall hole.
2) Open the grille & remove the wiring cover.
3) Connect the wire by using the plug & socket. After connection, fix the cable with the clamp with#
out fail.
D. Installation of pipes
1) Preparation work
a) Draws pipes & drain hose at the back of the indoor unit.
b) Fasten the refrigerant pipe & drain hose with the non#adesive tape.
c) Bend the pipe according to the position of wall hole for rear arrangement.
d) Cut away with a nipper, the piping hole lid in the lower left or right hand side of the unit according
to the piping direction.
2) Supplement of installation of pipes for Indoor Unit
Piping Installation of Indoor Unit
1) Once the pipes be connected at right hand side of the unit, please follow the instruction and the
diagram below
a) Remove the mounting plate from the unit, cut away the lid of the hole for right piping and pull out
the drain hose through the hole.
b) Detach the pipe supporting plate to loose the pipes and bending of the pipe as follow. Cut the
12
ENGLISH
˚ Ł conder.qxd 20.02.03 18:12 Page 24
Page 13

11. Во время работы кондиционера не вставляйте внутрь установки посторонние предметы.
Это может привести к его поломке или нанесению увечий находящимся поблизости людям.
12. Не устанавливайте рядом с кондиционером нагревательные или разогревающиеся во
время работы устройства. Это может привести к деформации внешней панели и воздушного
фильтра кондиционера.
13. Убедитесь в отсутствии предметов, препятствующих циркуляции воздуха, его
равномерному распределению по всему объему помещения.
14. Воздух в закрытом помещении теряет свою свежесть. После продолжительной
работы кондиционера помещение необходимо хорошо проветрить.
УХОД И ОБСЛУЖИВАНИЕ КОНДИЦИОНЕР
А
Внимание!
Перед тем, как приступить к чистке кондиционера выключите его, отсоедините штепсельный
разъем от питающей сети.
В процессе чистки не допускайте попадания воды во внутренний и внешний блоки
кондиционера;
протирайте поверхности блоков с помощью сухой и мягкой ткани. Допускается слегка
смачивать протирочную ткань водой или моющим средством.
Чистка передней панели внутреннего блока кондиционера
1. Для снятия передней панели потяните ее наверх, предварительно нажав на боковые
стороны.
2. Протрите переднюю панель с помощью слегка смоченной в воде или моющем средстве
ткани, затем протрите ее насухо.
3. Установите переднюю панель на место и защелкните ее.
Замена воздухоочистителя
Следует производить один раз в три года.
1. Снимите воздушные фильтры.
2. Замените воздухоочиститель. Снимите упаковочный пакет с фильтров очистки воздуха и
установите новые фильтры в соответствующие рамки.
Внимание! Не пораньте руки об острые ребра теплообменника.
3. Вставьте воздушные фильтры на место.
Чистка воздушных фильтров
Производить не реже одного раза в три месяца.
1. Откройте переднюю панель, возьмитесь пальцами руки за имеющейся упор, слегка
приподнимите фильтр и затем снимите его.
Для чистки воздушного фильтра от пыли можно использовать пылесос или вымыть их водой
и затем тщательно протереть сухой мягкой тканью.
Внимание! Чистка воздушных фильтров и передней панели с применением воды
температурой выше 45°С может повлечь их деформацию и обесцвечивание. Не допускайте
нахождения влажного после чистки воздушного фильтра под прямыми солнечными лучами
или вблизи с открытым огнем # это может привести к деформации фильтра.
2. Установите воздушные фильтры на прежние места, при этом стрелка на их поверхности
должна быть обращена вверх.
УСТР
АНЕНИЕ НЕИСПРАВНОСТЕЙ
Прежде чем звонить в сервисный центр проверьте работу кондиционера в соответствии с
приводимыми ниже рекомендациями. Это позволит сохранить ваши деньги и время.
РУССКИЙ
left hand at the position B, the right hand at position A and bending the piping backward gradually
as illustrate on diag. 2 until to the position of right hole of the unit.
During the bending, pay attention for the folding of piping
c) Straighten the pipe and pull through the hole of the unit and check any deformation of the pipe.
2) Check the elbow (position H) of the pipes whether they are folded or deformed during the bend#
ing by pulling the insulation(at position H) downward(to position B).
3) During the bending of pipe, you feel the pipes has been folded/ deformed, or once you hear the
sounding "shuh", please inspect the elbow of the pipe whether it is the deformed or folded.
3) Connection of pipes.
a) The pipe must be clean, wastes or sands shall not be entered
b) Connecting pipes fit their centres fasten the flare nut sufficiently by hand.
c) Fasten with a spanner or a torque wrench as illustrated below. Forced fastening without careful
centering way that may damage the threads and cause a leakage of gas.
d) Provide heat insulation around both gas and liquid pipes as illustrated below.
Pipe Dia (mm) Fastening Torgue (N.m)
06.35 14%18
09.52 34%41
012.7 49%54
E. Fixing the indoor unit body
1) Secure surely the unit body onto the upper putlock of the mounting plate.
2) Check the fixing condition by moving the body right & left.
IV
. OUTDOOR UNIT INSTALLATION
A. Installation Outdoor Unit on the metal frame support
Attention: The metal frame must be strongly fixed with bolts & nuts in order to support the unit on
top. The unit must be fixed firmly & horizontally.
B. Connection of pipe
1) Connect the pipes to the 2#way & 3#way valves of the unit, fit their centers, fasten the flare nut
sufficiently by hand.
2) Fasten with a spanner or a torque wrench as illustrated.
C. Purging method before Gas Leak test
1) Open the valve rod cap.
2) Detach the cap of service port.
3) Open the valve rod of the 2#way valve counter clockwise 90°.
4) Air#purging for 10#15 sec.
5) Fasten the service port cap.
6) Open the valve rods of both the 2#way & 3#way valves counter clockwise in full.
7) Fasten the caps of 2#way valve & 3#way valves.
After air purging inspection of gas leakage by electronic detector or any other method for all the
connection joints of the piping between indoor & outdoor unit.
Attention: Air#purging must be done if you don't vacuum the system, otherwise moisture air will be
in the system & cause the damage of the unit.
D. Connection of Inside and Outside Cable
1) Remove the wiring cover.
2) Connect the wiring between indoor & outdoor unit by using the plugs of the provided wire.
3) Re#fix the wiring cover.
1324
ENGLISH
˚ Ł conder.qxd 20.02.03 18:12 Page 26
Page 14

Номинальное значение уровня шума получены в лаборатории после сборки
кондиционера и может несколько отличаться после установки аппарата в помещении
пользователя.
Соединительная силовая проводка кондиционера # тип "X", соединительная межблочная
проводка # тип "М".
Мощность по охлаждению и обогреву приведены в таблице с техническими
характеристиками на корпусе кондиционера.
При температуре воздуха вне помещения выше +38°С будет заметно падать
холодопроизводительность кондиционера, а при температуре ниже +3°С будет заметно
сокращаться теплопроизводительность аппарата.
Если температура вне помещения будет ниже 0°С, то температура выходящего из сопла
внутреннего блока воздуха будет не выше +35°С.
Если температура вне помещения будет #8°С, то температура выходящего из сопла
внутреннего блока снизится до +20°С. В этих условиях избегайте находится под
воздействием потока воздуха, подаваемого кондиционером, это опасно.
Во избежание травм не касайтесь вращающихся частей кондиционера во время его работы.
По вопросам о работе индикаторов и технических параметров обращайтесь к имеющейся на
корпусе кондиционера этикетке с техническими характеристиками.
РЕКОМЕНДАЦИИ ПО Р
АЦИОНАЛЬНОМУ ИСПОЛЬЗОВАНИЮ КОНДИЦИОНЕРА
1.Выбирайте приемлемую температуру. При охлаждении температуру в помещении
лучше поддерживать ниже температуры наружного воздуха не более чем на 5°С. Это
позволит уменьшить расход электроэнергии. Излишнее охлаждение воздуха внутри
помещения может повредить вашему здоровью.
В начале работы кондиционера в режиме охлаждения циркуляция воздуха в помещении
должна быть установлена на максимальный режим с тем, чтобы быстрее добиться желаемой
температуры. Затем переключите вентилятор на более низкую или минимальную скорость
вращения, что снизит шумность работы кондиционера в целом.
2. Правильно устанавливайте положение механических жалюзи окна выхода воздуха.
Рекомендуется направлять поток воздуха вверх при работе кондиционера в режиме
охлаждения и вниз при режиме обогрева.
3. Отсоединяйте штепсельный разъем от питающей сети, если кондиционер
продолжительное время не используется.
4. Следите за чистотой воздушного фильтра и очистителя воздуха. Сильно
загрязненный воздушный фильтр препятствует прохождению потока воздуха, что приводит к
снижению эффективности в режиме охлаждения.
5. Используйте оконные шторы для уменьшения попадания прямых солнечных лучей в
кондиционируемое помещение и уменьшения оттока охлажденного воздуха.
6. Не направляйте мощный поток охлажденного воздуха на животных и растения. Это может
плохо отразиться на их состоянии.
7. Попадание воды на внутренний блок кондиционера может привести к поражению
электрическим током, а также к его поломке.
8. Провод заземления должен быть надежно подсоединен. Не подключайте провод
заземления к трубам водо# и газоснабжения, а также к заземлению телефона.
9. Напряжение питающей сети кондиционера должно быть в диапазоне от 198 до 242 В.
10. Для подключения кондиционера к питающей сети необходимо дополнительно
установить специальную проводку и розетку. Недопустимо подключение кондиционера к
розетке, используемой для работы других устройств. Если напряжение в сети меньше или
больше требуемого, то это может привести к нарушениям в работе кондиционера. Если
перегорел предохранитель, его необходимо заменить на идентичный, указанный в
электрической схеме кондиционера. Никогда не заменяйте предохранитель куском провода.
РУССКИЙ
23
4) Keep the excess length of the wire for service.
E. Installation of drain pipe
1) Install the drain hose so as to be downward slope without fail as shown on diag.
2) Don't do the drainage as shown on diag. (b), (c) or (d).
3) In the case that the attached drain hose is in a room, apply heat insulation to it without fail.
4) Please pour water in the drain plate of the indoor unit, and confirm that the drainage can be car#
ried out to outside.
F. After installation
1) After installation
2) After installation, put the refrigerant pipe & the wire together with the provided wrapping strap..
3) Seal the wall opening with putty.
G. Test Run
1) Open the front panel of the indoor unit, you will see the emergency. Press this key, the unit will
operate.
2) Use remote control.
Attention:
1) Please read this manual before using the air#conditioner.
2) Once the unit need to be dismounted, please contact the professional installation people or
dealer.
14
ENGLISH
˚ Ł conder.qxd 20.02.03 18:12 Page 28
Page 15

ХАРАКТЕРИСТИКИ КОНДИЦИОНЕРА
Микроконтроллер автоматически управляет кондиционером, своевременно
переключает его на необходимый режим работы, поддерживая тем самым комфортные
условия в помещении по таким показателям, как температура и влажность воздуха.
Циркуляция воздуха. Имеется четыре режима вращения вентилятора внутреннего
блока: максимальная, средняя, минимальная скорости и автоматический режим вращения
вентилятора.
Имитация естественного ветра с помощью жалюзи выходного сопла внутреннего блока
кондиционера.
Режим "СОН": кондиционер автоматически регулирует температуру в ночное время в
соответствии с физиологическими особенностями человеческого организма.
Функция осушения воздуха: кондиционер автоматически управляет влажностью воздуха в
помещении, сохраняя его сухим и свежим, что не приводит к изменению температурного
показателя.
Бесшумная работа. Применение крыльчатки центробежного вентилятора большого
диаметра позволяет значительно снизить шумность воздушного потока раоты
электродвигателя вентилятора.
Таймер с 24часовым диапазоном установки времени включения или выключения
кондиционера
В случае аварийного отключения от сети или с ПДУ микроконтроллер сохраняет
информацию о последнем режиме работы. При этом отпадает необходимость при каждом
включении повторно вводить установки. Достаточно нажать кнопку включения на ПДУ и
кондиционер будет работать с учетом произведенных ранее установок.
При создании кондиционера производитель учитывал желания потребителя получить
технически современную модель, позволяющую достичь наибольшего комфорта: в данной
установке использована наиболее совершенная система освежения и двойной
фильтрации кондиционируемого воздуха.
Внешний вид корпуса кондиционера спроектирован так, что не привлекая к себе большого
внимания, он, несомненно, придаст любому интерьеру современный вид.
МЕРЫ ПРЕДОСТ
ОРОЖНОСТИ
1. Розетка и вилка должны быть установлены надежно. В противном случае возможно
поражение электрическим током, перегрев проводов и возгорание. В целях обеспечения
безопасной эксплуатации кондиционер необходимо заземлить. Необходимо обеспечить
хороший и прочный контакт провода заземления внешнего блока.
2. При работающем кондиционере запрещается извлекать штепсельный разъем из розетки
питающей сети. Это может привести к поражению электрическим током или возгоранию.
3. Никогда не скрепляйте и не наращивайте провода электропитания для удлинения шнура
питания. Это может привести к перегреву электропроводки и ее возгоранию.
4. Не пользуйтесь случайными удлинителями и не подключайте изделие к многоместной
розетке, питающей другие электроприборы. Это может привести к поражению
электрическим током или возгоранию электропроводки.
5. Не прикасайтесь к деталям кондиционера мокрыми руками. Это может привести к
поражению электрическим током.
6. Не вставляйте пальцы рук, стержни и подобные им предметы в жалюзи решеток входа и
выхода воздуха. Это может привести к возникновению опасных ситуаций.
7. Не находитесь продолжительное время под воздействием потока охлажденного воздуха,
поступающего из кондиционера. Это может привести к ухудшению вашего самочувствия и
возникновению проблем со здоровьем.
8. При появлении запаха гари или при появлении дыма немедленно отключите
кондиционер от питающей сети и обратитесь в сервисный центр.
РУССКИЙ
индикатор будет мигать с частотой один раз в две секунды.
Индикатор функции "СОН"
Светится при включении функции "СОН" оранжевым светом и выключается при ее отмене.
В режиме обогрева при обмерзании наружного блока и переключении кондиционера в
режим удаления обмерзания внутренний блок на непродолжительное время будет отключен.
При этом оранжевый индикатор будет мигать.
Метод принудительного включения кондиционера
Откройте переднюю крышку внутреннего блока и нажмите кнопку "АВАРИЯ" (аварийное
включение), при этом кондиционер включится в автоматическом режиме. Повторным
нажатием данной кнопки выключите кондиционер.
Регулирование направления воздушного потока в горизонтальной плоскости
Жалюзи горизонтальной регулировки направления воздушного потока устанавливаются в
желаемое положение только вручную.
В начале сезона активного использования кондиционера необходимо:
Убедиться в отсутствии предметов, препятствующих свободной циркуляции воздуха во
внутреннем и наружном блоках кондиционера. Если в них скопилась пыль, ее необходимо
удалить.
Эксплуатация кондиционера без воздушного фильтра может привести к нарушениям в его
работе.
Убедитесь в отсутствии пробок и деформаций в дренажной трубке.
В конце сезона активного использования кондиционера необходимо:
В сухой солнечный день на несколько часов включите кондиционер в режим вентиляции для
просушки внутреннего блока.
Очистите экран фильтра и замените освежитель воздуха.
Отключите кондиционер от питающей сети.
Извлеките батарейки из ПДУ.
ДОПОЛНИТЕЛЬНЫЕ ПОЯСНЕНИЯ
Данная серия изделий представляет собой кондиционеры со сплит#системой.
Кондиционеры, работающие только на охлаждение рекомендуется использовать при
годовой температуре от +18 до + 43°С.
Кондиционеры, работающие как на охлаждение так и на обогрев рекомендуется
использовать при годовой температуре от #8°С до +43°С.
Оба типа аппарата обеспечивают работу в автоматических режимах охлаждения, осушения
воздуха, вентилирования.
Полный объем заправляемого в кондиционеры данной серии хладагента вполне достаточен
при длине межблочных соединительных трубок 3#5 метров. При увеличении длины
соединительных трубок на каждый добавленный метр рекомендуется дозаправлять 15 г
хладагента П22.
Длина соединительных трубок не должна превышать 15#ти метров. Если длина
соединительных трубок меньше 3#х метров, то во время установки кондиционера
необходимо немного уменьшить количество хладагента.
Максимальное значение номинальной мощности кондиционера получены при максимально
допустимой нагрузке в соответствии с международными стандартами.
Максимальные и минимальные значения напряжений соответствуют значения
срабатывания защиты компрессора.
РУССКИЙ
1522
˚ Ł conder.qxd 20.02.03 18:12 Page 30
Page 16

Примечания:
По наступлении времени срабатывания таймера включения кондиционер включится и будет
работать с учетом прежних установок.
Отключение таймера включения, осуществляется последовательным нажатием кнопки 9,
затем кнопки SЕТ/С.
Выключение кондиционера через заданное время
1. Откройте крышку ПДУ и нажмите кнопку таймера выключения 11, при этом индикация
таймера выключения начнет мигать, сообщая о готовности таймера выключения к вводу
новых данных.
2. Кнопками 4 установите время, спустя которое кондиционер должен выключиться.
3. По завершении изменений временных показателей таймера выключения нажатием кнопки
SЕТ/С завершите ввод. Индикатор таймера выключения прекратит мигать, а из внутреннего
блока будет услышан сигнал подтверждения. Начнется отсчет времени до выключения
кондиционера.
Примечание
Отключение таймера выключения кондиционера. производится нажатием кнопки 11, а затем
кнопки SЕТ/С.
Работа кондиционера при включении режима "СОН"
1. Вставьте штепсельный разъем в розетку питающей сети, нажмите кнопку 5, кондиционер
включится.
2. Для установки предпочитаемого режима нажмите кнопку МОDЕ.
3. Установите желаемую скорость вращения вала вентилятора внутреннего блока.
4. Введите значение желаемой температуры.
5. Нажатием кнопки 10 включается режим "СОН", о чем информирует соответствующая
индикация на экране ПДУ.
Примечания:
При включении режима "СОН" и работе кондиционера в режимах охлаждения или осушения
установленная температура через 1 час повысится на 1°С, через два часа повысится на 2°С.
При включении режима "СОН" и работе кондиционера в режиме обогрева установленная
температура через один час работы автоматически понизится на 1°С, а через два часа
понизится на 2°С. При этом вентилятор внутреннего блока работает с минимальной
скоростью.
Индикаторы режимов работы кондиционера
Индикатор включения кондиционера
Расположен на панели приемника сигналов. Светится красным светом при подключении к
питающей сети и зеленым светом при включении в рабочий режим.
Светится также зеленым светом при включении компрессора, и изменяет цвет на красный
при выключении компрессора.
Индикатор таймера
При включенном таймере индикатор светится желтым светом, при выключении таймера
индикатор гаснет.
В режиме обогрева при низкой температуре внутри помещения внутренний блок будет
временно отключен с тем, чтобы избежать попадания холодного воздуха в помещение, при
этом индикатор светится.
Если температура во внутреннем блоке не соответствует требуемой, то желтый индикатор
будет мигать с частотой два раза в секунду.
При переключении кондиционера в режим удаления обмерзания наружного блока желтый
РУССКИЙ
9. Не пытайтесь самостоятельно отремонтировать вышедший из строя кондиционер.
В таком случае вам будет отказано в гарантийном ремонте.
10. Не устанавливайте предохранители с номиналом, отличным от предусмотренного
производителем. Это может привести к поломке кондиционера или его возгоранию.
11. Отключайте кондиционер от питающей сети, если в течение продолжительного периода
времени он не используется.
12. На время чистки кондиционер необходимо выключить и отсоединить от питающей сети.
Невыполнение указанного требования может привести к поражению электрическим током.
13. При отключении штепсельного разъема из розетки питающей сети не тяните за провод.
Это может привести к возгоранию проводки.
14. Не располагайте газовые плиты вблизи от окна выхода воздуха из кондиционера. Поток
воздуха может привести к неполному сгоранию газа или вызвать полное прекращение
горения.
15. Не храните рядом с блоками кондиционера жидкости, являющиеся источниками
взрывоопасных испарений. Это может привести к их возгоранию.
16. Убедитесь в надежности крепления внешнего блока кондиционера. Плохое крепление
может привести к падению внешнего блока и, как следствие, повлечь травмы.
17. Не наступайте на крышку внешнего блока кондиционера. Падение внешнего блока может
привести к травмам.
18. Не закрывайте посторонними предметами окон воздухозаборников и воздухоотводов
внутреннего и внешнего блоков кондиционера. Это может привести как к снижению
эффективности работы аппарата, так и к его поломке.
ОСНОВНЫЕ ЧАСТИ
Внутренний блок
Наружный блок
РУССКИЙ
2116
˚ Ł conder.qxd 20.02.03 18:12 Page 32
Page 17

ПУЛЬТ ДИСТАНЦИОННОГО УПРАВЛЕНИЯ
Внимание!
• убедитесь в отсутствии препятствий между пультом ДУ и приемным устройством
внутреннего блока;
• кондиционер устойчиво принимает сигналы с пульта ДУ на расстоянии до 8 метров;
• не роняйте и не бросайте пульт ДУ;
• не допускайте попадания жидкости внутрь пульта ДУ, не оставляйте пульт под прямыми
солнечным облучением и вблизи других мощных источников тепла.
1. Окно передачи данных.
2. Жидкокристаллический дисплей.
3. Кнопка выбора режима работы: выберите один из пяти имеющихся режимов работы:
автоматический;
охлаждение;
осушение воздуха;
вентиляции;
обогрев.
Продолжительное удержание кнопки в нажатом положении позволяет быстро и
последовательно просмотреть все имеющиеся режимы. При этом окно передачи данных
РУССКИЙ
не обеспечивает заметного снижения температуры в помещении.
Кнопки установки температуры не функционируют.
Работа кондиционера в режиме осушения воздуха
1. Вставьте штепсельный разъем в розетку питающей сети, нажмите кнопку 5, кондиционер
включится.
2. Для установки режима осушения нажмите кнопку МОDЕ.
3. Нажатием кнопки 7 включите двигатель привода жалюзи окна воздухоотвода. При
повторном нажатии на указанную кнопку двигатель отключается.
4. Нажатием кнопок 4 введите значение желаемой температуры.
Примечания:
Если комнатная температура опускается ниже установленной более чем на два градуса,
компрессор и вентиляторы внешнего и внутреннего блоков выключаются. Если комнатная
температура лежит в пределах ±2°С от установленной, кондиционер включается в режим
осушения воздуха.
Если комнатная температура выше установленной более чем на два градуса кондиционер
переключается в режим охлаждения.
Данный процесс характеризуется умеренным охлаждением воздуха с одновременным его
осушением. При этом понижения температуры в помещении не происходит.
Устанавливаемая температура выбирается в диапазоне от 16 до 30°С.
Работа кондиционера в автоматическом режиме
1. Вставьте штепсельный разъем в розетку питающей сети, нажмите кнопку 5, кондиционер
включится.
2. Для установки автоматического режима кондиционирования нажмите кнопку МОDЕ.
2. Нажмите кнопку 7 # жалюзи окна воздухоотвода начнут совершать колебательные
движения вверх#вниз. При повторном нажатии жалюзи остановятся в зафиксированной
позиции.
3. Нажатием кнопки 6 установите желаемую скорость вращения вала вентилятора
внутреннего блока.
В соответствии с комнатной температурой микрокомпьютер будет автоматически
переключать кондиционер с режима охлаждения в режим обогрева, поддерживая
комфортную температуру в помещении.
Примечания:
В данном режиме автоматически поддерживаемая температура не отображается на экране
ПДУ.
Однако существует возможность повышать или понижать поддерживаемую температуру
кнопками 4, при этом значение температуры изменяется на 1°С.
Работа кондиционера при включении таймера
Включение кондиционера через заданное время
1. Нажмите кнопку таймера включения 9. Показатель установленного прежде времени
включения кондиционера появится на дисплее, окно таймера включения начнет мигать,
сообщая о готовности устройства для ввода новых данных.
2. Установка времени для таймера включения осуществляется с помощью кнопок 4. При
каждом нажатии показатель времени будет изменяться на один час.
3. После изменений в показатель времени таймеров нажмите кнопку подтверждения ввода
SЕТ/С. При этом окно прекратит мигать, а зуммер внутреннего блока подаст
подтверждающий сигнал. Индикатор таймера включится, сообщая, что отсчет времени
начался. Через установленное время кондиционер автоматически включится.
РУССКИЙ
17
Внимание!
На рисунке показаны все
возможные индикации
жидкокристаллического
дисплея. Символы
индикации будут
появляться и исчезать в
зависимости от
установленного режима
работы. В моделях,
работающих только на
охлаждение режим
"обогрев" отсутствует.
20
˚ Ł conder.qxd 20.02.03 18:12 Page 34
Page 18

Показатель температуры устанавливается в пределах от 16 до 30 °С.
Внимание!
Для защиты компрессора от перегрузки кондиционер оборудован предохранительным
устройством, исключающим повторное включение компрессора ранее, чем через три
минуты после предыдущего выключения.
Работа кондиционера в режиме обогрева
1. Вставьте штепсельный разъем в розетку питающей сети, нажмите кнопку 5, кондиционер
включится.
2. Для установки режима обогрева нажмите кнопку МОDЕ.
3. Нажатием кнопки 7 включите двигатель привода жалюзи окна воздухоотвода. Повторное
нажатие кнопки отключает двигатель.
4. Нажатием кнопки 6 устанавливается желаемая скорость вращения вала вентилятора
внутреннего блока.
5. Нажатием кнопок 4 вводится значение желаемой температуры.
Примечания:
Если комнатная температура ниже установленной, компрессор переключается в режим
обогрева.
При повышении комнатной температуры выше установленной, компрессор и вентилятор
внешнего блока выключаются, работает только вентилятор внутреннего блока, а также
шаговый двигатель горизонтальных жалюзи (изменение направления потока воздуха по
вертикали).
Диапазон устанавливаемой температуры в режиме обогрева: от 16 до 30°С.
В режиме обогрева в течение 20 секунд после включения компрессора горизонтальные
жалюзи внутреннего блока остаются закрытыми. Это позволяет избежать подачи холодного
воздуха в помещение после повторного включения кондиционера.
В режиме обогрева, если температура в помещении выше установленной температуры
компрессор отключается, вентилятор при этом продолжает вращаться еще 3 минуты, то
есть до повторного включения компрессора. Если температура в помещении ниже
установленной температуры, компрессор включится повторно для обеспечения процесса
обогрева.
При низких значениях уличной температуры на конденсоре наружного блока может
возникнуть обледенение. Подобные явления значительно снижают эффективность работы
кондиционера в режиме обогрева. Для устранения эффекта обмерзания кондиционер
оборудован устройством автоматического размораживания. В течение 5#12 минут данное
устройство удаляет обмерзание. На это время внутренний блок будет отключен.
Внимание!
Кондиционер работает в режиме обогрева при температуре наружного воздуха от #8°С до
+25°С. При прочих значениях температур могут появляться отказы в режиме обогрева.
Работа кондиционера в режиме вентиляции
1. Для установки режима вентиляции нажмите кнопку МОDЕ.
2. Нажмите кнопку 7 # жалюзи окна воздухоотвода начнут совершать колебательные
движения вверх#вниз. При повторном нажатии на указанную кнопку жалюзи остановятся в
зафиксированной позиции.
3. Нажатием кнопки 6 установите желаемую скорость вращения вала вентилятора
внутреннего блока.
Внимание!
В режиме вентилирования компрессор отключен. Работает только вентилятор внутреннего
блока, при этом потребление электроэнергии снижается до нескольких Ватт. Данный режим
РУССКИЙ
мигать не будет до тех пор, пока кнопка выбора режимов не будет отпущена.
4. Кнопки ввода установок температуры (времени): установка температуры (времени)
при каждом нажатии кнопок 4 будет либо увеличиваться на 1°C (1 ч), либо будет
уменьшаться на 1°C (1 ч).
Временные установки изменяются в диапазоне от 1 до 24 часов.
5. Кнопка включения/выключения: при нажатии данной кнопки сохраненные в памяти
температурные, временные и прочие установки передаются с ПДУ на внутренний блок. В
соответствии с ними кондиционер начинает работать. При повторном нажатии кнопки
кондиционер немедленно выключится.
6. Кнопка переключения скорости вращения вентилятора: осуществляется выбор
скорости вращения вентилятора в следующей последовательности:
автоматическая;
высокая;
средняя;
низкая скорость.
Удерживая кнопку в нажатом состоянии можно последовательно переключаться между
режимами, однако окно передачи мигать не будет до тех пор, пока кнопка не будет отпущена
и тем самым не будет выбран необходимый режим.
7. Кнопка управления потоком кондиционированного воздуха: автоматическим
регулярным покачиванием горизонтальных жалюзи кондиционированный воздух
равномерно распределяется в вертикальной плоскости.
При повторном нажатии данной кнопки жалюзи остановятся в выбранном положении.
9. Кнопка таймера включения: включение кондиционера в заданное время.
10. Кнопка включения функции "СОН".
11. Кнопка таймера выключения: выключение кондиционера в заданное время.
12. Кнопка восстановления первоначальных установок: нормализация работы ПДУ в
случае появления сбоев в работе кондиционера.
13. Кнопка подтверждения установок таймера: необходима после ввода в память
таймера времени включения и выключения кондиционера. Цифры в окне таймера прекратят
мигать после нажатия данной кнопки, при этом начнется отсчет времени таймером.
14.0тсек элементов питания ПДУ: для замены элементов питания сдвиньте с небольшим
усилием крышку отсека по направлению стрелки и установите новые элементы.
ЭКСПЛУ
АТАЦИЯ КОНДИЦИОНЕРА
Работа кондиционера в режиме охлаждения
1. Вставьте вилку штепсельного разъема в розетку, нажмите на пульте ДУ кнопку 5,
кондиционер включится.
2. Для переключения кондиционера в режим охлаждения нажмите кнопку МОDЕ.
3. Нажмите кнопку 7 # жалюзи окна воздухоотвода начнут совершать колебательные
движения вверх#вниз. При повторном нажатии на указанную кнопку жалюзи остановятся в
зафиксированной позиции.
4. Нажатием кнопки 6 выберите необходимую скорость вращения вала вентилятора.
5. С помощью кнопок 4 установите желаемую температуру.
Примечания:
В зависимости от разницы температуры в помещении и установленной температуры
микроконтроллер включает и выключает кондиционер в режим охлаждения.
Если комнатная температура выше показателя установленной температуры, то компрессор
работает в режиме охлаждения.
Если комнатная температура опускается ниже установленной температуры, компрессор и
вентилятор наружного блока выключаются, а вентилятор внутреннего блока продолжает
работать в режиме вентиляции.
РУССКИЙ
1918
˚ Ł conder.qxd 20.02.03 18:12 Page 36
 Loading...