

Page 1
Robotic vacuum
Робот-пылесос
3
11
VT-1803
cleaner
1
IM VT-1803.indd 1 7/2/19 3:20 PM
Page 2
IM VT-1803.indd 2 7/2/19 3:20 PM
Page 3

E N G L I S H
ROBOTIC VACUUM CLEANER VT-1803
The robotic vacuum cleaner is intended for room
cleaning in automatic mode.
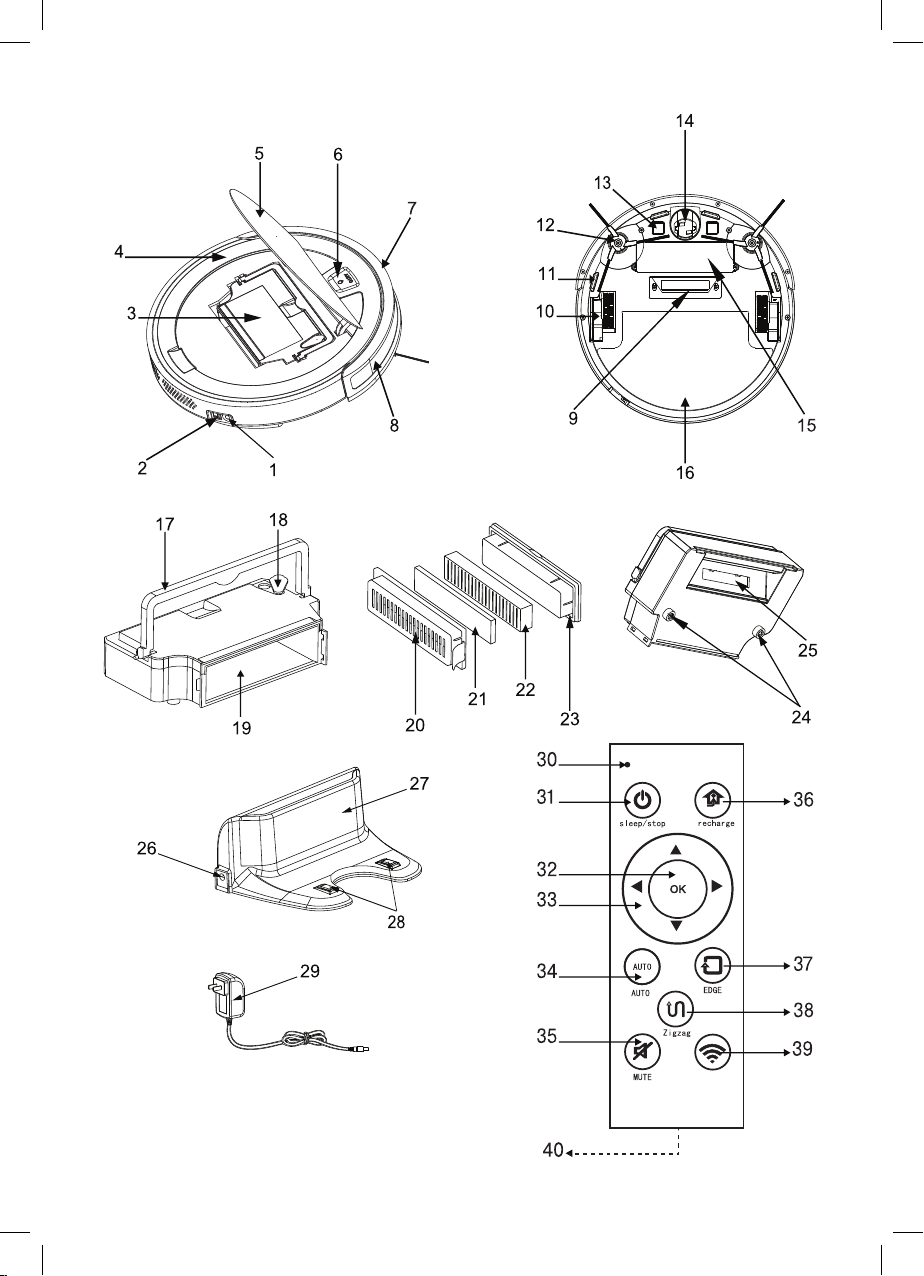
DESCRIPTION
1.
AC/DC adapter connection socket
2.
Power switch «I/0»
3.
Dust bin
4.
Body
5.
Lid
6.
Start/stop button «AUTO »
7.
Front bumper
8.
Sensor window
9.
Suction nozzle
10.
Driving wheels
11.
Anti-drop sensors
12.
Side brushes
13.
Contact points for battery charging
14.
Front wheel
15.
Rechargeable battery
16.
Floor wet cleaning attachment
Dust bin
17.
Dust bin handle
18.
Water inlet plug
19.
Filter installation place
20.
Filter holder with lock
21.
Foam filter
22.
HEPA filter
23.
HEPA filter holder
24.
Water drop openings
25.
Garbage spill-proof lid
Charging station
26.
Power adapter connection socket
27.
Sensor panel
28.
Contact points for battery charging
29.
Power adapter
Remote control
30.
Remote control operation indicator
31.
On/standby/off button «sleep/stop »
32.
Cleaning on/off button « »
33.
Vacuum cleaner manual operation buttons
« »
34.
Auto room cleaning button «AUTO »
35.
Voice signal on/off button «MUTE »
36.
Return to the charging station button
«recharge »
37.
«Along the wall» cleaning mode button «EDGE »
38.
«Zigzag» cleaning button «Zigzag »
39.
Network connection button «WI-FI «
40.
Battery holder
SAFETY MEASURES AND OPERATION
RECOMMENDATIONS
Read this instruction manual carefully before using
the robotic vacuum cleaner and keep it for the
whole operation period. Mishandling of the unit may
lead to its breakage and cause harm to the user or
damage to his/her property.
To avoid the risk of fire, electric shock and to prevent injury, observe the following safety measures.
•
Use the unit in strict accordance with the instruction manual.
•
Use only the accessories supplied with the unit.
•
Before charging the rechargeable battery for the
first time, make sure that voltage of the mains
corresponds to the operating voltage of the
power adapter.
•
Do not charge the rechargeable battery in
places with high moisture and high temperature.
Charge the accumulator battery at the temperature from +5° C to +35° C and relative humidity no
more than 80%.
•
If you don’t use the charging station for a long
time, unplug the power adapter.
•
Do not touch the power adapter body with wet
hands.
•
Do not use the vacuum cleaner outdoors, for
cleaning wet and damp floors.
•
Do not use the vacuum cleaner in the rooms with
unsteady furniture, especially if there are fragile
interior objects or burning candles placed on it.
•
Do not place or install foreign objects on the vacuum cleaner body, make sure that there are no
pets on the vacuum cleaner body.
•
Do not switch the unit on if the air inlet is blocked
by a foreign object.
•
Keep hair, free hanging clothes and interior objects
away from the vacuum cleaner path of motion.
•
Set additional obstacles for the vacuum cleaner
when cleaning the stair landings.
•
Do not use the vacuum cleaner for collecting
such inflammable liquids as gasoline or solvents. Do not use the vacuum cleaner in places
where such liquids are stored.
•
Do not use the vacuum cleaner for collecting
burning or smoking cigarettes, matches, cinders
as well as fine dust, for example, of plaster, concrete, flour or ashes.
•
Do not use the vacuum cleaner if:
–
the dust bin is not installed;
–
the HEPA filter is not installed in the bin.
•
Do not immerse the vacuum cleaner, the power
adapter and the charging station into water or
any other liquids.
3
IM VT-1803.indd 3 7/2/19 3:20 PM
Page 4
ENGLISH
Attention! The unit contains a lithium battery.
Prevent children from swallowing the lithium battery. If your child has swallowed a battery,
immediately see your doctor.
•
Close supervision is necessary when children or people with disabilities are near the
operating unit.
•
This unit is not intended for usage by children.
•
During the operation and breaks between
operation cycles, keep the unit away from
children.
•
The unit is not intended to be used by people
with physical or mental disabilities (including
children) or by persons lacking experience or
knowledge if they are not under supervision of
a person who is responsible for their safety or
if they are not instructed by this person on the
usage of the unit.
•
Do not leave children unattended to prevent
using the unit as a toy.
•
For children safety reasons do not leave
polyethylene bags used as packaging unattended.
Attention! Do not allow children to play with polyethylene bags or packaging film. Danger of suf-
focation!
•
Do not use the connecting cord of the power
adapter to carry the charging station. Provide
that the connecting cord does not touch sharp
edges of furniture and hot surfaces. Provide
that the vacuum cleaner does not run over the
connecting cord of the power adapter.
•
Periodically check that the power adapter and
the connecting cord are not damaged.
•
Never use the unit if the power adapter or
connecting cord is damaged, if the unit
works improperly or after it was dropped.
•
Do not attempt to repair the unit. Do not disassemble the unit by yourself, if any malfunction is detected or after it was dropped,
unplug the unit and apply to any authorized
service center at the contact addresses given
in the warranty certificate and on the website
www.vitek.ru.
•
To avoid damages, transport the unit in the original packaging only.
•
Before you dispose of the vacuum cleaner,
remove the battery and apply to the corresponding center for recycling of it. Do not burn the
vacuum cleaner even if it is badly damaged
without removing the battery to avoid the battery explosion.
•
Transport the unit in the original packaging only.
•
Keep the unit in a dry cool place out of reach of
children and people with disabilities.
THE UNIT IS INTENDED FOR HOUSEHOLD USE
ONLY, ITS COMMERCIAL USAGE AND USAGE
IN PRODUCTION AREAS AND WORK SPACES IS
PROHIBITED.
BEFORE THE FIRST USE
After unit transportation or storage under cold
(winter) conditions, it is necessary to keep it
for at least three hours at room temperature
before switching on.
•
Unpack the vacuum cleaner and remove any
advertising stickers and package materials.
•
Keep the original package.
•
Check the unit for damages, do not use it in case
of damages.
•
Read the safety instructions and the operation
manual.
•
Make sure that operating voltage of the power
adapter corresponds to the voltage of your
mains.
•
The unit is intended for operation with AC system
and 50 Hz or 60 Hz frequency, the unit does not
need any additional settings for operating with
the required nominal frequency.
REMOTE CONTROL
Attention! The unit contains a lithium battery.
Prevent children from swallowing the lithium battery. If your child has swallowed a battery,
immediately see your doctor.
•
Press on the side lock of the battery holder (40)
and remove it.
•
Install the CR2025 battery into the holder (40)
strictly following the polarity.
•
Install the holder (40) in the remote control body.
Notes:
–
if there is an isolation insert in the remote control, remove the insert;
–
replace the battery in time;
–
do not recharge the battery;
–
remove the battery if you are not planning to use
the unit for a long time;
–
remove the used battery from the unit and dispose of it safely;
–
avoid short circuiting the battery clips.
BEFORE USING THE VACUUM CLEANER
Manual battery charging
It is recommended to charge the battery in manual
mode before using the vacuum cleaner.
4
IM VT-1803.indd 4 7/2/19 3:20 PM
Page 5
E N G L I S H
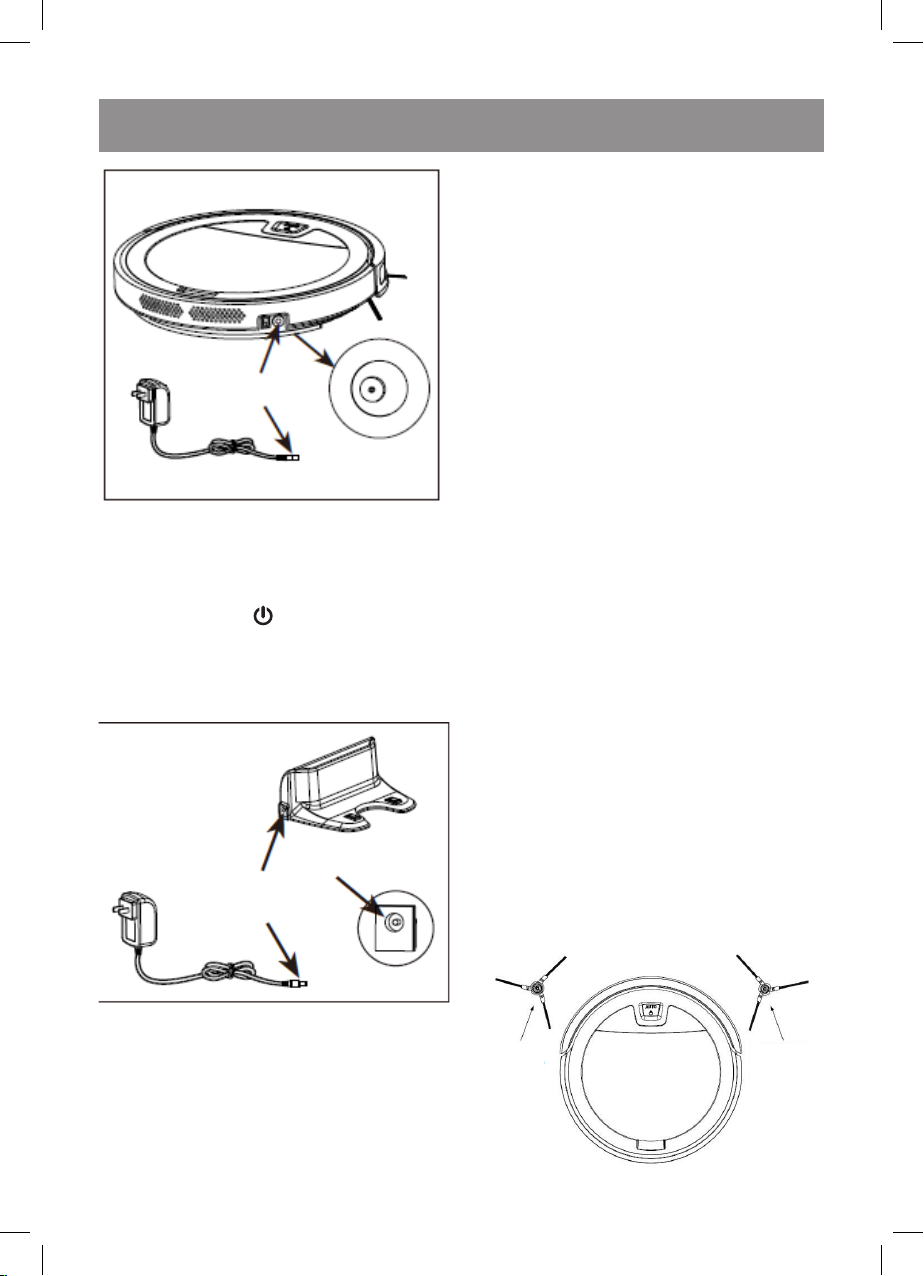
•
Connect the power adapter (29) connecting cord jack to the socket (1) on the vacuum
cleaner body.
•
Connect the power adapter (29) to the mains
socket, you will hear a voice signal and the start/
stop button «AUTO » illumination will be flashing green.
•
The duration of the first battery charging should
be at least 8 hours.
Charging station
•
Do not place the charging station next to objects
with high reflective power, such as mirrors, otherwise the vacuum cleaner’s return to the charging station will be hindered.
BEFORE USING THE VACUUM CLEANER
•
Remove all kinds of power cords, power extension cords and other similar items from the floor
that may interfere with the movement of the vacuum cleaner.
•
The vacuum cleaner is intended for operation on a smooth floor or on a carpet with low
pile (less than 1 cm). Do not use the vacuum
cleaner for cleaning the floors and carpets with
high pile.
•
Make sure that there are no tablecloths, curtains
or other furnishings hanging to the floor along
the path of motion of the vacuum cleaner.
•
The free space under the furniture should be
at least 6 centimeters, otherwise the vacuum
cleaner will simply get stuck under the furniture.
•
If the distance from the floor to the furniture is
less than 6 centimeters, it is necessary to lift
the furniture or to provide a barrier against the
vacuum cleaner getting in such places.
•
Provide additional obstacles for the vacuum
cleaner when cleaning the stair landings.
•
Arrange furniture for free movement of the vacuum
cleaner, remove foreign objects from the floor.
•
Do not use the vacuum cleaner in the rooms
with unsteady furniture, especially if there
are fragile interior objects or burning candles
placed on it.
•
Do not place or install foreign objects on the vacuum cleaner body, make sure that there are no
pets on the vacuum cleaner body.
•
Before using the vacuum cleaner make sure that
there are no narrow places in the path of motion
of the vacuum cleaner.
USING THE VACUUM CLEANER
•
Connect the power adapter (29) connecting cord
jack to the socket (26) on the charging station.
•
Place the charging station on the flat floor sur-
Left brush
(the center
is gray)
Right brush
(the center
is yellow)
face next to the wall, the charging station base
must be perpendicular to the floor.
•
There should be at least 1,5 meters of free
space in front of the charging station and at least
0,5 meter at the sides.
5
IM VT-1803.indd 5 7/2/19 3:20 PM
Page 6
ENGLISH
•
The side brushes (12) are not interchangeable.
Before using the vacuum cleaner make sure that
the brushes (12) are installed properly.
•
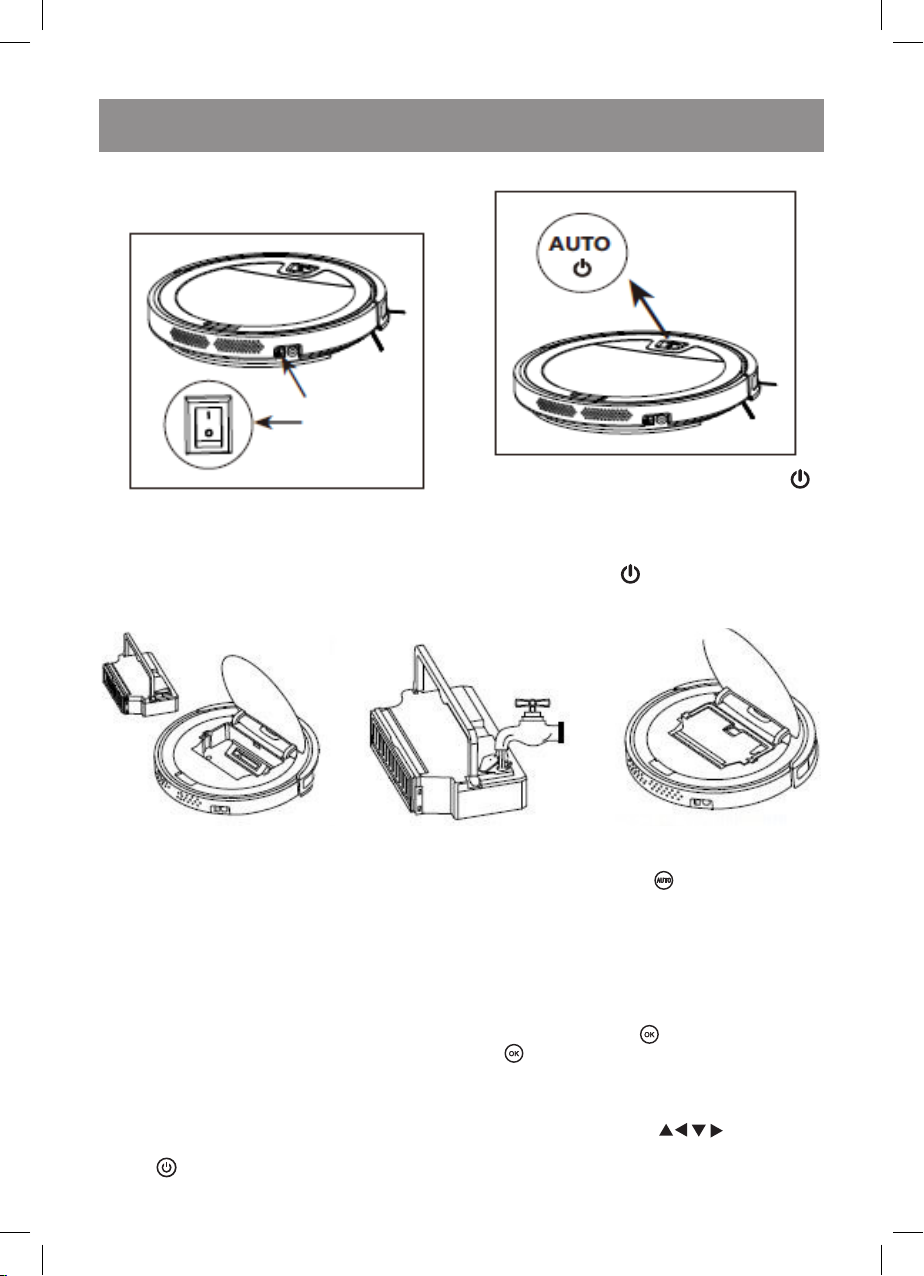
Switch the vacuum cleaner on, setting the power
switch (2) to the position «I/0».
•
You will hear a melody, the button (6) illumination will be glowing green, the vacuum cleaner
will switch on in the standby mode.
Wet floor cleaning
Automatic room cleaning mode
•
Press the start/stop button (6) «AUTO »,
you will hear a voice signal, the vacuum
cleaner will switch on and start cleaning in the
auto mode.
•
To stop the vacuum cleaner press the start/stop
button (6) «AUTO » again.
•
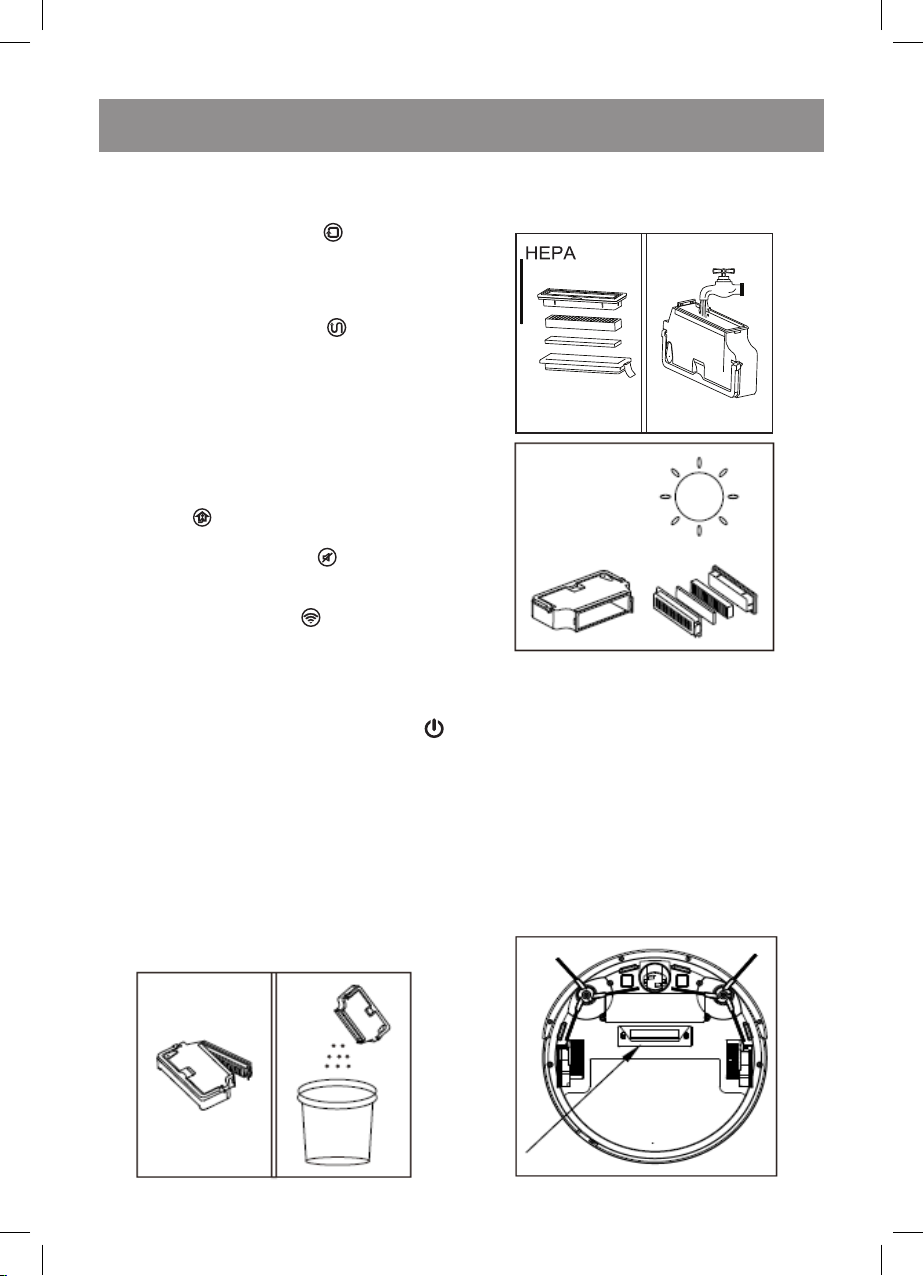
Open the lid (5), take the handle (17) and remove
the dust bin (3).
•
Open the water inlet lid (18) and fill the water
Automatic room cleaning mode
•
To switch on the auto room cleaning mode press
the button (34) «AUTO ».
tank with water, close the water inlet lid (18).
•
Install the dust bin (3) back to its place, close
the lid (5).
•
Attach the fabric attachment (16) to the vacuum
cleaner bottom with the «stickers».
Notes:
–
if you are not going to use the vacuum cleaner for
a long time, pour the water out of the water tank.
–
the water tank capacity is 100 ml.
Temporary stop of the vacuum cleaner during
cleaning
•
The automatic cleaning mode is the most commonly used, in this mode the vacuum cleaner
cleans the entire surface of the floor.
•
You can stop the vacuum cleaner by pressing the button (32) « ». Press the button (32)
« » again to switch the vacuum cleaner on and
continue cleaning.
Using of the remote control
•
You can select the required cleaning mode with
the remote control.
•
Press the on/standby/off button (31) «sleep/
stop » on the remote control.
Vacuum cleaner manual operation
•
Use the buttons (33) « » to direct the
vacuum cleaner to the necessary area for cleaning or to lead it out of places difficult for cleaning.
6
IM VT-1803.indd 6 7/2/19 3:20 PM
Page 7
E N G L I S H
«Along the wall» cleaning mode
→
•
In this mode the vacuum cleaner cleans the room
along the walls.
•
Press the button (37) «EDGE » on the remote
control to switch the cleaning mode on.
«Zigzag» cleaning mode
•
In this cleaning mode the vacuum cleaner cleans
the room moving crablike.
•
Press the button (38) «Zigzag » on the remote
control, the vacuum cleaner will switch on and
start cleaning.
Returning the vacuum cleaner to the charging
station
•
When the vacuum cleaner battery is discharged,
the vacuum cleaner will automatically return to
the charging station.
•
You can send the vacuum cleaner to the charging station manually by pressing the button (36)
«recharge » on the remote control.
Switching voice signals on/off
•
Use the button (35) «MUTE » to switch voice
signals on/off.
Connection to WI-FI
•
Press the button (39) «WI-FI » on the remote control, the vacuum cleaner will switch to the Wi-Fi connection and setting mode. If you have «Tuya Smart»
application installed on your smartphone, you can
control the vacuum cleaner operation remotely.
•
You can connect the vacuum cleaner to WI-FI by
pressing and holding the button (6) «AUTO »
for 5 seconds.
CLEANING AND MAINTENANCE
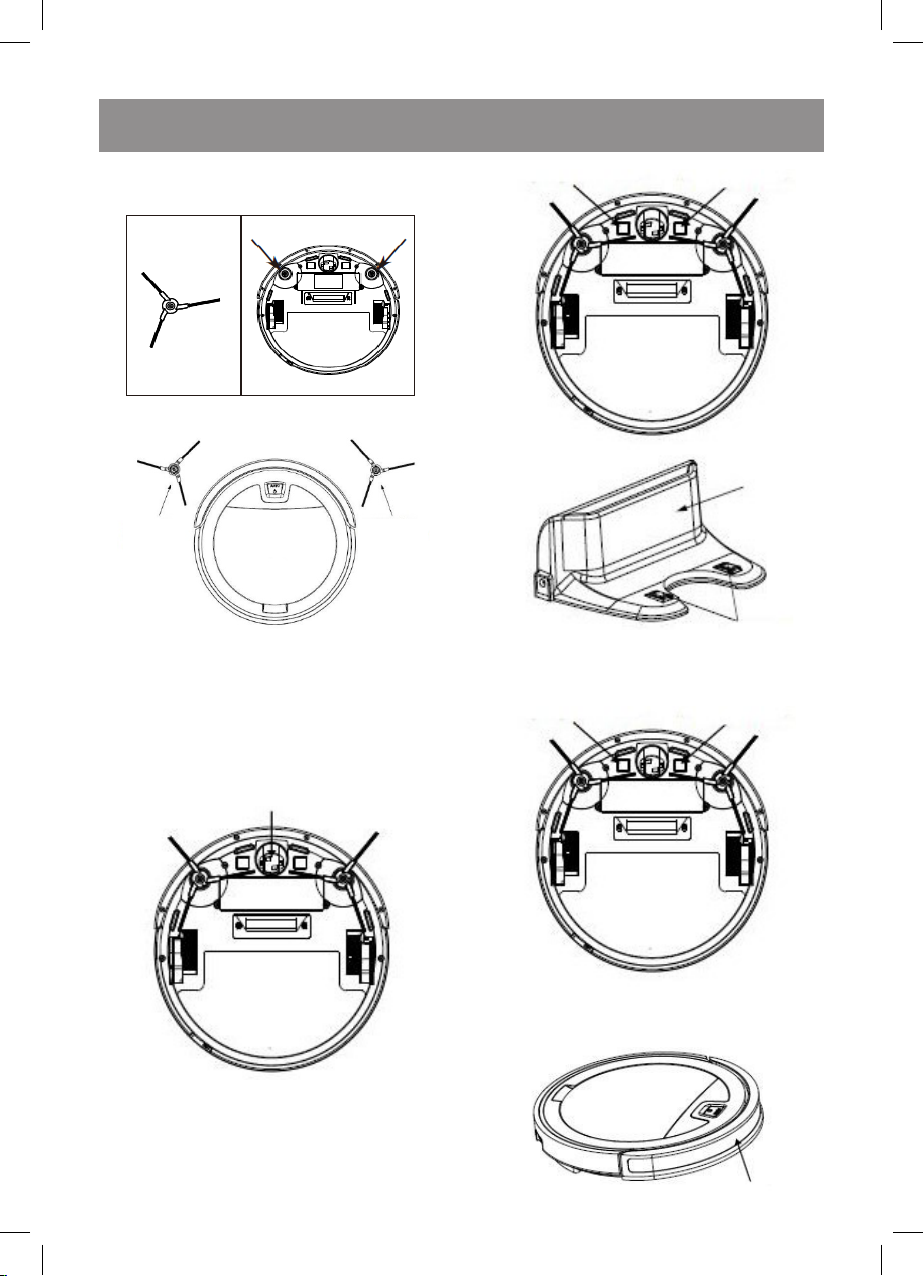
•
It is recommended to clean the dust bin (3) and
the filters (21, 22) after every use of the vacuum
cleaner.
•
Before cleaning switch the vacuum cleaner off by
setting the power switch (2) to the position «0».
•
Disconnect the power adapter (29) from the
mains, remove the connecting cord jack from the
socket (26) on the charging station.
•
Open the lid (5), take the handle (17) and remove
the dust bin (3).
•
Take the filter holder (20) lock and remove the
filter block.
•
Remove dust and garbage from the dust bin (3).
•
Remove the HEPA filter holder (23) from the filter holder (20) and remove the HEPA filter (22),
remove the foam filter (21), clean the filter holders (20, 23) and the filters (21, 22) from dust and
garbage, wash them under a warm water jet.
•
Wash the dust bin (3).
•
Dry the filters (21, 22) thoroughly and the filter
holders (20, 23). Assemble the filter block. Before
installing the filter block to the installation place
(19) make sure that all the filter parts are dry.
Notes:
–
do not wash the filters (21, 22) and the filter holders (20, 23) in a dishwashing machine.
–
do not dry the HEPA filter (22) with a hairdryer.
7
IM VT-1803.indd 7 7/2/19 3:20 PM
Page 8
ENGLISH
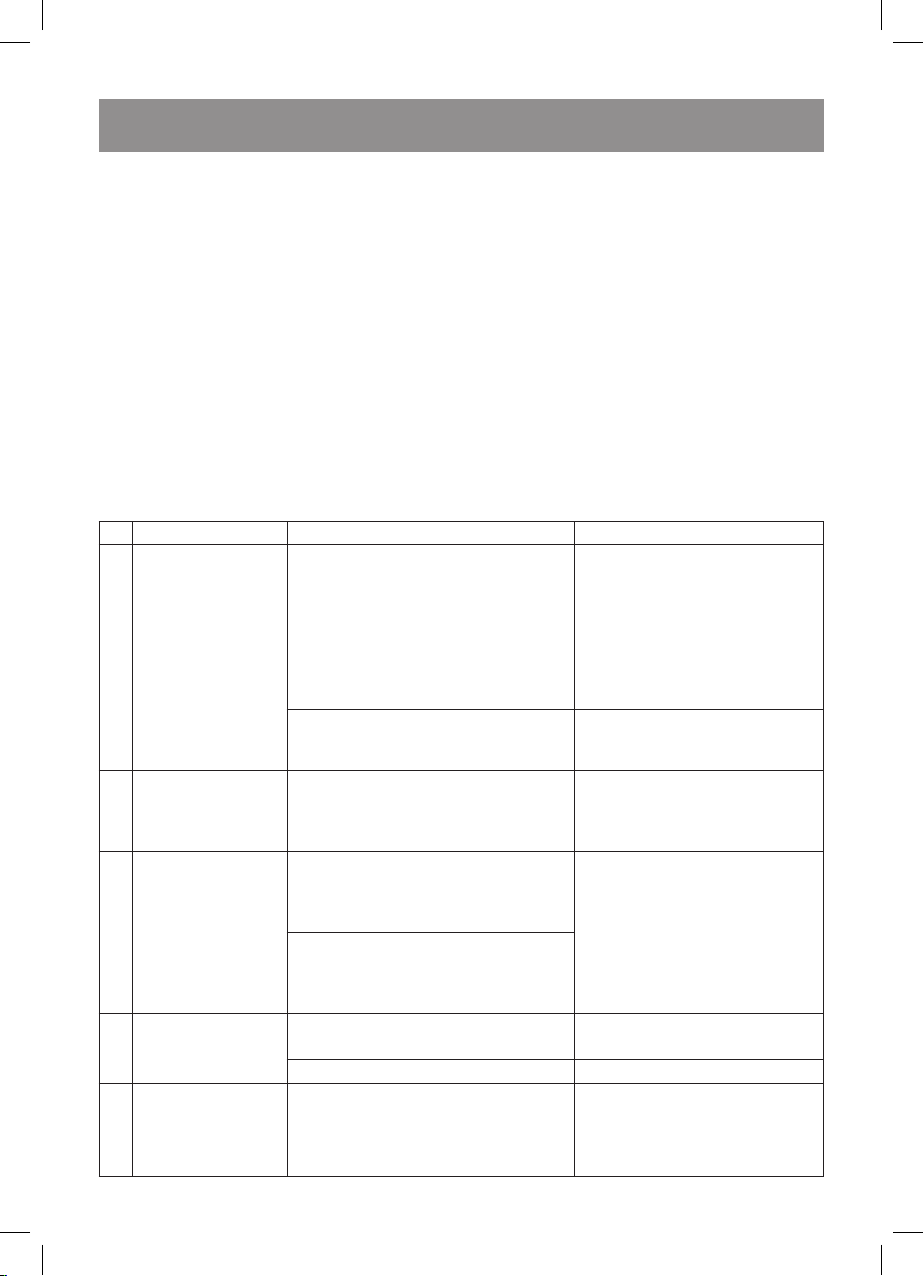
•
Clean the suction nozzle (9) on the bottom part
of the vacuum cleaner body (4).
Left brush
(the center
is gray)
•
Unscrew the fastening screws with a screwdriver (not included) and remove the side
brushes (12), wipe them with a slightly damp
cloth, clean the brush (12) installation places
from dust.
•
The side brushes (12) are not interchangeable,
before installing the brushes (12) make sure that
they are installed properly.
Right brush
(the center
is yellow)
•
Clean the contact points for battery charging (13) on the vacuum cleaner and the contact
points on the charging station (28) from dust.
•
Clean and wipe the anti-drop sensors (11)
on the bottom part on the vacuum cleaner body.
•
Clean the front wheel (14) from dust and garbage and wipe it. Remove hair, if there are any,
make sure that nothing hinders the wheel (14)
free rotation.
8
IM VT-1803.indd 8 7/2/19 3:20 PM
Page 9
E N G L I S H
•
Wipe the front bumper (7).
•
Wipe the vacuum cleaner body (4) with a slightly
damp cloth and then wipe it dry.
•
Do not immerse the vacuum cleaner body (4),
the charging station, the power adapter (29)
and the connecting cord of the power adapter
into water or any other liquids. Provide that no
liquid gets inside the vacuum cleaner body (4).
•
Do not use solvents or abrasives for cleaning the
vacuum cleaner body (4), the charging station
and the power adapter (29).
Removing the battery (15)
•
Before you dispose of the vacuum cleaner,
remove the battery and apply to the corresponding center for recycling of it. Do not burn the
vacuum cleaner even if it is badly damaged
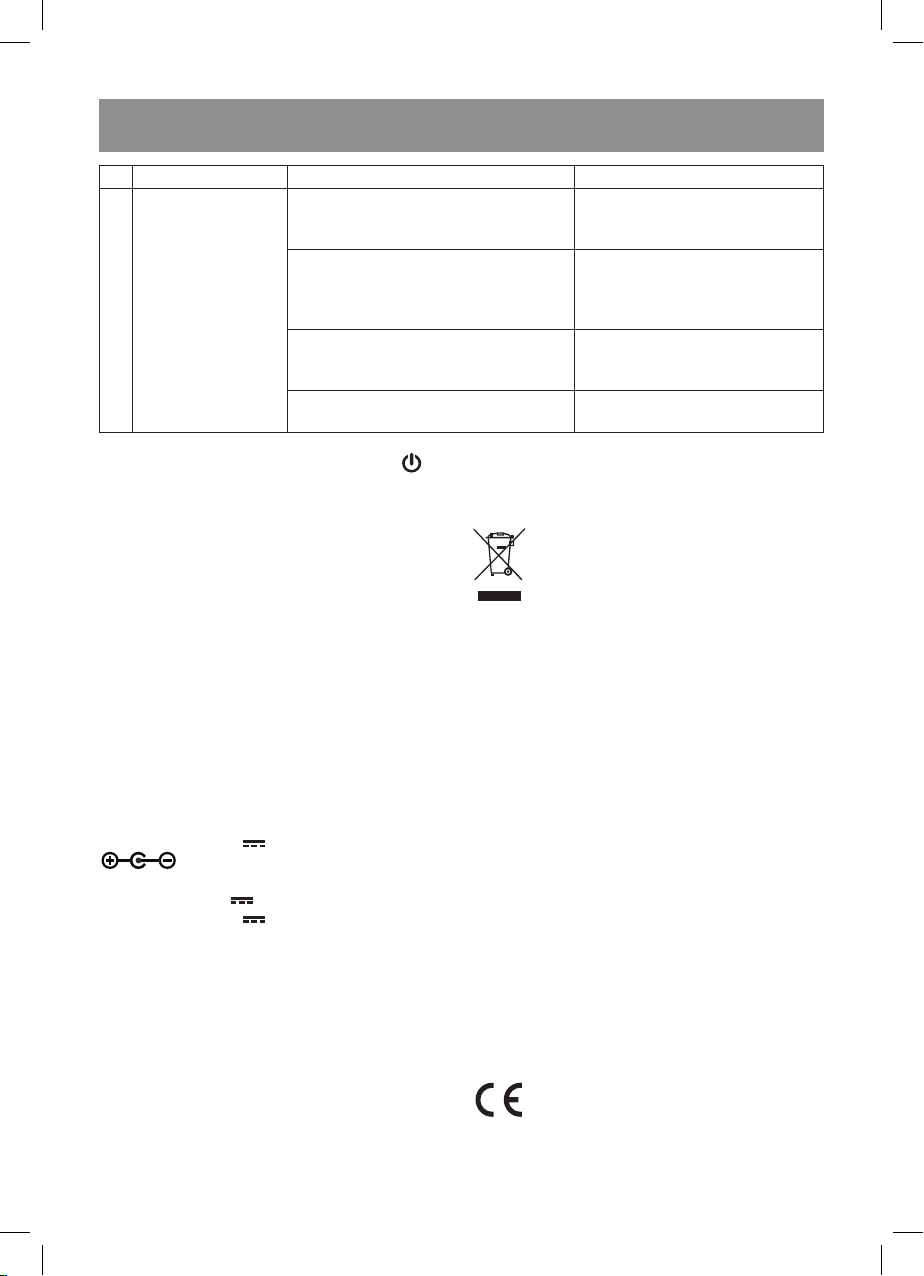
Possible troubles and troubleshooting
№ Malfunction Possible causes Solution
1 The battery doesn‘t
charge.
2 The vacuum cleaner
gives alarms,
periodically switches
on and off.
3 The vacuum cleaner
finishes cleaning
ahead of time and
spontaneously
returns to the
charging station.
4 The vacuum
cleaner doesn‘t see
obstacles
5 The vacuum cleaner
doesn‘t respond to
the remote control.
The vacuum cleaner is set improperly on
the charging station.
The charging station power adapter
is disconnected from the mains.
It is possible that foreign objects (wires,
threads, hanging curtains, etc.) have
been wound onto the driving wheels of
the vacuum cleaner.
If the battery charge is too low for the
room cleaning, the vacuum cleaner
automatically returns to the charging
station.
The operation time of the vacuum
cleaner depends on the cleaning area,
floor surface, room configuration and
the selected cleaning mode.
Anti-drop sensors are dirty. Turn over the vacuum cleaner and
The sensors on the front bumper are dirty. Wipe the front bumper.
The battery in the remote control is
discharged and has to be replaced.
without removing the battery to avoid the battery explosion.
•
It is recommended to remove the battery (15) for
long storage of the vacuum cleaner.
•
Unscrew two fastening screws of the battery lid
and remove the lid.
•
Remove the battery and remove the socket slot
on the plate.
STORAGE
•
Before taking the vacuum cleaner away for long
term storage, clean its body (4), the dust bin (3)
and the filters (21, 22).
•
Remove the battery from the remote control.
•
Use the original package for storage.
•
Keep the vacuum cleaner in a dry cool place out
of reach of children and disabled persons.
Make sure that the contact
points for battery charging on
the vacuum cleaner body and on
the charging station are clean.
If necessary, wipe the contact
points.
Slightly move the vacuum cleaner
body by hands to provide better
contact with the charging station.
Connect the charging station and
plug the power adapter to the
mains socket.
Remove the foreign objects from
the driving wheels and from the
floor.
It is normal.
Do not interfere with the vacuum
cleaner operation.
wipe the anti-drop sensors.
Remove the battery holder from
the remote control, remove the old
battery, install a new one strictly
following the polarity and install
the holder into the remote control.
9
IM VT-1803.indd 9 7/2/19 3:20 PM
Page 10
ENGLISH
№ Malfunction Possible causes Solution
5 The vacuum cleaner
doesn‘t respond to
the remote control.
Notes: - before applying to the service center try to restart the vacuum cleaner, switch it off by pressing
and holding the start/stop button (1) «AUTO » and then switch the vacuum cleaner on again. If the problem is not solved, contact the service center.
DELIVERY SET
Robotic vacuum cleaner – 1 pc.
Charging station – 1 pc.
Power adapter – 1 pc.
Side brushes – 2 pc.
Remote control – 1 pc.
Wet cleaning attachment – 1 pc.
Instruction manual – 1 pc.
TECHNICAL SPECIFICATIONS
Vacuum cleaner
Power supply: Rechargeable battery -
Li-Ion 14,8 V 2000 mAh
Battery charging time: 5 hours
Operation time: up to 2 hours
Power: 20 W
Power adapter:
Power supply: 100-240 V~50-60 Hz 0,5 A
Output voltage: 19 V 0.6 A
Charging station:
Input voltage: 19 V 0.6 A
Output voltage: 19 V 0.6 A
Remote control:
Power supply: CR2025 battery, 3 V
Dust bin capacity: 0,2 L
Water tank capacity: 0,1 l
Noise level: 65-68 dB
The manufacturer preserves the right to change
design, structure and specifications not affecting
general principles of the unit operation without a preliminary notification due to which insignificant differences between the manual and product may be
observed. If the user reveals such differences, please
report them via e-mail info@vitek.ru for receipt of an
updated manual.
The vacuum cleaner is switched off
or the vacuum cleaner battery is
discharged.
The signal from the remote control is not
transmitted, because the infrared emitter
on the remote control or the infrared
receiver on the vacuum cleaner are dirty.
There are other sources of infrared
signals in the room that affect the
operation of the vacuum cleaner.
The distance from the remote control is
more than 5 meters.
RECYCLING
For environment protection do not throw out the unit
and the batteries (if included), do not discard the
unit and the batteries with usual household waste
after the service life expiration; apply to specialized
centers for further recycling.
The waste generated during the disposal of the unit
is subject to mandatory collection and consequent
disposal in the prescribed manner.
For further information about recycling of this product apply to a local municipal administration, a disposal service or to the shop where you purchased
this product.
The unit operating life is 3 years
Guarantee
Details regarding guarantee conditions can be obtained from the dealer from whom the appliance
was purchased. The bill of sale or receipt must be
produced when making any claim under the terms
of this guarantee.
This product conforms to the EMC Directive
2014/30/EU and to the Low Voltage
Directive 2014/35/EU.
10
Make sure that the battery is fully
charged and the vacuum cleaner
is switched on.
Wipe the infrared emitter on the
remote control and the infrared
receiver on the vacuum cleaner
bumper.
Do not use other remote controls
during the vacuum cleaner
operation.
Bring the remote control closer
to the vacuum cleaner.
IM VT-1803.indd 10 7/2/19 3:20 PM
Page 11
РУССКИЙ
РОБОТ-ПЫЛЕСОС VT-1803
Основное назначение пылесоса-робота, это
уборка помещений в автоматическом режиме.
ОПИСАНИЕ
1. Гнездо для подключения сетевого
адаптера
2. Выключатель питания «I/0»
3. Контейнер-пылесборник
4. Корпус
5. Крышка
6. Кнопка старт/стоп «AUTO »
7. Передний бампер
8. Окно датчиков
9. Всасывающее сопло
10. Ведущие колёса
11. Датчики защиты от падения
12. Боковые щётки
13. Контакты для зарядки аккумуляторной
батареи
14. Переднее колесо
15. Аккумуляторная батарея
16. Насадка для влажной очистки пола
Контейнер для пыли и мусора
17. Ручка контейнера
18. Пробка заливочного отверстия
19. Место установки фильтров
20. Держатель фильтров с фиксатором
21. Поролоновый фильтр
22. НЕРА-фильтр
23. Держатель НЕРА-фильтра
24. Отверстия для капель воды
25. Крышка от высыпания мусора
Зарядная станция
26. Гнездо для подключения сетевого адаптера
27. Панель датчиков
28. Контакты для зарядки аккумуляторной
батареи
29. Сетевой адаптер
Пульт дистанционного управления
30. Индикатор работы пульта
31. Кнопка включения/дежурного режима/
выключения «sleep/stop »
32. Кнопка включения/выключения уборки « »
33. Кнопки ручного управления пылесосом
« »
34. Кнопка автоматической уборки
помещения «AUTO »
35. Кнопка включения/выключения голосовых
сигналов «MUTE »
36. Кнопка возврата пылесоса на зарядную
станцию «recharge »
37. Кнопка режима уборки «вдоль стены»
«EDGE »
38. Кнопка «зигзагообразной» уборки
«Zigzag »
39. Кнопка подключения к сети «WI-FI »
40. Держатель элемента питания
МЕРЫ БЕЗОПАСНОСТИ И РЕКОМЕНДАЦИИ
ПО ИСПОЛЬЗОВАНИЮ
Перед использованием робота-пылесоса
внимательно прочитайте инструкцию по эксплуатации и сохраняйте её в течение всего
срока эксплуатации. Неправильное обращение с устройством может привести к его
поломке, причинению вреда пользователю
или его имуществу.
Для снижения риска возникновения пожара,
для защиты от поражения электрическим током
и для предохранения от получения травм следуйте приведённым ниже рекомендациям.
• Используйте данное устройство только в
соответствии с инструкцией по эксплуатации.
• Используйте только те аксессуары, кото-
рые входят в комплект поставки.
• Перед первой зарядкой аккумуляторной
батареи убедитесь в том, что напряжение
в электрической сети соответствует рабочему напряжению сетевого адаптера.
• Не заряжайте аккумуляторную батарею в
местах с повышенной влажностью и высокой температурой. Производите зарядку
аккумуляторной батареи при температуре от +5°C до +35°C и при относительной
влажности не более 80%.
• Если вы не используете зарядную станцию
в течение длительного периода времени,
выньте сетевой адаптер из элек трической
розетки.
• Не прикасайтесь к корпусу сетевого адап-
тера мокрыми руками.
• Запрещается использовать пылесос вне
помещений, для уборки на влажных и
мокрых полах.
• Не используйте пылесос в помещениях с
неустойчивой мебелью, особенно если на
ней установлены хрупкие предметы интерьера или горящие свечи.
• Не кладите и не устанавливайте на корпус
пылесоса посторонние предметы, а так же
следите за тем, чтобы на корпусе пылесоса
не размещались домашние животные.
11
IM VT-1803.indd 11 7/2/19 3:20 PM
Page 12

РУССКИЙ
• Запрещается включать устройство, если
воздухозаборное отверстие пылесоса
заблокировано посторонним предметом.
• Следите за тем, чтобы волосы, а также сво-
бодно висящие элементы одежды и интерьера не находились на пути движения
пылесоса.
• При уборке лестничных площадок, устано-
вите дополнительную преграду для пылесоса.
• Запрещается использовать пылесос для
сбора легковоспламеняющихся жидкостей, таких как бензин или растворители.
Запрещается использование пылесоса в
местах хранения таких жидкостей.
• Запрещается с помощью пылесоса соби-
рать горящие или дымящиеся сигареты,
спички, тлеющий пепел, а также тонкодисперсную пыль – например, от штукатурки,
бетона, муки или золы.
• Запрещается использовать пылесос, если:
– не установлен контейнер для сбора
пыли и мусора;
– в контейнере не установлен НЕРА-фильтр.
• Не погружайте пылесос, сетевой адаптер и
зарядную станцию в воду или любые другие жидкости.
Внимание! Устройство содержит литиевый
элемент питания. Не допускайте попадания литиевого элемента питания в пищевод
ребёнка. Если ребенок проглотил элемент
питания, немедленно обратитесь к врачу.
• Будьте особенно внимательны, если
поблизости от работающего устройства находятся дети или лица с ограниченными возможностями.
• Данное устройство не предназначено для
использования детьми.
• Во время работы и в перерывах между
рабочими циклами размещайте устройство в местах, недоступных для детей.
• Прибор не предназначен для использова-
ния лицами (включая детей) с пониженными физическими, психическими или
умственными способностями, или при
отсутствии у них опыта или знаний, если
они не находятся под контролем или не
проинструктированы об использовании
прибора лицом, ответственным за их безопасность.
• Осуществляйте надзор за детьми, чтобы
не допустить использования устройства в
качестве игрушки.
• Из соображений безопасности детей
не оставляйте полиэтиленовые пакеты,
используемые в качестве упаковки, без
присмотра.
Внимание! Не разрешайте детям играть с
полиэтиленовыми пакетами или упаковочной
плёнкой. Опасность удушья!
• Запрещается использовать соединитель-
ный шнур сетевого адаптера для переноски зарядной станции, соединительный
шнур не должен касаться острых кромок
мебели и горячих поверхностей. Следите
за тем, чтобы пылесос не переезжал соединительный шнур сетевого адаптера.
• Регулярно проверяйте состояние сете-
вого адаптера и соединительного шнура
на отсутствие повреждений.
• Запрещается использовать устройство
при наличии повреждений сетевого
адаптера или соединительного шнура,
если устройство работает с перебоями,
а также после падения устройства.
• Запрещается самостоятельно ремонтиро-
вать прибор. Не разбирайте прибор самостоятельно, при возникновении любых
неисправностей, а также после падения
устройства выключите прибор и обратитесь в любой авторизованный (уполномоченный) сервисный центр по контактным
адресам, указанным в гарантийном талоне
и на сайте www.vitek.ru.
• Во избежание повреждений перевозите
устройство только в заводской упаковке.
• Прежде чем утилизировать пылесос,
извлеките аккумуляторную батарею и
сдайте её в соответствующий пункт приёма. Запрещается сжигать пылесос, даже
если он очень сильно повреждён, не вынув
из него аккумуляторную батарею, во избежание взрыва аккумуляторной батареи.
• Перевозите устройство только в заводской
упаковке.
• Храните устройство в сухом прохладном
месте, недоступном для детей и людей с
ограниченными возможностями.
УСТРОЙСТВО ПРЕДНАЗНАЧЕНО ТОЛЬКО
ДЛЯ БЫТОВОГО ИСПОЛЬЗОВАНИЯ В
ЖИЛЫХ ПОМЕЩЕНИЯХ, ЗАПРЕЩАЕТСЯ
КОММЕРЧЕСКОЕ ИСПОЛЬЗОВАНИЕ
И ИСПОЛЬЗОВАНИЕ УСТРОЙСТВА В
ПРОИЗВОДСТВЕННЫХ ЗОНАХ И РАБОЧИХ
ПОМЕЩЕНИЯХ.
12
IM VT-1803.indd 12 7/2/19 3:20 PM
Page 13

РУССКИЙ
ПЕРЕД ПЕРВЫМ ИСПОЛЬЗОВАНИЕМ
После транспортировки или хранения
устройства в зимних (холодных) условиях необходимо выдержать его при
комнатной температуре не менее трёх
часов.
• Извлеките пылесос из упаковки и уда-
лите упаковочные материалы и рекламные
наклейки.
• Сохраните заводскую упаковку.
• Проверьте целостность устройства, при
наличии повреждений не пользуйтесь
устройством.
• Изучите инструкцию по мерам безопас-
ности и правилам использования пылесоса.
• Убедитесь в том, что рабочее напряжение
сетевого адаптера соответствует напряжению в электрической сети.
• Устройство предназначено для работы в
сети переменного тока с частотой 50 Гц
или 60 Гц, для работы устройства при требуемой номинальной частоте никакая
настройка не требуется.
ПУЛЬТ ДИСТАНЦИОННОГО УПРАВЛЕНИЯ
Внимание! Устройство содержит литиевый
элемент питания. Не допускайте попадания литиевого элемента питания в пищевод
ребёнка. Если ребенок проглотил эле-
мент питания, немедленно обратитесь
к врачу.
• Нажмите на боковой фиксатор держателя
элемента питания (40) и выньте его.
• Установите элемент питания CR2025 в
держатель (40) строго соблюдая полярность.
• Установите держатель (40) в корпус пульта
дистанционного управления.
Примечания:
– при наличии изолирующей прокладки в
пульте ДУ, выньте прокладку;
– своевременно меняйте элемент питания;
– запрещается перезаряжать элемент пита-
ния;
– вынимайте элемент питания, если устрой-
ство не будет использоваться в течение
длительного времени;
– использованный элемент питания должен
быть удалён из устройства и безопасно
утилизирован;
– не допускайте замыкания выводов эле-
мента питания.
ПОДГОТОВКА ПЫЛЕСОСА
Ручная зарядка аккумуляторной батареи
Перед использованием пылесоса, рекомендуется провести зарядку аккумуляторной
батареи в ручном режиме.
• Вставьте штекер соединительного шнура
сетевого адаптера (29) в гнездо (1) на корпусе пылесоса.
• Вставьте сетевой адаптер (29) в электриче-
скую розетку, при этом прозвучит голосовое
оповещение и подсветка кнопки старт/стоп
«AUTO » будет мигать зелёным цветом.
• Первую зарядку аккумуляторной батареи,
рекомендуется проводить не менее 8 часов.
Зарядная станция
• Вставьте штекер соединительного шнура
сетевого адаптера (29) в гнездо (26) на
зарядной станции.
13
IM VT-1803.indd 13 7/2/19 3:20 PM
Page 14

РУССКИЙ
• Установите зарядную станцию на ров-
ную поверхность пола у стены, основание
зарядной станции должно быть перпендикулярно полу.
• Свободное пространство перед заряд-
ной станцией должно быть не менее
1,5 метра, с боков зарядной станции
свободное расстояние должно быть не
менее 0,5 метра.
• Не устанавливайте зарядную станцию
вблизи предметов с большой отражающей
способностью, например, около зеркал, в
противном случае поиск зарядной станции
пылесосом будет затруднён.
ПЕРЕД ИСПОЛЬЗОВАНИЕМ ПЫЛЕСОСА
• Уберите с пола всевозможные шнуры пита-
ния, сетевые удлинители и другие подобные предметы, которые могут помешать
передвижению пылесоса.
• Пылесос предназначен для работы на
гладком полу или на ковровом покрытии с
низким ворсом (менее 1 см). Запрещается
использовать пылесос для чистки ковровых покрытий с длинным ворсом.
• Убедитесь, что по пути движения пыле-
соса отсутствуют свисающие до пола
скатерти, шторы или другие предметы
интерьера.
• Свободное пространство под предметами
мебели должно быть не менее 6 сантиметров, в противном случае пылесос просто
застрянет под мебелью.
• Если расстояние от пола до мебели мене
6 сантиметров, необходимо приподнять
мебель или обеспечить преграду от попадания пылесоса в такие места.
• При уборке на лестничных площадках
необходимо обеспечить дополнительную
преграду для пылесоса.
• Расставьте предметы мебели для свобод-
ного передвижения пылесоса, уберите с
пола посторонние предметы.
• Не используйте пылесос в помещениях с
неустойчивой мебелью, особенно если на
ней установлены хрупкие предметы интерьера или горящие свечи.
• Не кладите и не устанавливайте на корпус
пылесоса посторонние предметы, а так же
следите за тем, чтобы на корпусе пылесоса
не размещались домашние животные.
• Перед использованием пылесоса, убеди-
тесь в отсутствие узких мест по пути передвижения пылесоса.
ИСПОЛЬЗОВАНИЕ ПЫЛЕСОСА
левая щетка
(центр серого
цвета)
• Боковые щётки (12) не являются взаимоза-
правая щетка
(центр жёлтого
цвета)
меняемыми, перед использованием пылесоса убедитесь в правильности установки
щёток (12).
• Включите пылесос, установив выключатель
питания (2) в положение «I/0».
• Прозвучит мелодия, подсветка кнопки (6)
будет светиться зелёным цветом, пылесос
находится в дежурном режиме.
Режим автоматической уборки помещения
14
IM VT-1803.indd 14 7/2/19 3:20 PM
Page 15

РУССКИЙ
• Нажмите кнопку старт/стоп (6) «AUTO »,
прозвучит голосовое оповещение, пылесос включится и начнёт уборку помещения
в автоматическом режиме.
Влажная уборка пола
• Для остановки пылесоса повторно нажмите
кнопку старт/стоп (6) «AUTO ».
• Откройте крышку (5), возьмитесь за руч-
ку (17) и выньте контейнер-пылесборник (3).
• Откройте крышку заливочного отверстия (18)
и наполните резервуар водой, закройте
крышку заливочного отверстия (18).
• Установите контейнер-пылесборник (3) на
место, закройте крышку (5).
• Закрепите тканевую насадку (16) на днище
пылесоса с помощью «липучек».
Примечания:
– если вы не будете использовать пылесос
длительное время, вылейте воду из резервуара.
– ёмкость резервуара 100 мл воды.
Использование пульта дистанционного
управления
• С помощью пульта дистанционного управ-
ления вы можете выбрать нужный режим
уборки помещения.
• Нажмите на пульте дистанционного управ-
ления (ДУ) кнопку включения/дежурного
режима/выключения (31) «sleep/stop ».
Режим автоматической уборки помещения
• Для включения режима автоматической
уборки помещения нажмите кнопку (34)
«AUTO ».
Временная остановка пылесоса во время
уборки
• Автоматический режим уборки, наиболее
часто используемый, в этом режиме пылесос очищает всю поверхность пола.
• Кнопкой (32) « » вы можете остановить
пылесос, повторным нажатием кнопки (32)
« » включите пылесос для продолжения
уборки.
Ручное управление движением
пылесоса
• Используя кнопки (33) « », вы
можете направить пылесос в нужный участок для уборки или вывести пылесос из
проблематичных для уборки мест.
Режим уборки «Вдоль стены»
• В этом режиме пылесос очищает помеще-
ние вдоль стен.
• Для включения режима уборки нажмите на
пульте ДУ кнопку (37) «EDGE ».
Режим уборки «Зигзаг»
• В этом режиме уборки, пылесос будет
убирать помещение, двигаясь зигзагообразно.
• Нажмите кнопку (38) «Zigzag » на пульте
ДУ, пылесос включится и начнёт уборку.
Возвращение пылесоса на зарядную
станцию
• Когда аккумуляторная батарея пылесоса
будет разряжена. Пылесос автоматически
вернётся на зарядную станцию.
• Вы можете отправить пылесос на заряд-
ную станцию вручную, нажав кнопку (36)
«recharge » на пульте ДУ
Включение/выключение голосовых
сигналов
• Для включения/выключения голосовых сиг-
налов используйте кнопку (35) «MUTE ».
15
IM VT-1803.indd 15 7/2/19 3:20 PM
Page 16

РУССКИЙ
→
Подключение к сети WI-FI
• Нажмите кнопку (39) «WI-FI » на пульте
дистанционного управления, пылесос включится в режим настройки и подключения к
сети WI-FI. Если на смартфоне установлена
программа «Tuya Smart», вы можете дистанционно управлять работой пылесоса.
• Подключить пылесос к сети WI-FI можно
нажатием и удержанием в течение 5 секунд
кнопки (6) «AUTO ».
ЧИСТКА И УХОД
• Рекомендуется проводить чистку контей-
нера для пыли и мусора (3) и фильтров
(21, 22) после каждого использования пылесоса.
• Перед чисткой пылесоса, выключите его,
установив выключатель питания (2) в положение «0».
• Выньте сетевой адаптер (29) из электри-
ческой розетки, выньте штекер соединительного шнура из гнезда (26) на зарядной
станции.
• Откройте крышку (5), возьмитесь за руч-
ку (17) и выньте контейнер-пылесборник (3).
• Снимите с держателя фильтров (20), дер-
жатель НЕРА-фильтра (23) и выньте из
него НЕРА-фильтр (22), выньте поролоновый фильтр (21), очистите держатели
фильтров (20, 23), фильтры (21, 22) от
пыли и мусора и промойте их под струёй
тёплой воды.
• Промойте контейнер-пылесборник (3).
• Хорошо просушите фильтры (21, 22) и
держатели фильтров (20, 23), соберите
блок фильтров, перед установкой блока
фильтров в место установки (19), убедитесь, что все элементы фильтра сухие.
Примечания:
– не используйте для промывки фильтров
(21, 22) и держателей фильтров (20, 23)
посудомоечную машину;
– запрещается использовать фен для сушки
НЕРА-фильтра (22).
• Возьмитесь за фиксатор держателя филь-
тров (20) и снимите блок фильтров.
• Удалите из контейнера-пылесборника (3)
пыль и мусор.
• Очистите всасывающее сопло (9) на ниж-
IM VT-1803.indd 16 7/2/19 3:20 PM
ней части корпуса (4) пылесоса.
16
Page 17

РУССКИЙ
левая щетка
(центр серого
цвета)
правая щетка
(центр жёлтого
цвета)
• Используя отвёртку (не входит в комплект
поставки) отверните крепёжные винты и
снимите боковые щётки (12), протрите их
слегка влажной тканью, очистите от пыли
места установки щёток (12).
• Боковые щётки (12) не являются взаи-
мозаменяемыми, перед установкой щёток (12) убедитесь в правильности их
установки.
• Очистите от пыли контакты для зарядки
аккумуляторной батареи (13) на пылесосе
и контакты (28) на зарядной станции.
• Очистите и протрите датчики защиты от
падения (11), расположенные на нижней
части корпуса пылесоса.
• Очистите переднее колесо (14) от пыли
и мусора и протрите его, при наличии
волос, удалите их, убедитесь, что свободному вращению колеса (14) ничего не
мешает.
17
IM VT-1803.indd 17 7/2/19 3:20 PM
Page 18

РУССКИЙ
• Протрите передний бампер (7).
• Протрите корпус пылесоса (4) слегка влаж-
ной тканью, после чего вытрите насухо.
• Запрещается погружать корпус пыле-
соса (4), зарядную станцию, сетевой
адаптер (29), соединительный шнур сетевого адаптера в воду или любые другие
жидкости. Не допускайте попадания жидкости внутрь корпуса пылесоса (4).
• Запрещается для чистки корпуса пыле-
соса (4), зарядной станции и сетевого
адаптера (29), использовать растворители
и абразивные чистящие средства.
Извлечение аккумуляторной батареи (15)
• Прежде чем утилизировать пылесос,
извлеките аккумуляторную батарею и
сдайте её в соответствующий пункт приёма. Запрещается сжигать пылесос, даже
если он очень сильно повреждён, не вынув
из него аккумуляторную батарею, во избежание взрыва аккумуляторной батареи.
Возможные неисправности и их устранение
№ Неисправность Возможные причины Устранение
1 Нет зарядки
аккумуляторной
батареи.
Пылесос плохо установлен на
зарядную станцию.
• Рекомендуется отсоединять аккумулятор-
ную батарею (15) при длительном хранении пылесоса.
• Открутите два крепёжных шурупа крыш-
ки аккумуляторной батареи и снимите
крышку.
• Извлеките аккумуляторную батарею и вынь-
те разъём гнезда на плате.
ХРАНЕНИЕ
• Прежде чем убрать пылесос на длительное
хранение, проведите чистку корпуса пылесоса (4), контейнера-пылесборника (3)
и фильтров (21, 22).
• Выньте элемент питания из пульта дистан-
ционного управления.
• Используйте для хранения пылесоса
заводскую упаковку.
• Храните пылесос в сухом прохладном
месте, недоступном для детей и людей
с ограниченными возможностями.
Убедитесь, что контакты для
зарядки аккумуляторной
батареи на корпусе пылесоса и
зарядной станции чистые, при
необходимости протрите контакты.
Вручную слегка переместите
корпус пылесоса для обеспечения
контакта пылесоса с зарядной
станцией.
Сетевой адаптер зарядной
станции не вставлен в
электрическую розетку.
2 Пылесос подаёт
аварийные сигналы,
периодически
включается и
выключается.
3 Пылесос
раньше времени
заканчивает уборку
и самопроизвольно
возвращается на
зарядную станцию.
IM VT-1803.indd 18 7/2/19 3:20 PM
Возможно, на ведущие
колёса пылесоса намотались
посторонние предметы
(провода, нитки, свисающие
шторы и т.д.).
Если заряда аккумуляторной
батареи не хватает на
уборку помещения, пылесос
автоматически возвращается
на зарядную станцию.
18
Подключите зарядную станцию
и вставьте сетевой адаптер
в электрическую розетку.
Удалите посторонние предметы
с ведущих колёс, уберите
посторонние предметы с пола.
Это нормальное явление.
Никакого вмешательства в работу
пылесоса не требуется.
Page 19

РУССКИЙ
№ Неисправность Возможные причины Устранение
3 Пылесос
раньше времени
заканчивает уборку
и самопроизвольно
возвращается на
зарядную станцию.
4 Пылесос
не определяет
препятствия
5 Пылесос не
реагирует на пульт
дистанционного
управления.
Примечание: - прежде, чем обратиться в сервисный центр, попробуйте перезагрузить пылесос, выключив его нажатием и удержанием кнопки старт/стоп (1) «AUTO », после этого
повторно включите пылесос. Если проблема не устранена, обратитесь в сервисный центр.
КОМПЛЕКТ ПОСТАВКИ
Пылесос-робот – 1 шт.
Зарядная станция – 1 шт.
Сетевой адаптер – 1 шт.
Боковые щётки – 2 шт.
Пульт дистанционного управления – 1 шт.
Насадка для влажной уборки пола – 1 шт.
Инструкция – 1 шт.
Время работы пылесоса
зависит от площади
уборки, поверхности пола,
конфигурации помещения
и выбранного режима уборки
помещения.
Загрязнены датчики защиты
от падения.
Загрязнены датчики
на переднем бампере.
Элемент питания в пульте
дистанционного управления
разряжен и требует замены.
Пылесос выключен или
аккумуляторная батарея
пылесоса разряжена.
Сигнал с пульта ДУ не
передается, потому что
инфракрасный излучатель на
пульте ДУ или инфракрасный
приемник на пылесосе
загрязнены.
В комнате находятся другие
источники с инфракрасным
сигналом, влияющие на
работу пылесоса
Расстояние от пульта ДУ
более 5 метров.
Мощность: 20 Вт
Объем пылесборника: 0,2 л
Объём резервуара для воды: 0,1 л
Уровень шума: 65-68 дБ
Сетевой адаптер:
Электропитание: 100-240 В~50-60 Гц 0,5 А
Выходное напряжение: 19 В 0,6 А
Это нормальное явление.
Никакого вмешательства в работу
пылесоса не требуется.
Переверните пылесос и протрите
датчики защиты от падения.
Протрите передний бампер.
Выньте держатель элемента
питания из пульта ДУ, удалите
старый элемент питания,
установите новый элемент питания,
строго соблюдаю полярность, и
установите держатель в пульт ДУ.
Убедитесь, что аккумуляторная
батарея полностью заряжена
и пылесос включен.
Протрите инфракрасный
излучатель на пульте ДУ
и инфракрасный приемник
на бампере пылесоса.
Не используйте другие пульты ДУ
во время работы пылесоса.
Приблизьте пульт ДУ к пылесосу.
ТЕХНИЧЕСКИЕ ХАРАКТЕРИСТИКИ
Пылесос
Электропитание: Аккумуляторная
батарея Li-Ion 14,8 В 2000 мАч
Время заряда аккумулятора: 5 часов
Время работы: до 2 часов
IM VT-1803.indd 19 7/2/19 3:20 PM
Зарядная станция:
Входное напряжение: 19 В 0,6 А
Выходное напряжение: 19 В 0,6 А
Пульт дистанционного управления:
Электропитание: 3 В, 1 элемент питания
типа «CR2032»
19
Page 20

РУССКИЙ
УТИЛИЗАЦИЯ
несоответствия, просим сообщить об этом по
электронной почте info@vitek.ru для получения
обновленной версии инструкции.
Срок службы устройства – 3 года
В целях защиты окружающей среды, после
окончания срока службы прибора и элементов питания (если входят в комплект), не
выбрасывайте и вместе с обычными бытовыми отходами, передайте прибор и элементы питания в специализированные пункты
для дальнейшей утилизации.
Отходы, образующиеся при утилизации изделий, подлежат обязательному сбору с последующей утилизацией в установленном порядке.
Для получения дополнительной информации
об утилизации данного продукта обратитесь
в местный муниципалитет, службу утилизации
бытовых отходов или в магазин, где Вы приобрели данный продукт.
Производитель сохраняет за собой право изменять дизайн, конструкцию и технические характеристики, не влияющие на общие принципы
работы устройства, без предварительного уведомления, из-за чего между инструкцией и
изделием могут наблюдаться незначительные
различия. Если пользователь обнаружил такие
Данное изделие соответствует всем
требуемым европейским и российским
стандартам безопасности и гигиены.
ИЗГОТОВИТЕЛЬ: СТАР ПЛЮС ЛИМИТЕД
(STAR PLUS LIMITED)
МЕСТОНАХОЖДЕНИЕ И ПОЧТОВЫЙ
АДРЕС ДЛЯ СВЯЗИ: ЮНИТ БИ ЭНД СИ,
15Й ЭТАЖ,КЭЙСИ АБЕРДИН ХАУС, №38,
ХЁНГ ИП РОУД, ВОНГ ЧУК ХАНГ, ГОНКОНГ,
КНР
ИМПОРТЕР: ООО «ВИТЕК.РУС»
МЕСТОНАХОЖДЕНИЕ И ПОЧТОВЫЙ
АДРЕС ДЛЯ СВЯЗИ: 117209, РФ,
Г. МОСКВА, СЕВАСТОПОЛЬСКИЙ ПР-КТ,
Д. 28, КОРП. 1.
www.vitek.ru
ТЕЛЕФОН ДЛЯ СПРАВОК: 8-800-100-18-30
СДЕЛАНО В КНР
GB
A production date of the item is indicated in the serial number on the technical data plate. A serial number is an eleven-unit number, with
the first four figures indicating the production date. For example, serial number 0606ххххххх means that the item was manufactured
in June (the sixth month) 2006.
RUS
Дата производства изделия указана в серийном номере на табличке с техническими данными. Серийный номер представляет
собой одиннадцатизначное число, первые четыре цифры которого обозначают дату производства. Например, серийный
номер 0606ххххххх означает, что изделие было произведено в июне (шестой месяц) 2006 года.
ЗАПРЕЩЕНО УТИЛИЗИРОВАТЬ
С БЫТОВЫМ МУСОРОМ.
ОБРАТИТЕСЬ НА СООТВЕТСТВУЮЩИЙ
ПУНКТ ПЕРЕРАБОТКИ ЭЛЕКТРИЧЕСКОГО
И ЭЛЕКТРОННОГО ОБОРУДОВАНИЯ.
20
IM VT-1803.indd 20 7/2/19 3:20 PM
Page 21

VT-1803
Robotic vacuum
cleaner
Робот-пылесос
Инструкция по использованию
программы TUYA SMART APP
2
9
1
IM VT-1803.indd 1 7/3/19 11:43 AM
Page 22

ENGLISH
Tuya Smart APP SOFTWARE
INSTRUCTION MANUAL
– Your device must support Android 4.0 /
IOS 7.0 or later versions.
– Make sure that your smartphone or tab-
Tuya Smart APP is a home AI application
developed for Android and IOS.
Tuya Smart APP developer provides the
software and technical support for users.
Please, read the user agreement to learn
let has persistent connection with Wi-Fi,
3G or 4G network.
– You can scan the QR-code to download
«Tuya Smart» application or find it in
Android APP market or App Store.
about the terms of provision of this application.
Let’s take a look at Tuya Smart APP operation when an Android smartphone
connects to the vacuum cleaner
Step 1
Download and install the
Tuya Smart app. Create
an account.
IM VT-1803.indd 2 7/3/19 11:43 AM
Step 2
Read the user agreement
and make a decision.
2
Step 3
Select the method of registration
in the application.
Page 23

E N G L I S H
Step 4
Press “continue”.
Step 7
Make up a password
for logging in the Tuya Smart
app.
Step 5
You can select your country
of residence.
Step 8
Create your virtual home.
3
Step 6
Enter the received confirmation
code.
Step 9
Select smart devices in the
various rooms of your home.
IM VT-1803.indd 3 7/3/19 11:43 AM
Page 24

ENGLISH
Step 10
Enter the name for your home.
Step 13
Select the small appliances
section and select the robotic
vacuum cleaner.
Step 11
Finish creating the home.
Step 14
1. Make sure that your
smartphone has a stable
connection with a WI-FI network.
4
Step 12
Add a smart device.
2. Switch on the vacuum
cleaner WI-FI connection mode.
→
→
3. Switch the vacuum cleaner
on, setting the power switch
to the position «I/0».
4. You will hear a melody, the
button „AUTO ” illumination
will be glowing green, the vacuum
cleaner will switch on in the
standby mode.
5. Press and hold the button
“AUTO ” for 5 seconds,
the vacuum cleaner will switch
to the Wi-Fi connection mode.
The second option:
6. Press the button “WI-FI ”
on the remote control,
the vacuum cleaner will switch
to the Wi-Fi connection mode.
IM VT-1803.indd 4 7/3/19 11:43 AM
Page 25

E N G L I S H
Step 15
Select a WI-FI network and
enter the password to connect
to the network. Press “Confirm”.
Step 18
The vacuum cleaner control tab
will appear on the display.
Step 16
The device search will start.
Connection to the vacuum cleaner via “access point”
Step 19
Add the device.
Step 17
After the device is found, press
“Finish”.
Step 20
Enter the network security
password.
5
IM VT-1803.indd 5 7/3/19 11:44 AM
Page 26

ENGLISH
Step 21
Connect your smartphone
directly to the device.
Step 24
After the device is found, press
«Finish».
Step 22
Go to the smartphone settings,
select the Wi-Fi tab and select
the device.
Step 25
1. The vacuum cleaner control
tab will appear on the display.
6
Step 23
The device search will start.
2. You can control the
vacuum cleaner in the manual
mode or select the automatic
room cleaning program.
3. The tab will show
the battery charge.
4. You can select the
automatic room cleaning
modes:
“Auto”, “Along the wall”,
if you need to return the
vacuum cleaner to the
charging station, press the
icon “Station”, “Zigzag”
cleaning mode, and also
you can switch the sound
on or off by pressing the icon
“Sound”.
5. To set the cleaning start
time go to the setting tab
by pressing the icon
“Time setting”.
IM VT-1803.indd 6 7/3/19 11:44 AM
Page 27

E N G L I S H
Step 26
Pressing the icon “Time setting”
will open the tab for setting
the operation time of the vacuum
cleaner.
Step 29
Select the cleaning mode on
the “Mode” tab and confirm it.
Step 27
Set the vacuum cleaner switch
on time and press “Repeat”
“Once”.
Step 30
Switch to the “Add timer” tab
and make sure that the preset
vacuum cleaner switching
on time is active.
7
Step 28
You can select the day of vacuum
cleaning.
Step 31
You can enter the necessary data
on the “Information about the
device” tab and use it for reference
or delete unnecessary devices.
IM VT-1803.indd 7 7/3/19 11:44 AM
Page 28

ENGLISH
RECYCLING
For environment protection do not throw out
the unit and the batteries (if included), do not
discard the unit and the batteries with usual
household waste after the service life expiration; apply to specialized centers for further
recycling.
The waste generated during the disposal of the
unit is subject to mandatory collection and consequent disposal in the prescribed manner.
For further information about recycling of this
product apply to a local municipal administration,
a disposal service or to the shop where you purchased this product.
The manufacturer preserves the right to change
design, structure and specifications not affecting
general principles of the unit operation without a
preliminary notification due to which insignificant
differences between the manual and product may
be observed. If the user reveals such differences,
please report them via e-mail info@vitek.ru for
receipt of an updated manual.
The unit operating life is 3 years
Guarantee
Details regarding guarantee conditions can be
obtained from the dealer from whom the appliance was purchased. The bill of sale or receipt
must be produced when making any claim under
the terms of this guarantee.
This product conforms to the EMC
Directive 2014/30/EU and to the Low
Voltage Directive 2014/35/EU.
8
IM VT-1803.indd 8 7/3/19 11:44 AM
Page 29

РУССКИЙ
ИНСТРУКЦИЯ ПО ИСПОЛЬЗОВАНИЮ
ПРОГРАММЫ Tuya Smart APP
– Ваше устройство должно поддержи-
вать Android 4.0 / IOS 7.0 или выше.
– Убедитесь, что ваш смартфон или
Tuya Smart APP – интеллектуальное
приложение для дома, разработанное
для платформ Android и IOS.
Издатель приложения Tuya Smart APP,
предоставил программное обеспечение
и техническую поддержку пользовате-
планшет имеет устойчивое соедине-
ние с сетями WI-FI, 3G или 4G.
– Для загрузки приложения «Tuya Smart »
вы можете, отсканировав QR-код или
найти его в Android APP market или
App Store.
лей. Для ознакомления и правилами
предоставления данного приложения,
пожалуйста, ознакомьтесь с пользовательским соглашением.
Рассмотрим работу программы «Tuya Smart APP» при подключении
к пылесосу смартфона с операционной системой «Android»
Шаг 1
Скачайте и установите
приложение «Tuya Smart».
Создайте учётную запись.
IM VT-1803.indd 9 7/3/19 11:44 AM
Шаг 2
Прочитайте пользовательское
соглашение и примите
решение.
9
Шаг 3
Выберите способ
регистрации в приложении.
Page 30

РУССКИЙ
Шаг 4
Нажмите продолжить.
Шаг 7
Придумайте пароль
для входа в приложение
«Tuya Smart».
Шаг 5
Вы можете выбрать свою
страну проживания.
Шаг 8
Создайте свой виртуальный
дом.
10
Шаг 6
Введите полученный код
подтверждения.
Шаг 9
Выберите умные устройства
в различных комнатах дома.
IM VT-1803.indd 10 7/3/19 11:44 AM
Page 31

РУССКИЙ
Шаг 10
Введите название дома.
Шаг 13
Выберите раздел мелкая
бытовая техника и выберите
пылесос-робот.
Шаг 11
Завершите создание дома.
Шаг 14
1. Убедитесь, что ваш
смартфон имеет устойчивое
соединение с сетью WI-FI.
11
Шаг 12
Добавьте умное устройство.
2. Включите режим сопряжения
пылесоса с сетью WI-FI.
→
→
3. Включите пылесос,
установив выключатель
питания в положение «I/0».
4. Прозвучит мелодия, подсветка
кнопки «AUTO » будет светиться
зелёным цветом, пылесос
находится в дежурном режиме.
5. Нажмите и удерживайте
в течение 5 секунд кнопку
«AUTO », пылесос перейдёт
в режим сопряжения с сетью WI-FI.
Второй способ:
6. Нажмите на пульте
дистанционного управления
кнопку «WI-FI », пылесос
перейдёт в режим сопряжения
с сетью WI-FI.
IM VT-1803.indd 11 7/3/19 11:44 AM
Page 32

РУССКИЙ
Шаг 15
Выберите сеть WI-FI и введите
пароль для подключения к сети.
Нажмите «Подтвердить».
Шаг 18
На дисплее отобразится
вкладка управления
пылесосом.
Шаг 16
Начнётся поиск устройства.
Соединение с пылесосом через «точку доступа»
Шаг 19
Добавьте устройство.
12
Шаг 17
После нахождения
устройства, нажмите
«Завершить».
Шаг 20
Введите пароль доступа
к сети.
IM VT-1803.indd 12 7/3/19 11:44 AM
Page 33

РУССКИЙ
Шаг 21
Подключите смартфон
напрямую к устройству.
Шаг 24
После нахождения устройства,
нажмите «Завершить».
Шаг 22
Зайдите на смартфоне
в настройки, выберите
вкладку сети WI-FI
и веберите устройство.
Шаг 25
1. На дисплее отобразится
вкладка управления
пылесосом.
Шаг 23
Начнётся поиск устройства.
2. Вы можете управлять
пылесосом в ручном
режиме или выбрать
программу автоматической
уборки помещения.
3. На вкладке отображается
состояние аккумуляторной
батареи.
4. Вы можете выбрать
режимы автоматической
уборки помещения:
«Авто», «Вдоль стены»,
при необходимости
возвращения пылесоса
на зарядную станцию,
нажмите символ «Станция»,
зигзагообразный режим
уборки «Зигзаг», а также
включить или отключить звук,
нажав на символ «Звук».
5. Для установки времени
начала уборки перейдите
на вкладку установки,
нажав на символ
«Установка времени».
13
IM VT-1803.indd 13 7/3/19 11:44 AM
Page 34

РУССКИЙ
Шаг 26
При нажатии на символ
«Установка времени»,
откроется вкладка для
установки временных
интервалов работы пылесоса.
Шаг 29
На вкладке «Mode» выберите
режим уборки и подтвердите
его.
Шаг 27
Установите время включения
пылесоса и нажмите
«Повторить» «Один раз».
Шаг 30
Перейдите на вкладку
«Добавить таймер» и убедитесь,
что установленное время
включения пылесоса активно.
14
Шаг 28
Вы можете выбрать необходимый
день проведения уборки
пылесосом.
Шаг 31
На вкладке «Информация
об устройстве», вы можете
ввести необходимые данные
и использовать их в качестве
справочного материала или
удалить не нужное устройство.
IM VT-1803.indd 14 7/3/19 11:44 AM
Page 35

РУССКИЙ
УТИЛИЗАЦИЯ
В целях защиты окружающей среды, после
окончания срока службы прибора и элементов питания (если входят в комплект), не
выбрасывайте их вместе с обычными бытовыми отходами, передайте прибор и элементы питания в специализированные пункты
для дальнейшей утилизации.
Отходы, образующиеся при утилизации изделий, подлежат обязательному сбору с последующей утилизацией в установленном порядке.
Для получения дополнительной информации
об утилизации данного продукта обратитесь
в местный муниципалитет, службу утилизации
бытовых отходов или в магазин, где Вы приобрели данный продукт.
Производитель сохраняет за собой право
изменять дизайн, конструкцию и технические характеристики, не влияющие на общие
принципы работы устройства, без предварительного уведомления, из-за чего между
инструкцией и изделием могут наблюдаться
незначительные различия. Если пользователь обнаружил такие несоответствия, просим сообщить об этом по электронной почте
info@vitek.ru для получения обновленной версии инструкции.
Срок службы устройства – 3 года
Данное изделие соответствует всем
требуемым европейским и российским
стандартам безопасности и гигиены.
ИЗГОТОВИТЕЛЬ: СТАР ПЛЮС ЛИМИТЕД
(STAR PLUS LIMITED)
МЕСТОНАХОЖДЕНИЕ И ПОЧТОВЫЙ
АДРЕС ДЛЯ СВЯЗИ: ЮНИТ БИ ЭНД СИ,
15Й ЭТАЖ,КЭЙСИ АБЕРДИН ХАУС, №38,
ХЁНГ ИП РОУД, ВОНГ ЧУК ХАНГ, ГОНКОНГ,
КНР
ИМПОРТЕР: ООО «ВИТЕК.РУС»
МЕСТОНАХОЖДЕНИЕ И ПОЧТОВЫЙ
АДРЕС ДЛЯ СВЯЗИ: 117209, РФ,
Г. МОСКВА, СЕВАСТОПОЛЬСКИЙ ПР-КТ,
Д. 28, КОРП. 1.
www.vitek.ru
ТЕЛЕФОН ДЛЯ СПРАВОК: 8-800-100-18-30
СДЕЛАНО В КНР
15
IM VT-1803.indd 15 7/3/19 11:44 AM
Page 36

GB
A production date of the item is indicated in the serial number on the technical data plate. A serial number is
an eleven-unit number, with the first four figures indicating the production date. For example, serial number
0606ххххххх means that the item was manufactured in June (the sixth month) 2006.
RUS
Дата производства изделия указана в серийном номере на табличке с техническими данными. Серийный
номер представляет собой одиннадцатизначное число, первые четыре цифры которого обозначают дату
производства. Например, серийный номер 0606ххххххх означает, что изделие было произведено в июне
(шестой месяц) 2006 года.
ЗАПРЕЩЕНО УТИЛИЗИРОВАТЬ
С БЫТОВЫМ МУСОРОМ.
ОБРАТИТЕСЬ НА СООТВЕТСТВУЮЩИЙ
ПУНКТ ПЕРЕРАБОТКИ ЭЛЕКТРИЧЕСКОГО
И ЭЛЕКТРОННОГО ОБОРУДОВАНИЯ.
IM VT-1803.indd 16 7/3/19 11:44 AM
 Loading...