

Page 1

ИНСТРУКЦИЯ ПО ЭКСПЛУАТАЦИИ
MANUAL INSTRUCTION
МОДЕЛЬ VT1221
ПАРОВОЙ УТЮГ
HOUSEHOLD ELECTRONIC STEAM IRON
1221.qxd 01.12.03 15:42 Page 2
Page 2

РУССКИЙ
19
DO'S
1. Check the mains voltage stated on the iron.
2. Unwind and straighten the power cord before use.
3. Depress the control button for select the temperature, pilot light
glows.
4. To turn off the appliance, depress and hold the control button for
2 sec when it is not in use, even for a short period of time.
5. Disconnect the iron from mains supply outlet when filling or emp$
tying water.
6. Remove the water remained in the water tank.
7. Use the Self$Cleaning function at least once a month.
8. Switch off the steam function by moving the steam control knob to
position when it is not in use, even for a short period of time.
9. If the supply cord is damaged, it must be replaced by the manu$
facturer or its service agent or similarly qualified person in order to
avoid a hazard.
DO NOT'S
1. Do not allow children touch the iron or the power cord when
ironing.
2. Do not leave the iron unattended when it is connected to a mains
supply outlet.
3. Do not use an extension power cord set unless competent author$
ity has approved it.
4. Do not add perfumed, vinegar or other chemical liquids into the
water tank; they can damage the iron seriously.
5. Do not immerse the iron in water or any other liquid.
6. Do not use the iron when it is damaged or it works improperly.
7. Do not roll the power cord around the iron for storage until it has
cooled down completely.
8. Do not attempt to open the cabinets or dismantle any parts from
the iron; there is no serviceable part inside.
2
ENGLISH
На ярлыке означает: изделие нельзя гладить!
(например, эластик)
Примечание:
вид ткани
синтетика
синтетика
ацетатволокно
триацетат
с люрексом
полиамид
(нейлон)
полиэстер
вискоза
шелк
шерсть
шерсть
хлопок
хлопок
лен лен
синтетика
акрил
полипропилен
полиэтан
волокно
позиция
терморегулятора
ярлык
шелк
1221.qxd 01.12.03 15:42 Page 4
Page 3
18
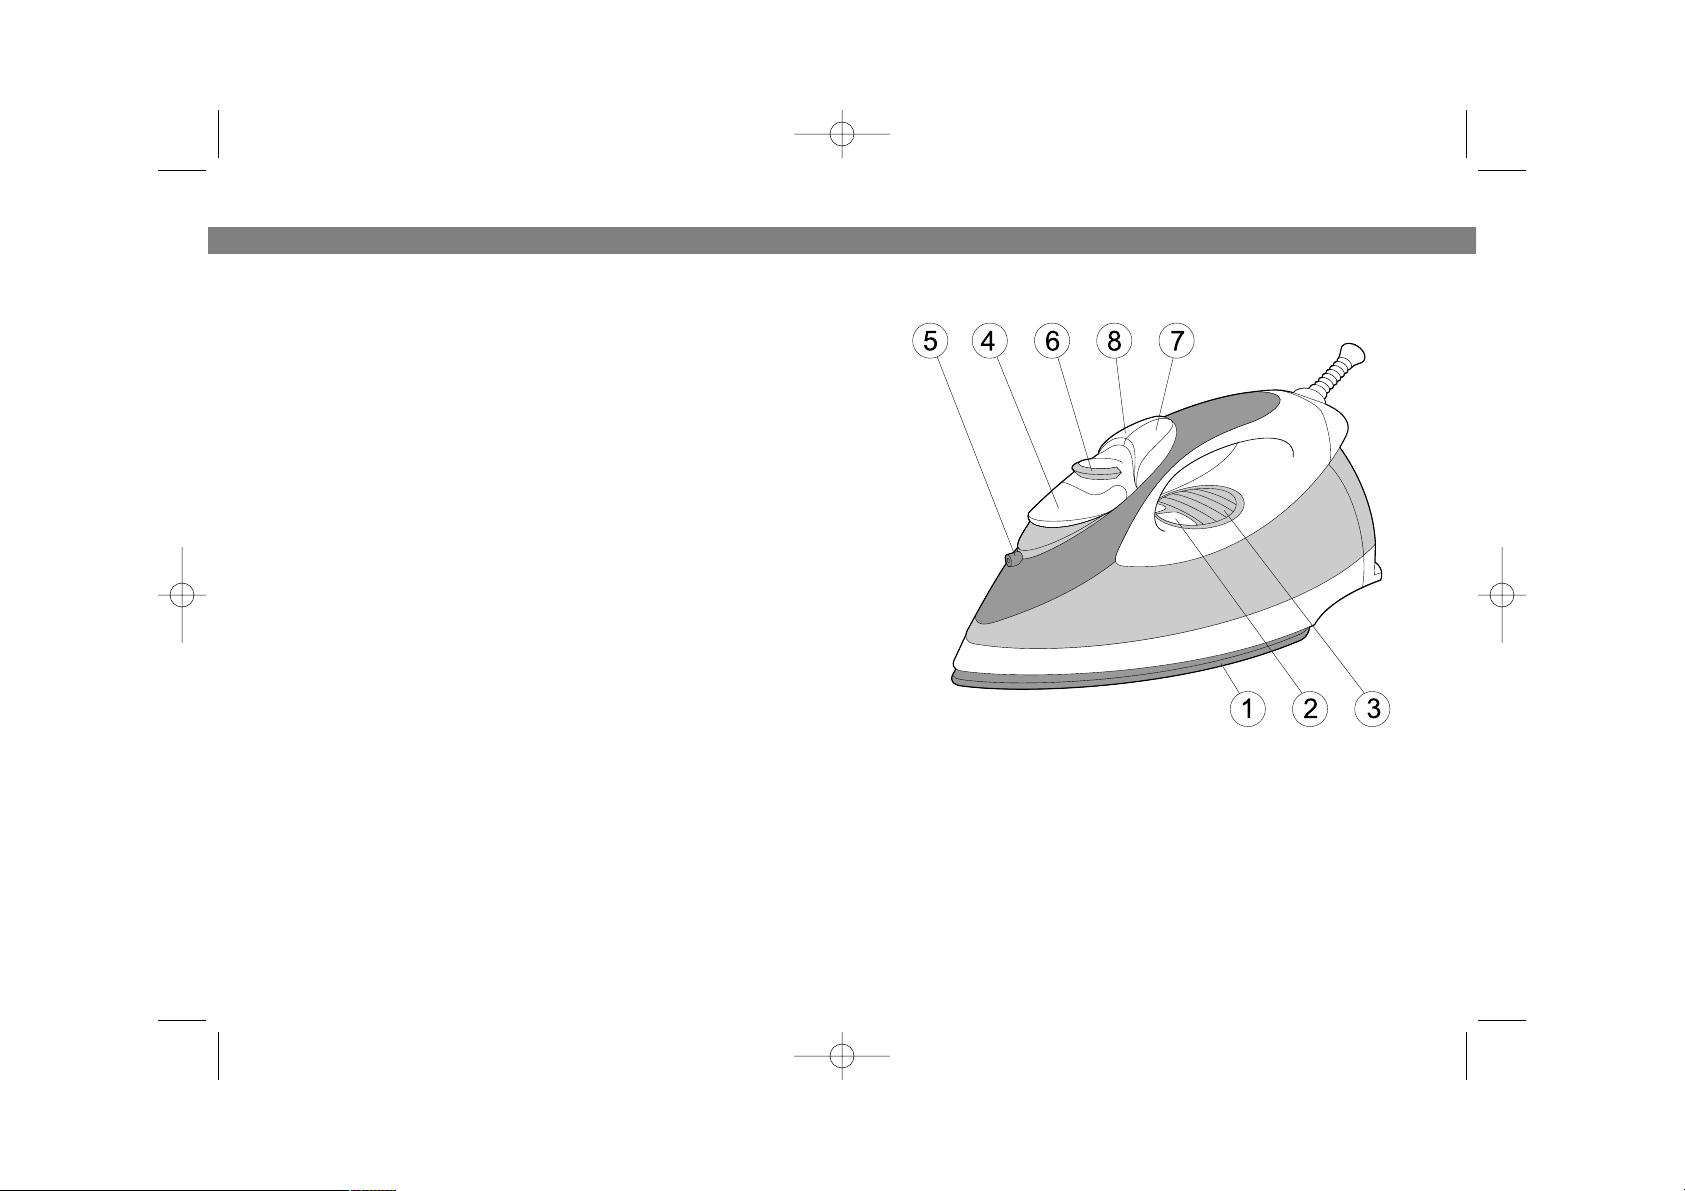
GET TO KNOW YOUR IRON
3
1. Sole Plate
2. Direct Access Control Button
3. Liquid Crystal Dysplay (LCD)
4. Pilot Light
5. Water Inlet Cover
6. Spray Nozzle
7. Steam Control/Self$
Cleaning Knob
8. Burst Of Steam Button
9. Spray Button
ENGLISH
FIGURE 1
положении или, через 16$39 секунд в неподвижном горизонтальном, $
утюг отключается автоматически, при этом на дисплее начнет мигать
индикатор !. Достаточно просто подвинуть утюг $ и он вновь готов к
работе. После того, как утюг автоматически отключается, он
поддерживает температуру в течение 60 секунд.
ЧИСТКА
$
Перед чисткой отключите утюг от сети и дайте ему остыть.
$ Протрите поверхность утюга влажной тканью, используя жидкое
чистящее средство.
$ Старайтесь сохранить подошву утюга гладкой. Избегайте резких
соприкосновений с металлическими предметами.
$ Для чистки утюга не используйте материалы, которые могут ободрать
подошву, а также абразивные вещества.
СПЕЦИФИКАЦИЯ
Питание 230 В ~ 50 Гц
Максимальная мощность 2020 Вт
СРОК СЛУЖБЫ УТЮГА НЕ МЕНЕЕ 5ТИ ЛЕТ
РУССКИЙ
1221.qxd 01.12.03 15:42 Page 6
Page 4

$ Отключите утюг от сети и держите его горизонтально над раковиной.
$ Установите регулятор режимов отпаривания (6) в позицию “ ”
и удерживайте его в этом положении.
$ Из отверстий на подошве будет выделяться вода с частицами накипи
и грязи. Двигайте утюгом вперед и назад.
$ Когда резервуар очистится, отпустите регулятор режимов
отпаривания (6).
$ Поставьте утюг вертикально и дайте ему остыть.
$ Протрите подошву сухой тканью.
Предостережение: Во избежание ожога избегайте попадания горячей
воды на кожу.
УДАЛЕНИЕ ВОДЫ ИЗ РЕЗЕРВУАРА
После использования необходимо удалить из резервуара утюга
оставшуюся воду.
$ Установите регулятор режимов отпаривания (6) в положение .
$ Переверните резервуар утюга и слегка потрясите его.
$ Нажмите кнопку подачи пара (7).
$ Нажмите кнопку увлажнения (8).
СИСТЕМА “ANTIDRIP”
Система предотвращает вытекание воды из подошвы: утюг
автоматически прекращает отпаривание при слишком низких
температурах. Когда это произойдет, Вы услышите щелчок.
АВТОМАТИЧЕСКАЯ ЗАЩИТА ОТ НАКИПИ
Встроенная система защиты от накипи препятствует образованию накипи
и продлевает срок службы утюга.
АВТОМАТИЧЕСКОЕ ОТКЛЮЧЕНИЕ
Через 5$10 минут при нахождении в неподвижном вертикальном
17
HINTS FOR IRONING
1. Sort out the articles to be ironed according to the type of fabric. This
will minimize the frequency of temperature adjustment for different
garments.
2. Test ironing a small area on the backside or inside the garment if you
are unsure about the type of fabric. Start with a low temperature and
increase gradually.
3. Wait for about three minutes before ironing heat sensitive fabrics.
Temperature adjustment needs certain time to reach the required level
no matter it is higher or lower.
4. Delicate fabrics such as silk, wool, velour, etc. are best ironed with
an ironing cloth to prevent shine marks.
5. You may need a few times of press to activate the spray, burst and
vertically burst function.
READ THE GARMENT LABELS AND FOLLOW THE MANUFACTURER'S
IRONING INSTRUCTIONS THAT ARE OFTEN SHOWN BY SYMBOLS
SIMILAR TO THE FOLLOWING:
4
ENGLISH РУССКИЙ
1221.qxd 01.12.03 15:42 Page 8
Page 5

16
HOW TO FILL WATER
1. Disconnect the iron from mains
supply outlet.
2. Move the Steam Control/Self$
Cleaning Knob to position:
3. Release the Water Inlet
Cover.
4. Fill water through the water inlet
hole.
5. Fill up to the 'Max' level marked
on the side of water tank.
Note:
For best result, it is advisable to use demineralised water or distilled
water. Do not use chemically descaled water or any other liquids.
HOW TO SET TEMPERATURE
1. Connect the iron to a suitable mains supply outlet.
2. The LED display will light up at "dot one" flashing.
3. To adjust the temperature settings depress the direct access con$
trol button “"” or "#" a beep will be audible every time the control
button is pressed.
4. The temperature setting can be alternately adjusted by pressing up
and down of the direct access control
button from MAX $ ••• (3dot) $ •• (2dot) $ • (1dot)
5. For example: at ••(2dot) you can directly adjust to ••• (3dot) or
•(1dot) by simply press """ for a higher temperature or press "#" for
a lower temperature.
6. If pressing """ at Max it will return toy (1dot) and etc.
7. The "indicator lights" will flash to indicate the iron is heating up or
cooling down. The "indicator lights" will flash at the time of ironing, this
is perfectly normal as it shows the iron maintain the heat
setting you have chosen.
8. When the required temperature is reached; the "indicator lights" will
stop flashing and beep one.
9. The iron is ready for use.
5
$ Нажмите кнопку подачи струи пара (7).
$ Произойдет интенсивное выделение пара из подошвы утюга.
ВЕРТИКАЛЬНОЕ ОТПАРИВАНИЕ
Вертикальное отпаривание
разглаживает складки на тонких
тканях, занавесках, одежде.
$ Повесьте одежду на плечики.
$ Держите утюг вертикально на
расстоянии 15 $ 30 см от одежды.
Нажмите на кнопку подачи струи
пара (7) несколько раз, двигая
утюгом вдоль того места, которое
вы отпариваете.
$ При отпаривании глубоких складок
нажмите на кнопку несколько раз.
Обратите внимание:
$ Иногда необходимо нажать на кнопку подачи струи (7) пара
несколько раз, прежде чем пар начнет поступать из подошвы.
$ Не рекомендуется использовать функцию подачи пара более трех
раз.
САМООЧИСТКА
Режим самоочистки следует применять раз в месяц для удаления накипи,
ворсинок и загрязнений, образовавшихся внутри утюга. Эта процедура
поможет вам продлить срок службы вашего утюга.
$ Заполните емкость для воды наполовину (см. раздел “
Наполнение
резервуара водой
”).
$ Поставьте утюг вертикально.
$ Включите утюг в сеть.
$ Установите температуру “MAX” с помощью кнопок
“"” или "#" (2)
.
$ По достижении выбранной температуры индикатор перестанет мигать
и раздастся звуковой сигнал.
РУССКИЙ ENGLISH
1221.qxd 01.12.03 15:42 Page 10
Page 6

$ Установите регулятор режимов отпаривания (6) в
позицию .
$ Установите подходящую для изделия температуру глаженья с
помощью кнопок
“"” или "#" (2)
.
$ По достижении выбранной температуры индикатор перестанет мигать
и раздастся звуковой сигнал. Утюг готов к работе.
ПАРОВОЕ ГЛАЖЕНИЕ
$ Включите прибор в сеть.
$ Установите температуру глаженья
“MAX” или «
•••
» с помощью кнопок
“"” или "#" (2)
. Для наилучшего
результата не используйте для
парового глажения режимы “
•” и
“••”.
$ По достижении выбранной
температуры индикатор перестанет
мигать и раздастся звуковой сигнал.
Утюг готов к работе.
$ Установите регулятор режимов отпаривания (4) в нужную позицию :
для интенсивного отпаривания $
для слабого отпаривания $
в промежуточное положение между
интенсивным отпариванием и глажением без пара
для глаженья без пара $
$ После использования установите регулятор (4) в положение .
КРАТКОВРЕМЕННАЯ ОБРАБОТКА
ПАРОМ
Эта функция используется для
разглажи$
вания глубоких складок.
Установите температуру глаженья “MAX”
или «
•••
» с помощью кнопок
“"” или "#"
(2)
. По достижении выбранной температуры
индикатор перестанет мигать и раздастся
звуковой сигнал. Утюг готов к работе.
15
FIRST TIME IRONING
1. Remove any protective films or stickers from the sole plate and the
cabinet if any.
2. Unwind and straighten the power cord.
3. Fill the iron as described in "How to fill water".
4. Connect the iron to a suitable mains supply outlet.
5. The "indicator lights" light and one beep can be heard.
6. "Indicator lights" will flash on LCD.
7. Set the temperature to '•••'(3dot) by control button as described
in "How to set temperature".
8. The "indicator lights" will flash to indicate the iron in heating up.
9. When the required temperature is reached; the "indicator lights"
will be gone and beep twice. The iron is ready for use.
10. Move the Steam Control/Self$Cleaning Knob to position; steam
starts coming out from the holes in the sole plate.
11. Begin first time ironing with an old towel.
12. When the water tank is empty and there is no more steam pro$
duced; the preparation work is completed. The iron is now ready for
proper use.
SPRAYING
This function can be used any time
and is not affect any setting.
1. Fill the water tank as described
in How To Fill Water.
2. Aim the nozzle to the garment.
3. Press the Spray Button.
Note: It may be necessary to press
the spray button a few times to start
this function.
DRY IRONING
1. Connect the iron to a suitable mains supply outlet.
2. The LCD light up for a second and one beep can be heard.
3. "Indicator lights" will flash on LCD.
6
ENGLISH РУССКИЙ
1221.qxd 01.12.03 15:42 Page 12
Page 7

различными видами отделок рекомендуется гладить при низких тем$
пературах.
$ Сначала рассортируйте изделия по видам ткани.
$ Рекомендуется начинать гладить с тканей, требующих более низкой
температуры утюжки, таких, как синтетика.
$ Если изделие состоит из нескольких видов ткани, выбирайте мини$
мальную температуру для этих компонентов. (Например, изделие со$
стоит из 60% синтетики и 40% хлопка: для утюжки выбирается пози$
ция для синтетических тканей (·), и процесс утюжки осуществляется
без пара).
$ Если Вы не знаете состав изделия, найдите на нем место, которое
незаметно при носке, и попробуйте подобрать соответствующую тем$
пературу глаженья, начиная с минимальной.
$ При утюжке чистошерстяных тканей (100% шерсть), утюг нужно уста$
новить в позицию парового глаженья. Рекомендуется установить
регулятор отпаривания в максимальную позицию и гладить через тон$
кую ткань. Шерстяные изделия могут лосниться после глаженья. Что$
бы этого избежать, утюжьте изделия с изнаночной стороны.
$ Бархат и другие ткани, на которых быстро появляются блестящие
пятна, необходимо гладить в одном направлении при слабом нажатии.
$ Утюг должен всегда находиться в движении.
$ Шелк и синтетические ткани необходимо гладить с изнаночной сторо$
ны. Во избежание появления пятен не увлажняйте такие ткани.
УВЛАЖНЕНИЕ
При любой температуре глажения для
смачивания ткани водой нужно нажать
кнопку увлажнения (8).
Иногда необходимо нажать кнопку
несколько раз. При этом в резервуаре
должна находиться вода.
ГЛАЖЕНИЕ БЕЗ ПАРА
$
Включите прибор в сеть.
14
4. To select the temperature setting according to the recommenda$
tion of the garment label, depresses the control button. See "How
To Set Temperature".
5. When the required temperature reached; the "Indicator lights" will
be gone and beep twice.
6. The iron is now ready to use.
7. To switch off the appliance, depress and hold the control button for
2 sec. The LCD will go blank with a long beep and "Indicator lights"
will flash on the LCD display.
8. Disconnect the iron from mains supply outlet.
9. When the iron gets cool completely, store it vertically in a safe
place.
STEAM IRONING
1. Fill the iron as described in "How
To Fill Water".
2. Connect the iron to a suitable
mains supply outlet
3. The LCD light up for a second
and one beep can be heard.
4. "Indicator lights" will flash on
LCD.
5. Select the temperature setting to
2$dot, 3$dots or MAX (see How
To Set Temperature)
6. When the required temperature is reached; the "Indicator lights"
will be gone and has beep twice.
7. Rotate the Variable Steam / Self$Cleaning Knob to give the desired
amount of steam.
8. The iron is now ready to use.
9. To switch off the appliance, depress and hold the control button for
2 second. The LCD will black and "Indicator lights" will flash on the
LCD display.
10. Disconnect the iron from mains supply outlet.
11. When the iron gets cool completely, store it vertically in a safe
place.
7
РУССКИЙ ENGLISH
1221.qxd 01.12.03 15:42 Page 14
Page 8

УСТАНОВКА ТЕМПЕРАТУРЫ
$ Регулировка температуры нагрева осуществляется с помощью
кнопок
“"” или "#" (2).
$ Каждое нажатие на кнопки
“"” или "#" (2) сопровождается
звуковым сигналом.
$ При установке желаемой температуры с помощью кнопок
“"” или
"#" (2), загорается соответствующий индикатор на дисплее (3)
.
$ Индикатор будет мигать до тех пор, пока утюг не нагреется до
выбранной температуры.
$ По достижении выбранной температуры индикатор перестанет мигать
и раздастся звуковой сигнал.
$ Это означает, что утюг готов к работе.
ПЕРВОЕ ИСПОЛЬЗОВАНИЕ
$ Удалите этикетки с подошвы и корпуса утюга.
$ Раскрутите сетевой шнур.
$ Наполните резервуар водой как описано в разделе “
Наполнение
резервуара водой”
.
$
Включите прибор в сеть.
$ Установите максимальную температуру нагрева нажатием кнопок
“"”
или "#"
, регулирующих температуру (2).
$ Установите регулятор отпаривания (4) в положение из отверстий в
подошве начнет выделяться пар.
$ Прогладьте какую$нибудь ненужную ткань.
$ Когда вся вода испарится, утюг будет готов к использованию.
ТЕМПЕРАТУРА ГЛАЖЕНИЯ
$
Прочитайте ярлык на изделии, которое Вы собираетесь гладить, и
всегда выполняйте правила ухода за изделием.
$ Если инструкция по утюжке изделия отсутствует и Вы знаете вид тка$
ни, обратитесь к таблице температур в конце инструкции.
$ Таблица может быть использована только для тканей и не подходит
для отделок изделий (оборок, блестящих нашивок и т.д.). Изделия с
13
Note: Set the Steam Control Knob to this position after use:
BURST OF STEAM
This function provides extra amount of steam to remove stubborn wrin$
kles.
1. Fill the iron as described in the
section of How To Fill Water.
2. Select the temperature to '•••'
(3 dots) or "Max" setting , by press
the control knob (See How To Set
Temperature).
3. The "Indicator lights" will be gone
when the temperature reached
and beep twice.
4. The iron is ready for use.
5. Press the Burst Of Steam Button.
6. Steam will shoot from the holes of the soleplate into the fabric
being ironed and removing the wrinkles.
7. For stubborn wrinkles, wait a few seconds before pressing the
Burst Of Steam Button again. Most wrinkles can be removed with$
in three presses.
Note:
It may be necessary to press the burst of steam button a few times to
start this function.
For optimum steam quality, do not operate the Burst Of Steam more
than three times after the pilot light goes off.
BURST OF STEAM IN VERTICAL POSITION
Warning: Do not apply steam on any clothes or fabrics that are being
worn by human or pets. Temperature of steam is very high.
This function provides extra amount of steam to remove wrinkles on
delicate garments in hanging position, hanging curtains, or other
hanging fabrics.
1. Fill the iron as described in "How To Fill Water".
2. Select the temperature to '•••' (3 dots) or "Max" setting , by press
the control button. See "How To Set Temperature".
8
ENGLISH РУССКИЙ
1221.qxd 01.12.03 15:42 Page 16
Page 9

МЕРЫ ПРЕДОСТОРОЖНОСТИ
• Перед эксплуатацией прибора внимательно прочитайте инструкцию.
• Используйте утюг в целях, предусмотренных инструкцией.
• Удостоверьтесь, что напряжение прибора (см. маркировку) соответст$
вует локальному напряжению сети в вашем доме.
• При отключении прибора от сети тяните за штепсель, а не за электри$
ческий шнур.
• Не используйте утюг с поврежденным электрическим шнуром, а также
с любыми другими неисправностями. Для предотвращения пораже$
ния электрическим током не разбирайте утюг. При неисправности от$
несите утюг квалифицированным специалистам для ремонта.
•
Пользуйтесь утюгом только на гладильной доске.
• Если Вам необходимо отлучиться, всегда выключайте утюг, отсоеди$
няйте его от сети и ставьте на основание.
• При работе электрических приборов вблизи детей необходимо на$
блюдение взрослых. Не оставляйте включенный утюг без присмотра.
• Чтобы избежать поражения электрическим током, не погружайте утюг
в воду или в любую другую жидкость.
• При соприкосновении с горячими поверхностями утюга или горячей
водой вы можете получить ожог.
• При наполнении утюга водой, всегда отсоединяйте его от сети.
• Чтобы избежать перегрузки сети, не включайте одновременно не$
сколько приборов.
НАПОЛНЕНИЕ РЕЗЕРВУАРА ВОДОЙ
Убедитесь, что утюг отключен от сети.
1. Установите регулятор
отпаривания (6) в положение
2. Откройте крышку отсека для
заполнения водой (4).
3. Медленно налейте воду в
отверстие резервуара до отметки
“MAX”.
Примечание: Если вода очень
жесткая, мы рекомендуем
использовать дистиллированную или
деминерализованную воду.
12 9
3. When the required temperature is reached; the "Indicator lights"
will be gone and beep twice. The iron is ready for use.
4. Hold the iron between 15 and 30 centimeters away from the gar$
ment.
5. Press the Burst of Steam Button.
6. Steam will penetrate into the garment removing the wrinkles.
7. For Stubborn wrinkles, wait a few seconds before pressing the
Burst Of Steam Button again.
8. Most wrinkles can be removed within three presses.
BUILDIN ANTISCALE SYSTEM
The build$in anti$scale cartridge is designed to reduce the build$up of
lime scale that occurs during steam ironing. This will prolong the work$
ing life of your iron. The anti$scale cartridge will not completely stop the
natural process of lime scale build$up.
SELFCLEANING
This function removes the scales and minerals built up in the Steam
Chamber. The iron will remain in the best condition if this function is
performed at least once a month or more regularly depending on the
hardness of the water used.
1. Fill the iron as described in "How To Fill Water"; fill the water tank up to half.
2. Place the iron on a surface in upright standing position.
3. Connect to a mains supply outlet.
4. Select the 'Max' temperature setting.
5. When the required temperature is reached, the "Indicator lights"
will be gone and have a double beep sound.
6. Depress and hold the direct access control button for 2 sec for turn
off the iron.
7. Disconnect the iron from mains supply outlet.
8. Hold the iron horizontally over a sink.
9. Turn and hold the Steam Control/Self$Cleaning Knob to
(Descaling) position.
10. Steam and boiling hot water will drain from the holes on the sole$
plate washing away the scales and minerals that have built up
inside the steam chamber.
РУССКИЙ ENGLISH
1221.qxd 01.12.03 15:42 Page 18
Page 10

10
11
1. Керамическая подошва
2. Кнопки, регулирующие температуру
3. Жидкокристаллический дисплей
4. Отсек для заполнения водой
5. Распылитель
6. Регулятор различных режимов отпаривания/самоочистки
7. Кнопка подачи струи пара
8. Кнопка увлажнения
ОПИСАНИЕ ЧАСТЕЙ УТЮГА
РУССКИЙ
11. Gently move the iron back and forth until the water tank is empty.
12. When Self$Cleaning is complete, release the Steam Control/Self$
Cleaning Knob.Rest your steam iron back on its heel rest and allow
to fully cool down. Wipe the soleplate with a cold damp cloth.
ANTIDRIP
Anti$drip system, which is designed to prevent water escaping from the
soleplate when the iron is too cold automatically. During use, the anti
drip system may emit a loud clicking sound, particularly during heat$up
or whilst cooling down. This is perfectly normal and indicates that the
system is functioning correctly.
AUTO SHUTOFF
The Auto shut$off feature will operate automatically when the iron is
unattended and it is connected to a mains supply outlet.
Auto shutoff in horizontal
The iron will switch off automatically between 16$39 seconds if the iron
is immobile in the ironing position (horizontal). “!” will be shown on
LCD displays. Simply moving the iron, the iron will back on.
Autoshut off in vertical
The iron will switch off automatically between 5 to 10 minutes if the iron
is left on its heel rest position (vertically). “!” will be shown on LCD
displays. Simply moving the iron, the iron will back on.
EMPTYING AND STORING
Ensure the Steam Control/Self$Cleaning Knob to position.
Disconnect the iron from the mains supply outlet. Hold the iron upside
down and gently shake it to remove the remaining water.When the iron
get cool completely, store it vertically in a safe place.
SPECIFICATION
Power requirement 230 V ~ 50 Hz
Max. power 2020 W
SERVICE LIFE OF THE IRON NOT LESS THAN 5 YEARS
ENGLISH
1221.qxd 01.12.03 15:42 Page 20
 Loading...