


Assembly instructions
D
F
NL
DK
S
N
SF
CZ
Montageanleitung Notice de Montage Montage Instructies Montagevejledning Monteringsanvisning Montasjeveiledning Kokoonpano-ohjeet Návod na montáž
MERKUR / NEPTUNE 6700, 8300, 9900, 11500
002.03.0905

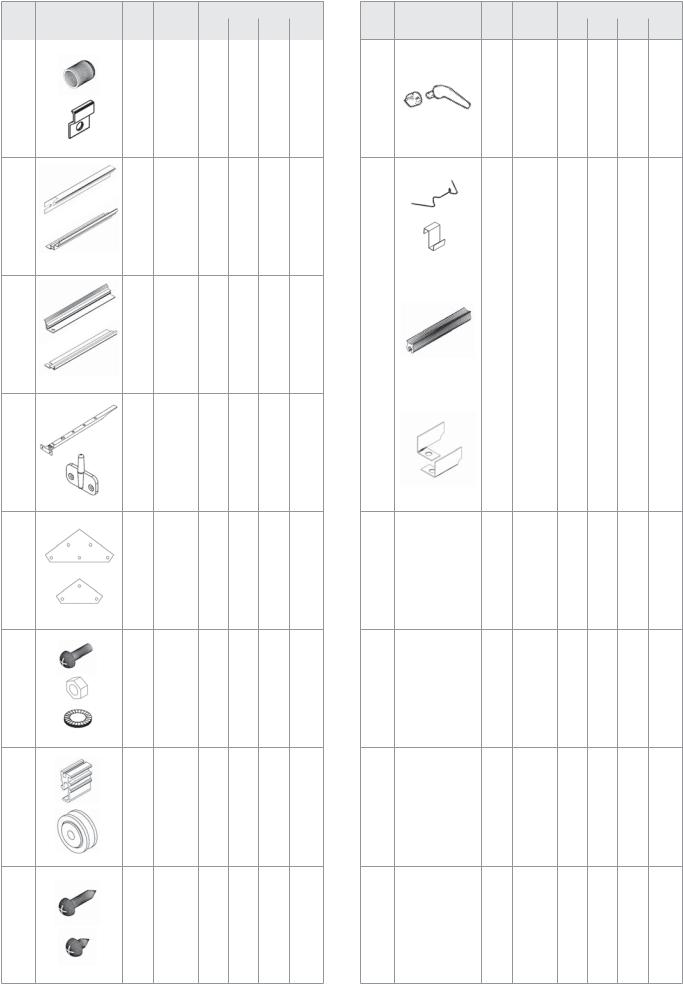
Item |
Part |
Sect. |
Size |
|
Quantity per |
|
||||
No. |
Ref. |
mm |
6700 |
8300 |
9900 |
11500 |
||||
|
||||||||||
1001 |
|
1-6 |
M6 x 12 |
203 |
|
215 |
231 |
|
247 |
|
1002 |
|
1-6 |
M6 |
203 |
|
215 |
231 |
|
247 |
|
|
|
|
|
|
|
|
|
|
|
|
2022 |
|
1A |
2484 |
2 |
|
|
|
|
|
|
2023 |
|
1A |
3106 |
|
|
2 |
|
|
|
|
2024 |
|
1B |
3728 |
|
|
|
2 |
|
|
|
2025 |
|
1B |
4350 |
|
|
|
|
|
2 |
|
|
|
|
|
|
|
|
|
|
|
|
2027 |
|
1A |
2484 |
2 |
|
|
|
|
|
|
2028 |
|
1A |
3106 |
|
|
2 |
|
|
|
|
2029 |
|
1B |
3728 |
|
|
|
2 |
|
|
|
2030 |
|
1B |
4350 |
|
|
|
|
|
2 |
|
|
|
|
|
|
|
|
|
|
|
|
3032 |
|
1A/B |
1350 |
6 |
|
8 |
10 |
|
12 |
|
2055 |
|
4B |
1511 |
6 |
|
8 |
10 |
|
12 |
|
2100 |
|
2-3 |
425 |
2 |
|
2 |
2 |
|
2 |
|
|
|
|
|
|
|
|
|
|
|
|
3095 |
|
1-2 |
1778 |
6 |
|
6 |
6 |
|
6 |
|
3049 |
|
3 |
1427 |
2 |
|
2 |
2 |
|
2 |
|
2096 |
|
3 |
619 |
1 |
|
1 |
1 |
|
1 |
|
2097 |
|
3 |
619 |
1 |
|
1 |
1 |
|
1 |
|
3096 |
|
3 |
1241 |
1 |
|
1 |
1 |
|
1 |
|
3097 |
|
3 |
1241 |
1 |
|
1 |
1 |
|
1 |
|
2033 |
|
4B |
1898 |
4 |
|
4 |
4 |
|
4 |
|
|
|
|
|
|
|
|
|
|
|
|
2022 |
|
2 |
2484 |
1 |
|
1 |
1 |
|
1 |
|
2035 |
|
2 |
2476 |
1 |
|
1 |
1 |
|
1 |
|
2046 |
|
3 |
2484 |
1 |
|
1 |
1 |
|
1 |
|
|
|
|
|
|
|
|
|
|
|
|
3036 |
|
2-3 |
1350 |
4 |
|
4 |
4 |
|
4 |
|
2037 |
|
2-3 |
1535 |
2 |
|
2 |
2 |
|
2 |
|
2038 |
|
2-3 |
1535 |
2 |
|
2 |
2 |
|
2 |
|
|
|
|
|
|
|
|
|
|
|
|
1047 |
|
3 |
1257 |
1 |
|
1 |
1 |
|
1 |
|
|
|
|
|
|
|
|
|
|
|
|
Item |
Part |
Sect. |
Size |
|
Quantity per |
|
||||
No. |
Ref. |
mm |
6700 |
8300 |
9900 |
11500 |
||||
|
||||||||||
3041 |
|
2-3 |
1802 |
2 |
|
2 |
2 |
|
2 |
|
3042 |
|
2-3 |
1802 |
2 |
|
2 |
2 |
|
2 |
|
3101 |
|
2-3 |
1802 |
2 |
|
2 |
2 |
|
2 |
|
2054 |
|
2 |
1318 |
1 |
|
1 |
1 |
|
1 |
|
|
|
|
|
|
|
|
|
|
|
|
1043 |
|
2-3 |
170 |
4 |
|
4 |
4 |
|
4 |
|
2048 |
|
3 |
1318 |
1 |
|
1 |
1 |
|
1 |
|
|
|
|
|
|
|
|
|
|
|
|
2056 |
|
1A/B |
255 |
6 |
|
8 |
10 |
|
12 |
|
3057 |
|
4B |
841 |
3 |
|
4 |
5 |
|
6 |
|
|
|
|
|
|
|
|
|
|
|
|
2050 |
|
4A |
2484 |
1 |
|
|
|
|
|
|
2051 |
|
4A |
3106 |
|
|
1 |
|
|
|
|
2052 |
|
4A |
3728 |
|
|
|
1 |
|
|
|
2053 |
|
4A |
4350 |
|
|
|
|
|
1 |
|
|
|
|
|
|
|
|
|
|
|
|
3058 |
|
5 |
1760 |
2 |
|
2 |
2 |
|
2 |
|
3021 |
|
5 |
1800 |
2 |
|
2 |
2 |
|
2 |
|
|
|
|
|
|
|
|
|
|
|
|
1017 |
|
4B |
– |
4 |
|
4 |
4 |
|
4 |
|
1018 |
|
4B |
– |
8 |
|
8 |
8 |
|
8 |
|
|
|
|
|
|
|
|
|
|
|
|
1059 |
|
5 |
621 |
1 |
|
1 |
1 |
|
1 |
|
1060 |
|
5 |
621 |
1 |
|
1 |
1 |
|
1 |
|
|
|
|
|
|
|
|
|
|
|
|
1061 |
|
5 |
621 |
2 |
|
2 |
2 |
|
2 |
|
1062 |
|
5 |
613 |
1 |
|
1 |
1 |
|
1 |
|
|
|
|
|
|
|
|
|
|
|
|
2 |
002.03.0905 |
Item |
Part |
Sect. |
Size |
|
Quantity per |
|
||
No. |
Ref. |
mm |
6700 8300 9900 11500 |
|||||
|
||||||||
1019 |
|
6 |
15 |
2 |
2 |
2 |
2 |
|
1013 |
|
3 |
20 |
2 |
2 |
2 |
2 |
|
1063 |
6 |
635 |
2 |
2 |
2 |
2 |
1064 |
6 |
602 |
2 |
2 |
2 |
2 |
1065 |
6 |
522 |
4 |
4 |
4 |
4 |
1066 |
6 |
602 |
2 |
2 |
2 |
2 |
1067 |
6 |
295 |
2 |
2 |
2 |
2 |
1016 |
6 |
40 |
4 |
4 |
4 |
4 |
1091 |
2-3 |
175 |
2 |
2 |
2 |
2 |
1092 |
1-4 |
120 |
12 |
12 |
12 |
12 |
1004 |
5 |
M4 x 16 |
2 |
2 |
2 |
2 |
1007 |
5 |
M4 |
2 |
2 |
2 |
2 |
1009 |
5 |
M4 |
2 |
2 |
2 |
2 |
1014 |
5 |
25 |
2 |
2 |
2 |
2 |
1015 |
5 |
22 |
2 |
2 |
2 |
2 |
1003 |
5 |
3.5x16 |
16 |
16 |
16 |
16 |
1006 |
6 |
3.5x6 |
12 |
12 |
12 |
12 |
Item |
Part |
Sect. |
Size |
Quantity per |
|
No. |
Ref. |
mm |
6700 8300 9900 11500 |
||
|
1111 |
5 |
22 |
1 |
1 |
1 |
1 |
1011 |
7 |
70 |
348 |
396 |
444 |
492 |
1012 |
7 |
11 |
126 |
142 |
158 |
174 |
|
|
|
|
|
|
|
|
7 |
95000 |
1 |
|
|
|
1020 |
7 |
105000 |
|
1 |
|
|
7 |
115000 |
|
|
1 |
|
|
|
|
|
|
|||
|
7 |
125000 |
|
|
|
1 |
|
|
|
|
|
|
|
5001 |
3 |
40 |
1 |
1 |
1 |
1 |
5002 |
3 |
40 |
1 |
1 |
1 |
1 |
002.03.0905 |
3 |

SICHERHEITSVORKEHRUNGENSafetyWarning
1.PLEASE READ THESE INSTRUCTIONS CAREFULLY AND COMPLETELY BEFORE ASSEMBLING YOUR GREENHOUSE.
2.Sharp edges and corners can cause injury. Always wear protective glasses, gloves, shoes and headgear when handling the aluminium profiles, glass and polycarbonate sheets. Broken glass is a safety hazard – always clear up immediately and dispose of with care.
3.The product you have purchased is intended only for the growing of plants and should only be used for this purpose. When used for other purposes we will take no responsibility.
4.It is recommended that this greenhouse is assembled by two people.
5.Should you encounter difficulties constructing this house, or in fitting the glass or polycarbonate sheets, please contact your retailer
– do not use force!
Assembly Instructions
SITE SELECTION
Always try to select a sunny location, sheltered from the wind as much as possible.
IMPORTANT
Before assembling your new greenhouse, please check that all parts in the provided list are included. Please take each bundle out of the packaging in order to identify the parts better.
It is important that the opened bundles do not get mixed with one another.
If something is missing please contact your retailer.
NECESSARY TOOLS
Screw drivers (Normal and Crosshead PH2), 10 mm spanner or wrench.
MAINTENANCE
The greenhouse should be thoroughly washed with a gentle detergent occasionally. Please check that the detergent used does not react aggressively with aluminium or the glass fixing clips.
Ensure that the upper and lower door tracks are cleaned regularly to avoid a build up of debris.
0. BASE
Important! The base must be exactly square and level. A zinc-coated steel base is available as an accessory for all greenhouse models.
(Attention! Only when the greenhouse has to be located in a very windy and unprotected location: Drill through both the profile at the base of the greenhouse and the steel base, and connect them with nuts and bolts.)
If you would rather construct your own stone or concrete foundation, please follow the dimensions specified in diagram 0. Treated wooden beams at least 18 mm high and not more then 32 mm wide should be positioned between the stone/concrete foundation and the aluminium frame, and connected to the foundation with 50 mm long bolts (not provided).
All diagrams are shown from the inside of the house, with the exception of those enclosed in a double frame, indicating the outside view.
1. SIDE ELEMENTS
Lay all of the parts on the floor and connect them loosely.
At this stage it is necessary with each vertical aluminium bar (3032) to include an extra connecting bolt, to later connect corner braces (2056) (1.5). On the outside bars (3032) include one additional bolt, to also connect cross braces (3095) (1.2).
Loosely connect the corner plate (1092) (1.1).
In step 4 the corner plate bolts must also be connected to the gabel ends.
2. PLAIN GABEL END
Lay all of the parts on the floor and connect them loosely.
Include two extra connecting bolts in the vertical bars (3041 and 3042) to connect the cross braces (2.2) & (2.6). In the vertical bar (3101) please include only one extra bolt.
3. DOOR GABEL END
Lay all of the parts on the floor and connect them loosely.
Attention: The door can be assembled to the left or the right of the middle bar.
The door runner bar (1047) will be connected to the horizontal bar (2048). Connect these loosely from the outside with two nuts and bolts.
Connect the clips (1013) with (5001) & (5002) as shown in (3.7) with a bolt, in order to strengthen the structure. Please ensure that the clip edge overlaps, and fixes the vertical bars (3041) or (3042) as shown.
Please include two extra bolts in the vertical bars (3041), (3042) and (3101).
4A. CONNECTING THE SEPARATE
ELEMENTS
Bolt the side elements to the end elements. (4.1) & (4.2).
Loosely connect the corner plate (1092) above the eaves (4.3).
Assemble the ridge bar and then the corner plates (1092) on the gabel ends (4.4).
4B. CONNECTING THE SEPARATE
ELEMENTS
Connect the roof glazing bars (2055) between the eaves (4.5) and the ridge bar (4.6). Insert extra bolts into each glazing bar depending on which house you have bought. The number is indicated in a circle on each bar and to be read beginning from both ends.
The corner braces (2056) (4.5), the roof braces (3057) (4.7) and the cross
braces (2033) (4.10) can now be connected.
Now position your greenhouse on the prepared base/foundation and connect loosely.
Adjust the greenhouse until it is completely square and tighten all bolts.
Please do not over tighten.
Press the end protectors (1017) and (1018) onto the profile ends (4.8).
4 |
002.03.0905 |

5. DOOR
Attention: Do not stand the assembled door on the door gliders (1014) to avoid damaging them.
Push the door gliders (1014) onto both ends of door bar (1060) (5.1).
Assemble the door as shown in diagram 5.
Connect door rollers (1015) to the door bar (1062) using bolt (1004), washer (1009) and nut (1007) (5.4).
Bolt door bar (1062) to upper bar (1059) (5.3) and slide the door seals (3021) into the side bars (3058) (5.6).
Connect the door fixer (1111) as shown.
The door rollers can now slide into door runner bar (1047) (5.7). Please ensure that the door gliders are also running on the bottom track (5.5).
Once the door is correctly in place, connect nuts and bolts into both ends of door runner bar (1047) as door stoppers.
Adjust the door so that it moves freely.
6. ROOF VENTS
Connect the side bars (1065) and the top bar (1064) depending on the glass thickness.
Up to 4 mm, see (6.1). For 4mm and over, see (6.2).
Place the bolts to connect the bottom bar (1066) in the prepared holes, and then slide the glass into the tracks in side bars (1065) (6.3).
Now connect bottom bar (1066), and ensure that the window is totally square before tightening all bolts.
Position the window in the ridge bar from one end (6.4) and (6.5) and slide it to the required position (6.6).
Connect the window sill (1063) with the extra bolts in the roof bars (6.7).
Bolt the window opener (1067) to the bottom bar (1066) using screws (1006) (6.8).
Place the plastic cap (1019) over the end of the window opener (6.6) and connect both window fixers (1016) onto the window sill (1063) using screws (1006) (6.8).
7.GLAZING – CLEAR/FROSTED GLASS
Please note the already mentioned safety precautions.
Press the glazing seals (1020) onto the aluminium profiles (7.3) and cut to length.
On the roof begin by positioning the glass at
the ridge and fix in place using the glazing spring clips (1011) (7.2).
The following pane should slide under the pane directly above it with the glass retaining clips (1012) between the panes (7.1). Continue as shown in the glazing plan.
If difficulties arise in placing the last glass sheet, please ensure that those above have not slipped down.
On the sides please begin from the bottom.
FINISHING
If desired, it is possible to seal the greenhouse at the edges using silicon. Silicon is not included.
Place the warning label inside the house.
A full range of greenhouse accessories, to help you make the most of this product, is available from your stockist. Please inform yourself as to the possibilities.
SAFETY NOTICE
In the event of high wind conditions, close the door and all vents.
In the event of heavy snowfall, clear the roof of the building or take suitable measures to support the roof. Heat the building in winter.
COMMENTS
For the complete protection of your new greenhouse, we advise you to include it in your house insurance. Please take note of possible building rules relating to the positioning of greenhouses.
Please stick the included greenhouse model label onto the door bar (1062) after successfully assembling this product. This information is important in the event that replacement parts are later required.
Please keep these Assembly Instructions in a safe place, for future reference!
Our policy is one of continuous improvement and we reserve the right to change the specifications without prior notice.
002.03.0905 |
5 |

SICHERHEITSVORKEHRUNGENSicherheitsvorkehrungen
1.BITTE LESEN SIE DIESE MONTAGEANLEITUNG VOR BEGINN DES AUFBAUS KOMPLETT DURCH!
2.Bei der Handhabung von Polycarbonatplatten oder von Glas sollten Sie immer Handschuhe tragen. Scharfe Kanten können zu Verletzungen führen. Auch scharfe Kanten oder Ecken der Aluminiumprofile können zu Verletzungen führen, also auch hier immer Handschuhe tragen!
3.Das von Ihnen erworbene Produkt ist für die Aufzucht von Pflanzen konstruiert und sollte auch ausschließlich dafür genutzt werden. Bei anderweitiger Nutzung ist jegliche Haftung ausgeschlossen.
4.Für die Montage dieses Produktes sind zwei Personen erforderlich.
5.Sollten Sie beim Montieren des Hauses oder beim Einsetzen der Verglasung Schwierigkeiten haben, dann setzen Sie sich bitte mit Ihrem Händler in Verbindung – Wenden Sie keine Gewalt an!
Aufbaubeschreibung
STANDORTWAHL
Suchen Sie den sonnigsten, aber gleichzeitig auch einen windgeschützten Platz aus.
WICHTIG
Bevor Sie mit der Montage Ihres Gewächshauses beginnen, überprüfen Sie, ob alle in der Liste aufgeführten Teile vorhanden sind. Nehmen Sie die einzelnen Bündel aus der Verpackung, um sie besser identifizieren zu können.
Es ist wichtig, dass die geöffneten Bündel nicht durcheinander geraten.
Fehlt etwas, dann setzen Sie sich bitte mit Ihrem Lieferanten in Verbindung.
BENÖTIGTE WERKZEUGE
Schraubenzieher (Normal und Kreuzschlitz PH2), 1 Schraubenschlüssel 10 mm.
WARTUNG
Das Gewächshaus sollte hin und wieder gründlich mit einer milden Waschmittellauge abgewaschen werden. Das Glas kann mit einem Reinigungsmittel gesäubert werden, das weder den Aluminiumrahmen, noch die Glasfederklammern angreift. Reinigen Sie regelmäßig die Türlaufschiene.
0. FUNDAMENT
Wichtig! Das Fundament muss absolut rechtwinklig und eben sein. Ein verzinktes Stahlfundament ist für alle Gewächshaus-Modelle als Zubehör erhältlich.
(Achtung! Nur wenn das Gewächshaus an einer sehr ungeschützten und windigen Stelle aufgebaut werden muss: Durchbohren Sie die Grundprofile und das Stahlfundament und verschrauben Sie beide mit Schrauben und Muttern miteinander)
Wollen Sie jedoch selbst ein Fundament aus Stein oder Beton fertigen, dann richten Sie sich bitte nach den Massangaben im Abschnitt 0. Vorbehandelte witterungsgeschützte Holzleisten von mindestens 18 mm Dicke und höchstens 32 mm Breite werden zwischen Stein-Betonfundament und Aluminiumrahmen gesetzt, entsprechend der Zeichnung durchbohrt und mit 50 mm langen Schrauben (nicht mitgeliefert) im Fundament verschraubt.
Alle Zeichnungen sind von der Innenseite des Hauses gesehen abgebildet, mit Ausnahme der Abbildungen, die in einem Doppelrahmen dargestellt sind, diese beschreiben die Außenansicht.
1. SEITENTEILE
Alle Teile auf dem Boden auslegen und lose verschrauben.
Dabei müssen in den äußeren senkrechten Verglasungsleisten (3032) je 2 Leerschrauben und in die restlichen Verglasungsleisten (3032) je 1 Leerschraube hinzugefügt werden, an der später die Traufenwinkel (2056) bzw. Diagonalstreben (3095) befestigt werden (1.2/1.5). Die Eckbleche (1092) wie in (1.1) dargestellt lose verschrauben.
Sie müssen in Schritt 4 die äußeren Schrauben wieder lösen, um Giebelende bzw. Giebelseite Tür mit den Seitenteilen zu verschrauben.
2. GIEBELENDE OHNE TÜR
Auch diese Teile auf dem Boden auslegen und lose verschrauben.
Ebenfalls in jede senkrechte Verglasungsleiste (3041 u. 3042) diesmal zwei Leerschrauben hineingeben, um später (in 2.2 und 2.6) zu verschrauben. In die Leiste (3101) eine Leerschraube einfügen.
3. GIEBELSEITE MIT TÜR
Wiederum die Teile auf dem Boden ausbreiten und lose verschrauben.
Achtung: Die Tür kann linksoder rechtsseitig montiert werden.
Die Türlaufschiene (1047) wird an der waagerecht über der Tür liegenden Schiene (2048) angebracht. Verschrauben Sie diese von außen lose mit zwei Schrauben und Muttern. Als Verstärkung schrauben Sie die Klammern (1013),(5001) u. (5002) wie in (3.7) dargestellt mit der über der Tür laufenden Schiene.
Beachten Sie, dass die Nase des Halters in das senkrechte Profil (3041/3042) (3.7) greift.
In die senkrechten Profile (3041/3042/3101) jeweils 2 Leerschrauben einfügen.
4A. ZUSAMMENBAU DER EINZEL-
NEN ELEMENTE
Die Seitenteile mit den Giebelseiten verschrauben(4.1/4.2). Einbau der Eckbleche (1092) Dachseite oberhalb der Traufe (4.3). Den Dachfirst montieren (4.4) und dort die Eckbleche (1092) im Giebelbereich einsetzen.
4B. ZUSAMMENBAU DER EINZEL-
NEN ELEMENTE
Jetzt die Dachstreben (2055) mit dem Dachfirst und den Traufen verschrauben (4.5/4.6). Beachten Sie, dass je nach Größe des von Ihnen erworbenen Hauses Leerschrauben in die Dachmittelprofile eingesetzt werden müssen. Wie viele, lesen Sie an den eingekreisten Zahlen ab.
Versteifung (3057) wie in (4.7) dargestellt anbringen.
Das soweit zusammen geschraubte Gewächshaus auf das Fundament setzen und lose mit dem Fundament verschrauben.
6 |
002.03.0905 |

Jetzt prüfen, ob das Haus absolut rechtwinklig ist. Sonst entsprechend verrücken. Anschließend die Schrauben fest anziehen.
Die Schrauben müssen fest, aber nicht zu fest angezogen werden.
Die Schutzkappen (1017/1018) auf die Profilenden drücken (4.8) und die diagonalen Dachversteifungen (2033) montieren (4.10).
5 TÜR
Achtung: Niemals die montierte Tür auf die Türgleiter (1014) stellen.
Die Türgleiter (1014) an den Enden in das untere Türprofil (1060) hineindrücken (5.1).
Türteile, wie in der großen Zeichnung zu sehen, zusammenschrauben.
Die beiden Türrollen, wie in (5.4) gezeigt, mittels der M4 Schrauben, Unterlegscheiben und Muttern mit dem Türoberteil verschrauben.
Die Türdichtung (3021) in die senkrechten Streben (3058) der Tür anbringen (5.6). Das Türoberteil mit dem obersten Türpaneel verschrauben (5.3).
Die Türrollen werden in die Türschiene hineingeschoben. Es muss sichergestellt werden, dass die unteren Türführungen gemäß Abbildung (5.5) eingeführt werden.
Nachdem Sie nach Schritt 5 die Tür eingesetzt haben, setzen Sie Schrauben und Muttern
als Türstopper an die beiden Enden der Türschiene (1047).
Die Tür so einstellen (5.7), dass sie reibungslos läuft.
6. DACHFENSTER
Das Dachfenster entsprechend der Abbildung zusammenschrauben. Die Seitenrahmen (1065) mit dem Dachfensteroberteil (1064) verschrauben. Bei einer Verglasung dünner als 4 mm verfahren wie in (6.1), bei einer Verglasung 4 mm oder dicker wie in (6.2).
Das Glas in die Seitenrahmen hineinschieben (6.3), aber vorher Schrauben in die Bohrungen der Seitenrahmen hineinstecken.
Jetzt das untere Fensterprofil (1066) mit den Seitenrahmen verschrauben.
Achtung: Das Fenster muss rechtwinklig sein.
Das Dachfenster in den First vom Firstende aus einführen und das Fenster in die vorgesehene Stellung bringen (6.4/6.5/6.6).
Die Dachfensterschwelle entsprechend (6.7) mit den vorhandenen Leerschrauben festschrauben. Den Dachfensteraufsteller (1067) mit dem unteren Fensterprofil verschrauben.
Hierbei werden die Schrauben (1006) verwendet (6.8).
Die vorhandene Gummikappe (1019) über das untere Ende des Dachfensteraufstellers streifen (6.6). Die beiden Einrastzapfen (1016) auf der Dachfensterschwelle mit den Schrauben (1006) festschrauben (6.8).
7.VERGLASUNG BLANK-/NÖR- PELGLAS
Bitte beachten Sie die oben erwähnten Sicherheitsvorkehrungen.
Die Glasdichtung (1020) auf die Alu-Profile drücken (7.3) und entsprechend auf Länge schneiden .
Beginnen Sie mit der Verglasung am Giebel und benutzen Sie hierzu die Verglasungsfederklammern (1011) (7.2) und Glashalteklammern (1012) (7.1), wie im Glasplan abgebildet.
Bei Schwierigkeiten mit dem Einsatz der letzten Glasscheiben muss überprüft werden, dass die oberen Scheiben nicht heruntergerutscht sind.
DIE LETZTEN HANDGRIFFE
Wenn Sie es wünschen, können Sie das Gewächshaus an den vorhandenen Fugen mit Silikon abdichten. Das Silikon wird aber nicht mitgeliefert.
Den beiliegenden Warnungsaufkleber von innen aufkleben.
Ihr Lieferant hält ein reichhaltiges Sortiment an Gewächshaus-Zubehör für Sie bereit. Sprechen Sie ihn an.
SICHERHEITSHINWEIS
Bei starkem Wind sollten alle Öffnungen und die Tür geschlossen werden.
Dächer von Gewächshäusern sind so rechtzeitig von Schnee zu räumen, dass keine gefährliche Schneebelastung eintreten kann.
ANMERKUNGEN
Zum vollen Schutz des Gewächshauses empfehlen wir, es mit in Ihre Hausversicherung einzuschließen. Beachten Sie eventuell vorhandene örtliche Bauvorschriften.
Den mitgelieferten Typaufkleber nach erfolgter Montage des Gewächshauses auf das Radgehäuse (1062) kleben.
Die Typbezeichnung benötigen Sie zur Angabe bei der Bestellung evtl. benötigter Ersatzteile. Bitte heben Sie die Montageanleitung auf!
Alle Maßangaben sind Annäherungswerte. Änderungen vorbehalten.
002.03.0905 |
7 |

SICHERHEITSVORKEHRUNGENPrécautions d’emploi
1.VEUILLEZ LIRE ENTIEREMENT CETTE NOTICE DE MONTAGE AVANT DE COMMENCER L’INSTALLATION !
2.Portez toujours des gants lorsque vous maniez des plaques de polycarbonate ou du verre. Les bords tranchants peuvent entraîner des blessures. On peut aussi se blesser avec les bords et coins tranchants des profilés en aluminium, il faut donc là encore toujours porter des gants !
3.Le produit que vous venez d’acquérir est conçu pour la culture de plantes et doit être uniquement utilisé à cet effet. L’utilisation dans un autre cadre entraîne l’exclusion de toute garantie.
4.Le montage de ce produit nécessite l’intervention de deux personnes.
5.Si vous rencontrez des difficultés lors du montage de la serre ou de la pose des verres, veuillez contacter votre revendeur – N’employez pas la force !
Descriptif de la construction
CHOIX DE L’EMPLACEMENT
Choisissez l’emplacement le plus ensoleillé et le mieux protégé du vent.
IMPORTANT
Avant de commencer le montage de votre serre, vérifiez que les pièces énumérées dans la liste sont au complet. Retirez les différents paquets de l’emballage, afin de mieux les identifier.
Mais attention de ne pas mélanger les
paquets quand vous les ouvrez.
Le montage de la serre se fait par étape pan par pan : étape 1A/B cotés, étape 2 et 3 pignons, étape 4A/B assemblage des cotés avec les pignons puis le toit, étape 5R/L porte, étape 6 lucarne, étape 7et 8 A/B vitrage.
Les profilés sont emballés par paquets. Chaque paquet correspond à une étape.
S’il manque quelque chose, veuillez contacter votre fournisseur.
OUTILS NECESSAIRES
Tournevis (plat et cruciforme PH2) 1 clé de 10
ENTRETIEN
La serre doit être de temps en temps lavée avec une lessive douce. Le verre se nettoie avec un détergent qui n ‘agresse ni le cadre en aluminium ni les clips à ressort des vitrages.
0. FONDATIONS
Important ! Les fondations doivent impérativement être d’équerre et de niveau. Des fondations en acier galvanisé sont disponibles en tant qu’accessoires pour tous les modèles
de serres.
Attention ! Uniquement lorsque la serre doit être installée à un endroit très peu protégé et exposé au vent : Percer des trous dans les traverses de base et dans les fondations en acier et assemblez-les à l’aide de boulons et d’écrous.
Si vous voulez cependant réaliser vous-même des fondations en pierre ou en béton, référezvous dans ce cas aux dimensions indiquées au paragraphe 0. Des baquettes en bois prétraitées et résistantes aux intempéries, d’au moins 18 mm d’épaisseur et de 32 mm de largeur maxi., sont placées entre les fondations béton-acier et le cadre en aluminium, percées selon le plan et fixées dans les fondations à l’aide de vis de 50 mm de longueur (non fournies).
Tous les plans sont représentés de l’intérieur de la serre, à l’exception des figures représentées dans un double cadre, qui montrent une vue externe.
1. PAROIS LATÉRALES
Etaler toutes les pièces sur le sol et les visser sans serrer.
Il faut prévoir de coulisser un boulon supplémentaire dans chaque profilé de vitrage vertical (3032) pour fixer plus tard les renforts latéraux (2056) (1.5).
Sur les profilés de vitrage vertical extérieurs (3032), coulisser un boulon supplémentaire pour fixer les entretoises diagonales (3095). (1.2)
Vous aurez besoin de ces boulons pour poser ultérieurement les entretoises (1.2)
Fixer sans serrer les équerres (1092) (1.1). A l’étape 4 les équerres seront fixées sur les pignons.
2. PIGNON SANS PORTE
Etaler toutes les pièces sur le sol et les visser sans serrer.
Mettre 2 boulons supplémentaires dans chaque profilé (3041 et 3042) (2.2 et 2.6).
Dans le profilé (3001) coulisser un seul boulon.
3. PIGNON AVEC PORTE
Etaler toutes les pièces sur le sol et les visser sans serrer.
Attention ! Selon le sens dans lequel vous voulez ouvrir la porte, positionnez le rail à droite ou à gauche.
Le rail de la porte coulissante (1047) se monte sur la barre horizontale de porte (2048). Fixez celui-ci à l’extérieur sans serrer avec deux boulons et écrous.
Pour renforcer, fixez les attaches (1013), (5001) & (5002) comme indiqué en (3.8). Veillez à ce que le talon de l’attache rentre dans la traverse
verticale (3041 / 3042)(3.7).
Coulisser 2 boulons supplémentaires dans chaque profilé de vitrage vertical (3041 / 3042 / 3101).
4A. ASSEMBLAGE DES DIFFE-
RENTS ELEMENTS
Assemblez les côtés et les pignons (4.1/4.2). Fixer sans serrer les équerres 1092 (4.3) Fixer le faîtage avec les équerres 1092 (4.4).
4B. ASSEMBLAGE DES DIFFE-
RENTS ELEMENTS
Pensez que selon la taille de la serre que vous avez achetée, des boulons doivent être coulissés d’avance dans les profilés de toit (2055). Les chiffres entourés vous en indiquent le nombre.
8 |
002.03.0905 |

Assemblez maintenant les profilés de toit (2055) sur les gouttières (4.5) et sur le faîtage (4.6).
Fixer les renforts latéraux (2056) (4.5), fixer les renforts horizontaux (3057) comme indiqué en (4.7), ensuite fixer les profilés (2033) (4.10).
Placer la serre ainsi assemblée sur les fondations et la fixer sans serrer.
S’assurer que la serre est parfaitement d’équerre. Sinon recaler comme il faut. Ensuite bien serrer sans forcer.
Enfoncer les protections (1017 et 1018) aux extrémités des traverses (4.8).
5. PORTE
Attention : ne pas faire reposer la porte une fois montée sur ces coulisseaux (1014) afin de ne pas les endommager.
Enfoncer les coulisseaux de porte (1014) aux extrémités de la traverse inférieure de la porte (1060) (5.1).
Assembler les parties de la porte comme indiqué sur le grand plan.
Fixer les roulettes (1015) sur la traverse supérieure de la porte (1062), comme indiqué en (5.4) avec les vis (1004), les rondelles (1009) et les écrous (1007).
Assembler la traverse de la porte (1062) sur le panneau de porte le plus haut (1059) (5.3).
Poser les joints de porte (3021) sur les montants verticaux (3058) (5.6).
Mettre le loquet (1111) .
Coulisser la porte en s’assurant que les coulisseaux (1014) soient correctement positionnés dans le rail du bas de la porte (5.5) et que les roulettes soient correctement positionnées dans le rail du haut de la porte (5.7)
Une fois que la porte sera posée selon l’étape 5, placez un boulon et un écrou pour faire une butée à l’extrémité du rail de la porte coulissante (1047) (étape 3).
Ajuster la porte de manière à ce qu’elle coulisse correctement.
6. LUCARNE
Assembler la lucarne comme indiqué sur la figure. Assembler les cadres latéraux (1065) et le haut de la lucarne (1064). Pour un vitrage de 4 mm ou moins comme sur la figure (6.1), pour un vitrage de plus de 4 mm comme sur la figure (6.2)
Insérer le verre dans le cadre (6.3) en ayant pris soin de placer avant les boulons dans les trous.
Assembler alors le profilé inférieur (1066) de la fenêtre sur les cadres latéraux.
Attention ! La fenêtre doit être d’équerre.
Coulisser la lucarne dans l’une des extrémités du faîtage et mettre la lucarne dans la position prévue (6.4 / 6.5 / 6.6).
Fixer en serrant, la traverse inférieure de la lucarne (1063) (6.7) avec les boulons déjà coulissés.
Fixer la poignée de lucarne (1067) au profilé inférieur de la lucarne (1066) avec les vis (1006) (6.8). Mettre le cache en caoutchouc (1019) sur l’extrémité inférieure de la poignée de lucarne (6.6).
Bien visser les deux tétons (1016) sur la traverse inférieure de la lucarne (1063) avec les vis (1006) comme indiqué en (6.8).
7. VITRAGE EN VERRE
Veuillez suivre les consignes de sécurité évoquées précédemment. (port de gants).
Enfoncer les joints de vitrage (1020) dans les profilés en aluminium (7.3) et les couper à la bonne longueur.
Commencez par le vitrage de la toiture en utilisant les clips à ressort (1011) (7.2) et les cavaliers de retenu de vitrage (1012) (7.1) comme indiqué sur le plan de vitrage.
En cas de difficultés lors de l’installation des derniers verres, vérifier que les verres du haut n’ont pas glissé.
Pour les cotés, commencer par les verres du bas.
DERNIERES INTERVENTIONS
Coller de l’intérieur l’autocollant d’avertissement fourni avec la serre.
Votre fournisseur tient à votre disposition une large gamme d’accessoires de serres. Interrogez-le.
CONSIGNE DE SECURITE
En cas de grand vent, toutes les lucarnes et la porte doivent être fermées.
En cas de neige, enlever la neige du toit.
REMARQUES
Pour une protection complète de la serre, nous recommandons de l’inclure dans votre assurance habitation. Respectez les éventuelles règles de sécurité locales en vigueur en matière de construction.
Une fois le montage de la serre effectué, coller l’autocollant signalétique fourni sur le logement de roue (1062).
Vous aurez besoin de ces données pour commander d’éventuelles pièces détachées. Conserver soigneusement la notice de montage !
Conformément à notre politique d‘amélioration constante, nous nous réservons le droit de modifier les spécifications de nos produits à tout moment et sans préavis.
002.03.0905 |
9 |

Veiligheidsvoorschriften
1.LEEST U EERST DE GEHELE INSTRUCTIES DOOR ALVORENS TE BEGINNEN MET DE OPBOUW VAN DE KAS.
2.Draag altijd handschoenen als u met glas, polycarbonaat platen of aluminium werkt, deze kunnen scherpe hoekjes en/of randen hebben die tot verwondingen kunnen leiden. Draag ook beschermde kleding en schoenen en een veiligheidsbril + helm. Indien glas gebroken is dient u het veilig en meteen op te ruimen.
3.Het product dat u heeft gekocht is alleen bestemd voor het kweken van planten. Wanneer deze voor andere doeleinden zal worden gebruikt dragen wij hier geen verantwoordelijkheid voor.
4.Wij raden u aan de kas met twee personen in elkaar te zetten.
5.Mocht u problemen hebben het glas of polycarbonaat platen in te passen, neem dan contact op met uw leverancier. Gebruik geen geweld.
Montage Instructies
KIEZEN PLAATS
Probeer altijd een zonnige plaats te kiezen die zoveel mogelijk tegen wind beschut.
BELANGRIJK
Voordat u begint aan het in elkaar zetten van uw kas, kijkt u of u alle benodigdheden hebt door deze uit de doos te halen en te controleren met behulp van de lijst.
Het is belangrijk dat de open pakketten niet door elkaar gehaald worden.
Als er onderdelen missen, neem dan contact op met uw leverancier.
VEREISTE GEREEDSCHAPPEN
Schroevendraaiers (normale en kruiskop PH2) en een 10mm moer of steeksleutel.
ONDERHOUD
Om uw kas schoon te houden dient deze af toe gereinigd te worden met een zacht reinigingsmiddel, zorg dat dit niet het aluminium aantast of de beglazing clips.
Om te voorkomen dat er zich vuil opbouwt in de deurrails, zal men deze regelmatig moeten schoonmaken.
0. FUNDERING
Belangrijk! Let op dat de fundering haaks en waterpas staat.
Een gegalvaniseerde fundering is voor ieder type kas verkrijgbaar bij uw leverancier.
Attentie! Alleen als de kas op een erg winderige en onbeschermde plaats staat dan moet u de kas en de fundering aan elkaar koppelen.
Doormiddel van gaatjes te boren door de profielen en deze aan elkaar te koppellen met behulp van schroeven.
Als u liever uw eigen stenen of betonnen fundering wilt gebruiken, volg dan de afmetingen in diagram 0.
Geïmpregneerde houten balken van minstens 18mm hoog en niet meer dan 32 mm breed zullen tussen het aluminiumframe en de stenen/betonnen fundering moeten worden geplaatst.
Deze moeten dan aan elkaar worden gemaakt met 50mm lange schroeven. De 50mm schroeven zijn niet inbegrepen.
Alle diagrammen worden vanaf de binnenkant van de kas getoond. Alleen op de tekeningen met het dubbele frame wordt de kas van de buitenkant bekeken.
1. ZIJKANTEN
Leg de onderdelen uit op de grond en schroef ze losjes aan elkaar vast.
In deze fase is het noodzakelijk om elk verticaal aluminium profiel (3032) te voorzien van een extra boutje, om later het kruisgording profiel (2056)(1.5) aan te verbinden.
Aan de buitenprofielen (3032) dient een bout te zitten die later het kruis gordingprofiel (3095) verbindt. (1.2)
Verbind nu de hoekplaat (1092) losjes. (1.1)
In stap 4 zullen de hoekplaatjes ook met boutjes worden bevestigd aan de gevels.
2. DE PUNTGEVEL
Leg de onderdelen uit op de grond en schroef ze losjes aan elkaar vast.
Voeg twee extra boutjes toe in de verticale profielen (3041) en (3042) om het kruis gordingprofiel te bevestigen. (2.2) en (2.6). In het verticale profiel (3101) hoeft u maar een extra boutje toe te voegen.
3. DE DEURGEVEL
Leg de onderdelen uit op de grond en schroef ze losjes aan elkaar vast.
Attentie: De deur kan zowel rechts als links van het midden profiel geplaatst worden.
Het deurrail profiel (1047) zal worden vastgemaakt aan het horizontale profiel (2048).
Verbind deze twee losjes vanaf de buitenkant met twee moertjes en boutjes.
Verbind de clips (1013) zoals u kunt zien in (3.7) met (5001) en (5002) met een boutje, voor extra stevigheid.
Zorg er wel voor dat de randen van de clip goed aansluiten en overlappen op het verticale profiel (3041) of (3042) zoals op de tekening.
Voeg ook een extra boutje toe in de verticale profielen (3041), (3042) en (3101).
4A. HET SAMENVOEGEN VAN DE LOSSE ELEMENTEN.
Schroef de zijkanten aan de beide gevels. (4.1), (4.2)
Bevestig de nokbalk aan beide kopgevels, tevens dient u ook de hoekplaatjes (1092) te bevestigen. (4.3) (4.4)
4B. HET SAMENVOEGEN VAN DE LOSSE ELEMENTEN.
Verbind nu de dakprofielen (2055) tussen de nokbalk (4.6) en de zijkanten (4.5).
Voeg extra boutjes toe aan het beglazingsprofiel, afhankelijk van welk model kas u gekocht heeft. Het nummer is te vinden in een cirkel op het begin en/of eind van elk profiel.
De hoek, dak en kruis gordingprofielen, kunnen nu worden verbonden. (2056)(4,5), (3057)(4,7), (2033)(4,10).
Plaats nu het frame op de fundering en bevestig het geheel losjes.
10 |
002.03.0905 |
 Loading...