

Vision Fitness T9700S User Manual
Owner’s
Guide
T9700S AND T9700HRT
PLATFORM TREADMILLS


ongratulations on choosing a VISION FITNESS Treadmill. You’ve taken
an important step in developing and sustaining an exercise program! Your
Treadmill is a tremendously effective tool for achieving your personal
fitness goals. Regular use of your Treadmill can improve the quality of your
life in so many ways…
Here are just a few of the health benefits of aerobic exercise:
• Weight Loss
• A Healthier Heart
• Improved Muscle Tone
• Increased Daily Energy Levels
• Reduced Stress
• Help In Countering Anxiety and Depression
• An Improved Self Image
The key to reaping these benefits is to develop the exercise habit. Your
new Treadmill will help you eliminate the obstacles that prevent you from
getting in your exercise time. Snow and rain and darkness won't
interfere with your workout when you have your Treadmill in the comfort of
your home. This Owner’s Guide provides you with basic information on
starting an exercise program. A more complete knowledge of your new
Treadmill will assist you in realizing your goal of a healthy lifestyle.
Some kinds of service to your Treadmill should only be performed by your
VISION FITNESS retailer. Please contact your authorized VISION FITNESS
retailer should service be required. If a question or problem arises which
cannot be handled by your VISION FITNESS retailer, please contact us:
VISION FITNESS
P.O. Box 280
500 South C.P. Avenue
Lake Mills, WI 53551
Ph: 1.800.335.4348
Fax: 1.920.648.3373
www.visionfitness.com
C
ALL MODELS
T9700S T9700HRT
GENERAL
Table of Contents
SAFETY INSTRUCTIONS . . . . . . . . . . 4
MOVING & LEVELING . . . . . . . . . . . 7
POWER & EMERGENCY STOP . . . . . 8
FEEDBACK DISPLAY . . . . . . . . . . . . 9
FEATURES . . . . . . . . . . . . . . . . . . 12
USER LOG-IN . . . . . . . . . . . . . . . . 16
FEATURES . . . . . . . . . . . . . . . . . . 17
CHOOSING PROGRAM, LEVEL, TIME . 18
PROGRAM DETAILS . . . . . . . . . . . . 20
HRT - FAT BURN . . . . . . . . . . . . . . 24
HRT - SPEED TRAINING . . . . . . . . . 28
HRT - ENDURANCE . . . . . . . . . . . . 33
HEART RATE TRAINING . . . . . . . . . 38
CUSTOM PROGRAMS . . . . . . . . . . 41
ALL MODELS
GENERAL
T9700HRT
CONSOLE
T9700S
CONSOLE
FEATURES . . . . . . . . . . . . . . . . . . 13
EASY START . . . . . . . . . . . . . . . . 14
QUICK-KEYS . . . . . . . . . . . . . . . . 15
TROUBLESHOOTING . . . . . . . . . . . 44
COMMON QUESTIONS . . . . . . . . . 45
TENSIONING THE BELT . . . . . . . . . 46
HOME WARRANTY . . . . . . . . . . . . 48
COMMERCIAL WARRANTY . . . . . . . 50
DEVELOPING A FITNESS PROGRAM . 52
FITNESS GUIDELINES . . . . . . . . . . 55
WEEKLY WORKOUT LOGS . . . . . . . 58
MONTHLY WORKOUT LOGS . . . . . . 60

3
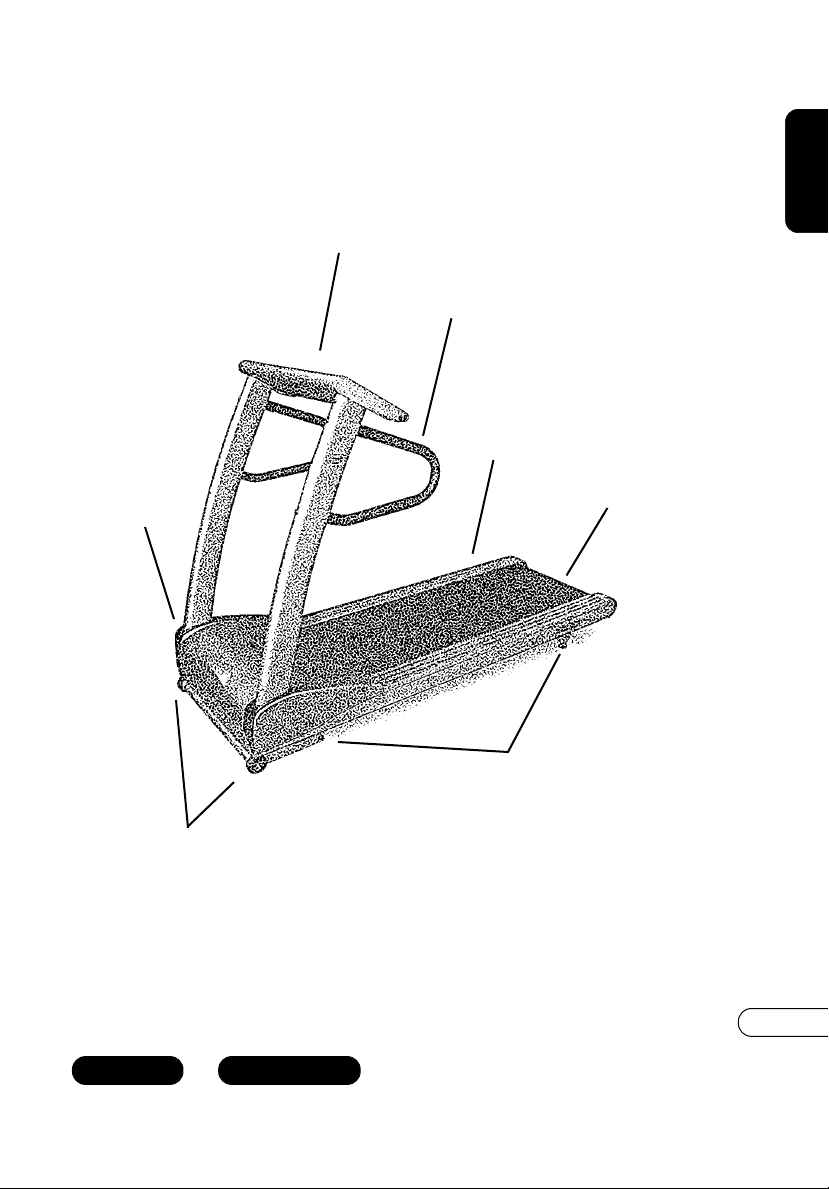
ALL MODELS
TRANSPORT WHEELS
CONSOLE
T9700S
FULL PLATFORM TREADMILLS
HANDLEBARS
SIDE
RAILS
MOTOR
COVER
LEVELERS
RUNNING BELT
T9700HRT

4
ALL MODELS
IMPORTANT SAFETY INSTRUCTIONS
SAVE THESE INSTRUCTIONS
When using an electrical product, basic precautions should always be
followed, including the following:
Read all instructions before using this exercise product.
To reduce the risk of burns, fire, electrical shock or injury
to persons:
• Use this exercise product for its intended use as described in this Owner’s
Guide. Do not use attachments not recommended by the manufacturer.
• Never drop or insert any object into any opening.
• Do not remove the Treadmill motor covers or roller covers. Service should
be performed only by an authorized VISION FITNESS retailer.
• Never operate this Treadmill if it has a damaged cord or plug, if it is not
working properly, if it has been damaged, or immersed in water. Return
the Treadmill to a retailer for examination and repair.
• Keep the cord away from heated surfaces.
• Do not use outdoors.
• To disconnect, turn the switch to the OFF position, then remove plug from
outlet.
• Never place the power cord under carpeting or place any object on
top of the power cord, which may pinch and damage it.
• Unplug your VISION FITNESS Treadmill before moving it.
CHILDREN
• Keep children off your VISION FITNESS Treadmill at all times.
• When the VISION FITNESS Treadmill is in use, young children and pets
should be kept at least 10 feet away.
WARNING!
5
ALL MODELS
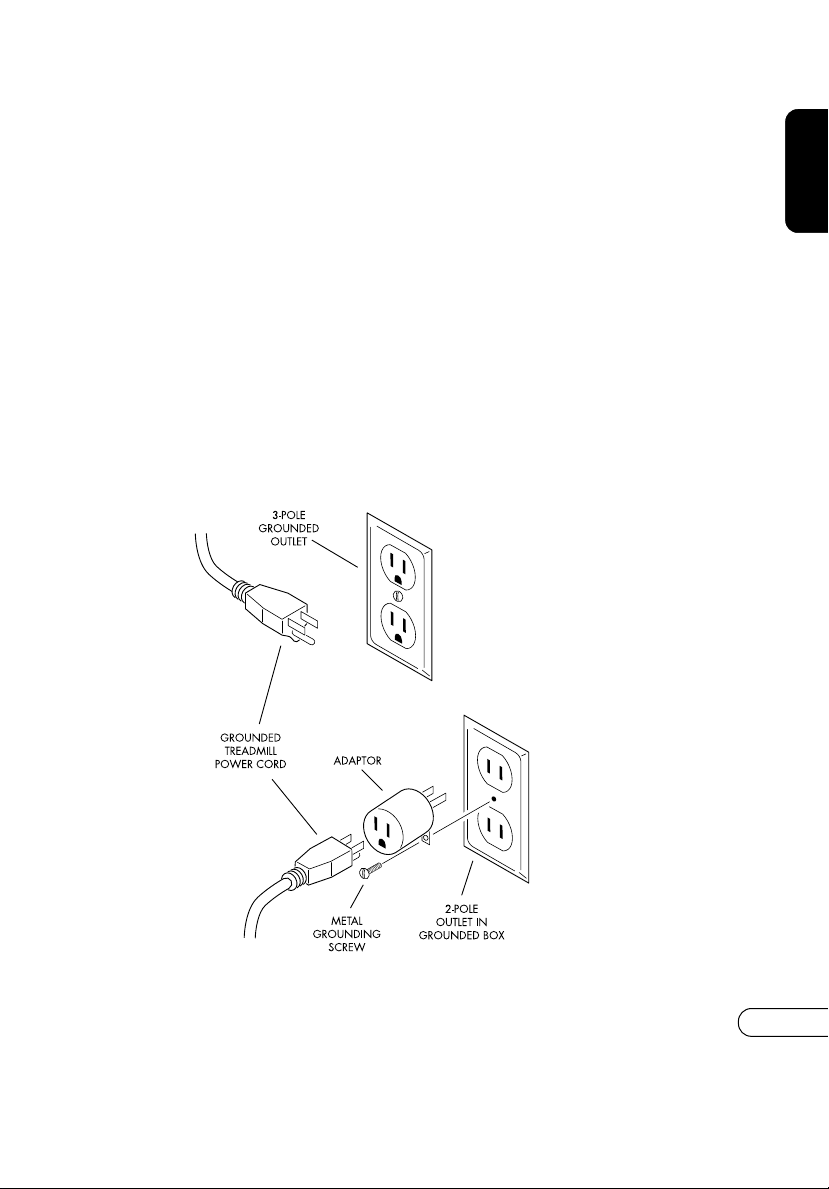
WALL POWER TO TREADMILL
This product is for use on a nominal 120-volt circuit, and has a grounding
plug that looks like the plug illustrated below. A temporary adapter such
as the one illustrated below may be used to connect this plug to a 2-pole
receptacle as shown, if a properly grounded outlet is not available. The
temporary adapter should be used only until a properly grounded outlet
can be installed by a qualified electrician. The green colored rigid ear,
lug, or the like extending from the adapter must be connected to a
permanent ground such as a properly grounded outlet box cover.
Whenever the adapter is used, it must be held in place by a metal screw.
Surge Protectors or Extension Cords should not be used. They do not
supply enough electricity to the treadmill and can damage it.

6
ALL MODELS
OTHER SAFETY TIPS FOR YOUR VISION FITNESS TREADMILL
CAUTION!
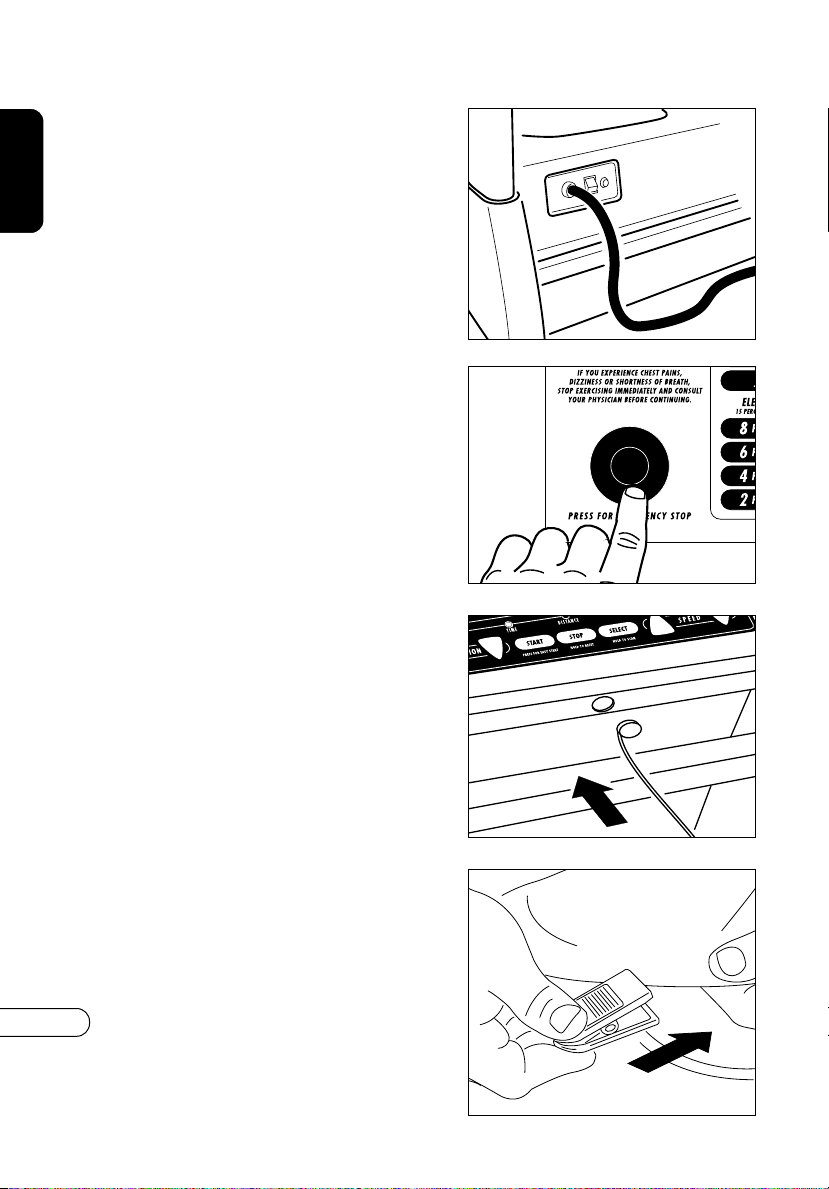
: If you experience chest pains, nausea, dizziness or shortness of
breath, stop exercising immediately and consult your physician before
continuing.
• Do not wear clothing that might catch on any part of the Treadmill.
• Read this Owner’s Guide before operating this Treadmill.
CLEANING
• Clean with soap and slightly damp cloth only; never use solvents.
7
ALL MODELS
PLACEMENT IN YOUR HOME
It is important that you place your Treadmill in a comfortable and inviting
room. Your Treadmill is designed to use minimal floor space. Many
people will place their Treadmills facing the TV or a picture window. If at
all possible, avoid putting your Treadmill in an unfinished basement. To
make exercise a desirable daily activity for you, the Treadmill should be in
an attractive setting.
NOTE: If you place your Treadmill facing out from a wall, you should leave
3 feet between the wall and the Treadmill to ensure safe operation.
LEVELING
The Treadmill should be level for optimum use. Once you have placed the
Treadmill where you intend to use it, raise or lower one or both of the
adjustable levelers located on the back of the Treadmill frame. A carpenter’s
level is recommended. If your Treadmill is not level, the running belt may
not track properly. Once you have leveled the Treadmill, lock the levelers
in place by tightening the nuts against the frame.
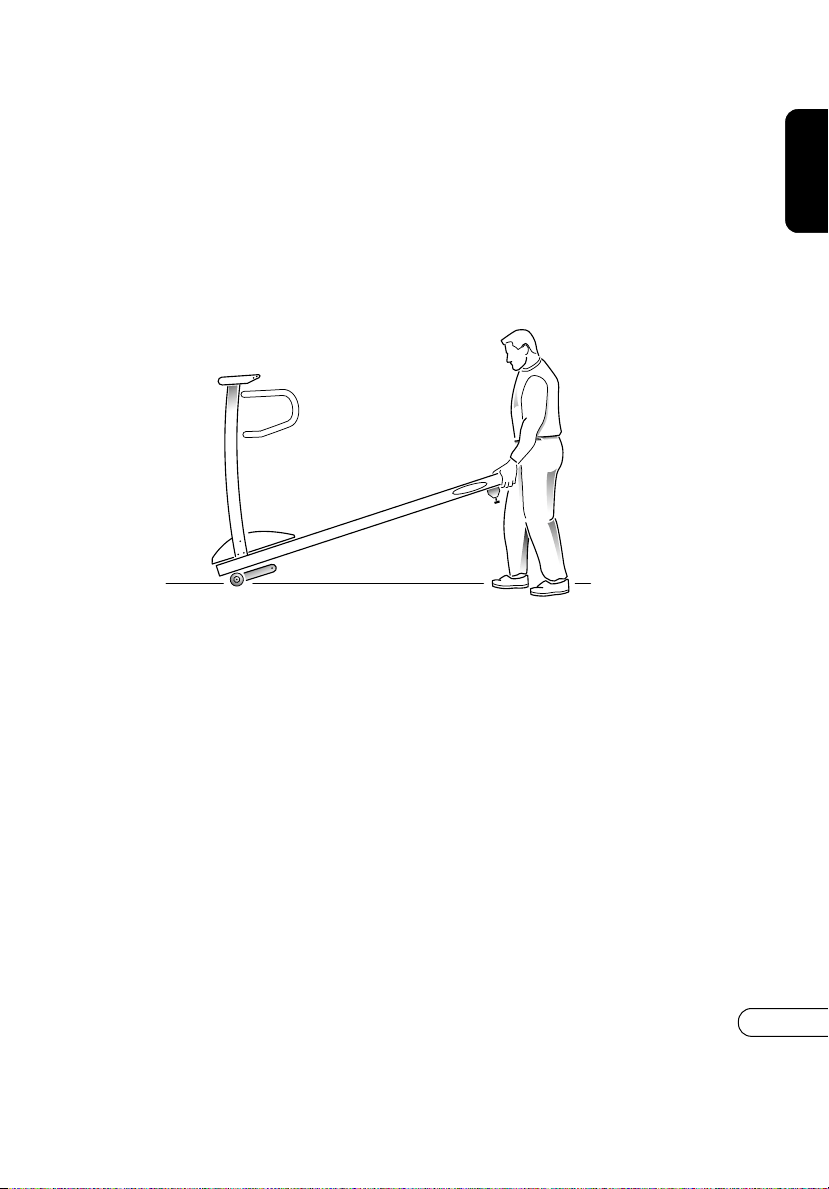
MOVING YOUR VISION FITNESS TREADMILL
Your VISION FITNESS Treadmill has a pair of transport wheels built
into the front legs. To move, firmly grasp the back end of the frame,
carefully lift and roll.
CAUTION: Our Treadmills are well-built and heavy, weighing up to
325 lbs.! Use care and additional help if necessary.
8
ALL MODELS
POWER
Ensure that your Treadmill is
properly connected to a power
outlet, then turn on the Power
switch, located at the front of the
main frame.
EMERGENCY STOP
If at any time you need to stop the
Treadmill quickly, simply press the
red Emergency Stop button. This
will instantly cut all power and the
Treadmill will come to a stop. To
resume your workout, you will
need to re-enter any data.
SAFETY KEY CLIP & TETHER
Your VISION FITNESS Treadmill
will not start unless the Safety Key
is inserted into the keyhole in the
center of the console case. You
should attach the clip end to your
clothing. If at any time you need
to stop the Treadmill quickly simply
pull the Safety Key off the console.
This will cut all power to the
Treadmill and it will come to a
complete stop. To resume your
workout, place the Safety Key
back in place. This will send you
back to the start-up mode.
9
ALL MODELS
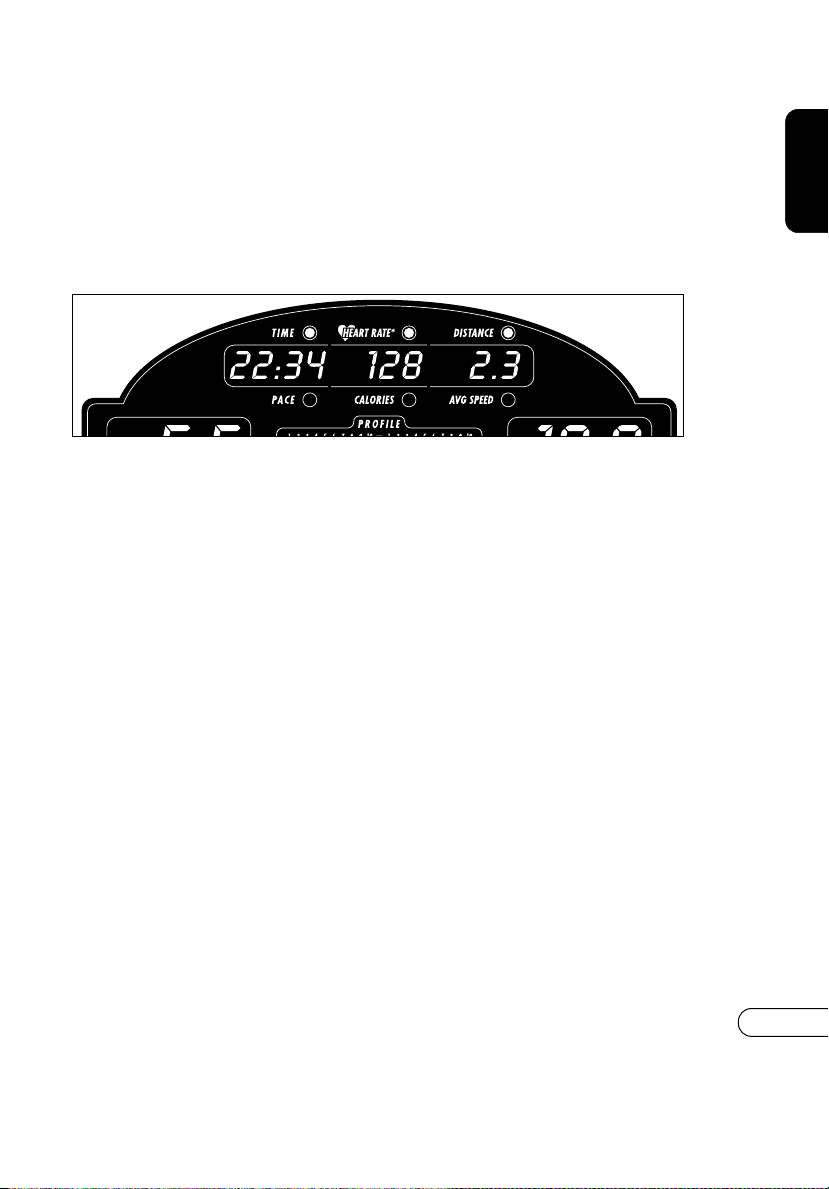
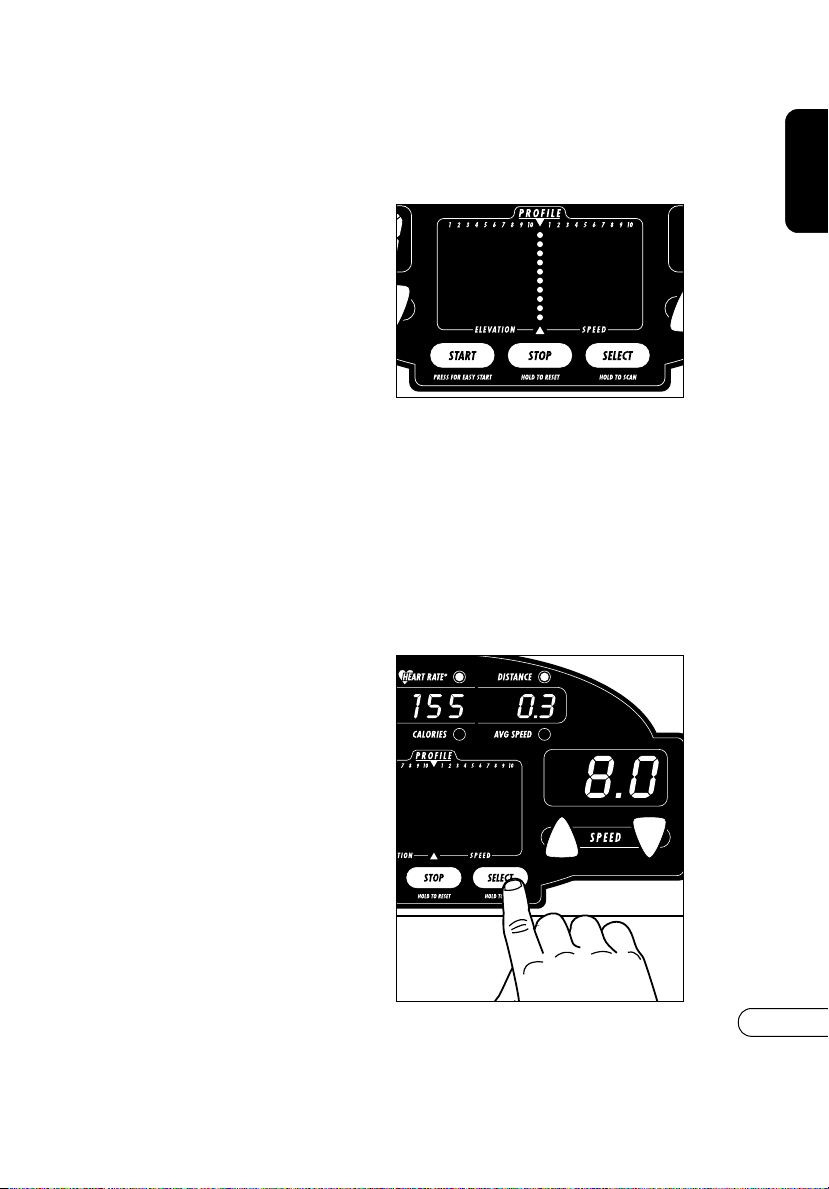
T9700S & T9700HRT FEEDBACK DISPLAY
ALPHANUMERIC MESSAGE CENTER
This is a display that will scroll the operation instructions in the top center
display window. It will also display your feedback when the LED next to
the appropriate word is lit.
TIME
Shown as Minutes:Seconds. View the Time remaining or the Time elapsed
in your workout.
DISTANCE
Shown as Miles. View Distance traveled during workout.
CALORIES
Shown as estimated accumulated Calories burned during workout.
HEART RATE
Shown as Beats-per-Minute. You can monitor your Heart Rate at any time
during a workout. A Heart Rate chest strap is required.
AVERAGE SPEED
Shown as Miles per Hour. Equals accumulated Distance ÷ elapsed Time.
Corresponds to simulated outdoor walking or running Speed.
PACE
Shown as Time (Minutes:Seconds) required to travel 1 mile at current
Speed.
10
ALL MODELS
T9700S & T9700HRT
FEEDBACK DISPLAY
ELEVATION
Shown as percentage of incline,
Elevation is visible in the left-hand
LED window. Indicates how steeply
inclined the running surface is, to
simulate running on a hill.
SPEED
Shown as Miles/Hour, Speed is
visible in the right-hand LED
window. Indicates how fast the
running surface is moving, to
simulate outdoor running.
PROFILE MATRIX WINDOW 10 X 21
The Left dots #1-10 will show an
Elevation Profile in 10 segments in
ORANGE. This profile is not an
exact representation of the
elevation profile, but just a bar
graph.
The Right dots #1-10 will show a
Speed Profile in 10 segments in
RED. This profile is not an exact
representation of the speed profile,
but just a bar graph.
(continued on next page.)
11
ALL MODELS
T9700S & T9700HRT
FEEDBACK DISPLAY
PROFILE MATRIX WINDOW 10 X 21
The Center column will be the
Segment Progress Bar. The bar will
be displayed in GREEN and
shows how much time is left in
your current segment. This will take
the segment time and divide it into
10 dots and as you complete
more of the segment more of the
dots are lit.
SCAN FUNCTION
To scan through the functions
during your workout, simply press
the SELECT button. To continuously
Scan, press and hold until the
Console double-beeps (about 2
seconds.)
For example: if your workout is 10 minutes long, each segment is 1 minute
long. The Segment Progress Bar will then divide that 1 minute into 10 dots
of 6 seconds per dot. The dots would clear and start counting up as each
segment passes. There would be an audio beep to signal the segment
change.
12
ALL MODELS
T9700S & T9700HRT FEATURES
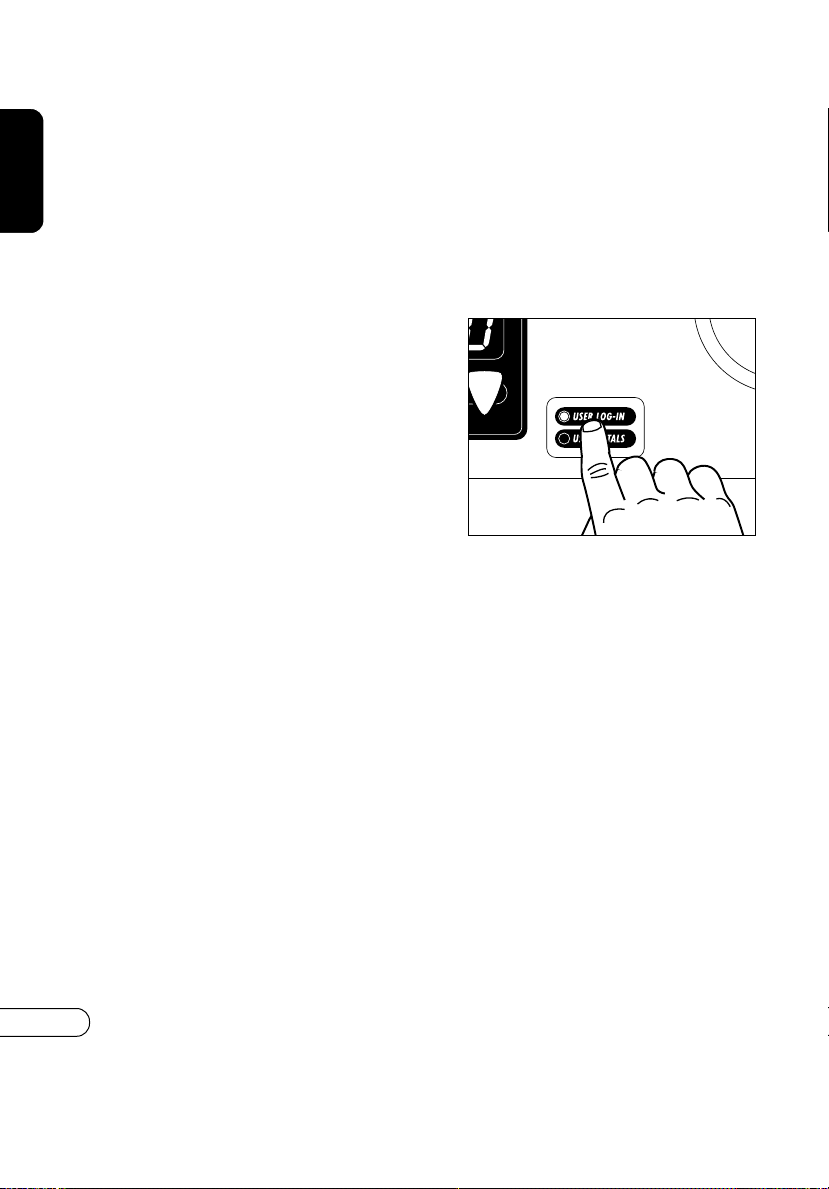
USER LOG-IN
The console on the T9700S and T9700HRT has a special feature that
allows you to Log-In and save all data from your workout. To use this
function follow these steps.
PRESS USER LOG-IN BUTTON
When selected, the green LED
next to the button will be lit. Use
the Arrow keys to choose a user
I.D. number (1-10). This will
appear in the Alphanumeric
Message Center. Then press
SELECT. Press START or use arrows
to select time of workout.
CONTACT HR BAR
Using the contact heart rate bar will give you a quick view of your heart
rate. To use the contact heart rate bar, just grab the metal handgrips. Your
heart rate will appear in the window in the center of the bar. Your heart
rate is an excellent indicator of exercise intensity. For more information
about your heart rate and exercise, please see Page 38 of this Owner’s
Guide.
NOTE: For the Heart Rate Training programs you must use the chest
transmitter. See Page 40.
13
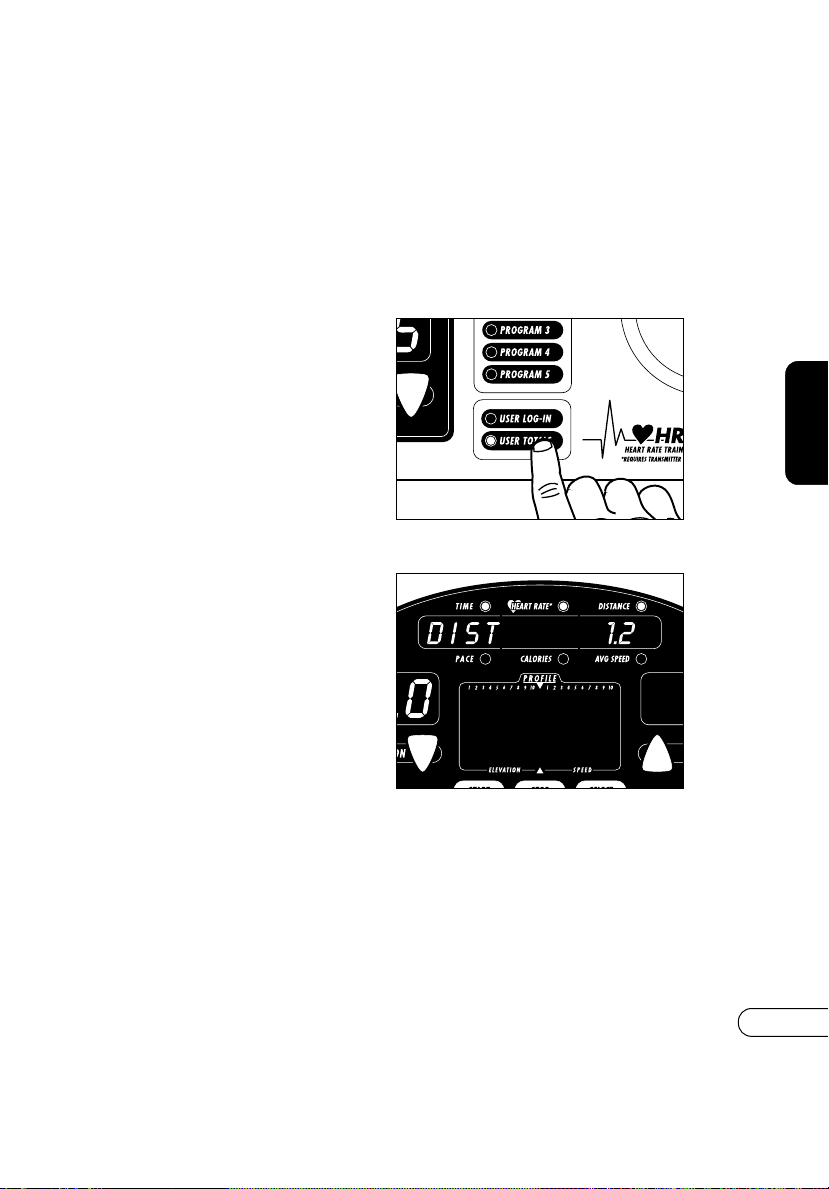
T9700S
T9700S FEATURES
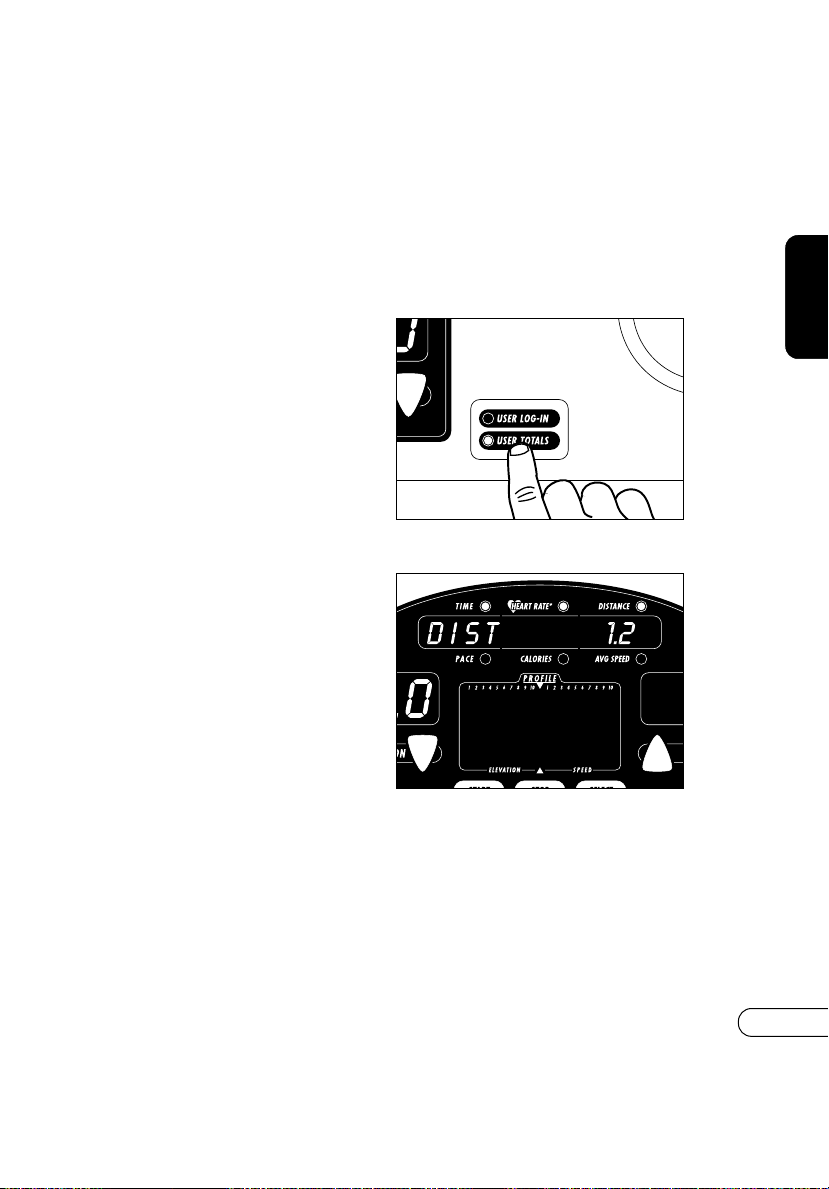
USER TOTALS BUTTON
To use this function you will need to use the same User Log-In code and
follow these three steps.
PRESS USER TOTALS BUTTON
When selected, the orange LED
next to the button will be lit. Use
the Arrow keys to enter your User
I.D. Number. This is the same
number that you use to log-in
before you begin working out.
Then press SELECT.
TOTALS ARE DISPLAYED
Now your accumulated totals for
Distance, Hours, Calories, and
Average Speed are displayed.
They will scroll across the
Alphanumeric Message Center.
RESET USER TOTALS
When reviewing your user totals,
simply press and hold the STOP
key on the overlay. This will clear
the user total information.
14
T9700S
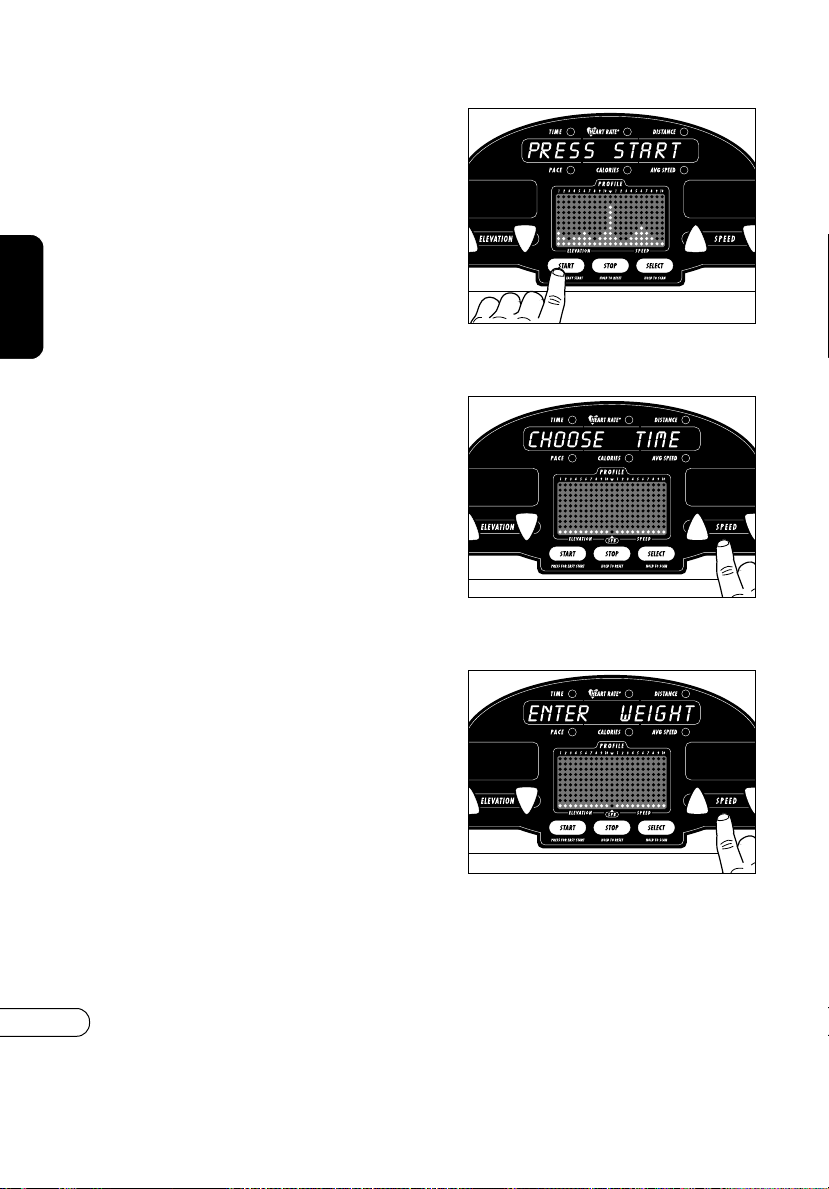
CHOOSING A TIME
Choose Time using Arrow keys
and press SELECT. The Time
window will blink to let you know
what time you have input. Time
will count down.
T9700S EASY START
To start the T9700S, simply press
START; the Treadmill will start and
Time will count up.
ENTERING YOUR WEIGHT
Enter weight using Arrows and
press START. The Alphanumeric
Message Center window will
display “Weight lbs. 150” to let
you know what Weight you have
input. After you press START the
Matrix will display a 3,2,1 count
down and “beep”. The belt will
start after the count down
15
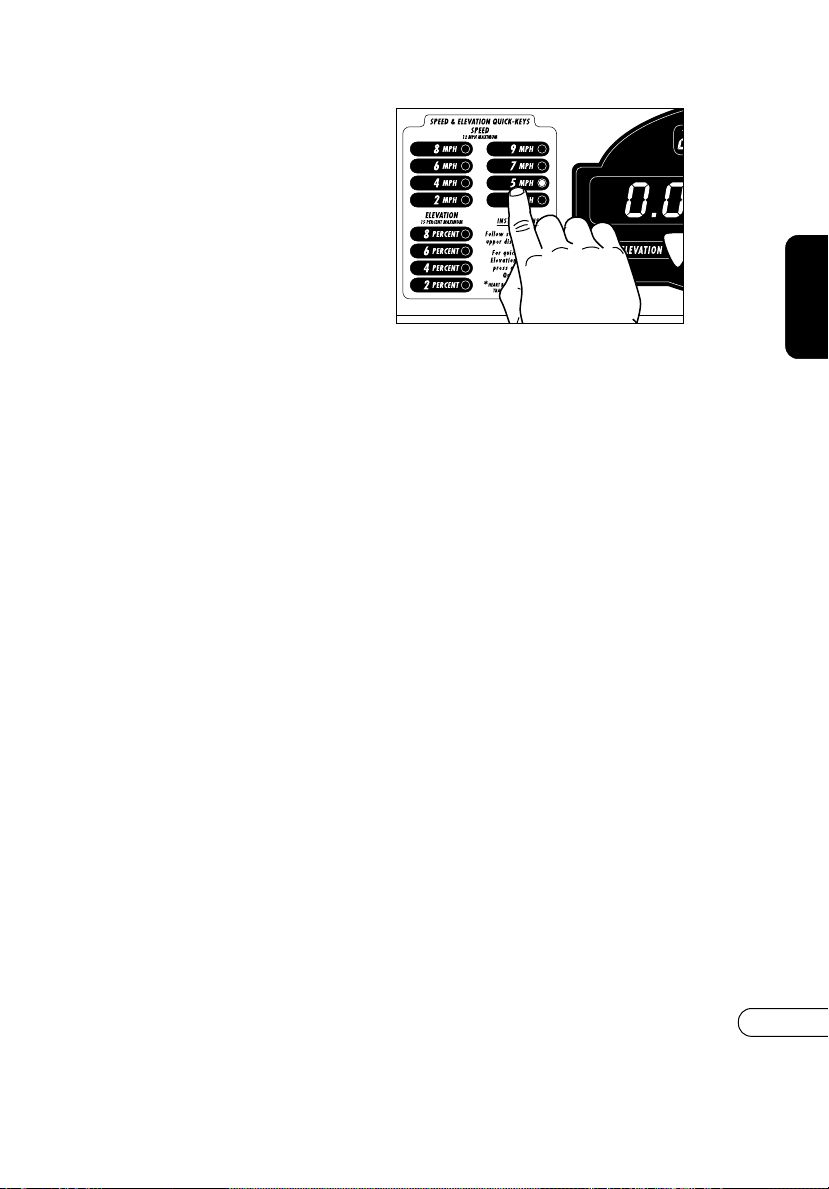
T9700S
T9700S QUICK-KEYS
We have made adjusting your
speed and elevation as simple as
the press of a single key. Once the
treadmill is started, you can press
any of the Quick-Keys and they
will take you to the Speed or
Elevation that is on that key. You
can always control Speed and
Elevation with their standard
arrows.
16
T9700HRT
T9700HRT FEATURES
USER LOG-IN
The console on the T9700HRT has a special feature that allows you to
Log-In and save all data from your workout. To use this function follow
these steps.
PRESS USER LOG-IN BUTTON
When selected, the green LED
next to the button will be lit. Use
the Arrow keys to choose a user
I.D. number (1-10). This will
appear in the Alphanumeric
Message Center. Then press
SELECT.
CHOOSE A PROGRAM
Select the desired program by
using one of the Quick-Keys or
press START to enter the Manual
mode.
17
T9700HRT
T9700HRT FEATURES
USER TOTALS BUTTON
To use this function you will need to use the same User Log-In code and
follow these three steps.
PRESS USER TOTALS BUTTON
When selected, the orange LED
next to the button will be lit. Use
the Arrow keys to enter your User
I.D. Number. This is the same
number that you use to log-in
before you begin working out.
Then press SELECT.
TOTALS ARE DISPLAYED
Now your accumulated totals for
Distance, Hours, Calories, and
Average Speed are displayed.
They will scroll across the
Alphanumeric Message Center.
RESET USER TOTALS
When reviewing your user totals,
simply press and hold the STOP
key on the overlay. This will clear
the user total information.
 Loading...