

Visioneer PaperPort OneTouch, OneTouch Installation Manual

Visioneer OneTouch Scanner
Installation Guide
FOR WINDOWS


TABLE OF CONTENTS i
TABLE OF CONTENTS
Getting Started with your new Scanner . . . . . . . . . . . . . . . . . . . . . . . 1
Step 1: Installing the Scanner Software . . . . . . . . . . . . . . . . . . . . . . . 1
Step 2: Connecting the Scanner . . . . . . . . . . . . . . . . . . . . . . . . . . . . . 2
Getting the PaperPort Software User’s Guide . . . . . . . . . . . . . . . 3
Step 3: Checking Out Your Scanner . . . . . . . . . . . . . . . . . . . . . . . . . 3
If the Scanner Is Not Properly Connected . . . . . . . . . . . . . . . . . . 4
Three Ways to Scan . . . . . . . . . . . . . . . . . . . . . . . . . . . . . . . . . . . . . . 5
Scanning by Pressing the OneTouch Buttons . . . . . . . . . . . . . . . . . . 5
About the OneTouch Buttons . . . . . . . . . . . . . . . . . . . . . . . . . . . . . . 6
Scanning from the Button Panel on the Screen . . . . . . . . . . . . . . . . . 7
About the Configuration Dialog Box . . . . . . . . . . . . . . . . . . . . . . 7
Getting Help . . . . . . . . . . . . . . . . . . . . . . . . . . . . . . . . . . . . . . . . 9
Selecting New Options for the Buttons . . . . . . . . . . . . . . . . . . . . 9
Creating New Configurations . . . . . . . . . . . . . . . . . . . . . . . . . . 10
Adjusting Scan Settings and Page Settings . . . . . . . . . . . . . . . . . 10
Setting Preferences . . . . . . . . . . . . . . . . . . . . . . . . . . . . . . . . . . . 13
Scanning from the PaperPort Software . . . . . . . . . . . . . . . . . . . . . . 14
Using Twain and Scan Manager - for Value Series Scanners . . . . . . 15
Adjusting Scanner Settings . . . . . . . . . . . . . . . . . . . . . . . . . . . . 17
Selecting a Predefined Scanner Setting . . . . . . . . . . . . . . . . 17
Selecting Scan Configuration Options . . . . . . . . . . . . . . . . . 18
Customizing a Scanner Setting . . . . . . . . . . . . . . . . . . . . . . 18
Adjusting the Brightness and Contrast . . . . . . . . . . . . . . . . 19
Selecting the Area of the Item You Want to Scan . . . . . . . . 19
Using Twain and Scan Manager Pro - for Performance Series Scanners
20
Getting Help with the PaperPort Software . . . . . . . . . . . . . . . . 22
Adjusting the Settings on the Scan Manager Pro . . . . . . . . . . . . 22
Saving a New Profile . . . . . . . . . . . . . . . . . . . . . . . . . . . . . . 24
Adjusting the Resolution and Sharpness . . . . . . . . . . . . . . . 24

ii TABLE OF CONTENTS
Adjusting the Brightness and Contrast . . . . . . . . . . . . . . . . 25
Adjusting Gamma, Saturation, and Color Hue . . . . . . . . . . 26
Adjusting Output Size . . . . . . . . . . . . . . . . . . . . . . . . . . . . . 26
Saving a Custom Size . . . . . . . . . . . . . . . . . . . . . . . . . . . . . 28
The Scan Info Box . . . . . . . . . . . . . . . . . . . . . . . . . . . . . . . 29
Zooming In and Out . . . . . . . . . . . . . . . . . . . . . . . . . . . . . 29
Setting Preferences . . . . . . . . . . . . . . . . . . . . . . . . . . . . . . . 29
Getting Help with the Scan Manager Pro . . . . . . . . . . . . . . 30
Scanning 35mm Slides and Negatives . . . . . . . . . . . . . . . . . . . . . . . 31
A Brief Explanation . . . . . . . . . . . . . . . . . . . . . . . . . . . . . . . . . . 31
Installation Troubleshooting . . . . . . . . . . . . . . . . . . . . . . . . . . . . . . 34
Cleaning the Scanner Glass . . . . . . . . . . . . . . . . . . . . . . . . . . . . . . . 34
How to Uninstall Your Scanner . . . . . . . . . . . . . . . . . . . . . . . . . . . . 34
Step 1: Uninstalling the OneTouch Software . . . . . . . . . . . . . . 34
For Windows 98, 98 SE, and ME: . . . . . . . . . . . . . . . . . . . 34
For Windows 2000 and XP: . . . . . . . . . . . . . . . . . . . . . . . . 35
Step 2: Uninstalling the PaperPort Software . . . . . . . . . . . . . . . 36
Contacting Technical Support . . . . . . . . . . . . . . . . . . . . . . . . . . . . . 37
ONETOUCH SCANNER INSTALLATION GUIDE 1
GETTING STARTED WITH YOUR NEW SCANNER
Congratulations on purchasing your OneTouch scanner. With your scanner, you can quickly scan paper
documents and color photos to place their electronic images on your computer. If you have a
transparency adaptor with your scanner, you will also be able to scan 35mm negatives and slides.
STEP 1: INSTALLING THE SCANNER SOFTWARE
To install the scanner software:
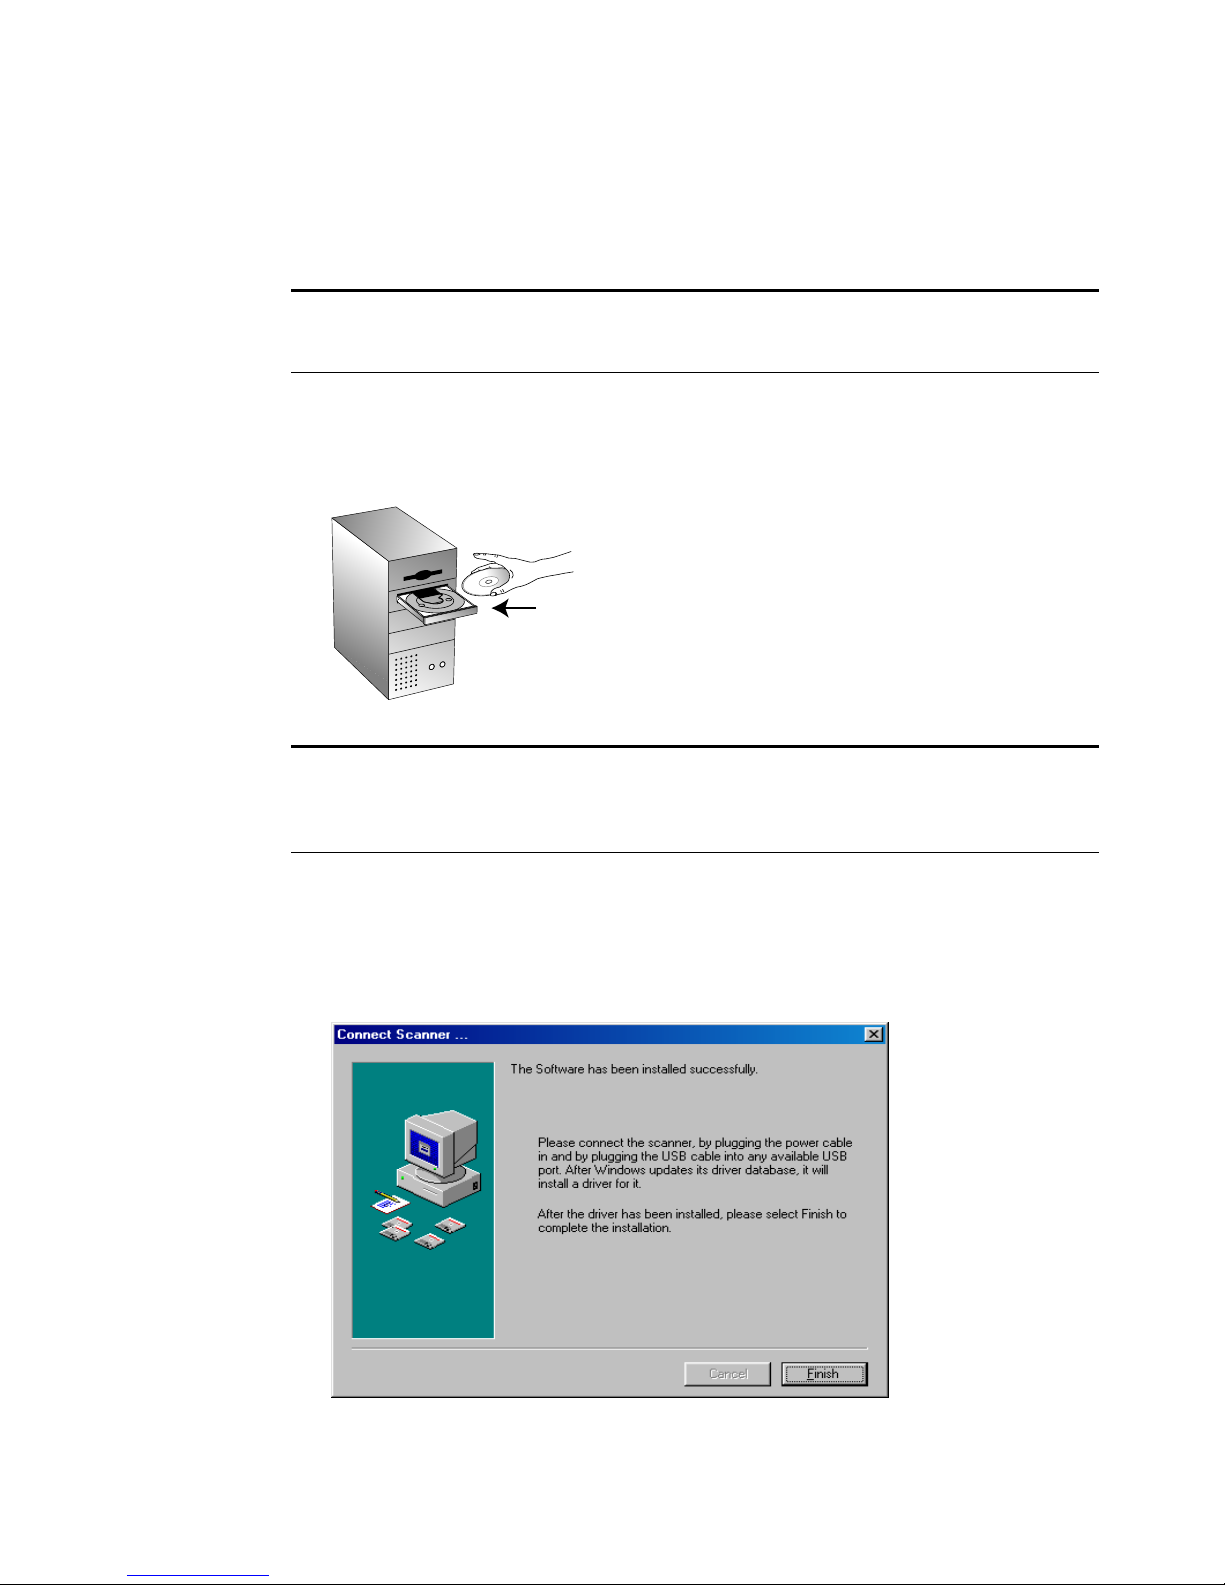
1. Start your computer and make sure that no other applications are running.
2. Insert the CD into your computer’s CD-ROM drive. The CD automatically starts.
3. When the CD window appears, select the language in which you require installation instructions.
Then click the PaperPort button, select the language you would like PaperPort to be installed in
and follow the instructions on the screen to install the scanner software on your computer.
When you are finished installing the software, a message instructs you to connect the scanner to the
computer.
4. Follow the steps in “Step 2: Connecting the Scanner” to connect the scanner. When you’re finished,
click Finish in the dialog box above.
Note: You must install the scanner software before connecting the scanner to your computer.
Otherwise, the correct driver software for your scanner will not be installed and it may not work
properly.
Note: If the CD does not automatically start, make sure the CD drive’s door is completely shut. If the
CD still doesn’t start, click the Windows icon named My Computer. The window shows the drives
available on your computer. Double-click the icon for your CD-ROM drive to see the list of files on
the CD. Double-click the file named START32.EXE. The CD starts.
2 ONETOUCH SCANNER INSTALLATION GUIDE
STEP 2: CONNECTING THE SCANNER
The OneTouch scanner connects to any available USB port. Check your computer’s manual for the USB
port location.
To connect your OneTouch scanner:
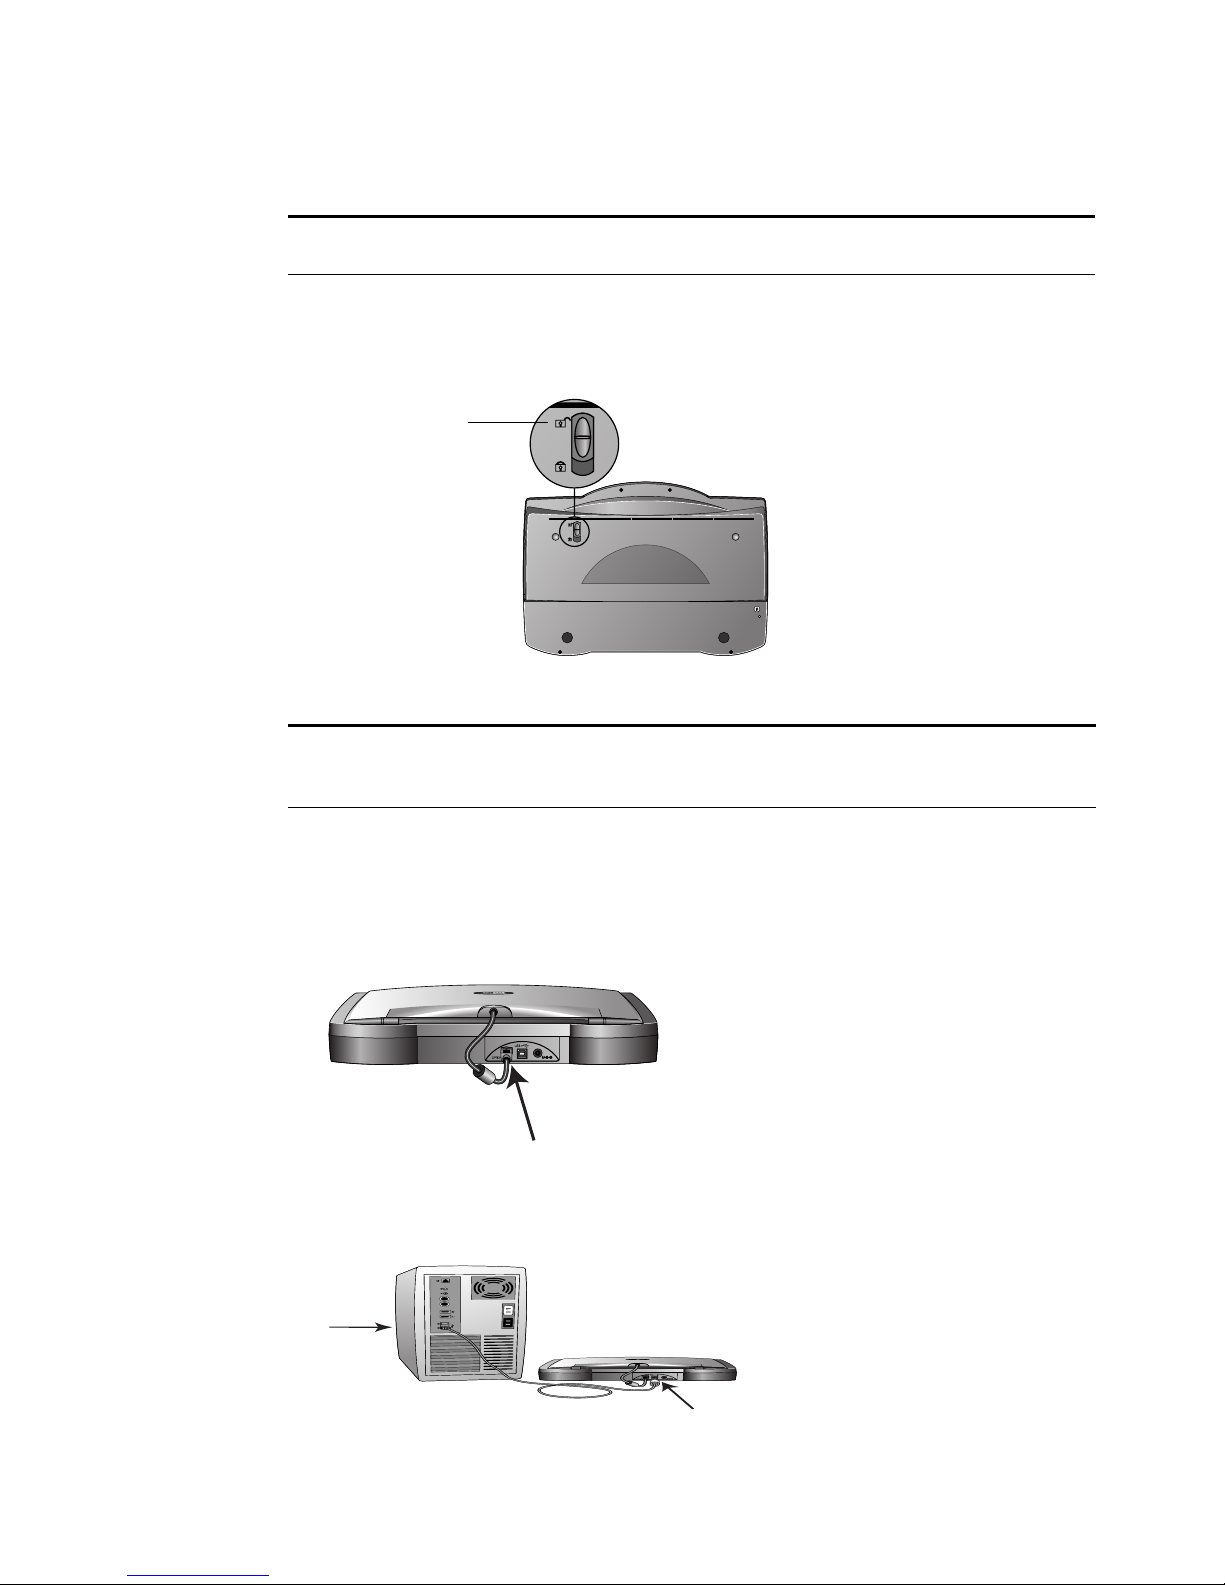
1. Your scanner may have a locking tab. Turn the scanner over to see the locking tab on the bottom.
Slide the locking tab to the unlocked position.
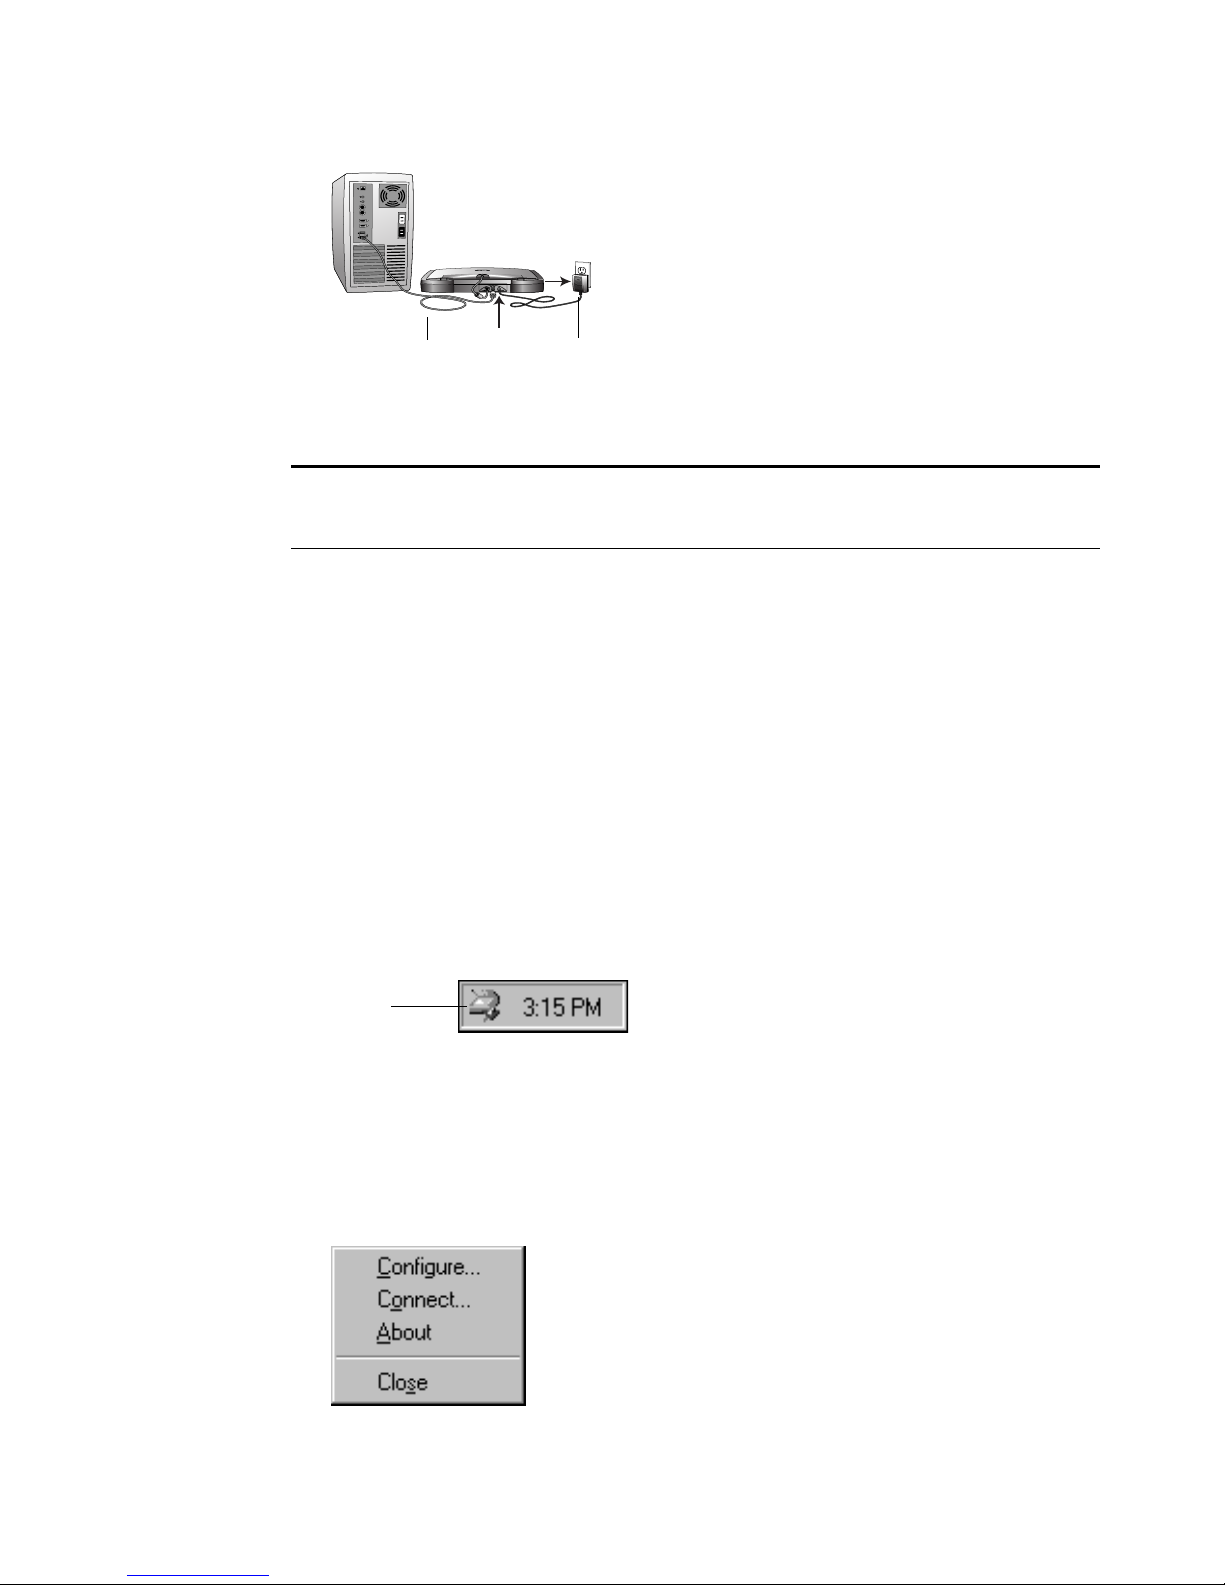
2. If your scanner does not have a Transparency Adaptor, go to Step 3. If your scanner has a
Transparency Adaptor, check that the cable is plugged into the Option port on the back of the
scanner.
Your scanner is shipped with the cable already plugged into the Option port, however, if the cable
came loose during shipping, you must plug it into the port securely.
3. If your USB cable is connected to the scanner, plug the USB cable on the back of your scanner into
any USB port on your computer. If you USB cable is separate, plug one end of the cable into any
USB port on your computer and plug the other end of the cable into the scanner’s USB port.
Note: You do not have to shut off the power to your computer when connecting the scanner to a USB
port.
Note: The locking tab protects the scanner’s scan head by holding it securely in position. Lock the
scanner when transporting it from one location to another, but always remember to unlock it before
scanning. The scanner will not scan when locked.
Unlocked position
STEP 3: CHECKING OUT YOUR SCANNER 3
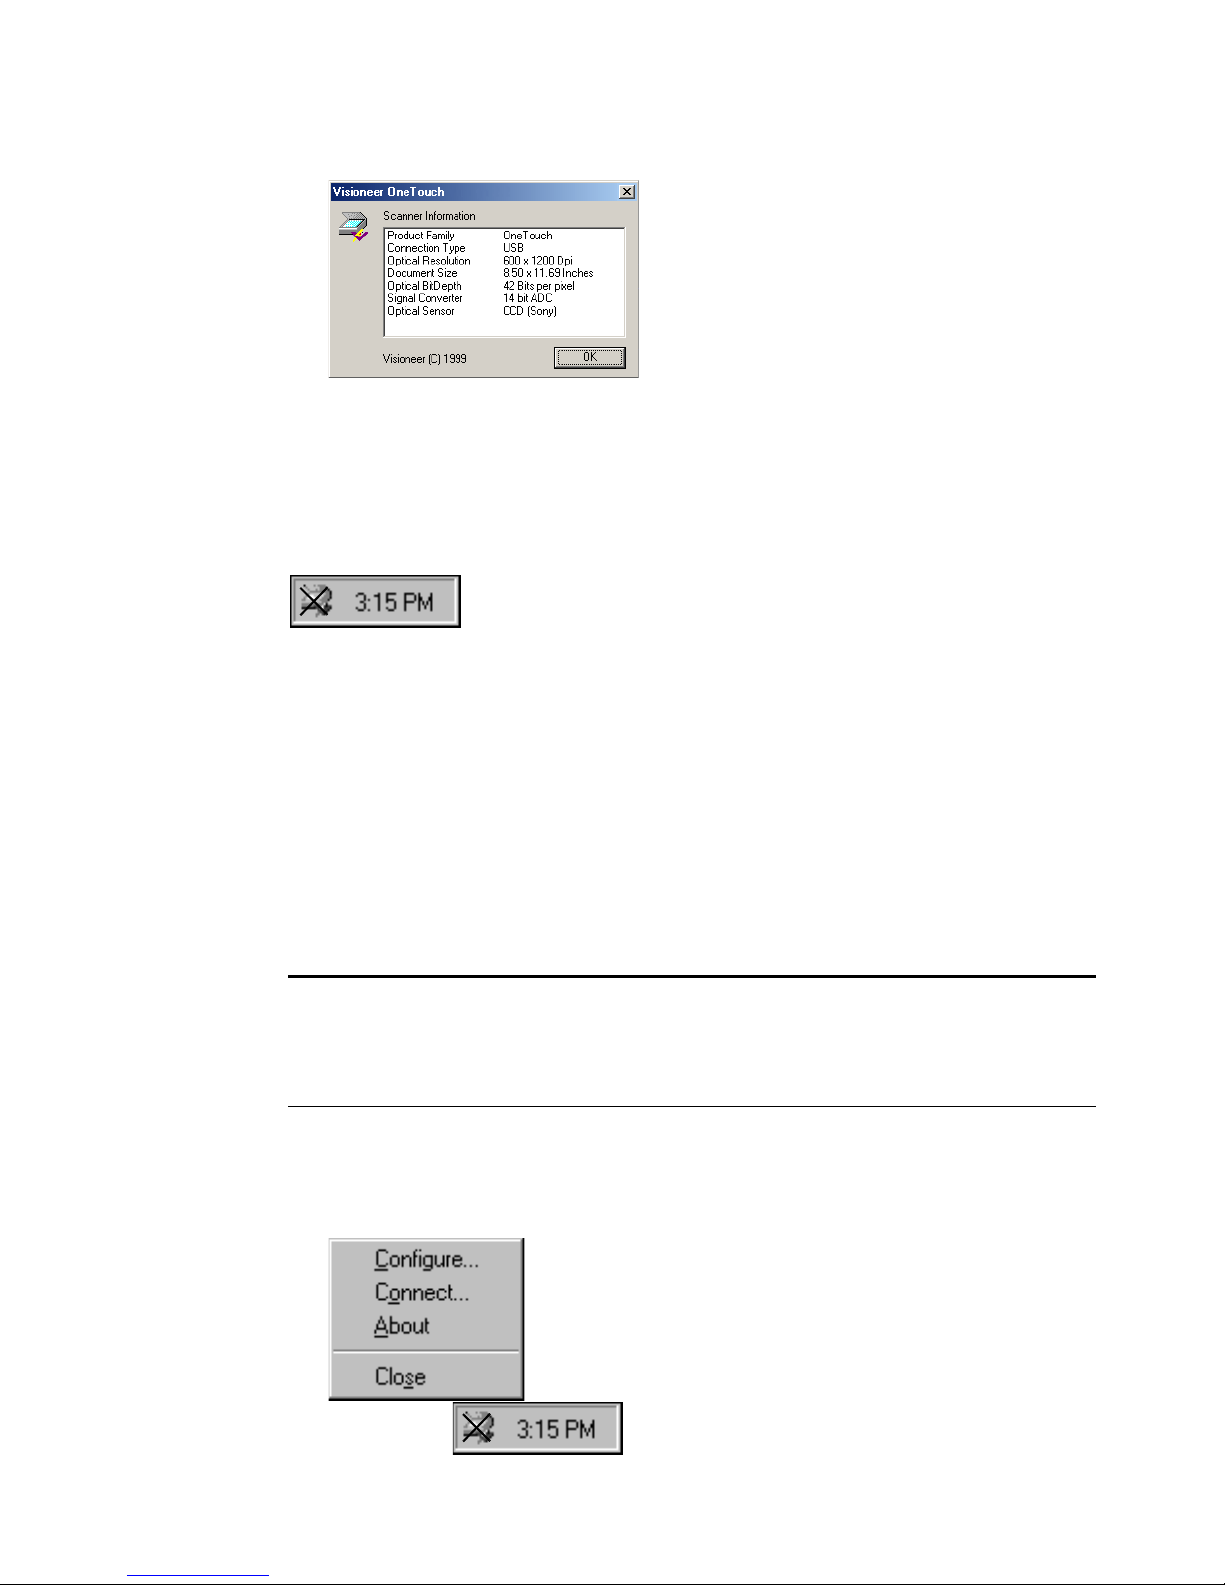
4. Plug the power supply cable into the jack on the back of the scanner, then plug the power supply
into a wall outlet.
A progress message appears saying that the scanner has been found. The scanner is now correctly
installed.
5. Click the Finish button.
6. From the CD, install the other software applications.
7. When you have finished installing the other software, remove the CD from your computer and store
it in a safe place.
GETTING THE PAPERPORT SOFTWARE USER’S GUIDE
The Installation CD also includes your ScanSoft PaperPort User’s Guide. This guide provides more
detailed information about the PaperPort software’s features. Please see the CD to view or print the guide.
STEP 3: CHECKING OUT YOUR SCANNER
The OneTouch software adds the scanner icon to the Windows taskbar (at the bottom right corner of the
computer screen). If the scanner is properly connected, the scanner icon looks like the one in this figure.
If the icon has a red X through it, the scanner is not properly connected. See the next section, “If the
Scanner Is Not Properly Connected,” for the steps to fix the problem.
To check the status of the scanner:
1. Right-click the scanner icon.
The shortcut menu appears.
Note: If your computer is running Windows XP, you may see messages about using a fast USB 2.0
connection for the scanner. If your computer is not equipped with USB 2.0 ports, you can just
disregard those messages.
Power supplyUSB Cable
Scanner Icon
4 ONETOUCH SCANNER INSTALLATION GUIDE
2. Choose About from the shortcut menu.
A dialog box confirms that the scanner is properly connected.
3. Click OK to close the dialog box. Your scanner is ready to scan.
IF THE SCANNER IS NOT PROPERLY CONNECTED
If the scanner icon on the Windows taskbar has a red “X” through it, the scanner is not properly
connected.
Check for one of these possible problems:
■ Is a cable loose or not plugged in securely? Inspect all cable connections. Make sure all the cables
are plugged in securely.
■ Is the scanner’s locking tab in the locked position? Slide the locking tab to the unlocked position.
If you tried to scan with the scanner locked, you must restart your computer after unlocking the
scanner.
■ Did you restart the computer after installing the software? If you didn’t restart the computer, it
may not have loaded all of the software files. Try restarting your computer.
Please see the Readme file in the PaperPort directory on your computer’s hard drive. The Readme file
contains additional information that may help you diagnose problems connecting the scanner. Also see
“Installation Troubleshooting” on page 34 of this Guide for more information.
To connect the scanner:
1. After checking for all the above problems, right-click the scanner icon with the red X over it.
The shortcut menu appears.
Note: The scanning lamp under the scanner’s glass needs to warm up before you can scan. A status
message lets you know when the lamp is ready. The lamp then remains ready so you don’t have to wait
for it to warm up each time you want to scan. To conserve electricity and prolong the life of the
scanner, you can set the length of time for the lamp to remain lit before powering down. See “Setting
Preferences” on page 13.
THREE WAYS TO SCAN 5
2. Choose Connect from the shortcut menu.
The software finds the scanner and makes the connection. The scanner icon will no longer have a
red X through it, and you’re ready to begin scanning.
If you try all the troubleshooting procedures described above, in the Readme file and the “Installation
Troubleshooting” on page 34 and the scanner icon still has a red X through it, you may have a
malfunctioning scanner. Please see “Contacting Technical Support” on page 37 for technical assistance
telephone numbers. Also visit our web site at www.visioneer-europe.com for additional technical
information.
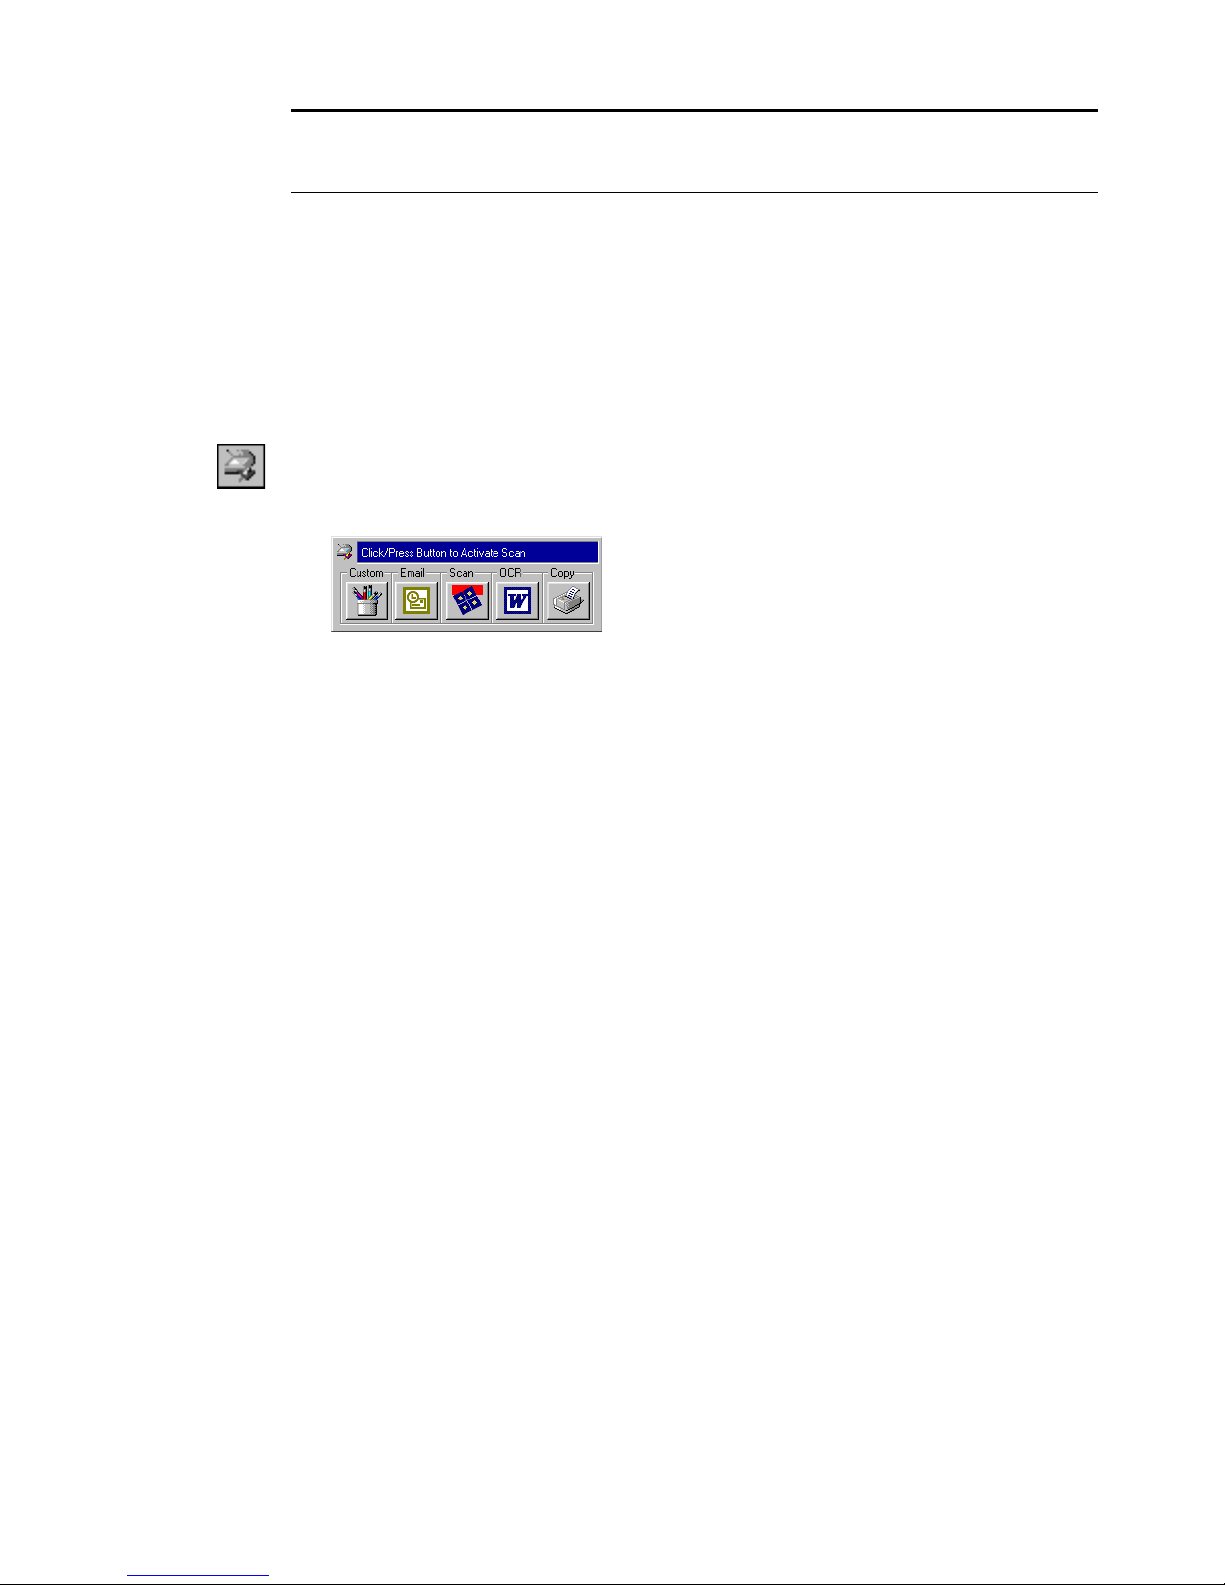
THREE WAYS TO SCAN
You can scan paper items by pressing a OneTouch button, by clicking a button on the screen, or from the
PaperPort software (or other Twain software).
■ Scan with the scanner buttons.
Press a button on the scanner’s front panel.
■ Scan from the screen
Click the scanner icon on the Windows taskbar. A panel representing the scanner buttons appears.
Click a button on the panel.
■ Scan from the PaperPort software (or other Twain software)
Start the PaperPort software, then click the Twain icon on the PaperPort Command Bar. You can also
scan from other Twain software.
SCANNING BY PRESSING THE ONETOUCH BUTTONS
Pressing a scanner button scans the item, and then sends the image either to the printer, or to a software
application—called the destination application—on your computer.
6 ONETOUCH SCANNER INSTALLATION GUIDE
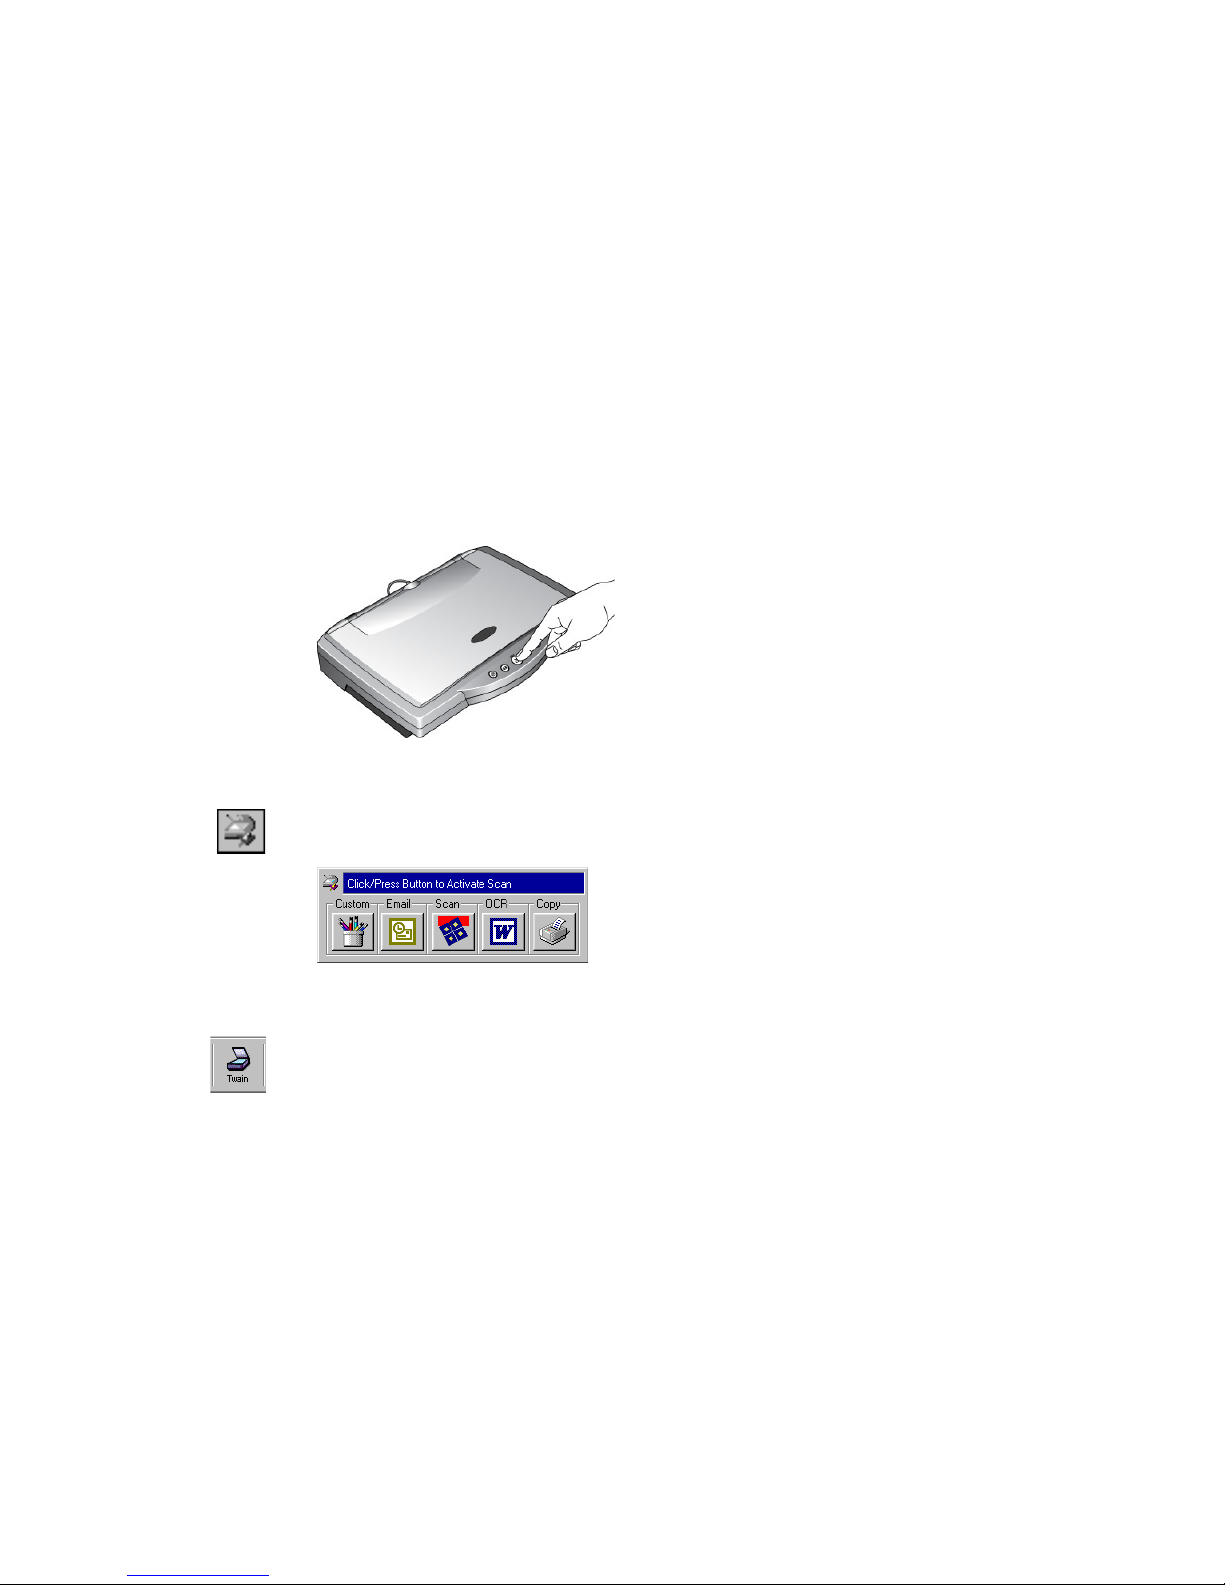
To scan by pressing a button on the scanner:
1. Place an item to scan on the glass, face down, and align the edge of the item with the arrow marker
at the lower left corner of the glass.
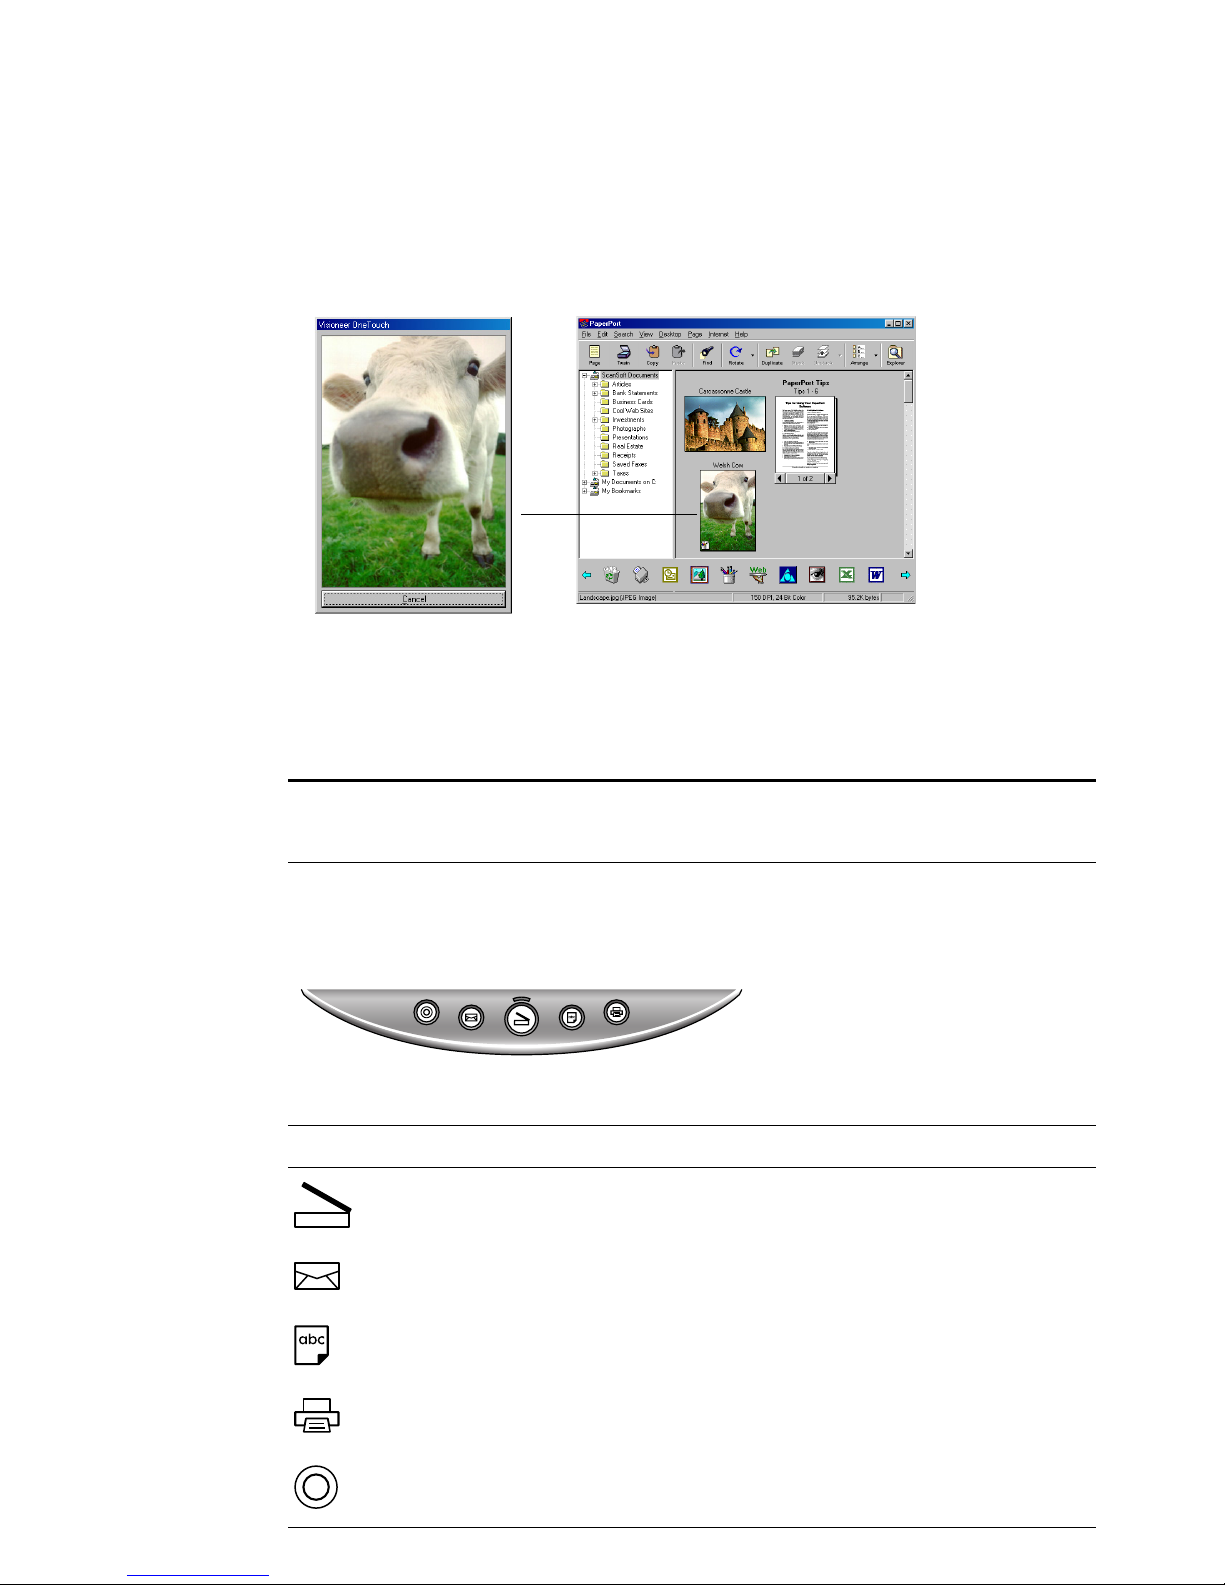
2. Close the lid and press one of the scanner buttons.
The scanner starts scanning the item. Messages just above the Windows taskbar shows the status of
the scanning. During scanning, the scan progress window shows a small copy of the image, as
illustrated by this example:
When the scan is complete, the scanned image appears in the destination software. In this example,
the destination software is the PaperPort Desktop.
ABOUT THE ONETOUCH BUTTONS
The OneTouch buttons are preconfigured for typical scanning tasks. To change the settings for the
buttons, see “About the Configuration Dialog Box” on page 7.
The following table lists the scanner’s preconfigured settings:
Note: Your OneTouch scanner may have 3 or 5 OneTouch buttons. The pages below show all 5
OneTouch options, if your scanner has 3 OneTouch buttons, follow the guides for Email, Copy/Print
and Scan only.
Button Function Preconfigured Settings
Scan Scans the item as a color page and displays it in PaperPort
Email
Scans the item as a color photo and attaches it to a new
email message in your email application
OCR
Converts the item’s text to black and white word processing
text, and displays it in a word processing application
Copy/Print
Prints the scanned item in black and white on your printer/
copier at the printer/copier’s default resolution
Custom
Scans the item as a color photo and displays it in an image
processing application
SCANNING FROM THE BUTTON PANEL ON THE SCREEN 7
SCANNING FROM THE BUTTON PANEL ON THE SCREEN
Scanning from the button panel on the screen is just like pressing a scanner button, except you click the
button on the screen. The scanner scans the item, and then sends the image either to the printer, or to a
destination application on your computer. This method of scanning is especially helpful if the scanner is
not located close to your computer.
To scan from the screen:
1. Place an item to scan on the glass, face down, close the lid, and then click the scanner icon on the
Windows taskbar.
The scanner button panel appears on the screen.
2. Click the button you want to use to scan.
The scanner starts scanning the item; the messages about the scanning appear above the Windows
taskbar; the progress window shows the image as it is scanned. When the scan is complete, the
scanned image appears in the destination application.
The icons on the buttons indicate the destination application for the scanned image. For example, in the
illustration above, the icon on the email button is for the email application, MS Outlook. When you
click the email button, the item is scanned, and then MS Outlook opens. In this case, the scanned image
automatically becomes an attachment to send with an email message.
A question mark icon on a button means your computer does not have an application that corresponds
to that button’s functions. For example, if your computer does not have an email application, the Email
button will have a question mark icon on it.
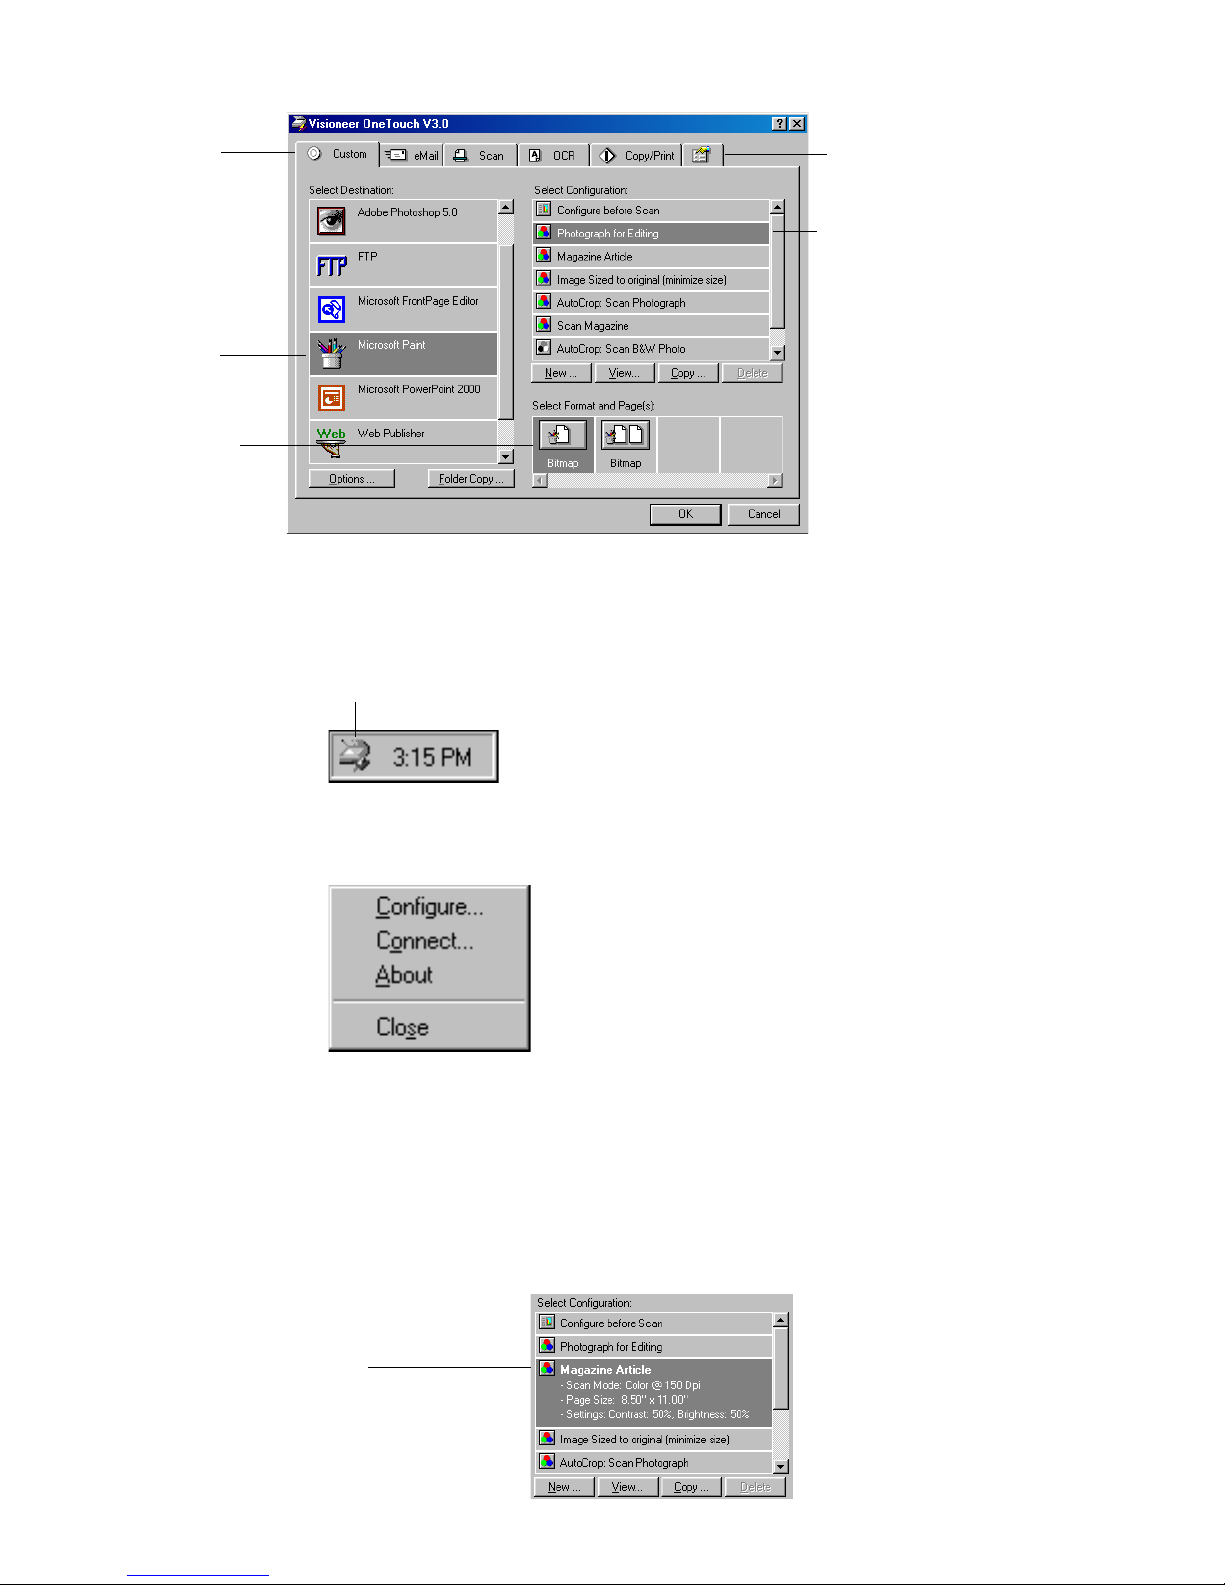
ABOUT THE CONFIGURATION DIALOG BOX
The Configuration dialog box shows the current settings for each scanner button.
The tabs across the top of the dialog box correspond to the buttons. Clicking a tab shows the current
settings for the corresponding button on the scanner.
For example, the following figure shows the current settings for the Custom button because the Custom
tab is selected. The Custom button is set up to scan the item with the configuration named Photograph
for Editing, and then after the scanning is finished, to open Microsoft Paint to display the scanned image.
The Format and Page(s) setting is to scan as a bitmap for a single page item.
Note: If a button is not preconfigured, the Configuration dialog box appears when you press that
button so you can configure it manually. For example, if your computer does not have email software
installed, the Email button cannot be preconfigured.
8 ONETOUCH SCANNER INSTALLATION GUIDE
See “Setting Preferences” on page 13 to set Preferences.
To display the Configuration dialog box:
1. Right-click the scanner icon.
The shortcut menu appears.
2. Choose Configure from the shortcut menu.
The Configuration dialog box appears. The options on the Configuration dialog box are:
Select Destination—the list of applications that can open to display the scanned image. Select the
application that you want to automatically open to display or process the scanned image.
Select Configuration—the list of the button’s scan configurations. The configuration settings include:
color, black and white, or grayscale, resolution in dots per inch (dpi), page size, brightness, and contrast.
To see the details about a configuration, click its icon in the list. Click the icon again to close the detailed
information.
Select a software
application to
send the scanned
image to that
application.
Select a setting
for scanning
the item.
Select format
and page(s)
options for the
button.
Click this
tab to set
preferences.
Click the tab
that corresponds
to the scanner
button you want
to configure.
Scanner icon
Clicking an icon expands
the configuration to show
its settings

SCANNING FROM THE BUTTON PANEL ON THE SCREEN 9
Select Format and Page(s)—a set of options for selecting a format for the scanned image and whether to
scan a single page or multiple pages. The formats are bitmap and PaperPort. Use PaperPort for scanning
any item. Bitmaps are usually for photos or artwork. The page icons represent single or multiple page
scanning.
Options—displays a dialog box for selecting options about the destination application for the scanned
image. Each destination application has its own options dialog box.
Folder Copy—displays a dialog box for selecting the folder to use for storing copies of the scanned
images.
GETTING HELP
You can get help with the scanner’s features or any of the options on the Configuration dialog box using
either of the following methods:
■ When the Configuration dialog box is displayed, press the F1 key on your keyboard
■ Click the Help button at the top right corner of the Configuration dialog box
SELECTING NEW OPTIONS FOR THE BUTTONS
You can select a new destination application, configuration, and image format for a scanner button to
optimize it for the type of scanning you want to do. You use the Configuration dialog box to select new
options.
To select new options for a scanner button:
1. Press and hold down the button that you want to change. The Configuration dialog box appears.
The tab of the button whose options you want to change is already selected. If the tab is not
selected, click it.
You can also right-click the scanner icon in the Windows taskbar to see the shortcut menu, and then
choose Configure to display the Configuration dialog box.
2. Scroll the list of applications in the Select Destination list and click the new application you want to
use to view and work with the scanned image.
Note: If you select a word processing program such as Microsoft Word and a configuration for OCR,
the text in scanned images is automatically converted to editable text by the optical character
recognition (OCR) software that you receive with the scanner. The converted text then appears in the
selected destination application.
Scan single page
Scan multiple pages
Scan multiple pages and
stack them on the
PaperPort Desktop
Help button
 Loading...