

Page 1
Page 2

Technical Support
Visit Visioneer’s web site at www.visioneer.com for technical support including help
during installation, driver updates, spare parts and documentation.
Visioneer's 90-Day Limited Product Warranty (Upgradeable to 1
year)
If you find physical defects in the materials or the workmanship
used in making the product described in this document, Visioneer
will repair, or at its option, replace, the product at no charge to
you, provided you return it (postage prepaid, with proof of your
purchase from the original reseller) during the
3-month period after the date of your
original purchase of the product. Upon registration of the product with Visioneer at
www.visioneer.com, the warranty is automatically extended for an additional 9
months for a total of 12 months
.
THIS IS VISIONEER'S ONLY WARRANTY AND YOUR EXCLUSIVE REMEDY CONCERNING
THE PRODUCT, ALL OTHER REPRESENTATIONS, WARRANTIES OR CONDITIONS,
EXPRESS OR IMPLIED, WRITTEN OR ORAL, INCLUDING ANY WARRANTY OF
MERCHANTABILITY, FITNESS FOR A PARTICULAR PURPOSE OR NON-INFRINGEMENT, ARE
EXPRESSLY EXCLUDED. AS A RESULT, EXCEPT AS SET OUT ABOVE, THE PRODUCT IS
SOLD “AS IS” AND YOU ARE ASSUMING THE ENTIRE RISK AS TO THE PRODUCT'S
SUITABILITY TO YOUR NEEDS, ITS QUALITY AND ITS PERFORMANCE.
IN NO EVENT WILL VISIONEER BE LIABLE FOR DIRECT, INDIRECT, SPECIAL, INCIDENTAL
OR CONSEQUENTIAL DAMAGES RESULTING FROM ANY DEFECT IN THE PRODUCT OR
FROM ITS USE, EVEN IF ADVISED OF THE POSSIBILITY OF SUCH DAMAGES.
All exclusions and limitations in this warranty are made only to the extent permitted
by applicable law and shall be of no effect to the extent in conflict with the express
requirements of applicable law.
Page 3

1
CONGRATULATIONS
Congratulations on the purchase of your new
camera. Your camera has been carefully engineered
and manufactured to give you dependable
operation. Read this manual before operating the
camera to become more familiar with it.
This manual has been written and formatted with
depth and detail so that you can easily follow the
instructions to maximize the features of your
camera.
ENGLISH
Page 4

2
Table of Contents
Important Information......................................................................................4
Precautions ......................................................................................................5
Camera Features ..............................................................................................6
System Requirements ......................................................................................7
1. The Camera
Overview of your Visioneer LX 200 ................................................................8
Loading the Batteries ......................................................................................9
Turning the Camera On and Off ....................................................................10
LCD Menu Screens ..........................................................................................11
LCD Status Messages......................................................................................15
Turning the LCD On and Off ..........................................................................16
Camera Ready LED Status..............................................................................16
Camera Memory..............................................................................................17
2. Camera Mode
Taking Images ................................................................................................19
Main Menu......................................................................................................19
Mode..........................................................................................................20
Video Clips ............................................................................................20
Self-timer ................................................................................................21
Size............................................................................................................22
Quality ......................................................................................................23
Flash ..........................................................................................................24
EV ..............................................................................................................25
WB (White Balance) ..................................................................................26
Scene ........................................................................................................27
Brightness ................................................................................................28
Setup ........................................................................................................29
Digital Zoom ..................................................................................................33
Page 5

3
3. Review Mode
Enlargement ..................................................................................................34
Viewing Video Clips ......................................................................................34
Main Menu ....................................................................................................35
Delete ........................................................................................................35
Thumbnail..................................................................................................37
4. Software Installation
Installing the Camera Drivers and ArcSoft Applications ................................38
5. Transferring Photos to the Computer
Connecting the Camera to the Computer......................................................40
WDM/TWAIN Drivers (PC) ..........................................................................41
ArcSoft PhotoImpression (PC) ..............................................................41
Mass Storage Mode (DSC)........................................................................43
Unplugging the camera from the computer ............................................44
6. Other Features
Web Camera ..................................................................................................45
TV Mode ........................................................................................................46
7. Camera Maintenance
Cleaning the camera ......................................................................................49
8. Tips and Troubleshooting..............................................................................50
9. Camera Specifications ....................................................................................54
Page 6

4
IMPORTANT INFORMATION
FCC INFORMATION
FCC WARNING: This equipment meets the limits for a Class B digital device,
pursuant to Part 15 of FCC rules. Only the cable supplied with the camera
should be used. Operation with other cables is likely to result in interference to
radio and TV reception and could void the user’s authorization to operate this
equipment. This device complies with Part 15 of the FCC Rules. Operation is
subject to the following two conditions:
• This device may not cause harmful interference.
• This device must accept any interference received, including interference
that may cause undesired operation.
Tested To Comply
With FCC Standards
for HOME OR OFFICE USE
Changes or modifications not expressly approved by the manufacturer may void
the user’s authority to operate this equipment.
USER INFORMATION
NOTE: This equipment has been tested and found to comply with the limits for
a class B digital device, pursuant to Part 15 of the FCC Rules. These limits are
designed to provide reasonable protection against harmful interference in a
residential installation. This equipment generates, uses and can radiate radio
frequency energy and, if not installed and used in accordance with the
instructions, may cause harmful interference to radio communications. However,
there is no guarantee that interference will not occur in a particular installation.
If this equipment does cause harmful interference to radio or television
reception, which can be determined by turning the equipment on and off, the
user is encouraged to try to correct the interference by one or more of the
following measures:
•Reorient or relocate the receiving antenna.
•Increase the separation between the equipment and receiver.
• Connect the equipment into an outlet on a circuit different from that to
which the receiver is connected.
• Consult the dealer or an experienced radio/TV technician for help.
Page 7

5
VCCI INFORMATION
This is a Class B product, to be used in a domestic environment, based on the
Technical Requirement of the Voluntary Control Council for Interference (VCCI)
from Information Technology Equipment. If this is used near a radio or
television receiver in a domestic environment, it may cause radio interference.
Please install and use the equipment according to this instruction manual.
PRECAUTIONS
Be sure to observe the following precautions when using the camera:
•Do not open the case of the camera or attempt your own repairs. Always
leave this service to authorized repair facilities.
•Keep the camera away from water and other liquids, and never let it get
wet. Never use outdoors when it is raining or snowing.
•Should foreign matter or water get into the unit, immediately turn the
power off and contact your local authorized service center.
•Physical damage and malfunction of this unit can cause the image data
stored in its memory to be deleted. Be sure to always keep backup copies
of data by transferring them to a personal computer.
•Under the environment with electrostatic discharge, the camera may
malfunction and require the user to reset the camera.
•Shielded cables must be used with this unit to ensure compliance with the
Class B FCC limits.
•Do not leave the camera in places subject to extremely high temperatures,
such as in a closed vehicle or in direct sunlight.
•Remove the battery when camera is not used for long periods of time.
•Use 2x AA LR6 batteries only.
•Dispose of the batteries in a manner that complies with applicable laws.
•Do not place the camera in unstable locations where the camera may fall
and be damaged.
•Do not press on the lens.
•Do not unplug the camera from the TV or computer while the camera is in
operation; otherwise, the memory may be corrupted.
•Do not turn the power off or open the battery compartment when the LED
is blinking or lit up; otherwise, the image may not be stored.
Page 8

6
Camera Features
•Stores approximately 8 Fine, 15 Normal or 27 Economy (1600 x 1200
pixels) mode photos with 7MB internal memory
•Virtually unlimited storage using the removable MultiMediaCard (MMC)
or Secure Digital (SD). (MMC/SD memory cards are sold separately).
• 1.6" Color LCD
• USB connection and cable
• TV connection (NTSC and PAL)
•Built-in automatic flash
•Focus free from 3.9 feet (1.2 meters) to infinity
• 1600 x 1200 pixel output (2.0 Megapixels)
• TV On Screen Display (OSD) menu
•Up to 4X Digital Zoom
•EV Compensation
•Preset Scene Selection
•Video Clip Mode
•Web Camera (Windows only)
•Mass Storage Driver
•Self-timer
•Tripod socket
•Multi-language support
Page 9

7
System Requirements
PC:
•Microsoft Windows 98/ME/2000 and XP
• IBM PC/AT or compatible, 200 Mhz or higher
•Minimum 32MB RAM (64MB recommended)
• USB Port
• 640 x 480 monitor, minimum 16 bit color (1024 x 768 24 bit color
recommended)
• 175MB free hard disk space
• 56K or faster modem, ISDN or LAN connection (for the Web Camera
feature only)
• CD-ROM drive
Macintosh:
•Mac OS 9 or higher
•Macintosh Power PC or higher, Minimum 64MB of RAM
• USB Port
• 100MB of available Hard Disk Space
•Storage device only
Page 10
8
1. The Camera
Overview of Your Visioneer LX 200
FRONT/TOP
1. Shutter Button
2. Lug for Neck / Wrist Strap
3. Viewfinder
4. Self-timer LED
5. Flash
6. Flash Sensor
7. Ir Filter and Lens
8. Power Button
9. Camera Ready LED
10. LCD
11. Cable Connection Panel
12. Tripod Socket
13. Mode Switch
14. Navigation Button
15. Menu Button
16. OK Button
17. LCD On/Off Button
18. Battery & Memory Card
Door
BACK/BOTTOM
1
2
8
9
10
11
3
4
5
6
7
13
14
15
16
17
12
18
Page 11
9
Loading the Batteries
The Visioneer LX 200 uses 2x AA LR6 batteries.
Loading the Batteries:
1. Locate the Battery & Memory Card Door on the
bottom of the camera.
2. Slide the button on the Battery & Memory Card
Door towards the center of the camera. (fig.1.1)
3. Lift the Battery & Memory Card Door to open.
4. Insert the batteries with the positive terminal
toward the + sign, and the negative terminal
toward the – sign. (fig.1.2)
5. Close the Battery & Memory Card Door.
Note: Remove the batteries from the Visioneer LX 200 if the camera
will not be used for an extended period of time to prevent corrosion
or battery leaks.
Checking the Batteries
The camera has a battery indicator that shows the current battery level.
FULL
Batteries are full
and ready to use.
LOW
Batteries are low
and need to be
replaced soon.
fig.1.1
fig.1.2
Page 12
10
Turning the Camera on and off
When the camera is turned on, the camera ready LED
on the back of the camera blinks and the LCD will
display the default settings.
Turning the Camera on and off:
1. Press the Power button to turn the camera on.
(fig.1.3)
2. The camera is ready for picture taking when the
camera ready LED stops blinking. (fig.1.4)
3. To turn the camera off, press the Power button for
a few seconds.
T
fig.1.3
fig.1.4
T
Page 13
11
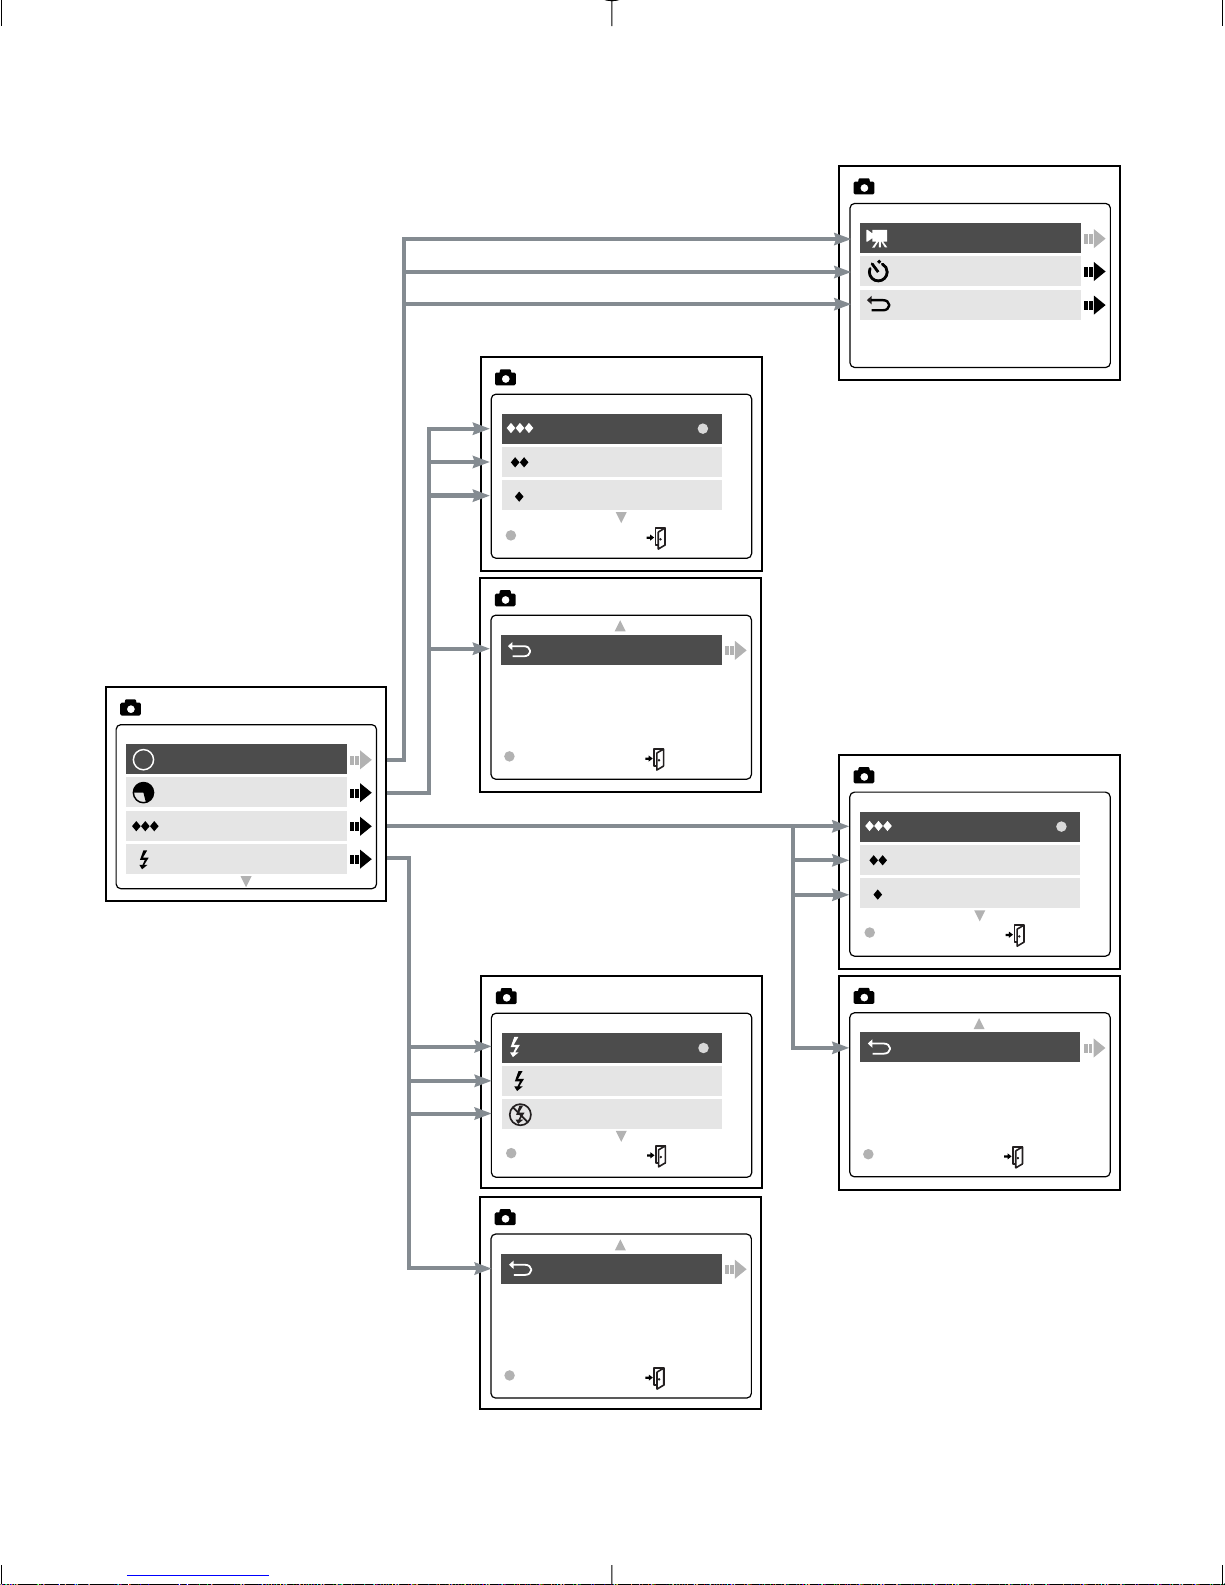
LCD Menu Screens
Mode
Size
Quality
Flash
MAIN MENU
M
Video Clip
Self-timer
Main Menu
MODE
1600 x 1200
1280 x 960
640 x 480
OK MENU
IMAGE SIZE
Fine
Normal
Economy
OK MENU
QUALITY
Auto
Flash
Flash Off
OK MENU
FLASH
A
Main Menu
OK MENU
IMAGE SIZE
Main Menu
OK MENU
QUALITY
Main Menu
OK MENU
FLASH
Page 14
12
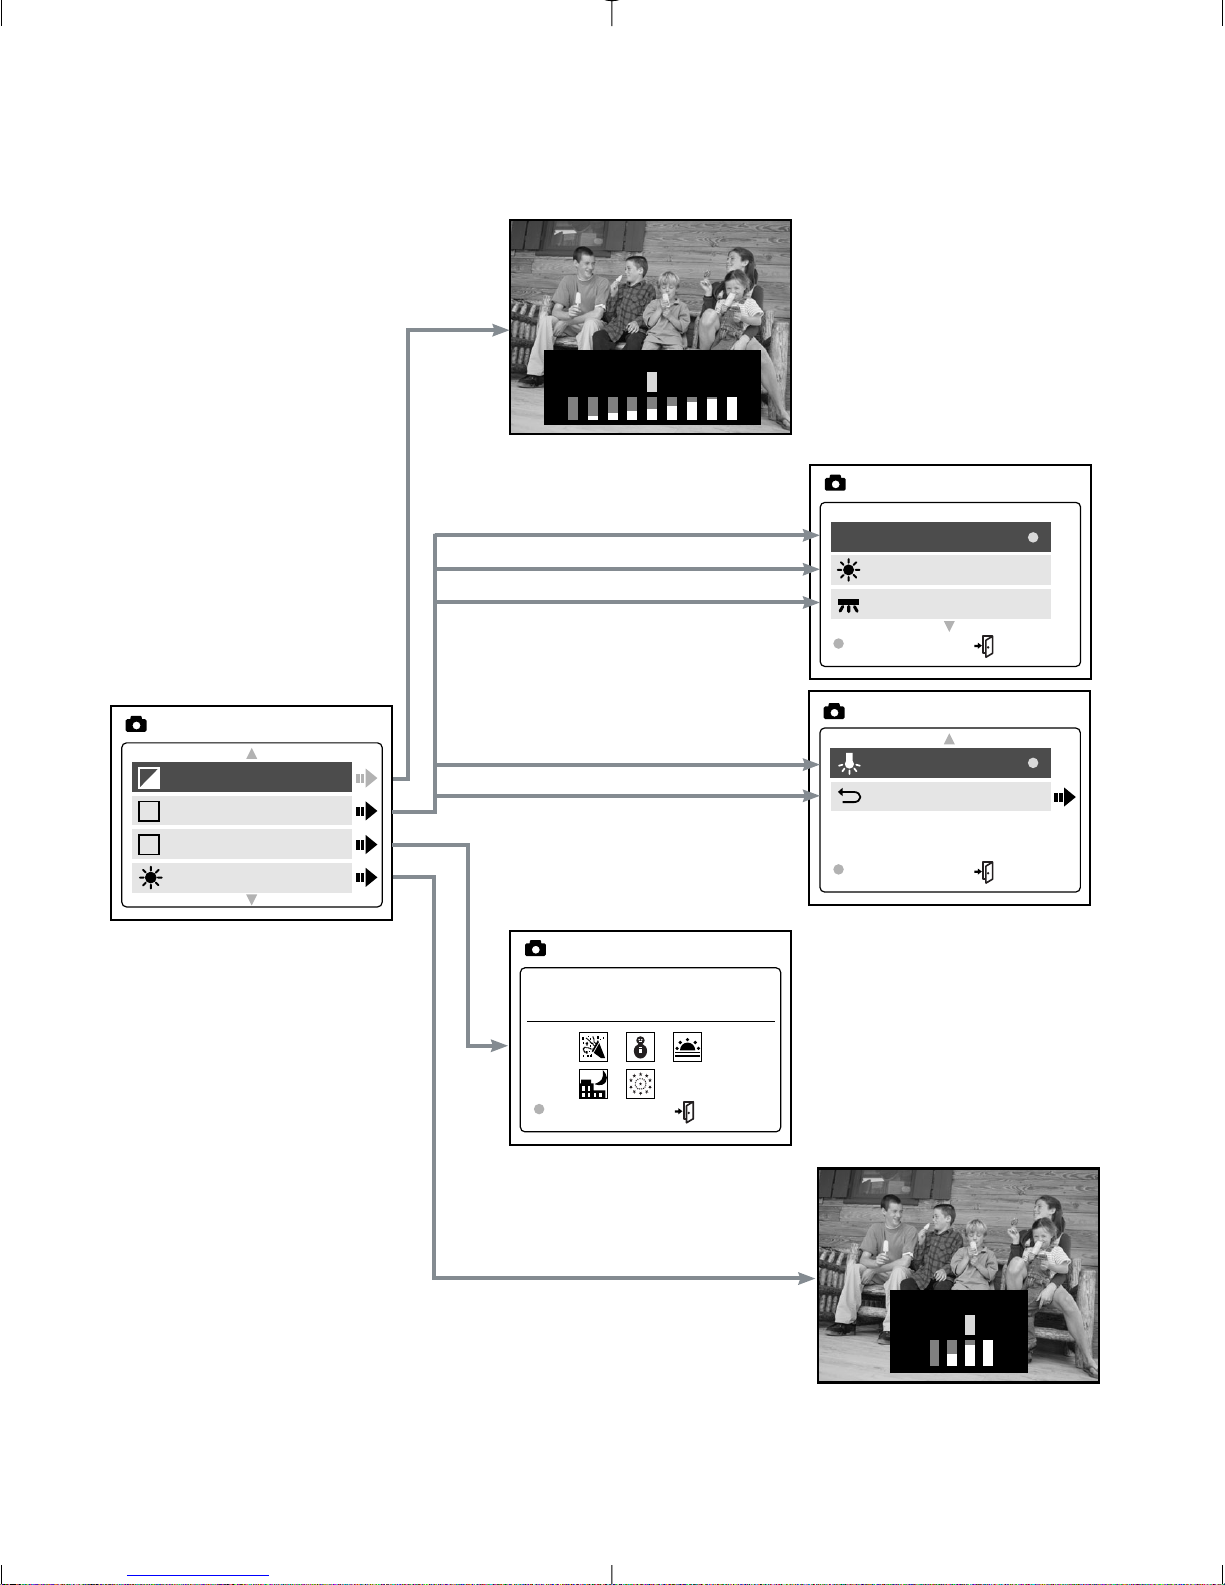
LCD Menu Screens
AWB
Sunny
Fluorescent
OK MENU
WB
Tungsten
Main Menu
OK MENU
WB
–
EXPOSURE VALUE +
–
Brightness +
EV
WB
Scene
Brightness
MAIN MENU
+
WB
S
–
O
ff
O
ff
SCENE
OK MENU
Page 15
13
LCD Menu Screens
F
Language
Default
Format
Main Menu
SETUP
SETUP
Time-out 60S
Driver DSC
TV PAL
PlayLogo O f f
SETUP
Language
Español
Deutsch
Italiano
OK MENU
Language
Setup
Exit
MAIN MENU
PC
DSC
NTSC
PAL
15S
30S
60S
90S
None
English
Français
OK MENU
This operation will
delete all images
No
Yes
Page 16
14
Delete
Thumbnail
Brightness
Exit
MAIN MENU
Delete One
Delete All
Main Menu
DELETE
DELETE
THIS FILE?
No
Yes
DELETE
ALL FILES?
No
Yes
–
Brightness +
LCD Menu Screens
Page 17
15
LCD Status Messages
Messages on the LCD indicate if the memory is full or if there is a
problem with the memory.
1. MEMORY CARD IS FULL:
The memory card is full.
2. INTERNAL MEMORY IS FULL:
The internal memory is full.
3. ERROR:
The camera’s internal memory or the
MMC/SD may be corrupted. Please format
the memory. (P.32)
MEMORY CARD FULL!
INTERNAL MEMORY FULL
ERROR!
Page 18
16
Turning the LCD On and Off
By default, the LCD automatically turns on
when the camera is powered on. Press to
turn the LCD on or off.
Using the Display ON/OFF Button:
1. Press once to turn the LCD icons off.
2. Press again to turn the LCD off.
3. Press to turn the LCD on.
Camera Ready LED Status
When the Camera Ready LED is:
1. Steady
The camera is in capture mode. Please hold the
camera steady during this time; otherwise, the image
may come out blurry. (fig.1.5)
2. Blinking
The flash is recharging or the camera is in storage mode. You may move
the camera in this mode. (fig.1.5)
Note: Do not open the Battery & Memory Card Door or turn the power
off while the Camera Ready LED is steady or blinking; otherwise, the
images or video clips in the camera may be damaged.
fig.1.5
1600
A
AWB
005/080
T
Page 19

17
Camera Memory
The Visioneer LX 200 can store files in one of two ways using either the
camera’s 7MB internal memory or the removable MMC/SD. Memory cards are
sold separately and can be purchased from major electronic or computer
retailers.
When the MMC/SD is inserted, the images and video clips stored in the
internal memory will be transferred automatically onto the memory card.
LCDDefault Memory
MMC/SD
No Internal Memory (7MB)
Note: If a MMC/SD with insufficient memory is inserted, there will only
be a partial transfer and the memory card will be filled. Please insert
a memory card with sufficient memory, or delete images. Please refer
to the Deleting Files section for instruction. (P. 35) The files that were
not transferred will remain in the internal memory.
When the camera’s internal memory or the MMC/SD is full, you will need
to delete images to continue to take pictures, or insert a new MMC/SD
memory card. Please refer to the Deleting Photos section for instructions.
Note: There may be available storage space by using a lower photo
quality setting. Refer to the QUALITY section to select a lower quality
setting on P. 23.
Page 20

18
Inserting the MMC/SD
Inserting the MMC/SD:
1. Locate the Battery & Memory Card Door on the
bottom of the camera.
2. Slide the button on the Battery & Memory Card
Door towards the center of the camera and lift the
door.
3. Insert the MMC/SD as indicated by the arrow.
(fig.1.6)
4. Close the Battery & Memory Card Door.
Note: If the internal memory or the MMC/SD is corrupted, the LCD will
read ERROR! The memory needs to be formatted. Please format all
files to continue. (P. 32)
fig.1.6
Page 21

19
2. Camera Mode
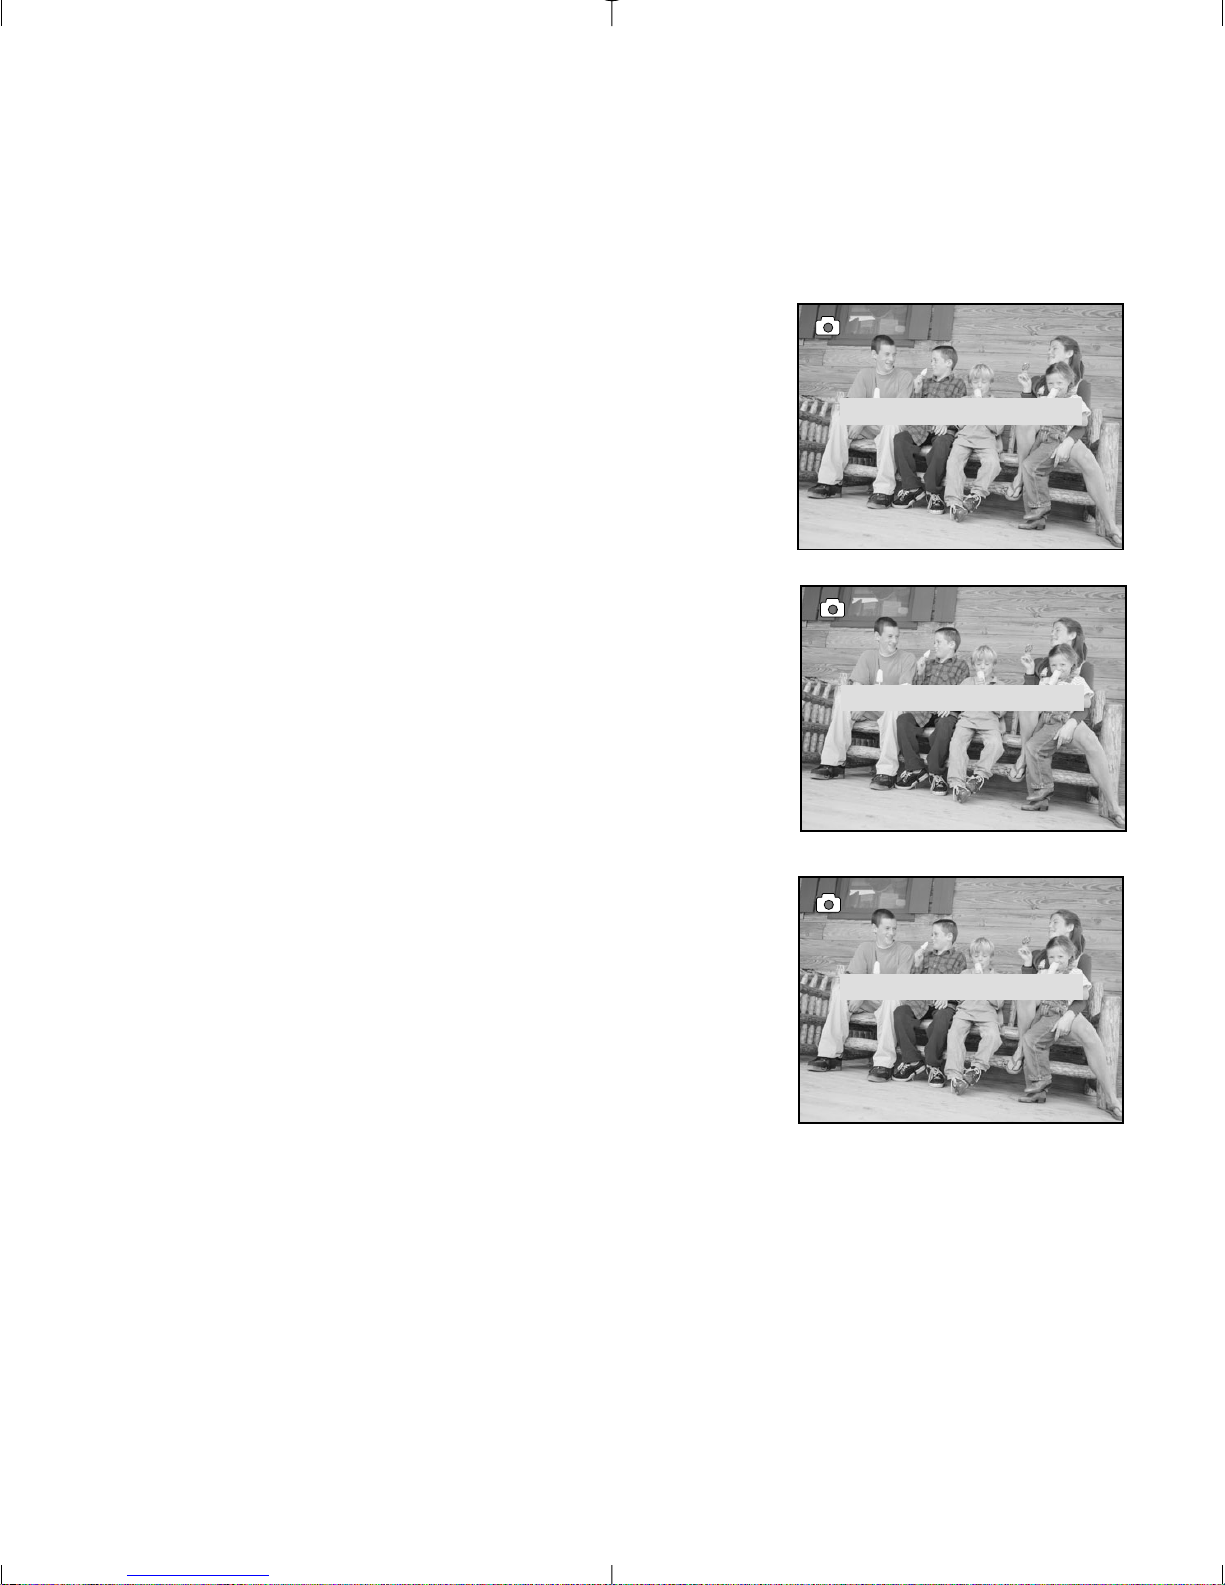
Taking Images:
1. Set the camera to Camera Mode by moving the
Mode Switch to .
2. Position the subject in the viewfinder OR the LCD.
(fig.2.1)
3. Gently press the Shutter button (fig.2.2) and keep
the camera still until the camera ready LED next to
the viewfinder flashes. (fig.2.3)
4. When the image has been captured, the camera
ready LED next to the viewfinder begins to blink.
This indicates that the image is being processed.
5. A preview of the image will be displayed on the
LCD for 1 second and the file counter number
displayed in the LCD will be updated.
MAIN MENU
1. In Camera Mode, press MENU.
2. Press or to toggle between the
options.
3. Press to view the sub-menu of the
selected option.
4. If you would like to exit any menu, press
until Main Menu is highlighted and
press to return to the Main Menu.
OR
5. Press MENU to return to picture taking mode.
fig.2.2
fig.2.3
fig.2.1
A
MAIN MENU
Mode
M
Size
Quality
Flash
Page 22

20
MODE - VIDEO CLIPS
Taking Video Clips:
1. When Video Clip is highlighted in the MODE
menu, press .
2. Press the Shutter button to begin recording a
continuous video clip. (fig.2.4)
3. Press the Shutter button again to stop
recording. (fig.2.5)
OR
4. The camera will continue recording until the
memory is almost full.
5. When the recording is completed, the camera
will return to still picture taking mode.
Note: To view your video clips on your computer, please complete all
the steps in the Software Installation section. (P. 38)
Note: The camera ready LED will blink rapidly when the camera is
storing the video clip. Do not open the Battery & Memory Card Door
or turn the camera off while the LED is blinking, or the video clip may
not be stored.
Note: To exit video clip mode before beginning to record, press MENU
to return to the Main Menu.
Mode
Size
Quality
Flash
MAIN MENU
A
M
Video Clip
Self-timer
Main Menu
MODE
SHUTTER TO •REC
MENU TO CANCEL
SHUTTER TO STOP
•REC
fig.2.4
fig.2.5
Page 23

21
MODE - SELF-TIMER
Self-timer:
1. Highlight Self-timer in the MODE menu, then
press . (fig.2.6)
2. Use the and to highlight Off or On.
3. Press OK to select.
4. Position the subject in the viewfinder or LCD.
5. Press the Shutter button.
6. The camera ready LED and the self-timer LED
will blink for 10 seconds and then the image
will be captured.
Note: The self-timer is automatically deactivated once the image is
taken.
SELF-TIMER
A
Self-timer
Off
On
Mode
Size
Quality
Flash
MAIN MENU
A
M
A
Video Clip
Self-timer
Main Menu
MODE
fig.2.6
+
Page 24

22
SIZE
1. In the SIZE menu, press or to toggle between 1600 x 1200, 1280
x 960 and 640 x 480 pixels.
2. Press OK to select the size and press MENU to return to picture taking
mode.
Images taken with 7MB (approx.)
1600 x 1200 1280 x 960 640 x 480
Fine 8 14 28
Normal 15 33 66
Economy 27 56 114
Note: The selected option will be marked by ( •).
Mode
Size
Quality
Flash
MAIN MENU
A
M
1600 x 1200
1280 x 960
640 x 480
OK MENU
IMAGE SIZE
Image Quality
Page 25

23
QUALITY
1. In the QUALITY menu, press or to toggle between Fine, Normal
and Economy.
2. Press OK to select the quality mode and press MENU to return to
picture taking mode.
Fine Normal Economy
Image Size 1600 x 1200 1280 x 960 640 x 480
JPEG ratios 5.1:1 12:1 24:1
Note: The selected option will be marked by ( •).
Mode
Size
Quality
Flash
MAIN MENU
A
M
Fine
Normal
Economy
OK MENU
QUALITY
A
Page 26

24
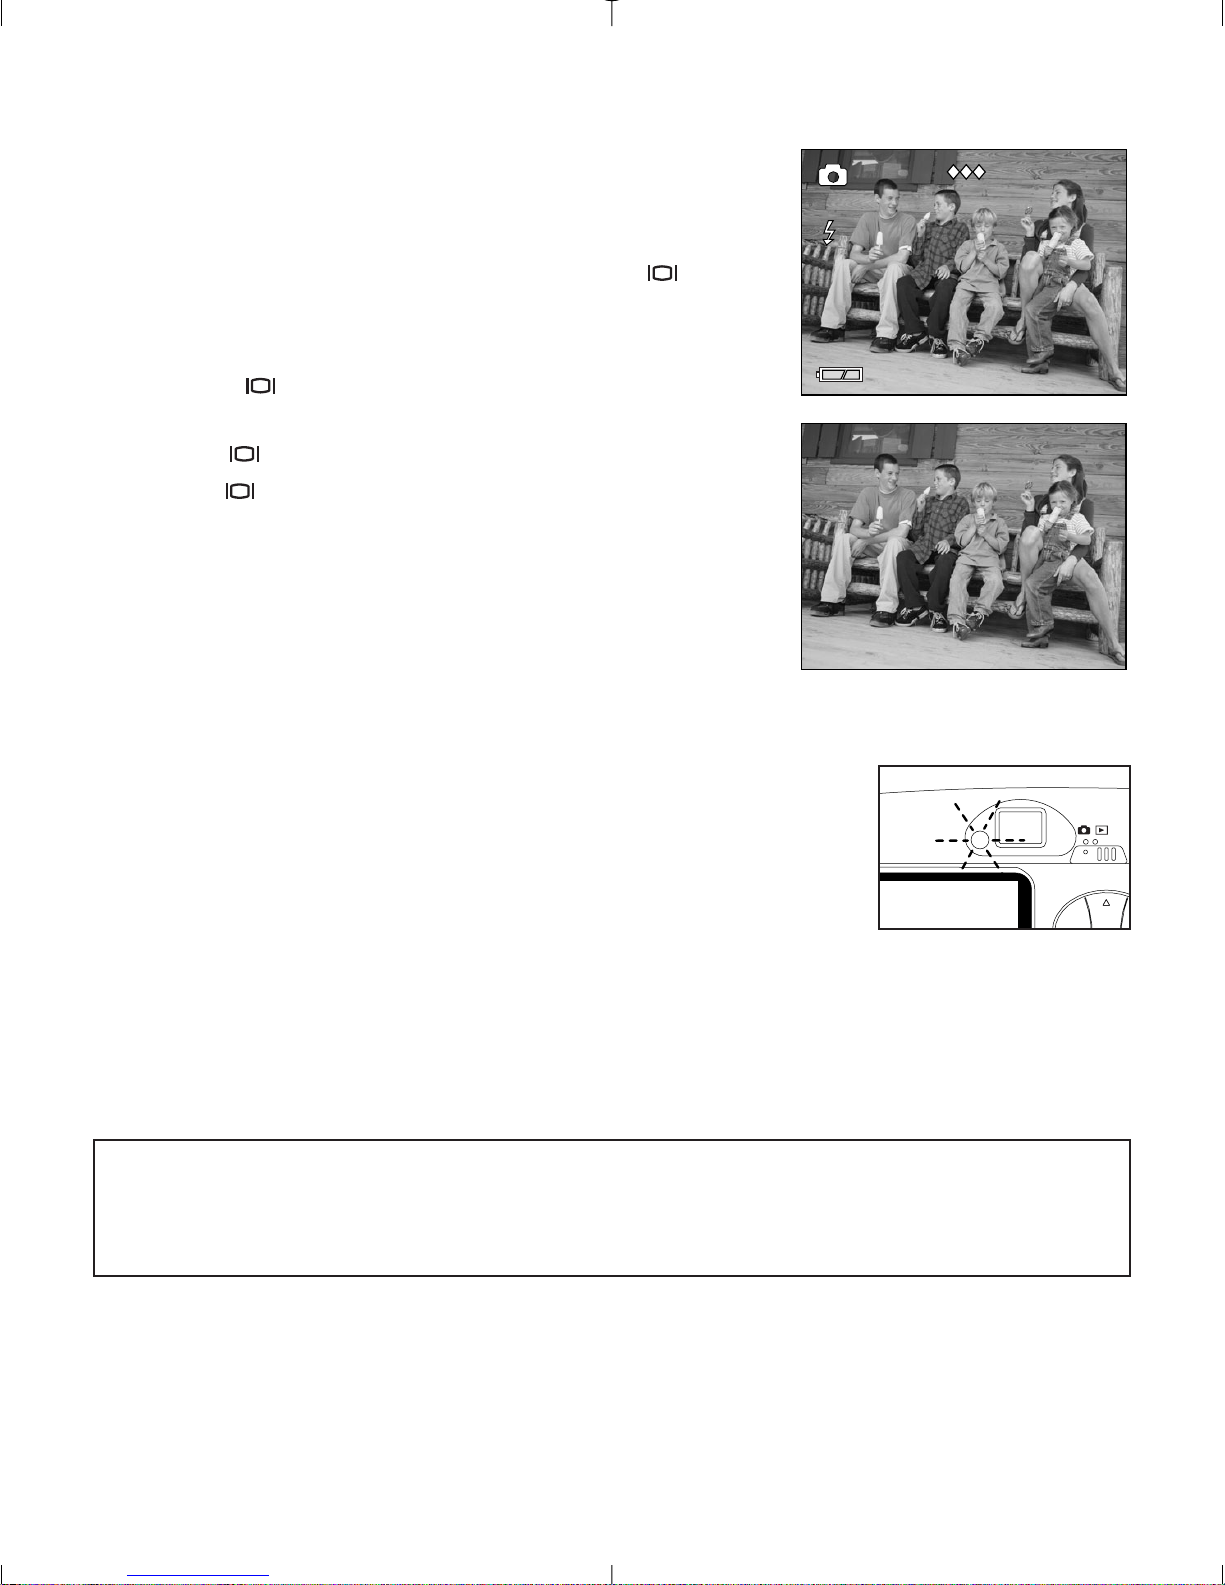
FLASH
1. In the FLASH menu, press or to choose between Auto ( ),
Flash ( ), and Flash Off ( ).
2. Press OK to select the flash mode and press MENU to return to picture
taking mode.
Flash Status Distance from subject
Auto ( ) 3.9ft (1.2m) to 8.5ft (2.5m)
Flash ( ) 3.9ft (1.2m) to 8.5ft (2.5m)
Flash OFF ( ) 3.9ft (1.2m) to infinity
Note: The selected option will be marked by (
•
).
Note: The flash may need time to recharge between images. While it is
charging the camera ready LED blinks. When it stops blinking you are
ready to take another picture. If the batteries are low, the flash will
not work. Please insert fresh batteries.
A
A
Mode
Size
Quality
Flash
MAIN MENU
A
M
Auto
Flash
Flash Off
OK MENU
FLASH
A
A
Page 27

25
EV - EXPOSURE VALUE
1. In the EV menu, press or to toggle between –2.0, -1.5, -1.0, -0.5,
0, +0.5, +1.0, +1.5 and +2.0.
2. Press MENU to exit.
Use this setting for scenes with low
light conditions.
Use this setting for scenes with bright
light conditions.
( + )
( – )
EV
WB
Scene
Brightness
MAIN MENU
+
WB
S
–
–
EXPOSURE VALUE +
Page 28

26
WB (WHITE BALANCE)
1. In the WB (WHITE BALANCE) menu, press or to choose between
AWB, Sunny, Fluorescent or Tungsten.
2. Press OK to select the white balance mode and press MENU to exit.
White Balance Option Explanation
Auto White Balance The camera will automatically
choose the white balance setting.
Sunny To be used outdoors with sufficient
sunlight.
Fluorescent To be used indoors with fluorescent
light conditions.
Tungsten To be used indoors with tungsten
light conditions.
EV
WB
Scene
Brightness
MAIN MENU
+
WB
S
–
AWB
Sunny
Fluorescent
OK MENU
WB
Page 29

27
PRESET SCENE SELECTION
1. In the Scene menu, press or to choose between Party/Indoor,
Beach/Snow, Sunset, Night Landscape, Fireworks and Off.
2. Press OK to select the scene mode and press MENU to exit.
Party/Indoor
Beach/Snow
Night
Landscape
Sunset
Fireworks
Use this mode in to capture the details of candlelit scenes or
other indoor background light conditions.
Use this mode to capture the details in high glare scenes
such as snow or shining water.
A slow shutter speed is used to capture the lights in night
scenes.
Photography Tip: With the slow shutter speed there is a
possibility of subject blur due to camera movement.
To r educe blurring, you may do the following:
1. Set your camera to Night Landscape mode.
2. Place your camera on a tripod or sturdy surface area.
3. Set the camera to self-timer mode.
4. Press the shutter button.
This mode captures the deep hues and color variations in
sunsets and sunrises.
Use this mode to capture the burst of light from fireworks
with a slower shutter speed.
-Due to the slower shutter speed, place the
camera on a tripod for better picture quality.
EV
WB
Scene
Brightness
MAIN MENU
+
WB
S
–
O
ff
O
ff
SCENE
OK MENU
Page 30

28
BRIGHTNESS
Use this option to change the LCD brightness.
1. In the BRIGHTNESS menu, press or to toggle between the
options.
2. Press MENU to exit.
A
EV
WB
Scene
Brightness
MAIN MENU
+
WB
S
–
A
–
Brightness +
Page 31

29
SETUP
Using the SETUP menu:
1. Use or to toggle between the options.
2. When the option is highlighted, use to change the setting.
3. Press to select and scroll to the next option or press MENU to exit.
Setup Option Selection Options Explanation
Time-out 15, 30, 60, 90 Sets the automatic power off option.
None Deactivates the automatic power off option.
Driver PC WDM/TWAIN Driver. Use this mode when using
ArcSoft PhotoImpression, NetMeeting or other
video conferencing software.
DSC Mass Storage mode. Use this mode to view
your images and video clips using the Mass
Storage driver.
TV NTSC
PAL
Play Logo On/Off Turns the start up animation on or off.
Language , Sets the language in your camera.
English,
Français,
Español,
Deutsch,
Italiano
Default Sets all camera settings to the
factory default.
Format Formats the internal memory or the MMC/SD
by deleting all files.
Setup
Exit
MAIN MENU
Time-out 60S
Driver DSC
TV PAL
PlayLogo O f f
SETUP
Sets the mode the camera needs to adapt to
your TV.
Page 32

30
TIME-OUT
To extend battery life, the camera will
automatically power off after 60 seconds of
inactivity. Use this option to change the
default setting.
DRIVER
Please refer to the Transferring Files to the
Computer section on P. 38 for further
information.
TV
Please refer to the TV Mode section on P. 46
for further information.
PLAY LOGO
Use this option to activate or deactivate the animation that appears on
the LCD when the camera is powered on.
LANGUAGE
Use this option to change the language setting in your camera. All menus
and messages will be displayed in the selected language.
1. Press to highlight Language.
2. Press to enter its submenu.
3. Press or to highlight the language of your choice.
4. Press OK to select.
5. Press or to highlight No or Yes.
6. Press OK to select and to return to the Main Menu.
Time-out 60S
Driver DSC
TV PAL
PlayLogo O f f
SETUP
Language
Default
Format
Main Menu
SETUP
F
Page 33

31
DEFAULT
To set your camera to its default settings:
1. When the Default option is highlighted, press .
2. The camera will reset to the factory defaults.
3. Press MENU to exit.
Mode Default Setting
Size 1600 x 1200
Quality Fine
EV 0 ( )
White Balance AWB
Scene Off
Brightness 3 ( )
Time-out 60
Driver DSC
TV NTSC
Play Logo Off
Language English
Note: The default version for TV mode will vary depending on the
country where the camera was purchased.
Page 34

32
FORMAT
Formatting deletes all files. Use this option to format the internal
memory or the MMC/SD.
To format the:
•Internal memory – The MMC/SD card must not be in the camera.
• MMC/SD – Insert the MMC/SD into the camera.
1. When the Format option is highlighted, press to enter its
submenu.
2. Press or to highlight No or Yes.
3. Press OK to select.
4. If Yes is selected, ALL FILES will be deleted.
5. If No is selected, no change will be made, and you will return to the
Main Menu.
Note: If ERROR! is displayed on the LCD screen, this means that the
internal memory or the memory in the MMC/SD is corrupted. Please
format the memory to continue.
Page 35

33
Digital Zoom
The camera can use up to 4x Digital Zoom to take images.
Using the Digital Zoom:
1. In Camera mode, press ( T ) to zoom into the subject.
2. Press ( W ) to zoom out and to return to normal mode.
Size Max. Zoom
1600 x 1200 4x
1280 x 960 4x
640 x 480 No Zoom
Page 36

34
3. REVIEW MODE
In review mode, you can review your captured images and video clips through
the LCD.
Using REVIEW mode:
1. Slide the Mode Switch towards .
2. Press or to scroll through each file.
Enlargement (JPG)
When viewing images, you may use enlargement to
zoom into the stored image.
To use Enlargement:
1. While viewing a JPG file, press OK to view the
file in 2x Enlargement Mode.
2. Press OK to enter 4x Enlargement mode.
3. Press OK to return to normal viewing mode.
Note: In 2x and 4x enlargement mode, press to navigate in the image.
Size Max. Enlargement
1600 x 1200 4x
1280 x 960 4x
640 x 480 No Enlargement
Viewing Video Clips (AVI)
To view video clips:
1. Press OK to play the video clip.
JPEG
A
005/080
AVI
Press OK Play AVI
A
005/080
File Type Format
Image JPG
Video Clip AVI
Page 37

35
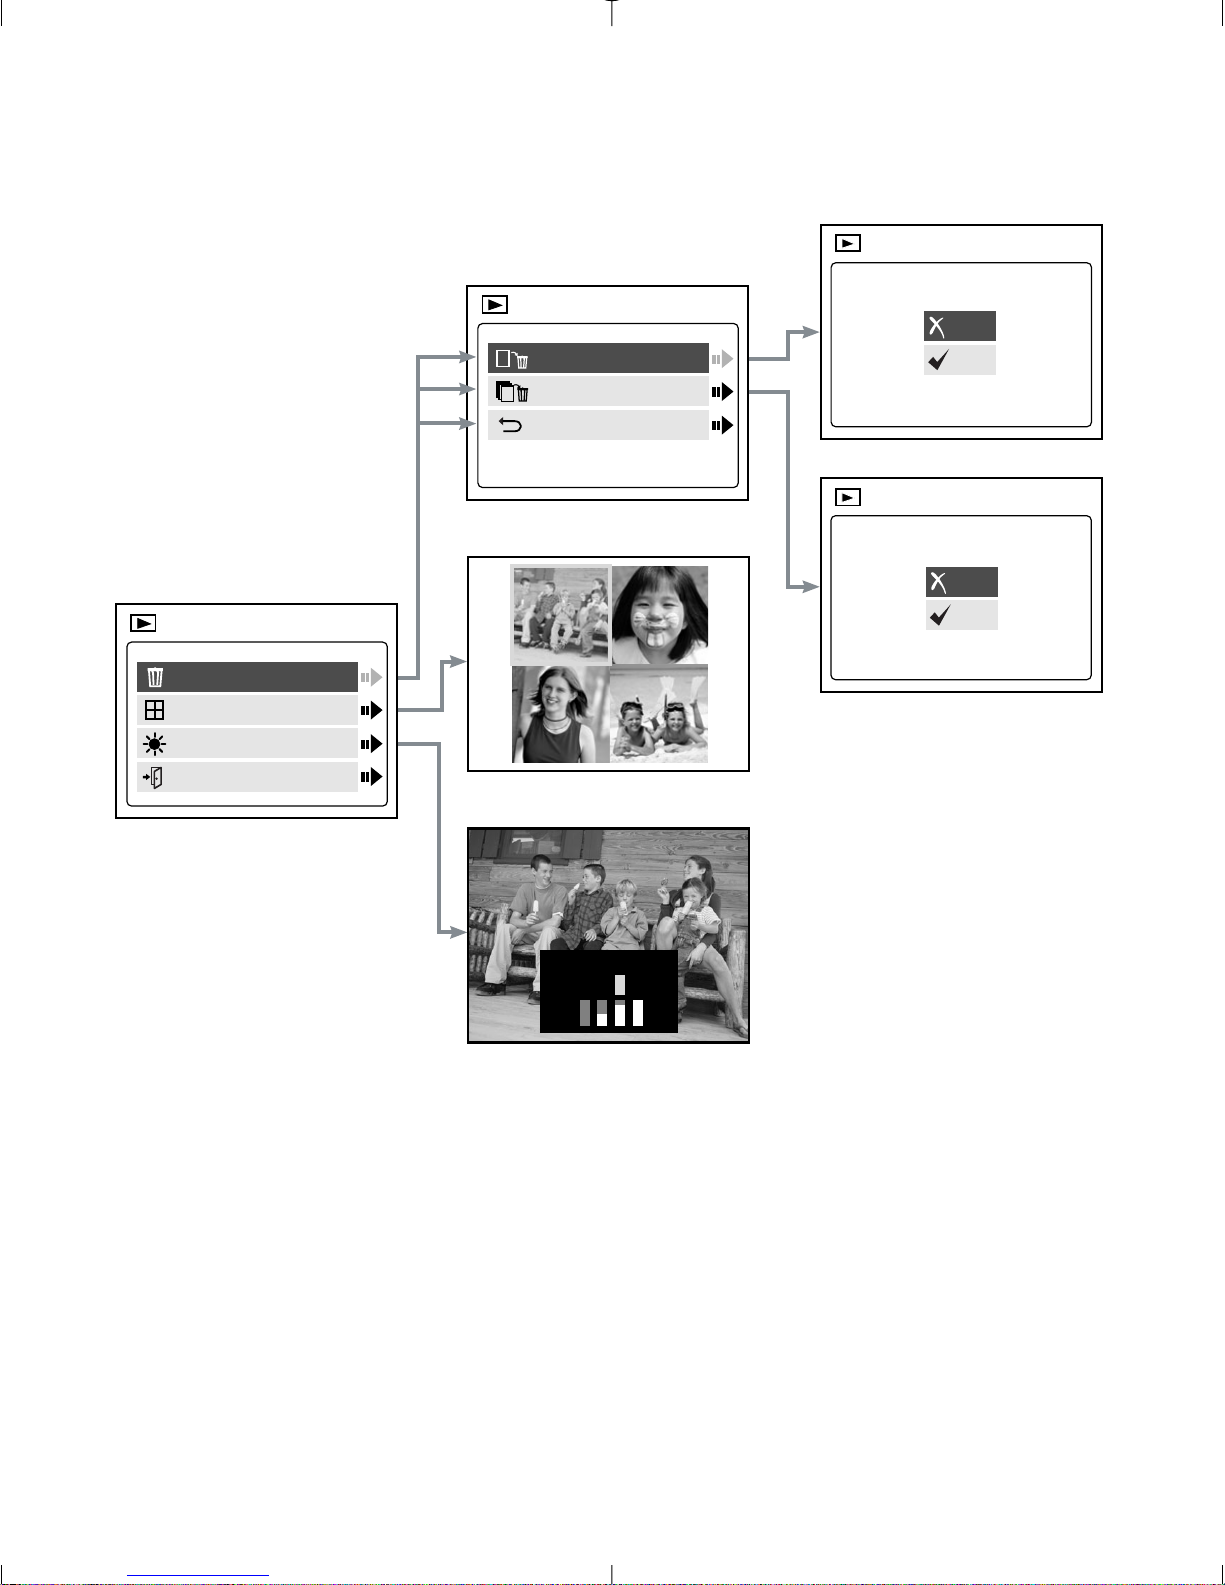
MAIN MENU
To use the MAIN MENU in Review Mode:
1. Press MENU to enter the MAIN MENU.
2. Use or to toggle between the options.
3. When the option is highlighted press to
enter its submenu.
4. If you would like to exit any menu, press
until Exit or Main Menu is highlighted to
return to the previous menu.
OR
5. Press MENU to exit.
DELETE
To delete one file from the internal memory:
1. When Delete One is highlighted in the DELETE menu, press .
2. The next screen will read " This File?" Press or to highlight No
or Yes. Press OK to select.
3. If Yes is selected, the file will be deleted.
4. If No is selected, no change will be made, and you will return to the
Main Menu.
Delete
Thumbnail
Brightness
Exit
MAIN MENU
Delete One
Delete All
Main Menu
DELETE
A
DELETE
A
THIS FILE?
No
Yes
Page 38

36
DELETE
To delete ALL files from the internal memory:
1. When Delete All is highlighted in the DELETE menu, press .
2. The next screen will read "All Files?" Press or to highlight No
or Yes. Press OK to select.
3. If Yes is selected, ALL FILES will be deleted.
4. If No is selected, no change will be made, and you will return to the
Main Menu.
To Delete Files from the MMC/SD:
1. Insert the MMC/SD into the camera.
2. Follow the steps above.
Note: Once images have been deleted, you will not be able to recover
them.
Delete One
Delete All
Main Menu
DELETE
A
DELETE
A
ALL FILES?
No
Yes
Page 39

37
THUMBNAIL
To view files in Thumbnail mode:
1. When Thumbnail is highlighted in the Main Menu, press to
enter the Thumbnail mode.
2. Use to navigate between all of the stored files.
3. Press OK to view the selected file.
BRIGHTNESS
Please refer to the Brightness section on P. 28.
Delete
Thumbnail
Brightness
Exit
MAIN MENU
A
A
A
Page 40

38
4. Software Installation
NOTE: Do not connect the camera to your computer before the camera
drivers and software installation is completed.
Installing the Camera Drivers and ArcSoft Applications:
1. Insert the CD-ROM included in your camera's packaging into your
computer's CD-Rom drive.
2. The installation screen will appear on the computer monitor. Follow the
software installation instructions on your screen to install the software.
3. When the CD-Rom installation is finished, set the camera to PC driver
mode and connect your camera to the computer to complete the
camera driver installation. (P. 40)
Note for Windows 98 First Edition Users:
A "Script" error may be encountered while
upgrading DirectX from the Microsoft Web
page, if using Internet Explorer version 4.0 or
earlier. Please select the "No" option if these
errors occur. Please reboot the computer
after completing the DirectX update. You may
then connect the camera to the computer
using the USB cable provided. You may
encounter the following message multiple times. (fig 4.1) Please select
"Yes" and continue to follow the on screen instructions.
fig.4.1
Page 41

39
Note for Windows 2000 Users:
When this window appears (fig 4.2), click
[Yes] to continue installation. (This message
will also appear for "Universal Serial Bus
controllers" and “Visioneer LX200 Video
Capture”. Click [Yes] to continue the
installation.)
Note for Windows XP Users:
When this window appears (fig 4.3), click
[Continue Anyway] to continue installation.
(This message will also appear for "Universal
Serial Bus controllers", "Visioneer LX200
Mass Storage" and "Visioneer LX200 Video
Capture". Click [Continue Anyway] to
continue the installation.)
4. Follow the on-screen instructions to complete the installation.
5. Reboot your computer before transferring files.
NOTE: If your computer has the CD-ROM automatic installation
disabled, click on START. Select MY COMPUTER and locate the CD-ROM
Drive. Double click on the CD-ROM Drive icon to show its contents.
Double-click on the file named SETUP.EXE and follow the instructions
on your screen.
Note for Mac users: It is not necessary to install the software in the
CD-Rom. Please refer to p.43-44 for instructions on how to use the
Mass Storage feature.
fig.4.2
fig.4.3
Page 42

40
NOTE: Windows 98 first edition users select only PC mode.
5. Transferring Files to the Computer
You can view and store the files you have captured with the camera using
your PC. To download the files for viewing, you must first install the
software that comes with your camera.
Connecting the Camera to the Computer:
1. Select either PC (Windows Only) or DSC in the Setup Menu.
•Set the Mode switch to .
•Press the MENU button. Use the button until Setup is highlighted.
•Press to enter the Setup menu.
•In the Setup menu, press until Driver is highlighted.
•Press to select DSC or PC.
2. Connect your camera to the computer using the USB cable provided.
3. Plug the rectangular end of the USB cable that is
included with the Visioneer LX 200 into your PC’s
USB port. Please refer to your computer’s
documentation for more information on the location
of the USB port. (fig.5.1)
4. Open the Cable Connection panel on the camera, by
sliding the door in the downward direction, then lift
the door.
5. Plug the square end of the USB cable into the USB
connector located inside the Cable Connection panel.
6. When the camera is connected to the computer for the first time, the
camera’s driver installation will begin. Please follow the on-screen
instructions to complete the installation.
fig.5.1
Time-out 60S
Driver DSC
TV PAL
PlayLogo Of f
SETUP
Setup
Exit
MAIN MENU
Time-out 60S
Driver PC
TV PAL
PlayLogo Of f
SETUP
Page 43

41
Windows Only
Using the PC Driver Mode
You may use this mode to view your images with ArcSoft
PhotoImpression.
This mode allows you to take video clips on your computer and to use
the camera as a web camera.
Setting PC Mode in your camera
1. Turn the camera on.
2. In the Setup menu, press until Driver is highlighted.
3. Press to change the setting to PC.
4. Turn the camera off.
5. Connect the camera to the computer.
6. Launch ArcSoft PhotoImpression
software by clicking on StartPrograms-ArcSoft Camera Suite
and choose PhotoImpression from
the application list on your screen.
(fig.5.2)
7. Click on the [Camera/Scanner]
button. (fig.5.2 a)
8. Click on the drop-down list under
SELECT SOURCE and choose
Visioneer LX200 DC Memory.
(fig.5.2 b)
Setup
Exit
MAIN MENU
Time-out 60S
Driver PC
TV PAL
PlayLogo Off
SETUP
fig.5.2
Page 44

42
9. Click on the Camera/Scanner Icon. (fig.5.2 c) A second window will
appear showing the contents (pictures) of your camera’s memory, and
options on how to handle them. (fig.5.2 d)
10.Select the picture(s) you want to retrieve, by pressing the Ctrl key on
your keyboard and clicking once on each thumbnail.
OR
Click on Edit-Select All.
Click on Acquire and all pictures will be transferred. (fig.5.2 e)
OR
Click on Edit-File Transfer.
The pictures just retrieved will be placed as thumbnails on the bottom
of your application window. To open them, double-click on the
thumbnail. (fig.5.2 f)
You are now ready to print, store or further enhance your pictures. Refer
to ArcSoft’s Software Guide for a tutorial on all the features
PhotoImpression offers.
Page 45

43
NOTE: Windows 98 first edition users select only PC mode.
Note for Windows users: If switching between PC and DSC mode,
please unplug your camera from the computer first.
Using the Mass Storage (DSC)
This mode allows the camera to become an external hard disk drive (DSC)
and you may view or download images and video clips stored in your
camera’s internal memory or MMC/SD memory card onto your computer.
Setting Mass Storage in your camera:
1. Turn the camera on.
2. In the Setup menu, press until Driver is highlighted.
3. Press to change the setting to DSC.
4. Turn the camera off.
5. Connect the camera to the computer.
6. Open My Computer to locate the removable disk drive that contains
the files in your camera’s internal memory or MMC/SD.
7. You may view or download files.
NOTE: Please refer to your computer’s documentation for more
information on the location of the USB port.
Note: To view your video clips in your computer please complete all
the steps in the Software Installation section on p. 38.
Note: If an AVI file cannot be viewed on a computer that does not
have the camera drivers installed, please download and install DirectX
from www.microsoft.com.
Setup
Exit
MAIN MENU
Time-out 60S
Driver DSC
TV PAL
PlayLogo O f f
SETUP
+
Page 46

44
For Mac Users:
1. Set your camera to DSC Mode.
2. Connect your camera to the computer.
3. After a few moments, the external hard drive will appear on the
desktop.
4. Open the “untitled” removable drive that is on your desktop and open
DCIM to view your files.
5. Click on the file that you would like to view.
Unplugging the camera from the computer
For Windows ME/2000/XP:
1. Click once on the "Unplug or Eject Hardware" icon on the
right hand side of your task bar. (fig.5.3)
2. If the camera is in PC Driver mode, select "Stop Visioneer
LX 200 USB Driver V 0.1."
OR
If the camera is in DSC Driver mode, select "Stop Visioneer LX 200
USB Mass Storage Device."
3. Click [OK] in the "Safe to Remove Hardware" prompt.
4. Unplug the USB from the camera. (fig.5.2)
For Mac:
1. Drag the “untitled” removable drive icon on the desktop to the Trash.
2. Unplug the USB cable from the camera.
Note for Mac users: For better performance, please use the USB port
located in the back of your computer.
fig.5.3
Page 47

45
6. Other Features
Windows Only
Web Camera (PC Mode)
You may also use the Visioneer LX 200 as a web camera and a video
conferencing camera. It will work with many popular video conferencing
software titles.
Using the camera as a Web Camera:
1. Follow the steps from the Connecting the camera to the computer
section.
2. Launch Microsoft NetMeeting software.
3. To start the video, click on the start video icon.
4. Follow the NetMeeting on-screen instructions, or refer to NetMeeting’s
Help section.
NOTE: If you do not have NetMeeting already installed on your
computer, please visit www.microsoft.com for instructions on how to
obtain a copy.
Page 48

46
TV Mode
The camera allows you to view individual files and record clips on the
television. To begin, check your television documentation to determine
what video standard you should set your camera to either NTSC or PAL.
Changing the TV Mode setting:
1. In the Setup menu press until TV is highlighted
2. Press to change the setting to NTSC or PAL.
Connecting to the television:
1. Connect the AV cable into the jack marked VIDEO
or VIDEO IN on your television.
2. Turn on your television.
3. Set the television to video mode according to
the instructions in the owner’s manual. (This is
usually channel 3, 4 or AV).
4. Turn the camera on by pressing the Power
button.
5. Connect the other end of the cable into the
VIDEO port located underneath the cable
connection panel. (fig.6.1)
fig.6.1
Setup
Exit
MAIN MENU
Time-out 60S
Driver DSC
TV PAL
PlayLogo O f f
SETUP
+
Page 49

47
Using TV Mode
1. Connect the camera to the TV.
2. Turn the camera on.
3. Slide the Mode Switch to .
4. The TV will become a live viewfinder.
Note: You may record your TV Mode session by using your VCR.
Please refer to your VCR documentation to learn more about
recording.
Using the TV Menu:
1. In TV Mode, slide the Mode Switch to .
2. Press MENU to view the TV MENU.
FW Version
This will display the Firmware Version that your camera is using.
Delete One
1. When you are viewing a file, press MENU.
2. Press to highlight Delete One.
3. Press OK and the file that is in the background will be deleted.
Thumbnail
1. In the TV MENU, press to highlight Thumbnail.
2. Press OK to view all your files in Thumbnail mode.
3. In Thumbnail mode, use to navigate through your files.
Note: Press OK to play a video clip in this mode.
Language
1. In the TV MENU, press to highlight Language.
2. Press to change the Language setting.
Page 50

48
Time-out
1. In the TV MENU, press to highlight Time-out.
2. Press to change the Time-out setting.
Save
1. In the TV MENU, press to highlight Save.
2. Press OK to Save your changed settings.
Default
1. In the TV MENU, press to highlight Default.
2. Press OK to set the camera to its default settings.
Page 51

49
7. Camera maintenance
Cleaning the camera:
Clean the outside of the camera by wiping it with a clean, soft and dry
cloth.
Cleaning the lens, viewfinder and LCD:
1. Blow gently on the lens and/or viewfinder to remove dust and dirt.
2. Wipe the lens and/or viewfinder gently with a soft, lint-free cloth or an
untreated lens-cleaning tissue.
Note: Do not use cleaning solutions unless they are designed
specifically for camera lenses. Do not wipe the camera lens, viewfinder
or LCD with chemically treated eyeglass lens tissues as it may scratch.
Page 52

50
8. Tips and Troubleshooting
SYMPTOM
POWER
Cannot turn on the
camera.
The following
message appears on
the computer screen
when opening an
AVI file: “Cannot
play back the video
stream: no suitable
decompressor could
be found.”
The video quality
is poor.
The video is too
slow.
POSSIBLE
CAUSE
The battery was not
installed correctly.
Battery is dead or
weak.
Battery compartment
was not closed
correctly.
The video stream
decompressor is not
installed.
The video quality
setting needs to be
changed.
POSSIBLE
SOLUTION
Install the battery
correctly using the
direction indicators on
the inside of the battery
cover.
Replace the battery.
Close the battery
compartment properly.
Complete all the steps in
the installing the
software section on
page 38.
OR
Install DirectX from
www.microsoft.com
Go to Tools-OptionsVideo. In the Video
Quality section, move
the arrow towards Better
quality or Faster video
for better results.
VIEWING VIDEO CLIPS (.AVI FILES) ON A COMPUTER
WEB CAMERA
Page 53

51
Tips and Troubleshooting
SYMPTOM
Web camera
video/picture/video
clip has poor quality.
Flash picture taken
is too light.
Flash picture taken
is too dark.
Flash did not work
Picture taken has
poor quality.
POSSIBLE
CAUSE
Poor lighting.
Lens is dirty.
Subject is too close.
Subject is too close.
Subject is too far away.
Flash is not on.
There was sufficient light
for the shot and the flash
was not needed.
Camera’s flash has been
turned off.
Flash did not charge.
Battery is empty.
Subject or camera moved
as picture was taken.
POSSIBLE
SOLUTION
Take web camera/picture/
video clip in better lighting.
Clean lens with a soft
cloth. See the Camera
maintenance section.
Stand at least 3.9ft (1.2m).
away from the subject.
Move subject further away.
Move subject closer.
Turn flash on.
This is normal as your
camera’s electronic light
sensor is programmed to
only fire the flash when
needed.
Turn on Automatic Flash.
Verify that the LED has
stopped blinking before
taking the picture.
Replace the battery.
Hold camera steady until
picture is taken.
WEB CAMERA/PICTURES/VIDEO CLIPS
TAKING PICTURES
Page 54

52
Tips and Troubleshooting
SYMPTOM
Daylight
picture/video clip
taken is too dark.
Cannot take a
picture/video clip.
Image is blurred
when looking
through the
viewfinder.
Part of the picture/
video clip is
missing
POSSIBLE
CAUSE
The subject is in front
of bright light.
Memory is full.
Camera is not set to
picture/video clip
taking mode.
Power is off.
Camera is in "Auto
Power Off" mode.
Viewfinder is dirty.
Something was
blocking the lens when
taking the picture.
POSSIBLE
SOLUTION
Change the subject’s
position.
Delete all pictures and
continue shooting.
Download photos to
your PC and delete
photos from the
camera’s memory.
Insert a MMC/SD with
available memory space.
Set the unit to picture/
video clip taking mode.
Turn power on.
Turn power on.
Clean the viewfinder
with a soft cloth or
cotton swab. See the
Camera maintenance
section.
Keep hands, fingers, etc.
away from the lens.
TAKING PICTURES/VIDEO CLIPS
Page 55

53
Tips and Troubleshooting
SYMPTOM
Camera is not
responding during
image capture.
There is something
wrong with the
color of the
captured image.
The LCD monitor is
not clear.
The LCD is not
displaying
anything.
Camera is not
responding during
image downloading
to PC.
POSSIBLE
CAUSE
The battery level is low
and the camera
doesn't have enough
power to complete the
image capture.
White Balance is not
set properly.
The LCD plastic
monitor cover is dirty.
LCD is turned off.
The battery level is
low.
The operating system
may not be allocating
adequate resources to
download the image.
There is a TWAIN driver
(PC Mode) conflict with
other pre-installed
devices.
POSSIBLE
SOLUTION
Replace batteries.
Reset White Balance.
You should clean the
LCD monitor cover.
Turn on the LCD by
pressing .
Replace batteries.
Reset the camera by
opening and closing the
Battery & Memory Card
Door. Reset the computer.
If you have any
problems using PC
mode, please use Mass
Storage (DSC Mode) to
download your stored
files. (P. 43)
TAKING PICTURES/VIDEO CLIPS
WHITE BALANCE
LCD
DOWNLOADING PICTURES TO PC
Page 56

54
9. Camera Specifications
Lens
Focusing
Image Sensor
Image Size
Image
Quality/Image Size
Sensor Output
Sensitivity
Exposure
EV compensation
Digital Zoom
Image Storage
Preset Scene
Selection
Removable Storage
9.9 mm f/3.2 glass lens, 5 elements in 5 groups,
(Equivalent to 48mm lens on 35mm format)
Focus free 1.2m to infinity
CMOS (1600 x 1200 active pixel), Pixel Pitch 4.2um x
4.2um, 8.4mm array Diagonal.
6.72 x 5.04 mm
Nine different image qualities to be selected by user.
Images are defined with Fine, Normal and Econ with 3
different JPEG compression ratios
Fine Normal Economy
Image Size 1600 x 1200 1280 x 960 640 x 480
JPEG ratios 5.1:1 12:1 24:1
1600 x 1200 pixels and 30-bit color depth output
(aspect ratio is 4 : 3)
Sensitivity ISO 100 Silver Halide Film
Auto exposure, Auto white balance
Menu selection on +/- 2EV in 0.2 steps
Digital Zoom up to 4X in 0.2 steps
Images taken with 7MB (approx.)
1600 x 1200 1280 x 960 640 x 480
Fine 8 14 28
Normal 15 33 66
Economy 27 56 114
Party/Indoor, Beach/Snow, Sunset, Night Landscape,
Fireworks and Off
MMC/SD card slot
Image Quality
Page 57

55
Camera Specifications
Output file format
Optical Viewfinder
Image Review
On Screen Display
(OSD)Menu on LCD
Frame Counter
Multi Language
Support
Self-timer
Flash Unit
JPEG compression, AVI
Reversed Galilean type with 85% coverage and 0.45x
magnification
On 1.6" TFT LCD (resolution 312 x 230) with white
LED back lighting and continuous enlargement
capability up to 4X
Display: Frame counter, Battery status User selectable:
Flash mode, self-timer, image quality, NTSC/PAL TV
mode, image delete indicator, camera live view mode
and review mode, video clip, white balance (AWB,
Sunny fluorescent tungsten), brightness (4 steps),
timeout period, PC driver selection (TWAIN/WDM and
Mass storage), Format memory, digital zoom
(Continuous up to 4X), multi-language selection, EV
Compensation, selection for pre-defined exposure
shooting for such as Party/Indoor, Beach/Snow,
Sunset, Night Landscape, Fireworks and Off.
Shown on LCD
User selectable UI on LCD OSD menu. The language
included Spanish, Italian, German, English, French,
Simplified Chinese and Japanese.
Approx. 10s delay with blinking red LED
-Flash-off-mode
-Auto Flash
- Always Flash (for user use in backlight condition)
- When USB is plugged-in, strobe charging is disabled
- 2.7m maximum distance.
- Charge time is less than 7 seconds at room
temperature when using new 2x AA alkaline
batteries included
-Variable Flash output control by photo-diode to
allow user to take picture at close distant
Page 58

56
Camera Specifications
Power Source
Battery Life
Power Management
Dimensions
Weight
Connectivity
Web Camera
Video Mode
System
Connectivity
PC Software
Image Refresh Rate
for Web Camera
Video Resolution
Accessories
3V 2x AA LR6 batteries
Up to 120 Pictures (approx.)
Auto-power-off after 15, 30, 60, 90 seconds or no
auto time out (User Programmable) without activity
110 x 62 x 35.9mm
116.2g (without battery and MMC/SD card)
USB 1.1 connector direct to PC or Mac
MMC/SD connector connects to MMC/SD card reader
Video connector direct to TV (NTSC / PAL)
WDM for mini port stream driver
PAL or NTSC selectable
TWAIN Driver, WDM Driver and Mass Storage Driver
for Windows 98, Me, 2000, XP
Mass Storage Driver for Mac OS 9.x or above
Arcsoft PhotoImpression
22fps
QVGA, Record & Playback
CD-Rom
- Camera Drivers and ArcSoft software
- Multilingual User's Guide
TV Cable
USB Cable
Wrist Strap
2x AA Alkaline Batteries
Pouch
Multilingual User's Guide
Multilingual Quick Start Guide
Page 59

Copyright © 2002 Visioneer, Inc.
Reproduction, adaptation, or translation without prior written permission is prohibited, except as
allowed under the copyright laws.
The Visioneer brand name and logo are registered trademarks of Visioneer, Inc. PhotoImpressions is
a trademark of ArcSoft, Inc. Adobe Acrobat is a trademark of Adobe Systems Inc. Microsoft is a U.S.
registered trademark of Microsoft Corporation. Windows is a trademark of Microsoft Corporation.
Mac and Macintosh are registered trademarks or trademarks of Apple Computer, Inc. in the U.S. and
other countries. Information is subject to change without notice and does not represent a
commitment on the part of Visioneer. The software described is furnished under a licensing
agreement. The software may be used or copied only in accordance with the terms of such an
agreement. It is against the law to copy the software on any medium except as specifically allowed
in the licensing agreement.
No part of this document may be reproduced or transmitted in any form or by any means, electronic
or mechanical, including photocopying, recording, or information storage and retrieval systems, or
translated to another language, for any purpose other than the licensee's personal use and as
specifically allowed in the licensing agreement, without the express written permission of Visioneer.
Restricted Rights Legend
Use, duplication, or disclosure is subject to restrictions as set forth in contract subdivision (c)(1)(ii) of
the Rights in Technical Data and Computer Software Clause 52.227-FAR14. Governmental laws and
other regulations, such as copyright laws, may protect Images captured by photography or video
using this product. The customer is solely responsible for complying with all such laws and
regulations.
513114-00
Version 1.00
Part Number: 05-0553-000
 Loading...