

Page 1

ICAM320 USER MANUAL
VER. 1.0 07/27/2000
Contents
CONTENTS .........................................................................................................1
INTRODUCTION................................................................................................3
INSTALLATION................................................................................................. 4
INSTALLING THE SOFTWARE................................................................................ 5
CONNECTING THE CAMERA.................................................................................5
CAPTURING VIDEO CLIPS.............................................................................8
HELPFUL HINTS FOR RECORDING VIDEO CLIPS OR CAPTURING STILL IMAGES....... 9
VIDEO FORMAT SETTINGS.................................................................................10
ACQUIRING IMAGES THROUGH TWAIN................................................ 13
WHERE TO FIND THE CAMERA COMMANDS.......................................................13
IMAGE FORMAT SETTINGS.................................................................................14
CAPTURING & TRANSFERRING IMAGES.............................................................14
APPENDICES....................................................................................................15
TROUBLESHOOTING.......................................................................................... 15
INDEX ................................................................................................................17
Page 2

2
COPYRIGHT NOTICE
Copyright 2000. All rights reserved. All other trademarks used in this documentation are
for reference purposes only and remain the sole property of their respective owners.
FCC STATEMENT
This device complies with Part 15 of FCC Rules. Operation is subject to the following two
conditions: (1) this device may not cause harmful interference, and (2) this device must
accept any interference received, including interference that may cause undesired
operation.
This equipment has been tested and found to comply with the limits for a Class B digital
device, pursuant to part 15 of the FCC Rules. These limits are designed to provide
reasonable protection against harmful interference in a residential installation. This
equipment generates, uses, and can radiate radio frequency energy and, if not installed
and used in accordance with the instructions, may cause harmful interference to radio
communications. However, there is no guarantee that interference will not occur in a
particular installation. If this equipment does cause harmful interference to radio or
television reception, which can be determined by turning the equipment off and on, the
user is encouraged to try to correct the interference by one or more of the following
measures:
• Reorient or relocate the receiving antenna.
• Increase the separation between the equipment and the receiver.
• Connect the equipment into an outlet on a circuit different from that to which the
receiver is connected.
Page 3

3
Introduction
The desktop video camera is fast becoming a must-have communications tool.
With your new camera and fun-to-use application software, you can now
spice up your communication with live video, video clips and photos. This
manual shows you how.
• Installation shows you how to connect the camera to your PC and install
the software.
• The next two chapters, Capturing Video Clips and Acquiring images
through TWAIN, provide step-by-step instructions on how to use your
camera for recording video e-mail, video-conferencing, and still image
capture for documents, presentations etc.
• The Appendices provide a Troubleshooting section. If you have a problem,
we recommend you look at the section first before contacting technical
support.
If you’re looking for something in particular, try the Index at the end. We
have included many of the words and terminology you may encounter while
using this camera.
For instructions on how to use the bundled application software, please refer
to the software manual on CD-ROM.
Page 4
4
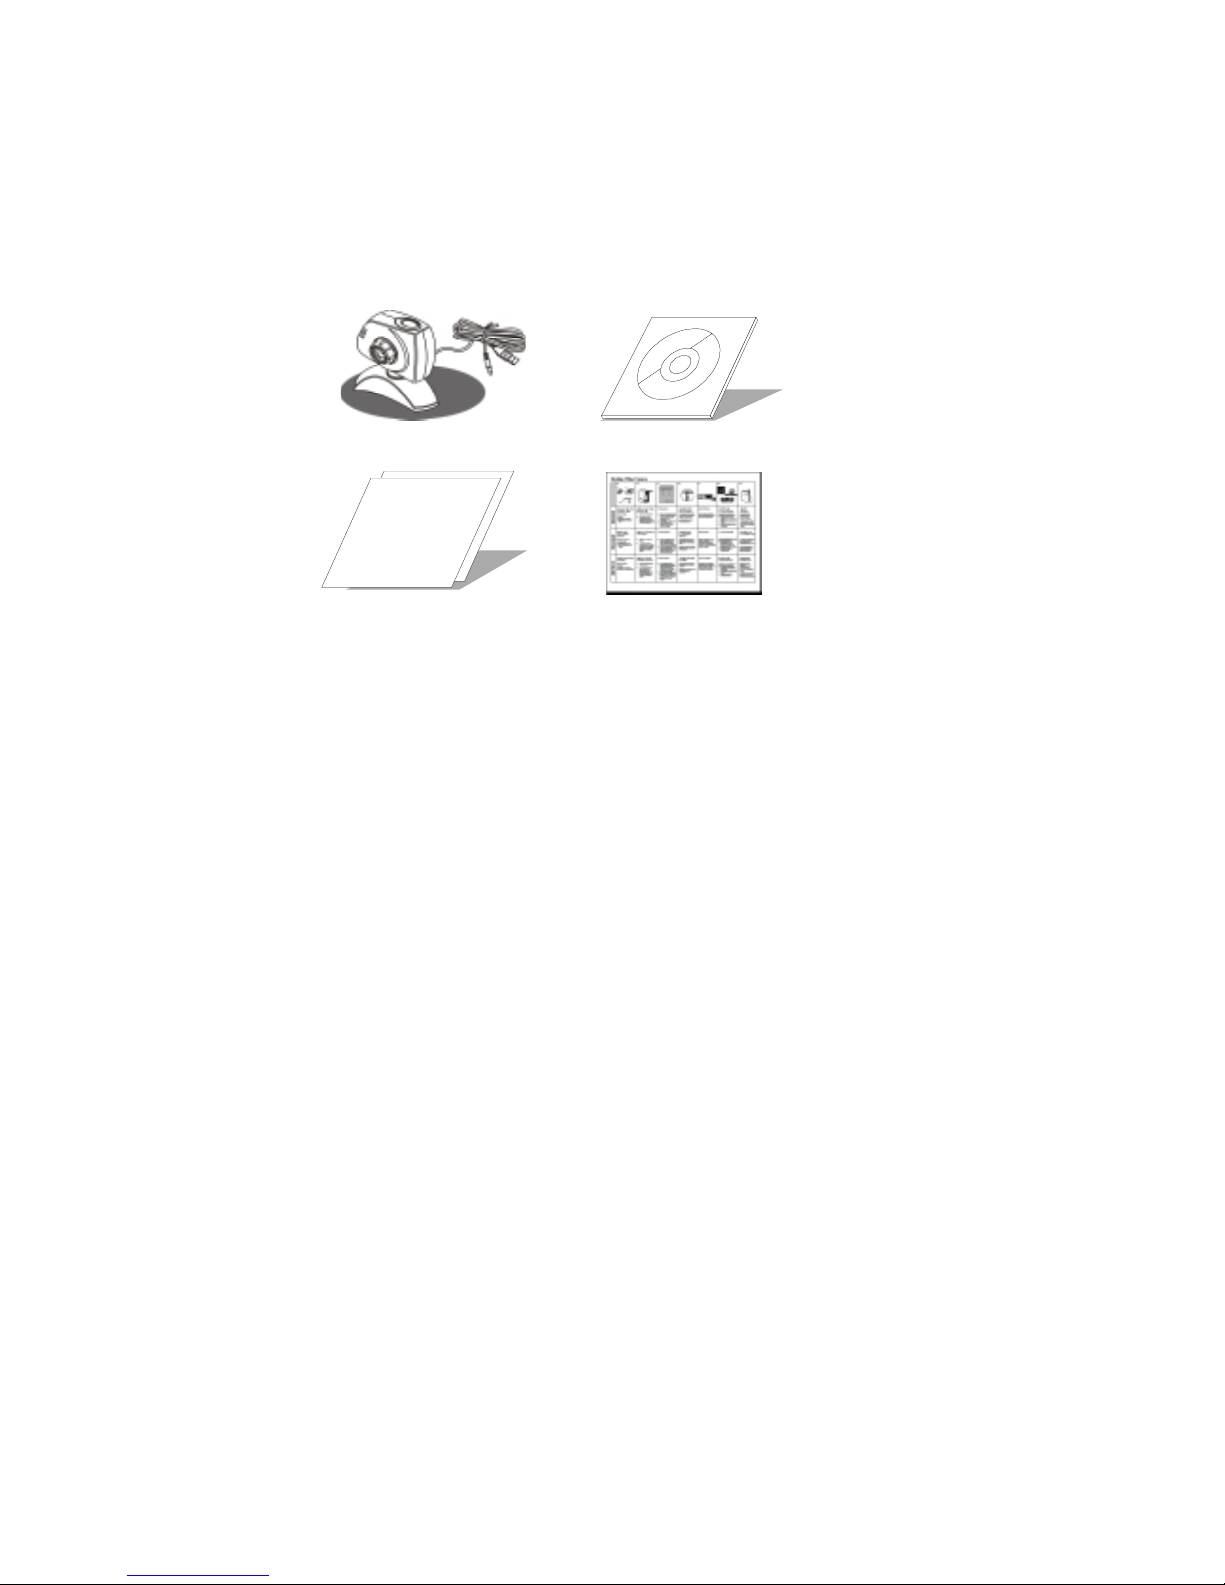
Installation
You have already unpacked the box to get to this manual, so we hope you can
find the following to continue with the installation:
Camera Software on CD-ROM
T echnical
Support
Technical Support card Quick Installation Guide
We also assume that you have checked out the system requirements and that
your PC is suitable for this camera. Just to make sure, please check that your
computer:
• IBM-compatible PC; Pentium 233 or above processor
• Memory: at least 32MB RAM; 64MB RAM or more recommended
• 150MB hard disk space or larger
• 800x600 /24 bit display
• Universal Serial Bus (USB) port
• CD-ROM drive
• Microphone and speakers (optional)
• Windows 98
How check out your system - Windows 98
Go to the System option in the Control Panel.
Page 5
USER’S MANUAL 5
IMPORTANT: To avoid installation problems, please install the software
before connecting the camera to your PC.
Installing the software
The camera's software comes on CD-ROM and includes a setup wizard that
makes installation a snap. Before starting, close any open applications and
then:
Under Windows 98
1. Insert the CD into your drive.
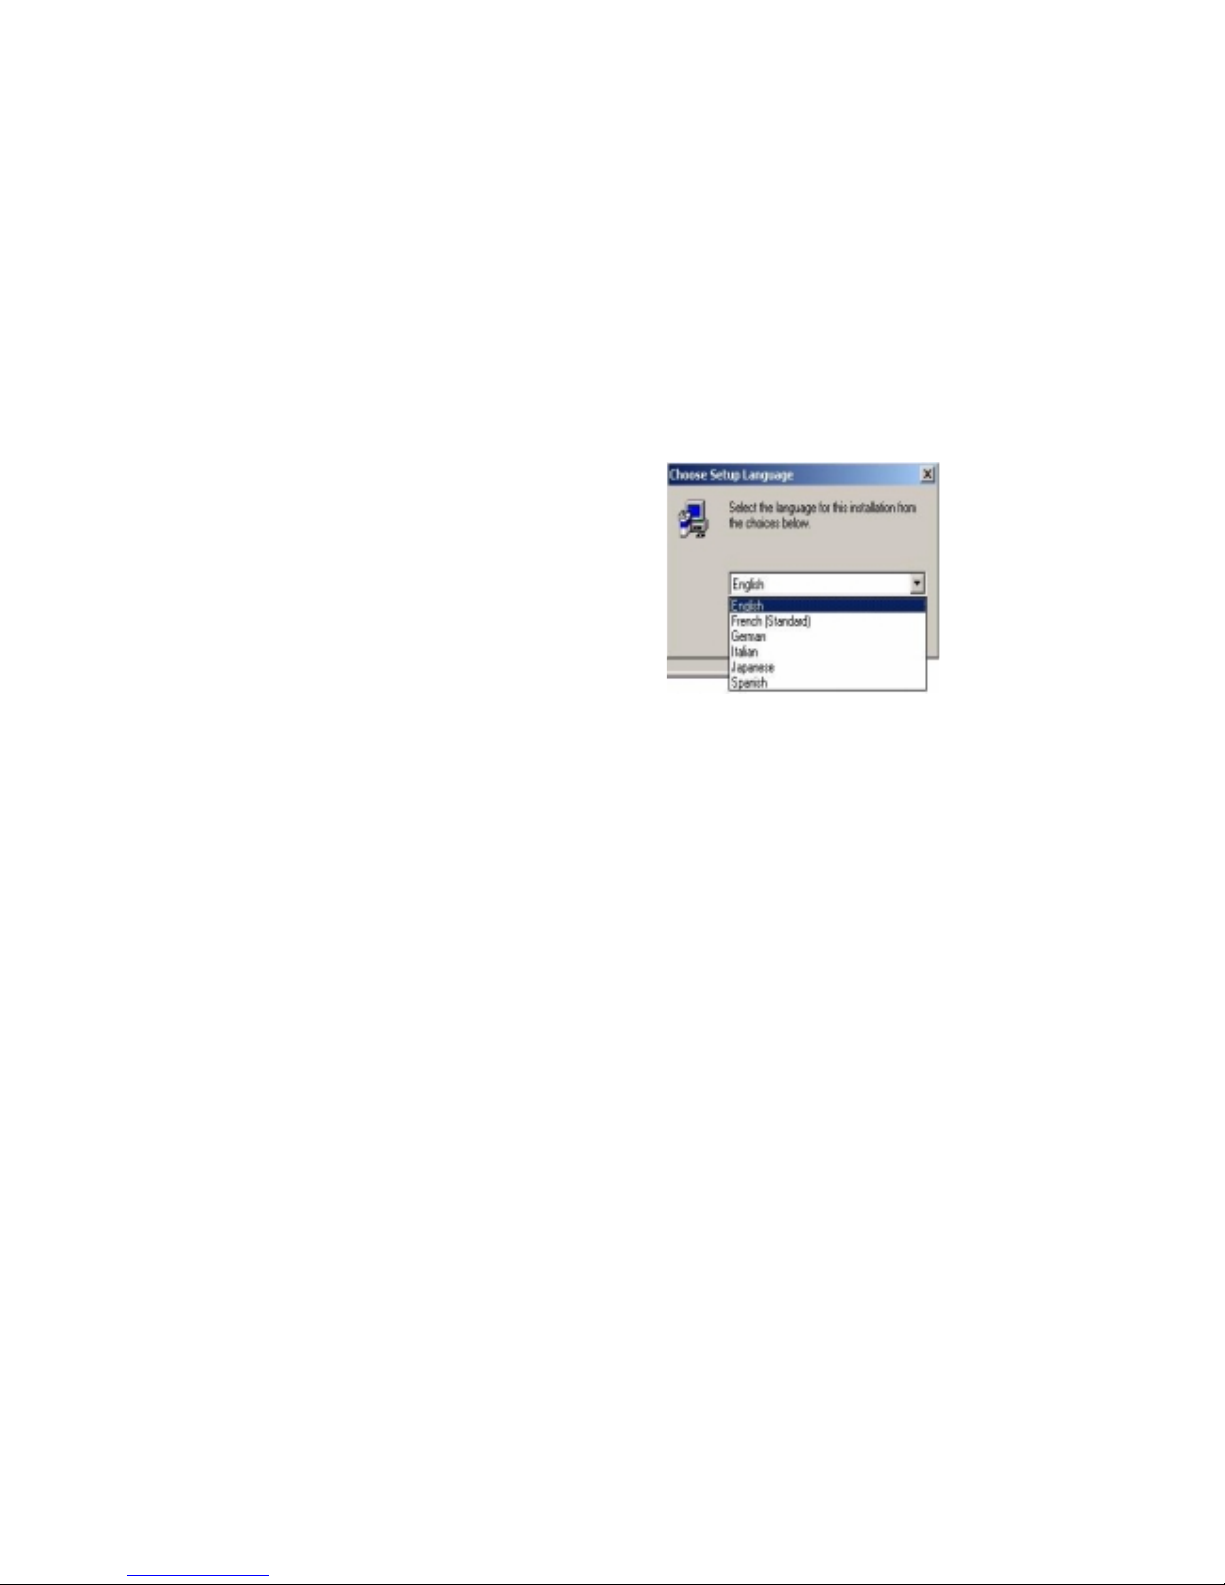
2. The Setup Wizard pops up
automatically with a few choices for
you to make. First, select the
language of your choice and click
Continue.
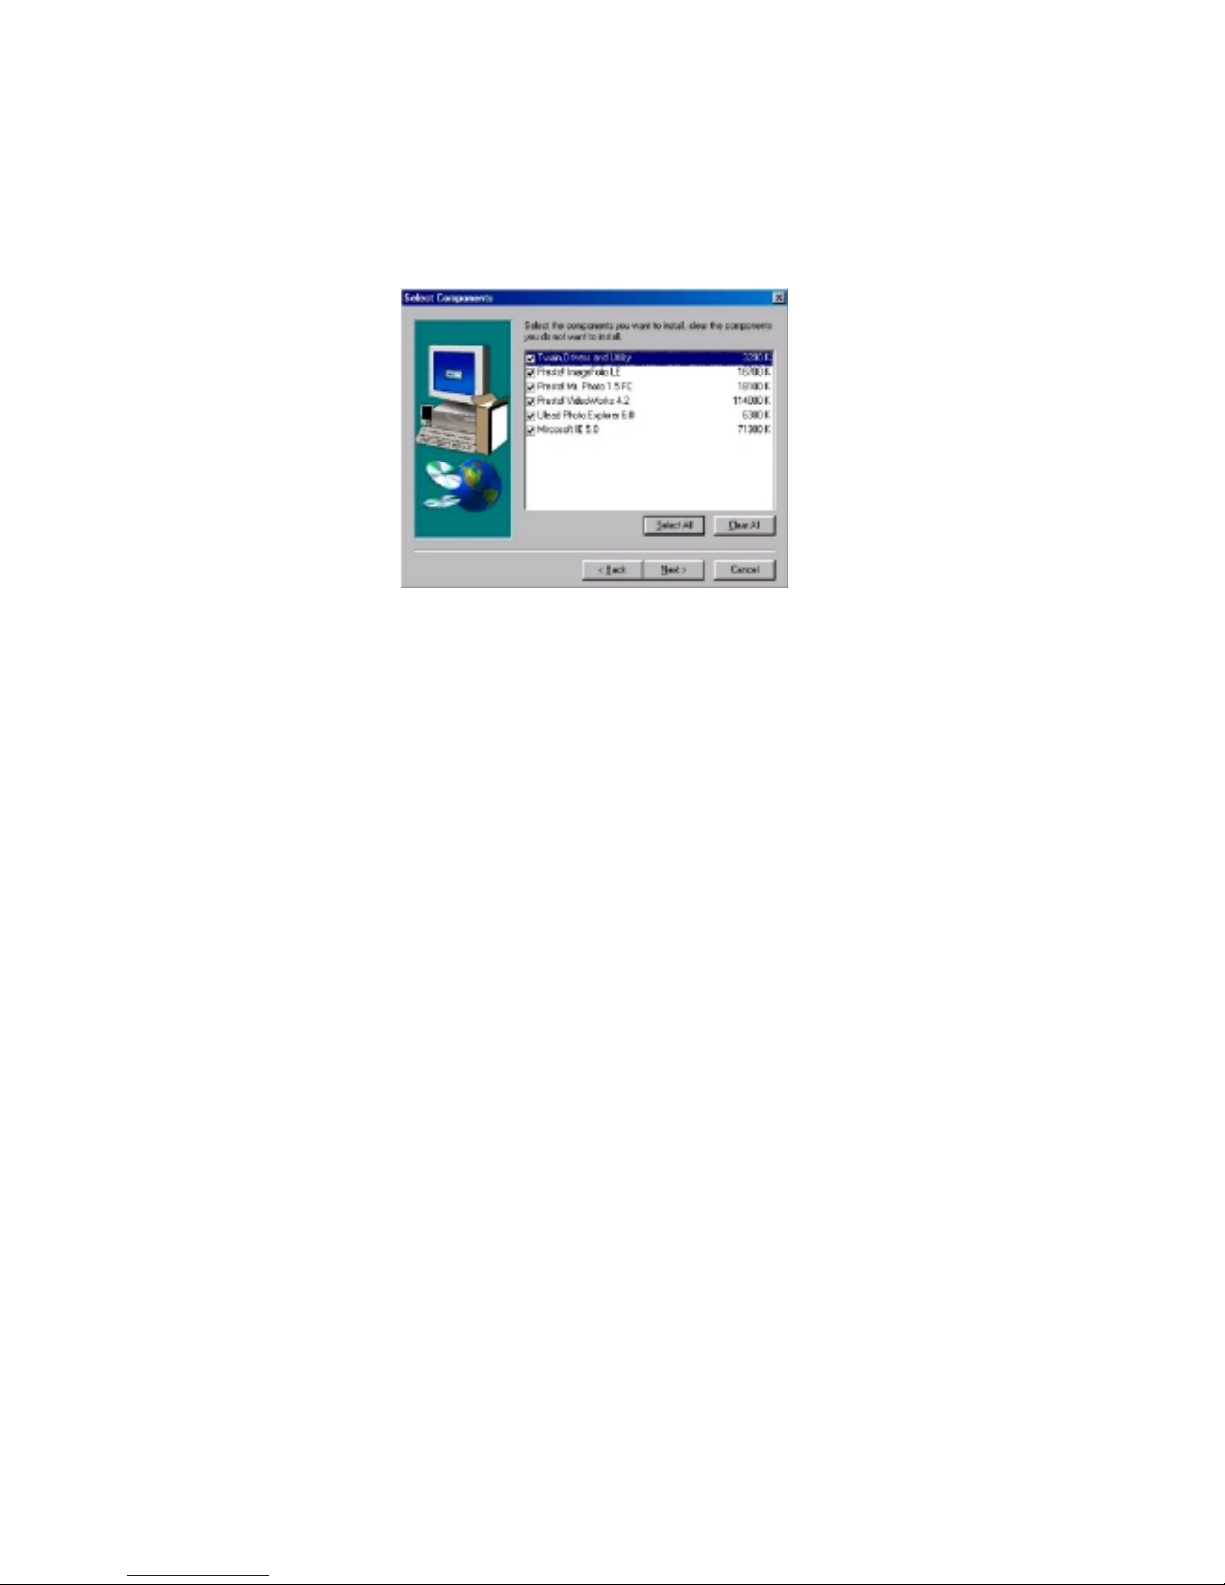
3. Select Typical or Custom installation
and click Continue.
4. The last screen in the setup wizard
asks you to restart Windows. After
this, you're ready to have fun with
your camera!
Note: If for any reason, the Setup
doesn’t run automatically, please use
the
Start menu Run command to
launch the Setup.exe file on the CDROM (e.g. d:\setup.exe).
If you try the above and it doesn't seem to work, please check out the
Troubleshooting section at the end of this manual.
Page 6
6
Applications included
• There are several software applications accompanied within the CD. You
can install any or all of them easily when launch the setup program.
With iCAM320 and bundled applications, you have not only more funs in
your life, but also make your communications full of color and live.
Web Chatting: Keep in touch with your friends! Using Microsoft
Netmeeting for on-line chatting over the INTERNET.
Web Sharing:
Share your personal video clips and pictures with
family and friends. Presto will help you in creating
and managing your video and photo archives.
Multimedia
Explorer:
Quickly viewing any multimedia file (such as image,
GIF animation, video or sound file) in your computer.
Photo Explorer provides the advantage of finding
images visually.
Page 7

USER’S MANUAL 7
Adjusting monitor display properties
Your monitor settings may need to be adjusted for better quality displays. To
check your monitor settings:
1. From the Windows Start menu (icon is on the Windows Taskbar), select
Settings followed by Control Panel
2. On the Control Panel double-click Display
3. In the Display window, click on the Settings tab
4. From the color palette field, select the desired setting (High Color or
True Color). For best display quality, we recommend you select True
Color.
A
djust monitor setting
under the Color
Page 8

8
Connecting the camera
Your camera features intelligent USB interface technology that guarantees a
simple installation process. The dynamic “Plug & Play” function (after setup,
you can unplug and re-plug your camera any time, without having to reinstall
the driver) provides automatic detection of your camera (Note: under
Windows 98, your camera will be automatically configured upon connection
to your PC). Simply follow the instructions below:
Except from connecting the USB port, there also audio connectors should be
plug into your sound card accordingly. Once your camera is connected, you
are ready to have fun with video-conferencing, video and still image
capturing!
Insert the camera cable
into the PC port labeled
USB
Page 9

USER’S MANUAL 9
Capturing Video Clips
Using iCAM320 video camera, you can record video and transfer them to
your favorite image or video editing programs. With this standard link, you
can also use your camera with your favorite videoconferencing program.
Helpful hints for recording video clips or capturing still images
The procedure you follow to record a video is simple and similar for most
popular application software. Please refer to the software manual or Help file
for details.
Once you have recorded your video clip, you can have fun with your clips in
the application program that you are working with. In the video editing
software, you can edit and enhance your video, send them out as video e-mail
or save them to disk for later use.
The following hints will help you achieve the best results with your camera:
Camera placement
• Position the camera so that the subject is centered
• Place the camera on a steady surface
Lighting
• Use sufficient lighting
• Place the light source behind the camera and facing the subject. If you
cannot avoid backlight (i.e. light source pointing directly at the camera
lens and behind the subject), you may enable backlight compensation
with the camera software
• Maintain consistent a lighting environment, i.e. do not mix fluorescent
and other light types
• Do not aim the camera directly at the light source
Page 10

10
Video format settings
Before recording, you can adjust the relative formats as your requirements.
There are different ways to capture your video clips. You can capture a single
frame as a still image. By setting the frame rate and capture time, multiple
frame capture and sequential capture can easily create a video file too.
In the bundled video capture program, select video format under Capture
menu. Please do refer the online help or read-me file of detail descriptions of
each item.
Page 11

USER’S MANUAL 11
You must select the Exposure Type as Band 60Hz or Band 50 Hz according
to the power source of your PC. In different areas there will need different
settings. The general setting for each area are as below:
- 50 HZ CHINA, HONG-KUNG, JAPAN, EUROPE.
- 60 Hz Taiwan, Korea, USA.
There are a number of items can be choose from depending on your particular
need. For Brightness & contrast, also known as tone correction commands,
these settings allow the image to be adjusted according to the lighting
environment. The contrast makes the difference between dark and light areas
more or less obvious.
In iCAM320, we had implemented an intelligent detector. After you complete
the installation, it can then adjust the light source automatically according to
the environment.
Page 12

12
Hue
The degree value of Hue change the HLS color wheel. The color sequence on the HLS
wheel is counter-clockwise from the red to the purple colors of the rainbow.
Saturation
The saturation control allows you to adjust the color content of your image. The higher the
saturation level (up to 256), the greater the color intensity. If you adjust the saturation level
to 0 (zero), the image will appear in grayscale mode.
Sharpen
Increasing the sharpness level will bring your image into sharper focus, lessening it will
blur your image. You might adjust the focus from iCAM320 directly. Rotating the circle
around the camera lens for the clearest possible pictures.
White Balance
To adjust color balance, you can do so either manually or select Auto White Balance and
the software automatically corrects the color. To do adjust the settings manually according
to one of the common light sources (incandescent, fluorescent or natural), adjust the
sliders until the image appears to your preference.
Focus adjustment
Page 13

USER’S MANUAL 13
Acquiring images through
TWAIN
To acquire pictures from within the included image editing program, other
image editing programs, or other programs that can accept images, you can
do so via a standard link called TWAIN. Any program that supports TWAIN
can access the camera and make full use of its functions. Such programs
include MGI PhotoSuite, Adobe PhotoShop, CorelDraw, Ulead Photo
Explorer, MetaCreation Painter, Adobe PhotoDeluxe, Ulead PhotoImpact,
NewSoft Presto! PageManager, etc. This chapter describes the TWAIN
interface in detail and explains all the camera settings.
Where to find the camera commands
After installing the camera and associated software, you should be able to
find the camera commands, as follows:
1. From within the Twain-compliant
application, choose
Select Source
in the
File menu and the Select
Source dialog appears. Select the
name of the camera (and, if
applicable, the correct model
number). The dialog box closes.
2. Choose
Acquire in the File menu,
and the TWAIN window opens:
Page 14

14 CAPTURING IMAGES THROUGH TWAIN
Image format settings
Before acquiring, there are a number of image size can be selected as your need.
Each display size is represented in pixels:
Capturing & transferring images
Regardless of what you want to do with your camera, once the TWAIN
window is open, the process is the same:
1. Place the camera on a steady surface and position the camera so that the
subject is entered.
2. Adjust the focus for the clearest possible pictures.
3. Click the take picture button on the TWAIN window.
4. Select the desired pictures and click Transfer To Application button to
transfer the pictures to your application for future editing or posting.
When you want to return to the TWAIN-compliant application, click the Exit
button.
Page 15

15
Appendices
Troubleshooting
This section provides information on maintaining the camera and helps you
solve problems you might encounter when using the camera. If you continue
to experience problems, or the problem you face is not covered in this guide,
please contact your dealer.
The camera does not work
Check to make sure you have connected the camera correctly to you PC.
"No capture device found" message appears
A. Make sure the camera and PC are connected properly.
B. Locate the camera under the Windows Control Panel: double-click
Multimedia, click the Devices tab, and select Video Capture Devices.
If the camera is not listed, unplug the camera, re-plug it and reinstall
driver (see Installing the software for instructions). If the camera is listed,
but other cameras are also installed, disable all other cameras, make sure
your camera is enabled and try again.
C. To remove the driver, go to Windows Control Panel, double-click System,
click the Device Manager tab, and select Image Devices. Select the driver
for your camera, click Remove, and then reinstall the driver (see
Installing the software for instructions).
"Camera not connected" message appears
A. Unplug the camera and re-plug it. Restart your PC.
B. Reinstall the software.
Image display window appears black, blue, green or no image appears in
the window
Make sure the camera cable is firmly connected and the lens is clean and not
obstructed by other objects.
No camera image or no motion in video
Unplug the camera and re-plug it. Restart your PC.
Page 16

16
After installing the camera software, the camera is not detected by the
software
Some PC’s have been shipped without the USB Port mode enabled. To
enable the USB port, you must run the system CMOS setup program. This
setup program is only available when you power up the computer. The
procedure is different for each system so you will need to refer to your PC
manual for more details.
Blurred video/still image
A. Adjust the manual focus on the camera hardware.
B. Adjust the sharpness settings with the software
Camera software stops working after installing other application
programs
Installing other application will modify the system register so that the camera
no longer works. If this occurs, please reinstall the camera software from the
product CD-ROM.
If you have any questions regarding the bundled application software, you
may contact the respective software companies directly (please refer to
software manuals for contact information).
Camera maintenance
• Keep the camera away from moisture and extreme temperature
• Clean the outside of the camera with a clean, dry cloth
• Never use harsh or abrasive cleaners or organic solvents on the camera or
on any of its parts.
• Never disassemble or touch the inside of the camera. This could result in
electrical shock and void your warranty coverage.
To remove dust and dirt, blow gently on the lens. Moisten the lens by
breathing lightly on it. Wipe the lens gently with a soft lint-free cloth or an
untreated lens-cleaning tissue. Do not use a cleaning solution unless it is
designed specifically for camera lenses. Do not wipe the camera lens with
chemically treated eyeglass lens tissues as it may scratch the lens.
Page 17

17
Index
A
Acquiring images through
TWAIN, 13
After installing the camera
software, the camera is not
detected by the software, 16
Appendices, 15
B
Blurred video/still image, 16
Brightness, 11
C
The camera does not work, 15
Camera maintenance, 16
“Camera not connected” message
appears, 15
Camera placement, 9
Camera software stops working
after installing other application
programs, 16
Capturing & transferring images,
14
Check out your system –
Windows 95/98, 4
Connecting the camera, 8
Contrast, 11
Copyright Notice & FCC
Statement, 2
H
Hue, 12
Helpful hints, 9
I
Image display window appears
black, blue, green or no image
appears in the window, 15
Image format settings, 14
Installing the software, 5
Introduction, 3
L
Lighting, 9
M
Monitor adjustment, 7
N
“No capture device found”
message appears, 15
No camera image or no motion in
video, 15
S
Saturation, 12
Sharpen, 12
Page 18

18
T
TWAIN, 15
Troubleshooting, 15
W
Where to find the camera
commands, 13
White balance, 12
V
Video format settings, 10
 Loading...