

Page 1

Visioneer
9650 Scanner
Installation Guide
FOR WINDOWS
Page 2

COPYRIGHT INFORMATION
Copyright © 2003 Visioneer, Inc.
Reproduction, adaptation, or translation without prior written permission is prohibited, except as allowed under the copyright laws.
The Visioneer brand name and logo are registered trademarks of Visioneer, Inc. The PaperPort brand name and logo are registered trademarks of ScanSoft, Inc.
Microsoft is a U.S. registered trademark of Microsoft Corporation. Windows is a trademark of Microsoft Corporation. TextBridge is a registered trademark of
ScanSoft, Inc. ZyINDEX is a registered trademark of ZyLAB International, Inc. ZyINDEX toolkit portions, Copyright © 1990-1998, ZyLAB International,
Inc. All Rights Reserved. All other products mentioned herein may be trademarks of their respective companies.
Information is subject to change without notice and does not represent a commitment on the part of Visioneer. The software described is furnished under a
licensing agreement. The software may be used or copied only in accordance with the terms of such an agreement. It is against the law to copy the software on
any medium except as specifically allowed in the licensing agreement. No part of this document may be reproduced or transmitted in any form or by any
means, electronic or mechanical, including photocopying, recording, or information storage and retrieval systems, or translated to another language, for any
purpose other than the licensee's personal use and as specifically allowed in the licensing agreement, without the express written permission of Visioneer.
Part Number: 05-0486-300
Restricted Rights Legend
Use, duplication, or disclosure is subject to restrictions as set forth in contract subdivision (c)(1)(ii) of the Rights in Technical Data and Computer Software
Clause 52.227-FAR14. Material scanned by this product may be protected by governmental laws and other regulations, such as copyright laws. The customer
is solely responsible for complying with all such laws and regulations.
FCC Radio Frequency Interference Statement
This equipment has been tested and found to comply with the limits for the class B digital device, pursuant to part 15 of the FCC Rules. These limits are
designed to provide reasonable protection against interference in a residential installation. This equipment generates, uses and can radiate radio frequency
energy and if not installed, and used in accordance with the instructions, may cause harmful interference to radio communications. However, there is no
guarantee that interference will not occur in a particular installation. If this equipment does cause harmful interference to radio or television reception, which
can be determined by turning the equipment off and on, the user is encouraged to try and correct the interference by one or more of the following measures:
• Reorient or relocate the receiving antenna.
• Increase the separation between the equipment and receiver.
• Connect the equipment into an outlet on a circuit different from that to which the receiver is connected.
• Consult the dealer or an experienced radio/TV technician for help.
This equipment has been certified to comply with the limits for a class B computing device, pursuant to FCC Rules. In order to maintain compliance with
FCC regulations, shielded cables must be used with this equipment. Operation with non-approved equipment or unshielded cables is likely to result in
interference to radio and TV reception. The user is cautioned that changes and modifications made to the equipment without the approval of manufacturer
could void the user's authority to operate this equipment.
This device complies with part 15 of the FCC Rules. Operation is subject to the following two conditions: (1) This device may not cause harmful interference,
and (2) this device must accept any interference received, including interference that may cause undesired operation.
Page 3

T
ABLE OF CONTENTS
TABLE OF CONTENTS
Welcome . . . . . . . . . . . . . . . . . . . . . . . . . . . . . . . . . . . . . . . . . . . . . . 1
What’s in the Box . . . . . . . . . . . . . . . . . . . . . . . . . . . . . . . . . . . . . . . 1
The Visioneer 9650 Scanner . . . . . . . . . . . . . . . . . . . . . . . . . . . . . . . 2
What You Need . . . . . . . . . . . . . . . . . . . . . . . . . . . . . . . . . . . . . . . . . 4
Documentation . . . . . . . . . . . . . . . . . . . . . . . . . . . . . . . . . . . . . . . . . 5
i
Installing
. . . . . . . . . . . . . . . . . . . . . . . . . . . . . . . . . . . . . . . . . . . . . . 6
Step 1: Assemble the Scanner . . . . . . . . . . . . . . . . . . . . . . . . . . . . . . . 6
Step 2: Connect and Power On the Scanner . . . . . . . . . . . . . . . . . . . 9
Step 3: Install the Software . . . . . . . . . . . . . . . . . . . . . . . . . . . . . . . . 10
Step 4: Connect the USB Cable . . . . . . . . . . . . . . . . . . . . . . . . . . . . 14
Scanning
. . . . . . . . . . . . . . . . . . . . . . . . . . . . . . . . . . . . . . . . . . . . . 16
Loading Documents to Scan . . . . . . . . . . . . . . . . . . . . . . . . . . . . . . 16
Scanning Items . . . . . . . . . . . . . . . . . . . . . . . . . . . . . . . . . . . . . . . . 18
Your Scanner and the TWAIN Standard . . . . . . . . . . . . . . . . . .18
If your computer is running Windows ME or XP . . . . . . . . . . . 18
Scanning from Windows 98SE, ME, 2000, or XP . . . . . . . . . . . . . . 19
Adjusting the Image with the Scan Manager . . . . . . . . . . . . . . . . . .24
Adjusting the Color Mode, Resolution, Brightness
and Contrast . . . . . . . . . . . . . . . . . . . . . . . . . . . . . . . . . . . . . 24
Adjusting the Output Size . . . . . . . . . . . . . . . . . . . . . . . . . . . . . 26
Manually Setting the Scan Area . . . . . . . . . . . . . . . . . . . . . . . . . 28
Reversing the Image . . . . . . . . . . . . . . . . . . . . . . . . . . . . . . . . . . 30
Adjusting Color and Gray Images . . . . . . . . . . . . . . . . . . . . . . . 31
Adjusting Color Settings . . . . . . . . . . . . . . . . . . . . . . . . . . . . . . 33
Scanning from Windows ME or XP . . . . . . . . . . . . . . . . . . . . . . . . . 38
Maintenance
. . . . . . . . . . . . . . . . . . . . . . . . . . . . . . . . . . . . . . . . . . 43
Clearing Paper Jams . . . . . . . . . . . . . . . . . . . . . . . . . . . . . . . . . . . . . 43
Page 4

T
ii
ABLE OF CONTENTS
Care and Maintenance . . . . . . . . . . . . . . . . . . . . . . . . . . . . . . . . . . . 44
Cleaning the Scanner Glass . . . . . . . . . . . . . . . . . . . . . . . . . . . . 44
Cleaning the Automatic Document Feeder . . . . . . . . . . . . . . . . 44
Replacing the ADF Pad Assembly . . . . . . . . . . . . . . . . . . . . . . . 45
Troubleshooting . . . . . . . . . . . . . . . . . . . . . . . . . . . . . . . . . . . . . . . 47
How to Uninstall Your Scanner . . . . . . . . . . . . . . . . . . . . . . . . . . . . 50
Step 1: Uninstalling the Visioneer 9650 Software . . . . . . . . . . .50
Step 2: Uninstalling the PaperPort Software . . . . . . . . . . . . . . . 51
Visioneer 9650 Scanner Specifications . . . . . . . . . . . . . . . . . . . . . . . 52
Visioneer 9650 Scanner Parts List . . . . . . . . . . . . . . . . . . . . . . . . . . 53
Index
. . . . . . . . . . . . . . . . . . . . . . . . . . . . . . . . . . . . . . . . . . . . . . . . 55
Page 5

W
ELCOME
Your new Visioneer 9650 USB scanner can scan stacks of items or single
items, and place their images on your computer.
Warning
: Do not plug in the USB cable until after you have
installed the software. Carefully follow the steps and sequence
described in the installation procedure beginning on page 6.
HAT’S IN THE BOX
W
Before starting the assembly and installation, check the contents of the
box to make sure that all parts are included. If any items are missing or
damaged, contact the dealer where you purchased the scanner.
Visioneer 9650 Scanner Power cordUSB cable
Paper Guide Paper Guide Extension
Replacement ADF Pad
Installation CD
ISIONEER
V
Paper Stop
Installation Guide, Quick Install Card,
and Technical Support Card
9650 S
CANNER INSTALLATION GUIDE
Power supply
1
Page 6
2
V
ISIONEER
9650 S
CANNER INSTALLATION GUIDE
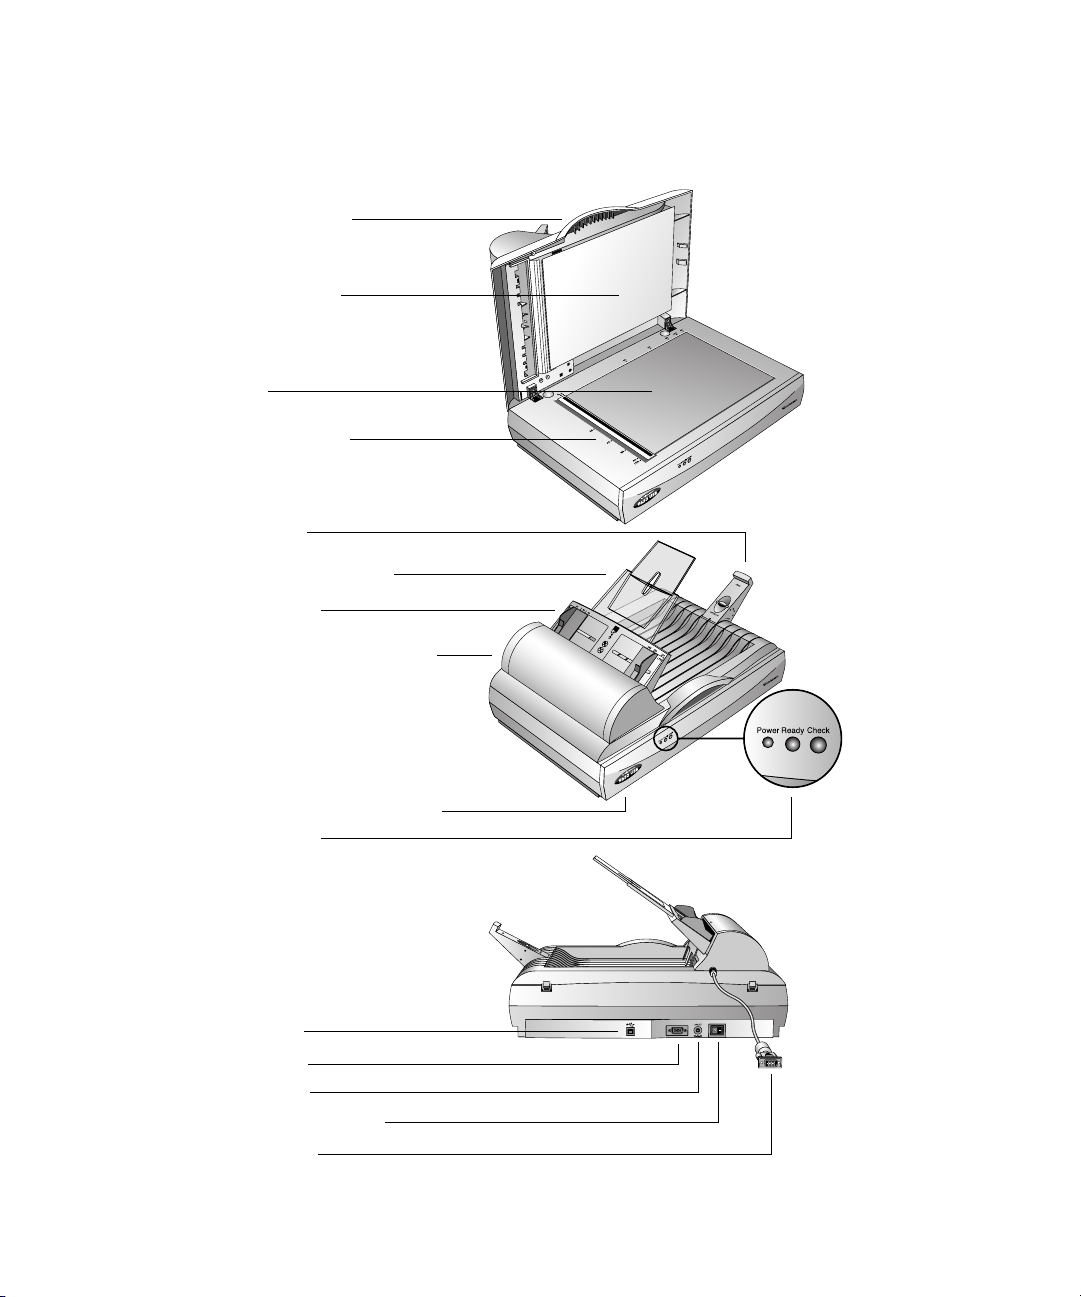
THE V
Document Cover
Document Pad
Glass
Reference Frame
Paper Stop
Paper Guide Extension
Paper Guide
Automatic Document Feeder
ISIONEER
9650 S
CANNER
Lock (on underside of scanner)
Status Lights
USB Port
ADF port
Power jack
Power On/Off Switch
ADF Cable
Page 7

THE V
ISIONEER
9650 S
CANNER
Document Cover—Protects the document from light and contamination during scanning.
Document Pad—Helps to secure the document in place on the scanner glass.
Reference Frame—Place items face down within this frame. Markings on the border of the
frame show where to align various paper sizes.
Glass—Place items face down aligned at the upper left corner of the glass.
Paper Stop—Holds items in place as they are ejected from the Automatic Document Feeder.
Adjust the stop for either letter-sized or legal-sized pages.
Paper Guide Extension—Unfolds to support multiple pages to scan.
Paper Guide—Holds pages in place. Adjust to fit the size of the paper to scan.
Automatic Document Feeder (ADF)—Feeds a stack of pages onto the glass for scanning.
3
Lock—Locks or unlocks the scanning head; located on the underside of the scanner.
Status Lights—Shows the scanner’s status. Blinking Green light: scanner is preparing itself
or the lamp is warming up. Steady Green light: the scanner is on and ready to scan. See
“Troubleshooting” on page 47 for additional details.
USB Port—Connects the scanner to the computer.
ADF Port—Connects the ADF cable from the Automatic Document Feeder to the scanner.
Power Jack—Connects the power cord to the scanner.
Power On/Off Switch—Turns the scanner’s power on and off.
ADF Cable—Supplies power from the scanner body to the Automatic Document Feeder.
Page 8

4
V
ISIONEER
9650 S
CANNER INSTALLATION GUIDE
W
HAT YOU NEED
An IBM-compatible Pentium PC with:
A CD-ROM drive
■
An available Universal Serial Bus (USB) port; 1.1 or 2.0
■
Microsoft Windows operating system: 98SE, 2000, ME, or XP
■
Available internal memory (RAM) as follows:
■
64 MB or more
■
128 MB recommended for Windows XP
■
200 MB of free hard disk space
■
Note
: The new USB 2.0 ports operate at higher speeds than USB 1.1
ports. If your computer is not equipped with USB 2.0 ports, you can
add them with the Visioneer Hi-Speed USB 2.0 PCI Card. Visit the
Visioneer web site at www.visioneer.com for ordering information, or
contact the dealer where you purchased your Visioneer 9650 USB
scanner. However, you do not have to add USB 2.0 ports to the
computer. Your scanner automatically works with both USB 1.1 and
USB 2.0 ports.
A VGA or SVGA Monitor
Recommended settings for your monitor are as many colors as
possible—High Color (16-bit), True Color (24-bit or 32-bit). Set the
resolution to at least 800 by 600 pixels.
To set your monitor’s colors and resolution, open the Windows Control
Panel, double-click Display, and then click the Settings tab.
Page 9

D
OCUMENTATION
D
OCUMENTATION
Your scanner is delivered with the following documentation:
Quick Install Card—abbreviated installation instructions.
■
Visioneer 9650 Scanner Installation Guide—on the Installation CD;
■
contains detailed installation, scanning, configuration, and
maintenance information.
Online Help—for the scanner, Scan Manager, and PaperPort
■
software applications.
5
Page 10
6
V
ISIONEER
9650 S
CANNER INSTALLATION GUIDE
Installing
Warning: Do not plug in the USB cable until after you have
installed the software. Complete the installation steps in the order
described in the installation procedure below.
Installation is a quick, four-step process:
1. Assemble the scanner
2. Connect and power on the scanner
3. Install the software
4. Connect the USB cable to your computer
S
1: A
TEP
SSEMBLE THE SCANNER
All the components to assemble the scanner are included in the box.
To assemble the scanner:
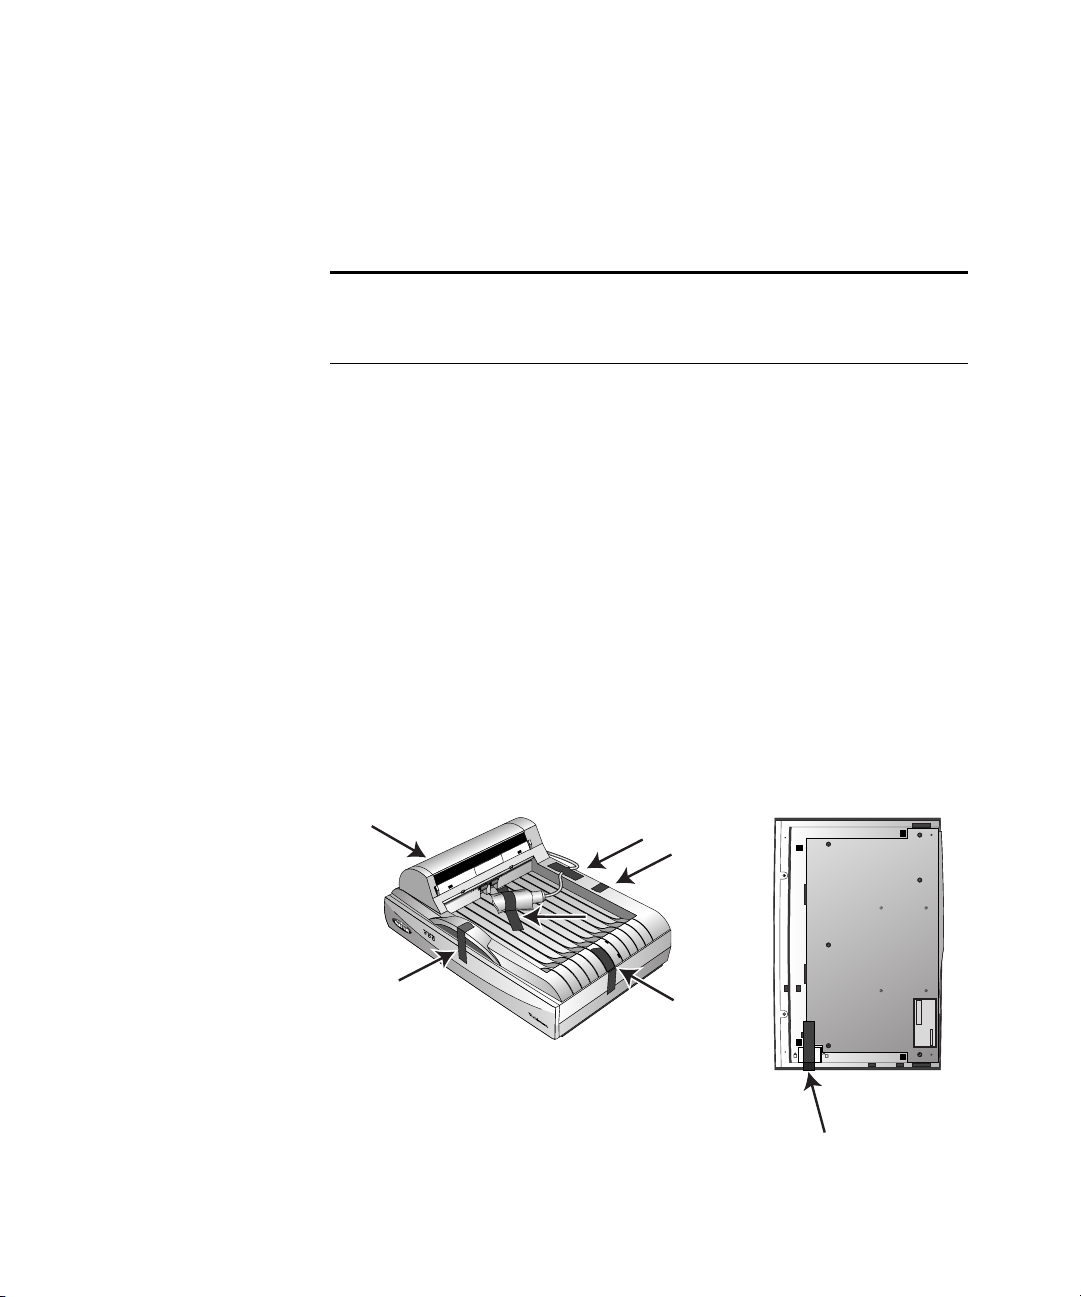
1. Remove all shipping tape from the top and bottom of the scanner.
Page 11
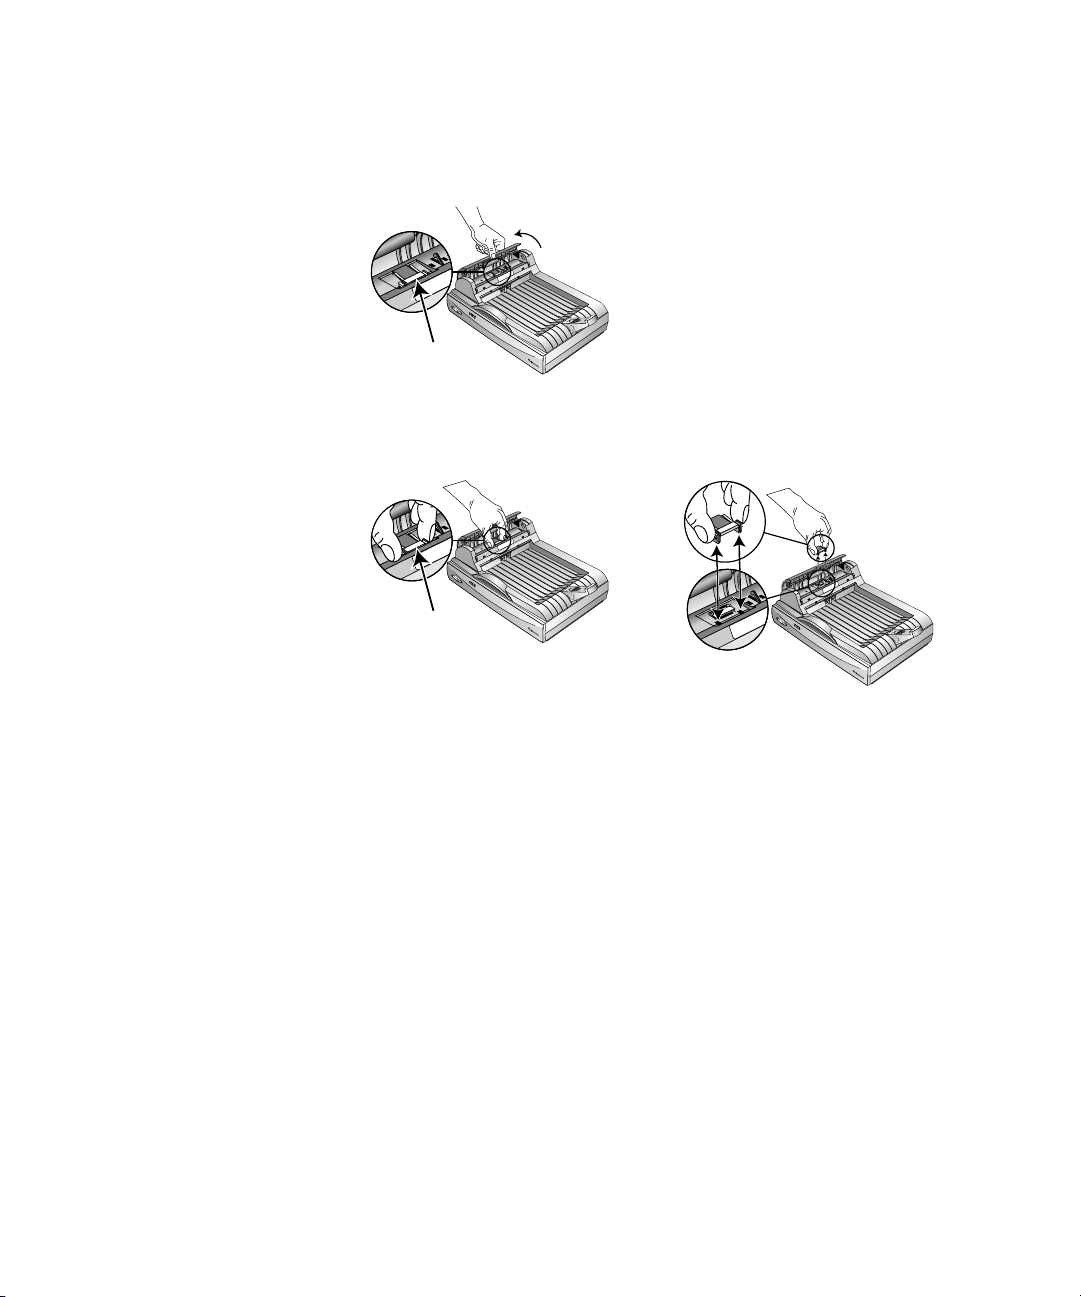
STEP 1: ASSEMBLE THE SCANNER 7
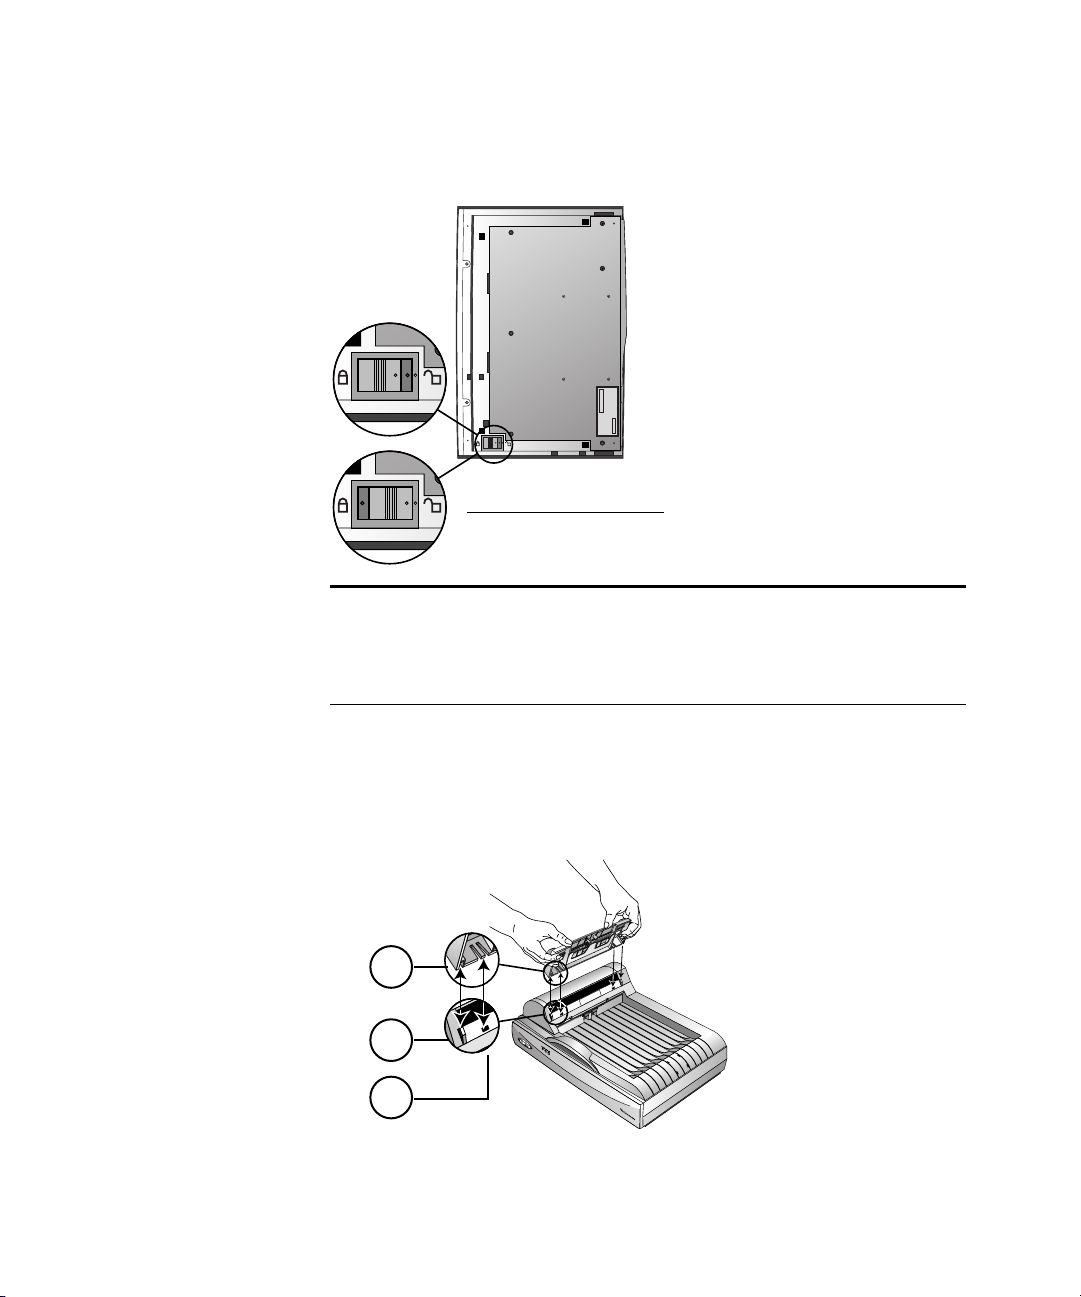
2. Slide the locking tab on the bottom of the scanner to its unlocked
position.
Unlocked position
Note: The locking tab protects the scanner’s scan head by holding it
securely in position. Lock the scanner when transporting it from one
location to another, but always remember to unlock it before
scanning. The scanner will not scan when locked.
3. Insert the slots (A) on the Paper Guide onto their tabs (B) on the
scanner and slide the Guide down into place. The catch tabs (C)
“snap” into place. Refer to the picture on page 2 to see the location
of the assembled parts.
A
B
C
Page 12
8 VISIONEER 9650 SCANNER INSTALLATION GUIDE
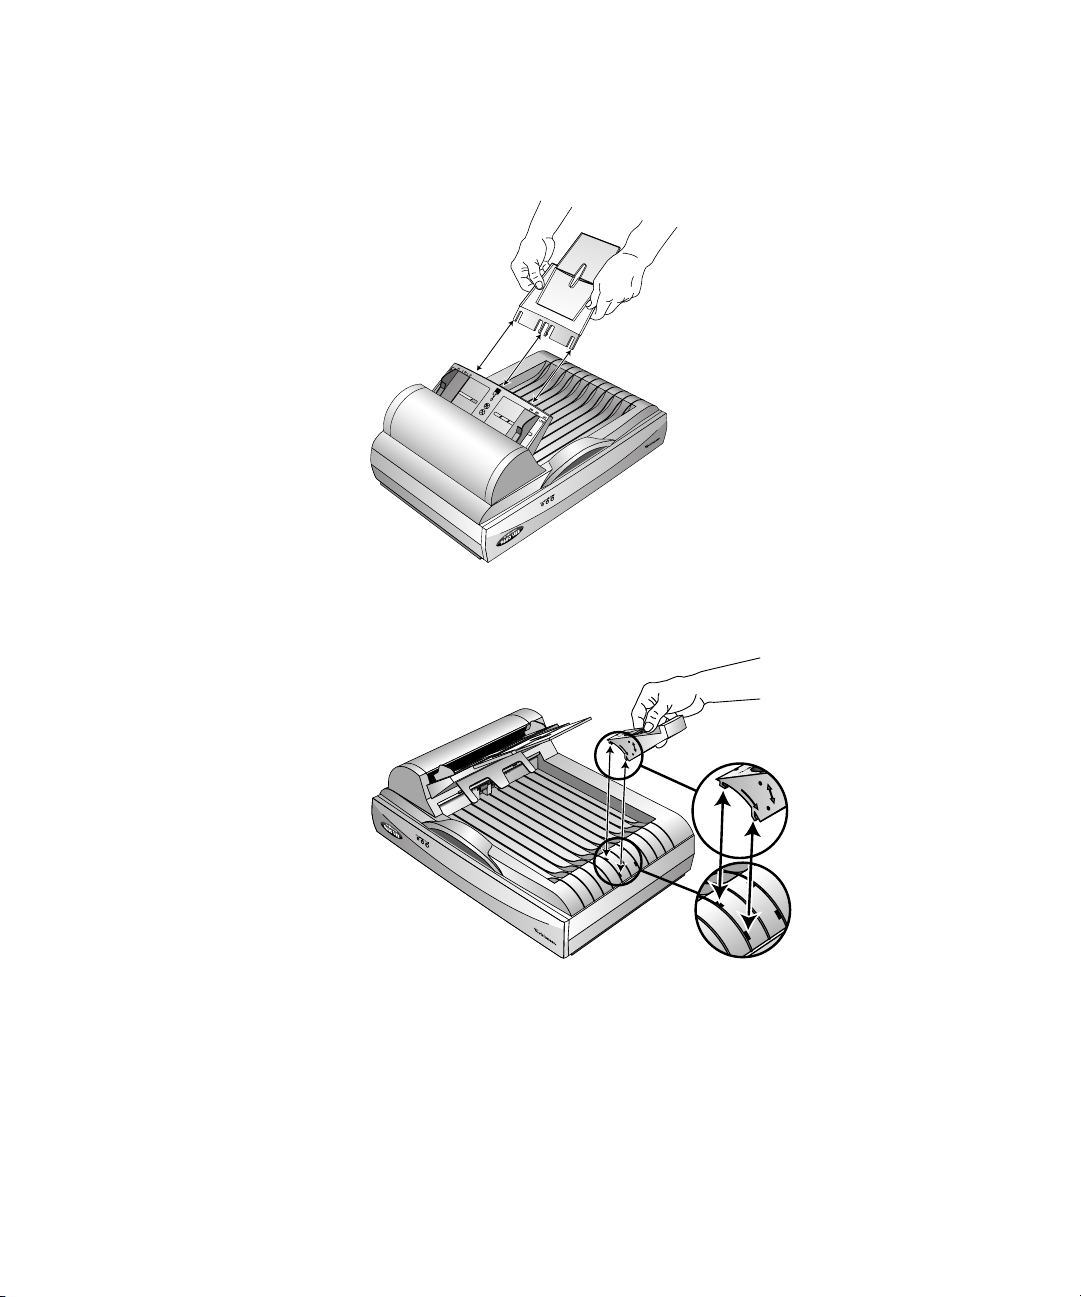
4. Insert the Paper Guide Extension into the Paper Guide and “snap”
its tabs into place.
5. Insert the Paper Stop onto the back of the scanner and slide it
downward to “snap” its tabs into place.
6. Proceed to “Step 2: Connect and Power On the Scanner” to
connect the ADF and power cables and turn on the power.
Page 13
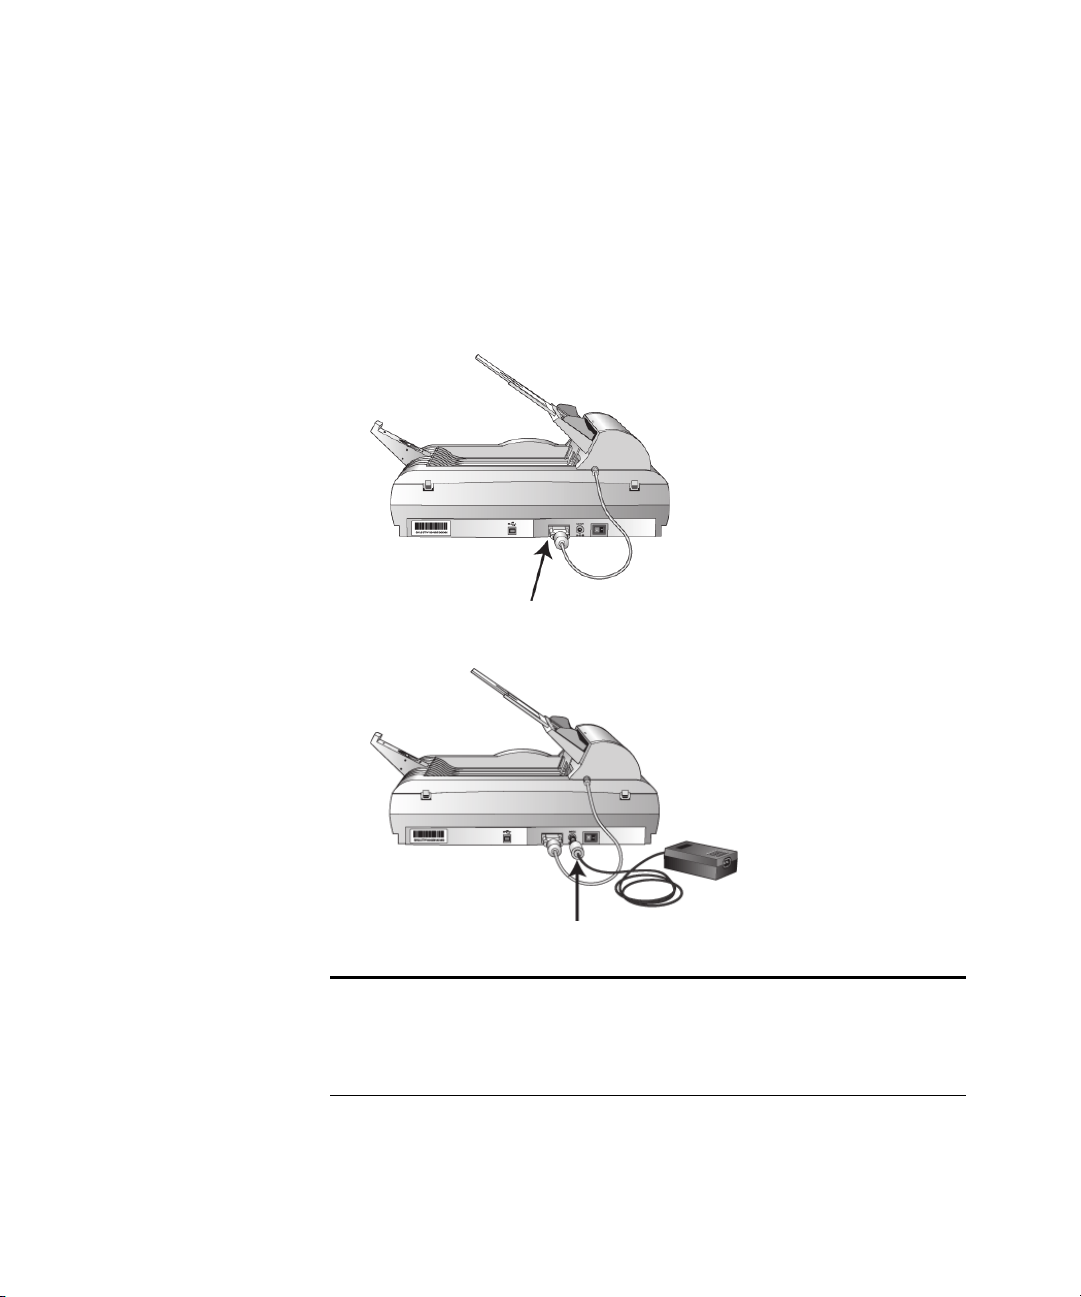
STEP 2: CONNECT AND POWER ON THE SCANNER 9
STEP 2: CONNECT AND POWER ON THE SCANNER
Before installing the software, connect the ADF cable, connect the
scanner to a power source, and turn the power on.
To connect the scanner and turn the power on:
1. Plug the ADF cable into the ADF port on the body of the scanner.
Plug the power supply into its power port on the scanner.
2.
Note: Only use the power supply (ADP-20LB Rev. B made by Delta
Electronics, Inc.) included with your scanner. Connecting any other
type of power supply may damage your scanner and will void its
warranty.
Page 14
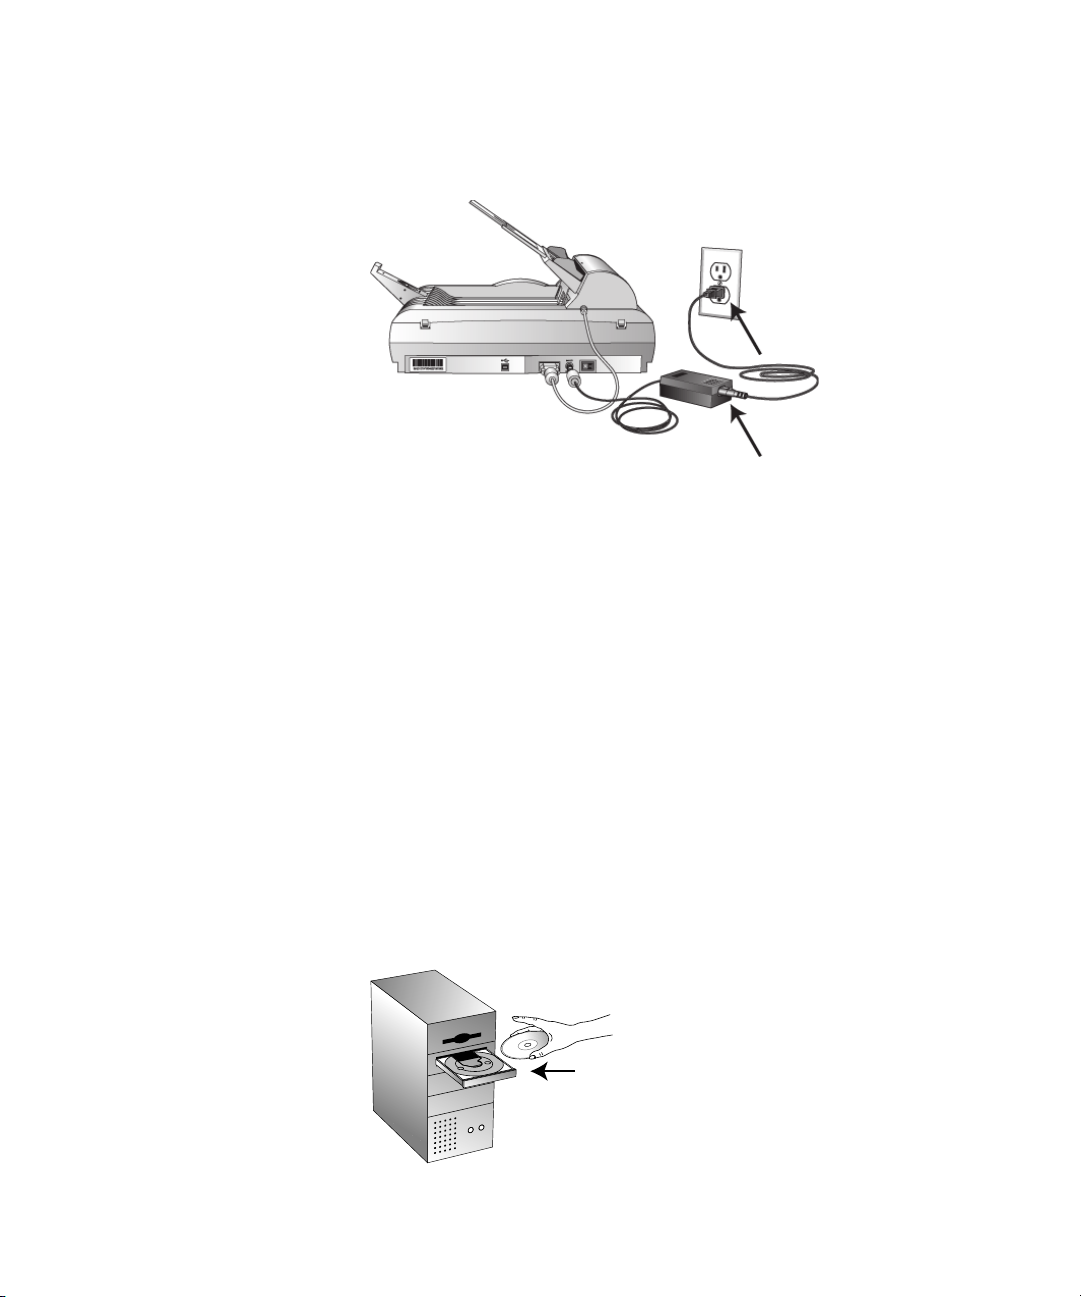
10 VISIONEER 9650 SCANNER INSTALLATION GUIDE
3. Plug the power cord into the power supply and then into a wall
outlet.
4. Turn on the power switch, located on the back of the scanner to the
right of the power port.
The status light comes on and flashes indicating that the scanner is
receiving power.
STEP 3: INSTALL THE SOFTWARE
The Installation CD includes all the necessary installation files, as well
as the PaperPort software files and other software files.
To install the software:
1. Start Microsoft Windows and make sure that no other applications
are running.
2. Insert the installation CD into your computer’s CD-ROM drive.
The CD automatically starts.
Page 15

STEP 3: INSTALL THE SOFTWARE 11
Note: If the CD does not automatically start, check the following:
■ Make sure the CD drive’s door is completely shut.
■ Click the My Computer icon on your desktop. Double-click the
icon for your CD-ROM drive. In the list of files on the CD,
double-click the file named START32.EXE.
3. On the installation menu, select Install Products.
The next installation screen appears.
Page 16

12 VISIONEER 9650 SCANNER INSTALLATION GUIDE
4. Click in the box for ScanSoft PaperPort and Scanner.
If you want to also install the other software, click their boxes as
well.
5. Click Install Now.
6. On the PaperPort 9.0 Welcome window, click Next.
7. On the License Agreement window, read the ScanSoft license
agreement. If you accept the terms, select I accept the terms in the
license agreement, and then click Next.
8. On the Customer Information window, accept the current values or
enter new information, and then click Next.
9. On the Setup Type window, click Next.
10. Click Install to begin the installation.
11. On the Product Registration window, do one of the following:
■ Select Register online, click OK, and then follow the
registration instructions.
■ Select Print registration form, click OK, and then follow the
instructions to complete and print the registration form.
■ Select Remind me in 7 days and click OK.
Page 17
STEP 3: INSTALL THE SOFTWARE 13
12. On the Visioneer License Agreement window, read the license
agreement. If you accept the terms, select I Agree, and click Next.
13. On the Visioneer Product Registration window, complete the
required information, and then click Register.
Note that the serial number of you scanner is located on the side of
the scanner body.
Serial Number
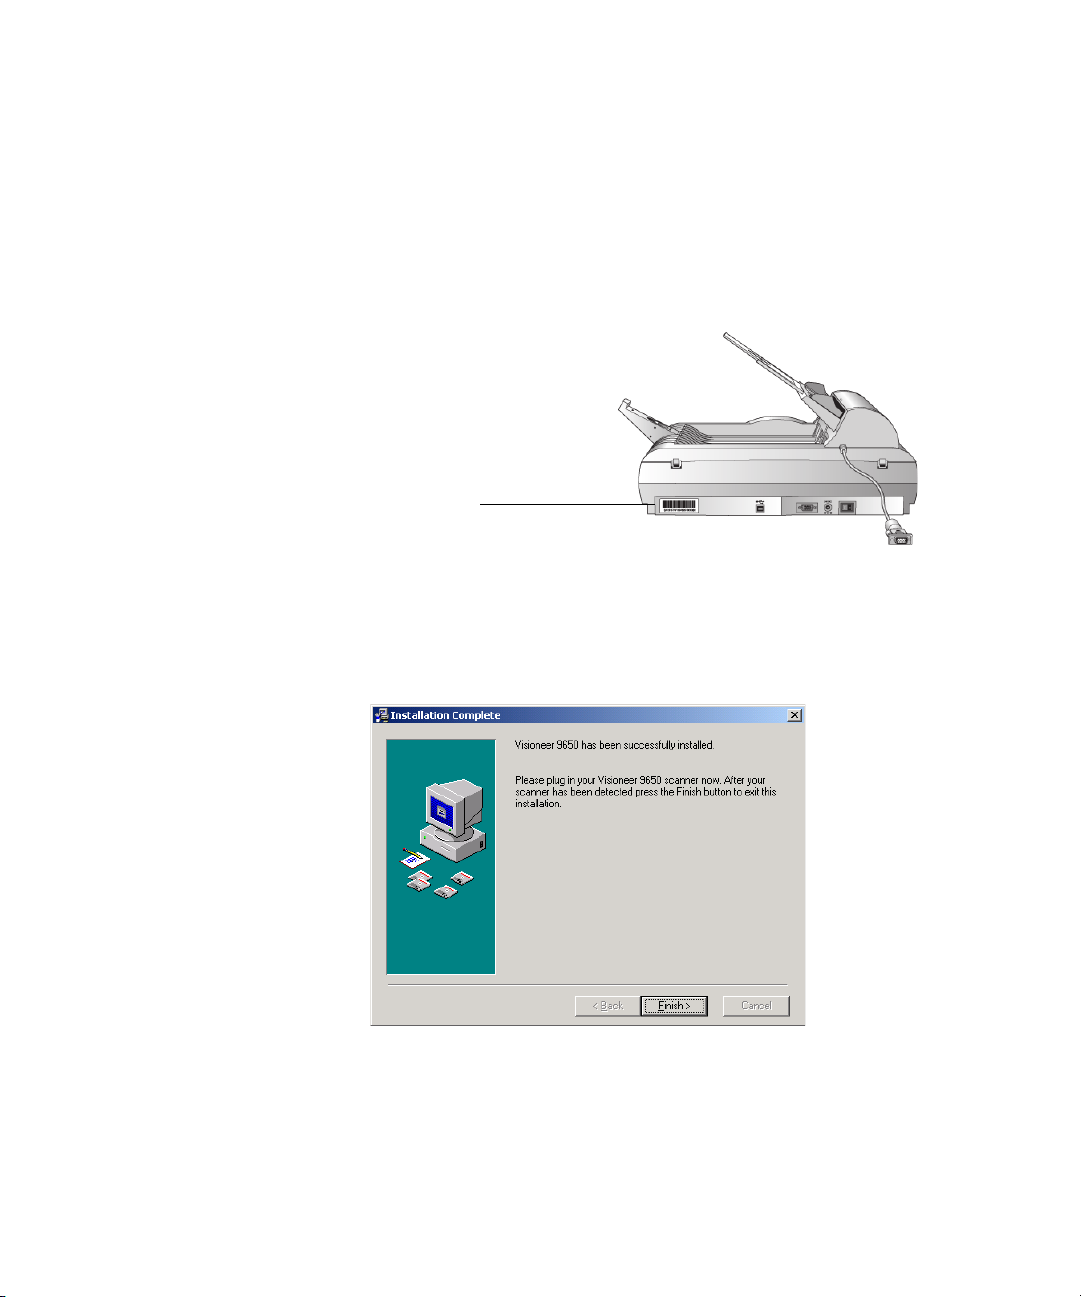
14. On the Welcome window, click Next to start the installation.
15. When you see this Installation Complete window, STOP. Do NOT
click Finish yet. Leave the window open and proceed to the next
section,“Step 4: Connect the USB Cable”.
Page 18
14 VISIONEER 9650 SCANNER INSTALLATION GUIDE
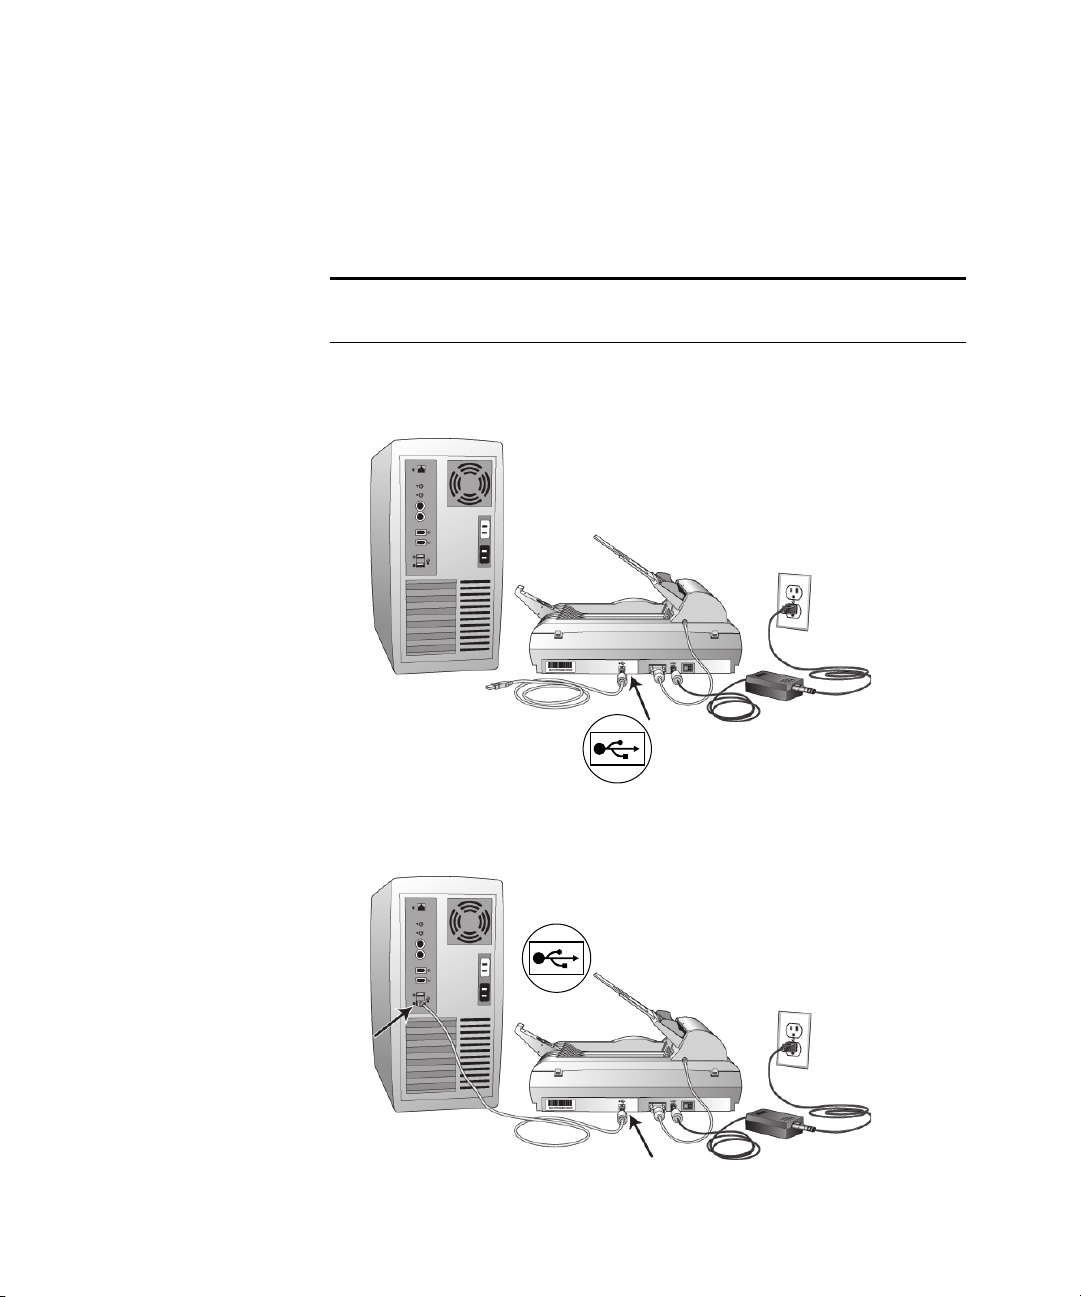
STEP 4: CONNECT THE USB CABLE
Your Visioneer 9650 scanner connects to any available USB port.
Check your computer’s manual for the USB port locations.
Note: You do not have to shut off the power to your computer when
connecting the scanner to a USB port.
1. Plug the USB cable into the USB port on the scanner. The USB
port is identified by its USB symbol.
2. Plug the USB cable into a USB port on the computer, keyboard, or
into a USB hub.
Page 19

STEP 4: CONNECT THE USB CABLE 15
If the plug does not attach easily, make sure that you are plugging it
in correctly. Do not force the plug into the connection.
Note: If you have not installed the software, unplug the USB cable
from the computer and install the software now. When the software
installation is complete, a message tells you to connect the scanner.
Your computer recognizes that a scanner is plugged into the USB
port and loads the appropriate software to run the scanner.
3. Now click Finish on the Installation Complete window.
4. Click Finish on the InstallShield Wizard Completed window.
5. When installation is finished, click Exit on the Main Menu and
then restart your computer.
6. If you removed the CD from the CD drive and want to install
other software, reinsert the CD into the drive.
In addition to installing the other software from the CD, you can
also view and print the User Guides and Installation Guide.
Page 20
16 VISIONEER 9650 SCANNER INSTALLATION GUIDE
Scanning
This section explains how to scan documents with your Visioneer 9650
scanner.
LOADING DOCUMENTS TO SCAN
Your scanner can scan a stack of documents or a single item.
To load a stack of documents in the Automatic Document Feeder:
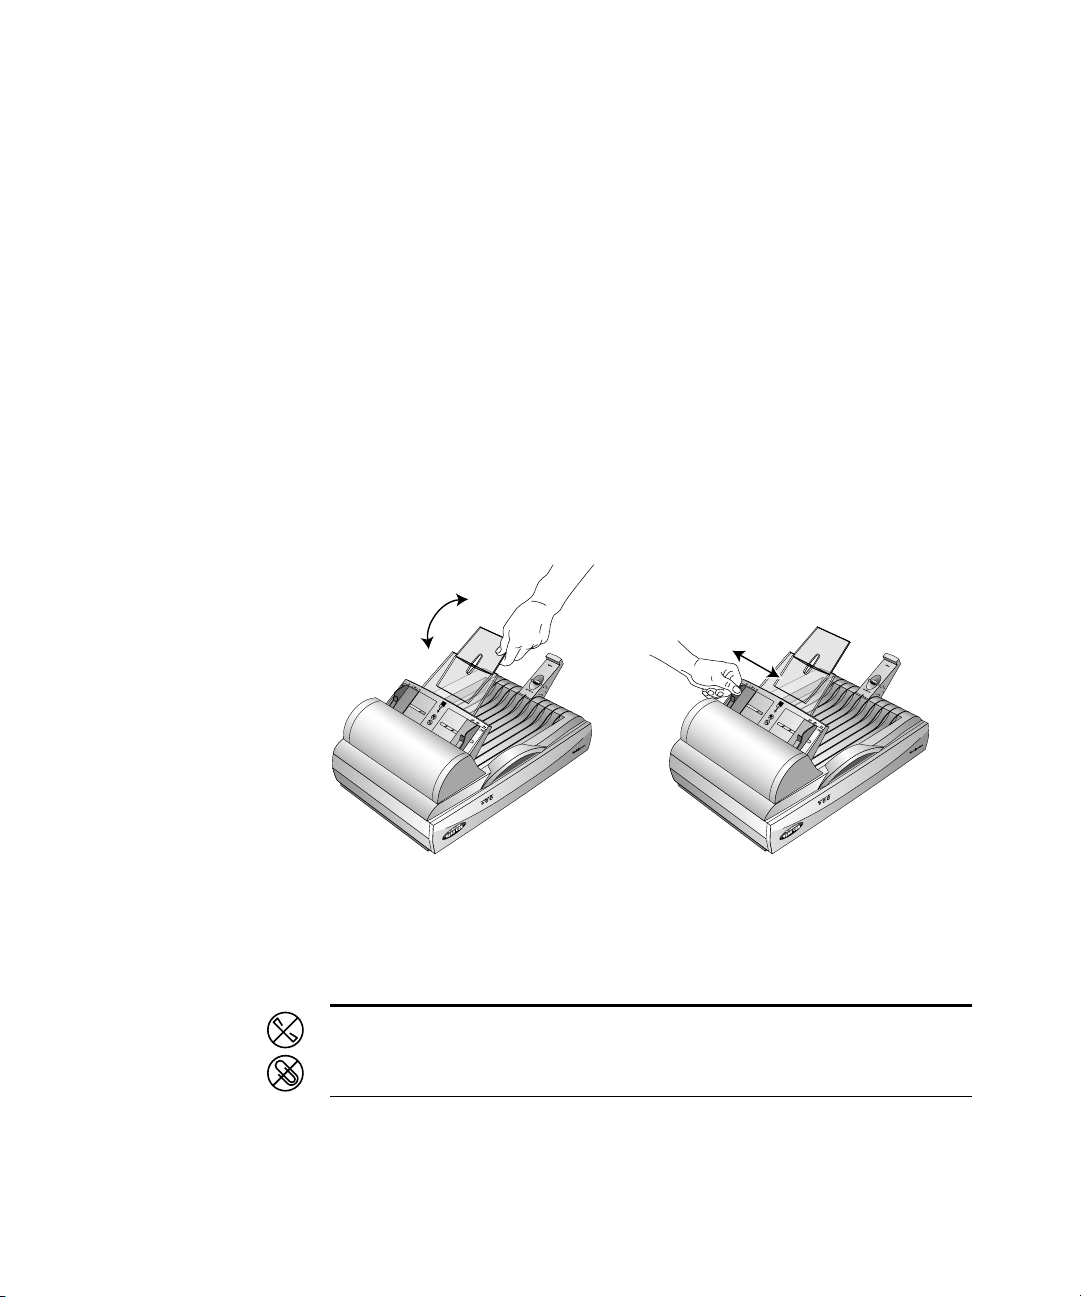
1. Unfold the Paper Guide Extension and adjust the Paper Guide for
the size of paper.
You can also adjust the Paper Stop at the back of the scanner for the
size of the paper. Pull out the slide on the Stop for letter-sized
pages. Push it in for legal-sized pages.
Note: Remove any staples or paper clips from the documents before
loading them into the Automatic Document Feeder. Staples and paper
clips can jam the feed mechanism and scratch the glass.
Page 21

LOADING DOCUMENTS TO SCAN 17
2. Load your stack of documents face up, with their tops into the
Automatic Document Feeder.
Important: Items scanned using the Automatic Document Feeder
must be a minimum of 5 x 7 inches (12.7 x 17.8 cm).
To load a single item:
1. Place the item on the scanner glass, face down.
2. Align the item with the arrow on the reference frame.
3. Close the cover.
Page 22

18 VISIONEER 9650 SCANNER INSTALLATION GUIDE
SCANNING ITEMS
You can scan from the PaperPort software or other TWAIN software.
YOUR SCANNER AND THE TWAIN STANDARD
Your Visioneer 9650 USB scanner uses the TWAIN standard for
scanning. TWAIN is a widely recognized procedure that computers use
to receive images from scanners, digital cameras, and other digital
devices. The PaperPort software application that you received with your
scanner uses the TWAIN standard, and this guide shows how to scan
with it. Many other graphics and imaging applications also comply with
the TWAIN standard, so you can use your scanner with those
applications too. To use your scanner with other TWAIN-compliant
software, please refer to their user guides.
IF YOUR COMPUTER IS RUNNING WINDOWS ME OR XP
Instead of using the TWAIN standard, your scanner can also use
Microsoft’s Windows Image Acquisition (WIA) standard for scanning,
which is also available from other applications. Therefore, you can use
your scanner with other applications on a computer running Windows
ME or XP too. See “Scanning from Windows ME or XP” on page 38.
Page 23
SCANNING FROM WINDOWS 98SE, ME, 2000, OR XP 19
SCANNING FROM WINDOWS 98SE, ME, 2000, OR XP
The instructions in this section are for scanning with the TWAIN
software on computers running Windows 98SE, ME, 2000, or XP. If
your computer is running Windows ME or XP and you want to use the
WIA software, see “Scanning from Windows ME or XP” on page 38.
To scan an item:
1. Load a stack of documents in the Automatic Document Feeder, or
place an item face-down on the glass and align it with the arrow on
the reference frame. See “Loading Documents to Scan” on page 16
for details.
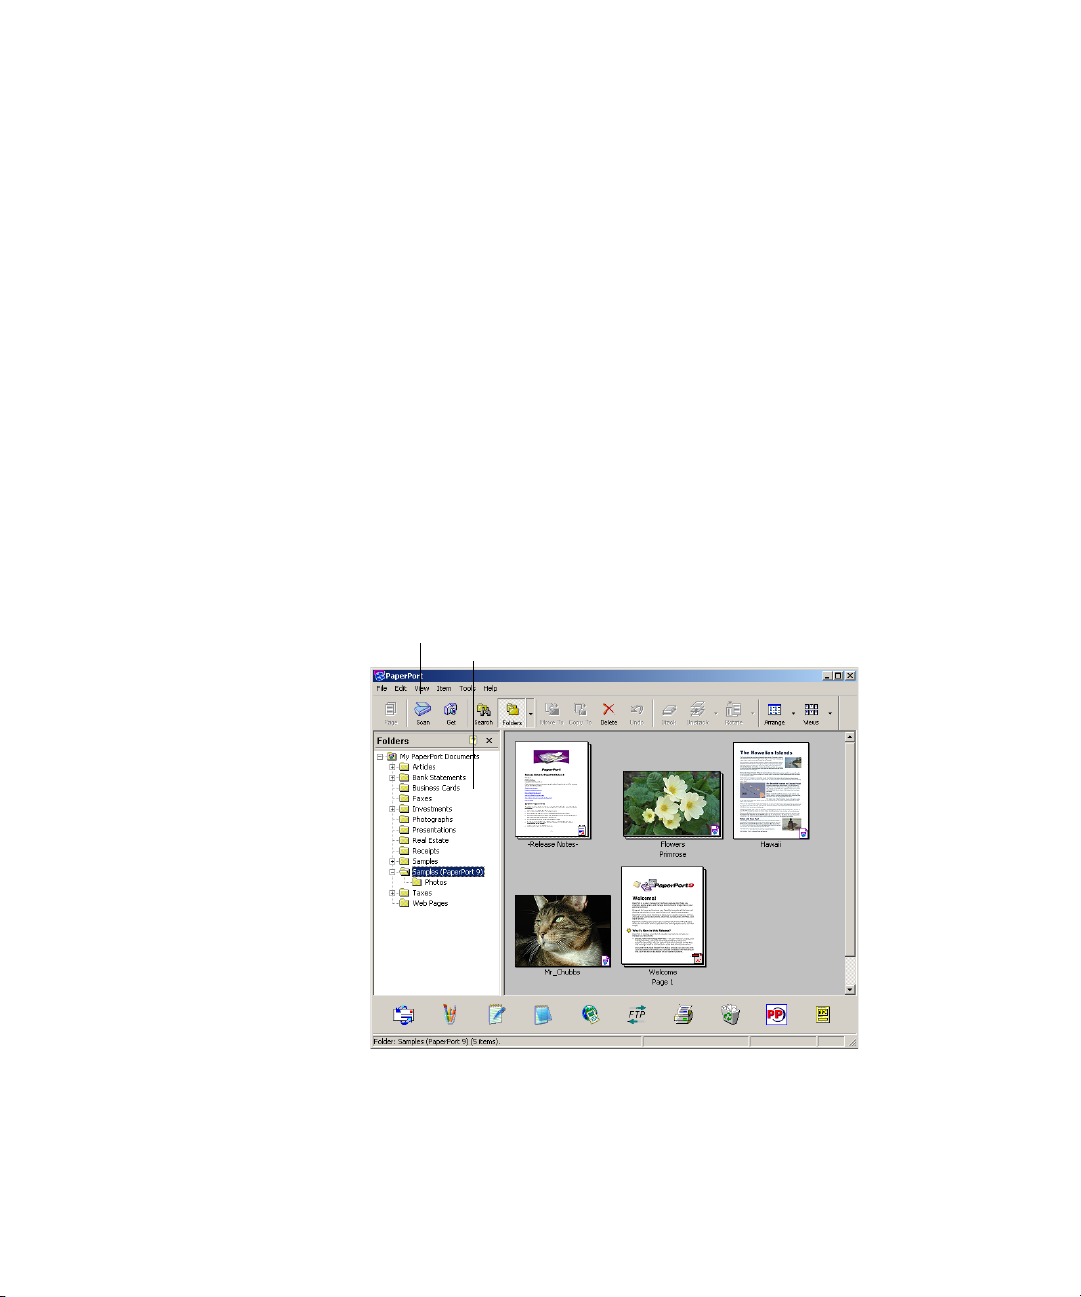
2. Open the PaperPort software. On the Windows taskbar, click Start,
point to Programs, point to ScanSoft PaperPort 9.0, and then
click PaperPort.
The PaperPort desktop opens.
Scan icon
Folders pane
Page 24
20 VISIONEER 9650 SCANNER INSTALLATION GUIDE
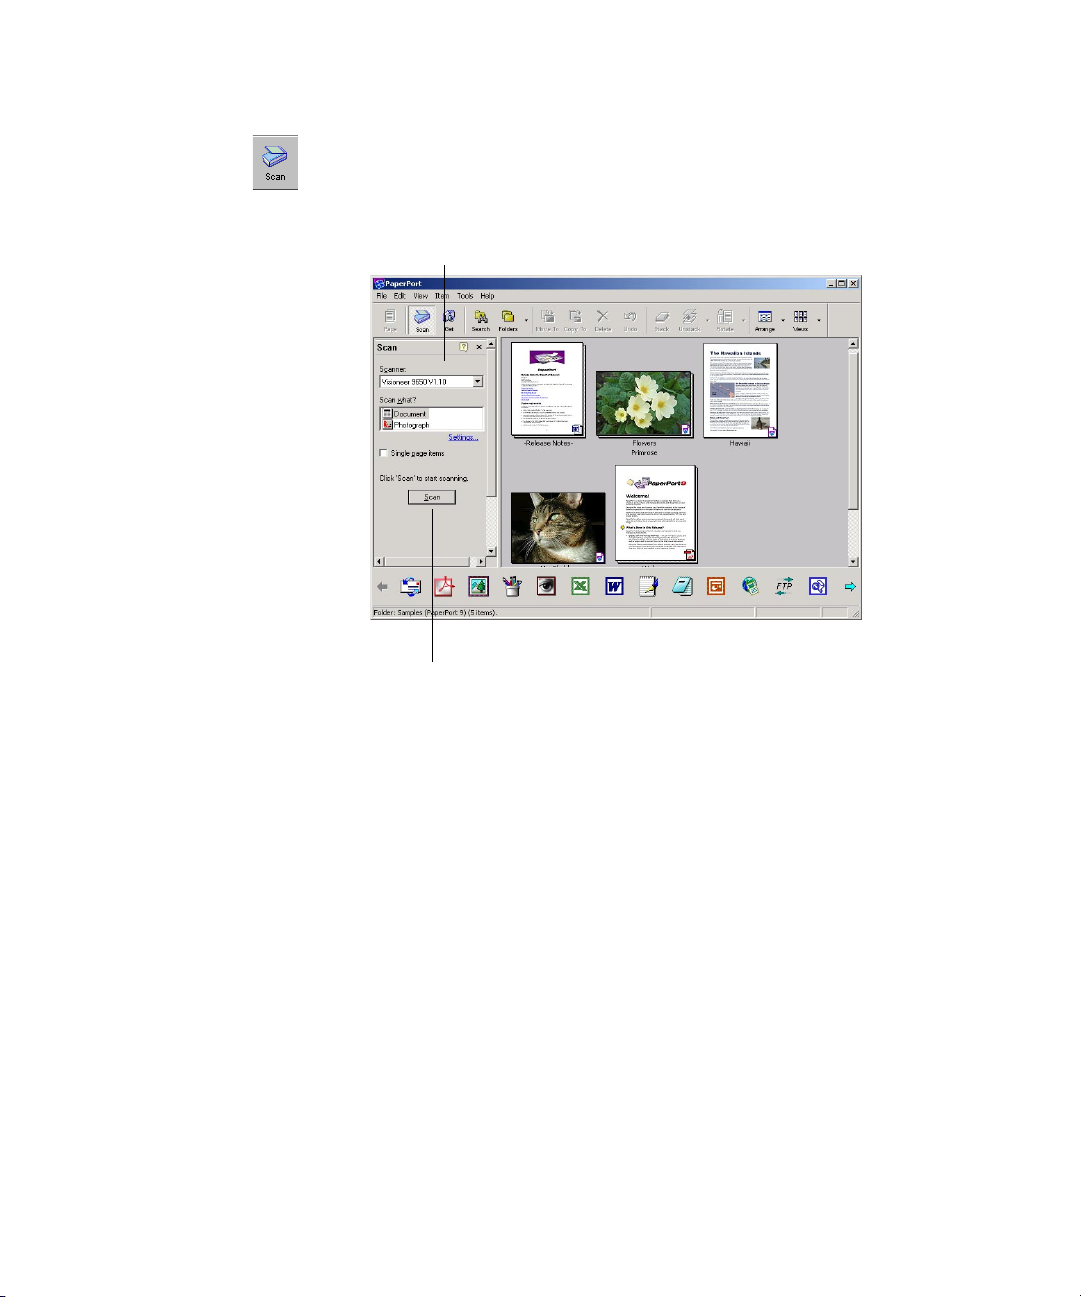
3. Click the Scan icon on the PaperPort command bar.
The Folders pane (which shows folders for organizing your scanned
images) is replaced by the Scan pane.
Scan pane
Click this Scan button to
display the Scan Manager
4. From the Scanner drop-down list, select your Visioneer 9650
V1.10 scanner, if it’s not already selected.
5. In the “Scan what?” section, choose to scan a Document or
Photograph.
6. Click Settings to view and change the format for the scanned item’s
file name and the file type. The default file type for documents is
.pdf and the default for photographs is .jpg.
7. Use the Single page items check box as follows:
■ When the check box is selected, pages are scanned and placed on
the PaperPort desktop.
■ When the check box is not selected, pages are scanned but are
not placed on the PaperPort desktop until you close the Scan
Manager and indicate the scanning job is finished.
Page 25

SCANNING FROM WINDOWS 98SE, ME, 2000, OR XP 21
8. Click the Scan button at the bottom of the Scan pane.
The Scan Manager opens. Use the Scan Manager to select scanning
options and to start the scanner.
9. From the Scan Method drop-down list, choose whether you are
going to scan a single item (Flatbed) or a stack of items (ADF).
Choose Flatbed to scan
a single item
Choose ADF to scan a
stack of documents
Click Preview to check
the image
Click Scan when you’re
ready to scan
10. If you want to see what the scanned image will look like before
scanning its final image, click the Preview button.
The scanner scans a preview of the item and displays it in the Scan
Manager. You can now use the options on the Scan Manager to
fine-tune the image. For example, to adjust the brightness, drag the
Dark/Light slider. For details on adjusting images, see “Adjusting
the Image with the Scan Manager” on page 24.
Note: If you preview when scanning a stack of documents, the first
page of the stack feeds through the ADF for the preview. After
adjusting the scanner settings, replace that page on the stack so it is
scanned with the rest of the pages.
11. To preview the item with the new settings, click the Preview
button again on the Scan Manager.
Page 26
22 VISIONEER 9650 SCANNER INSTALLATION GUIDE
12. When you are satisfied with the preview image, click Scan.
If the Single page items check box is selected on the PaperPort
desktop, the item appears as a thumbnail on the desktop.
13. If the Single page items check box is not selected, thumbnails do
not appear until you indicate the scanning job is finished.
■ Close the Scan Manager.
■ On the PaperPort - Scan message box, click Done.
Note: Refer to “The Single Page Items Check Box” on page 23.
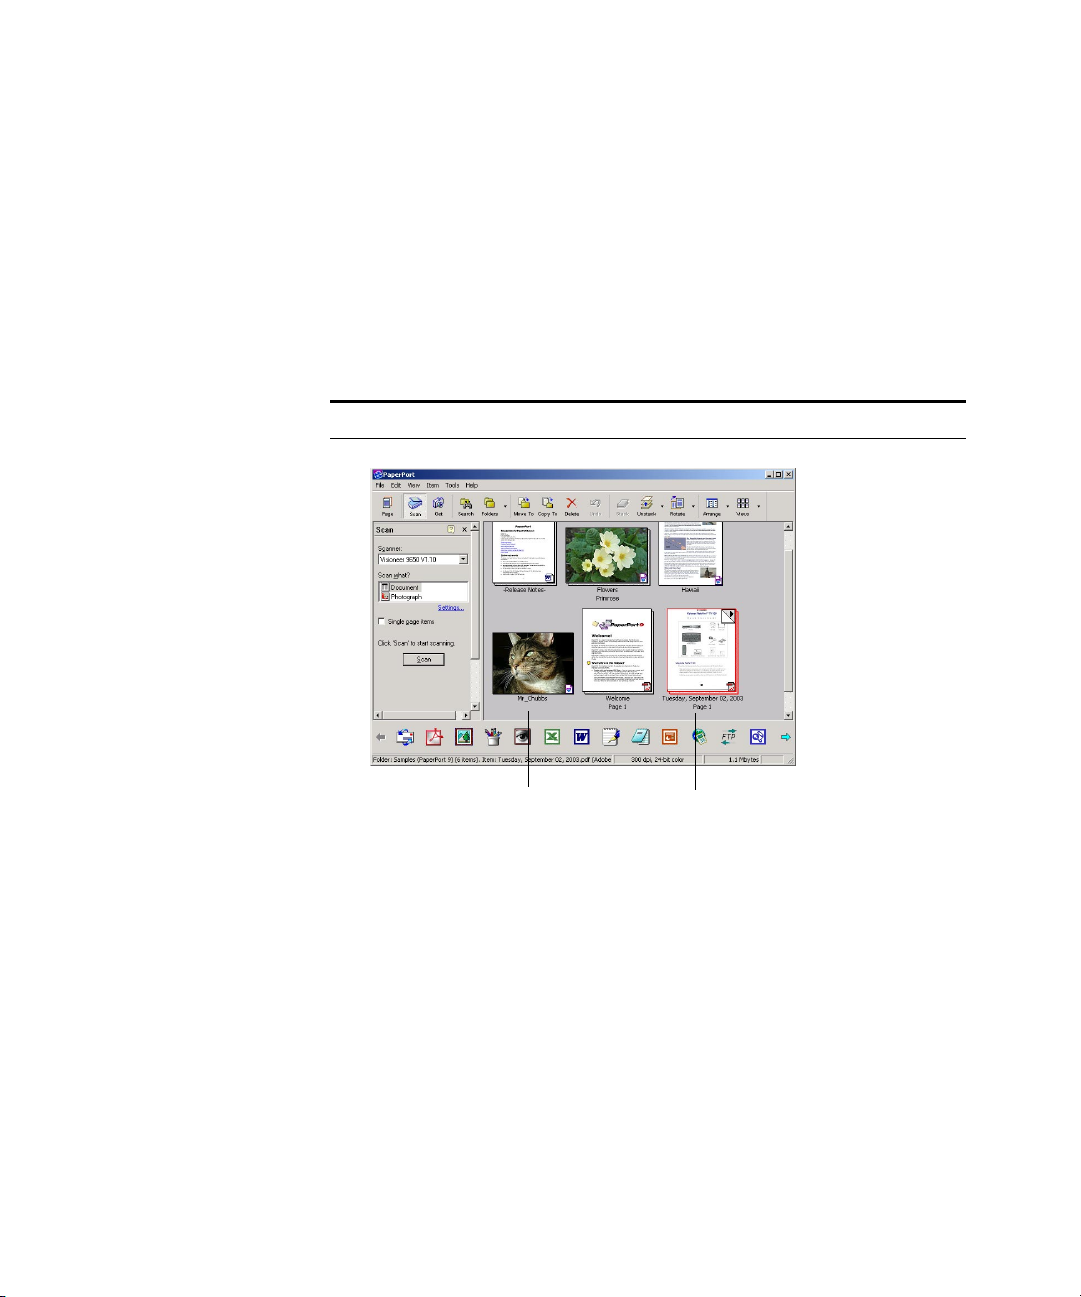
A thumbnail image of the
scanned item appears on
the PaperPort desktop
Thumbnail images of a stack
of documents scanned with
the ADF.
ON THE PAPERPORT DESKTOP
■ By default, the name of the scanned image is the day, date, and
number of scanned items that day. For example, the second item
scanned on a day is followed by a (2), the third by a (3) and so on.
To change a name, click it to select its text and type a new name.
■ The thumbnail images of the stack of documents has “go to page
arrows” so you can click through the pages in the stack. The page
counter next to the scroll arrows shows which page you’re viewing
and the total number in the stack.
Page 27
SCANNING FROM WINDOWS 98SE, ME, 2000, OR XP 23
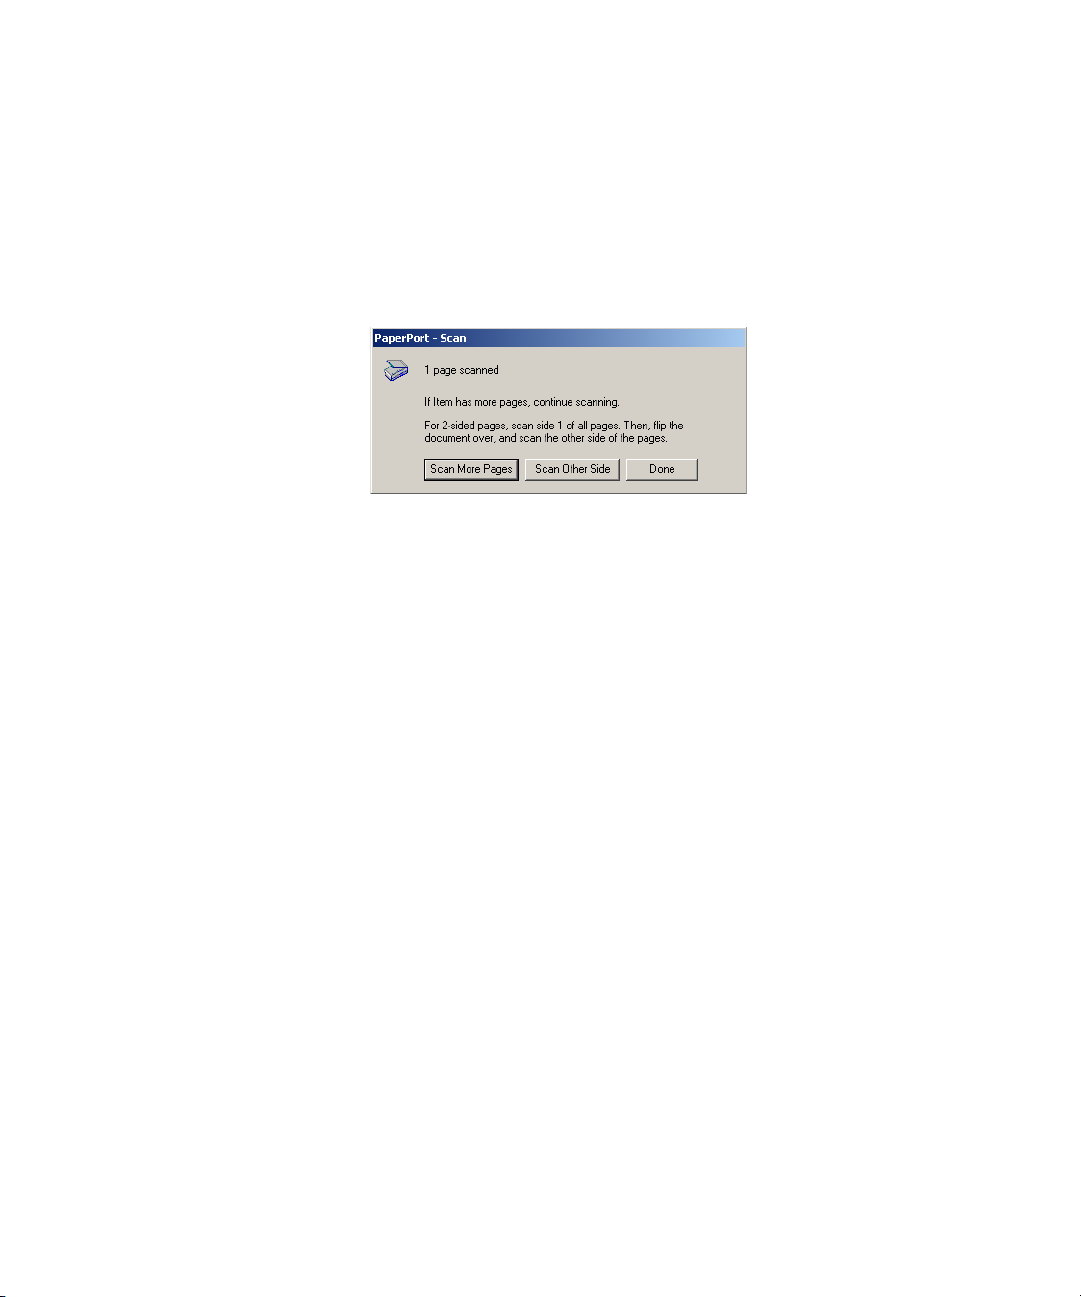
THE SINGLE PAGE ITEMS CHECK BOX
The Single page items check box provides the option to add additional
items to a scanning job and scan double-sided items. If the check box is
selected, scanned items immediately appear on the PaperPort desktop.
If the check box is not selected (this is the default), the following
message box appears when you close the Scan Manager.
■ Click Scan More Pages to scan additional pages and add them to the
stack of items placed on the PaperPort desktop.
■ Click Scan Other Side to reload and scan the other side of
previously scanned pages. This option is only available once.
■ Click Done if you are finished scanning. The scanned items are
placed on the PaperPort desktop.
To learn more about the PaperPort software please see the ScanSoft
PaperPort User’s Guide on the Installation CD.
Page 28
24 VISIONEER 9650 SCANNER INSTALLATION GUIDE
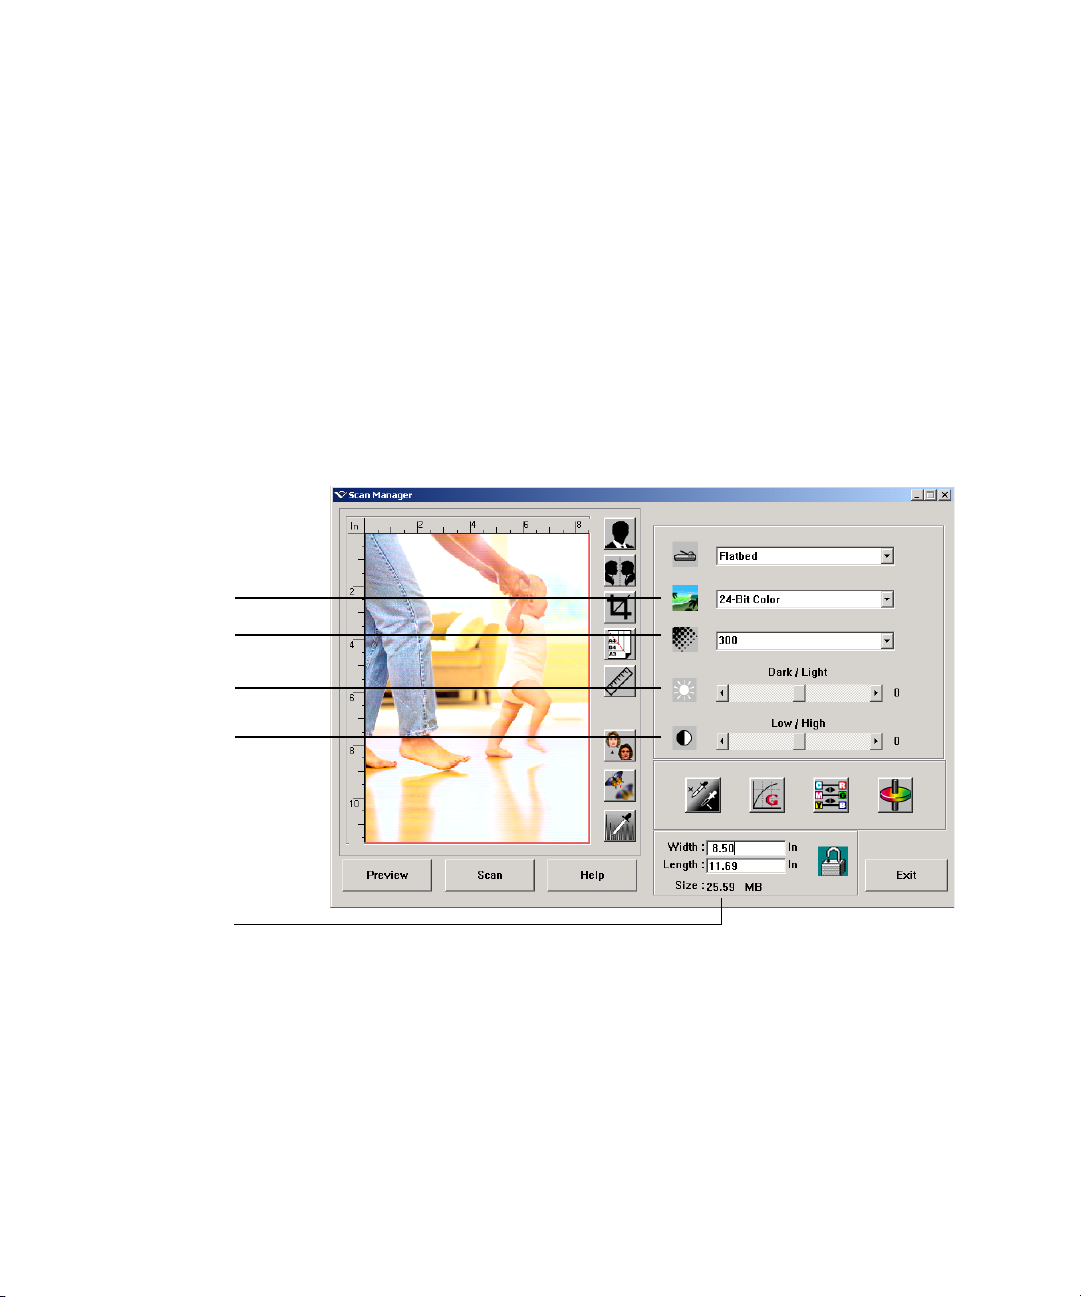
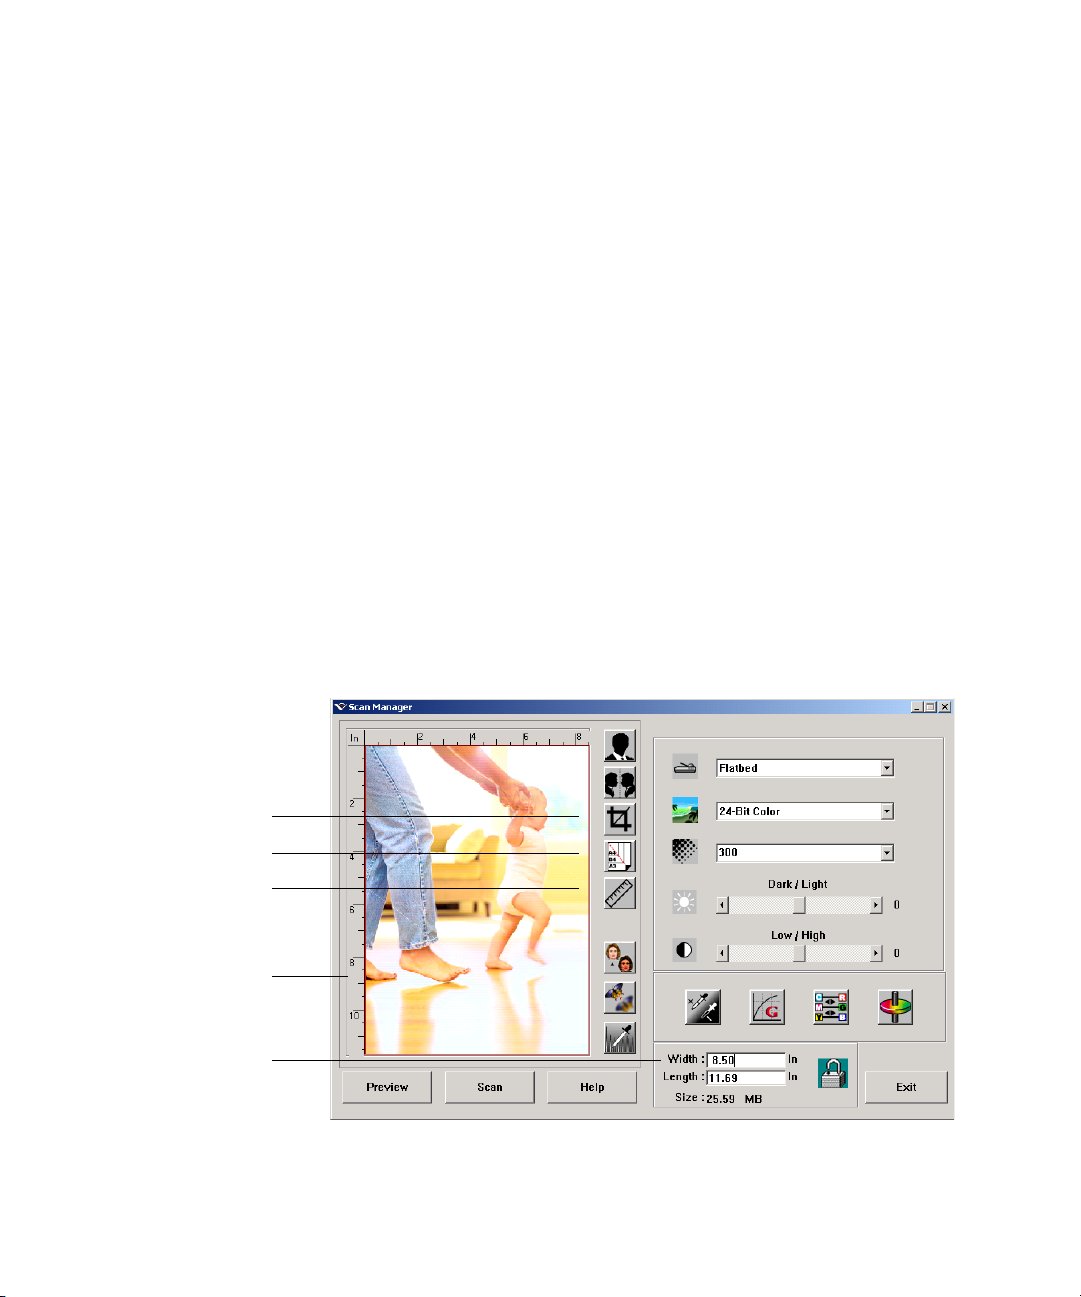
ADJUSTING THE IMAGE WITH THE SCAN MANAGER
The Scan Manager has a wide variety of options to adjust your scanned
images. Using those options you can produce the best possible scan of
your documents, color photos, magazine articles, business cards, or any
other items you scan.
ADJUSTING THE COLOR MODE, RESOLUTION, BRIGHTNESS AND
ONTRAST
C
The Scan Manager’s drop-down menus and sliders are for adjusting the
color mode, resolution, brightness, and contrast.
Color Mode
Resolution
Brightness
Contrast
File size
COLOR MODE
From the Color Mode drop-down menu, select the appropriate color
mode for the item(s) you’re scanning:
Page 29

Halftone Example
ADJUSTING THE IMAGE WITH THE SCAN MANAGER 25
■ Black and White—scans in black and white. The scanning pixels
are all the same size and are either black or white. Use this setting
for letters, memos, pen and ink drawings and other black and
white material. This setting produces the smallest file size for
scanned items.
■ Halftone—scans the image so it appears to consist of gray tones.
A pop-up menu appears so you can choose one of the halftone
options. Notice that the preview image changes as you select each
option so you can see which one is best for scanning. Halftones
produce simulated gray tones by using black and white pixels of
different sizes and is often used to produce newspaper and
magazine images. Use this setting for lower resolution black and
white images. The halftone settings also produce small file sizes.
■ 8-Bit Gray—scans the image using up to 256 true shades of gray.
Use this setting to scan black and white photographs and other
higher quality black and white images. You can also scan a color
photo with this setting to turn its colors into gray shades. The file
size is about one third the size of a color scan.
■ 24-Bit Color—scans the image in full color. Use this setting to
scan color photographs and other color images. The file size is the
largest of the color mode options.
Note: You can see the file size at the bottom of the Scan Manager.
RESOLUTION
Resolution determines the amount of detail you can see in the scanned
image. The resolution setting for a scan is in dots-per-inch (dpi). The
higher the resolution, the finer the details, however, higher dpi settings
also take longer to scan and produce larger files sizes. Usually the higher
resolution settings are used for precision work, such as photographs or
fine artwork.
■ Click the Resolution drop-down menu and select the resolution for
the item.
The resolution settings on your Visioneer 9650 scanner range from
50 dpi to 1200 dpi.
Page 30
26 VISIONEER 9650 SCANNER INSTALLATION GUIDE
BRIGHTNESS AND CONTRAST
Sometimes an item is scanned with the brightness and contrast set to be
too light or too dark. For example, a note written with a light pencil
may need to be scanned darker to improve legibility.
Brightness refers to the lightness or darkness of the image. Contrast is
the range between the darkest and lightest portions of the image. The
greater the contrast, the more the difference between the lighter and
darker shades in the image.
■ Dark/Light slider—adjusts the brightness of the scan. Drag the
slider to the right or left to increase or decrease the brightness.
■ Low/High slider—adjusts the contrast. Drag the slider to the
right or left to increase or decrease the contrast.
ADJUSTING THE OUTPUT SIZE
The output size is the width and height of the image after it is scanned.
For example, if you plan to print the image on a piece of paper you can
select the output size to be 8.5 by 11.0 inches.
Preview Auto-Area
Paper Size
Units
Ruler Units
Output Dimensions
Page 31

ADJUSTING THE IMAGE WITH THE SCAN MANAGER 27
PREVIEW AUTO-AREA
The item you’re scanning may not fill the scanner glass. In that case you
can preview the item and use the Preview Auto-Area button to
automatically set the size of the scanned image.
■ Click the Preview Auto-Area button to let the Scan Manager
automatically determine the size of the item being previewed.
For example, if you preview the scan of a small photo, the Scan
Manager automatically determines that the scan area is only where
the photo is located on the glass.
You can manually adjust the scan area. For example, if you want the
scan to include a border around the image, drag the edges of the scan
area box.
PAPER SIZE
If you know the size of the item(s) you’re scanning, set the paper size.
This automatically sets the scan size to the paper size.
■ Click the Paper Size button and select the image’s paper size from
the pop-up menu.
UNITS
The ruler around the edges of the image area and the output
dimensions can be displayed in inches, centimeters, or pixels.
■ Click the Units button to select the units for the ruler. Clicking the
button toggles through the three choices. The ruler and output
dimensions change to the new units.
Page 32

28 VISIONEER 9650 SCANNER INSTALLATION GUIDE
MANUALLY SETTING THE SCAN AREA
You can manually adjust the output area to scan specific sections of an
image. For example, if you’re scanning a photograph and want to focus
on one section, manually setting the output size removes the rest of the
photograph from the final scanned image.
Move pointer
Manually set scan area
Resize pointer
Output Dimensions
To manually set an output area:
1. Put the mouse pointer on an edge of the scan area box so it
becomes a resize pointer and then drag to set a new size for the box.
2. To move the box, put the mouse pointer inside the box so the
pointer becomes a four-headed arrow. Drag to move the box to a
new position.
3. The output dimensions change to reflect the new scan area size.
Now, when you scan, only the area inside the scan area box is
scanned to the PaperPort Desktop.
Note: If you want to reset the scan area to the full size of the image
again, click the Preview Auto-Area button.
Page 33

ADJUSTING THE IMAGE WITH THE SCAN MANAGER 29
Here’s a sample of a manually selected output area:
This is the area manually
selected for scanning.
MANUALLY SETTING THE WIDTH AND LENGTH
This is the image that appears
on the PaperPort Desktop
when the scanning is finished.
Lock Scaling
The output dimensions at the bottom of the Scan Manager show the
Width and Length of the scan area. You can set the area by typing
numbers into those boxes.
To manually set the width and length:
1. Click in a box and type a new dimension.
2. Repeat in the other box.
The scan area box changes to reflect the new size.
3. To maintain the same width to length ratio, click the Lock Scaling
icon next to the dimension.
With the Lock Scaling locked, when you type a new width or
length, the other setting changes so the relative size of the scan area
remains constant.
Page 34
30 VISIONEER 9650 SCANNER INSTALLATION GUIDE
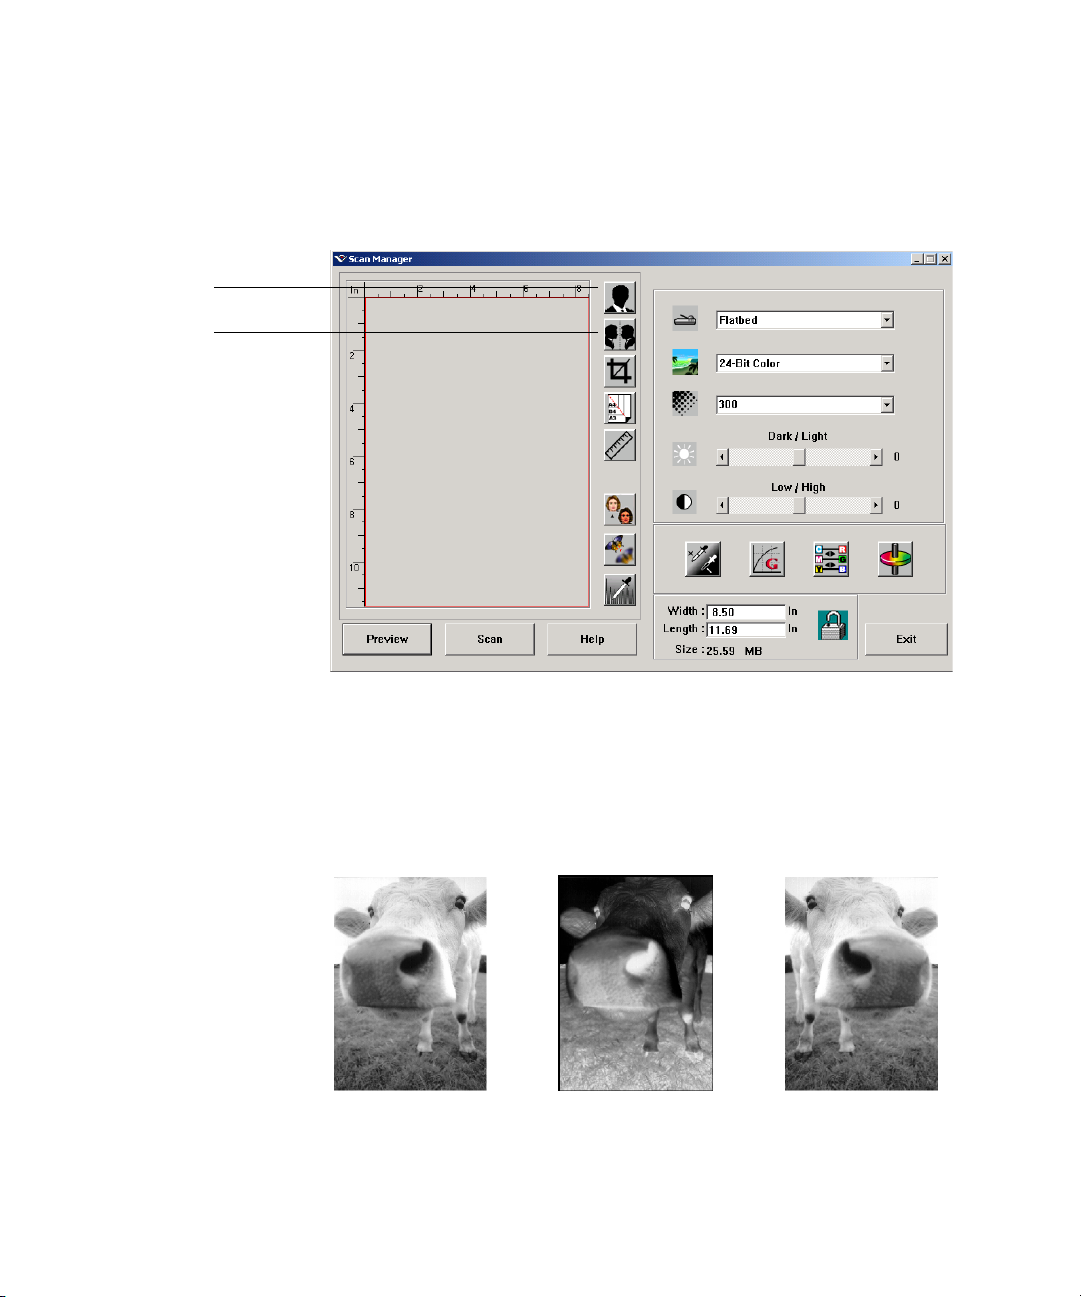
REVERSING THE IMAGE
The Scan Manager has an Invert button and a Mirror button for
reversing the scanned image.
Invert
Mirror
Invert reverses the black and whites or the colors of an image.
Mirroring flips the image 180 degrees.
■ Click the Invert or Mirror button to see the image you want.
Original Image Inverted Image Mirrored Image
Page 35

Descreen
Sharpen
Auto Level
ADJUSTING THE IMAGE WITH THE SCAN MANAGER 31
ADJUSTING COLOR AND GRAY IMAGES
The Scan Manager has three buttons—Descreen, Sharpen, and Auto
Level—for quickly adjusting color and gray images. These buttons do
not apply to black and white or halftone images.
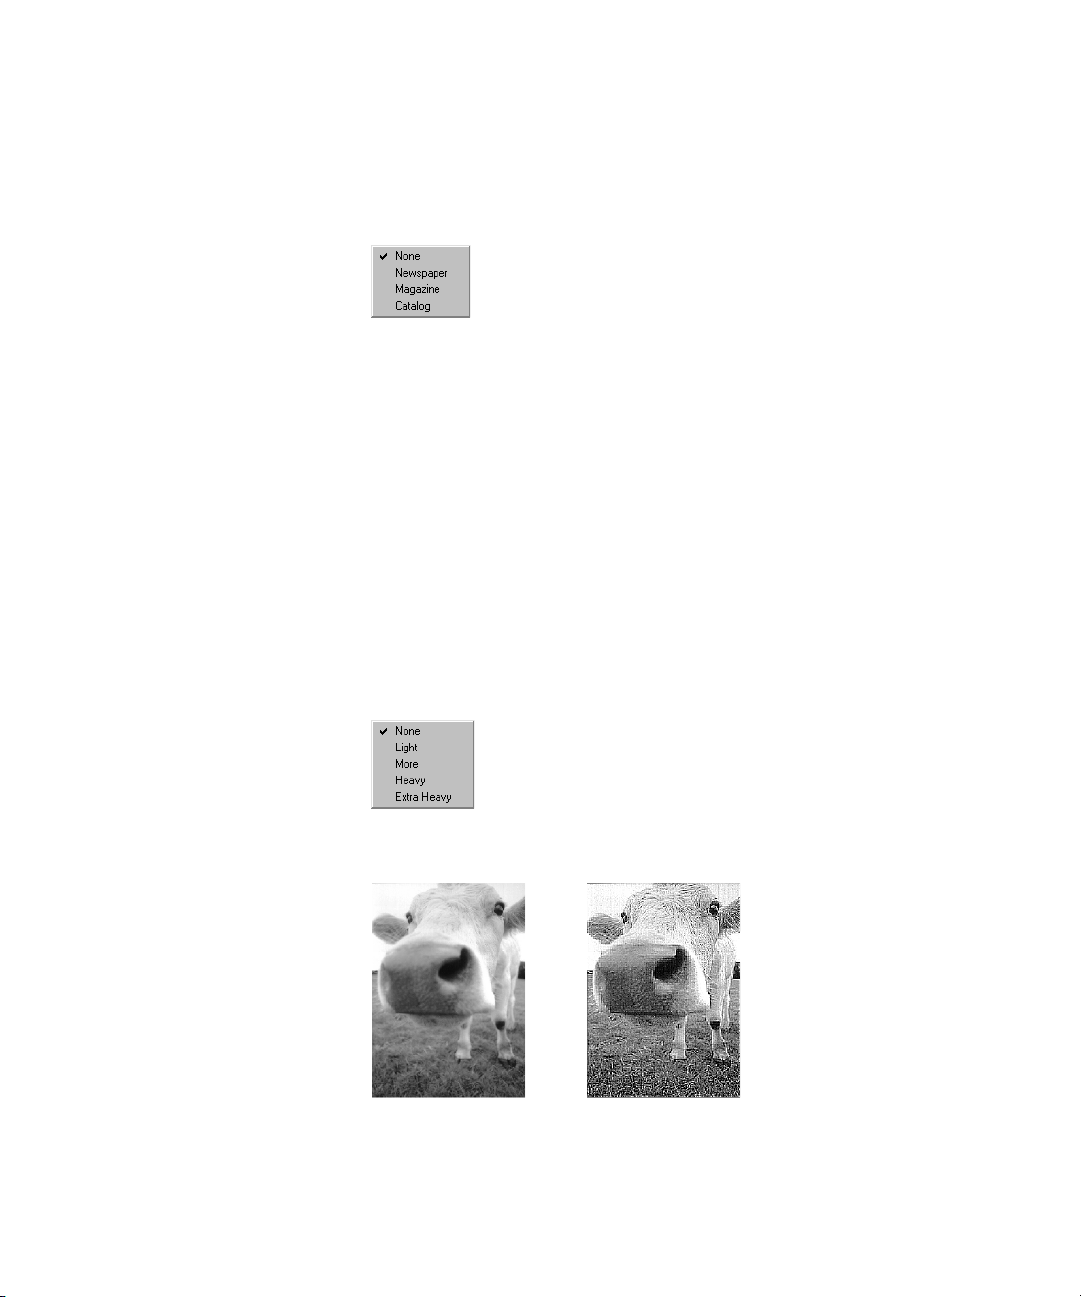
DESCREEN IMAGE
Select this option when scanning a picture from a newspaper or
magazine article, sales catalog, or other source that contains images with
patterns or dots. Scans of patterns or dots sometimes have a distorted or
wavy appearance. The scanner scans the item to compensate for the
patterns and dots, and produces a clearer image. The scanning may slow
down a bit when this option is selected. You don’t need to select this
option when scanning photographs.
Original Image Descreened Image
Page 36
32 VISIONEER 9650 SCANNER INSTALLATION GUIDE
To descreen an image:
1. Click the Descreen button.
2. Choose the appropriate option from the Descreen pop-up menu.
Watch the preview image as you select various options to see which one
is best for your final scanned image.
SHARPEN IMAGE
Sharpness determines the amount of blur in an image. Your scanner can
sharpen an original blurred image by adjusting the blurry edges in
sections of the image.
To sharpen an image:
1. Click the Sharpen button.
2. Choose the appropriate option from the Sharpen pop-up menu.
Original Image Sharpened Image
Page 37

ADJUSTING THE IMAGE WITH THE SCAN MANAGER 33
AUTO LEVEL
Your scanner can analyze a color image to automatically determine the
best settings to match the colors of the original image. Click this button
to let the scanner automatically adjust the color settings.
Original Image Auto Level Adjusted
ADJUSTING COLOR SETTINGS
The buttons for manually adjusting a preview image’s color settings
offer several advanced color options. The availability of each option
depends on the selected Image Type for the image.
Highlight/Shadow Levels
Curves
Color Balance
Hue/Saturation/Lightness
Page 38

34 VISIONEER 9650 SCANNER INSTALLATION GUIDE
HIGHLIGHT/SHADOW LEVELS
Images have light and dark areas. The highlight is the lightest spot on
an image; shadow is the darkest spot. The range of colors between the
highlight and shadow determines the range of colors of the image.
Using the Highlight/Shadow Levels features, however, you can extend
the original range of colors between the highlight and shadow to reveal
more details in the midrange colors.
To adjust the highlight and shadow levels:
1. Click the Highlight/Shadow button.
The dialog box that appears shows a histogram of the saturation,
gamma, and hue (S, G, H) of the range of colors for the highlight
and shadow.
Saturation is the strength or purity of a color, gamma controls the
brightness of the midtones of the color, and hue is the color your
eyes see as reflected from the image. The gamma setting in this
dialog box is in conjunction with the hue and saturation but you
can also set gamma by itself for an image. See the section “Curves,”
below for more information
2. From the Channel drop-down menu, choose RGB to adjust all the
channels together, or choose a single channel if available.
Page 39
ADJUSTING THE IMAGE WITH THE SCAN MANAGER 35
3. Enter new settings in the boxes for the three levels, or drag the
small triangles at the bottom of the histogram.
As you change the settings, the histogram changes to reflect the new
levels.
4. Click Preview to see the effect of the new settings on the preview
image.
5. Click Reset to reset the levels to their original values.
6. Click OK when the levels are what you want.
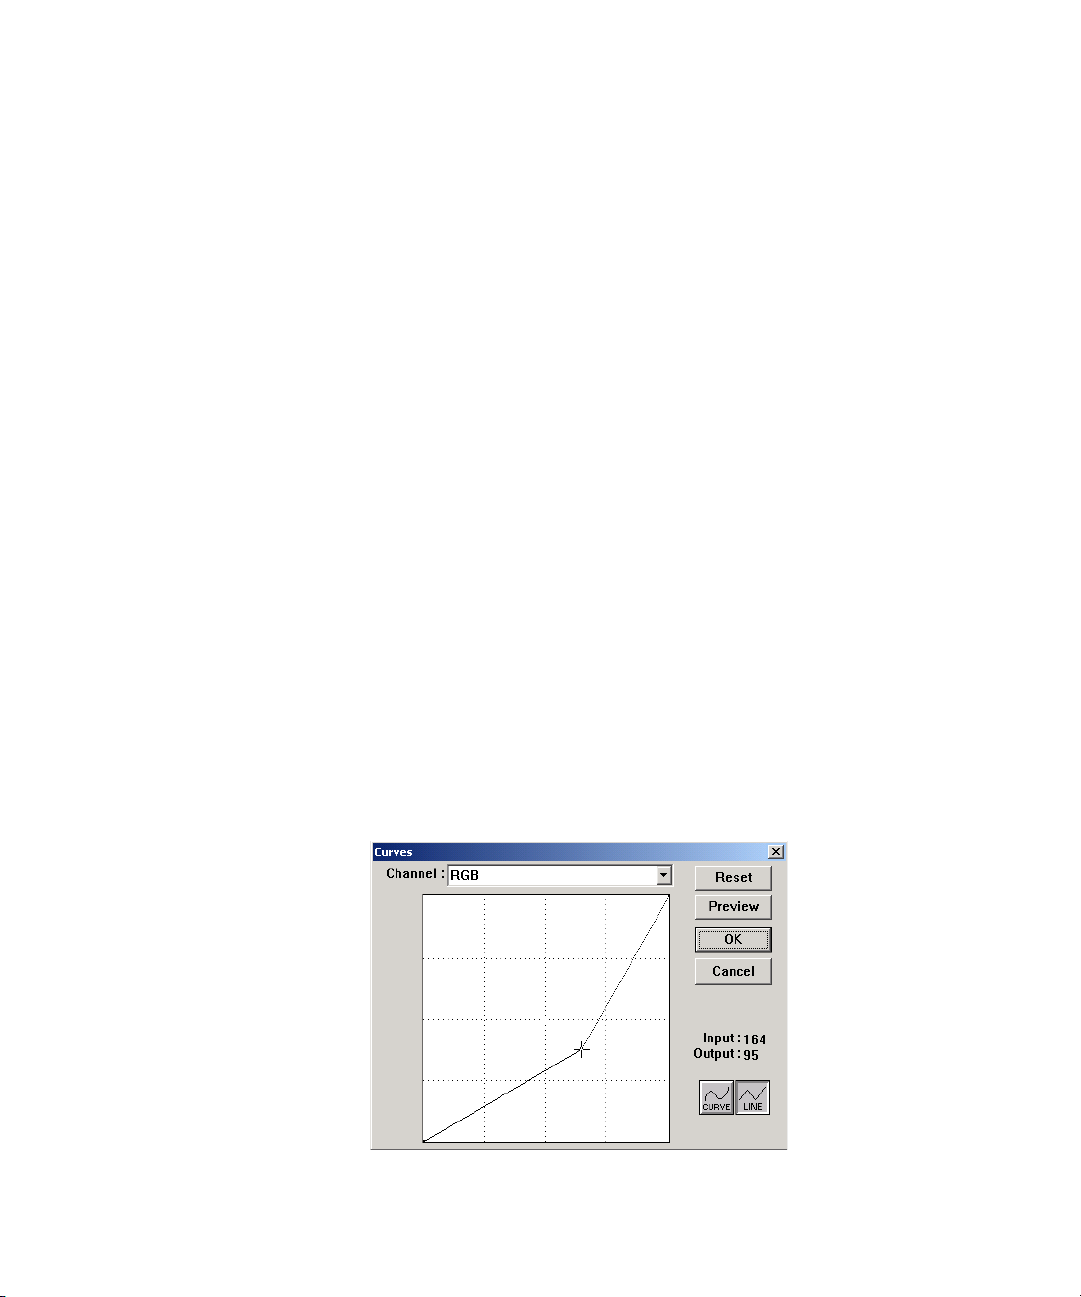
CURVES
Like the Highlight/Shadow levels, the Curves feature also adjusts the
range of midtone colors on an image. However, with the Curves feature
you can set the gamma individually to adjust midtone levels without
losing details from the lightest or darkest areas.
To adjust the gamma curve:
1. Click the Curves button.
The dialog box that appears shows a plot of the gamma. The
gamma of the original image is represented by a straight line from
the lower left to upper right corners. Changing the straight line to a
curve changes the gamma setting for the midtones on the original
image.
Page 40
36 VISIONEER 9650 SCANNER INSTALLATION GUIDE
2. From the Channel drop-down menu, choose RGB to adjust the
gamma of all the channels together, or choose a single channel if
available.
3. Drag the line up or down to set a new gamma.
The input and output values represent values on the horizontal and
vertical axes for the new gamma setting. Click the Curve or Line
button to see the display as a smooth curve or a line. You can drag
the line at multiple points.
4. Click Preview to see the effect of the new settings on the preview
image.
5. Click Reset to reset the levels to their original values.
6. Click OK when the levels are what you want.
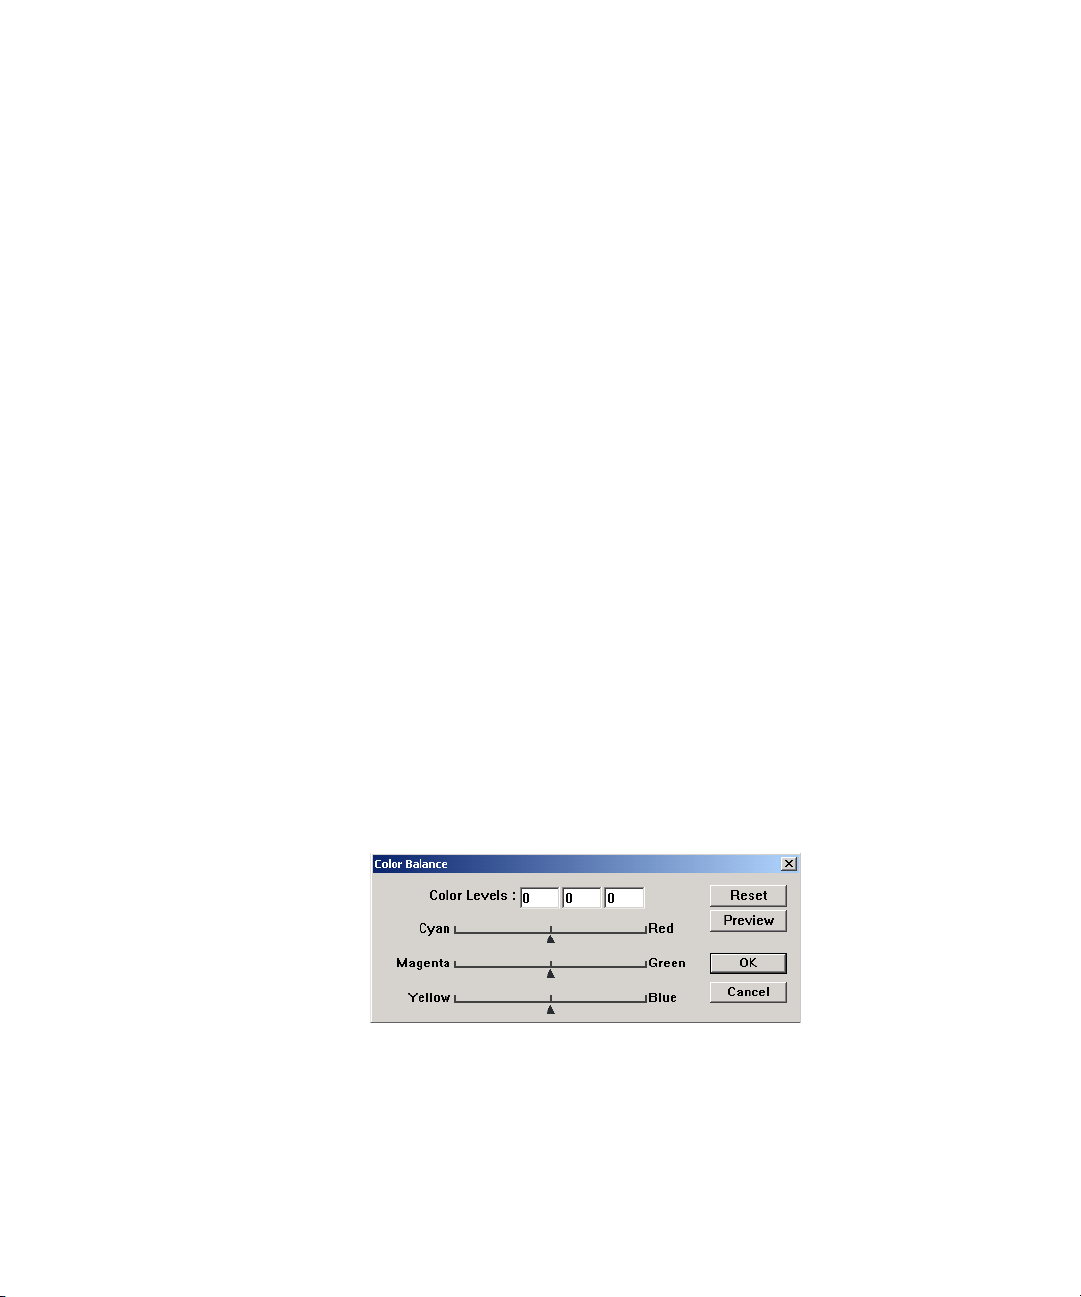
COLOR BALANCE
The color balance refers to the relative amounts of the three primary
colors in an image. By adjusting the color balance you can sometimes
compensate for an image with too much or too little of a color.
To adjust the color balance:
1. Click the Color Balance button.
The settings in the dialog box are initially set to zero for each of the
colors, indicating no change to the original image’s color balance.
2. Type a number in the color levels boxes to set a new color level, or
drag the triangles to the left or right.
Page 41
ADJUSTING THE IMAGE WITH THE SCAN MANAGER 37
Each color is paired with its complementary color, so as you drag a
triangle you are increasing a color while decreasing its
complementary color.
3. Click Preview to see the effect of the new settings on the preview
image.
4. Click Reset to reset the levels to their original values.
5. Click OK when the levels are what you want.
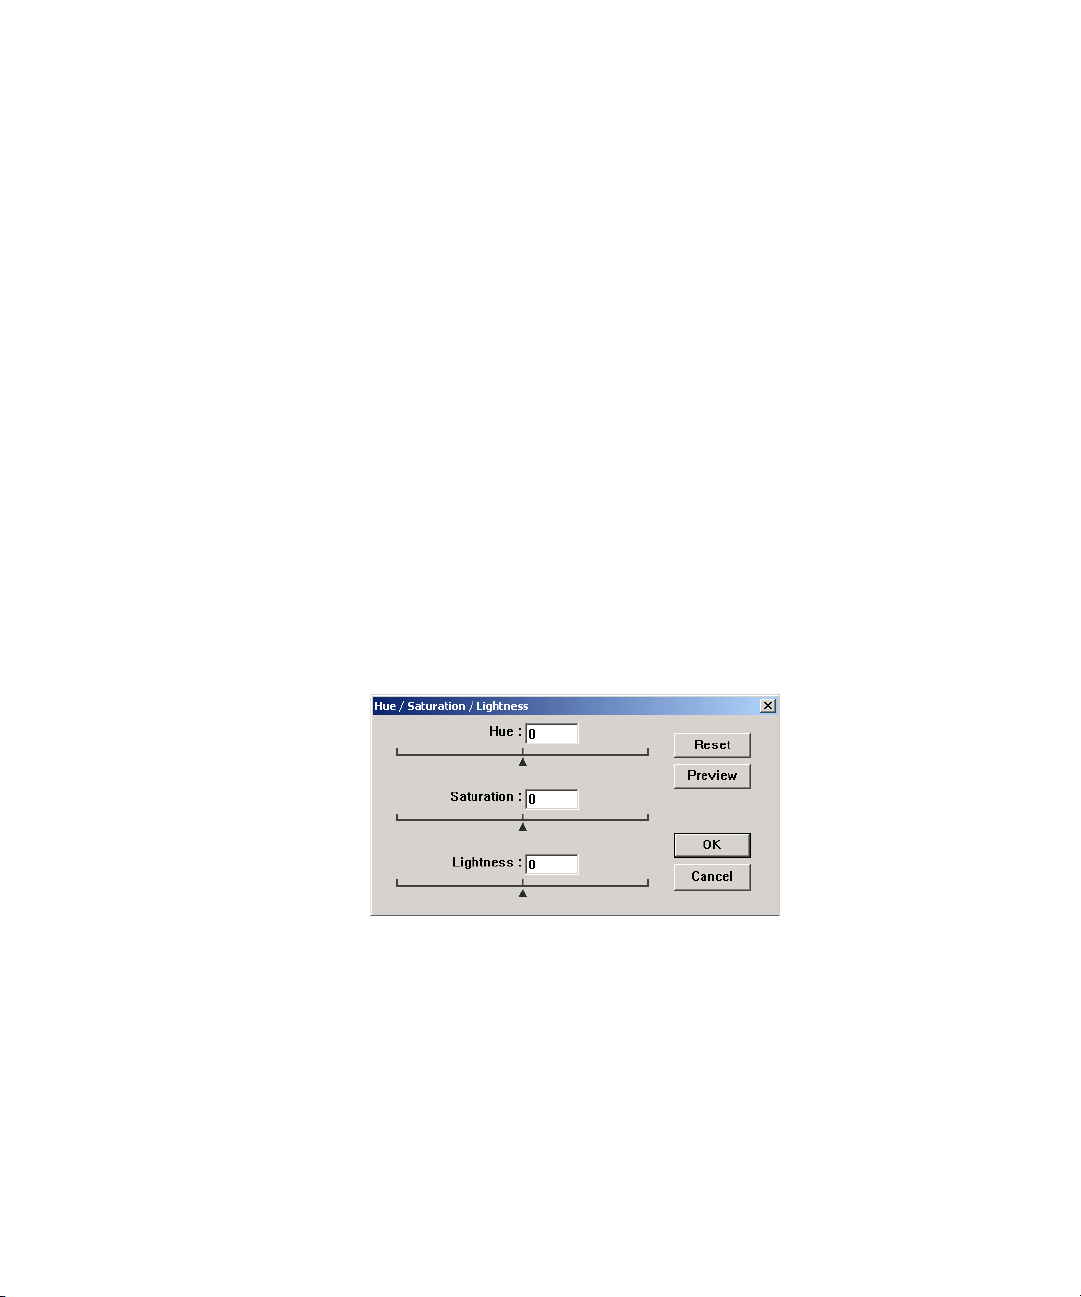
HUE/SATURATION/LIGHTNESS
Hue is the color your eyes see as reflected from the image, saturation is
the strength or purity of a color and determines whether a color is pale
or rich, and lightness is the intensity of the color.
To adjust the hue/saturation/lightness:
1. Click the Hue/Saturation/Lightness button.
The settings in the dialog box are initially set to zero, indicating no
change to the original image’s hue, saturation, or lightness.
2. Type a number in the color boxes to set a new levels, or drag the
triangles to the left or right.
3. Click Preview to see the effect of the new settings on the image.
4. Click Reset to reset the levels to their original values.
5. Click OK when the levels are what you want.
Page 42

38 VISIONEER 9650 SCANNER INSTALLATION GUIDE
SCANNING FROM WINDOWS ME OR XP
If your computer is running the Windows ME or XP operating system,
you have a choice of scanning using the TWAIN-compliant Visioneer
Scan Manager software as just described (see “Scanning from Windows
98SE, ME, 2000, or XP” on page 19) or scanning using the Microsoft
Windows Image Acquisition (WIA) standard as described below.
Note: The screen captures in this section show the WIA-standard
screens as they appear in the Windows XP operating system. If you
are using Windows ME, the screens will look slightly different, but
function in the same manner.
To scan an item:
1. Load a stack of documents in the Automatic Document Feeder, or
place an item face-down on the glass and align it with the arrow on
the reference frame. See “Loading Documents to Scan” on page 16
for details.
2. On the Windows taskbar, click Start, point to All Programs, point
to ScanSoft PaperPort 9.0, and then click PaperPort.
3. Click the Scan icon on the PaperPort command bar.
The Folders pane is replaced by the Scan pane.
Scan pane
Page 43
SCANNING FROM WINDOWS ME OR XP 39
4. From the Scanner drop-down list, select Visioneer 9650 V1.10.
5. In the “Scan what?” section, choose to scan a Document or
Photograph.
6. Click Settings to view and change the format for the scanned item’s
file name and the file type. The default file type for documents is
.pdf and for photographs is .jpg.
7. Use the Single page items check box as follows:
■ When the check box is selected, pages are scanned and placed on
the PaperPort desktop.
■ When the check box is not selected, pages are scanned but not
placed on the PaperPort desktop until you indicate the scanning
job is finished.
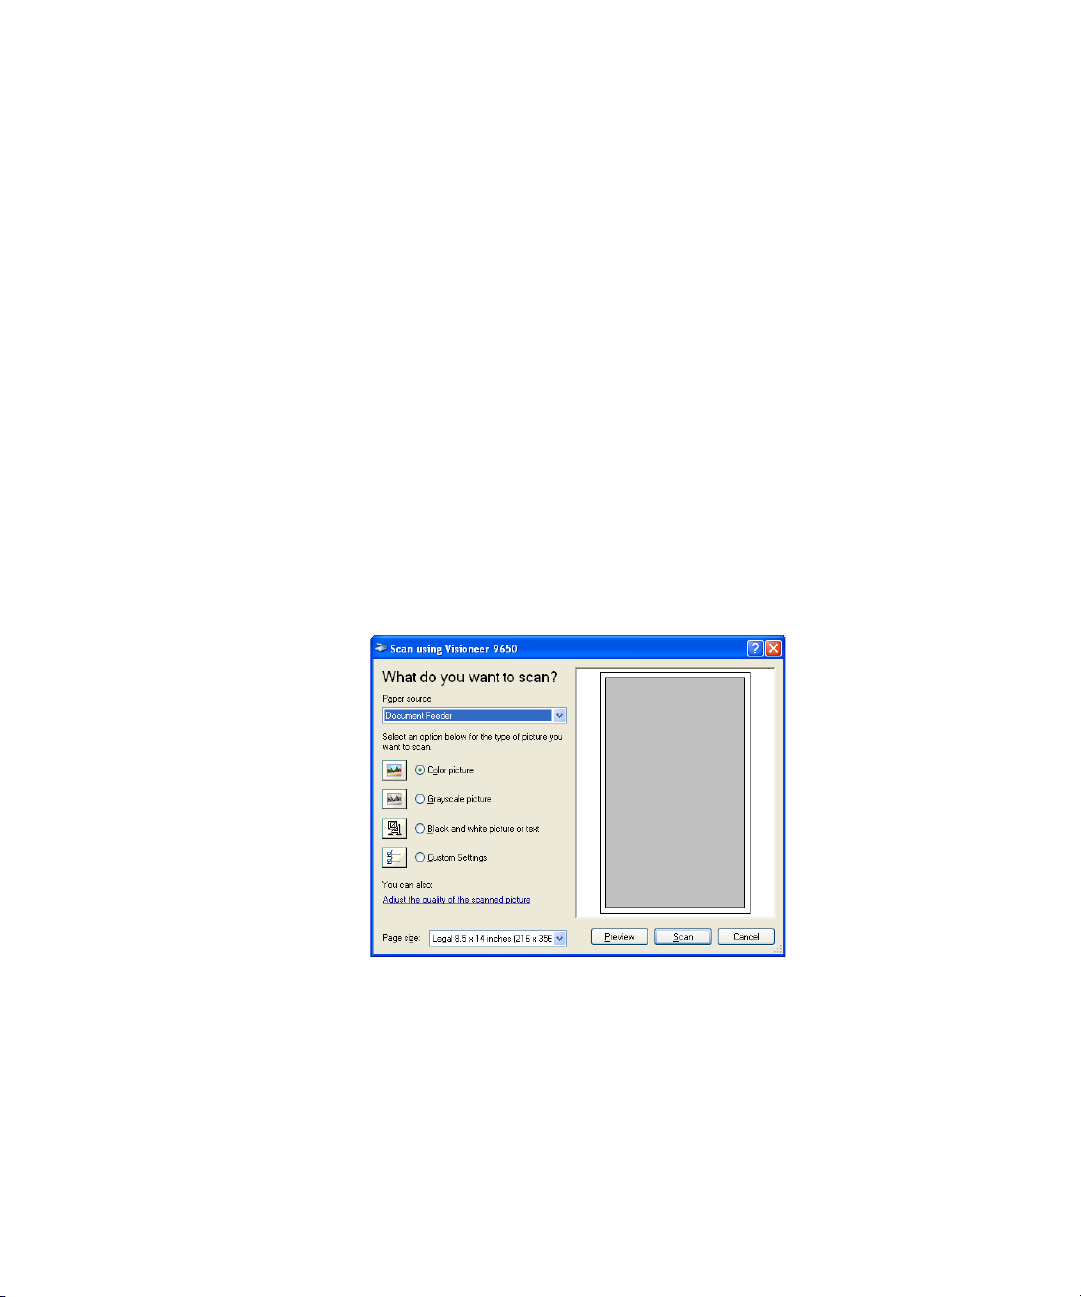
8. Click the Scan button on the Scan pane.
The Scan using Visioneer 9650 window opens. Use this window to
select scanning options and start the scanner.
9. From the Paper Source drop-down list, select Flatbed or Document
Feeder (if you are going to use the ADF).
If you selected Document Feeder, select a paper size from the Page
size drop-down list.
Page 44

40 VISIONEER 9650 SCANNER INSTALLATION GUIDE
Note: If your computer is running Windows ME, the ADF can scan
only one page at a time.
10. Click the button most appropriate for the item you’re scanning.
11. Click Preview if you want to preview the image before scanning.
The image is displayed on the right side of the window.
Note: If you preview when scanning a stack of documents, the first
page of the stack feeds through the ADF for the preview. After
adjusting the scanner settings, replace that page on the stack so it is
scanned with the rest of the pages.
12. Adjust settings of the previewed image as desired:
■ Change the button selection for the type of image.
■ Adjust the custom settings; refer to the next section, “Fine
Tuning Your Scans”.
■ Change the size of the scanned image. To do this, click and hold
the mouse pointer over one of the four sizing-boxes on the
corners of the previewed image. Then drag the box to increase or
decrease the size of the image.
13. Preview the image again. When you are satisfied with the image,
click the Scan button.
If the Single page items check box is selected on the Scan pane, the
scanned item appears as a thumbnail on the PaperPort desktop.
14. If the Single page items check box is not selected, thumbnails do
not appear until you indicate the scanning job is finished.
■ On the PaperPort - Scan message box, click Done.
Note: Refer to “The Single Page Items Check Box” on page 23.
Page 45
SCANNING FROM WINDOWS ME OR XP 41
FINE TUNING YOUR SCANS
You can select new settings before you scan an item to fine tune exactly
how you want to scan a particular item.
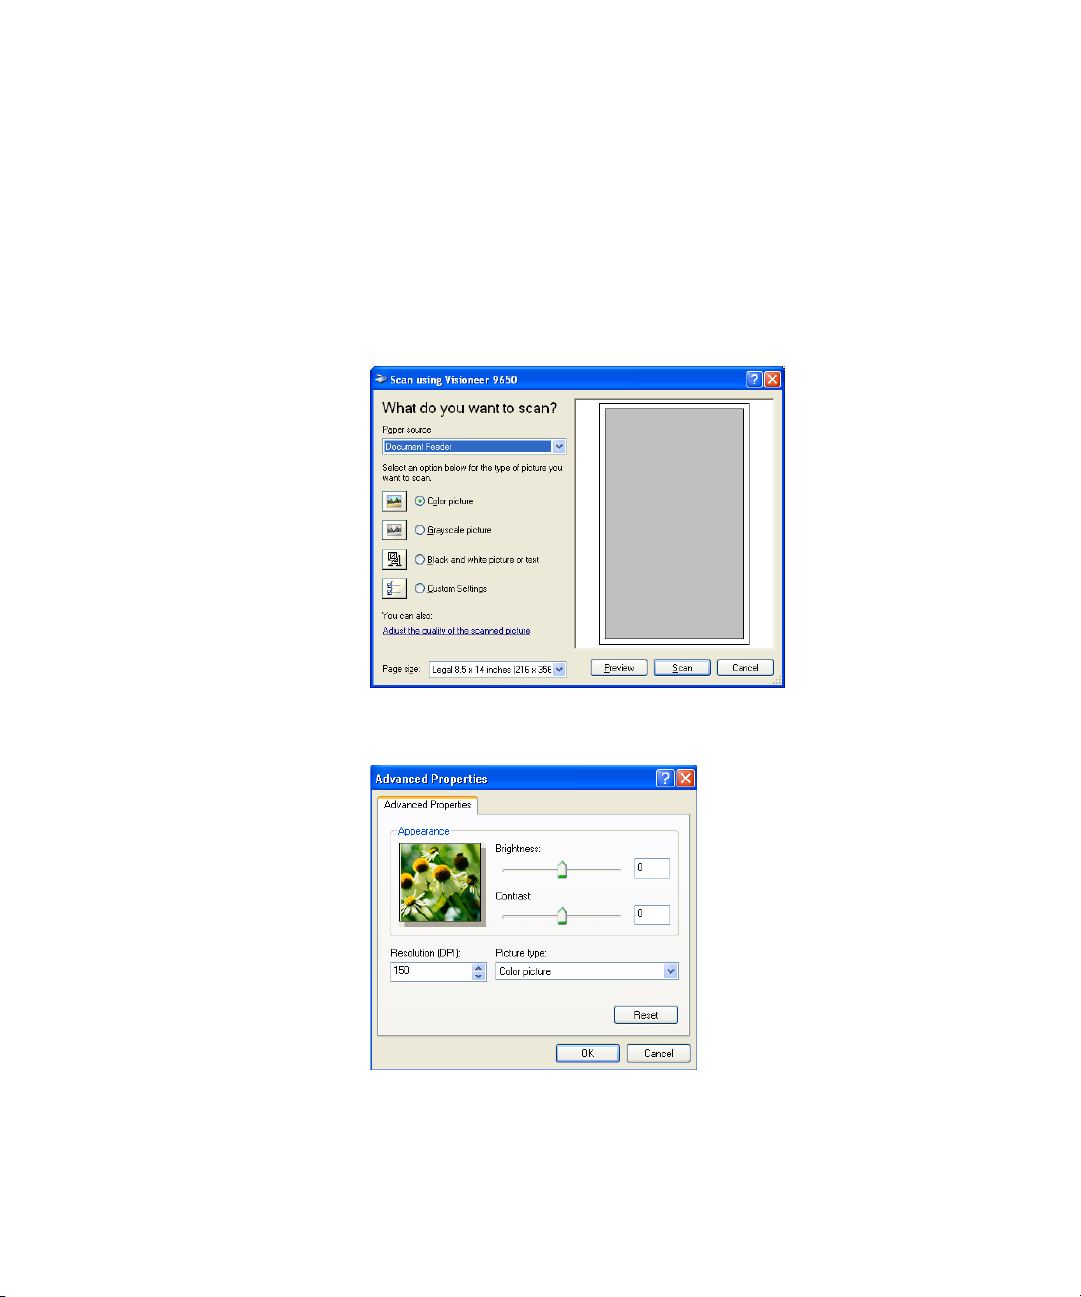
To select the scanner settings before you scan:
1. On the scan window, click Adjust the quality of the scanned
picture.
The Advanced Properties dialog box opens.
2. Select the options for scanning.
Page 46

42 VISIONEER 9650 SCANNER INSTALLATION GUIDE
Brightness and Contrast—Drag the sliders to the right or left to
adjust the brightness and contrast of the scanned image. The
Contrast setting does not apply to the setting Black and White
picture or text.
Resolution (DPI)—Click the up and down arrows to choose the
dots per inch (dpi) of the resolution. The maximum resolution is
600 dpi; the minimum is 100 dpi. The higher the dpi setting, the
sharper and clearer the scanned image. However, higher dpi settings
take longer to scan and produce larger files for the scanned images.
Picture type—Click the drop-down menu and choose the most
appropriate type for the item you’re scanning.
3. Click OK.
The Custom Settings button is now set to scan with the options
you selected.
If you want to reset the settings and start over, click Reset.
Page 47

CLEARING PAPER JAMS 43
Maintenance
This section contains information on maintenance activities,
troubleshooting, uninstalling, technical support, and scanner
specifications.
CLEARING PAPER JAMS
If your scanner stops scanning due to a paper jam in the Automatic
Document Feeder, a warning dialog box appears after a few moments.
To clear a paper jam:
1. Open the Automatic Document Feeder cover.
Page 48
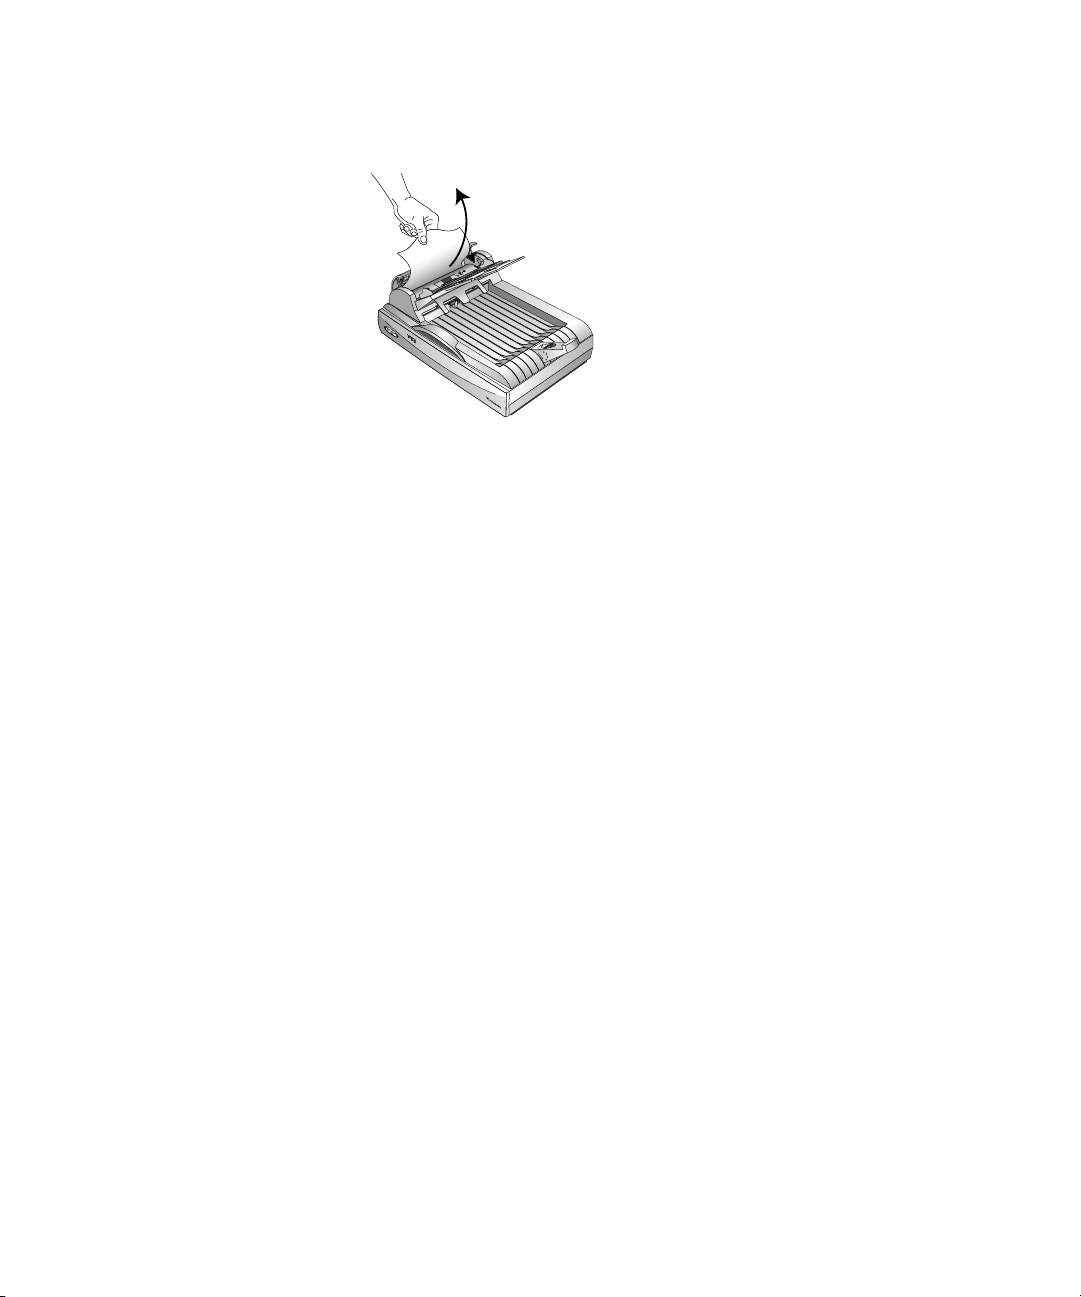
44 VISIONEER 9650 SCANNER INSTALLATION GUIDE
2. Remove the jammed paper and close the cover.
To reduce the number of paper jams, smooth and straighten paper
before scanning, adjust the guides to the paper size, and insert the paper
evenly into the ADF.
CARE AND MAINTENANCE
Your scanner is designed to be maintenance-free. Occasional cleaning,
however, can help ensure continual optimal performance.
CLEANING THE SCANNER GLASS
Scanning items that have excessive amounts of dirt or dust may dirty
the glass. To ensure the best quality scanned item, wipe the scanner glass
with a soft clean cloth to rid the glass of dust or other debris.
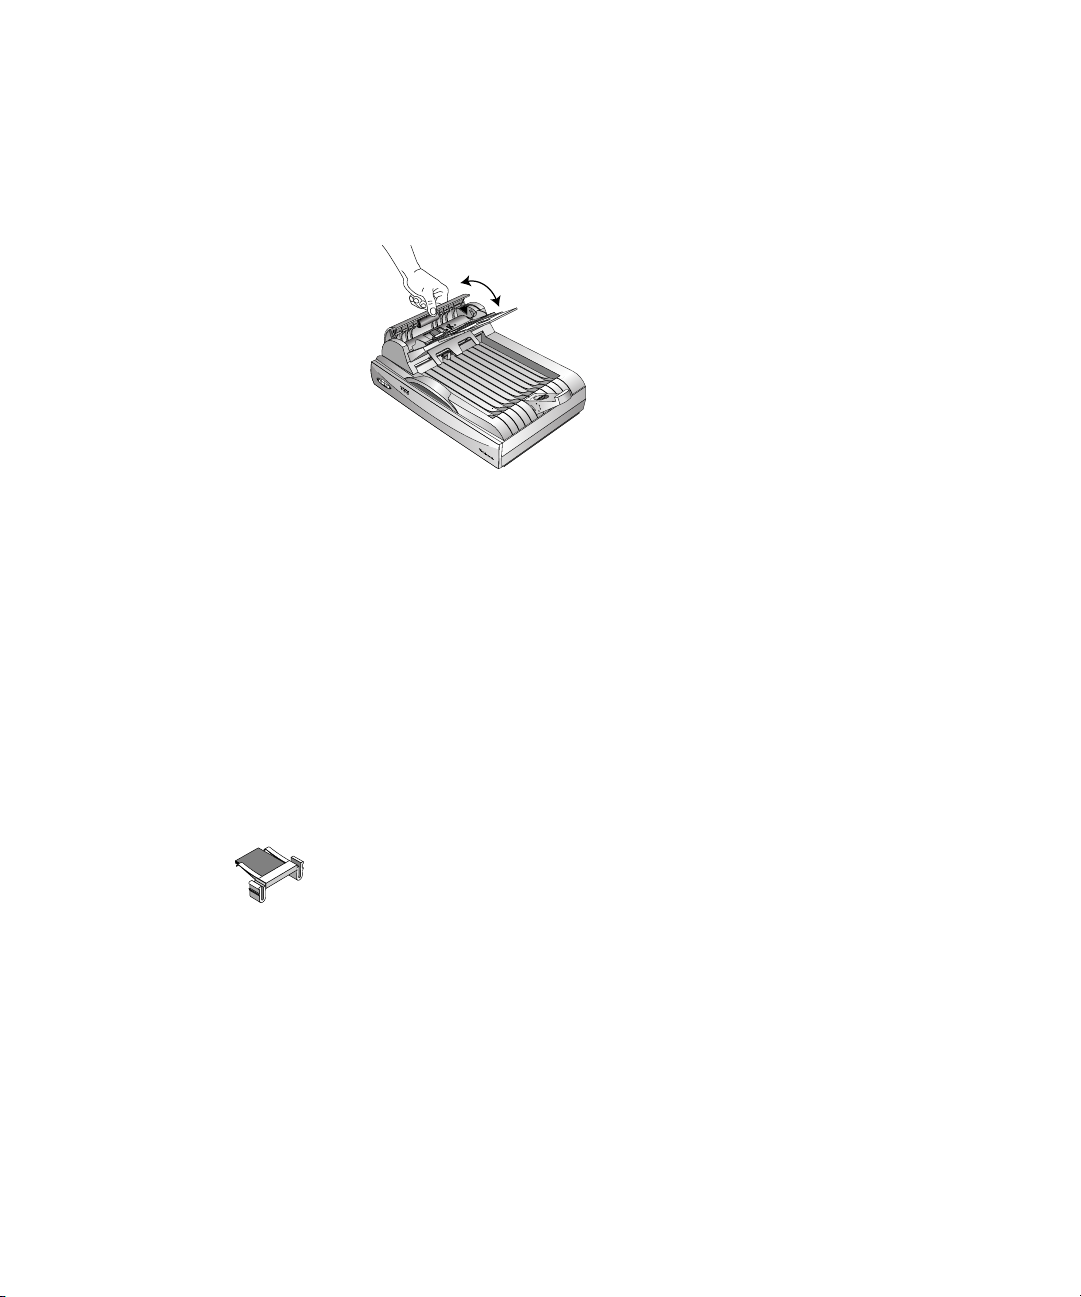
CLEANING THE AUTOMATIC DOCUMENT FEEDER
You may need to clean the ADF feed mechanism if your scanned
documents do not feed easily into the ADF, or several feed in at the
same time.
Page 49
CARE AND MAINTENANCE 45
To clean the ADF:
1. Wet a cotton swab with some isopropyl alcohol (95%).
2. Open the ADF cover.
3. Wipe the feed roller from side to side. Rotate the roller to clean its
entire surface.
4. Wipe the pad from top to bottom. Be careful not to snag the swab
on the springs on either side of the pad.
5. Close the cover when you’re finished.
REPLACING THE ADF PAD ASSEMBLY
The ADF pad spring may begin to wear out after 150,000 scanned
pages. Problems with documents feeding into the ADF is an indication
that the pad spring may be wearing out.
You received a replacement pad in the original scanner box, and you can
also order a new one. See the “Visioneer 9650 Scanner Parts List” on
page 53 for ordering information.
Page 50
46 VISIONEER 9650 SCANNER INSTALLATION GUIDE
To replace the ADF Pad assembly:
1. Open the ADF cover.
2. Squeeze the plastic clamps that hold the pad assembly in place and
lift the pad up and out
3. Reverse the procedure to replace the new pad into its slots.
Page 51

TROUBLESHOOTING 47
TROUBLESHOOTING
In addition to the troubleshooting information contained in this
section, please see the Readme file in the PaperPort directory on your
computer’s hard drive. The Readme file contains additional information
that may help you diagnose problems with the scanner.
If you try all the troubleshooting procedures described in this section
and in the Readme file, and the scanner still has problems, you may
have a malfunctioning scanner. Please see the technical support card
that you received with your scanner for technical assistance telephone
numbers. Also visit our web site at www.visioneer.com for additional
technical information.
Problem: The scanner won’t scan. What’s wrong?
Check for one of these possible problems:
• Is a cable loose or not plugged in securely? Inspect all cable
connections. Make sure all the cables are plugged in securely.
• Are the scanner’s status lights on? Turn on the scanner’s power. If
the lights still don’t come on, plug the power supply into another
electrical outlet.
• Is the scanner’s locking tab in the locked position? Slide the
locking tab to the unlocked position. If you tried to scan with the
scanner locked, you must restart your computer after unlocking the
scanner.
• Did you restart the computer after installing the software? If you
didn’t restart the computer, it may not have loaded all of the software
files. Try restarting your computer.
• Did you select another Twain source for scanning? If you use
multiple Twain devices with your computer, you may have selected
another source for images. Start the PaperPort software click the
Scan icon and choose Visioneer 9650 V1.10.
Page 52

48 VISIONEER 9650 SCANNER INSTALLATION GUIDE
Problem: During installation I got the error message: PaperPort
Installation is not complete. What do I do?
The installation procedure was not successful. You need to reinstall the
PaperPort software.
Problem: I got the error message: PaperPort cannot allocate enough
memory to perform internal critical operations. What do I do?
Close any other active applications so that additional memory is
available. If you click Continue, PaperPort moves the file to the
PaperPort data directory and renames the file with the prefix “bad.”
This allows you to recover the file later.
To recover the file, you can import it into PaperPort by using the
Import command in the File menu.
Problem: If the USB cable is disconnected during a scan, the
scanner does not reconnect when the USB cable is plugged back in.
• Unplug the power cable from the scanner, and then plug it back in.
• If the scanner does not reconnect:
1. Unplug the power cable from the scanner.
2. Restart your computer.
3. After the restart is complete, plug the power cable back in.
Problem: If I power the scanner off (using the power on/off switch),
and then power it back on, the scanner does not reconnect.
When you power off the scanner, complete the following steps to power
it back on:
1. On the right side of the Windows taskbar, right-click the scanner
icon, and then select Close from the shortcut menu.
2. Turn the power back on.
3. Wait until the scanner finishes its self-test. The green light will
stop blinking.
4. On the Windows taskbar, click Start, point to Programs, point
to ScanSoft PaperPort 9.0, and then click PaperPort.
Page 53

TROUBLESHOOTING 49
Problem: The status light is blinking what does this mean?
The status light indicates the current state of the scanner. Descriptions
of the most common patterns are listed below. Contact Visioneer
Technical Support if you experience a different blinking pattern.
• Blinking green: indicates the scanner is preparing to scan.
• Blinking amber, 1 long + 6 short blinks: indicates a problem with
the status light itself. Contact Visioneer Technical support.
• Blinking amber, 1 long + 7 short blinks: indicates a scanner lock
error. Make sure the lock on the bottom of the scanner is in the
unlocked position.
• Blinking amber, 1 long + 11 short blinks: indicates a paper jam.
Refer to “Clearing Paper Jams” on page 43.
Problem: How do I uninstall PaperPort?
See the section, “How to Uninstall Your Scanner” on page 50.
Uninstalling does not delete your scanned items, and they remain in the
PaperPort Data folder.
Page 54

50 VISIONEER 9650 SCANNER INSTALLATION GUIDE
HOW TO UNINSTALL YOUR SCANNER
To uninstall the Visioneer 9650 scanner, remove the scanner software
first, and then remove PaperPort, or other scanner software.
STEP 1: UNINSTALLING THE VISIONEER 9650 SOFTWARE
1. On the Windows taskbar, click Start, point to Settings, and then
click Control Panel.
2. Double-click the Scanners/Camera icon.
■ For Windows 98SE or 2000: Click the Devices tab, select
Visioneer 9650, and click the Remove button to remove the
scanner from the list. Click OK.
■ For Windows ME or XP: Right-click the Visioneer 9650 icon,
and select Delete to delete it from the list.
3. Unplug the USB cable from the scanner.
4. Click the Back button in the toolbar to go back to the Control
Panel.
5. Double-click the Add/Remove Programs icon.
■ Windows 98SE or ME: The Add/Remove Programs Properties
window opens. Select the Install/Uninstall tab.
■ Windows 2000 or XP: The Add or Remove Programs window
opens. Make sure the Change or Remove option is selected.
6. From the list of programs, select Visioneer 9650.
■ Windows 98SE or ME: Click the Add/Remove button.
■ Windows 2000 or XP: Click the Change/Remove button.
7. Click OK when the message asks: Are you sure you want to
completely remove Visioneer 9650 and all of its components.
8. On the Maintenance Complete window, click Finish.
The Visioneer 9650 software is removed from your computer.
9. Close all open windows and restart your computer.
Page 55

HOW TO UNINSTALL YOUR SCANNER 51
STEP 2: UNINSTALLING THE PAPERPORT SOFTWARE
To uninstall PaperPort 9.0 from Windows 98SE or ME:
1. On the Windows taskbar, click Start, point to Settings, and then
click Control Panel.
2. Double-click the Add/Remove Programs icon.
3. On the Add/Remove Programs Properties window, select the
Install/Uninstall tab.
4. Select PaperPort 9.0 and click Remove.
5. On the Welcome window, click Next.
6. On the Program Maintenance window, select the Remove option,
and then click Next.
7. On the Remove the Program window, select the Remove files
option, and then click Remove.
The PaperPort software is removed.
8. On the Uninstall Completed window, click Finish.
9. Close all open windows and restart your computer.
To uninstall PaperPort 9.0 from Windows 2000 or XP:
1. On the Windows taskbar, click Start, point to Settings, and then
click Control Panel.
2. Click the Add or Remove Programs icon.
The Add or Remove Programs window opens.
3. Select PaperPort 9.0 and click Remove.
4. A message window opens, asking if you are sure you want to
remove PaperPort 9.0 from your computer. Click Yes .
The PaperPort software is removed.
5. Close all open windows and restart your computer.
Page 56

52 VISIONEER 9650 SCANNER INSTALLATION GUIDE
VISIONEER 9650 SCANNER SPECIFICATIONS
Bit depth True 42-Bit color (internal), 14-Bit gray (internal),
1-Bit line art/text
Scanning resolution Optical resolution: 600 x 1200 dpi, Hardware
supersampling
Interpolated resolution: 2400 dpi
Maximum item sizes ADF Mode 8.5 x 14 inches (21.6 x 35.6 cm)
Flatbed Mode 8.5 x 11.69 inches (21.6 x 29.7 cm)
ADF scanning speed Up to 12 pages per minute @ 200 dpi B&W
Light source Cold cathode fluorescent lamp
Interface USB 2.0 Full Speed
Scanner dimensions
Height 7.5 inches (19 cm)
Width 12 inches (30.5 cm)
Length 17.5 inches (44.5 cm)
Weight 10.95 pounds (4.96 kg)
Operating temperature 50°–104° F (5°–35° C without condensation)
Relative humidity 20%–80% (@35° C without condensation)
Power supply
Input voltage/frequency 100 Vac, 50/60 Hz (Japan)
120 Vac, 60 Hz (North America)
230 Vac, 50 Hz (Europe)
Output voltage/watt 24 V DC, 20.16 watt maximum
Power consumption < 20 W
Safety and agency certifications UL, C–UL, TUV/GS, FCC Class B, CE
Page 57

VISIONEER 9650 SCANNER PARTS LIST 53
VISIONEER 9650 SCANNER PARTS LIST
Please use the following part names and numbers when ordering
replacements for your Visioneer 9650 scanner.
Part Name Part Number
Paperguide assembly 57-0097-000
Paperguide extension 57-0098-000
Paper stopper assembly 57-0099-000
ADF Pad assembly 57-0100-000
AC Power Cord 35-0060-000
Power supply 37-0046-000
Page 58

54 VISIONEER 9650 SCANNER INSTALLATION GUIDE
Page 59

INDEX 55
INDEX
Numerics
24-bit color 25
8-bit gray 25
A
ADF 3, 21
ADF cable 3
ADF pad replacement 45
ADF port 3
ADF, cleaning 44
adjust scan 41
amber status light 49
auto level scan 31
Automatic Document Feeder 3
B
bit depth 52
brightness 24, 26
C
CD
other software 15
starting manually 11
CD-ROM drive 4
color
auto levels 33
color adjust 31, 33
color adjustment
manual setting 33
color balance 33, 36
color channels 34
color curves 33, 35
color intensity 37
color mode 24
color purity 37
color range 34
color richness 37
computer restart 47
contrast 24, 26
D
Descreen 31
distorted image 31
document cover 2, 3
document default format 39
document pad 3
document stack 22
dpi (dots-per-inch) 25, 42
F
flatbed 39
flatbed scan 21
G
gamma 34, 35
gray scale adjust 31
H
halftone 25
hardware requirements 1
help information 47
highlight/shadow levels 33, 34
hue 34
hue/saturation/lightness 33, 37
I
image
auto level color 33
color balance 36
color range 34
Descreen 31
reverse 29
select scan area 28
sharpen 31, 32
L
lock scaling 29
locking tab 3, 7, 47
M
midtone colors 35
monitor 4
Page 60

O
on/off switch 3, 10
output area selection 28
output size 26
P
paper guide and stop 3
paper jam 43
paper size 27
PaperPort
scan icon 19
Scan pane 20
scanning with Windows XP or ME 38
PaperPort desktop 19
thumbnail 22
patterns on picture 31
photograph default format 39
preview auto-area 27
preview scan 21
R
requirements
monitor 4
resolution 24, 25
reverse image 29
RGB 34
ruler units 27
S
saturation 34
scan
file name 22
minimum size 17
multiple pages 21, 22
PaperPort desktop 22
preview 21
single page 21
scan adjust 41
scan icon 19
Scan Manager 21
scan output size 26
scan preview 21
scanner
locking tab 7
uninstall 50
scanner features 3
scanning from PaperPort 19
setting width and length 29
Single Page Items checkbox 23, 40
stack of documents 22
status light 3, 10, 47
blink pattern 49
problem indication 49
system requirements 4
T
technical support 47
thumbnail 22
TWAIN standard 18
U
uninstall 50
USB port 3
V
Visioneer Web site 47
W
wavy appearance 31
Web site for help 47
WIA Advanced Properties 41
WIA scan adjust 41
WIA standard 18
width to length ratio 29
Windows 98SE, ME, 2000, or XP 19
 Loading...