

Page 1

Visioneer® OneTouch
9520 Photo Scanner
User's Guide
for Windows
Page 2

Visioneer
OneTouch 9520 Photo Scanner
User’s Guide
FOR WINDOWS
Page 3

COPYRIGHT INFORMATION
Copyright © 2007 Visioneer, Inc.
Reproduction, adaptation, or translation without prior written permission is prohibited, except as allowed under the copyright laws.
The Visioneer brand name and logo are registered trademarks of Visioneer, Inc. The PaperPort brand name and logo are registered trademarks of Nuance
Communications, Inc. Corel® and Paint Shop Pro® are registered trademarks of Corel, Corp. ArcSoft Scrapbook Suite® is a registered brand name of
ArcSoft, Inc. Adobe®, Adobe® Acrobat®, Acrobat® Reader®, and the Adobe® Acrobat® PDF® logo are registered trademarks of Adobe Systems
Incorporated in the United States and/or other countries. The Adobe PDF logo will appear in this product’s software, and full access to Adobe software features
is only available if any Adobe product is installed on your computer.
This product is covered by one or more of the following patents: 6, 480, 304; 5,818,976; 5,499,108; 5,517,332.
Microsoft is a U.S. registered trademark of Microsoft Corporation. Windows is a trademark of Microsoft Corporation. ZyINDEX is a registered trademark of
ZyLAB International, Inc. ZyINDEX toolkit portions, Copyright © 1990-1998, ZyLAB International, Inc. All Rights Reserved. All other products mentioned
herein may be trademarks of their respective companies.
Information is subject to change without notice and does not represent a commitment on the part of Visioneer. The software described is furnished under a
licensing agreement. The software may be used or copied only in accordance with the terms of such an agreement. It is against the law to copy the software on
any medium except as specifically allowed in the licensing agreement. No part of this document may be reproduced or transmitted in any form or by any
means, electronic or mechanical, including photocopying, recording, or information storage and retrieval systems, or translated to another language, for any
purpose other than the licensee's personal use and as specifically allowed in the licensing agreement, without the express written permission of Visioneer.
Part Number: 05-0701-100
Restricted Rights Legend
Use, duplication, or disclosure is subject to restrictions as set forth in contract subdivision (c)(1)(ii) of the Rights in Technical Data and Computer Software
Clause 52.227-FAR14. Material scanned by this product may be protected by governmental laws and other regulations, such as copyright laws. The customer
is solely responsible for complying with all such laws and regulations.
Visioneer's Limited Product Warranty
IF YOU FIND PHYSICAL DEFECTS IN THE MATERIALS OR THE WORKMANSHIP USED IN MAKING THE PRODUCT DESCRIBED IN
THIS DOCUMENT, VISIONEER WILL REPAIR, OR AT ITS OPTION, REPLACE THE PRODUCT AT NO CHARGE TO YOU, PROVIDED YOU
RETURN IT (POSTAGE PREPAID, WITH PROOF OF YOUR PURCHASE FROM THE ORIGINAL RESELLER) DURING THE 90-DAY PERIOD
AFTER THE DATE OF YOUR ORIGINAL PURCHASE OF THE PRODUCT. UPON RECEIPT DURING THE INITIAL 90-PERIOD BY
VISIONEER OF A VALID REGISTRATION OF THE PRODUCT, THIS LIMITED PRODUCT WARRANTY PERIOD IS EXTENDED TO THE
12-MONTH PERIOD AFTER THE DATE OF YOUR ORIGINAL PURCHASE. IF A VALID REGISTRATION IS NOT RECEIVED DURING THE
INITIAL 90-DAY PERIOD, THE 12-MONTH WARRANTY IS NO LONGER AVAILABLE AND YOUR PRODUCT WARRANTY WILL
TERMINATE AFTER THE 90-DAY INITIAL PERIOD EXPIRES.
THIS IS VISIONEER'S ONLY WARRANTY AND YOUR EXCLUSIVE REMEDY CONCERNING THE PRODUCT, ALL OTHER
REPRESENTATIONS, WARRANTIES OR CONDITIONS, EXPRESS OR IMPLIED, WRITTEN OR ORAL, INCLUDING ANY WARRANTY OF
MERCHANTABILITY, FITNESS FOR A PARTICULAR PURPOSE OR NON-INFRINGEMENT, ARE EXPRESSLY EXCLUDED. AS A RESULT,
EXCEPT AS SET OUT ABOVE, THE PRODUCT IS SOLD “AS IS” AND YOU ARE ASSUMING THE ENTIRE RISK AS TO THE PRODUCT'S
SUITABILITY TO YOUR NEEDS, ITS QUALITY AND ITS PERFORMANCE.
IN NO EVENT WILL VISIONEER BE LIABLE FOR DIRECT, INDIRECT, SPECIAL, INCIDENTAL OR CONSEQUENTIAL DAMAGES
RESULTING FROM ANY DEFECT IN THE PRODUCT OR FROM ITS USE, EVEN IF ADVISED OF THE POSSIBILITY OF SUCH DAMAGES.
All exclusions and limitations in this warranty are made only to the extent permitted by applicable law and shall be of no effect to the extent in conflict with the
express requirements of applicable law.
RoHS and WEEE Compliance
This product is compliant with RoHS Regulations of the European Parliament and Council Directive on the Restrictions of the Use of Certain Hazardous
Substances in Electrical and Electronic Equipment (2002/95/EC), and with the Waste Electrical and Electronic Equipment (WEEE) Directive (2002/96/EC).
FCC Radio Frequency Interference Statement
This equipment has been tested and found to comply with the limits for the class B digital device, pursuant to part 15 of the FCC Rules. These limits are
designed to provide reasonable protection against interference in a residential installation. This equipment generates, uses and can radiate radio frequency
energy and if not installed, and used in accordance with the instructions, may cause harmful interference to radio communications. However, there is no
guarantee that interference will not occur in a particular installation. If this equipment does cause harmful interference to radio or television reception, which
can be determined by turning the equipment off and on, the user is encouraged to try and correct the interference by one or more of the following measures:
• Reorient or relocate the receiving antenna.
• Increase the separation between the equipment and receiver.
• Connect the equipment into an outlet on a circuit different from that to which the receiver is connected.
• Consult the dealer or an experienced radio/TV technician for help.
This equipment has been certified to comply with the limits for a class B computing device, pursuant to FCC Rules. In order to maintain compliance with
FCC regulations, shielded cables must be used with this equipment. Operation with non-approved equipment or unshielded cables is likely to result in
interference to radio and TV reception. The user is cautioned that changes and modifications made to the equipment without the approval of manufacturer
could void the user's authority to operate this equipment.
This device complies with part 15 of the FCC Rules. Operation is subject to the following two conditions: (1) This device may not cause harmful interference,
and (2) this device must accept any interference received, including interference that may cause undesired operation.
Page 4

TABLE OF CONTENTS i
TABLE OF CONTENTS
Welcome . . . . . . . . . . . . . . . . . . . . . . . . . . . . . . . . . . . . . . . . . . . . . . 1
What’s in the Box . . . . . . . . . . . . . . . . . . . . . . . . . . . . . . . . . . . . . . . 1
The Visioneer OneTouch 9520 Photo Scanner . . . . . . . . . . . . . . . . . 2
What You Need . . . . . . . . . . . . . . . . . . . . . . . . . . . . . . . . . . . . . . . . . 4
Documentation . . . . . . . . . . . . . . . . . . . . . . . . . . . . . . . . . . . . . . . . . 4
Installing . . . . . . . . . . . . . . . . . . . . . . . . . . . . . . . . . . . . . . . . . . . . . . 5
Before You Begin . . . . . . . . . . . . . . . . . . . . . . . . . . . . . . . . . . . . . . . . 5
Step 1: Assemble the Scanner . . . . . . . . . . . . . . . . . . . . . . . . . . . . . . . 6
Step 2: Install the Software . . . . . . . . . . . . . . . . . . . . . . . . . . . . . . . . 8
Step 3: Connect the Scanner . . . . . . . . . . . . . . . . . . . . . . . . . . . . . . 14
Register Your Scanner and Check for Updates . . . . . . . . . . . . . . . . . 22
Scanning . . . . . . . . . . . . . . . . . . . . . . . . . . . . . . . . . . . . . . . . . . . . . 23
Scan with the Scanner Buttons . . . . . . . . . . . . . . . . . . . . . . . . . . . . 24
About the OneTouch Buttons . . . . . . . . . . . . . . . . . . . . . . . . . . 25
Check a Scanner Button’s Settings Before You Scan . . . . . . . . . 27
Scan from the OneTouch Button Panel . . . . . . . . . . . . . . . . . . . . . . 29
The OneTouch Button Panel’s Features . . . . . . . . . . . . . . . . . . 30
Scanning From the TWAIN Interface . . . . . . . . . . . . . . . . . . . . . . . 32
A Note About the TWAIN Standard . . . . . . . . . . . . . . . . . . . . 32
Accessing the TWAIN Interface from PaperPort . . . . . . . . . . . . 33
Setting Up Your Scanner to Work With PaperPort . . . . . . . . . . 38
Setting Up Your Scanner to Work With
Corel Paint Shop Pro . . . . . . . . . . . . . . . . . . . . . . . . . . . . . . . . . 44
The Two TWAIN Interface Options . . . . . . . . . . . . . . . . . . . . . . . . 45
Scanning from the Basic Interface . . . . . . . . . . . . . . . . . . . . . . . . . . 46
Scanning from the Advanced Interface . . . . . . . . . . . . . . . . . . . . . . . 50
Adjusting the Image on the Advanced Interface . . . . . . . . . . . . . 53
Adjusting the Resolution . . . . . . . . . . . . . . . . . . . . . . . . . . . . . . 55
Page 5

ii TABLE OF CONTENTS
Adjusting the Brightness and Contrast . . . . . . . . . . . . . . . . . . . . 57
Adjusting Gamma, Saturation, and Color Hue . . . . . . . . . . . . . 58
Adjusting Input Size . . . . . . . . . . . . . . . . . . . . . . . . . . . . . . . . . 59
Creating a New Advanced Interface Profile . . . . . . . . . . . . . . . . 62
Scanning 35mm Slides and Negatives . . . . . . . . . . . . . . . . . . . . . . . 63
A Brief Explanation . . . . . . . . . . . . . . . . . . . . . . . . . . . . . . . . . . 63
The Scanning Mask . . . . . . . . . . . . . . . . . . . . . . . . . . . . . . . . . . 63
Positioning 35mm Slides in the Mask . . . . . . . . . . . . . . . . . . . . 64
Positioning a 35mm Negative Film Strip . . . . . . . . . . . . . . . . . . 65
Scanning 35mm Slides or Negatives from the
TWAIN Interface . . . . . . . . . . . . . . . . . . . . . . . . . . . . . . . . . . . 66
Configuring the Scanner. . . . . . . . . . . . . . . . . . . . . . . . . . . . . . . . . 72
About the OneTouch Properties Window . . . . . . . . . . . . . . . . . 73
Selecting New Settings for a Button . . . . . . . . . . . . . . . . . . . . . . . . . 76
Setting Destination Application Properties . . . . . . . . . . . . . . . . 78
Selecting Format Options . . . . . . . . . . . . . . . . . . . . . . . . . . . . . 87
Scanning with Optical Character Recognition (OCR) . . . . . . . . 91
Selecting Options for a Button . . . . . . . . . . . . . . . . . . . . . . . . . 93
Creating a New Scan Configuration . . . . . . . . . . . . . . . . . . . . . 97
Editing or Deleting Scan Configurations . . . . . . . . . . . . . . . . . 105
Configure Before Scan . . . . . . . . . . . . . . . . . . . . . . . . . . . . . . . 107
Scan and Burn to a CD . . . . . . . . . . . . . . . . . . . . . . . . . . . . . . 112
Scanning with Event Forwarding . . . . . . . . . . . . . . . . . . . . . . . 115
Creating an HTML Web Page from
Your Scanned Documents . . . . . . . . . . . . . . . . . . . . . . . . . . . . 117
Transferring Scanned Documents to Storage . . . . . . . . . . . . . . 119
Checking the Hardware and Setting the
Lamp Power Save Mode . . . . . . . . . . . . . . . . . . . . . . . . . . . . . 129
Scanning with the Windows Image Acquisition . . . . . . . . . . . . . . . 132
Page 6

TABLE OF CONTENTS iii
Maintenance . . . . . . . . . . . . . . . . . . . . . . . . . . . . . . . . . . . . . . . . . 137
Cleaning the Scanner Glass . . . . . . . . . . . . . . . . . . . . . . . . . . . . . . 137
Troubleshooting . . . . . . . . . . . . . . . . . . . . . . . . . . . . . . . . . . . . . . 137
How to Uninstall Your Scanner . . . . . . . . . . . . . . . . . . . . . . . . . . . 140
Uninstalling the OneTouch 4.0 Scanner Software . . . . . . . . . . 140
Uninstalling the PaperPort Software . . . . . . . . . . . . . . . . . . . . 140
To Install Another Driver . . . . . . . . . . . . . . . . . . . . . . . . . . . . . . . 141
Visioneer 9520 Photo Scanner Specifications . . . . . . . . . . . . . . . . . 142
Visioneer 9520 Photo Scanner Parts List . . . . . . . . . . . . . . . . . . . . 143
Index . . . . . . . . . . . . . . . . . . . . . . . . . . . . . . . . . . . . . . . . . . . . . . . 145
Page 7

iv TABLE OF CONTENTS
Page 8
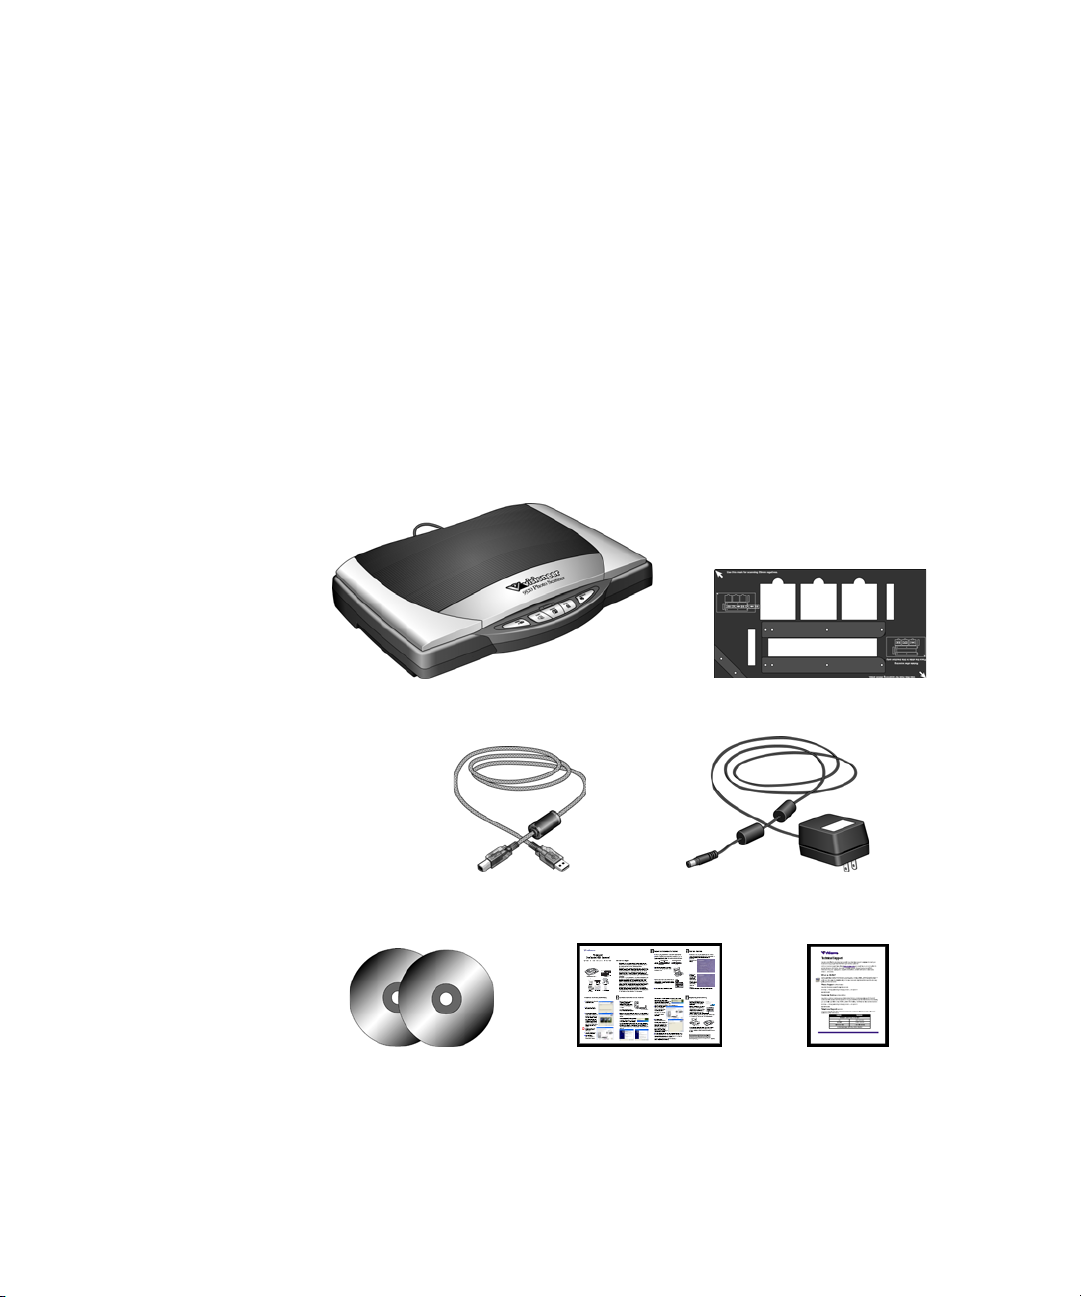
WELCOME
Technical Support Card
Visioneer OneTouch 9520 Photo Scanner
USB Cable
Quick Install Guide
Power Adaptor
Transparency Mask
Two CD’s
Disc 1 and Disc 2
Congratulations on purchasing your Visioneer OneTouch 9520 Photo
scanner. With this scanner you can quickly scan paper documents, color
photos, 35mm slides and negatives and place their electronic images on
your computer.
WHAT’S IN THE BOX
Before starting the installation, check the contents of the box to make
sure that all parts are included. If any items are missing or damaged,
contact the dealer where you purchased the scanner.
VISIONEER ONETOUCH 9520 PHOTO SCANNER USER’S GUIDE 1
Page 9
2 VISIONEER ONETOUCH 9520 PHOTO SCANNER USER’S GUIDE
Glass
Reference marks
Scanner lid
Option port
OneTouch buttons panel
USB port
Status light
OneTouch buttons
Power jack
Email
Copy
Photo
Archive
Transparency light source
TPA cable
Locking tab (underneath)
Scan
THE VISIONEER ONETOUCH 9520 PHOTO SCANNER
Page 10

THE VISIONEER ONETOUCH 9520 PHOTO SCANNER 3
Scanner lid—Protects the document from light and contamination.
Transparency light source—The light source for scanning 35mm
slides and negatives. Shines light down through 35mm slide or negative
transparencies, then through the glass onto the scanning sensors in the
body of the scanner.
Glass—Items are placed face down aligned at the arrow symbol at the
upper left corner.
Reference marks—Marks on the border of the glass show where to
align various paper sizes.
Locking tab—Protects the scanner’s scan head by holding it securely in
position. The locking tab, located on the underside of the scanner, must
be unlocked before scanning. The scanner will not scan when locked.
OneTouch button panel—Scans to the appropriate application
indicated by the button. For example, pressing the Email button scans
the document, then opens your Email program with the image of the
scanned document as an attachment to a new message ready for you to
address and send.
Status light—Shows the scanner’s status. Green light: scanner is ready
to scan. Orange light: scanner is busy.
Option port—Connects the TPA cable to the scanner. The cable must
be attached for the transparency light source to operate.
USB port—Connects the scanner to the computer. Your Visioneer
9520 scanner can connect to either a USB 1.1 or a USB 2.0 port.
Power jack—Connects the power adaptor to the scanner.
TPA (Transparency Adapter) cable—Supplies power from the scanner
body to the transparency light source.
Note: The scanner does not have an on/off switch. The scanner is
ready to scan as soon as the Visioneer software loads on your
computer.
Page 11

4 VISIONEER ONETOUCH 9520 PHOTO SCANNER USER’S GUIDE
WHAT YOU NEED
IBM-compatible Pentium 4 PC, or AMD equivalent with:
■ A CD-ROM drive
■ An available Universal Serial Bus (USB) port
■ Microsoft
(Service Pack 1 and 2), or Vista
■ Windows 2000 and XP: A minimum of 512 megabytes (MB) of
internal memory (RAM)
Windows Vista: A minimum of 1 gigabyte (GB) of internal memory
(RAM)
■ 350 MB minimum of free hard disk space
A VGA or SVGA Monitor
The recommended settings for your monitor are:
■ High Color (16-bit) or True Color (24-bit or 32-bit)
■ Resolution set to at least 800 x 600 pixels
To set your monitor’s colors and resolution:
■ Open the Windows Control Panel
■ Double-click on Display then select the Settings tab
®
Windows® operating system: 2000 (Service Pack 4), XP
DOCUMENTATION
Your scanner is delivered with the following documentation:
■ Quick Install Guide—Abbreviated installation instructions.
■ Visioneer OneTouch 9520 Photo Scanner User’s Guide—On the
Installation CD; contains detailed installation, scanning,
configuration, and maintenance information.
■ ScanSoft PaperPort User’s Guide—On the Installation CD; contains
detailed feature and configuration information for the PaperPort
software.
■ Online Help—For the scanner configuration, TWAIN, and WIA
interfaces.
Page 12

BEFORE YOU BEGIN 5
Installing
Installation is a quick, three-step process:
1. Assemble the scanner
2. Install the software
3. Connect the scanner
BEFORE YOU BEGIN
Please make sure of the following before you begin installation:
■ If your computer has AntiVirus or AntiSpyware software
running, you may see messages during installation asking you to
allow the installation to proceed. Although the messages will
differ based on the software your computer is running, in each
case you should allow the installation to proceed. Alternatively,
you can turn off the AntiVirus or AntiSpyware software before
installing your scanner, but if you do, make sure to turn it back
on again when installation is finished.
■ If you already have a scanner connected to your computer it is
recommended that you remove its driver program prior to
installing your Visioneer OneTouch 9420 USB scanner. You can
remove these programs from the Windows Add/Remove
Programs list. Please refer to the user manual for your previous
scanner for instructions to remove the driver and software
applicable to that scanner.
■ The information in this User’s Guide may cover software not
provided with the scanner you purchased. Disregard any
information about software not applicable to your scanner.
Please visit our web site at www.visioneer.com for the latest
software updates for your Visioneer OneTouch 9420 USB
scanner.
■ If your computer is running Windows Vista, you may see the
Vista User Access Control screen asking you to confirm system
changes. Click the continue button to allow the installation to
proceed.
Page 13
6 VISIONEER ONETOUCH 9520 PHOTO SCANNER USER’S GUIDE
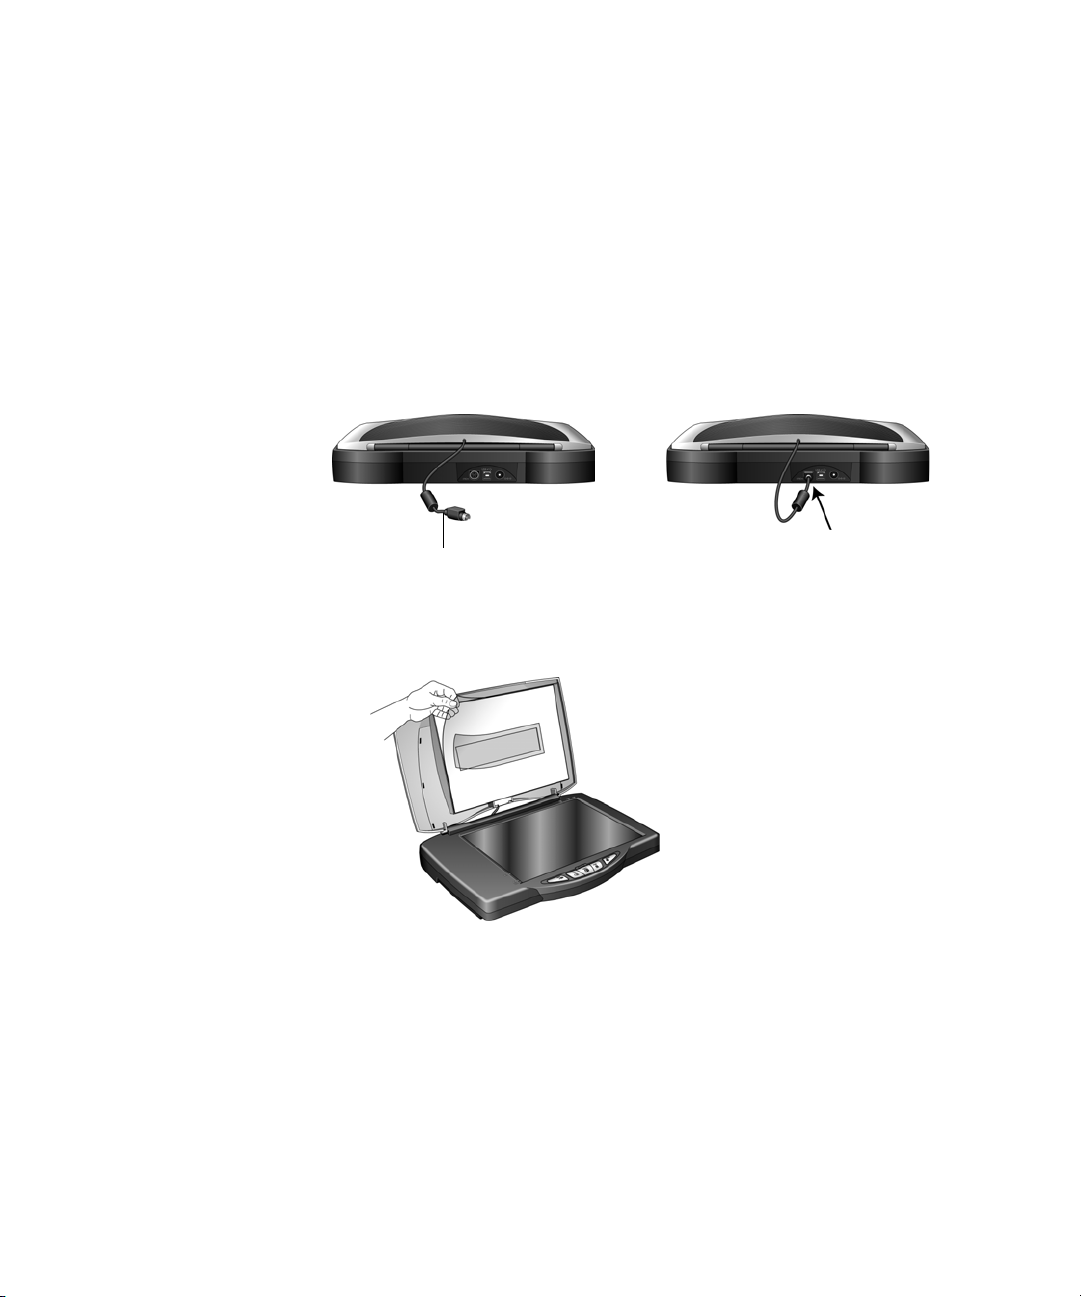
Transparency Adapter Cable
STEP 1: ASSEMBLE THE SCANNER
To assemble the scanner:
1. Remove any shipping tape from the top and bottom of the scanner.
2. Plug the Transparency Adapter Cable into the Option port on the
body of the scanner.
The Transparency Adapter Cable must be securely attached for your
scanner to be able to scan 35mm slide and negative transparencies.
3. Open the lid and remove the protective film from the Transparency
Adapter. Discard the protective film
Page 14
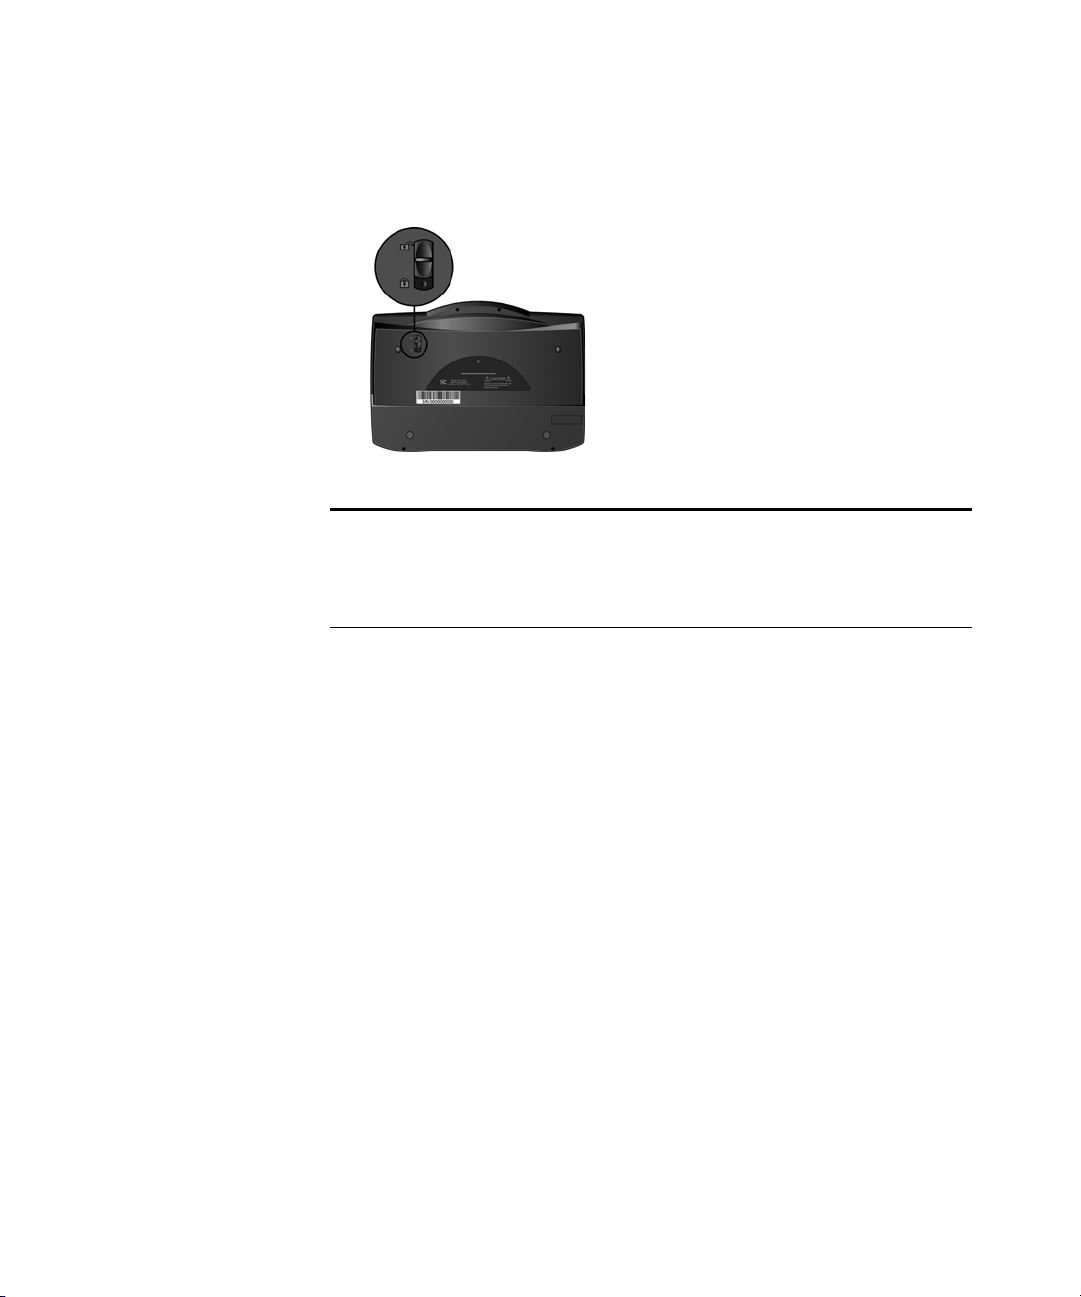
STEP 1: ASSEMBLE THE SCANNER 7
4. Turn the scanner over and slide the lock tab to the unlocked
position. The scanner must be unlocked for you to continue with the
installation. It must also be unlocked to scan.
Note: The locking tab protects the scanner’s scan head by holding it
securely in position. Lock the scanner when transporting it from one
location to another, but remember to unlock it before scanning. The
scanner will not scan when locked.
5. Proceed to “Step 2: Install the Software.”
Page 15

8 VISIONEER ONETOUCH 9520 PHOTO SCANNER USER’S GUIDE
STEP 2: INSTALL THE SOFTWARE
Note: The software is on the two CD’s you received with your
scanner. Please be sure to install from Disc 1 first.
To install the software:
1. Start Microsoft Windows and make sure no other applications are
running.
2. Insert Disc 1 into your computer’s CD-ROM drive.
The Main Menu automatically opens.
Note: If the CD does not start, check the following:
■ Make sure you have inserted Disc 1.
■ Make sure the CD drive’s door is completely shut.
■ Make sure the CD was inserted in the drive in the proper
direction (label side up).
To launch the CD manually:
■ Open the Windows option for My Computer. You can do this
by double-clicking on the My Computer icon on your desktop.
■ Double-click the icon for your CD-ROM drive.
■ The Installation menu for the CD should now open.
If the menu does not open:
■ From the list of files on the CD, double-click the file named
START32.EXE.
Page 16

STEP 2: INSTALL THE SOFTWARE 9
3. On the Main Menu, select Install Products.
4. Make sure the boxes for Nuance PaperPort®, Scanner Driver,
and Corel® Paint Shop Pro® are checked.
If you also want to install the ArcSoft Suite software, select it too.
5. Click Install Now.
Page 17

10 VISIONEER ONETOUCH 9520 PHOTO SCANNER USER’S GUIDE
The PaperPort installation options opens:
1. The Select Language window opens. Click the drop-down menu
arrow and select the language you want to use. Click OK.
The first PaperPort Installation window opens.
2. On the PaperPort Welcome window, click Next.
Installing PaperPort will uninstall any existing version of PaperPort
and will install the newer version while retaining all of your
previous PaperPort files.
3. Read the PaperPort license agreement and select I accept the terms
in this agreement, then click on Next. If you choose not to accept
the license agreement, the installation will terminate and the
PaperPort software will not be installed.
4. On the Customer Information window, accept the current values or
enter new information, then click Next.
5. On the Setup Type window, keep the default Setup Type and click
Next.
6. Click Install to begin the installation.
Reminder: If your computer is running an AntiVirus or
AntiSpyware application, you may see messages asking you to allow
installation. Select the option to allow installation to proceed with
the install.
7. On the Product Registration window, do one of the following:
■ Select Register online, click OK, then follow the registration
instructions.
■ Select Print registration form, click OK, then follow the
instructions to complete and print the registration form.
■ Select Remind me in 7 days and click OK.
8. At the InstallShield Wizard Completed window, click Finish.
If a message window opens instructing you to restart your
computer, click Restart.
Page 18

STEP 2: INSTALL THE SOFTWARE 11
The Welcome to the OneTouch 4.0 Setup Wizard opens.
1. Click Next.
2. On the Visioneer License Agreement window, read the license
agreement. If you accept the terms, select I Agree.
If you choose not to accept the license agreement, the installation
will terminate and the scanner driver will not be installed.
3. Click Next.
Page 19
12 VISIONEER ONETOUCH 9520 PHOTO SCANNER USER’S GUIDE
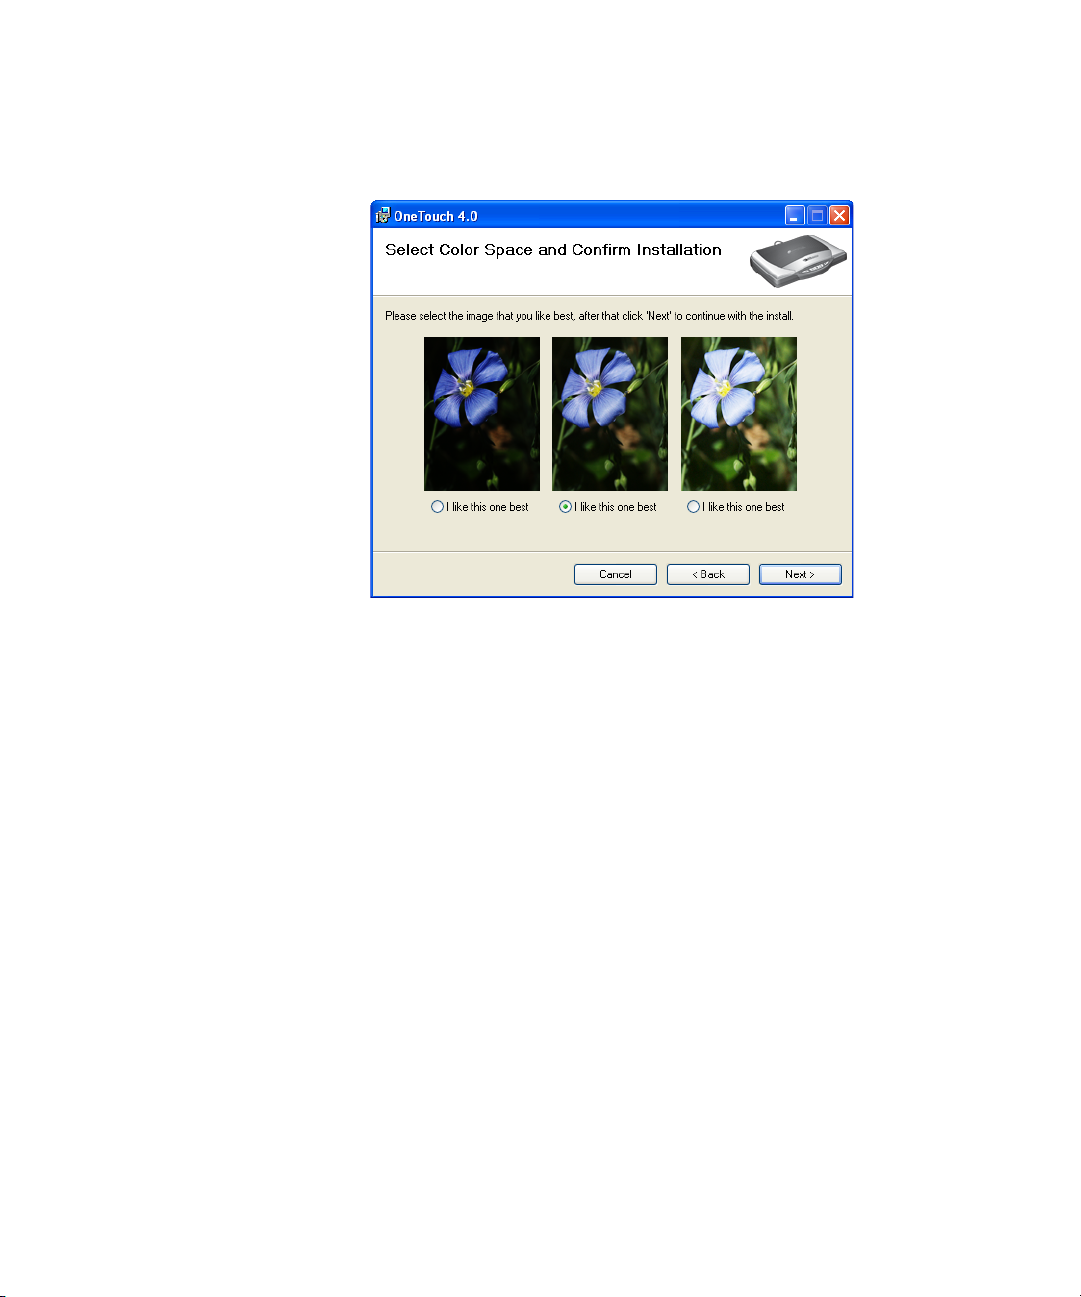
A window opens with image quality samples asking you to select an
image for your Color Space setting.
The Color Space setting sets the gamma value for the scanner so
scanned items look good on your monitor. Gamma controls the
brightness of the midtones of colors. That setting can be changed
later on as you’re scanning.
4. Select the option that looks best to you and click Next.
The driver installation will now begin.
Reminder: If your computer is running AntiVirus or AntiSpyware
software, you may see messages asking you to allow installation.
Select the option to allow installation to proceed.
Page 20
STEP 2: INSTALL THE SOFTWARE 13
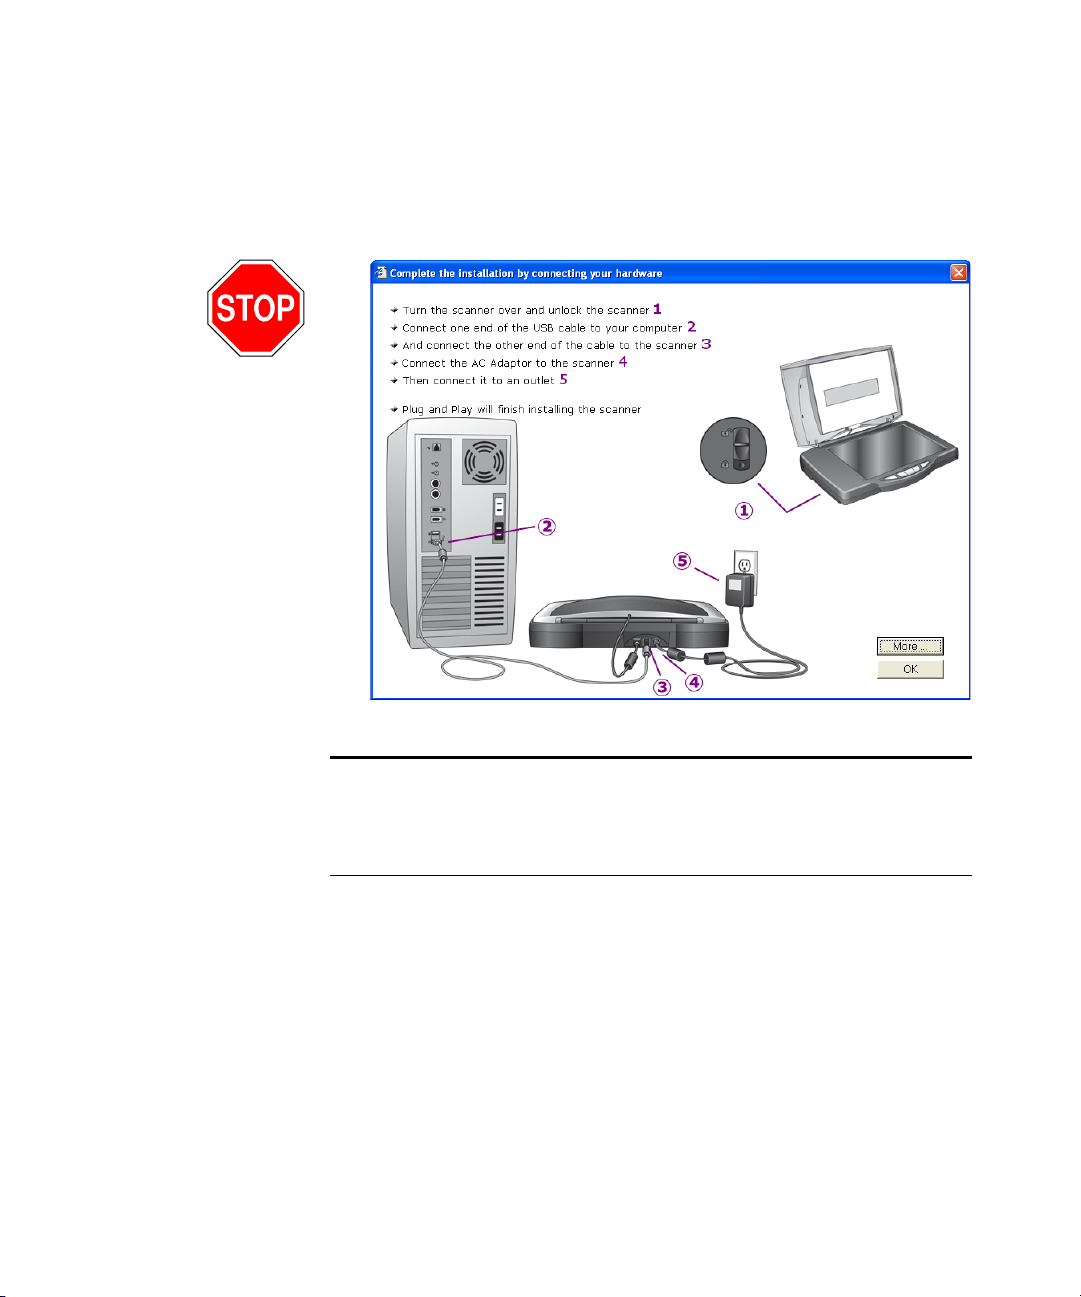
5. STOP when you see the “Complete the installation by connecting
your hardware” window. Do NOT click on OK yet. Leave the
window open and proceed to
“Step 3: Connect the Scanner” on
page 14.
Note: If you want to see more information about your scanner and a
quick explanation of how to use the OneTouch features, click the
More button on the window. When you’re finished, return to the
window to continue the installation process.
Page 21
14 VISIONEER ONETOUCH 9520 PHOTO SCANNER USER’S GUIDE
USB
STEP 3: CONNECT THE SCANNER
Make sure the locking tab is unlocked, then connect the scanner.
To connect your scanner:
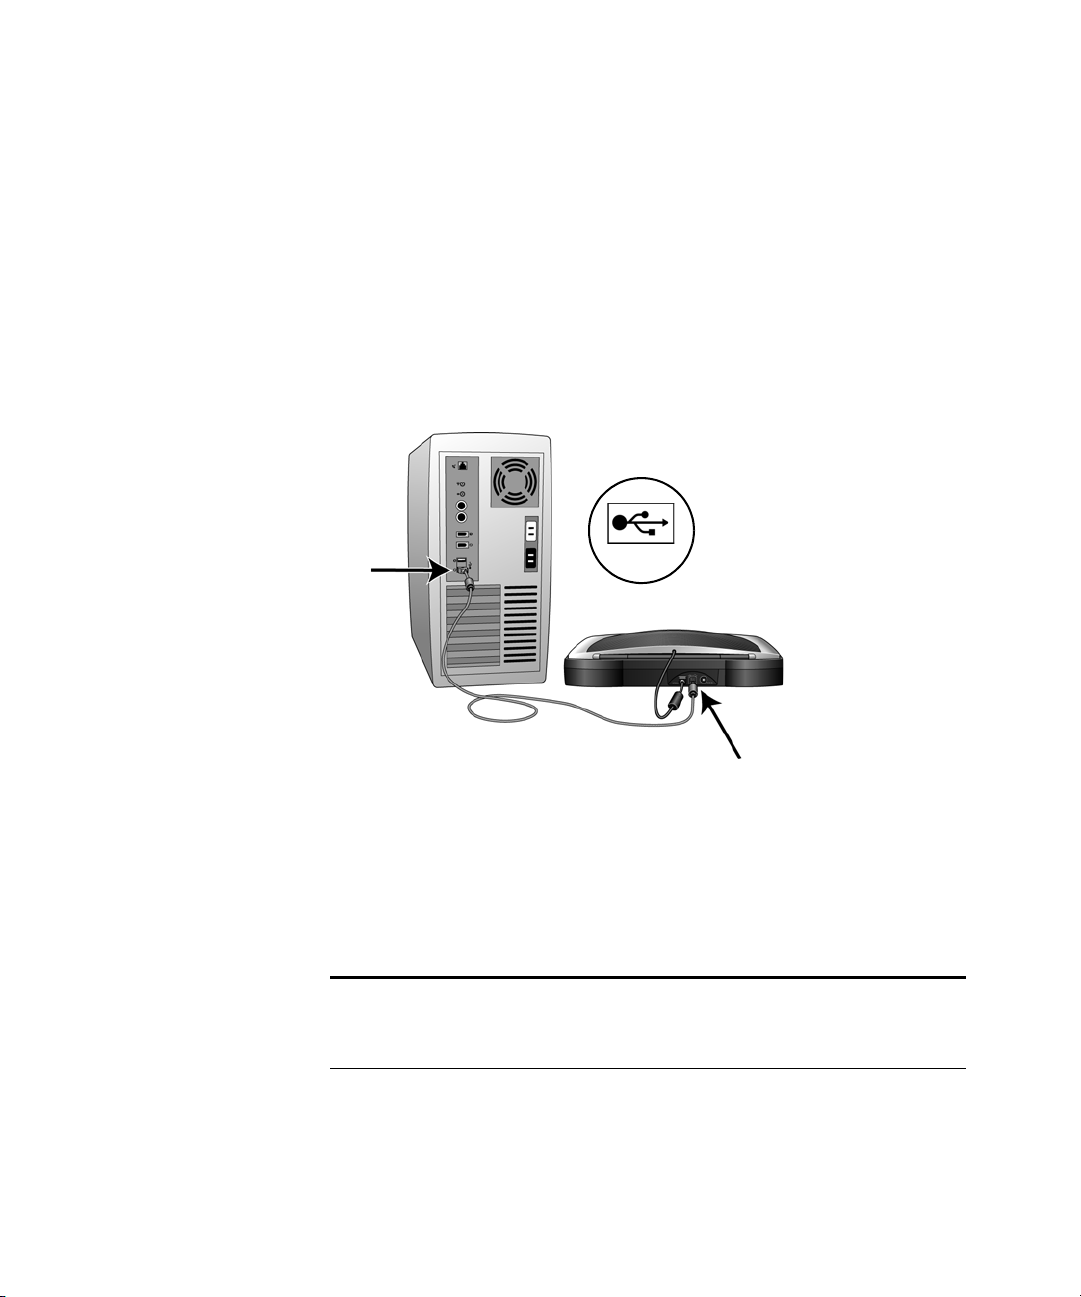
1. Remove any tape from the USB cable.
2. Using the steps on the screen as your guide, plug the flat, computer
end of the USB cable into an available USB port on the computer.
3. Plug the other end of the USB cable into the scanner’s USB port.
If the plug does not attach easily, make sure that you are plugging it
in correctly. Do not force the plug into either connection.
You can also connect the scanner to a USB port on the computer’s
keyboard if it has one, or to a USB hub. If you use a USB hub, it
must have its own power supply already plugged into an electrical
outlet.
Note: If you have not installed the software, unplug the USB cable
from the computer and install the software now. When the software
installation is complete, a message tells you to connect the scanner.
Page 22
STEP 3: CONNECT THE SCANNER 15
Status light
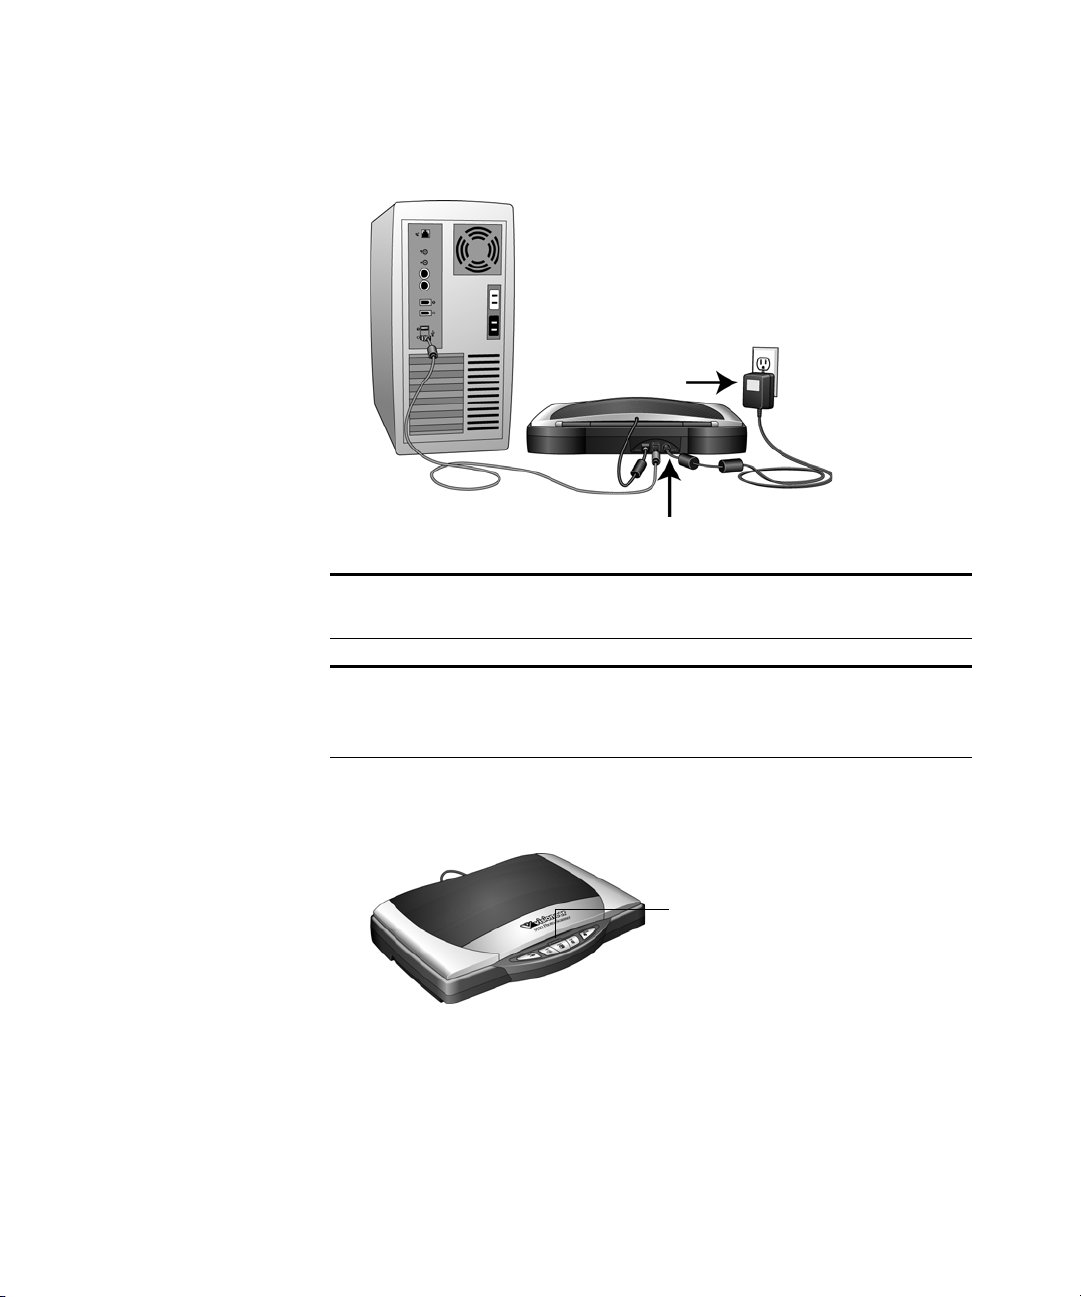
4. Plug the power adaptor into the scanner power port, then into a
wall outlet.
Note: Your scanner does not have a power switch. Plugging it in turns
on the power.
Note: Only use the power adaptor (Model No. PA-08J made by YHI,
Ltd.) included with your scanner. Connecting any other type of power
supply may damage your scanner, and will void its warranty.
The status light on the front of the scanner is illuminated,
indicating the scanner is receiving power.
Page 23
16 VISIONEER ONETOUCH 9520 PHOTO SCANNER USER’S GUIDE
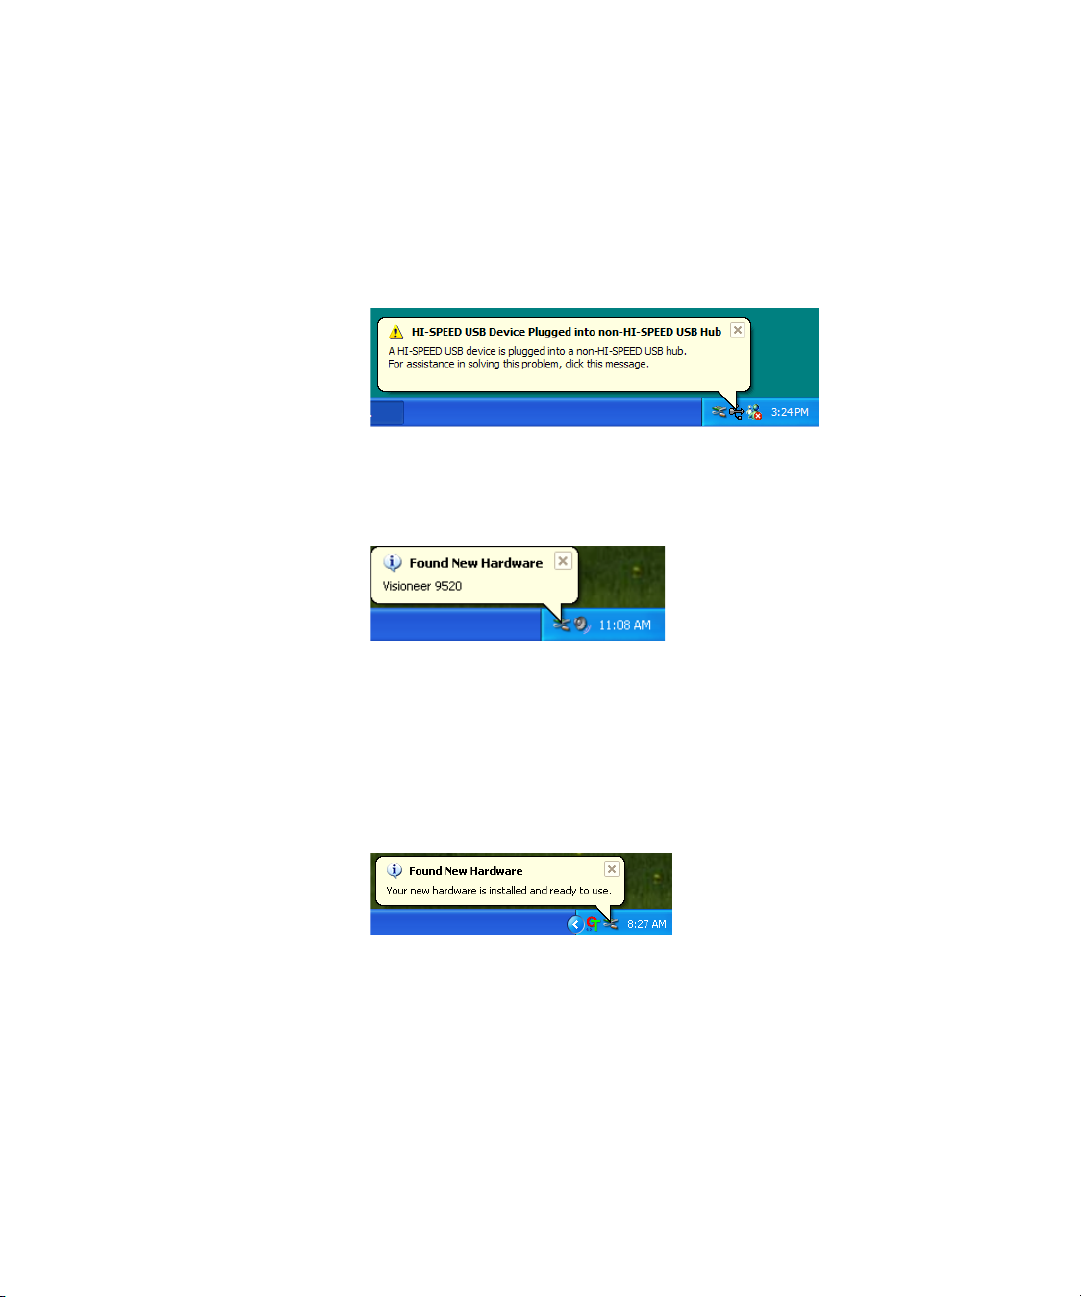
If you are using Windows XP and have plugged the USB cable into
a USB 1.1 port, an information bubble may open explaining that
“A HI-SPEED USB device is plugged into a non-HI-SPEED USB
hub”. Plug the USB cable into a USB 2.0 port (if available) or just
disregard the message. If you leave it plugged into the USB 1.1
port, your scanner may scan a bit slower than with a USB 2.0 port.
Your computer recognizes that a scanner has been plugged into the
USB port. If your computer is running Windows XP or Windows
Vista, you will see the Found New Hardware message.
The computer loads the appropriate software from the CD to run
the scanner.
Do not proceed until you receive a message that your computer has
found the new hardware, or updated the driver database. For Windows
XP and Windows Vista, you will see a message similar to the following,
that your new hardware is found and ready to use.
Page 24

STEP 3: CONNECT THE SCANNER 17
5. When the software is finished loading, return to the Connect
Scanner window and click OK to finish the installation process.
Note: If you want to see more information about your scanner and a
quick explanation of how to use the OneTouch features, click the
More button on the window. When you’re finished, return to the
window and click OK to complete the installation process.
Page 25
18 VISIONEER ONETOUCH 9520 PHOTO SCANNER USER’S GUIDE
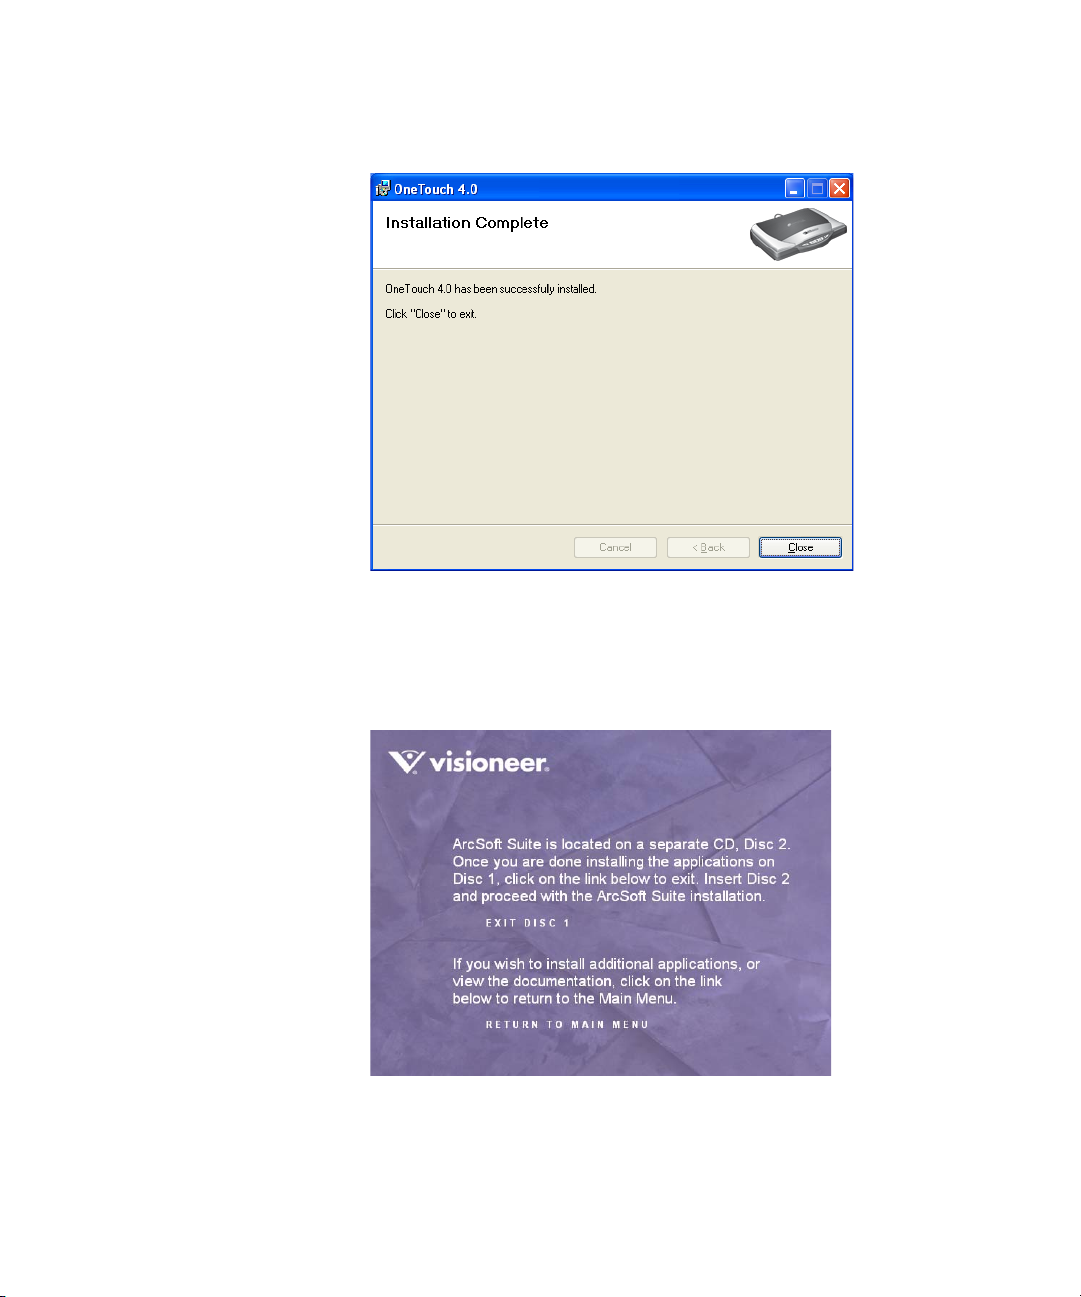
6. Click Close on the Installation Complete window.
7. If you selected Corel Paint Shop Pro to install, its installation will
now begin. Follow the instructions on the screen.
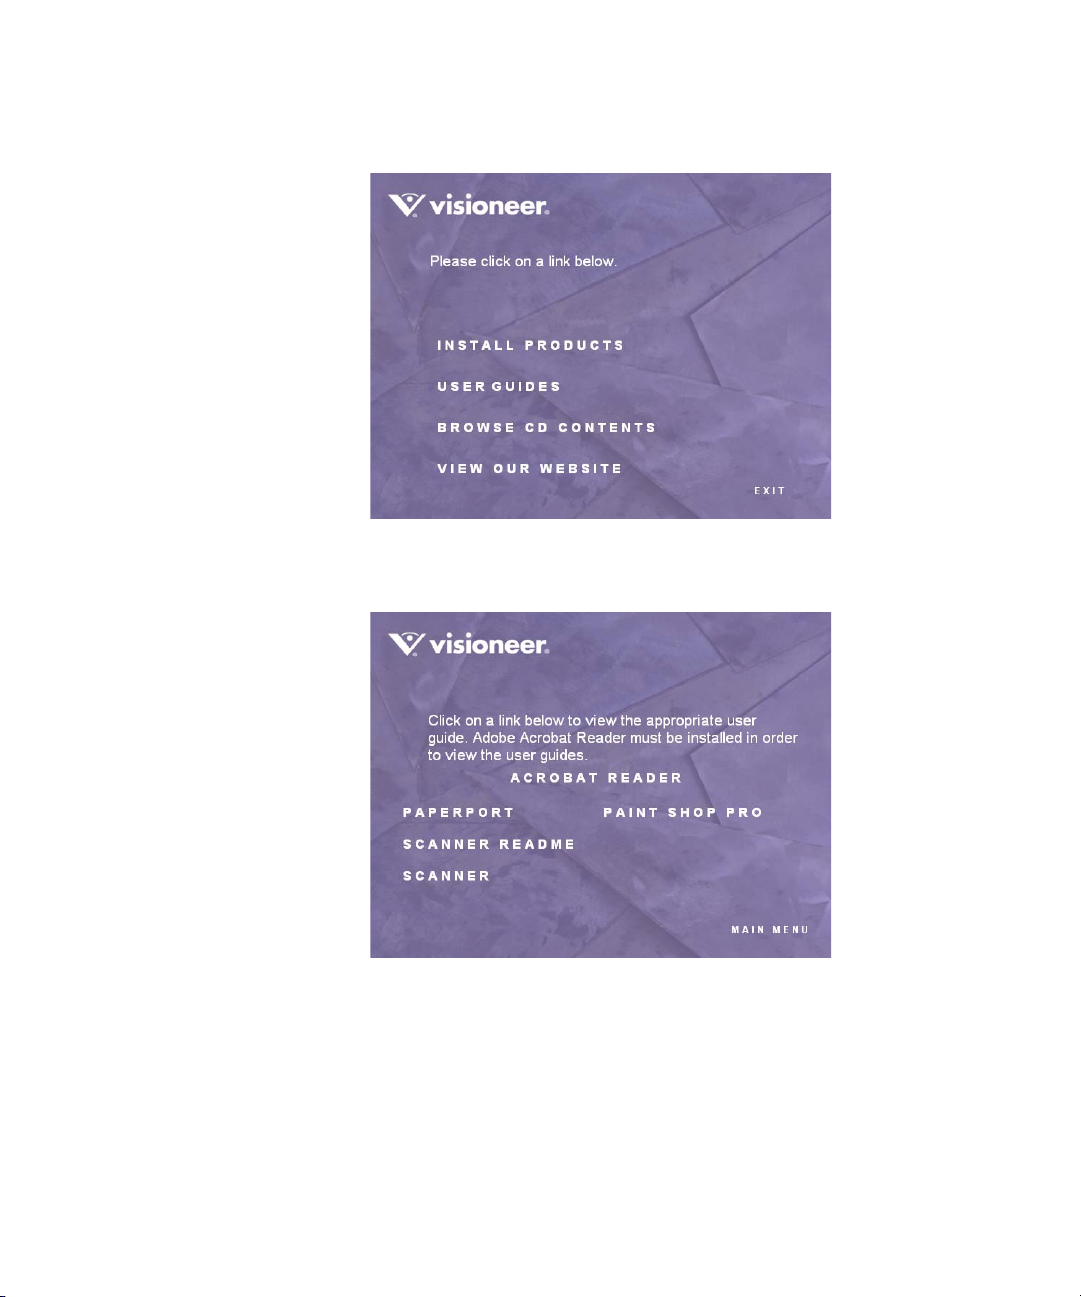
8. If you also selected ArcSoft Suite to install, a window opens with
instructions.
Page 26

STEP 3: CONNECT THE SCANNER 19
Note: ArcSoft Suite contains several scanning and image
enhancement software applications with features that include intuitive
steps to scan, photo editing, hands-on instructions to build collages
from your digital images, and easy-to-use project templates.
Note: If you did not select ArcSoft Suite to install, you can still follow
the next steps to install it now. If you don’t want to install it, skip to
step 11 below to view the user guides for your scanner and software.
9. Remove Disc 1 and insert Disc 2.
The ArcSoft Main Menu opens.
10. Click Install ArcSoft Suite and follow the instructions on the
screen to install the software.
11. When installation is finished, remove Disc 2 and reinsert Disc 1 to
view the user guides for your scanner and software.
Page 27
20 VISIONEER ONETOUCH 9520 PHOTO SCANNER USER’S GUIDE
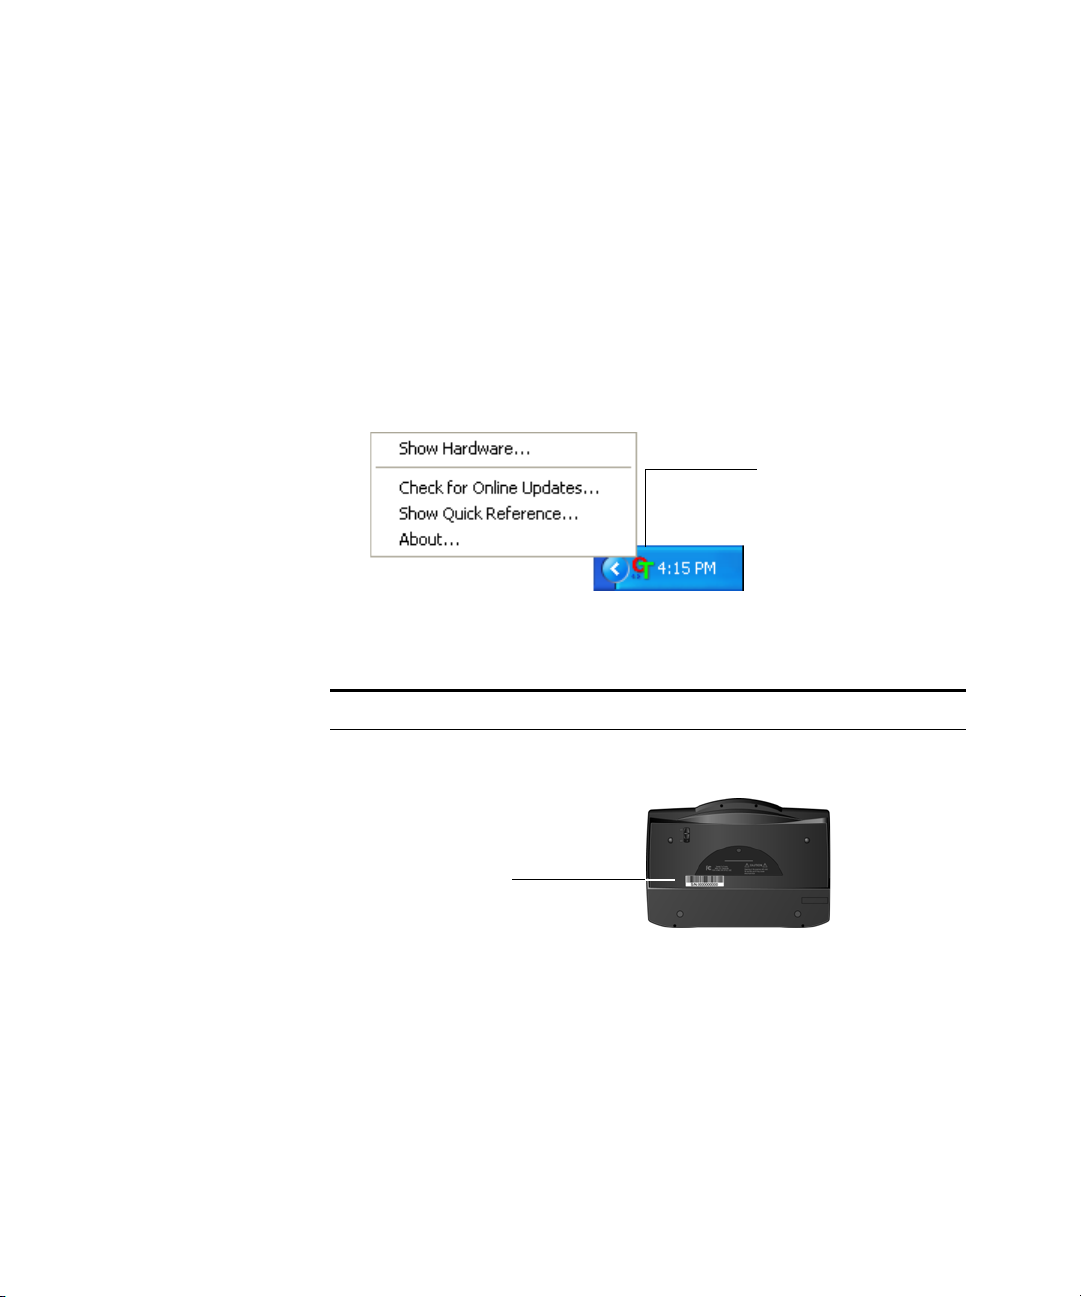
12. On the Main Menu, click User Guides.
The Visioneer User Guides window opens. Use this window to view
and save the User Guides you want.
The User Guides are in Adobe® Acrobat® PDF format. The CD
also includes a free copy of Acrobat
®
Reader® in case your
computer does not have it already installed. The Scanner Readme
file is in HTML format and will open in any standard browser.
If you need to, click Acrobat Reader to install it now. Follow the
instructions on the installation windows.
Page 28

STEP 3: CONNECT THE SCANNER 21
To view and save the User Guides:
1. Click the name of a User Guide you want to view and it will open
in Acrobat Reader. Use the Acrobat Reader Save command to save
that User Guide on your computer.
2. Return to the Visioneer User Guides window and repeat the process
to open, view, and save all the other User Guides you want. The
Scanner Readme file has late-breaking news about your scanner.
3. When you’re finished, click Main Menu to return to the main
Visioneer Installation window and click Exit.
4. Remove the CD and store both CD’s in a safe place.
That’s it! Installation is finished and your Visioneer scanner is ready to scan.
Page 29
22 VISIONEER ONETOUCH 9520 PHOTO SCANNER USER’S GUIDE
The OneTouch Icon
The Serial Number
REGISTER YOUR SCANNER AND CHECK FOR UPDATES
Registering your scanner is important as it provides you with access to
our free telephone support service. Registration also gives you free access
to software updates for your scanner.
To register your scanner:
1. Right-click on the OneTouch icon in the Windows Notification
Area (at the bottom right corner of the screen).
2. Choose Check for Online Updates from the pop-up menu.
3. Follow the instructions on the screen and register your scanner by
entering your scanner’s serial number and your email address.
Note: A valid email address is required.
The serial number is located on the underside of the scanner.
After registration is complete you will receive an email message with
your RegID.
Your RegID is important as you will need it when accessing free
telephone support, or checking for online updates.
4. After receiving your RegID, write it down on a piece of paper and
keep it with your scanner so you will be able to find it easily.
Page 30
REGISTER YOUR SCANNER AND CHECK FOR UPDATES 23
Scanning
This section describes how to scan paper documents as well as 35mm
slides and negatives.
You can use several different methods to scan with your scanner:
■ OneTouch Scanner Buttons—Each scanner button is set up to scan
for a particular function, such as Email to attach a scanned item to a
new Email message, or Photo to scan photographs to the Corel Paint
Shop Pro software where you can touch up the colors. See
the Scanner Buttons” on page 24.
■ OneTouch Button Panel—Scanning from the on-screen OneTouch
Button Panel is the same as pressing a scanner button, except you
click an icon that represents the scanner button. See
OneTouch Button Panel” on page 29.
■ TWAIN Interface—This option is for scanning 35mm slides and
negatives, but you can also use it to scan paper items. The TWAIN
interface is available from both the PaperPort software and the Corel
Paint Shop Pro software that you received with your scanner, as well
as from other programs such as Microsoft Word. The TWAIN
interface has two options—the Basic Interface and the Advanced
Interface. You use the Advanced Interface to scan 35mm slides and
negatives. See
and “Scanning From the TWAIN Interface” on page 32
“Scanning 35mm Slides and Negatives” on page 63
“Scan with
“Scan from the
■ Windows Image Acquisition (WIA)—This option uses the
Microsoft Windows set of choices for scanning paper items only.
Scanning with WIA is available only if your computer is running
Windows XP or Windows Vista. See
Image Acquisition” on page 132.
“Scanning with the Windows
Page 31

24 VISIONEER ONETOUCH 9520 PHOTO SCANNER USER’S GUIDE
SCAN WITH THE SCANNER BUTTONS
Pressing a scanner button scans the item, then sends the image to the
Destination Application associated with the button.
To scan by pressing a OneTouch button on the scanner:
1. Place an item face down on the glass. Align the edge of the item
with the arrow at the upper-left corner of the glass. Close the
scanner lid and press one of the OneTouch buttons.
A scan progress window opens, then the image is sent to the
selected application for the OneTouch button. In this example, the
image is scanned in the TIFF format and the Destination
Application is the PaperPort Desktop.
You can now work with the image in its Destination Application.
For example, if you want to convert the TIFF image in PaperPort to
a PDF image, drag it to the PDF icon at the bottom of the window.
Please see the PaperPort User’s Guide for more information. If you
scan to another Destination Application, see its user guide.
Page 32

SCAN WITH THE SCANNER BUTTONS 25
ABOUT THE ONETOUCH BUTTONS
OneTouch is your main scanning interface for using the scanner. The
OneTouch Buttons on the scanner mirror the software OneTouch
Button Panel. Changing the button settings on the OneTouch Button
Panel makes the same changes to the buttons on the scanner.
Pressing a scanner button scans the item, and then sends the image to
the Destination Application associated with the button. Each button’s
scanning function are the selected settings shown in the OneTouch
Properties window.
The OneTouch buttons are preconfigured for typical scanning tasks. To
change button settings, see
page 76.
“Selecting New Settings for a Button” on
Based on the recommended installation of PaperPort and the scanner
driver, your scanner is preconfigured to scan items for various basic
tasks, such as email or fax, then send the scanned image to an
appropriate, pre-selected Destination Application. To change the button
settings see
If PaperPort is not installed, then the options for sending to word
processing applications such as Microsoft Word will not be available.
The following table describes the preconfigured button settings. These
are the default settings on installation of the OneTouch software and
they can be reconfigured to reflect your own scanning needs:
“Selecting New Settings for a Button” on page 76.
Page 33

26 VISIONEER ONETOUCH 9520 PHOTO SCANNER USER’S GUIDE
Button Function Preconfigured Settings
Attaches the scanned item to
a new email message
Copy/Print the scanned item
Scan a photo
Scan a page
Sends the scanned image to a
storage folder
Note: The default page size in each configuration is based on the
location selected in your Windows setup.
Scans the item as a color document in the PDF format.
Opens your email application with the scanned image
attached to a new message ready to address and send.
Scans the item as a color document in the BMP format.
Sends the image to your printer/copier at the printer/
copier’s default resolution, and begins printing.
Scans the item as a 6 x 4 inch vivid color photo in the JPG
format. Opens the Corel Paint Shop Pro software where
you can touch up and color correct the picture.
Scans the item as a black and white US letter document in
the TIFF format. Opens the PaperPort software where you
can process the image, or send it to another application on
your computer.
Scans the item as a color document in the PDF format and
stores it in a folder for archiving. The image is not
displayed on the screen in a Destination Application. The
default location of the folder is:
C:\Documents and
Settings\<your user name>\My Documents\My
OneTouch Archive\PDF Documents
.
For example:
■ If the Windows location is set to “United States” the default page
size in each profile will be based on the United States standard
page sizes such as 8.5”x11”.
NoteIf the Windows location is “United Kingdom” the default page
size in each profile is based on the ISO 216 standard and the majority
of the profiles will default to A4.
Note: The email application will default to the email program
specified in the internet options of Internet Explorer.
Page 34

SCAN WITH THE SCANNER BUTTONS 27
Press, hold down, then release
a scanner button.
The tabs correspond to
the scanner buttons.
This sample shows the
settings for the Scan
button. To change the
settings of a button, you
choose them on this
window.
See “Configuring the
Scanner” on page 72 for
the steps to choose new
settings for a scanner
button.
The icon indicates the
Destination Application
for the button.
The name of the button.
Your document will be
scanned with these settings.
CHECK A SCANNER BUTTON’S SETTINGS BEFORE YOU SCAN
1. To check the settings before scanning, press, hold down, then release
the scanner button you want to check.
The OneTouch Properties window opens for you to change the
settings before scanning. The button you pressed on the scanner is
already selected on the top of the window for you.
Note that the OneTouch Button Panel also opens with more details
about the settings of the scanner button you pressed (in this case the
Scan button). This is the OneTouch Button Panel’s “Detail View.”
Page 35

28 VISIONEER ONETOUCH 9520 PHOTO SCANNER USER’S GUIDE
Press the scanner button.
If you make changes in the OneTouch Properties window, then
click its Apply button, the information in the OneTouch Button
Panel will update to show the new settings.
Note: If you closed the OneTouch Properties window and want to
re-open it, you can press and hold down the scanner button again, or
right-click the icon on the Button Panel.
2. When you are ready to scan, simply press the scanner button. Do
not hold down the scanner button.
You can also scan by clicking an icon on the OneTouch Button
Panel.
Note: To scan from the Button Panel, the OneTouch Properties
window must be closed. Click the window’s close box, or click the
Cancel or OK button on the window. See the next section,
“Scan
from the OneTouch Button Panel.”
Page 36

SCAN FROM THE ONETOUCH BUTTON PANEL 29
OneTouch Icon.
SCAN FROM THE ONETOUCH BUTTON PANEL
Scanning from the button panel on your computer’s screen works just
like pressing a button on the scanner. The scanner scans the item, then
sends the image to the Destination Application indicated by the button’s
icon. This method of scanning is especially helpful if the scanner is not
located close to your computer.
To scan from the button panel on the screen:
1. Place an item face down on the glass. Align the edge of the item
with the arrow marker at the upper-left corner of the glass.
2. Close the scanner lid and click the OneTouch icon in the Windows
System Tray (at the bottom right corner of the screen).
The button panel opens on the screen. The five buttons on the
panel correspond to the same five buttons on the scanner.
3. Click a button on the panel (not on the scanner).
The scanner starts scanning the item. When the scan is complete,
the scanned image opens in the Destination Application indicated
by the button’s icon just as if you had scanned using a scanner
button. For example, if you click the Scan button, the scanned
image opens in the PaperPort program.
Note: When scanning from the panel, the OneTouch Properties
window cannot be open at the same time. If it is, close it before
scanning.
Page 37

30 VISIONEER ONETOUCH 9520 PHOTO SCANNER USER’S GUIDE
Click these green
arrows to cycle
through the panel’s
views. This is the
panel’s Button
view.
This view shows the connected
scanner(s). You can click either the
green arrow or the scanner icon to
get back to the previous view. This
is the panel’s Hardware view.
This view shows the scan settings for
the button currently selected on the
OneTouch Properties window. Rightclick the icon to see the window. This
is the panel’s Detail view.
THE ONETOUCH BUTTON PANEL’S FEATURES
The OneTouch Button Panel is your on-screen set of controls for the
scanner. In addition, the panel shows information about the scanner
and its settings.
Click the green arrows at the top of the panel to cycle back and forth
through three views of the panel.
1. Click the arrow pointing to the left to see the scanners currently
attached to your computer.
Click the arrow that points to the right to see the scan setting
details of the currently selected button.
2. On the OneTouch Button Panel:
■ Left-click a Destination Application icon to start the scanning. If
the OneTouch Properties window is open, you must close it first.
■ Right-click a Destination Application icon to see its scan settings.
3. To close the OneTouch Button Panel, click the close button at its
top right corner.
Page 38

SCAN FROM THE ONETOUCH BUTTON PANEL 31
ABOUT THE ONETOUCH BUTTON PANEL’S NAMES AND ICONS
The button names on the panel are the same as button names on the
scanner. The icons indicate the Destination Applications so you can see,
at a glance, where the image will be sent when scanning is finished.
The Email button—Scans a page in color then sends it to your email
application. The email application opens and the image is automatically
attached to a new message ready for you to address and send.
The Copy button—Scans a page in color then sends the image to your
printer/copier. The printer/copier starts and prints a copy of the page.
This is a quick way to print a copy of the original page.
The Photo button—Specifically designed for photographs, scans a
photo in vivid color at a 6 x 4 inch size then sends the image to the
Corel Paint Shop Pro software that you received with your scanner. Use
Paint Shop Pro to touch up the image, enhance its colors, and so forth.
See the Corel Paint Shop Pro user guide for more information. You can
also access the TWAIN interface from Paint Shop Pro. See
“Setting Up
Your Scanner to Work With Corel Paint Shop Pro” on page 44.
The Scan button—Scans a page in black and white and sends the
image to the PaperPort software that you received with your scanner.
From there you can easily convert the image to many different formats,
such as PDF or DOC. See the PaperPort user guide for more
information. You can also access the TWAIN interface from PaperPort.
See
“Scanning From the TWAIN Interface” on page 32.
The Archive button—Scans a page as a color document and sends it
directly to a folder without opening it first in a Destination Application.
Use this option when you don’t need to see the scanned images, but
simply want to store them in a folder.
A question mark for a button means your computer does not have
appropriate software for the initial factory settings. In that case, you can
re-set the button’s Destination Application to a software application that
you know is on your computer. See
“Selecting New Settings for a
Button” on page 76 to change the settings of a button.
Page 39

32 VISIONEER ONETOUCH 9520 PHOTO SCANNER USER’S GUIDE
SCANNING FROM THE TWAIN INTERFACE
Your 9520 OneTouch scanner is specially designed to be a Photo
scanner as well as have the ability to scan 35mm slides and negatives.
This means you can make exact copies of your photos and documents,
as well as scan 35mm slides and both positive and negative filmstrips.
A NOTE ABOUT THE TWAIN STANDARD
Your scanner uses the TWAIN interface to scan Photographs,
Documents, 35mm Slides and Negatives. TWAIN is a widely
recognized standard that computers use to receive images from scanners,
digital cameras, and other digital devices. The TWAIN scanning
interface can be accessed from any TWAIN scanning application you
have installed on the computer. Three TWAIN compliant software
applications are provided with your scanner: Nuance PaperPort, Corel
Paint Shop Pro, and ArcSoft Suite. This section specifically describes
how to use the features of the TWAIN interface for scanning, however,
the instructions in this section may use the PaperPort software as an
example only.
Refer to the User Guide you received with your other scanning
application for instructions on setting up that application to access the
TWAIN interface. As previously stated, the scanning method is the
same, but you will need to your product’s user guide for instructions on
how to access the scanner and how file handling works.
Instructions for setting up the PaperPort software to access the TWAIn
interface is provided in this User’s Guide.
Page 40

SCANNING FROM THE TWAIN INTERFACE 33
ACCESSING THE TWAIN INTERFACE FROM PAPERPORT
As previously stated, you can access the TWAIN interface from any
TWAIN compliant scanning application. You can configure any of your
OneTouch buttons to automatically open the TWAIN interface when
you press a button on the scanner.
Below are instructions for accessing the TWAIN interface from
OneTouch and from PaperPort.
Opening the TWAIN Interface from OneTouch
1. First choose a OneTouch button that you would like to change the
scanning function for, in this example we used the scan button.
2. Press, hold down, then release the Scan button.
3. When the OneTouch Properties window opens, the Scan tab will
be the active tab.
4. Under Select Configuration click on Configure Before Scan.
5. Right-Click on Configure Before Scan and make sure there is a
check mark next to TWAIN.
Page 41

34 VISIONEER ONETOUCH 9520 PHOTO SCANNER USER’S GUIDE
This is the Basic
TWAIN Interface
Click either Advanced Interface or Basic Interface to
toggle between the two TWAIN interface options.
6. Click OK to save your changes and close the OneTouch Properties
window.
7. Press the Scan button on the scanner or click on the Scan button on
the OneTouch Panel.
8. The TWAIN interface will now open.
Note: If you choose to use OneTouch Configure Before Scan for
scanning from the TWAIN interface, the final image will be sent to
the destination application set for that button.
Note: At this time the TWAIN interface is where you will adjust your
scan settings. Please see the following section for adjusting the scan
settings in the Basic and Advanced interfaces. 35mm slide and
negative scanning is only available from the Advanced TWAIN
interface.
Page 42

SCANNING FROM THE TWAIN INTERFACE 35
Scan icon. Folders pane.
To access the TWAIN interface from PaperPort:
1. On the Windows taskbar, click Start, point to Programs, point to
ScanSoft PaperPort, then click PaperPort.
The PaperPort Desktop opens.
2. Click the Scan icon on the PaperPort command bar.
Page 43

36 VISIONEER ONETOUCH 9520 PHOTO SCANNER USER’S GUIDE
Scan pane.
If this Scan button is not active, see the section on page 38 to
set up your scanner to work with PaperPort.
Click the arrow to see
the list of scanners.
The Folders pane (which shows folders for organizing your scanned
images) is replaced by the Scan pane.
3. Click the Scanner drop-down arrow, and select TWAIN: Visioneer
9520 from the drop-down list.
Note: Please wait a few moments for your selection from the dropdown list to become active. This delay only occurs the first time you
select from the list while PaperPort initializes the scanner. Later on,
selecting from the list activates immediately.
Note: If the Scan button at the bottom of the panel is not available
when you make a selection from the Scanner drop-down list, then
your scanner needs to be setup to work with PaperPort. See the
section “Setting Up Your Scanner to Work With PaperPort” on
page 38.
Page 44

SCANNING FROM THE TWAIN INTERFACE 37
4. In the “Scan what?” section, choose to scan a Document or
Photograph.
If you want to change the format of the scanned item’s file name or
file type before you start scanning, click Settings. The default file
type for documents is .pdf and the default for photographs is .jpg.
See the ScanSoft PaperPort User’s Guide for more information about
the PaperPort Settings.
5. When scanning documents, use the Create single page items check
box as follows:
■ When the check box is selected, each page is placed on the
PaperPort Desktop as an individual file.
■ When the check box is not selected, the scanned pages are not
placed on the PaperPort Desktop until you indicate the scanning
job is finished by clicking Done on the TWAIN interface then
clicking Done on the PaperPort-Scan window. Multiple pages
are “stacked” on the PaperPort Desktop. Note that items scanned
as .jpg files cannot be stacked on the desktop. Please see the
ScanSoft PaperPort User’s Guide for more information about
stacks.
6. Make sure the option Display scanner dialog box is selected.
If this option is not selected, the TWAIN interface will not open
when you click the Scan button. Instead, the items are scanned
with the basic PaperPort settings. Documents are scanned in Black
and White in the .pdf file format, and Photographs are scanned in
Color in the .jpg file format.
7. Click the Scan button in the Scan pane.
The TWAIN Interface opens. You’re ready to start scanning.
Note: The interface that opens—Basic or Advanced—is the one you
were using the last time you opened the TWAIN interface.
Page 45

38 VISIONEER ONETOUCH 9520 PHOTO SCANNER USER’S GUIDE
If this Scan button is not active, you need to
set up PaperPort to work with your scanner.
SETTING UP YOUR SCANNER TO WORK WITH PAPERPORT
When you select a scanning option on the PaperPort window from the
Scanner drop-down list, either TWAIN: Visioneer 9520 or WIA:
Visioneer 9520 (Windows XP only), the Scan button at the bottom of
the panel should become active. If it doesn’t, you need to set up
PaperPort to work with your scanner.
Note: Setting up your scanner is a one-time-only process for each
option from the Scanner drop-down list. Therefore, you may have to
set up your scanner once each for TWAIN: Visioneer 9520 and
WIA: Visioneer 9520. The setup process, described below, is the
same for each option. You will not have to set up the scanner again
for an option unless you uninstall the scanner and PaperPort
software, then re-install them.
Page 46

SCANNING FROM THE TWAIN INTERFACE 39
To setup your scanner:
1. From the Scanner drop-down list, select one of the options, such as
Twain: Visioneer 9520.
2. Click the Setup button.
A window opens to begin the setup process.
3. Click Yes then click Next.
The next window offers you the option to run hardware
diagnostics.
Page 47

40 VISIONEER ONETOUCH 9520 PHOTO SCANNER USER’S GUIDE
4. Click Yes (recommended) then click Next.
The next window is for checking the connection between your
scanner and the computer.
5. Click Next.
After the Setup Wizard checks the connections, the next window is
displayed. It has a series of setup options, but only the Basic scan
test is necessary because your scanner was already tested and
calibrated when you installed the OneTouch 4.0 software.
Page 48

SCANNING FROM THE TWAIN INTERFACE 41
6. Click Next.
The next window tells you to insert a page or photo into the
scanner.
7. Place an item face down on the glass. Align the edge of the item
with the arrow at the upper-left corner of the glass and close the lid.
Page 49

42 VISIONEER ONETOUCH 9520 PHOTO SCANNER USER’S GUIDE
8. Click Next.
The TWAIN Interface opens.
Note: If you are setting up the scanner for WIA, the WIA interface
opens instead.
9. Click the Scan button on the TWAIN interface.
The Setup Wizard runs the scan test.
A message window opens that says “Basic scan test passed.”
Page 50

SCANNING FROM THE TWAIN INTERFACE 43
10. Click Next on the message window.
The final Setup window opens to let you know the setup process is
finished.
11. Click Finish.
Your scanner is now setup for the scanning option you selected (in
the example above, it’s the TWAIN option) and the Scan button on
the PaperPort window will now become active.
Page 51

44 VISIONEER ONETOUCH 9520 PHOTO SCANNER USER’S GUIDE
SETTING UP YOUR SCANNER TO WORK WITH COREL PAINT SHOP PRO
If you want to scan photographs, 35mm slides, or 35mm negatives from
within Corel Paint Shop Pro, you need to first set up the Corel Paint
Shop Pro software to access the scanner. This is a one time setup and does
not need to be repeated each time you scan.
To set up Corel Paint Shop Pro for your Visioneer 9520 Photo
scanner:
1. Open the Corel Paint Shop Pro software from the Windows taskbar
by pointing to Programs, then to the Corel Paint Shop Pro folder,
then to Corel Paint Shop Pro.
2. From the Corel File menu, choose Import, then TWAIN Source.
3. The Select Source dialog box opens.
4. Choose Visioneer 9520 4.0 (32-32) and click Select.
That completes the setup of Corel Paint Shop Pro and you’re now ready
to use it to scan 35mm35mm slides or negatives.
5. To access the TWAIN interface, from the File menu, choose
Import, then TWAIN Acquire.
Page 52

THE TWO TWAIN INTERFACE OPTIONS 45
The Basic Interface has the settings
for scanning typical documents. It is
only for scanning paper items on the
Flatbed.
The Advanced Interface has all the scan settings of the
Basic Interface, plus a range of additional settings for
more advanced image adjustment. Use this Interface for
scanning 35mm slides and negatives.
THE TWO TWAIN INTERFACE OPTIONS
When scanning from PaperPort, Corel Paint Shop Pro or other TWAIN
application, you have two TWAIN interface options:
■ Basic Interface—Use the Basic Interface if you don’t need to make
many adjustments before scanning. The Basic Interface is only for
scanning paper items on the Flatbed.
■ Advanced Interface—The Advanced Interface includes all the
settings of the Basic Interface, plus a wide range of more advanced
settings, such as color saturation, gamma, and hue. The Advanced
Interface is also where you select settings to scan 35mm slides and
negatives.
To switch between the Basic and Advanced Interfaces, click the Basic
Interface or Advanced Interface button.
Page 53

46 VISIONEER ONETOUCH 9520 PHOTO SCANNER USER’S GUIDE
Click the Advanced Interface button if you would rather
scan with the Advanced Interface. You must use the
Advanced Interface to scan 35mm slides or negatives.
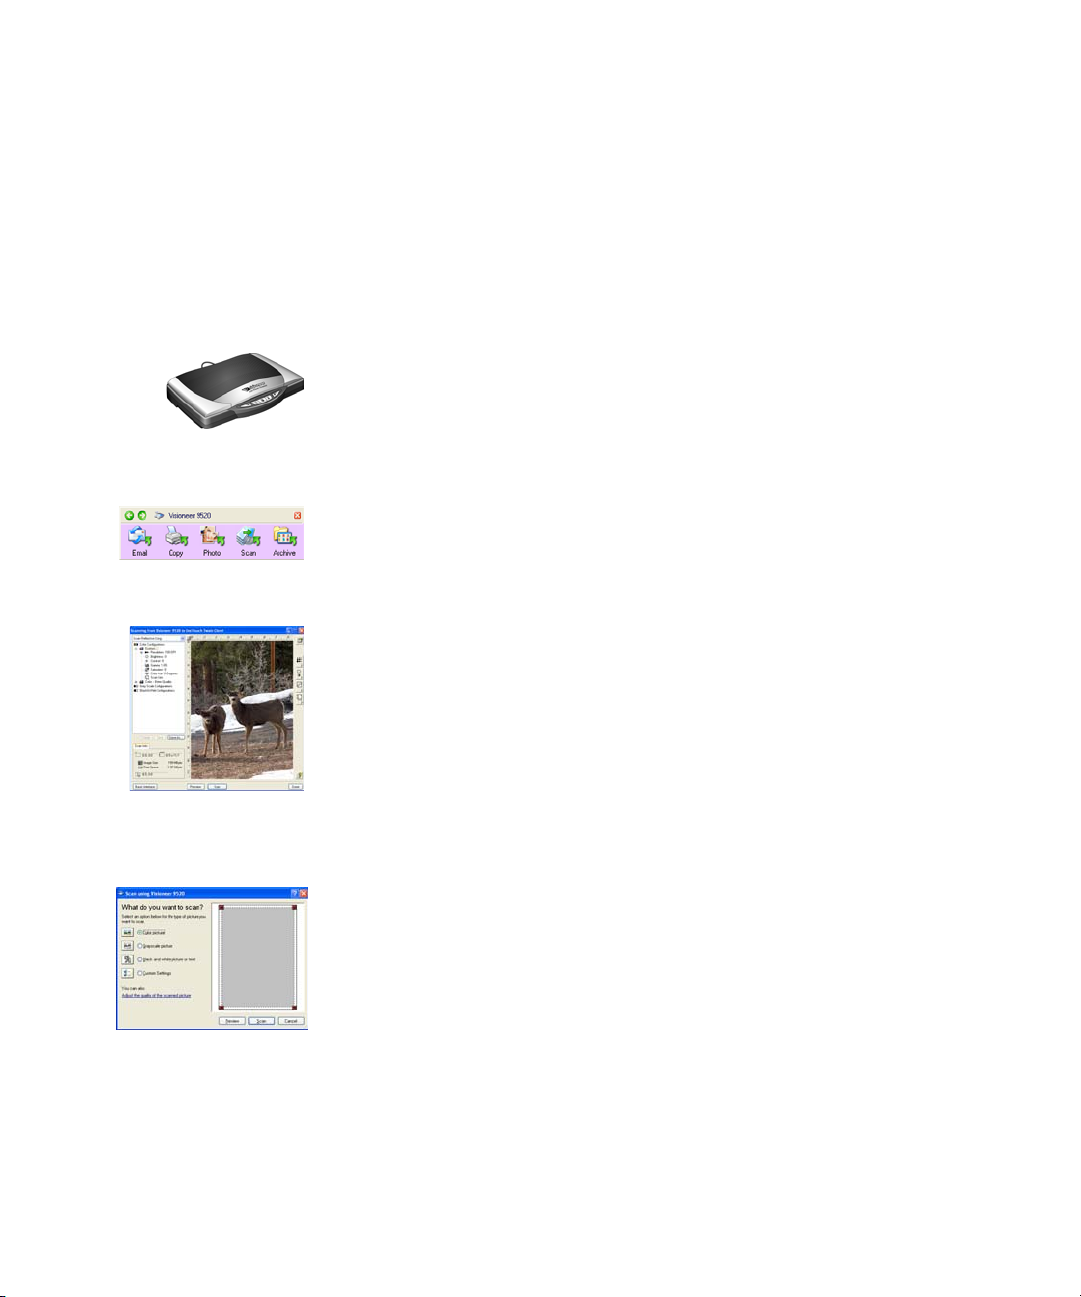
SCANNING FROM THE BASIC INTERFACE
The Basic Interface can scan a preview of the image so you can adjust its
appearance before scanning the final image. After adjusting the
appearance, you click the Scan button on the Basic Interface (not on the
scanner) to scan the item.
1. The Scan Type menu’s option is only Scan Reflective Using for
scanning paper items. You cannot use the Basic Interface to scan
35mm slides or negatives.
2. Choose the color, grayscale, or black and white option from the
Picture Type menu.
3. Click the Preview button.
The scanner scans the item and displays a preview image. You can
now use the options on the Basic Interface to adjust the image.
4. To adjust the brightness and contrast, drag their sliders to the left or
right.
Page 54

SCANNING FROM THE BASIC INTERFACE 47
Click Scan when
you’re satisfied with
the preview image.
Click Done when
you’re finished
scanning.
5. To choose another resolution, use the Resolution (DPI) menu.
You can also change the picture type again, for example, from color
to grayscale, and you can change the paper size from the Paper Size
menu. To scan only a portion of the image see the section
“Scanning Part of an Image” on page 49.
6. To preview the item with the new settings, click the Preview button
again on the Basic Interface.
7. When you are satisfied with the preview image, click Scan.
8. When you’re finished scanning items, click Done to close the Basic
Interface.
Page 55

48 VISIONEER ONETOUCH 9520 PHOTO SCANNER USER’S GUIDE
A thumbnail image
of the scanned item
appears on the
PaperPort desktop.
The small icon
represents the file
format, in this case
the .jpg format.
9. If you’re using PaperPort, the PaperPort Scan message box opens.
Click Done.
When scanning is complete, thumbnail images appear on the
PaperPort Desktop.
Single page items appear as individual thumbnails on the PaperPort
desktop.
Depending on the file type you selected for the images, multiple
pages appear as PaperPort stacks. For example, images with the .pdf
file type can be stacked, but images with the .jpg file type cannot
and will appear as individual items.
Page 56

SCANNING FROM THE BASIC INTERFACE 49
The selected scan area.
This is the image that
appears on the PaperPort
desktop when scanning is
finished.
SCANNING PART OF AN IMAGE
To scan part of an image, you draw a box around the part you want.
The scanner then only scans that portion of the image and places it in
the scanning application (in this case the PaperPort Desktop).
1. Put the pointer on the image and drag a box around the section of
the image that you want to scan.
A dotted outline shows the selected area in the image.
You can now move or resize the outline to select the specific area
you want to scan.
2. To move the dotted outline, put the pointer in the selected area and
drag the mouse.
3. To resize the area, put the pointer on a dotted line and drag.
4. If you want to remove the selected area and start over, click
Remove.
5. Click Scan when you’re ready to scan the portion of the image.
Page 57

50 VISIONEER ONETOUCH 9520 PHOTO SCANNER USER’S GUIDE
Click an icon to select a
configuration—Color, Grey
Scale, or Black&White.
Clicking the “+” sign shows
details of the scan settings.
Click a setting in the list to
change it. The setting’s options
appear on the right side of the
Advanced Interface where you
can make changes if necessary.
When you are satisfied
with the scan settings,
click Scan.
Click Preview to
view the image in
the window.
Check the Scan Info to
make sure your computer
has sufficient space for the
image. Warning icons on
this box appear if your
computer does not have
enough space for the
scanned image’s file.
Choose a scanning option. Scan
Reflective Using is for scanning
paper items. The other options
are for transparencies.
If you don’t need all the
features of the Advanced
Interface, click Basic
Interface to return to it.
Use these buttons to manually select settings. See
“Adjusting the Image on the
Advanced Interface” on
page 53 for details.
SCANNING FROM THE ADVANCED INTERFACE
The Advanced Interface has more options for scanning than the Basic
Interface. It is also for scanning 35mm slides and negatives.
1. Start PaperPort or other TWAIN application and open the TWAIN
interface.
2. If the Basic Interface opens, click the Advanced Interface button.
The Advanced Interface opens.
Page 58

SCANNING FROM THE ADVANCED INTERFACE 51
3. From the menu at the top left panel, select the type of scanning:
■ Scan Reflective Using to scan paper items.
■ Scan Slide Using to scan 35mm slides.
■ Scan Negative Using to scan 35mm negative filmstrips.
See “Scanning 35mm Slides and Negatives” on page 63 for
information about scanning 35mm slides and negatives.
4. Click one of the icons to select a configuration.
For example, select Color Configurations then select Custom to
scan a color item with the preset Custom scan settings.
The configuration settings appear as a list. Click the + (plus) sign to
see the full list. Click the - (minus) sign to collapse the list.
■ Black&White is for letters, memos, pen and ink drawings, and
other black and white material. This setting produces the
smallest file size for scanned items.
■ GrayScale scans the image using up to 256 true shades of gray.
Use this setting to scan black and white photographs and other
higher quality black and white images. You can also scan a color
photo with this setting to turn its colors into gray shades. The
file size is about one third the size of a color scan.
■ Color scans the image in full color. Use this setting to scan color
photographs and other color images. The file size is the largest of
the image type options.
5. Click the Preview button to view the image before scanning.
6. Review the image to determine if adjustments are needed.
7. To adjust a setting, click the setting in the list on the left below the
selected configuration.
A panel opens on the right side of the Advanced Interface for the
selected setting. Select new options on that panel. See
“Ad ju sti ng
the Image on the Advanced Interface” on page 53 for details on
changing scan settings.
8. (optional) To preview the image again, click the Preview button
again. Readjust the settings if necessary.
Page 59

52 VISIONEER ONETOUCH 9520 PHOTO SCANNER USER’S GUIDE
9. When you’re satisfied with the image, click the Scan button.
10. When you’re finished scanning items, click Done to close the
Advanced Interface.
11. If you’re using PaperPort, the PaperPort Scan message box opens.
Click Done.
When scanning is finished, a thumbnail of the scanned image(s)
appears on the PaperPort desktop.
Single page items appear as individual thumbnails on the PaperPort
desktop.
12. Use the PaperPort software to work with the image.
GETTING HELP WITH THE PAPERPORT SOFTWARE
The PaperPort software includes a complete set of help topics that
answer questions about each feature of the software. To open the Help
Topics window, press the F1 key or choose PaperPort Help from the
Help menu.
You can also refer to the PaperPort Getting Started Guide.
Page 60

SCANNING FROM THE ADVANCED INTERFACE 53
Resolution
Brightness/Contrast
Color (Gamma, Saturation,
and Hue)
Scan Size
ADJUSTING THE IMAGE ON THE ADVANCED INTERFACE
You can adjust the scan settings on the Advanced Interface to produce
the best possible image for the items you’re scanning.
To adjust a setting:
1. On the left side of the Advanced Interface, select a configuration,
for example, Color Configurations.
2. Click a setting in the list of settings, or click its corresponding
button on the right side of the Advanced Interface.
Note: The list of scan settings for a configuration applies only to that
type of configuration. For example, the Black&White Configuration
does not have a setting for adjusting the Color Hue.
Page 61

54 VISIONEER ONETOUCH 9520 PHOTO SCANNER USER’S GUIDE
Click to close the
settings panel
The following figure shows an example of the Advanced Interface if you
click the Resolution setting in the list, or click the Resolution button.
Note: The information in the scan settings list and the options you
select on the various settings panels are interactive. As you change the
settings on the panel, the numbers in the list on the left also change.
Page 62

SCANNING FROM THE ADVANCED INTERFACE 55
ADJUSTING THE RESOLUTION
Resolution determines the amount of detail you can see in the scanned
image. The resolution setting for a scan is in dots-per-inch (dpi). The
higher the resolution, the finer the details, however, higher dpi settings
also take longer to scan and produce larger files sizes. Usually the higher
resolution settings are used for precision work, such as photographs or
fine artwork.
The following figure shows the resolution options.
Note: The location of various buttons on the panels may be slightly
different on your Advanced Interface window. The appearance of the
window depends on your monitor’s screen resolution.
Page 63

56 VISIONEER ONETOUCH 9520 PHOTO SCANNER USER’S GUIDE
To adjust the resolution:
1. To use one of the preset resolutions for typical scanned items, click
one of the options in the list.
For example, to set the resolution for scanning a business card,
select Business Card. That setting is preset to read small print on a
typical business card.
2. To set the resolution manually, drag the Resolution slider to the left
to decrease the resolution or to the right to increase it.
You can also type a number directly into the resolution setting box,
or click the up and down arrows to increase or decrease the setting.
3. Click Reset to return the resolution to its original setting.
The resolution panel also includes an advanced setting for Moire
patterns. Moire patterns are wavy, rippled lines that sometimes appear
on the scanned images of photographs or illustrations, particularly
newspaper and magazine illustrations. To scan the image and limit or
eliminate moire patterns, select the Reduce Moire option.
Page 64

SCANNING FROM THE ADVANCED INTERFACE 57
ADJUSTING THE BRIGHTNESS AND CONTRAST
Sometimes an item is scanned with the brightness and contrast set to be
too light or too dark. For example, a note written with a light pencil
may need to be scanned darker to improve legibility.
The following figure shows the brightness and contrast options.
Contrast is only available for Color and Gray Scale configurations.
To adjust the brightness and contrast:
1. Drag the Brightness slider to the left to make the item darker or to
the right to make the item lighter.
2. Drag the Contrast slider to the left to decrease the contrast or to
the right to increase the contrast.
You can also type a number directly into the brightness or contrast
setting boxes, or click the up and down arrows next to the box to
increase or decrease the setting.
3. Click Reset to return the settings to their original numbers
Page 65

58 VISIONEER ONETOUCH 9520 PHOTO SCANNER USER’S GUIDE
ADJUSTING GAMMA, SATURATION, AND COLOR HUE
If you’re using the Color Configuration to scan, you can adjust a group
of color settings. Gamma controls the brightness of the color midtones,
saturation is the strength or purity of a color, and hue is the color your
eyes see as reflected from the image.
The following figure shows the color options.
To adjust the color settings:
1. Drag the Gamma, Saturation, and Color Hue sliders to the left to
decrease the settings or to the right to increase the settings.
You can also type a number directly into the setting boxes, or click
the up and down arrows next to the boxes.
2. Click Reset to return the settings to their original numbers.
Page 66

SCANNING FROM THE ADVANCED INTERFACE 59
ADJUSTING INPUT SIZE
You can scan documents up to 8.5" by 11.69", but you can select other
scan sizes, or adjust the input size to scan only specific sections of an
image. For example, if you’re scanning a photograph and want to focus
on one section, adjusting the input size removes the rest of the
photograph from the final scanned image.
The following figure shows the input size options.
To manually set the image size:
1. To scan at one of the preset input sizes, select the image size from
the menu.
To scan a specific area of the image, click on the image and drag a
box around the area you want.
The dotted outline shows the selected area in the image.
Page 67

60 VISIONEER ONETOUCH 9520 PHOTO SCANNER USER’S GUIDE
The Scan Info box shows the size
and position of the area.
The selected scan area.
This is the image that appears
on the PaperPort desktop
when scanning is finished.
The following figure shows an example of a manually selected area.
Note that the selected area in the example has the number “1” in its
upper left corner indicating it is your first selected area. You can
select up to six separate areas on an image at a time.
You can now move or resize the outline to select the specific area
you want to scan.
2. To move the dotted outline, put the pointer in the selected area and
drag the mouse.
3. To resize the selected area, put the pointer on a dotted line and drag
the line.
Note that as you drag the dotted line, the menu selection for the
image size changes to Custom to indicate you are customizing the
size.
The Scan Info box on the lower left portion of the Advanced
Interface shows the information for the new area. If you selected
multiple areas, tabs on the Scan Info box represent each area. Click
on an area’s tab to see its Scan info.
Page 68

SCANNING FROM THE ADVANCED INTERFACE 61
Location of the top
left corner of the
image in the
Preview window.
Physical size of the
image to scan.
Size of the file of the
scanned image.
The space on your
computer’s hard drive.
Current location of
the pointer as you
drag it on the
Preview window.
Tabs for each selected area. Click a tab to
see the information for its area.
Click to remove the
selected area.
4. If the dotted line is not exactly where you want it, put the pointer
on the line and drag the line.
5. If you want to remove the selected area and start over, click Remove
on the Scan Info box.
Note: Clicking Remove re-selects the entire 8.5" by 11.69" area.
6. When the settings are what you want, click Scan.
THE SCAN INFO BOX
The following figure shows the information on the Scan Info box:
THE RULER UNITS
The ruler around the edges of the image help you precisely position a
custom sized image. You can change the ruler units to suit the type of
measurements you want.
To set the ruler units:
1. Click the arrow icon at the top left corner of the Preview Image on
the Advanced Interface.
2. As you click the icon, the ruler units cycle among inches,
centimeters, and pixels.
Page 69

62 VISIONEER ONETOUCH 9520 PHOTO SCANNER USER’S GUIDE
CREATING A NEW ADVANCED INTERFACE PROFILE
You cannot change the settings of the preset profiles in the Advanced
Interface. However you can create new profiles and save them for future
use.
To create a new profile:
1. On the Advanced Interface, select one of the preset profiles, for
example, Black&White Configurations>Custom.
2. Adjust the settings as required then click the Save As button.
The Save Profile dialog box opens.
3. Type a name for the new profile and click OK. The name must be
at least two characters long.
Your new profile is added to the configuration list.
To change or delete a profile you created:
1. Select your profile from the configuration list.
2. Make changes to the profile as needed, and then click Save.
3. If you want to delete the selected profile, click Delete.
Page 70

SCANNING 35MM SLIDES AND NEGATIVES 63
The filmstrip holder is for 35mm negative filmstrips.
The mask has three holders for 35mm slides.
SCANNING 35MM SLIDES AND NEGATIVES
Your 9520 OneTouch scanner is specially designed to scan 35mm slides
and negatives. You can scan both positive and negative film images.
A BRIEF EXPLANATION
Your scanner has sensors that capture the image of the item being
scanned. Those sensors are located in the body of the scanner. When
you scan a paper item, the light in the bottom of the scanner shines up
on the paper and reflects the paper’s image down onto the scanning
sensors. If a 35mm slide or negative is on the glass, however, the light
from the bottom of the scanner would shine up through the transparent
35mm slide or negative and would not reflect its image onto the sensors.
That is why your scanner has a light in its lid. When you scan a 35mm
slide or negative, the light in the bottom of the scanner turns off, and
the light in the lid shines down through the film onto the sensors to
capture the film’s image.
THE SCANNING MASK
The scanning mask that you received with the scanner has places for
both 35mm negative film strips and 35mm slides.
Page 71

64 VISIONEER ONETOUCH 9520 PHOTO SCANNER USER’S GUIDE
Calibration slot.
POSITIONING 35MM SLIDES IN THE MASK
1. Place the mask on the glass so the arrow on the mask labeled Use
this mask for scanning 35mm slides is aligned with the arrow in
the upper left corner of the scanner.
Make sure the text on the mask faces up so it fits properly on the
glass, aligned at the corner.
2. Follow the printed directions on the mask and place the 35mm
slides horizontally into the slide holder.
Notice that the mask has a narrow slot next to the slide holder. That
slot is for calibration to assure that you get the best possible scan
results. Do not place items in the calibration slot.
3. Close the lid. You’re now ready to start scanning the slides.
4. See “Scanning 35mm Slides or Negatives from the TWAIN
Interface” on page 66 to start the scanning.
Page 72

SCANNING 35MM SLIDES AND NEGATIVES 65
POSITIONING A 35MM NEGATIVE FILM STRIP
1. Slide the filmstrip into the 35mm negative mask and center the
frame you want to scan in the opening.
2. Place the mask on the glass so the arrow on the mask labeled Use
this mask for scanning 35mm negatives is aligned with the arrow
in the upper left corner of the scanner.
The 35mm negative holder also has a calibration slot next to it. Do
not place items to be scanned in the calibration slot.
3. Close the lid. You’re now ready to start scanning the slides.
4. See “Scanning 35mm Slides or Negatives from the TWAIN
Interface” on page 66 to start the scanning.
Page 73

66 VISIONEER ONETOUCH 9520 PHOTO SCANNER USER’S GUIDE
SCANNING 35MM SLIDES OR NEGATIVES FROM THE TWAIN INTERFACE
1. Place the 35mm slides or negatives into the scanning mask and
position the mask on the scanner glass. Close the scanner lid.
2. Open the TWAIN interface in one of the TWAIN applications on
your computer.
To open the Corel Paint Shop Pro software that you received with
your scanner, from the Windows taskbar point to Programs, then
to the Corel Paint Shop Pro folder, then to Corel Paint Shop Pro.
From the Corel File menu, choose Import, then TWAIN Acquire.
You can also use the PaperPort software to open the TWAIN
interface. See
3. The TWAIN Advanced Interface opens.
“Scanning From the TWAIN Interface” on page 32.
If the Basic Interface opens instead, click the Advanced Interface
button.
Page 74

SCANNING 35MM SLIDES AND NEGATIVES 67
Choose a transparency
scanning option:
Scan Slide Using:
for 35mm slides.
Scan Negative Using:
for negatives.
4. Click the drop-down menu at the top of the Advanced Interface
and choose the type of transparency to scan.
■ Scan Slide Using to scan 35mm slides.
■ Scan Negative Using to scan 35mm negative filmstrips.
The Advanced Interface then shows a representation of the type of
transparency you are scanning.
Page 75

68 VISIONEER ONETOUCH 9520 PHOTO SCANNER USER’S GUIDE
This example of the Advanced Interface
is for scanning 35mm slides.
This example of the Advanced Interface is
for scanning a filmstrip of 35mm negatives.
Selection boxes appear around the
images. Four boxes appear for
negatives (as shown here), and
three for 35mm slides.
Selection box 2 is selected here.
Click on a box to select it.
The selection boxes are also represented
by the tabs here on the Scan Info box.
Click on a tab to see the information
about a selected image. See “The Scan
Info Box” on page 61 for details.
5. Click Preview to preview the image.
The scanner scans a preview image of the slides or negatives.
Selection boxes appear on the window. The selection boxes show
where the scanner will scan for the images.
Page 76

SCANNING 35MM SLIDES AND NEGATIVES 69
Click an icon to select a
configuration—Color or Grey
Scale. Clicking the “+” sign
shows details of the scan
settings.
6. From the list on the left side of the interface, select the scan
configuration for the images.
Note that as you select different configurations, the images change
based on the selection. For example, if you select Grey Scale, the
images will be in shades of grey. Similarly, select a configuration for
vivid colors and the image colors will be deeper and more intense.
7. Use the selection boxes to select the image to scan, crop an image,
or remove it from scanning.
■ Move the selection box—You may need to move a selection box
to fit exactly over the image you want to scan. For example, if
you only have three negatives in a film strip, the boxes will not be
aligned directly on the images and you will need to move them.
Page 77

70 VISIONEER ONETOUCH 9520 PHOTO SCANNER USER’S GUIDE
This example
shows a selection
box not aligned
directly over the
image.
Put the pointer
into the box. The
pointer becomes
a four-headed
arrow. Press and
hold down the
mouse button
then drag the box
to its correct
position.
This shows the box
now positioned
correctly over the
image.
Put the pointer
on an edge. The
pointer becomes
resize pointer.
Press and hold
down the mouse
button then drag
the edge to crop
the image.
When the image is
scanned, only the
cropped section is
scanned.
To move a selection box, put the pointer in the box. The pointer
becomes a four-headed drag arrow. Press and hold down the
mouse button and drag the box so it fits exactly over the image.
■ Crop an Image—You can crop an image so only a portion of the
image is scanned. To crop the image, put the pointer on one of
the box edges. The pointer becomes a resize pointer. Press and
hold down the mouse button and drag the edge to crop the
image.
Page 78

SCANNING 35MM SLIDES AND NEGATIVES 71
To remove a selection box, select it by
clicking on it or clicking its tab, then
click the Remove button.
■ Remove an image from scanning—You may want to only scan
one negative in a filmstrip. In that case, you remove selection
boxes around the other images. To remove a selection box, select
it by either clicking in it or clicking its tab on the Scan Info box,
then click the Remove button on the Scan Info box.
8. You can also adjust the image quality and select new TWAIN
settings. See
“Adjusting the Image on the Advanced Interface” on
page 53 for details about adjusting settings.
Tip: For 35mm slides or negatives, set the resolution to 1200 dpi or
better. Visioneer recommends using a resolution of 2400 dpi. Refer to
“Adjusting the Resolution” on page 55 for steps to set the resolution.
9. Click Scan when you are satisfied with the image.
10. When you’re finished scanning the slides or negatives, click Done
to close the Advanced Interface.
11. The scanned image appears in the scanning application, where you
can then modify the image.
Page 79

72 VISIONEER ONETOUCH 9520 PHOTO SCANNER USER’S GUIDE
Right-click on a button (for
example, the Scan button) and
the OneTouch Properties
window opens for that button.
Configuring the Scanner
When you first connect your scanner to a computer, the scanner’s
software configures each OneTouch button with appropriate settings
consisting of: a Destination Application, a Scan Configuration, and a
Document Format. To change the settings, you reconfigure the buttons
by selecting new options from the OneTouch Properties window.
To open the OneTouch Properties window:
1. Click the OneTouch icon.
On the button panel, right-click the button you want to configure.
The OneTouch Properties window opens for that button.
Note: Remember that left-clicking a button on the OneTouch
Button Panel starts the scanner scanning. Right-clicking opens the
OneTouch Properties window.
You can also open the window by pressing and holding down a
button on the scanner. See
Before You Scan” on page 27.
“Check a Scanner Button’s Settings
Page 80

SCANNING 35MM SLIDES AND NEGATIVES 73
Select the Destination
Application that will
open when you are
finished scanning. You
use the destination
application to view
and work with your
scanned images.
Select a
configuration
for scanning
the item.
Select the file
format for
your scanned
images.
Click this
tab to select
options.
Click the tab that
corresponds to the
scanner button you
want to configure.
ABOUT THE ONETOUCH PROPERTIES WINDOW
The OneTouch Properties window is where you can select new settings
for the buttons. The tabs across the top of the window correspond to
the buttons on the scanner.
Note: Some of the options on the OneTouch Properties Window
(and other OneTouch windows and dialog boxes) are “grayed out”
and are not available. Grayed out options are not appropriate for your
Visioneer 9520 scanner. If you use the OneTouch application with
other Visioneer scanners, grayed out options become active, if
appropriate.
The following example of the OneTouch window shows the settings for
Scan button. The button is set to scan with the scan configuration
named Scan US Letter Document and then open PaperPort to display
the scanned image. The format option is set to scan in the TIFF image
format.
Page 81

74 VISIONEER ONETOUCH 9520 PHOTO SCANNER USER’S GUIDE
Click a configuration to
view the details of its
settings. Click again to
close the details.
Color GrayscaleBlack and White
Configure
Before Scan
The settings on the Properties window are:
Select Destination—The list of applications that can open to display
the scanned image for the selected button. To configure the list of
available applications, click the Options tab at the top of the dialog box
and select the desired options. See
page 93 for more information.
Select Configuration—The list of available scan configurations for the
selected button. The configuration’s basic settings include: scanning
mode, resolution (dpi), page size, brightness (Br), and contrast (Cr). To
see the configuration’s basic settings, click its icon. Click the icon again
to close the detailed information.
“Selecting Options for a Button” on
These icons next to each scan configuration indicate the scanning
mode:
Note: Use Configure Before Scan if you want to set the scanning
mode manually before scanning. See
“Configure Before Scan” on
page 107.
You can also click the Edit button or double-click the configuration to
see more detailed information about it.
Page 82

SCANNING 35MM SLIDES AND NEGATIVES 75
Option Tab.
Button Tabs.
Select Format—a set of file formats for the scanned image for the
selected button. The formats are based on the type of Destination
Application you select. This example shows the formats that apply to
Microsoft Outlook.
The button names indicate their file types. See “Selecting Format
Options” on page 87 for more about the formats.
Button tabs—click to select a button. The settings in the window then
correspond to the selected button.
Options tab—displays a window for choosing options related to the
selected Destination Application.
Page 83

76 VISIONEER ONETOUCH 9520 PHOTO SCANNER USER’S GUIDE
Select a software
application as the
destination to send
scanned images.
Select a configuration
for scanning the item.
Select a format for
the scanned image.
SELECTING NEW SETTINGS FOR A BUTTON
For each of the five OneTouch buttons, you can select a new
Destination Application, Scan Configuration, and Document
Format.
To select new settings for the Scanner Button:
1. Click the tab of the button you want to change.
Each button has its own settings. So, as you click the tabs, the
available settings on the window change to show them for each
button.
2. From the Select Destination list, select the application where you
want documents sent when scanning is finished.
See “Selecting Options for a Button” on page 93 to display a full list
of the Destination Applications that you can use with the scanner.
Note: If you select a word processing program such as Microsoft
WordPad or Microsoft Word and a page format that can be used for
OCR (such as Text or RTF) the text in scanned images is
automatically converted to word processing text.
Page 84

SELECTING NEW SETTINGS FOR A BUTTON 77
3. From the Select Configuration list, select a scan configuration.
To scan in color, select one of the configurations indicated by the
small color icon, such as the Scan Color Document configuration.
The scan configuration list is preset for the application you select in
the Select Destination list. If you select a different application, the
configurations are for that application. However, you can create
your own scan configurations as well.
4. Select a Format option.
The available options apply to the Destination Application you
select. For example, if you select Microsoft Word as the Destination
Application, the available formats are for text, such as .txt and .rtf.
But if you select Microsoft Paint as the Destination Application,
then the available formats are for graphics, such as .bmp and .jpg.
5. Click OK to accept the changes and close the window.
To accept the changes and keep the window open so you can work
with other features, click Apply.
Note that while the OneTouch Properties window is open, you
cannot scan by clicking a button on the Button Panel. You must
close the OneTouch Properties window first. However, you can
scan at any time by pressing a button on the scanner.
Now when you press or click a scanner button, the document is
scanned using the new settings for that button.
Page 85

78 VISIONEER ONETOUCH 9520 PHOTO SCANNER USER’S GUIDE
Click a Destination
Application.
Click the Properties
button.
SETTING DESTINATION APPLICATION PROPERTIES
The different types of Destination Applications have various properties
that you can select.
1. On the OneTouch Properties window, click a Destination
Application.
2. Click the Properties button.
A OneTouch 4.0 Link Properties dialog box opens for the type of
Destination Application you selected, and the available options are
for that application.
Page 86

SELECTING NEW SETTINGS FOR A BUTTON 79
PAPERPORT PROPERTIES
These properties apply to PaperPort, and are for designating the folder
to receive your scanned items.
1. Select the PaperPort folder where you want the file of the scanned
image to be located.
2. Click OK.
3. Click OK or Apply on the OneTouch Properties window.
When PaperPort opens after you finish scanning, the thumbnails of
your scanned documents are on the PaperPort Desktop in that
folder.
Page 87

80 VISIONEER ONETOUCH 9520 PHOTO SCANNER USER’S GUIDE
TEXT DOCUMENTS PROPERTIES
These properties apply to Microsoft Word, Microsoft Excel®, and the
other applications indicated by their icons in the list. The properties
apply to the OCR settings for the applications.
1. Click in the OCR settings boxes for the options you want.
The options will apply to all the applications in the group.
■ Always send a file, even when no text was found—The
scanned file is sent to the OCR reader even if the image does not
appear to contain text. This could occur if you scanned a
photograph with a scanner button set for text applications.
■ Show message if text recognition failed—A message will
appear on the screen if the OCR reader does not detect text in
the image.
2. To add another application to the list, click the Add Application
button. The Add Text Based Link dialog box opens.
Page 88

SELECTING NEW SETTINGS FOR A BUTTON 81
3. Click Browse to find the application you want to add to the list.
When you select the application using the Browse button, steps 1
and 2 on the dialog box are automatically filled in, and the
application icon appears in step 3.
4. Select the icon in Step 3 of the dialog box. That is the icon that will
appear in the OneTouch Destination List.
5. In step 4 of the dialog box, select the file formats that the
application will accept.
Refer to the documentation that you received with the application
to see which text formats the application accepts.
The options you select at step 4 determine the page format icons in
the OneTouch Properties window for that group of applications.
6. Click the Add button.
7. Click OK or Apply on the Link Properties window.
8. Click Refresh on the OneTouch Properties window.
9. Click OK or Apply on the OneTouch Properties window.
Page 89

82 VISIONEER ONETOUCH 9520 PHOTO SCANNER USER’S GUIDE
IMAGE DOCUMENTS PROPERTIES
These properties apply to image processing applications such as
Microsoft Paint.
1. Click in the Color document handling settings boxes for the
options you want.
The options will apply to all the applications in the group.
■ Convert Bitmaps using Screen resolution—Use this option to
ensure that an image will fit on the computer’s screen. When a
computer screen is set to a lower resolution, bitmap images with
a higher resolution may be too big to fit on the screen.
Converting the bitmap image to match the screen resolution
ensures that the image fits on the screen.
■ Convert Bitmaps to JPEG—JPEG files can be compressed to
produce smaller files sizes and, therefore, shorter transmission
times when you email the file or upload it to the internet. Use
this option to provide that compression capability to image files.
Page 90

SELECTING NEW SETTINGS FOR A BUTTON 83
2. To add another application to the list, click the Add Application
button.
See the steps on page 81 to add an application to the list.
3. Click OK.
4. Click OK or Apply on the OneTouch Properties window.
5. Click Refresh on the OneTouch Properties window.
STORAGE PROPERTIES
These properties apply to the Destination Application named Transfer
to Storage. If a CD burner is attached to your computer, you can also
use this dialog box to start the Burn to CD process. See the section
“Scan and Burn to a CD” on page 112.
Note: The Burn to CD option is only available for Windows XP or
Windows Vista with a CD burner installed on your computer.
You can also set up multiple configurations to store scanned items in
separate locations. See
“The Storage Options Tab (Archive)” on
page 103 and “Scanning to Multiple Folders” on page 121.
Page 91

84 VISIONEER ONETOUCH 9520 PHOTO SCANNER USER’S GUIDE
1. Click the Storage Layout options you want.
■ All documents are in the root—The scanned documents are
saved in the root of the folder specified in the Storage Location.
■ Documents are put into folders by month, week, or type—
Folders are created based on your selection (month, week, or
type) and the scanned documents are saved in those folders. New
folders are created for each month and week so you can keep
track of when you scanned the documents.
2. Click the Browse button to specify the location to store the
scanned documents, or type a location directly into the box.
If you are scanning to a shared network drive, it must be a mapped
drive. For more information about mapped drives, see your
network administrator.
If you have a CD burner attached to your Windows XP or
Windows Vista computer, the option Show message when ready
to burn 5" CD (700MB), should also be selected so you will see a
message when it’s time to click the Burn to CD button.
3. Click OK.
4. Click OK or Apply on the OneTouch Properties window.
Page 92

SELECTING NEW SETTINGS FOR A BUTTON 85
EMAIL PROPERTIES
These properties apply to email applications so you can specify the
folder for documents that you will attach to an email message.
Microsoft Outlook
®
will accept direct attachment of documents to a
blank email message as soon as scanning is finished, but other email
applications do not. If you’re using one of those applications, such as
America Online
®
(AOL), you need to know which folder contains the
scanned documents so you can manually attach them to your email
messages.
1. Click the Browse button for Folder for storing attachments and
choose a folder for your email attachments.
2. If you are using AOL on your computer, and the folder name for
AOL is incorrect, click the Browse button and find the correct
AOL folder.
For scanned images to be auto-attached to a blank email message,
you must have the specific folder location AOL uses to find the
attachments. Please contact AOL for more information about the
folder location in which AOL stores attachments.
Page 93

86 VISIONEER ONETOUCH 9520 PHOTO SCANNER USER’S GUIDE
3. If you need to change your email client, or any other internet
options, click the Internet Options button.
The Windows Internet Options Control Panel opens. Click the
Programs tab and choose a new email client from the Email list.
These are the standard Windows Internet options. Please see your
Windows documentation for more information about Internet
options. If you are using AOL, please see the AOL user manual for
making changes to the Internet options applicable to AOL.
4. Select the options for color document handling.
■ Convert Bitmaps using Screen resolution—Use this option to
ensure that an image will fit on the computer’s screen. When a
computer screen is set to a lower resolution, bitmap images with
a higher resolution may be too big to fit on the screen.
Converting the bitmap image to match the screen resolution
ensures that the image fits on the screen.
■ Convert Bitmaps to JPEG—JPEG files can be compressed to
produce smaller files sizes and, therefore, shorter transmission
times when you email the file or upload it to the internet. Use
this option to provide that compression capability to image files.
5. Click OK.
6. Click OK or Apply on the OneTouch Properties window.
Page 94

SELECTING NEW SETTINGS FOR A BUTTON 87
Image Formats Text Formats; TEXT
is only one of several
text formats available.
SELECTING FORMAT OPTIONS
The option that you select determines the file format of the scanned
document. Appropriate format options and file types are available for
the type of Destination Application selected for the button.
The available options are for images and text.
IMAGE FORMATS
Select an image file format for photos, artwork or other documents that
you want to save as images. BMP and TIFF are standard image file
formats generally used if you want to do additional image processing,
such as photo touch-up or color correction. Both of those file formats
tend to be larger than the JPG format.
Because JPG image files can be reduced in size, the JPG format is often
used for images on web pages, or if file size might be a problem when
electronically sending the files. JPG files are reduced in size by lowering
their image quality, and you can select the degree of quality for your
scanned images from the JPG page format icon.
The PDF format is often used to create images of text pages. You may
want to select PDF as the page format when scanning text pages that do
not require OCR processing or other processing. The PDF format is
also used to put multi-page documents on web sites as pdf-readable
files. As with the JPG option, the PDF format can be reduced in size or
quality.
Page 95

88 VISIONEER ONETOUCH 9520 PHOTO SCANNER USER’S GUIDE
To select a JPEG or PDF file size:
1. Select JPG or PDF as the format.
2. Right-click on the JPG or PDF icon.
A menu opens.
3. Choose the file size/image quality option for your scanned images.
Minimize Size—Smallest file size, lowest image quality.
Normal—Medium file size, some loss of image quality.
Maximum Quality—Largest file size, no loss of image quality.
Your selection pertains only to the button currently selected on the
OneTouch Properties window. Other buttons that have JPG or
PDF selected as the Format are not affected, so you can set the JPG
or PDF file size/image quality independently for each button.
4. Click OK or Apply on the OneTouch Properties window.
Page 96

SELECTING NEW SETTINGS FOR A BUTTON 89
The specific text format; this example is for Rich Text
Format (RTF) used with Microsoft Word, WordPad,
and other word processing applications.
TEXT FORMATS
The Text Formats are for text file types. The names of the formats
indicate their file types.
Selecting the text format option also selects OCR processing as an
automatic step for scanning. Therefore, when you scan a document
with the text format selected, the text portions of the document are
automatically converted to editable text. See
“Scanning with Optical
Character Recognition (OCR)” on page 91
Select a text format for documents with text or numbers, such as a
business letter, report, or spreadsheet. The text format icon has several
file formats available, depending on the Destination Application you
select.
The specific file format is the file name extension on the text format
icon.
As you select Destination Applications that are text applications, the
text format icon changes to match the file type of the application. In
some cases, the Destination Application supports several file types, and
you can right-click on the icon to choose the particular file type and
OCR options for that application.
Page 97

90 VISIONEER ONETOUCH 9520 PHOTO SCANNER USER’S GUIDE
To select a file type for the text format:
1. Select the Destination Application.
2. Right-click on the text format icon.
A menu opens. The following figure shows an example for the
TEXT format with Microsoft Outlook selected as the Destination
Application. The menu options depend on the type of Destination
Application you select.
3. Choose the file type you want for the text format.
Your selection of a file type pertains only to the button currently
selected on the OneTouch Properties window. Other buttons that
have a text option selected as the Format are not affected, so you
can set the text file type independently for each button.
Simple Text—The .txt file format. Text with no formatting; used
by the standard Microsoft Notepad application.
Rich Text Format—The .rtf file format. Text that retains
formatting when converted. Available with Microsoft WordPad and
Word.
Excel Spreadsheet—The .xls file format used by Microsoft Excel.
HTML Document—The .htm file format used to create web
pages.
4. Click OK or Apply on the OneTouch Properties window.
Page 98

SELECTING NEW SETTINGS FOR A BUTTON 91
SCANNING WITH OPTICAL CHARACTER RECOGNITION (OCR)
Optical Character Recognition (OCR) converts text and numbers on a
scanned page into editable text and numbers. You can then work with
the text and numbers to edit, spellcheck, change font or type size, sort,
calculate, and so forth.
To scan with OCR:
1. Select a Destination Application that has one of the Text formats
(TEXT, RTF, XLS, or HTML).
2. Scan the document.
Your scanned pages open in the Destination Application with their
text ready for editing and other text processing.
Note: OCR scanning is also for spreadsheets so you can work in
Microsoft Excel (or other spreadsheet applications) with the figures
and text from the original spreadsheets.
To se l e ct O C R s e t ti n g s:
1. Select the Destination Application.
2. Right-click on a text format icon to see the drop-down menu.
3. Choose OCR options.
A dialog box of OCR options opens.
Page 99

92 VISIONEER ONETOUCH 9520 PHOTO SCANNER USER’S GUIDE
4. Select the option you want for the OCR conversion of your
documents.
Auto orient page—Select this option to check the page orientation
and automatically rotate an improperly oriented page image so the
text is recognizable by the OCR process.
Single column output—Select this option to produce a single
column of text in the Destination Application, even if the original
image had multiple columns of text.
5. Click OK.
Note that the OCR options apply to all the Destination
Applications for which OCR applies. If you change them for one
Destination Application, those changes apply to the others as well.
Page 100

SELECTING NEW SETTINGS FOR A BUTTON 93
Options tab.
Click the arrow
to see the menu
to choose the
button.
SELECTING OPTIONS FOR A BUTTON
The OneTouch Options determine the types of Destination
Applications available for a button, as well as the location of the files of
your scanned items.
To select options:
1. Open the OneTouch Properties window and click the Options tab.
2. Click the menu arrow and choose the button for new options.
3. Select button options:
Show All Destinations—This option selects all the Destination
Application categories. The list of Destination Applications
available for the selected button will include all the applications on
your computer that fall into these categories. The list also includes
printers and other devices connected to your computer so, for
example, you can scan an item and have it printed immediately.
 Loading...