

Page 1
ELCOME
W
Congratulations on purchasing your Visioneer PaperPort flatbed
scanner. With your scanner, you can quickly scan paper documents and
color photos to place their electronic images on your computer.
Please note that this guide covers installation steps for a family of
PaperPort flatbed scanners—the PaperPort 3100, 6000, and 6100 series
of scanners.
HAT’S IN THE BOX
W
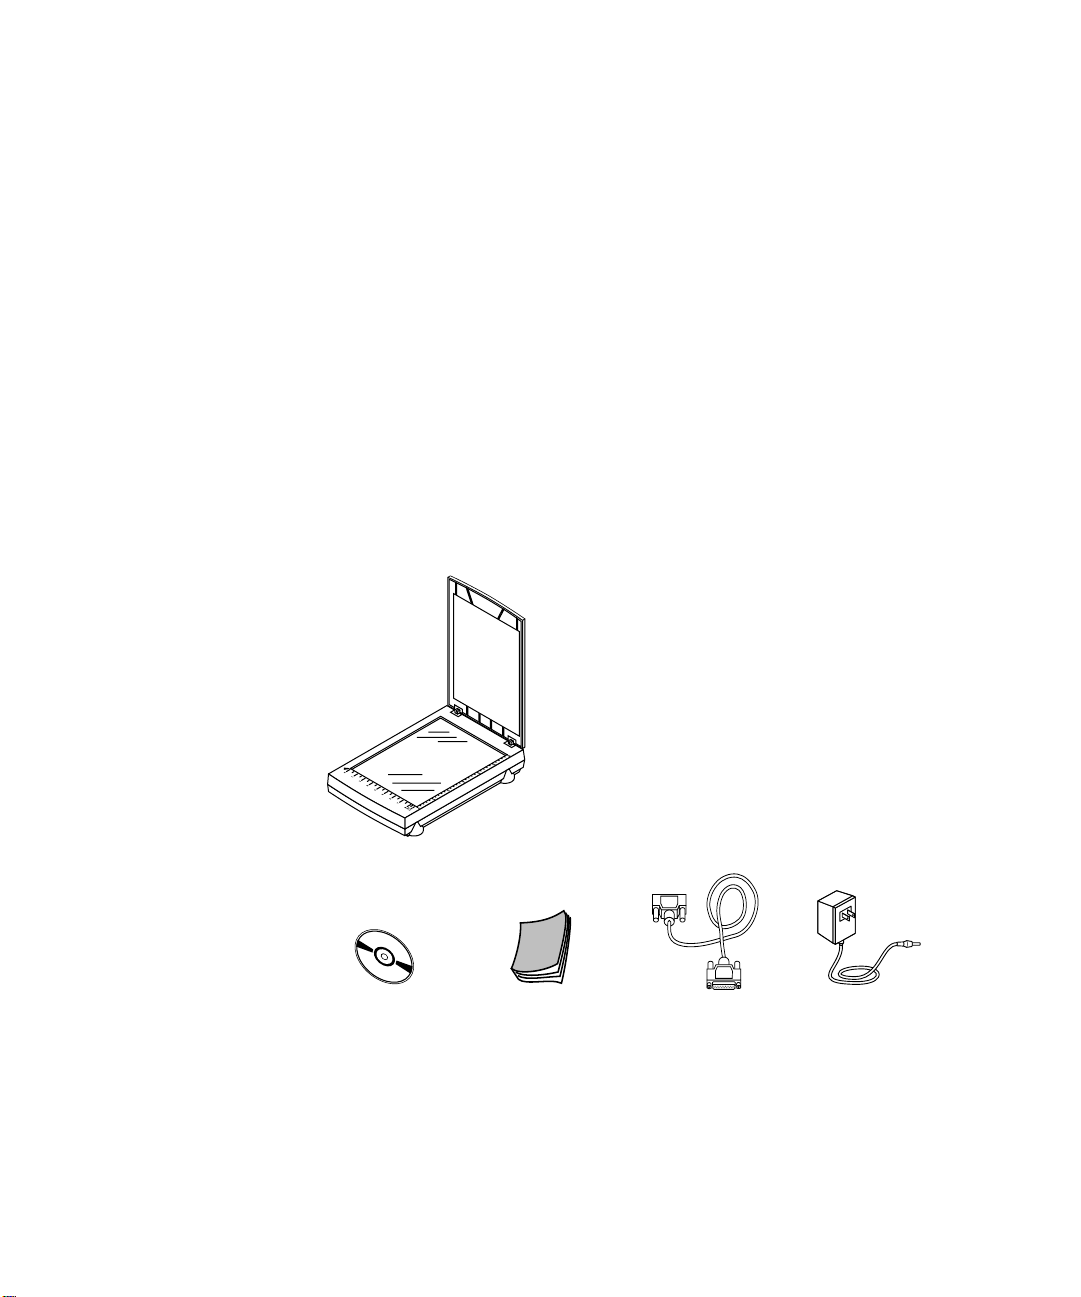
Before starting the installation, check the contents of the box to make
sure that all parts are included. If any items are missing or damaged,
contact the dealer where you purchased the scanner.
Software CD Installation Guide Power cord Scanner cable
▼
NOTE:
for the PaperPort software. You can print a copy from the CD to
your printer.
The CD also includes the
APERPORT FLATBED SCANNER INSTALLATION GUIDE
P
PaperPort U ser’ s G uide
, the manual
1
Page 2

2
APERPORT FLATBED SCANNER INSTALLATION GUIDE
P
HAT YOU NEED
W
To use the scanner and software, you need the following:
IBM PC (or 100-percent compatible) 486 or higher
■
Microsoft W indo ws 95 or Microsoft NT 4.0
■
16 megabytes (MB) or more of available internal memory (RAM)
■
35 MB of free hard disk space
■
A VGA or SVGA monitor. Recommended settings for your monitor
■
are as many colors as possible—High Color (16-bit), True Color
(24-bit), or 32-bit if your monitor has that capability. Set the
resolution to at least 800 by 600 pixels. To set your monitor’s colors
and resolution, open the Windows Control Panel, double-click
Display, and then click the Settings tab.
■
A CD-ROM drive
ETTING THE PAPERPORT USER’S GUIDE
G
The CD also includes your
PaperPort User’s Guide
PaperPort Getting Started Guide
and
. These guides provide more detailed information
about PaperPort’s features. Please see the CD to view these guides.
You can also print these guides from the CD.
Page 3
THE S
CANNER
3
THE S
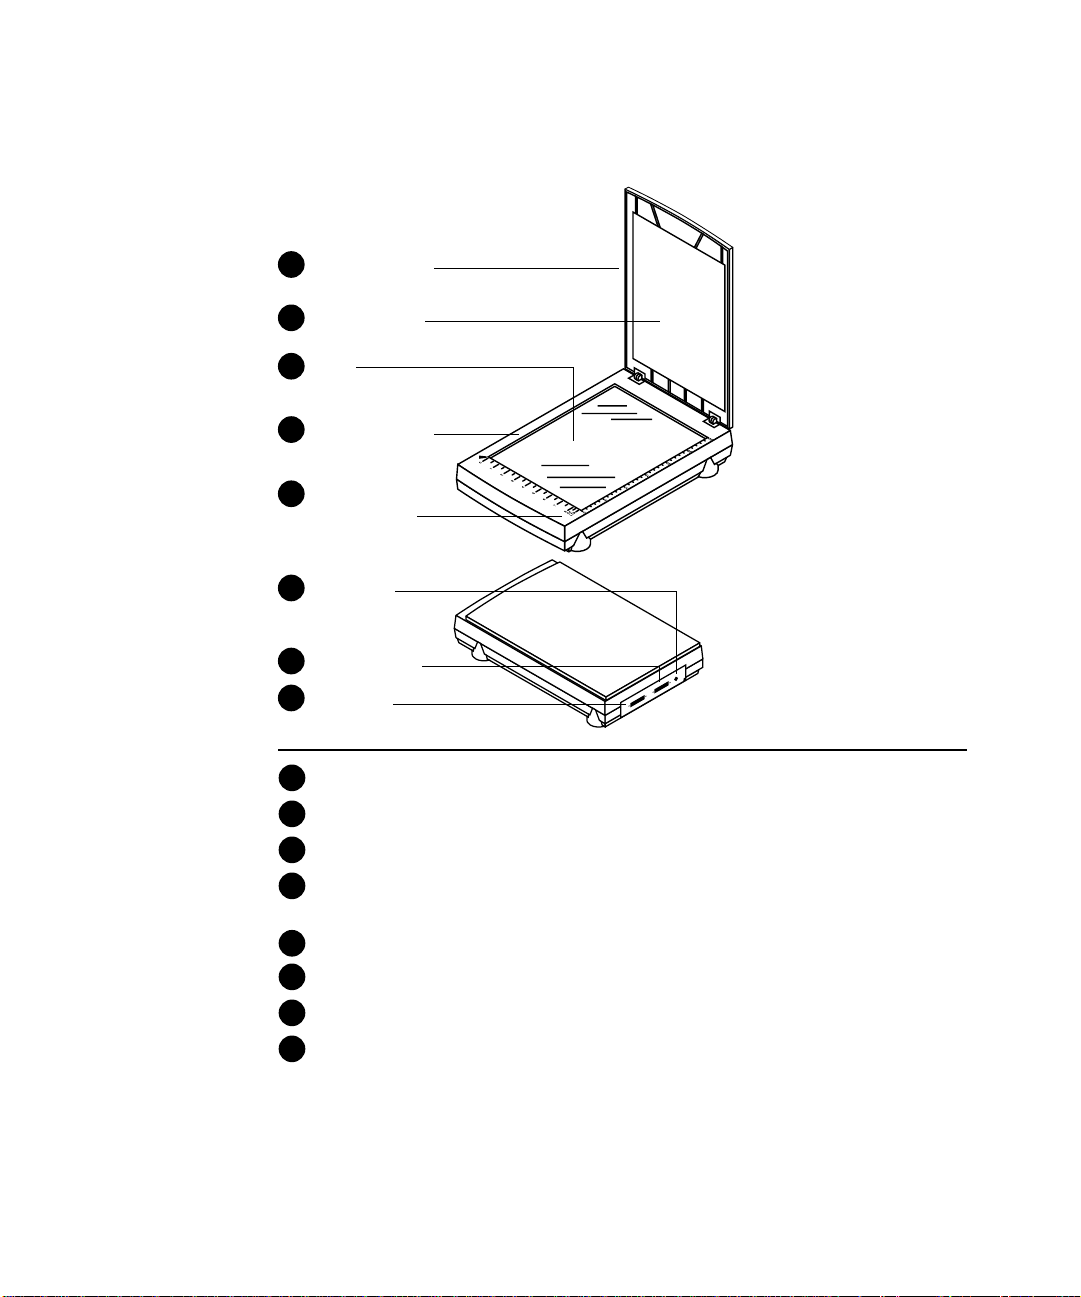
Document cover
1
Document pad
2
Glass
3
Reference frame
4
Button (Some
5
Models Only)
Power jack
6
To PC parallel
7
8
To printer
CANNER
Document cover. Close the document cover after placing items on the scanner glass.
1
Document pad. Helps to secure the document in place on the scanner glass.
2
Glass. Place items face down on top of the glass, in the upper left corner.
3
Reference frame. Place items face down within this frame. Both inches and centimeter
4
markings appear along the border of the frame.
Button (Some Models Only). Previews scan or starts PaperPort software if it is not running.
5
Power jack. Plug the scanner power cord into this jack.
6
To PC parallel. Plug the cable that connects the scanner to the computer into this port.
7
To printer. Plug your printer cable into this port.
8
▼ NOTE: The scanner does not have an on/off switch. Simply start
the PaperPort software and click the Twain button. For more
information, see “Setting Up the Scanner” on page 8.
Page 4

4
Feature PaperPort 3100 Series PaperPort 6000 Series PaperPort 6100 Series
APERPORT FLATBED SCANNER INSTALLATION GUIDE
P
CANNER FEATURES
S
The following table lists some of the important features of the scanners:
Optical
Resolution
Maximum
Resolution
Scanning
Modes
Maximum
Document Size
Operating
Systems
300 x 600 dpi 600 x 1200 dpi 600 x 1200 dpi
2400 x 2400 dpi 2400 x 2400 dpi 2400 x 2400 dpi
30 bit color (24-bit
output)
10 bit grayscale
1 bit line art
8.5 inches x 11 inches 8.5 inches x 11 inches 8.5 inches x 11 inches
Windows 95
Windows NT 4.0*
* Use with Windows NT 4.0 depends on your hardware configuration.
See the README file on the PaperPort CD for more information.
G
ETTING HELP
The PaperPort software includes a complete help system that answers
questions about the scanner and its software. If you have questions or
the scanner doesn’t seem to work correctly, please use the help.
30 bit color (24-bit
output)
10 bit grayscale
1 bit line art
Windows 95
Windows NT 4.0*
36 bit color (24-bit
output)
12 bit grayscale
1 bit line art
Windows 95
Windows NT 4.0*
To get help while using the PaperPort software:
Press the F1 key, or from the
■
Topics
▼
TIP:
support card that you received with your scanner.
to display the Help Topics window.
For specific information and numbers to call, see the technical
Help
menu, choose
PaperPort Help
Page 5
ONNECTING THE SCANNER TO YOUR COMPUTER
C
ONNECTING THE SCANNER TO YOUR COMPUTER
C
The PaperPort scanner connects to any available parallel (LPT) port on
the back of your computer.
▼
NOTE:
Please follow the sequence of steps in this section. Do not
connect the power cable until all other connections are complete.
To connect the PaperPort scanner:
1. Save any open files then shut down Windows.
2. Turn off the power to your computer.
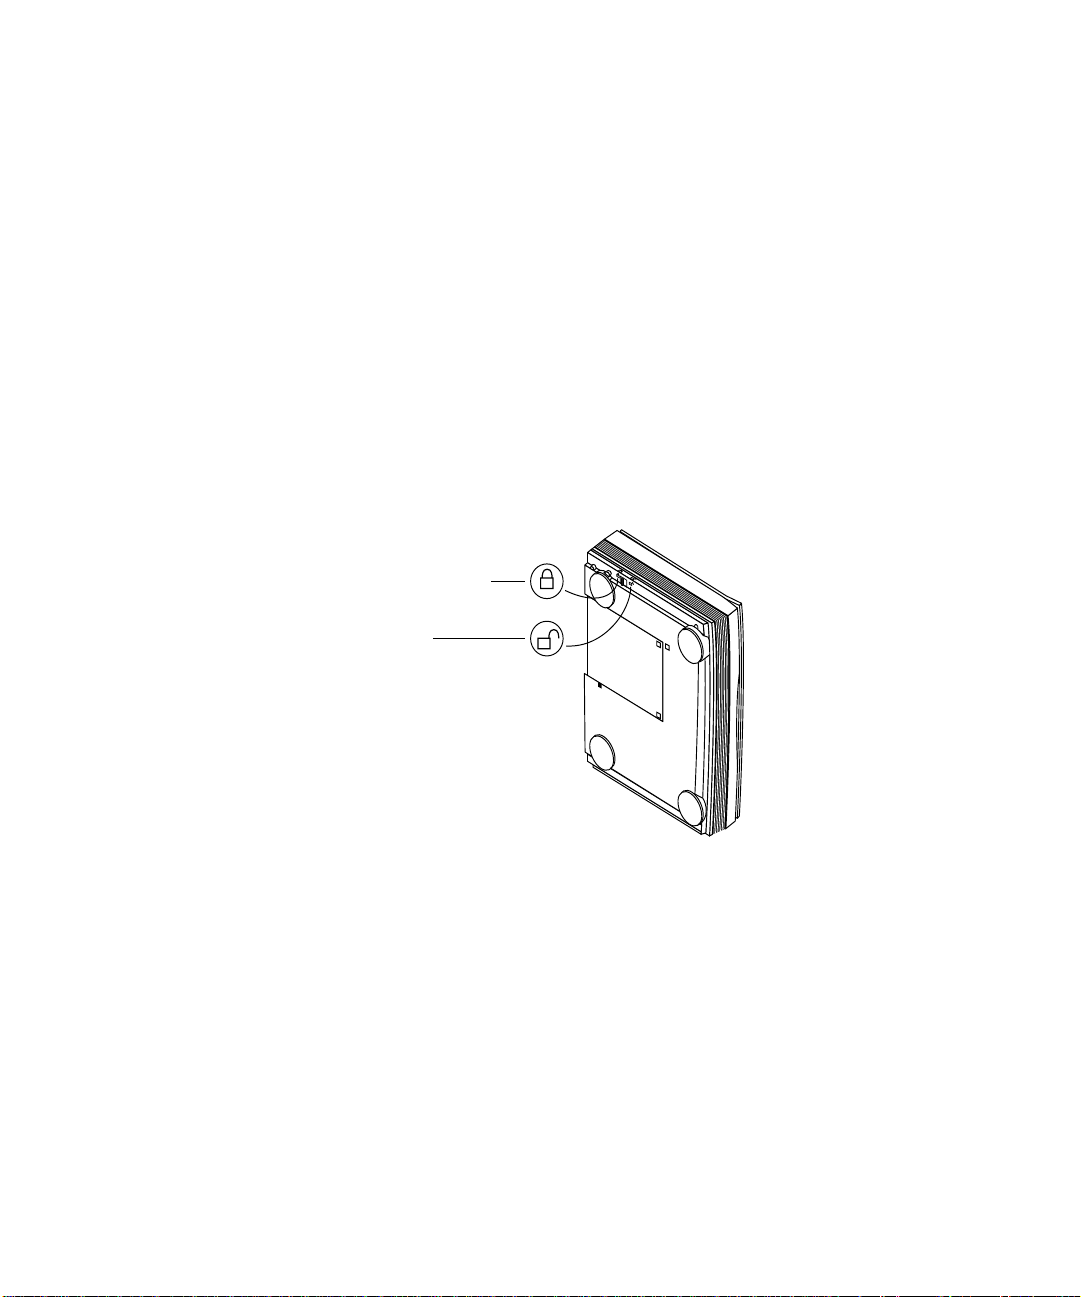
3. Not all models have locks, but if your scanner has a lock button,
slide the lock button to the unlocked position.
Locked position
Unlocked
position
5
NOTE: On the PaperPort 3100, the lock is on the right hand side.
▼
4. If a printer cable is attached to your computer’s parallel port,
unplug it and plug it into the port marked “To printer” on the back
of the scanner.
5. Plug the PC end of the scanner cable into an available parallel port
on the back of your computer.
6. Plug the other end of the scanner cable into the port on the back of
the scanner marked “To PC parallel port.”
If the plug does not attach easily, make sure that you are plugging it
in correctly. Do not force the plug into the connection.
Page 6
6 PAPERPORT FLATBED SCANNER INSTALLATION GUIDE
▼ NOTE: If you want to “daisy-chain” the scanner and a Zip drive so
they share the port, first connect the Zip driv e to the computer, then
connect the scanner to the Zip drive.
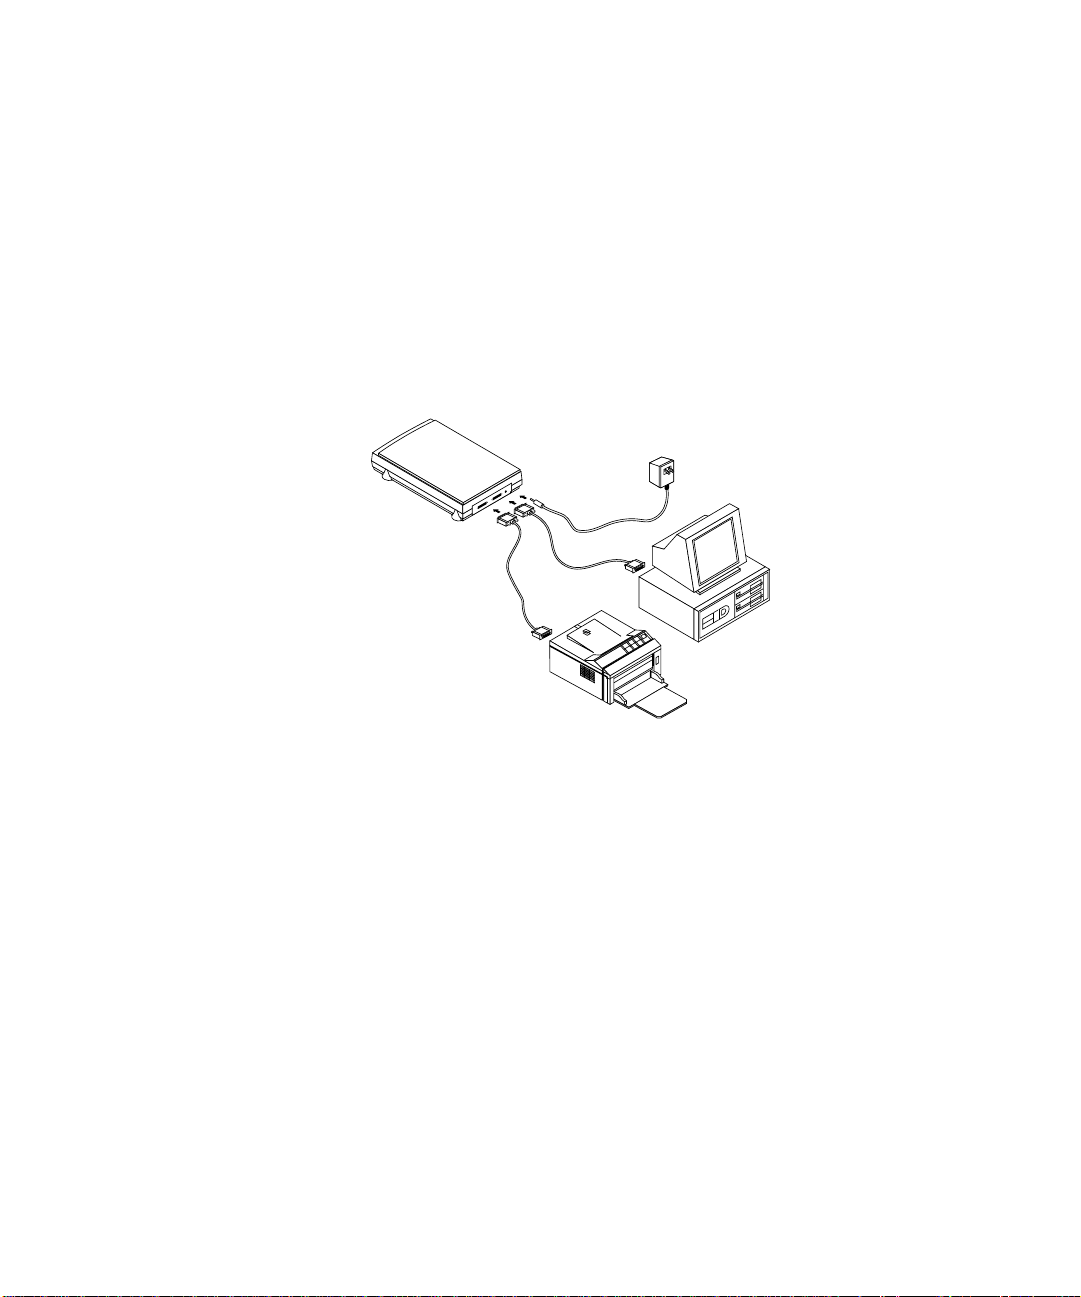
7. Plug the power adapter cable into the jack on the PaperP ort scanner.
8. Plug the power adapter into an AC (wall) outlet.
The power-on light on the front of the scanner comes on indicating
the scanner is receiving power.
The following diagram show the cable connections.
Printer cable
Power cord
Scanner
cable
9. Turn on your computer. You’re ready to begin installing the
PaperPort software.
▼ NOTE: On some PaperPort scanners the power-on light remains lit
when the computer is turned off. This is normal even though the
computer is turned off.
Page 7

INSTALLING THE PAPERPORT SOFTWARE 7
INSTALLING THE PAPERPORT SOFTWARE
The PaperPort CD includes all the PaperPort software files.
▼ NOTE: The CD also includes the PaperPort User’ s G uide, the manual
for the PaperPort software. You can read the guide while the CD is
running, or print a copy directly from the CD to your printer.
To install the PaperPort software:
1. Start Microsoft Windows and make sure that no other applications
are running.
2. Insert the PaperPort CD into your computer’s CD-ROM drive.
The CD automatically starts.
3. Follow the instructions on the screen to install the PaperPort
software on your computer. Later, after the scanner is working,
you can install the other applications provided on the CD.
▼ NOTE: If the PaperPort CD does not automatically start, make sur e
the CD drive’s door is completely shut. If the CD still doesn’t start,
click the Windows 95 icon that shows the drives on your computer.
(Usually, the icon is named My Computer.) The window shows the
drives available on your computer. Double-click the icon for your
CD-ROM drive to see the list of files on the CD. Double-click the
file named START.EXE. The CD starts.
▼ TIP: For a quick look at how to use the PaperPort features, choose
One-Minute Guide from the PaperPort Help menu.
Page 8

8 PAPERPORT FLATBED SCANNER INSTALLATION GUIDE
SETTING UP THE SCANNER
The steps to set up the scanner identify the type of scanner y ou hav e and
prepares the PaperPort software to scan with it.
To set up the scanner:
1. If the PaperPort software isn’t currently running, double-click the
PaperPort icon on the Windows desktop to start it. The PaperPort
Desktop appears.
If your scanner has a button on its fr ont panel you can also pr ess the
button to start the PaperPort software.
2. From the File menu, choose Select Source. The Select Source
dialog box appears, listing all TWAIN devices installed on your
computer.
3. Choose the appropriate option for your model of the PaperPort
scanner, and then click Select.
Your scanner is now set to scan with the PaperPort software.
▼ NOTE: You don’t need to complete Steps 2 and 3 again, unless you
change the selected source to another TWAIN device.
Page 9

SCANNING AN ITEM 9
SCANNING AN ITEM
The following procedure provides the basic steps for scanning an item.
You can scan many types of items, from small business cards to A4-sized
pages. The PaperPort software also has special settings for scanning color
photos and fine print (like the fine print on a contract). For more
information about scan settings, see “Adjusting Scan Settings” on
page 11.
To scan an item:
1. If the PaperPort software isn’t currently running, double-click the
PaperPort icon on the Windows desktop to start it. The PaperPort
Desktop appears.
If your scanner has a button on its fr ont panel you can also pr ess the
button to start the PaperPort software.
2. Open the scanner cover, place the item face down onto the upper
left edge of the scanner glass, and close the cover.
3. Click the Twain icon on the Command Bar, or choose Acquire
from the File menu.
The PaperPort Scan Manager dialog box appears. The following
figure is a sample of the dialog box. The one you see may be slightly
different. For details about the Scan Manager’s features for your
scanner, choose PaperPort Help Topics from the Help menu and
see the information about the PaperPort Scan Manager.
Page 10

10 PAPERPORT FLATBED SCANNER INSTALLATION GUIDE
Select an option
appropriate for how
you want to use the
scanned item.
View and adjust the scan
settings.
Restore the default
settings.
Adjust the brightness or
contrast of the scanned
item.
Set the measurement
units to view the
dimensions of the
preview item.
Scan the item to the
PaperPort Desktop.
Preview the item
before you scan.
4. Click one of the options to “Scan Page For.” For example, to make
sure the software is installed corr ectly use the current default setting
of Color Photo—Faster. To scan other items, select scan settings
appropriate for the items. For more information, see “Adjusting
Scan Settings” on page 11.
Preview the item
here.
Use predefined area
icons to select the area
of an item to scan.
Drag the borders of
the selection rectangle
surrounding the item
to adjust the area that
the scanner scans.
The Auto icon is the default.
It selects the entire item to scan.
5. Drag the selection rectangle around the item to resize the area the
scanner scans, or click one of the predefined scan area icons.
6. Click the Preview button.
If your scanner has a button on the front panel, you can press it
instead of clicking the Preview button.
The scanner scans the item and displays a pr eview of the item in the
Preview area of the PaperPort Scan Manager dialog box.
7. (optional) Repeat Steps 4, 5, and 6 to adjust and preview the scan.
8. When you are satisfied with the preview item, click the Scan button
on the PaperPort Scan Manager dialog box to scan the item.
The scanned item appears in PaperPort.
▼ NOTE: If your scanner has a button on the front panel, pressing the
button only previews the item. To scan you must click the Scan
button on the PaperPort Scan Manager dialog box.
Page 11

Thumbnail item
ADJUSTING SCAN SETTINGS 11
ADJUSTING SCAN SETTINGS
With the P aperP ort scanner, you can adjust the scan settings to fine-tune
the scanned item. This section tells you how to:
■ Select a predefined scan setting.
■ Customize a scan setting.
■ Scan in color.
■ Adjust the brightness and contrast.
■ Select the area of the item you want to scan.
SELECTING A PREDEFINED SCAN SETTING
Selecting the proper scan setting before scanning provides the best
results for a scanned item. The scan setting determines the sharpness of
the item and the number of possible shades of gray or color. These
selections affect the speed of the scan and the file size.
In the PaperPort Scan Manager dialog box, you can select one of the
predefined scan settings described in the following table.
Page 12

12 PAPERPORT FLATBED SCANNER INSTALLATION GUIDE
Scan Page For Default Setting To Scan Description
Faxing, Filing,
or Copying
Editing Text
(OCR)
Black & White
Photo
Color Photo—
Faster
Color Photo—
Better Quality
Black-and-white
200 dpi
Black-and-white
300 dpi
Grayscale
100 dpi
Color
100 dpi
Color
300 dpi
Newspaper and
magazine articles,
receipts, forms, and
other text items
Business letters,
contracts, memos, and
other documents that
you want to edit
Black-and-white
photos
Color pages with
many graphics, or
mixed graphics and
text, line art, or
photos that require a
quick scan
Photographs and
color items
Provides the fastest scan time
and smallest file size.
Enhances the use of OCR
software for converting item
text to editable text. Provides
higher quality and a larger file
size than the Faxing, Filing or
Copying scan setting.
Provides the best setting for
black-and-white photos.
Creates a reasonable scanned
color item in a file that is not
too large. PaperPort’s default
setting.
Provides the ideal setting for
color items, item editing,
desktop publishing, and highquality output. Results in a
color scan with slower scan
time and a larger file size.
To select a scan setting:
1. Click the Twain icon on the Command Bar, or choose Acquire
from the File menu. The PaperPort Scan Manager dialog box
appears.
2. In the Scan Page F or options, select the scan setting appropriate for
the item you want to scan. For example, to scan an article that you
want to fax, choose the Faxing, Filing, or Copying setting.
Page 13

ADJUSTING SCAN SETTINGS 13
3. To see the details of the scan setting, such as the bit depth and
resolution, click the Advanced Settings button. The Advanced
Settings dialog box appears.
4. Click OK to return to the PaperPort Scan Manager dialog box.
CUSTOMIZING A SCAN SETTING
You can customize a predefined scan setting or create a new custom scan
setting.
▼ TIP: At any time, click the Restore Defaults button to restore the
original predefined scan settings.
To customize a scan setting:
1. Click the Twain icon on the Command Bar, or choose Acquire
from the File menu. The PaperPort Scan Manager dialog box
appears.
2. In the Scan Page For options, select a predefined scan setting to
modify a setting, or select Custom to create a new scan setting.
3. Click the Advanced Settings button. The Advanced Settings dialog
box appears.
4. Select your choices for item type, resolution, gamma, and name.
5. Click OK to return to the PaperPort Scan Manager dialog box.
SCANNING IN COLOR
Your PaperPort scanner is initially set to scan Color Photo—Faster.
To scan at a higher resolution, select Color Photo—Better Quality.
▼ NOTE: Scanning at a higher resolution creates a larger file size and
takes longer to scan. To minimize the file size and the time required
to get a better quality scan, select just the area of the item that you
want to scan. For more information about selecting the area of an
item, see “Selecting the Area of the Item You Want to Scan” on
page 15.
Page 14

14 PAPERPORT FLATBED SCANNER INSTALLATION GUIDE
To scan in color:
1. Click the Twain icon on the Command Bar, or choose Acquire
from the File menu. The PaperPort Scan Manager dialog box
appears.
2. Click Color Photo—Faster or Color Photo—Better Quality.
You can also use these settings for any other color items such as
color pages from articles.
3. Scan the item in the normal manner.
ADJUSTING THE BRIGHTNESS AND CONTRAST
Sometimes an item is scanned with the brightness and contrast set to be
too light or too dark. For example, a note written with a light pencil
may need to be scanned darker to improve legibility.
You can adjust the brightness and contrast at which grayscale and color
items are scanned. You can also adjust the brightness for black-andwhite items. If an item is currently displayed in the preview area, the
changes you make using the Brightness and Contrast control bars are
reflected in the preview item.
To adjust brightness and contrast:
1. Click the Twain icon on the Command Bar, or choose Acquire
from the File menu. The PaperPort Scan Manager dialog box
appears.
2. Drag the Brightness slider to the left to make the item darker or to
the right to make the item lighter. When you release the mouse
button, the change is reflected in the preview item.
3. Drag the Contrast slider to the left to decrease the contrast or to the
right to increase the contrast. When you release the mouse button,
the change is reflected in the preview item.
Page 15

ADJUSTING SCAN SETTINGS 15
SELECTING THE AREA OF THE ITEM YOU WANT TO SCAN
▼ NOTE: The steps for selecting the area to scan are slightly different
for the PaperPort 6000B scanner. If you have a PaperPort 6000B
scanner please skip this section and see page 17.
By default, the PaperPort software automatically scans an entire item
placed on the scanner. However, you may want to select only a certain
area of an item to scan. Selecting an appropriate scan area can result in a
faster scan and a smaller file size.
To select the area you want to scan, you can use the pr edefined scan ar ea
icons or manually select an area. For example, if you have a photo that is
letter size, but you want to scan only an ar ea appr oximately 6 x 8 inches,
you can use the A5 icon to set these dimensions for y ou. The Predefined
scan areas are as follows:
■ Auto—A utomatically sets the entire item as the scan area. B y default,
Auto is selected.
■ Card—Scans an ar ea 4 x 2.5 inches (10.2 x 6.4 cm), equivalent to an
average business card.
■ A5—Scans an area 5.8 x 8.3 inches (14.8 x 21 cm).
■ B5—Scans an area 7.2 x 10.1 inches (18.2 x 25.7 cm).
■ Letter—Scans an area 8.5 x 11 inches (21.6 x 27.9 cm).
■ A4—Scans an area 8.3 x 11.7 inches (21 x 29.7 cm).
If you don’t select an icon, Auto is automatically selected. You can also
manually select the area that is scanned by dragging the borders
surrounding the preview image to reduce or enlarge the area.
Page 16

16 PAPERPORT FLATBED SCANNER INSTALLATION GUIDE
To select the area you want to scan:
1. Click the Twain icon on the Command Bar, or choose Acquire
from the File menu. The PaperPort Scan Manager dialog box
appears.
2. Click the Preview button. An image of the scanned item appears in
the Preview area. By default, the Auto icon is selected and a
selection rectangle surrounds the entire item.
3. (optional) In the Scan Area settings, select the units of measur e y ou
want to use for the scan area. You can select either inches,
centimeters, or pixels.
4. (optional) To use a scan area icon other than Auto, click one of the
predefined scan area icons, such as A4 or Card, in the P review area.
A selection rectangle reflecting the measur ement of the selected scan
area icon appears. For example, if you click the Letter icon,
a rectangle that is 8.5 x 11 inches appears.
5. Drag the rectangle to position it over the area you want to scan.
6. To change the dimensions of the rectangle, click the rectangle, and
then drag the borders of the rectangle to resize it. This effectively
allows you to crop the item. The dimensions of the selected area
appear in the Scan Area settings.
7. Scan the item as you usually do.
Page 17

ADJUSTING SCAN SETTINGS 17
SELECTING THE AREA OF THE ITEM YOU WANT TO SCAN (6000B)
This section only applies to the PaperPort 6000B scanner.
When you preview an item to scan, the selection rectangle around the
image indicates the scan area. However, you may want to select only a
certain area of an item to scan. Selecting an appropriate scan area can
result in a faster scan and a smaller file size.
To select the area you want to scan, you can choose a predefined scan
area from the drop-down size list, or manually select an area.
For example, if you hav e a photo that is letter size, but you want to scan
only an area approximately 5 x 7 inches, you can use the 5 x 7 scan area
from the drop-down list to set these dimensions for you.
The box next to the drop-down list shows the currently selected scan
area. You can also manually select the area that is scanned by dragging
the borders of the selection rectangle surrounding the preview image to
reduce or enlarge the area.
To select the area you want to scan:
1. Click the Twain icon on the Command Bar, or choose Acquire
from the File menu. The PaperPort Scan Manager dialog box
appears.
2. Click the Preview button. An image of the scanned item appears in
the Preview area. A selection rectangle shows the current scan area.
3. (optional) In the Scan Configuration settings, select the units of
measure you want to use for the scan area. You can select either
inches, centimeters, or pixels.
4. (optional) If you want the scan area to be one of the predefined
sizes, choose one of the predefined scan areas from the drop-down
list, such as A4 or Business Card. The selection rectangle indicates
the measurement of the selected scan area. For example, if you
choose the Letter option, the rectangle’s size is 8.5 x 11 inches.
5. Drag the selection rectangle to position it over the area you want to
scan.
Page 18

18 PAPERPORT FLATBED SCANNER INSTALLATION GUIDE
6. To change the dimensions of the rectangle, click the rectangle, and
then drag the borders of the rectangle to resize it. This effectively
allows you to crop the item. The dimensions of the selected area
appear in the Scan Configuration settings.
7. Scan the item as you usually do.
CLEANING THE SCANNER GLASS
Scanning items that have excessiv e amounts of dirt or dust may dir ty the
glass. To ensure the best quality scanned item, wipe the scanner glass
with a soft clean cloth to rid the glass of dust or other debris.
Page 19

PAPERPORT SCANNER SPECIFICATIONS 19
PAPERPORT SCANNER SPECIFICATIONS
Bit Depth 3000/3100/6000 Series:
30-Bit color (internal), 10-Bit gray
(internal), 1-Bit line art/text
6100:
36-Bit color (internal), 12-Bit gray
(internal), 1-Bit line art/text
Scanning resolution Optical resolution:
3000/3100 Series: 300 x 600 dpi
6000 Series: 600 x 1200 dpi
6100 Series: 600 x 1200 dpi
Maximum resolution (interpolated):
2400 x 2400
Maximum Item sizes 8.5
Scanner dimensions
Height 3.2
Width 12 inches (30.6 cm)
Length 16.3 inches
Weight 8.3 pounds
Operating temperature 50°–104 ° F (10°–40° C)
Relative humidity 20%–80%
Power supply
Input voltage/frequency 100 Vac, 50/60 Hz (Japan)
Output voltage/watt 12 V DC, 15 watt maximum
Safety and agency certifications UL, ULc, GS, FCC Class B,
Hardware warranty One-year limited warranty
x 11.69 inches (21.6 x 29.7 cm)
inches (8.2 cm)
(41.4 cm)
120 Vac, 60 Hz (North America)
230 Vac, 50 Hz (Europe)
VCCI Class 2, CE
Page 20

Declaration of Conformity
The following equipment:
Type of Product: Image Scanner
Model Numbers: PaperPort 3000; PaperPort 3100; PaperPort 6000
Distributed by: Visioneer, Inc. Telephone: (510) 608-0300
Located at: 34800 Campus Drive
Fremont, CA 94555
Facsimile: (510) 608-0352
is herewith confirmed to comply with the requirements set out in the Council Directive on the
Approximation of the Laws of the Member of States relating to Electromagnetic Compatibility
(89/336/EEC; 912/31/EEC; 93/68/EEC). For the evaluation regarding the Electromagnetic
Compatibility, the following standards were applied:
EMISSION EN 50081-1 (1992) IMMUNITY EN50082-1 (1992)
Conducted EN 55022 (1994) ESD IEC 1000-4-2 (1995)
Radiated (class B)
Harmonica EN 60555-2 (1987) EFT/Burst IEC 1000-4-4 (1995)
Flicker EN 60555-3 (1987) SURGE IEC 1000-4-5 (1995)
RS IEC 1000-4-3 (1995)
and also comply with the requirements set out in the council Directive 73/34/EEC for electrical
equipment used within certain voltage limits and the Amendment Directive 93/68/EEC. For the
evaluation of the compliance with this Directive, the following standard was applied:
EN 60950:1998+A1+A2
The following distributor is responsible for this declaration:
Company Name: Visioneer, Inc.
Company Address: 34800 Campus Drive, Fremont, CA 94555
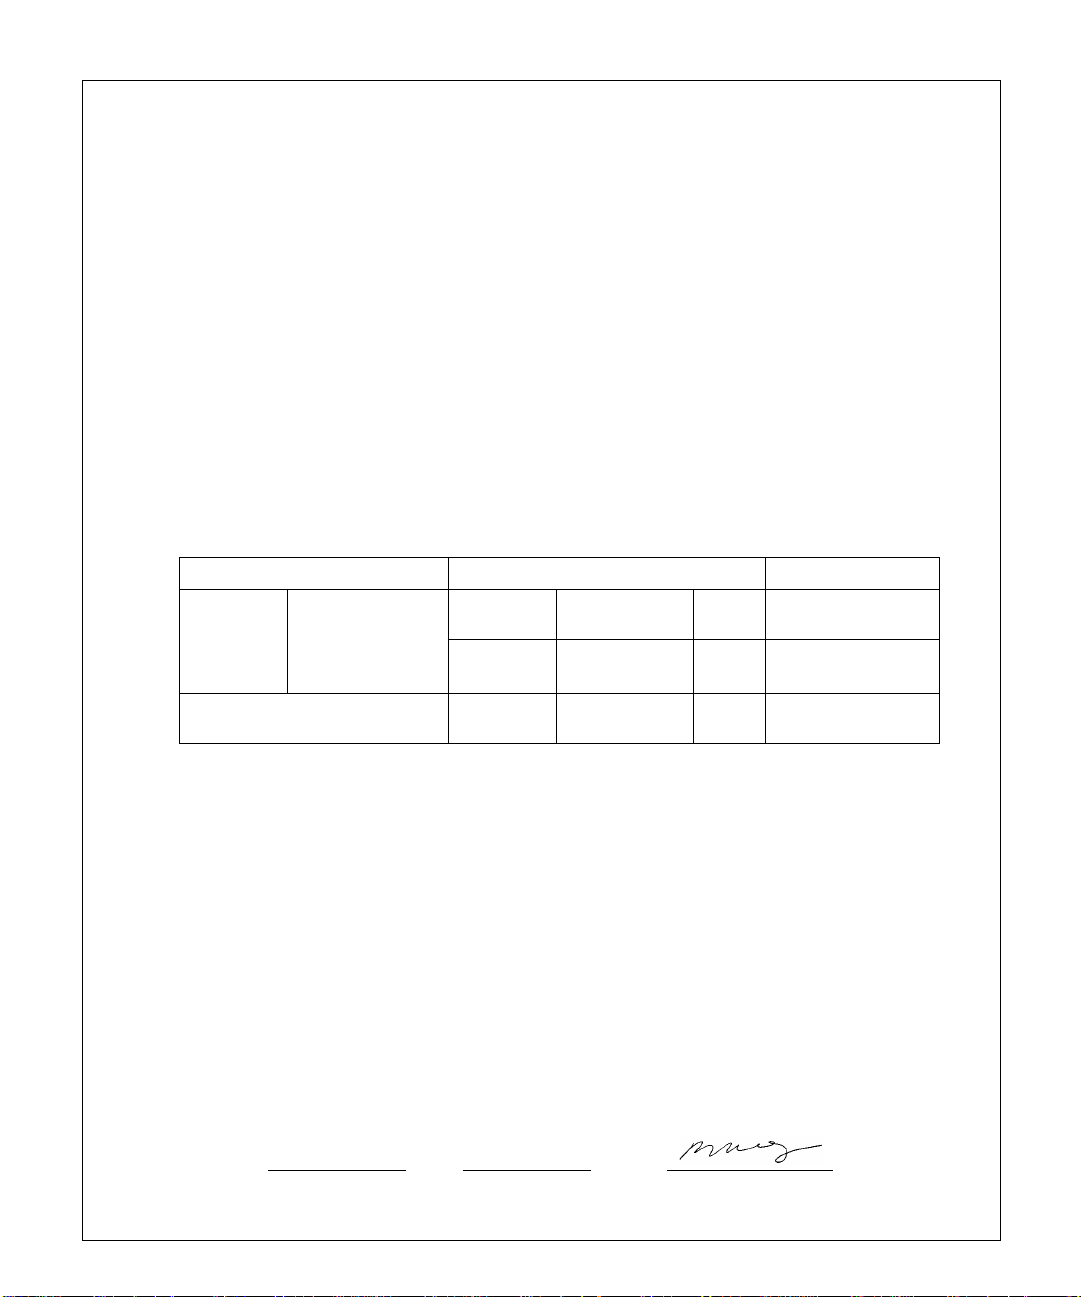
Person responsible for making this declaration:
Name: Mike Wong
Position/Title: Director of Manufacturing Operations
Fremont, CA 7/14/97
Place Date Legal Signature
Page 21
Declaration of Conformity
The following equipment:
Type of Product: Image Scanner
Model Numbers: PaperPort 6000B
Distributed by: Visioneer, Inc. Telephone: (510) 608-0300
Located at: 34800 Campus Drive
Fremont, CA 94555
Facsimile: (510) 608-0352
is herewith confirmed to comply with the requirements set out in the Council Directive on the
Approximation of the Laws of the Member of States relating to Electromagnetic Compatibility
(89/336/EEC; 93/68/EEC). For the evaluation regarding the Electromagnetic Compatibility,
the following standards were applied:
EMISSION EN 50081-1 (1992) IMMUNITY EN50082-1 (1992) Performance Criterion
Conducted
Radiated
EN 55022/A1
(class B)
ESD IEC 801-2
(IEC 1000-4-2)
RS IEC 801-3
(IEC 1000-4-3)
EFT/Burst IEC 801-4
(IEC 1000-4-4)
(1984) B
(1984) A
(1988) B
and also comply with the requirements set out in the council Directive 73/23/EEC for electrical
equipment used within certain voltage limits and the Amendment Directive 93/68/EEC. For the
evaluation of the compliance with this Directive, the following standard was applied:
EN 60950:1988/A1:1990/A2:1991
The following distributor is responsible for this declaration:
Company Name: Visioneer, Inc.
Company Address: 34800 Campus Drive, Fremont, CA 94555
Person responsible for making this declaration:
Name: Mike Wong
Position/Title: Director of Manufacturing Operations
Fremont, CA 2/12/98
Place Date Legal Signature
Page 22

22 PAPERPORT FLATBED SCANNER INSTALLATION GUIDE
 Loading...