


It all starts with a vision
It All Starts with a Vision
Fitness™
X 2 0 & X 3 0 E l l i p t i c a l T r a i n e r S E R V I C E M A N U A l


|
table of contents |
|
|
CHAPTER 1: Serial number location ................................................................... |
1 |
|
CHAPTER 2: Important Safety instructions |
|
2.1 |
Before Getting Started ............................................................................................... |
2 |
2.2 |
Read and Save These Instructions ........................................................................... |
3 |
2.3 |
Electrical Requirements ............................................................................................. |
4 |
|
CHAPTER 3: Preventative Maintenance |
|
3.1 |
Recommended Cleaning Tips ................................................................................... |
5 |
3.2 |
Check for Damaged Parts ......................................................................................... |
5 |
3.3 |
Care and Maintenance Instructions ........................................................................... |
6 |
|
CHAPTER 4: CONSOLE OVERLAY AND WORKOUT DESCRIPTION |
|
4.1 |
Console Overview - Simple Console ......................................................................... |
7 |
4.2 |
Simple Console Display Descriptions......................................................................... |
8 |
4.3 |
Console Overview - Deluxe Console.......................................................................... |
9 |
4.4 |
Deluxe Console Display Descriptions......................................................................... |
10 |
4.5 |
Console Overview - Premier Console........................................................................ |
11 |
4.6 |
Premier Console Display Descriptions....................................................................... |
12 |
4.7 |
Premier Console - Audio / Video Capabilities............................................................. |
16 |
4.8 |
Premier Console - USB Capabilities........................................................................... |
17 |
4.9 |
Premier Console - Importing Pictures......................................................................... |
18 |
|
CHAPTER 5: Manager MODE |
|
5.1 |
Engineering Mode - Simple Console.......................................................................... |
19 |
5.2 |
Engineering Mode - Deluxe Console.......................................................................... |
20 |
5.3 |
Engineering Mode - Premier Console........................................................................ |
21 |
|
CHAPTER 6: Troubleshooting |
|
6.1 |
Electrical Diagrams .................................................................................................... |
22 |
6.2 |
Electrical Diagram - Simple Console.......................................................................... |
24 |
6.3 |
Electrical Diagram - Deluxe Console.......................................................................... |
25 |
6.4 |
Electrical Diagram - Premier Console........................................................................ |
26 |
6.5 |
Troubleshooting - Console Power Issues................................................................... |
27 |
6.6 |
Troubleshooting - Noise in Stride............................................................................... |
28 |
6.7 |
Troubleshooting - Heart Rate Issues.......................................................................... |
29 |
|
CHAPTER 7: PART REPLACEMENT GUIDE |
|
7.1 |
Console Replacement................................................................................................ |
30 |
7.2 |
Heart Rate Grips Replacement.................................................................................. |
31 |
7.3 |
Cup Holder Replacement - X20 ................................................................................ |
32 |
7.3 |
Cup Holder Replacement - X30.................................................................................. |
33 |
7.4 |
Handlebar Replacement............................................................................................. |
34 |
7.5 |
Link Arm Replacement................................................................................................ |
35 |
7.6 |
Pedal Replacement - X20........................................................................................... |
36 |
7.6 |
Pedal Replacement - X30........................................................................................... |
37 |
7.7 |
Pedal Arm Replacement ............................................................................................ |
38 |
i

table of contents
7.8 |
Roller Replacement.................................................................................................... |
39 |
7.9 |
Crank Arm Replacement............................................................................................. |
40 |
7.10 |
Console Mast Boot Replacement .............................................................................. |
42 |
7.11 |
Rear Side Cover Replacement .................................................................................. |
43 |
7.12 |
Side Cover Replacement............................................................................................ |
44 |
7.13 |
Drive Belt Replacement.............................................................................................. |
46 |
7.14 |
Drive Axle Replacement.................................................................................................. |
47 |
7.15 |
ECB Controller Replacement.......................................................................................... |
48 |
7.16 |
ECB Replacement........................................................................................................... |
50 |
7.17 |
Testing the Elliptical Trainer............................................................................................. |
51 |
|
CHAPTER 8: Elliptical Trainer specifications and assembly guide |
|
8.1 |
Tools and Parts Included............................................................................................ |
52 |
8.2 |
Assembly Instructions ................................................................................................ |
53 |
8.3 |
Leveling the Elliptical Trainer...................................................................................... |
62 |
ii iv
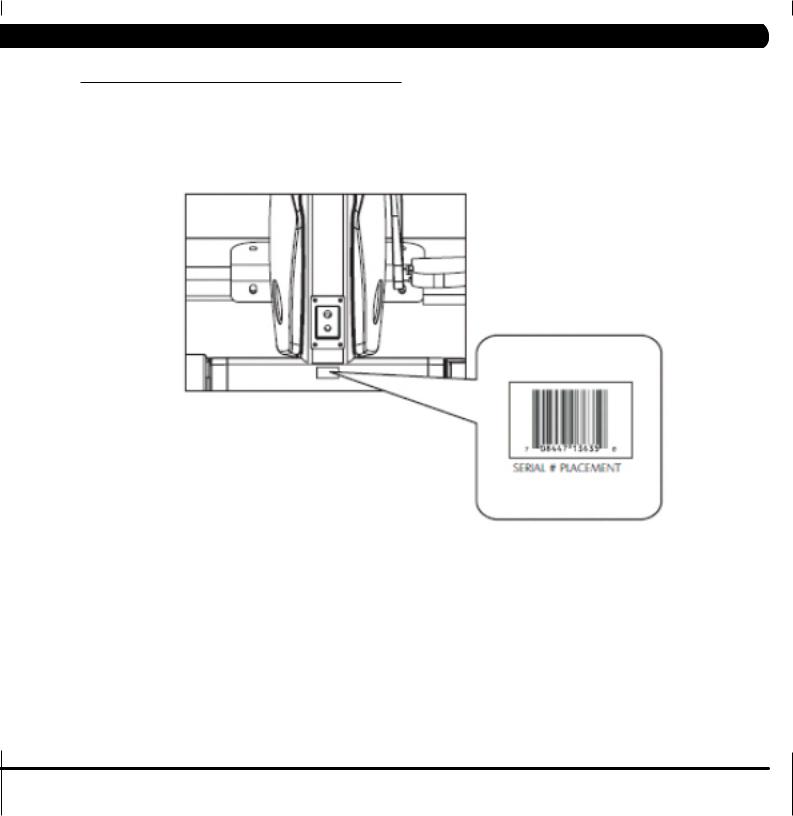
Chapter 1: Serial number location
1.1 Serial Number Location
1

Chapter 2: Important Safety Instructions
2.1 BEFORE GETTING STARTED
To ensure your safety and protect the equipment, read all instructions before operating the Elliptical Trainer.
CHOOSING A SITE
The site should be well lit and well ventilated. Locate the Vision Fitness X20 or X30 Elliptical Trainer on a structurally solid and flat surface. The Elliptical Trainer should have a clearance of 20" on one side and behind the unit, and 12" on the other side from the wall or other equipment. This zone is to allow easy access to the Elliptical Trainer and gives the user an easy exit path from the machine. If the site has a heavy plush carpet, to protect the
carpeting and machinery, you should place a rigid plastic base under the unit.
Please do not place the Vision Fitness X20 or X30 Elliptical Trainer in an area of high humidity, such as the vicinity of a steam room, indoor pool, or sauna. Exposure to intensive water vapor or chlorine could adversely affect the electronics, as well as other parts of the machine.
MOVING THE ELLIPTICAL TRAINER
Your Vision Fitness X20 & X30 Elliptical Trainers have transport wheels included for ease of mobility. To move your Elliptical Trainer, firmly grasp the rear of the frame assembly. Carefully lift and roll on the transport wheels.
CAUTION:
Vision Fitness Elliptical Trainers are well built and heavy, use care and additional help if necessary. This Elliptical Trainer can weigh up to 200 lbs.
2

Chapter 2: Important Safety Instructions
2.2 Read and Save these instructions
To ensure your safety and protect the equipment, read all instructions before operating a Vision Fitness X20 or X30 Elliptical Trainer.
To ensure proper use of the Vision Fitness X20 or X30 Elliptical Trainer, make sure that all users read this manual. Remind the users that before undertaking any fitness program, they should obtain complete physical examinations from their physicians. If, at any time while exercising, the user experiences dizziness, pain, or shortness of breath, nausea or feels faint, he or she must stop immediately.
*This Elliptical Trainer is only to be used for its intended purpose described in this manual. Do not use attachments that have not been recommended by Vision Fitness.
*Never drop or insert objects into any opening. Keep hands away from moving parts. If the item cannot be reached, contact a Vision Fitness authorized dealer for assistance.
*Never operate this product if it has a damaged cord or plug, if it is not working properly, or if it has been damaged or immersed in water.
*Do not use this product outdoors, near swimming pools or in areas of high humidity.
*Do not remove the side covers. Service should only be done by an authorized service technician.
*Keep children off your product at all times.
*When the Elliptical Trainer is in use, young children and pets should be kept at least 3 meters / 10 feet away.
*Do not wear clothing that might catch on any moving parts of this Elliptical Trainer.
*Keep the power cord away from heated surfaces.
*To disconnect, turn the power switch to the OFF position, then remove the plug from the outlet.
*Only use the power cord provided with your Vision Fitness product.
*Never place the power cord under carpeting or place any object on top of the power cord that may pinch and damage it.
*Unplug your product before moving it.
CAUTION! If you experience chest pains, nausea, dizziness, or shortness of breath, stop exercising immediately and consult your physician before continuing.
CAUTION! Any changes or modifications to this equipment could void the product warranty.
3

Chapter 2: Important Safety Instructions
2.3 Electrical Requirements
POWER REQUIREMENTS:
The Vision Fitness X20 and X30 Elliptical Trainers each use a wall mounted external power supply. Use only the power supply provided with your Elliptical Trainer. If you misplace the power supply, please contact your authorized Vision Fitness retailer for an original replacement. Use of the wrong power supply may cause damage to your Elliptical Trainer.
POWER SWITCH - There is a power switch on the back of the console. Turn off power to your console if it will not be used for an extended period of time.
4

Chapter 3: PREVENTATIVE MAINTENANCE
3.1 recommended cleaning tips |
|
3.2 Check for damaged parts |
Preventative maintenance and daily cleaning will prolong the life and look of your Vision Fitness X20 & X30 Elliptical Trainers.
Please read and follow these tips.
•Position the equipment away from direct sunlight. The intense UV light can cause discoloration on plastics.
•Locate your equipment in an area with cool temperatures and low humidity.
•Clean with a soft 100% cotton cloth.
•Clean with soap and water or other non-ammonia based all purpose cleaners.
•Wipe pedals, arms, console, heart rate grips, and the handlebar clean after each use.
•Do not pour liquids directly onto your equipment. This can cause damage to the equipment and in some cases electrocution.
•Adjust leveling feet when equipment wobbles or rocks.
•Maintain a clean area around the equipment, free from dust and dirt.
DO NOT use any equipment that is damaged or has worn or broken parts. Use only replacement parts supplied by Vision Fitness.
MAINTAIN LABELS AND NAMEPLATES. Do not remove labels for any reason. They contain important information. If unreadable or missing, contact Vision Fitness for a replacement at 800-335- 4348 or www.visionfitness.com.
MAINTAIN ALL EQUIPMENT. Preventative maintenance is the key to smoothly operating equipment. Equipment needs to be inspected at regular intervals. Defective components must be kept out of use until they are repaired. Ensure that any person(s) making adjustments or performing maintenance or repair of any kind is qualified to do so.
5

Chapter 3: PREVENTATIVE MAINTENANCE
3.3 Care and maintenance instructions
In order to maximize life span, and minimize down time, all Vision Fitness equipment requires regular cleaning, and maintenance items performed on a scheduled basis. This section contains detailed instructions on how to perform these items and the frequency of which they should be done. Some basic tools and supplies will be necessary to perform these tasks which include (but may not be limited to):
*Metric Allen wrenches
*#2 Phillips head screwdriver
* Adjustable wrench
*Lint free cleaning cloths
*Teflon based spray lubricant such as "Super Lube" or other Vision Fitness approved products.
*Mild water soluble detergent such as "Simple Green" or other Vision Fitness approved products
*Vacuum cleaner with an extendable hose and crevasse tool attachment.
DAILY MAINTENANCE ITEMS
1)Look and listen for loose fasteners, unusual noises, and any other indications that the equipment may be in need of service.
2)Clean the Elliptical Trainer before and after each use, including:
a.Use a damp, soft cloth with water or mild liquid detergent to clean all exposed surfaces. DO NOT use ammonia, chlorine, or any acid based cleaners.
b.Keep the console display free of fingerprints and salt build up caused by sweat.
c.Frequently vacuum the floor beneath the unit to prevent the accumulation of dust and dirt which can affect the smooth operation of the unit.
MONTHLY MAINTENANCE ITEMS
1)Inspect the console, grips, pedals, and shrouds for damage.
2)Adjust leveling feet if equipment rocks or wobbles.
3)Inspect the hardware on the frame for tightness. Tighten if necessary.
QuARTERLY MAINTENANCE ITEMS
1)Inspect the console mounting bolts for tightness, tighten if necessary.
2)Inspect the console, grips, and handlebar for damage.
3)Remove the side covers and inspect the grooves on the belts and pulleys for dust or dirt. Clean if necessary (Figures A-C).
FIGURE A |
FIGURE B |
FIGURE C
6
Chapter 4: Console Overlay and workout description
4.1 Console OVERVIEW - SIMPLE CONSOLE
SIMPLE CONSOLE HARDWARE
DESCRIPTIONS
A. POWER SWITCH - Turn off power to your console if it will not be used for an extended period of time.
B. MILES / KILOMETER SWITCH - Changes your exercise feedback to the English or Metric system.
C. ENTER KEY - Use this key in setup mode to select your program, exercise time, and resistance level.
D. START / PAUSE / HOLD TO RESET KEY - Press the START key to begin exercising in manual mode at the set default time. When exercising, press the START key to pause your workout. To reset press and hold the START key for three seconds.
E. UP OR DOWN ARROWS - Use these keys to change program number, exercise time, and resistance level in setup. During the workout use these keys to increase or decrease resistance.
7

Chapter 4: Console Overlay and workout description
4.2 SIMPLE CONSOLE DISPLAY DESCRIPTIONS
CONSOLE DISPLAY DESCRIPTIONS
A. PROFILE DISPLAY - This window provides an 8 x 12 block profile of your program profile. Each horizontal row of blocks represents your segment time, which is total workout time divided by twelve. Each vertical column of blocks represents the resistance level, which is one block for every two levels.
B FEEDBACK DISPLAY - During your workout these windows display exercise feedback about your workout including: -- Program - A number that represents one of seven program profiles that the console may be set to.
-- Level - The current resistance level of your workout. -- RPM - Revolutions Per Minute.
-- Time - The time elapsed or time remaining in your workout.
-- Distance - The total distance traveled in miles or kilometers since the start of the workout.
-- Heart Rate - Displays your heart rate in beats per minute when using the hand pulse grips.
-- Calories - An estimate of calories burned since the start of the workout.
-- Watts - A measurement of workload. It is determined by resistance level and stride rate.
8
Chapter 4: Console Overlay and workout description
4.3 Console OVERVIEW - DELUXE CONSOLE
CONSOLE OVERVIEW - The computerized display allows the user to select a workout that meets their desired fitness goals. It also allows the user to monitor the progress and feedback of each workout, so they can track improvements in overall fitness over time.
9

Chapter 4: Console overlay and workout description
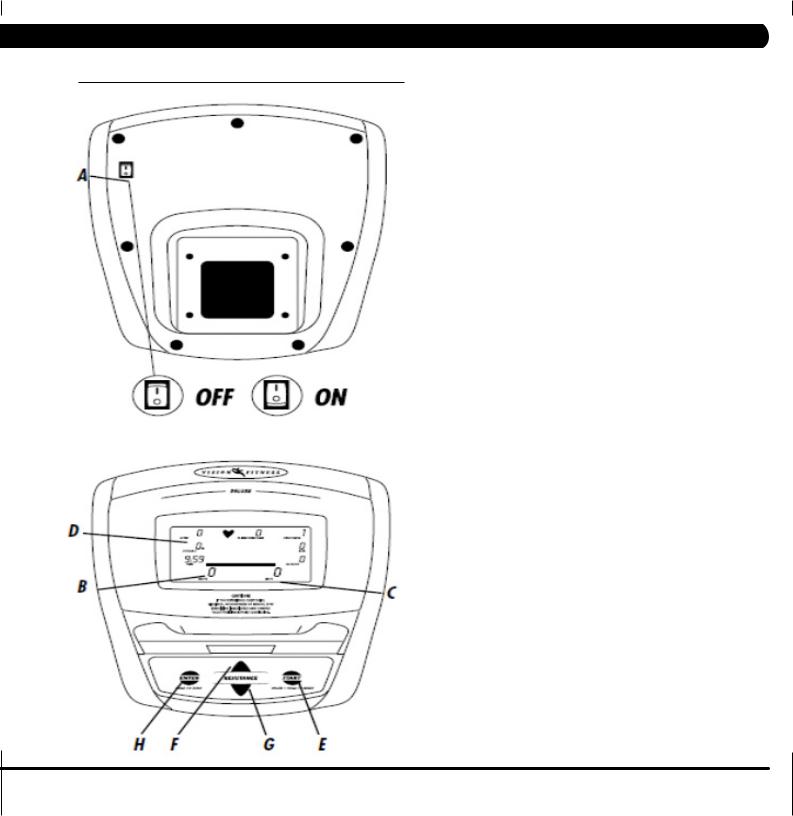
4.4 DELUXE CONSOLE DISPLAY DESCRIPTION
DELUXE CONSOLE HARDWARE DESCRIPTIONS
A.POWER SWITCH - Turn off power to your console if it will not be used for an extended period of time.
B.PROFILE DISPLAY - This window provides a 10 x 16 block profile of the workout segments you are about to complete or have
completed and the level resistance for each segment. Each column represents 1/16 of your total workout time. Each row represents two resistance levels.
C. MESSAGE BAR - The LCD display has an alpha-numeric scrolling text bar which provides step-by-step instructions in the setup mode, and instructions, feedback, or motivational messages during your workout and at the end of your workout.
D. FEEDBACK DISPLAY - During your workout, these display exercise feedback about your workout including:
--Time - The time elapsed or time remaining in your workout.
--Speed - The speed you are exercising at in miles or kilometers per hour.
--Distance - The total distance traveled in miles or kilometers since the start of the workout.
--RPM - This window provides feedback on the stride rate, pedal rate, in Revolutions Per Minute; one revolution is two full strides.
--Watts - A measurement of workload. It is determined by resistance level and stride rate.
--Calories - An estimate of calories burned since the start of the workout.
--Resistance - The current resistance level of your workout.
--Heart Rate - Displays your heart rate in beats per minute when using the hand pulse grips.
--% of Max Heart Rate - Displays the percent of your predicted maximum heart rate.
--METS - A measurement of oxygen consumption; one MET equals the approximate amount of oxygen consumed per minute by a person at
rest.
E. START / PAUSE / HOLD TO RESET KEY - Press the START key to begin exercising at the set default time. Press START when instructed to by the scrolling LCD message center to begin a program. When exercising, press the START key to pause your workout. To reset press and hold the START key for three seconds.
F. UP KEY - Use this key in setup mode to select programs and change display values. During your workout, use this key to decrease resistance.
G. DOWN KEY - Use this key in setup mode to select programs and change display values. During your workout, use this key to decrease resistance.
H. ENTER KEY - Use this key in setup mode to select your personal settings prior to your workout. During your workout, use this key to toggle between Heart Rate and % Maximum Heart Rate feedback.
10

Chapter 4: Console Overlay and workout description
4.5 CONSOLE OVERVIEW - PREMIER CONSOLE
PREMIER CONSOLE OVERVIEW
A. Stop Key
B.Start Key
C.Resistance Arrows
D.Screen Keys
E.Audio Out Jack (Headphones)
11

Chapter 4: Console overlay and workout description
4.6 Premier CONSOLE Display Descriptions
WELCOME SCREEN:
The welcome screen will take you through the log in process as a first time user or return user. The QUICK START function is also accessible from this screen.
LOG IN AS A GUEST:
To log in as a GUEST, select GUEST and enter your age and weight.
SET USER AGE OR WEIGHT:
To set user age use the arrow keys and select CONTINUE when finished.
LOG IN OPERATION:
Once you have selected LOG IN on the Welcome Screen, press any key next to a User Profile Icon that is not filled in. From there enter a user name, set age and weight and you are set to go. To edit a User Profile, select EDIT USER.
12

Chapter 4: Console overlay and workout description
4.6 Premier CONSOLE DISPLAY descriptionS - CONTINUED
ATM STYLE KEYS:
The Premier console is setup like an ATM machine with function keys next to icons on the screen for modifying screen data. To select a function or modify screen data simply press the key next to the icon you wish to choose.
RUN SCENES:
There are 4 scenes available as backgrounds during any of the console programs. To scroll through the available screens, select the "Camera" icons to scroll forward or back.
BEACH |
FOREST |
CITY |
MOUNTAIN |
13

Chapter 4: Console overlay and workout description
4.6 Premier CONSOLE DISPLAY Descriptions - CONTINUED
YELLOW ARROWS:
The yellow arrows next to the screen keys indicate that the key may be used to change a screen item or enter a function.
TRACK:
Follow the colored dot around the quarter mile track and watch the laps count up during your workout.
HEART RATE SCREEN:
Only available for HRT programs. The colored graph shows target and current heart rate as well as the percent of your maximum heart rate.
PROFILE:
View your workout as a bar graph where the purple bars indicate speed and the yellow flags elevation. At the bottom of the profile screen is the segment progress bar indicating time left for the current segment.
14

Chapter 4: Console overlay and workout description
4.6 Premier CONSOLE DISPLAY DescriptionS - CONTINUED
TRAINING CALENDAR:
To view your Training Calendar, log in as yourself and press the key next to the Training Calendar. From there you can select daily, weekly, or monthly stats. Any day, week, or month with an activity will be a lighter shade of green on the calendar.
DAILY STATS:
To view daily stats select DAILY STATS, then choose the day you would like to view by selecting NEXT DAY or PREVIOUS DAY and then selecting CONTINUE. Your stats for that day will be displayed on the screen. To get back to the calendar select BACK.
WEEKLY STATS:
To view your stats for a given week, select WEEKLY STATS, then choose a week you would like to view by selecting NEXT WEEK or PREVIOUS WEEK and then selecting CONTINUE. Your stats for that week will be displayed on the screen. To get back to the calendar select BACK.
MONTHLY STATS:
To view your stats for a given month, select MONTHLY STATS, then choose a month you would like to view by selecting NEXT MONTH or PREVIOUS MONTH and then selecting CONTINUE. Your stats for that month will be displayed on the screen. To get back to the calendar select BACK.
15

Chapter 4: Console overlay and workout description
4.7 Premier CONSOLE AUDIO / VIDEO CAPABILITIES
The Premier console has a port on its backside that contains RCA connectors for use with A/V equipment (DVD, CD, VCR, etc.). Plug in your A/V device and select the DVD function (3rd key down on the right side) while a program is in use. Headphones can be plugged directly into the console face for sound.
KEY FUNCTIONS IN DVD MODE
A. Volume Up |
B. Volume Down |
C. Display Adjustment |
D. Return to Run Screen |
E. Display Adjustment Up |
F. Display Adjustment Down |
Use the included clip to attach the DVD cord to the console mast to keep the cord from interfering with your workout. "A/V CORD NOT INCLUDED".
16
Chapter 4: Console overlay and workout description
4.8 Premier CONSOLE USB CAPABILITIES
The Premier console has three USB features:
*Save workout to USB for www.livestrong.com workout tracking.
*Import pictures for viewing on the console.
*Software updates.
The Advanced Feature allows users to view their workout history on www.livestrong.com by using the Save Workout to USB Function. NOTE: An internet connection and compatible web browser is necessary to view workouts online.
The USB Menu will appear on the Home Screen after you plug a USB drive into the console.
SAVE WORKOUT TO USB FOR WWW.LIVESTRONG.COM WORKOUT TRACKING
This feature allows users to save their last 10 workouts to a USB drive. Once the information is saved to a USB drive, you can upload the workout information to www.livestrong.com. In order to save and view your workout information on www.livestrong.com, follow these instructions:
*You must first create an account on www.livestrong.com.
*Insert a USB drive into the console. "USB MENU" will appear. Select "Save Workout to USB". Select user for which you want to save workout information. Press "Save to USB". Once the workout information has copied to the USB drive, you can safely remove the USB from the console.
*Plug the USB drive with saved workout information into a PC / MAC. Go to www.livestrong.com/equipment. Select "Browse". Direct the file browser to your USB location containing the .xml files from your workout. Select "Save".
Now you will be able to keep track and view all of your workouts completed on your equipment through www.livestrong.com.
17
 Loading...