


The user manual is available on
https://support.viofo.com
Copyright (c) 2019,Viofo Ltd, All rights reserved.
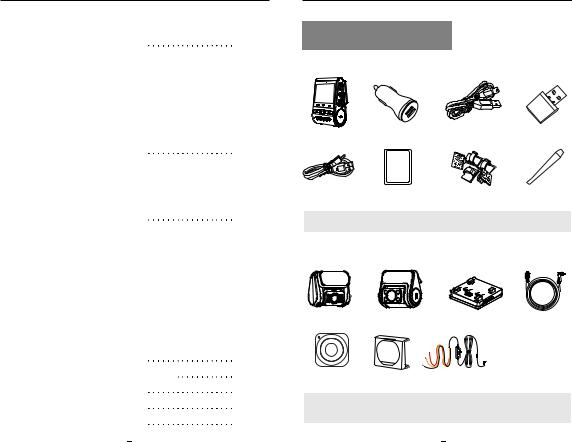
Table of Contents
Table of Contents
Product Overview |
2 |
Standard Items
Optional Accessory
Product Diagram
Inserting / Removing the Memory Card
LED Indicators
Buttons and Icons
Installation |
9 |
Front Camera Installation |
|
Rear Camera Installation |
|
Cable Connection |
|
Operation |
14 |
Power On / O
Loop Recording
Emergency Recording
Playback Videos
Motion Detection
PC Mode
View on a TV
PIP Mode
Firmware Upgrade
System Settings |
19 |
Review and Control on Smartphone |
23 |
Bluetooth Remote Control |
24 |
Notice |
25 |
Customer Service |
26 |
Product Overview
Product Overview
 Standard Items
|
|
|
V |
|
|
|
I |
|
|
|
OFO |
Front Camera |
Car Charger Adapter |
4M Car Charger USB Cable |
Card Reader Adapter |
|
|
TM |
|
|
|
TM |
|
USB Data Cable |
Spare Mount Sticky Pads |
Clips |
Trim Removal Tool |
*Note: The USB data cable is only for connecting the camera with computer to transfer video files or upgrade firmware, not for charging the camera.
 Optional Accessory
Rear Camera |
Infrared Interior Camera |
GPS module |
Rear Camera Cable |
Bluetooth Control |
CPL |
HK3 Hardwire Kits |
 Note: Users could choose rear camera or interior camera to connect with front camera. Rear camera to record at back of the road. Interior infrared camera to record inside of the car. Rear camera user maunal is also avialable for interior camera.
1 |
|
|
|
2 |
|
|

Product Overview
 Product Diagram
1) Front Camera
Menu / Power On | O 
Recording On | O / Menu Up 
Video Protect / Playback 
/ Menu Con rm
VIOFO
REC |
Wi-Fi |
MIC |
|
|
Rear |
Rear Camera USB Port |
|
|
|
AV |
|
AV Out |
|
|
|
USB |
|
Power In / |
|
|
microSD Card Reader Mode |
|
|
(computer) |
|
|
Microphone On | O |
|
|
/ Menu Down |
|
|
Live Video Source |
|
|
/ Wi-Fi On | O |
Product Overview
USB Power Port 


Mount 
Lens 
2) Rear Camera (Optional)


 Power In + Video Out
Reset Button 
Memory Card Slot 
Microphone 
 R
R
 MicroSD
 MIC
MIC
 Lens
Lens
VIOFO
|
|
Recording Status Indicator |
3) Bluetooth Remote Control (Optional) |
|
|
Wi-Fi Status Indicator |
|
REC |
Wi-Fi |
Microphone Status Indicator |
Transmit Indicator |
MIC |
|||
|
|
|
 Video Lock Button
3 |
|
|
|
4 |
|
|

Product Overview
 Inserting / Removing the Memory Card
Inserting the memory card
Push the memory card into the card slot until you hear a click, with the card label facing the forward (away from the screen).
VIOFO
|
R |
SD |
MicroSD |
|
|
|
MIC |
Removing the memory card
Ensure that the camera is turned o / not recording, and then push the edge of the memory card with your fingernail.
The card will spring out far enough to be removed.
Product Overview
Note:
The Micro SD card is sold separately. The microSD card must have a Class-10 or UHS-I rating and the capacity up to 256GB. 64GB,128GB and 256GB micro SD cards must be formatted with the FAT32 file system, either on a computer or in the camera.
We recommend you buy the VIOFO brand memory card which are manufactured with top-tier MLC NAND ash, making them durable and reliable.
Formatting the card
Format the card (‘Format’ option in Dash Camera ‘System settings’) to prepare for first use in the dash camera.
Formatting will permanently erase any data on the micro SD card. For best performance, format periodically (after backing up any important files).
 LED Indicators
LED |
LED Status |
Behavior |
|
|
|
|
|
REC |
Solid Red |
Recording |
|
|
|
||
Flashing Red |
Not recording; Updating Firmware |
||
|
|||
|
|
|
|
Wi-Fi |
Solid Red |
Wi-Fi Enabled |
|
|
|
||
O |
Wi-Fi Disabled |
||
|
|||
|
|
|
|
MIC |
Solid Red |
Microphone enabled |
|
|
|
||
O |
Microphone disabled |
||
|
|||
|
|
|
5 |
|
|
|
6 |
|
|
|
|
|
|
|
Product Overview |
|
|
|
|
|
|
|
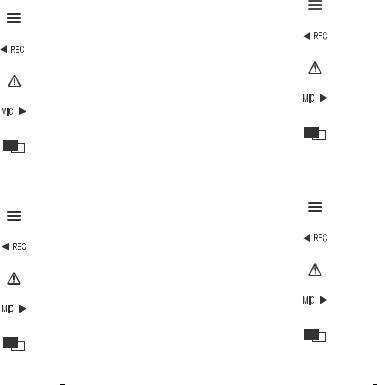
Buttons and Icons |
|
|||
|
|
||||
|
|
||||
|
|
|
|
|
|
|
Mode |
Buttons |
Behavior |
||
|
|
|
|
|
|
|
|
|
|
|
Click once to enter the menu |
|
|
|
|
|
|
|
Standby |
|
|
|
Click once to start recording |
|
|
|
|
||
|
|
|
|
|
|
|
|
|
|
To enter playlist |
|
|
Mode |
|
|
|
|
|
|
|
|
|
|
|
(Not Recording) |
|
|
|
|
|
|
|
|
Click once to enable / disable audio |
|
|
|
|
|
|
|
|
|
|
|
|
|
|
|
|
|
|
recording |
|
|
|
|
|
|
|
|
|
|
|
Long press to enable the Wi-Fi |
|
|
|
|
|
|
|
|
|
|
|
|
|
Mode |
Buttons |
Behavior |
||
|
|
|
|
|
|
|
|
|
|
|
Click once to take a video snapshot |
|
|
|
|
|
*Note: To enter the menu settings, please stop recording first. |
|
|
|
|
|
|
|
|
|
|
|
Click once to stop recording |
|
|
|
|
|
|
|
|
|
|
|
|
|
Recording |
|
|
|
Click once to lock the file being |
|
|
|
|
recorded |
|
|
Mode |
|
|
|
|
|
|
|
|
|
|
|
|
|
|
|
Click once to enable / disable |
|
|
|
|
|
|
|
|
|
|
|
audio recording |
|
|
|
|
|
|
|
|
|
|
|
|
|
|
|
|
|
Click once to toggle screen view |
|
|
|
|
|
|
|
|
|
|
Product Overview |
|
|
|
|
|
|
|
|
|
|
Mode |
Buttons |
Behavior |
||
|
|
|
|
|
|
|
|
|
Back to previous menu / Stop playback |
|
|
|
|
|
|
|
|
|
Menu up / Change playback speed / |
|
|
|
|
|
Playlist |
|
|
|
Delete the video |
|
|
|
|
|
|
|
|
Select the current / Play / Pause |
|
Mode |
|
|
|
|
|
|
|
|
Menu down / Change playback speed |
|
|
|
|
|
|
|
|
|
/ Lock current / Unlock current |
|
|
|
|
|
|
|
|
|
N / A |
|
|
|
|
|
|
|
|
|
|
Mode |
Buttons |
Behavior |
||
|
|
|
|
|
|
|
|
|
Return to previous menu / Exit |
|
|
|
|
setting menu |
|
|
|
|
|
Setting |
|
|
|
Menu up |
|
|
|
||
|
|
|
|
|
|
|
|
|
|
Menu |
|
|
|
Enter / Confirm |
Mode |
|
|
|
|
|
|
|
|
Menu down |
|
|
|
|
|
|
|
|
|
|
|
|
|
|
|
|
|
|
|
N / A |
|
|
|
|
|
7 |
|
|
|
8 |
|
|
 Loading...