

User Manual
Copyright (c) 2019,VIOFO Inc., All rights reserved.
Table of Contents
Notice
Installation
Accessories
Installation Method
Tips
Introduction
Interface
LED
Buttons and Icons
Operation
Switch ON
Switch OFF
Loop Recording
Emergency
Recording
Motion Detection
Play
PC Mode
Mute
Firmware Upgrade
3
4
7
11
Setting
Resolution
Bitrate
Loop Recording
Video Format
Exposure
WDR (Wide Dynamic Range)
Parking Mode
Parking G-sensor
Parking Motion Detection
Time-lapse Recording
Motion Detection
GPS
Speed Unit
G-sensor
Date Stamp
GPS Info Stamp
Camera Model Stamp
Record Audio
Screen Saver
Boot Delay
LED
Date / Time
Time Zone
Language
Beep Sound
Frequency
Image Rotation
Format
Format Warning
Default Setting
Car Number
Custom Text Stamp
Firmware Version
......................15
InstallationNotice
• Do not install or operate the camera with wet hands.
• Do not install the camera in a humid location or anywhere near
liquids and inflammable gases. The camera should be
installed/mounted in a location that does not compromise the
driver’s visibility and safety.
• Do not leave the camera installed/mounted inside an airtight
vehicle being exposed to extreme heat.
• Do not use the power that exceeds the rated voltage.
• Only use the original charging cable. The manufacturer is not
liable for damage resulting from the use of other charging cables.
• Do not disassemble the camera or its charging cable. Do not cut
the charging cable. Damage caused will not be covered under
warranty.
• Do not press the lens forcefully.
• Do not use any sharp objects on the camera or its accessories.
• Do not remove the Micro SD card when the camera is recording
or shutting down (avoids file damage).
• It is recommended to use a class 10 Micro SD card with a capacity
of 8GB or more (maximum supported capacity is 128G).
• To ensure stable read and write operations, it is necessary to
format the Micro SD card in-camera before initial use.
• Do not interrupt the power supply during a system upgrade, or
else the camera may not boot
• Product features/functions and content of this manual may
change without further notice.
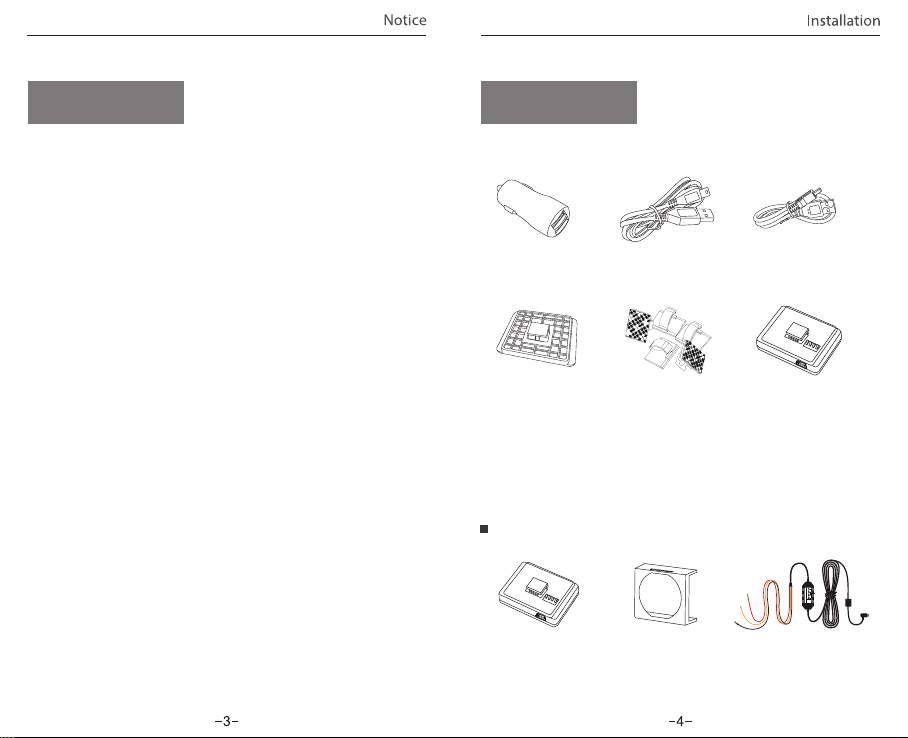
Accessories
Car Adapter
4m Car Charger
USB Cable
TM
TM
Non-GPS Mount
Clips
Note:
The long mini USB cable is for charging, the short USB cable is for
transferring files while connecting the camera with computer.
USB Data Cable
GPS Mount (optional)
Optional Accessory
Input: 12 / 24V; Output: 5V2A Max
VIOFO Hardwire Kit for Car Dash Camera
INPUT:
RED
— POWER
BLACK
— GND
YELLOW
— ACC
Circular Polarizer Filter Hardwire KitGPS module

Installation Method
1) Install the Mount
① Slide the mount into the slot on the back of the camera.
② Peel the glue protector off the sticker.
③ Choose a suitable location to install / mount the camera;
ensuring that it provides the best possible view.
2) Connect to Car Charger
Plug the USB charging adapter into your vehicle’s 12V/24V
female power socket. Insert the Mini USB cable’s male port
into the camera’s female Mini USB port.
Note:
① For GPS version mount, use the female Mini USB port on the
mount or on the camera’s side.
② For non-GPS version mounts, use the female Mini USB port
on the camera’s side.
3) Adjust the View Angle
Adjust the angle by moving the lens up / down.
Tips:
• Do not turn on ‘Motion Detection’ unless your vehicle is parked.
If ‘Motion Detection’ is enabled while driving, the camera may
not record continuously.
• It is recommended to keep the G-sensor set to ‘Low’ (default
setting).

• Do not install / mount the camera in a location that interferes with
the driver’s visibility and safety.
• Install / mount the camera close to the rearview mirror so that both
sides of the scene being recorded are equally covered by the
camera’s FOV (field of view).
• To ensure a clear view on rainy days the lens should be positioned
within the windshield wiper’s sweeping range.
• Do not install / mount the camera on or near airbag panels.
• Installation / mounting location should not be affected by sun
control film (window tint). There should not be any other electronic
equipment close to the camera for optimal performance.
Note: Do not install / mount the camera on or near an airbag panel
or within the airbag’s working range. The manufacturer is not liable
for any injury or death caused by the deployment of the airbag.
Introduction
(6)
(7)
(8)
(9)
(10)
(1)
(2)
(3)
(4)
(5)
(1)
Power
Mic/Right
(5)
(9) (10)
Card Slot
(2)
(6)
Rec / Left
USB Port
USB Port
(3) (4)
Menu
(7)
AV Out
(8)
Emergency / Confirm
Reset

LED Color
Solid Red
Flashing Red
Mode
Stand-by
Mode
Behavior
Power ON, Recording
1. Power ON, not recording
2. Upgrading
Buttons Behavior
To turn on / off device
Click once to enter the settings menu
Enter Playlist
Click once to start recording
Click once to disable audio recording
Click again to enable audio recording
Click once to turn the screen OFF,
Click again to turn the screen ON
Click once to capture a photo
Click once to lock the file being recorded
Click once to stop recording
Click once to disable audio recording,
Click again to enable audio recording
Playlist
Mode
Setting
Menu
Mode
2019/05/01 08:32:10
To turn on / off device
Back to previous menu
1. To select the last video
2. To delete the video
1. To select the next video
2. To lock / unlock the video
1. To enter the video selected
2. To play / pause the video
Click once to turn the screen OFF,
Click again to turn the screen ON
One click can back to recording mode
To select the last feature
To select the next feature
To enter the feature selected
Recording Mode
00:00:00
1440P30
1440P30
Recording Time
Video Resolution
Recording Status
Emergency Lock
Microphone
SD Card

Operation
1) Switch ON
Insert the Micro SD card into the camera’s card slot. Plug the USB
car adapter into the vehicle’s 12V/24V female power socket,
connect the Mini USB cable’s USB port end to the USB car adapter
and the Mini USB end to the camera’s female Mini USB port. Start
the engine, the device will switch ON automatically.
2) Switch OFF/ON
① Automatic: When the camera is ON, simply turn OFF the
engine or unplug the charging cable and the camera will switch
OFF automatically.
② Manual: Switching the camera OFF manually is required for
vehicles where the 12V/24V female power socket provides
continuous power after the engine is turned OFF.
③ When the camera is ON, press and hold the power button for
at least 5 seconds to turn the camera OFF.
④ Press the power button for at least 3 seconds to turn the
camera ON.
4) Emergency Recording
① Automatic emergency recording
When the G-sensor is activated due to a collision, current footage
will be automatically locked to avoid being overwritten by
loop-recording.
( Note: Collision sensing feature can be adjusted in settings
under the ”G-sensor” option )
② Manual emergency recording
Pressing the emergency record button during a recording will
lock the current file being recording. Once locked, the file will not
be overwritten by the loop-recording feature.
5) Motion Detection
If turned ON, the camera will start recording on detecting any
movement within its FOV (field of view). Once the camera does
not detect any movement for 60 seconds, it will stop recording
and go back to ‘Motion-Detection’ mode. A recording will resume
if any new movement is detected.
3) Loop Recording
① Insert a Micro SD card into the camera’s card slot and
automatic loop recording will begin once the camera detects
power.
② Time frame for each video file is 1/2/3/5/10 minutes.
③ When there is insufficient space on the Micro SD card, loop
recording will automatically overwrite the oldest files (one by
one).
④ Loop recording files are saved to SD card:\DCIM\Movie folder.
6) Play
① Under video mode, press [ ] button to access the playlist.
② Use the arrow buttons [ ] to select the desired video
and press the [ ]button to play.
③ Press the menu button to exit.

7) PC Mode
① Connect the camera to a computer using a Mini USB cable.
② Device will automatically turn on and “Mass Storage” will be
displayed.
③ The computer will detect “removable disk”.
④ There will be three folders under the DCIM folder:
\ Movie ( Loop recording video files )
\ RO ( Event recording files )
\ Photo ( Video snapshot )
⑤ Copy files are needed to computer drive.
8) Mute
During a private conversation, pressing the ‘ MIC ’ button will
mute the audio.
Firmware Upgrade
9)
① Download the latest firmware, unzip the file. Copy & paste or
drag & drop the .bin file to the root of the Micro SD card.
② Insert the Micro SD card into the camera’s card slot once the
transfer is completed.
③ Plug into a power source and then turn the camera ON.
④ LED indicator will start flashing to confirm the update’s
progress.
⑤ The camera will automatically reboot after the upgrade is
completed.
⑥ Currently installed firmware version can be verified by accessing
the ‘Version’ tab within the settings menu (last tab).
Note:
• Before using a Micro SD card to upgrade the firmware, formatting
the card in-camera is necessary to ensure stable read and write
operation.
• Do not unplug or power-off the camera during a firmware
upgrade, it may cause the camera to fail from booting.
-14-

Setting
Press the Menu button during video mode to access the settings.
(recording need to be stopped)
• Resolution: Setting a video resolution of footage recorded
2560 x 1600P 30fps; 2560 x 1440P 30fps; 2304 x 1296P 30fps;
1920X1080P 60fps, 1920X1080P 30fps, 1280X720P 120fps,
1280X720P 60fps, 1280X720P 30fps, are available for selection.
• Bitrate: You can set the bitrate for video. High bitrate may
improve the quality and smoothness of the video, especially when
recording fast motion or high contrast scenes. Using high bitrate
mode may decrease the amount of recording time available on your
memory card. Using a low bitrate will save space and record for a
longer time.
• Loop Recording: O / 1 / 2 / 3 / 5 / 10 minutes.
• Video Format: The options are . MP4 and . TS video format. TS
format is better to avoid file corruption.
• Exposure: Adjust the value of the EV (Exposure Value) to obtain
better recording results under dierent light sources. The range is
from-up to +2.0. The default is set at 0.0.
• WDR (Wide Dynamic Range):
brightest portion of the image to the darkest portion of the image.
WDR enables the camera to deliver video with near perfect exposure
in varying lighting situations.
• Parking Mode: There are 3 options under parking mode:
① Auto event detection:
The camera will automatically record for 1 minute while a moving
object is detected during parking. And it will stop recording if there
are no new movements.
Dynamic range is the ratio of the
② Time lapse recording:
Time-lapse record a video at low frames at 1 / 2 / 3 / 5 / 10 / 15 fps,
It keeps recording continuously without audio recorded.
③ Low bitrate recording:
This mode record video in low bitrate 4MB/s for both front and
rear. It keeps recording continuously in mini le size with audio
recorded.
Note: We recommend to buy VIOFO HK3 ACC hardwire kit cable for
parking mode recording.
• Parking G-sensor: The G-sensor detects
movement (such as an impact or collision), it will trigger an event
recording. We suggest setting it to High sensitivity in parking mode
recording.
significant
or sudden
• Parking Motion Detection: Adjusts the sensitivity of the motion
detection so minor motion caused by wind or rain doesn't trigger a
recording while in parking mode.
• Time-lapse Recording: Record video from frames captured at
specic time intervals to conserve memory and reduce the time it
takes to review video. The default is o.
• Motion Detection: When this feature is activated, a recording will
begin if there is movement in front of the camera. Once the camera
does not detect movement for 60 seconds, the recording will be
stopped and the device will switch to detect mode. The device will
record again if it will detect a new movement in front of the camera.
• GPS: Turns on / o GPS tracking. If disabled, your camera will no
longer measure your speed and position nor synchronize the
time/date with the atomic clock.
(only available when connecting with GPS signal)
Please use"Dashcam Viewer" to playback videos and to visualize your
position and speed on your computer.
• Speed Unit: Sets the speed unit, kilometer per hour (KPH) or miles
per hour (MPH).
-15-
-16-

Customer Service
• G-sensor: The G-sensor measures g-shock forces. The setting from
'Low’ to' High’ determines the amount of force needed to lock the file
from being overwritten by loop-recording. We recommend leaving it
set to 'Low’.
• Date Stamp: Imprints the time and date on the recorded video.
• GPS Info Stamp: Imprints the GPS information on the recorded
video.
• Camera Model Stamp: Imprints the camera model on the
recorded video.
• Record Audio: Turns the microphone ON / OFF. This can be also
activated by pressing the [ ]button while the camera is
recording.
• Screen Saver: Turns the screen OFF after a set time.
• Boot Delay: The camera will boot seconds later when powered on.
The settings are O / 5s / 10s.
• LED: Turns the LED light ON / OFF.
• Date / Time: System date / time setting.
• Time Zone: Sets the current time zone for GPS time and date
calibration.
Note: the time zone must be manually adjusted for daylight savings.
• Language: Display language setting (English, Traditional Chinese,
French, etc).
• Beep Sound: Turns all notication sounds ON / OFF.
• Frequency: Frequency adjustment setting to minimize flickering
and banding in recorded video.
• Image Rotation: Turns the screen upside down.
• Format: The operation will delete all data on the Micro SD card.
Note: Once you format the Micro SD card, all information will be
deleted and cannot be restored. Make sure you back up all important
files before proceeding.
• Format Warning: Sets the number of days between format
warnings.
• Default Setting: Restore camera to factory defaults.
• Car Number: Imprints a customized set of 11 digits to the recorded
video. Useful to add license plates or identifying features.
• Custom Text Stamp: Imprints the customize text on the recorded
video.
Firmware Version: Current firmware version check.
Customer Service
12-month Limited warranty , Lifetime technical support
support@viofo.com
www.facebook.com/viofo.world
+86 755 8526 8909 (CN)
Mon-Fri 9am-6pm
-17-
-18-
 Loading...