

VintageView WSBIG1 User Manual
WS-BIG1 Wall Mount
Wine Rack Instructions
Wine Master Cellars •10645 E 47th Ave, Denver, CO 80239 • phone: 866.650.1500 • fax: 866.650.1501
Please feel free to contact us regarding the assembly of this product.
WS-BIG1 contains:
• 1 Neck Strip
Before starting, open all Packaging for the WS-BIG1 and take inventory to make sure you have everything.
• 1 Spirit Level
• 1 Marking Pen or Pencil
There are four pre-drilled mounting holes in each strip, eight total, per rack. Appropriate fasteners must be utilized in
every mounting hole for proper installation. Fasteners are not included with your WS-BIG1. However, we recommend the
• Wood Surface: #8 x 1-1/4” wood screw
• Drywall/Wallboard Surface: #8 x 1-1/4” screw with spiral inserts for the bottom two holes in each strip (4 total) and
an expanding hollow wall anchor such as a toggle bolt for the top hole in each strip (2 total)
• Concrete, Brick or Stucco: 3/16” x 1 ¾” masonry screw or #8 x 1 ¼” screw with appropriate size expanding anchor
• 1 Base Strip
following fasteners for these surfaces:
• 2 Plastic Couplers
Tools Needed:
• 1 Tape Measure
• 1 Screwdriver
Fasteners:
• 8 Rubber Mounting Hole Caps
• Drill and Drill Bits (Necessary in Some Cases)
NOTE: If you are attaching the WS-BIG1 to a custom Floor to Ceiling Frame (FCF) you will attach the units to the
FCF using the self-drilling screws included in the FCF packaging.
WS-BIG1 Installation Instructions
B
.
M
I
1 - Determine which direction the bottle necks
should point.
1.1. If the bottle necks are to point to the right, the base
strip must be installed to the left of the neck strip.
1.2. If the bottle necks are to point to the left, the base
strip must be installed to the right of the neck strip.
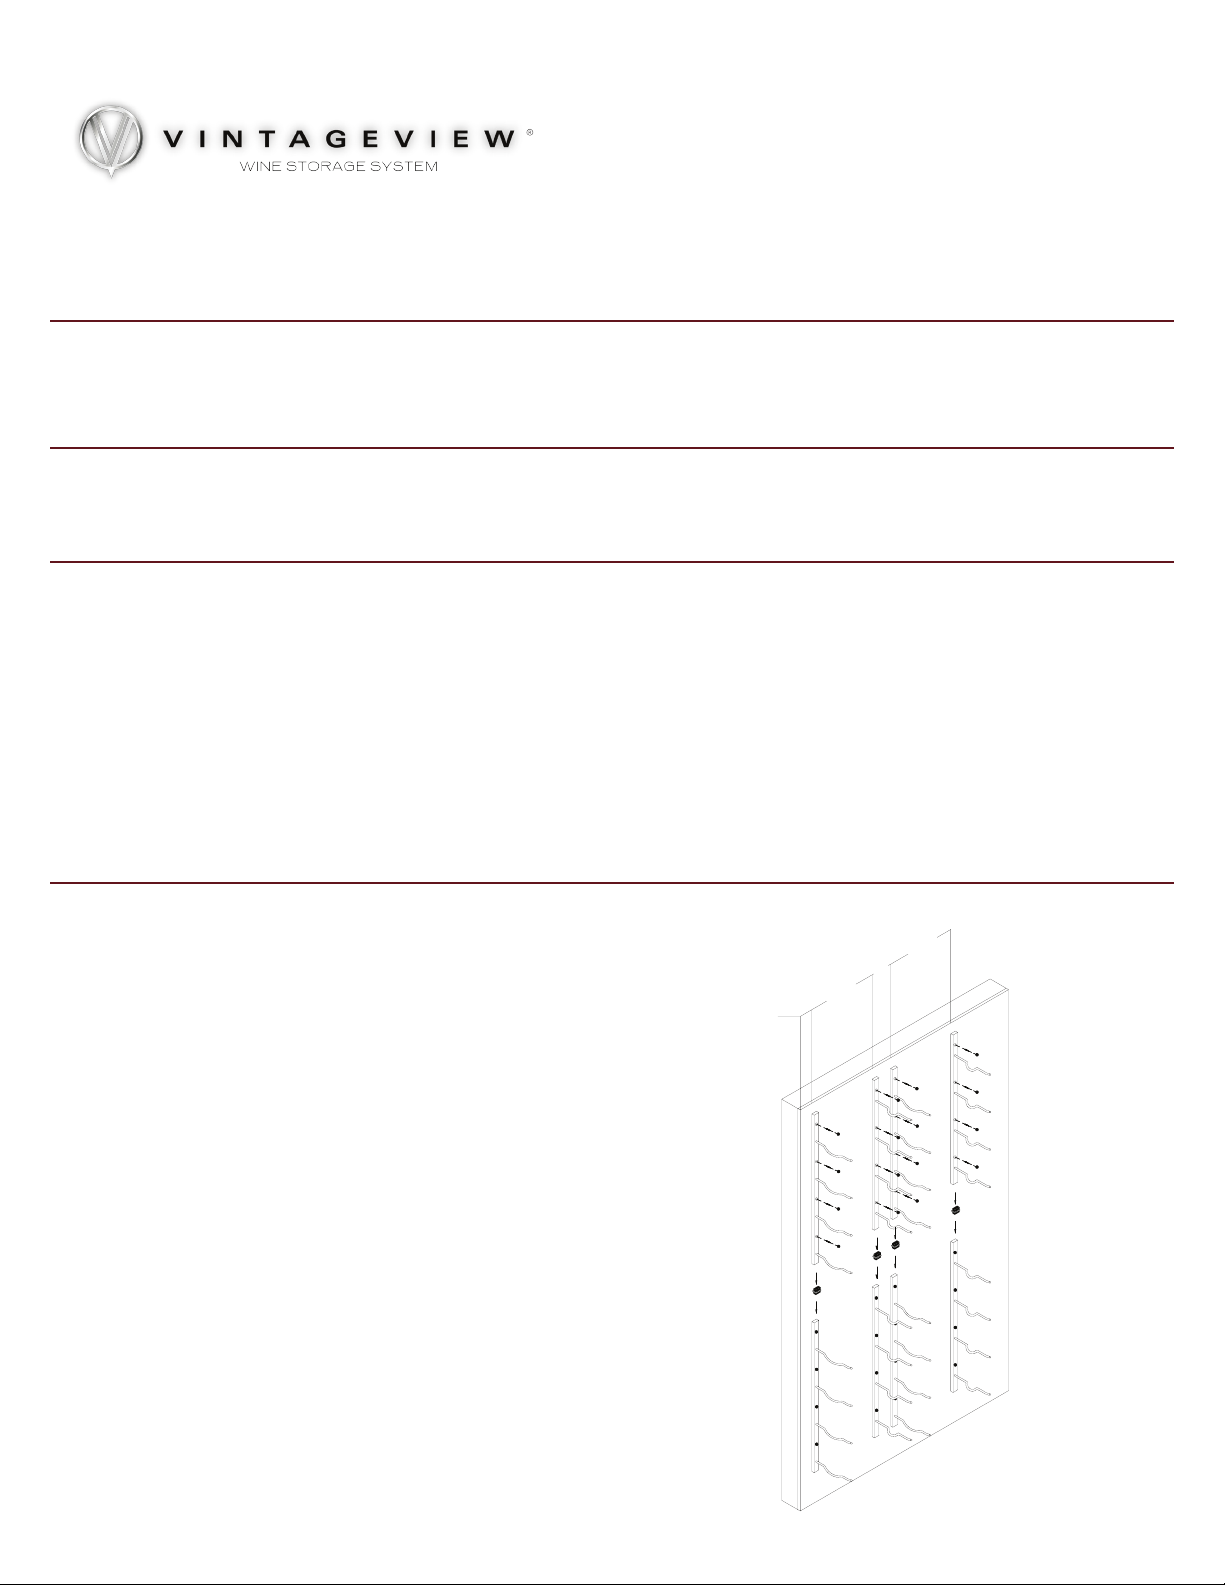
2 - Lay out the wall.
2.1. The centerline of the rst strip (either base or neck
depending on bottle neck direction) should be at least 3
½” from adjacent walls or obstructions. This allows for the
bottle to overhang the rack (Fig. 1, Dim. A).
2.2. From centerline of the rst strip, measure 10-14” to
the centerline of the next strip. This dimension should be
tailored to the specic bottle size (3L to 6L) that will be
stored in the rack (Fig. 1, Dim. B).
2.3. (For multiple columns) Locate the centerline of the
next strip (Fig. 1, Dim. C) twice the measurement used for
Dim. A, approximately 7”, away from the prior strip. [Dim.
A X 2 = Dim. C]
2.4. (For multiple columns) Continue marking the center-
lines, alternating between Dim. B and Dim. C.
DIM. A
.
M
I
D
D
C
.
B
M
I
D

3 - Determine appropriate fasteners for the wall
surface and fasten the strips to the wall.
3.1. Reference the Fasteners section for recom-
mended fastener types.
3.2. Using a level, ensure that each strip is
plumb prior to securing it to the wall.
3.3. Note that the strips may be slightly offset
vertically to achieve the proper bottle tilt.
(Bottles resting on the rack should have a slight
neck-down tilt).
4 - Insert the Mounting Hole Caps.
4.1.Remove the round rubber mounting hole
caps from the bag and snap them into place in
the back strip.
5 - Stacking racks (Optional).
5.1. When stacking racks, carefully remove the
black plastic end caps from the top of the lower
strips and from the bottom of the upper strips.
5.2. With the lower strips fastened to the wall,
per the above directions, insert the provided
black plastic couplers in the bottom of the up-
per strips and slide the strip into place such
that the bottom of the coupler slides into the
lower strip
5.3. Fasten the upper strip in place to the wall.
Warranty
Wine Master Cellars (“WMC”) warrants to the original consumer-purchaser that this product shall be free from defects
in workmanship and materials under normal and reasonable use for the lifetime of the product.
WMC will, at its option, renish or replace any product or part found to be defective during the warranty period and
excludes installation charges, shipping charges, and cost of removal and reinstallation. WMC may require you to return
the part(s) claimed to be defective, for its inspection - freight or postage prepaid.
This warranty does not include the cost of any inconvenience or property damage due to the failure of the product and
does not cover damage due to misuse, abuse, accident, or damage arising out of transportation of this product. THIS
WARRANTY IS EXCLUSIVE AND IN LIEU OF ALL OTHER OBLIGATIONS, LIABILITIES OR WARRANTIES. In no event shall
WMC be liable or responsible for INCIDENTAL OR CONSEQUENTIAL DAMAGES or for any other direct or indirect damage,
loss, cost, expense or fee. Neither the WMC distributor nor the retail establishment selling this product has any authority
to make any warranties or to promise remedies in addition to or inconsistent with those stated above. WMC’s maximum
liability, in any event, shall not exceed the purchase price of the product paid by the original consumer-purchaser. Some
states do not allow the exclusion or limitation of incidental or consequential damages. In such a case, the above limita-
tions or exclusions may not be applicable.
This warranty gives you specic legal rights, and you may also have other rights which vary from state to state.
 Loading...