

Robot
VR 302
User & care guide • Bedienungs- und P flegeanleitung
S
Thank you for chosing our new Vileda VR 302 robotic vacuum cleaner. VR 302 will become
your reliable partner for daily cleaning, helping remove the dirt, dust and hair so you don’t
have to.
Innehåll
Quick Start Guide 2
1. General Warnings 3
2. Getting to k now VR 302 6
3. Product Operation 9
3.1 Battery charging & recharging 9
3.2 Turning on and off 10
3.3 Cleaning modes & movement patterns 11
3.4 Scheduling 12
4. Maintenance 13
4.1 Cleaning dust bin and filters 13
4.2 Cleaning main brush and side brushes 15
4.3 Cleaning Sensors and Wheels 16
4.4 Cleaning driving wheels and center wheel 16
4.5 Battery Removal 16
5. Troubleshooting 17
6. Environmental and product recycling 18
7. Technical product specification 18
8. Vileda product guarantee 18
Quick Start Guide
2

1. General Warnings
IMPORTANT:
Read all instructions before use. Retain instructions for future
reference.
WARNING:
Use the Robot only as described in this manual. Failure to follow
all instructions listed below may result in electric shock, fire
and/or serious injury.
When using any electrical Robot, basic safety precautions
should always be observed, including the following, in order to
reduce the risk of fire, electrical shock, leaking batteries or
personal injury.
USE RESTRICTIONS:
• When starting the robot, always place it in the middle of a
room or surface, at least half a meter away from any cliffs.
• Only for indoor use. Do not use outdoors or on balconies.
• Intended for domestic use only.
• Robot is not a toy. Do not sit or stand on it. Small children and
pets should be supervised when the robot is cleaning.
• Do not let the Robot pick up anything that is flammable, burning
or smoking.
• Do not use this Robot to pick up anything wet.
• Do not use on long-pile carpet or on wet floors, like bathroom
or laundry.
• Use this product in temperature from 10°C to 35°C. Do not use
this product in high-temperature environment or under baking
sunlight for a long time.
• Before using, pick up objects like clothing, loose papers, pull
cords for blinds or curtains, power cords, and any fragile
objects as they may entangle with the cleaning brushes.
• WARNING: Black or dark coloured types of floors and stairs
could reduce the reliability of cliff sensors. Test with your
specific floor and stairs before use.
S
3

S
PERSONAL SAFETY:
• The intended use is described in this manual. The use of any
accessory or attachment or the performance of any operation
with this Robot other than those recommended in this
instruction manual may present a risk of personal injury.
• Children must be supervised to ensure they do not play with
the Robot.
• This Robot may only be used by children aged from 8 years
and above and persons with reduced physical, sensory or
mental capabilities or lack of experience and knowledge if
they have been given proper supervision or proper instruction
concerning use of the Robot in a safe way and understand
the hazards involved.
• Children shall not play with the Robot and should only use the
Robot as intended.
• Cleaning and user maintenance shall not be made by children
without supervision.
• Store in a dry place.
• Store out of reach of children.
• Use only with the attachments recommended by the
manufacturer.
• Do not use without the filter in place.
• Keep the product and all accessories away from fire, hot
surfaces and any flammables.
• Do not immerse the Robot in water or other liquid.
ELECTRICAL SAFETY INSTRUCTIONS:
• Never modify the charger in any way.
• The charger has been designed for a specific voltage. Always
check that the main voltage is the same as that stated on the
rating plate.
• Only use the charger supplied with the product. Do not
attempt to use the charger with any other product nor attempt
to charge this product with another charger.
• Before use, check the charger cord for signs of damage or
ageing.
• Do not abuse the charger cord; never carry the charger by
the cord.
4

• Do not over-bend the power cord or pressure the power cord
with heavy or sharp objects.
• Never pull the charger cord to disconnect from a socket;
grasp the charger and pull to disconnect.
• Keep the charger cord away from hot surfaces and sharp
edges.
• Do not handle the charger or the Robot with wet hands.
• Do not store or charge the Robot outdoors.
• Unplug the charger before cleaning.
Product contains electronic parts. DO NOT submerge it or
spray it with water. Clean with a dry cloth only.
BATTERY USE AND CARE:
• WARNING: For the purposes of recharging the battery, only
use the detachable supply unit (model no. GQ15-240060-AG
/ GQ15-240060-AB / GQ12-240060-AG / GQ12-240060-AB /
NLB060240W1U3 / NLB060240W1E3) provided with this
appliance.
• Only use the battery supplied with the product.
• Leaks from battery cells can occur under extreme conditions.
If the liquid gets on the skin, wash it immediately with soap
and water. If the liquid gets into the eyes, flush them
immediately with clean water for a minimum of 10 minutes
and seek medical attention.
• This product contains Lithium-Ion batteries. Do not incinerate
batteries or expose to high temperatures, as they may
explode.
• When the battery pack is not in use, keep away from other
metal objects such as: paper clips, coins, keys, nails, screws
or other small metal objects that can make a connection from
one terminal to another.
• Shorting the battery terminals may cause fire.
• The battery must be removed from the Robot before it is
discarded.
• The battery is to be disposed of safely and in accordance with
Environmental and Product Recycling, as per page XX of this
Manual. The battery must not be disposed of with household
waste.
S
5

S
• The Robot must be disconnected from the main supply when
removing the battery.
• WARNING: If the battery is damaged in any way, do not
attempt to recharge it. Contact Vileda customer service
address (see last page).
• Charge the battery for 5 hours before first use. After the first
use, charging time is about 4-5 hours.
• If the robot is not to be used more than 3 months, charge it
directly by power adapter for 5hrs.
• WARNING: Turn the robot’s main power switch to OFF when
transporting or when in storage, otherwise the battery may
become damaged.
• Only use the charger provided with the product. Do not
attempt to use the charger with any other product nor attempt
to charge this product with another charger as this may
damage the product and the battery, and will invalidate your
guarantee.
• WARNING: Only use a replacement battery as supplied by
Vileda.
SERVICE:
• Before using the Robot and after any impact, check for
• signs of wear or damage.
• Do not use the Robot if any part is damaged or defective.
• Repairs should only be carried out by an approved service
agent or a suitably qualified person.
• Never modify the Robot in any way as this may increase the
risk of personal injury.
• Only use replacement parts or accessories provided or
recommended by Vileda.
6
2. Getting to know VR 302
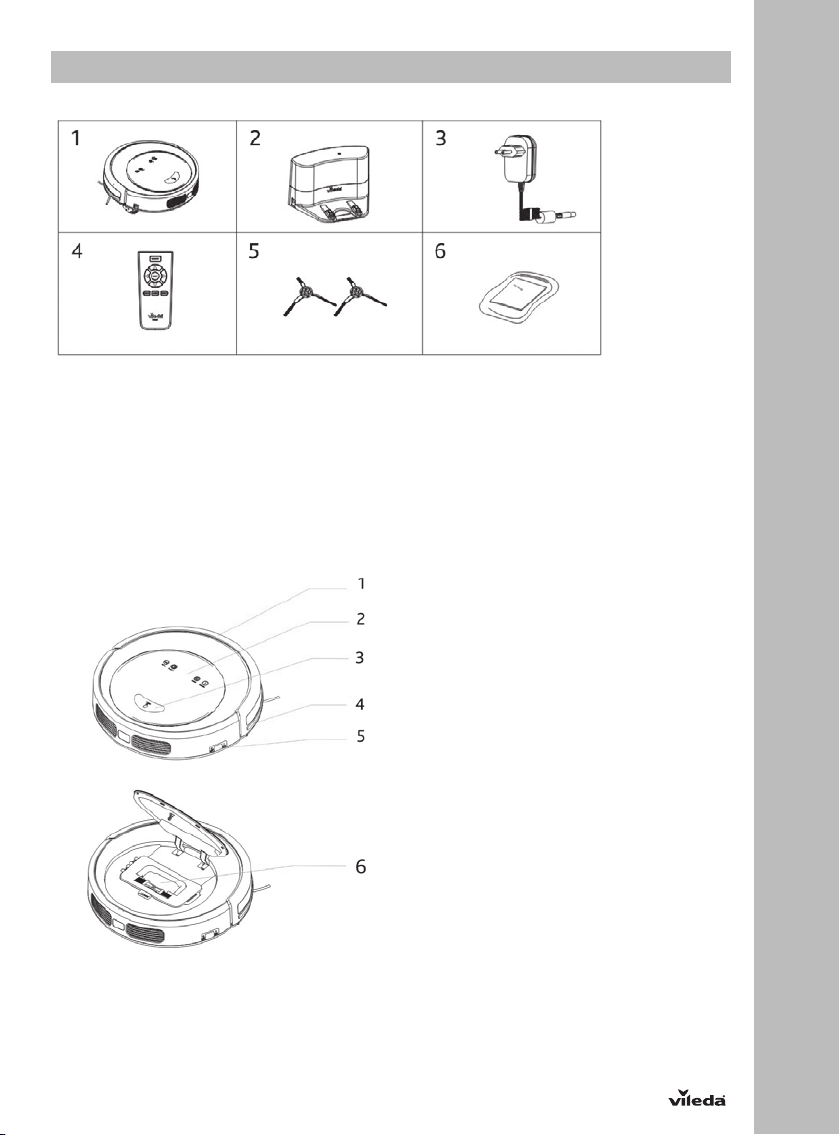
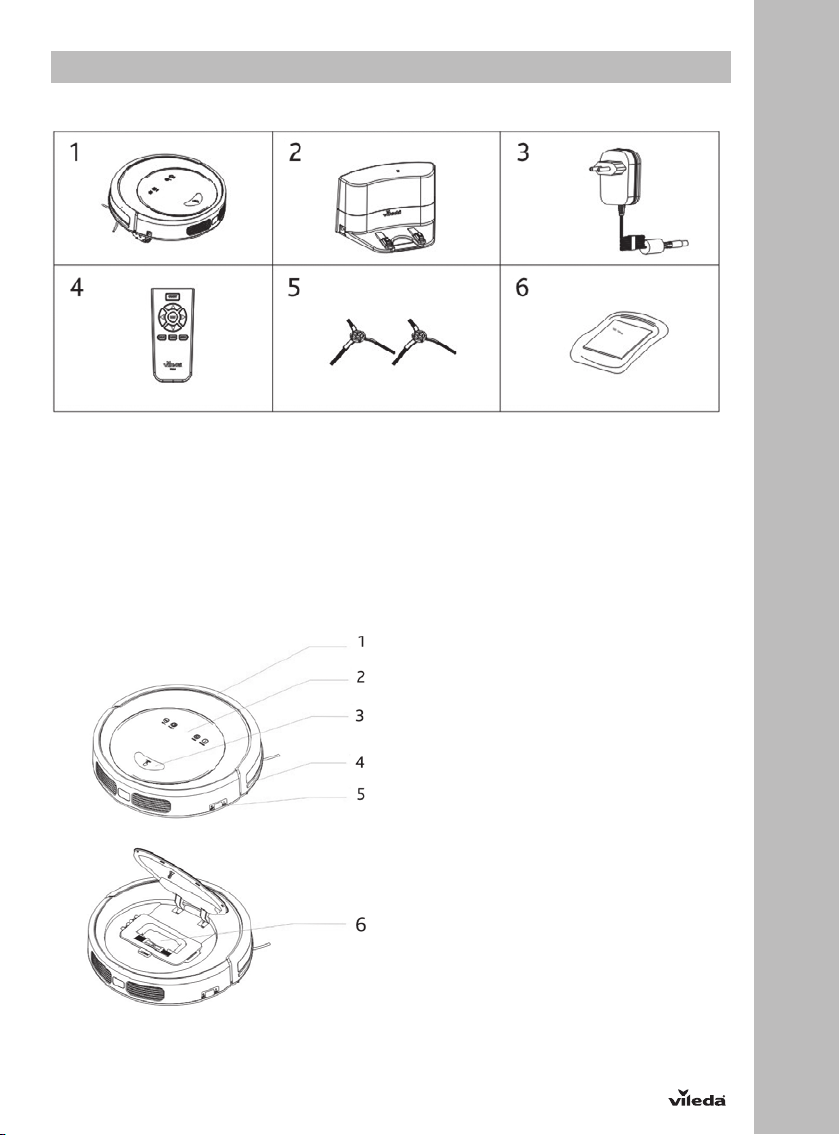
2.1 CONTENT
Package Contents:
1. Rob ot Main Body
2. Docking Station
3. Charger Cable + Adaptor
4. Remote Control incl. 2 Batteries
5. 2 Side brushes (left + right, marked by “L” and “R” on the sidebrushes))
6. User Manual
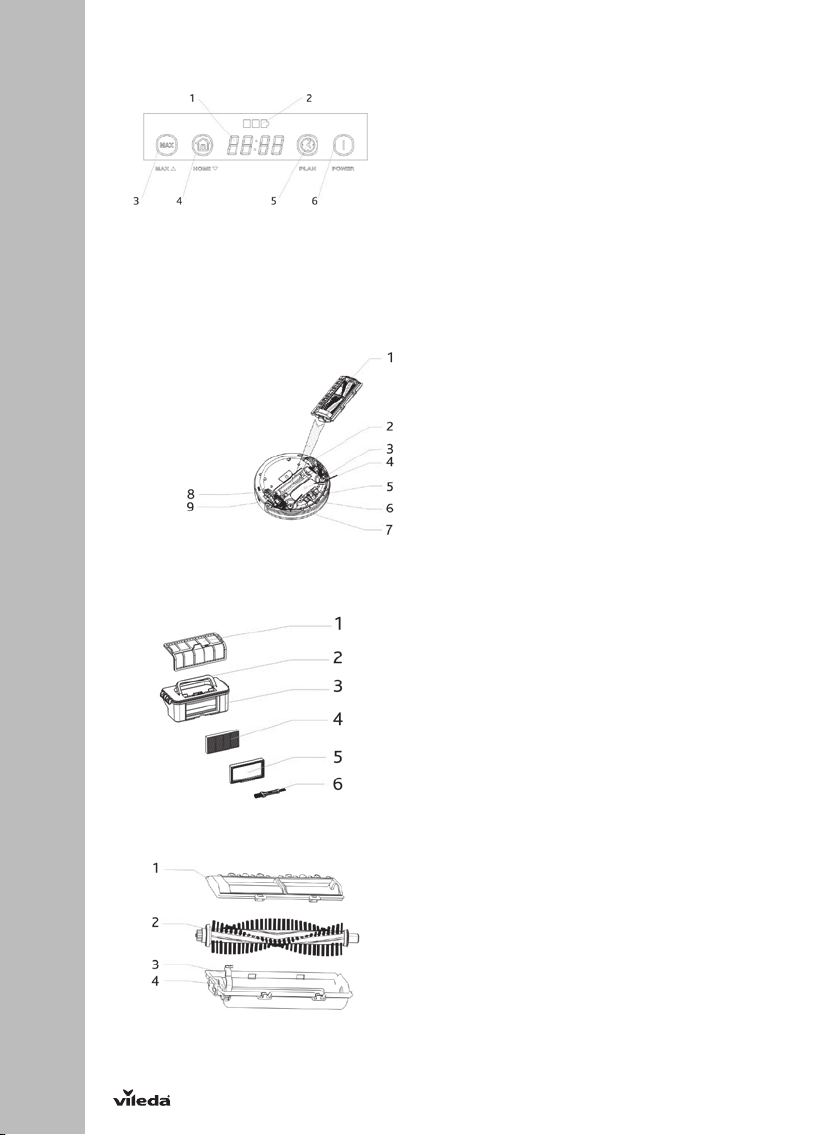
2.2 PRODUCT FEATURES AND FUNCTIONS
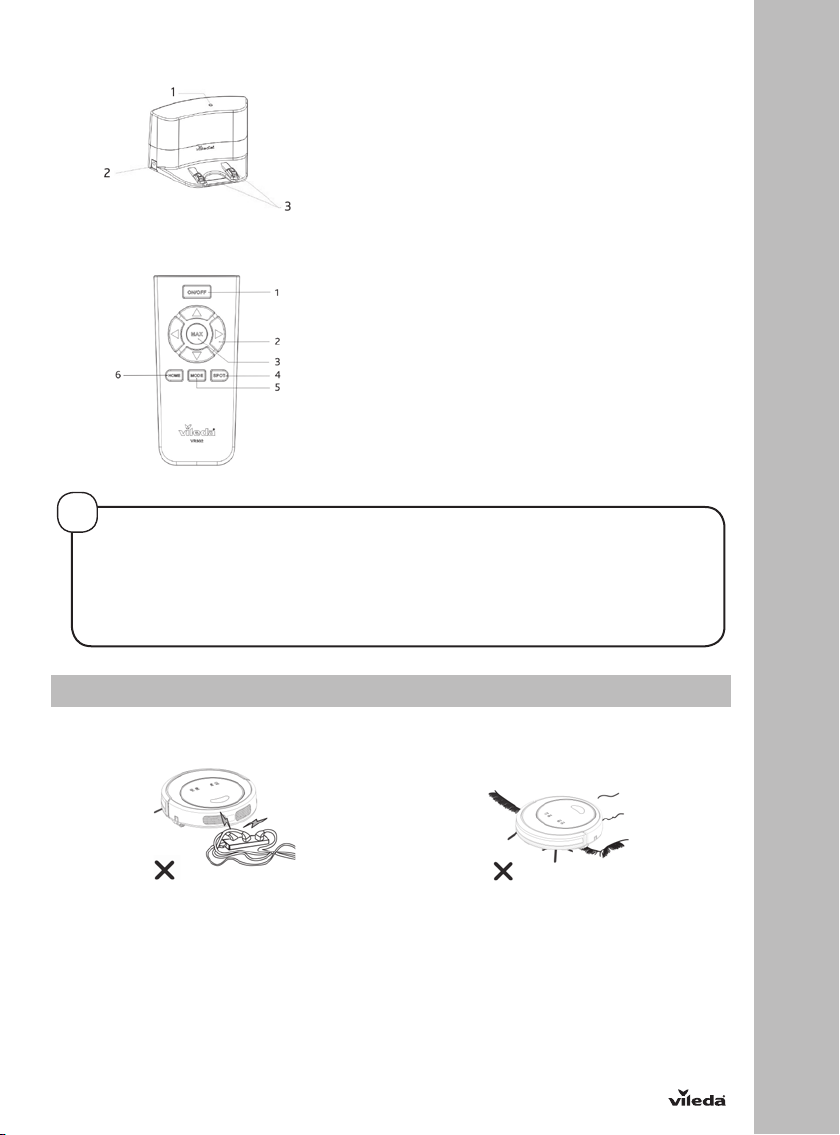
TOP VIE W
S
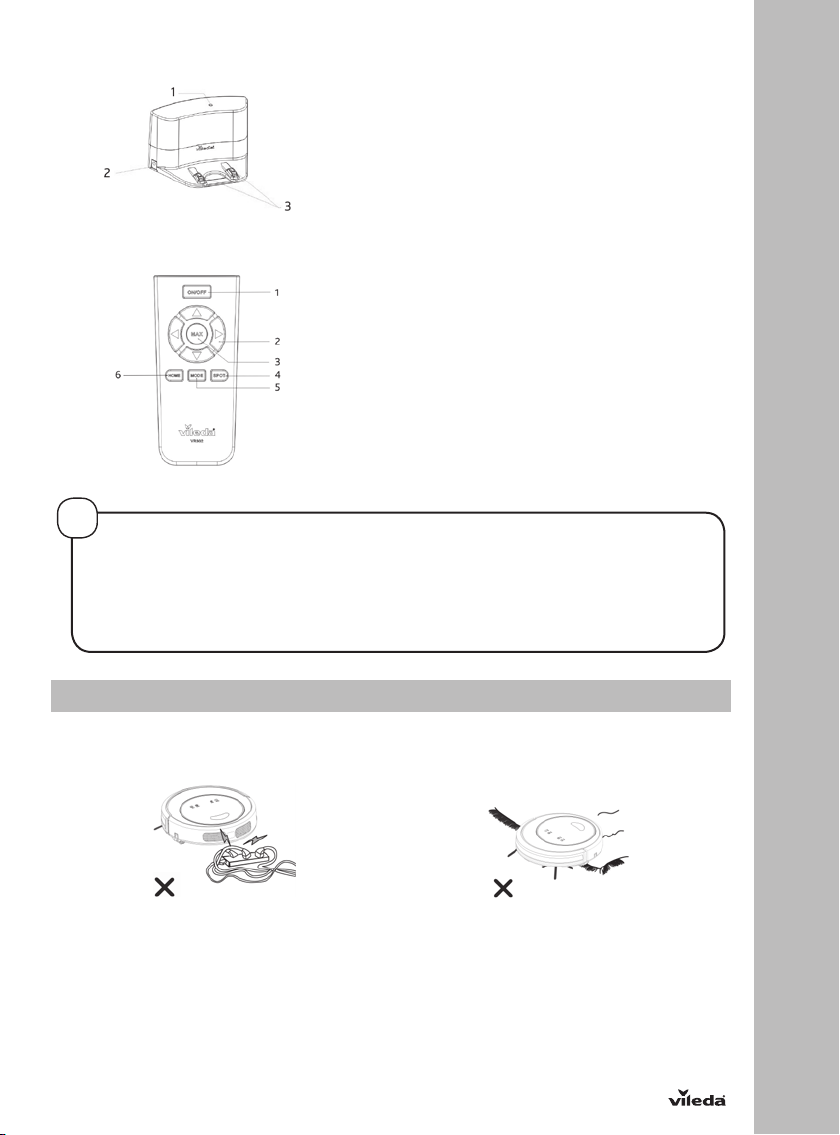
1. Soft bumper
2. LED display
3. Push button for opening the dust bin cover
4. Bumper strip with sensors
5. Main power sw itch
6. Dust bin
7
S
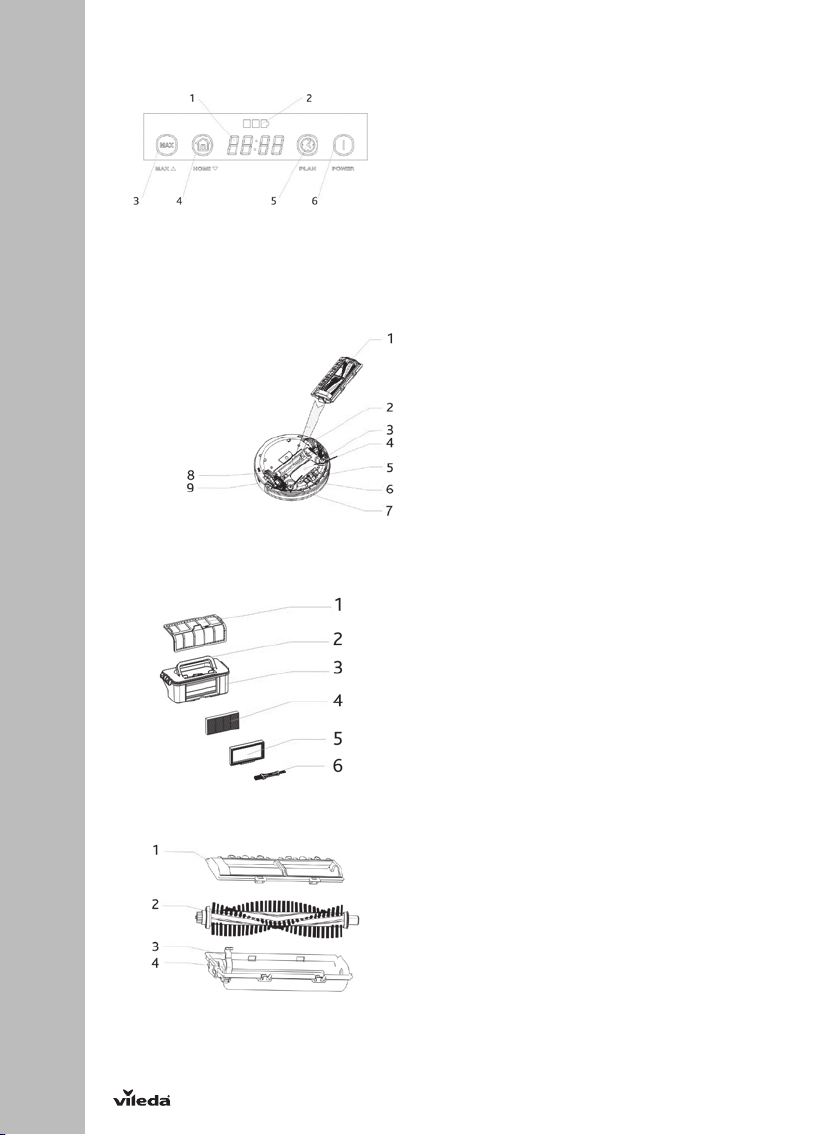
LED DISPLAY 1. LED panel, it shows the time, time setting and
BOTTOM V IEW
DUST BIN
common error codes by using numbers,
letters or graphs. The overview for the
different commands can be found on page XX
2. Battery Indiciation
3. MAX mode button / Increase number when
scheduling cleaning
4. Home button to find docking station and
charge / Decrease number when scheduling
cleaning
5. Scheduling function button
6. Eco cleaning / O N-OFF / Sleep Mode (hold
for 3 seconds)
1. Main brush kit
2. Left wheel
3. Left side br ush (marked with printed “L” on
sidebrush)
4. Battery Cover
5. Front wheel
6. Charging pole for automated charging
(dockingstation)
7. Right side brush (marked with printed "R" on
sidebrush)
8. Charging port
9. Right wheel
1. Primary mesh filter
2. Handle
3. Dust Bin
4. Secondary fine dust high efficiency filter filter
5. High efficiency filter frame
6. Maintenance brush
MAIN BRUSH KIT
1. Main brush cover plate
2. Main brush
3. Main brush holder
4. Main brush retainer
8
DOCKING STATION
1. Power indicator
2. Charging socket
3. Charging poles
REMOTE CONTROL
1. Power button / ON-OFF
2. Arrow keys for navigat ion of the robot
3. MAX mode button
4. Spot mode button
5. Cleaning mode button
6. Home / Auto charging button
•
!
HOW TO SE T UP YOUR REMOTE CONTROL
• Install two AA A type batteries into the remote controller before use.
• Remove the batteries if the remote controller will be left unused for a long period.
• If you use the remote controller near the charging station, the robot may not recognize the command and
may not work
S
3. Product Operation
TIPS BEFORE THE FIRST USE
Before you use the robot for the first time, make sure your home is ready and safe to use it:
Remove power cords and small objects
from the floor
The device is not suitable for long piled
carpets.
9
S
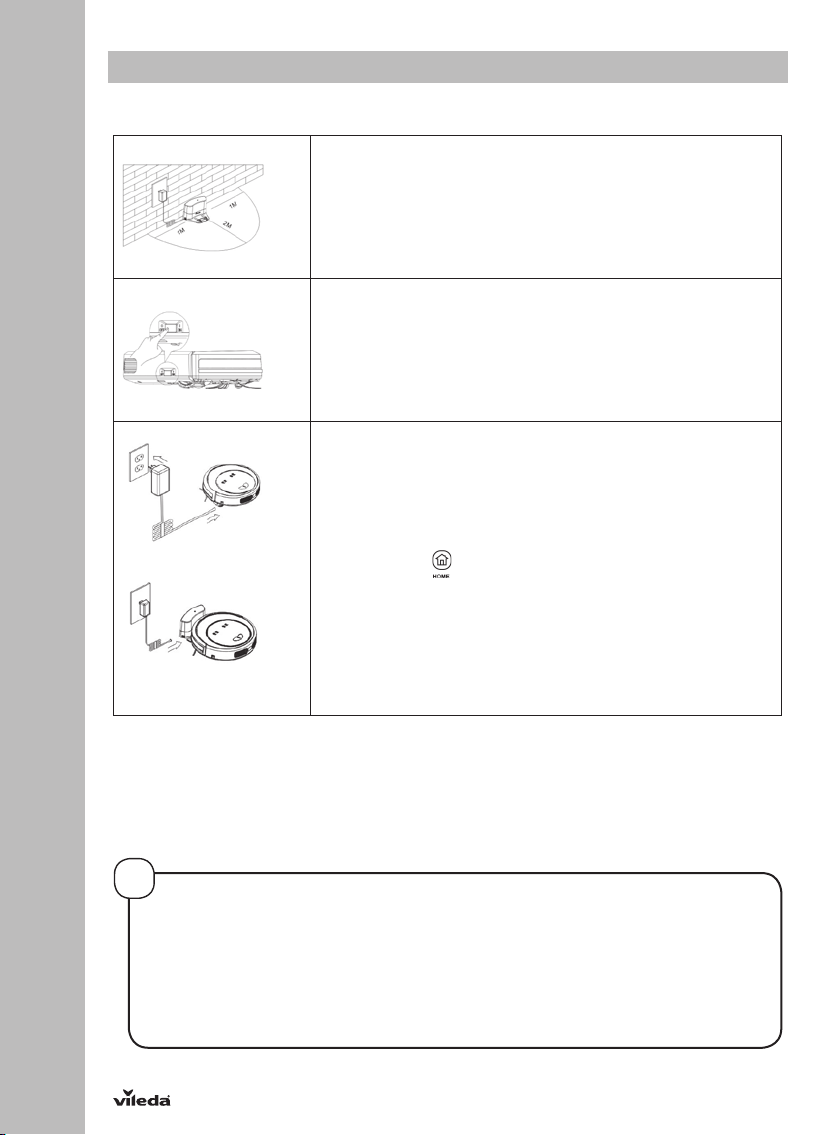
3.1 Battery charging & recharging
CHARGING BATTERY:
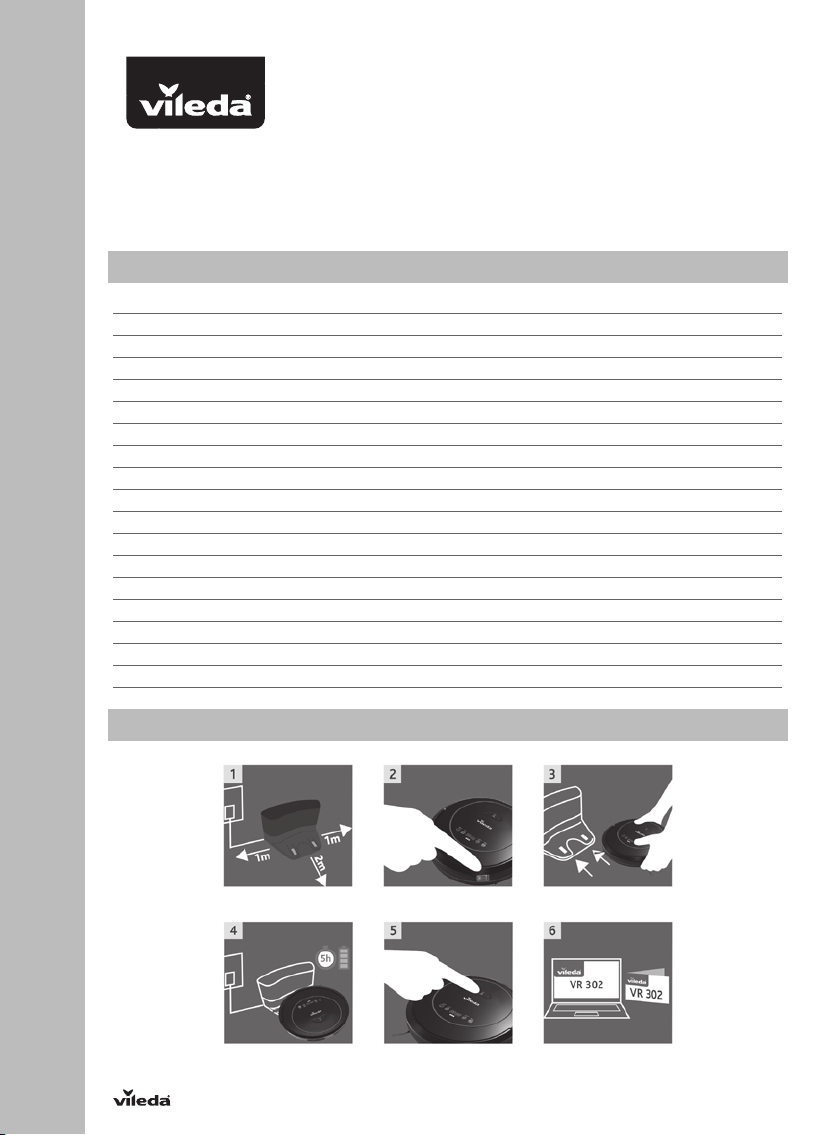
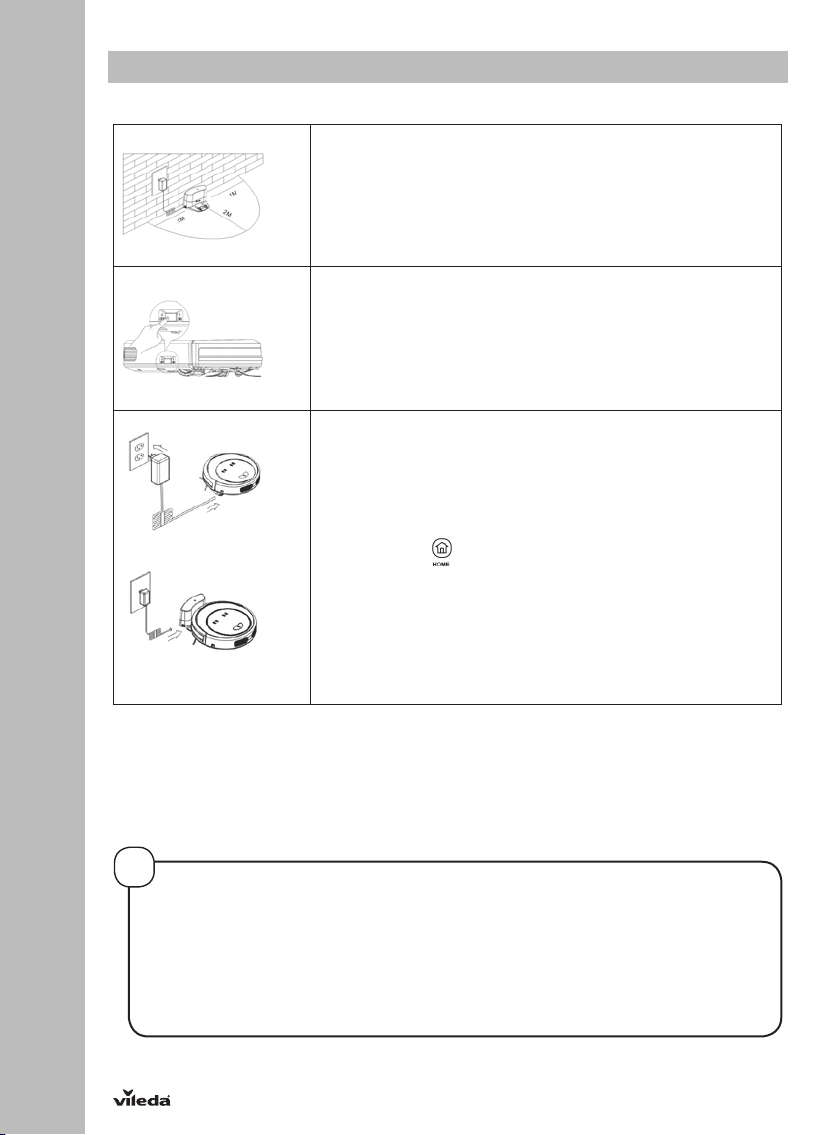
1. Placement of docking station
Place the docking station against the wall and remove
obstacles about 1 meter at two sides and about 2 meters
in front of the docking station.
2. If the robot is powered off, switch on the robot by pressing
the power switch at the right side of the robot.
3. Charge the robot in either way as shown above.
a. Plug the adapter into the robot and the other end to
power socket as shown in Fig.a.
b. Press the
control to operate the robot to go to charging home base
for recharging as shown in Fig.b.
4. During charging the battery indication will build up the three
bars of the battery in a row. When fully charged all three
battery blocks will be illuminated permanently.
button on either the robot or the remote
10
BATTERY INDICATION:
The battery indication is build in three blocks:
1. Three bloc ks illuminated: Battery is fully charged and full Eco program or MA X mode can be used.
2. Two blocks illuminated: Battery is half charged for up to 45min runtime in eco mode / xx min in ma x mode.
3. One block illuminated: Battery level is low. Recommended to start charging.
4. One block blinking: Battery needs to b e charged. No cleaning mo de possible.
!
TIPS TO E XTEND THE BATTERY LIF E:
• Before first use, c harge the robot for 5hrs.
• Charge the robot as soon as battery po wer is low.
• The robot will return to the docking station automatically when accomplish cleaning or battery power is
low. Therefore the docking station has to be plugged into the socket.
• If the robot is not to be used for a long time, fully charge the battery, turn the power switch off, remove
and store it in a coo l, dry place.
• If the robot is not to b e used more than 3 months, charge it directly by power adapter for 5hrs.
3.2 Turning on and off
1. STARTING UP
To turn your VR 302 on, switch the ON/OFF but ton on the right side of the devic e. You will hear a welcome melody
and the LED display will b e illuminated. Press the power button to star t the standard cleaning program.
To start the cleaning cycle press the power button to start the standard cleaning button
To pause the rob ot press the power but ton.
NOTE: when star ting the robot, always place it in the middle of a room or surface, at least half a meter away from
any cliff s.
2. STANDBY
Standby means, the robot’s main power is turned on, and the robot is ready to use. Through one of the following
methods, you can change into standby mode:
• When ro bot is cleaning, press “POWER” but ton on main body to pause robot and enter st andby mode.
• When cleaning, press the ON/OFF o n remote controller to pause the robot to enter standby.
3. SLEEP MODE
Turn robot to sl eep mode, its display will be in dark (but robot is not powere d off).
In order t o save power, you ca n turn the rob ot into slee p mode from st andby mode v ia either o f the follow ing method s:
a. Long press “POWER” but ton on main body for 3 sec onds, robot will enter into sleep mode.
b. Robot will automatically enter sle eping if power is low when in standby mode.
4. POWER OFF
To turn the dev ice off, switch the ON/OFF but ton on the right side of the robot.
3.3 Cleaning modes & movement patterns
FOUR DIFFERENT CLEANING MODES
S
1. Eco Cleaning Mode The robot cleans the room automatically and adjust its
2. MAX Cleaning Mode The robot will increase it’s suction power and slow down in
3. Spot Cleaning Mode
4. Scheduling mode After scheduled, the robot will leave the dockingstation and
cleaning pattern according to the room’s architecture. The Eco
mode balances energy consumption and the cleaning
performance.
speed to reach the peak performance and clean dirtier areas
thoroughly.
In this mode, the robot will clean intensively in a spiral way with
more suction power. This mode is created for picking up dirt
on a limited area of around 1,20 m x 1,20m. The mode lasts 90
seconds.
When activated in standby the robot will start and stop at the
same position. When activated while the robot is already
cleaning the robot will continue cleaning after the Spot
cleaning mode has finished.
start working daily in the Eco mode at the scheduled time.
11

S
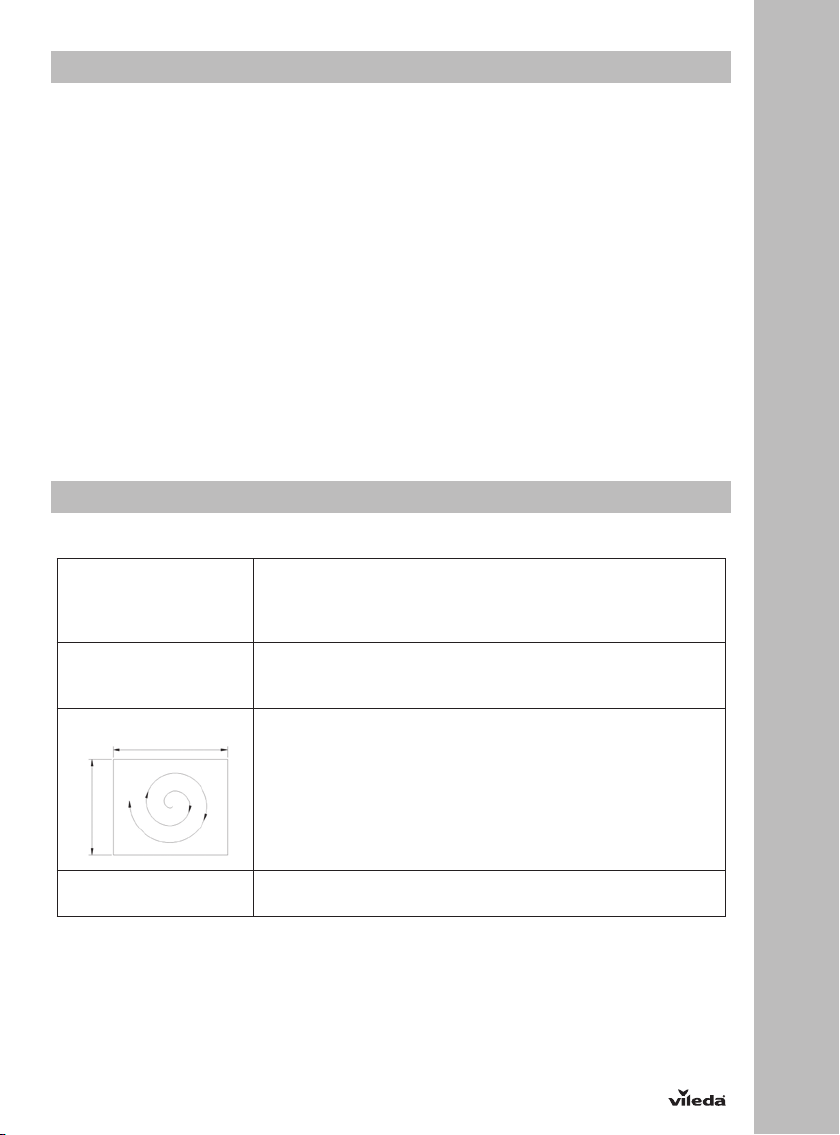
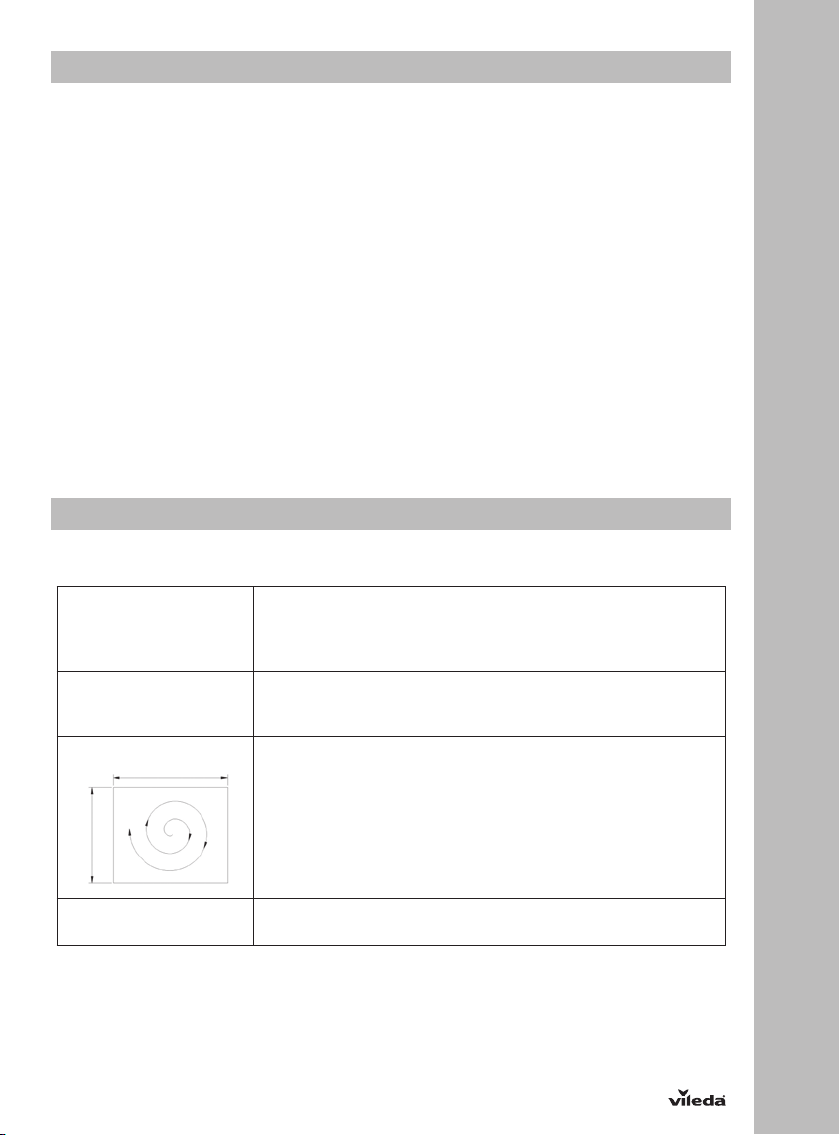
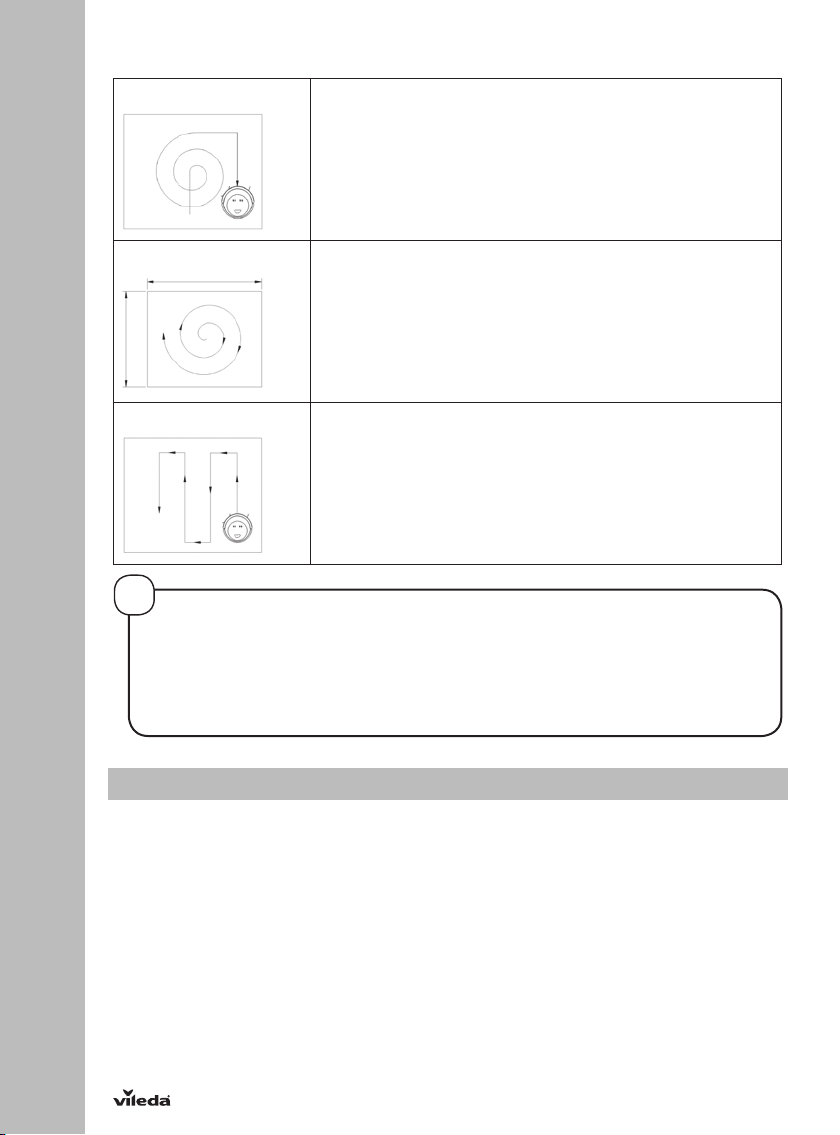
THE ROBOT IS EQUIPPED WITH THREE DIFFERENT MOVEMENT PATTERNS:
Automatic 1. In this mode, the robot will clean the area automatically
and adjust its cleaning behavior based on specific
situations.
Spiral cleaning mode
2. In this mode, robot takes the starting point as the center,
then turn outward in a spiral way, which mode is suitable for
an open area.
Zig-zag mode
3. The robot will automatically go into Zig-Zag cleaning when it
detected an open area or an environment with less
obstacles.
!
TIP FOR ADAPTING THE CLE ANING PATTERN
Press "mo de" button on the remote control to selec t the cleaning patter n:
Mode no. 1111 s hows on robot led display: intensive spiral cleaning mode;
Mode no. 2222 shows on robot led display: automatic cleaning mode;
Mode no. 3333 shows on robot led dis play: fast spiral cleaning mode;
Mode no. 4 444 shows on robot led displ ay: zig-zag cleaning mode.
3.4 Scheduling
Schedule the robot to st art cleaning automatically at a certain time every day.
NOTE: The robot ca n only be set when it’s in sta ndby or charging on dock ing station. I f the robot is in sle ep mode,
long pre ss “POWER” button on main body or ON/OFF on remo te controller to wake it up. If the robo t is in cleaning
mode, pause it before scheduling.
SCHEDULING ON THE ROBOT DISPLAY
1. Time Clock Set ting
• Press “P LAN” but ton shortly to enter t ime setting m ode. The LED pan el will show the c urrent time. Th e left
two numbers on LED panel will f lash, press “MAX” or “HOME” to increase or de crease hours.
• Press “POWER” button to enter the minute-setting, the left two numbers on LED panel will flash, press
“MA X” or “HOME” to increase or decrease minutes.
• Press “P OWER” button to confirm an d save the setting.
• Press “PLAN” button to quit the time s etting mode.
2. Setting scheduling time (keep the robot in standby or charging on station)
• Press “PLAN” button long to enter scheduling setting, the left two numbers on LED panel will flash, press
“MA X” or “HOME” to increase or decrease hours.
12
• Press “POWER” button to enter the minute-setting, the left two numbers on LED panel will flash, press
“MA X” or “HOME” to increase or decrease minutes.
• Press “P OWER” button to confirm an d save the setting.
• At last, press “PLAN” button to quit the time s etting mode.
• Press “PLAN” button to quit the time s etting mode.
NOTE: If machine is in real time setting, pls press “POWER” button to quit the real time setting, then long press
“PLA N” button to enter sche duling setting.
3. Cancel scheduling
• Set the scheduling time to 00:00 in scheduling setting.
!
TIPS FOR EASY SCHEDULING
• The scheduling time uses the machine's time as a reference. so, before scheduling, please set the
robot's time clock to be the same as real time.
• Once scheduled the machine, it will start cleaning at that time automatically, when the main switch is
switched on. the programed time will remain saved, even when switching the device off.
4. Maintenance
TIPS FOR BEST PERFORMANCE
To keep your Vileda rob ot at the best level of per formance, it is recommended to maintain the robot regularly.
Robot Part Care Frequency Replacement Frequency
Dust Bin After every uses -
High efficiency filter and Mesh
Filter
Side Brush and Main brush Once pe r week (twice per week in
Front Wheel and Driving Wheels
Cliff Sensors
Charging Contacts
Once pe r week (twice per week in
home wi th pets)
home wi th pets)
Once per month -
High efficiency filter: Every 3
months / Mesh Filter: Every 6
months
Every 6-12 months
S
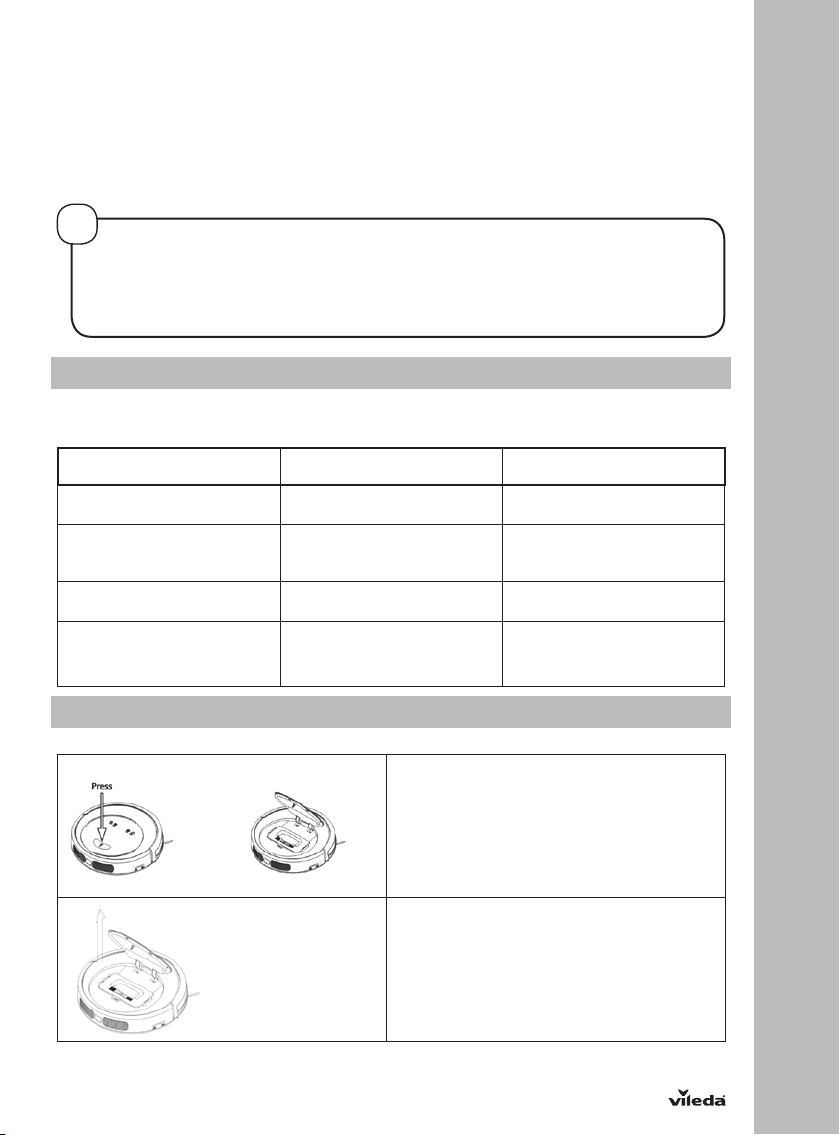
4.1 Cleaning dust bin and filters
Empty and clean dust bin after each use following the steps as shown in the below figures.
Press PUSH to open the cover.
Take out the dust bin
13

S
Take out the high efficiency fine dust filter
Open dust bin cover, take out the primary
mesh filter
Empty the dust box
Wash the dust bin and primary mesh filter or
clean it with the maintenance brush. The
high efficiency filter can softly be beaten to
release fine dust gathered. Do not wash the
fil ter.
14
Install the primary filter and high efficiency
filter back into the dust box
!
TIPS FOR THE FILTER USAGE:
• Wash pr imary mesh filter af ter 15~30 days of use. ma ximum life spa n for filters is 12-24 months
• Re-ins tall the dustb ox and primary filter after they’re full y dry
• Do not dry the filters under intense sunlight directly
• Don’t wash the high efficiency filter under water
• Spare parts can be bought separately. further information can be found at the vileda service or on the
vileda website
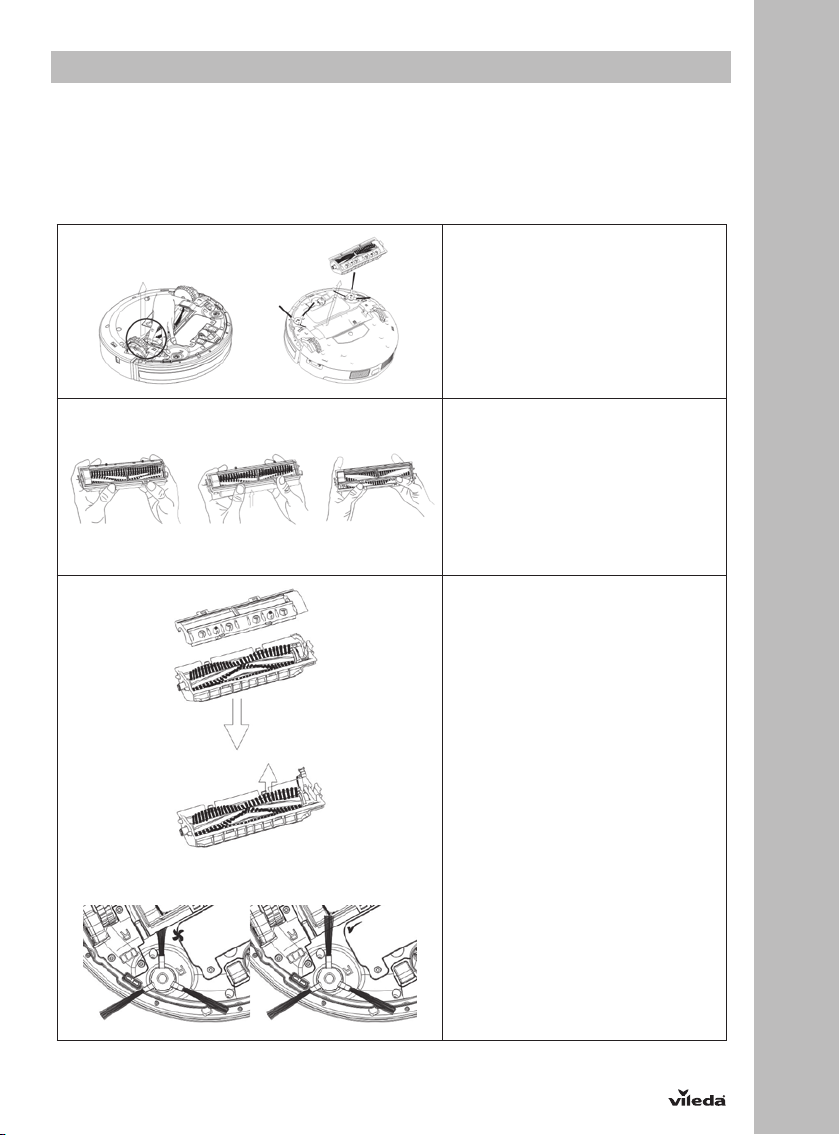
4.2 Cleaning main brush and side brushes
CLEANING OF SIDE BRUSHES
Check the side b rushes afte r every use and remove dust and d irt stuck to th e sidebrush es. Maximum l ife span for
side brush is 12 months.
NOTE: Before replacing side brushes, please pay attention to the left mark and the right ( ‘L’/ ‘R’ ) mark on side
brushes, which match with the ‘L’/ ‘R’ mark on the bottom base of robot.
CLEANING OF SIDE BRUSHES
Release the clamp on the right side
of the main brush kit and take it out
of the robot
Open the main brush cover
1. Let the lid of the main brush face
yourselves.
2. Both hands thumb holding the lid
of the main brush, push the red
part up.
3. Remove the cover of main brush.
Remove the main brush
1. Lever the red main brush retainer.
2. Remove the main brush from the
holder.
3. Clean the brush and the brush
holder, by either using the
maintenance brush or running
wat er.
NOTE: If hair got knotted on the main
brush, you can use a small scissor to
cut and remove it easily.
4. Re-install the main brush in the
original order of disassembly
after it’s fully dry.
5. Check if side brush can rotate
free. Take care that the side
brushes are not trapped by the
main brush kit.
S
15

S
4.3 Cleaning Sensors and Wheels
Once per month slightly wipe all the
sensors as well as the charging
poles from the dockingstation with a
soft cleaning cloth or tool.
NOTE: Keep the robot and sensors
dry and avoid to be affected with
damp.
4.4 Cleaning driving wheels and center wheel
Monthly remove hair and dust from
the left, right and front wheel with
the maintenance brush or a soft
cleaning tool.
4.5 Battery Removal
In case you want to replace the battery of VR 302, please make sure you use only a battery provided by the
manufacturer.
1. Make sure t he device is sw itched off at the main switch
2. Remove the screws on battery cover with a screw driver.
3. Remove the battery cover.
4. Lift the bat tery and remove it fro m the housing.
5. Unplug the wire connector that links the battery and robot.
16
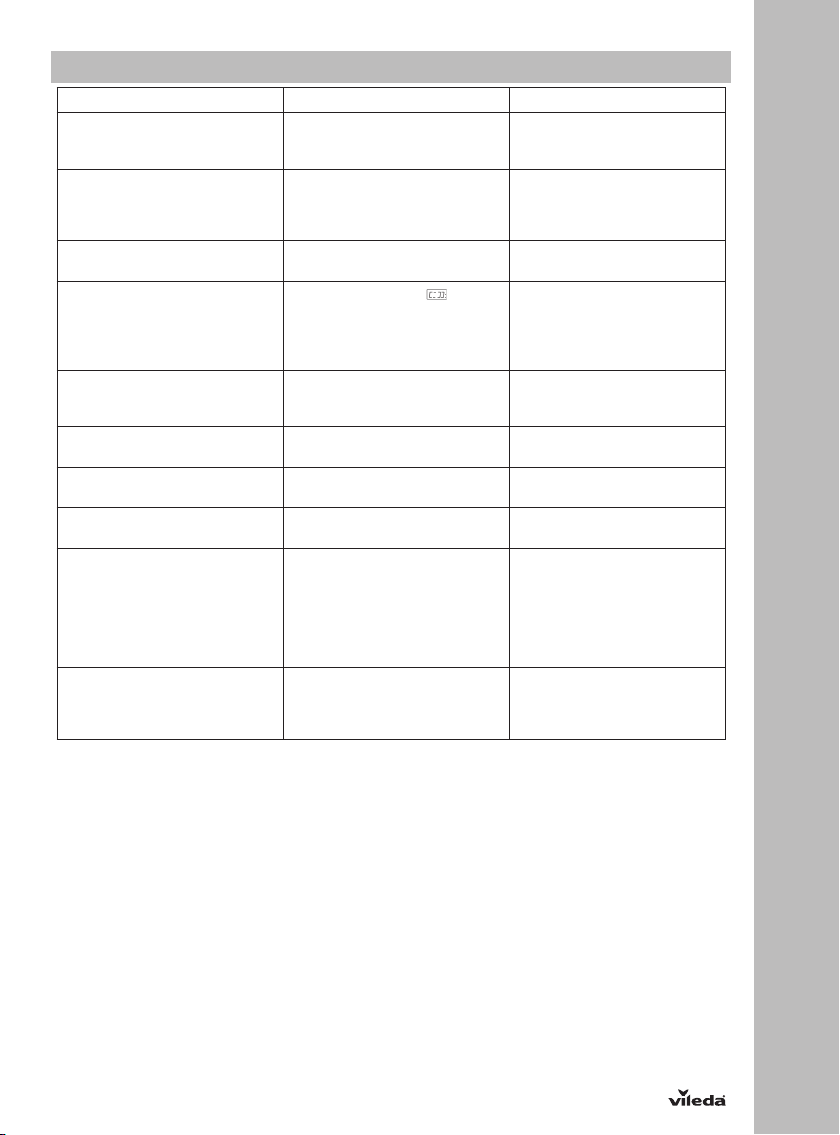
5. Troubleshooting
Problem Possible reason Possible solution
Robot is not running • Battery is too low.
• Dust bin is not inserted.
Low or no suction • Dust box is full.
Abnormal movement • Wheels are dirty.
Error sound is oc curing
Low bat tery after charging or no
charging possible
Display shows the error code
“A / U / B / F”l
Display shows the error code
“A / U / B / N"
Display shows the error code
“E / R / R / O"
Display shows the error code
“E / various / various / various"
Display shows the error code
“L / various / various / various"
If above d escribed solutio ns do not work, please try switching off VR 302, sw itch it on and check again.
For further help, technical advice, or to order spare or replacement parts contact Vileda (address see
last page).
• Filter is blocked with dirt.
• Suction port is blocked.
• Filter is missing.
• Cliff sensors are dirty.
• In combination with
on the display: low power.
• Robot is stuck.
• Wheels are blocked.
• Main on/off switch at the robot
i s off.
• Charger or battery is defective.
• Suction passage blocked. • Clean suction passage.
• Dust bin not placed in po sition
or robot without dust bin.
• Main sw itch is switched off
while, no charging possible.
• Device off the ground or sensors
jammed or dirt y.
• Motors overload or jammed. • Check if fan opening is free
shown
• Recharge the batter y for 5
hours.
• Inser t the dust bin.
• Empt y dust box.
• Clean the filter with br ush.
• Clear the por t with brush.
• Put filter back in p lace.
• Clean wheels.
• Clean cliff sensors.
• Charge the device.
• Put the ro bot in a safe place or
clean it s bottom sensors.
• Clean the wheels.
• Turn on main switch / “on/off”
to enable charging.
• Put back dust bin and place it
in position.
• Switch the main switch on and
continue charging the robot
• Put robot on soli d ground.
• Check sensit ivity of the f ront
bumper.
• Clean bottom anti-drop
sensor lens.
• Clean front bumper sensor
lens.
and clean dust box.
• Check if wheels or brush unit
is stuck or wired by obstacles.
S
17
S
6. Environmental and product recycling
The Vileda vacuum cleaning robot VR 302 fulfils the EU directive 2012/19/EC, covering electrical and electronic
appliances and the manageme nt of its dispos al.
The packaging material is entirely recyclable, and marked with the recycling symbol. Follow local regulations for
scrap ping. Keep the p ackaging ma terials (pla stic bags, p olysty rene part s, etc.) out of childr en’s reach, as they are
potentially dangerous.
When the product has reached the end of its life please do not dispose of it with general household waste. To
preven t possib le harm to th e environm ent or huma n health fr om uncont rolled was te dispo sal, recyc le it respo nsibly
to promote the sus tainable reuse of material re sources.
symbol identifies the Vileda VR101 as a product submitted to the regime of selecti ve electrical appliance
The
recycling collection.
The product co ntains a Li-Io n battery w hich should no t be disposed o f with general househ old waste. Dep osit the
battery in an official collection point for its recycling.
Batteries can be detrimental for the environment and can explode if they are exposed to high temperatures. The
violation of these precautions could cause fire and / or serious injuries.
For more detailed information about treatment, recovery and recycling of this Robot, please contact your local
city office, your household waste disposal serv ice or the shop w here you purchased the product.
For example, disposal of the Rob ot and any part of it may need to be taken to a Designate d Collection Facility.
7. Technical product specification
Model 0769 -01
Mechanical Specifications Size 34 x 9 cm
Electrical Specifications Rated Voltage 14,6 V DC
Battery Li-ion 2.150 mAh
Charging Time 240-300 min
Charger Specifications Rated Input Volt age (V AC) 100-240
* = Runtime + Sound level measured on hard floor
Weight 3,5 KG
Rated Power 22 W
Battery Li-ion 2.150 mAh
Rated Output Vol tage (V DC) 24
Rated Output Current (A) 0.6
18
8. Vileda product guarantee
A. OMFATTNING
1. Ge nom denna gar anti försäk rar Vileda a tt produk ten är fri från ma terial- och t illverkni ngsfel vid i nköpsdatum et
och två å r framåt. Det Viledaföretag som tillhandahåller och kommer att stå bakom denna garanti betecknas i
denna garanti eller medföljande broschyrer eller hittas på vår webbplats www.vileda.com.
2. Om under g arantitide n produkten v isar sig var a defekt (vid d et ursprungl iga köptillf ället) pga. fela ktigt mate rial
eller tillverkningsfel, kommer Vileda eller en auktoriserad medlem av service nätverket inom garantiregionen
utan ko stnad för arb ete eller mater ial att repar era eller (efte r Viledas bed ömning) ersät ta produkt en eller dess
delar i enlighet med villkoren och begränsningarna nedan. Vileda kan ersätta defekta produkter eller delar
med nya eller renoverade produkter eller delar. Alla ersatta produkter eller delar övergår i Viledas egendom.
3. Denna garanti täcker inte:
a) periodiskt underhåll och reparation eller utbyte av delar pga. förslitning;
b) förbrukningsartiklar (komponenter som förväntas behöva regelbundet byte under en produkts livstid
som t.ex. batterier eller dammfilter);
c) skador eller brister som uppstod genom användning och drift som inte är förenligt med normal personlig
användning i hemmet; och
d) skador eller förändringar av p rodukten till följd av
I. missbruk, inklusive:

- behandling som leder till fysiska, kosmetiska eller ytliga skador eller förändringar av produkten;
- misslyckande att installera produkten för dess normala ändamål eller i enlighet med Viledas
anvisningar för installation och användning;
- misslyckande att underhålla produkten enligt Viledas anvisningar för rätt underhåll;
- installation eller användning av produkten på ett sätt som strider mot tekniska föreskrifter eller
säkerhetsföreskrifter i det land den installerades eller används i;
II. Användning av produk ten med tillbehör, kringutrustning och andra produkter av en typ, skick och
standard avvikande från Viledas bestämmelser;
III. Reparation eller reparationsförsök genom personer som inte tillhör Vileda eller är auktoriserade
servicetekniker;
IV. Olyckor, brand, vätskor, kemikalier, övriga ämnen, översvämning, vibrationer, stark hetta, otjänlig
ventilation, strömsprång, för hög eller fel ingångsspänning, strålning, elektrostatiska urladdningar inkl.
blixtnedslag, övriga externa krafter och påverkningar.
B. VILLKOR
1. Garantitjänster lämnas endast om originalfakturan eller kvittot (som visar inköpsdatumet, modellbeteckningen
och säljarens namn) lämnas med den defekta produkten inom garantitiden. Vileda kan neka gratis
garantitjänster om dessa dokument inte uppvisas eller om de är inte fullständiga eller oläsliga. Garantin gäller
inte om modellbeteckningen eller serienumret på produkten har ändrats, tagits bort eller gjorts oläsligt.
2. Denna garanti täcker inte transportkostnader och risker i samband med transporten av produkten till och från
Vileda.
3. Vi vill göra dig uppmärksam på, att du måste själv betala undersökningskostnaden av din produkt om det
visar sig du inte har rätt till en garantireparation (av vilken anledning som helst) för att rätta till bristen eller at t
produkten fungerar korrekt och inget utrustningsfel kunde konstateras.
C. UNDANTAG OCH BEGRÄNSNINGAR
1. Förutom ovanstående utfäster Vileda ingen garanti (uttryckligen, underförstådd, lagstadgad eller annat)
beträffande produktkvalitet, prestanda, precision, tillförlitlighet, lämplighet för ett visst ändamål, eller annat.
2. Vileda a nsvarar in te för någon för lust eller s kada i samba nd med produ kten, denna g aranti ell er annat, ink lusive
förlust av vinst, intäkter, indirekta, sido- eller följdskador eller förluster.
3. Där gällande lagstiftning förbjuder eller begränsar dessa ansvarsundantag begränsar Vilda sitt ansvar
endast till den maximala utsträckningen den gällande lagen tillåter. Vissa länder t.ex. förbjuder undantag eller
begränsningar för skador till följd av försumlighet, grov lagstagdade, uppsåtlig försummelse, bedrägeri och
liknande handlingar. Enligt denna garanti kommer Viledas ansvar under inga omständigheter överskrida det
för prod ukten beta lda priset, m en om tillämpl ig lag tillåter e ndast högre a nsvarsbeg ränsningar g äller de högre
begränsningarna.
D. DINA LAGSTAGDADE RÄTTIGHETER SKYDDAS
Under nationell lagstiftning har konsumenter (lagstagda) rättigheter vid köp av konsumentvaror. Denna garanti
påverkar varken dina lagstadda rät tigheter eller de rättigheter som inte kan av talas bort eller begränsas, eller de
rättigheter mot den personen du köpte produkten av. Du får hävda din rätt efter eget omdöme.
E. DIN GARANT
Garantin för denna produkt utfästes och uppfylls av Freudenberg Haushaltsprodukte SE & Co.KG, Höhnerweg
2-4, 69465 Weinheim, Tyskland. Du kan även kontakta Viledas lokala kontor genom e-post eller telefonnummer
enligt nedan:
Freudenberg Household Products AB, konsumentkontakt@fhp-ww.com, 040 669 50 25
S
19

c
Thank you for chosing our new Vileda VR 302 robotic vacuum cleaner. VR 302 will become
your reliable partner for daily cleaning, helping remove the dirt, dust and hair so you don’t
have to.
Indhold
Quick Start Guide 20
1. General Warnings 21
2. Getting to k now VR 302 25
3. Product Operation 27
3.1 Battery charging & recharging 28
3.2 Turning on and off 29
3.3 Cleaning modes & movement patterns 29
3.4 Scheduling 30
4. Maintenance 31
4.1 Cleaning dust bin and filters 31
4.2 Cleaning main brush and side brushes 33
4.3 Cleaning Sensors and Wheels 34
4.4 Cleaning driving wheels and center wheel 34
4.5 Battery Removal 35
5. Troubleshooting 36
6. Environmental and product recycling 37
7. Technical product specification 37
8. Vileda product guarantee 37
20
Quick Start Guide

1. General Warnings
IMPORTANT:
Read all instructions before use. Retain instructions for future
reference.
WARNING:
Use the Robot only as described in this manual. Failure to follow
all instructions listed below may result in electric shock, fire
and/or serious injury.
When using any electrical Robot, basic safety precautions
should always be observed, including the following, in order to
reduce the risk of fire, electrical shock, leaking batteries or
personal injury.
USE RESTRICTIONS:
• When starting the robot, always place it in the middle of a
room or surface, at least half a meter away from any cliffs.
• Only for indoor use. Do not use outdoors or on balconies.
• Intended for domestic use only.
• Robot is not a toy. Do not sit or stand on it. Small children and
pets should be supervised when the robot is cleaning.
• Do not let the Robot pick up anything that is flammable, burning
or smoking.
• Do not use this Robot to pick up anything wet.
• Do not use on long-pile carpet or on wet floors, like bathroom
or laundry.
• Use this product in temperature from 10°C to 35°C. Do not use
this product in high-temperature environment or under baking
sunlight for a long time.
• Before using, pick up objects like clothing, loose papers, pull
cords for blinds or curtains, power cords, and any fragile
objects as they may entangle with the cleaning brushes.
• WARNING: Black or dark coloured types of floors and stairs
could reduce the reliability of cliff sensors. Test with your
specific floor and stairs before use.
c
21

c
PERSONAL SAFETY:
• The intended use is described in this manual. The use of any
accessory or attachment or the performance of any operation
with this Robot other than those recommended in this
instruction manual may present a risk of personal injury.
• Children must be supervised to ensure they do not play with
the Robot.
• This Robot may only be used by children aged from 8 years
and above and persons with reduced physical, sensory or
mental capabilities or lack of experience and knowledge if
they have been given proper supervision or proper instruction
concerning use of the Robot in a safe way and understand
the hazards involved.
• Children shall not play with the Robot and should only use the
Robot as intended.
• Cleaning and user maintenance shall not be made by children
without supervision.
• Store in a dry place.
• Store out of reach of children.
• Use only with the attachments recommended by the
manufacturer.
• Do not use without the filter in place.
• Keep the product and all accessories away from fire, hot
surfaces and any flammables.
• Do not immerse the Robot in water or other liquid.
22
ELECTRICAL SAFETY INSTRUCTIONS:
• Never modify the charger in any way.
• The charger has been designed for a specific voltage. Always
check that the main voltage is the same as that stated on the
rating plate.
• Only use the charger supplied with the product. Do not
attempt to use the charger with any other product nor attempt
to charge this product with another charger.
• Before use, check the charger cord for signs of damage or
ageing.
• Do not abuse the charger cord; never carry the charger by
the cord.

• Do not over-bend the power cord or pressure the power cord
with heavy or sharp objects.
• Never pull the charger cord to disconnect from a socket;
grasp the charger and pull to disconnect.
• Keep the charger cord away from hot surfaces and sharp
edges.
• Do not handle the charger or the Robot with wet hands.
• Do not store or charge the Robot outdoors.
• Unplug the charger before cleaning.
Product contains electronic parts. DO NOT submerge it or
spray it with water. Clean with a dry cloth only.
BATTERY USE AND CARE:
• WARNING: For the purposes of recharging the battery, only
use the detachable supply unit (model no. GQ15-240060-AG
/ GQ15-240060-AB / GQ12-240060-AG / GQ12-240060-AB /
NLB060240W1U3 / NLB060240W1E3) provided with this
appliance.
• Only use the battery supplied with the product.
• Leaks from battery cells can occur under extreme conditions.
If the liquid gets on the skin, wash it immediately with soap
and water. If the liquid gets into the eyes, flush them
immediately with clean water for a minimum of 10 minutes
and seek medical attention.
• This product contains Lithium-Ion batteries. Do not incinerate
batteries or expose to high temperatures, as they may
explode.
• When the battery pack is not in use, keep away from other
metal objects such as: paper clips, coins, keys, nails, screws
or other small metal objects that can make a connection from
one terminal to another.
• Shorting the battery terminals may cause fire.
• The battery must be removed from the Robot before it is
discarded.
• The battery is to be disposed of safely and in accordance with
Environmental and Product Recycling, as per page XX of this
Manual. The battery must not be disposed of with household
waste.
c
23

c
• The Robot must be disconnected from the main supply when
removing the battery.
• WARNING: If the battery is damaged in any way, do not
attempt to recharge it. Contact Vileda customer service
address (see last page).
• Charge the battery for 5 hours before first use. After the first
use, charging time is about 4-5 hours.
• If the robot is not to be used more than 3 months, charge it
directly by power adapter for 5hrs.
• WARNING: Turn the robot’s main power switch to OFF when
transporting or when in storage, otherwise the battery may
become damaged.
• Only use the charger provided with the product. Do not
attempt to use the charger with any other product nor attempt
to charge this product with another charger as this may
damage the product and the battery, and will invalidate your
guarantee.
• WARNING: Only use a replacement battery as supplied by
Vileda.
SERVICE:
• Before using the Robot and after any impact, check for
• signs of wear or damage.
• Do not use the Robot if any part is damaged or defective.
• Repairs should only be carried out by an approved service
agent or a suitably qualified person.
• Never modify the Robot in any way as this may increase the
risk of personal injury.
• Only use replacement parts or accessories provided or
recommended by Vileda.
24
2. Getting to know VR 302
2.1 CONTENT
Package Contents:
1. Rob ot Main Body
2. Docking Station
3. Charger Cable + Adaptor
4. Remote Control incl. 2 Batteries
5. 2 Side brushes (left + right, marked by “L” and “R” on the sidebrushes))
6. User Manual
2.2 PRODUCT FEATURES AND FUNCTIONS
TOP VIE W
c
7. Sof t bumper
8. LED display
9. Push button for opening the dust bin cover
10. Bumper strip with sensors
11. Main power switch
12. Dust bin
25
c
LED DISPLAY
BOTTOM V IEW
DUST BIN
1. LED panel, it shows the time, time setting and
common error codes by using numbers,
letters or graphs. The overview for the
different commands can be found on page XX
2. Battery Indiciation
3. MAX mode button / Increase number when
scheduling cleaning
4. Home button to find docking station and
charge / Decrease number when scheduling
cleaning
5. Scheduling function button
6. Eco cleaning / O N-OFF / Sleep Mode (hold
for 3 seconds)
1. Main brush kit
2. Left wheel
3. Left side br ush (marked with printed “L” on
sidebrush)
4. Battery Cover
5. Front wheel
6. Charging pole for automated charging
(dockingstation)
7. Right side brush (marked with printed "R" on
sidebrush)
8. Charging port
9. Right wheel
26
1. Primary mesh filter
2. Handle
3. Dust Bin
4. Secondary fine dust high efficiency filter filter
5. High efficiency filter frame
6. Maintenance brush
MAIN BRUSH KIT
1. Main brush cover plate
2. Main brush
3. Main brush holder
4. Main brush retainer
DOCKING STATION
1. Power indicator
2. Charging socket
3. Charging poles
REMOTE CONTROL
1. Power button / ON-OFF
2. Arrow keys for navigat ion of the robot
3. MAX mode button
4. Spot mode button
5. Cleaning mode button
6. Home / Auto charging button
•
!
HOW TO SE T UP YOUR REMOTE CONTROL
• Install two AA A type batteries into the remote controller before use.
• Remove the batteries if the remote controller will be left unused for a long period.
• If you use the remote controller near the charging station, the robot may not recognize the command and
may not work
c
3. Product Operation
TIPS BEFORE THE FIRST USE
Before you use the robot for the first time, make sure your home is ready and safe to use it:
Remove power cords and small objects
from the floor
The device is not suitable for long piled
carpets.
27
c
3.1 Battery charging & recharging
CHARGING BATTERY:
1. Placement of docking station
Place the docking station against the wall and remove
obstacles about 1 meter at two sides and about 2 meters
in front of the docking station.
2. If the robot is powered off, switch on the robot by pressing
the power switch at the right side of the robot.
3. Charge the robot in either way as shown above.
a. Plug the adapter into the robot and the other end to
power socket as shown in Fig.a.
b. Press the
control to operate the robot to go to charging home base
for recharging as shown in Fig.b.
4. During charging the battery indication will build up the three
bars of the battery in a row. When fully charged all three
battery blocks will be illuminated permanently.
button on either the robot or the remote
28
BATTERY INDICATION:
The battery indication is build in three blocks:
1. Three bloc ks illuminated: Battery is fully charged and full Eco program or MA X mode can be used.
2. Two blocks illuminated: Battery is half charged for up to 45min runtime in eco mode / xx min in ma x mode.
3. One block illuminated: Battery level is low. Recommended to start charging.
4. One block blinking: Battery needs to b e charged. No cleaning mo de possible.
!
TIPS TO E XTEND THE BATTERY LIF E:
• Before first use, c harge the robot for 5hrs.
• Charge the robot as soon as battery po wer is low.
• The robot will return to the docking station automatically when accomplish cleaning or battery power is
low. Therefore the docking station has to be plugged into the socket.
• If the robot is not to be used for a long time, fully charge the battery, turn the power switch off, remove
and store it in a coo l, dry place.
• If the robot is not to b e used more than 3 months, charge it directly by power adapter for 5hrs.
3.2 Turning on and off
1. STARTING UP
To turn your VR 302 on, switch the ON/OFF but ton on the right side of the devic e. You will hear a welcome melody
and the LED display will b e illuminated. Press the power button to star t the standard cleaning program.
To start the cleaning cycle press the power button to start the standard cleaning button
To pause the rob ot press the power but ton.
NOTE: when star ting the robot, always place it in the middle of a room or surface, at least half a meter away from
any cliff s.
2. STANDBY
Standby means, the robot’s main power is turned on, and the robot is ready to use. Through one of the following
methods, you can change into standby mode:
• When ro bot is cleaning, press “POWER” but ton on main body to pause robot and enter st andby mode.
• When cleaning, press the ON/OFF o n remote controller to pause the robot to enter standby.
3. SLEEP MODE
Turn robot to sl eep mode, its display will be in dark (but robot is not powere d off).
In order t o save power, you ca n turn the rob ot into slee p mode from st andby mode v ia either o f the follow ing method s:
a. Long press “POWER” but ton on main body for 3 sec onds, robot will enter into sleep mode.
b. Robot will automatically enter sle eping if power is low when in standby mode.
4. POWER OFF
To turn the dev ice off, switch the ON/OFF but ton on the right side of the robot.
3.3 Cleaning modes & movement patterns
FOUR DIFFERENT CLEANING MODES
c
1. Eco Cleaning Mode The robot cleans the room automatically and adjust its
cleaning pattern according to the room’s architecture. The Eco
mode balances energy consumption and the cleaning
performance.
2. MAX Cleaning Mode The robot will increase it’s suction power and slow down in
speed to reach the peak performance and clean dirtier areas
thoroughly.
3. Spot Cleaning Mode In this mode, the robot will clean intensively in a spiral way with
more suction power. This mode is created for picking up dirt
on a limited area of around 1,20 m x 1,20m. The mode lasts 90
seconds.
When activated in standby the robot will start and stop at the
same position. When activated while the robot is already
cleaning the robot will continue cleaning after the Spot
cleaning mode has finished.
4. Scheduling mode After scheduled, the robot will leave the dockingstation and
start working daily in the Eco mode at the scheduled time.
29
c
THE ROBOT IS EQUIPPED WITH THREE DIFFERENT MOVEMENT PATTERNS:
Automatic 1. In this mode, the robot will clean the area automatically
and adjust its cleaning behavior based on specific
situations.
Spiral cleaning mode
2. In this mode, robot takes the starting point as the center,
then turn outward in a spiral way, which mode is suitable for
an open area.
Zig-zag mode
3. The robot will automatically go into Zig-Zag cleaning when it
detected an open area or an environment with less
obstacles.
!
TIP FOR ADAPTING THE CLE ANING PATTERN
Press "mo de" button on the remote control to selec t the cleaning patter n:
Mode no. 1111 s hows on robot led display: intensive spiral cleaning mode;
Mode no. 2222 shows on robot led display: automatic cleaning mode;
Mode no. 3333 shows on robot led dis play: fast spiral cleaning mode;
Mode no. 4 444 shows on robot led displ ay: zig-zag cleaning mode.
3.4 Scheduling
Schedule the robot to st art cleaning automatically at a certain time every day.
NOTE: The robot ca n only be set when it’s in sta ndby or charging on dock ing station. I f the robot is in sle ep mode,
long pre ss “POWER” button on main body or ON/OFF on remo te controller to wake it up. If the robo t is in cleaning
mode, pause it before scheduling.
SCHEDULING ON THE ROBOT DISPLAY
1. Time Clock Set ting
• Press “P LAN” but ton shortly to enter t ime setting m ode. The LED pan el will show the c urrent time. Th e left
two numbers on LED panel will f lash, press “MAX” or “HOME” to increase or de crease hours.
• Press “POWER” button to enter the minute-setting, the left two numbers on LED panel will flash, press
“MA X” or “HOME” to increase or decrease minutes.
• Press “P OWER” button to confirm an d save the setting.
• Press “PLAN” button to quit the time s etting mode.
2. Setting scheduling time (keep the robot in standby or charging on station)
30
 Loading...