

User & care guide • Bedienungsanleitung • Manuale d'uso e manutenzione • Guía de usuario y
VR 201 PetProVR 201 PetPro
CLEANING ROBOT
cuidados • Manual de utilização e cuidados • Guide d'utilisation et d'entretien • Onderhouds- en
gebruikshandleiding • Bruksanvisning och skötselguide • Bruker og vedlikeholdsmanual •
Käyttö- ja hoito-opas • Instrukcja użytkowania i czyszczenia • Navodila za uporabo in nego •
Uživatelská příručka • Užívateľská príručka • Vodič za korisnika i za njegu
Model No: 0769-02

3
3a
3b
4
9
2
5
6
7
8
VR201 Explo KURTZ DESGN 03.05.18
8
11a
11b
1f
1a 1b
1d 1e
1c
11
10
13
17
16
14
15
12b
15
15
18
19
20
15
12a
7
7
1
VR201 Quick Start KURTZ DESGN 03.05.18
1 m
1 m
2 m
VR201 Packaging List KURTZ DESGN 26.04.18
PACKAGING CONTENT & QUICK START GUIDE
D Lieferumfang & Schnellstart Anleitung I Contenuto della confezione e Guida Rapida E Contenido y
Guía de inicio rápido P Conteúdo da embalagem & manual de iniciação rápida m Contenu de la boîte et
démarrage rapide n Inhoud van de doos en snelle start S Förpackningsinnehåll och snabbstartsguide
x Emballagens indhold & Hurtigstartsguide r Pakkauksen sisältö ja pikakäyttöopas Q Zawartość
opakowania i skrócona instrukcja obsługi t Vsebina pakiranja & Hiter začetek v Obsah balení a stručný
průvodce u Obsah balenia a stručný sprievodca 1 Sadržaj pakiranja i vodič za brzi start
PRODUCT OVERVIEW
D Produktübersicht I Descrizione del prodotto E Descripción del producto P Visão geral do produto
m Présentation du produit n Productvoorstelling S Produktöversikt x Produktoversigt
r Tuotekuvaus Q Przegląd produktu t Pregled izdelka v Přehled produktu u Prehľad produktu
1 Pregled proizvoda
1
2
OFF
ON
3a
3b
OFF
ON
2
4
5-6h
5
3
VR201 Empty Filter KURTZ DESGN 07.05.18
MAINTENANCE
VR201 Clean Brushes KURTZ DESGN 07.05.18
1
1
D Wartung I Manutenzione E Mantenimiento P Manutenção m Entretien n Onderhoud
S Underhåll x Vedligeholdelse/vedlikehold r Huolto Q Konserwacja t Vzdrževanje v Údržba
u Údržba 1 Održavanje
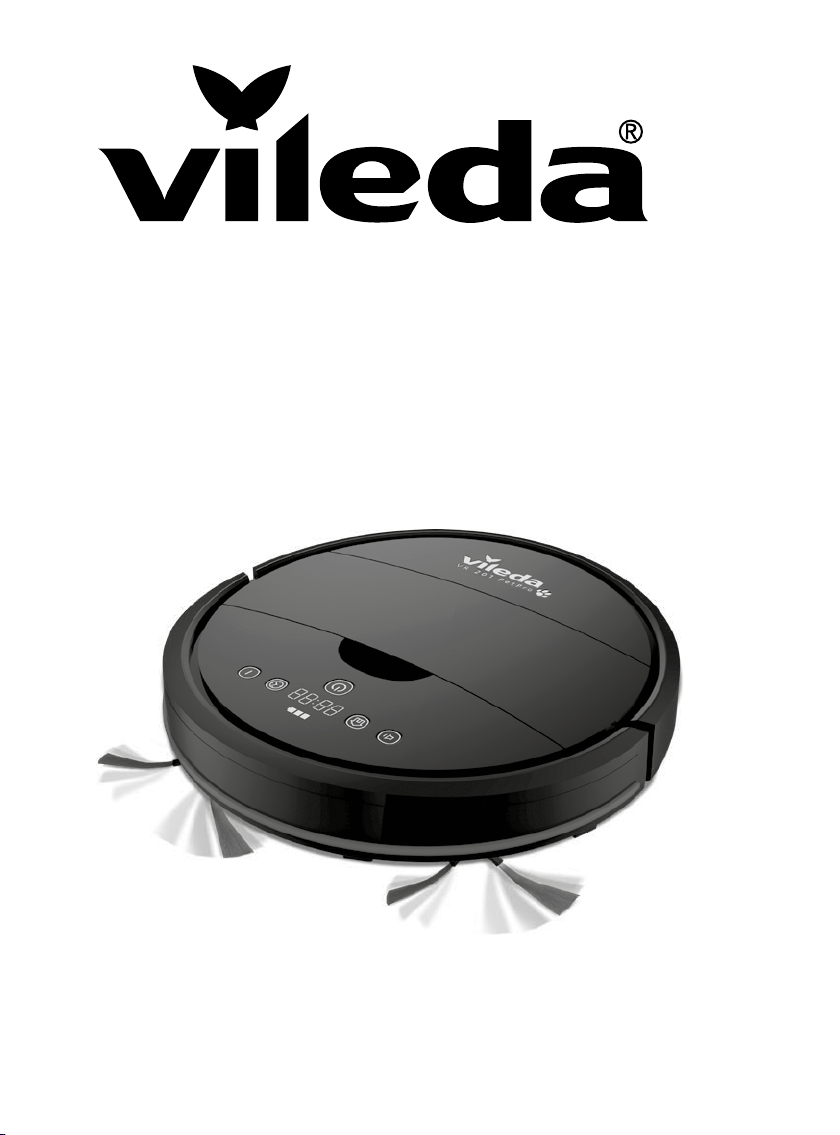
1 2
Tue
1
3
4
click!
1
2 3
off
4 5
5
2
3 4
5
6
click!
click!
4
5
VR201 Clean Bottom KURTZ DESGN 03.05.18
1
2
1
2
3
off
4
3
4
5
off
5
6
7

VR201: Setting Robot Time
VR201 Timer Settings KURTZ DESGN 03.05.18
VR201: Setting Scheduling Time
VR201: Setting Robot Time
+
VR201 Timer Settings KURTZ DESGN 03.05.18
VR201: Setting Scheduling Time
VR201: Setting Robot Time
VR201: Sound on/off
+
VR201 Timer Settings KURTZ DESGN 03.05.18
SCHEDULING
G Time Setting D Zeit einstellen I Impostazione dell’orario E Configuración de la hora
P Definição das horas m Réglage de l'heure n Tijd instellen S Tidsinställning x Tidsindstilling
r Ajan asettaminen Q Ustawienie czasu t Nastavitev časa v Nastavení času u Nastavenie času
1 Postavljanje vremena
G
Thank you for choosing our new Vileda VR 201 PetPro robotic vacuum cleaner. VR 201 PetPro
will become your partner for daily cleaning, helping remove dirt, dust and even pet hair from
your floors so you don’t have to.
+
G Daily cleaning schedule D Programmierung täglicher Reinigungszeit I Programmazione della
pulizia quotidiana E Programación diaria de limpieza P Programação diária da limpeza
m Programmation quotidienne du nettoyage n Dagelijkse schoonmaak programmeren
S Schemaläggning av daglig städning x Daglig rengøringsskema/timeplan r Päivittäinen
imurointiohjelma Q Dzienny harmonogram sprzątania t Časovno dnevno programiranje čiščenja
v Denní úklidov ý plán u Denný čistiaci plán 1 Raspored dnevnog čišćenja
Sound o n / off D Ton ein/ausschalten I Suono on / of f E S onido activado / desactivado P Som ligado/
G
desligado m Son on / off n Geluid aan / uit S Ljud på/av x Lyd til/fra / på/av r Äänet päällä/pois
Q
Włączanie i wyłącz anie dźwięków t Vklop / Izklop zvoka v Zapnutí / Vy pnutí zvuk u u Zapnutie/Vypnutie
1 Zvuk uključen / isključen
zvuku
+
CONTENTS
1. GENERAL WARNINGS 9
2. GET TING TO KNOW VR 201 PETPRO 13
3. PRODUCT OPERATION 14
4. MAINTENANCE 15
5. TROUBLESHOOTING 16
6. ENVIRONMENTAL AND PRODUCT RECYCLING 17
7. PRODUCT SPECIFICATION 17
8. VILEDA PRODUCT GUARANTEE 17
1. GENERAL WARNINGS
IMPORTANT
Read all instructions before use. Retain instructions for future
reference.
WARNING
Use the robot only as described in this manual. Failure to follow
all instructions listed below may result in electric shock, fire
and/or serious injury.
When using any electrical robot, basic safety precautions
should always be observed, including the following, in order to
reduce the risk of fire, electrical shock, leaking batteries or
personal injury.
8
9

G G
USE RESTRICTIONS
concerning use of the robot in a safe way and understand the
hazards involved.
• When starting the robot, place it in the middle of a room or
surface, at least half a metre away from an edge with a drop.
• Only for indoor use. Do not use outdoors or on balconies.
• Intended for domestic use only.
• The robot is not a toy. Do not sit or stand on it. Small children
and pets should be kept away from the robot and supervised
when the robot is cleaning.
• Do not put heavy or sharp objects on the top of the product.
• Do not let the robot pick up anything that is flammable, burning
or smoking.
• Do not use this robot to pick up anything wet.
• Do not use on long-pile carpets or rugs or on wet floors, for
example in the bathroom or laundry room.
• Only use this product in temperatures from 15° C to 35° C. Do
not use this product in a high-temperature environment or
direct sunlight for a long period of time.
• Before using, pick up objects like clothing, loose papers, pull
• Children shall not play with the appliance.
• Children shall not play with the Robot and should only use the
Robot as intended.
• This appliance contains batteries that are only replaceable by
skilled persons.
• Cleaning and user maintenance shall not be made by children
without supervision.
• Store in a dry place.
• Store out of reach of children.
• Use only with the attachments recommended by the
manufacturer.
• Do not use without the filter in place.
• Keep the product and all accessories away from fire, hot
surfaces and any flammables.
• Do not immerse the robot in water or other liquid.
• Do not use this product in areas above your body, as this may
increase the risk of personal injury.
cords for blinds or curtains, power cords, and any fragile
objects off the floor as they may entangle with the cleaning
ELECTRICAL SAFETY INSTRUCTIONS
brushes.
• Ensure the dust box is empty before use.
• WARNING: Black or dark coloured types of floors and stairs
could reduce the reliability of drop sensors. Test with your
specific floor and stairs before use.
• Never modify the charger in any way.
• The charger has been designed for a specific voltage. Always
check that the mains voltage is the same as that stated on the
rating plate.
• Before use, check the charger cord for signs of damage or
PERSONAL SAFETY
ageing.
• Do not abuse the charger cord; never carry the charger by
• The intended use is described in this manual. The use of any
accessory or attachment or the performance of any operation
with this robot other than those recommended in this
instruction manual may present a risk of personal injury.
• This robot is only intended for use by adults over the age of
18. This robot may only be used by children aged from 8 years
and above and persons with reduced physical, sensory or
mental capabilities or lack of experience and knowledge if
they have been given proper supervision or proper instruction
the cord.
• Do not over-bend the power cord or apply pressure to the
power cord with heavy or sharp objects.
• Never pull the charger cord to disconnect from a socket;
grasp the charger and pull to disconnect.
• Keep the charger cord away from hot surfaces and sharp
edges.
• Do not handle the charger, plug, adapter and wires or the
robot with wet hands.
• Do not store or charge the robot outdoors.
10
11

G G
• Unplug the charger before cleaning or maintaining. Product
contains electronic parts. Do not submerge it or spray it with
water. Clean with a dry cloth only.
• WARNING: If the battery is damaged in any way, do not attempt
to recharge it. Contact Vileda customer service address (see
last page).
• Charge the battery for 6 hours before first use. After the first
BATTERY USE AND CARE
use, charging time is about 5-6 hours.
• If the robot is not to be used for 3 months or longer, charge it
• Only use the battery supplied with the product.
• WARNING: For the purposes of recharging the battery, only
directly by the power adapter for 6 hours.
• WARNING: Only use a battery supplied by Vileda.
use the detachable supply unit (GQ12-190060-AG / GQ12190060-AB / NLB060190W1E4S58 / NLB060190W1U4S58)
SERVICE
provided with this appliance.
• Do not attempt to use the charger with any other product nor
attempt to charge this product with another charger, as this
may damage the product and the battery, and will invalidate
your guarantee.
• Only use the battery supplied with the product or provided by
the manufacturer.
• Leaks from battery cells can occur under extreme conditions.
If the liquid gets on the skin, wash it immediately with soap
and water. If the liquid gets into the eyes, flush them
• Before using the robot and after any impact, check for signs of
wear or damage.
• Do not use the robot if any part is damaged or defective.
• Repairs should only be carried out by an approved service
agent or a suitably qualified person.
• Never modify the robot in any way as this may increase the risk
of personal injury.
• Only use replacement parts or accessories provided or
recommended by Vileda.
immediately with clean water for a minimum of 10 minutes
and seek urgent medical attention.
• This product contains Lithium-Ion batteries. Do not incinerate
batteries or expose to high temperatures, as they may explode.
• When the battery pack is not in use, keep away from other
metal objects such as: paper clips, coins, keys, nails, screws
or other small metal objects that can make a connection from
one terminal to another.
• Shorting the battery terminals may cause fire.
• The battery must be removed from the robot before it is
discarded.
• The battery is to be disposed of safely and in accordance with
Environmental and Product Recycling, as per page 17 of this
manual. The battery must not be disposed of with household
waste.
• The robot must be disconnected from the mains supply when
removing the battery.
Please take page 3 in the manual for referen ce.
1. Display
1a. Silent button
1b. Home button to find
docking station and
decrease time for time
or schedule setting
1c. Time, error code and batter y
status indication
1d. Plan button
1e. Auto-cleaning button
1f. Power button
2. Dust box cover
3. Dust box incl. fine dust filter
3a. F ine dust filter
2. GETTING TO KNOW VR 201 PETPRO
3b. Filter frame
4. Maintenance brush
5. Soft bumper
6. Front bumper incl. obstacle
sensors
7. Side brushes
8. Charging socket
9. Main switch
10. Battery cover
11. M ain brush unit
11a. Main brush cover with
removal clamps
11b. Main brush
12a/12b. W heel s
13. Front wheel
14. Charging contacts
15. Drop sensors
16. Do cking station
17. C harging poles for
automated charging in
the docking station
18. LED indic ation of
docking station
19. Cable management system
20. Power supp ly socket
12
13
G G
BUTTONS, DISPLAY AND CLEANING MODES
TO TURN O N THE ROBOT, ACTIVATE THE MAIN SWITCH: "ON" (9)
1a. SILENT BU TTON
In stan dby or auto-c leaning mo de, press the SILENT button to enter the quiet cleaning mode for more comfort
while cleaning.
The robot will automatically choose the optimal cleaning pattern and reduce its noise level, by reducing
speed, brush bar rotat ion and suction power for a more quiet product perfor mance.
In silen t cleaning mode, press SILENT button to enter the standby mode.
In plan mo de: increase number when scheduling cleaning and setting time
1b. HOME BUTTON
In stan dby or operating mode, press the HOME button to find docking station and charge.
In plan mo de: decrease number when scheduling c leaning.
1c. TIME, ER ROR CODE AND BATTERY STATUS INDICATION
The numb er and letter combinations display the current time, scheduled cleaning and error codes.
The battery indication displays the remaining capacity level and battery charging status.
1d. PLAN BUT TON
You can program the cleaning time of your robot according to your needs. The robot will then automatically
star t to clean ever y day at the set time.
Step 1: In standby mod e press the PLAN and HOME button to enter the clock setting mode
Step 2: In standby mode pre ss the PLAN but ton to enter the time setting mode for daily cleaning
To clear the sc heduled cleaning tim e, press the PLAN but ton for 5 seconds
1e. AUTO-CLEANING BUTTON
In stan dby or silent mod e, press AUTO button to enter the auto cleaning mode.
The robot will automatically choose the optimal cleaning pattern, consisting of an iteration of auto, zig-zag
and spiral movement pattern.
In auto cleaning mode, pre ss the AUTO button to enter standby mode.
1f. POW ER BUTTON
Press the POWER button to switch the robot on and off. By pressing it when the robot is working, it enters
standby mode.
In stan dby mode, press POWER button to enter sleep mode.
Note: To switch off the sound of the robot press SILENT + PL AN button simultaneously
Note: When starting the robot, place it in the middle of a room or surface, at least half a metre away from an edge
with a drop.
STANDBY
Standby means, the robots main power is turned on, and the robot is ready to use. The power button is
flashing. When the robot is cleaning, press the activated button on main body to pause the robot and enter
standby mode.
SLEEP MODE
In sleep mode the robots display will turn dark (but robot is not powered off). The power but ton is pulsating
slowly.
In order to save power, you can turn the robot into sleep mode from standby mode via either of the following
methods:
• Long press “POWER” but ton on main body
• Robot will automat ically enter sleep mo de if the power is low or after 5min in standby mode
POWER OFF
To turn the dev ice off, deactivate the robot at its main switch (9).
Note: when storing the rob ot for a longer period of time, make sure the robot is sw itched off
3.3 TIME SCHEDULING
Please take page 8 in the manual for referen ce.
!
TIPS FOR EASY SCHEDULING
• The scheduling time uses the machine’s time as a referenc e. So, before scheduling, please set
the robots time c lock to be the sam e as real time.
• Once scheduled the machine, it will start cleaning at t hat time automatically, when the main sw itch
is switched on. The programed time will remain saved, even when switching the device off.
• To clear the scheduled cleaning time, press the “PLA N” button for 5 seconds.
Note: The robot can only be set when it’s in standby or charging on docking station. If the robot is in sleep mode,
long pre ss “POWER” button on main body. If the robot is in cleaning mode, pause it before scheduling.
4. MAINTENANCE
3. PRODUCT OPERATION
3.1 BATTERY CHARGING & RECHARGING
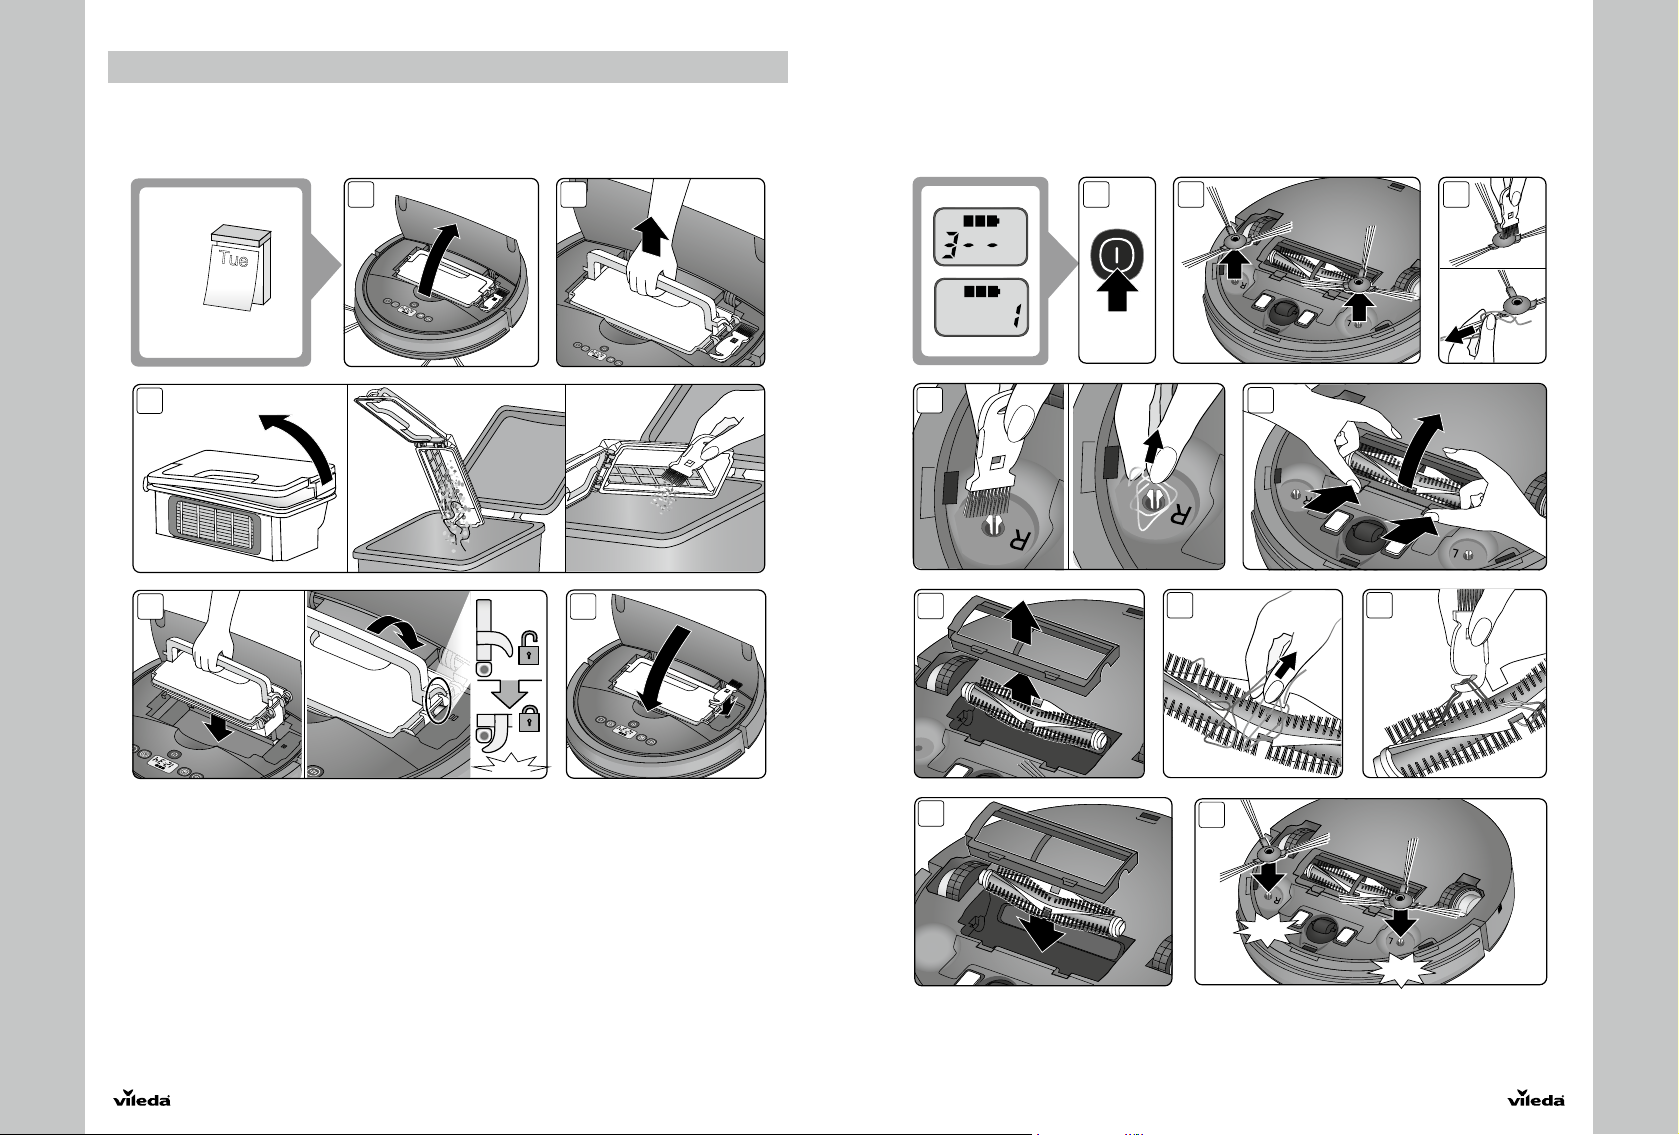
The bat tery indication (1c) is displayed in three blocks:
Three blocks illuminated: Bat tery is fully charged and full Auto and S ilent program c an be used.
Two blocks illuminated: Battery is half charged.
One block illuminated: Battery level is low. Recommended to start charging.
One block blinking: Bat tery needs to be charged. No cleaning mode possible.
TIPS TO EXTEND THE BATTERY LIFE:
!
• Before first use, ch arge the robot for 5-6 hours.
• Charge the robot as soon as batter y power is low.
• If the robot is not to be us ed for a long time, fully charge the b attery, turn the power s witch off,
remove and store i t in a cool, dry place.
• If the robot is not to be us ed for 3 months or longer, charg e it directly by the power adapter for 5-6
hours.
3.2 TURNING ON AND OFF
STARTING UP
To turn your robot on, activate the mainswitch, next to the dust box (9). You will hear a sound and the LED
display and the buttons will be illuminated.
If the plan mode is activated, the plan button w ill get illuminated as we ll.
To start the AUTO or SILENT cleaning cycle press the “AUTO” or “SILENT” mode button.
To pause the rob ot press the activate d button again.
Please take page 4-7 in the manual for referenc e
Tips for keeping the performance stable:
To keep your Vileda rob ot at the best level of per formance, it is recommended to maintain the robot regularly.
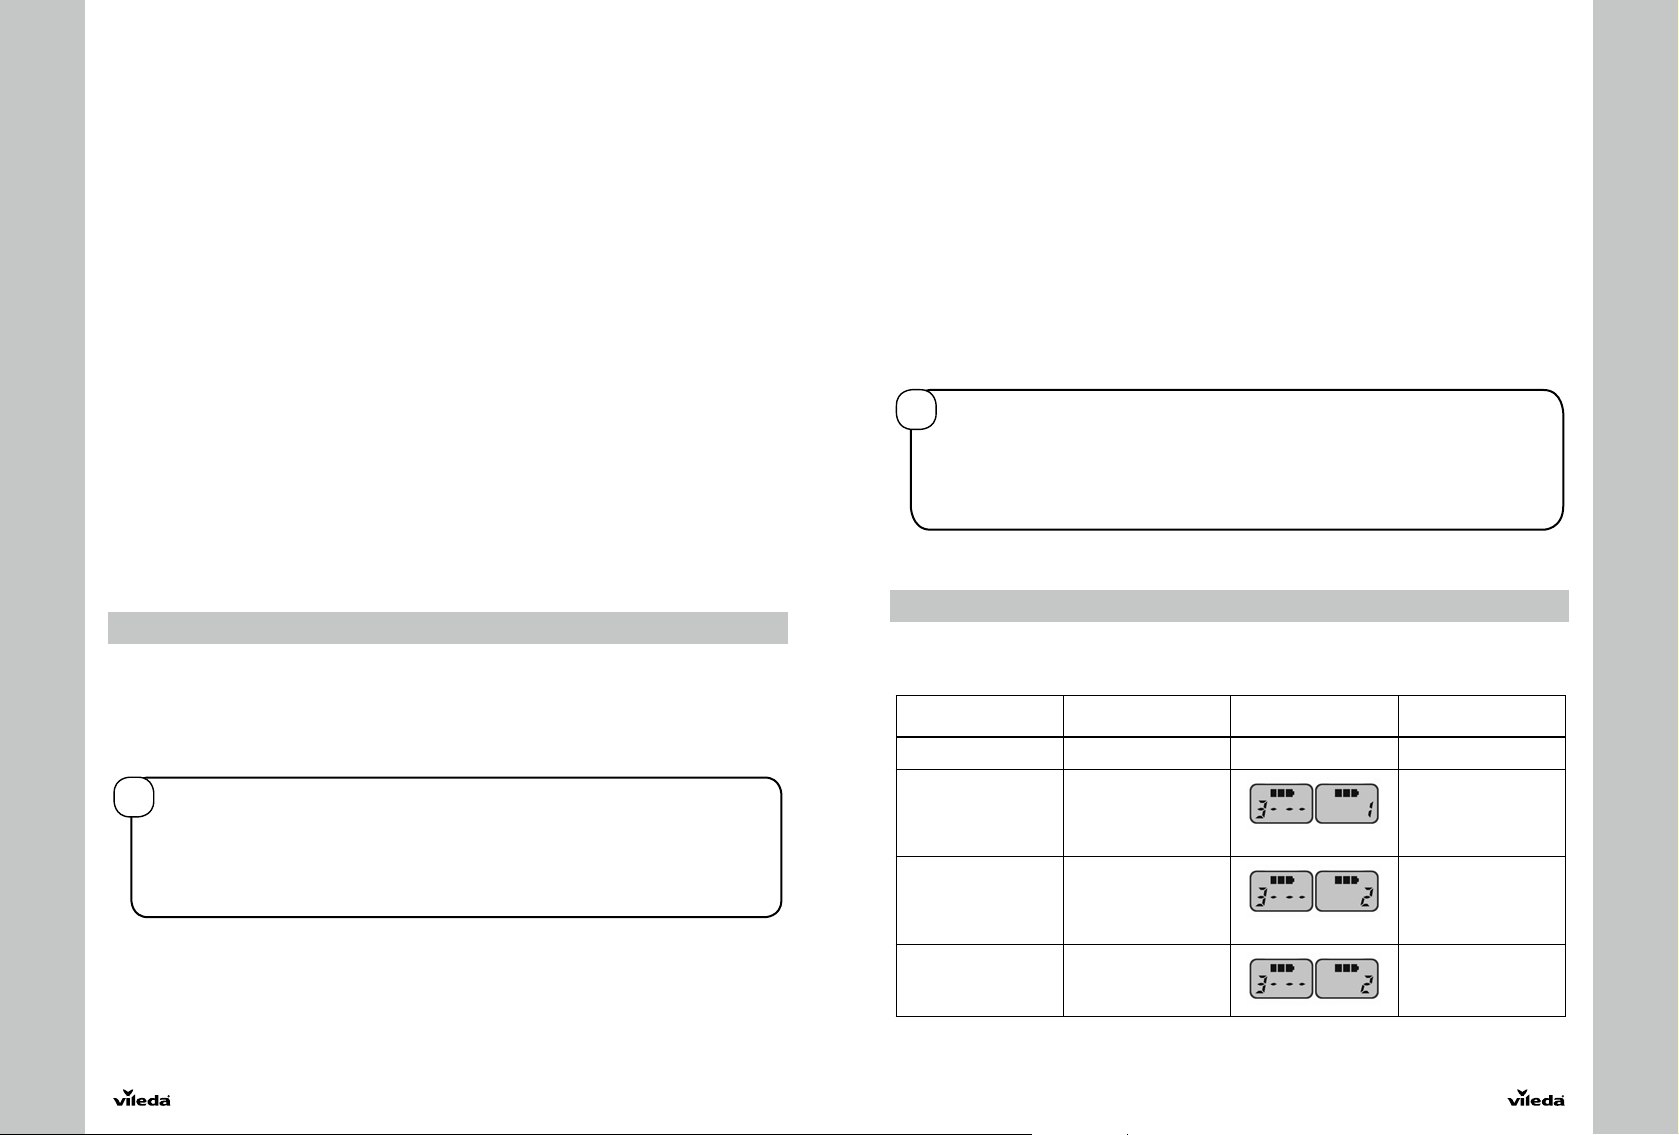
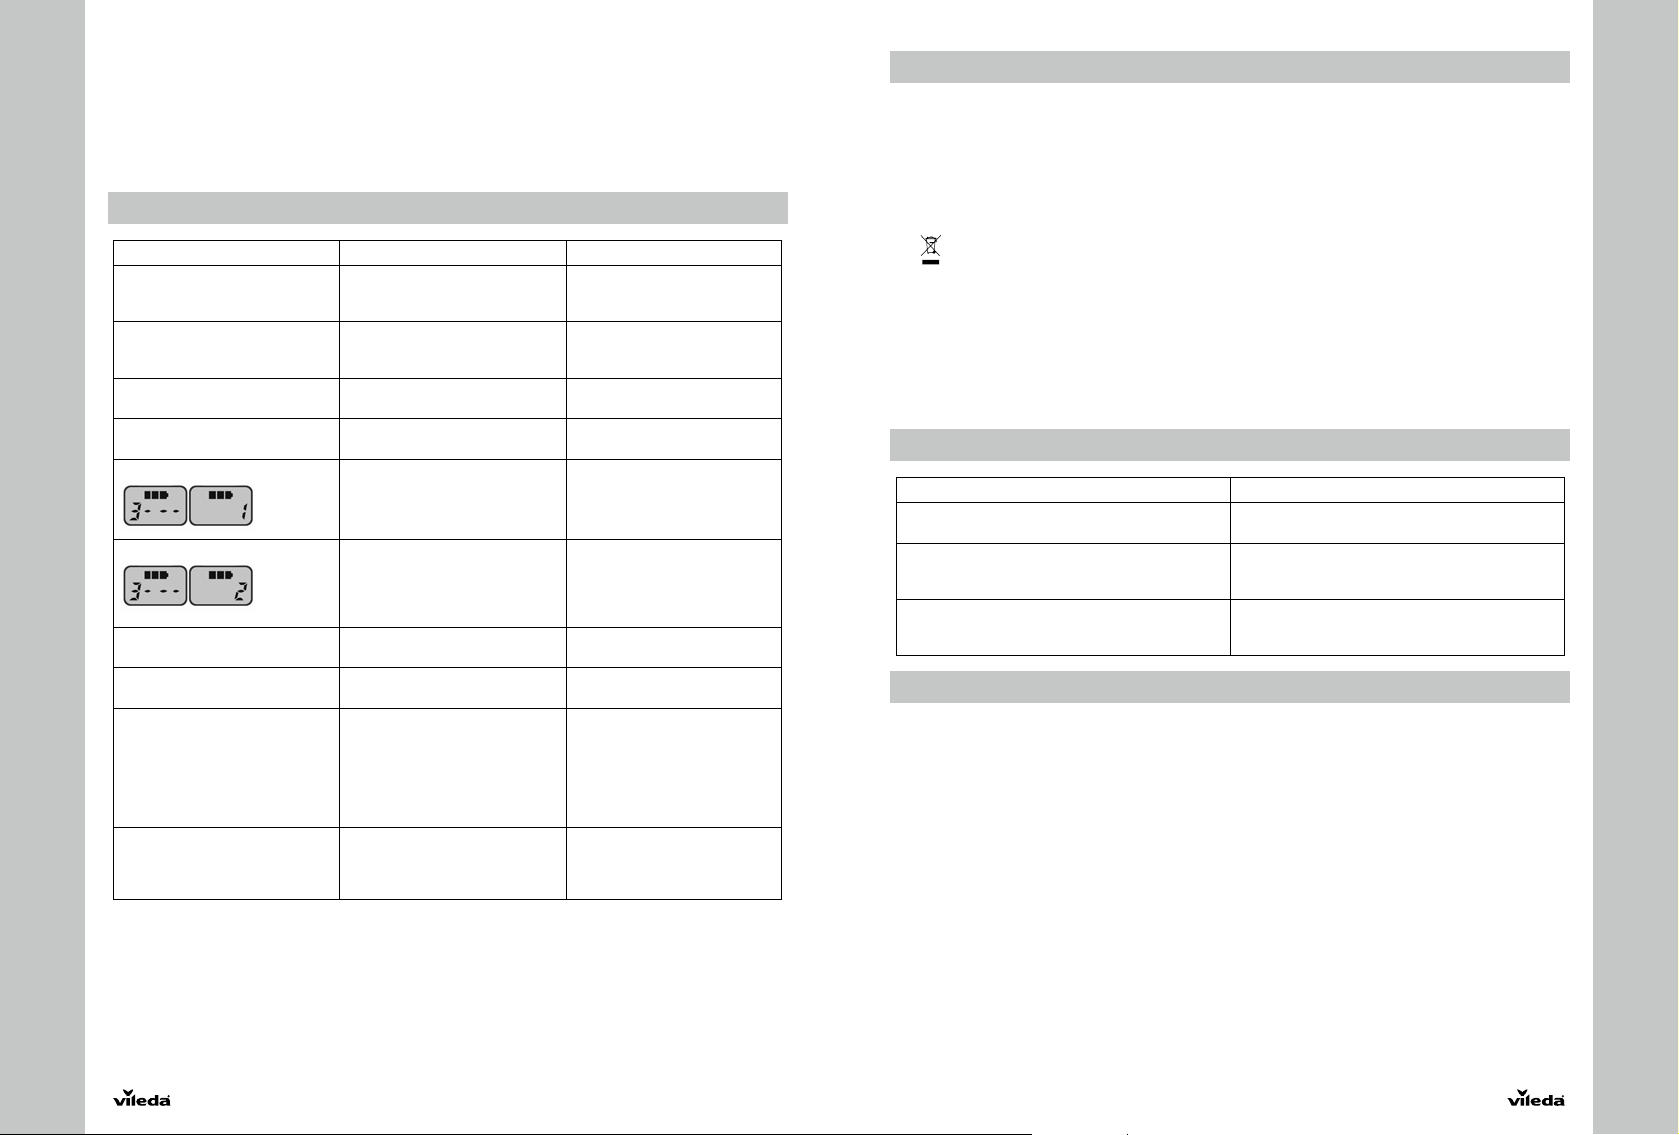
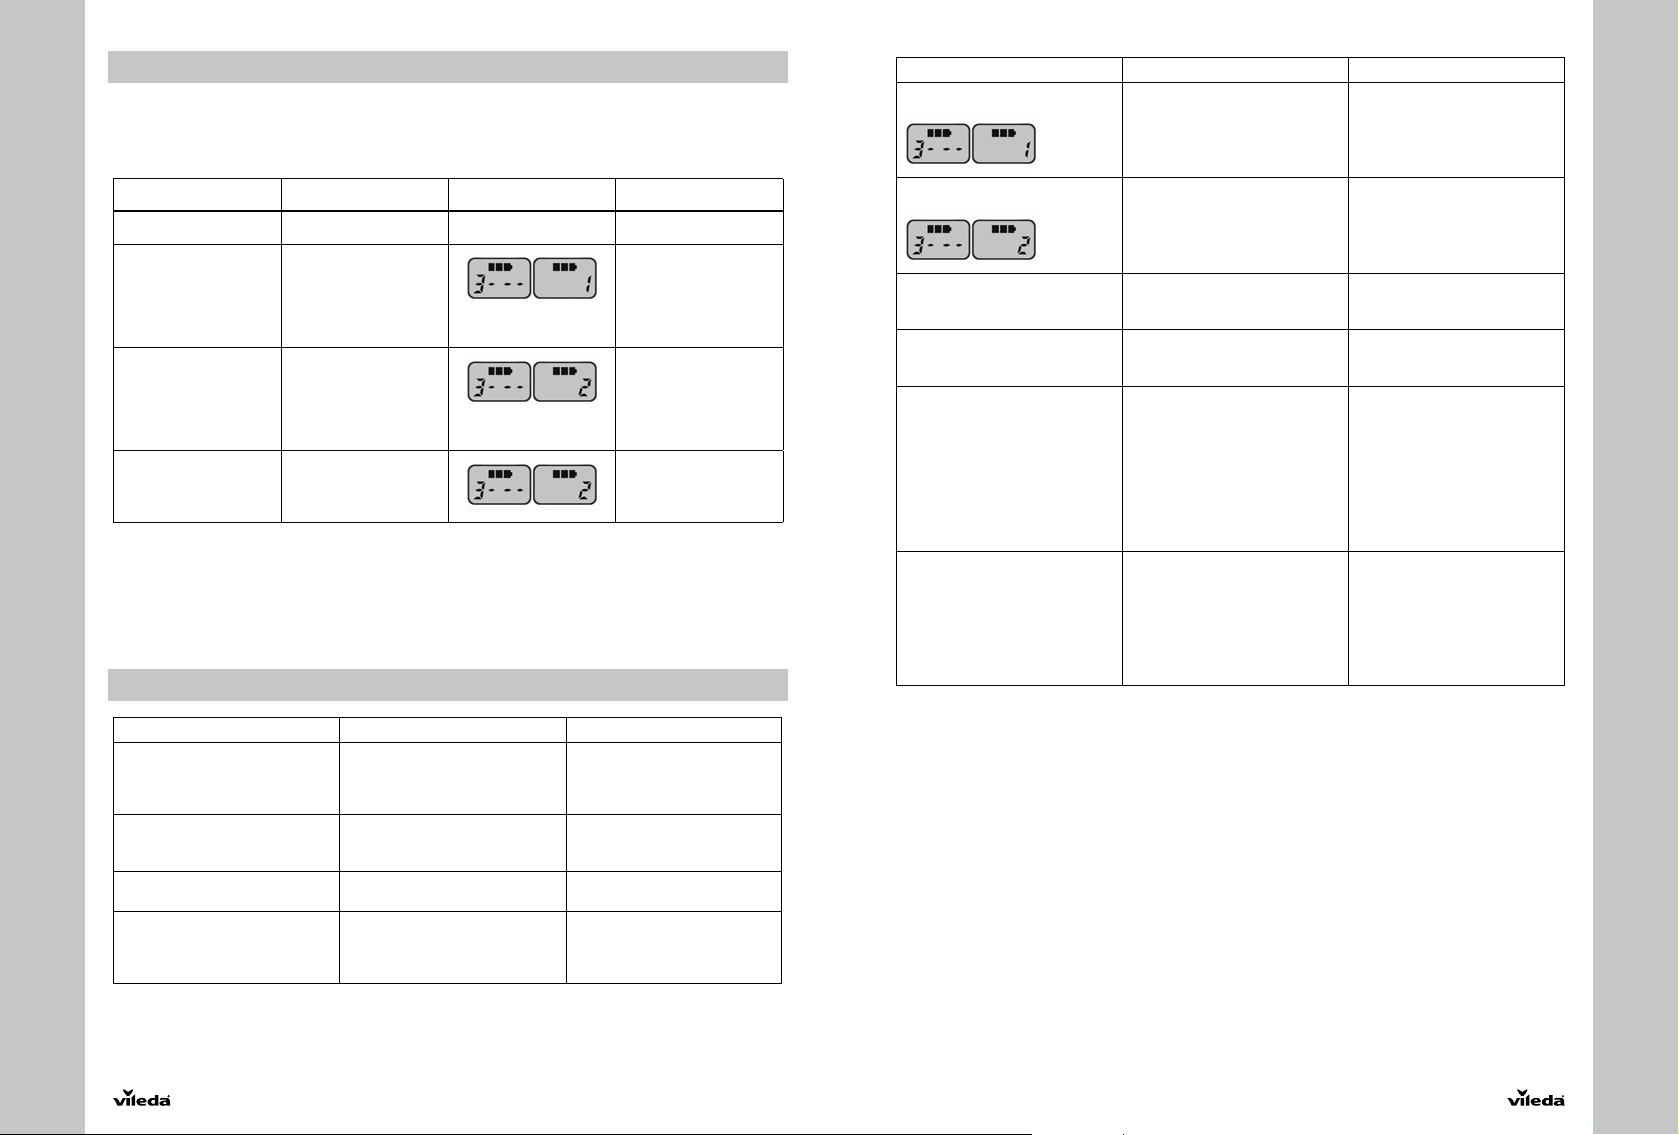
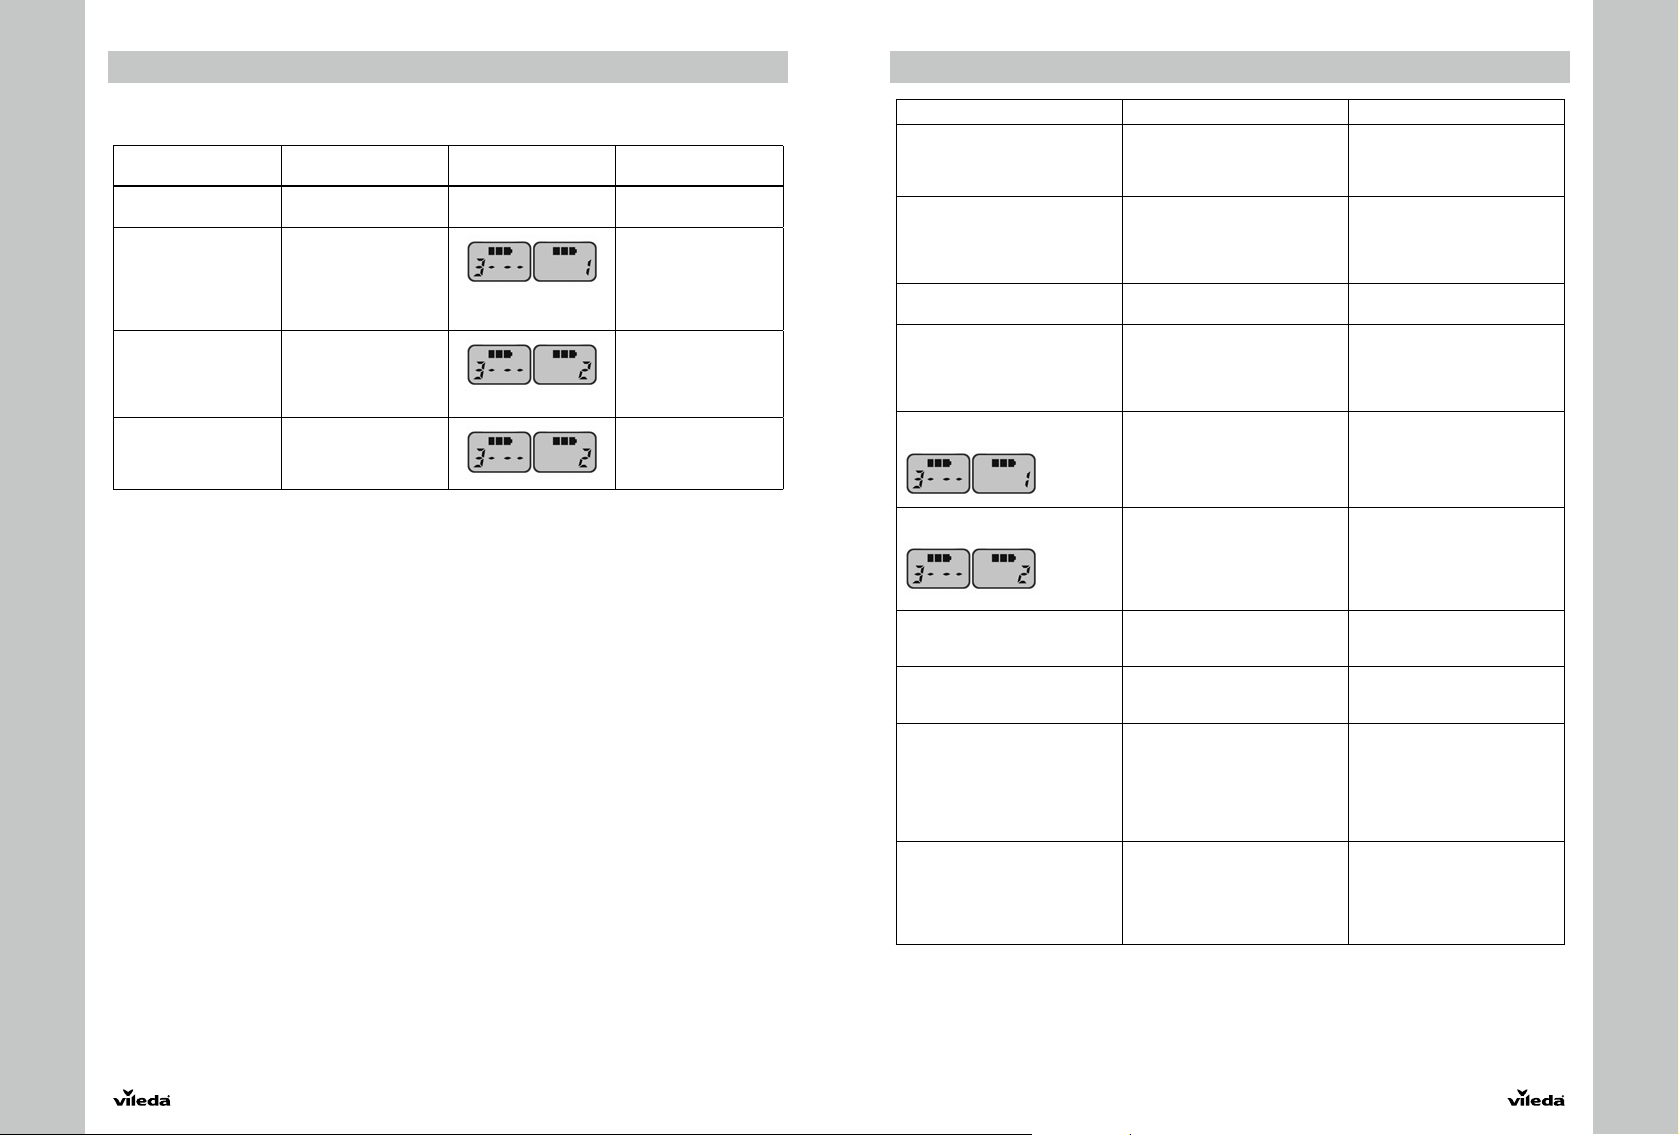
Robot Part Care Frequency Care Code Replacement
Dust box After every use — —
Side brush and
main brush
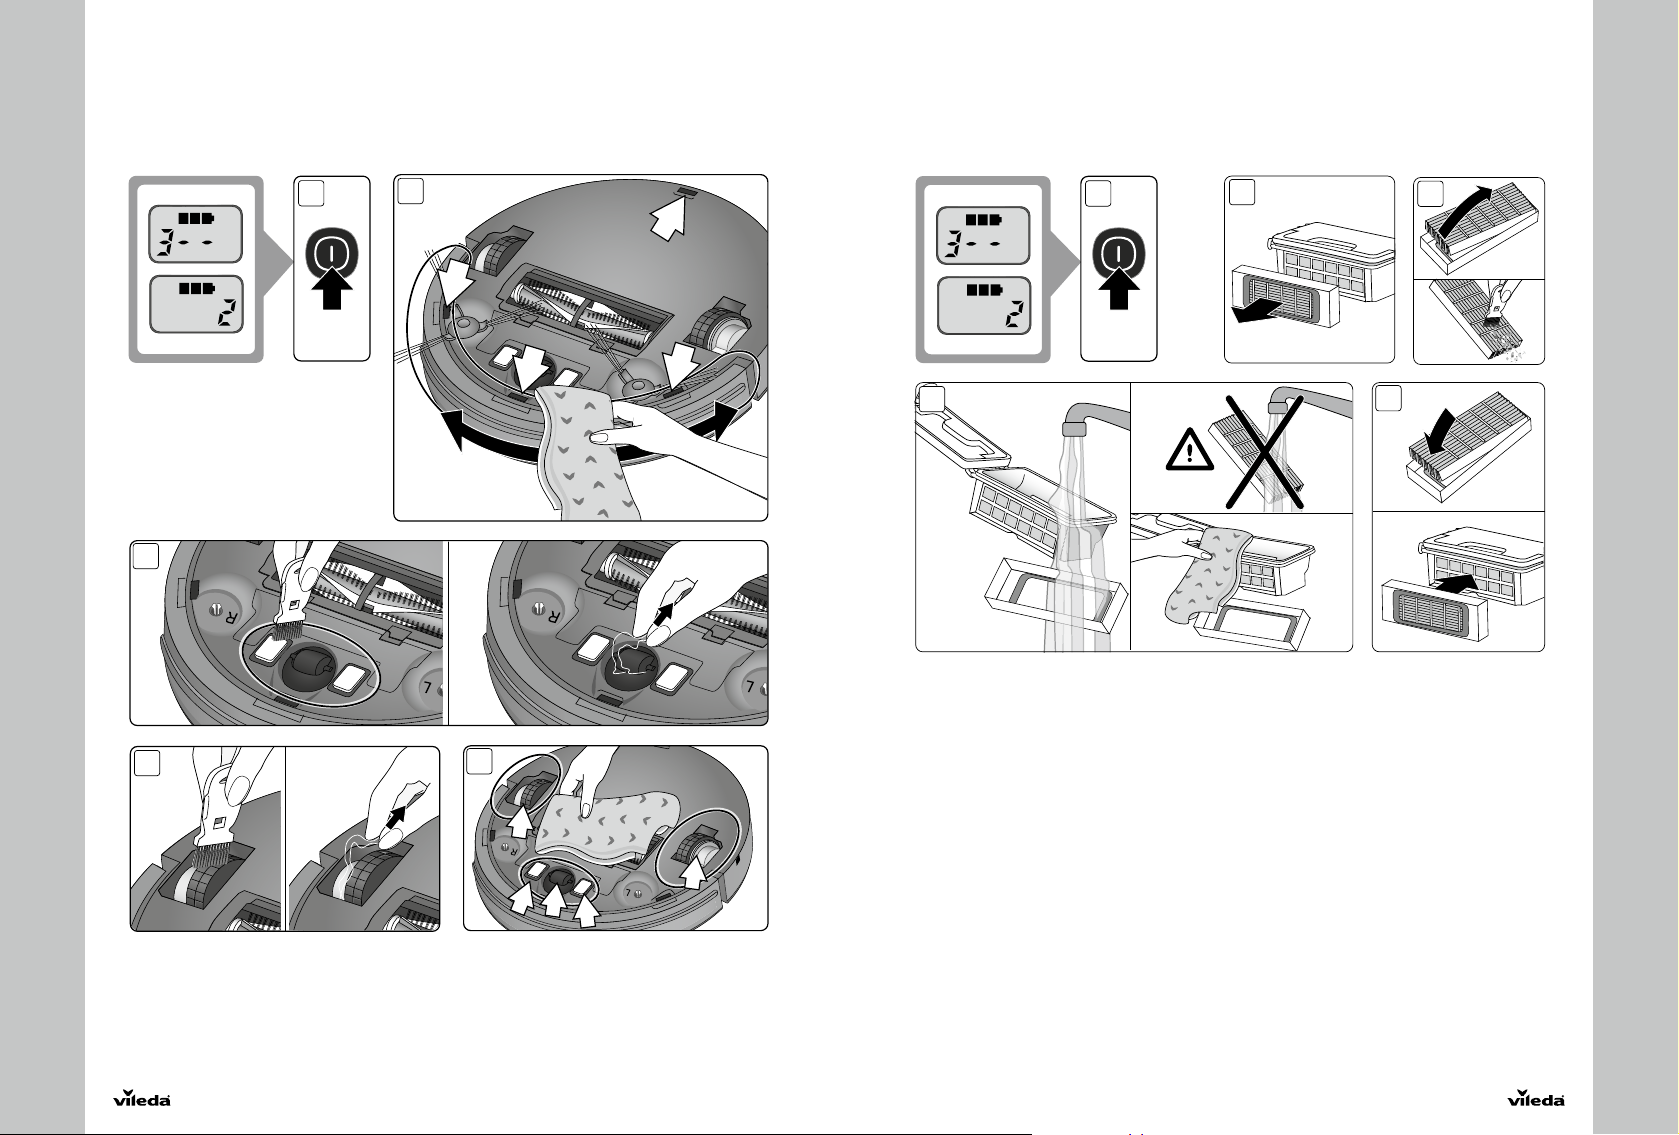
High efficiency filter Once per month (twice
Front wheel and
driving wheels
Drop sensors
Charging contacts
Once per week (twice
per week in home
with pets) and when
maintenance c ode "1" is
displayed
per month in home
with pets) and when
maintenance c ode «2» is
displayed
Once per month and
when maintenance code
"2" is displaye d
Frequency
Every 6-12 months for
the side brushes
High efficiency filter:
Every 4 months
—
14
15
G G
BATTERY REMOVAL AND REPLACEMENT
Only use a replac ement battery as supplie d by Vileda.
• Make sure the device is switched of f at the main swi tch
• Remove the screws on the battery cover with a screw driver
• Remove the battery cover
• Lift the battery and remove it f rom the housing
• Unplug the wire connector that links the battery and robot
5. TROUBLESHOOTING
Problem Possible reason Possible solution
Robot is not running • Battery is too low
Low or no suction • Dust box is full
Abnormal movement • Wheels are dirty
Low bat tery after charging or no
charging possible
Display shows the error code
Display shows the error code
Error code
“A / U / B / N”
Error code
“E / r / r / o”
Error code
“E / various / various / various”
Error code
“L / various / various / various”
If above described solutions do not work, please try switching off and on and check again.
For further help, technical advice, or to order spare or replacement parts contact Vileda (address see
last page).
• Dus t box is not inser ted
(correctly)
• Filter is blocked with dirt
• Filter is missing
• Drop sensors are dir ty
• Battery connection is not good
• Charger or battery is defective
• Main brush and side brushe s
are blocked
• Front wheel and driving wheels
are dirty/blocked
• Charging contacts are dusty
• Drop sensors are dusty
• Fine dust filter is blocked
• Dus t box not (correctl y) inser ted • Remove and reassemble
• Battery connection is not good. • Contact the V ileda serv ice
• Dev ice off the ground
• Sensors jammed or dirt y
• Motors overload or jammed • Check if fan opening is free
• Recharge the battery for 6
hours
• Insert the dust box
• Empty dus t box
• Clean the filter with brush
• Put filter bac k in place
• Clean wheels
• Clean drop sensors
• Contact the Vileda ser vice
(address see last page)
• Clean main brush and
side brushes as described in
the chapter “Maintenance”
• Clean the respect ive parts as
described in the chapter
“Maintenance”
dust box in the robot
(address see last page)
• Put ro bot on solid ground
• Check sensitivity of the front
bumper
• Clean bottom anti-drop
sensor lens
• Clean front bumper sensor lens
and clean dust box
• Check if wheels or brush unit
is stuck or wired by obst acles
6. ENVIRONMENTAL AND PRODUCT RECYCLING
The Vileda vacuum cleaning robot VR 201 PetPro fulfils the EU directive 2012/19/EC, covering electrical and
electronic appliances and the management of its disposal.
The packaging material is entirely recyclable, and marked with the recycling symbol. Follow local regulations for
scrap ping. Keep the p ackaging ma terials (pla stic bags, p olysty rene part s, etc.) out of childr en’s reach, as they are
potentially dangerous.
When the product has reached the end of its life please do not dispose of it with general household waste. To
preven t possib le harm to th e environm ent or huma n health fr om uncont rolled was te dispo sal, recyc le it respo nsibly
to promote the sus tainable reuse of material re sources.
symbo l identifie s the Vileda VR 2 01 PetPro as a produc t submitte d to the regime of s elective e lectrica l ap-
The
pliance recycling collection.
The product co ntains a Li-Io n battery w hich should no t be disposed o f with general househ old waste. Dep osit the
battery in an official collection point for its recycling.
Batteries can be detrimental for the environment and can explode if they are exposed to high temperatures. The
violation of these precautions could cause fire and / or serio us injuries.
For more d etailed inf ormation ab out treatme nt, recover y and recycli ng of this robo t, please con tact your lo cal city
office, your house hold waste dis posal serv ice or the shop w here you purchased the product.
For example, disposal of the robot and any part of i t may need to be take n to a Designated Collection Facilit y.
7. PRODUCT SPECIFICATION
Model 0769-02
Mechanical Specifications Size 32 x 8 cm
Electrical Specifications Rated Voltage 10,8 V
Charger Specifications Rated Input Volt age 100-240 V AC
Weight ~2.2 kg
Batte ry Li-Ion 10,8 V / 2600 mAh
Charging Time 5-6 h
Rated Output Vol tage 19 V DC
Rated Output Current 600 mA
8. VILEDA PRODUCT GUARANTEE
A. SCOPE
1. Freudenberg Household Product s LP (“FHP”) guarantees the produc t to be free from defects in materials and
workm anship a for period of t wo years from the date of purchase.
2. If the product becomes faulty for any reason for which FHP is responsible within two years from the date
of purchase (“the Guarantee Period”), FHP or an authorised service network member in the Guarantee
Area (meaning any where within the United Kingdom, including the Channel Islands and the Isle of Man and
the Republic of Ireland) will repair or replace it subject to the terms and limitations below. FHP may replace
defec tive produc ts or part s with new or re furbished p roducts or p arts. All p roducts and p arts repl aced becom e
the prop erty of FHP.
3. This guarantee does not cover:
a) periodic maintenance or repa ir or parts replacement due to wear and tear;
b) consumables (namely components that are expected to require necessary periodic replacement during
the life time of a product such as pads);
c) damage or defects caused by use, operation or treatment of the product inconsistent with normal
personal or domestic use;
d) damage or deterioration in the c ondition or pe rformance of the product arising as a result of:
I. misuse, including:
- treatment resulting in physical, cosmetic or surface damage to or d eterioration in product;
- failure to install or use the product for its normal purpose or in accordance with FHP’s instructions
on installation or use;
16
17
G
- failure to maint ain the product in accordance with FHP’s instructions on maintenan ce;
- installation or use of the product in a manner inconsistent with the technical or safety laws or
standards in the country where it is installed or used;
II. use of t he product wi th access ories, peri pheral equi pment and othe r products o f a type, cond ition and
standard other than prescribed by FHP;
III. repair or attempted repair by persons who are not FHP or authorised service network members;
IV. accidents, fire, liquids, chemicals, other substances, flooding, vibrations, excessive heat, improper
ventilation, power surges, excess or incorrect supply or input voltage, radiation, electrostatic discharges
including lighting, other external forces and impacts; or
V. any event or circumstances beyond the reasonable control of FHP.
B. TERMS
1. Gu arantee ser vices wil l be provided o nly if the orig inal invoice o r sales rece ipt (indicatin g the date of purc hase,
model name and dealer’s name) is presented with the defective product within the Guarantee Period. FHP
may refuse free-of-charge guarantee service if these documents are not presented or if they are incomplete
or illegible. This Guarantee will not apply if the model name or serial number on the product has been altered,
deleted, removed or made illegible.
2. Except where FHP has a legal duty to reimburse them, this Guarantee does not cover transport costs or any
risks associated with the transportation of the product to and from FHP.
3. If FHP or one of its authorised service network members carries out a diagnostic test on the product and that
test demonstrates that the product is working properly and no hardware fault is present, you will not be entitled
to a repair under this Guarantee. In that event, you will be liable to pay for any repairs to rectify the defect and
the cost of the diagnostic test.
C. EXCLUSIONS AND LIMITATIONS
1. E xcept as stat ed above, FHP ma kes no guarante e (expre ss, implied, s tatutory o r otherwi se) regarding pro duct
quality, performance, accuracy, reliability, fitness for a particular purpose, or otherwise.
2. FHP does not take responsibility for any damage caused by the incorrect use of the product. Save as set out
elsewhere in this Guarantee, the responsibility of FHP will not exceed the purchase price of the product. If you
have any doubts referring to the correct use of the product or in relation to this Guarantee, please call Vileda
Customer Service.
3. Nothing in this Guarantee is intended to restrict or limit FHP’s liability in any way in which it would be unlaw ful
to do so, including for death or personal injury caused by FHP’s negligence, or damage to private propert y
caused by the goods prov ing to be defective while in the consum er’s use as a result of FHP’s negligence or for
defective products under the Consumer Protection Act 1987.
D. YOUR LEGAL RIGHTS RESERVED
This Guarantee is in addition to, and does not affect, your legal rights in relation to goods that are faulty or not
as described. All products will be provided in accordance with the contract. Further advice relating to your legal
rights can be obtained from your local Citizens Advice Bureau or Trading Standards Office. You may assert any
rights you have at your sole discretion.
E. YOUR GUARANTOR
The Guarantee for this product is provided and will be honoured by Freudenberg Household Products LP,
2 Chichester Street, R ochdale, Lan cashire, OL16 2AX. ww w.vileda.com/uk Tel: 0345 7697356.
Vielen Dank, dass Sie sich für unseren neuen Saugroboter Vileda VR 201 PetPro entschieden
haben. Ab s ofort steht Ihnen mit dem Vileda V R 201 PetPro ein P artner in der täglichen B odenreinigung zur Verfügung. Er hilft Ihnen Staub, Schmutz und sogar Tierhaare von Ihren Böden
zu entfernen, sodass Sie dies nicht mehr selbst erledigen müssen.
INHALT
1. ALLGEMEINE WARNHINWEISE 19
2. KENNENLERNEN DES SAUGROBOTERS 24
3. BEDIENUNG DES GE RÄTS VR 201 PETPRO 25
4. WARTUNG 26
5. FEHLERBEHEBUNG 26
6. UMWE LT SCHUTZ UND E NTSORGUNG 28
7. TECHNISCHE DATEN 28
8. VILEDA PRODUKTGARANTIE 29
1. ALLGEMEINE WARNHINWEISE
WICHTIG
Lesen Sie vor Gebrauch die Anleitung sorgfältig durch.
Bewahren Sie die Anleitung zum Nachschlagen auf.
WARNUNG
V
erwenden Sie den Roboter ausschließlich wie in dieser
Anleitung beschrieben. Eine Nichtbefolgung der nachfolgend
aufgeführten Anweisungen kann zu Stromschlag, Feuer und/
oder ernsthaften Verletzungen führen.
Bei der Nutzung aller elektrischen Roboter müssen die
grundsätzlichen nachfolgenden Sicherheitsmaßnahmen stets
befolgt werden, um das Risiko eines Feuers, Stromschlags,
auslaufender Akkus oder von Körperverletzungen zu reduzieren.
D
18
19

D D
NUTZUNGSEINSCHRÄNKUNGEN
• Vor dem Start des Roboters das Gerät immer in der Mitte des
Raumes oder der zu reinigenden Oberfläche platzieren,
mindestens 50 cm entfernt von jeglichen Sturzkanten.
• Ausschließlich in geschlossenen Räumen verwenden. Nicht im
Freien oder auf dem Balkon einsetzen.
• Das Gerät ist nur für den Hausgebrauch bestimmt.
• Der Roboter ist kein Spielzeug. Stellen oder setzen Sie sich nicht
auf den Roboter. Kleine Kinder oder Haustiere müssen, während
der Roboter reinigt, beaufsichtigt werden.
• Legen sie keine schweren oder scharfen Gegenstände auf den Roboter
• Verhindern Sie, dass der Roboter entflammbare, brennende
oder rauchende Gegenstände aufsammelt.
• Verwenden Sie den Roboter nicht, um nasse Gegenstände
aufzusammeln.
• Den Roboter nicht auf langflorigen Teppichen oder nassen
Böden, wie bspw. im Bad oder Waschraum einsetzen.
• Verwenden Sie den Roboter bei einer Raumtemperatur zwischen
15°C und 35°C. Verwenden Sie das Gerät nicht bei hohen
Umgebungstemperaturen und lassen Sie es nicht über lange
Zeit direktem Sonnenlicht ausgesetzt.
• Entfernen Sie vor dem Gebrauch alle Gegenstände wie Kleidung,
Papier, Zugschnüre von Vorhängen oder Gardinen, Stromkabel
und alle zerbrechlichen Gegenstände vom Boden, da sie sich in
den Reinigungsbürsten des Roboters verfangen können.
• Dieses Gerät ist nur für den Gebrauch durch Erwachsene über
18 Jahren. Das Gerät kann von Kindern ab 8 Jahren sowie von
Personen mit reduzierten physischen, sensorischen oder
mentalen Fähigkeiten oder Mangel an Erfahrung und/oder
Wissen benutzt werden, wenn sie beaufsichtigt oder bezüglich
des sicheren Gebrauchs des Gerätes unterwiesen wurden und
die daraus resultierenden Gefahren verstanden haben.
• Kinder dürfen nicht mit dem Gerät spielen.
• Kinder dürfen das Gerät nicht als Spielzeug verwenden und
das Gerät ausschließlich in Übereinstimmung mit dem
Verwendungszweck nutzen.
• Dieses Gerät enthält Batterien, die nur von einer qualifizierten
Person ausgetauscht werden können.
• Das Reinigen und die Wartung des Geräts darf nicht von
Kindern ohne Beaufsichtigung durchgeführt werden.
• An einem trockenen Ort aufbewahren.
• An einem für Kinder unzugänglichen Ort aufbewahren.
• Das Gerät darf nur mit den vom Hersteller empfohlenen
Zubehörteilen verwendet werden.
• Das Gerät darf nicht ohne Filter betrieben werden.
• Halten Sie das Gerät und das gesamte Zubehör von Feuer,
heißen Oberflächen oder brennbaren Materialien fern.
• Das Gerät nicht in Wasser oder Flüssigkeiten tauchen.
• Nutzen Sie das Gerät nicht in Regionen oberhalb Ihres Körpers
um Personenschäden durch Fallen des Geräts zu vermeiden
• Stellen Sie sicher, dass der Schmutzbehälter vor der Benutzung leer ist.
• WARNUNG: Schwarze oder dunkle Böden und Treppen können
das zuverlässige Funktionieren der Sensoren beeinflussen.
Prüfen Sie vor dem Gebrauch, ob der Roboter für den Einsatz
auf Ihrem Boden geeignet ist.
ANWEISUNGEN ZUR ELEKTRISCHEN SICHERHEIT
• Am Ladegerät dür fen keinerlei Änderungen vorgenommen werden.
• Das Netzteil ist für eine bestimmte Spannung ausgelegt.
Überprüfen Sie stets, ob die Netzspannung der auf dem
Typenschild angegebenen Betriebsspannung entspricht.
PERSÖNLICHE SICHERHEIT
• Der Verwendungszweck wird in dieser Anleitung beschrieben.
Die Verwendung von anderem Zubehör oder Zusatzteilen
sowie der Einsatz des Geräts zu anderen als in dieser Anleitung
beschriebenen Zwecken kann zu Körperverletzungen führen.
Kinder müssen beaufsichtigt werden, um sicherzustellen, dass
sie das Gerät nicht als Spielzeug verwenden.
• Prüfen Sie vor dem Gebrauch, ob das Ladekabel Spuren von
Beschädigungen oder Alterung aufweist.
• Missbrauchen Sie nicht das Ladekabel; tragen Sie das Ladegerät
niemals am Kabel.
• Überdehnen Sie das Ladekabel nicht oder bringen Sie das
Ladekabel nicht mit besonders schweren oder scharfen
Objekten in Berührung.
20
21

D D
• Ziehen Sie niemals am Kabel, um das Ladegerät aus der
Steckdose zu ziehen; sondern halten Sie das Ladegerät fest,
um es aus der Steckdose zu ziehen.
• Halten Sie das Ladekabel von heißen Oberflächen und
scharfen Kanten fern.
• Berühren Sie das Ladegerät, den Stecker oder den Roboter
niemals mit nassen Händen.
• Lagern oder Laden Sie das Gerät nicht im Freien.
• Vor dem Reinigen oder der Wartung des Geräts muss der
Stecker aus der Steckdose gezogen werden. Das Gerät
beinhaltet elektronische Bestandteile. Tauchen oder
besprühen Sie das Gerät niemals mit Wasser. Reinigen Sie es
ausschließlich mit einem trockenen Tuch.
Objekte, die eine Verbindung zwischen den Polen des Akkus
herstellen könnten.
• Das Kurzschließen der Akkupole kann Feuer auslösen.
• Bevor das Gerät entsorgt wird, müssen die Akkus aus dem
Gerät entfernt werden.
• Die Akkus müssen sicher und gemäß Punkt Umweltschutz und
Produkt-Recycling auf Seite 27 dieser Anleitung entsorgt werden.
Die Akkus dürfen nicht über den Hausmüll entsorgt werden.
• Vor dem Herausnehmen der Akkus muss das Gerät vom Netz
genommen werden.
• WARNUNG: Wenn der Akku in irgendeiner Weise beschädigt ist,
versuchen Sie nicht, ihn aufzuladen. Kontaktieren Sie den ViledaKundendienst (Adresse auf der letzten Seite).
• Vor der ersten Nutzung des Geräts den Akku 6 Stunden aufladen.
VERWENDUNG UND PFLEGE DES AKKUS
• Verwenden Sie ausschließlich das mit dem Gerät mitgelieferte
Ladegerät.
Nach der ersten Nutzung beträgt die Ladezeit 5-6 Stunden.
• Sollte der Roboter länger als 3 Monate nicht genutzt worden sein,
laden Sie ihn vor der nächsten Nutzung für 5-6 Stunden auf.
• WARNUNG: Verwenden Sie zum Aufladen des Akkus
ausschließlich das mitgelieferte Ladegerät mit der folgenden
Modellnummer (GQ12-190060-AG / GQ12-190060-AB /
WARNUNG:
Wechseln Sie die Akkus nur durch von Vileda
gelieferte Akkus aus.
NLB060190W1E4S58 / NLB060190W1U4S58).
• Verwenden Sie das Ladegerät nicht für andere Geräte und
laden Sie dieses Gerät nicht mit anderen Ladegeräten auf, da
dadurch das Gerät und der Akku beschädigt werden können
und Sie Ihre Garantie verlieren.
• Verwenden Sie ausschließlich den mitgelieferten oder einen
vom Hersteller zur Verfügung gestellten Akku.
• Unter extremen Bedingungen kann die Akkuflüssigkeit aus
den Akkus auslaufen. Falls Akkuflüssigkeit auf die Haut
gelangt, sofort mit Wasser und Seife abwaschen. Wenn die
Akkuflüssigkeit in die Augen gelangt, die Augen sofort
mindestens 10 Minuten mit sauberen Wasser spülen und
einen Arzt aufsuchen.
SERVICE
• Vor dem Gebrauch des Gerätes und nach allen Stoßeinwirkungen
das Gerät auf Verschleiß oder Beschädigungen prüfen.
• Ein Gerät mit beschädigten oder defekten Teilen darf nicht
verwendet werden.
• Reparaturen dürfen nur von einer zugelassenen
Kundendienstvertretung oder von entsprechend qualifizierten
Personen durchgeführt werden.
• Nehmen Sie keine Änderungen an dem Gerät vor, da dadurch
das Risiko von Körperverletzungen erhöht wird.
• Verwenden Sie ausschließlich von Vileda geliefertes oder
empfohlenes Zubehör und Ersatzteile.
• Dieses Gerät enthält Lithium-Ionen-Akkus. Die Akkus niemals
ins Feuer werfen oder hohen Temperaturen aussetzen. Es
besteht Explosionsgefahr.
• Sollte der Akku nicht im Gerät eingesetzt sein, halten Sie ihn
von anderen metallischen Objekten fern. Bspw. Büroklammern,
Münzen, Schlüssel, Schrauben oder andere kleine metallische
22
23

D D
siehe Seite 3 der Bedienungsanleitung.
1. Display
1a. S tart/Stopp des Silent Reinigungsmodus
1b. Home Taste, zum Finden der
Ladestation und Verringern
der Uhrzeit / geplanten
Reinigungszeit
1c. Zeit-, Fehlermeldungs- und
Batteriestandsanzeige
1d. Plan Taste, zum Einstellen
der geplanten Reinigungszeit
1e. Start/Stopp des Auto Reinigungsmodus
1f. Betriebstaste
2. Ab deckung des
Schmutzbehälters
BEDIENUNGSKNÖPFE, DISPLAY UND REINIGUNGSMODI
SCHALTEN SIE DE N HAUPTSCHALTER AUF "ON", UM DEN ROBOTE R EINZUSCHALTEN (9)
1a. SILENT TASTE
Im Standby oder Auto-Reinigungs-Modus drücken Sie die Silent Taste um für einen höheren
Reinigungskomfort den Silent Modus zu aktivieren.
Der Roboter wird automatisch den optimalen Bewegungsablauf wählen und gleichzeitig seinen
Geräuschpegel durch geringere Geschwindigkeit und Saugkraft verringern, um für eine leisere
Produktleistung zu sorgen.
Im Silent Modus drücken S ie die Silent Taste, um in den St andby Modus zu gelangen.
Im Planungsmodus: Durch Drücken der Home Taste verringern Sie die Zahl bei der Einstellung der
Reinigungszeit und Uhrzeit.
Um die geplante Reinigungsze it zu löschen, drücken Sie die PL AN Taste für 5 Sekunden.
1b. HOME TASTE
Im Standby oder Betriebsmodus drücken Sie die Home Taste um die Ladestation zu finden und das Gerät
aufzuladen. Im Planungsmodus: Durch Drücken der Plan Taste verringern Sie die Zahl bei der Einstellung
der Reinigungszeit und Uhrzeit.
1c. ZEIT-, FEHLERMELDUNGS- UND BATTERIESTANDSANZEIGE
Die Ladestandsanzeige zeigt die verbleibende Akku-Kapazität sowie den Ak ku-Ladest and an.
1d. PLAN TASTE, ZUM EINSTELLEN DER GEPLANTEN REINIGUNGSZEIT
Sie können die Reinigungszeit Ihres Roboters entsprechend Ihrer Bedürfnisse programmieren. Der Roboter
wird dann täglich zur eingestellten Zeit automatisch anfangen zu reinigen.
Schr itt 1: Im Standby M odus drücken S ie die Planung s- und Hometa ste, um in der Mod us zur Einste llung der
Uhrzeit zu gelangen.
Schritt 2: Im Standby Modus drücken Sie die Planungstaste, um in den Modus zur Zeitprogrammierung für
die tägliche Reinigung zu gelangen.
Um die geplante Reinigungsze it zu löschen, drücken Sie die PL AN Taste für 5 Sekunden.
1e. START/STOPP DES AUTO-REINIGUNGSMODUS
Im Standby Modus drücken Sie die Auto-Reinigungs-Taste um in den automatischen Reinigungsmodus zu gelangen.
Der Roboter wird automatisch das optimale Reinigungsmuster wählen, das aus einer Iteration von Auto-,
Zickzack- und Spiral-Bewegungsmustern besteht.
Im automatischen Reinigungsmodus drücken Sie die AutoTaste, um in den Standby Modus zu gelangen.
1f. BETRIEBSTASTE
Drücken Sie die Betriebstaste, um den Roboter ein- und auszuschalten.
Durch Drücken während ein Reinigungsmodus aktiviert ist, gelangen Sie in den Standby Modus.
Im Standby Modus drücken Sie die Betriebstaste lange, um den Energiespar-Modus zu aktivieren.
Hinweis: Um Ton des Roboters abzustellen, drücken Sie die Silent- und Planungstaste gleichzeitig.
2. KENNENLERNEN DES SAUGROBOTERS
3. Schmutzbehälter inkl.
Feinstaubfilter
3a. Feinstaubfilter
3b. Filterrahmen
4. Wartungsbürste
5. Weiche Stoßleiste
6. Vordere Stoßleiste inkl.
Hindernissensoren
7. Seitenbürsten
8. Ladebuchse
9. Hauptschalter
10. Akkuabdeckung
11. Hauptbürsten Einheit
Die Zahlen- und Buchstabenkombinationen zeigen die aktuelle Uhrzeit, geplante Reinigungszeit und Fehlercodes an.
11a. Abdeckung der Hauptbürste
mit Halterungsclips
11b. H auptbürste
12a/12b. Antriebsräder
13. M ittelr ad
14. Ladekontak te
15. Treppensensoren
16. Ladestation
17. L adekontak te für
automatisches Laden in der
Ladestation
18. LED Anzeige der Ladestation
19. Kabelführungssystem
20. Ladebuchse
3.1 AUFLADEN DES AKKUS
Die Akkuanzeige (1c) ist in 3 Blöcke aufgeteilt
Drei Blöcke sind beleuchtet: Der Akku ist vollständig aufgeladen und sowohl das Auto-Programm, als auch
der Silent Modus können genutzt werden.
Zwei Blöcke sind b eleuchtet: De r Akku ist zur Hälfte geladen.
Ein Block beleuchtet: Der Akkustand ist niedrig. Es wird empfohlen,den Ladevorgang zu starten.
Ein Block blinkend: Der Akkustand ist sehr niedrig. Kein Reinigen mehr möglich.
TIPPS ZUM VERLÄNGERN DER AKKULEBENSDAUER:
!
• Laden Sie den Akku vor der ersten Verwendung für 5-6 Stunden auf.
• Laden Sie den Akku unverzüglich, sobald der Akkustand niedrig angezeigt wird.
• Sollten Sie den Roboter für längere Zeit nicht verwenden, laden Sie den Akku vorher vollständig
auf, schalten Sie das Gerät aus und lagern Sie den Roboter an einem kühlen, trockenen Ort.
• Sollte der R oboter für mehr als 3 Monate nicht verwendet worden sein, lade n Sie ihn vor der
ersten Nutzung für 5- 6 Stunden auf.
3.2 AN UND AUSSCHALTEN DES GERÄTS
INBETRIEBNAHME
Um Ihren Saugroboter einzuschalten, schalten Sie zunächst den Hauptschalter neben dem Schmutzbehälter an (9).
Die Bereitschaft wird durch einen Ton bestätigt und LED Anzeige und Knöpfe beleuchtet.
Wenn die geplante Reinigung programmiert ist, wird auch di e Plan Taste beleuchtet.
Um den Auto- oder Silent- Reinigungsmodus zu st arten, drücken Sie die Auto- od er Silent-Taste.
Um zu pausieren, drücken Sie die ak tivierte Taste erneut.
Hinweis: Platzieren Sie den Roboter zum Star t der Reinigung in der Mitte des Raumes oder der zu reinigenden
Fläche, mindestens 50 cm entfernt von jeglichen Sturzkanten.
STANDBY
Standby bedeutet, dass der Hauptschalter des Roboters angeschaltet ist und der Roboter bereit zur
Nutzung ist. Die Betriebstaste ist beleuchtet. Während der Roboter reinigt, drücken Sie die aktivierte Taste
auf dem Gerät, um in den Standby Modus zu gelangen und den Reinigungszyklus zu pausieren.
ENERGIESPAR-MODUS
Im Energiespar-Modus ist die LED-Anzeige des Roboters nicht in Betrieb, aber der Roboter weiterhin
eingeschaltet. Der Hauptschalter blinkt langsam. Um Energie zu sparen, können Sie ihn folgendermaßen
aktivieren:
• Halten Sie die Betriebst aste auf dem Gerät länger gedr ückt.
• Bei niedrigem Akkustand oder nach 5 min im Standby Modus wird der Energiespar-Modus automatisch
aktiviert.
AUSS CHA LTEN
Um das Gerät auszuschalten, deaktivieren Sie den Roboter am Hauptschalter des Geräts (9).
Hinweis: Stellen Sie sicher, dass der Roboter vor längerer Lagerung ausgeschalten ist.
3.3 ZEITPROGRAMMIERUNG
Siehe Seite 8 der Bedienungsanleitung
TIPS ZUR EINFACHEN ZEITPROGRAMMIERUNG:
!
• Die Zeitprogrammierung basi ert auf der eingestellten Uhrzeit auf dem Gerät. Bevor Sie die
Reinigungszeit programmieren, stellen Sie die Uhr zeit des Geräts auf die reale Uhrzeit ein.
• Sobald Sie das Gerät programmie rt haben, wird es immer zur gleichen Zeit automatisch mit der
Reinigung beginnen, sofern der Hauptschalter eingeschaltet ist. Die progammierte Zeit bleibt
auch nach dem Ausschalten des Geräts noch eingestellt.
• Um die geplante Reinigung szeit zu löschen, drücken Sie die PLAN Taste für 5 Sekunden.
Hinwei s: Die Progammierung ist nur im Standby-Modus oder während de s Aufladens in d er Ladesta tion möglich.
Befindet sich der Roboter im Energiespar-Modus, drücken Sie die Betriebstaste Taste. Befindet sich der Roboter
in der Reinigung, pausieren Sie die Reinigung vor Beginn der Zeitprogrammierung.
3. BEDIENUNG DES GERÄTS
24
25
D D
Siehe Seite 4-7 der Bedienungsanleitung
Tipps zur Aufrechterhaltung der gewünschten Leistung:
Um die Leistung des Vileda Saugroboters aufrecht zu erhalten, ist es empfohlen den Roboter regelmäßig zu
warten.
4. WARTUNG
Problem Mögliche Ursache Mögliche Lösung
Die LED-Anzeige zeigt einen
Fehlercode an
• Hauptbürste und Seitenbürsten
sind blockiert.
• Reinigen Sie die Haupt- und
Seitenbürsten wie im Kapitel
"Wartung" beschrieben.
Roboterteil Wartungshäufigkeit Wartungscode Ersetzungshäufigkeit
Schmutzbehälter Nach jeder Nutzung — —
Haupt- und
Seitenbürsten
Feinstaubfilter Einmal pro Monat
Vorderrad und
Antriebsräder
Hindernissensoren
Ladekontakte
ENTFERNEN UND EINSETZEN DES AKKUS
Wechseln Sie die Akkus nur durch von Vileda gelieferte Ak kus aus.
• Stellen Sie sicher, dass der Hauptschalter des Geräts ausgeschaltet ist.
• Entfernen Sie mit Hilfe eines Schraubenziehers die Schrauben aus der Batterieabdeckung.
• Entnehmen Sie die Akku-Abdeckung.
• Entnehmen Sie den Akku.
• Stecken Sie die Kabelver bindung die Rob oter und Akku verbindet, ab.
Einmal pro Woche
(zweimal pro Woche
in einem Haushalt mit
Haustieren) und wenn
der Wartungscode "1"
angezeigt wird
(zweimal pro Monat
in einem Haushalt mit
Haustieren) und wenn
der Wartungscode "2"
angezeigt wird
Einmal pro Monat und
wenn der Wartungscode
"2" angezeigt wird
Alle 6-12 Monate für die
Seitenbürsten
Feinstaubfilter:
alle 4 Mon ate
5. FEHLERBEHEBUNG
Problem Mögliche Ursache Mögliche Lösung
Der Roboter st artet die Reinigung
nicht
Niedrige oder keine Saugleistung • Schmutzbehälter ist voll
Ungewöhnliche Bewegung • Räder sind verschmutzt
Niedriger Akkustand nach dem
Aufladen oder kein Aufladen
möglich
• Niedriger Akkustand
• Schmutzbehälter ist nicht
(richtig) eingesetzt
• Filter ist verstopft
• Filter ist nicht eingesetzt
• Sensoren sind verschmutzt
• Hauptschalter des Geräts ist
ausgeschaltet
• Ladegerät oder Akku sind defekt
• Laden Sie das Gerät für 6
Stunden auf
• Set zen Sie den Schmutzbehälter korrekt ein
• Schmutzbehälter leeren
• Filter mit der Bürste reinigen
• Filter einsetzen
• Räder reinigen
• Sensoren reinigen
• Stellen Sie den Hauptschalter an
• Kontaktieren Sie den Vileda
Kundendienst (Adresse siehe
letzte Seite)
Die LED-Anzeige zeigt einen
Fehlercode an
Fehlercode
“A / U / B / N”
Fehlercode
“E/ r / r / o”
Fehlercode
“E / unterschiedlich
/ unterschiedlich
—
/ unterschiedlich”
Fehlercode
“L / / unterschiedlich
/ unterschiedlich
/ unterschiedlich”
Sollten die obenen beschriebenen Lösungsansätze nicht funktionieren, schalten Sie bitte das Gerät
am Hauptschalter aus und wieder ein und prüfen Sie, ob der Fehler weiterhin auftaucht.
Für weitergehende Hilfe, technische Fragen oder zur Bestellung von Ersatzteilen kontaktieren Sie
bitte den Vileda Kundendienst (siehe letzte Seite).
• Mittel- und Antriebsräder sind
verschmutzt/blockiert.
• Ladekontakte sind staubig.
• Treppensensoren sind staubig.
• Feinstaubfilter ist blockiert.
• Schmutzbehälter ist nicht
(richtig) eingesetzt.
• Die Batterieverbindung ist nicht
gut.
• Das G erät befindet s ich nicht auf
dem Boden.
• Die Sensoren sind blockiert
oder verschmutzt.
• Motorenüberlastung oder
Blockierung der Motoren
• Reinigen Sie die beschriebenen
Teile wie im Kapitel “Wartung”
beschrieben.
• Entfernen Sie den Schmutz
behälter und setzen Sie ihn
wieder korrekt ein.
• Kontaktieren Sie den Vileda
Kundendienst (Adresse siehe
letzte Seite).
• Stellen Sie den Roboter auf
festen Grund.
• Überprüfen Sie die Sensibilität
der vorderen Stoßleiste.
• Reinigen Sie die
Treppensensoren auf der
Unterseite des Roboters.
• Reinigen Sie die vordere
Stoßleiste des Roboters mit
den Hindernissensoren.
• Stellen Sie sicher, dass die
Saugöffnung nicht blockiert ist
und reinigen Sie den
Staubbehälter.
• Prüfen Sie, ob die Antriebsräder
oder Hauptbürsten-Einheit
blockiert ist und reinigen Sie
falls nötig.
26
27
D D
Der Vileda Saugroboter VR 201 PetPro erfüllt die EU-Richtlinie 2012/19/EC, welche die Verwertung von Elektround Elektronik- Altgeräten beinhaltet.
Die Verpackungsmaterialien sind wiederverwertbar und mit dem Recycle-Symbol versehen. Folgen Sie den
örtlichen Bestimmungen zur Entsorgung. Halten Sie das Verpackungsmaterial (Plastikbeutel, Kunststoffteile
etc.) fern von K indern, da diese für Kinder gefährlich sein können.
Bitte entsorgen Sie dieses Gerät am Ende seiner Nutzungsdauer nicht über den normalen Hausmüll. Um zu
verhindern, dass Umweltschäden enstehen, oder die menschliche Gesundheit durch falsche Müllentsorgung
geschädigt wird, recyclen Sie es verantwortungsvoll und werben Sie so für nachhaltiges Wiederverwenden von
Rohstoffen.
Das Symbol
einer Wiederverwer tung zugeführt werden sollen.
Das Gerät beinhaltet einen Li-Ionen Akku, der nicht mit dem häuslichen Müll entsorgt werden darf. Entsorgen Sie
den Akku an öffentlichen Sammelentsorgungspunkten.
Akkus und Batterien können der Umwelt schaden und explodieren, wenn sie zu hohen Temperaturen ausgesetzt
werden. Bei Nichtbeachtung dieser Sicherheitsmaßnahmen kann es zu Bränden oder schwerwiegenden
Verletzungen kommen.
Für mehr Informationen zur Entsorgung des Produkts, kontaktieren Sie bitte Ihre örtliche Behörde, den
Entsorgungsdienst oder das Geschäft, in welchem Sie das Produkt erworben haben.
Modell 0769-02
Mechanische Spezifikation Größe 32 x 8 cm
Elektrische Spezifikation Nennspannung 10,8 V
Ladegerät Spezifikation Nenn-Eingangsspannung 100-240 V AC
6. UMWELTSCHUTZ UND ENTSORGUNG
am Gerät weist darauf hin, dass dieses Gerät wertvolle recyclingfähige Materialien enthält, die
7. TECHNISCHE DATEN
Gewicht ~2,2 KG
Batte ry Li-Ion 10,8 V / 2600 mAh
Ladezeit 5-6 h
Nenn-Ausgangsspannung 19 V DC
Nenn-Ausgangsstrom 600 mA
A. UMFANG
1. Mit dieser Garantie gewährt Vileda für den Zeitraum von zwei Jahren, dass das vorliegende Produkt zum Zeitpunkt
des Ersterwerbs keine Material- oder Verarbeitungsfehler aufweist. Das Vileda-Unternehmen, das die Garantieleistung erbringt, ist in di eser Garantie angegeben oder Sie finden es auf unserer Webs eite www.vileda.de.
2. Sollte sich das Produkt während der Garantiezeit auf Grund von Material- oder Verarbeitungsfehlern als defekt (zum
Zeitpunkt des Ersterwerbs) erweisen, wird Vileda bzw. ein von V ileda benannter Fachbetrieb das Produkt bzw. dessen defekte Teile im Geltungsbereich der Garantie unter Übernahme der Arbeits- und Materialkosten nach eigenem
Ermessen und entsprechend der nachfolgenden Bedingungen reparieren oder austauschen. Vileda kann defekte
Produkte oder Teile durch neue oder neuwertige Produkte oder Teile ersetzen, wobei die ersetzten Produkte oder
Teile in das Eigentum von Vileda übergehen.
3. Diese Garantie umfasst nicht:
a) die regelmäßige Wartung oder den Ersatz von Teilen, die b edingt durch normalen Verschleiß abnutzen;
b) Verbrauchsmaterialien (Komponenten, die erwartungsgemäß im Laufe des Produktlebens regelmäßig ersetzt
werden müssen, wie z.B. Batterien, Akkus oder Schmutzfilter);
c) Schäden oder Defekte, die durch über den normalen privaten Gebrauch hinausgehenden Betrieb oder Be-
handlung des Produktes verursacht wurden; und
d) Schäden oder Veränderung am Produkt verursacht durch:
I. unsachgemäßen Gebrauch, einschließlich:
- einer Behandlung, die physische oder Oberflächen-Schäden oder Schönheitsfehler des Produkts zur Folge hat;
- Schäden durch Anschluss oder Nutzung des Produktes für einen anderen als seinen vorgesehenen Zweck
oder Nichtbeachtung unserer Bedienungs- und Installationsanleitungen;
- Schäden durch Nichtbeachtung der Pflege- und Wartungsanleitungen bei Wartung und Pflege des Produktes;
- Installation oder Nutzung des Produkts entgegen den geltenden technischen Standards oder Sicherheitsvorschriften im Land, in dem das Produkt installiert oder verwendet wird;
II. Verwendung des Produkts mit Zubehörteilen, Peripheriegeräten oder Komponenten, die nicht von Vileda
zugelassen wurden;
III. Reparaturen bzw. Reparaturversuche, die nicht durch Vileda oder von Vileda autorisierte Dritte durchgeführt wurden;
IV. Unfälle, Feuer, Flüssigkeiten, Chemikalien, andere Substanzen, Überflutung, Erschütterungen, übermäßige Hitze, ungenügende Belüftung, Spannungsschwankungen, übermäßige oder nicht vorschriftsmäßige
Versorgungs- oder Netzspannung, Strahlung, elektrostatische Entladungen wie Blitze, externe Kraft – und
Stoßeinwirkungen.
B. BEDINGUNGEN DER INANSPRUCHNAHME
1. Garantieleistungen werden nur erbracht, wenn das defekte Produkt innerhalb der Garantiezeit zusammen mit der
Originalrechnung bzw. dem Kassenbeleg (unter Angabe von Kaufdatum, Modellbezeichnung und Händlernamen)
vorgelegt werden. Vileda behält sich vor, die kostenfreie Garantieleistung abzulehnen, wenn der Kaufbeleg nicht
oder nur unvollständig bzw. unleserlich vorgelegt werden. Ferner besteht kein Garantieanspruch, wenn die Modellbezeichnung oder die Seriennummer auf dem Produkt geändert, gelöscht, entfernt oder anderweitig unleserlich
gemacht worden ist.
2. Diese Garantie deckt nicht die Transpor tkosten und –risiken für den Transport Ihres Produkts zu und von V ileda.
3. Vileda stellt Ihnen eine pauschale Untersuchungsgebühr in Rechnung, wenn die Untersuchung Ihres Produkts ergibt, dass Ihnen, gleich aus welchem Grund, kein Garantieanspruch zusteht oder bei der Untersuchung Ihres Produkts kein Fehler gefunden wurde und Ihr Gerät fehlerfrei funktioniert.
8. VILEDA PRODUKTGARANTIE
C. GARANTIEAUSSCHLÜSSE UND EINSCHRÄNKUNGEN
1. Mit Ausnahme der oben erwähnten Punkte übernimmt Vileda keine weitergehende Garantie (weder ausdrücklich,
stillschweigend, gesetzlich oder anderweitig) für die Qualität, Leistung, Genauigkeit, Zuverlässigkeit, Eignung zu einem bestimmten Zweck oder sonstige Eigenschaften des Produkts.
2. Weitergehende als denen sich aus diesen Garantiebedingungen ergebenden Ansprüche bestehen gegenüber Vileda nicht, insbesondere sind Schadensersatzansprüche ausgeschlossen.
3. Falls diese Haftungsausschlüsse geltendem Recht ganz oder teilweise widersprechen, begrenzt Vileda die Garantieleistung bzw. die Haftung soweit dies nach geltenden Vorschriften zulässig ist. Beispielsweise untersagen einige
Ländergesetze den Ausschluss oder die Einschränkung der Schadenersatzhaftung wegen Fahrlässigkeit, grober
Fahrlässigkeit, vorsätzlichem Fehlverhalten, Betrug und ähnlichen Handlungen. Jede Haftung, die nicht vollständig
ausgeschlossen werden kann, wird auf die Dauer dieser Garantie begrenz t, sofern das geltende Recht dies zul ässt.
Die Haf tung im Rahm en dieser G arantie ist d er Höhe nach au f den Kaufpr eis des Produ kts besc hränkt. Si eht das geltende Recht nur höhere Haftungsgrenzen vor, gilt diese höhere Haftungsbeschränkung.
28
29
D
D. VORBEHALT DES GESETZLICHEN VERBRAUCHERRECHTS
Verbrauchern können nach den nationalen Gesetzen betreffend den Verkauf von Konsumgütern gesetzliche Rechte zustehen. Diese Garantie beschränkt weder Ihre möglichen gesetzlichen Rechtsansprüche noch Ihre vertraglichen Rechte gegenüber Ihrem Verkäufer. Diese Rechte können Sie nach eigenem Ermessen gegenüber Ihrem Verkäufer geltend
machen.
E. GARANTIEGEBER
Die Garantie f ür Ihr Produkt wird Ihn en von der Vileda GmbH, Im Technolog iepark 19, 69469 W einheim einge räumt und erf üllt.
Sie können Vileda auch über das Kontaktformular auf www.vileda.de kontaktieren.
Wenn Sie nach dem Lesen der Bedienungsanleitung und nach dem Befolgen der Anweisungen sicher sind, dass das Produkt
defek t ist, wenden Sie sich bitte an das Ser vice Telefon von Viled a unter: D: 06201 80875941 (zum Festnet ztarif).
D
Viled a GmbH, Im Technolog iepark 19, 69469 W einheim, Deut schland, w ww.vileda.de. FHP Export Gm bH, 69448 Weinheim
Distributeur: A Joh. Alex. Niernsee KG, 1051 Wien C Promena AG, 4133 Prat teln 1
I
Grazie per aver scelto il nostro nuovo robot aspirapolvere Vileda VR 201 PetPro. VR 201 PetPro diventerà l’aiutante perfetto per le pulizie di ogni giorno e ti aiuterà a rimuovere sporco,
polvere e capelli lasciandoti più tempo libero.
CONTENUTI
1. AVVERTENZE GENERALI 31
2. COMP ONENTI DI VR 201 PET PRO 36
3. CARICA E RICARICA BATTERIA 37
4. MANUTENZIONE 38
5. RISOLUZIONE DEI PROBLEMI 39
6. DISPOSIZIONI IN M AT ERIA AMBIE NTALE, SMALTIMENTO E RICICLAGG IO DEL PRODOT TO 40
7. SPECIFICHE TECNICHE DEL PRODOTTO 40
8. GAR ANZIA SUL PRODOT TO VILEDA 41
1. AVVERTENZE GENERALI
30
IMPORTANTE
Leggere interamente le istruzioni prima dell’uso. Conservare le
istruzioni per consultazioni future.
ATTENZIONE
Utilizzare il robot esclusivamente come descritto nel presente
manuale. Il mancato rispetto delle istruzioni elencate di seguito
potrebbe causare scosse elettriche, incendi e/o gravi lesioni.
Quando si utilizzano robot elettrici è necessario rispettare
sempre le misure di sicurezza essenziali, incluse quelle
seguenti, per ridurre il rischio d’incendio, scosse elettriche,
perdite nelle batterie o lesioni personali.
31

I I
LIMITAZIONI D’USO:
o mentali, o mancanza di esperienza e conoscenza, solo
sotto la supervisione di persone responsabili della loro
• Al momento dell’accensione, posizionare sempre il robot al
centro di una stanza o di una superficie, ad almeno mezzo
metro di distanza da eventuali dislivelli.
• Solo per uso interno. Non utilizzare all’esterno o su balconi.
• Solo per uso domestico.
• Il robot non è un giocattolo. È vietato sedersi e salire sul robot.
I bambini piccoli e gli animali domestici devono essere sempre
sorvegliati quando il robot è in funzione.
• Non posizionare sopra al prodotto oggetti pesanti o taglienti.
• Non consentire al robot di raccogliere oggetti infiammabili, in
fiamme o che emettono fumo.
• Non utilizzare questo robot per raccogliere liquidi o oggetti
bagnati.
• Non utilizzare il prodotto su tappeti a pelo lungo o su superfici
bagnate, come il bagno o il locale lavanderia.
• Utilizzare questo prodotto a temperature comprese tra 15°C e
35°C. Non utilizzarlo in ambienti a temperature elevate o in
pieno sole per un periodo di tempo prolungato.
• Prima di utilizzare l’apparecchio, raccogliere dal pavimento
sicurezza.
• Tenere sotto controllo i bambini per assicurarsi che non
giochino con il robot.
• I bambini non possono giocare con il robot.
• Questo apparecchio contiene batterie che possono essere
sostituite solo da persone qualificate.
• La pulizia e la manutenzione non devono essere effettuate da
bambini.
• Conservare in luogo asciutto.
• Conservare fuori dalla portata dei bambini.
• Utilizzare unicamente con gli accessori raccomandati dal
produttore.
• Non utilizzare il prodotto senza filtro inserito.
• Tenere il prodotto e tutti gli accessori lontani dal fuoco, dalle
superfici calde e da eventuali materiali infiammabili.
• Non immergere il robot in acqua o in altri liquidi.
• Non utilizzare il prodotto in aree sopraelevate che superino
l’altezza del personale per evitare cadute dall’alto del prodotto
e danni al personale.
oggetti quali indumenti, pezzi di carta, cinghie e corde di
tapparelle o tende, cavi di alimentazione ed eventuali oggetti
fragili che potrebbero rimanere impigliati nelle spazzole.
AVVERTENZE SPECIFICHE PER LA SICUREZZA DEI
COMPONENTI ELETTRICI:
• Assicurarsi che il contenitore raccogli-sporco sia vuoto prima
dell’uso.
• ATTENZIONE: Pavimenti o scale di colore nero o scuro
potrebbero ridurre l’efficienza dei sensori del vuoto. Prima di
utilizzare l’apparecchio, provalo sul tuo pavimento o sulle tue
scale.
• Non modificare in nessun modo il caricabatterie.
• Il caricabatterie è stato progettato per funzionare ad una
determinata tensione. Controllare sempre che la tensione
della rete elettrica corrisponda al valore indicato sulla
targhetta dell’apparecchio.
• Prima dell’utilizzo, controllare che il cavo del caricabatterie
SICUREZZA PERSONALE:
non sia danneggiato o usurato.
• Non utilizzare in modo scorretto il cavo del caricabatterie;
• Le modalità d’uso previste sono descritte nel presente
manuale. L’utilizzo del robot o di qualsiasi suo accessorio con
modalità diverse rispetto a quelle previste nel presente
manuale di istruzioni comporta un rischio di lesioni personali.
• Questo apparecchio può essere utilizzato da bambini da 8
non trasportare in nessun caso il caricabatterie tenendolo
per il cavo.
• Non piegare eccessivamente il cavo di alimentazione né fare
troppa pressione sul cavo di alimentazione con oggetti
pesanti o taglienti.
anni in su e da persone con ridotte capacità fisiche, sensoriali
32
33

I I
• In nessun caso tirare il cavo del caricabatterie per scollegarlo
da una presa di corrente, ma afferrare il caricabatterie e tirare
quest’ultimo.
• Tenere il cavo del caricabatterie lontano da superfici calde e
da bordi taglienti.
• Non maneggiare il caricabatterie o il robot con le mani
bagnate.
• Non conservare né ricaricare il robot all’esterno.
• Scollegare il caricabatterie prima di pulire il prodotto. Il
prodotto contiene componenti elettronici. Non immergerlo in
acqua né spruzzarlo con acqua. Pulirlo esclusivamente
utilizzando un panno asciutto.
piccoli oggetti di metallo che potrebbero mettere in
connessione i due poli.
• Cortocircuitare i morsetti della batteria può provocare un
incendio.
• È necessario rimuovere la batteria dal robot prima dello
smaltimento di quest’ultimo.
• Lo smaltimento della batteria deve essere eseguito in modo
sicuro e in conformità alle disposizioni in materia ambientale
e di riciclaggio del prodotto, riportate alla pagina 40 del
presente manuale. Non è consentito smaltire la batteria
insieme ai rifiuti domestici.
• Prima di rimuovere la batteria, il robot deve essere scollegato
dall’alimentazione elettrica.
UTILIZZO E MANUTENZIONE DELLA BATTERIA:
• ATTENZIONE: In caso di danni alla batteria, non tentare di
ricaricarla ma contattare il Servizio Clienti Vileda all’indirizzo
• Utilizzare unicamente la batteria fornita in dotazione con il
prodotto.
• ATTENZIONE: Allo scopo di ricaricare la batteria utilizzare
esclusivamente il caricabatterie rimovibile (numero modello
GQ12-190060-AG / GQ12-190060-AB / NLB060190W1E4S58
/ NLB060190W1U4S58) fornito con l’apparecchiatura.
• Non tentare di caricare il prodotto con un altro caricabatterie
e non utilizzare il caricabatterie in dotazione per ricaricare
riportato sull’ultima pagina.
• Prima del primo utilizzo caricare la batteria dell’apparecchio
per 6 ore. Dopo il primo utilizzo, ogni ciclo di carica è di circa
5-6 ore.
• In caso di inutilizzo del robot per un periodo superiore a 3
mesi, caricarlo direttamente per 6 ore utilizzando l’adattatore.
• ATTENZIONE: Utilizzare esclusivamente batterie di ricambio
fornite da Vileda.
altri prodotti, poiché l’apparecchio e la batteria potrebbero
danneggiarsi e la garanzia verrebbe resa nulla.
ASSISTENZA:
• Utilizzare unicamente la batteria fornita in dotazione con il
prodotto o fornita dal produttore.
• In condizioni di impiego estreme potrebbero verificarsi perdite
di liquido dalle batterie. In caso di contatto del liquido con la
pelle, lavare immediatamente quest’ultima con acqua pulita e
sapone. In caso di contatto con gli occhi, sciacquare
immediatamente con acqua pulita per almeno 10 minuti e
consultare un medico.
• Questo prodotto contiene batterie agli ioni di litio. Non
bruciare né esporre le batterie a temperature elevate, poiché
potrebbero esplodere.
• Quando la batteria non è in uso, tenerla lontana da altri oggetti
• Prima di utilizzare il robot e dopo eventuali urti verificare la
presenza di segni di usura o danni.
• Non utilizzare il robot in caso di danni o difetti di uno dei suoi
componenti.
• Le riparazioni devono essere eseguite esclusivamente da un
tecnico del servizio assistenza certificato o da personale
qualificato.
• Non modificare in nessun caso il robot poiché tale operazione
potrebbe aumentare il rischio di lesioni personali.
• Utilizzare esclusivamente i ricambi o gli accessori forniti o
raccomandati da Vileda.
metallici quali: graffette, monete, chiavi, viti, chiodi o altri
34
35
I I
Si prega di andare a pagina 3 d el presente manuale per i riferiment i.
1a. Pulsante modalità silenziosa
1b. Pulsante Ho me per trovare la
base di ri carica e diminuire le
impostazioni dell’orario e di
programmazione
1c. Indicatore di co dici di errore,
orario e s tato della bat teria
1d. Pulsante plan
1e. Pulsante di p ulizia automa tica
1f. Pulsante di accensione
2. Copertura del contenitore
raccogli-sporco
3. Contenitore raccogli-sporco
con Filtro per polveri f ini
PULSANTI, DISPLAY E MODALITÀ DI PULIZIA
PER ACCENDERE IL ROBOT, AZIONARE L’INTERRUTTORE PRINCIPALE: "ON" (9)
1a. PULSANTE SILENZIOSO
In modalità standby o pulizia automatica, premere il pulsante silenzioso per entrare in modalità pulizia
silenziosa per un maggior comfort durante la pulizia.
Il robot s ceglierà au tomaticam ente la modal ità di pulizi a ottimal e e ridurrà il li vello sonoro, r iducendo la v elocità,
la rota zione delle spazzole e la potenza di aspira zione per un funzionamento del prodotto più silenzioso.
In modalità pulizia silenziosa, premere il pulsante silenzioso per entrare in modalità standby.
In modalità plan: aumentare il numero dur ante la programmazione dell a pulizia e l’impostazi one dell’ora.
1b. PULSANTE HOME
In modalità standby o di funzionamento, premere il pulsante home per trovare la base di ricarica ed eseguire
la rica rica In moda lità standb y o di funzionam ento, premere il p ulsante home p er trovare la ba se di ricari ca ed
eseguire la ricarica.
In modalità plan: diminuire il numero durante la programmazione della pulizia.
Per cancellare il tempo di pulizia progr ammato, premere il tasto PLAN per 5 secondi.
1c. INDICATORE DI CODICI DI ERRORE, ORARIO E STATO DELLA BATTER IA
Le combinazioni di numeri e lettere v isualizzano l’orario attuale, la pulizia programmata e i co dici di errore.
L’indicatore della batteria v isualizza il livello e lo stato di car ica della bat teria.
1d. PULSANTE PLAN
È possibile programmare l’orario di pulizia in base ai propri bisogni personali. Il robot inizierà la pulizia
automatica ogni giorno all’orario impostato.
Fase 1: In moda lità stand by premere i puls anti plan e hom e per entrare in m odalità di im postazio ne dell’orario
Fase 2: In modalità standby premere il pulsante plan per entrare in modalità di impostazione di pulizia
quotid iana. Per cancellare il tempo di pulizia progra mmato, premere il t asto PLAN per 5 secondi.
1e. PULSANTE DI PULIZIA AUTOMATICA
In modalità standby o s ilenziosa, premere il pulsante auto per entrare in mod alità di pulizia automatica.
Il robot sceglierà automaticamente la modalità di pulizia ottimale, che consiste in un’interazione della
modalità automatica, a zig zag e a spirale.
In modalità di pulizia automatica, premere il pulsante auto per entrare in mod alità standby.
1f. PUL SANTE DI ACCENSIONE
Premere il pulsante di accensione per accendere e spegnere il robot. Premendolo quando il robot è in
funzione, si entra in modalità standby.
In modalità standby, premere il pulsante di accensione per entrare in modalità sleep.
Nota: Per disattivare il suono del robot premere contemporaneamente i pulsanti silenzioso + plan
2. COMPONENTI DEL VR 201 PETPRO
3a. F iltro per polveri fini
3b. Portafiltri
4. Spazzola di puli zia
5. Paracolpi morbido
6. Paracolpi anteriore con sensori
7. Spazzole laterali
8. Presa di carica
9. Interruttore principale
10. Copertura batteria
11. U nità spazzola principale
11a. Copertura spazzola
principale con morsetti di
rimozione
11b. Spazzola principale
12a/12b. Ruote
13. Ruota anteriore
14. Contat ti di ricaric a
15. Sensori Scale
16. Base di ric arica
17. C ontatto di ricarica per la
carica automatica nella base
di ricarica
18. Indicato re LED della base di
ricarica
19. Sistema di Gestione del Cavo
20. Spina di alimentazione
3.1 CARICA E RICARICA BATTERIA
L’indicatore della batteria (1c) è formato da tre blocchi
Tre blocchi illuminati: La batteria è completamente carica ed è possibile utilizzare i programmi Automatico
e Silenzioso completi.
Due blocchi illuminati: La batteria è cari ca a metà.
Un blocco illuminato: Il livello della batter ia è basso. Inizio ricarica consigliato.
Un blocco lamp eggiante: È nece ssario ricaricare la bat teria. Nessuna modalità di pulizia poss ibile.
CONSIGLI PE R AUMENTARE L’AUTONOMIA DELL A BATTERIA:
!
• Prima del primo utilizzo, caricare il robot per 6 ore.
• Ricaric are il robot appena il livello di c arica della batter ia è basso.
• In caso di inutilizzo prolungato del robot, caricare completamente la batteria, spegnere
l’interruttore dell’alimentazione, rimuoverla e conservarla in un luogo fresco e asciutto.
• In caso di inutilizzo del robot per un periodo superiore a 3 mesi, caricarlo direttamente per
6 ore utilizzando l’adattatore.
3.2 ACCENSIONE E SPEGNIMENTO
ACCENSIONE
Per accendere il robot, azionare l'interruttore principale, vicino al contenitore raccogli-sporco (9).
Verrà eme ssa una melodia e il display a LED e i pulsanti si illuminer anno.
Se è attiva la mo dalità plan, anche il pulsante plan sarà illuminato.
Per iniziare il ci clo di Pulizia Automatica o Silenziosa premere il pulsante di modalità “Pulizia” o “Silenzioso”.
Per interrompere il funzionamento del robot premere nuovamente il pulsante azionato.
Nota: al momento dell’accensione, posizionare sempre il robot al centro di una stanza o di una super ficie, ad
almeno mezzo metro di distanza da eventuali dislivelli.
STAND -BY
Stand-by significa che l’interruttore principale del robot è acceso e che il robot è pronto per l’uso. Il pulsante di
accensione lampeggia: Durante il ciclo di pulizia, premere il pulsante azionato sull’unità principale per
interrompere il funzionamento del robot ed passare a lla modalità stand-by.
MODALITÀ SLEEP
Se il robot passa alla modalità sleep, il display diventerà nero (ma il robot non è spento). Il pulsante di
accensione lampeggia lentamente. Per risparmiare energia è possibile passare alla modalità sleep dalla
modalità st and-by mediante uno dei seguenti metodi:
• Prem ere a lungo il pulsante “PO WER” sull’unit à principale.
• Il robot passerà automaticamente alla modalità sleep in caso di livello di potenza basso o dopo 5 minuti in
modalità stand-by.
SPEGNIMENTO
Per spegnere il dispositivo, disat tivare il robot dall’interrut tore principale (9).
Nota: quando il robot viene riposto per un lungo p eriodo di tempo, assicurars i che il robot sia spento.
3.3 PROGRAMMAZIONE DELL’ORARIO
Si prega di andare a pagina 8 d el presente manuale per i riferiment i.
CONSIGLI PER UNA PROGRAMMAZIONE FACILE
!
• L’orario di programmazione utilizza come riferimento l’orario dell’apparecchio. Quindi, prima di
eseguire la programmazione, impostare l’orologio del robot in modo che coincida con l’ora
effettiva.
• Una volta programmato, l’apparecchio inizierà automaticamente la pulizia all’orario impostato
appena viene acceso l’interruttore principale. L’orario programmato rimane salvato anche
quando il dispositivo viene spento.
• Per c ancellare il te mpo di pulizia programmato, prem ere il tasto PL AN per 5 secondi.
Nota: Il robot si può impostare solamente quando è in stand-by o in carica sulla base di ricarica. Se il robot è in
modalità sleep, premere a lungo il pulsante “POWER” sull’unità principale. Se il robot è in modalità di pulizia,
interromperlo prima di effettuare l’impostazione.
3. CARICA E RICARICA BATTERIA
36
37
I I
Si prega di andare a pagina 4 -7 de l presente manu ale per i riferimenti
Consigli per ottenere le prestazioni migliori:
Per garantire le migliori prestazioni del tuo robot Vileda ti consigliamo di sottoporlo a regolare manutenzione.
Componente del Robot Frequenza di
Contenitore raccogli-
sporco
Spazzola laterale e
spazzola principale
Filtro ad alta efficienza
Ruota anteriore e ruote
di guida Sensori di vuoto
Contatti di r icarica
4. MANUTENZIONE
manutenzione
Dopo ogni utilizzo — —
Una volta alla settimana
(due volte alla settimana
in abit azioni con animali
domestici) e quando viene
visualizzato il codice di
manutenzione “1”
Una volta al mes e (due volte
al mese in abitazioni con
animali domestici) e quando
viene visualizzato il codice
di manutenzione “2”
Una volta al mes e
e quando viene
visualizzato il codice di
manutenzione “2”
Codice di
manutenzione
Filtro ad alta efficienza:
Frequenza di
sostituzione
Ogni 6-12 mesi
Ogni 4 mesi
—
Problema Possibile causa Possibile soluzione
Il robot non funziona • Il li vello della batteria è tropp o
Aspirazione ridotta o assente • contenitore raccogli-sporco
Movimento anomalo • Le ruote sono sporche
Basso livell o di carica della batteria
anche dopo la carica o impossibilità di ricarica
Sul display vengono visualizzati i
codici d’errore
5. RISOLUZIONE DEI PROBLEMI
basso
• il contenitore raccogli-sporco
non è inserito
pieno
• Filtro ostruito a causa dello
sporco
• Filtro non inserito
• I sensori di vuoto sono sporchi
• La connessione della batteria
non è buona
• Il caricabatterie o la batter ia
sono difettosi
• L a spazzola p rincipale e le
spazzola principale sono ostruite
• Ric aricare la bat teria per 6 ore
• Inserire il contenitore
raccogli-sporco
• Svuotare il contenitore
raccogli-sporco
• Pulire il filtro mediante una
spazzola
• Inserire nuovamente il filtro
• Pulire le ruote
• Pulire i sensori di vu oto
• Accendere l’interruttore
principale per abilitare la
ricarica
• Contattare il servizio Vileda
(indirizzo nell’ultima pagina)
• Pulire la spazzola principale e
le spazzole laterali come
spiegato nel capitolo
“Manutenzione”
RIMOZIONE E SOSTITUZIONE DELLA BATTERIA
Utilizzare e sclusivamente bat terie di ricambio fornite da Vileda.
• Assicurarsi che il dispositivo sia spento tramite l’interruttore principale
• Rimuovere le viti sul coperchio della bat teria con un cacciav ite
• Rimuovere il coperchio della batteria
• Sollevare la batteria e rimuoverla dall’alloggiamento
• Sco llegare il connettore del cavo che collega la b atteria e il rob ot
Sul display vengono visualizzati i
codici d’errore
Codice d’Errore
“A / U / B / N”
Codice d’Errore
“E / r / r / o”
Codice d’Errore
“E / varie / varie / varie”
Error code
“L / various / various / various”
Nel caso in cui le soluzioni precedentemente descritte risultassero inefficaci, provare a spegnere il robot, riaccenderlo ed eseguire una nuova verifica. Per ulteriore assistenza o consulenza tecnica o per ordinare componenti o ricambi, contattare Vileda (indirizzo riportato sull’ultima pagina).
• L a Ruota Anter iore e le Ruote di
Guida sono sporche/ostruite
• I c ontatti di ricarica sono
impolverati
• I sensori di vuoto sono impolverati
• Il Filtro p er polveri fini è ostr uito
• Il contenitore raccogli-sporco
non è inserito (correttamente)
• La connessione della batteria
non è buona
• Apparecchio sollevato da terra
• Sensori bloccati o sporchi
• Motore sovraccarico o bloccato • Verificare che l’apertura della
• Pulire le parti interessate come
spiegato nel capitolo
“Manutenzione”
• Rimuovere e rimontare il
contenitore raccogli-sporco
sul robot
• Contattare il Servizio Clienti
Vileda all’indirizzo riportato
sull’ultima pagina
• Posizionare il robot a terra
• Verifica re la sensibili tà del
paracolpi anteriore
• Pulire la lente del sensore
anticaduta inferiore
• Pulire la lente del sensore del
paracolpi anteriore
ventola sia libera e pulire il
contenitore raccogli-sporco
• Verificare se le ruote o l’unità
spazzole principali sono
bloccate da eventuali ostacoli
38
39
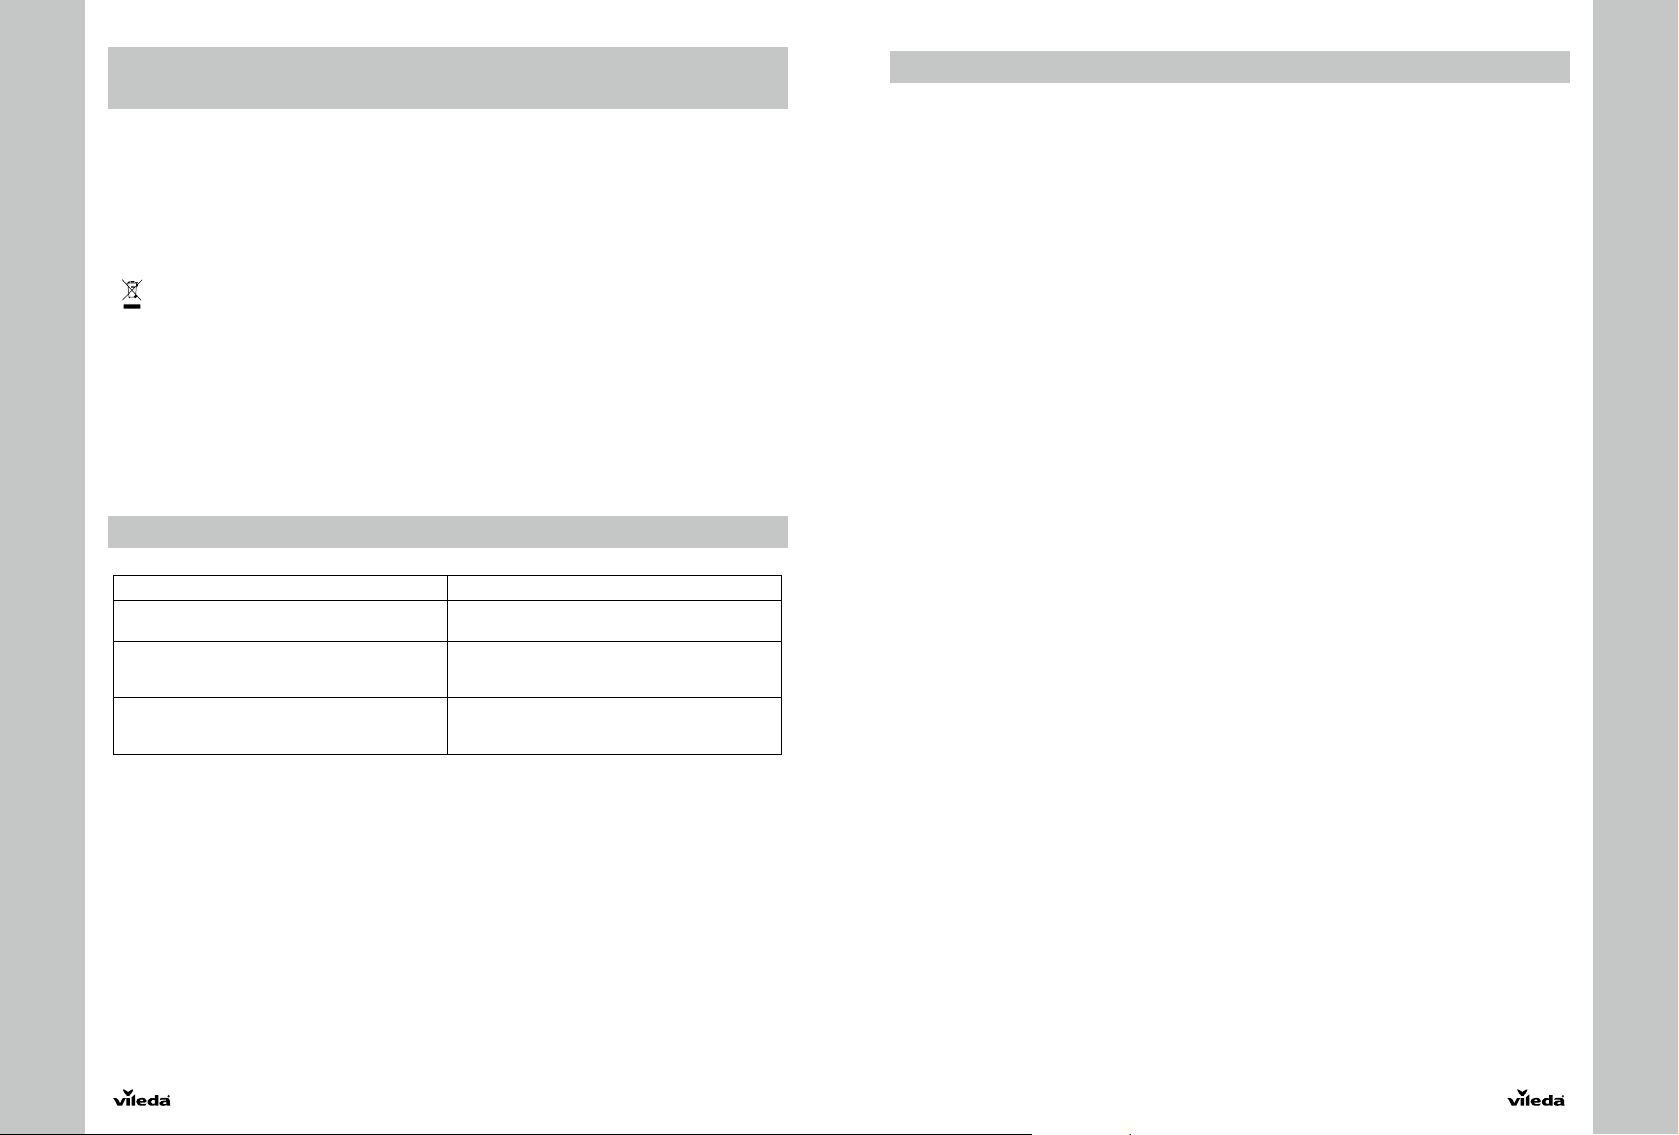
I I
6. DISPOSIZIONI IN MATERIA AMBIENTALE,
8. GARANZIA SUL PRODOTTO VILEDA
SMALTIMENTO E RICICLAGGIO DEL PRODOTTO
Il robot aspirapolvere Vileda VR 201 PetPro è soggetto alla Direttiva 2012/19/UE che disciplina la raccolta, la
gestione, il trattamento e lo smaltimento dei rifiuti delle apparecchiature elettriche ed elettroniche (RAEE).
Il materiale dell’imballaggio è interamente riciclabile e contrassegnato con il relativo simbolo. Attenersi alle
normative locali in materia di smaltimento rifiuti. Tenere i materiali dell’imballaggio (sacchetti in plastica,
componenti in polistirolo, ecc.) fuori dalla portata dei bambini, in quanto potenzialmente pericolosi.
Quando il prodotto raggiunge il termine della sua vita utile non deve essere smaltito come un normale rifiuto
urbano misto ma deve essere assoggettato a raccolta differenziata. Il riciclaggio responsabile contribuisce a
favorire il riutilizzo sostenibile delle risorse materiali, nonché ad evitare possibili danni all’ambiente o alla salute
umana causati dallo smaltimento incontrollato dei rifiuti.
simbo lo indica che i l robot Viled a VR 201 PetPro è un pro dotto sogg etto al regi me della racc olta diff erenziata
Il
delle apparecchiature elettriche ed elettroniche.
Il prodotto contiene una batteria agli ioni di litio che non deve venire smaltita insieme ai rifiuti domestici generici.
Rimuovere la batteria dalla apparecchiatura prima che quest’ul tima sia conferita come rif iuto.
Le batterie possono danneggiare l’ambiente ed esplodere se esposte ad elevate temperature. La violazione di
queste precauzioni può provocare incendi e/o gravi lesioni.
Per informazioni più dettagliate in merito ai sistemi di ritiro e di raccolta dei RAEE rivolgersi alla propria
ammini strazione c omunale, al se rvizio di sm altimento de i rifiuti dom estici locale o al pun to vendita pre sso il quale
è stato acquistato il prodot to.
Ad esempio, c’è la possibilità che il robot o qualsiasi suo componente vadano smaltiti presso una Struttura di
Raccolta Specifica.
7. SPECIFICHE TECNICHE DEL PRODOTTO
Modello 0769-02
Specifiche Meccaniche Dimensioni 32 x 8 cm
Specifiche Elettriche Tensione Nominale 10,8 V
Specifiche Caricabatterie Tensione Nominale di Ingresso 100-240 V AC
Peso ~2,2 KG
Batte ria Li-Ion 10,8 V, 2600 mAh
Tempo di Ricarica 5 -6 h
Tensione Nominale di Uscita 19 V DC
Corrente Nominale di Uscita 6 00 mA
A. AMBITO DI APPLICAZIONE
1. Con la presente Garanzia, Vileda garantisce per un periodo di due anni decorrenti dalla data originaria di
acquisto del prodotto che il prodotto medesimo è esente da difetti dovuti ai materiali utilizzati o da difet ti
originari del processo di fa bbricazione. Le co ndizioni di garanzia o fferte da Vileda qui di s eguito ripor tate sono
disponibili anche sul sito www.vileda.it
2. Se entro il periodo di garanzia sarà riscontrata la presenza di difetti nei materiali oppure di difetti originari
del processo di fabbricazione, Vileda o un membro della rete di assistenza da essa autorizzato, senza alcun
costo supplementare, effettuerà, a propria discrezione, la riparazione o la sostituzione del prodotto, oppure
la riparazione o la sostituzione dei componenti difettosi alle condizioni qui di seguito riportate. Vileda potrà
sosti tuire i prodot ti difettosi o i componenti difettosi con prodot ti o parti nuo ve o ricondizionate. Tutt i i prodotti
e le parti sostituite diventeranno di prop rietà di Vileda
3. Sono escluse dalla presente garanzia:
a) la manutenzione periodica, la riparazione o la sostituzione di parti danneggiate per cause riconducibili
alla normale usura.
b) materia li soggetti a u sura (componen ti per i quali si pr evedere la sos tituzione p eriodica durante il c iclo di
vita di un prodotto come le bat terie o i filtri).
c) danni o difetti causati da uso, attività o trattamenti del prodotto eccedenti l’uso personale e domestico
del prodotto medesimo.
d) la riparazione di danni o mutamenti del prodotto che siano r isultato di:
I. catt ivo uso, quali:
- trattamenti e utilizzi che siano tali da comportare mutamenti tecnici o estetici al prodotto, oppure
danneggiamenti o modifiche anche delle superfici del prodotto medesimo;
- installazione o utilizzo del prodotto per scopi diversi da quelli previsti ed indicati nel manuale di
istruzioni, oppure installazione o utilizzo in difformità rispetto a quanto previsto dalle istruzioni di
insta llazione o di utilizzo fornite da Vil eda;
- mancata manutenzione del prodotto oppure manutenzione eseguita in difformità rispetto a quanto
stabilito nelle istruzioni fornite da Vileda in merito alla corretta manutenzione;
- installazione e/o utilizzo del prodotto in violazione delle leggi e/o delle regole tecniche e/o degli
standard di si curezza vigenti nel paese in cui il prodotto viene installato o ut ilizzato;”
II. utilizzo del prodotto con accessori, periferiche o altri prodotti diversi da quelli prescritti da Vileda,
utilizzo del prodotto in condizioni diverse da quelle prescritte da Vileda medesima;
III. riparazioni o tentativi di riparazione effettuati da personale non appartenente all’organizzazione di
Viled a o non facente parte della Rete di servizio autorizzat a da Vileda stessa;
IV. Incidenti, incendi, liquidi, sostanze chimiche, altre sostanze, allagamenti, vibrazioni, calore
eccessivo, ventilazione inadeguata, sbalzi di tensione, alimentazione o tensione in ingresso non corretta
o in eccesso, radiazioni, scariche elett rostatiche c ompresa l’illuminazione, altre forze esterne ed urti
B. CONDIZIONI
1. Gli interventi in garanzia verranno forniti solo se una prova d’acquisto (indicante la data di acquisto, il nome
del prodotto ed il nome del rivenditore) sarà presentata a Vileda unitamente al prodotto difettoso, entro il
perio do di garanzi a. Vileda si ri serva di ri fiutare la for nitura del se rvizio in g aranzia se la do cumentaz ione sopra
indicata non sarà presentata o se sarà presentata in forma incompleta o illeggibile. La presente garanzia non
si applica se il nome del modello o il numero di serie indicati sul prodot to siano stati alterati, cancellat i, rimossi
o comunque resi illeggibili.
2. La presente garanzia non copre i costi di trasporto e i rischi associati al trasporto del vostro prodotto a o da
Viled a o l’addetto al ser vizio.
3. Vi informiamo che il costo della verifica di funzionalità del prodotto sarà a voi addebitato qualora, in seguito a
tale verifica, si riscontri che per qualsiasi motivo il prodot to in questione non rientra tra i casi che danno dirit to
alla riparazione ai sensi della presente garanzia.
C. ESCLUSIONI E LIMITAZIONI
1. Salvo quanto sopra indicato, Vileda non fornisce alcuna garanzia (espressa, implicita, legale o altro) per
quanto riguarda la qualità, le prestazioni, l’accuratezza, l’affidabilità e l’idoneità del prodotto per scopi di
natura diversa rispetto a quelli previsti ed indicati nel manuale di istruzioni che devono ritenersi pertanto non
consentiti
2. Vileda esclude qualsiasi responsabilità per eventuali danni diretti, indiretti, incidentali o consequenziali causati
da un uso improprio del prodotto. A meno che disposto altrove nella presente clausola la responsabilità di
Viled a non superer à il prezzo d’acqu isto del prod otto. Per qual siasi dubb io relativo a ll’uso corret to del prodo tto
o alla garanzia, contattare il Servizio Clienti Vileda.
40
41
I
3. Niente nella presente garanzia mira a limitare la responsabilità di Vileda per morte, lesioni personali o danni a
propri età private c ausati da merci che risultan o difettose m entre sono in uso p resso il consumatore a c ausa di
neglig enza da parte di Vileda.
D. I DIRITTI LEGALI A VOI RISERVATI
Il consumatore è titolare dei diritti previsti dal D.Lgs. 206/2005 in materia di vendita di prodotti di consumo. La presente g aranzia non pr egiudica i di ritti prev isti per leg ge, né esclud e, limita o infic ia in alcun mod o i diritti de l consumatore nei c onfronti del s oggetto da cu i il consumato re medesimo ha acquis tato il presen te prodotto. E’ la sciato alla discrezionalità del consumatore far valer i propri diritti nei confronti del venditore secondo quanto previsto dalla legge.
E. IL GARANTE
La garanzia per questo prodotto è fornita e sarà onorata alle condizioni e nei termini qui precisati da FHP di R.
Freudenberg sa s, via dei Valtor ta, 48 - 20127 Milano It alia.
E’ possibile anche contattare Vileda utilizzando il modulo di contatto sul sito w ww.vileda.it oppure tramite il
Servizio Consumatori Vileda: Numero Verde 800-074-500
E
Gracias por escoger el nuevo robot aspirador Vileda VR 201 PetPro. El VR 201 PetPro se convertirá en su compañero de confianza para la limpieza diaria, ayudándole a eliminar la suciedad y el polvo sin realizar ningún tipo de esfuerzo.
ÍNDICE
1. ADVERTENCIAS GENERALES 43
2. SABE R MÁS DE VR 201 PETPRO 47
3. CARG A Y RECARGA DE L A BATERÍA 48
4. MANTENIMIENTO 49
5. SOLUCIÓN DE PROBLEMAS 50
6. MEDIO AMBIENTE Y RECICLAJ E DEL PRODUCTO 51
7. ESPECIFICACIONES TÉCNICAS DEL PRODUCTO 51
8. GAR ANTÍA DEL PR ODUCTO VILEDA 51
42
1. ADVERTENCIAS GENERALES
IMPORTANTE
Lea todas las instrucciones antes de usarlo. Conserve las
instrucciones para futuras consultas.
ADVERTENCIA
Utilice el robot solo como se describe en este manual. El
incumplimiento de las instrucciones señaladas puede causar
descargas eléctricas, incendios y/o lesiones graves.
Al usar cualquier robot eléctrico, se deberán cumplir siempre las
precauciones de seguridad básicas, incluidas las siguientes, a fin
de reducir el riesgo de incendio, descargas eléctricas, fugas en las
baterías o lesiones personales.
43

E E
RESTRICCIONES DE USO
• Al encender el robot, colóquelo en el centro de la sala o superfície,
al menos a medio metro de distancia de cualquier desnivel.
• Solo para usar en interiores. No lo utilice al aire libre o en balcones.
• Diseñado únicamente para uso doméstico.
• El robot no es un juguete. No se siente ni se sitúe sobre él. Los niños
pequeños y las mascotas deben ser supervisados mientras el robot
esté limpiando.
• No coloque objetos pesados o afilados encima del producto.
• No deje que el robot recoja nada que sea inflamable, esté
quemándose o humeando.
• No utilice este robot para recoger algo mojado.
• No lo utilice en alfombras de pelo largo o en suelos húmedos, como
p. ej. baños o lavaderos.
• Utilice este producto con temperaturas de entre 15°C y 35°C. No lo
utilice con temperaturas ambientales altas o bajo la luz solar directa
• Los niños no deben jugar con el robot y solo deberá ser utilizado
para su uso previsto.
• Este dispositivo contiene baterias que solo deben ser reemplazadas
por personas cualificadas.
• No deje que los niños realicen las tareas de limpieza y mantenimiento
sin supervisión.
• Guárdelo en un lugar seco.
• Guárdelo fuera del alcance de los niños.
• Utilícelo únicamente con los accesorios recomendados por el fabricante.
• No lo utilice sin antes colocar el filtro.
• Mantenga el producto y todos los accesorios alejados del fuego,
superficies calientes y materiales inflamables.
• No sumerja el robot en agua u otro líquido.
• No use este producto por encima de la altura de la persona que lo
este utilizando, para evitar que el producto se caiga y cause daños
personales.
durante un periodo prolongado de tiempo.
• Antes de usarlo, recoja objetos como ropa, papeles sueltos,
cordones de persianas o cortinas, cables de alimentación y objetos
frágiles que puedan enredarse con los cepillos de limpieza.
• Asegúrese que la bandeja de suciedad está vacía antes de usarlo.
• ADVERTENCIA: Los suelos y escaleras negros o de colores oscuros
podrían reducir la fiabilidad de los sensores de desnivel. Pruebe con
su suelo y escaleras específicos antes de usarlo.
INSTRUCCIONES DE SEGURIDAD ELÉCTRICA
• Nunca modifique el cargador en modo alguno.
• El cargador ha sido diseñado para un voltaje específico. Compruebe
siempre que la tensión de alimentación es la misma que la indicada
en la placa de características.
• Antes de utilizarlo, compruebe que el cable del cargador no presenta
signos de deterioro o desgaste.
• No maltrate el cable del cargador; nunca lleve el cargador por el cable.
SEGURIDAD PERSONAL
• El uso previsto se describe en este manual. El uso de cualquier
accesorio o dispositivo o la realización de cualquier operación con
este robot, distintos a los recomendados en este manual de
instrucciones, puede constituir un riesgo de lesiones personales.
• Este robot solo puede ser utilizado por niños mayores de 8 años y
por personas con capaciades físicas, sensoriales o mentales
reducidas con falta de experiencia y conocimientos, siempre que
estén bajo supervisión o hayan recibido las instrucciones pertinentes
sobre el uso del robot de manera segura, y comprendan los peligros
que implica.
• Nunca doble el cable de alimentación o ejerza presión con objetos
pesados o afilados.
• Nunca tire del cable del cargador para desconectarlo de la toma de
corriente; sujete el cargador y tire para desconectarlo. Mantenga el
cable del cargador alejado de superficies calientes y bordes afilados.
• No manipule el cargador ni conecte el cable o el robot con las manos
mojadas.
• No guarde o cargue el robot al aire libre.
• Desenchufe el cargador antes de limpiarlo. El producto contiene
componentes electrónicos. No lo sumerja o rocíe con agua. Límpielo
solamente con un paño seco.
• Los niños deben ser supervisados para asegurarse que no juegan
con el robot.
44
45
E E
USO Y CUIDADO DE LA BATERÍA
• ADVERTENCIA: Utilice solo una batería subministrada por Vileda.
• Utilice únicamente la batería subministrada con el producto.
• ADVERTENCIA: Para cargar la batería del robot, utilice únicamente
el cargador (modelo no. GQ12-190060-AG / GQ12-190060-AB /
NLB060190W1E4S58 / NLB060190W1U4S58) subministrado con el
aparato.
• No intente utilizar el cargador con ningún otro producto ni intente
cargar este producto con otro cargador, ya que podría dañar el
producto y la batería, y anulará su garantía
• Utilice únicamente la batería subministrada con el producto o
provista por el fabricante.
• Se pueden producir fugas de las celdas de la batería bajo condiciones
SERVICIO
• Antes de usar el robot y después de cualquier golpe, verifique la
presencia de daños o desgaste.
• No utilice el robot si alguna parte está dañada o defectuosa.
• Las reparaciones deben ser realizadas únicamente por un agente
de servicio autorizado o una persona adecuadamente calificada.
• Nunca modifique el robot en modo alguno, ya que podría aumentar
el riesgo de lesiones personales.
• Utilice únicamente piezas de repuesto o accesorios subministrados
o recomendados por Vileda.
extremas. Si el líquido entra en contacto con la piel, lávese
inmediatamente con agua y jabón. Si el líquido entra en contacto
con los ojos, lávelos inmediatamente con agua limpia durante un
mínimo de 10 minutos y solicite atención médica.
• Este producto contiene baterías de ion-litio. No incinere ni exponga
las baterías a altas temperaturas, ya que pueden explotar.
• Si el paquete de batería no está en uso, manténgalo alejado de otros
productos metálicos como: clips, monedas, llaves, clavos, tornillos
u otros objetos de metal pequeños, que puedan establecer conexión
entre ambos terminales.
• El cortocircuito de los terminales de la batería puede provocar un
incendio.
• Se debe retirar la batería del robot antes de desecharlo.
• La batería se debe desechar de formar segura y de conformidad
con el medio ambiente y el reciclaje de productos, según se indica
en la página 51 de este manual. La batería no debe desecharse con
la basura doméstica.
• El robot debe estar desconectado de la corriente eléctrica cuando
se retire la batería.
• ADVERTENCIA: Si la batería está dañada, no intente recargarla.
Póngase en contacto con la dirección de servicio al cliente de Vileda
(véase la última página).
• Cargue la batería durante 6 horas antes de utilizarla por primera vez.
Después del primer uso, el tiempo de carga es de aproximadamente
5-6 horas.
• Si el robot no se va a usar durante más de 3 meses, cárguelo
directamente al adaptador de corriente durante 5 horas.
Por favor, vaya a la página 3 del manual para referencia
1. Pantalla
1a. Botón silencioso
1b. Botó n de inicio para
encontrar la estación base y
d e carga / Disminuir el
tiempo en la configuración
d e la programaci ón de la
limpieza
1c. Hora, código de error e
indicación del estado de la
batería
1d. Botó n de programaci ón
1e. Botó n de limpieza au tomática
1f. Botón de encendido
2. Depósito de suciedad
BOTONES, PANTALLA Y MODOS DE LIMPIEZA
PARA ENCENDER EL ROBOT, PULSE EL INTERRUPTOR PRINC IPAL: "ON" (9)
1a. BOTÓN SILENCIOSO
En el modo de espera o de limpieza automática, presione el botón silencioso para ir al modo de limpieza
silencioso para una mayor comodidad durante la limpieza.
El robot elegirá automáticamente el patrón de limpieza óptimo y reducirá el nivel de ruido, la velocidad , la
rotación del cepillo y la potencia de succión para un rendimiento más silencioso.
En el modo de limpieza silencioso, pulse el botó n silencioso p ara ir al modo de espera.
En el mod o planific ación: al pre sionar el bo ton silenc ioso, aument a el número al p rogramar e l tiempo y la ho ra de limpiez a.
1b. BOTÓN DE INI CIO
En el modo de espera o en funcionamiento, presione el botón de inicio para localizar la estación de carga y
cargar el dispositivo
En el mod o de planific ación: presio ne el botón para d isminuir el nú mero al config urar el tiempo y l a hora de limpi eza.
2. SABER MÁS DE VR 201 PETPRO
3. Depósito de suciedad co n
f iltro de polvo fino
3b. Marco del filtro
4. Cepillo de mantenimiento
5. Parachoques blando
6. Parachoques delantero.
Incluye sensores de
obstáculos
7. Cepillos laterales
8. Enchufe de carga
9. Interruptor principal
10. Tapa de la batería
11. Cepillo principal
11a. Tapa del cepillo principal con
ganchos de extracción
11b. Cepillo principal
12a/12b. Rue das
13. Rueda delantera
14. Polos de carga
15. Sensores de desnivel
16. Estaci ón base y de carga
17. Polo de ca rga para carga
automatizada (estación base
y d e carga)
18. Indicador LED de la estación
base y de carga
19. Sistema de gestión de cables
20. Enchufe de carga
46
47
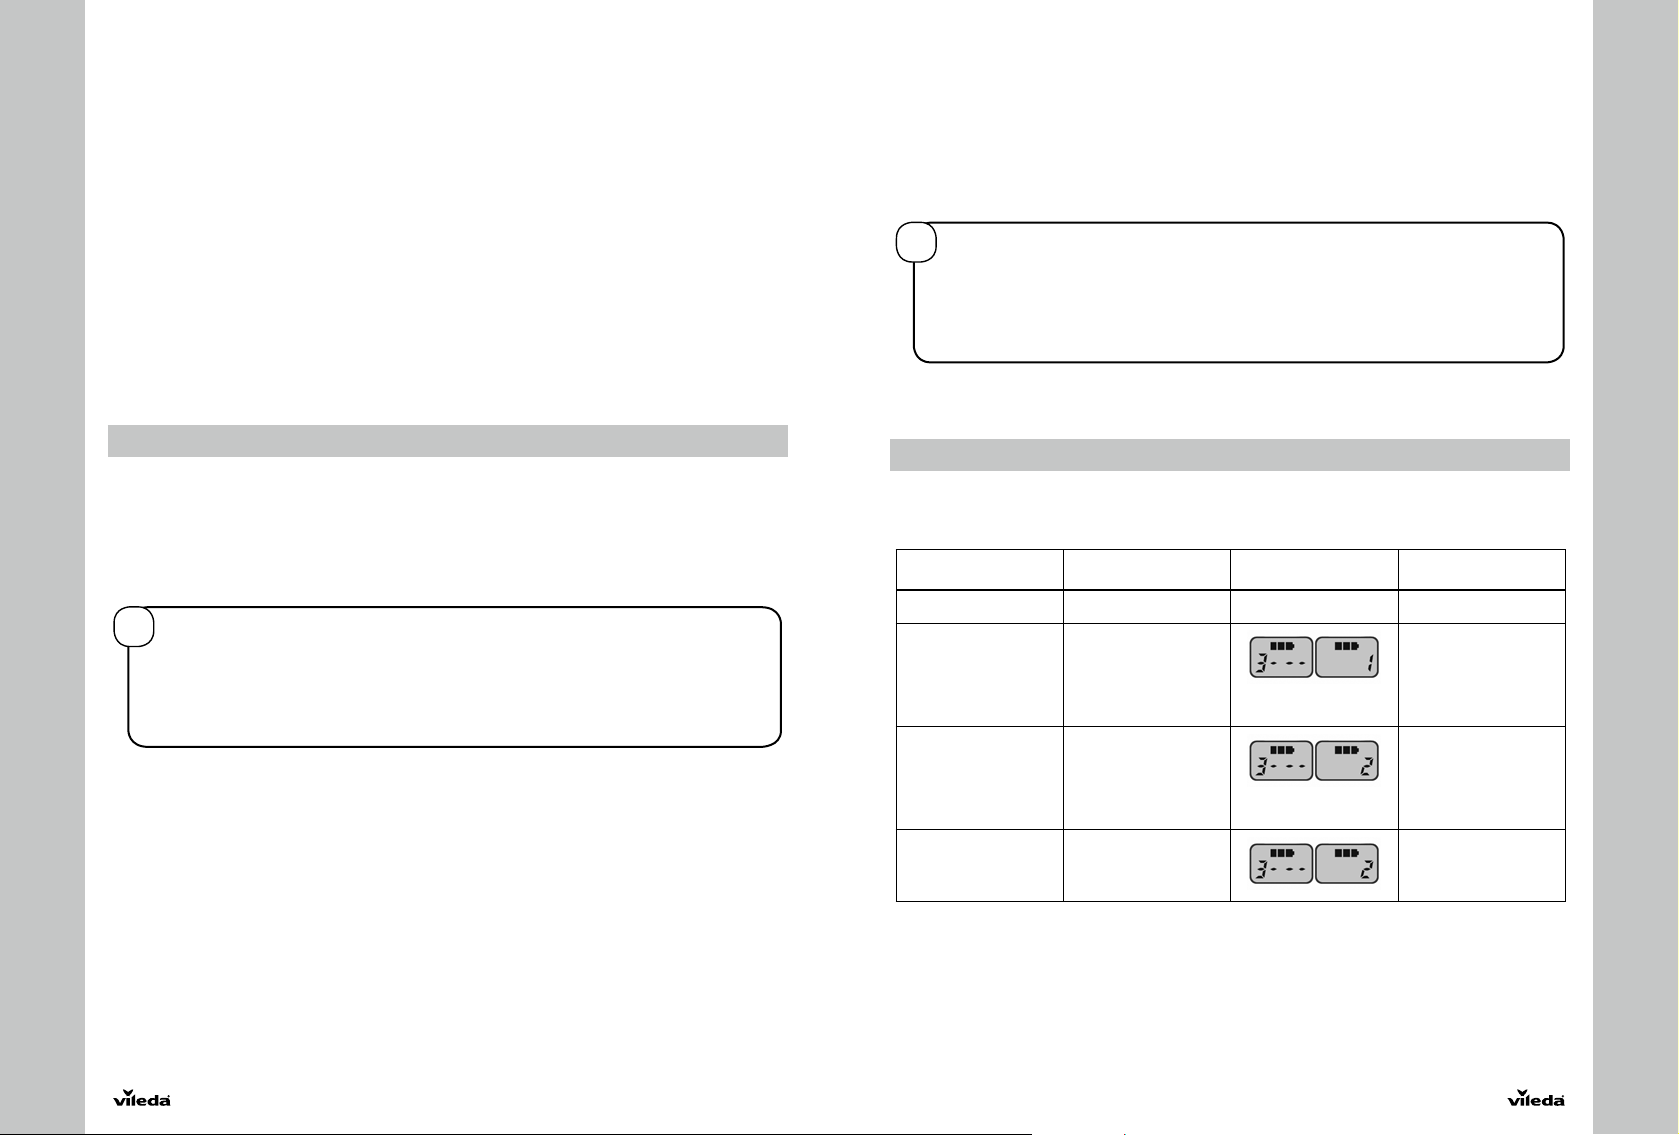
E E
1c. HORA, CÓDIGO DE ERROR E INDI CACIÓN DEL ES TA DO DE LA BATERÍ A
Las combinaciones de números y letras indican la hora actual, limpieza programada y códigos de error.
La indicación de la batería mu estra el nivel restante de ca pacidad y el est ado de carga.
1d. BOTÓN DE PROGRAMACIÓN
Es posible programar la hora de limpieza conforme a sus necesidades personales. El robot empezará
diariamente l a limpieza en modo automático a la hora programada.
Paso 1: En el mo do de espera pu lse el botón de p rogramació n y el botón de inic io para inici ar la configu ración
del reloj.
Paso 2: En el modo de espera pulse el b otón de programación para introducir la hora de limpie za diaria.
Para borrar el tiempo de limpieza programado, presio ne el botón PLA N durante 5 segun dos.
1e. BOTÓN DE LIMPIEZA AUTOMÁTICA
En el modo de espera o de limpieza silenc ioso, pulse el botón de limpieza automática para iniciarlo.
El robot elegirá automáticamente el patrón de limpieza óptimo, repitiendo los patrones de movimiento
automático, zig-zag y espiral.
En el mod o de limpieza automáti co, pulse el boton de limpi eza automáti ca para entrar e n el modo de espe ra.
1f. BOTÓN DE ENCENDIDO
Pulsar el botón de encendido para enceder o apagar el robot. Si se pulsa mientras el robot se encuentra en
funcionamiento, éste entrará en modo de espera.
En el modo de espera, pulse el botón de encendido para entrar en el modo suspensión.
Nota: Para apagar el sonido del robot pulse el botón silen cioso y el botón de programación simultáneamente.
3. FUNCIONAMIENTO DEL PRODUCTO
3.1 CARGA Y RECARGA DE LA BATERÍA
El indicador de baterí a (1c) consta de tres bloques
Tres bloques iluminados: La batería está completamente cargada y el modo de limpieza automático
y silencioso puede usarse.
Dos bloques iluminados: La batería se encuentra cargada a la mitad.
Un bloque iluminado: El ni vel de batería es bajo. Se re comienda su carga.
Un bloque parpadeando: Se nece sita cargar la batería. No es posible usar ningún modo de limpieza.
CONSEJOS PAR A ALARGAR LA VIDA DE L A BATERÍA:
!
• Antes de us ar por primera vez, cargar el robot durante 5-6 horas.
• Cargar el robot rápidamente cuan do el nivel de batería se a bajo.
• Si el robot no se va a usar durante mucho ti empo, cárguelo completamente, puls e el botón de
apagado, desco néctelo y guárdelo en un lugar fresco y se co.
• Si el robot no se va a usar durante más de 3 meses, cárguelo direct amente al adaptador de
48
corriente durante 5-6 horas.
3.2 ENCENDIDO Y APAGADO
PUESTA EN MARC HA
Para encender el robot, active el interruptor principal situado al lado del depósito de suciedad (9).
Se escuchará un sonido y los indicadores LED y los botones se iluminarán.Para encender el robot, active el
interruptor principal situado al lado del depósito de suciedad (9). Se escuchará un sonido y los indicadores
LED y los botones se iluminarán.
Si el modo programación está activado, el botón de programación también se iluminará.
Para iniciar el modo de limpiez a automático o silencioso, pulse los botones "CLEAN" o "SIL ENT".
Para parar el robot pulse el botón d e encendido de nuevo.
Nota: A l encender el ro bot, colóque lo en el centro de l a sala o super fície, al menos a m edio metro de di stancia de
cualquier desnivel.
MODO DE ESPERA
Modo de espera significa que el interruptor principal del robot está encendido y está listo para usarse.
El botón de encendido está parpadeando. Cuando el robot está en funcionamiento, pulse el botón de inicio
para pausar el robot y entrar en el modo de espera.
MODO SUSPENSIÓN
En el modo de suspensión, la pantalla del robot se volverá oscura (pero el robot no está apagado). El botón de
encendido parpadea lentamente. Para ahorrar batería, el robot puede entrar en modo suspensión a partir del
modo de espera de la siguiente manera:
• Mantenga pulsado e l botón "POWER".
• El robot entrará automáticamente en el modo suspensión si el nivel de batería es bajo o pasados 5 minutos en
modo de espera.
APAGAR E L ROBOT
Para apagar el robot usar el inter ruptor principal (9).
Nota: cu ando se guard e el robot dura nte un largo pe riodo de tie mpo, asegúre se que se encue ntra desco nectado.
3.3 PROGRAMACIÓN
Por favor, vaya a la página 8 del manual para referencia.
CONSEJOS PAR A UNA PROGR AMACIÓN SE NCILLA:
!
• La hora de programación utiliza la hora del robot como referencia. Por lo que antes d e
programar, ajuste el reloj del robot a la hora real.
• Una vez programado el robot, éste empezará a limpiar autom áticamente a la hora programada,
cuando el interruptor principal esté encendido. La hora programada se guardará, incluso con el
dispositivo apagado.
• Par a borrar el tiem po de limpieza programado, presione el botón PL AN durante 5 segundos.
Nota: El robot solo se puede programar cuando se encuentra en modo de espera o cargando en la estación de
carga. Si el robot se encuentra en modo de suspensión, mantenga pulsado el botón “POWER”. Si se encuentra en
modo limpieza, pause e l robot antes de programar.
4. MANTENIMIENTO
Por favor, vaya a la página 4-7 del manual para referencia.
Consejos para mantener unos resultados óptimos:
Para que su robot Vileda mantenga unos resultados óptimos, se recomienda realizar regularmente las tareas de
mantenimiento.
Pieza de robot Frecuencia de
Depósito de suciedad Depués de cada uso — —
Cepillos laterales y
cepillo principal
Filtro de alta eficiencia Una vez al m es (dos
Rueda delantera y
ruedas motrices
Sensores de desnivel
Contactos de c arga
mantenimiento
Una vez por semana
(dos veces por semana
si tiene mascotas en
casa) y cuando se
muestra el código de
mantenimiento "1"
veces al mes si
tiene mascotas en
casa) y cuando se
muestra el código de
mantenimiento "2"
Una vez al m es y cuando
se muestra el có digo de
mantenimiento "2"
EXTRACCIÓN Y SUSTITUCIÓN DE LA BATERÍA
Utilice solo una batería de repuesto subministrada por Vileda.
• Asegúrese que el dispositivo se encuentra desconectado del interruptor principal.
• Retire los tornillo s de la tapa de la batería con un destornillador.
• Retire la tapa de la batería.
• Lev ante la batería y retírela de la carcasa.
• Des enchufe el conector del cabl e que une la batería y el robot.
Código de
mantenimiento
Frecuencia de
reposición
Cada 6 - 12 mese s
Filtro de alta eficiencia:
cada 4 meses
—
49
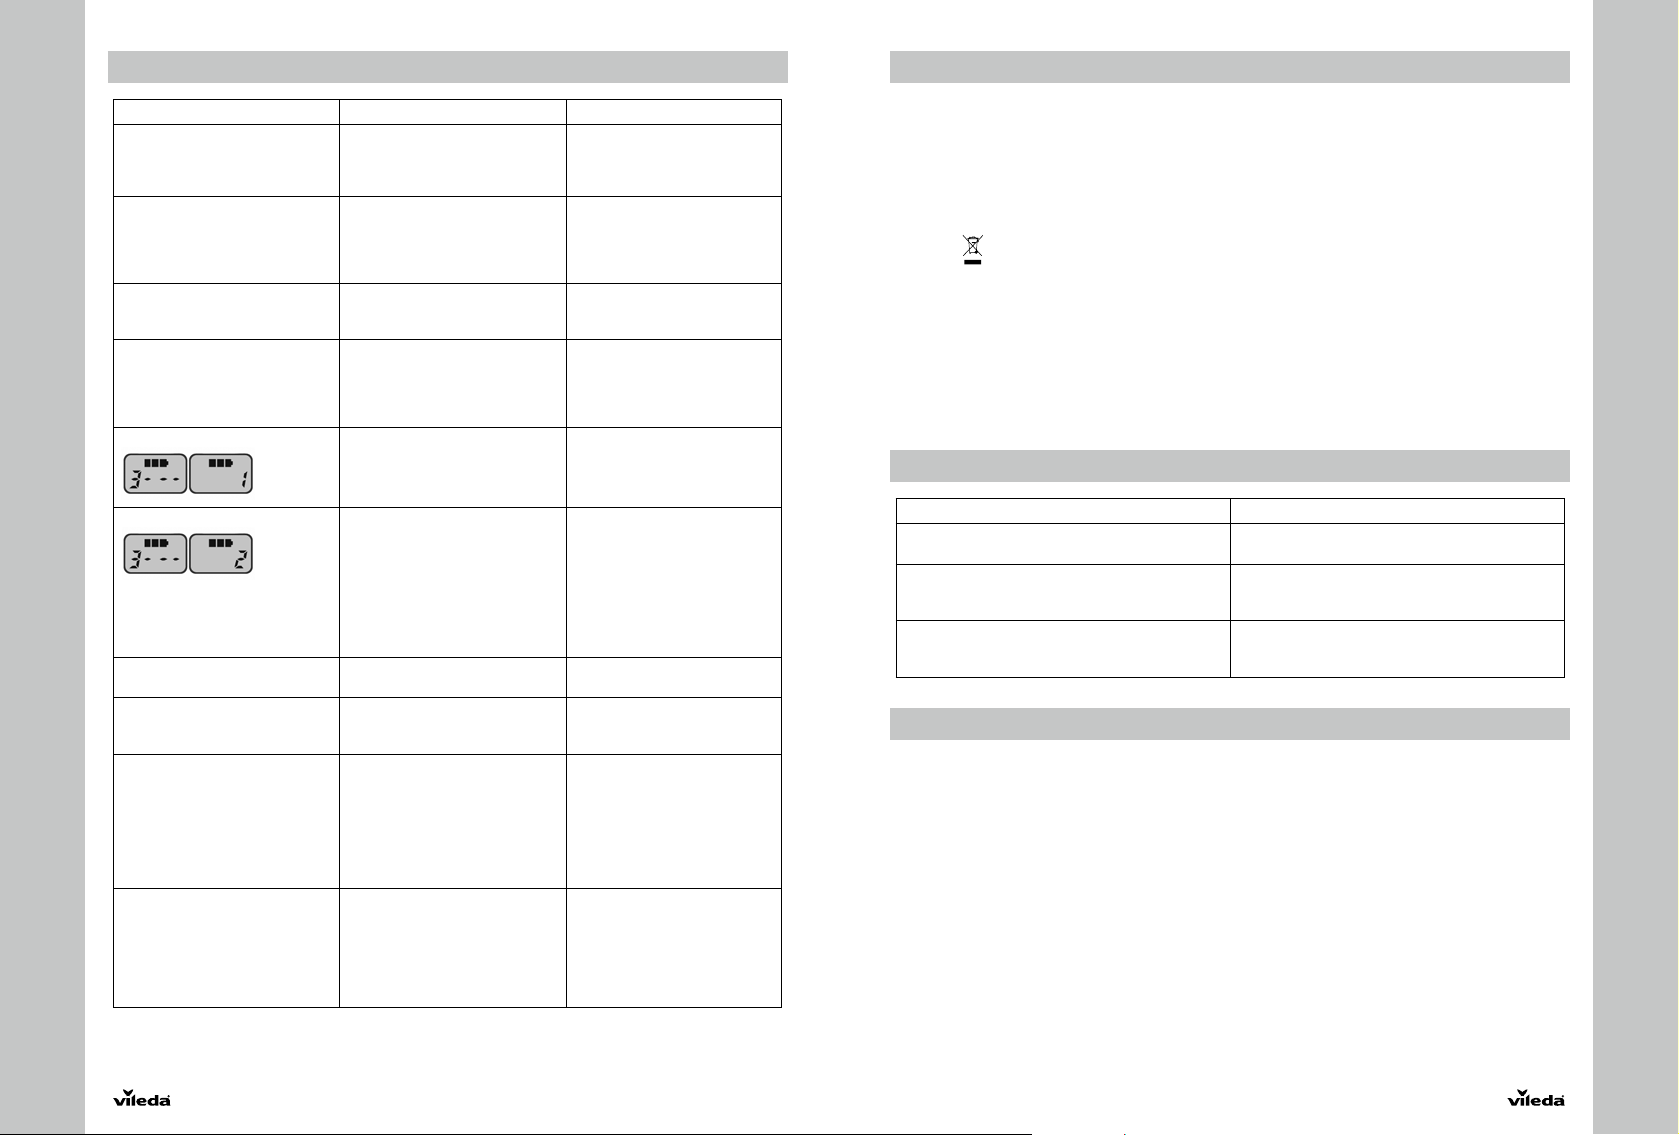
E E
Problema Posible razón Posible solución
El robot no funciona • La batería se encuentra
Aspiración baja o nula • El depósito de suciedad se
Movimiento anormal • Las ruedas están sucias
Batería baja de spués de cargar o
no se puede cargar
La pantalla muestr a el código de error
La pantalla muestr a el código de error
Código de error
“A / U / B / N”
Código de error
“E / r / r / o”
Código de error
“E / varios / varios / varios”
Error code
“L / varios / varios / varios”
Si las soluciones descritas anteriormente no funcionan, por favor apague y vuelva a encender el robot y
compruebe de nuevo. Para más ayuda, asesoramiento técnico, o para pedir piezas de reposición
contacte con Vileda (véase la dirección en la última página).
5. SOLUCIÓN DE PROBLEMAS
demasiado baja
• El depósito de suci edad no se ha
introducido (correctamente)
encuentra lleno
• El filtro est á bloqueado po r la
suciedad
• No se encuentra el filtro de suciedad
• Los s ensores de des nivel están
sucios
• La c onexión de la batería no es
buena
• El cargador o la bater ía están
defectuosos
• El cepillo central o cepillos
laterales están bloqueados
• La r ueda delantera o ruedas
motrices están sucias o
bloqueadas
• Los c ontactos de carga están
sucios
• Los s ensores de des nivel están
sucios
• El filtro de polvo fino está
bloqueado
• El depósito de suci edad no está
insertado (correctamente)
• La c onexión de la batería no es
buena
• El dispositivo no se encuentra en
el suelo
• Los sensores están bloqueados
o sucios
• Motor sobrecalentado o
bloqueado
• Recargue la batería durante
6 horas
• Inserte el depósito de suciedad
• Vacíe el depósito de su ciedad.
• Lim pie el filtro con el cepillo de
mantenimiento
• Vuel va a colocar el f iltro de
suciedad en su lugar
• Limpie las ruedas
• Limpie los sensores de
desnivel
• Encienda el interruptor
principal para facilitar la carga
• Contacte c on la dirección de
servicio al cliente de Vileda
(véase la última página)
• Limpie el cepillo central y
cepillos laterales según las
indicaciones del apartado
“Mantenimiento”
• Limpie las partes respectivas
según las indicaciones del
apartado “Mantenimiento”
• Retire y recoloque el depósito
de suciedad en el robot
• Contacte c on la dirección de
servicio al cliente de Vileda
(véase la última página)
• Coloque el robot sobre un suelo
sólido
• Compruebe la sensibilidad del
parachoques delantero
• L impie la lente del sensor de
desni vel de la base inferior
• L impie la lente del sensor del
parachoques frontal
• Compruebe si la apertura del
ventil ador está libre y limpie el
depósito de suciedad
• Compruebe si las ruedas o el
cepillo central se encuentran
atascados o enganchados por
obstáculos
6. MEDIO AMBIENTE Y RECICLAJE DEL PRODUCTO
El robot aspirador VR 201 PetPro cumple con la directivas EU 2012/19/CE, sobre los aparatos electrónicos y
eléctricos, y la gestión de su eliminación.
El material de embalaje es reciclable en su totalidad, y está indicado con el símbolo de reciclaje. Siga las
regulaciones locales para su desguace. Mantenga el material de embalaje (bolsas de plástico, partes de
poliestireno, etc.) fuera del alcance de los niños, y a que pueden ser p otencialmente peligrosos.
Una vez el p roducto haya a lcanzado e l final de su vid a útil, no lo des eche a la basur a doméstic a. Para evita r que se
produzcan daños en el medio ambiente o en la salud humana debido al desecho incontrolado de residuos,
recíclelo de manera respons able para potenciar la reutilización sostenible de los recursos materiales.
El simbolo
aparatos eléctricos.
El produ cto contiene una batería de ion-lítio, que no debe ser eliminada junto con la basura doméstica. Deposite
la bater ía en un punto de recogida oficial para su recicl aje.
Las baterías pueden ser perjudiciales para el medio ambiente y pueden explotar si están expuestas a altas
temperaturas. El incumplimiento de estas advertencias podría causar incendios y/o lesiones graves.
Para más información sobre el tratamiento, recuperación o reciclaje de este robot, póngase en contacto con la
oficina local de su ciudad, el servicio de recogida de basura de su localidad o con el comercio donde adquirió el
producto.
Por ejemplo, para eliminar el robot y cualquier parte de él, necesitará un cent ro designado a tal efecto.
identifica el robot VR 201 PetPro como un producto sujeto al régimen de reciclaje selectivo de
7. ESPECIFICACIÓN TÉCNICA DEL PRODUCTO
Modelo 0769-02
Especificaciones mecánicas Medidas 32 x 8 cm
Especificaciones eléctricas Voltaje clasificado 10,8 V
Especificaciones de carga Voltaje de entrada nominal 100-240 V AC
Peso ~2,2 KG
Batería Li-Ion 10,8 V, 2600 mAh
Tiempo de carga 5-6 horas
Voltaje de salida nominal 19 V DC
Corri ente nominal de s alida 600 mA
8. GARANTÍA DEL PRODUCTO VILEDA
A. ALCANCE
1. Con esta garantía, Vileda garantiza que el producto está libre de defectos de materiales y de mano de obra
desde la fecha original de compra por un período de 2 años a partir de esa fecha. L a empresa Vileda que
proporciona y honra esta garantía está designada en esta garantía, en los folletos que la acompañan o se
puede encontrar en www.vileda.com/es
2. Si durante el periodo de garantía el producto resulta ser defectuoso (en la fecha de la compra original) debido
a impropios materiales o mano de obra, Vileda o un miembro de la red de servicio técnico autorizado del área
de garantía reparará, sin ningún cargo por el trabajo o por las piezas, o reemplazará el producto o la pieza
defectuosa sujeto a las limitaciones de abajo. Vileda sustituirá los productos defectuosos o las piezas con
nuevos productos o piezas o restaurados. Todos los productos y piezas reemplazados pasan a ser propiedad
de Vileda.
3. Esta garantía no cubre:
a) Un mantenimiento periódico y reparac ión o reemplazo de piez as debido al desgaste y a las roturas;
b) Consumibles (componentes que se espera que requieran periódicamente un reemplazo durante su vida
útil como las gamuzas).
c) Daños causados por su uso, operaciones o tratamientos del producto inconsistente con el uso
doméstico.
d) Daños o d efectos caus ados por el uso, o peración o tr atamiento de l producto res pecto a su uso p ersonal
o doméstico normal:
50
51
 Loading...