

Vileda Relax Plus Owner's Manual
Owner's Manual • Manuale dell'Utilizzatore • Benutzerhandbuch • Manual del usuario • Manual do Utilizador
Manuel de l'Utilisateur • Gebruikershandleiding • Εγχειρίδιο Χρήστη • Kullanıcı Kılavuzu

2
G
Thank you for having chosen the Vileda Relax Plus. Enjoy your new Relax Plus and relax!
Contents
General Warnings 3
Part Location 4
Product Anatomy 5
Battery Charging & Recharging 6
Using the Product 7
Cleaning Modes 8
Cleaning System 8
Removing and Emptying the Dustbin 9
Cleaning and Replacing the Filter 9
Cleaning Main Brushes 9
Replacing Side Brush 10
Troubleshooting 10
Environmental and Product Recycling 11
Battery Removal 12
Technical Specification 12
Vileda Product Guarantee 12

3
G
General Warnings
IMPORTANT:
Read all instructions before use. Retain instructions for future reference.
WARNING:
Use the unit only as described in this manual. Failure to follow all instructions listed below may result in electric
shock, fire and/or serious injury.
When using any electrical appliance, basic safety precautions should always be obser ved, including the following,
in order to reduce the risk of fire, electrical shock, leaking batteries or personal injury.
USE RESTRICTIONS:
• Only for indoor use. Do not use outdoors or on balconies.
• Intended for domestic use only.
• Device is not a toy. Do not sit or stand on it. Small Children and pets should be supervised when the robot is
cleaning.
• Do not pick up anything that is flammable, burning or smoking.
• Do not use this device to pick up anything wet.
• Do not use on long-pile carpet or on wet floors.
• Before using, pick up objects like clothing, loose papers, pull cords for blinds or curtains, power cords, and any
fragile objects as they may entangle with the cleaning brushes. If the device passes over a power cord and drags
it, there is a chance an object could tumble off a table or shelf.
PERSONAL SAFETY:
• The intended use is described in this manual. The use of any accessory or attachment or the performance of any
operation with this appliance other than those recommended in this instruction manual may present a risk of
personal injury.
• Children must be supervised to ensure they do not play with the appliance.
• This appliance can be used by children aged from 8 years and above and persons with reduced physical, sensory or mental capabilities or lack of experience and knowledge if they have been given supervision or instruction concerning use of the appliance in a safe way and understand the hazards involved.
• Children shall not play with the appliance.
• Cleaning and user maintenance shall not be made by children without supervision.
• Store in a dry place.
• Store out of reach of children.
• Use only with the attachments recommended by the manufacturer.
• Do not use without the filter in place.
• Keep the product and all accessories away from hot surfaces.
• Do not immerse the appliance in water or other liquid.
ELECTRICAL SAFETY INSTRUCTIONS:
• Never modify the charger in any way.
• The charger has been designed for a specific voltage. Always check that the mains voltage is the same as that
stated on the rating plate.
• Only use the charger supplied with the product. Do not attempt to use the charger with any other product nor attempt to charge this product with another charger
• Before use, check the charger cord for signs of damage or ageing.
• Do not abuse the charger cord; never carry the charger or charging station by the cord.
• Never pull the charger cord to disconnect from a socket; grasp the charger and pull to disconnect.
• Keep the charger cord away from hot surfaces and sharp edges.
• Do not handle the charger or the unit with wet hands.
• Do not store or charge the unit outdoors.
• Unplug the charger before cleaning.
Product contains electronic parts. DO NOT submerge it or spray it with water. Clean with a dry cloth only.
4
G
BATTERY USE AND CARE:
• Leaks from battery cells can occur under extreme conditions. If the liquid gets on the skin, wash it immediately with soap and water. If the liquid gets into the eyes, flush them immediately with clean water for a minimum of
10 minutes and seek medical attention.
• This product contains NiMH batteries. Do not incinerate batteries or expose to high temperatures, as they may
explode.
• When the battery pack is not in use, keep away from other metal objects such as: paper clips, coins, keys, nails,
screws or other small metal objects that can make a connection from one terminal to another.
• Shorting the battery terminals may cause fire.
• The battery must be removed from the appliance before it is discarded.
• The battery is to be disposed of safely.
• The appliance must be disconnected from the mains supply when removing the battery.
• In an emergency situation contact professional help immediately!
SERVICE:
• Before using the machine and after any impact, check for signs of wear or damage.
• Do not use the appliance if any part is damaged or defective.
• Repairs should be carried out by a service agent or a suitably qualified person in accordance with relevant safety regulations. Repairs by unqualified persons could be dangerous.
• Never modify the appliance in any way as this may increase the risk of personal injury.
• Only use replacement parts or accessories provided or recommended by the manufacturer.
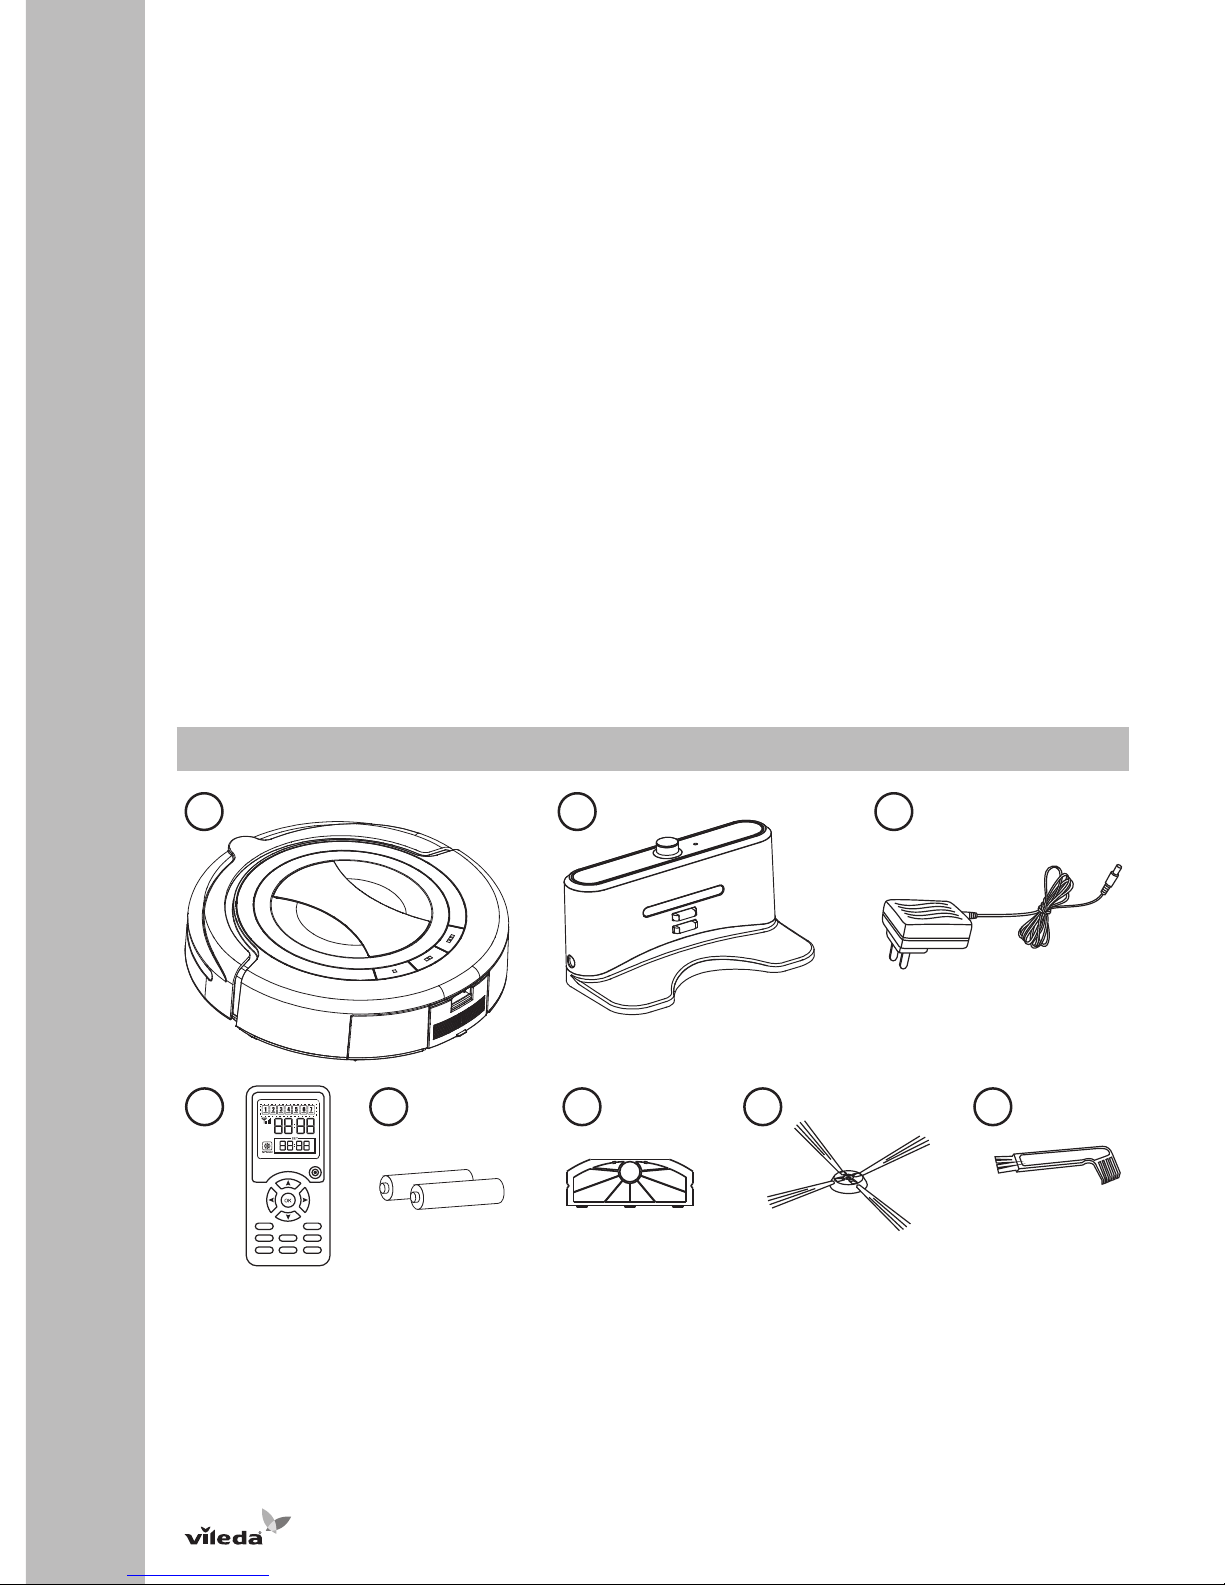
Part Location
1 2 3
4 5 6 7 8
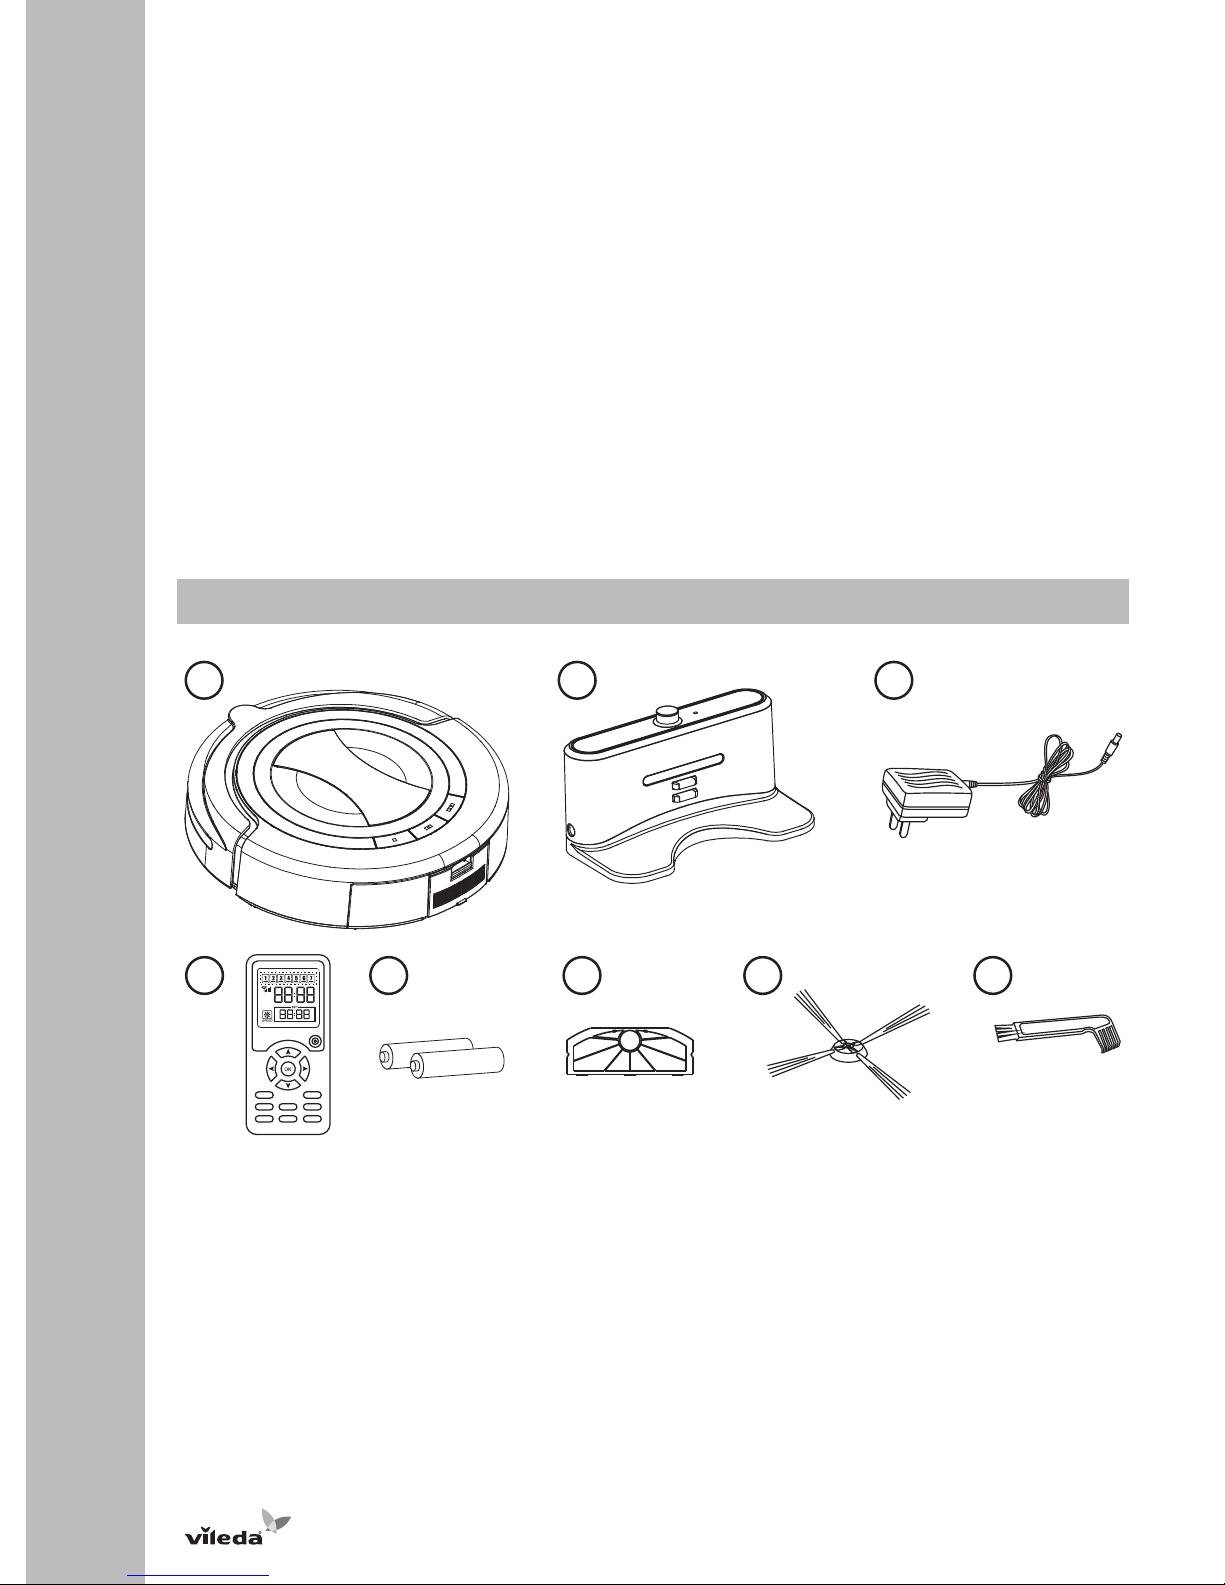
1. 1x Main Unit
2. 1x Charging Station
3. 1x Power Supply (* Picture may differ from provided box content)
4. 1x Timer
5. 2x Batteries AAA (for Timer)
6. 1x Filter (extra)
7. 1x Side Brush (extra)
8. 1x Maintenance Brush

5
G
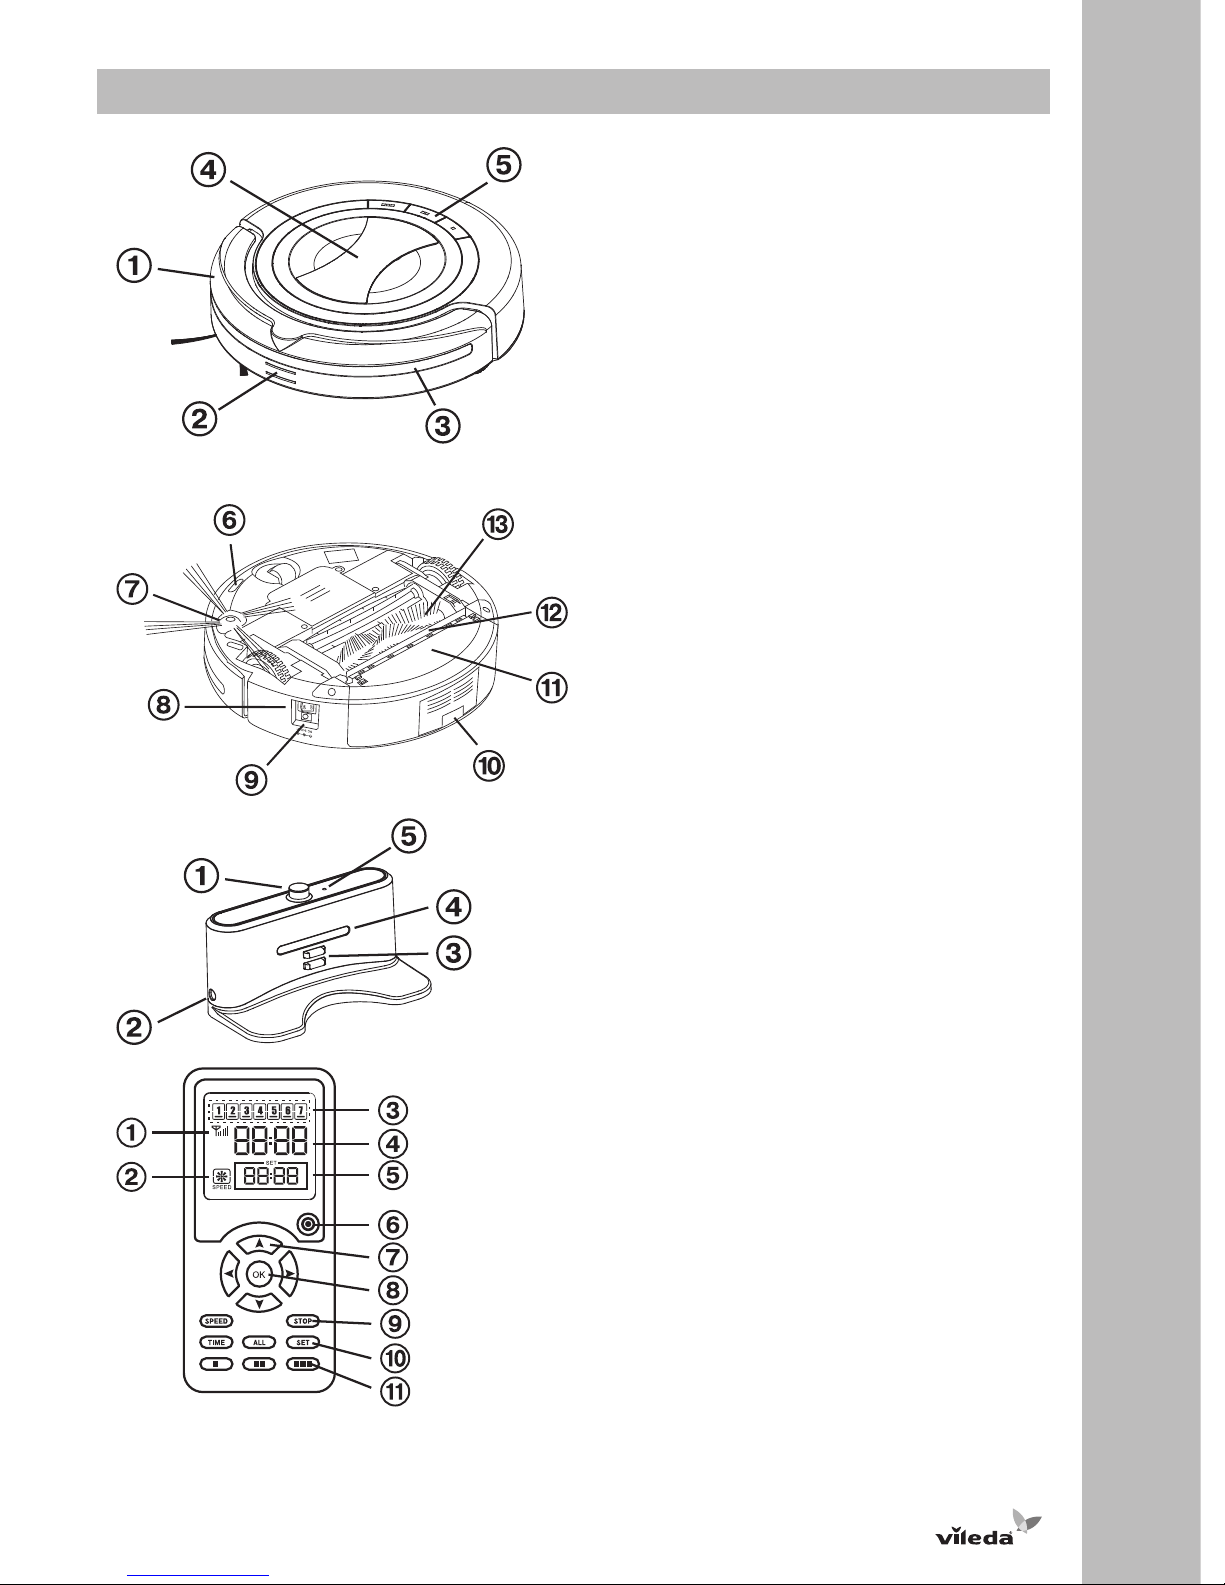
Product Anatomy
1. Front Bumper
2. Charging Contacts
3. Collision Sensors
4. Handle
5. Clean Mode Buttons
6. Cliff Sensors
7. Side Brush
8. Power Switch
9. Battery Charger Socket
10. Removable Dustbin
11. Filter
12. Vacuum Inlet
13. Main Brushes
1. Power Indicator
2. Charging Station Socket
3. Charging Contacts
4. Docking Sensor
5. Sync Button
1. Link Indicator
2. Speed Indicator
3. Week Display (1=Monday,
7=Sunday)
4. Clock Time Display
5. Scheduling Time Display
6. Power Button
7. Arrow Keys
8. OK Button
9. Control Buttons
10. Scheduling Buttons
11. Clean Mode Buttons
6
G
Battery Charging & Recharging
WARNING:
If the battery is damaged in any way, do not attempt to recharge it. Contact Vileda customer service address (see
last page).
Charge the battery manually for 12 hours before first use. After the first use, charging time is about 4-5 hours
Turn the robot’s power switch to OFF when transporting or when in storage, otherwise the battery may become
damaged.
MANUAL CHARGING:
1. Connect the DC plug of the battery charger to the battery charger socket located beside the power switch.
2. Connect the AC plug of the battery charger to the mains. The buttons on top of the robot will flash while charging and stop flashing when battery is fully charged .
3. Once the battery is fully charged unplug the battery charger from mains and battery charger socket.
SYNCHRONISATION OF CHARGING STATION:
1. Before first use the Charging Station has to be synchronized with the robot.
2. Ensure that the robot is switched off and that the Charging Station is connected to the mains.
3. Press and hold the sync button of the Charging Station with an auxiliar y tool (e.g. pencil) while switching the Robot on by pressing the power switch.
4. If the robot beeps two times the synchronisation was successful, otherwise please repeat the steps mentioned
above.
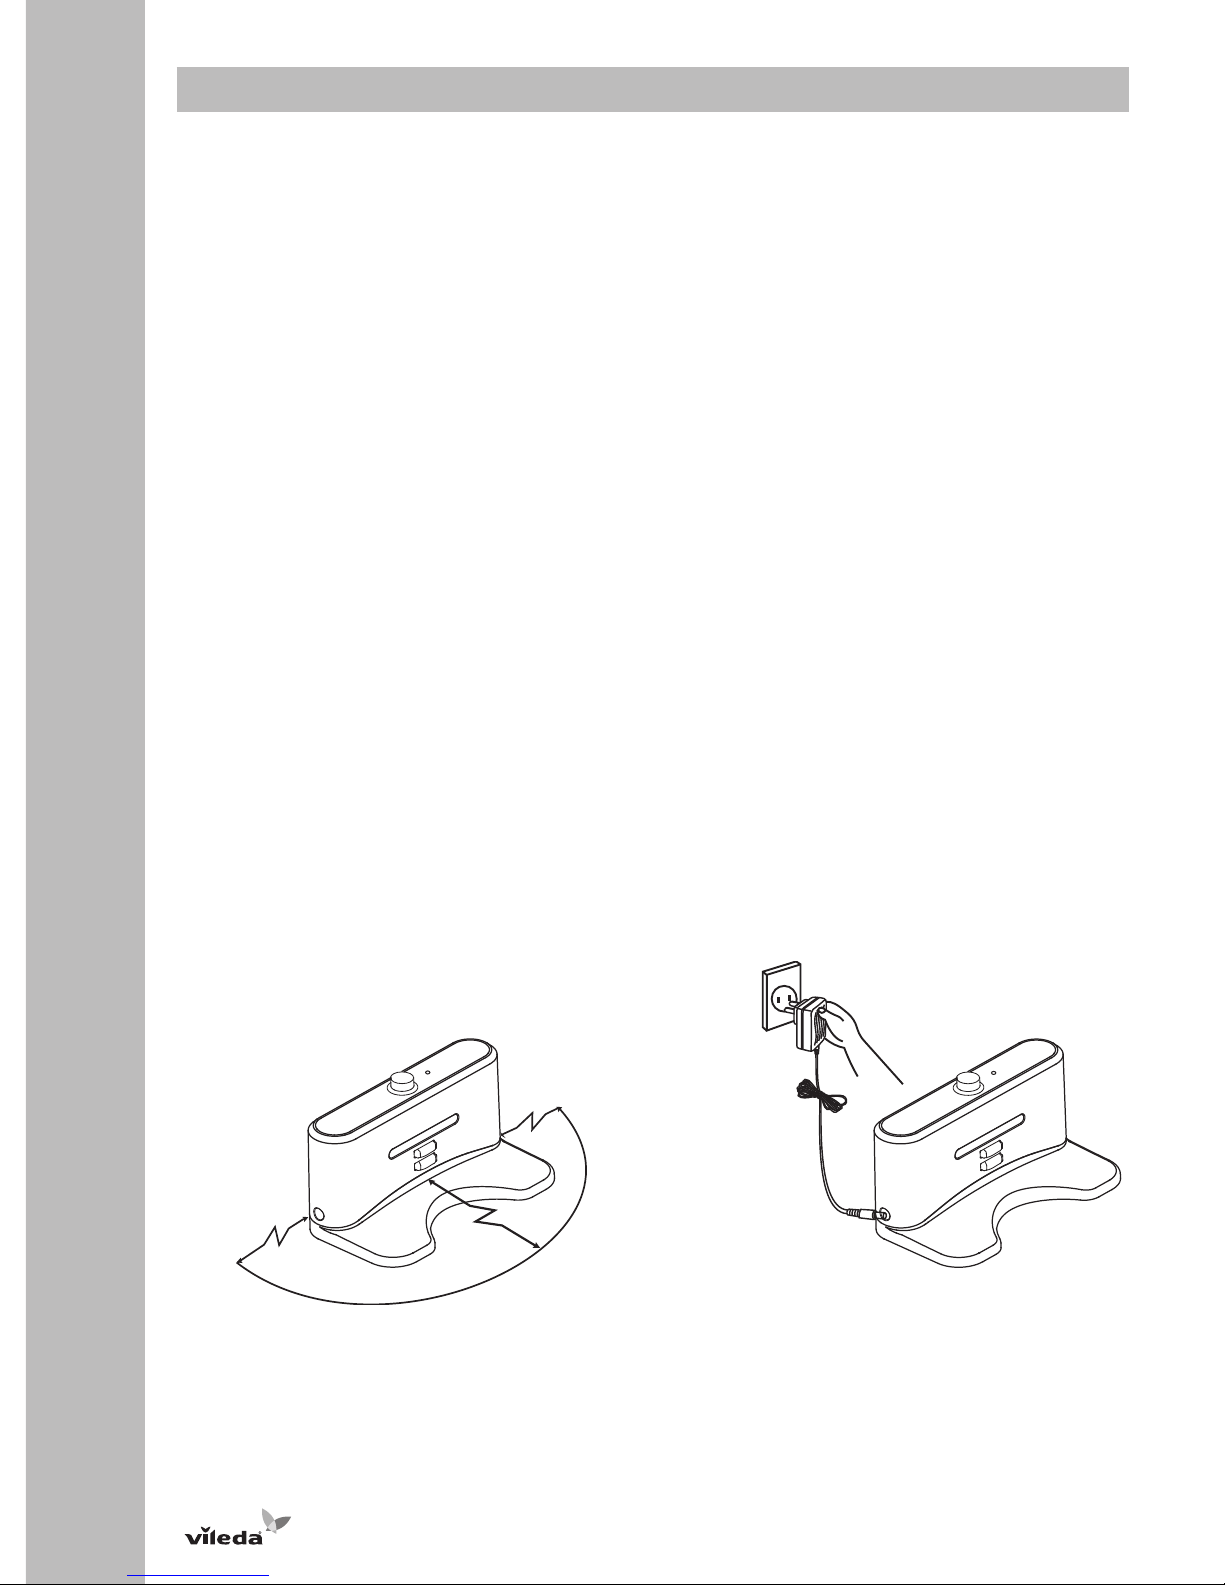
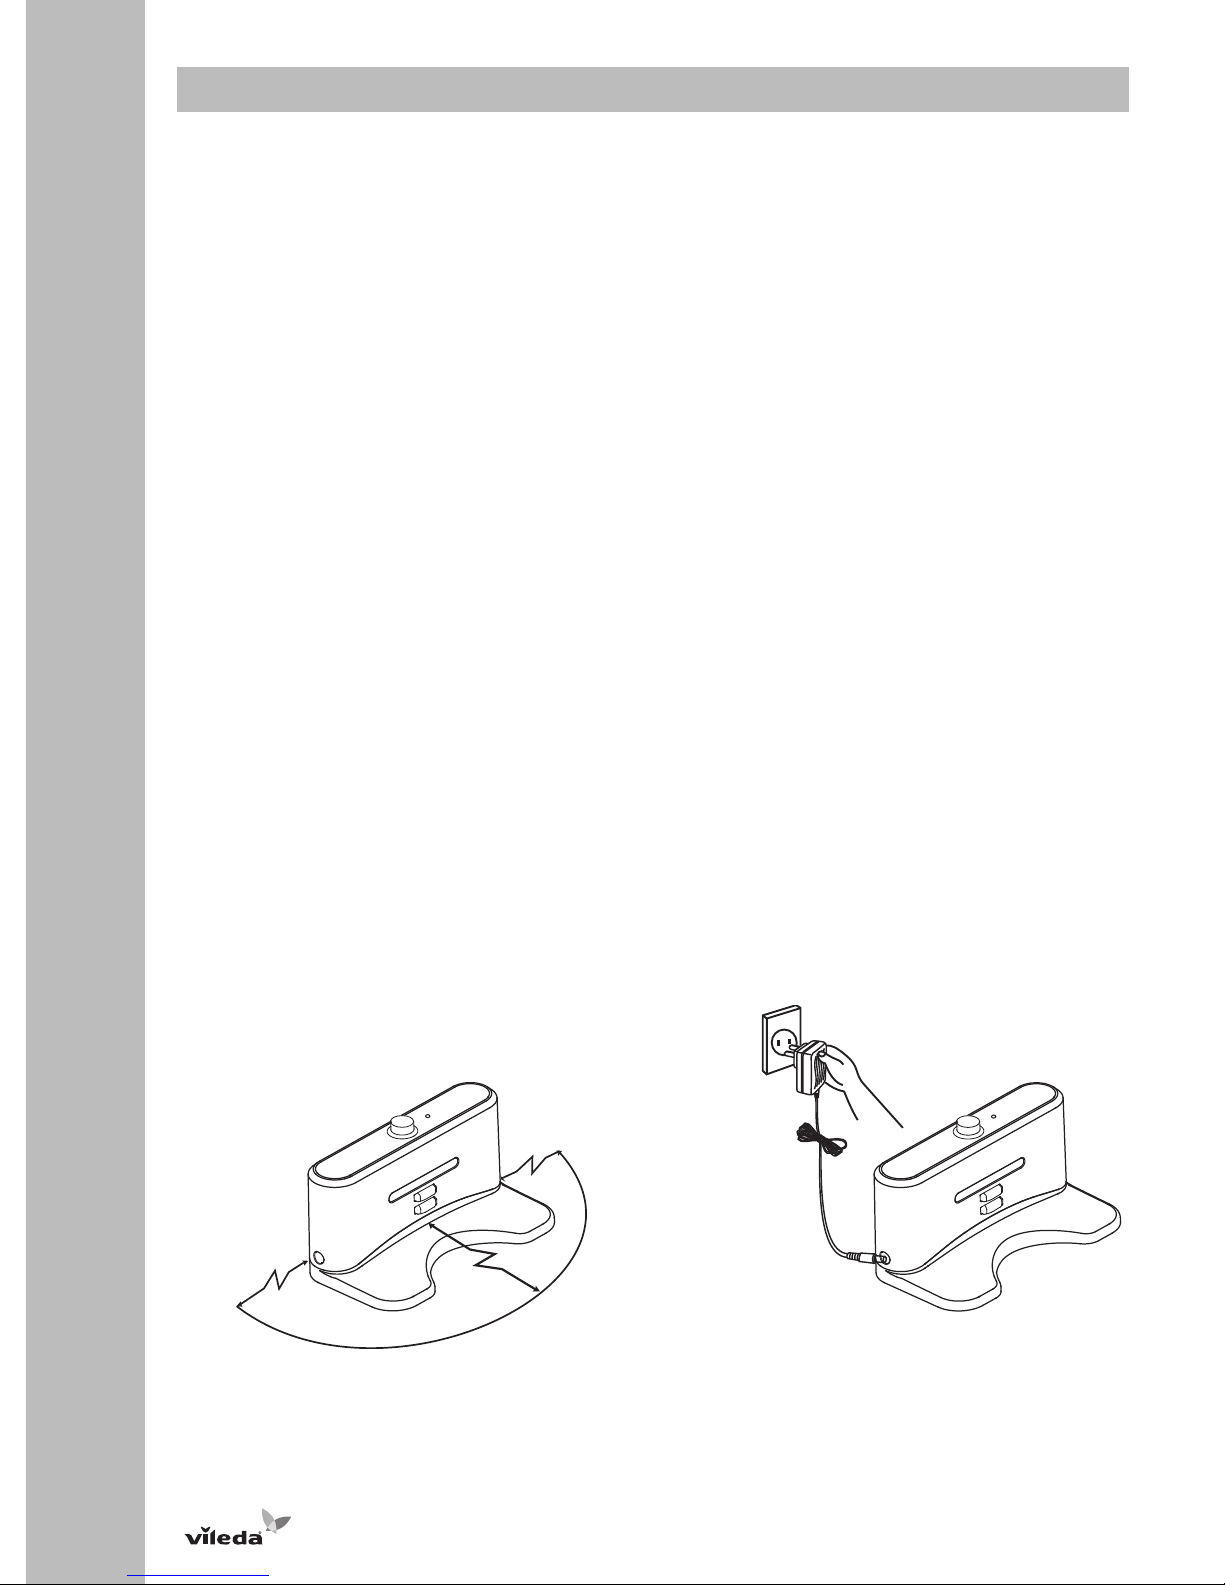
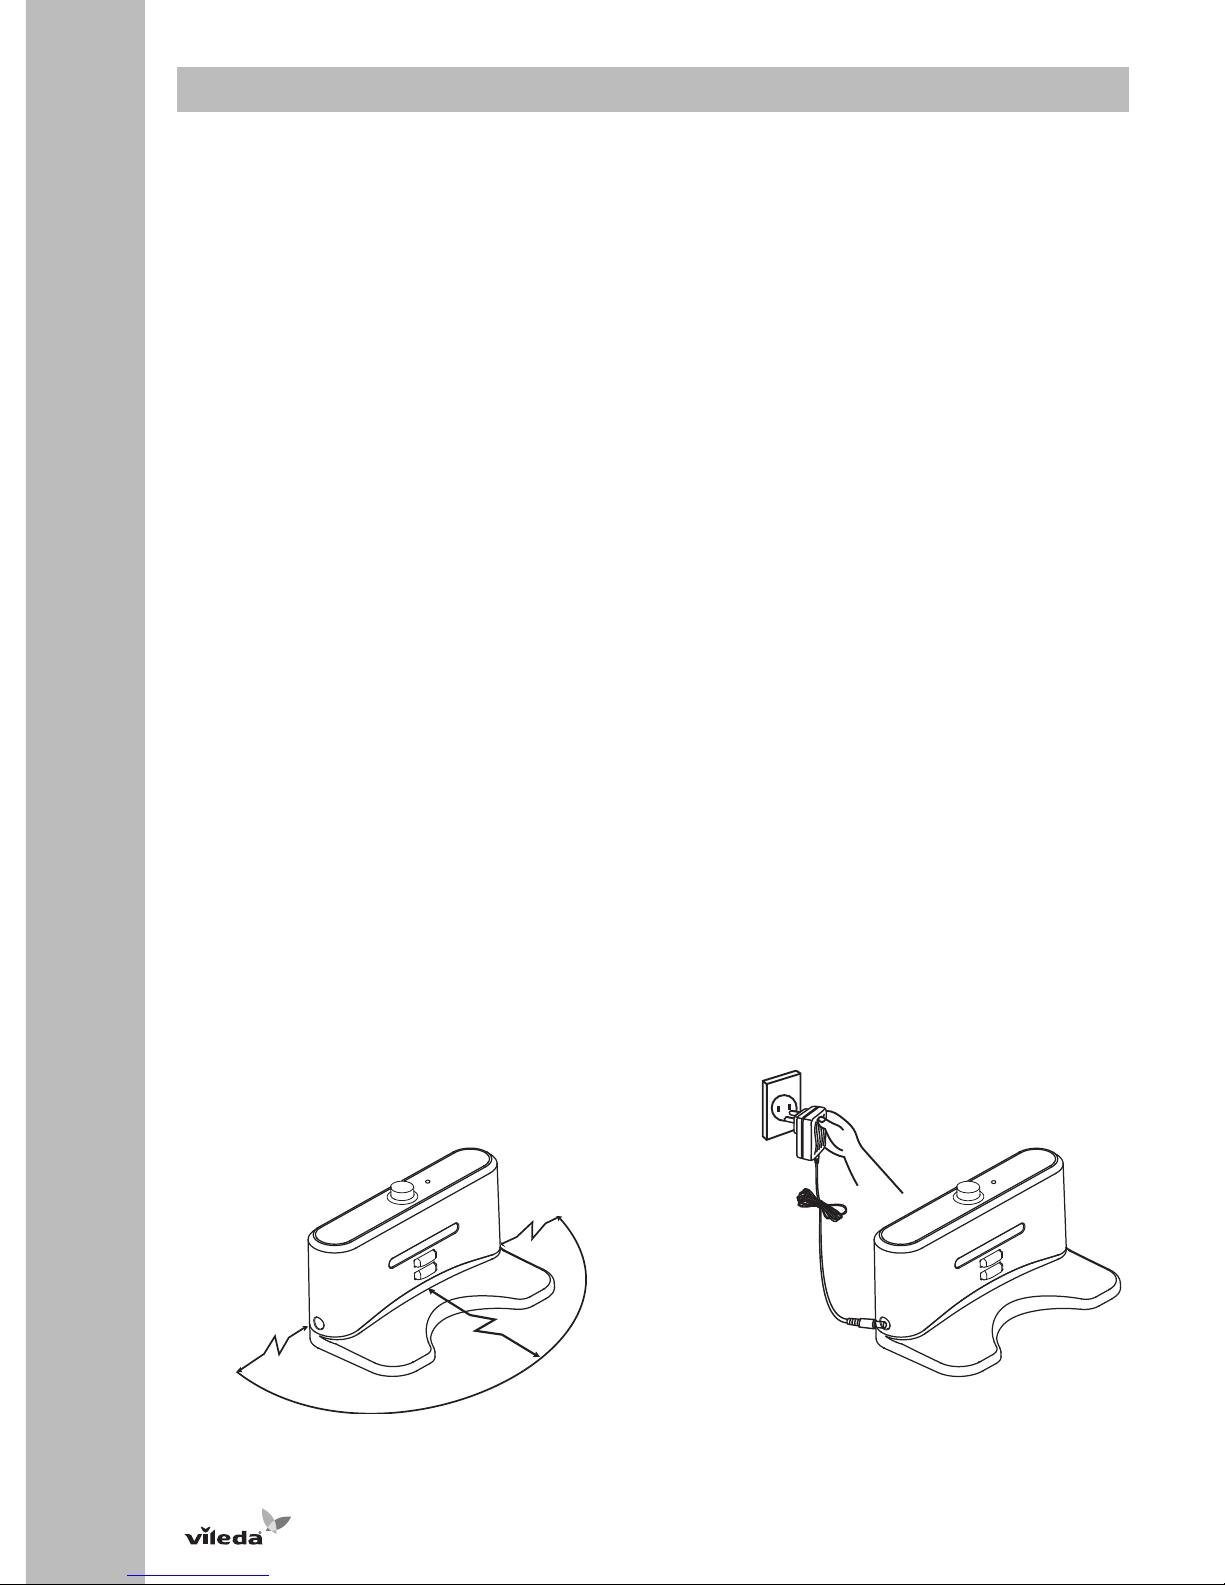
AUTONOMOUS CHARGING:
1. Install the Charging Station on a hard and flat ground and against a vertical wall.
2. Ensure that there are no obstacles within an area of 3m in front of the Charging Station and within 0.5m on its
right and left side.
3. Connect the DC plug of the battery charger to the battery charger socket of the Charging Station.
4. Connect the AC plug of the battery charger to the mains. The power indicator of the Charging Station will light
up in a red colour.
5. Ensure that the power cord is running alongside the wall, otherwise the robot could get entangled.
6. Ensure that the sensor windows of robot and Charging Station are not covered, otherwise the robot cannot
search for the Charging Station.
7. Place the robot a suitable distance from the Charging Station and switch the robot on, by pressing the power switch.
8. Press the ”OK” button and “up” button on the Timer in succession to make the robot search for the Charging
Station.
0.5m
0.5m
3m
Battery life is up to 60 minutes and decreases over time. The central button on top of the robot will flash when battery level is low. Then recharging is needed. The Robot will search for and drive back to the Charging Station autonomously in case of low battery during manual cleaning for 60 minutes and/or any scheduled cleaning. Whilst
searching for the Charging Station the central button on top of the robot will flash.
To maintain peak performance of the battery it is recommended to charge 12 hours before first use or when used
again after a long time.
7
G
WARNING:
Only use the charger provided with the product. Do not attempt to use the charger with any other product nor attempt to charge this product with another charger as this may damage the product and the battery, and will invalidate your guarantee.
WARNING:
Only use a replacement battery as supplied by the manufacturer.
Using the Product
Before using, pick up objects like clothing, loose papers, pull cords for blinds or curtains, power cords and any
fragile objects as they may entangle with the cleaning brushes. If the device passes over a power cord and drags
it, there is a chance an object could tumble off a table or shelf.
MANUAL CLEANING:
1. Ensure the battery is charged.
2. Place the Robot in the middle of the room.
3. To turn the Robot ON press the power switch.
4. To START the Robot, press one of the Clean Mode Buttons to choose desired cleaning mode (see section
"Cleaning Modes").
5. To PAUSE the Robot, press one of the Clean Mode Buttons.
6. To RESUME the Robot, press one of the Clean Mode Buttons again.
7. To turn the Robot OFF, press the power switch.
SYNCHRONISATION OF TIMER:
1. Before first use the Timer has to be synchronized with the robot.
2. Ensure that the robot is turned off and that the Timer is equipped with batteries.
3. Press and hold the “OK” button of the Timer whilst switching the Robot on by pressing the power switch.
4. If the robot beeps two times the synchronisation was successful, otherwise please repeat the steps mentioned
above.
TIME SETTING OF TIMER AND ROBOT:
1. Before using scheduled cleaning the system time of the robot has to be set.
2. Ensure that the robot is turned on and that the Timer is equipped with batteries.
3. Press the “time” button on the Timer. The clock time on the display of the Timer starts blinking.
4. Press "right" and "left" button to switch between hour, minute and weekday setting. Use "up" and "down" button to adjust weekday and system time.
5. To finish and save the setting press the "time" button again. To cancel the process press the power button of
the Timer.
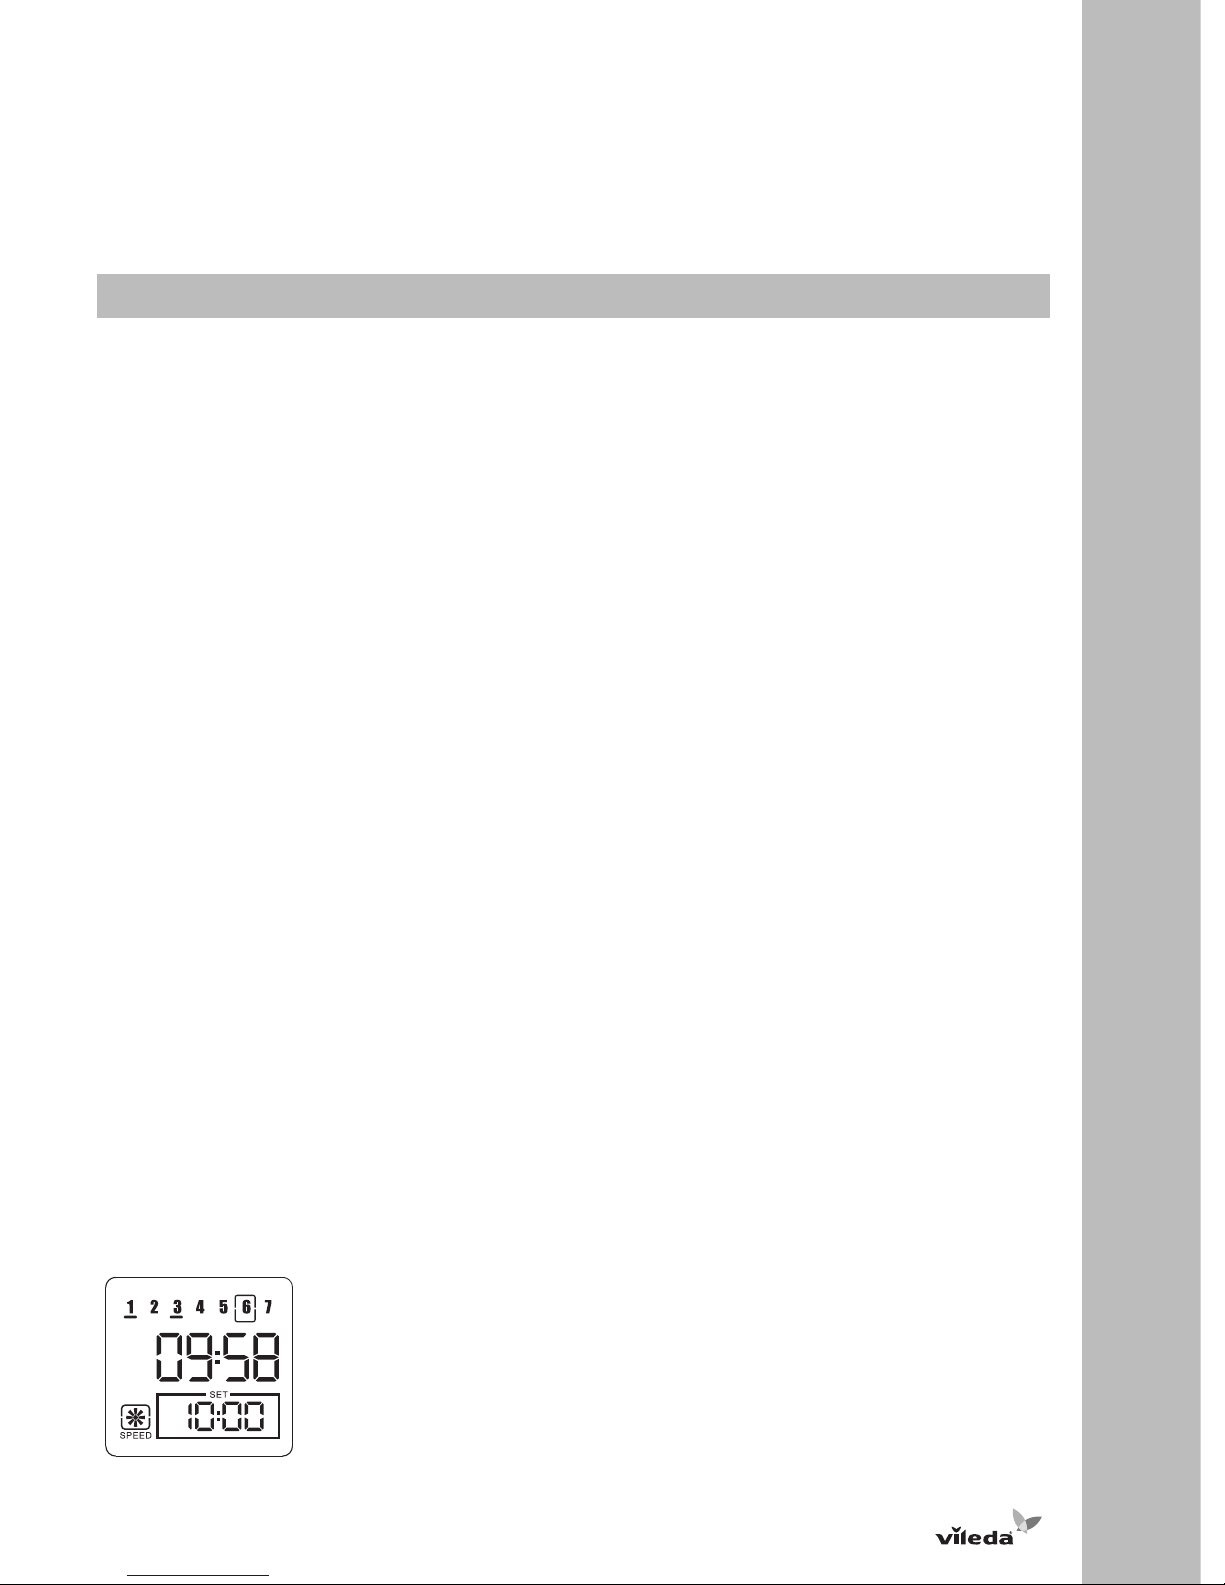
SCHEDULED CLEANING:
1. Ensure that the robot is turned on and that the Timer is equipped with batteries.
2. Press the “set” button on the Timer. The scheduling time on the display of the Timer will start blinking.
3. Press "right" and "left" button to switch between hour, minute and weekday setting.
4. Use "up" and "down" button to adjust the cleaning time and to switch between weekdays.
5. Press "OK" button to select and deselect the days for cleaning. If the robot should clean every day press the
"all" button to select all weekdays at once.
6. To finish and save the setting press the "set" button again. To cancel the process press the power button of
the Timer.
Example: Robot starts cleaning autonomously each Monday and Wednesday at 10 o’clock.
8
G
IMPORTANT:
For most efficient cleaning, keep your floors as clear as possible (e.g. temporarily remove wires, rugs, chairs,
small objects, ...). With fewer obstacles, the Robot will clean more effectively.
Cleaning Modes
The Robot uses its robotic intelligence to navigate autonomously around the room and efficiently clean the whole
floor and under furniture.
The Robot has 3 cleaning modes:
Short ( ■■)
Robot cleans for 5 minutes. Ideal for spot cleaning in one area.
Medium (■■■■)
The Robot cleans for 30 minutes. Ideal for mid-sized rooms (up to 25 m²).
Large ( ■■■ ) and Scheduled
Cleaning
The Robot cleans for 60 minutes and it automatically searches for the
Charging Station. Ideal for big rooms (more than 25 m²)..
WARNING:
Black or dark coloured types of flooring and stairs could reduce the reliability of the cliff sensors. Test with your
specific flooring and staris before letting the robot run without any supervision.
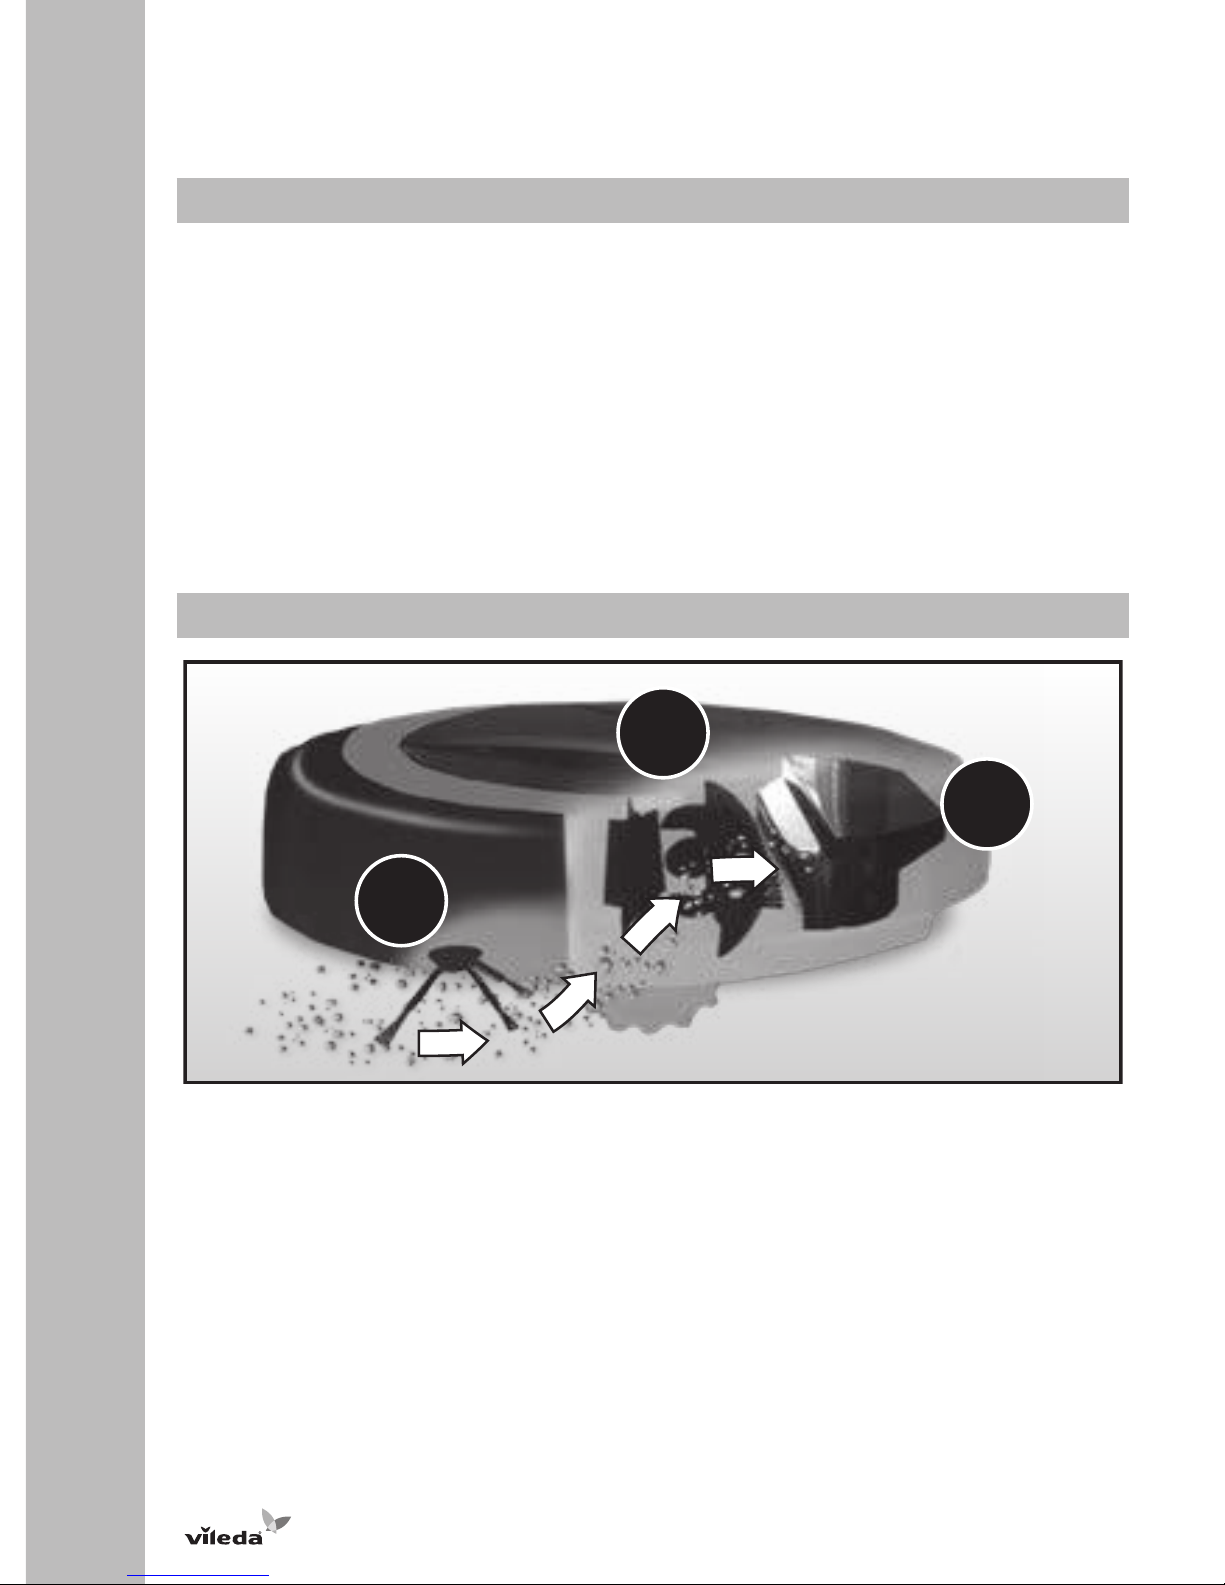
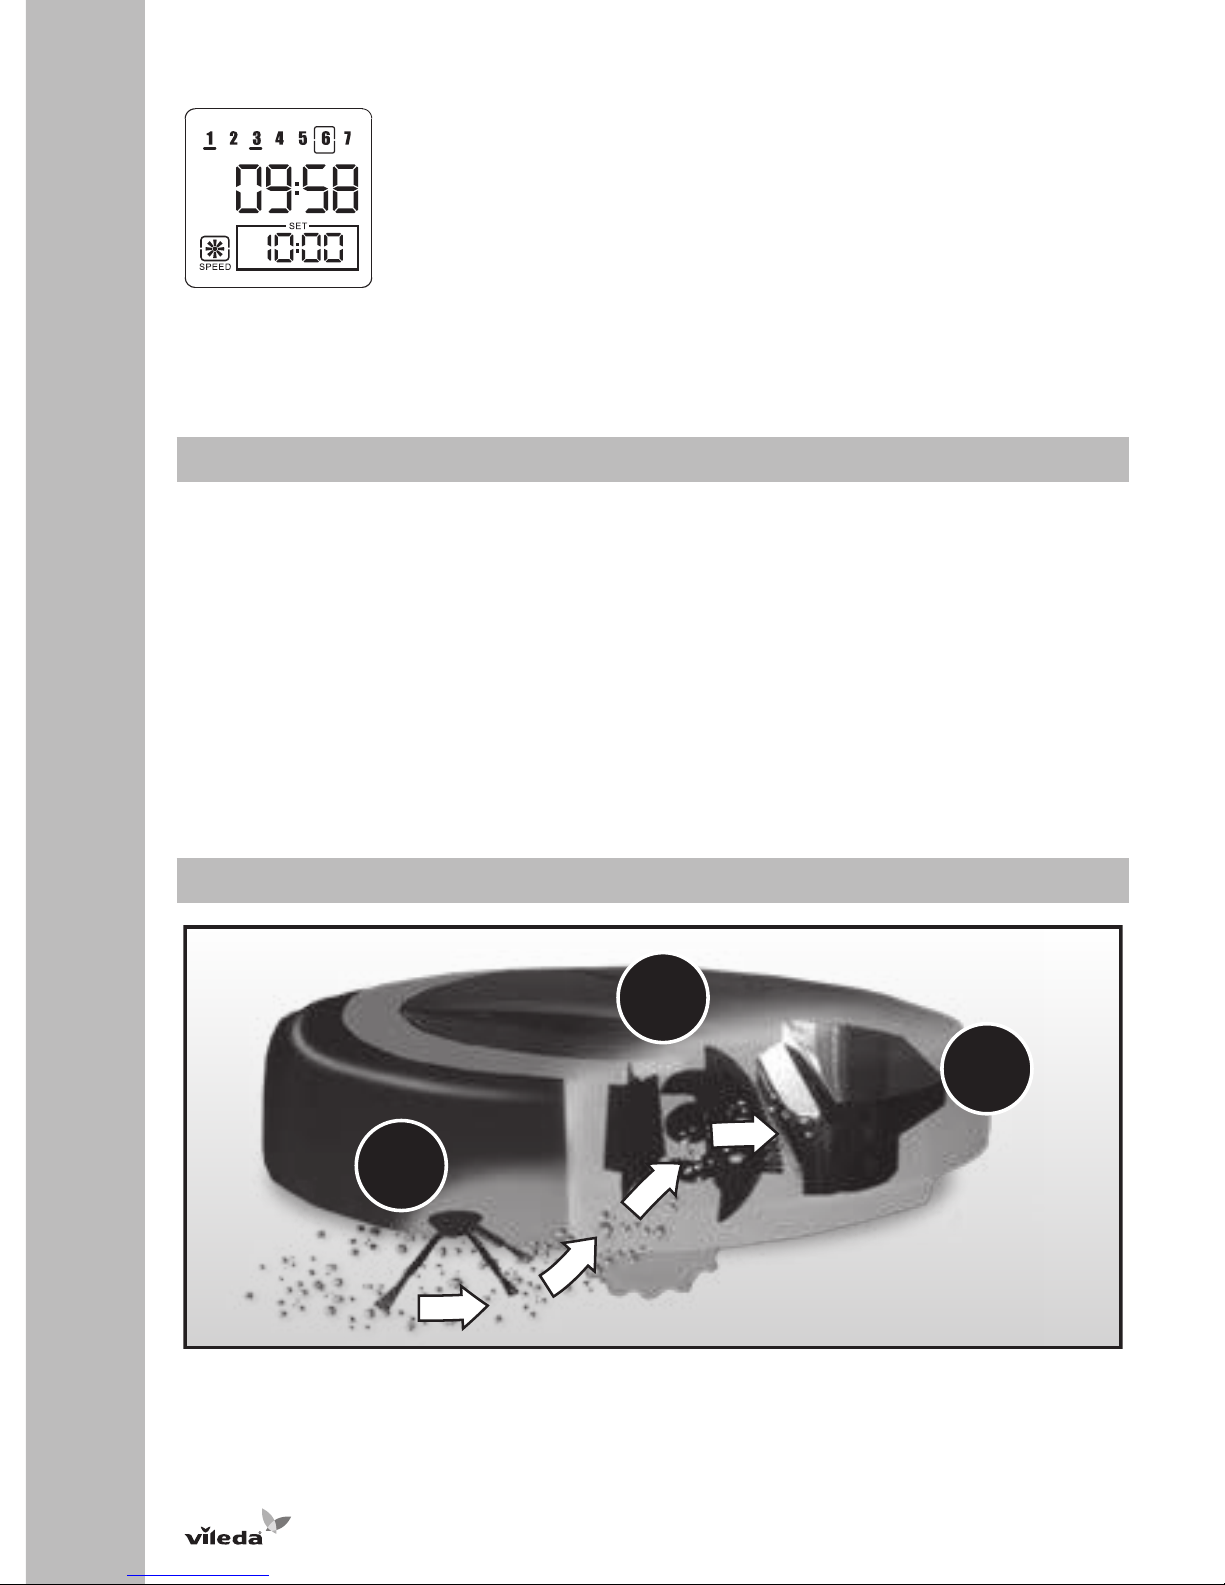
Cleaning System
1
2
3
1. Side brush sweeps into corners and along edges.
2. Two rotating brushes collect dirt, hair and particles into the dustbin.
3. Vacuum power picks up the remaining fine dirt.
The Robot works on all hard floors such as wood, parquet, tiles, linoleum and short-pile carpets.
9
G
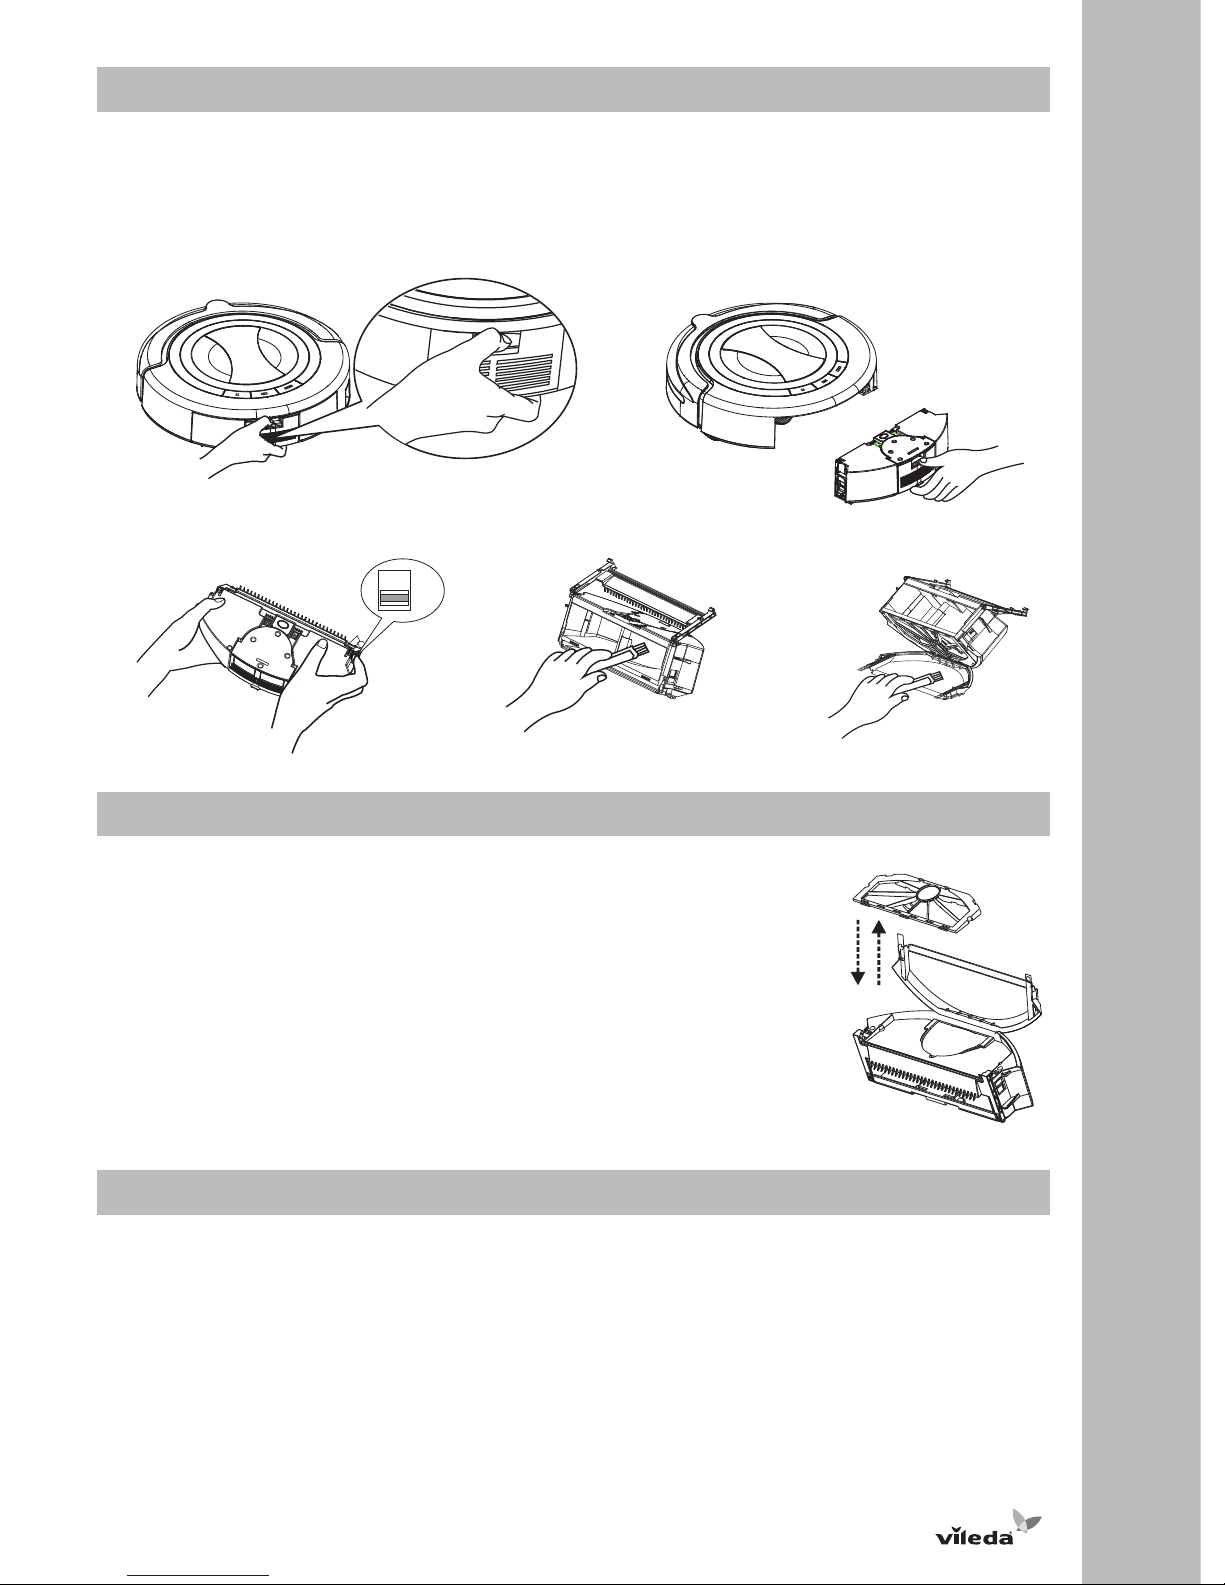
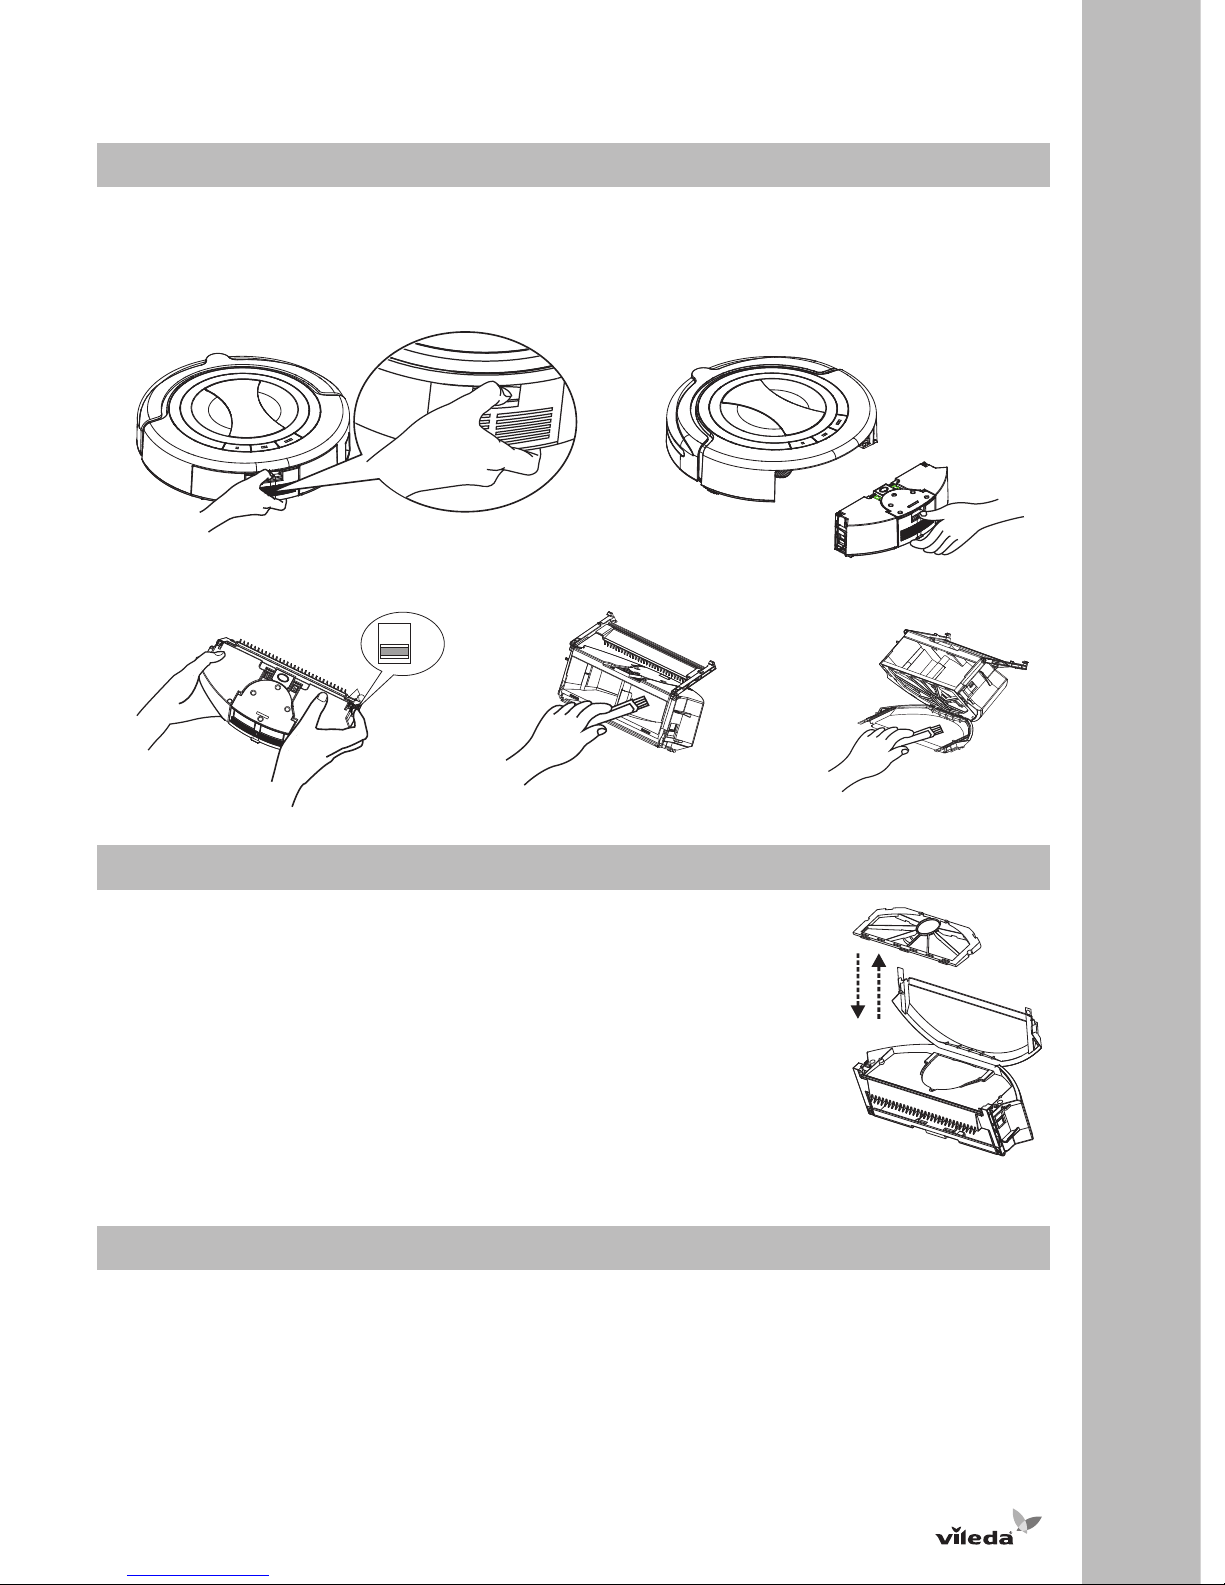
Removing and Emptying the Dustbin
1. Turn off the power switch.
2. Press down the dustbin release button and pull out the dustbin.
3. Place the dustbin over a waste bin, slide the two clips to open the fencing plates and empty the dustbin in the
waste bin.
4. Close the fencing plates, reinsert the dustbin and push until you hear a clicking sound.
Cleaning and Replacing the Filter
1. Place the dustbin over a waste bin and slide the two clips to open the fencing plates.
2. Take the filter out of the dustbin by pulling the flaps.
3. Clear the dirt on the filter using the maintenance brush.
4. Insert clean filter or new filter to the dustbin and close the fencing plates.
To buy new filters, please contact Vileda customer service address (see last page).
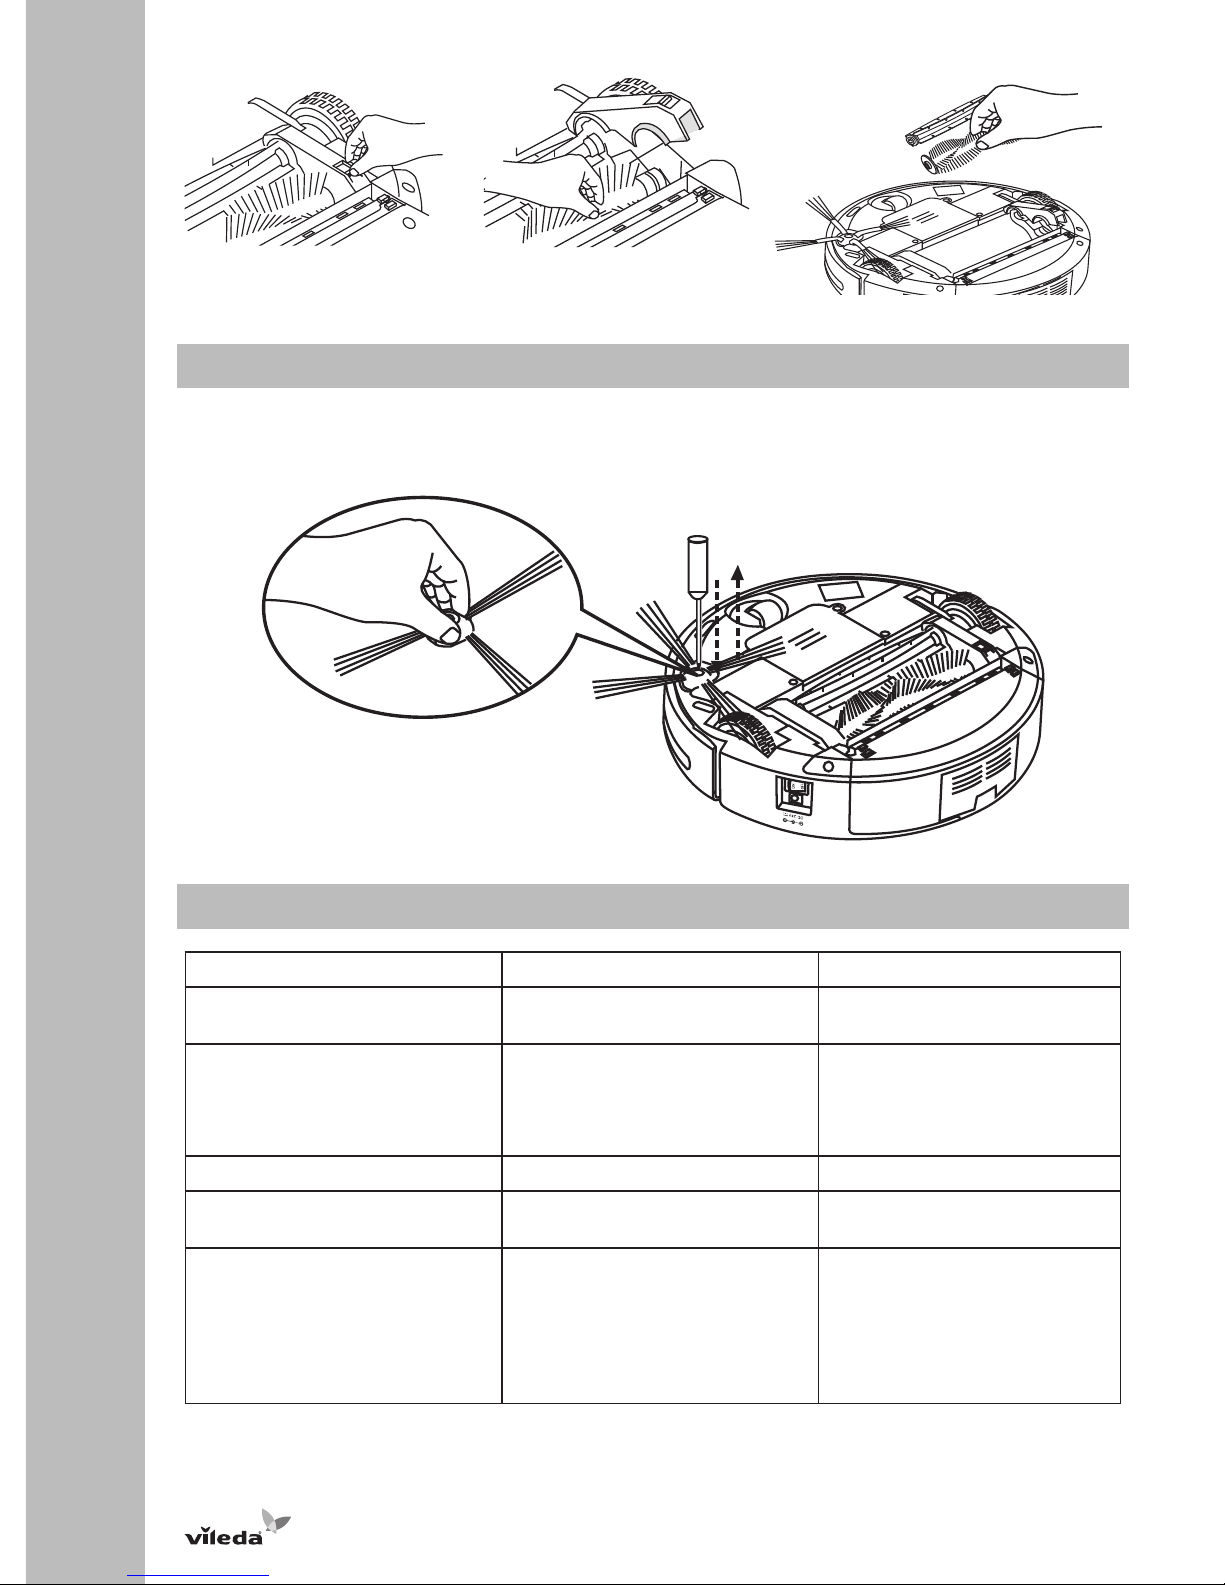
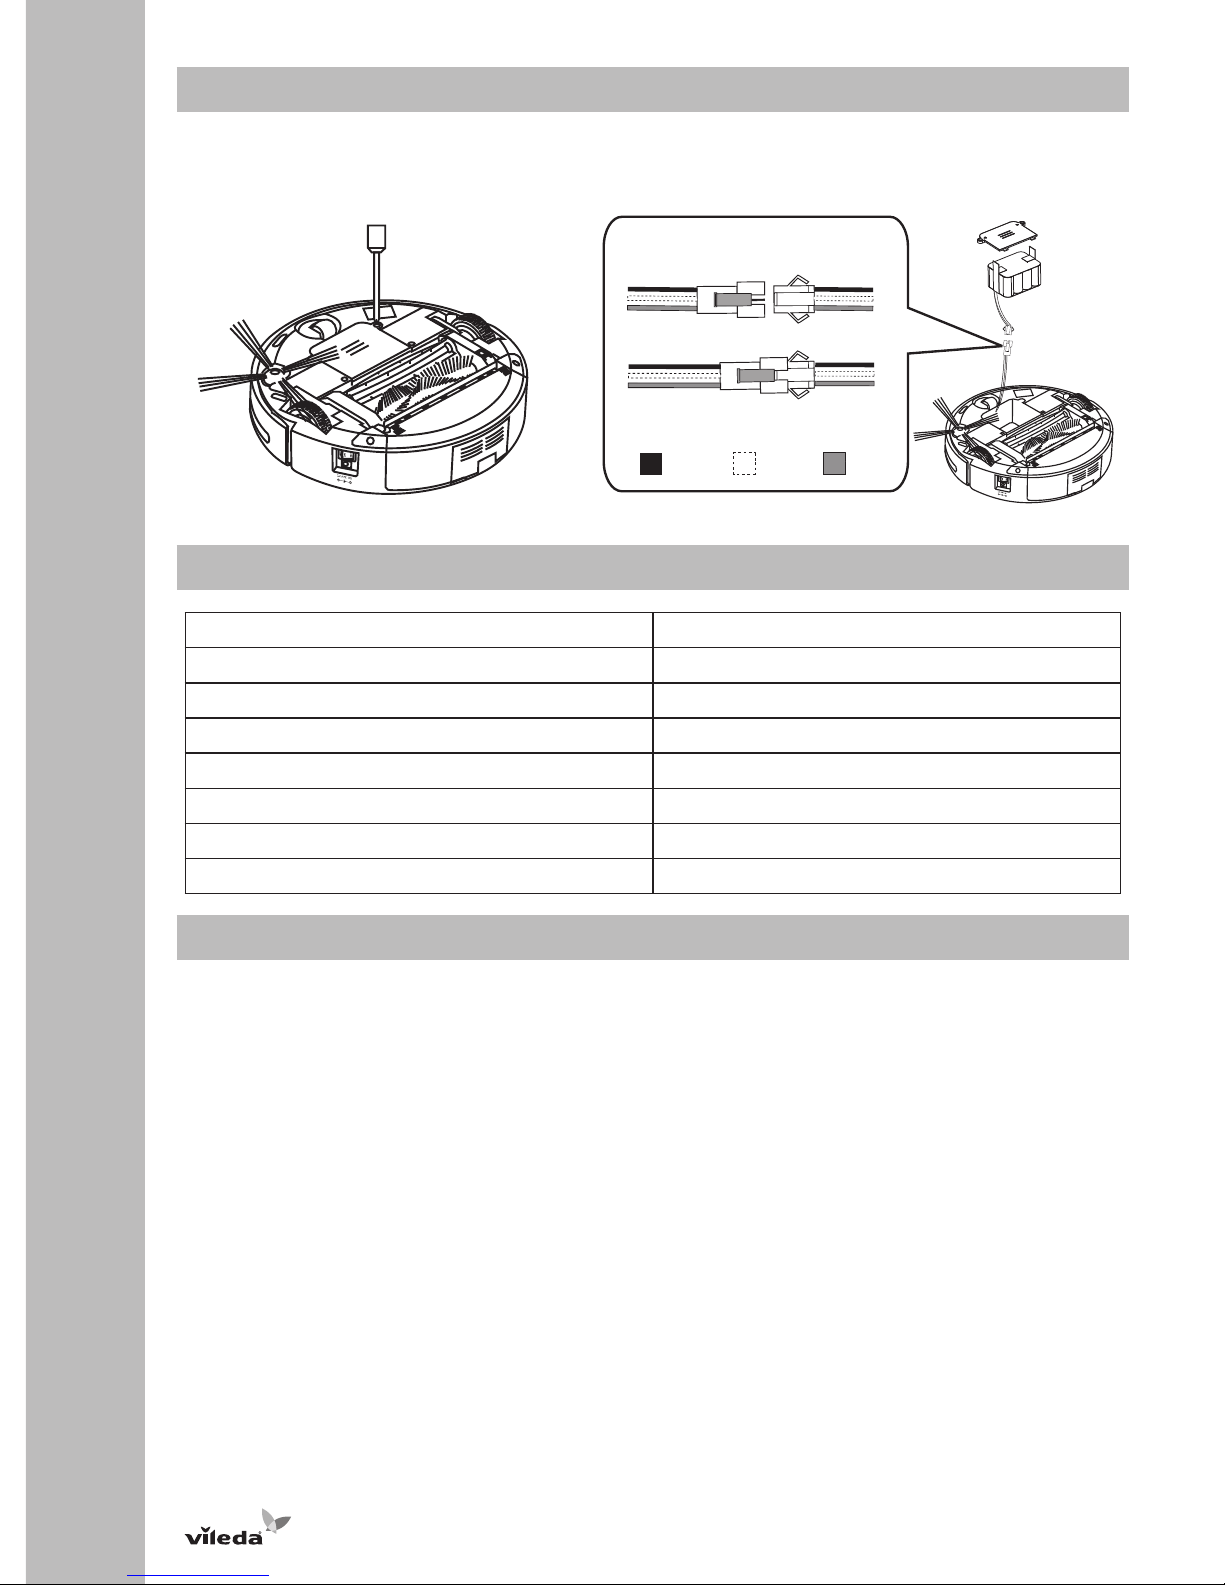
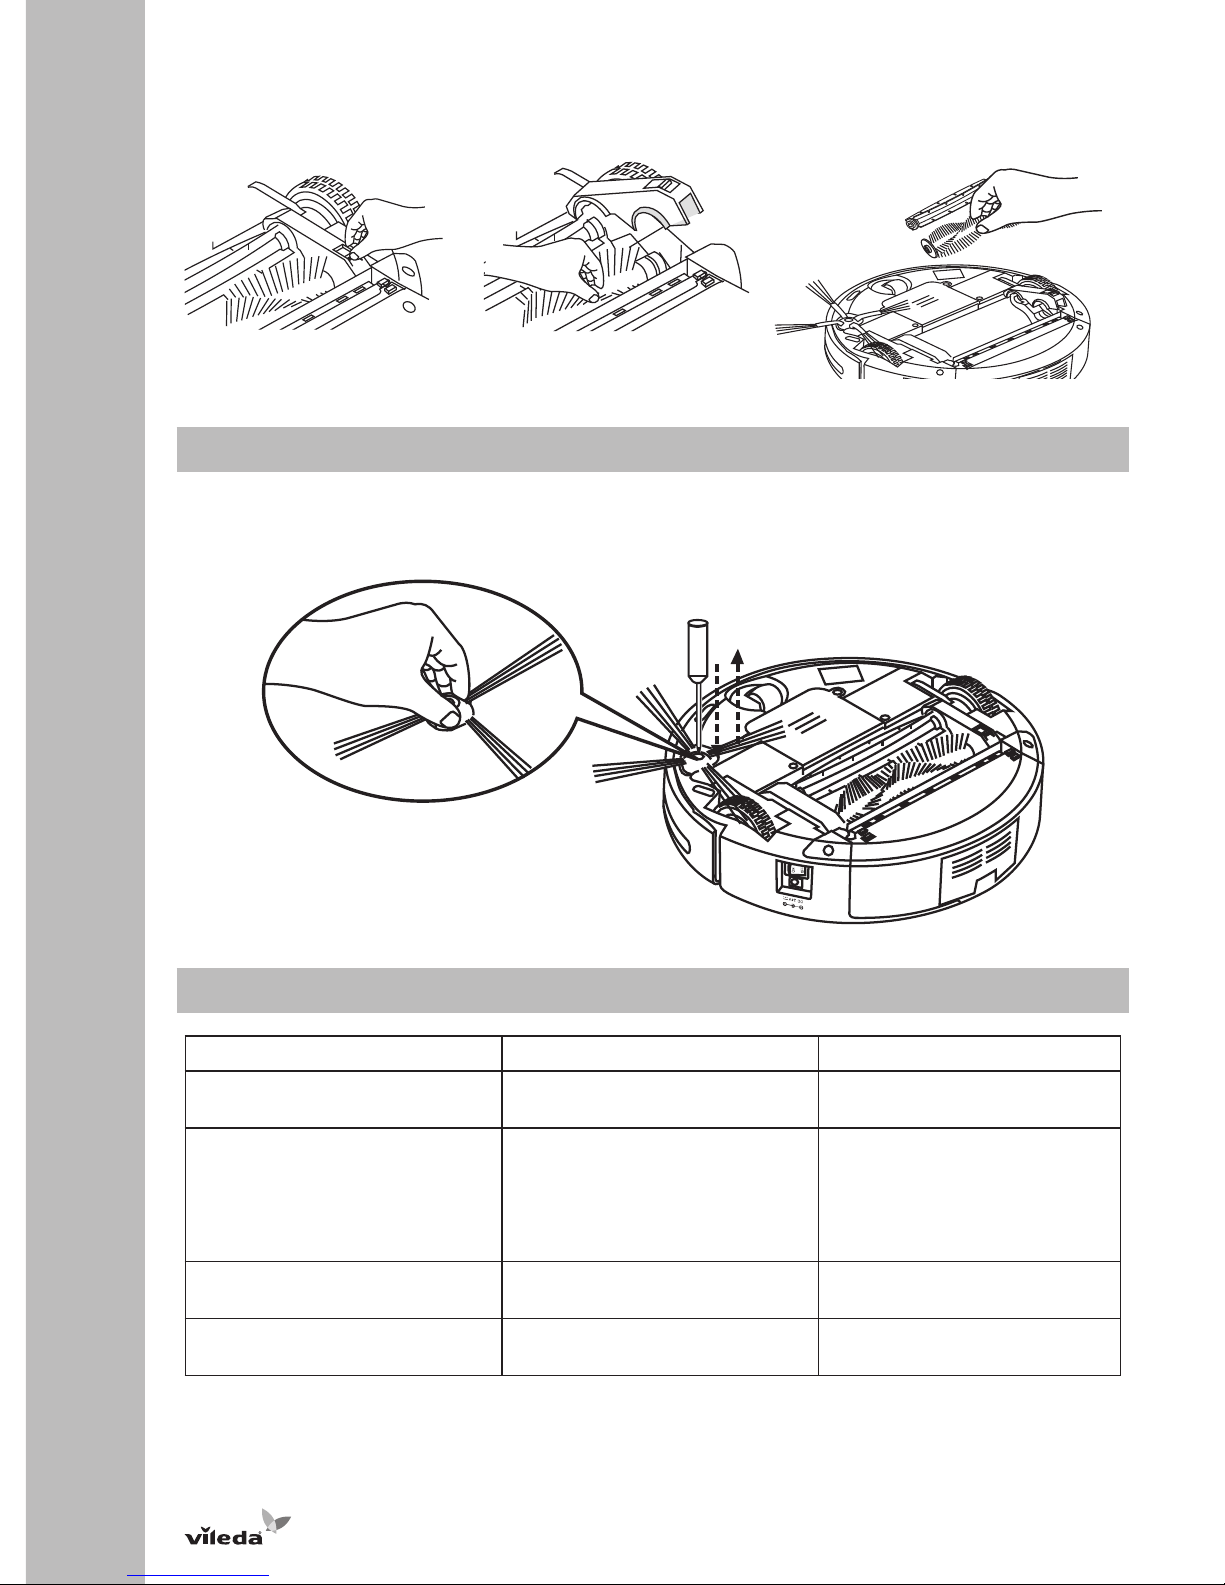
Cleaning Main Brushes
Main brushes do not need to be cleaned after each use. However, regular cleaning is recommended to avoid
excessive build-up of hair that could damage the robot.
1. Turn off the power switch and put the robot on a flat surface with its bottom up.
2. Remove the brush retainer by pushing on the flap.
3. Take out the main brush and the rubber brush as shown in the illustration.
4. Remove all hairs and dirt from both brushes. Plus, clean the brush chamber.
5. Wipe out dirt on the shaft and bearing of the brush.
6. Place brushes back into the slot.
7. Put the brushes retainer back and push until you hear a clicking sound.
10
G
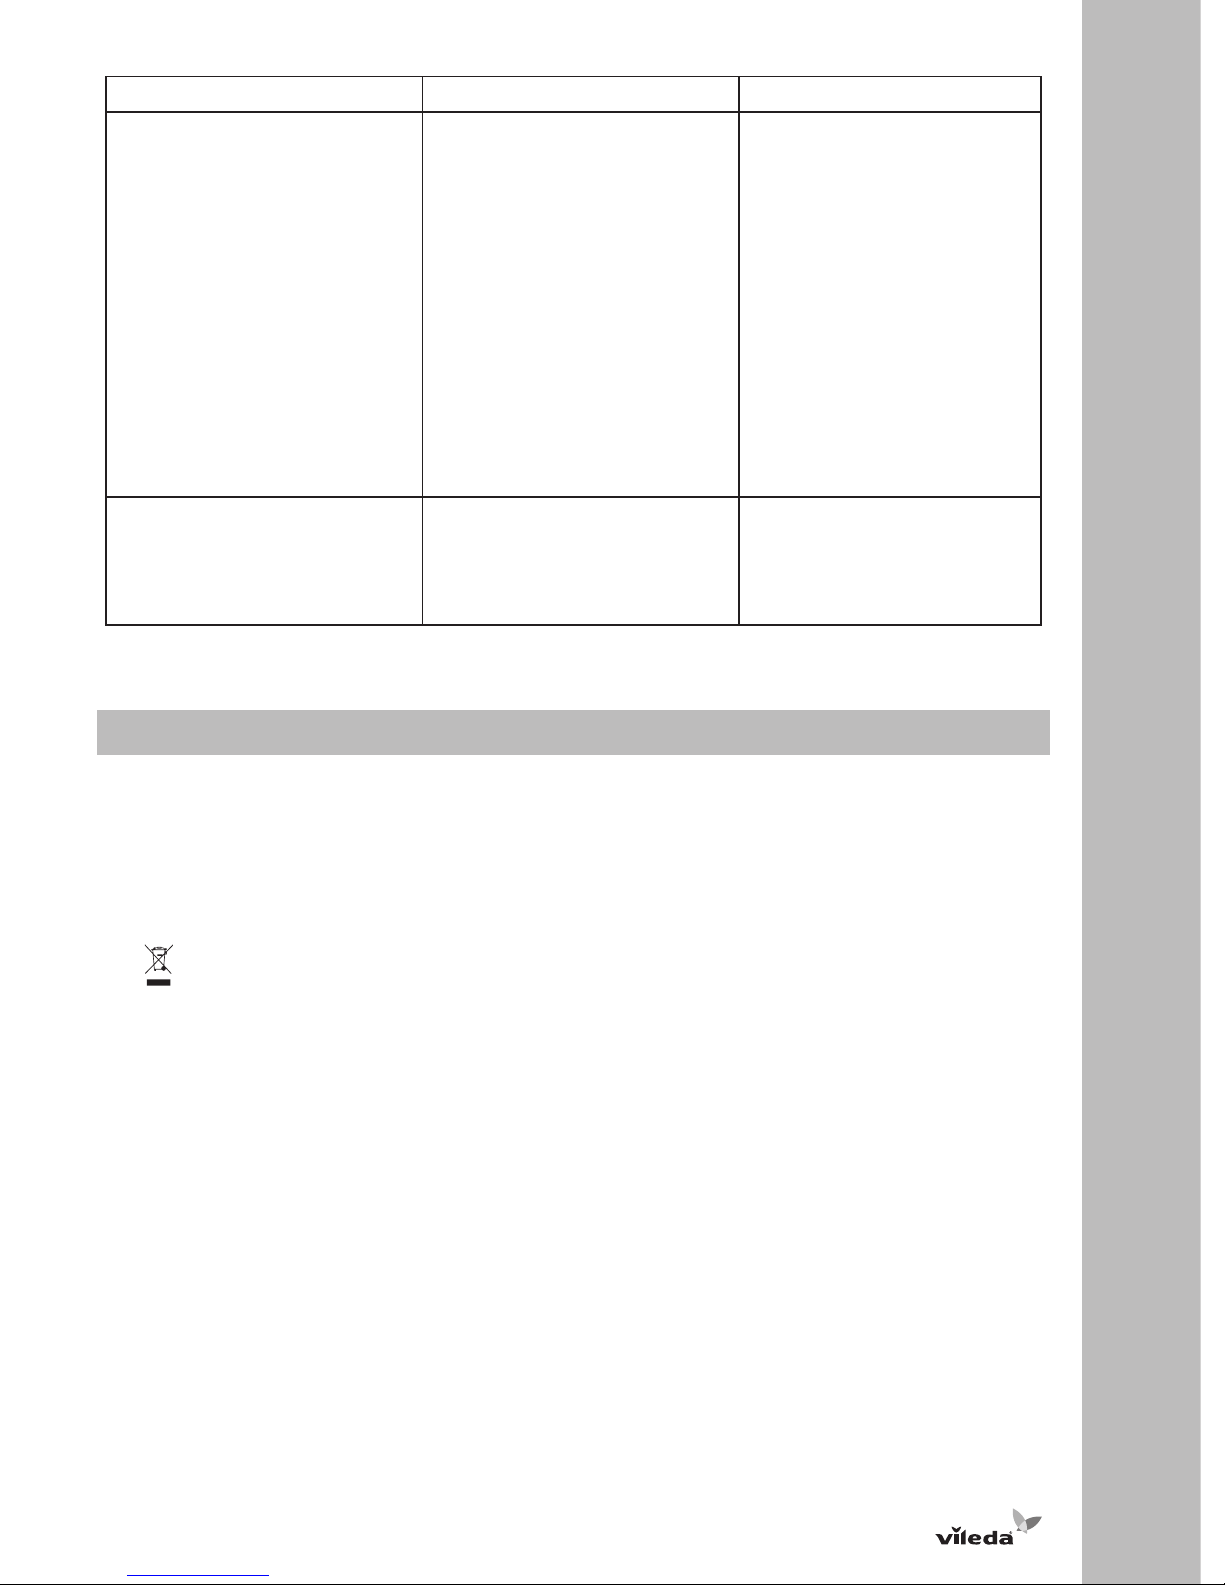
Replacing Side Brush
1. Turn off the power switch and put the robot on a flat surface with its bottom up.
2. Use a cross-head screwdriver to loosen the screw and remove the side brush.
3. Insert new side brush and tighten the screw.
Troubleshooting
Problem Possible reason Possible solution
Robot does not detect cliffs. • Cliff sensors are dirty. • Clean the sensors with a dry
cloth.
Robot stops cleaning or does not
start cleaning and all light
indicators are flashing.
• Main brushes are jammed
• Drive wheels are jammed.
• Dustbin is not inserted correctly.
• Clean main brushes and
restart.
• Clean drive wheels and restart.
• Insert dustbin and restart
Central light indicator is flashing. • Low battery. • Recharge battery.
Robot only moves in circles in the
same position.
• One wheel is blocked. • Remove hairs and dirt from
wheels.
Timer does not work. • No battery or low battery.
• Timer is not synchronized.
• Distance between Timer and
robot is too big.
• Insert charged battery.
• Synchronize Timer (see section
"Using the Product").
• Ensure that distance between
Timer and robot is less than
10m.
11
G
Problem Possible reason Possible solution
Robot cannot find the Charging
Station.
• Charging Station is not properly
connected to the mains.
• Charging Station is covered by
an obstacle.
• Obstacle sensors of robot or
docking sensor of Charging
Station are dirty.
• Charging Station is not
synchronized.
• Battery of robot is totally empty.
• Plug the charger correctly to
the mains and to the Charging
Station and check if power
indicator lights up.
• Ensure there are no obstacles
within 3m in front of the
Charging Station and within
0.5m of its side.
• Clean the sensors with a dry
cloth.
• Synchronize Charging Station
(see section "Battery Charging
& Recharging").
• Charge the robot once
manually.
Robot does not start scheduled
cleaning.
• Robot is turned off.
• Weekday for autonomous
cleaning is not selected.
• Turn the robot on by pressing
the power switch.
• Select weekday for autonomous cleaning (see section
"Using the Product").
For further help, technical advice, or to order spare or replacement parts contact Vileda (address see
last page)
Environmental and Product Recycling
The Vileda Relax Plus fulfils the EU directive 2002/96/CE, covering Electrical and electronic appliances and the
management of its disposal.
The packaging material is entirely recyclable, and marked with the recycling symbol. Follow local regulations for
scrapping. Keep the packaging materials (plastic bags, polystyrene parts, etc.) out of children’s reach, as they are
potentially dangerous.
When the product has reached the end of its life please do not dispose of it with general household waste. To prevent possible harm to the environment or human health from uncontrolled waste disposal, recycle it responsibly
to promote the sustainable reuse of material resources.
The
symbol identifies the Vileda Relax Plus as a product submitted to the regime of selective electrical appliance recycling collection.
The product contains a NiMH battery which should not be disposed of with general household waste. Deposit
the battery in an official collection point for its recycling.
Batteries can be detrimental for the environment and can explode if they are exposed to high temperatures.
The violation of these precautions could cause fire and / or serious injuries.
For more detailed information about treatment, recovery and recycling of this product, please contact your local
city office, your household waste disposal service or the shop where you purchased the product.
12
G
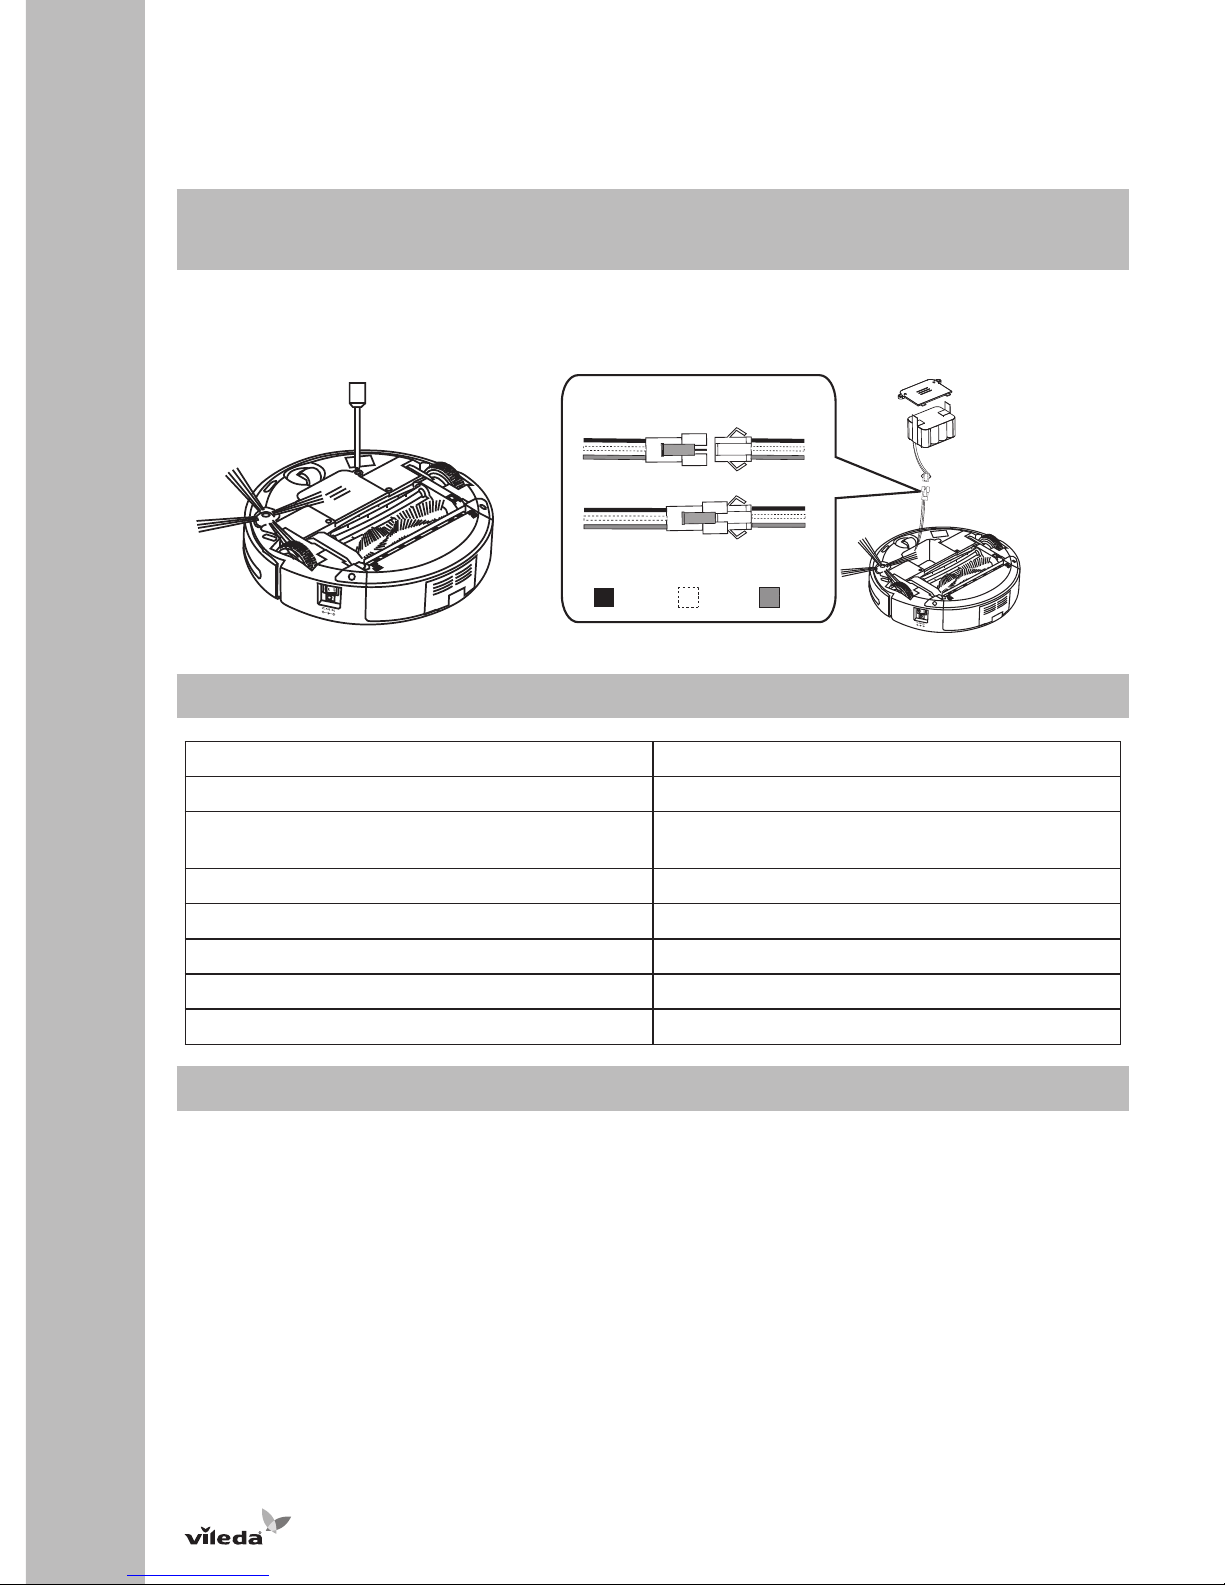
Battery Removal
1. Turn off the power switch and put the robot on a flat surface with its bottom up.
2. Use a cross-head screwdriver to loosen the two screws and remove the battery cover plate.
3. Lift the battery and disconnect the battery by pressing and pulling the flaps at the electrical connector.
Technical Specification
Battery type 14.4V DC, 1700 mAh NiMH
Charging time 4-5 hours
Charging period for fully discharged battery 12 hours
Charger output 24 V DC
Charger input 100-240 V AC
Unit Average Power 24W
Dust Capacity 0.35 l
Unit Size 32x9 cm
Vileda Product Guarantee
A. SCOPE
1. By this Guarantee, Vileda guarantees the product to be free from defects in materials and workmanship at the
date of original purchase for a period of two years from that date. The Vileda company that provides and will
honour this Guarantee is designated in this Guarantee or accompanying leaflets or can be found on our website
www.vileda.com.
2. If within the guarantee period the product is determined to be defective (at the date of original purchase) due
to improper materials or workmanship, Vileda or an authorized service network member in the Guarantee Area
will, without charge for labour or parts, repair or (at Vileda’s discretion) replace the product or its defective
parts subject to the terms and limitations below. Vileda may replace defective products or parts with new or
refurbished products or parts. All products and parts replaced become the property of Vileda.
3. This guarantee does not cover:
a) periodic maintenance and repair or parts replacement due to wear and tear.
b) consumables (components that are expected to require periodic replacement during the lifetime of a
product such as pads).
c) damage or defects caused by use, operation or treatment of the product inconsistent with normal
personal or domestic use.
d) damage or changes to the product as a result of:
I. misuse, including:
- treatment resulting in physical, cosmetic or surface damage or changes to the product;
- failure to install or use the product for its normal purpose or in accordance with Vileda instructions
on installation or use;

13
G
- failure to maintain the product in accordance with Vileda instructions on proper maintenance;
- installation or use of the product in a manner inconsistent with the technical or safety laws or
standards in the country where it is installed or used;
II. use of the product with accessories, peripheral equipment and other products of a type, condition and
standard other than prescribed by Vileda;
III. repair or attempted repair by persons who are not Vileda or authorized service network members;
IV. Accidents, fire, liquids, chemicals, other substances, flooding, vibrations, excessive heat, improper
ventilation, power surges, excess or incorrect supply or input voltage, radiation, electrostatic discharges
including lighting, other external forces and impacts.
B. TERMS
1. Guarantee services will be provided only if the original invoice or sales receipt (indicating the date of purchase,
model name and dealer’s name) is presented with the defective product within the guarantee period. Vileda
may refuse free-of-charge guarantee service if these documents are not presented or if they are incomplete
or illegible. This Guarantee will not apply if the model name or serial number on the product has been altered,
deleted, removed or made illegible.
2. This Guarantee does not cover transport costs and risks associated with transport of your product to and from
Vileda or the service agent.
3. We would like to inform you that the diagnosis fee of your product shall be paid by you if the diagnosis of your
product proves that you will not be entitled to a repair under this guarantee (for whatever reason) to rectify the
defect or your product is working properly and no hardware fault could be designed.
C. EXCLUSIONS AND LIMITATIONS
1. Except as stated above, Vileda makes no guarantee (express, implied, statutory or otherwise) regarding
product quality, performance, accuracy, reliability, fitness for a particular purpose, or otherwise.
2. Vileda does not take responsibility for secondary or indirect damages caused by the incorrect use of the
product. Save as set out elsewhere in this clause the responsibility of Vileda will not exceed the purchase price
of the product. If you have any doubts referring to the correct use of the product or referring to the guarantee,
call Vileda Customer Service.
3. Nothing in this guarantee is intended to restrict Vileda’s liability for death, personal injury or damage to private
property caused by the goods proving defective while in the consumer’s use as a result of Vileda’s negligence.
D. YOUR LEGAL RIGHTS RESERVED
As a consumer, you have legal rights in relation to goods that are faulty or not as described. Advice about your legal
rights is available from your local Citizens Advice Bureau or Trading Standards Office. Nothing in this guarantee
will affect these rights.
E. YOUR GUARANTOR
The guarantee for this product is provided and will be honoured by Freudenberg Household Products, Vileda
House, 2 Chichester Street, Rochdale, Lancashire, OL16 2AX. www.vileda.com Tel: 0845 7697356.
14
I
Grazie per aver scelto Vileda RelaxPlus Cleaning Robot.
Per garantire il massimo delle prestazioni e della sicurezza, si prega di dedicare qualche
attimo del vostro tempo alla lettura di questo manuale. Vileda ti rende la vita più facile.
Buon divertimento!
Contenuti
Avvertenze Generali 15
Contenuto 16
Componenti del Robot 17
Caricare e ricaricare la batteria 18
Come utilizzare il prodotto 19
Programmi di pulizia 20
Funzionamento 20
Svuotare e pulire il vano raccoglisporco 21
Pulizia e sostituzione del filtro 21
Pulire le spazzole principali 21
Sostituzione della spazzola laterale 22
Soluzione di problemi 22
Istruzioni e avvertenze per lo smaltimento del prodotto 23
Istruzioni e avvertenze per la rimozione e smaltimento della batteria 24
Specifiche tecniche 24
Garanzia Convenzionale dei Prodotti Vileda 24

15
I
Avvertenze Generali
IMPORTANTE:
LEGERE ATTENTAMENTE TUTTE LE ISTRUZIONI PRIMA DI UTILIZZARE IL PRODOTTO. CONSERVARE IL
MANUALE DI ISTRUZIONI ED AVVERTENZE PER OGNI EVENIENZA FUTURA.
ATTENZIONE:
Leggere attentamente tutte le istruzioni riportate nel seguente manuale. Il mancato rispetto delle seguenti
indicazioni può essere fonte di pericoli per la salute e sicurezza in quanto può causare incendio, shock elettrico
e infortuni gravi. Quando si usa un'apparecchiatura elettrica, è necessario osservare le fondamentali regole di
prudenza, incluse quelle di seguito riportate, al fine di evitare rischi di incendio, shock elettrico, la fuoriuscita di
liquidi dalla batteria o infortuni anche gravi.
LIMITAZIONI D'USO:
• Questo prodotto è destinato esclusivamente alla pulizia di ambienti interni. Non usare all'esterno o sul balcone
• Questo prodotto è destinato esclusivamente ad un UTILIZZO DOMESTICO.
• Il prodotto non è un giocattolo. Vietato sedersi o salire su di esso. Bambini ad animali domestici devono essere
sorvegliati quando il prodotto è in funzione.
• Non utilizzare il prodotto per raccogliere oggetti roventi, infiammati, infiammabili o che emettono fumo. Non
utilizzare il prodotto in prossimità di tali oggetti.
• Non utilizzare il prodotto su superfici bagnate, umide o per raccogliere liquidi o oggetti bagnati.
• Non utilizzare su tappeti a pelo lungo o su pavimenti bagnati
• Prima di utilizzare il prodotto, rimuovere dal pavimento tessuti, cordicelle di tapparello o tende, fili elettrici e
tutti gli oggetti fragili poichè potrebbero intrappolarsi e bloccare le spazzole rotanti. Se il dispositivo passa
sopra un cavo o una cordicella e lo trascina con sé, potrebbe far cadere oggetti da un tavolo o da uno scaffale
con conseguenti possibili rischi per la sicurezza di persone, animali o beni.
AVVERTENZE SPECIFICHE PER LA SICUREZZA DELLE PERSONE, DEI
BENI E DEGLI ANIMALI DOMESTICI:
• La destinazione, le limitazioni e le modalità d’uso e di smaltimento del prodotto sono descritte in questo
manuale. L’utilizzo dell’apparecchio o di qualsiasi suo accessorio con modalità difformi rispetto a quelle
previste nel presente manuale di istruzioni ed avvertenze può essere causa di incidenti e/o infortuni.
• I bambini devono essere sorvegliati per assicurarsi che non giochino con l'apparecchio.
• Questo apparecchio non può essere utilizzato da bambini di età inferiore ai 14 anni né dalle persone con ridotte
capacità fisiche, sensoriali o mentali, a meno che non siano controllati e istruiti all'uso del prodotto in sicurezza
e comprendano i rischi correlati al suo utilizzo. I bambini non devono giocare con l'apparecchio. La pulizia e la
manutenzione del prodotto non deve essere eseguita dai bambini. Un pericolo può verificarsi se l'apparecchio
passa sopra il cavo di alimentazione
• Conservare inambiente asciutto.
• Conservare in luogo lontano dalla portata dei bambini.
• Utilizzare soltanto con gli accessori consigliati dal produttore.
• Non utilizzare il prodotto senza il filtro.
• Tenere il prodotto e gli accessori lontano da superfici calde.
• Non immergere l'apparecchio in acqua o qualsiasi altro liquido
AVVERTENZE SPECIFICHE PER LA SICUREZZA DELLA PARTE
ELETTRICA:
• Non modificare in nessun modo il caricabatteria.
• Il caricabatteria è stato progettato per funzionare ad un determinato voltaggio. Controllare sempre che il
voltaggio della presa elettrica di rete sia identico a quello indicato sull’etichetta tecnica posta sul caricabatterie.
• Usare esclusivamente il caricabatteria fornito con il prodotto. Non tentare di utilizzare il caricabatteria con un
altro prodotto; non tentare di caricare il prodotto con un altro caricabatteria.
• Prima dell’utilizzo verificare che il cavo del caricabatteria non sia danneggiato o usurato.
• Non sollecitare il cavo del caricabatteria; non trasportare o trascinare il caricabatteria tenendolo per il cavo.
• Impugnare il caricabatteria e tirare per disconnetterlo dalla presa; non tirare il caricabatteria per il cavo.
• Tenere il cavo del caricabatteria lontano da superfici calde e da angoli taglienti.
• Non maneggiare il caricabatteria o l’unità con le mani bagnate o umide.
• Non conservare o ricaricare il prodotto all’esterno.
• Disconnettere il caricabatteria prima di procedere alle operazioni di pulizia.

16
I
Il prodotto contiene componenti elettroniche. Non immergerlo in acqua o pulirlo con acqua. Pulire soltanto con
un panno asciutto.
AVVERTENZE SPECIFICHE PER L’UTILIZZO, LA MANUTENZIONE E LO
SMALTIMENTO DELLA BATTERIA:
• In condizioni eccezionali potrebbero verificarsi perdite di liquido dalla batteria. Se il liquido entra in contatto
con la pelle, lavarsi immediatamente con acqua e sapone. Se, invece, il liquido entra in contatto con gli occhi,
sciacquarsi immediatamente per almeno 10 minuti e consultare un medico.
• Questo prodotto contiene batterie al nichel-metallo idruro. Non bruciare le bat terie e non esporle a temperature
elevate poiché potrebbero esplodere.
• Quando la batteria non è in uso, tenerla lontano da altri oggetti metallici quali graffette, monete, chiavi, viti,
chiodi o altri piccoli oggetti che potrebbero mettere in connessione i due poli.
• Non accorciare i poli in metallo della batteria in quanto potrebbe causare fiamme o incendio.
• La batteria deve essere rimossa dall’apparecchio precedentemente allo smaltimento di quest’ultimo. Le
modalità per lo smaltimento della batteria sono indicate in seguito nel presente manuale.
• La batteria deve essere smaltita in sicurezza secondo quanto indicato in seguito nel presente manuale.
• L’apparecchio deve essere disconnesso dalla presa elettrica di rete prima di rimuovere la batteria.
• In situazioni di emergenza contattare immediatamente un professionista!
AVVERTENZE SPECIFICHE PER L’USO, LA MANUTENZIONE E LA
RIPARAZIONE:
• Prima di utilizzare il prodotto e dopo ogni collisione con mobili ed oggetti, verificare che non vi siano segni di
danneggiamento o usura.
• Non utilizzare il prodotto se una delle sue componenti è danneggiata o difettosa
• Non tentare di riparare il prodotto. In caso di danneggiamento contattare il numero verde 800-074-500.
• Non modificare in alcun modo il prodotto. Qualsiasi modifica potrebbe incrementare il rischio di infortuni.
• Utilizzare esclusivamente ricambi o accessori forniti o raccomandati da Vileda.
Contenuto
1 2 3
4 5 6 7 8
1. 1x Unità principale
2. 1X Base di Ricarica
3. 1x Carica batteria (* L'immagine può differire dal contenuto della confezione)
4. 1x Telecomando
5. 2x Batterie AAA (per il telecomando)
6. 1x Filtro (pezzo di ricambio)
7. 1x Spazzola laterale (pezzo di ricambio)
8. 1x Spazzola per la pulizia
17
I
Componenti del Robot
1. Paracolpi frontale
2. Contatti di carica
3. Sensori anti-collisione
4. Manico
5. Pulsanti programmi di pulizia
6. Sensori del vuoto
7. Spazzola laterale
8. Pulsante di accensione/spegnimento
9. Presa per lo spinotto del caricabatteria
10. Vano raccoglisporco rimovibile
11. Filtro
12. Vano Aspirapolvere
13. Spazzole principali
1. Indicatore della carica della batteria
2. Presa per lo spinotto del
caricabatteria
3. Contatti di carica
4. Sensore di posizionamento
5. Pulsante sincronizzazione
1. Indicatore di connessione
2. Indicatore di velocità
3. Visualizzazione giorno della settimana
(1=Lunedì, 7=Domenica)
4. Visualizzazione dell'ora
5. Schermata di programmazione
6. Pulsante di accensione
7. Tasti freccia
8. Pulsante OK
9. Pulsanti di controllo
10. Pulsanti programmazione
11. Pulsanti programma di pulizia
18
I
Caricare e ricaricare la batteria
AVVERTENZA:
ATTENZIONE: se la batteria è danneggiata o usurata non provare a ricaricarla. Contattare il numero verde 800074 -500.
Caricare la batteria per 12 ore prima di utilizzare il prodotto per la prima volta. Dopo il primo utilizzo, ricaricare per
un tempo di circa 4-5 ore.
In caso di trasporto o inutilizzo, posizionare il tasto di alimentazione del robot nella posizione di spegnimento per
evitare che la batteria si danneggi.
CARICA MANUALE:
1. Collegare la presa DC del caricabatteria alla presa per lo spinotto situata a fianco del pulsante di accensione/spegnimento.
2. Collegare la presa AC del caricabatteria all'alimentazione. Gli indicatori posti sopra il robot lampeggeranno
durante il periodo di ricarica e smetteranno di lampeggiare quando la batteria sarà completamente carica.
3. Quando la batteria sarà completamente carica, scollegare il caricatore dall'alimentazione e dalla presa per lo
spinotto del caricabatteria.
SINCRONIZZAZIONE DELLA BASE DI RICARICA:
1. Prima del primo utilizzo la Base di Ricarica deve essere sincronizzata con il robot.
2. Assicurarsi che il robot sia spento e che la Base di Ricarica sia collegata all'alimentazione.
3. Tenere premuto l'apposito pulsante di sicronizzazione posto sulla Base di Ricarica e contemporaneamente accendere il Robot premendo il pulsante di accensione/spegnimento.
4. Se il robot suona due volte, la sincronizzazione è avvenuta con successo; in caso contrario ripetere i passaggi precedenti.
RICARICA AUTONOMA:
1. Posizionare la Base di Ricarica su una superficie dura e piana e contro una parete verticale.
2. Assicurarsi che non vi siano ostacoli di fronte alla Base di Ricarica entro un'area di 3 m e di 0,5 m sul lato destro e sinistro.
3. Collegare la presa DC del caricabatterie allo presa per lo spinotto nella Base di Ricarica.
4. Collegare la presa AC del caricatore all'alimentazione. L'indicatore di energia della Base di Ricarica diventerà giallo.
5. Assicurarsi che il cavo elettrico sia disposto lungo la parete, altrimenti il robot potrebbe rimanere bloccato.
6. Assicurarsi che i sensori del robot e della Base di Ricarica non siano oscurati, altrimenti il robot non riuscirà a
trovare la Base di Ricarica autonomamente.
7. Posizionare il robot a una distanza adeguata dalla Base di Ricarica e accenderlo premendo il pulsante di accensione.
8. Premere il pulsante ”OK” e il pulsante “up” del telecomando in successione per far cercare la base al robot.
0.5m
0.5m
3m
Il livello di autonomia della batteria arriva fino a 60 minuti e diminuisce durante il tempo di utilizzo del prodotto.
L’indicatore centrale posto sopra al robot lampeggerà quando il livello di batteria è basso. In tal caso occorre ricaricare il prodotto.

19
I
Il robot ricercherà la Base di Ricarica autonomamente in caso di batteria scarica durante la pulizia manuale di
60 minuti e durante quella programmata. Mentre cercherà la Base di Ricarica, il pulsante centrale sopra al robot lampeggerà.
Per mantenere la batteria alla massima efficienza è necessario ricaricare il prodotto per 12 ore prima di utilizzarlo per la prima volta ed ogni volta che lo si riutilizza dopo un lungo periodo di inattvità.
ATTENZIONE:
USARE ESCLUSIVAMENTE IL CARICABATTERIA FORNITO CON IL PRODOTTO. NON TENATRE DI UTILIZZARE
IL CARICABATTERIA CON UN ALTRO PRODOTTO; NON TENTARE DI CARICARE IL PRODOTTO CON UN ALTRO
CARICABATTERIA POICHÈ IL PRODOTTO POTREBBE DANNEGGIARSI E LA GARANZIA NON SARÀ PIÙ VALIDA.
ATTENZIONE: L’uso di un caricabatterie diverso da quello fornito con il prodotto può causare rischio di incedio.
ATTENZIONE:
Utilizzare batterie di ricambio solo se fornite da Vileda.
Come utilizzare il prodotto
Prima di utilizzare il prodotto, rimuovere dal pavimento tessuti, fogli di carta, cordicelle per richiudere le tende, fili
elettrici e tutti gli oggetti fragili pochè potrebbero intrappolarsi e bloccare le spazzole rotanti. Se l’apparecchio
passa sopra un cavo e lo trascina con sè potrebbe far cadere oggetti da un tavolo o una libreria
PULIZIA MANUALE:
1. Assicurarsi che la batteria sia carica.
2. Posizionare il Vileda RelaxPlus Cleaning Robot al centro della stanza.
3. Per accendere il Vileda RelaxPlus Cleaning Robot premere il pulsante principale di accensione/spegnimento.
4. Per accendere Vileda RelaxPlus Cleaning Robot premere uno dei Pulsanti di modalità di pulizia per scegliere
quello desiderato (vedere sezione “Modalità di pulizia”).
5. Per mettere in pausa Vileda RelaxPlus Cleaning Robot premere uno dei tasti di comando.
6. Per riavviare Vileda RelaxPlus Cleaning Robot premere nuovamente il pulsante di comando.
7. Per spegnere Vileda RelaxPlus Cleaning Robot premere il pulsante principale di accensione/spegnimento.
SINCRONIZZAZIONE DEL TELECOMANDO:
1. Prima del primo utilizzo il telecomando deve essere sincronizzato con il robot.
2. Assicurarsi che il robot sia spento e che nel telecomando siano inserite le pile.
3. Premere il pulsante “OK” del Telecomando e nel frattempo accendere il Robot premendo il pulsante di accensione.
4. Se il robot suona due volte, la sincronizzazione è avvenuta con successo, altrimenti ripetere i passaggi precedenti.
IMPOSTAZIONE DELL’ORA DEL TELECOMANDO E DEL ROBOT:
1. Prima di usare la funzione di pulizia programmata, si deve impostare l’ora del robot.
2. Assicurarsi che il robot sia acceso e che nel Telecomando siano inserite le pile.
3. Tenere premuto il pulsante “time” (ora) del telecomando. L’ora dell’orologio sullo schermo del Telecomando
inizierà a lampeggiare.
4. Premere i pulsanti “right” (destra) e “left” (sinistra) per regolare le ore, i minuti e il giorno della settimana. Usare i pulsanti “up” (su) e “down” (giù) per impostare il giorno della settimana e l’ora del sistema.
5. Per concludere e salvare le impostazioni premere nuovamente il pulsante “time”. Per cancellare il processo
premere il pulsante di accensione del Telecomando.
PULIZIA PROGRAMMATA:
1. Assicurarsi che il robot sia acceso e che nel Telecomando siano inserite le pile.
2. Premere il pulsante “set” del Telecomando. L’ora registrata sullo schermo del Telecomando inizierà a lampeggiare.
3. Premere i pulsanti “right” e “left” impostare l’ora, i minuti e il giorno della settimana.
4. Usare i pulsanti “up” e “down” per impostare l’ora in cui si vuole che il Robot si attivi e selezionare i giorni della
settimana in cui si desidera che Vileda RelaxPlus Cleaning Robot pulisca autonomamente.
5. Premere il pulsante “OK” per selezionare e deselezionare i giorni di pulizia. Se si vuole che il robot pulisca tutti
i giorni della settimana premere il pulsante “all” (tutti).
6. Per terminare e salvare la configurazione premere nuovamente il pulsante “set”. Per cancellare il processo premere il pulsante di accensione del Telecomando.
20
I
Esempio: Il Robot inizia a pulire autonomamente tutti i lunedì e i mercoledì alle 10.
IMPORTANTE:
Per ottenere una migliore pulizia, tenere il pavimento quanto più possibile libero da ostacoli (ad esempio cavi, sedie, tappeti, piccoli oggetti, ecc.). Con meno ostacoli, Vileda RelaxPlus Cleaning Robot si muoverà più rapidamente pulendo più efficacemente.
Programmi di pulizia
Vileda RelaxPlus Cleaning Robot usa il suo sistema di navigazione intelligente che gli consente di navigare autonomamente all’interno della casa e di pulire efficacemente tutto il pavimento anche negli angoli, lungo i muri e
sotto i mobili
Il Robot ha tre programmi di pulizia:
Breve ( ■■)
Il Robot pulisce per 5 minuti. Ideale per pulire un’area ristretta.
Media (■■■■)
il Robot pulisce per 30 minuti. Ideale per le stanze di medie dimensioni (fino
a 25 metri quadrati).
Lunga ( ■■■ ) e Pulizia
Programmata:
il robot pulisce per almeno 60 minuti. Ideale per le stanze di grandi dimensioni (più di 25 metri quadrati).
AVVERTENZA:
Pavimenti e scale nere o di colorazioni scure potrebbero ridurre l’affidabilità dei sensori del vuoto. Testare il prodotto sul tuo specifico pavimento e sulle scale prima di utilizzarlo.
Funzionamento
1
2
3
1. La spazzola laterale pulisce negli angoli e lungo i bordi.
2. Due spazzole rotanti raccolgono lo sporco, i capelli e le briciole all’interno del vano raccoglisporco.
3. L’aspirapolvere interno rimuove anche la polvere più sottile.
21
I
Vileda RelaxPlus Cleaning Robot funziona su tutti i pavimenti duri come ad esempio legno, parquet, mattonelle,
linoleum e sui tappeti a pelo corto.
Svuotare e pulire il vano raccoglisporco
1. Spegnere Vileda RelaxPlus Cleaning Robot.
2. Premere verso il basso il pulsante di rilascio del vano raccoglisporco.
3. Posizionare il vano raccoglisporco sopra al sacco dell’immondizia, far scivolare le due clip per aprire il contenitore e svuotare il vano raccoglisporco nel sacco del’immondizia.
4. Chiudere il contenitore, reinserire nell’unità principale il cassetto raccoglisporco fino ad udire un “Click”.
Pulizia e sostituzione del filtro
1. Posizionare il vano raccoglisporco sopra al sacco dell’immondizia, far scivolare
le due clip per aprire il contenitore.
2. Rimuovere il filtro dal vano raccoglisporco premendo sui bordi.
3. Rimuovere lo sporco dal filtro usando la spazzola per la pulizia in dotazione.
4. Inserire il filtro pulito o un nuovo filtro nel vano raccogli sporco e chiudere
ilcontenitore.
Per acquistare un nuovo filtro contattare il servizio consumatori Vileda al
numero verde 800.074.500
Pulire le spazzole principali
Non è necessario pulire le spazzole principali dopo ogni utilizzo. Tuttavia, si consiglia di pulirle regolarmente per
prevenire un eccessivo accumulo di capelli che potrebbe danneggiare il robot.
1. Spegnere Vileda Relax Plus Cleaning Robot e capovolgerlo su un piano.
2. Rimuovere il ferma spazzola premendo sulla linguetta di fissaggio.
3. Rimuovere la spazzola principale e la spazzola in gomma come mostrato nell’illustrazione.
4. Rimuovere completamente i capelli e lo sporco intrappolato nelle spazzole. Pulire anche il vano in cui le spazzole sono posizionate.
22
I
5. Rimuovere lo sporco presente sul piccolo asse metallico e staccare la clip di fissaggio.
6. Reinserire le spazzole nella loro posizione.
7. Rimettere il ferma spazzole e spingere fino a sentire un “click”.
Sostituzione della spazzola laterale
1. Spegnere Vileda RelaxPlus Cleaning Robot e capovolgerlo su un piano.
2. Usare un cacciavite a croce per rimuovere la spazzola laterale.
3. Inserire la nuova spazzola laterale e stringere la vite.
Soluzione di problemi
Problema Possibile motivazione Possibile soluzione
Il robot non riconosce il vuoto e
cade.
• I sensori del vuoto sono sporchi. • Pulire i sensori con un panno
asciutto.
Il Robot si ferma durante la pulizia
o non inizia la pulizia e tutti gli
indicatori luminosi lampeggiano.
• Le spazzole principali sono
inceppate.
• Le ruote sono inceppate.
• Il vano raccoglisporco è mal
inserito.
• Pulire le spazzole principali e
riavviare.
• Pulire le ruote e riavviare.
• Reinserire il cassetto dello
sporco e riavviare.
L’indicatore luminoso centrale
lampeggia.
• La batteria potrebbe essere
scarica.
• Riaricare la batteria.
Il Robot gira su sé stesso nella
stessa posizione.
• Una ruota è bloccata. • Rimuovere peli e sporco dalle
ruote.
23
I
Problema Possibile motivazione Possibile soluzione
Il Telecomando non funziona. • Mancanza della pila o pila
scarica.
• Il Telecomando non è sincronizzato.
• La distanza tra il telecomando e il
robot è troppa.
• Inserire una pila carica.
• Sincronizzare il Telecomando
(vedere sezione “Come
utilizzare il prodotto”).
• Assicurarsi che la distanza tra il
Telecomando e il robot sia
inferiore a 10 m.
Il Robot non trova autonomamente
la Base di Ricarica.
• La Base di Ricarica non è ben
collegata all’alimentazione.
• La Base di ricarica è coperta da
un ostacolo.
• I sensori anti-collisione del robot
o il sensore di posizionamento
della Base di Ricarica sono
sporchi.
• La Base di Ricarica non è
sincronizzata.
• La batteria del robot è
completamente scarica.
• Collegare correttamente il
caricatore all’alimentazione e
alla Base di Ricarica e
assicurarsi che l’indicatore di
carica della batteria si accenda
• Assicurarsi che non vi siano
ostacoli di fronte alla Base di
Ricarica entro un’area di 3 m e
di 0,5 m sul lato destro e
sinistro.
• Pulire i sensori con un panno
asciutto.
• Sincronizzare la Base di
Ricarica (vedere sezione
“Caricare e ricaricare la
batteria”).
• Caricare il robot manualmente
una volta.
Il Robot non inizia la pulizia
programmata.
• Il Robot è spento.
• Non è stato selezionato il giorno
della settimana per la pulizia
autonoma.
• Accendere il robot premendo il
pulsante di accensione/
spegnimento.
• Selezionare il giorno della
settimana per la pulizia
automatica (Vedere sezione
“Come utilizzare il prodotto”).
Per ulteriore assistenza, consigli tecnici o per ordinare o sostituire parti di ricambio contattare il
servizio consumatori Vileda al numero verde 800-074-500.
Istruzioni e avvertenze per lo smaltimento del prodotto
Il simbolo del “contenitore di spazzatura barrato” riportato sul prodotto indica che lo stesso é soggetto a regime di raccolta differenziata previsto per le apparecchiature elettriche ed elettroniche dalla direttiva 2012/19/UE
e che pertanto non va smaltito come normale rifiuto urbano. I Comuni organizzano centri di raccolta differenziata
dei rifiuti di apparecchiature elettriche ed elettroniche presso i quali potrete conferire gratuitamente il prodotto al
termine del suo utilizzo. Nel caso di acquisto di una nuova apparecchiatura di tipo equivalente sarà facoltà dell’utente riconsegnare il Vileda Relax Plus usato, al venditore il quale provvederà al ritiro gratuito dello stesso ed al
trasporto presso i centri di raccolta differenziata. Si raccomanda uno scrupoloso rispetto delle norme sull’uso e
sullo smaltimento del prodotto al fine di evitare la dispersione di sostanze pericolose nell’ambiente che potrebbero causare effetti negativi per l’ambiente e per la salute umana. Lo smaltimento abusivo dei rifiuti è punito dalla
legge e comporta l’irrogazione delle sanzioni amministrative previste dalla legislazione vigente. Un corretto smaltimento del prodot to favorisce il riciclo dei materiali di cui è composta l’apparecchiatura. Per informazioni più dettagliate sul trattamento, recupero e riciclaggio di questo prodotto, contattare il servizio di riciclaggio del proprio
comune. Il simbolo
identifica che Vileda Relax Plus è un prodotto sottoposto al regime di utilizzo, riciclaggio e
recupero per le apparecchiature elettroniche.
24
I
Il materiale utilizzato per l’imballaggio del prodotto é interamente riciclabile come evidenziato dal simbolo apposto sullo stesso. Attenersi alla norme legisltive e regolamentari locali vigenti in materia di smaltimento. Tenere il
materiale di imballaggio (sacchetti di plastica, parti in polystyrene, etc..) lontano dalla portata dei bambini perchè
potenzialmente pericolosi.
Istruzioni e avvertenze per la rimozione e smaltimento
della batteria
1. Spegnere Vileda RelaxPlus Cleaning Robot e capovolgerlo su un piano.
2. Usare un cacciavite a croce per allentare le due viti e rimuovere la piastra copri-batteria.
3. Sollevare la batteria e scollegarla premendo le alette del connettore elettrico.
Specifiche tecniche
Tipo di batteria 14,4V DC, 1700 mAh NiMH
Tempo di carica 4-5 ore
Periodo di carica per batteria nel caso sia
completamente scarica
12 ore
Output del caricabatteria 24 V DC
Intput del caricabatteria 100-240 V AC
Potenza Media dell'Unità 24W
Capacità di raccolta polvere 0,35 l
Misure dell'Unità 32x9 cm
Garanzia Convenzionale dei Prodotti Vileda
A. AMBITO
1. Con la presente Garanzia, Vileda garantisce per un periodo di due anni decorrenti dalla data originaria di
acquisto del prodotto che il prodotto medesimo è esente da difetti dovuti ai materiali utilizzati o da difetti
originari del processo di fabbricazione. Le condizioni di garanzia offerte da Vileda qui di seguito riportate sono
disponibili anche sul sito www.vileda.it.
2. Se entro il periodo di garanzia sarà riscontrata la presenza di difetti nei materiali oppure di difetti originari
del processo di fabbricazione, Vileda o un membro della rete di assistenza da essa autorizzato, senza alcun
costo supplementare, effettuerà, a propria discrezione, la riparazione o la sostituzione del prodotto, oppure
la riparazione o la sostituzione dei componenti difettosi alle condizioni qui di seguito riportate. Vileda potrà
sostituire i prodotti difettosi o i componenti difettosi con prodotti o parti nuove o ricondizionate. Tutti i prodotti
e le parti sostituite diventeranno di proprietà di Vileda.
3. Sono escluse dalla presente garanzia::
a) la manutenzione periodica, la riparazione o la sostituzione di parti danneggiate per cause riconducibili
alla normale usura;

25
I
b) materiali soggetti a usura (componenti per i quali si prevedere la sostituzione periodica durante il ciclo di
vita di un prodotto come le batterie o i filtri sporco);
c) danni o difetti causati da uso, attività o trattamenti del prodotto eccedenti l’uso personale e domestico
del prodotto medesimo;
d) la riparazione di danni o mutamenti del prodotto che siano risultato di:
I. cattivo uso, quali:
- trattamenti e utilizzi che siano tali da comportare mutamenti tecnici o estetici al prodotto, oppure
danneggiamenti o modifiche anche delle superfici del prodotto medesimo;
- installazione o utilizzo del prodotto per scopi diversi da quelli previsti ed indicati nel manuale di
istruzioni, oppure installazione o utilizzo in difformità rispetto a quanto previsto dalle istruzioni di
installazione o di utilizzo fornite da Vileda;
- mancata manutenzione del prodotto oppure manutenzione eseguita in difformità rispetto a quanto
stabilito nelle istruzioni fornite da Vileda in merito alla corretta manutenzione;
- installazione e/o utilizzo del prodotto in violazione delle leggi e/o delle regole tecniche e/o degli
standard di sicurezza vigenti nel paese in cui il prodotto viene installato o utilizzato;
II. utilizzo del prodotto con accessori, periferiche o altri prodotti diversi da quelli prescritti da Vileda;
utilizzo del prodotto in condizioni diverse da quelle prescritte da Vileda medesima.
III. riparazioni o tentativi di riparazione effettuati da personale non appartenente all’organizzazione di
Vileda o non facente parte della Rete di servizio autorizzata da Vileda stessa.
IV. difetti dovuti ad incidenti, incendi, liquidi, sostanze chimiche, altre sostanze, allagamenti, vibrazioni,
calore eccessivo, ventilazioni inadeguata, sbalzi di tensione, alimentazioni in eccesso o non corretta o
la tensione di ingresso, radiazioni, scariche elettrostatiche compresa l’illuminazione, altre forze esterne
e gli impatti negativi.
B. CONDIZIONI
1. Gli interventi in garanzia verranno forniti solo se una prova d’acquisto - indicante la data di acquisto, il nome del
prodotto ed il nome del rivenditore - sarà presentata a Vileda unitamente al prodotto difettoso, entro il periodo di
garanzia. Vileda si riserva di rifiutare la fornitura del servizio in garanzia se la documentazione sopra indicata non
sarà presentata o se sarà presentata in forma incompleta o illeggibile. La presente garanzia non si applica se il nome
del modello o il numero di serie indicati sul prodotto siano stati alterati, cancellati, rimossi o comunque resi illeggibili.
2. Vi informiamo che il costo della verifica di funzionalità del prodotto sarà a voi addebitato qualora, in seguito a tale
verifica, si riscontri che per qualsiasi motivo il prodotto in questione non rientra tra i casi che danno diritto alla
riparazione ai sensi della presente garanzia.
C. ESCLUSIONI E LIMITAZIONI
1. Salvo quanto sopra indicato, Vileda non fornisce alcuna garanzia (espressa, implicita, legale o altro) per quanto
riguarda la qualità, le prestazioni, l’accuratezza, l’affidabilità e l’idoneità del prodotto per scopi di natura diversa
rispetto a quelli previsti ed indicati nel manuale di istruzioni che devono ritenersi pertanto non consentiti.
2. Vileda esclude qualsiasi responsabilità per eventuali danni diretti, indiretti, incidentali o consequenziali a persone,
animali o cose o all’ambiente, nonché eventuali responsabilità per perdite di prodotti e/o ricavi, derivanti da un
utilizzo del prodotto non conforme alle prescrizioni di montaggio, uso e manutenzione contenute nel manuale di
istruzioni ed avvertenze che accompagna il prodotto.
3. Qualora la legge vigente vieti o limita queste esclusioni di responsabilità, Vileda escluderà o limiterà la propria
responsabilità solo nella misura massima consentita dalla legge vigente. Ad esempio, in alcuni paesi la legge
vigente vieta l’esclusione o la limitazione dei danni derivanti da negligenza, colpa grave, dolo, frode e atti simili.
La responsabilità di Vileda per questa garanzia non potrà in nessun caso essere superiore al prezzo pagato per il
prodotto, fatta salva l’esistenza di normative vigenti e applicabili che prevedano limitazioni differenti.
D. I DIRITTI LEGALI A VOI RISERVATI
Il consumatore è titolare dei diritti previsti dal D.Lgs. 206/2005 in materia di vendita di prodotti di consumo. La presente
garanzia non pregiudica i diritti previsti per legge, né esclude, limita o inficia in alcun modo i diritti del consumatore nei
conf ronti del sogget to da cui il c onsumato re medesimo ha acq uistato il prese nte prodot to. E’ lasci ato alla dis crezionalità
del consumatore far valer i propri diritti nei confronti del venditore secondo quanto previsto dalla legge.
E. IL GARANTE
La garanzia per questo prodotto è fornita e sarà onorata alle condizioni e nei termini qui precisati da Freudenberg
Haushaltsprodukte SE & Co. KG, Hohnerweg 2-4, 69465 Weinheim, Germania. E’ possibile anche contattare
Vileda utilizzando il modulo di contatto sul sito www.vileda.it oppure utilizzando uno dei numeri di telefono indicati
in questo manuale.
I FHP di R. Freudenberg s.a.s, Via dei Valtorita, 48, 20127 Milano, ITALIA. www.vileda.it
26
D
Danke, dass Sie sich für den Vileda Relax Plus entschieden haben. Wir wünschen Ihnen viel
Spaß mit Ihrem Staubsaugerroboter und beim Füße hochlegen!
Inhalt
Wichtige Sicherheitshinweise 27
Verpackungsinhalt 28
Aufbau des Roboters 29
Aufladen des Akkus 30
Anwendung des Roboters 31
Reinigungsmodi 32
Reinigungsvorgang 32
Entfernen und Reinigen des Staubbehälters 33
Reinigen und Austauschen des Filters 33
Reinigen der Hauptbürste 33
Austauschen der Seitenbürste 34
Fehlerbehebung 34
Entsorgung/ Umweltschutz 35
Entnahme des Akkus 36
Technische Daten 36
Vileda Herstellergarantie 36

27
D
Wichtige Sicherheitshinweise
WICHTIG:
Lesen Sie vor dem Benutzen die gesamte Anleitung durch. Bewahren Sie die Anleitung zum späteren Nachschlagen auf.
ACHTUNG:
Benutzen Sie das Gerät nur so, wie in diesem Handbuch beschrieben. Nichtbeachtung der im Folgenden genannten Anleitungen kann zu elektrischen Schlägen, Feuer und/oder ernsten Verletzungen führen.
Wenn Sie ein elektrisches Gerät benutzen, sollten stets grundlegende Sicherheitsvorkehrungen getroffen
werden, unter anderem die im Folgenden aufgeführten. So reduzieren Sie das Risiko von Feuer, elektrischen
Schocks, auslaufender Akkus oder Personenschäden.
EINSCHRÄNKUNGEN FÜR DIE BENUTZUNG:
• Nur für Innenräume. Benutzen Sie das Gerät nicht draußen oder auf Balkonen.
• Für den privaten Hausgebrauch.
• Gerät ist kein Spielzeug. Setzen oder stellen Sie sich nicht darauf. Kleine Kinder und Haustiere sollten beauf-
sichtigt werden, während der Roboter in Betrieb ist.
• Saugen Sie mit dem Gerät nichts Flammbares, Brennendes oder Rauchendes ein.
• Saugen Sie mit dem Gerät nichts Nasses oder Feuchtes ein.
• Benutzen Sie das Gerät nicht auf Hochflorteppichen oder nassen Böden.
• Heben Sie vor dem Gebrauch Gegenstände wie Kleidung, lose Papiere, Zugschnüre für Vorhänge oder Gar-
dinen und alle zerbrechlichen Gegenstände auf, da sich diese in den Reinigungsbürsten verfangen können.
Wenn das Gerät über ein Kabel fährt und dieses mit sich zieht, kann es eventuell den damit verbundenen Gegenstand zu Boden werfen.
PERSÖNLICHE SICHERHEITSHINWEISE:
• Die vorgesehene Verwendungsart wird in diesem Handbuch beschrieben. Das Verwenden von Zubehörteilen
oder Aufsätzen sowie das Verwenden des Geräts auf eine andere Art als in dieser Anleitung beschrieben, kann
ein Risiko auf Personenschäden darstellen.
• Kinder müssen beaufsichtigt werden, um sicherzustellen, dass sie nicht mit dem Gerät spielen.
• Dieses Gerät kann von Kindern ab 8 Jahren und darüber, sowie von Personen mit verminderten physischen,
sensorischen und mentalen Fähigkeiten oder Personen mit Mangel an Erfahrung und Wissen benutzt werden,
wenn sie beaufsichtigt werden oder darin eingewiesen wurden, wie das Gerät sicher zu verwenden ist, und sie
die daraus resultierenden Gefahren verstehen.
• Kinder dürfen nicht mit dem Gerät spielen.
• Säubern und Wartung durch den Benutzer dürfen nicht unbeaufsichtigt von Kindern übernommen werden.
• Gerät trocken lagern.
• Außerhalb der Reichweite von Kindern lagern.
• Gerät nur mit vom Hersteller empfohlenen Aufsätzen verwenden.
• Nicht ohne eingesetzten Filter verwenden.
• Halten Sie das Gerät und alle Zubehörteile von heißen Flächen fern.
• Tauchen Sie das Gerät nicht in Wasser oder andere Flüssigkeiten.
ELEKTRISCHE SICHERHEITSHINWEISE:
• Modifizieren Sie das Netzteil nie auf irgendeine Art.
• Das Netzteil ist für eine bestimmte Spannung ausgelegt. Überprüfen Sie stets, ob die Netzspannung der auf
dem Leistungsschild entspricht.
• Benutzen Sie nur das mit dem Gerät gelieferte Netzteil. Versuchen Sie nie, das Netzteil mit einem anderen Ge-
rät zu verwenden, und laden Sie das Gerät nie mit einem anderen Netzteil auf.
• Überprüfen Sie vor dem Betrieb das Netzteilkabel auf Schäden oder Korrosion.
• Setzen Sie das Netzteilkabel keinen unverhältnismäßigen Belastungen aus. Heben Sie das Netzteil oder die La-
destation nie am Kabel hoch.
• Ziehen Sie nie am Kabel, um das Netzteil aus der Steckdose zu ziehen. Greifen Sie das Netzteil und ziehen Sie
zum Entfernen.
• Halten Sie das Netzteilkabel von heißen Flächen und scharfen Kanten fern.
• Fassen Sie das Netzteil oder die Reinigungseinheit nicht mit nassen Hände an.
• Lagern oder laden Sie das Gerät nicht draußen.
• Ziehen Sie das Netzteil vor der Reinigung aus der Steckdose.
28
D
• Das Gerät enthält elektronische Teile. Tauchen Sie es NICHT unter Wasser oder besprühen es mit Flüssigkeiten. Nur mit trockenem Tuch reinigen.
AKKUPFLEGE UND SICHERHEIT:
• Akkus und Batterien können unter extremem Bedingungen auslaufen. Wenn die Flüssigkeit in Kontakt mit Ihrer Haut kommt, waschen Sie diese sofort mit Seife und Wasser. Wenn die Flüssigkeit in Berührung mit Ihren
Augen kommt, spülen Sie sie sofort für mindestens 10 Minuten mit klarem Wasser aus und suchen Sie ärztliche Hilfe auf.
• Dieses Gerät enthält NiMH-Akkus. Verbrennen Sie die Akkus nicht und setzten Sie sie keinen hohen Temperaturen aus, da sie explodieren können.
• Wenn der Akkupack nicht in Betrieb ist, halten Sie ihn von anderen Metallgegenständen fern, z.B.: Büroklammern, Münzen, Schrauben oder andere kleine Metallobjekte, die eine Verbindung zwischen den Polen herstellen können.
• Ein Kurzschluss der Akkupole kann einen Brand auslösen.
• Der Akku muss entfernt werden, bevor das Gerät entsorgt wird.
• Der Akku muss sicher und ordnungsgemäß entsorgt werden.
• Das Gerät muss vom Stromnetz genommen werden, bevor der Akku entfernt wird.
• Kontaktieren Sie in einer Notsituation umgehend professionelle Hilfe!
WARTUNG:
• Überprüfen Sie das Gerät vor jeder Benutzung und nach Stößen auf Zeichen von Verschleiß oder Beschädigungen.
• Benutzen Sie das Gerät nicht, wenn irgendein Teil beschädigt oder defekt ist.
• Reparaturen sollten nur von einem Kundendienstmitarbeiter oder einer entsprechend qualifizierten Person gemäß aller relevanten Sicherheitsvorschriften ausgeführt werden. Reparaturen durch unqualifizierte Personen
können gefährlich sein.
• Modifizieren Sie das Gerät nie auf irgendeine Art, da dies die Gefahr von Personenschäden erhöht.
• Benutzen Sie nur Ersatzteile und Zubehörteile, die vom Hersteller bereitgestellt oder empfohlen werden.
Verpackungsinhalt
1
2 3
4 5 6 7 8
1. 1x Haupteinheit
2. 1x Ladestation
3. 1x Akku-Netzteil (* Bild kann von geliefertem Inhalt abweichen)
4. 1x Zeitsteuerung
5. 2x AAA-Batterien (für Zeitsteuerung)
6. 1x Filter (extra)
7. 1x Seitenbürste (extra)
8. 1x Reinigungsbürste

29
D
Aufbau des Roboters
1. Vorderer Stoßdämpfer
2. Ladekontakte
3. Kollisionssensoren
4. Griff
5. Tasten für Reinigungsmodi
6. Höhensensoren
7. Seitenbürste
8. Netzschalter (An/ Aus)
9. Akku-Netzteilbuchse
10. Herausnehmbarer Staubbehälter
11. Filter
12. Saugöffnung
13. Hauptbürsten
1. Betriebsanzeige
2. Akku-Netzteilbuchse
3. Ladekontakte
4. Andocksensor
5. Synchronisationstaste
1. Verbindungsanzeige
2. Geschwindigkeitsanzeige
3. Wochenanzeige (1=Montag,
7=Sonntag)
4. Uhrzeitanzeige
5. Anzeige für geplante Reinigungszeit
6. An-/Aus-Taste
7. Pfeiltasten
8. OK-Taste
9. Kontrolltasten
10. Tasten für Reinigungsplanung
11. Tasten für Reinigungsmodi
30
D
Aufladen des Akkus
ACHTUNG:
1. Wenn der Akku in irgendeiner Weise beschädigt ist, versuchen Sie nicht, ihn aufzuladen. Kontaktieren Sie den
Vileda-Kundendienst (Adresse auf der letzten Seite).
2. Laden Sie den Akku vor dem ersten Gebrauch 12 Stunden lang auf. Nach dem ersten Gebrauch beträgt die Ladezeit 4-5 Stunden.
3. Schalten Sie den Netzschalter des Roboters während Transport und Lagerung aus, da der Akku sonst beschädigt werden kann.
MANUELLES AUFLADEN:
1. Stecken Sie den DC-Stecker des Akku-Netzteils in die Akku-Netzteilbuchse, die sich neben dem Netzschalter befindet.
2. Verbinden Sie den AC-Stecker des Akku-Netzteils mit dem Stromnetz. Die Tasten oben auf dem Roboter blinken während des Ladevorgangs und hören auf zu blinken, wenn der Akku vollständig geladen ist.
3. Wenn der Akku vollständig geladen ist, entfernen Sie das Akku-Netzteil vom Stromnetz und aus der AkkuNetzteilbuchse.
SYNCHRONISATION MIT DER LADESTATION:
1. Vor dem ersten Gebrauch muss die Ladestation mit dem Roboter synchronisiert werden.
2. Stellen Sie sicher, dass der Roboter ausgeschaltet und die Ladestation ans Stromnetz angeschlossen ist.
3. Drücken und halten Sie die Synchronisationstaste der Ladestation mit einem Hilfswerkzeug, während Sie den
Roboter über den Netzschalter anschalten.
4. Wenn der Roboter zweimal piept, war die Synchronisation erfolgreich, andernfalls wiederholen Sie bitte die
obigen Schritte.
SELBSTSTÄNDIGES AUFLADEN:
1. Installieren Sie die Ladestation auf einem festen, flachen Untergrund und mit der Rückseite gegen eine vertikale Wand.
2. Stellen Sie sicher, dass auf einer Fläche von 3Metern vor der Ladestation und 0,5m zu beiden Seiten keine
Hindernisse stehen.
3. Stecken Sie den DC-Stecker des Akku-Netzteils in die Akku-Netzteilbuchse der Ladestation.
4. Verbinden Sie den AC-Stecker des Akku-Netzteils mit dem Stromnetz. Die Betriebsanzeige der Ladestation
leuchtet rot auf.
5. Stellen Sie sicher, dass das Stromkabel entlang der Wand verläuft, da der Roboter sich sonst darin verfangen könnte.
6. Stellen Sie sicher, dass die Sensoren des Roboters und der Ladestation nicht verdeckt sind, da der Roboter die
Ladestation sonst nicht selbstständig suchen kann.
7. Platzieren Sie den Roboter in angemessenem Abstand zur Station auf dem Boden und schalten Sie ihn über
den Netzschalter an.
8. Drücken Sie die ”OK” -Taste und die “Hoch” -Taste der Zeitsteuerung kurz nacheinander, damit der Roboter
die Ladestation sucht.
0.5m
0.5m
3m
 Loading...