

Viking VESO130(T)/530(T)–30” Wide, DESO127(T)/527(T)–27” Wide, VESO127(T)/527(T)–27” Wide, DESO130(T)/530(T)–30” Wide, VEDO127(T)/527(T)–27” Wide Installation Manual
...
Viking Range Corporation
111 Front Street
Greenwood, Mississippi 38930 USA
(662) 455-1200
For product information,
call 1-888-VIKING1 (845-4641)
or visit the Viking Web site at
vikingrange.com
F20363C EN
(031408J)
Viking Installation Guide
Professional & Designer Series
Built-In Electric Single and Double Ovens
3
IMPORTANT–Please Read and Follow!
W A R N I N G
The use of cabinets for storage above
the oven may result in potential
fire or burn hazard.
W A R N I N G
ELECTRICAL GROUNDING
INSTRUCTIONS
This oven must be electrically grounded
in accordance with local codes or, in the
absence of local codes, with the
National Electrical Code, ANSI/NFPA 70
– latest edition.
W A R N I N G
Frame grounded by a
4-conductor cable assembly.
See pages 18-19.
DO NOT USE AN EXTENSION CORD
WITH THIS APPLIANCE. SUCH USE MAY
RESULT IN FIRE, ELECTRICAL SHOCK OR
OTHER PERSONAL INJURY.
W A R N I N G
The misuse of th e ov en do or(s) (e.g.
stepping, sitting, or leaning on them) can
result in hazards or injuries and damage to
the product.
W A R N I N G
The oven is heavy – use extreme care
when handling!
W A R N I N G
DO NOT use the handle or oven door to
lift th e oven. Remove door bef ore
installation to ensure that it is not used to
lift the unit. Make sure pins are inserted
into hinges befo re removing doo r to
prevent injury to hands and/or fingers.
W A R N I N G
This appliance should not be used for
space heating. This information is based
on safety considerations.
• Before beginning, read these instructions
thoroughly and carefully.
• Do not remove permanently affixed labels,
warnings or plates from the
product as this may void the warranty.
• Observe all local and national codes,
requirements and ordinances.
• Installation must conform with local codes or in
the absence of codes, the National Electrical
Code, ANSI/NFPA 70 – latest edition.
• IN MASSACHUSETTS: This appliance must be
installed by a Massachusetts licensed plumber or
electrician.
• IN CANADA: Installation must be in accordance
with the current CSA C22.1 Canadian Electrical
Codes Part 1 and/or local codes.
• Installers should leave these instructions with the
consumer who should retain them for the local
inspector’s use and for future
reference.
Site Preparation
It is recommended that a thorough site inspection be
conducted PRIOR to unpacking and moving this appliance.
Note:
Wiring diagram is located on top of oven or in control panel.
Table of Contents
Important Information _________________________________________________ 3
Warnings ____________________________________________________________ 3
Dimensions–Professional Single ________________________________________ 4
Specifications & Electrical Requirements–Professional Single________________ 5
Dimensions–Designer Single ___________________________________________ 6
Specifications & Electrical Requirements–Designer Single __________________ 7
Cutout Dimensions–Professional Single Built-In ___________________________ 8
Cutout Dimensions–Professional Single Undercounter _____________________ 8
Cutout Dimensions–Designer Single Built-In _____________________________ 9
Cutout Dimensions–Designer Single Undercounter _______________________ 9
Dimensions–Professional Double _______________________________________ 10
Specifications & Electrical Requirements–Professional Double ______________ 11
Dimensions–Designer Double __________________________________________ 12
Specifications & Electrical Requirements–Designer Double _________________ 13
Cutout Dimensions–Professional Double Built-In _________________________ 14
Cutout Dimensions–Designer Double Built-In ____________________________ 15
General Information __________________________________________________ 16
Recommendations for Unpacking ______________________________________ 16
Recommendations for Moving _________________________________________ 16
Site Preparation ______________________________________________________ 17
Installation Procedure _________________________________________________ 17
Performance Checklist ________________________________________________ 21
Final Preparation _____________________________________________________ 23
Service & Parts _______________________________________________________ 23
2
5
Specifications & Electrical Requirements
Professional Single Oven
Description VESO127(T)/527(T)–27” Wide VESO130(T)/530(T)–30” Wide
Overall Width 26 1/2” (67.3 cm) 29 1/2” (74.9 cm)
Overall Height 28 3/4” (73.0 cm)
Overall Depth to edge of door—25 9/16” (64.9 cm)
with door open—45 3/4” (116.2 cm)
Cutout Width 25 1/2” (64.8 cm) 28 1/2” (72.4 cm)
Cutout Height 28 1/8” (71.4 cm)
Cutout Depth 24” (61.0 cm)
Electrical Requirements 4-wire ground, 240VAC, 30 amp electrical connection
Unit equipped with No.10 ground wire in unit. Fuse separately.
Maximum Amp Usage 24.0 amps—240 VAC
20.8 amps—208 VAC
Oven Interior Width 22 5/16” (56.7 cm) 25 5/16” (64.3 cm)
Oven Interior Height 16 1/2” (41.9 cm)
Oven Interior Depth 16 13/16” (42.7 cm)
Oven Volume (measured toAHAM standard)* 3.6 cu. ft. 4.1 cu. ft.
Oven Volume (total ovencavity) 4.1 cu. ft. 4.7 cu. ft.
Approximate Shipping Weight 237 lbs. (108 kg) 261 lbs. (118 kg)
*The AHAMStandard for measuring ovencapacity subtracts the doorplug and convectionbaffle dimension from thetotal oven volume.
4
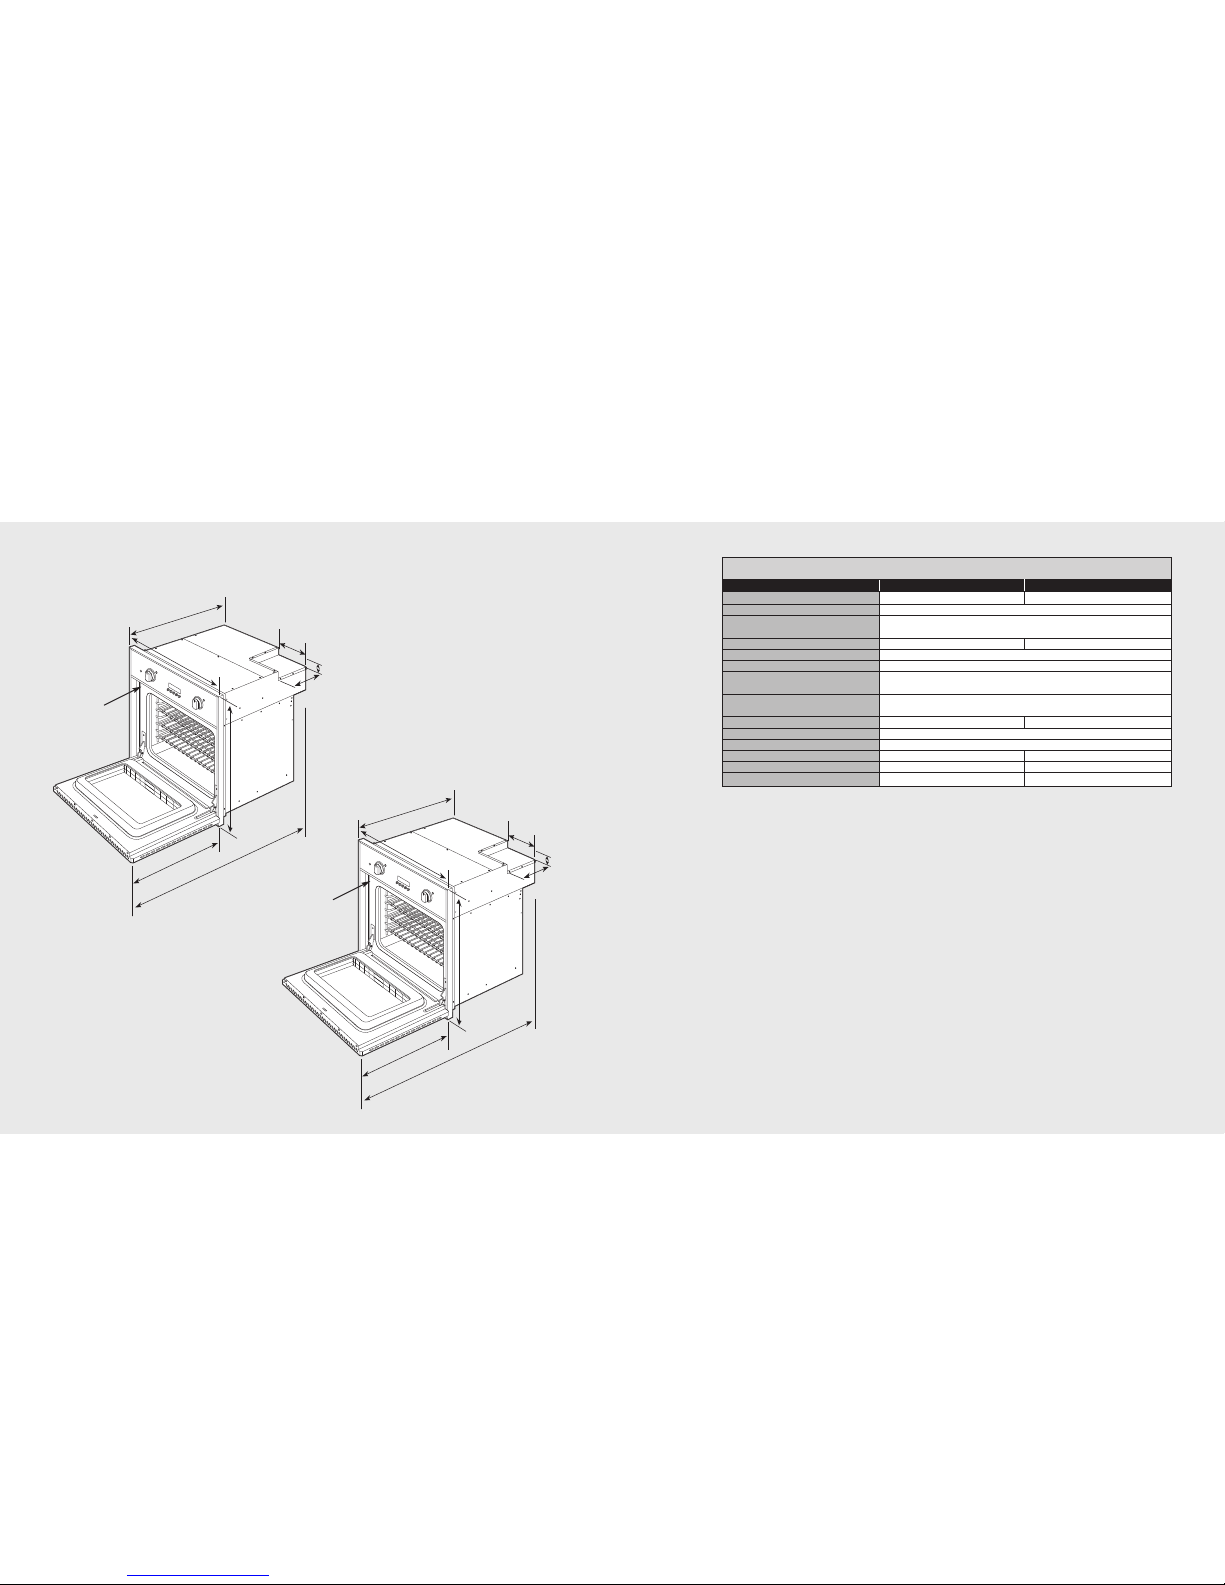
Dimensions–Single Oven
(Professional Series–Mechanical and Touch Control Models)
25–
9/1
6”
(
6
4.
9 c
m)
2
0
–
1/2”
(52
.
1
cm
)
4
5
–
3
/
4
”
(
11
6.
2
cm
)
2
9
–
1/
2
”
(
7
4
.9
cm
)
2
8
–
3
/
4
”
(
7
3
.
0
cm
)
2
5
–
9
/
1
6”
(
6
4
.
9
c
m
)
2
0
–
1
/
2
”
(5
2
.
1
c
m
)
4
5
–
3
/
4
”
(
11
6
.
2
c
m
)
2
6
–
1/
2
”
(
6
7
.
3
c
m
)
2
8
–
3
/
4
”
(
7
3
.
0
cm
)
8
”
(
2
0
.
3
cm
)
8
–
5
/
1
6
”
(
2
1
.
1
c
m
)
3
–
7
/
8
”
(
9.
8
cm
)
8
”
(
2
0
.
3
cm
)
8
–
5/
16”
(
2
1
.
1
c
m
)
3
–
7
/
8
”
(
9
.
8
c
m
)
30” Wide
Rating Label
Location
27” Wide
Rating Label
Location
7
Designer Single Oven
Description DESO127(T)/527(T)–27” Wide DESO130(T)/530(T)–30” Wide
Overall Width 26 1/2” (67.3 cm) 29 1/2” (74.9 cm)
Overall Height 29 1/4” (74.3 cm)
Overall Depth to edge of door—25 11/16” (65.2 cm)
with door open—46” (116.8 cm)
Cutout Width 25 1/2” (64.8 cm) 28 1/2” (72.4 cm)
Cutout Height 28 1/8” (71.4 cm)
Cutout Depth 24” (61.0 cm)
Electrical Requirements 4-wire ground, 240VAC, 30 amp electrical connection
Unit is equipped with No.10 ground wire in conduit.
Should be fused separately.
Maximum Amp Usage 24.0 amps—240 VAC
20.8 amps—208 VAC
Oven Interior Width 22 5/16” (56.7 cm) 25 6/16” (64.3 cm)
Oven Interior Height 16 1/2” (41.9 cm)
Oven Interior Depth 16 13/16” (42.7 cm)
Oven Volume (measured toAHAM standard)* 3.6 cu. ft. 4.1 cu. ft.
Oven Volume (total ovencavity) 4.1 cu. ft. 4.7 cu. ft.
Approximate Shipping Weight 237 lbs. (108 kg) 261 lbs. (118 kg)
*The AHAMStandard for measuring ovencapacity subtracts the doorplug and convectionbaffle dimension from thetotal oven volume.
Specifications & Electrical Requirements
6
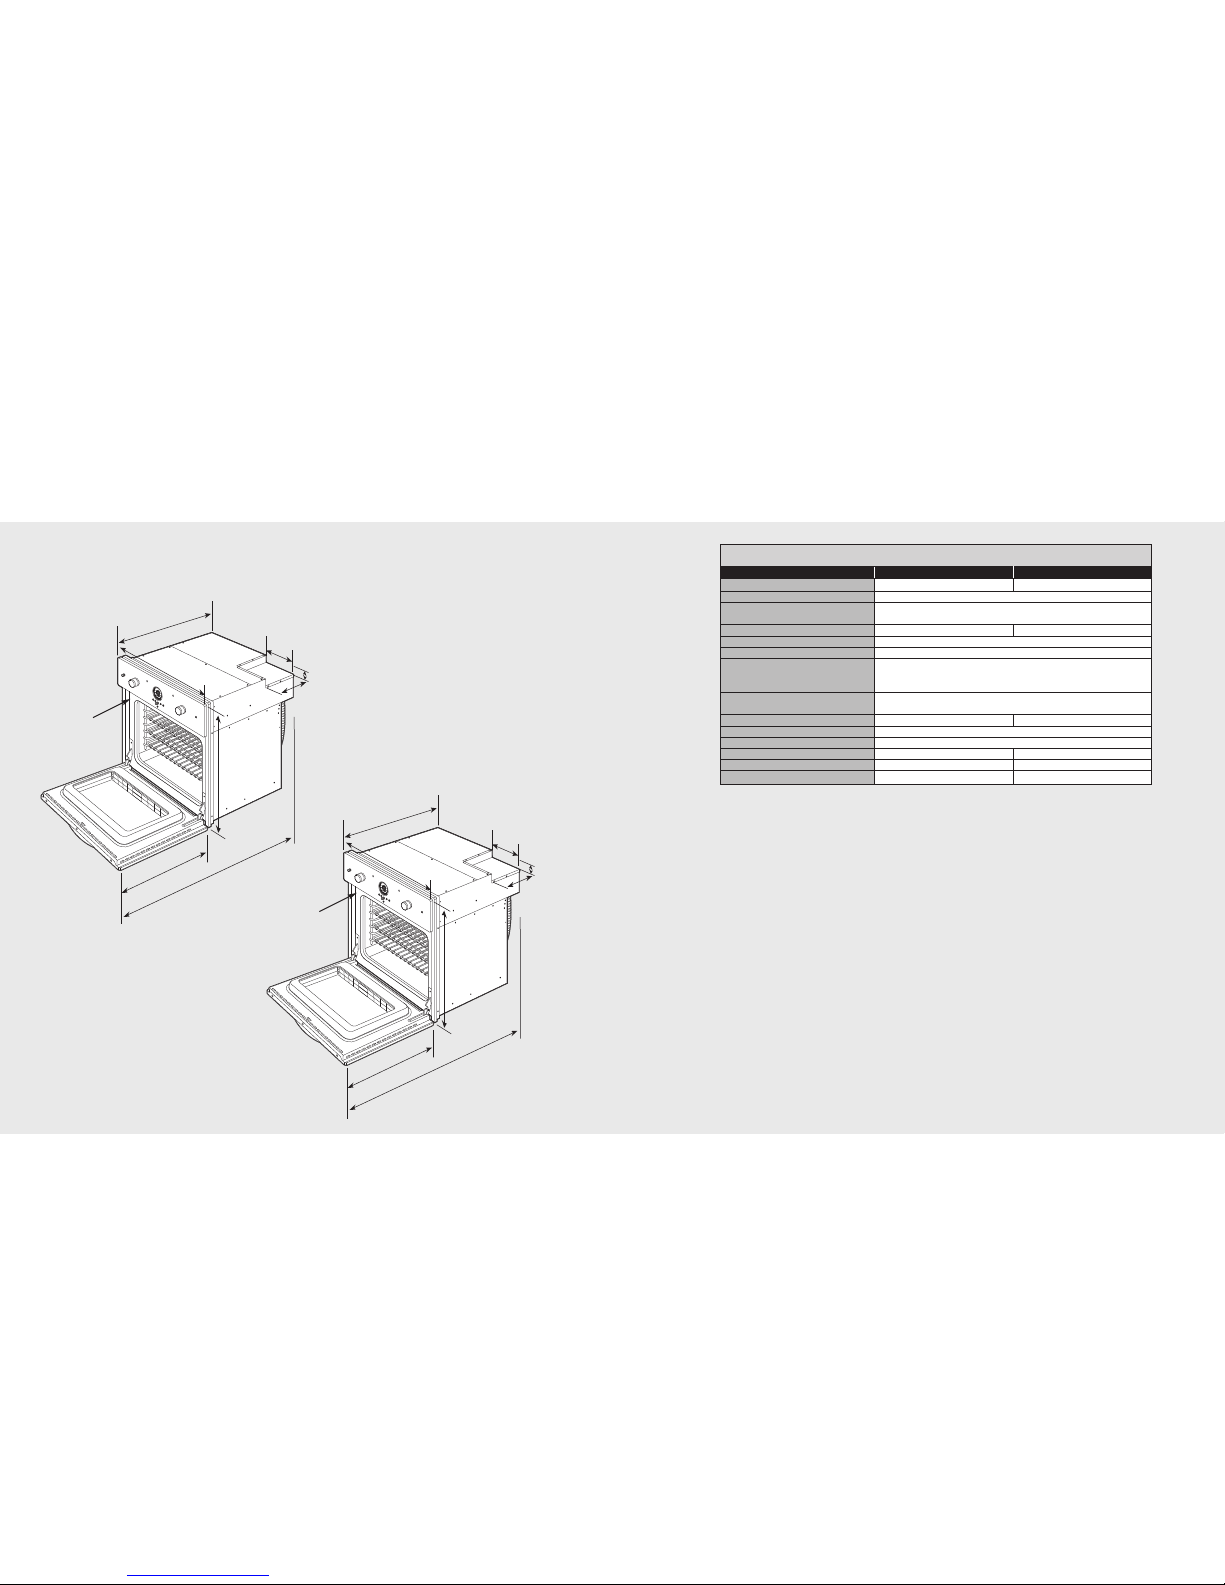
Dimensions–Single Oven
(Designer Series–Mechanical and Touch Control Models)
20
–
1/4
”
(51
.
4
c
m
)
2
6
–
1
/2
”
(
67
.
3
cm
)
2
9
–
1
/
4
”
(
7
4
.
3
cm
)
4
6
”
(11
6
.
8
cm
)
2
5
–
1
1
/
1
6
”
(
6
5.
2
c
m
)
20
–
1/4
”
(51
.4
c
m
)
2
9
–
1/
2
”
(
7
4.
9
cm
)
2
9
–
1
/
4
”
(
7
4.
3
cm
)
4
6
”
(11
6
.
8
cm
)
8
”
(
2
0
.
3
cm
)
8
–
5
/
1
6
”
(
2
1
.
1
c
m
)
3
–
7
/
8
”
(
9
.
8
cm
)
2
5
–
1
1
/
1
6
”
(
6
5.
2
cm
)
8
”
(
2
0
.
3
cm
)
8
–
5
/
1
6
”
(
2
1
.
1
cm)
3
–
7
/
8
”
(
9
.
8
c
m
)
30” Wide
27” Wide
Rating Label
Location
Rating Label
Location
 Loading...