

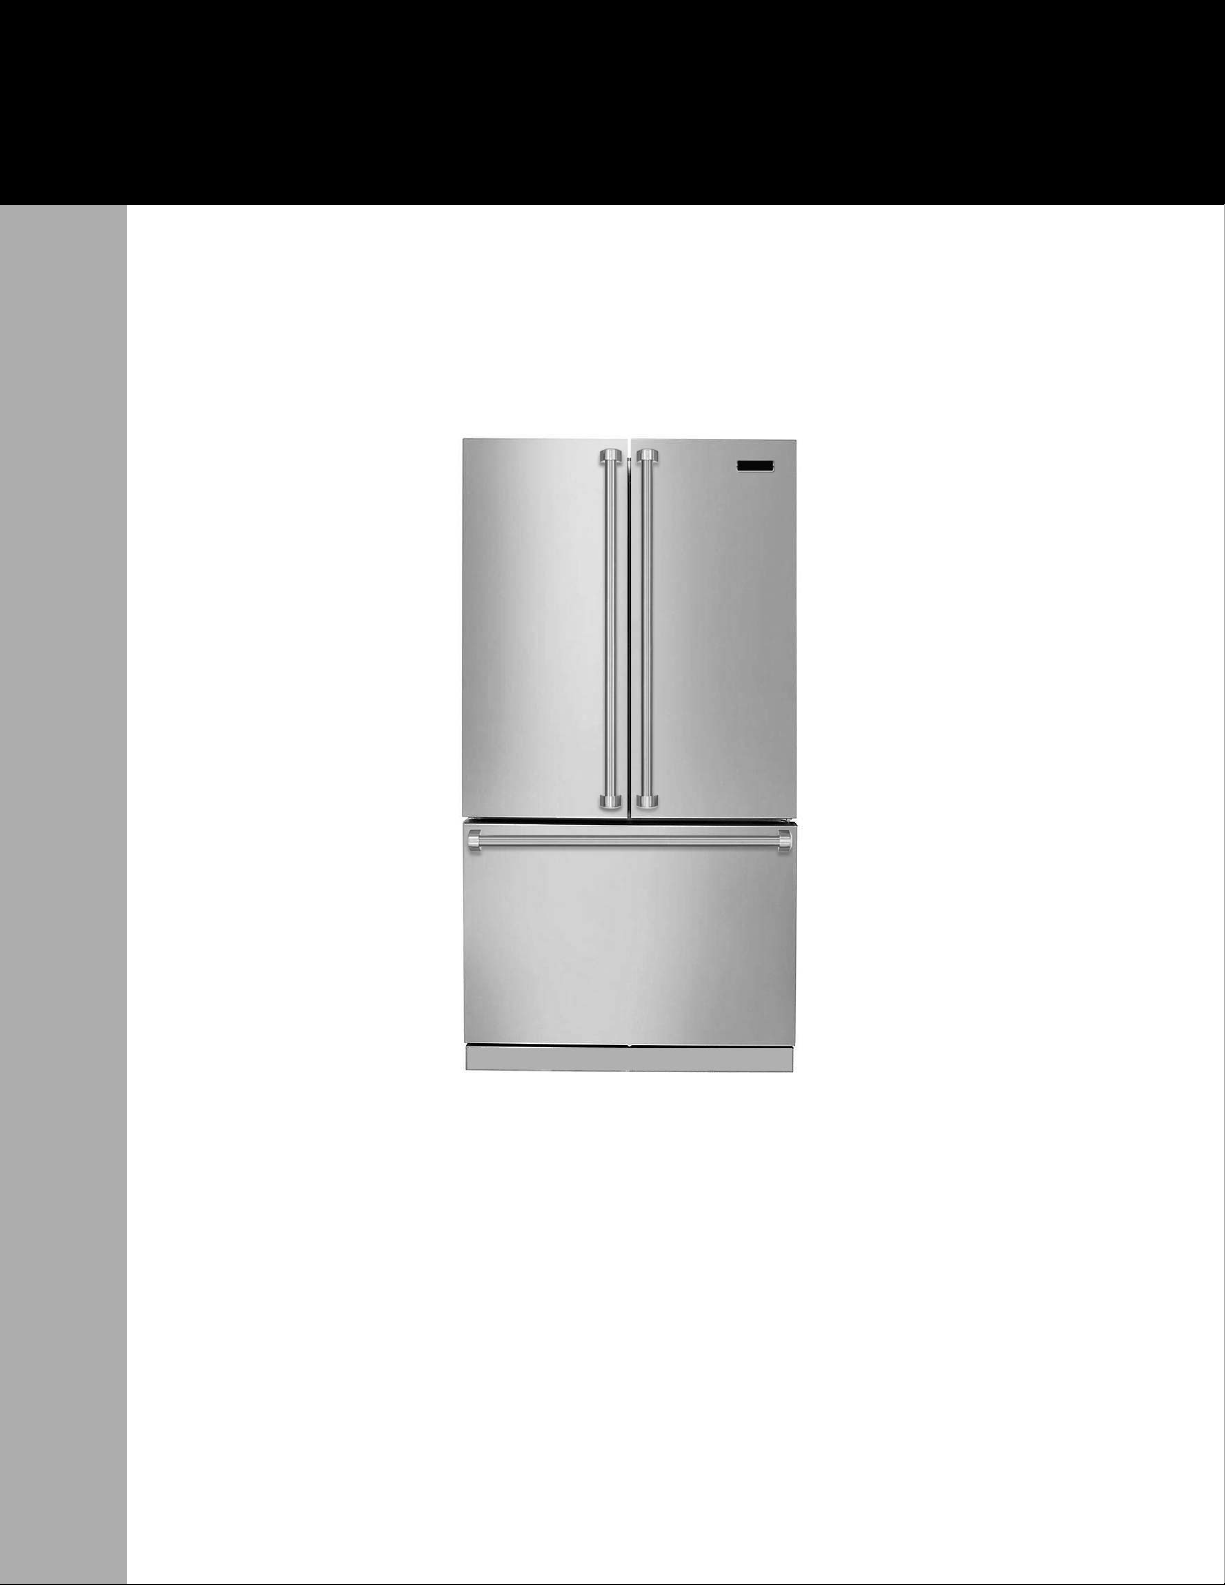
Use / Install Guide
Guide Uso / d’installation
Guía de d’utilisation / Instalación
3 Series
French Door Bottom Freezer/Refrigerator
Refrigerador con congelador inferior de puerta doble
Réfrigérateur à portes françaises/Congélateur en bas
RVRF3361 / CRVRF3361

Finding Information
Please read and save this guide
We hope you will enjoy and appreciate the care and
attention we have put into every detail of your new, state-ofthe-art refrigerator.
Your appliance is designed to offer years of reliable
service. This Use and Care Guide will provide you with
the information you need to become familiar with your
refrigerator’s care and operation.
We appreciate your choice of our refrigerator and hope
that you will again select our products for your other major
appliance needs.
NOTE
Registering your product with Viking Range, LLC enhances
our ability to serve you. You can register online at www.
vikingrange.com or by sending your Product Registration
Card in the mail.
Questions?
Table of contents
Finding Information .............................................................. 2
Safety..................................................................................... 3
Feature Overview .................................................................. 5
Installation ............................................................................. 6
Removing the Doors ............................................................. 9
Installing the Door Handles ................................................11
Connecting the Water Supply ............................................12
Controls ............................................................................... 13
Automatic Ice Maker ........................................................... 15
Storage Features ................................................................. 16
Storing Food and Saving Energy ........................................20
Normal Operating Sounds & Sights ................................... 21
Changing the Water and Air Filters .................................... 22
Care and Cleaning .............................................................. 24
Your complete satisfaction is our ultimate goal. If you have
any questions or comments about this product, please
contact the dealer from whom you purchased it, or contact
our Consumer Support Center at 1-888-845-4641.
For online support and product information visit www.
vikingrange.com in the US or brigade.ca in Canada
Installation Checklist
Doors
Handles are secure and tight
Door seals completely to cabinet on all sides
Leveling
Refrigerator is level, side-to-side and tilted ¼” (6
mm) front-to-back
Toe grille is properly attached to refrigerator
Cabinet is sitting solid on all corners
Electrical Power
House power turned on
Refrigerator plugged in
Solutions to Common Problems .........................................26
Service Information ............................................................. 29
Warranty .............................................................................. 30
Ice Maker
House water supply connected to refrigerator
No water leaks present at all connections - recheck
in 24 hours
Ice maker is turned ON
Front fi lter must be fl ush with fi lter housing (select
models)
Final Checks
Shipping material removed
Fresh food and freezer temperatures set
Crisper humidity controls set
Registration card sent in
2
Safety
Important safety instructions
Safety Precautions
Do not attempt to install or operate your unit until you have
read the safety precautions in this manual. Safety items
throughout this manual are labeled with a Danger, Warning,
or Caution based on the risk type.
Defi nitions
This is the safety alert symbol. It is used to alert you to
potential personal injury hazards. Obey all safety messages
that follow this symbol to avoid possible injury or death.
DANGER
DANGER indicates an imminently hazardous
situation which, if not avoided, will result in death or
serious injury.
WARNING
WARNING indicates a potentially hazardous
situation which, if not avoided, could result in death
or serious injury.
CAUTION
CAUTION indicates a potentially hazardous
situation which, if not avoided, may result in minor
or moderate injury.
Child Safety
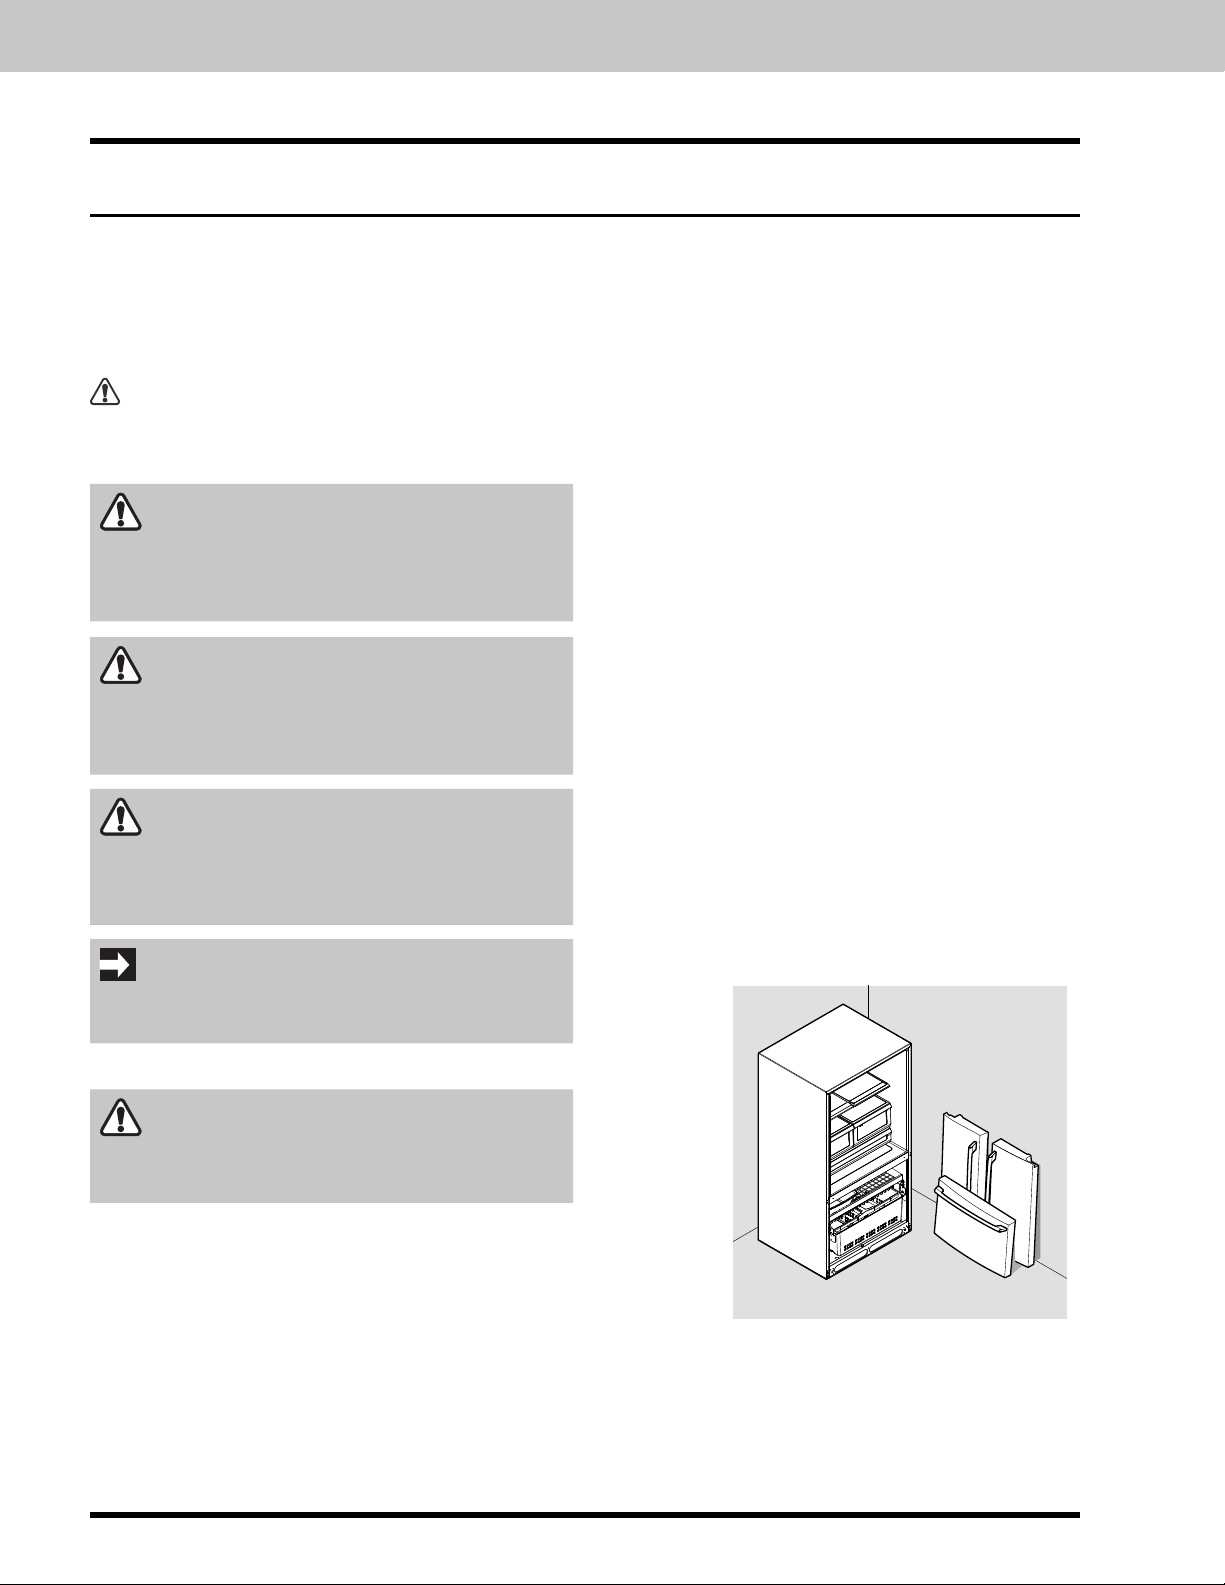
Packing Materials:
• Packing cartons covered with rugs, bedspreads, plastic
sheets, or stretch wrap may become airtight chambers
and can quickly cause suffocation.
• Destroy or recycle the product’s carton, plastic bags,
and any other exterior wrapping material immediately
after the refrigerator is unpacked. Children should
never play with these items.
Child Entrapment and Suffocation:
• These problems are not limited to the past. Whether
junked, abandoned, or temporarily stored (even for a
few hours), unattended refrigerators and freezers are
dangerous. Please take the precautions listed below.
Proper Disposal of Refrigerators/Freezers
We strongly encourage responsible appliance recycling/
disposal methods. Check with your utility company or
visit www.energystar.gov/recycle for more information on
recycling your old refrigerator.
Before you recycle or dispose of your old refrigerator/freezer:
• Remove the doors.
• Leave the shelves and baskets in place so children
may not easily climb inside.
• Have refrigerant and compressor oil removed by a
qualifi ed service technician.
IMPORTANT
Indicates installation, operation, or maintenance
information which is important but not hazard-related.
General Safety
WARNING
Please read all safety instructions before using your
new refrigerator.
• Do not store or use gasoline or other fl ammable
liquids near this or any other appliance. Read product
labels for warnings regarding fl ammability and other
hazards.
• Do not operate the refrigerator in the presence of
explosive fumes.
• Avoid contact with any moving parts of the automatic
ice maker.
• Remove all staples from the carton to avoid injury.
Staples can also damage fi nishes if they come in
contact with other appliances or furniture.
3
Safety
IMPORTANT
CFC/HCFC DISPOSAL
Your old refrigerator may have a cooling system
that used CFCs or HCFCs (chlorofl uorocarbons or
hydrochlorofl uorocarbons). CFCs and HCFCs are believed
to harm stratospheric ozone if released to the atmosphere.
Other refrigerants may also cause harm to the environment
if released to the atmosphere.
If you are throwing away your old refrigerator, make
sure the refrigerant is removed for proper disposal by a
qualifi ed technician. If you intentionally release refrigerant,
you may be subject to fi nes and imprisonment under
provisions of environmental legislation.
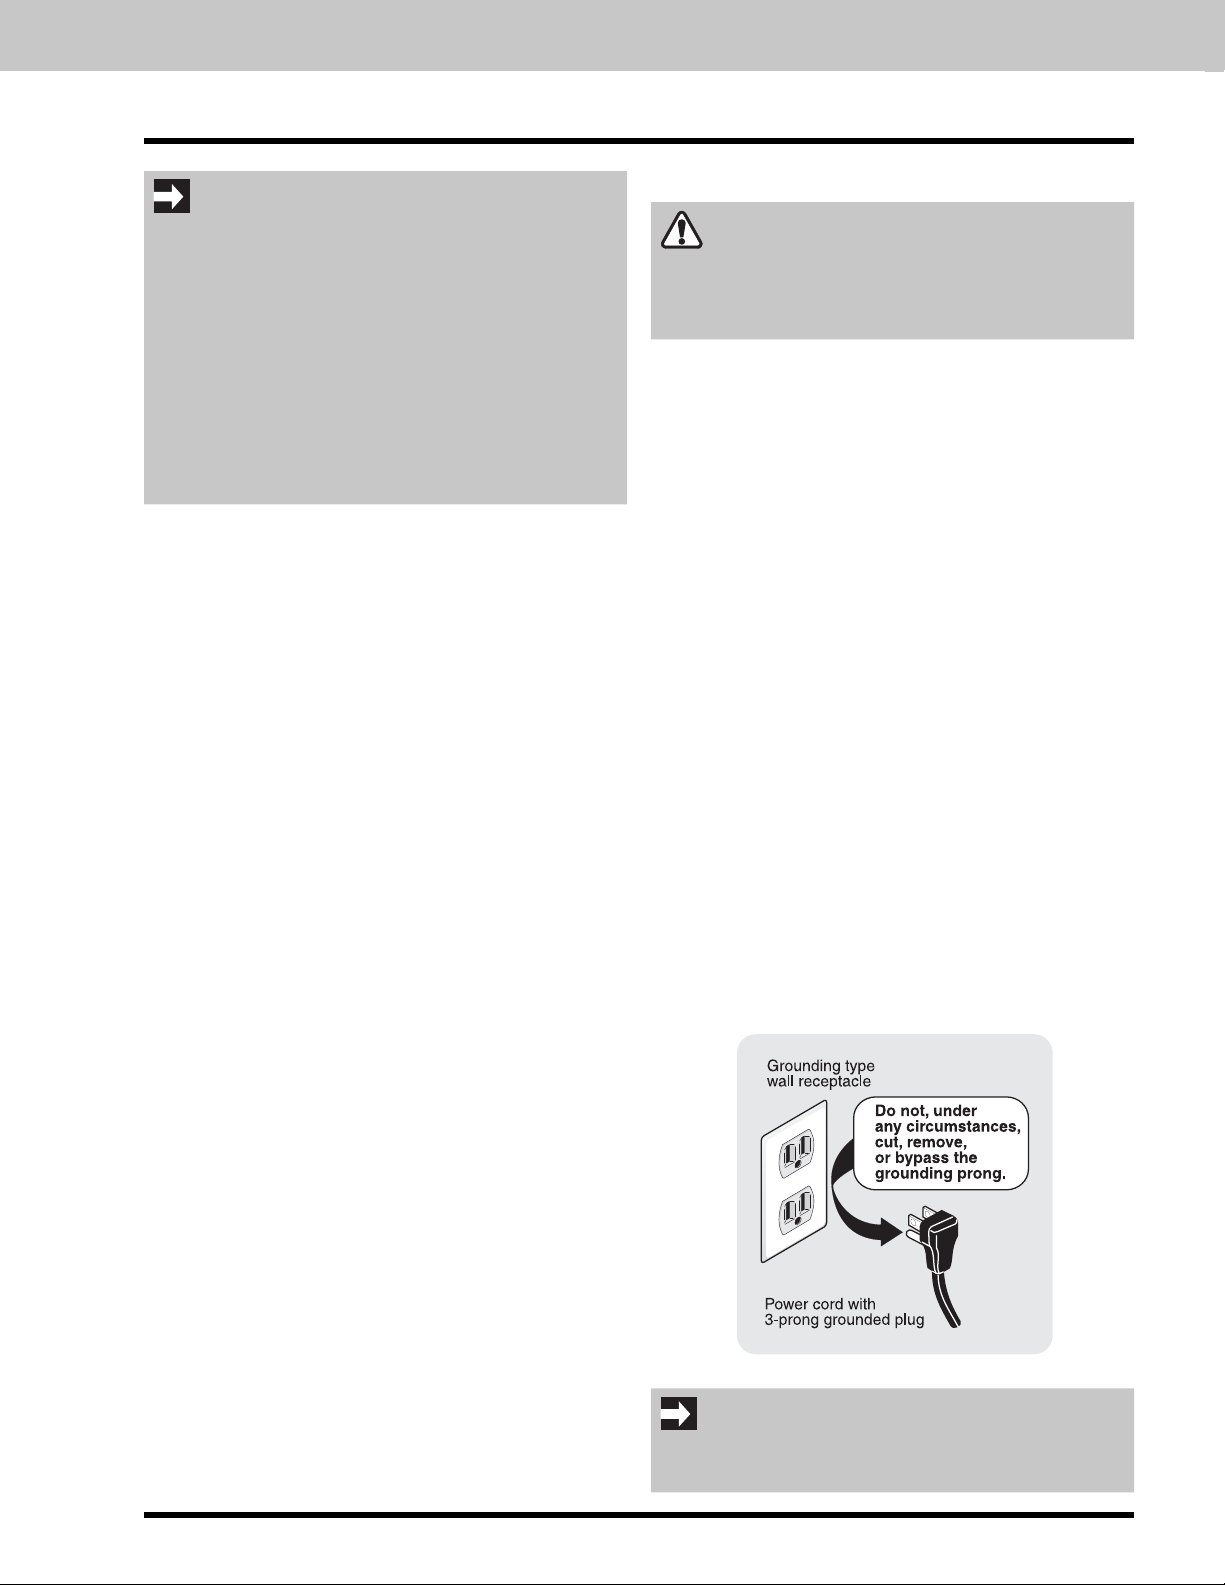
Electrical information
WARNING
You must follow these guidelines to ensure that
your refrigerator’s safety mechanisms are operating
correctly.
• The refrigerator must be plugged into its own
dedicated 115 Volt, 60 Hz, AC-only non-GFCI
electric outlet. The power cord of the appliance is
equipped with a three-prong grounding plug for your
protection against electrical shock hazards. It must
be plugged directly into a properly grounded threeprong receptacle. The receptacle must be installed in
accordance with local codes and ordinances. Consult
a qualifi ed electrician.
cord or adapter plug.
• If the power cord is damaged, it should be replaced
by the manufacturer, service technician, or a qualifi ed
person.
• Never unplug the refrigerator by pulling on the power
cord. Always grip the plug fi rmly and pull straight out
from the receptacle to prevent damaging the power
cord.
• To avoid electrical shock, unplug the refrigerator
before cleaning and before replacing a light bulb or
LED light.
• Performance may be affected if the voltage varies
by 10% or more. Operating the refrigerator with
insuffi cient power can damage the compressor. Such
damage is not covered under your warranty.
• Do not plug the unit into an outlet controlled by a wall
switch or pull cord to prevent the refrigerator from
being turned off accidentally.
Do not use an extension
IMPORTANT
To turn off power to your refrigerator, unplug the power
cord from the wall outlet.
4
Feature Overview
Understanding features and terms
Your refrigerator is designed for optimal convenience and storage fl exibility. The illustration below is provided to assist you
with familiarizing yourself with product features and terminology.
NOTE
Features may vary according to model. Model is shown without freezer drawer cover.
Water
Flipper Guide
LED Light
Filter
Covered Door Bin
Flipper
Mullion
Air Filter
Adjustable
Spill-Proof
Shelves
Crisper
Drawer
Special Items
Rack (inside CZD)
Adjustable
Hinges
Ice
Maker
Ice
Bucket
Adjustable
Spill-Proof
Shelves
Crisper
Drawer
Tilt-Out
Bin
Temperature
Adjustable Cold
Zone Drawer
Freezer Baskets
Toe Grille
Wire Tilt-Out Shelf
(inside freezer drawer)
IMPORTANT
Features not included with your refrigerator can be purchased at www.vikingrange.com in the US or
brigade.ca in Canada or by calling 1-888-845-4641.
5
Installation
Phillips Head
or
Quadrex Head
Screwdriver
(OR)
OR
Ǫ" and ¼"
Socket
Adjustable
OR
Ǫ" Fixed
Wrench
ANDAND
6mm
Allen Wrench
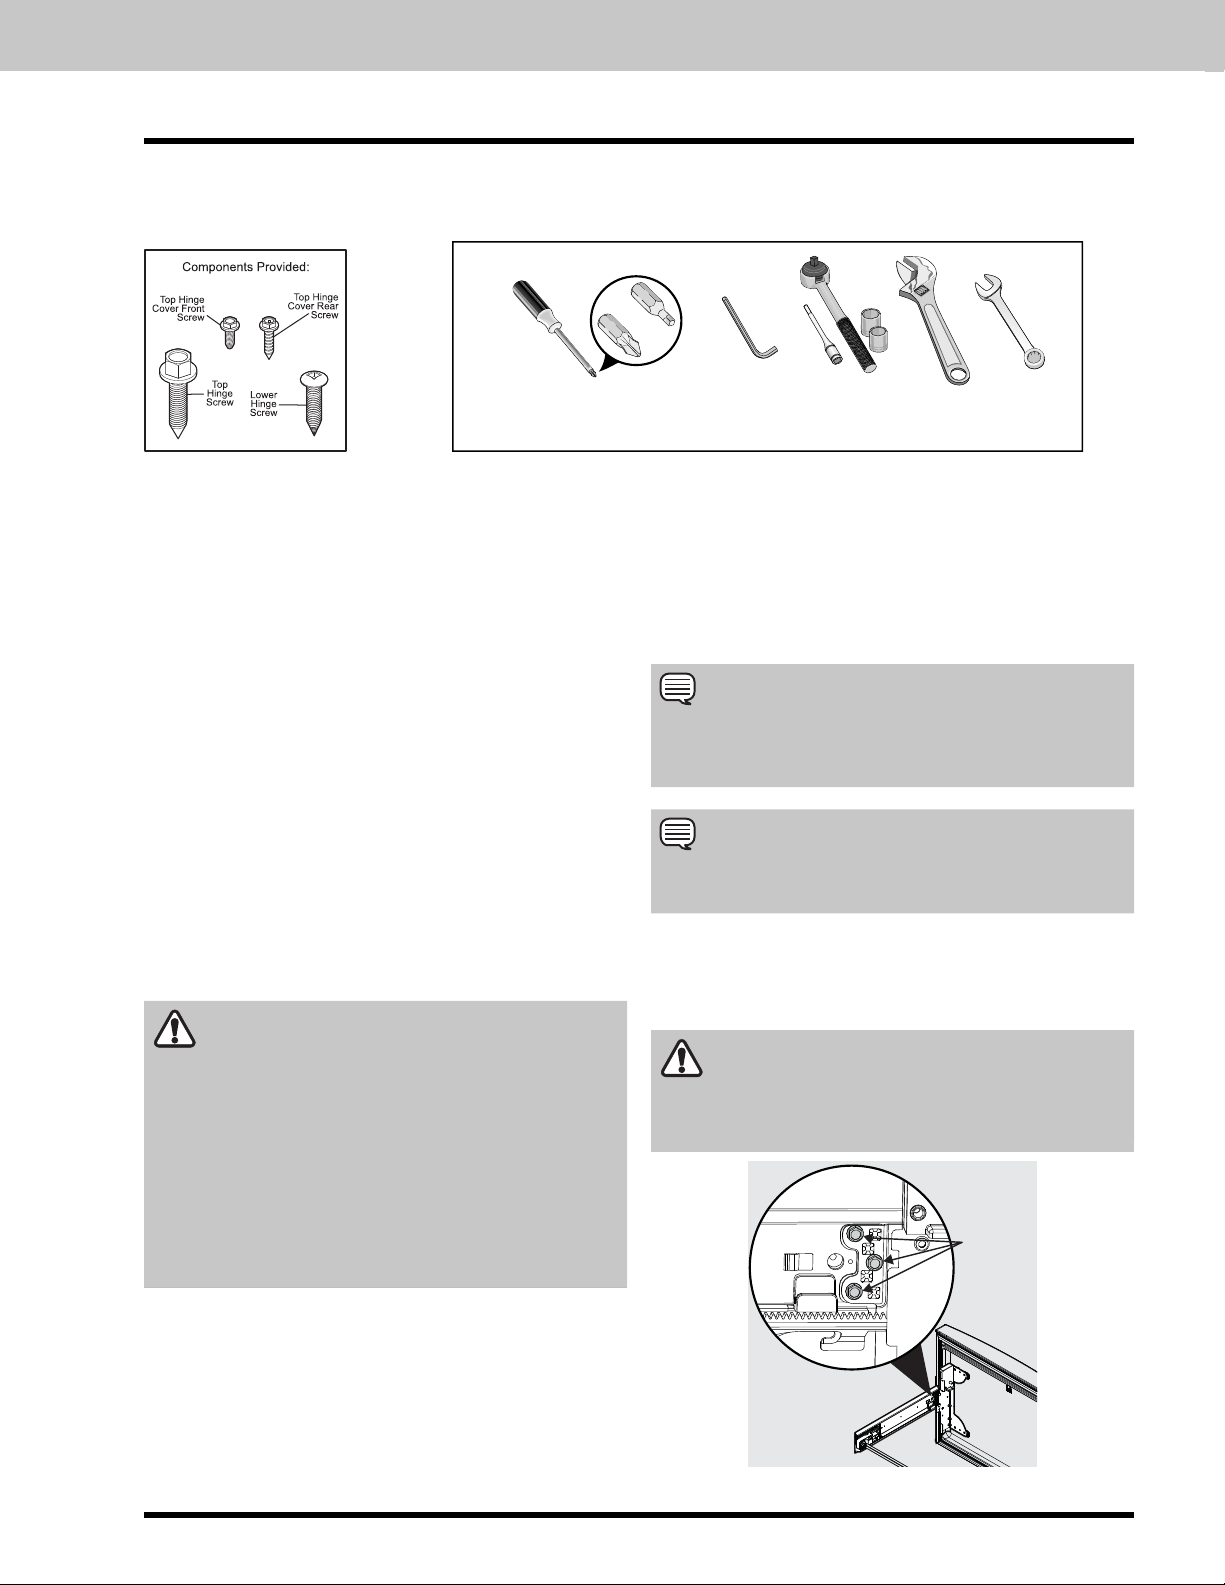
Required Tools
You will need the following tools:
Tools Necessary:
This Use & Care Guide provides general installation and
operating instructions for your model. We recommend using
a service or kitchen contracting professional to install your
refrigerator. Use the refrigerator only as instructed in this Use
& Care Guide.
Before starting the refrigerator, follow
these important fi rst steps.
Location
• Choose a place that is near a grounded, non-GFCI,
electrical outlet.
adapter plug.
• If possible, place the refrigerator out of direct sunlight
and away from the range, dishwasher, or other heat
sources.
• The refrigerator must be installed on a fl oor that is
level and strong enough to support a fully loaded
refrigerator.
• Consider water supply availability for models
equipped with an automatic ice maker.
Do Not use an extension cord or an
Installation
CAUTION
DO NOT install the refrigerator where the
temperature will drop below 55°F (13°C) or rise
above 110°F (43°C). The compressor will not be
able to maintain proper temperatures inside the
refrigerator.
DO NOT block the toe grille on the lower front
of your refrigerator. Suffi cient air circulation
is essential for the proper operation of your
refrigerator.
Wrench
• Allow the following clearances for ease of installation,
proper air circulation, and plumbing and electrical
connections:
Sides & Top
Back 1 inch (25.4 mm)
⅜ inch (9.5 mm)
Wrench
Door opening
NOTE
If your refrigerator is placed with the door hinge against a
wall, you may have to allow additional space so the door
can be opened wider.
NOTE
The refrigerator doors are designed to shut by themselves
within a 20 degree opening.
Your refrigerator should be positioned to allow easy access to
a counter when removing food. For best use of refrigerator
drawers and freezer baskets, the refrigerator should be in a
position where both can be fully opened.
CAUTION
Do Not loosen or remove these (3) hex head
screws.
DO NOT
Loosen
or
Remove
These 3
Hex
Screws
6
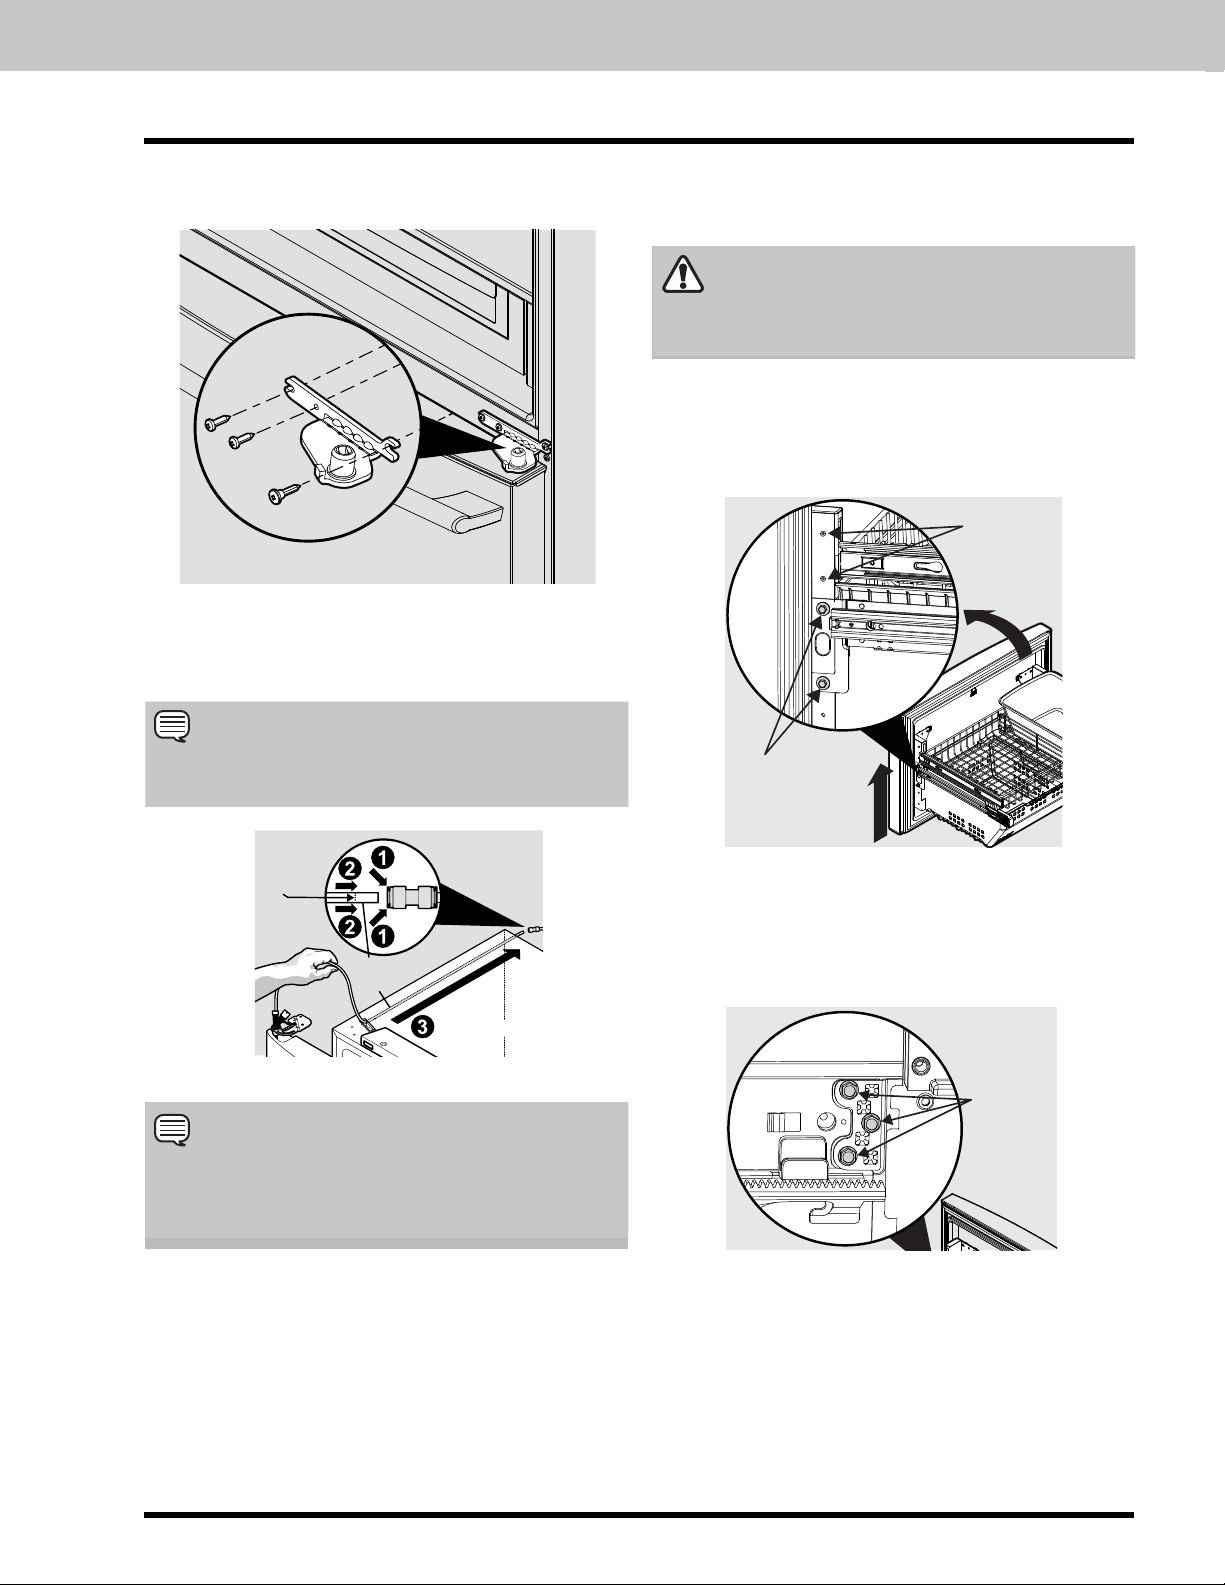
Installation
Level Refrigerator & Adjust Doors
(if necessary)
Guidelines for fi nal positioning of your refrigerator:
• All four corners of the cabinet must rest fi rmly on the
fl oor.
• The sides should tilt
(to ensure that doors close and seal properly).
• Doors should align with each other and be level.
Most of these conditions can be met by raising or
lowering the adjustable front rollers.
To level the cabinet using the front rollers:
1. Slightly open freezer drawer if the toe grill is installed. Lift
the toe grille and gently pull forward.
2. Make initial cabinet adjustments by using the front roller height
adjusting screws. Use a 3/8 inch socket wrench to turn the
adjustment screws (1 per side).
To raise: turn adjustment screw clockwise.
To lower: turn adjustment screw counterclockwise.
3. Ensure both doors are bind-free with their seals touching
the cabinet on all four sides and that cabinet is stable.
4. After unit is leveled, lower anti-tip leg using a 3/8 inch
socket wrench until it fi rmly contacts the fl oor.
¼ inch (6 mm) from front to back
To make fi nal door height adjustments:
1. Open freezer drawer to make lower hinge visible.
2. Insert 6mm Allen wrench into the shaft of the lower hinge.
3. Adjust the height by turning clockwise or
counterclockwise. Turning clockwise will lower the door.
Turning counterclockwise will raise the door. Default
setting is to the lowest height when you receive your
appliance
Raise
To adjust the fl ipper mullion:
1. Loosen the screw located on the fl ipper mullion hinge.
Door
Anti-tip
Leg
5. Install the toe grill by fi tting into place.
Toe Grille Must
Fit in Slot on
Anti-tip Bracket
Door
Raise
Lower
(2) Retaining Clips
Adjusting Flipper Mullion Screw
2. Adjust fl ipper mullion height. For proper connection with
the fl ipper mullion guide, there should be a separation
about the thickness of a coin (0.060 inches, or 1.5 mm)
between the guide and fl ipper mullion.
Adjusting Flipper Mullion Height
3. Re-tighten screw.
7
Installation
Shelf features (Select Models)
CAUTION
Shelves must be removed prior to moving the
refrigerator.
CAUTION
To avoid injury from breakage, handle tempered glass
shelves carefully.
NOTE
Features may vary according to model.
Your refrigerator includes glass shelves that are designed to
catch and hold accidental spills.
You can easily adjust shelf positions in the fresh food
compartments to suit your needs. The shelves have mounting
brackets that attach to slotted supports at the rear of each
compartment.
To change the position of a shelf:
1. Before adjusting a shelf, remove all food.
Reposition the Air Seal
(Slide-out Shelves)
1. Remove air seal by pushing down on the fl ap with a
downward rotation.
2. Position the air seal towards the outside end of the shelf to
avoid the air tower when shelf is pushed back into place.
3. Install seal by sliding lower tab of seal up into bottom
rear slot of shelf with seal at a downward angle then
pulling up on seal fl ap until seal sits snug on back of
shelf and fl ap sits at about a 10 degree angle from shelf
surface.
2. Lift the front edge up and pull the shelf out.
3. Replace by inserting the mounting bracket hooks into the
desired support slots.
4. Lower the shelf and lock into position.
Full Custom-DesignTM Shelf
or
Reposition the Air Seal
(Channel in rear)
1. Remove air seal by pushing seal straight back.
2. Position the air seal towards the outside edge of the shelf to
avoid the air tower when shelf is pushed back into place.
3. Install seal by sliding the open channel end of the seal
onto back edge of shelf until seal sits snug on back of
shelf and fl ap sits at about a 10 degree angle from shelf
surface.
Air Seal
Air Seal
8
Removing the Doors
Getting through narrow spaces
If your refrigerator will not fi t through an entrance area,
before installing the door handles, you can remove the
doors. Check fi rst by measuring the entrance.
To prepare for removing the doors:
1. Make sure the electrical power cord is unplugged from
the wall outlet.
2. Open the freezer drawer and remove the toe grille (see
“Installation” section).
3. Remove any food from the door shelves and close the
doors.
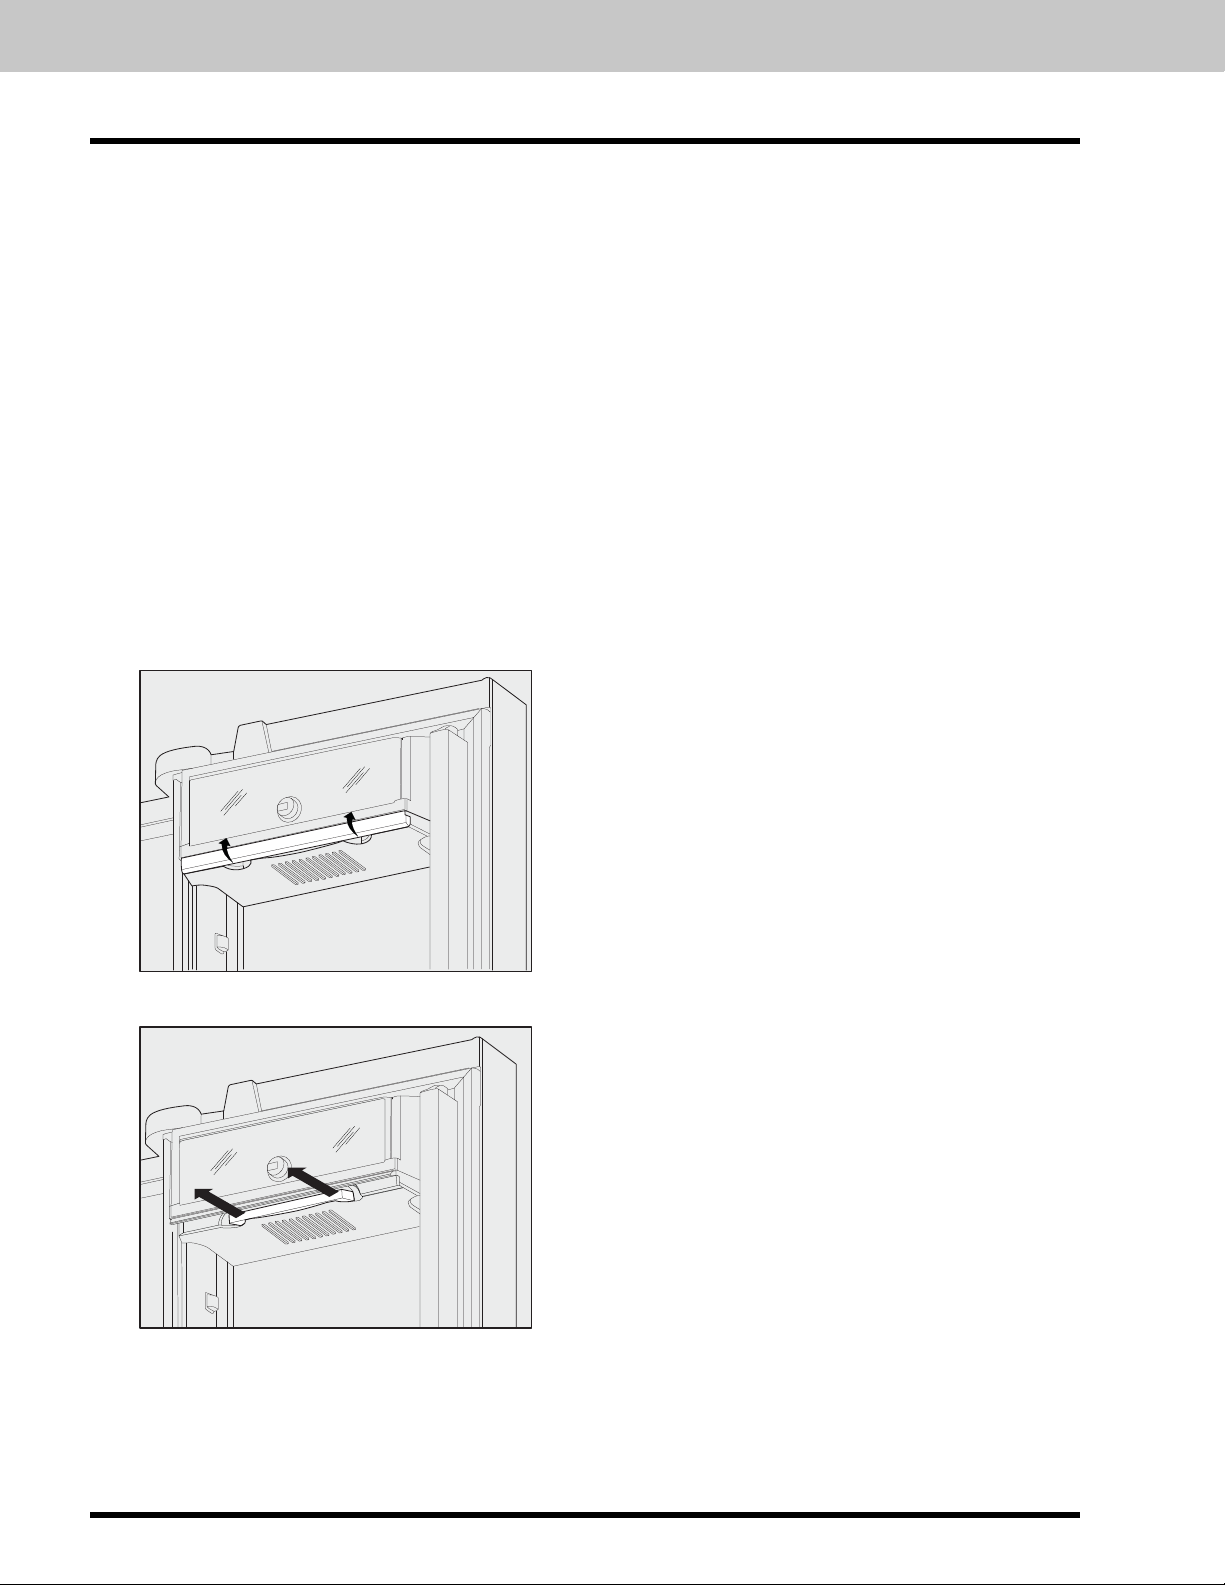
To remove the top hinge covers:
1. Remove the two screws from each cover over the top
door hinges.
2. Lift inside edge of hinge cover and tilt back.
Top Hinge
Cover
Hinge
Screws
Multi-wire
Cables
Leave
Hinge
With
Door
Rear
Cover
Screw
Ground
Top
Screw
Hinge
Front
Cover Screw
Front
Cover Screw
Rear
Cover
Screw
Ground
Screw
Top
Hinge
Water
Line
Top Hinge
Cover
Hinge
Screws
To remove the refrigerator doors:
1. Trace lightly around the door’s top hinges with a pencil.
This makes reinstallation easier.
2. Disconnect the harness by grasping both sides of the
connector fi rmly, depress the latch, and pull apart.
Remove the two screws from the top hinge. Lift the door
off of the bottom hinge and set it aside.
3. Detach the water tube from the connector located
behind the refrigerator and pull the tube back out to
the front of the unit. The connector releases when you
press inward on the outer sleeve while pushing the tube
toward the connector then while continuing to hold in
the sleeve, pull the tube away.
NOTE
Use care while pulling the water tube from the unit to
be sure that you do not kink the tube.
Leave
Hinge
With
Door
NOTE
DO NOT remove the ground screw from hinge.
Press
Press
Water
Line
Approximately
5 feet
NOTE
You will be pulling approximately fi ve feet of water
tube from the back of the refrigerator.
9
Removing the Doors
4. Unscrew the three lower hinge screws and slide the
hinge inwards.
Lower Hinge Removal
To reinstall the refrigerator doors:
Reverse the above steps.
NOTE
Removal and Installation of lower
Freezer Drawer
CAUTION
Drawer is heavy. Use caution when lifting
Removing Freezer Drawer:
1. Remove (4) hex head drawer screws.
2. Lift up drawer to remove.
DO NOT
Remove
Other
Screws
Upon replacement, the tube needs to be fully
inserted up the marking line.
Insert tube
up to the
marking
line
Water
Line
Press
Press
Approximately
5 feet
NOTE
When reinserting the water tube and replacing the
top hinge cover, be sure that you do not kink the
tube.
Once both doors are in place, ensure they are aligned with
each other and level (Please see the Installation section for
more details), and replace the top hinge cover.
Remove
Hex Head
Drawer Screw
Replacing Freezer Drawer:
1. Lower drawer back into place.
2. Replace (4) hex head drawer screws and tighten.
DO NOT
Loosen
or
Remove
These 3
Hex
Screws
10
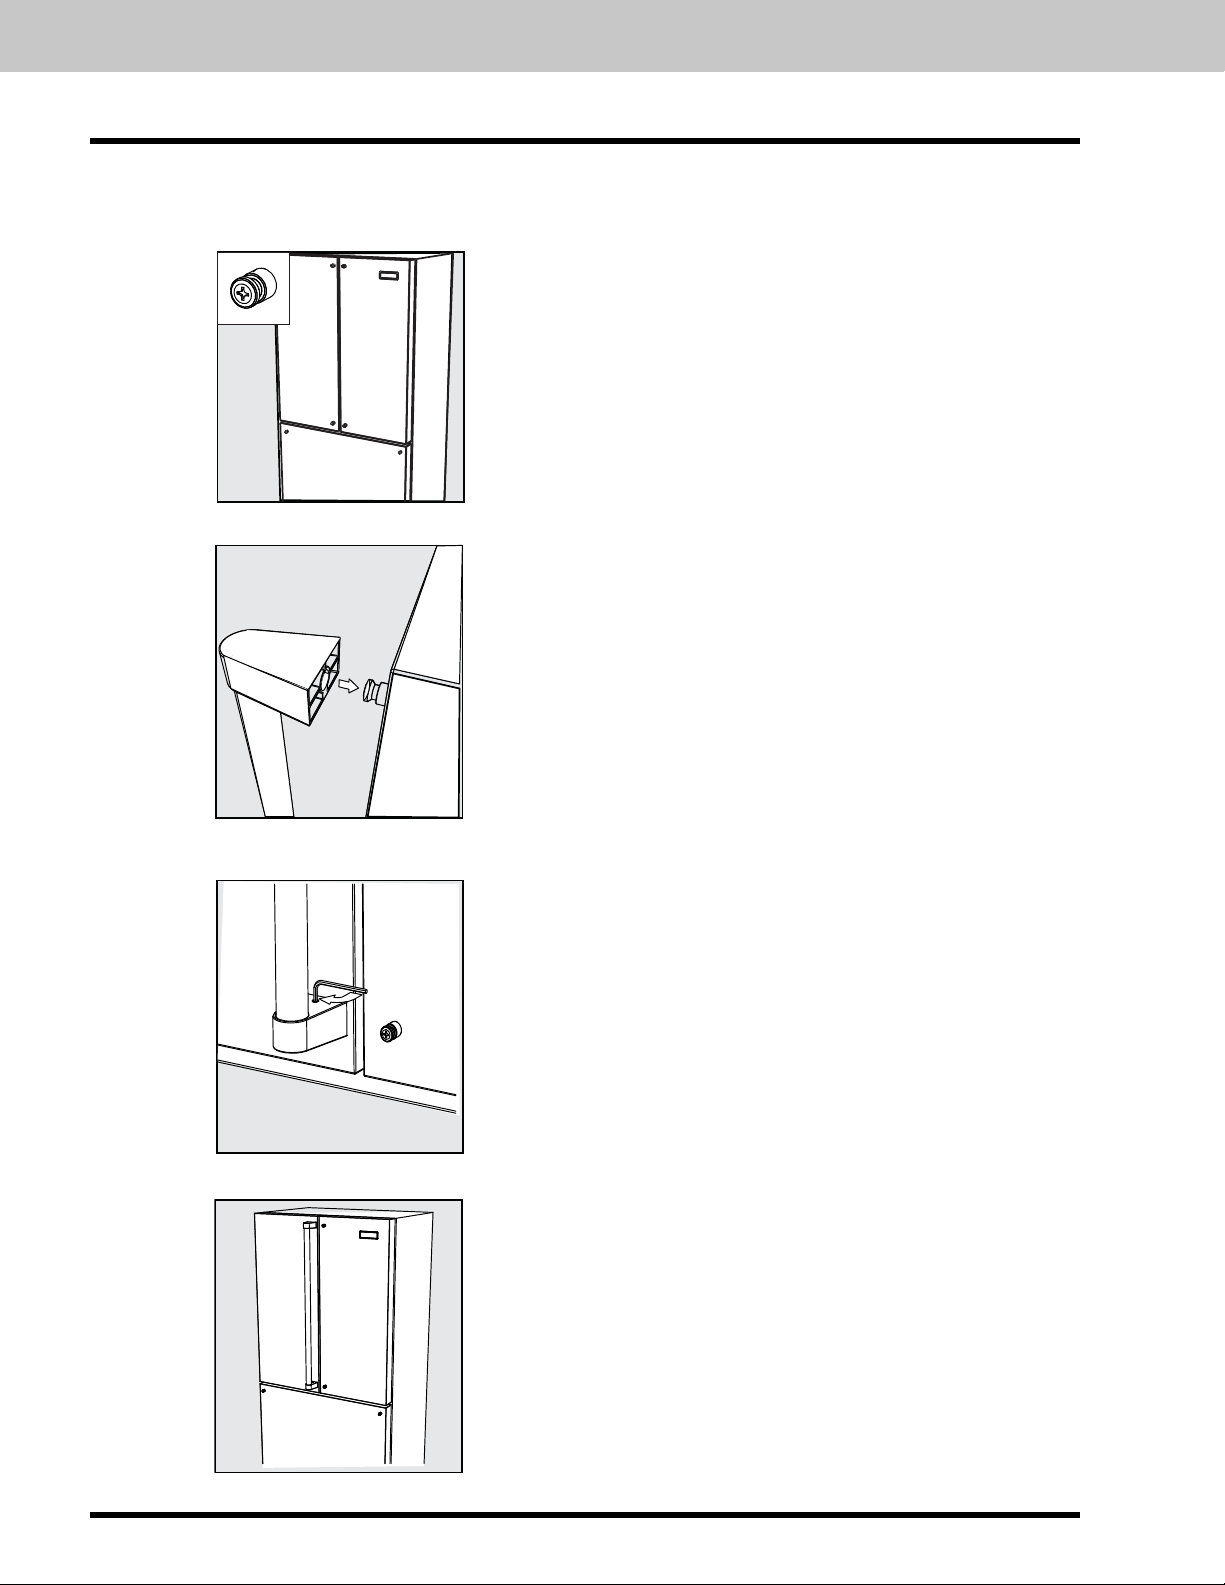
Installing the Door Handles
1. There are 6 handle studs on the refrigerator.
2. Slide handle endcaps over door stud.
3. Tighten the set screw. There are 2 set screws per handle
assembly.
4. Repeat with all 3 handle assemblies.
11
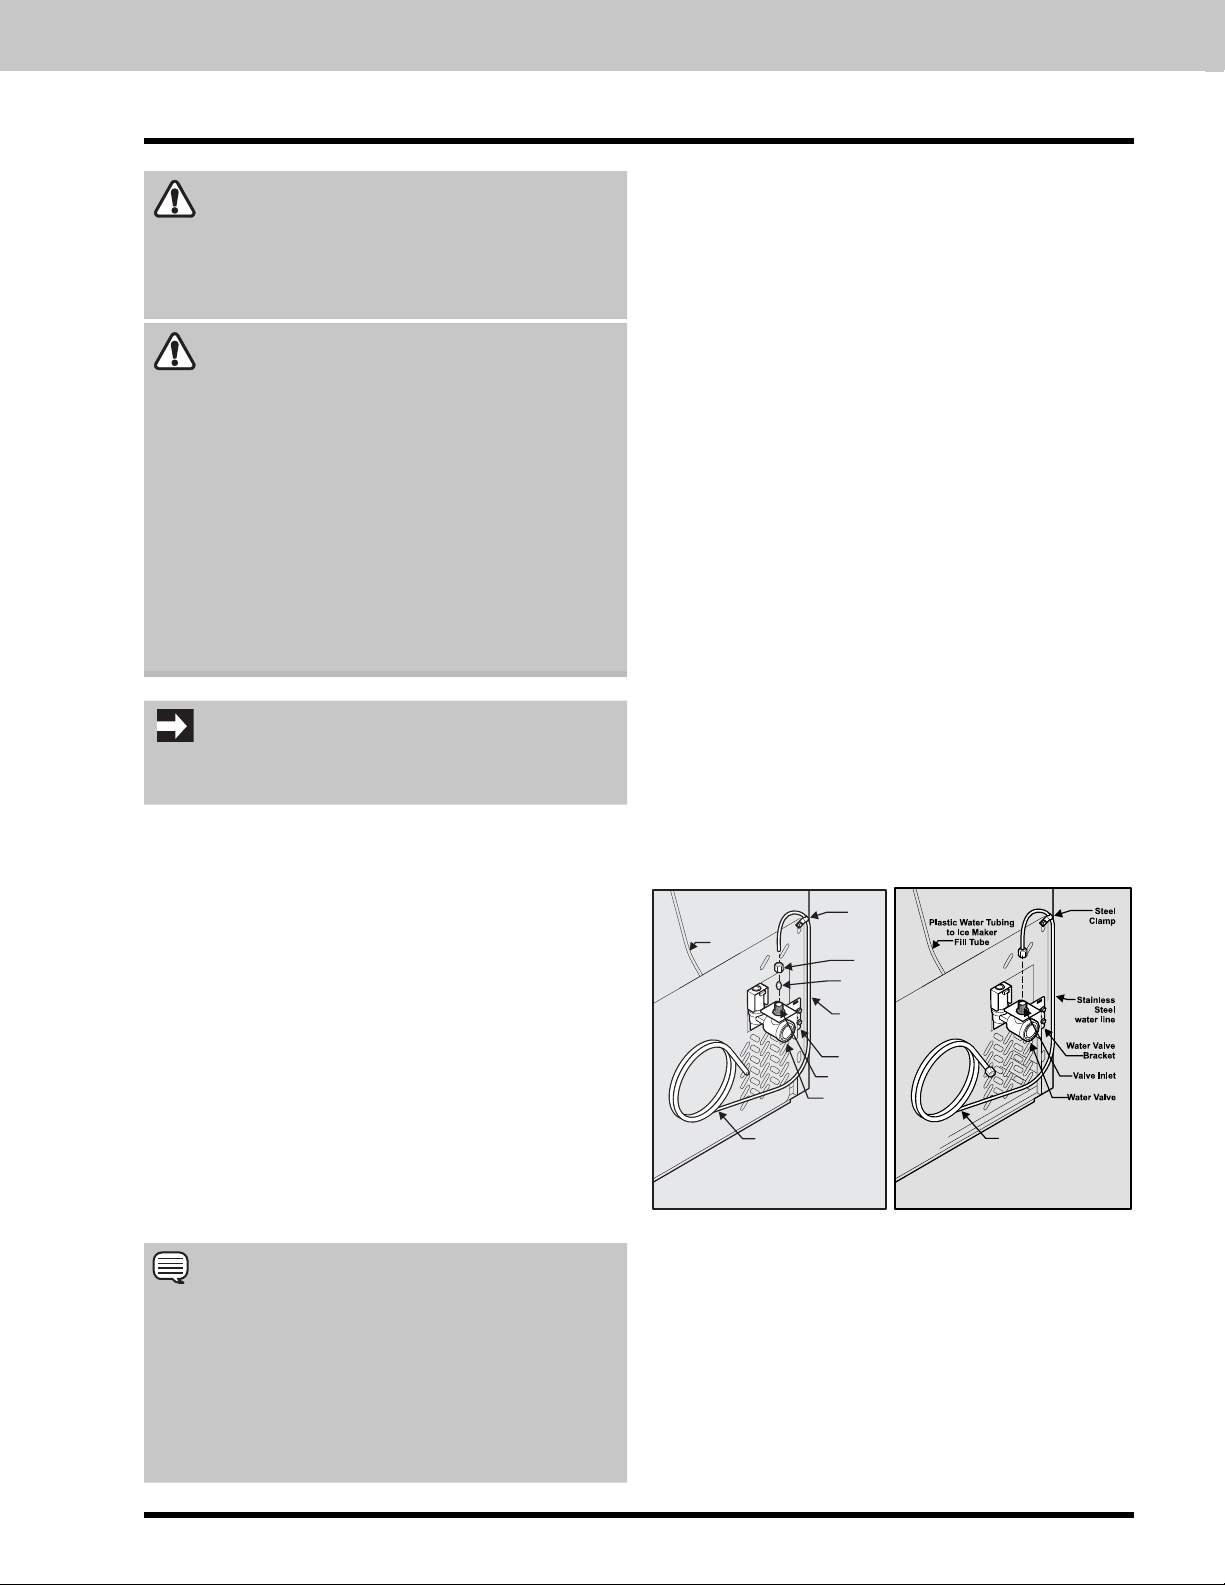
Connecting the Water Supply
Copper water line
from household water supply
(Include enough tubing in loop to allow
moving refrigerator out for cleaning.)
Ferrule
(Sleeve)
Copper
water line
Water Valve
Valve Inlet
Water Valve
Bracket
Steel
Clamp
Plastic Water Tubing
to Ice Maker
Fill Tube
Brass
Compression
Nut
To Connect Water Supply Line To Ice Maker Inlet Valve
WARNING
To avoid electric shock, which can cause death or
severe personal injury, disconnect the refrigerator
from electrical power before connecting a water
supply line to the refrigerator.
CAUTION
To Avoid Property Damage:
• Copper or Stainless Steel braided tubing is recommended
for the water supply line. Water supply tubing made of
¼ inch plastic is not recommended to be used. Plastic
tubing greatly increases the potential for water leaks, and
the manufacturer will not be responsible for any damage if
plastic tubing is used for the supply line.
• DO NOT install water supply tubing in areas where
temperatures fall below freezing.
• Chemicals from a malfunctioning softener can damage
the ice maker. If the ice maker is connected to soft water,
ensure that the softener is maintained and working
properly.
IMPORTANT
Ensure that your water supply line connections comply with
all local plumbing codes.
Before Installing The Water Supply Line, You Will Need:
• Basic Tools: adjustable wrench, fl at-blade screwdriver,
and Phillips
• Access to a household cold water line with water
pressure between 30 and 100 psi.
• A water supply line made of ¼ inch (6.4 mm) OD,
copper or stainless steel tubing. To determine the
length of tubing needed, measure the distance from
the ice maker inlet valve at the back of the refrigerator
to your cold water pipe. Then add approximately 7 feet
(2.1 meters), so the refrigerator can be moved out for
cleaning (as shown).
• A shutoff valve to connect the water supply line to
your household water system. DO NOT use a selfpiercing type shutoff valve.
• Do not reuse compression fi tting or use thread seal
tape.
• A compression nut and ferrule (sleeve) for connecting a
copper water supply line to the ice maker inlet valve.
TM
screwdriver
1. Disconnect refrigerator from electric power source.
2. Place end of water supply line into sink or bucket. Turn ON
water supply and fl ush supply line until water is clear. Turn
OFF water supply at shutoff valve.
3. Remove plastic cap from water valve inlet and discard
cap.
4. If you use copper tubing - Slide brass compression nut,
then ferrule (sleeve) onto water supply line. Push water
supply line into water valve inlet as far as it will go (¼
inch / 6.4 mm). Slide ferrule (sleeve) into valve inlet
and fi nger tighten compression nut onto valve. Tighten
another half turn with a wrench; DO NOT over tighten.
See Figure 1.
If you use braided fl exible stainless steel tubing - The nut and
ferrule are already assembled on the tubing. Slide compression
nut onto valve inlet and fi nger tighten compression nut onto
valve. Tighten another half turn with a wrench; DO NOT over
tighten. See Figure 2.
5. With steel clamp and screw, secure water supply line (copper tubing
only) to rear panel of refrigerator as shown.
6. Coil excess water supply line (copper tubing only), about
2½ turns, behind refrigerator as shown and arrange coils
so they do not vibrate or wear against any other surface.
7. Turn ON water supply at shutoff valve and tighten any
connections that leak.
8. Reconnect refrigerator to electrical power source.
9. To turn ice maker on, lower wire signal arm (freezer ice
maker) or set the ice maker’s On/Off power switch to the
“On” position (fresh food ice maker).
Figure 1
(Include enough tubing in loop
to allow moving refrigerator out
for cleaning)
Figure 2
6 ft (1.8 Meters) braided flexible
stainless steel water line from
household water supply
Check with your local building authority for recommendations
on water lines and associated materials prior to installing your
new refrigerator. Depending on your local/state building codes,
Viking Range, LLC recommends for homes with existing valves
its water line kit 054414-000 (with a 6 ft. Stainless Steel Water
Line) and for homes without an existing valve, Viking Range, LLC
recommends its water line kit 054415-000 (with a 20 ft. Copper
Water Line with self-tapping saddle valve). Please refer to www.
vikingrange.com for more information.
NOTE
12

TruTouch Controls
An indicator light will be illuminated above most active features.
Touch the icon to activate the options below.
on off Press and hold for three seconds to turn off the cooling system to clean the
refrigerator. It also turns off the ice maker. The temperature displays will read
OFF.
default settings Resets all refrigerator settings such as temp, temp display and tones to their
factory default settings.
Setting cooling temperatures
Press the + or – indicator to adjust the temperature to the desired setting. The temperature display will begin to blink with the fi rst touch. The display will time out after 10 seconds and return
to the basic display.
energy saver Keep this switch set on energy saver (light on) for lowest energy usage. If
moisture appears on the cabinet between the doors, pressing this button will
turn the light off and enable an electric heater used to reduce moisture on the
cabinet between the doors.
temp mode Touch to toggle display from Fahrenheit to Celsius.
fast freeze Activates a faster rate for freezing food.
fast ice Increases the production of ice.
water fi lter Press and hold for three seconds to reset after fi lter change.
air fi lter Filter condition status is always displayed when door is open. Press and hold
for three seconds to reset after fi lter change.
mute sounds Tones emitted by each key press can be turned off based on user preference.
The sounds are muted when the red indicator is lit. Warning signals will stay
active.
IMPORTANT
Pressing the power on/off icon does not turn off power to your refrigerator. You must
unplug the power cord from the wall outlet.
Alarms
Door Ajar If the door has been left open for an extended period of time, an alarm will
sound and the door ajar indicator will display on the bottom display of the
control panel. The alarm is turned off by closing the door. The mute sounds
key will blink to prompt the reset of any active alarms. Press this key to reset
any system alarms.
High Temp In the event of a high temperature condition, the temperature display will blink
and display “HI”. After 20 minutes, the alarm will sound and the high temp
indicator will be red on the bottom of the control panel. The mute sounds
icon will illuminate until pressed, acknowledging the alarm, at which time the
highest temperature reached will be displayed and the refrigerator will resume
normal operation. In case the high temp alarm is not acknowledged at the fi rst
alarm sound time out, when the door is fi rst opened, the alarm sound will be
repeated.
Power Fail In the event of a power failure, the power fail alert will be displayed and the
temperature display will blink until the mute sounds icon is pressed, acknowledging the alarm. Other modes may be turned off until the alarm is acknowledged. The power fail alert is turned off and the refrigerator will resume
normal operation. The high temp alarm may also be illuminated until a safe
operating range temperature has been reached.
13
TruTouch Controls
Sabbath Mode
The Sabbath Mode is a feature that disables portions of the
refrigerator and its controls in accordance with observance
of the weekly Sabbath and religious holidays within the
Orthodox Jewish community.
Sabbath Mode is turned ON and OFF by pressing and
holding the freezer temp
indicators for fi ve seconds. The display shows “Sb” while in
Sabbath mode.
In the Sabbath Mode, the High Temp alarm is active for
health reasons. For example, if the door is left ajar the
High Temp alarm is activated. The refrigerator will function
normally once the door is closed, without any violation of the
Sabbath/Holidays. The High Temp alarm is permitted when
cabinet temperature is outside the safe zone for 20 minutes.
The alarm silences itself after 10 minutes while the High
Temp icon stays lit until the Sabbath mode is exited.
For further assistance, guidelines for proper usage and a
complete list of models with the Sabbath feature, please visit
the web at
http:\\www.star-k.org.
“-” and the refrigerator temp “+”
NOTE
If the Temperature Adjustable Cold Zone Drawer
is not turned off prior to putting the unit into Sabbath
Mode, it will continue to adjust itself to maintain the set
point even if the display does not illuminate to show that
it is still on.
NOTE
The recommended settings for a product installed in a
kitchen is 37˚F for the fresh food compartment and 0˚F
for the freezer.
IMPORTANT
If your product has food freezing in the fresh food
compartment, increase the temperature setting 1 or 2
degrees.
IMPORTANT
If you place food within 1 inch in front of the air ports,
there may be the chance of freezing food.
NOTE
While in Sabbath Mode, neither the lights nor the control
panel will work until Sabbath Mode is deactivated.
Refrigerator stays in Sabbath Mode after power failure
recovery. It must be deactivated with the buttons on the
control panel.
NOTE
During Sabbath Mode, the ice maker is turned off by main
control board.
Sabbath Mode and the Temperature Adjustable Cold
Zone Drawer
The Temperature Adjustable Cold Zone Drawer should be
turned off for the Sabbath/Holidays. Before putting the
refrigerator into the Sabbath mode, turn the Cold Zone
drawer off by pressing the drawer
display will show “OFF” and the drawer will turn off. Then
enter the Sabbath mode function on the main refrigerator
display. See the “TruTouch Sabbath Mode” section. When in
Sabbath mode, the display will not illuminate and the drawer
will remain off. The drawer can still be used as a non-temp
controlled drawer in this mode. When the refrigerator is taken
out of Sabbath mode, the Cold Zone drawer will have to be
turned back on.
on/off button. The
Air Port
14

Automatic Ice Maker
Ice maker operation & care
After the refrigerator is installed properly, the ice maker can
produce ice within 24 hours. It can completely fi ll an ice bin
in about three days.
When using the ice maker for the fi rst time and in order
for the ice maker to work properly, it is necessary to clear
air from water fi lter tubing. Once ice maker begins making
ice, allow the bucket to fi ll completely, then discard the fi rst
TWO FULL buckets of ice. It will take at least two days to
completely fi ll the bucket on regular ice making mode or 1
days on fast ice mode.
The ice maker produces approximately 2 to 2.5 lbs (0.9 to 1.1
kg) of ice every 24 hours depending on usage conditions.
The ice bin will hold approximately 7 lbs (3.2 kg) of ice.
IMPORTANT
Your ice maker is turned on at the factory so it can work as
soon as you install your refrigerator. If you cannot connect
a water supply, lift the ice maker’s wire signal arm to turn it
off. Otherwise, the ice maker’s fi ll valve may make a loud
chattering noise when it attempts to operate without water.
Turning the ice maker on and off
Ice production is controlled by lifting/lowering the ice maker’s
wire signal arm. To gain access to the ice maker, pull the
freezer drawer out. Lift the wire signal arm to turn the ice
maker OFF and lower the wire signal arm to turn it ON.
½
• The following sounds are normal when the ice maker
is operating:
- Motor running
- Ice dropping into ice bin
- Water valve opening or closing
- Running water
• Ice cubes stored too long may develop an odd fl avor.
Empty the ice bin as explained below.
Fast Ice Function
Your refrigerator is equipped with a Fast Ice Function, that
will, if activated at your user interface, allow an increase in ice
production. You do not need to deactivate it, if not needed,
your refrigerator will operate on normal conditions.
CAUTION
If the water supply to your refrigerator is softened,
be sure the softener is properly maintained.
Chemicals from a water softener can damage the ice
maker.
Cleaning the ice maker
Clean the ice maker and ice bin at regular intervals, especially
prior to vacation or moving.
1. Turn off the ice maker.
2. Remove the ice bin.
3. Empty and carefully clean the ice bin with mild
detergent. Do not use harsh or abrasive cleaners. Rinse
with clean water.
4. Allow the ice bin to dry completely before replacing in
the freezer.
5. Replace the ice bin. Turn the ice maker on.
Remove and empty the ice bin if:
• An extended power failure (one hour or longer) causes
ice cubes in the ice bin to melt and freeze together.
Remove the ice bin and shake to loosen the cubes or clean
as explained above.
Ice maker tips
• If your refrigerator is not connected to a water supply
or the water supply is turned off, turn off the ice maker
by lifting wire signal arm.
CAUTION
NEVER use an ice pick or similar sharp instrument to
break up the ice. This could damage the ice bin.
To loosen stuck ice, use warm water. Before
replacing the ice bin, make sure it is completely dry.
15

Storage Features
Shelf features
CAUTION
To avoid injury from breakage, handle tempered
glass shelves carefully.
NOTE
Features may vary according to model.
Your refrigerator includes glass shelves that are designed to
catch and hold accidental spills.
You can easily adjust shelf positions in the fresh food
compartments to suit your needs. The shelves have mounting
brackets that attach to slotted supports at the rear of each
compartment.
To change the position of a shelf:
1. Before adjusting a shelf, remove all food.
2. Lift the front edge up and pull the shelf out.
3. Replace by inserting the mounting bracket hooks into
the desired support slots.
4. Lower the shelf and lock into position.
Drawers
Your refrigerator includes a variety of storage drawers. These
drawers are located in fi xed positions at the bottom of the
fresh food compartment.
Crispers
Crisper drawers are designed for storing fruits, vegetables,
and other fresh produce.
Opening Crisper Drawer
Full Custom-DesignTM Shelf
or
Crisper humidity control
Crisper drawers include a sliding control for adjusting the
humidity inside the crisper. Leafy vegetables keep best when
stored with the Humidity Control set on Higher Humidity.
Fresh fruits keep best when stored with the Humidity
Control set on Lower Humidity.
Adjusting Crisper Humidity
16
Storage Features
T E M P E R A T U R E
A D J U S T A B L E
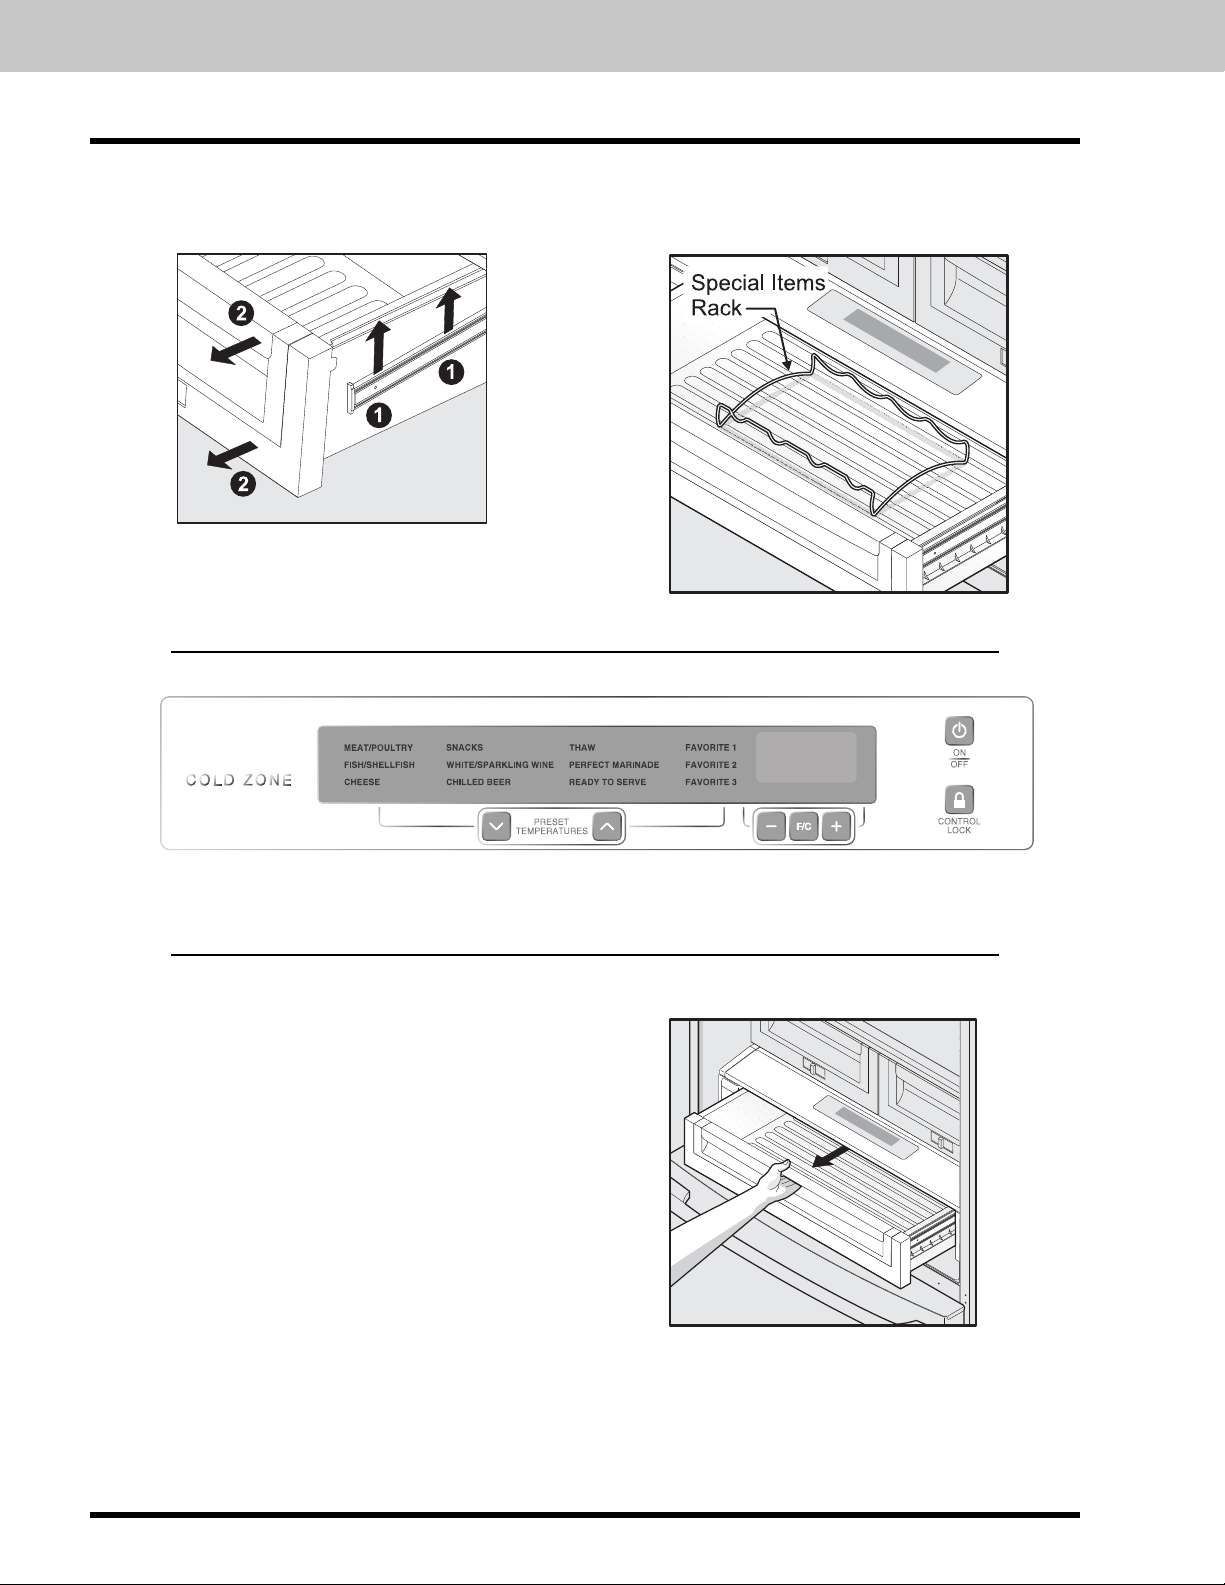
To remove the Crisper Drawer for cleaning:
1 Pull the drawer out until it stops.
2 Lift the front slightly and remove the drawer.
Removing Crisper
Drawer
Temperature Adjustable Cold Zone Drawer
TEMPERATURE
ADJUSTABLE
Special items rack
The innovative design of the special items rack allows you to
store four bottles of wine or soft drink bottles.
The Temperature Adjustable Cold Zone Drawer is designed to keep food items at a precise temperature whether cooler,
warmer, or the same as the fresh food section of the refrigerator. The thaw setting holds a temperature for thawing frozen
foods for 12 hours. At the end of that time, it then switches to the mixed items setting to store the thawed food.
To operate:
1. To turn on and off, press the drawer’s On/Off button. The
2. Press F/C if you prefer to display Fahrenheit “F, ” or
3. Press either the up or down scroll buttons to
4. Once an option is selected, the drawer will adjust and
5. When turned off, the Cold Zone drawer functions as a
6. The three favorite selections provide fl exibility to
7. The control buttons can be locked to prevent
numeric display will show a temperature between “28°F and
38°F” when on and “OFF” when off.
Celsius “C”.
illuminate the desired item.
maintain the temperature for the setting selected.
standard meat pan. The Cold Zone drawer is best used
for packaged food products. Leafy vegetables and
unpackaged fruits are best kept in one of the crisper
drawers.
set and store personal temperature selections. The
temperature is adjusted up by pressing the + or –
buttons. The drawer will store the selected temperature
setting until it is changed.
accidental changes by pressing the control lock button
for three seconds. Deactivate by pressing for three
seconds again.
Opening the Drawer
17
Storage Features
IMPORTANT
DO NOT clean the display area of the Custom TempTM
Drawer with abrasive or caustic cleaners. Wipe clean with a
moist sponge.
CAUTION
The Temperature Adjustable Cold Zone Drawer and
cover can be removed for cleaning but the control
unit, attached to the right side of the fridge, cannot
be removed. Do not immerse the Cold Zone drawer
cover in water or put it in a dishwasher. Clean with a
damp cloth or sponge.
To remove the Temperature Adjustable Cold Zone
Drawer for cleaning:
1 Pull the drawer out until it stops.
2 Lift the front slightly and remove the drawer.
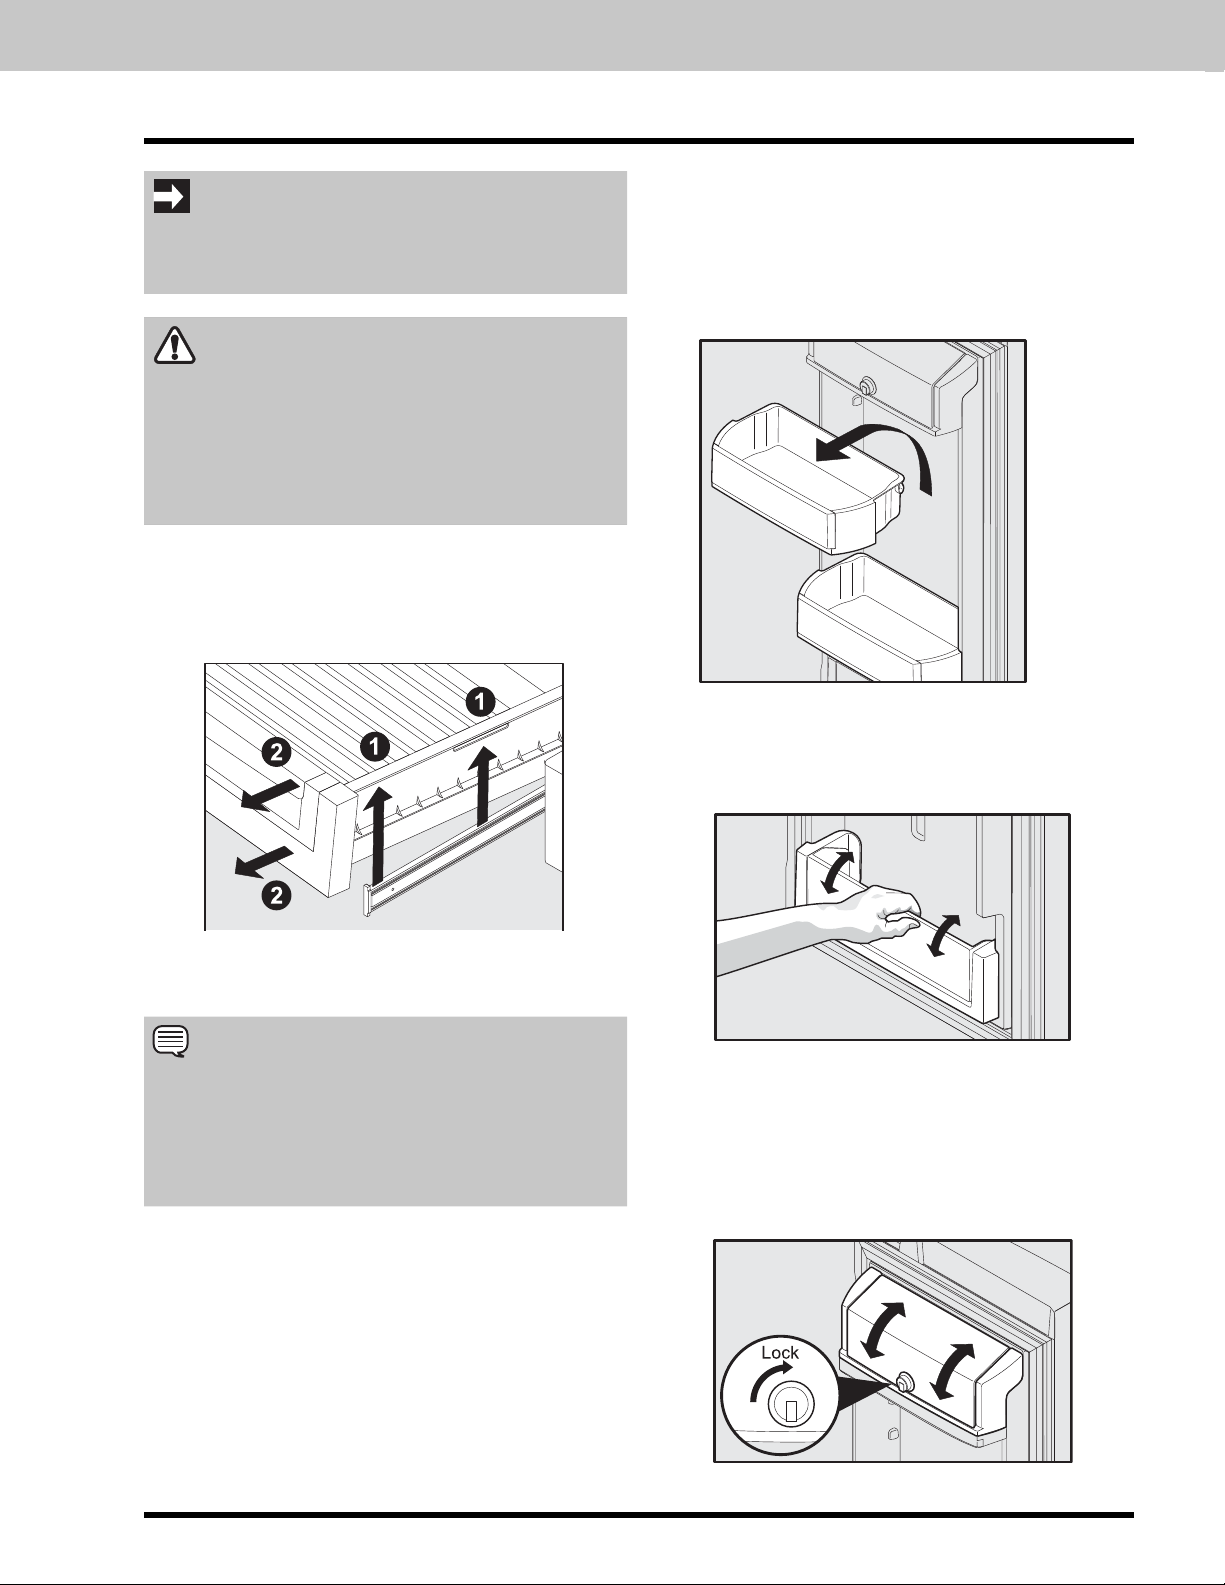
To change the position of an adjustable door bin:
1. Before adjusting a bin, remove all food.
2. Grip the bin fi rmly with both hands and lift it upward.
3. Remove the bin.
4. Place the bin just above desired position.
5. Lower the bin onto supports until locked in place.
Adjustable Door Bin
Tilt can bins
The can bins allow you to effi ciently and securely store up to
eight 12-ounce canned beverages.
Removing the Drawer
NOTE
When the refrigerator is turned off by pressing the main
TruTouch Conotrol on/off button, the Temperature
Adjustable Cold Zone drawer will also be turned off. When
the refrigerator is turned back on, the Cold Zone drawer
will resume operations at the temp setting that was set
before the refrigerator was turned off.
Doors
Storage bins
The doors to your fresh food compartment use a system of
modular storage bins. All of these bins are removable for
easy cleaning. Some of them have fi xed positions, while
others can be adjusted to your needs.
Door bins are ideal for storing jars, bottles, cans, and
large drink containers. They also enable quick selection of
frequently used items.
Tilt Can Bin
Covered Door Bin
Use the covered door bin, at the top of the fresh food
compartment door, for short-term storage of cheese, spreads,
or butter. The covered door bin is designed to be warmer than
the open area and includes a lift-up cover that may be locked
and a dairy divider.
Covered Door Bin
18
Storage Features
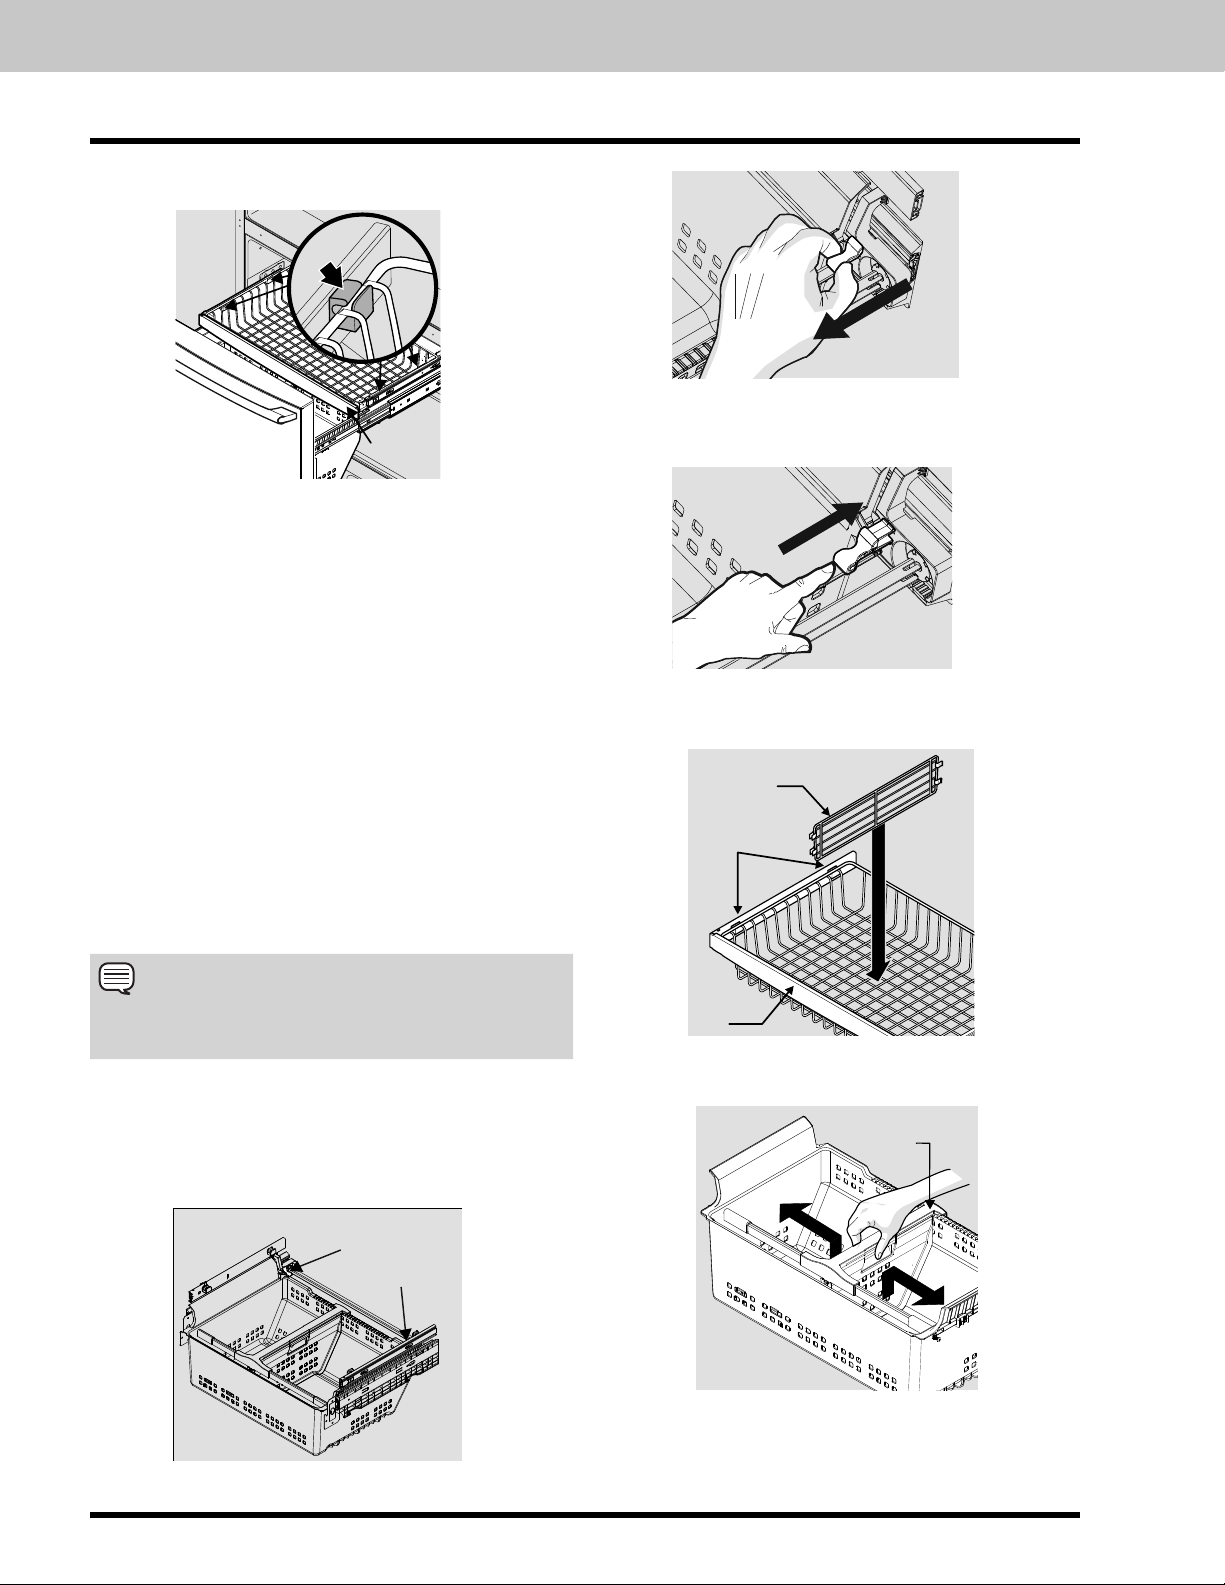
Freezer Features
Clip
Stabilizer
Bar
Freezer Baskets
To Remove Upper Freezer Basket
1. Find the side where the basket frame is aligned to the
clip opening. The basket frame should be aligned to
both front and rear clips on the same side (either left or
right side).
2. If the basket frame is not aligned to the left or right side, push
the basket sideways (to either side) until it is aligned.
3. By grabbing the basket wire frame close to the frontal
clip, pull up to take the basket frame out.
4. Grab the basket frame close to the rear clip and pull up
until it comes out of the clip.
5. Once one side of the basket is off the clips or retainers,
slide the basket sideways until the other side of the frame
is aligned with the clip openings on the opposite side of
the freezer.
6. In the same way, pull up the basket frame from the
frontal and rear clips until it is out of the clips.
7. Remove the basket.
Pull to Remove
Replacing Lower Freezer Basket Instructions
1. Place freezer basket back inside the freezer drawer.
2. Replace clips by sliding them back into the slots.
Push to Replace
Dividers Removal
Lift up on the front of the upper divider and pull out.
Upper Basket
Divider
Retainers
Reverse the steps to reinstall the basket.
NOTE
If basket is not resting on stabilizer bar retainer clips, the
drawer will not close properly.
Removing Lower Freezer Basket Instructions
1.. Locate the basket clips in the rear corners of the basket
and pull them out to remove.
2. Open fresh food doors completely.
3. Lift the basket up and remove.
Location of
basket clip.
One each side.
Stabilizer
Bar
Squeeze handle and lift up in the center of the divider to
move it side-to-side. (The divider cannot be removed.)
Lower Basket
Divider
Tilt Wire Shelf
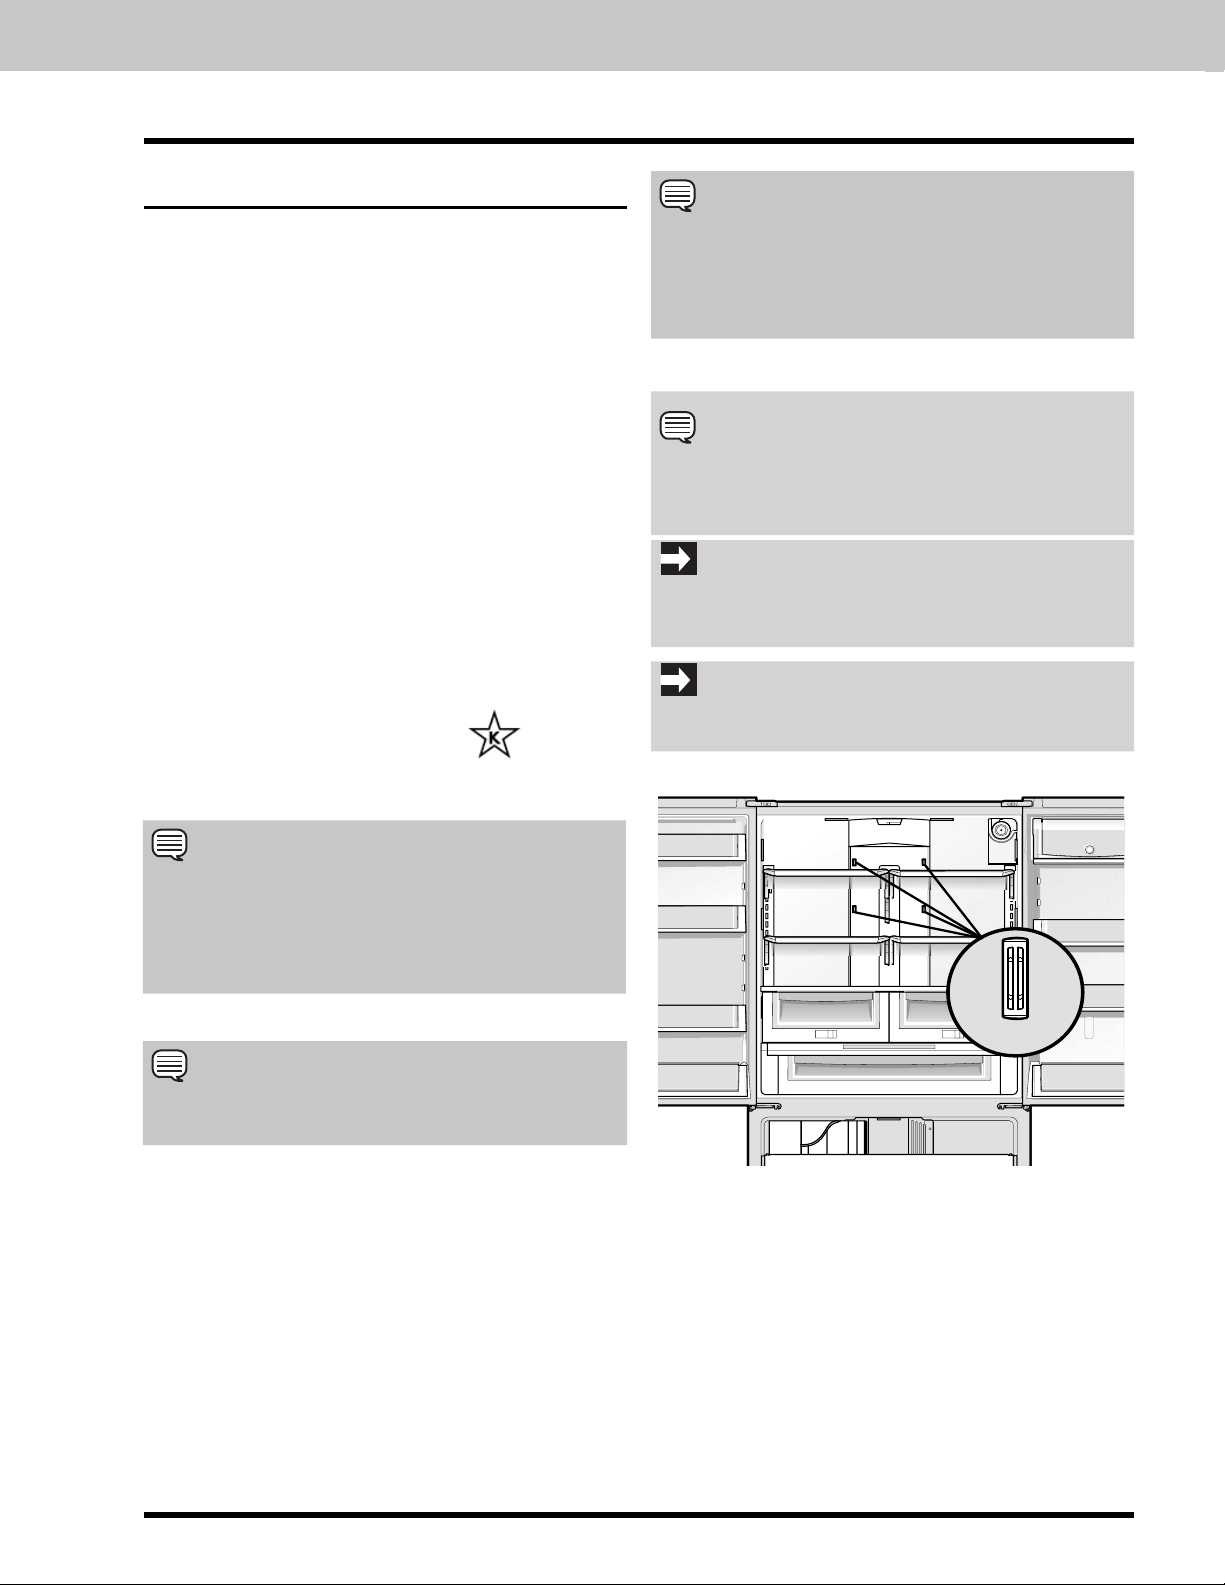
The freezer tilt wire shelf (located on the inside of the freezer
drawer) is not designed to be removed.
19

Storing Food and Saving Energy
Ideas for storing foods
Fresh food storage
• Keep the fresh food compartment between 34°F and
40°F with an optimum temperature of 37°F.
• Avoid overcrowding the refrigerator shelves, which
reduces air circulation and causes uneven cooling.
Fruits and vegetables
• Store fruits and vegetables in crisper drawers, where
trapped moisture helps preserve food quality for
longer time periods.
• Wash items and remove excess water.
• Wrap any items that have strong odors or high
moisture content.
Meat
• Wrap raw meat and poultry separately and securely
to prevent leaks and contamination of other foods or
surfaces.
• Use the Temperature Adjustable Cold Zone drawer
and set to meat/poultry setting for short-term storage.
Any meat to be kept longer than two days should be
frozen.
Frozen food storage
• Keep the freezer compartment at 0°F or lower.
• A freezer operates most effi ciently when it is at least
full.
Packaging foods for freezing
• To minimize food dehydration and quality
deterioration, use aluminum foil, freezer wrap, freezer
bags, or airtight containers. Force as much air out
of the packages as possible and seal them tightly.
Trapped air can cause food to dry out, change color,
and develop an off-fl avor (freezer burn).
• Wrap fresh meats and poultry with suitable freezer
wrap prior to freezing.
• Do not refreeze meat that has completely thawed.
Ideas for saving energy
Installation
• Locate the refrigerator in the coolest part of the room,
out of direct sunlight, and away from heating ducts or
registers.
• Do not place the refrigerator next to heat-producing
appliances such as a range, oven, or dishwasher. If
this is not possible, a section of cabinetry or an added
layer of insulation between the two appliances will
help the refrigerator operate more effi ciently.
• Level the refrigerator so that the doors close tightly.
Temperature settings
• Refer to the “Controls” section for procedures on
temperature settings.
Food storage
• Avoid overcrowding the refrigerator or blocking cold
air vents. Doing so causes the refrigerator to run
longer and use more energy.
• Cover foods and wipe containers dry before placing
them in the refrigerator. This cuts down on moisture
build-up inside the unit.
• Organize the refrigerator to reduce door openings.
Remove as many items as needed at one time and
close the door as soon as possible.
⅔
• Do not place a hot container directly on a cold shelf.
Remember, such an extreme temperature change may
damage the glass.
Loading the freezer
• Prior to grocery shopping, activate “fast freeze”
so that on your return you can ensure your newly
purchased food designated for the freezer will be
preserved as quickly as possible.
• Activating “fast freeze” also will help your freezer
more effi ciently maintain the selected temperature
after placing new purchases with pre-existing frozen
foods.
• Avoid adding too much warm food to the freezer at
one time. This overloads the freezer, slows the rate
of freezing, and can raise the temperature of frozen
foods.
• Leave a space between packages, so cold air can
circulate freely, allowing food to freeze as quickly as
possible.
20
Normal Operating Sounds
Understanding the sounds you
may hear
Your new, high-effi ciency refrigerator may introduce
unfamiliar sounds. These sounds normally indicate your
refrigerator is operating correctly. Some surfaces on fl oors,
walls, and kitchen cabinets may make these sounds more
noticeable.
Energy effi cient foam in your refrigerator is not a sound
insulator.
NOTE
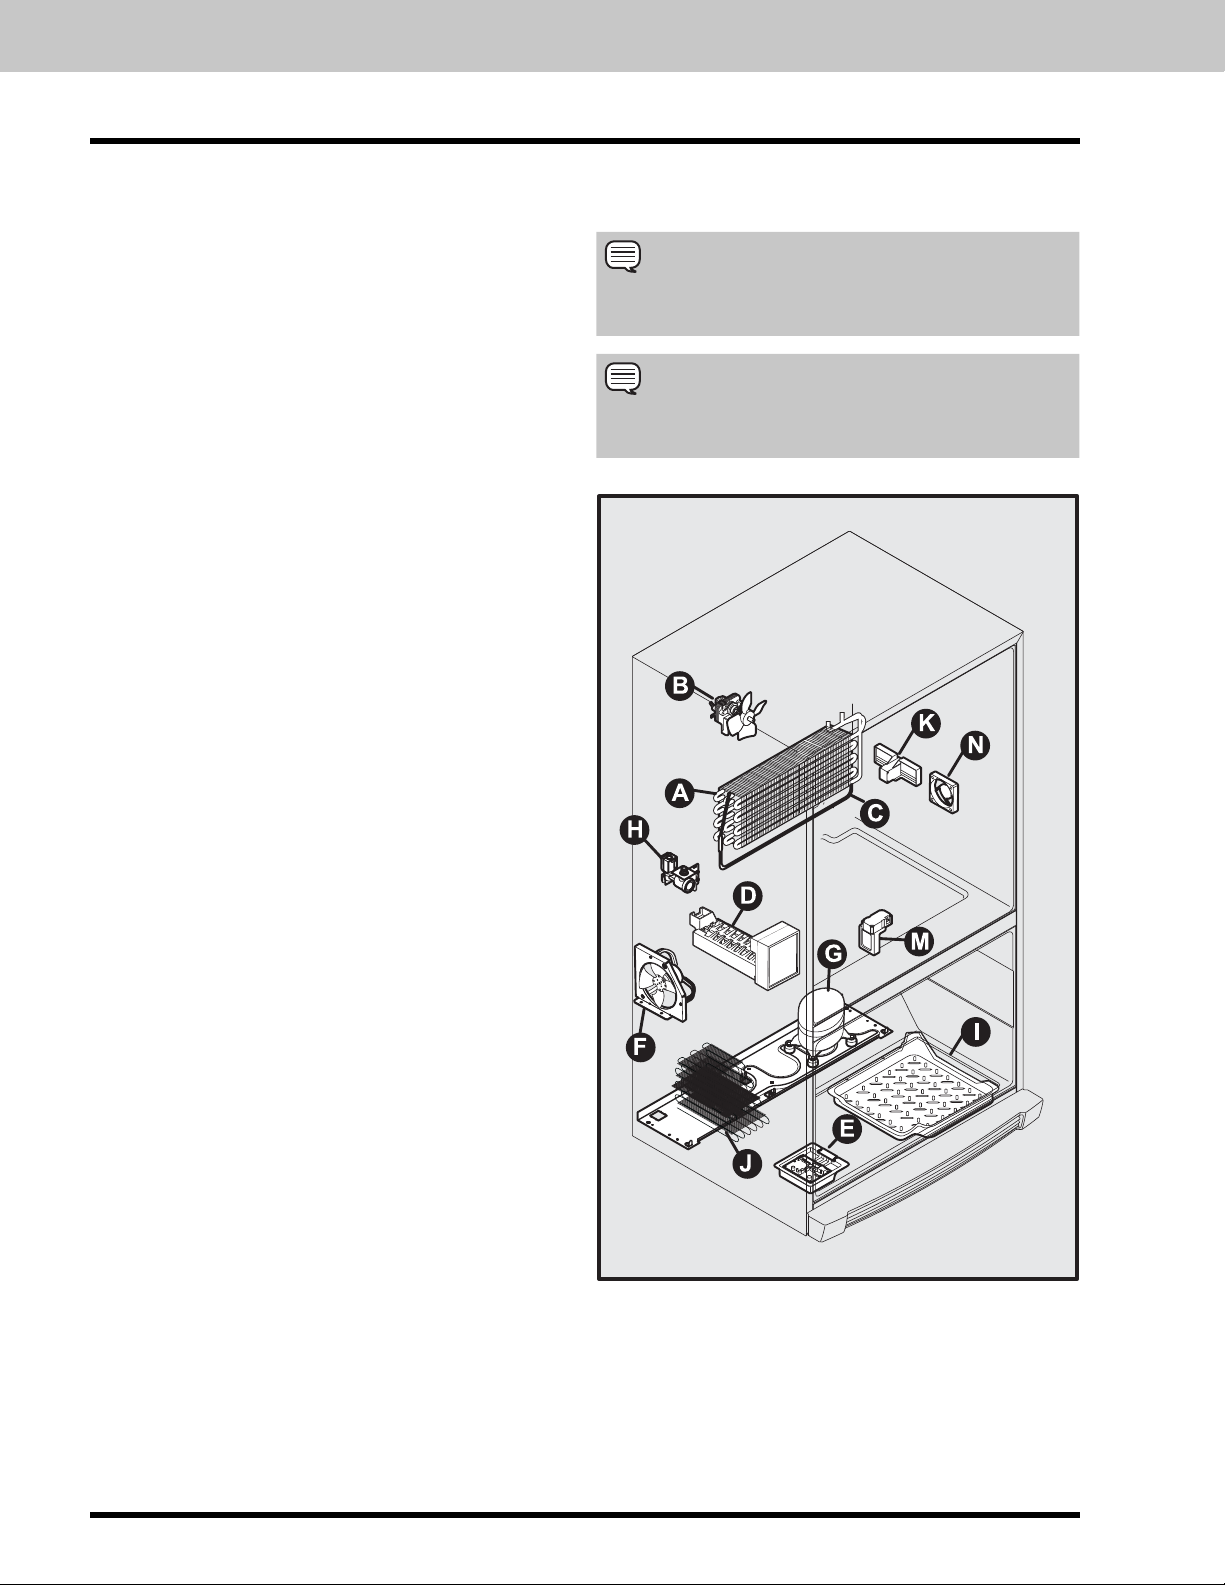
The following is a list of major components in your
refrigerator and the sounds they can cause:
A Evaporator Refrigerant through the evaporator may
create a boiling or gurgling sound.
B Evaporator fan You may hear air being forced through
the refrigerator by the evaporator fan.
C Defrost heater During defrost cycles, water dripping
onto the defrost heater may cause a hissing or sizzling
sound. After defrosting, a popping sound may occur.
D Automatic ice maker When ice has been produced,
you will hear ice cubes falling into the ice bin. Ice maker
fan, water valve activation, and refrigerant gas fl uid may
create sounds from its operation.
E Electronic control & automatic defrost control These
parts can produce a snapping or clicking sound when
turning the cooling system on and off.
F Condenser fan You may hear air being forced through
the condenser.
G Compressor Modern, high-effi ciency compressors run
much faster than older models. The compressor may
have a high-pitched hum or pulsating sound.
NOTE
During automatic defrost cycle, a red glow in the back wall
vents of your freezer compartment is normal.
H Water valve Makes a buzzing sound each time it opens
to fi ll the ice maker.
I Drain pan (not removable) You may hear water dripping
into the drain pan during the defrost cycle.
J Condenser May create minimal sounds from forced air.
K Motorized Temperature Adjustable Cold Zone drawer
M Motorized damper May produce a light humming
during operation.
N Temperature Adjustable Cold Zone drawer fan Turns off
when door opens or the Cold Zone drawer is turned off.
21
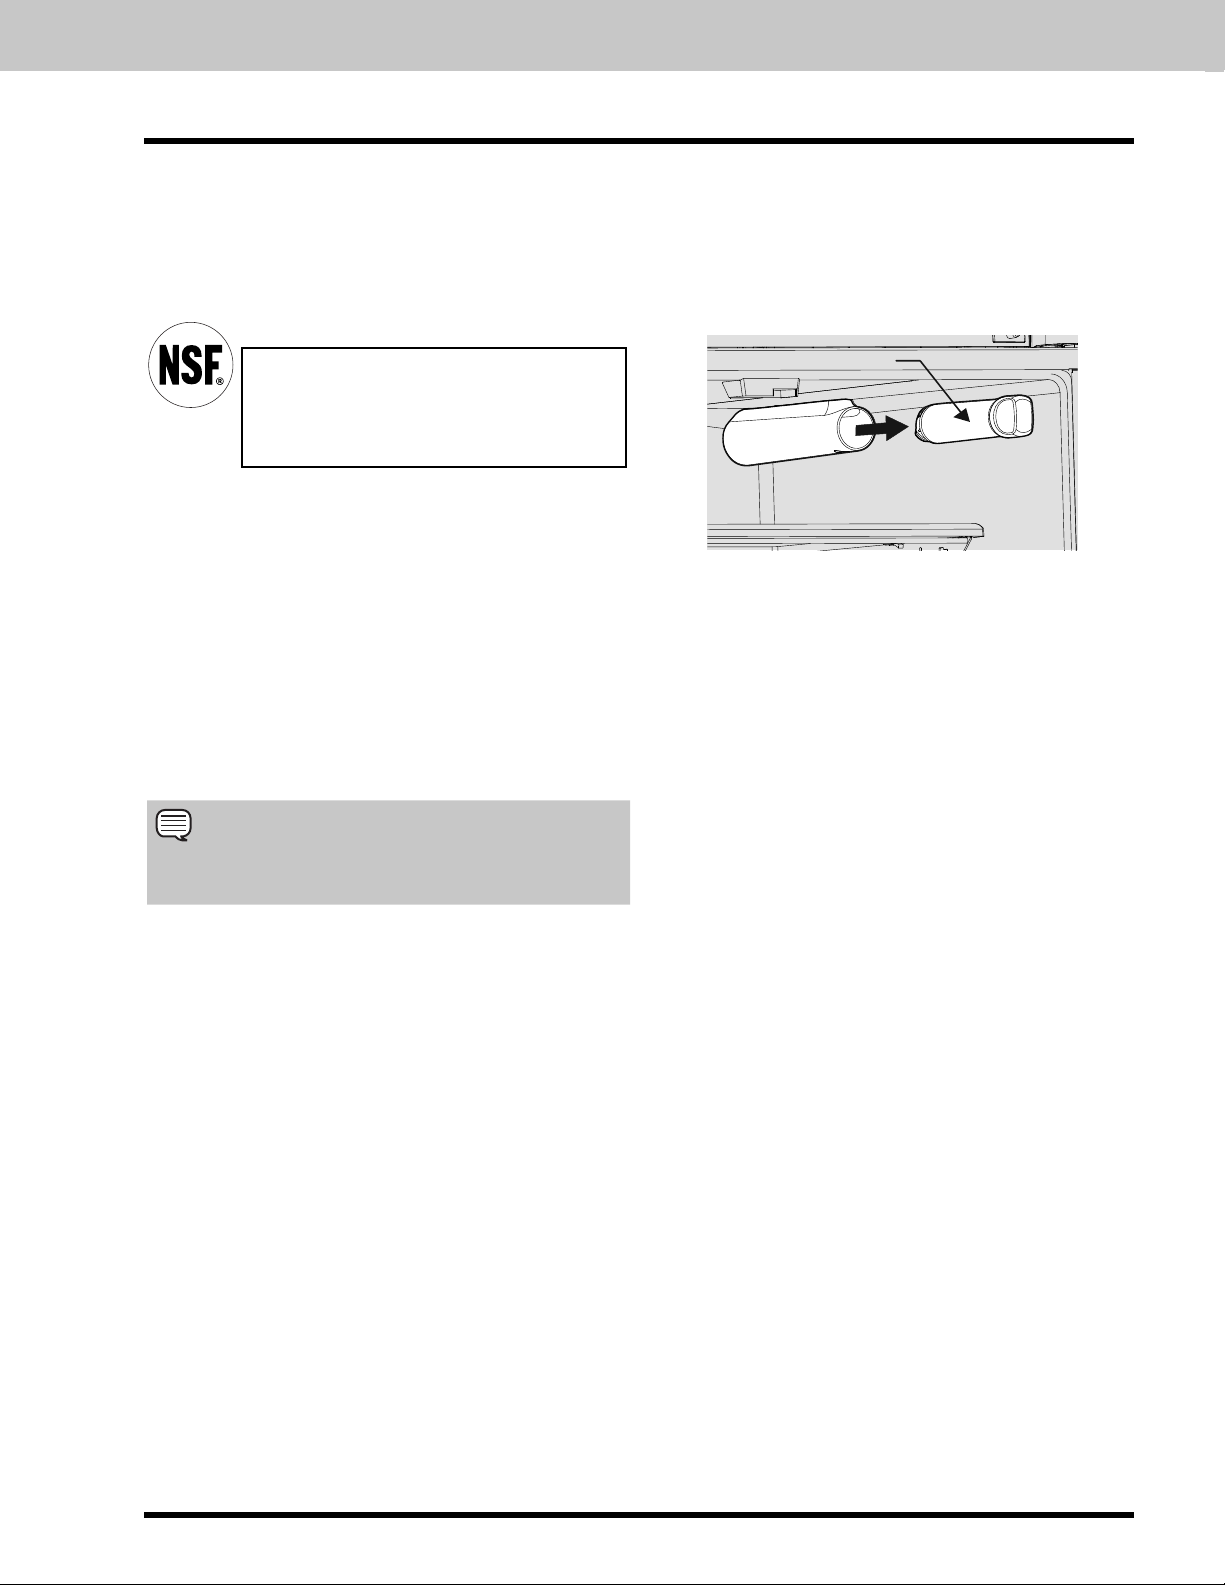
Changing The Water and Air Filters
Your refrigerator is equipped with separate water and air
fi ltering systems. The water fi lter system fi lters all the water
used to produce ice. The air fi lter removes odors and
impurities from the refrigerator compartment.
About your advanced water fi lter
The ProChill fi lter system is tested and
certifi ed by NSF International to NSF/ANSI
Standards 42, 53 and 401 for the reduction
of claims specifi ed on the performance data
sheet.
Do not use with water that is microbiologically unsafe or of
unknown quality without adequate disinfection before or
after the system. Systems certifi ed for cyst reduction may
be used on disinfected waters that may contain fi lterable
cysts.
• Rated Capacity - 125 gallons/473 liters
• Rated service fl ow - .65 gallons per minute
• Maximum Rated Pressure - 100 pounds per square
inch
• Recommended Minimum Operating Pressure: 30
pounds per square inch
• Operating Temp.: Min. 33°F, Max. 100°F
NOTE
When ordering your replacement fi lter, please reorder the
same fi lter type that is currently in your refrigerator.
Water fi lter
The water fi lter is located at the top right side of the fresh
food compartment.
To replace your water fi lter
1 . Turn Off the ice maker power switch.
2. Remove the old fi lter by rotating it counter-clockwise (to
the left) 90 degrees to release it.
3. Slide the old fi lter cartridge straight out of the housing
and discard it.
Filter Cartridge
4. Unpackage the new fi lter cartridge. Slide it into the
fi lter housing as far as it will go with the grip end
horizontal.
5. Push lightly inward on the fi lter while rotating it
clockwise (to the right). The fi lter will then pull itself
inward as it is rotated. Rotate the fi lter 90 degrees until
it stops and the grip end is vertical. You may be able to
feel a very light click as the fi lter locks into place.
6. Press a drinking glass against the water dispenser
while checking for any leaks at the fi lter housing. Any
spurts and sputters that occur as the system purges
air out of the dispenser system are normal.
7. Continue dispensing water for 3-4 minutes or until 1.5
gallons of water has fl owed through the system. You
will likely need to empty and refi ll your glass several
times.
8. Turn On the ice maker.
9. Press and hold the Water Filter reset button on the control
panel for three seconds. When the display changes from Red
to Green, the status has been reset.
Replacing your ProChill water fi lter
In general, you should change the water fi lter every six
months to ensure the highest possible water quality. The
Water Filter Status light on the Touch Panel prompts you
to replace the fi lter after a standard amount of water (125
gallons/473 liters) has fl owed through the system.
If your refrigerator has not been used for a period of time
(during moving for example), change the fi lter before
reinstalling the refrigerator.
It is not necessary to turn the water supply off to change
the fi lter. Be ready to wipe up any small amounts of water
released during the fi lter replacement.
22
Changing The Water and Air Filters
Air fi lter
The air fi lter is located under the utility bin.
Replacing your TruAir air fi lter
To ensure optimal fi ltering of refrigerator odors, you should
change the air fi lter every six months (the fi lter status light
on the Touch Panel prompts you to replace the fi lter after six
months).
1. Open the air fi lter door.
2. Remove the old fi lter and discard it.
3. Unpack the new fi lter and slide it into the housing.
4. To close the air fi lter door, push the top and bottom to
lock the door closed.
5. Press and hold the Air Filter Reset button on the control
panel for three seconds. When the display changes from
“Replace” to “Good,” the status has been reset.
6. The Air Filter Reset will turn itself off after a few
seconds.
Ordering replacement fi lters
Order new fi lters by calling 888-845-4641, online at www.
vikingrange.com in the US or brigade.ca in Canada, or
through the dealer where you bought your refrigerator. You
may want to consider ordering extra fi lters when you fi rst
install your refrigerator.
Water Filter Replacement Cartridge #RWFVRF1
Air Filter Replacement Cartridge #RAFVRF
23
Care and Cleaning
Protecting your investment
Keeping your refrigerator clean maintains its appearance and prevents odor build-up. Wipe up any spills immediately and
clean the freezer and fresh food compartments at least twice a year.
NOTE
Do not use abrasive cleaners such as window sprays, scouring cleansers, fl ammable fl uids, cleaning waxes, concentrated
detergents, bleaches, or cleansers containing petroleum products on plastic parts, interior doors, gaskets, or cabinet liners.
Do not use paper towels, scouring pads, or other abrasive cleaning materials.
• Never use metallic scouring pads, brushes, abrasive cleaners, or strong alkaline solutions on any surface.
• Never use CHLORIDE or cleaners with bleach to clean stainless steel.
• Do not wash any removable parts in a dishwasher.
• Always unplug the electrical power cord from the wall outlet before cleaning.
NOTE
If you set your temperature controls to turn off cooling, power to lights and other electrical components will continue until
you unplug the power cord from the wall outlet.
• Remove adhesive labels by hand. Do not use razor blades or other sharp instruments which can scratch the appliance
surface.
• Do not remove the serial plate. Removal of your serial plate voids your warranty.
• Before moving your refrigerator, raise the anti-tip brackets so the rollers will work correctly. This will prevent the fl oor
from being damaged.
CAUTION
• Pull the refrigerator straight out to move it. Shifting it from side to side may damage fl ooring. Be careful
not to move the refrigerator beyond the plumbing connections.
• Damp objects stick to cold metal surfaces. Do not touch refrigerated surfaces with wet or damp hands.
IMPORTANT
If you store or move your refrigerator in freezing temperatures, be sure to completely drain the water supply system.
Failure to do so could result in water leaks when the refrigerator is put back into service. Contact a service representative to
perform this operation.
Refer to the guide on the next page for details on caring and cleaning specifi c areas of your refrigerator.
24
Care and Cleaning
Care and cleaning tips
Part Cleaning Agents Tips and Precautions
Interior &
Door Liners
Door Gaskets Soap and water Wipe gaskets with a clean soft cloth.
Soap and water
Baking soda and
water
Use two tablespoons of baking soda in one quart of warm water.
Be sure to wring excess water out of sponge or cloth before cleaning
around controls, LED lights or any electrical part.
Drawers &
Bins
Glass Shelves Soap and water
Toe Grille Soap and water
Exterior &
Handles
Exterior &
Handles
(Stainless
Steel Models
Only)
Soap and water Use a soft cloth to clean drawer runners and tracks.
Glass cleaner
Mild liquid sprays
Mild liquid sprays
Vacuum
Soap and water
Non abrasive glass
cleaner
Soap and water
Stainless steel
cleaners
Vacation and moving tips
Occasion Tips
Do not wash any removable items (bins, drawers, etc.) in dishwasher.
Allow glass to warm to room temperature before immersing in warm
water.
Remove toe grille (see Installation Instructions).
Vacuum both sides and wipe with sudsy cloth or sponge. Rinse and dry.
Do not use commercial household cleaners containing ammonia, bleach
or alcohol to clean handles.
Use a soft cloth to clean smooth handles.
Do not use a dry cloth to clean smooth doors.
Never use CHLORIDE or cleaners with bleach to clean stainless steel.
Clean stainless steel front and handles with non-abrasive soapy water and
a dishcloth. Rinse with clean water and a soft cloth.
Use a non-abrasive stainless steel
purchased at most home improvement or major department stores.
Always follow manufacturer’s instruction. Do not use household cleaners
containing ammonia or bleach.
NOTE: Always clean, wipe and dry with grain to prevent scratching.
Wash the rest of the cabinet with warm water and mild liquid detergent.
Rinse well and wipe dry with a clean soft cloth.
cleaner. These cleaners can be
Short Vacations Leave refrigerator operating during vacations of three weeks or less.
Use all perishable items from refrigerator compartment.
Turn automatic ice maker off and empty ice bucket, even if you will only be gone a few days.
Long Vacations Remove all food and ice if you will be gone one month or more.
Turn the cooling system off (see “Controls” section for location of On/Off button) and disconnect
power cord.
Turn water supply valve to closed position.
Clean interior thoroughly.
Leave doors open to prevent odors and mold build-up. Block doors open if necessary.
Moving Remove all food and ice.
If using a handcart, load from the side.
Adjust rollers all the way up to protect them during sliding or moving.
Pad cabinet to avoid scratching surface.
Replacing LED Lights
Both the freezer and fresh food compartments of your refrigerator include maintenance-free LED lights. To replace, contact
an authorized service technician or call Customer Service at 1-888-845-4641.
25
Solutions to Common Problems
Before you call...
If you experience a concern with your refrigerator or notice a product behavior or condition that you do not understand, you
can usually avoid a call to your service representative by referring to this section for an answer. Beginning with the following
table, this information includes concerns, potential causes, and common solutions.
Automatic Ice Maker
Concern Potential Cause Common Solution
Ice maker is not making
any ice.
Ice maker is not making
enough ice.
Freezer ice maker will not
stop making ice.
Ice cubes are freezing
together.
• Ice maker is turned off.
• Refrigerator is not connected to water line or
water valve is not open.
• The water supply line is kinked.
• The water fi lter is not seated properly.
• The water fi lter may be clogged with foreign
material.
• Saddle valve on cold water pipe is clogged
or restricted by foreign material.
• Ice maker is producing less ice than you
expect.
• The water fi lter may be clogged with foreign
material.
• The water supply line is kinked.
• Saddle valve on cold water pipe is clogged
or restricted by foreign material.
• Heavy traffi c, opening or closing of the
doors excessively.
• Freezer control is set too warm
• Water pressure is extremely low. Cut-off
and cut-on pressures are to low. (well
system only)
• Reverse osmosis sytem is in regenerative
phrase
• Ice maker wire signal arm is being held
down by some package in the freezer that
has fallen against the ice maker.
• Ice cubes are not being used frequently
enough.
• Ice cubes are hollow (shells of ice with
water inside). The hollow cubes break open
in the bin and leak their water onto existing
ice, which causes it to freeze together.
• Turn on ice maker by lowering the wire signal arm.
• Connect the unit to the household water supply and
ensure the supply valve is open.
• Ensure that the supply line does not kink when the
refrigerator is pushed into place against the wall.
• Remove and re-install the water fi lter. Be sure to push
the fi lter fi rmly so that you hear it lock solidly into
position.
• If water dispenses slowly or not at all, or if the fi lter is
six months old or older, it should be replaced.
• Turn off household water line valve. Remove valve.
Ensure that valve is not a self-piercing saddle valve.
Clean valve. Replace valve if necessary.
• The ice maker will produce approximately 2 to 2.5
lbs (0.9 to 1.1 kg) of ice every 24 hours depending
on usage conditions.
• If the fi lter is six months old or older, it should be
replaced.
• Ensure that the supply line does not kink when the
refrigerator is pushed into place against the wall.
• Turn off household water line valve. Remove
valve. Ensure that valve is not a self-piercing
saddle valve. Clean valve. Replace valve if
necessary.
• Press Fast Freeze to temporarily increase ice
production rate.
• Set freezer control to colder setting to improve
performance of the ice maker. ALlow 24 hours for
temperature to stabilize.
• Have someone turn up the cut-off and cut-on
pressure on the water pump system (well system
only)
• It is normal for a reverse osmosis system to be
below 20 psi during the regenerative phase.
• Move the item and release wire signal arm. Remove
any ice cubes that may have frozen together over the
wire signal arm.
• Remove ice container and discard ice. The ice maker
will produce fresh supply. Ice should be used at least
twice weekly to keep the cubes separated.
• This generally occurs when the ice maker does not
get enough water. This is usually the result of a
clogged water fi lter. Replace the water fi lter.
Odors In Refrigerator
Concern Potential Cause Common Solution
Interior is dirty.
Odors
Interior needs to be cleaned.
Food with strong odors is stored in
refrigerator.
See Care & Cleaning Tips.
Cover food tightly. Air fi lter may need to be
changed more frequently if foods with strong odors
are routinely stored in refrigerator.
26
Solutions to Common Problems
Opening/Closing Of Doors/Drawers
Concern Potential Cause Common Solution
Door(s) will not close. Door was closed too hard, causing other door
Drawers are diffi cult to
move.
to open slightly
Refrigerator is not level. It rocks on the fl oor
when moved slightly.
An object has fallen from the baskets blocking
the door from closing.
Food is touching shelf on top of drawer.
Drawer is overloaded
Refrigerator Operations
Concern Potential Cause Common Solution
Compressor does not
run.
Freezer control is set to “OFF”
Refrigerator is in defrost cycle.
Plug at wall outlet is disconnected.
House fuse is blown or a tripped circuit breaker.
Power outage.
Close both doors gently
Ensure fl oor is level and solid, and can adequately
support the refrigerator. Contact a carpenter to
correct a sagging or sloping fl oor.
Check for ice or food items blocking drawer.
Keep less food in drawer.
Remove or redistribute food.
Set freezer control
This is normal for a fully automatic defrost refrigerator.
The defrost cycle occurs periodically, lasting about 30
minutes.
Ensure plug is tightly pushed into outlet.
Check/replace fuse with a 15 amp time-delay fuse.
Reset circuit breaker.
Check house lights. Call local Electric Company.
Refrigerator runs too
much or too long.
Digital temperature
displays are fl ashing.
Your variable speed compressor is designed to
run 100% of the time except during the defrost
cycle. At times it will run faster, such as after a
defrost cycle
Electronic control system has detected a
performance problem.
It is normal for the compressor to run continuously
except during defrost mode.
Call your local service representative, who can
interpret any messages or number codes fl ashing on
the digital displays.
Temperatures Are Too Cold
Concern Potential Cause Common Solution
Freezer temperature
too cold. Refrigerator
temperature is
satisfactory.
Refrigerator temperature
too cold. Freezer
temperature is satisfactory.
Food stored in drawers
freezes.
Food stored in
Temperature Adjustable
Cold Zone freezes
Fast Freeze function is activated.
Freezer control is set too cold.
Ice maker is on.
Fast Ice function is activated.
Refrigerator control is set too cold. Set refrigerator control to a warmer setting. Allow 24
Refrigerator control is set too cold. See solution above.
Temperature Adjustable Cold Zone control is
set too cold.
Deactivate Fast Freeze function.
Set freezer control to a warmer setting. Allow 24
hours for temperature to stabilize.
It is normal for the freezer compartment to over cool
while automatic ice maker is on.
Deactivate Fast Ice function.
hours for temperature to stabilize.
Adjust Temperature Adjustable Cold Zone control to a
warmer setting. Meat should be stored at a temperature
just below the freezing point for maximum fresh storage
time. It is normal for ice crystals to form due to the
moisture content of meat.
27
Solutions to Common Problems
Temperatures Are Too Warm
Concern Potential Cause Common Solution
Freezer/Refrigerator
temperature is too warm.
Freezer temperature is
too warm. Refrigerator
temperature is
satisfactory.
Refrigerator temperature
is too warm. Freezer
temperature is
satisfactory.
Temperature in the
Adjustable Cold Zone
Drawer is too warm
Water/Moisture/Frost Inside Refrigerator
Concern Potential Cause Common Solution
Moisture collects on
inside of refrigerator
walls.
Water collects on bottom
side of drawer cover.
Moisture collects in
bottom of drawer.
Moisture collects on
outside of refrigerator or
between doors.
Doors are opened too frequently or too long.
Door is slightly open.
Freezer control is set too warm. Set freezer control to a colder setting. Allow 24 hours
Refrigerator control is set too warm. Set refrigerator control to a colder setting. Allow 24
Temperature control is set too warm. Adjust temperature control to a colder setting.
Weather is hot and humid.
Door is slightly open.
Door is opened too often or too long.
Flipper Muillion
Vegetables contain and give off moisture. Moisture on the bottom side of the cover is not
Washed vegetables and fruit drain while in
the drawer.
Fruits and vegetables are kept past their
prime.
Weather is humid.
Door is slightly open, causing cold air from
inside refrigerator to meet warm air from
outside.
Warm air enters the refrigerator whenever the door is
opened. Open the door less often.
See Concern section, Opening/Closing of Doors/
Drawers.
for temperature to stabilize.
hours for temperature to stabilize.
The rate of frost buildup and internal sweating
increases.
See Concern section, Opening/Closing of Doors/
Drawers.
Open door less often to allow internal temperature to
stabilize.
Adjust fl ipper mullion. (See page 8)
unusual.
Move humidity control (select models) to lower setting.
Dry items before putting them in the drawer. Water
collecting in bottom of drawer is normal.
Routinely clean out old fruits and vegetables especially
if they begin to break down.
This is normal in humid weather. When humidity is
lower, the moisture should disappear.
See Concern section, Opening/Closing of Doors/
Drawers.
28

Service Information
If service is required, call your dealer or authorized service agency. The name of the authorized service agency can be
obtained from the dealer or distributor in your area.
Have the following information readily available:
• Model number
• Serial number
• Date purchased
• Name of dealer from whom purchased
Clearly describe the problem that you are having. If you are unable to obtain the name of an authorized service agency, or
if you continue to have service problems, contact Viking Range at (888) 845-4641 or write to:
VIKING RANGE, LLC
PREFERRED SERVICE
111 Front Street
Greenwood, Mississippi 38930 USA
Record the information indicated below. You will need it if service is ever required. The serial number and model numbers
for your refrigerator are located on the upper wall, behind the lighting:
Model No. _____________________________________________Serial No. __________________________________
Date of Purchase ________________________________________Date Installed ______________________________
Dealer’s Name _____________________________________________________________________________________
Address ___________________________________________________________________________________________
________________________________________________________________________________________________
If service requires installation of parts, use only authorized parts to insure protection under the warranty.
Keep this manual for future reference.
29

Warranty
FREESTANDING FRENCH DOOR REFRIGERATOR/FREEZER WARRANTY
ONE YEAR FULL WARRANTY
Freestanding french door refrigerator/freezers and all of their component parts, except as detailed below*†, are warranted to be
free from defective materials or workmanship in normal residential use for a period of one (1) year from the date of original retail
purchase. Viking Range, LLC, warrantor, agrees to repair or replace, at its option, any part which fails or is found to be defective
during the warranty period.
*FULL NINETY (90) DAY COSMETIC WARRANTY: Product is warranted to be free from cosmetic defects in materials or
workmanship (such as scratches on stainless steel, paint/porcelain blemishes, etc.) for a period of ninety (90) days from the date
of original retail purchase or closing date for new construction, whichever period is longer. Any defects must be reported to the
selling dealer within ninety (90) days from date of original retail purchase. Viking Range, LLC uses high quality processes and
materials available to produce all color fi nishes. However, slight color variation may be noticed because of the inherent differences
in painted parts and porcelain parts as well as differences in kitchen lighting, product locations, and other factors. Therefore, this
warranty does not apply to color variation attributable to such factors.
†FULL NINETY (90) DAY WARRANTY IN “RESIDENTIAL PLUS” APPLICATIONS: This full warranty applies to applications where
use of the product extends beyond normal residential use, but the warranty period for products used in such applications is ninety
(90) days. Examples of applications covered by this warranty are bed and breakfasts, fi re stations, private clubs, churches, yachts,
etc. Under this “Residential Plus” warranty, the product, its components and accessories are warranted to be free from defective
material or workmanship for a period of ninety (90) days from the date of original retail purchase. This warranty excludes use of the
product in all commercial locations such as restaurants, food service locations and institutional food service locations.
SIX YEAR FULL WARRANTY ON SEALED REFRIGERATION PARTS AS LISTED
Any sealed refrigeration system component, as listed below, is warranted to be free from defective materials or workmanship
in normal household use during the fourth through the sixth year from the date of original retail purchase. Viking Range, LLC,
warrantor, agrees to repair or replace, at its option, any part which fails or is found to be defective during the warranty period.
Sealed Refrigeration System Components: Compressor, Evaporator, Condenser, Connecting Tubing, Dryer/Strainer
TWELVE YEAR LIMITED WARRANTY ON SEALED REFRIGERATION PARTS AS LISTED
Any sealed refrigeration system component, as listed above, which fails due to defective materials or workmanship in normal
household use during the seventh through the twelfth year from the date of original retail purchase will be repaired or replaced,
free of charge for the part itself, with the owner paying all other costs, including labor.
This warranty extends to the original purchaser of the product warranted hereunder and to each transferee owner of the product
TERMS AND CONDITIONS
during the term of the warranty and applies to products purchased and located in the United States, Canada, Mexico, and the
Caribbean (excluding Cuba, Dominican Republic, and Haiti). Products must be purchased in the country where service is requested.
If the product or one of its component parts contains a defect or malfunction during the full warranty period after a reasonable
number of attempts by the warrantor to remedy the defect or malfunction, the owner is entitled to either a refund or replacement
of the product or its component part or parts. Replacement of a component part includes its free installation, except as specifi ed
under the limited warranty. Under the terms of this warranty, service must be performed by a factory authorized Viking Range,
LLC service agent or representative. Service will be provided during normal business hours, and labor performed at overtime or
premium rates shall not be covered by this warranty.
Owner shall be responsible for proper installation, providing reasonable and necessary maintenance, providing proof of purchase
upon request, and making the appliance reasonably accessible for service. The return of the Owner Registration Card is not a
condition of warranty coverage. You should, however, return the Owner Registration Card so that Viking Range, LLC can contact
you should any question of safety arise which could affect you.
This warranty gives you specifi c legal rights, and you may also have other rights which may vary from jurisdiction to jurisdiction.
WHAT IS NOT COVERED BY THIS WARRANTY: This warranty shall not apply to damage resulting from abuse, failure to provide
reasonable and necessary maintenance, accident, delivery, negligence, natural disaster, loss of electrical power to the product for
any reason, alteration, outdoor use, improper installation, improper operation, or repair or service of the product by anyone other
than an authorized Viking Range, LLC service agency or representative. This warranty does not apply to commercial usage.
OWNER’S SOLE AND EXCLUSIVE REMEDY FOR A CLAIM OF ANY KIND WITH RESPECT TO THIS PRODUCT SHALL BE THE
REMEDIES SET FORTH ABOVE. VIKING RANGE IS NOT RESPONSIBLE FOR CONSEQUENTIAL OR INCIDENTAL DAMAGE,
INCLUDING BUT NOT LIMITED TO FOOD OR MEDICINE LOSS, DUE TO PRODUCT FAILURE, WHETHER ARISING OUT OF
BREACH OF WARRANTY, BREACH OF CONTRACT OR OTHERWISE. Some jurisdictions do not allow the exclusion or limitation
of incidental or consequential damages, so the above limitation or exclusions may not apply to you. Any implied warranties of
merchantability or fi tness for a particular purpose applicable to this product are limited in duration to the period of coverage of the
applicable express written limited warranties set forth above. Some states do not allow limitations on how long an implied warranty
lasts, so the above limitation may not apply to you.
LIMITATION OF REMEDIES AND DURATION OF IMPLIED WARRANTY
To obtain warranty service, contact an authorized Viking Range, LLC service agent, or Viking Range, LLC, 111 Front Street,
WARRANTY SERVICE
Greenwood, Mississippi 38930, (888) 845-4641. Provide model and serial number and date of original purchase or closing
date for a new construction. For the name of your nearest authorized Viking Range, LLC service agency, call Viking Range,
LLC. IMPORTANT: Retain proof of original purchase to establish warranty period.
Specifi cations subject to change without notice
30

31

Renseignements
Veuillez lire et conserver ce guide
Félicitations et bienvenue dans le monde distingué des
propriétaires Brigade. Nous espérons que vous allez
aimer et apprécier le soin et l’attention que nous avons
apportée à chaque détail de votre nouveau appareil
ultra moderne.
Votre appareil est conçu pour vous offrir des années de
service fi able. Ce manuel d’utilisation et d’entretien
vous fournira les informations nécessaires pour vous
familiariser avec le fonctionnement et l’entretien de votre
appareil.
Nous apprécions votre choix d’acquérir un appareil Brigade
et nous espérons que vous reviendrez vers nous
pour vos autres besoins d’appareils ménagers principaux.
Pour plus d’informations sur la gamme complète et toujours
plus large de produits, contactez votre distributeur
ou visitez-nous en ligne sur brigade.ca.
REMARQUE
L’enregistrement de votre produit nous permet de
mieux vous servir. Vous pouvez l'enregistrer en ligne
à l'adresse www.vikingrange.com ou en envoyant la
carte d'enregistrement du produit par la poste.
Des questions?
Votre entière satisfaction est notre objectif ultime. Si vous
avez des questions ou des commentaires à propos
de ce produit, veuillez contacter le distributeur qui vous a
vendu le produit, ou contactez notre centre
d’assistance à la clientèle au 1-888-845-4641.
Table des matières
Renseignements ................................................................1
Sécurité ..............................................................................2
Aperçu des caractéristiques ..............................................4
Installation .........................................................................5
Dépose des portes ............................................................8
Installation de la porte gè
Raccorder l’alimentation en eau ........................................ 11
Commandes ....................................................................12
Distributeur d’eau et de glaçons automatique ................14
Caractéristiques de rangement .......................................15
Conservation des aliments et économie d’énergie .........19
Bruits et éléments visuels d’un fonctionnement normal .20
Remplacement des fi ltres à eau et à air ..........................21
Entretien et nettoyage.....................................................23
Solutions aux problèmes courants ..................................25
Service après-vente .........................................................28
Garantie ...........................................................................29
re ..............................................10
Liste de vérifi cation d'installation
Portes
Les poignées sont bien fi xées
Les portes se ferment hermétiquement sur tous les
côtés de la caisse
Mise à niveau
Les côtés du réfrigérateur sont de niveau. Le
réfrigérateur est incliné de l'avant vers l'arrière de
6 mm (¼ po)
La grille de protection est correctement fi xée au
réfrigérateur
Les quatre coins de la caisse reposent fermement
sur le plancher
Alimentation en électricité
Le système électrique de la maison est sous tension
Le réfrigérateur est branché
Machine à glaçons
Le système d'alimentation en eau est raccordé au
réfrigérateur
Il n'y a aucune fuite au niveau des raccords -
seconde vérifi cation 24 heures plus tard
La machine à glaçons est allumée
Le fi ltre avant est bien ajusté dans le boîtier du fi ltre
(certains modèles)
Vérifi cations fi nales
Le matériel d'expédition est enlevé
Les températures pour les aliments frais et de
congélation sont programmées
Les contrôles d'humidité pour les fruits et légumes
sont programmés
La carte d'enregistrement est envoyée
1-FR

Sécurité
Instructions de sécurité importantes
Mesures de sécurité
Ne tentez pas d'installer ou d'utiliser votre appareil avant
d'avoir lu les mesures de sécurité présentées dans ce guide.
Les mesures de sécurité présentées dans ce guide sont
identifi ées par les mots Danger, Avertissement ou Attention,
selon le type de risque encouru.
Défi nitions
Voici le symbole d'avertissement concernant la sécurité.
Il est utilisé pour vous avertir des risques de blessures
potentiels. Respectez tous les messages qui suivent ce
symbole afi n de prévenir les blessures ou la mort.
DANGER
La mention DANGER indique un danger imminent qui
causera la mort ou de graves blessures, s'il n'est pas
évité.
AVERTISSEMENT
La mention AVERTISSEMENT indique une situation
potentiellement dangereuse qui, si elle n'est pas évitée,
peut entraîner des blessures graves, voire la mort.
ATTENTION
La mention ATTENTION signale la présence d'une
situation potentiellement dangereuse qui, si elle
n'est pas évitée, est susceptible de causer des
blessures mineures ou moyennement graves.
IMPORTANT
Cette mention précède des renseignements importants
relatifs à l'installation, au fonctionnement ou à
l'entretien. Toutefois, ceux-ci n'impliquent aucune notion
de danger.
Sécurité générale
• Enlevez toutes les agrafes du carton pour éviter les
blessures. Les agrafes peuvent aussi endommager
les fi nis si elles viennent en contact avec d’autres
appareils ménagers ou des meubles.
Sécurité des enfants
Matériaux d’emballage :
• Les cartons d’emballage recouverts de tapis,
de couvertures, de feuilles de plastique ou de
fi lm étirable peuvent devenir étanches à l’air et
provoquer rapidement la suffocation.
• Détruisez ou recyclez le carton, les sacs en plastique
et tout autre matériau d’emballage externe
immédiatement après le déballage du réfrigérateur.
Les enfants ne devraient jamais jouer avec ces articles.
Dangers d’enfermement et de suffocation des enfants :
• Ces problèmes ne sont pas dépassés. Qu’ils
soient mis au rebut, abandonnés ou mis de côté
(même pour quelques heures), les réfrigérateurs
et les congélateurs laissés sans surveillance sont
dangereux. Veuillez prendre les précautions qui
fi gurent dans la liste ci-dessous.
Mise au rebut appropriée de votre réfrigérateur/
congélateur
Nous encourageons le recyclage des appareils ménagers
ainsi que les méthodes d'élimination responsables. Vérifi ez
auprès de votre entreprise de recyclage ou visitez le site
www.energystar.gov/recycle pour obtenir des informations
sur la manière de recycler votre ancien réfrigérateur.
Avant de recycler ou d'éliminer votre ancien réfrigérateur/
congélateur :
• Retirez les portes.
• Laissez les clayettes et les paniers en place pour que
les enfants ne puissent pas grimper facilement à
l'intérieur.
• Demandez à un technicien qualifi é d'enlever le
réfrigérant et l'huile du compresseur.
AVERTISSEMENT
Veuillez lire toutes les instructions de sécurité avant
d’utiliser votre nouveau réfrigérateur.
• N’entreposez pas et n’utilisez pas d’essence ni
d’autres liquides infl ammables à proximité de cet
appareil ou de tout autre appareil électroménager.
Lisez les étiquettes du produit concernant les risques
d’infl ammabilité et autres avertissements.
• Ne faites pas fonctionner le réfrigérateur en présence
de vapeurs explosives.
• Évitez tout contact avec les pièces mobiles de la
machine à glaçons automatique.
2-FR

Sécurité
IMPORTANT
ÉLIMINATION DE CFC/HCFC
Votre vieux réfrigérateur peut avoir un système
de refroidissement qui utilise les CFC ou HCFC
(chlorofl uorocarbures ou hydrochlorofl uorocarbures).
Les CFC et les HCFC sont jugés nocifs pour la
couche d’ozone stratosphérique s’ils sont libérés
dans l’atmosphère. D’autres réfrigérants peuvent
également causer des dommages à l’environnement
lorsqu’ils sont rejetés dans l’atmosphère.
Si vous vous débarrassez de votre vieux
réfrigérateur, assurez-vous que les réfrigérants
sont retirés pour une élimination appropriée
par un technicien qualifi é. Si vous libérez
intentionnellement des réfrigérants, vous pouvez
être soumis à des amendes et à des peines
d’emprisonnement en vertu des dispositions de la
législation environnementale.
Électricité
AVERTISSEMENT
Vous devez suivre ces directives pour que les
mécanismes de sécurité de votre réfrigérateur
fonctionnent correctement.
• Le réfrigérateur doit être branché sur sa propre prise
électrique de 115 V c.a., 60 Hz, sans mise à la terre.
Le cordon d’alimentation de l'appareil est muni d’une
fi che à trois broches avec mise à la terre afi n de vous
protéger contre les chocs électriques. Cette fi che doit
être branchée directement sur une prise murale à trois
alvéoles correctement mise à la terre. La prise murale
doit être installée selon les codes et les règlements
locaux. Consultez un technicien qualifi é. N'utilisez pas
de rallonge électrique ni de fi che d'adaptation.
• Si le cordon d’alimentation est endommagé, il doit
être remplacé par le fabricant, un technicien de
service après-vente ou une personne qualifi ée.
• Ne débranchez jamais le réfrigérateur en tirant sur le
cordon. Agrippez fermement la fi che et tirez-la hors
de la prise électrique en la tenant droite pour éviter
d'endommager le cordon d'alimentation.
• Débranchez le réfrigérateur avant de le nettoyer ou
de remplacer une ampoule ou une DEL.
• Une tension variant de 10 % ou plus risque de nuire
aux performances de votre appareil. L’utilisation
du réfrigérateur sans une alimentation électrique
suffi sante peut endommager le compresseur. Un tel
dommage n’est pas couvert par la garantie.
• Ne branchez pas le réfrigérateur sur une prise
commandée par un interrupteur mural ou un cordon
de tirage pour éviter qu’il ne soit accidentellement
éteint.
Prise avec mise à la terre
Ne coupez pas,
n'enlevez pas et ne
mettez pas hors circuit
la broche de mise à la
terre de cette fiche.
Cordon électrique muni
d’une fiche à trois broches
avec mise à la terre
IMPORTANT
Pour couper le courant de votre réfrigérateur,
débranchez la fi che de la prise de courant.
3-FR

Aperçu des caractéristiques
(
)
Explication des caractéristiques et des termes
Votre réfrigérateur est conçu pour vous offrir une commodité optimale et de la polyvalence de rangement. L'illustration
ci-dessous est fournie afi n que vous puissiez vous familiariser avec les caractéristiques et la terminologie de l'appareil.
REMARQUE
Les caractéristiques peuvent varier selon les modèles. Les tiroirs sont illustrés sans leurs
couvercles.
Filtre
Guide de rabat
Ampoule à DEL
à eau
Balconnet fermé
Meneau
basculant
Filtre à air
Clayettes
réglable
Bac à
légumes
Étagère pour
articles spéciaux
l'intérieur du TZF)
Charnières
réglables
Machine
à glaçons
Bac à
glaçons
Clayettes
réglable
Bac à
légumes
Balconnet
basculant
Température
réglable Zone
Froide tiroir
Paniers
du congélateur
Grille de protection
IMPORTANT
Il est possible de vous procurer les accessoires
dont votre réfrigérateur n’était pas équipé sur le
site www.brigade.ca ou en composant le 1-888845-4641
Clayette basculante métallique
à l'intérieur du tiroir du congélateur
4-FR

Installation
Outils nécessaires
Vous aurez besoin des outils suivants :
Composants fournis:
Vis avant du
couvre-charnière
supérieur
Vis de
charnière
supérieure
Ce guide d'utilisation et d'entretien contient des
instructions d'installation et d'utilisation spécifi ques à
votre modèle. Nous vous conseillons de faire appel à un
réparateur ou à un entrepreneur pour l'installation de
votre réfrigérateur. N'utilisez votre réfrigérateur que selon
les instructions contenues dans ce guide d'utilisation et
d'entretien. Avant de mettre le réfrigérateur en marche,
suivez ces étapes initiales importantes.
Vis arrière du
couvre-charnière
supérieur
Vis de
charnière
inférieure
Outils nécessaire :
7RXUQHYLV
4XDGUH[RX
3KLOOLSV
Emplacement
• Placez l'appareil près d’une prise électrique sans
disjoncteur de fuite de terre. N'utilisez pas de
rallonge électrique ni de fi che d'adaptation.
• Si possible, ne placez pas le réfrigérateur directement
sous la lumière du soleil et installez-le loin de la cuisinière,
du lave-vaisselle et des autres sources de chaleur.
• Le réfrigérateur doit être installé sur un plancher
de niveau et suffi samment solide pour supporter le
poids du réfrigérateur une fois rempli.
• Prenez en considération la proximité de
l’alimentation en eau pour les modèles équipés
d’une machine à glaçons automatique.
(OU)
ETET
&Op$OOHQPP
OU
&OpjGRXLOOHV
ǪSRHWóSR
OU
Clé à
PROHWWH
¿[HǪSR
Ouverture de la porte
REMARQUE
Si votre réfrigérateur est positionné contre un mur sur le
côté des charnières, vous devrez peut-être le distancer
du mur pour permettre une plus grande ouverture de la
porte.
REMARQUE
Les portes du réfrigérateur sont conçues pour se
refermer d'elles-mêmes lorsqu'elles ont un angle de 20
degrés ou moins.
Votre réfrigérateur doit être placé près d’un comptoir
de manière à vous permettre d’y déposer facilement
la nourriture. Pour faciliter l’utilisation des bacs du
réfrigérateur et des paniers du congélateur, placez le
réfrigérateur de manière à permettre aux deux portes de
s’ouvrir complètement.
Clé
ATTENTION
N'INSTALLEZ PAS le réfrigérateur dans un endroit où la
température descend en dessous de 13°C (55°F)
ou monte au-dessus de 43°C (110°F). Sinon, le
compresseur ne pourra pas maintenir la température
appropriée à l’intérieur du réfrigérateur.
N'OBSTRUEZ PAS la grille de protection située dans
la partie avant inférieure de votre réfrigérateur. Une
bonne circulation d’air est essentielle pour que votre
réfrigérateur fonctionne correctement.
Installation
• Respectez les distances suivantes pour faciliter
l’installation, assurer une circulation d'air appropriée
et raccorder la plomberie et les branchements
électriques :
Côtés et dessus 9,5 mm (⅜ po
Arrière 25,4 mm (1 pouce)
ATTENTION
NE PAS desserer ni retirer ces 3 vis à tête
hexagonale.
NE PAS
desserrer
ni retirer
ces
3 vis
à tête
hexagonale
5-FR

r
Installation
Mettez à niveau le réfrigérateur et
ajustez les portes (si nécessaire)
Directives pour le positionnement fi nal de votre réfrigérateur
:
• Les quatre coins de la carrosserie doivent reposer
fermement sur le plancher.
• Les côtés devraient être inclinés de 6 mm (¼ po) de
l’avant à l’arrière (pour s’assurer que les portes se
ferment hermétiquement et correctement).
• Les portes doivent être alignées et de niveau.
La plupart de ces conditions peuvent être résolues en
levant ou en abaissant les roulettes avant ajustables.
Pour mettre à niveau la carrosserie à l’aide des roulettes avant:
1 Ouvrez légèrement le tiroir du congélateur.
2 Enlevez la grille de protection (selon les directives
concernant la grille de protection de votre modèle
des illustrations ci-dessous).
3 Vous pouvez lever ou abaisser chaque porte. Utilisez
une clé à douilles de po pour tourner les vis
d’ajustement (1 de chaque côté).
Pour lever : tournez la vis d’ajustement vers la droite.
Pour abaisser : tournez la vis d’ajustement vers la gauche
4 Assurez-vous que les deux portes ne soient pas liées
à leurs joints qui touchent la carrosserie sur les quatre
côtés et que la carrosserie soit stable.
Pour effectuer les derniers réglages de la hauteur de la porte:
1. Ouvrir le tiroir du congélateur pour rendre la charnière
inférieure visible.
2. Insérer la clé Allen 6 mm dans l'axe de la charnière
inférieure.
3. Régler la hauteur en tournant dans le sens horaire ou
antihoraire. Tourner dans le sens horaire baissera la
porte. Tourner dans le sens antihoraire soulèvera la
porte. Le réglage par défaut est à la hauteur la plus
basse lorsqu'on reçoit l'appareil.
Elever
Ajustement du meneau basculant :
1 Desserrez la vis se trouvant sur la charnière du
meneau basculant.
Meneau du
déflecteu
Porte
Porte
Élever
Pied
antibasculement
Abaisser
5 Lorsque l’appareil est de niveau, abaissez la patte
antibasculement jusqu’à ce qu’elle touche au sol.
Plinthe doit s'insérer
dans fente de
support anti-bascule
(2) Agrafes de retenue
Vis
Charnière
à meneau
basculant
Réglage de la vis du meneau basculant
2 Ajustez la hauteur du meneau basculant. Pour
obtenir un bon raccordement avec le guide du
meneau basculant, l'écart devrait être de l'épaisseur
d'une pièce de monnaie (1,5 mm ou 0,060 po) entre
le guide et le meneau basculant.
Guide de
meneau
Meneau
basculant
Épaisseur
d'une pièce
de monnaie
Réglage de la hauteur du meneau basculant
3 Resserrez la vis.
6-FR

Installation
Caractéristiques des clayettes
(Certains modèles)
ATTENTION
Les étagères doivent être retirés avant de déplacer le
réfrigérateur.
ATTENTION
Pour éviter les blessures provoquées par des clayettes en
verre trempé cassées, manipulez celles-ci soigneusement.
REMARQUE
Les caractéristiques peuvent varier selon les modèles.
Votre réfrigérateur comporte des clayettes en verre
conçues pour retenir les renversements accidentels.
Vous pouvez facilement ajuster la position des clayettes
dans les compartiments d'aliments frais, selon vos besoins.
Les clayettes possèdent des supports qui se montent
dans les fentes des rails situés à l’arrière de chaque
compartiment.
Remettre le joint hermétique
(Étagères à glissière )
1 Retirer le joint hermétique en poussant vers le bas sur
le rabat avec une rotation vers le bas.
2 Placer le joint hermétique vers l'extrémité extérieure
de l'étagère pour éviter la tour d'air lorsque remise en
place.
3 Installez le joint en faisant glisser le rabat inférieur du
joint vers le haut dans fond fente arrière de l'étagère
avec joint à un angle vers le bas, puis en tirant sur le
rabat de joint jusqu'à ce que le joint soit bien ajusté
sur le dos de l'étagère et le rabat est assis à un angle
d'environ 10 degrés de la surface de l'étagère.
Pour changer la position d’une clayette :
1 Avant de régler la position d’une clayette, enlevez
tous les aliments qui s’y trouvent.
2 Soulevez le devant de la clayette et retirez-la.
3 Remettez la clayette en place en insérant les crochets
des supports dans les fentes désirées des rails.
4 Abaissez la clayette et verrouillez-la en place.
Custom-Design
MC
ou
Remettre le joint hermétique
(Canal à l’arrière)
1 Retirer le joint hermétique en enfonçant le joint
directement vers l'arrière.
2 Placer le joint hermétique vers le bord extérieur de
l'étagère pour éviter la tour d'air lorsque la tablette
est repoussée en place.
3 Installez le joint en faisant glisser l'extrémité ouvert du
canal du joint sur le bord arrière de l'étagère jusqu’à
ce que soit bien ajusté à l'arrière de l'étagère et le
rabat est assis à un angle d'environ 10 degrés de
la surface de l'étagère.
Joint étanche
à l’air
7-FR
Joint
étanche à l’air

Retrait des portes
Passage par des espaces étroits
Si votre réfrigérateur ne peut pas passer par une zone
d’entrée, vous pouvez enlever les portes. Vérifi ez tout
d’abord en mesurant l’entrée.
Pour se préparer à enlever les portes :
1 Assurez-vous que le cordon d’alimentation électrique
est débranché de la prise murale.
2 Ouvrez le tiroir du congélateur et retirez la grille de
protection (voir la section Installation).
3 Retirez les aliments sur les étagères de la porte et
fermer les portes.
Pour enlever les couvercles de la charnière supérieure :
1 Retirez les deux vis de chaque couvercle par-dessus
les charnières supérieures de la porte.
2 Soulevez l’intérieur du bord du couvercle de la
charnière et incliner vers l'arrière.
Vis
Couvercle
Arrière
VisSol
CouverclePenture
Supérieure
VisPenture
VisCouvercleAvant
Enlever les portes du réfrigérateur
1 Tracer au crayon légèrement autour des charnières
supérieures de la porte. Cela facilite la réinstallation.
2 Débrancher le câblage en saisissant fermement les
deux côtés du connecteur, appuyer sur le verrou et
écartez. Retirez les deux vis de la charnière supérieure.
Soulevez la porte hors de la charnière inférieure et
mettez-le de côté.
CâblesMulti-Fils
Laisser
Penture
AvecPorte
Vis
Couvercle
Arrière
Penture
Supérieure
VisCouvercleAvant
VisSol
Penture
Supérieure
LigneEau
Couvercle
Penture
Supérieure
VisPenture
Laisser
Penture
Avec
Porte
REMARQUE
NE retirez PAS la vis de borne de terre e la charnière.
3 Détacher le tube de l’eau au connecteur situé à l’arrière
du réfrigérateur et tirer le tube arrière vers l’avant de
l’appareil. Le connecteur se libère lorsque vous appuyez
sur le manchon extérieur vers l'intérieur tout en poussant
le tube vers le connecteur, puis tout en continuant à
pousser vers l'intérieur du manchon, détacher le tube.
REMARQUE
Faites attention en extrayant le tube d'eau
de l'appareil pour être sûr que vous ne pliez pas le
tube.
Enfoncer
Enfoncer
Ligne
Eau
Environ 5 pieds
(1,5 m)
REMARQUE
La longueur du tube d’eau que vous tirerez de ’arrière
du réfrigérateur sera d’environ 1,5 m (5 pi).
8-FR

Retrait des portes
4 Dévisser les trois vis inférieures de la charnière et
glisser la charnière vers l’intérieur.
Enlèvement de la charnière inférieur
Pour réinstaller les portes du réfrigérateur :
Inverser les étapes ci-dessus.
REMARQUE
Après le remplacement, le tube doit être pleinement
inséré jusqu'à la ligne de marquage.
Instructions de retrait et de
remise du tiroir de congélateur
ATTENTION
Le tiroir est lourd. Soyez prudent lors de l’élévation
Retrait du tiroir de congélateur
1. Retirez les (4) vis à tête hexagonale du tiroir.
2. Soulevez le tiroir pour le retirer.
Ne retirez
pas les
autres vis
Insérer tube
jusqu'á ligne
marquage
Enfoncer
Enfoncer
Ligne
Eau
Environ 5 pieds
(1,5 m)
REMARQUE
En réinsérant le tube d'eau et en remplaçant le
couvercle de la charnière supérieure, veillez à ne pas
plier le tube.
Une fois que les deux portes sont en place, s’assurer qu’ils
sont alignées avec les autres et mettre à niveau (veuillez
voir la section Installation pour plus de détails) et replacez
le couvercle sur la charnière supérieure.
Retirez la vis à
tête hexagonale
du tiroir
NE PAS
desserrer
ni retirer
ces
3 vis
à tête
hexagonale
Remise du tiroir de congélateur
1. Redescendez le tiroir à sa place.
2. Remettez en place les 4 vis à tête hexagonale du tiroir et
serrez-les.
9-FR

Installation de la porte gère
1 Il y a 6 poignée goujons sur le réfrigérateur.
2 Faire glisser les embouts de poignée sur goujon de la porte.
3 Serrez la vis. Il y a 2 vis de fi xation selon le montage de la
poignée.
4 Répéter l’opération avec tous les ensembles de 3 poignées.
10-FR

Raccorder l’alimentation en eau
Raccordement de l'alimentation en eau à l'arrivée du robinet
AVERTISSEMENT
Pour éviter un choc électrique qui pourrait causer de graves
blessures ou même la mort, coupez l'alimentation électrique du
réfrigérateur avant de le raccorder à l'alimentation en eau.
ATTENTION
Pour éviter des dommages matériels :
• Il est recommandé d'utiliser une conduite en cuivre ou tressée
en acier inoxydable pour l’alimentation en eau. L'utilisation
d'un tube en plastique de 6,4 mm (¼ po) n'est pas
recommandée. Un tube en plastique augmente grandement
les risques de fuite d'eau et le fabricant n’est pas responsable
des dommages causés par l'utilisation d'un tube en plastique
pour l'alimentation en eau.
• N’INSTALLEZ PAS un tuyau d’alimentation en eau en
plastique dans les régions où les températures descendent
sous le point de congélation.
• Les produits chimiques provenant d’un adoucisseur qui
fonctionne mal peuvent endommager la machine à glaçons. Si
la machine à glaçons est raccordée à un adoucisseur, assurezvous que ce dernier est entretenu adéquatement et qu'il
fonctionne correctement.
IMPORTANT
Assurez-vous que votre conduite d'alimentation en eau est
conforme aux codes de plomberie locaux.
Avant d'installer l'alimentation en eau, vous aurez besoin :
• Des outils de base suivants : Une clé à molette, un tournevis
à pointe plate et un tournevis PhillipsMC.
• Un accès à la canalisation d’eau froide domestique d’une
pression située entre 30 et 100 lb/po².
• Une conduite d'alimentation en eau en cuivre ou en acier
inoxydable, d'un diamètre extérieur de 6,4 mm (¼ po). Pour
déterminer la longueur de la conduite en cuivre nécessaire,
vous devez mesurer la distance entre le robinet d'arrivée
d'eau de la machine à glaçons derrière le réfrigérateur et
la conduite d'eau froide. Puis, ajoutez approximativement
2,1 mètres (7 pieds) afi n de pouvoir déplacer le
réfrigérateur au moment du nettoyage (tel qu'illustré).
• Un robinet d'arrêt qui raccorde la conduite d'alimentation
en eau à votre système de distribution d'eau domestique.
N'UTILISEZ PAS de robinets d'arrêt de type auto-perceur.
• Ne pas réutiliser la bague de compression ou du
ruban d’étanchéité pour joints fi letés.
• Un écrou à compression et une bague (un raccord) pour
raccorder la conduite d'alimentation en eau au robinet
d'arrivée d’eau de la machine à glaçons.
REMARQUE
Vérifi ez auprès des autorités du bâtiment de votre région pour
obtenir des recommandations relatives aux conduites d'eau
et aux matériaux à utiliser avant d'installer votre nouveau
réfrigérateur. En fonction des codes du bâtiment de votre
région, Viking Range, LLC recommande sa trousse de conduite
d'eau 054414-000 (cette trousse comprend une conduite
en acier inoxydable de 1,8 m [6 pi]) pour les demeures qui
disposent déjà d'un robinet. Pour les demeures sans robinet,
Viking Range, LLC recommande sa trousse de conduite d'eau
054415-000 (cette trousse renferme une conduite en cuivre de
6 m [20 pi] dotée d'un robinet de serrage autotaraudeur). Pour
obtenir plus de renseignements, veuillez vous reporter au site
Web www.brigade.ca.
d’eau de la machine à glaçons :
1. Débranchez le réfrigérateur de l'alimentation électrique.
2. Placez l’extrémité de la conduite d'alimentation en eau dans
un évier ou un seau. OUVREZ l'alimentation en eau et laissez
couler l'eau jusqu'à ce qu'elle soit claire. Fermez l'alimentation
en eau à l'aide du robinet d'arrêt.
3. Dévissez le capuchon en plastique du robinet d'arrivée d’eau et
jetez-le.
4. Si vous utilisez un tuyau en cuivre - Faites glisser l’écrou à
compression en laiton, puis installez la bague (le raccord) sur la
conduite d'alimentation en eau. Poussez la conduite en cuivre
dans le robinet d'arrivée d'eau, aussi loin que possible (6,4 mm
ou ¼ po). Faites glisser la bague (le raccord) dans le robinet
et serrez à la main l’écrou à compression sur le robinet. Serrez
d'un autre demi-tour à l'aide d'une clé; NE SERREZ PAS trop.
Reportez-vous à la fi gure 1.
Si on utilise des tubes tressés en acier inoxydable souple -
L'écrou et la bague sont déjà installés sur le tuyau. Faites glisser
l'écrou à compression sur l'entrée du robinet et serrez à la main
l'écrou sur le robinet. Serrez d'un autre demi-tour à l'aide d'une
clé; NE SERREZ PAS trop. Reportez-vous à la fi gure 2.
5 Fixez la conduite d'alimentation en eau (tuyau en cuivre
seulement) au panneau arrière du réfrigérateur au moyen d'un
collier en acier et d'une vis, comme illustré.
6. Enroulez l'excédent de la conduite d'alimentation (environ
2½ tours) derrière le réfrigérateur, tel qu'illustré, et placez
cet excédent de sorte qu'il ne vibre pas ou qu'il ne s'use pas
contre d'autres surfaces (tuyau en cuivre seulement).
7. OUVREZ le robinet d'arrêt de l'alimentation en eau et serrez
toute connexion qui fuit.
8. Rebranchez le réfrigérateur.
9. Pour mettre la machine à glaçons en marche, abaissez le fi l
métallique du levier de signalisation (machine à glaçons du
congélateur) ou placez le commutateur de Marche/Arrêt de la
machine à glaçons en position de marche (machine à glaçon du
réfrigérateur).
Tube en plastique
relié au tube de
remplissage du bac
à glaçons
Conduite en cuivre pour
l’alimentation en eau du système
(La boucle comprend une longueur de
conduite suffisante pour pouvoir
déplacer le réfrigérateur lors du
nettoyage.)
de distribution domestique
Figure 1 Figure 2
Collier
en acier
Écrou à
compression
en laiton
Bague
(manchon)
Conduite
d'eau en
cuivre
Support
du robinet
d'eau
Robinet
d'arrivée
d'eau
Robinet
d'eau
Tube en plastique
relié au tube de
remplissage du
bac à glaçons
Conduite d'eau en acier
inoxydable de 1,8 m partant
de l'approvisionnement en
eau de la maison
Serre-
joint
Conduite
d'eau
en acier
inoxydable
Support
du robinet
d'eau
Robinet
d’arrivée
d’eau
Robinet d'eau
11-FR

TruTouch Commandes
Un voyant rouge s’allume au-dessus de la fonction activée.
Appuyez sur l’icône correspondante pour activer les options ci-dessous.
on off (marche/arrêt)
Appuyez sur cette touche et maintenez-la enfoncée pendant trois secondes pour éteindre le
système de refroidissement afi n de pouvoir nettoyer le réfrigérateur. L’activation de cette touche
arrêtera également la machine à glaçons. L’affi chage de la température indiquera « OFF » (arrêt).
default settings (réglages de l’usine)
Restitue les valeurs défi nies en usine de tous les réglages du réfrigérateur (comme la température,
l’affi chage de la température, les alarmes, etc.).
Réglage des températures de refroidissement
Appuyez sur les indicateurs « + » ou « - » pour ajuster la température au réglage désiré.
L’affi chage de la température commencera à clignoter lorsque vous appuierez pour la première
fois sur l’un ou l’autre des indicateurs. Après 10 secondes, l’affi cheur revient à l’affi chage de base.
energy saver (économiseur d’énergie)
Pour que la consommation énergétique soit minimale, la fonction « Energy Saver » doit être ac-
tivée (lumière allumée). Si de la condensation se forme sur la caisse entre les portes, appuyez sur
ce bouton pour éteindre la lumière et mettre en marche un générateur de chaleur électrique qui
réduira la condensation présente sur la caisse entre les portes.
temp mode (mode de température)
Appuyez sur cette touche pour passer du mode d’affi chage en degrés Fahrenheit à celui en de-
grés Celsius, et vice-versa.
fast freeze (congélation rapide)
Active un cycle plus rapide de congélation des aliments.
fast ice (fabrication rapide de glaçons)
Augmente la production de glaçons.
water fi lter (fi ltre à eau)
Appuyez sur cette touche et maintenez-la enfoncée pendant trois secondes pour le réinitialiser
après le changement de fi ltre.
air fi lter (fi ltre à air)
L’état du fi ltre à air s’affi che lorsque la porte est ouverte. Appuyez sur cette touche et maintenez-
la enfoncée pendant trois secondes pour le réinitialiser après le changement de fi ltre.
mute sounds (blocage du son)
Les signaux sonores émis à chaque pression effectuée sur les touches peuvent être désactivés au
choix de l’utilisateur. Le voyant rouge lumineux indique que les signaux sonores sont désactivés.
Les signaux d’avertissement demeureront actifs.
IMPORTANT
Appuyer sur l’icône On/Off (marche/arrêt) ne coupe pas l’alimentation en électricité de votre
réfrigérateur. Pour couper l’alimentation, vous devez débrancher le cordon d’alimentation de la prise
murale.
Alarmes
Door Ajar (porte entrouverte)
Si la porte reste ouverte pendant une période prolongée, une alarme retentira et l’indicateur door
ajar (porte entrouverte) apparaîtra au bas de l’affi cheur du tableau de commande. L’alarme s’éteint
lorsque la porte est fermée. La touche mute sounds (blocage du son) clignotera pour demander la
réinitialisation des alarmes en fonction. Appuyez sur cette touche pour réinitialiser n’importe quelle
alarme du système.
High Temp (température élevée)
Si la température du réfrigérateur est élevée, l’affi chage de la température clignotera et indiquera
« HI » (élevé). Après 20 minutes, l’alarme se fera entendre et l’indicateur de température élevée
(high temp) s’allumera en rouge au bas du tableau de commande. L’icône du blocage du son (mute
sounds) restera allumée jusqu’à ce que vous appuyez pour arrêter l’alarme; après quoi, la tempéra-
ture la plus élevée atteinte s’affi chera et le réfrigérateur reviendra à son mode de fonctionnement
normal. Si l’alarme de température élevée n’est pas arrêtée après avoir retenti pour la première fois,
cette alarme se fera de nouveau entendre lorsque vous ouvrirez la porte du réfrigérateur.
Power Fail (panne d’électricité)
Si une panne d’électricité survient, l’indicateur d’alerte power fail (panne d’électricité) apparaîtra
et l’affi chage de la température clignotera jusqu’à ce que vous appuyiez sur l’icône mute sounds
(blocage du son) pour désactiver l’alarme. Les autres modes peuvent être désactivés avant que
l’alarme ne le soit. L’indicateur d’alerte POWER FAIL (Panne d’électricité) s’éteint et le réfrigérateur
revient à son mode de fonctionnement normal. Il se peut que l’alarme HIGH TEMP (Température
élevée) soit aussi allumée jusqu’à ce qu’une température de fonctionnement sécuritaire soit atteinte.
12-FR

TruTouch Commandes
Mode sabbat TruTouch
Le mode sabbat est une fonction qui permet de désactiver
certaines parties du réfrigérateur et les commandes des
modèles à technologie TruTouch afi n de se conformer
aux rites du sabbat hebdomadaire et des autres fêtes
religieuses de la communauté juive orthodoxe.
Il est possible d'ACTIVER ou de DÉSACTIVER le mode
sabbat en appuyant et en tenant enfoncées la touche
« - » de la commande de température du congélateur
et la touche « + » de la commande de température du
réfrigérateur pendant cinq secondes. L'affi cheur indique
« Sb » lorsque le réfrigérateur est en mode sabbat.
En mode sabbat, l'alarme de température élevée (High
Temp) est activée pour des raisons de santé. Par exemple,
si la porte est entrouverte l’alarme haute température
est activé. Le réfrigérateur fonctionnera normalement
une fois la porte fermée, sans toute violation du Sabbat/
vacances. L’alarme haute température est permise lorsque
la température du cabinet est à l’extérieur de la zone sûre
pendant 20 minutes. L’alarme se fait taire après 10 minutes
alors que l’icône High Temp reste allumé jusqu’à ce que
vous quittez le mode Sabbat.
Pour plus de renseignements, de directives
d'utilisation et pour consulter une liste complète
des modèles qui possèdent la fonction de sabbat,
veuillez visiter le site http:\\www.star-k.org.
Mode sabbat et tiroir Température réglable
Zone Froide
Le tiroir Température réglable Zone Froide devrait être
désactivé pendant le sabbat et la période des fêtes. Avant
d'activer le mode sabbat, désactivez le tiroir Température
réglable Zone Froide en appuyant sur la touche on/off
(marche/arrêt) du tiroir. L'affi cheur indique « OFF » (arrêt)
et le tiroir se désactive. Activez ensuite le mode sabbat
sur l'affi cheur principal du réfrigérateur. Reportez-vous à la
section « Mode sabbat » de TruTouch. En mode Sabbat,
l'écran ne s'illuminera pas et le tiroir restera éteint. Le tiroir
peut toujours être utilisé comme tiroir à température non
contrôlée. Lorsque le mode sabbat est désactivé, le tiroir
Température réglable Zone Froide devra être réactivé.
REMARQUE
Si le tiroir Température réglable Zone Froide n'est pas
activé avant de mettre l'appareil en mode sabbat, il
continuera à s'ajuster afi n de maintenir le point de
réglage même si l'écran ne s'allume pas pour montrer
qu'il est toujours activé.
IMPORTANT
Si votre aliment congèle dans le compartiment pour
aliments frais, augmenter le réglage de température de 1
ou 2 degrés.
REMARQUE
En mode sabbat, ni l'éclairage, ni la distributrice, ni le
tableau de commande ne fonctionnera si le mode sabbat
est désactivé.
Le réfrigérateur reste en mode sabbat après une panne
d'électricité. Il doit être désactivé par les boutons sur le
tableau de commande.
REMARQUE
En mode sabbat, la machine à glaçons est désactivée par
le tableau de commande principal.
IMPORTANT
Si vous placez des aliments à moins de 1 pouce (2,5 cm)
devant les bouches d'air, il y a une possibilité de congeler
des aliments.
2UL¿FHGDLU
13-FR

Distributeur d’eau et de glaçons automatique
Utilisation et entretien de la machine à
glaçons
Une fois que le réfrigérateur a été installé correctement, la
machine à glaçons commence à produire de la glace après
24 heures. Elle peut remplir complètement le bac à glaçons
en trois jours environ.
Pour vous assurer que la machine à glaçons fonctionne
correctement lorsque vous l'utiliserez pour la première
fois, il est nécessaire de retirer l'air du tuyau du fi ltre à
eau. Lorsque la machine à glaçons commence à produire
de la glace, faites-lui remplir DEUX fois le bac à glaçons et
jetez le contenu. Il faudra au moins deux jours pour remplir
complètement le bac à glaçons en mode de fabrication
normal et 1½ jour en mode de fabrication (fast ice).
La machine à glaçons produit environ 0,9 à 1,1 kg (2 à 2,5 lbs)
de glace toutes les 24 heures, selon le mode de fabrication
utilisé. Le bac à glaçons tiendra environ 3,2 kg (7 lbs) de
glace.
IMPORTANT
La machine à glaçons est ajustée en position de marche
à l’usine pour qu’elle puisse fonctionner dès que votre
réfrigérateur est installé. Si vous ne pouvez raccorder
l'appareil à un système d’alimentation en eau, mettez
l’interrupteur ON/OFF (marche/arrêt) de la machine à
glaçons à OFF (arrêt). Sinon, il se peut que le robinet de
remplissage de la machine à glaçons émette un fort bruit
lorsqu’il essaiera de fonctionner sans eau.
Mise en marche et arrêt de la machine à
glaçons
La fabrication de glaçons est commandée en montant ou en
abaissant la manette de la machine à glaçons. Pour accéder à
la machine à glaçons, retirez le tiroir du congélateur. Soulevez
la manette pour mettre la machine à glaçons en position OFF
(arrêt) et abaissez-la pour la mettre en position ON (marche).
ON
(Marche)
OFF
(Arrêt)
Manette
• Certains bruits de fonctionnement sont normaux. Ils
sont produits par :
- Le fonctionnement du moteur
- Les glaçons qui tombent dans le bac
- Le robinet d’eau qui s’ouvre ou se ferme
- L’eau qui coule
• Les glaçons conservés trop longtemps peuvent
développer un goût douteux. Videz le bac à glaçons,
tel qu'expliqué ci-dessous.
Fonction Fast Ice
(fabrication de glaçons rápido)
Votre réfrigérateur est muni d'une fonction de fabrication
rapide de glaçons « intelligente » qui permet, lorsqu'elle est
activée, d'augmenter la vitesse de production des glaçons.
Si vous ne désirez pas utiliser cette fonction, il n'est pas
nécessaire de la désactiver; votre réfrigérateur fonctionnera
en mode normal.
ATTENTION
Si l’eau de l’alimentation de votre réfrigérateur est
adoucie, assurez-vous que l’adoucisseur est entretenu
et fonctionne correctement. Les produits chimiques
provenant d’un adoucisseur peuvent endommager la
machine à glaçons.
Nettoyage de la machine à glaçons
Nettoyez la machine à glaçons et le bac à glaçons à
intervalles réguliers, surtout pendant les vacances ou lors
d'un déménagement.
1 Mettez la machine à glaçons en position d'arrêt.
2 Enlevez le bac à glaçons.
3 Videz et nettoyez soigneusement le bac à glaçons
à l’aide de détergent doux. N’utilisez pas de
nettoyants puissants ou abrasifs. Rincez à l’eau claire.
4 Laissez le bac à glaçons sécher complètement avant
de le remettre dans le congélateur.
5 Remettez le bac à glaçons en place. Réactivez la
machine à glaçons.
Enlevez et videz le bac à glaçons si :
• Une panne de courant prolongée (une heure ou
plus) a fait que les glaçons ont fondu dans le bac à
glaçons et qu’ils se sont soudés ensemble.
Enlevez le bac à glaçons et secouez-le pour libérer les
glaçons ou nettoyez-le comme il est expliqué ci-dessus.
Conseils sur la production de glaçons
• Si votre réfrigérateur n’est pas raccordé à une
alimentation en eau ou si l’alimentation en eau est
coupée, arrêtez la machine à glaçons en soulevant la
manette de marche/arrêt.
ATTENTION
N’UTILISEZ JAMAIS de pic à glace ni d'instrument pointu
du même genre pour détacher les glaçons. Ceci pourrait
endommager le bac à glaçons.
Utilisez de l'eau tiède pour libérer des glaçons coincés.
Avant de reposer le bac à glaçons, assurez-vous qu'il est
bien sec.
14-FR

Caractéristiques de rangement
Caractéristiques des clayettes
ATTENTION
Pour éviter les blessures provoquées par des
clayettes en verre trempé cassées, manipulez celles-ci
soigneusement.
REMARQUE
Les caractéristiques peuvent varier selon les modèles.
Votre réfrigérateur comporte des clayettes en verre
conçues pour retenir les renversements accidentels.
Vous pouvez facilement ajuster la position des clayettes
dans les compartiments d'aliments frais, selon vos besoins.
Les clayettes possèdent des supports qui se montent
dans les fentes des rails situés à l’arrière de chaque
compartiment.
Pour changer la position d’une clayette :
1 Avant de régler la position d’une clayette, enlevez
tous les aliments qui s’y trouvent.
2 Soulevez le devant de la clayette et retirez-la.
3 Remettez la clayette en place en insérant les crochets
des supports dans les fentes désirées des rails.
4 Abaissez la clayette et verrouillez-la en place.
Custom-Design
MC
Tiroirs
Votre réfrigérateur comprend une variété de tiroirs de
rangement. Ces tiroirs sont normalement situés à des
endroits fi xes dans le bas du compartiment réfrigérateur.
Bacs à fruits et à légumes
Les bacs à fruits et à légumes permettent le rangement
des fruits, des légumes et d'autres produits frais.
Ouverture des bacs à fruits et à légumes
Contrôle d’humidité des bacs à fruits et à
légumes
Chaque bac à fruits et à légumes comporte un réglage
coulissant permettant de contrôler l’humidité à l’intérieur du
bac. Les légumes à feuilles se conserveront plus longtemps
en réglant le niveau d'humidité à son maximum. Les fruits
frais se conserveront plus longtemps en réglant le niveau
d'humidité à son minimum.
ou
15-FR
BasHaut
Contrôle de l’humidité
Humidité
élevée
Réglage de l'humidité dans les bacs à fruits et à légumes
Humidité
faible

Caractéristiques de rangement
T E M P E R A T U R E
A D J U S TA B L E
Retrait des bacs à fruits et à légumes pour le nettoyage :
1 Sortez le tiroir jusqu'au bout.
2 Soulevez légèrement l'avant du bac à fruits et à
légumes, puis retirez-le.
Retrait des bacs à fruits et à légumes
Tiroir Température Réglable Zone Froide
TEMPERATURE
ADJUSTABLE
Étagère pour articles spéciaux
La conception novatrice de l'étagère pour articles spéciaux
vous permet d'y ranger quatre bouteilles de vin ou de
boisson gazeuse.
Étagère pour
articles spéciaux
Le tiroir Température réglable Zone Froide est conçu pour conserver les aliments à une température précise soit plus fraîche,
plus chaude ou la même que le compartiment à aliments frais. Le réglage de décongélation maintient une température pour
décongeler des aliments pendant 12 heures. À la fi n de cette période, il passe ensuite au réglage mixte pour conserver les
aliments décongelés.
Fonctionnement :
1 Pour activer et désactiver, appuyez sur la touche
On/Off (marche/arrêt) du tiroir. L'affi chage numérique
indique une température entre -2°C (28°F) et +3°C (38°F)
lorsqu'il est activé. Lorsqu'il est désactivé, il affi che OFF
(arrêt).
2 Appuyez sur F/C si vous préférez un affi chage en degrés
Fahrenheit « F » ou Celsius « C ».
3 Appuyez sur les touches de défi lement vers le haut ou
vers le bas pour surligner l'élément désiré.
4 Une fois le choix fait, la température du tiroir sera ajustée
et maintenue selon le réglage choisi.
5 Lorsque désactivé, le tiroir Zone Froide fonctionne comme
un bac à viande normal. Le tiroir Zone Froide convient
mieux pour les produits emballés. Il est préférable de
conserver les légumes feuillus et les fruits non emballés
dans l'un des deux bacs à légumes.
6 Les trois sélections préférées offrent la fl exibilité pour
choisir le réglage et la température de conservation. La
température est réglée vers le haut en appuyant sur la
touche + ou vers le bas en appuyant sur la touche -. Le
tiroir mémorisera la température sélectionnée jusqu'à ce
qu'elle soit modifi ée.
7 Les touches de commande peuvent être verrouillées
pour empêcher toute modifi cation accidentelle.
Pour ce faire, appuyez sur la touche control lock
(verrouillage des commandes) et maintenez-la
enfoncée pendant trois secondes. Désactivez en
appuyant à nouveau pendant trois secondes.
Ouverture du tiroir
16-FR

Caractéristiques de rangement
Pour changer la position d’un balconnet réglable :
IMPORTANT
NE NETTOYEZ PAS la zone d'affi chage du tiroir avec des
nettoyants abrasifs ou corrosifs. Essuyez au moyen d'une
éponge humide.
ATTENTION
Le tiroir Température réglable Zone Froide et son couvercle
peuvent être retirés aux fi ns de nettoyage (le tableau de
commande fi xé sur le côté droit du réfrigérateur ne peut
pas être enlevé). N'immergez pas le couvercle du tiroir
Custom TempMC dans l'eau et ne le mettez pas dans le lavevaisselle. Nettoyez avec un linge humide ou une éponge.
Retrait du tiroir Température réglable Zone Froide pour le
nettoyer :
1 Sortez le tiroir jusqu'au bout.
2 Soulevez légèrement l'avant du bac à fruits et à
légumes, puis retirez-le.
1 Avant de régler un balconnet, enlevez tous les aliments.
2 Agrippez fermement le balconnet avec les deux
mains et soulevez-le.
3 Enlevez le balconnet.
4 Placez le balconnet juste au-dessus de la position désirée.
5 Abaissez le balconnet sur ses supports jusqu’à ce
qu’il se verrouille en place.
Retrait du tiroir
REMARQUE
Lorsque le réfrigérateur est arrêté en appuyant sur
la touche d'alimentation principale TruTouch, le tiroir
Température réglable Zone Froide sera également
désactivé. Lorsque le réfrigérateur est à nouveau activé,
le tiroir Température réglable Zone Froide reprendra son
fonctionnement au réglage de température sélectionné
avant l'arrêt du réfrigérateur.
Portes
Balconnets
Les portes du compartiment d’aliments frais utilisent un
système de balconnets modulaires. Tous ces balconnets
peuvent être enlevés pour faciliter le nettoyage. Certains
ont une position fi xe, d’autres peuvent être réglés selon
vos besoins.
Les balconnets peuvent contenir des pots, des bouteilles,
des canettes et de grosses bouteilles de boisson. Ils
permettent aussi une sélection facile des articles utilisés
fréquemment.
Balconnet réglable
Support à canettes
Le support à canettes permet de ranger effi cacement et
de façon sécuritaire jusqu’à huit canettes de 355 mL (12
oz).
Support à canettes
Balconnet fermé
Utilisez le compartiment des produits laitiers, situé dans
le haut de la porte du compartiment réfrigérateur, pour le
rangement temporaire du fromage, des pâtes à tartiner
ou du beurre. Le compartiment des produits laitiers est
conçu pour être moins froid que la zone de rangement
ouverte et comporte un couvercle rabattable pouvant être
verrouillé ainsi qu'un séparateur de produits laitiers (certains
modèles).
Verrou
Balconnet fermé
17-FR

Caractéristiques de rangement
Caractéristiques du congélateur Pour enlever le
panier du congélateur supérieur
Agrafe
Instructions pour remettre du panier du congélateur
1 Remettre le panier du congélateur à l’intérieur du
Barre
stabilisatrice
Paniers du congélateur
1 Trouver le côté où le cadre du panier est aligné sur
l'attache d’ouverture. Le cadre du panier doit être
aligné à la fois aux attaches avant et arrière du même
côté (gauche ou droite).
2 Si le cadre du panier n'est pas aligné sur les côtés
gauche ou droit, pousser sur le panier vers le côté (de
chaque côté) jusqu'à qu’il soit aligné.
3 En saisissant le cadre métallique du panier à proximité
de l’attache frontal, tirer vers le haut pour extraire le
cadre de panier.
4 Saisissez le cadre de panier à proximité de l'attache
arrière et tirez jusqu'à ce qu’il sorte de l'attache.
5 Une fois qu'un côté du panier est sorti des attaches
ou des dispositifs de retenue, faire glisser le panier
sur le côté jusqu'à ce que l’autre côté du cadre soit
alignée sur les ouvertures de l'attache du côté opposé
du congélateur.
6 De la même manière, tirer le cadre du panier vers le
haut hors des attaches avant et arrière jusqu'à ce qu’il
soit hors des attaches.
7 Retirez le panier.
Inverser les étapes pour réinstaller le panier.
REMARQUE
Si le panier ne repose pas sur les attaches de retenue de la barre
stabilisatrice, le tiroir ne fermera pas adéquatement.
Instructions pour retirer du panier du congélateur
1 Repérer les attaches du panier dans les coins arrière
du panier et les tirer pour enlever.
2 Ouvrir complètement les portes pour aliments frais.
3 Soulever le panier
et enlever.
Emplacement
d'agrafe de panier.
Un de chaque côté.
tiroir du congélateur.
2 Remettre les attaches en les faisant glisser dans les
fentes.
Retrait des séparateurs
Soulever l’avant du diviseur supérieur et extraire.
Presser la poignée et soulever le centre du diviseur pour le
déplacer latéralement. (Le diviseur ne peut pas être retiré).
Tirer pour enlever
Enfoncer pour
remplacer
Diviseur pour panier
du milieu
Retenues
Barre
stabilisatrice
Diviseur de panier supérieur
Diviseur Panier
Inférieur
Diviseur de panier inférieur en plastique
Clayette basculante métallique
La clayette basculante métallique du congélateur (située à
l'intérieur du tiroir du congélateur) n'est pas conçue pour
être retirée.
18-FR

Conservation des aliments et économie d’énergie
Conseils pour la conservation des
aliments
Conservation des aliments frais
• Conservez le compartiment réfrigérateur à une
température située entre 1,1°C et 4,4°C (34°F et
40°F), la température optimale étant de 2,8°C (37°F).
• Évitez de surcharger les clayettes du réfrigérateur,
car cela réduit la circulation de l'air et entraîne un
refroidissement inégal.
Fruits et légumes
• Rangez les fruits et les légumes dans les bacs qui
leur sont destinés, car l'humidité y est conservée,
ce qui aide à garder la qualité de ces aliments pour
longtemps.
• Lavez les articles et retirez l'excès d'eau.
• Les aliments à degré d’humidité élevé ou ayant une
forte odeur doivent être enveloppés avant d’être
rangés.
Viande
• Enveloppez séparément et soigneusement les
viandes crues et la volaille afi n de prévenir les fuites
et la contamination des autres aliments ou des
surfaces de l'appareil.
• Utilisez le tiroir à charcuterie ou le tiroir Custom
MC
Temp
à court terme de la viande et de la volaille. Toute
viande devant être conservée plus de deux jours doit
être congelée.
et réglez en fonction d'une conservation
Chargement du congélateur
• Avant de faire vos provisions, activez la fonction «
fast freeze » (congélation rápido) afi n de pouvoir
congeler rapidement vos nouveaux achats destinés
pour le congélateur.
• L'activation de la fonction « fast freeze » (congélation)
aide aussi votre congélateur à maintenir plus
effi cacement la température choisie en mettant les
nouveaux achats avec des aliments déjà congelés.
• Évitez d’ajouter trop d’aliments chauds en même
temps dans le congélateur. Ceci surcharge le
congélateur, ralentit la vitesse de congélation et peut
faire augmenter la température des aliments congelés.
• Laissez de l’espace entre les emballages pour que
l’air circule librement, ce qui permettra aux aliments
de congeler le plus rapidement possible.
Conseils pour l'économie d'énergie
Installation
• Placez le réfrigérateur dans l’endroit le plus froid
de la pièce, éloigné de la lumière du soleil et des
conduits de chauffage ou des bouches de chaleur.
• Ne le placez pas près d’une cuisinière, d’un four ou
d’un lave-vaisselle. Si cela n’est pas possible, ajoutez
une planche ou une couche d’isolation entre les deux
appareils pour aider le réfrigérateur à fonctionner
plus effi cacement et de façon plus économique.
• Mettez le réfrigérateur à niveau pour que les portes
se ferment bien.
Conservation des produits surgelés
• Conservez le compartiment congélateur à une
température égale ou inférieure à -17,8°C (0°F).
• Le congélateur fonctionne de manière plus effi cace
lorsqu'il est rempli au moins au ⅔.
Emballage des aliments pour la congélation
• Pour minimiser la déshydratation des aliments et leur
détérioration, utilisez du papier d’aluminium, de la
pellicule pour congélation, des sacs de congélation
ou des récipients étanches. Retirez autant d'air que
possible des emballages et fermez-les de manière
hermétique. L’air enfermé peut provoquer la
déshydratation, le changement de couleur et donner
mauvais goût aux aliments (brûlures de congélation).
• Enveloppez les viandes et les volailles fraîches dans
une pellicule conçue pour la congélation avant de les
congeler.
• Ne faites pas recongeler de la viande qui a été
complètement décongelée.
Réglage de la température
• Reportez-vous à la section « Commandes » de ce
guide pour connaître les procédures à suivre pour le
réglage de la température.
Conservation des aliments
• Ne surchargez pas le réfrigérateur et ne bloquez pas
les sorties d’air froid. Sinon, le réfrigérateur devra
fonctionner plus longtemps et utiliser plus d’énergie.
• Recouvrez les aliments et essuyez les contenants
avant de les placer au réfrigérateur. Vous réduirez
ainsi la formation de condensation à l’intérieur de
l'appareil.
• Organisez votre réfrigérateur afi n de l'ouvrir le
moins souvent possible. Faites en sorte que vous
puissiez prendre plusieurs articles en même temps et
refermez la porte aussitôt que possible.
• Ne mettez pas un contenant chaud directement
sur une clayette froide. N'oubliez pas qu'un tel
changement de température peut endommager le
verre.
19-FR

Bruits d'un fonctionnement normal
Pour comprendre les bruits que vous
entendez
Votre nouveau réfrigérateur de haute effi cacité peut
émettre des sons qui ne vous sont pas familiers. Ces bruits
indiquent habituellement que votre réfrigérateur fonctionne
correctement. Certaines surfaces sur le plancher, les murs et
les armoires de cuisine peuvent rendre ces sons plus distincts.
On trouvera ci-dessous une liste des principaux
composants de votre réfrigérateur et des sons qu’il peut
émettre :
A Évaporateur Le déplacement du réfrigérant dans
l’évaporateur risque d’entraîner un gargouillement
ou un bruit d’ébullition.
B Ventilateur de l’évaporateur Vous pouvez entendre
le déplacement d’air produit par le ventilateur de
l’évaporateur à travers le réfrigérateur.
C Élément chauffant de dégivrage Pendant les cycles de
dégivrage, l’eau qui s’écoule sur l’élément chauffant
peut provoquer un siffl ement ou un bref crépitement.
Après le dégivrage, un bruit sec peut se produire.
D Machine à glaçons automatique Lorsque les glaçons
sont produits, vous pouvez les entendre tomber
dans le bac à glaçons. Le ventilateur de la machine
à glaçons, la mise en marche du robinet d'eau et le
fl uide frigorigène peuvent émettre des sons pendant
leur fonctionnement.
E Commandes électroniques et commandes du
dégivrage automatique Ces pièces peuvent produire
un claquement ou un clic lorsqu’elles arrêtent ou
mettent en marche le système de refroidissement.
F Ventilateur du condenseur Vous pouvez entendre le
déplacement d’air acheminé au condenseur.
G Compresseur Les compresseurs modernes de haute
effi cacité fonctionnent plus rapidement que les
anciens modèles. Ils peuvent émettre une vibration
ou un bourdonnement aigu.
H Robinet d'eau Émet un bourdonnement chaque fois
qu’il s’ouvre pour remplir la machine à glaçons.
I Plateau de dégivrage (inamovible) Vous pouvez
entendre les gouttes d’eau tomber dans le plateau
de dégivrage pendant le cycle de dégivrage.
J Condenseur Peut émettre de faibles sons provoqués
par le passage de l’air.
K Le volet motorisé du tiroir Température réglable Zone
Froide Peut produire un léger bourdonnement
pendant qu'il fonctionne.
M Volet motorisé Peut produire un léger ronronnement
pendant son fonctionnement.
N Ventilateur du tiroir Température réglable Zone Froide
S'éteint lorsque la porte s'ouvre ou que le tiroir
Température réglable Zone Froide est fermé.
REMARQUE
La mousse écoénergétique de votre réfrigérateur n’isole
pas des sons.
REMARQUE
Pendant le cycle de dégivrage automatique, une lueur
rouge à l’arrière des évents muraux de votre congélateur
est normale.
20-FR

Remplacement des fi ltres à eau et à air
Votre réfrigérateur est équipé d’un système de fi ltration
pour l’eau et d’un autre pour l’air. L'eau servant à la
production de glaçons et entièrement fi ltrée par le
système de fi ltration de l'eau. Le fi ltre à air enlève les
odeurs et les impuretés présentes dans le réfrigérateur.
Pour en savoir plus sur votre fi ltre à eau
perfectionné
Le système de fi ltration pour la glace et l'eau
ProChill a été testé et
est certifi é ANSI/NSF selon les normes
42 ,53 et 401 concernant la réduction
des allégations spécifi ées sur la fi che de
performances.
N'utilisez pas ce fi ltre avec de l'eau qui présente des
dangers microbiologiques ou dont la qualité est inconnue
sans qu'elle ne soit d'abord désinfectée avant ou après
son entrée dans le système. Les systèmes certifi és pour
la réduction des spores peuvent être utilisés pour de
l'eau désinfectée pouvant contenir des spores fi ltrables.
• Capacité nominale : 473 litres (125 gallons)
• Débit nominal d’utilisation - 2,45 L (0,65 gallon)
par minute
• Pression maximale d’utilisation - 100 lb/po²
• Pression de fonctionnement minimale
recommandée : 30 lb/po²
• Température de fonctionnement : Min. 0,5°C (33°F),
max. 37,8°C (100°F)
REMARQUE
Lorsque vous commandez votre fi ltre de rechange, veuillez
recommander le même type de fi ltre qui est actuellement
dans votre réfrigérateur.
Filtre à eau
Le fi ltre à eau se trouve dans la partie inférieure gauche du
compartiment réfrigérateur.
Remplacement du fi ltre à eau ProChill
En général, vous devriez changer le fi ltre à eau tous les six
mois pour assurer la plus haute qualité d’eau possible. Le
témoin indiquant l'état du fi ltre à eau situé sur le panneau
tactile s'allumera tous les six mois pour vous indiquer de
remplacer le fi ltre. Le rendement du témoin d'état du
fi ltre à eau dont est muni cet appareil n'a pas été testé ou
certifi é par la NSF.
Pour remplacer votre fi ltre à eau :
Il ne faut pas couper l’alimentation en eau pour changer le
fi ltre. Soyez prêt à essuyer les petites quantités d’eau libérées
pendant le remplacement du fi ltre.
1 Interrupteur pour désactiver la machine à glaçons.
2 Retirer le fi ltre en le tournant dans le sens antihoraire
(vers la gauche) à 90 degrés pour le libérer.
3 Faire glisser la veille cartouche de fi ltre directement
hors du boîtier et le jeter.
Cartouche de filtre
4 Déballer la nouvelle cartouche de fi ltre. Faites-le
glisser dans le boîtier de fi ltre aussi loin qu’il pourra
aller avec l’extrémité de la poignée horizontale.
5 Poussez légèrement vers l’intérieur sur le fi ltre tout
en tournant dans le sens horaire (vers la droite). Le
fi ltre sera alors tirer par lui-même vers l’intérieur en
tournant. Faire pivoter le fi ltre de 90 degrés jusqu’à la
butée et l’extrémité de la poignée est verticale. Vous
pourriez être en mesure de sentir un déclic très léger
lorsque le fi ltre se verrouille en place.
6 Appuyez sur un verre contre le distributeur d’eau tout
en vérifi ant la présence de fuites au niveau du boîtier
de fi ltre. Les poussées et postillons qui se produisent
alors que système purge de l’air hors du système
de distribution sont normaux.
7 Continuer de distribuer de l’eau pendant 3 à 4
minutes ou jusqu’à ce que 5,7 litres (1,5 gallons) d’eau
ait coulée dans le système. Vous aurez probablement
besoin de vider et de remplir votre verre à plusieurs
reprises.
8 Désactiver la machine à glaçons.
9 Maintenir la touche de réinitialisation enfoncée du
fi ltre à air sur le panneau de commande pendant trois
secondes. Lorsque l’affi chage passe de rouge à vert,
l’état a été réinitialisé.
Si votre réfrigérateur n’a pas été utilisé pendant une
longue période (pendant un déménagement par exemple),
changez le fi ltre avant de réinstaller votre réfrigérateur.
Il n’est pas nécessaire de couper l’eau pour changer le
fi ltre. Soyez prêt à essuyer toute petite quantité d’eau qui
serait libérée pendant le remplacement du fi ltre.
21-FR

Remplacement des fi ltres à eau et à air
Filtre à air
Le fi ltre à air est situé sous le bac de rangement
Remplacement du fi ltre à air TruAir
En général, vous devriez changer le fi ltre à air tous les six
mois (le voyant lumineux indiquant l'état du fi ltre sur le
panneau tactile vous avertira de remplacer le fi ltre après
six mois d'utilisation) pour assurer une fi ltration optimale
des odeurs du réfrigérateur.
1 Ouvrez la porte du fi ltre à air.
2 Enlevez le fi ltre usé et jetez-le.
3 Déballez le nouveau fi ltre et glissez-le dans le boîtier.
4 Pour fermer la porte du fi ltre à air, poussez le bas et
le haut pour verrouiller la porte.
5 Appuyez sur la touche Air Filter Reset (réinitialisation du
fi ltre à air) sur le tableau de commande et maintenez-la
enfoncée pendant trois secondes. Lorsque l'affi chage
passe de « Replace » (à remplacer) à « Good » (bon), cela
signifi e que l'état du fi ltre a été réinitialisé.
6 Le bouton Air Filter Reset (réinitialisation du fi ltre à
air) s'éteindra de lui-même après quelques secondes.
Pour commander des fi ltres de rechange
Pour commander de nouveaux filtres, appelez le 1 -888-845-4641
ou allez sur le site www.brigade.ca ou demandez au marchand chez
qui vous avez acheté votre réfrigérateur. Vous pouvez également
commander des filtres supplémentaires lorsque vous installez votre
réfrigérateur pour la première fois.
Filtre à eau Cartouche de remplacement n° RWFVRF1
Filtre à air Cartouche de remplacement n° RAFVRF
22-FR

Entretien et nettoyage
Protection de votre investissement
Gardez votre réfrigérateur propre pour conserver son apparence et éviter les odeurs. Essuyez immédiatement tout
renversement et nettoyez les compartiments congélateur et réfrigérateur au moins deux fois par an.
REMARQUE
Évitez d'utiliser des nettoyants abrasifs comme des vaporisateurs à fenêtre, des nettoyants à récurer, des liquides
infl ammables, des cires nettoyantes, des détergents concentrés, des produits javellisants ou des nettoyants à base de
pétrole pour nettoyer les pièces en plastique, les portes intérieures, les joints et les revêtements de la caisse. Évitez
d'utiliser du papier essuie-tout, des tampons à récurer ou tout autre matériel de nettoyage abrasif.
• N’utilisez jamais de tampons à récurer métalliques, de brosses, de nettoyants abrasifs ni de solutions alcalines fortes
pour nettoyer votre réfrigérateur.
• N'utilisez jamais de CHLORE ou de nettoyants avec javellisant pour nettoyer l'acier inoxydable.
• Ne lavez aucune des pièces amovibles dans le lave-vaisselle.
• Débranchez toujours le cordon d’alimentation de la prise murale avant de nettoyer l'appareil.
REMARQUE
Si vous réglez la commande de température pour qu'elle arrête le système de refroidissement, le courant électrique
qui alimente l'éclairage et les autres composants électriques sera maintenu jusqu’à ce que vous débranchiez le cordon
d'alimentation de la prise murale.
• Enlevez les étiquettes adhésives à la main. N’utilisez pas de lame de rasoir ni d'autres instruments pointus qui
peuvent rayer la surface de l’appareil.
• N’enlevez pas la plaque signalétique. Le retrait de la plaque de série annule la garantie.
• Avant de déplacer le réfrigérateur, montez les supports anti-renversement afi n que les roulettes puissent fonctionner
correctement. Ceci évitera d'abîmer le plancher.
ATTENTION
• Tirez le réfrigérateur en le maintenant droit pour le déplacer. Le déplacement latéral du réfrigérateur peut
endommager le revêtement de sol. Faites attention à ne pas déplacer le réfrigérateur plus loin que les
raccordements de plomberie ne le permettent.
• Les objets humides collent aux surfaces froides. Ne touchez pas les surfaces froides du réfrigérateur avec les mains
humides.
IMPORTANT
Si vous entreposez ou déplacez votre réfrigérateur dans un endroit exposé au gel, assurez-vous de vidanger
complètement le système d’alimentation en eau. Le non-respect de cette recommandation peut entraîner des fuites
d’eau lorsque le réfrigérateur est remis en service. Communiquez avec un représentant du service après-vente pour
effectuer cette opération.
Reportez-vous à la page suivante pour connaître les détails concernant l’entretien et le nettoyage de zones spécifi ques
de votre réfrigérateur.
23-FR

Entretien et nettoyage
Astuces d'entretien et de nettoyage
Pièce Agents de nettoyage Conseils et précautions
Intérieur et
revêtements
de porte
Joints des
portes
Bacs et
balconnets
Eau savonneuse
Bicarbonate de soude et
eau
Eau savonneuse Essuyez les joints avec un chiffon propre et doux.
Eau savonneuse Utilisez un chiffon propre pour essuyer les glissières et les rainures.
Utilisez deux cuillerées à table de bicarbonate de soude dans 0,47 L (1 pinte)
d’eau tiède.
Essorez bien l’eau de l’éponge ou du chiffon avant de nettoyer autour des
commandes, de l’ampoule DEL ou de toute pièce électrique.
Ne lavez aucune des pièces amovibles (bacs, balconnets, etc.) dans le lave-vaisselle.
Clayettes en
verre
Grille de
protection
Extérieur et
poignées
Extérieur et
poignées
(modèles
en acier
inoxydable
seulement)
Eau savonneuse
Nettoyant pour verre
Pulvérisation liquide douce
Eau savonneuse
Pulvérisation liquide douce
Aspirateur
Eau savonneuse
Nettoyant pour verre non
abrasif
Eau savonneuse
Nettoyant pour acier
inoxydable
Laissez le verre se réchauffer à la température ambiante avant de l’immerger
dans l’eau chaude.
Enlevez la grille de protection (reportez-vous aux instructions d’installation).
Passez l’aspirateur sur l’arrière de la grille et essuyez-la au moyen d'une
éponge ou d'un linge savonneux. Rincez et séchez.
N’utilisez pas de nettoyant ménager commercial à base d’ammoniaque, de
javellisant ou d'alcool pour nettoyer les poignées.
Utilisez un chiffon doux pour polir les poignées.
N’utilisez pas un chiffon sec pour nettoyer des portes lisses.
N'utilisez jamais de CHLORE ou de nettoyants avec javellisant pour nettoyer
l'acier inoxydable.
Nettoyez l’avant et les poignées en acier inoxydable au moyen d'un chiffon
à vaisselle non abrasif imbibé d’eau savonneuse. Rincez avec un chiffon doux
imbibé d’eau propre.
Utilisez un nettoyant pour acier inoxydable
peuvent être achetés dans la plupart des magasins de rénovation ou dans les
grands magasins. Suivez toujours les instructions du fabricant. N'utilisez pas de
nettoyant ménager à base d'ammoniaque ou de javellisant.
REMARQUE : Nettoyez, essuyez et séchez toujours dans le sens des stries
pour éviter les rayures.
Lavez le reste de l’extérieur avec de l’eau chaude et un détergent liquide
doux. Rincez bien et séchez au moyen d'un chiffon propre et doux.
Conseils pour les vacances et les déménagements
Situation Conseils
non abrasif. Ces nettoyants
Vacances de
courte durée
Vacances de
longue durée
Déménagement Enlevez toute la nourriture et la glace.
Laissez le réfrigérateur fonctionner si vous partez pour moins de trois semaines.
Consommez tous les aliments périssables qui se trouvent dans le réfrigérateur.
Éteignez la machine à glaçons et videz le bac, même si vous ne partez que pour quelques jours.
Si vous partez pour plus d’un mois, enlevez toute la nourriture et la glace de l'appareil.
Éteignez le système de refroidissement (reportez-vous à la section « Commandes » pour connaître
l'emplacement de l'interrupteur) et débranchez le cordon d'alimentation.
Fermez le robinet d'arrivée d'eau.
Nettoyez soigneusement l’intérieur.
Laissez les deux portes ouvertes afi n de prévenir les odeurs et l’accumulation de moisissure. Bloquez les
portes en position ouverte, si nécessaire.
Si vous utilisez un chariot, chargez-le par le côté.
Placez les roulettes tout en haut pour les protéger durant le déplacement ou le déménagement.
Couvrez la caisse pour éviter d’égratigner la surface.
Remplacement des ampoules à DEL
Les balconnets du réfrigérateur et du congélateur sont équipés d’un éclairage LED sans entretien. Pour les remplacer,
contactez un technicien agréé.
24-FR

Solutions aux problèmes courants
Avant de faire appel au service après-vente
Si vous avez un problème avec votre réfrigérateur ou que vous remarquez un fonctionnement anormal de l’appareil, vous
pouvez dans la plupart des cas, éviter d’appeler le service après-vente en consultant ce chapitre pour trouver une réponse à
votre question. En commençant par le tableau ci-dessous, vous pourrez ainsi avoir accès à de l'information qui comprend les
problèmes courants, leurs causes et les solutions suggérées.
Machine à glaçons automatique
Problème Cause possible Solution courante
La machine à glaçons ne
fabrique pas de glace.
La machine à glaçons ne
fabrique pas assez de
glace.
La machine à glaçons
n’arrête pas de produire
des glaçons.
Les glaçons collent
ensemble.
• La machine à glaçons est désactivée.
• Le réfrigérateur n’est pas raccordé à la conduite
d’eau ou le robinet n’est pas ouvert.
• La conduite d’alimentation en eau est tordue.
• Le fi ltre à eau n’est pas bien installé.
• Il est possible que le fi ltre à eau soit obstrué par un
corps étranger.
• Le robinet-vanne à étrier du tuyau d’eau froide
est bouché ou partiellement obstrué par un corps
étranger.
• La machine à glaçons produit moins de glace que la
quantité à laquelle vous vous attendiez.
• Il est possible que le fi ltre à eau soit obstrué par un
corps étranger.
• La conduite d’alimentation en eau est tordue.
• Le robinet-vanne à étrier du tuyau d’eau froide
est bouché ou partiellement obstrué par un corps
étranger.
• Trafi c lourd, ouverture ou fermeture des portes
excessivement.
• La commande du congélateur est réglée trop chaud
(machine à glaçons du congélateur).
• La pression d’eau est extrêmement faible. Les
pressions de coupure et de reprise sont trop faibles
(systèmes à fontaine uniquement).
• Le système d’osmose inverse est en phase de
régénération.
• Un article dans la congélateur s’appuie contre le fi l
métallique du levier de signalisation de la machine à
glaçons et le maintient abaissé.
• Les glaçons ne sont pas utilisés assez fréquemment.
• Les glaçons sont creux (des coquilles de glace contenant
de l’eau qui n’est pas encore gelée). Les glaçons creux
se brisent dans le bac et répandent de l’eau sur les
glaçons qui s’y trouvent déjà, de sorte que les glaçons
s’agglomèrent ensemble en gelant.
• Mettez la machine à glaçons en marche, abaissez le fi l
métallique du levier de signalisation.
• Raccordez l’appareil à l’alimentation en eau domestique et
assurez-vous que le robinet est ouvert.
• Assurez-vous que le tuyau d’alimentation en eau n’est pas tordu
quand vous poussez le réfrigérateur pour le remettre en place
contre le mur.
•Retirez et réinstallez le fi ltre à eau. Assurez-vous de pousser
fermement sur le fi ltre afi n de l’entendre s’enclencher solidement
en place.
• Si l’eau du distributeur coule lentement ou à peine, ou si le
fi ltre est en place depuis six mois ou plus, il faut le remplacer.
• Fermez le robinet de la conduite d’eau domestique. Enlevez le
robinet. Assurez-vous que le robinet n’est pas un robinet-vanne
à étrier autoperceur. Nettoyez le robinet. Remplacez le robinet, si
nécessaire.
• Les machines à glaçons automatique chacune environ 0,9 à
1,1 kg (2 à 2,5 lb) de glace par période de 24 heures.
• Si le fi ltre est en place depuis six mois ou plus, il faut le remplacer.
• Assurez-vous que le tuyau d’alimentation en eau n’est pas tordu
quand vous poussez le réfrigérateur pour le remettre en place
contre le mur.
• Fermez le robinet de la conduite d’eau domestique. Enlevez le
robinet. Assurez-vous que le robinet n’est pas un robinet-vanne
à étrier autoperceur. Nettoyez le robinet. Remplacez le robinet, si
nécessaire.
• Appuyez sur Fast Freeze (congélation rapide) pour augmenter
provisoirement le taux de production de glaçons. (Machine
à glaçons du congélateur uniquement.)
• Régler la commande du congélateur à plus froid pour
améliorer le rendement de la machine à glaçons (machine
à glaçons du congélateur). Attendre 24 heures pour que la
température se stabilise.
• Faire augmenter la pression de coupure et de reprise sur le
système de pompe à eau (systèmes à fontaine uniquement).
• Il est normal pour un système d’osmose inverse d’être
inférieure à 20 psi (1,4 bar) pendant la phase de régénération.
• Déplacez l’objet et dégagez le fi l métallique du levier de
signalisation. Enlevez les glaçons qui pourraient être soudés au
fi l métallique du levier de signalisation.
• Retirez le bac à glaçons et jetez les glaçons. La machine à glaçons
produira de nouveaux glaçons. Pour que les glaçons ne collent
pas les uns aux autres, il faut utiliser la machine à glaçons au moins
deux fois par semaine.
• Ceci se produit en général quand la machine à glaçons ne reçoit
pas suffi samment d’eau. Habituellement, ce problème est causé
par un fi ltre à eau obstrué. Remplacez le fi ltre à eau.
Présence d'odeurs dans le réfrigérateur
Problème Cause possible Solution courante
L’intérieur est sale.
Odeurs
L’intérieur doit être nettoyé.
Il y a des aliments qui dégagent une forte odeur
dans le réfrigérateur.
25-FR
Reportez-vous à la section « Conseils d'entretien et de
nettoyage ».
Couvrez bien les aliments. Le fi ltre à air peut avoir besoin
d'être changé plus fréquemment si des aliments dégageant
une forte odeur sont régulièrement conservés dans le
réfrigérateur.

Solutions aux problèmes courants
Ouverture et fermeture des portes et des tiroirs
Problème Cause possible Solution courante
Les portes ne ferment
pas.
Les tiroirs sont diffi ciles
à déplacer.
Fonctionnement du réfrigérateur
Problème Cause possible Solution courante
Le compresseur ne
fonctionne pas.
Le réfrigérateur
fonctionne trop souvent
ou trop longtemps.
Les affi cheurs
numériques de
température clignotent.
Le réfrigérateur n'est pas de niveau. Il oscille sur
le plancher lorsque vous le bougez légèrement.
Un objet est tombé de l'un des paniers et
empêche la porte de se fermer.
Les aliments touchent la clayette au-dessus du tiroir.
Le tiroir est surchargé
Le système de refroidissement est arrêté.
Un cycle de dégivrage est en cours.
La fi che est débranchée de la prise murale.
Les fusibles domestiques sont grillés ou le
disjoncteur du circuit est déclenché.
Panne de courant.
Votre compresseur à vitesse variable est conçu pour
fonctionner à 100 % du temps sauf pendant le cycle
de dégivrage. Tantôt il ira plus vite, tel qu’après un
cycle de dégivrage
Le système de commande électronique a détecté
un problème de fonctionnement.
Assurez-vous que le plancher est solide, de niveau et qu’il
peut supporter le poids du réfrigérateur de façon adéquate.
Adressez-vous à un menuisier pour corriger l'affaissement ou
la pente du plancher.
Assurez-vous que le tiroir n'est pas bloqué par de la
glace ou un aliment.
Rangez moins d’aliments dans le tiroir.
Retirez ou redistribuez les aliments.
Mettez le système de refroidissement en marche.
Reportez-vous à la section « Commandes » pour
connaître l'emplacement de l'interrupteur du système de
refroidissement.
Il s’agit d’une condition normale pour un réfrigérateur
à dégivrage automatique. Le cycle de dégivrage a lieu
de façon périodique et il dure environ 30 minutes.
Assurez-vous que la fi che est bien enfoncée dans la
prise.
Vérifi ez/remplacez le fusible temporisé de 15 A.
Réinitialisez le disjoncteur du circuit.
Vérifi ez les lumières de la maison. Appelez la compagnie
d'électricité.
Il est normal que le compresseur fonctionne
continuellement, sauf durant le mode dégivrage.
Téléphonez à votre représentant du service après-vente qui
pourra vous donner la signifi cation des divers messages et
des codes qui clignotent sur les affi cheurs numériques.
Températures trop froides
Problème Cause possible Solution courante
La température du
congélateur est trop
froide. La température du
réfrigérateur est correcte.
La température du
réfrigérateur est trop
froide. La température du
congélateur est adéquate.
Les aliments rangés dans
les bacs gèlent.
Les aliments rangés dans
la Zone Froide gèlent
La fonction de congélation rapide (Fast Freeze) est
activée.
La commande de la température du congélateur
a été ajustée à un niveau trop bas.
La machine à glaçons est activée.
La fonction de fabrication rapide de glaçons
(Fast Ice) est activée.
La commande de la température du réfrigérateur
a été réglée à un niveau trop bas.
La commande de la température du réfrigérateur
a été réglée à un niveau trop bas.
La commande de la température de la Zone
Froide a été réglée à un niveau trop bas.
26-FR
Désactivez la fonction de congélation rapide.
Ajustez la commande du congélateur à un réglage plus
chaud. Allouez 24 heures pour permettre à la température
de se stabiliser.
Il est normal que le compartiment du congélateur
refroidisse davantage lorsque la machine à glaçons est
activée.
Désactivez la fonction de fabrication rapide de glaçons.
Ajustez la commande du réfrigérateur à un réglage
plus chaud. Allouez 24 heures pour permettre à la
température de se stabiliser.
Reportez-vous à la solution donnée ci-dessus.
Ajustez la commande de température de la zone de
refroidissement à un réglage plus élevé. Pour que les
viandes préservent le maximum de fraîcheur, celles-ci
doivent être conservées à une température juste audessous du point de congélation. Il est normal de voir
apparaître des cristaux de glace sur la viande à cause de
sa teneur en humidité.

Solutions aux problèmes courants
Températures trop chaudes
Problème Cause possible Solution courante
La température à l’intérieur du
réfrigérateur/congélateur est
trop chaude.
La température du congélateur
est trop chaude. La
température du réfrigérateur
est correcte.
La température à l’intérieur du
réfrigérateur est trop chaude.
La température du congélateur
est adéquate.
La température dans le tiroir
de la zone de refroidissement
ou le tiroir Zone Froide est trop
chaude (certains modèles).
Présence d'eau/d'humidité/de givre à l'intérieur du réfrigérateur
Problème Cause possible Solution courante
De l’humidité apparaît sur
les parois intérieures du
réfrigérateur.
De l’eau s’accumule sur la
surface intérieure du couvercle
de tiroir.
Les portes sont ouvertes trop fréquemment
ou trop longtemps.
La porte est légèrement ouverte.
Le réglage de la commande de la
température du congélateur a été ajusté à
un niveau trop élevé.
Le réglage de la commande du réfrigérateur
est trop chaud.
La commande de température est réglée à
un niveau trop chaud.
La température à l’extérieur est chaude et
humide.
La porte est légèrement ouverte.
La porte est ouverte trop fréquemment ou
trop longtemps.
Certains contenants sont ouverts.
Les légumes laissent échapper l’humidité
qu’ils contiennent.
De l’air chaud pénètre dans le réfrigérateur chaque
fois que la porte est ouverte. Ouvrez la porte moins
fréquemment.
Reportez-vous à la section « Problème », à la partie
« Ouverture et fermeture des portes et des tiroirs ».
Ajustez la commande du congélateur à un réglage
plus froid. Allouez 24 heures pour permettre à la
température de se stabiliser.
Ajustez la commande du réfrigérateur à un réglage
plus froid. Allouez 24 heures pour permettre à la
température de se stabiliser.
Ajustez la commande de température à un réglage
plus froid.
L’accumulation de givre et d’humidité à l’intérieur
de la caisse augmente.
Reportez-vous à la section « Problème », à la
partie « Ouverture et fermeture des portes et des
tiroirs ».
Ouvrez la porte moins souvent pour permettre à la
température interne de se stabiliser.
Gardez les contenants fermés.
La formation d'humidité sur le côté inférieur du
couvercle est fréquente.
Ajustez la commande d’humidité (certains
modèles) à un réglage plus bas.
De l’humidité s’accumule au
fond du tiroir.
De l’humidité apparaît à
l’extérieur du réfrigérateur ou
entre les portes.
Les fruits et les légumes lavés s’égouttent une
fois déposés dans le tiroir.
Des fruits et des légumes sont conservés
malgré qu'ils soient moins frais.
Le taux d'humidité à l'extérieur est élevé.
La porte est légèrement ouverte et l’air froid
de l’intérieur du réfrigérateur rencontre l’air
chaud de l’extérieur.
27-FR
Asséchez les aliments avant de les déposer dans
le tiroir. Une accumulation d’eau au fond du tiroir
est normale.
Enlevez régulièrement les fruits et les légumes
trop mûrs, particulièrement s'ils commencent à se
détériorer.
Ceci est normal si le taux d'humidité à l'extérieur
est élevé. Lorsque les conditions météorologiques
seront moins humides, l’humidité disparaîtra.
Reportez-vous à la section « Problème », à la
partie « Ouverture et fermeture des portes et des
tiroirs ».

Service après-vente
Si un SAV s’impose, appelez votre revendeur ou un centre de réparation agréé Viking. Vous pouvez obtenir les
coordonnées du centre de réparation agréé le plus proche auprès de votre revendeur ou distributeur.
Tenez-vous prêt à fournir les informations suivantes.
• Numéro de modèle
• Numéro de série
• Date d’achat
• Nom du revendeur où vous avez fait l’achat
Décrivez clairement le problème. Si vous ne pouvez pas obtenir les coordonnées d’un centre de réparation agréé le plus
proche ou si vos problèmes persistent, contactez la Viking Range, LLC au 1-888-845-4641 ou écrivez à :
VIKING RANGE, LLC
PREFERRED SERVICE
111 Front Street
Greenwood, Mississippi 38930 États-Unis
Notez les informations indiquées ci-dessous. Vous en aurez besoin pour tout service après-vente nécessaire. Le numéro de
série et le numéro de modèle de votre réfrigérateur se situe sur la paroi supérieure, derrière l’éclairage :
N° de modèle __________________________________ N° de série ________________________________________
Date d’achat ____________________________________Date d’installation __________________________________
Nom du revendeur __________________________________________________________________________________
Adresse ___________________________________________________________________________________________
___________________________________________________________________________________________________
___________________________________________________________________________________________________
Si le dépannage exige l’installation de pièces, utilisez uniquement des pièces agréées pour être sûr d’être couvert dans le
cadre de la garantie.
Conservez ce manuel à titre de référence ultérieure.
28-FR

Garantie
RÉFRIGÉRATEUR À PORTES FRANÇAISES/CONGÉLATEUR EN BAS - GARANTIE
Les réfrigérateurs/congélateurs verticaux/juxtaposés/réfrigérateurs seulement ou congélateurs seulement encastrés et tous leurs composants,
sauf indication contraire ci-dessous*†, sont garantis contre tout défaut de matériel ou vice de fabrication lors d’une utilisation normale au
domicile d’un particulier pendant une période d’un (1) an à partir de la date d’achat chez le revendeur. Viking Range, LLC, le garant, accepte de
réparer ou remplacer, à son choix, toute pièce défaillante ou défectueuse pendant la période de garantie.
*GARANTIE COSMÉTIQUE COMPLÈTE DE QUATRE-VINGT-DIX (90) JOURS : Le produit est garanti comme étant dépourvu de défauts
cosmétiques de matériaux ou de fabrication (notamment rayures sur l’inox, taches sur la peinture/porcelaine, etc.) pendant une période de
quatre-vingt-dix (90) jours à partir de la date de l’achat initial chez le détaillant ou de la date de fermeture pour travaux, selon la plus longue
des deux périodes. Tout défaut devra être signalé au revendeur dans les quatre-vingt-dix (90) jours de la date d’achat initiale chez le revendeur.
Viking Range, LLC utilise des procédés et des matériaux de haute qualité pour produire toutes les fi nitions couleur. Toutefois, de légers écarts
de couleur pourront être remarqués en raison des différences inhérentes aux composants peints et en porcelaine, de même qu’aux différences
d’éclairage en cuisine, d’emplacement des produits et d’autres facteurs. Par conséquent, cette garantie ne s’applique pas aux variations de
couleur imputables à de tels facteurs.
†GARANTIE DE QUATRE-VINGT-DIX (90) JOURS POUR APPLICATIONS « RÉSIDENTIELLE PLUS » : Cette garantie complète concerne les
applications où l’utilisation du produit dépasse le cadre d’une utilisation résidentielle normale, mais où la période de garantie pour les produits
utilisés dans de telles applications est de quatre-vingt-dix (90) jours. Citons entre autres applications couvertes par cette garantie les gîtes du
passant, les casernes de pompiers, les clubs privés, les églises, les yachts, etc. Dans le cadre de cette garantie « Résidentielle Plus », le produit,
ses composants et ses accessoires sont garantis comme étant dépourvus de matériaux défectueux ou vice de fabrication pendant une période
de quatre-vingt-dix (90) jours à partir de la date de l’achat initial chez le revendeur. Cette garantie exclut l’utilisation du produit dans tous les
sites commerciaux tels que les restaurants, les libres-services et les services de restauration d’entreprise.
GARANTIE COMPLÈTE DE SIX ANS SUR LES COMPOSANTS DE RÉFRIGÉRATION ÉTANCHES INDIQUÉS
Tout composant du circuit frigorifi que fermé, comme indiqué ci-dessous, est garanti contre tout défaut de matériel ou vice de fabrication lors
d’une utilisation normale à domicile au cours de la 4e à la 6e année, à partir de la date d’achat initial chez le revendeur. Viking Range, LLC, le
garant, accepte de réparer ou remplacer, à son choix, toute pièce défaillante ou défectueuse pendant la période de garantie.
Composants du circuit frigorifi que fermé : compresseur, évaporateur, condenseur, tube de raccordement, déshydratateur-fi ltre
GARANTIE LIMITÉE DE DOUZE ANS SUR LES COMPOSANTS DE RÉFRIGÉRATION ÉTANCHES INDIQUÉS
Tout composant du circuit frigorifi que fermé, comme indiqué plus haut, qui tombe en panne en raison de matériels défectueux ou de vices de
fabrication lors d’une utilisation normale au domicile d’un particulier durant la septième année jusqu’à la douzième année inclusivement, à partir
de la date d’achat initial sera réparé ou remplacé, gratuitement pour ce qui est de la pièce elle-même, le propriétaire prenant en charge tous les
autres coûts, notamment la main-d’œuvre.
Cette garantie est donnée à l’acheteur initial du produit garanti en ceci et à chaque propriétaire cessionnaire du produit durant la période de
garantie, et elle s’applique aux produits achetés et situés aux États-Unis et au Canada. Les produits devront être achetés dans le pays où le service après-vente est requis. Si le produit ou un de ses composants présente un défaut ou un dysfonctionnement pendant la période de garantie
complète, après un nombre raisonnable de tentatives par le garant pour remédier au défaut ou dysfonctionnement, le propriétaire aura droit à
un remboursement ou à un remplacement du produit ou de ses composants. Le remplacement d’un composant inclut son installation gratuite,
sauf indication contraire dans la garantie limitée. Dans le cadre de cette garantie, la réparation devra être effectuée par un représentant ou un
centre de réparation agréé Viking Range, LLC. La réparation sera effectuée aux heures normales d’ouverture et les heures supplémentaires ou
tarifs majorés pour la main-d’œuvre ne seront pas pris en charge par cette garantie.
GARANTIE COMPLÈTE D’UN AN
TERMES ET CONDITIONS
Le propriétaire sera responsable d’une installation correcte, d’une maintenance raisonnable et nécessaire, de la communication d’un justifi catif
d’achat sur demande et de l’accessibilité de l’appareil pour maintenance. Le renvoi de la carte d’enregistrement du propriétaire n’est pas une
condition de couverture sous garantie. Vous devrez toutefois renvoyer la carte d’enregistrement du propriétaire pour permettre à la Viking
Range, LLC de prendre contact avec vous au sujet de problèmes de sécurité éventuels pouvant vous concerner.
Cette garantie vous donne des droits légaux spécifi ques et vous pourrez également avoir d’autres droits, variables d’une juridiction à l’autre.
CE QUI N’EST PAS COUVERT PAR CETTE GARANTIE : Cette garantie ne s’appliquera pas aux dommages résultant d’une utilisation abusive,
d’un manque d’entretien raisonnable et nécessaire, d’un accident, d’une livraison, d’un acte de négligence, d’une catastrophe naturelle, d’une
coupure de courant pour une raison quelconque, d’une altération, d’une utilisation extérieure, d’une installation ou d’une utilisation impropre,
ou d’une réparation ou maintenance dont l’auteur n’est pas un représentant ou un centre de réparation agréé Viking Range, LLC. Cette garantie
ne s’applique pas à une utilisation commerciale.
LE SEUL RECOURS EXCLUSIF DU PROPRIÉTAIRE POUR UNE RÉCLAMATION QUELCONQUE CONCERNANT CE PRODUIT SE RÉSUME
AUX RECOURS DÉFINIS PLUS HAUT. VIKING RANGE, LLC N’EST PAS RESPONSABLE DE DOMMAGES INDIRECTS OU ACCESSOIRES, Y
COMPRIS MAIS SANS S’Y LIMITER LA PERTE D’ALIMENTS OU DE MÉDICAMENTS CAUSÉE PAR LA PANNE DU PRODUIT, UNE VIOLATION DE LA GARANTIE, UNE VIOLATION DU CONTRAT OU AUTRE. Certaines juridictions n’autorisant PAS l’exclusion ou la limitation des
dommages indirects ou accessoires, la limitation ou les exclusions ci-dessus pourraient ne pas s’appliquer à votre cas. Toute garantie tacite de
qualité commerciale ou d’adaptation à un but particulier applicable à ce produit est limitée à la période de couverture des garanties limitées
écrites expresses applicables défi nies plus haut. Certaines provinces n’autorisant pas les limitations de durée de garantie, il est possible que la
limitation ci-dessus ne vous concerne pas.
Pour obtenir une réparation sous garantie, contactez un centre de réparation Viking Range, LLC agréé ou la Viking Range, LLC, 111 Front Street,
Greenwood, Mississippi 38930, (888) 845-4641. Fournissez les numéros de modèle et de série et la date d’achat initial ou la date de fi n de la
nouvelle construction. Pour obtenir le nom du centre de réparation agréé Viking Range, LLC le plus proche, appelez la Viking Range, LLC. IMPORTANT : Conservez le justifi catif d’achat initial qui permettra d’établir la période de garantie.
LIMITATION DES RECOURS ET DURÉE DE GARANTIE TACITE
RÉPARATION SOUS GARANTIE
Caractéristiques techniques sujettes à modifi cation sans préavis.
29-FR

30-FR

Dónde obtener información
Lea y conserve este manual.
Esperamos que disfrute y aprecie el cuidado y la atención
que hemos puesto en cada detalle de su nuevo e innovador refrigerador.
Su electrodoméstico está diseñado para ofrecerle años de
servicio confi able. Este manual de uso y cuidado contiene
la información que necesita para familiarizarse con el
cuidado y la operación de su refrigerador.
Agradecemos que haya y esperamos que vuelva a seleccionar nuestros productos cuando necesite otro electrodoméstico para su hogar.
NOTA
Al registrar su producto con Viking Range, LLC nos
permite servirle mejor. Puede registrar su producto en
línea en
www.vikingrange.com o enviando su tarjeta de registro
por correo.
¿Preguntas?
Nuestra meta principal es su completa satisfacción. Si
tiene preguntas o comentarios sobre este producto,
comuníquese con la distribuidora donde lo compró, o
comuníquese con el Centro de Apoyo al Consumidor llamando al 1-888-845-4641.
Índice
Dónde obtener información ..............................................1
Seguridad ..........................................................................2
Descripción de las características/funciones .....................4
Instalación..........................................................................5
Desmontaje de las puertas ................................................8
Se encarga de sacar las puertas .....................................10
Conexión del suministro de agua ....................................11
Controles .........................................................................12
Distribuidor/fabricador automático de hielo y agua .......14
Características del almacenamiento interior ...................15
Almacenamiento de alimentos y ahorro de energía .......19
Sonidos y señales normales de funcionamiento .............20
Para cambiar los fi ltros de agua y aire .............................21
Cuidado y limpieza ..........................................................23
Soluciones de problemas comunes .................................25
Información sobre el servicio ...........................................28
Si desea más información sobre la variedad completa y creciente de productos, comuníquese con su distribuidora o
visítenos en línea en vikingrange.com.
Lista de verifi cación de instalación
Puertas
Las manijas están fi rmemente instaladas
La puerta se cierra bien contra el refrigerador en
todos los costados
Nivelación
El refrigerador está nivelado de lado a lado e
inclinado ¼” (6 mm) de adelante hacia atrás
La rejilla inferior está fi rmemente instalada en el
refrigerador
El refrigerador descansa fi rmemente sobre sus
cuatro esquinas.
Suministro eléctrico
El suministro eléctrico del hogar está activado
El refrigerador está enchufado
Garantía ...........................................................................29
Fabricador de hielo
El suministro de agua está conectado al
refrigerador
No hay escapes en ninguna de las uniones; vuelva
a verifi car a las 24 horas
El fabricador de hielo está ENCENDIDO
El fi ltro delantero debe estar al ras del alojamiento
del fi ltro (algunos modelos)
Inspección fi nal
Material de empaque removido
Temperaturas del refrigerador y congelador
programadas
Controles de humedad del cajón para verduras
programados
Tarjeta de registro enviada
1-SP

Seguridad
Instrucciones importantes de seguridad
Precauciones de seguridad
No intente instalar o usar su producto hasta haber leído
las precauciones de seguridad indicadas en este manual.
Las indicaciones de seguridad que contiene este manual
van precedidas por el título “Peligro”,“Advertencia”
o “Precaución”, de acuerdo con el nivel de riesgo.
Defi niciones
Este es el símbolo de alerta de seguridad. Se usa para
alertar sobre peligros potenciales de lesiones personales.
Obedezca todos los mensajes de seguridad que tengan este
símbolo para evitar posibles lesiones personales o la muerte.
PELIGRO
PELIGRO indica una situación de peligro inminente que, si
no se evita, podría causar lesiones graves o la muerte.
ADVERTENCIA
ADVERTENCIA indica una situación potencialmente
peligrosa que, si no se evita, podría causar lesiones
graves o la muerte.
PRECAUCIÓN
PRECAUCIÓN indica una situación potencialmente
peligrosa que, si no se evita, podría causar lesiones
personales leves o moderadas.
• Quite todas las grapas de la caja de cartón, a fi n
de evitar lesiones. Las grapas pueden causar cortes
graves y dañar los acabados si entran contacto con
otros artefactos o muebles.
Seguridad de los niños
Materiales de empaque:
• Las cajas de cartón cubiertas con alfombras, colchas,
hojas de plástico o envolturas elastizadas y cualquier
otro material de empaque pueden convertirse en
cámaras sin aire y causar asfi xia rápidamente.
• Destruya o recicle inmediatamente la caja de cartón,
las bolsas de plástico y cualquier otro material de
empaque exterior después de que el refrigerador
sea desempacado. Los niños nunca deben jugar con
estos artículos.
Atrapamiento y asfi xia de niños:
• Estos problemas no son sólo del pasado. Los
refrigeradores y congeladores abandonados,
desechados o guardados temporalmente
(aún durante unas pocas horas) que se dejen
desatendidos siguen siendo peligrosos. Debe tomar
las precauciones que se indican a continuación.
Cómo desechar adecuadamente los refrigeradores y
congeladores
Recomendamos usar métodos de reciclaje y eliminación
responsables. Consulte con su compañía eléctrica local
o visite www.energystar.gov/recycle para obtener más
información sobre cómo reciclar su refrigerador viejo.
IMPORTANTE
Indica información de instalación, funcionamiento o
mantenimiento que es importante, pero que no está
relacionada con la seguridad.
Seguridad general
ADVERTENCIA
Lea todas las instrucciones de seguridad antes de usar su
nuevo refrigerador.
• No almacene ni use gasolina ni otros líquidos
infl amables en la proximidad de este o de cualquier
otro electrodoméstico. Lea las etiquetas de los
productos para informarse sobre la infl amabilidad y
otros peligros.
• No haga funcionar el refrigerador en la presencia de
vapores explosivos.
• Evite entrar en contacto con las piezas móviles de la
máquina automática de hacer hielo.
Antes de reciclar o desechar su refrigerador o congelador
viejo.
• Retire las puertas.
• Deje los compartimientos y cestas en su lugar, de
modo que los niños no puedan entrar o trepar con
facilidad en este espacio interior.
• Solicite a un técnico de servicio califi cado que retire
el refrigerante y el aceite del compresor.
2-SP

Seguridad
IMPORTANTE
ELIMINACIÓN DE CFC/HCFC
Es posible que su frigorífi co antiguo cuente con un
sistema de refrigeración que utilice CFC o HCFC
(clorofl uorocarburos o hidroclorofl uorocarburos).
Se considera que si los CFC y HCFC se emiten a la
atmósfera pueden dañar el ozono estratosférico.Es
posible que otros refrigerantes también perjudiquen
el medio ambiente si se emiten a la atmósfera.
En caso de que vaya a tirar su frigorífi co antiguo,
asegúrese de que un técnico cualifi cado se encarga
de retirar el refrigerante para su correcta eliminación.
Si emite refrigerantes de manera intencionada,
puede ser objeto de multas o encarcelamiento
conforme a las disposiciones de la legislación en
materia de medio ambiente.
Información eléctrica
ADVERTENCIA
Usted debe seguir estas indicaciones para asegurarse
de que los mecanismos de seguridad de su refrigerador
estén funcionando en forma correcta.
• El refrigerador debe ser enchufado en su propio
tomacorriente eléctrico dedicado de 115 voltios, 60
Hz., CA sin protección de falla de conexión a tierra.
El cordón eléctrico está equipado con un enchufe
de tres clavijas para su protección contra riesgos de
choque eléctrico. Debe ser enchufado directamente
a un tomacorriente debidamente puesto a tierra
provisto de tres alvéolos. El tomacorriente debe ser
instalado de acuerdo con los códigos y reglamentos
locales. Consulte a un electricista califi cado. No use
un cable de extensión ni un adaptador.
• Si se daña el cordón eléctrico, debe ser reemplazado
por el fabricante, por un técnico de servicio o por
una persona califi cada.
• Nunca desenchufe el refrigerador tirando del cordón
eléctrico. Siempre sujete fi rmemente el enchufe y tire
en dirección recta hacia afuera del tomacorriente,
para evitar dañar el cable eléctrico.
• Para evitar sufrir un choque eléctrico, desenchufe
el refrigerador antes de la limpieza y antes de
reemplazar una bombilla o luz LED.
• Una variación de voltaje de 10% o más puede afectar
el rendimiento del refrigerador. Si el refrigerador
funciona con energía insufi ciente se puede dañar
el compresor. Este daño no está cubierto por la
garantía.
• No enchufe el refrigerador a un tomacorriente
controlado por un interruptor de pared o por un
interruptor de cordón pues el refrigerador puede ser
apagado accidentalmente.
Tomacorriente con puesta
a tierra
No corte, retire
ni deshabilite la
clavije de conexión
a tierra bajo ninguna
circunstancia.
Cordón eléctrico de
3 clavijas con puesta
a tierra
IMPORTANTE
Para apagar el refrigerador, desenchufe el cordón
eléctrico del tomacorriente.
3-SP

Descripción de las características
Descripción de las características y terminología
Su refrigerador fue diseñado para ofrecer la mayor conveniencia y fl exibilidad de almacenamiento de alimentos. La
ilustración siguiente lo ayudará a familiarizarse con las características del producto y la terminología utilizada.
NOTA
Las características pueden variar según el modelo. La ilustración muestra el modelo sin
cubierta del cajón de congelar.
Estantes
ajustables
a prueba
de derrames
Cajón para las
verduras
Soporte para
articulos
especiales (en
el interior del
TCZ)
Bisagras
ajustables
Guía de la aleta
Fabricador
de hielo
Depósito
de hielo
Luz LED
Filtro
de agua
Compartimiento
cerrado de la puerta
Aleta
parteluz
Filtro de
aire
Estantes
ajustables
a prueba
de derrames
Cajón para
las verduras
Compartimiento
inclinable
Temperatura
ajustable
zona fría cajón
Cestas
del congelador
Rejilla inferior
Compartimiento inclinable de alambre
(cajón interior del congelador)
IMPORTANTE
Los dispositivos no incluidos con su refrigerador se pueden comprar en www.vikingrange.com o llamando al 1-888845-4641
4-SP

Instalación
Herramientas necesarias
Usted necesitará las siguientes herramientas:
Piezas proporcionadas:
Tornillo delantero
de la cubierta
de la bisagra
superior
Tornillo de
la bisagra
superior
Tornillo de
la bisagra
inferior
Tornillo trasero
de la cubierta
de la bisagra
superior
Herramientas necesarias:
(O bien)
Destornillador
Phillips o
Quadrex
Esta Guía de uso y cuidado le proporciona instrucciones
generales de instalación y funcionamiento para su modelo
de electrodoméstico. Recomendamos contratar a un
profesional de servicio o de remodelaciones para instalar
el refrigerador. Use su refrigerador solamente como se
indica en esta Guía de uso y cuidado. Antes de encender el
refrigerador, siga estos importantes primeros pasos.
Ubicación
• Elija un lugar que se encuentre próximo a un
tomacorriente con conexión a tierra sin protección
de falla de conexión a tierra. No utilice un cable de
extensión ni un adaptador.
• Si es posible, coloque el refrigerador en un lugar
donde no reciba luz solar directa. Colóquelo lejos de
la estufa, del lavavajillas automático y de cualquier
otra fuente de calor.
• El refrigerador debe ser instalado en un piso que
tenga la superfi cie nivelada y que resista el peso del
refrigerador completamente cargado.
• Tenga en cuenta la disponibilidad de suministro
de agua en aquellos modelos que incluyen un
fabricador automático de hielo.
PRECAUCIÓN
Y
Llave Allen
de 6mm
Y
Llave de cubo
de Ǫ" y ¼"
(O bien)
(O bien)
Llave
inglesa
Llave
fija de Ǫ"
Instalación
• Deje los siguientes espacios libres para facilitar la
instalación del refrigerador, la circulación adecuada
del aire y las conexiones eléctricas y de plomería:
Costados y parte superior ⅜" (9,5 mm)
Parte trasera 1" (25,4 mm)
NOTA
Si instala su refrigerador con las bisagras contra una
pared, es posible que deba dejar un mayor espacio libre
para poder abrir la puerta completamente.
Apertura de la puerta
NOTA
Las puertas del refrigerador están diseñadas para cerrarse
por sí solas a un ángulo de abertura de 20 grados.
El refrigerador debe instalarse de manera que, al extraer
alimentos de su interior, permita el acceso a un mostrador.
Para poder usar mejor los cajones y las cestas del
refrigerador, el mismo debe estar en una posición en la que
ambas puertas puedan abrirse completamente.
NO instale el refrigerador en lugares donde la
temperatura descienda de los 55°F (13°C) o se eleve
por encima de los 110°F (43°C). El compresor no podrá
mantener las temperaturas adecuadas dentro del
refrigerador.
NO bloquee la rejilla inferior en la parte delantera de la
base del refrigerador. Se necesita circulación sufi ciente
de aire para asegurar el funcionamiento adecuado del
refrigerador.
PRECAUCIÓN
NO afl oje ni retire estos tres (3) tornillos
hexagonales.
hexagonales
5-SP
NO afloje
ni retire
estos
tres
tornillos

Instalación
z
Nivelación del refrigerador y ajuste de
las puertas (de ser necesario)
Pautas para el posicionamiento fi nal de su refrigerador:
• Las cuatro esquinas del gabinete deben estar
fi rmemente apoyadas en el piso.
• Los costados deben inclinarse ¼ de pulgada (6 mm)
del frente hacia atrás (para garantizar que las puertas
queden cerradas herméticamente).
• Las puertas deben estar alineadas entre sí y estar
niveladas.
Es posible cumplir la mayoría de esas condiciones elevando
o bajando los rodillos ajustables frontales.
Para nivelar el armario usando las ruedas delanteras:
1 Abra ligeramente el cajón del congelador si está
instalada la rejilla inferior. Levante la rejilla inferior y
tire suavemente hacia abajo.
2 Haga los ajustes iniciales en el mueble utilizando los
tornillos de ajuste de altura de los soportes de rodillo
delanteros. Utilice una llave de cubo de 3/8 pulgadas
para girar los tornillos de ajuste (1 por cada lado)
Para levantar: gire los tornillos de ajuste en el sentido
de las agujas del reloj.
Para bajar: gire los tornillos de ajuste en el sentido
contrario a las agujas del reloj.
3 Asegúrese de que ninguna de las puertas tenga picos
y sus sellos toquen el mueble en los cuatro lados y de
que el mueble esté estable.
4 Una vez nivelada la unidad, baje la pata anti volqueo
utilizando una llave de cubo de 3/8 pulgadas hasta
que esté fi rmemente apoyada en el suelo.
Para realizar ajustes fi nales de la altura de la puerta:
1. Abra el cajón del congelador para que quede visible
la bisagra inferior.
2. Inserte una llave Allen de 6 mm
en el eje de la bisagra inferior.
3. Ajuste la altura girando en el sentido de las agujas del
reloj o en el sentido contrario. Al girar en el sentido
de las agujas la puerta baja. Al girar en el sentido
contrario la puerta sube. El ajuste por defecto al
recibir el aparato es en la altura mínima.
Soulever
Para ajustar la aleta parteluz:
1 Afl oje el tornillo ubicado en la bisagra de la aleta
parteluz.
Aleta
partelu
Puerta
Pata
antibasculement
5 Coloque la rejilla inferior ajustándola bien.
La rejilla inferior
deberá encajar en la
ranura antibloqueo
Puerta
Soulever
Ambaisser
Tornillo
de
fijación
Bisagra
de aleta
parteluz
Ajuste del tornillo de la aleta parteluz
2 Ajuste la altura de la aleta parteluz. Para realizar
adecuadamente la conexión con la guía de la aleta
parteluz, debe haber sufi ciente separación entre la
guía y la aleta parteluz (aproximadamente el grosor
de una moneda, es decir, 0,06" o 1,5 mm).
Guía de
parteluz
Aleta
parteluz
Grosor de
una moneda
(2) enganches de sujeción
Ajuste de la altura de la aleta parteluz
3 Vuelva a apretar el tornillo.
6-SP

Instalación
Características de las bandejas
(Modelos selectos)
PRECAUCIÓN
Saque las bandejas antes de trasladar el frigorífi co.
PRECAUCIÓN
Para evitar lesiones causadas por rotura, manipule
cuidadosamente las bandejas de vidrio templado.
NOTA
Las características pueden variar según el modelo.
Su refrigerador incluye bandejas de vidrio, las cuales
han sido diseñadas para atrapar y contener derrames
accidentales.
Es posible ajustar fácilmente las posiciones de las bandejas en
el refrigerador de acuerdo con sus necesidades. Las bandejas
tienen soportes de montaje que se instalan en los soportes
ranurados en la parte trasera de cada compartimiento.
Para cambiar la posición de una bandeja:
1 Antes de ajustar una bandeja, retire todos los
alimentos que estén encima.
2 Levante el borde delantero hacia arriba y tire de la
bandeja para sacarla.
3 Vuelva a instalar la bandeja insertando los ganchos
del soporte de montaje en las ranuras de soporte
correspondientes.
4 Baje la bandeja y acóplela en su lugar.
Estante completo Custom-Design
MC
Reposicionar la junta estanca
(Bandejas de extracción deslizante):
1 Saque la junta estanca empujando hacia abajo en la
solapa con movimiento de rotación hacia abajo.
2 Coloque la junta estanca hacia la parte exterior de la
bandeja para evitar la torre de aire al volver a colocar
la bandeja.
3 Instale la junta deslizando la pestaña inferior de la
junta hacia arriba y haciéndola entrar en la ranura
posterior inferior de la bandeja con la junta en ángulo
hacia abajo y a continuación tire hacia arriba de la
solapa de la junta hasta que quede bien colocada
en la parte posterior de la bandeja y la solapa quede
a un ángulo de unos 10 grados de la superfi cie
de la bandeja.
Reposicionar la junta estanca
(Canal en la parte posterior)
1. Retire la junta estanca tirando de ella hacia atrás.
2. Coloque la junta estanca hacia el borde exterior de la
bandeja para evitar la torre de aire al volver a colocar
la bandeja.
3. Coloque la junta deslizando el extremo del canal
abierto de la junta sobre el borde posterior de la
bandeja hasta que la junta quede bien ajustada en la
parte posterior de la bandeja y la solapa a un ángulo
de 10 grados de la superfi cie de la bandeja.
o
Junta
estanca
Junta
estanca
7-SP

Desinstalación de las puertas
Atravesar espacios estrechos
Si el frigorífi co no cabe por la entrada, es posible desmontar
las puertas. Compruebe antes las medidas de la entrada.
Preparación para desmontar las puertas:
1 Asegúrese de que el cable de alimentación eléctrica
está desenchufado de la toma de la pared.
2 Abra el cajón congelador y quite la parrilla inferior (ver
sección de Instalación).
3 Saque todos los alimentos de las bandejas de las
puertas y cierre las puertas.
Para extraer las tapas de la bisagra superior:
1 Retire los dos tornillos de cada tapa por encima de
las bisagras superiores de la puerta.
2 Levante el borde interior de la tapa de la bisagra e
inclínela hacia atrás.
Tornillo de
Tapa de
bisagra
superior
Tornillos de
la bisagra
Cables
multipolares
Deje la
bisagra
con la
puerta
Tornillo de
tapa
trasera
Bisagra
superior
tapa frontal
Tornillo de
tapa frontal
Tornillo
inferior
Tornillo de
tapa
trasera
Tornillo
inferior
Bisagra
superior
Tubería
de agua
Tapa de
bisagra
superior
Tornillos de
la bisagra
Para desmontar las puertas del frigorífi co
1 Realice un trazo ligero alrededor de las bisagras
superiores de la puerta con un lápiz. Esto facilita
después la colocación.
2 Desconecte el mazo de cables sujetando fi rmemente
ambos lados del conector, apriete el pestillo y separe.
Quite los dos tornillos de la bisagra superior. Levante
la puerta para extraerla de la bisagra inferior y déjela a
un lado.
3 Suelte el tubo de agua del conector situado detrás del
frigorífi co y tire de él hasta pasarlo por el frontal del
aparato. El conector se suelta al pulsar hacia dentro en
el manguito exterior apretando a la vez el tubo hacia
el conector y, manteniendo la presión en el manguito
tirar del tubo hacia fuera.
NOTA
Tome precauciones a sacar el tubo de agua de la
unidad para no dañarlo.
Deje la
bisagra
con la
puerta
NOTA
NO saque el tornillo de tierra de la bisagra
Pulse
Pulse
Tubería
de agua
Aproximadamente 1,5 m
NOTA
Sacará alrededor de 1,5 metros de tubo de agua de la
parte trasera del frigorífi co.
8-SP

Desinstalación de las puertas
4 Desatornille los tres tornillos de la bisagra inferior y
deslice la bisagra hacia dentro.
Retirada de la bisagra inferior
PRECAUCIÓN
Asegúrese de que las puertas se dejan a un lado en
posición segura donde no puedan caer y provocar
lesiones personales o daños a las puertas o tiradores.
Para volver a montar las puertas
del frigorífi co:
Repita el procedimiento anterior en el sentido contrario.
Desmontaje e instalación de cajón
congelador inferior
PRECAUCIÓN
Cajón es pesado. Tenga cuidado al levantar
Retirar la gaveta del congelador
1. Retire los cuatro tornillos hexagonales del cajón
2. Levante el cajón para extraerio.
No retire los
demás tornillos
NOTA
Después de sustituirlo, el tubo deberá insertarse por
completo hacia arriba hasta la línea de la marca.
Inserte el tubo
hasta la
línea de
la marca
Pulse
Pulse
Tubería
de agua
Aproximadamente 1,5 m
NOTA
Al volver a insertar el tubo y sustituir la tapa de la bisagra
superior, asegúrese de no dañar el tubo.
Una vez colocadas ambas puertas, compruebe que estén
alineadas entre sí y niveladas (consulte la sección Instalación
para ver información más detallada) y vuelva a colocar
la tapa de la bisagra superior.
Quite el tornillo
de cabeza
hexagonal
del cajón
NO afloje
ni retire
estos
tres
tornillos
hexagonales
Reemplazar la gaveta del congelador
1. Baje el cajón para volver a colocar en su sitio.
2. Vuelva a colocar los cuatro tornillos hexagonales del cajón
y apriételos.
9-SP

Se encarga de sacar las puertas
1. Hay 6 pernos de mango en el refrigerador.
2. Deslice el mango tapones sobre montantes de puerta.
3 Apriete el tornillo de ajuste.
Hay 2 tornillos para montaje de la manija.
4 Repita con todos los conjuntos de mango 3.
10-SP

Conexión del suministro de agua
Para conectar la tubería de suministro de agua con la
ADVERTENCIA
Para evitar choques eléctricos, los cuales pueden causar la
muerte o lesiones graves, desconecte el refrigerador del
suministro eléctrico antes de conectar una tubería de suministro
de agua al refrigerador.
PRECAUCIÓN
Para evitar daños a la propiedad:
• Se recomienda el uso de tuberías tejidas de cobre o de acero
inoxidable para el suministro de agua. No se recomienda el
uso de tuberías de suministro de agua de plástico de ¼". Las
tuberías de plástico aumentan la posibilidad de escapes de
agua, por lo que el fabricante no se hará responsable por ningún
daño si las utiliza para el suministro.
• NO instale la tubería de suministro de agua en áreas donde
las temperaturas puedan llegar a estar por debajo de los 32°F
(0°C).
• Las sustancias químicas provenientes de un suavizador de
agua defectuoso pueden dañar el fabricador de hielo. Si el
fabricador de hielo está conectado a un suavizador de agua,
asegúrese de que dicho suavizador reciba mantenimiento y
que funcione correctamente.
IMPORTANTE
Asegúrese de que las conexiones de la tubería de suministro de
agua cumplan con todas las normas locales de plomería.
Para instalar la tubería de suministro de agua se necesita lo
siguiente:
• Herramientas básicas: llave ajustable, destornillador plano y
destornillador PhillipsMC.
• Acceso a una tubería de agua fría de la vivienda con
presión entre 30 y 100 psi.
• Una tubería de cobre o de acero inoxidable para suministro
de agua de ¼” (6,4 mm) de diámetro externo. Para
determinar la longitud necesaria de la tubería, mida la
distancia desde la válvula de admisión del fabricador de
hielo (en la parte trasera del refrigerador) hasta la tubería
de agua fría. Luego agregue aproximadamente 7 pies
(2,1 m) de tubería para poder sacar el refrigerador para la
limpieza (como se muestra).
• Una válvula de cierre para conectar la tubería de suministro
de agua al sistema de tuberías de su vivienda. NO use una
válvula de asiento autoperforante de cierre.
• No vuelva a utilizar los accesorios de compresión ni utilice
cinta para sellar roscas.
• Una tuerca de compresión y una guarnición (manguito) para
conectar la tubería de cobre del suministro de agua a la
válvula de admisión del fabricador de hielo.
NOTA
Consulte las autoridades locales de construcción para obtener
recomendaciones para las tuberías de agua y los materiales
correspondientes antes de instalar el refrigerador nuevo.
Dependiendo de los códigos locales y estatales de construcción,
Viking Range, LLC recomienda el uso del kit de tubería de agua
054414-000 (con una tubería de acero inoxidable para agua de 6
pies) para los hogares con válvulas de agua preexistentes y el kit
de tubería de agua 054415-000 (con una tubería de cobre para
agua de 20 pies con válvula de asiento autoperforante) para los
hogares sin válvulas de agua. Visite la página www.vikingrange.
com para obtener más información.
válvula de admisión del fabricador de hielo
1. Desconecte el refrigerador del suministro eléctrico.
2. Coloque el extremo de la tubería de suministro de agua en
un fregadero o un cubo. ABRA el suministro de agua y deje
correr el agua en la tubería hasta que salga agua limpia.
CIERRE el suministro de agua con la válvula de cierre.
3. Retire la tapa plástica de la admisión de la válvula de agua y
deseche la tapa.
4. Si utiliza tuberías de cobre, deslice la tuerca de compresión
de latón y la guarnición (manguito) en la tubería de
suministro de agua. Inserte la tubería de agua en la
admisión de la válvula de agua tan adentro como sea
posible (¼" / 6,4 mm). Inserte la guarnición (manguito)
en la admisión de la válvula y apriete a mano la tuerca de
compresión en la válvula. Apriete media vuelta adicional
con una llave. NO apriete demasiado. Vea la fi gura 1.
Si utiliza tubo de acero inoxidable fl exible trenzado, la
tuerca y la férula ya están colocadas en la tubería. Deslice
la tuerca de compresión sobre la admisión de la válvula y
apriétela a mano. Apriete media vuelta adicional con una
llave. NO apriete demasiado. Vea la fi gura 2.
5. Asegure la tubería de suministro de agua (tubería de cobre
solamente) al panel trasero del refrigerador, como se muestra,
usando la abrazadera de acero y el tornillo.
6. Enrolle la tubería sobrante (tubería de cobre solamente)
(aproximadamente 2 vueltas y media) detrás del refrigerador,
como se muestra en la fi gura, y colóquela de manera que no
vibre ni roce ninguna otra superfi cie.
7. ABRA la válvula de suministro de agua y apriete cualquier
conexión que presente escapes.
8. Vuelva a conectar el refrigerador al suministro eléctrico.
9. Para encender el productor de hielo, baje el brazo de señal
metálico (productor de hielo del congelador) o coloque el
interruptor de alimentación de encendido/apagado del productor
de hielo en la posición de “Encendido” (productor de hielo de
alimentos frescos).
Tubería de plástico para
el agua que conecta con
la tubería de
llenado del
fabricador
de hielo
Tubería de cobre para el
agua proveniente del
suministro de aguade
(El bucle debe incluir suficiente tubería
para permitir sacar el refrigerador
para limpiarlo.)
Figura 1 Figura 2
Sujetador
de acero
Tuerca de
compresión
de latón
Guarnición
(manguito)
Tubería de
agua de
cobre
inoxidable
Soporte de
la válvula
de agua
Admisión de
la válvula
Válvula de agua
la vivienda
Tubería de plástico para el
agua que conecta
con la tubería de
llenado del
fabricador de hielo
Tubería de agua flexible de acero
inoxidable frenzado de 6 pies del
(El bucle debe incluir suficiente tubería para permitir
sacar el refrigerador para limpiarlo.)
suministro de agua del hogar
Abrazadera
de acero
Tubería
de agua
de acero
inoxidable
Soporte de
la válvula
de agua
Admisión de
la válvula
Válvula
de agua
11-SP

TruTouch Controles
Una luz indicadora se encenderá sobre la mayoría de las funciones de modo activo.
Toque un símbolo para activar las siguientes opciones.
“fast freeze” (congelado rápido)
Activa la función de congelado rápido de alimentos.
“on off” (encendido/apagado)
Oprima y mantenga oprimido este ícono durante tres segundos para apagar el sistema de
enfriamiento para limpiar el refrigerador. También apaga el fabricador de hielo. Las pantallas
de temperatura mostrarán “OFF” (apagado).
“default settings”
Restablece la confi guración del refrigerador (como la temperatura, (confi guración
predeterminada) despliegue de la temperatura y las señales sonoras) al ajuste predeterminado
de fábrica.
Ajuste de las temperaturas de enfriamiento
Oprima el indicador + o el – para ajustar la temperatura al valor deseado. La temperatura destellará en
la pantalla al primer toque. El despliegue de la temperatura se apagará después de 10 segundos y la
pantalla regresará a su modo de funcionamiento normal.
“energy saver” (ahorro de energía)
Mantenga este interruptor confi gurado en ahorro de energía (luz encendida) para obtener el
menor uso de energía. Si aparece humedad en el gabinete entre las puertas, al presionar este
botón, se apagará la luz y permitirá que un calentador eléctrico utilizado reduzca la humedad
del gabinete entre las puertas.
“temp mode”
Toque este ícono para cambiar el formato de temperatura de Fahrenheit (modo de
temperatura) a Celsius.
Filtro de agua
Oprímalo y manténgalo oprimido durante tres segundos para reponerlo después de cambiar
el fi ltro.“fast ice” (hielo rápido)
Aumenta la producción de hielo.
Filtro de aire
El estado de la condición del fi ltro se mostrará siempre que la puerta esté abierta. Oprímalo y
manténgalo oprimido durante tres segundos para reponerlo después de cambiar el fi ltro.
“mute sounds”
Permite desactivar las señales sonoras emitidas al oprimir cada tecla (modo silencioso)
según las preferencias del usuario. El modo silencioso está activado cuando la luz indicadora
roja está encendida. Las señales de alerta permanecerán activas.
IMPORTANTE
Oprimir el símbolo “system on/off” (encender/apagar el sistema) no desconecta el suministro
eléctrico al refrigerador. Para desconectar el suministro eléctrico, debe desenchufar el cordón
eléctrico del tomacorriente.
Alarmas
Puerta abierta Si la puerta se deja abierta por un periodo prolongado de tiempo, sonará una
alarma y el indicador de puerta abierta se iluminará (en la pantalla inferior del panel
de control). La alarma se desactiva cerrando la puerta. La tecla del modo silencioso
parpadeará para indicar que hay alarmas activas. Oprima esta tecla para restaurar
cualquier alarma del sistema.
Temperatura alta En caso de temperatura alta, el indicador de temperatura destellará y mostrará el
mensaje “HI” (alta). Después de 20 minutos, la alarma sonará y el indicador de alta
temperatura se encenderá de color rojo en la parte inferior del panel de control.
El ícono de modo silencioso se encenderá hasta que lo oprima para confi rmar
la alarma. En ese momento se mostrará la temperatura más alta alcanzada y el
refrigerador continuará su funcionamiento normal. Si no confi rma la alarma de
temperatura alta en la primera interrupción de la alarma sonora, la alarma se
encenderá nuevamente cuando abra la puerta por primera vez.
“Power Fail” En caso de una falla eléctrica, la alarma “power fail” (falla eléctrica) se mostrará en la
(falla eléctrica) pan talla y destellará hasta que oprima el ícono “mute sounds” (modo silencioso)
para indicar que recibió el mensaje. Es posible que las demás funciones se
desactiven hasta que indique que recibió el mensaje de alarma. La alarma
“power fail” (falla eléctrica) se apagará y el refrigerador regresará a su modo de
funcionamiento normal. La alarma de temperatura alta también puede permanecer
iluminada hasta que el refrigerador alcance una temperatura de funcionamiento
segura.
12-SP

TruTouch Controles
Modo sabático TruTouch
El modo sabático es una función que desactiva parte de las
opciones del refrigerador y los controles TruTouch según la
observación del Shabat y las fi estas judías por parte de la
comunidad judía ortodoxa.
Puede ACTIVAR y DESACTIVAR el modo sabático
oprimiendo y manteniendo oprimidas simultáneamente por
cinco segundos la tecla "-" en el control de temperatura
del congelador y la tecla "+" en el control de temperatura
del refrigerador. La pantalla mostrará "Sb" durante el modo
sabático.
En el modo sabático, la alarma de temperatura alta
permanece activa por razones de salud. Por ejemplo, si
la puerta queda entreabierta se activa la alarma de alta
temperatura. El refrigerador funciona normalmente una
vez que la puerta está cerrada, sin cualquier violación
de las fi estas de sábado. La alarma de alta temperatura
se permite cuando temperatura gabinete está fuera de
la zona de seguridad durante 20 minutos. La alarma se
silencia después de 10 minutos mientras el icono de alta
temperatura se mantiene encendido hasta que se salga el
modo sabático.
Para obtener más asistencia, instrucciones para el
uso adecuado y una lista completa de modelos con
modo sabático, visite el siguiente sitio en Internet:
http://www.star-k.org.
NOTA
Si el cajón Temperatura ajustable zona fría no se apaga
antes de activar el modo sabático, el mismo se ajustará
automáticamente para mantener la temperatura
seleccionada incluso si la pantalla no se enciende para
mostrar que está activado.
NOTA
El ajuste recomendado par un producto instalado en una
cocina es 37˚F para el compartimento de alimentos frescos
y 0˚F para el congelador.
IMPORTANTE
Si su producto tiene alimentos congelándose en el
compartimento de alimentos frescos, aumente el ajuste de
la temperatura en 1 o 2 grados.
IMPORTANTE
Si coloca alimentos a 1 pulgada delante de los conductos
de aire, es posible que los alimentos se congelen.
NOTA
Durante el modo sabático, no funcionarán las luces ni el
panel de control hasta que se desactive el modo sabático.
El refrigerador permanecerá en el modo sabático después
de una falla eléctrica. Esta función debe ser desactivada
usando los botones del panel de control.
NOTA
Durante el modo sabático, el control principal apaga el
fabricador de hielo.
Modo sabático y el cajón Temperatura ajustable zona fría
cajón
El cajón Temperatura ajustable zona fría debe estar apagado
durante el Shabat y otras fi estas judías. Antes de activar el
modo sabático del refrigerador, apague el cajón Zona Fría
oprimiendo el botón "on/off" (encendido/apagado) del
cajón. La pantalla mostrará "OFF" (apagado) y el cajón se
apagará. Luego acceda a la función de modo sabático en la
pantalla principal del refrigerador. Consulte la sección "Modo
sabático" de las instrucciones del refrigerador TruTouch.
Cuando el electrodoméstico esté en modo sabático, la
pantalla no se encenderá y el cajón permanecerá apagado.
Puede seguir usando el cajón como un cajón normal
sin control de temperatura. Cuando se apague el modo
Sabático, deberá volver a encender el cajón Zona Fría.
Entrada
de aire
13-SP

Fabricador automático de hielo
Cuidado y funcionamiento del
distribuidor de hielo
Después de haber instalado el refrigerador correctamente,
el fabricador de hielo podrá comenzar a producir hielo
durante las siguientes 24 horas. El depósito de hielo tardará
aproximadamente tres días para llenarse.
Cuando utilice el fabricador de hielo por primera vez, y para
que el mismo funcione correctamente, es necesario liberar
el aire atrapado en la tubería del fi ltro de agua. Una vez que
el fabricador de hielo comience a fabricar hielo, permita
que el depósito para hielo se llene y deseche los primeros
DOS depósitos de hielo COMPLETOS. El fabricador de
hielo tardará por lo menos dos días para llenar el depósito
completamente en modo normal o 1 día y medio en modo
rápido.
El fabricador de hielo produce 2 a 2.5 libras (0,9 a 1,1 kg)
de hielo cada 24 horas, dependiendo de las condiciones de
uso. El hielo mantenga aproximadamente 7 libras (3.2 kg) de
hielo.
IMPORTANTE
El fabricador de hielo se activa en la fábrica, de modo
que pueda funcionar tan pronto como instale su
refrigerador. Si no puede conectar el suministro de agua,
levante el brazo del fabricador de hielo para apagarlo. De
lo contrario, la válvula de llenado de la máquina de hacer
hielo puede producir ruido cuando trate de funcionar sin
agua.
Para encender y apagar el fabricador de
hielo
La producción de hielo se controla levantando y bajando
el brazo de alambre del fabricador de hielo. Para acceder
al fabricador, tire del cajón del congelador hacia afuera.
Levante el brazo de alambre para APAGAR el fabricador de
hielo y bájelo para ENCENDERLO.
“ON”
(Encendido)
“OFF”
(Apagagar)
Brazo de
alambre
• Los siguientes sonidos son normales cuando el
fabricador de hielo está en funcionamiento:
- Motor en funcionamiento
- El hielo que cae en el depósito de hielo
- Apertura o cierre de la válvula de agua
- Agua que fl uye
• Los cubos de hielo almacenados durante un tiempo
prolongado pueden adquirir un sabor extraño. Vacíe
el envase de hielo como se indica a continuación.
Función de hielo rápido
El refrigerador viene equipado con una función
"inteligente" de hielo rápido que, de ser activada en la
interfaz del usuario, le permitirá aumentar la producción
de hielo. No es necesario desactivar esta función; de no
necesitarla, el refrigerador funcionará normalmente.
PRECAUCIÓN
Si el suministro de agua al refrigerador pasa por un
suavizador, asegúrese de que el suavizador se mantenga
funcionando de manera apropiada. Las sustancias
químicas provenientes de un suavizador de agua pueden
dañar el fabricador de hielo.
Limpieza del fabricador de hielo
Limpie el fabricador de hielo y el depósito de hielo con
frecuencia, especialmente antes de mudarse o salir de
vacaciones.
1 Apague el fabricador de hielo.
2 Retire el depósito de hielo.
3 Vacíe y limpie cuidadosamente el depósito del
hielo con un detergente suave. No use limpiadores
abrasivos o ásperos. Enjuague con agua limpia.
4 Espere a que el depósito del hielo se seque
completamente antes de volver a colocarlo en el
congelador.
5 Vuelva a colocar el depósito de hielo. Encienda el
fabricador de hielo.
Retire y vacíe el depósito de hielo si:
• Una falla de energía eléctrica prolongada (una hora o
más), causará que los cubos de hielo en el depósito
comiencen a derretirse y a quedar congelados
adheridos entre sí.
Retire el depósito de hielo y sacúdalo para afl ojar los cubos
o límpielo como se explicó anteriormente.
PRECAUCIÓN
Sugerencias para el fabricador de hielo
• Si su refrigerador no está conectado a un suministro de
agua o el suministro de agua se ha cerrado, apague el
fabricador de hielo levantando el brazo de alambre.
NUNCA use un picahielo o un instrumento afi lado similar
para separar el hielo. Esto podría dañar el depósito de
hielo.
Para liberar el hielo atascado, use agua tibia. Antes
de reinstalar el depósito, asegúrese de que esté
completamente seco.
14-SP

Características del almacenamiento interior
Características de las bandejas
PRECAUCIÓN
Para evitar lesiones causadas por rotura, manipule
cuidadosamente las bandejas de vidrio templado.
NOTA
Las características pueden variar según el modelo.
Su refrigerador incluye bandejas de vidrio, las cuales
han sido diseñadas para atrapar y contener derrames
accidentales.
Es posible ajustar fácilmente las posiciones de las bandejas en
el refrigerador de acuerdo con sus necesidades. Las bandejas
tienen soportes de montaje que se instalan en los soportes
ranurados en la parte trasera de cada compartimiento.
Para cambiar la posición de una bandeja:
1 Antes de ajustar una bandeja, retire todos los
alimentos que estén encima.
2 Levante el borde delantero hacia arriba y tire de la
bandeja para sacarla.
3 Vuelva a instalar la bandeja insertando los ganchos
del soporte de montaje en las ranuras de soporte
correspondientes.
4 Baje la bandeja y acóplela en su lugar.
Estante completo Custom-Design
MC
Cajones
Su refrigerador incluye una variedad de cajones de
almacenamiento. Estos cajones se encuentran en posiciones
fi jas en la parte inferior del refrigerador.
Cajones para las verduras
Los cajones para las verduras han sido diseñados para
guardar frutas, verduras y otros alimentos frescos.
Para abrir el cajón para verduras
Control de humedad del cajón de las verduras
Los cajones de las verduras están equipados con un control
deslizante para ajustar la humedad dentro del cajón. Las
verduras de hojas grandes permanecen mejor conservadas
con el control de humedad en la posición de mayor
humedad. La fruta fresca permanece mejor conservada con
el control de humedad en la posición de menor humedad.
alto
bajo
Control de humedad
o
15-SP
humedad
Para ajustar el nivel de humedad del cajón
Más
Menos
humedad
para verduras

Características del almacenamiento interior
T E M P E R AT U R E
A D J U S TA B L E
Para remover el cajón para verduras para limpiarlo:
1 Tire del cajón hasta que se detenga.
2 Levante levemente la parte delantera y retire el cajón.
Desinstalación del cajón para verduras
Cajón Temperatura Ajustable Zona Fría
TEMPERATURE
ADJUSTABLE
Soporte para artículos especiales
El diseño innovador de los soportes para artículos
especiales le permite refrigerar cuatro botellas de vino o de
bebidas gaseosas.
Soporte para
artículos
especiales
El cajón Temperature Ajustable Zona fría está diseñado para mantener los alimentos a una temperatura precisa, bien sea
más baja o más alta que la temperatura del refrigerador. El ajuste de descongelación mantiene una temperatura ideal para
descongelar alimentos durante 12 horas. Al fi nalizar este tiempo, el cajón se enciende en el ajuste de alimentos mixtos
para refrigerar los alimentos descongelados.
Para utilizarlo:
1 Para encender y apagar esta función, oprima el botón
"On/Off" (encendido/apagado) del cajón. La pantalla
digital mostrará una temperatura entre los 28° F y 38° F
cuando esté encendida y "OFF" (apagado) cuando esté
apagada.
2 Oprima "F/C" para cambiar la pantalla para que muestre
grados Fahrenheit “F” o Celsius “C”.
3 Oprima los botones de navegación hacia arriba o hacia
abajo para seleccionar la opción deseada.
4 Una vez que seleccione una opción, el cajón se ajustará y
mantendrá la temperatura para el ajuste seleccionado.
5 Cuando está apagado, el cajón Temperatura ajustable
zona fría funciona como una bandeja para carnes normal.
El cajón Temperatura ajustable zona fría es ideal para
alimentos empacados. Es mejor guardar las verduras y las
frutas sin empaque en uno de los cajones para verduras.
6 Las tres selecciones favoritas ofrecen fl exibilidad
de confi gurar y guardar opciones de temperatura
personalizadas. Puede ajustar la temperatura oprimiendo
los botones "+" o "–". El cajón mantendrá la temperatura
seleccionada hasta que sea cambiada.
7 Puede bloquear el control para evitar cambios
accidentales oprimiendo el botón "control lock"
(bloqueo del control) durante tres segundos. Desactive
esta opción oprimiendo nuevamente el botón durante
tres segundos.
Para abrir el cajón
16-SP

Características del almacenamiento interior
Para cambiar de posición un compartimiento ajustable de
IMPORTANTE
NO limpie la pantalla del cajón Temperatura ajustable
zona fría con limpiadores abrasivos o cáusticos. Limpie
con una esponja húmeda.
PRECAUCIÓN
El cajón Temperatura ajustable zona fría y la cubierta pueden
ser removidos para limpiarlos, pero la unidad de control, fi jada
a la parte derecha del refrigerador, no puede ser removida. No
sumerja la tapa del cajón Custom TempMC en agua ni la coloque
en un lavavajillas. Límpiela con un paño húmedo o con una
esponja.
Para retirar el cajón Temperatura ajustable zona fría para
limpiarlo:
1 Tire del cajón hasta que se detenga.
2 Levante levemente la parte delantera y retire el
cajón.
la puerta:
1 Antes de ajustar un compartimiento, retire todos los
alimentos.
2 Sostenga fi rmemente el compartimiento con ambas
manos y levántelo hacia arriba.
3 Retire el compartimiento.
4 Coloque el compartimiento justo sobre el lugar
deseado.
5 Baje el compartimiento hacia los soportes hasta que
quede acoplado en su lugar.
Desinstalación del cajón
NOTA
Cuando se apaga el refrigerador usando el botón principal de
encendido/apagado TruTouch, el cajón Temperatura ajustable
zona fría también se apaga. Cuando se vuelve a encender el
refrigerador, el cajón Custom TempMC continúa funcionando al
ajuste programado antes de que se apagara el refrigerador.
Puertas
Compartimientos de almacenamiento
Las puertas del refrigerador tienen un sistema de
compartimientos de almacenamiento modulares. Todos estos
compartimientos son removibles para facilitar su limpieza.
Algunos de ellos tienen posiciones fi jas, mientras que otros
pueden ser ajustados de acuerdo a sus necesidades.
Los compartimientos de las puertas son ideales para
guardar frascos, botellas, latas y envases de bebidas
grandes. También permiten seleccionar rápidamente los
artículos de uso frecuente.
Compartimiento ajustable de la puerta
Compartimientos inclinables para latas
Los compartimientos inclinables para latas le permiten
guardar de manera efi ciente y segura hasta ocho latas de
bebidas de 355 ml.
Compartimiento inclinable para latas
Compartimiento cerrado de la puerta
Use el compartimiento cerrado situado en la parte superior
de la puerta del refrigerador para el almacenamiento (a
corto plazo) de queso, productos para untar o mantequilla.
El compartimiento cerrado de la puerta está diseñado para
estar a una temperatura un poco más alta que el resto del
refrigerador. Este compartimiento incluye una tapa que
puede ser bloqueada y un divisor (modelos selectos).
u
e
q
o
o
l
B
17-SP
Compartimiento cerrado de la puerta

Características del almacenamiento interior
Características del congelador
Enganche
Tire para sacar
Instrucciones para volver a colocar la cesta del
Barra
estabilizadora
Cestas del congelador
Para sacar la cesta superior del congelador
1. Busque el lateral en el que el bastidor de la cesta
queda está alineado con la abertura del enganche.
El bastidor de la cesta deberá estar alineado con los
enganches delantero y posterior del mismo lado (bien a
la izquierda o a la derecha).
2. Si el bastidor de la cesta no está alineado con el lado
izquierdo o derecho, empuje la cesta hacia un lado
hasta que quede alineada.
3. Agarrando el bastidor metálico de la cesta cerca del
enganche delantero, tire hacia arriba para sacar el
bastidor de la cesta.
4. Agarre el bastidor de la cesta cerca del enganche
trasero y tire hacia arriba hasta que se suelte del
enganche.
5. Una vez se suelte de los enganches un lado de la cesta,
tire de ella lateralmente hasta que el otro lado quede
alineado con las aberturas de los enganches del otro
lado del congelador.
6. De la misma manera, tire hacia arriba del bastidor de la
cesta desde los enganches delanteros y traseros hasta
que se suelte.
7. Saque la cesta
Siga el procedimiento en el sentido contrario para volver a
colocar la cesta.
congelador
1 Vuelva a colocar la cesta del congelador en el interior
del cajón del congelador.
2 Vuelva a colocar los enganches deslizándolos de
nuevo en las ranuras.
Empuje para
volver a colocar
Desinstalación de las divisiones
Levante la parte delantera de la división superior y tire de
ella hacia afuera.
División de la cesta
media
Fijadores
NOTA
Si la cesta no se apoya en los enganches de retención de la
barra estabilizadora, el cajón no se cerrará correctamente.
Instrucciones para sacar la cesta del congelador
1 Busque los enganches de la cesta en las esquinas
posteriores de la cesta y extráigalos para sacar la
cesta.
2 Abra por completo las puertas de alimentos frescos.
3 Levante la cesta y sáquela.
Ubicación
del enganche
de la cesta.
Uno a cada lado.
Barra
estabilizadora
Apriete el asa y levante por el centro de la división para
moverla de lado a lado. (La división no puede quitarse).
División
de la cesta
inferior
Incline la bandeja de rejilla
La bandeja de rejilla del congelador (situada en el interior del
cajón del congelador) no está diseñada para extraerse.
18-SP

Almacenamiento de alimentos y ahorro de energía
Sugerencias para almacenar
alimentos
Almacenamiento de alimentos frescos
• Mantenga la temperatura del refrigerador entre 34°F
(1°C) y 40°F (4°C) con una temperatura óptima de
37°F (3°C).
• Evite colocar demasiados alimentos en las bandejas
del refrigerador. Esto reduce la circulación del aire y
produce enfriamiento irregular.
Frutas y verduras
• Almacene las frutas y verduras en los cajones
especiales, donde la humedad ayuda a mantener la
calidad de los alimentos durante más tiempo.
• Lave los alimentos y elimine el exceso de agua.
• Envuelva los productos que tengan olores fuertes o
un alto contenido de humedad.
Carne
• Envuelva bien las carnes crudas separadamente para
evitar que goteen y contaminen otros alimentos o
superfi cies.
• Use el cajón para charcutería o el cajón Temperatura
ajustable zona fría y ajústelo en la opción de carnes
para almacenamiento a corto plazo. Cualquier carne
que vaya a ser guardada por más de dos días debe
congelarse.
Almacenamiento de alimentos congelados
• Mantenga el congelador a una temperatura de 0°F
(-18°C) o inferior.
• Un congelador funciona más efi cientemente cuando
se utilizan ⅔ de su capacidad.
conserven adecuadamente.
• La activación de la función “fast freeze” (congelación
rapide) también ayudará a mantener efi cientemente
la temperatura seleccionada después de colocar
alimentos frescos con otros alimentos previamente
congelados.
• Evite agregar demasiados alimentos tibios en el
congelador de una sola vez. Esto sobrecarga el
congelador, disminuye la velocidad de congelación
y puede elevar la temperatura de los alimentos
congelados.
• Deje un espacio entre los paquetes de modo que el
aire frío pueda circular libremente, permitiendo que
los alimentos se congelen lo más pronto posible.
Sugerencias para el ahorro de
energía
Instalación
• Ubique el refrigerador en la parte más fresca de la
habitación, alejado de la luz directa del sol y de las
tuberías o rejillas de la calefacción.
• No coloque el refrigerador cerca de los
electrodomésticos que produzcan calor, tales como
la estufa, el horno o el lavavajillas. Si esto no es
posible, instale una sección de los armarios o una
capa de aislamiento entre los dos electrodomésticos,
para contribuir al mejor funcionamiento del
refrigerador.
• Nivele el refrigerador de modo que las puertas
cierren herméticamente.
Ajuste de la temperatura
• Consulte la sección “Controles” para conocer los
procedimientos de ajuste de temperatura.
Envoltura de los alimentos para su
congelación
• Para reducir al mínimo la deshidratación de los
alimentos y el deterioro de la calidad, use papel
de aluminio, papel (plástico) de envolver, bolsas
de congelador o envases herméticos. Saque todo
el aire que sea posible de los paquetes y séllelos
herméticamente. El aire atrapado puede secar los
alimentos, cambiarles el color y desarrollar un mal
sabor (quemadura de congelación).
• Envuelva las carnes de res y de pollo frescas con
envoltura para congelador apropiada antes de
congelarlas.
• No vuelva a congelar carne que se haya
descongelado completamente.
Almacenamiento en el congelador
• Antes de realizar sus compras, active la opción "fast
freeze" (congelación) para asegurarse de que cuando
regrese con los alimentos recientemente comprados
que deban ser almacenados en el congelador se
Almacenamiento de alimentos
• No coloque demasiados artículos en el refrigerador
ni bloquee los respiraderos del aire frío. Si lo
hace, el refrigerador funcionará por períodos más
prolongados y usará más energía.
• Cubra los alimentos y seque los envases
antes de colocarlos en el refrigerador. Esto
reduce la acumulación de humedad dentro del
electrodoméstico.
• Organice el refrigerador a fi n de evitar la apertura
frecuente de la puerta. Saque tantos artículos como
necesite de una sola vez y cierre la puerta tan pronto
como sea posible.
• No coloque envases calientes directamente sobre
estantes fríos. Recuerde, estos cambios drásticos de
temperatura podrían dañar el vidrio.
19-SP

Sonidos normales de funcionamiento
Interpretación de sonidos que
puede hacer su refrigerador
Su nuevo refrigerador de alta efi ciencia puede generar
sonidos que no le son familiares. Estos sonidos generalmente
indican que su refrigerador está funcionando de manera
correcta. Algunas superfi cies en los pisos, paredes y armarios
de la cocina pueden aumentar el volumen de estos sonidos.
A continuación se incluye una lista de los principales
componentes de su refrigerador y de los sonidos que
pueden producir:
A Evaporador Cuando el refrigerante pasa por el
evaporador puede crear un sonido de hervor o
gorgoteo.
B Ventilador del evaporador Es posible que se escuche
el aire cuando es expulsado a través del refrigerador
por el ventilador del evaporador.
C Calentador de descongelación Durante los ciclos
de descongelación, el agua que gotea en el
calentador de descongelación puede causar un
sonido de chisporroteo o crepitación. Después de la
descongelación puede producirse un ruido seco.
D Fabricador automático de hielo Cuando el hielo ha
sido producido, se puede escuchar los cubos de
hielo caer en el depósito de hielo. El ventilador del
fabricador de hielo, la activación de la válvula de
agua y el fl ujo del gas refrigerante pueden generar
ruido durante el funcionamiento normal.
E Control electrónico y control automático de
descongelación Estas piezas pueden producir un
ruido seco o un chasquido cuando se enciende y se
apaga el sistema de enfriamiento.
F Ventilador del condensador Se puede escuchar el
aire cuando es expulsado a través del condensador.
G Compresor Los compresores modernos de alta
efi cacia funcionan mucho más rápido que en
modelos anteriores. El compresor puede producir un
zumbido agudo o un sonido pulsante.
H Válvula de agua Produce un zumbido cada vez que
se abre para llenar el fabricador de hielo.
I Bandeja de desagüe (no extraíble) Se puede
escuchar el agua gotear en la bandeja durante el
ciclo de descongelación.
J Condensador El aire forzado puede producir sonidos
mínimos.
K Regulador motorizado del cajón Temperatura
ajustable zona fría. Puede producir un leve zumbido
durante el funcionamiento.
M Regulador motorizado Puede producir un leve
zumbido durante el funcionamiento.
N Ventilador del cajón Zona Fría e apaga cuando se
abre la puerta o cuando se desactiva el cajón Zona
Fría.
NOTA
La espuma de ahorro de energía de su refrigerador no es
antiacústica.
NOTA
Durante el ciclo de descongelación automática, es normal
ver un refl ejo rojo en los respiraderos de la pared trasera
de su congelador.
20-SP

Para cambiar los fi ltros de agua y aire
Su refrigerador viene equipado con sistemas fi ltrantes de
agua y aire. El sistema de fi ltrado de agua fi ltra toda el
agua utilizada para fabricar hielo. El fi ltro de aire elimina los
olores e impurezas del refrigerador.
NOTA
El panel de control incluye controles que supervisan el
estado de los fi ltros de agua y de aire. Consulte la sección
"Controles" para obtener más información.
Información acerca del fi ltro de agua
moderno
El sistema fi ltrante ProChill ha sido probado
y certifi cado por NSF International según
las Normas NSF/ANSI 42, 53 y 401 para
la reducción de lo expuesto en la hoja de
datos de rendimiento.
No utilice este sistema con agua que no sea
microbiológicamente segura o de calidad desconocida sin
el tratamiento desinfectante adecuado antes o después
de pasar por el sistema fi ltrante. Los sistemas certifi cados
para la reducción de quistes pueden ser usados con agua
desinfectada con quistes fi ltrables.
• Capacidad nominal: 125 galones
• Flujo de servicio nominal: 2,45 litros por minuto
• Presión máxima nominal: 100 psi
• Presión mínima recomendada para el
funcionamiento: 30 psi
• Temp. de funcionamiento: Min. 33°F (1°C),
Máx. 100°F (38°C)
Filtro de agua ProChill
El fi ltro de agua está situado en la parte superior derecha del
compartimento de alimentos frescos.
Para reemplazar el fi ltro de agua
Por lo general, el fi ltro de agua debe cambiarse cada seis
meses para garantizar la máxima calidad posible del agua.
El Estado del fi ltro del panel en la interfaz de usuario le
indica que cambie el fi ltro cuando ha pasado una cantidad
establecida de agua 125 galones/473 litros para el ProChill
por el sistema.
derrame de agua que se produzca durante el reemplazo del
fi ltro.
1 Apague el interruptor de alimentación del sistema de
fabricación de hielo.
2 Quite el fi ltro viejo girándolo en el sentido contrario a
las agujas del reloj (hacia la izquierda) 90 grados hasta
que quede suelto.
3 Saque el cartucho de fi ltro viejo directamente del
alojamiento y deséchelo.
Cartucho de filtro
4 Desempaquete el cartucho de fi ltro nuevo. Hágalo
entrar en el alojamiento del fi ltro hasta el máximo
posible con el extremo de agarre horizontal.
5 Apriete el fi ltro ligeramente hacia dentro girándolo en
el sentido de las agujas del reloj (hacia la derecha). El
fi ltro entrará al girarlo. Gire el fi ltro 90 grados hasta
que se detenga y el extremo de agarre esté vertical.
Es posible que note un ligero clic cuando el fi ltro
queda colocado en su posición.
6 Presione un vaso de agua contra el dispensador
mientras comprueba si existen fugas en el alojamiento
del fi ltro. Los chorros o chisporroteos que se
produzcan cuando el sistema purgue el aire fuera del
dispensador son normales.
7 Siga dispensando agua durante 3-4 minutos o hasta
haber hecho pasar 5,5 litros de agua por el sistema.
Probablemente deberá vaciar y rellenar el vaso varias
veces.
8 Encienda la máquina de hielo.
9 Mantenga pulsado el botón de reinicio del fi ltro de
agua en el panel de control durante tres segundos.
Cuando la pantalla cambie de rojo a verde, el estado
se habrá restablecido.esté completamente acoplado,
la parte delantera del cartucho fi ltrante debe quedar
al ras con el botón de liberación del fi ltro.
Si su refrigerador no ha sido usado durante algún tiempo
(por ejemplo, durante una mudanza), cambie el fi ltro antes
de reinstalar el refrigerador.
No es necesario cerrar el suministro del agua para cambiar
el fi ltro. Esté preparado para limpiar cualquier pequeño
21-SP

Para cambiar los fi ltros de agua y aire
Filtro de aire
El fi ltro de aire está ubicado debajo del compartimiento
multiuso.
Para reemplazar el fi ltro de aire
En términos generales, el fi ltro de aire debe ser
reemplazado cada seis meses (la luz de estado del fi ltro
en el panel Teclado le avisa que debe reemplazar el fi ltro
después de seis meses) para asegurar el fi ltrado óptimo de
los olores del refrigerador.
1 Abra la compuerta del fi ltro de aire.
2 Retire el fi ltro antiguo y deséchelo.
3 Desempaque el fi ltro nuevo y deslícelo en el interior
del compartimiento.
4 Para cerrar la compuerta del fi ltro de aire, presione la
parte superior e inferior para enganchar la compuerta.
5 Oprima y mantenga oprimido durante tres segundos
el botón “Air Filter Reset” (reposición del fi ltro
de aire), situado en el panel de control. Cuando la
pantalla cambie de “Replace” (reemplazar) a “Good”
(correcto) el fi ltro ha sido repuesto correctamente.
6 “Air Filter Reset” (reposición del fi ltro) se apagará
luego de unos pocos segundos.
Pedidos de fi ltros de repuesto
Puede pedir fi ltros nuevos llamado al 1-888-845-4641, por
Internet en www.viingrange.com, o a través del distribuidor
donde adquirió su refrigerador. Puede considerar pedir
fi ltros adicionales cuando instale por primera vez su
refrigerador.
Cartucho de repuesto de fi ltro de agua Nº RWFVRF1
Cartucho de repuesto de fi ltro de aire Nº RAFVRF
22-SP

Cuidado y limpieza
Mantenimiento protector del electrodoméstico
El refrigerador debe mantenerse limpio para que conserve su aspecto y se evite la acumulación de olores. Limpie
inmediatamente cualquier derrame y limpie el congelador y el refrigerador por lo menos dos veces al año.
NOTA
En los componentes plásticos, puertas interiores o revestimientos del armazón del electrodoméstico no use limpiadores
abrasivos como rociadores limpiaventanas, limpiadores para restregado, líquidos infl amables, ceras limpiadoras,
detergentes concentrados, blanqueadores o limpiadores que contengan productos derivados del petróleo. No use
toallas de papel, esponjas de restregar o cualquier otro material abrasivo de limpieza.
• Nunca use esponjas de restregar metálicas, escobillas, limpiadores abrasivos o soluciones alcalinas fuertes en
ninguna de las superfi cies.
• Nunca limpie las superfi cies de acero inoxidable con CLORO o limpiadores que contengan blanqueadores.
• No lave ninguna pieza desmontable en el lavavajillas.
• Siempre desenchufe el cable eléctrico del tomacorriente antes de la limpieza.
NOTA
Si ajusta los controles de temperatura para desactivar la refrigeración, el suministro eléctrico a las luces y otras piezas
eléctricas permanecerá activado hasta que desenchufe el cordón eléctrico de la pared.
• Retire a mano las etiquetas adhesivas. No use hojas de afeitar ni ningún otro instrumento afi lado que pueda rayar la
superfi cie del electrodoméstico.
• No retire la placa de serie. Si retira la placa de serie, su garantía será anulada.
• Antes de mover el refrigerador, levante los soportes antivuelco para que las ruedas funcionen correctamente. Esto
evitará que se dañe el piso.
PRECAUCIÓN
• Tire del refrigerador en dirección recta hacia afuera para moverlo. Si lo mueve de lado a lado puede dañar el
revestimiento del piso. Tenga cuidado de no desplazar el refrigerador más allá de las conexiones de plomería.
• Los objetos húmedos se pegan en las superfi cies frías de metal. No toque la superfi cie refrigerada con las manos
mojadas o húmedas.
IMPORTANTE
Si usted almacena o mueve su refrigerador en temperaturas de congelación, asegúrese de desaguar completamente el
sistema de suministro de agua. De lo contrario, pueden producirse escapes de agua cuando el refrigerador sea puesto
de nuevo en funcionamiento. Póngase en contacto con un representante del servicio técnico para realizar esta operación.
Consulte la guía en la página siguiente para obtener detalles sobre el cuidado y la limpieza de áreas específi cas del
electrodoméstico.
23-SP

Cuidado y limpieza
Sugerencias de cuidado y limpieza
Pieza
Interior y
revestimiento
de las puertas
Juntas de la
puerta
Cajones y Agua y jabón Use un paño suave para limpiar los rodillos y rieles de los cajones.
Bandejas de
vidrio
Rejilla inferior Agua y jabón
Exterior y
manijas
Exterior
y manijas
(modelos
de acero
inoxidable
solamente)
Agentes de
limpieza
Agua y jabón
Bicarbonato de
sodio y agua
Agua y jabón Limpie las juntas con un paño limpio y suave.
Agua y jabón
Limpiavidrios
Rociadores de
líquidos suaves
Rociadores de
líquidos suaves
Aspiradora
Agua y jabón
Limpiavidrios no
abrasivo
Agua y jabón
Limpiadores de
acero inoxidable
Sugerencias y precauciones
Use 2 cucharadas de bicarbonato de sodio en 1 litro de agua tibia.
Asegúrese de escurrir el excedente de agua de la esponja o paño antes de limpiar
los controles, la LED o cualquier otra pieza eléctrica.
No lave ningún componente extraíble (compartimientos, cajones, etc.) en el
lavavajillas.
Espere a que el vidrio se entibie a temperatura ambiente antes de sumergirlo en
agua tibia.
Retire la rejilla inferior (vea las instrucciones de instalación).
Aspire ambos lados y límpielos con una esponja o un paño con jabón. Enjuague y
seque.
Para limpiar las manijas, no use limpiadores comerciales domésticos que
contengan amoníaco, blanqueadores ni alcohol.
Use un paño suave para limpiar las manijas lisas.
No limpie las puertas lisas con un paño seco.
Nunca limpie las superfi cies de acero inoxidable con CLORO o limpiadores que
contengan blanqueadores.
Limpie la parte delantera y las manijas de acero inoxidable con un paño y agua
jabonosa no abrasivos. Enjuague con agua limpia y un paño suave.
Use un limpiador
comprados en la mayoría de los grandes almacenes o de las tiendas de bricolaje.
Siempre siga las instrucciones del fabricante. No use limpiadores domésticos que
contengan amoníaco o blanqueadores.
NOTA: Siempre limpie, y seque a favor del grano para evitar rayar la superfi cie.
Lave el resto del aparato con agua tibia y detergente líquido suave. Enjuague bien
y seque con un paño suave y limpio.
de acero inoxidable no abrasivo. Estos limpiadores pueden ser
Sugerencias para vacaciones y mudanzas
Ocasión Sugerencias
Vacaciones cortas Deje el refrigerador en funcionamiento si sale de vacaciones durante tres semanas o menos.
Consuma todos los alimentos perecederos del refrigerador.
Apague el fabricador automático de hielo y vacíe el depósito de hielo, incluso si se va sólo por unos
pocos días.
Vacaciones largas Saque todos los alimentos y el hielo del refrigerador si se va de vacaciones por un mes o más.
Apague el sistema de refrigeración (consulte la ubicación del botón “On/Off” (encendido/apagado)
en la sección "Controles") y desconecte el suministro eléctrico.
Cierre la válvula de suministro de agua.
Limpie bien el interior del refrigerador.
Deje las puertas abiertas para evitar la acumulación de olores y de moho. De ser necesario, trabe las
puertas para que queden abiertas.
Mudanza Retire todos los alimentos y el hielo del interior.
Si va a usar una carretilla, levante el refrigerador por un costado.
Ajuste las ruedas hasta arriba para protegerlas durante la mudanza.
Acolche el exterior del refrigerador para evitar rayar la superfi cie.
Para reemplazar la luz LED
Tanto el compartimiento del refrigerador como el del congelador presentan una luz led que no necesita mantenimiento.
Para reemplazarla, póngase en contacto con el técnico del servicio autorizado.
24-SP

Soluciones de problemas comunes
Antes de solicitar servicio técnico...
Si usted experimenta un problema con su refrigerador u observa algún comportamiento o estado que usted no
comprenda, generalmente puede evitar llamar a su representante de servicio si consulta esta sección para encontrar una
solución. La tabla siguiente incluye información sobre problemas, sus posibles causas y las soluciones comunes.
Máquina automática de hacer hielo
Problema Posible causa Solución común
El fabricador automático
de hielo no produce
hielo.
• El productor de hielo está apagado.
• El refrigerador no está conectado al suministro de
agua o la válvula de agua no está abierta.
• La tubería de suministro de agua está doblada.
• El fi ltro de agua no está correctamente colocado.
• Es posible que el fi ltro de agua esté tapado con
partículas extrañas.
• La válvula de asiento autorroscante de la tubería de
agua fría está tapada o bloqueada por partículas
extrañas.
• Encienda el productor de hielo, baje el brazo de señal metálico.
• Conecte la unidad al suministro de agua doméstico y
asegúrese de que la válvula de suministro esté abierta.
• Asegúrese de que la tubería de suministro no se doble al
empujar el refrigerador para colocarlo en su lugar contra la
pared.
• Extraiga y reinstale el fi ltro de agua. Asegúrese de empujar
el fi ltro con fi rmeza, de manera que pueda escuchar cuando
se trabe completamente en su lugar.
• Si no sale agua del dispensador o si sale lentamente, o si el
fi ltro tiene seis meses o más, se debe reemplazar.
• Cierre la válvula de la tubería de suministro doméstico de
agua. Retire la válvula. La válvula no debe ser una válvula
de asiento autorroscante autoperforante. Limpie la válvula.
Reemplace la válvula en caso de que sea necesario.
El fabricador automático
de hielo no produce
sufi ciente hielo.
El productor de hielo no
deja de producir hielo.
Los cubos de hielo se
congelan en forma de
bloque.
• El productor de hielo produce menos hielo de lo
esperado.
• Es posible que el fi ltro de agua esté tapado con
partículas extrañas.
• La tubería de suministro de agua está doblada.
• La válvula de asiento autorroscante de la tubería
de agua fría está tapada o bloqueada por
partículas extrañas.
• Utilización excesiva, excesiva apertura y cierre de
las puertas.
• El congelador está ajustado a demasiada
temperatura (máquina de hielo).
• La presión del agua es extremadamente baja.
Las presiones de corte son demasiado bajas (solo
sistemas de pozos).
• El sistema de ósmosis inversa está en fase de
regeneración.
• El brazo de señal metálico del productor de hielo está
sujeto por algún envase del congelador que se ha caído
contra el productor de hielo.
• Los cubos de hielo no se utilizan con demasiada
frecuencia.
• Los cubos de hielo están huecos (cubos de hielo
congelados por fuera con agua líquida adentro).
Los cubos de hielo se rompen en el compartimiento
y derraman el agua sobre el resto del hielo, de
manera que se congelan juntos.
• Los productores de hielo de alimentos frescos y del
congelador producirán cada uno aproximadamente 2 a
2,5 libras (0,9 a 1,1 kg) de hielo cada 24 horas, según las
condiciones de uso.
• Si el agua del dispensador sale con mayor lentitud que
lo normal, o si el fi ltro tiene seis meses o más, se debe
reemplazar.
• Asegúrese de que la tubería de suministro no se doble al
empujar el refrigerador para colocarlo en su lugar contra la
pared.
• Cierre la válvula de la tubería de suministro doméstico de
agua. Retire la válvula. La válvula no debe ser una válvula
de asiento autorroscante autoperforante. Limpie la válvula.
Reemplace la válvula en caso de que sea necesario.
• Pulse Congelado rápido para aumentar temporalmente la
velocidad de producción de hielo. (Solo máquina de hielo
del congelador).
• Ajuste el control del congelador a una posición más
fría para aumentar el rendimiento de la máquina de hielo
(máquina de hielo del congelador). Deje que la temperatura
se estabilice durante 24 horas.
• Indique a alguna persona que active las presiones de corte
del sistema de bombeo de agua (solo sistemas de pozos).
• Es normal que el sistema de ósmosis inversa esté por
debajo de 20 psi
• Desplace el artículo y libere el brazo de señal metálico.
Extraiga todos los cubos de hielo que se puedan haber
congelado juntos sobre el brazo de señal metálico.
• Quite el recipiente de hielo y deseche el hielo. El productor
de hielo produce suministro fresco. El hielo se debe utilizar
al menos dos veces por semana para mantener los cubos
separados.
• Esto generalmente ocurre cuando el productor de hielo
no obtiene sufi ciente agua. Esto generalmente se produce
cuando el fi ltro de agua está tapado. Reemplace el fi ltro de
agua.
Olores en el refrigerador
Problema Posible causa Solución común
El interior está sucio.
Olores
Es necesario limpiar el interior.
Hay alimentos con olores fuertes en el
refrigerador.
25-SP
Consulte las sugerencias para el cuidado y la limpieza.
Cubra bien los alimentos. Puede que sea necesario
cambiar el fi ltro con mayor frecuencia si se almacenan
en el refrigerador alimentos con olores fuertes con
frecuencia.

Soluciones de problemas comunes
Apertura/cierre de puertas/cajones
Problema Posible causa Solución común
La(s) puerta(s) no
cierra(n).
Es difícil mover los
cajones.
Funcionamiento del refrigerador
Problema Posible causa Solución común
El compresor no
funciona.
La puerta se ha cerrado con demasiada
fuerza, lo que provoca que la otra puerta se
abra ligeramente.
El refrigerador está desnivelado. Se
balancea en el piso cuando se mueve
levemente.
Se cayó un objeto de las cestas y está
evitando que cierre la puerta.
Los alimentos obstruyen la bandeja que se
encuentra encima del cajón.
El cajón está sobrecargado
El sistema de refrigeración está apagado.
El refrigerador está en el ciclo de
descongelación.
El cordón eléctrico está desenchufado.
Se ha quemado un fusible de la casa o se ha
disparado el disyuntor.
Interrupción de la energía eléctrica.
• Cierre ambas puertas suavemente.
Asegúrese de que el piso esté nivelado, sea sólido
y que pueda soportar adecuadamente el peso del
refrigerador. Llame a un carpintero para corregir el
hundimiento o desnivel del piso.
Verifi que que no hayan alimentos o hielo
bloqueando el cajón.
Almacene menos cantidad de alimentos en el cajón.
Retire alimentos o reorganícelos.
Encienda el sistema de refrigeración. Consulte la
ubicación del botón "On/Off" (encendido/apagado) en
la sección de controles.
Esto es normal en un refrigerador con descongelación
automática. El ciclo de descongelación se realiza
periódicamente y dura aproximadamente 30 minutos.
Asegúrese de que el enchufe esté fi rmemente
conectado al tomacorriente.
Verifi que o reemplace el fusible con un fusible de
acción retardada de 15 amp. Restablezca el disyuntor.
Verifi que las luces del hogar. Llame a su compañía
eléctrica.
El refrigerador funciona
demasiado o por
demasiado tiempo.
Los indicadores digitales
de temperatura están
destellando.
La temperatura de la habitación o del
El compresor de velocidad variable está
diseñado para funcionar 100% del tiempo,
excepto durante el ciclo de descongelación.
A veces se ejecutará más rápidamente,
tal como después de un ciclo de
descongelación
El sistema de control electrónico ha
detectado un problema de rendimiento.
Es normal que el refrigerador funcione más bajo estas
Es normal que el compresor funciona continuamente,
excepto durante el modo de descongelación.
Llame a su representante quien podrá interpretar cualquier
mensaje o código numérico que destelle en los indicadores.
Las temperaturas son demasiado frías
Problema Posible causa Solución común
Temperatura del
congelador demasiado
fría. La temperatura
del refrigerador es
satisfactoria.
La temperatura
del refrigerador
es demasiado fría.
La temperatura
del congelador es
satisfactoria.
Los alimentos
almacenados en los
cajones se congelan.
Los alimentos
almacenados en el cajón
Temperature Ajustable
Zona fría se congelan
(modelos selectos).
La función de congelado rápido está
activada.
El control del congelador está en un ajuste
demasiado frío.
El fabricador de hielo está encendido.
La función de hielo rápido está activada.
El control del refrigerador está en un ajuste
demasiado frío.
El control del refrigerador está en un ajuste
demasiado frío.
El control de la temperatura del cajón
Temperature Ajustable Zona fría) está en un
ajuste demasiado frío.
Desactive la función de congelación rápida.
Gire el control del congelador a un ajuste más
tibio. Espere 24 horas hasta que la temperatura se
estabilice.
Es normal que el congelador se enfríe demasiado
mientras el fabricador automático de hielo esté
encendido.
Desactive la función de hielo rápido.
Gire el control del refrigerador a un ajuste más
tibio. Espere 24 horas hasta que la temperatura se
estabilice.
Vea la solución anterior.
Cambie el control de temperatura del cajón
Temperature Ajustable Zona fría a un ajuste más alto.
La carne debe ser almacenada a temperaturas justo
por debajo del punto de congelación, para prolongar
el período de frescura. Es normal que se formen
cristales de hielo por el contenido de humedad de la
carne.
26-SP

Soluciones de problemas comunes
Las temperaturas son demasiado tibias
Problema Posible causa Solución común
La temperatura
interna del congelador
o refrigerador es
demasiado tibia.
Temperatura interna del
congelador demasiado
tibia. La temperatura
del refrigerador es
satisfactoria.
La temperatura interna
del refrigerador es
demasiado tibia.
Temperatura satisfactoria
del congelador.
La temperatura del cajón
Temperature Ajustable
Zona fría) o del cajón
Temperatura ajustable
zona fría es demasiado
alta (modelos selectos).
Las puertas se abren con demasiada
frecuencia o durante demasiado tiempo.
La puerta está levemente abierta.
El control del congelador está en un ajuste
demasiado tibio.
El control del refrigerador está en un ajuste
demasiado tibio.
El control de la temperatura está en un
ajuste demasiado tibio.
Cada vez que se abre la puerta, entra aire caliente en
el refrigerador. Abra la puerta con menor frecuencia.
Consulte el apartado "Apertura/cierre de puertas/
cajones" en la sección "Problema".
Cambie el control del congelador a un ajuste más
frío. Espere 24 horas hasta que la temperatura se
estabilice.
Cambie el control del refrigerador a un ajuste más
frío. Espere 24 horas hasta que la temperatura se
estabilice.
Gire el control de temperatura a un ajuste más frío.
Agua/humedad/escarcha dentro del refrigerador
Problema Posible causa Solución común
Se acumula humedad
dentro de las
paredes interiores del
refrigerador.
Se acumula agua en la
parte inferior de la tapa
del cajón.
Se acumula humedad en
el fondo del cajón.
Se acumula humedad
en el exterior del
refrigerador o entre las
puertas.
El ambiente es húmedo y caluroso.
La puerta está levemente abierta.
La puerta se abre con demasiada frecuencia
o por demasiado tiempo.
Hay envases abiertos en el interior.
Las verduras contienen y emiten humedad. La presencia de humedad en la parte inferior de la
El agua de frutas y verduras lavadas se
escurre dentro del cajón.
Se guardan las frutas y verduras más allá de
su madurez
El ambiente es húmedo.
La puerta está levemente abierta, lo
que hace que el aire frío del interior del
refrigerador entre en contacto con el aire
caliente del exterior.
La velocidad de acumulación de escarcha y de
condensación interna aumenta.
Consulte el apartado "Apertura/cierre de puertas/
cajones" en la sección "Problema".
Abra la puerta con menor frecuencia para permitir que
la temperatura interna se estabilice.
Mantenga los envases tapados.
cubierta no es inusual.
Cambie el control de humedad (modelos selectos) a
un ajuste menor.
Escurra y deje secar los alimentos antes de introducirlos
en el cajón. La acumulación de agua en el fondo del
cajón es normal.
Retire con frecuencia frutas y verduras viejas,
especialmente si comienzan a pudrirse.
Esto es normal en ambientes húmedos. Cuando la
humedad del ambiente se reduzca, la acumulación de
humedad en el refrigerador desaparecerá.
Consulte el apartado "Apertura/cierre de puertas/
cajones" en la sección "Problema".
27-SP

Información sobre el servicio
Si necesita servicio, llame a a una agencia de servicio autorizada. El concesionario o la distribuidora de su área puede darle
el nombre de las agencias de servicio autorizadas.
Tenga a la mano la siguiente información.
• Número de modelo
• Número de serie
• Fecha de compra
• Nombre de la distribuidora donde hizo la compra
Describa claramente el problema que tiene. Si no puede obtener el nombre de una agencia de servicio autorizada,
o si continúa teniendo problemas con el servicio, comuníquese con Viking Range, LLC al teléfono 1-888-845-4641 o escriba a:
VIKING RANGE, LLC
PREFERRED SERVICE
111 Front Street
Greenwood, Mississippi 38930 EE.UU.
Anote la información que se indica abajo. La necesitará si alguna vez requiere servicio. Los números de serie y de modelo
de su refrigerador se encuentran en la pared superior, detrás de las luces:
N.° de modelo __________________________________ N.° de serie ___________________________________________
Fecha de compra ________________________________ Fecha de instalación ___________________________________
Nombre de la distribuidora ______________________________________________________________________________
Dirección ______________________________________________________________________________________________
_______________________________________________________________________________________________________
_______________________________________________________________________________________________________
Si el servicio requiere la instalación de piezas, use solamente piezas autorizadas para asegurar la protección de la garantía.
Conserve este manual para su referencia futura.
28-SP

Garantía
REFRIGERADOR CON CONGELADOR INFERIOR DE PUERTA DOBLE
Se garantiza que los todos de abajo/de refrigeradores con congeladore inferior de puerta doble y todas sus piezas, excepto según se detalla
a continuación*†, están libres de defectos en los materiales o la mano de obra bajo uso residencial normal por un periodo de uno (1) año
a partir de la compra minorista original. Viking Range, LLC, el garante, acepta reparar o reemplazar, a su opción, cualquier pieza que no
funcione o que se determine defectuosa durante el periodo de la garantía.
*GARANTÍA COSMÉTICA TOTAL DE 90 (NOVENTA) DÍAS: Se garantiza que el producto está libre de defectos cosméticos en los materiales
o la mano de obra (como rayones en el acero inoxidable, imperfecciones en la pintura/porcelana, etc.) por un periodo de 90 (noventa) días
a partir de la fecha de compra minorista original o a la fecha de cierre por una nueva construcción, el periodo que sea mayor. Todo defecto
se deberá reportar al vendedor en un lapso de 90 (noventa) días a partir de la fecha de la compra minorista original.Viking Range, LLC utiliza
procesos y material de alta calidad para producir todos los acabados de color. Sin embargo, es posible que se observen leves variaciones
de color debido a las diferencias inherentes de las partes pintadas y de las partes de porcelana, así como las diferencias en la iluminación de
la cocina, las ubicaciones del producto y otros factores. Por lo tanto, esta garantía no aplica a la variación de color que se atribuya a dichos
factores.
†GARANTÍA TOTAL DE 90 (NOVENTA) DÍAS EN APLICACIONES “RESIDENCIALES PLUS”. Esta garantía total es válida para las
aplicaciones en las que el uso del producto vaya más allá del uso residencial normal; no obstante, el período de garantía para los productos
que se usen en tales aplicaciones será de 90 (noventa) días. Ejemplos de aplicaciones que esta garantía cubre son las casas de alojamiento
con desayuno, estaciones de bomberos, clubes privados, iglesias, yates, etc. Bajo esta garantía “Residential Plus”, se garantiza que el
producto, sus componentes y accesorios, estarán libres de defectos en los materiales o la mano de obra por un periodo de noventa (90) días
a partir de la fecha de compra minorista original. Esta garantía excluye el uso del producto en locales comerciales tales como restaurantes,
servicios alimenticios y servicios alimenticios institucionales.
GARANTÍA TOTAL DE SEIS AÑOS EN LAS PIEZAS DE REFRIGERACIÓN SELLADAS COMO SE INDICA
Se garantiza que los componentes sellados del sistema de refrigeración, como se listan abajo, estarán libres de defectos en los materiales y
la mano de obra bajo uso doméstico normal durante el cuarto y hasta el fi nal del sexto año a partir de la compra minorista original. Viking
Range, LLC, el garante, acepta reparar o reemplazar, a su opción, cualquier pieza que no funcione o que se determine defectuosa durante el
periodo de la garantía.
Componentes sellados del sistema de refrigeración: Compresor, evaporador, condensador, tubo de conexión, secador/cedazo
GARANTÍA LIMITADA DE DOCE AÑOS EN LAS PIEZAS DE REFRIGERACIÓN SELLADAS COMO SE INDICA
Cualquier componente sellado del sistema de refrigeración, como se lista arriba, que falle debido a materiales o mano de obra defectuosa
bajo uso doméstico normal durante el séptimo al doceavo año a partir de la fecha de la compra minorista original será reparado o
reemplazado, sin costo alguno por la pieza misma, y corriendo todos los costos a cargo del propietario, inclusive la mano de obra.
Esta garantía se extiende al comprador original del producto garantizado y a cada propietario subsiguiente del producto durante el término
de la garantía, y aplica a los productos que se compren y encuentren en Estados Unidos, México y el Caribe (excepto Cuba, República
Dominicana y Haití). Los productos se deben haber comprado en el país en el que se requiere servicio. Si el producto o una de sus piezas
componentes tiene un defecto o funciona mal durante el periodo completo de la garantía, después de un número razonable de intentos por
parte del garante para corregir los defectos o el mal funcionamiento, el propietario tiene derecho a recibir un reembolso o al reemplazo del
producto o de su pieza o piezas componentes. El reemplazo de una pieza incluye su instalación gratuita, excepto como se especifi ca bajo
la garantía limitada. De acuerdo con los términos de esta garantía, un agente o representante de servicio autorizado por Viking Range, LLC
autorizado por la fábrica debe proporcionar el servicio. El servicio se dará dentro del horario normal de ofi cina y la mano de obra que se dé
durante horas extras o con tarifas especiales no estará cubierto por esta garantía.
El propietario será responsable de la instalación adecuada, de dar un mantenimiento razonable y necesario, de proporcionar comprobante de
compra si se le solicita y de hacer que el aparato esté razonablemente accesible para llevar a cabo el servicio. La devolución de la Tarjeta de
registro del propietario no es una condición para la cobertura de la garantía. Sin embargo, debe devolver la Tarjeta de registro del propietario
para que Viking Range, LLC pueda comunicarse con usted en caso de que surja algún problema de seguridad que pudiese afectarle a usted.
Esta garantía le otorga derechos legales específi cos, y es posible que tenga otros derechos que pueden variar entre jurisdicciones.
GARANTÍA TOTAL DE UNO AÑO
TÉRMINOS Y CONDICIONES
LO QUE ESTA GARANTÍA NO CUBRE: Esta garantía no aplica por los daños que sean el resultado de abuso, falta de un mantenimiento
razonable y necesario, accidente, entrega, negligencia, desastres naturales, falta en el suministro de energía eléctrica al producto por alguna
razón, alteración, uso en exteriores, instalación inadecuada, manejo inadecuado o que la reparación o servicio que se dé a producto sea
efectuada por terceros que no sea una agencia o representante autorizado de Viking Range, LLC. Esta garantía no aplica a usos comerciales.
LIMITACIÓN DE SOLUCIONES Y DURACIÓN DE LA GARANTÍA IMPLÍCITA
EL RECURSO ÚNICO Y EXCLUSIVO DEL PROPIETARIO POR UNA RECLAMACIÓN DE CUALQUIER TIPO REFERENTE A ESTE
PRODUCTO SERÁN LOS RECURSOS DISPUESTOS ARRIBA. VIKING NO ES RESPONSABLE DE DAÑOS RESULTANTES O INCIDENTALES,
INCLUIDOS PERO SIN LIMITARSE A LA PÉRDIDA DE COMIDA O MEDICINA DEBIDO A LA FALLA DEL PRODUCTO, YA SEA QUE
RESULTE DE UNA VIOLACIÓN DE LA GARANTÍA, INCUMPLIMIENTO DEL CONTRATO O DE OTRA CAUSA. Algunas jurisdicciones no
permiten la exclusión ni la limitación de daños incidentales ni resultantes, de manera que es posible que la limitación o exclusiones indicadas
no apliquen en su caso. Todas las garantías implícitas de comercialización o idoneidad para un propósito particular aplicable a este producto
se limitan en duración al periodo de cobertura de las garantías limitadas expresadas por escrito aplicables que se disponen arriba. Algunos
estados no permiten la limitación en la duración de una garantía implícita, de manera que la limitación de arriba puede no aplicar en su caso.
SERVICIO DURANTE LA GARANTÍA
Para obtener servicio durante la garantía, comuníquese con un representante de servicios de Viking Range, LLC o a Viking Range, LLC, 111
Front Street, Greenwood, Mississippi 38930, (888) 845-4641. Proporcione los números de modelo y de serie y la fecha de compra original o la
fecha de cierre en caso de construcciones nuevas. Si desea saber el nombre de la agencia de servicio autorizada por Viking Range, LLC más
cercana, llame a Viking Range, LLC. IMPORTANTE: Retenga el comprobante de la compra original para establecer el periodo de la garantía.
Las especifi caciones están sujetas a cambio sin previo aviso.
29-SP

30-SP

Viking Range, LLC
111 Front Street
Greenwood, Mississippi 38930 USA
(662) 455-1200
For product information, call 1-888-(845-4641)
or visit our web site at vikingrange.com in the US or brigade.ca in Canada
Pour toute information concernant le produit, appelez 1-888-845-4641
ou visitez le site Web à www.brigade.ca
Para obtener información sobre los productos, llame al teléfono 1-888-(845-4641)
o visite el sitio web en vikingrange.com
062326-000B EN FR SP
(063017)
 Loading...