

Viking Designer Topaz User Manual
User’s Guide
KEEPING THE WORLD SEWING™

This household sewing machine is designed to comply with IEC/EN 60335-2-28 and UL1594
IMPORTANT SAFETY INSTRUCTIONS
When using an electrical appliance, basic safety precautions should always be followed, including the following:
Read all instructions before using this household sewing machine.
DANGER – To r educe the risk of electric shock:
• A sewing machine should never be left unattended when plugged in. Always unplug this sewing machine
from the electric outlet immediately after using and before cleaning.
• Always unplug before relamping. Replace bulb with same type rated 5 Watt.
WARNING – To reduce the risk of burns, À re, electric shock,
or injury to person:
• This sewing machine is not intended for use by persons (including children) with reduced physical, sensory or mental
capabilities, or lack of experience and knowledge, unless they have been given supervision or instruction concerning use of
the sewing machine by a person responsible for their safety.
• Children should be supervised to ensure that they do not play with the sewing machine.
• Use this sewing machine only for its intended use as described in this manual. Use only attachments
recommended by the manufacturer as contained in this manual.
• Never operate this sewing machine if it has a damaged cord or plug, if it is not working properly, if it has
been dropped or damaged, or dropped into water. Return the sewing machine to the nearest authorized
dealer or service center for examination, repair, electrical or mechanical adjustment.
• Never operate the sewing machine with any air openings blocked. Keep ventilation openings of the
sewing machine and foot controller free from the accumulation of lint, dust, and loose cloth.
• Keep À ngers away from all moving parts. Special care is required around the sewing machine needle.
• Always use the proper needle plate. The wrong plate can cause the needle to break.
• Do not use bent needles.
• Do not pull or push fabric while stitching. It may deÁ ect the needle causing it to break.
• Wear safety glasses.
• Switch the sewing machine off (“0”) when making any adjustment in the needle area, such as threading
needle, changing needle, threading bobbin, or changing presser foot, etc.
• Always unplug sewing machine from the electrical outlet when removing covers, lubricating, or when
making any other user servicing adjustments mentioned in the instruction manual.
• Never drop or insert any object into any opening.
• Do not use outdoors.
• Do not operate where aerosol (spray) products are being used or where oxygen is being administrated.
• To disconnect, turn all controls to the off (“0”) position, then remove plug from outlet.
• Do not unplug by pulling on cord. To unplug, grasp the plug, not the cord.
• This sewing machine is provided with double insulation. Use only identical replacement parts.
See instructions for Servicing of Double-Insulated Appliances.
SAVE THESE INSTRUCTIONS
SERVICING OF DOUBLE INSULATED PRODUCTS
In a double-insulated product, two systems of insulation are provided instead of grounding. No ground means is provided
on a double-insulated product, nor should a means for grounding be added to the product. Servicing of a double-insulated
product requires extreme care and knowledge of the system and should be done only by qualiÀ ed service personnel.
Replacement parts for a double-insulated product must be identical to those parts in the product. A double-insulated product
is marked with the words ‘DOUBLE INSULATION’ or ‘DOUBLE INSULATED’.

1
2
2
3
4
Set Up
Page 10-31
Sewing Mode
Page 32-44
Embroidery Set Up
Page 55-58
Taking care of the
machine
Page 68-70
Stitch and alphabet overview, page 71-73
Machine overview and accessories, page 6-9
Embroidery Mode
Page 59-67
Basic Sewing
Techniques
Page 45-54
5
6

Table of contents
Machine overview ............................................................6
Included accessories ........................................................8
1. Set Up
Unpacking ........................................................................10
Connecting the f
oot control cord..............................10
Connect the power cord and foot control ..............10
Packing away after sewing ............................................11
Extended Sewing Surface .............................................11
Using the free arm .........................................................11
Spool pins and spool caps ............................................12
Threading the Upper Thread .......................................13
Needle threader .............................................................14
Cutting the thread .........................................................14
Threading for twin needles ..........................................15
Thread sensor .................................................................15
Bobbin Winding, model 20 ...........................................16
Bobbin Winding, model 30 ...........................................17
Inserting the bobbin ......................................................18
Thread tension................................................................19
EXCLUSIVE SENSOR SYSTEM™ (ESS) ...................19
Lower the feed teeth ....................................................20
Changing the presser foot............................................20
Changing the needle ......................................................20
Needles ............................................................................21
Threads .............................................................................22
Pictogram Pen .................................................................22
Stabilizers .........................................................................22
USB port ..........................................................................23
USB embroidery stick ...................................................23
5D™ Embroidery Software .........................................24
How to Update your machine ....................................24
Function Buttons ............................................................25
Touch Panel overview ...................................................27
SET Menu .........................................................................28
2. Sewing Mode
Sewing Mode overview .................................................32
Selecting a stitch
.............................................................33
Selecting a font ...............................................................33
Exclusive SEWING ADVISOR™ ................................34
Stitch Settings ..................................................................35
Programming ...................................................................37
My Stitches Menu ...........................................................40
Sewing pop-up messages ..............................................41
3. Basic Sewing Techniques
Seam ..................................................................................45
Ov
ercast ...........................................................................45
Seam and Overcast ........................................................46
Baste ..................................................................................47
Darning and Mending ....................................................47
Hem...................................................................................48
Blind Hem ........................................................................49
Sewing buttonholes .......................................................50
Sewing on buttons .........................................................52
Sewing zippers ................................................................53
Taper Satin Stitch, model 30 ........................................54
4. Embroidery Set Up
Embroidery unit overview ...........................................55
Embr
oidery hoop overview .........................................55
Designs .............................................................................55
Connect the embroidery unit .....................................56

Remove the embroidery unit ......................................56
Hoop the fabric ..............................................................57
Slide on the hoop ...........................................................57
Getting started embroidering .....................................58
5. Embroidery Mode
Embroidery Mode overview ........................................59
Load a design ...................................................................60
Load a f
ont .......................................................................60
Embroidery information ...............................................61
Adjust designs .................................................................62
Hoop options ..................................................................63
Embroidery functions ....................................................64
Embroidery pop-up messages .....................................65
4. Taking care of the machine
Changing the light bulbs ...............................................68
Cleaning the machine
....................................................68
Trouble shooting ............................................................69
Stitch table - menu 1. Utility stitches .........................71
Stitch overview ...............................................................73
Alphabets .........................................................................73
Index .................................................................................74
1
2
4
5
7
3
8
9
11
12
13
14
10
15
19
20
21
22
23
25
26
28
30
24
31
32
9
34
33
29
16
27
6
18
17
6
Machine overview
1. Lid
2. Pre-Tension thread guide
3. Thread tension discs
4. Thread take-up lever
5. Thread tension for bobbin winding
6. Thread slots
7. Function Button Panel
8. Thread cutter
9. Light bulbs
10. Sensor One-Step Buttonhole Foot
socket
11. Built-In Needle threader
12. Presser foot
13. Stitch plate
14. Bobbin cover
15. Free arm
16. Drop feed teeth switch
17. Button ruler and built-in tape measure
18. Base plate
19. Needle bar with needle clamp screw
20. Presser bar
21. Presser foot ankle
22. Stitch panel
23. Main spool pin
24. Spool caps
25. Auxiliary spool pin
26. Bobbin winding lever (model 30)
27. Bobbin winder (model 30)
28. Thread cutter for bobbin winding
(model 30)
29. Bobbin winding thread guide
30. Handwheel
31. GraphicDisplay
32. Touch Panel
33. Built-in USB port
34. ON/OFF switch, connectors for
power cord and foot control
Front side
39
38
40
41
43
44
42
46
45
35
36
37
7
35. Bobbin stop (model 20)
36. Bobbin winder (model 20)
37. Thread cutter for bobbin winding (model 20)
Rear side
38. Handle
39. Embroidery unit connection socket
Parts of the embroidery unit
(For model 30 type BE18, for model 20 type BE19)
40. Embroidery unit socket
41. Embroidery arm
42. Embroidery unit release button (underside)
43. Embroidery hoop attachment
44. Level adjusting feet
Accessory tray
There are special places for presser feet and bobbins in the
accessory tray, plus space for needles and other accessories. Store
the accessories in the tray so they are easily accessible.
45. Space for accessories
46. Removable presser feet and bobbin holder
64
63
62
47
48
49
50 51
52
53
54
55
56
57
58
60
59
61
8
Included accessories
47. 2 thread nets. Slide on the spool when using synthetic threads
that easily unwind.
48. Screwdriver
49. Ligth bulb remover
50. Seam ripper
51. Brush
52. 2 non-Stick glide plates
53. 2 felt pads
54. 2 spool caps, large (1 attached to the machine upon delivery)
55. Spool cap, small
56. Spool cap, medium (attached to the machine upon delivery)
57. 6 bobbins (one in machine upon delivery)
58. Multipurpose tool/ Button reed
59. USB embroidery stitck (1 GB)
60. Hoop Clips (16 with model 30, 10 with model 20)
61. Pictogram Pen
Hoops Included
62. DESIGNER™ Royal Hoop, 360x200mm (Only with model 30)
63. DESIGNER™ Crown Hoop, 260x200mm (Only with model 20)
64. DESIGNER™ Splendid Square Hoop, 120x120mm
Accessories Included - not in picture
• Scissors
• Needles
• Carrying case (attached on the machine upon delivery)
• Foot control
• Foot control cord
• Power cord
• Embroidery thread
• Pieces of fabric and stabilizer
• 5D™ Embroidery Machine Communication CD
• DESIGNER TOPAZ™ Sampler CD
• DESIGNER TOPAZ™ 30 Bonus Sampler CD (Only with
model 30)
• DESIGNER TOPAZ™ Sampler Book
• User´s Guide
• Quick Guide
• Accessory User’s Guide
• Warranty card
9
Presser feet
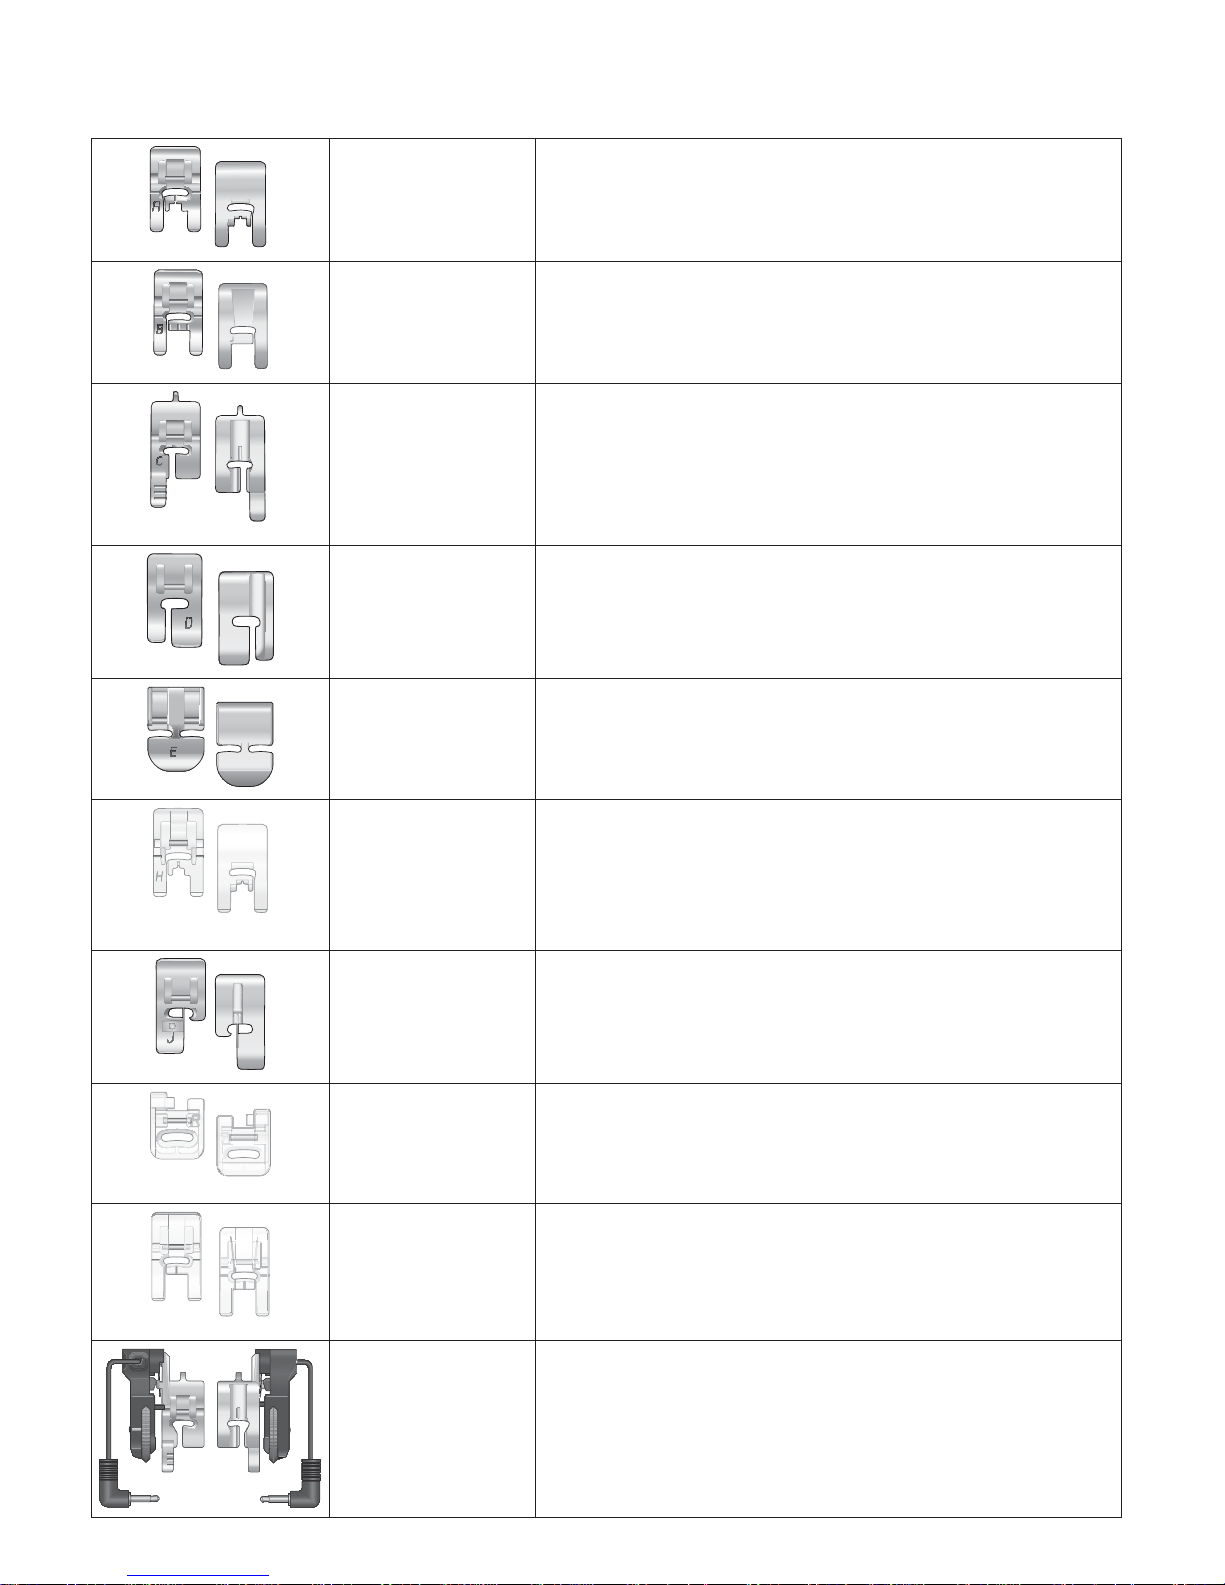
7
Utility Foot A Attached on the machine upon delivery. This foot is used mainly for
straight stitching and zigzag stitching with a stitch length longer than 1.0.
7
Decorative Stitch
Foot B
When sewing decorative stitches or short zigzag stitches and other utility
stitches with less than 1.0 mm stitch length, use this foot. The tunnel on
the underside of the foot is designed to feed smoothly over the stitches.
7
Buttonhole Foot C This foot is used for sewing buttonholes step by step. Use the guide lines
on the toe of the foot to position the garment edge. The two tunnels
on the bottom of the foot ensures a smooth feed over the buttonhole
columns. The À nger on the back of the foot holds cording for corded
buttonhole.
Blind Hem Foot D This foot is used for blind hem stitches. The inner edge of this foot
guides the fabric. The right toe of the foot is designed to ride along the
hem edge.
7
Zipper Foot E This foot can be snapped on either to the right or to the left of the
needle, making it easy to sew close to both sides of the zipper teeth.
Move needle position to right or left to sew closer to zipper teeth or for
covering large cording.
7
Non-Stick Glide
Foot H
This foot, with a non-stick coating underneath, is used when sewing
foam, vinyl, plastic or leather to minimize the risk of these materials
sticking to the foot.
Edging Foot J This foot is used for overcasting and seam/overcasting. Stitches form
over the pin which prevents puckering at the edge of the fabric.
Embroidery/
Darning Foot R
This foot is used for free motion embroidery/quilting/stitching and hoop
embroidery.
7
Decorative Stitch Foot
B Transparent
A clear foot for decorative sewing ma kes it easy to match stitches. Same
tunnel on the underside as Presser Foot B.
7
Sensor One-Step
Buttonhole Foot
When connected to the machine, the buttonhole is sewn in a suitable
length to the button size that has been entered into the machine.
OFF
ON
123
10
Set Up
1. Set Up
Unpacking
1. Place the machine on a sturdy, Á at surface, remove the
packaging and lift off the cover.
2. Remove the packing material and the foot control.
3. The machine is delivered with an accessory bag, a power cord
and a foot control cord.
4. Wipe the machine, particularly around the needle and stitch
plate to remove any soil before sewing.
Connecting the foot control cord
Among the accessories you will À nd the foot control cord and
the power cord. Connecting the foot control cord to the foot
control is only necessary the very À rst time you are going to use
the machine.
1. Take out the foot control cord. Turn the foot control over.
Connect the cord to the socket inside the space of the foot
control.
2. Push À rmly to make sure it is properly connected.
3. Lay the cord in the slot on the underside of the foot control.
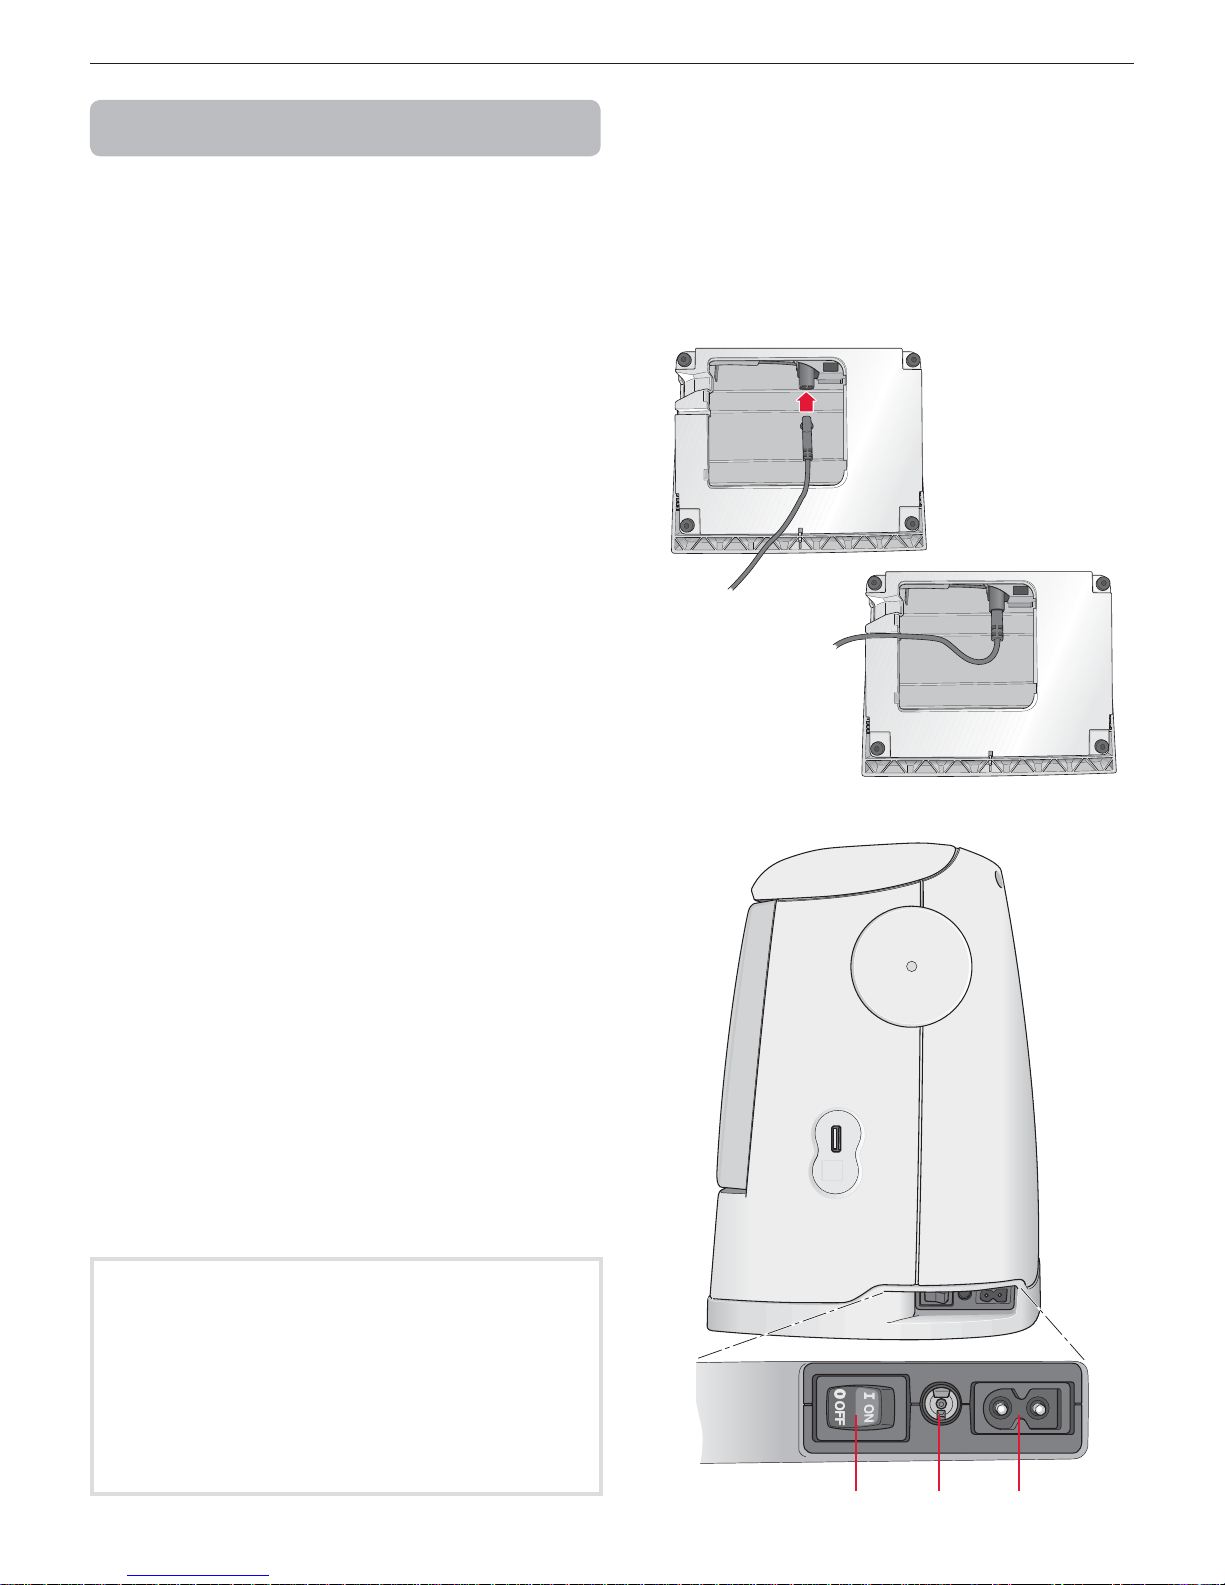
Connect the power cord and foot
control
On the underside of the machine you will À nd information about
the power supply voltage (V) and the frequency (Hz).
Note: Before plugging in the foot control, check to ensure that it is of type
“FR5” (see underside of foot control).
1. Connect the foot control cord to the front socket on the
bottom right side of the machine (1).
2. Connect the power cord to the rear socket on the bottom
right side of the machine (2).
3. Press the ON/OFF switch to ON to turn on power and light
(3).
For the USA and Canada
This sewing machine has a polarized plug (one blade wider
than the other). To reduce the risk of electric shock, this
plug is intended to À t in a polarized outlet only one way. If
the plug does not À t fully in the outlet, reverse the plug. If
it still does not À t, contact a qualiÀ ed electrician to install
the proper outlet. Do not modify the plug in any way.
11
1
Set Up
Packing away after sewing
1. Press the ON/OFF switch (3) to OFF.
2. Unplug the cord from the wall socket and then from the
machine (2).
3. Unplug the foot control cord from the machine (1). Wind the
foot control cord inside the space on the underside of the
foot control.
4. Place all accessories in the accessory tray. Slide the tray on to
the machine, behind the free arm.
5. Place the foot control in the space above the free arm.
6. Put on the cover.
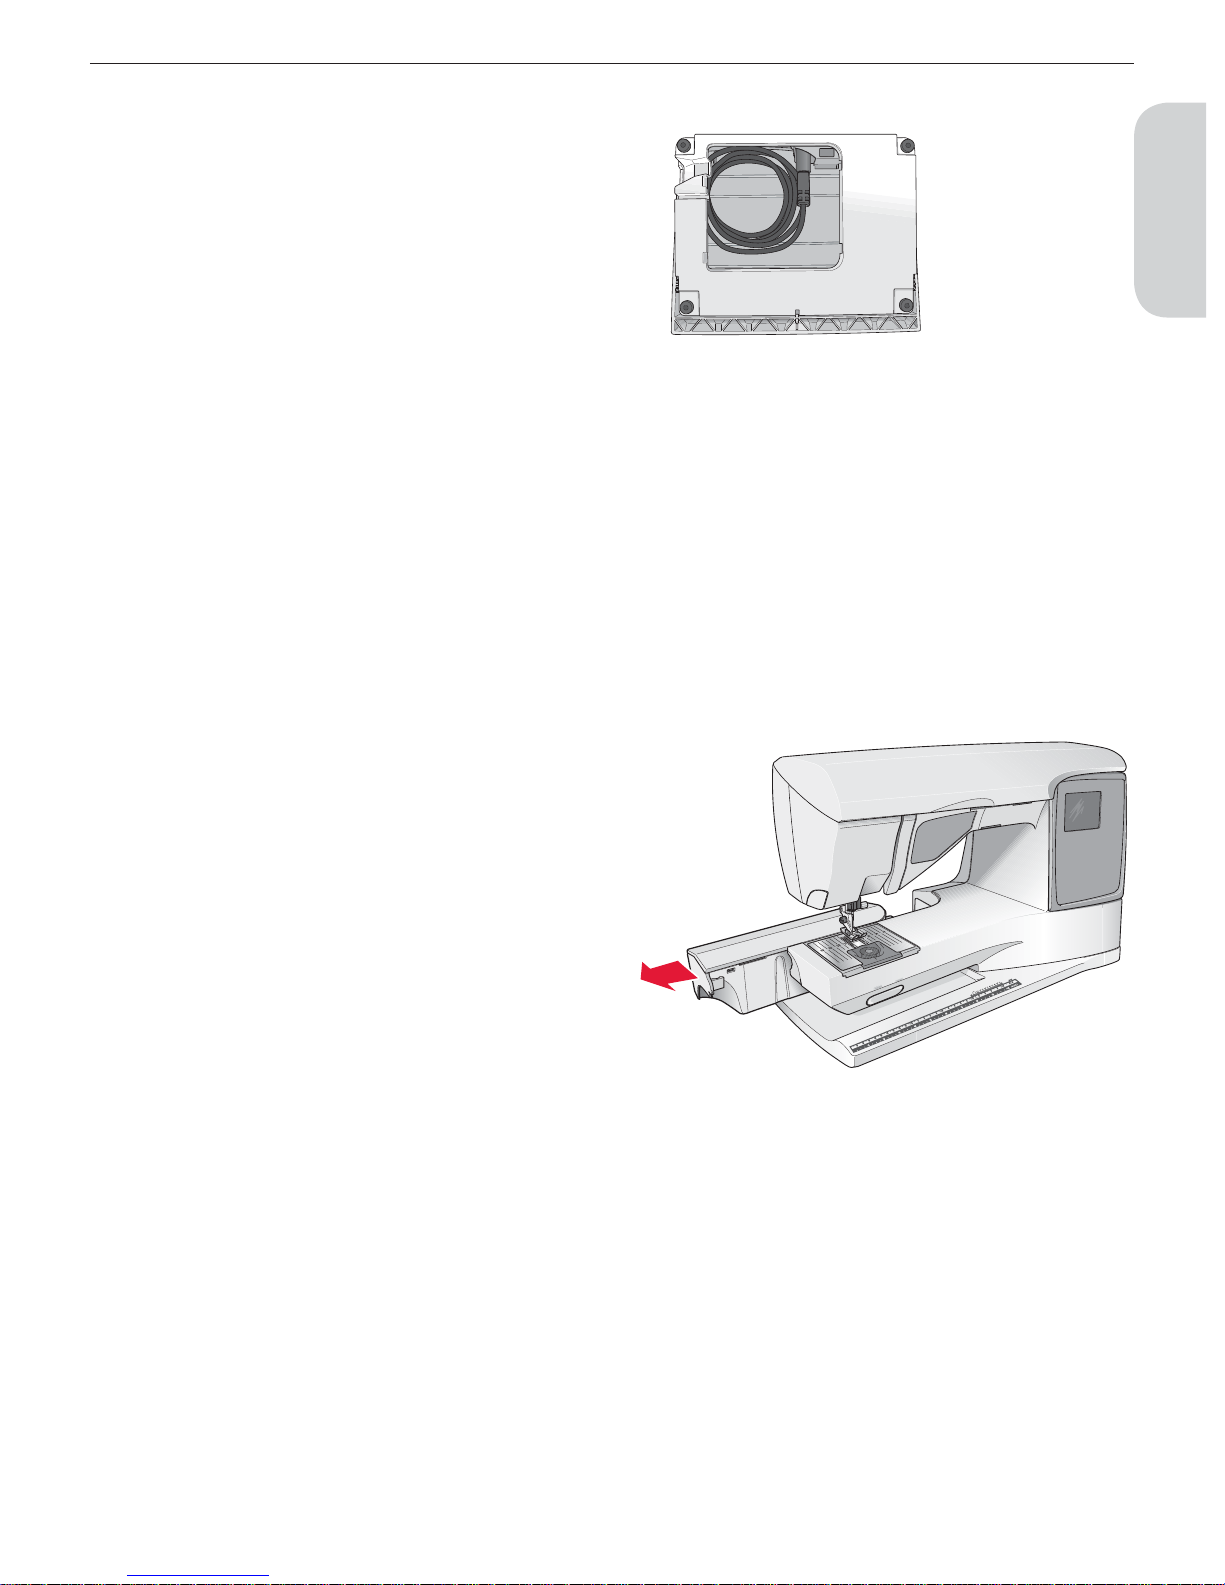
Extended Sewing Surface
The space at the right side of the needle, between the needle
and the arm, gives you a great deal of extra space. This makes
sewing large projects and quilts much easier than on other sewing
machines. Keep the accessory tray on the machine to provide a
large, Á at work surface.
Using the free arm
Slide the accessory tray to the left when you wish to remove it and
use the free arm.
Use the free arm to facilitate sewing trouser legs and sleeve hems.
To replace the accessory tray, slide it onto the machine until it À ts
in place.
A
B
12
Set Up
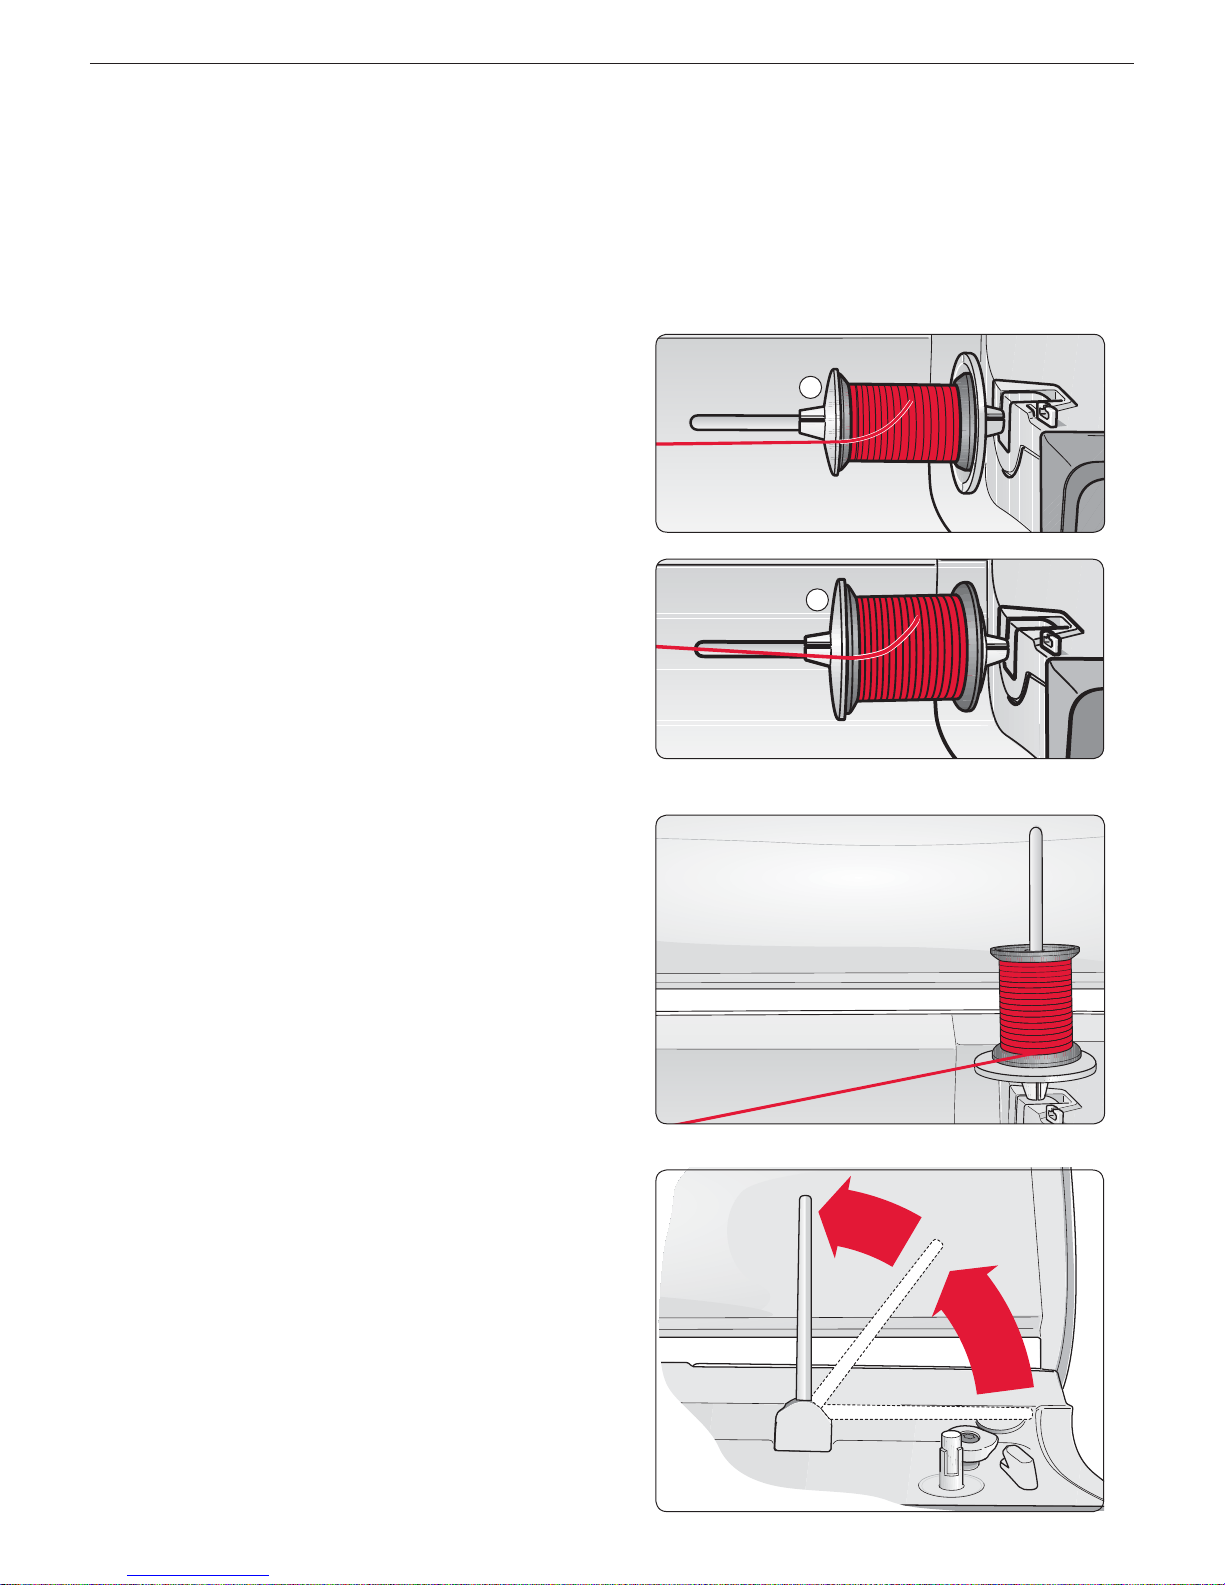
Spool pins and spool caps
Your sewing machine has two spool pins; a main spool pin and
an auxiliary spool pin. The spool pins are designed for all types
of thread. The main spool pin is adjustable and can be used in a
horizontal position (the thread reels off the stationary spool) or
in a vertical position (the thread spool rotates). Use the horizontal
position for all regular sewing threads and the vertical position for
large spools or specialty threads.
Horizontal position
Lift the spool pin up slightly from its horizontal position to easily
place the thread spool on the pin. The thread should reel over
the top, in a counterclockwise direction, as shown in the picture.
Slide on a spool cap and then move the spool pin back to the
horizontal position.
There are two spool caps on the spool pin upon delivery. For
medium sized thread spools, the medium sized cap (A) is placed
in front of the spool. For large thread spools, the large cap (B) is
placed in front of the spool.
The Á at side of the spool cap should be pressed À rmly against the
spool. There should be no space between spool cap and thread
spool.
Two extra spool caps, one small and one large, are also included
as accessories for your machine. The small spool cap can be used
for small thread spools. The second large spool cap can be used
when winding a bobbin from a second spool of thread or when
sewing with a twin needle.
Vertical position
Lift the spool pin up and all the way to the right. Lock the spool
pin in the vertical position by slightly pressing it down. Slide on
the large spool cap. For spools smaller than the medium size
spool cap or when using specialty threads, place a felt pad under
the thread spool to prevent the thread from reeling off too fast.
For larger spools, the felt pad is not needed.
Note: No spool cap should be placed on top of the spool as this prevents the
spool from rotating.
Auxiliary spool pin
The auxiliary spool pin is used when winding a bobbin from a
second spool of thread or for a second spool when sewing with a
twin needle.
Lift the auxiliary spool pin up and to the left. Slide on the large
spool cap. For spools smaller than the medium size spool cap,
place a felt pad under the thread spool to prevent the thread from
reeling off too fast. For larger spools, the felt pad shall not be
used.

A
B
C
D
E
13
1
Set Up
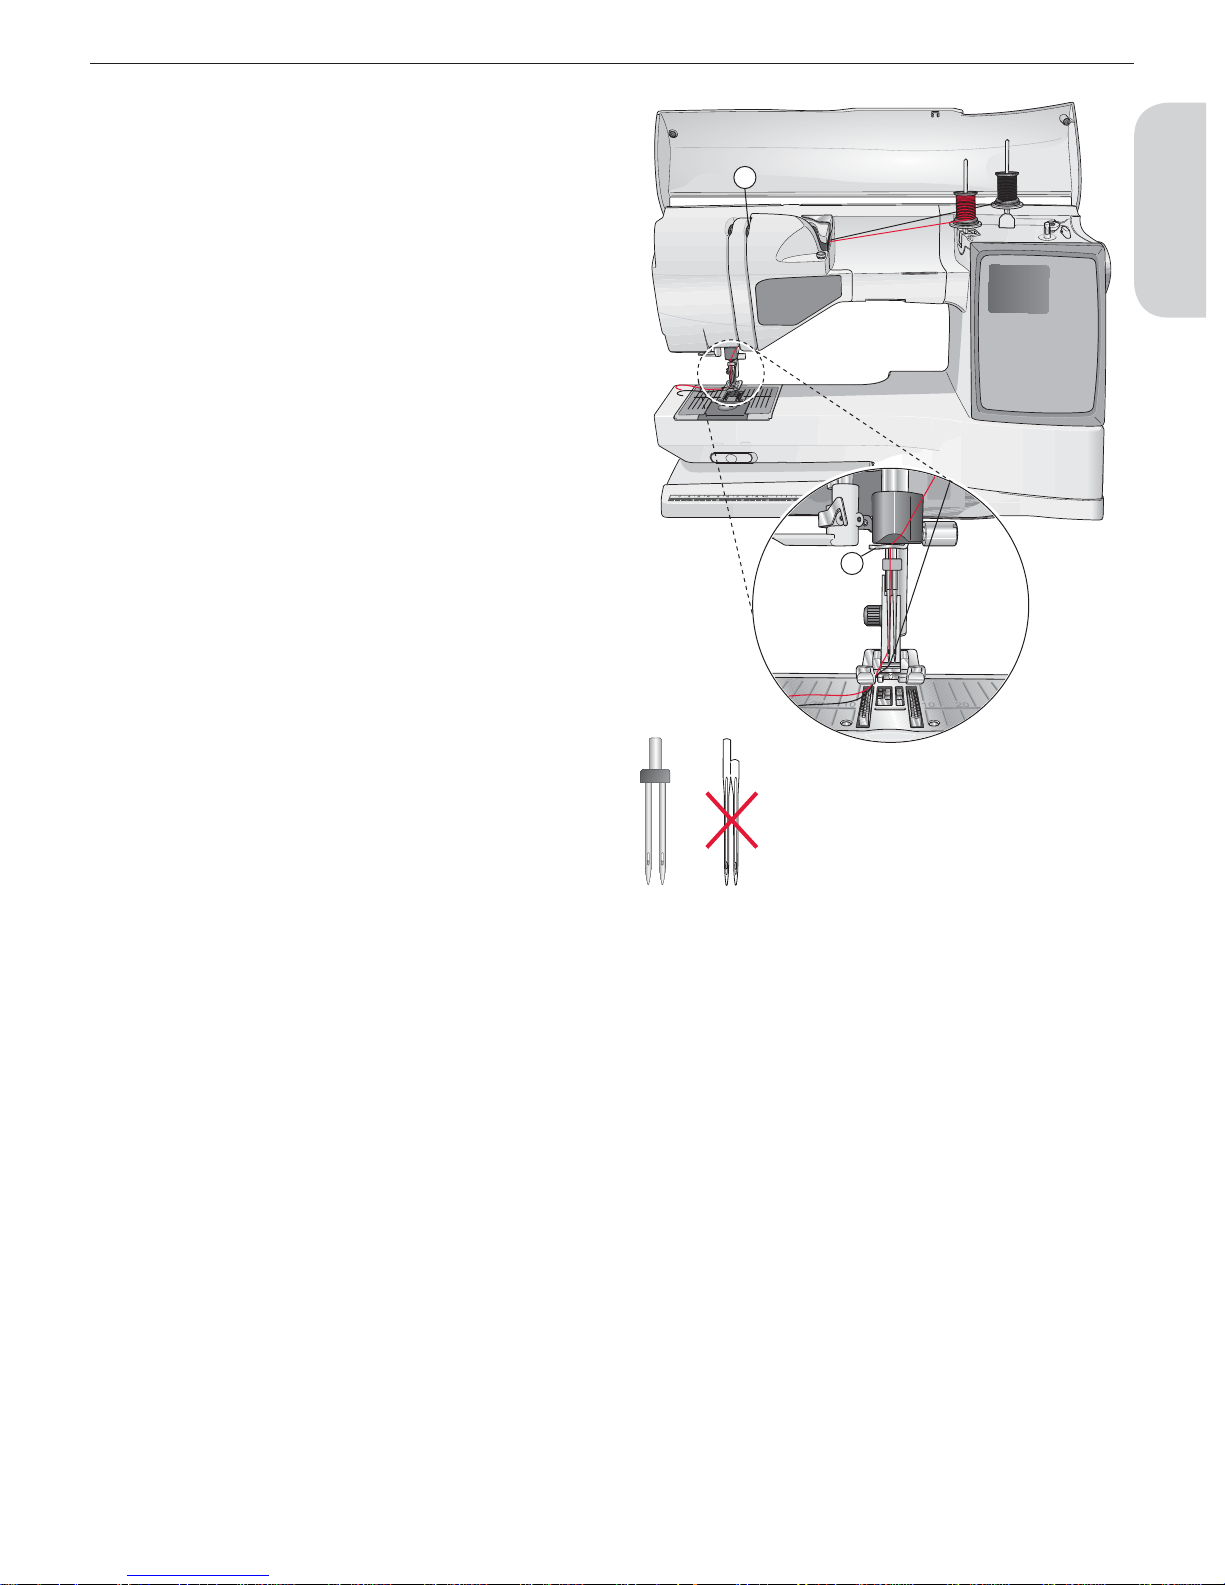
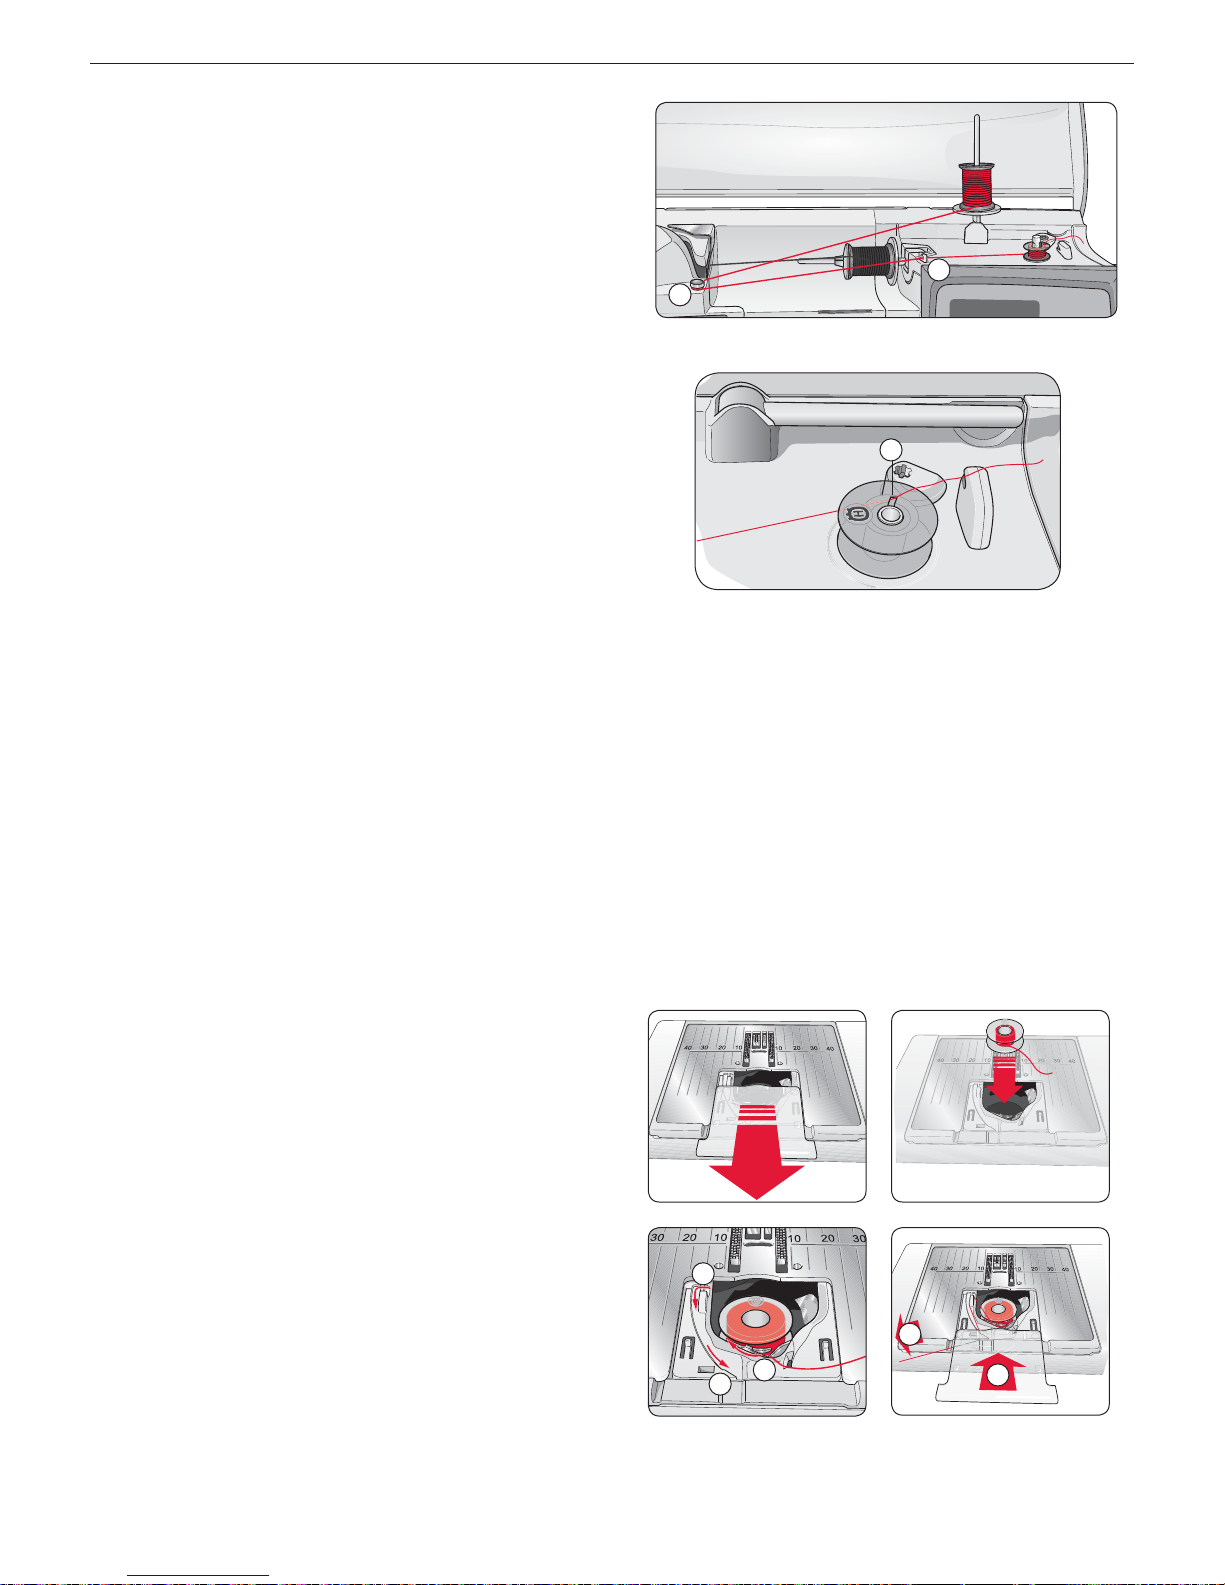
Threading the Upper Thread
Make sure the presser foot is raised and the needle is in the up
position.
1. Place the thread on the spool pin and the spool cap on the
spool as described on page 12.
2. Spool pin in horizontal position:
Bring the thread over and behind the pre-tension thread guide
(A) and under the thread guide (B).
Spool pin in vertical position:
Instead of bringing the thread into the pre-tension guide (A),
bring it directly under the thread guide (B).
3. Bring the thread down between the thread tension discs (C).
4. Continue threading in the direction indicated by the arrows.
Bring the thread from the right into the slot on the take-up
lever (D).
5. Take the thread down and behind the last guide just above the
needle (E).
12
3
4
A
B
C
14
Set Up
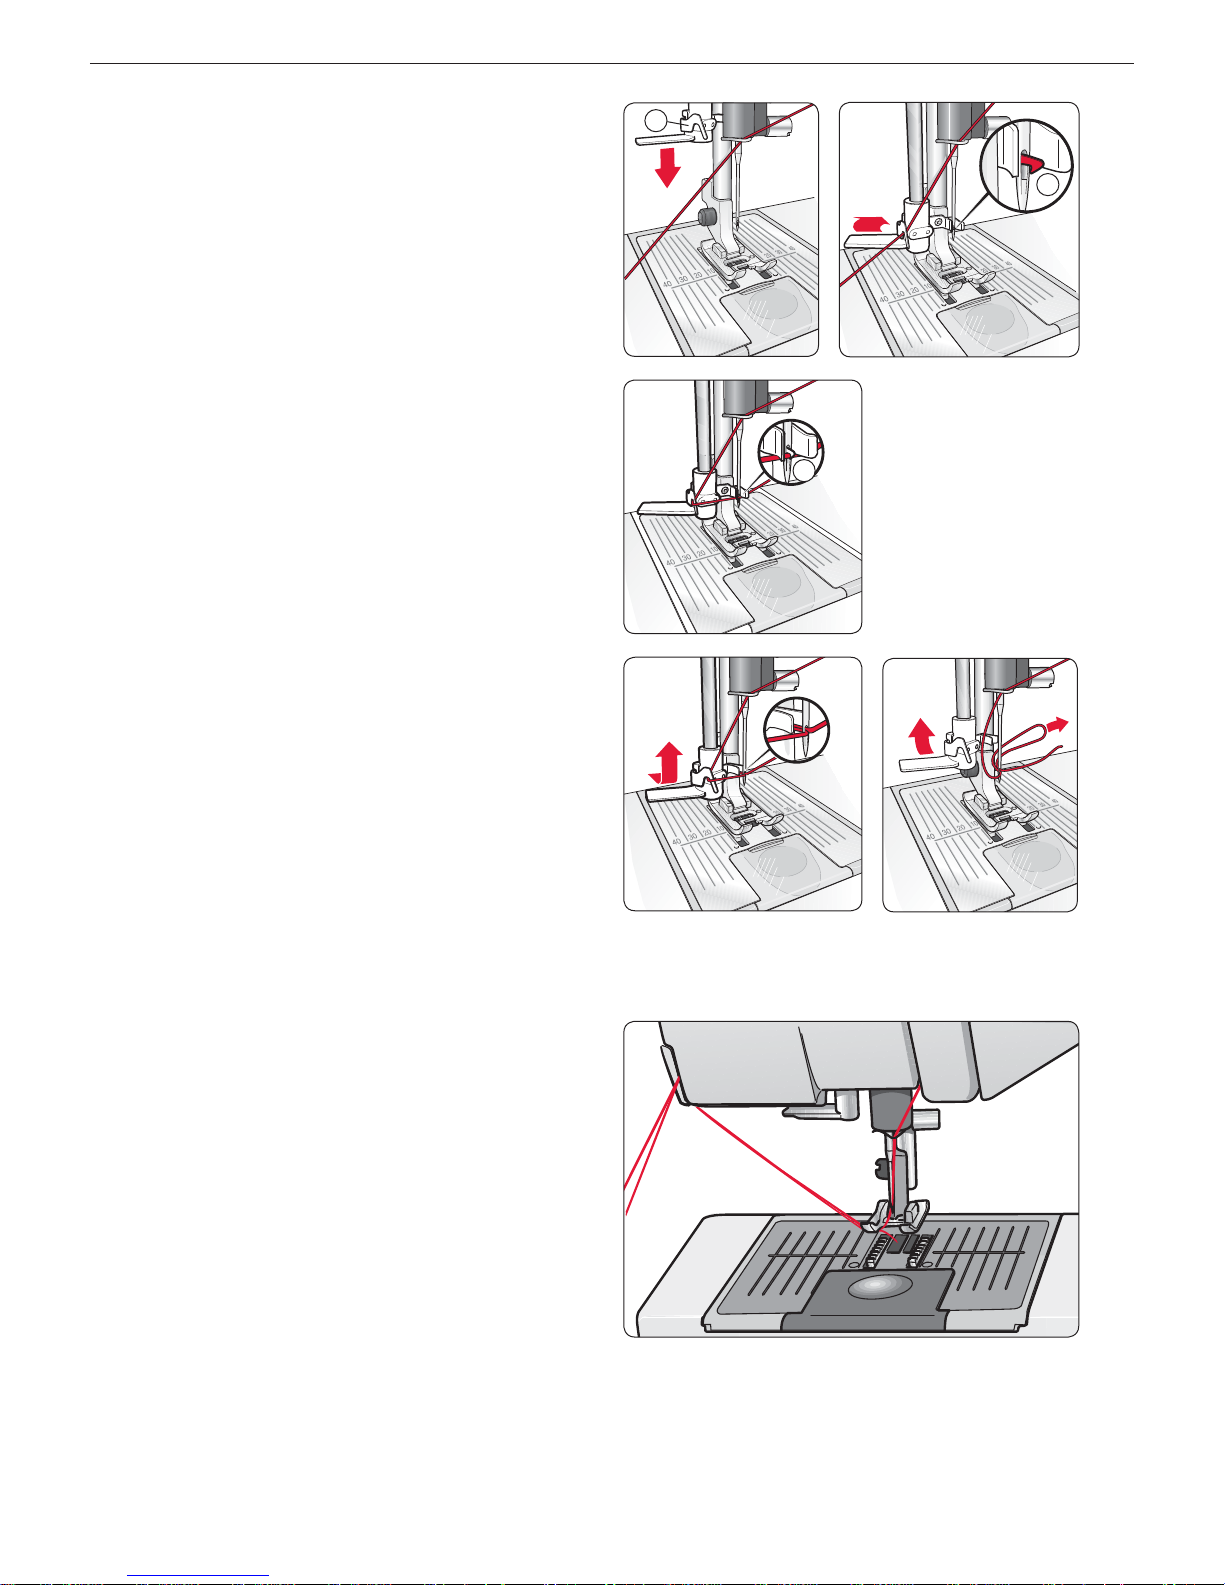
Needle threader
The needle must be in the up position to use the built-in needle
threader. We also recommend lowering the presser foot.
1. Use the handle to pull the needle threader all the way down,
catching the thread under the guide (A).
2. Push back to bring the needle threader forward until the metal
Á anges cover the needle. A small hook will pass through the
needle eye (B).
3. Place the thread under the Á anges in front of the needle, so
the thread catches into the small hook (C).
4. Let the needle threader gently swing back. The hook pulls the
thread through the needle eye and forms a loop behind the
needle. Pull the thread loop out behind the needle.
5. Place the thread under the presser foot.
Note: The needle threader is designed to be used for size 70-120 needles. You
cannot use the needle threader for size 60 needles or smaller, the wing needle,
twin needle, triple needle or when the Sensor One-Step Buttonhole Foot is on.
There are also some other optional accessories that require manual threading
of the needle.
When threading the needle manually, make sure that the needle is threaded
from front to back. The white presser foot ankle makes it easy to see the eye
of the needle. The bobbin case cover can be used as a magnifying glass.
Cutting the thread
Once you have À nished sewing, you can cut the threads by raising
the presser foot and pulling the threads on the left side of the
machine from back to front into the thread cutter.
A
D
B
15
1
Set Up
Threading for twin needles
1. Insert a twin needle.
2. Use a second thread spool or wind a bobbin with the thread
you are going to use as the second upper thread.
3. Lift the spool pin up and all the way to the right. Lock the
spool pin in the vertical position by slightly pressing it down.
Slide on the large spool cap. For spools smaller than the
medium size spool cap, place a felt pad under the thread
spool.
4. Place the À rst thread spool on the spool pin. The spool
should rotate in a clockwise direction when the thread reels
off the spool.
5.
LEFT NEEDLE: Thread the machine as described on page 13.
Check to ensure that the thread lies between the left thread
tension discs (A). Thread the left needle manually.
6. Pull out the auxiliary spool pin and slide on the large spool
cap. For spools smaller than the medium size spool cap, place
a felt pad under the thread spool.
7. Place the second thread on the spool pin. The second spool
should rotate in a counterclockwise direction when the thread
reels off the spool.
8.
RIGHT NEEDLE: Thread the machine as before but this thread
should lie between the right thread tension discs (A) and
outside the needle thread guide (B). Thread the right needle
manually.
Note: Only use symmetrical twin needles (C). Do not use this type of twin
needle (D), since it may damage your sewing machine.
Thread sensor
If the upper thread breaks or runs out or if the bobbin thread
runs out, the machine stops and a pop-up appears on the display.
If upper thread breaks: Re-thread the machine and press OK.
The pop-up disappears. If bobbin thread runs out; replace with a
full bobbin and continue sewing.
C
C
A
B
C
D
16
Set Up
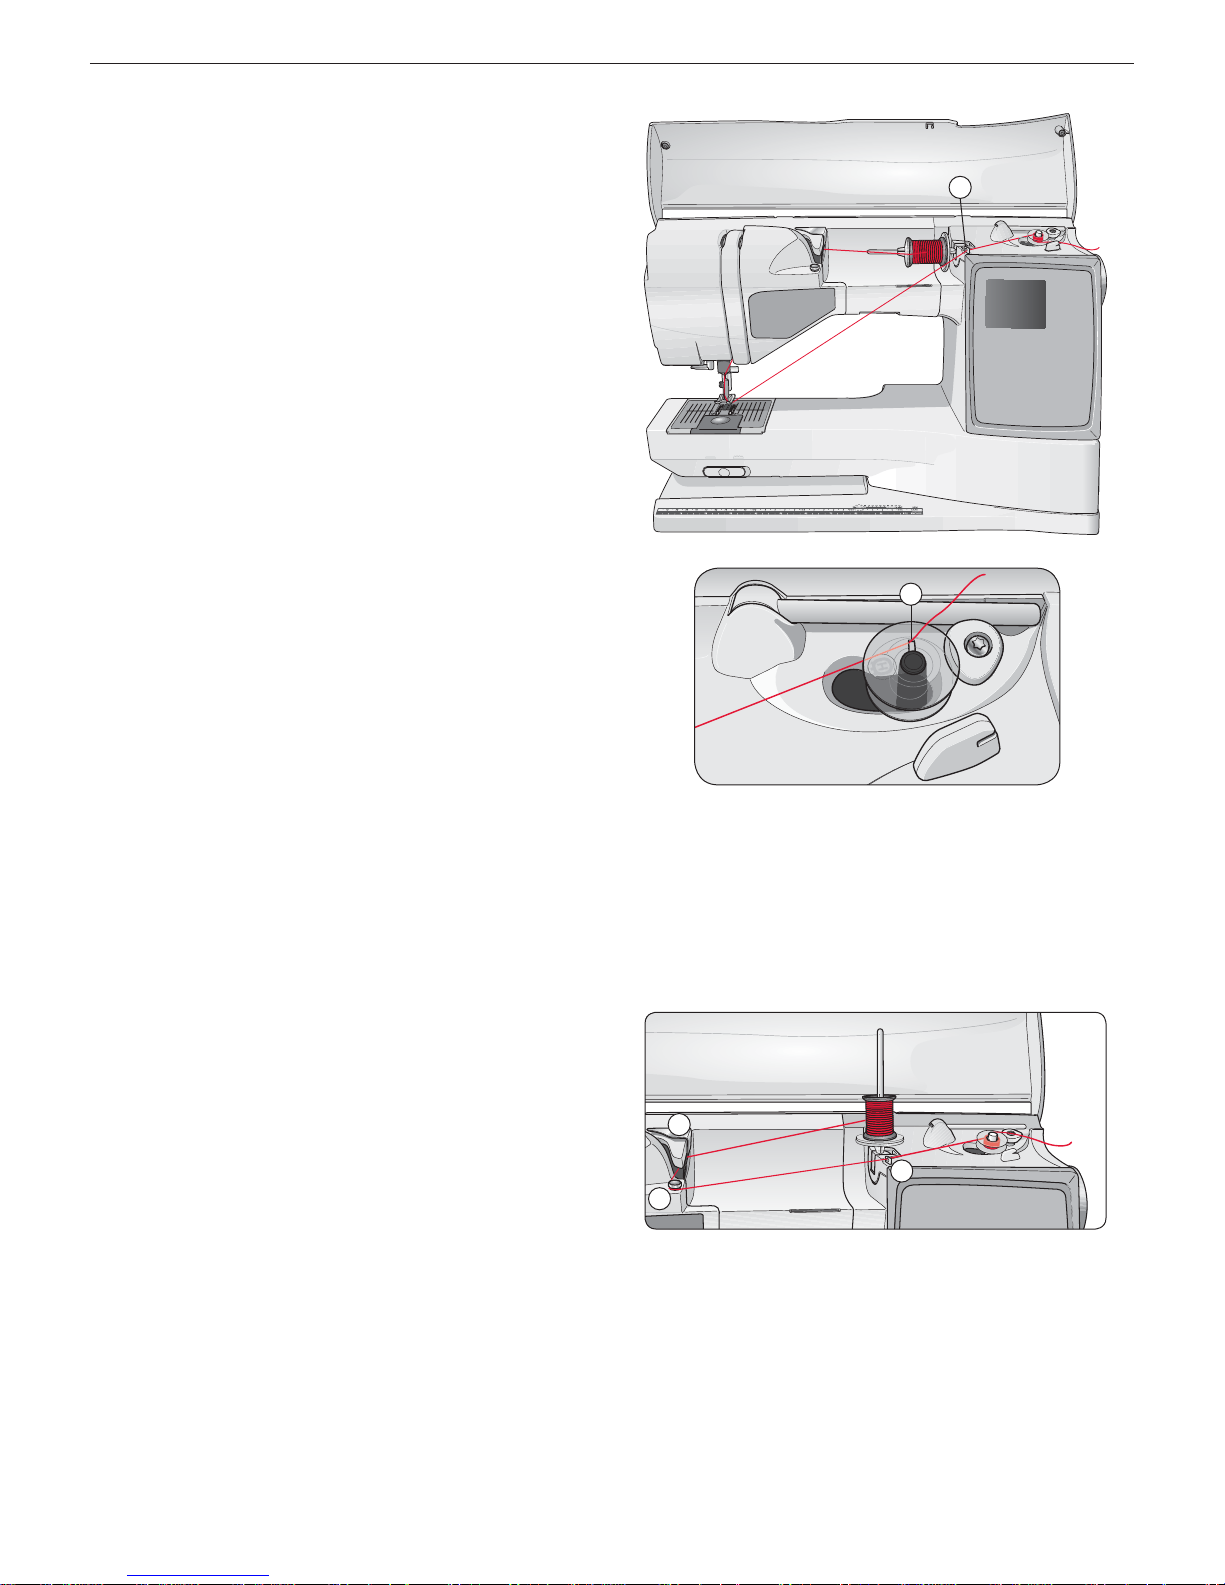
Bobbin Winding, model 20
Winding the bobbin with the
machine threaded
Make sure that the presser foot is up and the needle is in the
highest position.
Note! Do not use a plastic presser foot when bobbin winding.
1. Place an empty bobbin on the bobbin winder on the top
of the machine. The bobbin only À ts on one way, with the
logo facing up. Use only original HUSQVARNA VIKING®
bobbins.
2. Thread the machine with the main spool pin in the horizontal
position.
Note: If the thread spool is too large to be in horizontal position, wind
the bobbin as described under “Winding Specialty Threads” below.
3. Pull the thread from the needle under the presser foot and to
the right through the bobbin winding thread guide (C).
4. Guide the thread through the hole in the bobbin (D) from the
inside to the outside.
5. Push the bobbin winder to the right. A pop-up message
appears on the GraphicDisplay. Press the foot control or
the Start/Stop button to start winding. Hold the end of the
thread À rmly when starting to wind. Once the bobbin begins
to wind, cut the excess thread.
When the bobbin is full, it will stop automatically. Push the
bobbin winder back to the left, remove the bobbin and cut
off the thread on the thread cutter.
Winding Specialty Threads
We do not recommend winding speciality threads such as
“invisible” or other stretchy threads, metallic or Á at metallic
threads through the needle.
Always wind these threads at minimum speed.
1. Place an empty bobbin on the bobbin winder on the top
of the machine. The bobbin only À ts on one way, with the
logo facing up. Use only original HUSQVARNA VIKING®
bobbins.
2. Place the large spool cap and a felt pad under the spool on the
main spool pin set in the vertical position.
3. Bring the thread over and behind the pre-tension thread
guide (A) and down around the thread tension disc (B), then
through bobbin winding thread guide (C) as illustrated.
4. See Winding the bobbin with the machine threaded, step 4-5.
Note: Depending on the type of thread, wrap the thread one or two
turns around the bobbin thread tension disc (B) to put more tension
on the thread. Embroidery weight bobbin thread should be taken two
turns around the bobbin thread tension disc.
Note: When using earlier version of HUSQVARNA
VIKING® bobbins that do not have a hole, wind several
turns of thread on the bobbin to get started.
C
A
B
C
D
17
1
Set Up
Bobbin Winding, model 30
Winding the bobbin with the
machine threaded
Make sure that the presser foot is up and the needle is in the
highest position.
Note! Do not use a plastic presser foot when bobbin winding.
1. Place an empty bobbin on the bobbin winder on the top
of the machine. The bobbin only À ts on one way, with the
logo facing up. Use only original HUSQVARNA VIKING®
bobbins.
2. Thread the machine with the main spool pin in the horizontal
position.
Note: If the thread spool is too large to be in horizontal position, wind
the bobbin as described under “Winding Specialty Threads” below.
3. Pull the thread from the needle under the presser foot and to
the right through the bobbin winding thread guide (C).
4. Guide the thread through the hole in the bobbin (D) from the
inside to the outside.
5. Push the bobbin winder lever towards the bobbin to wind.
A pop-up message appears on the GraphicDisplay. Press the
OK button to start winding. To adjust the winding speed use
the left/right arrow buttons. Hold the thread À r mly when
starting to wind. Once the bobbin begins to wind, cut the
excess thread.
Once the bobbin is full, the bobbin winder lever will move
back and the winding will stop automatically. The pop-up
message closes. Remove the bobbin and cut the thread using
the bobbin thread cutter.
Winding Specialty Threads
We do not recommend winding speciality threads such as
“invisible” or other stretchy threads, metallic or Á at metallic
threads through the needle.
Always wind these threads at minimum speed.
1. Place an empty bobbin on the bobbin winder on the top
of the machine. The bobbin only À ts on one way, with the
logo facing up. Use only original HUSQVARNA VIKING®
bobbins.
2. Place the large spool cap and a felt pad under the spool on the
main spool pin set in the vertical position.
3. Bring the thread over and behind the pre-tension thread
guide (A) and down around the thread tension disc (B), then
through bobbin winding thread guide (C) as illustrated.
4. See Winding the bobbin with the machine threaded, step 4-5.
Note: Depending on the type of thread, wrap the thread one or two
turns around the bobbin thread tension disc (B) to put more tension
on the thread. Embroidery weight bobbin thread should be taken two
turns around the bobbin thread tension disc.
Note: When using earlier version of HUSQVARNA
VIKING® bobbins that do not have a hole, wind several
turns of thread on the bobbin to get started.
B
C
E
F
G
12
34
I
H
D
18
Set Up
Bobbin Winding while embroidering or
sewing
Model 30 has a separate motor for bobbin winding to wind
bobbins while sewing or embroidering.
1. Place an empty bobbin on the bobbin winder on the top
of the machine. The bobbin only À ts on one way, with the
logo facing up. Use only original HUSQVARNA VIKING®
bobbins.
2. Raise the auxiliary spool pin. Place the large spool cap, felt
pad and thread spool on the spool pin.
3. Bring the bobbin thread around the thread tension disc (B)
and through the thread guide (C) as illustrated.
4. Guide the thread through the hole in the bobbin (D) from the
inside to the outside.
5. Push the bobbin winder lever towards the bobbin to wind.
A pop-up message appears on the GraphicDisplay. Press the
OK button to start winding. To adjust the winding speed use
the left/right arrow buttons. Hold the thread À r mly when
starting to wind. Once the bobbin begins to wind, cut the
excess thread.
Once the bobbin is full, the bobbin winder lever will move
back and the winding will stop automatically. The pop-up
message closes. Remove the bobbin and cut the thread using
the bobbin thread cutter.
Note: Make sure that the thread does not touch the cap of the horizontal
spool pin when winding the bobbin. If it does, place the cap and spool on
the vertical spool pin higher.
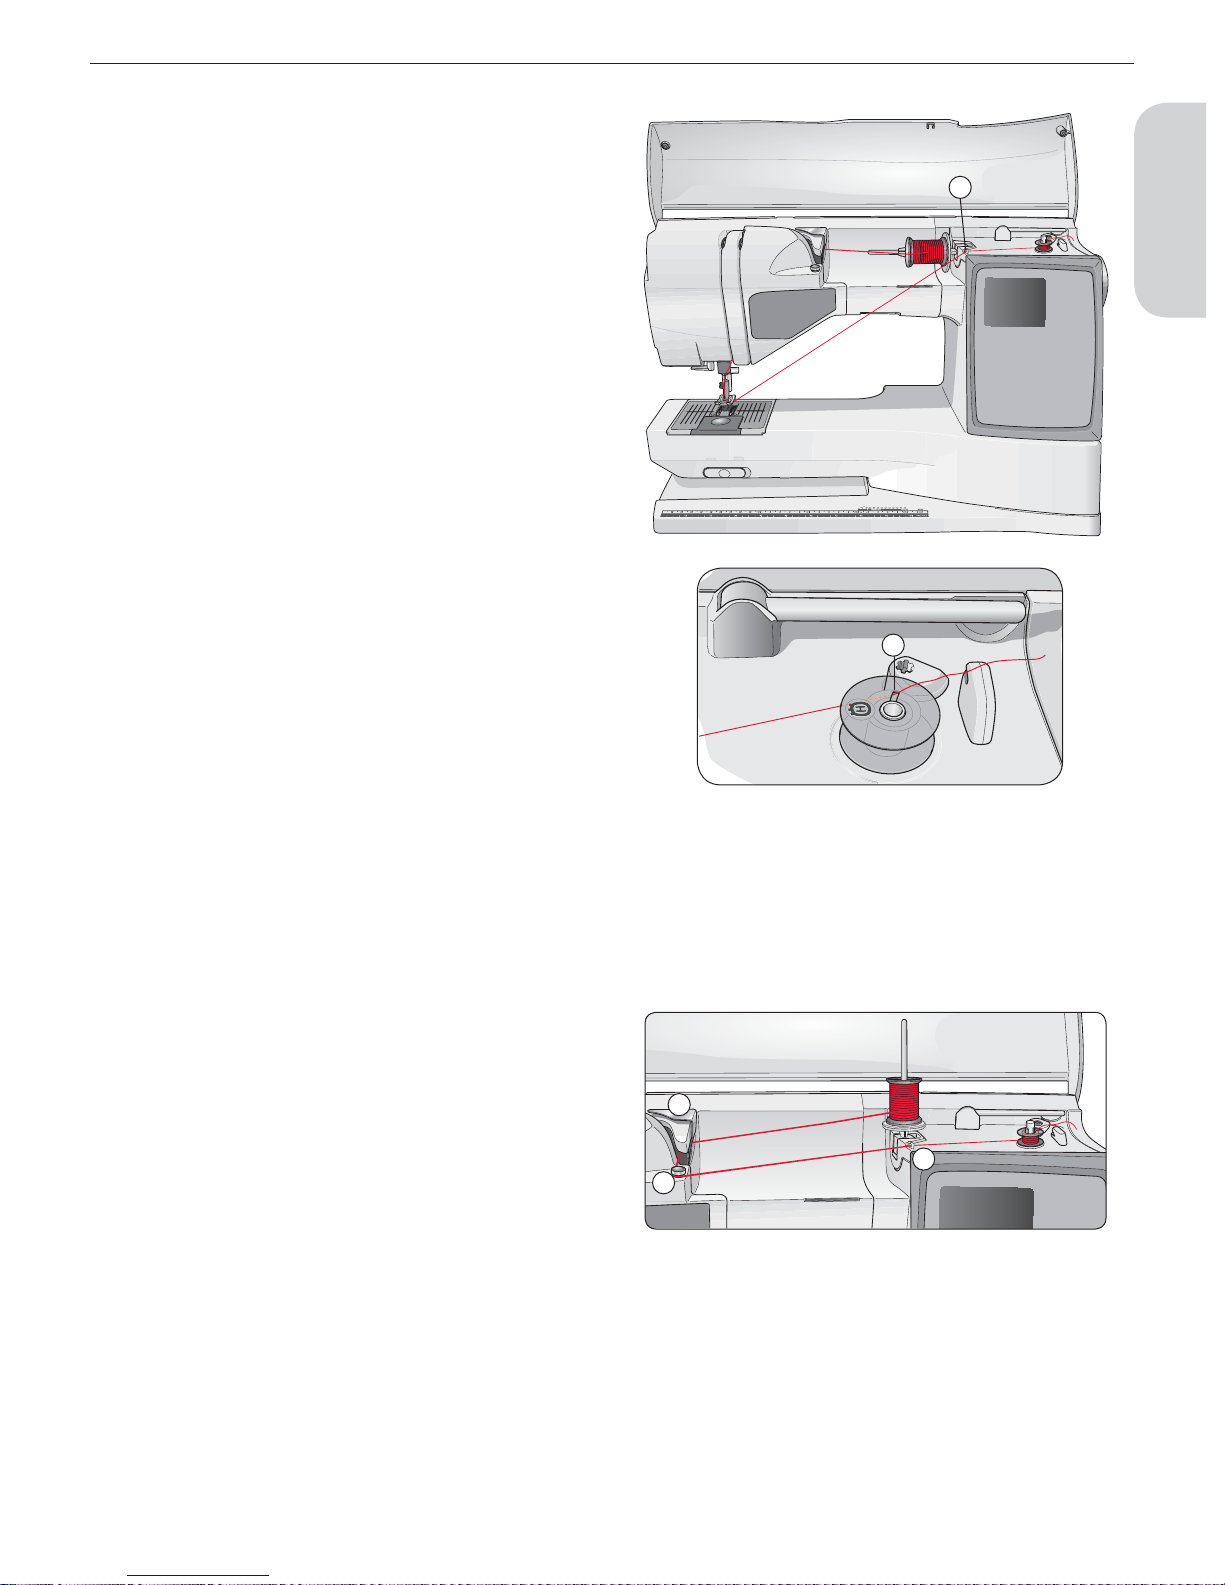
Inserting the bobbin
1. Remove the bobbin cover by sliding it towards you.
2. Place the bobbin in the bobbin case. It drops in only one way
with the logo facing up. The thread unreels from the left of
the bobbin. The bobbin will then rotate counter-clockwise
when you pull the thread.
3. Place your À nger on the bobbin to keep it from turning as you
pull the thread À rmly to the right and then to the left into the
tension spring (E) until it “clicks” into place.
4. Continue threading around (F) and to the right of the thread
cutter (G). Slide on the bobbin cover (H). Pull the thread to
the left to cut (I).
Note: When using earlier version of HUSQVARNA
VIKING® bobbins that do not have a hole, wind several
turns of thread on the bobbin to get started.

1
2
3
19
1
Set Up
Thread tension
Your machine automatically sets the best thread tension for the
selected stitch and fabric. Go to the SET Menu to adjust the
thread tension for specialty thread, techniques or fabric (see page
28).
Correct and incorrect thread tension
For the best stitch appearance and durability make sure the needle
thread tension is correctly adjusted, i.e. for general sewing, the
threads evenly meet between the two fabric layers (1).
If the bobbin thread is visible on the top side of the fabric, the
needle thread tension is too tight (2). Reduce the needle thread
tension.
If top thread is visible on the underside of the fabric, the needle
thread tension is too loose (3). Increase the needle thread tension.
Note: For decorative stitches and buttonholes the top thread should be visible
on the underside of the fabric.
EXCLUSIVE SENSOR SYSTEM™
(ESS)
Sensor Foot Pressure
Thanks to the Sensor Foot Pressure, the presser foot actually
senses the thickness of fabric, embroidery or stitching to sew
over it smoothly and evenly with perfect fabric feeding.
If you want to see the actual setting of the presser foot pressure
for the selected fabric and adjust the pressure manually, go to the
SET Menu (see page 28).
Sensor Foot Lift
The presser foot on your sewing machine is raised and lowered in
four levels with the Sensor Foot Up and Down buttons (see page
25).
The presser foot is automatically lowered when you start sewing.
When you stop with the needle in the down position, the presser
foot automatically senses the thickness of the fabric and raises
the presser foot to just the right height to Á oat over the fabric for
pivoting. Go to the SET Menu to turn off this function (see page
28).
12
20
Set Up
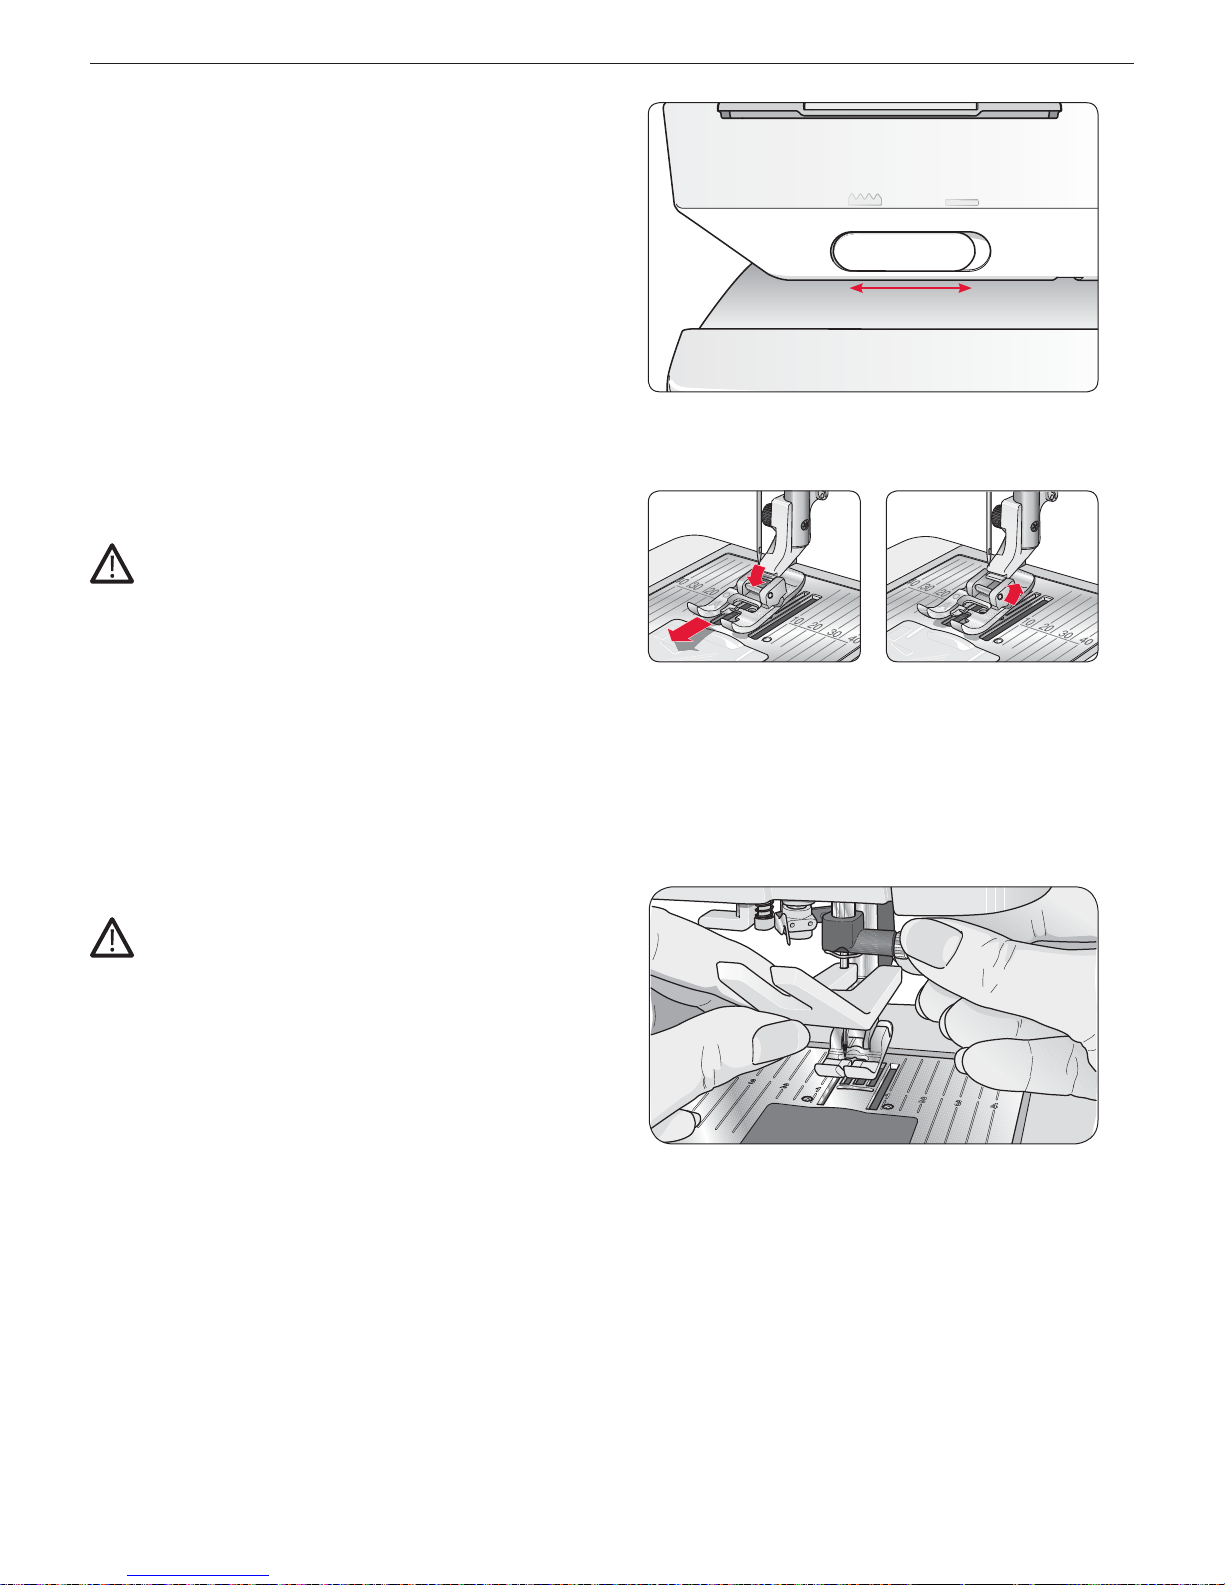
Lower the feed teeth
The feed teeth are lowered when you move the switch on the
front of the free arm to the right. Move the switch to the left if
you wish to raise the feed teeth. The feed teeth will raise as you
begin to sew. The feed teeth should be lowered when sewing on
buttons and for free motion sewing.
When embroidering, the feed teeth are lowered automatically as
the embroidery unit is connected. When the embroidery unit is
removed, the feed teeth are raised automatically when you start
sewing.
Changing the presser foot
Turn off the ON/OFF switch
1. Make sure the needle is in the highest position and the presser
foot lifted. Pull the presser foot towards you.
2. Line up the cross pin on the foot with the gap in the presser
foot ankle. Push back until the foot snaps into place.
Changing the needle
Turn off the ON/OFF switch
1. Use the hole in the multipurpose tool to hold the needle.
2. Loosen the screw in the needle clamp with the screwdriver.
3. Remove the needle.
4. Insert the new needle using the multipurpose tool. Push the
new needle upwards with the Á at side away from you until it
will go no further.
5. Use the screwdriver to tighten the screw.
1
2
A
D
B
C
21
1
Set Up
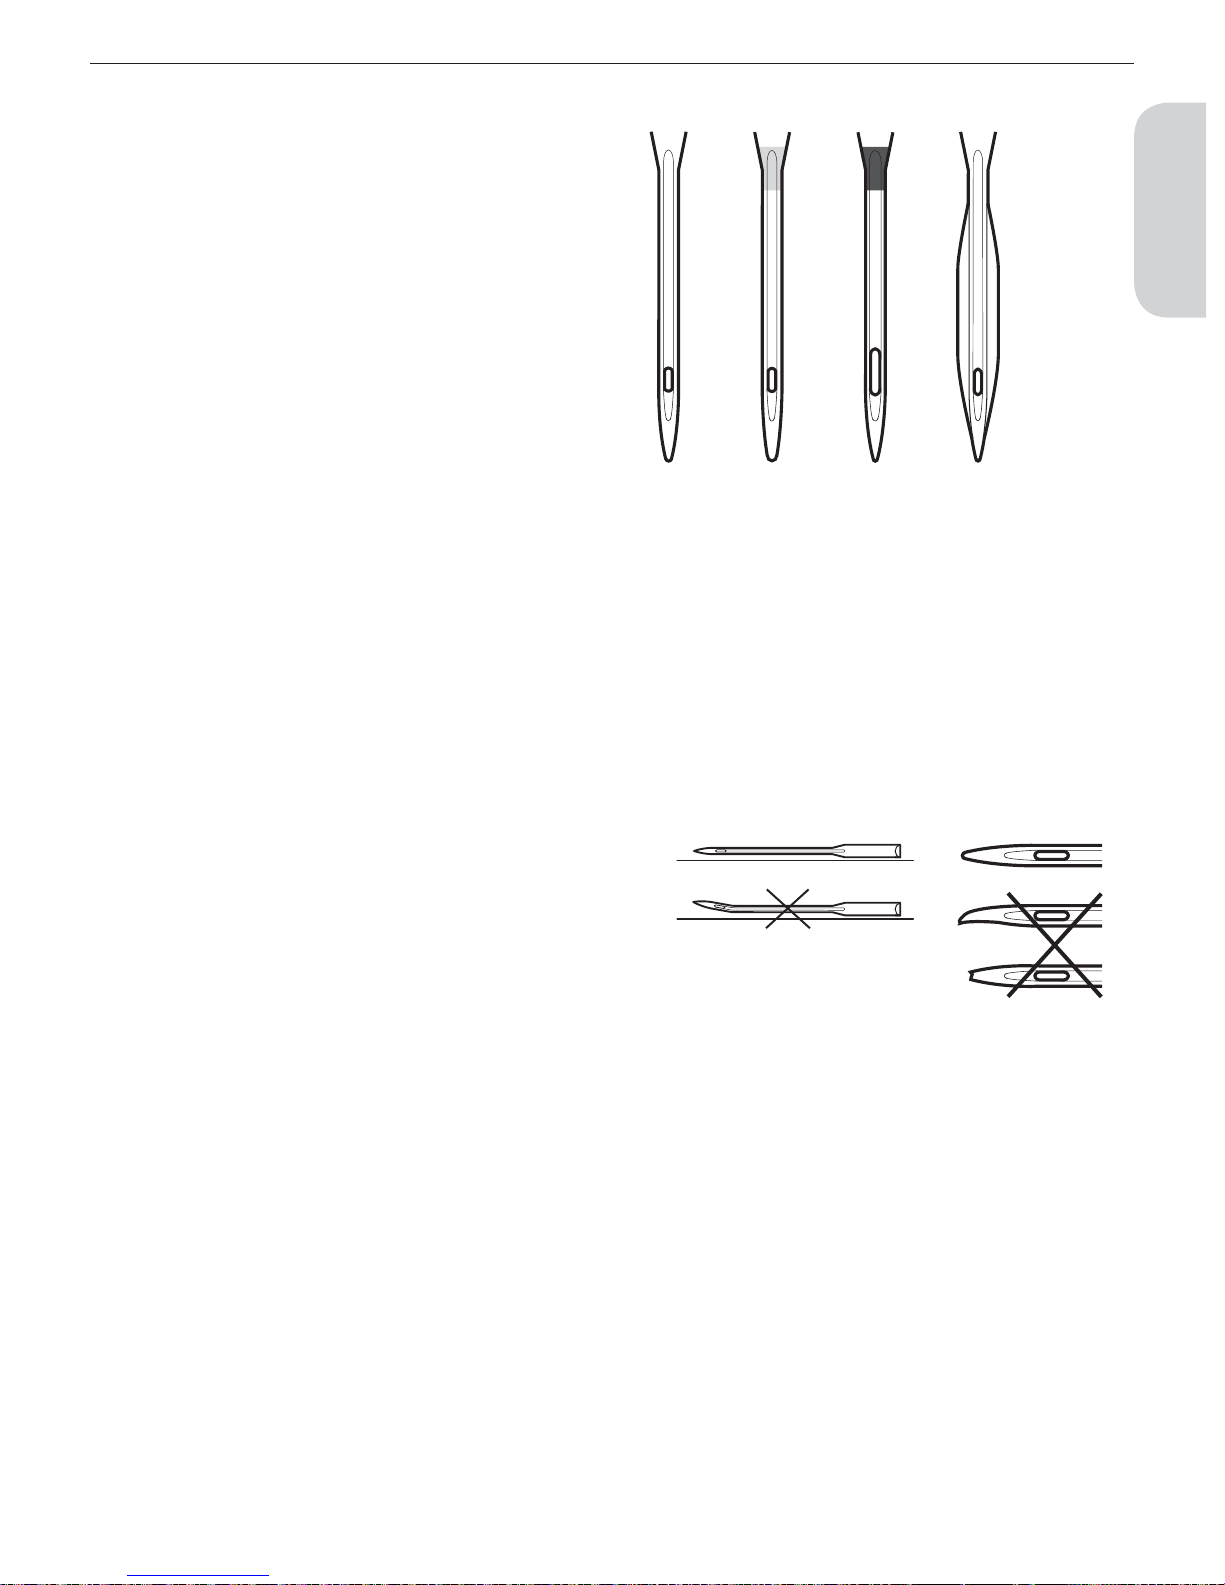
Needles
The sewing machine needle plays an important role in successful
sewing. To ensure you will get a quality needle, we recommend
needles of system 130/705H. The needle package included with
your machine contains needles of the most frequently used sizes
for sewing on woven and stretch fabrics.
Universal needle (A)
Universal needles have a slightly rounded point and come in a
variety of sizes. For general sewing in a variety of fabric types and
weights.
Stretch needle (B)
Stretch needles have a special scarf to eliminate skipped stitches
when there is a Á ex in the fabric. For knits, swimwear, Á eece,
synthetic suedes and leathers. Marked with a yellow band.
Denim needle (C)
Denim needles have a sharp point to penetrate tightly woven
fabrics without deÁ ecting the needle. For canvas, denim,
microÀ bers. Marked with a blue band.
Wing needle (D)
The Wing needle has wide wings on the side of the needle
to poke holes in the fabric when sewing entredeux and other
hemstitches on natural À ber fabrics.
Note: Change the needle often. Always use a straight needle with a sharp
point (1). A damaged needle (2) can cause skipped stitches, breakage of
needles or snapping of thread. A damaged needle can also damage the stitch
plate.
22
Set Up
Threads
There are many threads on the market today developed for
different purposes.
All purpose sewing thread
All purpose sewing thread is made of synthetic, cotton or
cotton covered polyester. This type of thread is used for sewing
garments and projects.
Embroidery thread
Embroidery thread is made of various À bers: rayon, polyester,
acrylic or metallic. These threads create a smooth glossy
appearance for embroidery and other decorative stitching.
When embroidering, use embroidery bobbin thread.
Note: When using a metallic or a Á at À lm thread for embroidering, you may
need to use a needle with a larger eye and lower the embroidery speed. Thread
the sewing machine with the spool in the vertical position.
Transparent thread
Transparent thread, also called monoÀ lament thread, is single
clear synthetic thread. It is used for quilting and other decorative
sewing. Thread the sewing machine with the spool in the vertical
position. When winding a bobbin, wind at slow speed and wind
the bobbin half full.
Pictogram Pen
Use an air or water soluble marking pen for embroidery and
Pictograms on all types of fabrics. The color disappears after a
few hours. You can also use cold water to completely remove the
markings. Make sure that all markings are removed before ironing
or washing with soap or detergent.
Stabilizers
Tear-away stabilizers
Tear-away stabilizers are used with stable woven fabrics. Place
underneath fabric for decorative stitching or hoop with the fabric
when embroidering. Tear away excess stabilizer after stitching.
Iron-on tear-away
Iron-on tear-away is a totally stable stabilizer that has a slick side
that will iron on to fabric. It is recommended for knits and all
unstable fabrics. Fuse it to the wrong side of the fabric before
decorative stitching or hooping. Tear away excess stabilizer after
stitching.
Cut-away stabilizer
Cut-away stabilizer does not tear so the excess has to be cut away.
It is recommended for knits and all unstable fabrics, especially for
hoop embroidery.
Water soluble stabilizer
Water soluble stabilizer is placed on top of the fabric when
embellishing/embroidering napped and looped fabrics such as
terry cloth. When embroidering cutwork, use it underneath the
fabric. Place your work in water to dissolve the excess stabilizer. It
is available in different thicknesses.
Disintegrating stabilizer
Disintegrating stabilizer is a stable, loosely woven fabric that is
used for techniques such as cutwork and to crochet off the fabric
edge. The stabilizer disappears with heat.
Sticky stabilizer
Sticky stabilizer is used for hoop embroidery when the fabric to
be embroidered is too delicate or too small to be hooped. Hoop
the sticky stabilizer with the paper side up. Remove the paper and
place the project to be embroidered onto the sticky surface. Tear
away sticky stabilizer after stitching.
Some fabrics have excess dye which can cause
discoloration on other fabrics or on your sewing
machine. This discoloring may be very difÀ cult or
impossible to remove.
Fleece and denim fabric, especially in red and blue,
often contain a lot of excess dye.
If you suspect that your fabric/ready-to-wear garment
contains a lot of excess dye, always pre-wash it before
sewing/embroidering to avoid the discoloration.
OFF
ON
23
1
Set Up
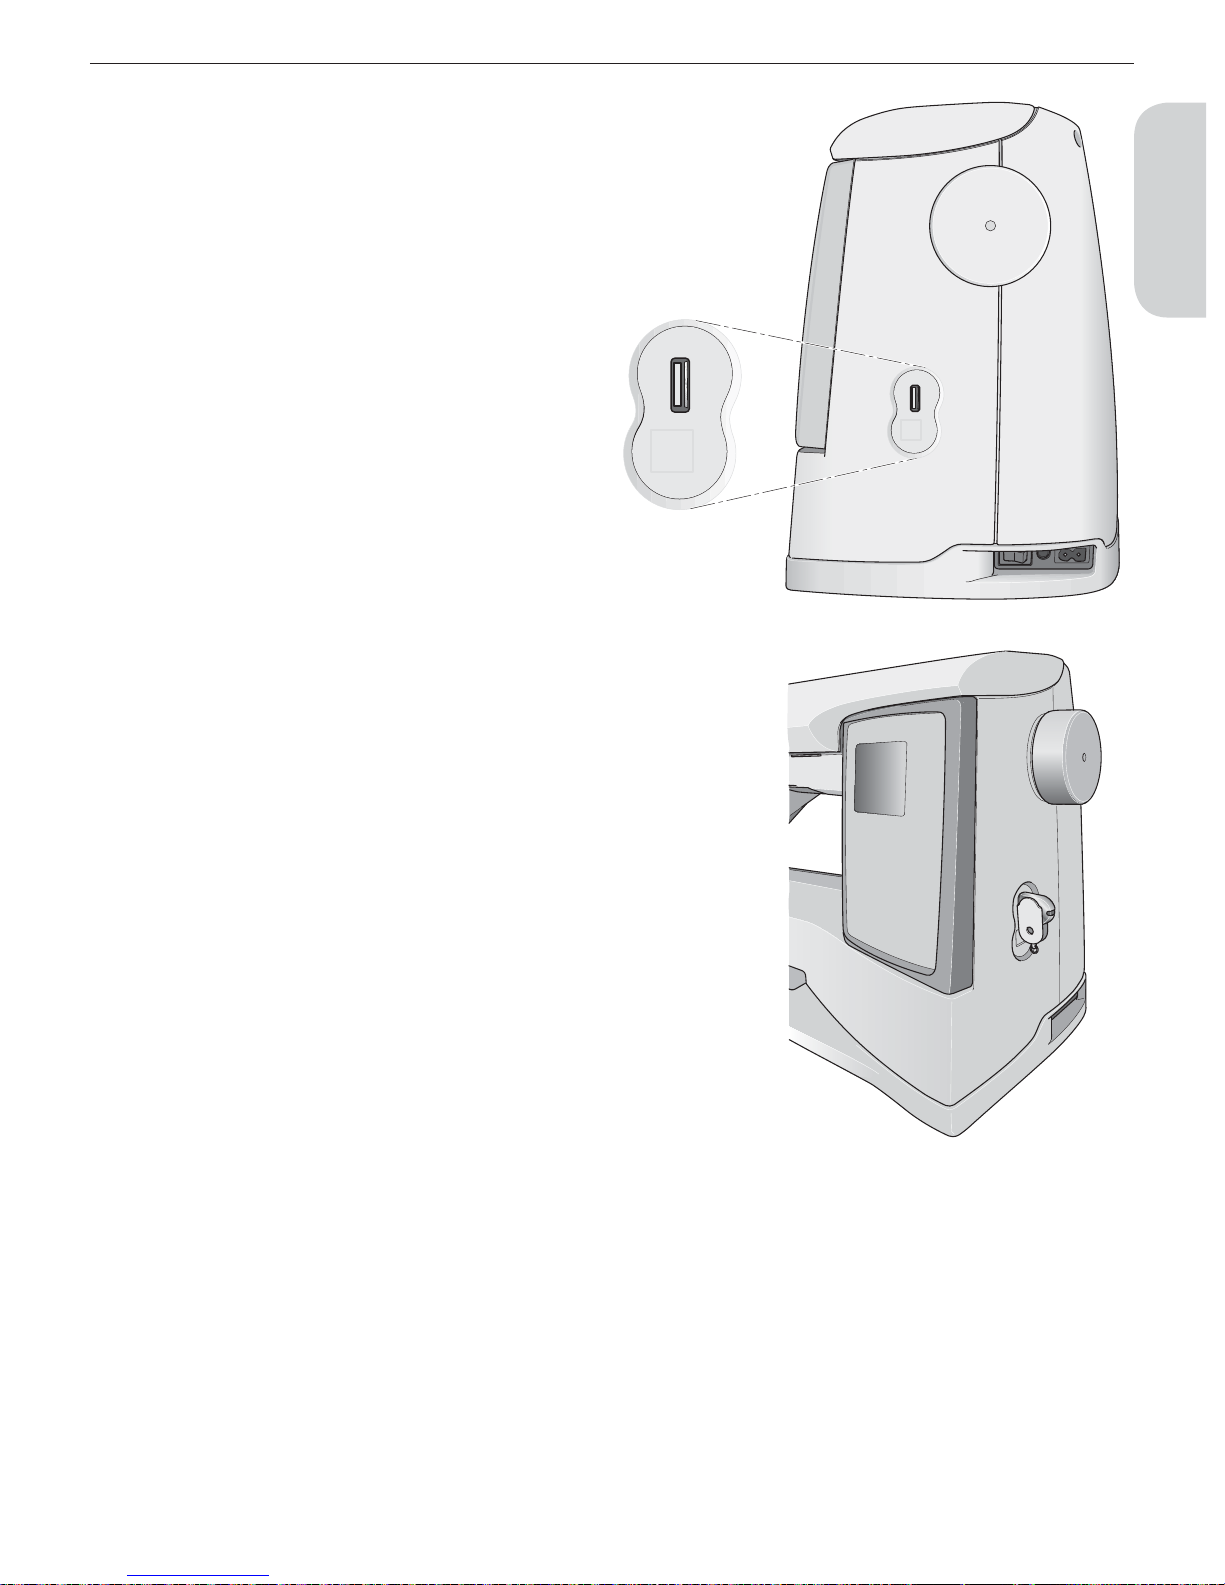
USB port
On the right side of your machine you will À nd a USB port to
connect your USB embroidery stick.
USB embroidery stick
Delivered with your machine is a USB embroidery stick.
Upon delivery the stick contains embroidery designs and one
embroidery font. Use the stick to save designs from your PC and
load them on your machine.
Note: Only original HUSQVARNA VIKING® USB embroidery sticks
will be supported.
Connect to and remove from USB port
Insert the USB embroidery stick in the USB port on the right side
of your machine. The USB plug can only be inserted one way do not force it into the port!
To remove, carefully pull the USB embroidery stick out straight.
Using the USB embroidery stick
A light at the end of the stick indicates that the USB embroidery
stick is plugged in correctly. When loading from the stick the light
Á ashes.
Note: Do not remove the USB embroidery stick while loading, adjusting or
stitching-out a design.
The USB embroidery stick provided with the machine can be left
in the machine when putting on the hard cover. Make sure that
the cover of the USB stick is turned downwards.

24
Set Up
5D™ Embroidery Software
5D™ QuickFont
Create font À les (.vf3) for your HUSQVARNA VIKING®
DESIGNER TOPAZ™ embroidery machine from most
TrueType® or OpenType® fonts on your computer.
5D™ Organizer
Find your designs and pictures easily. Browse them in different
sizes and print selected groups as full worksheets or thumbnail
catalogs. Convert your designs between major embroidery
formats, to pictures or desktop wallpaper for your computer.
Installing your software
If you own other HUSQVARNA VIKING® 5D™ Embroidery
System software, you may need to install the 5D™ Embroidery
System 9.2 (or higher version) Update instead of installing the
Embroidery Machine Communication Software. Then add the
HUSQVARNA VIKING® DESIGNER TOPAZ™ 30 or 20
sewing and embroidery machine from the Machine Manager in
5D™ ConÀ gure, as described in Step 4.
1. Ensure you are logged onto your computer with a user name
that is an administrator on the computer, then install your
software from the CD provided (attached inside the back
cover of this User’s Guide).
2. Insert your CD. In Windows® 7/Vista, an AutoPlay message
may appear, asking what you wish to do with the CD. Click
the option to Run Menu.exe. Select your desired language,
and select the ’Install Embroidery Machine Communication
Software’ option from the menu.
3. Follow the instructions in the installation Wizard. When asked
to enter your Installation Code, enter the following number:
9200.
4. In the 5D™ ConÀ gure Wizard under MyMachines select
your machine type: HUSQVARNA VIKING® DESIGNER
TOPAZ™ 30 or 20. Under Send 1 or Send 2 select
HUSQVARNA VIKING® DESIGNER TOPAZ™ 30 or 20,
USB Embroidery Stick.
Note You can À nd more detailed information about the installation in
the 5D™ Embroidery System Getting Started Guide, in the folder
’UserGuides’ on the CD. Your installation CD includes an option to
Install Drivers. However, this is not required for the HUSQVARNA
VIKING® DESIGNER TOPAZ™ series embroidery machine.
Register your 5D™ software
After À nishing the software installation, you can select to register
your software by clicking on R egister in the men u. Create an account
and enter your details to receive customized 5D™ newsletters.
Important!
During the registration process you will be given an option to
enter which sewing and embroidery machine(s) you own. This is
NOT a product or warranty registration. The machine information
entered here is only used to customize 5D™ Software newsletters.
For product and warranty registration, go to the HUSQVARNA
VIKING® web site at www.husqvarnaviking.com.
To register later, select the Register button in 5D™ ConÀ gure at
any time.
How to Launch the Programs
Shortcuts on the Desktop
1. Double-click on the Shortcut to the 5D™ Embroidery
System program folder. A list of the programs appears.
2. Double-click on 5D™ Organizer, 5D™ QuickFont or 5D™
ConÀ gure to launch it.
Alternatively use the Start Menu to open modules under Start, All
Programs, 5D™ Embroidery System.
Viewing and Printing PDF Guides
To À nd all the Reference and Sample Guides for your 5D™
Embroidery System software, go to Start, All Programs, 5D™
Embroidery System then choose Reference Guides or Sample
Guides. Choose the relevant folder, then select the desired PDF
Guide. Double-click on the desired name to launch the relevant
.pdf À le if you have Adobe Acrobat installed on your computer.
To install the Acrobat Reader, insert the 5D™ Embroidery
System CD and select that option from the menu that appears.
How to Update your machine
Be sure to consult the web site at www.husqvarnaviking.com and/
or your local authorized HUSQVARNA VIKING® dealer for
updates and upgrades for your machine and User’s Guide.
Update instructions
1. Go to the HUSQVARNA VIKING® web site at
www.husqvarnaviking.com and À nd your sewing machine.
Here you will À nd updates available for your machine.
2. Download the update software to your USB embroidery stick,
following the instructions on the web site.
3. Make sure that your machine is turned off. Connect the USB
embroidery stick loaded with the new software version to the
USB port on your machine.
4. Press and hold the Needle Stop Up/Down button and the
Reverse button at the same time. With both of these buttons
À rmly depressed, turn on your machine.
5. The new Software version will install automatically. When the
LED next to the reverse button starts Á ashing, release the
buttons.
6. The update procedure can take several minutes. The
GraphicDisplay will be blank while the LEDs next to the
Reverse button and two other buttons are indicating in
different combinations.
7. When the update is completed the machine will restart
automatically. Check the software version number in the SET
Menu.
Note: If the update is not completed successfully the LEDs next to the
Reverse button and two other buttons will Á ash simultaneously. Turn
off the machine and start the update from the beginning. If the problem
remains contact your authorized dealer.
 Loading...