

ViewSonic VX510 User Manual
VX510 LCD Display
User Guide
Guide de l’utilisateur
Bedienungsanleitung
Guía del usuario
Guida dell'utente
Guia do usuário
Användarhandbok
Käyttöopas
Full 15" Diagonal Viewable Screen
Ɋɭɤɨɜɨɞɫɬɜɨ ɩɨɥɶɡɨɜɚɬɟɥɹ
Instrukcja obsáugi

Contents
Product Registration ..............................................................2
For Your Records ..................................................................2
Getting Started
Package Contents ................................................................. 3
Precautions ........................................................................... 3
Quick Installation ................................................................... 4
Installation of Wall Mount (Optional) ..................................... 5
Using the LCD Display
Setting the Timing Mode .......................................................6
OSD and Power Lock Settings..............................................6
Adjusting the Screen Image ..................................................7
Main Menu Controls ..............................................................9
Other Information
Specifications......................................................................13
Troubleshooting...................................................................14
Customer Support...............................................................15
Cleaning the LCD Display...................................................16
Limited Warranty.................................................................17
Appendix
Safety Guidelines................................................................18
Compliance Information for U.S.A.......................................19
CE Conformity for Europe...................................................19
02/09/04 A
ViewSonic VX510 1

Copyright © ViewSonic Corporation, 2004. All rights reserved.
Macintosh and Power Macintosh are registered trademarks of Apple Computer, Inc.
Microsoft, Windows, Windows NT, and the Windows logo are registered trademarks of Microsoft
Corporation in the United States and other countries.
ViewSonic, the three birds logo, OnView, ViewMatch, and ViewMeter are registered trademarks of
ViewSonic Corporation.
VESA is a registered trademark of the Video Electronics Standards Association. DPMS and DDC
are trademarks of VESA.
NERGY STAR
E
As an E
NERGY STAR
E
®
is a registered trademark of the U.S. Environmental Protection Agency (EPA).
NERGY STAR
®
guidelines for energy efficiency.
®
partner, ViewSonic Corporation has determined that this product meets the
Disclaimer: ViewSonic Corporation shall not be liable for technical or editorial errors or omissions
contained herein; nor for incidental or consequential damages resulting from furnishing this material, or the performance or use of this product.
In the interest of continuing product improvement, ViewSonic Corporation reserves the right to
change product specifications without notice. Information in this document may change without
notice.
No part of this document may be copied, reproduced, or transmitted by any means, for any purpose
without prior written permission from ViewSonic Corporation.
Product Registration
To meet your future needs, and to receive any additional product information as it becomes available,
please register your product on the Internet at:
www.viewsonic.com.
The ViewSonic
ROM also provides an opportunity for you to print the registration form, which you may mail or fax
to ViewSonic.
For Your Records
®
Wizard CD-
Product Name:
Model Number:
Document Number:
Serial Number:
Purchase Date:
ViewSonic VX510
VS10090
A-CD-VX510-1
______________
______________
Product disposal at end of product life
ViewSonic is concerned about the preservation of our environment. Please dispose of this product
properly at the end of its useful life. For TCO'03 recycling information, please refer to our website:
1. USA: www.viewsonic.com/pdf/recyclePlus.pdf
2. Europe: www.viewsoniceurope.com
3. Taiwan: recycle.epa.gov.tw
ViewSonic VX510 2

Getting Started
Congratulations on your purchase of a ViewSonic® LCD display.
Important! Save the original box and all packing material for future shipping needs.
NOTE:
The word “Windows” in this user guide refers to the following Microsoft
operating systems: Windows ‘95, Windows NT, Windows ‘98, Windows 2000,
Windows Me (Millennium), and Windows XP.
Package Contents
Your LCD display package includes:
•LCD display
•Power cord
•Video cable
• ViewSonic Wizard CD-ROM
NOTE:
User Guide PDF files and INF/ICM display optimization files. The INF file
ensures compatibility with Windows operating systems, and the ICM file (Image
Color Matching) ensures accurate on-screen colors. ViewSonic
you install both files.
The CD jacket contains the Quick Start Guide, and the CD includes the
recommends that
Precautions
• Sit at least 18" from your LCD display.
•
Avoid touching the screen.
difficult to remove.
•
Never remove the rear cover.
display contains high-voltage parts. You may
be seriously injured if you touch them.
• Avoid exposing your LCD display to direct
sunlight or another heat source. Orient your
LCD display away from direct sunlight to
reduce glare.
•Always handle your LCD display with care
when moving it.
Skin oils are
Your LCD
• Place your LCD display in a well-ventilated
area. Do not place anything on your LCD
display that prevents heat dissipation.
• Ensure the area around the LCD display is
clean and free of moisture.
• Do not place heavy objects on the LCD
display, video cable, or power cord.
• If smoke, abnormal noise, or strange odor is
present, immediately switch the LCD display
off and call your dealer or ViewSonic. It is
dangerous to continue using the LCD display.
•Do not rub or apply pressure to the LCD panel,
as it may permanently damage the screen.
ViewSonic VX510 3

Quick Installation
1 Remove two rear panel covers
2 Connect power cord
3 Connect video cable
• Make sure both the LCD display and
computer are turned OFF
• Connect the video cable from the LCD
display to the computer
Macintosh users:
require a Macintosh adapter. Attach the
adapter to the computer and plug the video
cable into the adapter.
To order a ViewSonic
contact ViewSonic
Models older than G3
®
Macintosh adapter,
Customer Support
.
4 Turn ON LCD display and
computer
Turn ON the LCD display, then turn ON the
computer. This sequence (LCD display
before computer) is important.
NOTE:
message asking them to install the INF file.
This is on the CD.
Windows users may receive a
5 Insert the ViewSonic Wizard CD
into the computer’s CD drive.
Follow the on-screen instructions
If your computer does not have a CD-ROM
drive, see “Customer Support.”
(1) Wait for the CD-ROM to auto-start.
NOTE:
double-click on the CD-ROM icon in the
Windows Explorer, then double-click on
viewsonic.exe.
If the CD-ROM does not auto-start:
5 Wizard CD (continued)
(2) Follow the on-screen instructions.
6 Windows users: Set the timing
mode (resolution and refresh
rate)
Example:
For instructions on changing the resolution
and refresh rate, see the graphic card’s user
guide.
Installation is complete. Enjoy your new
ViewSonic LCD display.
To be best prepared for any future customer
service needs: print this user guide and write
the serial number in
page 2. (See back of LCD display.)
You can register your product online at the
website for your region. See the Customer
Support table in this guide.
The ViewSonic Wizard CD-ROM also
provides an opportunity for you to print the
registration form which you may mail or fax
to ViewSonic.
1024 x 768 @ 60 Hz.
“For Your Records”
on
Rear panel
covers
Power cord
AC outlet
(wall socket)
D-SUB
AC IN
Computer
power cord
ViewSonic VX510 4
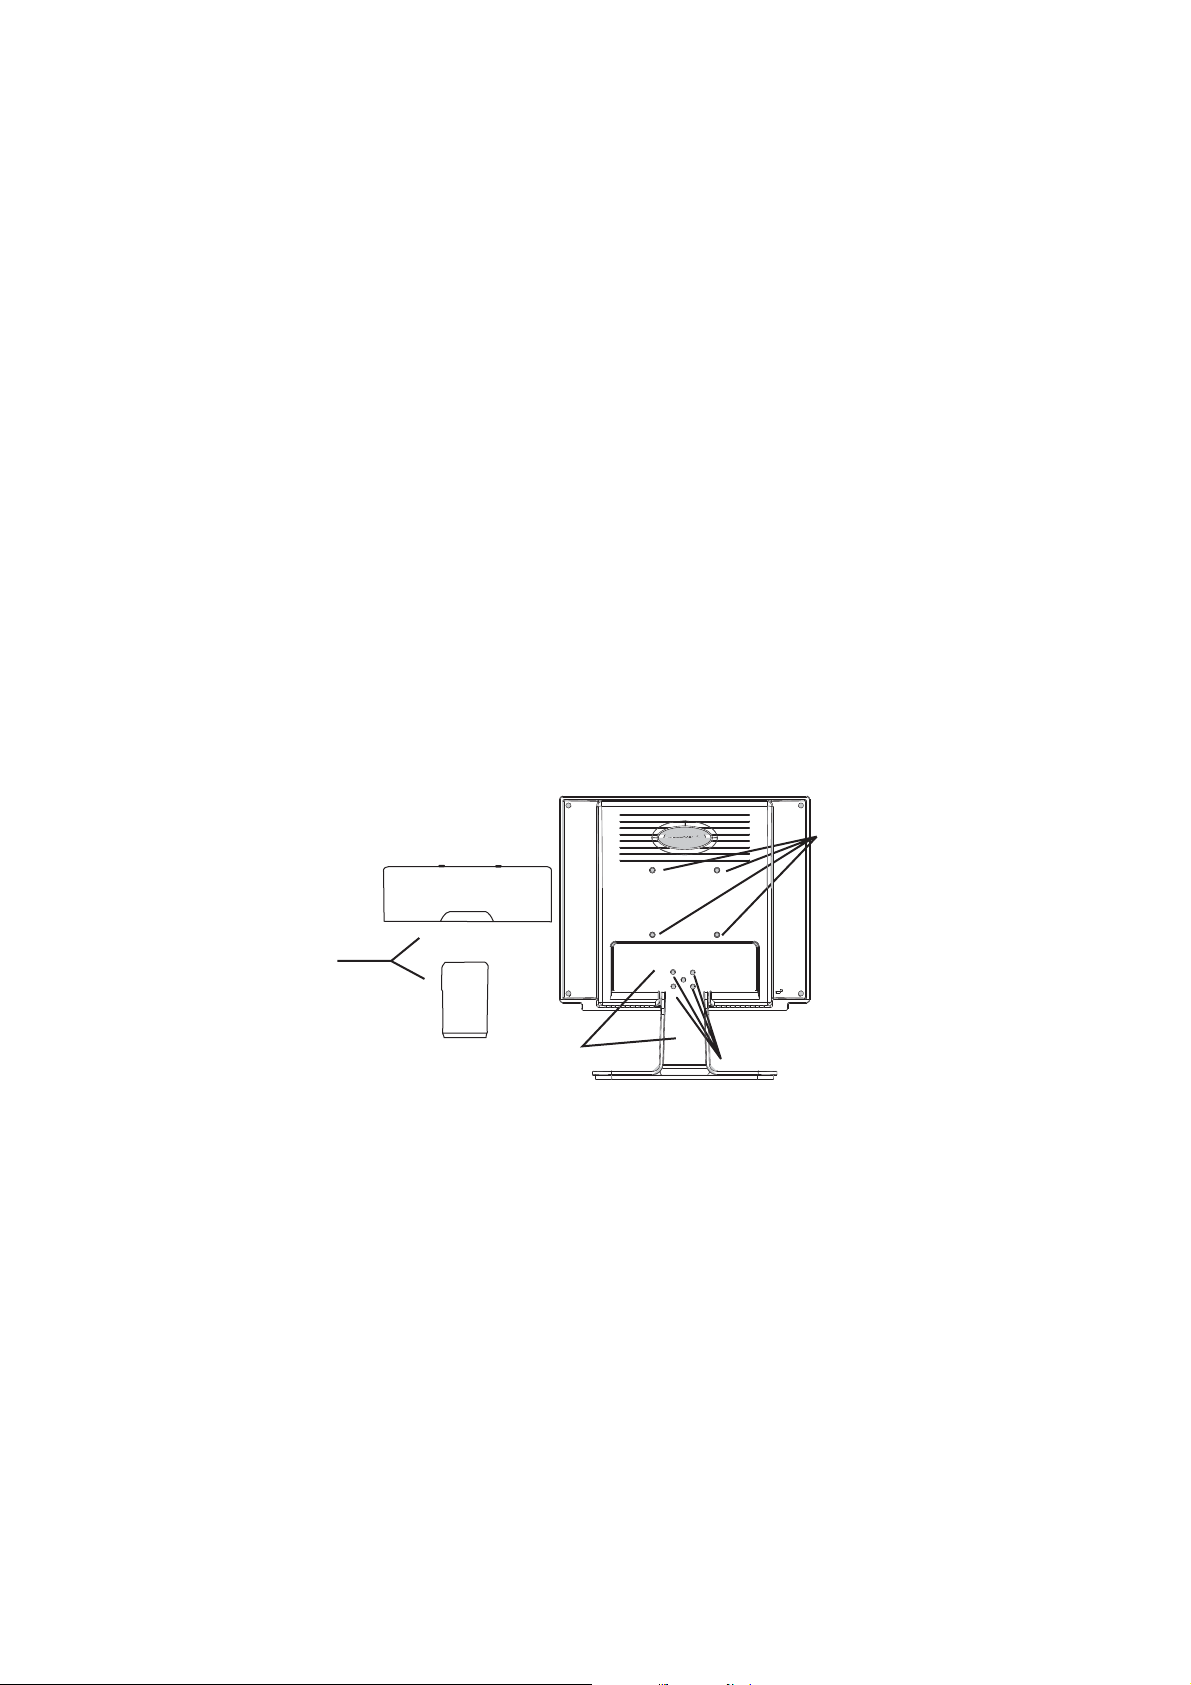
Installation of Wall Mount (Optional)
To obtain a wall-mounting kit, contact ViewSonic or your local dealer. Refer to
the instructions that come with the base mounting kit. To convert your LCD
display from a desk-mounted to a wall-mounted display, do the following:
Disconnect Power.
1
Lay the LCD display face down
2
3
Remove the Plastic Covers from
4
Remove the five screws attaching
5
Remove the Rubber Plugs from
on a towel or blanket.
the back of the LCD display.
the base.
inside the four VESA screw holes.
6
Attach the mounting bracket
(75 mm x 75 mm
Attach the LCD display to the
7
distance).
wall-mounting kit.
REAR PANEL
COVERS
from the VESA compatible wal
wall, following the instructions in
FOUR
VESA
SCREW
HOLES
PLASTIC
COVERS
FIVE BASE SCREWS
-mounting kit
l
the
ViewSonic VX510 5

Using the LCD Display
Setting the Timing Mode
Setting the timing mode is important for maximizing the quality of the
screen image and minimizing eye strain. The
resolution
example 75 Hz). After setting the timing mode, use the OnView
to adjust the screen image.
For the best picture quality set your LCD display timing mode to:
VESA 1024 x 768 @ 60Hz.
To set the Timing Mode:
(example 1024 x 768) and
refresh rate
timing mode
(or vertical frequency;
consists of the
®
controls
Set the resolution: Right-click on the Windows desktop >
1
Settings
Set the refresh rate: See your graphic card's user guide for instructions.
2
WARNING:
> set the resolution.
Do not set the graphics card in your computer to exceed the
maximum refresh rate of 85Hz/
doing so may result in permanent damage to
1024 x 768@75Hz;
Properties
your LCD display.
OSD and Power Lock Settings
•
OSD Lock:
buttons are pressed the message
•
OSD Unlock:
•
Power Button Lock:
seconds. If the power button is pressed the message
will display for a few seconds. With or without this setting, after a power
failure, your LCD display’s power will automatically turn ON when power is
restored.
Press and hold [1] and the up arrow ▲ for 10 seconds. If any
OSD Locked
Press and hold [1] and the up arrow
Press and hold [1] and the down arrow
will display for a few seconds.
again for 10 seconds.
▲
for 10
▼
Power Button Locked
>
•
Power Button Unlock:
10 seconds.
Press and hold [1] and the down arrow
ViewSonic VX510 6
again for
▼
 Loading...