

Page 1

SD-A160/SD-P20
Smart Display
User Guide
使用手册
使用手冊
Model No. VS16472
Page 2

Thank you for choosing ViewSonic
As a world leading provider of visual solutions, ViewSonic is dedicated to
exceeding the world’s expectations for technological evolution, innovation,
and simplicity. At ViewSonic, we believe that our products have the potential
to make a positive impact in the world, and we are condent that the
ViewSonic product you have chosen will serve you well.
Once again, thank you for choosing ViewSonic !
Page 3

Compliance Information
Please read before proceeding
• Use only the batteries and power adapter provided by the manufacturer. The use of
unauthorized accessories may void your warranty.
• Do not store your device in temperatures higher than 50°C (122°F).
• The operating temperature for this device is from 0°C (32°F) to 35°C (95°F).
i2
Page 4

Declaration of RoHS2 Compliance
This product has been designed and manufactured in compliance with Directive 2011/65/
EU of the European Parliament and the Council on restriction of the use of certain
hazardous substances in electrical and electronic equipment (RoHS2 Directive) and
is deemed to comply with the maximum concentration values issued by the European
Technical Adaptation Committee (TAC) as shown below:
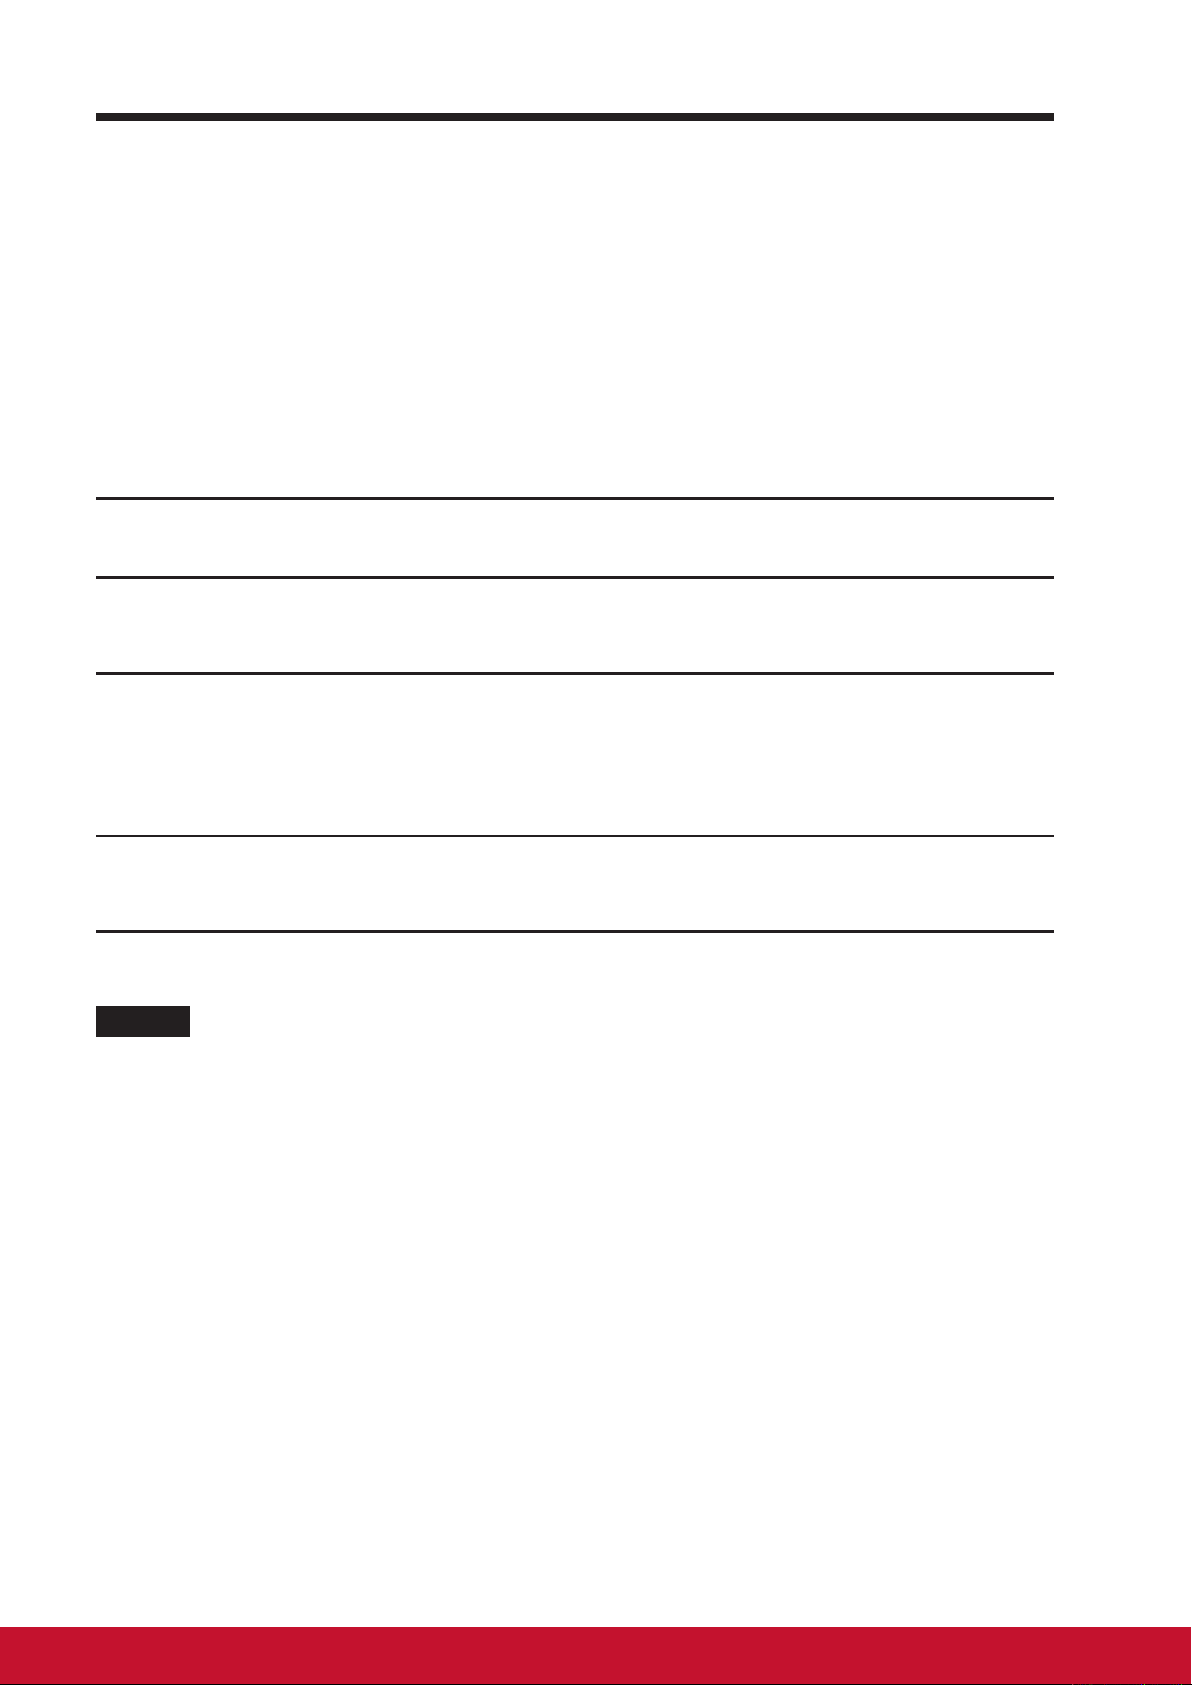
Substance
Lead (Pb) 0.1% < 0.1%
Mercury (Hg) 0.1% < 0.1%
Cadmium (Cd) 0.01% < 0.01%
Hexavalent Chromium (Cr6+) 0.1% < 0.1%
Polybrominated biphenyls (PBB) 0.1% < 0.1%
Polybrominated diphenyl ethers
(PBDE)
Certain components of products as stated above are exempted under the Annex III of the
RoHS2 Directives as noted below:
Examples of exempted components are:
1. Mercury in cold cathode uorescent lamps and external electrode uorescent lamps
(CCFL and EEFL) for special purposes not exceeding (per lamp):
(1) Short length (≦500 mm): maximum 3.5 mg per lamp.
(2) Medium length (>500 mm and ≦1,500 mm): maximum 5 mg per lamp.
(3) Long length (>1,500 mm): maximum 13 mg per lamp.
Proposed Maximum
Concentration
0.1% < 0.1%
Actual Concentration
2. Lead in glass of cathode ray tubes.
3. Lead in glass of uorescent tubes not exceeding 0.2% by weight.
4. Lead as an alloying element in aluminium containing up to 0.4% lead by weight.
5. Copper alloy containing up to 4% lead by weight.
6. Lead in high melting temperature type solders (i.e. lead-based alloys containing 85% by
weight or more lead).
7. Electrical and electronic components containing lead in a glass or ceramic other than
dielectric ceramic in capacitors, e.g. piezoelectric devices, or in a glass or ceramic
matrix compound.
Page 5

Important Safety Instructions
1. DO NOT place objects on top of the device, as objects may scratch the screen.
2. DO NOT expose the device to dirty or dusty environments.
3. DO NOT place the device on an uneven or unstable surface.
4. DO NOT insert any foreign objects into the device.
5. DO NOT expose the device to strong magnetic or electrical eld.
6. DO NOT expose the device to direct sunlight as it can damage the LCD Screen. Keep
it away from heat sources.
7. DO NOT use the device in the rain.
8. Please check with your Local Authority or retailer for proper disposal of electronic
products.
9. The device and the adapter may produce some heat during normal operation or
charging. To prevent discomfort or injury from heat exposure, DO NOT leave the
device on your lap.
10. POWER INPUT RATING: Refer to the rating label on the device and be sure that
the power adapter complies with the rating. Only use accessories specied by the
manufacturer.
11. DO NOT use a pen or any sharp object to tap the screen.
12. Clean the screen with a soft cloth. If needed, dampen the cloth slightly before
cleaning. Never use abrasives or cleaning solutions.
13. Always power off the device to install or remove external devices that do not support
hot-plug.
14. Disconnect the device from an electrical outlet and power off before cleaning the
device.
15. DO NOT disassemble the device. Only a certied service technician should perform
repair.
16. The device has apertures to disperse heat. DO NOT block the device ventilation, the
device may become hot and malfunction as a result.
17. Users have to use the connection to USB interfaces with USB 2.0 version or higher.
18. PLUGGABLE EQUIPMENT: the socket-outlet shall be installed near the equipment
and shall be easily accessible.
iiiii
Page 6

Copyright Information
Copyright © ViewSonic Corporation, 2017. All rights reserved.
Android, Google, Google Play, the Google Play logo and other marks are trademarks of
Google Inc.
This product has an AndroidTM platform based on Linux, which can be expanded by a
variety of JME-based application SW.
All products used in this device and trademarks mentioned herein are trademarks or
registered trademarks of their respective owners.
Wi-Fi and the Wi-Fi CERTIFIED logo are registered trademarks of the Wireless Fidelity
Alliance.
microSD™ is a trademark of SD Card Association.
Java, JME and all other Java-based marks are trademarks or registered trademarks of
Sun Microsystems, Inc. in the United States and other countries.
The actual included applications (apps) may differ from the illustrated screen shots.
VESA
and DDC are trademarks of VESA
ENERGY STAR
(EPA).
As an ENERGY STAR® partner, ViewSonic Corporation has determined that this product
meets the ENERGY STAR® guidelines for energy efciency.
Disclaimer: ViewSonic Corporation shall not be liable for technical or editorial errors
or omissions contained herein; nor for incidental or consequential damages resulting
from furnishing this material, or the performance or use of this product.In the interest of
continuing product improvement, ViewSonic Corporation reserves the right to change
product specications without notice. Information in this document may change without
notice.
No part of this document may be copied, reproduced, or transmitted by any means, for
any purpose without prior written permission from ViewSonic Corporation.
®
is a registered trademark of the Video Electronics Standards Association. DPMS
®
.
®
is a registered trademark of the U.S. Environmental Protection Agency
Intellectual Property Right Information
Right to all technologies and products that comprise this device are the property of their
respective owners:
This product has an Android platform based on Linux, which can be expanded by a variety
of Java-Script-based application SW.
Java, JME and all other Java-based marks are trademarks or registered trademarks of
Sun Microsystems, Inc. in the United States and other countries.microSD is a trademark
of SD Card Association.
Page 7

Product Registration
To meet your future needs, and to receive any additional product information as it
becomes available, please register your product on the Internet at: www.viewsonic.com.
For Your Records
Product Name:
Model Number:
Document Number:
Serial Number:
Purchase Date:
Product disposal at end of product life
ViewSonic respects the environment and is committed to working and living green. Thank
you for being part of Smarter, Greener Computing. Please visit ViewSonic website to learn
more.
USA & Canada: http://www.viewsonic.com/company/green/recycle-program/
Europe: http://www.viewsoniceurope.com/uk/support/recycling-information/
Taiwan: http://recycle.epa.gov.tw/recycle/index2.aspx
SD-A160/SD-P20
ViewSonic Smart Display
VS16472
SD-A160/SD-P20_UG_ENG Rev. 1A 04-26-17
_______________________________
_______________________________
viv
Page 8
Table of Contents
Table of Contents
1 SD-A160/SD-P20 Smart Display Features
2 Set Up Your SD-A160/SD-P20 Smart Display
2.1 Connection ......................................................................... 3
2.2 Get Your Smart Display Ready for Use .............................. 4
2.3 Power on Your Device ........................................................ 5
2.4 Power Off Your Device ....................................................... 6
3 About Your SD-A160/SD-P20 Smart Display
3.1 Touch Screen ..................................................................... 7
3.2 Connecting to HDMI-compliant Devices via HDMI Out ...... 8
3.3 USB On-The-Go to PC ....................................................... 9
3.4 Support to connect with SD-160/SD-T160
(optional monitor models)
4 Troubleshooting
4.1 Touch Screen Problems ................................................... 10
4.2 Other Problems ................................................................ 10
5 Appendix
Specication ..............................................................................11
......................... 9
Page 9
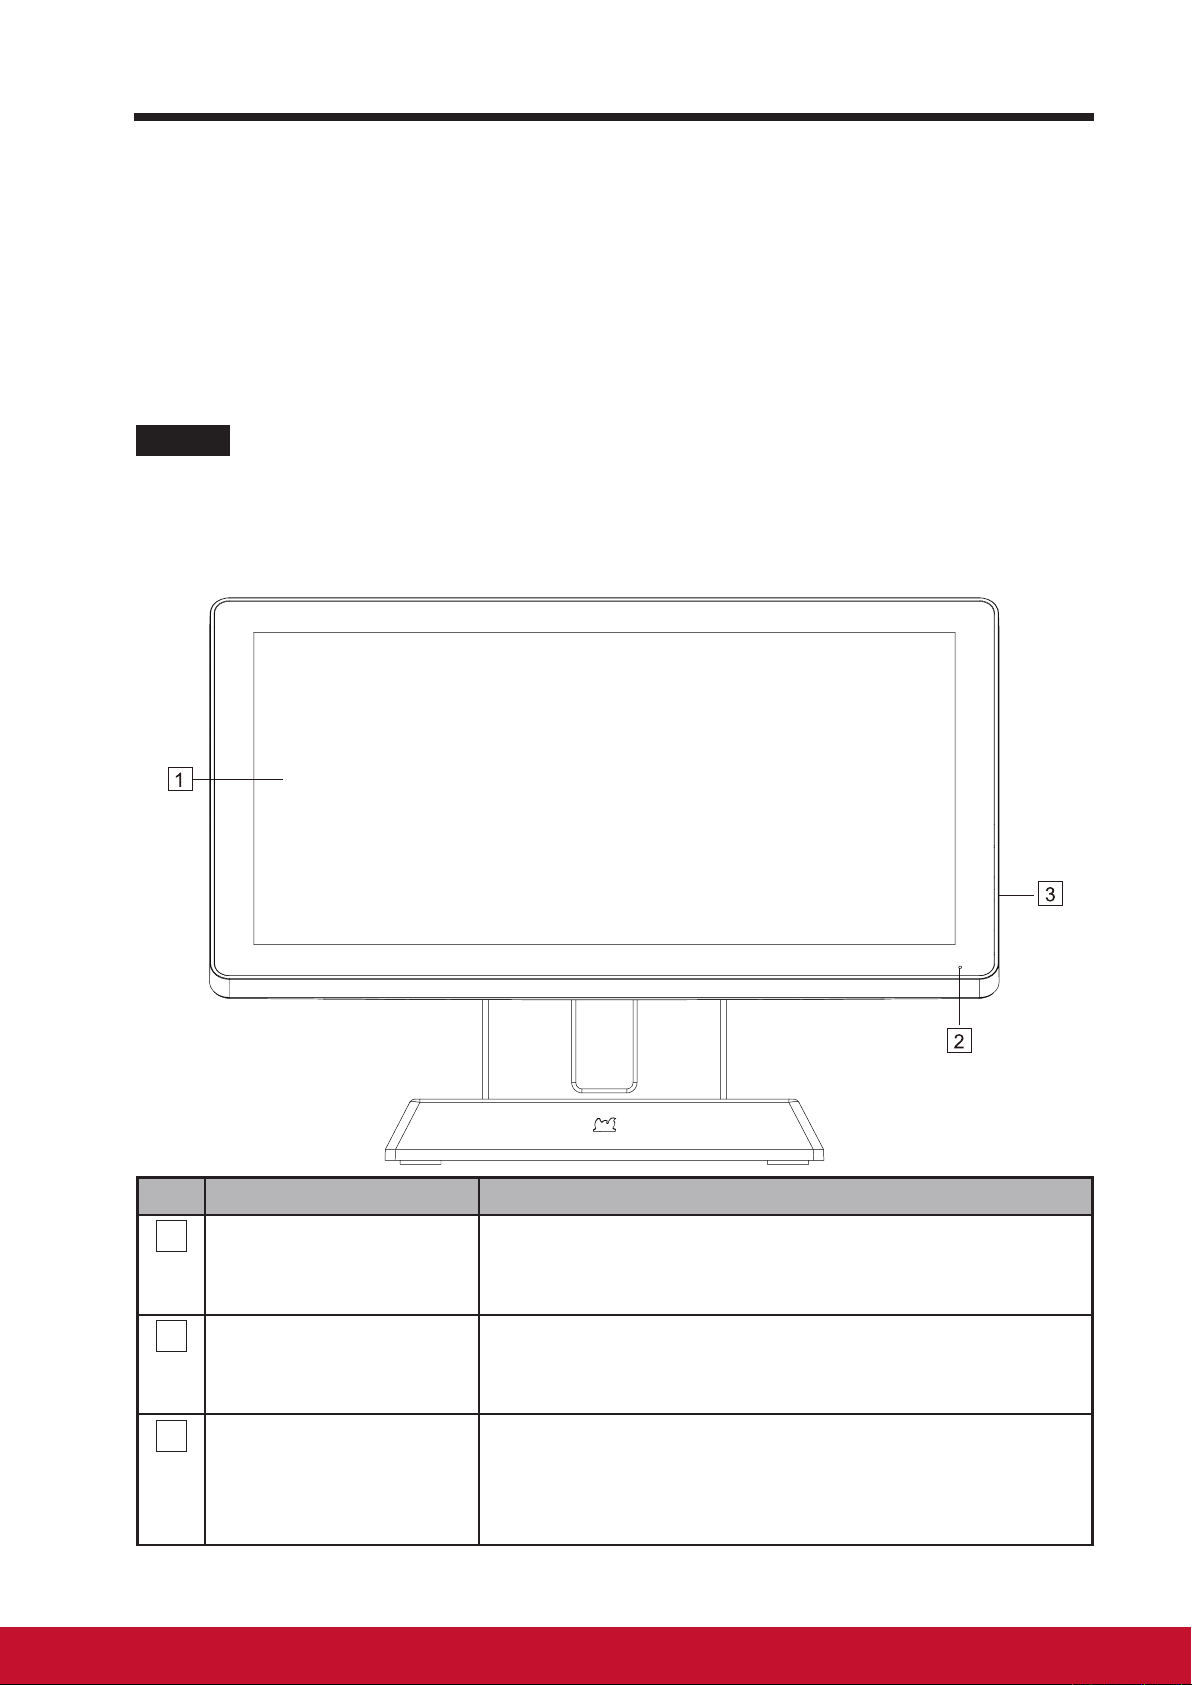
Table of Contents
SD-A160/SD-P20 is a Smart Display with 15.6-inch quad-core display running
on Android 5.1 (Lollipop) Comes with 1366x768p HD resolution, allow you to
work with HDMI-out, full-sized USB connectivity as well.
1 SD-A160/SD-P20 Smart Display Features
This section introduces you to the features of your Smart Display.
NOTE
• The features or applications described in this User’s manual may vary depended on the
device model purchased.
Front View
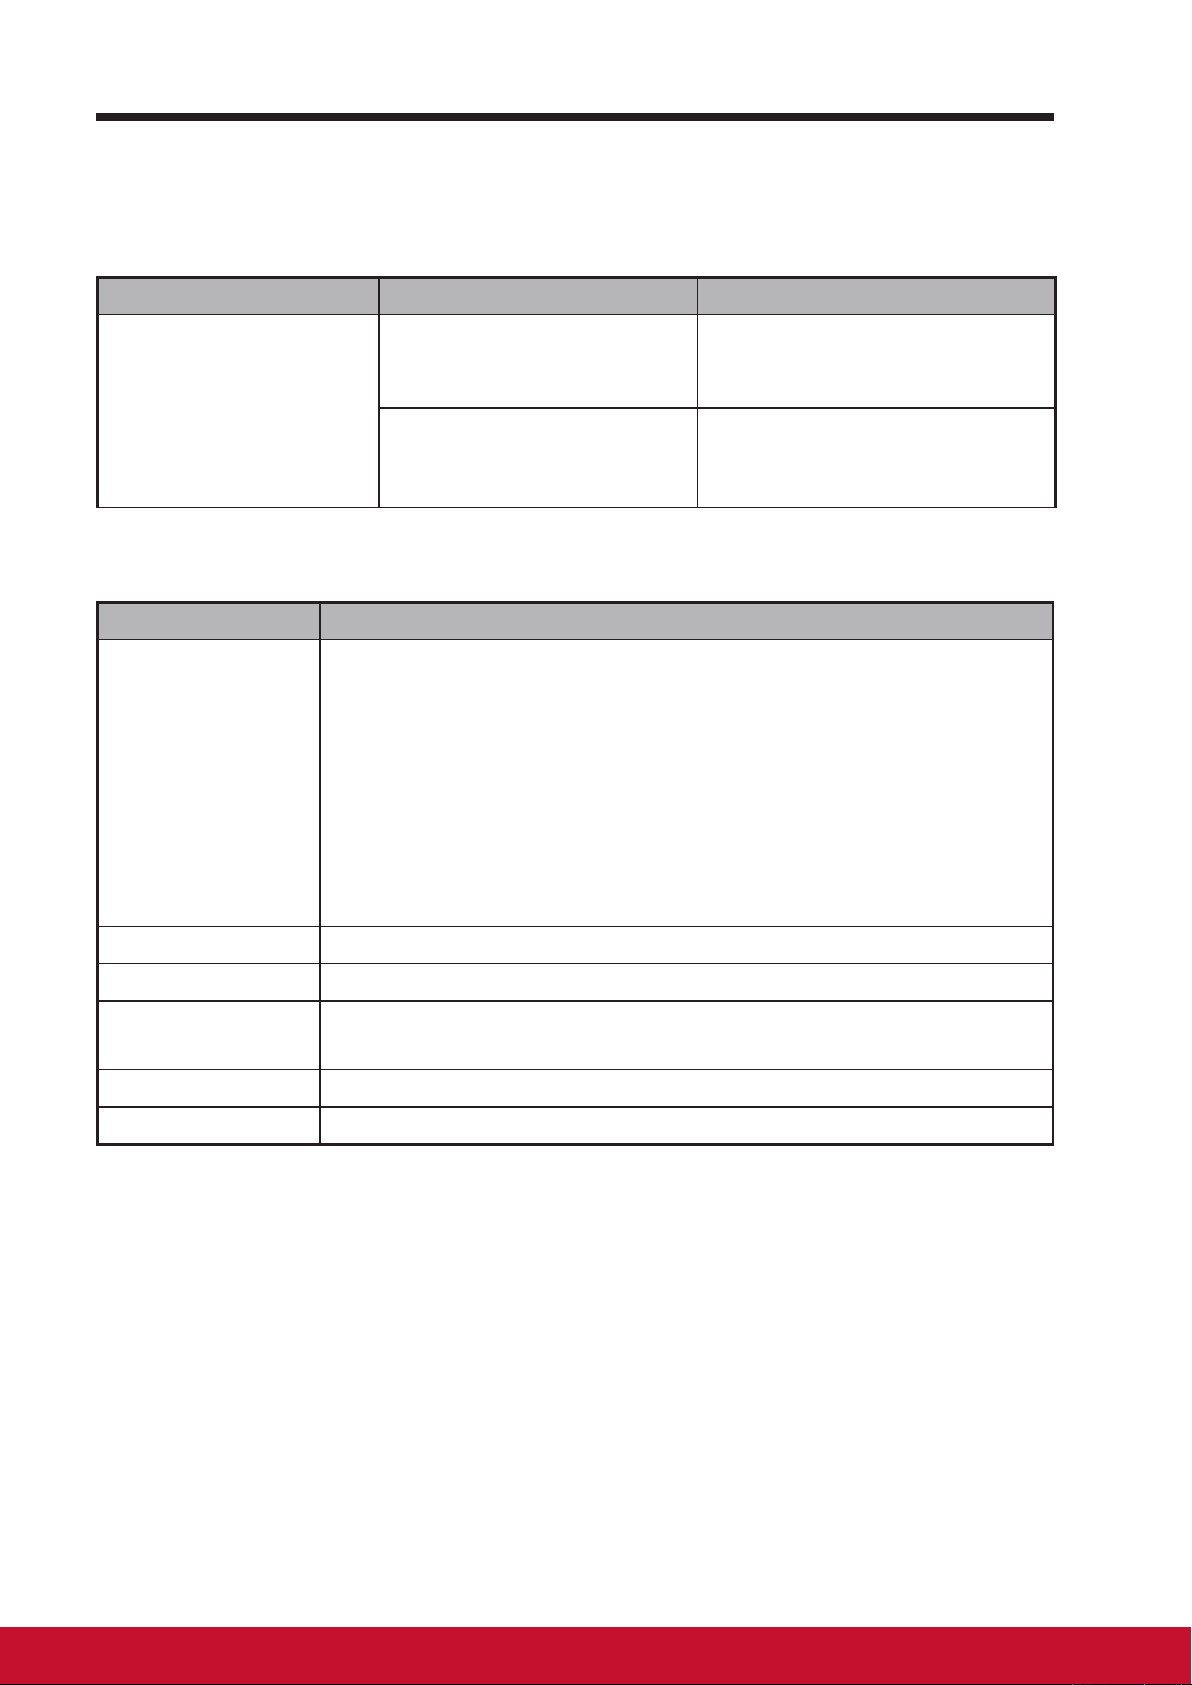
No. Components Descriptions
1
Touch screen
2
LED indicator
Power button Press to power on / lock the smart display.
3
- Touch the screen to control the on-screen
congurations including menu items,applications,
buttons,keyboard and so on.
- LED in blue when power on.
- LED turns into amber when smart display be
locked.
- When the display is on, press this button and
hold for about 3 seconds to shut down the smart
display (under Android mode).
1vi
Page 10
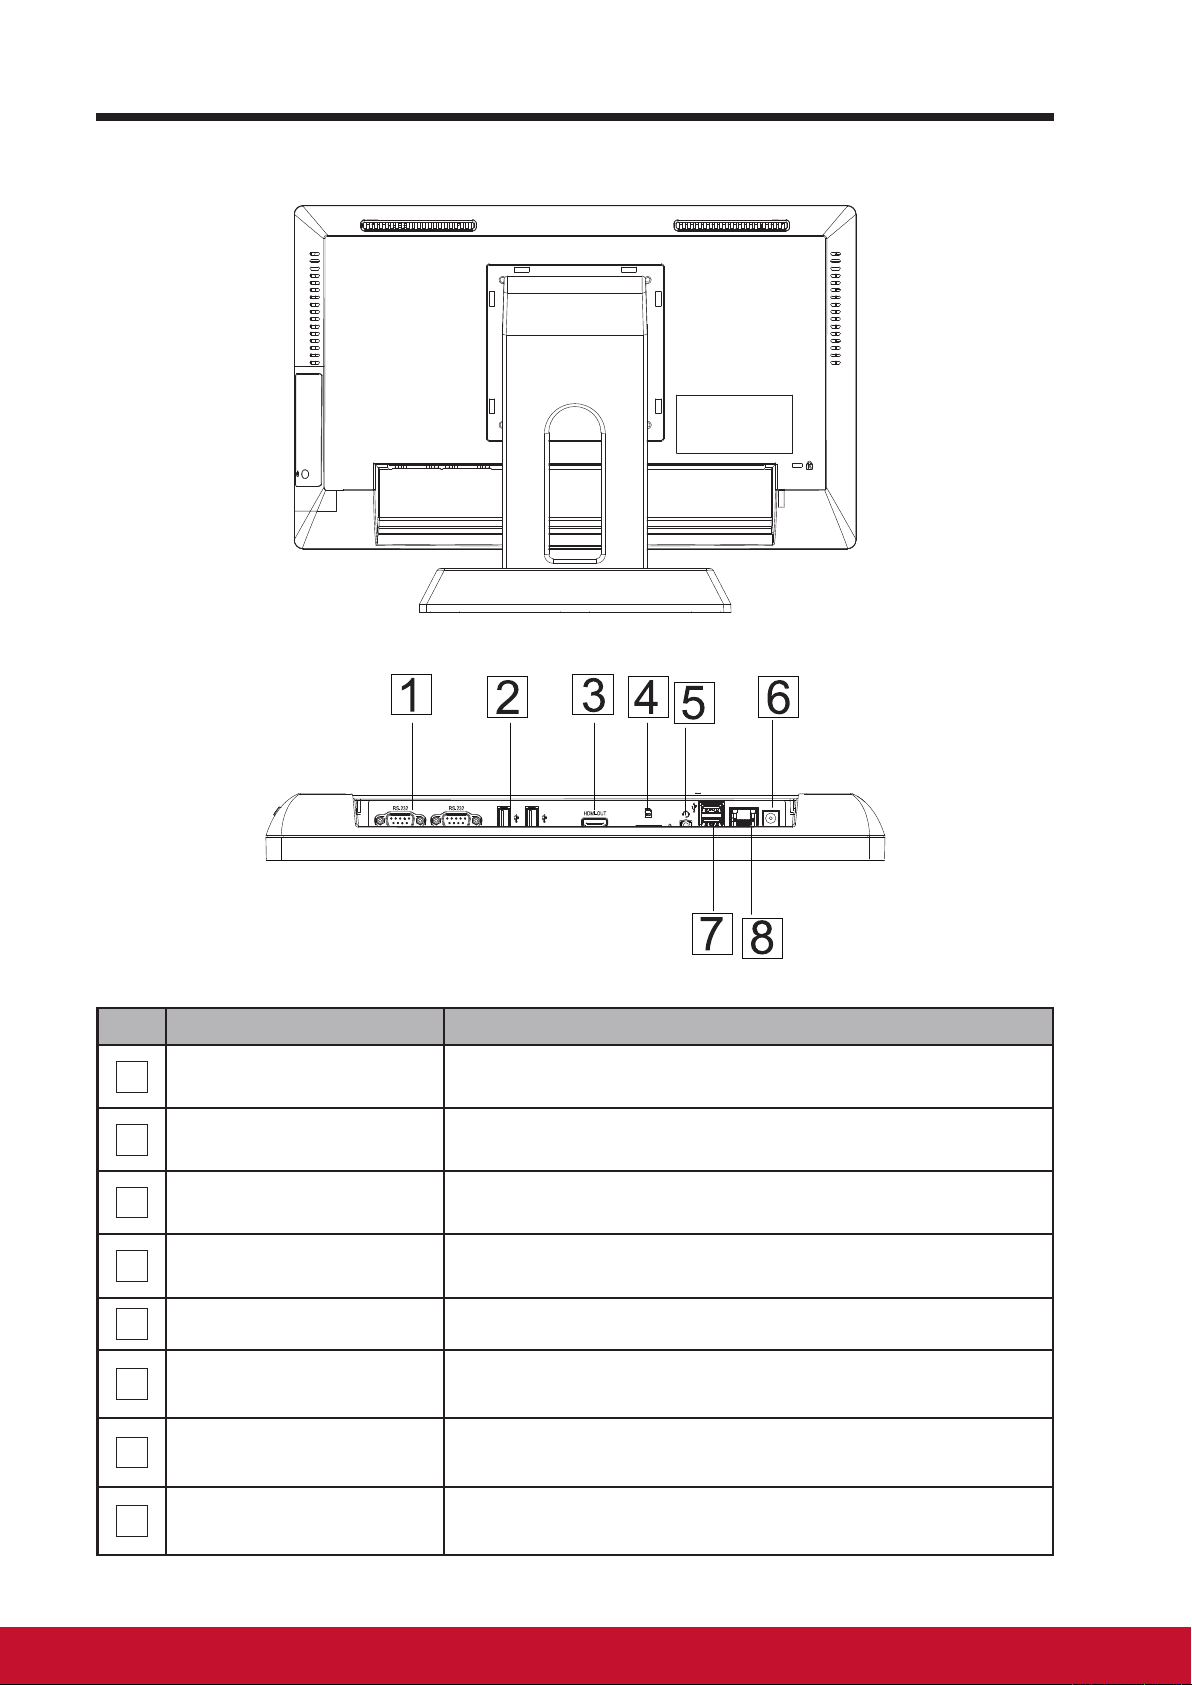
Table of Contents
Back View
Back View
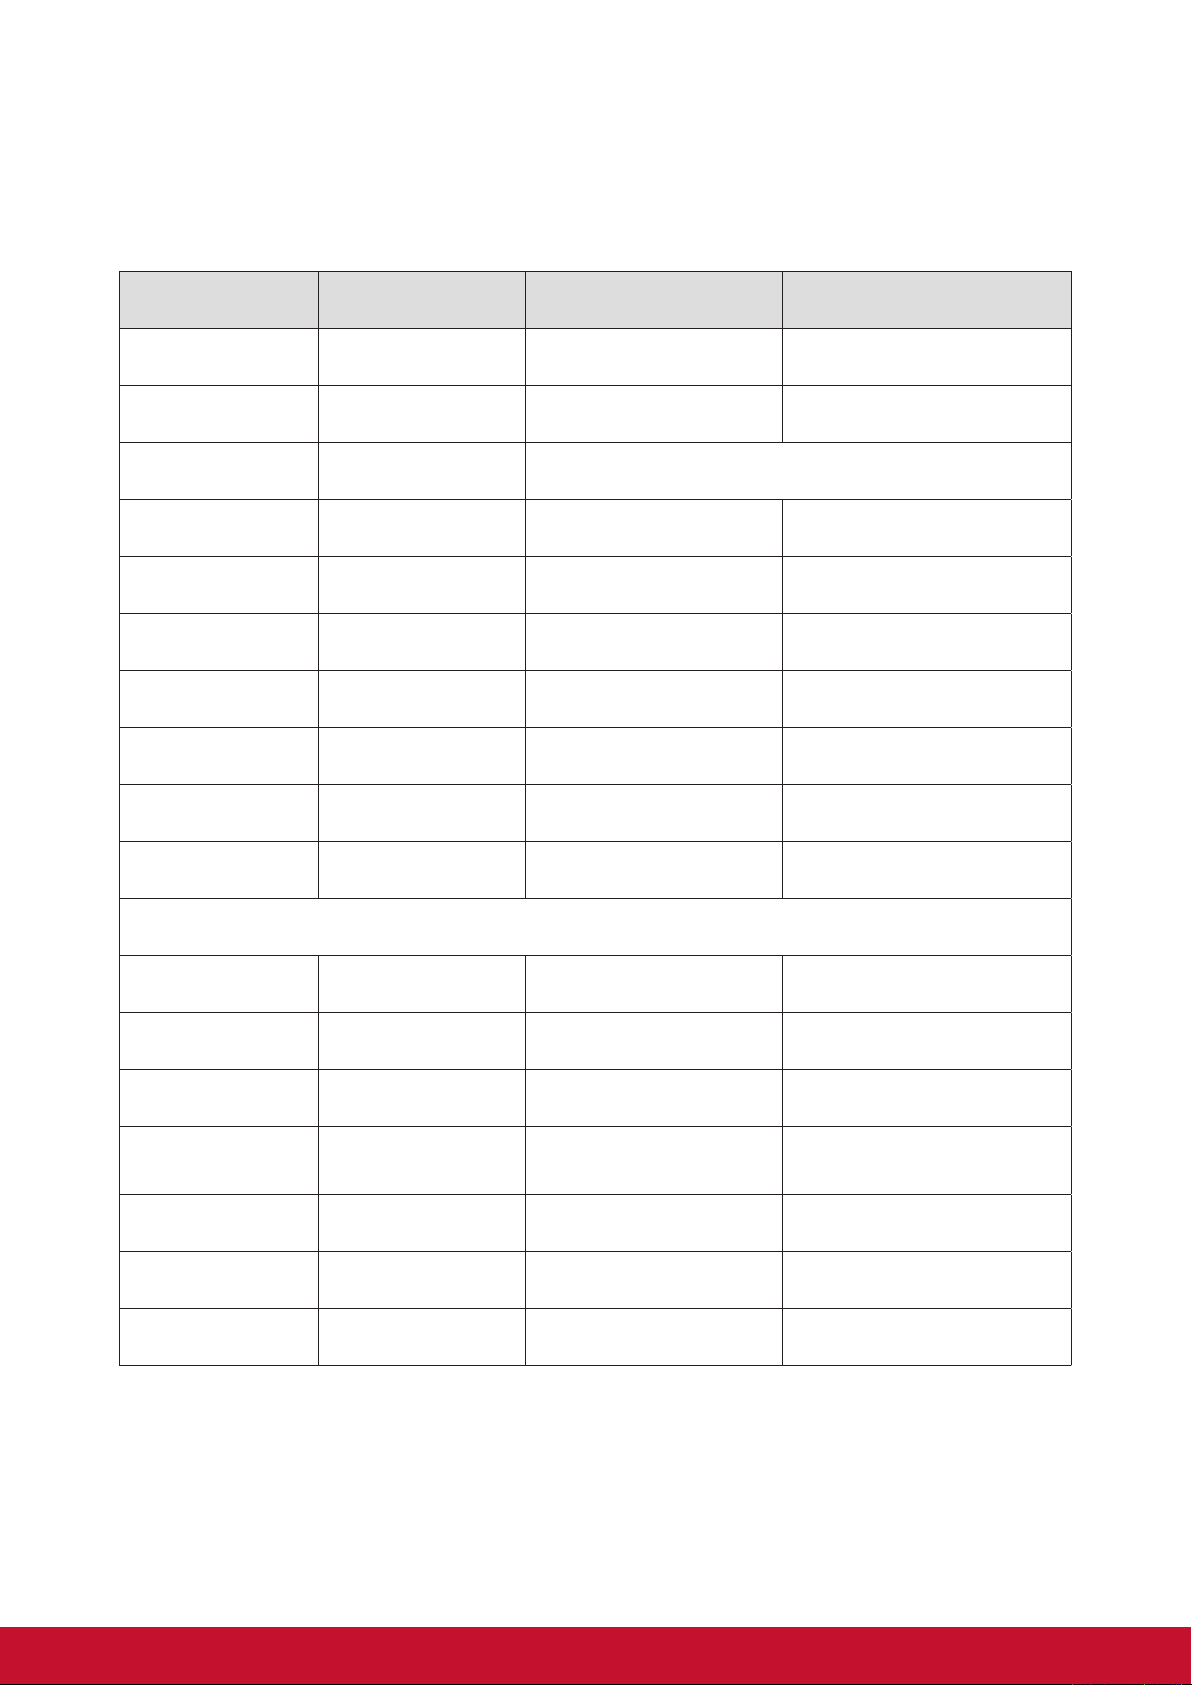
No. Components Descriptions
RS-232 Jack x2
1
USB type-A x2 (2.0)
2
HDMI OUT
3
SD Card Slot
4
Headset Jack Connect to earphone or headset.
5
DC in Port Connect to power adaptor.
6
USB type-A x2 (2.0)
7
LAN port (RJ-45) Connect to a RJ45 cable for network connection.
8
Connect to serial display device, printer or other
PC.
Used for keyboard, mouse, ash disk (supports
FAT32 format only) or printer connections.
Connect to digital high quality device for video and
audio congurations.
Input SD card to extend storage capacity.
(Up to 32 GB)
Used for keyboard, mouse, ash disk (supports
FAT32 format only) or printer connections.
Page 11
Set Up Your SD-A160/SD-P20 Smart Display
2 Set Up Your SD-A160/SD-P20 Smart Display
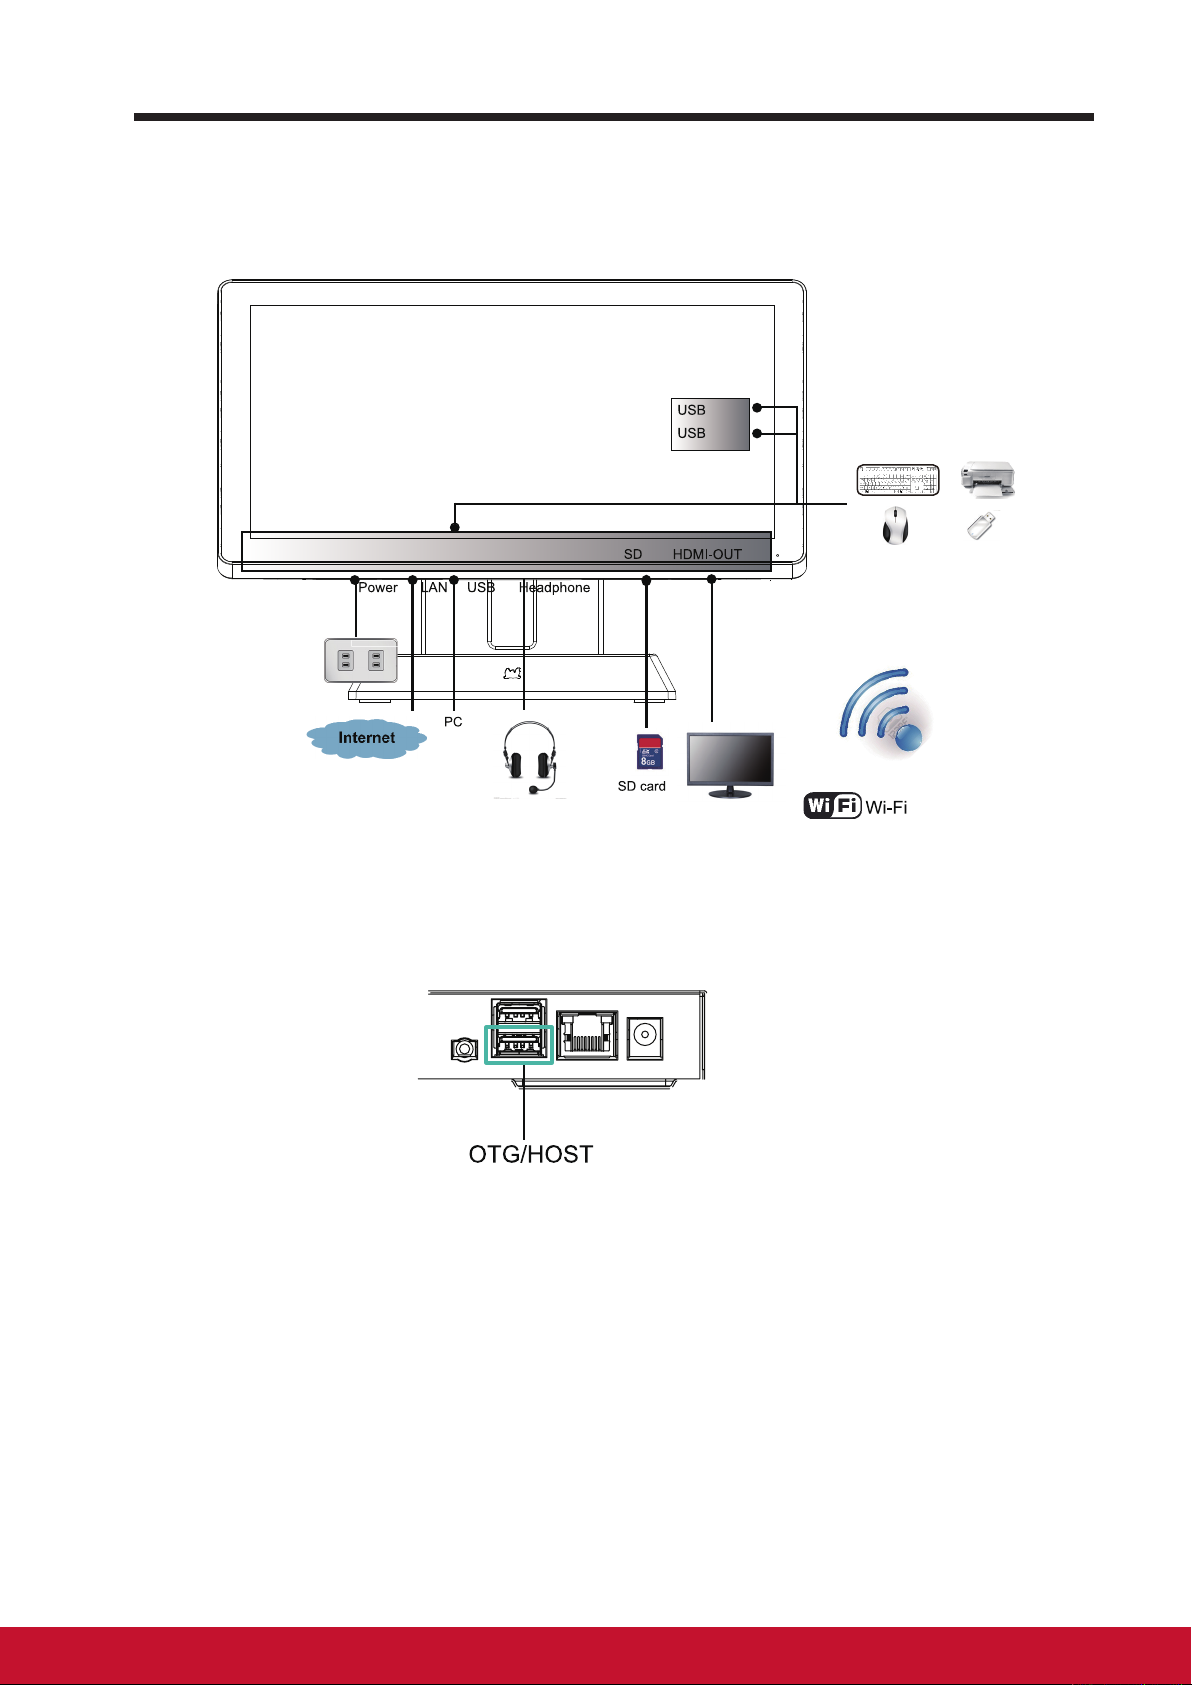
2.1 Connection
32 32
Page 12
Set Up Your SD-A160/SD-P20 Smart Display
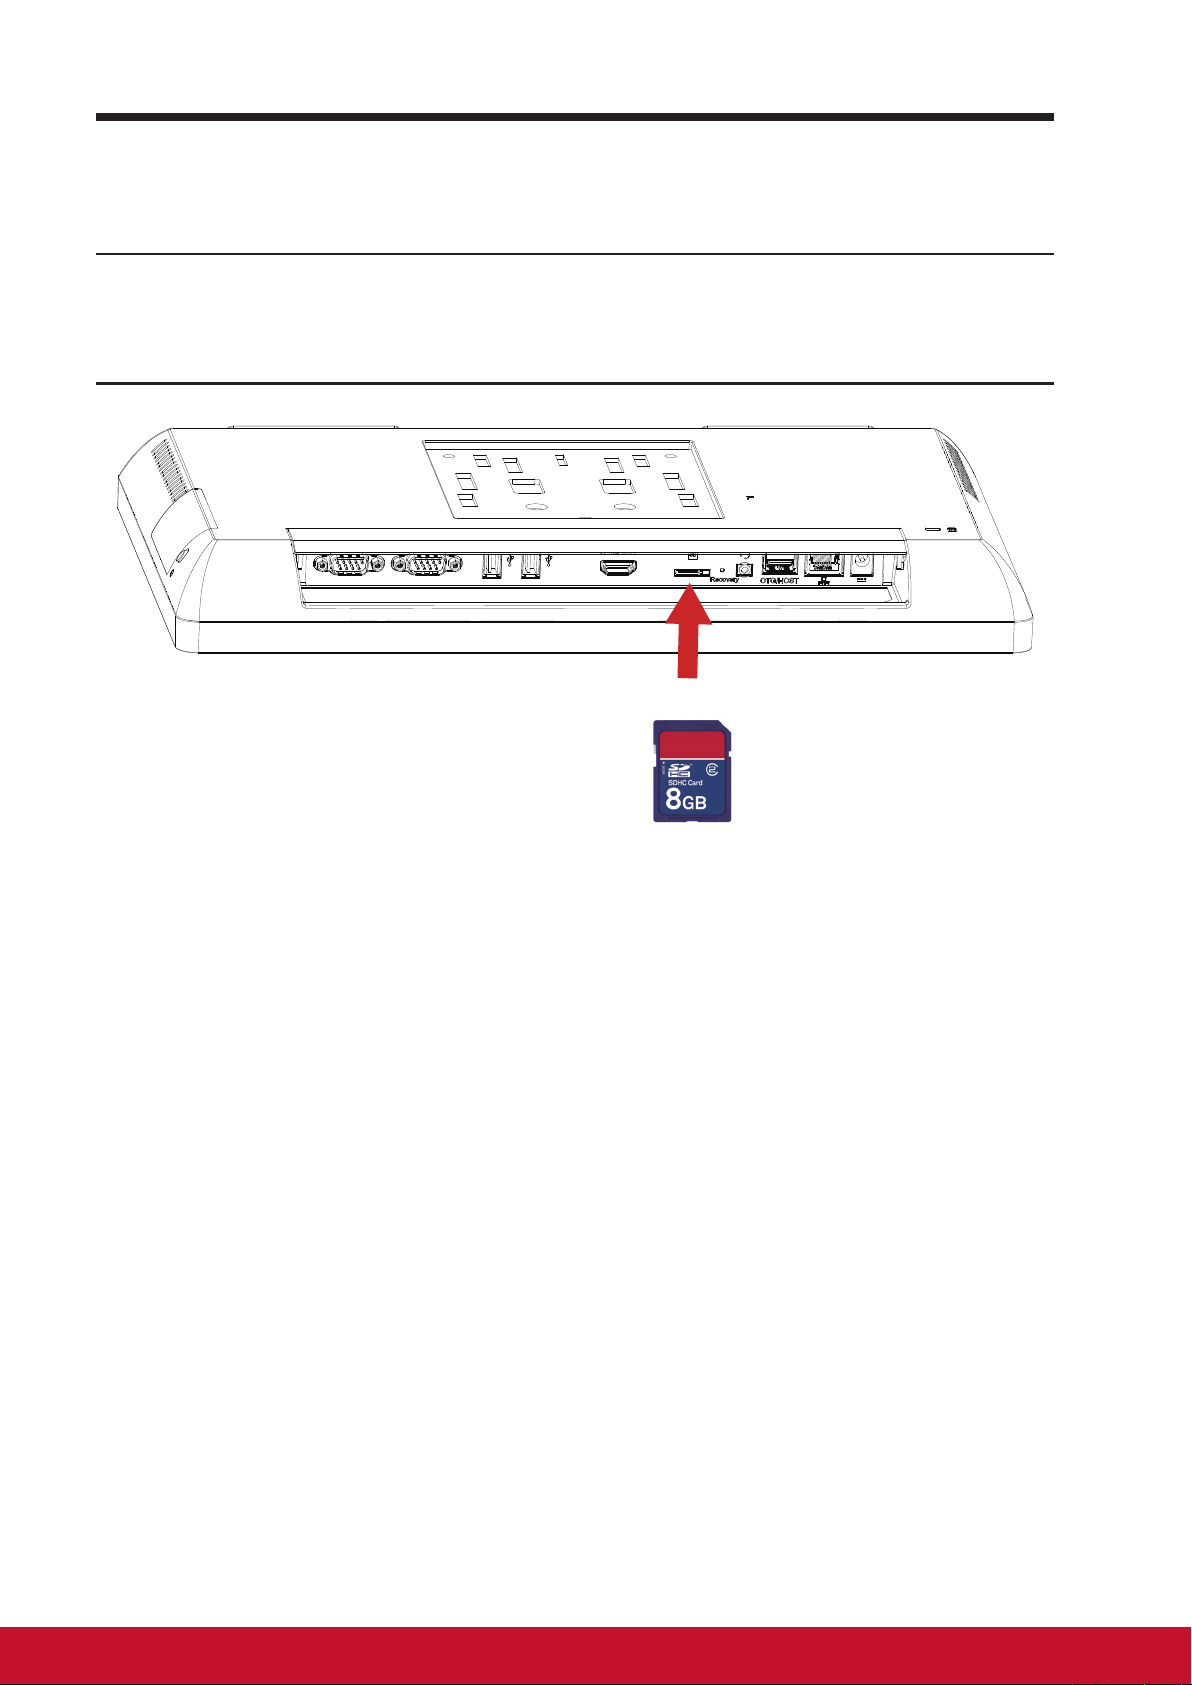
2.2 Get Your Smart Display Ready for Use
Insert the SD card
Insert a SD card if desired and / or
1
available on the back of your smart
display.
Page 13
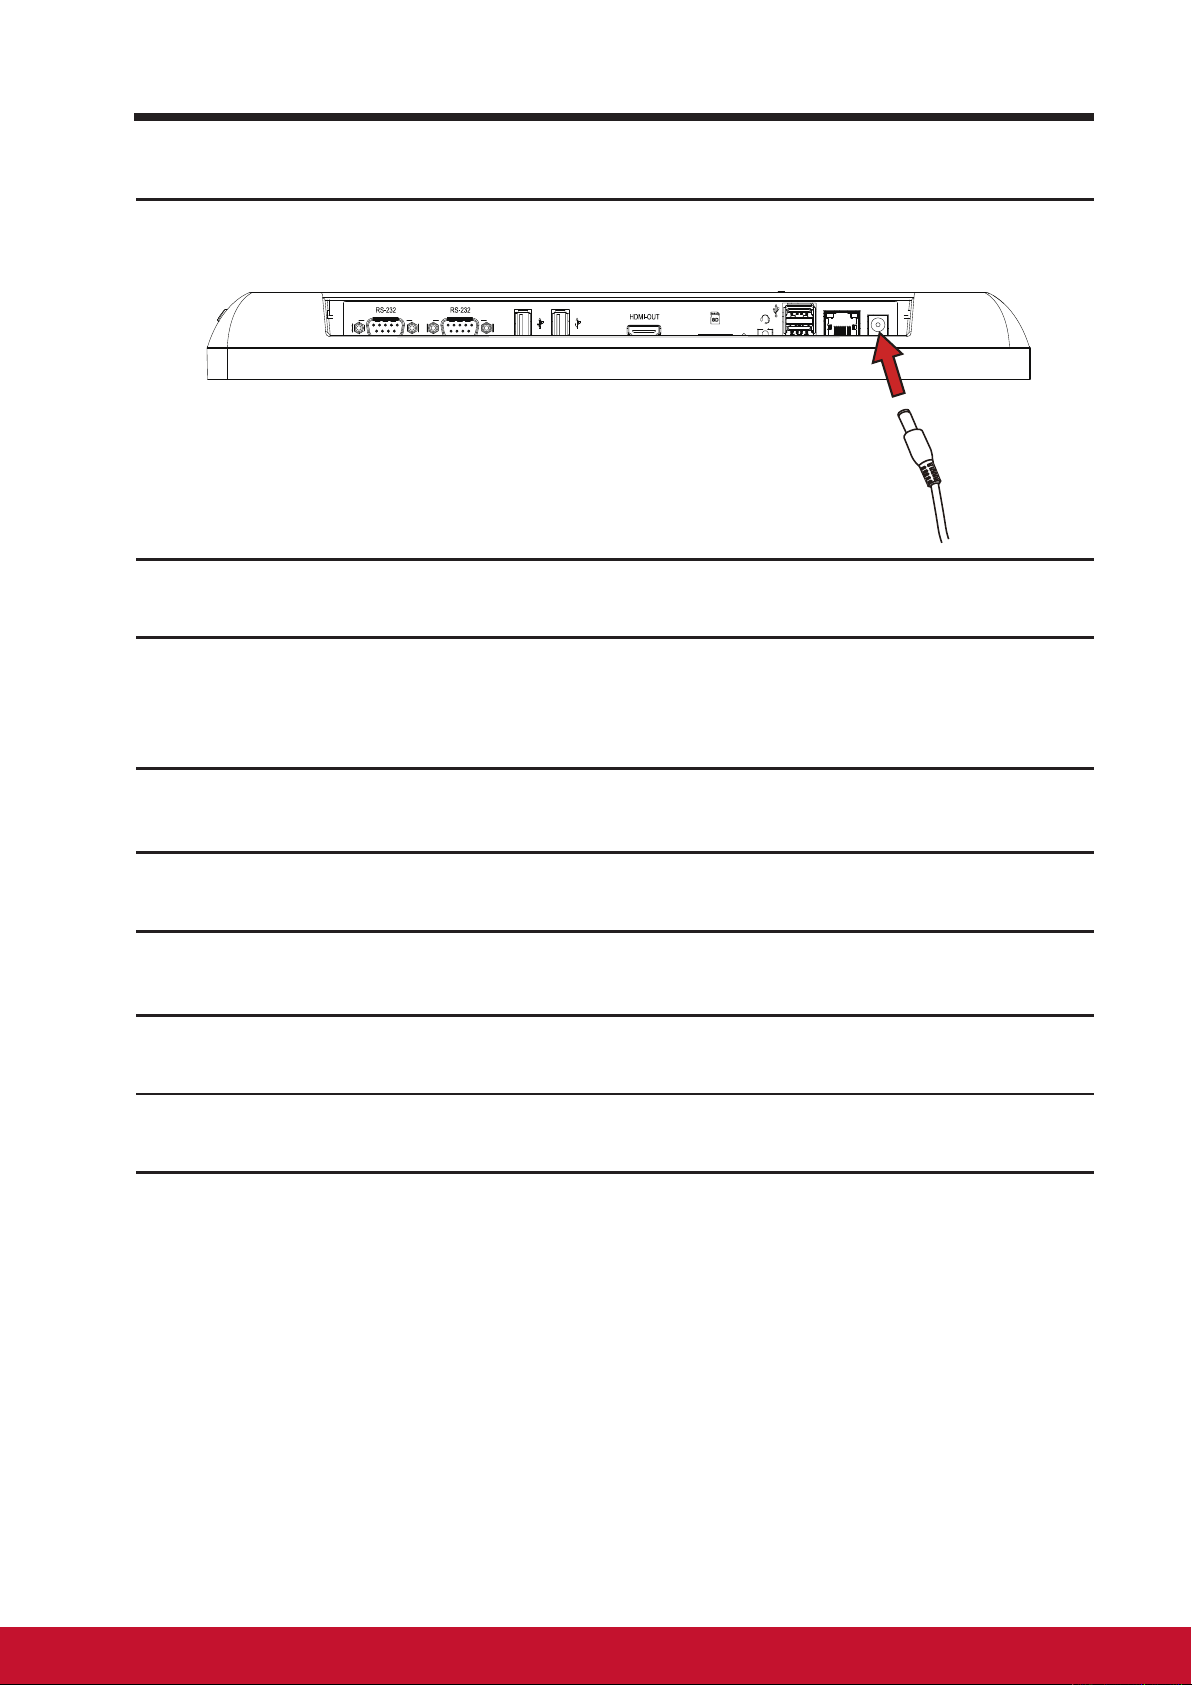
Connect the Power Cord
Connect the included power cord to the power jack.
1
Connect the other end of the power cord to a suitable power outlet.
2
Set Up Your SD-A160/SD-P20 Smart Display
2.3 Power on Your Device
Press the power button gently to power on your device
After connecting the power cord, you can press the power button about
1
0.5 seconds to power on your device.
Once powered-up, the LED indicator will show solid Blue.
2
The unlock display will appear after a short boot-up period. (If the lock
3
screen function is enabled).
Touch and slide the lock icon to unlock the screen if necessary.
4
The device is ready for use when the Home screen is displayed.
5
54
Page 14
Set Up Your SD-A160/SD-P20 Smart Display
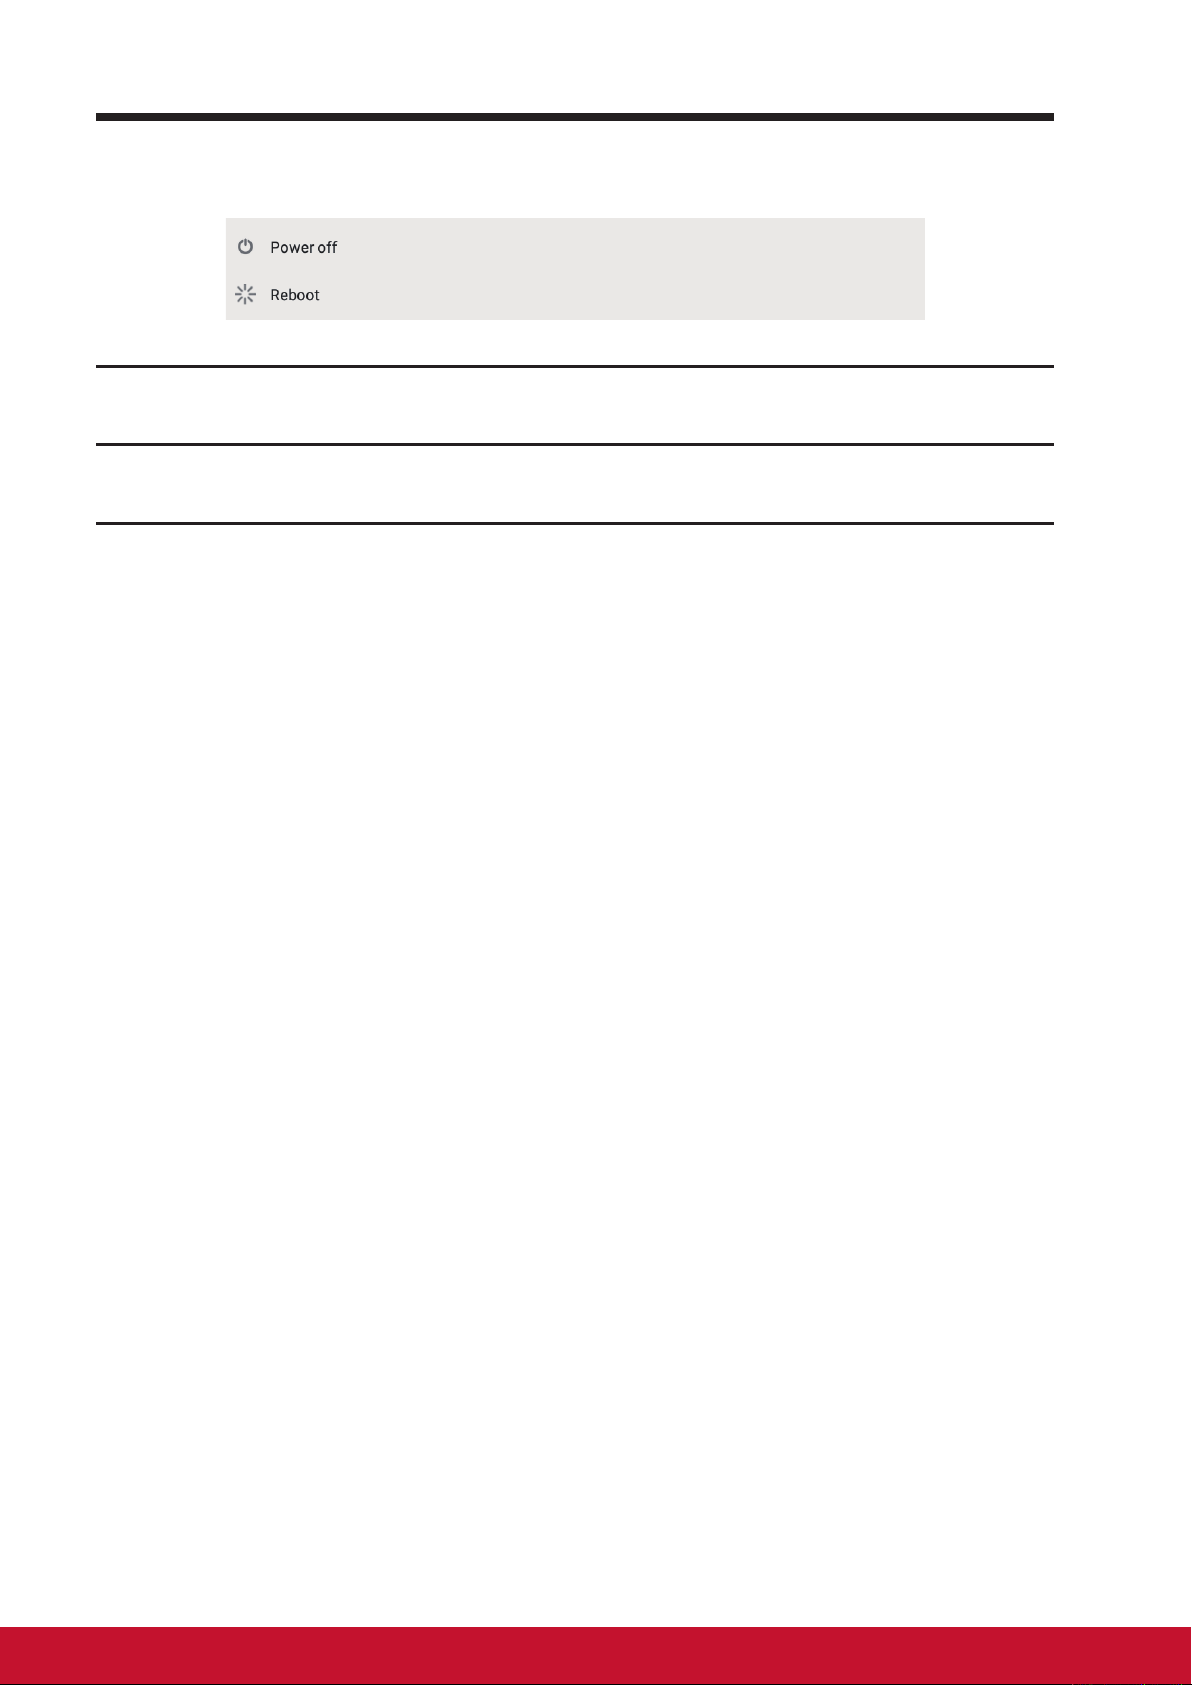
2.4 Power Off Your Device
Press and hold the power button for about 3 seconds.
1
When the power off menu appears, touch OK.
2
Page 15
About Your SD-A160/SD-P20 Smart Display
3 About Your SD-A160/SD-P20 Smart Display
3.1 Touch Screen
The main way to control the device is using your nger to touch the sensitive
surface of the screen directly. You can manipulate icons, buttons, menu
items, on-screen keyboard and other items on the touch screen with below
methods:
Methods Descriptions
Touch Simply touch the items with you nger.
- Act on items on the screen including application and settings
icons.
- Type letters and symbols using the on-screen keyboard.
- Press the on-screen buttons.
Touch and
Hold
Drag Touch and hold an item then move the item with your nger until
Swipe or Slide Quickly move your nger across the surface of the screen
Zoom Out Move two ngers close together on the screen to reduce the
Zoom In Move two ngers apart on the screen to enlarge the view of an
Touch and hold an item on the screen by touching it without
lifting your nger until an action occurs.
reaching the target position.
- Move an item on the screen.
- Scroll through Home screens, web pages, lists, entries, photo
thumbnails, contacts and so on.
without pausing when you rst touch it.
view of an image or web page.
image or web page.
76
Page 16
About Your SD-A160/SD-P20 Smart Display
3.2 Connecting to HDMI-compliant Devices via HDMI
Out
HDMI (High-Denition Multimedia Interface) is a compact audio/video
interface for transferring uncompressed digital audio/video data. You can
obtain the best user experience for video playback and gaming via HDMI.
SD-A160/SD-P20 is equipped with a HDMI out for connection to an external
HDMI-compliant device.
How to begin
A type A (HDMI) to type A (HDMI) HDMI cable must be available.
1
Connect the Type A connector of the HDMI cable to the desired HDMI
2
compliant device.
Connect the Type A connector of the HDMI cable to the HDMI-OUT
3
port located on the back of your SD-A160/SD-P20 .Tap the setting/
Display/dual-screen to turn on this function, you can run different
application on device and the conncted external display two screens. .
Always set the appropriate resolution. SD-A160/SD-P20 supports with
4
max. resolution of 1920*1080.
NOTE
• The switching of two display mode: To show different content on two screen,touch
screen of the left (right) side of 50 pixels region adn fast slide to the right (left),the focus
application on screen will only display on external display and the Smart Dispay device
an operate other application.
• Show same content on two screen: The is a simulaneous button on the status bar right
of the volume up icon),click on the button to make the two screens display the same
content.
Page 17

About Your SD-A160/SD-P20 Smart Display
3.3 USB On-The-Go to PC
SD-A160/SD-P20 can connect to Window PC as USB OTG
1) Use a USB Type-A to type-A cabe connecting the dual USB OTG.
2) Tap
3) Click
4) If you want return to standard USB port just cancel the
"Settings/Display/
"Connect to PC" item to be
USB
"
3.4 Support to connect with SD-160/SD-T160
(optional monitor models)
98
Page 18
Troubleshooting
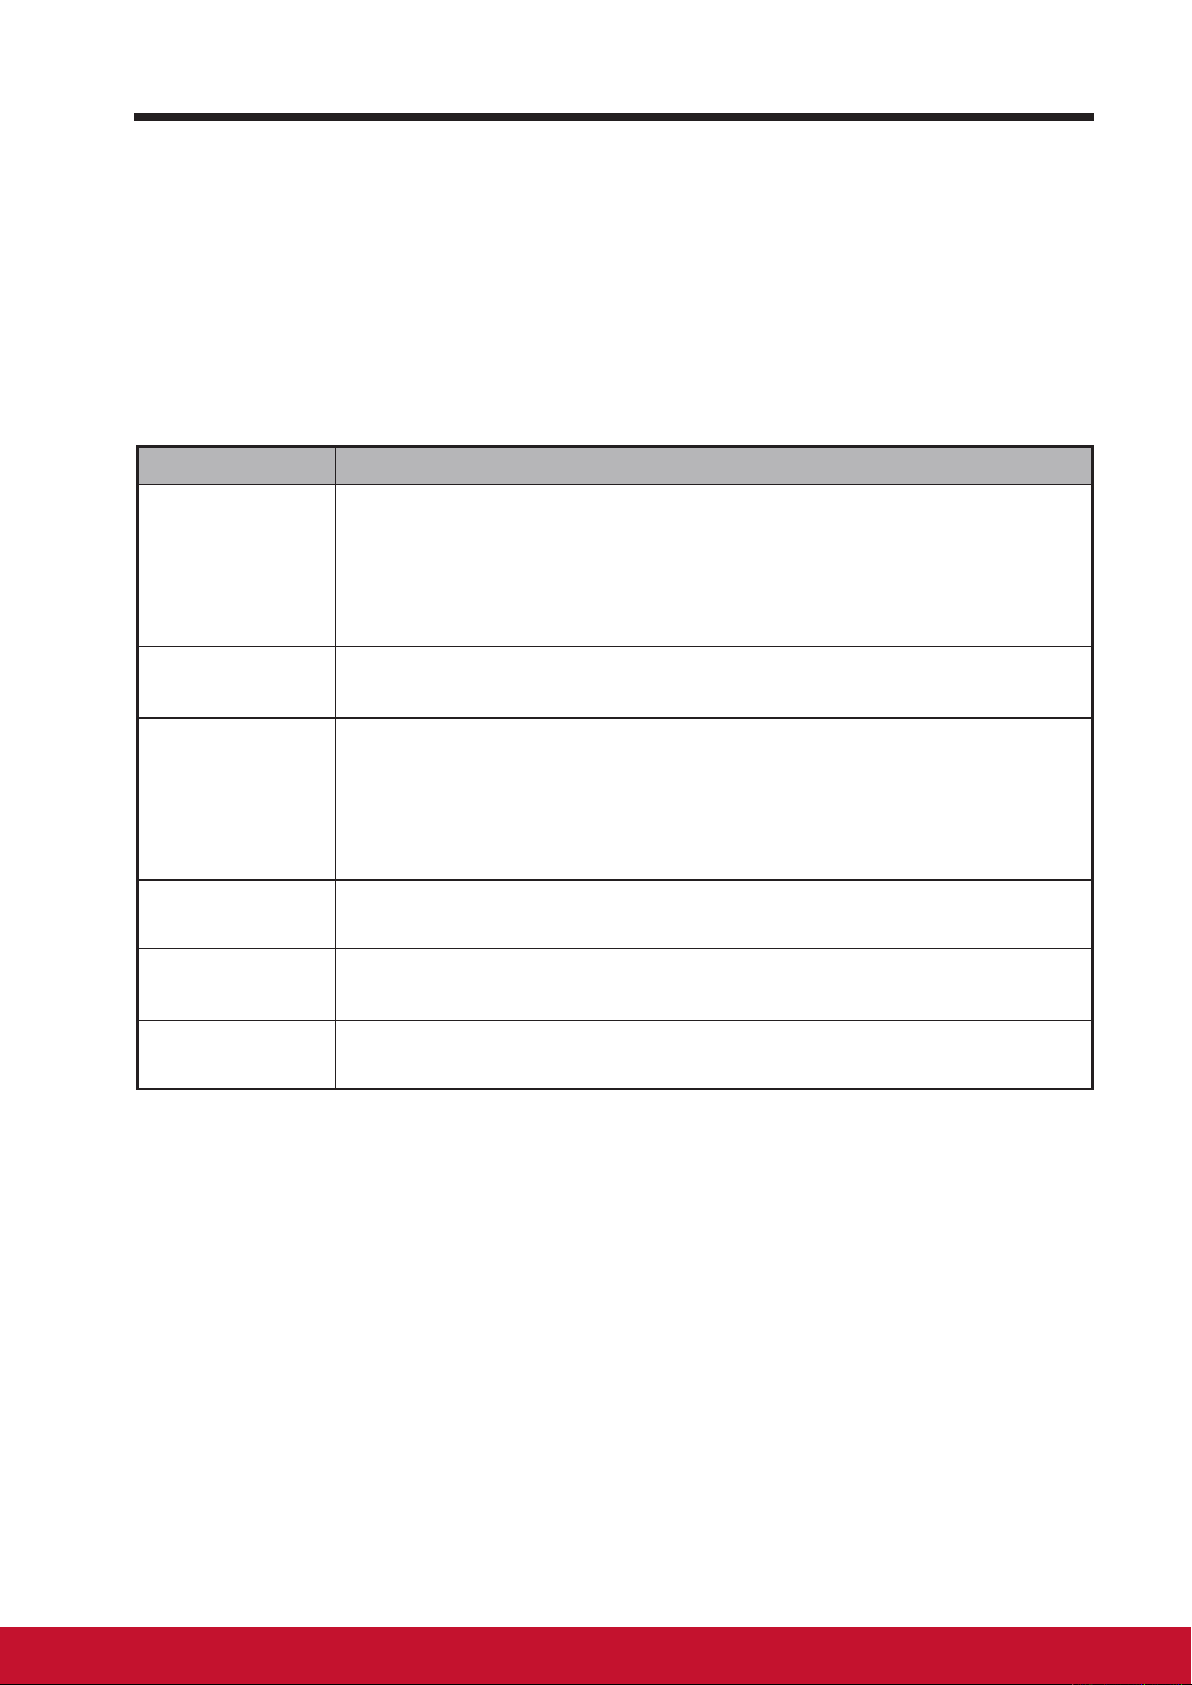
4 Troubleshooting
4.1 Touch Screen Problems
Problems Causes Solutions
Touch screen does
not respond to hand
gestures or render
them properly.
power noise during
device turn on process
Water drop or spot above
the glass surface.
4.2 Other Problems
Problems Solutions
If the LED does not light blue with the device booting-up then:
-
Ensure that the power adaptor is plugged-in to a suitable
power socket
-
Ensure that the DC connector is fully inserted into the correct
No power
socket on the rear of the SD-A160/SD-P20 located under
the cover
-
Check the power socket with another device (i.e. table lamp)
-
If there is still no power then contact ViewSonic support or
the Reseller from whom the device was purchased
Re-Plug the wire.
Clean and remove the water
drop then re-plug the USB
wire.
No display Check external device and connections.
Lock-up Restart
App doesn't
function
No network Check WiFi settings, try Ethernet if available.
No audio Check volume level setting.
Check with App author.
SD-A160/SD-P20
device.
Page 19

5 Appendix
Specication
LCD Spec.
Size 36.92cm (15.6” viewable)
Resolution 1366x768
Brightness 220 cd/m
Backlight LED
Thickness 3.8 mm
Touch screen PCT 10 points touch supported
Hardware
2
Appendix
Buttons Power button *1
Power LED Indicator Blue (on) / Amber (saving)
I/O ports LAN RJ45, supports 10/100 Mbps
HDMI-OUT
Headset
SD card
DC-IN Jack
USB type A *4
RS-232 Serial port
Card reader SD card
Speakers 2.0 Watt *2
Adaptor
Physical
Input: 100V~240V
Output: 12V, 4A, 48W
387.5mm x 278.7 x 205 (mm)
15.3 x 11.0 x 8.1(inches)
Weight
3.8Kg (Net)
5.0Kg (Gross)
1110
Page 20
Customer Support
For technical support or product service, see the table below or contact your reseller.
NOTE: You will need the product serial number.
Country/Region Website
Australia/New Zealand www.viewsonic.com.au
Canada www.viewsonic.com T = 1-866-463-4775 service.ca@viewsonic.com
Europe www.viewsoniceurope.com http://www.viewsoniceurope.com/eu/support/call-desk/
Hong Kong www.hk.viewsonic.com T= 852 3102 2900 service@hk.viewsonic.com
India www.in.viewsonic.com T= 1800 419 0959 service@in.viewsonic.com
Korea ap.viewsonic.com/kr/ T= 080 333 2131 service@kr.viewsonic.com
Latin America
(Argentina)
Latin America (Chile) www.viewsonic.com/la/
Latin America
(Columbia)
Latin America (Mexico) www.viewsonic.com/la/
www.viewsonic.com/la/
www.viewsonic.com/la/
T= Telephone
C = CHAT ONLINE
AUS= 1800 880 818
NZ= 0800 008 822
C= http://www.viewsonic.com/la/
soporte/servicio-tecnico
C= http://www.viewsonic.com/la/
soporte/servicio-tecnico
C= http://www.viewsonic.com/la/
soporte/servicio-tecnico
C= http://www.viewsonic.com/la/
soporte/servicio-tecnico
Email
service@au.viewsonic.com
soporte@viewsonic.com
soporte@viewsonic.com
soporte@viewsonic.com
soporte@viewsonic.com
Nexus Hightech Solutions, Cincinnati #40 Desp. 1 Col. De los Deportes Mexico D.F. Tel: 55) 6547-6454 55)6547-6484
Other places please refer to http://www.viewsonic.com/la/soporte/servicio-tecnico#mexico
Latin America (Peru) www.viewsonic.com/la/
Macau www.hk.viewsonic.com T= 853-2840-3687 service@hk.viewsonic.com
Middle East ap.viewsonic.com/me/ Contact your reseller service@ap.viewsonic.com
Puerto Rico & Virgin
Islands
Singapore/Malaysia/
Thailand
South Africa ap.viewsonic.com/za/ Contact your reseller service@ap.viewsonic.com
United States www.viewsonic.com T = 1-800-688-6688 service.us@viewsonic.com
www.viewsonic.com
www.viewsonic.com.sg T= 65 6461 6044 service@sg.viewsonic.com
C= http://www.viewsonic.com/la/
soporte/servicio-tecnico
T= 1-800-688-6688 (English)
C = http://www.viewsonic.com/la/
soporte/servicio-tecnico
soporte@viewsonic.com
service.us@viewsonic.com
soporte@viewsonic.com
Page 21

Limited Warranty
ViewSonic® Smart Display
What the warranty covers:
ViewSonic warrants its products to be free from defects in material and workmanship,
under normal use, during the warranty period. If a product proves to be defective in
material or workmanship during the warranty period, ViewSonic will, at its sole option,
repair or replace the product with a like product. Replacement product or parts may
include remanufactured or refurbished parts or components. The replacement unit will be
covered by the balance of the time remaining on the customer’s original limited warranty.
ViewSonic provides no warranty for the third-party software included with the product or
installed by the customer.
How long the warranty is effective:
ViewSonic Smart Display products are warranted for between 1~3 years, depending on
your country of purchase, for all parts including the light source and for all labor from the
date of the rst consumer purchase.
User is responsible for the backup of any data before returning the unit for service.
ViewSonic is not responsible for any data loss.
Who the warranty protects:
This warranty is valid only for the rst consumer purchaser.
What the warranty does not cover:
1. Any product on which the serial number has been defaced, modied or removed.
2. Damage, deterioration or malfunction resulting from:
a. Accident, misuse, neglect, re, water, lightning, or other acts of nature,
unauthorized product modication, or failure to follow instructions supplied with
the product.
b. Repair or attempted repair by anyone not authorized by ViewSonic.
c. Causes external to the product, such as electric power uctuations or failure.
d. Use of supplies or parts not meeting ViewSonic’s specications.
e. Normal wear and tear.
f. Any other cause which does not relate to a product defect.
3. Any product exhibiting a condition commonly known as “image burn-in” which results
when a static image is displayed on the product for an extended period of time.
4. Removal, installation, insurance, and set-up service charges.
How to get service:
1. For information about receiving service under warranty, contact ViewSonic Customer
Support (Please refer to the web site and Customer Support pages). You will need to
provide your product’s serial number.
2. To obtain warranty service, you will be required to provide (a) the original dated sales
slip, (b) your name, (c) your address, (d) a description of the problem, and (e) the
serial number of the product.
3. Take or ship the product freight prepaid in the original container to an authorized
ViewSonic service center or ViewSonic.
4. For additional information or the name of the nearest ViewSonic service center,
contact ViewSonic.
1312
Page 22

Limitation of implied warranties:
There are no warranties, express or implied, which extend beyond the description
contained herein including the implied warranty of merchantability and tness for a
particular purpose.
Exclusion of damages:
ViewSonic’s liability is limited to the cost of repair or replacement of the product.
ViewSonic shall not be liable for:
1. Damage to other property caused by any defects in the product, damages based
upon inconvenience, loss of use of the product, loss of time, loss of prots, loss of
business opportunity, loss of goodwill, interference with business relationships, or
other commercial loss, even if advised of the possibility of such damages.
2. Any other damages, whether incidental, consequential or otherwise.
3. Any claim against the customer by any other party.
4. Repair or attempted repair by anyone not authorized by ViewSonic.
OTA update disclaimer:
ViewSonic Corporation assumes no liability for any errors or omissions in the information
displayed. This rmware update is intended for ViewSonic
®
smart display. ViewSonic
assumes no liability for data loss or any damages caused as a result of any updates
made on any device or damage to or failure of other equipment to which the products
are connected, whether incidental, consequential or otherwise. You agree to take full
responsibility for all les and data and to maintain all appropriate backup of les and data
stored on any device prior to performance of any update. Users shall be responsible
for obtaining the necessary rights to access and use any third party content. ViewSonic
assumes no liability for the performance, availability and use of third party products and
services. Corporate names and trademarks mentioned herein are the property of their
respective companies. Copyright © 2015 ViewSonic Corporation. All rights reserved.
4.3: ViewSonic Smart Display Warranty SD_LW01 Rev. 1A 08-21-12
Page 23

感谢您选择 ViewSonic
作为世界领先显示解决方案提供商,ViewSonic 一直专注在技术发展、创新和
简单化方面超过世界的预期。在ViewSonic,我们相信我们的产品能够对世界
产生积极的影响,并且我们深信您选择的 ViewSonic 产品会很好地为您服务。
再次感谢选择 ViewSonic!
Page 24

符合性信息
请先阅读下列信息
• 只使用制造商提供的电池和电源适配器。若使用未经授权的附件,可能失去保修资
格。
• 请勿将您的设备存放在温度高于 50°C (122°F) 的地方。
• 此设备的工作温度范围是 0°C (32°F) 到 35°C (95°F)。
下列信息仅适用于欧盟成员国:
右侧所示的标志表示符合“废旧电气和电子设备指令 2012/19/EU”(WEEE)。
此标志表明不得按非分类市政垃圾废弃设备,而应根据当地法律使用回收系统。
如果此设备内含的电池、蓄电池和纽扣电池带有化学符号 Hg、Cd 或 Pb,则意
味着电池内重金属含量超过 0.0005% 汞或 0.002% 镉或 0.004% 铅。
i2
Page 25

版权信息
版权所有© ViewSonic Corporation,2017。保留所有权利。
Android™ 是 Google Inc. 的商标。经 Google 许可后使用此商标。
此产品安装有一个基于 Linux 的 Android™ 平台,通过多个 JME 应用程序软件可以进
行扩充。
本设备中使用所有产品及本文提及的商标是其各自拥有者的商标或注册商标。
Google™、Google 标志、Android™、Android 标志和 Gmail™ 是 Google Inc. 的商
标。经 Google 许可后使用该商标。
Wi-Fi 和 Wi-Fi 认证标志是 Wireless Fidelity Alliance 的注册商标。
microSD™ 是 SD Card Association 的商标。
Java、JME 以及其他所有基于 Java 的标志是 Sun Microsystems, Inc. 在美国和/或其他
国家(地区)的商标或注册商标。
实际包含的应用程序可能与屏幕截图示例存在差异。
VESA
VESA® 的商标。
ENERGY STAR
作为 ENERGY STAR
STAR® 的能效指导方针。
免责:ViewSonic Corporation 对于本资料中包含的技术或编辑错误或疏漏,包括因提
供本资料而导致的偶然或必然的损失以及本产品的性能或使用,不应承担责任。为了不
断改进产品,ViewSonic Corporation 保留变更本产品规格而无须另行通知的权利。本
文档中的信息如有变更,恕不另行通知。
未经 ViewSonic Corporation 事先书面许可,不得出于任何目的以任何形式复印、复制
或传播本文档的任何部分。
®
是 Video Electronics Standards Association 的注册商标。DPMS 和 DDC 是
®
是美国环境保护局 (EPA) 的注册商标。
®
的合作伙伴,ViewSonic Corporation 确认此产品符合 ENERGY
知识产权信息
本设备中所包含所有技术和产品之知识产权均属其各自拥有者所者:
此产品安装有一个基于 Linux 的 Android 平台,通过多个 Java-Script 应用程序软件可
以进行扩充。
Google、Google 标志、Android、Android 标志、Gmail 和 YouTube 是 Google Inc. 的
商标。Java、JME 以及其他所有基于 Java 的标志是 Sun Microsystems, Inc. 在美国和/
或其他国家(地区)的商标或注册商标。microSD 是 SD Card Association 的商标。
Page 26

产品注册
为了满足您的未来需求,并接收我们在以后提供的更多产品信息,请注册您的产品,
网址是:www.viewsonic.com。
记录内容
产品名称:
型号:
文档号:
序列号:
购买日期:
产品达到使用寿命后废弃产品
ViewSonic 注重环境保护,致力于绿色工作和生活。感谢您参与“更加智能和环保的计
算”行动。如需更多信息,请访问 ViewSonic 网站。
美国和加拿大:http://www.viewsonic.com/company/green/recycle-program/
欧洲:http://www.viewsoniceurope.com/uk/support/recycling-information/
台湾:http://recycle.epa.gov.tw/recycle/index2.aspx
注意:本手册请保留备用。
SD-A160/SD-P20
ViewSonic Smart Display
VS16472
SD-A160/SD-P20_UG_SCH Rev. 1A 02-14-17
______________________________________
______________________________________
iiiii
Page 27

电子电器产品有害物质限制使用标识要求
本产品有害物质的名称及含量标识如下表:
有害物质
部件名称
铅 (Pb)
外壳 ○ ○ ○ ○ ○ ○
电路板组件 × ○ × ○ ○ ○
电源线 / 适配器 × ○ × ○ ○ ○
外部信号连接线 × ○ ○ ○ ○ ○
液晶面板 × ○ ○ ○ ○ ○
本表格依据 SJ/T 11364 的规定编制。
○: 表示该有害物质在该部件所有均质材料中的含量均在
GB/T26572 规定的限量要求以下。
×: 表示该有害物质至少在该部件的某一均质材料中的含量超出 GB/T26572
规定的限量要求。
环保使用期限说明
此电子电器产品在说明书所述的使用条件下使用本产品,含有的有害物质或
元素不致发生外泄,不致对环境造成污染或对人身、财产造成严重损害的期
限为10年。
汞
(Hg)
镉
(Cd)
六价铬
(Cr6+)
多溴联苯
(PBB)
多溴联苯醚
(PBDE)
Page 28

重要安全注意事项
1. 请勿在此设备上放置任何物品,以免刮伤屏幕。
2. 请勿将此设备放置于脏乱或多尘的环境中。
3. 请勿将此设备放置在不平整或不稳定的表面上。
4. 请勿将任何异物插入此设备。
5. 请勿让此设备暴露于强电磁场。
6. 请勿让阳光直接照射此设备,以免损坏液晶屏幕。使其远离热源。
7. 请勿在雨中使用此设备。
8. 请咨询当地相关部门或零售商以了解如何处理处理废弃的产品。
9. 此设备和适配器在正常操作或充电时会产生热量。请勿将此设备放在腿上使用,
以免因受热而产生不适或伤害。
10. 功率输入额定值:参见此设备上的额定值标签,确保电源适配器与额定值相符。
仅使用制造商指定的附件。
11. 不要用钢笔或任何尖锐物件点击屏幕。
12. 用软布清洁触摸屏。如果需要,在清洁前可略微蘸湿软布。切勿使用研磨剂或清洁
剂。
13. 在安装或卸下不支持热插拔的外部设备之前,务必先关闭此设备的电源。
14. 在清洁此设备之前,先关闭此设备的电源并从电源插座上拔掉电源线。
15. 请勿拆解此设备。应由取得认证的技术服务人士进行修理。
16. 此设备通过散热孔进行散热。请勿堵塞此设备的通风散热孔,以免其因温度过高而
发生故障。
17. 用户必须使用 USB 2.0 或以上版本的 USB 接口连接。
18. 可插入装置:装置应安装在电源插座附近,并且应便于插拔电源线。
viv
Page 29

目录
目录
1 SD-A160/SD-P20 智能显示器特性
2 设置您的 SD-A160/SD-P20 智能显示器
2.1 连接 .................................................................................... 3
2.2 准备使用您的智能显示器 .................................................... 4
2.3 打开设备的电源 .................................................................. 5
2.4 关闭设备的电源 .................................................................. 6
3 关于您的 SD-A160/SD-P20 智能显示器
3.1 触摸屏 ................................................................................. 7
3.2 通过 HDMI 输出连接到 HDMI 兼容设备.............................. 8
4 故障排除
5 附录
3.3 USB On-The-Go 至 PC ...................................................... 9
3.4 支持连接 SD-160/SD-T160 (可选配显示器) ........................ 9
4.1 触摸屏问题........................................................................ 10
4.2 其他问题 ........................................................................... 10
规格 11
Page 30

SD-A160/SD-P20 智能显示器特性
SD-A160/SD-P20 是一款桌上型平板电脑,采用 15.6 英寸四核显示屏,运
行 Android 5.1 (Lollipop) 系统。它提供 1366x768p HD 分辨率,支持 HDMI-
out、全尺寸 USB 等多种连接。
SD-A160/SD-P20 智能显示器特性
1
此部分向您介绍此智能显示器的各项特性。
注意
• 本用户手册中介绍的特性或应用可能因您购买的型号不同而存在差异。
前部概览
编号 组件 说明
1
2
3
触控屏 通过触摸屏幕控制屏幕上的配置,包括菜单项目、应用程
序、按钮、键盘等。
LED 指示灯
电源按钮 按此按钮打开电源/锁定智能显示器。
-
处于开机状态时,LED 显示蓝色。
-
当智能显示器处于锁定状态时,LED 变为橙色。
-
按住约 0.5 秒打开电源。
-
当显示器处于工作状态时,锁定智能显示器。
-
当智能显示器处于锁定状态时,恢复非锁定状态的显示。
-
当显示器处于工作状态时,按住此按钮约 6 秒可以关闭智
能显示器(在 Android 模式下)。
1vi 1vi
Page 31

SD-A160/SD-P20 智能显示器特性
后部概览
编号 组件 说明
RS-232 端口 x 2
1
USB 2.0 端口 x 2
2
HDMI OUT(输出)
3
SD 卡槽
4
耳麦输出端口
5
电源输入接口
6
USB Type-A 端口 x 2
7
网络接口(RJ45)
8
连接萤幕、打印机或个人计算机。
连接键盘、鼠标、闪存盘(只支持 FAT32 格式)
或打印机。
连接数字高质量设备进行视频和音频配置。
插入 SD 卡以增加存储容量。(最多 32 GB)
连接耳麦。
连接电源适配器。
连接键盘、鼠标、闪存盘(只支持 FAT32 格式)
或打印机。
连接 RJ45 网线以接入网络。
Page 32

设置您的 SD-A160/SD-P20 智能显示器
设置您的 SD-A160/SD-P20 智能显示器
2
2.1 连接
32
Page 33

设置您的 SD-A160/SD-P20 智能显示器
2.2 准备使用您的智能显示器
插入SD卡
在智能显示器后部插入 SD 卡(若需要和/或有可用的卡)。
1
Page 34

连接电源线
将随附的电源线插入电源插孔。
1
将电源线另一端插入合适的电源插座。
2
设置您的 SD-A160/SD-P20 智能显示器
2.3 打开设备的电源
轻按电源按钮打开设备的电源
连接电源线后,可以按住电源按钮 0.5 秒打开设备电源。
1
打开电源后,LED 指示灯显示稳定蓝色。
2
经过短暂引导时间后,出现解锁显示。(若启用了锁定屏幕功能)
3
按住并滑动锁图标以解锁屏幕(若需要)。
4
主屏幕显示出来后,即可使用此设备了。
5
54
Page 35

设置您的 SD-A160/SD-P20 智能显示器
2.4 关闭设备的电源
按住电源按钮约 3 秒钟。
1
当关闭电源菜单出现时,按
2
OK(确定)
。
Page 36

关于您的 SD-A160/SD-P20 智能显示器
关于您的 SD-A160/SD-P20 智能显示器
3
3.1 触摸屏
此设备的主要控制方式是用手指直接触按屏幕的敏感表面。您可以利用下列方
法操控触摸屏上的图标、按钮、菜单项目、屏幕键盘、以及其他项目:
方法 说明
触按
按住
拖动
滑动
缩小
放大
用手指触按项目。
-
操作屏幕上的项目,包括应用程序和设置图标。
-
使用屏幕键盘键入字母和符号。
-
按屏幕上的按钮。
按住屏幕上的项目:触按后不提起手指,直至发生操作。
用手指按住并移动项目,直至其到达目标位置。
-
在屏幕上移动项目。
-
滚动主屏幕、网页、列表、条目、照片缩略图、联系人等。
手指触按屏幕表面后,快速滑过屏幕表面(不停留)。
在屏幕上捏合两个手指,缩小图像或网页视图。
在屏幕上分开两个手指,放大图像或网页视图。
76
Page 37

关于您的 SD-A160/SD-P20 智能显示器
3.2 通过 HDMI 输出连接到 HDMI 兼容设备
HDMI(High-Definition Multimedia Interface,高清多媒体接口)是精致音频 /视
频接口,用于传输无压缩的数字音频/视频数据。利用这些输入,可以获得 最佳的
视频播放和游戏用户体验。SD-A160/SD-P20 配备 HDMI 输出,可以连接外部
HDMI 兼容设备。
如何开始
必须准备一条“A 型(HDMI)转 A 型(HDMI)”线。
1
将线缆的 A 型 HDMI 接头连接到所需的 HDMI 兼容设备。
2
将 HDMI 线的 A 型接头连接到 SD-A160/SD-P20 后部的 HDMI 端口。
3
点击设置/显示/双屏显示来开启此功能,你可以在本智能一体机和外接
显示器两个不同屏幕上运行不同的应用。
若是连接 PC 或笔记本电脑,务必设置合适的分辨率。SD-A160/SD-P20
4
支持的最大分辨率是 1366*768。
注意
• 两屏显示模式切换:手指触模屏幕左(右) 边50个像素区域快速向右(左)滑动,焦点应
用窗口就只在外接显示器上显示,而在本智能一体机可以操作其他的应用程序。
• 两屏显示相同内容:在状态栏上有一个同步的按钮图标(在音量加大图目标右边),
点击按钮图标即可让两屏显示相同内容。
Page 38

关于您的 SD-A160/SD-P20 智能显示器
3.3 USB On-The-Go 至 PC
1)使用 USB OTG 连接 USB A 型至 A 型电缆。
2)点击“设置/显示/ USB”
3)点击“连接到PC”项目
4)如果想返回标准 USB 端口请点选取消
3.4 支持连接 SD-160/SD-T160 (可选配显示器)
98
Page 39

故障排除
故障排除
4
4.1 触摸屏问题
问题 原因 解决办法
触摸屏对手势没有响
应或响应不正确。
设备开启过程中存在电源
噪声。
玻璃表面上有水滴或斑
点。
重新开机。
清洁并擦去水滴,然后重新
开机。
4.2 其他问题
问题 解决办法
不通电 按住 LED 电源指示灯至少 1-2 秒,如果 LED 不随着设备启动
而显示蓝色,则:
-
确保电源适配器插入合适的电源插座
-
确保直流插头完全插入 SD-A160/SD-P20 后部盖板下面的正
确插口
-
用另一个设备(如台灯)检查电源插座是否供电
-
如果仍不通电,请联系 ViewSonic 支持人员或者联系向您销
售此设备的经销商
没有显示 检查外部设备和连接。
锁定 按 LED 电源指示灯重新启动。
应用程序不工作 联系应用程序作者。
没有网络 检查 WiFi 设置,尝试 Ethernet(若可用)。
没有音频 检查音量设置。
Page 40

附录
5
规格
LCD规格
尺寸 39.62cm(15.6”)
分辨率 1366x768
亮度 220 cd/m
背光灯 LED
厚度 3.8 mm
触摸屏 PCT10点触控支持
硬件
按钮 电源按钮 *1
2
附录
电源LED指示灯 蓝色(工作)/橙色(省电)
I/O端口
读卡器 SD 卡
扬声器 2.0 W *2
适配器 输入:110V~230V
尺寸
重量
LAN(RJ45,支持 10/100 Mbps)*1
HDMI-OUT
耳机插孔
SD 卡槽
直流输入插孔
USB type A *4
RS-232
输出: 12V, 4A, 48W
387.5mm (W) x 278.7mm (H) x 205mm (D)
(15.3 x 11.0 x 8.1 inches)
3.7Kg(净重)
4.4Kg(毛重)
1110
Page 41

客户支持
关于技术支持或产品服务,请参照下表或洽询经销商。
注意:您需要提供产品序列号。
国家/
地区
中国 www.viewsonic.com.cn 4008 988 188 service.cn@cn.viewsonic.com
香港 www.hk.viewsonic.com 852 3102 2900 service@hk.viewsonic.com
澳门 www.hk.viewsonic.com 853 2840 3687 service@hk.viewsonic.com
网站 电话 电子邮件
Page 42

有限保修
ViewSonic
保修范围:
ViewSonic 保证其产品在正常使用情况下在保修期内不存在材料和工艺上的缺陷。如果
产品在保修期内出现材料或工艺上的缺陷,ViewSonic 将根据其判断进行修理或用类似
产品更换缺陷产品。更换用产品或部件可能包含改造或翻新的部件或组件。更换单元的
保修期是客户原始有限保修的剩余时间。ViewSonic 对于产品包含的第三方软件和客户
安装的第三方软件不提供任何保修。
保修期:
自客户初次购买之日起,ViewSonic 智能显示器享受1到3年的所有部件(包括灯源)和
所有人工保修服务,具体时间取决于购买时所在的国家/地区。
在返修设备之前对数据进行备份是用户的责任。ViewSonic 对于任何数据丢失不承担责
任。
保修适用对象:
此保修仅对第一购买者有效。
®
智能显示器
保修范围不包括:
1. 序列号磨损、修改或撕毁的任何产品。
2. 因下列原因导致的损坏、磨损或工作不正常:
a. 意外事件、使用不当、疏忽、火灾、水灾、闪电、或其他自然灾害,未经授权
变更产品,不遵循随产品提供的使用说明。
b. 由未经 ViewSonic 授权的人员进行修理或尝试修理。
c. 产品外部原因,如电源波动或故障。
d. 使用不符合 ViewSonic 规格的耗材或部件。
e. 正常磨损和破损。
f. 与产品缺陷无关的任何其他原因。
3. 在产品上长时间显示静态图像而导致“图像残留”的任何产品。
4. 拆卸、安装、保险和设置服务费用。
如何获取服务:
1. 有关如何获得保修服务的信息,请联系 ViewSonic 客户支持(请参见网站和客户
支持页面)。您需要提供产品的序列号。
2. 为获得保修服务,您需要提供 (a) 注明日期的原始销售凭证、(b) 您的姓名、(c) 您
的地址、(d) 故障描述、以及 (e) 产品序列号。
3. 将产品放在原始包装箱中,送到或运到(预付运费)ViewSonic 授权服务中心或
ViewSonic。
4. 如需其他信息或最近 ViewSonic 服务中心的名称,请与 ViewSonic 联系。
1312
Page 43

隐含保修限制:
不提供超出此处所述范围的任何明示或隐含保修,包括针对适销性和特定目的适用性的
隐含保修。
损失排除:
ViewSonic 的责任仅限于修理或更换产品的费用。ViewSonic 对下列损失不应承担责
任:
1. 由于本产品缺陷而导致的其他财产损失、由于不方便而导致的损失、使用本产品的
损失、时间损失、收益损失、商业机会丧失、信誉损失、干扰商业关系、或其他商
业损失,即使被告知这些损失的可能性也不例外。
2. 偶然、必然或其他形式的任何损失。
3. 任何其他方对客户的任何索赔。
4. 由未经 ViewSonic 授权的人员进行修理或尝试修理。
OTA更新免责:
ViewSonic Corporation 对所显示信息中的任何错误或疏漏不承担任何责任。此固件更
新专门用于 ViewSonic® 智能显示器。对于因在任何设备上进行更新而导致的数据丢失
或任何损失,或者与产品相连的其他设备的损坏或故障,无论是偶然的、必然的还是其
他形式的,ViewSonic 不承担任何责任。您同意对所有文件和数据承担全部责任,并在
执行任何更新之前维护设备中存储的文件和数据的合适备份。用户应对获取必要权限访
问和使用任何第三方内容承担责任。ViewSonic 对第三方产品和服务的性能、可用性和
使用不承担任何责任。此处涉及的各公司名称和商标分别是其所属公司的资产。版权所
有 © 2014 ViewSonic Corporation。保留所有权利。
4.3: ViewSonic Smart Display Warranty SD_LW01 Rev. 1A 08-21-12
Page 44

感謝您選購 ViewSonic 產品
ViewSonic 身為領導全球視覺解決方案的供應商,致力超越全球對科技演化、
創新與簡化的期待。在 ViewSonic,我們相信自己的產品擁有對世界產生正面
影響的潛力,而我們自信您選購的 ViewSonic 產品將能為您提供絕佳的服務。
再次感謝您選擇 ViewSonic 產品!
Page 45

台灣 RoHS 符合性聲明
依檢驗標準 CNS15663 之規定將限用物質含有情況標示於表列商品之本體、包裝、標貼、
或說明書。以下表格列出了產品中可能包含的有害物質的名稱和含量。
限用物質及其化學符號
)
多溴聯苯
(PBB)
部件名稱
支架/外殼 ○ ○ ○ ○ ○ ○
印刷電路板 (PCBA)* ○ ○ ○ ○ ○ ○
玻璃面板 ○ ○ ○ ○ ○ ○
電纜/電線/連接器 ○ ○ ○ ○ ○ ○
電源設備/外接電源供應器 ○ ○ ○ ○ ○ ○
配件/其他 ○ ○ ○ ○ ○ ○
本表格依據 CNS15663 的規定編制。
備考1.〝超出 0.1 wt %〞及〝超出 0.01 wt %〞係指限用物質之百分比含量超出百分比含量基準值。
備考2.〝○〞係指該項限用物質之百分比含量未超出百分比含量基準值。
備考3.〝-〞係指該項限用物質為排除項目。
鉛
(Pb)
汞
(Hg)
鎘
(Cd)
六價鉻
+6
(Cr
多溴二苯醚
(PBDE)
*電路板元件包括印刷電路板及其構成的零部分,如電阻 、電容、積體電路、連接器等。
上述某些產品元件在 RoHS 排除條款 III 下得以免除,範圍如下:
排除元件範例:
Examples of exempted components are:
1. 特殊用途的冷陰極燈管及外部電極螢光燈管(CCFL 及 EEFL)中的水銀不超過(每燈
管):
(1) 短型(≦500 公釐):每燈管最多 3.5 毫克。
(2) 中型(>500 公釐及 ≦1,500 公釐):每燈管最多 5 毫克。
(3) 長型(>1,500 公釐):每燈管最多 13 毫克。
2. 陰極射線管中的玻璃可含鉛。
3. 螢光燈管玻璃含鉛量不得超過重量的 0.2%。
4. 鉛作為鋁合金中的元素時,其含量最高可達重量的 0.4%。
5. 銅合金中所含的鉛,最高可達重量的 4%。
6. 高熔點類之焊錫可含鉛(即以鉛為基底的合金,鉛含量可達重量的 85% 以上)。
7. 電器及電子元件中玻璃或陶瓷所使用的鉛(不包括介電陶瓷電容),例如壓電裝置,或
者玻璃或陶瓷複合材料。
i2
Page 46

重要的安全指示
1. 請勿按壓或觸碰螢幕;請勿將本裝置與微小物品一同存放,否則容易刮傷螢幕或掉入裝
置內部。
2. 請勿將本裝置放置在骯髒或灰塵聚積的環境中,請保持環境乾燥清潔。
3. 請勿將本裝置放置在不平穩的工作表面上。
4. 請勿於裝置上方放置物品,或使物品掉落在裝置上;請勿將異物強行推入本裝置內
部。
5. 請勿將本裝置放置在有強烈磁場或電場的環境中;請勿將軟碟片放在裝置附近或上
方,否則可能導致軟碟片內資料遺失。
6. 請勿將本裝置放置在陽光直射之處,尤其是車內,否則將導致螢幕受損。
7. 請勿將本裝置放置在(或靠近)液體、雨水或潮濕的環境中。
8. 若要正確丟棄電子產品,請聯絡當地管轄機構或零售商。
9. 本裝置及變壓器在運作或充電時,溫度可能稍微升高,請勿將本裝置置於膝上或身 體
上的任何部位,以免其高溫引起身體不適或受傷。
10. 電源額定值:請參考本裝置的電源額定值標籤,並確蓋變壓器符合額定值。僅限使 用
製造商指定的原廠配件。
11. 切勿使用鉛筆或任何尖銳物品點選螢幕。
12. 請使用軟布清潔觸控式螢幕。必要時可在清潔前將軟布稍微沾濕。請勿使用磨蝕性 溶
劑或清潔劑。
13. 由於不支援熱插拔,若要安裝或移除某些外接設備時,請先關閉本裝置的電源。
14. 清潔本裝置前,請先拔除電源插頭,並取出已安裝的電池。請將本裝置及其他附屬 零
件放置在孩童無法觸及之處。
15. 請勿擅自拆解本裝置,僅限由合格的技術人員維修電腦。
16. 本裝置上有貧散熱孔,請勿將本裝置放置在柔軟的物體上(例如:床、沙發、膝上),
或其他可能導致本裝置過熱而引起系統當機之處。
17. 使用者必須連接至 USB 2.0 版本或更高版本的 USB 介面。
18. 電源插座應安裝於設備附近;且容易插拔電源線。
19. 使用過度恐傷害視力。 注意事項內容:
(1)使用30分鐘請休息10分鐘。
(2)未滿2歲幼兒不看螢幕,2歲以上每天看螢幕不要超過 1 小時。
Page 47

版權聲明
版權所有 © ViewSonic® Corporation, 2017。保留所有權利。
Android 是 Google Inc. 的商標。本商標是在 Google 同意情況下使用。
本產品是基於 Linux 架構下的 Android™ 作業平台,可透過各種以 JME 為基礎的應用軟體
進行擴充。
本裝置所使用的全部產品與本手冊所提及之商標,皆為其各別擁有人的商標或註冊商標。
Google™ Google 標誌、Android™ Android 標誌和 Gmail™ 皆為 Google Inc. 的商標。
本註冊商標是在 Google 同意情況下使用。
Wi-Fi 及 Wi-Fi CERTIFIED 標誌為 Wireless Fidelity Alliance 的註冊商標。
microSD™ 為 SD Card Association 的商標。
Bluetooth 及 Bluetooth 標誌為 Bluetooth SIG, Inc. 的商標。
Java、JME 及其他所有 Java 商標均為 Sun Microsystems, Inc. 在美國或其他國家的商標
或註冊商標。
VESA® 是視訊電子標準協會的註冊商標。 DPMS 和 DDC 是 VESA® 的商標。
ENERGY STAR® 美國環保局 (EPA) 的註冊商標。
身為 ENERGY STAR® 的夥伴,ViewSonic Corporation 保證本產品完全符合 ENERGY
STAR® 的能源效率規定。
免責聲明:ViewSonic 公司不對本文檔中的技術、編輯錯誤或遺漏負責;亦不對因提供本資
料,或因本產品之性能或使用所造成意外或衍生的損壞負責。
為了持續產品改良的利益,ViewSonic 公司保留在沒有通知的情況下變更此產品規格的權
利。本文件中資訊如有修改,恕不另行通知。
未經 ViewSonic Corporation 事先書面同意,任何人均不得為任何目的,以任何方式複製、
翻版或傳送此文件。
智慧財產權資訊
本裝置採用的各種技術和產品之權利均屬於其各擁有人的財產:
本產品是基於 Linux 架構下的 Android 作業平台,可透過各種以 JavaScript 為基礎的應用
軟體進行擴充。
Google、Google 標誌、Android、Android 標誌、Gmail 及 YouTube 均為 Google Inc.之商
標。
Bluetooth 及 Bluetooth 標誌為 Bluetooth SIG, Inc. 的商標。
Java、JME 及其他所有 Java 商標均為 Sun Microsystems, Inc. 在美國或其他國家的商標
或註冊商標。
microSD 為 SD Card Association 的商標。
iiiii
Page 48

電磁相容資訊
請先閱讀後再繼續
• 請務必使用製造商提供的電池和電源變壓器。使用未授權的配件可能使保固失效。
• 請勿將本裝置存放在溫度超過 50°C 或 122°F 的環境下。
• 本裝置的操作溫度介於 0°C (32°F) 至 35°C (95°F) 之間。
NCC
根據台灣 NCC 低功率電波輻射性電機管理辦法規定:
第十二條:經型式認證合格之低功率射頻電機,非經許可,公司,商號或使用者均不得擅
自變更頻率、加大功率或變更原設計之特性及功能。
第十四條:低功率射頻電機之使用不得影響飛航安全及干擾合法通信;經發現有干擾現象
時,應立即停用,並改善至無干擾時方得繼續使用。
前項合法通信,指依電信法規定作業之無線電通信。低功率射頻電機須忍受合法通信或工
業、科學及醫療用電波輻射性電機設備之干擾。
產品註冊
為滿足您將來之需並讓您在第一時間內收到任何額外的產品資訊,請在以下網際網路位址
註冊您的產品:www.viewsonic.com。
使用者紀錄
產品名稱:
機型:
文件編號:
序號:
購買日期:
產品壽命結束時的棄置方式
ViewSonic 尊重環境並致力於以保護環境的態度工作與生活。感謝您購買更聰明、更環保
的電腦運算裝置。請上 ViewSonic 網站了解更多資訊。
美國和加拿大:http://www.viewsonic.com/company/green/recycle-program/
歐洲:http://www.viewsoniceurope.com/eu/support/call-desk/
台灣:http://recycle.epa.gov.tw/recycle/index2.aspx
SD-A160/SD-P20
ViewSonic Smart Display
VS16472
SD-A160/SD-P20_UG_TCH Rev. 1A 04-26-17
______________________________________
______________________________________
Page 49

目錄
1 SD-A160/SD-P20 智慧型顯示器功能
2 設置 SD-A160/SD-P20 智慧型顯示器
2.1 連接 .................................................................................... 3
2.2 使用智慧型顯示器前的準備工作 ......................................... 4
2.3 將裝置開機.......................................................................... 5
2.4 關閉裝置 ............................................................................. 6
3 關於 SD-A160/SD-P20 智慧型顯示器
3.1 觸控式螢幕.......................................................................... 7
3.2 通過 HDMI 輸出連接到 HDMI 兼容設備.............................. 8
目錄
4 故障排除
5 附錄
3.3 USB On-The-Go至PC ........................................................ 9
3.4 支持連接 SD-160/SD-T160 (可選配顯示器)........................ 9
4.1 觸控螢幕問題 .................................................................... 10
4.2 其他問題 ........................................................................... 10
規格 ...........................................................................................11
vPB
Page 50

SD-A160/SD-P20 智慧型顯示器功能
SD-A160/SD-P20 是一款桌上型平板電腦,採用 15.6 英寸四核顯示屏,運
行 Android 5.1 (Lollipop) 系統。它提供 1366x768p HD 分辨率,支持 HDMI-
out、全尺寸 USB 等多種連接。
SD-A160/SD-P20 智慧型顯示器功能
1
本節介紹智慧型顯示器的功能。
注意
• 本使用手冊所述之功能或應用視購買的裝置機型而定,可能有所不同。
前視圖
編號 元件 說明
1
2
3
觸控式螢幕 觸控式螢幕用以控制螢幕上的設定,包括功能表項
目、應用程式、按鈕及鍵盤等。
LED 指示燈
電源按鈕 觸碰即可開啟/鎖定智慧型顯示器。
處於開機狀態時,LED 顯示藍色。
-
當智慧顯示器處於鎖定狀態時,LED 變為橙色。
-
觸碰約 0.5 秒即可開啟電源。
-
在顯示器開啟時鎖定智慧型顯示器。
-
在智慧型顯示器已鎖定時恢復解除被鎖定的顯示器。
-
顯示器開啟時,按住此按鈕約 3 秒,可關閉智慧型顯
-
示器(在 Android 模式下)。
1PB
Page 51

SD-A160/SD-P20 智慧型顯示器功能
後視圖
編號 元件 說明
1
2
RS232 埠 x 2
連接螢幕、印表機或個人電腦。
USB 2.0 埠 x 2 用於鍵盤、滑鼠、隨身碟(僅支援 FAT32 格
式)或印表機連接。
3
4
HDMI OUT(輸出)
連接到高品質的數位設備和視頻音訊配置。
SD 記憶卡槽 輸入SD記憶卡,即可擴充儲存容量。
(最多 32 GB)
5
6
7
耳機插孔
電源輸入埠
USB Type-A 埠 x 2 用於鍵盤、滑鼠、隨身碟(僅支援 FAT32 格
連接一般耳機或頭戴式耳機。
連接電源變壓器。
式)或印表機連接。
8
乙太網路連接埠
連接 RJ45 線,藉以連接網路。
(RJ45)
Page 52

設置 SD-A160/SD-P20 智慧型顯示器
設置 SD-A160/SD-P20 智慧型顯示器
2
2.1 連接
32
Page 53

設置 SD-A160/SD-P20 智慧型顯示器
2.2 使用智慧型顯示器前的準備工作
插入SD記憶卡
在智慧型顯示器的背後插入 SD 記憶卡(若需要及/或有可用的卡)。
1
Page 54

連接電源線
將隨附的電源線連接至電源插孔。
1
將電源線的另一端接至合適的電源插座。
2
設置 SD-A160/SD-P20 智慧型顯示器
2.3 將裝置開機
輕觸電源按鈕,即可將裝置開機
連接電源線後,您可觸碰前面板底端的電源按鈕約 0.5 秒,將裝置開
1
機。
開機後,LED指示燈將亮藍燈。
2
解除鎖定畫面將會在短暫開機後出現。(若啟用鎖定螢幕功能)。
3
必要時觸碰並滑動鎖定圖示,將螢幕解鎖。
4
顯示首頁畫面時,即可開始使用此裝置。
5
54
Page 55

設置 SD-A160/SD-P20 智慧型顯示器
2.4 關閉裝置
按住電源按鈕約 3 秒鐘。
1
出現關機功能表時,觸碰 OK(確定)。
2
Page 56

關於 SD-A160/SD-P20 智慧型顯示器
關於 SD-A160/SD-P20 智慧型顯示器
3
3.1 觸控式螢幕
控制裝置的主要方式為使用手指直接觸碰螢幕的感應表面。您可使用以下方法
操控觸控式螢幕上的圖示、按鈕、功能表項目及其他項目:
方法 說明
碰觸
按住
拖曳 觸碰並按住一個項目,然後用手指移動該項目,直至達到目標位
滑動
縮小
放大
使用手指觸碰項目。
對螢幕上的項目作用,包括應用程式及設定圖示。
-
使用螢幕鍵盤輸入字母及符號。
-
按下螢幕按鈕。
-
按住螢幕上的項目:觸碰後,請勿抬起手指,直至發生一項動作
為止。
置。
移動螢幕上的一個項目。
-
瀏覽首頁畫面、網頁、清單、項目、相片縮圖、聯絡人等。
-
在螢幕上方快速移動手指,而不要在一開始碰到時就停止不動。
在螢幕上將兩隻手指併攏,以縮小影像或網頁。
在螢幕上將兩隻手指張開,以放大影像或網頁。
76
Page 57

關於 SD-A160/SD-P20 智慧型顯示器
3.2 通過 HDMI 輸出連接到 HDMI 兼容設備
HDMI(High-Definition Multimedia Interface,高清多媒體接口)是精緻音頻 /視
頻接口,用於傳輸無壓縮的數字音頻/視頻數據。利用這些輸入,可以獲得 最佳的
視頻播放和遊戲用戶體驗。SD-A160/SD-P20 配備 HDMI 輸出,可以連接外部
HDMI 兼容設備。
如何開始
必須準備一條“A 型(HDMI)轉 A 型(HDMI)"線。
1
將電纜的 A 型 HDMI 接口連接到所需的 HDMI 兼容設備。
2
將 HDMI 線的 A 型接頭連接到 SD-A160/SD-P20 後部的 HDMI 端口。
3
點擊設定/顯示/雙屏顯示來開啟此功能,你可以在本智能一體機和外接
顯示器兩個不同屏幕上使用不同的應用程式。
若是連接 PC 或筆記本電腦,務必設置合適的分辨率。 SD-A160/SD-P20
4
支持的最大分辨率是 1920*1080。
注意
• 兩屏顯示模式切換:手指觸模屏幕左(右) 邊50個畫素區域快速向右(左)滑動,焦點應
用就只在外接顯示器上顯示,而在本智能一體機可以操作其他的應用程序。
• 兩屏顯示相同內容:在狀態欄上有一個同步的按鍵圖標(在音量加大圖目標右邊),點
擊此按鍵圖標即可讓兩屏顯示相同內容。
Page 58

關於 SD-A160/SD-P20 智慧型顯示器
3.3 USB On-The-Go至PC
1) 使用 USB OTG 連接 USB A 型至 A 型電纜。
2)
點擊“設置/顯示/ USB”
3)
點擊“連接到PC”項目
4)如果想返回標準 USB 端口請點選取消
3.4 支持連接 SD-160/SD-T160 (可選配顯示器)
98
Page 59

故障排除
4 故障排除
4.1 觸控螢幕問題
問題 原因 解決方法
觸控螢幕對手勢沒有
反應或反應位置不正
確。
開啟過程中存在電源
裝置
雜訊。
玻璃表面上有水滴或斑
點。
重新開機。
清潔並擦去水滴,然後重新
開機。
4.2 其他問題
問題 解決方法
無電源 若 LED 在裝置開機後未亮起藍燈,請觸碰 LED 電源指示燈至
少 1-2
請確定電源變壓器插入合適的電源插座。
-
確認 DC 接頭完全插入位於槽蓋下方,SD-A160/SD-P20 背
-
面的正確插座內。
以另一個裝置檢查電源插座(如桌燈)。
-
若仍無電源,請洽詢 ViewSonic 支援服務,或購買此裝置的
-
經銷商。
無顯示 檢查外接裝置及連接。
鎖定 觸碰 LED 電源指示燈,重新啟動。
,然後:
秒
應用程式無作用 會同應用程式作者共同檢查。
無網路 檢查 WiFi 設定,若可行,請嘗試使用乙太網路。
無聲音 檢查音量設定。
Page 60

附錄
5
規格
LCD 規格
尺寸 39.62cm(15.6 吋)
解析度 1366x768
亮度 220 cd/m
背光 LED
厚度 3.8 mm
觸控式螢幕 PCT10點觸控支持
硬體
按鈕 電源按鈕 *1
2
附錄
電源 LED 指示燈 藍燈(開啟)/橙燈(省電)
I/O 連接埠 LAN(RJ45,支援 10/100 Mbps)
HDMI-OUT
耳機插孔
SD 記憶卡
DC 輸入插孔
USB type A *4
RS-232
讀卡機 SD 記憶卡
喇叭 2.0 瓦 *2
變壓器
外觀尺寸
重量
輸入:100V~240V
輸出: 12V、4A、48W
387.5mm (寬) x 278.7mm (高) x 205mm (深)
(15.3 x 11.0 x 8.1 inches)
3.7Kg(淨重)
4.4Kg(毛重)
1110
Page 61

客戶支援
關於技術支援或產品服務,請參照下表或洽詢經銷商。
注意事項:您需要產品序號。
公司名稱 地址/網址
優派國際股份
有限公司
優派香港有限公司
中國 www.viewsonic.com.cn T= 4008 988 188 service.cn@cn.viewsonic.com
澳門 www.hk.viewsonic.com T= 853 2840 3687 service@hk.viewsonic.com
新北市中和區連城路 192 號 9 樓
香港尖沙咀東部科學館道 1 號
康宏廣場南座 15 樓 03 室
T = 電話
F = 傳真
T= 886 2 2246 3456
F= 886 2 2249 1751
Toll Free= 0800-899880
T= 852 3102 2900 service@hk.viewsonic.com
電子郵件
www.viewsonic.com.tw/support/
repair/
service@tw.viewsonic.com
Page 62

有限保固
ViewSonic® Smart Display
擔保範圍:
ViewSonic 保證此產品在保證期限內無任何材料和製程上之瑕疵。如果在保固期間,產品
證實材料或工藝方面的缺陷。ViewSonic 將負責修復類似此產品或以同型產品替換。替換
產品或部份零件可能包含重新製造或整修的零件或組件。是否更換設備視客戶的原始有限
保固剩下的時間而定。 ViewSonic 對於產品隨附或客戶安裝的第三方軟體不提供任何擔
保。
擔保有效期:
根據購買國家,ViewSonic Smart Display 自首位消費者購買日起提供 1 至 3 年免零件
(包括光源)及工本費保固。
送回服務站之前,由使用者負責備份所有資料。
對於任何資料的遺失,ViewSonic 概不擔負任何責任。
受保對象:
此擔保僅對第一購買者有效。
不在擔保範圍內的事項:
1. 任何序號被損毀、塗改或擦除的產品。
2. 由於以下原因造成的產品損壞、損傷或故障:
a. 意外事故、操作失當、疏忽、火災、水災、閃電或其他自然災害、未經授權的產品
修改或未依產品隨附說明而造成的損壞。
b. 被未經 ViewSonic 授權之任何人員修復或嘗試修復。
c. 產品外部之原因,例如電源不安定或電源故障。
d. 使用不符合 ViewSonic 規格的耗材或零件所造成的損壞。
e. 正常損耗。
f. 與產品缺陷無關的其他原因所致。
3. 任何一款展示的產品都會出現一種情形稱之為〝圖像燒傷〞,當靜態圖像在顯示器上超
長時間顯示時,便會出現這種現象。
4. 拆卸、安裝、單程運送、保險及設定服務費用。
如何獲得服務:
1. 有關如何在保固期內獲得服務的資訊,請與 ViewSonic 客戶支援聯繫。
2. 若要獲得擔保之服務,您需要提供(a)原始銷售日期購買單據,(b)您的姓名、
(c)您的地址、(d)關於問題的故障說明、(e)此產品的序號。
3. 請將產品放入原來的包裝容器,攜帶產品或以預付運費的方式將產品運送至獲授權的
ViewSonic 服務中心或 ViewSonic 公司。
4. 如需其他資訊或是最近的 ViewSonic 服務中心名稱,請與 ViewSonic 公司聯繫。
有限隱含保固:
除了此文中說明的擔保,不提供任何其他明文規定或隱含的擔保,包括適銷性和特殊目的
的適用性隱含擔保。
1312
Page 63

損失免責條款:
ViewSonic 的責任僅限於承擔修復或替換產品的費用。ViewSonic 將不負責承擔:
1. 由於本產品缺陷導致的任何財產損失、由於本產品使用不便導致的損失、使用本產品導
致的損失、 時間損失、利潤損失、商業機會損失、商譽損失、業務關係損失、其他商
業損失,即便已被提醒會造成這樣的損失時 ViewSonic 也不負責。
2. 任何其他損失,不論是意外的、繼發性的或其他損失。
3. 任何他方對客戶提出的索賠。
4. 被未經 ViewSonic 授權的任何個人修復或嘗試修復過。
OTA 更新免責聲明:
ViewSonic Corporation 對於顯示器資訊中的任何錯誤或遺漏概不負責。本韌體更新僅適
用於 ViewSonic
®
智慧型顯示器。ViewSonic 對於因任何裝置上之更新,或其他連接本產
品設備受損或故障所造成之任何資料遺失或受損,不論是否屬意外、間接或其他因素,
一概不予負責。您同意完全負責所有檔案及資料並於執行任何更新前保留所有適當檔案
備份與儲存在任何裝置上之資料。 使用者應負責取得必要存取權限及使用任何第三方內
容。ViewSonic 對於效能、可用性及使用第三方產品和服務概不負責。此處提及之公司
名稱與商標皆為各別公司所有之財產。Copyright © 2013 ViewSonic Corporation. 版權所
有。
4.3: ViewSonic Smart Display Warranty SD_LW01 Rev. 1A 08-21-12
Page 64

1514
 Loading...