

Page 1

SC-T45
Thin Client
User Guide
Model No. VS15166
Page 2

Compliance Information
FCC Statement
This device complies with part 15 of FCC Rules. Operation is subject to the following
two conditions: (1) this device may not cause harmful interference, and (2) this device
must accept any interference received, including interference that may cause undesired
operation.
This equipment has been tested and found to comply with the limits for a Class B digital
device, pursuant to part 15 of the FCC Rules. These limits are designed to provide
reasonable protection against harmful interference in a residential installation. This
equipment generates, uses, and can radiate radio frequency energy, and if not installed
and used in accordance with the instructions, may cause harmful interference to radio
communications. However, there is no guarantee that interference will not occur in a
particular installation. If this equipment does cause harmful interference to radio or
television reception, which can be determined by turning the equipment off and on, the
user is encouraged to try to correct the interference by one or more of the following
measures:
• Reorient or relocate the receiving antenna.
• Increase the separation between the equipment and receiver.
• Connect the equipment into an outlet on a circuit different from that to which the receiver
is connected.
• Consult the dealer or an experienced radio/TV technician for help.
Warning: You are cautioned that changes or modications not expressly approved by the
party responsible for compliance could void your authority to operate the equipment.
For Canada
CAN ICES-3 (B)/NMB-3(B)
CE Conformity for European Countries
The device complies with the EMC Directive 2004/108/EC and Low Voltage
Directive 2006/95/EC.
Following information is only for EU-member states:
The mark is in compliance with the Waste Electrical and Electronic Equipment
Directive 2002/96/EC (WEEE).
The mark indicates the requirement NOT to dispose the equipment including any
spent or discarded batteries or accumulators as unsorted municipal waste, but
use the return and collection systems available.
If the batteries, accumulators and button cells included with this equipment, display
the chemical symbol Hg, Cd, or Pb, then it means that the battery has a heavy
metal content of more than 0.0005% Mercury or more than, 0.002% Cadmium, or
more than 0.004% Lead.
i
Page 3

Important Safety Instructions
1. Read these instructions completely before using the equipment.
2. Keep these instructions in a safe place.
3. Heed all warnings.
4. Follow all instructions.
5. Do not use this equipment near water. Warning: To reduce the risk of re or electric
shock, do not expose this apparatus to rain or moisture.
6. Do not block any ventilation openings. Install the equipment in accordance with the
manufacturer’s instructions.
7. Do not install near any heat sources such as radiators, heat registers, stoves, or other
devices (including ampliers) that produce heat.
8. Do not attempt to circumvent the safety provisions of the polarized or grounding-type
plug. A polarized plug has two blades with one wider than the other. A grounding
type plug has two blades and a third grounding prong. The wide blade and the third
prong are provided for your safety. If the plug does not t into your outlet, consult an
electrician for replacement of the outlet.
9. Protect the power cord from being tread upon or pinched, particularly at the plug,
and the point where if emerges from the equipment. Be sure that the power outlet is
located near the equipment so that it is easily accessible.
10. Only use attachments/accessories specied by the manufacturer.
11. Use only with the cart, stand, tripod, bracket, or table specied by the
manufacturer, or sold with the equipment. When a cart is used, use caution
when moving the cart/equipment combination to avoid injury from tipping over.
12. Unplug this equipment when it will be unused for long periods of time.
13. Refer all servicing to qualied service personnel. Service is required when the unit
has been damaged in any way, such as: if the power-supply cord or plug is damaged,
if liquid is spilled onto or objects fall into the unit, if the unit is exposed to rain or
moisture, or if the unit does not operate normally or has been dropped.
14. Do not remove equipment covers and access any of the components inside the
equipment. Any access inside the equipment without an authorized or certied
technician may cause serious injuries and damage. For any problem, contact your
dealer for assistance.
15. Don’t use a keyboard and mouse that in total require more than 200 mA of rated
current during operation.
16. Use only power supplies listed in the user instructions.
ii
Page 4

Declaration of RoHS2 Compliance
This product has been designed and manufactured in compliance with Directive 2011/65/
EU of the European Parliament and the Council on restriction of the use of certain
hazardous substances in electrical and electronic equipment (RoHS2 Directive) and
is deemed to comply with the maximum concentration values issued by the European
Technical Adaptation Committee (TAC) as shown below:
Substance
Proposed Maximum
Concentration
Actual Concentration
Lead (Pb) 0.1% < 0.1%
Mercury (Hg) 0.1% < 0.1%
Cadmium (Cd) 0.01% < 0.01%
Hexavalent Chromium (Cr6+) 0.1% < 0.1%
Polybrominated biphenyls (PBB) 0.1% < 0.1%
Polybrominated diphenyl ethers
(PBDE)
0.1% < 0.1%
Certain components of products as stated above are exempted under the Annex III of the
RoHS2 Directives as noted below:
Examples of exempted components are:
1. Mercury in cold cathode uorescent lamps and external electrode uorescent lamps
(CCFL and EEFL) for special purposes not exceeding (per lamp):
(1) Short length (≦500 mm): maximum 3.5 mg per lamp.
(2) Medium length (>500 mm and ≦1,500 mm): maximum 5 mg per lamp.
(3) Long length (>1,500 mm): maximum 13 mg per lamp.
2. Lead in glass of cathode ray tubes.
3. Lead in glass of uorescent tubes not exceeding 0.2% by weight.
4. Lead as an alloying element in aluminium containing up to 0.4% lead by weight.
5. Copper alloy containing up to 4% lead by weight.
6. Lead in high melting temperature type solders (i.e. lead-based alloys containing 85% by
weight or more lead).
7. Electrical and electronic components containing lead in a glass or ceramic other than
dielectric ceramic in capacitors, e.g. piezoelectronic devices, or in a glass or ceramic
matrix compound.
iii
Page 5

Copyright Information
Copyright © ViewSonic® Corporation, 2014. All rights reserved.
ViewSonic, the three birds logo, OnView, ViewMatch, ViewMeter, and MultiClient are
either registered trademarks or trademarks of ViewSonic Corporation.
Microsoft
companies.
Other product names mentioned herein are used for identication purposes only and may
be trademarks and/or registered trademarks of their respective companies.
Disclaimer: ViewSonic Corporation shall not be liable for technical or editorial errors or
omissions contained herein; nor for incidental or consequential damages resulting from
furnishing this material, or the performance or use of this product.
®
, Windows®, and MultiPoint™ are trademarks of the Microsoft group of
ENERGY STAR® is a registered trademark of the U.S. Environmental Protection
Agency (EPA). As an ENERGY STAR® partner, ViewSonic Corporation has
determined that this product meets the ENERGY STAR® guidelines for energy
efciency.
In the interest of continuing product improvement, ViewSonic Corporation reserves the
right to change product specications without notice. Information in this document may
change without notice.
No part of this document may be copied, reproduced, or transmitted by any means, for any
purpose without prior written permission from ViewSonic Corporation.
NOTE
• Display Off Mode
Within 15 minutes of user inactivity, the display will be turned off to reduce
power consumption by the factory default. The display returns to the Display
Normal mode upon sensing a request from a user such as moving the mouse
or pressing a key.
(To adjust the setting, log in to the system with an administrative account,
click Start > Control Panel > System and Security > Power Options >
Choose when to turn off the display, select a desired option through the
drop-down menu, and then click Save Changes to apply.)
• System Sleep Mode
To switch to the System Sleep mode for your SC-T45, please do the following:
1. Press Alt + F4 on the keyboard.
2. On the appeared window, click the drop-down menu to select Sleep.
(To return to the Normal mode, press the Power button. You may need to
provide user credentials.)
NOTE
• The default power management settings have been selected for compliance
with ENERGY STAR that are recommended by the ENERGY STAR program
for optimal energy savings.
iv
Page 6

Product Registration
To meet your future needs, and to receive any additional product information as it
becomes available, please register your product on the Internet at: www.viewsonic.com.
For Your Records
Product Name:
Model Number:
Document Number:
Serial Number:
Purchase Date:
SC-T45
ViewSonic Thin Client
VS15166
SC-T45_UG_ENG Rev. 1B 11-28-13
_______________________________
_______________________________
Product disposal at end of product life
ViewSonic respects the environment and is committed to working and living green. Thank
you for being part of Smarter, Greener Computing. Please visit ViewSonic website to learn
more.
USA & Canada: http://www.viewsonic.com/company/green/recycle-program/
Europe: http://www.viewsoniceurope.com/uk/support/recycling-information/
Taiwan: http://recycle.epa.gov.tw/recycle/index2.aspx
v
Page 7
About This User’s Manual
This manual provides detailed instructions on how to set up, use, and manage your ViewSonic SC-T45 thin
clients.
Manual Structure and Subjects
Chapter Subject
1 Provides an overview of ViewSonic SC-T45 thin clients.
2 Provides detailed instructions on how to set up ViewSonic SC-T45 thin clients.
3
Specications Provides detailed information on key components of ViewSonic SC-T45 thin clients.
Provides instructions on how to congure client settings and customize ViewSonic SC-T45 thin clients with
the ViewSonic Client Setup application.
Notes, Tips, and Warnings
Throughout this manual, the notes, tips, and warnings in the following formats are used to provide important
information, useful advice, and prevent injuries to you, damage to your devices, or loss of data on your
system.
NOTE
• A note provides important information for a specic situation.
TIP
• A tip gives a piece of useful advice to perform a task more efciently.
WARNING
• A warning provides crucial information that must be followed to prevent injuries
to you, damage to your devices, or loss of data on your system.
Style Conventions
The following styles are used throughout this manual while referring to operational items on input devices,
hardware panels, or application interfaces.
Item Style Example
keys on the keyboard bold Ctrl + F2, Ctrl + Alt + F9, Alt + Tab
application windows or
entry lists
buttons or tabs on a window,
toolbars, taskbar, or menu
options on a window, screen, list,
or menu
selecting a series of options bold
rst letter
capitalized
bold OK, Next, Save, Applications tab
bold
ICA Connection list, RDP Connection list, View Connection list
Use Application Mode, Remote Desktop Services,
Better Appearance (32-bit), Web Interface
Applications > Citrix ICA, Applications > Remote Desktop,
Applications > VMware View, System > FBWF
vi
Page 8

Table of Contents
Compliance Information ...............................................................................................................i
Important Safety Instructions ......................................................................................................ii
Declaration of RoHS Compliance ..............................................................................................iii
Copyright Information .................................................................................................................iv
Product Registration ....................................................................................................................v
About This User’s Manual ..........................................................................................................vi
1 Overview ............................................................................................1
1.1 Introduction ...........................................................................................................2
1.2 Features .................................................................................................................2
1.3 Package Contents ................................................................................................2
1.4 Exterior Views .......................................................................................................3
1.5 Panel Components ...............................................................................................4
1.6 LED Indicators ......................................................................................................6
1.7 Before Getting Started .........................................................................................6
1.8 Quick Service Access with your SC-T45 ............................................................7
2 Setting Up Your SC-T45 ....................................................................8
2.1 Positioning Your SC-T45 ......................................................................................9
2.2 Getting Connected .............................................................................................12
3 Conguring Client Settings ...........................................................13
3.1 ViewSonic Client Setup ......................................................................................14
3.1.1 Interface Overview ............................................................................................................. 14
3.1.2 Client Settings at a Glance ................................................................................................. 15
3.2 Conguring System Settings ............................................................................16
3.2.1 System Tab Overview ........................................................................................................ 16
3.2.2 Available Settings at a Glance ........................................................................................... 17
3.2.3 Conguring the Access Privileges and Password of ViewSonic Client Setup .................... 18
3.2.4 Conguring Shadow Settings for Remote Assistance ........................................................ 19
3.2.5 Updating Firmware from the Management Computer ........................................................ 21
3.2.6 Taking Snapshots for System Backup and Recovery ........................................................ 23
3.2.7 Restoring the System State with a Created Snapshot ....................................................... 24
3.2.8 Conguring FBWF (File-Based Write Filter) ....................................................................... 27
3.3 Conguring External Device Settings ..............................................................29
3.3.1 Devices Tab Overview ........................................................................................................ 29
3.3.2 Available Settings at a Glance ........................................................................................... 29
3.3.3 Conguring Settings for USB Storage Devices .................................................................. 30
3.3.4 Disabling or Enabling Attached Audio Devices .................................................................. 31
3.4 Conguring User Interface Settings .................................................................32
3.4.1 User Interface Tab Overview .............................................................................................. 32
3.4.2 Available Settings at a Glance ........................................................................................... 32
3.4.3 Conguring the Display of Standard Desktop Shortcuts for Quick Access ........................ 33
vii
Page 9

3.5 Conguring Service Access Settings ...............................................................34
3.5.1 Applications Tab Overview ................................................................................................. 34
3.5.2 Available Settings at a Glance ........................................................................................... 35
3.5.3 Conguring Basic RDP Connection Settings ..................................................................... 35
3.5.4 Accessing Remote Desktop Services ................................................................................ 37
3.5.5 Conguring Advanced RDP Connection Settings .............................................................. 38
3.5.6 Conguring Basic ICA Connection Settings ....................................................................... 42
3.5.7 Accessing Citrix XenDesktop/XenApp Services ................................................................ 50
3.5.8 Conguring Advanced ICA Connection Settings ................................................................ 54
3.5.9 Conguring VMware View Connection Settings ................................................................. 67
3.5.10 Accessing VMware View Services ..................................................................................... 69
3.5.11 Conguring Advanced View Connection Settings .............................................................. 71
3.5.12 Conguring Web Browser Settings .................................................................................... 73
3.6 Changing the Display Language for your SC-T45 ...........................................76
Specications ..........................................................................................80
Other Information .....................................................................................81
Customer Support ....................................................................................................................81
Limited Warranty ....................................................................................................................82
viii
Page 10

Overview
1
This chapter provides an overview of your SC-T45 thin clients.
1.1 Introduction
Desktop virtualization and simple endpoint devices 2
1.2 Features
Key features of ViewSonic SC-T45 2
1.3 Package Contents
Check your package contents 2
1.4 Exterior Views
Overview of thin client outside elements 3
1.5 Panel Components
Descriptions of front and rear panel components 4
1.6 LED Indicators
Descriptions of signals for LED indicators 6
1.7 Before Getting Started
About FBWF (File-Based Write Filter)
About the default user accounts
About the behavior of the system startup
1.8 Quick Service Access with your SC-T45
Standard and customized desktop shortcuts 7
6
6
7
Page 11

Overview
Introduction
1.1 Introduction
Desktop virtualization provides a new perspective to reconsider the design and implementation of an IT
infrastructure. In a desktop virtualization infrastructure, a station is no longer a cumbersome desktop, but
simply an endpoint device for users to access delivery services from the server(s).
With the introduction of the desktop virtualization technologies, you can considerably benet from:
• Centralized management of work environments
• Drastically reduced endpoint software/hardware issues
• Application/Desktop access across different platforms
• Simplied system maintenance
• Improved system security
• More scalability with low-cost endpoint devices
1.2 Features
The key features of ViewSonic SC-T45 thin clients are:
• Support for a wide range of desktop virtualization solutions from industry-leading companies:
Ź Microsoft® Remote Desktop
Ź Citrix® XenApp™, XenDesktop®, and VDI-in-a-Box™
Ź VMware® View™
• Support for high-denition technologies:
Ź Microsoft® RemoteFX®
Ź Citrix® HDX™
Ź VMware® View™ PCoIP®
• Simple click-access to various applications/desktops
• Built-in ViewSonic Client Setup as the local client management application
1.3 Package Contents
Please check your package contents. Ensure that all of the items are present in your package. If any items
are missing or damaged, please contact your dealer immediately.
ViewSonic SC-T45 AC adapter Stand (VESA plate)
Driver CD Quick Start Guide Compliance information brochure
SC-T45
Thin Client
11/06/12SC-T45_CD
2
Page 12
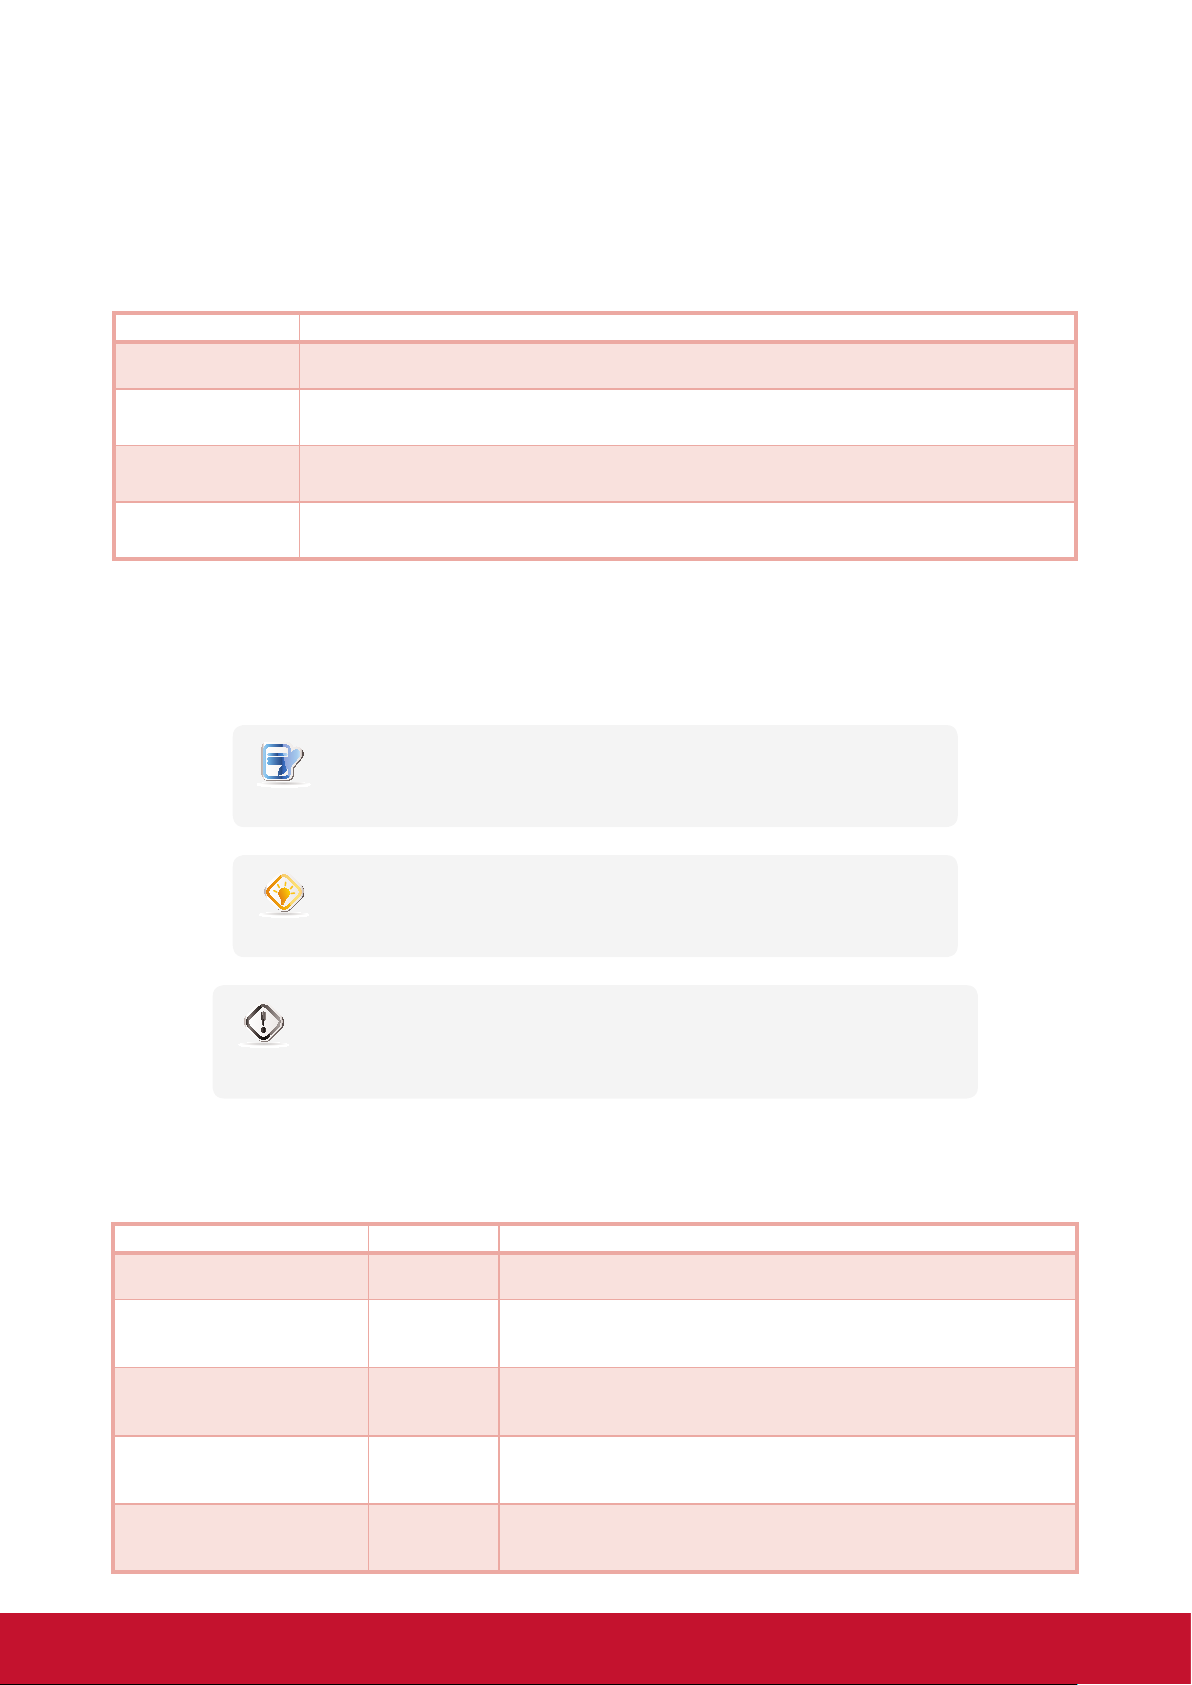
1.4 Exterior Views
Right Rear View Left Front View
Overview
Exterior Views
Rear Panel
Front Panel
3
Page 13
Overview
Panel Components
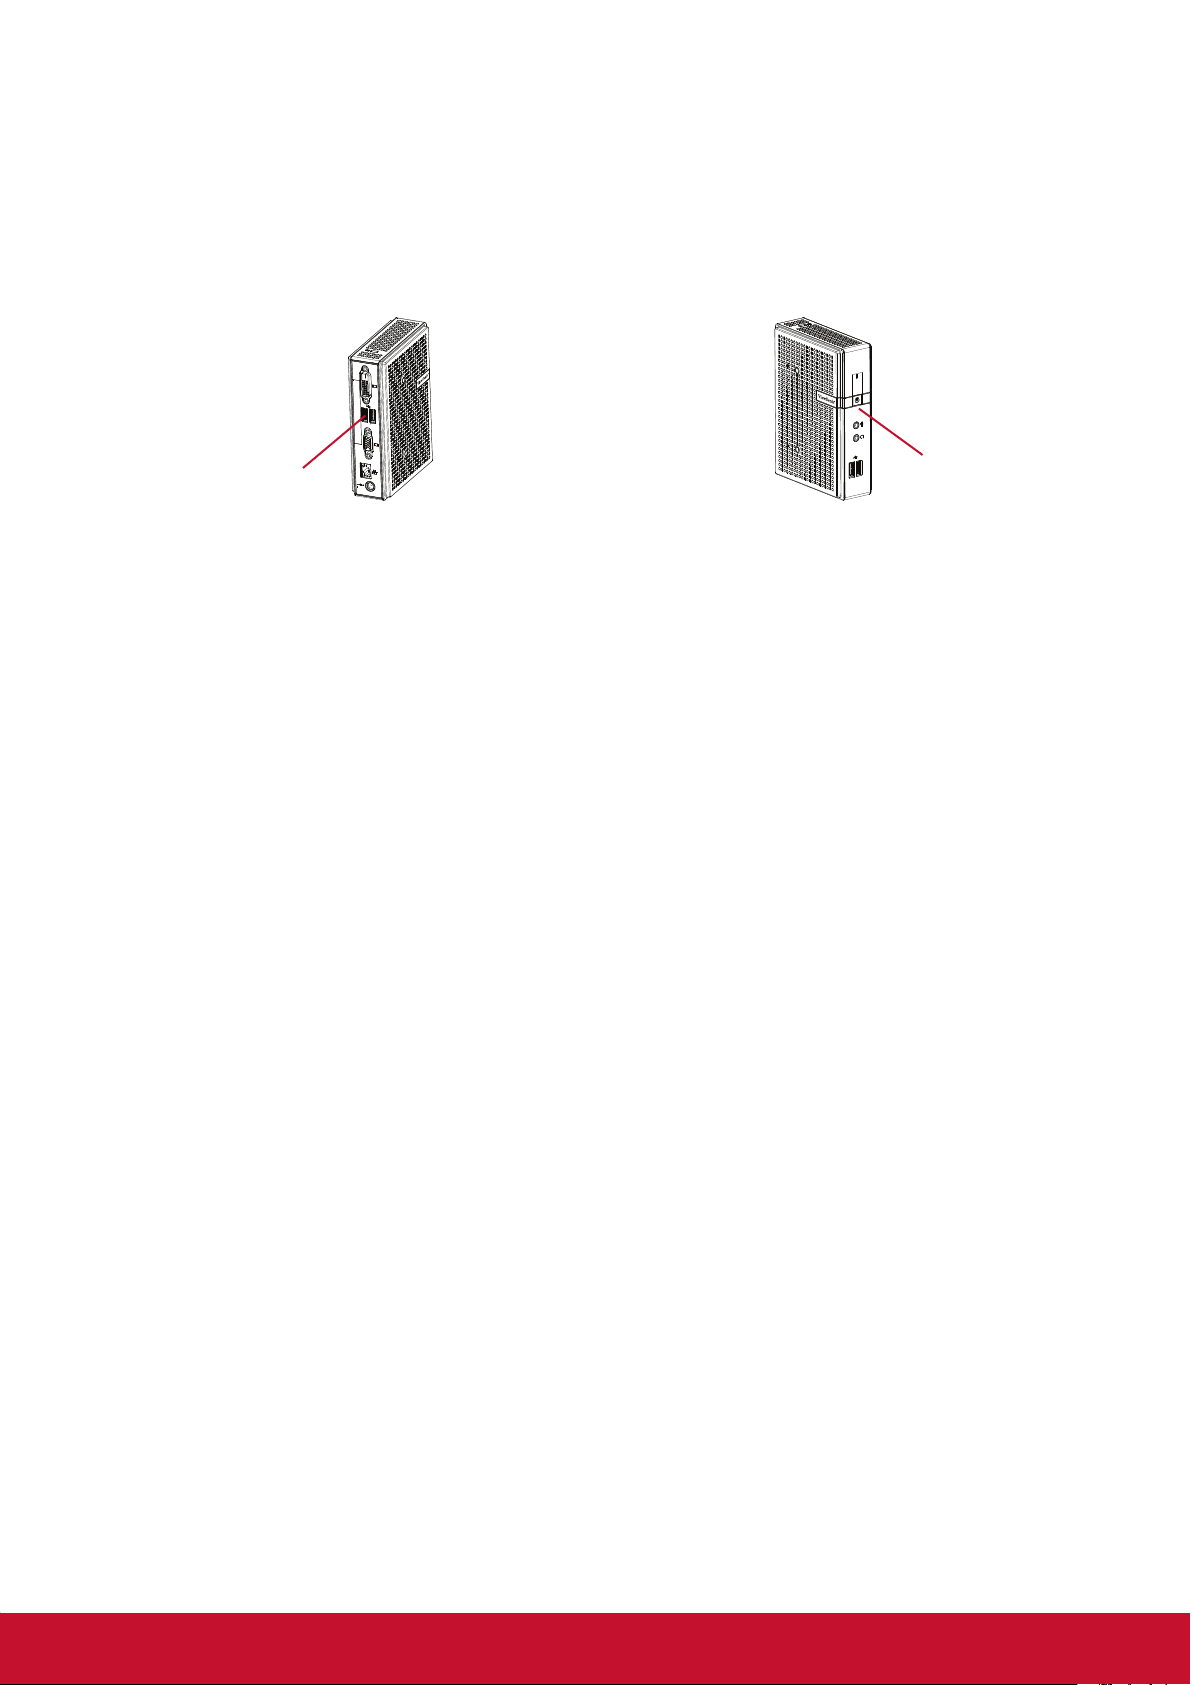
1.5 Panel Components
1
2
3
4
5
Front Panel Components
No. Component Sign Name Description
1
2
3
4
5
Power LED Indicates the status of power.
Power button Press to turn on the thin client.
Microphone port Connects to a microphone.
Headphone port
USB port Connects to a USB device.
Connects to a set of headphones or a speaker
system.
4
Page 14
6
7
8
9
10
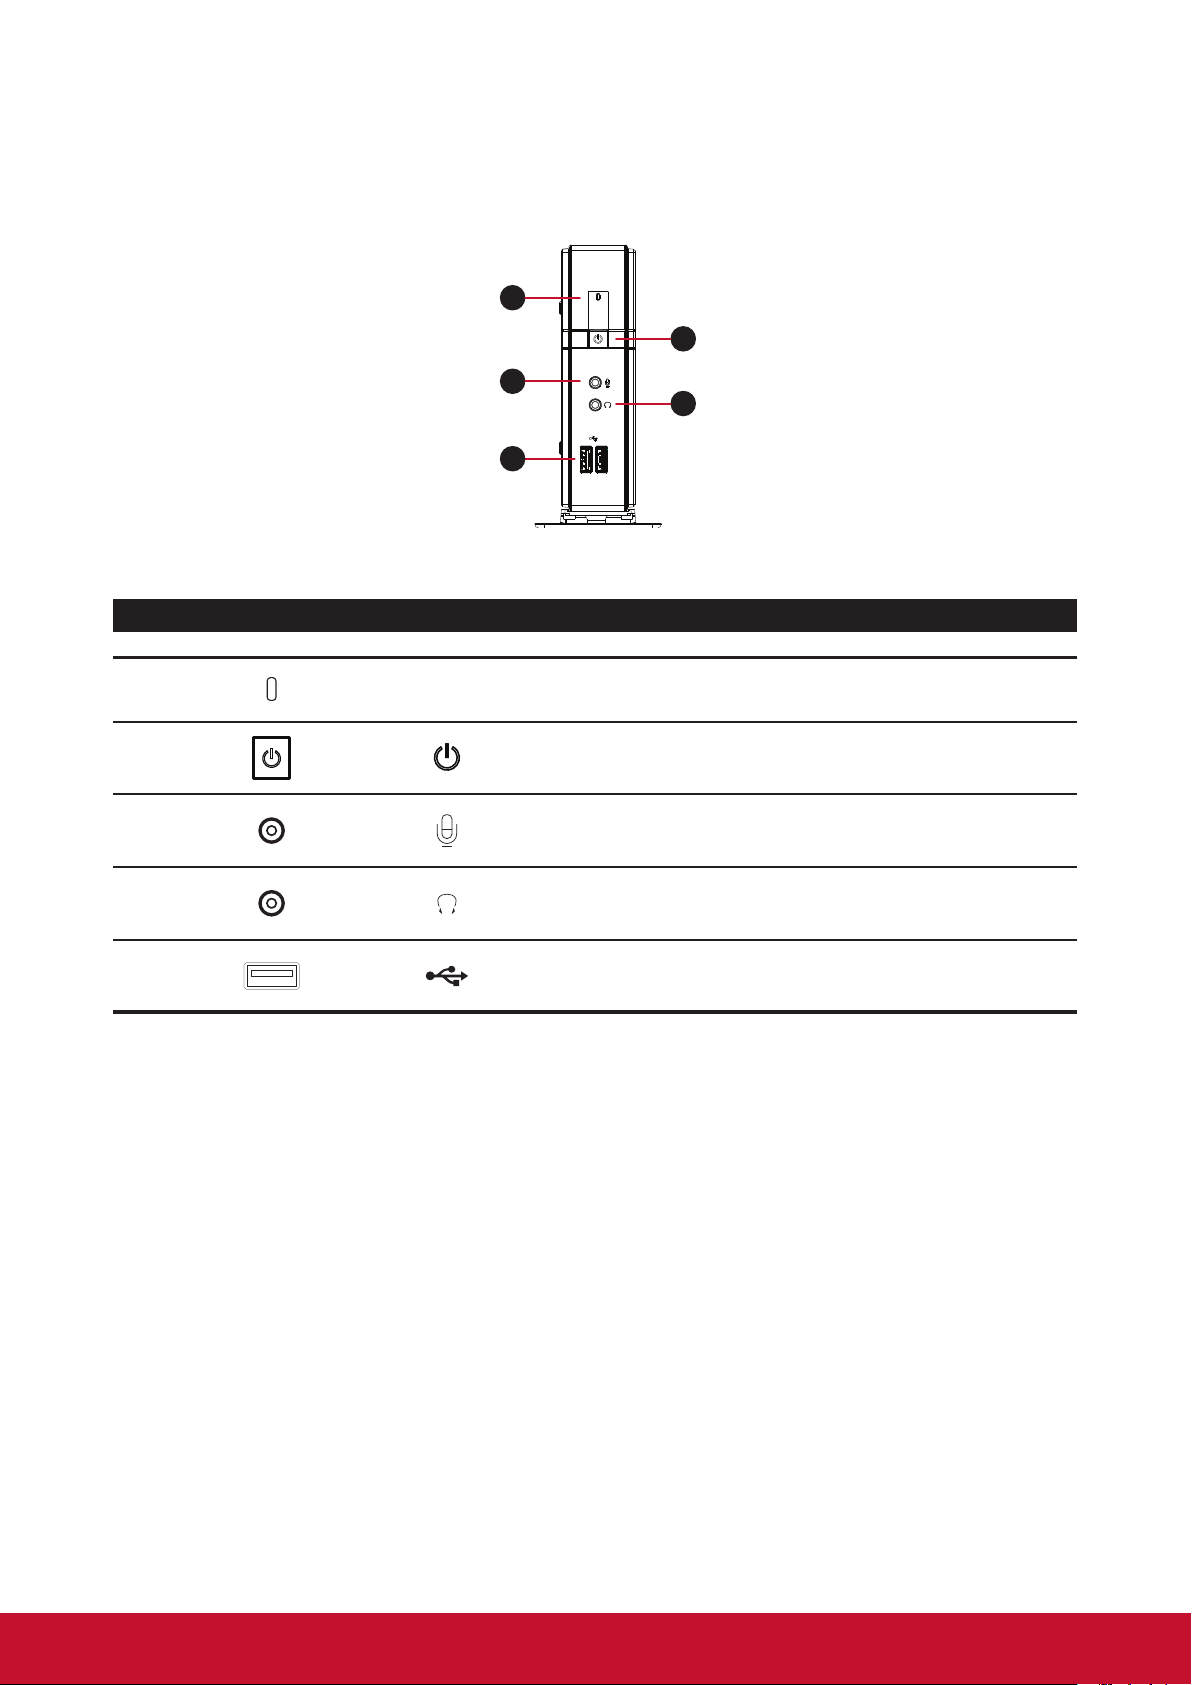
Rear Panel Components
No. Panel Component Sign Component Name Description
Overview
Panel Components
10
6
7
8
9
DVI-I port Connects to a monitor.
USB port Connects to a keyboard or mouse.
VGA port Connects to a monitor.
LAN port Connects to a network.
DC IN Connects to an AC adaptor.
5
Page 15
Overview
LED Indicators
1.6 LED Indicators
Your SC-T45 is equipped with a Power LED to indicate the state of power. The meanings of LED signals
are described as follows:
LED Signal Meaning
Power LED
The LAN port of your SC-T45 has two LED indicators showing the state of networking. The meanings of
LED signals are described as follows:
Off The client is off.
Blue The client is on.
LED Signal
Left LED
(transmission rate)
Off Off The client is not connected to a LAN.
Off Amber blinking The client connects to a 10 Mbps LAN.
Orange Amber blinking The client connects to a 100 Mbps LAN.
Green Amber blinking The client connects to a 1000 Mbps LAN.
Right LED
(transmission activity)
Meaning
1.7 Before Getting Started
About FBWF (File-Based Write Filter)
Before getting started on client conguration through the ViewSonic Client Setup software or through the
Windows Embedded Standard operating system, please note that any changes to the system in a session
will not be kept by default after the system restart. This is due to a special feature called FBWF (File-Based
Write Filter) in your Windows Embedded-based system.
You can change the default via the ViewSonic Client Setup software. It’s strongly recommended that you
read the related section in this ViewSonic Client Setup User’s Manual rst before making any changes to
your system.
WARNING
• Please read the following section FIRST before making any changes to your
system: “3.2.8 Conguring FBWF (File-Based Write Filter)” on page 27.
About Default User Accounts
There are two default user accounts for your Windows Embedded-based system: one is the standard, the
other administrative. The default credentials are shown as follows:
Type Account Name Password
Administrator Administrator Administrator
Standard user User User
NOTE
• The passwords are case sensitive.
6
Page 16

Overview
Quick Service Access with your SC-T45
About the Behavior of System Startup
Every time when the system is started up, it will automatically log in to the Windows Embedded operating
system using the default standard user account as indicated in the preceding table about default user
accounts.
1.8 Quick Service Access with your SC-T45
With ViewSonic SC-T45, you can simply access desktop virtualization solutions from Microsoft, Citrix,
and VMware, by mouse-clicking. Two types of access shortcuts are available: standard and customized.
The former is available on the desktop by default; the latter can be created and customized through the
ViewSonic Client Setup software.
Custom Desktop Shortcuts
Detailed instructions on how to create and customize your service access shortcuts are provided in this
User’s Manual for SC-T45. With ViewSonic Client Setup, you can customize the desktop of your SC-T45 to
meet your plan for desktop virtualization.
7
Page 17

Setting Up Your SC-T45
This chapter provides detailed instructions on how to set up your
SC-T45 thin clients.
2.1 Positioning Your SC-T45
To mount your SC-T45
Step 1: Remove the Stand from Your SC-T45
Step 2: Understand Your Stand / VESA Mount Kit for SC-T45
Step 3: Store Screws inside the Bracket
Step 4: Remove Screws from the Bracket
Step 5: Mount Your SC-T45
2.2 Getting Connected
How to connect peripherals and power for SC-T45 12
2
9
10
11
11
12
8
Page 18

2.1 Positioning Your SC-T45
There are two ways to position your SC-T45:
• Put it (with its stand) on a desk or a desired place uprightly.
• Mount it on the back of a monitor using a VESA mount kit.
To mount your SC-T45 on the back of a monitor, please follow the steps below:
Step 1: Remove the Stand from Your SC-T45
Step 2: Understand Your Stand / VESA Mount Kit for SC-T45
Step 3: Store Away Screws inside the Bracket
Step 4: Remove Screws from the Bracket
Step 5: Mount Your SC-T45
Step 1: Remove the Stand from Your SC-T45
Setting Up Your SC-T45
Positioning Your SC-T45
To remove the stand from your SC-T45, please do the following:
1. Place your SC-T45 on a at surface with the stand side upward.
2. Remove the screw that xes the stand to your SC-T45.
3. Store away the removed screw inside the stand. Detailed instructions will be
provided in Step 2 and 3.
NOTE
• It’s highly recommended to store screws away inside the stand when not
needed
to prevent them getting lost.
冠信电脑股份有限公司
:
精致型电脑
:
:冠信電腦股份有限公司 制造商
JPAA
製造商
精簡型電腦 产品名称
:
Atrust Computer Corp.
:
Thin Client 產品名稱
:
Made in Taiwan
+5V 3A
:
Manufacturer
Model Name
Model / 型號 / 型号 : Atrust t62
Input/輸入 / 输入
台灣製造 / 台湾制造 /
9
Page 19
Setting Up Your SC-T45
Positioning Your SC-T45
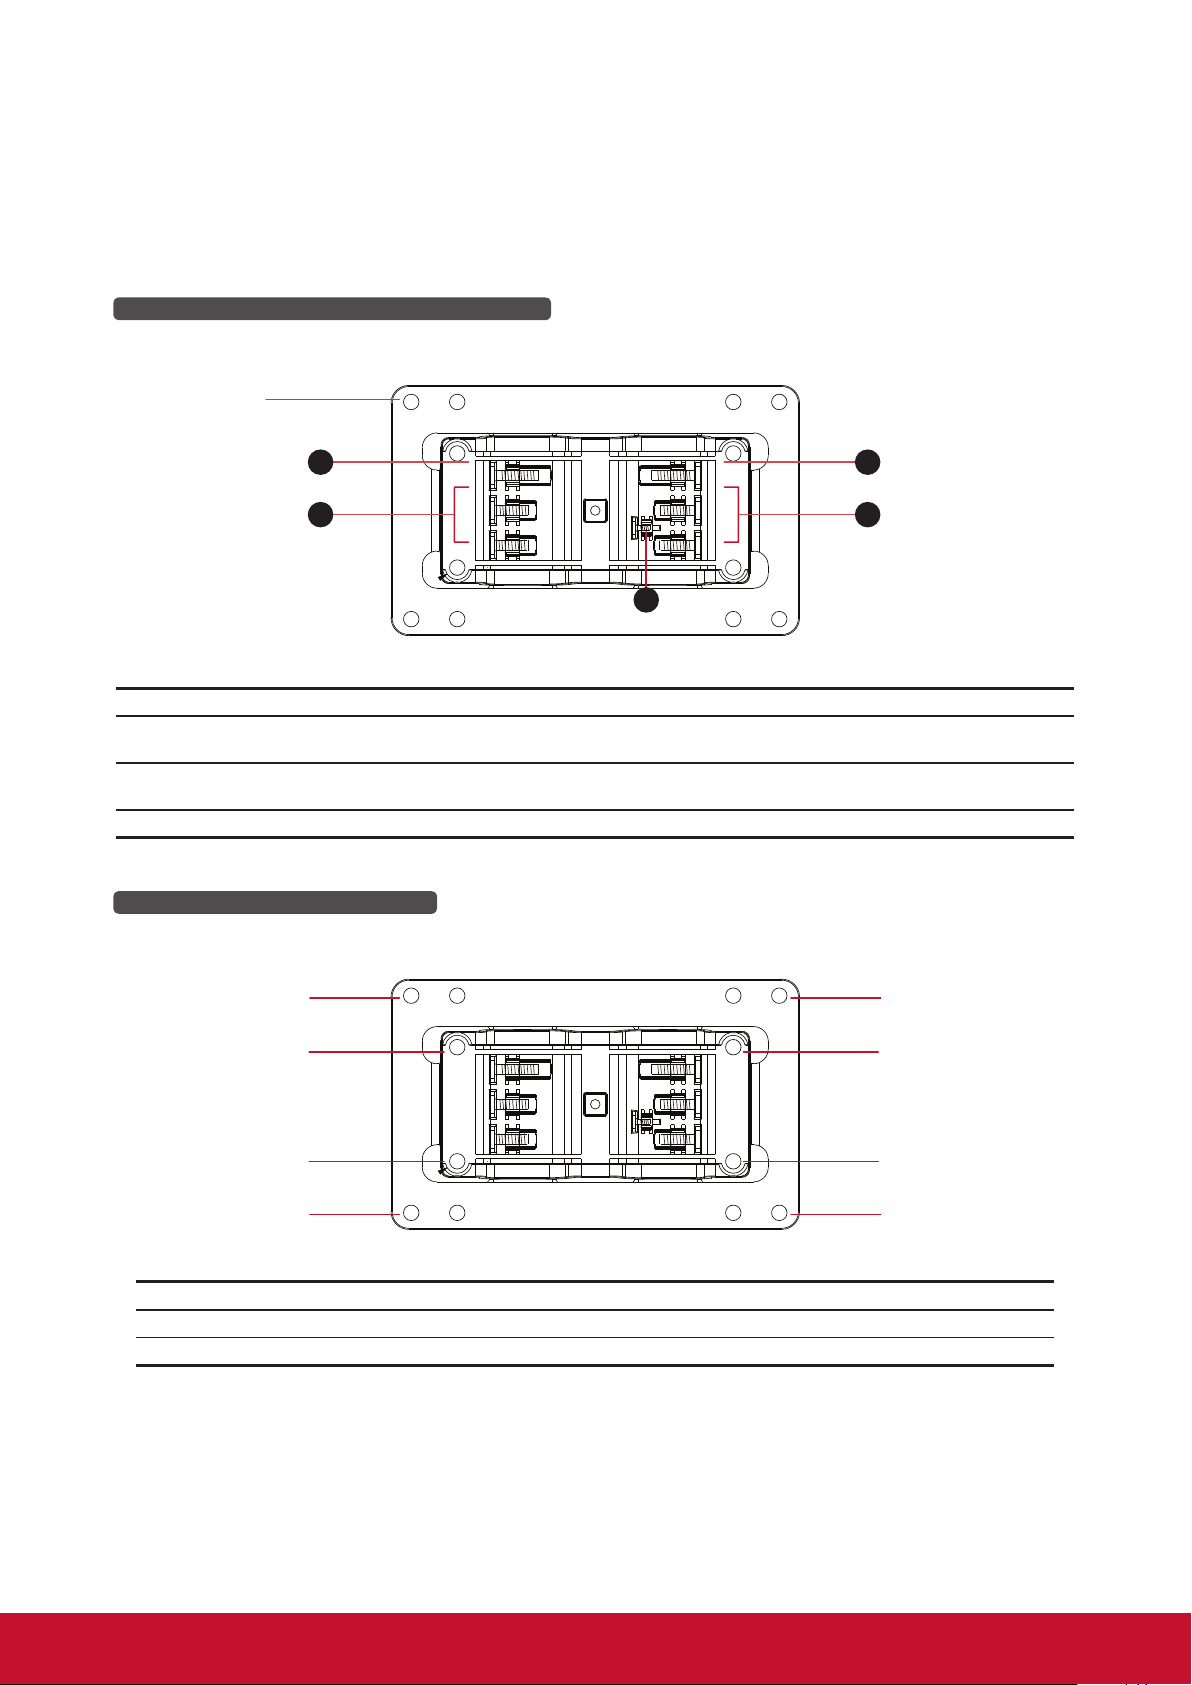
Step 2: Understand Your Stand / VESA Mount Kit for SC-T45
The stand for your SC-T45 is dual-purpose: it can be used as a stand or as a VESA mount kit. All screws of
different types supplied with the stand / VESA mount kit can be stored away inside the main bracket when
not needed.
Screws Stored Away insde the Bracket
The following gure shows different types of screws stored away inside the main bracket.
Dual-purpose
bracket
1
2
1
2
3
Screw Type Number
1 2
2 4
3 1 The smallest-size screw used to secure the bracket to your SC-T45 as a stand.
Description
The largest-size screws used to secure the bracket to a monitor as a VESA mount if the middlesize screws cannot rmly secure the bracket and your SC-T45 to the monitor.
The middle-size screws used to secure the bracket to your SC-T45 and to a monitor when using
the bracket as a VESA mount.
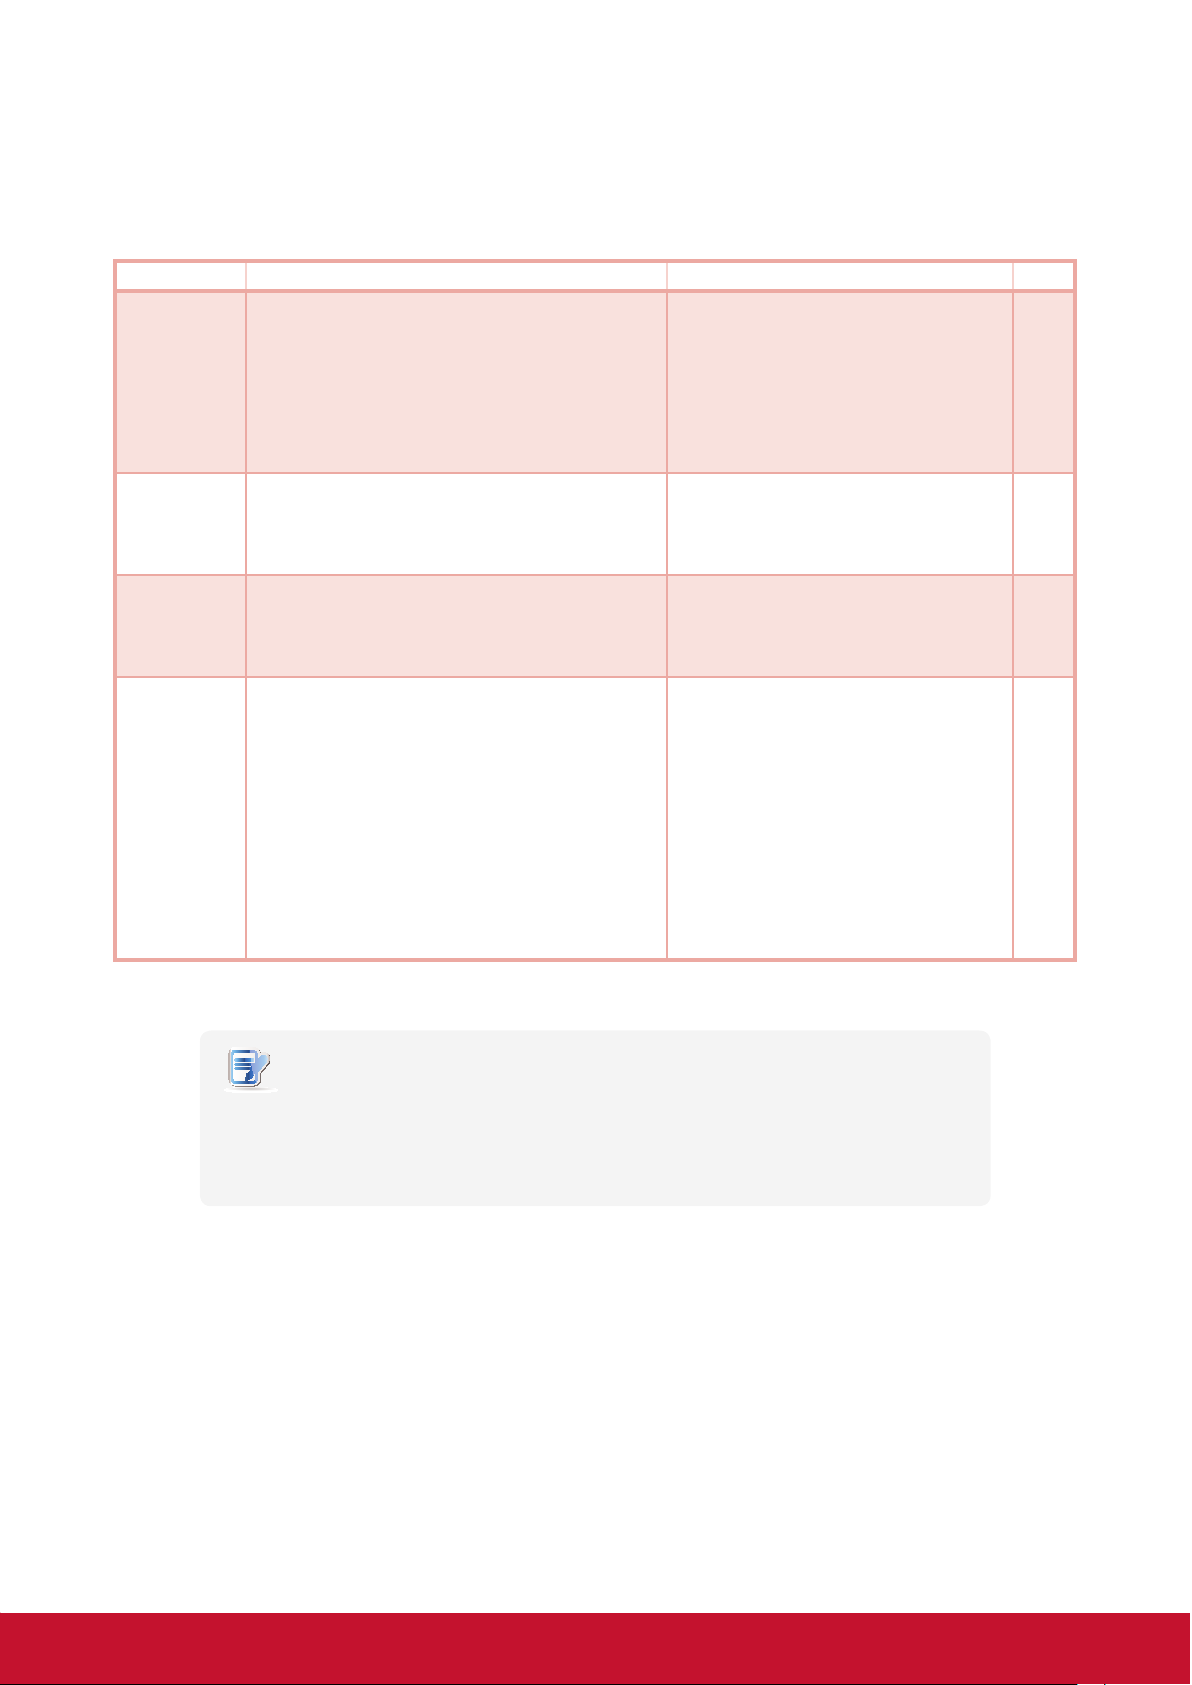
Mount Holes on the Bracket
Refer to the following gure and descriptions for the VESA mount holes on the bracket.
1
1
2
2
1
Mount Hole
1 The VESA mount holes used to secure the bracket to a monitor (only two of them will be used).
2 The VESA mount holes used to secure the bracket to your SC-T45 (only two of them will be used).
Description
2
2
1
10
Page 20

Setting Up Your SC-T45
Positioning Your SC-T45
Step 3: Store Screws inside the Bracket
To store screws inside the bracket, please do the following:
NOTE
• It’s highly recommended to store screws inside the bracket when not needed
to prevent them getting lost.
1. Place a sheet of paper or a piece of cloth on a at surface, and then put your bracket on that paper or
cloth with the screw storage side upward.
2. Place the screw upon its storage space, and push the screw into the space with your nger until it
clicks
into place. For the smallest-size screw, use the tip of a screwdriver instead to push the screw.
NOTE
• Please refer to the gure and descriptions in “Step 2: Understand Your Stand /
VESA Mount Kit for SC-T45”” for the correct storage space of each screw.
Step 4: Remove Screws from the Bracket
To remove screws stored inside the bracket, please do the following:
1. Place a sheet of paper or a piece of cloth on a at surface, and then put your bracket on that paper or
cloth with the screw storage side downward.
2. Insert the tip of a screwdriver into the square holes to remove the desired screws from the bracket.
Square Hole
11
Page 21

Setting Up Your SC-T45
2
1
2
2
Getting Connected
Step 5: Mount Your SC-T45
To mount your SC-T45 on the back of a monitor, please do the following:
1. Refer to Step 2 and Step 4 to prepare required screws for mounting your SC-T45.
• You will need two (2) screws of type
• You will need two (2) screws of type
2. Place your SC-T45 on a at surface with the VESA mount hole side upward.
3. Refer to Step 2 to choose two of the four VESA mount holes on the bracket to align with two mount
holes on your SC-T45 such that the bracket projects out and is closer to the rear panel than the front
one as shown below, and then secure the bracket to your SC-T45 with two (2) screws of type
4. Align the mount holes on the bracket with the mount holes on the back of the monitor, and then
secure the bracket to the monitor with two (2) screws of type
located in the center of the monitor and the rear panel of your SC-T45 is facing rightward as shown
below.
to secure the bracket to your SC-T45.
or 2 to secure the bracket to the monitor.
.
or 1. Ensure that your SC-T45 is
Have SC-T45’s rear
panel
facing rightward.
2.2 Getting Connected
To make connections for your SC-T45, please do the following:
1. Connect your SC-T45 to your local network with an Ethernet cable.
2. Connect a keyboard and mouse to your SC-T45.
3. Connect and turn on the monitor(s).
4. Connect your SC-T45 to a power outlet using the AC adapter included in the package.
5. Connect other peripherals for your SC-T45 if needed.
12
Page 22

Conguring Client Settings
3
Conguring Client Settings
This chapter provides instructions on how to congure advanced
settings and customize your SC-T45 with ViewSonic Client
Setup.
3.1 ViewSonic Client Setup
Interface overview
Available settings at glance
3.2 Conguring System Settings
System tab overview
Available settings at a glance
3.3 Conguring External Device Settings
Devices tab overview
Available settings at a glance
3.4 Conguring User Interface Settings
User Interface tab overview
Available settings at a glance
14
15
16
17
29
29
32
32
3.5 Conguring Service Access Settings
Applications tab overview
Available settings at a glance
3.6 Changing the Display Language for your SC-T45 76
34
35
Page 23

Conguring Client Settings
ViewSonic Client Setup
3.1 ViewSonic Client Setup
3.1.1 Interface Overview
To access ViewSonic Client Setup on your SC-T45 thin client, please do the following:
1. Log in your SC-T45 thin client with an administrator account.
2. Click Start > All Programs > ViewSonic Client Setup.
3. The ViewSonic Client Setup window appears.
Interface Overview
2
4
3
1
5
Interface Elements
No. Name Description
1 System tab Click to congure settings for the operation and maintenance of the client.
2 Devices tab Click to congure settings for external devices of the client.
3 User Interface tab Click to congure the user interface of the client.
4 Applications tab Click to congure settings for service access through the client.
5 Navigation area
6 Conguration area Congure setting values when a setting item or entry is selected.
Click to select a setting item under a selected tab or to select a setting entry under a selected
setting item.
6
14
Page 24
Conguring Client Settings
ViewSonic Client Setup
3.1.2 Client Settings at a Glance
The following table provides a brief description of each setting item under four main setting categories.
Tab Setting Item Section Page
• conguring passwords
System
• conguring remote assistance settings
• updating rmware
• taking snapshots for system backup and recovery
• conguring FBWF (File-Based Write Filter) settings
3.2 Conguring System Settings 16
Devices
User Interface • conguring the display of service access shortcuts 3.4 Conguring User Interface Settings 32
Applications
• conguring settings for USB storage devices
• conguring settings for audio devices
• conguring Microsoft RDP connection settings
• conguring Citrix ICA connection settings
• conguring VMware View connection settings
• conguring session settings for the Web browser
3.3 Conguring External Device Settings 29
3.5 Conguring Service Access Settings 34
NOTE
• The table above is only applicable to ViewSonic SC-T45 thin clients running
Windows Embedded Standard 7. The available setting categories and items of the
ViewSonic Client Setup software for other Windows Embedded-based, Linuxbased, and
ARM Linux-based thin clients might be different.
15
Page 25
Conguring Client Settings
Conguring System Settings
3.2 Conguring System Settings
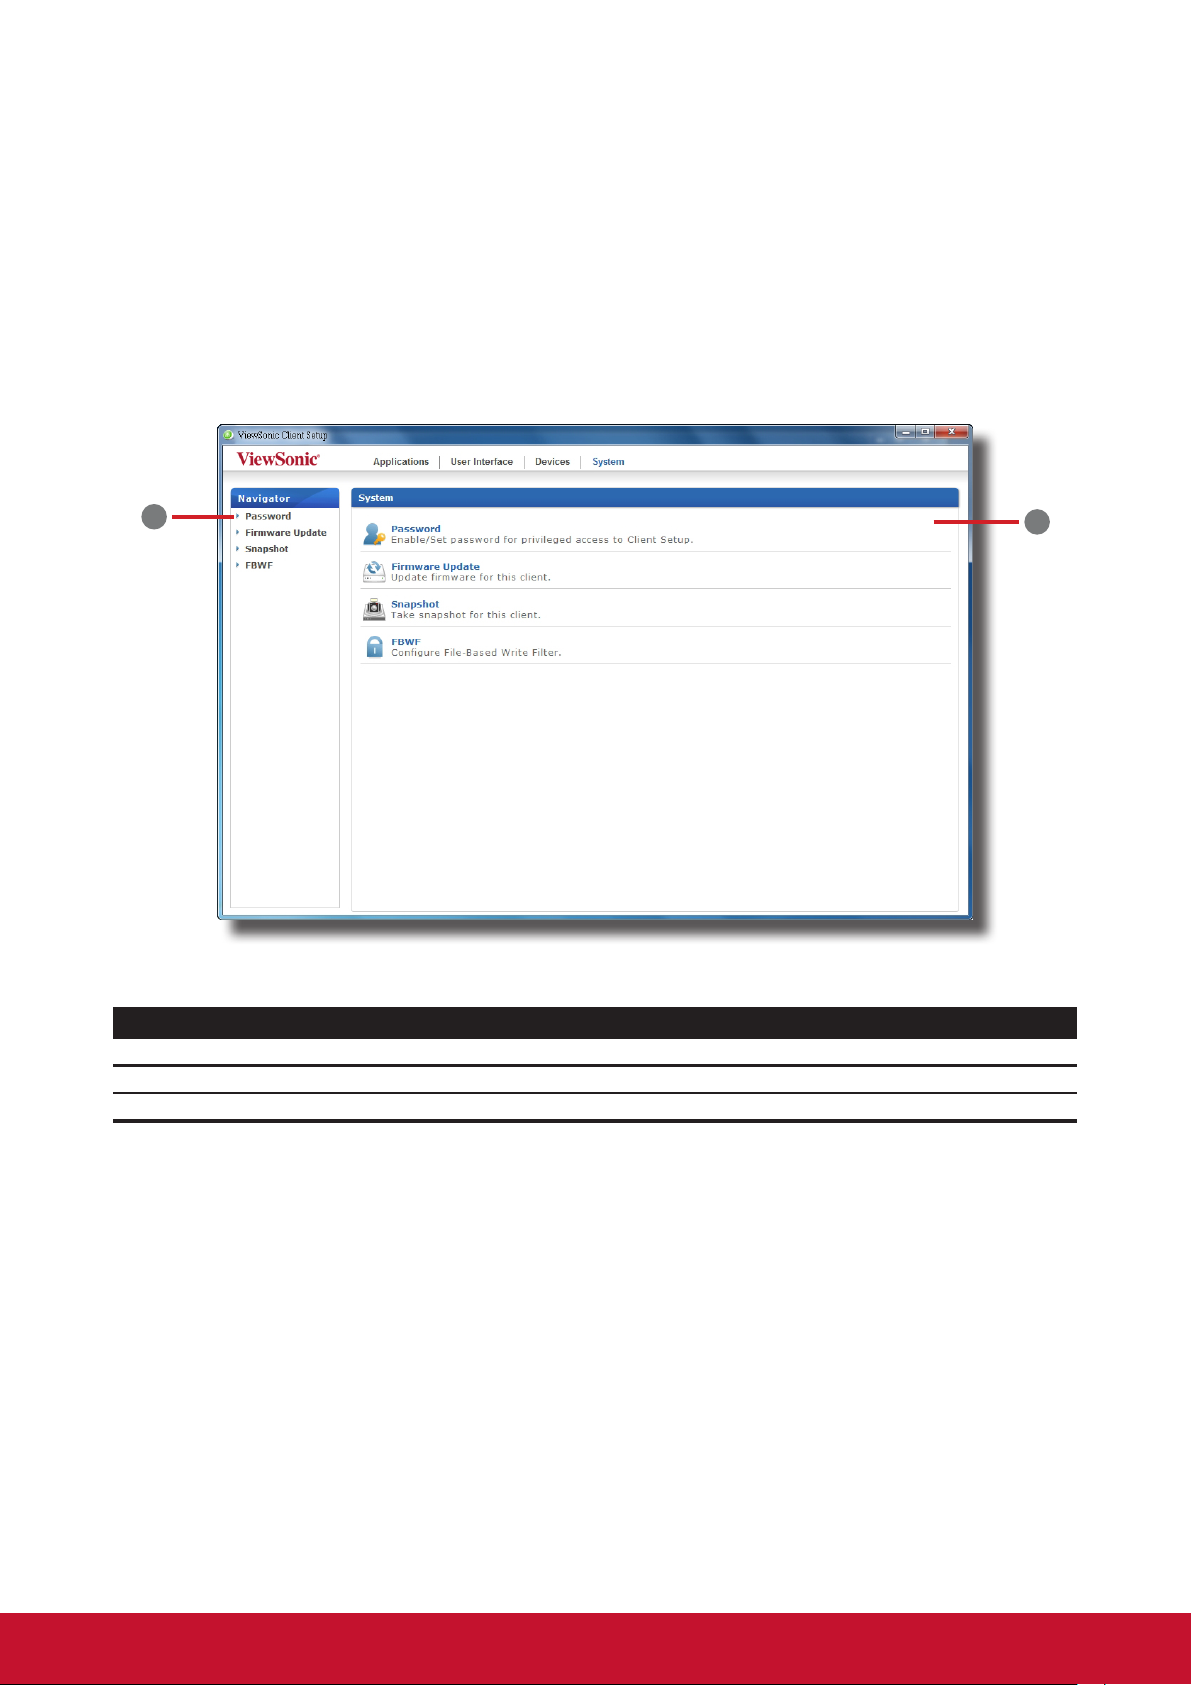
3.2.1 System Tab Overview
System tab enables you to congure settings for the operation and maintenance of clients. To access
available settings of System tab, click the tab on ViewSonic Client Setup.
System Tab Overview
1
Interface Elements
No. Name Description
1 Navigation area Click to select a setting item under System tab.
2 Conguration area Congure setting values when a setting item or entry is selected.
2
16
Page 26
Conguring Client Settings
Conguring System Settings
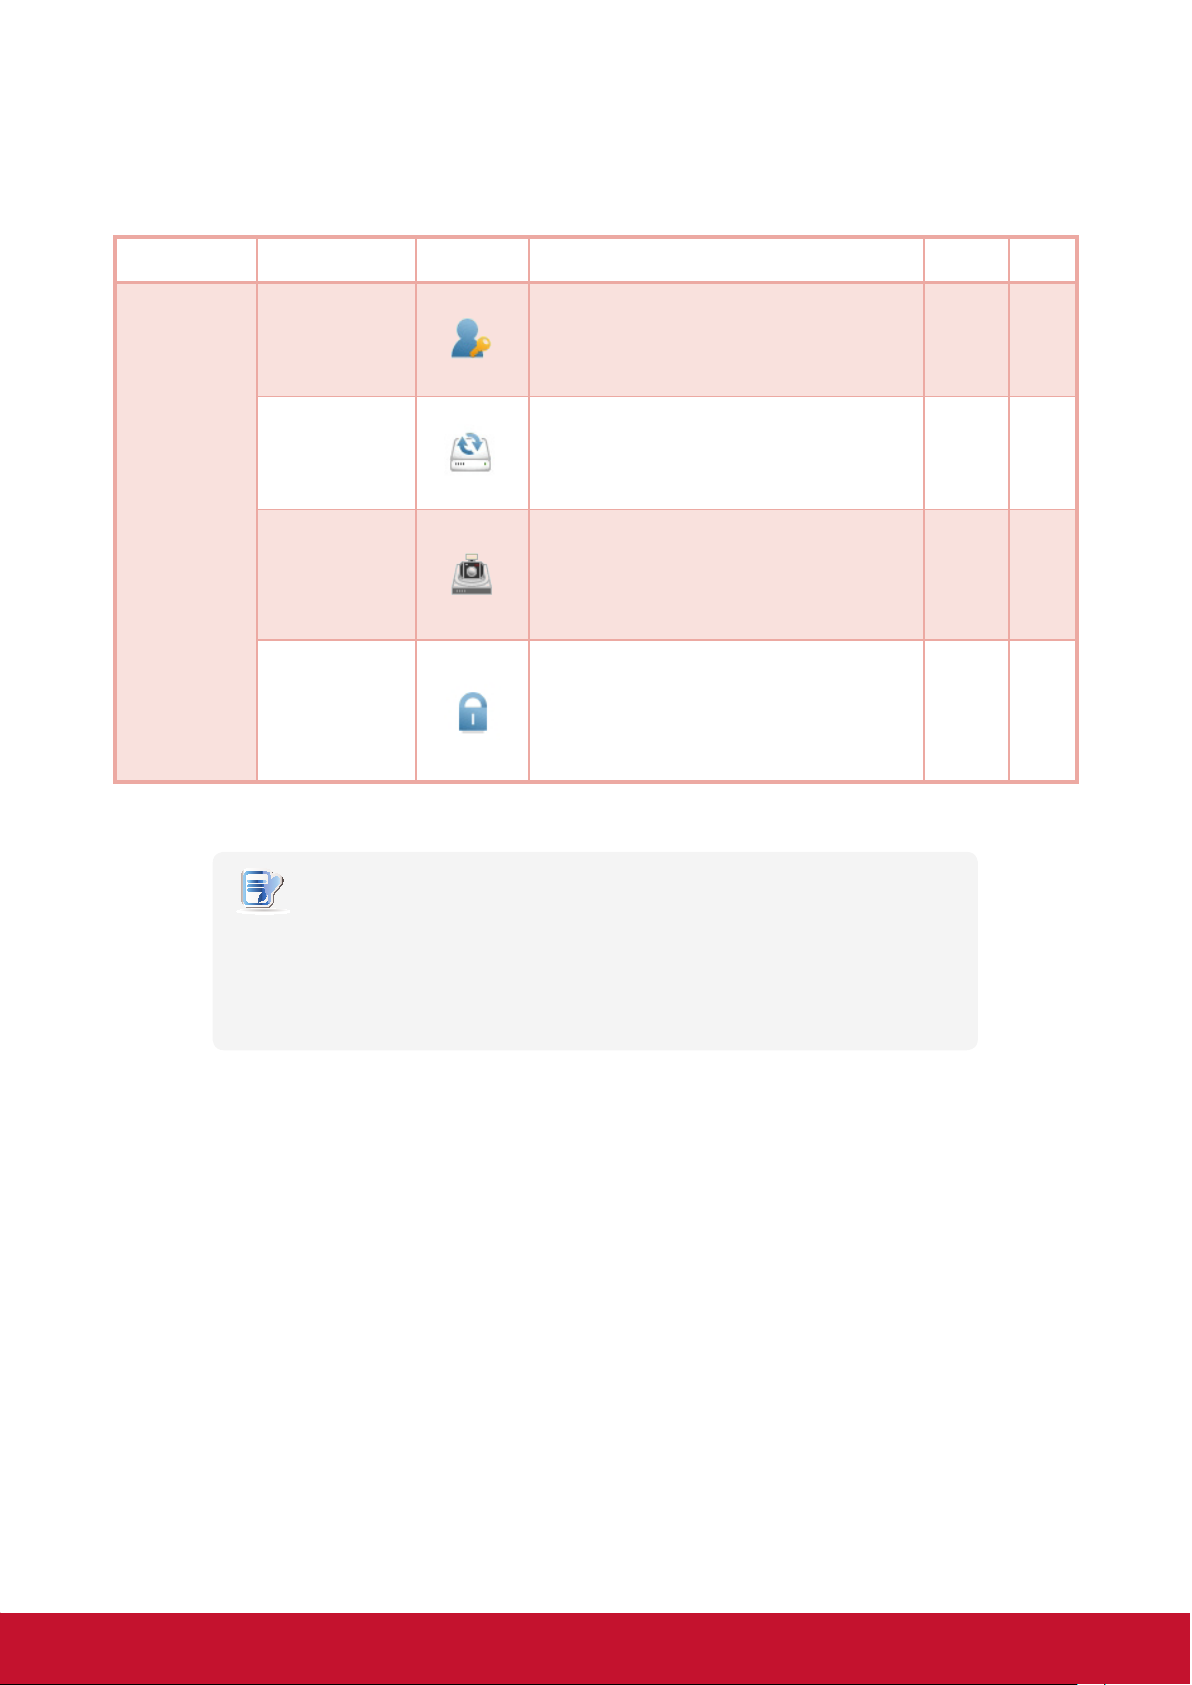
3.2.2 Available Settings at a Glance
Tab Setting Icon Description Section Page
System
Click to congure the access privileges of ViewSonic
Password
Firmware Update
Snapshot
FBWF
Client Setup for client users.
Click to congure settings for remote assistance.
Click to update rmware locally with the help of a
remote server. This feature is only applicable when
the client is managed by the ViewSonic Device
Manager software.
Click to take a snapshot (system backup at a specic
point of time) for the client, which you can use to
restore the client to that system state when needed.
Click to congure FBWF (File-Based Write Filter)
settings. Enabling FBWF option will redirect all writes
targeted for disk volumes to a RAM cache. All system
changes will only affect the session where the
changes are made.
NOTE
• ViewSonic Device Manager is a remote client management software, helping
you remotely mange a large number of endpoint devices in a desktop
virtualization infrastructure. For more information about ViewSonic Device
Manager, You can nd the VDM on the CD wizard or refer to the user guide of
ViewSoic Device Manager.
3.2.3
3.2.4
3.2.5 21
3.2.6
3.2.7
3.2.8 27
18
19
23
24
17
Page 27
Conguring Client Settings
Conguring System Settings
3.2.3 Conguring the Access Privileges and Password of ViewSonic Client Setup
You can congure the access privileges of ViewSonic Client Setup for client users by the Password setting.
Setting Access Privileges and Password Only for Administrators
To set access privileges and password only for administrators, please do the following:
NOTE
• System administrators (and only administrators) are allowed to access
ViewSonic Client Setup by default. If you don’t enable user authentication
for administrators and don’t set a password here, the system administrator
privileges are sufcient to access ViewSonic Client Setup. If authentication is
enabled and the password is set, administrators will need that password to
enter ViewSonic Client Setup.
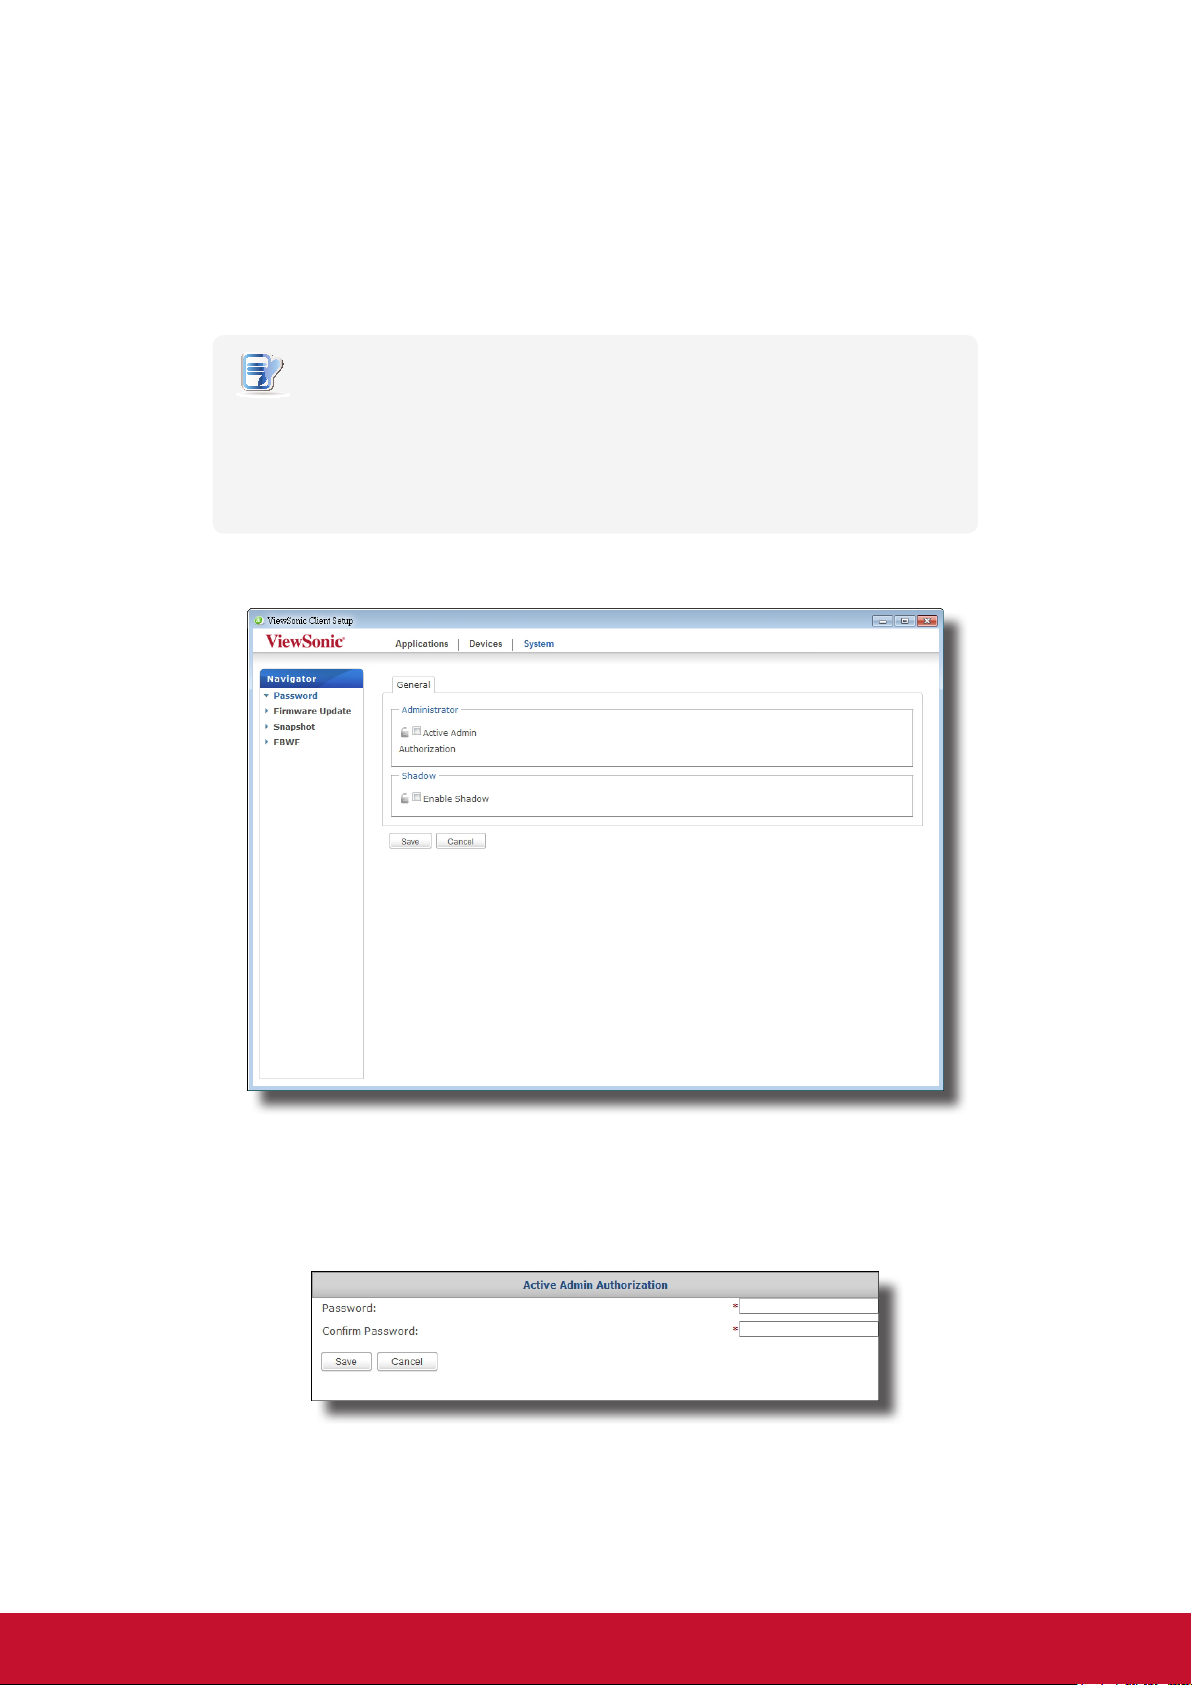
1. On ViewSonic Client Setup, click System > Password.
2. Under the Administrator section, click to check Active Admin Authorization.
3. The access privileges for administrators are granted and a window appears for you to set the
password.
4. Type in the desired password, and then click Save to apply.
5. Click Save to store all the changes.
18
Page 28
Conguring Client Settings
Conguring System Settings
Setting Access Privileges and Password Also for Standard Users
To set access privileges and password also for standard users, please do the following:
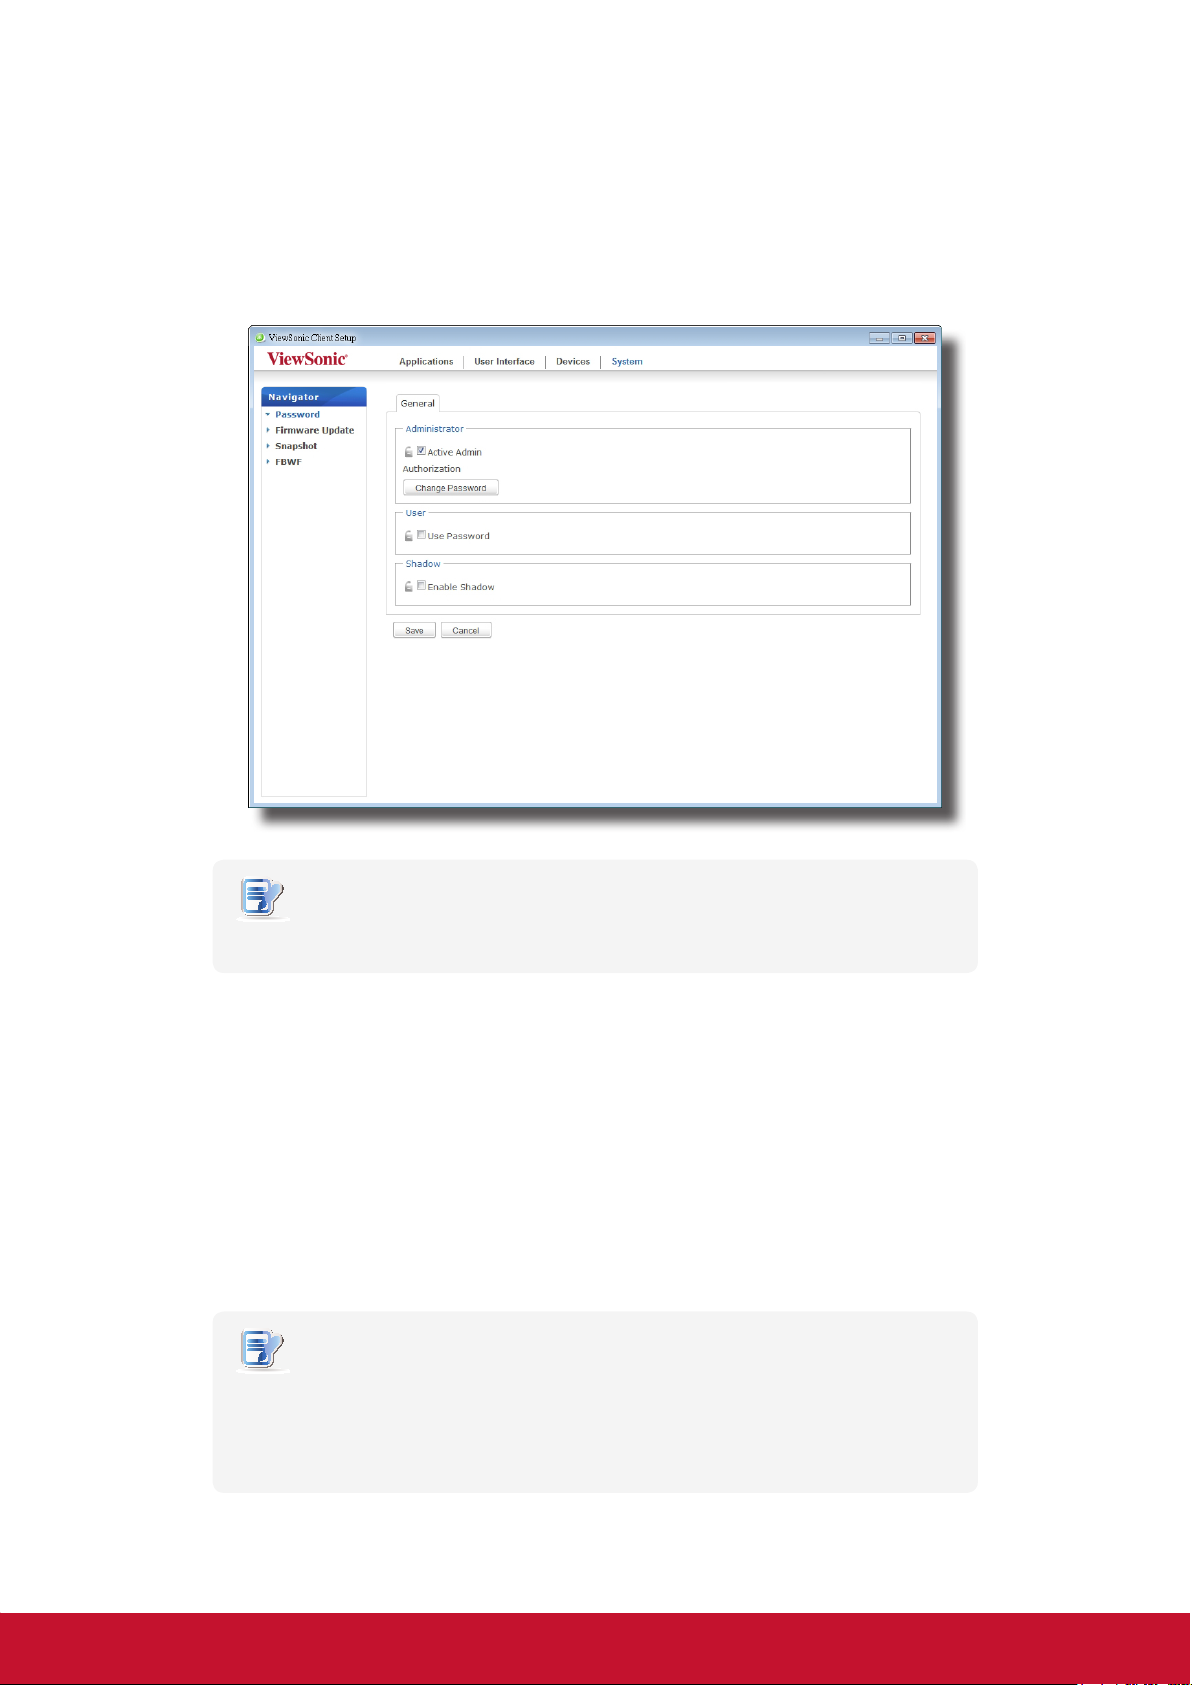
1. On ViewSonic Client Setup, click System > Password.
2. Under the User section, click to check Use Password.
NOTE
• The User section appears only when Active Admin Authentication is
checked.
3. The access privileges for standard users are granted and a window appears for you to set the
password.
4. Type in the desired password, and then click Save to apply.
5. Click Save to store all the changes.
3.2.4 Conguring Shadow Settings for Remote Assistance
The Shadow feature allows an administrator to remotely assist client users in resolving problems or
conguring local settings. When this feature is enabled, an administrator can monitor and control a client
from a remote computer just like a local user.
NOTE
• To use the Shadow feature on a remote computer, you need to install the
ViewSonic Device Manager and also Java software on the remote computer,
and add your client into a managed group under ViewSonic Device Manager.
For detailed instructions, please refer to the User’s Manual for ViewSonic
Device Manager.
19
Page 29

Conguring Client Settings
Conguring System Settings
To enable the Shadow feature and set the password for remote assistance, please do the following:
1. On ViewSonic Client Setup, click System > Password.
2. Under the Shadow section, click Enable Shadow.
3. The Shadow feature is enabled and a window appears for you to set the password for remote
assistance.
NOTE
• On a remote computer, an administrator will need this password to use the
Shadow feature (remote assistance) available in the ViewSonic Device
Manager software. For more information, please refer to the User’s Manual for
ViewSonic Device Manager.
4. Type in the desired password, and then click Save to apply.
5. Click Save to store all the changes.
NOTE
• When the Shadow feature is enabled, on SC-T45, the icon will appear in
the Notication area of the Task bar. If this feature is currently being performed
from a remote computer, the icon will change its color to yellow
.
20
Page 30

Conguring Client Settings
Conguring System Settings
3.2.5 Updating Firmware from the Management Computer
Update Firmware allows client users to update client rmware from the remote management computer.
NOTE
• Ensure that your client has been added into a managed group under
ViewSonic Device Manager installed on a remote computer, and that you
have imported client rmware les into ViewSonic Device Manager. These are
prerequisites of this feature.
• For more information on rmware update and ViewSonic Device Manager,
please refer to the User Manual for ViewSonic Device Manager.
To update client rmware from the remote management computer, please do the following:
1. On ViewSonic Client Setup, click System > Firmware Update.
2. Under the Firmware Update section, click the Firmware Type drop-down menu to select Firmware.
The system will then automatically download the Firmware list from the remote computer.
NOTE
• For information on the option Snapshot, please refer to sections “3.2.6 Taking
Snapshots for System Backup and Recovery” on page 23 and “3.2.7 Restoring
the System State with a Created Snapshot” on page 24. You can also update
the rmware of a client with a snapshot (the system backup of a client) which
is coming from another client of the same model and is with a newer rmware
version.
21
Page 31

Conguring Client Settings
Conguring System Settings
3. Upon completion, a window appears notifying you that the Firmware list has been loaded.
NOTE
• The available rmware versions depend on how many versions have been
imported into the remote ViewSonic Device Manager.
4. Click OK to continue.
5. Click drop-down menus to select the desired rmware version and other options.
Firmware Update Options
Item Description
Protocol Click to select the protocol used for downloading the rmware le set.
Firmware Version Click to select the desired rmware version from the Firmware list.
Language
Reboot immediate
Click to select the interface language of the system, including the ViewSonic Client Setup
software. Three languages are available: English, French, and Spanish.
Please refer to the section of language pack installation
Click to choose whether to restart the system immediately for rmware update or manually
restart the system later.
22
Page 32

Click to choose whether to keep client settings.
Conguring Client Settings
Conguring System Settings
NOTE: If Yes is selected, all client settings will remain unchanged after rmware update. If
Keep ACS conguration
NOTE: An unmanaged client is the client that is not added into a managed group under
No is selected, all client settings will be restored to the factory default, and the client
will become unmanaged.
ViewSonic Device Manager installed on a remote computer. For more information
on ViewSonic Device Manager, please refer to the User’s Manual for ViewSonic
Device Manager.
6. Click Update rmware to conrm your selections. The system will start updating its rmware after
restarting.
3.2.6 Taking Snapshots for System Backup and Recovery
A snapshot is the system backup of a client at a specic point of time, allowing you to restore the client to
that system state. This system backup can be stored on a remote computer or a locally attached USB ash
drive.
NOTE
• To store the system backup on a remote computer, ensure that the client has
been added into a managed group under ViewSonic Device Manager installed
on that remote computer.
To take a system snapshot for a client, please do the following:
1. On ViewSonic Client Setup, click System > Snapshot.
23
Page 33

Conguring Client Settings
Conguring System Settings
2. Under the Snapshot section, click the drop-down menu to select where to store the system backup.
Two options are available: Network and USB.
• To store the backup le set on the remote computer, please select Network.
• To store the backup le set on the locally attached USB fresh drive, please select USB.
3. Type in the desired description for this system backup, and then click Apply.
4. A message appears prompting for conrmation. Click OK to conrm.
5. The system will restart to complete the process automatically.
3.2.7 Restoring the System State with a Created Snapshot
System snapshots may be located on two places: a remote computer over the network or a USB ash drive.
NOTE
• For more information on the location of system snapshots, please refer to
section “3.2.6 Taking Snapshots for System Backup and Recovery” on page 23.
Depending on where your system snapshot is located, you can restore the system state either through a
network or a USB ash drive.
With a System Snapshot on a Remote Computer
To restore the system state with a snapshot on a remote computer, please do the following:
1. On ViewSonic Client Setup, click System > Firmware Update.
24
Page 34

Conguring Client Settings
Conguring System Settings
2. Under the Firmware Update section, click the Firmware Type drop-down menu to select Snapshot.
The system will automatically download the Snapshot list from the remote computer.
3. Upon completion, a message appears notifying you that the Snapshot list has been loaded.
NOTE
• Client snapshots stored on the remote computer are managed by ViewSonic
Device Manager. For more information on how to manage client snapshots
with ViewSonic Device Manager, please refer to its user’s manual.
4. Click OK to continue.
5. Click drop-down menus to select the desired snapshot and other options.
Options for Restoring a Snapshot
Item Description
Protocol Click to select the protocol used for downloading the snapshot le set.
Firmware Version Click to select the desired snapshot from the Snapshot list.
Reboot immediate
Click to choose whether to restart the system immediately for rmware update or manually
restart the system later.
6. Click Update rmware to conrm your selections. The system will start restoring the snapshot after
restarting.
25
Page 35

Conguring Client Settings
Conguring System Settings
With a System Snapshot on a USB Flash Drive
If you store the system snapshot of your client on a USB ash drive, this ash drive will enable you to return
your client to that system state.
NOTE
• For more information on how to store the system snapshot of a client on a USB
ash drive, please refer to section “3.2.6 Taking Snapshots for System Backup
and Recovery” on page 23.
To restore the system state with a snapshot on a USB ash drive, please do the following:
1. Plug the USB ash drive into a free USB port of the client.
2. Start up or restart the client.
3. During the POST (Power-On Self-Test) period, press F7 to open the Boot Device menu.
4. Select to boot from the attached USB ash drive.
5. The ViewSonic Thin Client Recovery System is launched.
6. Press Enter to continue.
26
Page 36

7. Select USB, and then click Next to continue.
Conguring Client Settings
Conguring System Settings
8. The recovery system start restoring the snapshot on the USB ash drive to the client.
9. After completion, click Finish to restart the client.
3.2.8 Conguring FBWF (File-Based Write Filter)
Enabling the FBWF feature will redirect all writes targeted for disk volumes to a RAM cache. All system
changes will only affect the session where the changes are made.
WARNING
• The FBWF feature is enabled by factory default. Except for changes to ACS
settings, all the changes made in a session will not be kept after the system
restart. Ensure that you choose the desired settings here before making any
changes to the system.
• An icon in the Notication area of the Taskbar will indicate the current FBWF
state of your system. For details, please refer to the description at the end of
this section.
27
Page 37

Conguring Client Settings
Conguring System Settings
To congure the FBWF settings, please do the following:
1. On ViewSonic Client Setup, click System > FBWF.
2. Click the State drop-down menu to enable/disable the FBWF feature.
3. Select the desired overlay cache threshold if the FBWF feature is enabled.
NOTE
• When the used memory cache exceeds the selected threshold, cached objects
that are not currently in use will be released.
4. Click Save to conrm your selections.
5. You may need to restart the system for the change(s) to take effect.
WARNING
• You need to restart the system for switching between the FBWF enabled and
disabled states. An icon will appear in the Notication area of the Taskbar to
indicate the current FBWF state of the system. The following table provides a
description of each icon:
Icon Name Description
The FBWF is currently enabled. Except for changes
Green Lock
to ACS settings, all the other changes made to the
system in current session will not be kept after the
system restart.
Orange Lock
Red Lock The FBWF is currently disabled.
The FBWF state was changed and will take effect
after the system restart.
28
Page 38

Conguring Client Settings
Conguring External Device Settings
3.3 Conguring External Device Settings
3.3.1 Devices Tab Overview
Devices tab enables you to congure settings for external devices of clients. To access available settings of
Devices tab, click the tab on ViewSonic Client Setup.
Devices Tab Overview
1
Interface Elements
No. Name Description
1 Navigation area Click to select a setting item under Devices tab.
2 Conguration area Congure setting values when a setting item or entry is selected.
2
3.3.2 Available Settings at a Glance
Tab Setting Icon Description Section Page
USB Storage
Devices
Audio
Click to congure settings for USB storage devices. 3.3.3 30
Click to congure settings for audio devices. 3.3.4 31
29
Page 39

Conguring Client Settings
Conguring External Device Settings
3.3.3 Conguring Settings for USB Storage Devices
To congure settings for USB storage devices, please do the following:
1. On ViewSonic Client Setup, click Devices > USB Storage.
2. Click the drop-down menu to select the desired setting. Three options are available: Enable USB
Storage, Read-Only Access, and Disable USB Storage.
NOTE
• If you disable locally attached USB storage devices, client users are not
allowed to use those devices in a Remote Desktop session.
• To use the locally attached USB storage devices in a Remote Desktop session,
you need to further congure the RDP (Remote Desktop Protocol) connection
settings under Applications tab. For detailed instructions, please refer to
section “3.5.5 Conguring Advanced RDP Connection Settings” on page 38.
3. Click Save to store your change.
30
Page 40

3.3.4 Disabling or Enabling Attached Audio Devices
To disable/enable attached audio devices, please do the following:
NOTE
• If you disable locally attached audio devices, client users are not allowed to
perform audio playback or recording with these devices in a Remote Desktop
session.
• To perform audio playback or recording with local audio devices in a Remote
Desktop session, you need to enable locally attached audio devices here (the
Audio setting item under Devices tab) and congure audio related settings
in the RDP connection settings. For detailed instructions on how to congure
audio related settings in an RDP connection settings, please refer to section
“3.5.5 Conguring Advanced RDP Connection Settings” on page 38.
1. On ViewSonic Client Setup, click Devices > Audio.
Conguring Client Settings
Conguring External Device Settings
2. Click to check/uncheck Enable System Audio Device.
3. Click Save to conrm your selection.
NOTE
• The change will not take effect until the client has been restarted.
31
Page 41

Conguring Client Settings
Conguring User Interface Settings
3.4 Conguring User Interface Settings
3.4.1 User Interface Tab Overview
User Interface tab enables you to congure settings for the user interface of clients. To access available
settings of User Interface tab, click the tab on ViewSonic Client Setup.
User Interface Tab Overview
1
Interface Elements
No. Name Description
1 Navigation area Click to select a setting item under User Interface tab.
2 Conguration area Congure setting values when a setting item or entry is selected.
2
3.4.2 Available Settings at a Glance
Tab Setting Icon Description Section Page
User Interface Desktop
Click to congure the display of standard desktop
shortcuts for quick service access.
32
3.4.3 33
Page 42

Conguring Client Settings
Conguring User Interface Settings
3.4.3 Conguring the Display of Standard Desktop Shortcuts for Quick Access
The Desktop setting enables you to display or hide the standard desktop shortcuts for service quick access.
Three standard desktop shortcuts are available: Receiver, Remote Desktop Connection, and VMware
View Client, separately for quick service access of Citrix XenApp/XenDesktop, Microsoft Remote Desktop/
Application, and VMware View.
NOTE
• You can customize your desktop shortcuts for quick service access. For
detailed instructions on how to create and customize your own desktop
shortcuts, please refer to section “3.5 Conguring Service Access Settings” on
page 34.
To display or hide the standard desktop shortcuts for quick service access, please do the following:
1. On ViewSonic Client Setup, click User Interface > Desktop.
2. Click to check/uncheck Remote Desktop Connection, Citrix Receiver, or VMware View Client.
3. Click Save to apply.
33
Page 43

Conguring Client Settings
Conguring Service Access Settings
3.5 Conguring Service Access Settings
3.5.1 Applications Tab Overview
Applications tab enables you to congure settings for service access on clients. To access available
settings of Applications tab, click the tab on ViewSonic Client Setup.
Applications Tab Overview
1
Interface Elements
No. Name Description
1 Navigation area
2 Conguration area Congure setting values when a setting item or entry is selected.
Click to select a setting item under Applications tab or to select a setting entry
under a selected setting item.
2
34
Page 44

Conguring Client Settings
Conguring Service Access Settings
3.5.2 Available Settings at a Glance
Tab Setting Icon Description Section Page
Remote Desktop
Citrix ICA
Applications
VMware View
Web Browser
Click to congure RDP (Remote Desktop Protocol)
connection settings and create an access shortcut for
Remote Desktop services.
Click to congure Citrix ICA (Independent Computing
Architecture) connection settings and create an
access shortcut for XenDesktop/XenApp services.
Click to congure VMware View connection settings
and create an access shortcut for View desktop
services.
Click to congure general or specic browser session
settings. A desktop shortcut is created
for a specic browser session launched with the
desired web page.
3.5.3 35
3.5.6 42
3.5.9 67
3.5.12 73
3.5.3 Conguring Basic RDP Connection Settings
The Remote Desktop setting allows you to congure RDP (Remote Desktop Protocol) connection settings
and create a desktop shortcut for Remote Desktop services. You can access desktop services for work
simply by double clicking on the shortcut.
To quickly congure RDP connection settings for Remote Desktop services, please do the following:
1. On ViewSonic Client Setup, Click Applications > Remote Desktop.
35
Page 45

Conguring Client Settings
Conguring Service Access Settings
2. The RDP Connection list appears in the Conguration area.
NOTE
• If you haven’t create any entry for RDP connections, the RDP Connection list
will be empty.
3. Click Add on the top of the RDP Connection list to create a new entry of RDP connection.
4. On General sub-tab, type in the session name and the server/virtual machine address under the
Server Settings section.
NOTE
• The red asterisks indicate the required elds.
• The remote computer can be a physical server or a virtual machine. Please
visit Microsoft’s websites at www.microsoft.com or support.microsoft.com for
more information.
5. Click Save to add this RDP connection entry.
6. The shortcut for Remote Desktop services is automatically created on the desktop.
NOTE
• Depending on your plan of service delivery and the conguration of your
server(s), you may need to congure other advanced RDP connection settings
for service access. For more information on other available settings, please
refer to section “3.5.5 Conguring Advanced RDP Connection Settings” on
page 38.
36
Page 46

3.5.4 Accessing Remote Desktop Services
To access Remote Desktop services, please do the following:
1. Double click the created (customized) access shortcut on the desktop.
NOTE
• You can also access Remote Desktop services through the standard desktop
shortcut Remote Desktop Connection. For detailed instructions on how to
access services via this standard shortcut, please refer to the Quick Start
Guide for SC-T45.
2. Follow the on-screen instructions and provide required credentials if needed.
3. The desired remote desktop is displayed on the screen.
An Example of Remote Desktops: Windows MultiPoint Server 2011
Conguring Client Settings
Conguring Service Access Settings
37
Page 47

Conguring Client Settings
Conguring Service Access Settings
3.5.5 Conguring Advanced RDP Connection Settings
The table below provides a description of each setting item for RDP connections. Please refer to this table to
congure advanced settings and customize your SC-T45 desktop shortcuts for service access.
General Sub-tab
Server Settings
Item Description
Session Name Type in the name for Remote Desktop sessions.
Sever Address
Connection Quality
Login Settings
Item Description
Username Type in the user/account name used for authentication.
Password Type in the password of the user account used for authentication.
Domain
Common Settings
Item Description
Autostart When Startup
Type in the IP address of the server/virtual machine where to deliver a Remote Desktop
session.
Select the setting that best describes the quality of your network connection. Three options
are available: Very Fast (LAN), Fast (Broadband), and
Slow (Modem).
Type in the domain of the server.
NOTE: Leave this eld blank if the server doesn’t belong to any domain.
Select whether to open a Remote Desktop session automatically or not when the client is
started up.
Select what to do when a Remote Desktop session is ended. Four options are available: Do
Nothing, Restart Application, Reboot, and Shutdown.
On Application Exit
Option Description
Do Nothing Returns to the Windows Embedded desktop.
Restart Application Opens a Remote Desktop session again.
Reboot Restarts your thin client.
Shutdown Turns off your thin client.
38
Page 48

Application Sub-tab
Application Mode
Item Description
Click the drop-down menu to enable/disable the Application mode. You can use this option to
select the session type. Two remote session types are available:
• Remote Desktop (when the Application mode is disabled)
• Remote Application (when the Application mode is enabled)
Conguring Client Settings
Conguring Service Access Settings
Use Application Mode
Start in the following folder
Program path and le name
NOTE: Remote Application sessions are Remote sessions used to access only specic
applications rather than full desktops.
NOTE: Before you can open a Remote Application session, you need to add the desired
application to the RemoteApp Programs list with RemoteApp Manager on the
application hosted server. For detailed instructions on how to add a desired
application to the RemoteApp Programs list on the server, please visit Microsoft
Support website at support.microsoft.com.
Type in the location of the desired application (on the host server) if
Use Application Mode is enabled.
NOTE: You can type in the location/path of the desired application in this eld, and specify
only the name of the application in Program path and le name (the next eld). Or,
you can type in the full path and name of the application in Program path and le
name, and leave this eld empty.
Type in the path and name of the desired application if Use Application Mode is enabled.
Remote APP Format Example
Windows Media Player C:\Programs Files (x86)\Windows Media Player\wmplayer.exe
Adobe Readear X C:\Programs Files (x86)\Adobe\Reader 10.0\Reader\ArcoRd32.exe
Adobe Readear X C:\Programs Files (x86)\Adobe\Reader 10.0\Reader\ArcoRd32
NOTE: the le extension can be omitted.
Window Settings
Item Description
Click the drop-down menu to select the desired color depth for a Remote Desktop session.
Four options are available: 15 Bit, 16 Bit, 24 Bit, and 32 Bit.
Color Depth
NOTE: If RemoteFX is enabled, then no matter which color depth you choose here, 32 bit
per pixel will be applied.
NOTE: You can congure the upper limit of the color depth for a Remote Desktop session
on the host server. In this case, no matter which color depth you choose here, the
value cannot exceed the dened limit.
39
Page 49

Conguring Client Settings
Conguring Service Access Settings
Click the drop-down menu to select the desired display resolution on a Remote Desktop
session. Six options are available: Fullscreen, 1400x1050, 1280x960, 1152x864, 1024x768,
and 800x600.
Option Description
Fullscreen
1400x1050
Resolution
Multi-Monitor Click the drop-down menu to enable/disable multiple displays in a Remote Desktop session.
Connection Settings
Item Description
1280x960
1152x864
1024x768
800x600
Click the drop-down menu to enable/disable printer mapping.
When Enable is selected, users can access a local or network printer in a Remote Desktop
session.
Opens a Remote Desktop session in full screen with the same
display resolution as the local desktop.
Opens a Remote Desktop session in a window with the 1400 x
1050 display resolution.
Opens a Remote Desktop session in a window with the 1280 x 960
display resolution.
Opens a Remote Desktop session in a window with the 1152 x 864
display resolution.
Opens a Remote Desktop session in a window with the 1024 x 768
display resolution.
Opens a Remote Desktop session in a window with the 800 x 600
display resolution.
Printer Mapping
Smart Card Mapping
Port Mapping
NOTE: You need to add the desired local or network printer(s) for your thin client rst, and
then enable this feature here to use that printer in a Remote Desktop session.
NOTE: To add a local or network printer for your Windows Embedded-based thin client,
please click Start > Printers and Faxes/Devices and Printers > Add a printer,
and then follow the on-screen instructions to add the desired local or network
printer.
Click the drop-down menu to enable/disable smart card mapping.
When Enable is selected, users can access smart cards through a smart card reader in a
Remote Desktop session.
Click the drop-down menu to enable/disable port mapping.
When Enable is selected, users can access attached devices using locally available ports, in
a Remote Desktop session.
NOTE: The types and availability of device ports on thin clients may vary, depending on your
product models.
40
Page 50

Local Resources Settings
Item Description
Conguring Client Settings
Conguring Service Access Settings
Click the drop-down menu to congure the computer sounds and audio playback setting in
a Remote Desktop session. Three options are available: Bring to this computer, Do not
play, and Leave at remote computer.
Option Description
Remote computer sound
Remote Audio recording
Bring to this computer
Do not play
Leave at remote computer
Click the drop-down menu to congure the audio recording setting in a Remote Desktop
session. Two options are available: Recording from this computer and Do not record.
Option Description
Recording from this computer
Do not record
NOTE: When Leave at remote computer is selected on the drop-down menu of Remote
computer sound, this setting item will be grayed out.
Allows computer sounds and audio playback in a
Remote Desktop session using locally attached audio
devices.
Disables computer sounds and audio playback in a
Remote Desktop session.
Leave computer sounds and audio playback at the
remote computer.
Allows audio recording in a Remote Desktop session
using locally attached audio devices.
Disables audio recording in a Remote Desktop
session using locally attached audio devices.
Drives
Supported plug and play devices
Other supported RemoteFX
USB device
Click the drop-down menu to enable/disable locally attached drives in a Remote Desktop
session.
Click the drop-down menu to enable/disable the local plug and play feature in a Remote
Desktop session.
Click the drop-down menu to enable/disable locally attached RemoteFX
USB devices.
41
Page 51

Conguring Client Settings
Conguring Service Access Settings
3.5.6 Conguring Basic ICA Connection Settings
The Citrix ICA setting allows you to congure ICA connections for Citrix XenDesktop/XenApp services and
create desktop shortcuts for service access. You can access on-demand desktop/application services for
work simply by double clicking on the shortcut.
NOTE
• The following topics in this section will guide you through the steps of creating
and customizing your own service access shortcuts on the desktop.
Connection Type: Web Interface
To quickly congure ICA connection settings for the Web Interface connection type, please do the following:
1. On ViewSonic Client Setup, Click Applications > Citrix ICA.
2. The available ICA Connection list appears in the Conguration area.
NOTE
• If you haven’t create any entry for ICA connections, the ICA Connection list will
be empty.
42
Page 52

Conguring Client Settings
Conguring Service Access Settings
3. Click Add on the top of the ICA Connection list to create a new entry of ICA connection.
4. On General sub-tab, leave the connection type as Web Interface as default, and then type in the
desired session name and the IP address of service-hosted server under the Server Settings section.
5. Click Save to add this ICA connection entry. The access shortcut is automatically created on the
desktop.
NOTE
• Depending on your plan of service delivery and the conguration of your
server(s), you may need to congure other advanced ICA connection settings
for service access. For more information on other available settings, please
refer to section “3.5.8 Conguring Advanced ICA Connection Settings” on page
54.
43
Page 53

Conguring Client Settings
Conguring Service Access Settings
Connection Type: XenDesktop
To quickly congure ICA connection settings for the connection of XenDesktop type, please do the following:
1. On ViewSonic Client Setup, Click Applications > Citrix ICA.
2. The available ICA Connection list appears in the Conguration area.
NOTE
• If you haven’t create any entry for ICA connections, the ICA Connection list will
be empty.
44
Page 54

Conguring Client Settings
Conguring Service Access Settings
3. Click Add on the top of the ICA Connection list to create a new entry of ICA connection.
4. On General sub-tab, click the Connection Type drop-down menu to select XenDesktop.
5. Type the session name, server address of the XenDesktop delivery controller, user credentials, the
domain of the server, and then click the Search icon
to discover available desktop groups.
NOTE
• The Search icon works only when required data (elds marked with a red
asterisk) have been provided.
6. Upon completion, the Search Dialog window appears for you to select the desktop group. Click the
drop-down menu to select the desired desktop group, and then click Select to conrm.
7. The selected desktop group name automatically appears in the Desktop Group eld.
8. Click Save to conrm. The customized access shortcut is automatically created on the desktop.
NOTE
• Depending on your plan of service delivery and the conguration of your
server(s), you may need to congure other advanced ICA connection settings
for service access. For more information on other available settings, please
refer to section “3.5.8 Conguring Advanced ICA Connection Settings” on page
54.
45
Page 55

Conguring Client Settings
Conguring Service Access Settings
Connection Type: XenApp
To quickly congure ICA connection settings for the connection of XenApp type, please do the following:
1. On ViewSonic Client Setup, Click Applications > Citrix ICA.
2. The available ICA Connection list appears in the Conguration area.
NOTE
• If you haven’t create any entry for ICA connections, the ICA Connection list will
be empty.
46
Page 56

Conguring Client Settings
Conguring Service Access Settings
3. Click Add on the top of the ICA Connection list to create a new entry of ICA connection.
4. On General sub-tab, click the Connection Type drop-down menu to select XenApp.
5. Type the session name, server address of the XenApp server, user credentials, the domain of the
server, and then click the Search icon
to discover available applications.
NOTE
• The Search icon works only when required data (elds marked with a red
asterisk) have been provided.
• If your XenApp server doesn’t belong to any domain, just type its computer
name in the Domain eld.
6. Upon completion, the Search Dialog window appears for you to select the application. Click the drop-
down menu to select the desired application, and then click Select to conrm.
7. The selected application name automatically appears in the Application Name eld.
8. Click Save to conrm. The customized access shortcut is automatically created on the desktop.
NOTE
• Depending on your plan of service delivery and the conguration of your
server(s), you may need to congure other advanced ICA connection settings
for service access. For more information on other available settings, please
refer to section “3.5.8 Conguring Advanced ICA Connection Settings” on page
54.
47
Page 57

Conguring Client Settings
Conguring Service Access Settings
Connection Type: Server Connection
To quickly congure ICA connection settings for the connection type of Server Connection, please do the
following:
1. On ViewSonic Client Setup, click Applications > Citrix ICA.
2. The available ICA Connection list appears in the Conguration area.
NOTE
• If you haven’t create any entry, the ICA Connection list will be empty.
48
Page 58

Conguring Client Settings
Conguring Service Access Settings
3. Click Add on the top of the ICA Connection list to create a new entry of ICA connection.
4. On General sub-tab, click the Connection Type drop-down menu to select Server Connection.
5. Type the session name, server address, user credentials, and domain.
NOTE
• Only connections to XenApp servers are supported by this connection type.
6. Click Save to conrm. The customized access shortcut is automatically created on the desktop.
NOTE
• Depending on your plan of service delivery and the conguration of your
server(s), you may need to congure other advanced ICA connection settings
for service access. For more information on other available settings, please
refer to section “3.5.8 Conguring Advanced ICA Connection Settings” on page
54.
49
Page 59

Conguring Client Settings
Conguring Service Access Settings
3.5.7 Accessing Citrix XenDesktop/XenApp Services
Accessing Citrix XenDesktop/XenApp Services Directly
To access Citrix XenDesktop/XenApp services directly, please do the following:
1. Double click the created (customized) shortcut on the desktop.
2. The desired application, content, or desktop is displayed on the screen.
Accessing Citrix XenDesktop/XenApp Services through the Web Browser
To access Citrix XenDeskop/XenApp services through the Web browser, please do the following:
1. Double click the created (customized) shortcut on the desktop.
2. The Web browser is launched with the XenDesktop/XenApp Logon screen.
XenApp Logon Screen Example: XenApp 6.0 Fundamentals
50
Page 60

Conguring Client Settings
Conguring Service Access Settings
XenApp Logon Screen Example: XenApp 6.5 Platinum
XenDesktop Logon Screen Example: XenDesktop 5.6 Platinum
51
Page 61

Conguring Client Settings
Conguring Service Access Settings
NOTE
• You may need to allow the Add-on from Citrix to access XenApp/XenDesktop
services. To allow Add-on, please do the following:
1. Click the pop-up Information bar on the top of the browser page when
accessing XenApp/XenDesktop services through the Web browser. A popup menu appears.
2. Click Run Add-on, and then follow the on-screen instructions to complete
the task.
3. Type in the required credentials and domain name, and then click Log On.
NOTE
• If your service-hosted server doesn’t belong to any domain, type in the server
name instead if required.
4. Click to select desired application, content, or desktop.
Screen for On-Demand Applications: XenApp 6.0 Fundamentals
52
Page 62

Conguring Client Settings
Conguring Service Access Settings
Screen for On-Demand Applications: XenApp 6.5 Platinum
Screen for On-Demand Desktops: XenDesktop 5.6 Platinum
53
Page 63

Conguring Client Settings
Conguring Service Access Settings
5. The selected application, content, or desktop is displayed on the screen.
An Example of Displayed Desktop: XenDesktop 5.6 Platinum
3.5.8 Conguring Advanced ICA Connection Settings
The table below provides a description of each setting item for ICA connections. Please refer to this table to
congure advanced settings and customize your SC-T45 desktop shortcuts for service access.
NOTE
• Please note that available settings vary depending on the selected connection
type.
54
Page 64

Settings for the Connection Type of Web Interface
NOTE
• For descriptions of available settings for the connection type of XenDesktop,
please refer to “Settings for the Connection Type of XenDesktop” on page 57.
• For descriptions of available settings for the connection type of XenApp,
please refer to “Settings for the Connection Type of XenApp” on page 61.
• For descriptions of settings for the connection type of Server Connection,
please refer to “Settings for the Connection Type of Server Connection” on
page 64.
General Sub-tab
Server Settings
Item Description
Conguring Client Settings
Conguring Service Access Settings
Session Name Type in the name for Citrix ICA sessions.
This table only provides descriptions for available settings when Web Interface is selected.
Four connection types are available:
Option Description
Web Interface
Connection Type
Sever Address Type in the IP address of the service-hosted server.
XenDesktop Provides desktop delivery services.
XenApp Provides application delivery services.
Server Connection
NOTE: When Web Interface is selected, your SC-T45 will use a Web browser for service
access. The Internet Explorer is always used no matter if you have installed other
browsers and which brower you have set as default. For more details, please refer
to section “3.5.7 Accessing Citrix XenDesktop/XenApp Services” on page 50.
Provides application, desktop, and content access
services through the interface of a Web browser
(Internet Explorer).
Provides full server access services for
administrators (XenApp servers only).
55
Page 65

Conguring Client Settings
Conguring Service Access Settings
Common Settings
Item Description
Autostart When Startup
On Application Exit Select what to do when a Citrix ICA session is ended. Four options are available: Do
Select whether to open a Citrix ICA session automatically or not when your SC-T45 is started
up.
Nothing, Restart Application, Reboot, and Shutdown.
Option Description
Do Nothing Returns to the Windows Embedded desktop.
Restart Application Opens a Citrix ICA session again.
Reboot Restarts your thin client.
Shutdown Turns off your thin client.
Application Sub-tab
Web Settings
Item Description
Click the drop-down menu to select the desired browser window mode. Two options are
available: Full Screen and Normal Mode.
Mode Setting
Option Description
Full Screen The browser is opened in the Full Screen mode.
Normal Mode The browser is opened in the Normal mode.
NOTE: This setting item is available only when Web Interface is selected in the Connection
Type eld. This type of connection allows you to access services through the
interface of the Web browser.
NOTE: The used Web browser for service access is always the Internet Explorer, no matter
which browser you set as the default.
56
Page 66

Settings for the Connection Type of XenDesktop
NOTE
• For descriptions of available settings for the connection type of Web Interface,
please refer to “Settings for the Connection Type of Web Interface” on page 55.
• For descriptions of available settings for the connection type of XenApp,
please refer to “Settings for the Connection Type of XenApp” on page 61.
• For descriptions of settings for the connection type of Server Connection,
please refer to “Settings for the Connection Type of Server Connection” on
page 64.
General Sub-tab
Server Settings
Item Description
Conguring Client Settings
Conguring Service Access Settings
Session Name Type in the name for Citrix ICA sessions.
This table only provides descriptions for available settings when XenDesktop is selected.
Four connection types are available:
Option Description
Web Interface
Connection Type
XenDesktop Provides desktop delivery services.
XenApp Provides application delivery services.
Server Connection
Type in the IP address of the server where the Desktop Delivery Controller is hosted.
Sever Address
Username Type in the user/account name used for authentication.
NOTE: For more information on the Desktop Delivery Controller for XenDesktop, please visit
Citrix websites support.citrix.com or www.citrix.com for online help.
Provides application, desktop, and content access
services through the interface of a Web browser
(Internet Explorer).
Provides full server access services for
administrators (XenApp servers only).
Password Type in the password of the user account used for authentication.
Domain Type in the domain of the server.
57
Page 67

Conguring Client Settings
Conguring Service Access Settings
Type in the desktop group.
Desktop Group
Common Settings
Item Description
Autostart When Startup
On Application Exit Select what to do when a Citrix ICA session is ended. Four options are available: Do
NOTE: You can use the Search icon
groups. For detailed instructions, please refer to “Connection Type: XenDesktop” on
page 44.
Select whether to open a Citrix ICA session automatically or not when your SC-T45 is started
up.
Nothing, Restart Application, Reboot, and Shutdown.
Option Description
Do Nothing Returns to the Windows Embedded desktop.
Restart Application Opens a Citrix ICA session again.
Reboot Restarts your thin client.
Shutdown Turns off your thin client.
in front of the eld to discover available desktop
Application Sub-tab
Window Settings
Item Description
Click the drop-down menu to select the desired color quality for a Citrix ICA session. Three
options are available: No preference, Better Speed (16-bit), and Better Appearance (32-
bit).
Option Description
Requested Color Quality
No preference No preference for a specic color quality.
Better Speed (16-bit)
Better Appearance (32-bit)
The 16-bit color quality is used for better display
speed.
The 32-bit color quality is used for better desktop
appearance.
58
Page 68

Conguring Client Settings
Conguring Service Access Settings
Click the drop-down menu to select the desired window size of a Citrix ICA session. Eight
options are available: Default, Seamless, Full Screen,
640 x 480, 800 x 600, 1024 x 768, 1280 x 1024, and 1600 x 1200.
NOTE: When the XenDesktop toolbar is enabled on the server side, you may not be able to
Window Size
NOTE: For more information about how to disable the XenDesktop toolbar,
NOTE: In case that you don’t want to disable the toolbar, you can use the toolbar or your
Device Mapping
Item Description
change the window size.
please visit Citrix websites at support.citrix.com or www.citrix.com for online help.
mouse to resize the launched window if needed.
Click the drop-down menu to enable/disable the mapping of the local drive(s) in
Mapping Local Drive
a Citrix ICA session. If Yes is selected, the locally attached drive(s) will become
available in launched Citrix ICA sessions.
Click the drop-down menu to enable/disable the mapping of the local serial
Mapping Local Serial Ports
device(s) in a Citrix ICA session. If Yes is selected, the locally attached serial
device(s) will become available in launched Citrix ICA sessions.
Click the drop-down menu to enable/disable the mapping of the local printer(s) in
Mapping local Printers
a Citrix ICA session. If Yes is selected, the locally attached printer(s) will become
available in launched Citrix ICA sessions.
Connection Settings
Item Description
Network Protocol
Click the drop-down menu to select the protocol(s) used for connection. Three options are
available: TCP/IP, TCP/IP + HTTP server location, and
SSL/TLS + HTTPS server location.
59
Page 69

Conguring Client Settings
Conguring Service Access Settings
Audio Quality
Click the drop-down menu to disable audio playback or choose the desired sound quality in a
Citrix ICA session.
Click the drop-down menu to disable audio playback or to congure the quality setting for
audio playback in a Citrix ICA session. Four options are available: High - high denition
audio, Medium - optimized for speech, Low - for low-speed connections, and Off.
Option Description
Allows endpoint devices to play a sound le at its
High - high denition audio
Medium - optimized for speech
Low - for low-speed connections
native data transfer rate. This is recommended
for connections where bandwidth is plentiful and
sound quality is important.
Compresses any sounds sent to endpoint
devices to a maximum of 64Kbps, resulting
in a moderate decrease in the quality of the
sound. This option is suitable for speeches and
recommended for most LAN-based connections.
Compresses any sounds sent to endpoint
devices to a maximum of 16Kbps, resulting
in a signicant decrease in the quality of the
sound. This option is suitable for low-bandwidth
connections, allowing reasonable audio
performance during a low-speed connection.
Encryption
Apply Windows key combinations
Off Disables audio playback in opened ICA sessions.
Click the drop-down menu to select the desired encryption method. Five options are
available: Basic, RC5 128 bit (login only), RC5 40 bit, RC5 56 bit,
RC5 128 bit.
Click the drop-down menu to select where to apply Windows key combinations. Three
options are available: On the local desktop, On the remote desktop, In full screen
desktops only.
60
Page 70

Settings for the Connection Type of XenApp
NOTE
• For descriptions of available settings for the connection type of Web Interface,
please refer to “Settings for the Connection Type of Web Interface” on page 55.
• For descriptions of available settings for the connection type of XenDesktop,
please refer to “Settings for the Connection Type of XenDesktop” on page 57.
• For descriptions of settings for the connection type of Server Connection,
please refer to “Settings for the Connection Type of Server Connection” on
page 64.
General Sub-tab
Server Settings
Item Description
Conguring Client Settings
Conguring Service Access Settings
Session Name Type in the name for Citrix ICA sessions.
This table only provides descriptions for available settings when XenApp is selected.
Four connection types are available:
Option Description
Web Interface
Connection Type
XenDesktop Provides desktop delivery services.
XenApp Provides application delivery services.
Server Connection
Sever Address Type in the IP address of the XenApp server.
Username Type in the user/account name used for authentication.
Password Type in the password of the user account used for authentication.
Type in the domain of the server.
Provides application, desktop, and content access
services through the interface of a Web browser
(Internet Explorer).
Provides full server access services for
administrators (XenApp servers only).
Domain
Application Name
NOTE: Type in the full computer/server name if your XenApp server doesn’t belong to any
Type in the application name.
NOTE: You can use the Search icon
domain.
in front of the eld to discover available
applications. For detailed instructions, please refer to “Connection Type: XenApp”
on page 46.
61
Page 71

Conguring Client Settings
Conguring Service Access Settings
Common Settings
Item Description
Autostart When Startup
On Application Exit Select what to do when a Citrix ICA session is ended. Four options are available: Do
Select whether to open a Citrix ICA session automatically or not when your SC-T45 is started
up.
Nothing, Restart Application, Reboot, and Shutdown.
Option Description
Do Nothing Returns to the Windows Embedded desktop.
Restart Application Opens a Citrix ICA session again.
Reboot Restarts your thin client.
Shutdown Turns off your thin client.
Application Sub-tab
Window Settings
Item Description
Click the drop-down menu to select the desired color quality for a Citrix ICA session. Three
options are available: No preference, Better Speed (16-bit), and Better Appearance (32-
bit).
Option Description
Requested Color Quality
Window Size
Device Mapping
Item Description
No preference No preference for a specic color quality.
Better Speed (16-bit)
Better Appearance (32-bit)
Click the drop-down menu to select the desired window size of a Citrix ICA session. Eight
options are available: Default, Seamless, Full Screen,
640 x 480, 800 x 600, 1024 x 768, 1280 x 1024, and 1600 x 1200.
Click the drop-down menu to enable/disable the mapping of the local drive(s) in
Mapping Local Drive
a Citrix ICA session. If Yes is selected, the locally attached drive(s) will become
available in launched Citrix ICA sessions through this connection.
Click the drop-down menu to enable/disable the mapping of the local serial
Mapping Local Serial Ports
device(s) in a Citrix ICA session. If Yes is selected, the locally attached serial
device(s) will become available in launched Citrix ICA sessions.
Click the drop-down menu to enable/disable the mapping of the local printer(s) in
Mapping local Printers
a Citrix ICA session. If Yes is selected, the locally attached printer(s) will become
available in launched Citrix ICA sessions through this connection.
The 16-bit color quality is used for better display
speed.
The 32-bit color quality is used for better desktop
appearance.
62
Page 72

Connection Settings
Item Description
Conguring Client Settings
Conguring Service Access Settings
Network Protocol
Audio Quality
Click the drop-down menu to select the protocol(s) used for connection. Three options are
available: TCP/IP, TCP/IP + HTTP server location, and
SSL/TLS + HTTPS server location.
Click the drop-down menu to disable audio playback or choose the desired sound quality in a
Citrix ICA session.
Click the drop-down menu to disable audio playback or to congure the quality setting for
audio playback in a Citrix ICA session. Four options are available: High - high denition
audio, Medium - optimized for speech, Low - for low-speed connections, and Off.
Option Description
Allows endpoint devices to play a sound le at its
High - high denition audio
Medium - optimized for speech
Low - for low-speed connections
native data transfer rate. This is recommended
for connections where bandwidth is plentiful and
sound quality is important.
Compresses any sounds sent to endpoint
devices to a maximum of 64Kbps, resulting
in a moderate decrease in the quality of the
sound. This option is suitable for speeches and
recommended for most LAN-based connections.
Compresses any sounds sent to endpoint
devices to a maximum of 16Kbps, resulting
in a signicant decrease in the quality of the
sound. This option is suitable for low-bandwidth
connections, allowing reasonable audio
performance during a low-speed connection.
Encryption
Apply Windows key combinations
Off Disables audio playback in opened ICA sessions.
Click the drop-down menu to select the desired encryption method. Five options are
available: Basic, RC5 128 bit (login only), RC5 40 bit, RC5 56 bit,
RC5 128 bit.
Click the drop-down menu to select where to apply Windows key combinations. Three
options are available: On the local desktop, On the remote desktop, In full screen
desktops only.
63
Page 73

Conguring Client Settings
Conguring Service Access Settings
Settings for the Connection Type of Server Connection
NOTE
• For descriptions of available settings for the connection type of Web Interface,
please refer to “Settings for the Connection Type of Web Interface” on page 55.
• For descriptions of available settings for the connection type of XenDesktop,
please refer to “Settings for the Connection Type of XenDesktop” on page 57.
• For descriptions of settings for the connection type of XenApp, please refer to
“Settings for the Connection Type of XenApp” on page 61.
General Sub-tab
Server Settings
Item Description
Session Name Type in the name for Citrix ICA sessions.
This table only provides descriptions for available settings when
Server Connection is selected.
Four connection types are available:
Option Description
Connection Type
Sever Address
Username Type in the user/account name used for authentication.
Web Interface
XenDesktop Provides desktop delivery services.
XenApp Provides application delivery services.
Server Connection
Type in the IP address of the XenApp server.
NOTE: Server Connection only supports connections to XenApp servers.
Provides application, desktop, and content access
services through the interface of a Web browser
(Internet Explorer).
Provides full server access services for
administrators (XenApp servers only).
Password Type in the password of the user account used for authentication.
Type in the domain of the server.
Domain
NOTE: Type in the full computer/server name if the server doesn’t belong to any domain.
64
Page 74

Common Settings
Item Description
Conguring Client Settings
Conguring Service Access Settings
Autostart When Startup
On Application Exit Select what to do when a Citrix ICA session is ended. Four options are available: Do
Select whether to open a Citrix ICA session automatically or not when your SC-T45 is started
up.
Nothing, Restart Application, Reboot, and Shutdown.
Option Description
Do Nothing Returns to the Windows Embedded desktop.
Restart Application Opens a Citrix ICA session again.
Reboot Restarts your thin client.
Shutdown Turns off your thin client.
Application Sub-tab
Window Settings
Item Description
Click the drop-down menu to select the desired color quality for a Citrix ICA session. Three
options are available: No preference, Better Speed (16-bit), and Better Appearance (32-
bit).
Option Description
Requested Color Quality
Window Size
Device Mapping
Item Description
No preference No preference in a specic color quality.
Better Speed (16-bit)
Better Appearance (32-bit)
Click the drop-down menu to select the desired window size of a Citrix ICA session. Eight
options are available: Default, Seamless, Full Screen,
640 x 480, 800 x 600, 1024 x 768, 1280 x 1024, and 1600 x 1200.
Click the drop-down menu to enable/disable the mapping of the local drive(s) in
Mapping Local Drive
a Citrix ICA session. If Yes is selected, the locally attached drive(s) will become
available in launched Citrix ICA sessions through this connection.
Click the drop-down menu to enable/disable the mapping of the local serial
Mapping Local Serial Ports
device(s) in a Citrix ICA session. If Yes is selected, the locally attached serial
device(s) will become available in launched Citrix ICA sessions.
Click the drop-down menu to enable/disable the mapping of the local printer(s) in
Mapping local Printers
a Citrix ICA session. If Yes is selected, the locally attached printer(s) will become
available in launched Citrix ICA sessions through this connection.
The 16-bit color quality is used for better display
speed.
The 32-bit color quality is used for better desktop
appearance.
65
Page 75

Conguring Client Settings
Conguring Service Access Settings
Connection Settings
Item Description
Network Protocol
Audio Quality
Click the drop-down menu to select the protocol(s) used for connection. Three options are
available: TCP/IP, TCP/IP + HTTP server location, and
SSL/TLS + HTTPS server location.
Click the drop-down menu to disable audio playback or choose the desired sound quality in a
Citrix ICA session.
Click the drop-down menu to disable audio playback or to congure the quality setting for
audio playback in a Citrix ICA session. Four options are available: High - high denition
audio, Medium - optimized for speech, Low - for low-speed connections, and Off.
Option Description
Allows endpoint devices to play a sound le at its
High - high denition audio
Medium - optimized for speech
Low - for low-speed connections
native data transfer rate. This is recommended
for connections where bandwidth is plentiful and
sound quality is important.
Compresses any sounds sent to endpoint
devices to a maximum of 64Kbps, resulting
in a moderate decrease in the quality of the
sound. This option is suitable for speeches and
recommended for most LAN-based connections.
Compresses any sounds sent to endpoint
devices to a maximum of 16Kbps, resulting
in a signicant decrease in the quality of the
sound. This option is suitable for low-bandwidth
connections, allowing reasonable audio
performance during a low-speed connection.
Encryption
Apply Windows key combinations
Off Disables audio playback in opened ICA sessions.
Click the drop-down menu to select the desired encryption method. Five options are
available: Basic, RC5 128 bit (login only), RC5 40 bit, RC5 56 bit,
RC5 128 bit.
Click the drop-down menu to select where to apply Windows key combinations. Three
options are available: On the local desktop, On the remote desktop, In full screen
desktops only.
66
Page 76

Conguring Client Settings
Conguring Service Access Settings
3.5.9 Conguring VMware View Connection Settings
The VMware View setting enables you to congure View connection settings for VMware View desktop
services and create desktop shortcuts for service access. You can access on-demand desktop services for
work simply by double clicking on the shortcut.
NOTE
• For more information on VMware desktop virtualization solutions, please visit
VMware website at www.vmware.com.
NOTE
• The following sections will guide you through the steps of creating your own
service access shortcuts on the desktop.
To quickly congure VMware View connection settings, please do the following:
1. On ViewSonic Client Setup, click Applications > VMware View.
2. The View Connection list appears in the Conguration area.
NOTE
• If you haven’t create any entry for View connections, the View Connection list
will be empty.
67
Page 77

Conguring Client Settings
Conguring Service Access Settings
3. Click Add on the top of the View Connection list to add a new entry of View connection.
4. Type in the desired session name, and then click Save to conrm.
NOTE
• This is the only required eld for the creation of a service access shortcut on
the desktop. Other data can be provided during the period of service access.
Depending on your needs, you might choose to type in more other data.
5. The new entry is added to the View Connection list and the access shortcut is automatically created
on the desktop.
68
Page 78

Conguring Client Settings
Conguring Service Access Settings
3.5.10 Accessing VMware View Services
To access VMware View services, please do the following:
1. Double click the created (customized) access shortcut on the desktop.
2. Type in the computer name or IP address of the View Connection Server, and then click Connect.
3. A window may appear with a certicate message about the server. Click Continue to go on.
4. A window may appear with a custom message for users. Click OK to continue.
5. Enter your credentials, and then click Login.
69
Page 79

Conguring Client Settings
Conguring Service Access Settings
6. A window appears with available desktops for the provided credentials.
7. Click the desired desktop, and then click the Display drop-down menu to select the desired display
size. Five options are available: Full Screen, Multimonitor, Window - Large, Window - Small, and
Custom.
8. Click Connect to launch the service.
Desktop Example: Windows 7 in Small Display Size
70
Page 80

Conguring Client Settings
Conguring Service Access Settings
3.5.11 Conguring Advanced View Connection Settings
The table below provides a description of each setting item for View connections. Please refer to this table to
congure advanced settings and customize your SC-T45 desktop shortcuts for service access.
General Sub-tab
Server Settings
Item Description
Session Name Type in the name for VMware View sessions.
Type in the computer name or IP address of the View Connection Server.
Connection Server
Port
Use secure connection (SSL) Check/Uncheck to enable/disable secure connection.
Login Settings
Item Description
Log in as current user
User Name Type in the user name for authentication.
Password Type in the password for authentication.
Domain Name Type in the domain name of the View Connection Sever.
Desktop Name
NOTE: For more information on View Connection Sever, please visit VMware website at
www.vmware.com.
Type in the port number used to communicate with the View Connection Server. To use the
default value, simply leave it blank.
Check to log in VMware View services with the current user credentials. When checked, the
User Name, Password, and Domain Name elds will be grayed out.
Type in the desktop name. Or, leave it blank for users to select one.
NOTE: If Manual is selected for the Display Protocol eld below, this eld will be grayed out.
Click the drop-down menu to select the display protocol. Three options are available:
Manual, Microsoft RDP, and PCoIP.
Display Protocol
Option Description
Manual Manually select the desired display protocol.
Microsoft RDP Use Microsoft RDP as the display protocol.
PCoIP Use VMware PCoIP as the display protocol.
71
Page 81

Conguring Client Settings
Conguring Service Access Settings
Common Settings
Item Description
Autostart When Startup
On Application Exit Select what to do when a VMware View session is ended. Four options are available: Do
Select whether to open a VMware View session automatically or not when your SC-T45 is
started up.
Nothing, Restart Application, Reboot, and Shutdown.
Option Description
Do Nothing Returns to the Windows Embedded desktop.
Restart Application Opens a VMware View session again.
Reboot Restarts your thin client.
Shutdown Turns off your thin client.
Application Sub-tab
Window Settings
Item Description
Click the drop-down menu to select the desired display size of a View desktop. Five options
are available: Full Screen, Multi Monitor, Large Window,
and Small Window.
Display
Option Description
Full Screen Opens the selected View desktop in full screen.
Multi Monitor Opens the selected View desktop in multiple displays.
Large Window Opens the selected View desktop in a large window.
Small Window Opens the selected View desktop in a small window.
72
Page 82

Conguring Client Settings
Conguring Service Access Settings
3.5.12 Conguring Web Browser Settings
The Web Browser setting item allows you to congure general or specic browser session settings.
Conguring General Browser Session Settings
To congure general browser session settings, please do the following:
1. On ViewSonic Client Setup, click Applications > Web Browser > Global Setting.
2. Refer to the table below to set up home page, proxy, and automatic conguration settings, and then
click Save to apply.
Basic Settings
Item Description
Home Page Type in the URL of a Web page for quick access via the Home button.
Proxy Settings
Item Description
Use a proxy server for your LAN Check to use a proxy server in your local area network.
HTTP Proxy Server Type in the IP address of the proxy server.
HTTP Proxy Port Type in the communication port of the proxy server.
No Proxy For Type in the IP address(es) to bypass the proxy server.
73
Page 83

Conguring Client Settings
Conguring Service Access Settings
Automatic Configuration
Item Description
Automatically detect settings Check to automatically detect browser settings.
Use automatic conguration script Check to allow automatic conguration and indicate the IP address where a conguration le
Address Type in the IP address when Use automatic conguration script is selected.
is located.
Conguring Specic Browser Session Settings
To congure specic browser session settings and create a desktop shortcut, please do the following:
TIP
• You can use this feature to create a desktop shortcut for a specic web page,
for example, your intranet home page.
1. On ViewSonic Client Setup, click Applications > Web Browser.
2. The Browser Session list appears in the Conguration area.
NOTE
• If you haven’t create any entry for browser sessions, the Browser Session list
will be empty.
74
Page 84

Conguring Client Settings
Conguring Service Access Settings
3. Click Add on the top of the Browser Session list.
4. On General sub-tab, type in the desired session name, the URL of the initial web page, and select
other settings if needed (refer to the table below for descriptions).
Common Settings
Item Description
Autostart When Startup
On Application Exit Select what to do when a browser session is ended. Four options are available: Do Nothing,
Select whether to open a browser session automatically or not when your SC-T45 is started
up.
Restart Application, Reboot, and Shutdown.
Option Description
Do Nothing Returns to the Windows Embedded desktop.
Restart Application Opens a browser session again.
Reboot Restarts your thin client.
Shutdown Turns off your thin client.
5. Click Save to conrm. The access shortcut is created automatically on the desktop.
75
Page 85

Conguring Client Settings
Changing the Display Language for your SC-T45
3.6 Changing the Display Language for your SC-T45
This section will guide you through the process of changing the display language for your SC-T45.
NOTE
• The installed version of Windows Embedded Standard 7 on your SC-T45
supports only single display language. You are not allowed to install multiple
language packs and switch between different display languages through
Control Panel.
However, you can change the default display language (English) to another
supported language if needed.
To change the display language for your SC-T45, please do the following:
1. Turn on your SC-T45.
2. The system will automatically log in to the Windows Embedded operating system using the default
standard user account.
NOTE
• There are two default user accounts for your Windows Embedded-based
system: one is the standard, the other administrative. The default credentials
are shown
as follows:
Type Account Name Password
Administrator Administrator Administrator
Standard user User User
• Every time when the system is started up, it will automatically log in to the
Windows Embedded operating system using the default standard user account
as indicated above.
76
Page 86

Conguring Client Settings
Changing the Display Language for your SC-T45
3. Log off the current User session, and then log in again with the Administrative account.
4. Click Start > All Programs > ViewSonic Client Setup to launch ViewSonic Client Setup.
5. On ViewSonic Client Setup, click System > FBWF, and then click the State drop-down menu
to select Disabled.
NOTE
• The FBWF (File-Based Write Filter) feature is enabled by factory default.
77
Page 87

Conguring Client Settings
Changing the Display Language for your SC-T45
6. Click Save to apply, and then restart your system for the change to take effect.
7. After system restart, log off the User session, and then log in again with the Administrative account.
8. Change to another display language by installing the language pack for that language. You can do this
through an external CD/DVD drive or USB ash drive.
• Connect an external CD/DVD drive to your SC-T45, and then insert the accompanying CD that
contains the desired language pack to the CD/DVD drive, or
• Copy the desired language pack from that CD to a USB ash drive, and then insert the ash drive
to your SC-T45.
9. Locate the desired language pack le (ZIP format) on the accompanying CD or your USB ash drive.
10. Right-click on the pack le, and then click Extract All on the pop-up menu.
11. Extract the pack le to a folder on the desktop or USB ash drive.
12. Locate Install on the folder, and then double-click it to execute.
78
Page 88

Conguring Client Settings
Changing the Display Language for your SC-T45
13. The installation of the selected language pack starts.
NOTE
• The installation may take about 20 minutes without obvious progress
messages displayed on the screen. Don’t turn off the system or double-click
Install repeatedly.
14. Upon completion, the system will restart twice automatically.
15. Log off the User session, and then log in again with the Administrative account.
16. Launch ViewSonic Client Setup and change FBWF to the default state (Enabled) if needed.
79
Page 89

Specications
Specications
ViewSonic SC-T45 thin client
Processor Intel® Cedar Trail dual-core 1.86 GHz
®
Chipset Intel
Memory 2 GB
Internal storage 4 GB for Windows Embedded Standard 7
Resolutions Up to 1920 x 1200
I/O interfaces Front:
Communications 1 x 10/100/1000Mb Ethernet
Power DC Power In: DC +12V, 3A
Operating system Windows Embedded Standard 7
Supported
Protocols
Management ViewSonic Client Setup
Security 1 x Kensington lock slot
Mount / Stand VESA mount kit / Stand, (W)68 x (H)10 x (D)111 mm
Dimensions (W)39.5 x (H)143 x (D)103 mm
Weight 450 g, including the dual-purpose stand/VESA mount kit
Environment Operating Temperature: 0° C ~ 35° C / 32° F ~ 95° F
NM10 (Graphics integrated)
Rear:
2 x USB 2.0
1 x Microphone
1 x Headphone
2 x USB 2.0
1 x RJ-45
1 x DVI-I
1 x VGA
1 x DC IN
Wi-Fi 802.11 b/g/n (optional)
External Power Adapter: AC 100-240V, 50/60Hz, 1A
Microsoft RDP with RemoteFX / Citrix ICA with HDX / VMware
PCoIP
Non-operating Temperature: -30° C ~ +60° C / -4° F ~ +140° F
Operating Humidity (Rh): 10% ~ 90%, non-condensation
Non-operating Humidity (Rh): 5% ~ 95%
80
Page 90

Other Information
Customer Support
For technical support or product service, see the table below or contact your reseller.
NOTE: You will need the product serial number.
Country/
Region
Australia/New
Zealand
Canada www.viewsonic.com
Europe www.viewsoniceurope.com www.viewsoniceurope.com/uk/support/call-desk/
Hong Kong www.hk.viewsonic.com T= 852 3102 2900 service@hk.viewsonic.com
India www.in.viewsonic.com T= 1800 266 0101 service@in.viewsonic.com
Korea www.kr.viewsonic.com T= 080 333 2131 service@kr.viewsonic.com
Latin America
(Argentina)
Latin America
(Chile)
Latin America
(Columbia)
Latin America
(Mexico)
Renta y Datos, 29 SUR 721, COL. LA PAZ, 72160 PUEBLA, PUE. Tel: 01.222.891.55.77 CON 10 LINEAS
Electroser, Av Reforma No. 403Gx39 y 41, 97000 Mérida, Yucatán. Tel: 01.999.925.19.16
Other places please refer to http://www.viewsonic.com/la/soporte/index.htm#Mexico
Latin America
(Peru)
Macau www.hk.viewsonic.com T= 853 2870 0303 service@hk.viewsonic.com
Middle East ap.viewsonic.com/me/ Contact your reseller service@ap.viewsonic.com
Puerto Rico &
Virgin Islands
Singapore/
Malaysia/
Thailand
South Africa ap.viewsonic.com/za/ Contact your reseller service@ap.viewsonic.com
United States www.viewsonic.com
Website
www.viewsonic.com.au
www.viewsonic.com/la/ T= 0800-4441185 soporte@viewsonic.com
www.viewsonic.com/la/ T= 1230-020-7975 soporte@viewsonic.com
www.viewsonic.com/la/ T= 01800-9-157235 soporte@viewsonic.com
www.viewsonic.com/la/ T= 001-8882328722 soporte@viewsonic.com
www.viewsonic.com/la/ T= 0800-54565 soporte@viewsonic.com
www.viewsonic.com
www.ap.viewsonic.com T= 65 6461 6044 service@sg.viewsonic.com
T = Telephone
F = FAX
AUS= 1800 880 818
NZ= 0800 008 822
T (Toll-Free)= 1-866-463-4775
T (Toll)= 1-424-233-2533
F= 1-909-468-3757
T= 1-800-688-6688 (English)
T= 1-866-379-1304 (Spanish)
F= 1-909-468-3757
T (Toll-Free)= 1-800-688-6688
T (Toll)= 1-424-233-2530
F= 1-909-468-3757
Email
service@au.viewsonic.com
service.ca@viewsonic.com
service.us@viewsonic.com
soporte@viewsonic.com
service.us@viewsonic.com
81
Page 91

Limited Warranty
ViewSonic® Thin Client
What the warranty covers:
ViewSonic warrants its products to be free from defects in material and workmanship during the warranty
period. If a product proves to be defective in material or workmanship during the warranty period, ViewSonic
will, at its sole option, repair or replace the product with a similar product. Replacement Product or parts may
include remanufactured or refurbished parts or components. The replacement unit will be covered by the
balance of the time remaining on the customer’s original limited warranty. ViewSonic provides no warranty
for the third-party software included with the product or installed by the customer.
How long the warranty is effective:
ViewSonic Thin Client products are warranted for (3) years from the rst consumer purchase for parts and
labor.
User is responsible for the back up of any data before returning the unit for service. ViewSonic is not
responsible for any data lost.
Who the warranty protects:
This warranty is valid only for the rst consumer purchaser.
What the warranty does not cover:
1. Any product on which the serial number has been defaced, modied or removed.
2. Damage, deterioration or malfunction resulting from:
a. Accident, misuse, neglect, re, water, lightning, or other acts of nature, unauthorized product
modication, or failure to follow instructions supplied with the product.
b. Any damage of the product due to shipment.
c. Removal or installation of the product.
d. Causes external to the product, such as electrical power uctuations or failure.
e. Use of supplies or parts not meeting ViewSonic’s specications.
f. Normal wear and tear.
g. Any other cause which does not relate to a product defect.
3. Any product exhibiting a condition commonly known as “image burn-in” which results when a static image
is displayed on the product for an extended period of time.
4. Removal, installation, one way transportation, insurance, and set-up service charges.
How to get service:
1. For information about receiving service under warranty, contact ViewSonic Customer Support (Please
refer to Customer Support page). You will need to provide your product’s serial number.
2. To obtain warranty service, you will be required to provide (a) the original dated sales slip, (b) your name,
(c) your address, (d) a description of the problem, and (e) the serial number of the product.
3. Take or ship the product freight prepaid in the original container to an authorized ViewSonic service center
or ViewSonic.
4. For additional information or the name of the nearest ViewSonic service center, contact ViewSonic.
Limitation of implied warranties:
There are no warranties, express or implied, which extend beyond the description contained herein including
the implied warranty of merchantability and tness for a particular purpose.
4.3: ViewSonic Thin Client Warranty Page 1 of 2 MC_LW01 Rev. 1a 09-02-11
82
Page 92

Exclusion of damages:
ViewSonic’s liability is limited to the cost of repair or replacement of the product. ViewSonic shall not be
liable for:
1. Damage to other property caused by any defects in the product, damages based upon inconvenience,
loss of use of the product, loss of time, loss of prots, loss of business opportunity, loss of goodwill,
interference with business relationships, or other commercial loss, even if advised of the possibility of
such damages.
2. Any other damages, whether incidental, consequential or otherwise.
3. Any claim against the customer by any other party.
4. Repair or attempted repair by anyone not authorized by ViewSonic.
Effect of state law:
This warranty gives you specic legal rights, and you may also have other rights which vary from state
to state. Some states do not allow limitations on implied warranties and/or do not allow the exclusion of
incidental or consequential damages, so the above limitations and exclusions may not apply to you.
Sales outside the U.S.A. and Canada:
For warranty information and service on ViewSonic products sold outside of the U.S.A. and Canada, contact
ViewSonic or your local ViewSonic dealer.
The warranty period for this product in mainland China (Hong Kong, Macao and Taiwan Excluded) is subject
to the terms and conditions of the Maintenance Guarantee Card.
For users in Europe and Russia, full details of warranty provided can be found in www.viewsoniceurope.com
under Support/Warranty Information.
4.3: ViewSonic Thin Client Warranty Page 2 of 2 MC_LW01 Rev. 1a 09-02-11
83
Page 93

 Loading...