

Page 1

SC-T25 (VTOS)
Thin Client
User Guide
Model No. VS16585
Page 2

2
Thank you for choosing ViewSonic
As a world leading provider of visual solutions, ViewSonic is dedicated to
exceeding the world’s expectations for technological evolution, innovation,
and simplicity. At ViewSonic, we believe that our products have the
potential to make a positive impact in the world, and we are confident that
the ViewSonic product you have chosen will serve you well.
Once again, thank you for choosing ViewSonic !
Page 3

3
Compliance Information
FCC Statement
This device complies with Part 15 of the FCC Rules. Operation is subject to the
following two conditions:
1. This device may not cause harmful interference.
2. This device must accept any interference received, including interference that
may cause undesired operation.
Note: This equipment has been tested and found to comply with the limits for
a Class A digital device, pursuant to Part 15 of the FCC Rules. These limits are
designed to provide reasonable protection against harmful interference when the
equipment is operated in a commercial environment. This equipment generates,
uses, and can radiate radio frequency energy, and if it is not installed and used
in accordance with the instruction manual, it may cause harmful interference to
radio communications. Operation of this equipment in a residential area is likely to
cause harmful interference, in which case the user will be required to correct the
interference at his own expense
Warning: You are cautioned that changes or modications not expressly approved
by the party responsible for compliance could void your authority to operate the
equipment.
For Canada
CAN ICES-3 (A)/NMB-3(A)
Page 4

4
Important Safety Instructions
1. Read these instructions completely before using the equipment.
2. Keep these instructions in a safe place.
3. Heed all warnings.
4. Follow all instructions.
5. Do not use this equipment near water. Warning: To reduce the risk of re or
electric shock, do not expose this apparatus to rain or moisture.
6. Do not block any ventilation openings. Install the equipment in accordance with
the manufacturer’s instructions.
7. Do not install near any heat sources such as radiators, heat registers, stoves, or
other devices (including ampliers) that produce heat.
8. Do not attempt to circumvent the safety provisions of the polarized or grounding-
type plug. A polarized plug has two blades with one wider than the other. A
grounding type plug has two blades and a third grounding prong. The wide blade
and the third prong are provided for your safety. If the plug does not t into your
outlet, consult an electrician for replacement of the outlet.
9. Protect the power cord from being tread upon or pinched, particularly at the plug,
and the point where if emerges from the equipment. Be sure that the power
outlet is located near the equipment so that it is easily accessible.
10. Only use attachments/accessories specied by the manufacturer.
11. Use only with the cart, stand, tripod, bracket, or table specied by the
manufacturer, or sold with the equipment. When a cart is used, use
caution when moving the cart/equipment combination to avoid injury from tipping
over.
12. Unplug this equipment when it will be unused for long periods of time.
13. Refer all servicing to qualied service personnel. Service is required when the
unit has been damaged in any way, such as: if the power-supply cord or plug is
damaged, if liquid is spilled onto or objects fall into the unit, if the unit is exposed
to rain or moisture, or if the unit does not operate normally or has been dropped.
14. Do not remove equipment covers and access any of the components inside the
equipment. Any access inside the equipment without an authorized or certied
technician may cause serious injuries and damage. For any problem, contact
your dealer for assistance.
15. Don’t use a keyboard and mouse that in total require more than 200 mA of rated
current during operation.
16. Use only power supplies listed in the user instructions.
Page 5

5
Declaration of RoHS2 Compliance
This product has been designed and manufactured in compliance with Directive
2011/65/EU of the European Parliament and the Council on restriction of the use
of certain hazardous substances in electrical and electronic equipment (RoHS2
Directive) and is deemed to comply with the maximum concentration values issued
by the European Technical Adaptation Committee (TAC) as shown below:
Substance
Proposed Maximum
Concentration
Actual Concentration
Lead (Pb) 0.1% < 0.1%
Mercury (Hg) 0.1% < 0.1%
Cadmium (Cd) 0.01% < 0.01%
Hexavalent Chromium (Cr6+) 0.1% < 0.1%
Polybrominated biphenyls (PBB) 0.1% < 0.1%
Polybrominated diphenyl ethers
(PBDE)
0.1% < 0.1%
Certain components of products as stated above are exempted under the Annex III
of the RoHS2 Directives as noted below:
Examples of exempted components are:
1. Mercury in cold cathode uorescent lamps and external electrode uorescent
lamps (CCFL and EEFL) for special purposes not exceeding (per lamp):
(1) Short length (≦500 mm): maximum 3.5 mg per lamp.
(2) Medium length (>500 mm and ≦1,500 mm): maximum 5 mg per lamp.
(3) Long length (>1,500 mm): maximum 13 mg per lamp.
2. Lead in glass of cathode ray tubes.
3. Lead in glass of uorescent tubes not exceeding 0.2% by weight.
4. Lead as an alloying element in aluminium containing up to 0.4% lead by weight.
5. Copper alloy containing up to 4% lead by weight.
6. Lead in high melting temperature type solders (i.e. lead-based alloys containing
85% by weight or more lead).
7. Electrical and electronic components containing lead in a glass or ceramic other
than dielectric ceramic in capacitors, e.g. piezoelectronic devices, or in a glass or
ceramic matrix compound.
Page 6

6
Copyright Information
Copyright © ViewSonic Corporation, 2017. All rights reserved.
ViewSonic, the three birds logo, and MultiClient are either registered trademarks or
trademarks of ViewSonic Corporation.
Microsoft
®
, Windows®, and MultiPoint™ are trademarks of the Microsoft group of
companies.
Product Registration
To meet your future needs, and to receive any additional product information as it
becomes available, please register your product on the Internet at: www.viewsonic.
com.
For Your Records
Product Name:
Model Number:
Document Number:
Serial Number:
Purchase Date:
SC-T25
ViewSonic Thin Client
VS16585
SC-T25_UG_ENG Rev. 1B 04-14-17
_______________________________
_______________________________
Product disposal at end of product life
ViewSonic respects the environment and is committed to working and living green.
Thank you for being part of Smarter, Greener Computing. Please visit ViewSonic
website to learn more.
USA & Canada: http://www.viewsonic.com/company/green/recycle-program/
Europe: http://www.viewsoniceurope.com/eu/support/call-desk/
Taiwan: http://recycle.epa.gov.tw/recycle/index2.aspx
Page 7

7
Contents
Connection Instructions: ...............................................................................1
1. Introduction ..............................................................................................2
2. VTOS management .............................................................................2
3. VTOS boot up & quick start tips below ......................................3
4. Local Keyboard Short Cuts ..............................................................4
5. Audio tips for the SC-T25 and Citrix HDX .................................7
6. Configure: Device ...............................................................................13
7. Configure: Displays ...........................................................................14
8. Configure: Servers .............................................................................17
9. Configure: Network ............................................................................19
10. Configure: Application .....................................................................20
12. FAQ ............................................................................................................32
Specifications ....................................................................................................45
Other Information .............................................................................................46
Page 8
1
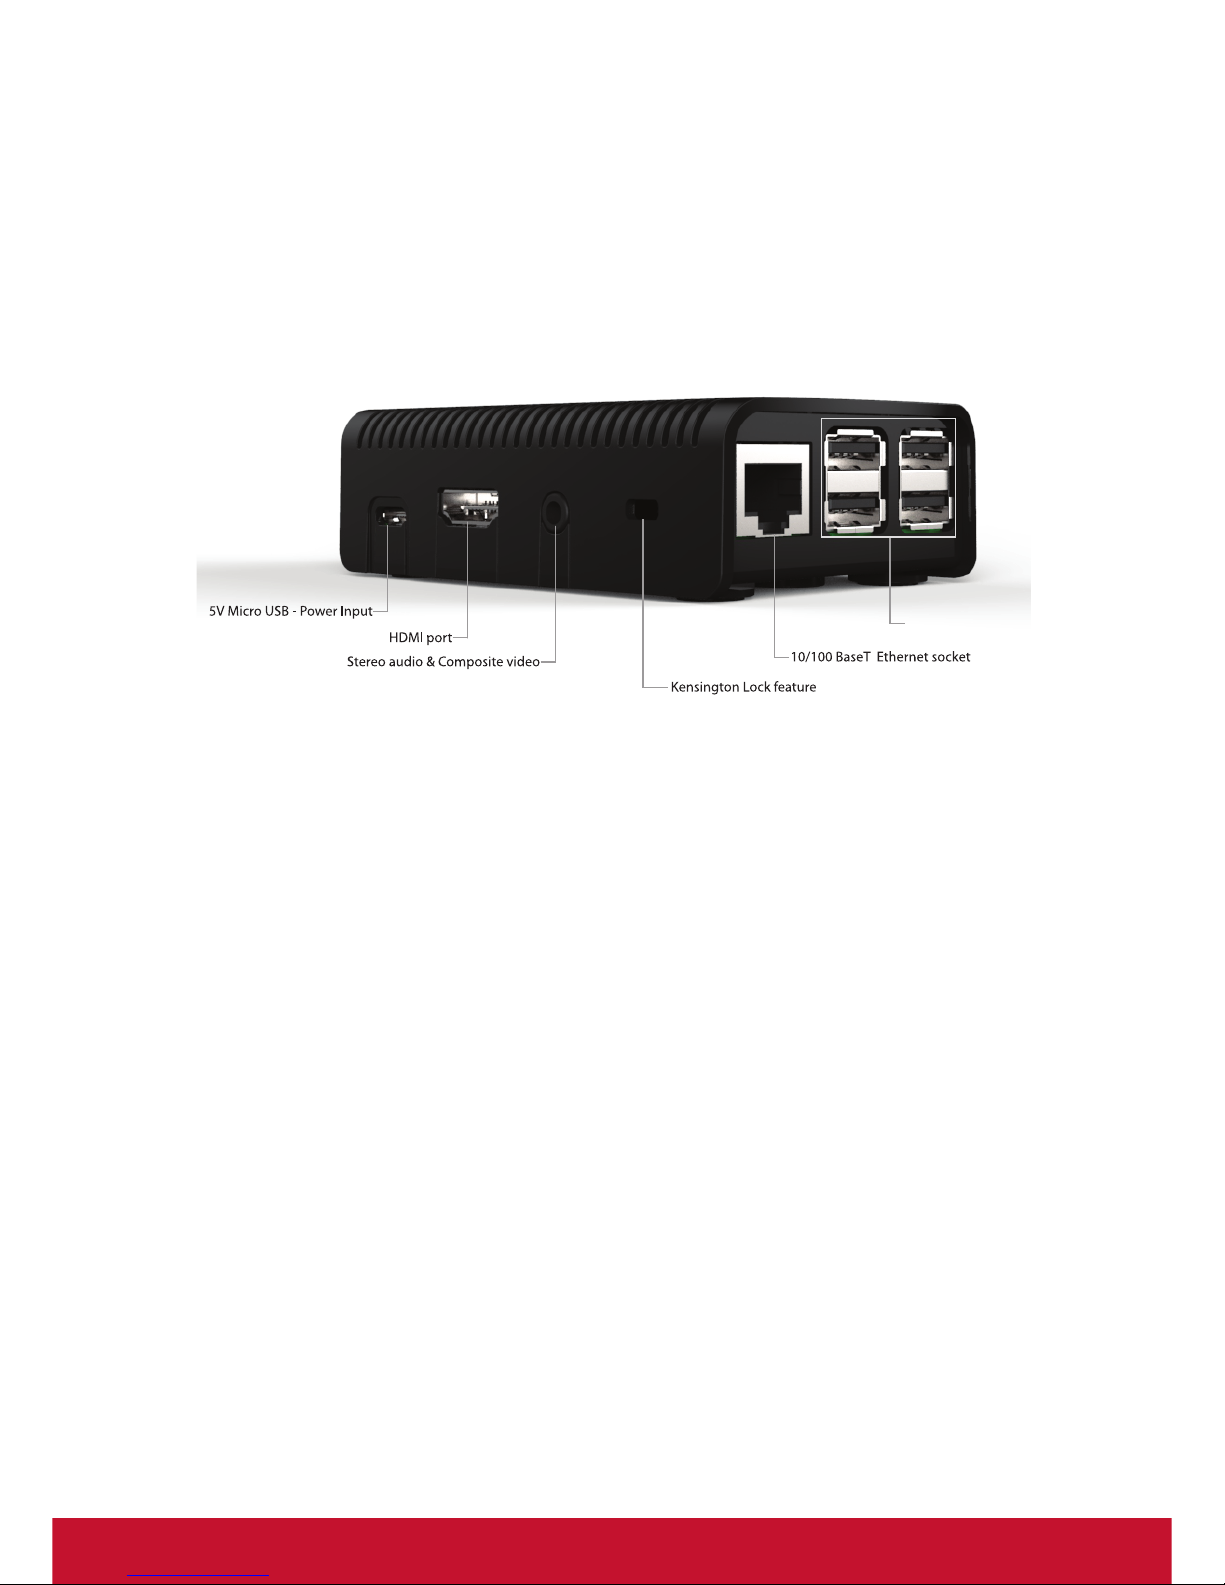
Connection Instructions:
Step 1: Connect to Network with Ethernet Cable to Ethernet Jack (Cable not
supplied)
Step 2: Connect Keyboard & Mouse into USB port (Not supplied)
Step 3: Connect to monitor via HDMI to HDMI socket (Cable not supplied)
Step 4: Plug-in power to micro-USB, use Power Adapter supplied.
*At boot up, follow the on screen instructions to congure your device.
SC-T25
Quick Start Guide
1
4 USB Ports
* Need some type of 3.5mm to
Plug-in power to micro-USB, use Power Adapter supplied
*Audio cable or headphones not included
Your SC-T25 is equipped with the LED to indicate the state of power and internal
storage.
The meanings of LED signals are described: LED Off(The client is off) / Red(The
client is on) / Activity Green( Internal Storage Activity)
NOTE: Please use the power adaptor from ViewSonic
®
or authorized source only.
(DSA-13PFC-05 FCA and DSA-13PFC-05-FUS)
Page 9

2
1. Introduction
VTOS has been optimized to deliver maximum Thin Client performance by using
Assembly Language routines and making full use of any integrated H.264 Hardware
decoders where possible.
An ARM Hard Float version of VTOS is available for the single Display SC-T25
delivering exceptional Citrix HDX performance at low cost.
A downloadable .exe installer for X86 Architecture VTOS RePC is used to create
a USB stick VTOS installer. Simply insert a 2GB or larger USB stick into the PC or
Laptop that you downloaded the .exe le to, then double click on the .exe installer
this will decompress the VTOS installer image and then write the image to the USB
stick. The newly created USB stick image also contains 4 text les which can be
edited before using the USB stick to install VTOS. The text les are mode.txt, proxy.
txt, vdm.txt & wireless.txt. See the self-explanatory information in each le.
The installation procedure for VTOS RePC is very simple, insert the USB stick into
the PC or Laptop to be Re-Purposed, boot up while tapping F10 to bring up the Boot
menu, select boot from USB.
A few seconds later the Blue ViewSonic Firmware Maintenance screen appears,
scroll down to the second choice “Wipe Everything and (Re) Install VTOS”, press
Enter
The installer will automatically detect the device’s storage and install VTOS
2. VTOS management
VTOS is managed with the ViewSonic Device Manager3.0 (VDM3.0) which may be
used for a variety of tasks, ranging from something as simple as rebooting a VTOS
device, to upgrading the device with the latest VTOS software. VDM3.0 runs on
Windows and Linux and supports all VTOS devices.
Page 10
3
3. VTOS boot up & quick start tips below
During installation of the X86 version of VTOS you have the option of selecting a
default Protocol for rst boot, this defaults to RDP if no option is chosen.
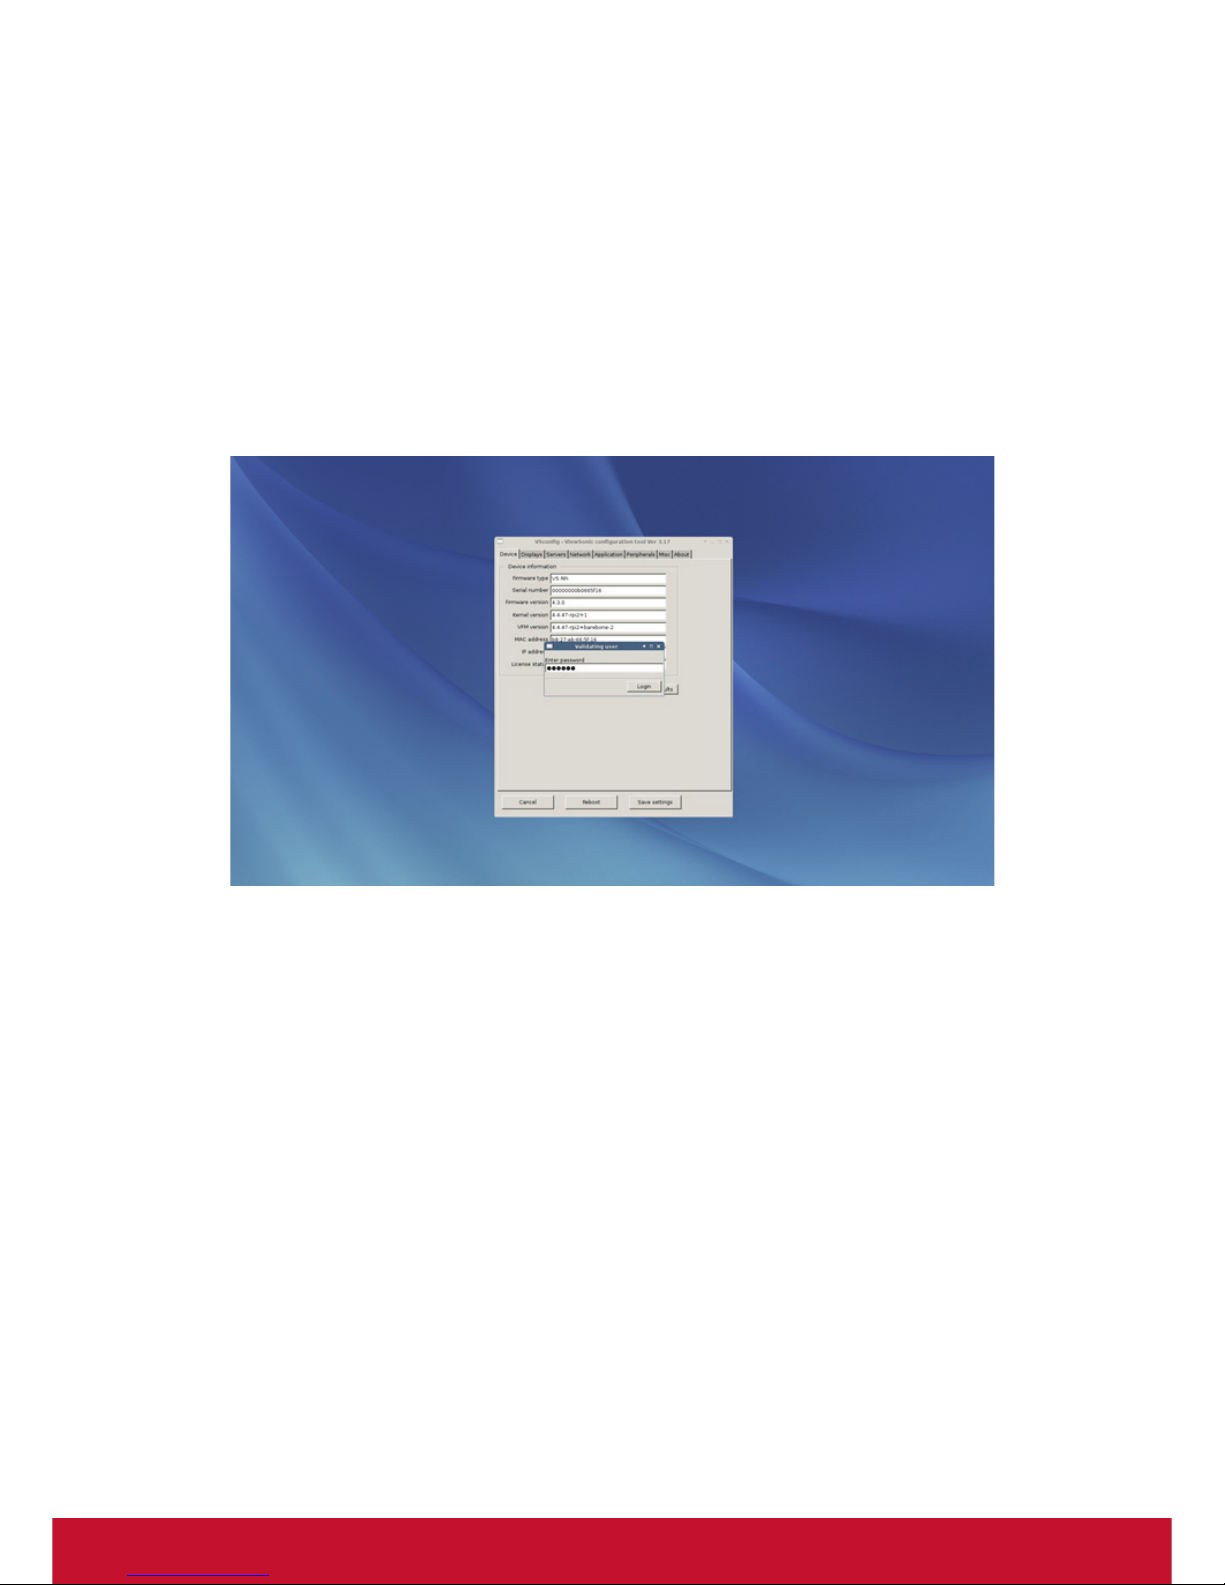
VTOS has the same look and feel regardless of the device that it is running on,
conguration may be carried out using VDM3.0 or the local Conguration menu
which is selected by clicking on the Congure Tab. The local Conguration menu can
be disabled by the Administrator setting a Password from the VDM3.0 console or a
password can be set on Vscong -> Misc Tab
The image below shows a password protected Vscong Conguration Menu
Password Required
Page 11
4
4. Local Keyboard Short Cuts
• Ctrl + Alt + c — launches Vsconfig
• Ctrl + Alt + t — launches a terminal console
Page 12
5
• Ctrl + Alt + d — switches desktop workspace
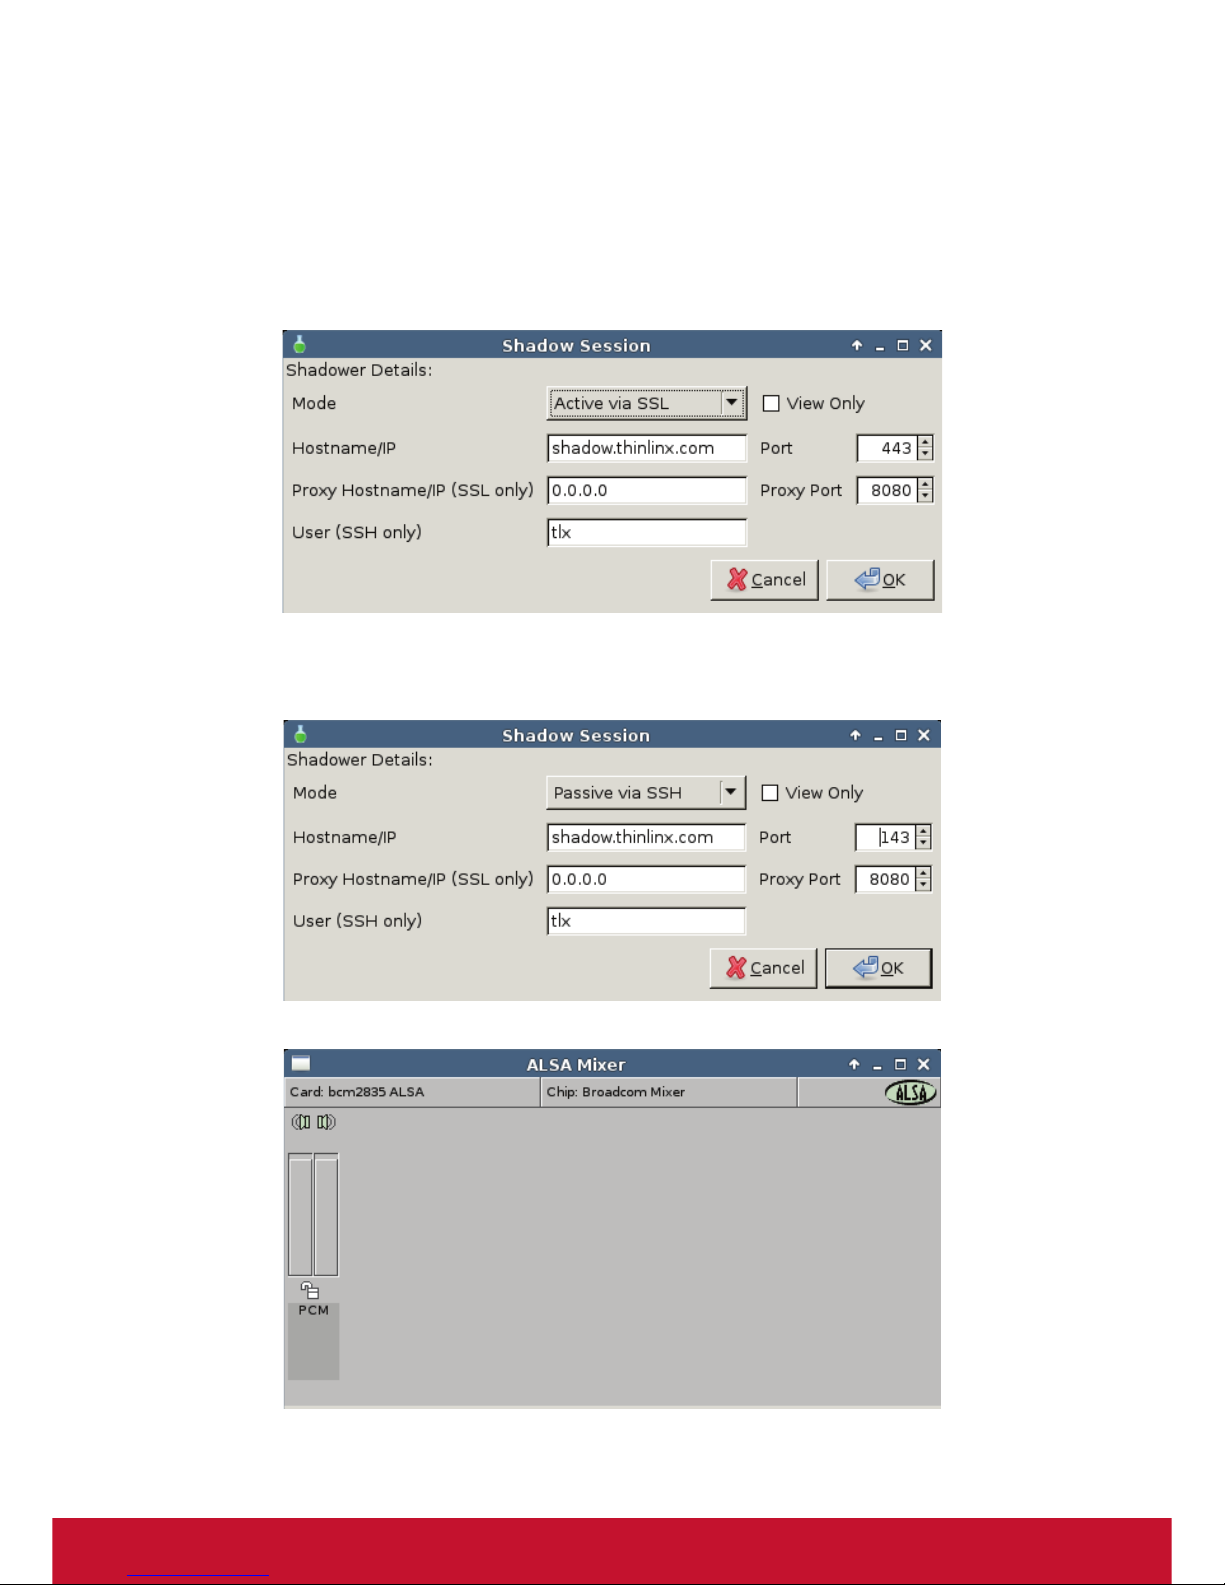
• Ctrl + Alt + s — enables shadowing mode using VNC. Two modes are available
the default “Active” mode, the end user just clicks on OK and their Desktop
session appears on the “Shadower” as defined by the Hostname/IP in the
dialog box below. The end user may select the View Only checkbox to restrict
the Administrator to View only, not allowing the Administrator to manipulate the
Desktop.
The end user may be instructed by the Administrator to change the Shadow Mode to
Passive via SSH, in this case the Port must also be changed from the default 443 to
143
• Ctrl + Alt + v — launches the ALSA mixer for Audio adjustments
Page 13
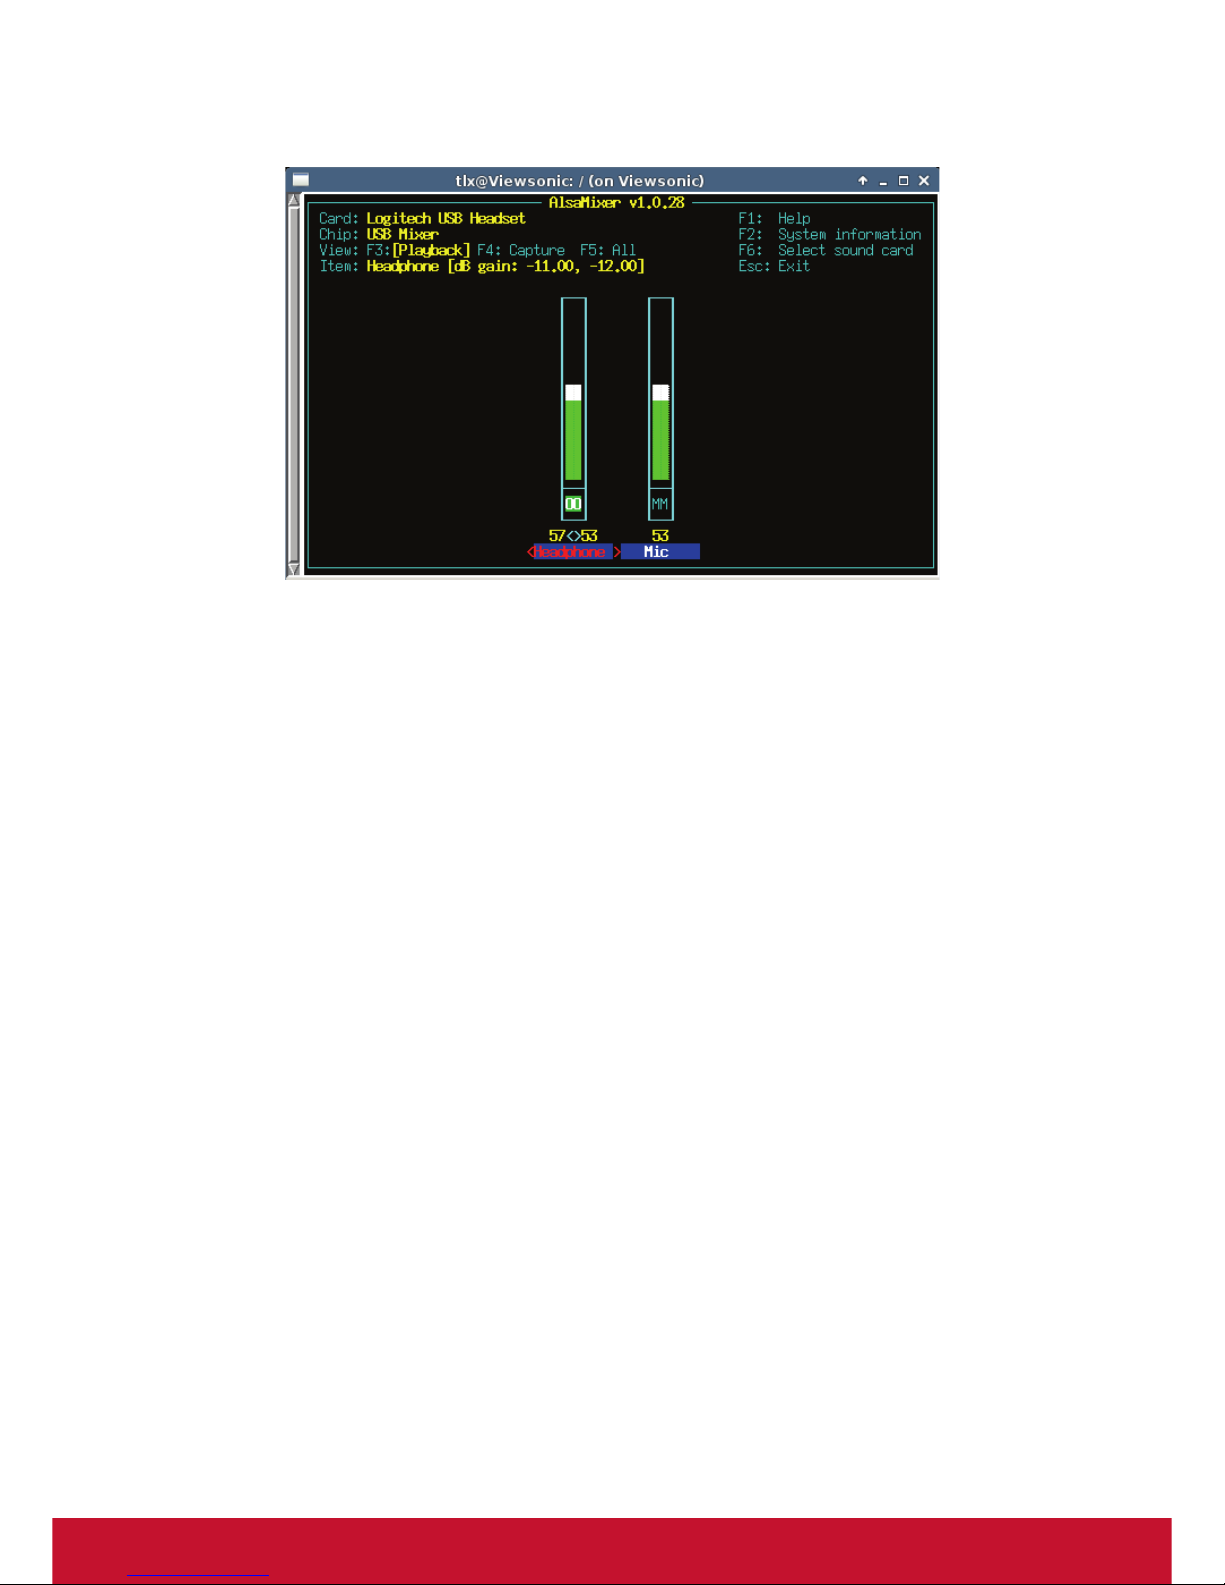
6
You can also open an xterm with Ctrl-Alt-t and then enter alsamixer to set volumes
Page 14
7
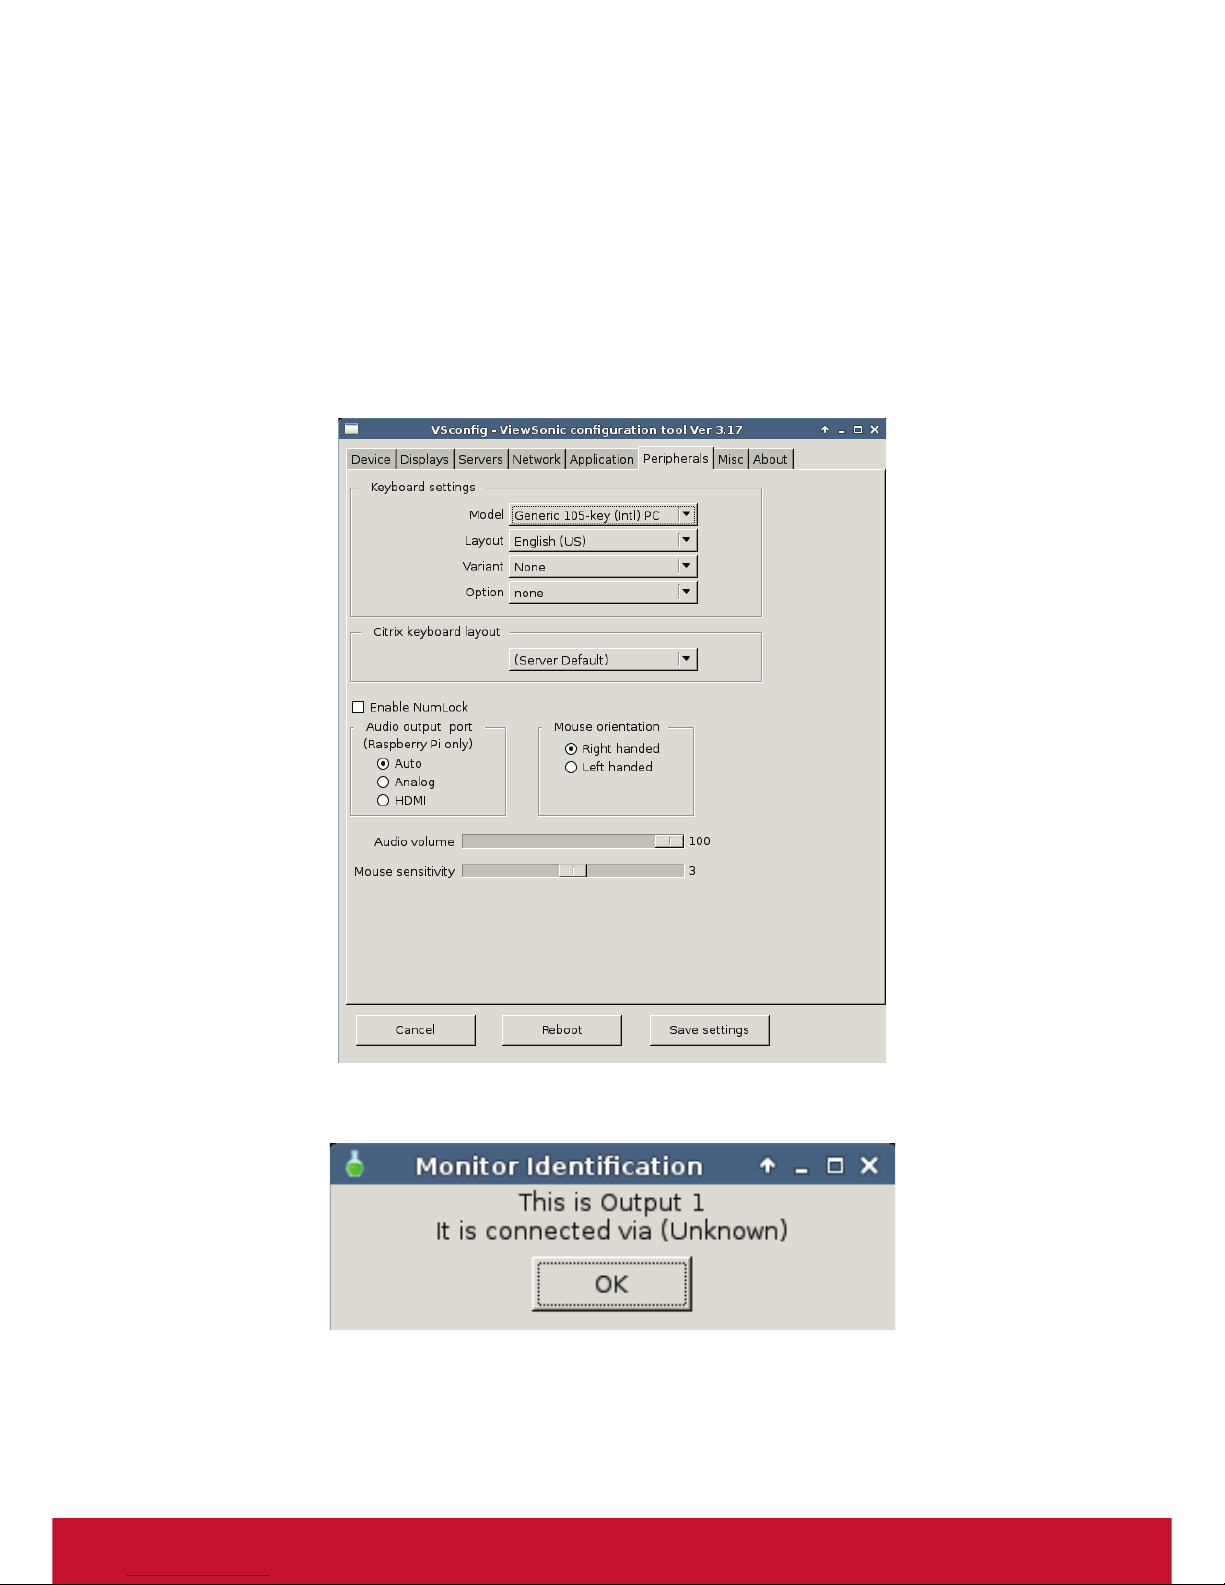
5. Audio tips for the SC-T25 and Citrix HDX
If you wish to use a USB audio device or USB Headset please ensure that you plug
them in before starting the SC-T25 (or reboot after plugging in Devices).
You also need to set the USB Audio Headset & Microphone default volume before
you Log into the HDX session using Ctrl-Alt-v as above. Alternatively you can
open an xterm with Ctrl-Alt-t and then enter alsamixer to set volumes If you are not
using USB audio devices you may set the default audio volume using the Vscong
Peripherals Tab. On the SC-T25 only you can also force either HDMI audio output or
Analog audio output.
• Ctrl + Alt + r — invoked twice in 2 seconds to reset image to factory default
• Ctrl + Alt + i — launches the Monitor identification, useful for 2 or 3 Monitors
Page 15

8
Depending on your conguration, the default log out screen looks like the image
below.
Logged Out
Login
Page 16
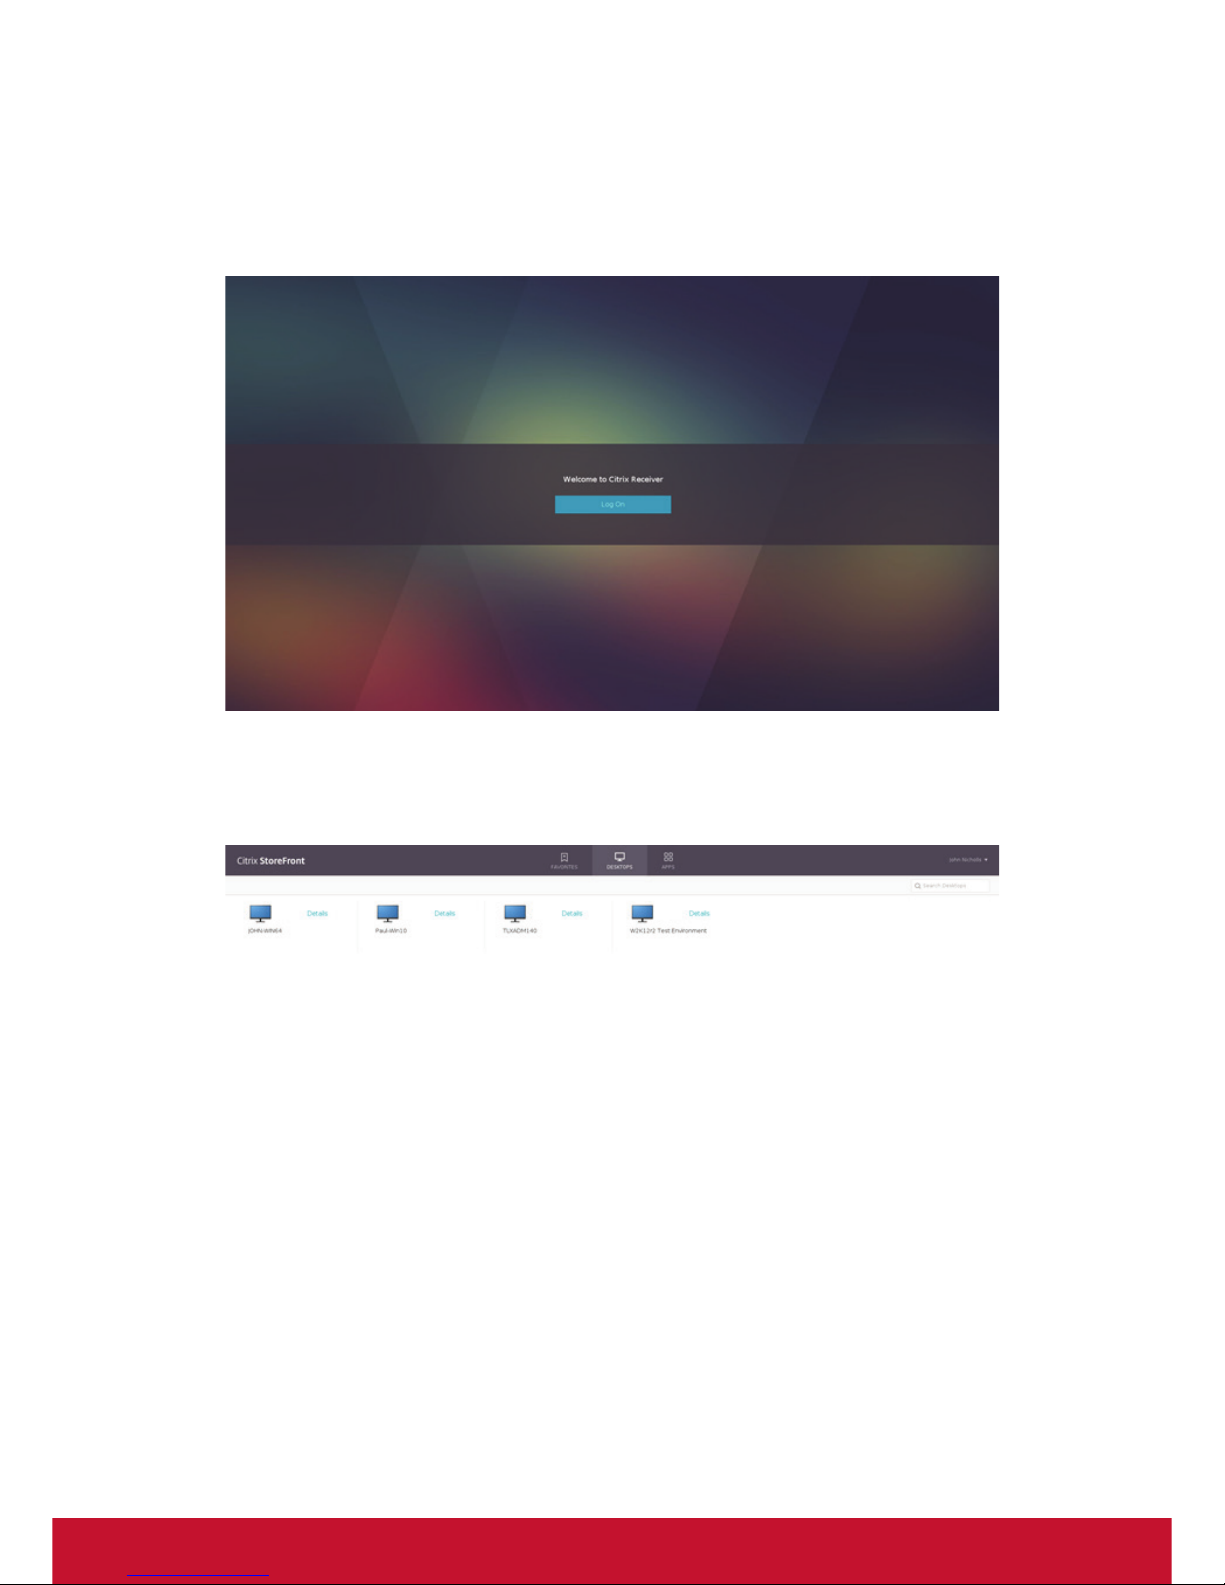
9
In the image above, Citrix HDX mode has been congured to connect to Citrix
Storefront at https://xendesktop.thinlinx.com If I enter my login details of john@
test in the User name dialog and my password I will be connected immediately to
my Citrix Storefront Login screen for the user john at domain test, click on Log on to
enter Storefront
I am now logged into Storefront and can launch Desktops or Apps by clicking on
the Icons shown below. When I log out of the Desktop or App I am returned to
the Storefront as shown below. If I click in the top right corner and select Log off
Storefront, I see the screen further below
Page 17

10
If I then enter the name of the Desktop in the Command line arguments box in the
image below, in this case Windows10, instead of connecting to Storefront when I
click on Log ON my Windows 10 Desktop is launched instead. When I Log out of my
Windows 10 Desktop I see the Logged Out image on page 8 above. I can lock down
the Desktop by selecting the Auto reconnect check box shown in the image below.
In this case when I Log out of my Desktop I see the empty Login Screen shown on
Page 10 above
Page 18

11
In the image below I have congured Auto Login by clicking the Auto login dialog
box and entering my Login details, the boot time to logged into my Desktop with
this conguration is approximately 30 seconds from power on. When I log out of my
Desktop I see the Logged Out image on Page 8 above. If I click on New Session
I am logged back into my Desktop again, I do NOT see storefront at any time. If I
want to just Auto Log into Storefront on each boot up, I just remove the Windows10
Desktop name in the Command line arguments box below.
Page 19

12
Click on the Congure Tab to open the Vscong dialog box which is shown below,
you will notice Eight Tabs, Device, Displays, Servers, Network, Application,
Peripherals, Misc and About. The Administrator is able to set a Vscong password
using VDM3.0 to lock out any local conguration changes by disabling access to
Vscong without the correct Password (as shown on Page 2 in this document)
Page 20

13
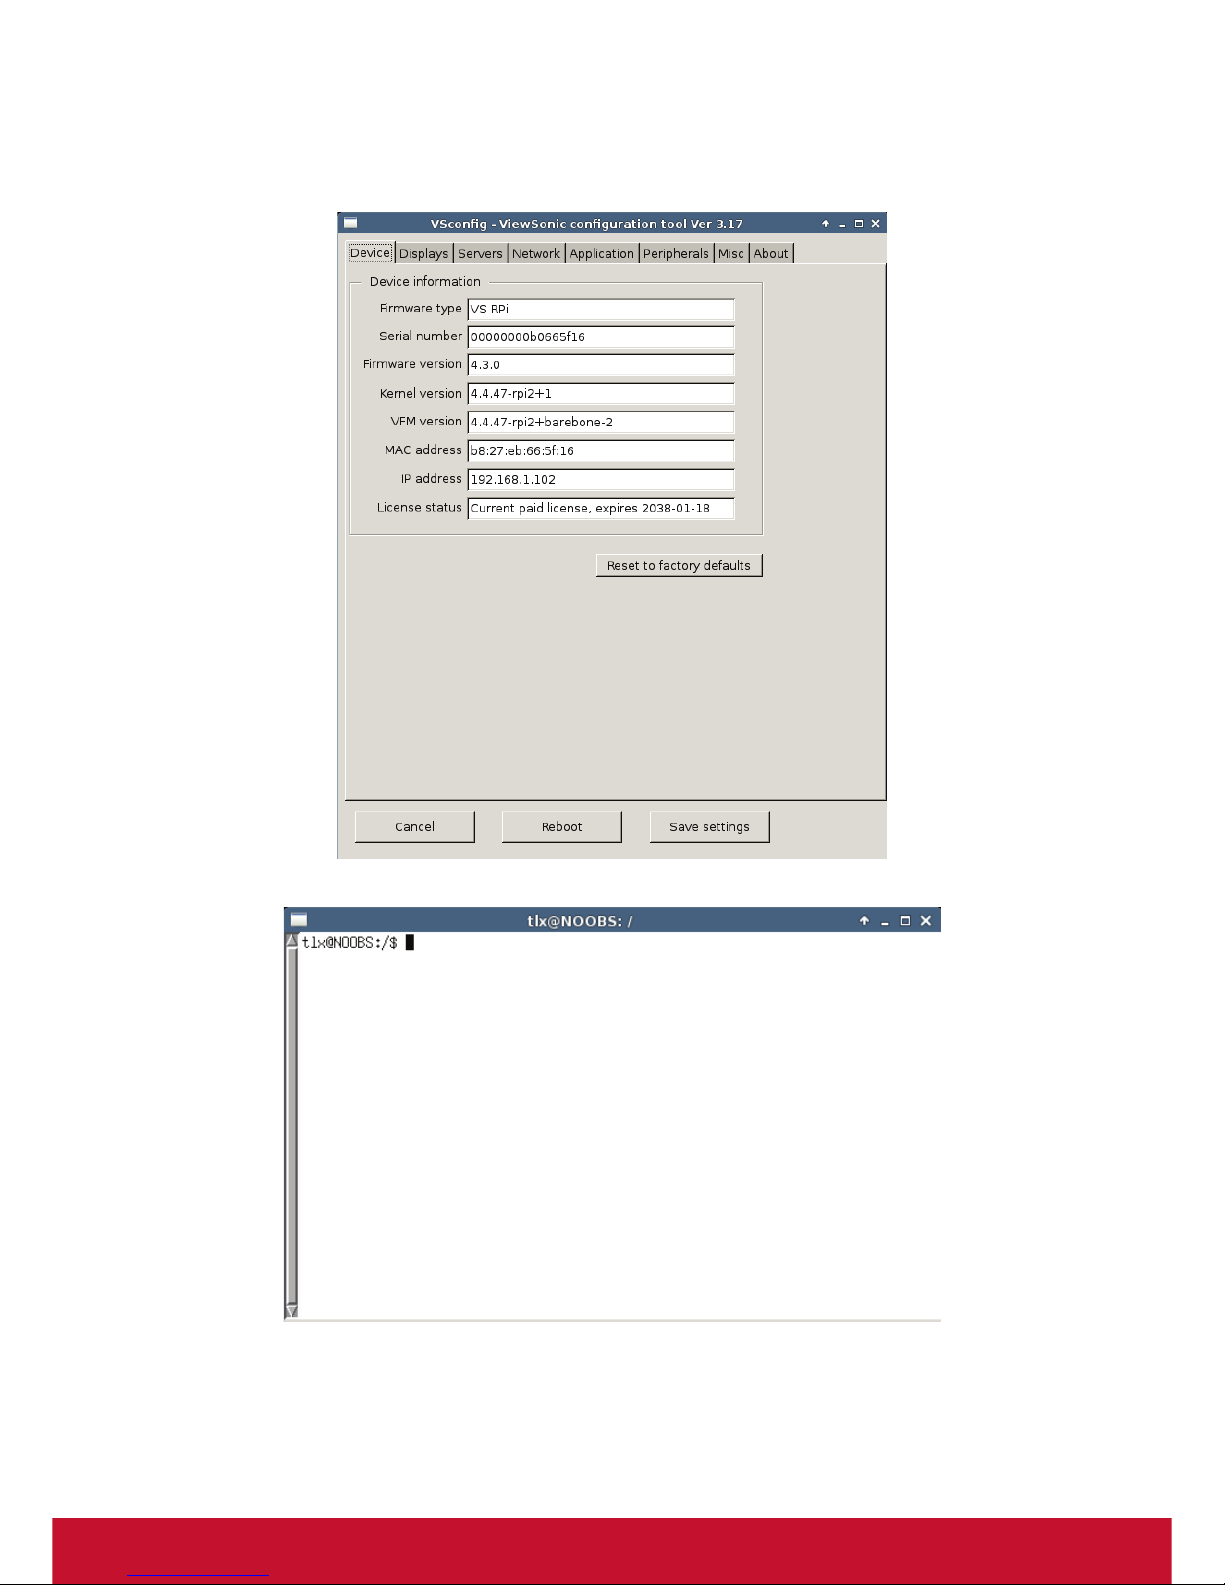
6. Configure: Device
Firmware Type which is currently one of three different variations for different
devices.
TLX SC-T25 is our SC-T25 release, TLX NUC32 is our 32-Bit Intel Small Form
Factor release optimized for the Intel NUC series, and Phoenix PC is our generic 32bit X86 release for the Re-Purpose PC & Laptop Market.
Serial number is the Hardware Serial number
Firmware version, in this example the Firmware release is version 4.3.0
Kernel version, in this example the Linux Kernel is 4.4.47-SC-T252+
VFM version, in this example the ViewSonic Firmware Maintenance version is Linux
Kernel 4.4.47-SC-T252+barebone-1
MAC address of the active Network interface
IP address of the Device
License status, is shown as paid
Reset to factory defaults will erase any conguration changes and reset VTOS to
the installation factory default.
Page 21

14
7. Configure: Displays
The Displays Tab is shown below, in this example a Single display has been
congured, the default is to auto detect and auto congure the display which
normally results in a display congured for the native resolution of the attached
monitor.
The Video mode default is Clone which results in a Mirror Image on the second and
or third displays
The Orientation defaults to Landscape but may be switched to Portrait which is
useful for some Digital Signage displays
The SC-T25 valid resolutions are shown below, choose a matching resolution from
the drop down Resolution box. (Check that your Monitor actually supports the
resolution that you require)
800 x 600, 1024 x 768, 1280 x 720, 1280 x 960, 1280 x 1024, 1366 x 768,
1440 x 900, 1600 x 1200, 1680 x 1050, 1920 x 1080, 1920 x 1200
1920 x 1080 is also known as 1080p this is the default resolution on most Monitors
Page 22

15
In the example shown below Dual Displays have been congured, the Video mode is
set to Extend Desktop, Output 1 is set to None and Output 2 is set to Right of Output
1, Output 3 is set to None as any unused or non-existent Displays must be set to
None. The choices are Right of, Left of, Above, Below or None. The Referent value
can be any of the other two Outputs, this choice will not appear until you set the
Position. The Position option for Output 2 & 3 will not appear until Extend Desktop is
selected. The Orientation is either the default Landscape or Portrait, the resolution
can be selected from the drop down Resolution Tab. When conguring multiple
Monitors the Identify Monitors Tab can be a useful tool, especially when conguring
three Monitors.
Page 23

16
After making any changes click on Save settings, you must also do this before
pressing the Identify Monitors Tab.
Page 24

17
8. Configure: Servers
VDM3.0 Server Discovery, there are three methods for a VTOS device to discover
the location of the PC or Virtual Machine running VDM3.0. The default Auto setting,
can use all three methods, discovery order is DHCP Option ags, Static Assignment,
or UDP Broadcast.
1. (1) DHCP – Tick this check box to select DHCP only discovery, see the VDM3.0
user guide at the link below for more details on this discovery method
2. (2) Static - Tick this check box to select Static only discovery. For Static
discovery a default Hostname of “VDM3.0” has already been entered in the Static
and Auto Hostname dialog box. The advantage of this method of discovery is
the System Administrator can set a DNS CNAME by assigning “VDM3.0” to the
Hostname of the system running VDM3.0. No configuration is required at the
client as VTOS will be able to use DNS to resolve the “VDM3.0” Hostname and
the default Auto choice will use Static Discovery if DHCP options have not been
configured.
If you change the default 5808 Port number here you must also change the port
number on VDM3.0 under Edit Settings.
3. UDP Broadcast – Tick this check box to select UDP only discovery
Page 25

18
More details on these discovery methods are provided in the VDM3.0 User guide
Time Server, Set the Timezone and Time Server name
Enable PXE Server, this is used for PXE boot installations of RePC versions of
VTOS on many devices of the same class simultaneously, see the VDM3.0 user
guide for more information
Page 26

19
9. Configure: Network
The Network Tab is used to congure the Wired and or Wireless interfaces. The
default VTOS setting is Wired DHCP, in some cases the DHCP server does not
provide the DNS information. In this situation you should set DHCP with DNS
Override from the drop down box, then manually enter the DNS information in DNS
1 and or DNS 2. A Static IP and DNS can also be entered. If you are using Wireless,
leave Wired checked, check Wireless, and select the Protocol from the dropdown
list. More details can be found in the VDM3.0 user guide
Page 27

20
10. Configure: Application
The Application Tab is used to select a Mode for the Remote Desktop connection
and is also used to select other modes. The SC-T25 has a reduced list of Modes as
shown in the image below
Page 28

21
Depending on the Mode selected in the Mode dialog box, the other selections will
change to the defaults for the selected Mode or will be grayed out. In most situations
you should accept the defaults, then enter your connection details. The image below
shows a HDX session congured to auto connect and auto login into a Windows
7 HDX session. See FAQ further below in this document for more details on HDX
conguration
SSH Mode; this mode may be used to open an ssh session to a remote system
Page 29

22
RDP Mode; launch the TurboRDP client in standard RDP mode, this mode is not
suitable for Video playing, AutoCad etc
Select Submode RemoteFX to launch the TurboRDP client in RemoteFX mode,
currently supports either Software JPEG2000 or H.264 hardware decode on
Intel devices. All other devices including the Raspberry Pi currently use Software
JPEG2000 decode.
RDP & RemoteFX can be congured for either Auto Login or to simply connect to the
Server but not Log in.
VNC mode; launches the TurboVNC client, see more information on TurboVNC at
the link below
http://www.turbovnc.org/About/Introduction
The default connection Dialog Box is shown below
X11 Mode; this mode allows the user to connect to a Linux Desktop using XDMCP
which delivers excellent performance on a LAN but is inherently insecure as it does
not encrypt the trafc.
Page 30

23
Spice Mode; use this mode to connect to a Redhat Linux session
https://en.wikipedia.org/wiki/SPICE_(protocol)
NoMachine NX; use this mode to connect to a NoMachine Server
https://www.nomachine.com/
Page 31

24
Web Mode; In the image below the Chrome Web Browser has been congured in
Kiosk mode to connect to a Citrix Storefront Server via Citrix Receiver, the Storefront
address is dened in the Server[:port] Dialog and the Kiosk mode checkbox has
been selected
A Web Browser connection to a Citrix Storefront supports both http and https
connections whereas Citrix HDX native mode only allows for an https connection
which requires the upload of a SSL Certicate via the VDM3.0 Upload Icon. See
FAQ further below for more details.
The Web Browser will prompt to save the Login and Password details on rst
connection to the Storefront but only when the connection is an Encrypted SSL
connection (https)
After logging out of the Citrix HDX session you can Log on again by pressing the Log
On button.
If you wish to close the Web Browser press Alt-F4, then New session to restart it
Telnet Mode; an older Protocol but still useful on some networks even today
Page 32

25
TN3270 Mode; allows a connection to a IBM Mainframe 3270 Series
http://x3270.bgp.nu/screenshots.html
Horizon (VMware); Not available for the SC-T25
Performance Monitor Mode; launches the nmon CPU / Network / Memory usage
Monitor, nmon can also be run on a local xterm or in a ssh session to remotely monitor the parameters below
Page 33

26
User defined (Bespoke);
Digital Signage;
Page 34

27
Media Player; launches SMplayer
Page 35

28
11. Configure: Misc
The Misc Tab is used to congure the following,
Device hostname, set the hostname which then appears on VDM3.0
Change Vsconfig password, the Vscong password can be set here, this will then
only allow access to the Vscong menu if the correct password is entered. The
VDM3.0 Administrator can change this password remotely
Enable Google Cloud Print, this option enables your device as a Google Cloud
Printer Gateway
There are also three checkboxes which can be selected
1. Enable power save mode
2. Enable Firewall
3. Enable IoT Gateway, switches the Citrix Octoblu IoT Gateblu Gateway on or off
When the Gateblu Gateway is switched on a gateblu directory is created in the /
home/tlx directory. See image below. To register your SC-T25 as an Octoblu Gateblu
Gateway you need to fetch the uuid and token from the SC-T25 which you can do by
using VDM3.0 to download the device log les
Page 36

29
To download the VTOS log les use VDM3.0 -> Tools -> Log -> Get Device Log les
This will download the log les one of which is the meshblu.json le containing the
uuid and token. See image below showing the Log les which are downloaded to the
directory that you select. You will note that each Log le name is the SC-T25 Mac
Address with the log le type appended. Just open the le that ends in _meshblu,
you can then copy and paste the uuid and token into the “Claim Thing” creation page
on the Octoblu Website
https://www.octoblu.com/
https://www.octoblu.com/
Page 37

30
Page 38

31
The About Tab; Displays Copyright and Version information
Page 39

32
12. FAQ
How do I upgrade VTOS RPi 4.2.5 to the new VTOS RPi
4.3.0 using VDM3.0?
Upgrading your current RPi VTOS 4.2.4 or 4.2.5 version to the latest VTOS RPi
4.3.0 version is easy using the ViewSonic Device Manager3.0 (VDM3.0)
The VTOS 4.3.0 release has many enhancements, bug xes and a 50% faster boot
time from power on to logged into a Citrix HDX session, the new VDM3.0 is available
at this link Download VDM3.0 here
You must install the new VDM3.0 rst before upgrading the previous VTOS 4.2.4 or
4.2.5 releases to the new VTOS 4.3.0
The new VTOS 4.3.0 Firmware is downloaded to the PC running VDM3.0 by clicking
on the VDM3.0 Download Icon, a new VDM3.0 Client 7.12.4 which MUST be
downloaded and installed before the VTOS rmware upgrade, this ensures that the
old 4.2.4 or 4.2.5 image is completely upgraded including the VFM Partition.
This upgrade must be done on a wired Network, all future upgrades after VTOS
4.3.0 has been installed can be done on Wired or WiFi Networks. Your conguration
information will be lost in this upgrade procedure but future upgrades from 4.3.0
onward will retain conguration information. A particularly important step is to install
the new VDM3.0 Client 7.12.4 before upgrading the Firmware and to carry out a
factory reset after the upgrade from version 4.2.5 to version 4.3.0
The 3 easy steps to upgrade are,
(a) Click on the VDM3.0 Download Icon and then select the check box next to
VDM3.0 Client 7.12.4 for Platform VS_RPi and also select the check box next to VS
RPi rmware 4.4.47-4.3.0 for Platform VS_RPi. This will download and automatically
unzip the les to the VDM3.0 Client and VDM3.0 Firmware directories. Select the
check boxes next to the devices to be upgraded
(b) You MUST install the new VDM3.0 Client rst, click on VDM3.0 -> Tools -> Install
-> Install VDM3.0 client, the selected SC-T25 will download and install the VDM3.0
client which takes around 10 seconds
(c) Click on the VDM3.0 -> Upgrade Icon, click on OK to install the latest Firmware
version 4.4.7-4.3.0
(d) After the upgrade is completed you MUST carry out a Factory Reset on the
SC-T25 using Ctrl-Alt-r pressed twice within 2 seconds, the device will reboot a few
seconds later. This action will erase previous conguration information which may
not be compatible with the new 4.3.0 release. Factory reset may also be done via
VDM3.0 -> Tools -> Reset to factory defaults or using the local Vscong menu ->
Device Tab.
This step is not needed in version 4.3.0 onward which retains previous conguration
information, do not use this step on VTOS 4.3.0 onward as your previous
conguration information will be erased if you do this.
Steps (b) & (d) are only required for updates from the previous VTOS 4.2.4 or 4.2.5
to VTOS 4.3.0
Page 40

33
Only steps (a) & (c) are required to upgrade VTOS 4.3.0 and later versions
In this case step (b) is required to ensure that the VFM partition is also upgraded
as well as the Boot & Root Partitions. The new VDM3.0 Client 7.12.4 must be
running on VTOS to ensure that the VFM Partition is upgraded which is why Step
(b) is necessary. The VFM partition on VTOS versions 4.2.4 & 4.2.5 is not capable
of carrying out upgrades over WiFi but the new 4.3.0 VFM partition is. After the
rmware 4.3.0 upgrade has been completed using steps (a), (b), (c) & (d) above, all
future upgrades can be done on Wired or WiFi Networks using just steps (a) & (c)
above
Further information on how upgrades are carried out is shown below
The Viewsonic Firmware Maintenance (VFM) partition is used for upgrading the
rmware, the SC-T25 boots from this partition during the Upgrade and runs the tiny
Ram based Upgrader which allows the current partitions to be rewritten with the new
VTOS
VTOS uses 3 separate partitions on the SD Card. VFM is the Viewsonic Firmware
Maintenance partition
(1) Boot
(2) VFM
(3) Root
VFM holds a tiny version of Linux that boots and runs completely in RAM, this is
used to carry out upgrades
The version of VFM on your Viewsonic 4.2.5 is very limited, it can only upgrade the
Boot and Root partitions not the VFM partition, and it can only carry out upgrades
over a Wired connection, NOT a WiFi connection. Also it does not retain the previous
information
Page 41

34
Version 4.2.5 contains the old VDM3.0 Client which is the client end of the VDM3.0
connection. You must upgrade the VDM3.0 Client to 7.12.4 before you upgrade the
VTOS Firmware otherwise the VFM partition is NOT upgraded to the new version of
VFM until you carry out another Firmware upgrade on the same device
Page 42

35
How do I congure VTOS Citrix HDX mode to auto connect
and auto login?
Firstly set the time zone using the VDM3.0 Zone Icon, this must be set to the same
time zone as the Citrix Server
Use VDM3.0 to upload the client end SSL Certicate to the VTOS devices by
selecting the check boxes next to their names, then click on the Upload Icon, select
CA Certicate (.cer), and browse to the Directory with the SSL certicate Certicates
can be exported in either DER (binary) or PEM (ASCII) format. If you export your
certicate using Windows it will be DER by default - use the “Base64-encoded”
option instead; this is what Windows calls PEM. The “.cer” lename extension
doesn’t really mean anything and is used for both formants, ensure you rename your
exported (ASCII) certicate with a .pem extension. After the Certicate is installed
click on the VDM3.0 Reboot Icon to permanently save the certicate to the device’s
storage.
Use VDM3.0 Protocol Icon to select HDX mode put your StoreFront server name
(must be the FQDN as exactly it appears in the server’s SSL certicate!) in VDM3.0’
“Hostname[:Port]” box, your logon credentials in the VDM3.0 autologin boxes, and
(optionally) the name of any application or desktop you want to automatically launch
in the “Cmd line arguments” box. The application/desktop name is just the human
readable label as it appears in StoreFront or the web UI, and you don’t have to quote
it if it contains spaces.
Reboot, The SC-T25 will connect and Log into the Storefront, you will see all your
authorised Apps and Desktops, or if you have added the App or Desktop name in the
Cmd line arguments box the App or Desktop will auto launch
Ensure that you enabled http basic authentication on the storefront servers
See an example image below which is the conguration to use to auto launch and
auto login into a HDX Windows Desktop named Windows10
Page 43

36
I am using NetScaler and cannot connect in HDX mode but
Web mode works
Are you using a Netscaler gateway via HTTPS, with the back end HDX servers
on your internal network using HTTP? Have your Windows Receiver clients been
registry hacked to allow insecure HTTP StoreFront stores? If so, you should be
aware that there is *no way* to perform an equivalent hack on Linux Receiver (we
have asked Citrix to consider adding this). It is therefore essential that *both* the
Netscaler gateway *and* the StoreFront server are congured to use HTTPS, and
that the client is able to validate both (has all necessary CA certicates installed).
Web mode has no such restriction, which is why it works for you in Web mode but
not HDX.
Page 44

37
When I attempt to register devices using VDM3.0 I get
an error “SSL handshake error All product registration
requests have been cancelled”
Some versions of Windows are missing the SSL Certicate that VDM3.0 needs, you
can x this easily by using Internet Explorer to connect to the ViewSonic License
Server at https://tls.ViewSonic.com Windows will download and install the missing
SSL Certicate, close VDM3.0, reopen VDM3.0 and now you will be able to register
your SC-T25s
The ViewSonic Management Software (VDM3.0) does not
discover my VTOS device, how can I x this problem?
On some versions of Windows some dll les required by VDM3.0 are missing
VDMerver.exe uses the DLL msvcr100.dll and srvcli.dll which are both in the
folder “C:\Windows\SysWOW64\” These DLLs are most likely missing if you don’t
have “Microsoft Visual C++ 2010 SP1 Redistributable Package (x86)” installed.
Downloaded it from here
https://www.microsoft.com/en-us/download/details.aspx?id=8328
VDM3.0 still can’t discover the client
Press Control AlT and t Lower case t for terminal This will open an xterm, enter /sbin/
ifcong to see the IP ADDRESS and ping whatever you like. VDM3.0 in installation
mode uses UDP broadcast, check your Firewall on the Server, also check that the
date is correct by opening an xterm with Ctrl-Alt-t and entering date
HOW TO set up your Printers
USB Locally connected Printers are easy if you are using Citrix or RemoteFX...In
the case of Citrix plug the Printer into the NUC, boot the NUC and connect to the
Remote Desktop, the Printer will be detected and the drivers will be installed. In
some cases Windows won’t be able to nd the drivers in which case you will need to
go the Printer Manufacturers Website, download and install the Drivers. In the case
of RemoteFX, boot the NUC with the Printer attached and then use the ViewSonic
Management Software (VDM3.0) to redirect the printer using VDM3.0 -> Tools ->
Setup USB Redirection. Select the checkbox next to the Printer and then reboot the
NUC to save the conguration. Connect to your Remote Desktop the Printer will be
detected and the drivers will be installed. In some cases Windows won’t be able to
nd the drivers in which case you will need to go the Printer Manufacturers Website,
download and install the Drivers.
Page 45

38
In the case of a USB Printer using standard RDP or a Network Printer you must
congure CUPS on the NUC to enable the remote system to see the Printer.
Just select Web Mode to launch Chrome and then click on the Congure printers
Bookmark at the top left. Chrome will connect to the Local CUPS Server running on
VTOS Please Google CUPS (Common Unix Printing System) for the ne print on
how to set up CUPS printing. For the best results when you set up your local printer
you should consider providing the Windows PPD le instead of using the closest
Linux Printer Driver. This is particularly important for Multi Function Printers where
no Linux PPD driver exists Once you have the Windows PPD le extracted from your
Windows installation Disk you can use VDM3.0 to copy the PPD le to your VTOS
device. To copy the PPD le use VDM3.0 -> Upload -> select PPD le.
When you congure CUPS, select this PPD le, reboot the VTOS device to save
the PPD le to ash. You can also congure a Printer using CUPS as a RAW printer
where the Server Printer Driver does all the work before sending the Raw data to the
Printer.
How do I get out of fullscreen mode?
It depends on what mode you’re in: HDX: shift-f2. Allegedly. RDP and RemoteFX:
control-alt-enter. This will release pointer grab, but the FreeRDP window will still
intercept keystrokes while the window is in focus. Spice: shift-f11 (and then shift-f12
to ungrab the keyboard and pointer). VNC: control-alt-shift-f, or use f8 to bring up the
conguration menu and click on Full Screen to toggle it off. X11: you can’t, but you
can use control-shift to toggle key grab between local and remote window managers.
This will allow you to use local keyboard shortcuts such windows-d to show the
desktop, control-alt to switch windows and so forth. Everything else: there is no
fullscreen mode, you just have a window that’s been sized to t the current screen
resolution. You can use normal window manager controls to resize or minimize it.
I tried changing resolution but now my screen is black/
my monitor says “scan rate out of range”. I don’t have
VDM3.0/ can’t get someone else to change settings using
VDM3.0. What can I do?
Use the appropriate key sequence to exit from fullscreen mode for whichever
protocol you are currently using (see “How do I get out of fullscreen mode”, above),
and then press the control-alt-r key combination twice within two seconds. This will
cause your client to reset to a safe default resolution (1024x768) and reboot.
Is there a way to bring up the conguration tool other than
from the dialog window that comes up after a session has
ended? I don’t want to close my application right now.
Yes. First exit fullscreen or defocus your fullscreen application (see “How do I get out
of fullscreen mode”, above) and then use the control-alt-c key combination.
Page 46

39
My thin client can’t connect to anything and the
conguration tool says that it has no IP address. What can
I do?
Unplug the network cable, wait at least six seconds, and then plug in back in again.
This will reset the interface and trigger a new DHCP request.
Can I share my display with another person (for training or
troubleshooting purposes)?
Yes. RDP and HDX (ICA) protocols have their own session shadowing features –
which may or may not work with our client implementations – but VTOS also has a
VNC server capability that you can use. To initiate a shadow connection, rst exit
fullscreen or defocus your fullscreen application (see “How do I get out of fullscreen
mode”, above), and then press control-alt-s and enter the hostname or IP address
and TCP port number of the shadower in the window that appears. You have
the option of either connecting to a listening VNC client over an SSL connection
(active mode), or setting up a TCP port forward via an SSH tunnel and awaiting
a connection (passive mode). Active mode has the advantage of using ordinary
HTTPS and being able to use a web proxy, which makes it suitable for highly secure
environments that don’t permit direct connection to the Internet. Passive mode has
the advantage of also providing an SSH port forward, allowing SSH as well as VNC
access from the remote SSH endpoint. Unlike typical VNC servers, both modes of
operation “dial out” to a remote server, which permits traversal of rewalls and NAT
gateways and implicitly ensures operator consent. For active mode, the shadowing
system must be running stunnel (www.stunnel.org) redirecting to a VNC client
application in listen mode (we recommend TurboVNC - www.virtualgl.org). Use of
SSL is mandatory. For passive mode, the shadowing system must be running an
SSH server that accepts publickey authentication and permits port forwarding, and
has a user with a ~/.ssh/authorized_keys le that contains VTOS’ SSH host public
keys. A thin client using VTOS can do both these things, and can therefore be used
to shadow sessions on another VTOS thin client.
The web browser / Citrix / whatever says that the server
SSL certicate is not trusted, but I’m sure that I have
installed the correct CA certicate. What’s wrong?
It’s likely that your thin client’s local clock is wrong. To verify this, you can start a
terminal using control-alt-t and then enter “date” in the window that appears. This
happens because the SC-T25 has no battery-backed clock, so unless it can contact
a network time server from which to get the current date and time, it will revert to a
nonsensical value such as the year 2000 or 2027 whenever its power is reset. By
default, it will try to contact Internet time servers, which may not succeed if there
is an intervening rewall or if hostname lookups are failing. To x the problem,
use VDM3.0 or the local conguration tool to set the time server to the name or IP
address of a local NTP server that the client will be able to connect to. Typically
this would be the same as the local DNS server (if it is an Active Directory domain
controller) or default gateway (if it is a router appliance).
Page 47

40
How do I obtain root access on a device running VTOS?
The O/S has been tightly locked down to help prevent thin clients from being used
as an attack vector against servers. Although SSH is installed, it does not support
password authentication, and in any case none of the accounts on the system –
including root – have password hashes; they are all locked accounts. The only way
you can get root access is to SSH in as root using a trusted key. By default, only
public keys belonging to ViewSonic developers are listed in /root/.ssh/authorized_
keys, but it is possible to use VDM3.0 to install more via the VDM3.0 Upload Icon ->
SSH Key. The public key that you upload must be in OpenSSH format. On Windows
platforms, PuTTYgen (part of the PuTTY suite - http://www.chiark.greenend.org.
uk/~sgtatham/putty/) can be used to display the public key of a PPK le in OpenSSH
format (copy and paste from the text box at the top – do not use the Save Public Key
button, as creates keys in a non-OpenSSH format).
Requirements: VDM3.0, PuTTYgen, PuTTY for Windows Devices. SC-T25 with
VTOS installed and ready.
PuTTY is an SSH client for Windows that you will use to generate your SSH keys.
You can download PuTTY from www.chiark.greenend.org.uk.
When you install the PuTTY client, you also install the PuTTYgen utility. PuTTYgen
is what you will use to generate your SSH key for a Windows VM.
This page gives you basic information about using
PuTTY and PuTTYgen to log in to your provisioned
machine. For more information on PuTTY, see the
PuTTY documentation
1. Generating an SSH key
To generate an SSH key with PuTTYgen, follow these steps:
2. Open the PuTTYgen program.
3. For Type of key to generate, select SSH-2 RSA.
4. Click the Generate button.
5. Move your mouse in the area below the progress bar. When the progress bar is
full, PuTTYgen generates your key pair.
6. Type a passphrase in the Key passphrase field. Type the same passphrase in
the Confirm passphrase field. You can use a key without a passphrase, but this
is not recommended.
7. Click the Save private key button to save the private key.
You must save the
private key. You will need it to connect to your machine.
8. Right-click in the text field labeled Public key for pasting into OpenSSH
authorized_keys file and choose Select All.
9. Right-click again in the same text field and choose Copy.
Page 48

41
10. Create a new text file (ex. Publickey.txt) and Paste the information into that text
file.
11. Rename that file PPK extension (ex. Publickey.PPK) Note: this is file you will
upload to the SC-T25 with VTOS.
12. Open the VDM3.0 manager
13. Locate and select the devices you want to upload the public key to.
14. Click on Upload from menu bar.
15. Select: SSH Key and location the public key then Click OK
Page 49

42
You will get a conrmation that the key has been up loaded successfully.
Once this is completed you will need Putty with the private key to get Root Access to
the device.
1. Open Putty
2. Session> Host Name (or IP Address): X.X.X.X
3. SSH>Auth> Private key file or Authentication: (Click on Browser) locate the
Private PPK file
Page 50

43
4. Click on Open
5. Click on Yes
6. Type root <Enter>; Passcode: **** <Enter>
You are now logged in as root.
How do I pair a Bluetooth Device?
ViewSonic will add a GUI to make this easy but for now you have to ssh as root and
then run the commands below, this example is for pairing a Bluetooth Keyboard
(modify for your detected Hardware)
# bluetoothctl
[NEW] Controller 00:10:20:30:40:50 pi [default]
Page 51

44
[bluetooth]# agent KeyboardOnly
Agent registered
[bluetooth]# default-agent
Default agent request successful
[bluetooth]# scan on
Discovery started
[CHG] Controller 00:10:20:30:40:50 Discovering: yes
[NEW] Device 00:12:34:56:78:90 myLino
[CHG] Device 00:12:34:56:78:90 LegacyPairing: yes
[bluetooth]# pair 00:12:34:56:78:90
Attempting to pair with 00:12:34:56:78:90
[CHG] Device 00:12:34:56:78:90 Connected: yes
[CHG] Device 00:12:34:56:78:90 Connected: no
[CHG] Device 00:12:34:56:78:90 Connected: yes
Request PIN code
[agent] Enter PIN code: 1234
[CHG] Device 00:12:34:56:78:90 Paired: yes
Pairing successful
[CHG] Device 00:12:34:56:78:90 Connected: no
[bluetooth]# connect device 00:12:34:56:78:90
Page 52

45
Specifications
ViewSonic SC-T25 Thin Client
Processor Broadcom BCM2837, 1.2GHz Quad Core Cortex A53
System memory 1GB, LPDDR2
Flash memory External 8GB micro SD
Resolution 1920x1200(Max)
I/O interfaces
USB2.0 x4, HDMI x1, RJ45 x1, DC input x1,
Kensington Slot x1 Audio/Composite video x1
Networking LAN:10/100 Mbps, WiFi: 802.11 b/g/n
Power Input/Output: 100-240Vac, 0.5A, 50-60 Hz / DC +12Vdc, 3A
Operating system VTOS(Linux Debian)
Support protocols HDX, VNC, X11, Web, Performance monitor
Management
ViewSonic Device Management 3.0
ViewSonic Conguration Tool
Security Kensington lock
Universal bracket
(Optional)
100x100mm
Dimensions 99mm (L) x 61mm (W) x 29.5mm (H)
Environment:
Operation condition
Temperature 0°C~40°C / 32°F~104°F
Humidity 20 % ~ 80%, Non-Condensation
Storage condition
Temperature -20°C~60°C / -4°F~ 140°F
Humidity 10% ~ 90%, Non-Condensation
Page 53

46
Other Information
Customer Support
For technical support or product service, see the table below or contact your reseller.
NOTE: You will need the product serial number.
Country/
Region
Website
T = Telephone
F = FAX
Email
Australia/New
Zealand
www.viewsonic.com.au
AUS= 1800 880 818
NZ= 0800 008 822
service@au.viewsonic.com
Canada www.viewsonic.com T= 1-866-463-4775 service.ca@viewsonic.com
Europe www.viewsoniceurope.com http://www.viewsoniceurope.com/eu/support/call-desk/
Hong Kong www.hk.viewsonic.com T= 852 3102 2900 service@hk.viewsonic.com
India www.in.viewsonic.com T= 1800 266 0101 service@in.viewsonic.com
Korea ap.viewsonic.com/kr/ T= 080 333 2131 service@kr.viewsonic.com
Latin America
(Argentina)
www.viewsonic.com/la/
C= http://www.viewsonic.com/la/
soporte/servicio-tecnico
soporte@viewsonic.com
Latin America
(Chile)
www.viewsonic.com/la/
C= http://www.viewsonic.com/la/
soporte/servicio-tecnico
soporte@viewsonic.com
Latin America
(Columbia)
www.viewsonic.com/la/
C= http://www.viewsonic.com/la/
soporte/servicio-tecnico
soporte@viewsonic.com
Latin America
(Mexico)
www.viewsonic.com/la/
C= http://www.viewsonic.com/la/
soporte/servicio-tecnico
soporte@viewsonic.com
Nexus Hightech Solutions, Cincinnati #40 Desp. 1 Col. De los Deportes Mexico D.F.
Tel: 55) 6547-6454 55)6547-6484
Other places please refer to http://www.viewsonic.com/la/soporte/servicio-tecnico#mexico
Latin America
(Peru)
www.viewsonic.com/la/
C= http://www.viewsonic.com/la/
soporte/servicio-tecnico
soporte@viewsonic.com
Macau www.hk.viewsonic.com T= 853-2840-3687 service@hk.viewsonic.com
Middle East ap.viewsonic.com/me/ Contact your reseller service@ap.viewsonic.com
Puerto Rico &
Virgin Islands
www.viewsonic.com
T= 1-800-688-6688 (English)
C = http://www.viewsonic.com/
la/soporte/servicio-tecnico
service.us@viewsonic.com
soporte@viewsonic.com
Singapore/
Malaysia/
Thailand
www.ap.viewsonic.com T= 65 6461 6044 service@sg.viewsonic.com
South Africa ap.viewsonic.com/za/ Contact your reseller service@ap.viewsonic.com
United States www.viewsonic.com T= 1-800-688-6688 service.us@viewsonic.com
Page 54

47
Limited Warranty
ViewSonic® Thin Client
What the warranty covers:
ViewSonic warrants its products to be free from defects in material and workmanship during the
warranty period. If a product proves to be defective in material or workmanship during the warranty
period, ViewSonic will, at its sole option, repair or replace the product with a similar product.
Replacement Product or parts may include remanufactured or refurbished parts or components. The
replacement unit will be covered by the balance of the time remaining on the customer’s original
limited warranty. ViewSonic provides no warranty for the third-party software included with the product
or installed by the customer.
How long the warranty is effective:
ViewSonic Thin Client products are warranted for (1) years from the rst consumer purchase for parts
and labor.
User is responsible for the back up of any data before returning the unit for service. ViewSonic is not
responsible for any data lost.
Who the warranty protects:
This warranty is valid only for the rst consumer purchaser.
What the warranty does not cover:
1. Any product on which the serial number has been defaced, modied or removed.
2. Damage, deterioration or malfunction resulting from:
a. Accident, misuse, neglect, re, water, lightning, or other acts of nature, unauthorized product
modication, or failure to follow instructions supplied with the product.
b. Any damage of the product due to shipment.
c. Removal or installation of the product.
d. Causes external to the product, such as electrical power uctuations or failure.
e. Use of supplies or parts not meeting ViewSonic’s specications.
f. Normal wear and tear.
g. Any other cause which does not relate to a product defect.
3. Any product exhibiting a condition commonly known as “image burn-in” which results when a static
image is displayed on the product for an extended period of time.
4. Removal, installation, one way transportation, insurance, and set-up service charges.
How to get service:
1. For information about receiving service under warranty, contact ViewSonic Customer Support
(Please refer to Customer Support page). You will need to provide your product’s serial number.
2. To obtain warranty service, you will be required to provide (a) the original dated sales slip, (b) your
name, (c) your address, (d) a description of the problem, and (e) the serial number of the product.
3. Take or ship the product freight prepaid in the original container to an authorized ViewSonic service
center or ViewSonic.
4. For additional information or the name of the nearest ViewSonic service center, contact ViewSonic.
Limitation of implied warranties:
There are no warranties, express or implied, which extend beyond the description contained herein
including the implied warranty of merchantability and tness for a particular purpose.
4.3: ViewSonic Thin Client Warranty Page 1 of 2
MC_LW01 Rev. 1a 09-02-11
Page 55

48
Exclusion of damages:
ViewSonic’s liability is limited to the cost of repair or replacement of the product. ViewSonic shall not
be liable for:
1. Damage to other property caused by any defects in the product, damages based upon
inconvenience, loss of use of the product, loss of time, loss of prots, loss of business opportunity,
loss of goodwill, interference with business relationships, or other commercial loss, even if advised
of the possibility of such damages.
2. Any other damages, whether incidental, consequential or otherwise.
3. Any claim against the customer by any other party.
4. Repair or attempted repair by anyone not authorized by ViewSonic.
Effect of state law:
This warranty gives you specic legal rights, and you may also have other rights which vary from state
to state. Some states do not allow limitations on implied warranties and/or do not allow the exclusion
of incidental or consequential damages, so the above limitations and exclusions may not apply to you.
Sales outside the U.S.A. and Canada:
For warranty information and service on ViewSonic products sold outside of the U.S.A. and Canada,
contact ViewSonic or your local ViewSonic dealer.
The warranty period for this product in mainland China (Hong Kong, Macao and Taiwan Excluded) is
subject to the terms and conditions of the Maintenance Guarantee Card.
For users in Europe and Russia, full details of warranty provided can be found in www.
viewsoniceurope.com under Support/Warranty Information.
4.3: ViewSonic Thin Client Warranty Page 2 of 2
MC_LW01 Rev. 1a 09-02-11
Page 56

 Loading...