


IFP52 Series
Commercial Touch Display
User Guide
IMPORTANT: Please read this User Guide to obtain important information on installing and using your product in
a safe manner, as well as registering your product for future service. Warranty information contained in this User
Guide will describe your limited coverage from ViewSonic® Corporation, which is also found on our web site at
http://www.viewsonic.com in English, or in specific languages using the Regional selection box in the upper right
corner of our website. “Antes de operar su equipo lea cu idadosamente las instrucciones en este manual”
Model No. VS18373 | VS18374 | VS18375
P/N: IFP6552-1A/IFP6552-1B | IFP7552-1A/IFP7552-1B/IFP7552-1BH | IFP8652-1A/IFP8652-1B/IFP8652-1BH

Thank you for choosing ViewSonic®
As a world-leading provider of visual solutions, ViewSonic® is dedicated to exceeding
the world’s expectations for technological evolution, innovation, and simplicity.
At ViewSonic®, we believe that our products have the potential to make a positive
impact in the world, and we are confident that the ViewSonic® product you have
chosen will serve you well.
Once again, thank you for choosing ViewSonic®!
2

Safety Precauons
Please read the following Safety Precauons before you start using the device.
• Keep this user guide in a safe place for later reference.
• Read all warnings and follow all instructions.
• Do not use the device near water. To reduce the risk of fire or electric shock, do
not expose the device to moisture.
• Never remove the rear cover. This display contains high-voltage parts. You may
be seriously injured if you touch them.
• Avoid exposing the device to direct sunlight or other sources of sustained heat.
• Do not install near any heat sources such as radiators, heat registers, stoves, or
other devices (including amplifiers) that may increase the temperature of the
device to dangerous levels.
• Use a soft, dry cloth to clean the external housing. For more information, refer
to the "Maintenance" section.
• When moving the device, be careful not to drop or bump the device on
anything.
• Do not place the device on an uneven or unstable surface. The device may fall
over resulting in an injury or a malfunction.
• Do not place any heavy objects on the device or connection cables.
• If smoke, an abnormal noise, or a strange odor is present, immediately turn the
device off and call your dealer or ViewSonic®. It is dangerous to continue using
the device.
• The device is a monitor with an LED backlight intended for general office use.
• Do not attempt to circumvent the safety provisions of the polarized or
grounding-type plug. A polarized plug has two blades with one wider than the
other. A grounding-type plug has two blades and a third grounding prong. The
wide blade and the third prong are provided for your safety. If the plug does not
fit into your outlet, obtain an adapter and do not attempt to force the plug into
the outlet.
• When connecting to a power outlet, DO NOT remove the grounding
prong. Please ensure grounding prongs are NEVER REMOVED.
• Protect the power cord from being treaded upon or pinched,
particularly at the plug, and at the point where it emerges from
the equipment. Ensure that the power outlet is located near the
equipment so that it is easily accessible.
3

• Only use attachments/accessories specified by the manufacturer.
• When a cart is used, use with caution when moving the cart/equipment
combination to avoid injury from tipping over.
• Disconnect the power plug from the AC outlet if the device is not being used for
a long period of time.
• Place the device in a well-ventilated area. Do not place anything on the device
that prevents heat dissipation. Also, avoid any direct lighting.
4

• CAUTION:
Immediately unplug your device from the wall outlet and refer servicing to a
qualified service personnel under the following conditions:
When the power supply cord or plug is damaged.
If liquid has been spilled onto or objects have fallen into the unit.
If the unit has been exposed to moisture.
If the unit does not operate normally or has been dropped.
Never place the device in an unstable location. The device may fall, causing
serious personal injury or death. Many injuries, particularly to children, can be
avoided by taking simple precautions such as:
Using cabinets or stands recommended by the manufacturer of the device.
Only using furniture that can safely support the device.
Ensuring the device is not overhanging the edge of the supporting furniture.
Not placing the device on tall furniture (e.g., cupboards or bookcases)
without anchoring both the furniture and the device to a suitable support.
Not placing the device on cloth or other materials that may be located
between the device and supporting furniture.
Educating children about the dangers of climbing on furniture to reach the
device or its controls.
If the existing device is going to be retained and relocated, the same
considerations as above should be applied.
5

Contents
Safety Precautions ....................................................... 3
Introduction .............................................................. 10
Package Contents .................................................................................................10
Wall Mounting Specifications (VESA) ...................................................................11
Product Overview ................................................................................................. 12
Front Panel ............................................................................................................ 12
Rear Panel ............................................................................................................. 12
Control Panel ......................................................................................................... 13
I/O Panels .............................................................................................................. 14
Remote Control ..................................................................................................... 16
Using Gestures ...................................................................................................... 19
Select and Deselect an Object (Clicking) ........................................................... 19
Display Menu Opons (Right-Clicking) .............................................................. 19
Double-Clicking ................................................................................................. 19
Moving an Object .............................................................................................. 20
Erasing Digital Ink .............................................................................................. 20
Making Connections .................................................. 21
Connecting External Devices and Touch Connection ...........................................21
USB Type-C Connection ......................................................................................... 22
DisplayPort Connection ......................................................................................... 22
HDMI Connection .................................................................................................. 22
VGA Connection .................................................................................................... 22
RS-232 Connection ................................................................................................ 23
USB and Networking Connections ........................................................................ 24
Media Player Connection ...................................................................................... 25
SPDIF Connection .................................................................................................. 26
Video Output Connection ..................................................................................... 27
66

Using Your ViewBoard ............................................... 28
Powering On/Off your ViewBoard ........................................................................ 28
Initial Launch Setup ..............................................................................................29
vLauncher - Customizable Welcome Screen.........................................................32
vLauncher Message ............................................................................................... 32
Applications ........................................................................................................... 33
Toolbar .................................................................................................................35
On-Screen Display (OSD) Menu ............................................................................ 41
General Settings .................................................................................................... 42
Input Settings ........................................................................................................ 43
Widget ................................................................................................................... 44
Settings - HDMI & VGA Input Source .................................................................... 45
Audio Settings ....................................................................................................... 45
Screen Settings ...................................................................................................... 46
Display Settings ..................................................................................................... 47
Low Blue Light Filter and Eye Health ..................................................................... 48
Adjust Settings - (VGA Only) .................................................................................. 50
Settings - ViewBoard Player .................................................................................51
Wireless & Network .............................................................................................. 51
Wi-Fi .................................................................................................................. 52
Ethernet ............................................................................................................ 53
Wireless Hotspot ............................................................................................... 54
VPN .................................................................................................................... 55
Share ..................................................................................................................... 57
SAMBA ............................................................................................................... 57
Display ................................................................................................................... 59
Wallpaper .......................................................................................................... 60
Protecon .......................................................................................................... 62
HDMI Out .......................................................................................................... 63
Preference ............................................................................................................. 64
Touch ................................................................................................................. 65
Language ........................................................................................................... 65
Keyboard & Input Method ................................................................................ 66
Date & Time ...................................................................................................... 67
Boot Mode ........................................................................................................ 68
Startup & Shutdown .......................................................................................... 69
Toolbar Seng .................................................................................................. 70
7

Input Source .......................................................................................................... 71
Rename Input Source ........................................................................................ 72
Source................................................................................................................ 73
App ........................................................................................................................ 74
APP .................................................................................................................... 75
System ................................................................................................................... 77
Storage .............................................................................................................. 78
Clone to USB ...................................................................................................... 78
Display ID ........................................................................................................... 79
Security .............................................................................................................. 80
Privacy and Copyright Protecon ...................................................................... 82
System Update .................................................................................................. 83
About Device ..................................................................................................... 84
Embedded Applications and Settings ......................... 85
Embedded Digital Whiteboarding App ................................................................. 85
Whiteboard ........................................................................................................... 85
ViewBoard Cast ....................................................................................................87
Cast Sender from Windows-based, Macbook, and Chrome devices. .................... 88
Cast Sender from Mobile Devices: iOS-based (iPhone, iPad) and Android OS based
phone/tablet. ........................................................................................................ 89
Screen Recorder ...................................................................................................90
Other Default Applications ................................................................................... 91
vSweeper ............................................................................................................... 91
Screen Lock ........................................................................................................... 92
Chromium.............................................................................................................. 93
Folders ................................................................................................................... 94
RS-232 Protocol ......................................................... 96
Description ...........................................................................................................96
RS-232 Hardware Specification ............................................................................. 96
LAN Hardware Specification .................................................................................. 97
RS-232 Communication Setting ............................................................................. 97
LAN Communication Setting ................................................................................. 97
Command Message Reference .............................................................................. 97
Protocol ................................................................................................................98
Set-Function Listing ............................................................................................... 98
8

Appendix ................................................................. 103
Specifications ...................................................................................................... 103
Display Modes ....................................................................................................104
VGA Mode ........................................................................................................... 104
HDMI/DisplayPort/Type-C Mode ........................................................................ 104
Troubleshooting .................................................................................................105
Maintenance.......................................................................................................107
General Precautions ............................................................................................ 107
Cleaning the Screen ............................................................................................. 107
Cleaning the Case ................................................................................................ 107
Regulatory and Service Information ........................ 108
Compliance Information ..................................................................................... 108
FCC Compliance Statement ................................................................................. 108
Industry Canada Statement ................................................................................. 108
CAN ICES-3 (B)/NMB-3(B) .................................................................................... 108
CE Conformity for European Countries ............................................................... 108
Declaration of RoHS2 Compliance....................................................................... 109
ENERGY STAR® statement ................................................................................... 110
Indian Restriction of Hazardous Substances ....................................................... 110
Product Disposal at End of Product Life .............................................................. 110
Copyright Information ........................................................................................111
Customer Service ................................................................................................ 112
Limited Warranty ................................................................................................ 113
Mexico Limited Warranty .................................................................................... 116
9

Introducon
Package Contents
• HDMI cable (10 ft/3 m) • Touch Pen x 2
• Power cable • Quick Start Guide
• Remote control • RS-232 adapter
• AAA battery x 2 • Clamp x 5
• USB cable for touch (10 ft /3 m) • USB Type-C cable (5 ft /1.5 m)
• Webcam Plate • Eraser
• Webcam Screws x 4
• Wall Mount Screws x 4
(M4x7mm x 2, M3x6mm x 2)
• Compliance Statement
(M8x20mm x 4)
M8 X 4
M3 X 2
ViewBoard IFP52 Series
Commercial Touch Display
Quick Start Guide
Package Contents
1
OK
Aspect
M4 X 2
IFP6552-1A/IFP6552-1B/IFP6552-1BH/IFP6552-1AJ
IFP7552-1A/IFP7552-1B/IFP7552-1BH/IFP7552-1AJ
IFP8652-1A/IFP8652-1B/IFP8652-1BH/IFP8652-1AJ
Commercial Touch Display
Quick Start Guide
Package Contents
1
IFP6530/IFP7530/IFP8630
Commercial Touch Display
Quick Start Guide
Package Contents
1
/IFP7530akschermndleidingFP7P7FP7P7P7P7P7P7P7P7FFFPPFPPFFFFFFFP7FP7FFP7P7PPFPFPFFFPPFPPFPFPFFFFFPFPFFFF
Inhoud v
1
X 2
X 1X 2
X 4
2
inch
60
60
Ho
M8 x4
M8 x4
X 2
X 1X 2
X 4
2
inch
600 x 400 mm
600 x 400 mm
M8 x 20 mm4
Pen
Container
M8 x 20 mm4
X 2X 2
X 4
OK
Aspect
M8 X 4
M3 X 2
M4 X 2
OK
Aspect
NOTE: The power cord and video cables included in your package may vary
depending on your country. Please contact your local reseller for more
informaon.
10

Wall Mounng Specicaons (VESA)
B
NOTE: Please follow the instrucons in the wall mount installaon guide to
install your wall mount or mobile mount bracket. If aaching to other
building materials, please contact your nearest dealer.
C
Model VESA Spec. (A x B) Standard Screw (C x D) Quanty
IFP6552 Series 600 x 400 mm M8 x 20 mm 4
IFP7552 Series 800 x 400 mm M8 x 20 mm 4
IFP8652 Series 800 x 600 mm M8 x 20 mm 4
NOTE: Do not use screws that are longer than the standard dimension, as they
may cause damage to the inside of the display.
11

Product Overview
Front Panel
HDMI
TOUCHUSB 3.0USB 3.0
Rear Panel
Front I/O
Control Panel
12

Control Panel
1
23
4 5 6
7
8
9
Number Item Descripon
1
2
Ambient Light Sensor to monitor the ambient light
Remote control receiver
• Power indicator light
• Press the key to turn on the device
3
• Press the key to turn o/on the display backlight only
• Press and hold to turn o the device
4
5
6
Back to the ViewBoard player’s main interface
Return to the ViewBoard player’s previous level
Disable/enable the touch screen
7
8
9
Freeze the current image on the screen
Decrease the Volume
Increase the Volume
13
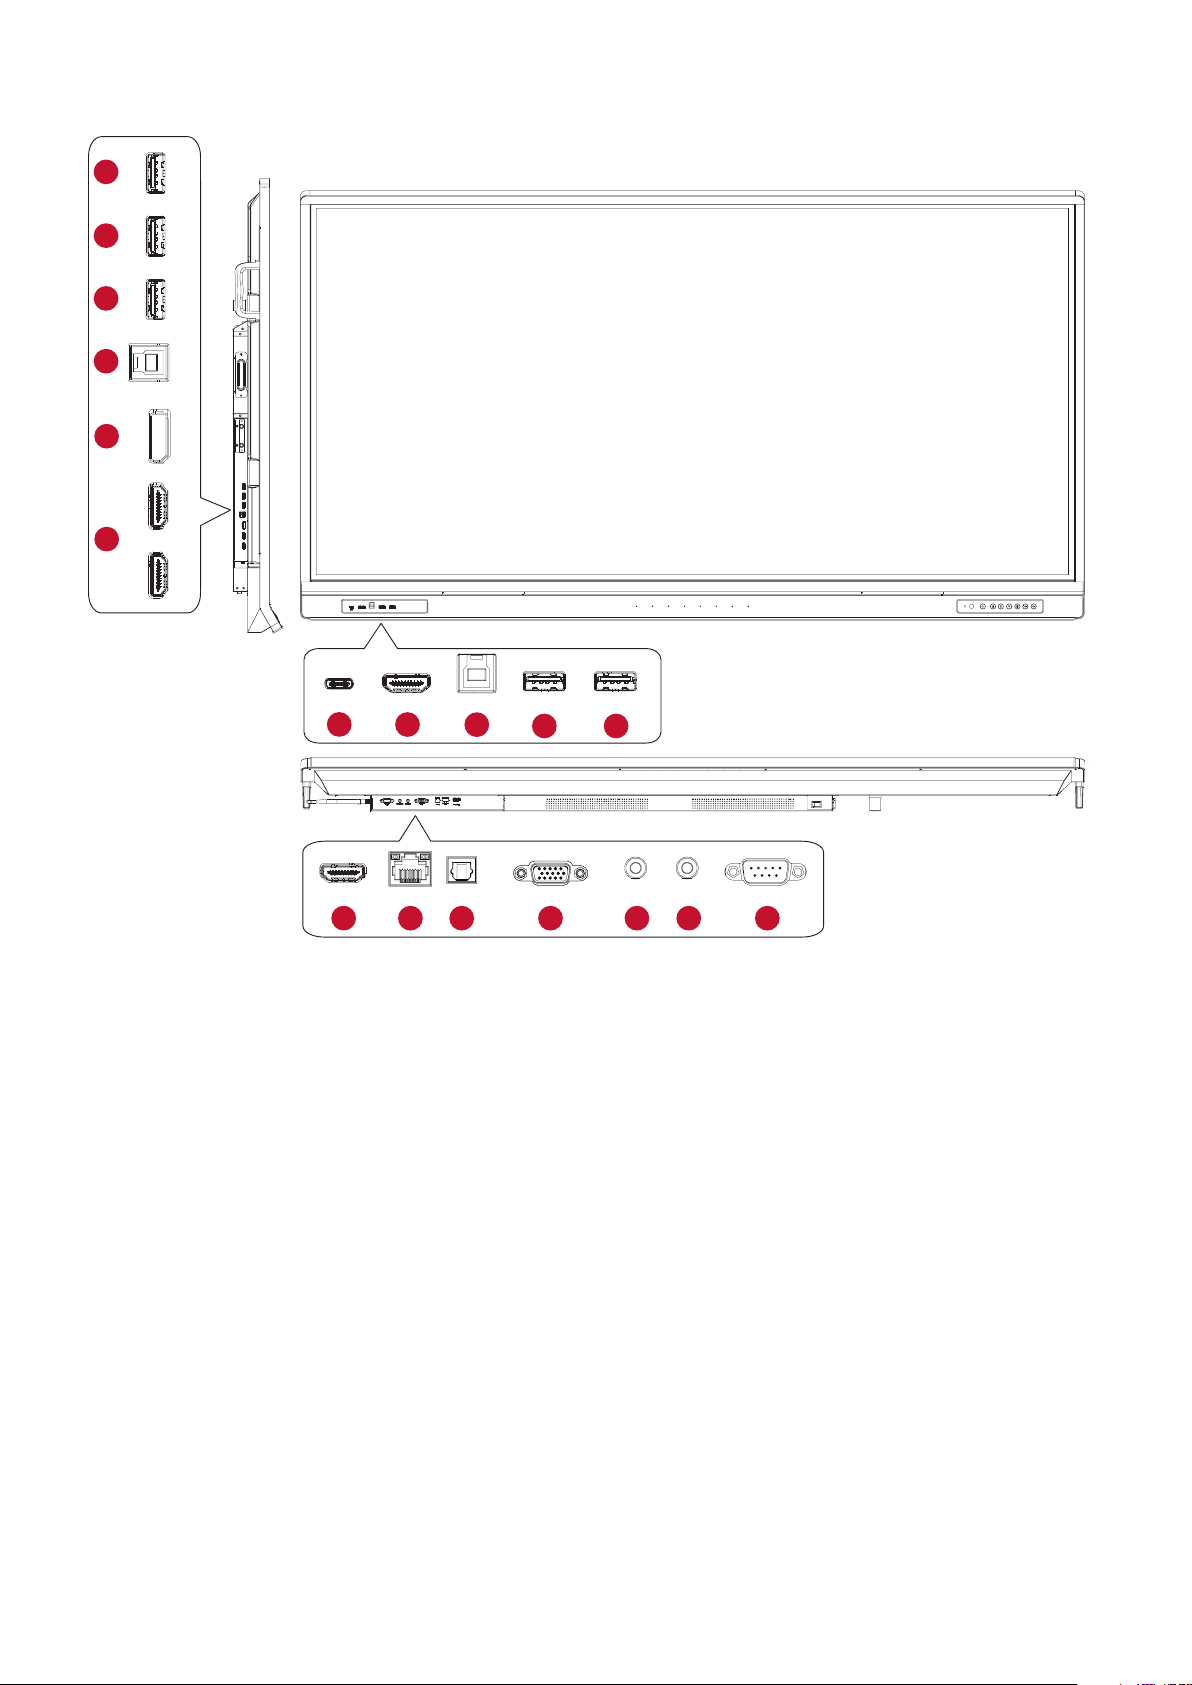
I/O Panels
HU
1
SB 3.0USB 3.0USB 2.0DP IN
1
2
3
TOUC
4
USB 3.0USB 3.0
USB 2.0
TOUCH
HDMI 1HDMI 2
DP IN
5
HDMI 1HDMI 2
HDMI
TOUCHUSB 3.0 USB 3.0
HDMIType-C
7
6
TOUCH USB 3.0 USB 3.0
3
1 1
HDMI OUTLAN SPDIFVGA AUDIO IN EARPHONE RS-232
8
9
10 11 12 13 14
14

Number Port Descripon
Connect USB devices such as hard disks, keyboard,
1
USB 3.0
mouse, etc. Automacally switches between PC and
ViewBoard.
2
3
4
5
6
7
8
9
USB 2.0
TOUCH
DisplayPort IN
HDMI 1/2
HDMI
USB Type-C
HDMI OUT
LAN
Connect USB devices such as hard disks, keyboard,
mouse, etc. [ 5V dc/0.5A ]
• Touch signal output to external PC.
• Aer connecon (with an external PC), the device
connected to the USB 3.0 port can directly be
used by the external PC.
DisplayPort input; connect to PC with DisplayPort
output.
High denion input; connect to PC with HDMI
output, set-top box, or other video device.
(See HDMI 1/2)
USB Type-C input; connect to PC with USB Type-C
output.
Connect to devices with HDMI input funcon.
Supports 1080p and 4K@60Hz.
Standard RJ45 (10M/100M/1000M) Internet
connecon interface.
NOTE: This network port is used for the
ViewBoard Player, Type-C and slot-in PC.
10
11
12
13
14
SPDIF
VGA
AUDIO IN
EARPHONE
RS-232
Mulchannel sound via opcal signals.
External computer video input.
External computer audio input.
Audio output to an external speaker/headset.
Serial interface; used for mutual transfer of data
between devices.
15

Remote Control
1
2
3
4
5
6
7
8
Number Descripon
1
2
3
4
5
6
7
8
9
10
11
12
Power on/o
Screen capture
Startup wring
Back to the ViewBoard player Home
Screen
Back/Return to the previous page
Increase/Decrease the Volume
Number Keypad
Informaon
Input source selecon
Media control buons:
• Red: Play/Pause
• Green: Stop
• Yellow: Forwards
• Blue: Backwards
Sengs menu
Up/Down/Right/Le/OK
OK
9
10
11
12
13
14
15
16
13
14
15
16
17
Freeze screen
Mute/Unmute
Increase/Decrease Brightness
Blank Screen
Adjust Aspect Rao
Aspect
17
16

Inserng Remote Control Baeries
To insert baeries into the remote control:
1. Remove the cover on the rear of the remote control.
2. Insert two “AAA” baeries, ensuring the “+” symbol on the baery matches the
“+” on the baery post.
3. Replace the cover by aligning it with the slot on the remote control and snapping
the latch shut.
WARNING: There is a risk of explosion if baeries are replaced with the incorrect
type.
NOTE:
• It is recommended that you do not mix battery types.
• Always dispose of old batteries in an environmentally friendly way. Contact
your local government for more information on how to dispose of batteries
safely.
17

Remote Control Receiver Range
The working range of the remote control is shown here. It has an eecve range of
6 meters, 30
° degrees le and right. Ensure there is nothing obstrucng the remote
control’s signal to the receiver.
HDMI
TOUCHUSB 3.0USB 3.0
30°
30°
6m
OK
Aspect
18

Using Gestures
Touch gestures allow the user to use pre-determined commands without using a
keyboard or mouse. Using gestures on the ViewBoard, the user can select/deselect
objects, change the locaon of an object, access sengs, erase digital ink, and
much more.
Select and Deselect an Object (Clicking)
Press and release the ViewBoard to
select/deselect opons or objects. This
is like a single, standard le mouse click.
Display Menu Opons (Right-Clicking)
Press and hold the ViewBoard with your
nger. This is like a single, standard right
mouse click.
Double-Clicking
Quickly press and release twice in the
same locaon on the ViewBoard. This is
like a double, standard le mouse click.
2x
19

Moving an Object
Press and hold the object on the
ViewBoard and slowly drag it with your
nger to your desired locaon.
Erasing Digital Ink
Use your aened hand, palm, or st
on the ViewBoard and move your hand
across the area which you wish to erase.
20

Making Connecons
Connecng External Devices and Touch Connecon
Type-C Cable
Type-C
or
USB Cable
TOUCH
DisplayPort Cable
DisplayPort
or
USB Cable
TOUCH
HDMI Cable
Computer
HDMI
or
TOUCH
VGA
USB Cable
VGA Cable
2121

Your external device(s) can be connected in any of the following conguraons:
USB Type-C Connecon
To connect via USB Type-C:
Connect a USB Type-C cable from your external device to the Type-C port on the
ViewBoard.
DisplayPort Connecon
To connect via DisplayPort:
1. Connect a DisplayPort cable from your external device to the DisplayPort port on
the ViewBoard.
2. Connect a USB cable to the external device from the TOUCH port of the
ViewBoard.
HDMI Connecon
To connect via HDMI:
1. Connect an HDMI cable from your external device to the HDMI port on the
ViewBoard.
2. Connect a USB cable to the external device from the TOUCH port of the
ViewBoard.
VGA Connecon
To connect via VGA:
1. Connect a VGA cable from your external device to the VGA port on the
ViewBoard.
2. Connect a USB cable to the external device from the TOUCH port of the
ViewBoard.
2222

RS-232 Connecon
Serial Port Cable
RS-232
Computer
When you use a RS-232 serial port cable to connect your display to an external
computer certain funcons can be controlled remotely by the PC, including Power
On/O, Volume adjustment, Input select, Brightness, and more.
23

USB and Networking Connecons
Just like any PC, it is easy to connect various USB devices and other peripherals to
your ViewBoard.
USB Peripherals
Plug the USB device cable into the USB port.
USB Cable
USB Device
Networking and Modem cables
Plug the network cable into the LAN port.
LAN
Network Cable
Router / Other
Network Signal Output
24

Media Player Connecon
HDMI
Media Player
HDMI
HDMI Cable
To connect to a media player:
1. Connect the HDMI cable to the HDMI ports on your ViewBoard and peripheral
device.
2. Plug in the power cord of your ViewBoard, and turn on the power supply switch.
3. Press the
Power button on the right-hand side of the ViewBoard to turn the
screen on.
4. Press the INPUT button on the remote control and switch to the “HDMI” input
source.
25

SPDIF Connecon
Optical Cable
SPDIF
Power amplifier / Stereo equipment
To connect to an external sound system:
1. Connect an opcal cable from the SPDIF port to your sound system’s opcal
connector.
2. Plug in the power cord of your ViewBoard, and turn on the power supply switch.
3. Press the
screen on.
Power button on the right-hand side of the ViewBoard to turn the
26

Video Output Connecon
HDMI Cable
HDMI OUT
Projector
To output video via a display device:
1. Connect an HDMI cable to the HDMI IN port of your display device, and the other
end to the HDMI OUT port of your ViewBoard.
2. Plug in the power cord of your ViewBoard, and turn on the power supply switch.
3. Press the
screen on.
Power button on the right-hand side of the ViewBoard to turn the
27

Using Your ViewBoard
Powering On/O your ViewBoard
1. Ensure the power cord is connected, plugged into a power outlet, and the power
switch is in the “On” posion.
NOTE: The AC IN socket and Power Switch are located at the rear of the device.
IFF6552 IFF7552 & IFP8652
2. Press the Power buon to turn on the ViewBoard.
3. To turn the ViewBoard o, press and hold the
2828
Power buon.

Inial Launch Setup
When you rst turn on your ViewBoard, an inial setup wizard will launch.
1. Select your Language:
2. Setup and verify your LAN connecon:
2929
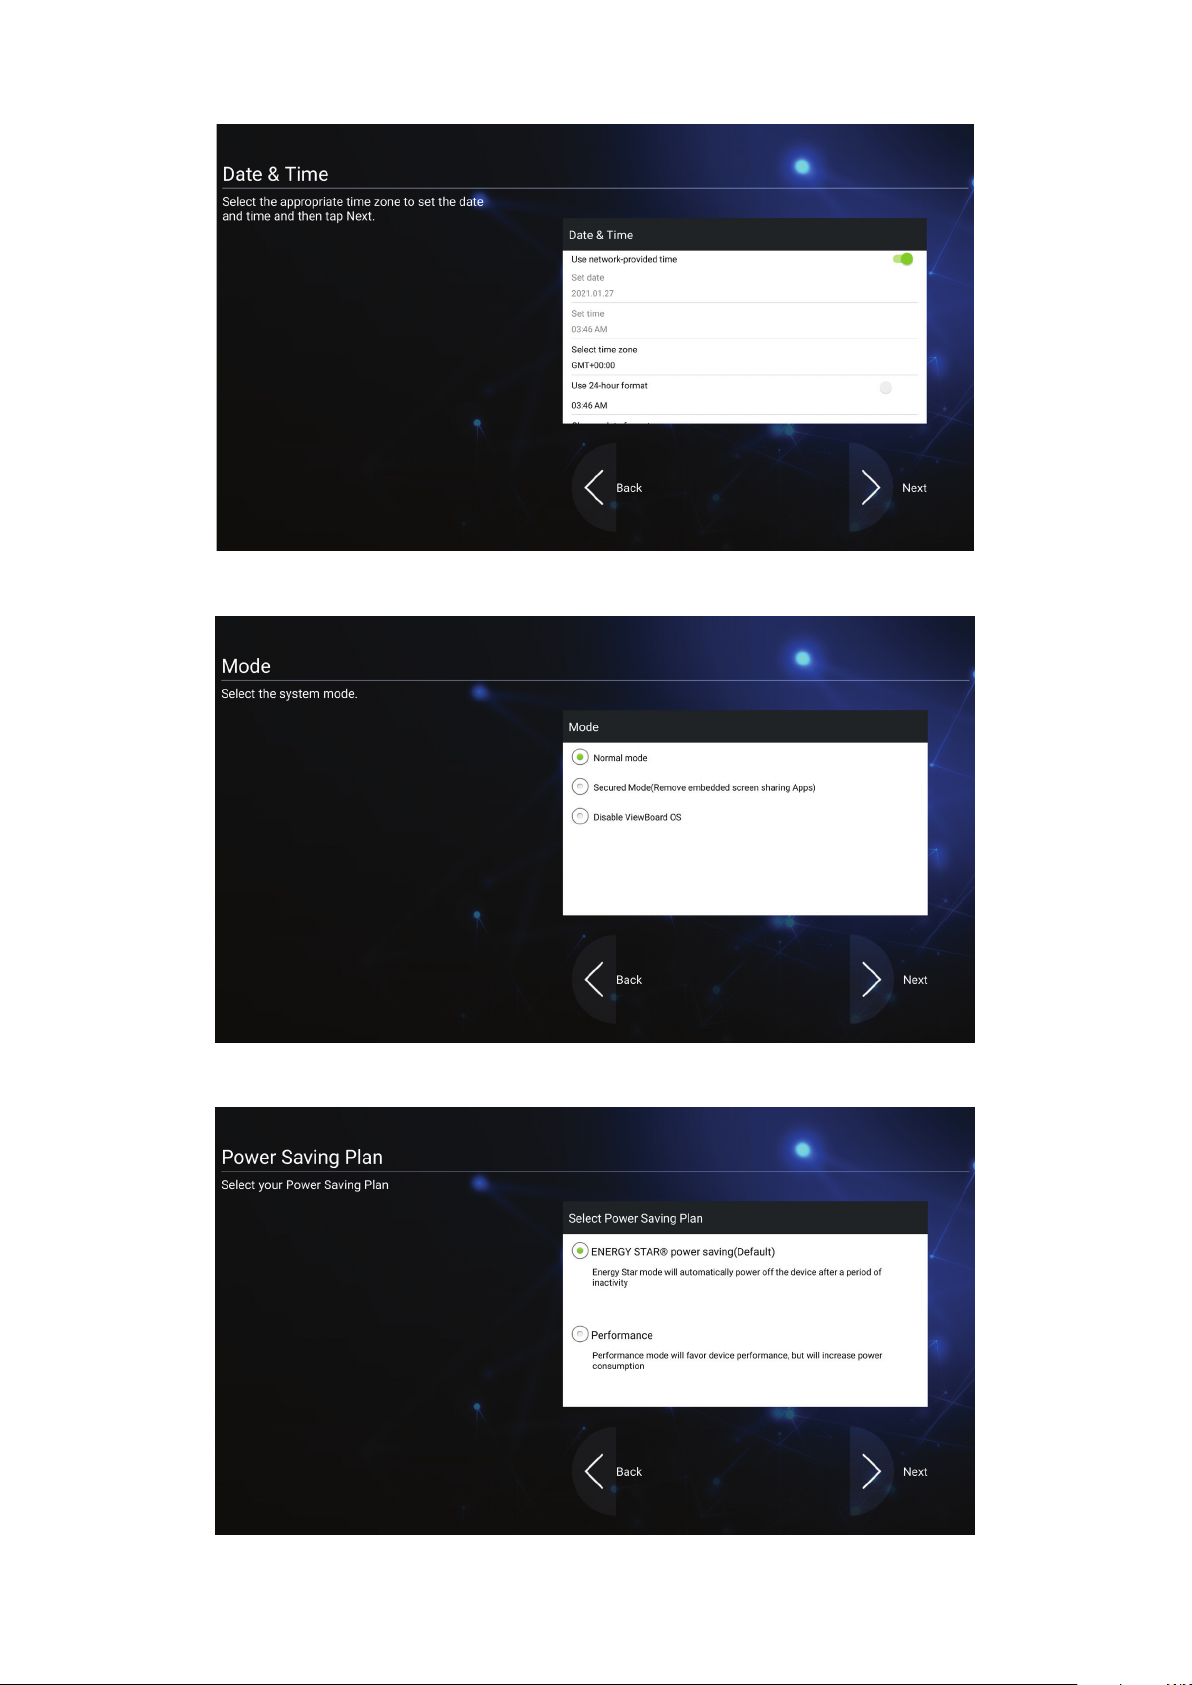
3. Select your Time Zone to set the Date and Time:
4. Select your preferred System Mode:
5. Select your Power Saving plan:
3030

6. Accept or Decline the Privacy and Copyright Protecon Terms.
3131

vLauncher - Customizable Welcome Screen
vLauncher Message
Both the vLauncher Title and Subtle can be customized by tapping on them.
3232

Addionally, a password can be set by tapping on Set Password.
Applicaons
Installed applicaons can all be found on the welcome screen. To view all
applicaons tap on the Down Arrow.
3333

To hide the applicaon drawer tap the Up Arrow.
To add a shortcut to an applicaon, tap, hold, and drag up the icon.
To remove an applicaon shortcut, tap, hold, and drag the icon down.
3434

Toolbar
Toolbar trigger icons are on the edge of the ViewBoard launcher providing access to
your tools.
To launch a tool:
1. Tap a Toolbar trigger icon.
2. Tap on your desired tool icon.
NOTE: The default toolbar seng is to be available for all input sources;
however, users can go to: Sengs > Preference > Toolbar seng to
adjust the opons: (1) available for all input sources, (2) hide the toolbar
for all input sources.
3535

Icon
Descripon
Return to the previous operaon screen.
Back
Home
Recent
App
Whiteboard
Recorder
NOTE: Only for the Embedded Player source.
Return to the Home Screen of the Embedded Player.
Display all embedded applicaons that are currently being used.
View all installed applicaons.
Launch the Whiteboard soware.
Record, view, and save the on-screen content.
3636

Icon
Descripon
Access the pen, highlighter, clear, and save opons.
Pen Highlighter Eraser Undo
Redo Clean Save Exit
Pen
Annotate the overlay of any input source with black, white,
yellow, orange, red, pink, green, or blue ink.
NOTE: The default pen seng supports up to 10-point wring.
Highlighter
Mark and highlight with yellow, grey, gold, orange, red, pink,
green or blue ink.
Draw
NOTE: The default highlighter seng supports up to 10-point
marking.
Eraser
Selecvely remove the digital ink on the screen.
Undo
Undo the previous acon.
Redo
Redo the previous acon.
Clean
Clears all the digital ink on the screen.
Save
Save the screen image and any annotaons.
Exit
Close the drawing tool.
3737

Icon
Descripon
View more applicaons within the ViewBoard tool bar.
More
Screen Freeze
Spotlight
Stopwatch Timer Hide/Unhide
Screen Capture
Screen Freeze
Convert the currently displayed content into a sll image; then
you can zoom in, zoom out, go back to full screen, and exit.
Zoom in Zoom out Fullscreen Exit
Spotlight
Highlight the focus content zone. Tap the Seng icon to adjust
the spotlight size and alpha blending eect.
3838

Icon
Descripon
Stopwatch
Tapping Start will iniate the stopwatch.
At any me, the stopwatch can be paused, resumed, split, or
reset.
More
Timer
Access the countdown mer with an oponal alarm seng.
Touch and swipe to adjust the numeric values, then click Start.
At any me, the countdown mer can be paused, resumed, or
reset.
Hide/Unhide
Hide or unhide the Tool bar trigger icons.
3939

Icon
Descripon
Screen Capture
More
Sengs
Take a screenshot of the current screen.
Access the General Sengs.
4040

On-Screen Display (OSD) Menu
Access General Sengs, Input Sengs, and Widgets through the OSD Menu.
ViewBoard has two opons for opening the OSD Menu:
Opon 1
Long press anywhere in the vLauncher background.
Opon 2
Press the INPUT buon on the remote control.
4141

General Sengs
To adjust the Backlight and enable/disable Eye Care:
1. Press INPUT on the remote control or long press the vLauncher background and
touch General on-screen (if needed) to display the General Settings menu.
2. Drag the brightness slider directly to adjust the backlight value, and/or touch On
or Off to enable/disable the function.
3. Press
exit.
To adjust the Volume:
1. Press INPUT on the remote control or long press the vLauncher background and
on the remote control, or touch a blank area outside of the menu to
touch General on-screen (if needed) to display the General Settings menu.
2. Drag the volume slider directly to adjust the value.
3. Press
4. Press
exit.
on the remote control to enable or disable the mute function.
on the remote control, or touch a blank area outside of the menu to
4242

Input Sengs
To select an Input Source:
1. Press INPUT on the remote control, press the setting button
panel, or press the setting icon from the toolbar to display the Input Settings menu.
2. Press q/p/t/u to select the input source you want.
NOTE: PC source will only display when the slot-in computer is connected.
3. Press
4. Press
exit.
NOTE: To adjust the sengs of an input source, touch the setting icon next to
on the remote control, or touch the input source.
on the remote control, or touch a blank area outside of the menu to
the highlighted input source.
on the front
4343

Widget
NOTE: Only available for the ViewBoard Player source.
To add a widget to the vLauncher welcome screen:
1. Long press the vLancher background via touch to launch the OSD Menu.
2. Select Widget.
3. Touch and hold the desired widget.
4. Drag the widget onto the vLauncher background.
4444

Sengs - HDMI & VGA Input Source
Press MENU on the remote control or select the seng icon next to the input
source in Input Sengs to launch the Sengs menu. Sengs include: Audio,
Screen, Display, and Adjust.
Audio Sengs
1. Press q on the remote control and select the Audio menu.
2. Press q/p/t/u on the remote control or directly touch the opon to select it.
3. Adjust the Volume, Bass, Treble, and Balance directly by touching and adjusng
each value, or with the remote control by pressing
4. Touch the Mute slider directly to enable/disable mute, or press
remote control.
5. Press
exit.
on the remote control, or touch a blank area outside of the menu to
to adjust the opon.
on the
4545

Screen Sengs
1. Press q on the remote control and select the Screen menu.
2. Press q/p/t/u on the remote control or directly touch the opon to select it.
3. Adjust your preference by touching each value directly, or with the remote
control by pressing
4. Press
exit.
on the remote control, or touch a blank area outside of the menu to
.
4646

Display Sengs
1. Press q on the remote control and select the Display menu.
2. Press q/p/t/u on the remote control or directly touch the opon to select it.
3. Adjust the Brightness, Contrast, Hue, and Sharpness directly by touching and
adjusng each value, or with the remote control by pressing
opon.
4. Drag the blue light slider directly to adjust the blue light value.
5. Press on the remote control, or touch a blank area outside of the menu to
exit.
to adjust the
4747

Low Blue Light Filter and Eye Health
The Blue Light Filter blocks high-energy blue light for a more comfortable viewing
experience.
NOTE: To meet TÜV Rheinland low blue light cercaon, the Display Sengs
must be:
• Mode: Standard (Brightness and Contrast are 50)
• Color Temperature: Filter
• Blue light Filter: 0
Calculang Breaks
When viewing screens for extended periods, it is recommended to take periodic
breaks from viewing. Short breaks of at least 10 minutes are recommended aer
one (1) hour of connuous viewing.
Taking shorter, more frequent breaks are generally more benecial than longer, less
frequent breaks.
Focus Fague (20-20-20 Rule)
To reduce the risk of eye fague by constantly looking at the screen, look away from
the screen at least every 20 minutes and gaze at a distant object (at least 20 feet
away) for at least 20 seconds.
Looking at Distant Objects
While taking breaks, users can further reduce eye strain and dryness by focusing on
objects that are further away from them for 10-15 seconds, then gaze at something
up close for 10-15 seconds. Repeat this up to 10 mes. This exercise reduces the
risk of your eyes’ focusing ability to “lock up” aer prolonged computer work.
4848

Eye and Neck Exercises
Exercises for the eyes
(1)
head upright. Move the
eyes up to look at the
ceilin
look at the floor
Eye Exercises
Eye exercises can help minimize eye strain. Slowly roll your eyes to the le, right,
up, and down. Repeat as many mes as needed.
Keep the body and the
g, then turn down to
Neck Exercises
Neck exercises can also help minimize eye strain. Relax your arms and let them
hang at your sides, bend forward slightly to stretch the neck, turn your head to the
right and to the le. Repeat as many mes as needed.
(2) Move the eyes le and
right slowly to look at
objects on the two sides.
.
(3) Move the eyes to look
at objects at the right
upper direcon and then
right lower direcon.
Repeat for the le upper
and le lower direcons.
4949

Adjust Sengs - (VGA Only)
1. Press q on the remote control and select the Adjust menu.
2. Press q/p/t/u on the remote control or directly touch the opon to select it.
3. Adjust your preference by touching each value directly, or with the remote
control by pressing
4. Press
exit.
on the remote control, or touch a blank area outside of the menu to
.
5050

Sengs - ViewBoard Player
When the ViewBoard is in the ViewBoard Player input source, press on the
remote control or tap the seng icon next to the input source in the On-Screen
Display (OSD) Menu’s Input Sengs to enter the Sengs menu.
Wireless & Network
Check current network connecon status, set up and manage Wi-Fi, Ethernet,
Bluetooth, and VPN, and establish a Wireless hotspot.
NOTE:
• Wi-Fi, Wireless hotspot and Bluetooth settings will appear when LB-WIFI-
001(optional) has been installed.
• Ethernet will disable automatically when Wi-Fi is enabled. Wi-Fi will disable
automatically when Ethernet is enabled.
5151

Wi-Fi
Setup and manage wireless access points.
• Tap the toggle buon to turn Wi-Fi On or O.
• Once On, you can: Add a Network, view Saved Networks, Refresh the network
list, or view Advanced sengs.
• In Advanced sengs, you can toggle Network nocaons On or O and view
Network card info.
5252

Ethernet
Set the local network and proxy.
• Tap the drop down menu to connect/disconnect the Ethernet.
• You can adjust Local network and Proxy sengs as well.
5353

Wireless Hotspot
Set and share my internet connecon with other devices.
• Tap the toggle buon to turn Wireless hotspot On or O.
• Tap Set up to set the Network name, Security, and Password.
5454

VPN
Setup and manage Virtual Private Networks.
To create a VPN prole:
1. Go to: Sengs > Wireless & Network > VPN and tap Add VPN.
2. Key in the Name.
5555

3. Select the VPN Type.
4. Choose to enable/disable PPP encrypon (MPPE) and/or show Advanced
opons.
5656

Share
SAMBA
The SAMBA Service provides le sharing via LAN. When the SAMBA Service is
enabled, the user can explore the ViewBoard le system with a PC or mobile
equipment.
1. To access, go to: Sengs > Share > SAMBA.
2. Tap the toggle buon to enable the SAMBA Service, then set a password if
needed.
3. Ensure the ViewBoard and client equipment are connected to the same network.
4. Log in to the ViewBoard with the client equipment. Input the ViewBoard’s IP
address.
5757

5. Key in the user name and password, then select OK (if necessary).
6. Aer a successful log in, the ViewBoard les will be available.
5858

Display
Adjust the Wallpaper, Theme, Protecon, and HDMI Out sengs.
5959

Wallpaper
Users can change their wallpaper with default images (both sll and live), or use
their own by tapping My Photo and selecng the image le.
6060

6161

Protecon
Toggle HDCP & Copyright and Burn-in Protecon Inverval On/O, and set a
Password for Screen Lock.
NOTE: Burn-in Protecon allows the user to program the me between a
gradually darker and brighter picture in minutes to prevent screen burnin.
• To set up a password for screen lock, tap Set Password and enter the desired
password.
6262

HDMI Out
Adjust the HDMI Out Resoluon seng.
Disable/enable the display speaker when connected via HDMI Out.
Item Descripon
On
O
The ViewBoard speaker will be muted and send 100%
volume via HDMI Out.
The volume percentage via HDMI Out will be the same as the
ViewBoard speaker.
6363

Preference
View and adjust Touch, Language, Keyboard & Input, Date & Time, Boot Mode,
Start up & Shut down, and Toolbar sengs.
6464

Touch
Adjust Touch Sengs and toggle Touch Sounds On/O.
Language
Adjust and choose the preferred language from the available languages.
6565

Keyboard & Input Method
Enable/disable the visual keyboard and/or change the default input method.
• Tap on Sengs to adjust the advanced keyboard sengs.
6666

Date & Time
Set the system me and format.
Item Descripon
Automac Date & Time
Time Zone
Time Format
Date Format
When enabled, the ViewBoard will automacally synchronize the
date and me via the Internet.
Select the appropriate me zone.
Choose from 12-hour or 24-hour me format. Simply toggle 24-hour
format On/O.
Select from the available date formats.
6767

Boot Mode
Adjust the preferred boot up mode and set/reset a password.
Item Descripon
Normal Mode
Secured Mode
Disable Embedded OS
ViewBoard Sengs Access
Password
Password for Protecon
Local File Protecon Policy
Color Correcon
Reset ViewBoard
The embedded screen sharing Apps will run normally.
The embedded screen sharing Apps will be removed.
The system will automacally reboot, and then the Embedded OS
will not appear.
Toggle to lock/unlock the ViewBoard Sengs.
Modify the Boot mode and ViewBoard Sengs entry password.
Choose how long to keep local storage les in the Folder app.
Color correct the ViewBoard display screen for color blind users.
Rest the ViewBoard to its factory default sengs.
6868

Startup & Shutdown
Set the Startup Input, Standby Mode, EnergyStar Mode, Black Screen Aer
Startup, Power o Reminder mer and Schedule sengs.
Item Descripon
Startup Input Adjust the Startup Input preference.
Display Seng when
No Signal
Standby Mode
EnergyStar Mode
Black Screen Aer
Startup
Time Switch
Power O Reminder
Schedule
Decide what happens to the display when there is no signal for
HDMI, PC, or VGA sources.
Decide what happens when you press the Power buon while the
ViewBoard is On.
Enable to automacally iniate Sleep Mode when the screen is idle
for one hour.
When enabled, the ViewBoard will turn o the backlight
automacally aer boong up.
When enabled, the ViewBoard will turn o without any reminder
aer the scheduled o me.
Schedule a Boot and Shut o me.
6969

Toolbar Seng
Adjust the Side toolbar sengs.
7070

Input Source
Adjust the input source names and sengs, as well as the side tool bar sengs.
71
71

Rename Input Source
Set labels for each input source that will be easily recognized when displayed.
7272

Source
Toggle Wake up by acve source, Signal auto search, and HDMI CEC and select Input
port auto switch.
Item Descripon
Wake up by Acve Source
Signal Auto Search
Input Port Auto Switch
Energy Saving
HDMI CEC
The screen will turn on automacally aer plugging in an
HDMI cable when the screen is o.
When enabled, if the current source does not have a signal, the
ViewBoard will automacally search for an input source.
The original signal will automacally switch to a new cable aer it’s
plugged in.
Set a me period to power o if no signal is detected.
Enable/disable HDMI CEC funcons.
7373

App
The user can view App informaon and force stop, uninstall, clear data, clear cache,
and clear defaults.
NOTE:
• Pre-loaded apps cannot be uninstalled.
• Not all apps support Clear Defaults.
7474

APP
View any running or installed applicaons. Tap on them for more detailed
informaon and opons.
• By tapping on a running applicaon, you can see more informaon, stop, or
report the applicaon.
7575

• Selecng All or Download will list all installed applicaons.
• Tapping on any applicaon will display further informaon and opons.
7676

System
View and adjust Storage, Security, System Update, and About device sengs.
7777

Storage
Users can check the storage status of their ViewBoard.
Clone to USB
Copy sengs to an external USB drive.
7878

Display ID
Assign a number to remote control the display by RS-232/LAN.
• To assign or change the Display ID, tap Change and input a number.
NOTE: The Display ID is for RS-232 users, and the range is 01~99.
7979

Security
Review Cercate, Trusted Credenal storage, and Unknown sources install
sengs.
• Tap on Install cercate from storage to add addional cercates.
8080

• Selecng Clear Credenals will remove all manually installed credenals.
NOTE: Pre-loaded credenals cannot be cleared.
• Under Trusted Credenals view and edit all trusted and installed CA cercates.
8181

• Tapping on a credenal will provide more detailed informaon.
• Allow the installaon of applicaons from unknown sources by selecng the box
under Unknown source security.
NOTE: Apps from unknown sources may not be compable or work properly.
Privacy and Copyright Protecon
Agree/disagree to allow the ViewBoard to collect user behavior data.
8282

System Update
The ViewBoard automacally searches for soware updates whenever connected
to the Internet (OTA). With just one click, users can update their version of
ViewBoard soware.
Item Descripon
Auto Update
Schedule
Manual Update
Check Update
Local Update
When the display is o, the system will automacally check
for a new version. If a new version is found, the system will
automacally update. Aer the update is complete, the
system will turn o.
Set the update me.
Update the soware manually.
Check for any available updates.
Update the system from an external USB device.
8383

About Device
Display Embedded Player informaon, Legal informaon, and Asset Tagging.
• By selecng Edit, the asset informaon can be adjusted.
• Tap on Legal informaon to check open source licenses.
8484

Embedded Applicaons and Sengs
Embedded Digital Whiteboarding App
Within ViewBoard, ViewSonic oers the embedded digital whiteboarding app,
Whiteboard.
Whiteboard
Floang Bar
Move the Floating Bar.
Switch between presentation and preparation modes.
Paste from the clipboard onto the canvas.
Click to open the web browser
Toolbar
Go to the previous canvas.
Go to the next canvas.
Add a new canvas.
Full Screen Capture
Toolbar Move Button
1. New Whiteboard File
2. Open File
3. Save File
Import resources (image, video, audio, etc.) to the whiteboard.
Infinite
Canvas
Button
Select and hold to move the toolbar to the left side, right
side, or bottom of the screen.
Select – Use two hands to zoom in/out on/of the working
panel.
1. New Whiteboard File
2. Open File
3. Save File
File Button
4. Save as File
5. Export
Selection
Button
Pen Button
Eraser to erase objects or clear the page.
Shape/Line
Button
Text Box Creates a Text box.
Select objects, text, and pictures to get other tools.
Writing tools, changing colors, transparency, thickness,
etc.
Create shapes, select shape colors, insert arrows.
85

Undo Button Undo previous actions.
Redo Button Redo previous actions.
Page Toggle
Button
Show or hide the current host information.
Whiteboard background management menu.
Select pages, sort pages, delete pages.
8686

ViewBoard Cast
Working with ViewBoard® Cast soware, the vCastReceiver app, will allow the
ViewBoard® to receive vCastSender laptop screens (Windows/Mac/Chrome) and
mobile (iOS/Android) users’ screens, photos, videos, annotaons, and camera(s).
Network Informaon
• ViewBoard® Cast soware, laptops, and mobile devices can connect to both the
same subnet and across the subnet network.
• Connected devices will show up under “Device List” on the same subnet
connecon.
• If the device does not show up under “Device List”, users will need to key-in the
on-screen PIN-code.
ViewBoard Cast is a wireless peer to peer data communicaon, therefore the below
port sengs are required:
Ports:
• CP: 56789, 25123, 8121, and 8000
• UDP: 48689 and 25123
Port and DNS acvaon:
• Port: 8001
• DNS: h1.ee-share.com
8787

Cast Sender from Windows-based, Macbook, and Chrome devices.
Mac, Windows, Chrome Devices:
1. Make sure your device is connected to the same network as the ViewBoard.
2. Visit the address that is shown on the ViewBoard to download the applicaon.
3. Launch the applicaon and enter the PIN Code or click Device List, then click the
connect icon next to the Device Name.
8888

Cast Sender from Mobile Devices: iOS-based (iPhone, iPad) and Android OS
based phone/tablet.
Android/iOS:
1. Make sure your device is connected to the same network as the ViewBoard.
2. Scan the QR Code that is shown on the ViewBoard to download directly from the
server, or download from the Google Play Store or the Apple Store.
3. Launch the applicaon and select the correct Device Name and input the pin to
connect. You can also directly input the pin-code displayed on the ViewBoard to
connect.
Apple AirPlay®:
1. Make sure your device is connected to the same network as the ViewBoard.
2. Directly open AirPlay and select the Device Name to connect.
3. Another “AirPlay Password” will be generated on-screen for connecon.
8989

Screen Recorder
Capture everything that is displayed on screen in a video format.
To launch the Screen Recorder applicaon:
1. Select the Screen Recorder icon in the applicaon drawer.
2. Tap the record icon
tap the check mark.
3. Select Start Now and a three (3) second countdown will begin. Screen recording
will begin immediately aer the countdown.
4. Aer stopping the recording, you will be able to preview the video, save it, or
and select the preferred recording conguraons. Then
discard it.
9090

Other Default Applicaons
vSweeper
Clear unnecessary data and unwanted les.
Advanced Sengs can also be customized to the user’s needs.
9191

Screen Lock
Set a screen lock password and enable screen lock.
NOTE: If the user forgets the password, use the remote control and press
INPUT-0-2-1-4 to restore the password to default.
To set a screen lock password:
1. Go to: Sengs > Protecon > Password for screen lock, or select the Screen Lock
icon in the apps list.
NOTE: If you select the Screen Lock icon and no password has been set, the
below prompt will appear:
2. Select Set Password, and input a new four (4) digit password. Then select OK.
3. Now when selecng the Screen Lock icon, the screen will be locked.
9292

Chromium
Web browser for surng the Internet.
9393

Folders
1. Storage Device Display
Select the appropriate storage device.
2. Icons
Item Descripon
Exit Click to exit.
Thumbnail Click to display file by thumbnail mode.
List Click to display file by list mode.
Select Click to select file.
Add Folder Click to add folder.
Copy Click to copy file.
Paste Click to paste file.
Cut Click to cut file.
Delete Click to delete file.
Rename Click to rename file.
Cancel Click to cancel.
9494

3. File Type Menu
Whiteboard Interactive whiteboard files
Documents Office files
Images Image files
Videos Video files
Audio Audio files
Archives Compressed file
Apk Apk files
Item Descripon
9595

RS-232 Protocol
This document describes the hardware interface spec and soware protocols of the
RS-232 interface communicaon between ViewSonic LFD and a PC or other control
units with RS-232 protocol.
The protocol contains three command secons:
• Set-Funcon
• Get-Funcon
• Remote control pass-through mode
NOTE: Below, “PC” represents all the control units that can send or receive the
RS-232 protocol command.
Descripon
RS-232 Hardware Specicaon
ViewSonic LFD communicaon port on the rear side:
1. Connector type: DSUB 9-Pin Male (female or 3.5 mm barrel connector)
2. Use of crossover (null modem) cable for connecon
3. Pin Assignment:
Male DSUB 9-Pin
(preferred)
Female DSUB 9-Pin
Pin # Signal Remark
1 NC
2 RXD Input to Display
3 TXD Output from Display
4 NC
5 GND
6 NC
7 NC
8 NC
9 NC
frame GND
3.5 mm barrel
connector (alternative
for limited space)
Item Signal Remark
Tip TXD Output from Display
Ring RXD Input to Display
Sleeve GND
96

LAN Hardware Specicaon
ViewSonic LFD communicaon port on the rear side:
1. Connector type: 8P8C RJ45
2. Pin Assignment:
Pin # Signal Remark
1 TX+ Output from Display
2 TX- Output from Display
3 RX+ Input to Display
4 BI_D3+ For 1G case
5 BI_D3- For 1G case
6 RX- Input to Display
7 BI_D4+ For 1G case
8 BI_D4- For 1G case
frame GND
RS-232 Communicaon Seng
- Baud Rate Select: 9600bps (xed)
- Data bits: 8 bits (xed)
- Parity: None (xed)
- Stop Bits: 1(xed)
LAN Communicaon Seng
- Type: Ethernet
- Protocol: TCP/IP
- Port: 5000 (xed)
- WOL Port: 9 (xed) for UDP
*3.2.0
- Cross subnet: No
- Logon Credenals: No
Command Message Reference
PC sends to LFD command packet followed by “CR”. Every me PC sends control
command to Display, the Display shall respond as follows:
1. If the message is received correctly it will send “+” (02Bh) followed by “CR”
(00Dh)
2. If the message is received incorrectly it will send “-” (02Dh) followed by “CR”
(00Dh)
97

Protocol
Set-Funcon Lisng
The PC can control the Display for specic acons. The Set-Funcon command
allows you to control the Display behavior at a remote site through the RS-232 port.
The Set-Funcon packet format consists of 9 bytes.
Set-Funcon Descripon:
Length:
LFD ID
Command Type
Command:
Value[1~3]:
CR
Total Byte of Message excluding “CR”
Identification for each of Display (01~98; default is 01)
ID “99” means to apply the set command for all connected
displays. Under such circumstances, only ID#1 display has to
reply.
The LFD ID can be set via the OSD menu for each Display.
Identify command type,
“s” (0x73h): Set Command
“+” (0x2Bh): Valid command Reply
“-“ (0x2Dh): Invalid command Reply
Function command code: One byte ASCII code.
Three bytes ASCII that defines the value.
0x0D
Set-Funcon Format
Send: (Command Type=“s”)
Name Length ID Command Type Command Value1 Value2 Value3 CR
Byte
Count
Bytes
order
1 Byte 2 Byte 1 Byte 1 Byte 1 Byte 1 Byte 1 Byte 1 Byte
1 2~3 4 5 6 7 8 9
Reply: (Command Type=“+” or “-”)
Name Length ID Command Type CR
Byte
Count
Bytes
order
1 Byte 2 Byte 1 Byte 1 Byte
1 2~3 4 5
NOTE: When PC applies command to all displays (ID=99), only the #1 set needs
to reply by the name of ID=1.
98

Example 1: Set Brightness as 76 for Display (#02) and this command is valid
Send (Hex Format)
Name Length ID Command Type Command Value1 Value2 Value3 CR
Hex 0x38
0x30
0x32
0x73 0x24 0x30 0x37 0x36 0x0D
Reply (Hex Format)
Name Length ID Command Type CR
Hex 0x34
0x30
0x32
0x2B 0x0D
Example 2: Set Brightness as 75 for Display (#02) and this command is NOT valid
Send (Hex Format)
Name Length ID Command Type Command Value1 Value2 Value3 CR
Hex 0x38
0x30
0x32
0x73 0x24 0x30 0x37 0x35
0x0D
Reply (Hex Format)
Name Length ID Command Type CR
Hex 0x34
0x30
0x32
0x2D 0x0D
99

Set-Funcon Table
A. Basic Funcon
Set Funcon Length ID Command Command Value Range Comments
Type (ASCII)
Power on
Backlight *3.2.0 8 A B 42 000 ~ 100
*3.2.1/ off
(standby)
Input Select 8 s “ 22
Brightness 8 s $ 24
8 s ! 21
Code
(ASCII)
Code
(Hex)
(Three ASCII
bytes)
000: STBY
001: ON
004: HDMI1
014: HDMI2
024: HDMI
006: VGA
007: Slot-in PC
(OPS)
009: DP
019: Type-C
*3.2.4
00A: Embedded/
Main (Android)
000 ~ 100
900: Bright down
(-1)
901: Bright up (+1)
*3.1.1
1. The Power-on
via LAN control may
works only under
specific mode. To
see display UG for
details. *3.1.1
2. “WOL by MAC address” may available
as alternative.*3.2.1
1. No need for USB
2. For the case of
two more same
sources, the 2nd
digital is used
to indicate the
extension.
3. The HEX of 00A
is 30 30 41.
1. For Android
platform whose main
mode is controlled
by backlight and the
other sources are
controlled by bright-
ness.
2. Derived from
Color calibration.
*3.2.0
Power lock 8 s 4 34
Volume 8 s 5 35
Mute 8 s 6 36
Button lock 8 s 8 38
Menu lock 8 s > 3E
100
000: Unlock
001: Lock
000 ~ 100
900: Volume
down(-1)
901:Volume up(+1)
000: OFF
001: ON (mute)
000: Unlock
001: Lock
000: Unlock
001: Lock
*See note in details
*See note in details
*See note in details
 Loading...