

Page 1

Connect the stand to the back of
the photo frame by aligning with
the notches and turning counter
clockwise until the stand is vertical.
Adjust the viewing angle by
sliding the stand up or down.
Connect the supplied power
adapter to the photo frame and to
an electrical outlet.
Slide the power switch on the
back of the photo frame to the
“ON” position.
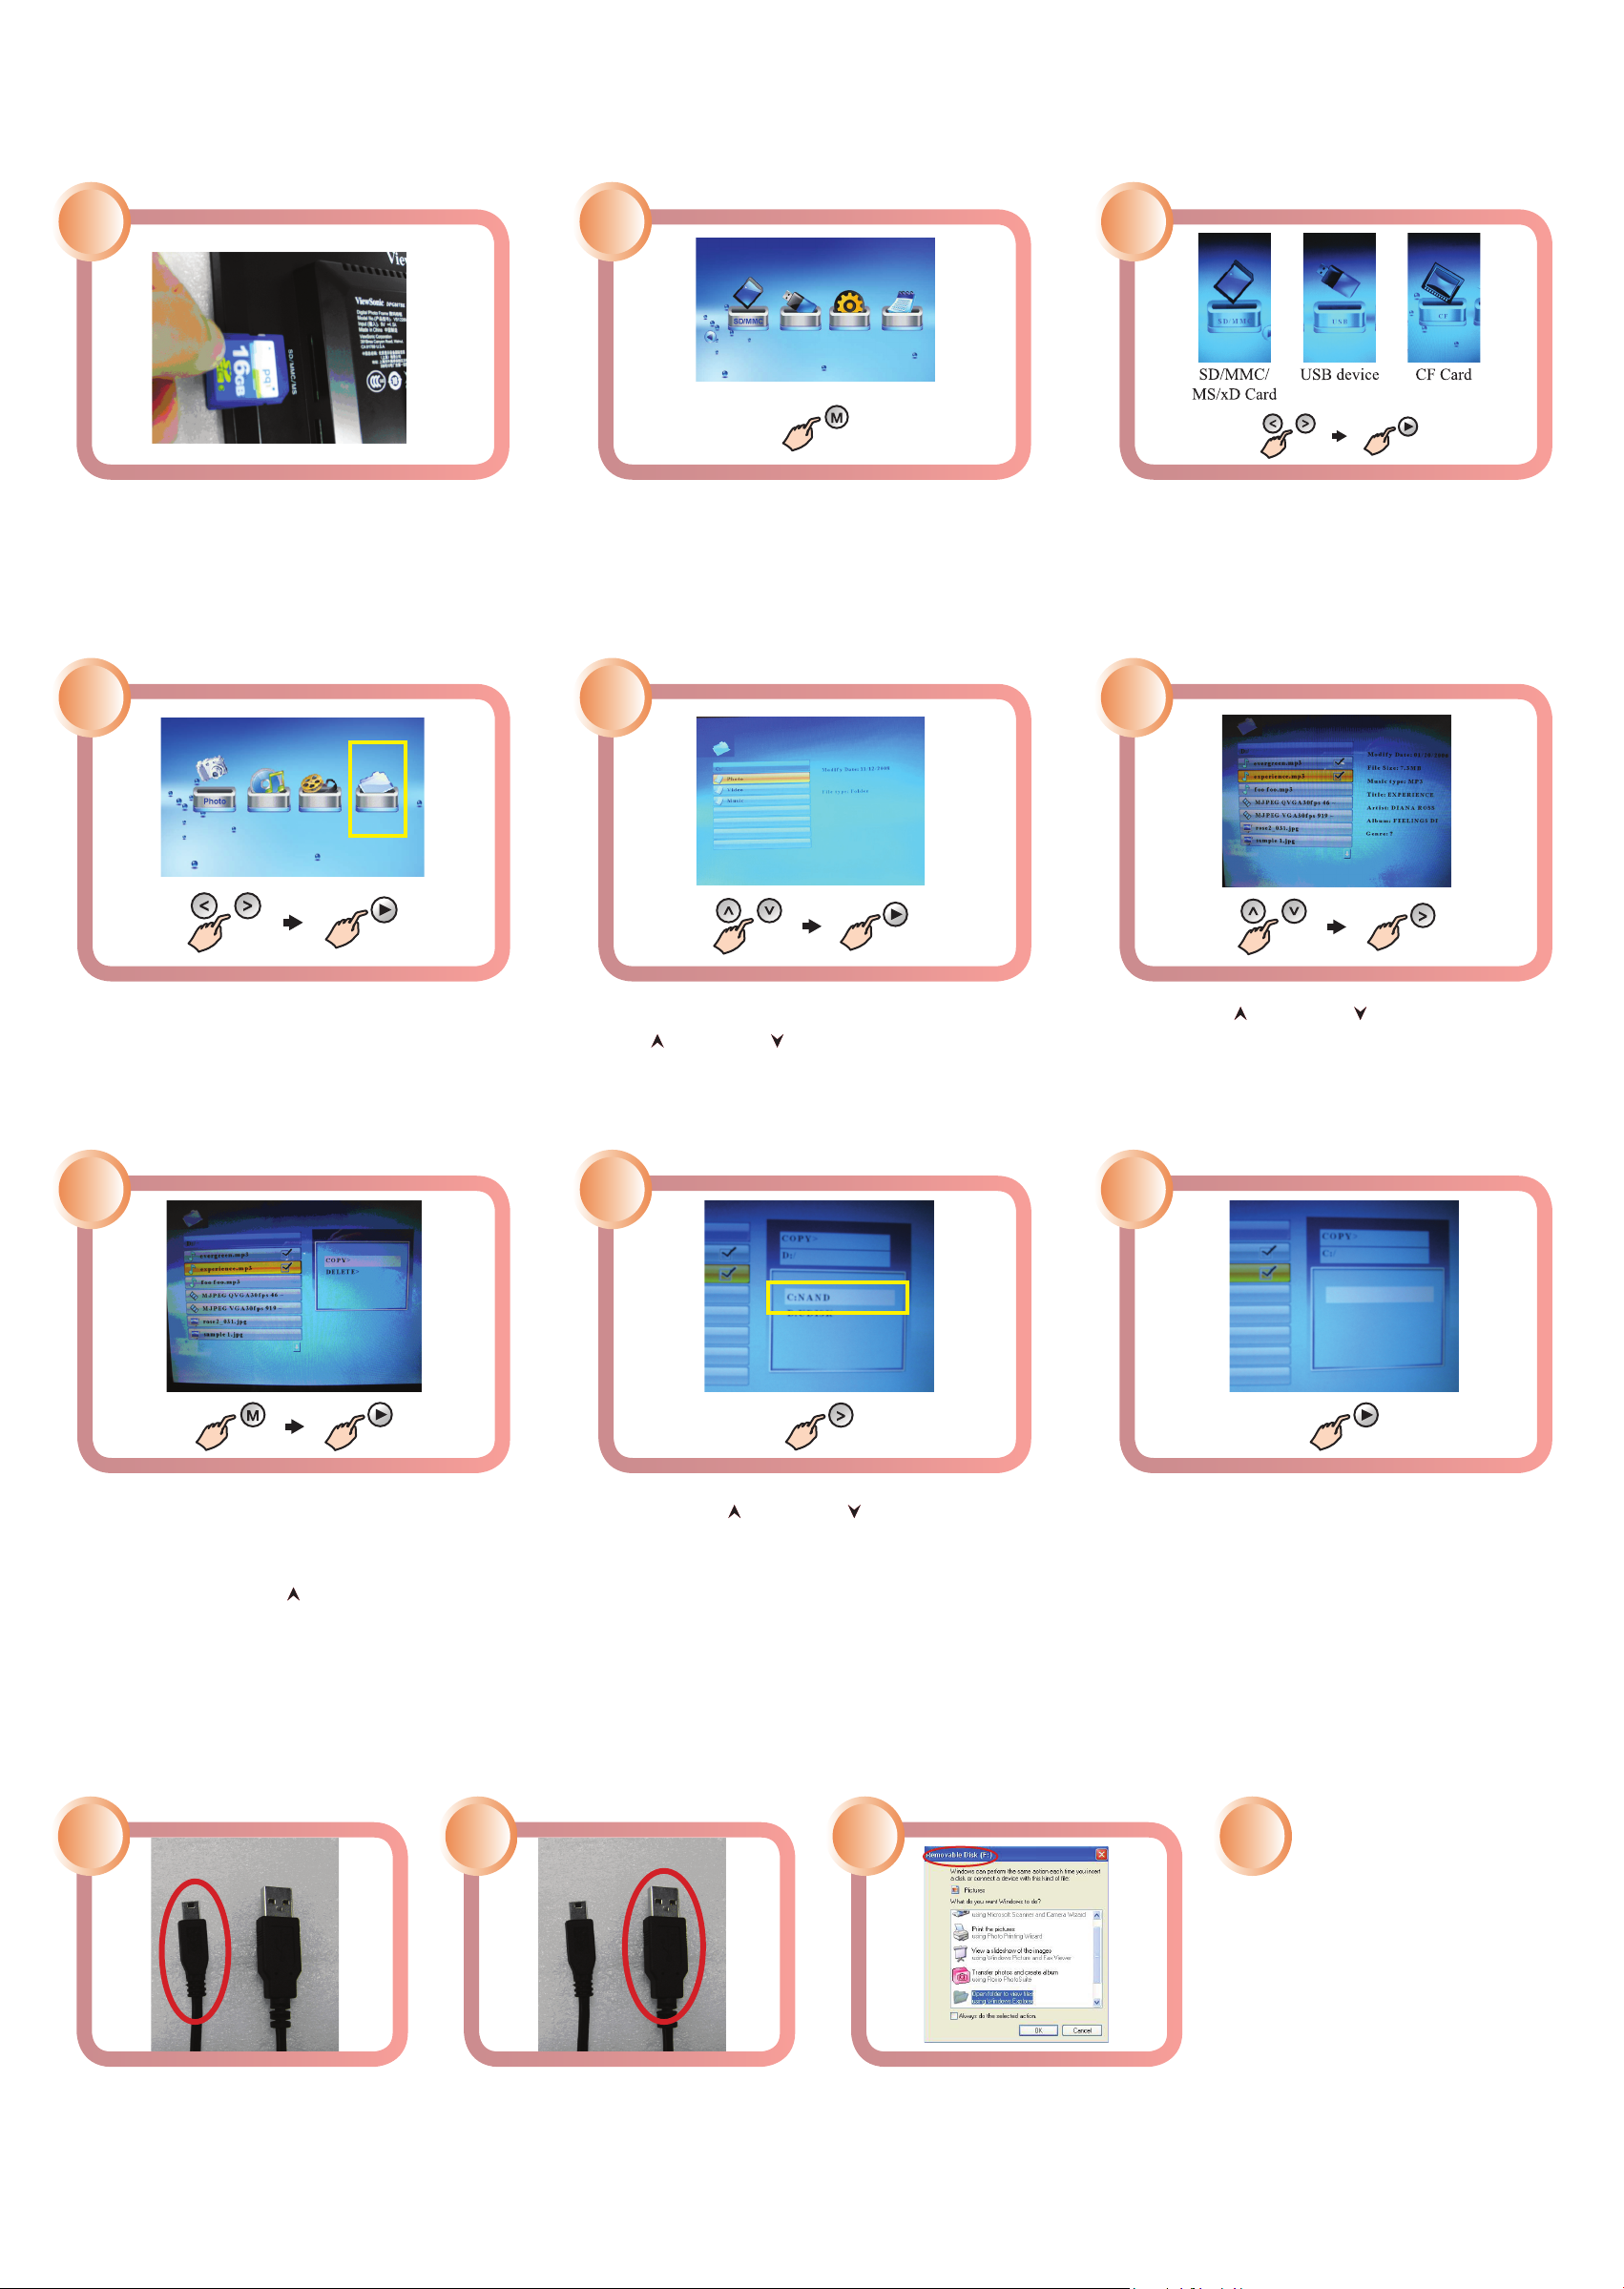
Insert your memory card into the 4-in-1 card
slot with the metallic contacts facing toward the
display screen.
Insert the Compact Flash (CF) memory card into
the CF card slot with the arrow on top and into
the pinholes pointing toward the CF opening slot.
Insert your USB ash drive into the USB
Host slot with the inner metallic contacts
facing toward the display screen.
If there are photos in the memory card or
USB ash drive, your photo frame will
automatically display them in a slideshow.
DPG807
Quick Start Guide
Activate the touch screen OSD by touching the blue backlight in the active touch screen
area. (Please note that the OSD timeout defaults to 20 seconds and can be adjusted in the
SETUP menu.)
1
Tap the Menu [M] button on the active touch screen
to access the main menu.
Tap the Left [<] or Right [>] button to highlight a
menu item.
The highlighted icon pops up with
a description.
Tap the Play/Conrm [►] button to
select the highlighted media source.
Select Viewing Mode
Insert Memory Cards and USB Flash Drive
Connect a Stand and Power Cable
Active touch screen area. Use gentle tap.
1 2
3
3 4
3
2
21
Page 2

Change Settings
1 2
3
Tap the Menu [M] button on the active touch
screen to access the main menu.
Tap the Left [<] or Right [>] button to highlight
the SETUP icon. Tap the Play/Conrm [►]
button to select the highlighted Setup icon.
1. To select a setting option, tap the
[ ] or [ ] button.
2. To change the value, tap the [ ] or [ ] button
and then tap the [►] button to conrm.
3. Tap the [ ] button to exit.
To increase or decrease the
volume, tap the [ ] or [ ]
button.
Use the [ ] or [ ] button to
select your desired audio
track or audio le and tap the
[►] button to play.
To increase or decrease the
volume, tap the [ ] or [ ]
button.
Use the [ ] or [ ] button to
view the next or previous
video le and tap the [►]
button to play.
press [ ] or [ ] to adjust volume
press [ ] or [ ] to select previous and next
5C-1
press [ ] or [ ] to adjust volume
press [ ] or [ ] to select previous and next
5B-1
To view the previous or next photo, tap the [ ] or [ ] button.
To rotate a picture, tap the [ ] or [ ] button.
To start slide show from the current picture, tap the [►] button.
To return to the thumbnail view, tap [ ].
To return to the main menu, tap [M].
[ ] or [ ]: ROTATE
[►]: SLIDESHOW
[ M ] :MENU Hold [ M ] : OSD MENU
5A-1
Tap the Left [<] or Right [>] button
to highlight your media type (i.e.,
photo, music, movie). Tap the
Play/Conrm [►] button to select
your highlighted media type.
Selecting “Photo” displays your
photos in thumbnail view. Tap
the Play/Conrm [►] button to
display your photo in full screen
view.
Selecting “Music” lists the music
les stored on your media. If there
is more than one le, scroll Up [
] or Down [ ] to select your le.
Tap the Play/Conrm [►] button to
play back the selected audio le.
Selecting “Video” lists the video les
stored on your media. If there is more
than one le, scroll Up [ ] or Down
[ ] to select your le. Tap the Play/
Conrm [►] button to play back your
video in full screen view.
OROR
5A
4
5B 5C
To show the OSD menu bar, press and hold the [M] button.
Tap the [ ] or [ ] button to navigate among the icons on the OSD menu.
To start or resume slide show from the current picture, highlight ► icon and tap the [►] button. The ► icon is changed to
icon.
To skip to previous picture, highlight icon and tap the [►] button.
To skip to next picture, highlight icon and tap the [►] button.
To stop or start music playback during slide show, highlight icon and tap the [►] button.
To start slide show with background music from the rst picture, highlight icon and tap the [►] button.
To zoom in the picture, highlight
icon and tap the [►] button. When a picture is magnied, tap the [ ], [ ], [ ] or [ ] icon to
shift the view to other part of the picture.
5A-2
Page 3
Transfer Files from PC to Photo Frame Internal Memory
Transfer Files from Memory Cards and USB Flash Drive to
Photo Frame Internal Memory
Use the supplied mini-USB
(small connector) to USB Type A
(large connector) cable. Connect
the small connector to the USB
port on the photo frame.
Connect the large connector to
your computer USB port.
Your computer detects and assigns
the appropriate drive letter for the
photo frame internal drive. In this
case, it is F Drive.
1 2
If your memory card or USB ash drive
is not already been inserted, please follow
procedures “Insert Memory Cards and USB
Flash Drive” above.
Tap the Menu [M] button to access the main
menu.
Use the Left [<] or Right [>] button to select
your media source. Tap the Play/Conrm
[►] button to select the highlighted media
source.
21 3
6
Use the Left [<] or Right [>] button to select
the “File” icon. Tap the Play/Conrm [►]
button to proceed.
If your le resides inside a folder, use the
Up [ ] or Down [ ] button to select a folder.
Tap the Play/Conrm [►] button to make
your selection.
Scroll Up [ ] or Down [ ] to highlight your
le and tap the Right [>] button to place a
check mark next to your selection. To select
more le, repeat this step.
4
Press and hold the Menu [M] button, a menu
with COPY and DELETE options is displayed
on the right. If “Copy” has not already been
selected, use the Up [ ] button to select COPY
and tap the Play/Conrm [►] button. All
available memory devices are shown.
Use the Up [ ] or Down [ ] button to
highlight NAND drive and tap the Right [>]
button. The destination directory screen is
shown.
To place your le in the root directory, tap
the Play/Conrm [►] button. File copy
is completed when the word “Finished” is
shown.
7 8 9
Some computers may not
recognize the photo frame
internal drive on the rst attempt. If this happens, unplug
the USB connector in step 2.
Turn the photo frame off and
then back on. Reconnect the
USB cable in step 2.
4
5
3
Page 4
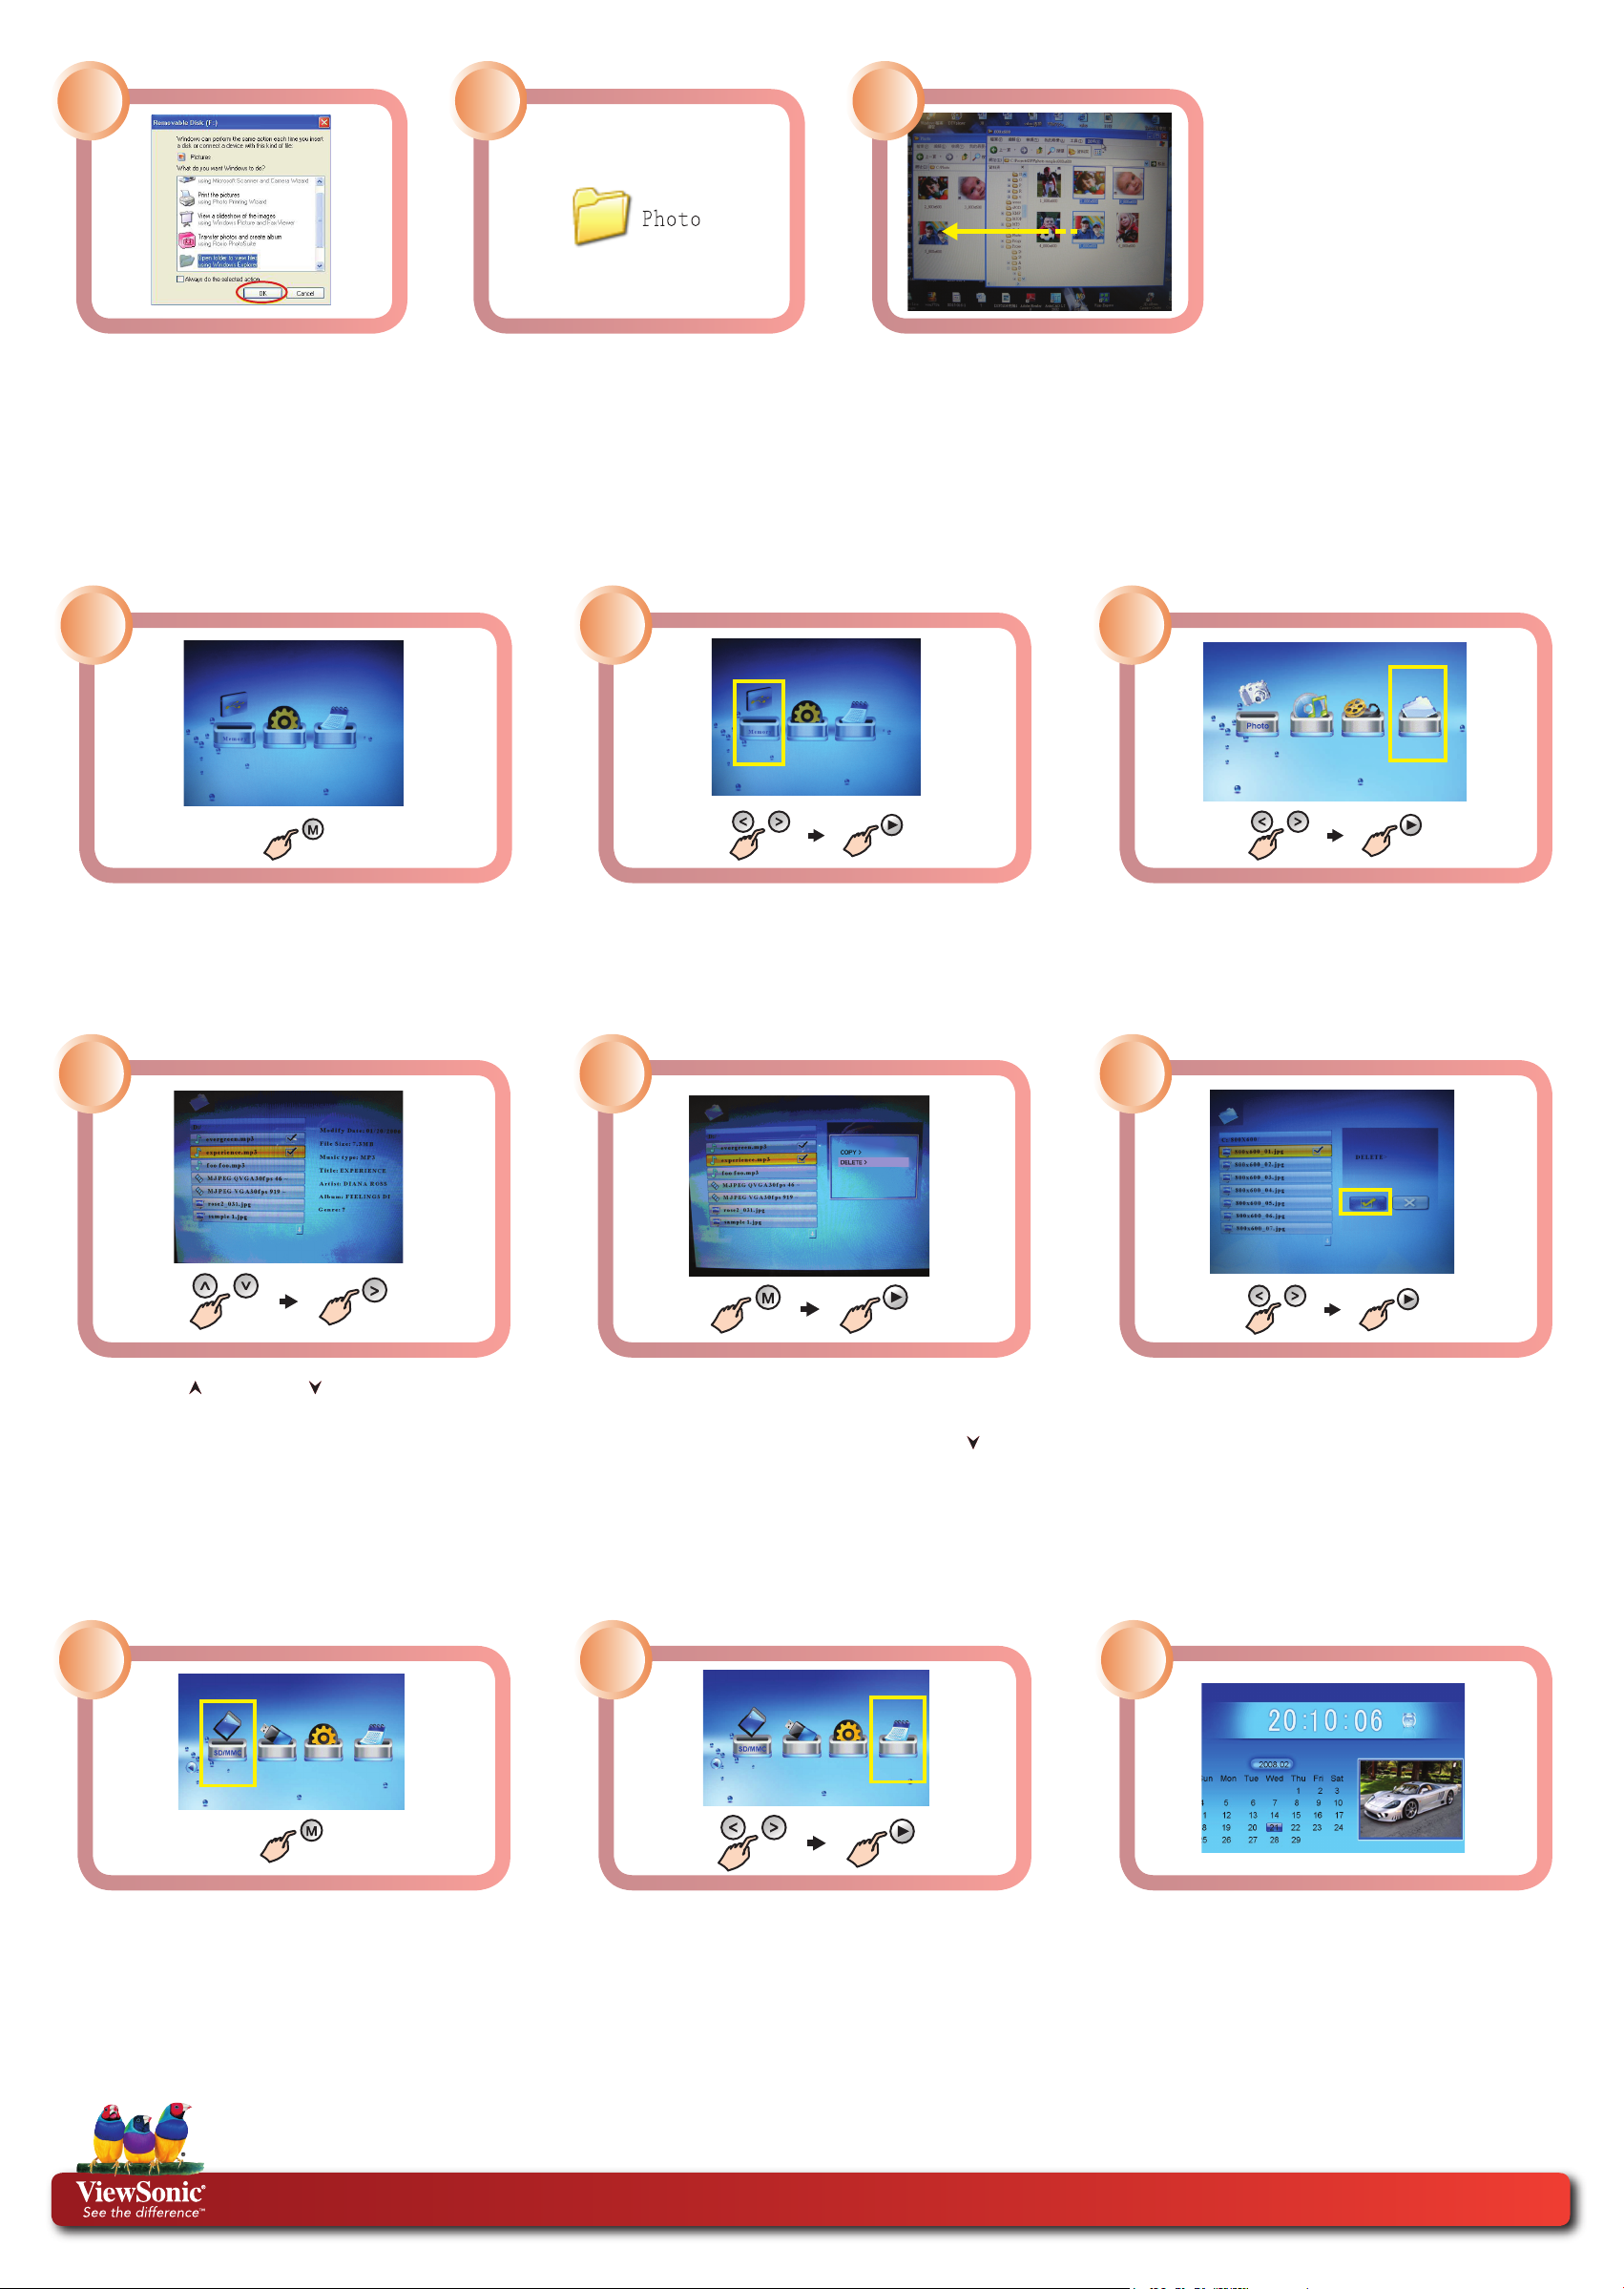
Delete Files from Internal Memory
Tap the Menu [M] button to access the main
menu.
Use the Left [<] or Right [>] button to
highlight the Memory icon. Tap the Play/
Conrm [►] button to select the highlighted
media source.
Use the Left [<] or Right [>] button to select
the “File” icon. Tap the Play/Conrm [►]
button to proceed.
Scroll Up [ ] or Down [ ] to highlight
your le and tap the Right [>] button to
place a check mark for your selection. To
select more le, repeat this step.
Press and hold the Menu [M] button. A
menu with COPY and DELETE options is
displayed on the right. Use the Down [ ]
button to select DELETE and tap the Play/
Conrm [►] button.
A DELETE conrmation options is displayed
on the right. Use the Left [<] or Right [>]
button to highlight a check mark. Tap the
Play/Conrm [►] button to proceed.
4 5
3
Display Calendar
1 2
DPF_Q SG _ D P G 8 07-1W_ 2W R e v. 1 B 1 2 - 1 6 -08
Copyr ig h t © 2008 V ie w Sonic C or p o r a tion. Al l r i g h t s rese rv e d .
ViewSonic service website: http://www.ViewSonic.com/support/
Toll free number: US (800) 688-6688, Canada (866) 463-4775
If “Open folder to view les using
Windows Explorer” is not already
highlighted, use your computer
mouse to select it, and click on
“OK”.
Open the folder on your computer
that contains the le you wish to
transfer to the photo frame.
Drag and drop your selected le
onto the photo frame internal
drive. After le transfer is completed, disconnect the USB cable.
NOTE: When the photo frame
is connected to the computer
through the USB cable, the OSD
buttons will not be functional.
Disconnect the USB cable before
operating the photo frame.
6
3
6
1 2
Tap the Menu [M] button to access the main
menu.
Use the Left [<] or Right [>] button to highlight
the CALENDAR icon. Tap the Play/Conrm
[►] button to select the highlighted icon.
The date and time can be adjusted in the SETUP
mode, please refer to
Change Settings
.
Note: The Digital Photo Frame will switch to
Calendar mode automatically if it is not used for
5 minutes (except for Pause mode).
75
 Loading...