


Osprey-50 USB Installation and
User’s Guide
Part Number:
Version Number:
Osprey Technologies Division
600 Airport Blvd.
Morrisville, NC 27560 USA
http://www.viewcast.com
Suite 900


Copyright 2000 ViewCast.com
This document is copyrighted by ViewCast.com. No part of this specification may be
reproduced, transcribed, transmitted or stored in a retrieval system in any part, or
by any means without the express written c onsent of ViewCast.com.
Disclaimer
ViewCast.com reserv es the right to change any products herein at any time and
without notice. ViewCast.com and Osprey Technologies Division make no
representations or warranties regarding the content of this document, and assumes
no re sponsibility for any errors contained herein.
Trademark Acknowledgment
Osprey-50 is a trademark of ViewCast.com. Microsoft, Windows NT, Windows 95,
Windows 98, Windows Media, and Video for Windows are trademarks or registered
trademarks of Microsoft Corporation. RealPlayer, RealProducer, and RealServer are
trademarks or registered trademarks of RealNetworks Corporation. Any other
product names, trademarks, trade names, service marks, or service names owned or
registered by any other company and mentioned herein are the property of their
respective companies.
ViewCast.com
Osprey Technologies Division
600 Airport Blvd., Suite 900
Morrisville, NC 27560 USA
www.viewcast.com
Created – December, 2000
FCC Notice
The Osprey-50 device has been tested and found to comply with the limits for a
Class B digital device, pursuant to Part 15 of the FCC Rules. These limits are
designed to provide reaso nable protection against harmful interference in a
residential installation. This device generates, uses, and c an radiate radio frequency
ener gy, and if not installed and used in accordance with the instructions, may c ause
harmful interference to radio communications. However, there is no guarantee that
interfere nce will not occur in a particular installation. If this device does cause
harmful interference to radio o r television reception, which can be deter mined by
turning the equipment on and off, the user is encouraged to try to correct the
interference by one or more of the following measures:
! Reorient or reloca te the receiving antenna.
! Increase the separation between the computer and the receiver.
! Connect the computer into an outlet on a circuit different from that to which
the receiver is connected.
! Consult the dealer or an experienced radio/TV technician for help.
Osprey-50 USB i

Shielded Cables
Connections between this device and pe ripherals must be made using shielded
cables in order to maintain complia nce wit h FCC radio emission limits.
Modifications
Modifications to this device, not approved by ViewCast.com, could void the authority
granted to the user by the FCC to operate the device.
Warranty
ViewCast.com warrants that the Osprey-50 you have purchased from ViewCast.com
or from a ViewCast.com business partner is free from defects on materials or
workmanship under normal use for the first year after your date of pur chase. Your
dated sales receipt is your proof of the date of purchase. This warranty extends only
to you, the original purchaser. You cannot transfer the warranty to anyone who
purchases the product from you.
During the warranty period, ViewCast.com will repair or replace a defect ive product
with new parts or with serviceable parts that are equivalent or superior to new parts
in performance.
This Limited Warranty extends only to products purchased from ViewCast.com or
from a ViewCast.com business partner.
This Limited Warranty also does not extend to any product that has been damaged
or rendered defective (a) as a result of accident, misuse or abuse; (b) as a result of
an act of God; (c) by operation outside the usage parameters stated in the product
documentation (d) by modification of the product (e) as a result of service by anyone
other than ViewCast.com or an authorized ViewCast.com business partner.
EXCEPT AS EXPRESSLY SET FORTH IN TH IS WARRANTY, VIEWCAST.COM.COM
MAKES NO OTHER WARRANTIES, EXPRESSED OR IMPLIED, INCLUDING ANY
IMPLIED WARRANTIES OF MERCHANTABILITY OR FITNESS FOR A PARTICULAR
PURPOSE. VIEWCAST.COM.COM EXPRESSLY DISCLAIMS ALL WARRANTIES NO T
STATED IN THIS LIMITED WARRANTY. ANY IMPLIED WARRANTIES THAT MAY BE
IMPOSED BY LAW ARE LIMITED TO THE TERMS OF THIS EXPRESS LIMITED
WARRANTY.
ViewCast.com is not liable for any damages caused by the product or by the failure
of the product to perform, including any lost profits, lost savings, incidental damages
or consequential damages. ViewCast.c om is not liable for any claim made by a third
party or made by you for a third party.
This limitation applies whether damages are sought or a claim made, under this
warranty or as a tort c laim (inclu ding neg ligence and st rict product liability) , a
contract claim or any oth er cla im. This limitation cannot be waived o r amen ded by
any person. This lim itation of liability will be effective even if ViewCast.com or an
authorized representative of ViewCast.com has been advis ed by you of the po ssibility
of such dama ges. This limitation of liability, however, will not apply to claims for
personal injury.
ii Osprey-50 USB

Some states do not allow limitation on how long an im plied warranty lasts. In such
states, the limitations or exclusions of this Limited Warranty may not apply to you.
Some states do not allow the ex clusion or limitation in incidental or conseq uential
damages for consumer products. In such states, the exclusion or limitation of this
Limited Warranty may not apply to you. This Limited Warranty gives you specific
legal rights. You may also have other rights that may vary from state to state. You
are advised to consult applicable state laws for a full determinat ion of your rights.
Osprey-50 USB iii

iv Osprey-50 USB

Table of Contents
Getting Started................................................................. 1
What is Streaming Video?.............................................................................. 1
About This Guide .......................................................................................... 2
Symbols.................................................................................................... 3
System Requirements ................................................................................... 3
Additional Requirements ........................................................................... 3
Troubleshooting............................................................................................ 4
Electronic Support ...................................................................................... 4
Phone Support ........................................................................................... 4
Installing the Osprey-50 USB Video Capture Device ......... 5
Installing the Osprey-50 USB Drivers .............................................................. 5
Completing the Osprey-50 USB Driver Installation.......................................... 6
Connecting the Osprey-50 USB Cable.............................................................. 7
Connecting the Audio and Video Sources ......................................................... 8
Connecting Video Cables ............................................................................. 8
Connecting Audio Cables ............................................................................. 9
Determining Your Audio Cable Type ..........................................................10
Connecting Your Audio Source ..................................................................10
Testing the Installation.................................................................................11
RealProducer G2 Installation.......................................... 13
Installing RealProducer.................................................................................13
Method One..............................................................................................13
Method Two..............................................................................................14
Completing the RealProducer Installation......................................................15
RealPlayer Installation ................................................... 19
Installing RealPlayer ....................................................................................19
Method One..............................................................................................19
Method Two..............................................................................................20
Completing the RealPlayer Installation .........................................................21

Installing the Windows Media Encoder Application........ 25
Installing Windows Media Encoder .................................................................25
Method One..............................................................................................25
Method Two..............................................................................................26
Completing the Windows Media Encoder Installation ......................................27
Installing the Windows Media Player.............................. 31
Installing Windows Media Player....................................................................31
Method One..............................................................................................31
Method Two..............................................................................................32
Completing the Windows Media Player Installation.........................................33
Capturing Video Using the AmCap Application................ 39
Capturing your Video and Audio ....................................................................39
Preparing to Capture..................................................................................39
Begin Capturing Video................................................................................41
Stop Capturing Video .................................................................................43
Viewing Captured Video .............................................................................43
Creating a Video Stream with RealProducer ................... 45
Creating a RealMedia File from an AVI File......................................................45
Placing Your RealMedia File on a Web Page .....................................................52
Creating a Video Stream with Windows Media
Technologies .......................................................................... 53
Creating a Windows Media File from an AVI File...............................................53
Appendix A - Troubleshooting......................................... 59
Blue Video Screen........................................................................................59
Black Preview Video Screen ..........................................................................59
Scrambled Video Image................................................................................59
Grainy, Dithered Image................................................................................60
Poor Video Quality at Large Frame Sizes.........................................................60
"Unable to Initialize Direct Draw" Message in Windows 98 ................................61
Unable to Open Driver or Similar Error Messages.............................................61
Video Compression and Playback Issues .........................................................61

Appendix B – Glossary of Terms ..................................... 63
4:2:2 Packed Video Format...........................................................................63
AVI (Audio Video Interface) ..........................................................................63
CCIR601.....................................................................................................63
CIF (Common Intermediate Format) ..............................................................63
Codec (Coder/Decoder) ................................................................................63
DirectDraw .................................................................................................64
Direct Capture.............................................................................................64
Grey8 Video Format.....................................................................................64
NTSC-NTSC-M, NTSC-J.................................................................................6 4
PAL-BDGHI, PAL-M, PAL-N, NC......................................................................64
Plausibly Live ..............................................................................................64
QCIF (Quarter Common Intermediate Format) ................................................65
RGB15 Video Format....................................................................................65
RGB24 Video Format....................................................................................65
RGB32 Video Format....................................................................................65
SECAM .......................................................................................................65
Streaming...................................................................................................66
YUV12 Planar Video Format ..........................................................................66
YVU9 Planar Video Format ............................................................................66
Appendix C – Other Resources........................................ 67
Osprey Product Line.....................................................................................67
ViewCast.com Product Line ...........................................................................67
RealNetworks Product Line............................................................................67
Appendix D – Uncompressed Video................................. 69
File Size Calculations....................................................................................69
Capture Size Limitations...............................................................................69
Appendix E – Ligos Indeo Installation ............................ 71
Installing Ligos Technology's Indeo ................................................................71


Getting Started
Thank you for purc hasing an Osprey-50 USB video capture device. The CD-ROM
included with the capture device makes it easy to create movies and streaming video
on your computer. It includes hardware and software allowing you to create
streaming video. The hardware and software for included in the Osprey-50 USB
package includes:
! Osprey-50 USB device enables you to take video from an external source,
such as a camcorder, VCR, DVD player, or other device, and store it as a file
on your computer .
! Windows Media Encoder allows you to take your video and create a streaming
media file.
! Windows Media Player allows you to view streaming media content.
! RealProducer software allows you to take your video and create a streaming
media file.
! RealPlayer allows you to view streaming media content.
What is Streaming Video?
Streaming video is a method, which represents a one-to-many, real-time broadcast
of video and audio over the Internet. It can also be transmitted over a variety of
local and wide-area network implementations. It can be a live broadcast of an event
or presentation, or on-de mand prerecorded video (a Re alMedia file).
When the term Streaming Video is used, it generally means audio and video
combin ed. St reaming Audio is audio only.
Streaming video allows users to view audio/video content without having to
download the file to their local computer. The video is "stre amed" to your computer,
which means the player on your side starts playing the content after a short
buffering period, which can be betwe en five to twenty seconds, depending on the
video bit-rate and network traffic. The buffer allows the player to maintain
continuous playback in the event of minor network congestion.
A simple example is a "shock-resistant" portable CD player. These CD players store
three to five seconds of a track from a CD in their memory, so if the player gets
bumped, it doesn't skip. Streaming video works the same way. The player keeps a
buffer of video and if there is any network congestion, the player keeps playing
without stopping. A streaming video player stores more in memory than the CD
player because network congestion can be several sec onds, as opposed to a bump to
the CD player lasting only about a second.
Osprey-50 USB 1

Getting Started
Streaming media also takes into account the viewer’s connection to the Internet. For
example, some people have 28.8K modem connections, others have 56K modem
connections, and some are directly connected via a T1 line. When you create your
streaming video, you need to set a bit-rate for the target audience. Yo u can either
set a single bit-rate, such as 56K, or a bit-rate including multiple settings, such as
28K, 56K, and 100K.
With a single bit-rate stream, only users co nnecting at the specific bit-rate or higher
are able to view the video stream. For example, if you set the bit-rate to 56K, a user
with a 28K-modem connection is not able to view the video.
With a multi-bit-rate stream, you can create a single stream s upporting multiple bitrates, so people with 28K modems can watch the stream along with people viewing
the stream at 100K. To do the same with single bit-rates, you have to create
multiple streams, all set to different bit-rates.
One advantage to having multiple streams of varying bit-rates is each stream can be
configured specifically for the target bit-rate. For example, a video image size of
320x240 (also known as "CIF", pronounced "Sif") is great for higher bit-rate s, such
as 100K. However, it is not a good size for lower bit-rates. A video image size of
160x120 (also known as "QCIF", pronounced "Q Sif", or "Q uarter Sif") is great for
low bit-rate connections like 28K or 56K.
With several single bit-rate streams, you can optimize your content for each
connection speed.
About This Guide
This ma nual is contains the following sections:
! Getting Started - Introduction to your Osprey-50 USB Capture Device
! Osprey-50 Device Installation - Installing the Osprey-50 USB Capture
Device and drivers
! RealProducer Installation - Insta lling the R ealProducer Software
! RealPlayer Installation - Installing the RealPlayer Software
! Windows Media Install ations - Installing the Windows Media Encoder and
Player software
! Capturing Video Using AmCap – Capturing uncompressed video
! Creating a Video Stream with RealProducer- Creating streaming media
with RealProducer
! Creating a Video Stream with Windows Media Technologies – Creating
streaming media with Windows Media Technologies
2 Osprey-50 USB

Getting Started
Symbols
This document contains symbols indicating useful information:
SEE ALSO: Indicates other sections of the document or other documents
containing related information
NOTE: Supplemental infor mation
SHORTCUT: Indicates shortcuts
WARNING: Indicates information no t to be ignored
System Requirements
The system requirements for the Osprey-50 USB product include the following:
! Computer with Sound Card with 1 available USB port
! Windows 98
! 120MHz Pentium or better (200+ MHz MMX recommended)
! 32 Megabytes Memory (64MB or better recommended)
! 500 Megabytes of Free Space (mainly for creating AVI files)
Additional Requirements
There are additional system requirements not included in the Osprey-50 USB which
include:
! Audio/Video input source - camera, camcorder, VCR, DVD, etc .
! Composite (RCA) or S-video cables to connect input source to Osprey-50 card
! Audio Cables to connect Audio/Video source to sound card
Osprey-50 USB 3

Getting Started
Troubleshooting
Refer to Appendix A for solutions to the most common problems prior
to contacting Technical Support.
Technical and customer support is available via phone, E-mail, or the World Wide
Web. Before you contact support, make sure you have the following information
available:
! System CPU type (Pentium)
! Amount of memory in your system (RAM)
! Operating system (Windows 98)
! Detailed information about the problem , including the exact wording of any
error messages
! Information about what you've already done to fix the problem
Electronic Support
For support on the Osprey-50, RealProducer, or RealPlayer, use the following E-mail
address:
! support@viewcast.com
Phone Support
For support on the Osprey-50, RealProducer, or RealPlayer, use the following phone
number:
! North America: (631) 434-3197
4 Osprey-50 USB

Installing the Osprey-50 USB Video
Capture Device
Installing the Osprey-50 USB Video Capture Device consists of several steps. These
steps are outline in this chapter of the manual. These include:
! Installing the Osprey-50 USB drivers
! Connecting the Osprey-50 USB cable to your computer
! Connecting the audio and video sources
! Testing the installation
Installing the Osprey-50 USB Drivers
To install the Osprey-50 USB drivers:
1. Click Start and select Run.
The Run window displays.
Figure 2-1: Run Wind ow
2. Click Browse.
The Browse window displays
Osprey-50 USB 5
Figure 2-2: Browse Window

Installing the Osprey-50 USB Video Capture Device
3. Locate your CD-ROM drive in the Look In drop-down list.
The contents of the CD-ROM display.
Figure 2-3: Contents of the CD-ROM
4. Double-click the O50USB folder.
5. Double-click the Osprey50USB_98-2K.exe file.
The Run window displays.
Figure 2-4: Run Wind ow
6. Click OK.
The installation process begins.
Click the Windows 98 button to begin the installation process. Then proceed to the
section titled “Completing the Osprey-50 USB Driver Installation”.
Completing the Osprey-50 USB Driver Installation
This section of the chapter describes the remaining part of the Osprey-50 USB driver
installation.
To complete the installation:
The Welcome window displays.
6 Osprey-50 USB
Figure 2-5: Welcome Window

Installing the Osprey-50 USB Video Capture Device
1. Click Next.
The Osprey-50 USB Installation window displays.
Figure 2-6: Osprey-50 USB Installation Window
2. Click Next.
After all the required files are copied, the installation prompts you to restart
your computer.
3. Click OK to restart your computer.
Connecting the Osprey-50 USB Cable
This section details how to connect your Osprey-50 USB cable to your computer.
Figure 2-7: Osprey-50 USB Cable
The US B port on your computer is a small rec tangular opening. It is usually located
near the other de vices connecting to your computer. These include your monitor,
printer, mouse, and keyboard.
Look for this symbol on your computer.
Osprey-50 USB 7
Figure 2-8: USB Port International Symbol

Installing the Osprey-50 USB Video Capture Device
If you do not see the symbol located on your computer, look at Figure 2-9 to help
you locate your USB port.
USB Ports
Figure 2-9: Tower Style Computer – Back View
Connecting the Audio and Video Sources
The third step is to connect your video input device to your Osprey-50 USB Video
Capture Device. You also connect your audio input device to your computer’s sound
card. This allows you to capture audio and video from the device and turn it into
videos and streaming media files.
Connecting Video Cables
The Osprey-50 USB cable has two inputs, one composite (RCA) and one S-Video.
See Figure 2-10.
Figure 2-10: Osprey-50 USB Video Capture Device Video Inputs
8 Osprey-50 USB

Installing the Osprey-50 USB Video Capture Device
There are many types of video sources. These include:
! Camcorders
! VCRs
! DVD players
These types of devices usually come with connections known as RCA style. RCA style
connections are also referred to as composite video. Your device may also have an
S-Video connection.
S-Video signals provide a sharper image with better color separation.
However, a compo site input also provides a very high quality image.
To connect your video input device to the Opsrey-50 USB cable:
1. Connect the cable to the Video Out port on your video source.
2. Connect the same c a ble to the input on the Osprey-50 USB cable.
You can use either an RCA style or S-Video cable to connect the video
input device to the Osprey-50 USB cable.
Connecting Audio Cables
Sound cards can vary between computers.
! Sound cards installed into an expansion s lot
! Sound cards built into the computer’s motherboard
The types of connections for the audio can also vary between computers and sound
card manufacturers.
! RCA style input
! 3.5mm style input (stereo or mono audio)
Sound cards with stereo capability often have two connectors for the
audio input. Sound cards without stereo input capability may have one
microphone and one line input.
In addition to the above differences, the connection ports on the so und card can be
labeled differently.
! Microphone In or Mic In
! Line In
Refer to your sound card or computer documentation for mo re specific
information on connecting audio to your sound card
Your audio source can be the same as your video input device. These include:
! Camcorders
! VCRs
! DVD players
Osprey-50 USB 9

Installing the Osprey-50 USB Video Capture Device
It could also be a microphone, CD player, or any device separate from the video
input device. Your audio device should have one of the following types of
connections:
! Dual RCA Connector
! Single RCA Connector
! 3.5mm stereo or mono
For assistance in determining the audio cable needed to complete the audio
connections, please refer to the next section titled “Determining Your Audio C a ble
Type”.
Determining Your Audio Cable Type
Audio Source
Connection
Sound Card
Connection
3.5mm
To use this table:
1. Locate your audio source connection type in the top row of the table.
2. Locate your sound card connection type in the left column of the table.
3. Look across the table to determine the audio cable type needed for your
specific co nfiguration.
The cable type columns describe the connector types on each end of the cable.
For example, your c a mcorder contains two RCA audio o utput connections and your
sound card has a 3.5mm connection. You need an audio cable, which has two RCA
style connectors on one end and a 3.5mm connector on the other end.
If you don’t have the appr opriate cables to complete the connections,
you may purchase cables at any retailed that sells audio and video
equipment.
Single RCA
Connection
Connections
Dual RCA
Connector
Two RCA
Single RCA
Two RCA
3.5mm
Single RCA
Connector
Single RCA
Single RCA
Single RCA
3.5mm
3.5mm
Connector
3.5mm
Single RCA
3.5mm
3.5mm
Connecting Your Audio Source
Connect the audio cable from your audio output device to the sound card. If your
sound card has a port labeled “Line In”, connect the remaining end of the cable to
this port. If your sound card has a port labeled “Mic In” connect the remaining end of
the cable to this port.
10 Osprey-50 USB

Installing the Osprey-50 USB Video Capture Device
Testing the Inst allation
Testing the installation prior to installing the remaining software is critica l. The
application used to test the insta llation is AMCAP.
To test the installation:
1. Click Start and select Programs.
2. Select Osprey-50.
3. Select AMCAP.
The AMCAP window displays.
4. Click Options.
5. Select Preview.
Video displays in the video window.
If you do not see video in the video window, refer to Appendix A –
Troubleshooting in this manual.
Figure 2-11: AMCAP Window
Osprey-50 USB 11

Installing the Osprey-50 USB Video Capture Device
12 Osprey-50 USB

RealProducer G2 Installation
RealProducer enables you to create RealNetworks RealMedia files from several
different media formats. These include:
! Convert AVI files to the RealMedia format
! Directly from the Osprey -50 and your sound card
It employs easy to use wizards that guide you through the creation process. It also
has a customizable interface so you can use the advanced mode instead of the
wizard s as you get more familiar with the software.
For more information on the RealProducer, view the RealProducer
docum entation after installation.
Installing RealProducer
There are two methods to begin the RealProducer installation routine.
Method One
Method One involves r unning the installation from the Osprey-50 installation
window. See Figure 3-1.
Osprey-50 USB 13
Figure 3-1: Osprey-50 Installation Window

RealProducer G2 Installation
Click the RealProducer button to begin the installation process. Then proceed to the
section titled “Completing the RealProducer Installation”.
Method Two
Method Two consists of bypassing the Osprey-50 automatic installation process.
To manually install RealProducer:
1. Click Start and select Run.
The Run window displays.
Figure 3-2: Run Wind ow
2. Click Browse.
The Browse window displays
Figure 3-3: Browse Window
3. Locate your CD-ROM drive in the Look In drop-down list.
The contents of the CD-ROM display.
14 Osprey-50 USB
Figure 3-4: Contents of the CD-ROM

RealProducer G2 Installation
4. Double-click the RealNetworks folder.
5. Double-click the Producer folder.
6. Double-click the RPRODG261.EXE file.
The Run window displays.
Figure 3-5: Run Wind ow
7. Click OK.
The installation process begins.
Proceed to the next section titled “Completing the RealProducer Installation”
beginning on page 15.
Completing the RealProducer Installation
This section of the chapter describes the remaining part of the RealProducer
installation.
To complete the installation process:
The installation begins by extracting all the required files to complete the pro cess.
Figure 3-6: Prep aring to Install RealProd uc e r G2
After the files are extracted, the RealProducer License Agreement window displays.
Figure 3-7: RealProducer G2 License Agreement Window
Osprey-50 USB 15

RealProducer G2 Installation
1. Click Accept to agree to the license agreement. If you do not agree to the
agreement, click Cancel to stop the installation process.
The RealProducer G2 License Agreement must be accepted to install the
software.
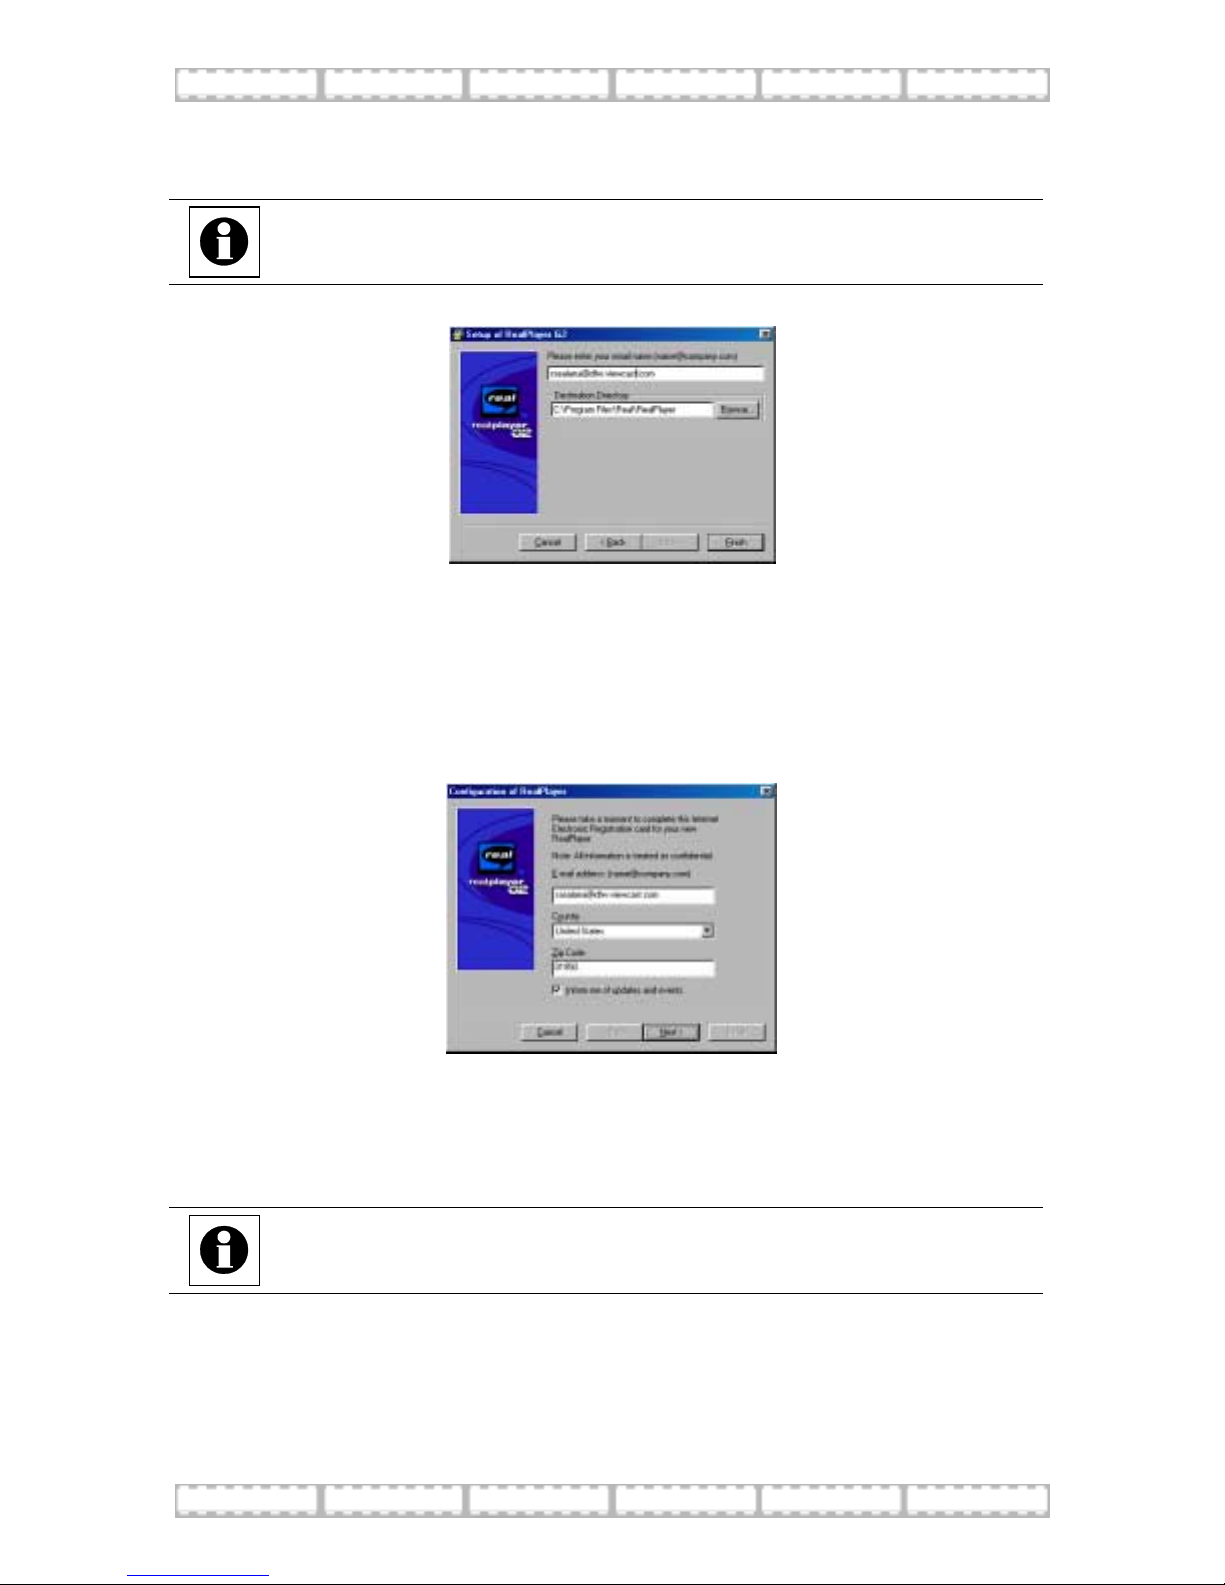
The Setup of RealProducer G2 window displays.
Figure 3-8: Setup of RealProducer G2 Window
2. Enter your e-mail address in the firs t field.
3. We recommend you do not change the Destination Directory. To change the
directory, click Browse.
4. Click Finish.
The Configuration of RealProducer window displays.
Figure 3-9: Co nf iguration of RealPr o ducer
The Enable Recording checkbox allows viewers of your content to
download the files to their hardware drive while the view the content. If
you do not want to allow people to download the content to their
computers, un-select this checkbox.
This option can be changed from within the RealProducer G2 software at
a later time.
16 Osprey-50 USB

RealProducer G2 Installation
5. Click Next after making your decision regarding the Enable Recording option.
The Configuration of RealProducer window displays.
Figure 3-10: C onfiguration of R e alProducer
6. Verify the address in the E-mail Address field. This is the same e-mail address
you entered earlier in the installation process.
7. Select your country from the Country drop-down list.
8. Enter your zip code in the Zip Code field.
The Inform Me of Updates and Events checkbox instructs RealNetworks
to send you periodic e-mail newsletters r egarding news and events. If
you do not want to receive the newsletters, deselect this checkbox.
9. Click Finish.
After the installation is co mplete, RealProdu cer la unches the first win dow of the
Recording Wizard. We recommend you cancel the Recording Wizard and exit
RealProducer G2 at this time.
Chapter 8 provides information on using the RealPro ducer.
This completes the installa tion of RealProduc er G2 .
The next step is ins talling RealNetworks’ RealPlaye r G2. For instructions r egarding
how to install RealPlayer G2, proceed to the "Installing RealPlayer" chapter of this
manual.
Osprey-50 USB 17

RealProducer G2 Installation
18 Osprey-50 USB

RealPlayer Installation
The RealPlayer software enables you to play RealNetworks RealMedia files created
with the RealProducer. The RealPlayer also enables you to listen to live and
prerecorded audio and video on the Internet. It also provides “one-button” access to
news and entertainment via presets that are configurable by the user.
For more information on the RealPlayer, view the RealPlayer
docum entation after installation.
Installing RealPlayer
There are two methods to begin the RealPlayer installation routine.
Method One
Method One involves r unning the installation from the Osprey-50 installation
window. See Figure 4-1.
Figure 4-1: Osprey-50 Installation Window
Click RealPlayer to begin the installation process. Then proceed to the section titled
“Completing the RealPlayer Installation”.
Osprey-50 USB 19

RealPlayer Installation
Method Two
Method Two consists of bypassing the Osprey-50 automatic installation process.
To manually install RealPlayer:
1. Click Start and select Run.
The Run window displays.
Figure 4-2: Run Wind ow
2. Click Browse.
The Browse window displays
Figure 4-3: Browse Window
3. Locate your CD-ROM drive in the Look In drop-down list.
The contents of the CD-ROM display.
4. Double-click the RealNetworks folder.
5. Double-click the Player folder.
20 Osprey-50 USB
Figure 4-4: Contents of the CD-ROM

RealPlayer Installation
6. Double-click the RN6PINST_6_45.EXE file.
The Run window displays.
Figure 4-5: Run Wind ow
7. Click OK.
The installation process begins.
Proceed to the next section titled “Completing the RealPlayer Installation”.
Completing the RealPlayer Installation
This section of the chapter des cribes the remaining part of the RealPlayer
installation.
To complete the installation process:
The installation begins by extracting all the required files to complete the pro cess.
Figure 4-6: Preparing to Install RealPlayer G2
After the files are extracted, the RealProducer License Agreement window displays.
Figure 4-7: RealPlayer G2 License Agreement Window
Osprey-50 USB 21
RealPlayer Installation
1. Click Accept to agree to the license agreement. If you do not agree to the
agreement, click Cancel to stop the installation process.
The RealPlayer G2 License Agreement must be accepted to install the
software.
The Setup of RealPlayer G2 window displays.
Figure 4-8: Setup of RealPlayer G2 Window
2. Enter your e-mail address in the firs t field.
3. We recommend you do not change the Destination Directory. To change the
directory, click Browse.
4. Click Finish.
After the files are copied to your computer, the Configuration of RealPlayer
window displays.
Figure 4-9: Configuration of RealPlayer Window
5. Ve rify your e-mail address in the E-mail Address field. This is the same e-mail
address entered earlier in the installation process.
6. Select your country from the Country drop-down list.
7. Type your zip code in the Zip Code field.
The Inform Me of Updates and Events checkbox instructs RealNetworks
to send you periodic e-mail newsletters r egarding news and events. If
you do not want to receive the newsletters, deselect this checkbox.
22 Osprey-50 USB

RealPlayer Installation
8. Click Next.
The Configuration of RealPlayer window displays.
Figure 4-10: Co nfiguration of RealPlayer Window
9. Select your Internet connection rate from the Connection Speed drop-dow n list.
If you are unsure of your connection rate to the Internet, re fer to the
manual provided with your modem. You should not select a connection
speed faster than your actual Internet connection. This does not improve
the quality of video and audio viewed on the Internet.
10. Click Next.
The Configuration of RealPlayer window displays.
Figure 4-11: Co nfiguration of RealPlayer Window
11. Select one or more of the pre-set channel cate gories available.
Osprey-50 USB 23

RealPlayer Installation
12. Click Next.
The RealPlayer window displays.
Figure 4-12: RealPlayer Window
The RealPlayer installation is complete. When RealPlayer launches the first time, it
plays a welcome sound. If you do not hear this sound, check all of the connections to
your sound card. If you are still having difficulty, refer to the RealPlayer
documentation or visit the RealNetworks web site.
24 Osprey-50 USB

Installing the Windows Media
Encoder Application
The Windows Media Encoder application allows you to crea te streaming media files
that are compatible with the Windows Media Player. You can create your content in
a variety of ways. These include:
! Convert AVI files to the Windows Media format
! Directly from the Osprey -50 and your sound card
It employs easy to use wizards that guide you through the creation process.
For more information on the Windows Media Encoder, view the Windows
Media documentation after installation.
Installing Windows Media Encoder
There are two metho ds to begin the Windows Media Encoder installation routine.
Method One
Method One involves r unning the installation from the Osprey-50 USB installation
window. See Figure 5-1.
Osprey-50 USB 25
Figure 5-1: Osprey-50 Installation Window

Installing Windows Media Applications
Click Wi n d ow s Me di a Encoder to begin the installation process. Then proceed to
the section titled “Completing the Windows Media Encoder Installation”.
Method Two
Method Two consists of bypassing the Osprey-50 USB automatic installation
process.
To manually install Windows Media Encoder:
1. Click Start and select Run.
The Run window displays.
Figure 5-2: Run Wind ow
2. Click Browse.
The Browse window displays
Figure 5-3: Browse Window
3. Locate your CD-ROM drive in the Look In drop-down list.
The contents of the CD-ROM display.
4. Double-click the WindowsMedia folder.
5. Double-click the Encoder folder.
26 Osprey-50 USB
Figure 5-4: Contents of the CD-ROM

ChapterTitle
6. Double-click the wmencoder.exe file.
The Run window displays.
Figure 5-5: Run Wind ow
7. Click OK.
The installation process begins.
Proceed to the next section titled “Completing the Windows Media Encoder
Installation”.
Completing the Windows Media Encoder Installation
This section of the chapter describes the remaining part of the Windows Media
Encoder installation.
To complete the installation process:
The Windows Media Encode r 7 Setup License Agreement window displays.
Figure 5-6: Windows Media Encoder 7 Setup License Agreement Window
Osprey-50 USB 27

Installing Windows Media Applications
1. Click Yes to co ntinue the installation.
The Windows Media Encoder 7 License Agreement must be accepted to
install the software.
The Welcome window displays.
Figure 5-7: Welcome Window
2. Click Next.
The Windows Media Encoder 7 Setup Wizard window displays.
Figure 5-8: Windows Media Encoder 7 Setup Wizard Window
3. Click Finish to inst all the required files to your computer.
The required files are installed.
Figure 5-9: Windows Media Encoder 7 Setup Wizard Window
28 Osprey-50 USB

ChapterTitle
After the required files are copied to your computer, the Setup Complete
window displays.
Figure 5-10: Setup Complete Window
4. Clic k to select the Exit Setup radio button.
5. Click OK to complete the installation.
We recommend that you complete the remaining software application
installation prior to capturing or compressing your video.
This completes the installation of the Windows Media Encoder software.
The next step is ins talling Microsoft's Windows Media Player. For instructio ns
regarding how to install the Windows Media Player, proceed to the "Installing the
Windows Media Player" chapter of this manual.
Osprey-50 USB 29

Installing Windows Media Applications
30 Osprey-50 USB

Installing the Windows Media Player
The Windows Media Player software enables you to play Microsoft's Windows Media
files created with the Windows Media Encoder. The Windows Media Player also
enables you to listen to live and prerecorded audio and video on the Internet. It also
provides “one-button” access to news and entertainment via presets that are
configurable by the user .
For more information on the Windows Media Player, view the
docum entation after installation.
Installing Windows Media Player
There are two methods to begin the Windows Media Player installation routine.
Method One
Method One involves r unning the installation from the Osprey-50 USB installation
window. See Figure 6-1.
Click Wi n d ow s Me di a Player to begin the installation process. Then proceed to the
section titled “Completing the Windows Media Player Installation”.
Osprey-50 USB 31
Figure 6-1: Osprey-50 Installation Window

Installing the Windows Media Player
Method Two
Method Two consists of bypassing the Osprey-50 USB automatic installation
process.
To manually install Windows Media Player:
1. Click Start and select Run.
The Run window displays.
Figure 6-2: Run Wind ow
2. Click Browse.
The Browse window displays
Figure 6-3: Browse Window
3. Locate your CD-ROM drive in the Look In drop-down list.
The contents of the CD-ROM display.
4. Double-click the WindowsMedia folder.
5. Double-click the Player folder.
32 Osprey-50 USB
Figure 6-4: Contents of the CD-ROM

Installing the Windows Media Player
6. Double-click the wmp7.exe file.
The Run window displays.
Figure 6-5: Run Wind ow
7. Click OK.
The installation process begins.
Proceed to the next section titled “Completing the Windows Media Player
Installation”.
Completing the Windows Media Player Installation
This section of the chapter desc ribes the remaining part of the Windows Media Player
installation.
To complete the installation:
The Windows Media Player 7 Setup window displays.
Figure 6-6: Windows Media Player 7 Setup Window
1. Close all of the applications currently r unning on y our system.
2. Click Yes.
The License Agreement window displays.
Figure 6-7: License Agreement Window
Osprey-50 USB 33

Installing the Windows Media Player
3. Click Yes to accept the terms of the license agreement.
The Windows Media Player 7 License Agreement must be accepted to
install the software.
The installation routine extracts the files needed to complete the installation.
The Welcome window displays.
Figure 6-8: Welcome Window
4. Click Next.
The Privacy Statement window displays.
Figure 6-9: Privacy Statement Window
5. Clic k to select the I have read the Privacy Statement checkbox.
34 Osprey-50 USB

Installing the Windows Media Player
6. Click Next.
The Windows Media Component Setup windo w displays.
Figure 6-10: Windows Media Component Setup Window
7. Clic k to select the co mpone nts you want t o install.
By default, all of the components are selected. This is the recommended
configuration.
8. Click Next.
The Windows Media Component Setup windo w displays.
Figure 6-11: Windows Media Component Setup Window
9. Click to select the components you want to configure.
Osprey-50 USB 35

Installing the Windows Media Player
10. Click Next.
The Windows Media Component Setup windo w displays.
Figure 6-12: Windows Media Component Setup Window
11. Click Next.
The installation process begins.
Figure 6-13: Windows Media Component Setup Window
After all of the nece ssary files are copied to your computer , the Setup Complete
window displays.
36 Osprey-50 USB
Figure 6-14: Setup Complete Window

Installing the Windows Media Player
12. Click Finish to restart your computer.
The Windows Media Player installation requires that your restart your
computer. This ensures the application performs as expected.
This completes the Windows Media Player installation.
The first step in creating streaming media is to capture your video. For information
on how to capture uncompressed video, refer to the "Capturing Video Using the
AmCap Application" chapter of the manual.
Osprey-50 USB 37

Installing the Windows Media Player
38 Osprey-50 USB

Capturing Video Using the AmCap
Application
This chapter of the manual provides detailed instructions on ca pturing your video
and audio using the AmCap application provided with the Osprey-50 USB capture
device. AmCap is a video capturing applic ation o nly. There a re no editing
capabilities.
There are other applications which you can use to not only capture your
video and audio but also edit, add titles, and add special effects. These
products include: Adobe Premier, MGI VideoWave, and Pinnacle Systems
DC50.
When capturing video from a source, the files can become very large. To help you
determine the approximate size of your captured video, please see "Appendix D –
Uncompress Video".
Capturing your Video and Audio
There are two steps in capturing your video. The first is to prepare the AmCap
application with the correct settings. The second is capturing the video.
Preparing to Capture
Prior to actually capturing your video, the AmCap application must be configured to
achieve the best results.
Osprey-50 USB 39

Capturing Video Using the AmCap Application
To prepare for video capture:
1. Click Start and select Programs.
2. Select Osprey-50.
3. Select AmCap.
The AmCap Application window displays.
Figure 7-1: AmCap Window
If AmCap does not contain an image, please see "Appendix A –
Troubleshooting".
4. Click Options and select Video Capture Filter.
The Properties window displays.
Figure 7-2: Properties Window
5. Select your video standard from the drop-down list.
6. Click OK.
7. Click Options and select Video Capture Pin.
The Properties window displays.
40 Osprey-50 USB
Figure 7-3: Properties Window

Capturing Video Using the AmCap Application
8. Select a frame per second rate in the Frame Rate field.
A rate of 15.000 frames per second is acceptable for most streaming
video uses.
9. Select a color depth from the Color Space/Compression drop-down list.
10. Select an capture window size from the Output Size drop-down list.
An output size of 320 x 240 is also known as CIF. A 160 x 120 output
size is known as QCIF. These are the most common window sizes for
streaming video.
If the viewers of your streaming video are going to have slower Internet
connections, 28.8 Kbps or 56 Kbps, we recommend using the smaller
window size of QCIF. This provides a better finished product for the
viewer.
11. Click OK.
12. Click Options and select Audio Capture Filter.
The Properties window displays.
Figure 7-4: Properties Window
13. Select the audio input you are using on your sound ca rd from the Pin Line
drop-down list.
14. Click OK.
The next step is to capture your video .
Begin Capturing Video
This section of the chapter details how to ca pture your video.
Prior to capturing your video, verify that your video source is connected
to the Osprey-50 USB device and your audio source is connected to your
sound card. For more information on connecting your sources, please
refer to the "Installing the Osprey-50 USB Video Capture Device"
chapter of this man ual.
Osprey-50 USB 41

Capturing Video Using the AmCap Application
To capture your video:
1. Click Capture and verify the selection Capture Audio is selected.
If you do not want to capture audio, deselect the Capture Audio
selection.
2. Click Capture and select Start Capture.
The Set Capture File window displays.
Figure 7-5: Set Capture File Window
3. Select a drive and directory for the captured video.
4. Type a file name for the captured video.
Uncompress video files can be very large. Make sure you have enough
disk space to accommodate the captured video. For additional
information regarding uncompressed video files, please see
"Appendix D – Uncompressed Video".
5. Click Open.
The Set File Size window displays.
Figure 7-6: Set File Size Window
6.
want to limit the file
If you … then …
type the size in megabytes in the Capture File Size
size of your captured
field.
video,
do not want to limit
the file size of your
captured video,
42 Osprey-50 USB
proceed to step 7.

Capturing Video Using the AmCap Application
7. Click OK.
The Ready to Capture window displays.
Figure 7-7: Ready to Capture Window
8. Click OK to begin capturing video and audio.
Stop Capturing Video
When you are ready to stop capturing video, click Capture and select Stop
Capture.
Viewing Captured Video
You should view your uncompressed video prior to converting it into a streaming
video format.
To view your captured video:
1. Locate your captured video using Windows Explorer.
2. Double-click on the file.
This launches your installed player and allows you to view your video.
If you are not satisfied with your video and would like to capture it again,
please refer to the "Begin Capturing Video" section of this chapter.
Congratulations! You have captured your video and now you are ready to convert
it into a streaming format. Please refer to one of the chapters below depending on
the format you have chosen to use.
! Creating a Video Stream with RealProducer
! Creating a Video Stream with Windows Media Technologies
Osprey-50 USB 43

Capturing Video Using the AmCap Application
44 Osprey-50 USB

Creating a Video Stream with
RealProducer
This chapter details how to create a RealMedia file. This chapter also includes how to
add the RealMedia file to your web page.
RealMedia files are much smaller in size th an AVI files. There is no direct
ratio for comparison because there are too many variables. However, as
an example, a 10MB AVI file may be reduced to less than 100KB when
compressed with RealProducer.
Creating a RealMedia File from an AVI File
To create a RealMedia file:
1. Click Start and select Programs.
2. Select RealProducer.
3. Select RealProducer G2.
The RealProducer G2 New Session window displays.
Figure 8-1: RealProducer G2 New Session Window
4. Clic k to select the Record From File radio button.
To record audio and video directly from the Osprey-50 video capture
card and your sound card, select Record from Media Device.
Osprey-50 USB 45

Creating a Video Stream with RealProducer
5. Click OK.
The Recording Wizard window displays.
Figure 8-2: Recording Wizard Window
6. Click Browse to locate the AVI file you created.
7. Click Next.
The Recording Wizard window displays.
Figure 8-3: Recording Wizard Window
8. Enter a title for your video in the Title field.
9. Enter the author of the video in the Author field.
10. Enter the year in the Copyright field.
11. Enter a description of your video in the Description field.
12. Enter a few keywords about your video in the Keywords field.
The keywords are utilized when people search for you r video.
46 Osprey-50 USB

Creating a Video Stream with RealProducer
13. Click Next.
The Recording Wizard window displays.
Figure 8-4: Recording Wizard Window
14. Click to select the Single-Rate for Web Servers radio button.
Single-rate streams are created for only one bit-rate. SureStream files
contain information allowing the streams to be played back at various
bit-rates.
15. Click Next.
The Recording Wizard window displays.
Figure 8-5: Recording Wizard Window
16. Select a Target Audience setting that is best suited for your viewing audience.
This setting optimizes your video for the selected target audience.
Osprey-50 USB 47

Creating a Video Stream with RealProducer
17. Click Next.
The Recording Wizard window displays.
Figure 8-6: Recording Wizard Window
18. Select the appropriate audio format.
For a majority of the videos you encode, Voice Only is the best setting.
19. Click Next.
The Recording Wizard window displays.
Figure 8-7: Recording Wizard Window
20. Click to select the Video Quality radio button.
The Normal Motion Video selection maintains the video quality from the
original AVI f ile.
48 Osprey-50 USB

Creating a Video Stream with RealProducer
21. Click Next.
The Recording Wizard window displays.
Figure 8-8: Recording Wizard Window
22. Enter the path and file name in the File Name field for your RealMedia file.
You can also click Save As to locate a specific dir ectory on your
computer for the Re alMedia file.
23. Click Next.
The Recording Wizard window displays.
Figure 8-9: Recording Wizard Window
24. Verify all the information on the summary window. If anything is incorrect, click
Back to return to the previous window and make any necessary changes.
Osprey-50 USB 49

Creating a Video Stream with RealProducer
25. Click Finish.
The RealProducer window displays with the first frame of your video in the left
video window.
Figure 8-10: RealProducer Window
26. Verify all of the settings on the RealProducer window.
If any of the settings are incorrect, you may change them on this
window. You do not need to go through the Recording Wizard again.
27. Click Start.
RealProducer begins to create a RealMedia file. The encoded video displays in
the video window on the right.
50 Osprey-50 USB
Figure 8-11: RealProducer Window

Creating a Video Stream with RealProducer
The time to encode an AVI file is approximately the same length as the
original video. For examp le, if your AV I file is 80 seconds, it takes
RealProducer approximately 80 seconds to create the RealMedia file.
When the RealMedia file is complete, the Processing Co mplete window displays.
Figure 8-12: Processing Complete Window
28. Click Close.
Janus is an on-line guide hosted by RealNetworks where you can list
information about your video. If you choose to add your clip to Janus,
you are prompted to complete a web form providing information about
your video. This helps people find your clip on the Internet.
The RealProducer displays a window verifying that you do not want to add yo ur
video to Janus.
Figure 8-13: RealProducer Window
29. Click No.
We suggest that you add your video to Janus when you are creating
video for streaming on the Inter net. In this example, however, you do
not need to add your video to Janus .
30. Click Play to view your RealMedia file.
RealPlayer displays your completed video.
Congratulations! You have successfully created a RealMedia file from an AVI file.
Osprey-50 USB 51
Figure 8-14: RealPlayer

Creating a Video Stream with RealProducer
The video looks different as a RealMedia clip as opposed to an AVI clip.
This is because the RealProducer compresses the video for easy viewing
over the Internet. This is part of the encoding process. If you exit the
RealProducer, and look at the RealMedia file size, you sho uld notice the
file size is significant ly smaller.
The remainder of this chapter includes supplemental information regarding how to
place your new RealMedia file on a web page.
Placing Your RealMedia File on a Web Page
It is easy to link your RealMedia file to your web page. There ar e a just a few things
to consider:
! Your web site and RealMedia file must exist on the same server
! If your web site is hosted on a remote system, copy your RealMedia file to
that system
On your web page, create a link to the RealMedia file. This is done in the same
manner as linking to an HTM or HTML file.
When someone access es your web page and clicks the link to the RealMedia file,
RealPlayer launches and your video begins playing.
The person accessing your video must have RealPlayer installed.
You should place a link to the RealNetworks page so people can
download RealPlayer if they do not have it installed on their computer.
If you do not have an existing web page, you can still share your video with friends
and family on the Internet by using one of the templates from Your Video on the
Web. Access the web site at www.yourvideoontheweb.com and follow the
instructions for uploading your video to the Internet.
For information on other ways to use RealProducer, visit the
RealNetworks web site at www.real.com.
52 Osprey-50 USB

Creating a Video Stream with
Windows Media Technologies
This chapter details how to create a Windows Media file from the AVI file you
created. This chapter also includes how to add the Windows Media file to your web
page.
Window s Media files are much smaller in size than AVI files. There is no
direct ratio for comparison because there are too many variables.
However, as an ex ample, a 10MB AVI file may be reduced to less than
100KB when compressed with Windows Media.
Creating a Windows Media File from an
AVI File
This section details how to transform your AVI file (created in Chapter 7) into a WMV
file.
To create a Windows Media File:
1. Click Start and select Programs.
2. Select Windows Media.
3. Select Windows Media Encoder.
The Windows Media Encoder Welcome window displays.
Figure 9-1: Windows Media Encoder Welcome Window
Osprey-50 USB 53

Creating a Video Stream with Windows Media Technologies
4. Clic k to select the Broadcast, capture, or convert a file using the New
Session Wizard radio button.
5. Click OK.
The New Session Wizard window displays.
Figure 9-2: New Session Wizard Window
6. Clic k to select the Convert an audio or video file into a Windows Media
File radio button.
7. Click Next.
The File Selection window displays.
Figure 9-3: File S e le ction Window
8. Enter the path to the AVI file created in Chapter 6. You can us e the Browse
button to look for the file.
9. Enter the path of the new WMV file. By de fault, it will be created in the same
directory as the AVI file.
54 Osprey-50 USB

Creating a Video Stream with Windows Media Technologies
10. Click Next.
The Output File Distribution window displays.
Figure 9-4: Output File Distribution Window
11. Click to select the File will stream from a Web server or play directly on a
computer radio button.
12. Click Next.
The Profile Selection window displays.
Figure 9-5: Pro file Selection Window
13. Select a Profile Selection setting that is best suited for your viewing audience.
This setting optimizes your video for the selected target audience.
Osprey-50 USB 55

Creating a Video Stream with Windows Media Technologies
14. Click Next.
The Display Information window displays.
Figure 9-6: Display Information Window
15. Enter informa tion about yo ur video clip.
16. Click Next.
The Settings Review window displays.
Figure 9-7: Settings Review Window
17. Click Finish to begin creation of the Windows Media file.
18. The Windows Media Encoder window will appear, along with an information
dialog.
The Information Dialog window displays.
19. Click OK. The Encoder will start encoding the video and it will be visible in the
window as it encodes.
56 Osprey-50 USB
Figure 9-8: Information Dialog Window

Creating a Video Stream with Windows Media Technologies
20. When the encoder finishes enc oding, the Encoding Results window will appear,
showing the results of the encode.
The Encoding Results window displays.
Figure 9-9: Encoding Results Window
21. Click Close to close the Encoding Results Window.
22. Click Session and select Exit to exit the Windows Media Encoder.
23. Click No when prompted to save the session settings.
Congratulations! You have successfully created a Windows Media file from an AVI
file. To view the clip, simply double click on the WMV file that you created, and it
display s in the Windows Media Player.
The video looks different as a Windows Media clip as opposed to an AVI
clip. This is because the Windows Media compresses the video for easy
viewing over the Internet. This is part of the encoding process. If you
exit the Windows Media, and look at the Windows Media file size, you
should notice the file size is signif icantly smaller.
Osprey-50 USB 57

Creating a Video Stream with Windows Media Technologies
58 Osprey-50 USB

Appendix A - Troubleshooting
This appendix contains a list of known issues that may occur when using the Osprey50 USB device with the RealProducer software. Also see the RealProducer
documentation and the documentation fo r your computer and Sound Card.
Blue Video Screen
The currently selected video input is not receiving an active video signal. Check that
the camera, VCR, or other video source is powered and that its output is connected
to the Osprey-50's input. Chec k that the correct video input is selected in the Control
Dialog's Source page.
Black Preview Video Screen
If you select a Color Format other than RGB o r Grey8, you may get a black preview
screen. The problem is that the application does not know how to decode these more
specialized formats. It must be able to locate a software video compressor on your
system that works with this format.
If you encounte r this situation with a Color Format that you need o r want to use, you
have to obtain a suitable compressor.
Scrambled Video Image
You may have set the wrong video signal format for the signal input you are using for example, you may have told the driver to look for NTSC-M video but are using a
PAL-BDGHI video source. First, make sure you know what signal format your video
source is generating. Then, go into the Signal field of the Control Dialog's Source
page, and click the button for that signal format.
Osprey-50 USB 59

Appendix A - Troubleshooting
Grainy, Dithered Image
Check that you are using a display format with greater than 256 colors. If a 256color format is used, the system can only approximate the actual colors, and does so
with a loss of resolution and precision. You can determine (and if necessary adjust)
the display depth from the field titled Color Palette under the Settings tab of the
Control Panel ... Display.
Poor Video Quality at Large Frame Sizes
Large frame sizes with the deep pixel depth (24- or 32-bit), or complex format
(YVU9 or YUV12 planar), impose heavy demands on the PCI bus's data transfer
capacity. Our experience is that some systems cannot handle these formats at full
frame sizes.
Systems vary in their data transfer limits. The characteristics of the PCI bridge are
often more important than processor speed.
If you are having problems, we recommend that you:
! Use a smaller frame size (480 x 320 or less)
! Use a shallower color format (RGB15 or RGB24 instead of RG B32)
! Try an RGB format instead of a YVU format, and a packed format instead of a
planar format
! If you have a choice of PCs for video capture, try using another system with a
different system board chipset
Unwanted Closed Caption Text
Closed Caption text consists of white or colored characters drawn on black character
cells. In video that contains Closed Captioning informatio n, the first active line of
video in each field contains encoded Closed Caption text. In video that does not have
Closed Captioning information, that line is simply ordinary video.
If you leave Closed Captioning enabled and view non-Closed Caption video, the
Ospr ey-50 USB de vice will attempt to interpret the first line of each field of video as
Closed Caption character codes. Some video may appear sufficiently similar to
Closed Caption data that the software thinks it is Closed Caption text. The result w ill
be occasional randomly drawn text appearing on the s creen.
The solution is to turn off Closed Captioning when you are viewing sources that are
not Closed Captioned. To do so, open the Control Dialog's Closed Caption page and
uncheck the Enable box in the Display field. The change takes effect when video is
restarted after e xiting the dialog.
60 Osprey-50 USB

Appendix A - Troubleshooting
"Unable to Initialize Direct Draw" Message
in Windows 98
The DirectDraw system files ddraw.dll, ddraw16.dll, and ddhelp.exe must be installed
in the Windows 98 system. Furthermore, th e file version as shown in the file
properties data must have 4.03 or higher in its first three digits. The software will
work even with this problem, except that Overlay draw ing will not be available.
Obtain and install a service pack from Microsoft if you do not have these files.
Unable to Open Driver or Similar Error
Messages
If AMCAP or any other application gives an error message stating that it can’t open
or find a driver for the Osprey-50 USB device, it may mean that the drivers were not
installed properly.
Video Compression and Playback Issues
When capturing video with AMCAP, you have an option of compressing the video
before it is output to the AVI file. The compression is done video a software “Codec”,
which s tands for “Compressor/Decompressor”. A software codec will compress the
video, and decompress it when you want to view the video. This is useful because
compressed video takes up less space than full frame (uncompressed) video, and it
will help to reduce the size of AVI files.
If you use a so ftware codec, keep in mind that other users may not have the same
codecs on their system, and they may not be able to view your AVI file. If you are
encoding with the RealProducer, it compresses the video but the RealPlayer can
deco de it. If yo u know your AVI files will only be used on one system, then you can
use an y codec and not worry about compat ibility issues.
How did I get these software codecs on my computer?
AMCAP can use any available software codec on your system. These codecs can be
installed manually, such as the Intel Indeo codec, or they may have come with other
software applications on your system. If you are not sure how a codec was installed,
then you should probably avoid using that codec, as you may not be able to
determine how to in stall it elsewhere.
Osprey-50 USB 61

Appendix A - Troubleshooting
62 Osprey-50 USB

Appendix B – Glossary of Terms
4:2:2 Packed Video Format
This mode represents e ach pixel with a total of 2 bytes (16 bits) of data. The data is
encoded as separate data for luminance (intensity) and chrominance (color). The se
modes are mainly useful as inputs to software compressors.
AVI (Audio Video Interface)
A Microsoft Windows format for files containing multiple streams of different kinds of
data, such as video, audio, and MIDI. Applications built with the Video for Windows
Development Kit use the AVI file format.
CCIR601
A video proportioning standard that can be selected on the Osprey-50’s Control
Dialog Format page. The default standard is Square Pixel. Selecting CCIR601
increases the video size; but Square Pixel is the most commonly used standard.
CIF (Common Intermediate Format)
320x240-pixel windows format for displaying video. See also "QCIF-Quarter Common
Intermediate Format".
Codec (Coder/Decoder)
Software or hardware encoding an analog stream (video or audio) into a compressed
digital format and then decodes and decompresses the digital data back into analog
data.
Osprey-50 USB 63

Appendix B – Glossary of Terms
DirectDraw
A software interface standard for transferring video processing from a PC's CPU to
the video adapter. The standard was first de veloped by Intel and called the Display
Control Interface (DCI) and is now supported by Microsoft with the name DirectDraw
as a registered trademark. The driver allows an application to send update
information directly to the video adapter.
Direct Capture
Direct, or uncompressed, capture provides the highest quality image, but takes the
most space. A 30-second clip of uncompressed video in 16-bit RGB format, CIF size,
uses nearly 150Mbytes of disk space. The images are digitized version of the input
and have no compression artifacts.
Grey8 Video Format
Each pixel has one byte of data, representing one of 256 grayscale levels.
NTSC-NTSC-M, NTSC-J
The input signal formats used in North America and Japan (NTSC-J). Full-sized NTSC
has 525 lines total, 480 lines visible, per frame and a display rate of 60 fields per
second, or 30 interlaced frames per sec.
PAL-BDGHI, PAL-M, PAL-N, NC
The input signal formats used in Europe (BDGHI), Brazil (M), Argentina, Paraguay,
and Uruguay. Full-sized PAL (other than PAL-M) has 625 lines total, 576 lines visible,
per frame and a display rate of 50 fields per s econd, or 25 interlaced frames per
second.
Plausibly Live
Broadcast of a prerecorded event that can be viewed on the client as it is being
broadcast. The stream is live, but the content is not.
64 Osprey-50 USB

Appendix B – Glossary of Terms
QCIF (Quarter Common Intermediate
Format)
A 160x120 pixel window format for displaying video (one-quarter the resolution of a
CIF window).
RGB15 Video Format
Each pixel has two bytes (16 bits) of data. There are 5 bits each of red, green, and
blue data; the sixteenth bit is unused. This is a "high color" mode, also known as a
"5:5:5."
RGB24 Video Format
Each pixel has three bytes (24 bits) of data - one each for red, green, and blue. This
is another "true color" mode with 16.7 million colors, and is a recommended form at
for capturing images with the highest possible color accuracy.
RGB32 Video Format
Each pixel has four bytes (32 bits) of data - one each for red, green, and blue, plus
one byte of padding. The pixel has 256 shades of each of the thr ee colors, for a total
of 16.7 million color s. This is a "true color" mode.
SECAM
The input signal format used in France and some other countries. Full-sized SECAM
has 625 lines total, 576 lines visible, per frame and a display rate of 50 fields per
second, or 25 interlaced frames per second.
Osprey-50 USB 65

Appendix B – Glossary of Terms
Streaming
Transmission of real-time data, commonly audio and video, from a server to a client
where the client "plays" content as it is received. This differs from downloaded,
cached, or buffered data, which is played after being received in full, or played part
by part.
YUV12 Planar Video Format
This is a complex fo rmat in which there are 12 bits of data per pixel. Each pixel has 8
bits of luminance data. Each group of 4 adjacent pixels shares two bytes of
chrominance data. The luminance, U-chrominance , and V-chrominance data are
organized into separate blocks.
YVU9 Planar Video Format
Similar to YUV12 planar, except that there are 9 bits of data per pixel and each byte
pair of chrominance data is shared by 16 adjacent pixels.
66 Osprey-50 USB

Appendix C – Other Resources
Osprey Product Line
ViewCast.com, Osprey Technologies Division
! Phone: 888-684-6622
! Fax: 919-319-0034
! Web: http://www.viewcast.com
! Email: info@viewcast.com
ViewCast.com Product Line
ViewCast.com, Inc.
! Phone: 800-250-6622
! Fax: 972-488-7199
! Web http://www.viewcast.com
! Email: info@dfw.viewcast.com
RealNetworks Product Line
RealNetworks, Inc.
! Phone: 206-674-2700
! Fax: 206-674-2699
! Web: http://www.real.com
! Email: info@real.com
Osprey-50 USB 67

Appendix C – Other Resources
68 Osprey-50 USB

Appendix D – Uncompressed Video
This appendix contains information regarding uncompress video. It includes the
following:
! File size calculations
! Capture size limitations
File Size Calculations
The video and audio files you create can be very large files. However, there is a
simple formula that helps you estimate the amount o f disk space you need pe r
uncompressed AVI file.
The formula for calculating the approximate file size of an AVI (uncompressed video)
file is:
height x width x color depth x fps x length (in seconds)
8,000,000
For example you have a video with the following characteristics:
! Video window size = 320 (h) x 240 (w)
! Color format = 24-bit RGB
! Frames per second (fps) = 30
! Length = 60 seconds
320 x 240 x 24 x 30 x 60
8,000,000
This results in an AVI file of approximately 414.72 megabytes.
Capture Size Limitations
The theoretical limit on an AVI version 1.0 file size is 4 gig (32 bits). However, due
to a problem in the MS API (Application Progra m Interface) used to create AVI files,
the index and seve ral other entries become corrupt if you crea te an AVI file larger
than 2 gig. Also, some players, such as the older MCI control, allow you to only play
back a 1 gig file.
Osprey-50 USB 69

Appendix D – Uncompressed Video
The following guidelines apply:
! If you want every application to be able to play back the file, limit the siz e to
1 gig.
! If you're only interested in Media Player and newer apps, limit the size to 2
gig.
! VidCap32 creates AVI files larger than 2 gig, but the indexes are corrupt and
can't be played back with any player. If VidCap32 runs out of space while
capturing, the entire AVI file is marked corrupt.
! You can use the riffwalk.exe utility in the Platform SDK to verify an AVI file.
It echoes an error if the file is corrupt.
The OpenDML committee developed a specification for AVI 2.0 file s. The
enhancements include:
! unlimited file size
! interleaved indexes
! support for field indexes in addition to frame indexes
The AVI 2.0 specification was also designed to be backwards compatible. So an
application which doe s not support AVI 2.0 should still be able to play back the first 1
gig of the file.
For AVI 2.0 files:
! AmCap creates AVI 2.0 format files; VidCap does not.
! AmCap creates AVI files as large as the file system allows. If AmCap runs out
of space, the AVI file is still good.
! Only Windows Media Player and other newer apps can play back the entire
AVI file.
To create a file greater than 4 gig, yo u must use NTFS. Here are the Windows file
system limits:
! FAT16: file 2 gigabytes, partition 2 gigabytes
! FAT16 (NT): file 4 gigabytes, partition 4 gigabytes
! FAT32: file 4 gigabytes, partition 2 terabytes
! NTFS: file 2 terabytes, partition 16 exabytes (18.4 x 10^18 bytes)
Hardware limits:
! IDE drive size limit: 540 megabytes
! EIDE drive size limit: 136.9 gigabytes
! BIOS boot partition size limit: 7.8 gig
Notes:
! A FAT16 partition larger than 2 gigabytes under NT is not visible to MS-DOS
! The NTFS file size limit is actually 2^32 clusters. Current industry standard
hard disk sector size is 512 bytes, giving a 2 terabyte file size limit.
70 Osprey-50 USB

Appendix E – Ligos Indeo Installation
Ligos Technology’s Indeo Video package contains software codecs and compressors
that enhance the usefulness of the card. You need to install this package if you want
to use the three YUV color formats:
! 4:2:2 packed
! YUV12
! YVU9
There is also a software compressor which creates compressed video files in real
time at full capture speed. Indeo is recommended if you are using Microsoft Windows
Media Encoder.
Installing Ligos Technology' s Indeo
Figure E-1: Indeo Installation Window
To install Ligos Technology’s Indeo Video software:
1. Click Yes to inst all Indeo Video software. Click No if yo u do not wish to install
the software at this time.
The Indeo® Installation window displays.
Osprey-50 USB 71
Figure E-2: Welcome Window

Appendix E – Ligos Indeo Install a tion
The Software License Agreement window displays.
Figure E-3: Software License Agreement Window
2. Click Yes.
The Choose Destination Location window displays.
Figure E-4: Choose Destination Location Window
3. Click Next. If you wish to change the destination location for the files, click
Browse.
The Setup Type window displays.
72 Osprey-50 USB
Figure E-5: Setup Type Window

Appendix E – Ligos Indeo Install a tion
4. Se lect Develo per and click Next.
A question window displays.
Figure E-6: Question Window
5. If you ... then ...
want to backup your system files, click Yes and proceed to step 6.
The Choose Destination window
displays.
do not want to backup your system
click No and proceed to step 7.
files,
6. Type the path or click Browse to locate the path in which you want to s ave the
backup of your system files.
Figure E-7: Choose Destination Window
7. Click Next.
The Start Copying Files window displays.
Figure E-8: Setup C opying Files Window
Osprey-50 USB 73

Appendix E – Ligos Indeo Install a tion
8. Click Next to pro ceed with the installation. Click Back to make any changes
prior to the installa tion.
After the files are copied to the system, the Indeo Software Setup Is Now
Complete window displays.
9. Click Finish.
Figure E-9: Setup Complete Window
74 Osprey-50 USB
 Loading...