

Page 1
Niagara 2120 User Guide
Document Number: 40- 0 3 2 6 6 - 02- A
Date: Fe b r uary 2010
Niagara 212 0
Page 2

Page 3

Niagara 2120 User Guide
ViewCast
Niagara SCX
ViewCast logo
SimulStream
Niagara
GoStream
Niagara logo
Osprey
Microsoft
Windows XP
Windows
Windows Media
RealVideo
Helix
RealPlayer
SureStream
RealSystem
QuickTime
iPod
Adobe
Flash
Preface
Copyrights
Copyright© 2010 ViewCast Corporation. All rights reserved. Trademarks or registered trademarks of
ViewCast Corporation or its subsidiaries include:
Trademarks or registered trademarks of Microsoft Corporation include:
Trademarks or registered trademarks of RealNetworks Inc. Corporation include:
Trademarks or registered trademarks of Apple Inc. include:
Trademarks or registered trademarks of Adobe Systems Inc. include:
ViewCast iii
Page 4

Preface
Niagara Technical Support
Phone: 972.488.7157
Fax: 972.488.7111 or submit
the technical support online
request from the ViewCast
Web site.
ViewCast USA Support
Hours of operation: Monday
through Friday: 9 a.m. – 5 p.m.
Central Time. Typical response
time is within one business day
for customers without a
Priority Support Agreement.
ViewCast
3701 West Plano Parkway,
Suite 300, Plano, TX 75075-7840
Toll Free (U.S. only):
800.540.4119
Web site: www.viewcast.com
Limited Warranty
ViewCast warrants its hardware products against
defects in material and workmanship under normal use
Corporate Contact Information
ViewCast collaborates and partners with various clients to integrate products into their individual
environments. For additional information, contact [email protected]. To purchase products,
contact [email protected]. For technical support for this product, contact the following:
For additional information, contact [email protected]. To purchase additional products, contact
Disclaimer
The information in this publication remains the property of ViewCast Corporation. Users may not
use, reproduce, or disclose this information without the implied consent and written approval of the
company.
ViewCast Corporation makes no representations or warranties with respect to the contents or use of
this manual and specifically disclaims any express or implied warranties of merchantability or fitness
for any particular purpose. Further, ViewCast Corporation reserves the right to revise this
publication to make enhancements in the products described in this manual, at any time, without
obligation to notify any person or entity of such revisions or changes. In no event will ViewCast
Corporation be liable for direct, indirect, special, incidental, or consequential damages arising out of
the use or inability to use the product or documentation, even if advised of the possibility of such
damages.
ViewCast Corporation is not responsible for any third-party license fees that may occur with the use
of our products by an end user including but not limited to creating or distributing content. The user
is responsible for any fees the Multimedia Patent Trust may apply for creating and distributing
MPEG content.
Warranties
For complete warranty details, refer to the specific warranty included with each product. General
warranty information includes the following:
iv ViewCast
Page 5

Niagara 2120 User Guide
for the period of one year (12 months) from date of
sale. Where specific warranties exist that provide more
substantial coverage, notwithstanding the warranty
provisions herein, such product warranties control and
preempt or supersede the warranty provisions herein.
Reseller Pass Through of
Standard Limited Warranties
Resellers pass the ViewCast standard limited warranties
for the products through to the customer without
modification. Any modification of a product voids the
ViewCast warranties or any other existing or available
warranty.
ViewCast v
Page 6

Preface
vi ViewCast
Page 7

Contents
Preface .......................................................................................................... iii
Copyrights .......................................................................................................................... iii
Corporate Contact Information ......................................................................................... iv
Disclaimer .......................................................................................................................... iv
Warranties ......................................................................................................................... iv
Contents ....................................................................................................... vii
About This Guide .......................................................................................... 1
Product Description ............................................................................................................ 1
Audience ............................................................................................................................. 2
Conventions for This Guide ................................................................................................. 2
Niagara 2120 User Guide
Rack Mount Safety Instructions .......................................................................................... 3
FCC Notice ........................................................................................................................... 4
Environmental Notices ........................................................................................................ 5
Warnings ............................................................................................................................. 6
Chapter 1: Overview ..................................................................................... 9
Media Appliance Functions ................................................................................................. 9
Install Overview ................................................................................................................ 10
Prerequisites ..................................................................................................................... 10
Package Contents .............................................................................................................. 10
System Requirements ....................................................................................................... 11
Specifications .................................................................................................................... 11
Niagara 2120 Front Panel ................................................................................................. 12
Review the Niagara 2120 Rear Panel ................................................................................ 15
Connecting the Niagara 2120 ........................................................................................... 16
Niagara 2120 Menu Bar Commands ................................................................................. 17
Niagara 2120 Browser Windows Flow .............................................................................. 18
Chapter 2: Easy Setup ................................................................................ 19
Web Interface ................................................................................................................... 19
Easy First Time Setup ........................................................................................................ 20
Connecting to an Electrical Power Source ................................................................. 20
ViewCast vii
Page 8

Contents
Performing the Initial Start Up ................................................................................... 21
Connecting to an IP Network ..................................................................................... 23
Defining the Network Properties ...................................................................................... 24
Chapter 3: Perform Basic Operations ....................................................... 27
Logging In .......................................................................................................................... 27
Viewing All Encoders ......................................................................................................... 29
Starting an Encoder ........................................................................................................... 30
Stopping an Encoder ......................................................................................................... 31
Editing an Adobe Flash H.264 Encoder ............................................................................. 33
Video Tab .................................................................................................................... 34
Audio Tab ................................................................................................................... 37
Output Tab ................................................................................................................. 38
H.264 Settings Tab ...................................................................................................... 40
Viewing Encoder Groups ................................................................................................... 41
Starting an Encoder Group ............................................................................................... 42
Stopping an Encoder Group .............................................................................................. 42
Creating Encoder Groups .................................................................................................. 43
Editing Encoder Groups .................................................................................................... 44
Starting an Encoder Group With the Stream Button ........................................................ 45
Stopping Encoding ............................................................................................................ 45
Shutdown .......................................................................................................................... 46
Chapter 4: Perform Advanced Operations ................................................ 47
Configuring Niagara 2120 Properties ................................................................................ 47
Changing Computer Name ................................................................................................ 48
Changing the Login Password From the Factory Default .................................................. 49
Restoring the Login Password to the Factory Default ................................................ 50
Configuring Alerts ............................................................................................................. 51
Configuring Network Properties ....................................................................................... 52
Configuring Network Card(s) ...................................................................................... 52
Configuring IP Address ............................................................................................... 53
Configuring Advanced Settings (Network) ................................................................. 53
System Configuration Settings .......................................................................................... 55
Setting Current System Configuration ....................................................................... 56
Configuring Email Settings .......................................................................................... 57
Configuring Default Directory Setting ............................................................................... 58
Setting the High Temperature Alert ........................................................................... 58
viii ViewCast
Page 9

Niagara 2120 User Guide
Setting CPU Thresholds .............................................................................................. 59
Setting SimulStream Filters ........................................................................................ 59
Restoring Niagara 2120 Factory Defaults ................................................................... 60
Viewing the Activity Log .................................................................................................... 62
Viewing Alerts ................................................................................................................... 64
Connecting an External Storage Device ............................................................................ 65
Using the Niagara SCX Interface ....................................................................................... 65
Appendix: Advanced Settings for H.264 ................................................... 67
CBR – Newscast ................................................................................................................. 69
CBR – Sports ...................................................................................................................... 71
CBR – Action ...................................................................................................................... 73
Mobile ............................................................................................................................... 75
VBR – Newscast................................................................................................................. 77
VBR – Sports ...................................................................................................................... 79
VBR – Action...................................................................................................................... 81
Settings ............................................................................................................................. 83
Other Settings ................................................................................................................... 87
Index ............................................................................................................. 89
ViewCast ix
Page 10

Contents
x ViewCast
Page 11

Niagara 2120 User Guide
About This Guide
Thank you for purchasing the ViewCast Niagara 2120 streaming media appliance. This user guide
provides step-by-step instructions for installing and using your new streaming media appliance. For
the latest ViewCast product information and news, visit our Web site at www.viewcast.com.
Product Description
The ViewCast Niagara 2120 streaming media appliance is a low-cost, easy-to-use, streaming media
appliance that supports H.264 streaming via the Adobe® Flash® Platform.
The Niagara 2120 is built on the legendary quality of ViewCast Osprey® video capture card technology,
which means you can count on the same highly reliable performance demanded by others who use
ViewCast technology, including the world’s leading broadcasters and content delivery networks.
The built-in Web interface of the Niagara 2120 simplifies system set-up and operation, allowing
complete system control from anywhere on the network. All you need to do is have a Flash Media
Server or CDN and set your streaming parameters from the intuitive Web interface and you can begin
streaming. The ViewCast SimulStream® driver enhancement software technology comes standard with
the Niagara 2120, which means you can stream in multiple, simultaneous resolutions, and bit rates to
computers, cell phones, and mobile devices anywhere around the world. ViewCast’s Niagara® SCX
streaming media management software is also included with the Niagara 2120, enabling centralized
set-up, monitoring, and control.
The Niagara 2120 streaming media appliance (Figure 1) allows you to maximize your audience through
Web-based video delivery. It lets you reach your audiences where they live and allows you to stream
both live and on-demand video to any IP network. With support for H.264 streaming to the Adobe
Flash Platform, you are afforded high-performance streaming capabilities across a broad range of
bandwidths to elevate the quality and impact of your Internet video programming. Now you may truly
enjoy the power and flexibility of more expensive professional-grade streaming appliances in the
compact, easy-to-use Niagara 2120.
Figure 1. ViewCast Niagara 2120
ViewCast 1
Page 12
About This Guide
Convention
Description
Example
Bold text
Characters to enter when
referenced in a procedure. The
names of keys or keys to press.
In the example, enter DTMF as
the group type.
Press Enter to save your changes.
NOTE:
Provides supplemental
information.
NOTE: The prompt may not
display if …
IMPORTANT!
Provides important data that
affects how the system or
software responds.
IMPORTANT! You must install
Niagara SCX prior to
configuring SCX options…
CAUTION
Provides information to help
avoid possible damage to
hardware or a system crash
(without data loss).
CAUTION Use case
sensitive commands to
keep from destroying…
WARNING!
Provides information to ensure
you avoid potential injury,
death, or permanent system
damage.
WARNING! Do
NOT touch
exposed wires.
Audience
The audience for this publication includes anyone who uses or administers the Niagara 2120. They
should have a basic technical understanding of streaming media. This user guide provides information
on the Niagara 2120 only.
Conventions for This Guide
This guide uses the document conventions specified in Table 1 to help you identify different types of
information.
Table 1. Guide Conventions
2 ViewCast
Page 13

Rack Mount Safety Instructions
Operating Temperature
The operating ambient temperature of a rack environment may be
greater than room ambient if installed in a closed or multi-unit
rack assembly. Therefore, users should install the equipment in an
environment compatible with the maximum ambient temperature
of 40° C.
Reduced Air Flow
You must not compromise the airflow required for safe equipment
operation when you install the equipment in a rack.
Mechanical Loading
Mounting of the equipment in the rack should be such that you do
not cause a hazard due to uneven mechanical loading.
Circuit Overloading
Consider the connection of the equipment to the supply circuit and
the effect that the overloading of the circuits might have on
current protection and supply wiring. You must also consider and
use the equipment nameplate ratings when you address this
concern.
Reliable Earthing
You must maintain reliable earthing of rack-mounted equipment.
Pay particular attention to supply connections other than direct
connections to the branch circuit (such as using power strips).
Niagara 2120 User Guide
ViewCast 3
Page 14

About This Guide
FCC Notice
WARNING! You must connect this device and peripherals using shielded cables that
comply with FCC radio emission limits.
WARNING! Modifications to this device not approved by ViewCast Corporation could
void the FCC-granted authority for the user to operate the device.
WARNING! The Niagara 2120 complies with the limits for a Class A digital device
pursuant to Part 15 of the FCC Rules. These limits provide reasonable protection against
harmful interference when users operate the equipment in a commercial environment. This
equipment generates, uses, and may radiate radio frequency energy and, if not installed and
used in accordance with the instruction manual, may cause harmful interference to radio
communications. Operation of this equipment in a residential area will likely cause harmful
interference. In this case the users must correct the interference at their own expense.
NOTE: To CATV Installer: Pay special attention to Section 820-40 of the NEC that provides
guidelines for proper grounding. It particularly specifies that you must connect the cable ground
to the grounding system of the building as close to the point of cable entry as practical.
WARNING! Equipment installation must comply with local and national electrical codes.
4 ViewCast
Page 15

Environmental Notices
Product Disposal
Information:
Dispose of this product in accordance with local and
national disposal regulations (if any). Include those
regulations governing the recovery and recycling of Waste
Electrical and Electronic Equipment (WEEE).
RoHS Compliant:
ViewCast Corporation commits to compliance with the
European directive on the Restriction of the Use of Certain
Hazardous Substances in Electrical and Electronic
Equipment, Directive 2002/95/EC, the RoHS directive.
This product supplied to the European Union does comply
with the RoHS directive. ViewCast certifies that this
equipment shipped to the European Union conforms to the
2002/95/EC directive.
For current RoHS statement, see www.viewcast.com.
Underwriters
Laboratories Inc.
Statement
Underwriters Laboratories Inc. has not tested the
performance or reliability of the security or signaling
aspects of this product. UL only tested for fire, shock and
casualty hazards as outlined in UL’s Standard for Safety UL
60950-1. UL Certification does not cover the performance or
reliability of the security or signaling aspects of this product.
UL does not represent, warranty, or certify the performance
of reliability of any security or signaling related functions of
this product.
Niagara 2120 User Guide
ViewCast 5
Page 16

About This Guide
Warnings
Only trained and qualified personnel should install, replace, or service this equipment.
Do not attempt to open the case of the appliance. If you do so, you incur a high risk of electrical shock
that may cause damage to the appliance or personal physical injury or death to you and/or others. No
user-serviceable parts exist inside the appliance. If you open the appliance case or make unauthorized
changes to the case, ViewCast voids your warranty.
Install the appliance away from any heat sources. This remains vital to the safety of the product users.
Do not install the appliance near any heat sources such as:
Radiators
Heat registers
Stoves
Other heat-producing equipment
WARNING! Installing the appliance near heat sources could result in personal injury
or death.
Never insert objects of any kind into the appliance through any appliance openings, as the
objects may touch dangerous voltage points, short out parts, and result in a risk of fire or
electrical shock.
Do not stack the appliance atop or below other electronic devices as this can cause heat build-up and
vibration of the appliance. These conditions can damage the appliance thereby voiding the limited
warranty.
NOTE: You may stack multiple Niagara 2120 units as these appliances accommodate stacking.
Do not install the appliance in any area where the temperature is less than 5°C or more than 40°C.
Transfer from temperature extremes may cause condensation. Let the appliance remain unplugged at
room temperature for at least 45 minutes before connecting it.
Use an outlet with surge suppression or ground fault protection when using the appliance. Unplug the
power cord from the wall outlet and disconnect the lines between the appliance and the video source
for added protection:
During a lightning storm
During dangerous weather conditions
When the encoder remains unattended or unused for long periods
Reduce the risk of fire or electric shock. Do not expose the appliance to any rain or moisture. Exposing
the appliance to rain or other types of moisture could result in appliance damages. Do not place any
liquids on or near the appliance. If you place liquids in any form on or near the appliance, do so at your
own risk, for you incur a high risk of electrical shock that could occur and cause damage to the
appliance.
6 ViewCast
Page 17

Niagara 2120 User Guide
WARNING! Exposing the appliance to rain or other types of moisture could result in
physical injury or death. Any liquids on or near the appliance may result in electrical shock
and personal injury or death.
Refer all servicing to authorized service personnel. You must have authorized personnel only service
any damaged appliance. Relevant damage may occur with but is not limited to the following:
An unplugged or damaged power supply cord
Spilled liquid on the appliance
Fallen objects on the appliance
Appliance exposure to rain or other moisture or liquid
Failure to perform functions as described in the User Guide
A dropped appliance
ViewCast assumes no liability or responsibility for any damaged appliance that clients continue using.
Use only attachments, accessories, or equipment specified by the manufacturer with the appliance.
Using accessories or attachments not recommended by the encoder manufacturer voids the Limited
Warranty.
Do not attempt to service the appliance yourself. If you open or remove covers, you may expose
yourself to dangerous voltage. Such action voids the Limited Warranty. Refer all servicing issues to
authorized service personnel only.
The plug-socket combination that serves as the main disconnecting device must be accessible at all
times.
Protect the power cord from anyone walking on it and being strained or pinched particularly at plugs,
electrical receptacles, and the point where the power cord exits the appliance.
Do not use adapter plugs or remove the grounding prong from the power cable.
Use only the type of power source indicated on the marking label on the back panel of the unit to
operate the appliance. Unplug the appliance power cord by gripping the plug and removing it from the
power source. Do not pull the cord to remove the power source from the appliance.
Do not plug the appliance into a wall outlet that contains an overload of electrical cords or power
strips/extension cords. This type of overload may result in fire or electrical shock risks.
Always handle the appliance carefully. Always avoid excessive shock and vibration to the appliance.
Excessive shock or vibration can damage the appliance.
WARNING! Excessive shock or vibration to the appliance may result in electrical shock
and personal injury or death.
ViewCast 7
Page 18

About This Guide
8 ViewCast
Page 19

Niagara 2120 User Guide
Chapter 1: Overview
Before you can use your Niagara 2120 streaming media appliance, you will first need to set up and
configure it. This chapter is dedicated to providing you with the details and step-by-step instructions
you need to make your installation as quick-and-easy as possible.
All you need to get started are the four following requirements:
Your audio and video source (such as a camera or deck)
A streaming media server or hosting provider
An IP connection and/or Internet connection
A networked computer running a compatible browser
The Niagara 2120, an easy-to-use streaming device, allows you to:
Connect to a compatible browser on a dynamic host configuration protocol/domain name server
(DHCP/DNS) network.
Configure and connect your audio and video source to the Niagara 2120.
Select your output formats and streaming settings.
Enter your streaming server information.
Start streaming your media.
You can configure and use the Niagara 2120 straight from the box for any streaming activities. Use the
Web interface for setting options and controlling your Niagara 2120 from another networked
computer, as well as advanced options.
WARNING! Read the installation instructions before connecting the system to the
power source.
Media Appliance Functions
Although it has many features and capabilities, the Niagara 2120 streaming media encoder performs,
in its most basic functions, as follows:
Takes analog audio and video inputs
Captures the signals
Encodes the signals into digital IP video formats
Delivers the IP audio and video content to a storage device or streams it over an IP network
ViewCast 9
Page 20

Chapter 1: Overview
Appliance
Niagara 2120
Power Cables
One of the following:
— North America Power Cable (110 vac)
— International Power Cable (220 vac)
— UK Power Cable (220 vac)
AC to DC converter
Converter
BNC-to-RCA, male-to-female (3)
BNC-to-mini-DIN (S-Video) adapter
Guides
Package insert (end-user license agreement, welcome letter,
package content list)
Install Overview
This section addresses the high-level actions you must perform to physically connect and setup your
Niagara 2120 system.
You must complete the following primary tasks to install the Niagara 2120:
1. Address and comply with all prerequisites.
2. Connect the Niagara 2120 streaming media appliance using its power source.
3. Connect the video source (camera or video recorder) to the system.
4. Connect the Niagara 2120 to an IP network.
5. Configure the Niagara 2120 system.
Prerequisites
Prerequisites you must consider prior to installing and connecting the Niagara 2120 include:
Ensure you have all packaged items and that they remain undamaged and in working order.
Ensure your environment meets all system requirements.
Ensure you comply with all safety instructions, notices, and warnings including:
o Rack Mount Safety Instructions
o FCC Notice
o Environmental Notices
o Warnings
Package Contents
Completely unpack all contents from the box and inspect each item for damage. Ensure that you have
all the components listed below:
10 ViewCast
Page 21

Niagara 2120 User Guide
Quick Start Guide
Software
Niagara 2120 CD
Browser
Interface
Any Internet Explorer (IE)-based computer, workstation, or laptop
that interfaces to a dynamic host configuration protocol/domain
name server (DHCP/DNS)-compatible network
User Interface
High speed internet, dial-up, and mobile device users
If any components are missing or damaged, do not continue with the installation. Contact the
ViewCast reseller from which you purchased your Niagara 2120 streaming media appliance for
assistance in obtaining any missing parts or for parts replacement.
System Requirements
Ensure your computer meets the following system requirements.
Specifications
Dual core processor
1 GB RAM
120 GB SATA HDD
Osprey 240e technology integrated on motherboard
Compact – 1 RU, ½ Rack (11.5” x 7.5” x 1.75”)
4.9 lbs (2.2 kg)
Power 60W
ViewCast 11
Page 22
Chapter 1: Overview
Item
Control Button
Name
Description
A
Power Button
with Indicator
Light
Starts the Niagara 2120.
Indicator light (blue) blinks to indicate power up
activity.
Press this button once to turn off the Niagara 2120
when it is on.
Remains solid when set to allow you to encode.
Press and hold for 5 seconds to execute an immediate
power off.
IMPORTANT! Use this only when the system does
not respond.
B
Reset Button
Resets the Niagara 2120.
Use a pointed device to insert in the hole and press the
reset button.
This button has three different options:
Press and release after the first set of 10 LEDs start to
light (approximately three seconds) to reboot the
Niagara 2120.
Niagara 2120 Front Panel
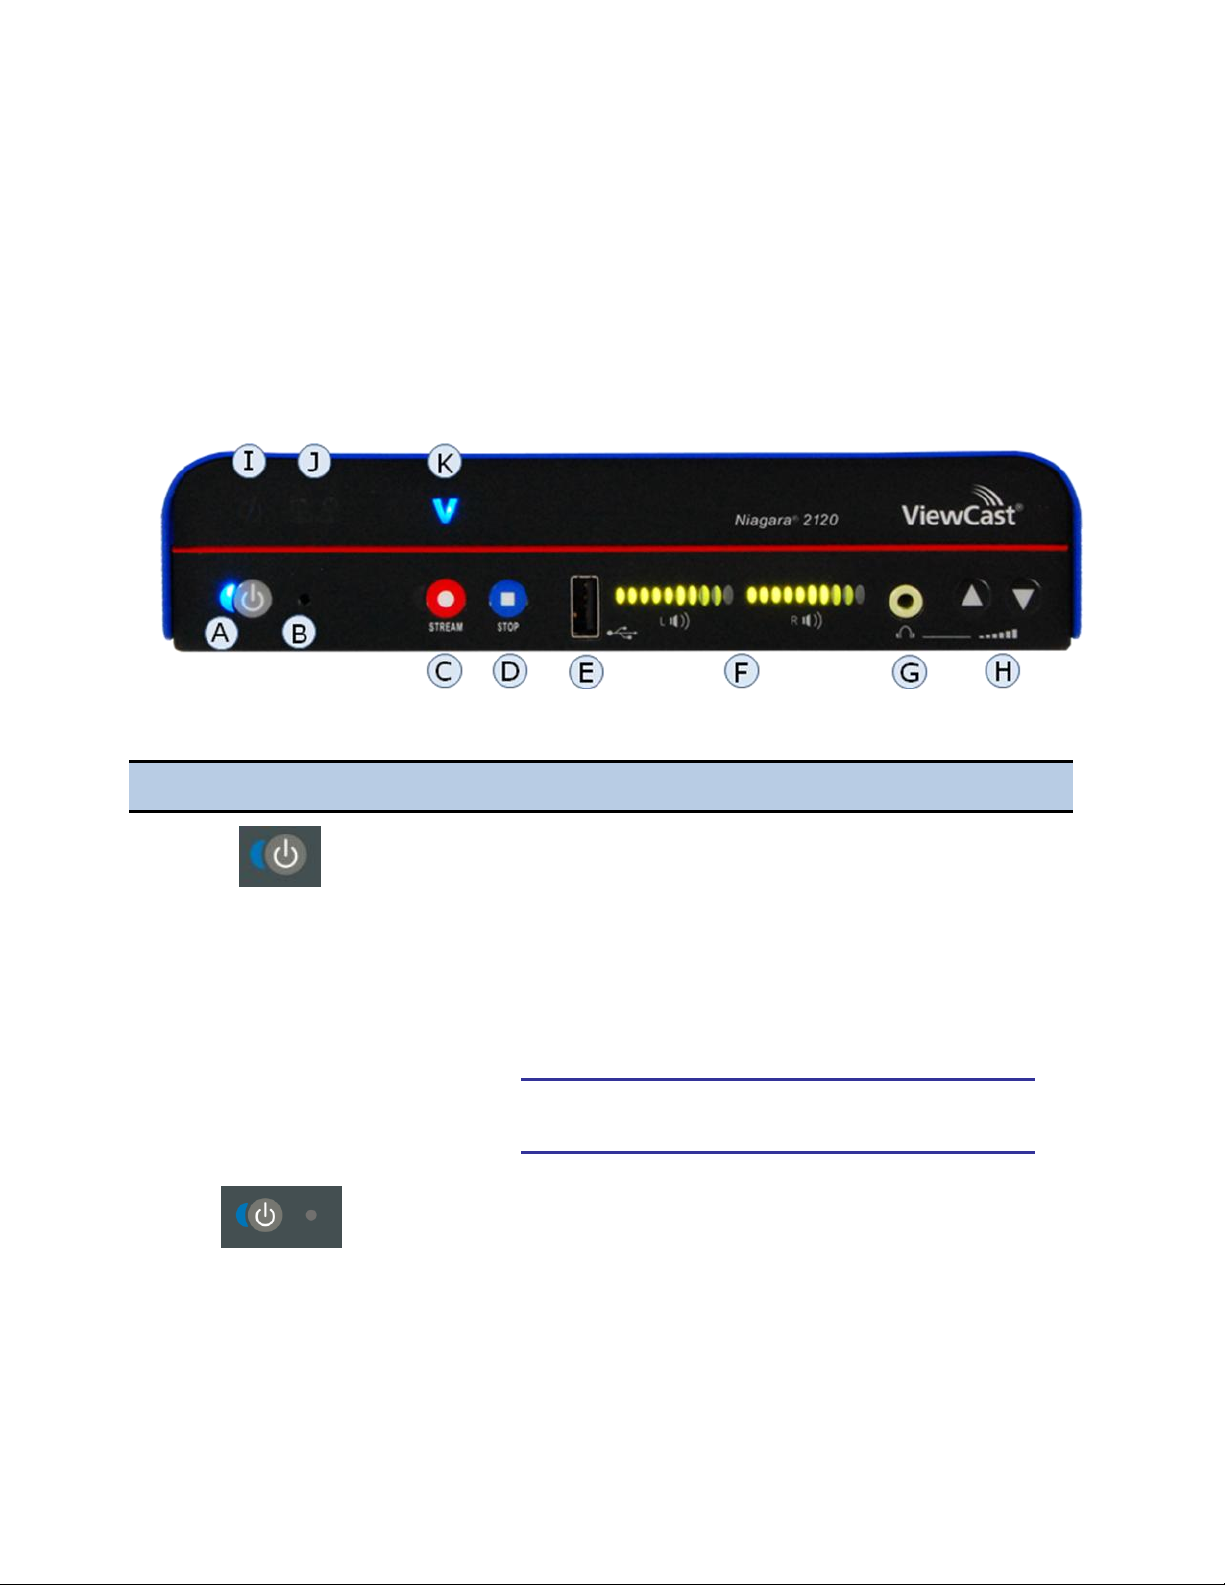
You should familiarize yourself with the front panel controls for the Niagara 2120. Besides the basic
buttons for power, start/stop, and audio volume control, several indicator lights also exist. Figure 2
and Table 2 below illustrate the buttons and lights that constitute the front panel functions and
interfaces.
Figure 2. Niagara 2120 Front Panel
Table 2. Front Panel Lights and Button Descriptions
12 ViewCast
Page 23
Niagara 2120 User Guide
Item
Control Button
Name
Description
NOTE: The lights on the volume indicator will illuminate
in one-second intervals.
Press and release after the second set of 10 LEDs start
to light (approximately 4 to 6 seconds) to keep all set
profiles and restore the Niagara 2120.
NOTE: The lights on the volume indicator will illuminate
in one-second intervals but do not progress all the way
to the far right.
Press and hold for approximately 10 seconds until all 20
LEDs remain lit to restore the Niagara 2120 to complete
factory defaults.
IMPORTANT! This option deletes all previously
set profiles.
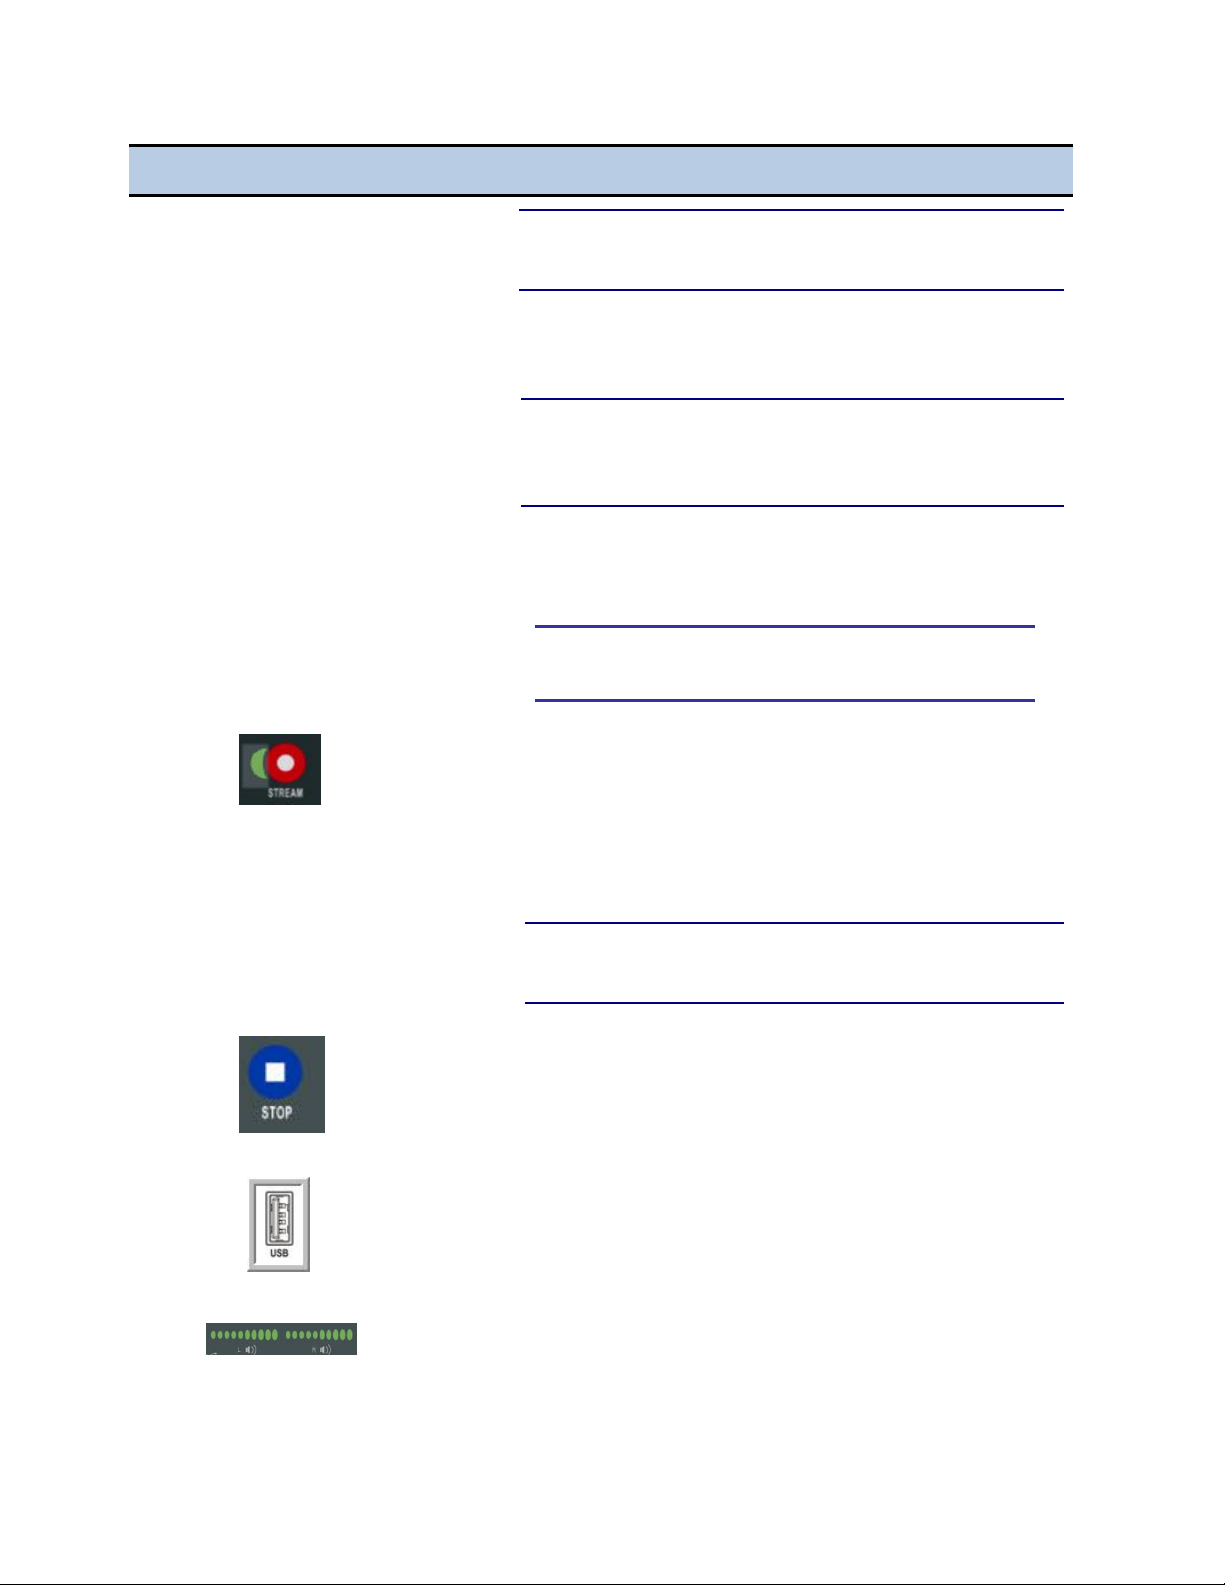
C
Streaming
Button and
Indicator Light
Activates streaming of all profiles assigned to the
button.
Indicator light (green) blinks to indicate when the
stream is preparing to start.
Indicator light (green) remains solid once you begin
streaming.
NOTE: Do not attempt to encode while light continues
blinking.
D
Stop
Stops the encoder streaming activity when you press
this button once.
E
USB Port
Allows exporting files to USB devices and installing
updates or firmware.
F
Audio level
meters
Shows incoming left and right audio channel input.
ViewCast 13
Page 24
Chapter 1: Overview
Item
Control Button
Name
Description
G
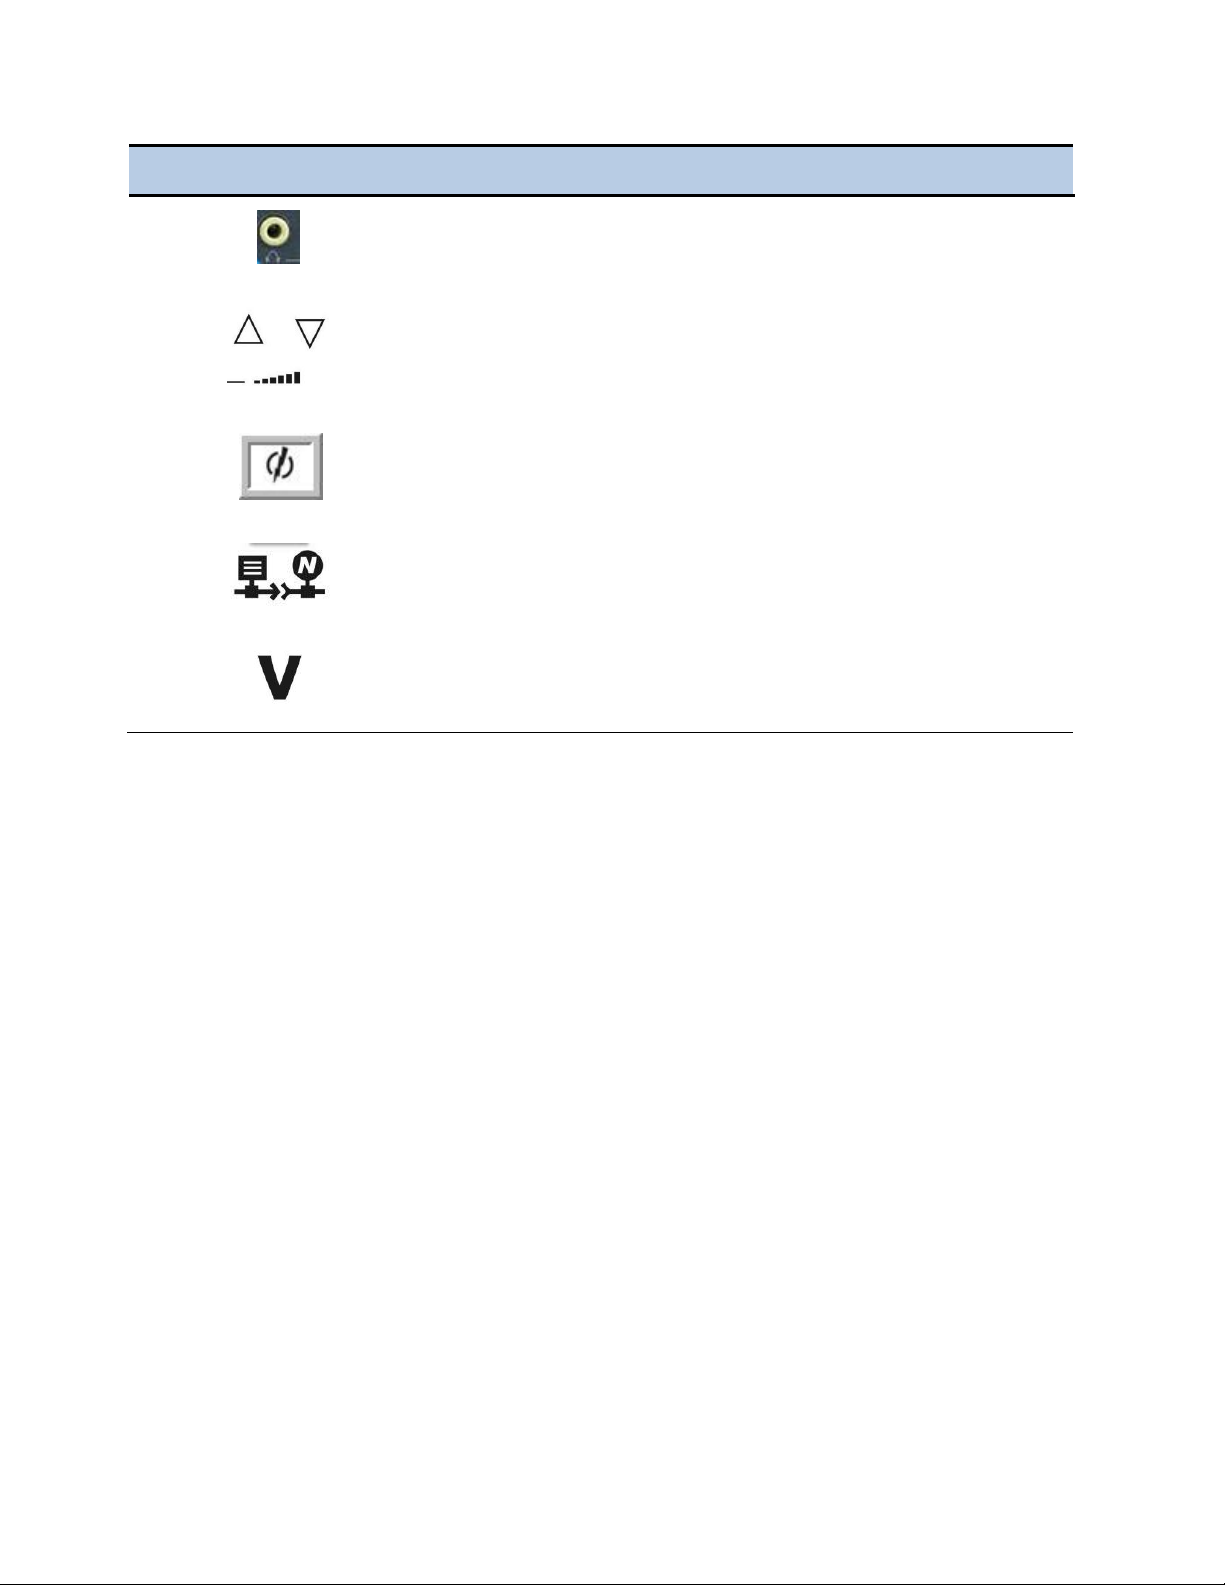
Headphone
Jack
Allows you to connect headphones to the Niagara 2120
for audio monitoring.
H
Volume Button
(Up/Down)
Audio level headphone control.
This control changes the volume on the headset output
only.
I
Alarm and
Status
Indicator
This indicator illuminates when a system alert occurs.
J
Remote
Control
Displays to indicate a remote user.
A remote user is accessing the Niagara 2120 across the
network (using the Niagara 2120 Web interface).
K
Video encoding status (active).
14 ViewCast
Page 25
Niagara 2120 User Guide
Port
Description
A
Service
Qualified ViewCast field technicians should be the only ones to
use this connection.
B
Power (DC Input
12V)
Direct current (DC) power supply for power input (12 Volt).
This port allows you to connect the Niagara 2120 to its power
supply.
C
PRI Ethernet Sec
Connects the Niagara 2120 to the IP network.
D
CVBS – Pb
Connects the composite video for the Niagara 2120.
This analog component video BNC for Pb input allows
professional-grade video connections.
E
USB
Connects USB control devices, such as a memory card (USB
memory device, keyboard, and mouse).
F
S-Vid-Y
Standard video port that provides (Y) connection in S-video (Y/C)
for most BNC video cameras and players.
This analog component video BNC for Y input allows
professional-grade video connections.
G
Vid-C – Pr
This analog component video BNC for Pr input allows
professional-grade video connections.
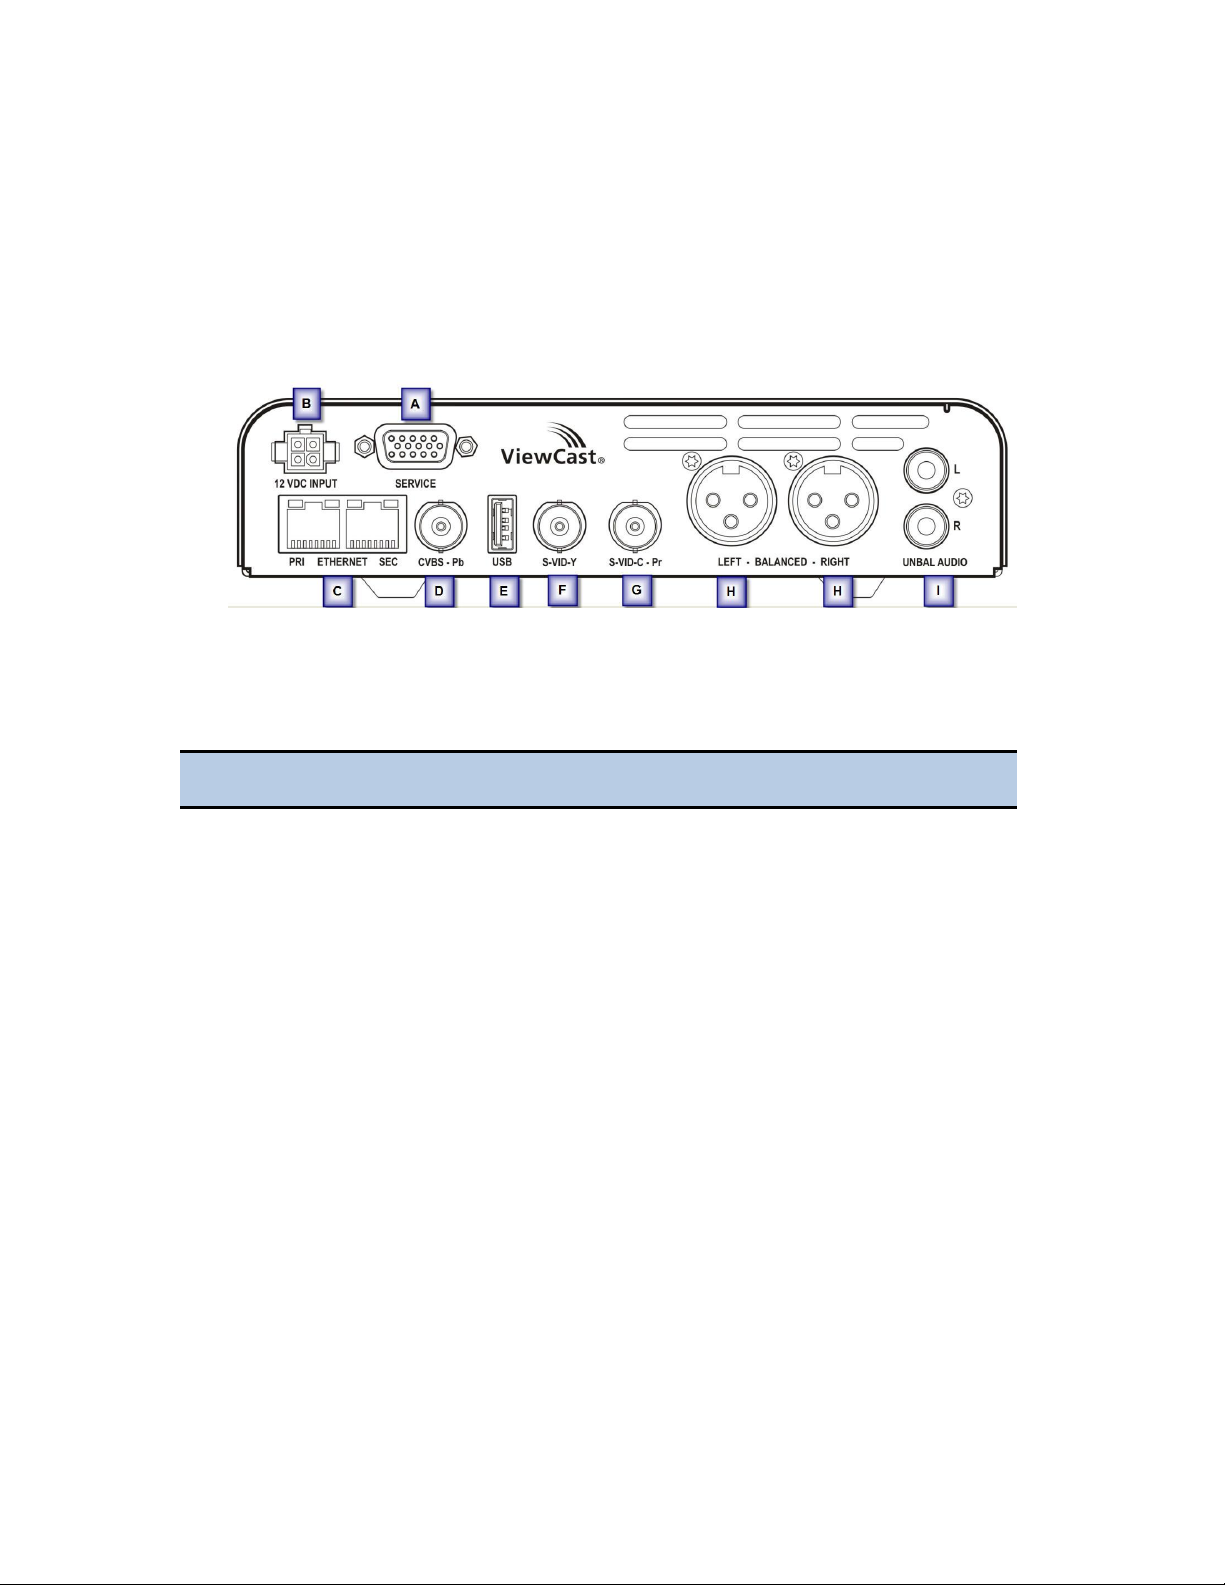
Review the Niagara 2120 Rear Panel
Figure 3 and Table 3 below describe all connectors and other components of the Niagara 2120 rear
panel.
Figure 3. Rear Panel
Figure 3 shows the rear panel of the Niagara 2120. Using the reference chart and images below, you
can connect the appropriate device and power to the Niagara 2120.
Table 3. Rear Panel Connection Descriptions
ViewCast 15
Page 26
Chapter 1: Overview
Port
Description
H
Balanced Left
and Right Audio
Inputs
Left/Right XLR connector for line level balanced audio sources.
Professional audio engineers use these inputs on high-end audio
and video playback equipment.
Noise cancellation and balanced stereo.
I
Unbalanced
Audio
Connectors
Left/Right RCA connector for stereo input.
Found on most standard video players and cameras.
Step
Action
1.
Connect the composite video (CVBS Pb – item D on Figure 3). Ensure you have a
tight connection by rotating the cuff to connect.
2.
Connect the right and left audio. Refer to Figure 3 item I for left and right
connections.
3.
Connect the power DC adaptor by linking the clasp over the top anchor (12V DC
Input – item B on Figure 3).
4.
Attach the Niagara 2120 to the network input (PRI Network – item C on Figure
3).
5.
Press Power (item B on Figure 2). Refer to Table 3 for descriptions for these
inputs.
Connecting the Niagara 2120
Follow the steps in Table 4 to configure all Niagara 2120 connections. The example uses composite
video input and unbalanced audio. The steps detailed in Table 4 refer to a direct connection to the
Niagara 2120 only.
Table 4. Configure Connections
16 ViewCast
Page 27
Niagara 2120 User Guide
Menu
Command
Function
Home
View general administrative information about the
ViewCast Niagara 2120.
Encoders
All Encoders – View the encoder profiles available
to start on the encoder box.
Active Group – Allows you set the one group that
you assign to the front panel Stream button.
Groups – Assign groups and encoders to that group.
Configuration
Niagara 2120 Properties – View details on the
Machine Properties of the Niagara 2120 including
the Network Name, Serial Number, and all software
versions installed.
Alerts – Modify the settings for each application
alert Niagara 2120 can generate during normal
operations.
Network Properties – View information on Niagara
2120 network properties and addresses for both
NIC ports and modify these properties.
System Configuration – Modify the system
configuration including setup for email alerts from
Niagara 2120 whenever it encounters an operation
error.
Status
View Activity Log – View all Niagara 2120 activities
including the time and date for each event.
View Alerts – View all alerts including the time and
date for each alert.
Log Out
Allows users to log off the system’s Web interface.
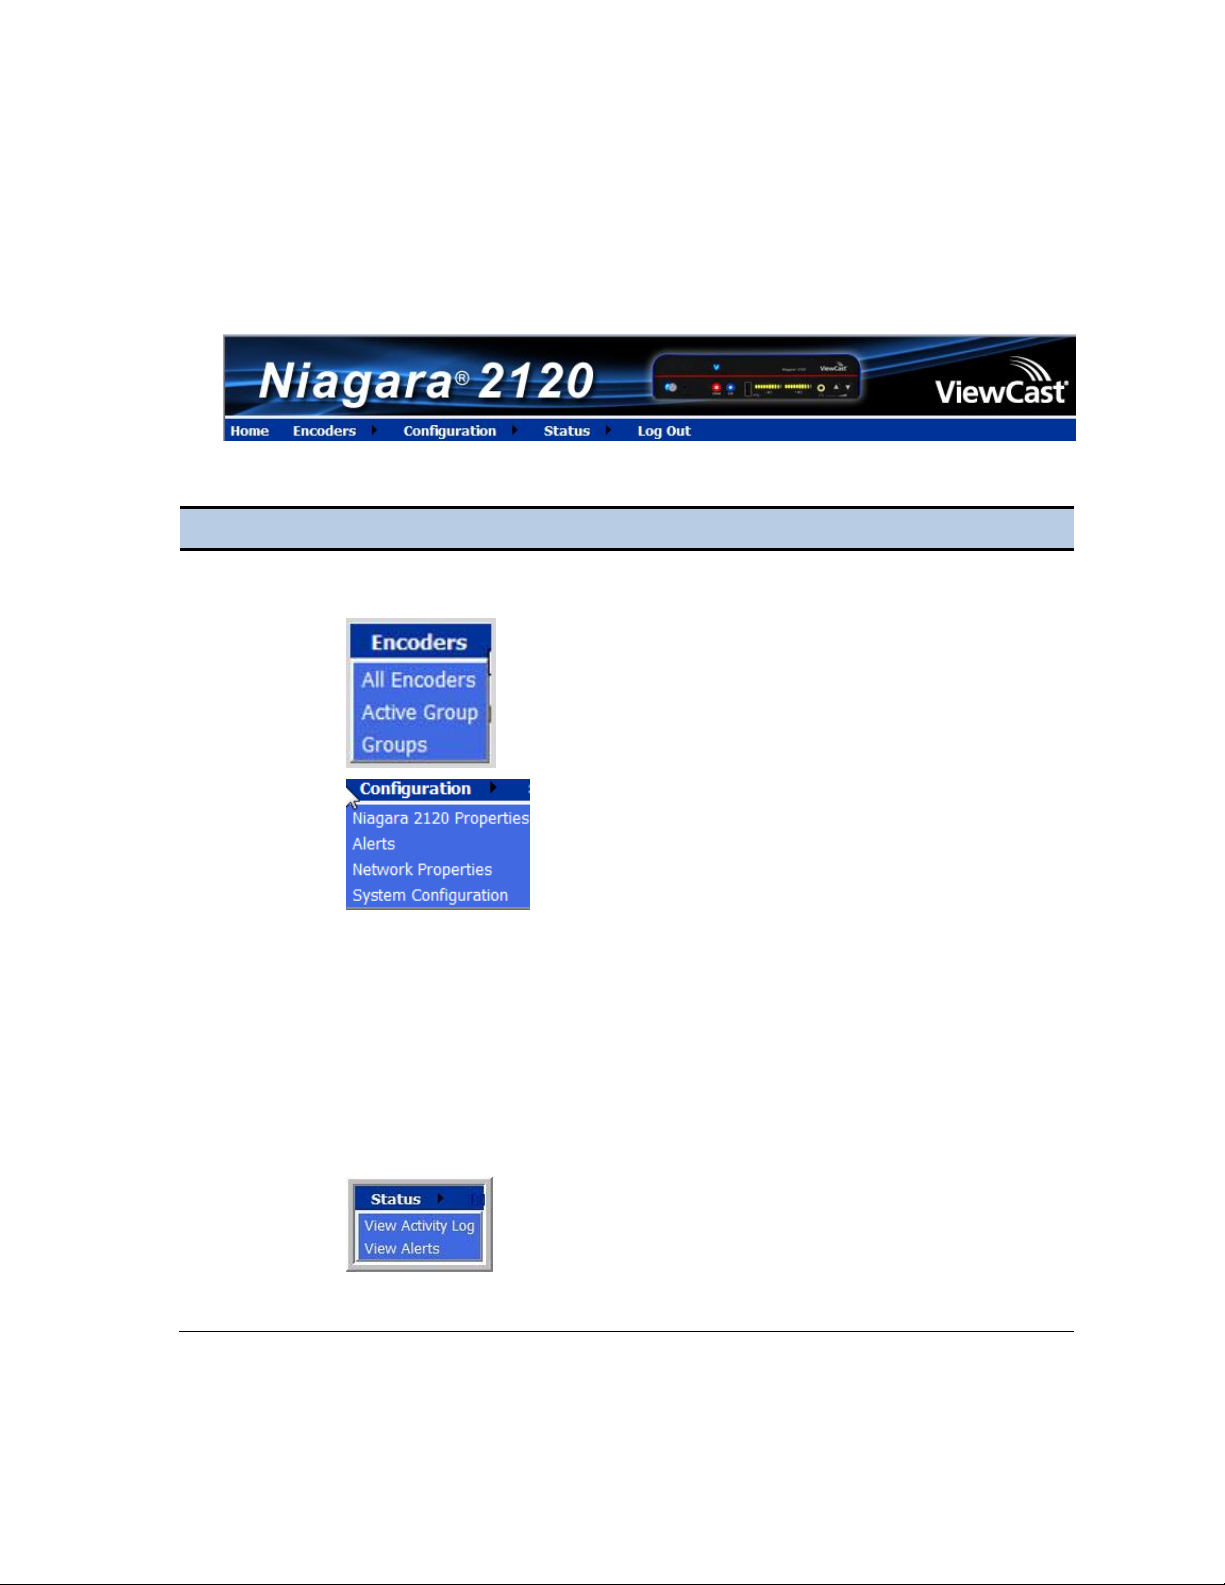
Niagara 2120 Menu Bar Commands
The home page menu bar (Figure 4) allows you to use the commands described in Table 5.
Figure 4. Menu Bar
Table 5. Menu Bar Commands
ViewCast 17
Page 28
Chapter 1: Overview
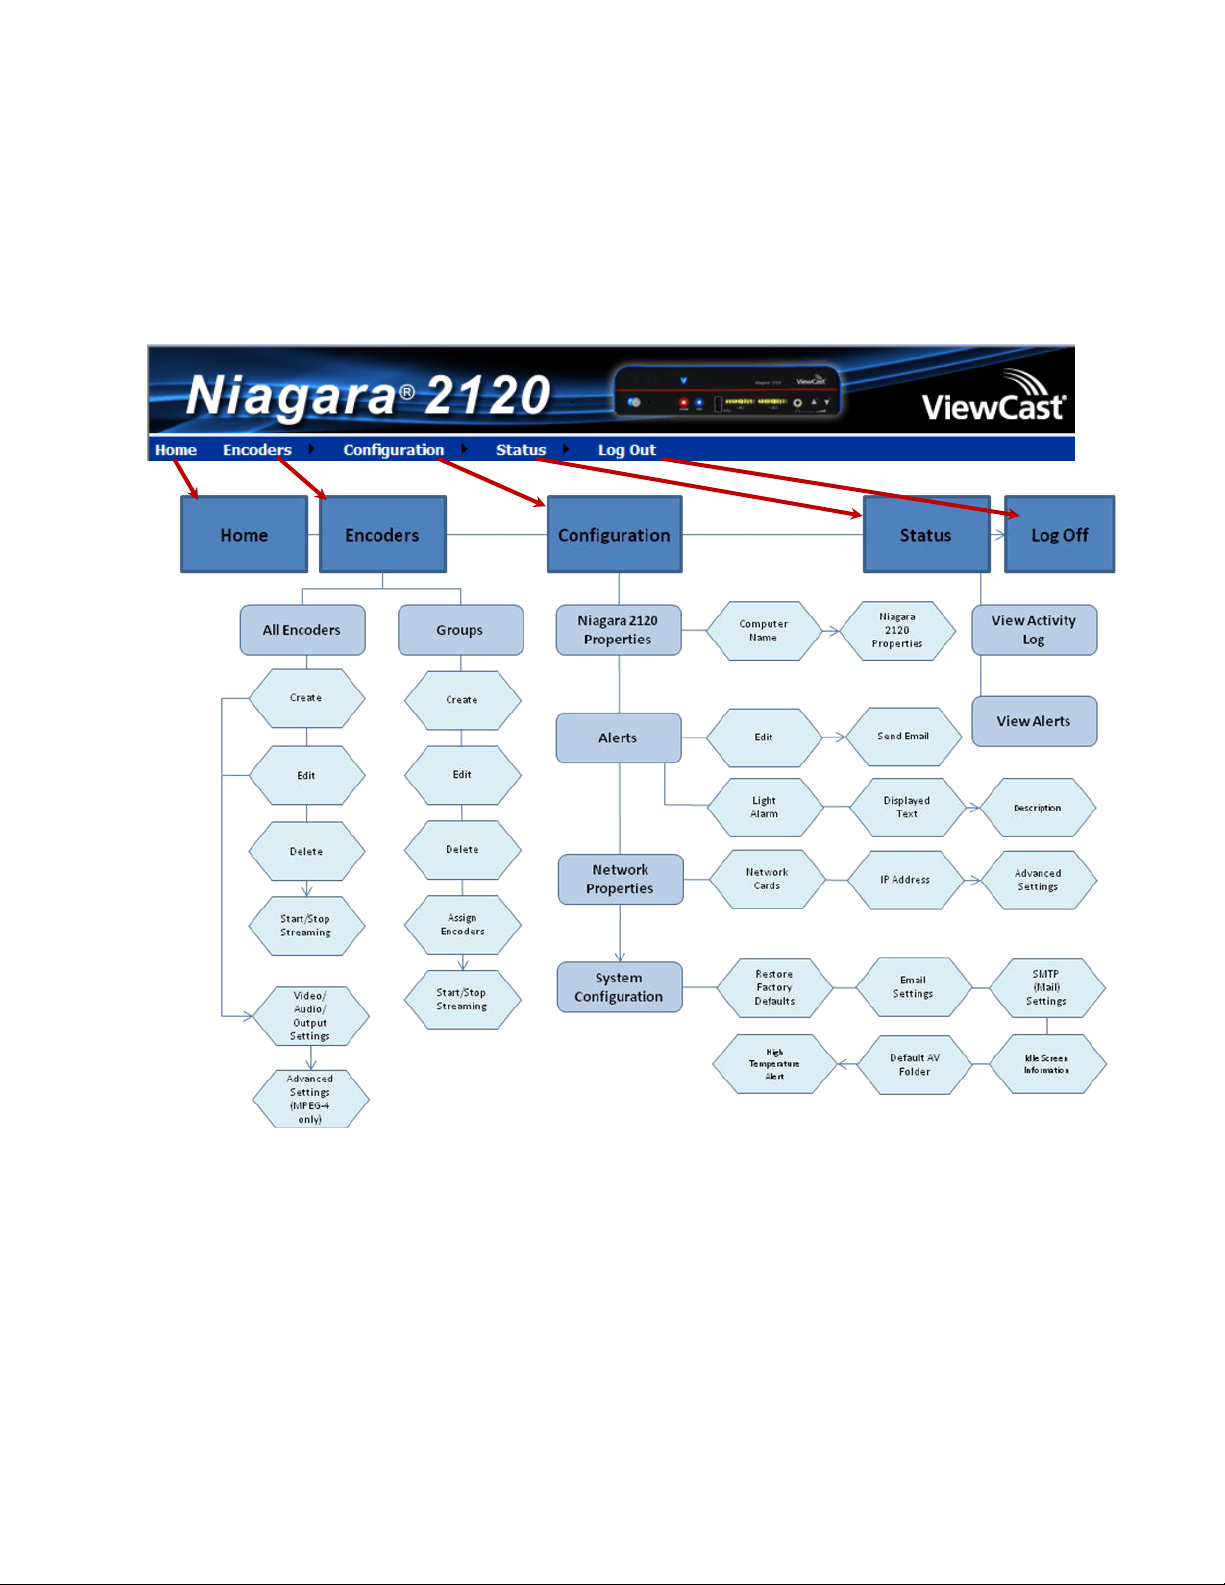
Niagara 2120 Browser Windows Flow
Figure 5 shows the interrelationship and flow of the available configuration windows you may use to
configure the Niagara 2120.
Figure 5. Niagara 2120 Browser Windows
18 ViewCast
Page 29

Niagara 2120 User Guide
Chapter 2: Easy Setup
The easy setup option explores the optimal configurations for the novice user to set up the Niagara
2120 quickly and easily. Easy setup includes actions you can perform on your Niagara 2120 streaming
media encoder using the Web interface to include configuring the following:
Encoder settings
Groups
Network properties
Machine properties
System
System alerts
Web Interface
The Niagara 2120 Web interface presents a logical flow of configuration information for the encoding
appliance. Refer to Figure 5 for a diagram and main menu options. Major considerations display on
the main menu and address:
Home
Encoders
o All Encoders including Encoder Properties
o Active Group
o Groups
Configuration
o Niagara 2120 Properties
o Alerts including Settings
o Network Properties
o System Configuration
Status
o Activity Log
o Alerts
Log Out
ViewCast 19
Page 30

Chapter 2: Easy Setup
Step
Action
1.
Attach the block end to the power cable that comes with the equipment.
2.
Connect the adaptor to the unit 12 VDC input located on the upper back panel
corner of the Niagara 2120.
Easy First Time Setup
You should read all instructions, notices, and warnings before getting started with your new Niagara
2120 hardware for the first time. Also, ensure you have all required parts and meet all system
requirements before installing this product.
Do not continue with the installation if you find any components missing or damaged. Contact the
ViewCast reseller where you purchased your Niagara 2120 system for assistance in obtaining any
missing or replacement parts.
Connecting to an Electrical Power Source
Niagara 2120 ships with one of the following power cables:
North America power cable
International power cable
UK power cable
Follow the steps in Table 6 to connect your power source to the Niagara 2120.
Table 6. Connect the Power Source
WARNING! The plug-socket combination must remain accessible at all times as it
serves as the main disconnecting device.
Do not work on the system or connect or disconnect cables during periods of lightning
activity.
20 ViewCast
Page 31
Niagara 2120 User Guide
Step
Action
1.
Ensure that you connect all devices (power cords, appliances, streaming devices, etc.) to
the Niagara 2120.
2.
Press POWER on the front panel to start the Niagara 2120.
3.
From another computer on the same DHCP/DNS network as the Niagara 2120, launch
Internet Explorer and type in http:// and the serial number of your Niagara 2120.
4.
If you do not have a DHCP network or you cannot connect to the Niagara 2120 through
its DNS name, you can connect a monitor, mouse, and keyboard directly to the Niagara
2120 to obtain or change the IP address. Connect a standard VGA monitor to the service
connector and the mouse/keyboard to USB ports. The Niagara 2120 will have a
Microsoft XP desktop. From the Desktop, you will launch Internet Explorer.
5.
Locate the serial number on the bottom of the appliance (in the format gf10xxxxxx).
6.
Enter your valid user name and password and click Log In when the Admin Log In
window (Figure 6) displays.
IMPORTANT! The setting to log in for the first time, defaults to the user name admin
and the password admin.
Figure 6. Admin Log In Window
NOTE: System administrators should previously configure all user names and
passwords for those who they allow to log on to the system.
7.
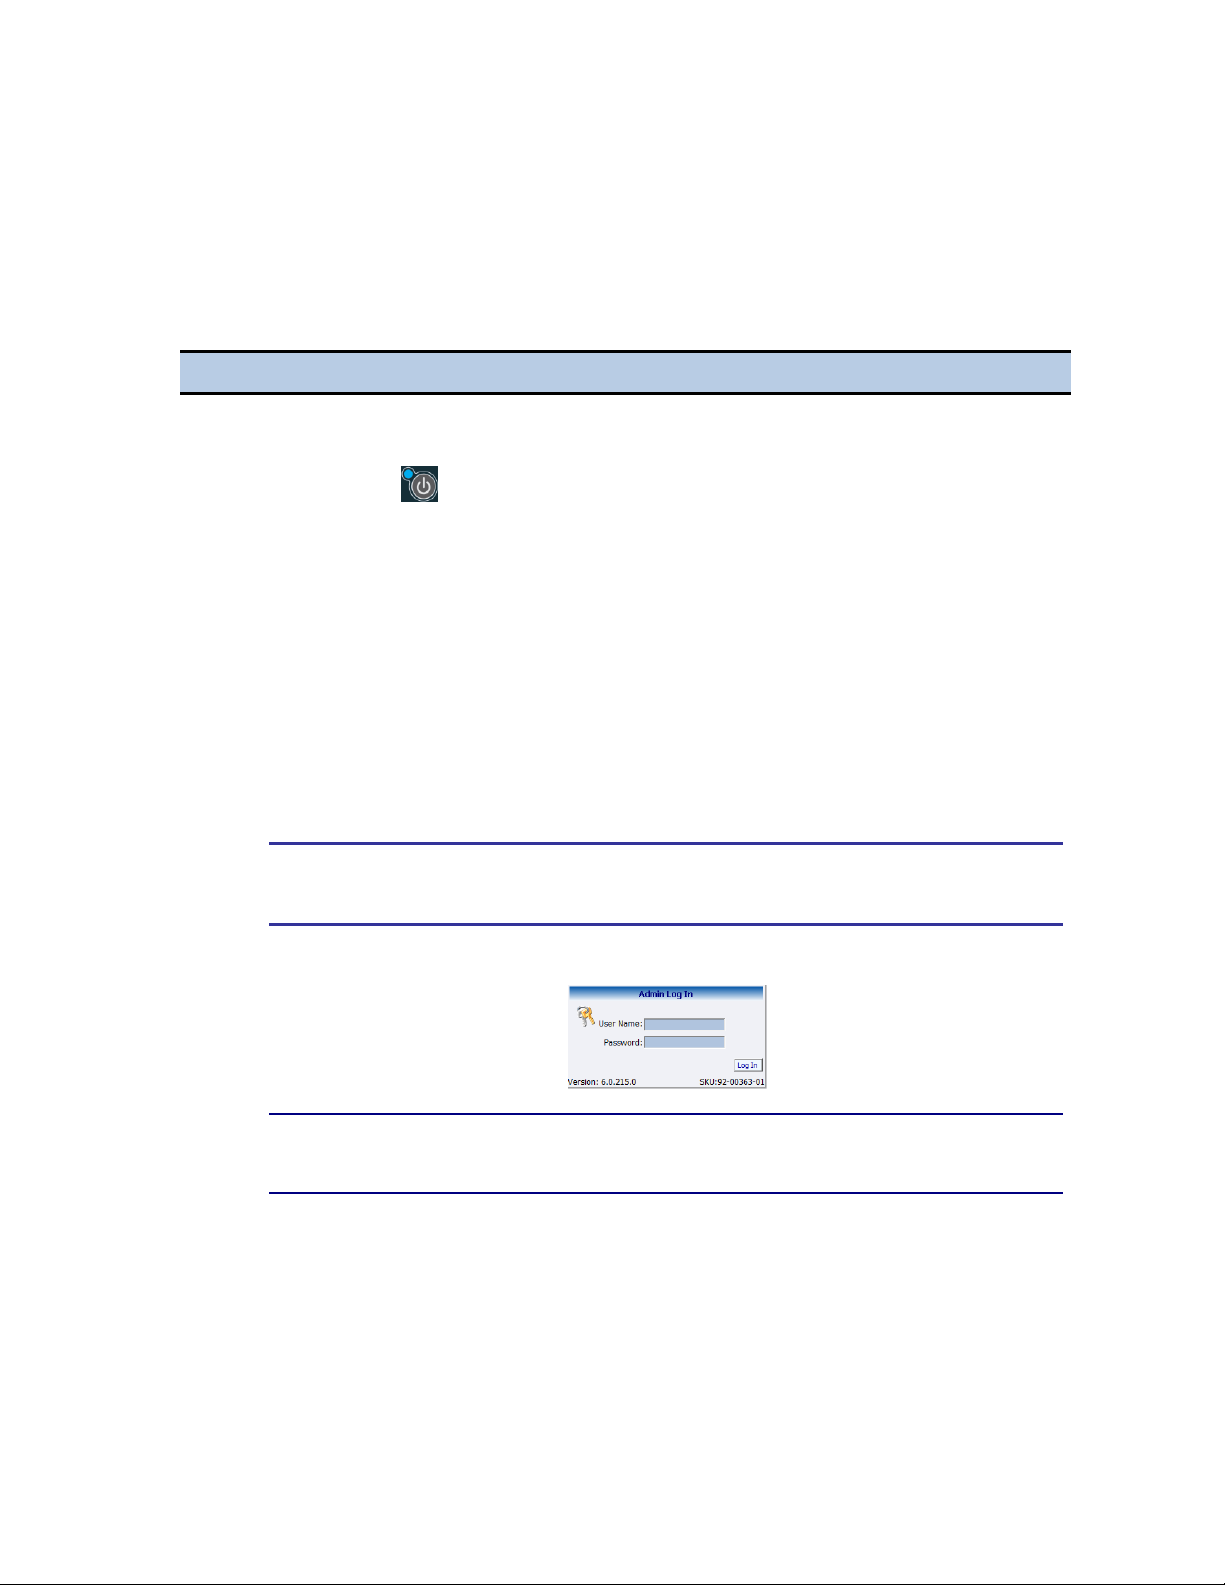
The first time you start the Niagara 2120 and log in, the system prompts you for the
date, time, and video standard (Figure 7). You may accept the default date, time, and
video standard or enter your desired date, time, and video standard then click Submit.
Figure 7. Date and Time Settings
Performing the Initial Start Up
Complete all steps in Tables 4 and 6 for connecting your Niagara 2120. Finally, you must follow a series
of menus that let you set up the initialized system (Table 7). The steps in Table 7 refer to a direct
connection to the Niagara 2120 only.
Table 7. First Start Up Session
ViewCast 21
Page 32
Chapter 2: Easy Setup
Step
Action
8.
The Admin Log In window may reappear once you submit the date, time, and video
standard fields. You must enter User Name and Password again.
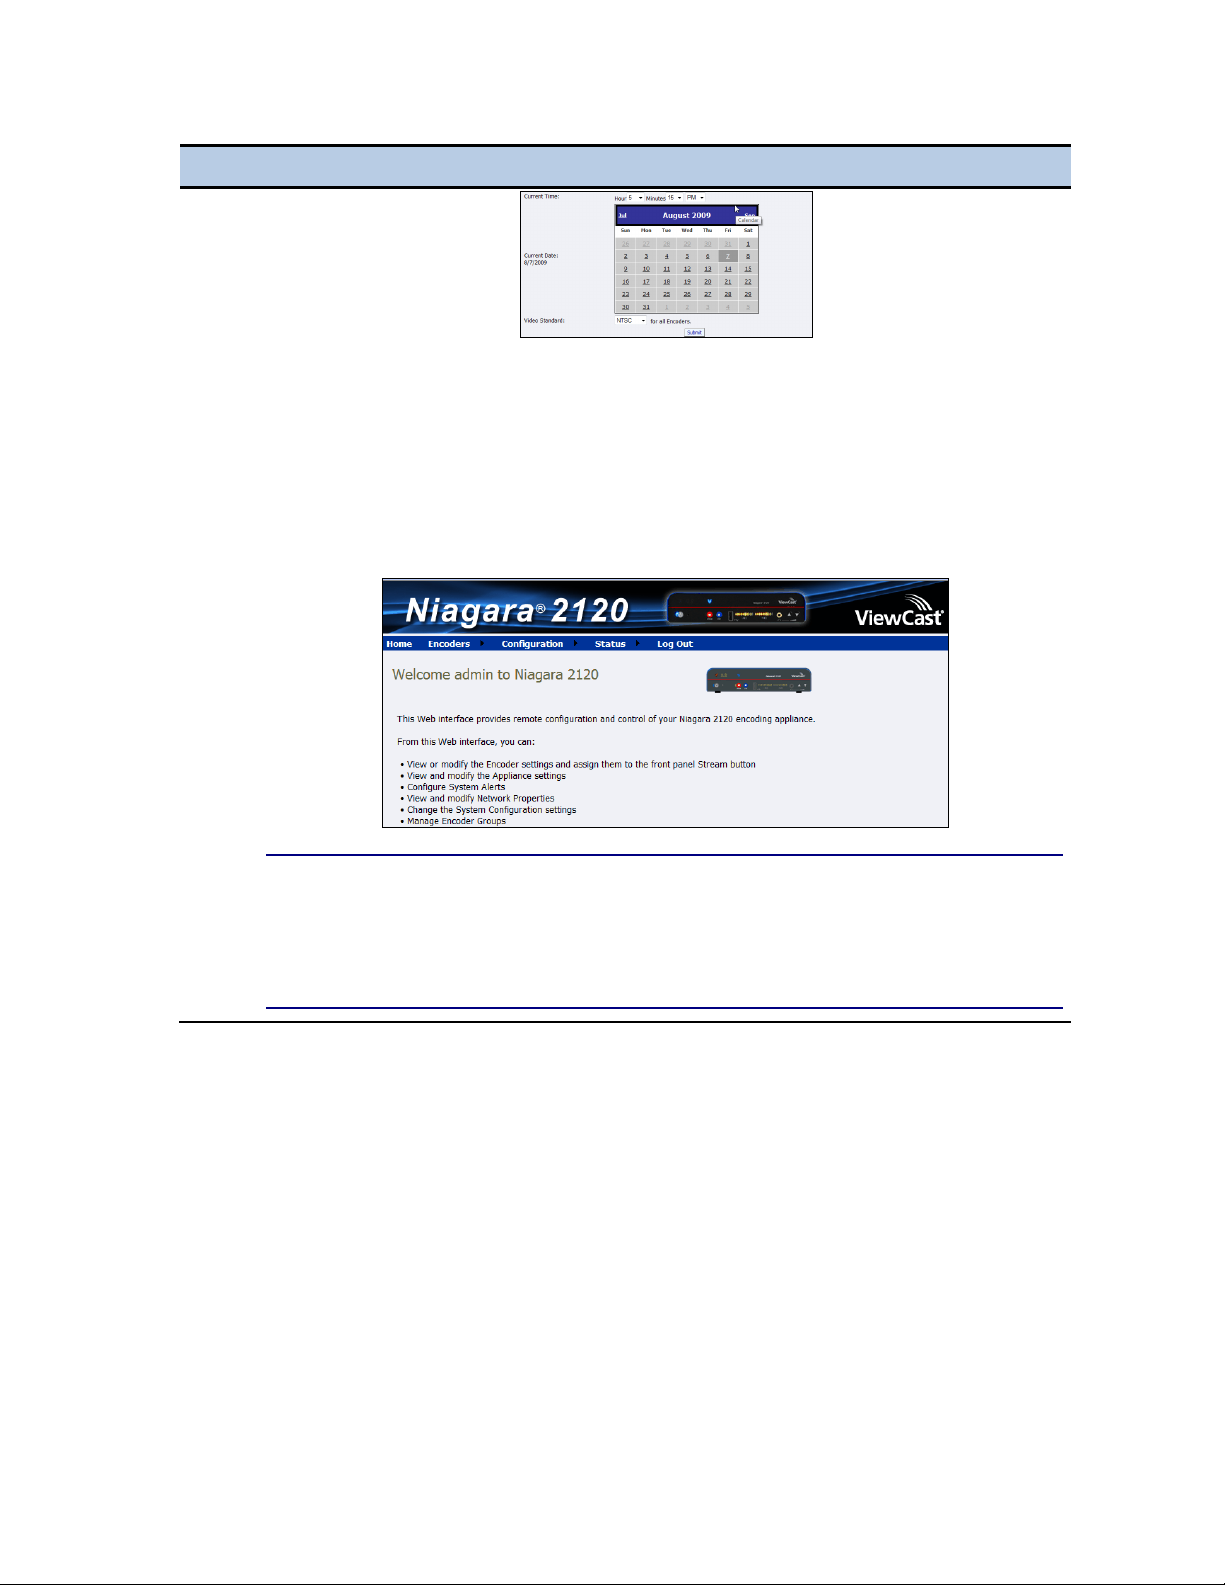
This time when you enter your valid user name and password, the system displays the
Welcome window (Figure 8) and Niagara 2120 Main Menu. Refer to Table 5 for a list
and description of main menu options.
Figure 8. Welcome
NOTE: You must identify, at a minimum, an encoder, a group, and basic system and
network configuration settings.
The Niagara 2120 front panel status light remains solid green once it becomes ready
to begin streaming.
22 ViewCast
Page 33
Niagara 2120 User Guide
Step
Action
1.
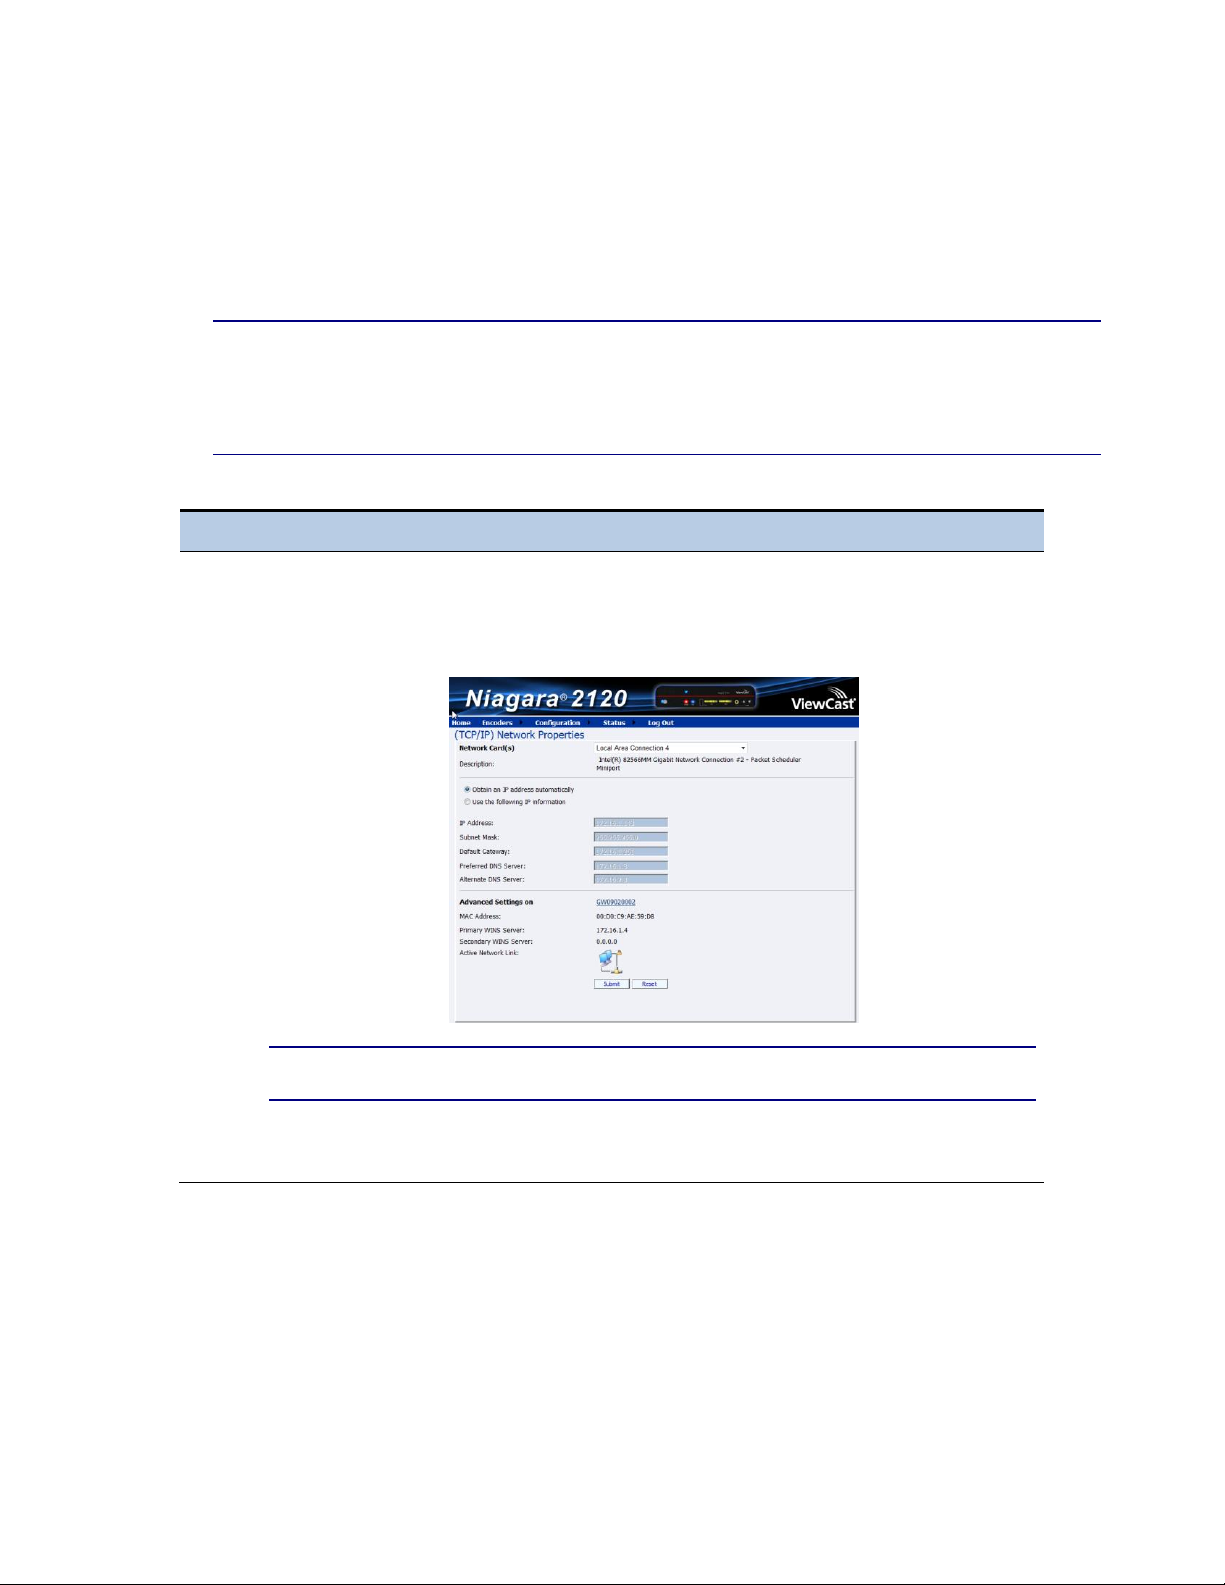
Click Configuration Network Properties. The Network Properties window appears
(Figure 9). The machine name is in the IP Address field.
Figure 9. Connect to IP Network
NOTE: You need not modify these default settings for most network environments.
2.
Click Submit to accept all network settings you configure.
Connecting to an IP Network
The Niagara 2120 network settings for its network interface defaults to obtain an IP address from a
DHCP server on the network. If a DHCP server is not available or is not on the network, Niagara 2120
assigns its own IP address.
NOTE: If you are not familiar with network protocols, contact your network administrator for
assistance. If you are not able to browse to the unit with a DHCP network, you may connect a
monitor, keyboard, and mouse to the Niagara 2120 to determine and set the network
connections.
Table 8. Connect to Network
ViewCast 23
Page 34

Chapter 2: Easy Setup
Field
Action
Network Cards
Options include primary NIC and secondary NIC
Description
Describes the NIC option
Obtain an IP address
automatically or Use the
following IP information
Click one of the radio buttons to either obtain an IP address
automatically or use input IP information (user inputs).
Refer to IP Address field below for information on setting
your own IP address.
IP Address
Input or accept the default static IP address. Press Enter to
accept your selection.
NOTE: You can only perform this action and the next four
(Subnet Mask, Default Gateway, Preferred DNS Server,
and Alternate DNS Server) if you click Use the following
IP information. You must click Submit to save any
changes.
Subnet Mask
Input or accept the default. Press Enter to accept your
selection.
Default Gateway
Input or accept the Default Gateway. Press Enter to accept
your selection.
Preferred DNS Server
Input or accept the default preferred domain name server
(DNS). Press Enter to accept your selection.
Alternate DNS Server
Input or accept the default alternate domain name server
(DNS). Press Enter to accept your selection.
Advanced Settings On
You may accept the default workstation identifier
(Advanced Setting on field).
You may alternately enter a new computer name by
clicking the underlined computer name to go to the
Machine Properties window and click Edit to change
the computer name. Click Submit to change the name.
NOTE: If you change the computer name, you must
reboot the system after you submit it.
MAC Address
View the default Media Access Control (MAC) address.
Defining the Network Properties
Table 9 provides Network Properties and the actions you can choose for each. To view this window,
click Configuration Network Properties, then click Use the following IP information.
Table 9. Network Properties Window Options
24 ViewCast
Page 35

Field
Action
Primary WINS Server
Input or accept the primary windows server identifier. Press
Enter to accept your selection.
Secondary WINS Server
Input or accept the secondary windows server identifier.
Press Enter to accept your selection.
Active Network Link
Displays the status of the network link.
Position your cursor in any appropriate field and enter your
selections. Press Enter or Submit to accept all selections.
Niagara 2120 User Guide
ViewCast 25
Page 36

Chapter 2: Easy Setup
26 ViewCast
Page 37
Niagara 2120 User Guide
Viewing all encoders
Viewing encoder groups
Starting an encoder
Starting an encoder group
Editing an encoder
Editing an encoder group
Stopping an encoder
Stopping an encoder group
Step
Action
1.
Locate the serial number on the side or bottom of the appliance (in the format
gf10xxxxxx).
2.
Open the Web browser on your computer.
3.
You can either:
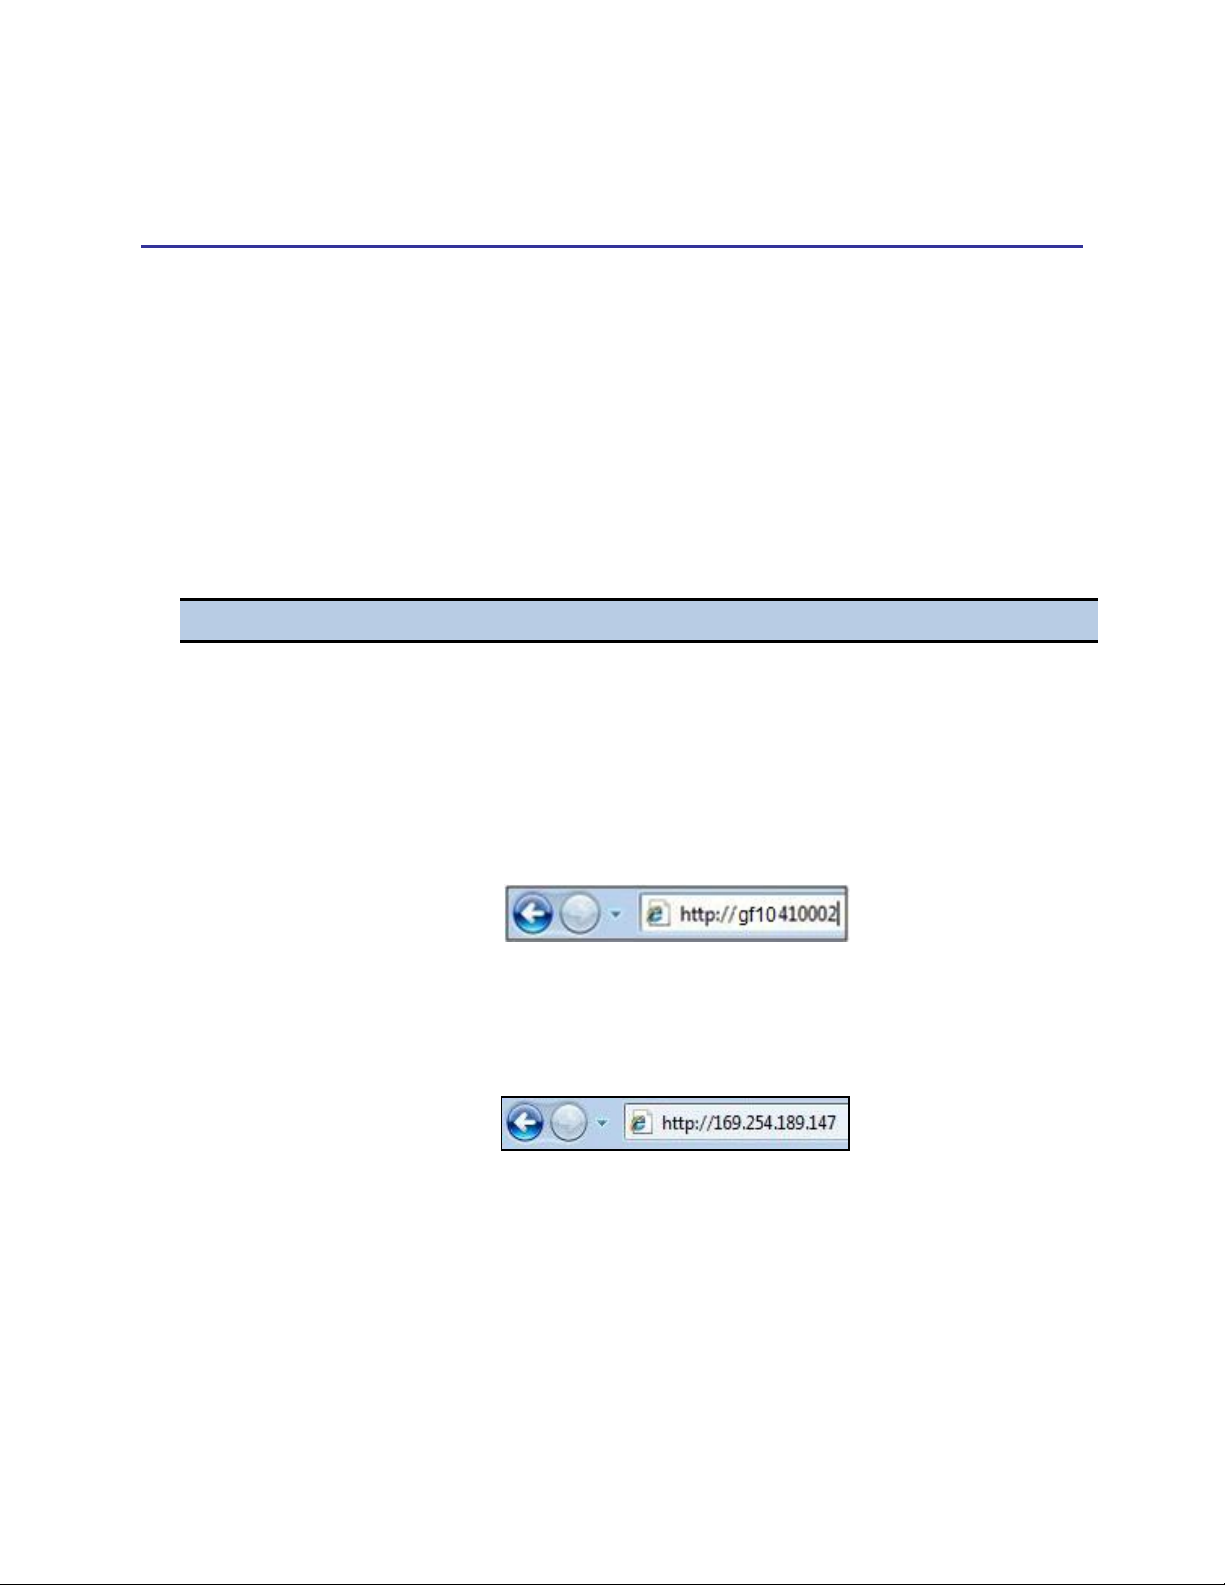
Type the Niagara 2120 serial number in the Address bar (Figure 10) and press Enter.
Figure 10. Address Bar
Or
Type the IP address in the Address bar (Figure 11) and press Enter.
Figure 11. IP Address
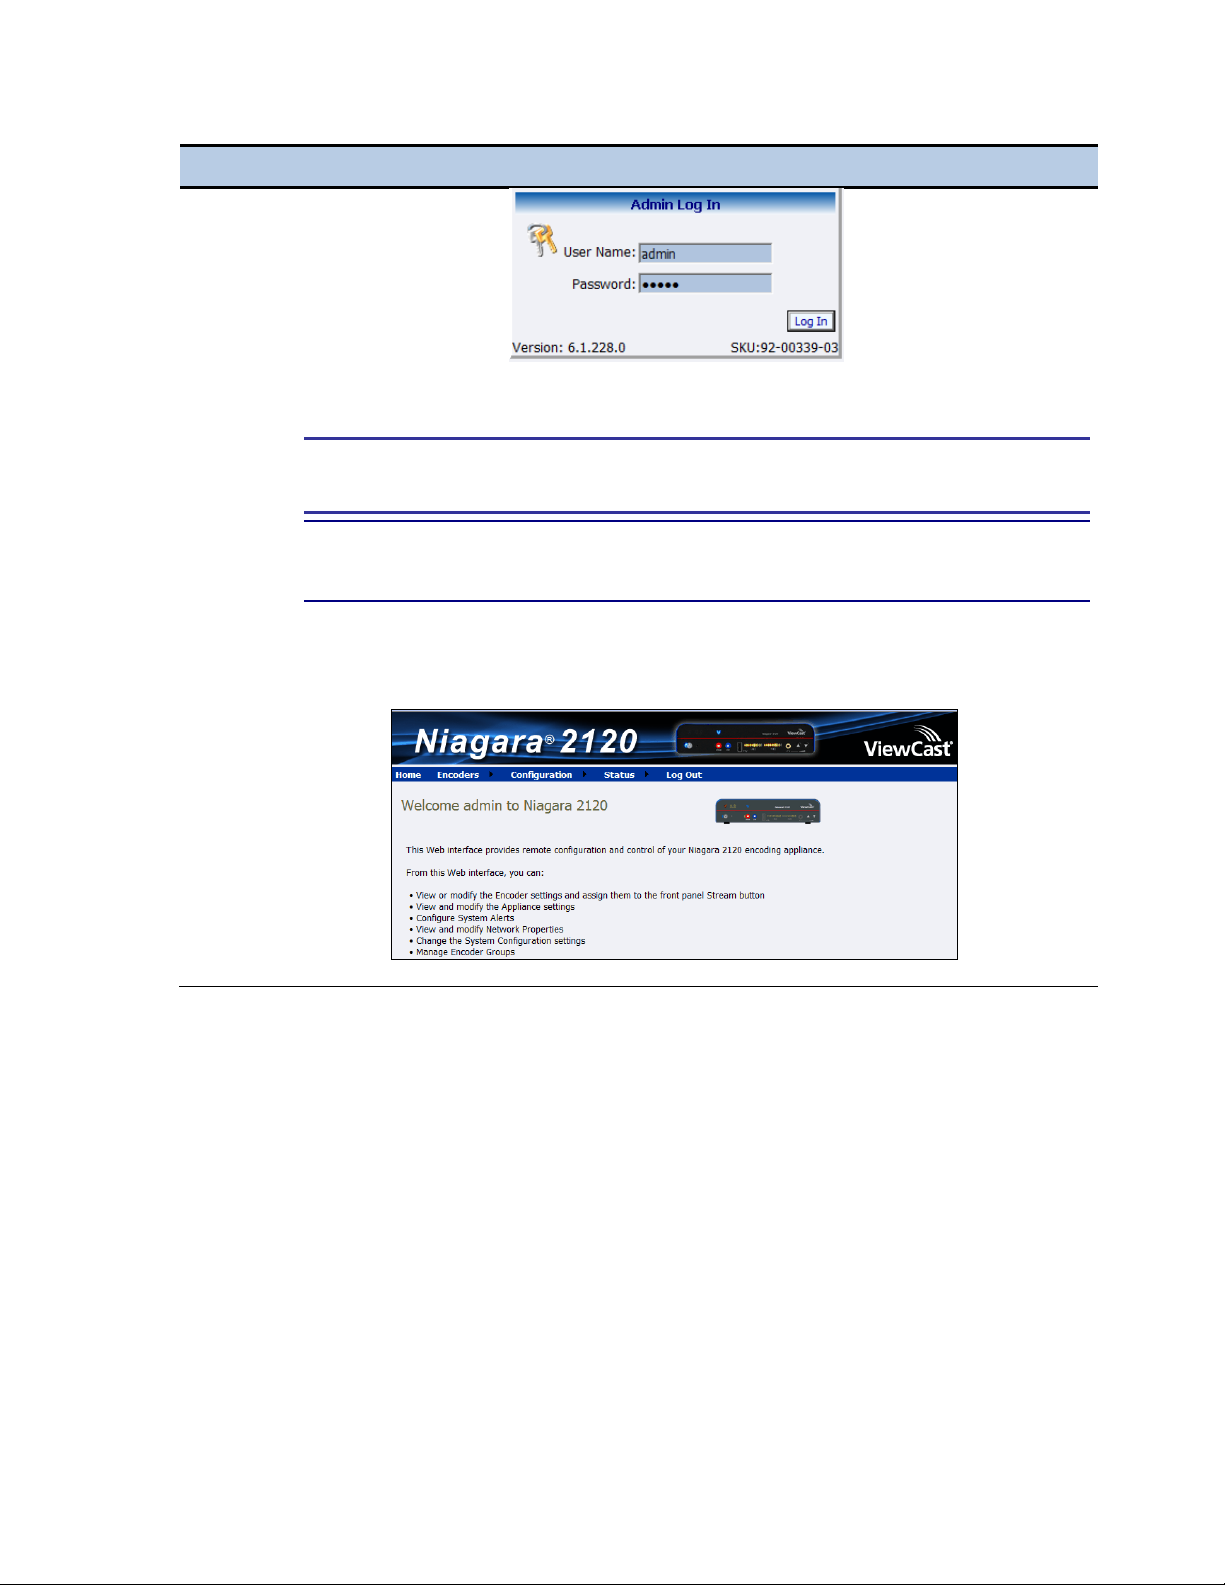
The Admin Log In window appears (Figure 12).
Figure 12. Admin Log In Window
Chapter 3: Perform Basic Operations
Basic operations include but are not limited to the following:
Logging In
Table 10. Logging In
ViewCast 27
Page 38
Chapter 3: Perform Basic Operations
Step
Action
4.
Type the User name and Password.
IMPORTANT! The setting to log in for the first time, defaults to the user name
admin and the password admin.
NOTE: System administrators should previously configure all user names and
passwords for those who they allow to log on to the system.
5.
Press Login. The Niagara 2120 Welcome window and Menu Bar appear (Figure 13).
Figure 13. Welcome Window
28 ViewCast
Page 39
Niagara 2120 User Guide
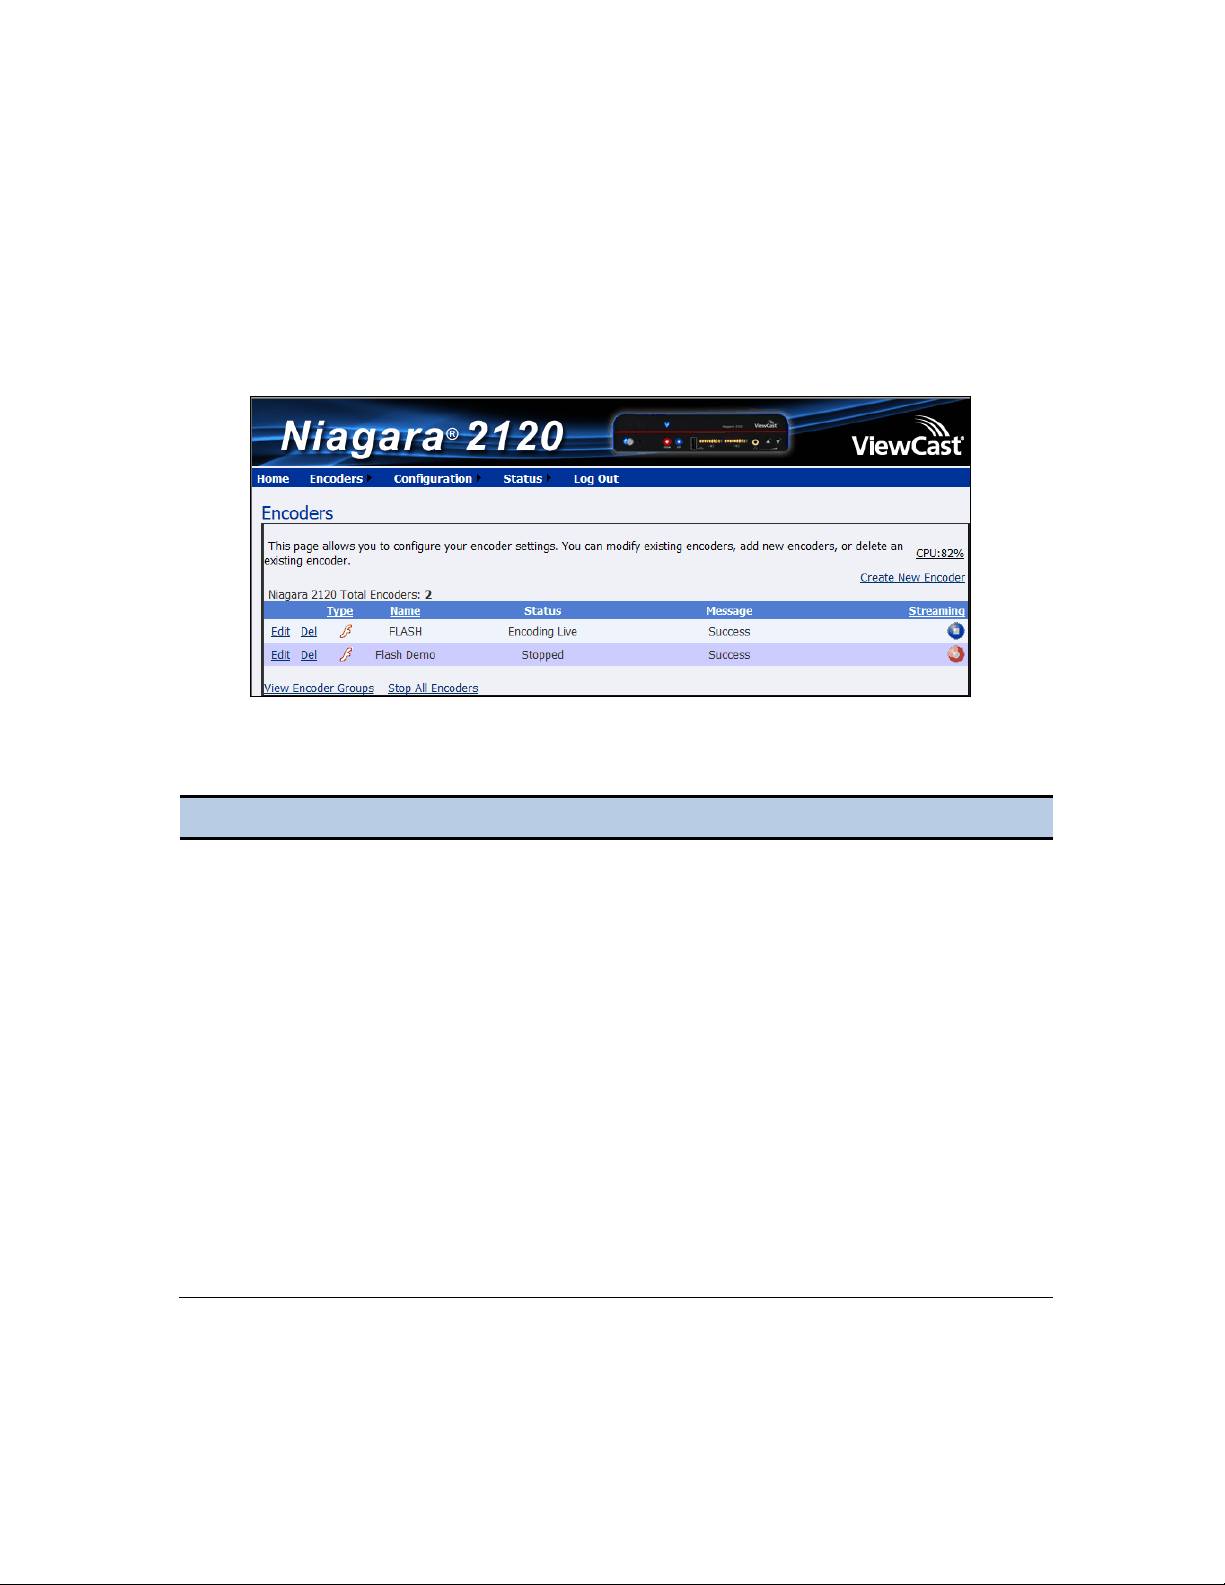
Figure 14. Encoders Window
Encoder Option
Description
Create New
Encoder
Allows you to create a new encoder.
Total Encoders
Displays the total number of encoders on the Niagara 2120.
Edit
Allows you to edit the encoder properties including groups, streaming
settings, and advanced streaming settings.
Del
Lets you delete an encoder from the list.
Type
Displays the encoder type.
Name
Displays the name of the encoder profile. This name appears on the LCD
display on the front panel.
Status
Displays the result of the last action.
Message
Displays the result of the last action.
Streaming
Displays as either Started (blue circle button) or Stopped (red circle
button) as the options for streaming for this encoder.
Viewing All Encoders
The Encoders window provides a list of all of the encoder profiles loaded on the Niagara 2120. On
the home page, click Encoders All Encoders.
Table 11. Encoder Options
ViewCast 29
Page 40
Chapter 3: Perform Basic Operations
Step
Action
1.
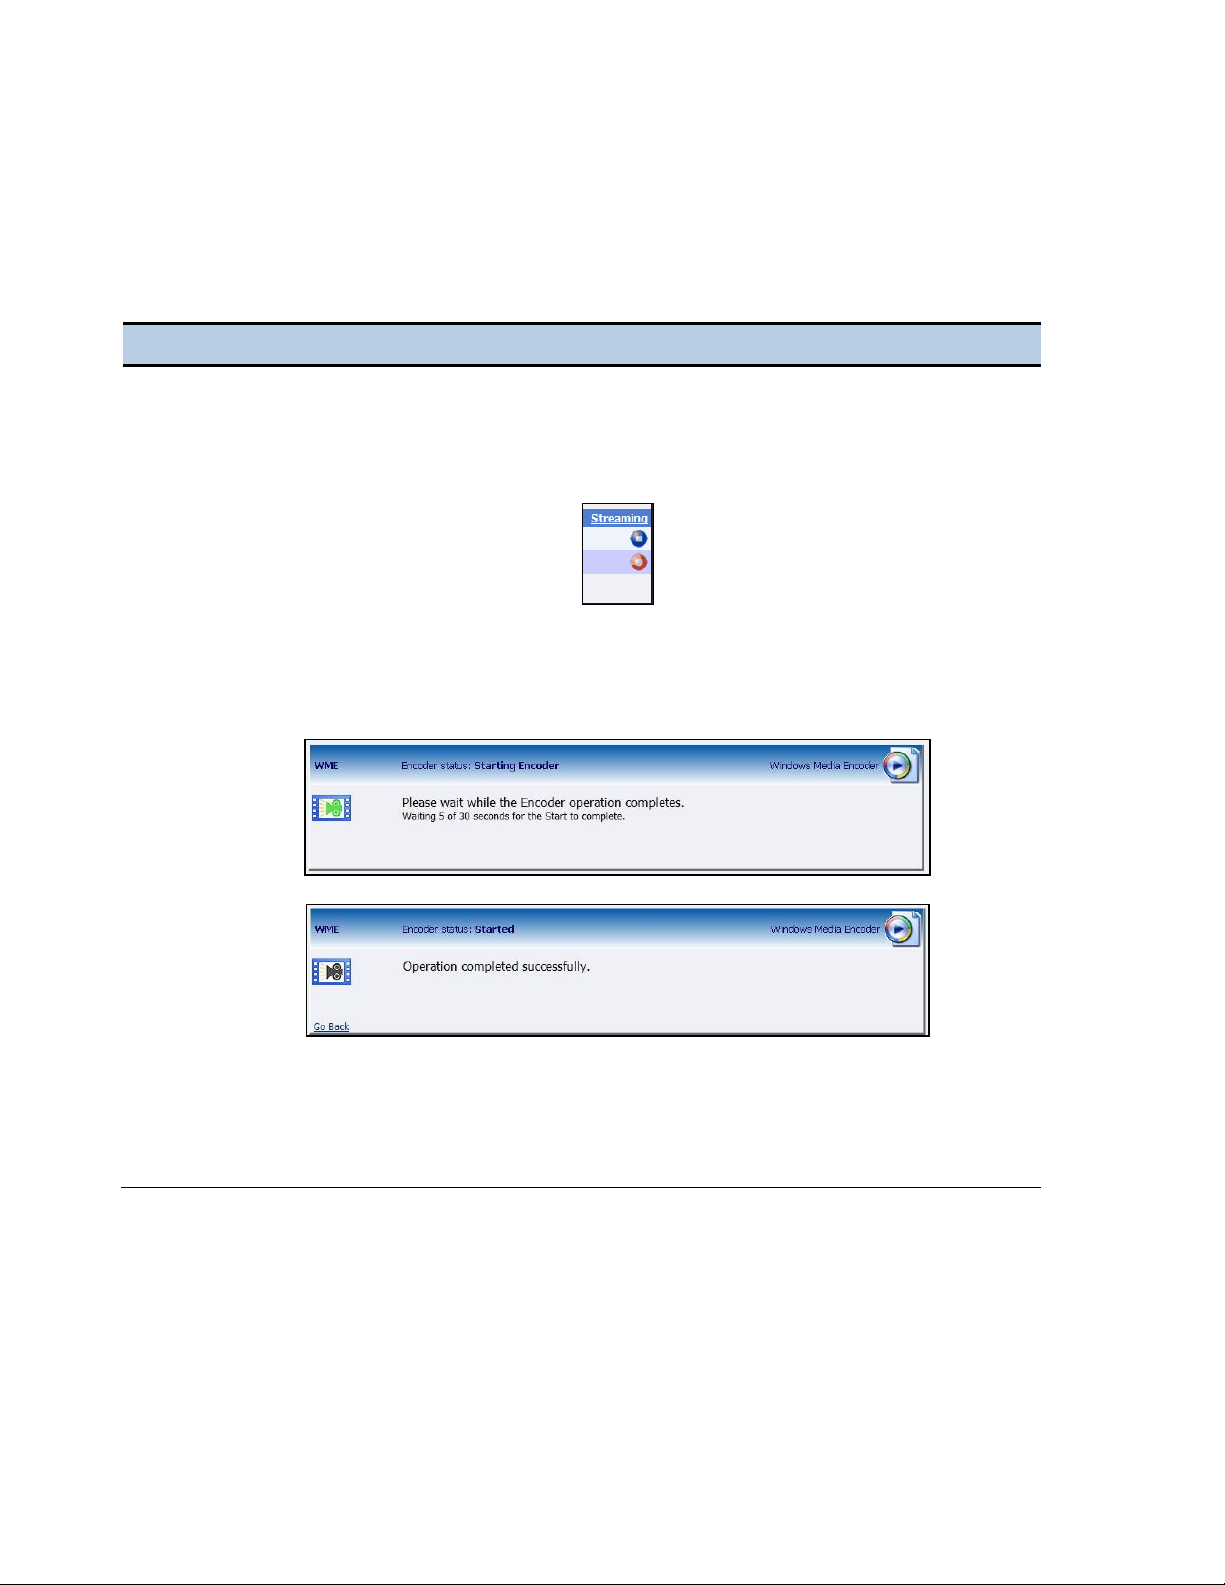
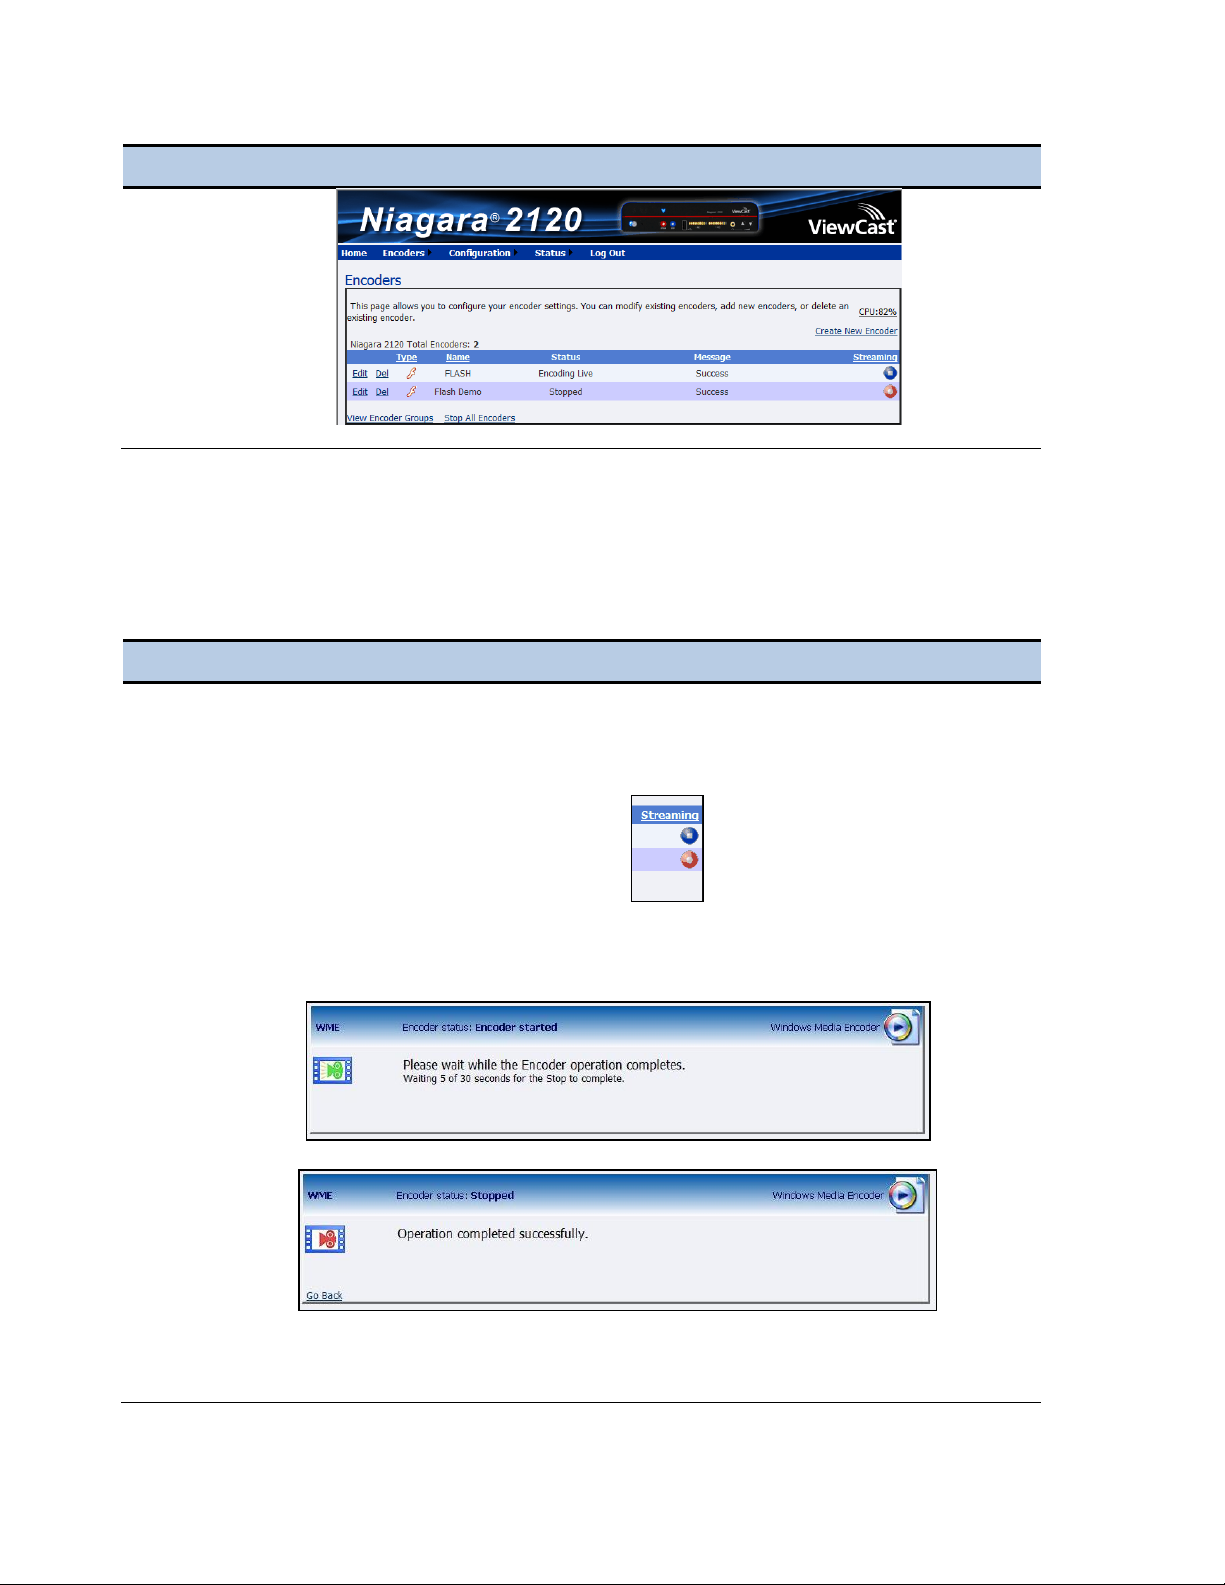
Click the red circle Stopped icon (Figure 15) in the Streaming column for the encoder you
want to start streaming.
Figure 15. Stopped Icon
Messages appear detailing the encoder start progress (Figure 16).
Figure 16. Encoder Start Status
The Encoders window appears with the encoder status updated and the streaming indicator
changes to a blue circle Started icon (Figure 17).
Figure 17. Encoders Window
Starting an Encoder
To start an encoder, on the home page click Encoders All Encoders.
Table 12. Starting an Encoder
30 ViewCast
Page 41
Step
Action
Stopping an Encoder
Step
Action
1.
Click the blue Started icon of the encoder you wish to stop streaming (Figure 18).
Figure 18. Started Icon
Messages appear detailing the encoder stop progress (Figure 19).
Figure 19. Encoder Stop Status
The Encoders window appears with the encoder status updated to reflect the Stopped
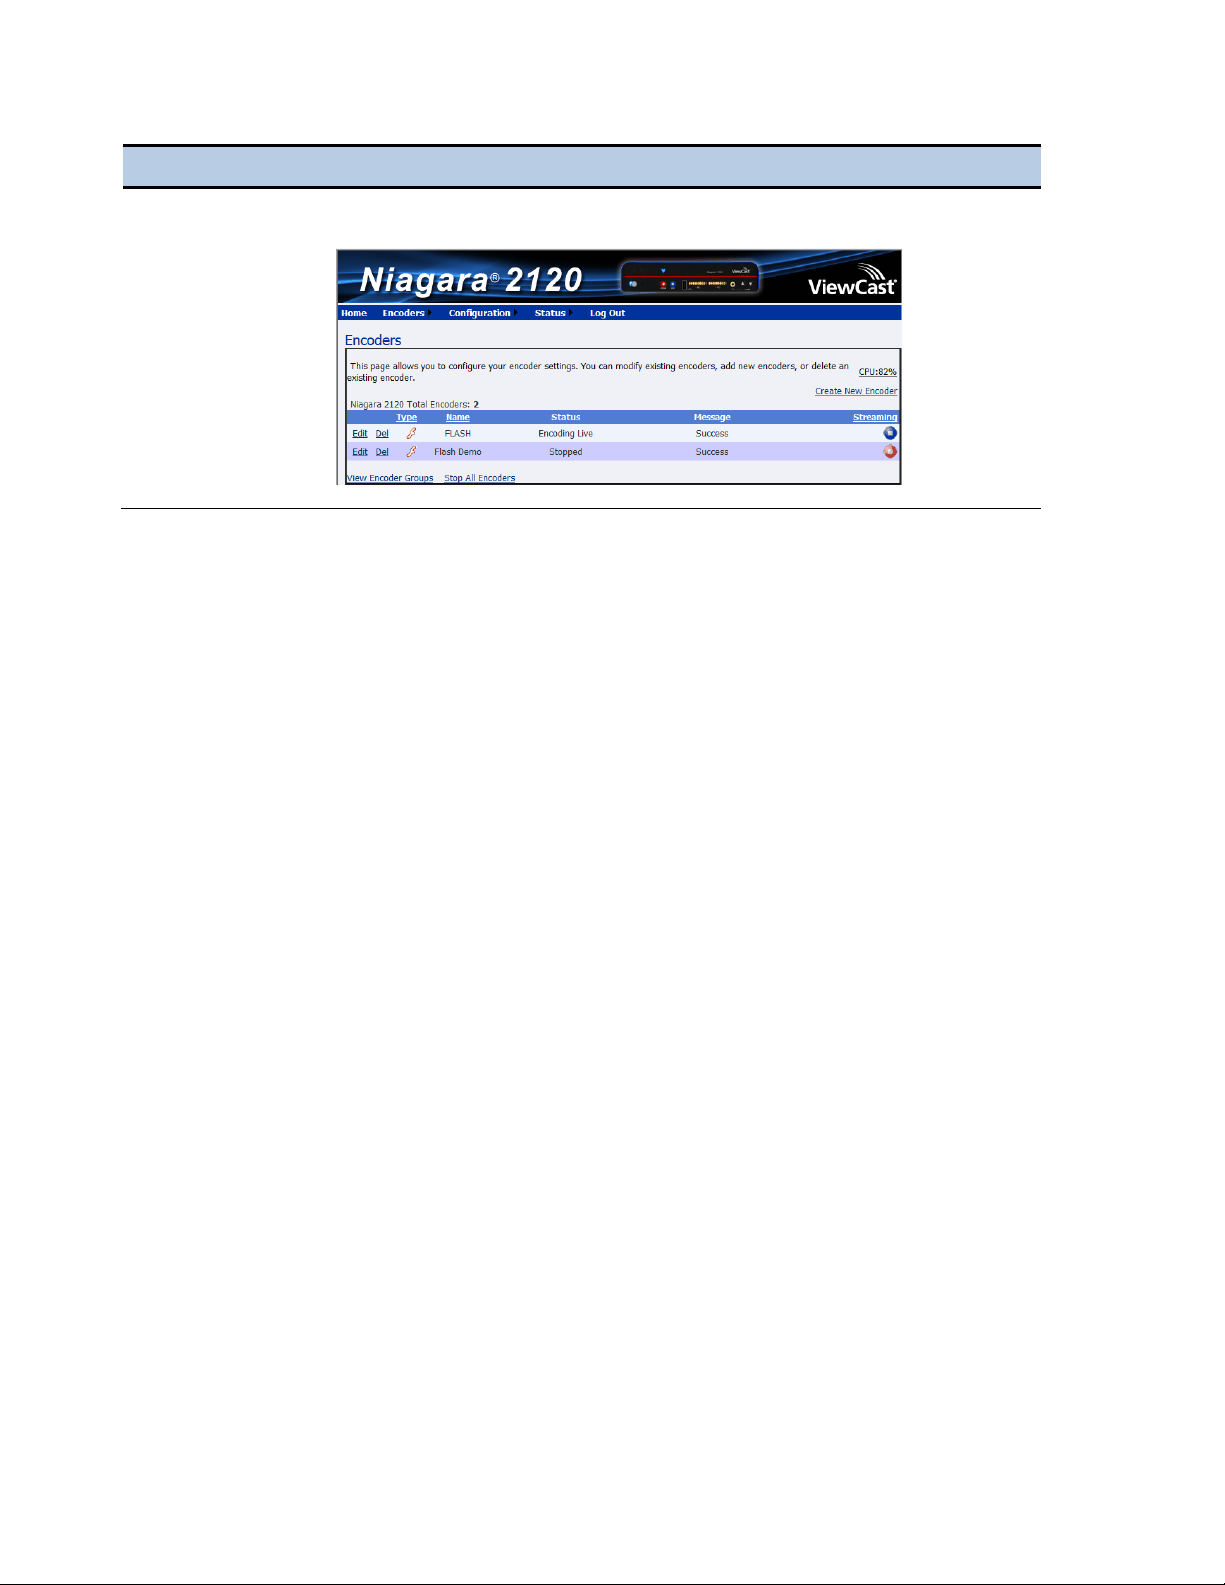
mode and the streaming indicator changes to a red circled Stopped icon (Figure 20).
To stop an encoder, on the home page click Encoders All Encoders.
Table 13. Stopping an Encoder
Niagara 2120 User Guide
ViewCast 31
Page 42
Chapter 3: Perform Basic Operations
Step
Action
Figure 20. Encoders Window
32 ViewCast
Page 43
Niagara 2120 User Guide
Editing an Adobe Flash H.264 Encoder
When you create a new encoder, the Encoder Properties window appears. The Encoder Properties
windows for editing a new encoder or an existing encoder are identical. You must configure the
video and audio settings for each encoder type. Use the tabs Video, Audio, Output, and H.264
Settings to edit the settings. Begin with configuring the video and audio settings, then the streaming
properties. The streaming properties and advanced streaming settings are different for each type of
encoder.
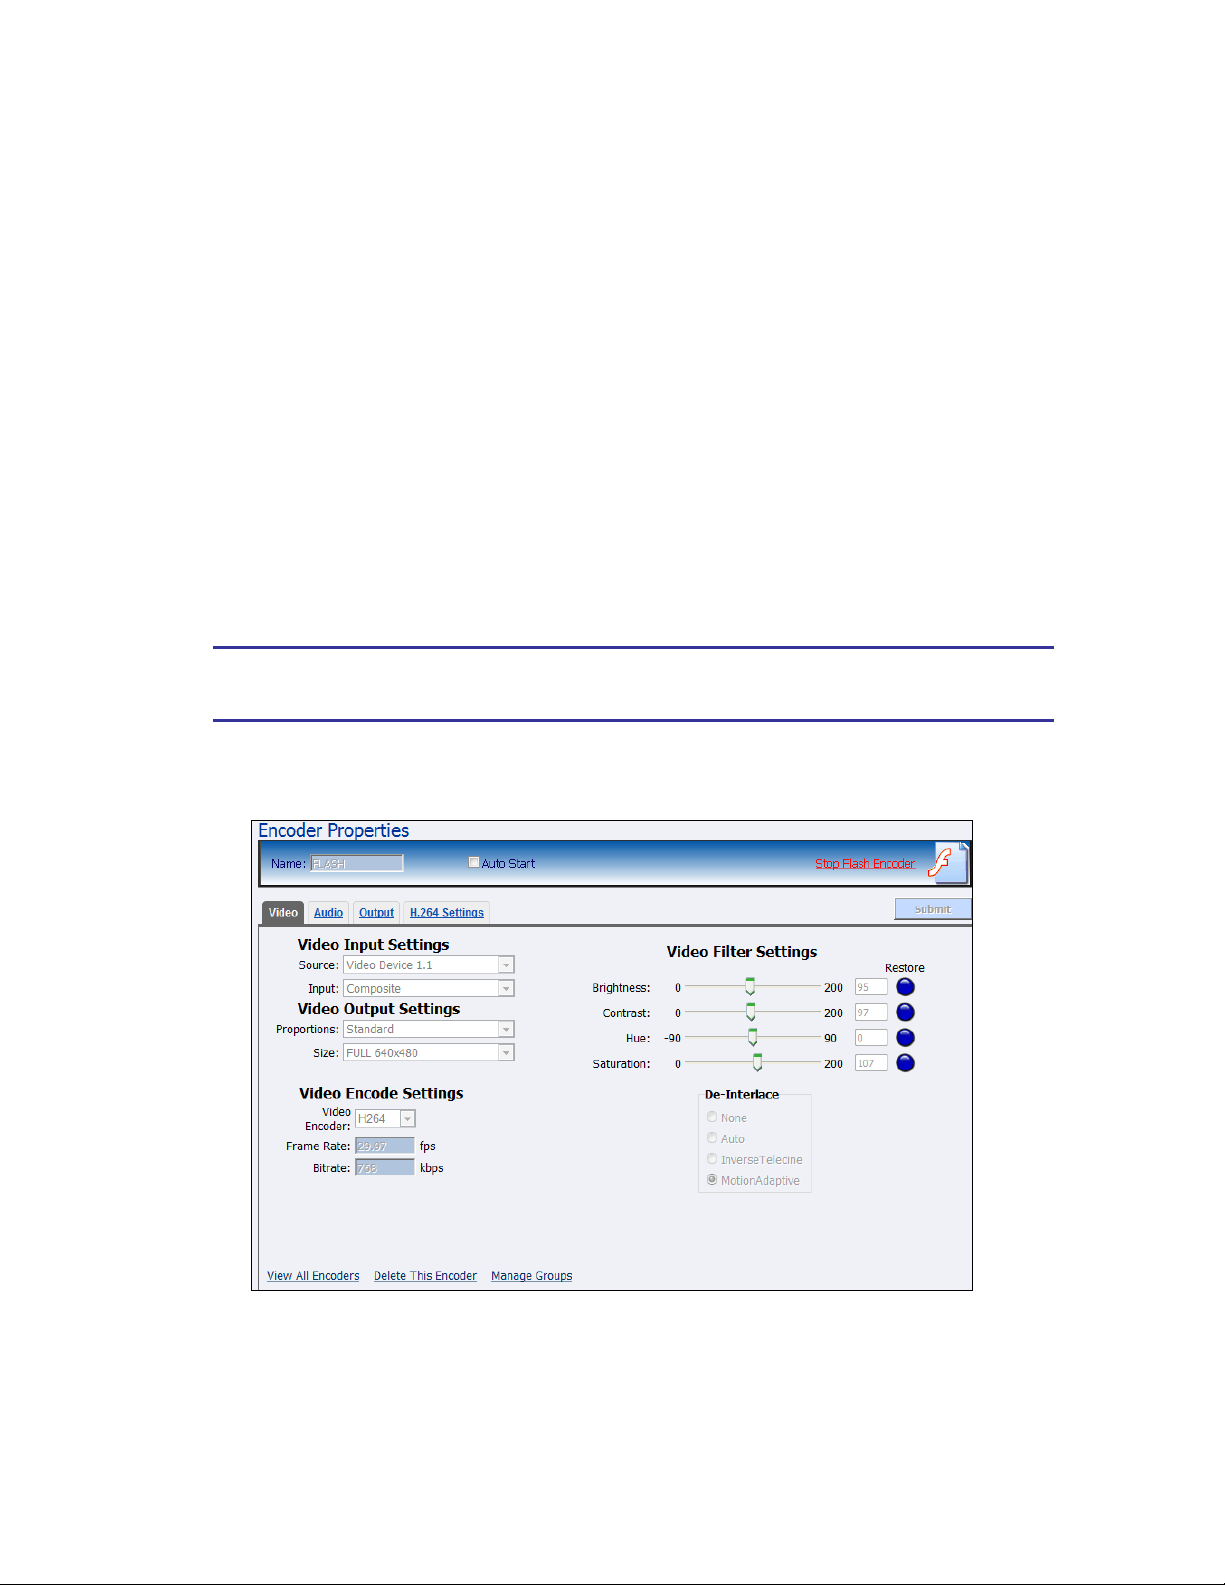
From the Flash Encoder Properties window (Figure 21), you can set the encoder to start streaming
automatically by clicking the Auto Start checkbox. You can also start the encoder from this window
by clicking the Start Flash Encoder link in the top right corner of the window.
Click Encoders All Encoders from the home page. Then click the Edit link next to the encoder
whose properties you wish to modify. The system displays the Encoder Properties window for the
selected encoder.
IMPORTANT! If you make any changes to the Encoder Properties window, you must click
Submit. Otherwise, all your changes will be lost.
Figure 21. Flash Encoder Properties
ViewCast 33
Page 44
Chapter 3: Perform Basic Operations
Step
Action
1.
In the Source field, click a device from the drop-down list.
The Niagara 2120 is a single-channel encoder. The video source is initialized into multiple
inputs denoted by the following incrementing decimal values:
Disabled
Video Device 1.1
Video Device 1.2
Video Device 1.3
Video Device 1.4
Video Device 1.5
2.
In the Input field, click the video input.
IMPORTANT! The video input must match the connectors on the back of
the Niagara 2120 and your video source.
3.
The Proportions field has two settings:
Video Tab
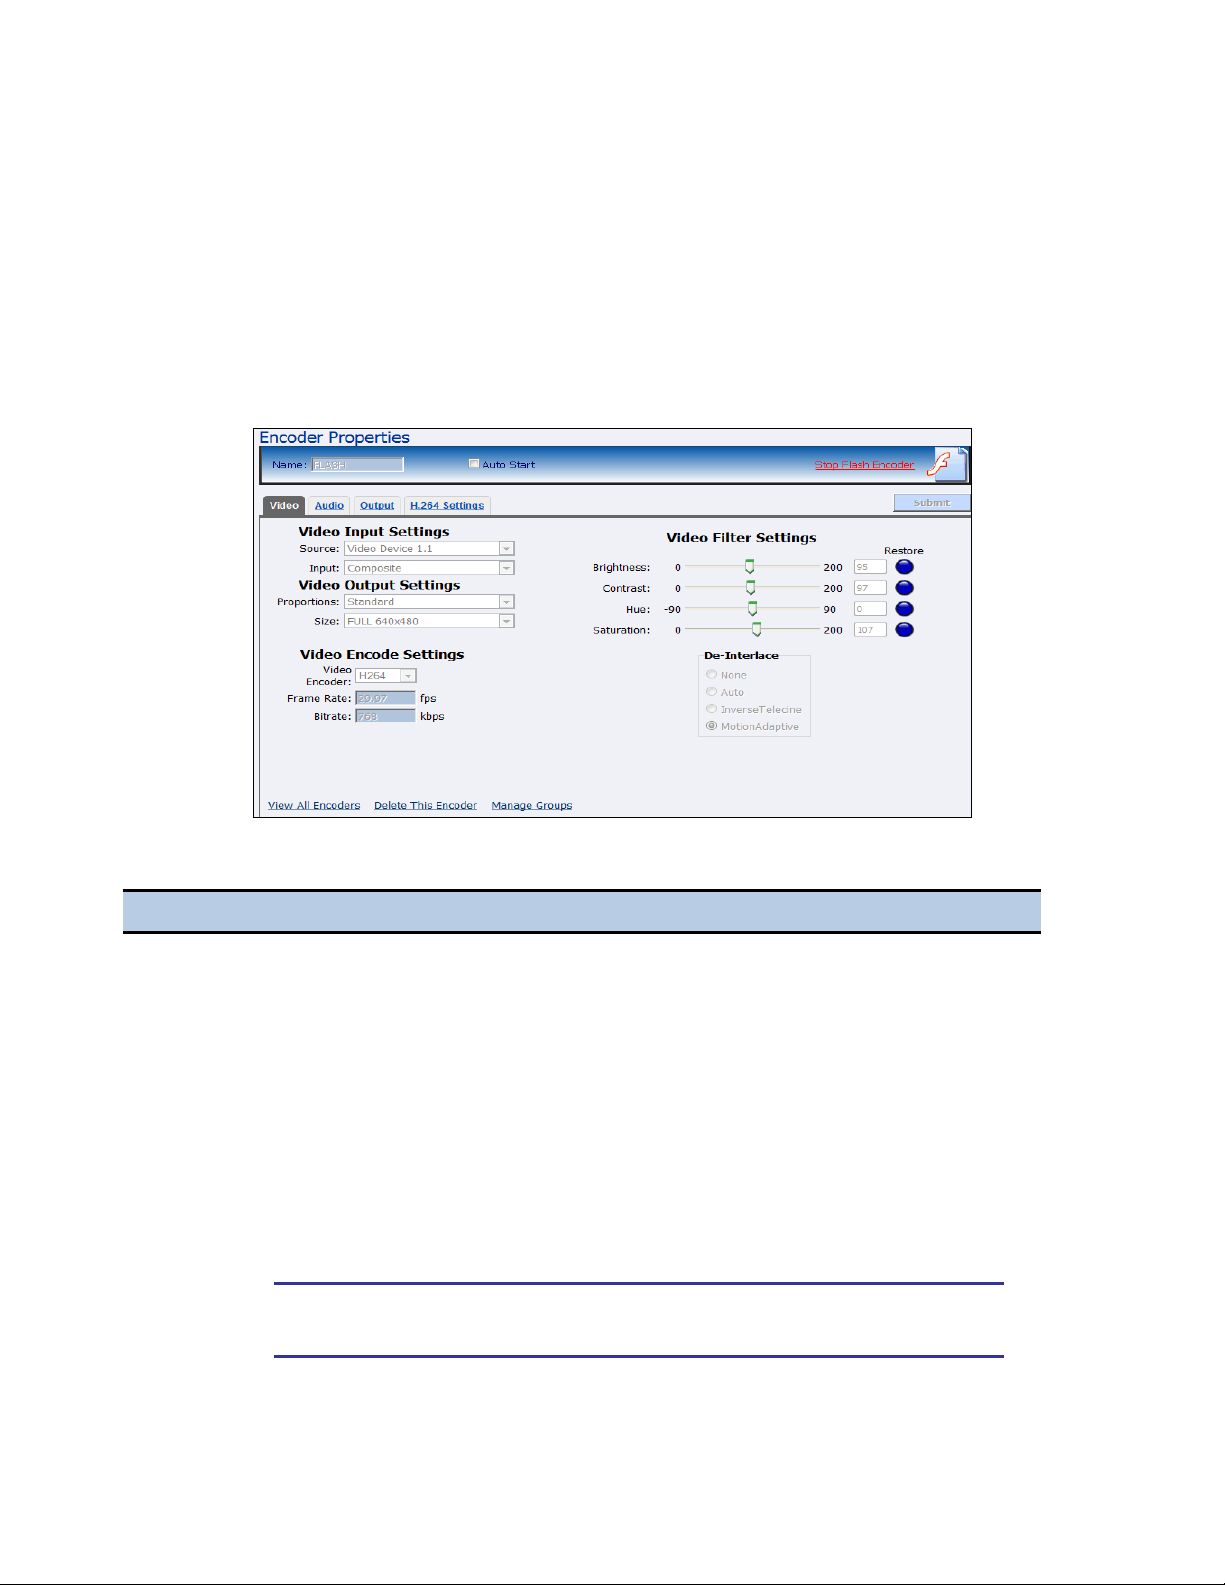
Flash adds some additional frame and bit rate controls. The frame rate changes the frames per
second that the video will encode. You can use the audio format setting to modify the audio
frequency and change stereo to mono. The bit rate settings pertain to the amount of data per
second the audio and video are captured. Decreasing the bit rate for both or either decreases the
playback viewing quality.
Figure 22. Video Tab
Table 14. Configuring Video Input Settings
34 ViewCast
Page 45
Niagara 2120 User Guide
Step
Action
Standard – Square pixels for a VGA monitor
CCIR-601 – Elongated pixels for a TV monitor
Click the setting that reflects the type of display on which your viewers will view your
content. For example, if you want to stream your video on the Internet for the user to view
on a computer monitor, click Standard. If you select an inaccurate setting, your video will
distort.
4.
In the Size field, click the pixel size of the encoded video. The standard sizes include:
Full-size for full screen video
CIF for video scaled from full-size to ¼ size
QCIF for video scaled from full-size to ¼ of CIF size
Custom
You can also specify a custom size for your video. This customization is useful when you are
capturing video to play on a mobile video-device that requires a non-standard size for
compatibility.
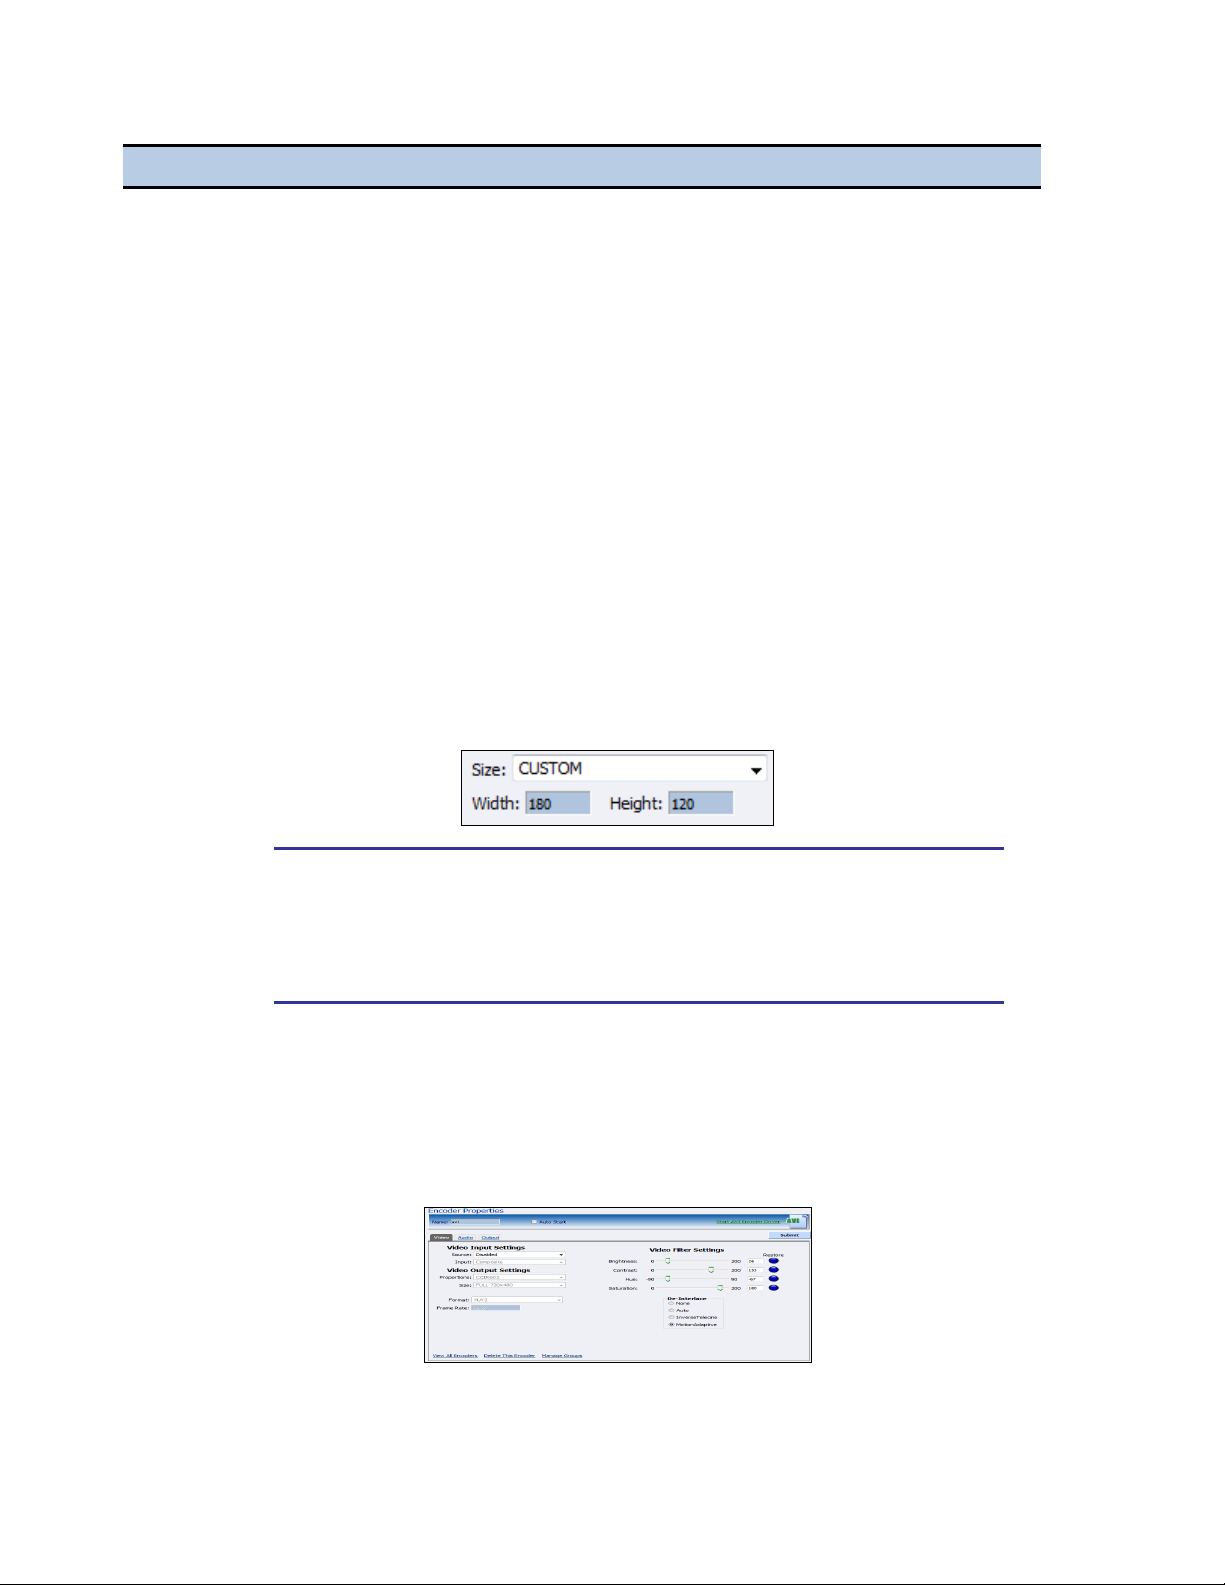
When you click Custom, two additional fields appear so you can enter the exact size you
want the resulting video to be (Figure 23).
Figure 23. Custom Fields
IMPORTANT! Ensure all of the encoders using the same video Proportion and
Size settings also use the same Video and Audio Source settings. For
example, all encoders capturing at Standard proportion and CIF size are set
to Osprey-5x0 video Device 1.1 while encoders capturing at Standard
proportion but QCIF resolution are set to Osprey-5x0 Video Device 1.2.
5.
Enter the frames per second in the Frame Rate field.
6.
Enter the Bitrate.
7.
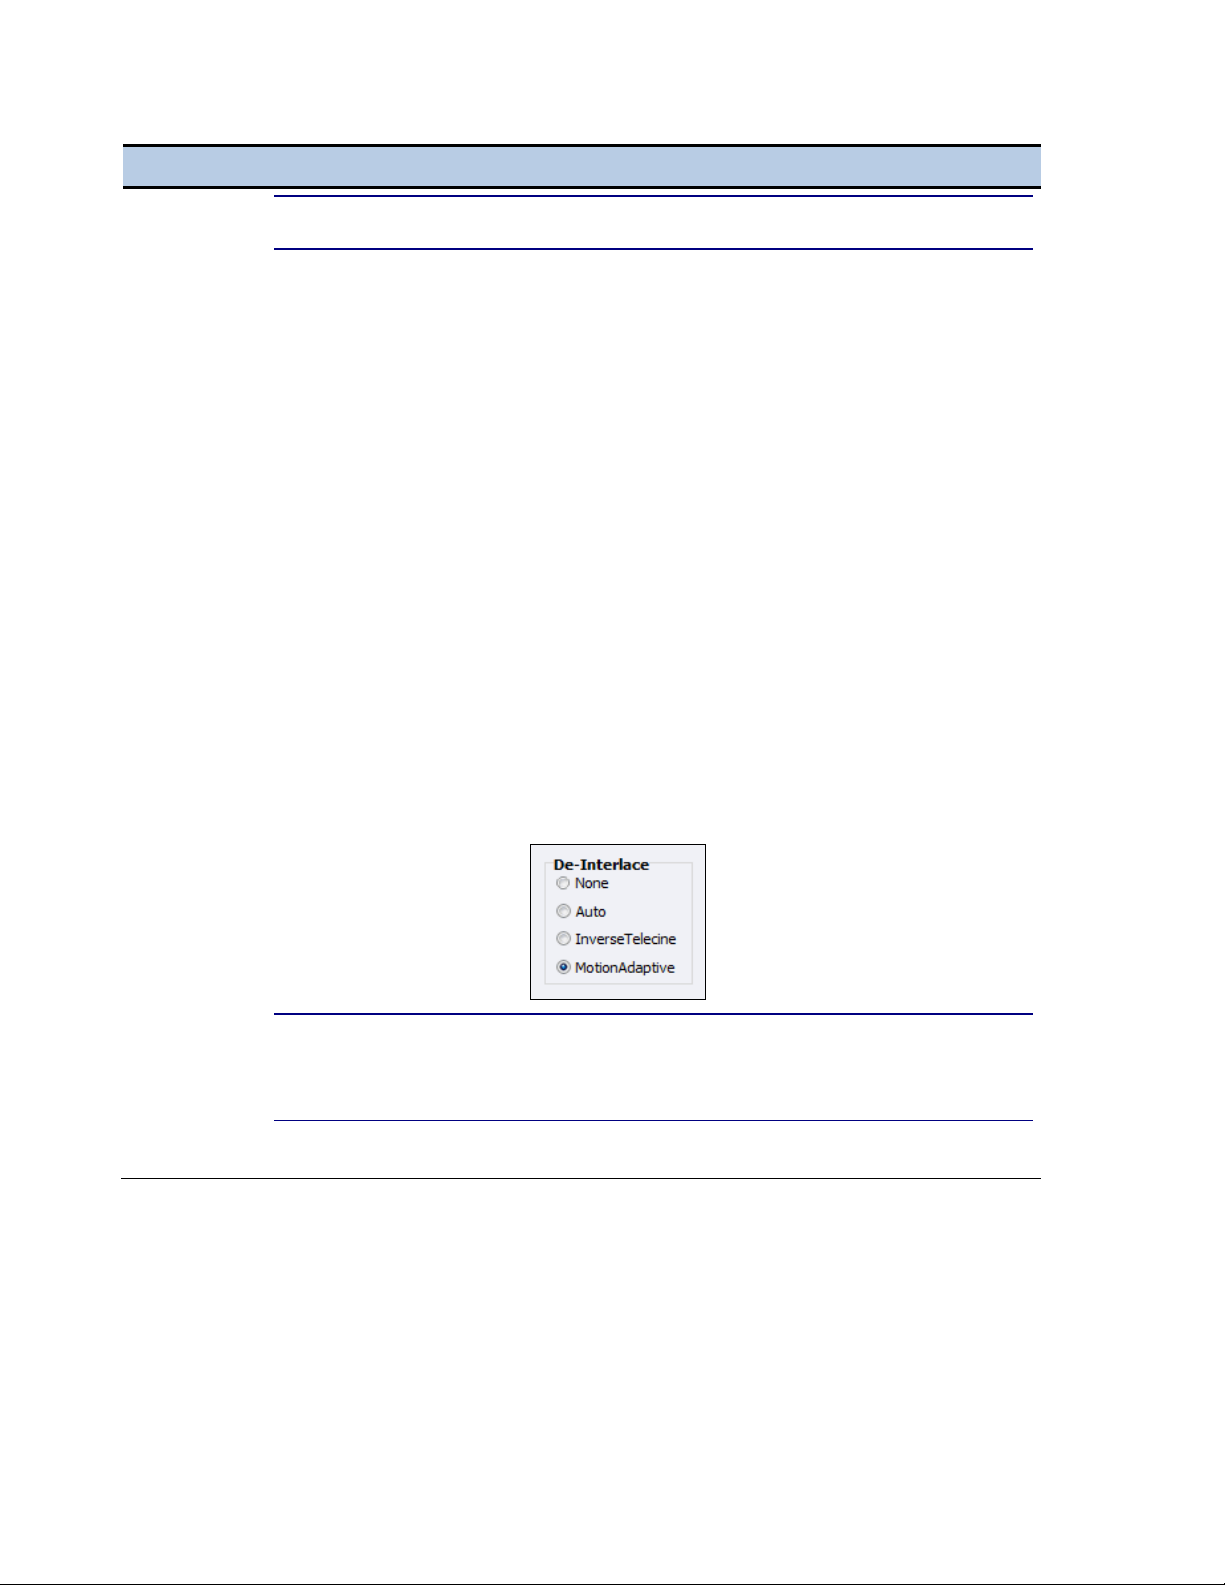
Drag the sliders to adjust the Brightness, Contrast, Hue, and Saturation (Figure 24).
Figure 24. Video Filter Settings
ViewCast 35
Page 46
Chapter 3: Perform Basic Operations
Step
Action
NOTE: Click Restore to the right of the filter to reset the settings to the default.
8.
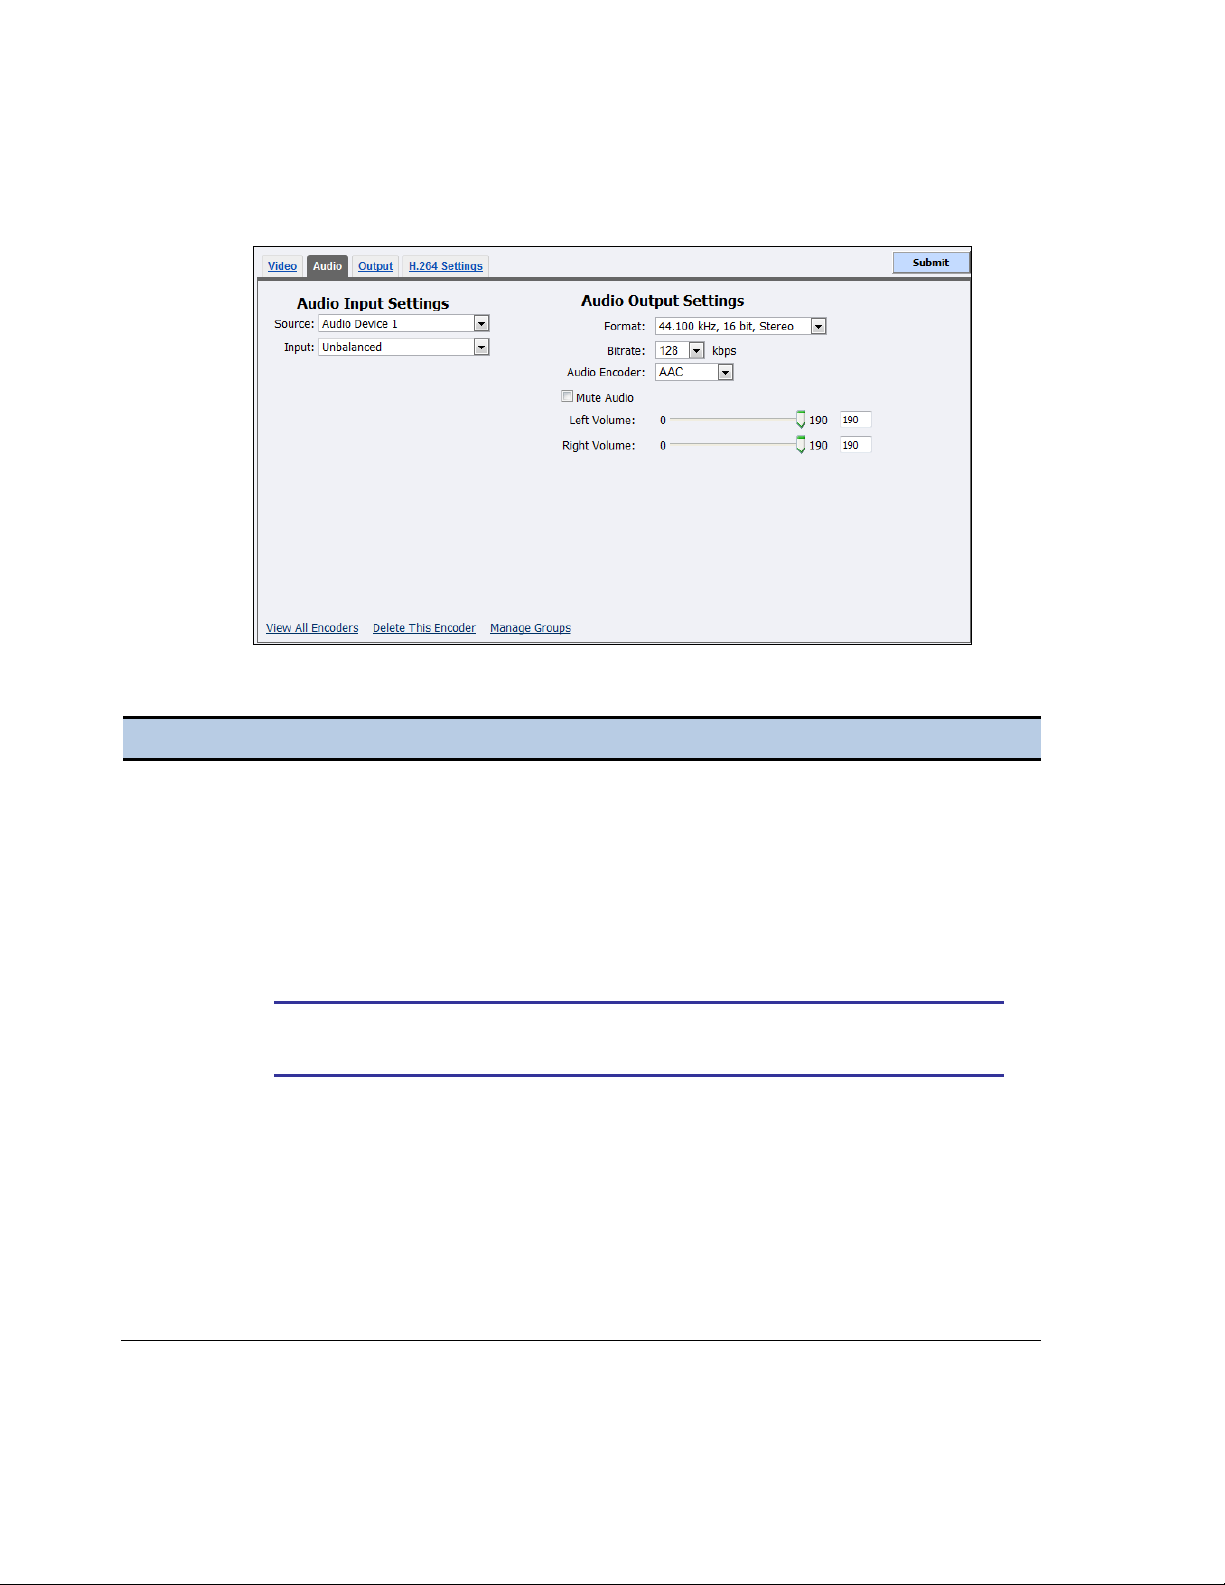
Click the De-Interlace setting you want to apply (Figure 25). Options include:
None
– Performs no de-interlacing of any kind.
Auto
– Applies inverse telecine de-interlacing to all telecine video.
– Applies motion adaptive de-interlacing to all video that is not telecine.
– Switches dynamically between the two modes as the content changes.
– Available for NTSC video only.
Inverse Telecine
– Drops the redundant fields and reassembles the video in a 24 fps progressive format.
– Applies inverse telecine de-interlacing to all telecine video.
– Performs no de-interlacing of video that is not telecine.
–Available for NTSC video only.
Motion Adaptive
– Is an algorithm for de-interlacing pure video (non-telecine) content.
– Applies motion adaptive interlacing to all video. It detects which portions of the image
are still and which portions are in motion then applies different processing to each
scenario.
Figure 25. De-Interlace Settings
NOTE: Telecine and inverse telecine only apply to NTSC video. They are not for PAL
and SECAM video. The system disables Auto and Inverse Telecine choices when
you select either PAL or SECAM as the video standard.
9.
Click Submit.
36 ViewCast
Page 47
Audio Tab
Step
Action
1.
In the Source field, select an audio source from the drop-down list.
The audio source is multiple inputs denoted by the following incrementing decimal values:
Disabled
Audio Device 1
Bluetooth Hands-free Audio
2.
In the Input field, click the audio input. The connection is either Unbalanced or XLR
Balanced.
IMPORTANT! The audio input must match the source connected on the
back of the Niagara 2120 and your audio source.
3.
Click the Format.
4.
Click the Bitrate.
5.
Click the Audio Encoder.
6.
(Optional) Click the Mute Audio checkbox to mute audio.
7.
Drag the sliders to adjust the Left Volume and Right Volume.
8.
Click Submit.
Niagara 2120 User Guide
Figure 26. Audio Tab
Table 15. Configuring Audio Settings
ViewCast 37
Page 48
Chapter 3: Perform Basic Operations
Step
Action
1.
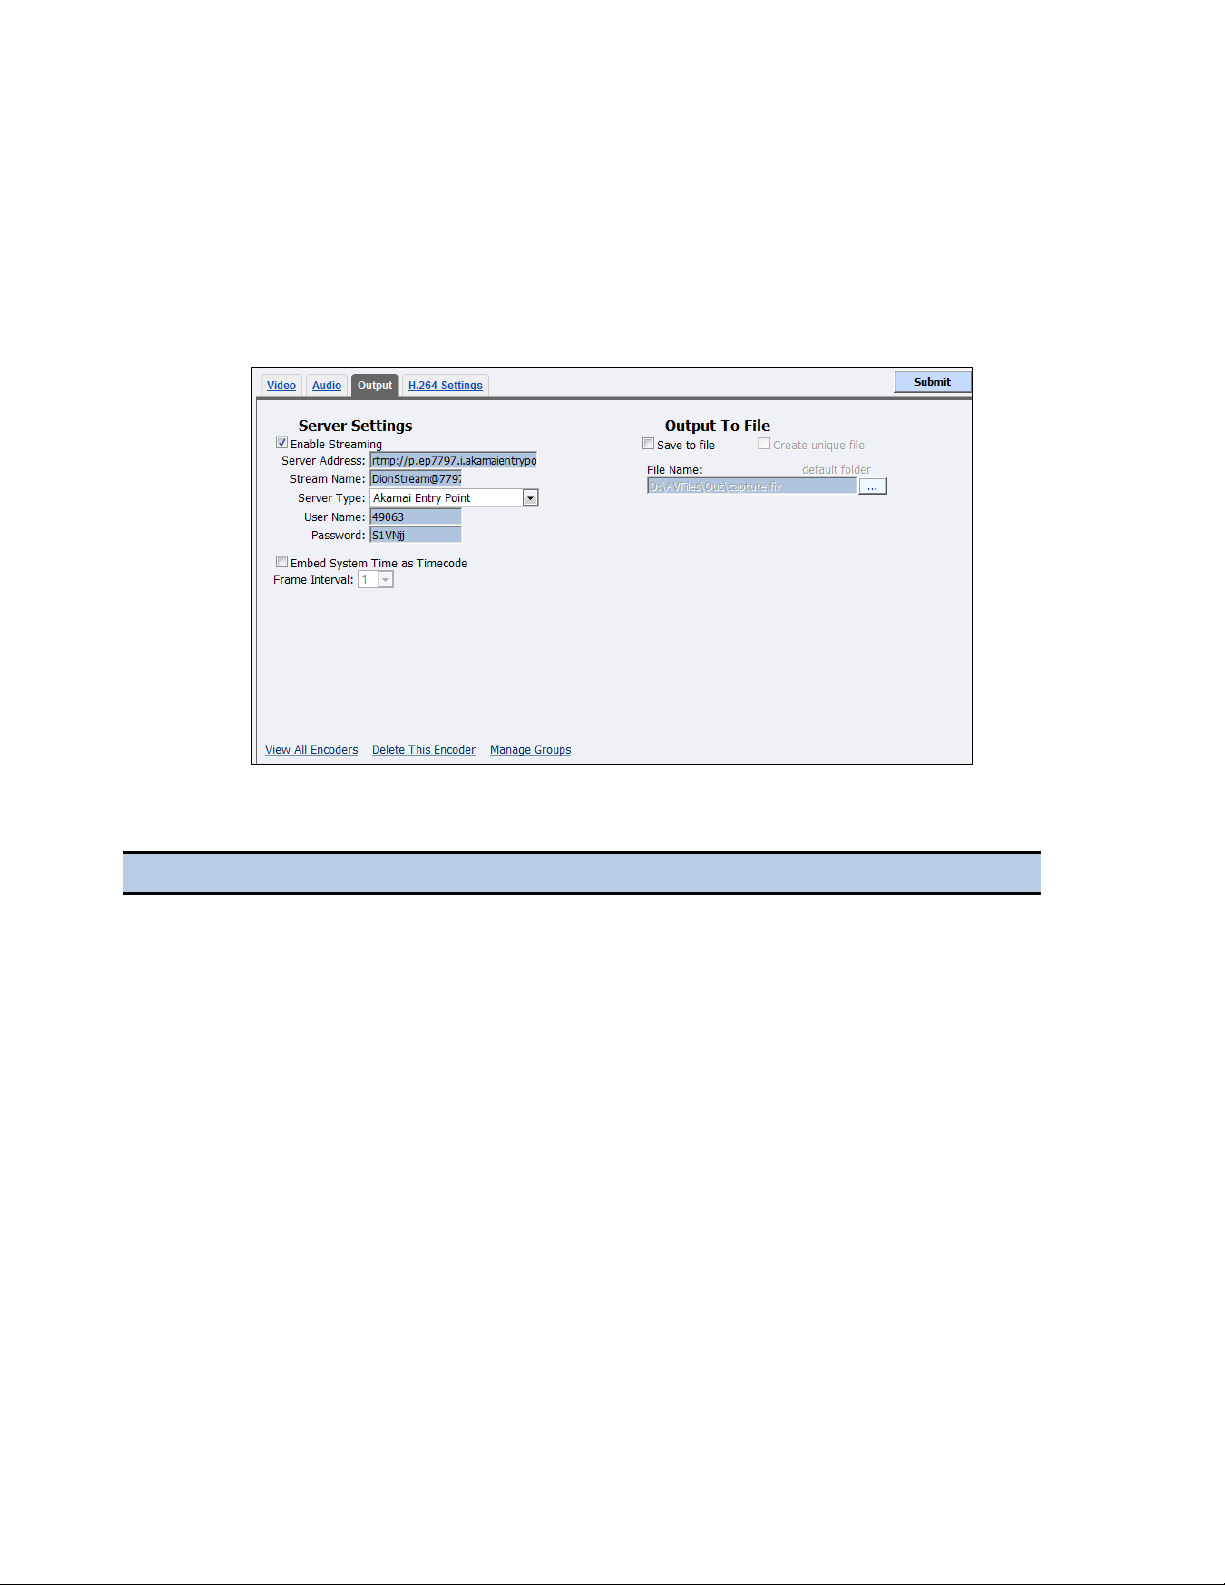
Click the Enable Streaming checkbox to enable live Flash streaming.
2.
Enter the proper IP address in the Server Address field.
3.
Enter the Stream Name.
4.
Click the Server Type. Options are available for streaming directly to Akamai and Limelight
CDNs.
5.
Enter the User Name and Password.
6.
Click the Enable System Time as Timecode checkbox.
7.
Click the Frame Interval.
8.
You can either:
Click the Save to File checkbox to save the encoded content to a file. Each time you
start this encoder, the system overwrites the previous file.
Or
Click Create unique file to create a file that the system does not overwrite.
Output Tab
These advanced settings affect the way the Encoder performs and if set incorrectly may lead to
abnormal encoder operations (Figure 27). Refer to Appendix B for suggested values for the type of
video you are streaming. You need Adobe Flash Media Server 2.5 or greater to stream Flash H.264.
Figure 27. Output Tab
Table 16. Configuring Output Settings
38 ViewCast
Page 49
Niagara 2120 User Guide
Step
Action
9.
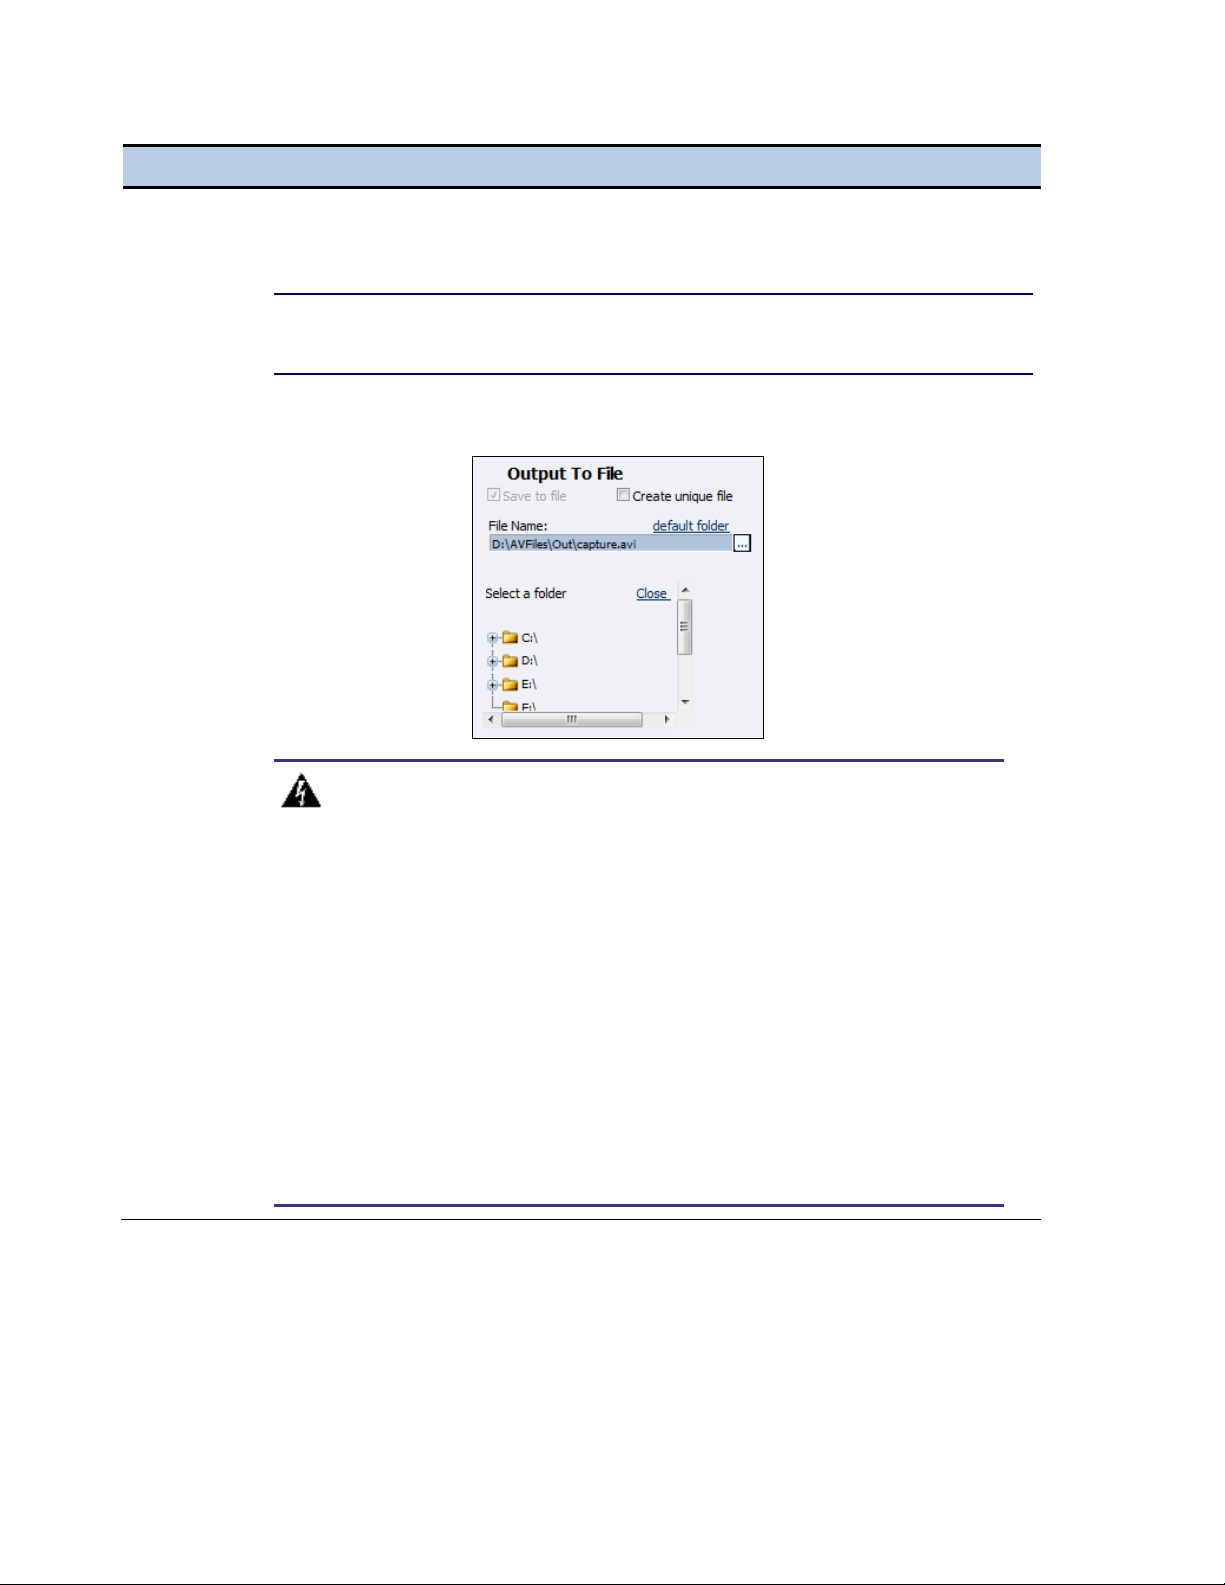
Accept the default location that displays in the File Name field or choose your own location
for the file. To choose your own personal location click the link (horizontal ellipses or … ) to
the right of the File Name field and display the options (Figure 28).
NOTE: By default, the system sets this folder to D:\AVFiles\Out\ with a default
filename of capture.xxx.
Figure 28. Save to File Location
WARNING! ViewCast strongly recommends you do not alter the
default directory setting unless you fully understand the risk of saving your
files to a directory not located on drive D. If you save your files to another
drive on the Niagara 2120, the system could delete the files when you use
the Restore to Niagara 2120 Factory Defaults feature.
Only drive D on the Niagara 2120 has available storage to save your files.
This drive has approximately 105 GB of storage capacity.
Use drives C, E, and F strictly for Niagara 2120 operational programs. Any
modifications to these drives can permanently damage your system and void
your warranty.
A better practice would be to use the Flash Media server to save a file or to
save it to a remote drive. If you inadvertantly fill all available space, you risk
losing your stream during a streaming event.
ViewCast 39
Page 50
Chapter 3: Perform Basic Operations
Step
Action
1.
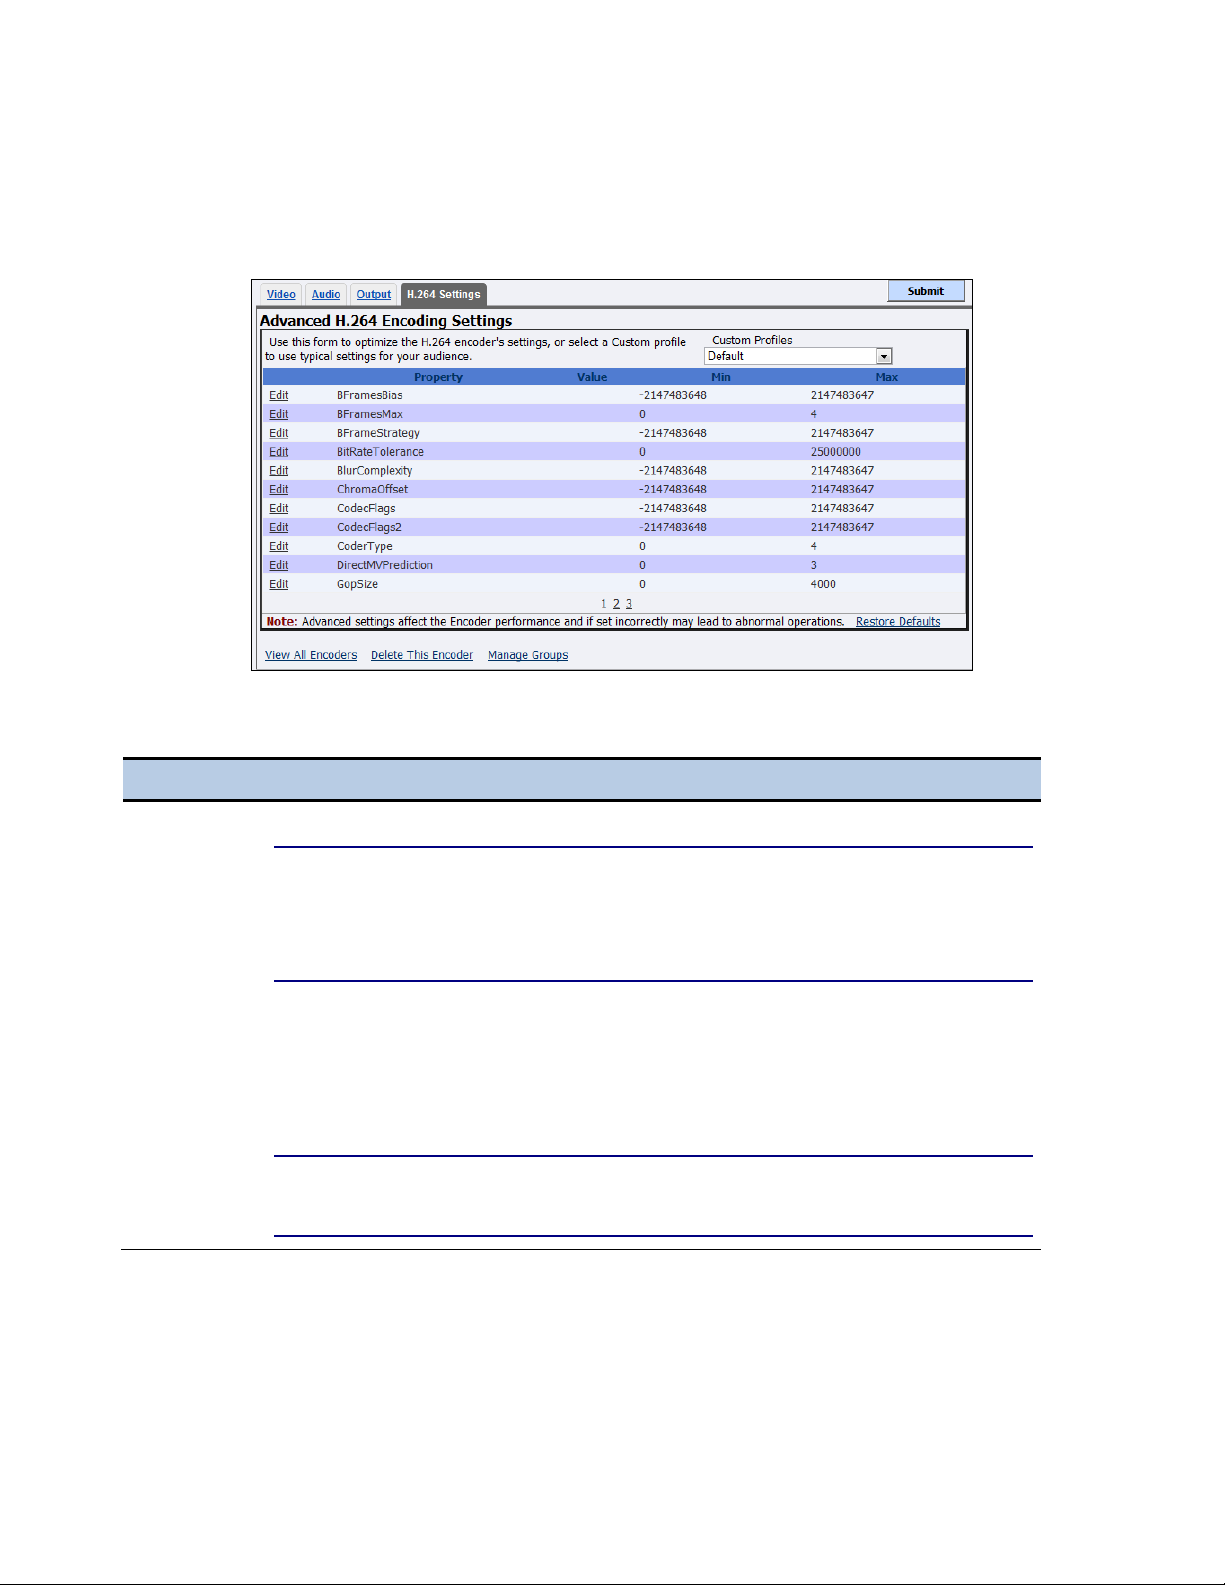
Click Edit next to the setting you want to modify.
IMPORTANT! These advanced settings affect the way the Encoder performs and if
set incorrectly may lead to abnormal encoder operations. Refer to Appendix:
Advanced Settings for H.264 for suggested values for the type of video you are
streaming.
2.
Change the value.
3.
Click Update.
4.
Click the Restore Defaults link at the bottom of the window to return the settings to the
defaults.
NOTE: The database has seven profiles. Clicking Restore Defaults for one profile
will change all profiles back to the default settings.
H.264 Settings Tab
Figure 29. H.264 Settings Tab
Table 17. Configuring H.264 Settings
40 ViewCast
Page 51
Niagara 2120 User Guide
Field
Description
CPU
Indicates the CPU usage.
Create New
Group
Allows you to create a new group.
Total Groups
Indicates the total number of groups on the Niagara 2120.
Edit
Allows you to edit a group.
Delete
Allows you to delete a group.
Groups
Displays the name of the group.
Active
Indicates which encoder group is active.
Assigned
Encoders
Indicates the encoder assigned to this group.
Start
Allows you to start this group.
Stop
Allows you to stop this group.
Viewing Encoder Groups
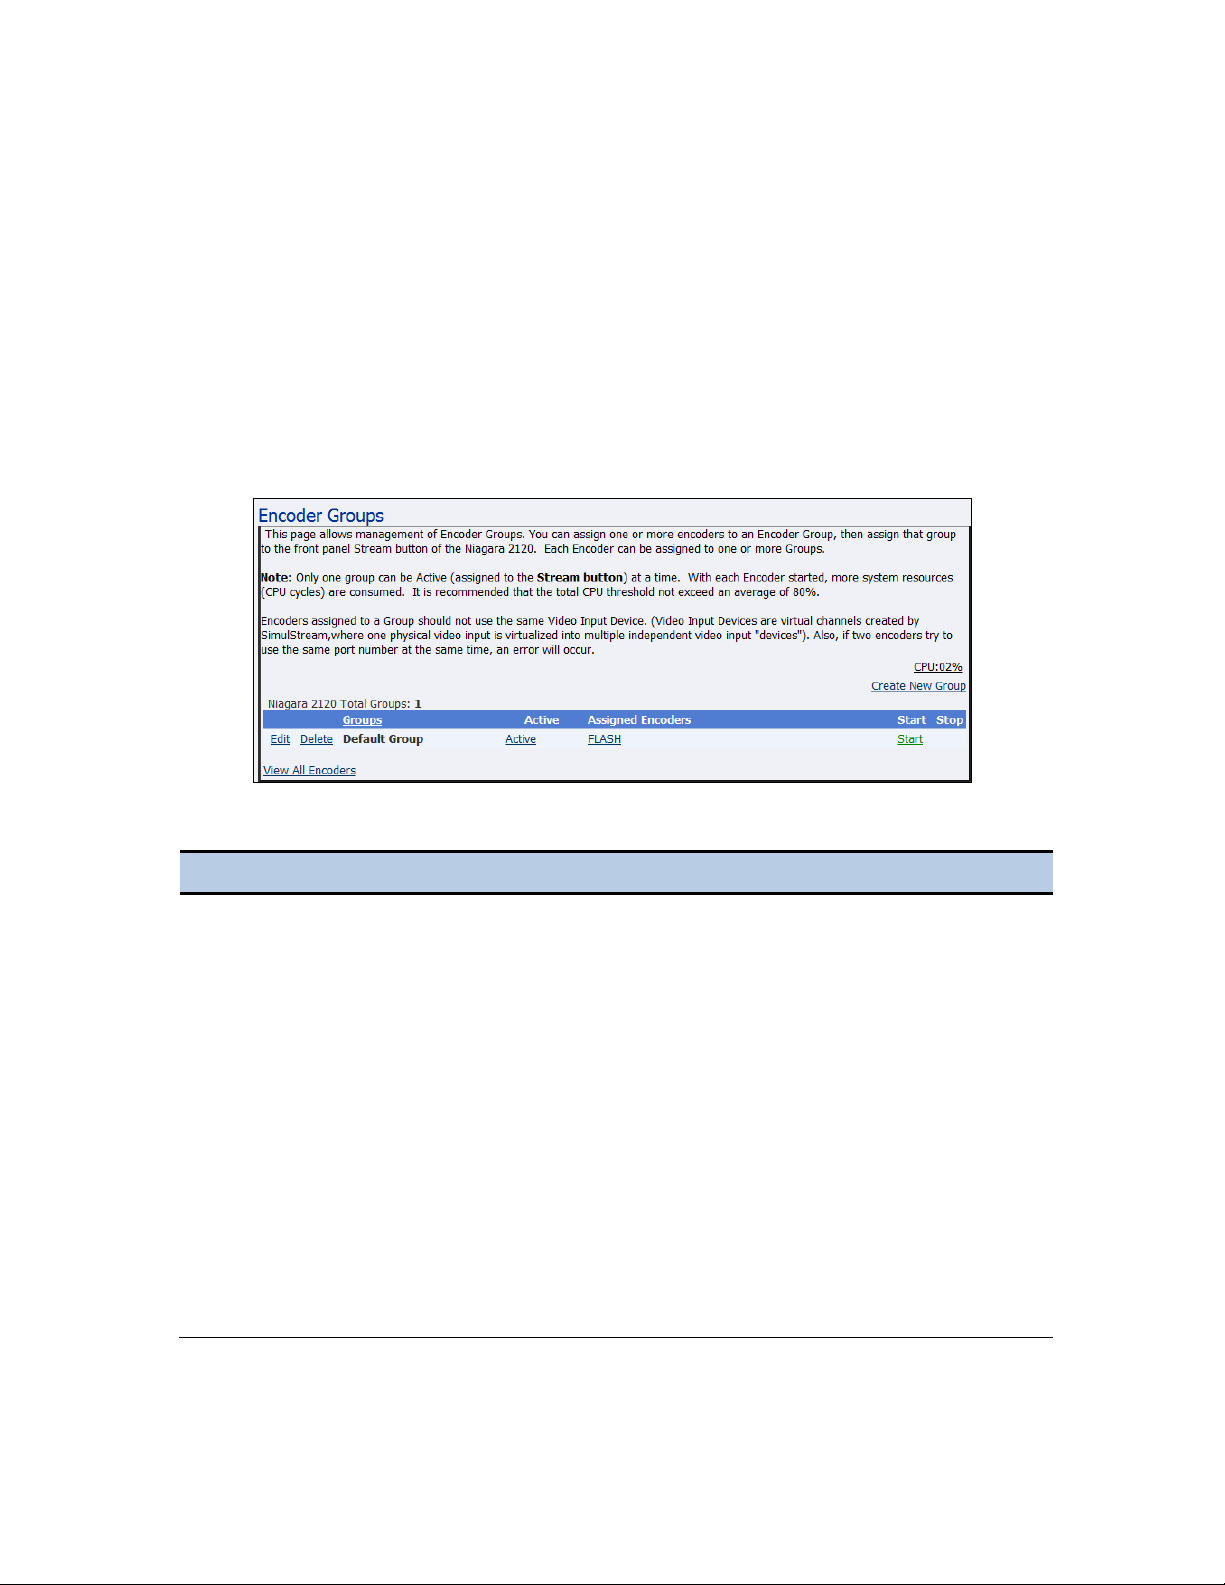
Encoder groups represent the cornerstone for streaming on the Niagara 2120. The Niagara 2120
comes with one default encoder (Flash) and one profile for that encoder type. You must have at
least one group assigned on the Niagara 2120 and one encoder profile assigned to that group.
The Encoder Groups window (Figure 30), a subset of Encoders (on the home page), allows you to
view the list of encoder groups available for assignment to the Niagara 2120. Click Encoders
Groups from the menu bar on the home page.
Figure 30. Encoder Groups List
Table 18. Encoder Groups Window
ViewCast 41
Page 52

Chapter 3: Perform Basic Operations
Starting an Encoder Group
To start an encoder group, click the Start link to the right in the Start column of the group you want
to start. The encoder group will start in a few seconds. The system displays any errors on the
Starting window while the group starts.
NOTE: With each encoder started, more system resources (CPU cycles) are consumed.
ViewCast recommends the total CPU threshold not exceed an average of 50 %.
Stopping an Encoder Group
To stop an encoder group, click the Stop link to the right in the Stop column of the group you want
to stop. The encoder group will stop in a few seconds. The system displays any errors on the
Stopping window while the group stops.
42 ViewCast
Page 53
Niagara 2120 User Guide
Step
Description
1.
Enter the name of the group.
2.
Click on the encoders you want to assign to the group.
3.
Click Submit.
Creating Encoder Groups
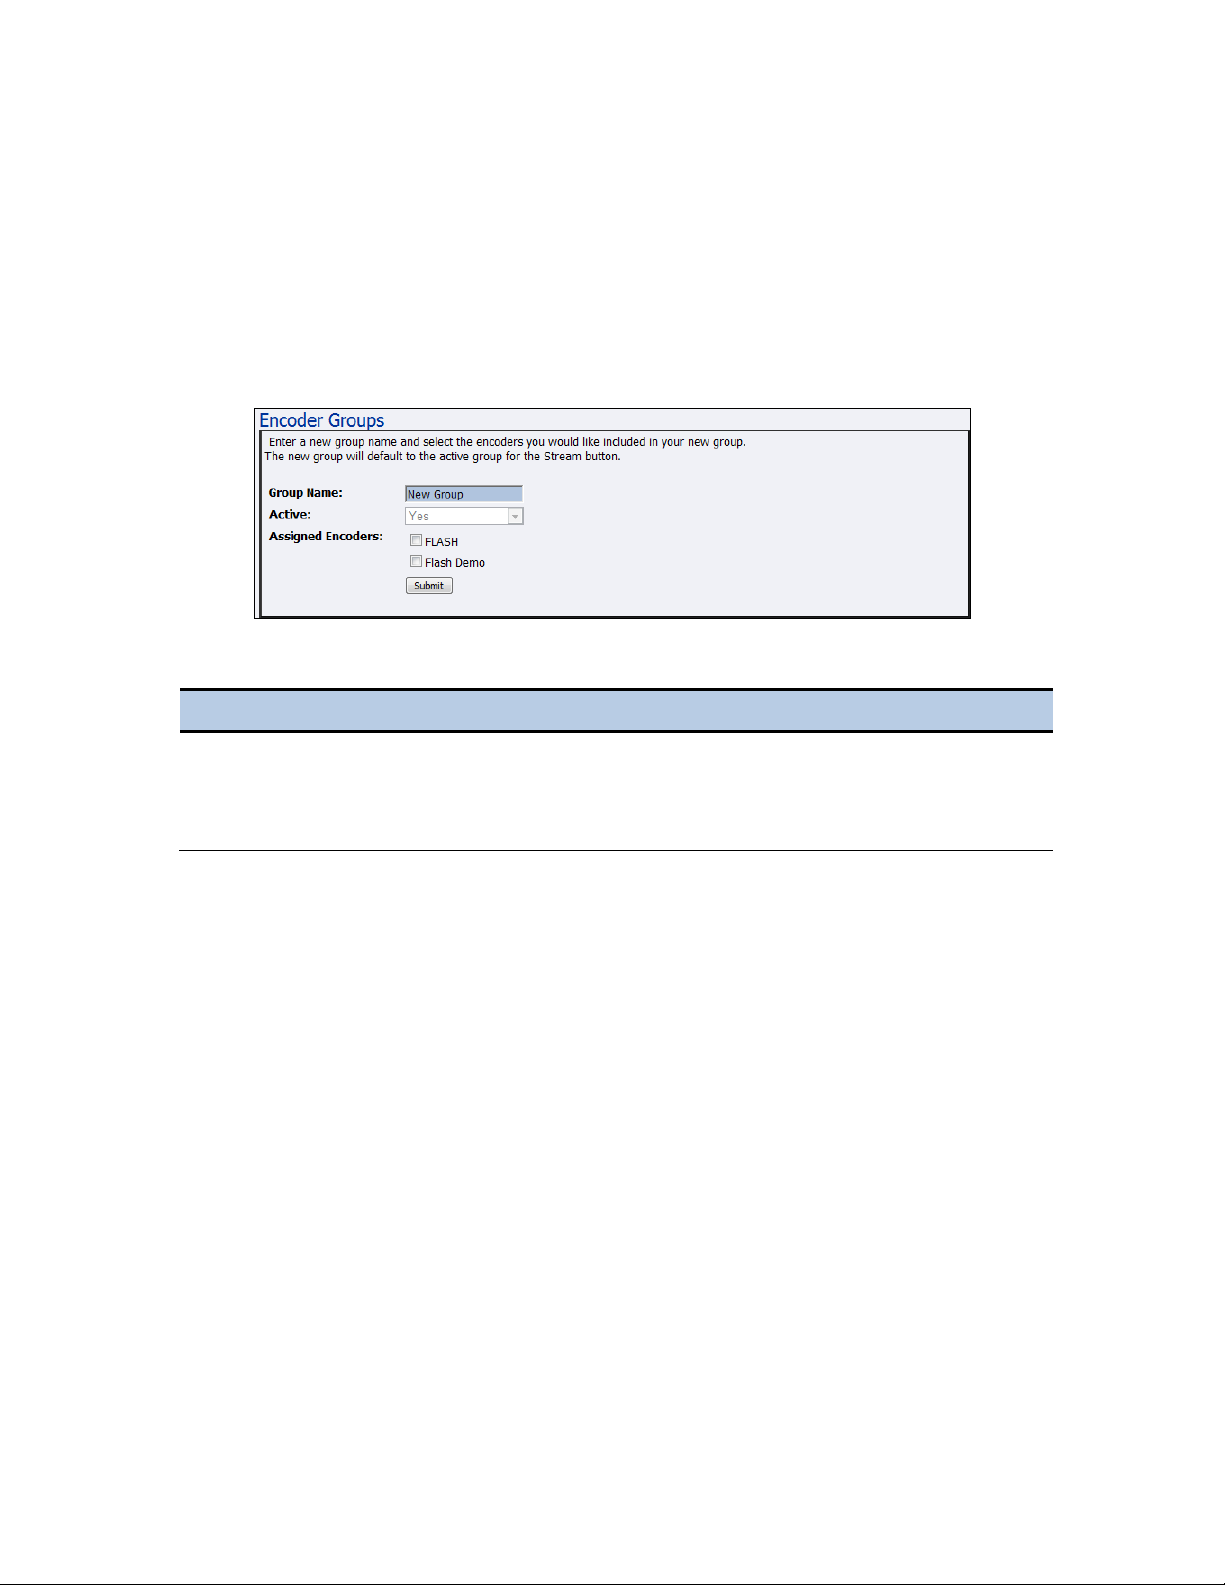
Encoders assigned to a group should not use the same video input device. If two encoders try to use
the same port number at the same time, an error will occur.
Click the Create New Group link on the Encoder Groups window (Figure 31).
Figure 31. Assign Encoders to Groups
Table 19. Creating Encoder Groups
ViewCast 43
Page 54
Chapter 3: Perform Basic Operations
Step
Description
1.
Enter the name of the group.
2.
Click Yes or No.
3.
Click on the encoders you want to assign to the group.
4.
Click Submit.
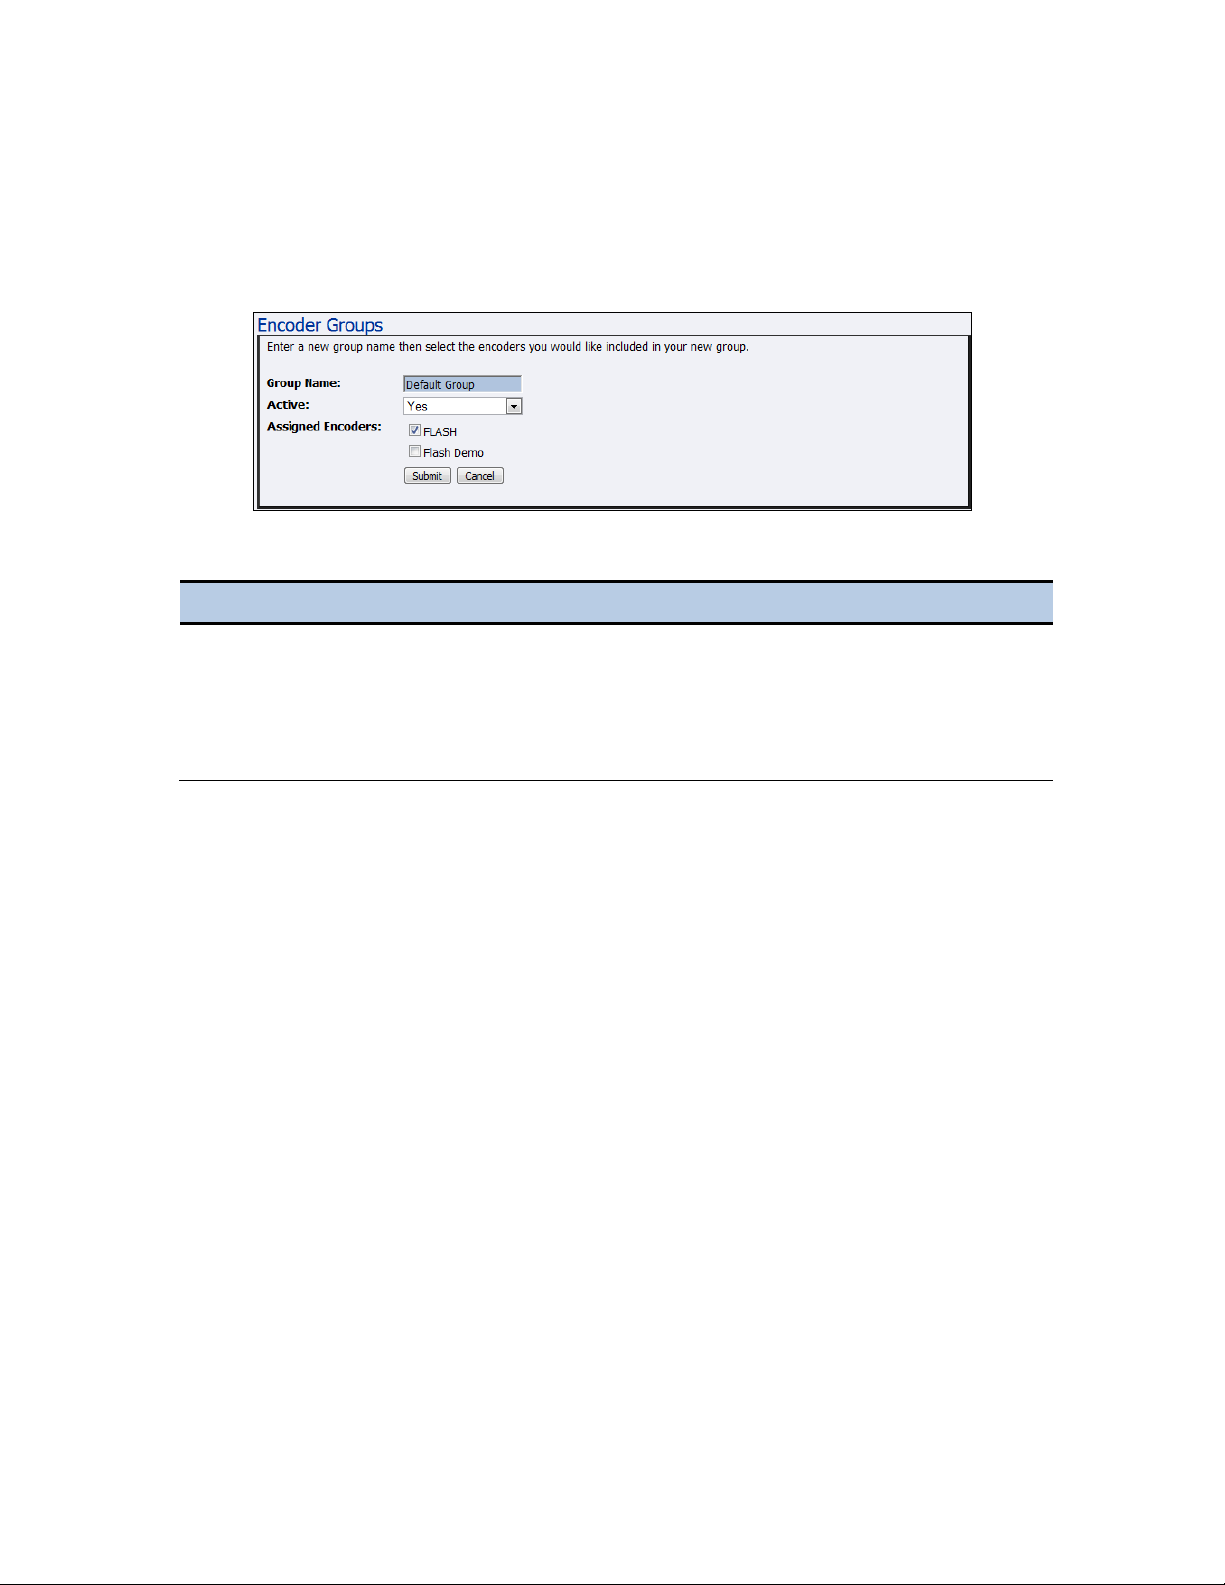
Editing Encoder Groups
Click the Edit link on the Encoder Groups window (Figure 32).
Figure 32. Encoder Groups Window
Table 20. Creating Encoder Groups
44 ViewCast
Page 55
Niagara 2120 User Guide
Step
Action
1.
Press Stream .
2.
The video encoding status blue light displays (V) to indicate a positive video
stream and the audio meters display to indicate positive audio tracking.
Starting an Encoder Group With the Stream
Button
Use the Stream button on the front panel to start the assigned encoder group. Follow the steps in
Table 21 to start encoding.
Table 21. Start Encoding
WARNING! Limitations exist for the number of streams you can encode
simultaneously. If you attempt to encode more streams than the Niagara 2120 can process
simultaneously, the streams drop frames and the video stutters. This results in a poor
viewer experience. If you fail to reduce the number of sessions to reduce CPU load, all
encoding sessions may self-terminate without warning.
Stopping Encoding
To stop the active encoding group, press the Stop button on the front panel. The Niagara 2120
browser displays the list of encoders and shows the status of each session.
ViewCast 45
Page 56

Chapter 3: Perform Basic Operations
Step
Action
1.
Briefly press Power on the front panel.
2.
The Niagara 2120 front panel status light starts blinking and turns off once it is
ready to stop streaming.
3.
The Niagara 2120 powers off after a few seconds.
Shutdown
To shut down the Niagara 2120 perform the steps in Table 22.
Table 22. Power Off the Niagara 2120
CAUTION: Allow the Niagara 2120 to power down normally. If you force the system to
shut down improperly, it can corrupt your data. If so, the next time you start the system,
it may take several minutes to complete startup.
46 ViewCast
Page 57
Niagara 2120 User Guide
Changing the computer name
Setting CPU thresholds
Changing the login password
Restoring factory defaults
Configuring alerts
Viewing the activity log
Setting high temperature alerts
Viewing alerts
Chapter 4: Perform Advanced Operations
Advanced operations include but are not limited to the following:
Configuring Niagara 2120 Properties
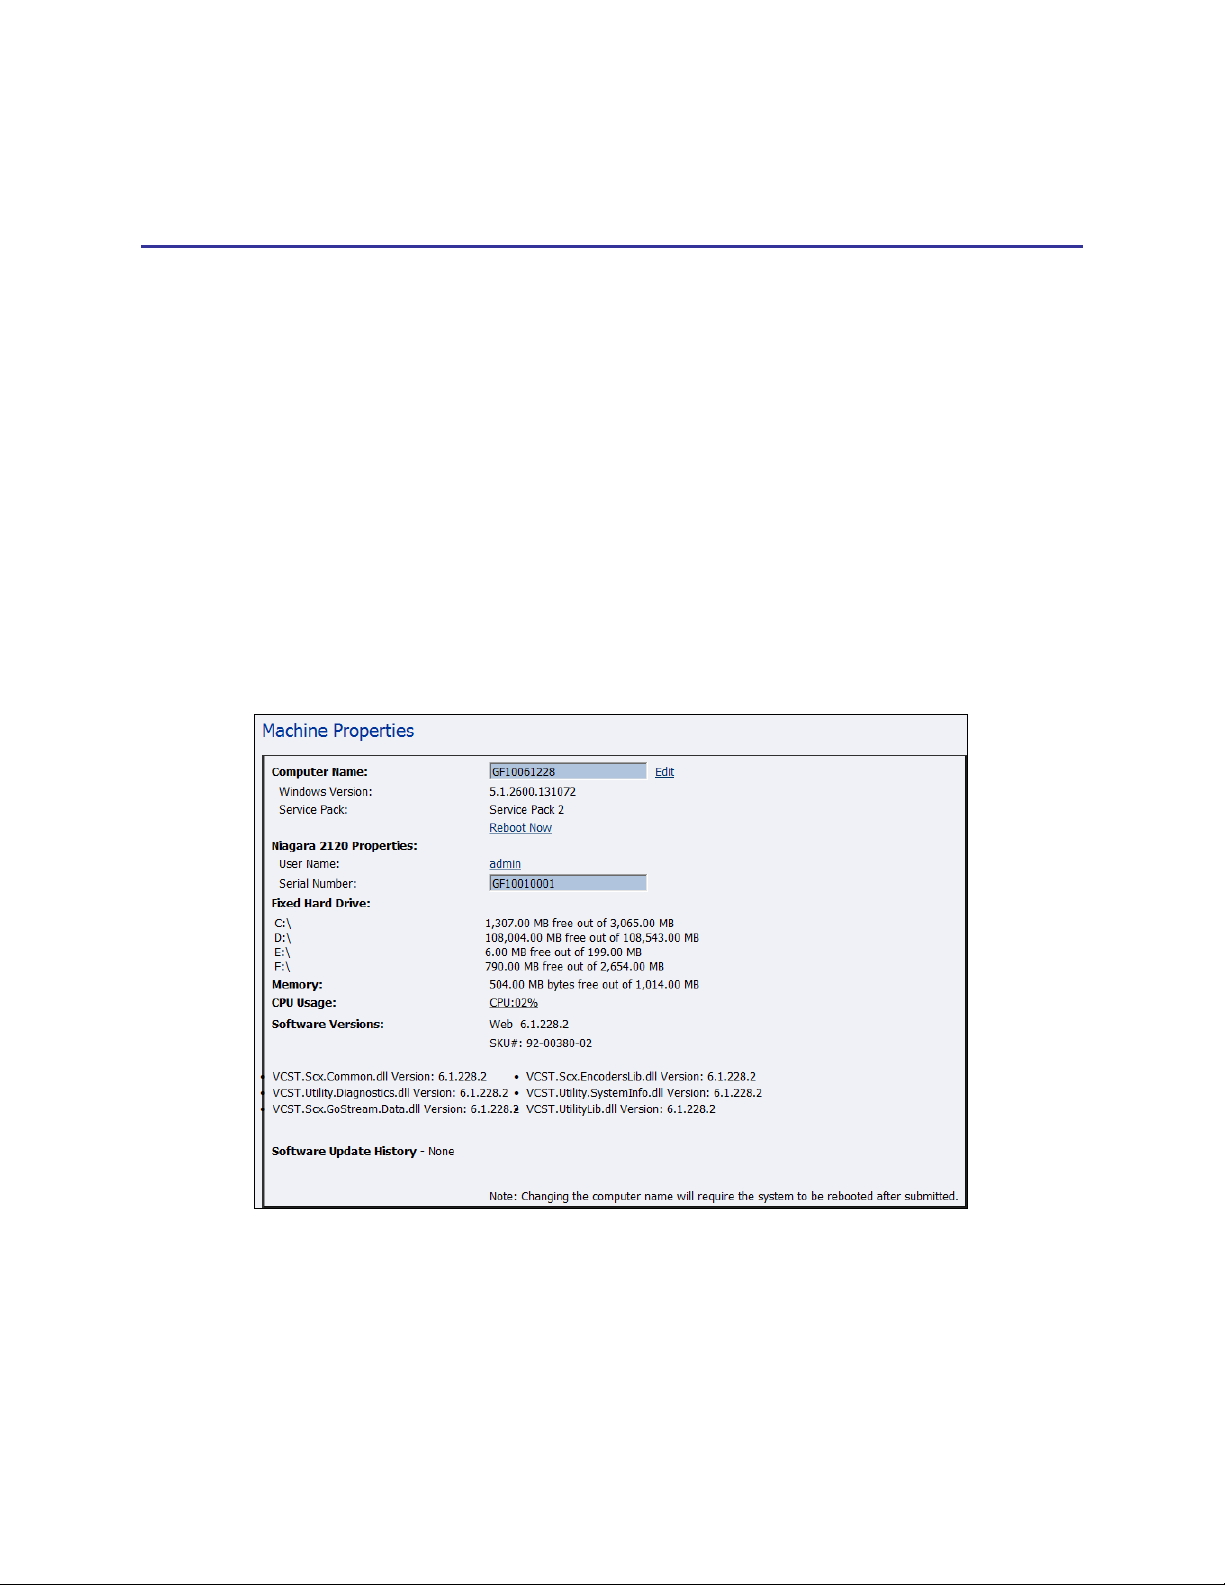
The Niagara 2120 Machine Properties window (Figure 33) provides details on software versions,
network name, serial number, and hard drive configurations. Click Configuration Niagara 2120
Properties from the menu bar on the home page.
Figure 33. Machine Properties Window
Most of the data on this window provides information only and users cannot alter it. However, you
can modify two fields:
Computer name
Admin password
ViewCast 47
Page 58
Appendix: Advanced Settings for H.264
Step
Action
1.
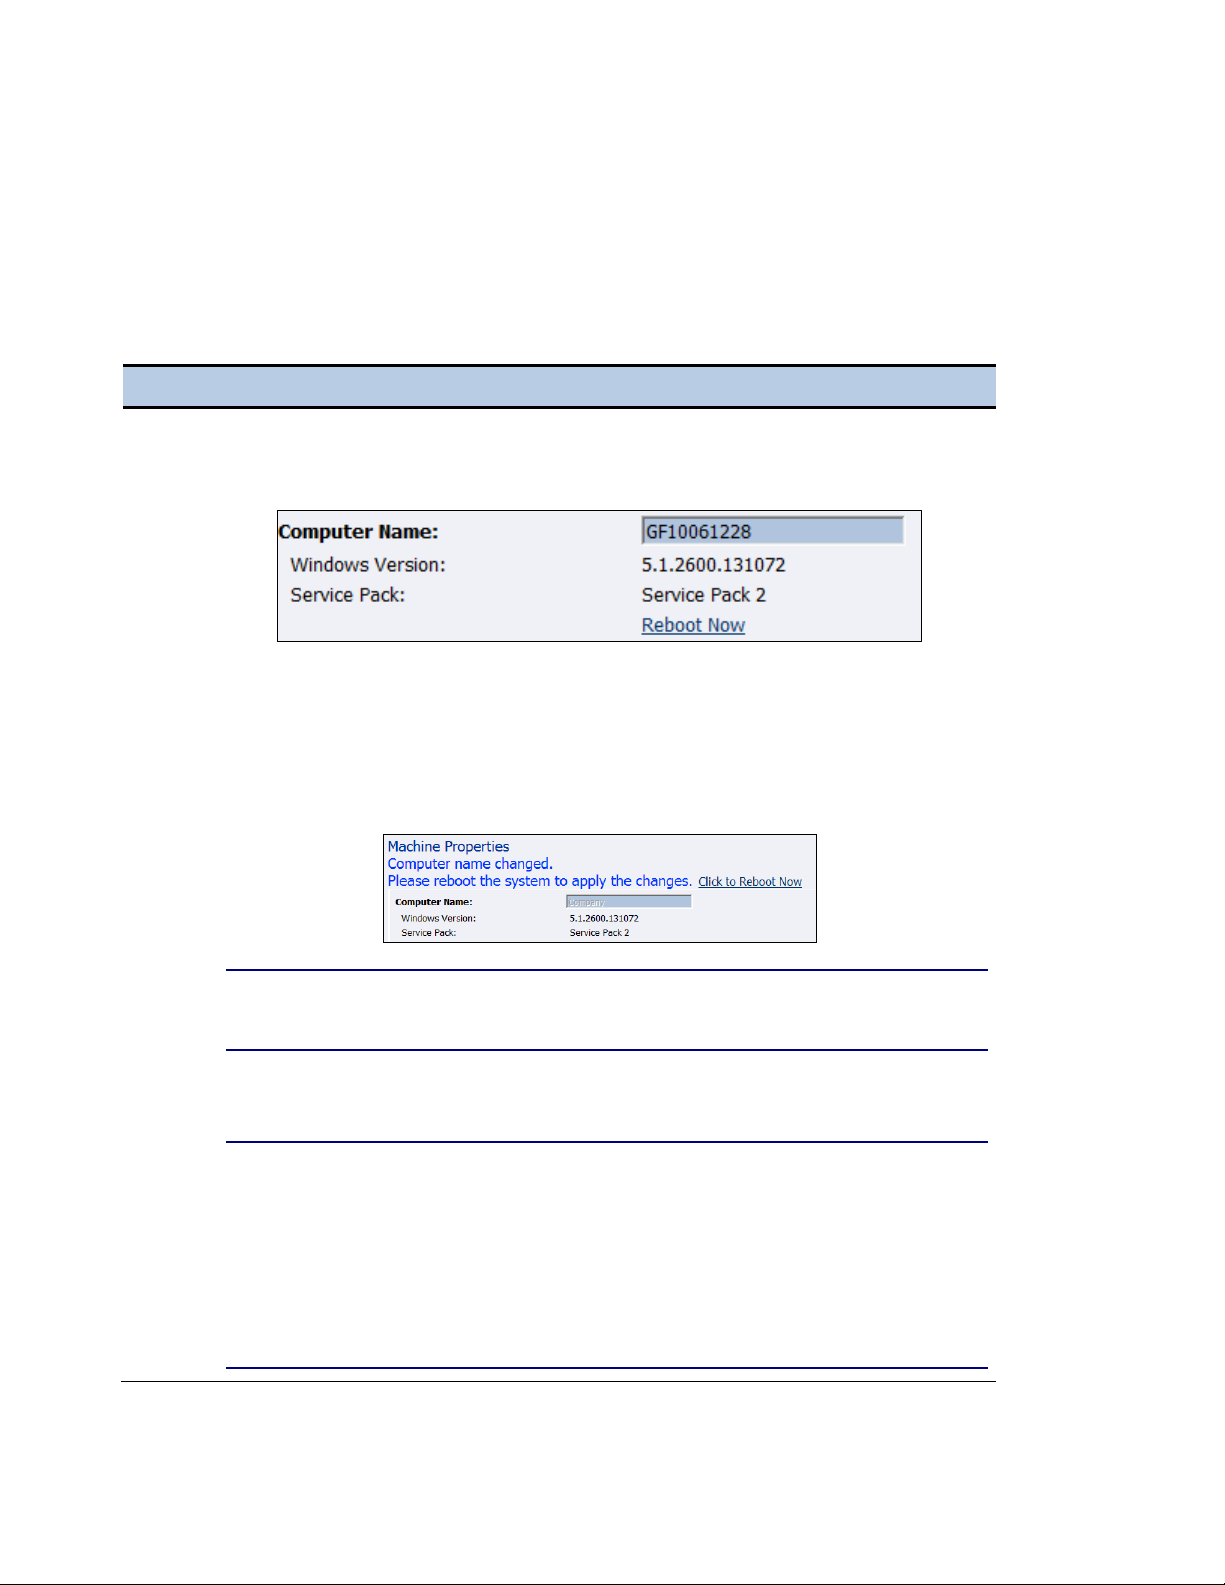
Click the Edit link next to the Computer Name field (Figure 34).
Figure 34. Computer Name Field
2.
The screen refreshes and the Computer Name field becomes an editable text field.
Type in a new name for the Niagara 2120.
3.
Click Submit at the bottom of the page.
Figure 35. Reboot Message
NOTE: The page refreshes, and the system prompts you to reboot the Niagara
2120. Your changes do not take effect until the system restarts (Figure 35).
4.
Click the Click to Reboot Now link to restart the system and apply the Computer
Name change.
NOTE: The restart process takes approximately two minutes to complete.
When the Niagara 2120 restarts, use the new system name in the IE browser
URL to return to the Login window.
If you close your Web browser and later want to log into the Web interface, you
must use the new computer name you created or the IP address of the
appliance to access the Niagara 2120.
Changing Computer Name
The Computer Name field contains the current network name for the Niagara 2120. This name is
the same name you typed into the Web browser to access the Niagara SCX Web interface.
Table 23. Changing Computer Name
48 ViewCast
Page 59
Niagara 2120 User Guide
Step
Action
1.
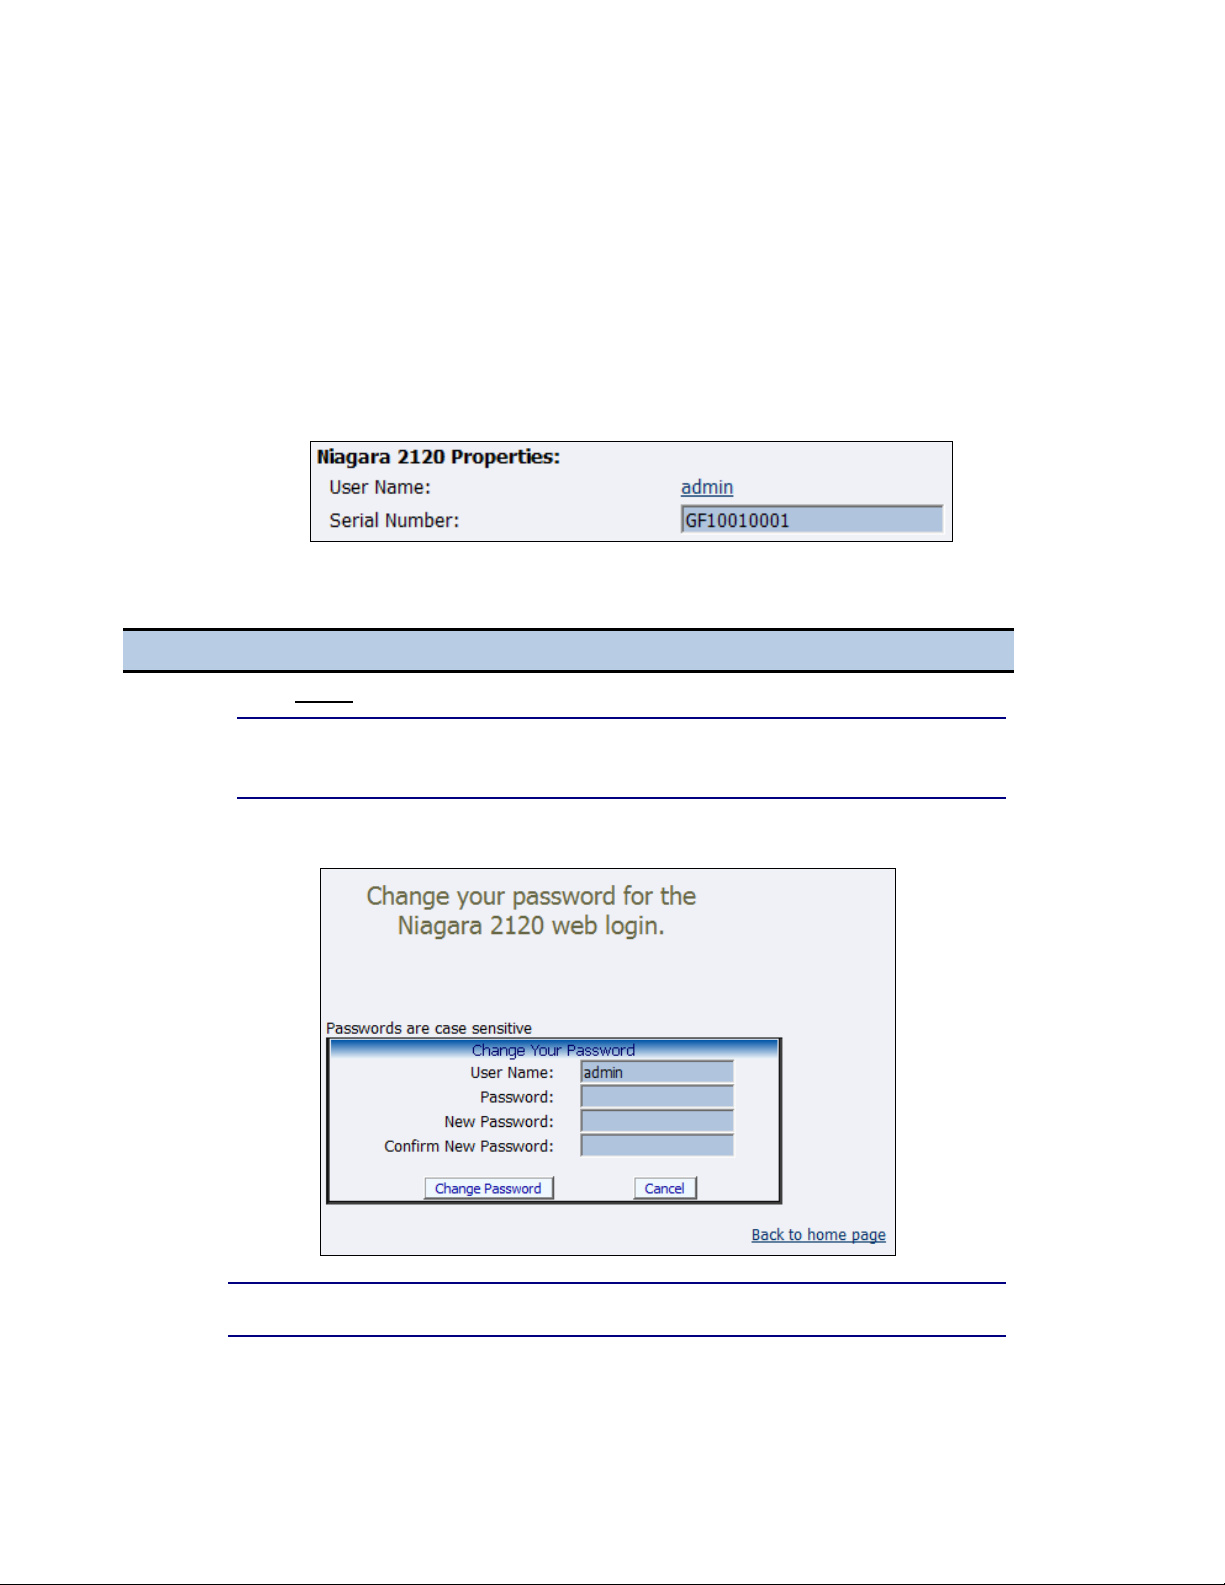
Click the admin link in the User Name field.
NOTE: The system displays a new window (Figure 37) that allows you to change
your login password for the Web interface.
Figure 37. Password Change Window
NOTE: You cannot change the User Name for the Web interface from this window.
2.
Type your current password in the Password field. Continue by typing your desired new
password in both the New Password and Confirm New Password fields. The Web
Changing the Login Password From the Factory
Default
The Niagara 2120 Properties section has two fields: User Name and Serial Number. You can only
change the User Name field, which changes the User Password from the factory default (Figure 36).
Figure 36. Properties Section
Table 24. Changing Login Password
ViewCast 49
Page 60

Appendix: Advanced Settings for H.264
Step
Action
interface password is case sensitive.
3.
Click the Change Password button. The system displays a confirmation page. You must
log back into the Web interface with your password.
Restoring the Login Password to the Factory Default
If you forget or lose your password, you can restore the default password by running the Restore
Niagara 2120 Factory Defaults option. For more information, see Restore Niagara 2120 Factory
Defaults in the System Configuration section later in this chapter.
50 ViewCast
Page 61
Niagara 2120 User Guide
Field
Description
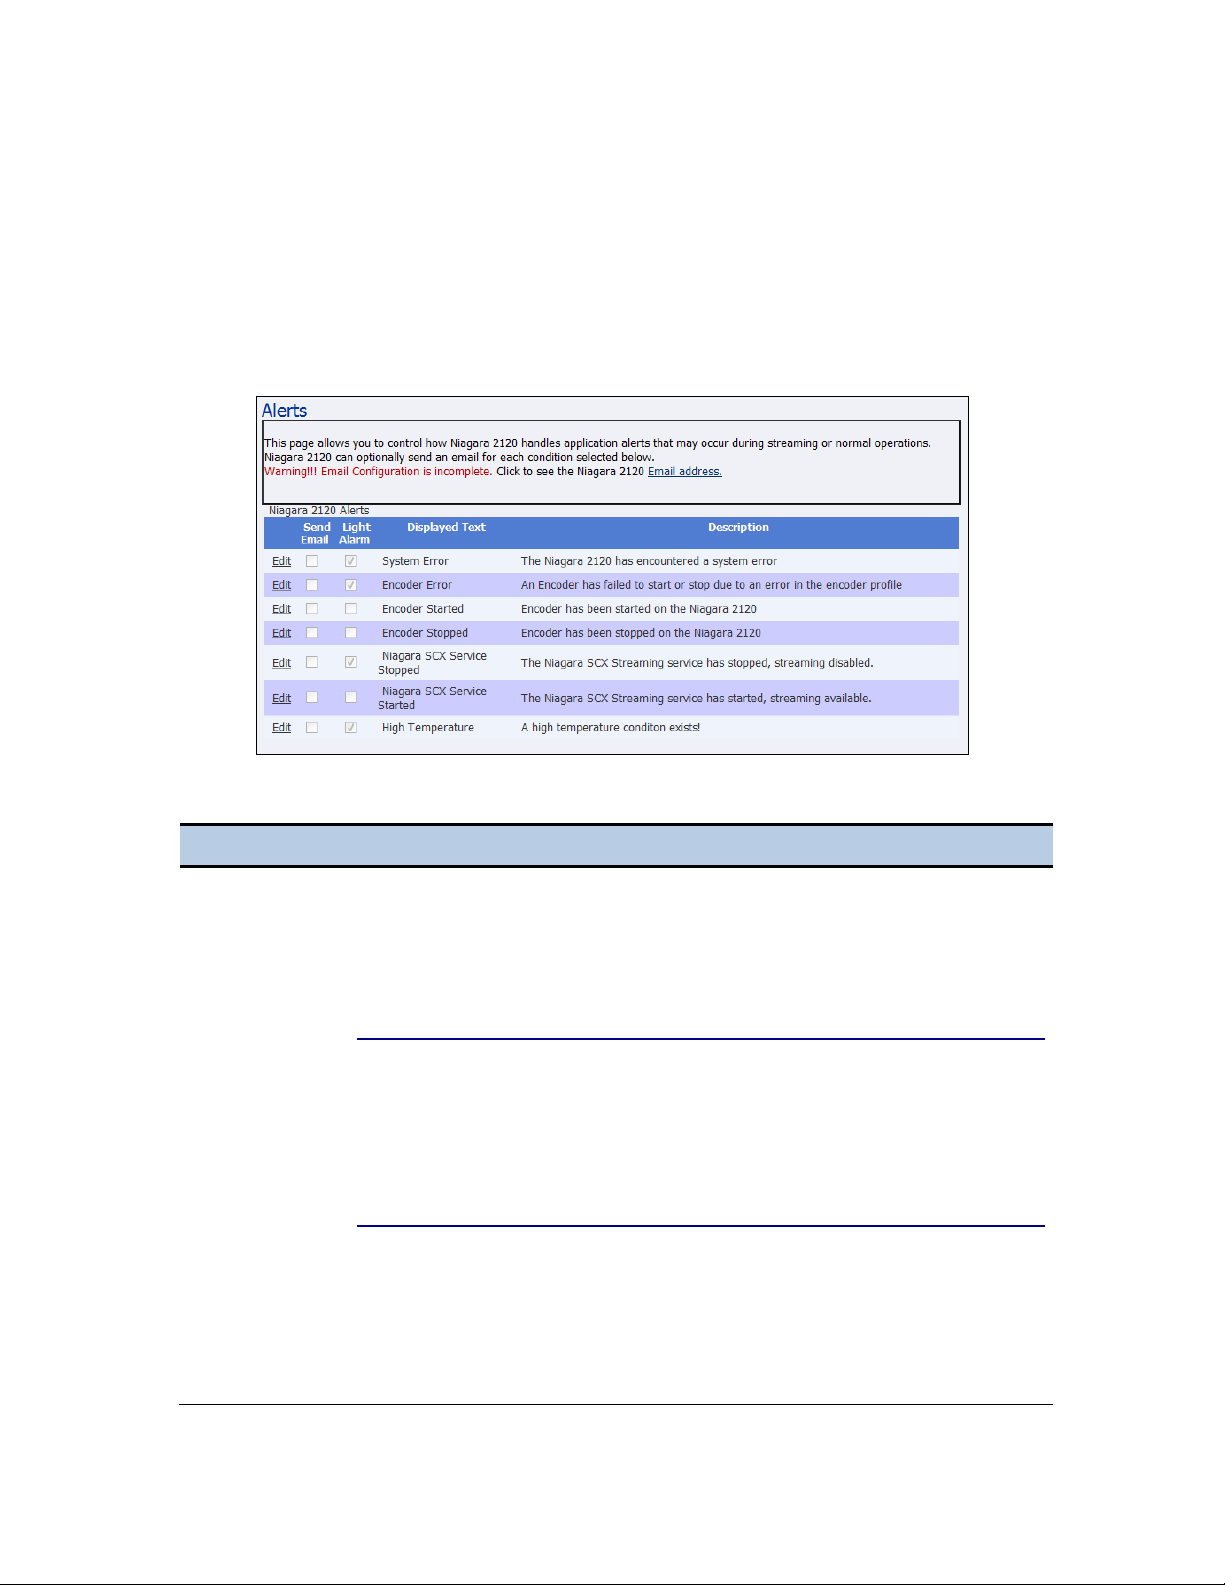
Email
Address
Click this link to configure email settings on the System Configuration Settings
window.
Edit
Click the Edit link next to the alert you want to change settings on.
Send Email
Click the Send Email checkbox to send an email to multiple recipients should
an alarm occur.
NOTE: You can optionally send an email alert to specific email address in
the event of an application alarm. You must specify the email address
where you want an alert sent, along with your email server user name,
password, and server name. For more information about configuring
the Niagara 2120 to send email alerts, see the System Configuration
section.
Light Alarm
Click the Light Alarm checkbox. The alarm light on the front panel of the
Niagara 2120 will automatically light when an alarm condition exists.
Displayed
Text
Displays the type of alert.
Description
Provides a description of the type of alert.
Configuring Alerts
Click Configuration Alerts from the menu bar on the home page. The Alerts window (Figure 38)
allows you to configure alerts for different situations that may occur during streaming or other
operations.
Figure 38. Alerts Window
Table 25. Configuring Alerts
ViewCast 51
Page 62
Appendix: Advanced Settings for H.264
Configuring Network Properties
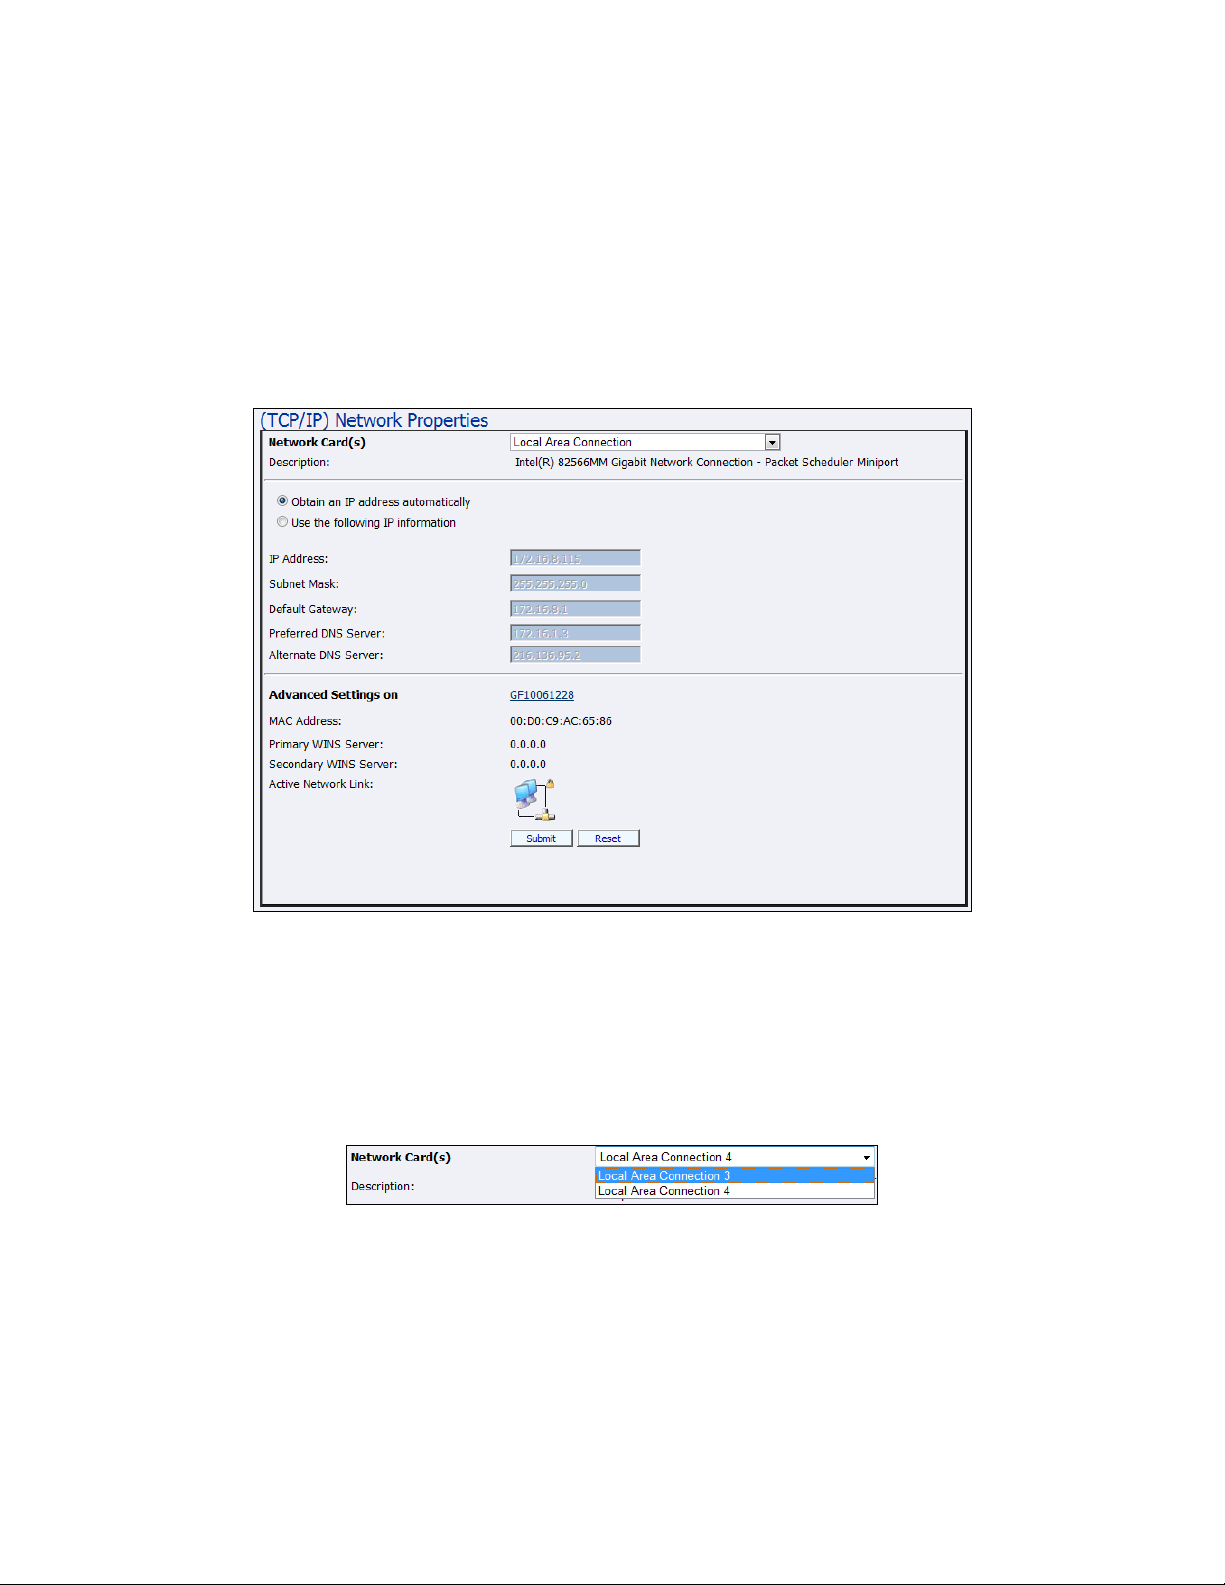
The Network Properties window (Figure 39) provides detailed information on the current network
settings for the Niagara 2120 Network Cards. Click Configuration Network Properties from the
menu bar on the home page.
Figure 39. Network Properties
Configuring Network Card(s)
The Niagara 2120 has two Gigabit network connections available on the Network Properties
window, Network Card(s) field). Select the card you wish to view from the drop-down menu in the
Network Card(s) field (Figure 40) to view the current properties for each card.
Figure 40. Network Card Options
52 ViewCast
Page 63
Niagara 2120 User Guide
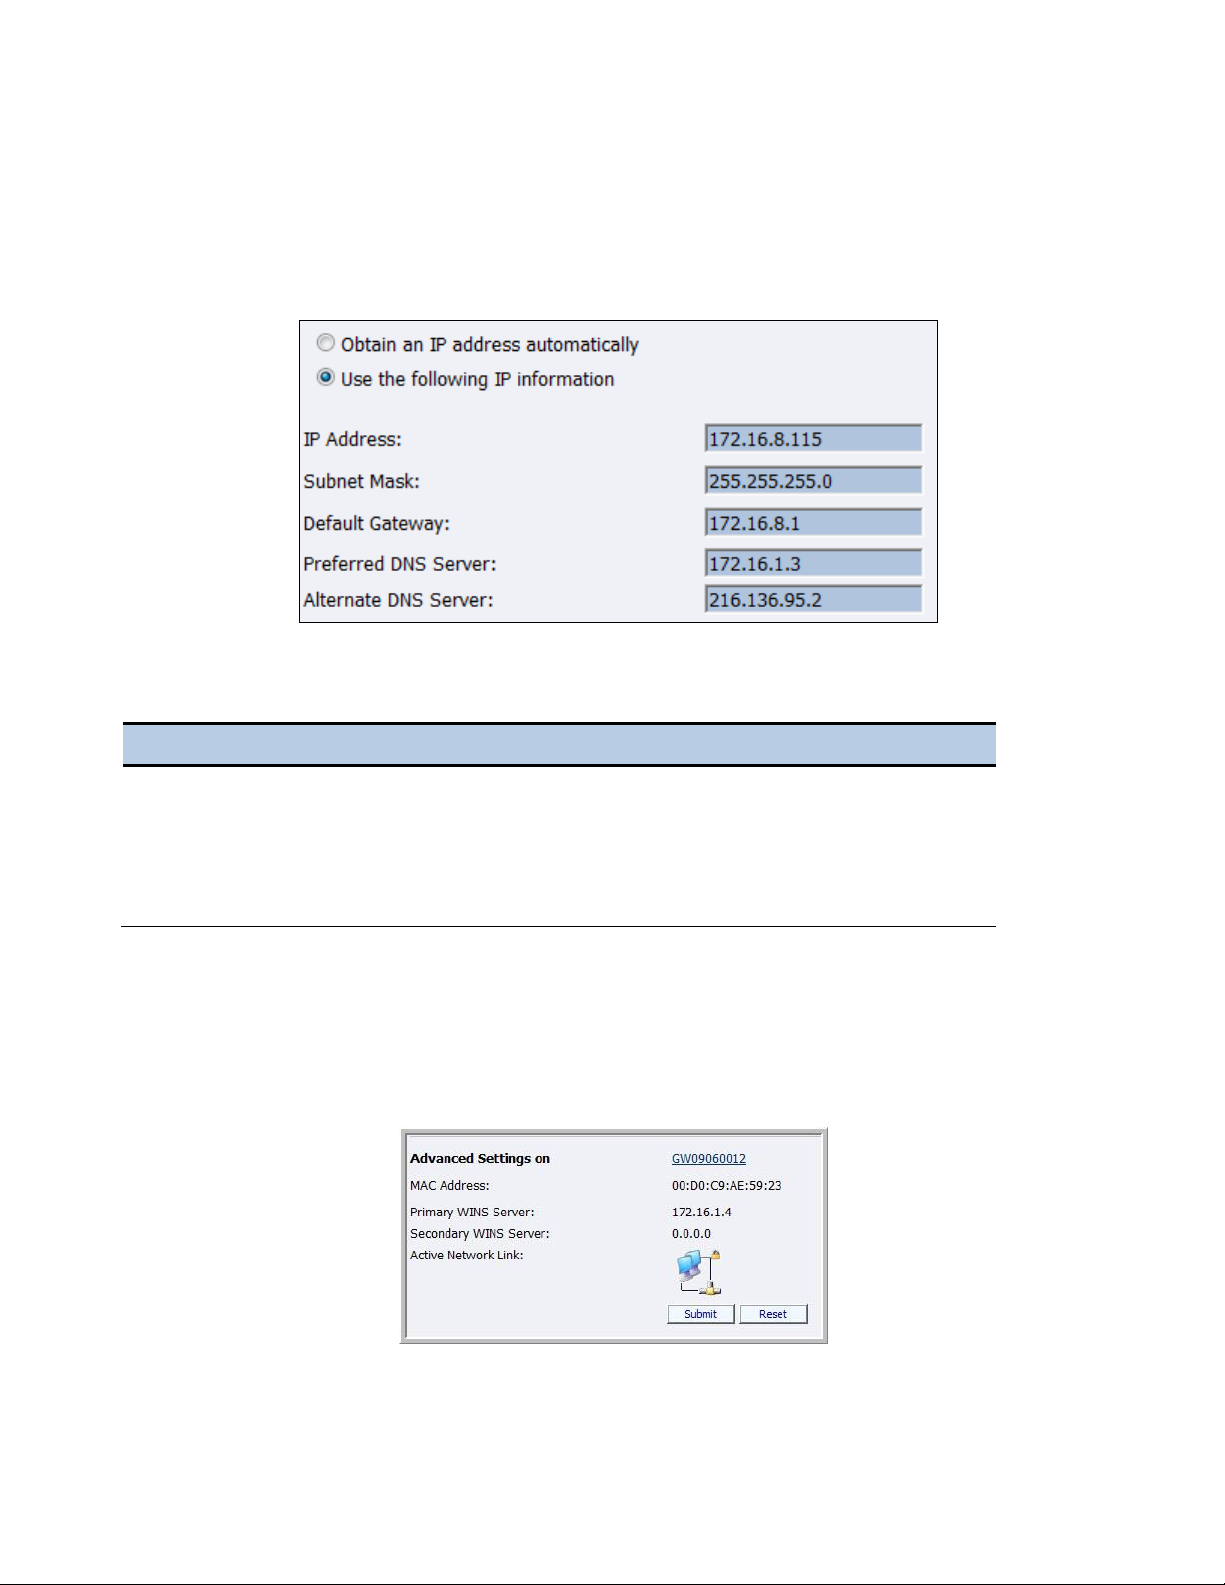
Figure 41. IP Address
Step
Action
1.
Click the Use the following IP information checkbox.
2.
Enter the appropriate information in the IP Address, Subnet Mask, Default Gateway,
Preferred DNS Server and Alternate DNS Server fields.
3.
Click Submit.
Configuring IP Address
Depending on your system configuration, you may need to configure the IP Address (Figure 41).
Table 26. Configuring IP Address
Configuring Advanced Settings (Network)
Advanced network settings provides the Niagara 2120 network name, MAC Address, and server IP
address settings (Figure 42).
Figure 42. Advanced Settings
ViewCast 53
Page 64
Appendix: Advanced Settings for H.264
Network Link Icon
Description
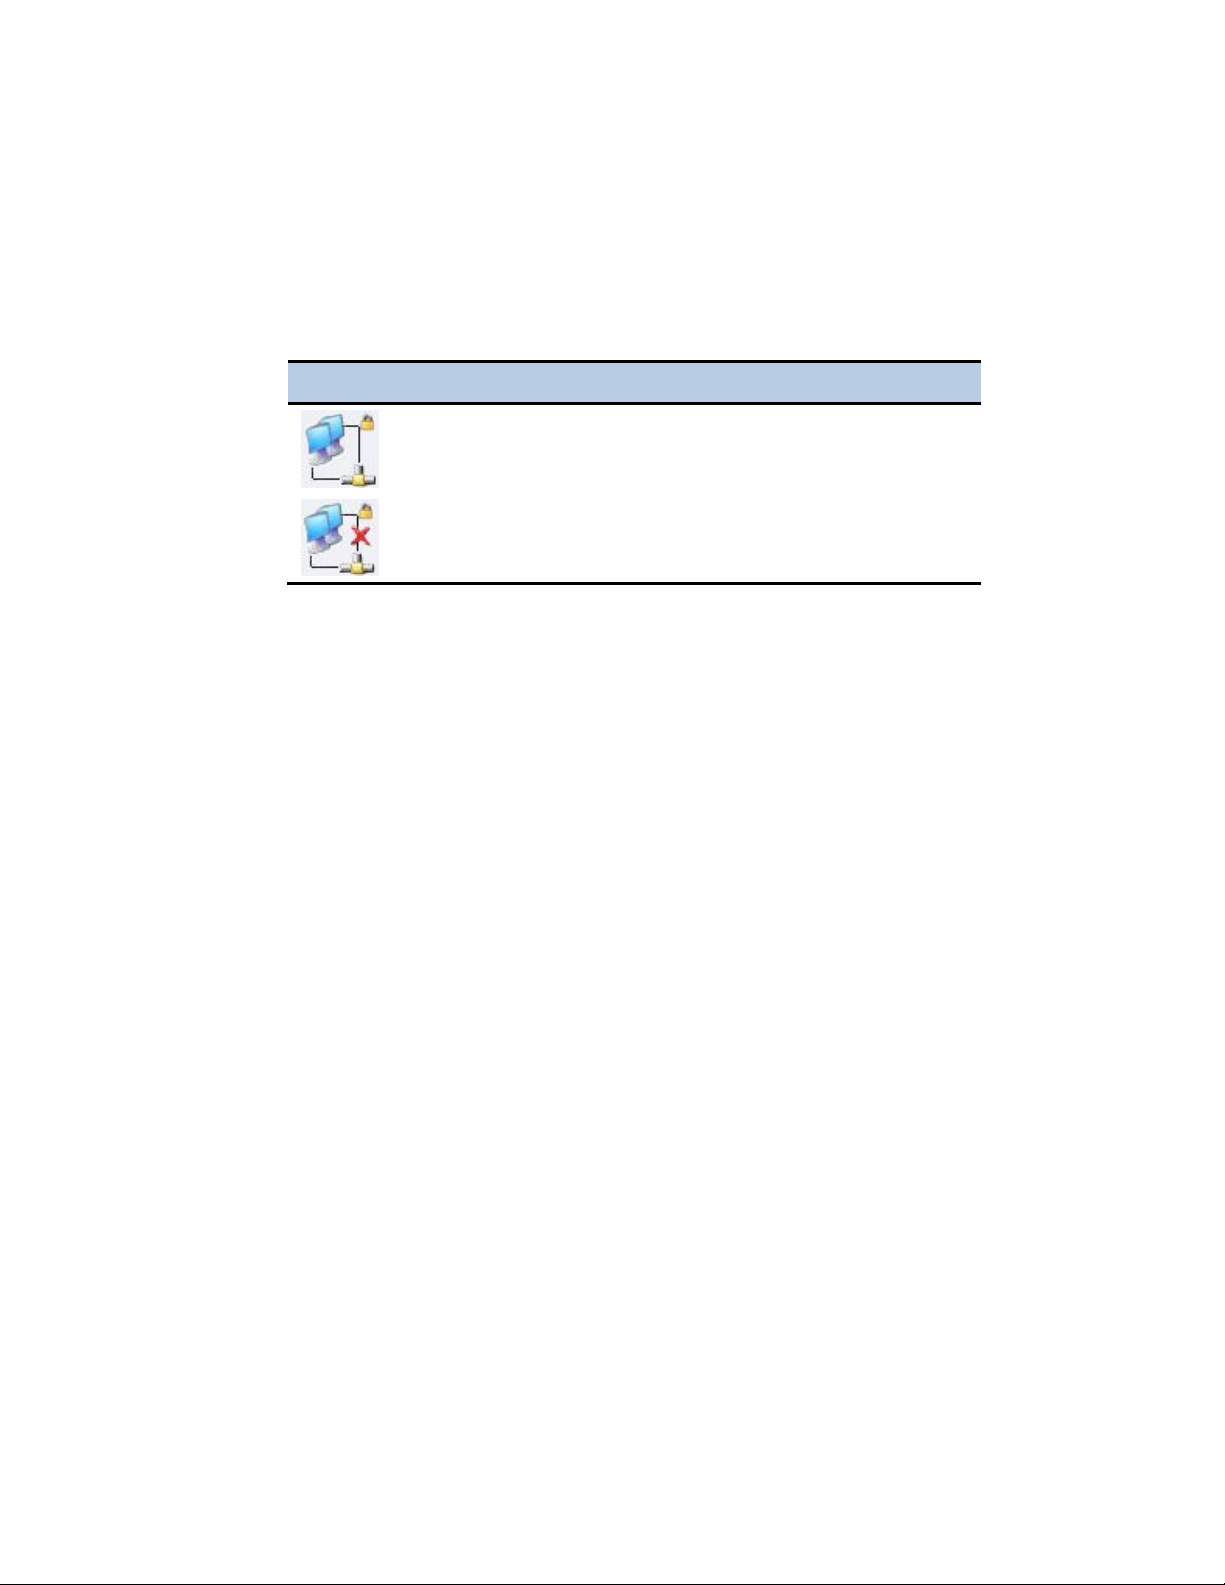
The system detects the network link.
The system does NOT detect the network link.
The Niagara 2120 network name (GW09060012) is a link. If you click this link, the system transfers
you to the Machine Properties window. From this window, you can change the name of the Niagara
2120.
The Active Network Link field uses one of two icons (Table 27) to indicate whether the network
interface card selected has a network connected.
Table 27. Network Links
54 ViewCast
Page 65
Niagara 2120 User Guide
System Configuration Settings
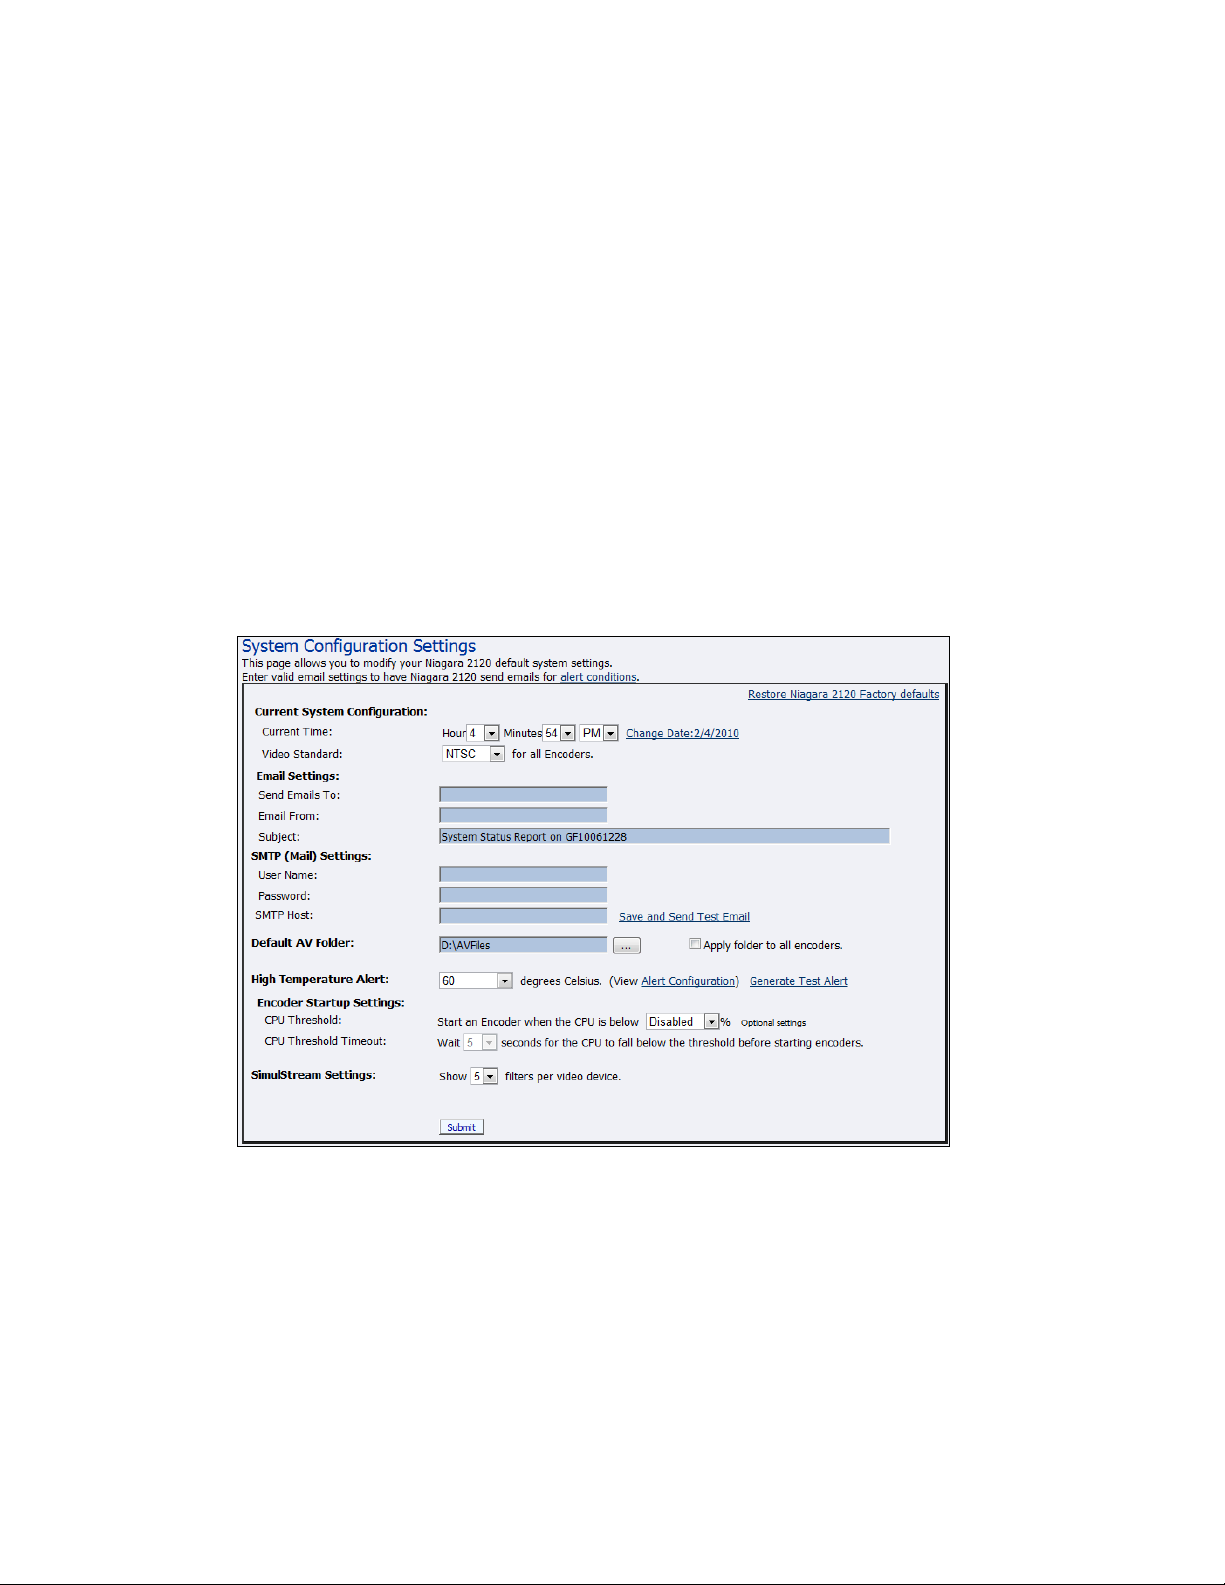
The System Configuration Settings window (Figure 43) allows you to modify your Niagara 2120
default system settings. You can configure email settings to enable Niagara 2120 to send an email to
predefined email addresses any time the Niagara 2120 encoder encounters an alert condition. You
can also customize the information the Niagara 2120 displays on its front panel when the system
exists in idle mode.
This window also allows you to restore your Niagara 2120 to its original factory disk image and
return all the system settings to their original states. Using the Restore Niagara 2120 Factory
defaults option removes all custom settings. It takes approximately 15 to 40 minutes to complete.
Click Configuration System Configuration from the menu bar on the home page.
Figure 43. System Configuration
ViewCast 55
Page 66
Appendix: Advanced Settings for H.264
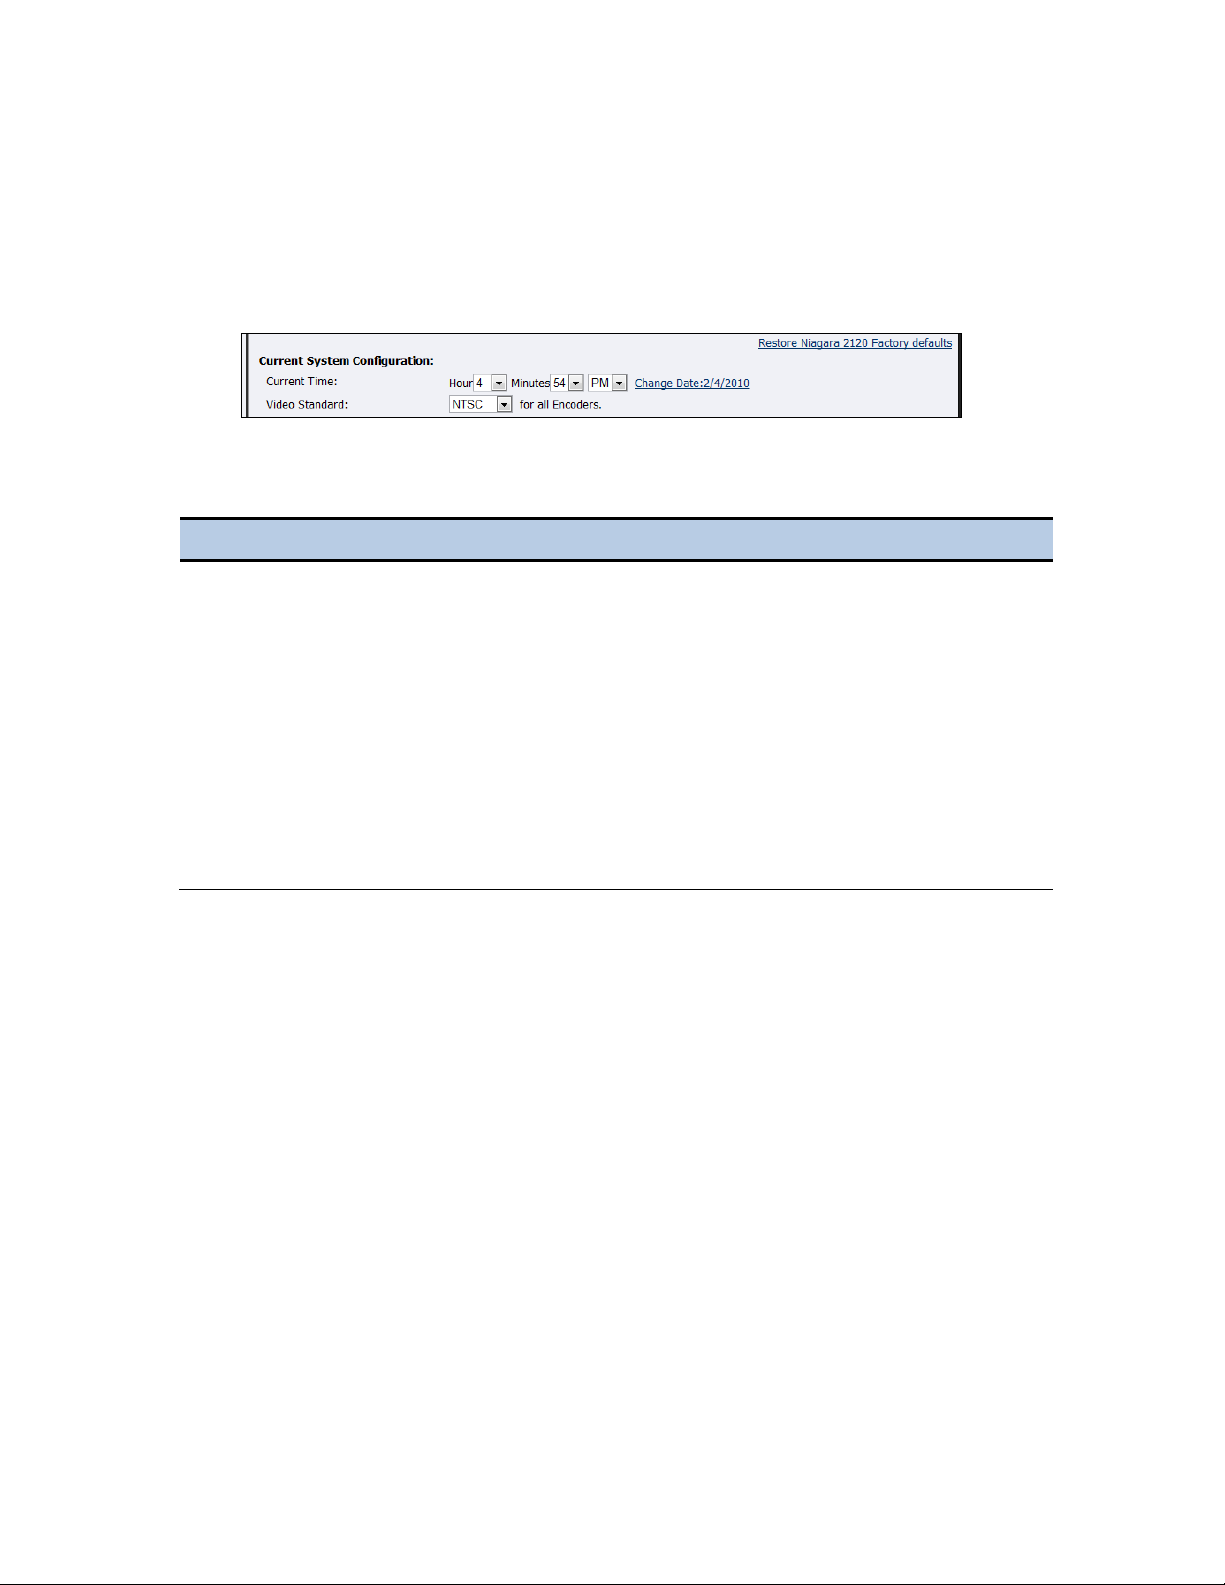
Figure 44. Current System Configuration
Step
Action
1.
Click the Hour in the drop-down list.
2.
Click the Minutes in the drop-down list.
3.
Click AM and PM in the drop-down list.
4.
Click the Change Date link. A calendar appears.
5.
Click the date on the calendar.
6.
Click the Video Standard from the drop-down list.
7.
Click Submit.
Setting Current System Configuration
You can set the current time, date, and the video standard for all encoders (Figure 44).
Table 28. Setting Current System Configuration
56 ViewCast
Page 67
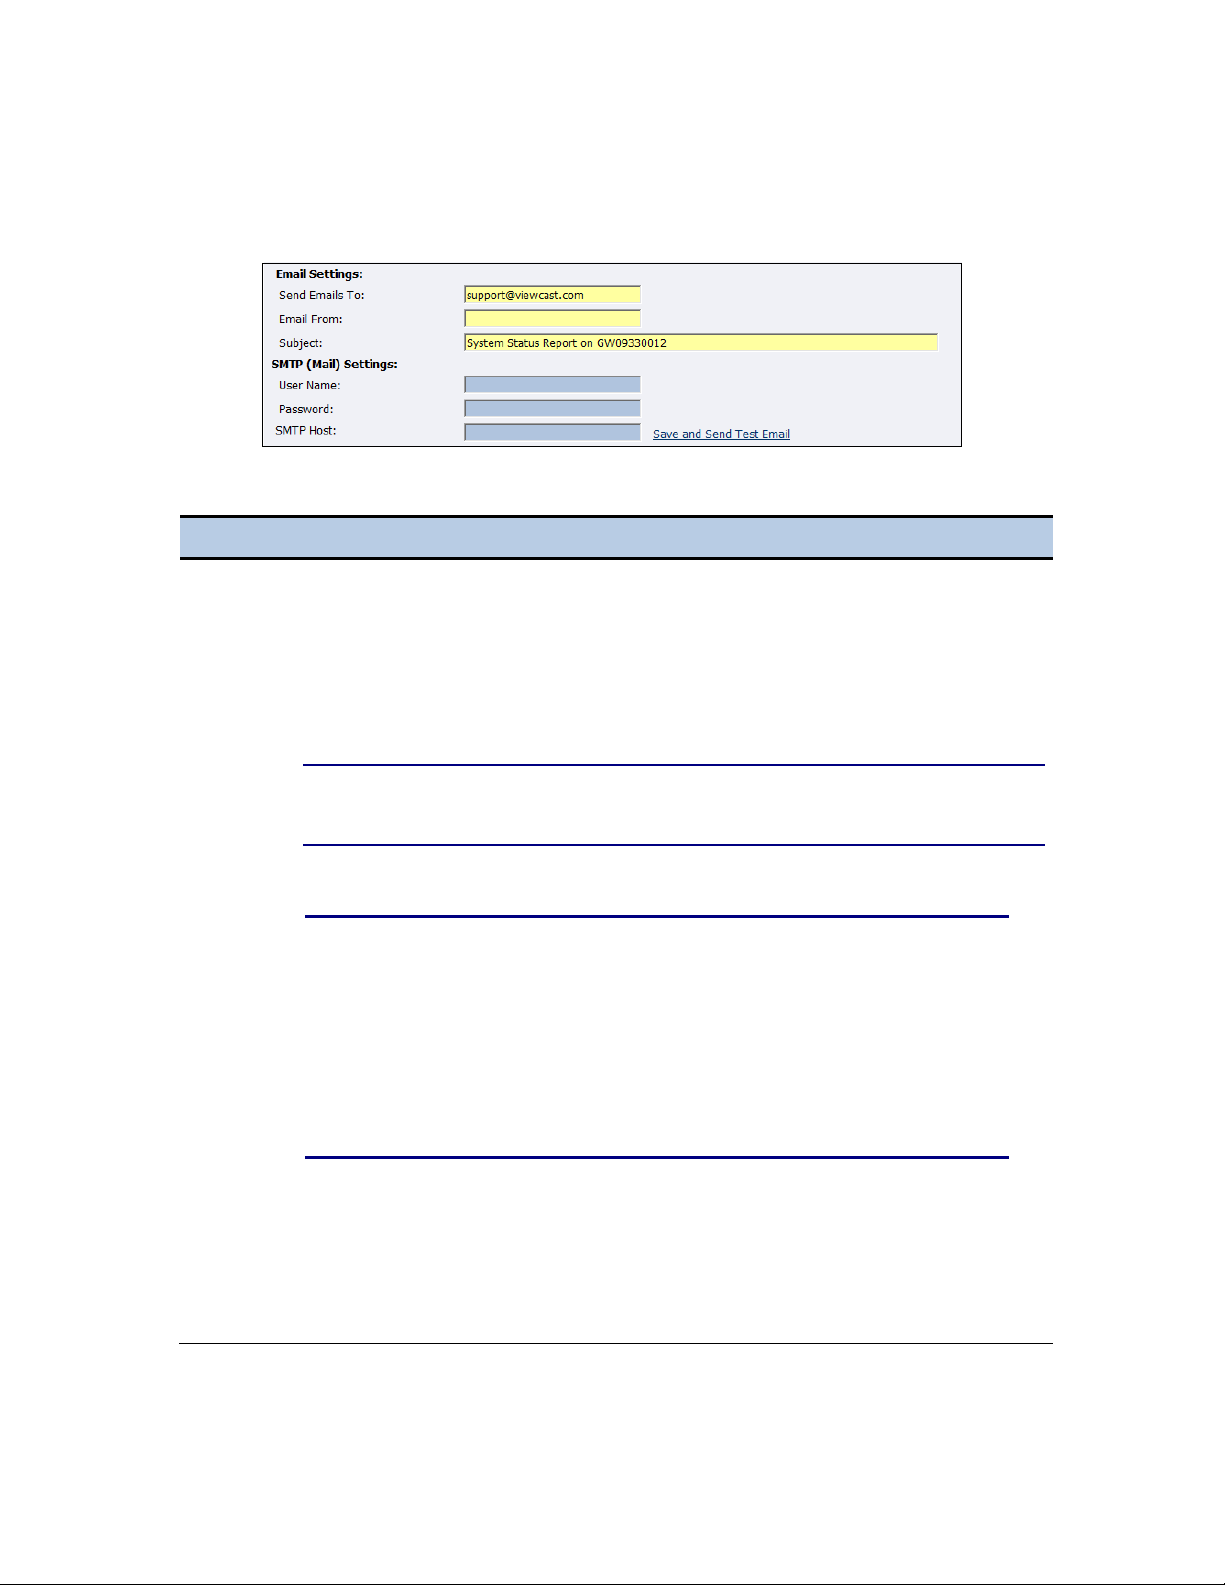
Configuring Email Settings
Step
Action
1.
Enter the email address you want the system to send the email. Separate multiple
email addresses with a comma.
2.
Enter a valid originating email address.
3.
Enter a subject line for your email alert.
4.
Enter the SMTP user name for server access.
NOTE: If you are unfamiliar with setting up an SMTP Email account for sending
email, contact your network administrator for assistance.
5.
Enter the password if required.
NOTE: For security purposes, the password for your account does not
display once the system enters it into the Niagara 2120 settings. Although
this field appears blank after you click Submit, the system retains the
password information.
If you change any information in this dialog box, you need to re-enter
your SMTP password before clicking Submit. Not doing so overwrites the
previously entered password with a blank entry.
6.
Enter the name of the SMTP server.
7.
Click the Save and Send Test Email to test your settings. The resulting window reports
the email as successful or it sends information that a send failure occurred.
8.
Click Submit.
Figure 45. Email/SMTP Setting Fields
Table 29. Setting Current System Configuration
Niagara 2120 User Guide
ViewCast 57
Page 68
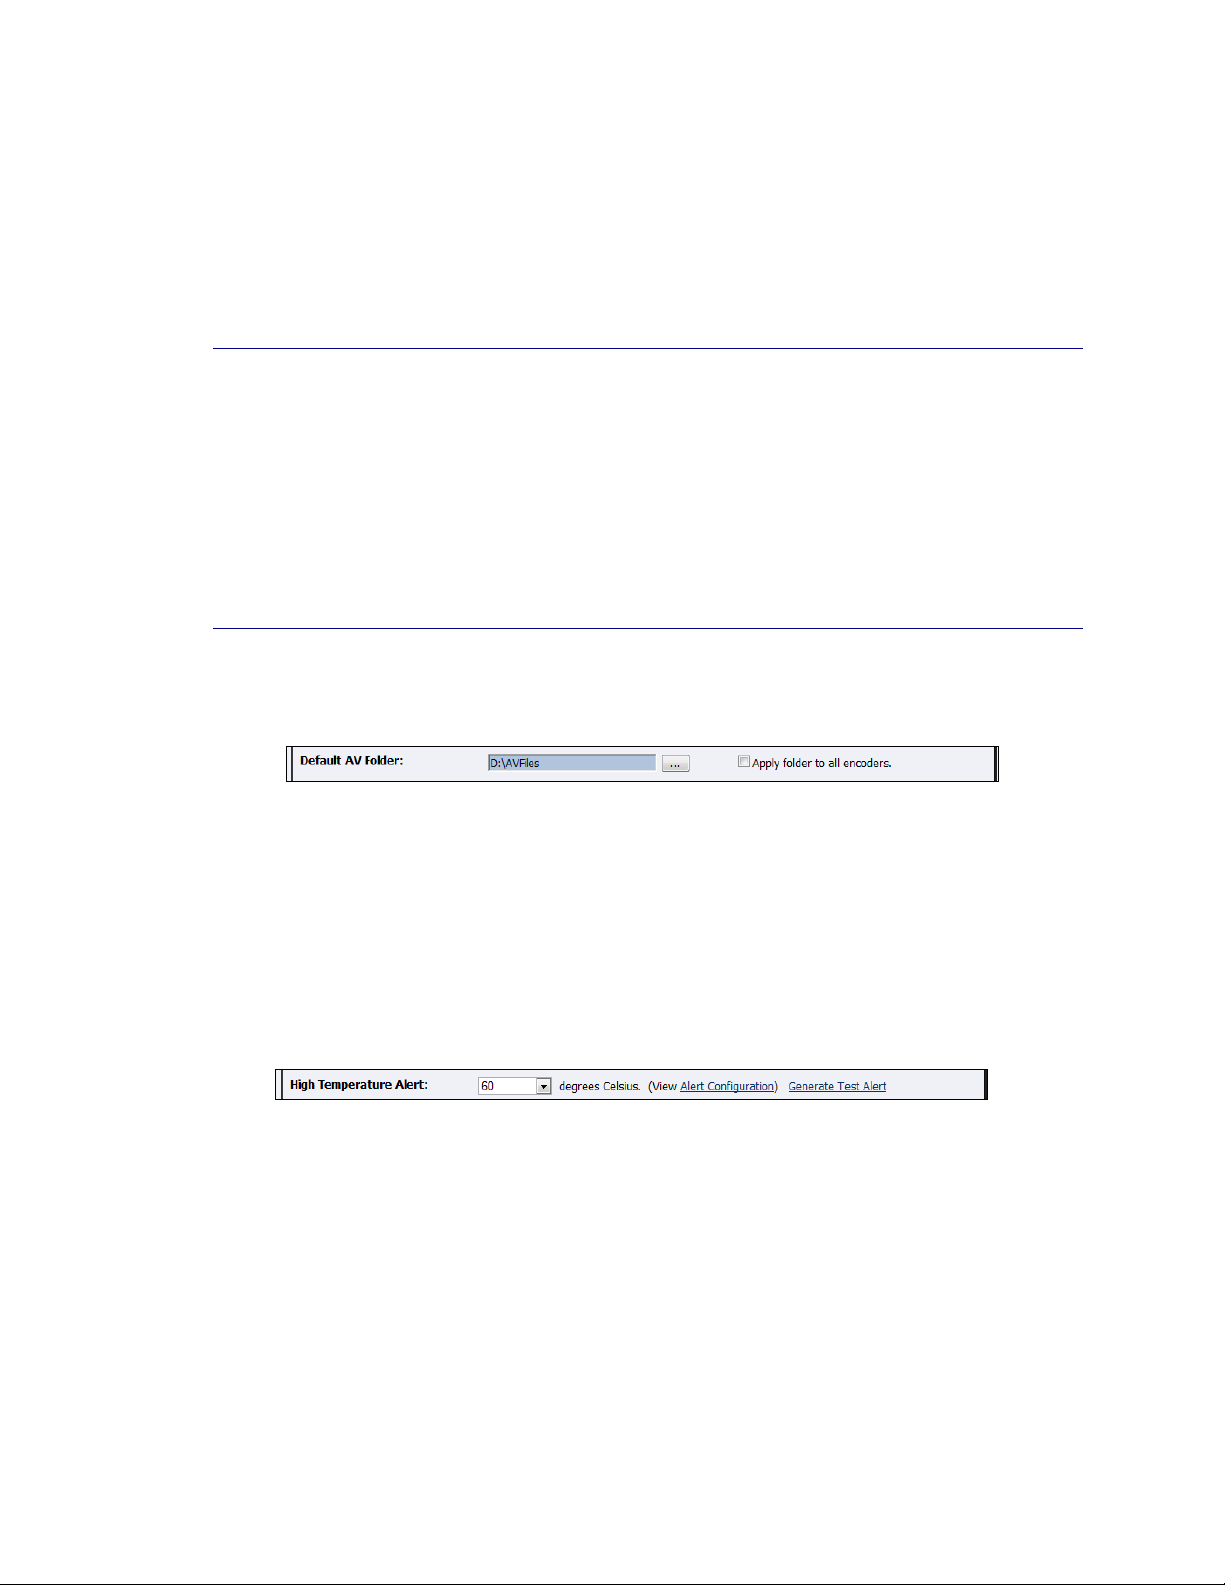
Appendix: Advanced Settings for H.264
Configuring Default Directory Setting
The Niagara 2120 stores AV files when you click the Save to File option in the encoder profile in the
Default AV folder. Refer to the Save to File option under the Flash Encoder Properties (Figure 46)
sections for information on setting an encoder profile to create an AV file.
NOTE: ViewCast strongly recommends you do not alter the default directory setting unless you
understand the risk of saving your files to a directory not located on the D: drive. If you save
your files to another drive on the Niagara 2120, the system could delete the files when you
use the Restore to Niagara 2120 Factory Defaults feature.
Only drive D on the Niagara 2120 has available storage to save your files. This drive has
approximately 105 Gigabytes of storage capacity.
Use drives C, E, and F strictly for the Niagara 2120 operational programs. Any modifications
to these drives can permanently damage your system and void your warranty.
Figure 46. Default AV Folder Field
Setting the High Temperature Alert
The Alert Configuration links to the Niagara 2120 Alerts window (Figure 47). Refer to pertinent
previous sections in this user guide for information on setting the Niagara 2120 Alerts.
Figure 47. High Temperature Alert
You can enable an alert if the Niagara 2120 reaches a predefined maximum temperature level. To
set the temperature level, click an option from the drop-down menu (Figure 48).
58 ViewCast
Page 69
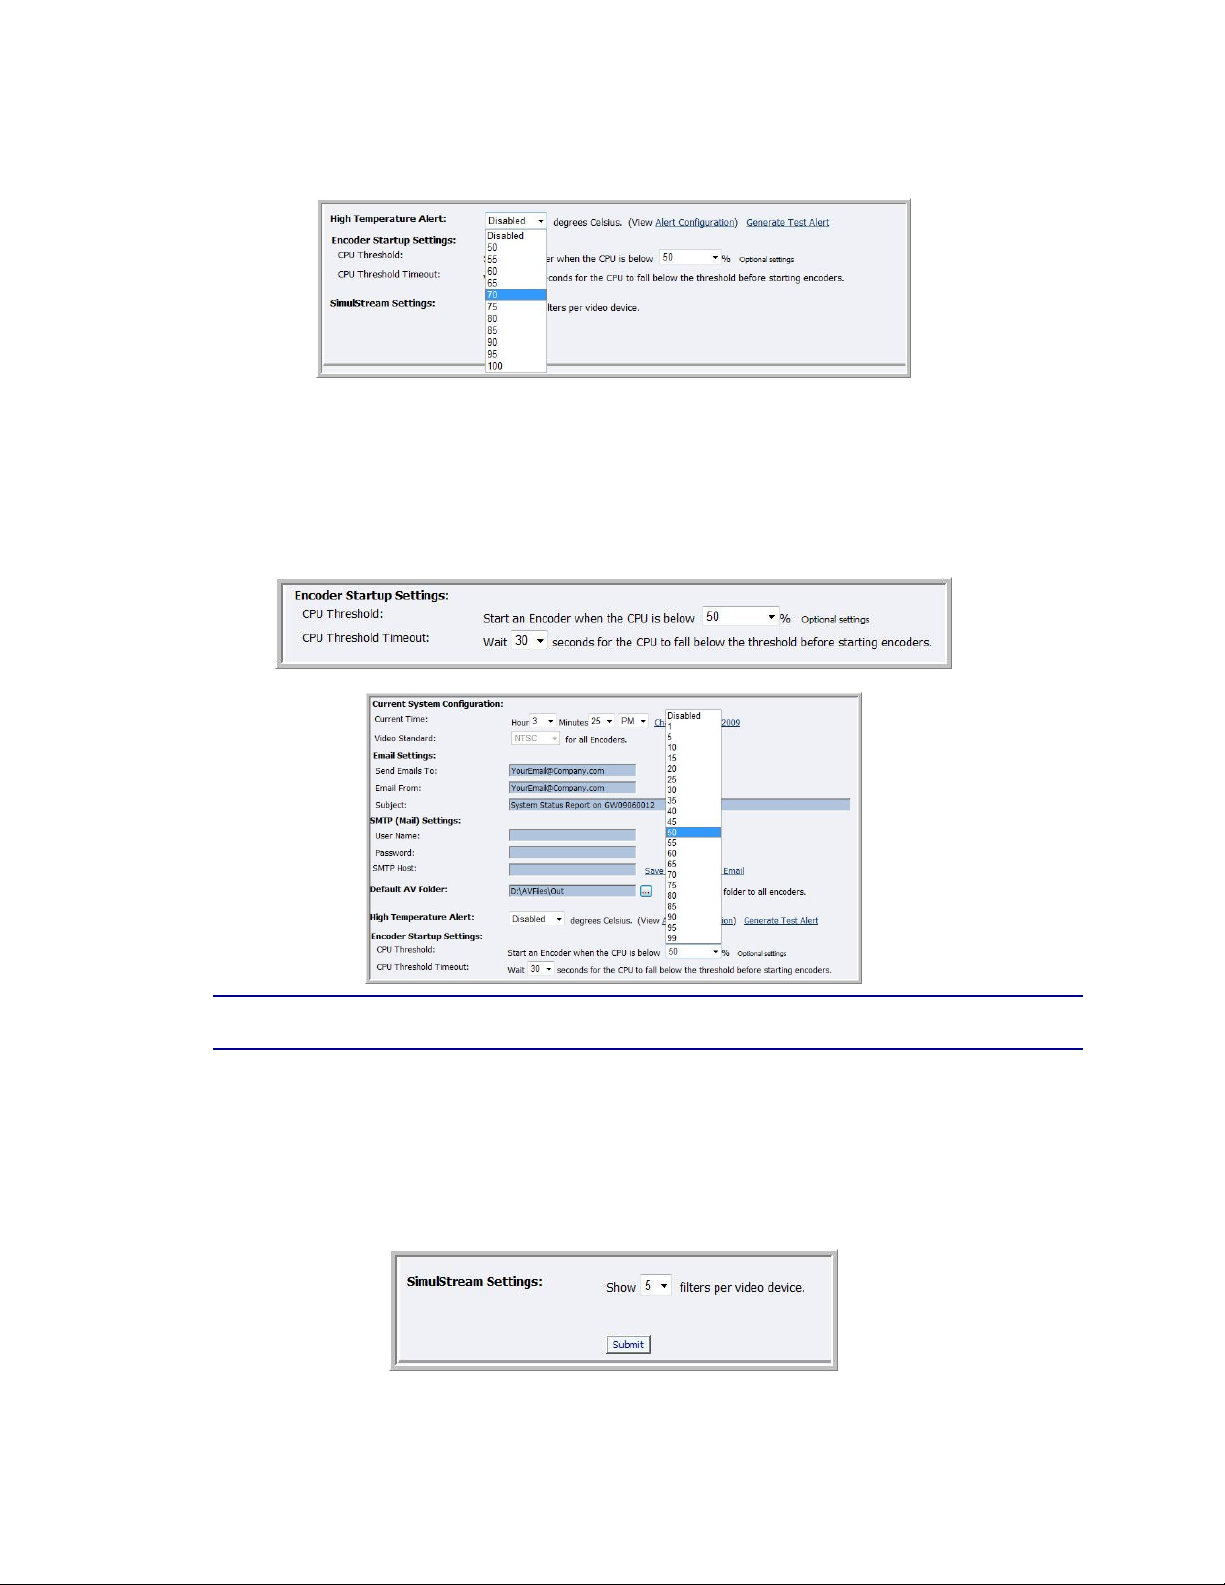
Niagara 2120 User Guide
Figure 48. Drop-Down Temperature Setting Options
Setting CPU Thresholds
You may set the CPU Threshold field (Figure 49) to accommodate optimal encoding capabilities. You
also may set the time between repetitive intervals for checking the CPU threshold.
Figure 49. Encoder Startup Settings
NOTE: ViewCast recommends a CPU threshold setting of 50% or lower.
Setting SimulStream Filters
You may indicate the number of SimulStream filters per video device using the SimulStream Settings
field (Figure 50).
Figure 50. SimulStream Settings
ViewCast 59
Page 70
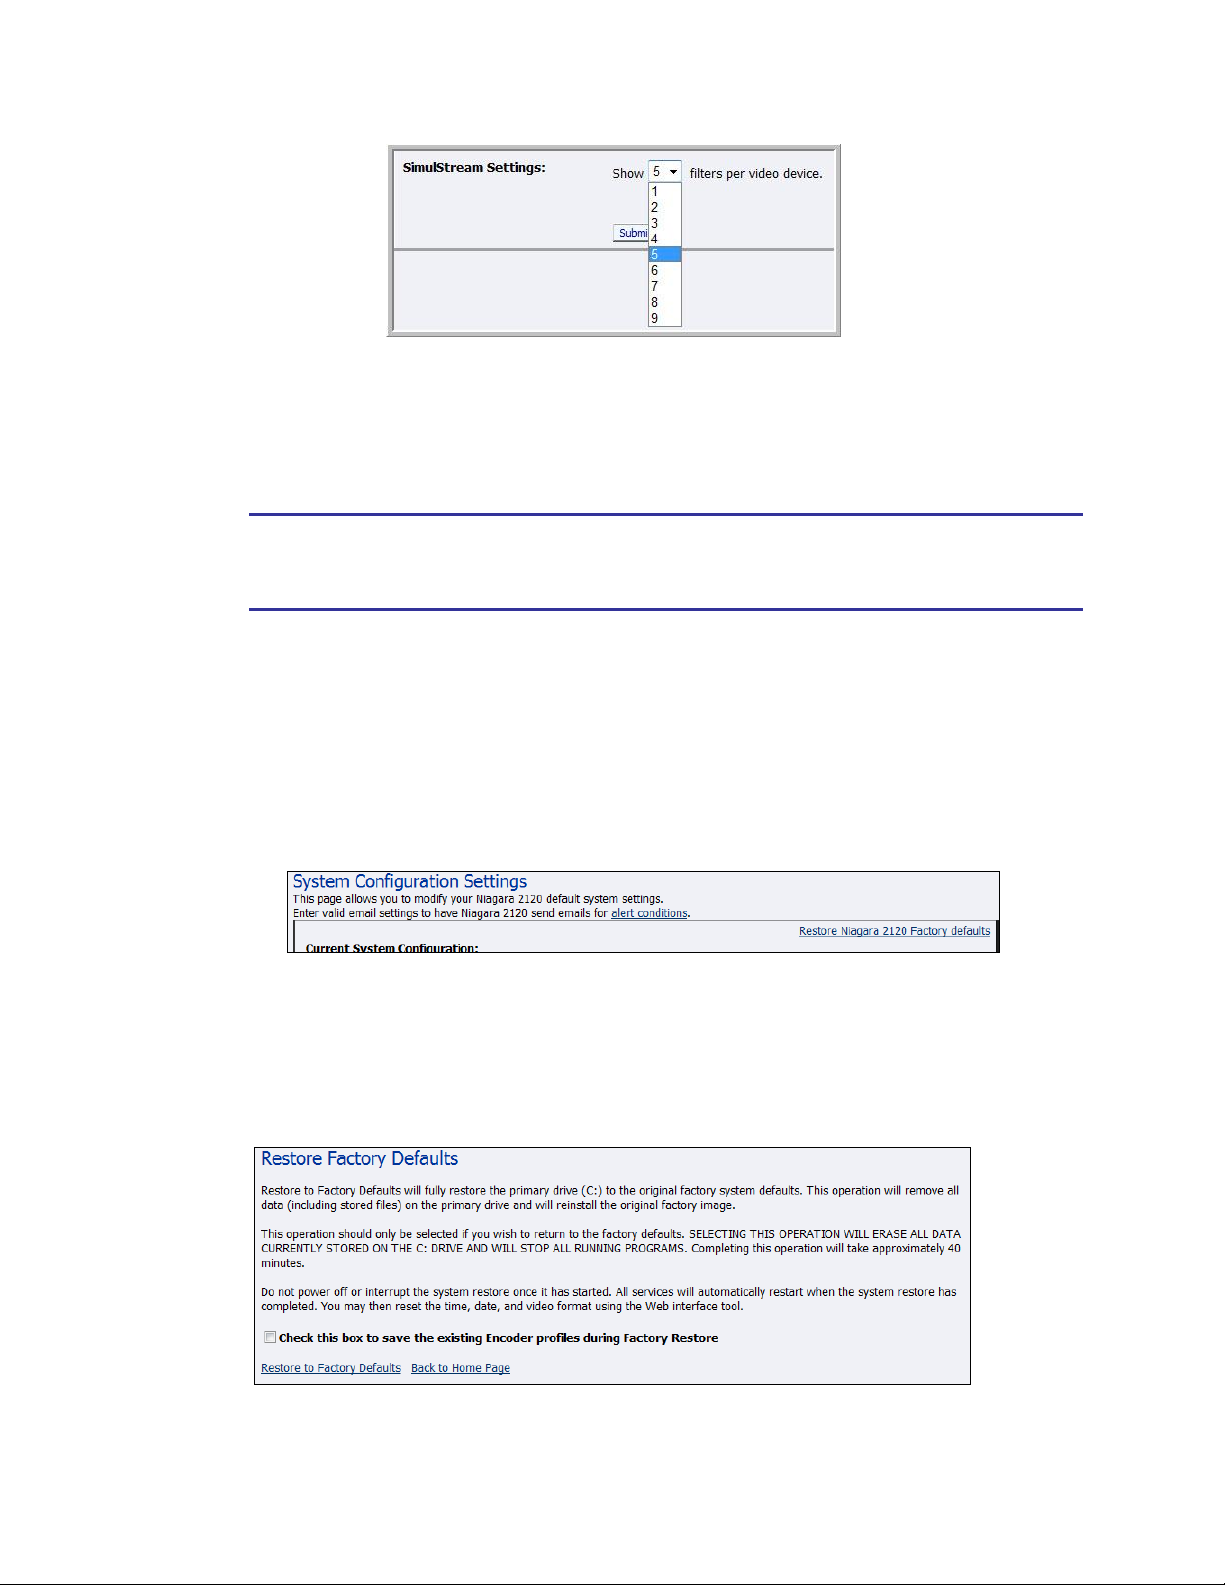
Appendix: Advanced Settings for H.264
Restoring Niagara 2120 Factory Defaults
Restore to Factory Defaults allows you to restore drive C to its original factory system defaults. This
action removes all data (including stored files) on the primary drive and reinstalls the original factory
image.
CAUTION Select this option only if you wish to return your system to its factory defaults.
Selecting this option erases all data currently stored on drive C and stops all currently
running programs. Remove any USB memory device before performing a Factory Restore.
This operation takes approximately 15 to 45 minutes to complete. Do not power off or interrupt the
system restore once it starts. All services automatically restart when the system restore completes.
You may then use the Niagara 2120 Web interface tool to reset the time, date, and video format.
Click the Restore Niagara 2120 Factory defaults link on the Configuration System Configuration
Settings window to start the process (Figure 51).
Figure 51. Restore Factory Defaults
Figure 52 provides you details regarding the process you are about to execute and allows you the
opportunity to cancel the process by clicking Back to Home Page.
Figure 52. Restore Factory Defaults
60 ViewCast
Page 71

NOTE: Restore to Factory Defaults rebuilds the Niagara 2120 primary disk drive C with the
original system image. You lose all custom settings and any files saved to drive C. You cannot
reverse this process. However, you can manually re-enter your custom settings once the
Niagara 2120 restore process completes.
Use the default directory, D:\AV Files\, for saving your audio and video files. The system only
re-images drive C when you use the Restore to Factory Defaults option. It preserves all files
and folders on drive D. Always use the default directory – drive D – for storage of personal
files to ensure the system does not remove your personal files.
WARNING! Remember that the system deletes all previously stored encoder profiles and
groups when you restore it to its factory defaults.
Niagara 2120 User Guide
ViewCast 61
Page 72
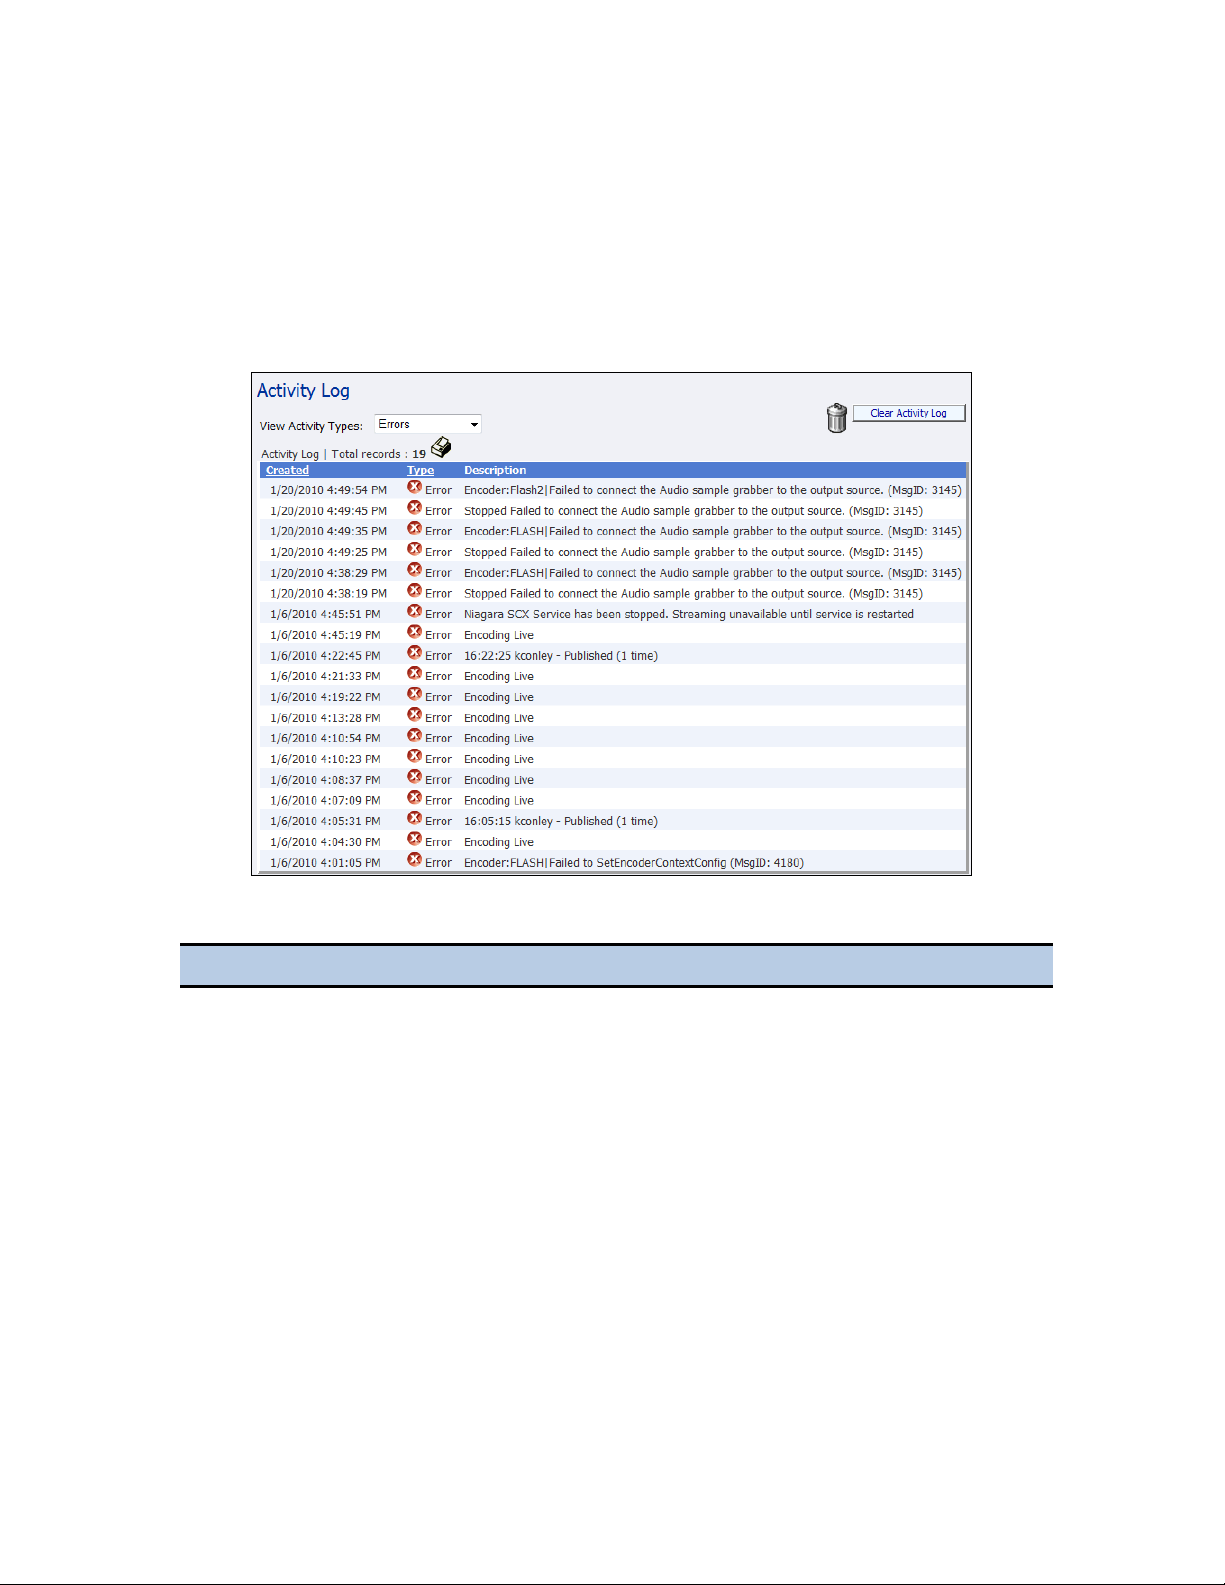
Appendix: Advanced Settings for H.264
Fields
Description
View Activity
Types
Select the types of activity you wish to view. Options include:
Show All
General
Errors
Warnings
Clear Activity Log
icon
Click this link to clear all logged activities.
Total records
Indicates the number of records for the selected view type.
Printer icon
Click the icon for a print view of the activity log. When the print friendly
view appears, click File Print to print a hard copy or save a soft copy of
the Activity Log.
Created
Displays the system date and time stamps for each event.
Type
Indicates the type of activity.
Viewing the Activity Log
The Activity Log records the encoder Start and Stop events. The system updates the log for every
event including the date and time. To view the activity log, on the home page click Status View
Activity Log.
Figure 53. Activity Log Window
Table 30. Activity Log Fields
62 ViewCast
Page 73

Fields
Description
Description
Displays a description of the activity.
Niagara 2120 User Guide
ViewCast 63
Page 74
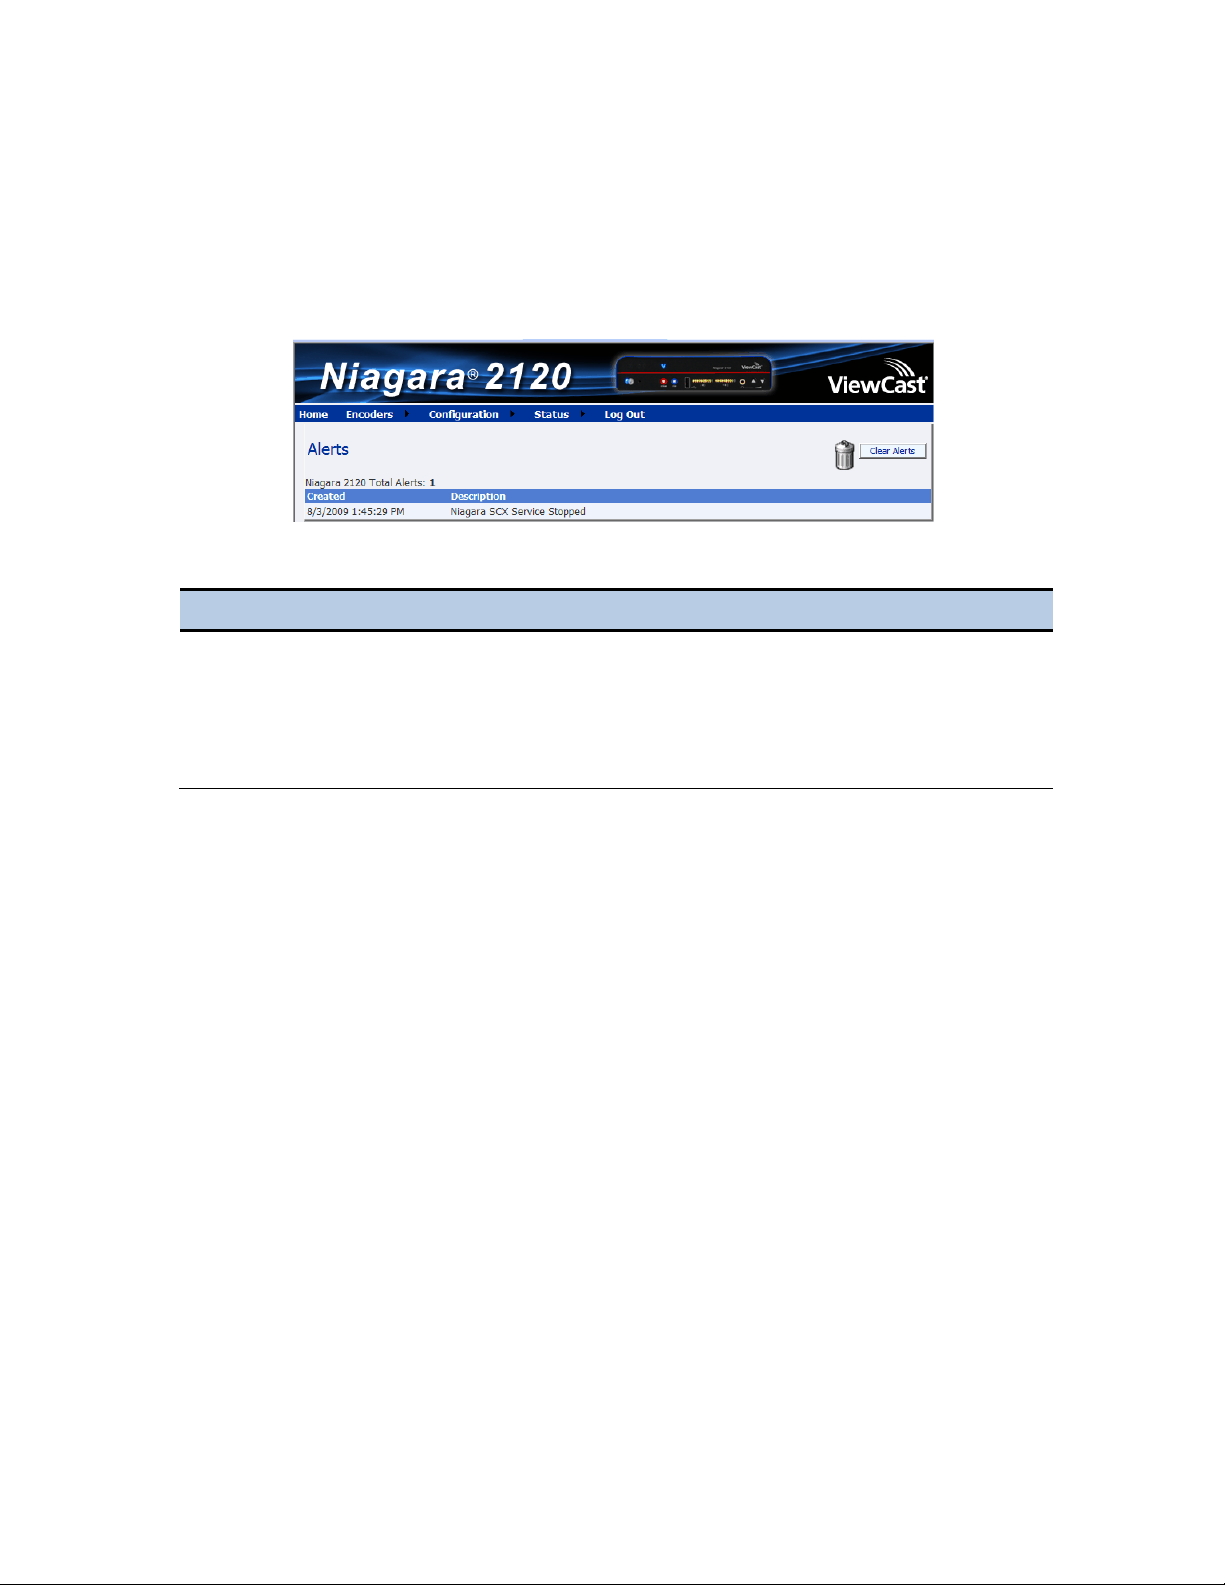
Appendix: Advanced Settings for H.264
Alert Fields
Description
Clear Alerts icon
Click this icon to clear all alerts.
Total Alerts
Indicates the number of alerts.
Created
Displays the date and time the alert occurred.
Description
Displays the message ID number for the alert and the description.
Viewing Alerts
Click Status View Alerts from the home page. The Alerts Window updates with every alert event
on the Niagara 2120. The alerts include any specific alert events for the encoder.
Figure 54. Alerts Window
Table 31. Alert Fields
64 ViewCast
Page 75

Niagara 2120 User Guide
Connecting an External Storage Device
The Niagara 2120 provides two USB ports, one on the front panel and one on the rear panel. You
can connect almost any standard USB memory device to one or both of these ports. This allows you
to export any AV files you created on the local storage drive of the Niagara 2120. The encoder
defaults to set the local storage drive D when you use the Save to File setting with the Niagara 2120
Web interface.
When you insert a USB memory device in one of the USB ports on the Niagara 2120, the Niagara
2120 automatically detects the removable storage device, and assigns a drive letter to the device.
Use standard Windows methods to transfer AV files from drive D to the attached USB device.
Using the Niagara SCX Interface
You may wish to perform even more advanced setup and operations. To do so, you may choose to
access the Niagara SCX interface. You may access the Niagara SCX interface through a remote
desktop by connecting a monitor, keyboard, and mouse to the Niagara 2120 or by installing the
Niagara SCX Explorer on a remote computer. Use the Niagara SCX User Guide for specific
information on how to use the Niagara SCX and the Niagara SCX Explorer software.
ViewCast 65
Page 76

Appendix: Advanced Settings for H.264
66 ViewCast
Page 77

Niagara 2120 User Guide
Setting
Value
BFramesBias
0
BFramesMax
0
BFramesStrategy
0
BitRateTolerance
1
BlurComplexity
20
ChromaOffset
0
CodecFlags
4196352
CodecFlags2
131328
CoderType
0
DirectMVPrediction
1
GOPSize
250
GOPSizeMin
25
IFrameQuantFactor
0.71
InLoopDeblockingFilterAlpha
0
InLoopDeblockingFilterBeta
0
Level
12
MotionEstimationMethod
7
MotionEstimationRange
16
MotionEstimationSubPelQuality
7
MotionEstimationSubPixelComparison
0
NoiseReduction
0
Appendix: Advanced Settings for H.264
In general, the default values (Table 32) for the H.264 encoder will meet your streaming
requirements. For devices with restricted bandwidths and under certain conditions such as low bit
rates, motion specific, or constant bit rate applications, you may need to adjust the advanced
settings. This section includes several examples to assist you in the selection of advanced variables.
These examples are suggestions and you should understand and select the appropriate values for
your streaming application. Refer to Table 40 for a definition of the setting variable.
Table 32. Default Settings
ViewCast 67
Page 78

Appendix: Advanced Settings for H.264
Setting
Value
QuantizerMax
51
QuantizerMaxDiffBetweenFrames
4
QuantizerMin
10
QuantizerScaleBlurOverTime
0.5
QuantizerScaleCompress
0.6
ReferenceFrames
2
SceneChangeDetectThreshold
45
TrellisRDQuantization
0
You can change the default settings according to the type of video you are streaming in constant bit
rate (CBR), mobile, or variable bit rate (VBR):
CBR - Newscast
CBR - Sports
CBR - Action
Mobile
VBR – Newscast
VBR – Sports
VBR - Action
68 ViewCast
Page 79

CBR – Newscast
Setting
Value
BFramesBias
0
BFramesMax
0
BFramesStrategy
0
BitRateTolerance
1
BlurComplexity
20
ChromaOffset
0
CodecFlags
41496352
CodecFlags2
131328
CoderType
0
DirectMVPrediction
1
GOPSize
300
GOPSizeMin
30
IFrameQuantFactor
0.71
InLoopDeblockingFilterAlpha
0
InLoopDeblockingFilterBeta
0
Level
12
MotionEstimationMethod
7
MotionEstimationRange
8
MotionEstimationSubPelQuality
7
NoiseReduction
0
QuantizerMax
51
QuantizerMaxDiffBetweenFrames
16
QuantizerMin
12
QuantizerScaleBlueOverTime
0.5
QuantizerScaleCompress
0.3
ReferenceFrames
6
SceneChangeDetectThreshold
45
Newscast type content has low motion and some scene changes.
Table 33. CBR – Newscast Settings
Niagara 2120 User Guide
ViewCast 69
Page 80

Appendix: Advanced Settings for H.264
Setting
Value
TrellisRDQuantization
0
70 ViewCast
Page 81

CBR – Sports
Setting
Value
BFramesBias
0
BFramesMax
0
bFramesStrategy
0
BitRateTolerance
1
BlurComplexity
20
ChromaOffset
0
CodecFlags
4196352
CodecFlags2
131328
CoderType
0
DirectMVPrediction
1
GOPSize
400
GOPSizeMin
40
InLoopDeblockingFilterAlpha
1
InLoopDeblockingFilterBeta
1
Level
12
MotionEstimationMethod
7
MotionEstimationRange
8
MotionEstimationSubPelQuality
7
MotionEstimationSubPixelComparison
0
NoiseReduction
0
QuantizerMax
51
QuantizerMaxDiffBetweenFrames
16
QuantizerMin
10
QuantizerScaleBlurOverTime
0.5
QuantizerScaleCompress
0.5
ReferenceFrames
6
SceneChangeDetectThreshold
55
A sports event sequence is a typical representation of a sports game.
Table 34. CBR – Sports Settings
Niagara 2120 User Guide
ViewCast 71
Page 82

Appendix: Advanced Settings for H.264
Setting
Value
TrellisRDQuantization
0
72 ViewCast
Page 83

Niagara 2120 User Guide
Setting
Value
BFramesBias
0
BFramesMax
0
BFramesStrategy
0
BitRateTolerance
1
BlurComplexity
20
ChromaOffset
0
CodecFlags
4196352
CodecFlags2
131328
CoderType
0
DirectMVPrediction
1
GOPSize
350
GOPSizeMin
35
IFrameQuantFactor
-0.8
InLoopDeblockingFilterAlpha
2
InLoopDeblockingFilterBeta
1
Level
12
MotionEstimationMethod
7
MotionEstimationRange
8
MotionEstimationSubPelQuality
7
MotionEstimationSubPixelComparison
0
NoiseReduction
0
QuantizerMax
51
QuantizerMaxDiffBetweenFrames
8
QuantizerMin
10
QuantizerScaleBlurOverTime
0.5
QuantizerScaleCompress
0.6
ReferenceFrames
6
CBR – Action
An action movie sequence has a lot of lasers, explosions, bright lights flickering, dust, and scene
changes.
Table 35. CBR – Action Settings
ViewCast 73
Page 84

Appendix: Advanced Settings for H.264
Setting
Value
SceneChangeDetectThreshold
45
TrellisRDQuantization
0
74 ViewCast
Page 85

Mobile
Setting
Value
BFramesBias
0
BFramesMax
0
BFramesStrategy
0
BitRateTolerance
1
BlurComplexity
20
ChromaOffset
0
CodecFlags
4196352
CodecFlags2
131328
CoderType
0
DirectMVPrediction
1
GOPSize
300
GOPSizeMin
30
IFrameQuantFactor
-0.71
InLoopDeblockingFilterAlpha
2
InLoopDeblockingFilterBeta
1
Level
11
MotionEstimationMethod
7
MotionEstimationRange
8
MotionEstimationSubPelQuality
7
MotionEstimationSubPixelComparison
0
NoiseReduction
0
QuantizerMax
51
QuantizerMaxDiffBetweenFrames
16
QuantizerMin
10
QuantizerScaleBlurOverTime
0.5
QuantizerScaleCompress
0.3
ReferenceFrames
2
SceneChangeDetectThreshold
50
Niagara 2120 User Guide
Table 36. Mobile Settings
ViewCast 75
Page 86

Appendix: Advanced Settings for H.264
Setting
Value
TrellisRDQuantization
0
76 ViewCast
Page 87

VBR – Newscast
Setting
Value
BFramesBias
0
BFramesMax
0
BFramesStrategy
0
BitRateTolerance
1
BlurComplexity
20
ChromaOffset
0
CodecFlags
4196352
CodecFlags2
131328
CoderType
0
ConstantRateFactor
22
DirectMVPrediction
1
GOPSize
300
GOPSizeMin
25
IFrameQuantFactor
0.71
InLoopDeblockingFilterAlpha
-1
InLoopDeblockingFilterBeta
-1
Level
12
MotionEstimationMethod
7
MotionEstimationRange
16
MotionEstimationSubPelQuality
8
MotionEstimationSubPixelComparison
0
NoiseReduction
0
QuantizerMax
51
QuantizerMaxDiffBetweenFrames
4
QuantizerMin
12
QuantizerScaleBlurOverTime
0.5
QuantizerScaleCompress
0.6
ReferenceFrames
6
SceneChangeDetectThreshold
45
Niagara 2120 User Guide
Table 37. VBR – Newscast Settings
ViewCast 77
Page 88

Appendix: Advanced Settings for H.264
Setting
Value
TrellisRDQuantization
0
78 ViewCast
Page 89

VBR – Sports
Setting
Value
BFramesBias
0
BFramesMax
0
BFramesStrategy
0
BitRateTolerance
1
BlurComplexity
20
ChromaOffset
0
CodecFlags
4196352
CodecFlags2
131328
CoderType
0
ConstantRateFactor
22
DirectMVPrediction
1
GOPSize
250
GOPSizeMin
25
IFrameQuantFactor
-0.8
InLoopDeblockingFilterAlpha
1
InLoopDeblockingFilterBeta
1
Level
12
MotionEstimationMethod
7
MotionEstimationRange
16
MotionEstimationSubPelQuality
8
MotionEstimationSubPixelComparison
0
NoiseReduction
0
QuantizerMax
51
QuantizerMaxDiffBetweenFrames
4
QuantizerMin
10
QuantizerScaleBlurOverTime
0.5
QuantizerScaleCompress
0.6
ReferenceFrames
6
SceneChangeDetectThreshold
65
Niagara 2120 User Guide
Table 38. VBR – Sports Settings
ViewCast 79
Page 90

Appendix: Advanced Settings for H.264
Setting
Value
TrellisRDQuantization
0
80 ViewCast
Page 91

VBR – Action
Setting
Value
BFramesBias
0
BFramesMax
0
BFramesStrategy
0
BitRateTolerance
1
BlurComplexity
20
ChromaOffset
0
CodecFlags
4196352
CodecFlags2
131328
CoderType
0
ConstantRateFactor
22
DirectMVPrediction
1
GOPSize
300
GOPSizeMin
30
IFrameQuantFactor
-0.71
InLoopDeblockingFilterAlpha
1
InLoopDeblockingFilterBeta
0
Level
12
MotionEstimationMethod
7
MotionEstimationRange
16
MotionEstimationSubPelQuality
8
MotionEstimationSubPixelComparison
0
NoiseReduction
0
QuantizerMax
51
QuantizerMaxDiffBetweenFrames
4
QuantizerMin
10
QuantizerScaleBlurOverTime
0.5
QuantizerScaleCompress
0.6
ReferenceFrames
4
SceneChangeDetectThreshold
85
Niagara 2120 User Guide
Table 39. VBR – Action Settings
ViewCast 81
Page 92

Appendix: Advanced Settings for H.264
Setting
Value
TrellisRDQuantization
0
82 ViewCast
Page 93

Settings
Setting
Explanation
BitRateTolerance
Setting the bit rate tolerance tells the encoder it must hit the
target bit rate almost exactly. However, this value can have an
adverse effect on quality because you are forcing the encoder
to stay at a target bit rate. More heavy frames may not get
enough bits to make the image look better while less heavy
frames get more than they need. As a result, the quality may
vary. If you set the value to 1, the encoder uses 0.01.
DirectMVPrediction
The default setting is temporal. Temporal breaks when bpyramid is applied. As a result, it is easy to mix the two
improperly. Spatial is a better default.
GOPSize
This value sets the maximum interval between IDR frames.
Theoretically, higher values improve compression because IDR
frames are the heaviest, but it can also reduce the appearance
of fluctuating quality.
GOPSizeMin
This value sets the minimum length between IDR frames. This
setting limits the minimum length after each IDR frame before
another can be placed.
InLoopDeblockingFilterAlpha
This value affects the overall amount of deblocking applied to
the picture. Higher values deblock more efficiently, but retain
less detail causing the image to appear softened.
The default value is 0 and should be sufficient to eliminate
most blocking, but it leaves the picture noticeably blurrier. In
general, values should be no lower than -3 and no higher than
3. This value is the most important parameter in determining
the overall sharpness of your encode.
InLoopDeblockingFilterBeta
This value determines whether something in a block is or is not
a detail when deblocking is applied. Lower values apply less
deblocking to more flat blocks with detail present and more
deblocking to blocks without detail. Higher values cause more
deblocking to be applied to less flat blocks with details
present. Raising the value of Beta deblocking is a good way to
get rid of ringing artifacts by applying more aggressive filtering
to blocks that aren’t very flat. Lowering the value of Beta
deblocking is a good way to reduce the amount of DCT blocks
without blurring the entire picture.
MotionEstimationMethod
This value sets the quality. It determines the motion detection
method (5 is dia, 7 is hex, 8 is umh, 2 is esa, 10 is teas).
Table 40 provides an explanation of each setting and its function.
Table 40. Explanation of Settings
Niagara 2120 User Guide
ViewCast 83
Page 94

Appendix: Advanced Settings for H.264
Setting
Explanation
Because teas (10) is not achievable in real time encoding there
is no reason to use it.
dia – (diamond) is the simplest search. It starts at the best
predictor, checks the motion vectors at one pixel upwards,
left, down, and to the right, chooses the best, and repeats the
process until it no longer finds any better motion vectors. This
setting is the fastest.
hex – (hexagon) is the default setting. It uses a similar strategy
to dia, except it uses a range-2 search of 6 surrounding points.
It is considerably more efficient than dia and hardly any
slower. This setting is a good choice for general use.
umh – (uneven multi-hex) is considerably slower than hex. It
searches a complex multi-hexagon pattern to avoid missing
harder-to-find motion vectors. umh is about 40 % slower than
hex.
esa – (exhaustive) is a highly optimized intelligent search of
the entire motion search space within range of the best
predictor. It is the mathematically equivalent to the brute
force method of searching every single motion vector in that
area, though faster. It is still considerably slower than umh.
teas – (transformed exhaustive) attempts to approximate the
effect of running a Hadamard transform comparison at each
motion vector. It’s a little bit better than esa but a little bit
slower, too slow for practical use.
MotionEstimationRange
This value controls the maximum range of the motion search.
For hex and dia, the encoder only uses between 4 and 16. umh
and esa allow you to increase past 16 to allow a wider range of
motion search, which is useful for high-definition footage and
for high-motion footage. Increasing MotionEstimationRange
significantly slows down encoding.
MotionEstimationSubPelQuality
This value controls the subpixel motion estimation quality.
Higher numbers are better. Levels 1 through 5 simply control
the subpixel refinement strength. Level 6 enables RDO for
mode decision, and level 8 enables RDO for motion vectors
and intra prediction modes. RDO levels are significantly slower
than the previous levels.
0 — fullpel only (not recommended)
1 — QPel SAD 1 iteration
2 — QPel SATD 2 iterations
3 — HPel on MB then Qpel
4 — Always Qpel
5 — Multi QPel + bime
84 ViewCast
Page 95

Niagara 2120 User Guide
Setting
Explanation
6 — RD on I/P frames
7 — RD on all frames
8 — RD refinement on I/P frames
9 — RD refinement on all frames
10 — QP-RD (requires trellis=2, aq-mode >0)
QuantizerMax
The default setting is 31. This value sets the maximum for the
quantizer. 51 is the highest quantizer available for use in the
H.264 specification and is very low quality.
IMPORTANT! For low bit rates you want to keep constant, it
is recommended that you use the default setting of 51 and not
31.
QuantizerMaxDiffBetweenFrames
This value determines the maximum change quantizer
between two frames. The purpose is to reduce the possibility
of any large quality jumps in the output video. It is better to
slow this change over a few frames rather than all at once. 4 is
good, however if you don’t want to see big jumps in bit rates
and don’t mind big jumps in quality, you can increase the
value to 8 or 16.
QuantizerMin
This value sets the minimum quantizer you will ever use. The
lower the quantizer the closer it is to its input. For most video,
anything below 10 is perceptually lossless. Anything below the
default of 8 is definitely lossless.
IMPORTANT! Raising gpmin higher than its default of 16 is
strongly discouraged because this could reduce the quality of
flat background areas of the frame.
QuantizerScaleCompress
The default setting is 0.60. Use this value to trade off the
number of bits allocated to “expensive” high-motion versus
“cheap” low-motion frames.
At one extreme, a setting of 0.0 aims for true constant bit
rates. Typically with high-motion scenes, this setting tends to
look bad. If you use low bit rates, however, low motion scenes
appear perfect but use more bits than needed.
The other extreme setting of 1.0 aims to achieve constant
quantization, however this setting throws many bits at highmotion scenes, and a lot less at low-motion scenes which can
cause the bit rate to fluctuate. 0.50 performs well on sports,
0.60 on action content, while 0.30 works well with news
broadcasts. 0.2 works well with drama-type movies, soap
operas, and shows.
ViewCast 85
Page 96

Appendix: Advanced Settings for H.264
Setting
Explanation
ReferenceFrames
This value is the number of previous frames each P-frame can
use as a reference. Recommended value is around 4 to 8. Each
increase has reduced benefit and constant speed loss with
higher CPU usage. However, 16 can be helpful for animated
content, video game capture, CGI, and other similar content.
SceneChangeDetectThreshold
0 turns off scene change detection. Higher values of scenecut
increase the number of scenecuts detected. A good default is
40.
IMPORTANT! Lowering the default causes less scene
detections so it would use less IDR frames. Those are
expensive heavyweight frames.
86 ViewCast
Page 97

Other Settings
Setting
Explanation
BlurComplexity
Apply a Gaussian blur with the given radius to the quantizer
curve. This value means the quantizer assigned to each frame
blurs temporally with its neighbors to limit quantizer
fluctuations.
BQuantFactor
This value sets the targets average reduction in bit rate for Bframes as compared to P-frames. Higher values increase the
quality of B-frames. This value makes them better references,
which can improve the overall image quality. The problem is
that the extra bits taken by the B-frames are from the Pframes, which makes this variable a balancing act.
BQuantOffset
This value is the quantizer scale offset between I-P-B-frames.
ChromaOffset
The encoder normally encodes all 3 color planes (luma, U
(chroma), V (chroma) ) at the same quantizer. The system adds
this value to the quantizers for the U and V planes. This value
allows you to bias the encode in favor of brightness (luma) by
setting positive values (chroma fields will have higher
quantizers), or in favor of color (chroma) by setting negative
values (chroma fields will have lower quantizers).
NOTE: The encoder only encodes the luma and chroma
planes at the quantizer up to quantizer 29. After this, chroma
is quantized progressively by a lower amount than luma until
you end with luma at quantizer 51. This behavior is not
adjustable, as it is required by the H.264 standard.
ConstantQuantizationRateControl
This value sets the encoder to use Constant Quantization Rate
Control. It keeps the encoding at a constant quantizer and
doesn’t restrict to target a certain bit rate, but rather restricts
to a certain quality no matter what bit rate it needs to use on
each frame to keep quality constant. This value is mostly for
quality encodes, set to -1 to disable this encode mode.
Level
This value sets the level flag in the output bit stream (as
defined by Annex A of the H.264 Standard) permissible levels
include:
1, 1.1, 1.2, 1.3, 2, 2.1, 2.2, 3, 3.1, 3.2, 4, 4.1, 4.2, 5, and 5.1
The encoder does not support level 1b from the specification.
MaxBFramesBetweenNonBFrames
This value sets the maximum number of concurrent B-frames
you can use. B-frames are similar to P-frames, except they can
Niagara 2120 User Guide
Table 41. Other Settings
ViewCast 87
Page 98

Appendix: Advanced Settings for H.264
Setting
Explanation
use motion prediction from future frames as well. This value
can lead to significantly better efficiency in terms of
compression ratio.
NoiseReduction
This value performs adaptive pseudo-dead zone noise
reduction, estimates film noise based on the value set and
attempts to remove the noise by dropping small details before
quantization. (100 to 1000 for de-noising)
TrellisRDQuantization
This value performs Trellis quantization to increase efficiency.
0 = No quantization
1 = Quantization on final macroblock
2 = Always quantize
NOTE: This value requires CABAC.
88 ViewCast
Page 99

Index
Niagara 2120 User Guide
Active Network Link field, 54
Activity Log Fields, 62
Activity Log Window, 62
Address Bar, 27
Admin Log In Window, 21, 27
Advanced Network Settings, 53
Advanced Settings, 53
Alert Fields, 64
Alerts Window, 51, 64
Assign Encoders to Groups Window, 43
audience for publication, 2
Audio Tab, 37
Back Panel Connections, 15
CBR – Action Settings, 73
CBR – Newscast Settings, 69
CBR – Sports Settings, 71
Change Computer Name, 48
Changing Computer Name, 48
Changing Login Password, 49
Check Package Contents, 10
Computer Name Field, 48
Configure Connections, steps for, 16
Configure the Niagara 2120 Connections, 16
Configuring Alerts, 51
Configuring Audio Settings, 37
Configuring H.264 Settings, 40
Configuring IP Address, 53
Configuring Output Settings, 38
Configuring Video Input Settings, 34
Connect an External Storage Device, 65
Connect Niagara 2120 to an IP Network, 23
Connect to an Electrical Power Source, 20
Connect to Network, steps for, 23
Connect your Niagara 2120 to a Power Source,
20
Conventions Used in This Guide, 2
CPU Threshold field, 59
Creating Encoder Groups, 44
Creating Encoder Groups, 43
Current System Configuration, 56
Custom Fields, 35
Date and Time Settings window, 21
Default Directory Setting, 58
Default Settings, 67
DefaultAVFolder field, 58
De-Interlace Settings, 36
Disclaimers, iv
Drop-Down Temperature Setting Options, 59
Easy First Time Set Up, 20
Easy Set Up, 19
Edit Encoder Groups, 43
Editing Encoder Groups, 44
Email Alert, 51
Email/SMTP Setting Fields, 57
Encoder Groups List window, 41
Encoder Groups Window, 41, 44
Encoder Options, 29
Encoder Start Status, 30
ViewCast 89
Page 100

Index
Encoder Startup Settings Windows, 59
Encoder Stop Status, 31
Encoders Window, 29, 30, 31
Environmental Notices, 5
Explanation of Settings, 83
FCC Notice, 4
First Start Up Session, 21
Flash Encoder Properties, 33
Front Panel Lights and Button Descriptions, 12
H.264 Settings Tab, 40
High Temperature Alert field, 58
Install Overview, 10
IP Address, 27, 53
Logging In, 27
Machine Properties Window, 47
Niagara 2120 Web Interface, 19
Niagara SCX User Guide, 65
Other Settings, 87
Output Tab, 38
Password Change Window, 49
Perform Advanced Operations, 47
Perform Basic Operations, 27
Perform the Initial Start Up, 21
Power Off the Niagara 2120, steps for, 46
Prerequisites, 10
Properties Section, 49
Rack Mount Safety Instructions, 3
Rear Panel Connection Descriptions, 15
Rear Panel diagram, 15
Reboot Message, 48
Media Encoder Functions, 9
Menu Bar, 17
Menu Bar Commands, 17
Mobile Settings, 75
Network Card Options, 52
Network Card(s), 52
Network Card(s) field, 52
Network Cards, 52
Network Link Options, 54
Network Properties, 52
Network Properties window, 52
Network Property Window Options, 24
Niagara 2120 Browser Window, Flow of, 18
Niagara 2120 Browser Windows Flow, 18
Niagara 2120 Front Panel diagram, 12
Niagara 2120 Front Panel, Review of, 12
Niagara 2120 network name, 54
Niagara 2120 Rear Panel, Review of, 15
Restore Factory Defaults window, 60
Restore Niagara 2120 Factory Defaults, 60
Restore the Login Password to the Factory
Default, 50
Save to File Location, 39
serial number, 27
Set CPU Thresholds, 59
Set SimulStream Filters, 59
Set the High Temperature Alert, 58
Setting Current System Configuration, 56, 57
Shut down the Niagara 2120, 46
SimulStream Settings, 59
Start Encoding, steps for, 45
Started Icon, 31
Starting an Encoder, 30
Stop an Encoding Group, 45
Stopped Icon, 30
Stopping an Encoder, 31
90 ViewCast
 Loading...