

Page 1
Document Number: 40-03288-01-A
Date: December 2010
Page 2

© 2010 ViewCast Corporation. All rights reserved.
ViewCast, GoStream, ViewCast logo, SimulStream, Niagara, SchedulStream, Niagara logo, Osprey,
and Niagara SCX are trademarks or registered trademarks of ViewCast Corporation or its
subsidiaries.
Microsoft, Windows XP, Windows, and Windows Media are trademarks or registered trademarks of
Microsoft Corporation.
QuickTime, iPhone, and iPod, are trademarks or registered trademarks of Apple Inc.
Adobe and Flash are trademarks or registered trademarks of Adobe Systems Inc.
Disclaimer
The information in this publication remains the property of ViewCast Corporation. Users may not use, reproduce, or disclose this information
without the implied consent and written approval of the company.
ViewCast Corporation makes no representations or warranties with respect to the contents or use of this manual and specifically disclaims any
express or implied warranties of merchantability or fitness for any particular purpose. Further, ViewCast Corporation reserves the right to
revise this publication to make enhancements in the products described in this manual, at any time, without obligation to notify any person or
entity of such revisions or changes. In no event will ViewCast Corporation be liable for direct, indirect, special, incidental, or consequential
damages arising out of the use or inability to use the product or documentation, even if advised of the possibility of such damages.
ViewCast Corporation is not responsible for any third-party license fees that may occur with the use of our products by an end user including
but not limited to creating or distributing content. The user is responsible for any fees the Multimedia Patent Trust may apply for creating and
distributing MPEG content.
Warranties
For complete warranty details, refer to the specific warranty included with each product. General warranty information includes the following:
Limited Warranty: ViewCast warrants its hardware products against defects in material and workmanship under normal use for the period of
one year (12 months) from date of sale. Where specific warranties exist that provide more substantial coverage, notwithstandi ng the warranty
provisions herein, such product warranties control and preempt or supersede the warranty provisions herein.
Reseller Pass Through of Standard Limited Warranties: Resellers pass the ViewCast standard limited warranties for the products through to
the customer without modification. Any modification of a product voids the ViewCast warranties or any other existing or available warranty.
Corporate Contact Information
ViewCast collaborates and partners with various clients to integrate products into their individual environments.
Niagara Technical Support: Phone: 972.488.7157, Fax: 972.488.7111 or submit the technical support online request from the ViewCast
website.
ViewCast USA Support: Monday through Friday: 9 a.m. – 5 p.m. Central Time. Typical response time is within one business day for customers
without a Priority Support Agreement.
ViewCast Corporation 3701 West Plano Parkway, Suite 300, Plano, TX 75075-7840 USA
Toll Free (U.S. only): 800.540.4119 website: www.viewcast.com
Page 3

Contents
About This Guide ............................................................................................................ 1
Product description............................................................................................................. 1
Audience ............................................................................................................................. 1
Conventions for this guide .................................................................................................. 2
Rack mount safety instructions .......................................................................................... 3
FCC notice ........................................................................................................................... 4
Environmental notices ........................................................................................................ 5
Warnings ............................................................................................................................. 6
Overview .......................................................................................................................... 9
Media appliance functions .................................................................................................. 9
Install overview ................................................................................................................. 10
Prerequisites ..................................................................................................................... 10
Package contents ....................................................................................................... 10
System requirements ........................................................................................................ 11
Specifications .................................................................................................................... 11
Installing additional software ........................................................................................... 11
Connecting to the Internet ............................................................................................... 12
Niagara 4100 front panel diagram .................................................................................... 13
Niagara 4100 back panel diagram .................................................................................... 14
Connecting the Niagara 4100 ........................................................................................... 15
Niagara 4100 EASE menu .................................................................................................. 16
Niagara 4100 home page .................................................................................................. 17
Menu bar commands ................................................................................................. 17
Niagara 4100 browser windows flow ............................................................................... 19
Niagara 4100 User Guide
Easy Setup ..................................................................................................................... 21
Web interface ................................................................................................................... 22
Easy first time set up ......................................................................................................... 23
Connecting to an electrical power source .................................................................. 23
Performing the initial start up .................................................................................... 24
Connecting to an IP network ...................................................................................... 25
Changing the network settings................................................................................... 25
ViewCast iii
Page 4

Contents
Basic Operations ........................................................................................................... 29
Starting up ......................................................................................................................... 29
Shutting down ................................................................................................................... 30
Starting an encoder........................................................................................................... 31
Checking CPU usage .......................................................................................................... 33
Stopping an encoder ......................................................................................................... 34
Connecting an external storage device ............................................................................ 35
Exporting captured video files .......................................................................................... 35
Advanced Operations ................................................................................................... 37
Logging in .......................................................................................................................... 37
Viewing all encoders ......................................................................................................... 39
Creating an encoder .......................................................................................................... 40
Starting an encoder........................................................................................................... 41
Stopping an encoder ......................................................................................................... 42
Editing an Adaptive Apple HTTP encoder ......................................................................... 43
Video tab .................................................................................................................... 44
Audio tab .................................................................................................................... 46
Apple HTTP Live Streaming Output tab ...................................................................... 47
Apple HTTP Live Streaming Security tab via FTP ........................................................ 49
Editing an Adaptive Adobe Flash encoder ........................................................................ 50
Video tab .................................................................................................................... 51
Audio tab .................................................................................................................... 54
Adobe Flash Dynamic Streaming Output tab ............................................................. 55
Adobe Flash Dynamic Streaming Security tab ........................................................... 57
Editing an Adobe Flash H.264 encoder ............................................................................. 58
Video tab .................................................................................................................... 59
Audio tab .................................................................................................................... 62
Output tab .................................................................................................................. 63
H.264 Presets tab ....................................................................................................... 65
Editing an MPEG-4 encoder .............................................................................................. 66
Video tab .................................................................................................................... 67
Audio tab .................................................................................................................... 71
Output tab .................................................................................................................. 73
H.264 Presets tab ....................................................................................................... 75
Editing a Windows Media encoder ................................................................................... 76
Video tab .................................................................................................................... 77
Audio tab .................................................................................................................... 79
Output tab .................................................................................................................. 80
DRM tab ...................................................................................................................... 83
iv ViewCast
Page 5

Niagara 4100 User Guide
Viewing encoder groups ................................................................................................... 84
Creating encoder groups .................................................................................................. 85
Starting an encoder group ................................................................................................ 86
Stopping an encoder group .............................................................................................. 86
Editing encoder groups ..................................................................................................... 87
Configuring the Preset ABC buttons ................................................................................. 88
Using Preset ABC buttons to start an encoder group ....................................................... 90
Viewing all encoders ......................................................................................................... 91
Editing preset encoders .................................................................................................... 91
Configuring machine properties ....................................................................................... 92
Changing the computer name .................................................................................... 93
Changing the login password from the factory default ............................................. 94
Restoring the login password to the factory default ................................................. 94
Configuring Alerts ............................................................................................................. 95
Configuring network properties ....................................................................................... 96
Configuring network cards ......................................................................................... 96
Configuring the IP address ......................................................................................... 97
Configuring advanced network settings ..................................................................... 97
System configuration settings .......................................................................................... 99
Setting current system configuration ....................................................................... 100
Configuring email/SMTP settings ............................................................................. 101
Configuring idle screen information ......................................................................... 102
Configuring default directory setting ....................................................................... 103
Setting CPU thresholds ............................................................................................. 104
Restoring Niagara 4100 factory defaults .................................................................. 104
Viewing the activity log ................................................................................................... 106
Viewing alerts ................................................................................................................. 107
Connecting an external storage device .......................................................................... 108
Using the Niagara SCX web interface ............................................................................. 108
Appendix A: DRM for Windows Media ...................................................................... 109
Importing a DRM profile ................................................................................................. 110
Appendix B: H.264 Advanced Settings ..................................................................... 115
CBR – Newscast ............................................................................................................... 117
CBR – Sports .................................................................................................................... 118
CBR – Action .................................................................................................................... 119
Mobile ............................................................................................................................. 120
VBR – Newscast............................................................................................................... 121
VBR – Sports .................................................................................................................... 122
ViewCast v
Page 6

Contents
VBR – Action.................................................................................................................... 123
Settings ........................................................................................................................... 124
Other settings ................................................................................................................. 127
Appendix C: Mapped Network Drive Setup .............................................................. 129
Appendix D: EASE Menu ............................................................................................ 139
Encoder menu ................................................................................................................. 140
Encoder start ............................................................................................................ 140
Encoder stop ............................................................................................................. 140
Encoder status .......................................................................................................... 140
Access Health menu ........................................................................................................ 141
CPU status ................................................................................................................ 141
Memory available ..................................................................................................... 141
Setup system menu ........................................................................................................ 142
Network link status .................................................................................................. 142
Network MAC address .............................................................................................. 142
View network settings .............................................................................................. 143
Enable DHCP ............................................................................................................. 143
Set static IP addresses .............................................................................................. 144
Set gateway address ................................................................................................. 145
Set date and time ..................................................................................................... 146
Set video standard .................................................................................................... 146
Factory restore ......................................................................................................... 147
Export files menu ............................................................................................................ 148
Export to USB drive .................................................................................................. 148
Shutdown Niagara 4100 ........................................................................................... 148
Index ............................................................................................................................. 149
vi ViewCast
Page 7
Niagara 4100 User Guide
About This Guide
Thank you for purchasing the ViewCast Niagara 4100 streaming media appliance. This user guide
provides step-by-step instructions for installing and using your new streaming media appliance. For the
latest ViewCast product information and news, visit our website at www.viewcast.com.
Product description
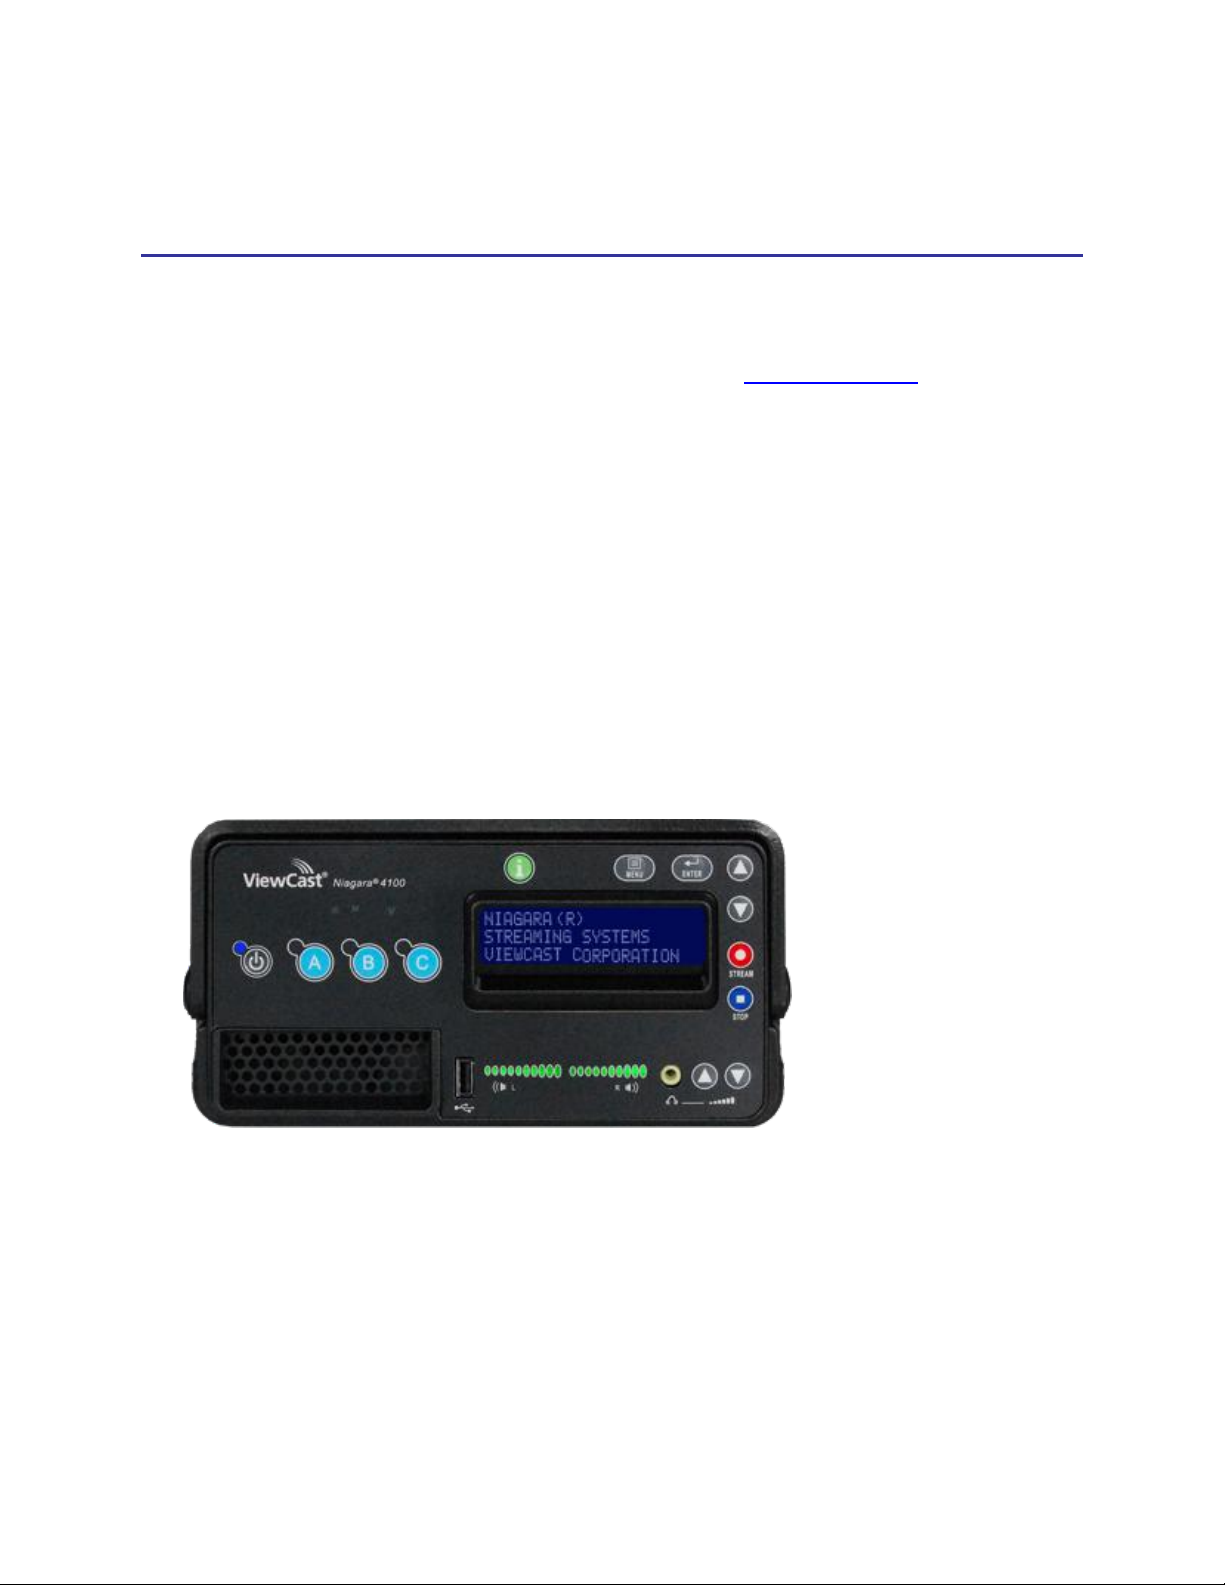
The Niagara 4100 is designed with a combination of simplicity, portability and power to quickly and
easily stream your high-definition (HD) content to broadband and mobile networks including live
Adapative streaming to Adobe® Flash Media Server and Apple® (iPhones® and iPads®), Adobe Flash®
H.264, MPEG-4, H.263, H.264, and Windows Media (Silverlight® compatible) SD and HD, as well as
container support for 3GPP and 3GPP2. With the ability to ingest HD video, the Niagara 4100 is ideal for
live sports, live newsgathering, webcasting or any streaming application where you need rock-solid HD
performance on the go.
This rugged, portable streaming appliance can ingest standard- or high-definition video sources through
its SDI input, and accommodates a variety of audio input formats, including embedded SDI, AES/EBU,
and balanced or unbalanced stereo.
Figure 1. ViewCast Niagara 4100
Audience
The audience for this publication includes anyone who uses or administers the Niagara 4100. They
should have a basic technical understanding of streaming media. This user guide provides information
on the Niagara 4100 only.
ViewCast 1
Page 8

About This Guide
Convention
Description
Example
Bold text
Characters to enter when
referenced in a procedure. The
name of fields or keys to press.
Enter DTMF as the group type.
Press Enter to save all your
changes.
Note:
Provides supplemental
information.
Note: The prompt may not
display if …
IMPORTANT!
Provides important data that
affects how the system or
software responds.
IMPORTANT! You must install
Niagara SCX prior to
configuring SCX options…
WARNING!
Provides information to ensure
you avoid potential injury,
death, or permanent system
damage.
WARNING! Do not touch
exposed wires.
CAUTION!
Provides information to help
avoid possible damage to
hardware or a system crash
(without data loss).
CAUTION! Use case sensitive
commands to keep from
destroying…
Conventions for this guide
This guide uses the document conventions specified below to help you identify different types of
information.
2 ViewCast
Page 9

Rack mount safety instructions
Operating Temperature
The operating ambient temperature of a rack environment may
be greater than room ambient if installed in a closed or multi-unit
rack assembly. Therefore, you should install the equipment in an
environment compatible with the maximum ambient
temperature of 40° C.
Reduced Air Flow
You must not compromise the airflow required for safe
equipment operation when you install the equipment in a rack.
Mechanical Loading
Mounting of the equipment in the rack should be such that you
do not cause a hazard due to uneven mechanical loading.
Circuit Overloading
Consider the connection of the equipment to the supply circuit
and the effect that the overloading of the circuits might have on
current protection and supply wiring. You must also consider and
use the equipment nameplate ratings when you address this
concern.
Reliable Earthing
You must maintain reliable earthing of rack-mounted equipment.
Pay particular attention to supply connections other than direct
connections to the branch circuit (such as using power strips).
Niagara 4100 User Guide
ViewCast 3
Page 10

About This Guide
FCC notice
WARNING! You must connect this device and peripherals using shielded cables to comply with FCC
radio emission limits.
WARNING! Modifications to this device not approved by ViewCast Corporation could void the FCC-
granted authority for you to operate the device.
WARNING! The Niagara 4100 complies with the limits for a Class A digital device pursuant to Part 15
of the FCC Rules. These limits provide reasonable protection against harmful interference when you
operate the equipment in a commercial environment. This equipment generates, uses, and may
radiate radio frequency energy and, if not installed and used in accordance with the instruction
manual, may cause harmful interference to radio communications. Operation of this equipment in a
residential area will likely cause harmful interference. In this case you must correct the interference
at your own expense.
To CATV Installer: Pay special attention to Section 820-40 of the NEC that provides guidelines for
proper grounding. It particularly specifies that you must connect the cable ground to the grounding
system of the building as close to the point of cable entry as practical.
WARNING! Equipment installation must comply with local and national electrical codes.
4 ViewCast
Page 11

Environmental notices
Product Disposal
Information:
Dispose of this product in accordance with local and
national disposal regulations (if any) including those
regulations governing the recovery and recycling of Waste
Electrical and Electronic Equipment (WEEE).
RoHS Compliant:
ViewCast Corporation commits to compliance with the
European directive on the Restriction of the Use of Certain
Hazardous Substances in Electrical and Electronic
Equipment, Directive 2002/95/EC, the RoHS directive.
This product supplied to the European Union does comply
with the RoHS directive. ViewCast certifies that this
equipment shipped to the European Union conforms to the
2002/95/EC directive.
For current RoHS statement, see www.viewcast.com.
Underwriters Laboratories
Inc. Statement
Underwriters Laboratories Inc. has not tested the
performance or reliability of the security or signaling
aspects of this product. UL only tested for fire, shock, and
casualty hazards as outlined in UL’s Standard for Safety UL
60950-1. UL Certification does not cover the performance
or reliability of the security or signaling aspects of this
product.
UL does not represent, warranty, or certify the
performance of reliability of any security or signaling
related functions of this product.
Niagara 4100 User Guide
ViewCast 5
Page 12

About This Guide
Warnings
Only trained and qualified personnel should install, replace, or service this equipment.
Do not attempt to open the case of the appliance. If you do, you incur a high risk of electrical shock that
may cause damage to the appliance or personal physical injury or death to you and/or others. No userserviceable parts exist inside the appliance. If you open the appliance case or make unauthorized
changes to the case, ViewCast voids your warranty.
Install the appliance away from any heat sources. This remains vital to the safety of the product users.
Do not install the appliance near any heat sources such as:
Radiators
Heat registers
Stoves
Other heat-producing equipment
WARNING! Installing the appliance near heat sources could result in personal injury or death.
Never insert objects of any kind into the appliance through any appliance openings, as the objects
may touch dangerous voltage points, short out parts, and result in a risk of fire or electrical shock.
Do not stack the appliance atop or below other electronic devices as this can cause heat build-up and
vibration of the appliance. These conditions can damage the appliance thereby voiding the limited
warranty.
You may stack multiple Niagara 4100 units as these appliances accommodate stacking.
Do not install the appliance in any area where the temperature is less than 5°C or more than 40°C.
Transfer from temperature extremes may cause condensation. Let the appliance remain unplugged at
room temperature for at least 45 minutes before connecting it.
Use an outlet with surge suppression or ground fault protection when using the appliance. Unplug the
power cord from the wall outlet and disconnect the lines between the appliance and the video source
for added protection:
During a lightning storm
During dangerous weather conditions
When the encoder remains unattended or unused for long periods
Reduce the risk of fire or electric shock. Do not expose the appliance to any rain or moisture. Exposing
the appliance to rain or other types of moisture could result in appliance damages. Do not place any
liquids on or near the appliance. If you place liquids in any form on or near the appliance, do so at your
own risk, for you incur a high risk of electrical shock that could occur and cause damage to the
appliance.
WARNING! Exposing the appliance to rain or other types of moisture could result in physical injury or
death. Any liquids on or near the appliance may result in electrical shock and personal injury or
death.
6 ViewCast
Page 13

Niagara 4100 User Guide
Refer all servicing to authorized service personnel. You must have authorized personnel only service any
damaged appliance. Relevant damage may occur with but is not limited to the following:
An unplugged or damaged power supply cord
Spilled liquid on the appliance
Fallen objects in or on the appliance
Appliance exposure to rain or other moisture or liquid
Failure to perform as described in the User Guide
A dropped appliance
ViewCast assumes no liability or responsibility for any damaged appliance that clients continue using.
Use only attachments, accessories, or equipment specified by the manufacturer with the appliance.
Using accessories or attachments not recommended by the encoder manufacturer voids the Limited
Warranty.
WARNING! When using 4-pin XLR to cigarette car plug cables, do not disconnect the car battery
adaptor or turn off the car engine before you turn off the player. Doing so may damage the player.
Do not attempt to service the appliance yourself. If you open or remove covers, you may be exposed to
dangerous voltage. Such action voids the Limited Warranty. Refer all servicing issues to authorized
service personnel only.
The plug-socket combination that serves as the main disconnecting device must be accessible at all
times.
Protect the power cord from anyone walking on it and being strained or pinched particularly at plugs,
electrical receptacles, and the point where the power cord exits the appliance.
Do not use adapter plugs or remove the grounding prong from the power cable.
Use only the type of power source indicated on the marking label on the back panel of the unit to
operate the appliance. Unplug the appliance power cord by gripping the plug and removing it from the
power source. Do not pull the cord to remove the power source from the appliance.
Do not plug the appliance into a wall outlet that contains an overload of electrical cords or power
strips/extension cords. This type of overload may result in fire or electrical shock risks.
Always handle the appliance carefully. Always avoid excessive shock and vibration to the appliance.
Excessive shock or vibration can damage the appliance.
WARNING! Excessive shock or vibration to the appliance may result in electrical shock and personal
injury or death.
ViewCast 7
Page 14

Page 15

Niagara 4100 User Guide
Overview
Before you can use your Niagara 4100 streaming media appliance, you first need to set up and configure
it. This chapter is dedicated to providing you with the details and step-by-step instructions you need to
make your installation as quick and easy as possible.
All you need to get started are the four following requirements:
AC power source (100 - 240 V)
Your audio and video source (such as a camera, video player, or other A/V output device)
A streaming media server or hosting provider
IP connection and/or Internet connection
The Niagara 4100, an easy-to-use streaming device, allows you to:
Connect to a compatible browser on a dynamic host configuration protocol/domain name server
(DHCP/DNS) network.
Configure and connect your audio and video source to the Niagara 4100.
Select your output formats and streaming settings.
Enter your streaming server information.
Start streaming your media.
You can configure and use the Niagara 4100 straight from the box for any streaming activities. Use the
web interface for setting options and controlling your Niagara 4100 from another networked computer,
as well as more advanced options.
WARNING! Read the installation instructions before connecting the system to the power source.
Media appliance functions
Although it has many features and capabilities, the Niagara 4100 streaming media appliance performs,
in its most basic functions, as follows:
Takes analog audio and SDI video inputs
Captures the signals
Encodes the signals into digital IP video formats
Delivers the IP audio and video content to a storage device or streams it over an IP network
ViewCast 9
Page 16

Overview
Appliance
Niagara 4100
Power Cables
One of the following:
o North America power cable (110 vac)
o International power cable (220 vac)
o UK power cable (220 vac)
AC to DC converter
Guides
Package insert (end-user license agreement, welcome letter,
package content list)
User guide (on CD in PDF format)
Quick Start Guide
Software
1 Niagara 4100 CD
Hardware
Rugged carrying case
Install overview
This section addresses the high-level actions you must perform to physically connect and set up your
Niagara 4100 system.
You must complete the following primary tasks to install the Niagara 4100:
Address and comply with all prerequisites.
Connect the Niagara 4100 streaming media appliance using its power source.
Connect the video source (camera or video recorder) to the system.
Connect the Niagara 4100 to an IP network.
Configure the Niagara 4100 system.
Prerequisites
Before installing and connecting the Niagara 4100, ensure you comply with the following prerequisites:
All packaged items are undamaged and in working order.
Your environment meets all system requirements.
Safety instructions, notices, and warnings detailed in About This Guide including:
o Rack Mount Safety Instructions
o FCC Notice
o Environmental Notices
o Warnings
Package contents
Completely unpack all contents from the box and inspect each item for damage. Ensure that you have all
the components listed below:
10 ViewCast
Page 17

Niagara 4100 User Guide
Browser Interface
Any Internet Explorer (IE)-based computer, workstation, or laptop that
interfaces to a dynamic host configuration protocol/domain name
server (DHCP/DNS)-compatible network
User Interface
High-speed Internet, dial-up, and mobile device users
If any components are missing or damaged, do not continue with the installation. Contact the ViewCast
reseller from which you purchased your Niagara 4100 streaming media appliance for assistance in
obtaining any missing parts or for parts replacement.
System requirements
Ensure your computer meets the following system requirements.
Specifications
Intel i7 processor
4 GB RAM or larger
HDD (160 GB or larger)
Osprey 710e HD technology
4.5” H x 8” W x 12” D)
8 lbs (3.6 kg)
90 W power supply
Installing additional software
The Niagara appliances run an embedded version of the Microsoft Windows 7 operating system (OS),
which is a sub-set of the normal retail version. The Microsoft License agreement limits the use of the
system to what the machine is designed to do.
The Microsoft Update process is turned off by default to prevent interruptions during live streaming
events. It is also not advised to use a Windows 7 installation CD to add features to the system or the
appliance may fail.
You may load additional software on the appliance; however, ViewCast does not support this additional
software. You also need to ensure the primary drive is not full or the appliance will fail. In the event of a
problem, you may need to perform a Factory Restore, which returns the appliance to the original
software load. You may save the current encoder profiles and reload them when the Factory Restore is
complete.
You can perform a Factory Restore at any time. This process returns the appliance to the software load
that came with the appliance. Perform a Factory Restore if the appliance becomes unstable due to
installed applications, viruses, etc. Please refer to the user guide for instructions.
ViewCast Support can provide assistance should the appliance fail to start. In most cases, you can
restore an appliance to operation without returning it to ViewCast. There is a fee in the event a user
returns an appliance due to applications the user installed or if the appliance failed because the primary
partition (drive C) is full.
ViewCast 11
Page 18

Overview
Connecting to the Internet
The Internet is a dangerous place. Never connect a Niagara appliance directly to the Internet. Always
use a router. A basic router is sufficient to protect the appliance and you can configure the router as
needed to forward specific ports to the appliance. The router’s bandwidth should match or exceed the
speed of the appliance’s network card.
The Shields Up test by Gibson Research (http://www.grc.com/intro.htm) is a good utility to verify you do
not expose the Niagara appliance to the Internet. Select to test All service ports. The utility queries the
appliance’s outside IP address for all service ports less than 1056. All of these ports should report as
Stealth and the analysis should show the tests have passed. Ports the router has forwarded show as
open. This is OK and you should consider the test as passed.
12 ViewCast
Page 19

Niagara 4100 User Guide
A
Press this button once to power up the appliance. When the appliance is powered up,
press this button once will power it down.
B
Allows exporting files to USB devices and installing updates or firmware.
C
Indicates audio input presence.
D
Allows headphones to be connected to the appliance for audio monitoring.
E
Controls the audio level on the headphones.
F
Press this button to stop an encoder when it is highlighted on the LCD display.
G
Press this button to start the encoder highlighted on the LCD display.
H
These buttons are used for EASE menu navigation on the LCD display.
I
Press this button to enter or accept the menu choice highlighted on the LCD display.
This button is used for EASE menu operations.
J
Press this button to activate the EASE menu on the LCD display.
K
When the Alarm Light indicator is lit, press this button to view a log of the most recent
alarms recorded.
Press Enter to clear these alarms from the log.
L
Displays menus and system messages.
M
This light indicates when the appliance detects that a video source is connected to one of
its video inputs.
Note: This light only illuminates when you start an encoder.
N
Indicates that another user is accessing the appliance across the network from a
computer.
O
Indicates that an application alert has occurred.
P
When an encoder profile is assigned to one of these buttons, press the assigned button
and then Stream to start the encoder.
Press the assigned button and then Stop to stop the encoder.
Niagara 4100 front panel diagram
You should familiarize yourself with the front panel controls for the Niagara 4100 (Figure 2). Besides the
basic buttons for power, start/stop, up/down and menu access, there are indicator lights that are
hidden until illuminated.
Figure 2. Niagara 4100 front panel
ViewCast 13
Page 20
Overview
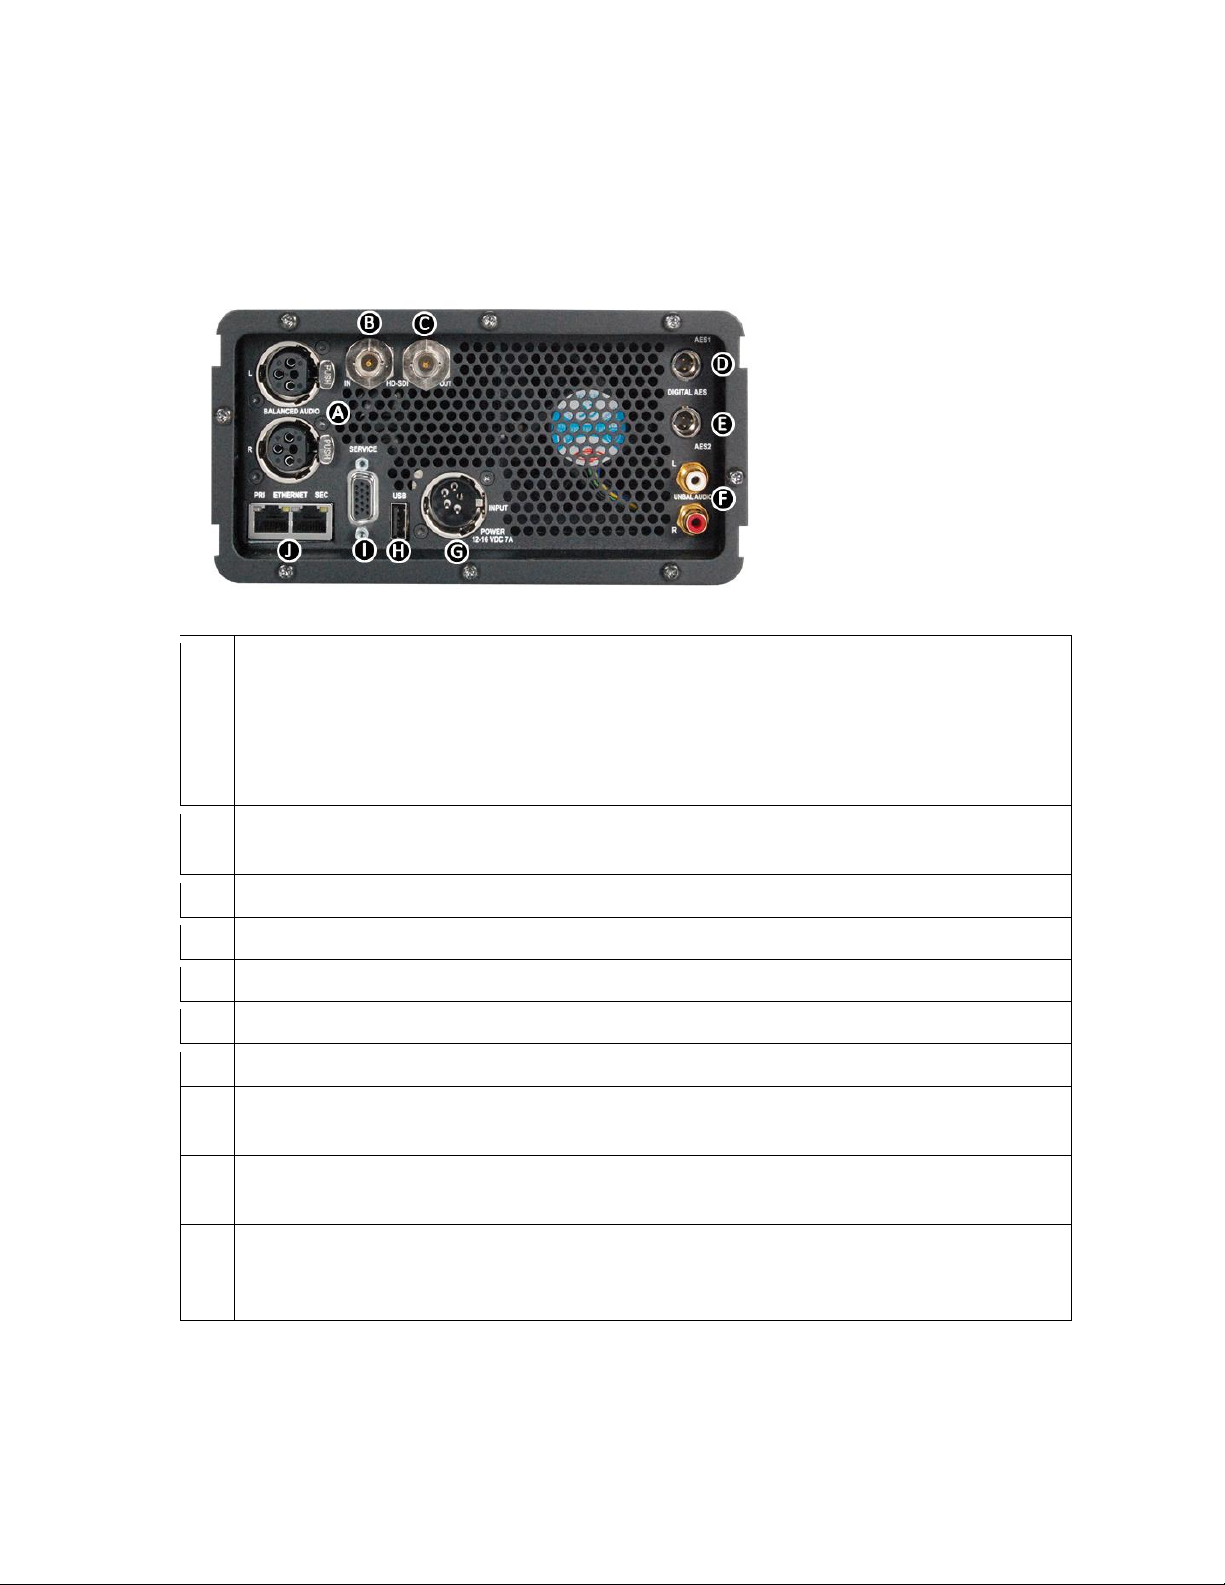
A
Left/right XLR connector for balanced audio sources. XLR connectors are used by
professional audio engineers and are found on high-end audio and video playback
equipment.
Note: A microphone preamplifier or mixer with XLR preamp functions is required to
connect an XLR microphone to the balanced audio input.
B
Receives high-definition SDI video to the unit. This SDI input allows professional-grade video
connections.
C
Transmits high-definition SDI video from the unit.
D
Digital AES audio 1.
E
Digital AES audio 2.
F
Left/right RCA connectors for unbalanced audio sources.
G
Provides system power.
H
Connects USB control devices, such as a memory card (USB memory device, keyboard, and
mouse).
I
Use this auxiliary VGA output port to connect an external VGA monitor so you can view the
operating system interface.
J
Dual Ethernet ports provide redundant connections to your network to connect a video test
signal, such as a color bar generator, to calibrate the video settings for video capture
settings.
Niagara 4100 back panel diagram
Refer to Figure 3 for all the connectors and other components of the Niagara 4100 back panel.
Figure 3. Niagara 4100 back panel
14 ViewCast
Page 21

Niagara 4100 User Guide
1.
Connect to the SDI digital input for video and audio (item B on Figure 3). Ensure you have a
tight connection.
2.
Connect the power adaptor (item G on Figure 3).
3.
Attach the Niagara 4100 to the network input (item J on Figure 3).
4.
Press Power (item A on Figure 2).
Connecting the Niagara 4100
Follow the steps in below to configure all Niagara 4100 connections. The example uses SDI video and
audio. The following steps refer to a direct connection to the Niagara 4100 only.
To connect the Niagara 4100:
ViewCast 15
Page 22
Overview
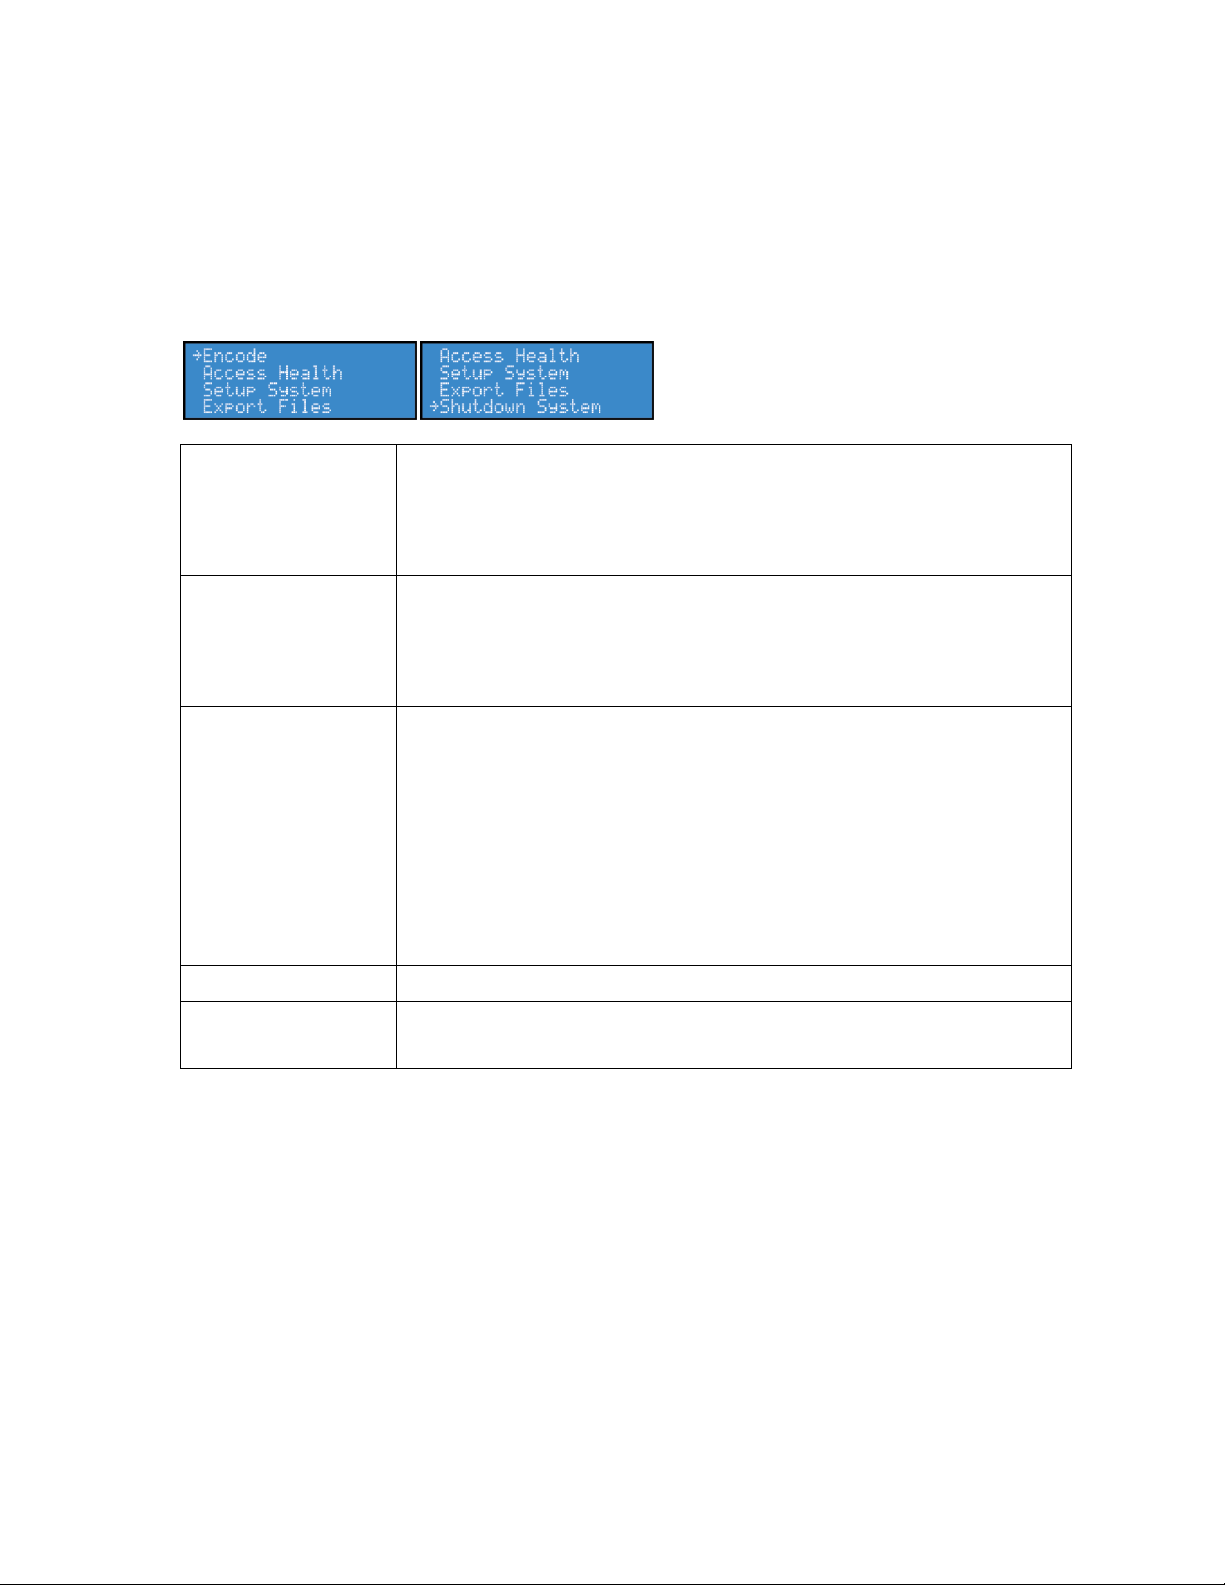
Encode
Start an encoding session.
Stop an encoding session.
View the status of an encoding session.
Shut down Niagara 4100.
Access Health
Check the CPU status.
View available memory.
Check the temperature of the unit.
Check the versions.
Setup System
Set the Preset A,B,C buttons.
View network settings.
Configure primary or secondary settings.
View link status.
Set the network MAC address.
Set time and date.
Set the video standard.
Perform a factory restore.
Export Files
Export files to a USB memory device.
Shutdown System
Restart system.
Power off system.
Niagara 4100 EASE menu
The Niagara 4100 EASE menu (Figure 4) is located on the LCD panel on the front of the unit. The menu
allows you to quickly and easily configure the Niagara 4100. You use the Up and Down arrow buttons to
navigate through the different functions on the EASE menu.
Figure 4. EASE menu
16 ViewCast
Page 23
Niagara 4100 User Guide
Home
View general administrative information about the ViewCast
Niagara 4100.
Use the menu bar commands.
All Encoders – View the encoder profiles available to start on
the encoder box.
Preset A – Assign a loaded encoder profile to the A button on
the front panel of the Niagara 4100.
Preset B – Assign a loaded encoder profile to the B button on
the front panel of the Niagara 4100.
Preset C – Assign a loaded encoder profile to the C button on
the front panel of the Niagara 4100.
Groups - Manage specific encoders assigned to groups.
Niagara 4100 Properties – View details on the Machine
Properties of the Niagara 4100 including the Network Name,
Serial Number, and all software versions installed.
Alerts – Modify the settings for each application alert Niagara
4100 can generate during normal operations.
Network Properties – View information on Niagara 4100
network properties and addresses for both NIC ports and
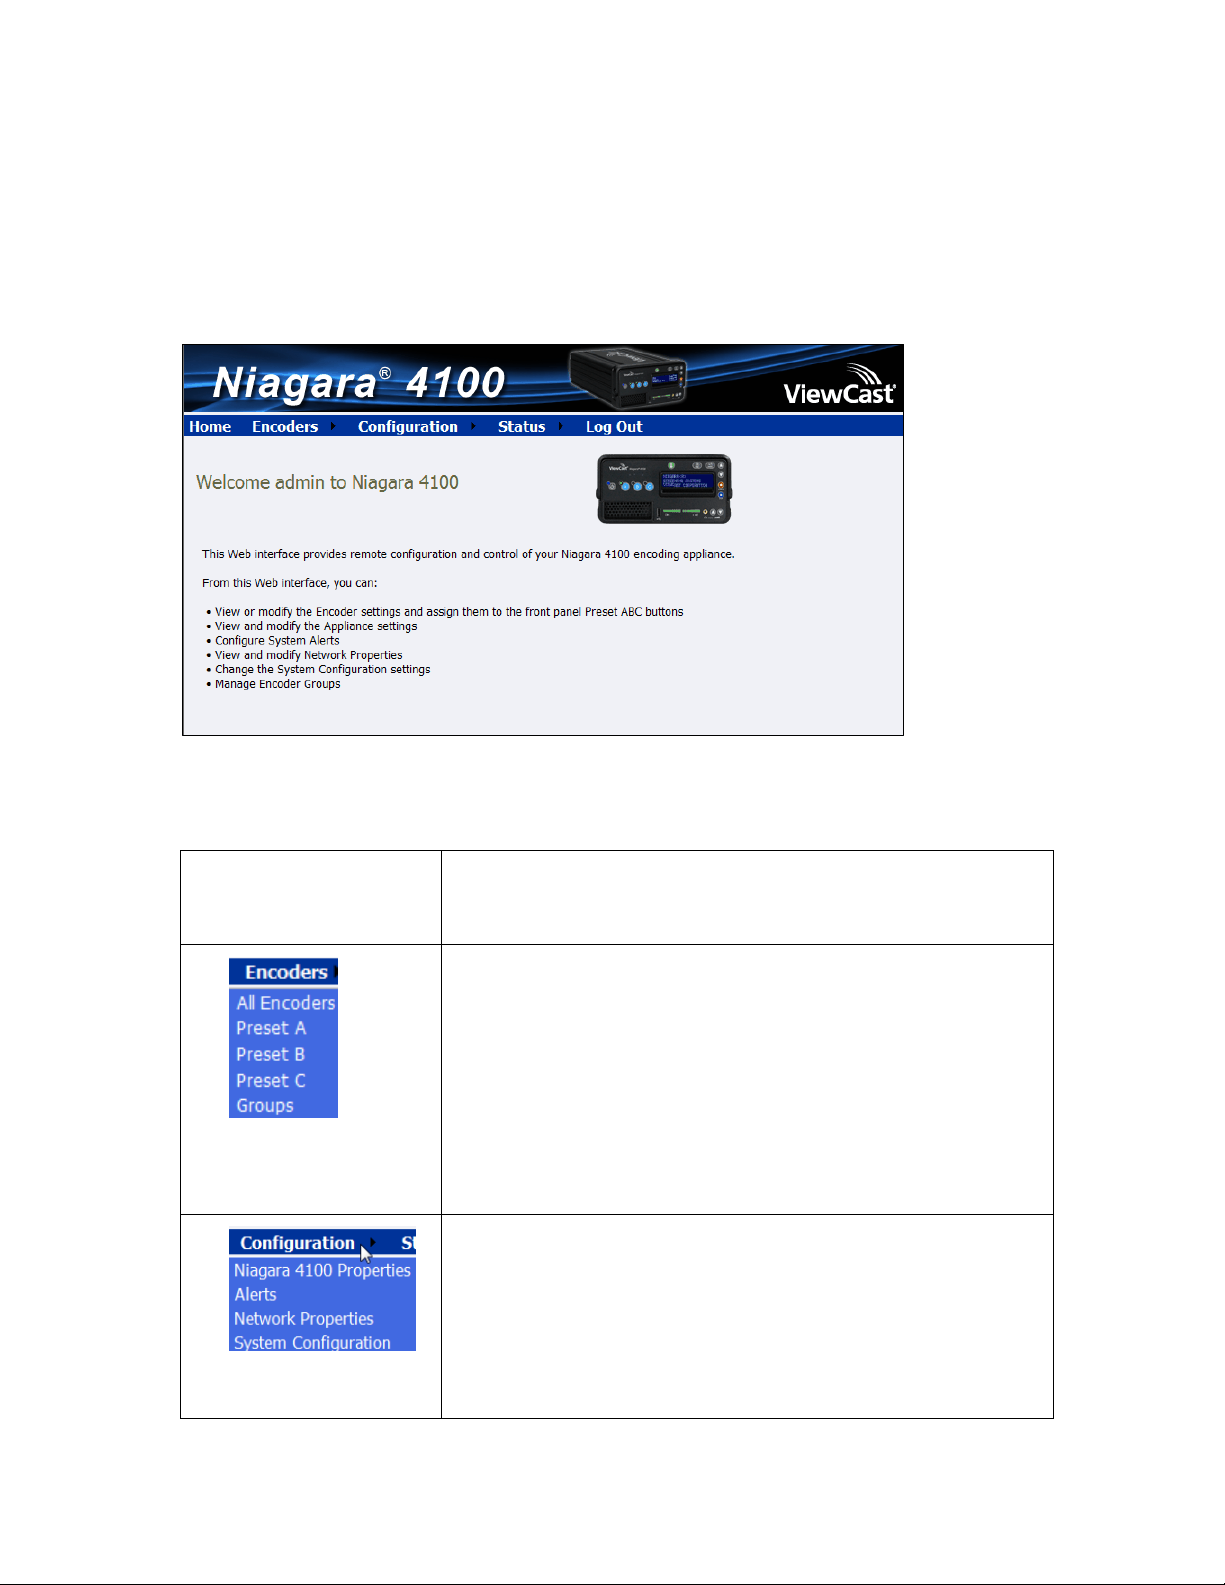
Niagara 4100 home page
The home page (Figure 5) is the first page that appears after you log into the Niagara SCX Remote
Management Software. From this page, you can access the different windows for configuring,
controlling, and monitoring the activities and alerts from the Niagara 4100.
Figure 5. Niagara 4100 home page
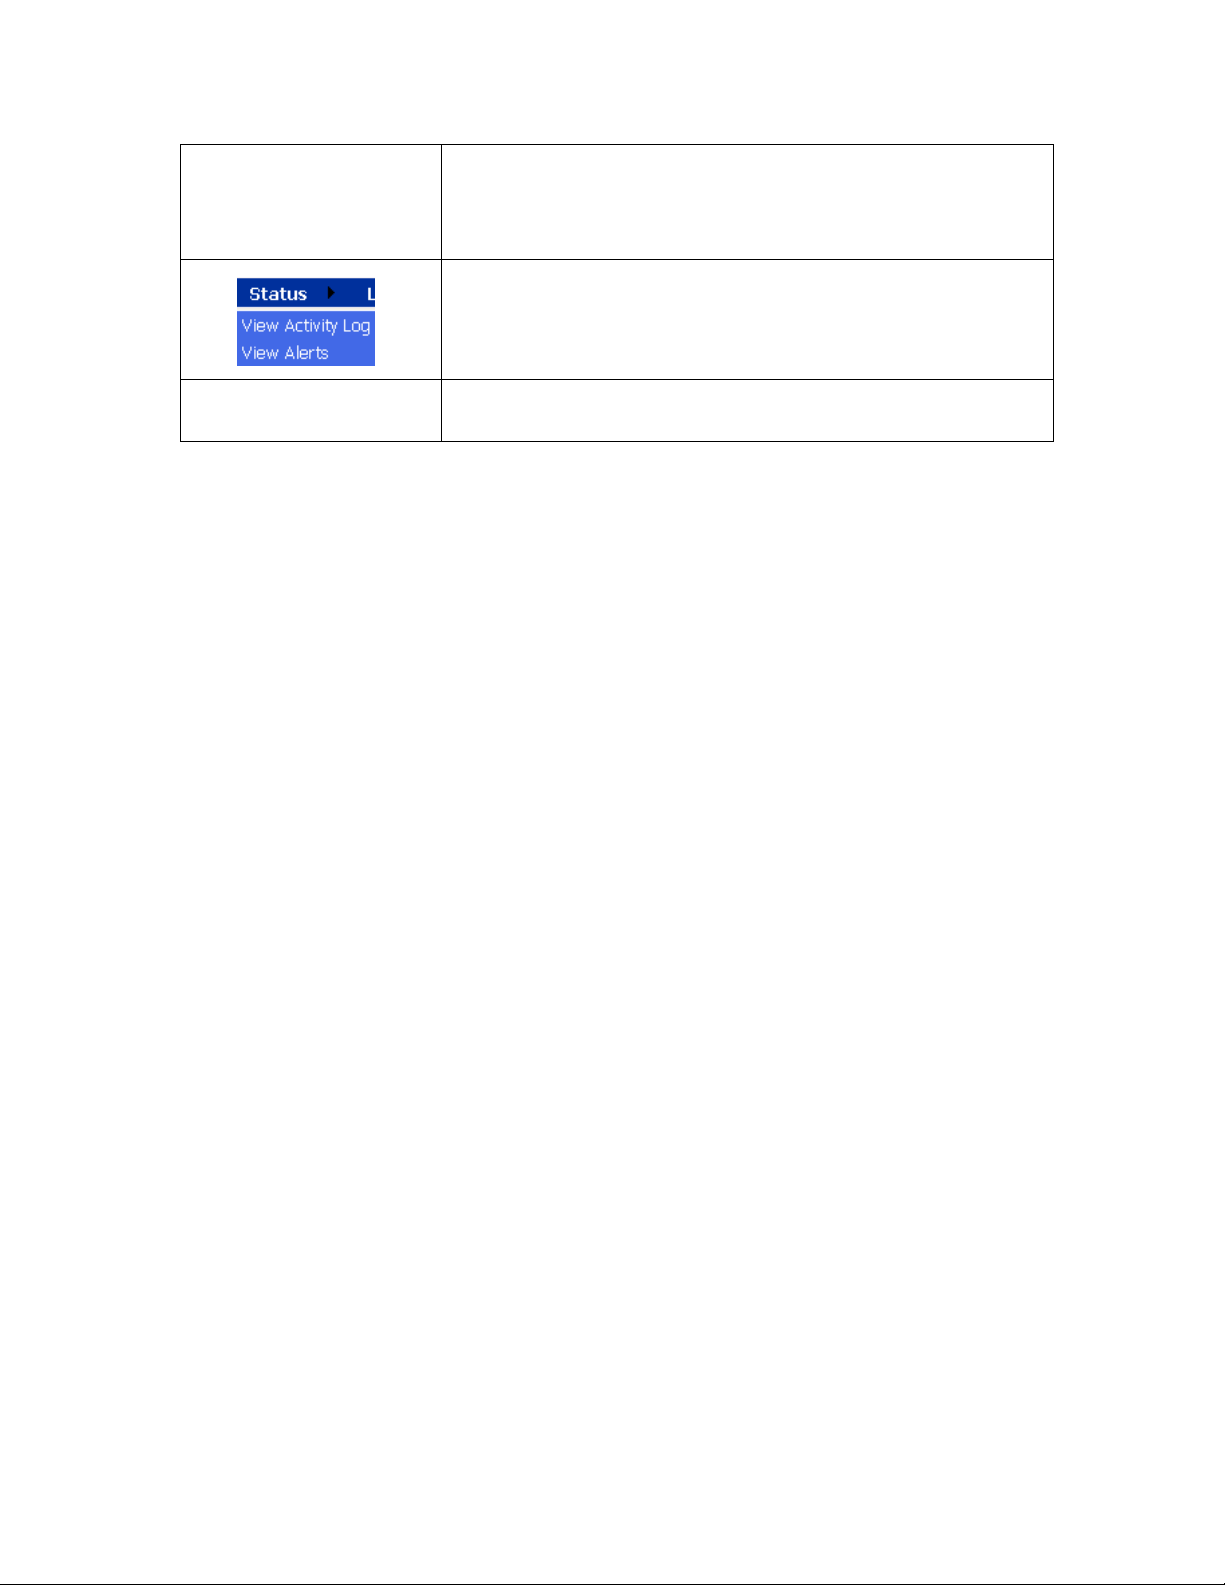
Menu bar commands
The home page menu bar allows you to use the menu bar commands.
ViewCast 17
Page 24
Overview
modify these properties.
System Configuration – Modify the system configuration
including setup for email alerts from Niagara 4100 whenever
it encounters an operation error.
View Activity Log – View all Niagara 4100 activities including
the time and date for each event.
View Alerts – View all alerts including the time and date for
each alert.
Log Out
Log out of the Niagara 4100 and return to the website login
screen.
18 ViewCast
Page 25
Niagara 4100 User Guide
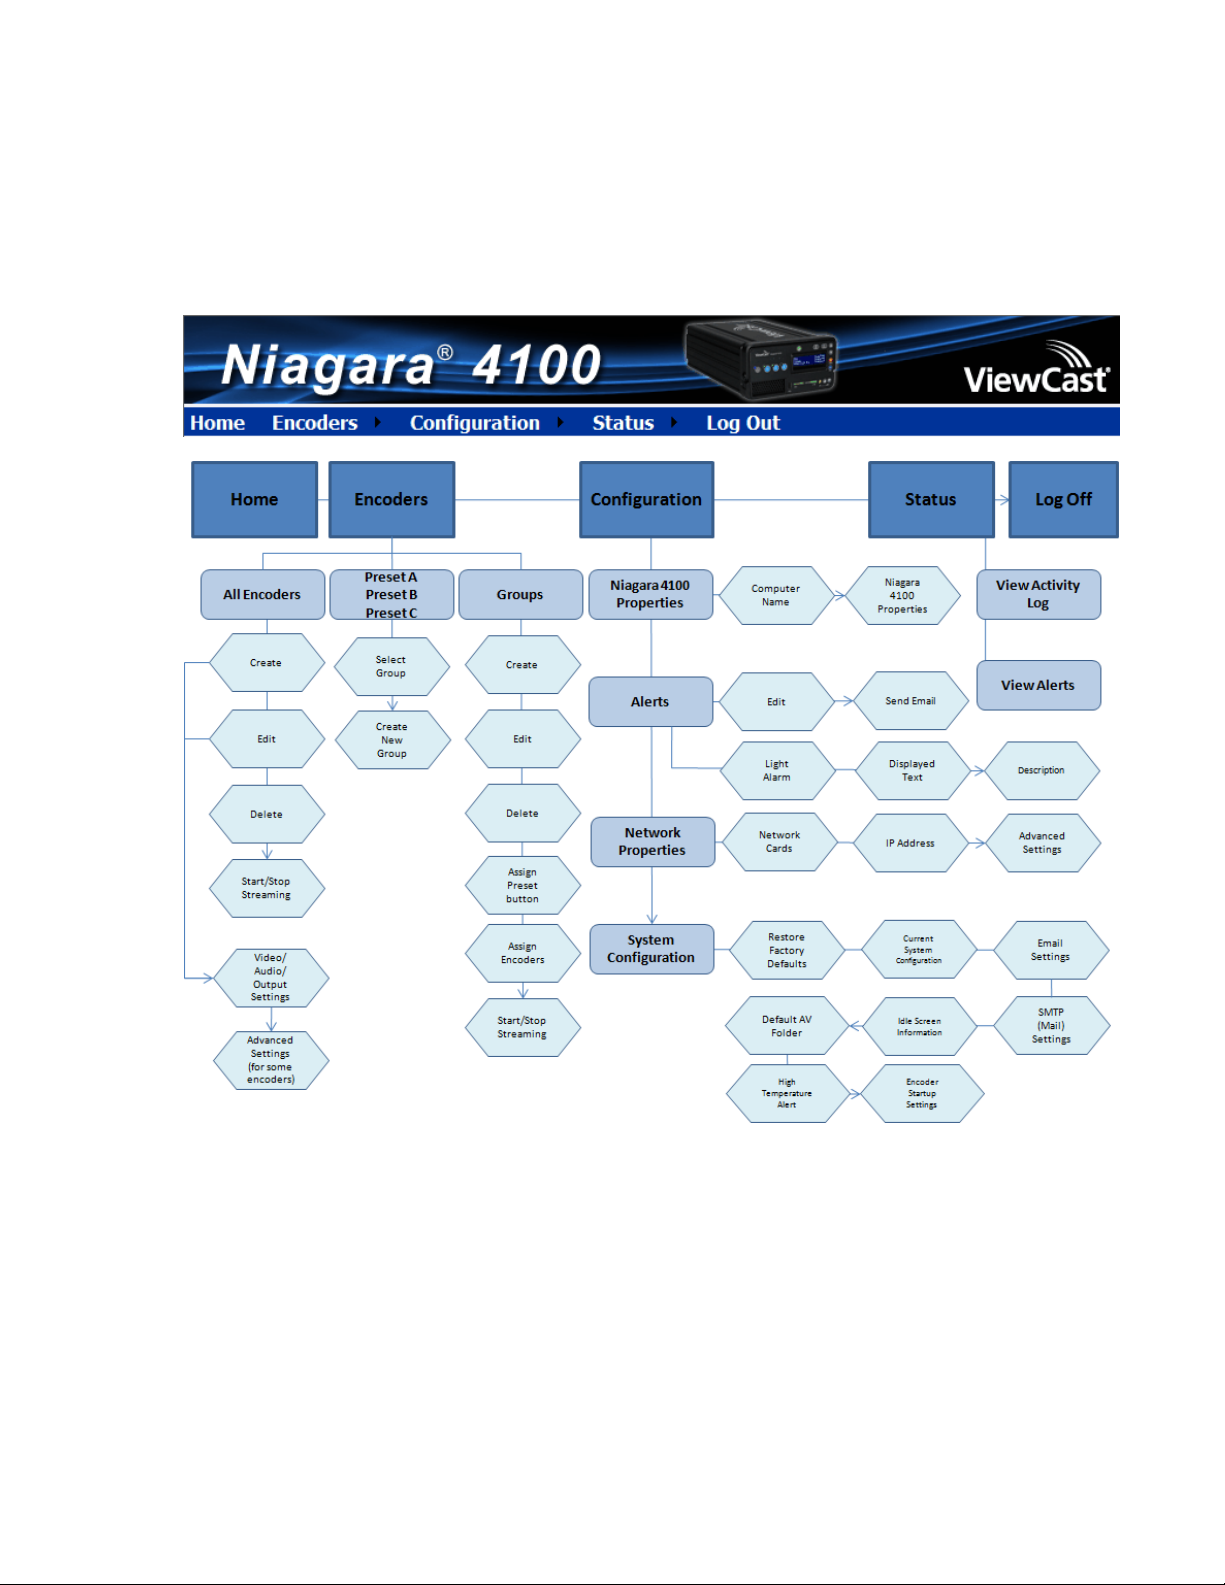
Niagara 4100 browser windows flow
Figure 6 shows the interrelationship and flow of the available windows you may use to configure the
Niagara 4100.
Figure 6. Niagara 4100 browser window
ViewCast 19
Page 26

Page 27

Niagara 4100 User Guide
Easy Setup
You use two interfaces to operate your Niagara 4100 streaming media appliance.
Niagara 4100 front panel LCD display and buttons
Web interface through Niagara SCX remote management software
Most of the basic operations can be performed from the front panel of the Niagara 4100 streaming
media appliance.
You should perform most setup and operations by accessing the Niagara SCX web interface from a
computer that resides on the same network as your Niagara 4100 appliance.
With the web interface, you can customize your encoding settings and assign specific encoding profiles
to the Preset ABC buttons on the front panel. The web interface provides the ability to control your
Niagara 4100 remotely from a computer that can be rooms or continents away from the system
provided that both your Niagara 4100 and the computer have Internet access to communicate with each
other.
The easy setup option explores the optimal configurations for the novice user to easily and quickly set
up the Niagara 4100. Easy setup includes actions you can perform on your Niagara 4100 streaming
media appliance using the web interface to include configuring the following:
Encoder settings
Groups
Network properties
Machine properties
System configuration
System alerts
ViewCast 21
Page 28

Easy Setup
Web interface
The web interface presents a logical flow of configuration information for the encoding appliance. Refer
to Figure 6 for a diagram and menu bar commands which include:
Home
Encoders
o All Encoders including encoder properties
o Presets A, B, and C
o Groups
Configuration
o Niagara 4100 Properties
o Alerts
o Network Properties
o System Configuration
Status
o Activity Log
o Alerts
Log Out
22 ViewCast
Page 29

Niagara 4100 User Guide
1.
Attach the block end to the power input located on the Niagara 4100 AC/DC adapter.
2.
Plug the other end of the cable into a wall outlet or surge protection enabled power strip
connected to a wall outlet or other common power source.
Easy first time set up
You should read all instructions, notices, and warnings in the About This Guide section prior to getting
started with your new Niagara 4100 hardware for the first time. Also, ensure you have all required parts
and meet all system requirements before installing this product.
Do not continue with the installation if you find any components missing or damaged. Contact the
ViewCast reseller where you purchased your Niagara 4100 system for assistance in obtaining any
missing or replacement parts.
Connecting to an electrical power source
Niagara 4100 ships with one of the following power cables:
North America power cable
International power cable
UK power cable
To connect the power source:
WARNING! The plug-socket combination must remain accessible at all times as it serves as the main
disconnecting device.
Do not work on the system or connect or disconnect cables during periods of lightning activity.
WARNING! When using 4-pin XLR to cigarette car plug cables, do not disconnect the car battery
adaptor or turn off the car engine before you turn off the appliance. Doing so may damage the
appliance.
ViewCast 23
Page 30
Easy Setup
1.
Ensure that you connect all devices (power cords, appliances, streaming devices, etc.) to the
Niagara 4100.
2.
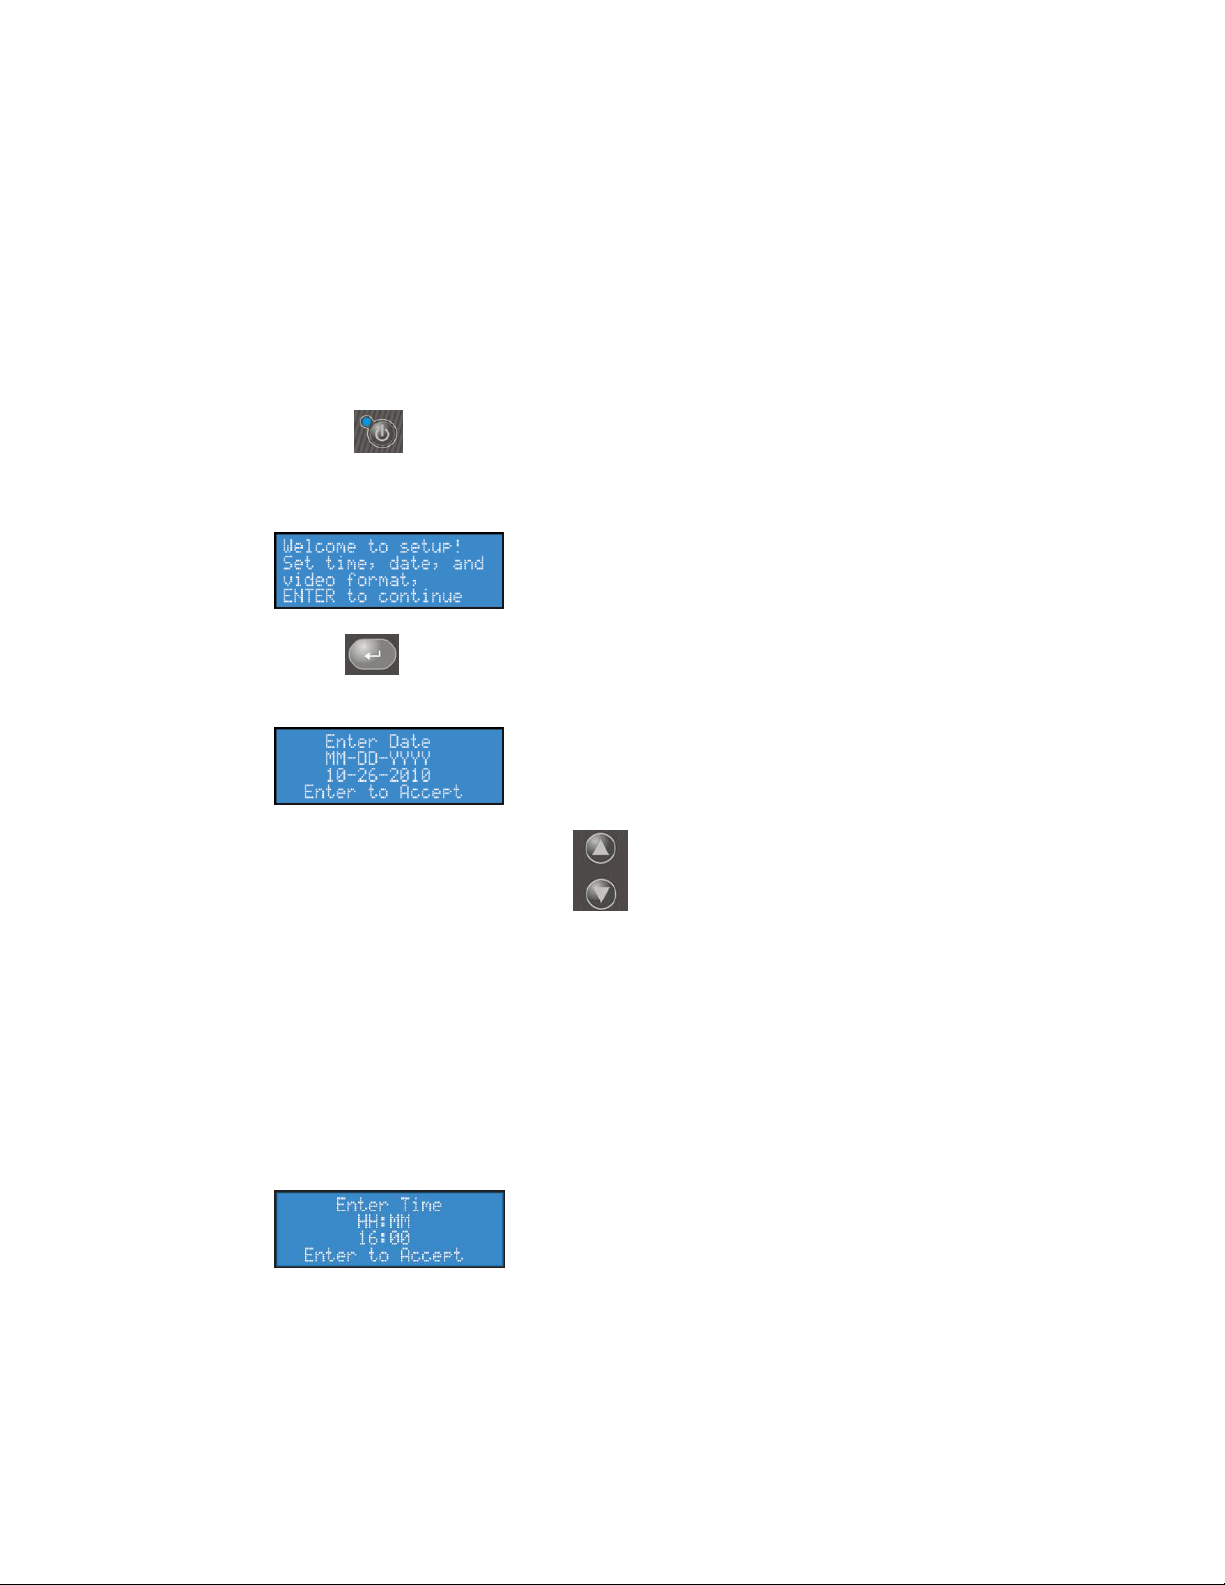
Press Power on the front panel to start the Niagara 4100. The LCD readout displays the
welcome screen (Figure 7).
Figure 7. Initializing messages
3.
Press Enter . The system prompts you to set the date (Figure 8).
Figure 8. Date screen
4.
Use the Up and Down arrow buttons to change the numerical value of the month.
5.
Press Stop to move to the field to the left. Press Stream to move to the field to the right.
6.
Use the Up and Down arrow buttons to increment the numerical value of the day and year.
Note: If you want to change a previous setting, continue pressing Stream until the cursor cycles
around to the desired field.
7.
Press Enter to accept the settings and move to the next screen to set the system clock (Figure
9). Niagara 4100 uses a 24-hour clock format for its system clock entries.
Figure 9. Time screen
8.
Use the Up and Down arrow buttons to change the numerical value of the hour.
9.
Press Stream to enter the value and move to the Minute field.
10.
Use the Up and Down arrow buttons to change the numerical value of the minute.
Performing the initial start up
The first time you power up the Niagara 4100, a series of menus appear on the LCD display that will
assist you in setting up the system clock, date, and video input format (NTSC (North America/Japan) or
PAL).
The steps below refer to a direct connection to the Niagara 4100 only.
To perform the initial start up:
24 ViewCast
Page 31
Niagara 4100 User Guide
11.
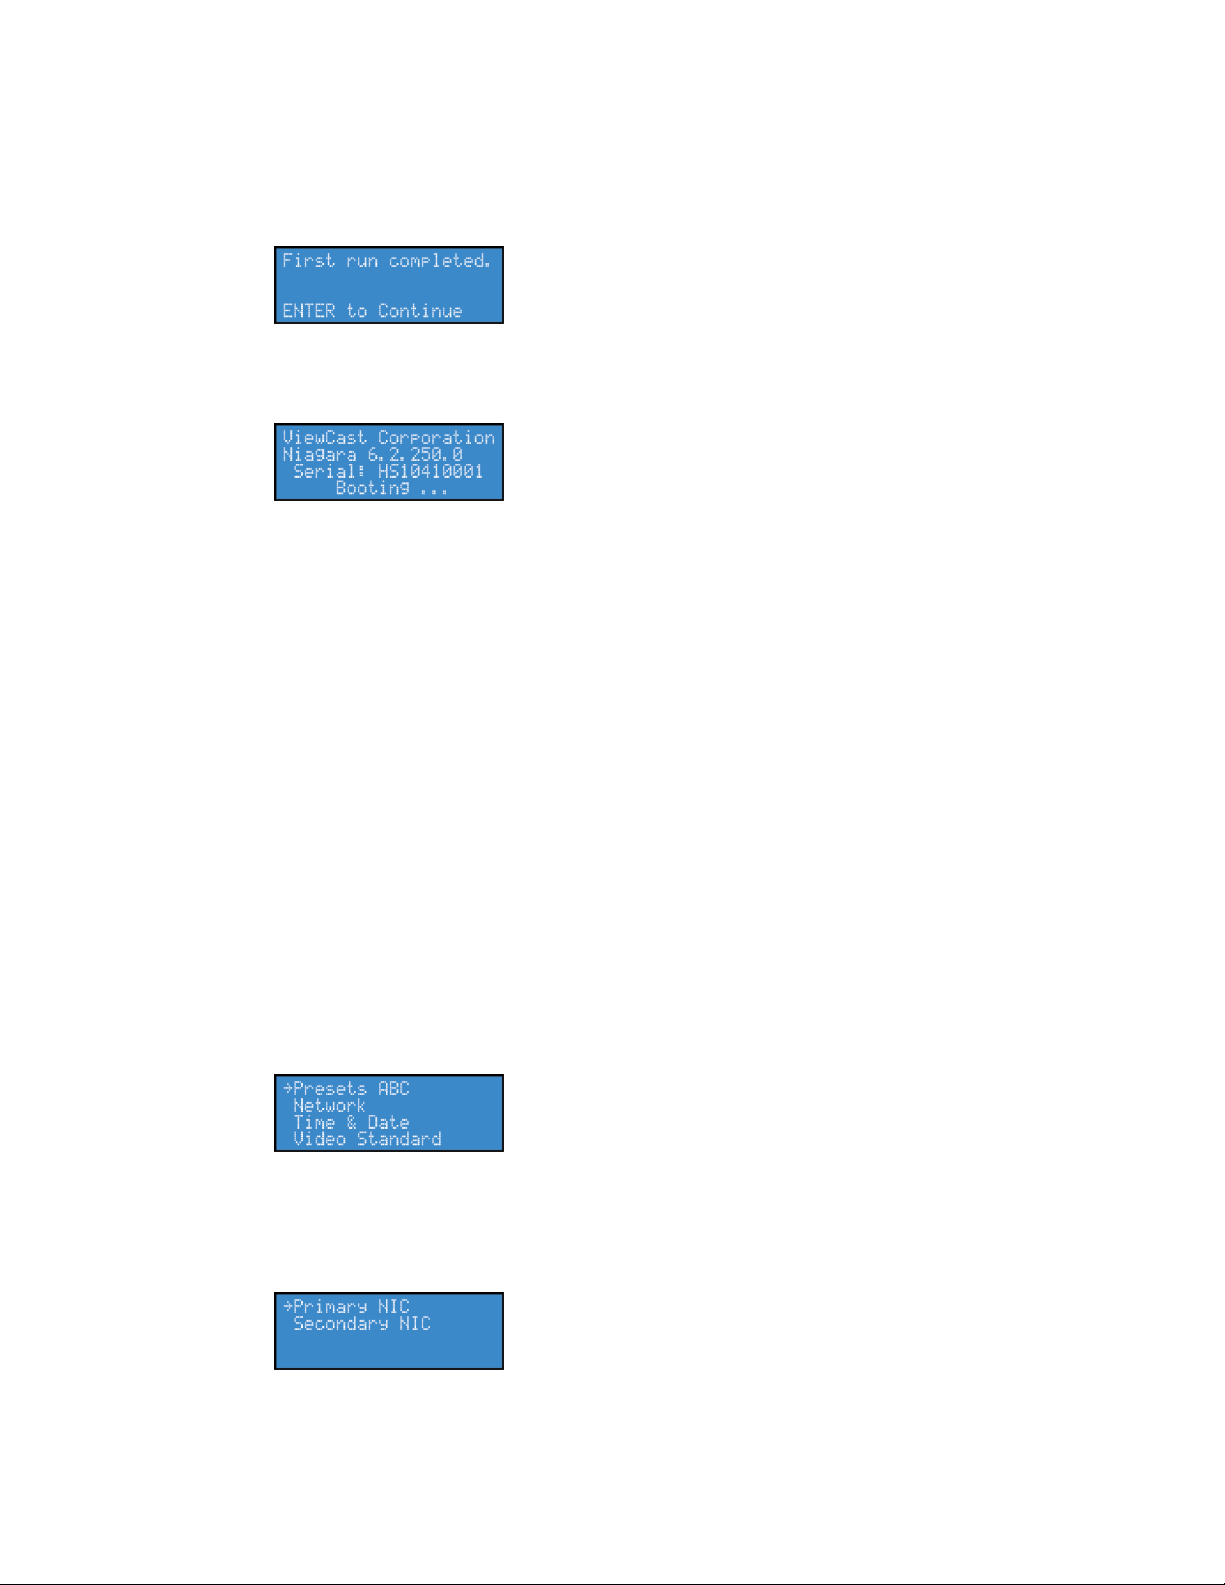
Press Enter to set the format. The screen appears (Figure 10) confirming you have successfully
set up your Niagara 4100.
Figure 10. Confirmation screen
12.
Press Enter to exit the setup menu and reboot the appliance. The following screen appears:
Figure 11. Booting screen
1.
Press Menu. The EASE menu appears.
2.
Use the Up and Down arrow buttons to select the Setup System option.
3.
Press Enter. The setup menu displays (Figure 12).
Figure 12. Setup menu
4.
Use the Up and Down arrow buttons to select Network.
5.
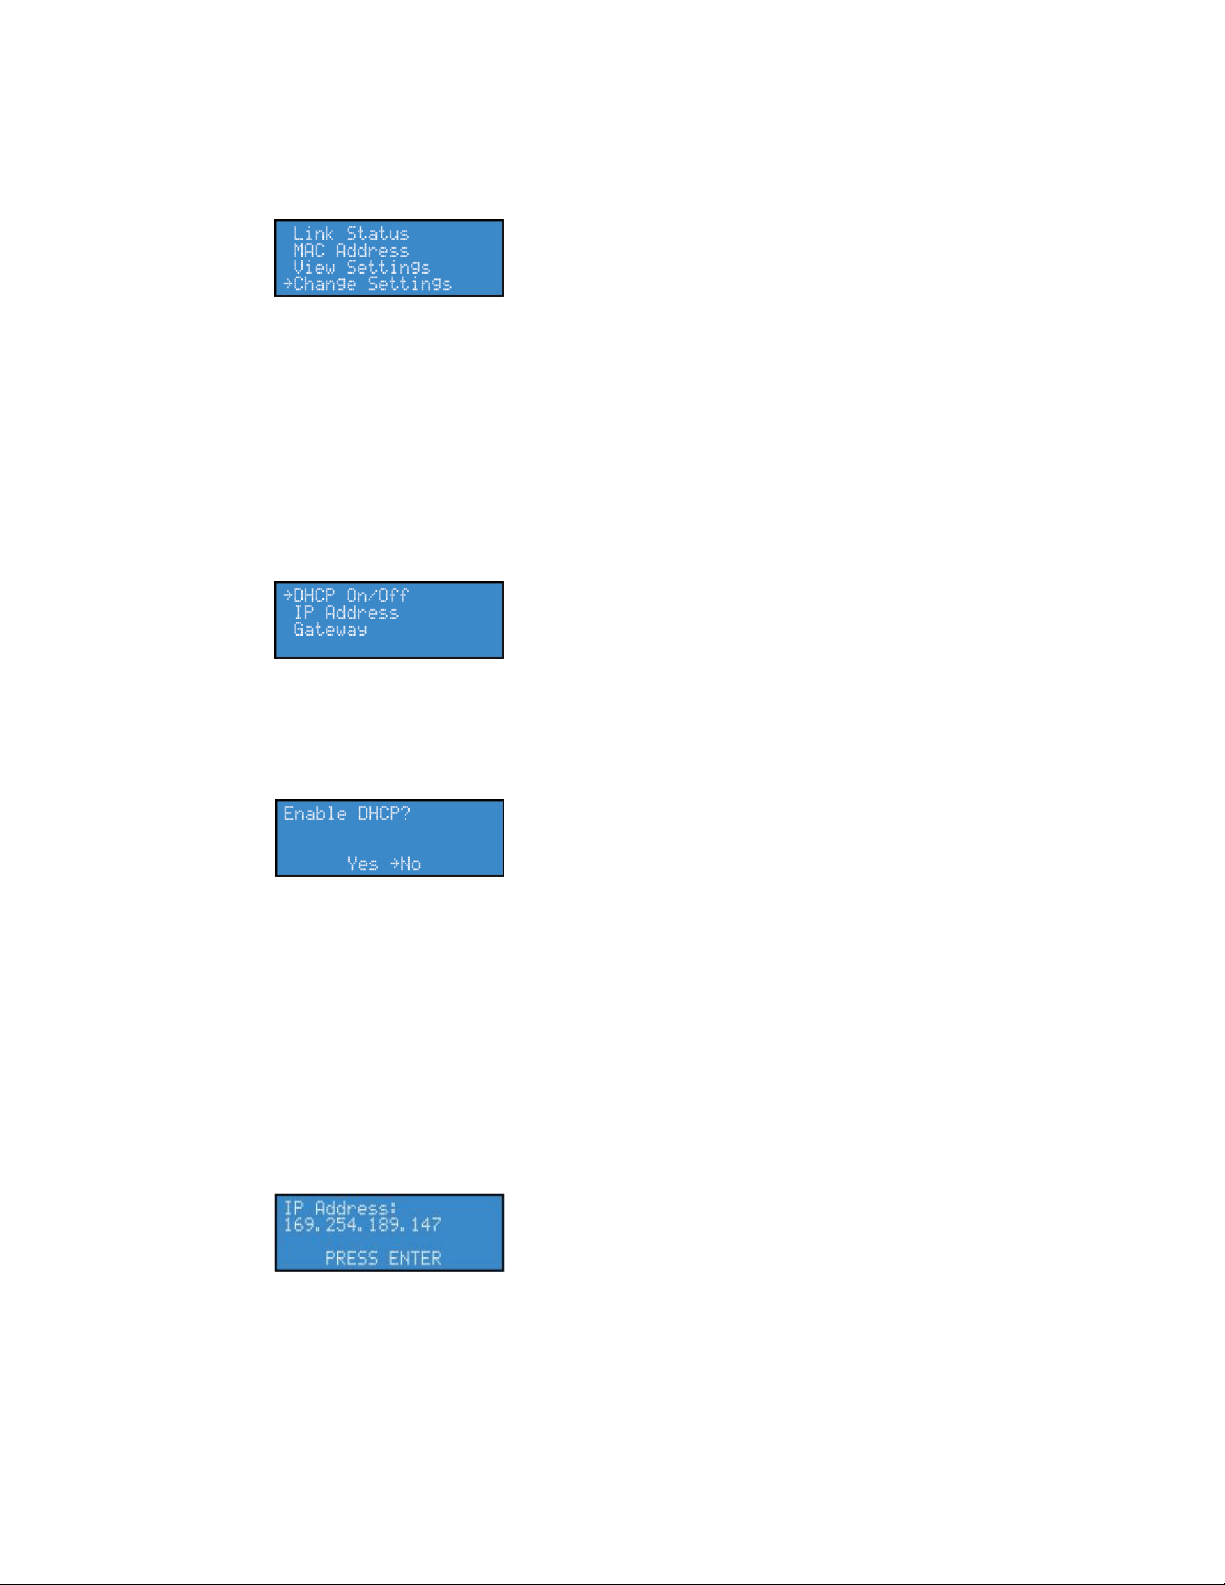
Press Enter. The network interface screen appears (Figure 13).
Figure 13. Interface screen
6.
Use the Up and Down arrow buttons to select the network interface you wish to modify.
Connecting to an IP network
The Niagara 4100 network settings for its network interfaces default to dynamically obtain an IP address
from a DHCP server on the network. If a DHCP server is not available or is not found on the network,
then Niagara 4100 assigns its own IP address.
If you are not familiar with network protocols, contact your network administrator for assistance.
Changing the network settings
For most network environments, it will not be necessary to modify these default settings. However, if
you wish to assign a static IP address or Gateway address to the appliance’s Network Interface Cards
(NICs), then you can change the network setting using the EASE menu.
To change the network settings:
ViewCast 25
Page 32
Easy Setup
7.
Press Enter. The settings screen appears (Figure 14).
Figure 14. Settings screen
8.
Use the Up and Down arrow buttons to select Change Settings.
9.
Press Enter. A screen appears that displays the various network settings.
10.
Select the network setting you wish to change.
Note: Once you modify the setting, the system saves the changes until you modify the settings
again or until you restore the system back to its original factory settings.
11.
Press Enter. The network settings screen displays (Figure 15).
Figure 15. Network settings screen
12.
Use the Up and Down arrow buttons to select DHCP On/Off.
13.
Press Enter. The enable DHCP screen appears (Figure 16).
Figure 16. Enable DHCP screen
Note: Press Menu to cancel this action and exit.
14.
Use the Up and Down arrow buttons to select Yes.
15.
Press Enter. The screen with the network settings appears.
16.
Repeat steps 12 through 15 to modify another network setting.
17.
Use the Up and Down arrow buttons to enter a static address for the IP and/or Gateway
address.
18.
Press Enter. The IP address screen appears (Figure 17).
Figure 17. IP address screen
19.
Use the Up and Down arrow buttons to change the numeric value incrementally and enter
either the static IP or Gateway address.
20.
Press Stream to move to the next field.
21.
Press Enter. The subnet address screen appears (Figure 18).
26 ViewCast
Page 33

Niagara 4100 User Guide
Figure 18. Subnet address screen
22.
Use the Up and Down arrow buttons to change the numeric value incrementally and enter the
subnet address.
23.
Press Enter.
Note: To remove a static IP and/or Gateway address, follow steps 12 through 15 to enable
DHCP. The system removes any previously entered static address.
ViewCast 27
Page 34

Page 35
Niagara 4100 User Guide
1.
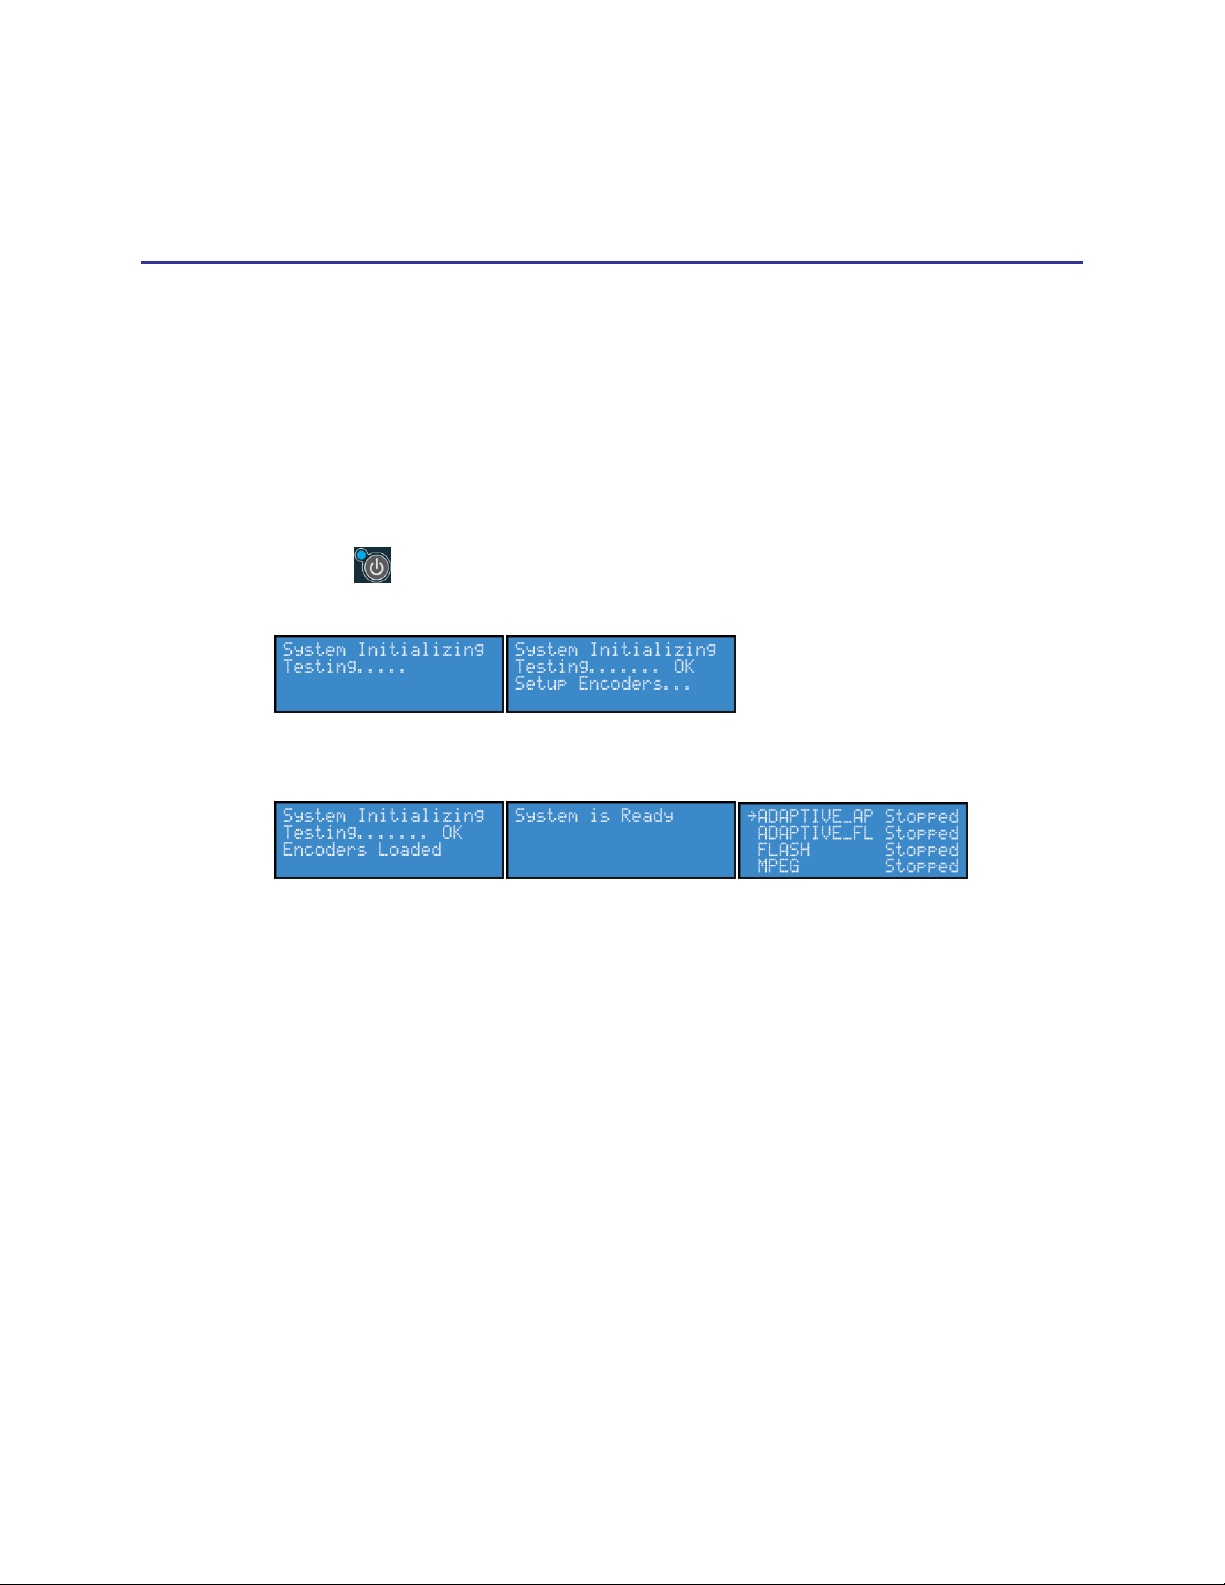
Press Power . The LCD readout displays the initializing messages (Figure 19).
Figure 19. Initializing messages
When the system is ready, the LCD display alternates between status readouts similar to the
following:
2.
Press Menu. The EASE menu appears.
Basic Operations
You may customize your encoder settings and assign specific encoder profiles using the front panel.
Starting up
If this is the first time you are using the Niagara 4100, refer to the Performing the initial start up section
before continuing.
To start up:
ViewCast 29
Page 36
Basic Operations
1.
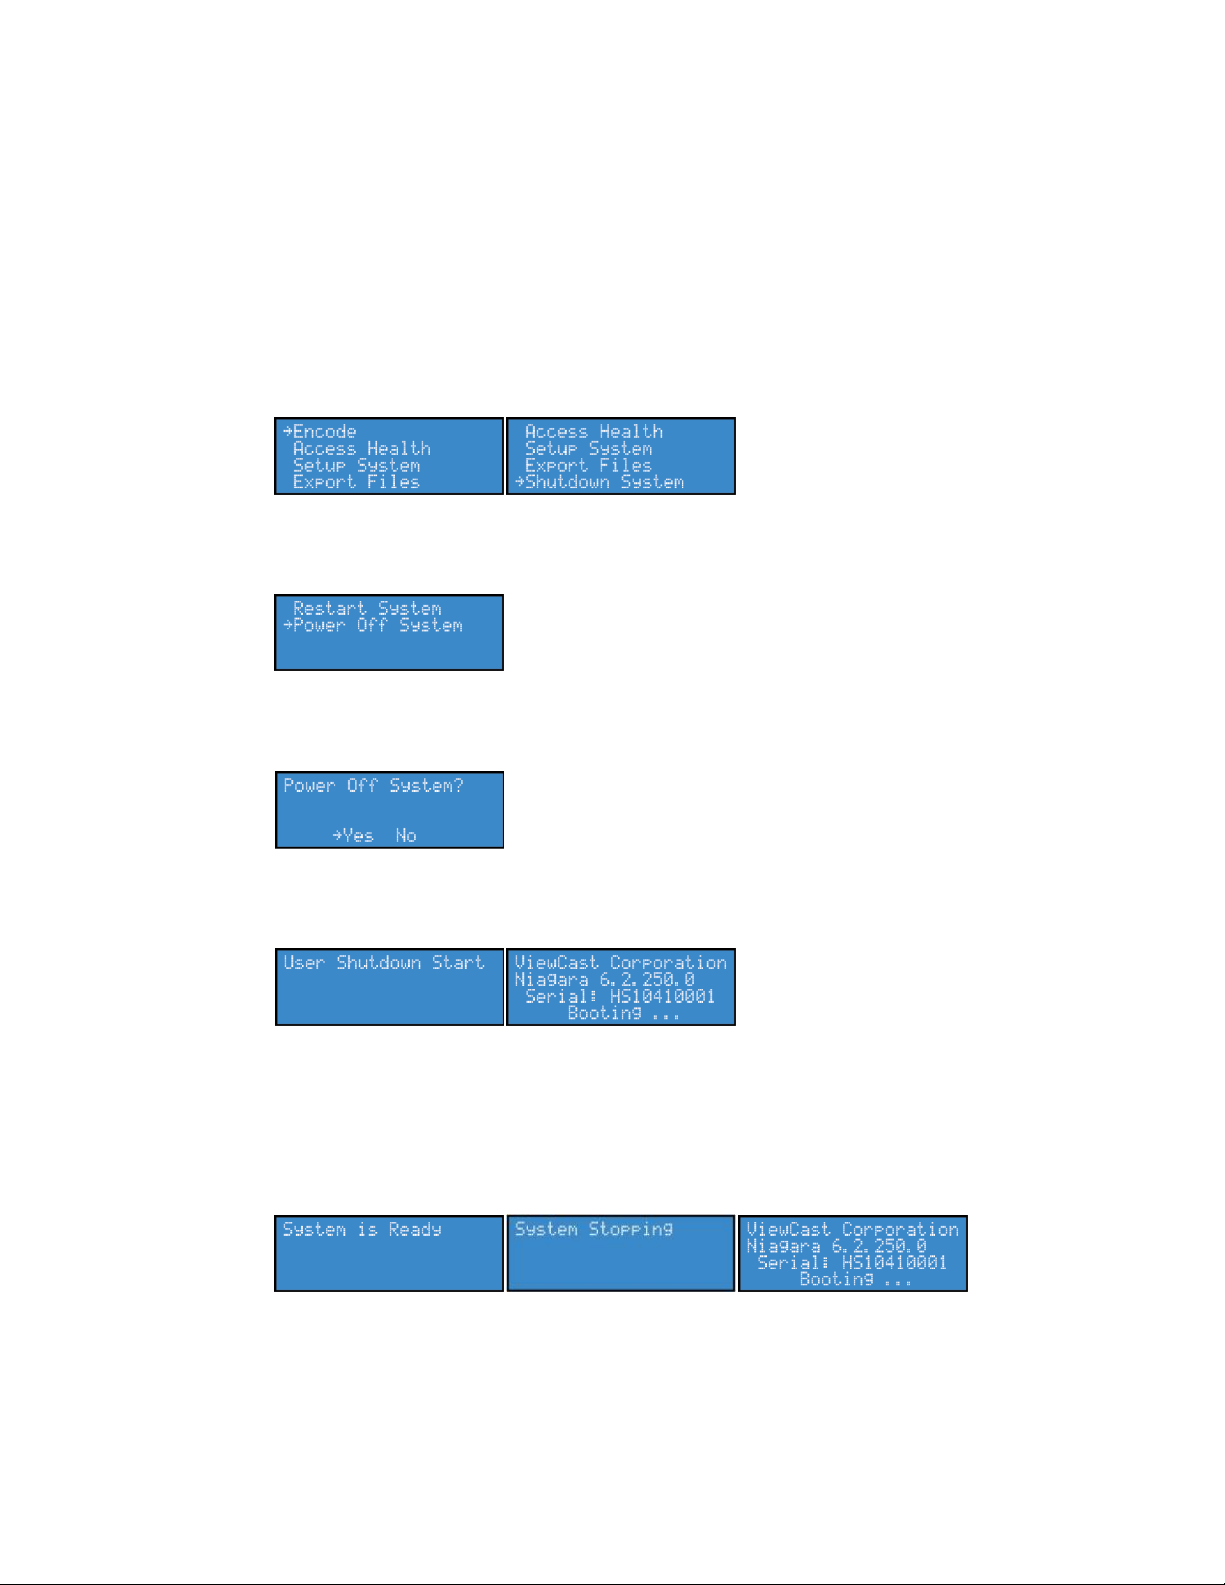
Press Menu. Tab down to Shutdown System (Figure 20).
Figure 20. EASE menu
2.
Press Enter. The shutdown screen appears (Figure 21).
Figure 21. Shutdown screen
3.
Tab to Power Off System. Press Enter. The Power Off System? screen appears.
Figure 22. Power off screen
4.
Tab to Yes and press Enter. The shutdown screens appear.
Figure 23. Shutdown screens
The system shuts down.
1.
Briefly press Power. The system stopping messages appear (Figure 24).
Figure 24. System stopping messages
After a few seconds, the system powers off.
Shutting down
Allow the Niagara 4100 to power down normally. If you force the system to shut down improperly, your
data can be corrupted. If so, the next time you start the system it can take several minutes to complete
startup.
To shut down:
You can also shut down the system using the following steps:
30 ViewCast
Page 37
Niagara 4100 User Guide
1.
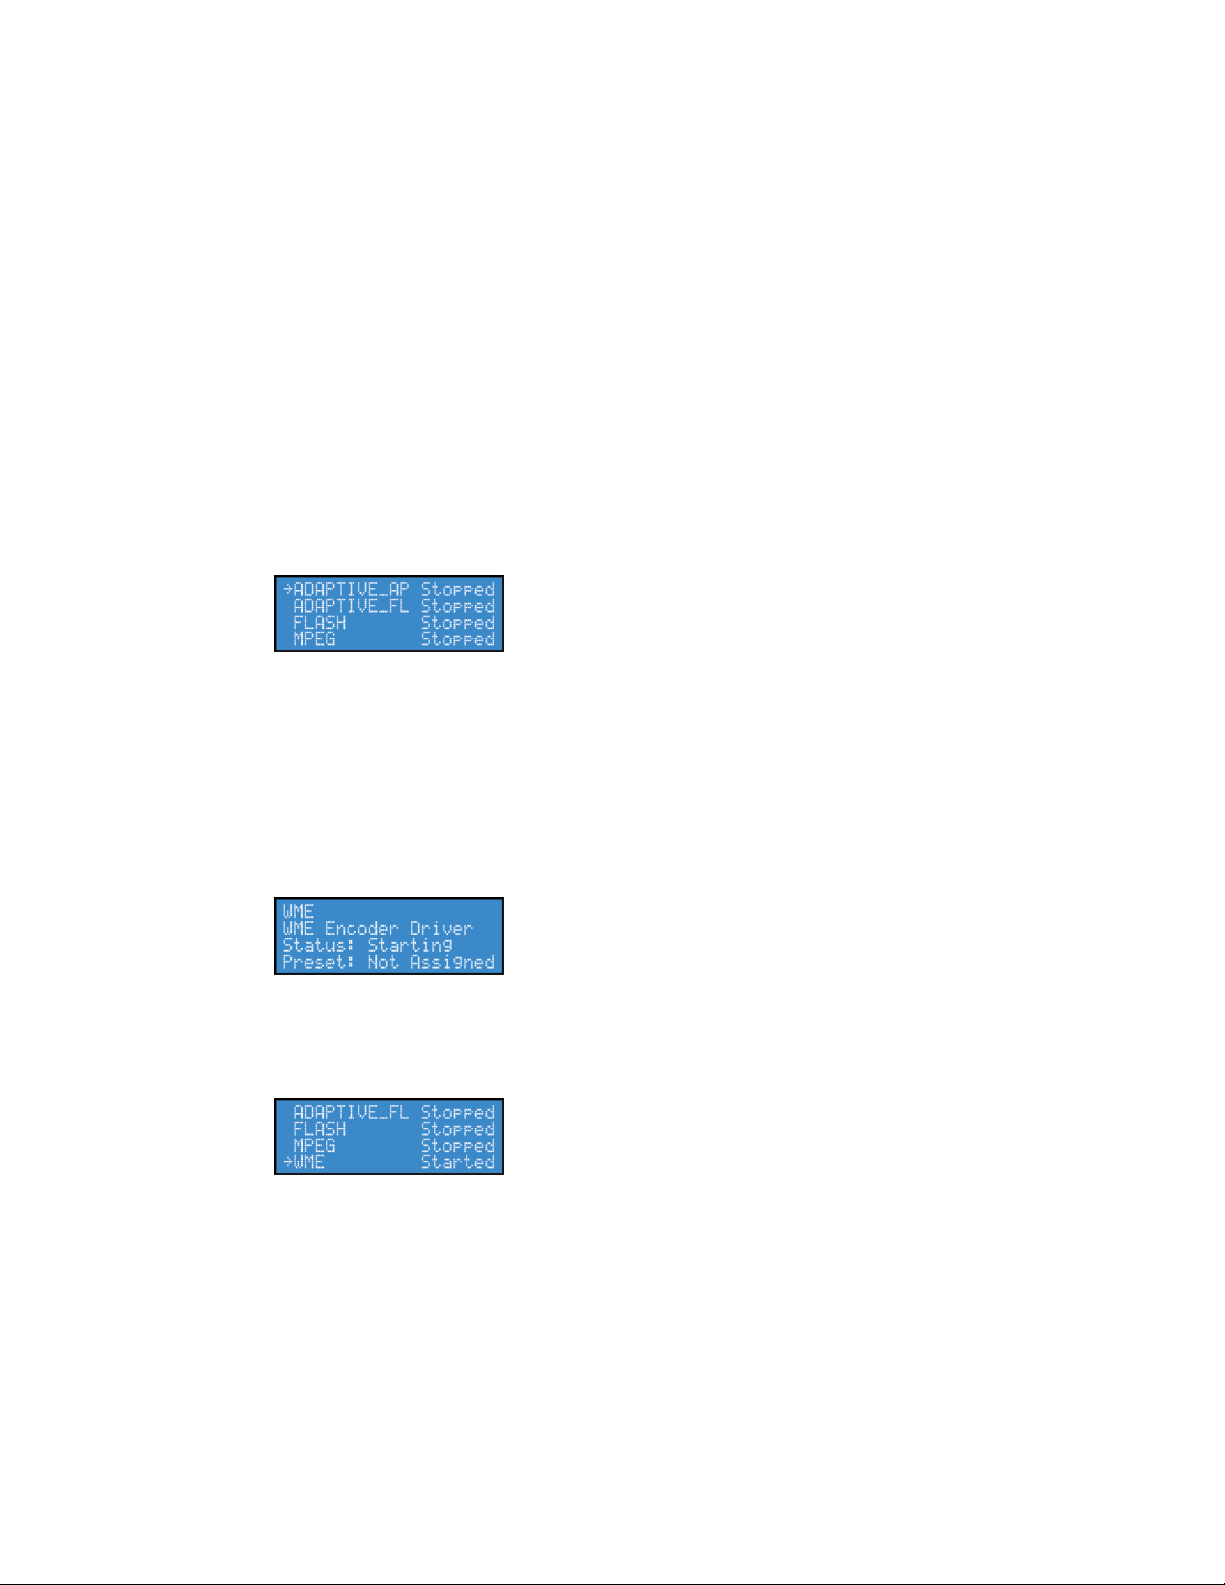
Press Stream on the front panel of your Niagara 4100. A list of available encoder profiles you
can use and the current status of each appears (Figure 25).
Figure 25. Encoder screen
Note: The system abbreviates the name of each encoder profile to the first 10 characters. When
creating names for custom profiles, be sure to create unique names that will be
distinguishable by the first 10 characters.
2.
Use the Up and Down arrow buttons to select the encoder profile you want Niagara 4100 to
use for this encoding session.
3.
Press Stream to start the encoder. The starting screen appears (Figure 26).
Figure 26. Starting screen
The encoder screen appears indicating that the encoder you selected has begun streaming
(Figure 27).
Figure 27. Encoder screen
Note: If the encoder you started is assigned to one of the Preset ABC buttons, the corresponding
button illuminates during and after the starting process.
4.
Repeat this method to start streaming multiple encoders at the same time.
WARNING! There is a limit to how many encoders the Niagara 4100 can stream at one time. If
you exceed this limit, the streams will drop frames and the video will apppear to stutter
resulting in a poor viewer experience. If you do not reduce the number of streams to lessen
the CPU load, all encoders could self-terminate without warning. Refer to the Checking
Starting an encoder
Niagara 4100 is a single-channel encoder, which means you can only connect and stream one audio and
video source at any given time. However, you can stream the same audio and video at multiple data
rates and multiple formats to provide the best user experience for different viewing audiences.
For example, you can stream Windows Media at full resolution at 1500 kbps and at the same time
stream Adobe Flash at CIF resolution at 500 kbps.
The Niagara 4100 LCD displays a list of available encoder profiles you can ue and the current status of
each.
To start an encoder:
ViewCast 31
Page 38

Basic Operations
CPU usage section to understand the limitations.
After the encoder session has successfully begun, the LCD display returns to the previous display of
available encoders. The screen will indicate that the encoder profile you selected has begun encoding.
The video detection light illuminates if horizontal video sync is detected on either the S-Video or
Composite video input of the Niagara 4100.
32 ViewCast
Page 39
Niagara 4100 User Guide
1.
Press Menu. The EASE menu appears.
2.
Use the Up and Down arrow buttons to select Access Health.
3.
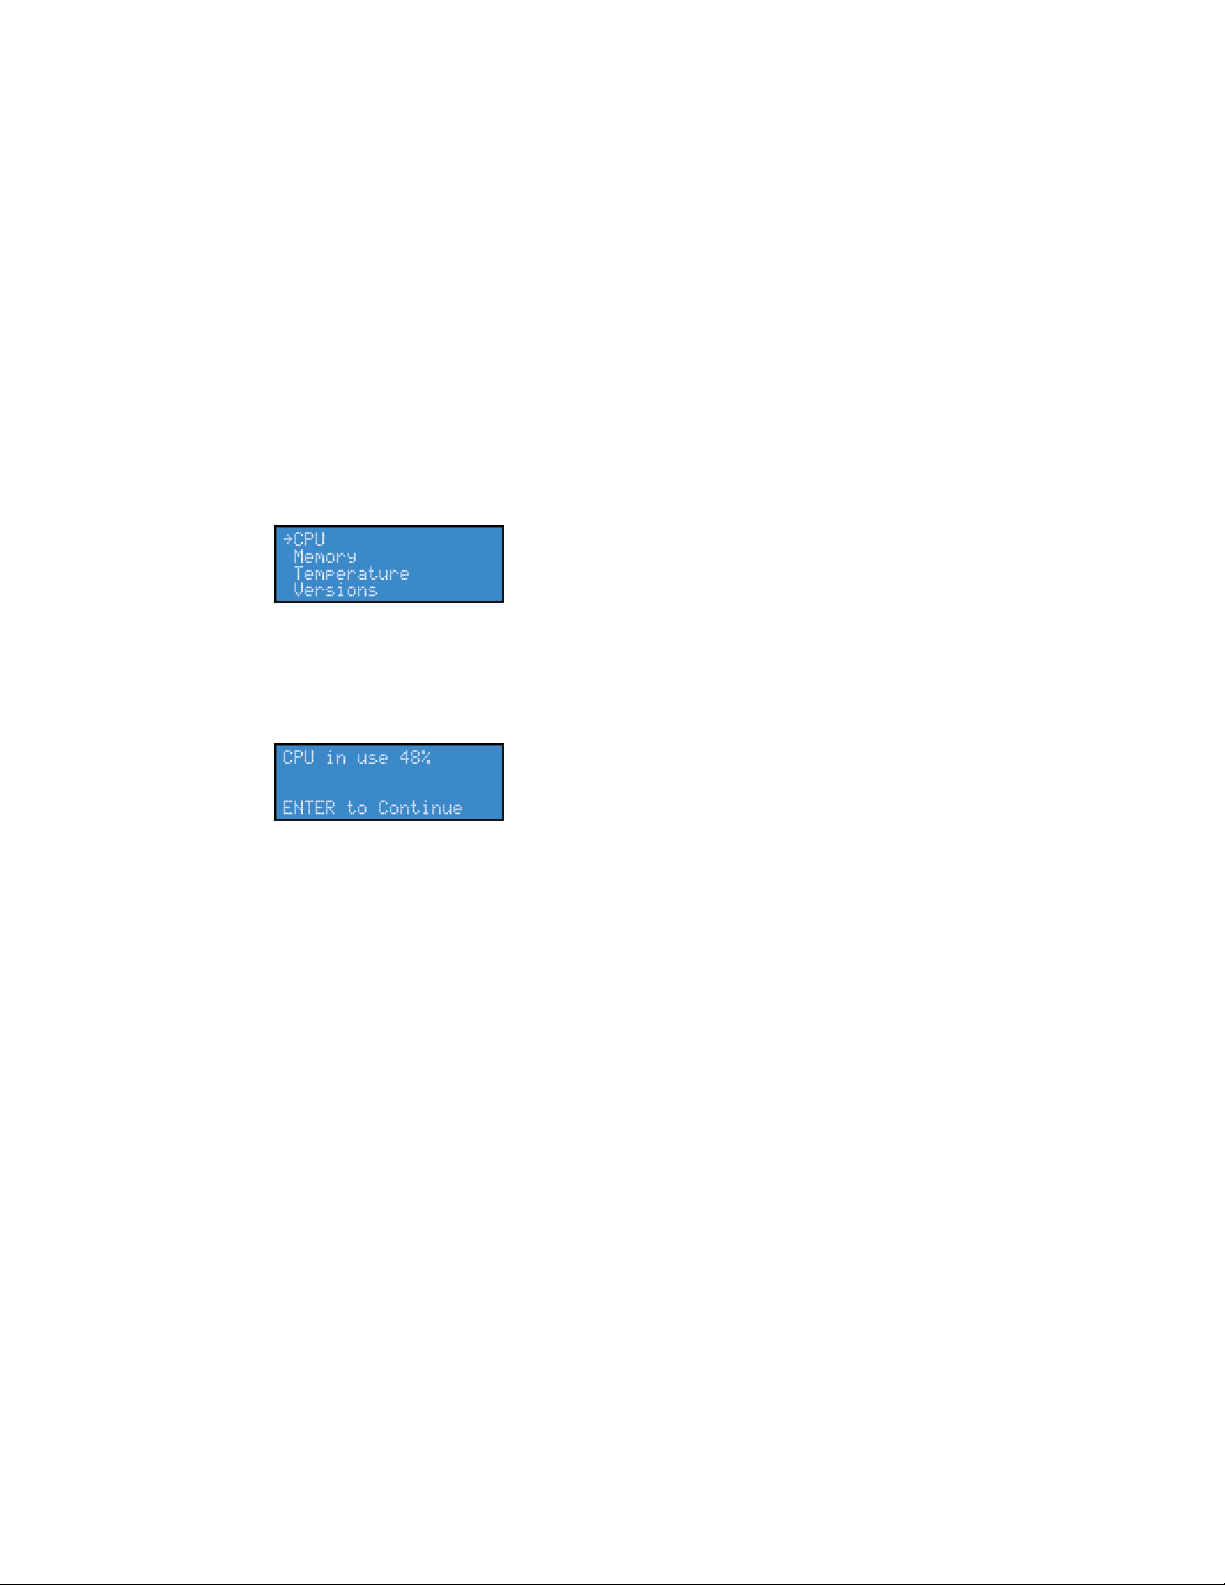
Press Enter. The access menu appears (Figure 28).
Figure 28. Access menu
4.
Use the Up and Down arrow buttons to select CPU.
5.
Press Enter. A screen appears (Figure 29) with the amount of CPU cycles currently in use.
Figure 29. CPU cycles screen
6.
Press Enter.
Checking CPU usage
When the Niagara 4100 is idle (no encoders are streaming), the CPU percentage is normally 4 % or less.
If one or more encoders are streaming, the percentage is much higher and fluctuates in a range of +/- 10
%. If the system is using less than 70 %, you may start another encoder without adversely affecting
system performance (depending on the complexity of the profile).
To check CPU usage:
ViewCast 33
Page 40
Basic Operations
1.
Press Menu. The EASE menu appears.
2.
Press Enter. The encoder screen appears.
3.
Use the Up and Down arrow buttons to highlight the encoder you wish to stop.
4.
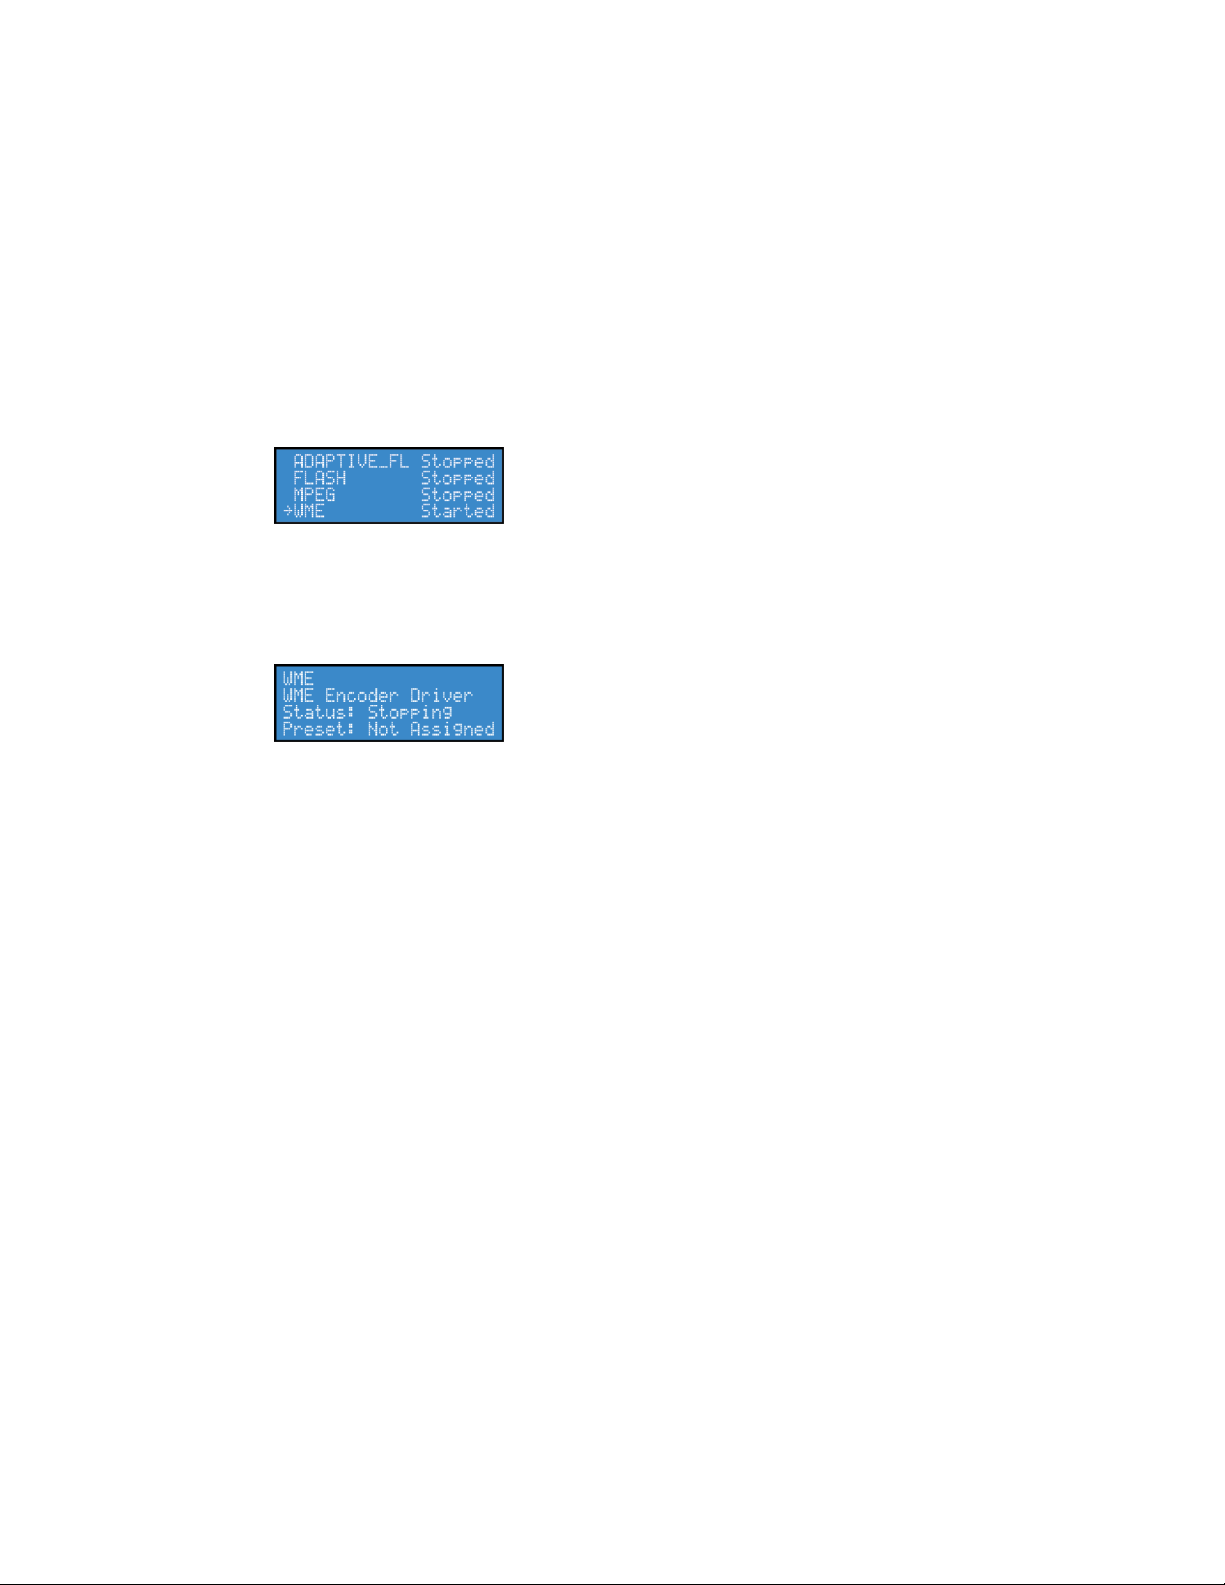
Press Stop. The encoder screen appears (Figure 30) showing the status of each encoder.
Figure 30. Encoder screen
5.
Use the Up and Down arrow buttons to select the encoder you want to terminate.
6.
Press Stop. The stopping screen appears (Figure 31).
Figure 31. Stopping screen
7.
Press Menu. The EASE menu appears.
Stopping an encoder
To stop an encoder:
34 ViewCast
Page 41
Niagara 4100 User Guide
1.
Insert a USB memory device into a USB port
2.
Press Menu. The EASE menu appears.
3.
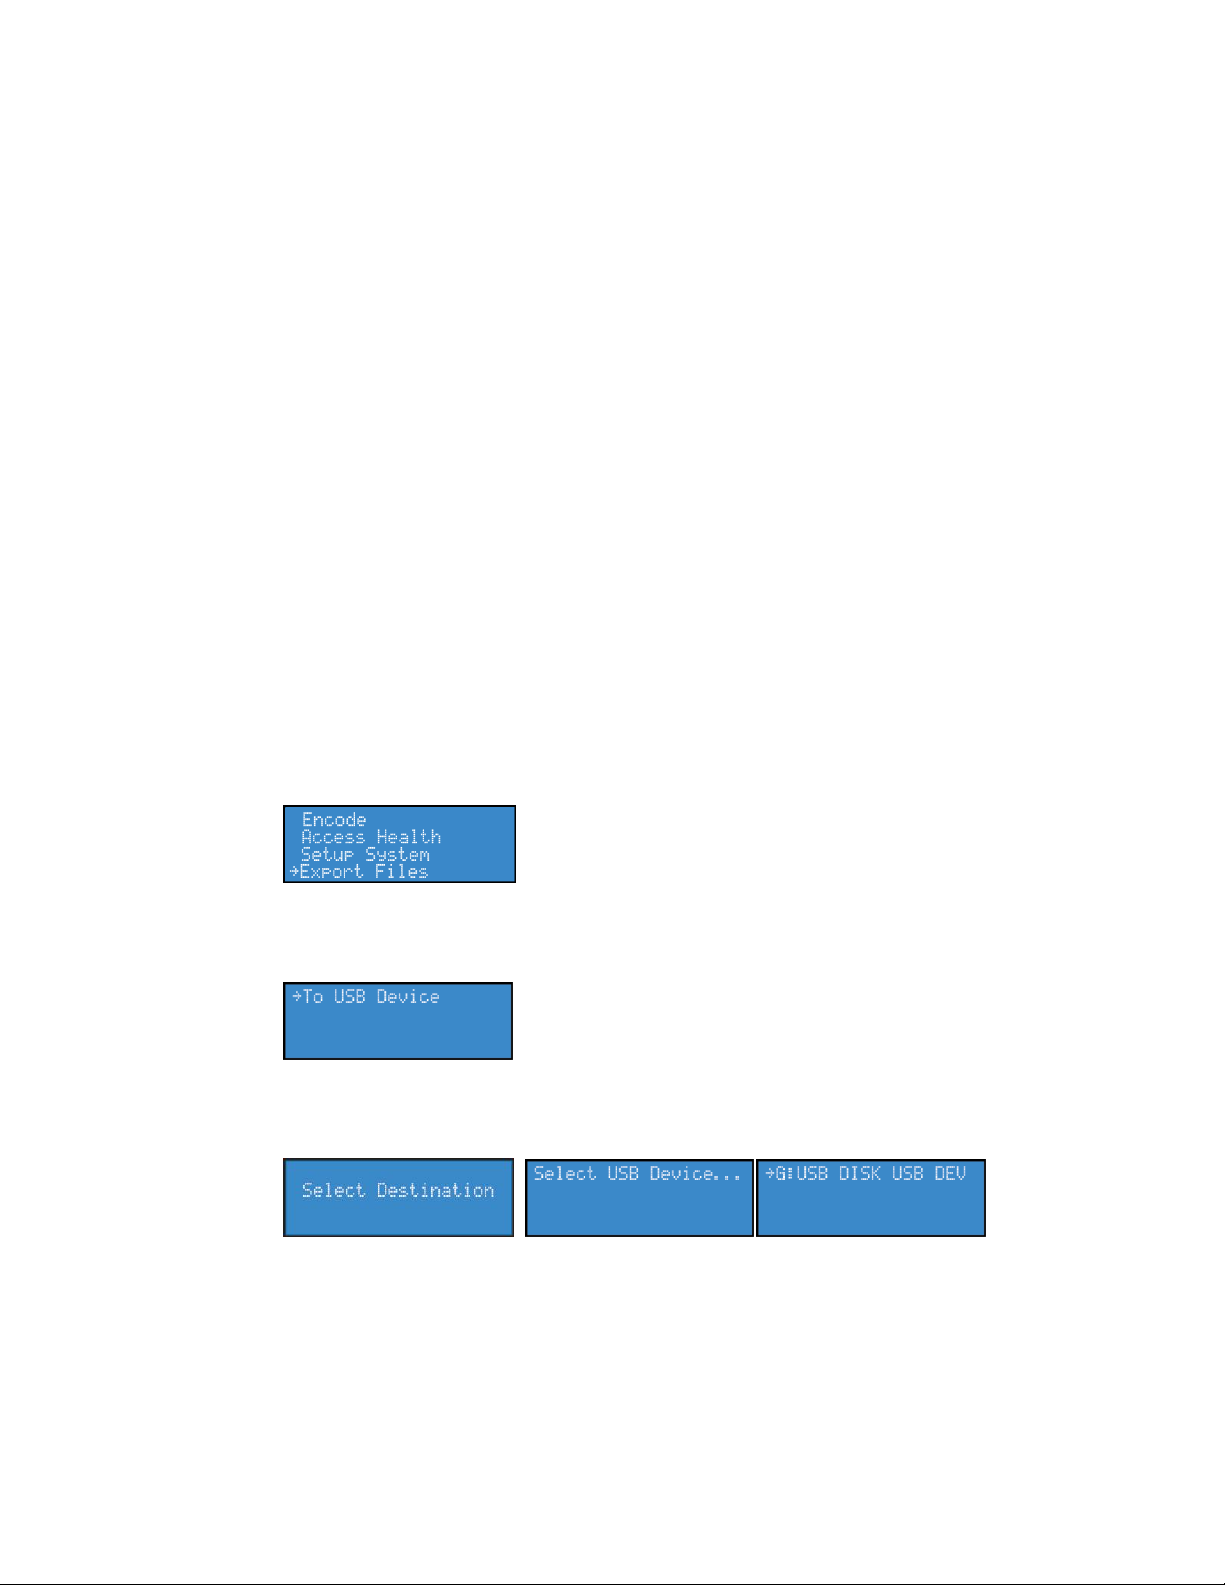
Use the Up and Down arrow buttons and highlight the Export Files option (Figure 32).
Figure 32. EASE menu
4.
Press Enter. The USB device screen appears (Figure 33).
Figure 33. USB Device screen
5.
Press Enter. The drive destination screens appear (Figure 34).
Figure 34. Drive Destination screens
6.
Use the Up and Down arrows to select the USB drive.
Connecting an external storage device
The Niagara 4100 has one USB port on the front panel and one on the back panel. You can connect
almost any standard USB memory device to one or both of these ports. You can then export any
audiovisual files you may have created on Niagara 4100’s local storage drive. The local storage drive is
drive D when you use the Save to File setting from the web interface.
When you insert a USB memory device in one of the USB ports on the Niagara 4100, the appliance
automatically detects the removable storage device, and assigns a drive letter to the device. This device
can capture files directly or you can use the Niagara 4100 Export Files function on the front panel menu.
Exporting captured video files
You can export your captured video files to an external USB drive. But first you must set a default
location through the web interface. Refer to Configuring default directory setting before completing the
steps below.
To export captured video files:
ViewCast 35
Page 42
Basic Operations
7.
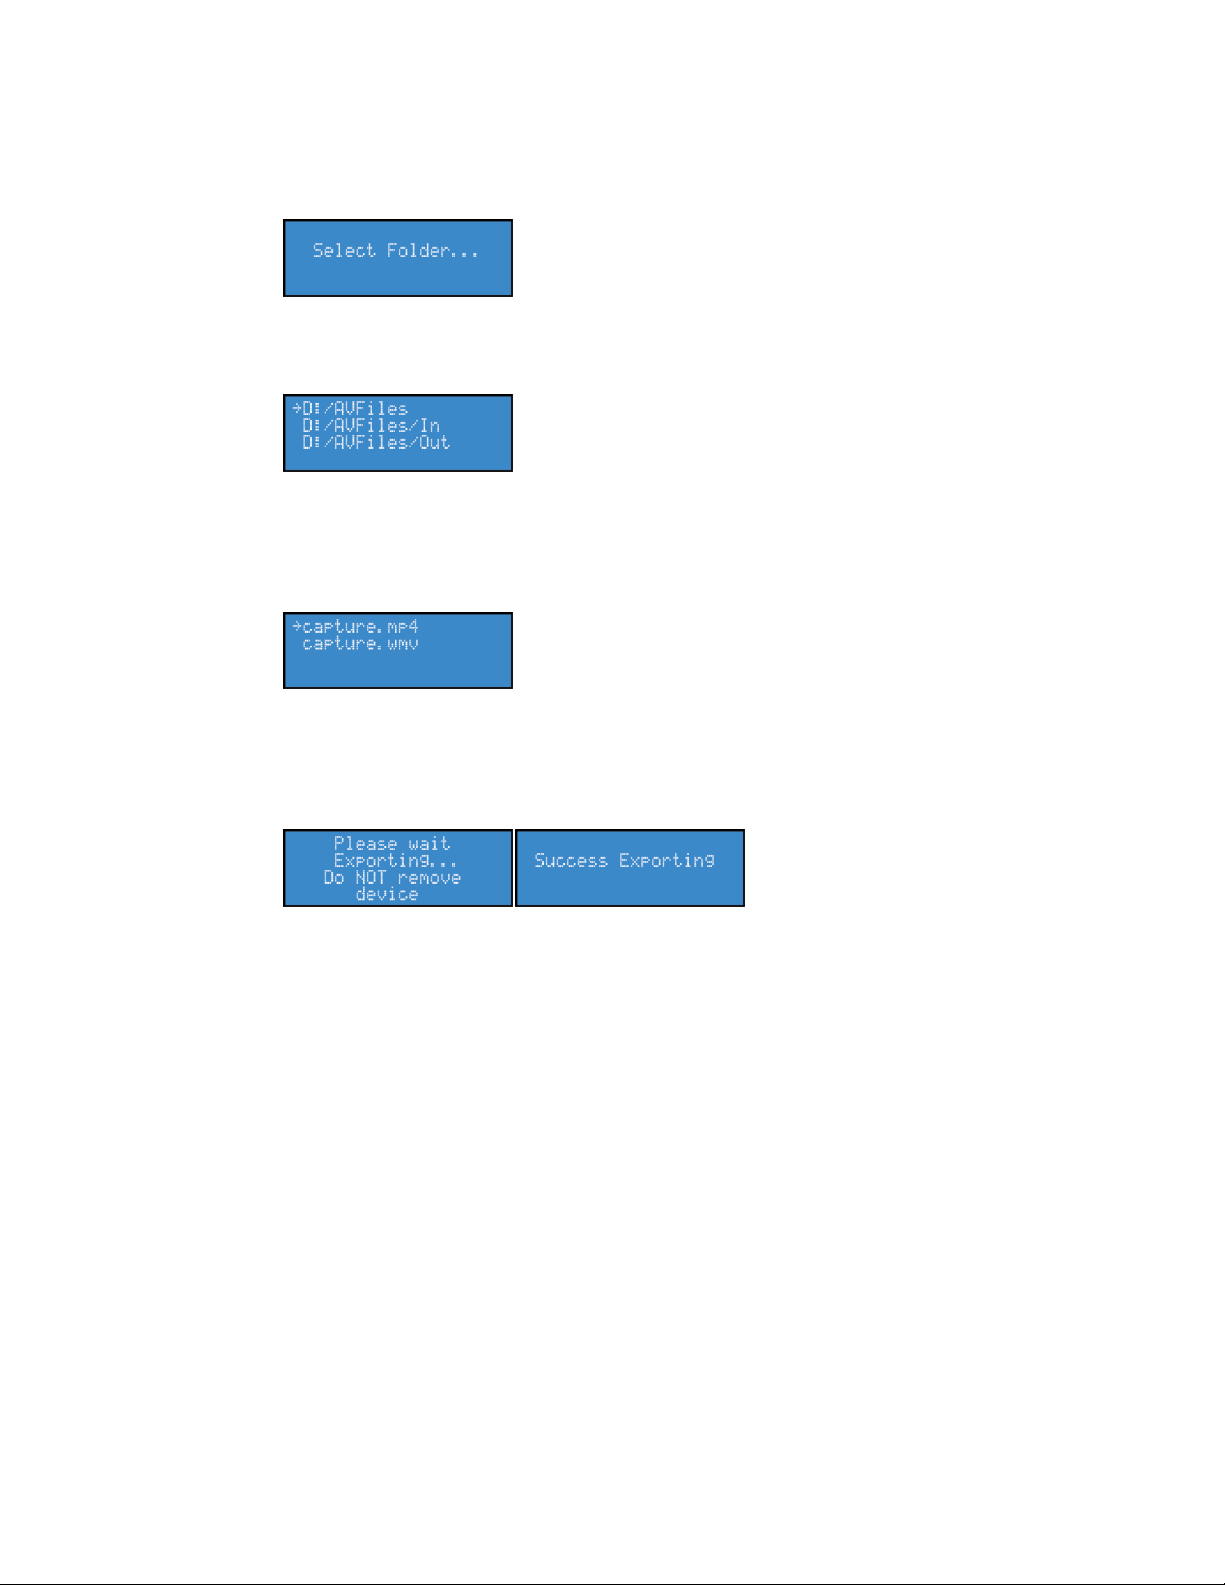
Press Enter. The select folder screen appears (Figure 35).
Figure 35. Select Folder screen
The select source screen appears (Figure 36).
Figure 36. Select source screen
8.
Use the Up and Down arrows to select the desired directory.
9.
Press Enter. The filename screen appears (Figure 37).
Figure 37. Filename screen
10.
Use the Up and Down arrows to select the desired file to transfer.
11.
Press Enter. While the Niagara 4100 exports the file, the exporting screens appear (Figure 38).
Figure 38. Exporting screens
36 ViewCast
Page 43

Niagara 4100 User Guide
Creating an encoder
Configuring the Preset ABC buttons
Viewing all encoders
Configuring machine properties
Starting/stopping an encoder
Viewing alert status
Editing an encoder
Configure network properties
Creating a group
1.
You can either locate the serial number:
On the underside of the appliance (in the format hsxxxxxx).
Or
On the LCD display when the system is idle (Figure 39).
Figure 39. System Ready screen
Note: If the system ready screen does not immediately display, use the Up and Down arrow
buttons to toggle through the system information until the system ready screen appears.
2.
Open the web browser on your computer.
3.
You can either:
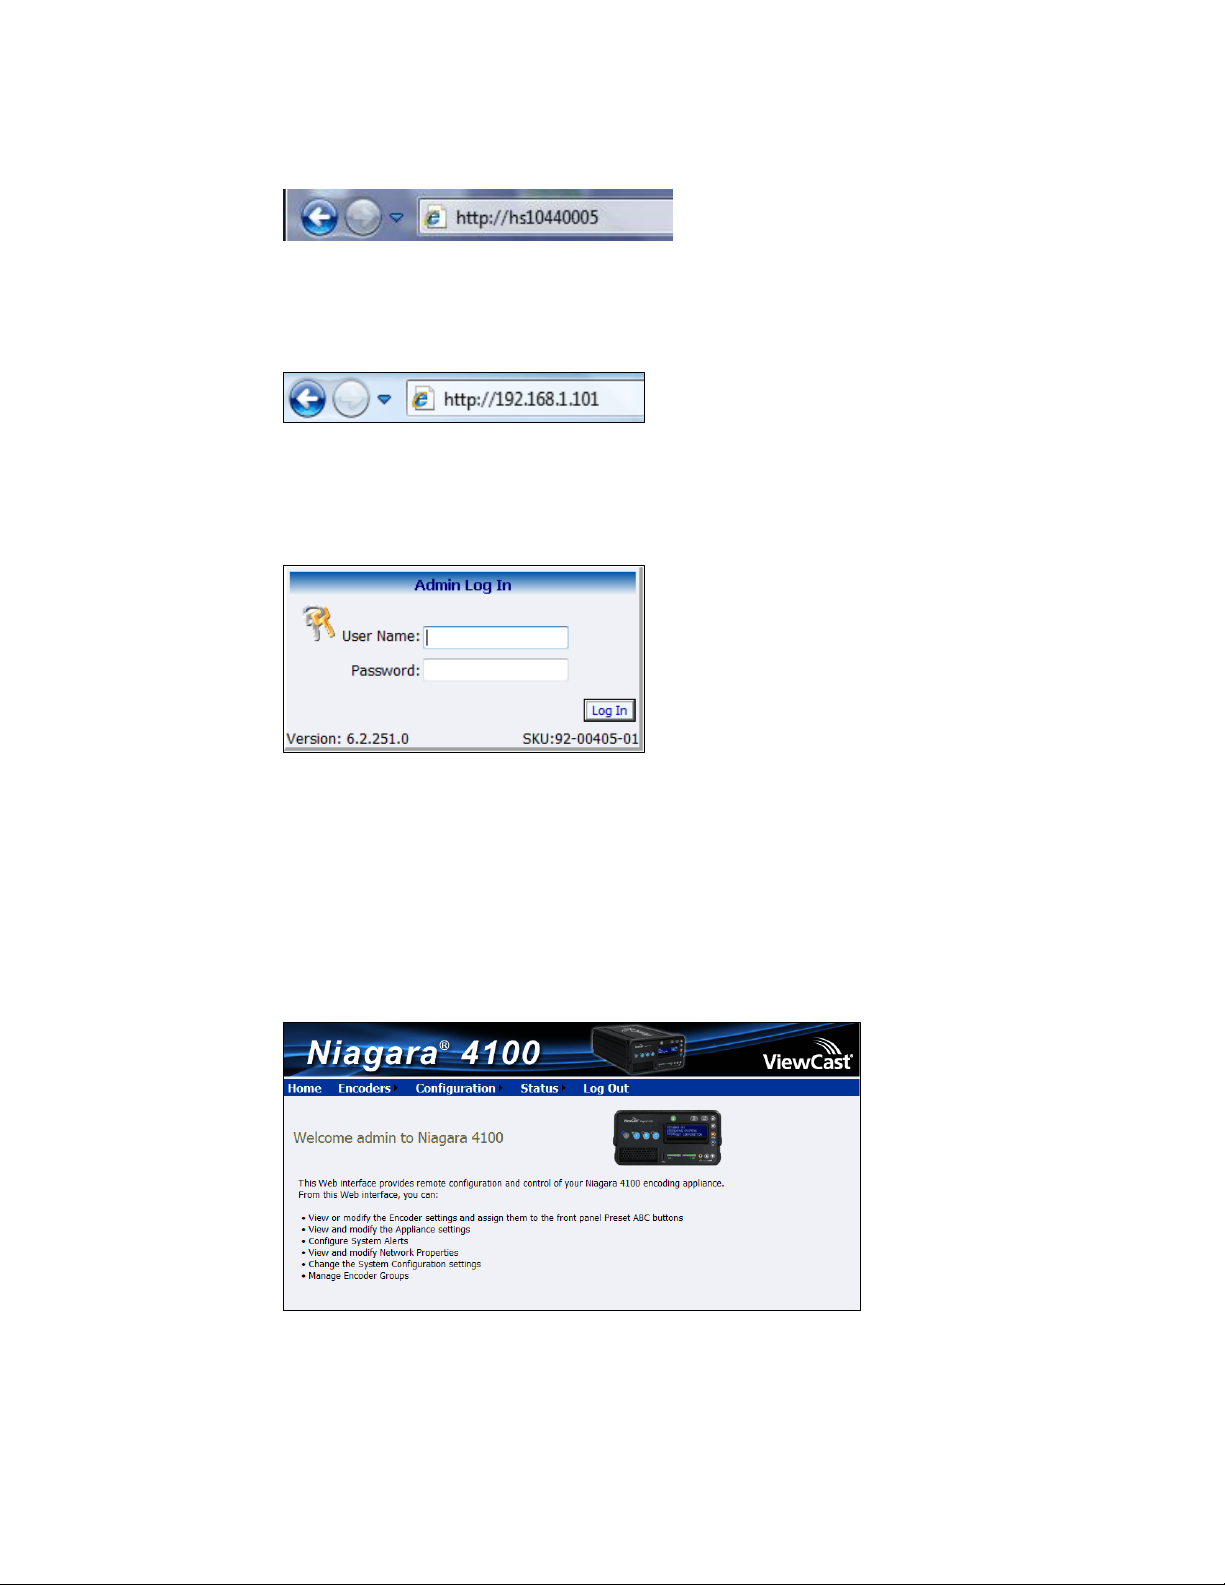
Type the Niagara 4100 serial number in the Address bar (Figure 40).
Advanced Operations
The Niagara 4100 includes a web interface, which allows you to access the advanced system settings.
The web interface also provides detailed settings and control over the encoder profiles installed on
Niagara 4100.
Advanced operations include but are not limited to the following:
The web interface does not require software and works with any computer that has a current web
browser, including Windows®, Macintosh®, and Linux® machines. For the best user experience,
ViewCast recommends Internet Explorer (you may need to use the compatibility mode). The Niagara
4100 must either reside on a shared IP network with the computer or can be directly connected to a
Windows computer using an Ethernet cable (RJ45).
Logging in
To log in:
ViewCast 37
Page 44
Advanced Operations
Figure 40. Serial number
Or
Type the IP address in the Address bar (Figure 41).
Figure 41. IP address
Note: The IP address appears on the system ready screen when the system is idle.
The Admin Log In window appears (Figure 42).
Figure 42. Admin Log In window
4.
Type the User Name and Password.
IMPORTANT! The setting to log in for the first time, defaults to the user name admin and the
password admin.
Note: System administrators should previously configure all user names and passwords for
those who they allow to log on to the system.
5.
Press Login. The Niagara 4100 Welcome Window and menu bar appear (Figure 43).
Figure 43. Welcome window
38 ViewCast
Page 45
Niagara 4100 User Guide
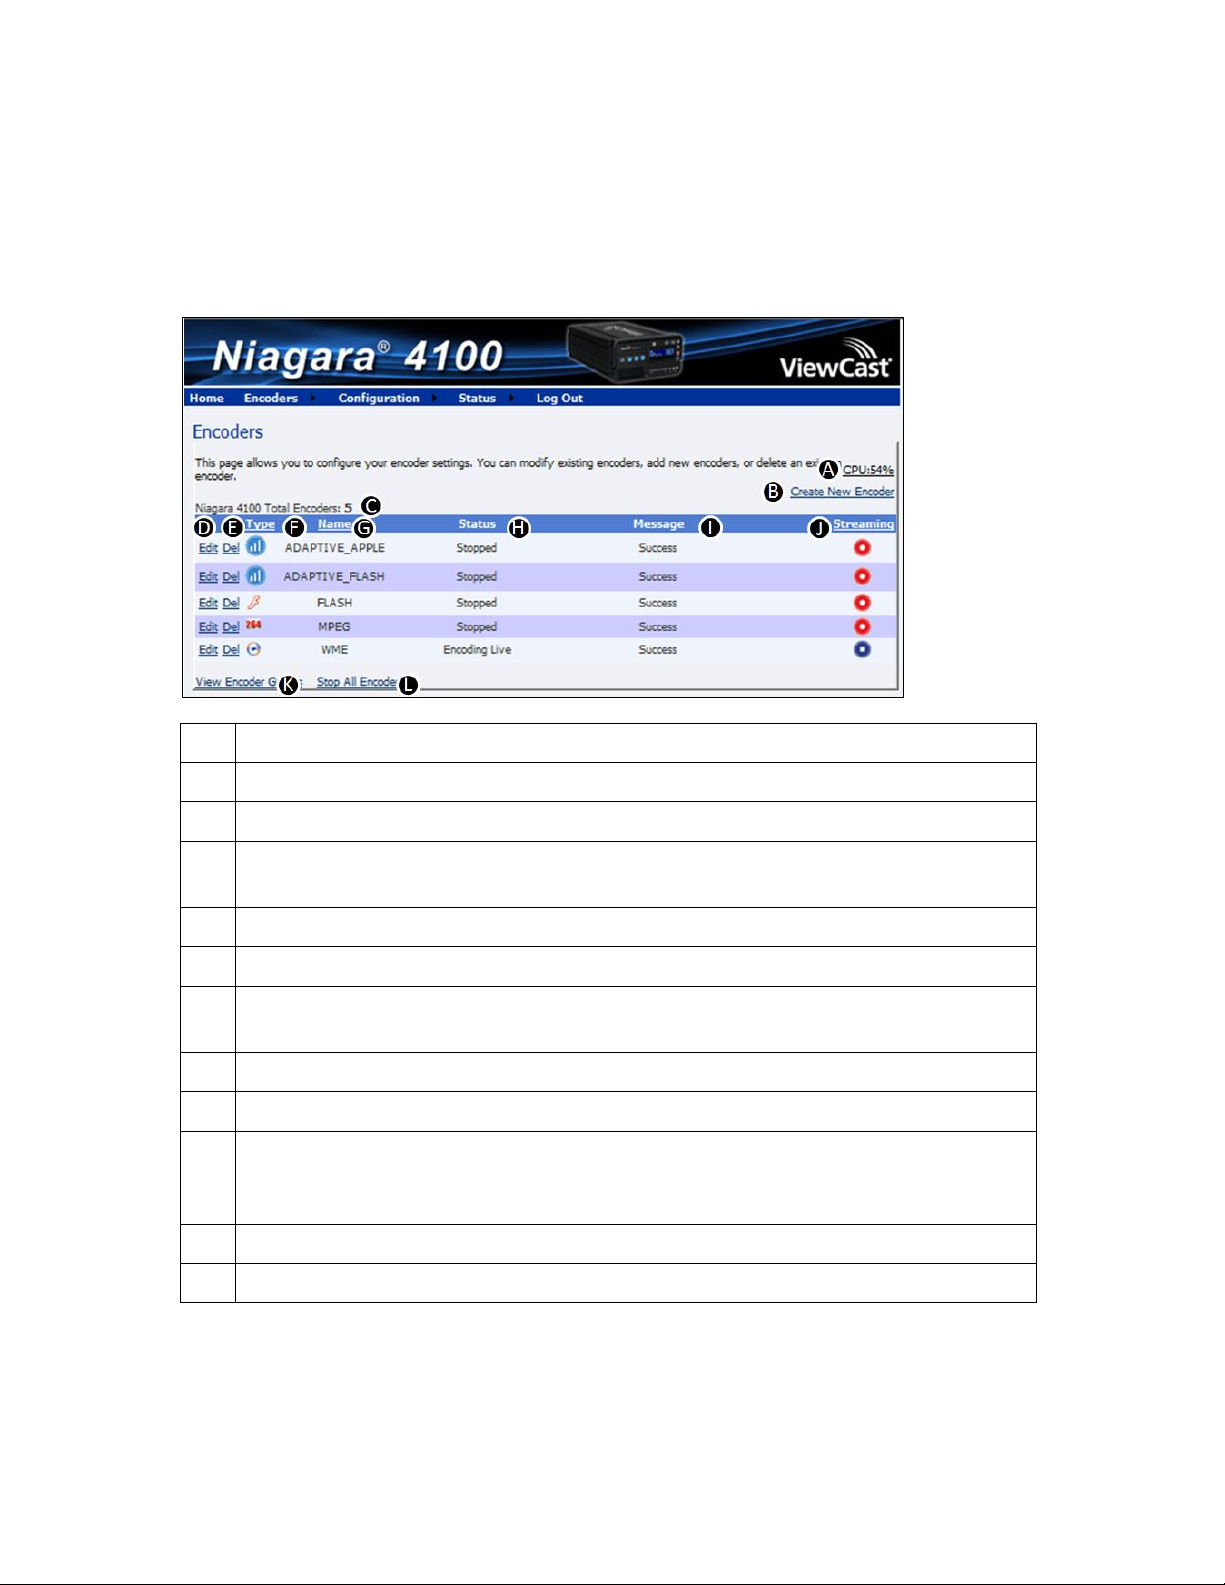
A
Displays the amount of CPU usage.
B
Click this link to create a new encoder.
C
Displays the total number of encoders.
D
Click this link to edit the encoder properties, streaming settings, and advanced
streaming settings.
E
Click this link to delete an encoder from the list.
F
Displays the encoder type (for example Flash).
G
Displays the name of the encoder profile. This name appears on the LCD display on the
front panel.
H
Displays the status of the last action.
I
Displays the message for the last action.
J
Displays as either Started (blue circle button) or Stopped (red circle button) as the
options for streaming for this encoder. You can start or stop an encoder by clicking the
icons.
K
Click this link to view encoder groups.
L
Click this link to stop all encoders.
Viewing all encoders
The Encoders window (Figure 44) provides a list of all of the encoder profiles loaded on the Niagara
4100. On the home page click Encoders All Encoders.
Figure 44. Encoders window
You can also view encoders by clicking on the View All Encoders link at the bottom of the Preset A, B, or
C window.
ViewCast 39
Page 46
Advanced Operations
1.
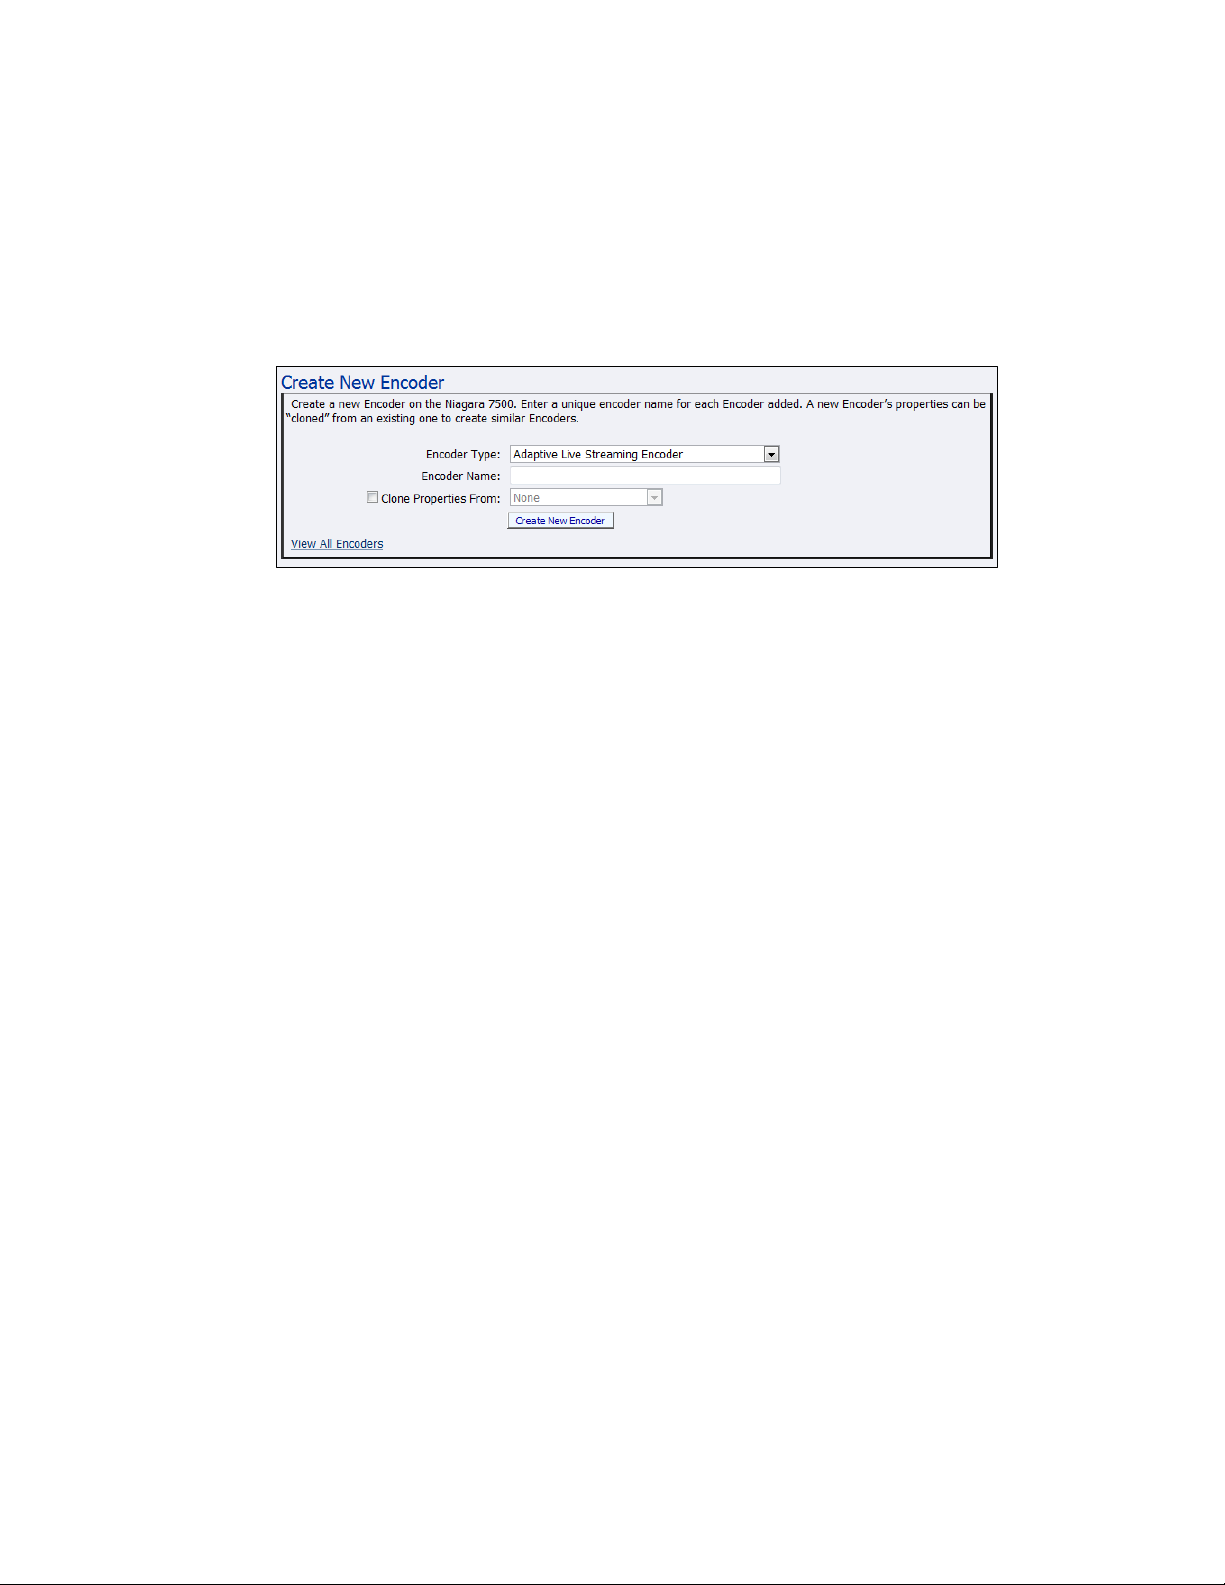
Click the Create New Encoder link. The Create New Encoder window displays (Figure 45).
Figure 45. Create New Encoder window
2.
Select the Encoder Type from the drop-down list.
3.
Enter the name of the encoder.
Note: Valid characters are alphanumeric, space, dash, and dot.
4.
To use the same properties from another encoder, enable Clone Properties From.
5.
Select the encoder from the drop-down list.
6.
Click Create New Encoder.
Creating an encoder
To create an encoder, on the home page click Encoders.
To create an encoder:
40 ViewCast
Page 47
Starting an encoder
1.
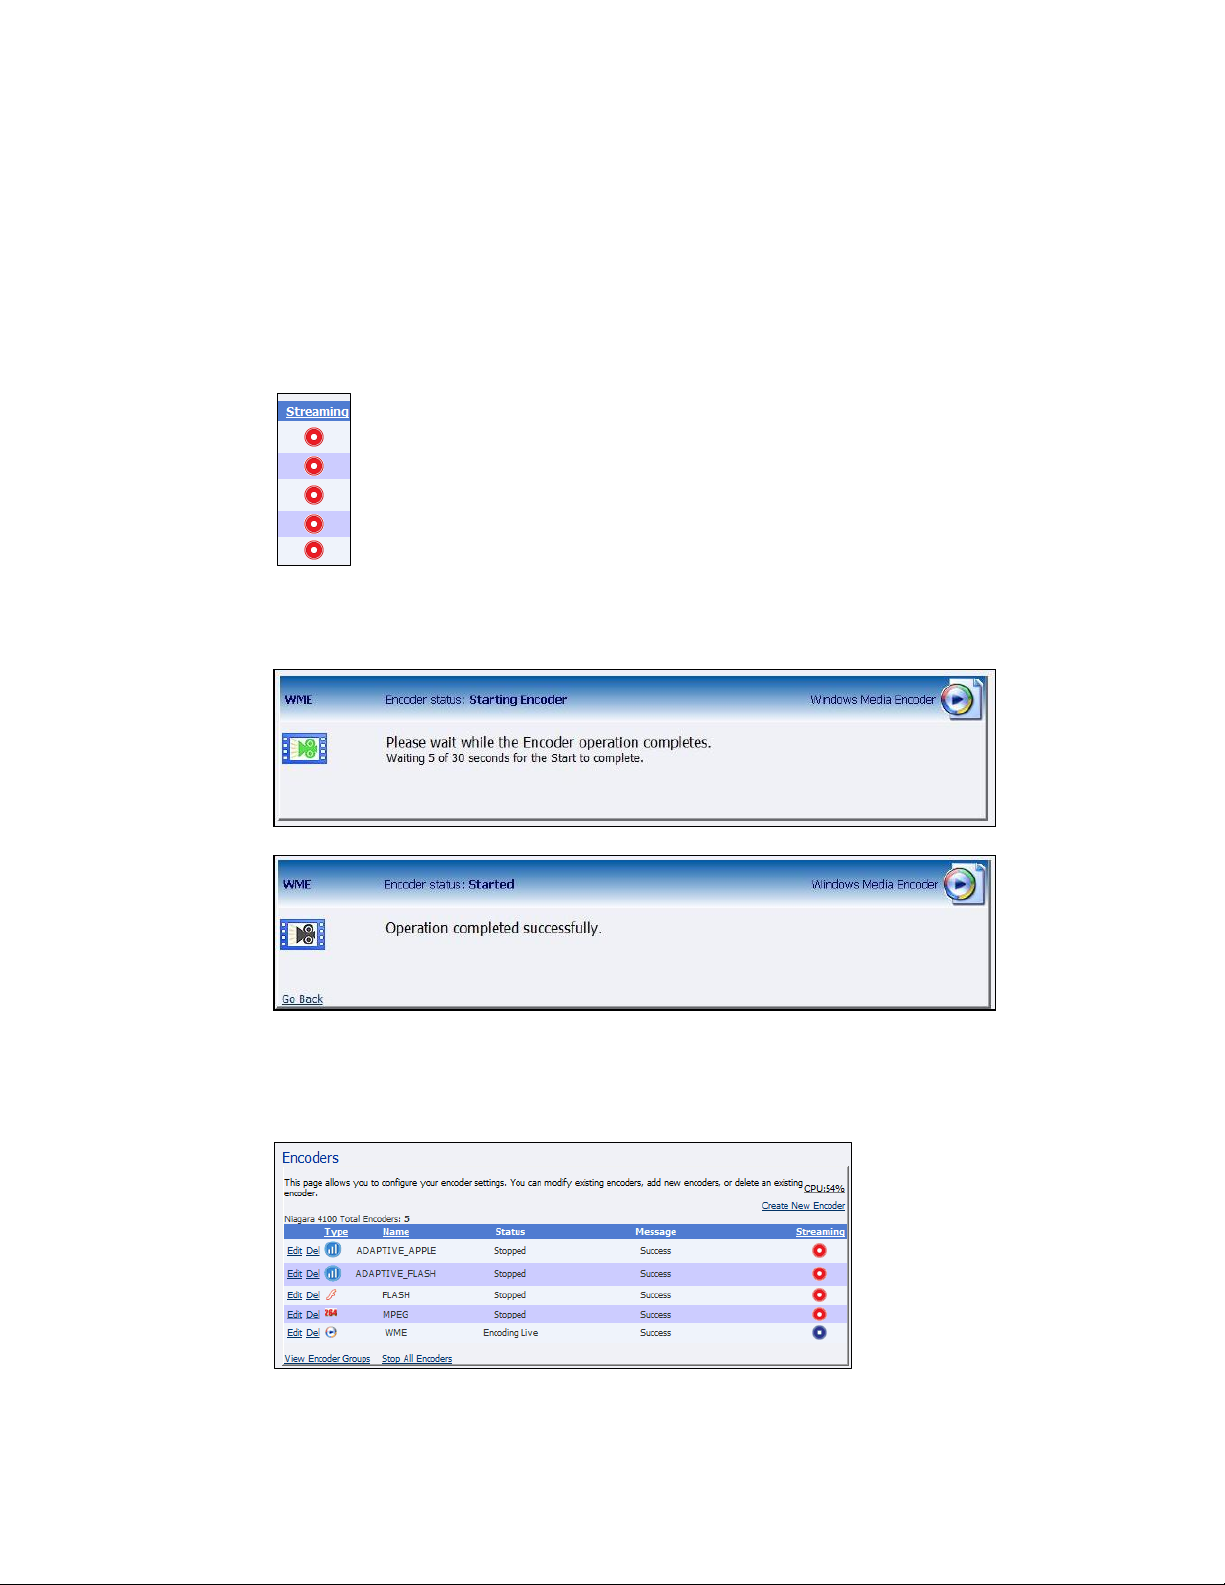
Click the red circle Stopped icon (Figure 46) in the Streaming column for the encoder you want
to start streaming.
Figure 46. Stopped icon
Messages appear detailing the encoder start progress (Figure 47).
Figure 47. Starting encoder
The Encoders window appears with the encoder status updated and the streaming indicator
changes to a blue circle Started icon (Figure 48).
Figure 48. Encoders window
To start an encoder, on the home page click Encoders All Encoders.
To start an encoder:
Niagara 4100 User Guide
ViewCast 41
Page 48
Advanced Operations
1.
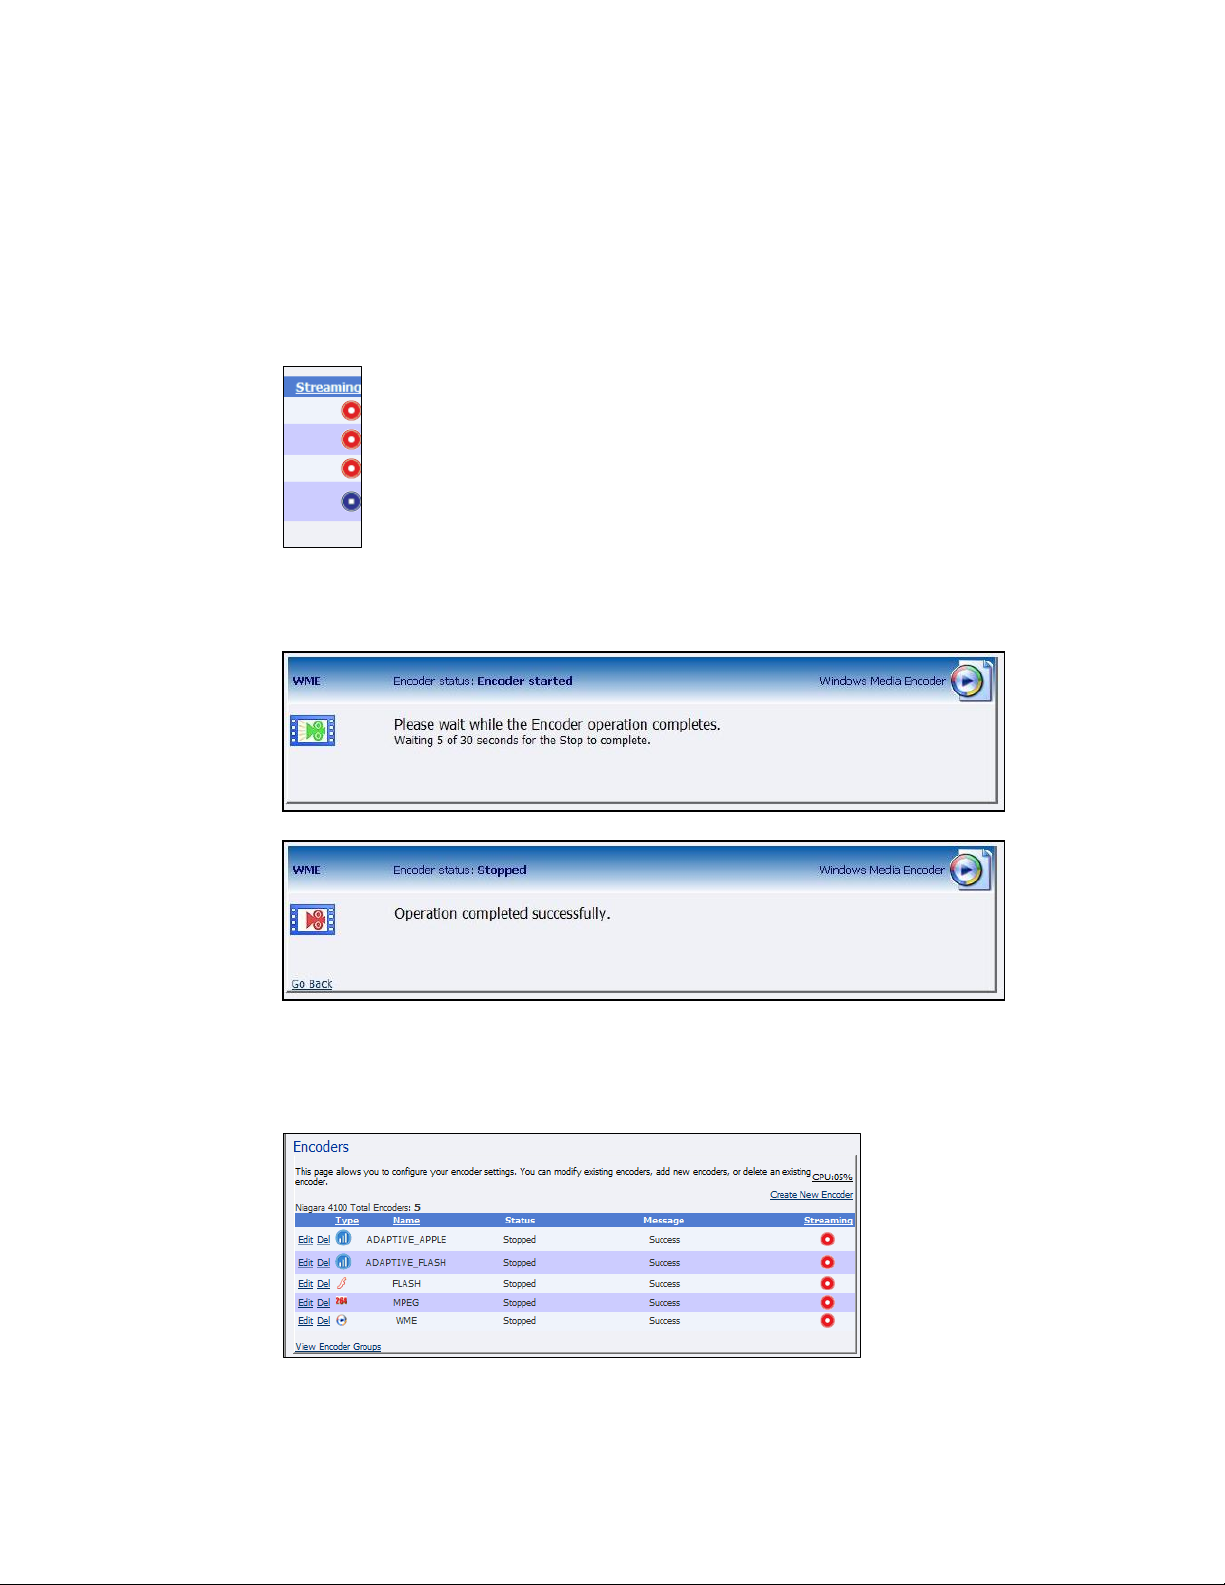
Click the blue Started icon of the encoder you wish to stop streaming (Figure 49).
Figure 49. Started icon
Messages appear detailing the encoder stop progress (Figure 50).
Figure 50. Encoder stopped
The Encoders window appears with the encoder status updated to reflect the Stopped mode
(Figure 51).
Figure 51. Encoders window
Stopping an encoder
To stop an encoder, on the home page click Encoders All Encoders.
To stop an encoder:
42 ViewCast
Page 49
Niagara 4100 User Guide
Editing an Adaptive Apple HTTP encoder
When you create a new encoder, the Encoder Properties window appears. The Encoder Properties
windows for editing a new encoder or an existing encoder are identical. You must configure the audio
and video settings for each encoder type.
Use the Video, Audio, Output, and Security tabs to edit the settings. Begin with configuring the video
and audio settings, then the streaming properties. The streaming properties and advanced streaming
settings are different for each type of encoder.
You have two options for for a publisher on the adaptive encoder:
Apple HTTP Live Streaming
Adobe Flash Dynamic Streaming
The fields on the Output tab and the Security tab are different depending on the type of publisher.
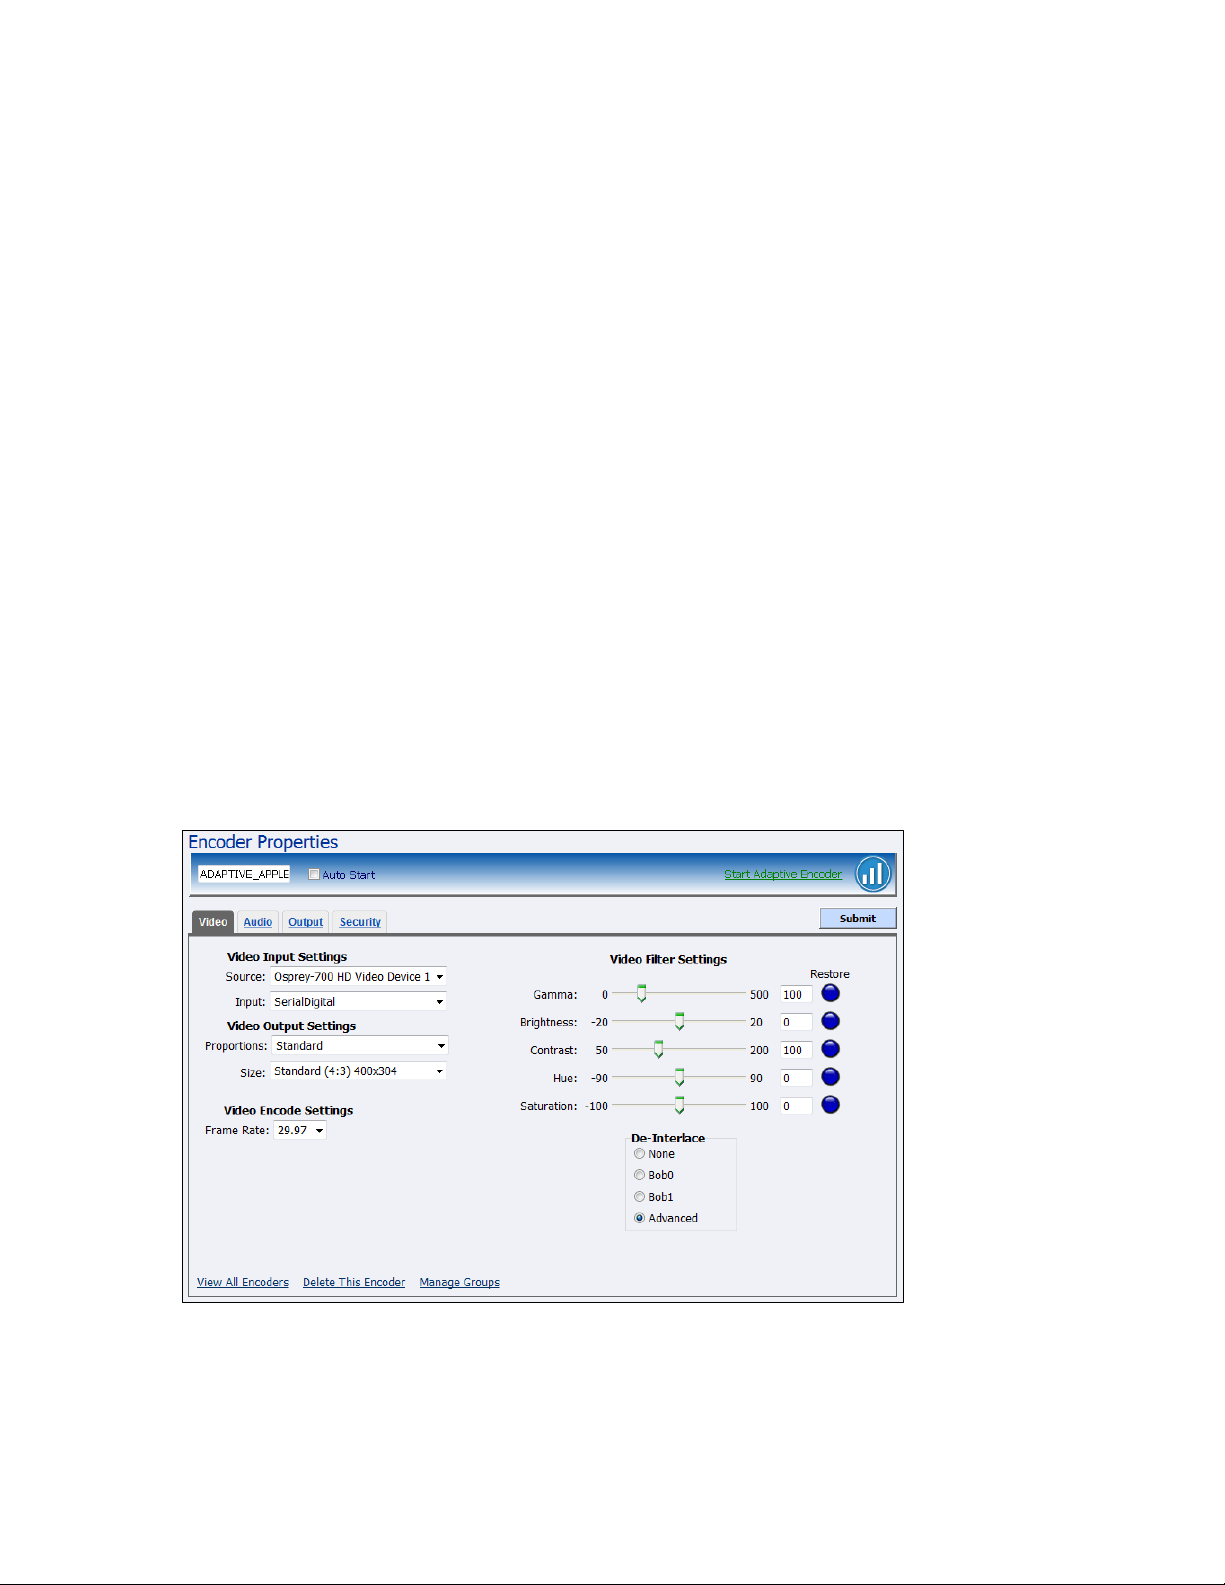
From the Adaptive Apple HTTP Encoder Properties window (Figure 52), you can set the encoder to start
streaming automatically by clicking the Auto Start checkbox. You can also start the encoder from this
window by clicking the Start Adaptive Encoder link in the top right corner of the window.
Click Encoders All Encoders from the home page. Then select the Edit link next to the adaptive
encoder whose properties you wish to modify. The system displays the Encoder Properties window for
the selected encoder.
IMPORTANT! If you make any changes to the Encoder Properties window, you must click Submit.
Otherwise, all your changes will be lost.
Figure 52. Adaptive Encoder Properties
ViewCast 43
Page 50
Advanced Operations
1.
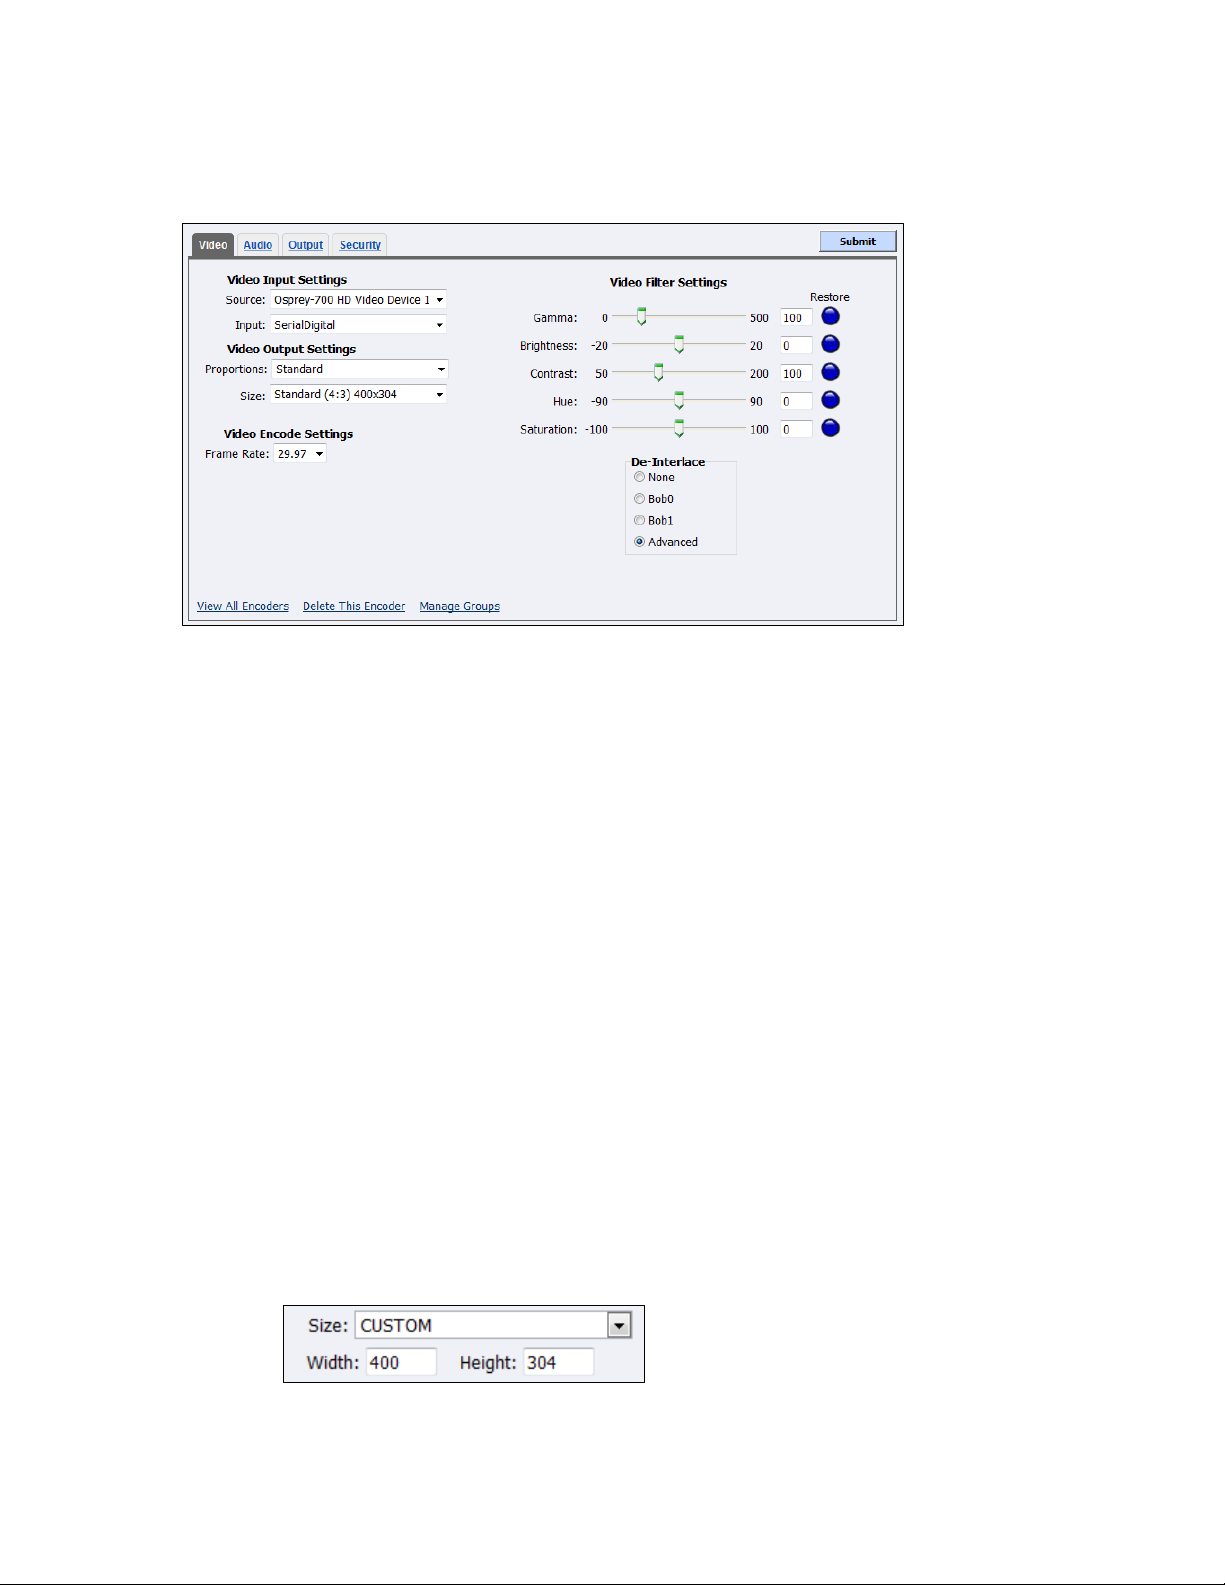
In the Source field, the default is Osprey-700 HD Video Device 1.
Note: Because the Niagara 4100 is a single-channel encoder, you can only connect and stream
one audio and video source at any given time. However, you can encode the same audio
and video at multiple data rates and multiple formats to provide the best user experience
for different viewing audiences.
2.
In the Input field, select the video input.
IMPORTANT! The video input must match the connectors on the back of the Niagara 4100 and
your video source.
3.
The Proportions field setting is Standard (square pixels for a VGA monitor).
4.
In the Size field, select the pixel size of the encoded video. The standard sizes include:
Standard
Wide screen
Custom
You can also specify a custom size for your video. This customization is useful when you are
capturing video to be played on a mobile video-device that requires a non-standard size for
compatibility.
When you click Custom, two additional fields appear so you can enter the exact size you want
the resulting video to be (Figure 54).
Figure 54. Custom fields
Video tab
Figure 53. Video tab
To configure video settings:
44 ViewCast
Page 51
Niagara 4100 User Guide
5.
Select the Frame Rate from the drop-down list.
6.
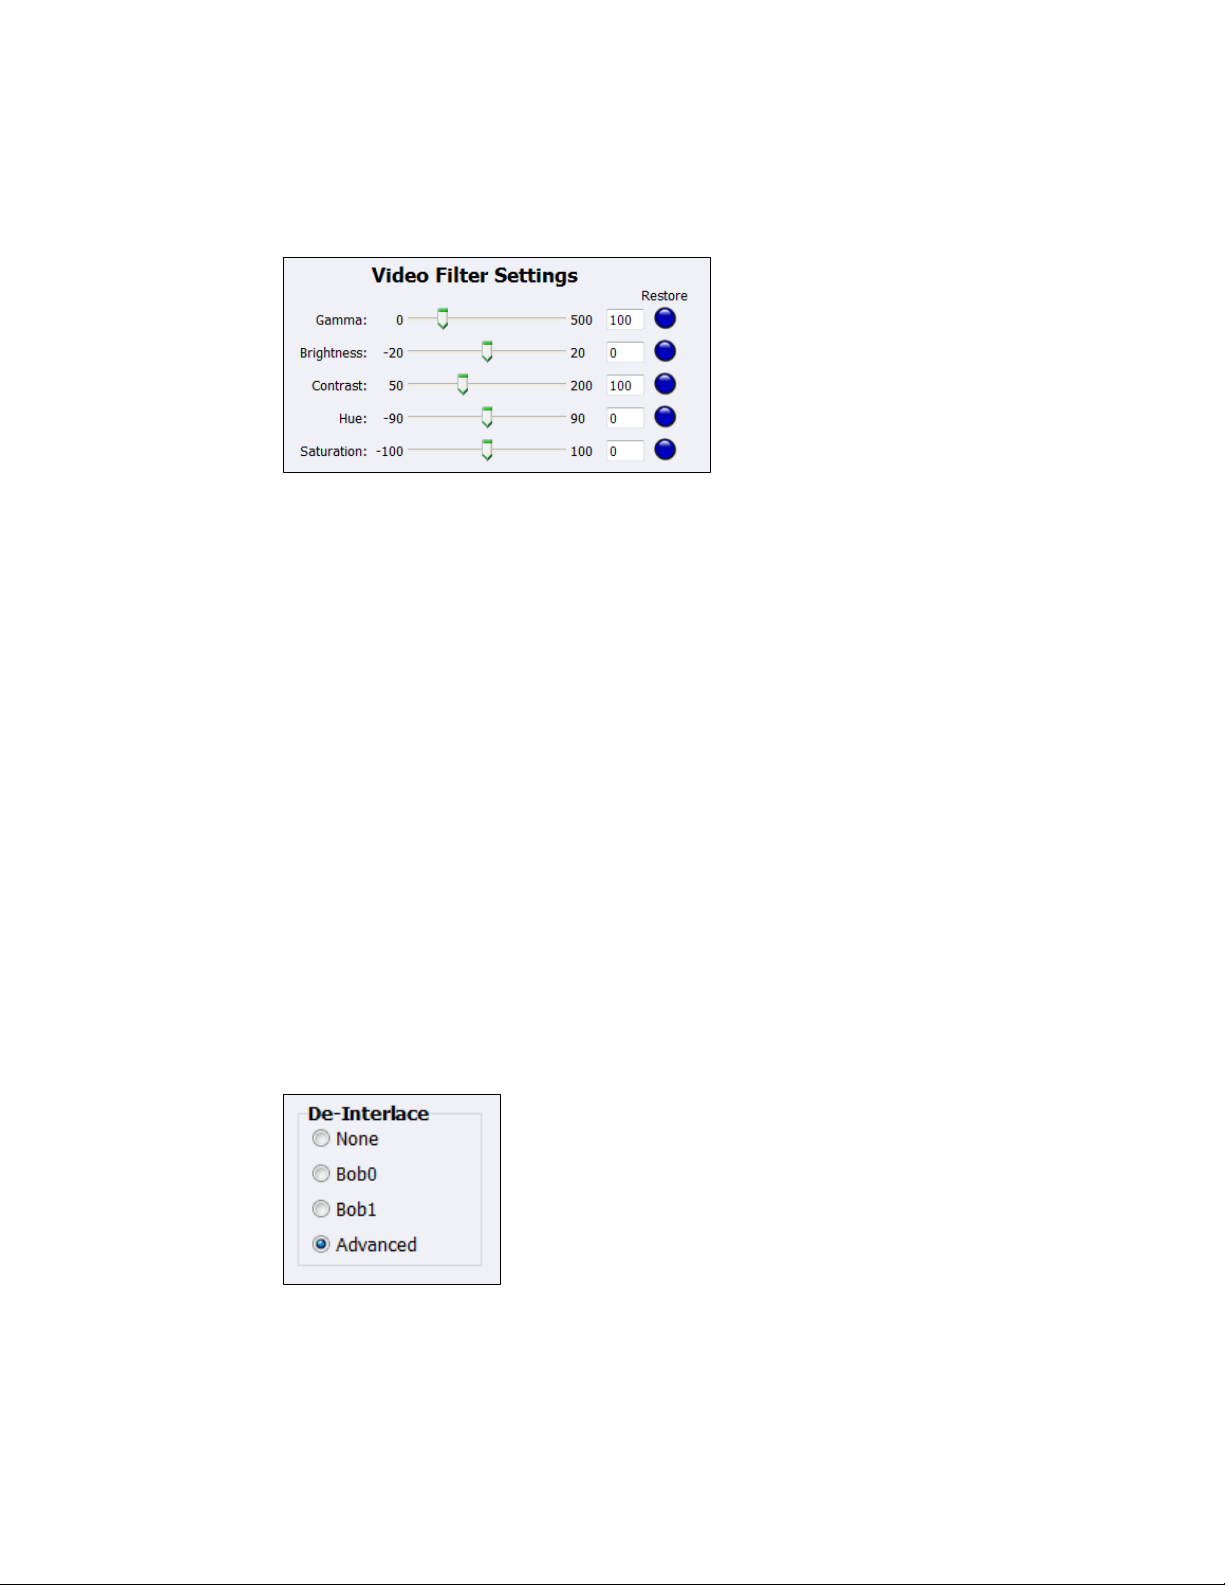
Drag the sliders to adjust the Gamma, Brightness, Contrast, Hue, and Saturation (Figure 55).
Figure 55. Video Filter Settings
Note: Click the Restore button to the right of the filter to reset the settings to the default.
7.
Click the De-Interlace setting you want to apply (Figure 56). Options include:
None
– Performs no de-interlacing of any kind.
Bob0
– Applies inverse telecine de-interlacing to all telecine video.
– Applies motion adaptive de-interlacing to all video that is not telecine.
– Switches dynamically between the two modes as the content changes.
– Available for NTSC video only.
Bob1
– Drops the redundant fields and reassembles the video in a 24 fps progressive format.
– Applies inverse telecine de-interlacing to all telecine video.
– Performs no de-interlacing of video that is not telecine.
–Available for NTSC video only.
Advanced
– Is an algorithm for de-interlacing pure video (non-telecine) content.
– Applies motion adaptive interlacing to all video. It detects which portions of the image
are still and which portions are in motion then applies different processing to each
scenario.
Figure 56. De-Interlace settings
Note: Telecine and inverse telecine only apply to NTSC video. They are not used for PAL and
SECAM video. The system disables Bob0 and Bob1 choices when you select either PAL or
SECAM as the video standard.
8.
Click Submit.
ViewCast 45
Page 52
Advanced Operations
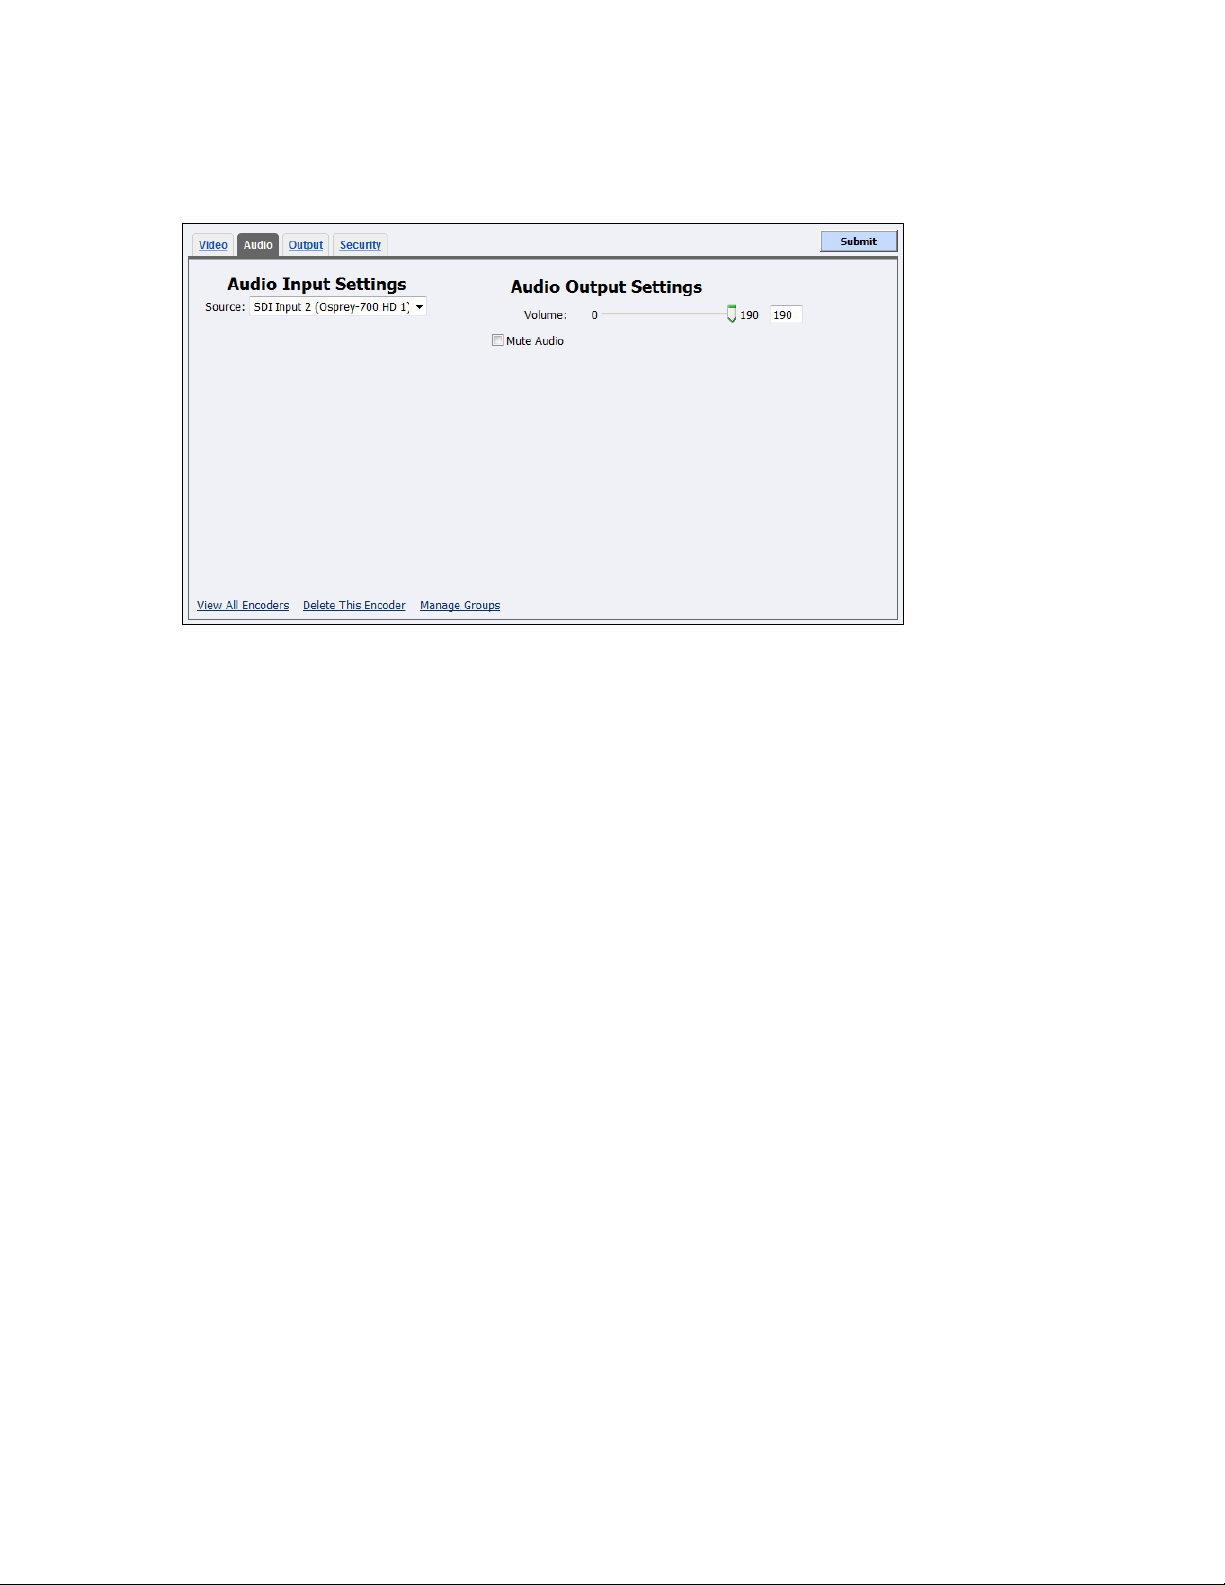
1.
In the Source field, click a device from the drop-down list.
AES Input 1 (Osprey-700 HD 1)
AES Input 2 (Osprey-700 HD 1)
Bal Input (Osprey-700 HD 1)
Digital Audio (S/PDIF) (High De
SDI Input 1 (Osprey-700 HD 1)
SDI Input 2 (Osprey-700 HD 1)
SDI Input 3 (Osprey-700 HD 1)
SDI Input 4 (Osprey-700 HD 1)
Unbal Input 1 (Osprey-700 HD 1)
Note: Because the Niagara 4100 is a single-channel encoder, you can only connect and stream
one audio and video source at any given time. However, you can encode the same audio
and video at multiple data rates and multiple formats to provide the best user experience
for different viewing audiences.
2.
Drag the slider to adjust the Volume.
3.
Click the checkbox to Mute Audio.
4.
Click Submit.
Audio tab
Figure 57. Audio tab
To configure audio settings:
46 ViewCast
Page 53
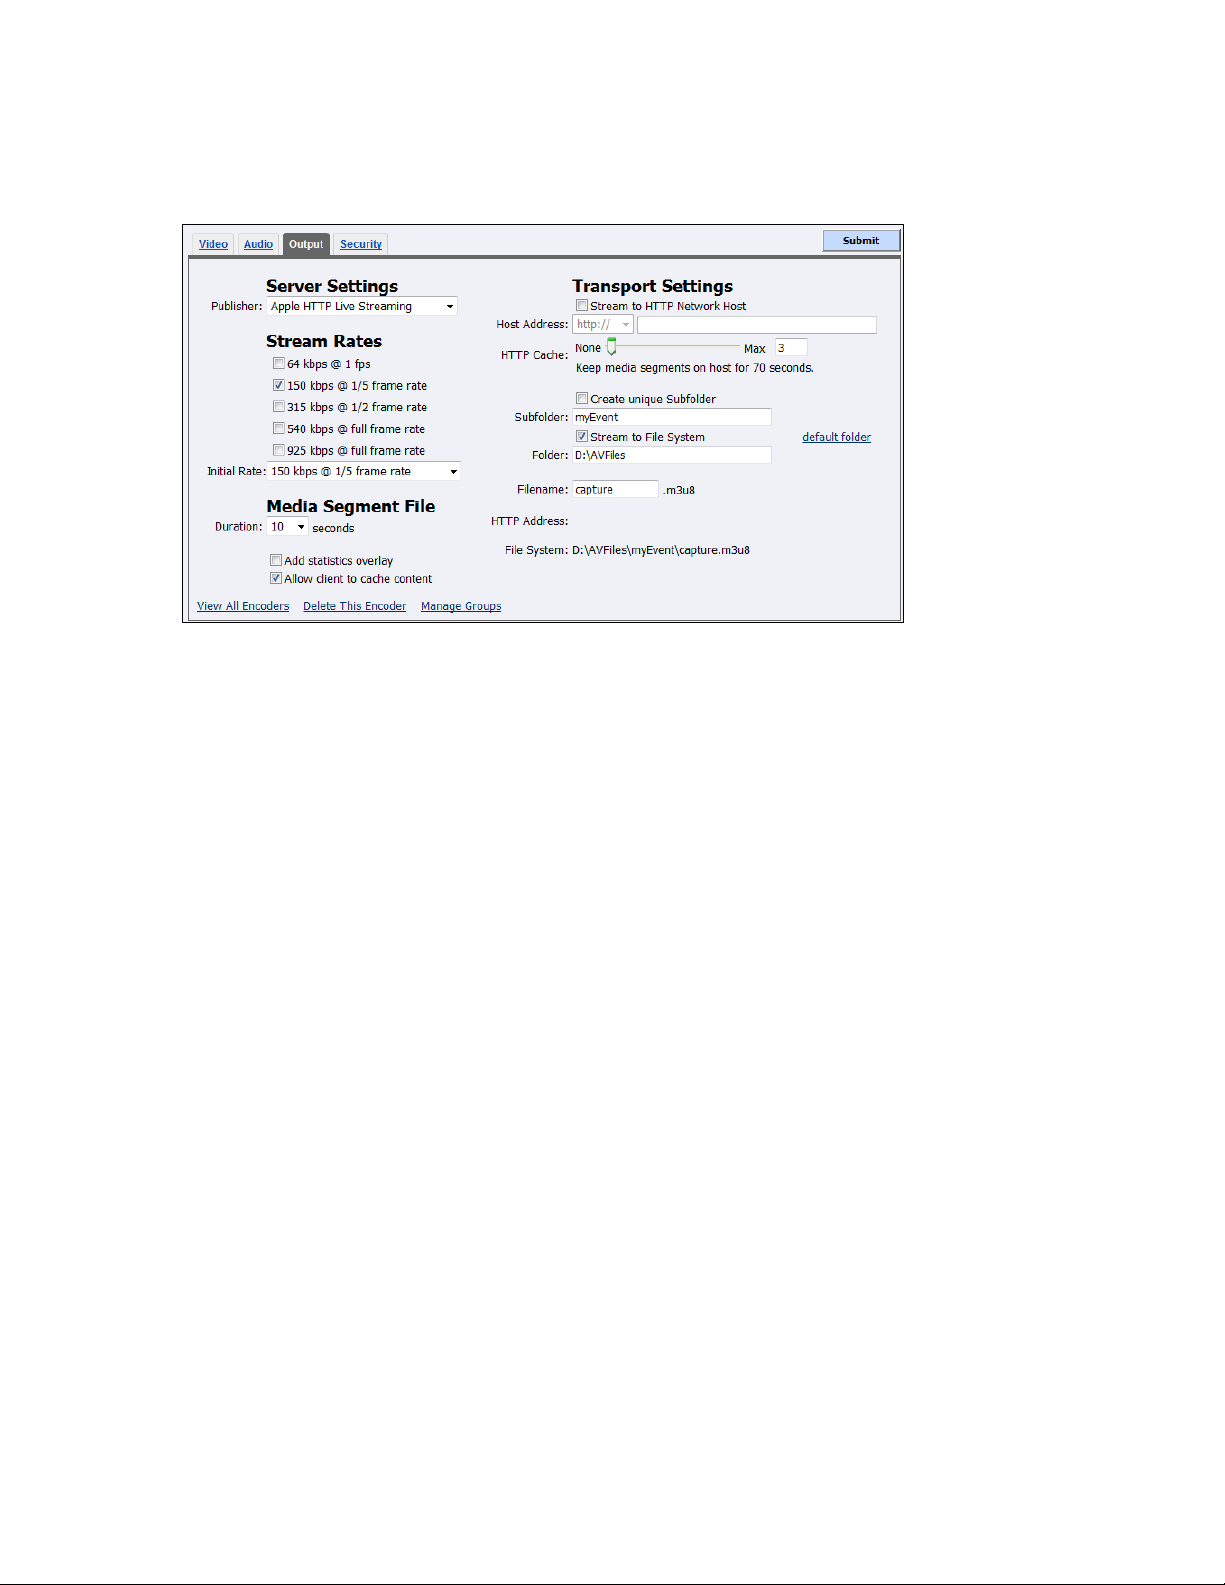
Apple HTTP Live Streaming Output tab
1.
In the Publisher field, click Apple HTTP Live Streaming.
Note: Because the Niagara 4100 is a single-channel encoder, you can only connect and stream
one audio and video source at any given time. However, you can encode the same audio
and video at multiple data rates and multiple formats to provide the best user experience
for different viewing audiences.
2.
Enable each Stream Rate you want to be available. The bandwidth is cumulative so you must
be careful not to exceed your network capability.
3.
In the Initial Rate field, select a rate from the drop-down list.
4.
In the Media Segment File, select the duration in seconds.
5.
(Optional) Enable Add statistics overlay.
6.
(Optional) Enable Allow client to cache content.
7.
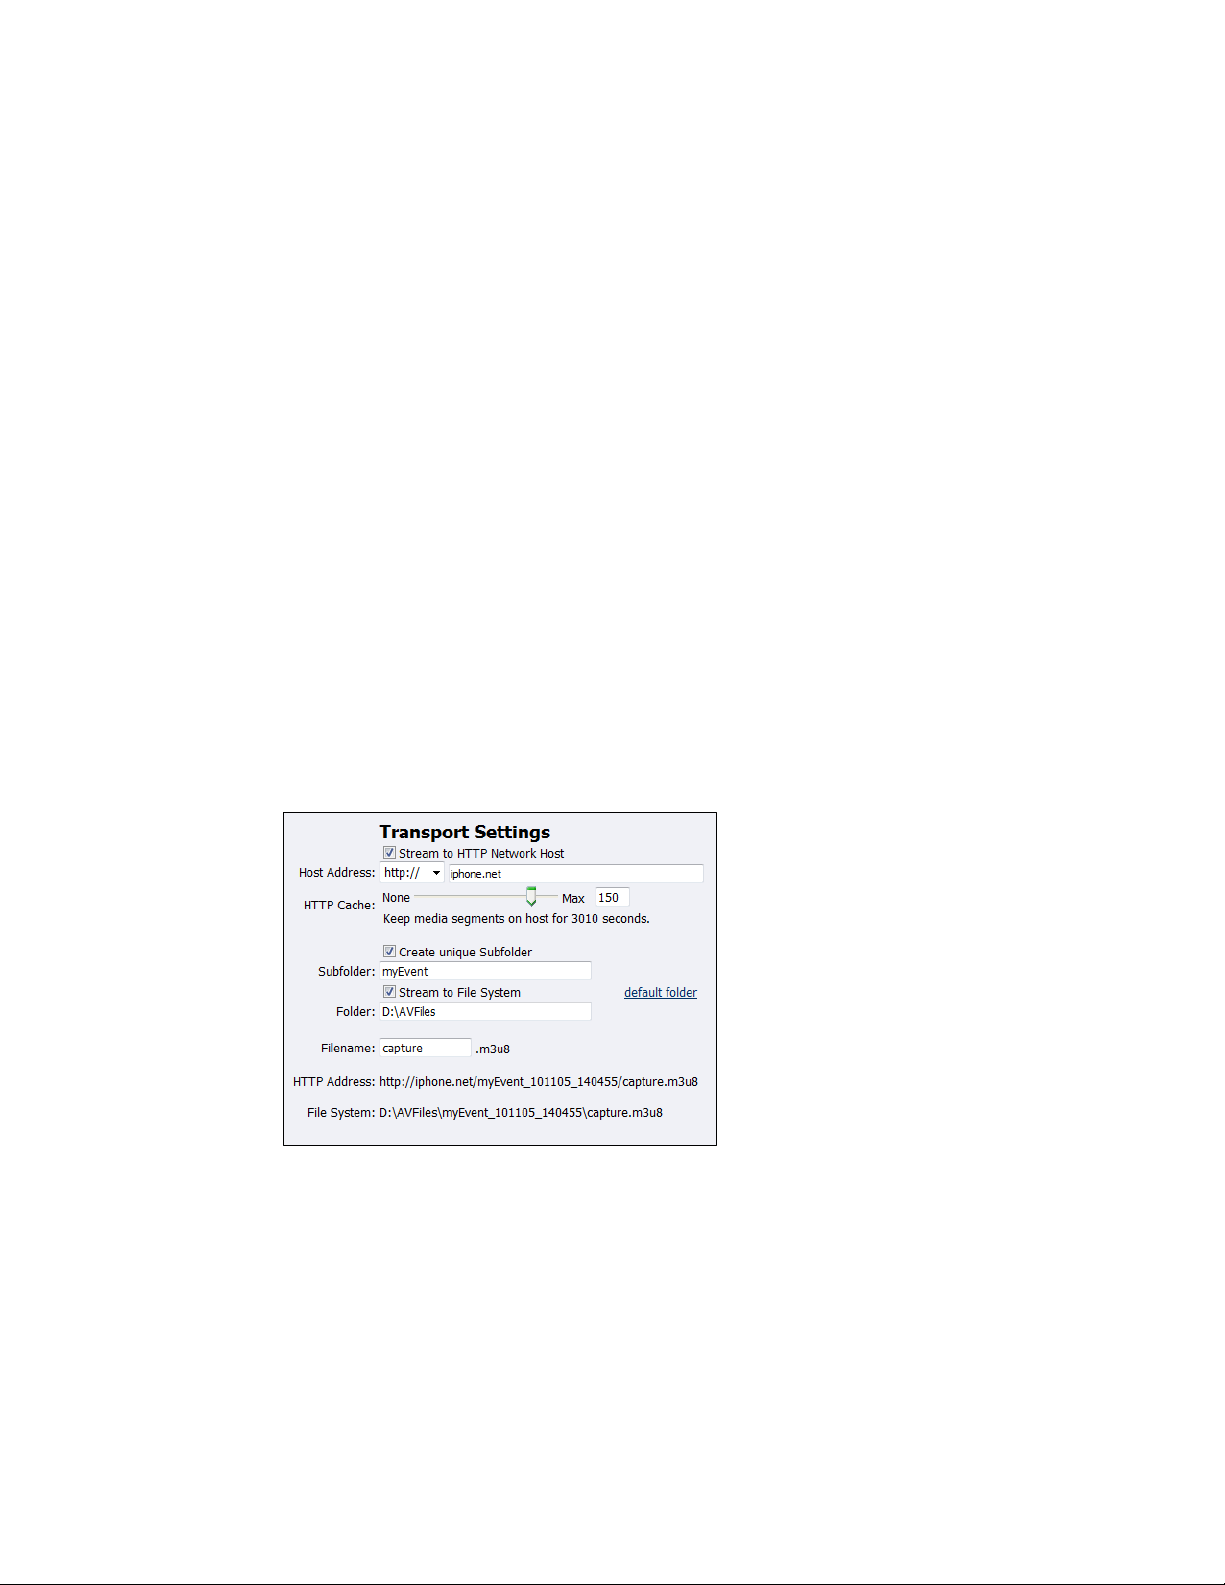
Enable Stream to HTTP Network Host.
8.
Select the Host Address:
http://
ftp://
Then enter the address in the next field.
9.
Indicate the maximum HTTP Cache by dragging the slider for the number of files to maintain.
A duration will be shown in seconds.
10.
Enable Create unique Subfolder to create a file that the system does not overwrite.
11.
Enter the name of the Subfolder.
12.
Enable Stream to File System.
13.
Accept the default location that displays in the Folder field. If the field is blank, click the
default folder link to automatically populate the field.
Figure 58. Apple HTTP Live Streaming Output tab
To configure output settings:
Niagara 4100 User Guide
ViewCast 47
Page 54
Advanced Operations
Note: By default, the system sets this folder to D:\AVFiles. See Exporting captured video files
for instructions on saving video files to a USB device.
WARNING! ViewCast strongly recommends you do not alter the default directory setting
unless you fully understand the risk of saving your files to a directory not located on drive
D. If you save your files to another drive on the Niagara 4100, the system could delete the
files when you use the Restore to Niagara 4100 Factory Defaults feature.
Only drive D on the Niagara 4100 has available storage to save your files. Check drive
properties for available free space to determine your storage capacity.
Use drives C, E, and F strictly for Niagara 4100 operational programs. Any modifications
to these drives can permanently damage your system and void your warranty.
A better practice would be to use a Flash Media server to save a file or to save it to a
remote drive. If you inadvertantly fill all available space, you risk losing your stream
during a streaming event.
14.
Enter the variant playlist file in the Filename field.
Note: The HTTP Address that displays at the bottom of the window is a combination of the
Host Address, Subfolder, and Filename.
The File System that displays at the bottom of the window is a combination of the Folder,
Subfolder, and HTTP Address.
Figure 59. Transport Settings
48 ViewCast
Page 55
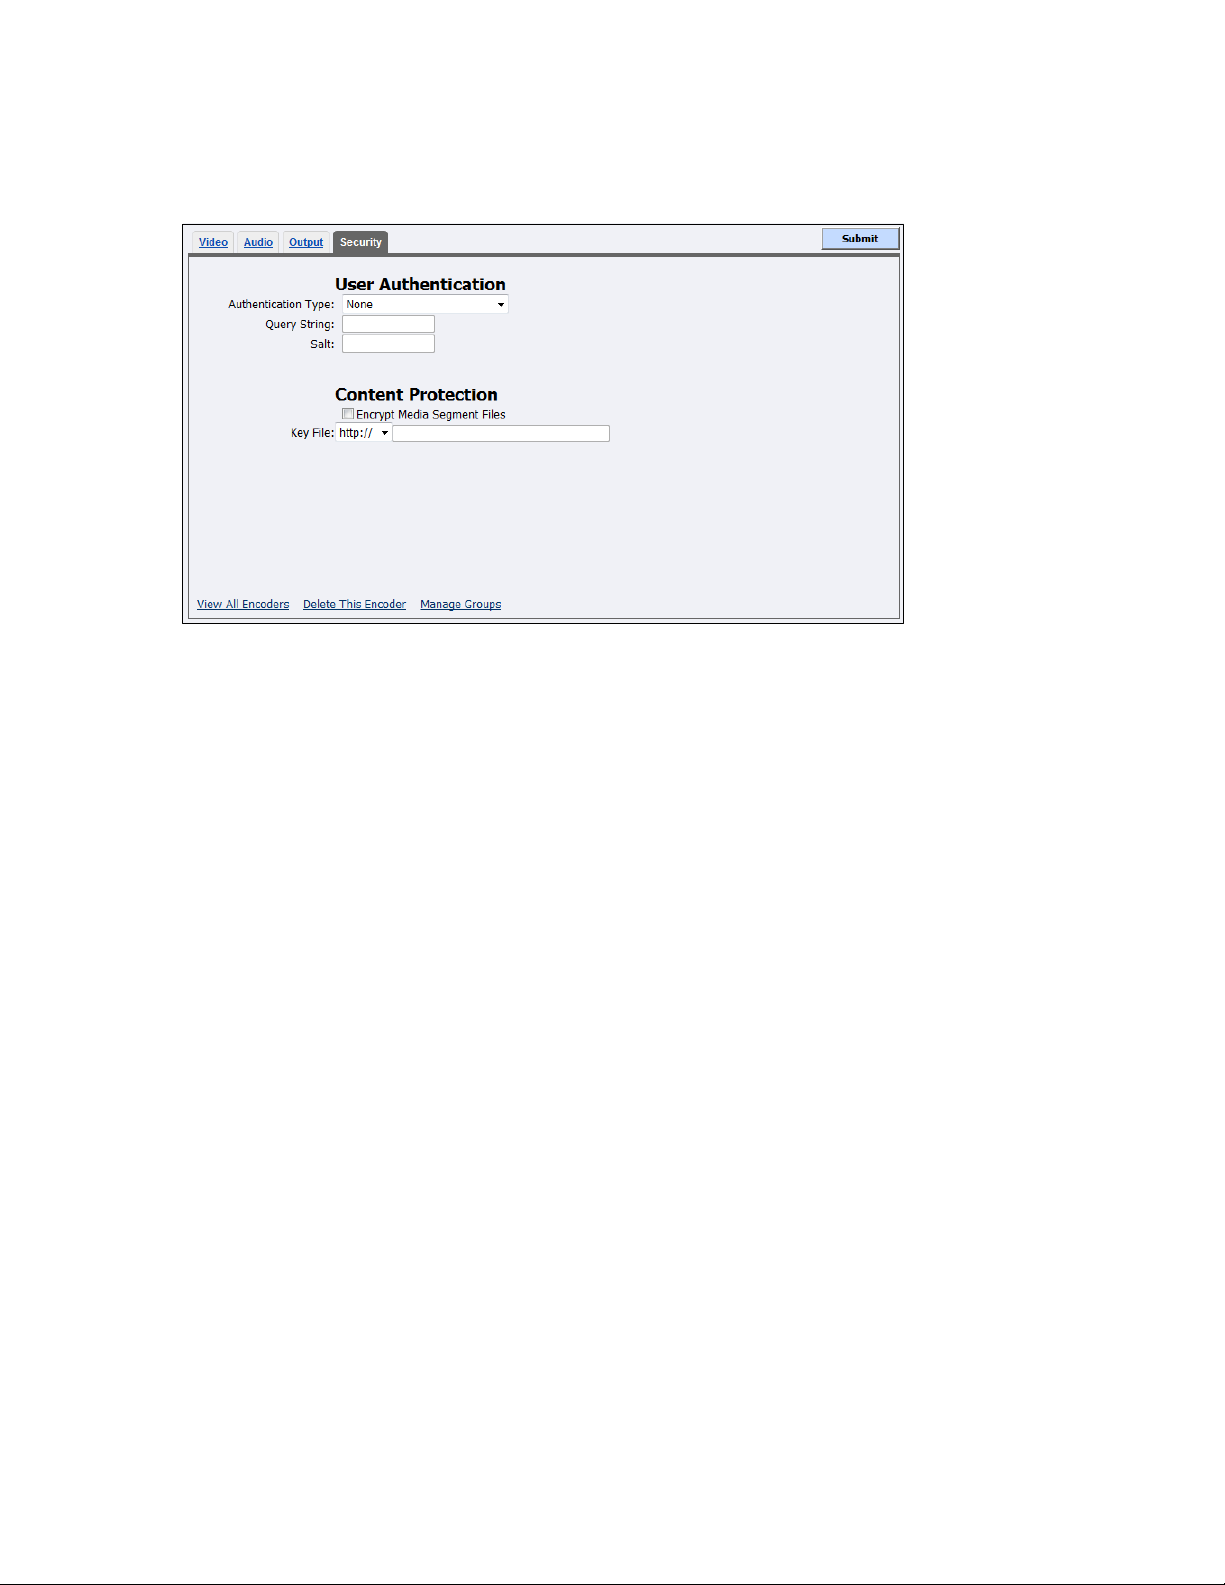
Apple HTTP Live Streaming Security tab via FTP
1.
Select the Authentication Type.
Note: If http: is selected as the Host Address on the Output tab, the option is Akamai Token
Authentication.
2.
Enter the Query String.
Note: You can enter a minimum of 5 characters and a maximum of 12 characters.
3.
Enter the password in the Salt field.
Note: You can enter a maximum of 20 characters.
4.
Enable Encrypt Media Segment Files to protect the content.
5.
Select the Key File.
Note: http:// is currently the only choice.
6.
Enter the URL in the next field.
Figure 60. Apple HTTP Live Streaming Security tab via FTP
To configure security settings:
Niagara 4100 User Guide
ViewCast 49
Page 56
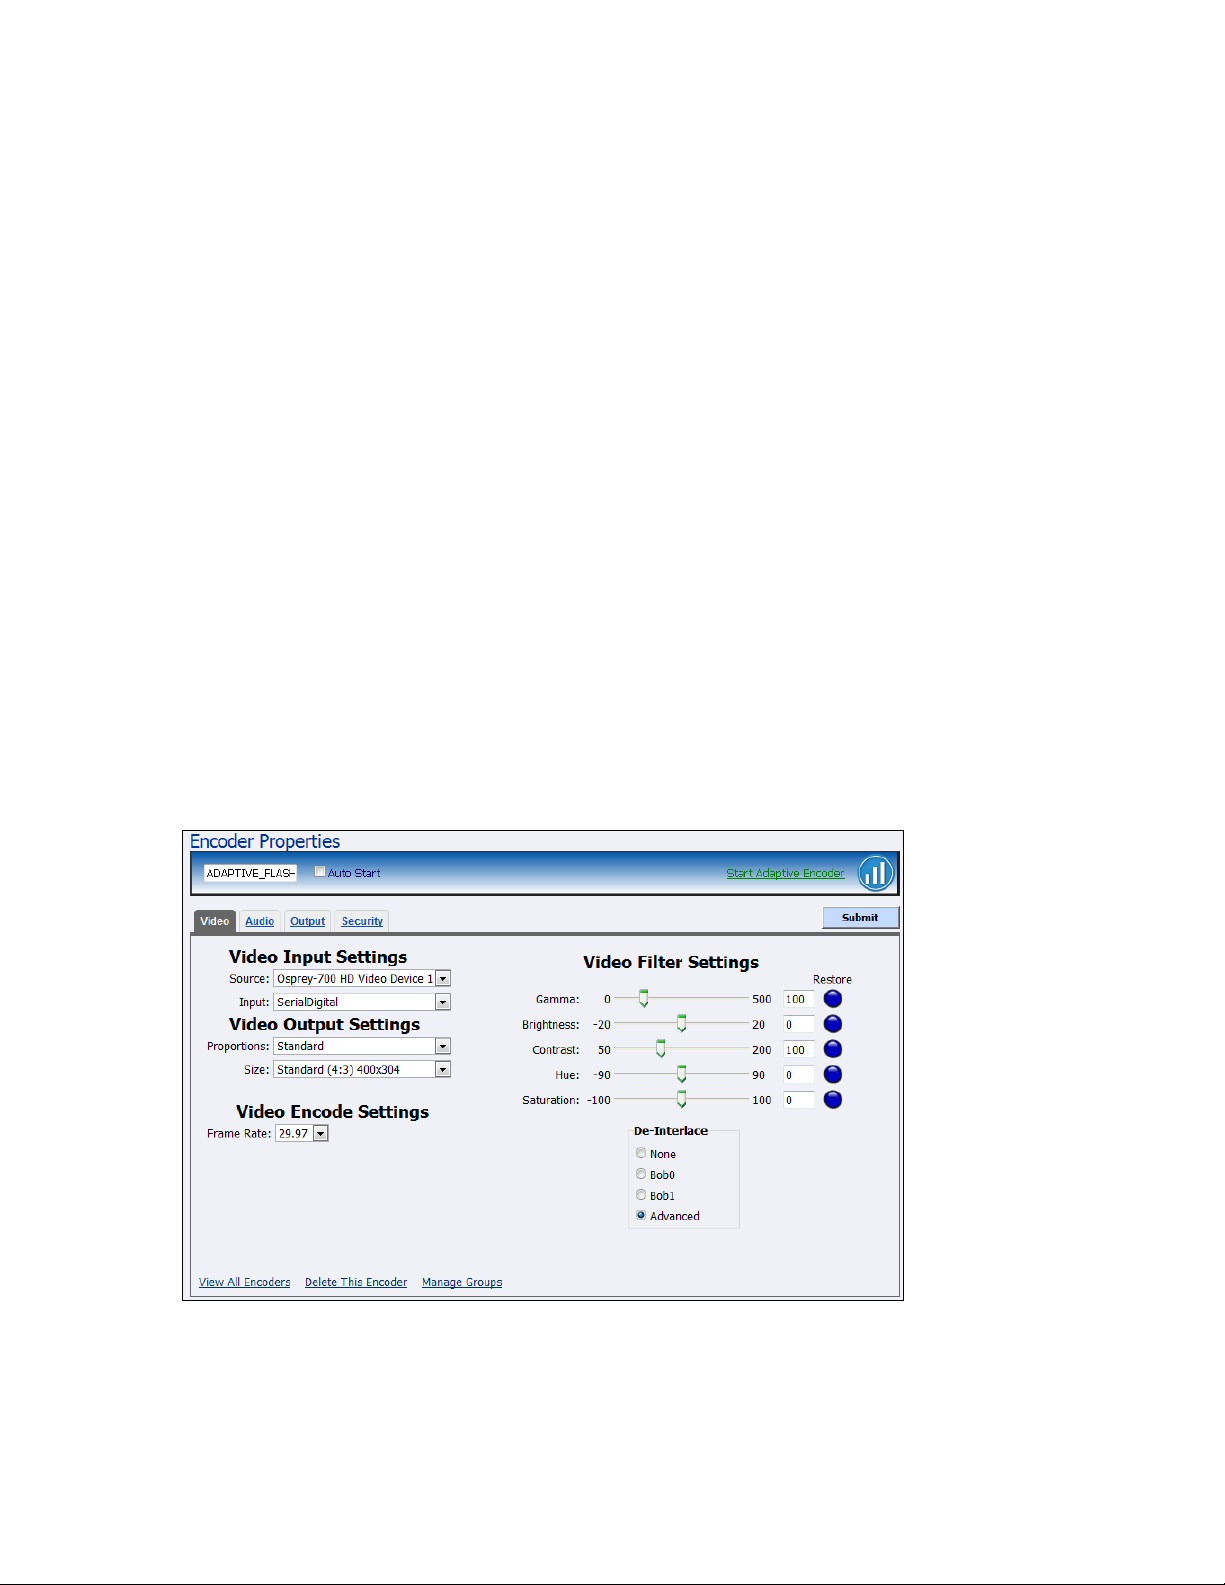
Advanced Operations
Editing an Adaptive Adobe Flash encoder
When you create a new encoder, the Encoder Properties window appears. The Encoder Properties
windows for editing a new encoder or an existing encoder are identical. You must configure the audio
and video settings for each encoder type.
Use the Video, Audio, Output, and Security tabs to edit the settings. Begin with configuring the video
and audio settings, then the streaming properties. The streaming properties and advanced streaming
settings are different for each type of encoder.
You have two options for for a publisher on the adaptive encoder:
Apple HTTP Live Streaming
Adobe Flash Dynamic Streaming
The fields on the Output tab and the Security tab are different depending on the type of publisher.
From the Adaptive Adobe Flash Encoder Properties window (Figure 61), you can set the encoder to start
streaming automatically by clicking the Auto Start checkbox. You can also start the encoder from this
window by clicking the Start Flash Encoder link in the top right corner of the window.
Click Encoders All Encoders from the home page. Then select the Edit link next to the Adaptive Adobe
Flash encoder whose properties you wish to modify. The system displays the Encoder Properties window
for the selected encoder.
IMPORTANT! If you make any changes to the Encoder Properties window, you must click Submit.
Otherwise, all your changes will be lost.
Figure 61. Adaptive Adobe Flash Encoder Properties
50 ViewCast
Page 57
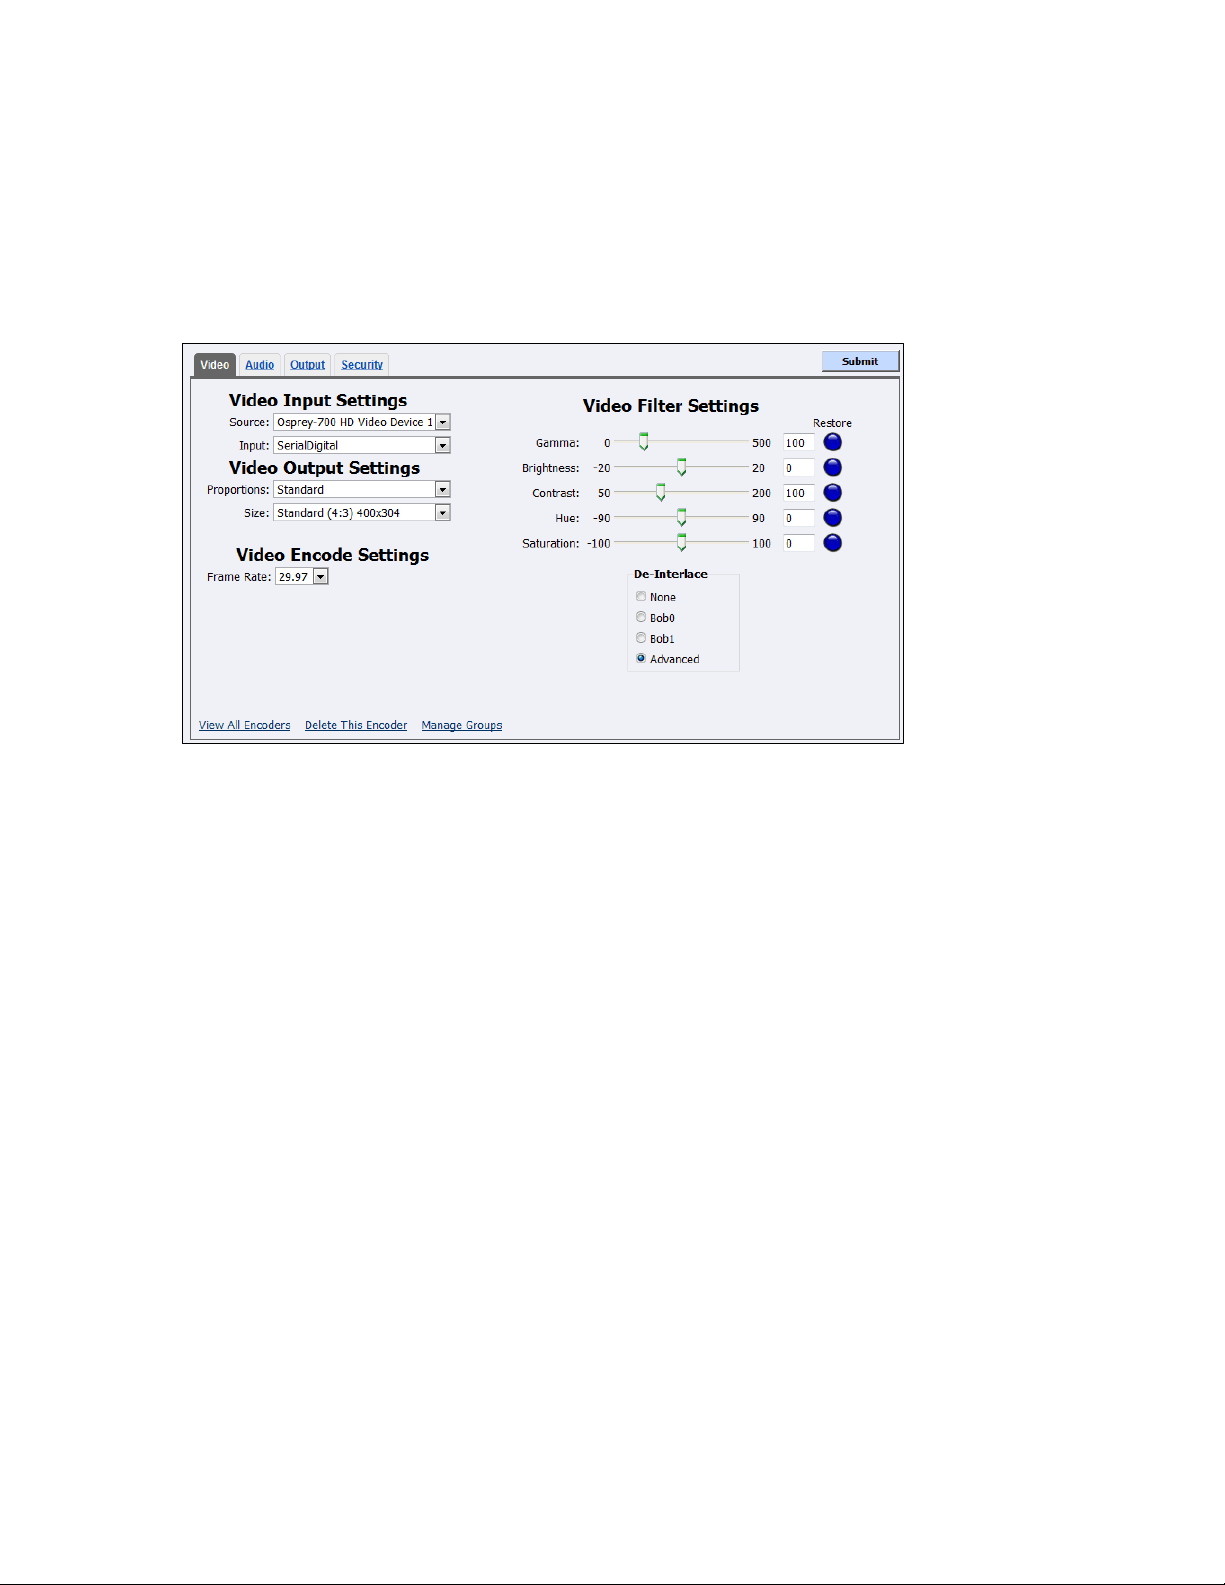
Niagara 4100 User Guide
1.
In the Source field, the default is Osprey-700 HD Video Device 1.
Note: Because the Niagara 4100 is a single-channel encoder, you can only connect and stream
one audio and video source at any given time. However, you can encode the same audio
and video at multiple data rates and multiple formats to provide the best user experience
for different viewing audiences.
2.
In the Input field, the video input is SerialDigital.
3.
The Proportions field setting is Standard (square pixels for a VGA monitor).
4.
In the Size field, select the pixel size of the encoded video. The standard sizes include:
Standard
Widescreen
Custom
You can also specify a custom size for your video. This customization is useful when you are
capturing video to be played on a mobile video-device that requires a non-standard size for
compatibility.
When you click Custom, two additional fields appear so you can enter the exact size you want
the resulting video to be (Figure 63).
Video tab
Flash adds some additional frame and bit rate controls. The frame rate changes the frames per second
that the video will be encoded. You can use the audio format setting to modify the audio frequency and
change stereo to mono. The bit rate settings pertain to the amount of data per second the audio and
video are captured. Decreasing the bit rate for both or either decreases the playback viewing quality.
Figure 62. Video tab
To configure video settings:
ViewCast 51
Page 58
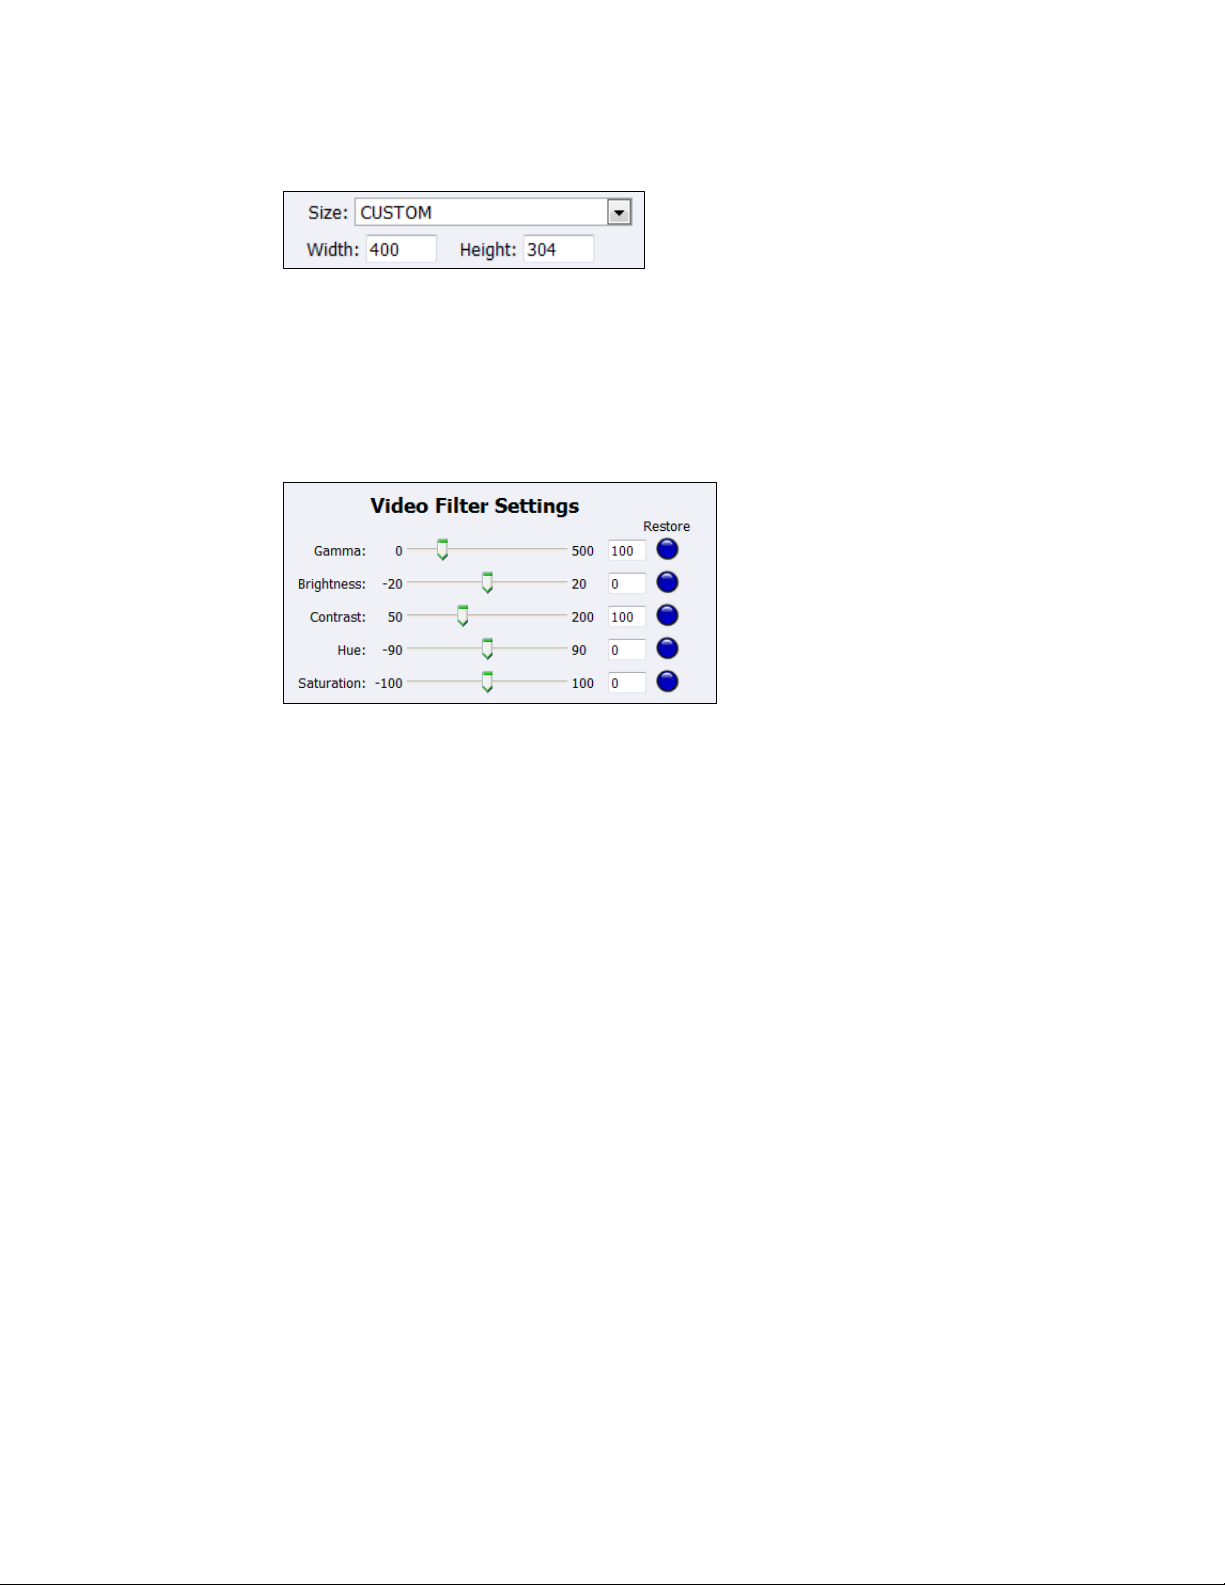
Advanced Operations
Figure 63. Custom fields
Note: Choosing a size larger than 1280 x 420 is not recommended due to the high data rates
CPU usage required.
5.
Select the Frame Rate from the dro-down list.
6.
Drag the sliders to adjust the Gamma, Brightness, Contrast, Hue, and Saturation (Figure 64).
Figure 64. Video Filter Settings
Note: Click the Restore button to the right of the filter to reset the settings to the default.
7.
Click the De-Interlace setting you want to apply (Figure 65). Options include:
None
– Performs no de-interlacing of any kind.
Bob0
– Applies inverse telecine de-interlacing to all telecine video.
– Applies motion adaptive de-interlacing to all video that is not telecine.
– Switches dynamically between the two modes as the content changes.
– Available for NTSC video only.
Bob1
– Drops the redundant fields and reassembles the video in a 24 fps progressive format.
– Applies inverse telecine de-interlacing to all telecine video.
– Performs no de-interlacing of video that is not telecine.
–Available for NTSC video only.
Advanced
– Is an algorithm for de-interlacing pure video (non-telecine) content.
– Applies motion adaptive interlacing to all video. It detects which portions of the image
are still and which portions are in motion then applies different processing to each
scenario.
52 ViewCast
Page 59

Figure 65. De-Interlace settings
Note: Telecine and inverse telecine only apply to NTSC video. They are not used for PAL and
SECAM video. The system disables Auto and Inverse Telecine choices when you select
either PAL or SECAM as the video standard.
8.
Click Submit.
Niagara 4100 User Guide
ViewCast 53
Page 60
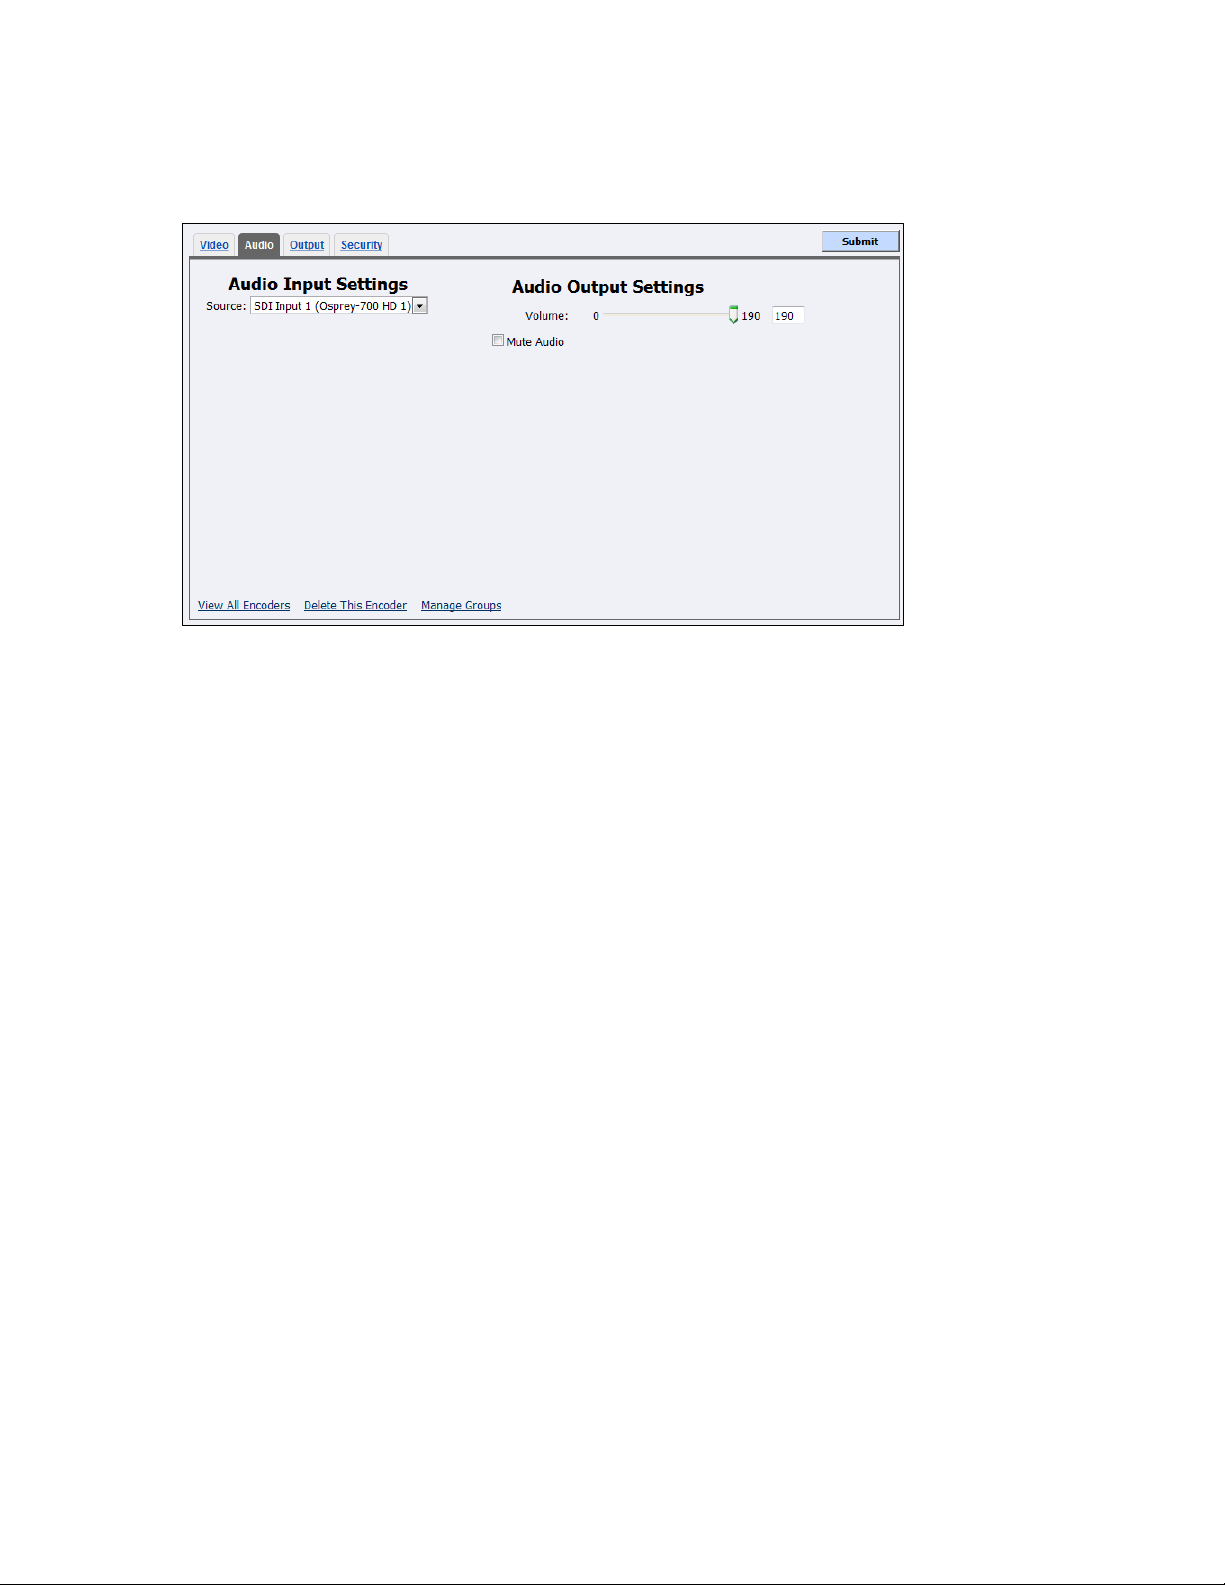
Advanced Operations
1.
In the Source field, select an audio source from the drop-down list:
AES Input 1 (Osprey-700 HD 1)
AES Input 2 (Osprey-700 HD 1)
AES Input 3 (Osprey-700 HD 1)
AES Input 4 (Osprey-700 HD 1)
Digital Audio (S/PDIF (High De
SDI Input 1 (Osprey-700 HD 1)
SDI Input 2 (Osprey-700 HD 1)
SDI Input 3 (Osprey-700 HD 1)
SDI Input 4 (Osprey-700 HD 1)
IMPORTANT! The audio input must match the connectors on the back of the Niagara 4100
and your audio source.
2.
Drag the slider to adjust the Volume.
3.
(Optional) Click to Mute Audio.
4.
Click Submit.
Audio tab
Figure 66. Audio tab
To configure audio settings:
54 ViewCast
Page 61
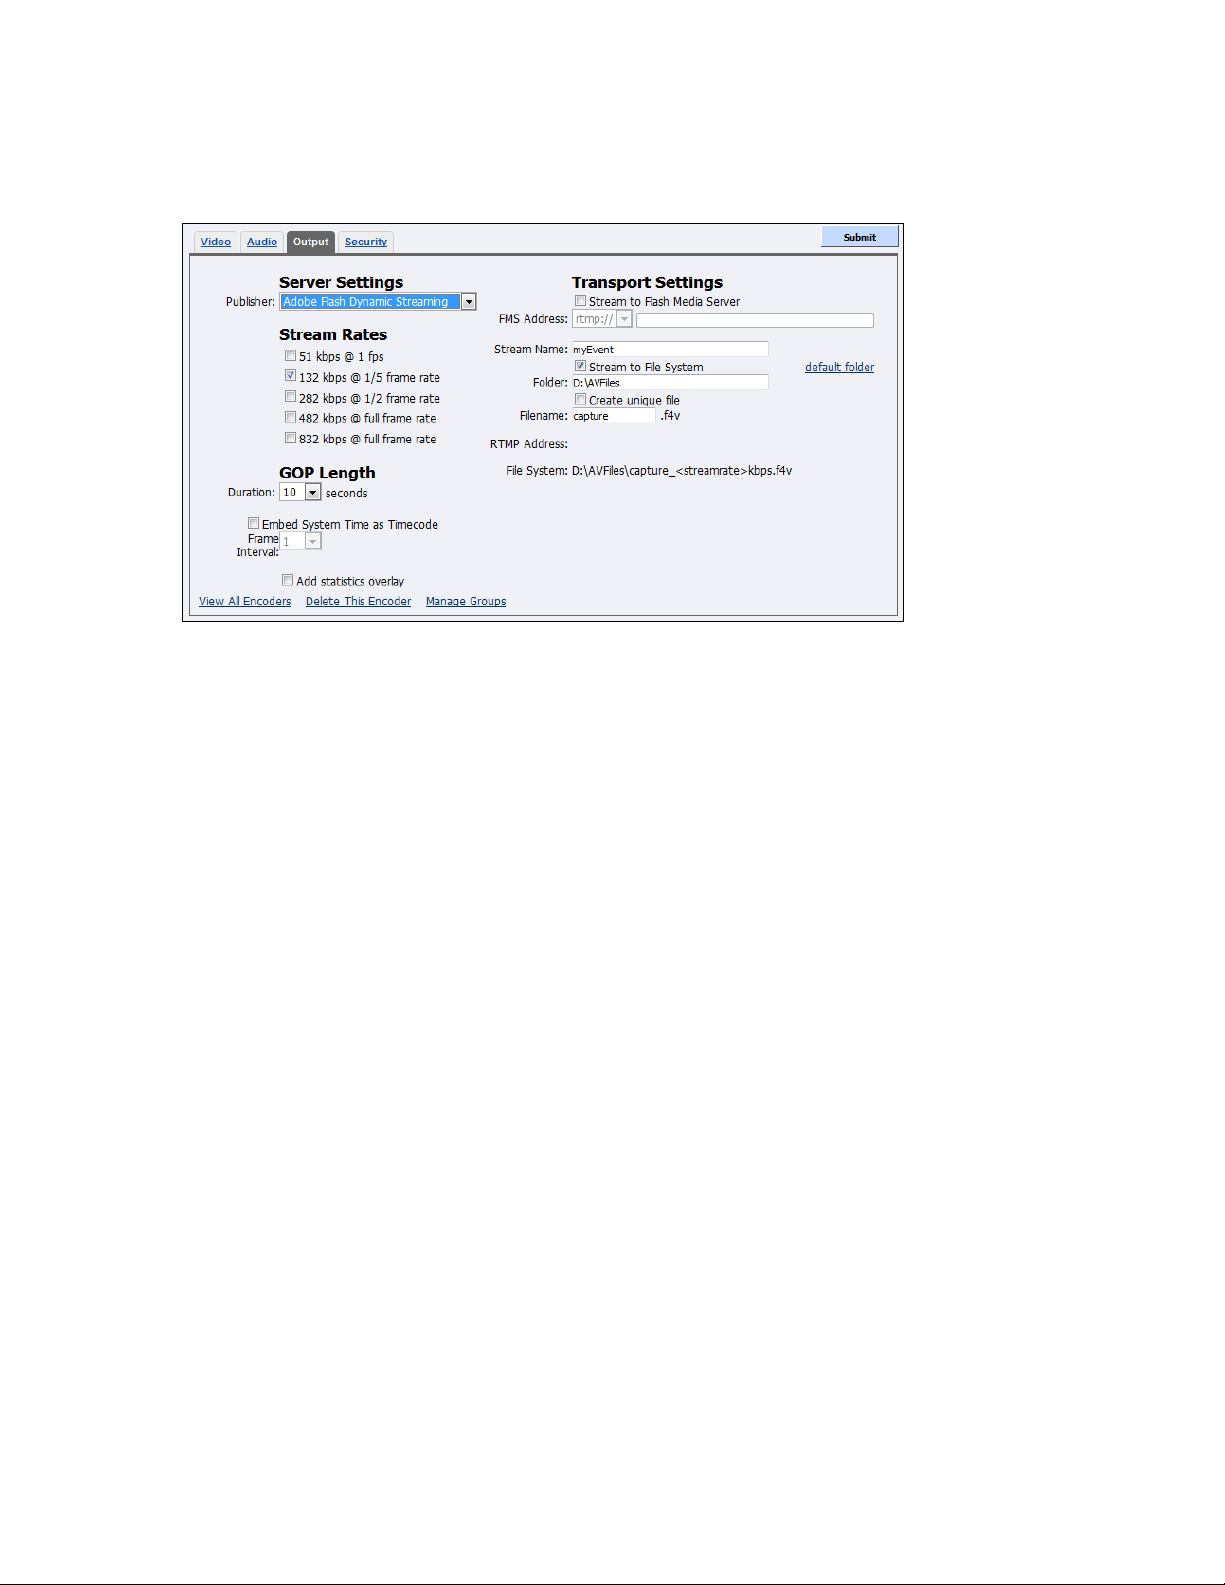
Adobe Flash Dynamic Streaming Output tab
1.
In the Publisher field, select Adobe Flash Dynamic Streaming.
Note: Because the Niagara 4100 is a single-channel encoder, you can only connect and stream
one audio and video source at any given time. However, you can encode the same audio
and video at multiple data rates and multiple formats to provide the best user experience
for different viewing audiences.
2.
Enable each Stream Rate that you want to be available. The bandwidth is cumulative so you
must be careful not to exceed your network capability.
3.
Select the Duration of the GOP in seconds.
4.
Enable the Embed System Time as Timecode.
5.
Enter the Frame Interval.
6.
(Optional) Enable the Add statistics overlay.
7.
Enable the Stream to Flash Media Server.
8.
Enter the FMS Address.
9.
Enter the Stream Name.
10.
Enable Stream to File System.
11.
Accept the default location that displays in the Folder field. If this field is blank, click the
default folder link to automatically populate the field.
Note: By default, the system sets this folder to D:\AVFiles. See Exporting captured video files
for instructions on saving video files to a USB device.
WARNING! ViewCast strongly recommends you do not alter the default directory setting
unless you fully understand the risk of saving your files to a directory not located on drive
D. If you save your files to another drive on the Niagara 4100, the system could delete the
files when you use the Restore to Niagara 4100 Factory Defaults feature.
Figure 67. Adobe Flash Dynamic Streaming Output tab
To configure output settings:
Niagara 4100 User Guide
ViewCast 55
Page 62
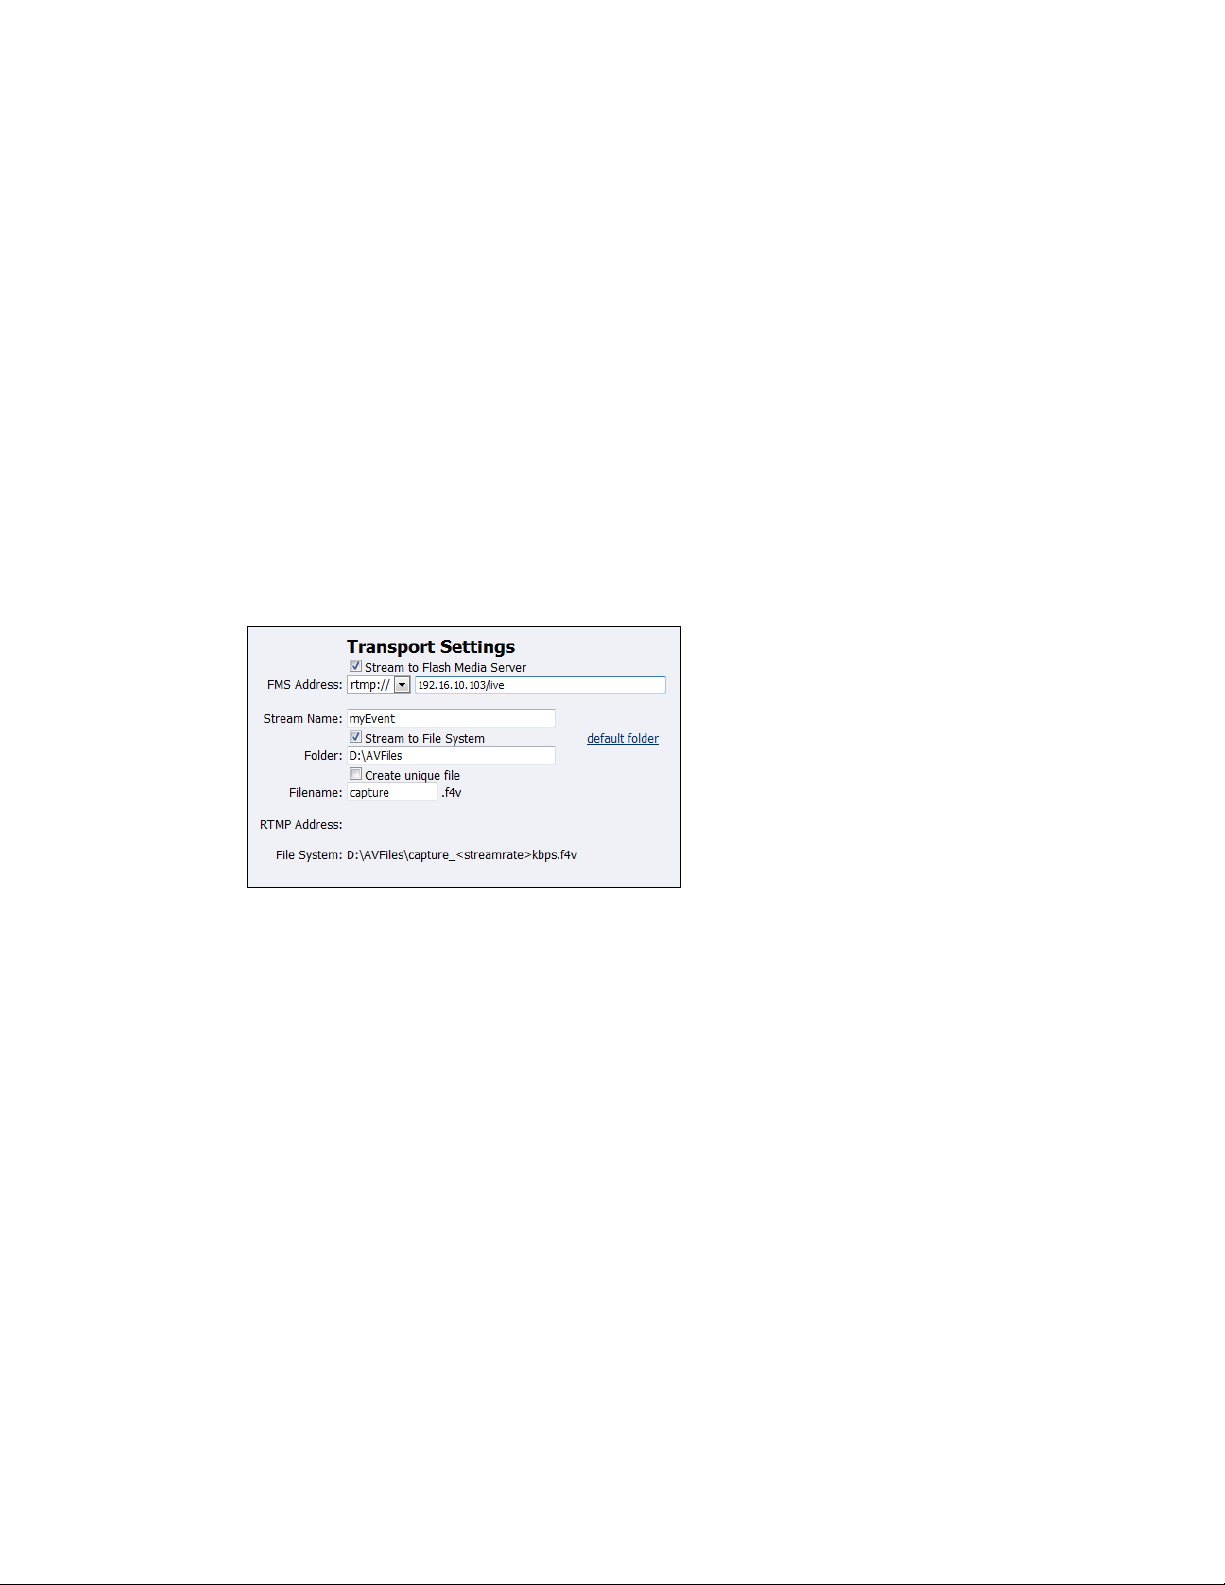
Advanced Operations
Only drive D on the Niagara 4100 has available storage to save your files. Check drive
properties for available free space to determine your storage capacity.
Use drives C, E, and F strictly for Niagara 4100 operational programs. Any modifications
to these drives can permanently damage your system and void your warranty.
A better practice would be to use a Flash Media server to save a file or to save it to a
remote drive. If you inadvertantly fill all available space, you risk losing your stream
during a streaming event.
12.
Enter the Filename.
Note: The RTMP Address that displays at the bottom of the window is the Host Address, FMS
Address.
The File System that displays at the bottom of the window is a combination of the Folder
and Filename.
Figure 68. Transport Settings
56 ViewCast
Page 63
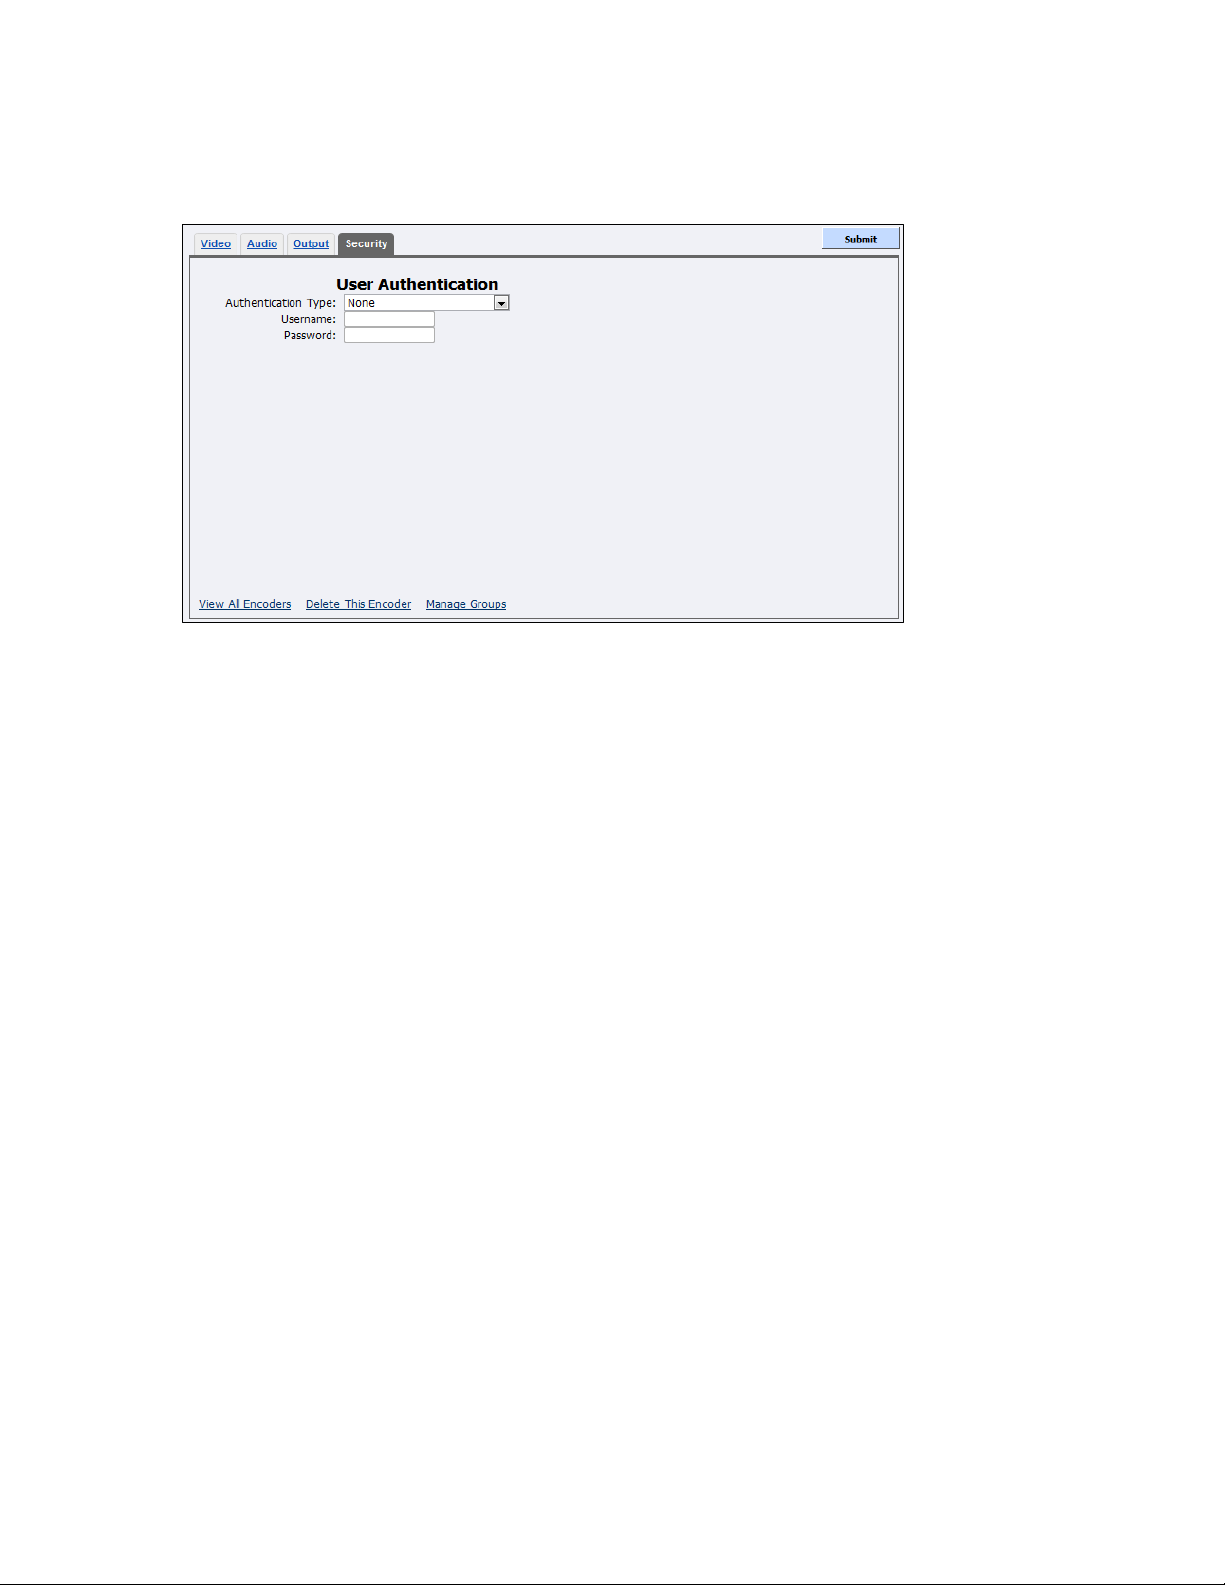
Adobe Flash Dynamic Streaming Security tab
1.
Select the Authentication Type for transport type:
Akamai Entry Point
LimeLight Server
2.
Enter the Username.
Note: You can enter a maximum of 80 characters.
3.
Enter the Password.
Note: You can enter a maximum of 20 characters.
Figure 69. Adobe Flash Dynamic Streaming Security tab
To configure security settings:
Niagara 4100 User Guide
ViewCast 57
Page 64
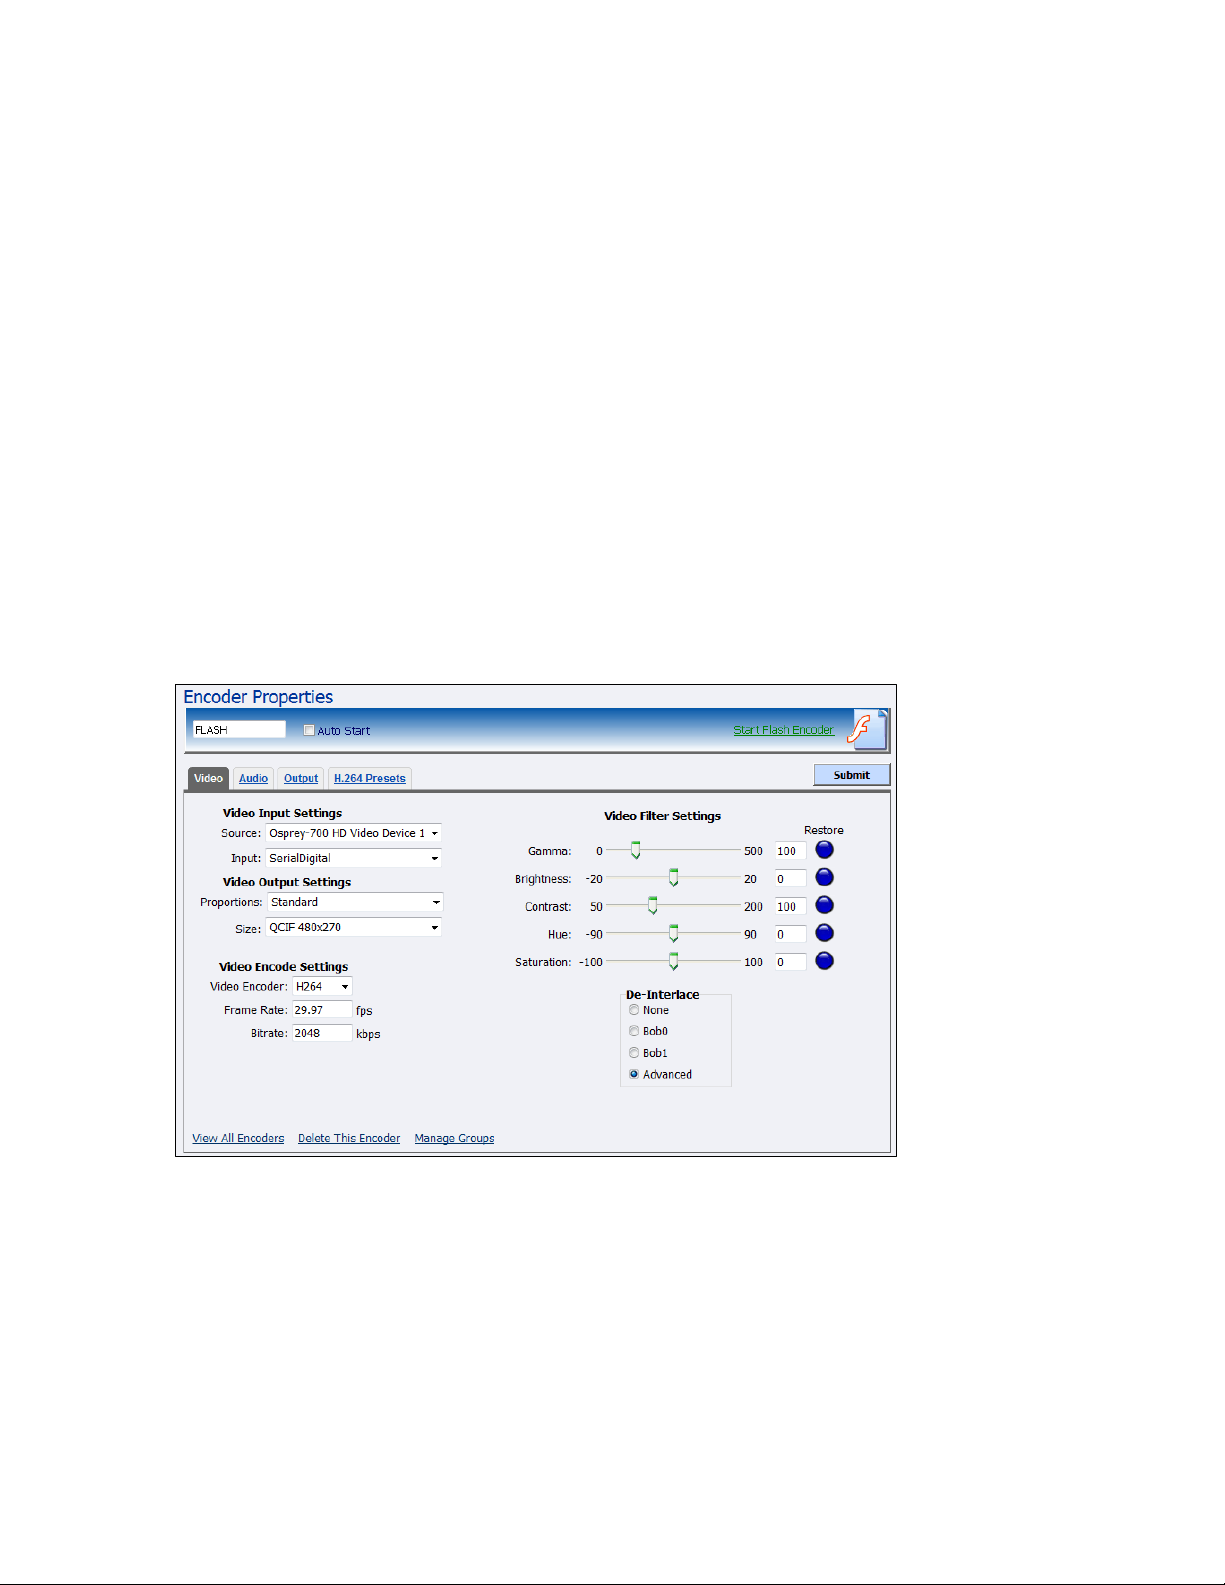
Advanced Operations
Editing an Adobe Flash H.264 encoder
When you create a new encoder, the Encoder Properties window appears. The Encoder Properties
windows for editing a new encoder or an existing encoder are identical. You must configure the audio
and video settings for each encoder type.
Use the Video, Audio, Output, and H.264 Presets tabs to edit the settings. Configure the video and audio
settings, then the streaming properties. The streaming properties and advanced streaming settings are
different for each type of encoder.
From the Flash Encoder Properties window (Figure 70), you can set the encoder to start streaming
automatically by clicking the Auto Start checkbox. You can also start the encoder from this window by
clicking the Start Flash Encoder link in the top right corner of the window.
Click Encoders All Encoders from the home page. Then select the Edit link next to the encoder whose
properties you wish to modify. The system displays the Encoder Properties window for the selected
encoder.
IMPORTANT! If you make any changes to the Encoder Properties window, you must click Submit.
Otherwise, all your changes will be lost.
Figure 70. Flash Encoder Properties
58 ViewCast
Page 65
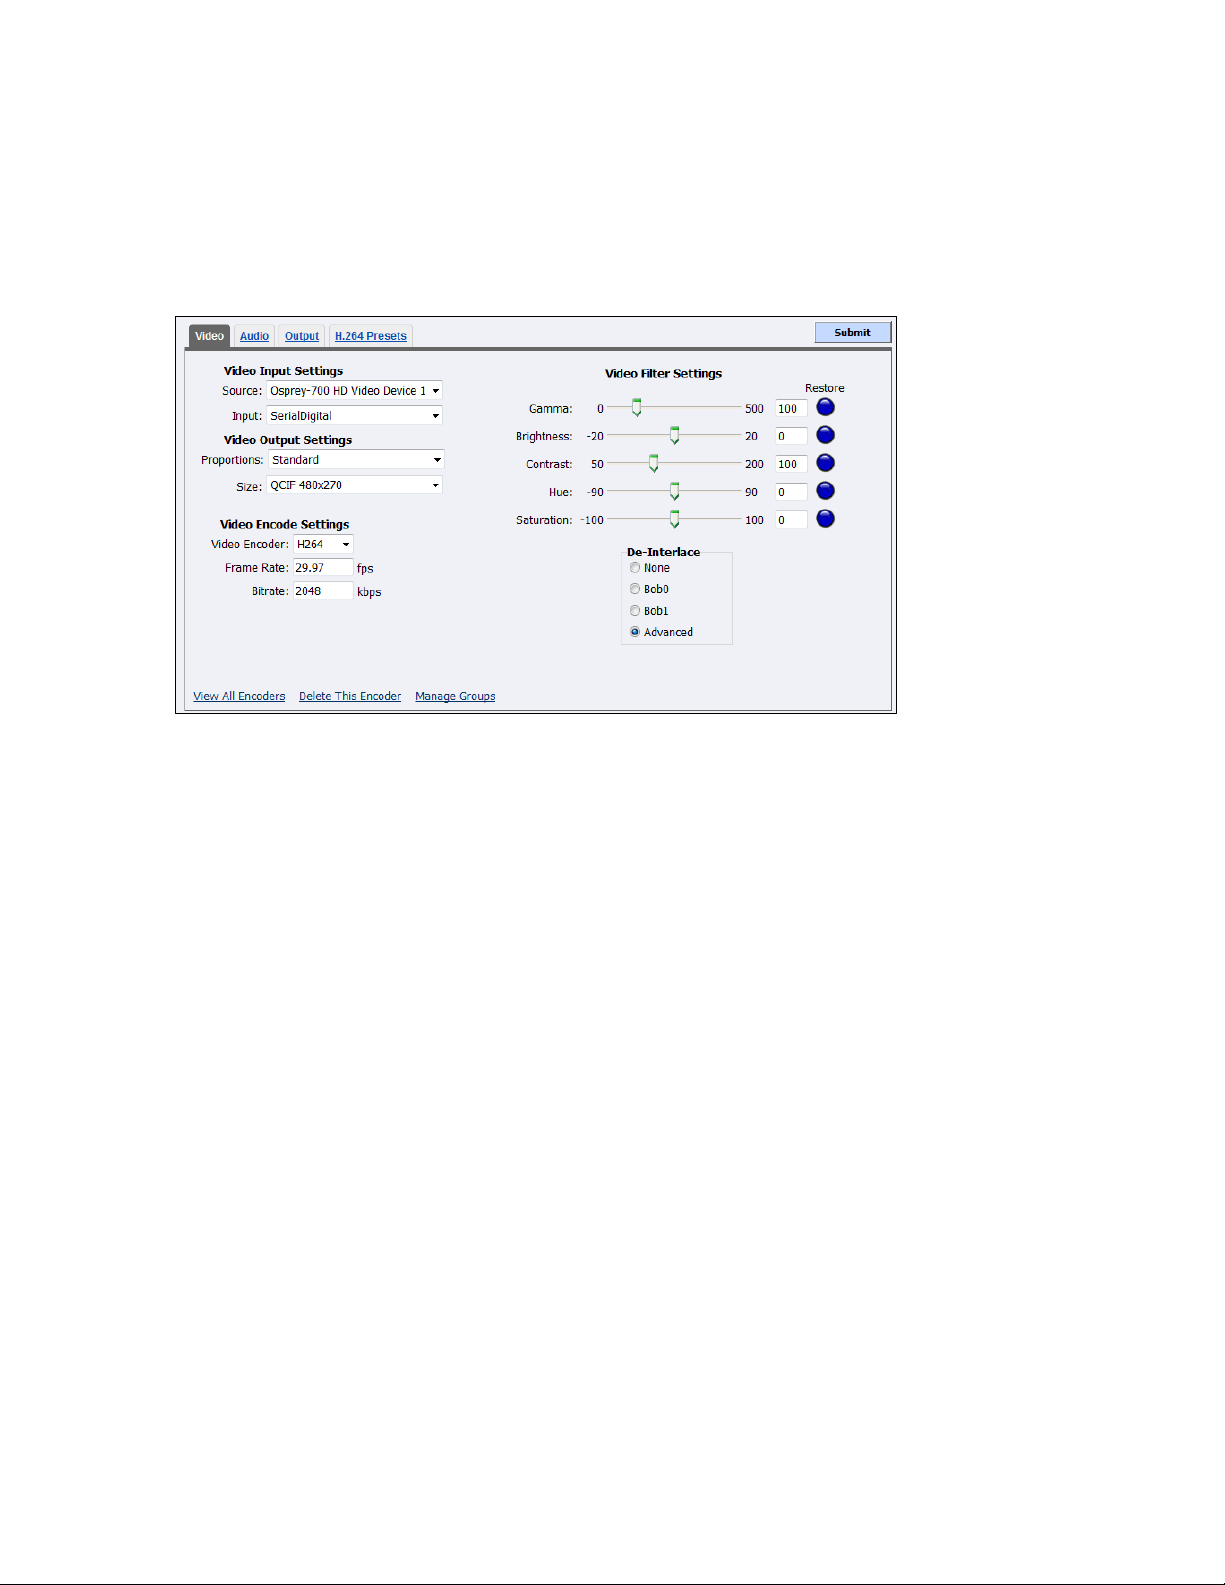
Niagara 4100 User Guide
1.
In the Source field, click a device from the drop-down list.
Osprey-700 HD Video Device 1
Disabled
Note: Because the Niagara 4100 is a single-channel encoder, you can only connect and stream
one audio and video source at any given time. However, you can encode the same audio
and video at multiple data rates and multiple formats to provide the best user experience
for different viewing audiences.
2.
In the Input field, the video input is SerialDigital.
3.
The Proportions field setting is Standard (square pixels for VGA monitor).
4.
In the Size field, click the pixel size of the encoded video from the drop-down list.
HD 1280x720
CIF for video scaled from full-size to ¼ size
QCIF for video scaled from full-size to ¼ size
Custom
You can also specify a custom size for your video. This customization is useful when you are
capturing video to be played on a mobile video-device that requires a non-standard size for
compatibility.
When you click Custom, two additional fields appear so you can enter the exact size you want
the resulting video to be (Figure 72).
Video tab
Flash adds some additional frame and bit rate controls. The frame rate changes the frames per second
that the video will be encoded. The bit rate settings pertain to the amount of data per second the audio
and video are captured.
Figure 71. Video tab
To configure video input settings:
ViewCast 59
Page 66
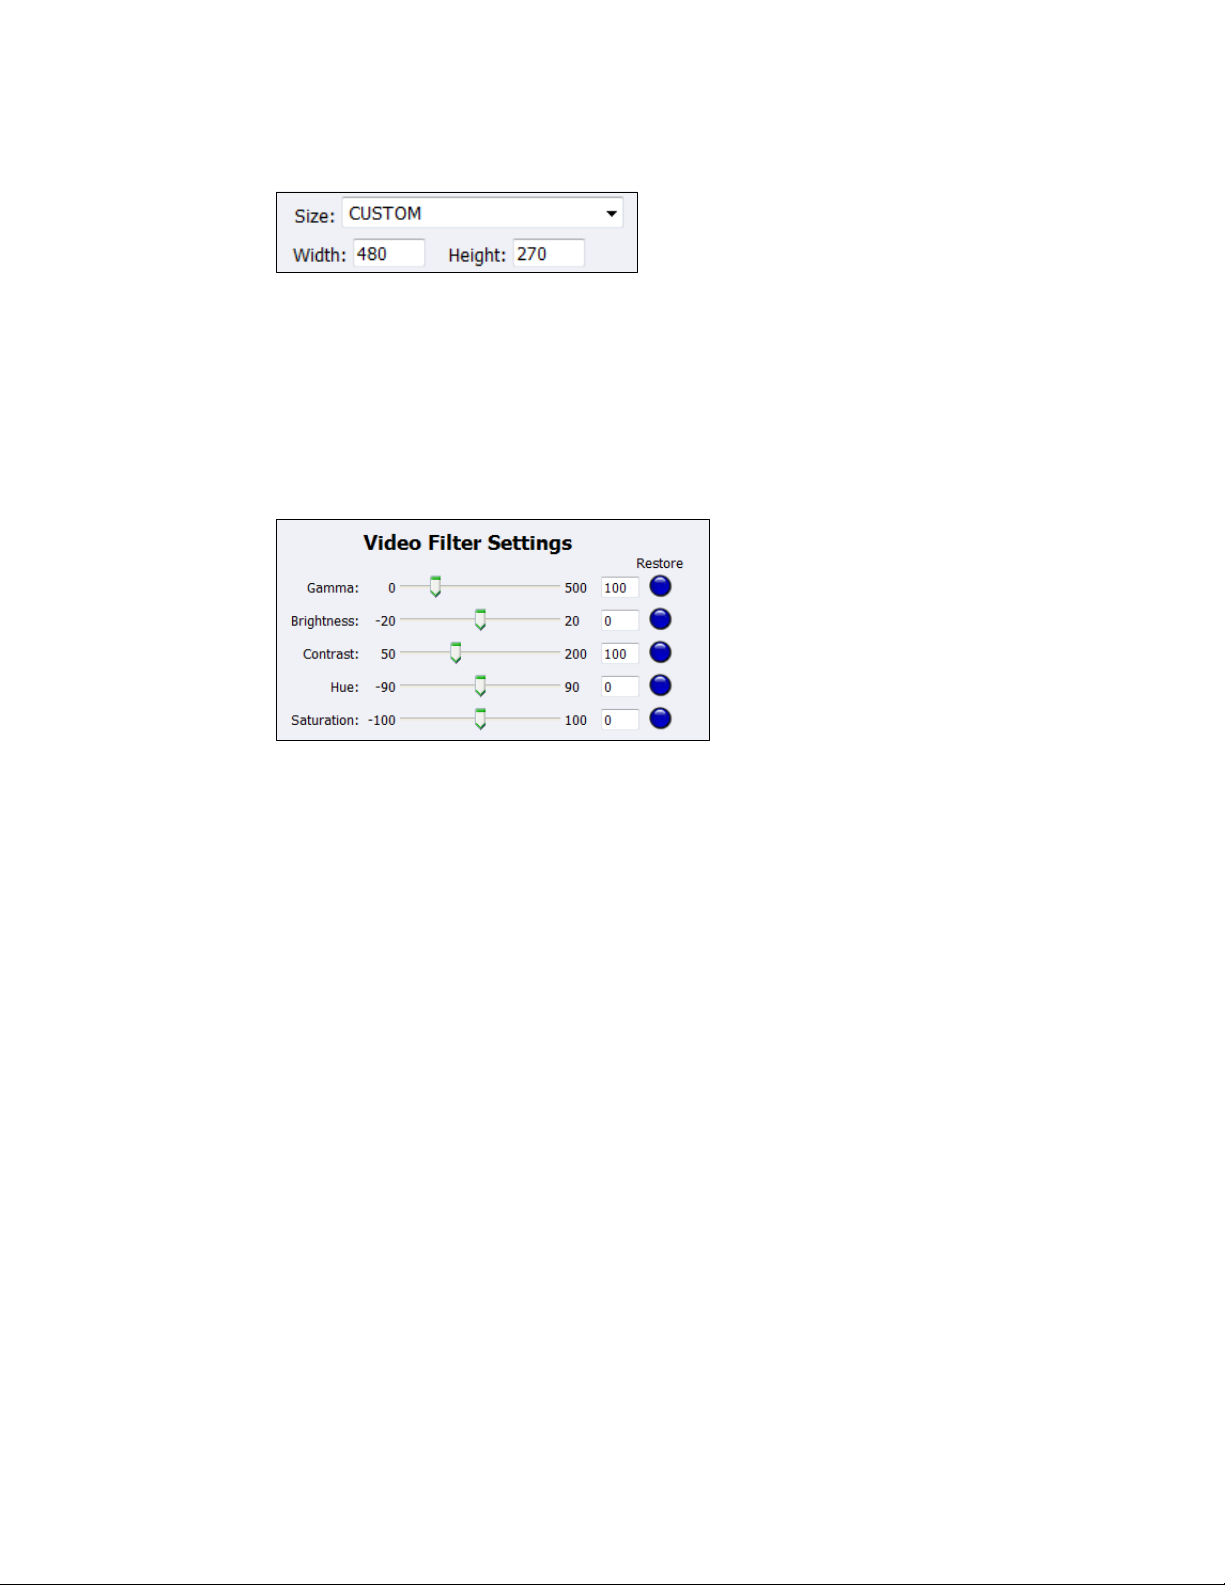
Advanced Operations
Figure 72. Custom fields
Note: Choosing a size larger than 1280 x 720 is not recommended due to the high data
rate and CPU usage required.
5.
Enter the frames per second in the Frame Rate field.
6.
Enter the Bitrate.
7.
Drag the sliders to adjust the Gamma, Brightness, Contrast, Hue, and Saturation (Figure 64).
Figure 73. Video Filter Settings
Note: Click Restore to the right of the filter to reset the settings to the default.
8.
Click the De-Interlace setting you want to apply (Figure 74). Options include:
None
– Performs no de-interlacing of any kind.
Bob0
– Applies inverse telecine de-interlacing to all telecine video.
– Applies motion adaptive de-interlacing to all video that is not telecine.
– Switches dynamically between the two modes as the content changes.
– Available for NTSC video only.
Bob1
– Drops the redundant fields and reassembles the video in a 24 fps progressive format.
– Applies inverse telecine de-interlacing to all telecine video.
– Performs no de-interlacing of video that is not telecine.
–Available for NTSC video only.
Advanced
– Is an algorithm for de-interlacing pure video (non-telecine) content.
– Applies motion adaptive interlacing to all video. It detects which portions of the image
are still and which portions are in motion then applies different processing to each
scenario.
60 ViewCast
Page 67
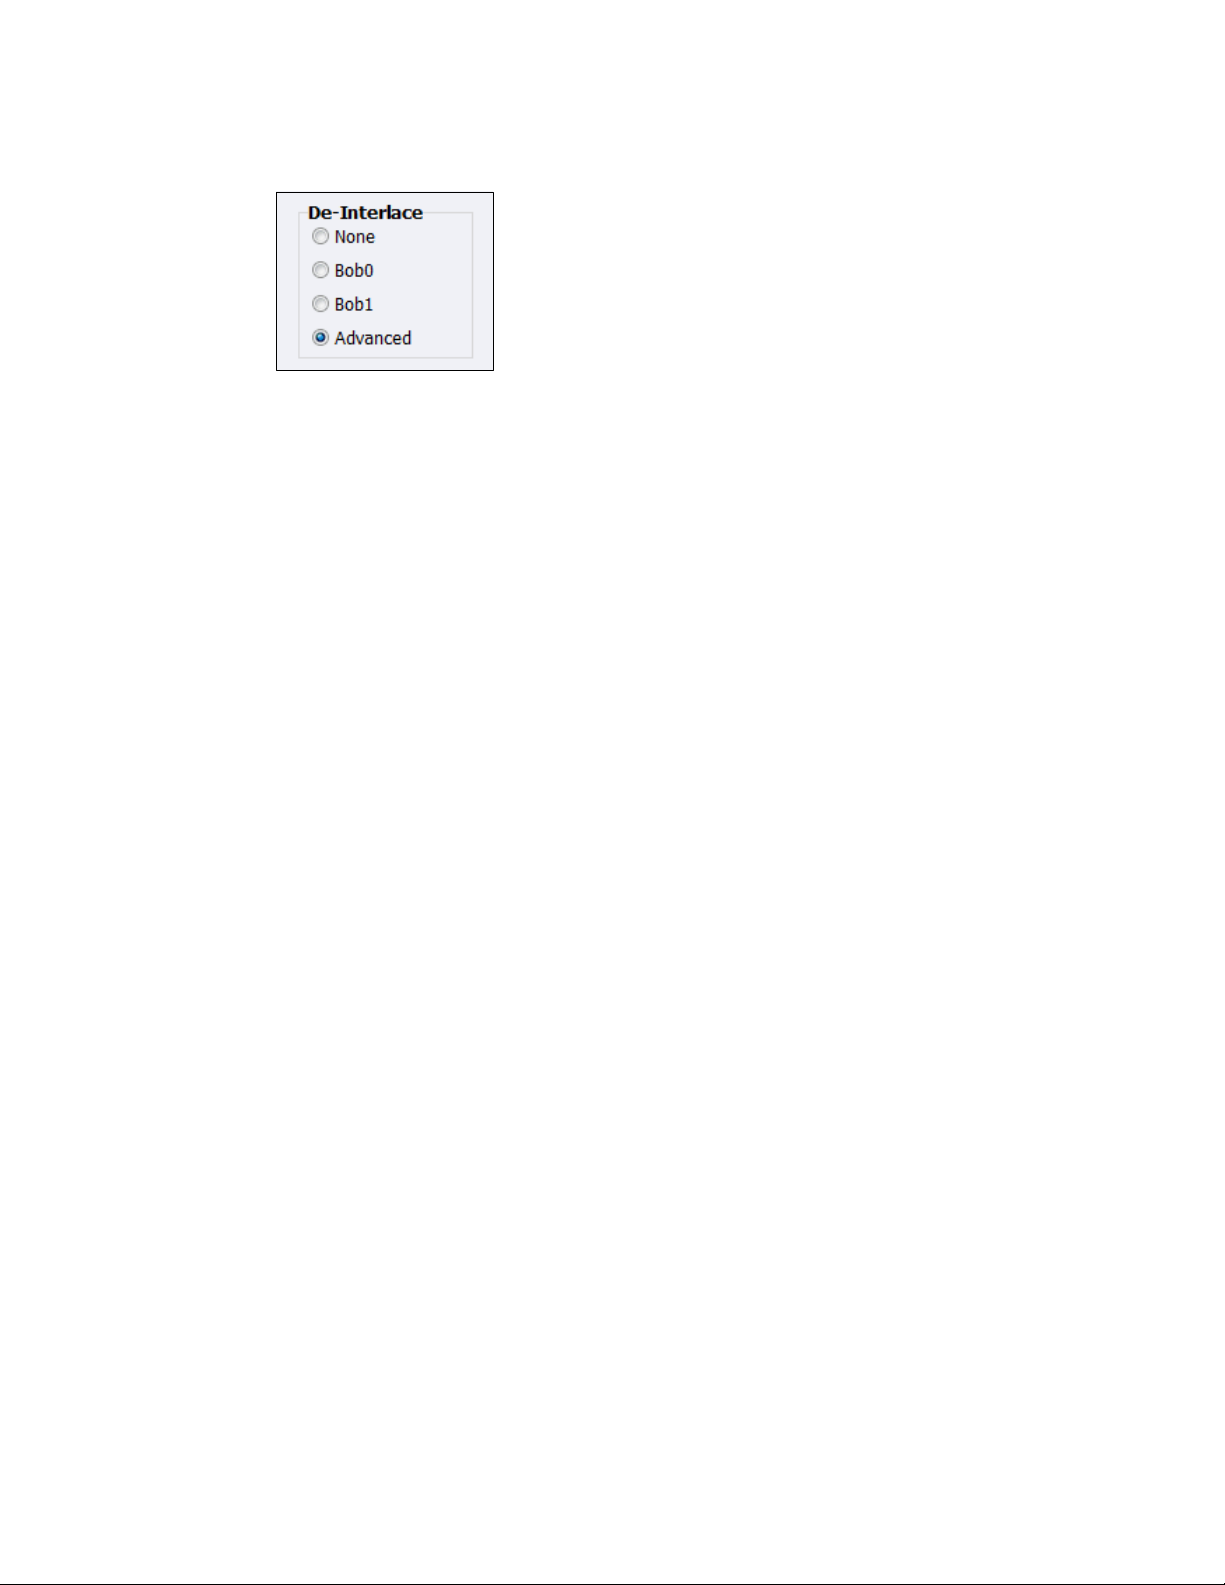
Figure 74. De-Interlace Settings
Note: Telecine and inverse telecine only apply to NTSC video. They are not used for PAL and
SECAM video. The system disables Bob0 and Bob1 choices when you select either PAL or
SECAM as the video standard.
9.
Click Submit.
Niagara 4100 User Guide
ViewCast 61
Page 68
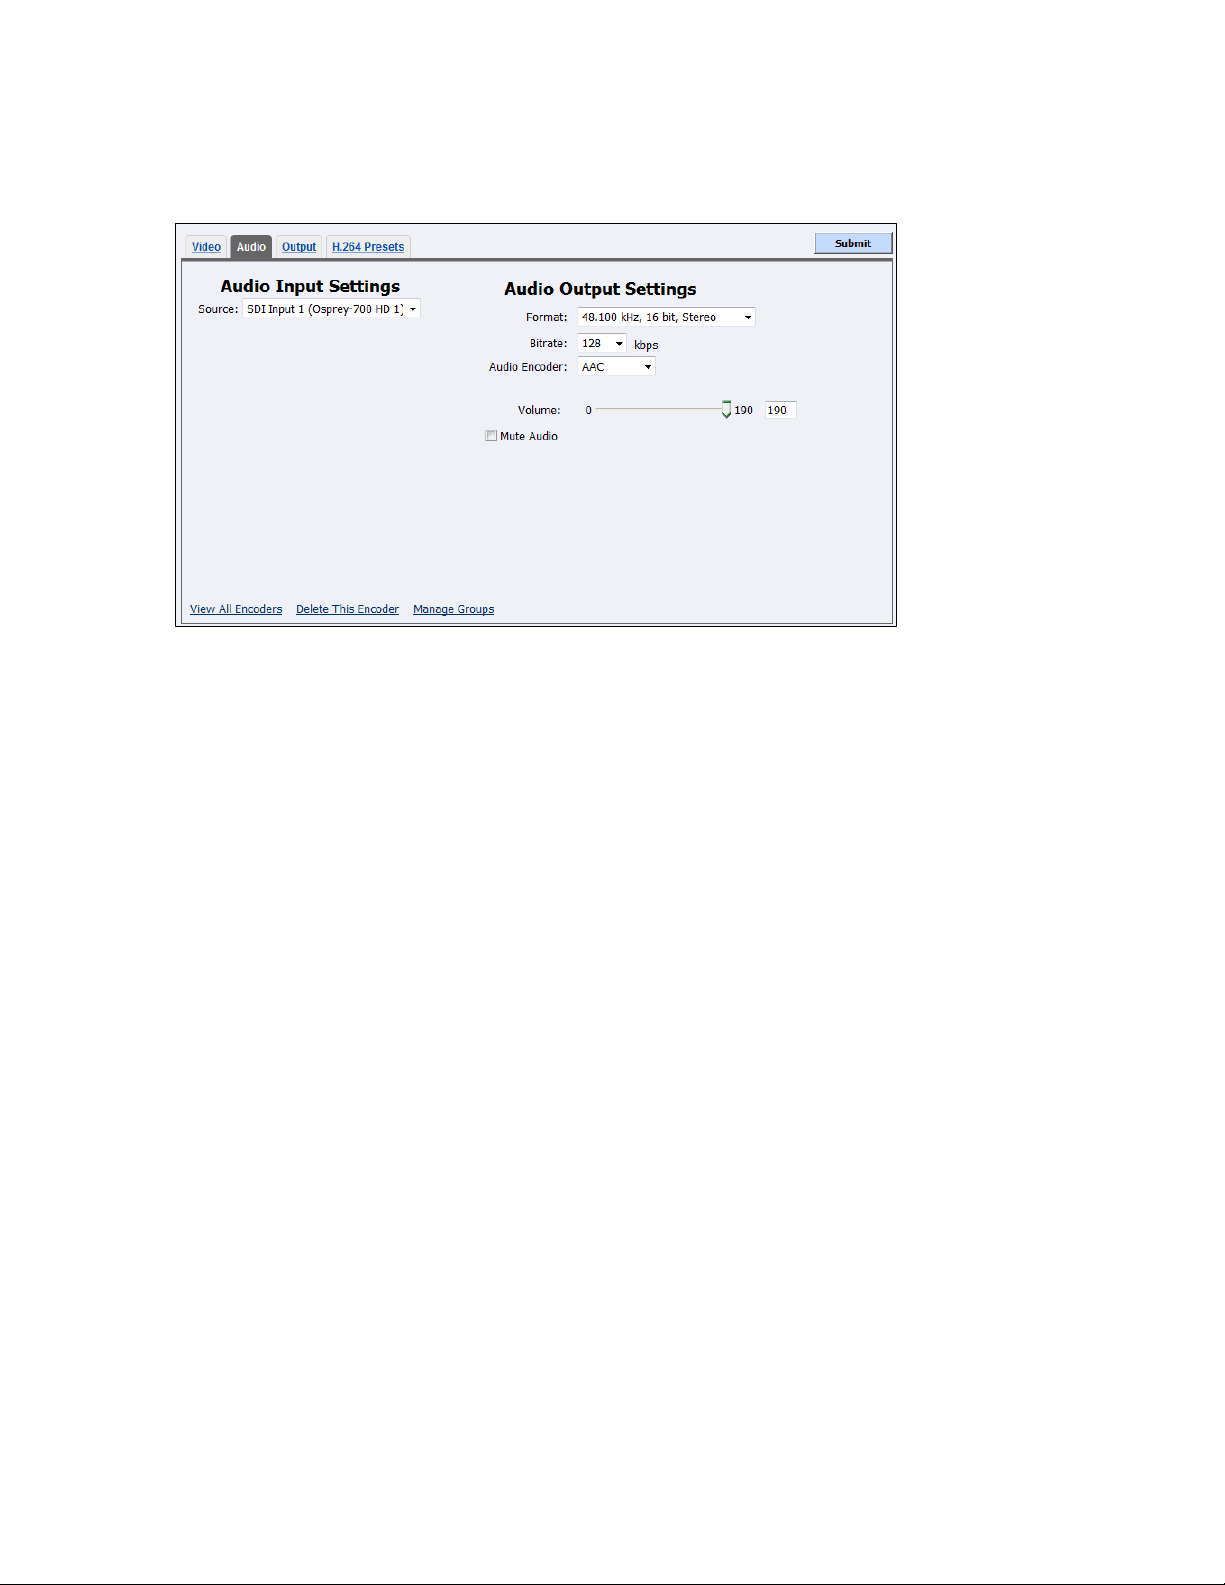
Advanced Operations
1.
In the Source field, select an audio source from the drop-down list.
Disabled
AES Input 1 (Osprey-700 HD 1)
AES Input 2 (Osprey-700 HD 1)
Bal Input 1 (Osprey-700 HD 1)
SDI Input 1 (Osprey-700 HD 1)
SDI Input 2 (Osprey-700 HD 1)
SDI Input 3 (Osprey-700 HD 1)
SDI Input 4 (Osprey-700 HD 1)
Unbal Input 1 (Osprey-700 HD-1)
IMPORTANT! The audio input must match the source connected on the back of the Niagara
4100 and your audio source.
3.
Click the Format from the drop-down list.
4.
Click the Bitrate from the drop-down list.
5.
Click the Audio Encoder from the drop-down list.
6.
Touch and drag the slider to adjust the Volume.
7.
(Optional) Click the Mute Audio checkbox to disable audio.
8.
Click Submit.
Audio tab
Figure 75. Audio tab
To configure audio settings:
62 ViewCast
Page 69
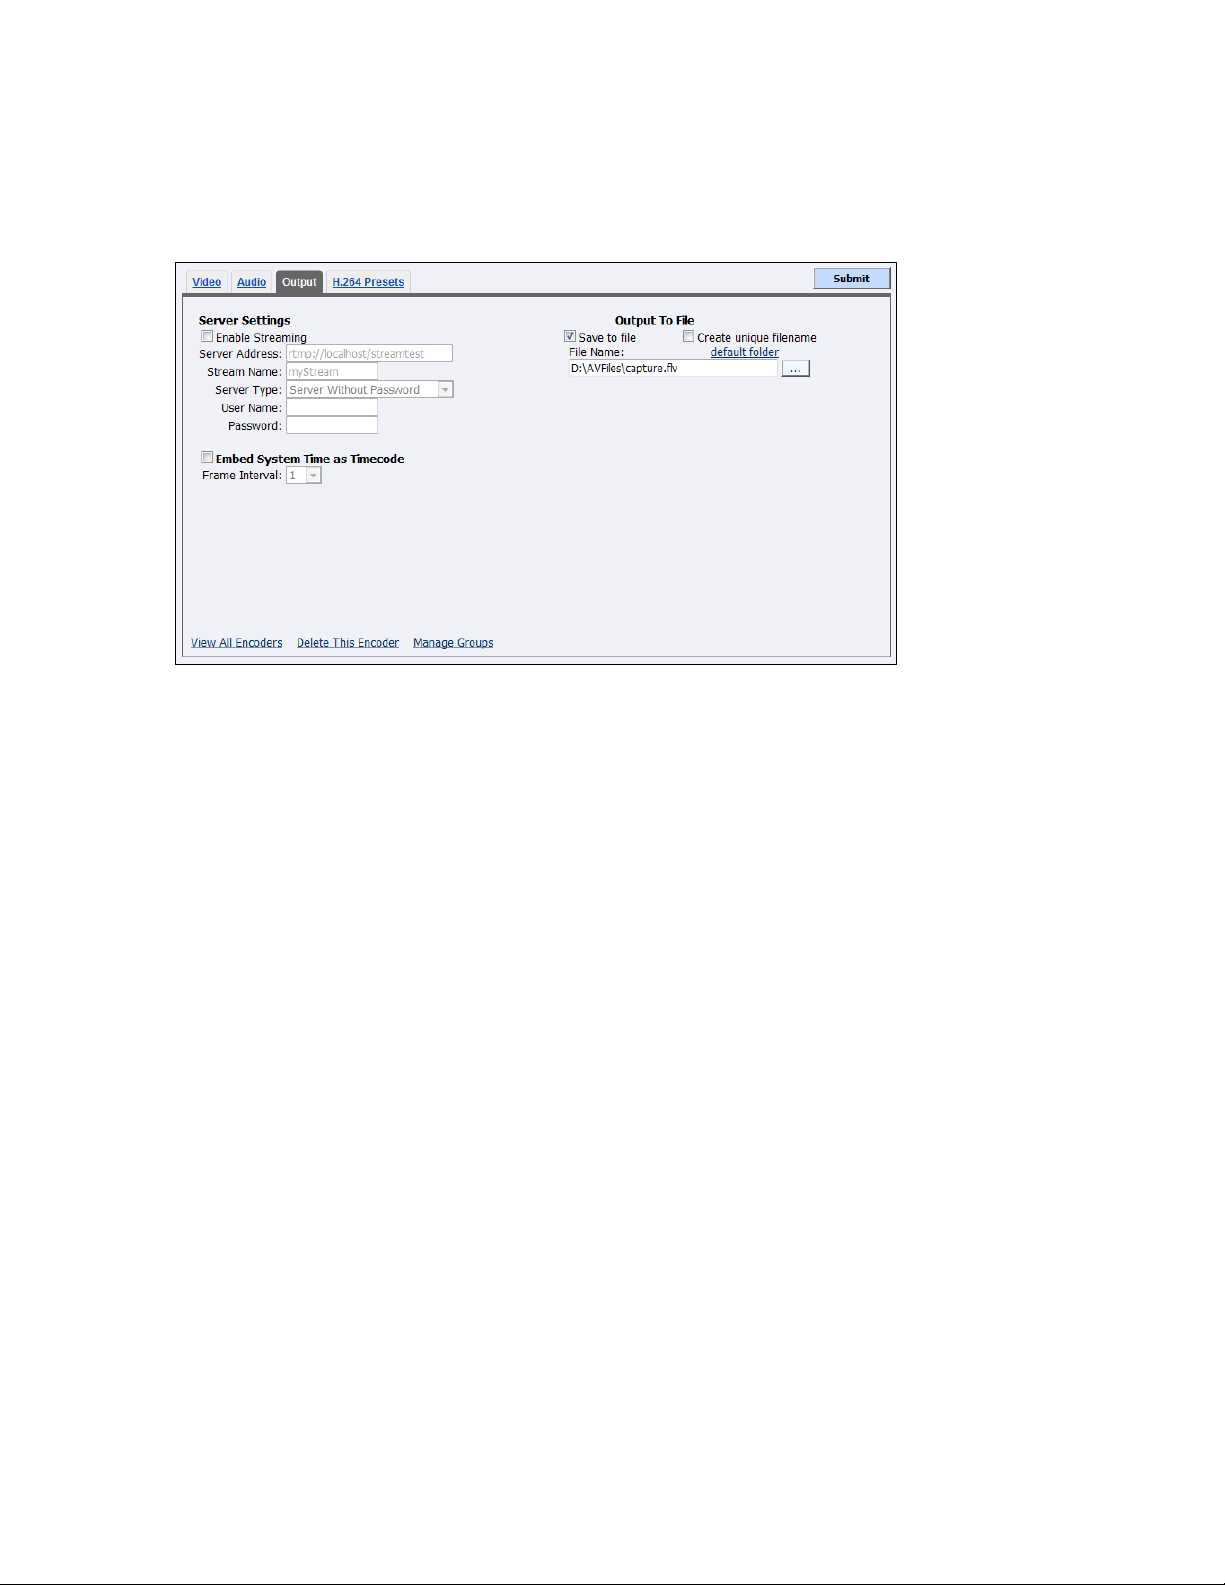
Output tab
1.
Click the Enable Streaming checkbox to enable live Flash streaming.
2.
Enter the proper IP address in the Server Address field.
3.
Enter the Stream Name.
4.
Click the Server Type from the drop-down list. Options are available for streaming directly to
Akamai and Limelight CDNs.
5.
Enter the User Name and Password.
6.
(Optional) Enable Embed System Time as Timecode.
7.
(Optional) Click the Frame Interval from the drop-down list.
8.
Enable Save to File to save the encoded content to a file. Each time you start this encoder, the
system overwrites the previous file.
Note: You must enable either Enable Streaming or Save to File. If both Enable Streaming and
Save to File are disabled, the encoder will not start and an error is generated.
9.
Enable Create unique file to create a file that the system does not overwrite.
10.
Accept the default location that displays in the File Name field or choose your own location
for the file. To choose your own personal location select the link (horizontal ellipses or … ) to
the right of the File Name field and display the options (Figure 77).
Note: By default, the system sets this folder to D:\AVFiles\ with a default filename of
capture.xxx.
You need Adobe Flash Media Server 3.5 or greater to stream Flash H.264.
Figure 76. Output tab
To configure output settings:
Niagara 4100 User Guide
ViewCast 63
Page 70
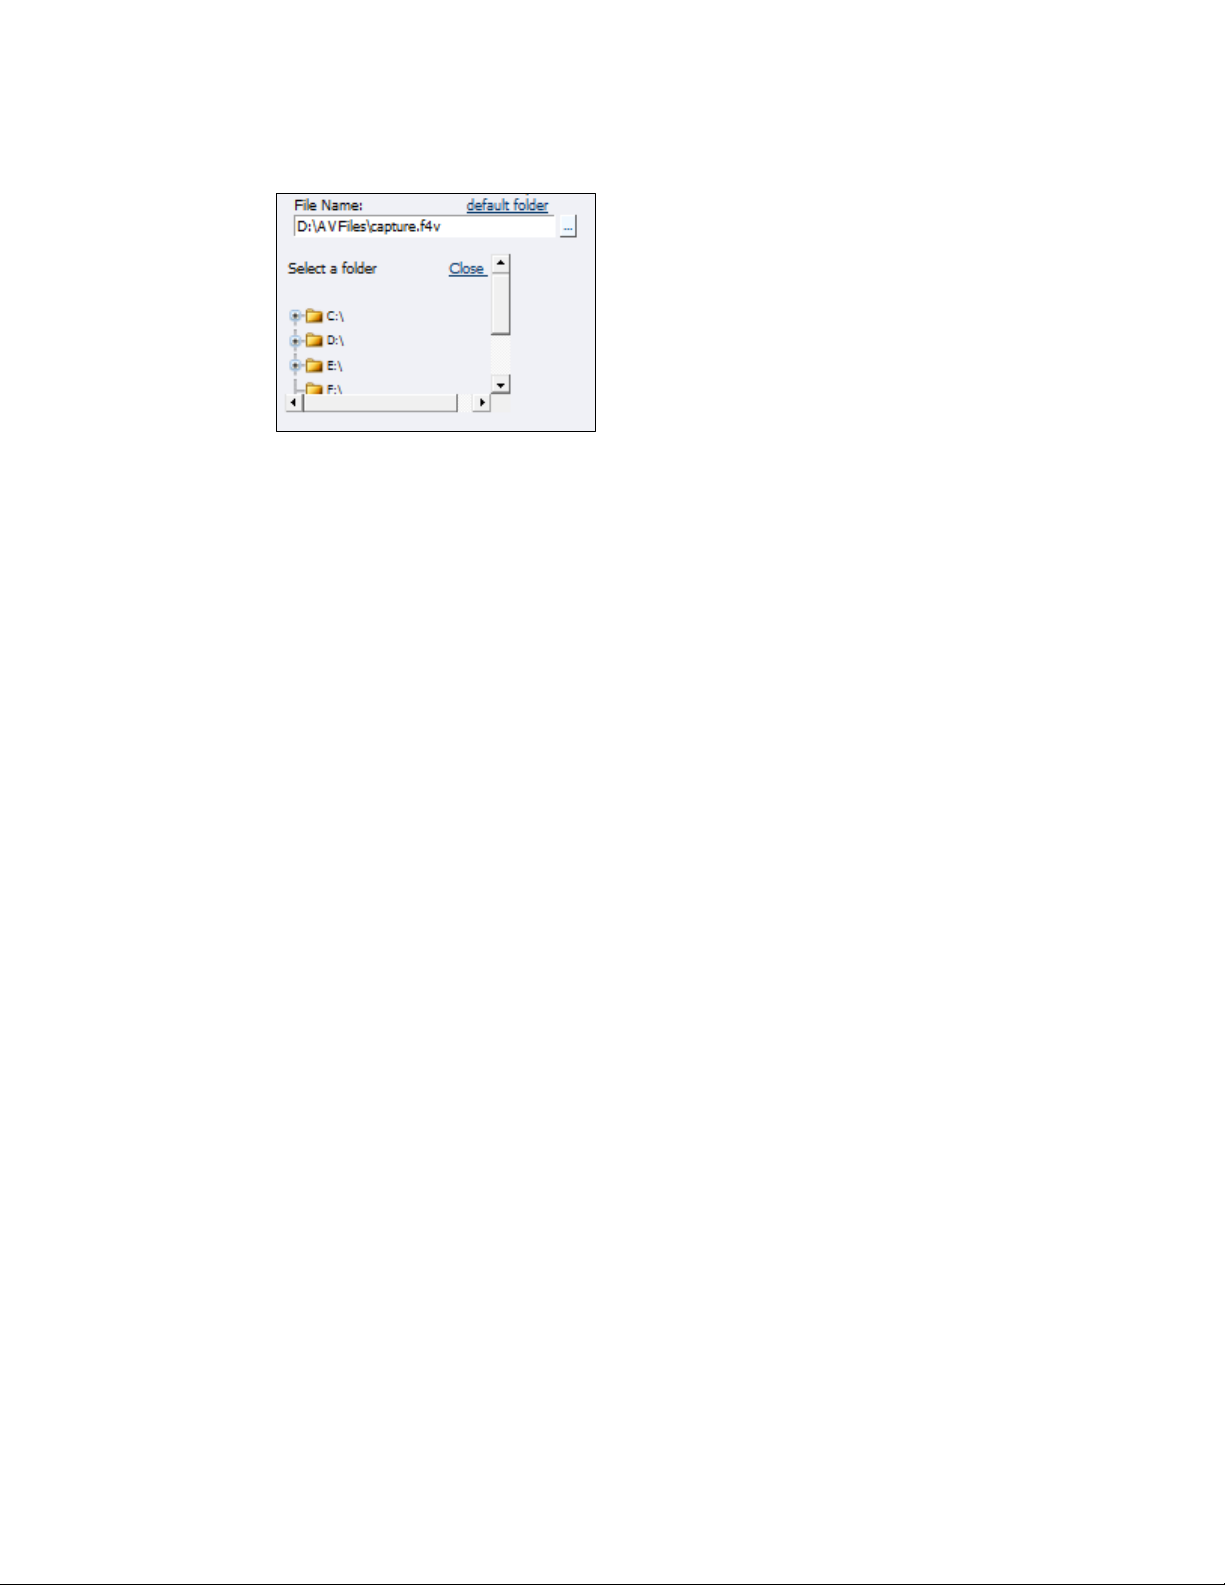
Advanced Operations
Figure 77. Save to File Location
WARNING! ViewCast strongly recommends you do not alter the default directory setting
unless you fully understand the risk of saving your files to a directory not located on drive
D. If you save your files to another drive on the Niagara 4100, the system could delete the
files when you use the Restore to Niagara 4100 Factory Defaults feature.
Only drive D on the Niagara 4100 has available storage to save your files. Check drive
properties for available free space to determine your storage capacity.
Use drives C, E, and F strictly for Niagara 4100 operational programs. Any modifications
to these drives can permanently damage your system and void your warranty.
A better practice would be to use the Flash Media server to save a file or to save it to a
remote drive. If you inadvertantly fill all available space, you risk losing your stream
during a streaming event.
64 ViewCast
Page 71
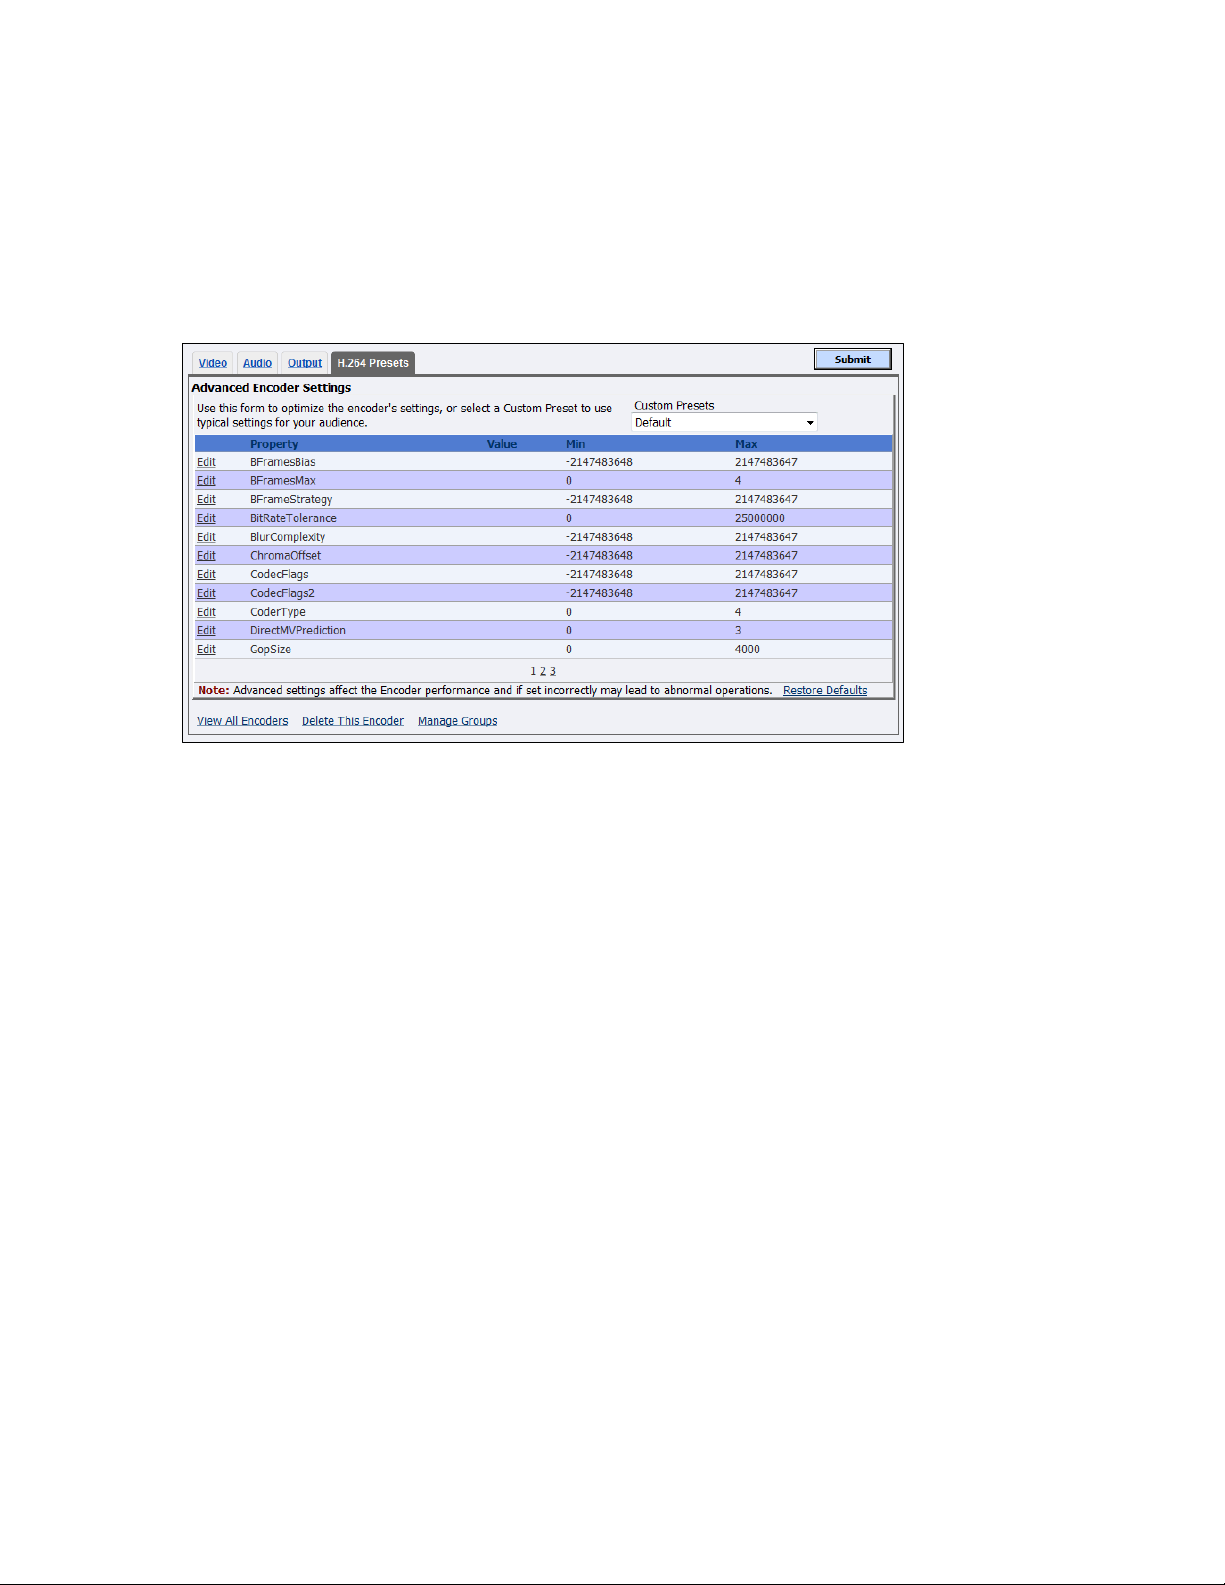
Niagara 4100 User Guide
1.
Click Edit next to the setting you want to modify.
IMPORTANT! These advanced settings affect the way the Encoder performs and if set
incorrectly may lead to abnormal encoder operations. Refer to Appendix B: H.264
Advanced Settings for suggested values for the type of video you are streaming.
2.
Change the value.
3.
Click Update.
4.
Click the Restore Defaults link at the bottom of the window to return the settings to the
defaults.
Note: The database has seven profiles. Clicking Restore Defaults for one profile will change
all profiles back to the default settings.
H.264 Presets tab
You can edit specific H.264 encoder settings or you can select a custom preset to use typical settings for
your profile. These advanced settings affect the way the Encoder performs and if set incorrectly may
lead to abnormal encoder operations (Figure 76). Refer to Appendix B for suggested values for the type
of video you are streaming and a complete list of typical settings.
Figure 78. H.264 Presets tab
To configure H.264 settings:
ViewCast 65
Page 72
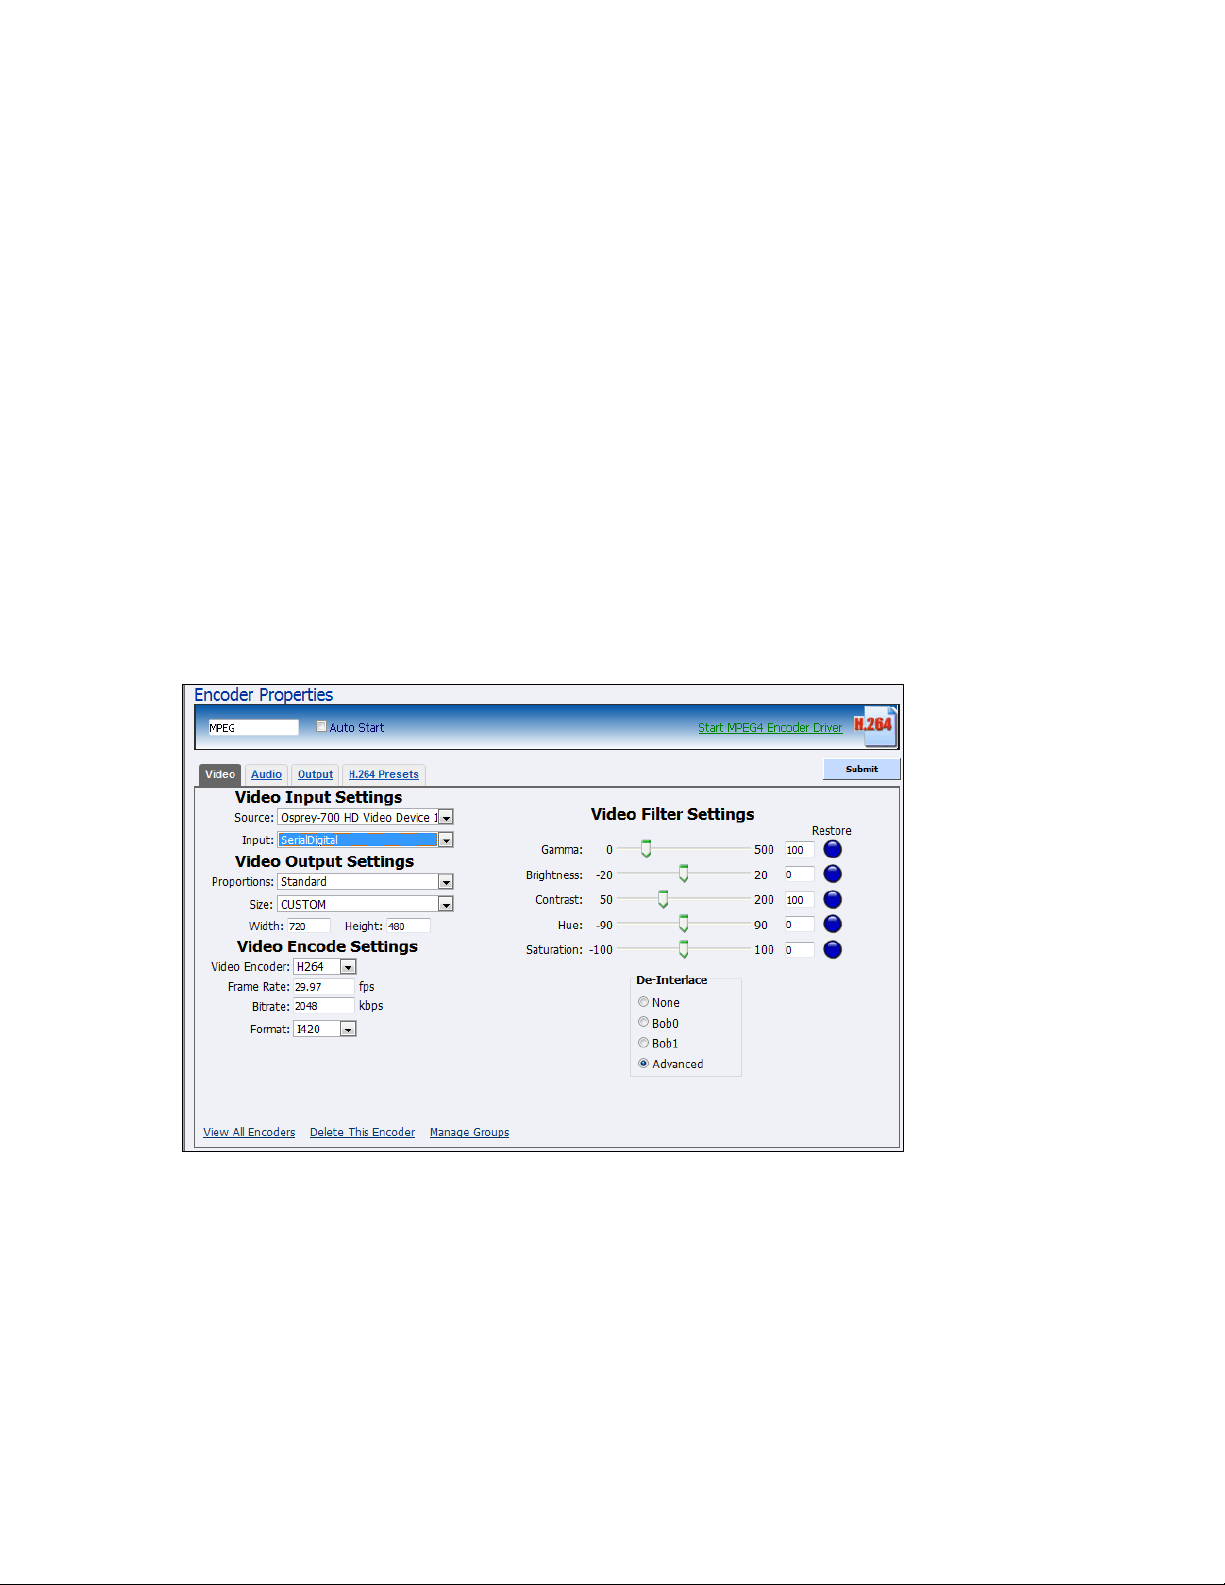
Advanced Operations
Editing an MPEG-4 encoder
When you create a new encoder, the Encoder Properties window appears. The Encoder Properties
windows for editing a new encoder or an existing encoder are identical. You must configure the audio
and video settings for each encoder type.
Use the Video, Audio, Output, and H.264 Presets tabs to edit the settings. Begin with configuring the
video and audio settings, then the streaming properties. The streaming properties and advanced
streaming settings are different for each type of encoder.
From the MPEG Encoder Properties window (Figure 79), you can set the encoder to start streaming
automatically by clicking the Auto Start checkbox. You can also start the encoder from this window by
clicking the Start MPEG4 Encoder Driver link in the top right corner of the window.
Click Encoders All Encoders from the home page. Then select the Edit link next to the MPEG encoder
whose properties you wish to modify. The system displays the Encoder Properties window for the
selected encoder.
IMPORTANT! If you make any changes to the Encoder Properties window, you must click Submit.
Otherwise, all your changes will be lost.
Figure 79. MPEG4 Encoder Properties
66 ViewCast
Page 73
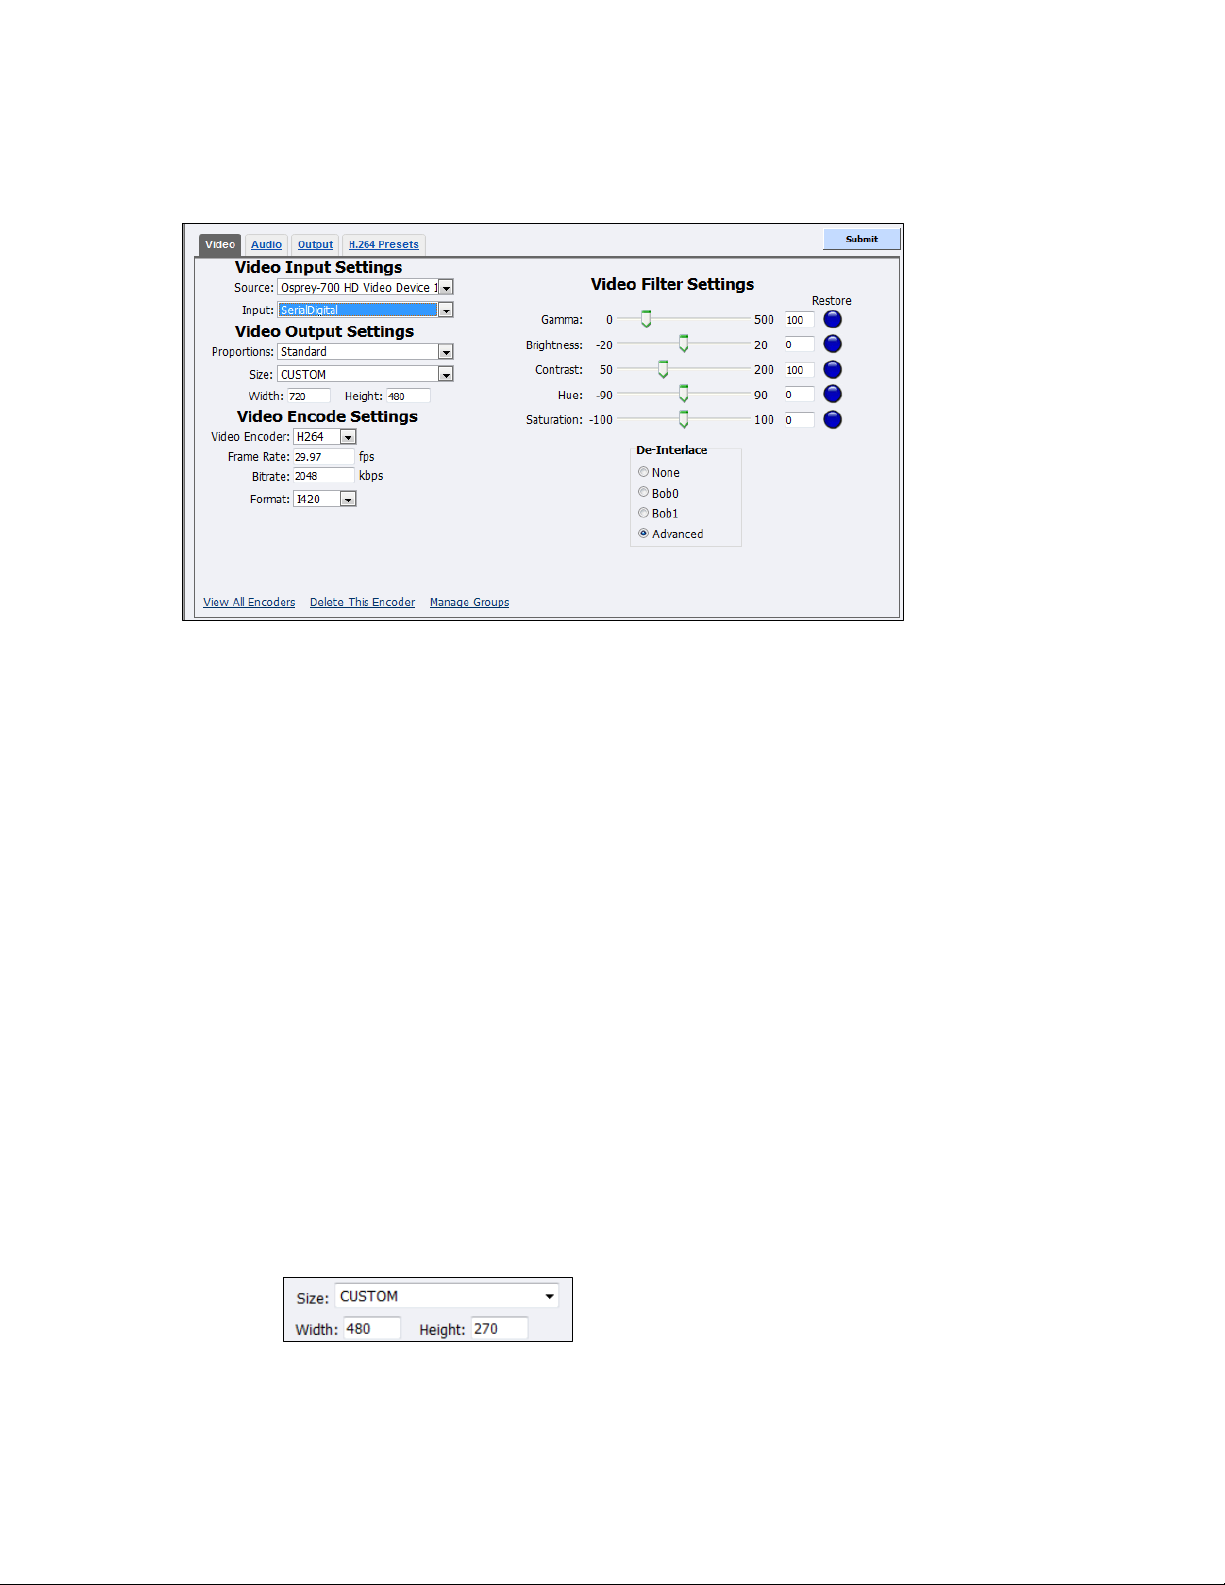
Video tab
1.
In the Source field, click a device from the drop-down list:
Osprey-700 HD Video Device 1
Disabled
Note: Because the Niagara 4100 is a single-channel encoder, you can only connect and stream
one audio and video source at any given time. However, you can stream the same audio
and video at multiple data rates and multiple formats to provide the best user experience
for different viewing audiences.
2.
In the Size field, select the pixel size of the encoded video. The standard sizes include:
HD 1280 x 720
Full-size for full screen video
CIF for video scaled from full-size to ½ size
QCIF for video scaled from full-size to ¼ size
Custom
You can also specify a custom size for your video. This customization is useful when you are
capturing video to be played on a mobile video-device that requires a non-standard size for
compatibility.
When you click Custom, two additional fields appear so you can enter the exact size you want
the resulting video to be (Figure 81).
Figure 81. Custom fields
Note: CIF and QCIF are proportional to the HD video resolution input.
3.
Click the type of Video Encoder for Internet video, mobile phones set top boxes, and create
Figure 80. Video tab
To configure video settings:
Niagara 4100 User Guide
ViewCast 67
Page 74
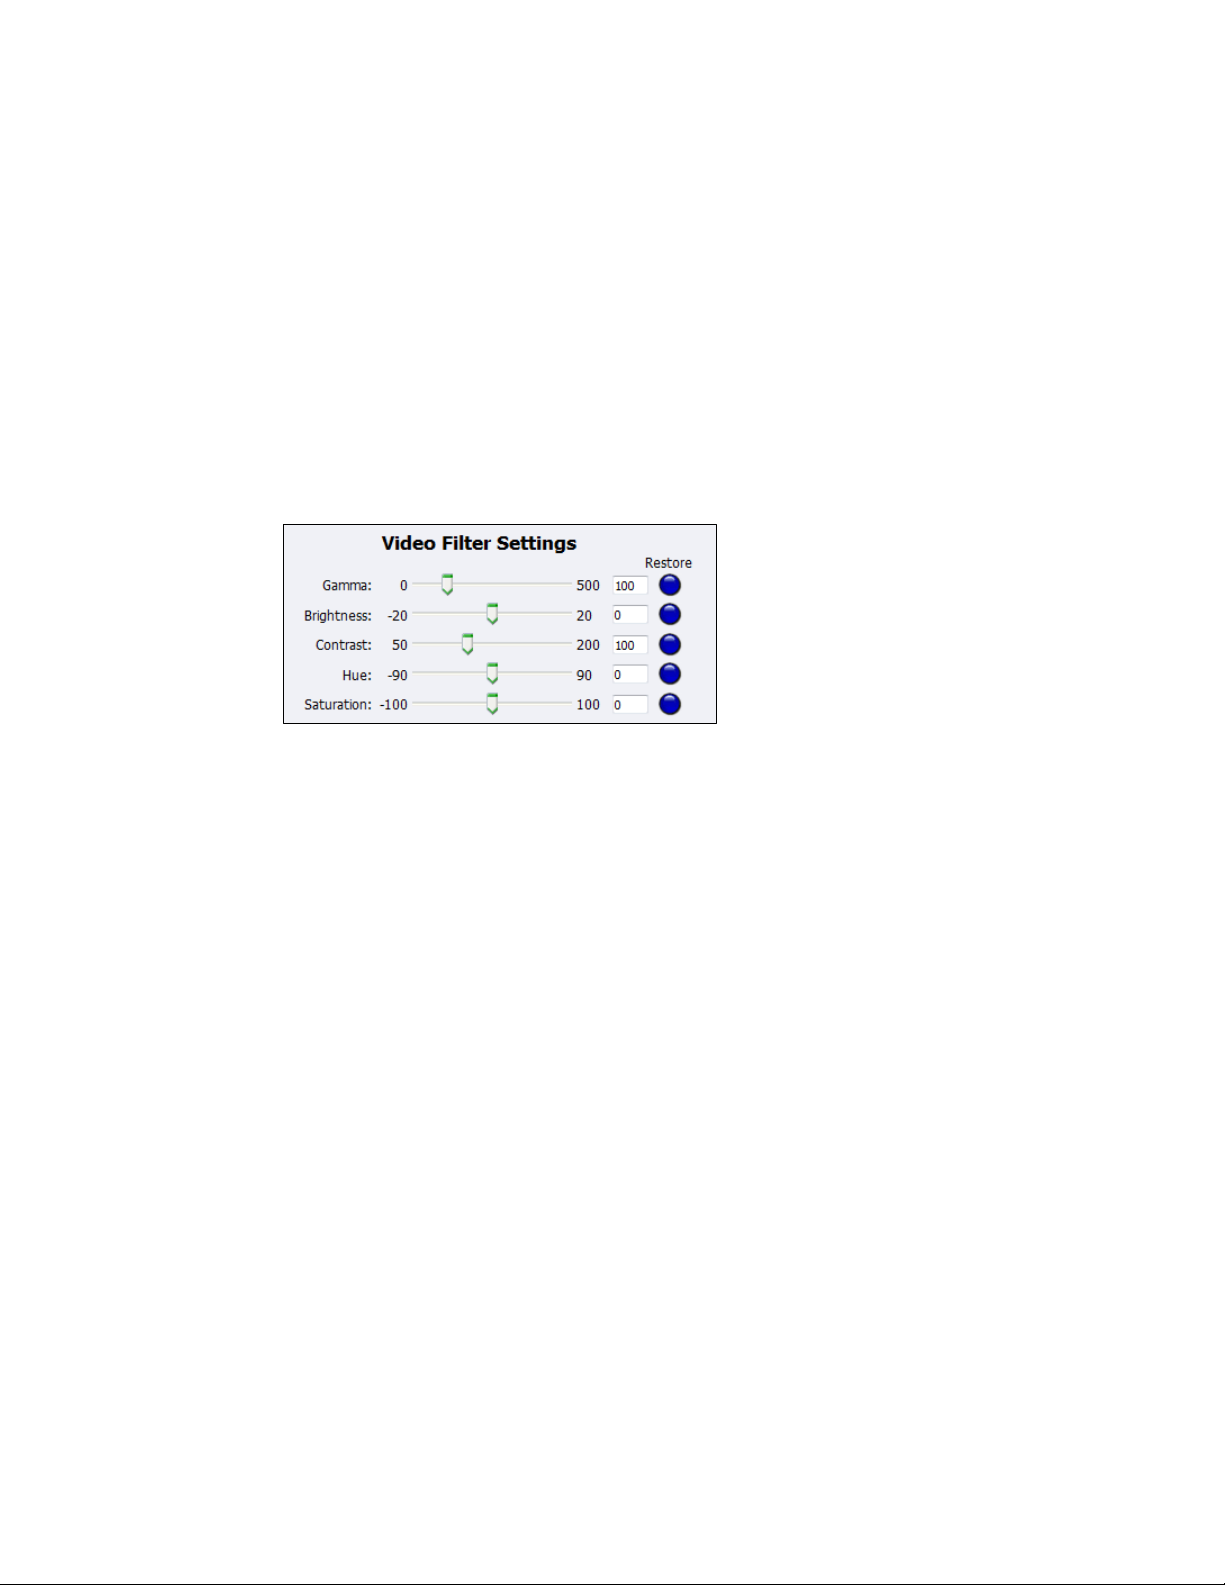
Advanced Operations
media files for other MPEG-4 compatible devices such as iPods according to the following
Motion Picture Expert Group (MPEG) types (refer to Table 1 and Table 2).
IMPORTANT! Choose the container type (MP4, 3G2, and 3GP) on the Output tab.
4.
Enter the frames per second in the Frame Rate field.
5.
Enter the kilobits per second in the Bitrate field.
6.
In the Format field, indicate the color space format.
IMPORTANT! If you specify a video size incompatible with the color space of your source
video, the system will automatically correct the size to the closes compatible setting when
you click Submit.
7.
Drag the sliders to adjust the Gamma, Brightness, Contrast, Hue, and Saturation (Figure 82).
Figure 82. Video Filter Settings
Note: Click Restore to the right of the filter to reset the settings to the default.
8.
Click the De-Interlace setting you want to apply (Figure 83). Options include:
None
– Performs no de-interlacing of any kind.
Bob0
– Applies inverse telecine de-interlacing to all telecine video.
– Applies motion adaptive de-interlacing to all video that is not telecine.
– Switches dynamically between the two modes as the content changes.
– Available for NTSC video only.
Bob1
– Drops the redundant fields and reassembles the video in a 24 fps progressive format.
– Applies inverse telecine de-interlacing to all telecine video.
– Performs no de-interlacing of video that is not telecine.
–Available for NTSC video only.
Advanced
– Is an algorithm for de-interlacing pure video (non-telecine) content.
– Applies motion adaptive interlacing to all video. It detects which portions of the image
are still and which portions are in motion then applies different processing to each
scenario.
68 ViewCast
Page 75

Figure 83. De-Interlace settings
Note: Telecine and inverse telecine only apply to NTSC video. They are not used for PAL and
SECAM video. The system disables Bob0 and Bob1 choices when you select either PAL or
SECAM as the video standard.
9.
Click Submit.
MPEG4 – MP4
MPEG-4 Part 2 is for situations where low bit rate and low resolution are
mandated by other conditions of the applications, such as network
bandwidth or device size. Examples of video applications for MPEG-4 are
cell phones, some low-end video conferencing systems, and surveillance
systems. MPEG-4 is important for legacy handheld devices that do not
support H.264.
H264 – MP4
H.264, MPEG-4 Part 10, or AVC (Advanced Video Coding) was designed for
high data compression while maintaining better quality than its
predecessor, H.263. It also addresses a broad range of applications from
low bit rate to high bit rate and from low resolution such as cell phones to
high resolution such as broadcast.
Niagara SCX’s H.264 is Baseline Profile.
The Third Generation Partnership Project (3GPP) defined 3GP as a multimedia container
format for use on 3G mobile phones. It stores video streams such as MPEG-4 or H.264 and
audio streams such as AAC.
This format has two defined standards:
3GPP for GSM-based mobile phones
3GPP2 for CDMA-based mobile phones
This setting creates an H.263 stream stored in a 3GPP container.
H264 – 3GP
This setting creates an H.264 stream stored in a 3GP container.
H264 – 3G2
This setting creates an H.264 stream stored in a 3G2 container.
MPEG4 – 3GP
This setting creates an MPEG-4 stream stored in a 3GP container.
MPEG4 – 3G2
This setting creates an MPEG-4 stream stored in a 3G2 container.
H263 – 3GP
This setting creates an H.263 stream stored in a 3GP container.
H263 – 3G2
This setting creates an H.263 stream stored in a 3G2 container.
Table 1. MPEG encoder and container descriptions
Niagara 4100 User Guide
ViewCast 69
Page 76

Advanced Operations
Container
H.263 Video
MPEG-4 Video
H.264 Video
MP4
N/A
3GP
3G2
Table 2. Valid output container selections for video encoder types
70 ViewCast
Page 77
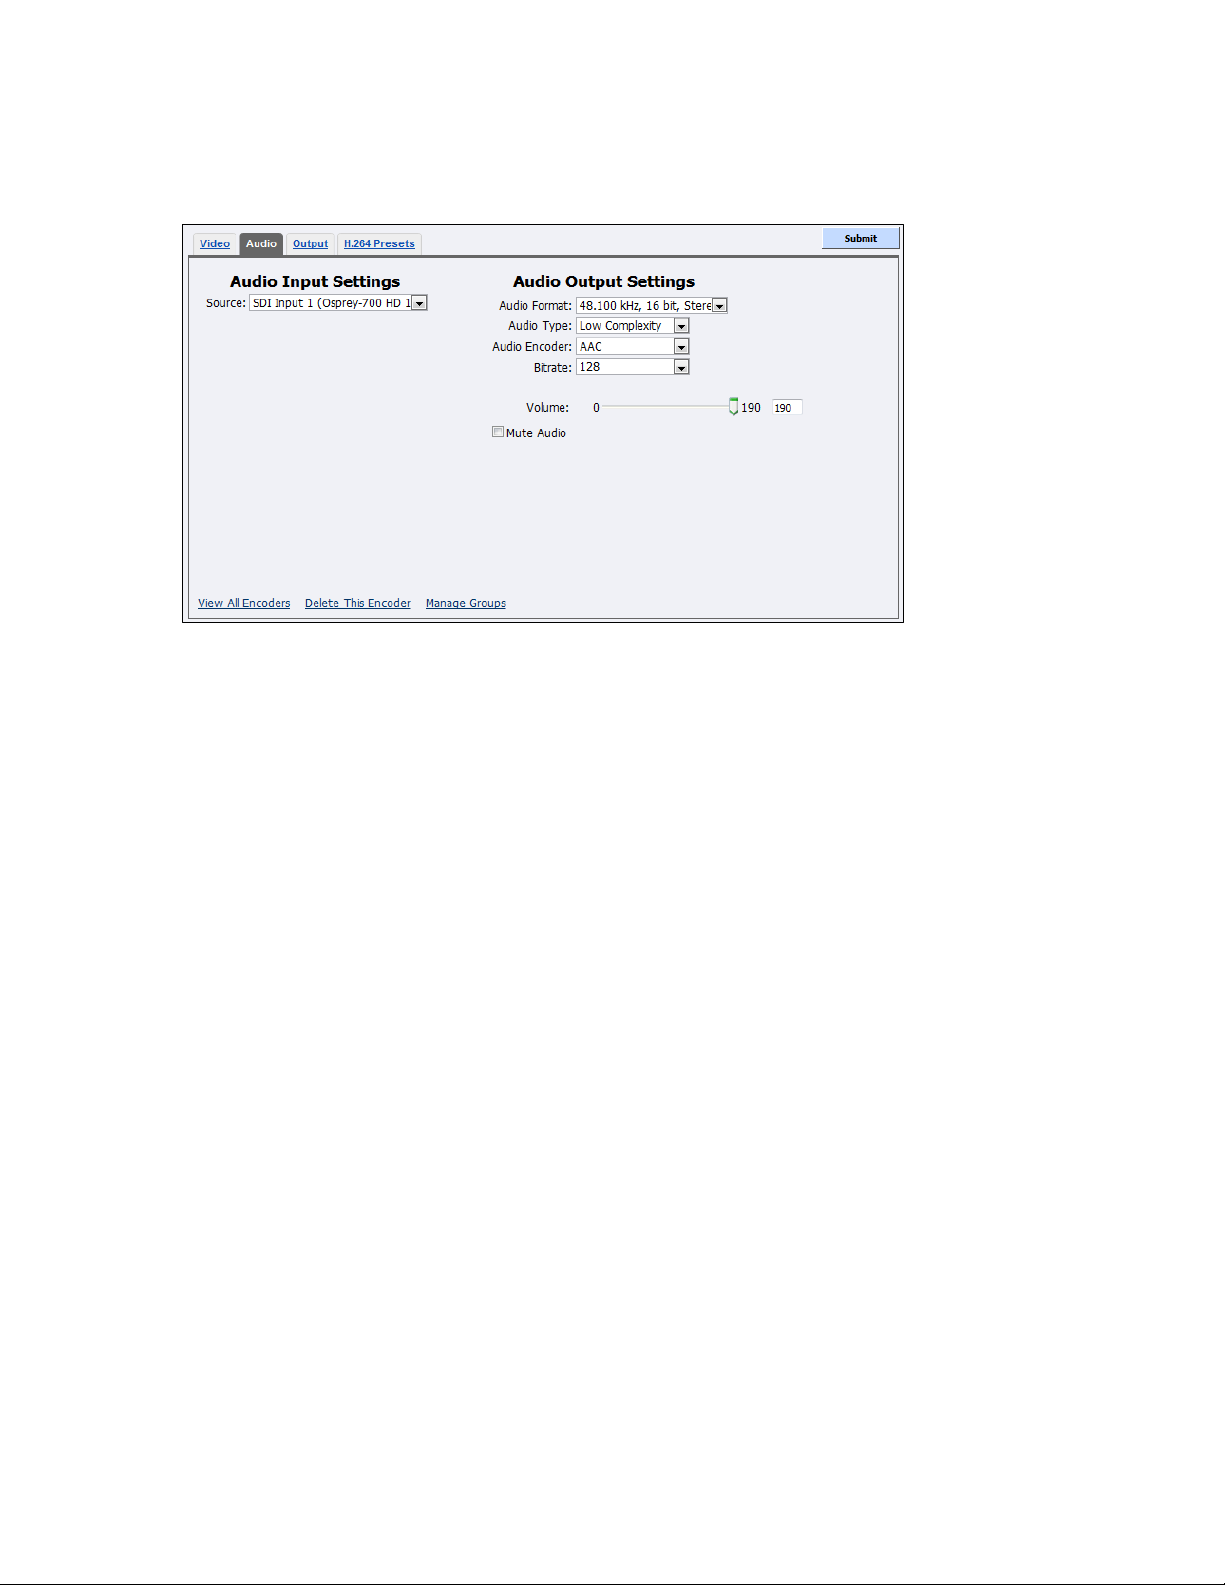
Audio tab
1.
In the Source field, select an audio source from the drop-down list.
The audio source is multiple inputs denoted by the following incrementing decimal values:
Disabled
AES Input 1 (Osprey-700 HD 1)
AES Input 2 (Osprey-700 HD 1)
Bal Input 1 (Osprey-700 HD 1)
Digital Audio (S/PDIF (High Def
SDI Input 1 (Osprey-700 HD 1)
SDI Input 2 (Osprey-700 HD 1)
SDI Input 3 (Osprey-700 HD 1)
SDI Input 4 (Osprey-700 HD 1)
Unbal Input 1 (Osprey-700 HD 1)
IMPORTANT! The audio input must match the connectors on the back of the Niagara 4100
and your audio source.
2.
Click the Audio Format from the drop-down list.
3.
Click the Audio Type from the drop-down list:
Main – The same as Low Complexity, but adds backward prediction.
Low Complexity – The simplest and most widely used AAC audio format type.
Note: Depending on the player on which the resulting stream will be rendered, either choice
will use a specific set of tools to encode the audio stream. Make your choice based on the
requirement of the playback software or device. The most widely supported format is the
Low Complexity profile.
4.
The default Audio Encoder is AAC (Advanced Audio Coding) a standardized, lossy
Figure 84. Audio tab
To configure audio settings:
Niagara 4100 User Guide
ViewCast 71
Page 78

Advanced Operations
compression and encoding scheme for digital audio. AAC achieves better audio quality than
MP3. AAC and MP3 are MPEG standards.
5.
Click the Bitrate from the drop-down menu.
6.
Drag the slider to adjust the Volume.
7.
(Optional) Click the Mute Audio checkbox to disable audio.
8.
Click Submit.
72 ViewCast
Page 79
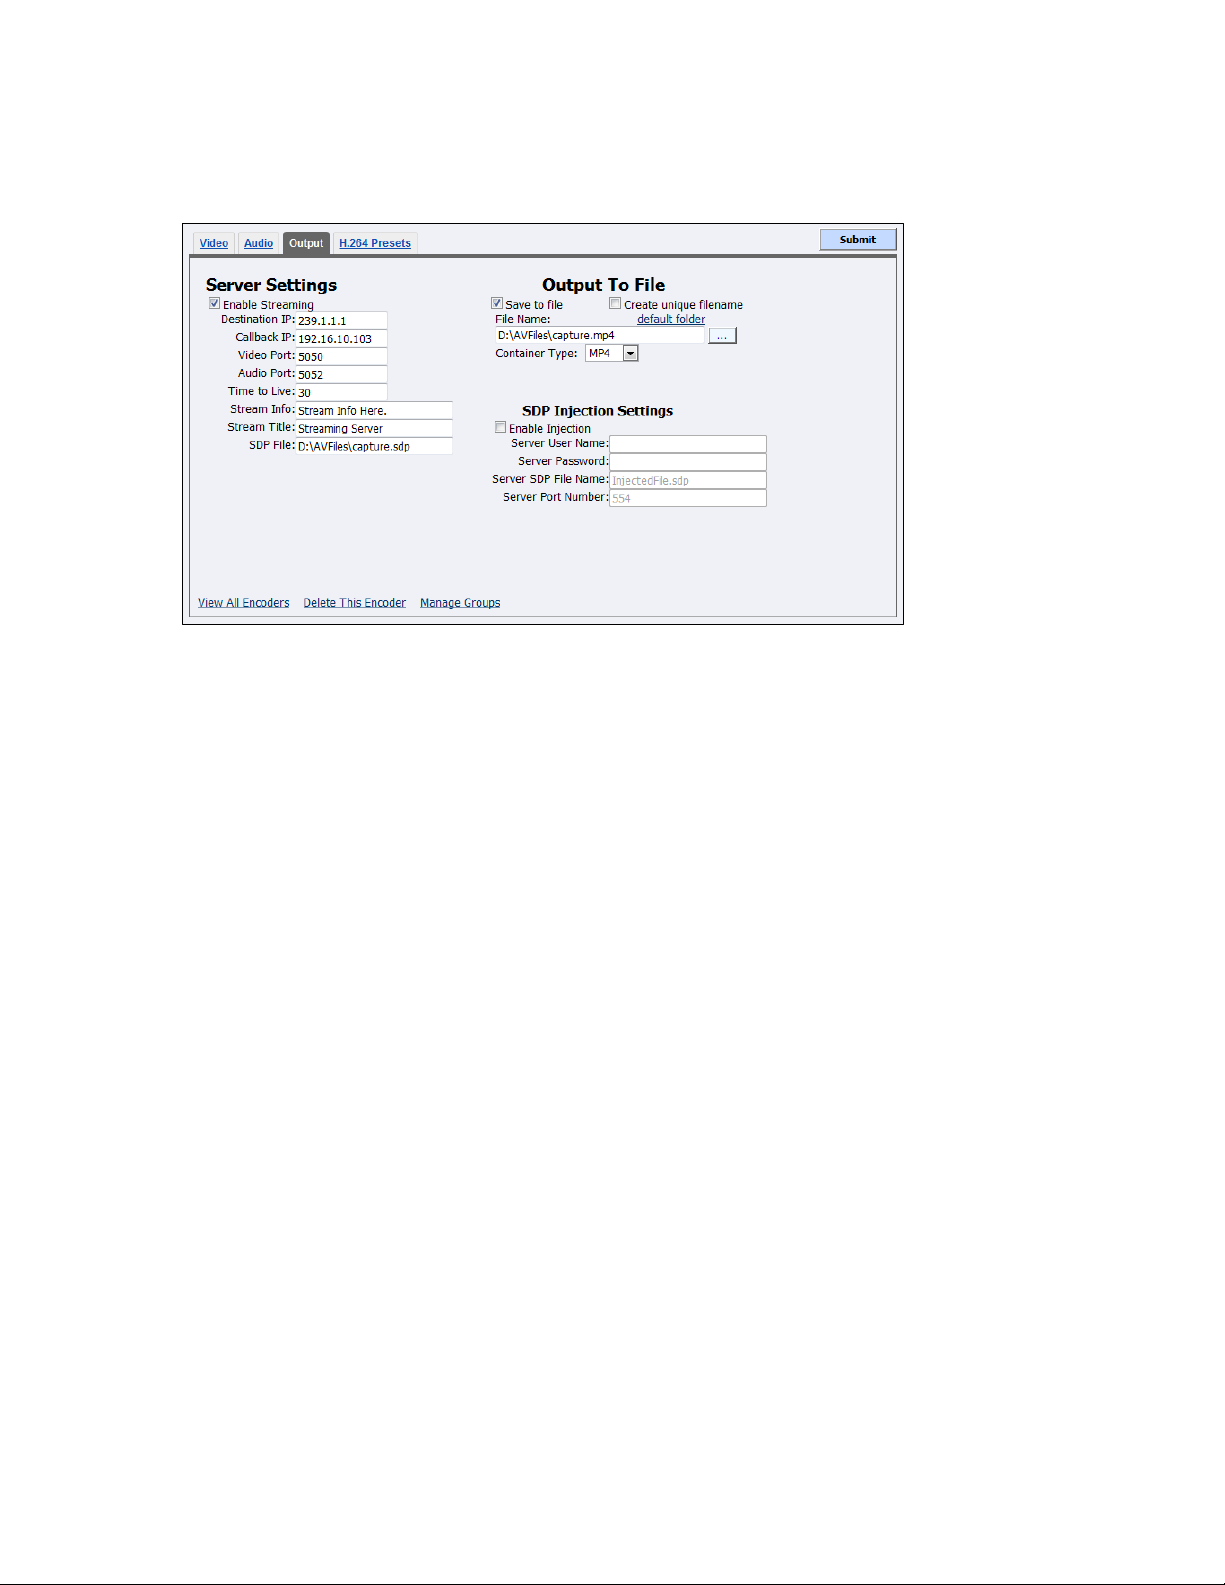
Output tab
1.
Click the Enable Streaming checkbox to stream your audiovisual content via RTSP.
2.
Set the appropriate streaming properties.
Note: The default settings will enable multicast streaming. If you do not want this, change the
IP address for Group to the IP address of the server to which you want to stream from the
encoder.
3.
In the SDP File field, enter a name and a destination path for the resulting SDP file created
when you start the stream. If you are streaming to Helix, a QuickTime, or a Darwin server,
refer to its respective documentation or online message boards for setup details specific for
the individual streaming server.
Note: You can stream point-to-point by selecting a share destination directory for the saved
SDP file. Remember to disable multicasting by entering in the IP address of the PC to
which you want to stream.
For example, if you want another PC to view the stream, save the SDP file to a share
folder on the local drive. The other PC can open the SDP file and the stream can be played
in a QuickTime or other MPEG-4 compatible streaming player. Since MPEG-4 encoding
can be CPU intensive, it is not recommended that you view the stream on the Niagara
encoder. Doing so may overtax the host CPU, which will cause video quality degradation
and encode session failure.
4.
Enable Save to File to save the encoded content to a file. Each time you start this encoder, the
system overwrites the previous file.
5.
Enable Create unique file to create a file that the system does not overwrite.
6.
Accept the default location that displays in the File Name field or choose your own location
for the file. To choose your own personal location select the link (horizontal ellipses or … ) to
the right of the File Name field and display the options (Figure 86).
Figure 85. Output tab
To configure output settings:
Niagara 4100 User Guide
ViewCast 73
Page 80
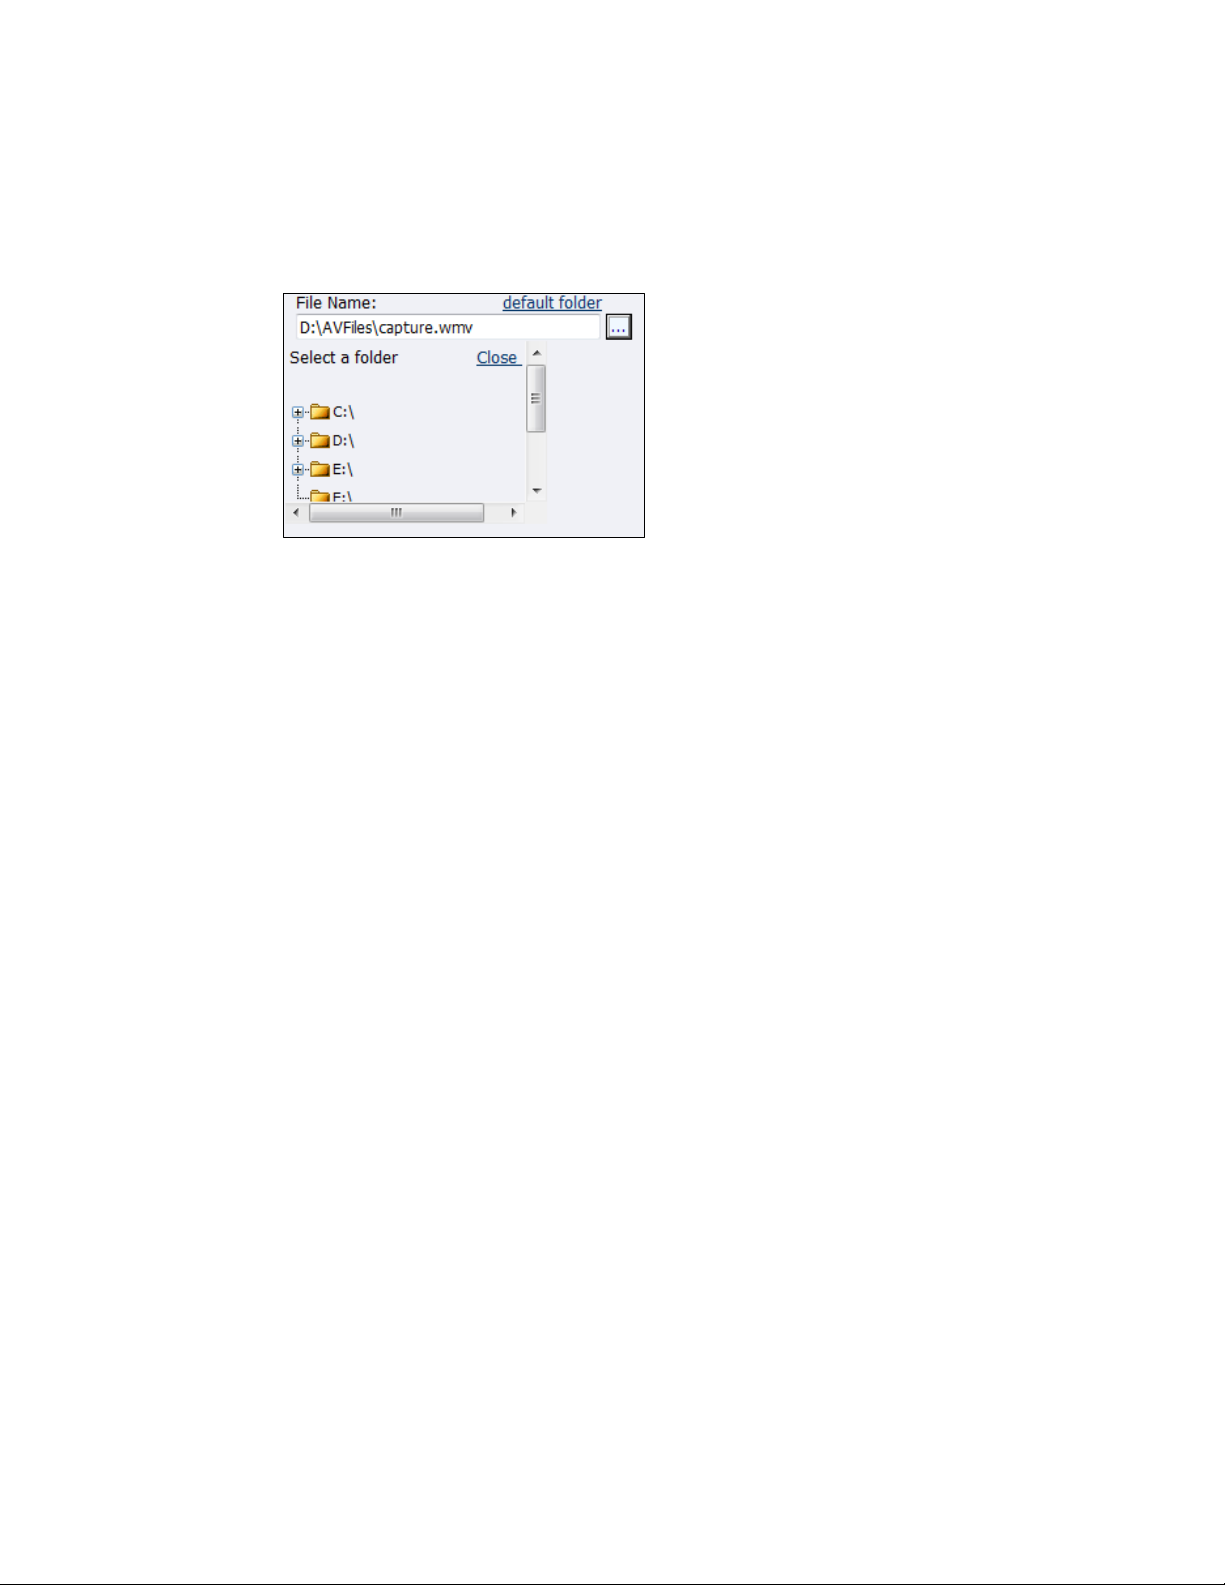
Advanced Operations
Note: By default, the system sets this folder to D:\AVFiles\ with a default file name of
capture.xxx. See Exporting captured video files for instructions on saving video files to a
USB device.
Figure 86. Select a folder
WARNING! ViewCast strongly recommends you do not alter the default directory setting
unless you fully understand the risk of saving your files to a directory not located on drive
D. If you save your files to another drive on the Niagara 4100, the system could delete the
files when you use the Restore to Niagara 4100 Factory Defaults feature.
Only drive D on the Niagara 4100 has available storage to save your files. Check drive
properties for available free space to determine your storage capacity.
Use drives C, E, and F strictly for Niagara 4100 operational programs. Any modifications
to these drives can permanently damage your system and void your warranty.
A better practice would be to use a streaming server to save a file or to save it to a remote
drive. If you inadvertantly fill all available space, you risk losing your stream during a
streaming event.
7.
Select the Container Type.
8.
Click the Enable Injection checkbox to inject an SDP file onto your server.
9.
Set the appropriate setting for the server.
10.
Enter the username and password.
11.
Enter the Server SDP File Name.
12.
Enter the Server Port Number.
13.
Click Submit.
74 ViewCast
Page 81
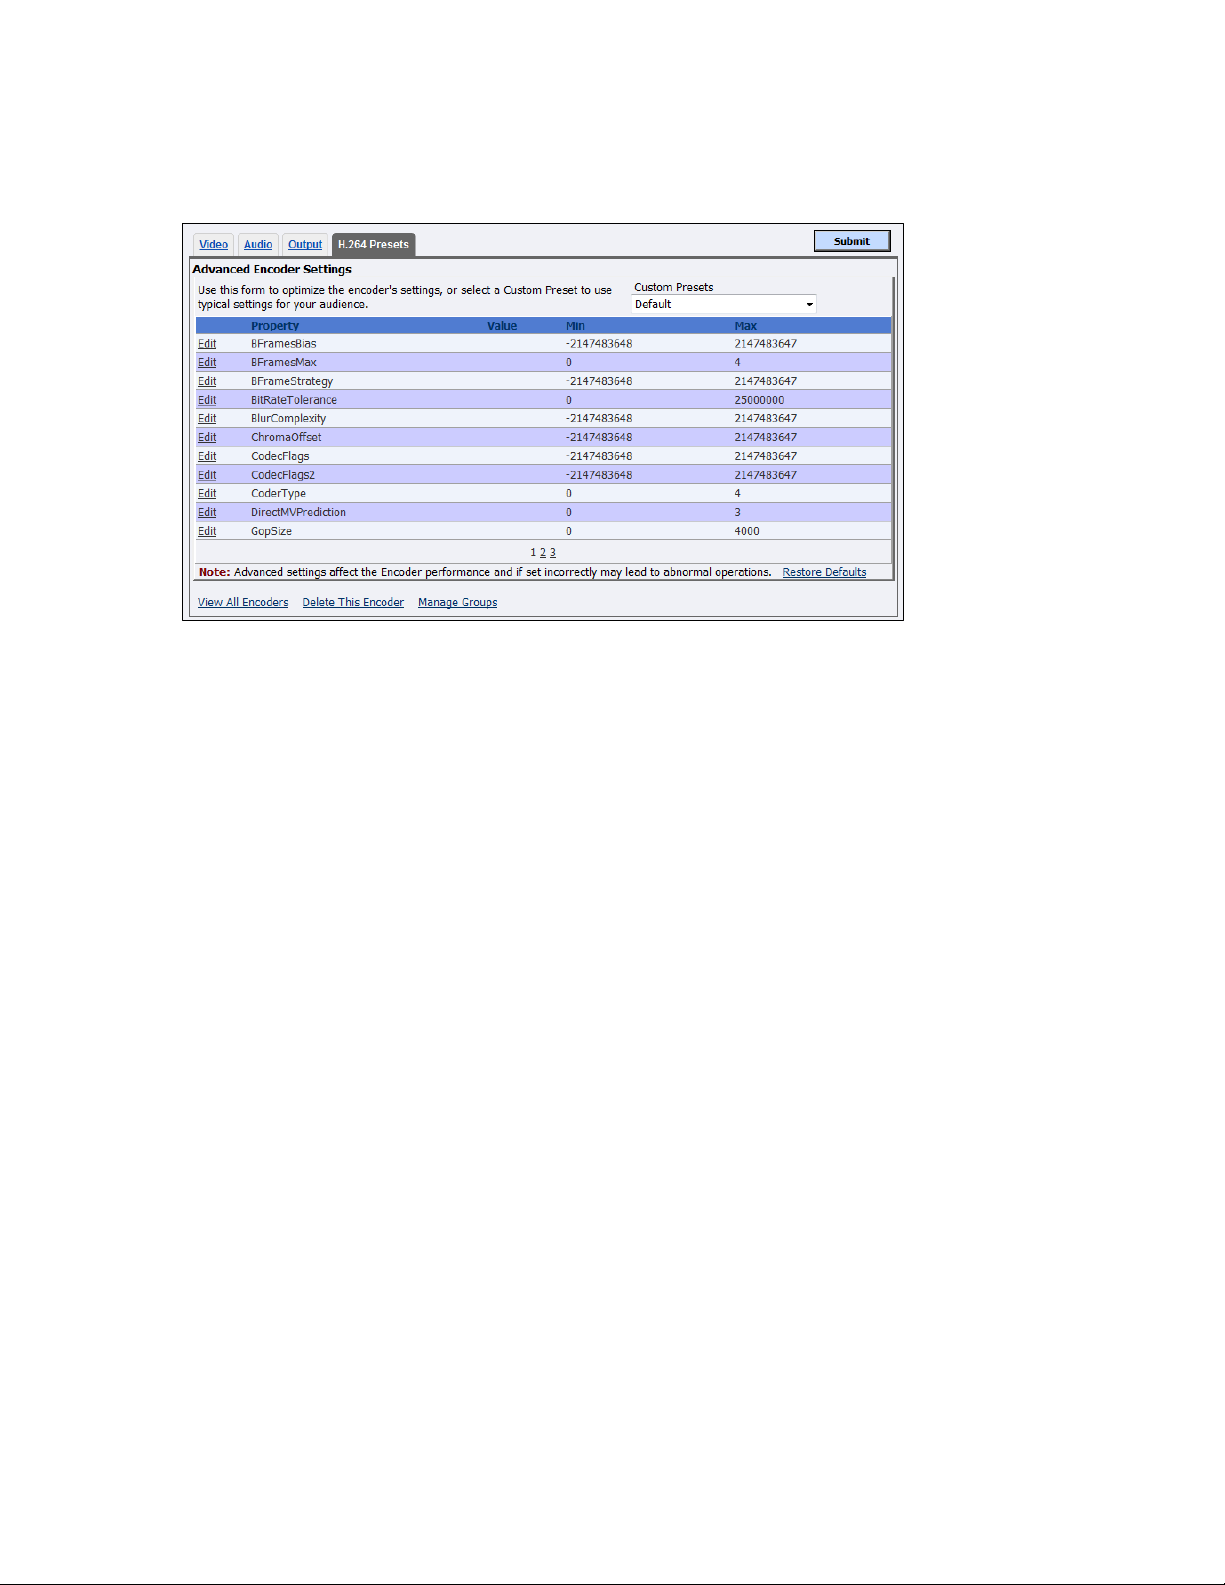
H.264 Presets tab
1.
Click Edit next to the setting you want to modify.
IMPORTANT! These advanced settings affect the way the encoder performs and if set
incorrectly may lead to abnormal encoder operations. Refer to the H.264 Advanced
Settings section in Appendix B for suggested values for the type of video you are streaming.
2.
Change the Value.
3.
Click Update.
4.
Click the Restore Defaults link at the bottom of the window to return the settings to the
defaults.
Note: The database has seven custom presets. Clicking Restore Defaults for one profile will
change all profiles back to the default settings.
Figure 87. H.264 Settings Tab
To configure H.264 settings:
Niagara 4100 User Guide
ViewCast 75
Page 82
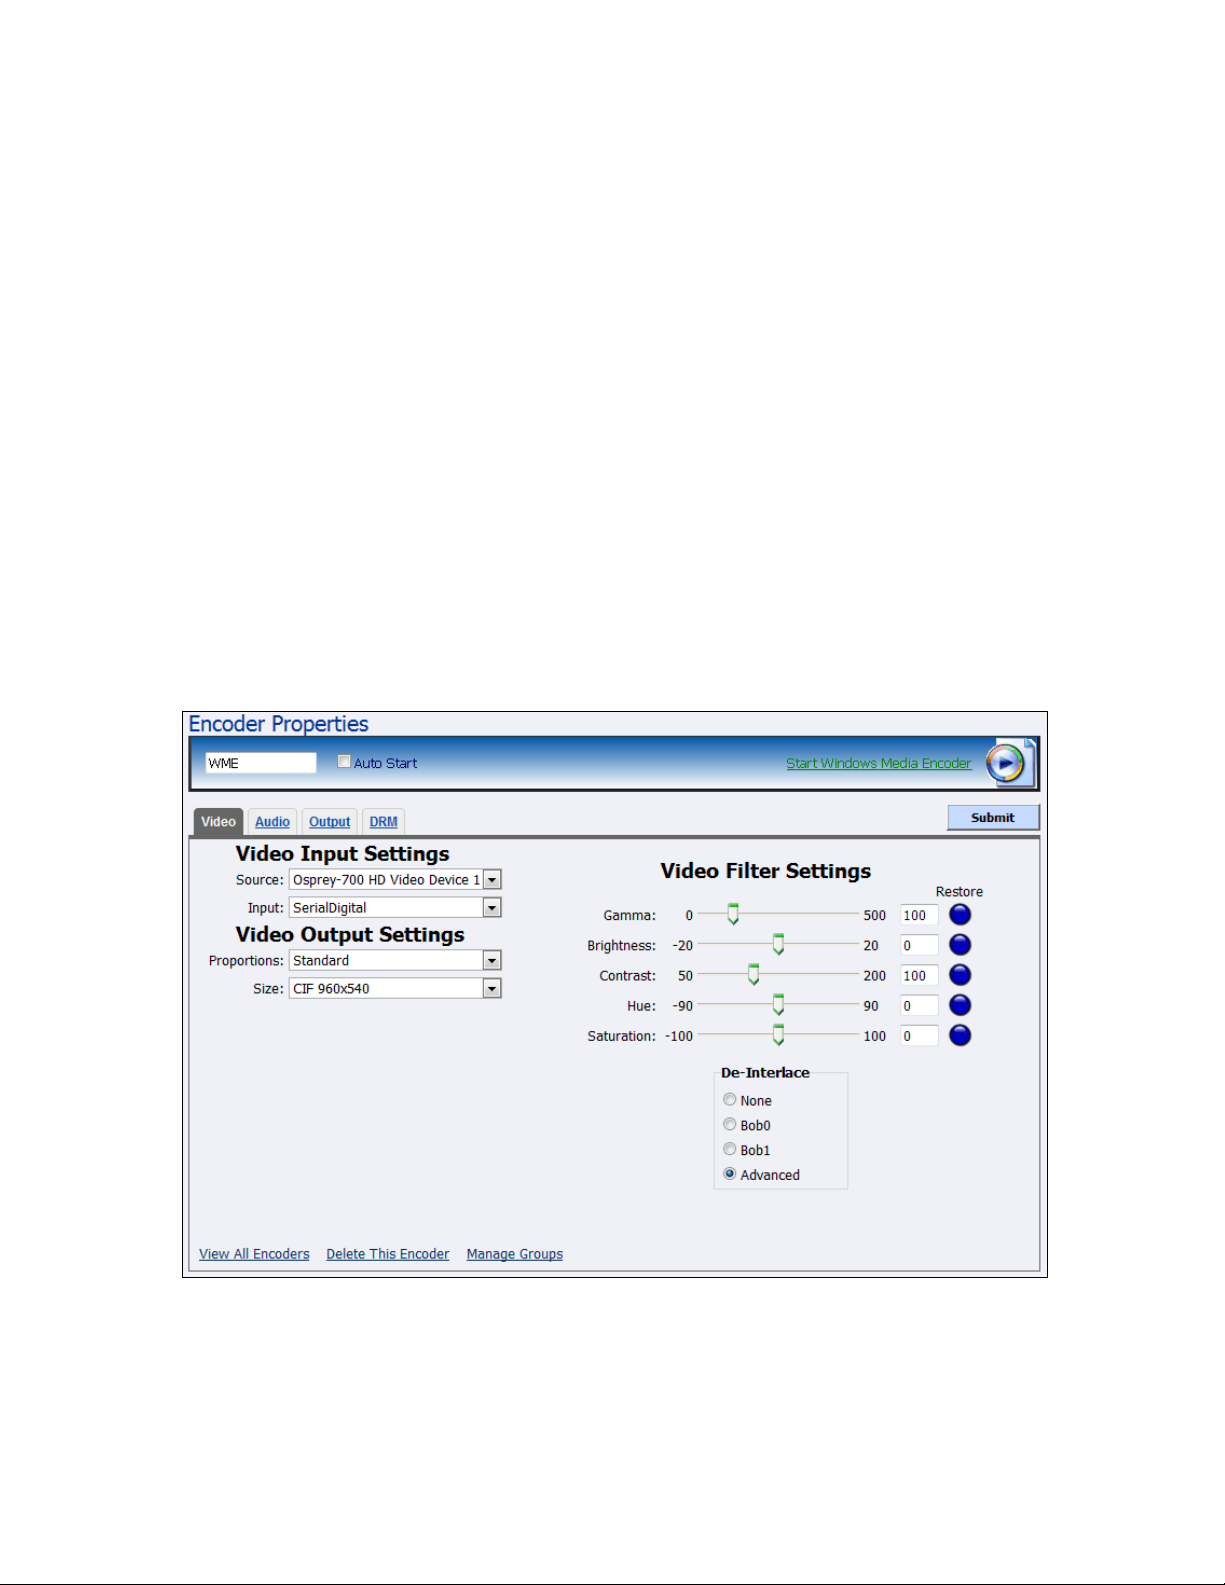
Advanced Operations
Editing a Windows Media encoder
When you create a new encoder, the Encoder Properties window appears. The Encoder Properties
windows for editing a new encoder or an existing encoder are identical. You must configure the video
and audio settings for each encoder type.
Use the Video, Audio, Output, and DRM tabs to edit the settings. If you plan to change the Windows
Media capture profile, use the Output tab first. Changes on the Output tab can adjust other settings
automatically. Configure the video and audio settings then the streaming properties. The streaming
properties and advanced streaming settings are different for each type of encoder.
From the Windows Media Encoder Properties window (Figure 88), you can set the encoder to start
streaming automatically by enabling Auto Start. You can also start this encoder from this window by
clicking the Start Windows Media Encoder link at the top right corner of the window.
Click Encoders All Encoders from the home page. Then select the Edit link next to the Windows Media
encoder whose properties you wish to modify. The system displays the Encoder Properties window for
the selected encoder.
IMPORTANT! If you make any changes to the Encoder Properties window, you must click Submit.
Otherwise, all your changes will be lost.
Figure 88. Windows Media encoder properties
76 ViewCast
Page 83
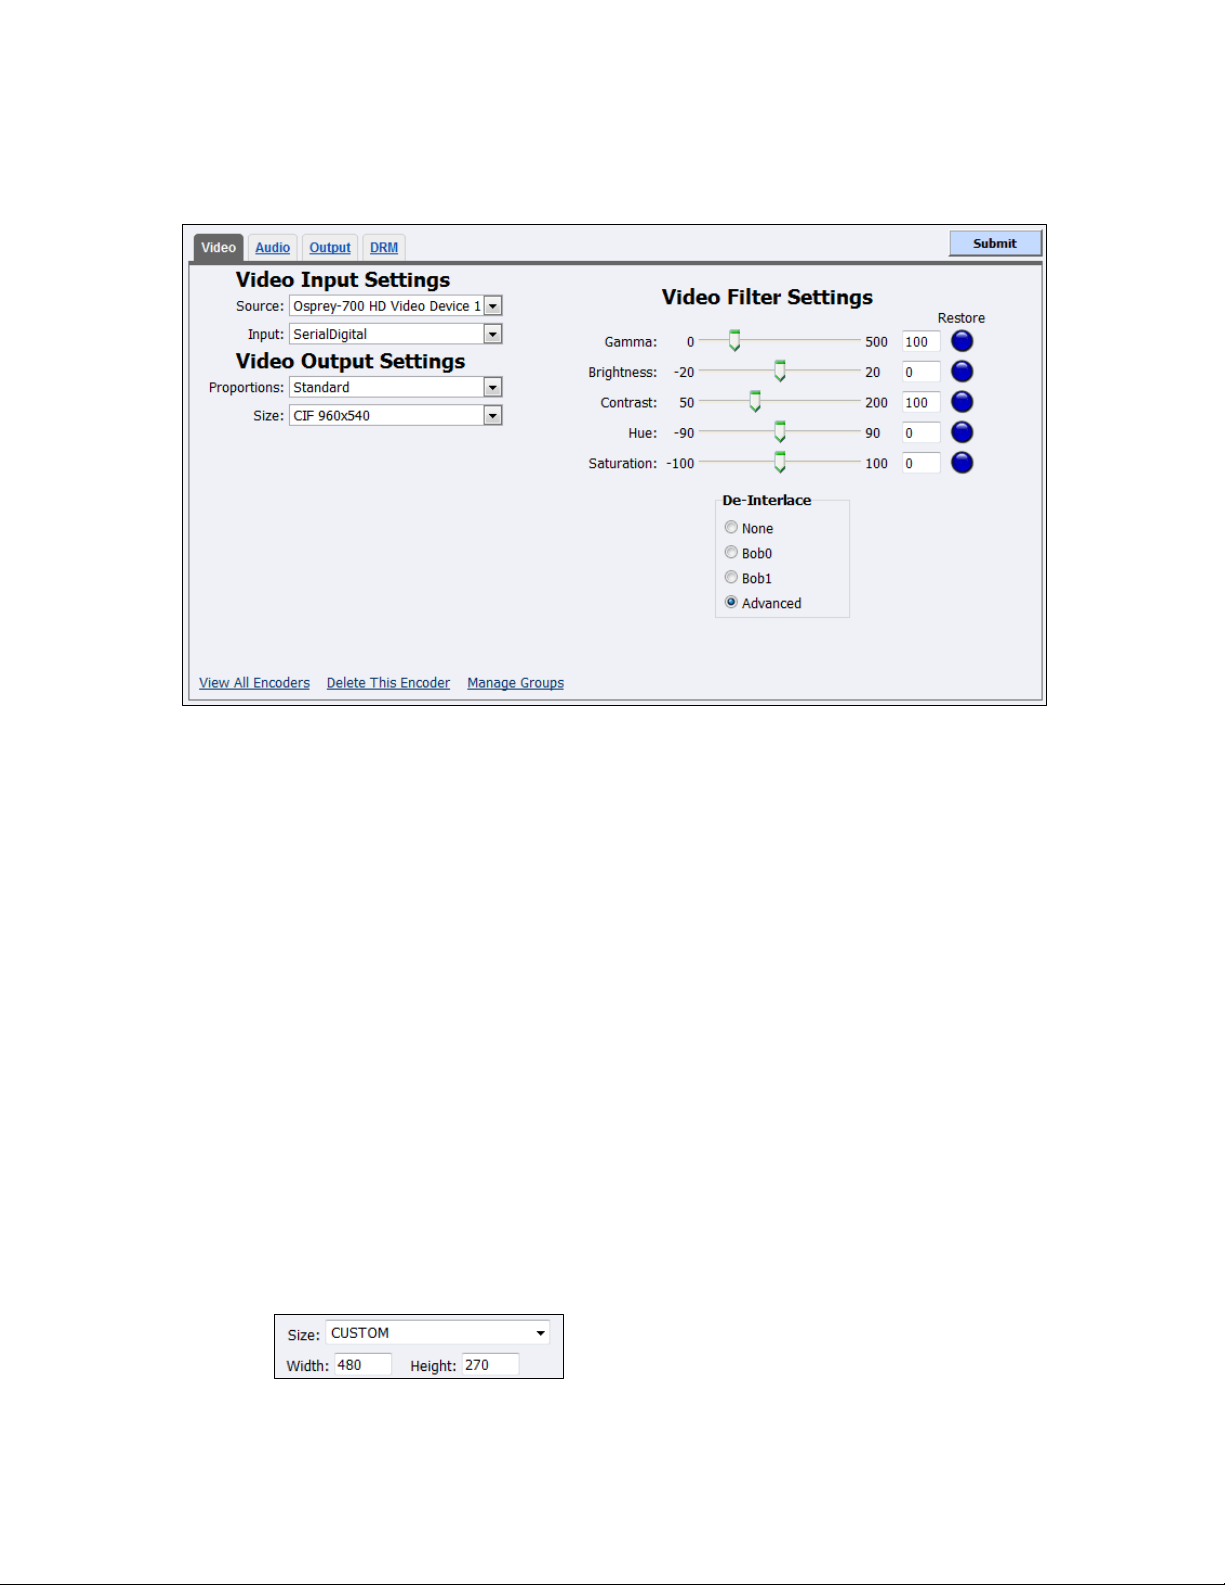
Video tab
1.
In the Source field, select Disabled or Osprey-700 HD Video Device 1.
Note: Because the Niagara 4100 is a single-channel encoder, you can only connect and stream
one audio and video source at any given time. However, you can encode the same audio and
video at multiple data rates and multiple formats to provide the best user experience for
different viewing audiences.
2.
In the Input field, the video input is SerialDigital.
3.
The Proportions field setting is Standard (square pixels for a VGA monitor).
4.
In the Size field, select the pixel size of the encoded video. The standard sizes include:
HD 1280x720
CIF for video scaled from full-size to ¼ size
QCIF for video scaled from full-size to ¼ of CIF size
Custom
Customization is useful when you are capturing video to be played on a mobile video-device
that requires a non-standard size for compatibility.
When you click Custom, two additional fields appear so you can enter the exact size you want
the resulting video to be (Figure 90).
Figure 90. Custom fields
Figure 89. Video tab
Niagara 4100 User Guide
To configure video settings:
ViewCast 77
Page 84
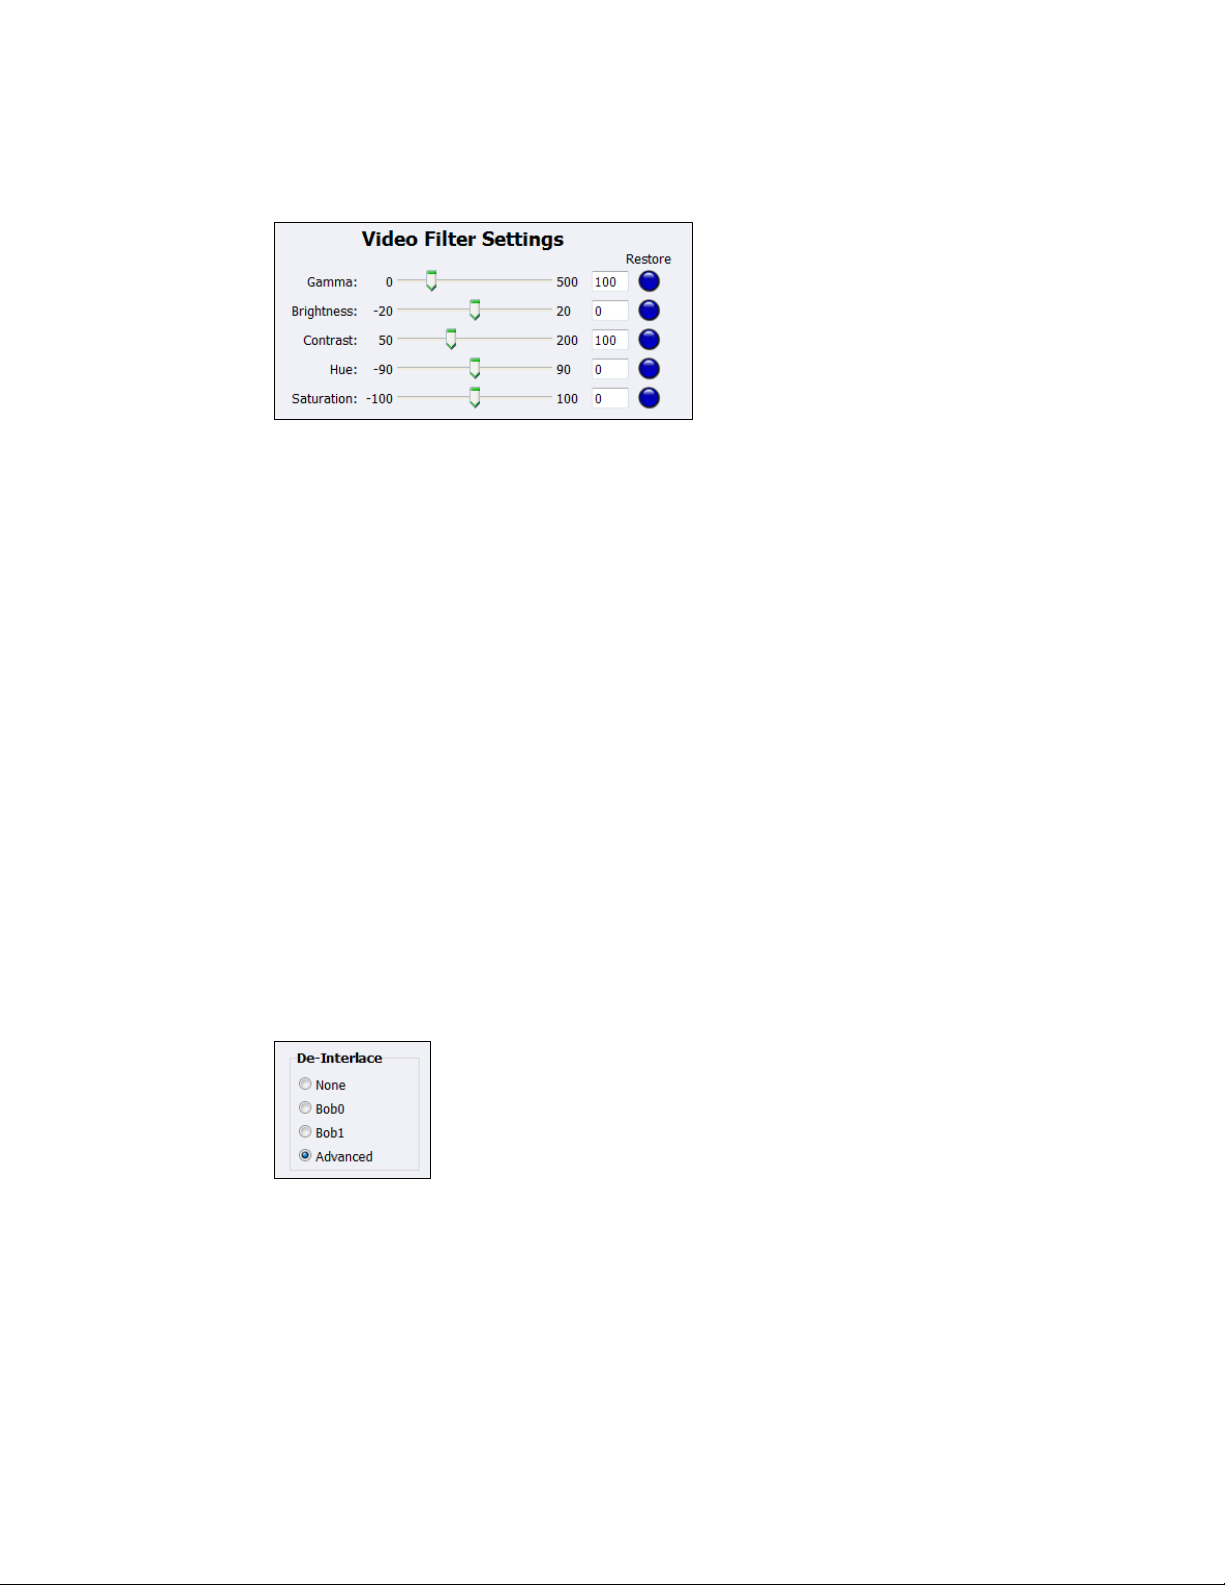
Advanced Operations
5.
Drag the sliders to adjust the Gamma, Brightness, Contrast, Hue, and Saturation (Figure 91).
Figure 91. Video filter settings
Note: Click Restore to the right of each filter to return the setting to the default.
6.
Click the De-Interlace settings you want to apply (Figure 92). Options include:
None
– Performs no de-interlacing of any kind.
Bob0
– Applies inverse telecine de-interlacing to all telecine video.
– Applies motion adaptive de-interlacing to all video that is not telecine.
– Switches dynamically between the two modes as the content changes.
– Available for NTSC video only.
Bob1
– Drops the redundant fields and reassembles the video in a 24 fps progressive format.
– Applies inverse telecine de-interlacing to all telecine video.
– Performs no de-interlacing of video that is not telecine.
–Available for NTSC video only.
Advanced
– Is an algorithm for de-interlacing pure video (non-telecine) content.
– Applies motion adaptive interlacing to all video. It detects which portions of the image
are still and which portions are in motion then applies different processing to each
scenario.
Figure 92. De-Interlace Settings
Note: Telecine and inverse telecine only apply to NTSC video. They are not used for PAL and
SECAM video. The system disables Bob0 and Bob1 choices when you select either PAL or
SECAM as the video standard.
7.
Click Submit.
78 ViewCast
Page 85
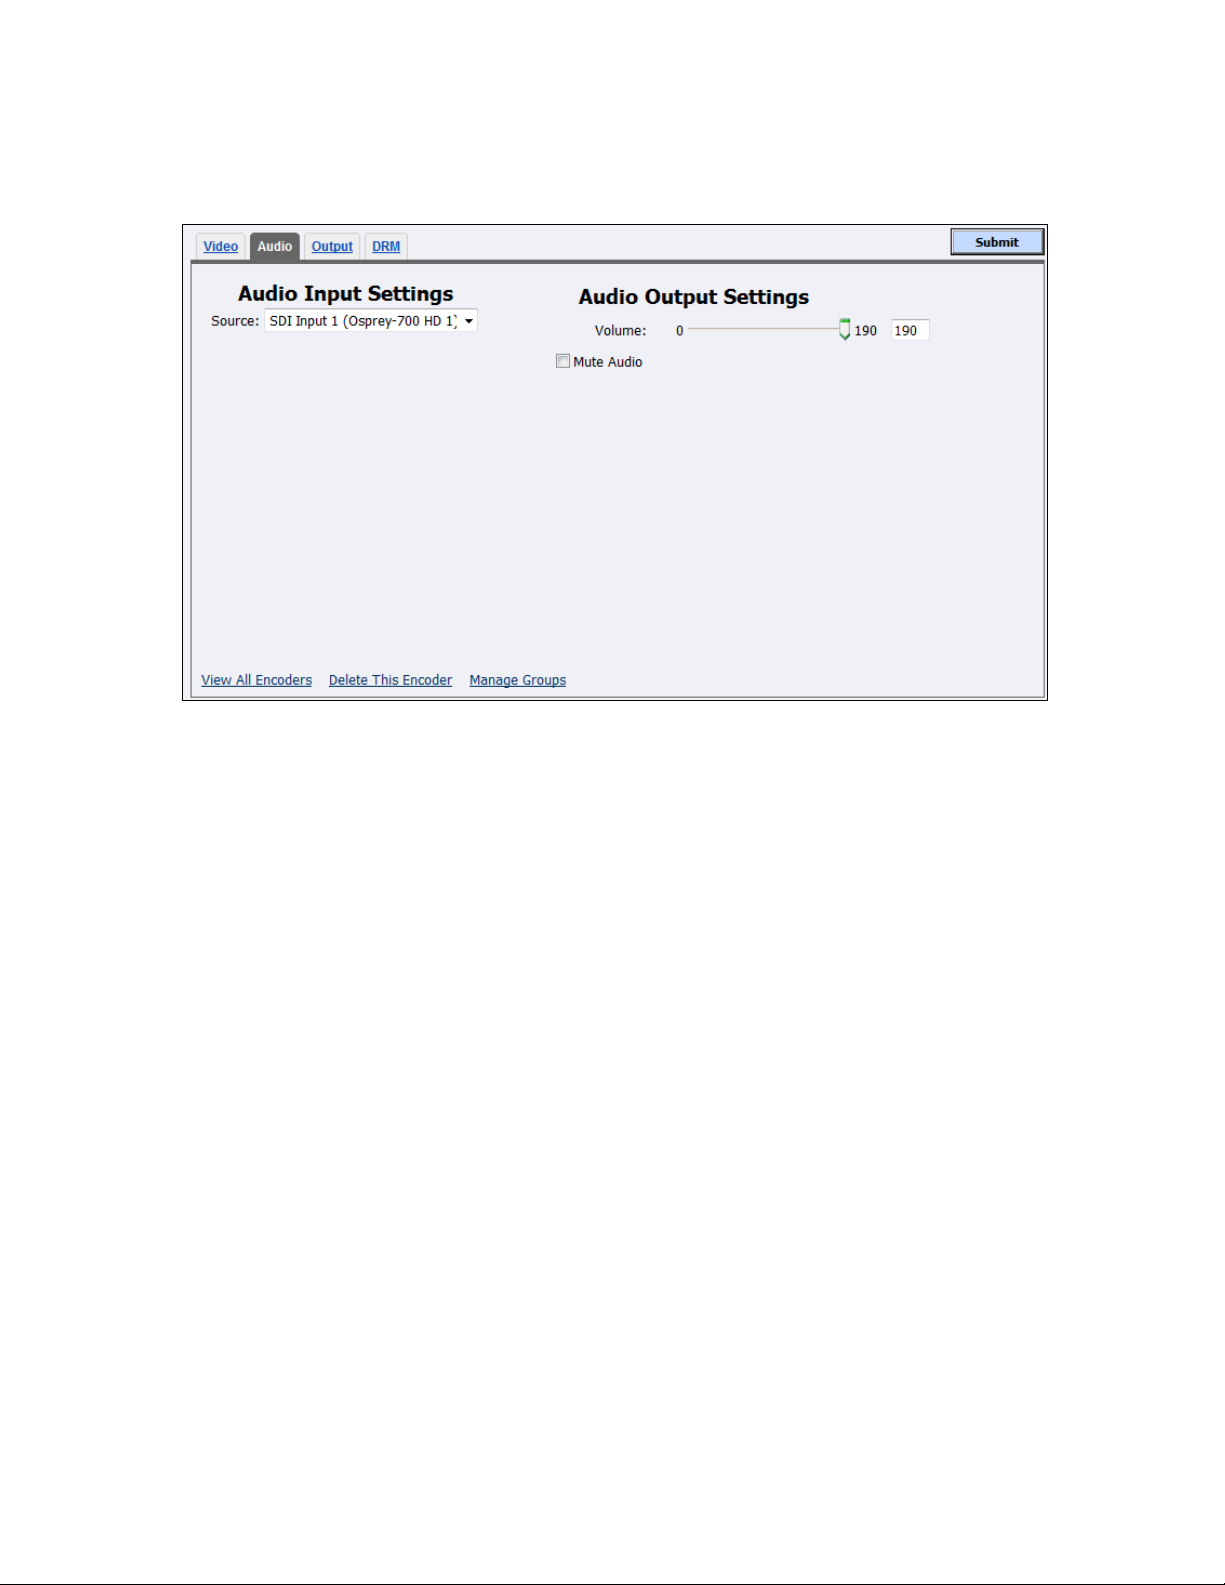
Audio tab
1.
In the Source field, select an audio source from the drop-down list:
Disabled
AES Input 1 (Osprey-700 HD 1)
AES Input 2 (Osprey-700 HD 1)
Bal Input 1 (Osprey-700 HD 1)
Digital Audio (S/PDIF (High De
SDI Input 1 (Osprey-700 HD 1)
SDI Input 2 (Osprey-700 HD 1)
SDI Input 3 (Osprey-700 HD 1)
SDI Input 4 (Osprey-700 HD 1)
Unbal Input 1 (Osprey-700 HD 1)
IMPORTANT! The audio input must match the connectors on the back of the Niagara 4100 and
your audio source.
2.
Drag the slider to adjust the Volume.
3.
(Optional) Click the Mute Audio checkbox to disable audio.
4.
Click Submit.
Figure 93. Audio tab
Niagara 4100 User Guide
To configure audio settings:
ViewCast 79
Page 86
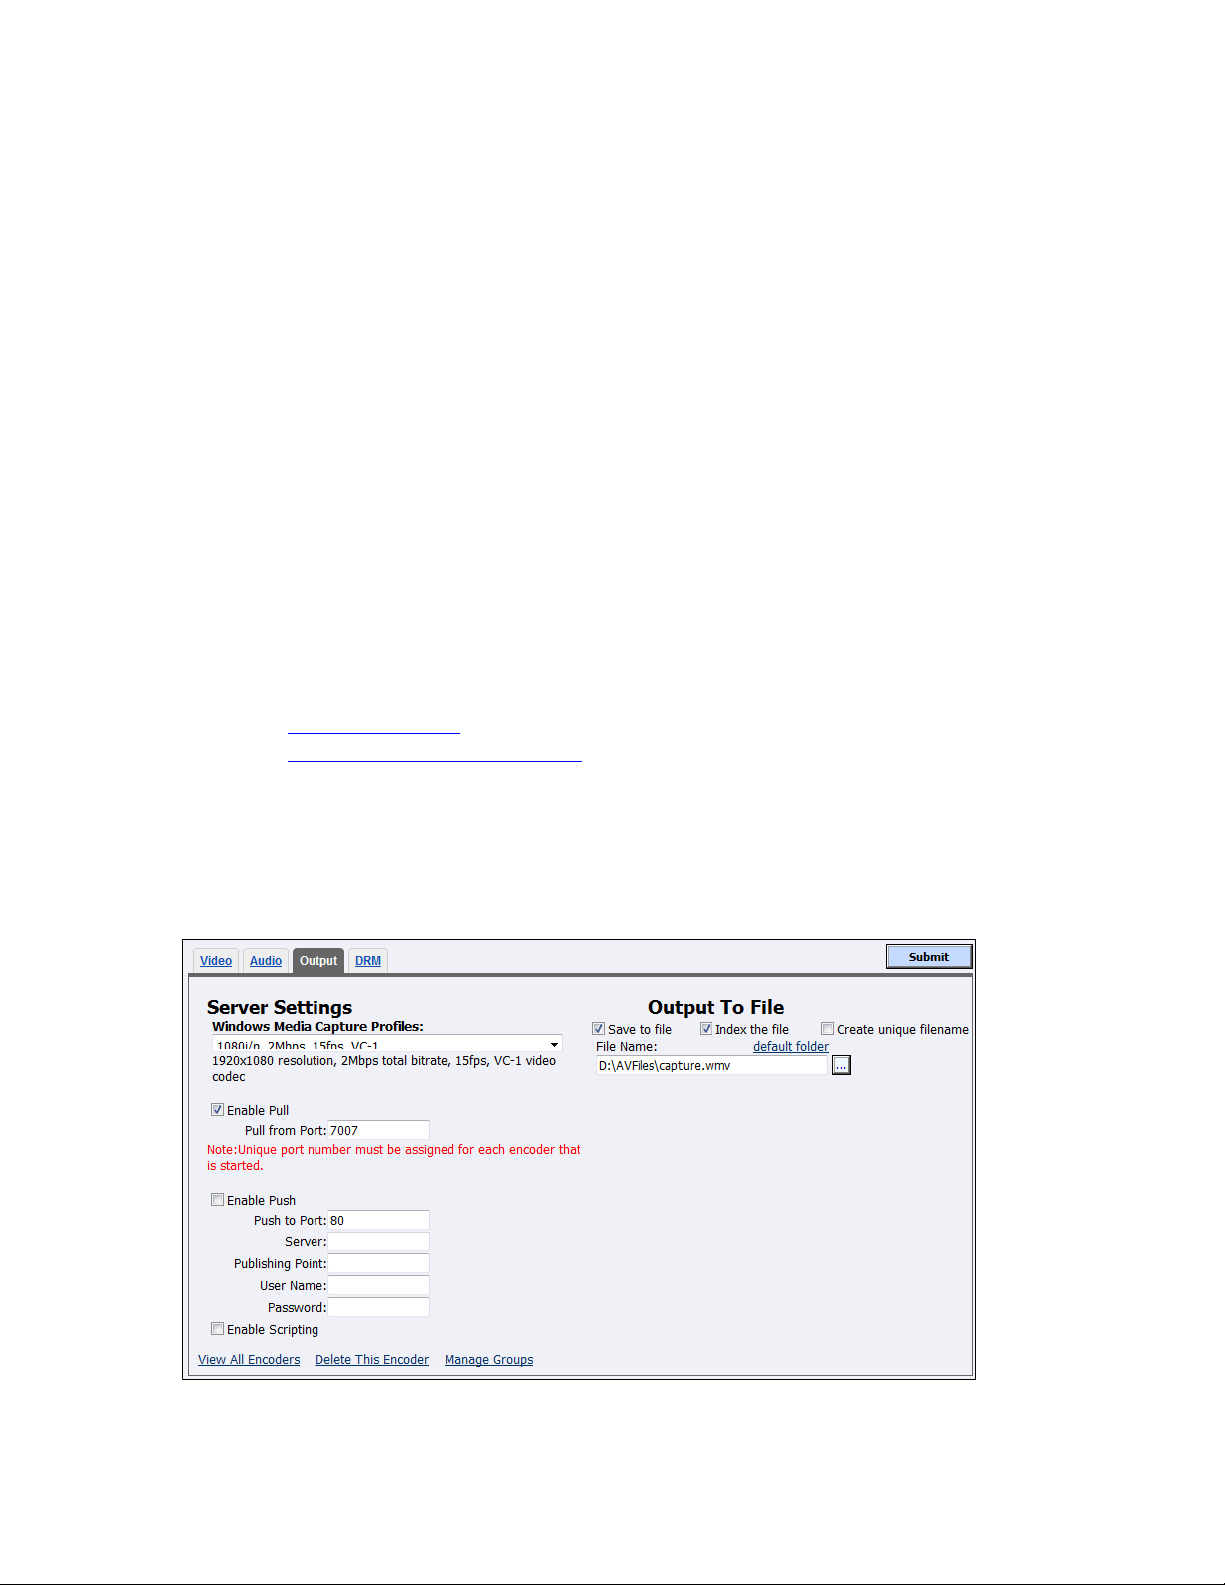
Advanced Operations
Output tab
Windows Media is both a storage format and a streaming format. In addition to the ability to output to a
file, the Windows Media encoder can stream to a Windows Media Server. The settings for Windows
Media encoder include the ability to set parameters for connecting and streaming to the server (Figure
94).
Some Windows Media Capture Profiles have pre-defined video resolutions and input selections. When
you select a Windows Media Capture Profile, verify your current video and audio settings have not been
modified. If they have been modified, simply change these settings back to their previous settings and
click Submit.
When streaming audio and video, there are two methods of delivery:
Pull – Niagara 4100 begins to generate broadcast packets as soon as you start the encoding.
However, it does not deliver the broadcast stream until Windows Media Server requests the
stream. This method does not provide a secure connection to the server and should only be used if
the encoder and server reside within the same network firewall.
Push – Niagara 4100 maintains a secure connection to Windows Media Server. This connection
allows Niagara 4100 to pass a user name and password to authenticate access to the server.
To enable clients to pull the stream from Niagara 4100, set up a session and begin broadcasting directly
from Niagara 4100. Clients (Windows Media servers or players) can connect to the stream at any time
by using the following URL format:
http://IP_address:port (for Internet connections)
http://encoding_computer_name:port (for LAN connections)
By default, Niagara 4100 supports up to 50 direct connections during a broadcast.
Note: The greater the number of direct connections to Niagara 4100, the more system resources is
required. ViewCast does not recommend directly connecting players to Niagara 4100. Streaming
servers should connect to Niagara 4100 and, in turn, players should connect to the servers.
Figure 94. Output tab
80 ViewCast
Page 87
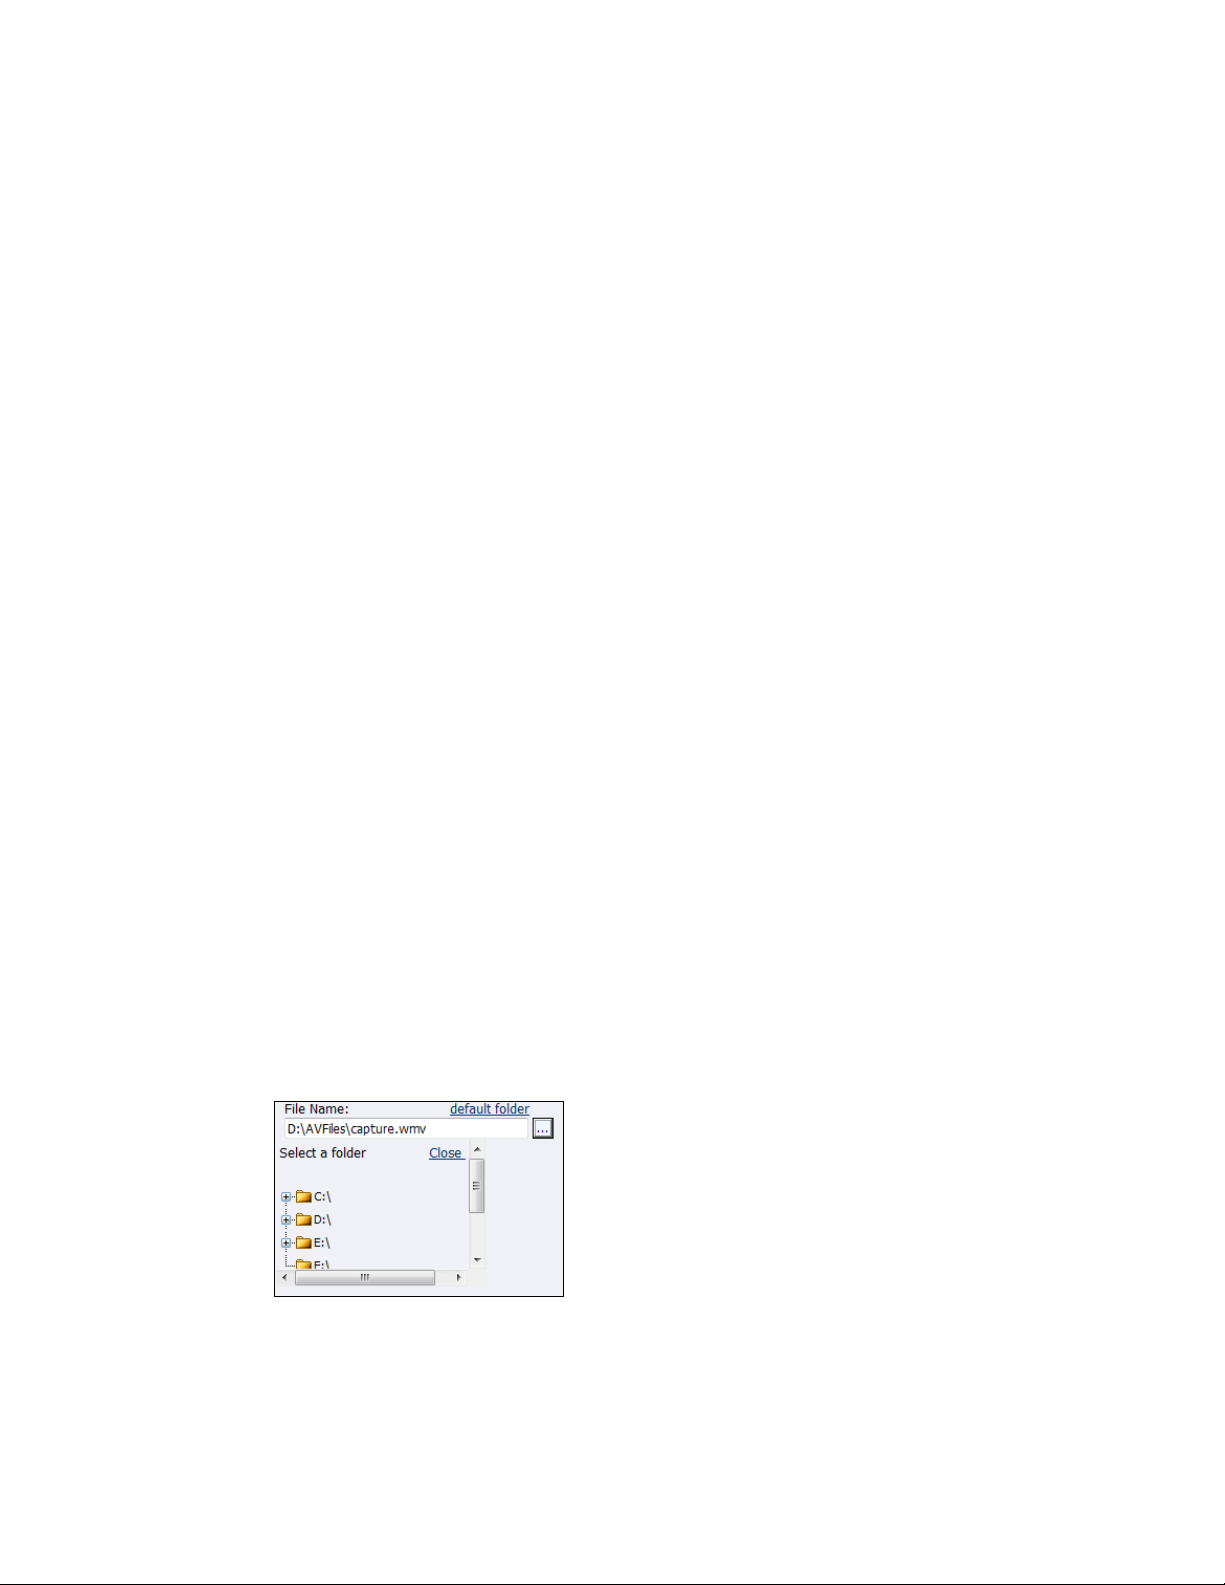
To configure output settings:
1.
Click on a Windows Media Capture Profile.
2.
Click the Enable Pull checkbox.
3.
Enter a port number that the server will use to pull the stream from Niagara 4100.
4.
Click the Enable Push checkbox.
IMPORTANT! Be sure to enter a port number not already assigned to another encoder. If two
encoders attempt to use the same port number, one or both encoders will fail to start.
5.
Enter a port number that the server will use to push the stream from Niagara 4100.
6.
Enter the Server name or IP address.
7.
Enter the Publishing Point.
8.
Enter the User Name.
9.
Enter the Password.
10.
Click the Enable Scripting checkbox to embed closed captions.
Note: If closed captions is enabled through the Osprey 700e HD driver, you cannot enable
scripting.
11.
You can:
Click the Save to File checkbox to save the encoded content to a file. Each time you start
this encoder, the system overwrites the previous file.
Click Index the file to drag the slider to any point in your video capture.
Click Create unique file to create a file that the system does not overwrite.
12.
Accept the default location that displays in the File Name field or choose your own location for
the file. To choose your own personal location select the link (horizontal ellipses or … ) to the
right of the File Name field and display the options (Figure 95).
Note: By default, the system sets this folder to D:\AVFiles\ with a default file name of
capture.xxx. See Exporting captured video files for instructions on saving video files to a
USB device.
Figure 95. Select a folder
WARNING! ViewCast strongly recommends you do not alter the default directory setting unless
you fully understand the risk of saving your files to a directory not located on drive D. If
you save your files to another drive on the Niagara 4100, the system could delete the files
when you use the Restore to Niagara 4100 Factory Defaults feature.
Niagara 4100 User Guide
ViewCast 81
Page 88

Advanced Operations
Only drive D on the Niagara 4100 has available storage to save your files. Check drive
properties for available free space to determine your storage capacity.
Use drives C, E, and F strictly for Niagara 4100 operational programs. Any modifications
to these drives can permanently damage your system and void your warranty.
A better practice would be to use the streaming server to save a file or to save it to a remote
drive. If you inadvertantly fill all available space, you risk losing your stream during a
streaming event.
13.
Click Submit.
Note: If you click to another window before you click Submit, your changes will be lost.
82 ViewCast
Page 89
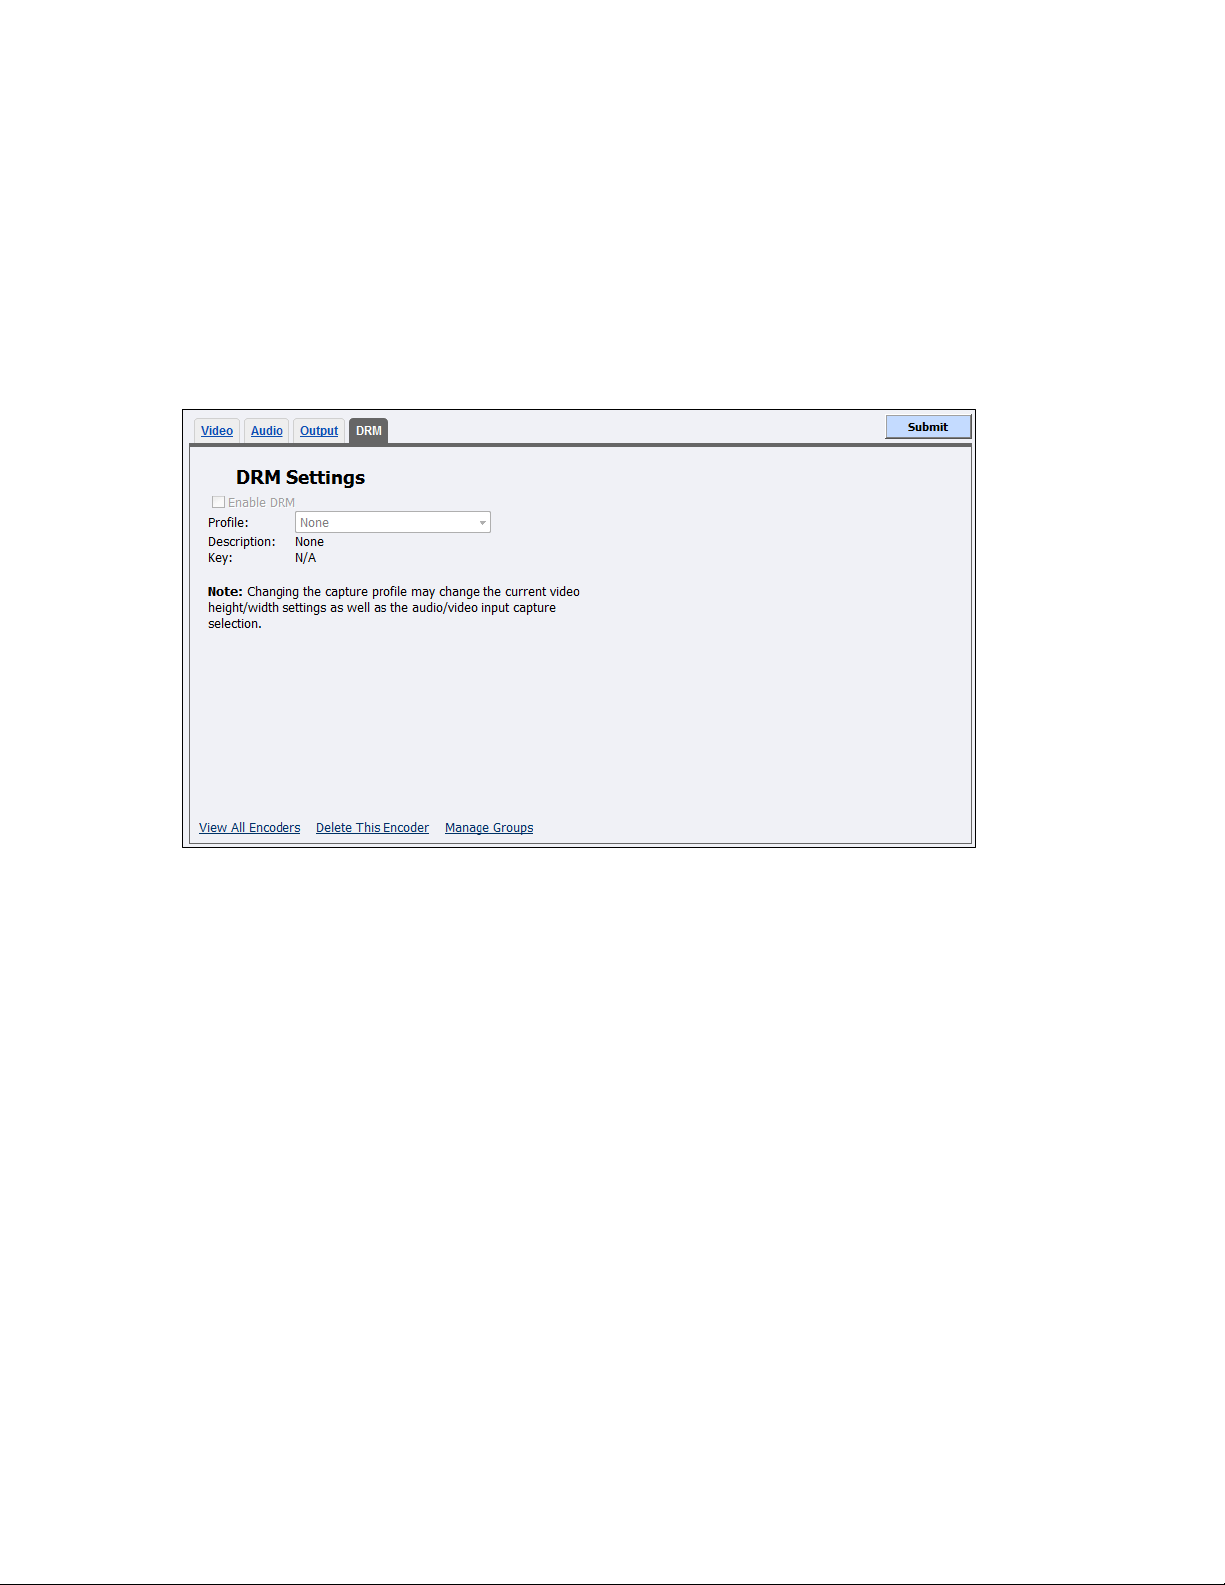
Niagara 4100 User Guide
1.
Click the Enable DRM checkbox.
2.
Click the DRM Profile you wish to apply from the drop-down list.
Note: When you enable DRM, Niagara SCX automatically changes the Windows Media Capture
Profile setting to a DRM-compatible Windows Media 9 setting. You may need to adjust this
setting after you enable DRM.
3.
Click Submit.
DRM tab
You can protect your content using a technology called Digital Rights Management (DRM). Niagara SCX
allows you to encrypt your content with DRM technology while you are encoding. You can apply DRM
while encoding to a file and when broadcasting a stream. Users are required to obtain a license to play
to content. This license contains the key to unlock the content and the rights that govern its use (Figure
96).
Refer to Appendix A on how to set up and import a DRM profile.
Figure 96. DRM tab
To configure DRM settings:
ViewCast 83
Page 90
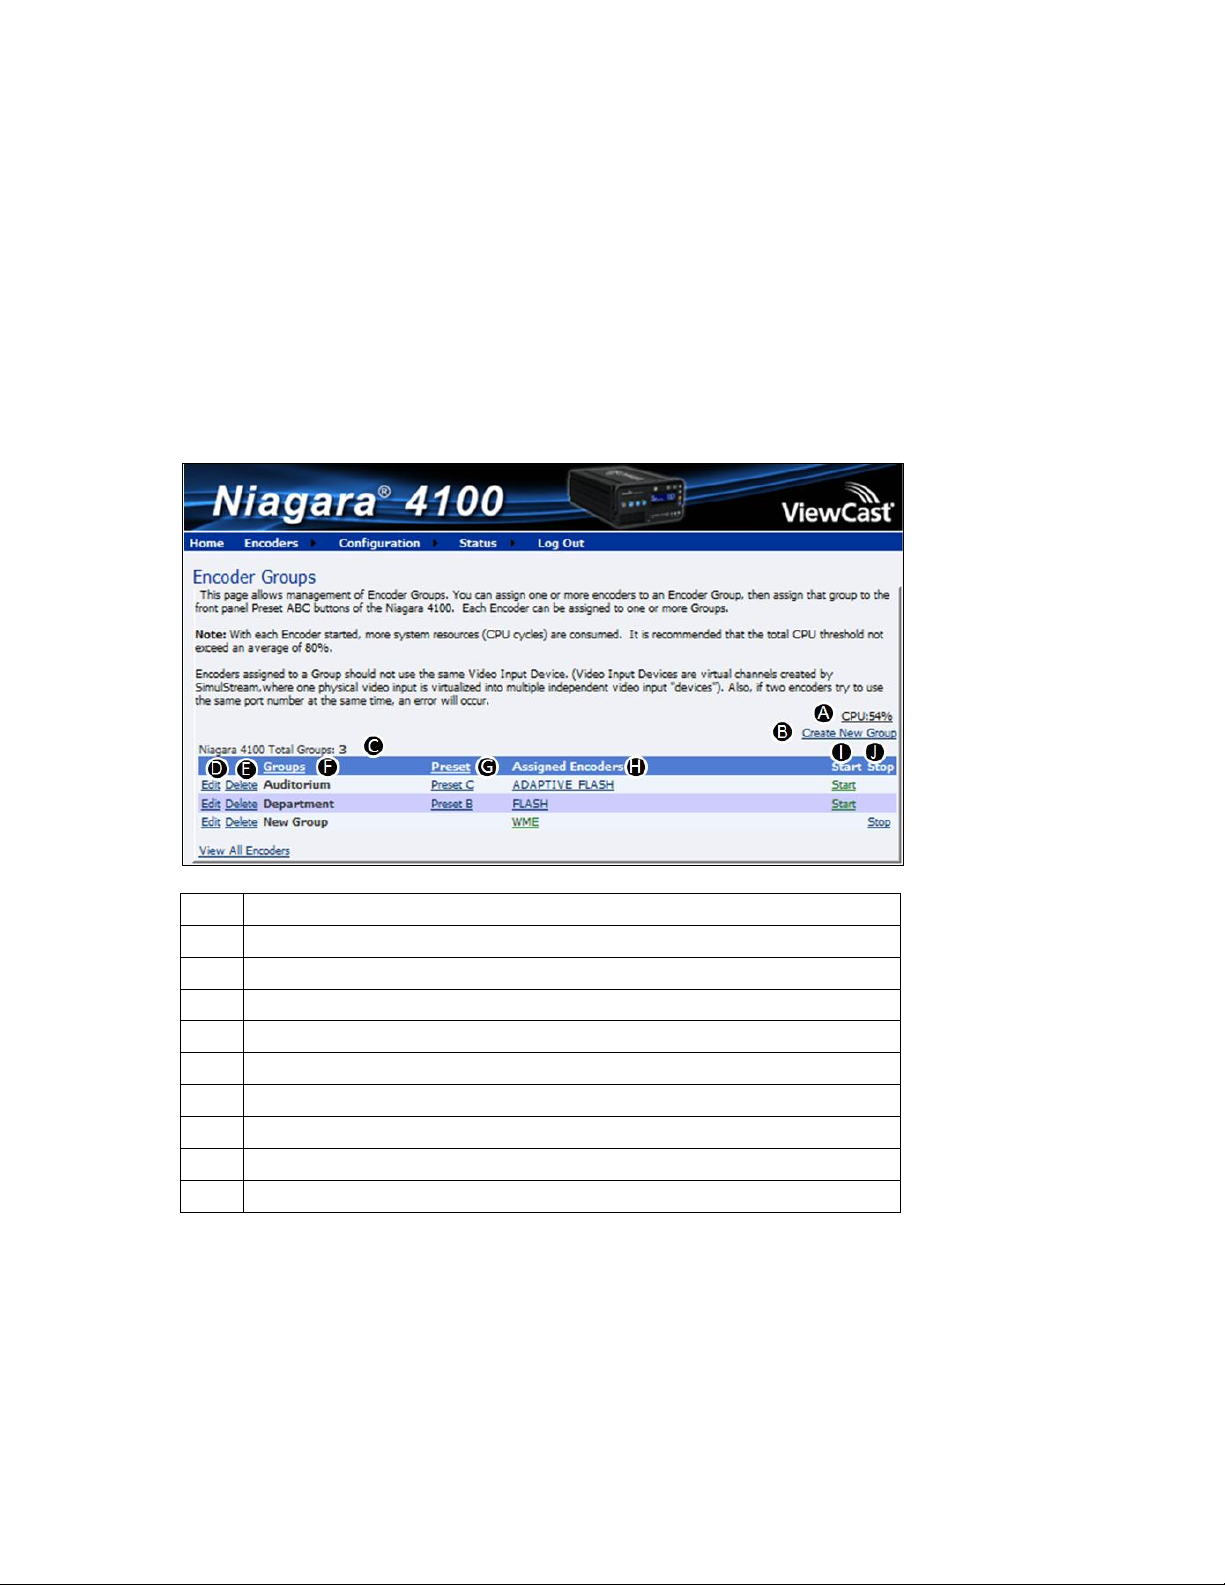
Advanced Operations
A
Indicates the CPU usage.
B
Allows you to create a new group.
C
Indicates the total number of groups on the Niagara 4100.
D
Allows you to edit a group.
E
Allows you to delete a group.
F
Displays the name of the group.
G
Indicates which preset button is assigned to this group.
H
Indicates the encoders assigned to this group.
I
Allows you to start this group.
J
Allows you to stop this group.
Viewing encoder groups
Encoder groups represent the cornerstone for streaming on the Niagara 4100. The Niagara 4100 comes
with several default encoders and profiles. You must have at least one group assigned on the Niagara
4100 and one encoder profile assigned to that group. The Preset ABC buttons on the appliance remain
unusable until you have this minimum configuration.
The Encoder Groups window (Figure 97), a subset of Encoders (on the Encoders window), allows you to
view the list of encoder groups available for assignment to the Niagara 4100. Click Encoders Groups
from the menu bar on the home page.
Figure 97. Encoder Groups window
84 ViewCast
Page 91
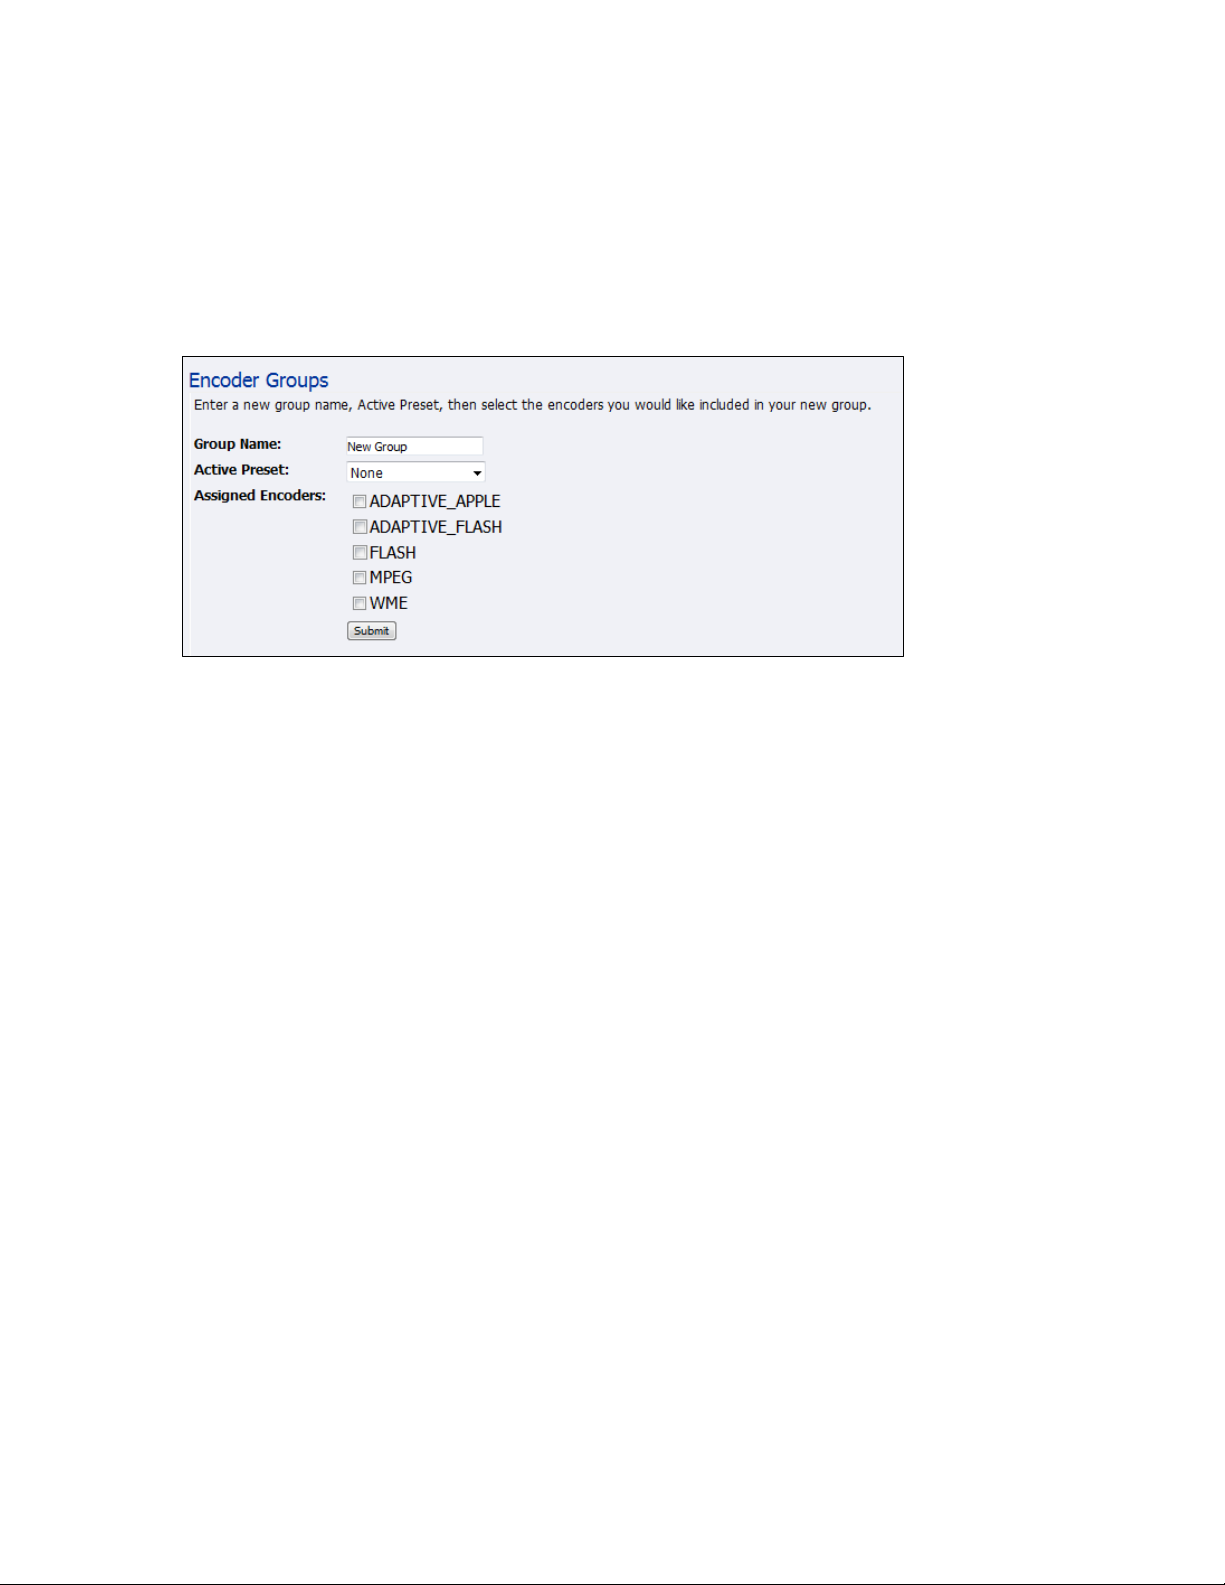
Niagara 4100 User Guide
1.
Enter the name of the group.
2.
Click on the preset button you want to assign to this encoder group.
3.
Click on the encoders you want to assign to the group.
4.
Click Submit.
Creating encoder groups
If two encoders try to use the same port number at the same time, an error will occur.
Select the Create New Group link on the Encoder Groups window. The encoder groups fields display
(Figure 98).
Figure 98. Encoder Groups window
To create encoder groups:
Note: It is possible to assign one encoder to two different encoder groups.
ViewCast 85
Page 92

Advanced Operations
Starting an encoder group
To start an encoder group, click the Start link to the right in the Start column of the group you want to
start. The encoder group will start in a few seconds. The system displays any errors on the Starting
window while the group starts.
Note: With each encoder started, more system resources (CPU cycles) are consumed. It is recommended
that the total CPU threshold not exceed an average of 70 %. Refer to the Checking CPU usage
section in Basic Operations.
Stopping an encoder group
To stop an encoder group, click the Stop link to the right in the Stop column of the group you want to
stop. The encoder group will stop in a few seconds. The system displays any errors on the Stopping
window while the group stops.
86 ViewCast
Page 93
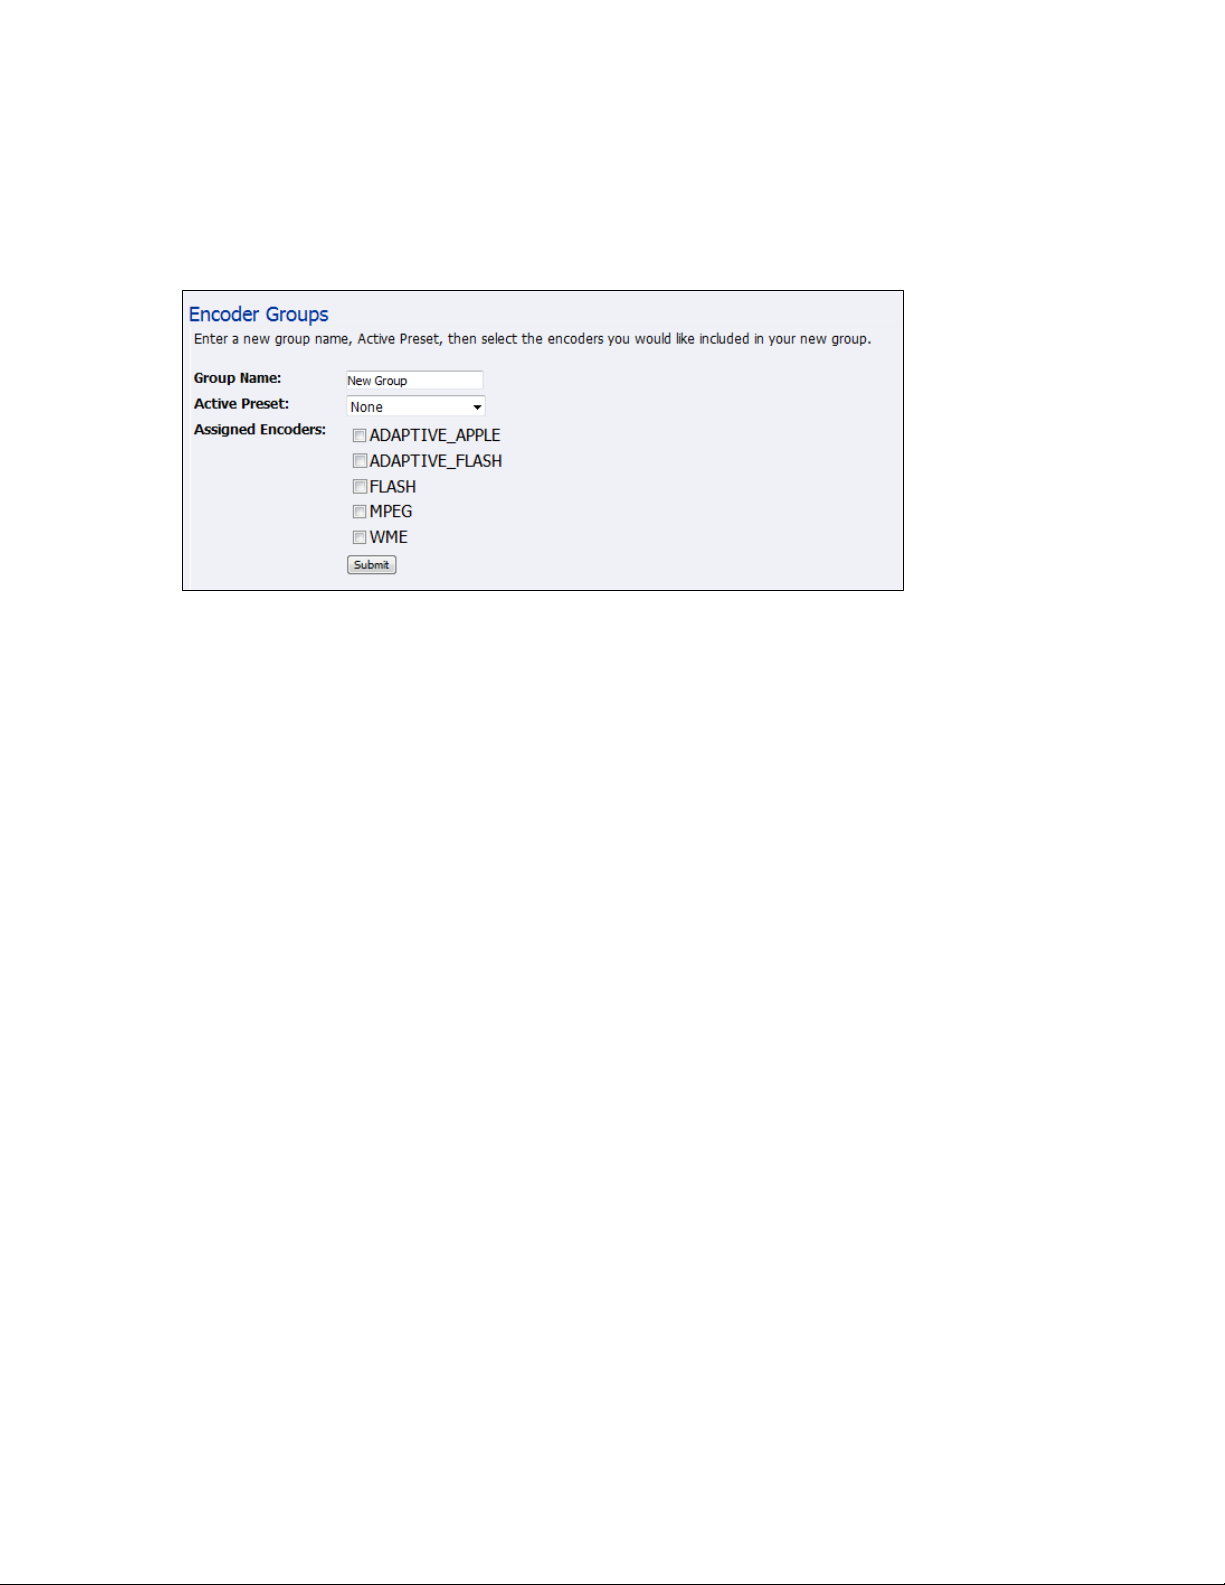
Niagara 4100 User Guide
1.
Enter the name of the group.
2.
Click on the preset button you want to assign to this encoder group.
3.
Click on the encoders you want to assign to the group.
4.
Click Submit.
Editing encoder groups
Select the Edit link on the Encoder Groups window. The encoder groups field displays (Figure 99).
Figure 99. Encoder Groups Window
To edit encoder groups:
ViewCast 87
Page 94
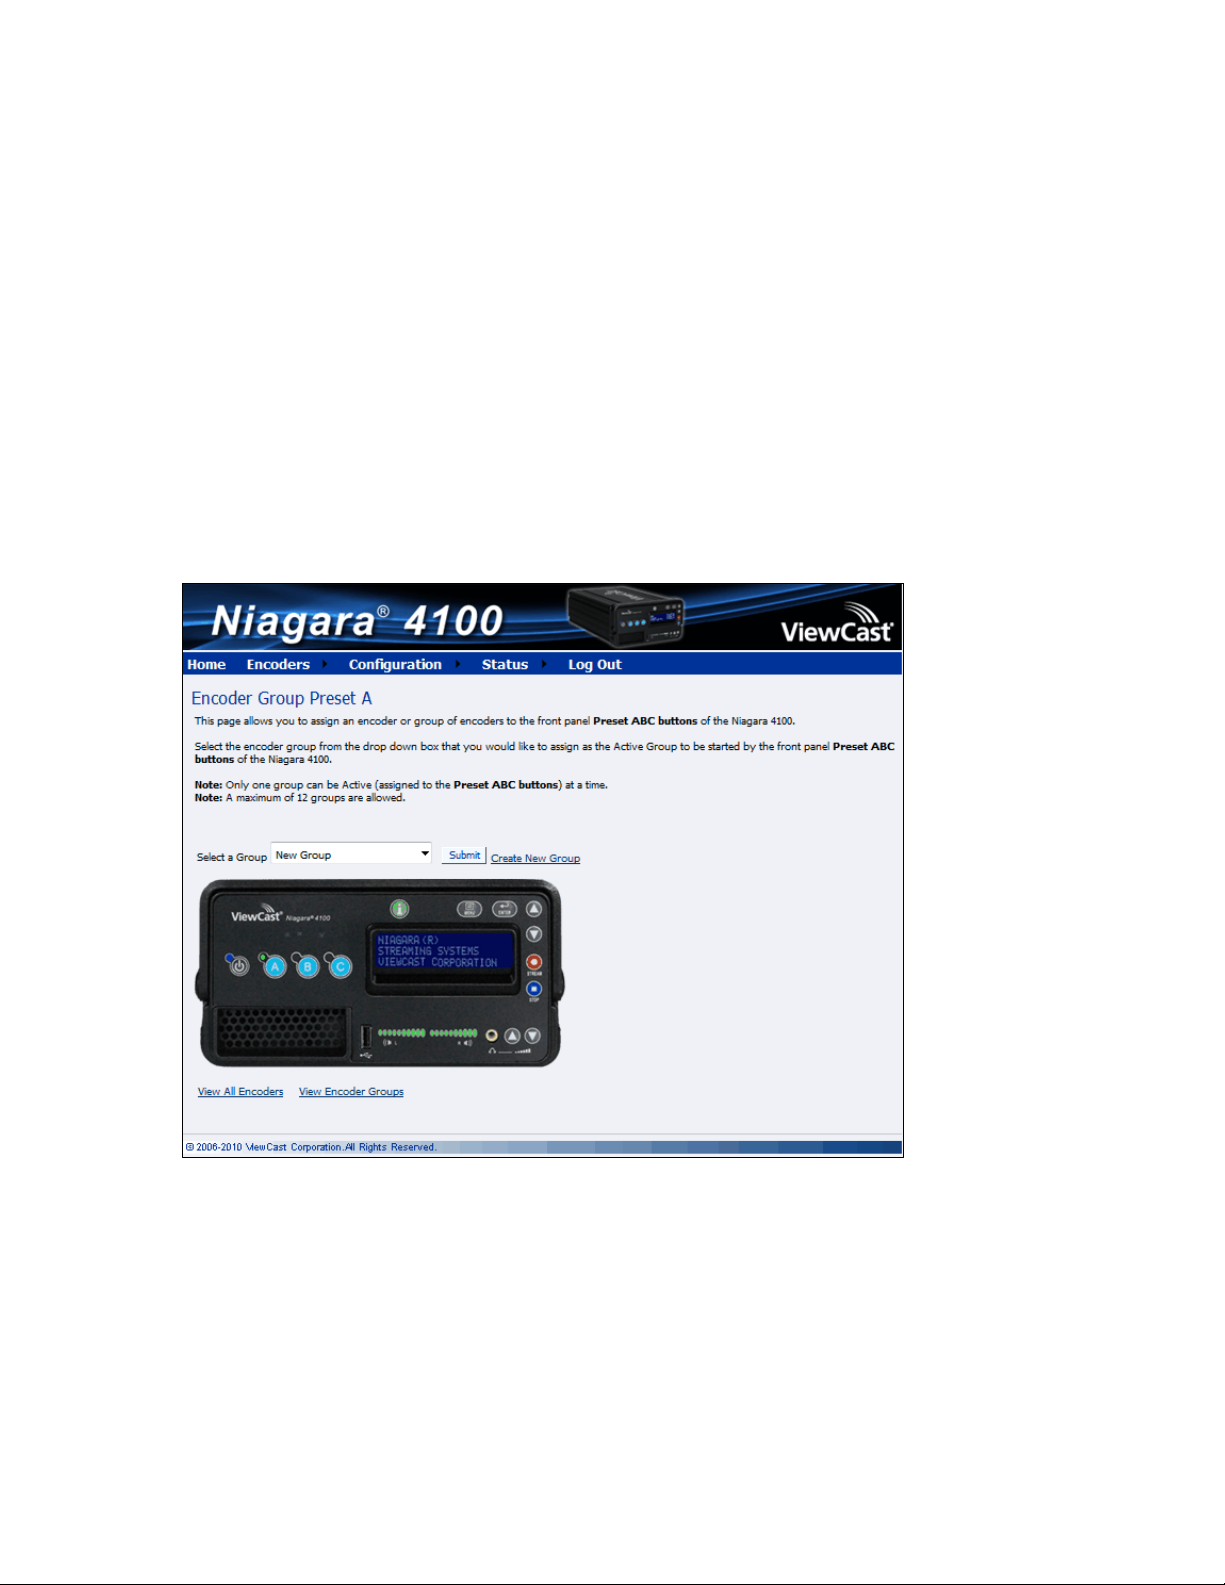
Advanced Operations
Configuring the Preset ABC buttons
The Niagara 4100 streaming media appliance provides one-button streaming via the Preset ABC buttons
located on the front panel of the system. By default, these buttons are not assigned. Use the web
interface to configure or preset each button to a specific group of encoders. (A preset is a quick way to
select and stream a group of encoder profiles.) Before you can configure the Preset ABC buttons, you
need to configure groups. The controls to configure these buttons are on the Encoder Preset A, Encoder
Preset B, and Encoder Preset C windows. Each window shows a graphic representation of the front
panel of the Niagara 4100.
An Edit Encoder link appears next to the View All Encoders link at the bottom of the window if an
encoder is assigned to this button.
To begin configuring the Preset ABC buttons, on the home page click Encoders Preset A. The Encoder
Preset A window appears.
Figure 100. Encoder Preset A window
88 ViewCast
Page 95
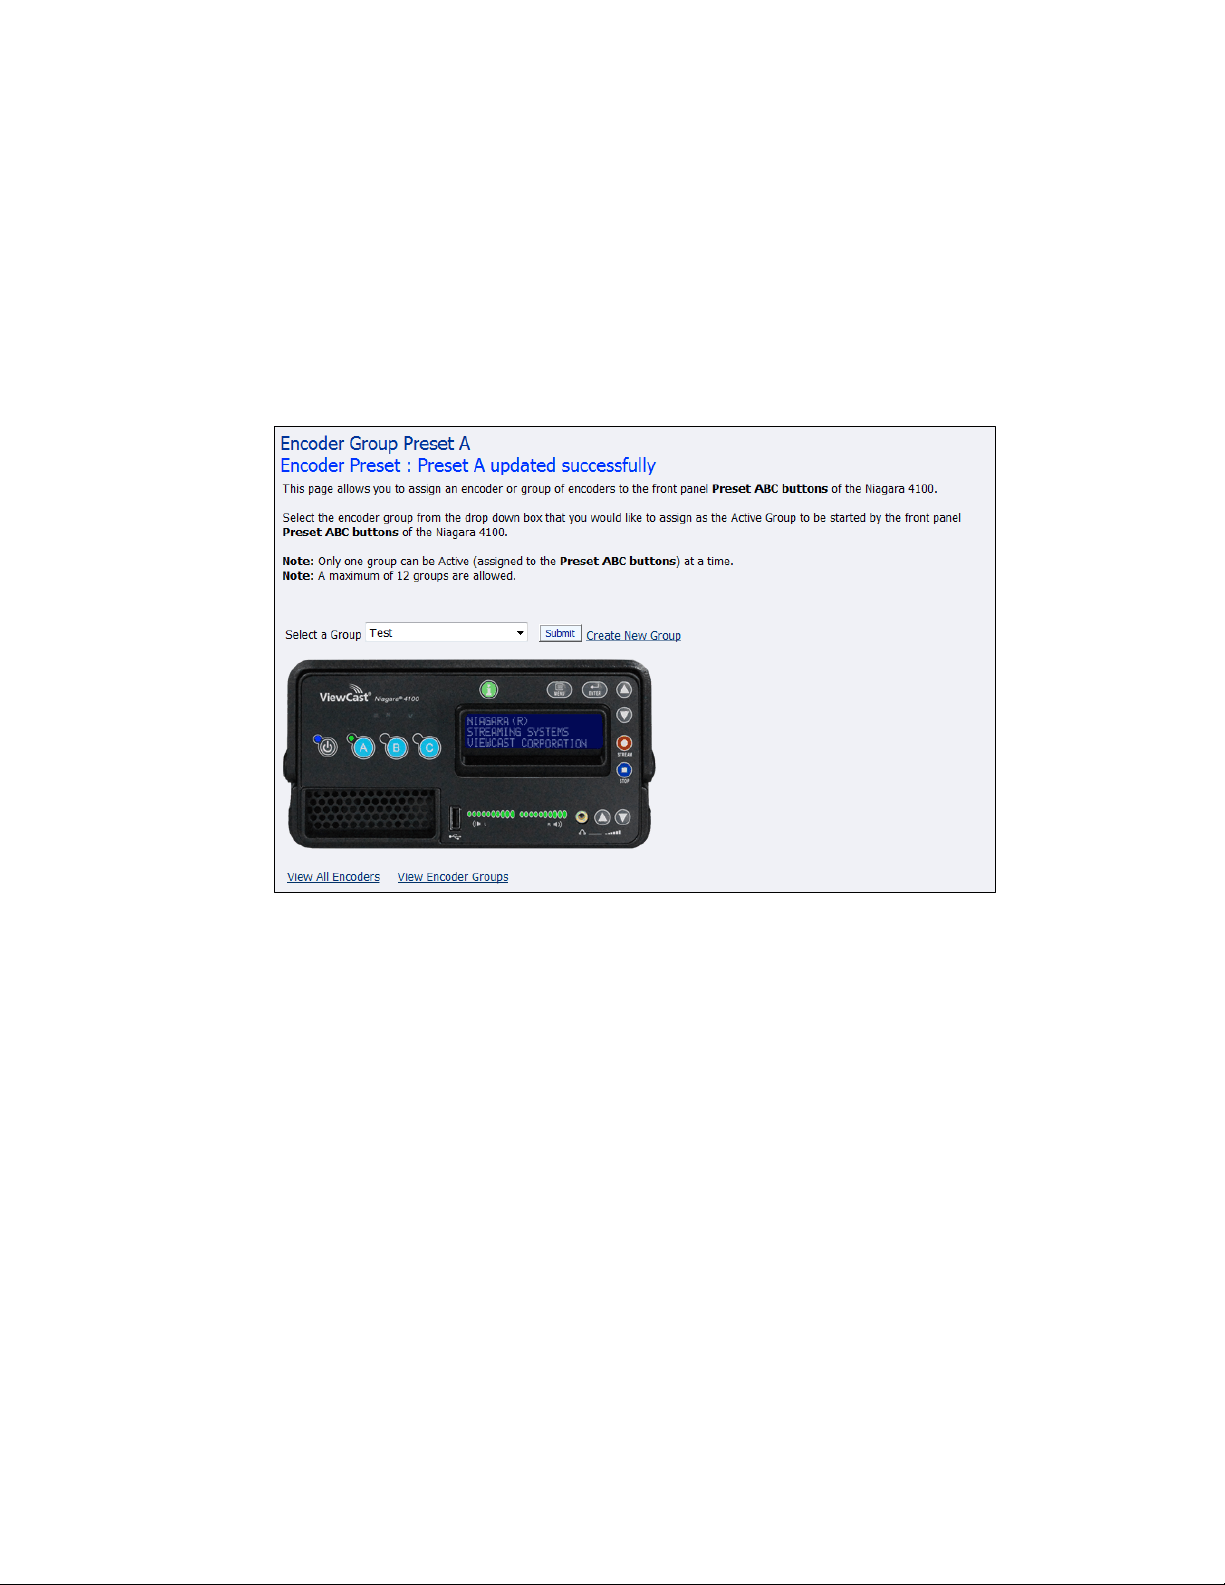
To assign Preset A button:
1.
Click the drop-down list in the Select a Group field. A complete list of all groups available on
the Niagara 4100 appears.
2.
Select a group.
3.
Click Submit.
The Encoder Preset A window updates with the encoder information (Figure 101).
Figure 101. Select Encoder
Note: The A button in the graphic is highlighted to show an encoder is assigned to this button.
4.
Repeat steps one through three to set an encoder for the B and C buttons.
Niagara 4100 User Guide
ViewCast 89
Page 96
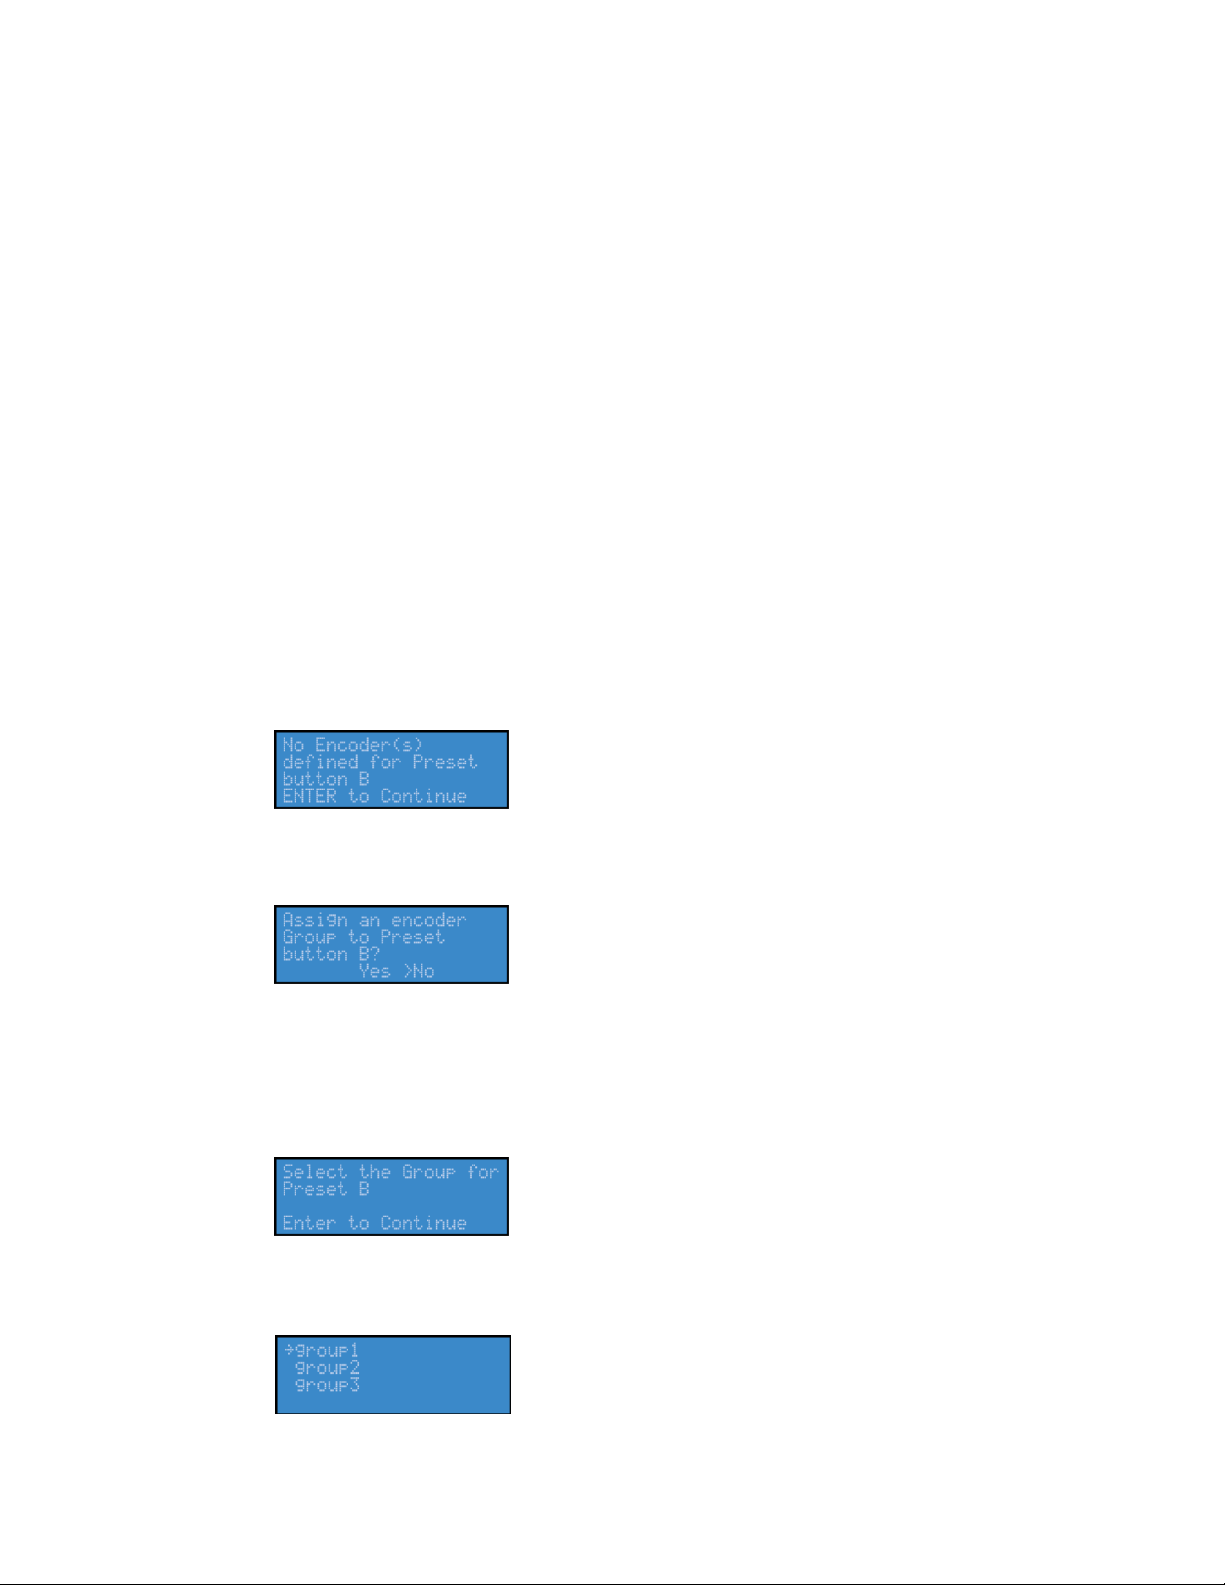
Advanced Operations
1.
Press the A, B, or C button on the front panel.
2.
Press Stream to start encoding. The indicator light next to the preset button displays to
indicate a positive video stream and the audio meters display to indicate positive audio
tracking.
WARNING! Limitations exist for the number of streams you can encode simultaneously. If
you attempt to encode more streams than the Niagara 4100 can process
simultaneously, the streams drop frames and the video stutters. This results in a poor
viewer experience. If you fail to reduce the number of sessions to reduce CPU load,
unexpected system behavior could occur.
3.
If you press a Preset button and no encoder groups are assigned to this button, the no
encoders screen appears (Figure 102).
Figure 102. No encoders screen
Press Enter. The assign an encoder screen appears (Figure 103).
Figure 103. Assign an encoders screen
Note: You must define encoder groups before you can assign them to a Preset button.
4.
Use the Up and Down arrows to select Yes.
5.
Press Enter. The select group screen appears (Figure 104).
Figure 104. Select group screen
6.
Press Enter. A screen with the list of available groups appears (Figure 105).
Figure 105. Group screen
Using Preset ABC buttons to start an encoder
group
Use the Preset ABC buttons on the front panel to start the assigned encoder group.
To use preset buttons to start encoding:
90 ViewCast
Page 97
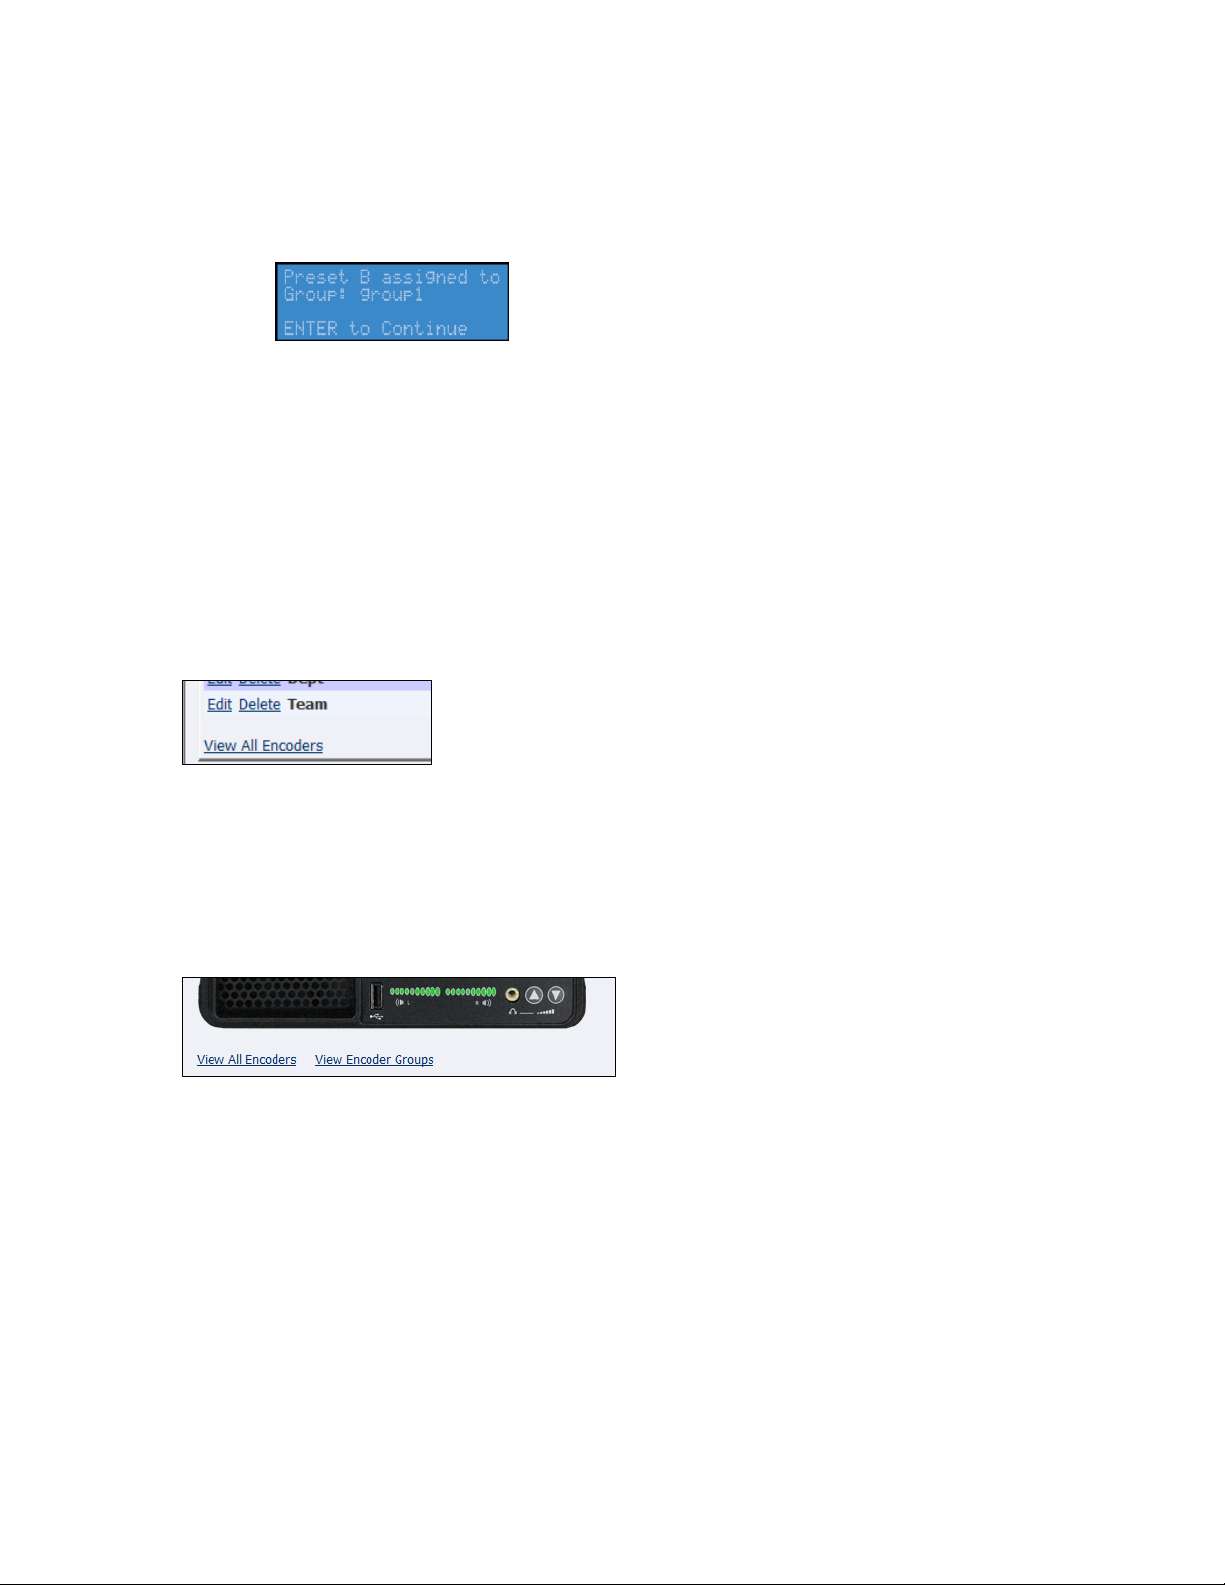
Niagara 4100 User Guide
7.
Use the Up and Down arrows to select the appropriate group.
8.
Press Enter. A confirmation screen appears (Figure 106).
Figure 106. Confirmation screen
9.
Press Enter. A group is now assigned to the Preset button.
Viewing all encoders
After assigning encoders to the A, B, and C buttons, the system updates the Preset column on the
Encoder Groups window to reflect these changes. To view these changes, select the View All Encoders
link at the bottom of the Encoder Groups window (Figure 107).
Figure 107. View All Encoders
Editing preset encoders
After assigning encoders to the A, B, and C buttons, you can access the Encoder Properties window by
clicking on the View All Encoders link at the bottom of the Preset window (Figure 108).
Figure 108. Editing Preset Encoders
ViewCast 91
Page 98
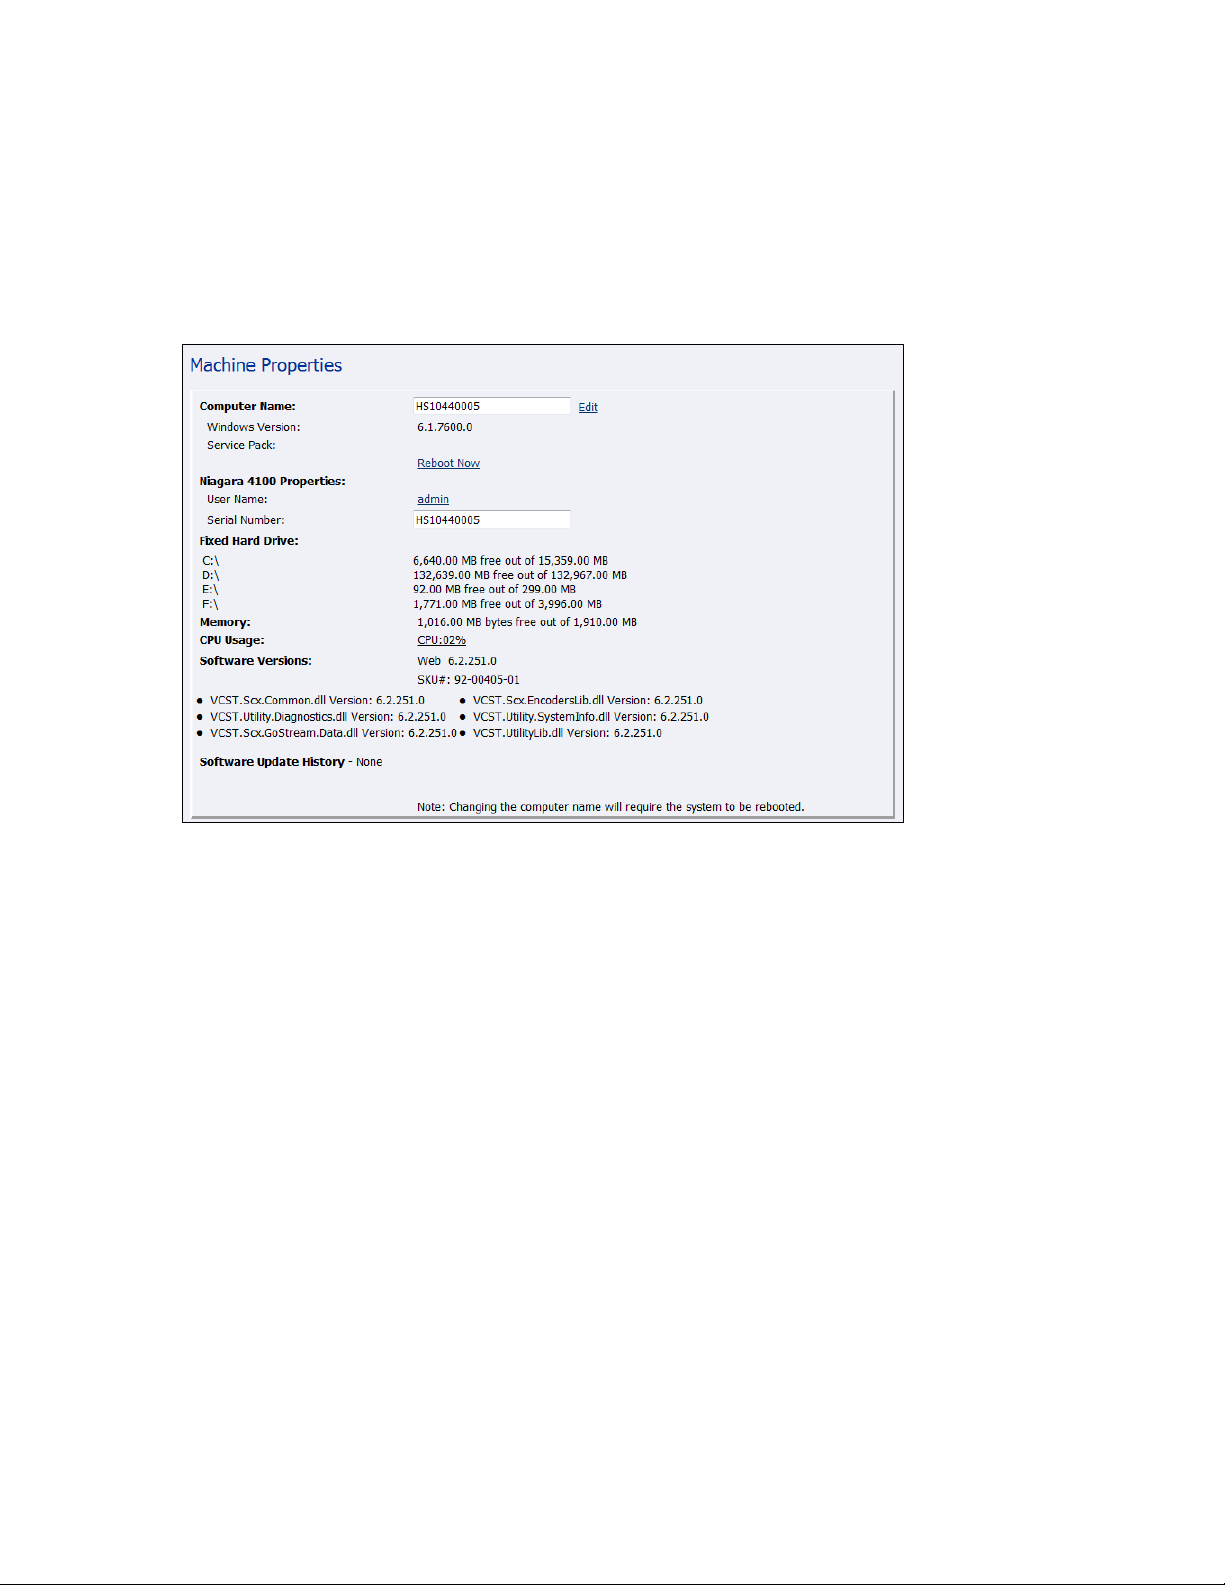
Advanced Operations
Configuring machine properties
The Niagara 4100 Machine Properties window (Figure 109) provides details on software versions,
network name, serial number, and hard drive configurations. Click Configuration Surf Properties from
the menu bar on the home page.
Figure 109. Machine Properties window
Most of the data on this window provides information only and users cannot alter it. However, you can
modify two fields:
Computer Name
Admin password
92 ViewCast
Page 99
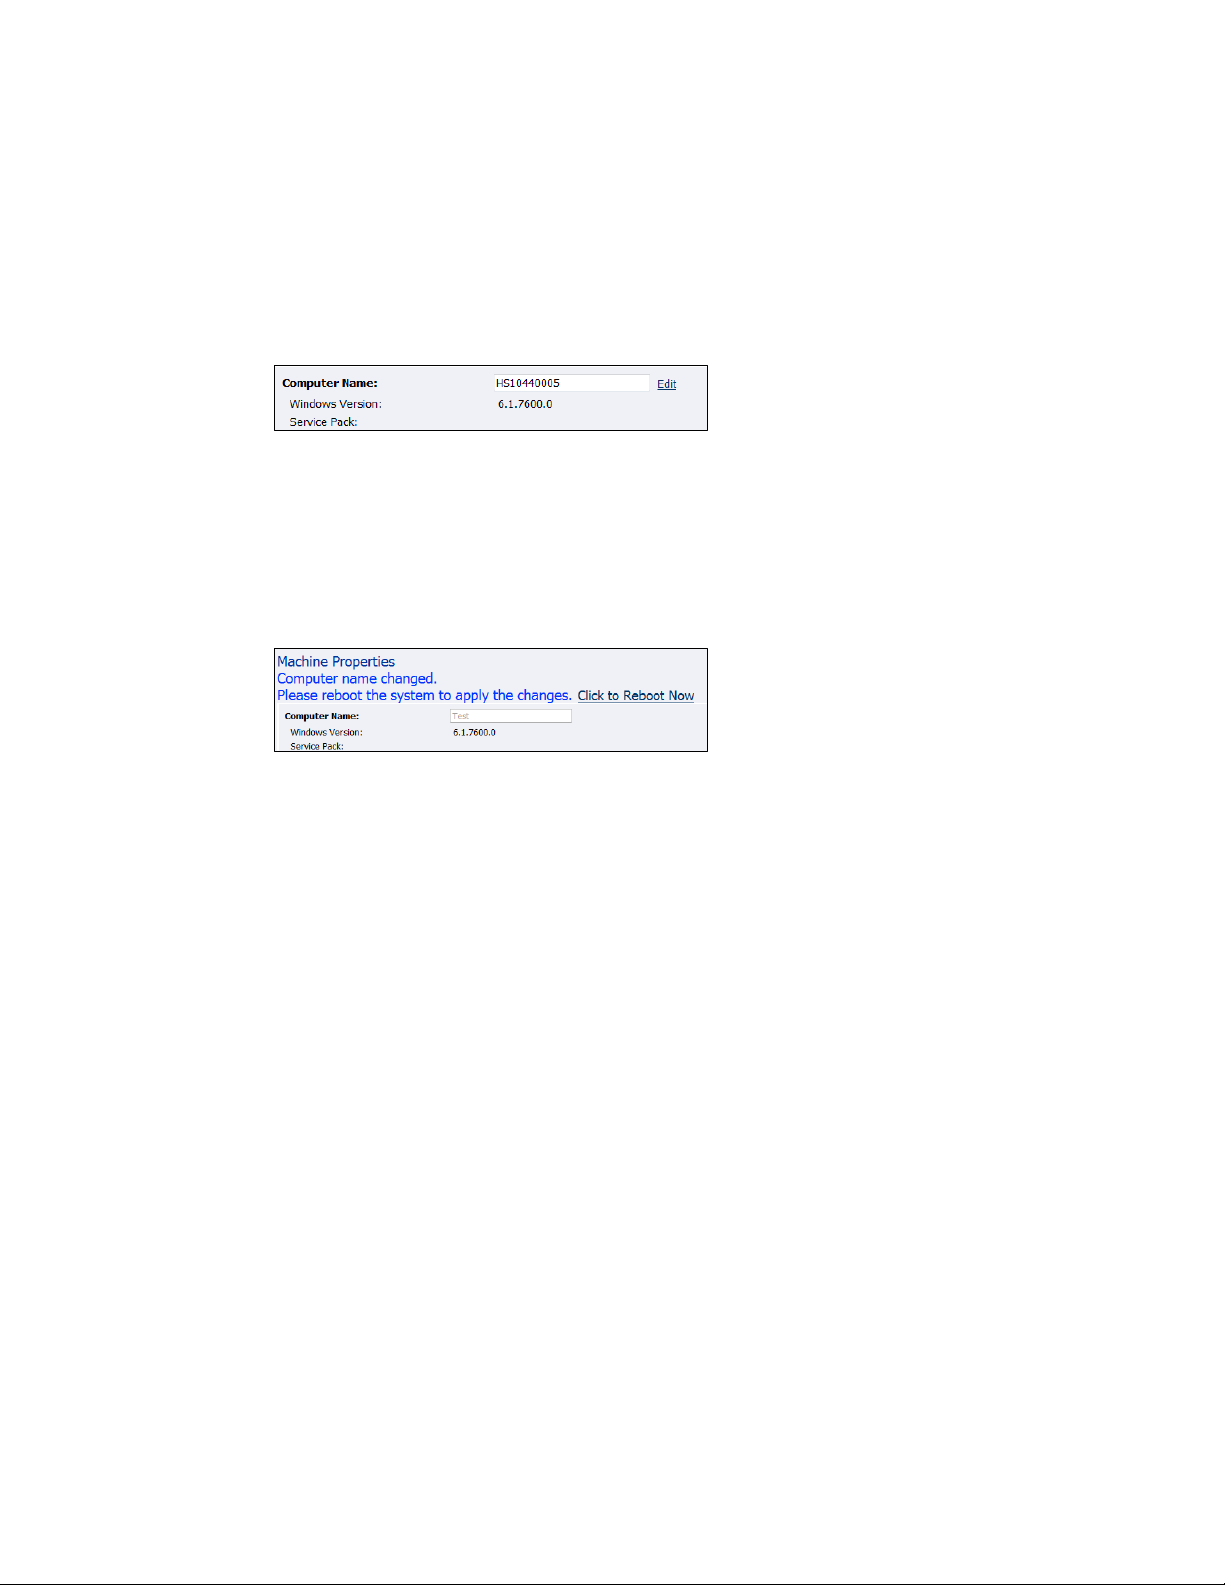
Niagara 4100 User Guide
1.
Click the Edit link next to the Computer Name field (Figure 110).
Figure 110. Computer Name field
2.
The screen refreshes and the Computer Name field becomes an editable text field. Type
in a new name for the Niagara 4100.
3.
Click Submit at the bottom of the page. The page refreshes, and the system prompts you
to reboot the Niagara 4100. Your changes do not take effect until the system restarts
(Figure 111).
Figure 111. Reboot message
4.
Click the Click to Reboot Now link to restart the system and apply the Computer Name
change.
Note: The restart process takes several minutes to complete.
When the Niagara 4100 restarts, use the new system name in the IE browser URL to
return to the Login window.
If you close your web browser and later want to log into the web interface, you must
use the new computer name you created or the IP address of the appliance to access
the Niagara 4100.
Changing the computer name
The Computer Name field contains the current network name for the Niagara 4100. This name is the
same name you typed into the web browser to access the Niagara SCX web interface.
To change computer name:
ViewCast 93
Page 100
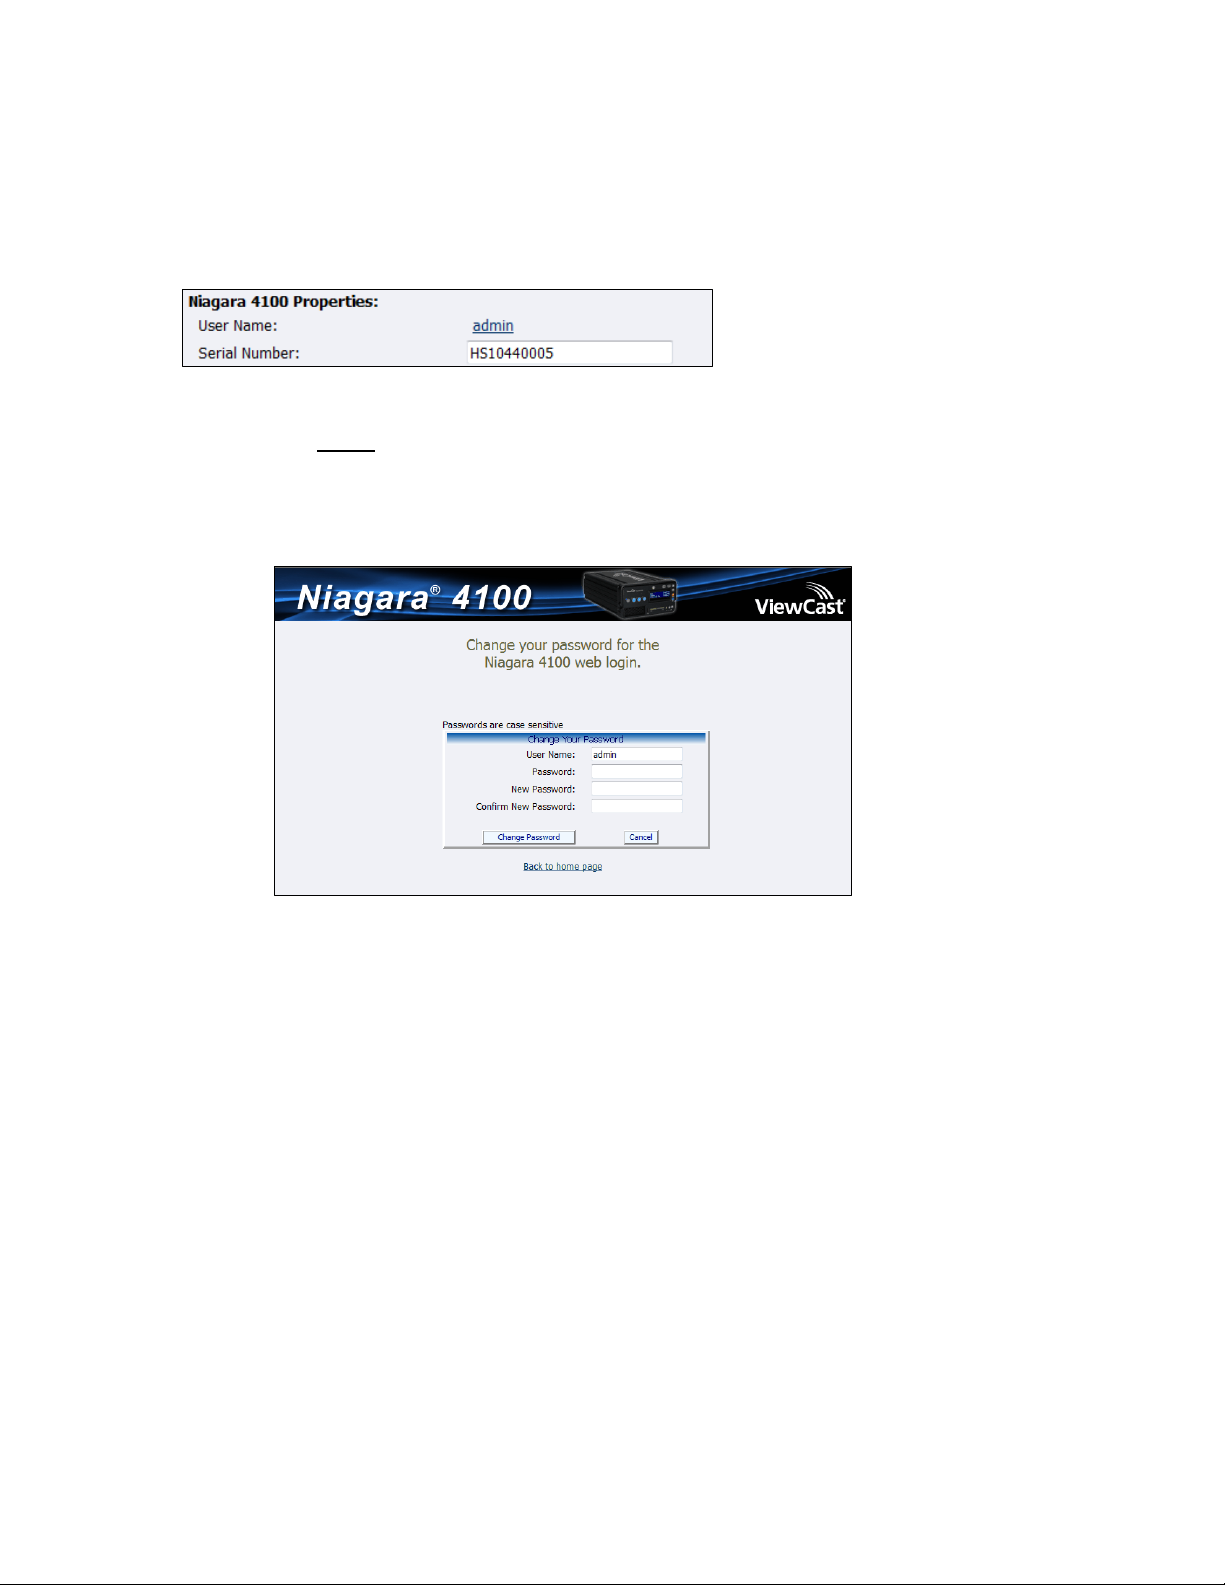
Advanced Operations
1.
Click the admin link in the User Name field.
Note: The system displays a new window (Figure 113) that allows you to change your login
password for the web interface.
Figure 113. Password Change window
Note: You cannot change the User Name for the web interface from this window.
2.
Type your current password in the Password field. Continue by typing your desired new
password in both the New Password and Confirm New Password fields. The web interface
password is case sensitive.
3.
Click the Change Password button. The system displays a confirmation page. You must log
back into the web interface with your password.
Changing the login password from the factory default
The Niagara 4100 Properties section has two fields: User Name and Serial Number. Only the User Name
field can be changed, which changes the User Password from the factory default (Figure 112).
Figure 112. Properties section
To change login password
Restoring the login password to the factory default
If you forget or lose your password, you can restore the default password by running the Restore SURF
Factory Defaults option. For more information, see Restore Niagara 4100 Factory Defaults in the System
Configuration section later in this chapter.
94 ViewCast
 Loading...