

Osprey 240e/450e User Guide
Osprey® 240e/450e User Guide
AVStream Driver Version 4.5
Document Number: 40-03239-04-A
Date: December 2010
ViewCast 1

© 2010 ViewCast Corporation. All rights reserved.
Osprey® and SimulStream® are registered trademarks of ViewCast Corporation Microsoft®, Windows®, Windows Server ®2003, AVStream®,
DirectShow®, Intel® CoreDuo®, and Windows Media® Encoder are trademarks or registered trademarks of Microsoft Corporation. Any other
product names, trademarks, trade names, service marks, or service names owned or registered by any other company and mentioned herein
are the property of their respective companies.
No part of this specification may be reproduced, transcribed, transmitted or stored in a retrieval system in any part or by any means without
the express written consent of ViewCast Corporation. ViewCast Corporation reserves the right to change any products herein at any time and
without notice. ViewCast Corporation makes no representations or warranties regarding the content of this document, and assumes no
responsibility for any errors contained herein.
UL Statement
Underwriters Laboratories Inc. has not tested the performance or reliability of the security or signaling aspects of this product. UL has only
tested for fire, shock and casualty hazards as outlined in UL’s standard for safety UL 60950-1. UL certification does not cover the performance
or reliability of the security or signaling aspects of this product. UL MAKES NO REPRESENTATIONS, WARRANTIES OR CERTIFICATIONS
WHATSOEVER REGARDING THE PERFORMANCE OR RELIABILITY OF ANY SECURITY OR SIGNALING RELATED FUNCTIONS OF THIS PRODUCT.
To maintain UL compliance, this product to be used only with UL Listed computers that include instructions for user installed accessories.
FCC Notice:
WARNING: Use shielded cables to connect this device to peripherals in order to maintain compliance with FCC radio emission limits.
WARNING: Modifications to this device not approved by ViewCast Corporation could void the authority granted to the user by the FCC to
operate the device.
The Osprey 240e video capture card has been tested and found to comply with the limits for a Class B digital device, pursuant to Part 15 of the
FCC Rules. These limits are designed to provide reasonable protection against harmful interference in a residential installation. This equipment
generates uses and can radiate radio frequency energy and, if not installed and used in accordance with the instructions, may cause harmful
interference to radio communications. However, there is no guarantee that interference will not occur in a particular installation. If this device
does cause harmful interference to radio or television reception the user is encouraged to try to correct the interference by one or more of the
following measures:
Reorient or relocate the receiving antenna.
Increase the separation between the equipment and receiver.
Connect the computer into an outlet on a circuit different from that to which the receiver is connected.
Consult the dealer or an experienced radio/TV technician for help.
If the above measures are unsuccessful, please consult the dealer or manufacturer of your radio or television receiver, or speak with an
experienced radio/TV technician.
Note: This reminder is provided to call to the CATV installer’s attention Section 820-40 of the NEC, which provides guidelines for proper
grounding and, in particular, specifies that the cable ground shall be connected to the grounding and, in particular, specifies that the cable
ground shall be connected to the grounding system of the building, as close to the point of cable entry as practical.
The Osprey 450e video capture card has been tested and found to comply with the limits for a Class A digital device, pursuant to Part 15 of the
FCC Rules. These limits are designed to provide reasonable protection against harmful interference when the equipment is operated in a
commercial environment. This equipment generates, uses, and can radiate radio frequency energy and, if not installed and used in accordance
with the instruction manual, may cause harmful interference to radio communications. Operation of this equipment in a residential area is
likely to cause harmful interference in which case users will be required to correct the interference at their own expense.
Shielded Cables: Connections between this device and peripherals must be made using shielded cables in order to maintain compliance with
FCC radio emission limits.
Modifications: Modifications to this device not approved by ViewCast Corporation could void the authority granted to the user by the FCC to
operate the device.
Note to CATV Installer: Section 820-40 of the NEC provides guidelines for proper grounding and, in particular, specifies the cable ground shall
be connected to the grounding system of the building, as close to the point of cable entry as practical.
Product Disposal Information
Dispose of this product in accordance with local and national disposal regulations (if any), including those governing the recovery and
recycling of waste electrical and electronic equipment (WEEE).
RoHS Compliant: ViewCast Corporation is committed to compliance with the European directive on the Restriction of the Use of Certain
Hazardous Substances in Electrical and Electronic Equipment, Directive 2002/95/EC, the RoHS directive.
For current RoHS statement, visit www.viewcast.com.
ViewCast Corporation 3701 W. Plano Parkway, Suite 300, Plano, TX 75075-7840 USA

Osprey 240e/450e User Guide
Contents
Overview ............................................................................................................................. 1
Warranties .......................................................................................................................... 1
System requirements .......................................................................................................... 2
Minimum system requirements ......................................................................................... 2
Installation Steps ............................................................................................................... 3
Installing the driver ............................................................................................................. 3
Custom installing AVStream ............................................................................................... 4
Installing the video capture card ........................................................................................ 4
Setting Driver Properties ................................................................................................... 7
OspreyConfig’s initial processing sequence ....................................................................... 8
Understanding the device properties window ................................................................. 11
Devices and global controls ........................................................................................ 13
Input tab ............................................................................................................................ 14
Osprey 450e AV option hardware add-on-device ...................................................... 16
Video standard group ................................................................................................. 17
Input Format group: analog inputs ............................................................................. 17
Video Proc Amp tab .......................................................................................................... 19
Video Decoder tab ............................................................................................................ 21
RefSize tab ......................................................................................................................... 23
Horizontal Format ....................................................................................................... 24
Horizontal Delay .......................................................................................................... 25
Source Width .............................................................................................................. 26
Reference Size for Crop and Logo Placement ............................................................. 27
525-Line (NTSC) Vertical Format ................................................................................. 27
Filters tab .......................................................................................................................... 29
SimulStream ................................................................................................................ 31
Deinterlace .................................................................................................................. 34
Currently Using group ................................................................................................. 35
Adaptive Deinterlace window ..................................................................................... 36
Device tab ......................................................................................................................... 38
No-Video Test Pattern ................................................................................................ 39
Buffers Requested ....................................................................................................... 39
ViewCast iii

Contents
Diagnostic logging ....................................................................................................... 40
Extras ........................................................................................................................... 40
Device Info .................................................................................................................. 42
Captions tab ...................................................................................................................... 43
Pin Select ..................................................................................................................... 44
Render NTSC Closed Captions On Video ..................................................................... 45
Render Logical White As ............................................................................................. 45
CC Pin .......................................................................................................................... 46
Logo tab ............................................................................................................................ 47
Pin Select ..................................................................................................................... 49
File and Color .............................................................................................................. 49
Enable Key Color ......................................................................................................... 50
Weighting .................................................................................................................... 51
Position and Size ......................................................................................................... 51
Size and Crop tab .............................................................................................................. 53
Pin Select ..................................................................................................................... 54
Reference Size ............................................................................................................. 54
Granularity .................................................................................................................. 55
Enable Cropping .......................................................................................................... 56
Default Output Size ..................................................................................................... 58
AVStream driver reference information ...........................................................................59
Post-Processing mode ....................................................................................................... 61
Efficient Video Rendering ................................................................................................. 63
Preview Pin to Video Renderer ................................................................................... 63
Preview Pin to Overlay Mixer to Video Renderer ....................................................... 63
Preview Pin to VMR7 .................................................................................................. 64
Preview Pin to VMR9 .................................................................................................. 65
Some Data Points ........................................................................................................ 65
Video standards and sizes ................................................................................................. 67
Color formats .............................................................................................................. 67
YUV format details ...................................................................................................... 68
Closed captioning (CC) ................................................................................................ 69
Captioning via CC or VBI pins ...................................................................................... 69
Direct CC rendering on video ...................................................................................... 70
CC streaming interface ................................................................................................ 71
Vertical Interval Timecode (VITC) ............................................................................... 71
Vertical Blanking Interval (VBI) capture ...................................................................... 72
The audio driver ................................ ................................................................ ................73
Selecting the audio source and input volume .................................................................. 73
iv ViewCast

Osprey 240e/450e User Guide
Audio properties page ...................................................................................................... 75
Audio formats ............................................................................................................. 76
Audio playback ............................................................................................................ 76
Audio configuration .................................................................................................... 76
Mono Source Mode .................................................................................................... 76
Audio level .................................................................................................................. 76
Appendix A: Osprey hardware specifications .................................................................79
Osprey 240e ...................................................................................................................... 79
Environmental specifications ...................................................................................... 79
Osprey 450e ...................................................................................................................... 81
Appendix B: Osprey 450e audio cable .............................................................................83
Appendix C: Troubleshooting ..........................................................................................85
Color bars on video screen ............................................................................................... 85
Scrambled video image ..................................................................................................... 85
Poor video quality at large frame sizes ............................................................................. 86
Multiple horizontal lines across video image ................................................................... 86
Cannot play back recorded audio ..................................................................................... 86
Audio recording control comes up with wrong device and wrong inputs ....................... 87
Index ..................................................................................................................................89
ViewCast v


Osprey 240e/450e User Guide
Limited Warranty
ViewCast warrants its hardware products against
defects in material and workmanship under normal use
for the period of one year (12 months) from date of
sale. Where specific warranties exist that provide more
substantial coverage, notwithstanding the warranty
provisions herein, such product warranties control and
preempt or supersede the warranty provisions herein.
Reseller Pass Through of
Standard Limited Warranties.
Resellers pass the ViewCast standard limited warranties
for the products through to the customer without
modification. Any modification of a product voids the
ViewCast warranties or any other existing or available
warranty.
Overview
Thank you for purchasing the ViewCast Osprey 240e/450e video capture card. This user guide
provides step-by-step instructions for installing and using your new video capture card. For the
latest ViewCast product information and news, visit our website at www.viewcast.com.
Warranties
For complete warranty details, refer to the specific warranty included with each product. General
warranty information includes the following:
ViewCast 1

Overview
System requirements
The following system requirements relate to your Osprey® video capture card only. The video
capture or encoding applications you use will likely require a much more powerful system than that
which is listed below. Please consult your software documentation for applicable system
requirements.
Minimum system requirements
Direct Mode: 2 GHz Intel® Pentium® 4 processor or equivalent
PostProcessing Mode and SimulStream®: 2 GHz Intel® Pentium® 4 processor or equivalent, 3
GHz recommended
Microsoft® Windows® Professional or Home Edition, Windows Server® 2003
Up to 7.5 MB of available hard disk space
256 MB of RAM, 512 MB recommended
One available PCI Express® slot
2 ViewCast

Osprey 240e/450e User Guide
Installation Steps
In all cases, use the setup.exe program on the product CD or in the web package if you downloaded it.
The setup program automates the Plug and Play steps needed to install the drivers and ensures they are
performed correctly. It also installs the bundled applets and User’s Guide. If you have multiple Osprey
capture cards in the system it configures all of the boards at the same time.
We recommend this method especially if Osprey software does reside on your host computer. After the
install is run, the software detects the card and its drivers initiate automatically.
If you are updating Osprey software, first uninstall the previous software version, reboot your computer,
and then install the update.
Installing the driver
Insert the Osprey Software CD into your CD-Rom drive. The main menu for the Osprey software appears
if you enable autoplay. If the main menu does not automatically appear, click on the Window’s
computer icon and select the CD-Rom and the setup.exe icon. The Osprey A/VStream – Install Shield
Wizard engages and guides you through the installation process.
ViewCast 3
Installation Steps
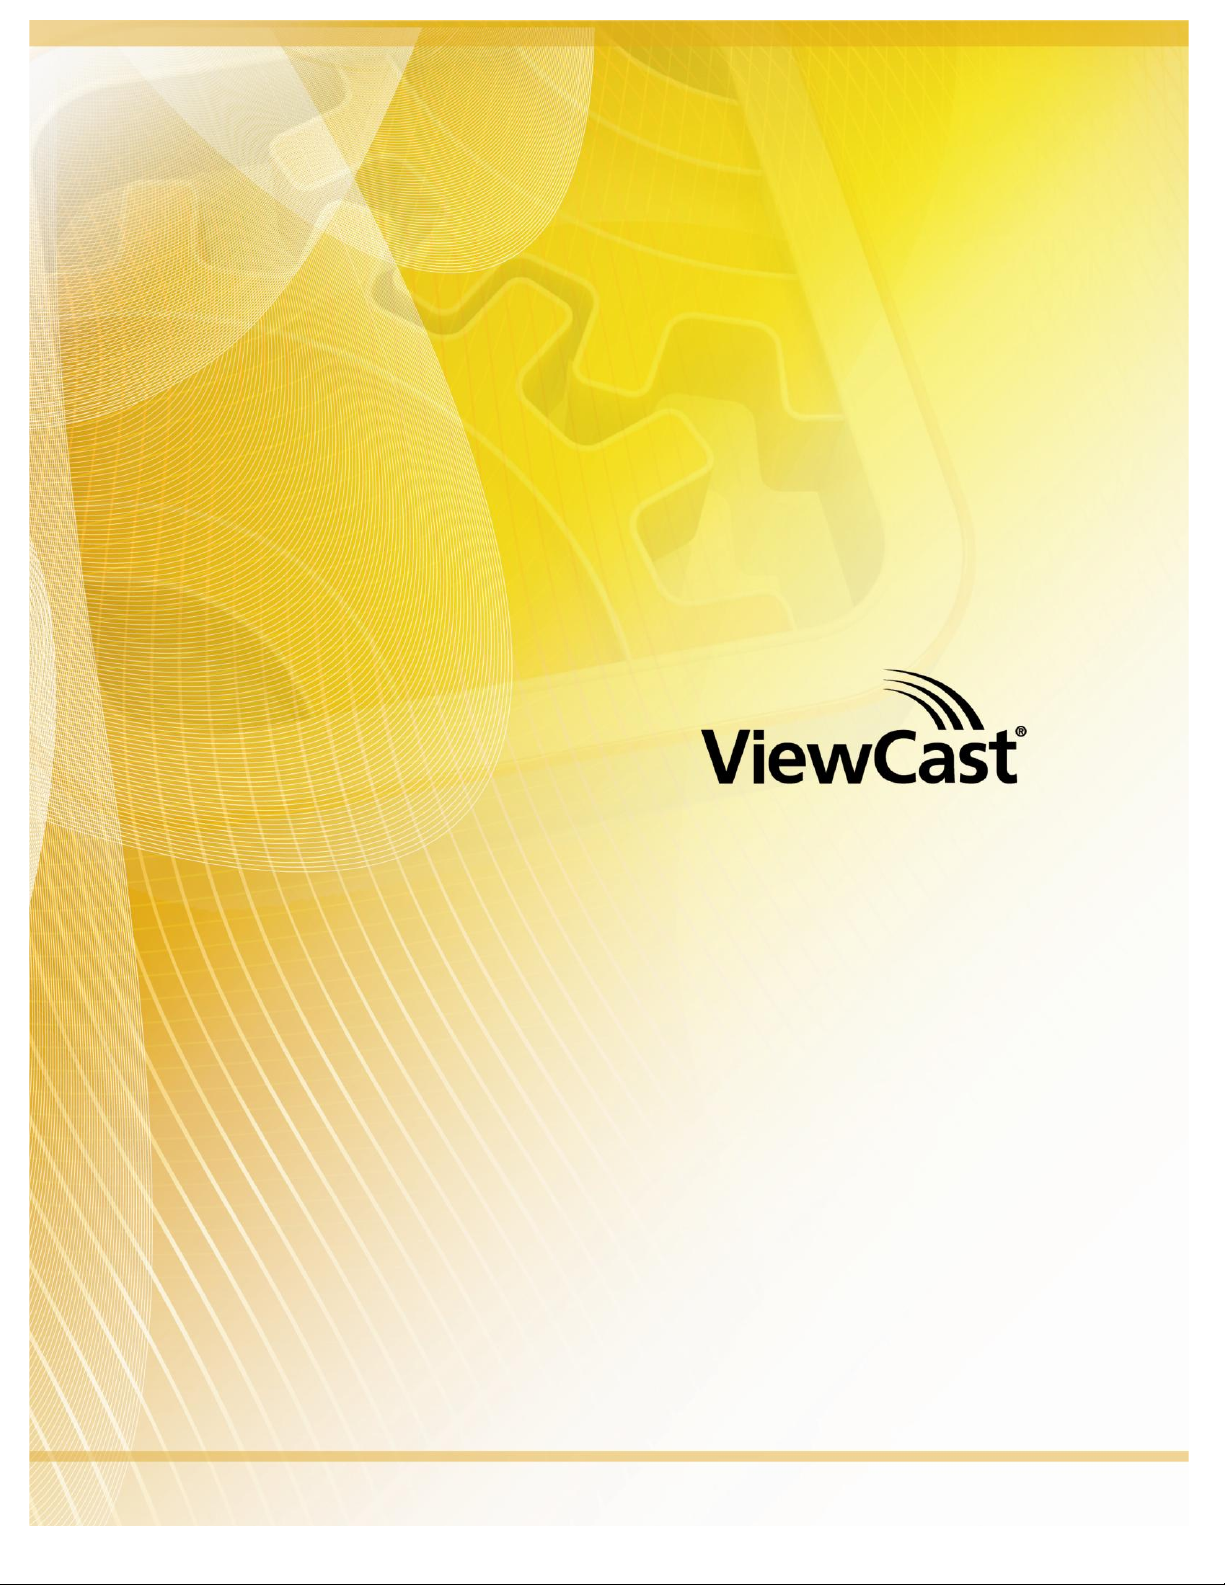
Custom installing AVStream
During the installation process, if you choose a Custom installation, your options are limited (Figure 1).
Figure 1. Osprey 240e Custom Setup screen
This window allows you to choose individual components you may want to install. You can also change
the location where components install.
Installing the video capture card
This manual covers one class of Osprey devices that include two PCI Express cards.
Class 6: o-240e, o-450e and related non-DSP PCI Express products
Both cards use the same driver. If you add a card from a different class then you need to install the
driver for that card.
When you add or move boards after the AVStream 4.5 driver is already installed, there are two
possibilities:
You add a board of a different class from what is already in the machine. For example, an
Osprey 240e is already in the machine with the current driver installed, and you want to add
an Osprey 530. For this case, you have to obtain and install the driver install package for the
new board.
You move a board from one slot to another, or if you add another board of the same type.
For example, you might have an Osprey 240e in the machine, and want to add another
Osprey 240e. In this case, the following sequence begins:
4 ViewCast
Osprey 240e/450e User Guide
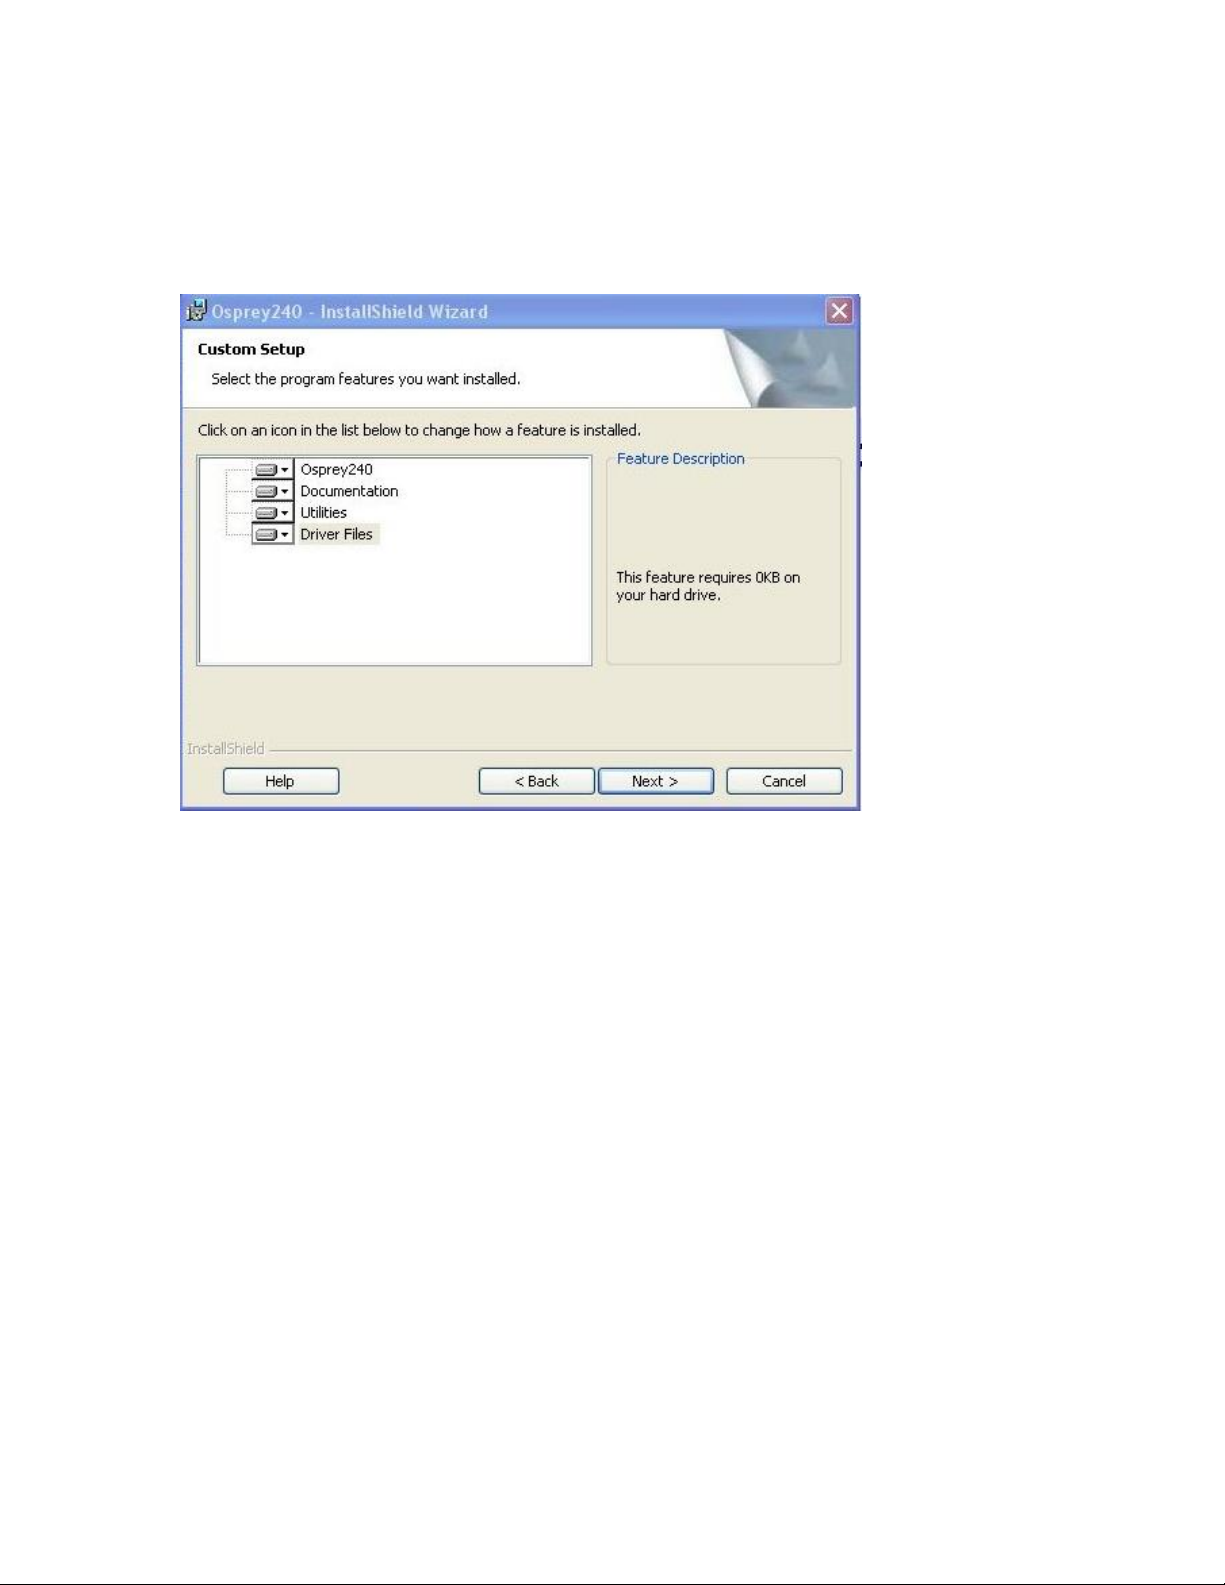
1.
Click Continue Anyway. We have tested our cards in thousands of PCs.
The Controller installing window displays, and the text inside this window changes to
Osprey Video Capture Device, Installing ... Then the Digital Signature Not Found window
appears on top of it.
2.
Click Continue Anyway. The Completing the Found New Hardware window displays.
3.
Click Finish. The Digital Signature Not Found window displays.
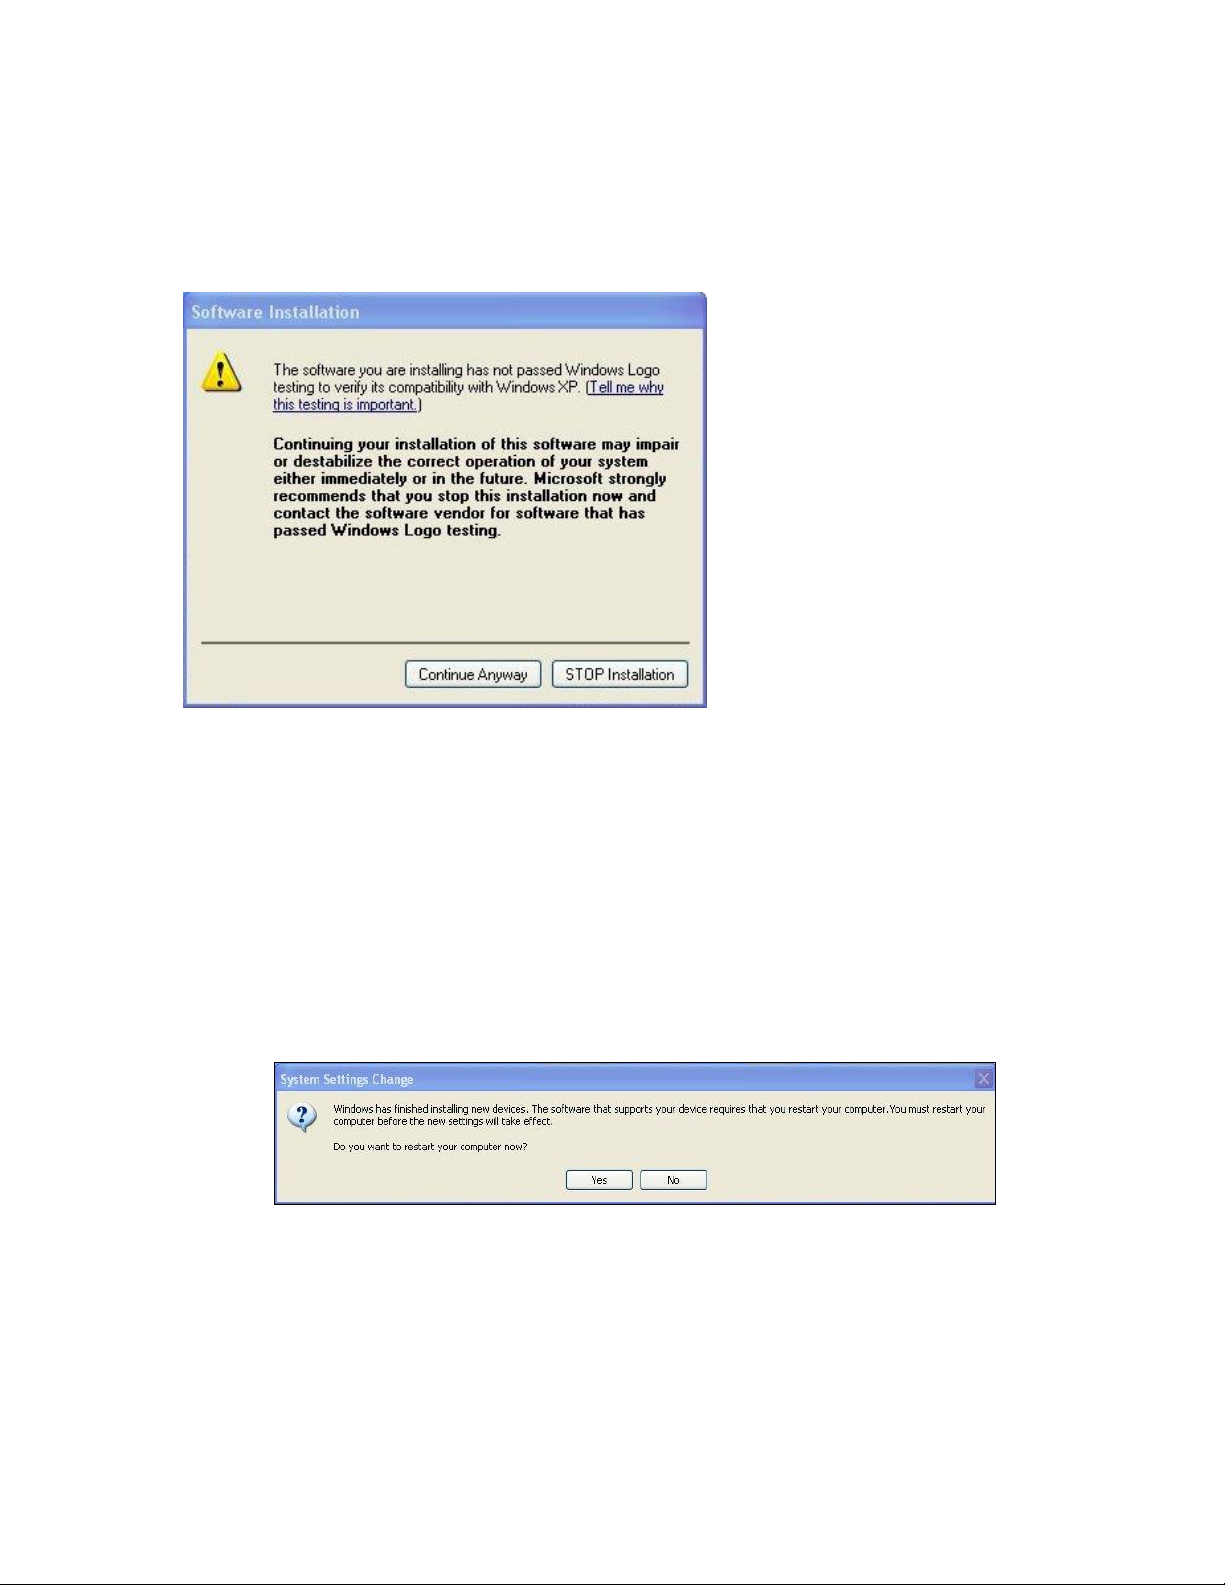
This window displays once for each Osprey board you are installing. The Systems Setting
Change window displays.
4.
Click Finish and click Yes to restart the system now (Figure 3).
Figure 3. System Settings Change Window
To install the video capture card:
The New Hardware Wizard runs and the Found New Hardware window appears followed by the Digital
Signature Not Found window (Figure 2)
Figure 2. Digital Signature Not Found Window
ViewCast 5

Osprey 240e/450e User Guide
Setting Driver Properties
After installing the Osprey card and AVStream driver, you need to access the card’s settings and possibly
modify them to fit your needs. This manual takes you step-by-step visually through the card settings.
Start by opening the Osprey Config utility. Afterwards, we can explore the driver.
You need to use a DirectShow application such as Microsoft Windows Media® Encoder or
RealProducer®. We also access card property pages through Osprey Config, the utility bundled with our
4.5 driver suite. Once installed you can see the card’s default settings and change them as needed.
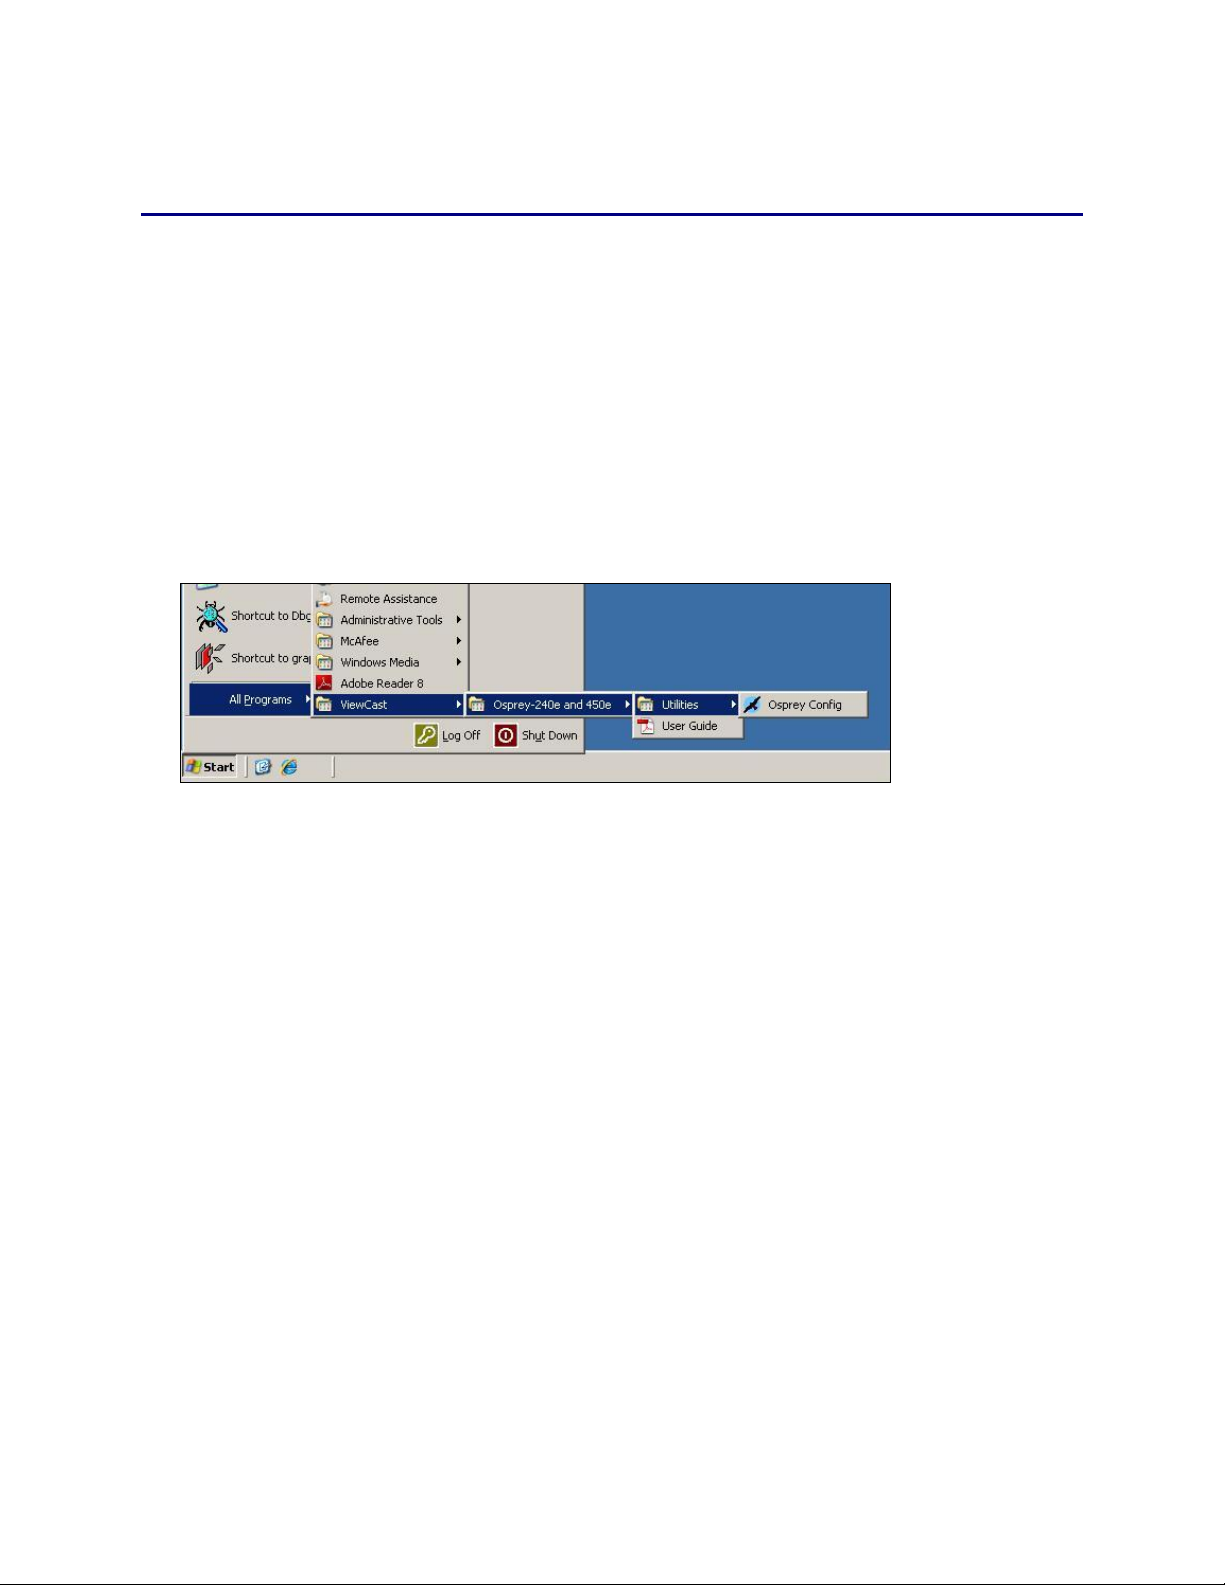
To open Osprey Config click All Programs in the Start menu of your Windows computer, then click the
ViewCast folder icon. Click Osprey 240e and 450e, then Utilities and the Osprey Config icon becomes
visible (Figure 4).
Figure 4. Accessing the OspreyConfig Utility
Note: Other DirectShow applications can find the property page too. If you use a third-party
application, you will find how to access the card’s settings in the third-party application’s
documentation.
ViewCast 7
Setting Driver Properties
OspreyConfig’s initial processing sequence
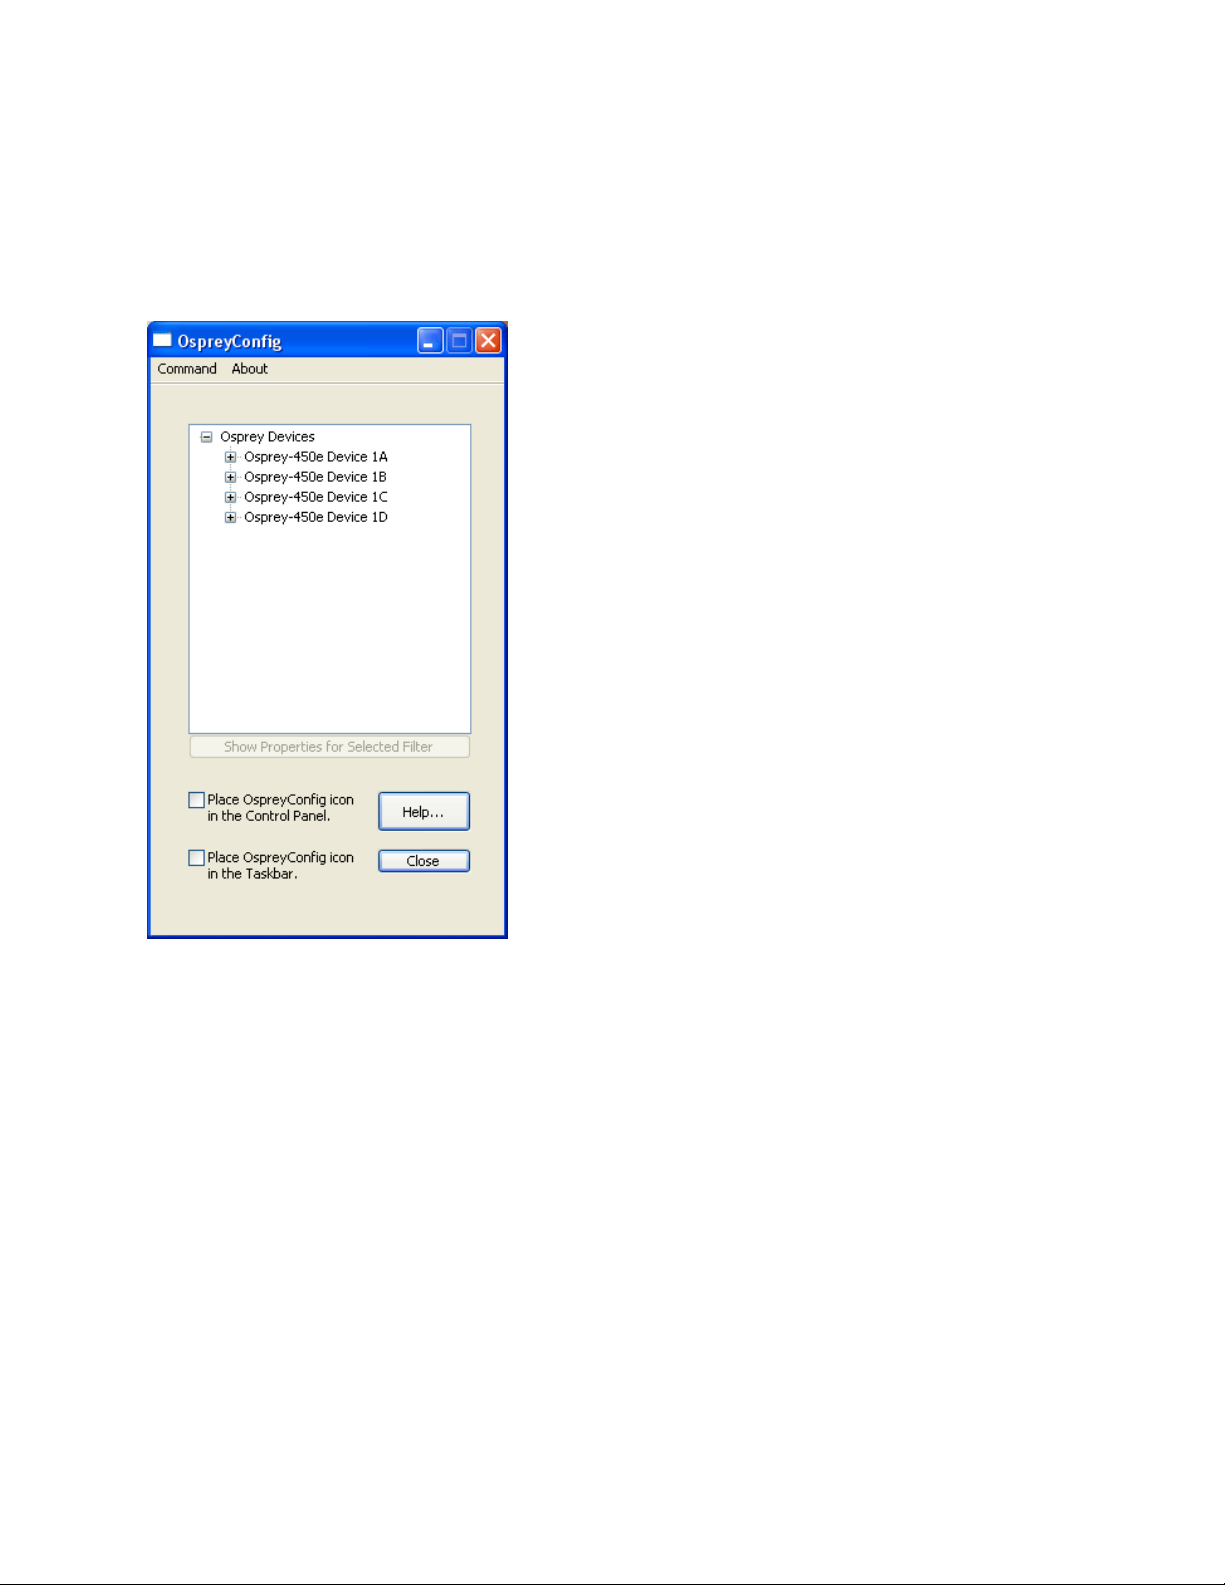
After clicking on the Osprey Config icon, the first screen of the application appears (Figure 5) showing
the cards and devices installed on your computer.
Figure 5. Initial OspreyConfig user interface
In this example, the computer in use has one card and four devices. The card can take a single input and
stream the content differently, for example, you can use several bit rates, sizes, and formats. Click the +
icon on the left side of the device you wish to configure, to change the properties of that device.
8 ViewCast
Osprey 240e/450e User Guide
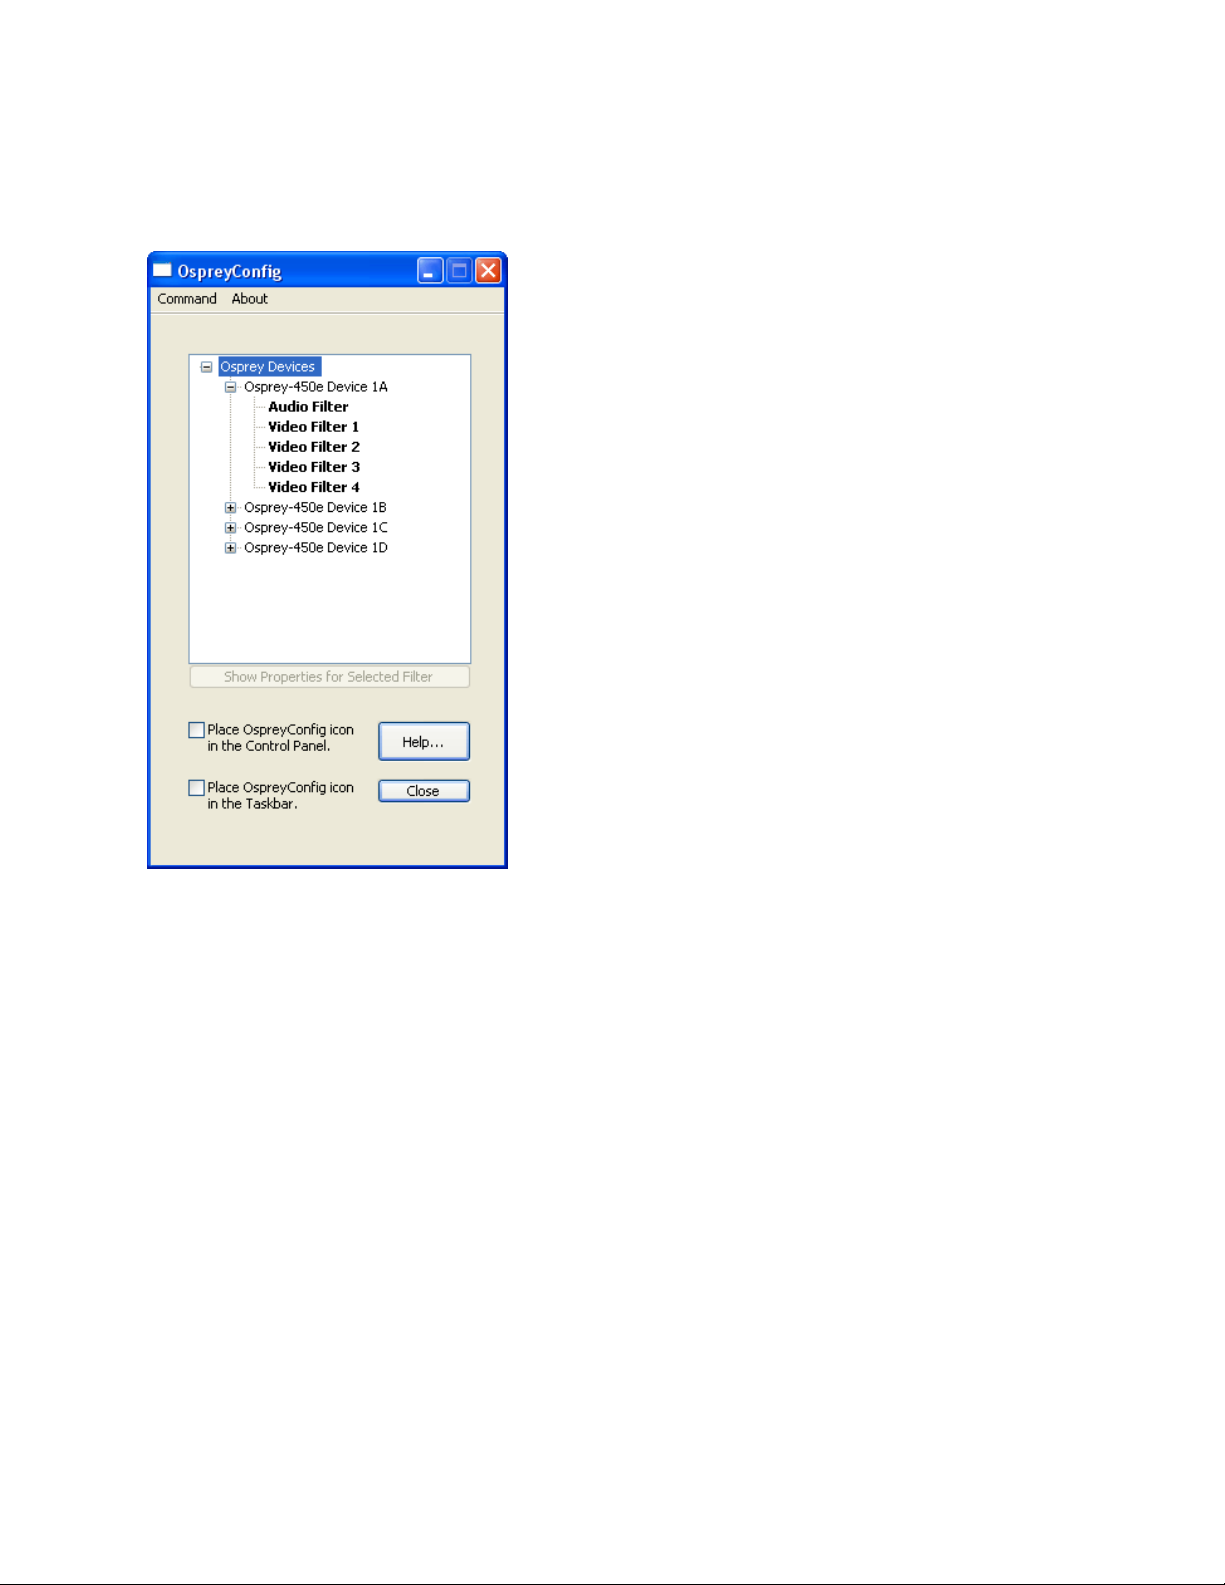
Figure 6 shows the user interface that appears when you select a filter. We expanded the Osprey 450e
Device 1A and selected Video Filter. We’ll continue with this device unless we indicate otherwise.
Figure 6. Selecting a device for configuration
ViewCast 9

Setting Driver Properties
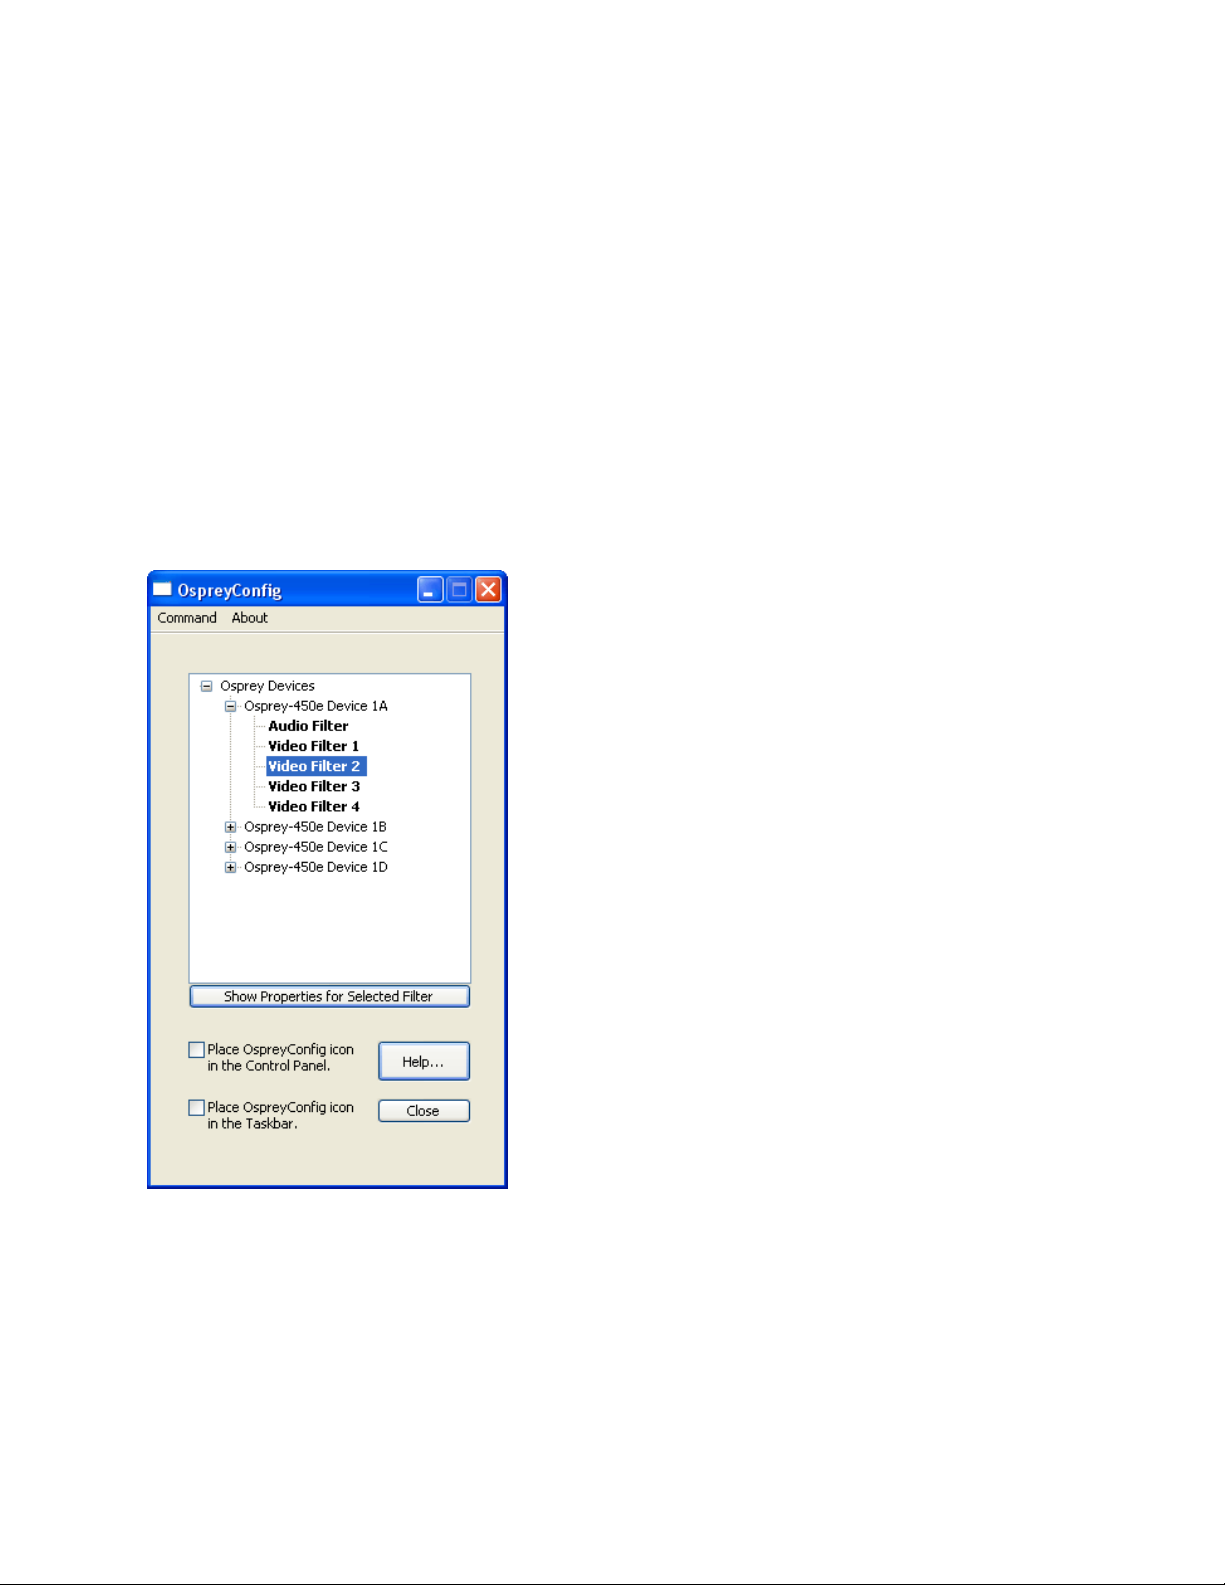
When you choose Device1A and Video Filter 1, the Show Properties for Selected Filter button becomes
active (Figure 7).
Figure 7. Control used to open the properties page
10 ViewCast
Osprey 240e/450e User Guide
Input
Select the video input, NTSC / PAL / SECAM video standard and
Input Format
Video Proc Amp
Set brightness, contrast, saturation, hue, and sharpness
Video Decoder
Select the video standard – NTSC, PAL, SECAM
RefSize
Setting Horizontal format and delay, source width and so forth
Filters
SimulStream®, deinterlace, and inverse telecine*
Device
Test Pattern, Capture Buffers, Diagnostic Logging
Understanding the device properties window
Osprey’s device properties window enables you to view and change the default settings of the 4.5
driver. Once you are familiar with the video card’s properties, you can make changes to get the
optimum performance from your card and change settings in real time.
Device properties are visible through tabs to select different controls (Figure 8). The 4.5 driver includes
changes from previous versions - the tabs have changed. They now take advantage of the 4.5 driver’s
advances and added functionality.
Figure 8. Osprey Video Device Properties window tabs
The Osprey 240e and Osprey 450e use the same driver. The same Video Device properties appear
whether you choose the Osprey 240e or the Osprey 450e. If you have other Osprey cards, they can still
coexist on your PC, but they use a separate version of the drivers provided with the card. You need the
driver version for Video Capture cards you use.
The Osprey 240e and 450e cards have the following tabs:
ViewCast 11

Setting Driver Properties
Captions
Set up on-video closed caption rendering
Logo
Set up on-video logos
Size and Crop
Set the default size, enable cropping, set the cropping rectangle
* Telecine refers to the technology used to transfer or repurpose analog film into electronic media.
Some of the 4.5 drivers’ controls work interactively and changes in value immediately update the video.
Examples include brightness, contrast, hue, saturation, and sharpness.
12 ViewCast
Osprey 240e/450e User Guide
Devices and global controls
The Osprey 240e and Osprey 450e video capture cards can present multiple output streams from a
single input device. For example, a company may wish to do a webcast globally to resellers, users, or
potential customers. Using the Filters Tab, you can set up different output streams with different bit
rates to accommodate users with different bandwidths.
Some changes may affect the filter, such as cropping, logos, and captions. For example, changes to the
Osprey 450e Device 1A, Filter 2 only affect that filter (Figure 9).
Change the values on Video Proc Amp, Video Decoder, Input, Filters, Device, and/or RefSize tabs and the
effect is global to the card. All characteristics on each device on the card change to those changed on a
single device. This is limited to the card on which the device changed. If you make changes on an Osprey
240e card residing with an Osprey 450e card, a change on the Osprey 240e does not affect the Osprey
450e devices.
Figure 9. OspreyConfig utility to access devices
DirectShow® discussions refer to pins and filters. These terms require technical experience with
Microsoft’s DirectX® 9 Software Developer’s Kit. References on tabs in the Osprey Driver relate to terms
used by Microsoft’s streaming video software application. They exist for users with a high degree of
technical expertise. You can simply ignore them and use the property tabs as discussed in this manual.
ViewCast 13
Setting Driver Properties
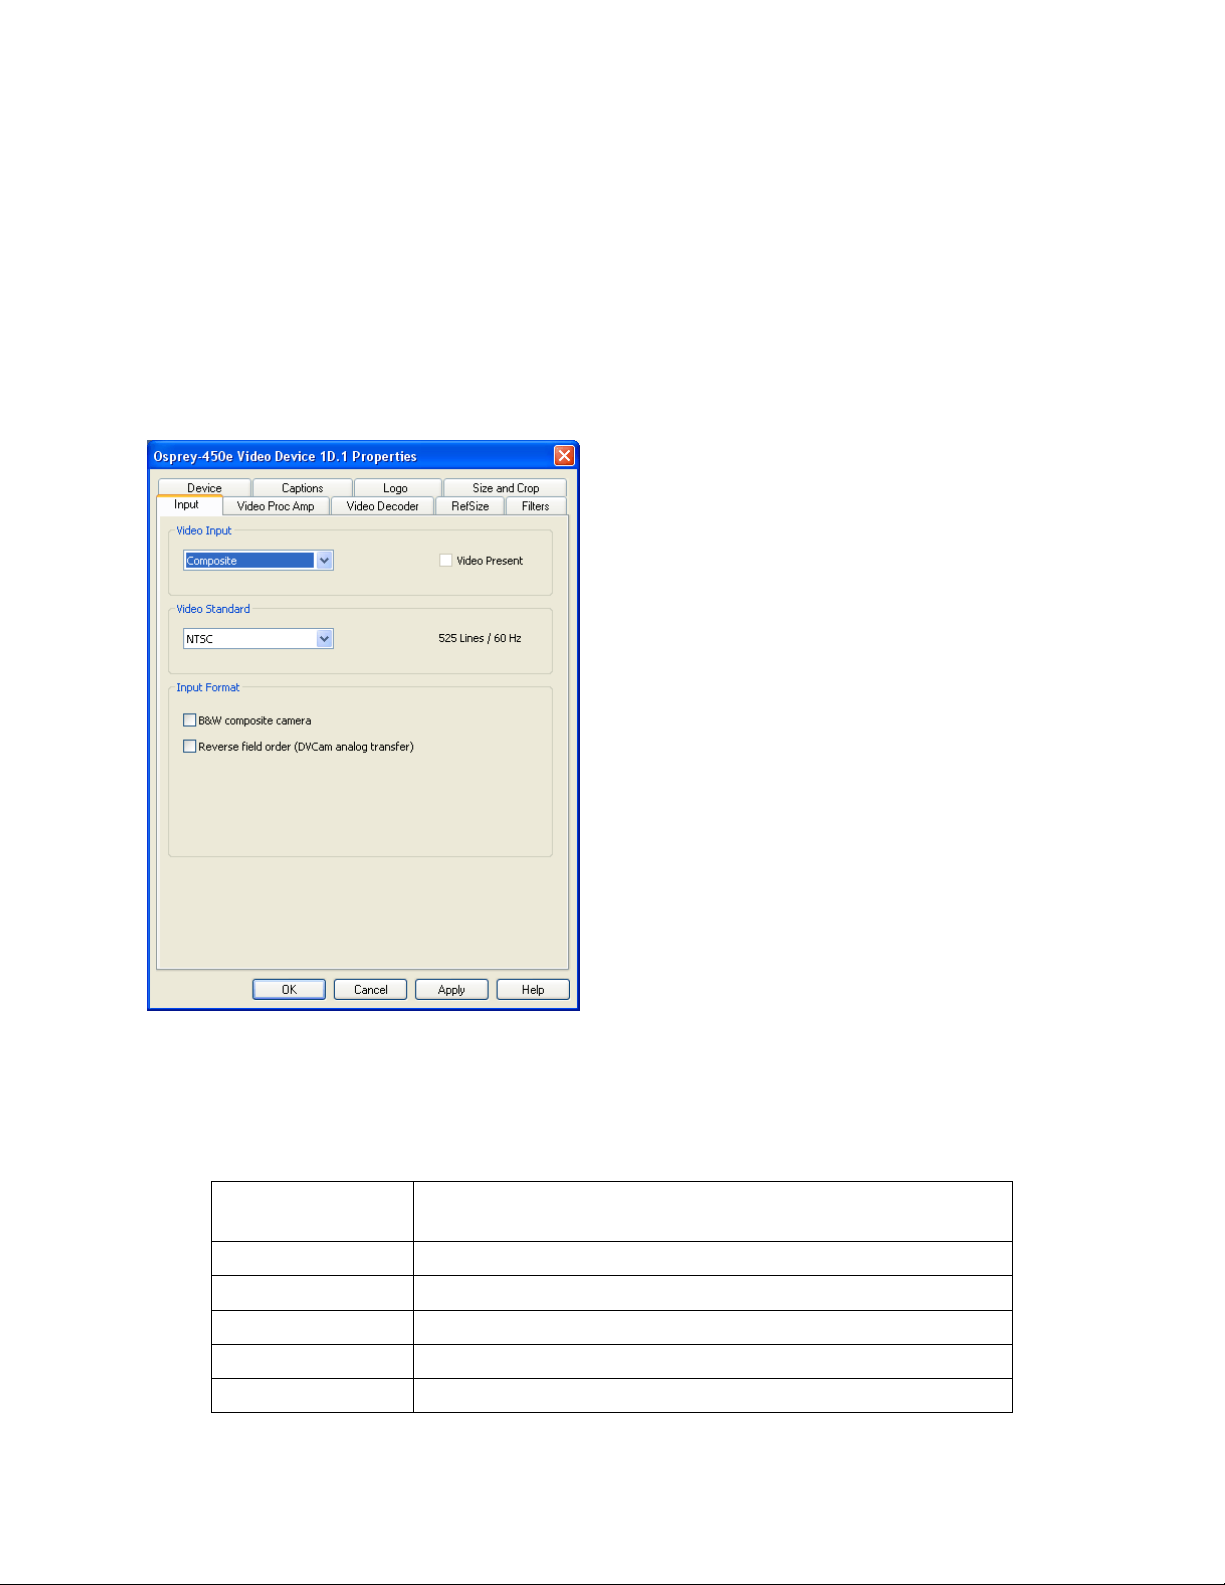
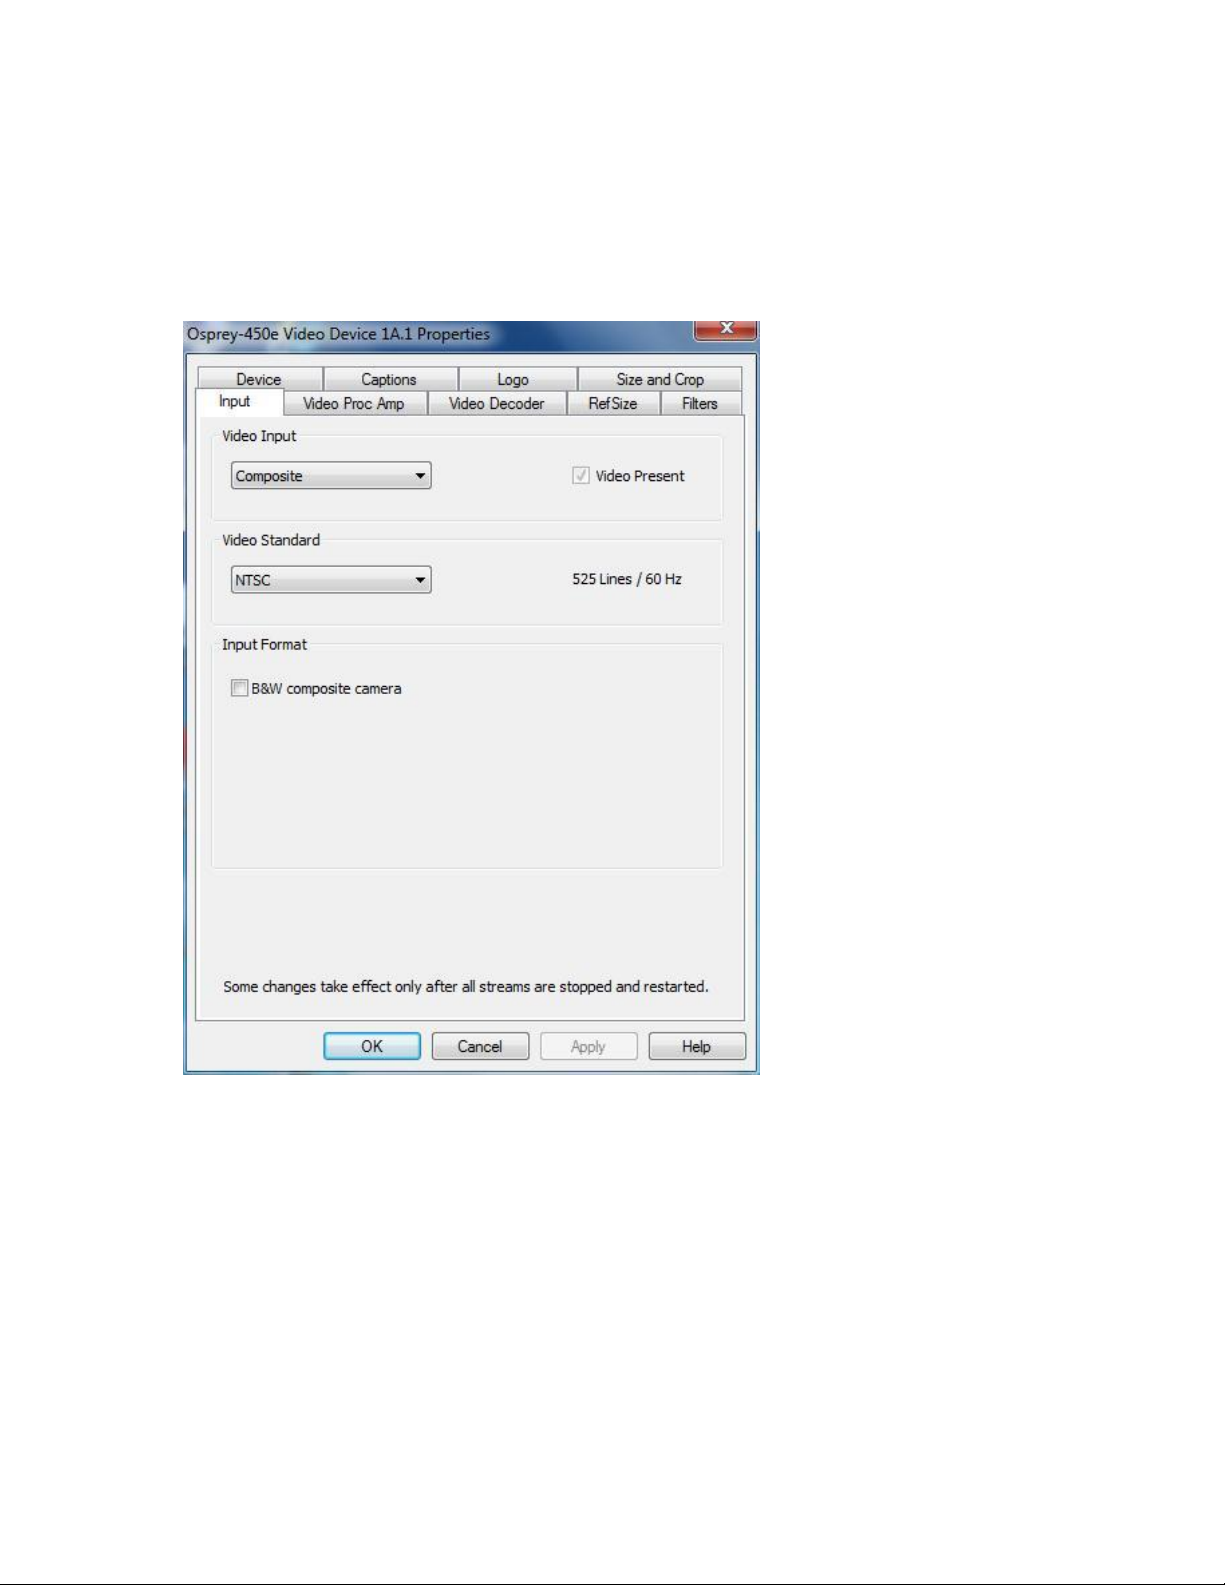
Input tab
The source of data from an Osprey 240e/450e that streams to the Internet, can come from a number of
devices such as DVD players, digital cameras, camcorders, and so forth.
Figure 10. Input tab
The controls on the Input tab of the driver properties card have a global effect on the Osprey capture
card on which they reside. If you have multiple Osprey cards, and you want to make global changes, you
have to make the change on each card.
14 ViewCast

Osprey 240e/450e User Guide
Video Input
The Video Input section of the tab allows you to select the video
input type coming from your source video.
Video Present
This indicator is enabled when video is present.
Video Standard
The Video Standard allows you to select the standard different
countries or geographical areas use (Figure 10) from the dropdown list. The North American standard is NTSC. The Japanese
standard is NTSC-Japan. The five PAL standards, B, D, G, H, and I
are similar and treated the same way by the Osprey driver. The
driver also supports PAL-M and N and SECAM video.
Input Format
This control works with digital cameras routing through the
Osprey’s card’s analog input.
OK
Click OK to accept the settings.
Cancel
Click Cancel to reject the settings and close the window.
Apply
Click Apply to apply the settings.
Help
Click Help to access the user guide.
The Input tab has the following controls.
ViewCast 15
Setting Driver Properties
Osprey 450e AV option hardware add-on-device
In addition to the standard components built into the Osprey 450e card, you can purchase the Osprey
450e AV Option hardware add-on device.
The AV Option exposes additional inputs for Component and S-Video as well as balanced audio. For
example, when you choose a Filter from standard Osprey 450e Device 1A; the default option provides a
single video capability: Composite.
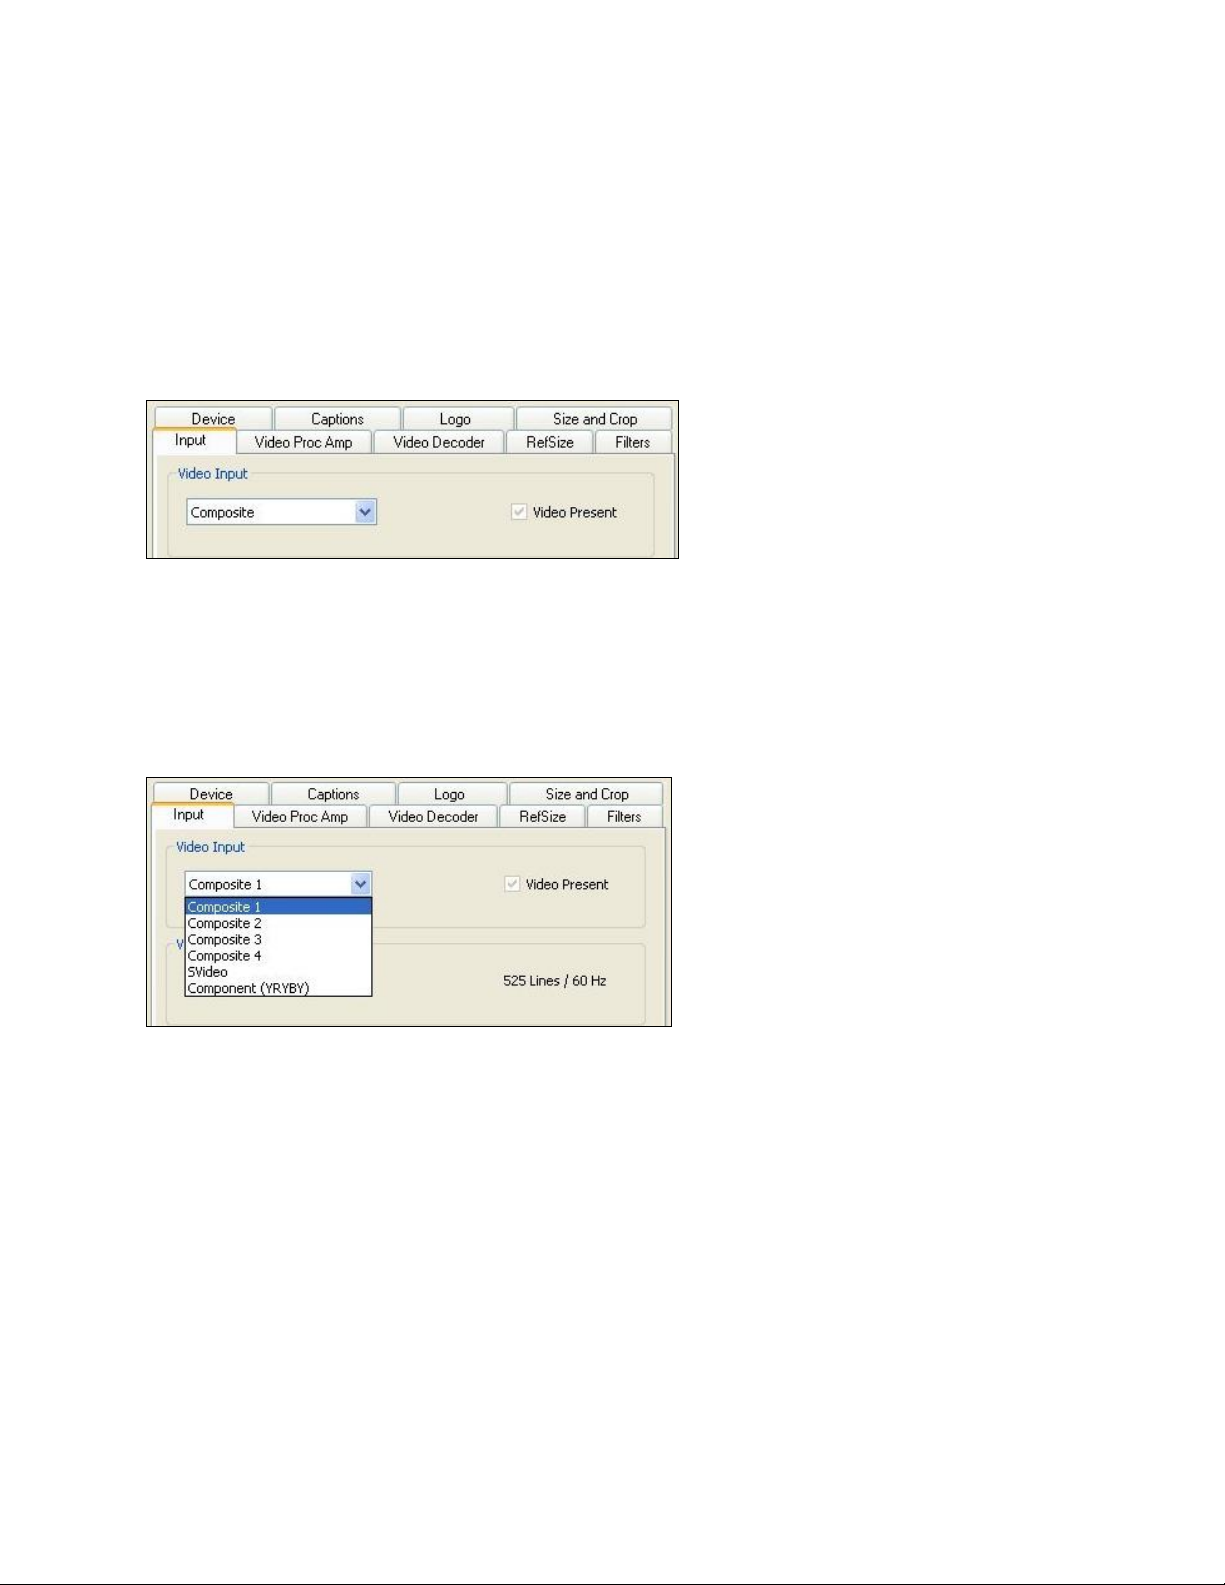
Figure 11. Input Tab without AV option
Without the AV hardware option the default input standard is limited to Composite. With the optional
add-on, you also have Composite 1,2,3,4, S-Video and Component YRYBY (Figure 11 and Figure 12).
Note: Separate video, abbreviated S-Video (also known as Y/C) is an analog video signal that
carries the video data as two separate signals. They include luma (~brightness) and chroma
(~color).
Figure 12. Osprey 450e card with optional plug-in
16 ViewCast
Osprey 240e/450e User Guide
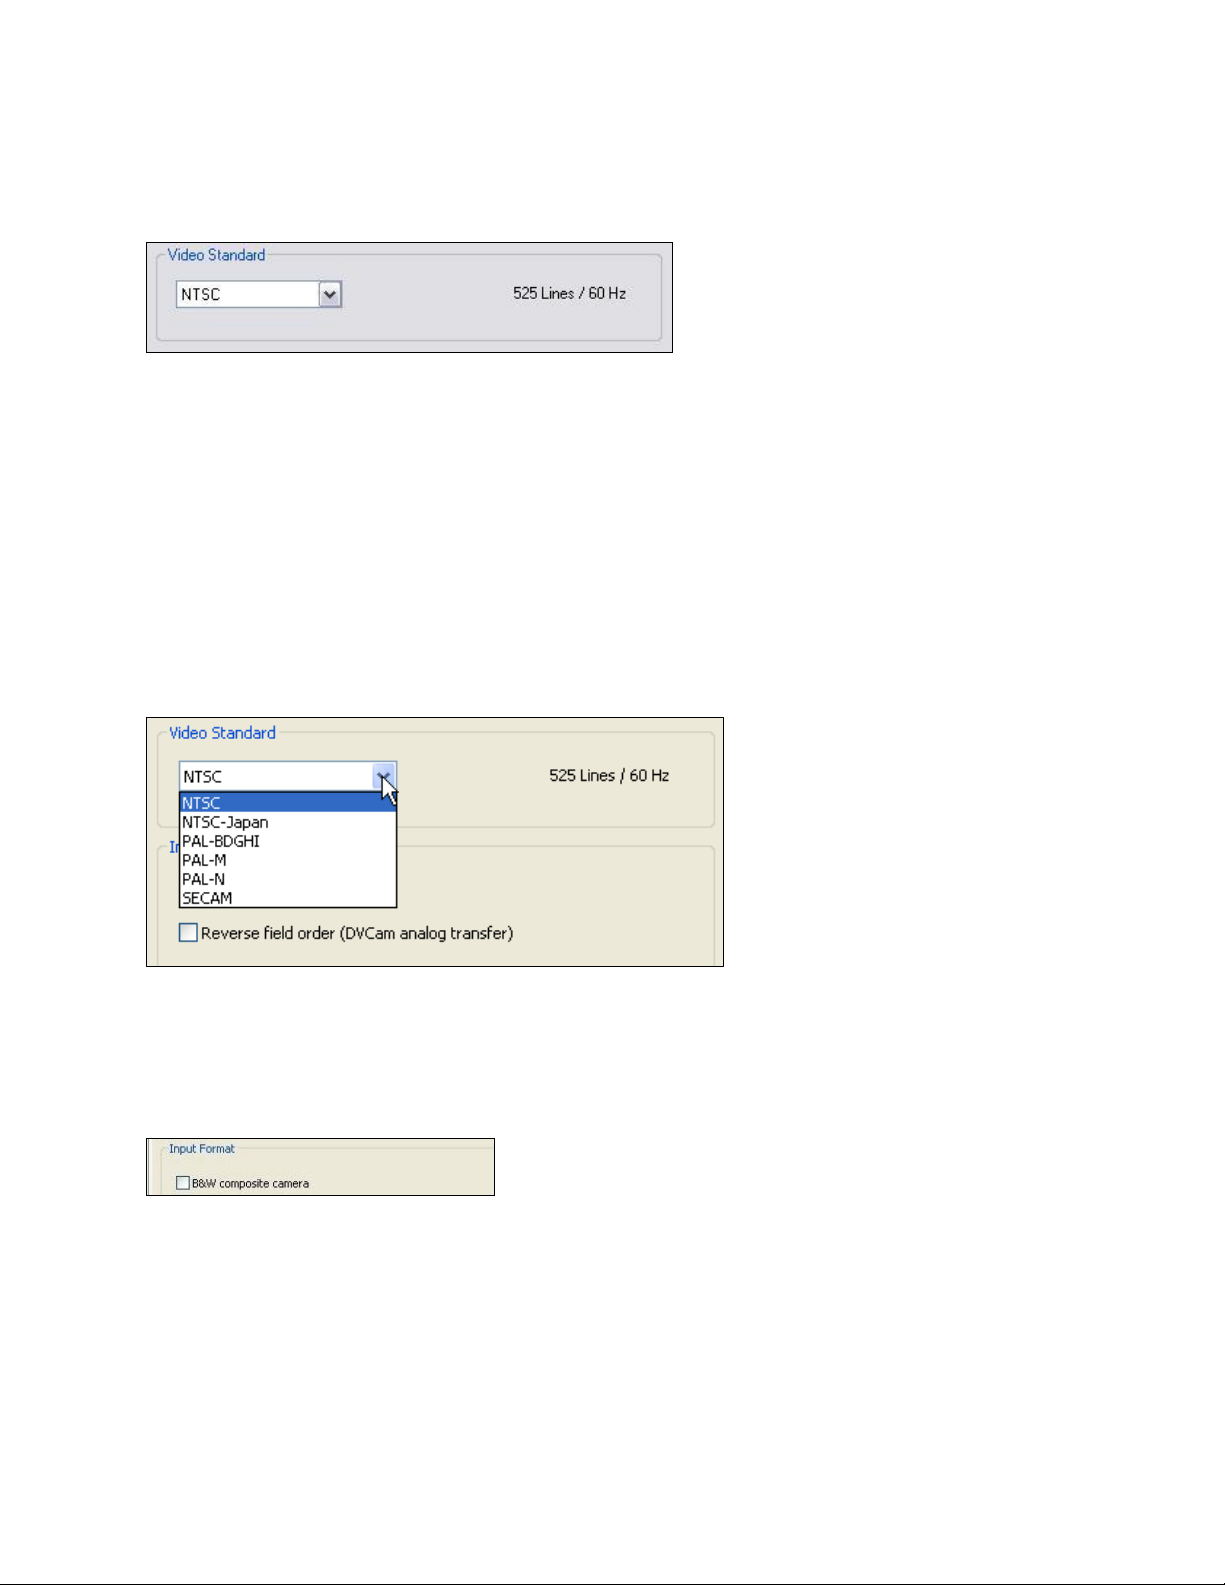
Video standard group
Figure 13. Video Standard field
Osprey cards can capture country centric data, which can be streamed to the Internet by an encoding
application. The Video Standard allows you to select a standard used in specific countries or
geographical areas. The Osprey driver has the ability to stream in a number of formats unique to
countries and, or geographic locations. You can change the format on the Osprey card by simply clicking
on the format from the Video Standard drop-down list.
The North American standard is NTSC. The Japanese standard is NTSC-Japan. The five PAL standards, B,
D, G, H, and I are similar, and are treated the same way by the Osprey driver. The driver also supports
PAL-M and N and SECAM video.
The Lines / Hz field changes to match the selected video standard, regardless of what video standard is
actually connected to the input.
Figure 14. Video Standard drop-down list
Input Format group: analog inputs
Below the Video Standard drop-down list are two checkboxes for Input Format (Figure 15).
Figure 15. Input Format
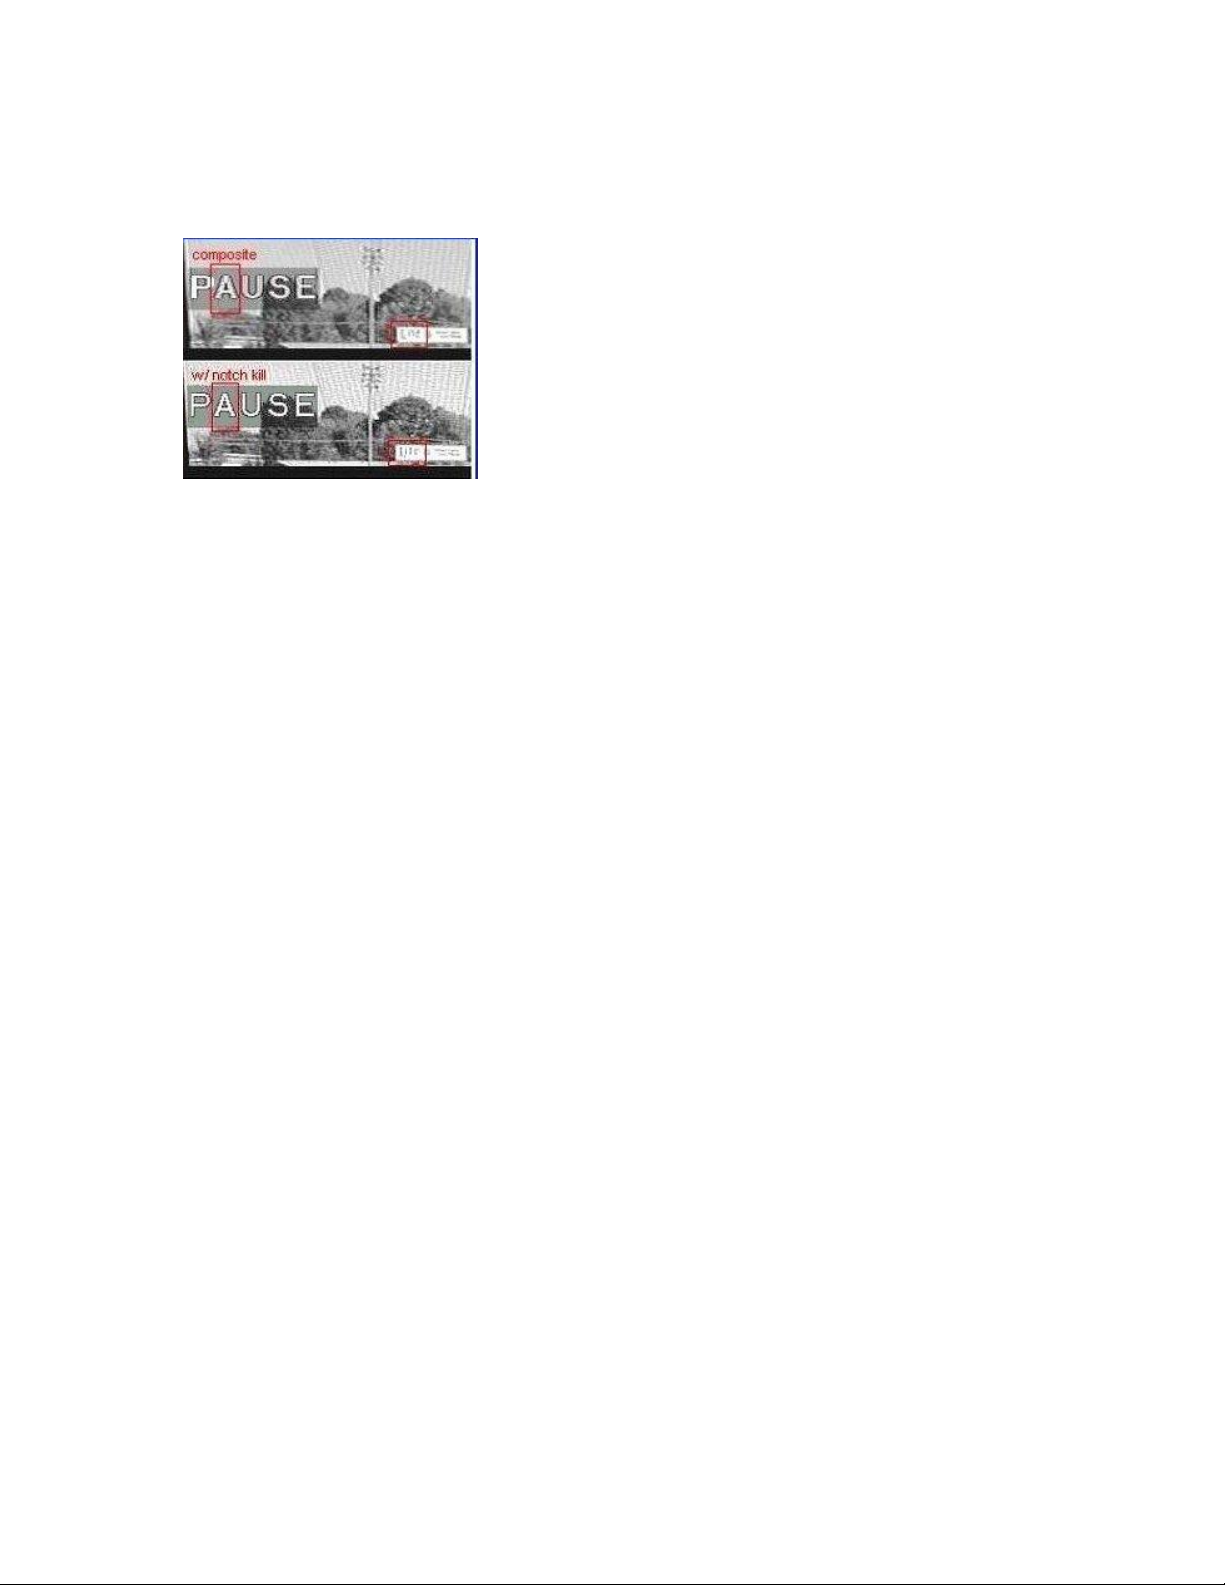
On the Osprey 240e/450e, when an analog input becomes the media source, the controls provide
adjustments that improve the clarity of video from monochrome sources. When a composite input line
is selected and a monochrome device is attached, the result is a sharper image, as shown in the notch
kill item in Figure 16. This control is only for true monochrome devices, without color capability.
ViewCast 17
Setting Driver Properties
B&W composite camera
Figure 16. Notch Kill
Black and white input sources are rare these days, but some do exist. For example, you may want to
stream black and white historical film in a documentary film.
18 ViewCast
Osprey 240e/450e User Guide
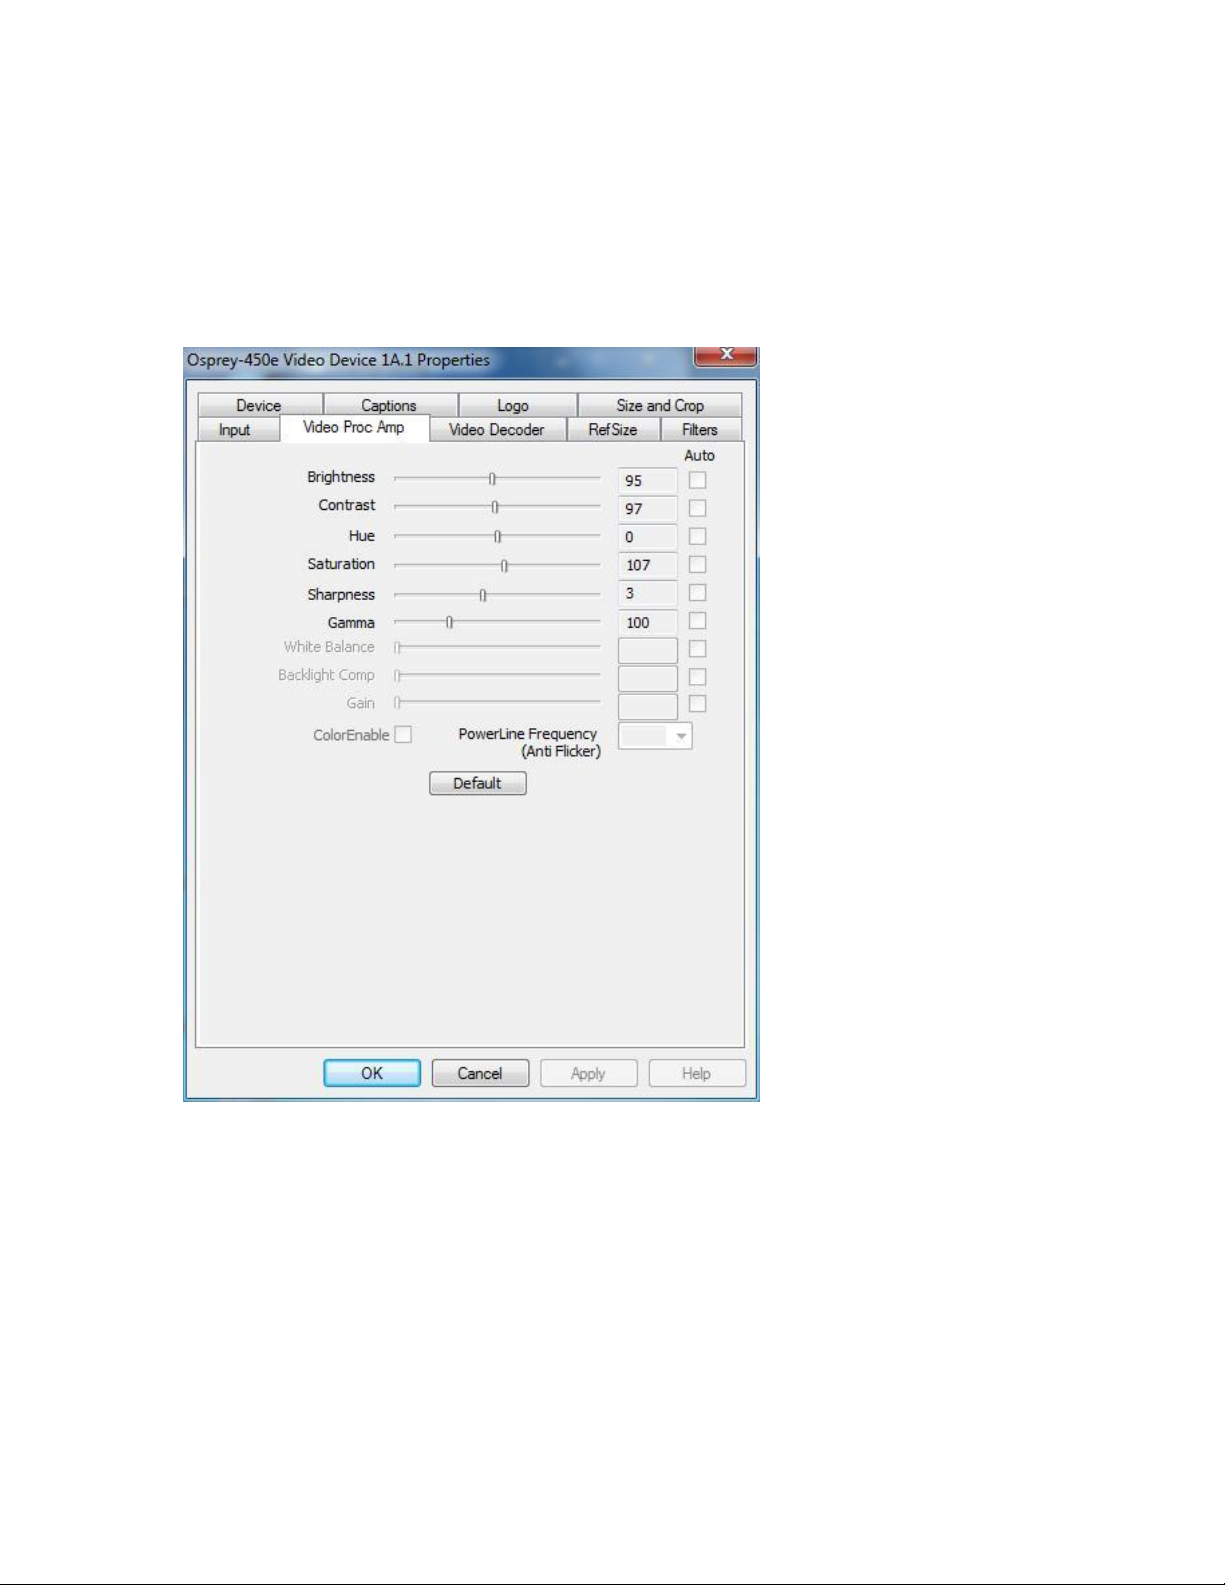
Video Proc Amp tab
Video Proc Amp stands for Video Process Amplifier. It controls various characteristics of streaming
output from Osprey 240e/450e cards. The Video Proc Amp is the second tab from the left of the Device
1A properties (Figure 17).
Figure 17. VideoProc Amp Tab
The Video Proc Amp uses slider controls to adjust brightness, contrast, hue, saturation, sharpness,
and gamma. If you’re using the preview or capture mode in real-time, then you can see your
adjustments as you make them with the Video Proc Amp controls.
ViewCast 19

Setting Driver Properties
Brightness and
Contrast
These are terms for what one would call a contrast ratio. It’s a measure of a display
system, defined as the ratio of the brightest color (white) to that of the darkest color
(black) that the system is capable of producing. A high contrast ratio is a desired
aspect of any display, but with the various methods of measurement for a system or
its part, different measured values can sometimes produce similar results. The control
exists in the event you need to change the ratio of an incoming signal.
Hue
Hue adjustment only functions for NTSC video. It sets the predominance of color,
classed as red, yellow, green, blue or an intermediate color based on a contiguous
pair of these colors
Saturation
In color theory, saturation or purity refers to the intensity of a specific hue. A highly
saturated hue has a vivid, intense color, while a less saturated hue appears more
muted and grey. With no saturation at all, the hue becomes a shade of grey. You are
able to adjust the saturation level in the event it is altered by a video feed.
Sharpness
This slider has eight positions corresponding to eight hardware filter settings.
Generally, the positions to the left result in smoother video, the positions to the right
result in sharper video. Since each step engages a different combination of discrete
filters, some steps may result in slight differences while other steps may result in
large differences. The range is 0 to 7.
Gamma
You would rarely use this control; however, a need may arise for its use. In the
simplest terms the input of a feed from a device into your card may not match the
digital output on your screen. The gamma control allows you to balance the red, blue
and green from the input to output within the normal range of people’s perceptions.
White Balance
This field is an unused DirectShow feature and is not selectable.
Backlight Comp
This field is an unused DirectShow feature and is not selectable.
Gain
This field is an unused DirectShow feature and is not selectable.
Color Enable
This field is an unused DirectShow feature and is not selectable.
PowerLine
Frequency
(Anti Flicker)
This field is an unused DirectShow feature and is not selectable.
Default
Click Default to return to the default settings.
Auto
This field is an unused DirectShow feature and is not selectable.
OK
Click OK to accept the settings.
Cancel
Click Cancel to close the window.
Apply
Click Apply to apply the settings.
Help
Click Help to access the user guide.
The Video Proc Amp tab has the following controls.
For all of the Video Proc Amp controls the driver maintains one setting per Osprey device. It does not
maintain individual settings for each input or type of input.
When you change the video standard or input you will not see changes in the slider controls – such as
the Hue button becoming disabled – until the driver properties dialog is closed and re-entered.
20 ViewCast
Osprey 240e/450e User Guide
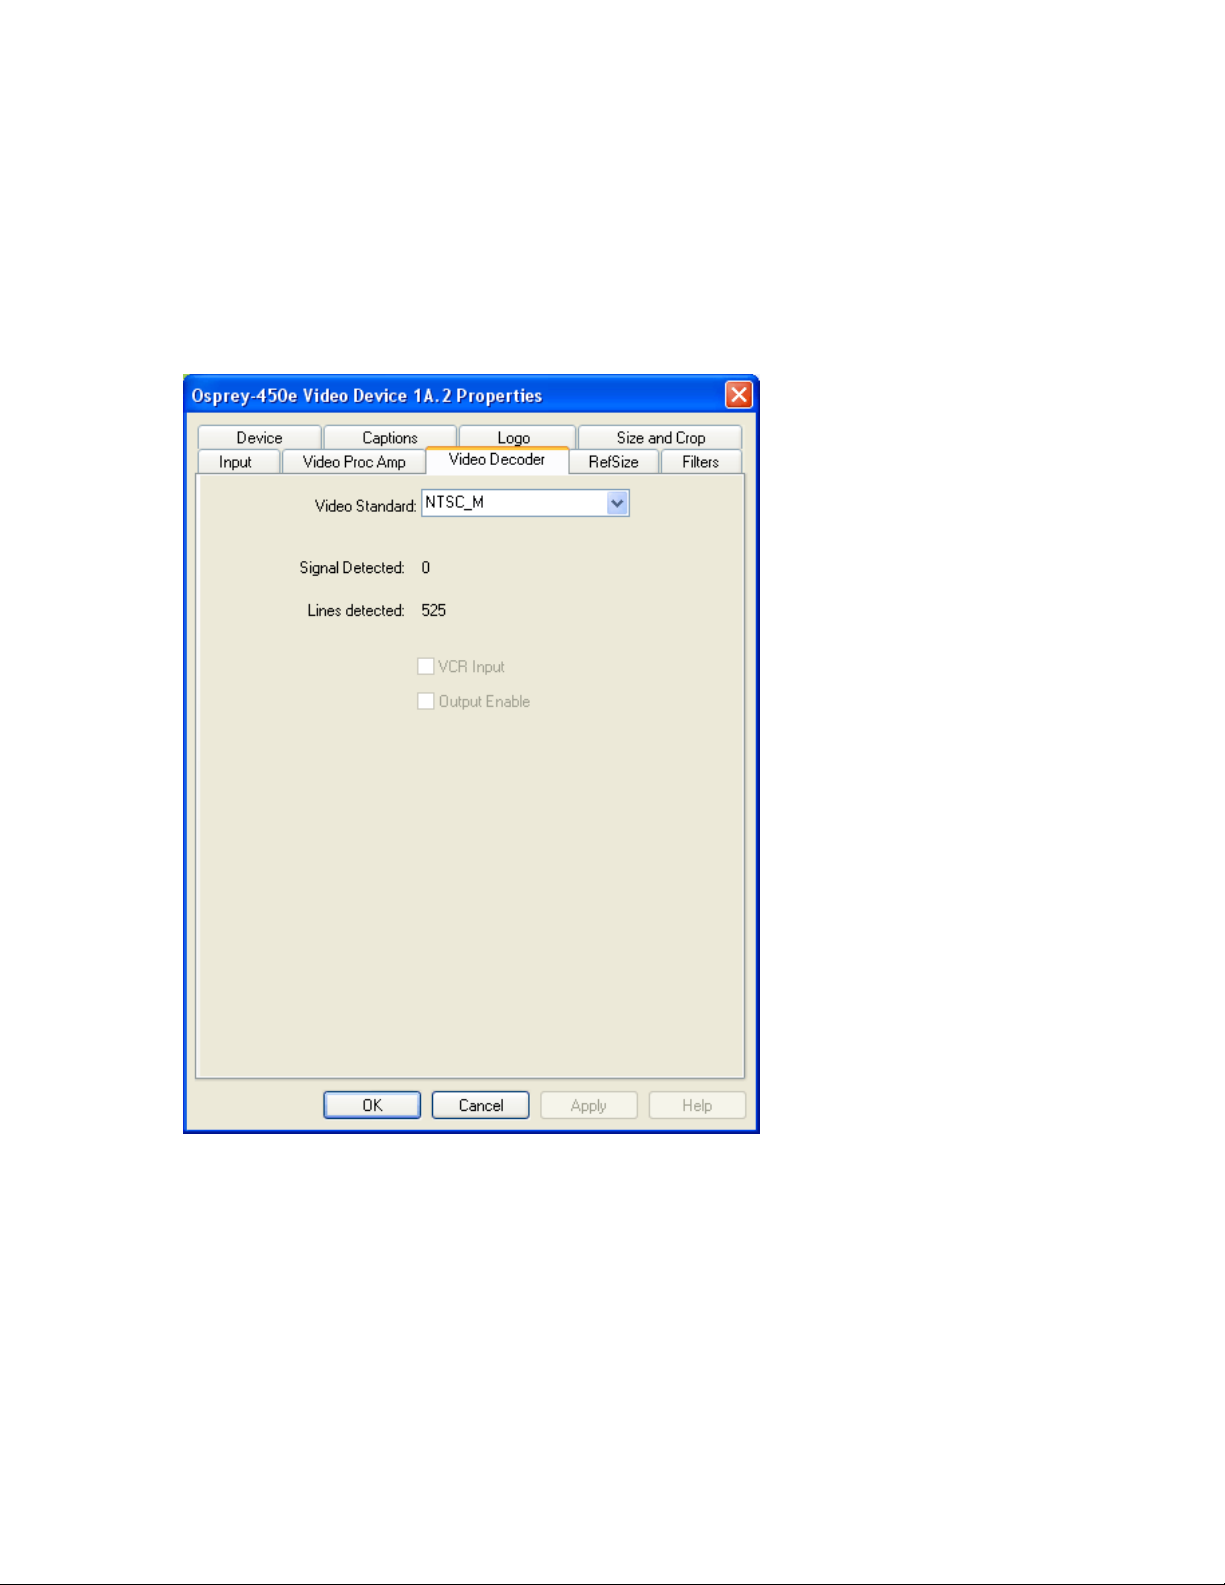
Video Decoder tab
The Video Decoder tab is a Microsoft DirectShow standard control for setting the NTSC/PAL/SECAM
video standards (Figure 18). We discussed NTSC while discussing the Input tab. PAL and SECAM are
standards used in Europe and other parts of the world. Your Osprey cards can function in computers in
various countries with different standards.
Figure 18. Video Decoder tab
Changes apply to all video previews and stream captures on the currently selected device. If you
have multiple Osprey cards, you can set the input individually for each of them. Changes made with
this control take effect immediately. If video is running and a standard is selected that does not
match the incoming signal, the video is likely to freeze or glitch until the signal matches the correct
standard.
ViewCast 21

Setting Driver Properties
Video Standard
Select the video standard
Signal Detected
When the card does not detect the input signal, this field displays a 0.
When the card detects the input signal, it displays 1.
Lines detected
This field displays the number of lines the card detects in the input
signal.
VCR Input
This field is a DirectShow feature that is not implemented.
Output Enable
This field is a DirectShow feature that is not implemented.
OK
Click OK to accept the settings.
Cancel
Click Cancel to reject the settings and close the window.
Apply
Click Apply to apply the settings.
Help
Click Help to access the user guide.
The Video Decoder tab has the following controls.
The driver treats PAL-BDGHI identically (the exceptions with PAL are PAL-M and PAL-N which are their
own beings) and the driver also treats all variations of SECAM the same.
22 ViewCast
Osprey 240e/450e User Guide
Horizontal
Format
Set the horizontal mode for the output. Options include Square
Pixels, CCIR-601 setting, 16:9 Wide, and Use WideScreen Signal
control.
Horizontal Delay
The horizontal delay control moves the video horizontally in the
capture or preview frame.
Source Width
The Source Width control can be used to trim the black left and right
edges of an image.
Reference Size for
Crop and Logo
Placement
This part of the dialog box displays the results of more fundamental
settings made elsewhere in the dialog box.
525-Line (NTSC)
Vertical Format
This control is for NTSC users. It has no effect for PAL and SECAM
625-line video standards.
OK
Click OK to accept the settings.
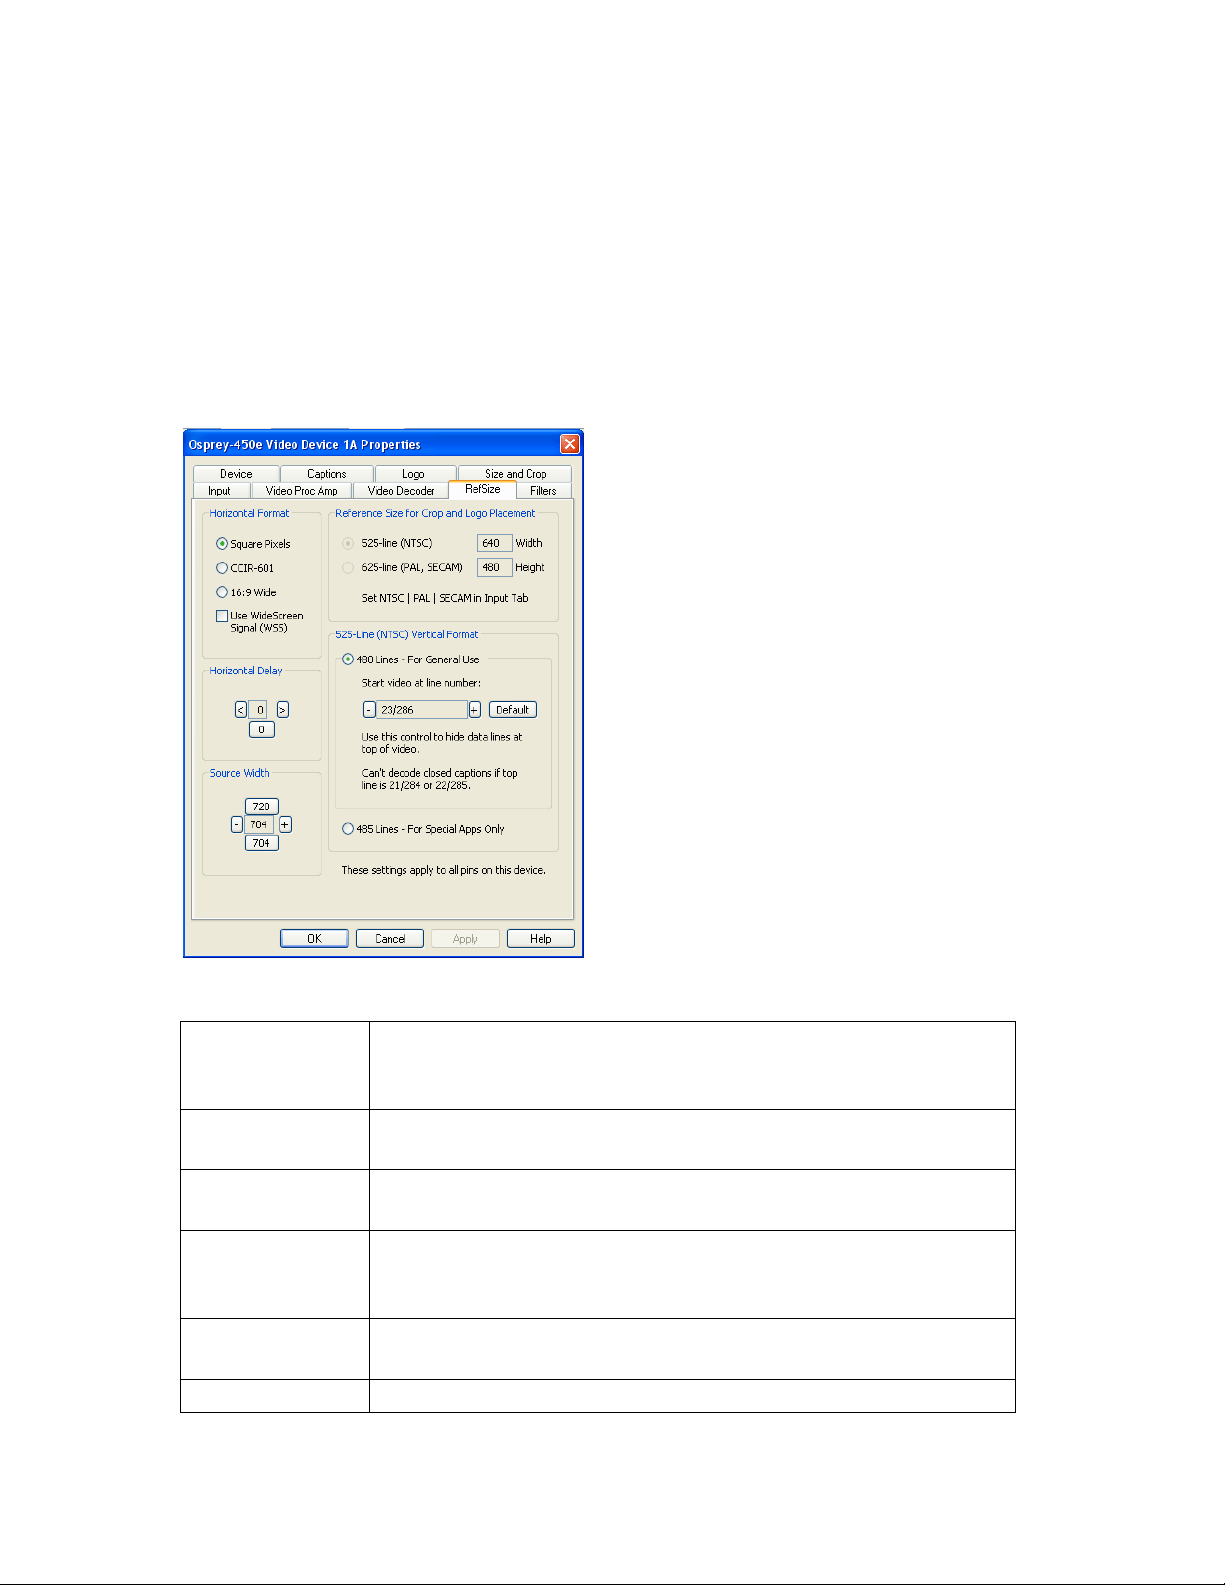
RefSize tab
Changes made to the RefSize tab (Figure 19) apply to all video previews and captures on the
currently selected device. The RefSize tab controls the features related to the reference size, format,
and proportions of the video. Most users can set up this page once and only refer to it occasionally
since this page does not provide everyday control for the final output size of your video. You’ll likely
control final output size from your application, the Size and Crop tab, or from the Pin Properties
dialog described in the next section.
Figure 19. RefSize tab
The RefSize tab has the following controls.
ViewCast 23
Setting Driver Properties
Cancel
Click Cancel to reject the settings and close the window.
Apply
Click Apply to apply the settings.
Help
Click Help to access the user guide.
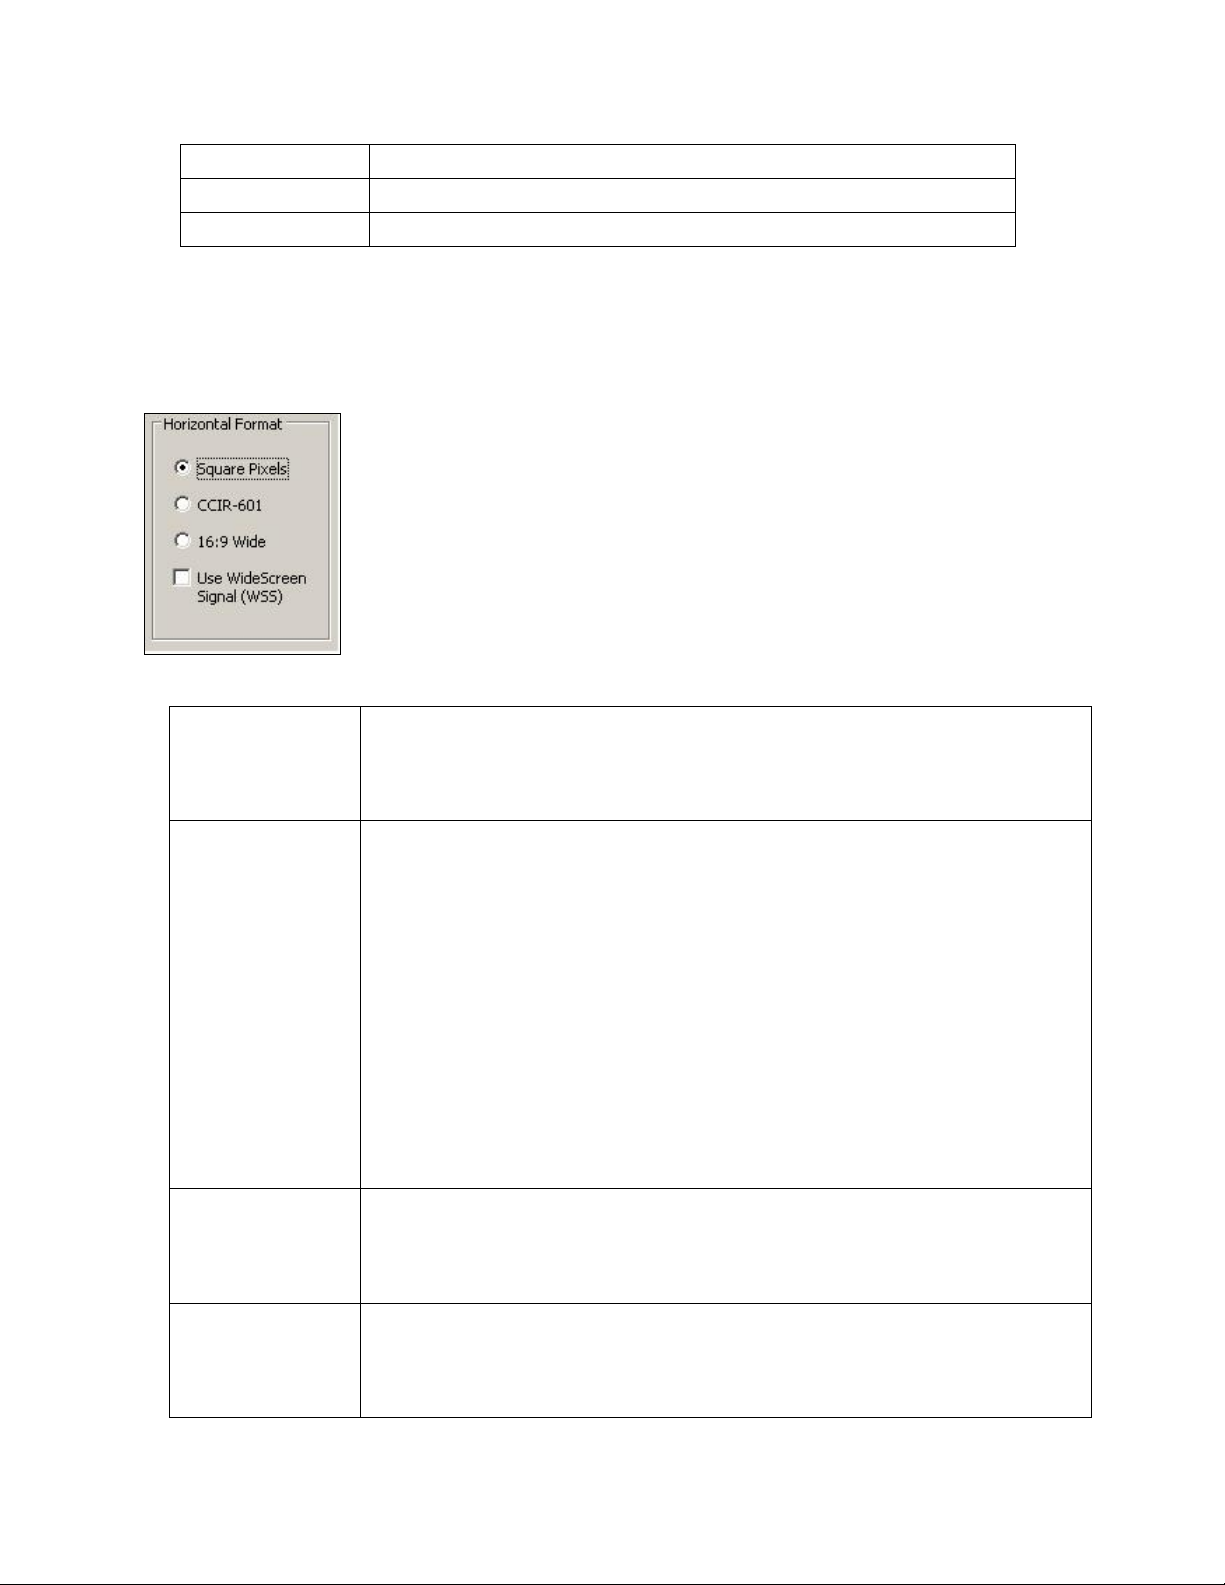
Square Pixels
Use the Square Pixels setting for normal 4:3 video (Figure 20) that is viewed
via a computer monitor. This setting results in a square aspect ratio sampling
of the source video. This results in a source image of 640 x 480 for 525-line
standards and 768 x 576 for 625-line standards.
CCIR-601
Use the CCIR-601 setting for 4:3 video that is viewed on a dedicated video
monitor. This setting results in a CCIR-601 aspect ratio sampling of the source
video. It results in a video input horizontal size of 720 pixels for both 525-line
and 625-line standards. This sizing is standard for dedicated monitors but the
resulting video appears horizontally stretched (525-line) or squeezed (625-line)
on a computer monitor.
It is more efficient to set the horizontal mode to match the size of the output.
For example, if your target video size is 640 x 480 using Square Pixel sizing in
PostProcessing Mode, it will avoid an unnecessary software scaling step in the
driver.
On some systems, for reasons external to this driver, 640 x 480 video renders
on screen a lot faster than 720 x 480 video – that is, the speed difference is a
lot more than the 9:8 ratio of numbers of pixels.
16:9 Wide
Select 16:9 Wide for 1.85:1 anamorphic video such as DVD content and any
widescreen content. The output video size is 852 x 480 for 525-line standards,
and 1024 x 576 for 625-line standards. To actually see output of this size, you
have to also select this size in your application.
Use WideScreen
Signal (WSS)
The Use WideScreen Signal (WSS) control enables automatic sidebars and
letterboxing when the input video aspect ratio does not match the output
aspect ratio. If the aspect ratio of your content is subject to change between
16:9 and 4:3, it is useful to enable this control.
Horizontal Format
Figure 20. Horizontal Format
The Horizontal Format has the following controls.
24 ViewCast

Osprey 240e/450e User Guide
WSS is a line of the vertical blanking interval (VBI) that encodes the aspect ratio
of the video. It is normally line 20 of 525-line video and line 22 of 625-line
video. It is generated by newer DVD players, and is present in PAL broadcast
content.
The Use WideScreen Signal (WSS) control is useful for both 4:3 and 16:9 input
formats, and for both 4:3 and 16:9 output formats. When selected, it has the
following effects:
4:3 video on a 4:3 window shows without sidebars or letterboxing
4:3 video on a 16:9 window shows with sidebars
16:9 video on a 16:9 window shows without sidebars or letterboxing
16:9 video on a 4:3 window shows with letterboxing
Horizontal Delay
Figure 21. Horizontal Delay
The Horizontal Delay control moves the video horizontally in the capture or preview frame. Video
devices differ in their timing characteristics, so some devices may need different adjustments from
other devices. Adjust this control if you are seeing a black line to the left or right of the video (Figure
21). Use the left and right arrow buttons to move the video to the left or right. Click 0 to restore the
default zero setting. The allowed range is -11 to 11. With uncropped video, the video shifts on every
second increment 0, 2, 4, …
ViewCast 25

Setting Driver Properties
Source Width
Figure 22. Source Width
The Source Width control (Figure 22) can be used to trim the black left and right edges of an image.
This control is only available for NTSC video, and only when the Horizontal Format is set to Square
Pixels such that the reference size is 640 x 480.
To trim an image:
1. With video preview running, click 720 to display the entire image, which usually includes
black left and right edges. Changes appear interactively.
2. Use the Horizontal Delay control immediately above this control to center them image so
the black edges are of equal width.
3. Click 704 to trim the image to the nominal borderless width.
4. Click + and - to adjust the trimmed size so that the black edges are completely removed but
no active video is lost. The allowed range is 688 to 720.
It is possible to obtain the same result using the cropping control (Size and Crop Tab) but there are
some differences.
The Source Width control affects all pins and all filters on the device, whereas the crop
control must be set separately for all SimulStream filters.
In Post-Processing Mode, this operation is often more efficient in terms of processing than a
crop operation. The crop and scale are done in hardware, so if you are using the resultant
640 x 480 image directly without further cropping there is no scale/crop processing cost
incurred.
26 ViewCast

Osprey 240e/450e User Guide
Reference Size for Crop and Logo Placement
Figure 23. Reference Size for Crop and Logo Placement
This part of the dialog is read-only because you do not set it directly – rather, it shows the results of
settings made elsewhere in the dialog.
The settings shown by the 525-line / 625-line buttons reflects the video standard selected in the
Input or Video Decoder tab (Figure 23). NTSC and PAL-M formats result in 525-line, 29.97 frame per
second video. PAL (other than –M) and SECAM formats result in 625-line, 25 frames per second
video.
The Height and Width fields show the size of the incoming video based on all the settings you have
made. They reflect the video standard (NTSC, PAL, or SECAM) that you have selected on the Input
Property Page, and the setting in the adjacent Horizontal Format group. They are updated when you
click the Apply button for these changes.
525-Line (NTSC) Vertical Format
Figure 24. 525-Line (NTSC) Vertical Format
This control is only meaningful for NTSC users. It has no effect for PAL and SECAM 625-line video
standards.
Select 480-line video for all normal applications. Select 485-line video for specialized applications.
When 480-line video is selected, you can select which video lines should be the top line of displayed
or captured video. For non-broadcast applications, all video lines starting with 21 / 284 can be part
ViewCast 27

Setting Driver Properties
of the displayed video. In films and analog broadcast video, however, lines 21 and 284 are often
used for Closed Caption. In broadcast video, lines 22 and 285 are sometimes used for proprietary
ancillary data. If these lines are used for data they will appear as moving bands or streaks across the
top lines. Therefore, the most generally useful start lines are 23 / 286.
Some broadcast video also uses additional top line pairs for ancillary data. We are seeing cases
where the top line has to be set to lines 26 / 289 in order to hide all the data lines.
You can set start lines all the way up to 27 / 290. (On the PCI products which have a Direct Mode
option, PostProcessing Mode must be set in order to have top lines below 23 / 286.)
When the start lines are below 23 / 286, the bottom of the video frame spills off the bottom of the
485-line NTSC-standard frame. In this case the driver adds black lines at the bottom of the frame.
Note: If you select start line 21 / 284, Closed Captions cannot be decoded. On the Osprey-
240e/450e, CC cannot be decoded if the start lines are 22 / 285 as well as 21 / 284.
Changes to this control take effect only when all video streams are stopped and restarted. All
streams must be stopped before any are restarted.
28 ViewCast

Osprey 240e/450e User Guide
SimulStream
Enables SimulStream to output the same video in different sizes,
color formats, frame rates, crops, logos, and captioning.
Deinterlace
Deinterlace settings are applied and stored per-device and are
applied to all filters and pins associated with a device.
Currently Using
The read-only indicators allow you to see the current algorithm.
OK
Click OK to accept the settings.
Cancel
Click Cancel to reject the settings and close the window.
Filters tab
The Filters tab (Figure 25) covers two independent technologies: SimulStream and deinterlacing.
Functionality for both technologies exists on the Filters tab. In this discussion we will examine each
technology separately.
Figure 25. Filters tab
The RefSize tab has the following controls.
ViewCast 29

Setting Driver Properties
Apply
Click Apply to apply the settings.
Help
Click Help to access the user guide.
Filters have two interrelated purposes:
They allow applications to enumerate and list DirectShow video capture and preview pins or
streams (each with different settings) as named entries in their video device select list. You
can set up the driver to show 1 to 10 filters per device. Each filter has one preview pin and
one capture pin. Standard applications can access a particular filter without any custom
programming specialized for Osprey devices.
Each filter has independent settings for cropping, default output size, logos, and captions
that can be stored between sessions. Compared to the previous pin-based method, there
are no requirements for a particular startup order, in order to associate settings with
instantiations.
30 ViewCast

Osprey 240e/450e User Guide
SimulStream
ViewCast includes an evaluation version of SimulStream with the Osprey 240e and Osprey 450e
cards. Evaluation mode works the same as full SimulStream except that an evaluation logo is
displayed on the video. If you have set up a custom logo, the evaluation logo and the custom logo
appear in the video. The evaluation logo appears until you purchase SimulStream. For details about
purchasing and installing SimulStream, refer to http://www.viewcast.com.
Figure 26. SimulStream option
Enable SimulStream in the evaluation mode, and specify how many filters you plan to
expose.
SimulStream is enabled for the currently selected device.
Figure 27. SimulStream enabled
If you have a SimulStream license, this checkbox controls SimulStream. If you have not turned on
SimulStream, the text line at the top of the control group shows that SimulStream is installed. If you
have SimulStream turned on, the text shows SimulStream is enabled.
ViewCast 31

Setting Driver Properties
Multiple instances
Figure 28. Multiple instances
You can have as many streams from the device as you want. They can have different resolutions, bit
rates, and formats. The term one filter means all streams have the same Osprey custom properties.
Specifically, cropping, logos (watermarks), and NTSC Closed Caption rendering settings work the
same for all streams on the device when the Multiple Instances option is selected.
The advantage of this mode is that it is simpler. We recommend this mode if you don’t use Osprey
custom cropping, logos, or closed captions, or if all streams have the same settings.
This setting affects all devices served by the currently accessed driver.
Multiple filters
Use this mode if you are using Osprey custom cropping, sizing, logos (watermarks), and NTSC Closed
Caption rendering, and want each stream to have separate settings for these items.
This mode is definitely more complicated than the one filter option just described – so only use it if you
are sure you need it.
Note: You do not have to use the Multiple Filters mode unless you specifically want different
crop, size, logo, or closed caption settings on different streams. If you want these settings to
be consistent on all streams for a particular Osprey card, use the Multiple Instances option.
The term “multiple filters” refers to the method of saving and accessing these different settings. You can
have 1 to 10 different filters, each holding different settings. The number of filters is determined by the
edit box in the picture above Show [4] filters per device.
For example, if you have 4 filters per device, each with separate crop, size, logo, and caption settings
and the underlying device has the name Osprey 240 Video Device 1, when you open a list of capture
devices with SimulStream enabled, Osprey 240 Video Device 1.1, Osprey 240 Video Device 1.2, and …1.3
and …1.4 appear.
To set the custom properties for one of these filters, select it from the device list and open the driver
properties dialog. The title at the top of the window confirms you are setting up, for example, Osprey
240 Video Device 1.2. When you set crop, size, logo, and caption settings, they are saved separately for
Device 1.2 and do not affect Devices 1.1, 1.3, or 1.4. Settings that are not per-filter – such as Reference
Size or the Video Proc Amp settings –affect all filters on the underlying Osprey 240 Video Device 1.
Later, whenever you select one of the four filters as your capture filter, the Osprey custom crop, logo,
and caption settings previously set for that filter is selected automatically.
This setting affects all devices served by the currently accessed driver. The driver prompts you to restart
the system or your application if this is needed.
32 ViewCast

Osprey 240e/450e User Guide
Allow multiple instances of each filter
This control enables you to allow multiple instances of an application to use a single Osprey device. For
example, with the option disabled, only one instance of WME can encode video from Osprey XXOe
Video Device 1. When the option is enabled, multiple instances of WME can encode video from the
same video device. However, all cropping, size, and logo settings apply to all instances.
When you apply this change, a message box displays prompting you to restart the system – this change
does not work correctly until you do so.
Show N filters per device
Figure 29. Show Filters
You can set up the driver to expose 1 to 10 filters per device (Figure 29). If, for example, 4 filters per
device are chosen, the device list shows four entries for the current device. For Device 1A, they are
designated as 1A.1, 1A.2, 1A.3, and 1A.4.
When you apply this change, a message box comes up prompting you to restart the system – it is
important that you do so. The number of filters you have requested do not display or work correctly
until the system is restarted.
Note: While it is possible to expose and enumerate up to 10 filters per device, the practical
number of filters depends on your hardware. When video is being directly rendered to the
screen, the video format and type of renderer used can make a major difference in system
performance and in the number of streams that are possible. If multiple capture devices are
in the system, the number of filters is the total across all the devices; in addition, some types
of processing such as deinterlacing and gamma correction that are performed once per
device may in this case occur multiple times. So, in summary, a high-end, multicore or
multiprocessor system can support 5, 6, or more concurrent filters on one device if the
processing per filter is light; but only 2 or 3 if the processing load inside or outside of the
driver is particularly heavy.
ViewCast 33

Setting Driver Properties
Auto
Apply inverse telecine deinterlacing to all telecine video. Apply motion
adaptive deinterlacing to all video that is not telecine. Switch dynamically
between the two modes as the content changes. Available for NTSC video
only.
Inverse Telecine
Apply inverse telecine deinterlacing to all telecine video. Perform no
deinterlacing of video that is not telecine. Available for NTSC video only.
Motion Adaptive
Apply motion adaptive deinterlacing to all video.
Adjust…
Click this button to display the Adaptive Deinterlace window. See Adaptive
Deinterlace window for information on using this dialog box.
Off
Perform no deinterlacing of any kind.
Deinterlace
Figure 30. Deinterlace settings
The deinterlace group has four radio buttons.
Deinterlace settings are applied and stored per-device and are applied to all filters and pins associated
with a device.
Inverse telecine
Telecine video is NTSC video that was originally created on film at 24 frames per second. In the telecine
conversion process, certain fields are repeated in a regular, recurring sequence. If a telecined sequence
is viewed directly on a progressive screen, interlacing artifacts are visible.
The inverse telecine process is the reverse of telecine; it drops the redundant fields and reassembles the
video in a 24 fps progressive format. Interlacing artifacts are 100 % removed. If the video is viewed at 24
fps, you see the exact timing and sequencing that was on the original film. If the video is viewed at 30
fps, every 5th frame is repeated; however, there are no deinterlacing artifacts.
Telecine and inverse telecine only apply to NTSC video. They are not used for PAL and SECAM video. The
Auto and Inverse Telecine buttons are disabled when PAL or SECAM is selected as the video standard.
34 ViewCast

Osprey 240e/450e User Guide
Motion adaptive deinterlace
Motion adaptive deinterlace is an algorithm for deinterlacing pure video (non-telecine) content. It
detects which portions of the image are still, and which portions are in motion, and applies different
processing to each.
Currently Using group
These indicators allow you to see the current algorithm. These are not control buttons; they are readonly indicators. They are mainly useful in Auto Mode, to indicate which algorithm – Inverse Telecine or
Motion Adaptive – is currently being applied. They are also useful in Inverse Telecine mode to show
whether telecine content is present and the Inverse Telecine algorithm is being applied.
The mode currently in use is marked by a green arrow (Figure 31). A mode that is possible under current
control settings but not currently in use is marked by a dark grey arrow. A mode that is not available
with the current control settings is marked by a pale outline arrow.
Figure 31. Current Using settings
With inverse telecine enabled, when telecine content is detected, the five Cine Phase dots show
whether the 3:2 pulldown sequence is shifting. If it is shifting, the green marker shifts. This happens in
mixed telecine/video content, and also in content that was converted to telecine and then post-edited
in the video domain. Whenever a shift happens, there are a few frames that are not deinterlaced. If
these shifts are frequent, you may have to switch to Motion Adaptive deinterlacing for consistent
quality.
When the telecine detector locks the first time in a streaming session, the leftmost Cine Phase button is
green. If the telecine sequence is perfectly coherent, the phase never shifts. Once it does shift, the
absolute phase of the Cine Phase display (which of buttons 1 through 5 is green) is not significant – the
only significant fact is that phase shifts are occurring. When the sequence relocks, all phase buttons are
equally correct.
ViewCast 35

Setting Driver Properties
Motion Threshold
The Motion Threshold slider and edit box adjust the threshold of
difference from spatially and temporally related pixels that is judged to
be motion. If you enter Test Mode and move the slider to the right, the
number of pixels that are considered in motion is greatly reduced. As you
move the slider to the left, the number of motion pixels greatly increases
until nearly the entire screen is considered in motion. The recommended
default is 10.
Smooth Motion
The Smooth Motion option results in more loss of detail in motion areas,
but edges are smoother. Since the eye does not see detail clearly in
areas of motion anyway – whereas edge artifacts are always highly
intrusive – the Smooth algorithm should be preferred for most
applications. The Smooth algorithm uses a bit more CPU.
Note: Both algorithms treat still areas (areas that are not green
in Test Mode) the same way, and there should be no loss of
detail in still areas.
Adaptive Deinterlace window
Use the adjust dialog to adjust the parameters that control motion adaptive deinterlacing (Figure 32).
Note: When the driver is using the Inverse Telecine algorithm, either in Telecine mode or Auto
mode, the Adjust settings have no effect at all, and Test Mode is inoperative.
Figure 32. Adaptive Deinterlace window
The Adaptive Deinterlace window has the following controls.
36 ViewCast

Osprey 240e/450e User Guide
Sharp Motion
The Sharp Motion option makes detail in motion areas sharper, but at
the expense of somewhat jagged diagonal edges.
Test Mode
The Test Mode option causes the motion adaptive algorithm to enter a
test mode that displays motion pixels as bright green dots. The dots are
mainly along edges that are in motion, but if the motion threshold is set
too high there may also be a random distribution of green dots caused
by pixel jitter and instability of the video signal. The extensiveness of the
green areas vary according to the settings of the other adjust controls.
Test mode is always automatically exited when you exit the Adjust
dialog.
In Test Mode, with the Sharp algorithm green speckles are on alternate
lines only, and with the Smooth algorithm they are on all lines.
Restore Defaults
Click this button to restore the default settings.
Help
Click Help to access the user guide.
Close
Click Close to close the window.
If your video format results in exact 2:1 or 4:1 vertical scaling for a particular pin, then all the
video comes from one field. This is the case for uncropped NTSC CIF (320x240) or QCIF (160
x 120). It may be the case for special cases of cropped video as well.
In the PostProcessing sequence as currently implemented, the sharp motion adaptive
deinterlacing algorithm has no effect on single-field streams, since it alters only the field
that these streams do not use. The smooth algorithm operates on both fields and may have
a detectable blurring effect on areas of motion. (Sharp and smooth are set in the Adjusts
subdialog.)
Inverse telecine, if enabled, does not affect the individual fields for a one-field pin; however,
if the pin’s frame rate is 24, the driver detects and removes the frames that are repeats. If
you are streaming multiple pins, and the exact single-field special scaling case holds true for
one pin but not another, different processing is applied to the two pins.
When Auto mode is selected, some kinds of content cause the driver to frequently switch
between Inverse Telecine and Motion Adaptive processing. Content such as title sequences
and commercials are often telecine, but cuts between scenes generally break the telecine
sequence, forcing the driver to resynchronize. It takes it a number of frames to lock on to
the new sequence. The driver drops back to the Motion Adaptive algorithm as soon as it
becomes aware that telecine sync has been lost. However, it may take it several frames to
discover that this has happened; these frames are not correctly deinterlaced.
You should decide whether to use Auto, Inverse Telecine, or Motion Adaptive mode
depending on the type of content you expect.
If the content is consistently telecine, then either Auto or Inverse Telecine is
recommended for perfect recovery of the original progressive format.
If the content is telecine with post-detelecine video-based editing, Auto mode results in
the best overall quality – but several frames may not be deinterlaced every time the pull
down phase sequence has to be relocked.
ViewCast 37

Setting Driver Properties
No-Video Test
Pattern
This control lets you select a pattern to display when no video signal
is present.
Buffers
Requested
The driver indicates the minimum number of video capture buffers
needed to allocate for proper operation.
Diagnostic
Logging
For use by ViewCast Technical Support Only.
Extras …
Click this button to display the Extras dialog box (see Extras).
Device Info …
Click this button to display the Device Info dialog box (see Device
Info).
OK
Click OK to accept the settings.
Cancel
Click Cancel to reject the settings and close the window.
If the content format is a rapidly changing mix of telecine and video, or is all video, or is
of unknown type, the Motion Adaptive setting gives the most consistent results. The
quality of telecine sequences is not the best possible, but there are no instances of
frames not deinterlaced at all due to telecine re-locking.
Device tab
Device controls (Figure 33) are less often used items. Unless specifically noted, changes made on this
page apply to all filters and all video previews and capture pins on the currently selected device. Unless
noted, different settings may be set and stored for different devices.
Figure 33. Device tab
The Device tab has the following controls.
38 ViewCast

Osprey 240e/450e User Guide
Apply
Click Apply to apply the settings.
Help
Click Help to access the user guide.
No-Video Test Pattern
You can select one of four patterns to appear when no video signal is present – 75% color bars,
100% color bars, blue, and black.
You can place a text line on the test pattern. If the Text edit box is empty - no spaces and no text
characters – then no text will exist. Otherwise, whatever you type here, up to 32 characters, displays
on the test pattern.
Click Show board ID info to display the board serial number.
Buffers Requested
The driver can tell DirectShow the minimum number of video capture buffers it needs to have
allocated for proper operation (Figure 34). The client application may ask for a different number of
buffers; in general DirectShow honors the larger of the requests.
Figure 34. Number of Capture Buffers Requested
Buffers are used in a round-robin style. The driver fills a buffer; the client then consumes the buffer,
and releases it when it is done. The buffer then circulates to the driver to be filled with video again.
If the client holds on to a large number of buffers at once, there may be no empty buffers available
to the driver and frames may be dropped. The solution is to allocate a larger number of buffers.
Capture and encoding applications generally need a large number of buffers so they can deeply
pipeline the downstream processing without danger of buffer starvation at the driver. If buffer
starvation is evident, in the form of dropped frames, you can try increasing the number of buffers
allocated for the Capture pin.
Preview video that is directly rendered on the screen does not use deep pipelining and cannot
benefit from it. There has been some evidence that too many buffers for direct rendering can harm
performance.
In that case, on the Capture pin, increase the number of buffers from the default 100 for deeper
pipelining and more resistance to dropped frames.
On the Capture pin, you can reduce the number of buffers to around 5 if the video is going to be
used only for direct rendering. Remember to put the number back to 100 or more for capture or
encoding – 5 may not be enough and may result in many dropped frames.
On the Preview pin, you can increase the number of buffers to 20 or more if you are using it for
capture or encoding rather than direct rendering.
ViewCast 39

Setting Driver Properties
Timecode Video Marking
Refer to the Vertical Interval Timecode (VITC) section of this guide for
more information.
Closed Caption
Timestamping
This control is a workaround to what we currently believe to be a
problem in DirectShow with capture of CC to AVI files. If you attempt
to capture a CC character pair stream along with a video stream to an
AVI file with Normal timestamping, the file becomes extremely large
and the capture fails within a few seconds. AVI-Compatible mode
allows capture of CC to AVI. Unfortunately, the problems with
timestamping mean that time synchronization between the video and
closed caption streams depend on their physical interleaving in the file,
so that time synchronization is quite poor. We do not have a
workaround for this at this time. For all applications other than capture
to AVI, this control should be set to Normal. WME9 among others
requires the Normal setting if CC is used.
Help
Click Help to access the user guide.
Close
Click Close to close the window.
Click Default to return to the default settings.
Diagnostic logging
For use by ViewCast Technical Support only.
Extras
Extras (Figure 35) are features of the AVStream driver that are new, not fully defined, or subject to
change. Extras may also include workarounds to apparent DirectShow issues that are expected to be
resolved fairly soon.
Figure 35. Extras
Extras should be expected to change more frequently than other aspects of the driver.
40 ViewCast

Osprey 240e/450e User Guide
ViewCast 41

Setting Driver Properties
Device Info
Figure 36. Device Info
The Device Info window displays useful information about the capture card and the driver, including
the DirectShow name of the device (Figure 36). Click OK to close the window.
42 ViewCast

Osprey 240e/450e User Guide
Pin Select
The drop-down list has three choices:
Capture
Preview
Both
Render NTSC
Closed Captions
On Video
The driver can render closed captions on video when NTSC video is
selected on the input.
Render Logical
White as
This control group maps white captions to a color other than white.
Captions tab
Figure 37. Captions tab
The Captions tab has the following controls.
ViewCast 43

Setting Driver Properties
CC Pin
This group controls whether the closed caption character pairs
emitted by the DirectShow CC pin are from Field 1 or Field 2 of the
video.
OK
Click OK to accept the settings.
Cancel
Click Cancel to reject the settings and close the window.
Apply
Click Apply to apply the settings.
Help
Click Help to access the user guide.
Capture
When you click Capture, the current captioning settings for the
capture pin are loaded, and changes you make apply only to the
capture pin, not to the preview pin.
Preview
The Preview button works analogously.
Both
When you click Both, changes you make to the captioning setup
apply to both the capture and preview pins. This setting is the
default.
Pin Select
If you like, however, you can have different setups for the two pins. For example, you could enable
cropping on the capture pin but not on the preview pin.
44 ViewCast

Osprey 240e/450e User Guide
Render NTSC Closed Captions On Video
Figure 38. Render NTSC Closed Caption On Video
The 4.5 driver can internally render closed captions on video when NTSC video is selected on the
input (Figure 38). There is a control to select which channel to render (although CC 1 is the only
channel that is commonly used).
This control only affects rendering on video performed internally by the driver. The AVStream 4.5
driver has two additional ways of delivering captions.
First, it exposes a DirectShow-standard CC pin. This pin can be used directly by applications
such as Windows Media Encoder’s scripting facility.
Second, the driver has a proprietary Closed Caption API for use by C++ developers. It
delivers raw captioning data from any CC or Text channel. It also delivers line-interpreted
data from these channels, suitable for a scripting display or for capture to an ASCII file. Is
also delivers XDS – “Vchip” and other ancillary data – in raw form.
Render Logical White As
The control group Render Logical White As (Figure 39) maps white captions to a color other than
white. This feature is a proprietary extension to the Closed Captioning standard. When logical white
is mapped to, for example, red, the CC standard captioning red also works; however, it is not
possible to distinguish “logical white” red captions from “standard colored” red captions. Since
standard colored captions are so little used, this characteristic has little practical effect.
Figure 39. Render Logical White As
ViewCast 45

Setting Driver Properties
CC Pin
Figure 40. CC Pin
This group controls whether the closed caption character pairs emitted by the DirectShow CC pin are
from Field 1 or Field 2 of the video. The DirectShow specification is that CC on a CC pin is always
from Field 1; however, this extension allows application developers to access Field 2 data such as
XDS data (including vchip) via a DirectShow standard pin.
46 ViewCast

Osprey 240e/450e User Guide
Pin Select
The drop-down list has three choices:
Capture
Preview
Both
Enable Logo on
File and Color sub
tab
From this control, enable or disable the logo.
Enable Key Color
on File and Color
sub tab
Control the key color and efficiency effect.
Logo tab
Figure 41. Logo tab
The Logo tab has the following controls.
ViewCast 47

Setting Driver Properties
Weighting on File
and Color sub tab
Set the degree of transparency of the logo.
Position and Size
sub tab
Set the position of the logo and the scale.
OK
Click OK to accept the settings.
Cancel
Click Cancel to reject the settings and close the window.
Apply
Click Apply to apply the settings.
Help
Click Help to access the user guide.
The logo property superimposes a graphic over captured video using the logo property controls
(Figure 41).
Logos have the following characteristics:
Use any RGB-24 bitmap in .bmp file format.
Specify a selectable key color; all parts of the logo graphic with that color are not drawn on
the video.
Use a transparency control to blend the logo graphic with the background video.
Interactively position and scale the logo.
Configure a logo to appear on both captured and previewed video, either simultaneously or
independently.
The logo property controls work best when you are already running preview video. With preview
video running, you can view your changes interactively. (If your application displays capture video in
real time, you can use capture video instead).
It is possible to have different logo settings on each pin, or a logo enabled on one pin but not the
other pin. However, selecting Both applies any logo settings on the File and Color and Position and
Size tabs to both pins simultaneously. The settings on the File and Color tab and the Position and
Size tab are also pin dependent. You can select either the Capture or Preview pin to have
independent settings for each one, or you can select Both to simultaneously apply the settings to
both the Capture and Preview pins.
48 ViewCast

Osprey 240e/450e User Guide
Capture
When you click Capture, the current logo settings for the capture pin
are loaded, and changes you make apply only to the capture pin, not
to the preview pin.
Preview
The Preview button works analogously.
Both
When you click Both, changes you make to the logo setup apply to
both the capture and preview pins.
Pin Select
You can have different setups for the two pins. For example, you could enable the logo on the
capture pin but not on the preview pin, and thereby save some CPU time.
Figure 42. Pin Select
File and Color
Figure 43. File and Color
The Enable Logo checkbox, which is repeated on both sub-tabs, enables or disables logos. If you
disable logos, all your other logo settings are retained for when you re-enable logos.
In Figure 43, the Browse for File button brings up a standard file select dialog. Logo files must be:
In .bmp format with a .bmp filename extension.
In RGB-24 format.
If you have a graphic in another format, edit it with a drawing or photo edit program such as
Windows Paint, and save it as RGB-24.
ViewCast 49

Setting Driver Properties
Enable Key Color
Figure 44. Enable Key Color
You can control the key color and the transparency effect. If preview video is running, you see your
changes interactively.
The key color disappears from the graphic so the underlying video shows through unchanged.
If you disable Enable Key Color, all colors are displayed.
If you enable the checkbox, key coloring is activated. The five radio buttons are activated. You can
select one of four standard colors – dark gray, medium gray, cyan, or magenta – or a custom color. If
you select Other, for a custom color, the three edit boxes – Red, Green, Blue – are activated, and
you can enter any color value into these boxes.
Key colors to identify transparent portions of logos can be exact or inexact. The Tolerance control
(Figure 45) determines this. If Tolerance is 0, then all key colors have to exactly match the Red /
Green / Blue values shown in the key color control group. If Tolerance is nonzero, then the Red /
Green / Blue values can deviate from the key color by the tolerance value and still be treated as
being equal to the key color. For example, if Tolerance is set to 5, and the key color is set to grey
(192, 192, 192), then pixels in the bitmap with value (187, 187, 187) are also transparent.
Figure 45. Tolerance control
50 ViewCast

Osprey 240e/450e User Guide
Weighting
The degree of transparency of the logo is variable through 101 steps. If the setting is 100, the logo is
opaque. If the setting is 0, the logo is completely transparent. If you have set a key color, the
weighting or transparency value is applied only to pixels that do not match the key color and hence
are always completely transparent. You can set the weighting either with the slider or by editing the
number in the text box (Figure 46).
Figure 46. Weighting
Figure 47. Logo position
Position and Size
The Position and Size sub-tab lets you position and scale the logo. It is strongly recommended that
you have preview video running when you use these controls.
The large indented rectangular area at the top of this sub-tab represents the video area where the
logo can be positioned. The smaller rectangle represents the logo. To position the logo, click on the
logo rectangle and drag it to the new position.
The four Nudge buttons, L, R, U, and D, move the logo left, right, up, or down exactly one pixel at a
time on the output video. Since the positioning rectangle may be scaled down from the full video
size, the Nudge buttons allow more accurate positioning of the logo.
The slide control at the bottom right of this sub-tab controls the scaling of the logo. The [1X Scale]
button returns the size to the original size of the .bmp graphic. The quality of a scaled image will not
be as good as the quality of the 1X image. We recommend that wherever possible for production
work, you prepare artwork of the exact size at which it will be used.
ViewCast 51

Setting Driver Properties
Figure 48. Logo position and size
Because the Logo tab is used to set up a logo interactively on live video, its behavior is
different from the behavior of the other tabs. The driver updates the controls on the Logo
tab immediately, without waiting for you to click Apply. You see Apply enabled after you
select a different pin spec. As soon as you make any change to any logo control, Apply
becomes disabled and stays that way until you change to another pin spec.
If you set up a logo with video set to one size, then resize the video, the logo is not scaled
correspondingly. This may not be desirable, since you may want the logo to expand to the
same scale as the video window. Click 1X Scale to restore the logo to its unscaled size or
import a logo prescaled to the new desired size to ensure the best image quality.
52 ViewCast

Osprey 240e/450e User Guide
Pin Select
This field has three choices:
Capture
Preview
Both
Size and Crop tab
This tab (Figure 49) has two functions. It sets the default output size, whether or not cropping is
enabled. It enables and disables cropping, and sets the cropping area.
Cropping means removal of unwanted video around the edges of the incoming image. For example,
if the incoming video is letterboxed, with an aspect ratio wider than 4:3, you can crop the black
slivers at the top and bottom of the image and capture just the active portion.
Figure 49. Size and Crop tab
The Size and Crop tab has the following controls.
ViewCast 53

Setting Driver Properties
Reference Size
Displays the full uncropped size of the incoming video. This read-only
information is determined by settings made on other tabs: the Input
tab and the RefSize tab.
Granularity
This control helps you choose crop and output sizes that observe
those restrictions
Enable Cropping
When enabled, your video is cropped to the indicated boundaries.
When disabled, your video is not cropped regardless of any crop
settings you may have made previously.
Default Output
Size
Select the height and width of captured video.
OK
Click OK to accept the settings.
Cancel
Click Cancel to reject the settings and close the window.
Apply
Click Apply to apply the settings.
Help
Click Help to access the user guide.
Capture
When you click Capture, the current crop settings for the capture pin
are loaded, and changes you make apply only to the capture pin, not
to the preview pin.
Preview
The Preview button works analogously.
Both
When you click Both, changes you make to the crop setup apply to
both the capture and preview pins. This setting is the default.
The default output size is the video size that appears in the DirectShow pin properties dialog as the
default choice. It is a pathway for setting a custom or nonstandard video size in applications that do
not have custom video sizing controls built into them.
Pin Select
You can have different setups for the two pins. For example, you could enable cropping on the
capture pin but not on the preview pin.
Reference Size
The reference size information is always read-only on this dialog tab. It is determined by settings
made on other tabs – specifically, the Input tab, where a 525-line or 625-line standard is selected,
and the RefSize tab, where Square Pixel or CCIR proportioning is selected. The read-only text box
describes which of these options is currently governing the reference size.
The reference width and height represent the full uncropped size of the incoming video. Your crop
settings are interpreted relative to this reference size. For example, if you are capturing 525-line
video, with a reference size of 640 x 480, and your crop rectangle is (0, 0, 640, 480), and then your
video is effectively uncropped. But if you are capturing 625-line video, with a reference size of 768 x
576, the same (0, 0, 640, 480) crop specification truncate the right and bottom edges of the video.
54 ViewCast

Osprey 240e/450e User Guide
Granularity
Alignment
Format
Horizontal
Vertical
Horizontal
Vertical
YUY2
4 1 2
1
UYVY
4 1 2 1 I420
4 2 2 1 YVU9
4 4 2 1 RGB555
4 1 2 1 RGB24
4 1 2 1 RGB32
4 1 2 1 Greyscale
4 1 2 1 [none]
4 1 2 1 [any]
4 4 2
1
Granularity
Osprey products impose restrictions on the possible width and/or height of the video, referred to as
granularity restrictions. For example, the I420 capture format requires that the capture width be a
multiple of 16 and the capture height be a multiple of 2. When video is cropped, they also impose a
requirement for alignment of the left side of the cropped video field. The specific requirements for
the 4.5 driver are changed from the 3.X.X driver versions.
The granularities for all products in Post Processing Mode are as follows:
The Granularity controls show you set restrictions for the selected video format, and assist you in
choosing crop and output sizes that observe those restrictions. Since alignment is the same for all
formats, there is no control for it.
Figure 50. Capture drop-down list
Because the preview and capture pins may be set to different color formats, they may have different
granularities. When the Size and Crop tab is opened, the Capture and Preview fields are initialized to
the current or most recently used format for the selected pin (Figure 50).
If your Pin Select setting is Capture, only the Capture granularity box is enabled; similarly for
Preview. The two small read-only edit boxes to the right of the group show the horizontal and
vertical granularities for the selected color format for the selected pin type.
ViewCast 55

Setting Driver Properties
If your Pin Select setting is Both, both the Capture and Preview fields are enabled, and the two fields
to the right of the group show the worst-case granularity that works for both the Capture and
Preview color formats. For example, if the Capture color format is I420 and the Preview color format
is YUY2, the resultant granularity is I420’s more stringent 4 x 2 requirement.
The granularity and alignment settings affect values you subsequently enter for crop width, crop
height, and default output width and height – they are adjusted to these granularities. Adjustments
are made when you click Recalc, Apply, or OK.
You can change the video format in the drop-down list, so that granularities are set for a different
format. Note that this does not automatically cause the pin to have this format – you still have to
select that format using the Pin Properties window or via your application. It just ensures the sizes
you select work correctly when you do select this color format in the application.
If you set up your crops with a less restrictive granularity (for example, YUY2) and then capture with
a more restricted granularity (for example, I420), the driver may automatically adjust the video crop
and/or output size without notifying you. Or, the capture may fail. You may also find that in the Pin
Properties window the default size you wanted is not listed – because it is not a legal size for this
format.
If you select [none] as the color format(s), the minimum granularity and alignment adjustments are
applied to your crop and size data.
If you select [any] as the video format, the coarsest granularity required by any of the available
formats is applied to your crop and size data. In practice, [any] is the same as YVU9, that is, 4 x 4.
You are guaranteed your crop and output sizes will never be adjusted, regardless of what video
format you select now or in the future.
Enable Cropping
If you disable Enable Cropping, your video is not cropped regardless of any crop settings you may
previously have made. The edit boxes showing the edges, height, and width of your crop is read-only
and shows settings for full-frame, uncropped video.
Figure 51. Enable Cropping
If you enable Enable Cropping, your video is cropped to the indicated boundaries. Previously stored
crop settings are recovered. The edit-boxes are enabled. The Top and Left boxes set the top left
corner of the cropping rectangle. The Right and Bottom boxes set the bottom right.
You can apply cropping to either the Capture pin or the Preview pin independently, or can be
applied to both simultaneously, depending on the currently selected Pin Select option.
56 ViewCast

Osprey 240e/450e User Guide
Recalc button
The Recalc button recalculates whichever of the six crop edit boxes you have not filled in. For
example, if you set Top, Left, Width, and Height, Recalc calculates Right and Bottom. If you set Top,
Left, Right, and Bottom, Recalc calculates Width and Height. Whichever of the vertical group was
least recently touched, is the item that is recalculated; similarly with the horizontal group. If you
have only changed one box of the group, you can force the order of recalculation by clicking one of
the other two boxes. For example: If you have changed Left, and you want to preserve Width (but
alter Right), then click on Width before Recalc. If you have changed Left, and want to preserve Right
(but alter Width), then click on Right before Recalc.
If your specification results in a crop rectangle that is too large or too small, Recalc adjusts it
appropriately. If it can’t set up an allowed size by changing just the third most recently clicked
setting, then it tries to change the second most recently clicked setting instead or as well. If it has to,
it changes your most recently changed setting.
Recalc also factors in granularity and positioning requirements as required.
In the Default Output Size group, Recalc changes the default output size if Auto Size is checked. If
Auto Size is not checked, Recalc leaves the output size alone.
Note: The crop width and height are subject to the granularity requirements of the selected video
format, as explained in the previous section. For example, if your video format is I420 and
you try to set a crop width of 360, it gets adjusted down to 352.
If you enable cropping, enter in some custom settings, and then disable cropping, an uncropped
specification is displayed and your settings disappear from view. However, the driver does
remember your custom settings, and if you enable cropping again, they reappear.
Versions 4.2.0 and later of the Osprey AVStream driver can upscale cropped video, up to the
reference size.
Cropping rectangles are frame-based rather than field-based. Thus if a crop rectangle is set up
defining a 320 x 240 area, then a capture of video sized at 320 x 240 results in video being captured
from two fields. You may therefore see interlacing artifacts in the captured video, unless a
deinterlacing filter is applied. This may be initially confusing since most users typically think of 320 x
240 video captures only coming from a single field and thus would not have interlaced artifacts.
However, in this case, the source video is only 320 x 240 in size (i.e. the crop rectangle) and thus any
captured video that is greater than the field height within the crop rectangle (equal to ½ cropped
ROI height) results in a scaled capture of multiple fields. Also, the driver uses both fields whenever
they are needed to interpolatively scale the output with best possible accuracy.
ViewCast 57

Setting Driver Properties
Default Output Size
Figure 52. Default Output Size
The standard DirectShow Properties dialog allows you to select the height and width of captured
video (Figure 52). If you click Auto Size, your default video size is sized automatically to your crop
settings. The three radio buttons, 1X Crop, 1/2X Crop, and 1/4X Crop, determine whether the output
size is scaled down from the crop size.
Example 1: If you are running standard 640 x 480 NTSC video, and the Enable Cropping checkbox is
not checked, your crop size is 640 x 480. With Auto Size checked, and the 1X Crop radio button
selected, your default size is 640 x 480; with 1/2X Crop, 320 x 240; and with 1/4X Crop, 160 x 120.
Example 2: If you have enabled cropping with size 320 x 240 (one quarter of the full video area), the
default Auto Sizes are as follows: 1X, 320 x 240; 1/2X, 160 x 120; 1/4X, 80 x 60.
If you leave Auto Size unchecked, the default size radio buttons are disabled and the height and
width edit boxes are enabled. You can set any default size with the following two restrictions:
Since the driver does not upscale video, the default size must be smaller than the crop size.
For example, if the crop size is 320 x 240, you cannot set default output size 400 x 300.
Sizes are subject to the granularity requirements of the selected video format, as explained
in the Granularity section above. For example, if your video format is I420 and you try to set
a default width of 360, it gets adjusted down to 352 as soon as you click on another control.
Pin Properties dialog default entry does not appear in the default VFW/DirectShow mapper dialog.
Thus, unless a VFW application, like Virtual Dub, specifically allows for custom resolutions, the VFW
app is only able to select from the options the VFW/DirectShow mapper lists.
58 ViewCast

Osprey 240e/450e User Guide
AVStream driver reference information
DirectShow technology uses terms with specific meanings. For example, filter, pin, driver and device
appear frequently when discussing DirectShow media standards. Figure 53 depicts the relationship
of DirectShow terms as they apply to Osprey hardware and drivers.
Figure 53. DirectShow
At the bottom of this diagram are one or more physical Osprey hardware devices. All Osprey devices
of a given type (such as Osprey 230 or Osprey 560) are controlled by a single Osprey binary, the
Osprey AVStream driver. For each physical device the AVStream driver creates one logical Video
Device and one logical Audio Device.
On top of each Osprey logical Video Device, one or more Video Filters is created. If the SimulStream
option is not installed, there is a single Video Filter for each Video Device. If SimulStream is installed,
there can be multiple Video Filters for each Video Device.
The distinction between Device and Filter is important mainly to SimulStream users. For nonSimulStream users, Device and Filter effectively mean about the same thing. For SimulStream users,
each SimulStream Filter acts as a virtual device that can be accessed by name and can deliver a
separate video stream with its own independent control settings.
When SimulStream is enabled, some functions and capabilities are device-level, and others are
filter-level. Examples of device-level functions are input select, and the controls for brightness,
contrast, hue, saturation, and sharpness. These are closely tied to the underlying hardware of the
device, which inherently allows only one input to be selected at a time, and one set of hardware
control settings to be applied. Examples of filter-level functions are crop, logo, and caption settings,
which can be different for each video filter, and in fact for each pin of each filter. Some other
capabilities such as deinterlace and software gamma correction could logically be either device-level
or filter-level, but are treated as device-level for practical reasons.
ViewCast 59

AVStream Driver Reference Information
Each Video Filter has one Capture Pin and one Preview Pin. A pin is the source or destination of a
video or audio stream. A video capture pin is a general purpose pin used for capture to a file, an
encoder, an on-screen renderer, or any other destination. A video preview pin is mainly intended for
on-screen rendering. Each Osprey Video Filter also has a Closed Caption pin and a Vertical Blanking
Interval (VBI) pin for capture of specialized ancillary data.
On top of each Osprey logical Audio Device, one Audio Filter is created, with one or more pins
capable of sourcing one or more audio streams. There is not much practical distinction between an
Audio Device and an Audio Filter in either the SimulStream or non-SimulStream cases.
Both devices, filters, and pins may have associated Properties. Properties are control parameters
that can be read from or written to the component. Some Property Pages are standard Windows
DirectShow pages. For example, the Property Page for an individual pin is a standard DirectShow
page. The Video Proc Amp and Video Decoder Pages are also DirectShow-standard. The rest are
proprietary to the Osprey driver.
As a user, you interact with Property through visual Property Sheets, Property Pages, or Property
Tabs that are part of a tabbed dialog. As a programmer, you can set properties directly from within
the code of your application, using either the standard DirectShow API or the custom Osprey
extension API that is available from ViewCast in a software development kit (SDK).
60 ViewCast

Osprey 240e/450e User Guide
Post-Processing mode
The Osprey 240/450e 4.5 driver operates in Post-Processing mode only. Post-Processing mode
enables a number of filters, transforms, and renderers within the driver, and supports the
SimulStream option.
Figure 54. Post-Processing mode
Figure 54 shows a possible graph of video data flow within the driver in Post-Processing mode. This
particular graph assumes that SimulStream is activated so that more than two video pins are
possible. Four video output pins are represented by the pale yellow round rectangles:
The upper pin produces scaled and/or cropped I420 video, with a logo and Closed Captions
rendered on the video.
The second pin produces scaled and/or cropped YUY2 video with a logo but no captioning.
In this particular graph, the upper two pins are scaled and cropping identically, so a single
scaling operation can service both pins.
The third pin has a different scale/crop specification, so its video runs through a separate
scaler/cropper. The video is captioned and converted to Rgb15.
The lower pin produces unscaled, uncropped D1 YUY2 video with no logo or captioning.
The video routed to all pins is in this example deinterlaced and gamma-corrected. Deinterlace or
inverse telecine if used are always applied globally to all pins, as is gamma correction. Scaling,
cropping, logoing, captioning, and color format conversion are performed separately for each pin.
Post-processing mode has the following capabilities:
With SimulStream disabled, there is still a maximum of one capture pin and one preview pin
on the device at a time. However, there are no restrictions on combinations of video size
ViewCast 61

AVStream Driver Reference Information
and rate, color formats, or crop settings. The driver color converts and copies video as
required to deliver up to 25 or 29.97 frames per second in any format to the two pins.
With SimulStream enabled, there can be multiple capture pins and multiple preview pins.
Each capture and preview pin pair is placed on a separate filter. The maximum number of
each type of pin is the same as the maximum number of filters you have elected to expose
in the SimulStream control group. Any pin can produce video at any size, rate, color format,
and crop setting. Of course, practical limits are imposed by the bandwidth of the machine.
The following post-processing filters can be applied, with or without SimulStream enabled:
Motion adaptive deinterlacing and inverse telecine
Gamma correction
Logos
On-video caption rendering
Some of these filters operate globally on all filters and pins of a device, and some operate on a perfilter or per-pin basis:
The Video Proc Amp controls – brightness, contrast, hue, saturation, and sharpness – are
applied globally in hardware to the incoming video.
The basic reference size – CCIR–601 or square pixel – is established in hardware. Horizontal
delay is also performed in hardware.
Deinterlace / inverse telecine and gamma correction are applied to all filters and pins on the device
and have the same settings for all filters and pins. (Adaptive deinterlacing does not affect quality of
single field 2:1 or 4:1 exact-scaled video, so long as the “sharp” algorithm is used. Inverse telecine
does not affect single field exact-scaled video.)
Crop, logo, and caption settings can be different for each pin of each filter, and the driver maintains
separate settings for each filter and pin.
Video size, color format, and frame rate can also be different for each pin. It is the responsibility of
the application to maintain these settings.
62 ViewCast

Osprey 240e/450e User Guide
Efficient Video Rendering
The following information is primarily useful to developers, but may also be helpful for those who
want to fine-tune existing applications. If you are seeing poor rendering performance, in terms of
either excessive CPU utilization or jerky, stuttering video, read this section.
There are at least four basic ways to render video from the capture driver onto the screen. They vary
greatly in their efficiency, and applications do not always make the best choice of renderer.
In these descriptions it is assumed that the AVStream driver’s Preview Pin is being used. The results
would be the same if the Capture Pin were used instead.
Preview Pin to Video Renderer
Figure 55. Video Renderer
Video Renderer is the oldest and simplest DirectShow renderer. It does not use DirectDraw in the
rendering process, which makes it substantially slower than VMR7 described below. It is the default
rendering pathway that is chosen when an application says Render without specifying a preferred
pathway. For this reason, many applications deliver unnecessarily slow rendering performance.
Video Renderer works best when your output format is RGB rather than YUV, with the RGB format
matched to your screen depth. On most modern systems that means RGB32 is the preferred format.
If a YUV format is used, an extra filter, AVI Decompressor, will be inserted into the graph to convert
the YUV to RGB. The driver can do this conversion faster internally.
Preview Pin to Overlay Mixer to Video Renderer
Figure 56. Overlay Mixer to Video Renderer
Compared to a direct connection of Preview Pin to Video Renderer, the combination of Overlay
Mixer plus Video Renderer provides performance that is …different. It is hard to be more specific
than that without reference to specific machines; refer to the data tables below.
This is the only pathway that renders closed captioning correctly when a DShow CC or VBI pin is
used rather than the driver’s internal rendering. For CC rendering, the output of the Line 21 filter
connects to an input of the Overlay Mixer.
The best video format to use with Overlay Mixer is YUY2.
ViewCast 63

AVStream Driver Reference Information
Preview Pin to VMR7
Figure 57. Video Mixing Renderer 7
VMR7 is short for Video Mixing Renderer 7. VMR7 is a newer renderer that is generally much faster
than the old Video Renderer. When the driver is running in Direct Mode, VMR7 uses an efficient
DirectDraw configuration to render with almost no CPU overhead, especially when YUY2 video is
used. When the driver is running in PostProcessing Mode, DirectDraw is not used but it is still the
fastest renderer.
Unfortunately, VMR7 is not the default video renderer in building a filtergraph – an application must
explicitly ask for VMR7 in its graph for it to be used. This causes many simpler applications to render
video much less efficiently than they might.
VMR7 works best with YUY2 video and there is usually little reason to use any other format. It will,
however, work fairly well with the RGB format – usually RGB32 – that matches the current screen
depth. We recommend letting DirectShow choose the video format. It generally makes the correct
choice. In particular, on some (usually older) systems, if two video frames are to be rendered with
VMR7 at the same time, only one can be YUY2; other(s) are RGB, with a conversion filter inserted
into the graph if necessary.
We do not provide an RGB24 option on the preview pin for use with 24-bit screens because on at
least some display adapters the rendering of RGB24 to VMR7 is incorrect.
Note: VMR7 cannot be used when closed captions are to be rendered from the driver’s DShow-
standard CC or VBI pin – use the Overlay Mixer to Video Renderer pathway instead. If the
driver’s internal rendering is used, the VMR7 works and is recommended.
64 ViewCast

Osprey 240e/450e User Guide
YUY2
the Osprey driver’s preview pin in YUY2 format
RGB15
the Osprey driver’s preview pin in RGB15 format
RGB32
the Osprey driver’s preview pin in RGB32 format
VR
old Video Renderer
VMR7
Video Mixing Renderer 7
VMR9
Video Mixing Renderer 9
AVI
AVI Decompressor
OVL
Overlay Mixer
Preview Pin to VMR9
Figure 58. Video Mixing Renderer 9
Video Mixing Renderer 9 is the newest video rendering method and the one on which Microsoft
supposedly is basing its future development. The intent is to combine the functionality of the
Overlay Mixer plus Video Renderer in one module that takes advantage of the latest developments
in DirectShow. We are finding that at its present stage of development, with our hardware, VMR9
does not achieve the high efficiency of YUY2–to–VMR7. Also, although VMR9 is supposed to
function as an overlay mixer for rendering captioning from the driver’s DShow CC or VBI pin, we
have never seen it function correctly.
Some Data Points
The following measurements are CPU percent on two machines – a fairly old P4, and a dual Opteron
244. The video size is 640 x 480. The screen depth is 32 bits. The following abbreviations are used:
The PostProc results are shown in two modes: with all post processing filters turned off, and with
the adaptive deinterlace filter turned on.
Generally these results show the following:
The great desirability of newer machines for video processing. This has to do with system
architecture more than raw CPU speed.
VMR7 is generally fastest. If you don’t need the driver’s PostProcessing, then Direct Mode
with VMR7 is especially fast.
Results for specific pathways can be inconsistent across different machines. For example, on
the P4, YUV to VR is faster than RGB to VR; on the Opteron, RGB is faster.
In evaluating these benchmarks, remember that all of them involve video rendering to the screen.
Depending on the exact pathway, video rendering can result in CPU utilization that is a lot higher
than for other capture scenarios. Specifically, writes to display adapter memory that are performed
by the CPU rather than with direct memory access (DMA) operations may be inordinately slow. If
you are streaming video or capturing to file you do not see numbers this high. If you are encoding
ViewCast 65

AVStream Driver Reference Information
video, you may see high CPU utilization, but much or most of it is from the encoder rather than the
driver.
66 ViewCast

Osprey 240e/450e User Guide
Video standards and sizes
Video standard refers to whether the video signal format is NTSC, PAL, or SECAM. Depending on the
exact product version you have, some or all of the following standards are available:
525-line formats:
NTSC-M – North America
NTSC-J – Japan
625-line formats:
PAL-B, D, G, H, I – many countries in Europe and elsewhere. B, D, G, H, and I refer to five
nearly identical subformats.
Full-sized NTSC-M and NTSC-J have 525 lines total, 480 lines visible, per frame and a display rate of
59.94 fields per second, or 29.97 interlaced frames per second. Although capture-to-PC applications
normally use only 480 video lines, the full NTSC frame actually contains 485 video lines, and the
AVStream driver provides a control to capture all 485 lines. The control is located on the RefSize
property tab.
Full-sized PAL and SECAM have 625 lines total, 576 lines visible, per frame and a display rate of 50
fields per second, or 25 interlaced frames per second.
The standard frame sizes are different for NTSC and PAL. For example, the half-frame size in pixels is
360 x 240 for NTSC, and 360 x 288 for PAL. The driver automatically adjusts the reference size and
default size for the video standard you are using.
Color formats
The Color format is the arrangement of data bits representing the colors of each pixel. For example,
in the RGB555 format, each pixel of data is stored as 5 bits of red, 5 bits of green, and 5 bits of blue
color information.
Video delivered by the Osprey board to the system is in uncompressed format. It is possible to
compress the video at a subsequent stage of processing. However, this dialog field refers specifically
to the uncompressed raw video that the board delivers to the system.
The Osprey AVStream driver supports the following capture pin formats.
YUY2 and UYVY – Each pixel is represented with a total of 2 bytes (16 bits) of data. The data
is encoded as separate data for luminance (intensity) and chrominance (color). This mode is
mainly used as an input to software compressors. See YUV format details.
YUV12 planar – Also known as I420. This is a complex format in which there are in the
aggregate 12 bits of data per pixel. Each pixel has 8 bits of luminance data. Each group of 4
adjacent pixels arranged in a 2 x 2 square shares two bytes of chrominance data. See YUV
format details.
YVU9 planar – Similar to YUV12 planar, except that there are in the aggregate 9 bits of data
per pixel, and each byte pair of chrominance data is shared by 16 adjacent pixels arranged in
a 4x4 square. See YUV format details.
ViewCast 67

AVStream Driver Reference Information
RGB32 – Each pixel has four bytes (32 bits) of data – one each for red, green, and blue, plus
one byte that is unused. The pixel has 256 shades of each of the three colors, for a total of
16.7 million colors.
RGB24 – Each pixel has three bytes (24 bits) of data – one each for red, green, and blue. This
is another “true color” mode with 16.7 million colors.
RGB555 – Each pixel has two bytes (16 bits) of data. There are 5 bits each of red, green, and
blue data; the sixteenth bit is unused. This is a “high color” mode, also known as “5:5:5.”
RGB8 (Greyscale) – The Osprey AVStream driver uses the RGB8 format for greyscale video.
RGB8 is a palletized format. Each pixel is represented by one byte, which indexes one of 256
colors in a color palette specified by the driver. The Osprey driver sets the color palette to
greyscale entries, and captures “Y8” luminance-only data.
YUV format details
YUY2, UYVY, YVU9, and YUV12 are YUV formats. In these formats, each pixel is defined by intensity
or luminance component, Y, and two color or chrominance components, U and V. Since the human
eye is less sensitive to color information than to intensity information, many video formats save
storage space by having one luminance byte per pixel while sharing the chrominance byte among
two or more pixels. YUV is also similar to the color encoding used for analog color television
broadcast signals.
YUY2 mode, sometimes referred to as 4:2:2 packed mode, consists of a single array of mixed Y, U,
and V data. Each pixel has one Y (intensity) byte. Each pixel shares its U and V bytes with one of the
pixels horizontally next to it.
YUY2 uses the same number of aggregate bytes per pixel as RGB15, which is two. However, YUY2 is
more efficient than RGB15 because it stores relatively more of the intensity information to which
that the human eye is most sensitive.
UYVY mode is similar to YUY2 except that the bytes are swapped as follows:
YVU9 and YVU12 are “planar” modes – the Y, U, and V components are in three separate
arrays. It is easiest to explain the format with an example: Let’s say you have a 320 x 240
YVU9 format. The buffer has 320 x 240 bytes of Y data, followed by 80 x 60 bytes of V data,
followed by 80 x 60 bytes of U data. So each U and each V byte together contain the color
information for a 4 x 4 block of pixels.
Similarly, a 320 x 240 YUV12 format has a 320 x 240 Y array, followed by a 160 x 120 U array,
and then a 160 x 120 V array.
Note: In the I420 format used by Osprey, the order of the U and V arrays is reversed from the
order in the YVU9 format.
68 ViewCast

Osprey 240e/450e User Guide
Closed captioning (CC)
The Osprey AVStream driver supports NTSC closed captions in three separate ways.
Through standard DirectShow CC and VBI pin.
By rendering captions directly onto video on the capture or preview pin. The captioned
video can be streamed, written to file, or rendered directly.
Through an Osprey custom property.
On products other than the Osprey 530/540/560, the driver also provides PAL/SECAM captions as
well as teletext data in raw form via the VBI pin (not through the CC pin). Refer to the next section
on Vertical Blanking Interval (VBI) Capture for more information. The rest of this section is specific
for NTSC captioning only.
Captioning via CC or VBI pins
Figure 59. CC or VBI pins
The driver supports the standard DirectShow CC and VBI pins. The CC character pair data can be
streamed to applications such as Windows Media Encoder 9, or rendered directly to the screen
using the DShow Overlay Mixer filter. The 4.5 driver can be set to output CC field 2 character pairs
on the CC pin, instead of the standard CC field 1 data. XDS (vchip) data is embedded in the field 2
stream.
The GraphEdit filtergraph shown here displays CC rendered onto preview video. The Overlay Mixer
combines the CC overlay with the preview video, which is then rendered onscreen. It is also possible
to capture the character pair stream as a standard stream of an AVI file, (although there will be
problems with timestamping and synchronization); or, to directly manipulate the CC stream in a
standard way with a custom application.
Our testing with the current version of DirectX 9 indicates that closed captions do not render
properly with the VMR9 renderer in place of the Overlay Mixer / Video Renderer combination.
Therefore, the default Video Renderer in combination with Overlay Mixer should be used.
When SimulStream is not installed, the driver supports two CC pin instances. One could be
associated with the video capture stream, the other with the preview stream. In practice, a
DirectShow Smart Tee Filter can be inserted into the graph to make any number of VBI pins. When
SimulStream is installed, you can have two CC pin instances per SimulStream filter.
ViewCast 69

AVStream Driver Reference Information
The driver has three built-in user-accessible controls that affect Closed Captioning.
On the RefSize property page, in the control group shown below, 480-line video must be
selected and the radio button to start video at either Lines 23/286 or Lines 22/285 must be
selected.
On the Captions property page, most of the controls relate to the driver’s internal direct
rendering on video. The following control selects field 1 or field 2 as the field to be streamed
through the CC pin. This control is per-filter; both available pins on the filter are set the
same way. For SimulStream users, the pins on different filters can have different settings.
On the Device -> Extras… property page, you have the choice to set with Normal or AVI-
Compatible timestamping of Closed Caption samples.
This control is a workaround to an apparent problem in DirectShow – if you attempt to capture a CC
character pair stream to an AVI file with Normal timestamping, the file becomes extremely large and
the capture will fail within a few seconds. The AVI-Compatible mode allows capture of CC to AVI.
Unfortunately, the problem with timestamping means that time synchronization between the video
and CC streams depend on their physical interleaving in the file, so that time synchronization is
poor. If the AVI file is set up to be non-interleaved, synchronization is not good. If the AVI file is set
up to be interleaved, synchronization is poor.
For all applications other than capture to AVI, this control should be set to Normal. WME9 among
others requires the Normal setting if CC is used.
Windows Media Player does not play back an AVI file with an embedded CC stream. The following
GraphEdit filtergraph plays back an AVI file containing a video stream plus a CC stream, with the CC
rendered on the video:
Direct CC rendering on video
The driver can render closed captions directly onto capture or preview video. The captioned video
can be encoded, written to file, or rendered directly to the screen.
70 ViewCast

Osprey 240e/450e User Guide
CC streaming interface
The driver supports an Osprey custom property which provides the closed caption character stream
for use by custom applications. The Osprey filter named CCLineInterp.ax, supplied with the driver
package, provides user-mode support for this captioning mode. The Osprey sample applet named
CCChannels.exe, also supplied with the driver package, demos a CC line interpreter and XDS (vchip)
extraction and display. Both the filter and the applet are provided in source code form in the SDK.
Vertical Interval Timecode (VITC)
Vertical Interval Timecode (VITC) data is embedded in the Vertical Blanking Intervals (VBIs) of some
video content. Timecodes mark each frame with an hour / minute / second / frame number marking
that can be use for frame-precise editing.
Figure 60. ActiveMovie Window
The current Osprey VITC implementation is preliminary in nature. The features and method of
implementation are subject to change. We invite comments on the timecode-related capabilities
that you need for your application.
Osprey’s approach to VITC is to invisibly watermark the video bits of each outgoing video frame with
its timestamp data. The illustration shows a timecode extracted from a watermarked frame and
rendered as text on the video. Four elements are used to produce it:
The device extracts timecode data from the vertical blanking interval (VBI) waveform.
The driver watermarks timecode into the video preview or capture pin’s output data.
A custom filter decodes the watermark from the video and renders it.
A GraphEdit graph combines the required filters.
The Osprey Timecode Filter resides in the module TCOverlay.ax and is installed and registered as
part of the standard driver installation. The source code for this filter is included in the Osprey
AVStream SDK.
The Osprey Timecode Filter also exposes to applications a custom property and callback function
that allows it to return the VITC data for each frame along with the frame’s timestamp to the
ViewCast 71

AVStream Driver Reference Information
application. This capability requires custom programming. Refer to the Osprey AVStream SDK Users’
Guide. A sample SDK applet named TCApp illustrates the interface.
Figure 61. Timecode Video Marking
Timecode stamping must be enabled in the driver before it can be used, and the field and line
number correctly set. To access the controls, go to the Device property tab and click Extras…
It is recommended that timecode marking be disabled when not in use, especially the auto search
feature – on a slow machine it uses several percent of CPU bandwidth – especially if timecodes are
not present.
Note: VITC and LTC – Longitudinal Timecode – are two distinct encoding systems, and this driver
supports only VITC.
A suggested reference on timecode is Timecode: a user’s guide – 3rd ed., John Ratcliff, Focal Press,
1999.
Vertical Blanking Interval (VBI) capture
The Osprey AVStream driver provides DirectShow-compatible VBI pins. VBI data includes Vertical
Interval Timecode (VITC) in both the NTSC and PAL worlds. In NTSC, line 21 Closed Captioning
(although it is part of the video interval rather than true VBI data), is commonly treated as VBI data.
In PAL, World Standard Teletext (WST) is encoded in the VBI data region.
The driver delivers VBI data as raw waveforms, which are then decoded by external DirectShow
filters. DirectShow provides three filters under the classification “WDM Streaming VBI Codecs” that
will decode data from VBI pins:
CC Decoder
NABTS/FEC VBI Codec
WST Codec
With the Osprey AVStream driver, either the CC pin or the VBI pin can be used to obtain closed
caption data. If the VBI pin is used, an extra filter is required to turn the raw waveform into CC
character pairs.
When SimulStream is not installed, the driver supports two VBI pin instances. In practice, a
DirectShow Smart Tee Filter can be inserted into the graph to make any number of VBI pins. When
SimulStream is installed, multiple VBI pins are allowed.
72 ViewCast

Osprey 240e/450e User Guide
The audio driver
Setup and control for audio are much simpler than for video.
Selecting the audio source and input volume
The audio source is set using the Osprey mixer driver interface. Most applications, including the
Windows Media Encoder applications, interface to the mixer driver directly and expose the look and
feel specific to that application. However, the default Windows interface to the mixer driver can also
be used. There are two simple methods for getting to the mixer source and volume control dialog
box.
The easiest method for accessing this interface is to right click the speaker symbol on your
taskbar (typically on the bottom right-hand side of your screen). Then select the Open
Volume Control option (Figure 62). (There is a checkbox in Control Panel Sounds and
Audio Devices to make this icon appear.)
If you do not see the speaker symbol, click Start on the Start Menu, select Start All
Programs Accessories Entertainment Volume Control.
Either of these two methods brings up the audio mixer interface for the audio playback device, as
shown below.
Figure 62. Open Volume Control
Figure 63. Recording Control
ViewCast 73

The Audio Driver
To get to the Osprey audio capture (recording) device, select Properties under Recording Control
options menu. This opens the Properties dialog. Click on the Mixer device drop-down list at the top
to see the list of audio input and output devices, including one or more Osprey cards. When you
have chosen the device, click OK, and you will be returned to the Recording Control display (Figure
63).
The Osprey device is not a mixer in that it does not allow for mixing the various audio sources.
Therefore, when one audio input is selected, any other input previously selected becomes
unselected. The Select checkbox at the bottom of each source sets which source is actually being
used.
Osprey cards have hardware gain control. To control hardware gain, use the volume slider in the
mixer applet. The unity gain setting is when the volume slider is all the way up (in default driver
settings).
The quick-access volume control (left click on the speaker symbol) on the task bar controls recording
volume and playback volume. To change record levels, go to Options Properties Recording.
74 ViewCast

Osprey 240e/450e User Guide
Audio properties page
Many applications, including Windows Media Encoder, display the illustrated property dialog for
setting audio source and volume level. This is a general-purpose DirectShow property page that our
driver has to support but which is not quite intuitive in its operation (Figure 64).
Figure 64. Audio properties page
To select the audio source using this dialog, select the desired input in the Pin Line: selection box,
then click Enable. This also deselects whichever input had been previously selected.
For example, if you select XLR Balanced instead of the first input on the list (Unbalanced), and you
close and reopen the window, Unbalanced appears in the selection box and the Enable box is not
checked. If you again select XLR Balanced, the Enable box automatically displays as checked.
This property page makes more sense if you understand it is designed to allow mixing of audio
inputs for devices that support that. Osprey audio capture filters do not support mixing of inputs –
you have to select one stereo input at time – so the DirectShow design is not convenient in this case.
ViewCast 75

The Audio Driver
Audio formats
The Osprey hardware supports sampling of analog audio at 32, 44.1 and 48 kHz in 16-bit PCM
format. Captured audio data is down-sampled and reformatted if necessary by Microsoft system
audio components, allowing an application to capture audio data in 8-bit and 16-bit mono or stereo
formats at any of the following data rates:
8 kHz
11.025 kHz
16 kHz
22.05 kHz
32 kHz
44.1 kHz
48 kHz
Audio playback
Osprey cards provides audio capture only, not audio playback. Continue to play back captured audio
using your system soundcard.
Audio configuration
The OspreyConfig applet is included as part of the Osprey AVStream driver package. It is also
provided in source form in the Osprey AVStream SDK. It provides supplementary controls that are
not available via the standard system properties.
OspreyConfig’s controls are device-specific and apply only to Osprey audio capture devices. Use the
Device menu list at the top of the applet’s window to select which device you are controlling.
Mono Source Mode
If set to Use Left Channel, then left channel audio data is copied to the right channel.
If set to Use Right Channel, then right channel audio data is copied to the left channel.
If set to Average Left and Right, no copying is done.
The Microsoft mixer component always averages both channels when converting to mono. If a
signal is present on, say, the left channel only, the Average mode will average the left channel with
the silent right channel, effectively halving the signal amplitude. Setting this control to Left results in
only left channel data in the mono capture, with no amplitude drop.
Audio level
This control sets the hardware Input Reference level and software-based Boost factor. The settings
are separate for each input of each device, and are applied to whichever input is selected in the
current application or in the system mixer. The settings displayed do not automatically update when
you change inputs in the application or mixer click update to refresh the settings.
76 ViewCast

Osprey 240e/450e User Guide
In Figure 64, the Audio Level control is different depending on which input is selected.
The Input Reference level is meaningful only on the analog unbalanced and balanced inputs, and is
calibrated differently for each when a digital input is selected this control is disabled. This is a
hardware gain control with the default level chosen such that the expected amplitude of a full
volume input signal will have adequate headroom without clipping. If you do experience clipping, or
are working with low-level signals, you can adjust this level. On this control, a higher reference level
results in lower gain, so the quietest setting is at the top of the scale. Click Default to restore the
default value.
Figure 65. Input reference level
The Boost setting is a software gain adjustment that applies to both analog and digital inputs. Boost
can be set individually for each input. It supplements the system mixer volume controls by providing
a wide adjustment range. You can use it to calibrate or normalize input levels across multiple inputs;
or to accommodate microphones or other non-line inputs that have nonstandard signal levels.
Again, the Default button restores the default value.
ViewCast 77

The Audio Driver
78 ViewCast

Osprey 240e/450e User Guide
Operating temperature range
0 to 40 C
Non-operating temperature range
-40 to +75 C
Operating humidity range
Between 5 % and 80 % (non-condensing) @ 40 C
Non-operating humidity range
95 % RH (non-condensing; gradient 30 % per hour
Operating altitude range
0 to 3,048 meters (10,000 feet)
Non-operating altitude range
0 to 15,240 meters (50,000 feet)
Appendix A: Osprey hardware
specifications
Osprey 240e
Environmental specifications
PCI Express Bus compliant
Approximate card weight = 85 grams
ViewCast 79

Appendix A: Osprey Hardware Specifications
Figure 66. Osprey 240e long backplate
Figure 67. Osprey 240e short backplate
Figure 68. PCI Express Bus compliance
PCI Express Bus compliant
Approximate weight is 198 grams
80 ViewCast

Osprey 240e/450e User Guide
Osprey 450e
Figure 69. Osprey 450e backplate
ViewCast 81

Appendix A: Osprey Hardware Specifications
82 ViewCast

Osprey 240e/450e User Guide
Mini-DIN
Signal
RCA Connectors
1
Channel A Left
Channel A Left Center
2
Channel A Right
Channel A Right Center
3
Channel B Left
Channel B Left Center
4
Channel B Right
Channel B Right Center
5
Channel C Left
Channel C Left Center
6
Channel C Right
Channel C Right Center
7
Channel D Left
Channel D Left Center
8
Channel D Right
Channel D Right Center
9
Shield
Channel A Left Shield
9
Shield
Channel A Right Shield
9
Shield
Channel B Left Shield
9
Shield
Channel B Right Shield
9
Shield
Channel C Left Shield
9
Shield
Channel C Right Shield
9
Shield
Channel D Left Shield
9
Shield
Channel D Right Shield
Appendix B: Osprey 450e audio cable
Figure 70 shows the male connector on the cable.
Figure 70. 9 pin mini-DIN male
ViewCast 83


Osprey 240e/450e User Guide
Appendix C: Troubleshooting
Color bars on video screen
The Osprey 240e/450e AVStream driver has a built-in color bar generator. If color bars appear in
your video preview window, it is an indication that video is not present on the selected video input
(Figure 71).
The color bar display can be adjusted or changed in the Device Properties tab, including the text
overlay on the screen.
Figure 71. No-Video Test Pattern
To solve this problem, check the following:
Check that the camera, VCR, or other video source is powered and that its output is
connected to the Osprey card’s input.
Check that the correct video input is selected in the Control Dialog’s Source page.
Scrambled video image
You may have set the wrong video signal format for the signal input you are using. For example, you
may have told the driver to look for NTSC-M video but are using a PAL-BDGHI video source. Make
sure you know what signal format your video source is generating. Go into the Video Standard field
of the Control Dialog’s Source page, and click the button for that signal format.
ViewCast 85

Appendix C: Troubleshooting
Poor video quality at large frame sizes
Large frame sizes with the deep pixel depth (24- or 32-bit), or complex format (YVU9 or YUV12
planar), impose heavy demands on the PCI bus’ data transfer capacity. Our experience is that some
systems cannot handle these formats at full frame sizes.
Systems vary in their data transfer limits. The characteristics of the PCI bridge are often more
important than processor speed.
If you are having problems, we recommend that you:
Use a smaller frame size (480 x 320 or less).
Use a shallower color format (RGB15 or RGB24 instead of RGB32).
Try a YUV format instead of an RGB format, and a packed format instead of a planar format.
If you have a choice of PCs for video capture, try using another system with a different system board
chipset.
Multiple horizontal lines across video image
If there are multiple, regularly spaced, horizontal lines across your video image and your source
material is copyrighted and copy-protected, you are seeing Macrovision™ copy protection.
The lines can vary in color from yellow to blue to green. These lines are not present in every frame
of video. There may also be a black band at the top of the frame.
There are other brands of copy-protection besides Macrovision. Some of these employ similar
methods (resulting in the above) and others do not. This is a good example of Macrovision effects
but you should find a good way if possible to briefly note that there are other forms of copy
protection and that they may have different effects on the picture.
Cannot play back recorded audio
If you have a sound card installed, you should be able to hear audio when you play back recorded
audio.
Verify that the volume control for your playback device is not muted.
Verify that the selected playback device is your sound card. Some Windows applications cannot use
a recording device unless a playback device is also installed. The Placeholder device cannot play back
recorded audio. You can use the same method to select playback device that you use when selecting
the audio source.
86 ViewCast

Osprey 240e/450e User Guide
Audio recording control comes up with wrong
device and wrong inputs
The cause of this problem may be that you currently have or have had previously, a Video for
Windows audio capture driver installed in the system. The Osprey AVStream install process normally
removes a previous Video for Windows driver, but if you have multiple Osprey cards installed you do
have the option of running the Video for Windows driver on some cards and the AVStream driver on
others. Unfortunately the Recording Control does not work smoothly in this situation. The Video for
Windows device will always try to act like it is the selected device even if it is not. You have to
manually enter Recording Control’s Options Properties dialog to select your device.
If you no longer have a need for the Video for Windows driver, you can uninstall it using instructions
obtainable from Osprey technical support. If you are comfortable using RegEdit to edit your registry,
you can instead go to the following location:
HKEY_LOCAL_MACHINE\SOFTWARE\Microsoft\Windows NT\CurrentVersion\Drivers32
ViewCast 87


Osprey 240e/450e User Guide
Index
16:9 Wide, 24
525-Line (NTSC) Vertical Format, 27
Accessing the OspreyConfig Utility, 7
ActiveMovie Window, 71
Adaptive Deinterlace window, 36
adjust dialog, 36
Audio Level control, 77
Audio properties page, 75
Auto, 34
Auto Size checkbox, 58
Auto Sizes, 58
AVI-Compatible mode, 40
basic reference size, 62
Both button, 44, 49, 54
Browse for File button, 49
buffers, 39
Captions tab, 43
Capture, 39
Capture button, 44, 49, 54
Capture color format, 56
Capture drop-down list, 55
capture pin formats, 67
CC Channel, 45
CC or VBI pins, 69
CC Pin, 46
CCIR-601 setting, 24
change the default settings of the 4.5 driver, 11
chroma, 16
Cine Phase, 35
Closed Caption Timestamping, 40
closed captioning, 70
Color formats, 67
Control used to open the properties page, 10
cropping, 53
Current Using settings, 35
Currently Using group, 35
Custom installation, 4
custom properties, 32
default output size, 53
Default Output Size, 58
degree of transparency, 51
Deinterlace settings, 34
Device controls, 38
Device Info, 42
Device Info window, 42
Device tab, 38
Digital Signature Not Found Window, 5
DirectShow, 59
Enable Cropping, 56
Enable Cropping checkbox, 58
Enable Key Color, 50
Enable Key Color checkbox, 50
Enable Logo checkbox, 49
Extras, 40
File and Color, 49
filtergraph, 64
filters, 13
Filters tab, 29
filters, pins, and properties, 59
Granularity controls, 55
Horizontal Delay, 25
Horizontal Format, 24
Initial OspreyConfig user interface, 8
Input Format, 17
Input reference level, 77
Input Reference level, 76
Input tab, 14
Input Tab without AV option, 16
Inverse Telecine, 34
inverse telecine process, 34
ViewCast 89

Appendix C: Troubleshooting
key color, 50
logical white, 45
Logo position, 51
Logo Position, 51
Logo position and size, 52
logo property controls, 48
Logo tab, 47, 52
luma, 16
motion adaptive, 34
motion adaptive deinterlace, 35
motion threshold, 36
multiple filters, 32
Multiple instances, 32
Multiple instances of each filter, 33
Normal timestamping, 40
Notch Kill, 18
No-Video Test Pattern, 39
Nudge buttons, 51
Number of Capture Buffers Requested, 39
one filter, 32
Osprey 240e Custom Setup screen, 4
Osprey 240e long backplate, 80
Osprey 240e short backplate, 80
Osprey 450e card with optional plug-in, 16
Osprey Config icon, 7
Osprey Video Device Properties window tabs,
11
OspreyConfig utility to access devices, 13
Other checkbox, 50
Overlay Mixer to Video Renderer, 63
PCI Express Bus compliance, 80
Pin Select, 49
Pin Select setting, 55
pins, 13
Post-Processing mode, 61
PostProcessing sequence, 37
Preview, 39
preview and capture pins, 55
Preview button, 44, 49, 54
Preview color format, 56
Recalc button, 57
Recording Control, 73
Reference Size for Crop and Logo Placement, 27
RefSize tab, 23
Render Logical White As, 45
Render NTSC Closed Caption On Video, 45
Selecting a device for configuration, 9
set cropping area, 53
sharp and smooth motion, 37
Show [4] filters per device, 32
Show Filters, 33
Show Properties for Selected Filter button, 10
SimulStream enabled, 31
SimulStream option, 31
Size and Crop tab, 53
Smooth Motion, 36
Source Width, 26
Square Pixel setting, 24
standard colored captions, 45
System Settings Change Window, 5
telecine, 34
Test Mode, 37
Timecode Video Marking, 40, 72
To install the video capture card, 5
To trim an image, 26
Tolerance, 50
Tolerance control, 50
Use WideScreen Signal (WSS), 24
vertical blanking intervals, 71
Vertical Interval Timecode, 71
Video Decoder tab, 21
video filter, 9
video input, 15
Video Mixing Renderer 7, 64
Video Mixing Renderer 9, 65
Video Proc Amp controls, 62
Video Process Amplifier, 19
Video Renderer, 63
90 ViewCast

Osprey 240e/450e User Guide
video rendering, 63
video standard, 15, 67
Video Standard, 17
Video Standard drop-down list, 17
Video Standard field, 17
VMR7, 64, 65
VMR9, 65
Volume Control, 73
Warranties, 1
ViewCast 91

viewcast.com
© 2010 ViewCast Corporation. ViewCast®, Niagara® (and design)TM are registered trademarks of ViewCast Corporation or its subsidiaries. All other trademarks are the property of their
respective owners. Product specifications and availability may change without notice. 40-03239-04-A
 Loading...