


8340
TNV-GDB-TERMINAUX-47313-1506
user
GUIDE
—
HD TERMINAL
MULTI-ROOM HD PVR
ILLICO 4K ULTRA HD
For more information, visit us at videotron.com/terminal-support For more information, visit us at videotron.com/terminal-support
32
TABLE OF CONTENTS
Welcome .......................................................................................................................................................3
Activation .....................................................................................................................................................4
Your Terminal ..............................................................................................................................................5
Connection ...................................................................................................................................................8
Your Remote Control .................................................................................................................................9
Programming Your Remote Control ......................................................................................................10
Equipment Settings ..................................................................................................................................12
Maintenance Plan .....................................................................................................................................13
Frequently Asked Questions ..................................................................................................................14
Customer Service and Technical Support ...........................................................................................16
Security ......................................................................................................................................................17
Signal Theft ...............................................................................................................................................19
Notes ...........................................................................................................................................................20
WELCOME
CONGRATULATIONS ON YOUR PURCHASE OF A BRAND NEW TERMINAL,
YOUR GATEWAY TO THE BEST TV ENTERTAINMENT EXPERIENCE.
With illico:
•Enjoy a customized TV experience that’s faster, more powerful and easier to use
•Get a faster, more user-friendly browsing tool
•Manage your recordings easily with the Multi-Room HD PVR
•Gain access to a personalized interactive 15-day Program Guide
• Use handy apps like the Miniguide and a variety of widgets (i.e. weather forecasts, lottery
results, illico news, etc.)
• Fully immerse yourself in the HD experience thanks to exceptional image quality and menus
adapted to HD TVs
•Watch your recordings on any TV in your home, thanks to the Multi-Room PVR
Entertainment that gives you:
• Exclusive access to illico On Demand, which offers thousands of movies and shows, many of
which you can watch for free
• Access to Club illico. Available with your monthly subscription, Club illico gives you access
to a vast catalogue of French on-demand movies, series, kids’ shows and documentaries
A multi-screen experience means:
• You can watch your favourite movies and shows wherever you want, on the screen
of your choice, with channel 900, illico.tv or one of our illico apps for mobiles, tablets, and
Apple Watch.
Powered by TCPDF (www.tcpdf.org)Powered by TCPDF (www.tcpdf.org)Powered by TCPDF (www.tcpdf.org)Powered by TCPDF (www.tcpdf.org)Powered by TCPDF (www.tcpdf.org)Powered by TCPDF (www.tcpdf.org)Powered by TCPDF (www.tcpdf.org)Powered by TCPDF (www.tcpdf.org)Powered by TCPDF (www.tcpdf.org)Powered by TCPDF (www.tcpdf.org)Powered by TCPDF (www.tcpdf.org)Powered by TCPDF (www.tcpdf.org)Powered by TCPDF (www.tcpdf.org)Powered by TCPDF (www.tcpdf.org)Powered by TCPDF (www.tcpdf.org)Powered by TCPDF (www.tcpdf.org)Powered by TCPDF (www.tcpdf.org)Powered by TCPDF (www.tcpdf.org)Powered by TCPDF (www.tcpdf.org)Powered by TCPDF (www.tcpdf.org)Powered by TCPDF (www.tcpdf.org)Powered by TCPDF (www.tcpdf.org)
For more information, visit us at videotron.com/terminal-support For more information, visit us at videotron.com/terminal-support
54
If you received your Terminal via Canada Post, please follow these steps:
1. Connect your Terminal by referring to the Connect Your Terminal section.
2. Turn on the Terminal. Activation should start automatically and may take up to 30 minutes.
If activation fails, dial 514-380-7834 or 1-866-380-2134.
Monday to Friday: 7:30 a.m. to 10 p.m. | Saturday and Sunday: 8 a.m. to 8 p.m.
3. Follow steps 3 to 5 below.
If you bought your HD Terminal or Multi-Room HD PVR from one of our authorized dealers
(rather than in a Videotron store), please follow these steps:
1. Connect your Terminal by referring to the Connect Your Terminal section.
2. Once your Terminal is connected, wait 30 minutes before calling the telephone number below
for activation.
Toll-free number: 1-877-226-6385
Monday to Friday: 8:00 a.m. to 9:30 p.m. | Saturday and Sunday: 8 a.m. to 8 p.m.
3. Complete the Quick-Start Wizard that automatically appears when your Terminal is turned on
for the first time.
The Quick-Start Wizard allows you to:
i. Select your preferred language.
ii. Activate an Administrator PIN for managing certain functions on the Terminal and
ordering on-demand content. Administrator PIN: _________________
iii. Activate and configure Parental Controls.
4. Create an Order PIN to access content that is permitted by Parental Controls.
Order PIN: _________________
5. Follow the instructions on page 10 to program the remote to your TV.
IMPORTANT: If the error message “WIZ 502” appears on the screen, you should immediately
contact Videotron Technical Support (p. 16), as this indicates that some applications will not work.
ACTIVATION
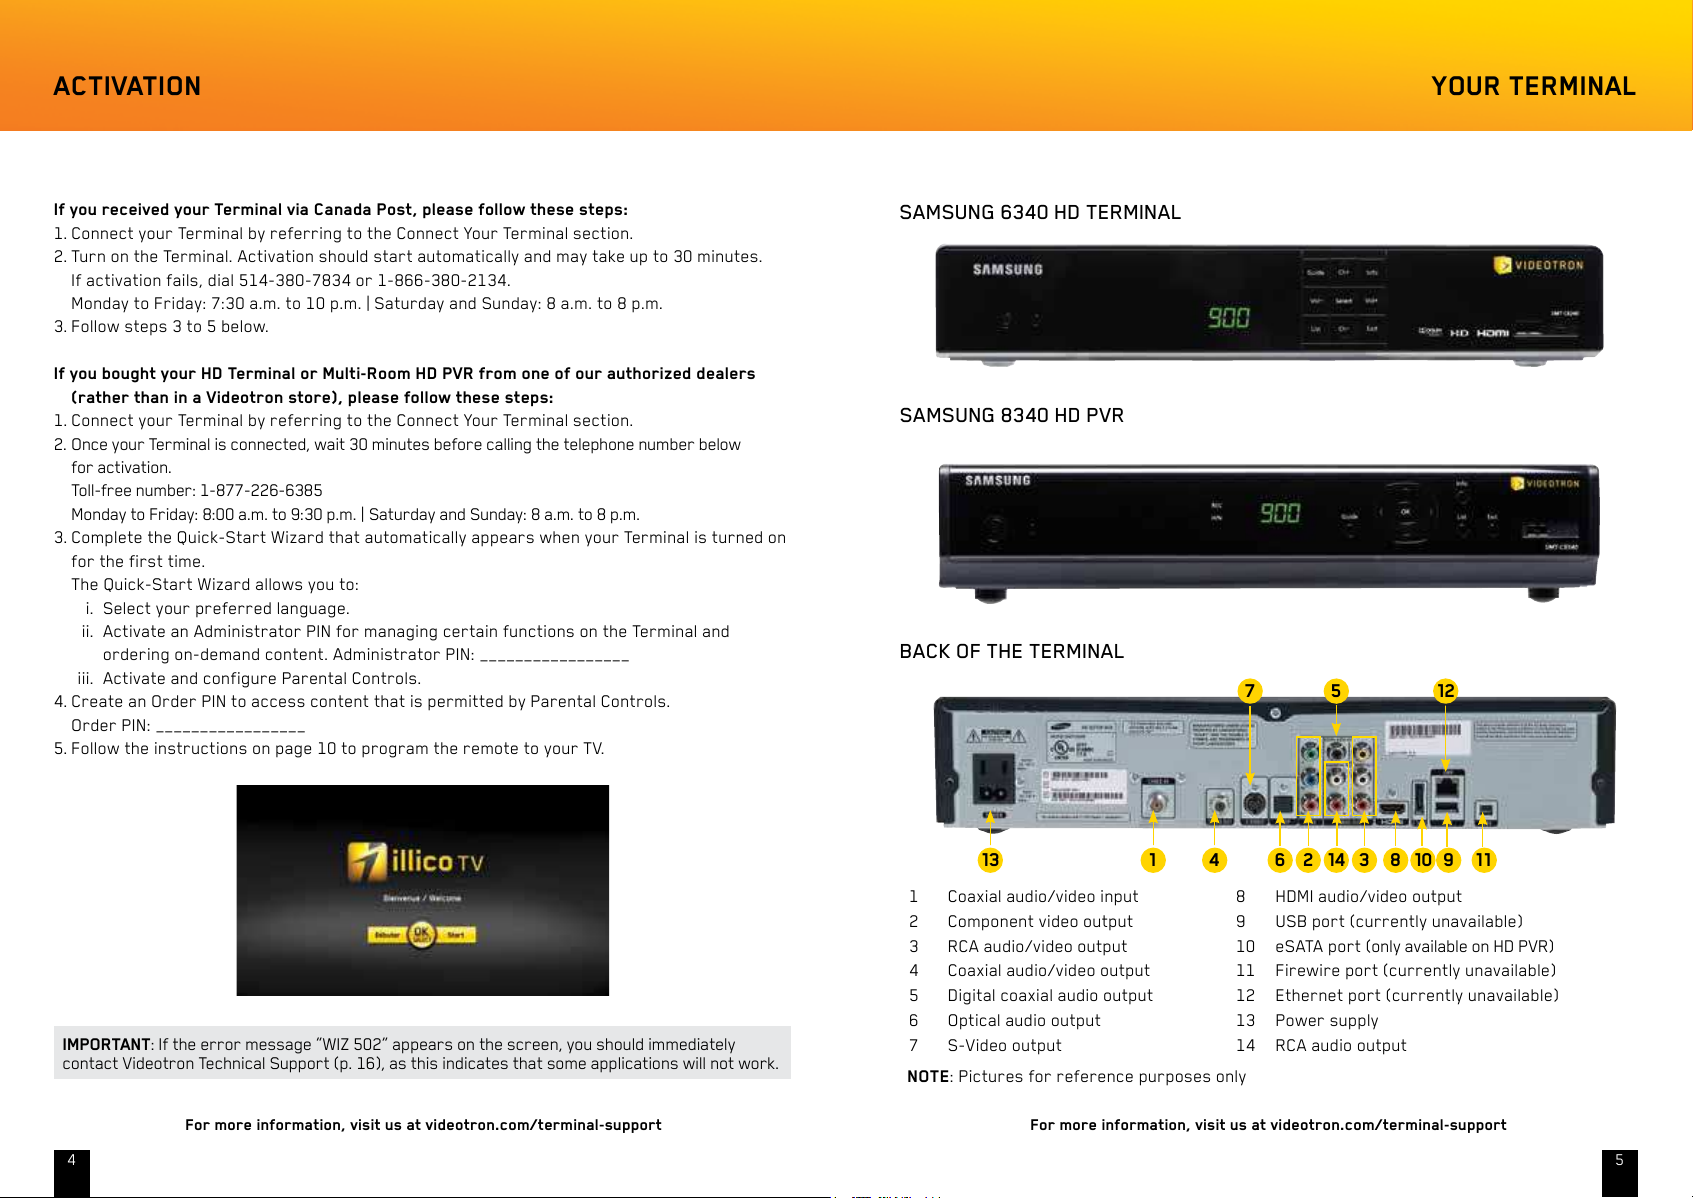
SAMSUNG 6340 HD TERMINAL
YOUR TERMINAL
SAMSUNG 8340 HD PVR
BACK OF THE TERMINAL
1 Coaxial audio/video input 8 HDMI audio/video output
2 Component video output 9 USB port (currently unavailable)
3 RCA audio/video output 10 eSATA port (only available on HD PVR)
4 Coaxial audio/video output 11 Firewire port (currently unavailable)
5 Digital coaxial audio output 12 Ethernet port (currently unavailable)
6 Optical audio output 13 Power supply
7 S-Video output 14 RCA audio output
1 413
12
2 3146
7
5
8 10 9 11
NOTE: Pictures for reference purposes only
For more information, visit us at videotron.com/terminal-support For more information, visit us at videotron.com/terminal-support
6 7
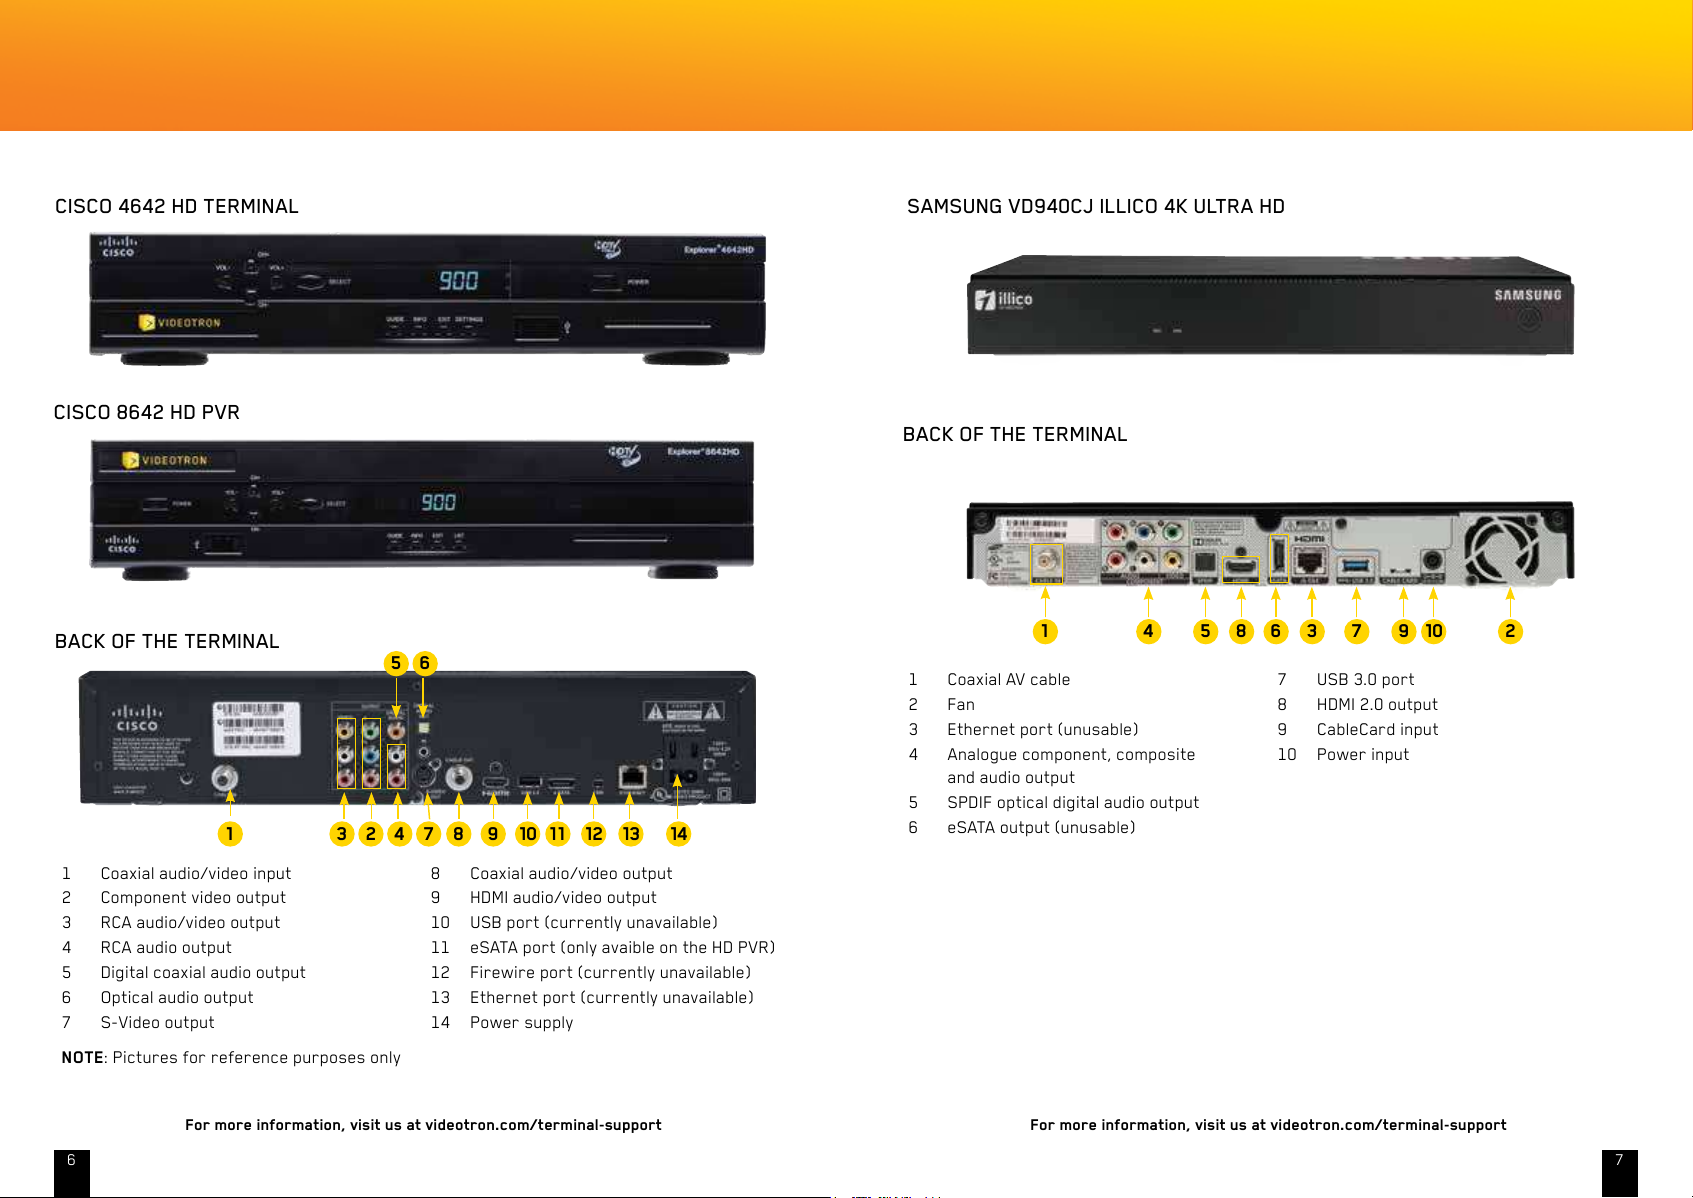
CISCO 8642 HD PVR
1 Coaxial audio/video input 8 Coaxial audio/video output
2 Component video output 9 HDMI audio/video output
3 RCA audio/video output 10 USB port (currently unavailable)
4 RCA audio output 11 eSATA port (only avaible on the HD PVR)
5 Digital coaxial audio output 12 Firewire port (currently unavailable)
6 Optical audio output 13 Ethernet port (currently unavailable)
7 S-Video output 14 Power supply
13 141
5
7423 12111098
6
BACK OF THE TERMINAL
NOTE: Pictures for reference purposes only
CISCO 4642 HD TERMINAL
SAMSUNG VD940CJ ILLICO 4K ULTRA HD
BACK OF THE TERMINAL
1 Coaxial AV cable 7 USB 3.0 port
2 Fan 8 HDMI 2.0 output
3 Ethernet port (unusable) 9 CableCard input
4 Analogue component, composite
and audio output
10 Power input
5 SPDIF optical digital audio output
6 eSATA output (unusable)
23 7 9 104 5 681
For more information, visit us at videotron.com/terminal-support For more information, visit us at videotron.com/terminal-support
98
CONNECTION
IMPORTANT:
1. If your screen is blank or starts flashing, please restart your Terminal by unplugging the power
cord and plugging it back in.
2. If the problem persists, or if the “WIZ 502” error message pops up, please contact Technical
Support at 1-877-380-2611.
3. Should the self-installation fail, a fee may apply if a technician is required to come to your home.
TV
DTV
Video
Input
Y
Pb
Pr
Audio
Input
Audio
(L)
Audio
(R)
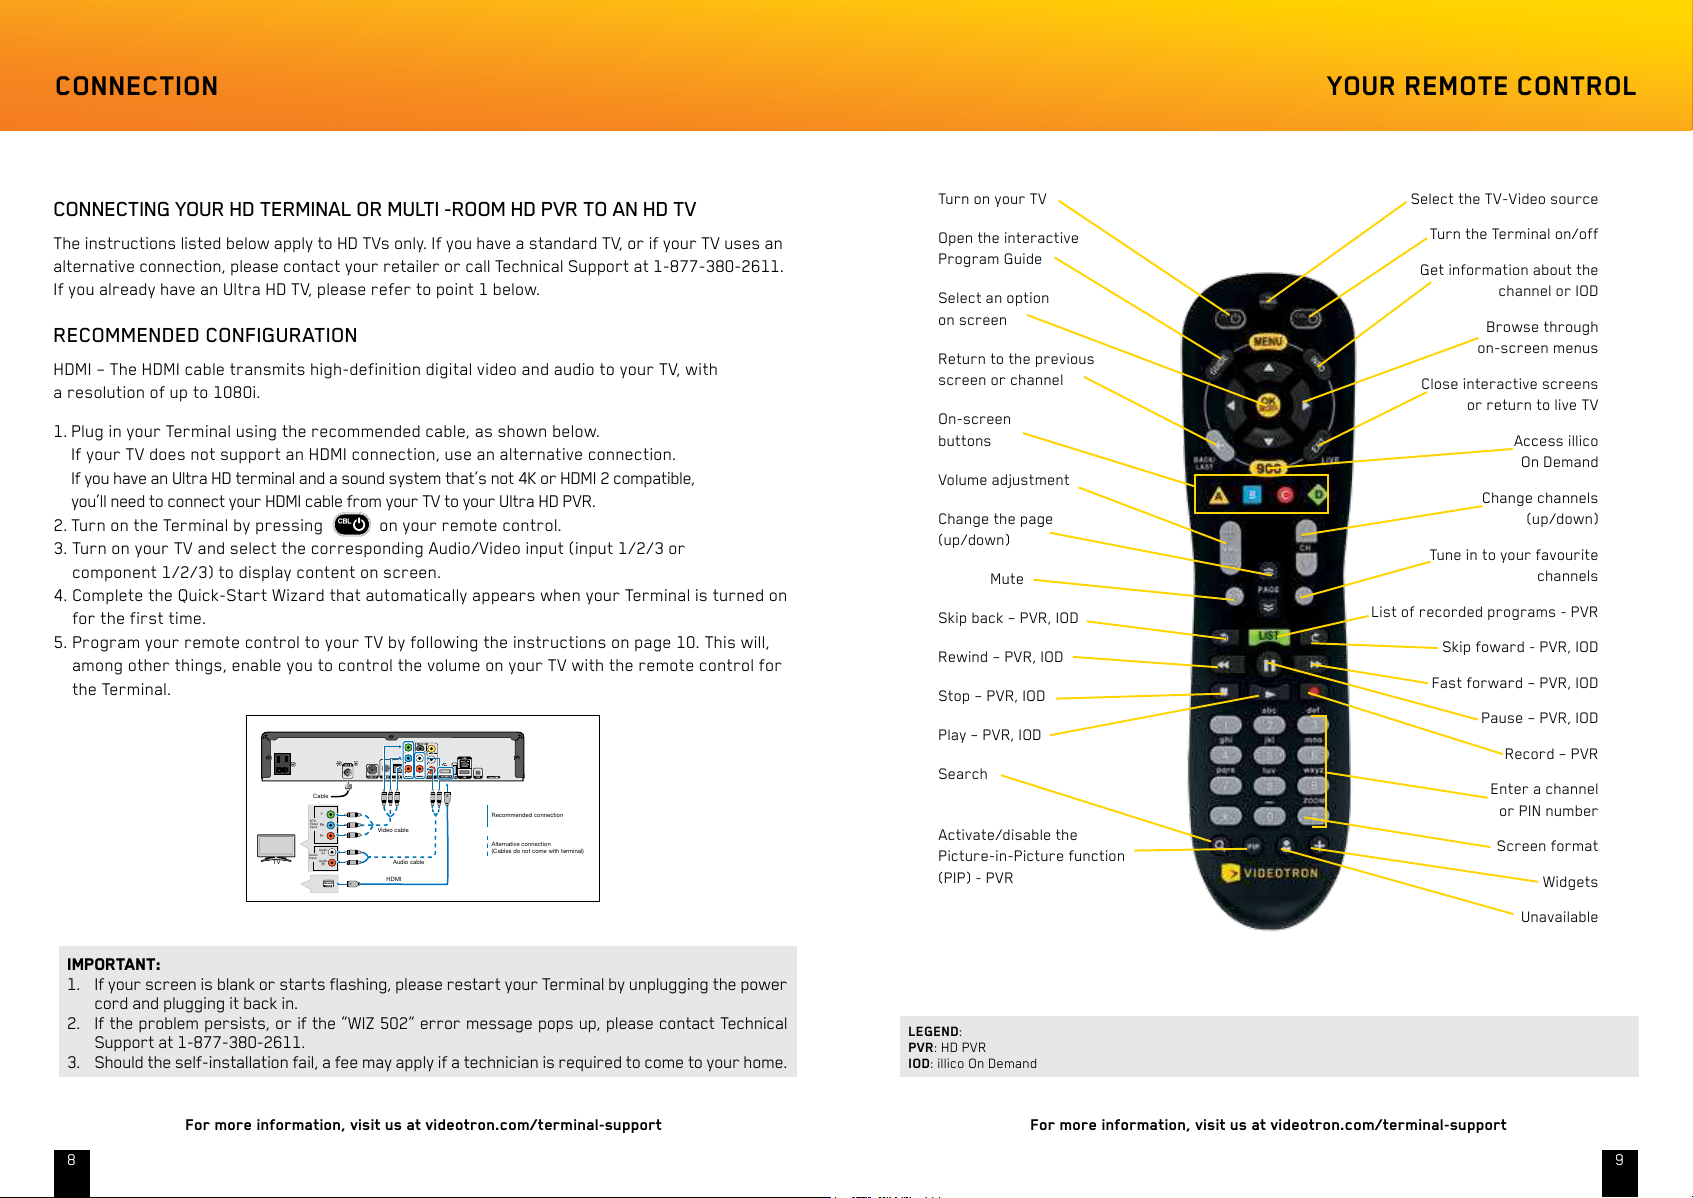
Audio cable
Video cable
Recommended connection
Alternative connection
(Cables do not come with terminal)
Cable
HDMI
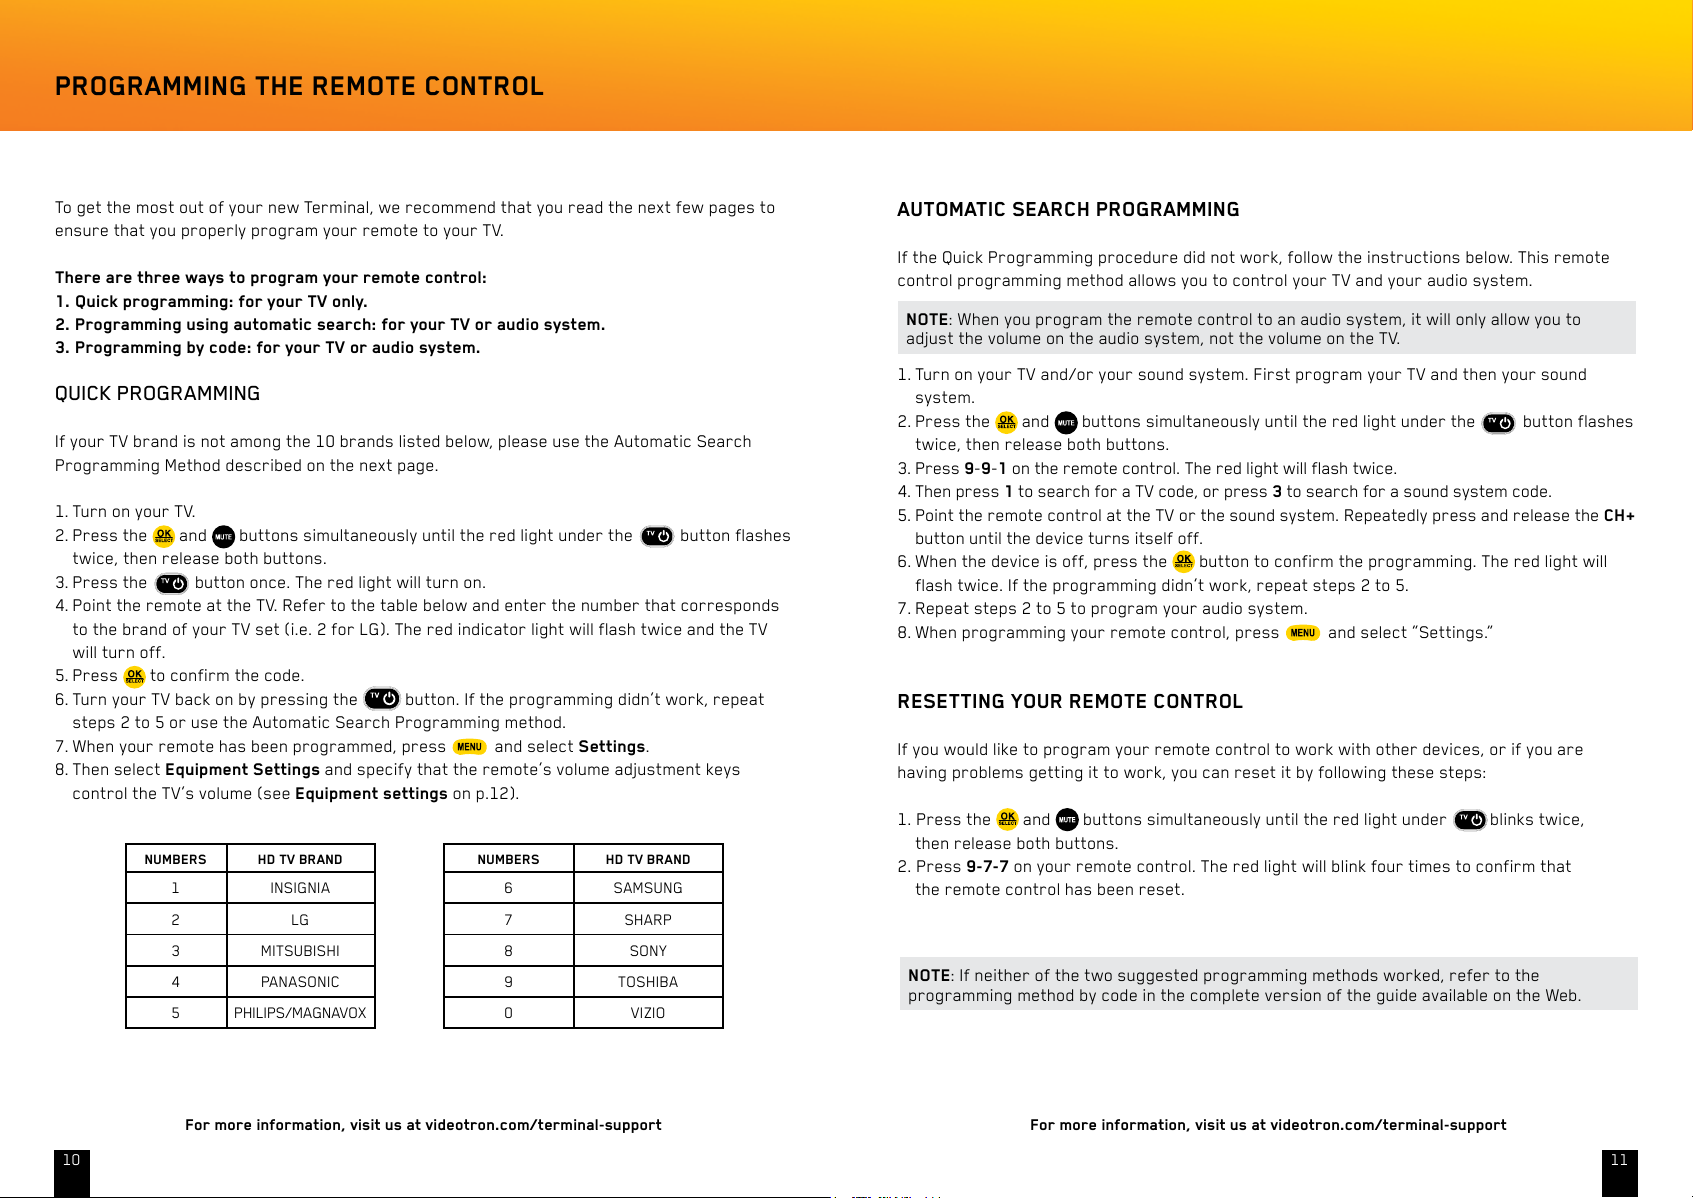
YOUR REMOTE CONTROL
Turn on your TV
Open the interactive
Program Guide
Select an option
on screen
Return to the previous
screen or channel
On-screen
buttons
Volume adjustment
Change the page
(up/down)
Mute
Skip back – PVR, IOD
Rewind – PVR, IOD
Stop – PVR, IOD
Play – PVR, IOD
Search
Activate/disable the
Picture-in-Picture function
(PIP) - PVR
Select the TV-Video source
Turn the Terminal on/off
Get information about the
channel or IOD
Browse through
on-screen menus
Close interactive screens
or return to live TV
Access illico
On Demand
Change channels
(up/down)
Tune in to your favourite
channels
List of recorded programs - PVR
Skip foward - PVR, IOD
Fast forward – PVR, IOD
Pause – PVR, IOD
Record – PVR
Enter a channel
or PIN number
Screen format
Widgets
Unavailable
LEGEND:
PVR: HD PVR
IOD: illico On Demand
CONNECTING YOUR HD TERMINAL OR MULTI -ROOM HD PVR TO AN HD TV
The instructions listed below apply to HD TVs only. If you have a standard TV, or if your TV uses an
alternative connection, please contact your retailer or call Technical Support at 1-877-380-2611.
If you already have an Ultra HD TV, please refer to point 1 below.
RECOMMENDED CONFIGURATION
HDMI – The HDMI cable transmits high-definition digital video and audio to your TV, with
a resolution of up to 1080i.
1. Plug in your Terminal using the recommended cable, as shown below.
If your TV does not support an HDMI connection, use an alternative connection.
If you have an Ultra HD terminal and a sound system that’s not 4K or HDMI 2 compatible,
you’ll need to connect your HDMI cable from your TV to your Ultra HD PVR.
2. Turn on the Terminal by pressing
on your remote control.
3. Turn on your TV and select the corresponding Audio/Video input (input 1/2/3 or
component 1/2/3) to display content on screen.
4. Complete the Quick-Start Wizard that automatically appears when your Terminal is turned on
for the first time.
5. Program your remote control to your TV by following the instructions on page 10. This will,
among other things, enable you to control the volume on your TV with the remote control for
the Terminal.
For more information, visit us at videotron.com/terminal-support For more information, visit us at videotron.com/terminal-support
1110
To get the most out of your new Terminal, we recommend that you read the next few pages to
ensure that you properly program your remote to your TV.
There are three ways to program your remote control:
1. Quick programming: for your TV only.
2. Programming using automatic search: for your TV or audio system.
3. Programming by code: for your TV or audio system.
QUICK PROGRAMMING
If your TV brand is not among the 10 brands listed below, please use the Automatic Search
Programming Method described on the next page.
1. Turn on your TV.
2. Press the
and buttons simultaneously until the red light under the button flashes
twice, then release both buttons.
3. Press the
button once. The red light will turn on.
4. Point the remote at the TV. Refer to the table below and enter the number that corresponds
to the brand of your TV set (i.e. 2 for LG). The red indicator light will flash twice and the TV
will turn off.
5. Press to confirm the code.
6. Turn your TV back on by pressing the
button. If the programming didn’t work, repeat
steps 2 to 5 or use the Automatic Search Programming method.
7. When your remote has been programmed, press
and select Settings.
8. Then select Equipment Settings and specify that the remote’s volume adjustment keys
control the TV’s volume (see Equipment settings on p.12).
PROGRAMMING THE REMOTE CONTROL
NUMBERS HD TV BRAND NUMBERS HD TV BRAND
1 INSIGNIA 6 SAMSUNG
2 LG 7 SHARP
3 MITSUBISHI 8 SONY
4 PANASONIC 9 TOSHIBA
5 PHILIPS/MAGNAVOX 0 VIZIO
AUTOMATIC SEARCH PROGRAMMING
If the Quick Programming procedure did not work, follow the instructions below. This remote
control programming method allows you to control your TV and your audio system.
NOTE: When you program the remote control to an audio system, it will only allow you to
adjust the volume on the audio system, not the volume on the TV.
1. Turn on your TV and/or your sound system. First program your TV and then your sound
system.
2. Press the
and buttons simultaneously until the red light under the button flashes
twice, then release both buttons.
3. Press 9-9-1 on the remote control. The red light will flash twice.
4. Then press 1 to search for a TV code, or press 3 to search for a sound system code.
5. Point the remote control at the TV or the sound system. Repeatedly press and release the CH+
button until the device turns itself off.
6. When the device is off, press the
button to confirm the programming. The red light will
flash twice. If the programming didn’t work, repeat steps 2 to 5.
7. Repeat steps 2 to 5 to program your audio system.
8. When programming your remote control, press
and select “Settings.”
RESETTING YOUR REMOTE CONTROL
If you would like to program your remote control to work with other devices, or if you are
having problems getting it to work, you can reset it by following these steps:
1. Press the
and buttons simultaneously until the red light under blinks twice,
then release both buttons.
2. Press 9-7-7 on your remote control. The red light will blink four times to confirm that
the remote control has been reset.
NOTE: If neither of the two suggested programming methods worked, refer to the
programming method by code in the complete version of the guide available on the Web.
For more information, visit us at videotron.com/terminal-support For more information, visit us at videotron.com/terminal-support
1312
This section will help you configure your video and audio preferences so that you can get
the most out of your HD TV and new Terminal.
Accessing your Terminal preferences:
1. Press to go to the main menu.
2. Using
select Settings then Equipment Settings, then press .
You can choose:
•When you would like your Terminal to switch to standby mode: Configure your Terminal so that
it turns off automatically when you want it to (date and time). When you would like your Terminal
to turn on: Configure your Terminal so that it turns on automatically when you want it to (date and
time).
•The model of your remote control: Select the model of your remote control to get the most out of
its features.
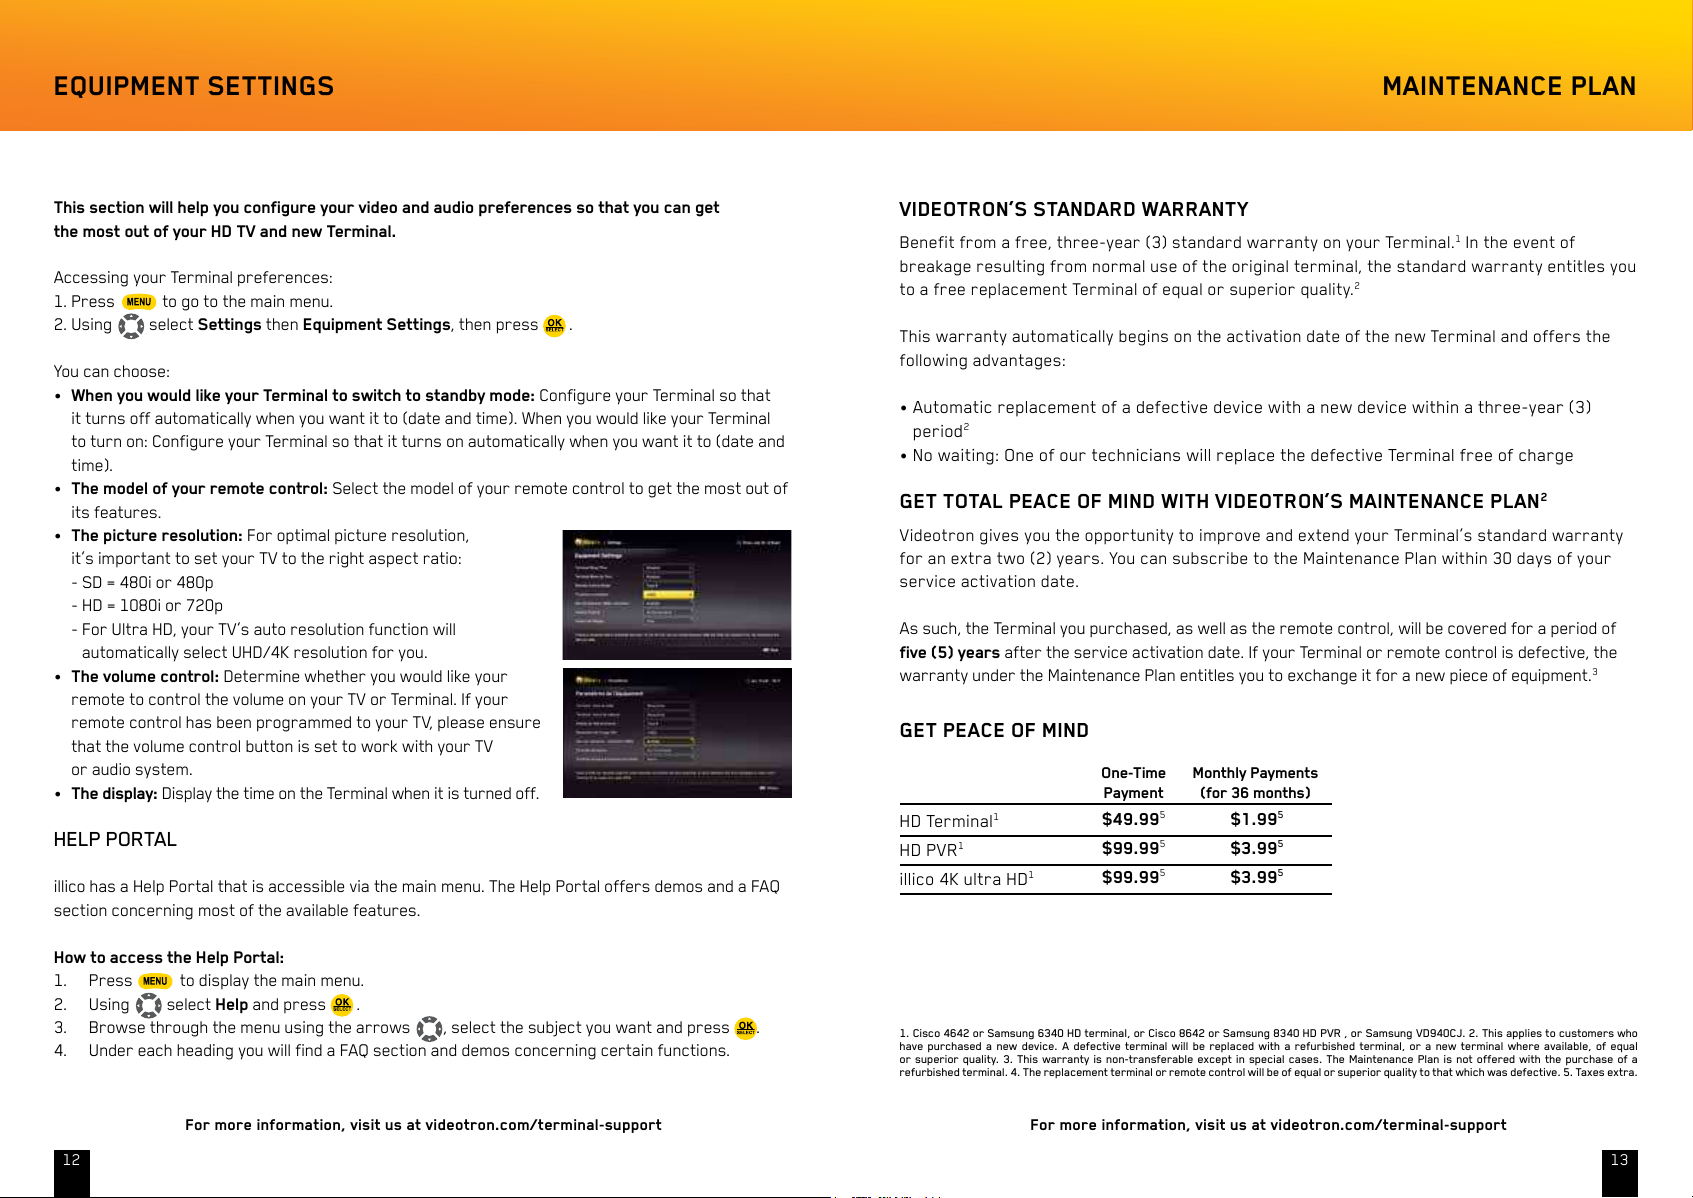
•The picture resolution: For optimal picture resolution,
it’s important to set your TV to the right aspect ratio:
- SD = 480i or 480p
- HD = 1080i or 720p
- For Ultra HD, your TV’s auto resolution function will
automatically select UHD/4K resolution for you.
•The volume control: Determine whether you would like your
remote to control the volume on your TV or Terminal. If your
remote control has been programmed to your TV, please ensure
that the volume control button is set to work with your TV
or audio system.
•The display: Display the time on the Terminal when it is turned off.
HELP PORTAL
illico has a Help Portal that is accessible via the main menu. The Help Portal offers demos and a FAQ
section concerning most of the available features.
How to access the Help Portal:
1. Press
to display the main menu.
2. Using
select Help and press .
3. Browse through the menu using the arrows
, select the subject you want and press .
4. Under each heading you will find a FAQ section and demos concerning certain functions.
VIDEOTRON’S STANDARD WARRANTY
Benefit from a free, three-year (3) standard warranty on your Terminal.
1
In the event of
breakage resulting from normal use of the original terminal, the standard warranty entitles you
to a free replacement Terminal of equal or superior quality.
2
This warranty automatically begins on the activation date of the new Terminal and offers the
following advantages:
•Automaticreplacementofadefectivedevicewithanewdevicewithinathree-year(3)
period
2
•Nowaiting:OneofourtechnicianswillreplacethedefectiveTerminalfreeofcharge
GET TOTAL PEACE OF MIND WITH VIDEOTRON’S MAINTENANCE PLAN
2
Videotron gives you the opportunity to improve and extend your Terminal’s standard warranty
for an extra two (2) years. You can subscribe to the Maintenance Plan within 30 days of your
service activation date.
As such, the Terminal you purchased, as well as the remote control, will be covered for a period of
five (5) years after the service activation date. If your Terminal or remote control is defective, the
warranty under the Maintenance Plan entitles you to exchange it for a new piece of equipment.
3
GET PEACE OF MIND
EQUIPMENT SETTINGS MAINTENANCE PLAN
One-Time Monthly Payments
Payment (for 36 months)
HD Terminal
1
$49.99
5
$1.99
5
HD PVR
1
$99.99
5
$3.99
5
illico 4K ultra HD
1
$99.99
5
$3.99
5
1. Cisco 4642 or Samsung 6340 HD terminal, or Cisco 8642 or Samsung 8340 HD PVR , or Samsung VD940CJ. 2. This applies to customers who
have purchased a new device. A defective terminal will be replaced with a refurbished terminal, or a new terminal where available, of equal
or superior quality. 3. This warranty is non-transferable except in special cases. The Maintenance Plan is not offered with the purchase of a
refurbished terminal. 4. The replacement terminal or remote control will be of equal or superior quality to that which was defective. 5. Taxes extra.
 Loading...