

Videoswitch VDM-9G80, VDM-9G120, VDM-16G80, VDM-4G120, VDM-16G120 User Manual
...
VDM Digital Recorder
User Manual
Products covered by this manual:
Cameras / Hard Drive
Capacity
4 9 16
80 Gbytes
VDM-4G80 VDM-9G80 VDM-16G80
120 Gbytes
VDM-4G120 VDM-9G120 VDM-16G120
160 Gbytes
VDM-4G160 VDM-9G160 VDM-16G160
320 Gbytes
VDM-4G320 VDM-9G320 VDM-16G320
500 Gbytes
VDM-4G500 VDM-9G500 VDM-16G500
600 Gbytes
VDM-4G600 VDM-9G600 VDM-16G600
Document Reference
Date Firmware
Vdm601r.doc 16/01/2004 VDM001G5
Videoswitch
Units 15 & 16 Telephone 01252-851510
Redfields Industrial Park Fax 01252-851296
Redfields Lane Email sales@videoswitch.co.uk
Church Crookham Web www.videoswitch.co.uk
Hants GU52 0RD

Videoswitch VDM Digital Recorder
Vdm601r.doc

Videoswitch VDM Digital Recorder
Vdm601r.doc
Contents:
1
Overview.............................................................................................................................................. 1
1.1 The VDM Digital Recorder......................................................................................................................................................1
1.2 The Front Panel......................................................................................................................................................................2
1.3 The Rear Panel.......................................................................................................................................................................3
1.4 Operating Modes....................................................................................................................................................................4
1.5 Screen Icons...........................................................................................................................................................................5
1.6 Menu Structure.......................................................................................................................................................................6
1.7 User Menu..............................................................................................................................................................................7
1.8 Supervisor Menu.....................................................................................................................................................................8
1.9 Engineer Menu .......................................................................................................................................................................9
2 Installation.........................................................................................................................................10
2.1 Connecting Up (4 Camera example) ....................................................................................................................................10
2.2 Setting Date and Time..........................................................................................................................................................11
2.3 Critical Alerts.........................................................................................................................................................................11
2.4 Operation..............................................................................................................................................................................11
3 Recording..........................................................................................................................................12
3.1 Update Rates........................................................................................................................................................................12
3.2 CD Capacity.......................................................................................................................................................................... 12
4 Remote Access.................................................................................................................................13
4.1 Configurations.......................................................................................................................................................................13
4.1.1 PSTN................................................................................................................................................................................13
4.1.2 ISDN.................................................................................................................................................................................13
4.1.3 Ethernet Local Area Network (LAN) .................................................................................................................................13
4.1.4 Ethernet using a Cross-over Cable...................................................................................................................................14
4.1.5 Broadband (ADSL)...........................................................................................................................................................14
4.2 Option Modules.....................................................................................................................................................................15
4.2.1 Installation.........................................................................................................................................................................15
4.2.2 VDM Firmware Upgrades.................................................................................................................................................16
4.3 PC Software..........................................................................................................................................................................16
4.3.1 Installing VDM-Connect....................................................................................................................................................16
4.3.2 Configuring VDM-Connect................................................................................................................................................16
4.3.3 Adding Sites to VDM-Connect..........................................................................................................................................16
4.3.4 Using VDM Connect.........................................................................................................................................................17
5 Routine Checks ................................................................................................................................18
5.1 Critical Alerts.........................................................................................................................................................................18
6 Viewing Live Images ........................................................................................................................19
6.1 Enter Live Mode....................................................................................................................................................................19
6.2 Live Display Modes...............................................................................................................................................................19
6.2.1 Full Screen Main Monitor..................................................................................................................................................19
6.2.2 Spot Monitor.....................................................................................................................................................................19
6.2.3 Picture-in-Picture..............................................................................................................................................................19
6.2.4 Quad.................................................................................................................................................................................19
6.2.5 9-way and 16-way Multi-Screen.......................................................................................................................................20
6.2.6 Zoom.................................................................................................................................................................................20
6.3 Auto-Sequencing..................................................................................................................................................................20
6.3.1 Auto-Sequencing Main Monitor........................................................................................................................................20
6.3.2 Auto-Sequencing Spot Monitor.........................................................................................................................................20
7 Replaying Recorded Images ...........................................................................................................21
7.1 Enter PLAY mode.................................................................................................................................................................21
7.1.1 Replay from Hard Drive(s)................................................................................................................................................21
7.1.2 Replay from CD................................................................................................................................................................21
7.2 Normal, Single Frame and Fast Play....................................................................................................................................21
7.3 Replay Display Modes..........................................................................................................................................................22
7.3.1 Full Screen (Main Monitor)...............................................................................................................................................22
7.3.2 Quad.................................................................................................................................................................................22
7.3.3 Zoom (Replay)..................................................................................................................................................................22
7.4 Searching by Date and Time................................................................................................................................................22
7.5 Sweep Mode.........................................................................................................................................................................23
7.6 Recalling Events...................................................................................................................................................................24
7.7 Stepping through Events ......................................................................................................................................................24

Videoswitch VDM Digital Recorder
Vdm601r.doc
7.8
Replaying Incidents..............................................................................................................................................................24
7.8.1 Selecting an Incident........................................................................................................................................................ 25
7.8.2 Go to the start of the current incident............................................................................................................................... 25
7.8.3 Go to the end of current incident...................................................................................................................................... 25
8 Archiving Images onto CD...............................................................................................................26
8.1 Quick Incident Recording..................................................................................................................................................... 26
8.2 Adjusting the Size of an Incident..........................................................................................................................................26
8.2.1 Enlarge an Incident by Moving the End ...........................................................................................................................26
8.2.2 Enlarge an Incident by Moving the Start.......................................................................................................................... 26
8.2.3 Reduce an Incident by Moving the End ...........................................................................................................................26
8.2.4 Reduce an Incident by Moving the Start.......................................................................................................................... 27
8.2.5 Reduce an Incident by Moving the Start or End...............................................................................................................27
8.3 Creating an Incident by Setting the Start and End............................................................................................................... 27
8.3.1 Set the start of an incident ...............................................................................................................................................27
8.3.2 Set the end of an incident ................................................................................................................................................27
8.4 Selecting Incidents............................................................................................................................................................... 28
8.5 Clearing unwanted incidents................................................................................................................................................ 28
8.6 Writing to CD........................................................................................................................................................................ 28
8.7 Replaying a CD.................................................................................................................................................................... 29
9 Information Screens.........................................................................................................................30
9.1 Viewing Drive Information ....................................................................................................................................................30
9.1.1 Re-Scan Drives................................................................................................................................................................ 30
9.2 Viewing Image Information................................................................................................................................................... 30
9.2.1 Image Authentication .......................................................................................................................................................30
9.3 System Information ..............................................................................................................................................................31
10 Setup..................................................................................................................................................32
10.1 Navigating the menus...........................................................................................................................................................32
10.2 User Menu............................................................................................................................................................................ 33
10.2.1 Incident Options ...............................................................................................................................................................33
10.2.1.1 Erase CD........................................................................................................................................................ 33
10.2.1.2 Filename.........................................................................................................................................................33
10.2.1.3 Erase Incident Markers................................................................................................................................... 33
10.2.2 Auto Sequence (Main Monitor) ........................................................................................................................................33
10.2.2.1 Sequence Mode ............................................................................................................................................. 33
10.2.2.2 Camera List ....................................................................................................................................................33
10.2.2.3 Dwell Times.................................................................................................................................................... 33
10.2.3 Auto Sequence (Spot Monitor).........................................................................................................................................33
10.2.3.1 Sequence Mode ............................................................................................................................................. 33
10.2.3.2 Camera List ....................................................................................................................................................33
10.2.3.3 Dwell Times.................................................................................................................................................... 33
10.2.4 PIP Mode .........................................................................................................................................................................33
10.2.5 Power-Up Options............................................................................................................................................................33
10.2.5.1 Main Monitor Mode......................................................................................................................................... 34
10.2.5.2 Sequence Main............................................................................................................................................... 34
10.2.5.3 Sequence Spot (Day) .....................................................................................................................................34
10.2.5.4 Sequence Spot (Night) ...................................................................................................................................34
10.2.5.5 Main Camera.................................................................................................................................................. 34
10.2.5.6 PIP Camera.................................................................................................................................................... 34
10.2.5.7 Spot Camera (Day)......................................................................................................................................... 34
10.2.5.8 Spot Camera (Night)....................................................................................................................................... 34
10.2.6 Anti-Flicker.......................................................................................................................................................................34
10.2.6.1 Full Screen......................................................................................................................................................34
10.2.6.2 PIP Screen......................................................................................................................................................34
10.2.6.3 Quad Screen ..................................................................................................................................................34
10.2.6.4 x9 Multi-Screen............................................................................................................................................... 34
10.2.6.5 x16 Multi-Screen............................................................................................................................................. 34
10.2.6.6 Text Windows................................................................................................................................................. 34
10.2.6.7 Always Interlace .............................................................................................................................................35
10.2.7 Titles................................................................................................................................................................................. 35
10.2.7.1 Digital Recorder Title...................................................................................................................................... 35
10.2.7.2 Camera Titles .................................................................................................................................................35
10.2.7.3 Alarm Titles..................................................................................................................................................... 35

Videoswitch VDM Digital Recorder
Vdm601r.doc
10.2.8
Show Camera Titles .........................................................................................................................................................35
10.2.8.1 Full Screen Titles ............................................................................................................................................35
10.2.8.2 PIP Titles.........................................................................................................................................................35
10.2.8.3 Quad Titles......................................................................................................................................................35
10.2.8.4 X9 Titles..........................................................................................................................................................35
10.2.8.5 X16 Titles........................................................................................................................................................35
10.2.9 Text Alignment..................................................................................................................................................................36
10.2.10 Time/Date Alignment........................................................................................................................................................36
10.2.11 Upgrade from CD..............................................................................................................................................................36
10.3 Supervisor Menu...................................................................................................................................................................37
10.3.1 Covert Permission (Main).................................................................................................................................................37
10.3.2 Covert Cameras (Main) ....................................................................................................................................................37
10.3.3 Covert Cameras (Spot).....................................................................................................................................................37
10.3.4 Passwords........................................................................................................................................................................37
10.3.4.1 Supervisor Password......................................................................................................................................38
10.3.4.2 User Password................................................................................................................................................38
10.3.4.3 Incident Password...........................................................................................................................................38
10.3.4.4 Playback Password.........................................................................................................................................38
10.3.4.5 Keyboard Password........................................................................................................................................38
10.3.5 Password Access Timeout ...............................................................................................................................................38
10.3.6 Erase Event List................................................................................................................................................................38
10.3.7 Event List needs Password ..............................................................................................................................................38
10.4 Engineer Menu .....................................................................................................................................................................39
10.4.1 Date and Time..................................................................................................................................................................39
10.4.1.1 Summer/Winter Time......................................................................................................................................39
10.4.1.2 Date/Time (DD/MM/YY HH:MM:SS)...............................................................................................................39
10.4.2 Timers...............................................................................................................................................................................39
10.4.2.1 Custom Recording ..........................................................................................................................................39
10.4.2.2 Alarms Enable/Disable....................................................................................................................................39
10.4.2.3 Activity Enable/Disable....................................................................................................................................40
10.4.2.4 Daytime...........................................................................................................................................................40
10.4.3 Record Settings................................................................................................................................................................40
10.4.3.1 Normal Mode...................................................................................................................................................40
10.4.3.1.1 Image Retention (Days).............................................................................................................................40
10.4.3.1.2 Cameras ....................................................................................................................................................40
10.4.3.1.3 Quality........................................................................................................................................................40
10.4.3.2 Custom Mode..................................................................................................................................................41
10.4.3.2.1 Rate ...........................................................................................................................................................41
10.4.3.2.2 Cameras ....................................................................................................................................................41
10.4.3.2.3 Quality........................................................................................................................................................41
10.4.3.3 Activity/Alarm Mode ........................................................................................................................................41
10.4.3.3.1 Rate ...........................................................................................................................................................41
10.4.3.3.2 Cameras ....................................................................................................................................................41
10.4.3.3.3 Quality........................................................................................................................................................41
10.4.3.3.4 Record .......................................................................................................................................................41
10.4.3.3.5 Storage Allocation (%) ...............................................................................................................................42
10.4.3.4 Record Options...............................................................................................................................................42
10.4.3.4.1 Recording Enabled ....................................................................................................................................42
10.4.3.4.2 Image Size Control ....................................................................................................................................42
10.4.3.4.3 Record Drives ............................................................................................................................................42
10.4.3.4.4 Drive Full Options ......................................................................................................................................42
10.4.4 Activity/Alarms..................................................................................................................................................................42
10.4.4.1 Activity Detection.............................................................................................................................................42
10.4.4.2 Enable Activity.................................................................................................................................................43
10.4.4.3 Alarm Polarities...............................................................................................................................................43
10.4.4.4 Enable Alarms.................................................................................................................................................43
10.4.4.5 Alarm Input/Camera Mapping.........................................................................................................................43
10.4.4.6 Permit alarm/activity locking?..........................................................................................................................43
10.4.4.7 Pull-Up Settings ..............................................................................................................................................43
10.4.4.7.1 Pull-Up Monitor ..........................................................................................................................................43
10.4.4.7.2 Pull-Up Hold Time......................................................................................................................................43
10.4.4.7.3 Sequence Time..........................................................................................................................................43

Videoswitch VDM Digital Recorder
Vdm601r.doc
10.4.4.7.4
Relay Hold Time........................................................................................................................................ 43
10.4.4.7.5 Restore after Activity/Alarm....................................................................................................................... 43
10.4.4.8 Display Active Pixels ......................................................................................................................................43
10.4.5 Critical Alerts.................................................................................................................................................................... 44
10.4.5.1 Cameras......................................................................................................................................................... 44
10.4.5.2 Drive Fail.........................................................................................................................................................44
10.4.5.3 Drive Full.........................................................................................................................................................44
10.4.6 Camera Inputs.................................................................................................................................................................. 44
10.4.6.1 Brightness....................................................................................................................................................... 44
10.4.6.2 Colour Boost...................................................................................................................................................44
10.4.6.3 Termination..................................................................................................................................................... 44
10.4.7 Remote Access................................................................................................................................................................ 44
10.4.7.1 System Address .............................................................................................................................................44
10.4.7.2 Remote Password ..........................................................................................................................................45
10.4.7.3 Remote Covert Cameras................................................................................................................................ 45
10.4.7.4 Network Settings ............................................................................................................................................45
10.4.7.4.1 Network Interface...................................................................................................................................... 45
10.4.7.4.2 IP Address................................................................................................................................................. 45
10.4.7.4.3 Sub-Net Mask ...........................................................................................................................................45
10.4.7.4.4 Gateway ....................................................................................................................................................45
10.4.7.4.5 Port............................................................................................................................................................ 45
10.4.7.4.6 PSTN Rings............................................................................................................................................... 45
10.4.7.4.7 ISDN Answer Mode................................................................................................................................... 45
10.4.7.4.8 ISDN MSN/Sub-Address...........................................................................................................................46
10.4.7.4.9 RS232 Baud Rate.....................................................................................................................................46
10.4.7.5 Keyboard/Clock Synchronisation.................................................................................................................... 46
10.4.8 Configurations.................................................................................................................................................................. 46
10.4.8.1 Restore Factory Configuration........................................................................................................................ 46
10.4.8.2 Get Configuration from CD............................................................................................................................. 46
10.4.8.3 Erase Hard Drives ..........................................................................................................................................46
10.4.8.3.1 Erase Hard Drive 1.................................................................................................................................... 46
10.4.8.3.2 Erase Hard Drive 2.................................................................................................................................... 46
10.4.8.3.3 Erase Both Hard Drives ............................................................................................................................47
10.4.8.3.4 Upgrades need engineer password?........................................................................................................47
10.4.9 Engineer Password.......................................................................................................................................................... 47
11 Changing Hard Drives......................................................................................................................48
11.1 Managing Hard Drives .........................................................................................................................................................48
11.1.1 Single Hard Drive Operation ............................................................................................................................................48
11.1.2 Dual Hard Drive Operation...............................................................................................................................................48
11.1.3 Changing Hard Drives......................................................................................................................................................48
11.1.4 Warnings.......................................................................................................................................................................... 48
12 Specifications ...................................................................................................................................50
12.1 Image Capture and Storage................................................................................................................................................. 50
12.2 Connectors........................................................................................................................................................................... 50
12.2.1 Power Input...................................................................................................................................................................... 50
12.2.2 Camera Inputs and Loop-Though Outputs....................................................................................................................... 50
12.2.3 Coax Monitor Outputs ......................................................................................................................................................50
12.2.4 S-Video Monitor Output.................................................................................................................................................... 50
12.2.5 S-Video Input ...................................................................................................................................................................50
12.2.6 Alarms and Keyboard....................................................................................................................................................... 51
12.2.7 Serial Port (RS232).......................................................................................................................................................... 51
12.2.8 Parallel Port (Printer)........................................................................................................................................................ 52
12.3 Options Module.................................................................................................................................................................... 52
12.4 Power Requirements............................................................................................................................................................ 53
12.5 Dimensions and Weight .......................................................................................................................................................53
12.6 Temperature and Humidity................................................................................................................................................... 53
12.7 Ventilation.............................................................................................................................................................................53
12.8 Safety................................................................................................................................................................................... 53

Videoswitch VDM Digital Recorder
Vdm601r.doc 1
1 Overview
1.1 The VDM Digital Recorder
The VDM Digital Recorder provides a one-box solution for multiplexing, digital recording of video images
from up to 16 cameras, CD backup and remote dial-up viewing of live or recorded images.
• All you need for a digital recording system is the VDM recorder, up to 16 cameras and a display
monitor. This set-up will permit the video images from all the cameras to be recorded onto hard disc
for a period of typically 31 days. Beyond that time, the oldest images will be over-recorded by new
images.
• Any images available on the hard disc can be played back without interrupting the recording
process. An instant search facility allows images to be found by time and date. Events can be
tagged by the built-in activity detection and by external alarms (e.g. PIR detectors), and tagged
events may be instantly recalled and stepped through.
• The SWEEP mode allows the contents of the hard drives to be rapidly scanned for the easy location
of particular areas of interest even when the date and time is not known.
• For permanently archiving images, a CD writer is included as standard in all VDM recorders. Any
incidents on the hard disc that you wish to archive onto CD may be marked. These are then copied
onto a blank CD. Both CD-R and CD-RW type CDs may be used. The CD-R discs have the
advantage for evidence of being permanent and completely protected from possible alteration. The
CD-RW discs on the other hand may be erased and re-used.
• Incidents stored onto CD may be played back in any VDM.
• CDs may also be played back on a PC with the free “VDM Replay” or “VDM Play” software.
• The CD drive also stores of the VDM’s configuration, which can facilitate subsequent installations.
• The CD drive is also used to install firmware updates to the system. These will be made available on
CD and on the Internet as new features are added.
An important feature of the VDM Digital Recorder is the inclusion of removable hard drives. This offers the
significant advantage over products with in-built hard drives in providing the user with the ability to upgrade
the drive capacity at any time. Additionally, it also means zero down-time if one of the two drives fails in
service; a replacement drive can be sourced and plugged in while the system continues unaffected on its
single remaining drive.
The removable hard drive facility also allows additional hard drives be used to extend the storage capability.
A further application is in situations where review of the recordings is required at another site; a hard drive
can be readily removed and transported.
Whilst the VDM Digital Recorders are designed to run out of the box with no set-up required, there is great
flexibility in the configuration options. The update rate and the image qualities of each camera may be
programmed to optimise the usage of the available hard drive capacity. These settings can be different
depending on time of day and on the alarm and activity status. An important feature of the VDM Digital
Recorders is that the actual size of the recorded images depends on how much detail there is in them.
Images with less information content use less discs space than those containing a lot of detail, such as
faces, people and number plates. The benefit is that the hard drive space is used much more efficiently;
enabling higher quality images and faster updates than would otherwise be possible. This is in contrast to
other systems where images are forced to a constant size, irrespective of their information content.
A variety of multi-screen screen modes are provided, including real-time quads and real-time picture-inpicture (PIP). Dual monitor outputs are provided for the main monitors, and a spot monitor output provides a
completely independent full screen display. Independent covert protection is possible on main and spot
monitors. Each monitor also has auto-sequencing facilities, with a user programmable set of cameras for
each.
The keyboard and menu system are fully protected by a multiple level password system that may be used if
required.
Videoswitch VDM Digital Recorder
Vdm601r.doc 2
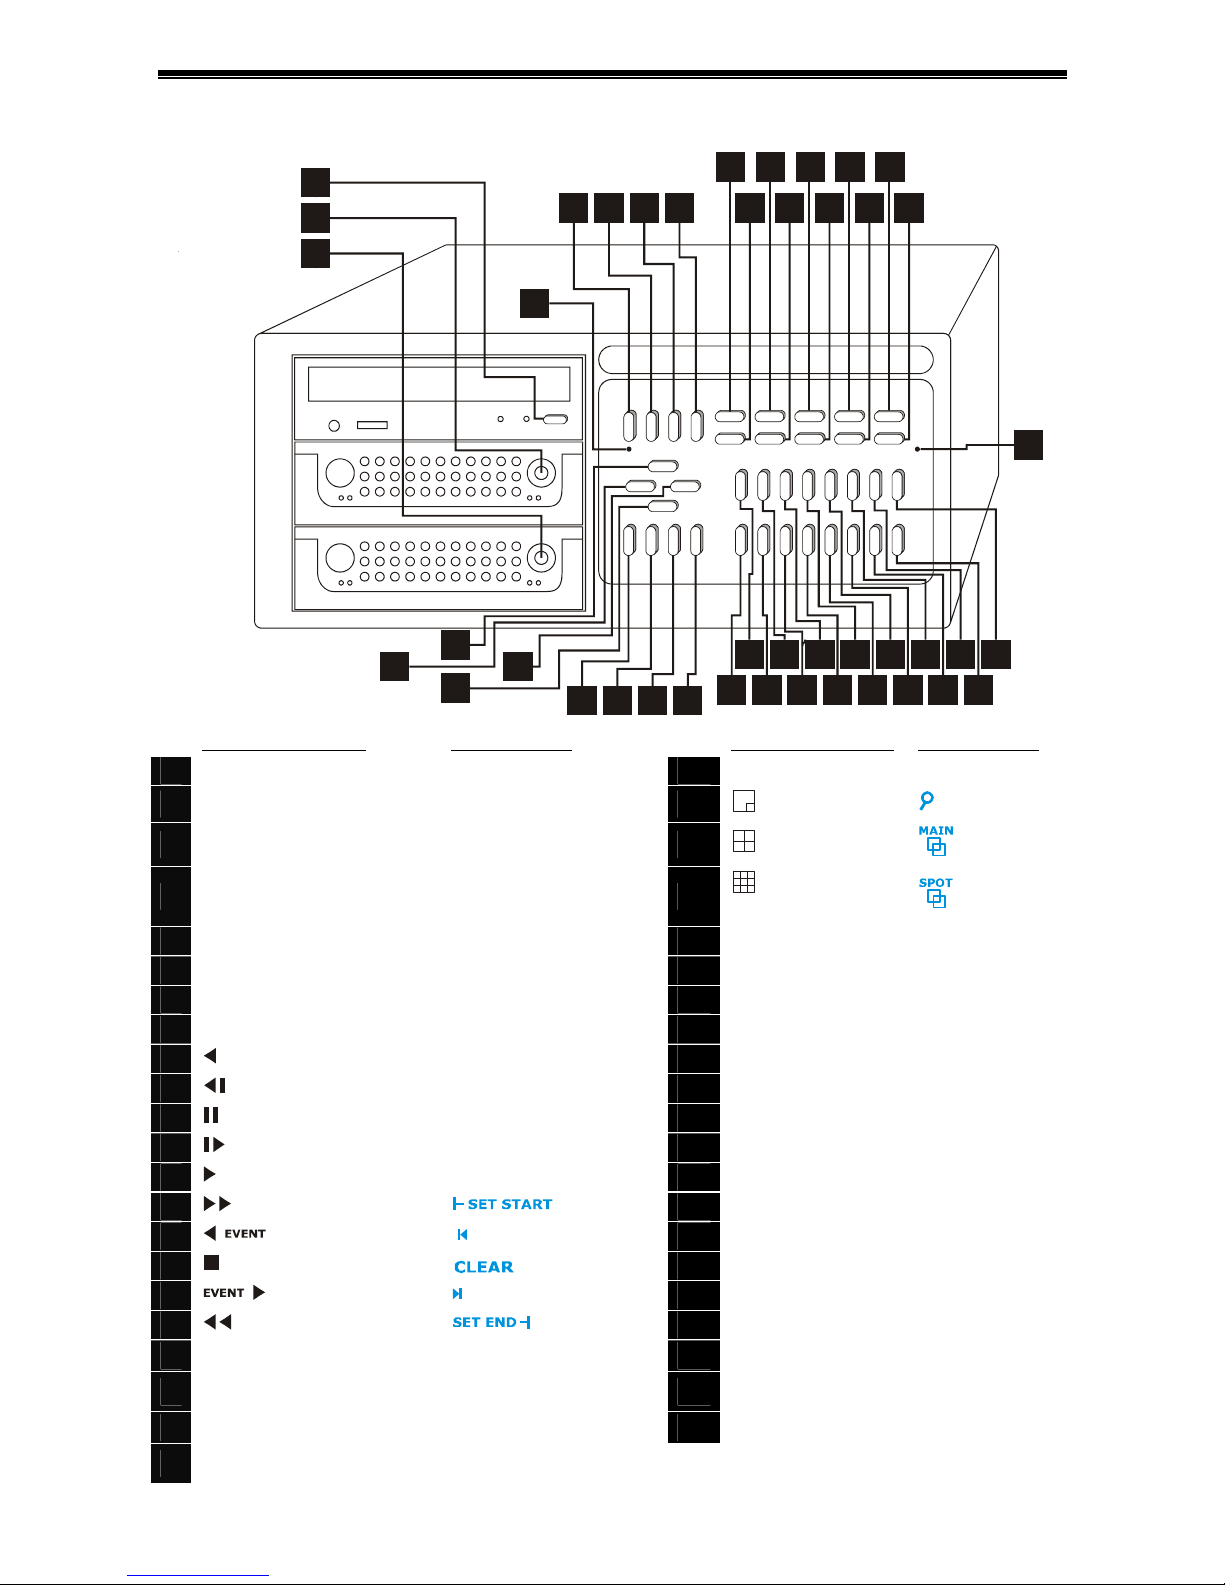
1.2 The Front Panel
1
2
3
4
20
22
19 21
23 24 25 26
9
1487
6
5
10151116121713
35
27 28 29 30 31 32 33 34
36 37 38 39 40 41 42
18
43
Standard Functions
ALT Functions
Standard Functions ALT Functions
1
Open/Close CD Drawer
23
ALT
n/a
2
Lock for Hard Drive 2
24
PIP (NO)
Zoom
3
Lock for Hard Drive 1
25
Quad (YES)
Sequence Main
4
RECORD
26
Multi-Screen
(DEFAULT)
Sequence Spot
5
SETUP SYSTEM INFO
27
Camera 1 (Main) Camera 1 (Spot)
6
INCIDENT DRIVE
28
Camera 2 (Main) Camera 2 (Spot)
7
EVENT IMAGE
29
Camera 3 (Main) Camera 3 (Spot)
8
SEARCH
30
Camera 4 (Main) Camera 4 (Spot)
9
Reverse Play
31
Camera 5 (Main) Camera 5 (Spot)
10
Reverse Single Step
32
Camera 6 (Main) Camera 6 (Spot)
11
Pause Play
33
Camera 7 (Main) Camera 7 (Spot)
12
Single Step Play
34
Camera 8 (Main) Camera 8 (Spot)
13
Forward Play
35
Camera 9 (Main) Camera 9 (Spot)
14
Fast Forward Play
of Incident
36
Camera 10 (Main) Camera 10 (Spot)
15
Prior Event
Incident Start
37
Camera 11 (Main) Camera 11 (Spot)
16
Live
38
Camera 12 (Main) Camera 12 (Spot)
17
Next Event
Incident End
39
Camera 13 (Main) Camera 13 (Spot)
18
Fast Reverse Play
of Incident
40
Camera 14 (Main) Camera 14 (Spot)
19
Í
LEFT
41
Camera 15 (Main) Camera 15 (Spot)
20
Í
UP
42
Camera 16 (Main) Camera 16 (Spot)
21
Í
RIGHT
43
Power LED
22
Í
DOWN
Note: To get an ALT function, press the ALT key and another key.
Videoswitch VDM Digital Recorder
Vdm601r.doc 3
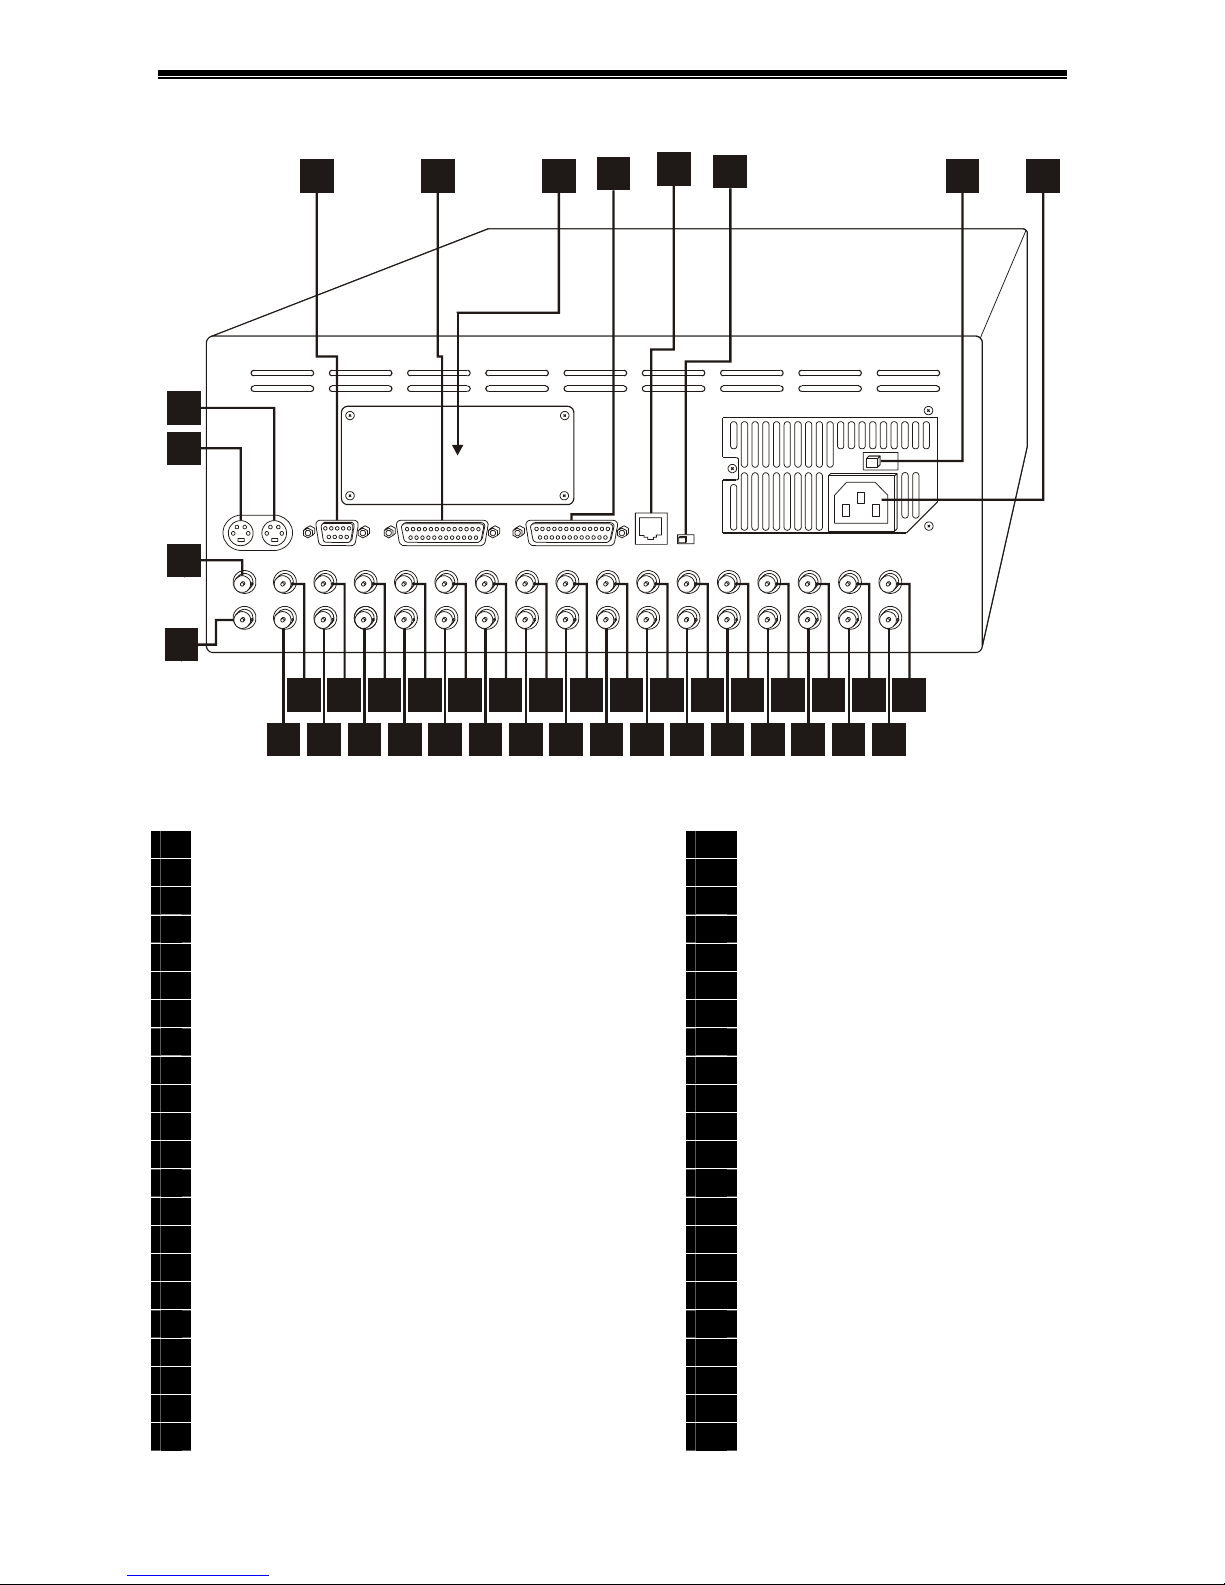
1.3 The Rear Panel
50
58
76
60 61 62 63 64 65 66 67 68 69 70 71 72 73 74 75
77 78 79 80 81 82
83
84 85 86 87 88 89 90 91
57
56
59
51
52
53
55
92
93
54
Connectors
Connectors
50
Modem/Computer (RS232)
72
Camera 13 Loop Output
51
Alarm Inputs, Relays, Keyboard (RS485)
73
Camera 14 Loop Output
52
Options Module blanking panel
74
Camera 15 Loop Output
53
Parallel Port (Printer)
75
Camera 16 Loop Output
54
Mains voltage selector switch (115 or 230Vac)
76
Camera 1 Input
55
Mains input connector (IEC)
77
Camera 2 Input
56
S-Video Input
78
Camera 3 Input
57
S-Video Monitor Output
79
Camera 4 Input
58
Main Monitor composite output
80
Camera 5 Input
59
Spot monitor composite output
81
Camera 6 Input
60
Camera 1 Loop Output
82
Camera 7 Input
61
Camera 2 Loop Output
83
Camera 8 Input
62
Camera 3 Loop Output
84
Camera 9 Input
63
Camera 4 Loop Output
85
Camera 10 Input
64
Camera 5 Loop Output
86
Camera 11 Input
65
Camera 6 Loop Output
87
Camera 12 Input
66
Camera 7 Loop Output
88
Camera 13 Input
67
Camera 8 Loop Output
89
Camera 14 Input
68
Camera 9 Loop Output
90
Camera 15 Input
69
Camera 10 Loop Output
91
Camera 16 Input
70
Camera 11 Loop Output
92
RS485 Keyboard Input
71
Camera 12 Loop Output
93
RS485 Termination (shown ON)

Videoswitch VDM Digital Recorder
Vdm601r.doc 4
1.4 Operating Modes
The VDM Digital Recorder is controlled via the front panel keys. All status information is displayed on the
main monitor.
The VDM has a number of operating modes that are called up during the set-up and operation of the
system. Each of these modes has a different easily identifiable screen display. Note that the camera-select
keys are used for entering numbers in some of the modes, and the camera 10 key is used to enter zero.
Screen Modes:
• The SELF-TEST mode is entered following power up. The VDM displays a blue start-up screen
while the self-test is in progress. On completion, the system will move on to the LIVE screen mode.
If the self-test fails, a critical alert message will be displayed.
• The LIVE mode is the default state of the system in which live camera images are displayed.
Different cameras and screen formats may be selected. For example, full screen, zoom, picture-inpicture (PIP), quad or multi-screen.
• The PLAY mode allows previously recorded images to be replayed. A wide range of keys allows
forward and reverse re-play, fast play, single-step and event stepping.
• The SYSTEM INFO mode displays details about the system such as the model, firmware revision,
checksum and the self-test results. In addition, the alarm input status and activity status is also
displayed for test purposes.
• The SEARCH mode allows a date and time to be entered in order to recall images from that date
and time. A single key press calls up the most recently recorded image.
• The SWEEP mode allows images to be recalled and viewed when date and time may not be
known. The whole range of images stored on the hard drive(s) may be rapidly swept to search for an
incident.
• The EVENT mode allows events generated by activity and external to be instantly recalled and
replayed, and also keeps a record of system alerts such as power-up and menu access.
• The INCIDENTS mode is used to specify incidents for backup onto CD.
• The DRIVES mode displays information about the disc drives, such as the range of dates and
times of video that is stored on each drive.
• The IMAGES mode displays information either about live image record rates and sizes, or about
individual replay images.
• The SETUP mode provides access to the menus for configuring the system and for archiving
images to CD.

Videoswitch VDM Digital Recorder
Vdm601r.doc 5
1.5 Screen Icons
The following icons may appear on the screen during the normal operation of the system:
Auto sequencing of Main monitor is on
Auto sequencing of Spot monitor is on
Zoom has been selected
An alarm input has been triggered
Activity has been detected
Alarms or activity are currently disabled by their timers
A hard disc drive
The CD drive
Pause
Single frame Forward play
Single frame Reverse play
Forward Play
Reverse Play
Fast forward play
Fast Reverse play
System is busy
The displayed image is at the beginning of an incident
The displayed image is at the end of an incident
Incidents have been selected for archiving onto CD
Incidents have been de-selected and will not be archived onto CD

Videoswitch VDM Digital Recorder
Vdm601r.doc 6
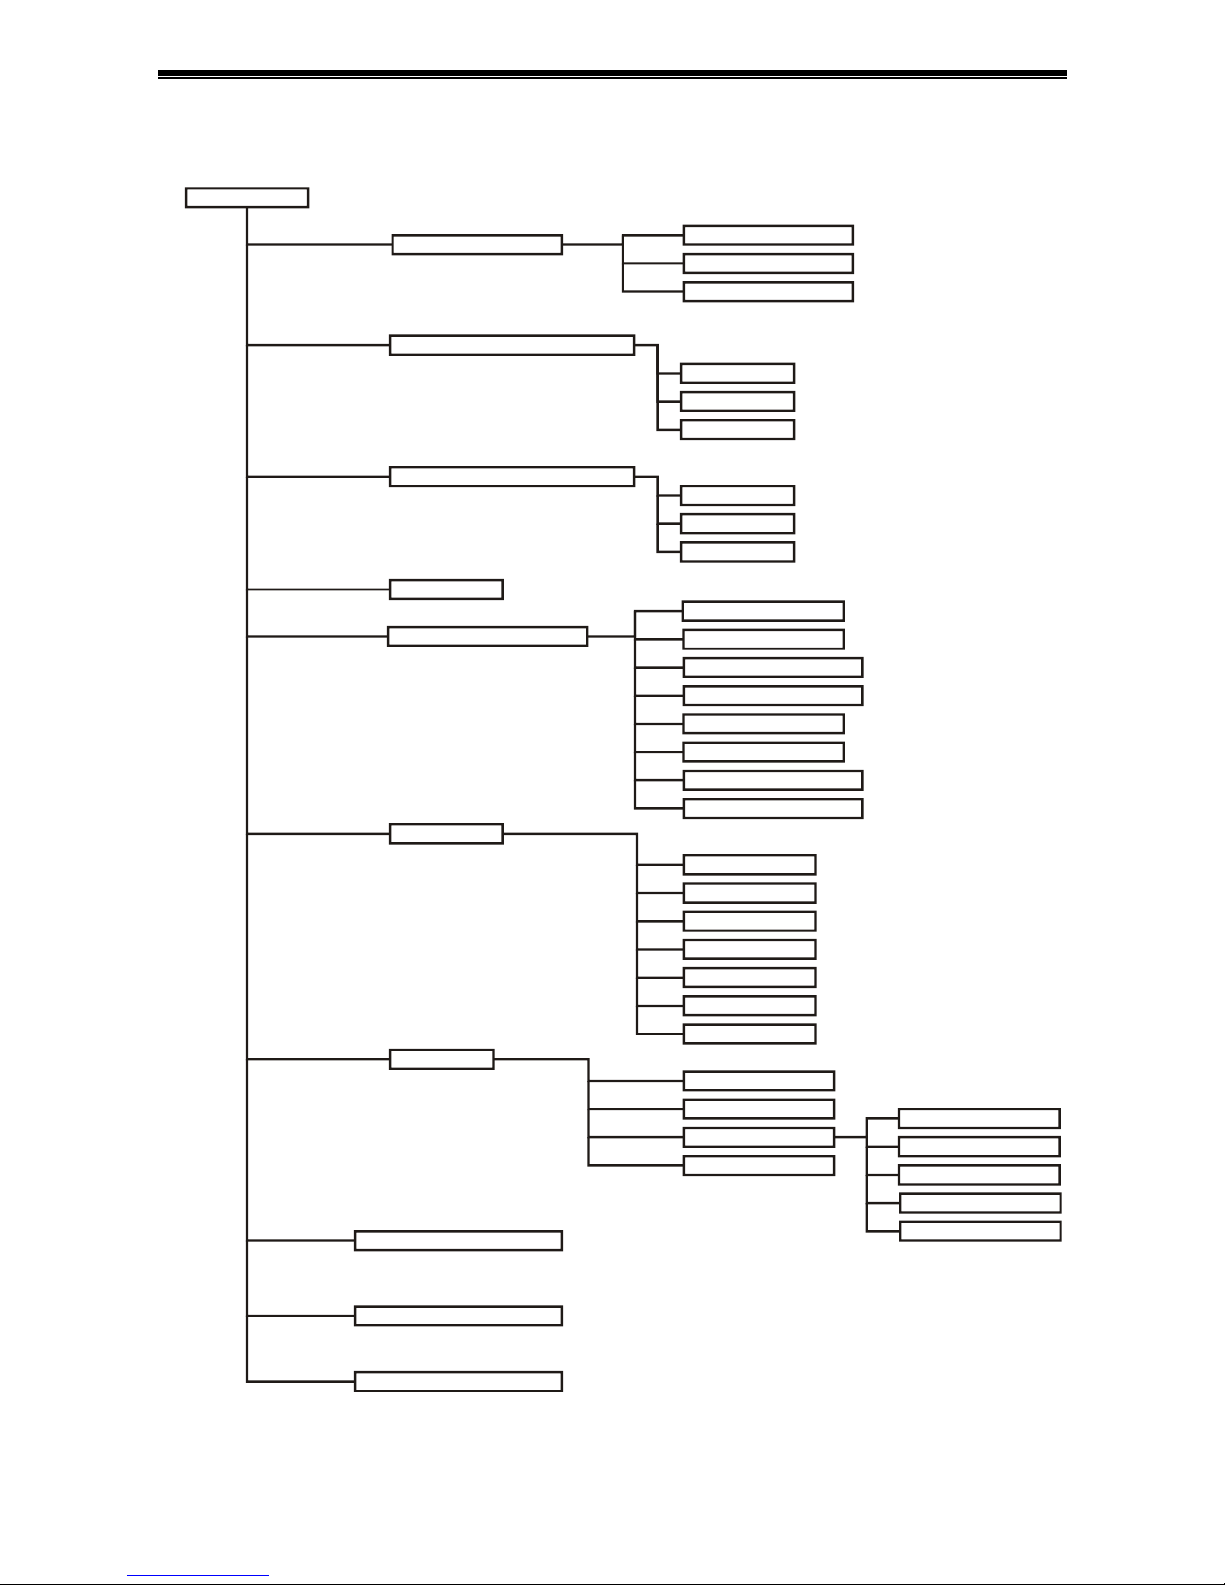
1.6 Menu Structure
The following sections summarise the menu structure. Note that the menu may vary slightly between
different versions of firmware installed in the VDM.
Press the SETUP key to enter and exit the menu system. Use the cursor keys
Í
, Í, Í and Íto
navigate through the menus. The DEFAULT key is very useful within the menus as it is used to set the
currently selected menu item to a default condition. In certain cases within the menu, the YES key needs to
be pressed to confirm that the selected action is required. Refer to section 10 for details.
Videoswitch VDM Digital Recorder
Vdm601r.doc 7
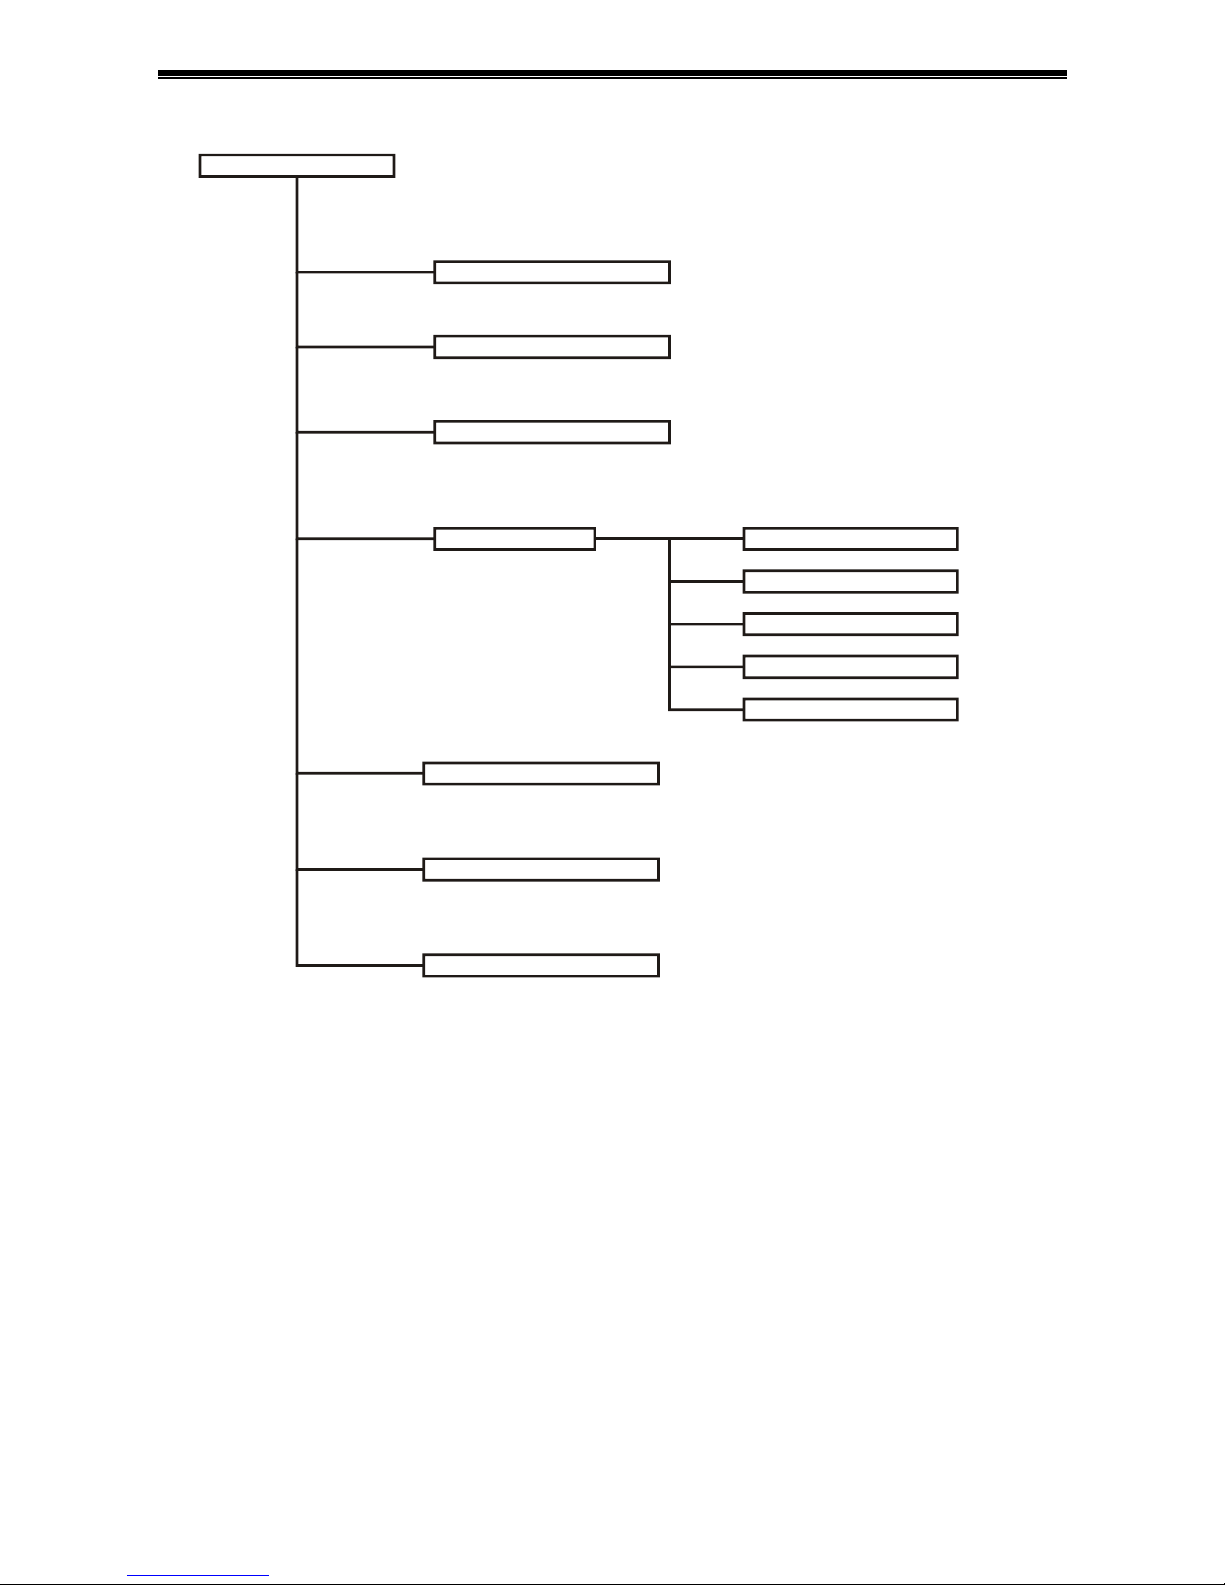
1.7 User Menu
User Menu
Sequence Mode
Camera List
Dwell T ime s
Auto Sequence (Main Monitor)
Sequence Mode
Camera List
Dwell T ime s
Auto Sequence Spot (Monitor)
Anti-Flicker
Full Screen
Full Screen Titles
PIP Titles
Quad Titles
x9 Titles
x16 Titles
Power-Up Options
Main Monitor Mode
PIP Mode
Titles
Multiplexer Title
Show Camera T itles
Upgrade Firmware from CD
Sequence Sp ot (Day)
Spot Camera (Day)
Sequence Sp ot (Night)
Spot Camera (Night)
PIP Screen
Quad Screen
X9 Multi- Scre e n
X16 Multi-Screen
Text Windows
Sequence Main
Main Camera
PIPCamera
Always Interlace
T ext Alignment
Alarm Titles
Time/Date Alignment
Filename
Erase CD
Erase Incident Markers
Incident Options
Camera Titles
Videoswitch VDM Digital Recorder
Vdm601r.doc 8
1.8 Supervisor Menu
Supervisor Menu
Passwords
Covert Cameras (Mai n )
Covert Cameras (Spot)
Covert Permis sion (Main)
User Password
Supervisor Password
Incident Password
Playback Password
Keyboard Password
Password Acce ssTimeout
Erase Event List
Event List Needs Password
Videoswitch VDM Digital Recorder
Vdm601r.doc 9
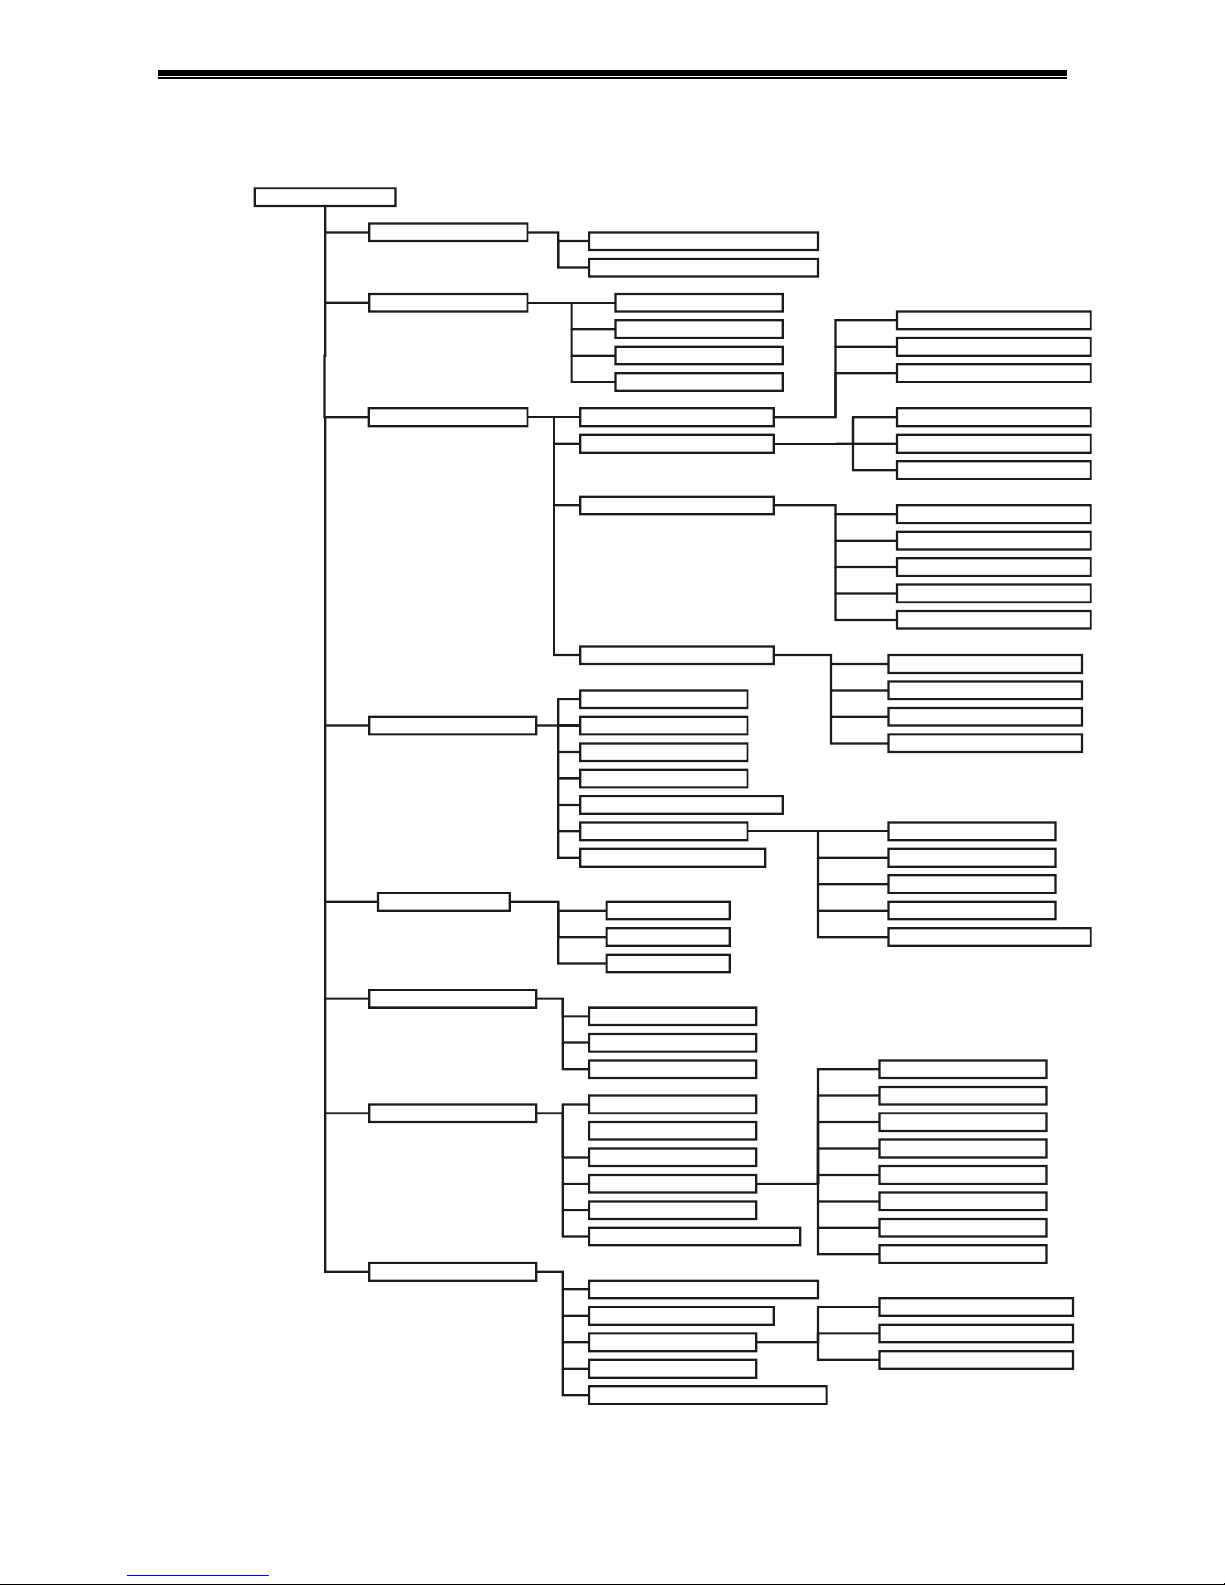
1.9 Engineer Menu
Engineer Menu
Upgrades need Engineer password
Erase Hard Drive(s)
Erase Hard Drive 1
Erase Hard Drive 2
Erase Hard Drives 1 and 2
Summer/Winter Time
Date/Time (DD/MM/YY HH:MM:SS)
Record Settings
Recording Enabled
Date and Time
Custom Recording
Critical Alerts
Colour Boost
Remote Access
Configurations
Restore Factory Configuration
Get Config from CD
Image Retention (Days)
Normal Mode
Cameras
Image Quality
Custom Mode
Rate
Cameras
Quality
Activity/Alarm Mode
Rate
Quality
Record
Storage A llocation (%)
Image Size Control
Drive Full Options
Cameras
Alarm Enable /Disable
Activity Enable /Disable
Timers
Activity Detection
Alarm Polarities
Pull-Up Hold Time
Sequence Time
Relay Hold Time
Restore after Activity/Alarm
Activity/Alarms
Pull-Up Settings
Engineer Password
Termination
Brightness
System Addres s
Remote Covert Cameras
RS232 Baud Rate
Keyboard/C lock Sy nchr o nisa t ion
Daytime
Enable Activity
Enable Alarms
Display Active Pixels
Drive Fail
Drive Full
Record Options
Record Drives
Remote Password
Network Interface
PSTN Rings
ISDN Answer Mode
ISDN MSN/Sub-Address
IP Address
Port
Camera Inputs
Network Settings
Sub-Net Mask
Gateway
Cameras
Alarm Input/Camera Mapping
Pull-Up Monitor
Videoswitch VDM Digital Recorder
Vdm601r.doc 10
2 Installation
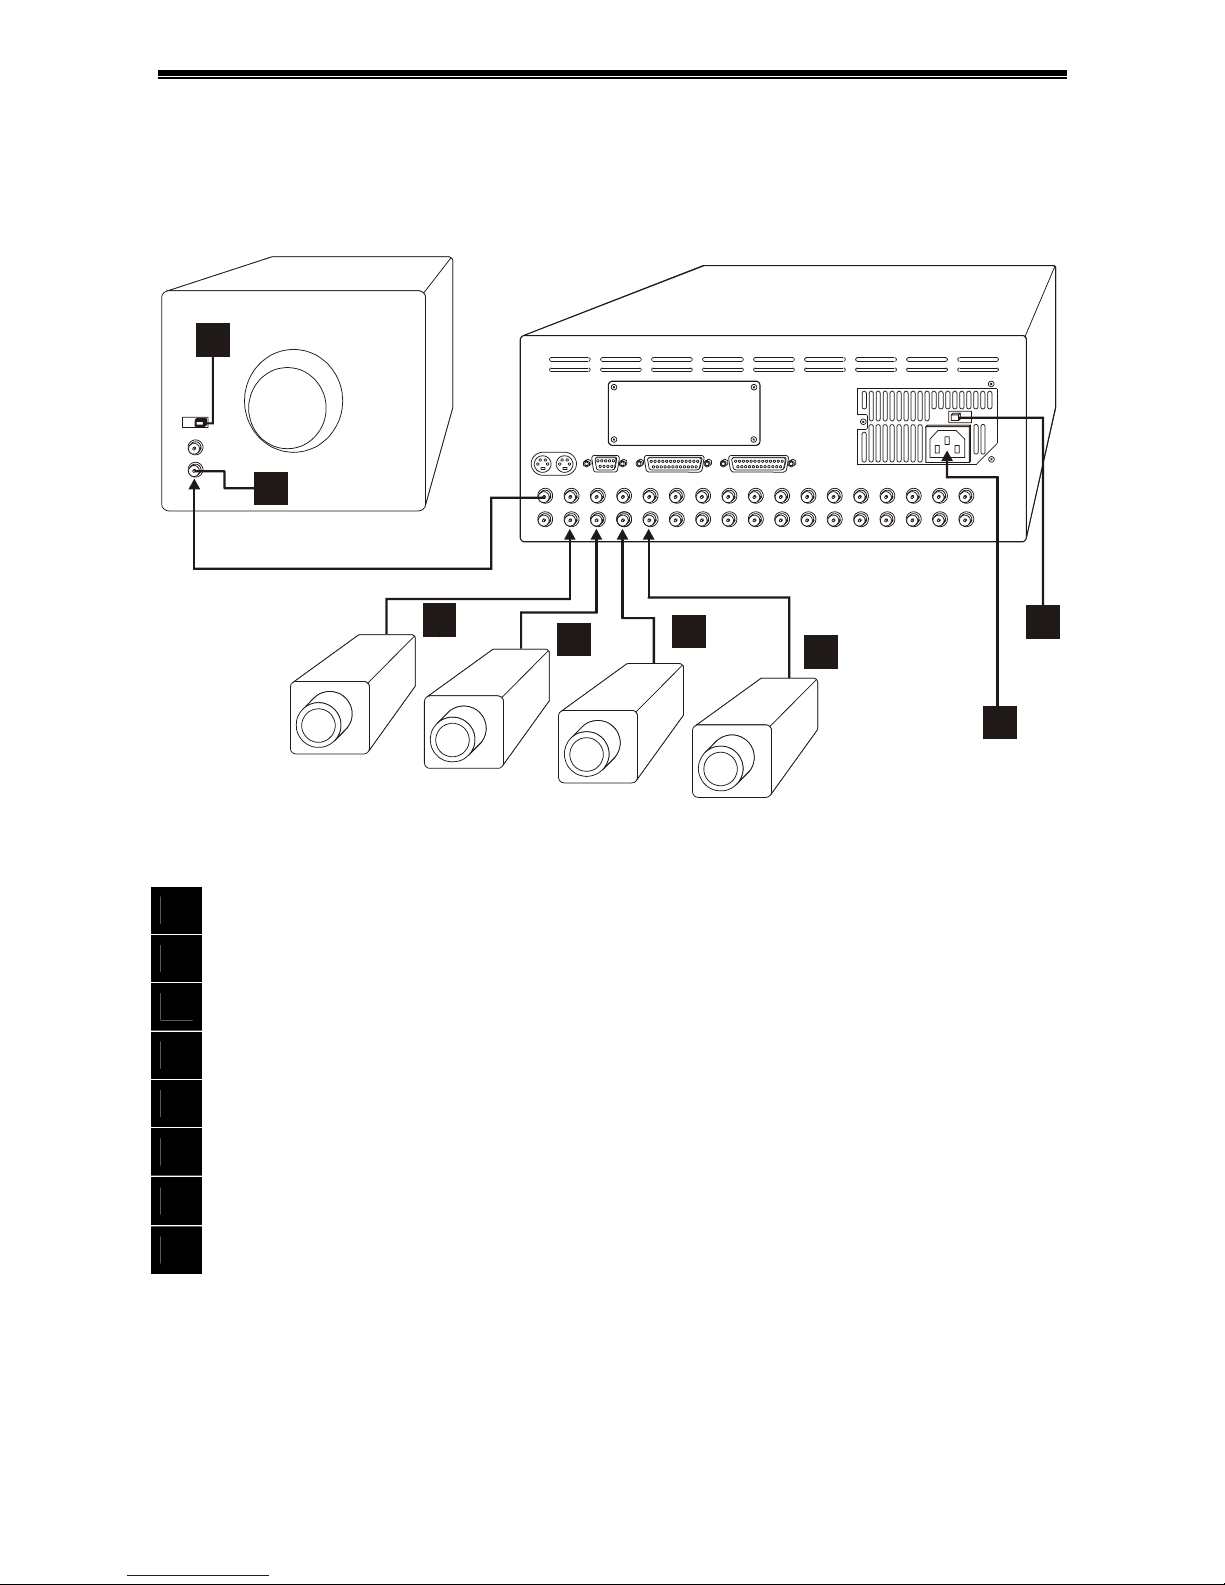
2.1 Connecting Up (4 Camera example)
102
101
100
103
104
105
107
106
75 Ohms
IN
Make these Connections…
100
Connect the video input of the Monitor to the main monitor output of the VDM using a BNC cable
101
Make sure that the monitor termination is switched on (i.e. to 75 Ohms)
102
Connect the first camera to Camera Input 1 on the VDM using a BNC cable
103
Connect the next camera to Camera Input 2 on the VDM using a BNC cable
104
Connect the next camera to Camera Input 3 on the VDM using a BNC cable
105
Connect the next camera to Camera Input 4 on the VDM using a BNC cable
106
Make sure that the voltage select switch is set to suit the mains supply voltage prior to applying power
otherwise damage may occur. The setting required in UK and Europe is 230Vac.
107
Connect the mains power using the IEC cable supplied using an IEC to 13A plug cable (provided)
When power is applied, the system will perform a self-test and display some system information on the
screen such as the serial number and firmware and hardware revision of the unit. Press any key while this
information is being display to keep it on the screen for longer.

Videoswitch VDM Digital Recorder
Vdm601r.doc 11
2.2 Setting Date and Time
For proper operation of the VDM Digital Recorder is essential that the date and time are set correctly.
If the displayed date and time is incorrect, set it as follows (numbers refer to Front Panel diagram 1.2):
Follow these steps…
SETUP
Press the SETUP key to enter the menu screen.
Í
Press the DOWN key to select the ENGINEER sub-menu
Í
Press the RIGHT key to enter the DATE and TIME sub-menu
Í
Press the DOWN key to select the DATE/TIME option
Í
Press the RIGHT key to enter the DATE/TIME option
1..10
Use the 1-10 keys (10 key is Zero for numeric entry) to enter the date and time in the following
order: Day, Month, Year, Hours, Minutes (Time is in 24-hour mode). The displayed day and
summer/winter-time must also be correctly displayed (automatic).
SETUP
Press the SETUP key to exit the menus.
Note:
If the system clock has an invalid date or time when the VDM is powered up (or at any time during
operation), the date and time setting window will be automatically displayed. This makes it easy for the user
to enter the correct date and time without needing to go into the menu.
When the clocks change between standard time (Winter) and summertime, the DATE/TIME setting must
not be changed. Instead, the Summer/Winter time setting should be used. In the UK and the rest of Europe,
the default AUTO Summer/Wintertime setting ensures that this happens automatically at the correct dates
so no action is required by the user.
2.3 Critical Alerts
The VDM constantly monitors the hard drives, camera inputs and system so that any fault condition will be
reported to the user as soon as possible by means of a red alert message on the screen and, if required, an
external alarm connected to the alert relay. Make sure that the alert settings are set correctly to take full
advantage of the Critical Alert monitoring facility.
If you get a red “Critical Alert” message when you first set up the system (or after a factory reset), this may
be because the Alert Monitoring menu options are not set correctly. Refer to section 10.4.5 for details.
Press the EVENTS key to view the alerts (pressing the DEFAULT key automatically scrolls to the most
recent events. The “Critical Alert” message is cleared when you exit the events screen (e.g. by pressing the
EVENTS key again), but may return if the alert condition is still present.
2.4 Operation
The VDM Digital Recorder should now be fully operational and recording images from all cameras. Refer to
the following sections of this manual for details on controlling and configuring the system.

Videoswitch VDM Digital Recorder
Vdm601r.doc 12
3 Recording
Unless specifically configured otherwise, the system will always be recording images from all cameras. Even
when you are playing back images, the system will continue recording.
RECORD
When the record LED is on, this indicates that recording is taking place.
3.1 Update Rates
This table gives an indication of the overall update rate in images per second that will apply for different
Image Retention settings (see section 10.4.3.1.1) and hard drive capacities assuming an average image
size of 20K bytes. Note that if the average image size is lower, update rates will be higher; if the average
image size is higher, update rates will lower.
To get the update rate per camera, divide the overall update rate by the number of cameras.
Image
Retention/ Drive
Size
80G 120G 160G 320G 500G 600G
7 Days 6 10 12.5 12.5 12.5 12.5
14 Days 3 5 6 12.5 12.5 12.5
31 Days 1.5 2 3 6
9 12
60 Days 0.75 1 1.5 3 5 6
Note that 24-hour mode operation on a conventional VCR time-lapse recorder is about 5
½ images per
second. The shaded cells in this table show where the update rate will be equal or better than a VCR in 24hour mode.
3.2 CD Capacity
This table gives an indication of the number of minutes of video that can be archived onto a 700Mbyte CD.
Note that all cameras are recorded.
Drive
Size/Image
Retention
80G 120G 160G 320G 500G 600G
7 Days 88 58 44 22 14 12
14 Days 176 118 88 44 28 23
31 Days 352 252 190 97 62 52
Videoswitch VDM Digital Recorder
Vdm601r.doc 13
4 Remote Access
4.1 Configurations
The various standard remote access configurations are illustrated in the following diagrams.
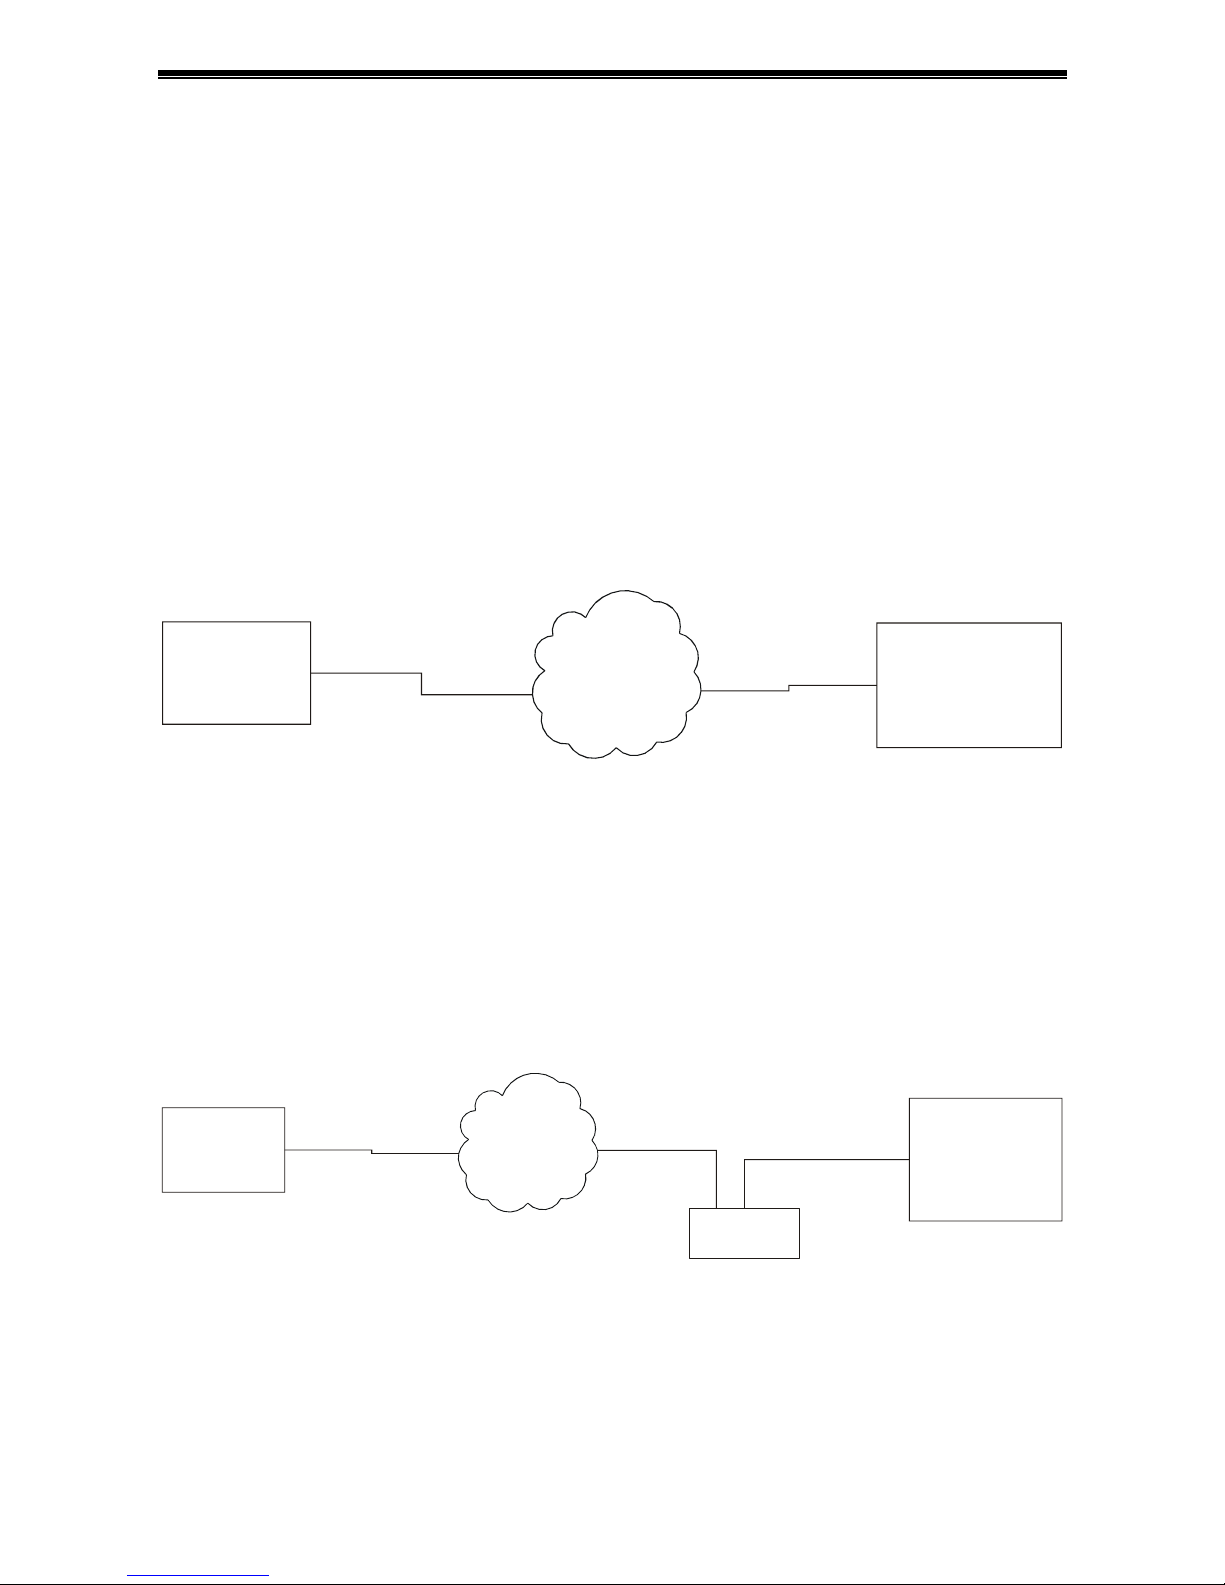
4.1.1 PSTN
Standard telephone lines (PSTN) provide the lowest cost and easiest method of achieving remote viewing of
images. A VDM/PSTN (modem) module must be installed in the VDM and the PC must have a standard
internal (or external) modem fitted. A telephone socket is required both at the VDM and at the PC end.
Image update rates of around an image every two seconds are typical, depending on the image quality
selected in the VDM-Connect remote access software.
The public telephone network is worldwide, and any number of PCs can access any number of VDMs on a
one-to-one basis.
VDM
+
VDM/PSTN
PC
+
PSTN MODEM
+
“VDM Connect”
PUBLIC
SWITCHED
TELEPHONE
NETWORK
(PSTN)
MODEM CABLE
MODEM CABLE
4.1.2 ISDN
ISDN provides almost instant dialling and faster update rates than PSTN. A VDM/ISDN module must be
installed in the VDM and a VDM/ISDN/TA terminal adaptor must be attached to the PC. An ISDN socket is
required both at the VDM and at the PC end.
Image update rates of around an image per second are typical, depending on the image quality selected in
the VDM-Connect remote access software.
The ISDN network is available in many countries (subject to regional variations), and any number of PCs
can access any number of VDMs on a one-to-one basis.
VDM
+
VDM/ISDN
VDM/ISDN/TA
PC
+
“VDM Connect”
INTEGRATED
SERVICES
DIGITAL
NETWORK
(ISDN)
CAT5 CABLE
CAT5 CABLE
RS232 (SERIAL)
CABLE
4.1.3 Ethernet Local Area Network (LAN)
Ethernet provides almost instant connection and faster update rates than ISDN. A VDM/ETHER-1 module
must be installed in the VDM and the PC must have an Ethernet card installed.
Image update rates of around four images per second are typical, depending on the image quality selected
in the VDM-Connect remote access software. Local area networks (LANs) generally employ Ethernet hubs
or switches, and the VDM plugs into this in the same way as a PC. Standard CAT5 cables are used
throughout.
 Loading...