

Page 1
Emergency Pneumatics.
Operating Instructions
VETTER Pneumatic Universal Tent
Article No. 9987007103 | © Vetter GmbH I 10/14 I Changes and errors excepted.
Page 2

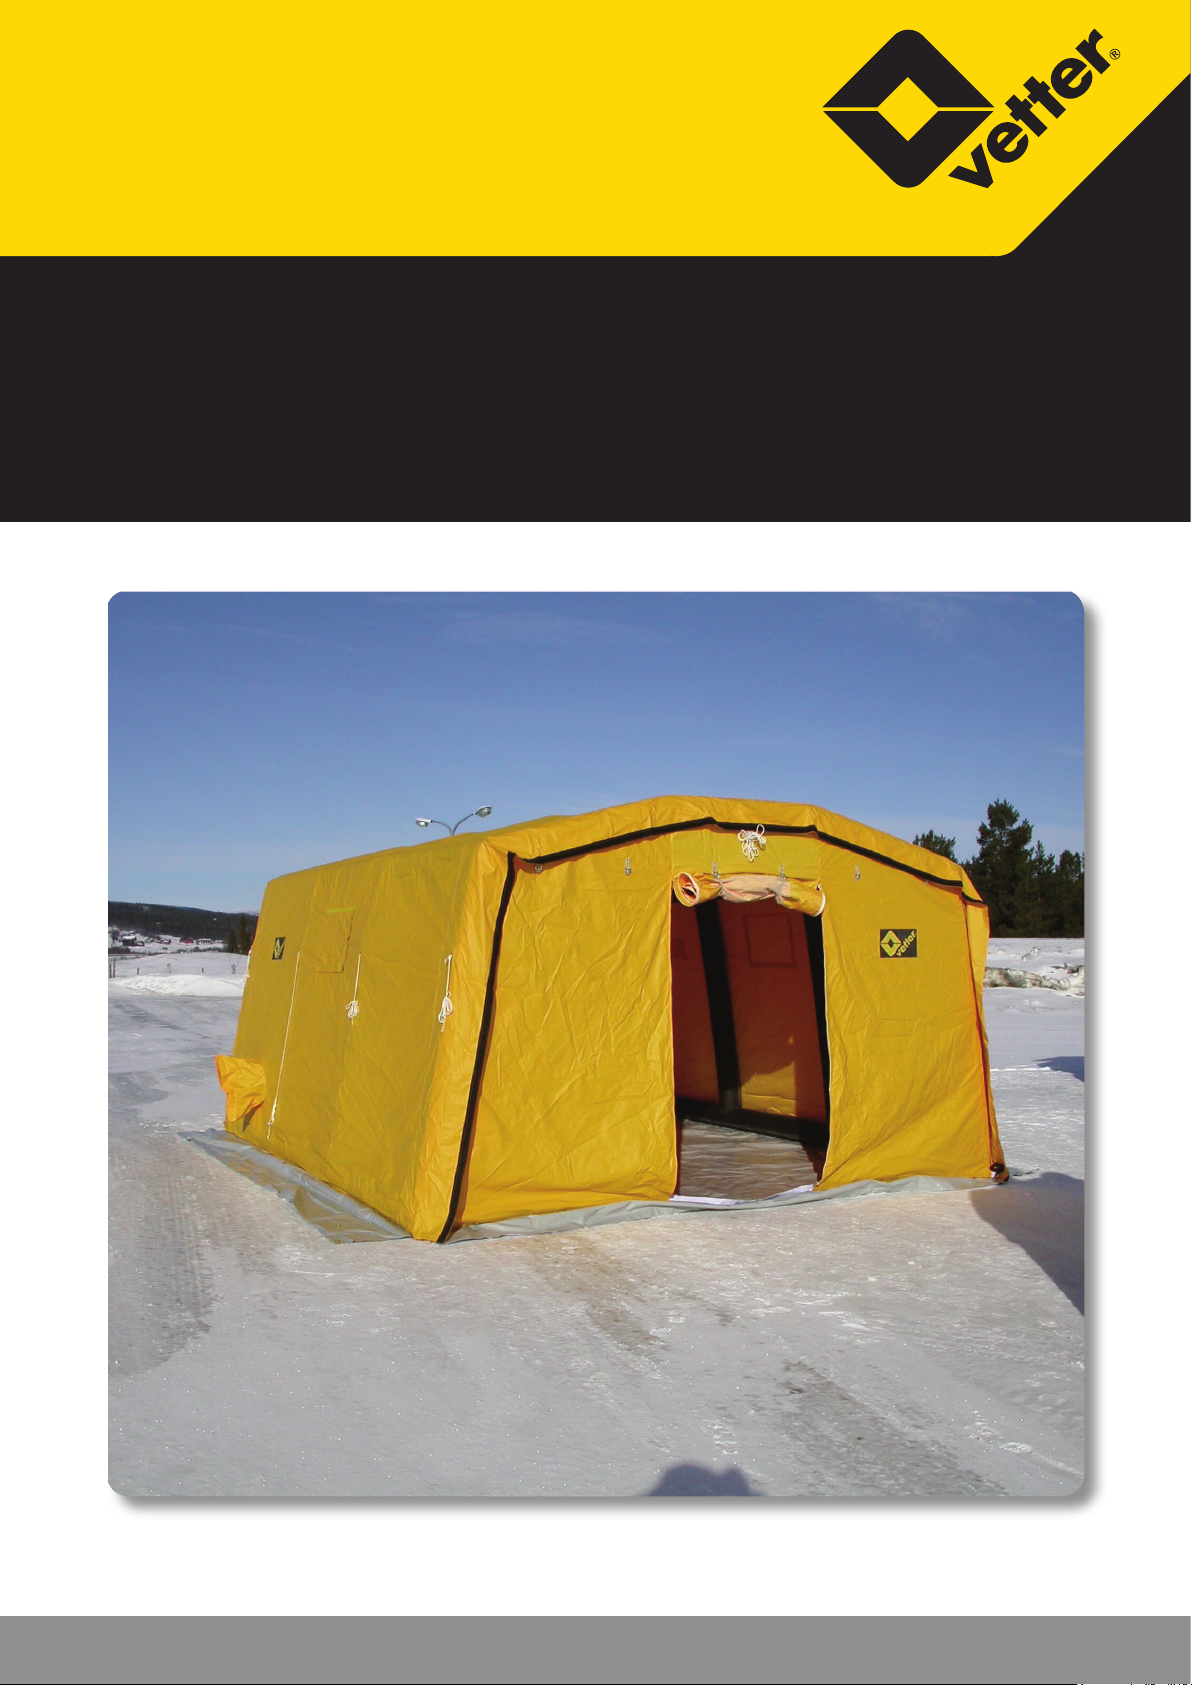
Vetter Pneumatic Universal Tent
Contents
1. Important preliminary remarks ....................................2
2. Description of the product ........................................2
2.1 Area of application ..........................................2
2.2 Scope of delivery ...........................................3
2.3 Optional accessories ........................................4
2.5 Correct handling and usage .................................4
2.6 Safety instructions ..........................................4
3. Preparing the product for use .....................................4
3.1 Preparations for operation ..................................4
4. Operating Instructions ............................................5
4.1 Operation with blower ......................................5
4.2 Operation with compressed air ..............................5
4.3 Deation ...................................................6
4.4 Folding Plan ................................................7
4.5 Additional Information PZ 30 and PZ 40 .....................8
5. Practical Tips ......................................................9
6. Repeated Inspections .............................................9
7. Repair Instructions .............................................. 10
8. Technical data ..................................................11
Page 1/12
Page 3

1. Important preliminary remarks
These instructions must be read carefully and complied with at
all times to ensure this product is used properly and as intended,
to ensure this product provides the greatest possible benet, and
that the entitlements within the scope of the Vetter warranty are
preserved.
Each use/operation of the pneumatic universal tent requires detailed knowledge and compliance of these instructions.
The operating instructions given here are to be regarded as part
of the product and are to be kept for the complete life duration of
the product. In case the product should be passed on to a successive user then the operating instructions must also be included.
2. Description of the product
2.1 Area of application
The range of application is almost inexhaustible:
9 as weather protection tent for changing into working clothes
during accidents with hazardous materials
9 as an awning to keep rain o hazardous materials during reco-
very operations, e.g. magnesium as bulk material
9 as a command center for aid organizations
9 as weather protection for the weapon demolition teams
9 as screening for criminal investigations by the police
9 as rst aid tent, center for injured people, temporary care of
patients
9 as catering tent during large operations
9 assembly of a triage
Page 2/12
Page 4

Vetter Pneumatic Universal Tent
2.2 Scope of delivery
Article No. Description PZ 12
(1520 0029 01)
1520 0030 01 Tent frame PZ 12 including tension rope X
1520 0006 01 Tent frame PZ 17 including tension rope X
1520 0049 01 Tent frame PZ 20 including tension rope X
1520 0031 00 Tent oor PZ 12 X
1520 0009 00 Tent oor PZ 17 X
1520 0050 00 Tent oor PZ 20 X
1520 0036 00 Tent cover PZ 12 X
1520 0012 00 Tent cover PZ 17 X
1520 0054 00 Tent cover PZ 20 X
1520 0040 00 Cover for entry PZ 12 X
1520 0079 00 Cover for entry PZ 17 X
1520 0055 00 Cover for entry PZ 20 X
1520 0042 00 Packing bag (110 x 85 x 40 cm) X
1520 0005 00 Packing bag (110 x 85 x 60 cm) X X
1520 0024 00 Square earthing pins X X X
1520 0283 01 Repair material X X X
1520 0025 00 Bag, red, for square earthing pins X X X
1523 0068 00 Hammer X X X
PZ 17
(1520 0004 01)
PZ 20
(1520 0047 01)
Article No. Description PZ 25
(1520 0089 01)
1520 0090 01 Tent frame PZ 25 including tension rope X
1520 0095 02 Tent frame PZ 30 including tension rope X
1520 0107 02 Tent frame PZ 40 including tension rope X
1520 0091 00 Tent oor PZ 25 X
1520 0096 01 Tent oor PZ 30 X
1520 0108 01 Tent oor PZ 40 X
1520 0092 00 Tent cover PZ 25 X
1520 0100 01 Tent cover PZ 30 X
1520 0112 01 Tent cover PZ 40 X
1520 0093 00 Cover for entry PZ 25 X
1520 0101 01 Cover for entry PZ 30/PZ 40 X X
1520 0005 00 Packing bag (110 x 85 x 60 cm) X X
1520 0115 00 Packing bag PZ 40 X
1520 0024 00 Square earthing pins X
1520 0335 00 Square earthing pins X X
1520 0283 01 Reparaturmaterial X X X
1520 0025 00 Bag, red, for square earthing pins X
1523 0139 00 Bag, red, for square earthing pins X X
1523 0068 00 Hammer X X X
PZ 30
(1520 0094 02)
PZ 40
(1520 0106 02)
Page 3/12
Page 5

2.3 Optional accessories
Article No. Description
1520046000 Packing blanket for PZ 12, PZ 17 and PZ 20
215 x 145 cm (85 x 57 inch), yellow, including
auto belt latch
1523003700 Packing blanket for PZ 25, PZ 30 and PZ 40
265 x 150 cm (104 x 59 inch), yellow, including
auto belt latch
2.5 Correct handling and usage
Always use compressed air with the pneumatic universal tents never ever use ammable or aggressive gases. Only Vetter original
ttings and parts may be used for the pneumatic universal tents.
2.6 Safety instructions
Only trained, reliable, and responsible employees are permitted
to use and operate this product. Wear the required protective
gear and clothing. Please contact the manufacturer or authorized
retailer when detecting cracks, ssures, holes, or leakages on the
pneumatic supporting frame during the product inspection. Such
defects can lead to bursting. Always avoid contact with hot or
sharp-edged materials.
Due to the light design of the pneumatic tents,
it is possible that heavy winds may cause
stability problems.
Always fasten tents with anchoring ropes or use ballast containers. Comply with DIN 7716 if storing the pneumatic universal
tents long-term.
3. Preparing the product for use
3.1 Preparations for operation
Inspect the pneumatic tent before and after each operation to ensure correct and perfect condition. It is imperative that the recommended folding instructions be observed.
Page 4/12
Page 6

Vetter Pneumatic Universal Tent
4. Operating Instructions
Open the packing cover. Lay out the tent at the required location.
The ground area must be free of any sharp-edged or pointed objects! The universal tents are designed to be inated with a blower
or with compressed air.
4.1 Operation with blower
eg. Tent blower 0.23-0.47 bar
(Art. no. 1523017700)
The ination connection for blowers is opened when air ows
through. Connect the ination hose of the blower to the ination
connection of the tent. Unscrew the cap from the ination connection in a counter-clockwise direction and check whether the valve
is closed. Make certain there is perfect locking of the couplings of
the ination hose with the tent coupling and the blower.
Start the blower and ll the tent until the maximum permitted
operating pressure of 0.3 bar/4.35 psi. The medical tent erects
automatically. The safety valve integrated into the support frame
avoids over-ination (greater than 0.3 bar/4.35 psi).
Note! Should parts of the support frame
become caught up during erection
then switch o the blower immediately
and rectify the problem. Ination can
then be continued after doing this.
Replace the cap after lling and tighten it by turning it in a clockwise direction.
4.2 Operation with compressed air
1
5
2
3
6
4
7
Connect the pressure regulator with the knurled wheel on the
compressed air bottle. Close the hand wheel (3) of the pressure
regulator. Open the valve on the bottle (5). The manometer (1)
indicates the pressure in the bottle. Adjust the back-pressure to
approximately 10 bar using the adjustment wheel (4). The set
pressure can be checked on the back-pressure manometer (2).
Connect the air hose of the pressure regulator (6) with the brass
coupling (7) of the ination connection. Open the pressure regulator and start ination. Observe the shower during the ination
process. Close the hand valve when the operating pressure of 0.3
bar/4.35 psi is reached.
Note! If, during erection of the tent, parts of the
tent frame become caught up in the tent cover,
then close the valve on the pressure regulator
immediately and rectify the cause of the problem.
After doing this, the ination process can be continued.
Page 5/12
Page 7

4.3 Deation
The deation of the support frame happens over the ination
connection. To deate the tent, close the air source (compressed
air cylinder, etc.) and disconnect the pressure reducer or the lling
hose of the blower. The deation valve is opened by pressing-in
and turning the pin (1) counter clockwise.
1
Pin before locking Pressing-in + turning Valve open
Fold the tent in the way, that the air can escape (Folding to the
direction of the ination connection). Any remaining air can be
removed with a vacuum adaptor (Item No.: 1700018300) in combination with an construction-site compressor adaptor (Item No.:
1600012000).
Connect the construction-site compressor adaptor (1) to the coupling of the vacuum adaptor (2) and turn it interlocking. Then
tighten the screwable part of t the vacuum adaptor. Now connect
the constructionsite compressor adaptor to the support frame.
Attach the quick-action coupling (3) to the connection hose of
the pressure regulator and open the hand valve of the pressure
regulator slowly.
It is also possible to deate the support frame with a blower with
deate function. Follow the operating instructions of the blower.
1
2
3
After deation and before packing, the valve
must be unlocked again in order to guarantee
perfect ination when it is next used!
Page 6/12
Page 8

Vetter Pneumatic Universal Tent
4.4 Folding Plan
Before repacking, tent frame must be completely empty.
1. The front of the tent is folded lengthwise in four equal sections.
Ination
connector
2. Then fold the PZ 12 four times in the direction of the ination
connector. All other tent types are folded ve times.
3. Now place the tent into the carrying bag.
Page 7/12
Page 9

4.5 Additional Information PZ 30 and PZ 40
Second inflation/
deflation connector
First inflation/
deflation
connector
Chamber
separation
The pneumatic rapid deployment tents type PZ 30 and PZ 40 are
designed and manufactured as 2-chamber tents to increase safety during use.
Ination and deation are carried out with two separate connectors. The ination/deation connectors of the tent are equipped
with quick-action couplings. To inate, connect the corresponding tube (Item No.: 1520033800) (see below).
Tent connectors
Connection coupling of the pressure regulator
To inate the tent, connect the nipples of the ination tubes with
the tent. Now connect the ination tubes to the pressure reducer
and start inating the tent. To deate the tent, close the air source
(compressed air cylinder, etc.), then open the ball valves to relieve
the line. Then disconnect the pressure reducer. The tent is being
deated. Decouple the ination tube from the tent to speed up
the deation process. Any remaining air can be removed with a
vacuum adaptor (Item No.: 1700018300) in combination with an
construction-site compressor adaptor (Item No.: 1600012000).
Also two vacuum adaptors with an construction-site compressor
adaptor can be connectes to the separate connectors of the tent
to speed up the deation process.
Page 8/12
Page 10

Vetter Pneumatic Universal Tent
5. Practical Tips
9 The individual separating walls, oor tarps, as well as the tent
tarpaulins are removed easily and quickly if and as needed.
9 Hook and loop fasteners are used to attach the tarpaulin to
the pneumatic supporting frame.
9 When using tent heaters, avoid blowing heat directly onto
parts of the tent.
9 If needed, lights can be suspended from the supporting
frame.
9 It is also possible to attach medical devices, for example, to
the transport loops. Do not suspend devices exceeding a
weight of 3 kilos.
9 Additional tents are easily connected using hook and loop
overlaps.
9 After use, clean the tent with a mild cleanser before packing.
Allow the parts to dry at normal room temperature. Treat outer
surfaces with commercially available impregnating agents.
9 Follow the instructions of the folding plan to fold and pack
the tent.
9 Make sure that the tent is folded and packed in an orderly
manner and as instructed to ensure the tent is easy to unpack
next time it is needed.
6. Repeated Inspections
The tents should be subjected to a visual and functional inspection by a trained technician at least once a year. This requires inating the tent to approx. 50 % of the max. working pressure (0.25
bar). Check all pressurized parts for ssures, cracks, cuts, puncture
holes, detached spots, and heat or chemical damage. If the pressure does not experience a signicant drop within one hour, the
tent is ready for use.
Please contact the manufacturer in case of larger damage or if you
have any questions.
Page 9/12
Comply with DIN 7716 if storing the pneumatic universal tents
long-term.
Page 11

7. Repair Instructions
Minor damage such as cracks, cuts, or punctures (max. 4 cm) can
be repaired by the operator with the enclosed repair kit. Please
follow these steps:
1. Select the size of the patch so that the patch extends approx.
4 cm beyond the damaged area on all sides.
2. Mark patch area on the supporting frame.
3. Roughen the area of the patch on the surface of the supporting frame as well as one side of the patch.
4. Apply a thin layer of the special adhesive to the roughened
spot on the supporting frame and the roughened side of the
patch.
5. Allow special adhesive to dry for approx. 10-15 minutes until
no longer sticky.
6. Press patch rmly onto the pretreated area of the supporting
frame and smooth out.
7. Allow unpressurized supporting frame to rest for at least 48
hours.
Only the factory is able to repair damage that is more extensive.
A trained technician must check the tent and its supporting frame
for leaks after the repairs.
Page 10/12
Page 12

Vetter Pneumatic Universal Tent
8. Technical data
Type PZ 12 PZ 17 PZ 20
Item No. (Set) 1520 0029 01 1520 0004 01 1520 0047 01
Size outside
(L x W x H)
Size Inside
(L x W x H)
Working pressure
Test pressure
Nominal capacity
Air requirement
Ination time ca. sec 40 50 55
Weight
cm 370 x 386 x 258 490 x 386 x 248 501 x 436 x 248
ft. 11.8 x 12.4 x 8.3 15.7 x 12.4 x 7.9 16.0 x 14.0 x 7.9
cm 370 x 350 x 240 490 x 350 x 230 501 x 400 x 230
ft. 11.8 x 11.2 x 7.7 15.7 x 11.2 x 7.4 16.0 x 12.8 x 7.4
bar 0.5 0.5 0.5
psi 7.25 7.25 7.25
bar 0.65 0.65 0.65
psi 9.4 9.4 9.4
l 1,088 1,366 1,555
cu.ft. 38.4 48.2 54.9
l 1,632 2,025 2,332
cu.ft. 57.6 71.5 82.3
kg 55 65 75
lbs 121 143 165
Type PZ 25 PZ 30 PZ 40
Item No. (Set) 1520 0089 01 1520 0094 02 1520 0106 02
Size outside
(L x W x H)
Size Inside
(L x W x H)
Working pressure
Test pressure
Nominal capacity
Air requirement
Ination time ca. sec 120 130 150
Weight
All rights reserved for technical changes within the scope of product improvement.
cm 500 x 536 x 258 600 x 550 x 310 800 x 550 x 310
ft. 16.0 x 17.2 x 8.3 19.2 x 17.6 x 9.9 25.6 x 17.6 x 9.9
cm 500 x 500 x 240 600 x 514 x 290 800 x 514 x 290
ft. 16.0 x 16.0 x 7.7 19.2 x 16.4 x 9.3 25.6 x 16.4 x 9.3
bar 0.5 0.5 0.5
psi 7.25 7.25 7.25
bar 0.65 0.65 0.65
psi 9.4 9.4 9.4
l 1,634 1,910 2,414
cu.ft. 57.7 67.4 85.2
l 2,568 2,866 4,060
cu.ft. 90.7 101.2 143.3
kg 85 104 117
lbs 187 229 258
Page 11/12
Page 13

Place your trust in emergency pneumatics!
We are the company who can help you, nd a solution to your problem!
Vetter GmbH
A Unit of IDEX Corporation
Sales
Blatzheimer Str. 10 - 12
D-53909 Zülpich
Germany
www.vetter.de
Tel.: +49 (0) 22 52 / 30 08-0
Fax: +49 (0) 22 52 / 30 08-590
Mail: vetter.rescue@idexcorp.com
Article No. 9987007103 | © Vetter GmbH I 10/14 I Changes and errors excepted. | Made in Germany
 Loading...