

Page 1

Emergency Pneumatics.
Operating Instructions
VETTER Safety cushion SP 16
Manufacturing No. Year of manufacture:
Article No. 9987003503 | © Vetter GmbH I 02/12 I Changes and errors excepted.
Page 2

VETTER Safety cushion SP 16
Page 1/15
Contents
1. Preliminary remarks ...............................................2
2. Completeness check ..............................................3
3. Description .......................................................4
3.1 Technical description . . . . . . . . . . . . . . . . . . . . . . . . . . . . . . . . . . . . . . .4
3.2 Technical data . . . . . . . . . . . . . . . . . . . . . . . . . . . . . . . . . . . . . . . . . . . . . .5
4. Using the Vetter safety cushion ....................................5
4.1 Selecting the site . . . . . . . . . . . . . . . . . . . . . . . . . . . . . . . . . . . . . . . . . . .5
4.2 Preparing the safety cushion for use .........................6
4.3 After the use ................................................6
4.4 Inspection and cleaning after use . . . . . . . . . . . . . . . . . . . . . . . . . . .7
4.5 Storage and maintenance ...................................7
5. Tests and inspections . . . . . . . . . . . . . . . . . . . . . . . . . . . . . . . . . . . . . . . . . . . . .8
5.1 Test periods . . . . . . . . . . . . . . . . . . . . . . . . . . . . . . . . . . . . . . . . . . . . . . . .8
5.2 Test instructions and certicates . . . . . . . . . . . . . . . . . . . . . . . . . . . .9
6. Packing instructions . . . . . . . . . . . . . . . . . . . . . . . . . . . . . . . . . . . . . . . . . . . . . .9
Test regulation for annual inspection . . . . . . . . . . . . . . . . . . . . . . . . . . . . . . . 11
Test regulation for main safety check . . . . . . . . . . . . . . . . . . . . . . . . . . . . . . . 13
Test regulation for general safety check .............................13
Test certicate for safety cushions . . . . . . . . . . . . . . . . . . . . . . . . . . . . . . . . . . 14
Page 3

Page 2/15
VETTER safety cushions must only be used for the rescue
of jumping or falling persons.
The falling height must not exceed 16 m
No jumps for exercising or demonstration purposes.
Important note!
The Safety Cushion must not be inated with a pressure
container having a valve tted with an integrated excess
ow valve (EFV).
Preliminary remarks1.
A prerequisite for the safe use of the VETTER safety cushions is
that these operating instructions and the safety instructions are
strictly observed after they have been carefully read.
Only duly authorized and trained personnel of the re department
must be commissioned with the use of the safety cushion.
The safety cushion must only be used in case of an emergency for
the rescue of jumping or falling persons.
Jumps for training or demonstration purposes are strictly forbidden!
Only specically designed falling objects, such as sand bags or
dummies, must be used for training or test purposes.
Any non-compliance with this instruction is a violation of the preventive measures of the re departments and will result in the exclusion of any liability. Please note that any non-compliance may
have legal consequences.
The improper application of or any unauthorized modication to
the safety cushion will exclude the liability of the manufacturer for
any resultant damage.
Only perfect and tested safety cushions must be used.
Please make sure that only the original Vetter ttings and valves
are used for lling the safety cushion.
Page 4
VETTER Safety cushion SP 16
Page 3/15
1
2
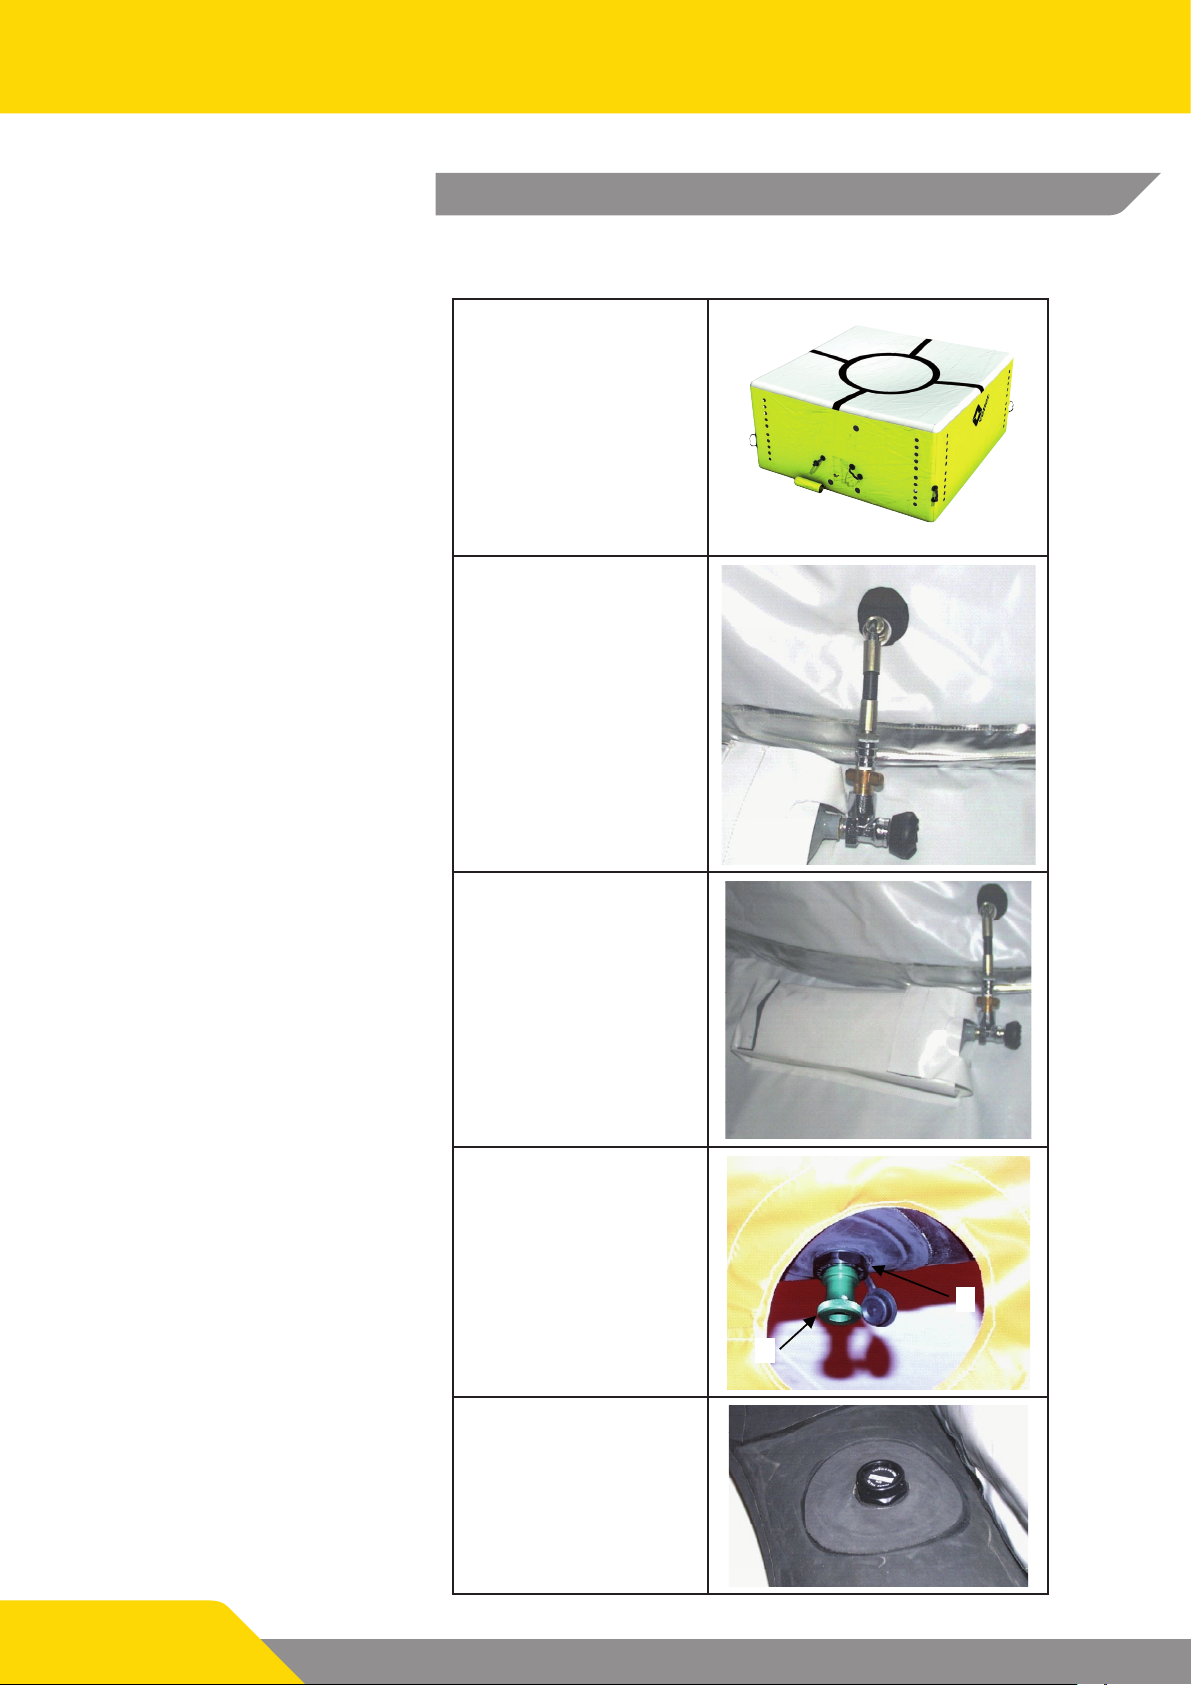
Completeness check2.
The completeness and integrity of the components must be checked before and after every use.
Safety cushion completely erected
Filling adapter
Compressed-air cylinder
6 l/300 bar
Quick-action ventilating
valve, item 1
with air vent key, item 2
Safety valve
Page 5
Page 4/15
Description3.
3500
3500
Ø
1
3
0
0
mm
The VETTER safety cushion consists of a self-erecting hose-equipped load-bearing frame. The supporting structure consists of an
extremely tear-proof and neoprene-coated fabric. The material
used for the external tarpaulins is hardly ammable and does not
disintegrate.
The load-bearing frame will be inated with air with a maximum
pressure of 0,3 bar when the valve at the compressed-air cylinder
is opened. The safety valve integrated in the cylinder ttings will
prevent over-ination and an inadmissible pressure increase due
to temperature inuences.
The safety cushion will be inated within 30 sec and erect itself
automatically.
It can only be used after it is fully inated and erected.
When a load hits the safety cushion, the internal supports will collapse.
After the load has been removed, the load-bearing frame will automatically re-erect itself and restore its original shape.
It may be possible after several load changes that minute quantities of air can leak through the safety valve. This can be easily
compensated by briey opening the air valve of the compressedair cylinder.
Attention! The position of the safety cushion may change
as a result of the previous jump. It will then have to be realigned/re-arranged.
Technical description3.1
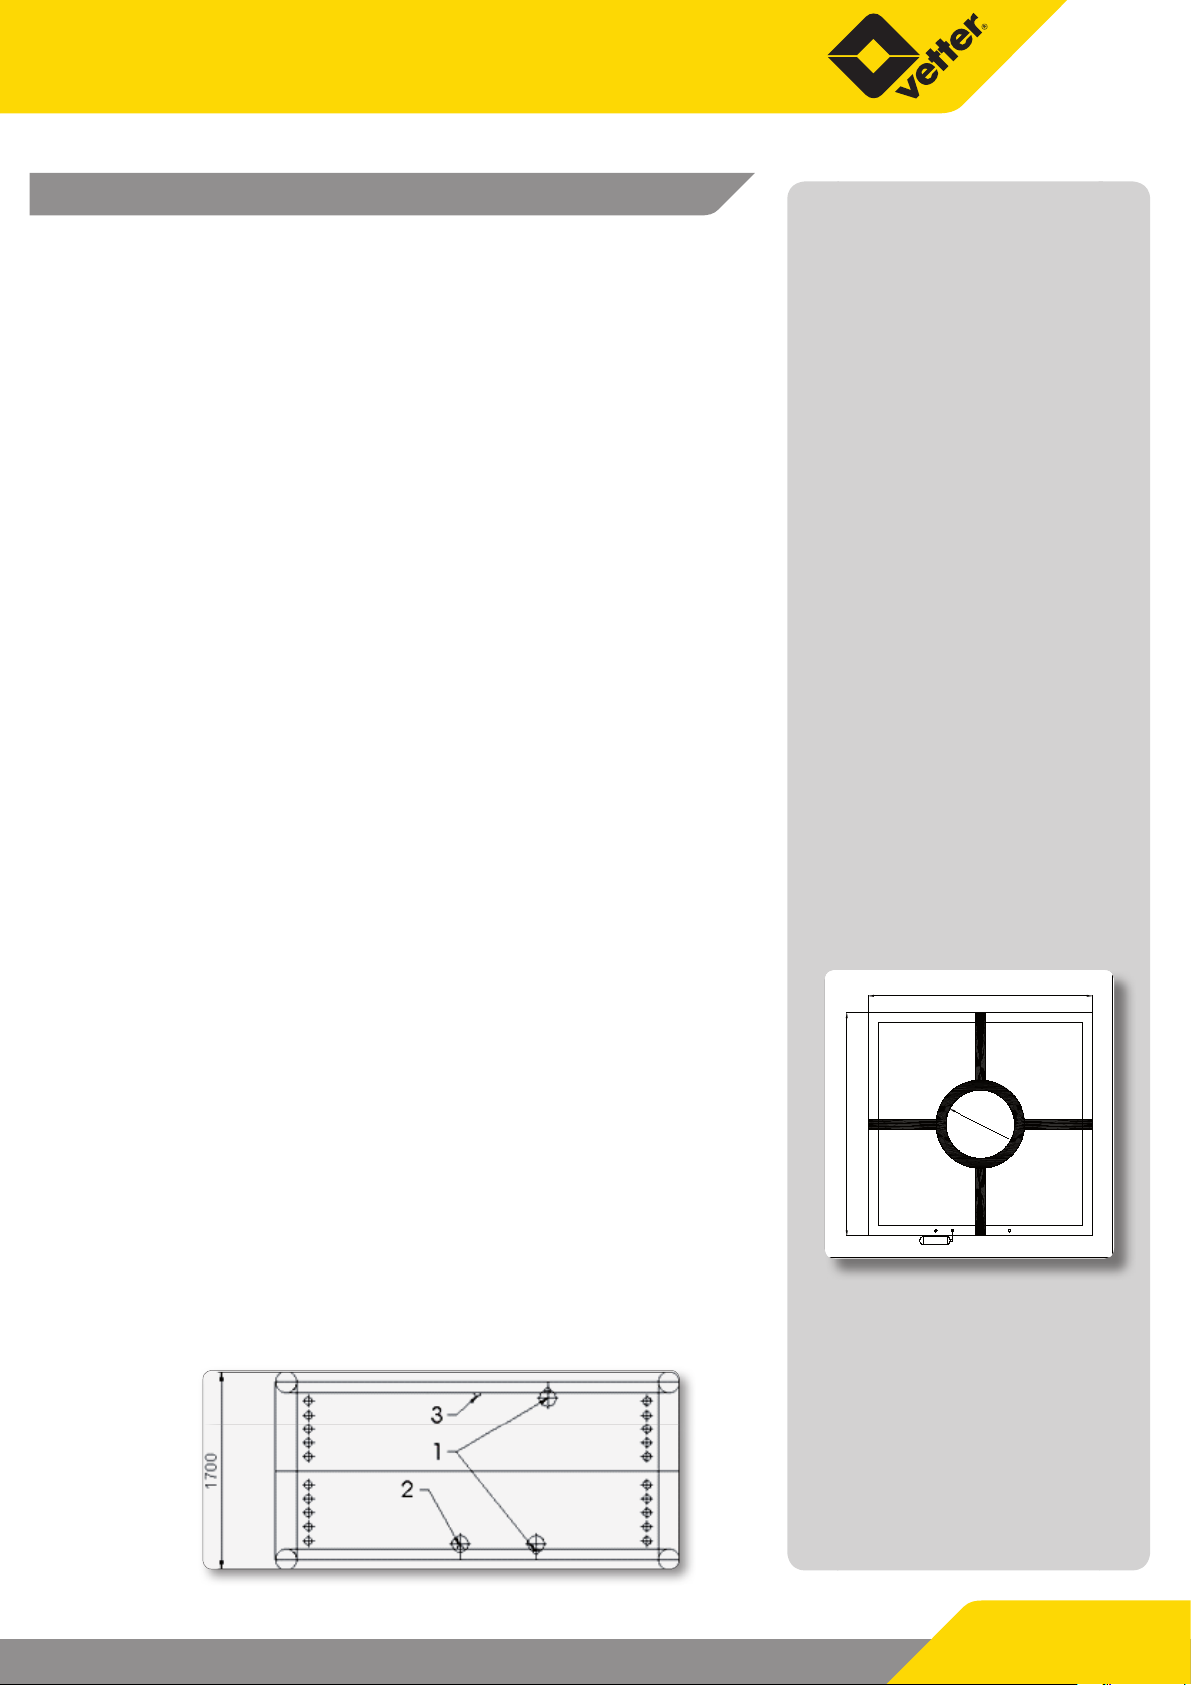
Top view at the entire appliance
External dimensions, approx. mm 3,500 x 3,500
Height, approx. mm 1,700
Side view of the entire appliance
1 Vent valves
2 Filling adapter
3 Safety valve
Page 6

VETTER Safety cushion SP 16
Page 5/15
Technical data3.2
Safety cushion SP 16
External dimensions, approx. mm 3,500 x 3,500
Height, approx. mm 1,700
Admissible operating pressure bar 0.3
Nominal volume Liter 950
Air requirement Liter 1,235
Maximum lling time sek. 30
Weight, incl. compressed-air cylinder, max. kg 60
Max. packaging dimensions, (L x W x H) mm 900 x 550 x 500
Temperature range °C - 20 / + 50
Using the Vetter safety cushion4.
The safety cushion must only be used if there is no other way of
rescuing the person(s) concerned (such as a re-escape ladder) or
if the use of the safety cushion becomes necessary for reasons of
time.
Injuries cannot be excluded with absolute certainty when the safety cushion is used.
Selecting the site4.1
The place where the safety cushion is put up depends primarily
on the on the actual situation and the local conditions.
The surface on which the safety cushion is placed should be free
from foreign particles that may cut or prick the covering material.
The safety cushion must also be protected against excessive
heat.
The jumping height must not exceed 16 m!
The exact location where the safety cushion is to be put up will be
determined by the ocer in charge of the operation.
The safety cushion must be put up in such a way that only vertical
jumps can be made. The person to be rescued must never be asked to jump sideways.
The safety cushion must be re-aligned after each jump, if necessary.
The safety cushion must only be lifted and re-positioned by its
carrier loops. It should not be dragged along on rough ground for
safety reasons and to ensure a long service life.
Page 7

Page 6/15
Preparing the safety cushion for use4.2
Take the safety cushion out of the vehicle and place it on sucient
empty space.
Undo the tightening belts of the packaging by pressing the keylocks.
Inate the safety cushion with air up to a maximum pressure of
0.3 bar by opening the valve of the compressed-air cylinder (turn
left).
If the maximum operating pressure of 0.3 bar is exceeded, the
safety valve integrated in the compressed-air cylinder will open
automatically and prevent an inadmissible pressure inside the
supporting structure. The safety valve will automatically close at
about 0.3 bar.
After activating the safety valve, the handwheel valve of the compressed air cylinder may be closed.
The safety cushion is only ready for use, when the pressure inside
the supporting structure has reached 0.3 bar and when the safety
cushion is completely erect.
It is not necessary to rell with compressed air as long as the safety cushion is fully inated / becomes inated again after use.
Filling the supporting frame is sucient for securely holding the
safety cushion upright in an intact state during use.
Put the safety cushion in its right position by lifting it on the carrier loops.
The jumping height must not exceed 16 m!
The safety cushion may only be used again after the rescued person has completely vacated the safety cushion and it has been
completely re-erected.
The ocer in charge of the operation decides, whether the safety
cushion is to be put up at the actual site of emergency or whether
it is to be put up at a safe place before its use, from where it will be
taken to the site of emergency.
It may well be possible that the person to be rescued might jump
into safety cushion although it has not been completely erected.
After the use4.3
Remove the safety cushion from the danger zone and empty the
load-bearing structure at an empty space.
In order to do so, open the protective rubber lock at the vent valve.
Open the vent valve with the help of the air vent key. In order to do
so, press the key into the valve until you hear that it has latched.
Fold the safety cushion temporarily and prepare it in the work-
Page 8

VETTER Safety cushion SP 16
Page 7/15
shop area for its next use.
Inspection and cleaning after use4.4
Re-inate the soiled safety cushion.
Clean it properly with hand-warm clean or soapy water.
Rinse the soapy water thoroughly and let the safety cushion dry at
normal room temperatures.
The empty compressed-air cylinder needs to be relled or exchanged by a full one.
Important! Check, whether the new compressed-air cylinder is tight.
Inspect the safety cushion and the lling gear for possible
damage.
Important Note!
The Safety Cushion must not be inated with a pressure container
having a valve tted with an integrated excess ow valve (EFV).
In doing this the set-up time would be dangerously extended
thus making it unsuitable for re service operation. We would like
to point out that the implied valves are not marked and that the
excess ow valve cannot be recognized in the assembled condition of the valve.
It is for this reason that it is only permitted to inate with equipment air bottles or inhaling air bottles whose valves do not have
an integrated excess ow valve.
Empty the safety cushion and close the vent valve.
Fold the safety cushion in accordance with the following packing
plan.
The Vetter safety cushion is now available for its next use.
Storage and maintenance4.5
Except in rescue and emergency vehicles, the safety cushion
must only be stored in clean and dry conditions as well as in dry
rooms.
Only persons, institutions or rms specically trained by the manufacturer and duly authorized are allowed to carry out maintenance work.
If there are any doubts about the reliable functioning or the safety
of the safety cushion ask the manufacturer for a test.
For this purpose return the rescue cushion to the manufacturer only without the compressed air cylinder!
Page 9

Page 8/15
Tests and inspections5.
The safety cushion must only be serviced and repaired by persons
who have been duly authorized by the manufacturer after having
attended a service and repair course, who work in service shops
authorized by the manufacturer for such work and who have sufcient knowledge of the safety regulations and accident prevention instructions applicable to such work.
Persons and institutions exclusively authorized to carry out the
inspections:
the annual inspection
As a recommendation of the manufacturer only authorized persons.
the main safety check
As a recommendation of the manufacturer only authorized persons after having attended an additional training course organized by the manufacturer or an instructor authorized by the manufacturer. This instructor must have been authorized in writing.
This authorization is valid for a maximum period of 60 months and
can be extended on application after a further course of training
has been attended.
The expert or the test institution in which he works must possess
the test equipment necessary to carry out the tests and inspections to the extent required.
the general safety test
The general safety test will be exclusively carried out by the manufacturer.
Test periods5.1
1. Year Annual inspection 9. Year Annual inspection
2. Year Annual inspection 10. Year General safety test
3. Year Annual inspection 11. Year Annual inspection
4. Year Annual inspection 12. Year Annual inspection
5. Year Main safety check 13. Year Main safety check
6. Year Annual inspection 14. Year Annual inspection
7. Year Annual inspection 15. Year Scrapping
8. Year Main safety check
If there are any doubts about the reliable functioning or the safety
of the safety cushion the manufacturer must always be approached for a general safety test.
Page 10

VETTER Safety cushion SP 16
Page 9/15
1
2
For this purpose return the rescue cushion to the manufacturer only without the compressed air cylinder!
For reasons of product safety and liability, the service life of the
safety cushion is limited to 15 years. It must not be used thereafter
for exercises or any other purposes.
Test instructions and certicates5.2
The individual tests, checks and inspections shall be carried out in
accordance with the operating instructions.
The tests, checks and inspections carried out shall be recorded in
a test protocol. (Please make a copy of the page, if required.)
The tests, checks and inspections carried out shall also be recorded permanently in the relevant logbook (included in the scope
of supply) and at the safety cushion itself (type plate).
Packing instructions6.
Check all VETTER safety cushions before the packing that they are
not damaged in any way.
The compressed-air cylinder must always be lled before the packing.
Only properly tested, dry and clean safety cushions must be packed.
Empty the load-bearing frame completely by opening the protective rubber cap (item 1) of the quick-action ventilating valve and
by pressing the air vent key (item 2) gently into it until the latching
of the key can be felt.
After the bulk of the air mass has escaped, fold up the safety cushion in accordance with the following folding instructions in order
to push out any extra air.
After that, spread the safety cushion out again.
If necessary, repeat this procedure until all the air has escaped
from the cushion.
or:
Suction o any remaining air comoletely out of the support frame
using the vacuum adapter (Art. No. 1600 0163 00).
To do this, latch the vacuum adapter into the deation valve and
connect to the air supply. Inlet pressure max. 6 bar, optimum 4
bar. If necessary, repeat this sequence before xing the packing
cover.
Page 11

Page 10/15
Start the packing only when the air has been completely discharged from the carrier frame.
Lay out the safety cushion evenly in a square pattern. Put the upper and lower supporting hoses on top of each other and press
the tarpaulin of the side walls inside by applying even pressure.
Starting position and front side is the connecting side to the compressed air bottle. Take the adjoining left-hand side to the compressed air bottle. Tilt again to the upper edge of the body of the
bottle.
Tilt the right side of the cushion to the centre.
Lay out to the left again to make a total width of approx. 850
mm.
You now roll the safety cushion towards the compressed-air cylinder as tightly as possible. The width of the rolled-up safety cushion must not exceed 900 mm.
Any air in the carrier-frame van escape via the vent valve which is
still open
If necessary, suction out the remaining air from the support frame once again using the vacuum adapter!
Once the remaining air has completely escaped
close the vent valve !!!
In order to do so, pull o the air vent key (the valve will then close
automatically) and press the rubber plugs into the valves.
Position a tested and lled compressed air bottle into the bottle
holder and connect with the ination hose. Check the padding in
the bottle holder to ensure correct position.
Page 12

VETTER Safety cushion SP 16
Page 11/15
123
4
6
7
91112
14
15
Place the valve protection cap.
Fold over the packing tarpaulin. The safety cushion can now be
tightened with the belts. The belts can now be tightened to such
a degree as necessary. Tension the belts at the corresponding belt
tensioners according to requirements.
It must be ensured that air vent valves are closed and
that the safety cushion is packed together with a lled
compressed-air cylinder. The compressed-air cylinder
used for this purpose comes under pressure vessel directive. Please observe the recurring test periods!
The safety cushion is now ready for being stowed away in a vehicle.
Test regulation for annual inspection
and check after each use
Manufacturing no:
Year of manufacture:
Test/check due: 1. Year
2. Year
3. Year
4. Year
6. Year
7. Year
9. Year
11. Year
12. Year
14. Year
To be scrapped after 15 years
The test and its results shall be recorded in writing by
lling in the test protocol, 9
an entry in the logbook for tests, 9
a note directly attached to the safety cushion (once a year 9
only).
Test regulation for the checks to be made without falling
loads after each use
1. Visual inspection of the cleaned safety cushion, in order to
identify external damage under inated conditions.
Page 13

Page 12/15
Test regulation for the checks to be carried out with falling loads after each use or by persons to be rescued if
required so in an emergency situation.
1. Visual inspection of the cleaned safety cushion, in order to
identify external damage under deated conditions (upper &
lower tarpaulin).
2. Inate the safety cushion.
3. Visual inspection of the following components, in order to
identify visible damage:
landing area 9
side tarpaulins 9
bottom tarpaulin 9
central partitioning wall 9
seams and bonding areas 9
(heat protection cover, if necessary) 9
carrier loops 9
cylinder mounting 9
control zip with seal 9
4. Internal inspection to identify foreign bodies
5. Unscrew the valve core of the vent valve
6. Insert the test manometer (Art. No.: 1530 0021 00)
7. Set the internal pressure of the supporting structure to 0.25
bar. The internal pressure must not decrease by more than 10
% within 60 min.
8. The safety valve must close tightly. Check the tightness of the
safety valve, if necessary.
9. Open the zip, in order to visually check the proper condition
of the bonded and stitched seams.
10. Close the zip and re-seal it.
11. Remove the test manometer and screw in the valve core of
the vent valve.
12. Check the tightness of the air vent valve.
13. Check the tightness of the lling socket (with soapy water).
Repairs of any kind must only be carried out by the manufacturer
or by a special rm duly authorized by the manufacturer.
If there are any doubts about the reliable functioning or the safety
of the Vetter safety cushion please contact the manufacturer.
Page 14

VETTER Safety cushion SP 16
Page 13/15
5
81310
15
15
Test regulation for main safety check
Manufacturing no:
Year of manufacture:
Test/check due: 5. Jahr
8. Year
13. Year
To be scrapped after 15 years
Test regulation for general safety check
Manufacturing no:
Year of manufacture:
Test/check due: 10. Year
To be scrapped after 15 years
This test will be exclusively carried out by the manufacturer.
Please make the arrangements for the test well in time.
Page 15

Page 14/15
Test certicate for safety cushions
Annual inspection
Main safety check
General safety check
Operator: Name 1
Name 2
Road
Zip code/place
District
The Vetter safety cushion Type SP 16
Manufacturing No.:
Year of manufacture:
was inspected/checked/
tested on
____________________________________________________
Test results:
No faults Faults as detailed below
Next test/check/
inspection:
The test/check/inspection has been permanently recorded on the
type plate.
by (name of expert):
____________________ ____________________
Place/Date Examiner in charge
Page 16

Place your trust in emergency pneumatics!
We are the company who can help you, nd a solution to your problem!
Vetter GmbH
A Unit of IDEX Corporation
Sales Germany
International sales
Blatzheimer Str. 10 - 12
D-53909 Zülpich
Germany
www.vetter.de
Tel.: +49 (0) 22 52 / 30 08-50
Fax: +49 (0) 22 52 / 30 08-70
Mail: vetter.info@idexcorp.com
Article No. 9987003503 | © Vetter GmbH I 02/12 I Changes and errors excepted. I Made in Germany
Tel.: +49 (0) 22 52 / 30 08-60
Fax: +49 (0) 22 52 / 30 08-71
Mail: vetter.info@idexcorp.com
 Loading...