

Page 1

VESTIL MANUFACTURING CORPORATION
2999 North Wayne St., Angola, IN 46703
Phone (260) 665-7586 • Fax (260) 665-1339
E-mail: sales@vestil.com • www.vestil.com
Revised 11-07
A company dedicated to solving ergonomic and
material handling problems since 1955
.
Fork Truck Attachments
OWNER’S
MANUAL
PALLET DUMPER / RETAINER
PAL-D/R
Contents
Safety Instructions for the Operator ................ 2
Installation Instructions.................................... 2
Operation Instructions ..................................... 2
Loading Instructions ........................................ 2
FAILURE TO READ AND COMPLY WITH OWNER'S MANUAL MAY RESULT IN ACCIDENT, LOSS, DAMAGE, INJURY OR DEATH!
Routine Maintenance .......................................3
Location of Center of Gravity............................4
Safety Label Identification ................................ 5
Warranty........................................................... 6
WARNINGS & SAFETY INSTRUCTIONS
Read owner's manual completely before operating unit!
• Read and understand the owner’s manual before using the
pallet dumper/retainer.
• Ensure that all safety and warning labels stay in place and
are legible. See the labels page in this manual.
• Observe all applicable OSHA laws regulating the use of this
Fork Truck Attachment.
• Secure the pallet dumper/retainer to the forklift mast using
the provided restraint strap before use.
• Never operate the pallet dumper / retainer unless you are
watching it.
• Never use the pallet dumper / retainer if the cradle is in need
of repairs or in the case of a malfunction.
• Do not stand below any part of a raised pallet dumper /
retainer.
• Never exceed the 2000 pound maximum loading capacity of
the pallet dumper/retainer.
• Consult factory for uneven loading or overhung loading.
• Not to be used as a personnel lift.
•
WARNING
of structural load.
• Fork truck manufacturers are to be consulted when
accessories are used that affect the truck’s capacity and safe
operation. The unit’s load-loss and center-of-gravity will be
made available on request. See OSHA 1910.178(a)5.
: Never use the platform to lift or support any type
RECEIVING INSTRUCTIONS
Every unit is thoroughly tested and inspected prior to
shipment. However, it is possible that the unit may incur
damage during transit. If damage is noticed when unloading,
make a note of it on the BILL OF LADING. Remove all packing
and strapping material, then inspect the unit again for damage.
IF DAMAGE IS EVIDENT, FILE A CLAIM WITH THE CARRIER
IMMEDIATELY!
• When elevation is not required, always transport the
pallet in the lowered position.
• Always transport pallet only in horizontal position when
fork truck is moving.
• Do not allow pallet to impact the floor, ground, or dumping
station etc., or there may be damage to the unit.
• Remove pallet and all loads before working on unit.
• Consult factory if adding or performing any modification
to the original equipment.
• Use only maintenance parts supplied or approved by the
manufacturer.
PAL-D/R
1
Page 2
Improper use might result in serious personal injuries and/or property damage. Therefore, EVERYONE who
might use, perform maintenance on, or service the pallet carrier/dumper must read, understand and apply the following
instructions:
This device is a [fork] lift truck attachment. BEFORE using this product, the lift truck should be marked: 1) to identify the
attachment; and 2) to show the approximate weight of the truck and attachment combination at maximum elevation with
load laterally centered. DO NOT exceed the center of gravity or maximum rated load of your lift truck.
DO NOT exceed the maximum rated load of either the pallet carrier or the fork truck, whichever is smaller. The
maximum rated load of the pallet carrier is 2,000 pounds (909kg), which means that the net weight applied to the pallet
carrier, must not exceed 2,000 pounds (909kg).
Secure the carrier to the fork truck with the safety chain. Wrap the safety chain around the fork carriage and fasten the
snap hook at the end of the chain through a link of a chain. There must be NO SLACK in the chain.
DO NOT dump/release the pallet carrier UNTIL everyone clears the zone of danger. Instruct all persons in the area to
move to a safe location until after dumping is complete and the pallet carrier has been latched and lowered.
Apply proper fork lift operation procedures applied at your worksite while using the pallet carrier.
ONLY use undamaged pallets in conjunction with this carrier. The load supported by the pallet should be evenly
distributed, and should be secured to the pallet, if necessary to prevent the load or part of it from falling off of the pallet as
it is transported to the dumping location. The load MUST NOT overhang the pallet
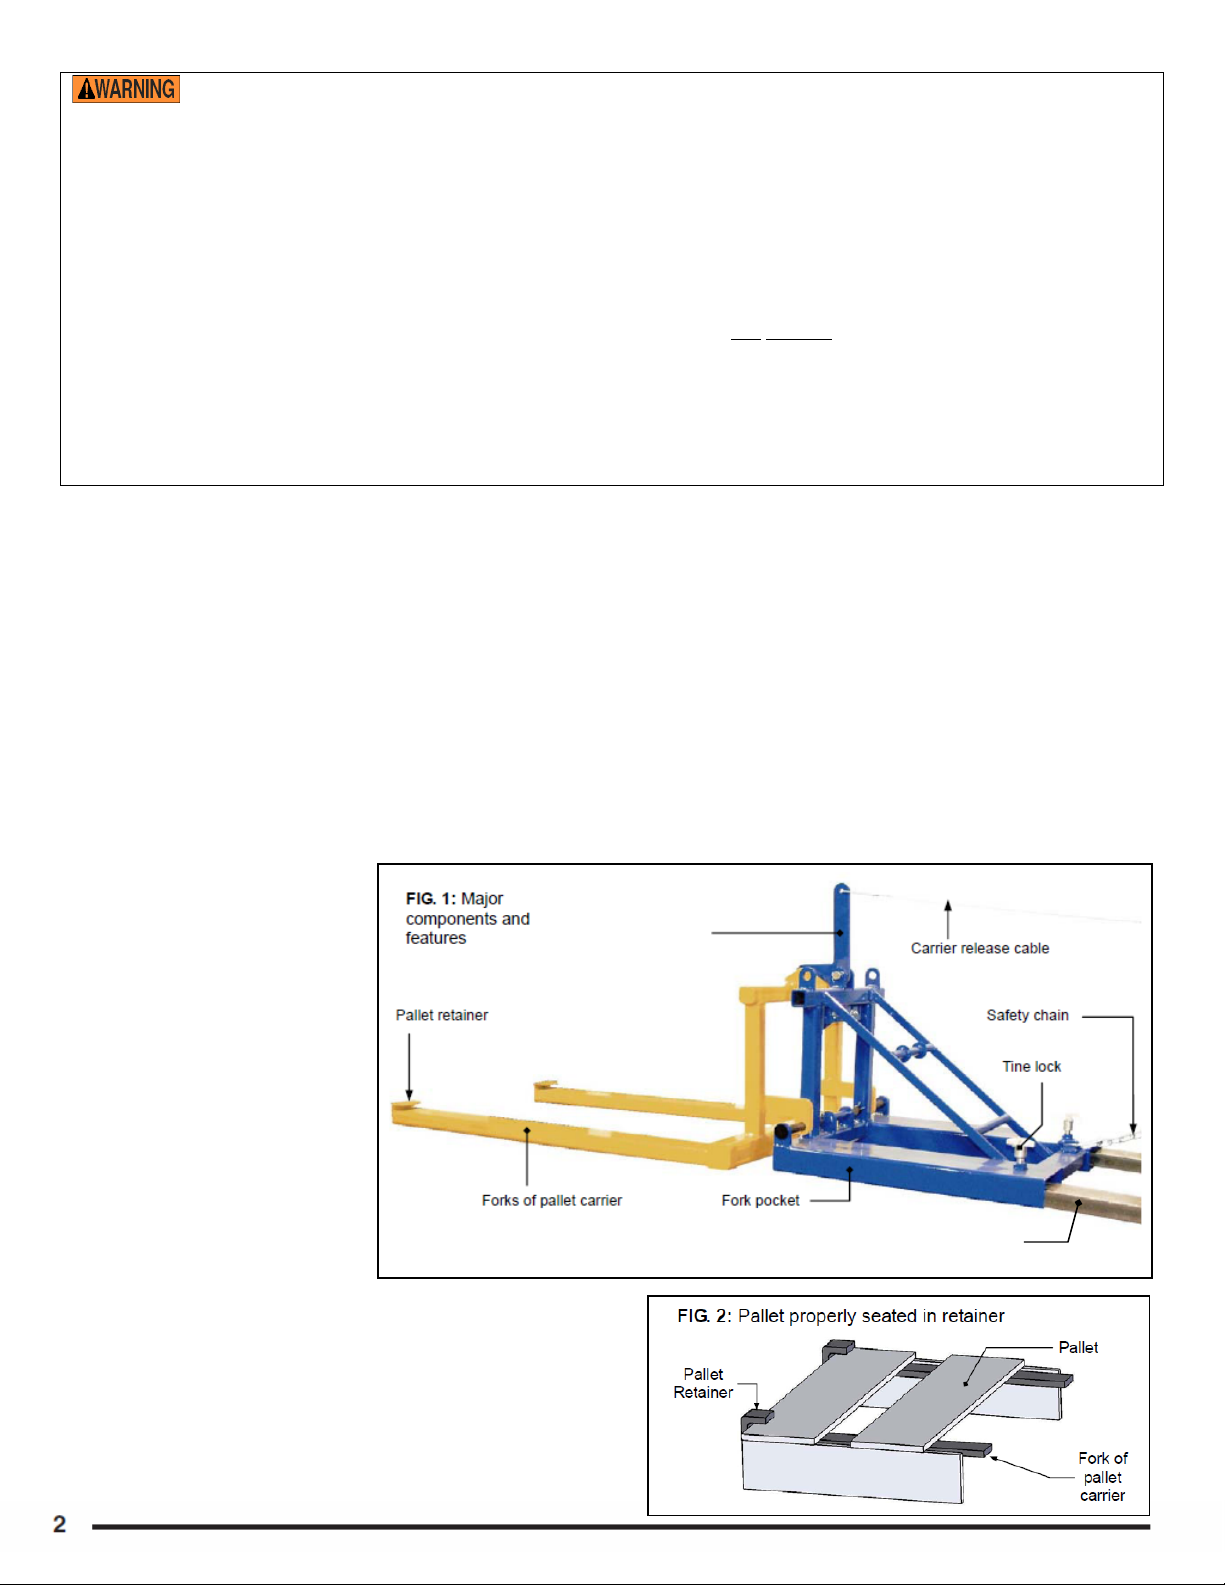
Attaching PAL-D/R to a Fork Truck
1. Align the forks with the fork pockets of the carrier supporting frame (see “Blue portion” of FIG. 1, below); then drive the
forks into the pockets until the tips of the forks contact the ends of the pockets.
2. Secure the PAL-D/R to the carriage of your fork truck with the safety chain: a) Wrap the chain through and around the
carriage of your fork truck; then b) fasten the snap hook at the end of the chain through a link in the chain so that no
slack remains in the chain. Fasten the hook to a link so that the chain cannot unwrap and disengage the fork carriage.
3. Tighten both of the tine locks (see FIG. 1) securely against the top surface of both tines/forks (of your fork lift).
Using the Pallet Carrier
1. Raise the forks so that the entire pallet carrier (see “Yellow portion” of FIG. 1, below) is no higher than necessary to
avoid contact between the carrier and obstacles encountered along the travel path. Tilt the mast backwards to raise the
tips of the forks.
2. Align the tips of the forks of the pallet carrier with the selected pallet, and drive the forks through the pockets of the
pallet so that the pallet retainers stick out of the opposite side. BEFORE lifting the pallet, adjust the elevation and
position of the forks to secure the pallet under both pallet retainers (see Fig. 2).
3. Raise the forks to lift the pallet
and drive to the dumping
location.
4. [To dump items into a
receptacle] Raise the forks
Pallet carrier
release latch
above the side of the
receptacle (e.g. dumpster),
and drive forward until the
side of the dumpster is directly
beneath the middle of the
forks of the pallet carrier.
Lower the carrier until it rests
on the side of the dumpster.
5. Disengage the pallet carrier
release latch by pulling the
carrier release cable, and
slowly raise the forks to allow
the pallet carrier to tilt forward.
Yellow/light colored portion = pallet carrier
Blue/dark colored portion = carrier supporting frame
Tine/fork of fork lift
Stop pulling the cable as the
carrier begins to tilt forward.
If necessary to direct the trash as it slides off of the pallet,
6.
slowly drive forward while raising the forks.
7. After unloading the pallet, lower the forks until the carrier
securely latches to the supporting frame (see “Blue
portion” of FIG. 1, above). Raise the carrier off of the
ground to verify that it is properly and securely latched to
the frame, and that the pallet is still properly retained.
8. Return the PAL-D/R to its designated storage location.
Copyright 2011 Vestil Manufacturing Corp.
Page 3

Evaluations and Maintenance
Before each use, inspect the listed components/features for obvious damage or structural deformation:
1. Safety chain and snap hook;
2. Pallet forks and pallet retainers;
3. Pallet carrier release latch;
4. Overall structure (particularly fork pockets and pallet carrier forks).
DO NOT use this device until it is restored to normal operating condition. If the PAL-D/R cannot be repaired, permanently
remove it from service.
At least once per month
, inspect:
1. Tine locks: confirm normal function.
2. Snap hook attached to the free end of the safety chain: confirm that the spring latch automatically closes securely
against the hook as shown in the diagram to the right. If either the snap hook or chain is damaged, do not use the
PAL-D/R until the damaged part has been replaced with a complete, new safety chain or snap hook.
3. Carrier release latch: confirm that the release latch functions normally. Pull the release cable and observe the
latch as it opens and closes. The latch should close automatically. If the latch does not automatically close,
replace the spring before resuming use of the platform.
4. Pivot points: inspect each pin as well as the hole each pin projects through, washers, and cotter pins for
soundness (lack of warps, bends, and cracks; no excessive wear). Replace any part that is damaged before
returning the PAL-D/R to use.
5. Overall structure: check the fork pockets, pallet carrier forks, pallet retainers, welds, carrier forks, and carrier
supporting frame for excessively rusted or worn regions, corroded areas, bends, warps and cracks. The structure
should be clean, square and rigid; it should be free of rust and corrosion. Remove dirt and debris. Do not use
this pallet carrier if excessively rusted or corroded.
6. Product labels: all labels should be readable and located as shown in the diagram on p. 6. If a label is unreadable
or missing, contact Vestil to order a replacement.
DO NOT use this device until it is restored to normal operating condition. If the PAL-D/R cannot be repaired, permanently
remove it from service.
Page 4

LOCATION OF CENTER OF GRAVITY
HCG: 37-1/4”
VCG: 5-1/2”
LOST LOAD: 340 LBS.
LOAD CENTER: 63-3/4”
(Effective thickness equals the total fork length minus the fork tube length.)
4
Page 5

Labeling diagram:
The product should always be labeled as shown in the
diagram below. Replace any label that is not easily
readable due to damage, fading, etc.
287: Product information label
218: Secure product to fork truck
773: Hazards associated with use
208: Pinch point
208
773
218
287
208
Page 6

Rev. 01/2011
LIMITED WARRANTY
Vestil Manufacturing Corporation (“Vestil”) warrants this product to be free of defects in material and workmanship
during the warranty period. Our warranty obligation is to provide a repla
is covered by the warranty
, after we receive a proper request from the warrantee (you) for wa rranty service.
cement for a defective original part if the part
Who may request service?
Only a warrantee may request service. You are a warrantee if you purchased the product from Vestil or from an
authorized distributor AND Vestil has been fully paid.
What is an “original part”?
An original part is a part used to make the product as shipped
to the warrantee.
What is a “proper request”?
A request for warranty service is pr oper if Vestil receives: 1) a photocopy of the Customer Invoice
shipping date; AND 2) a written request
for warranty service including your name and phone number. Send requests
that displays the
by any of the following methods:
Mail Fax Email
Vestil Manufacturing Corporation (260) 665-1339 sales@vestil.com
2999 North Wayne Street, PO Box 507 Phone
Angola, IN 46703 (260) 665-7586
In the written request, list the parts believed to be defective and include the address where replacements should be
delivered.
What is covered under the warranty?
After Vestil receives your request for warranty service, an authorized representative will contact you to determine
whether your claim is covered by the warranty. Before providing warranty service, Vestil may require you to send the
entire product, or just the defective part or parts, to its facility in Angola, IN. The warranty covers defects in the
following original dynamic components: motors, hydraulic pumps, electronic controllers, switches and cylinders. It
also covers defects in original parts that wear under normal usage conditions (“wearing parts”): bearings, hoses,
wheels, seals, brushes, batteries, and the battery charger.
How long is the warranty period?
The warranty period for original dynamic components is 30 days. For wearing parts, the warranty period is 30 days.
The warranty periods begin on the date when Vestil ships the product to the warrantee. If the product was purchased
from an authorized distributor, the periods begin when the distributor ships the product. Vestil may, at its sole
discretion, extend the warranty periods for products shipped from authorized distributors by up to 30 days to account
for shipping time.
If a defective part is covered by the warranty, what will Vestil do to correct the problem?
Vestil will provide an appropriate replacement for any covered part. An authorized representative of Vestil will contact
you to discuss your claim.
What is not covered by the warranty?
1. Labor;
2. Freight;
3. Occurrence of any of the following, which automatically voids the warranty
:
Product misuse;
Negligent operation or repair;
Corrosion or use in corrosive conditions;
Inadequate or improper maintenance;
Damage sustained during shipping;
Accidents involving the product;
Unauthorized modifications
: DO NOT modify the product IN ANY WAY without first receiving
written authorization from Vestil. Modification(s) might make the product unsafe to use or might
cause excessive and/or abnormal wear.
Do any other warranties apply to the product?
Vestil Manufacturing Corp. makes no other express warranties. All implied warranties are disclaimed to the extent
allowed by law. Any implied warranty not disclaimed is limited in scope to the terms of this Limited Warranty.
 Loading...