

Page 1

FRITSTÅENDE
FVC 66 D1 TRIO
FC 6090 K
FSK 06 TR
KERAMISK KOMFUR
BRUGERMANUAL
HKK66
Page 2

Kære kunde,
Vores mål er at tilbyde dig produkter, der er bedre, end du forventer
og tilbyde produkter, der er producerede i moderne faciliteter og
nøje testede med hensyn til kvalitet.
Din manual er lavet til at hjælpe dig med at bruge dette apparat,
der er produceret med den nyeste teknologi for at opnå den
højeste effektivitet.
Før du bruger apparatet, skal du nøje gennemlæse denne manual,
der indeholder informationer om korrekt og sikker opsætning,
vedligeholdelse og brug og kontakte den nærmeste autoriserede
tekniker for opsætning af dit produkt.
Page 3

Før komfuret anvendes første gang
Brænd ovnen ren
Hold børn under opsyn! Komfuret bliver meget varmt. Husk at fjerne emballagen
W
inde i ovnen
Inden du anvender ovnen første gang, skal
du brænde den ren. Sørg for en god ventilation ved at starte emhætten eller ved at
åbne et vindue.
Gør som følger:
1 Åbn ovnlågen og fjern alt tilbehør fra ov-
nen.
2 Luk ovnlågen. Sæt ovnen til over-/under-
varme
200 °C.
3 Lad ovnen stå på denne indstilling i
ca.1 time.
4 Skift til grillfunktion. Indstil funktions-
knappen til maks. grill
5 Lad ovnen stå på denne indstilling i
ca. 30 minutter.
6 Sluk for komfuret.
7 Lad derefter ovnlågen stå åben i ca.
2 timer, og luft ud i køkkenet.
8 Rengør ovnen, lågen og ovnens ribber
med varmt vand og opvaskemiddel. Tør
ovnen af.
Ovnen kan fortsat lugte lidt i den første tid,
den anvendes. Det påvirker ikke madens
smag, og det er ikke sundhedsskadeligt.
. Stil temperaturknappen på
=
.
Rengør tilbehøret
Vask plade, bradepande mm. i varmt vand
med opvaskemiddel. Skyl, og tør tingene
af.
Page 4

INDHOLD:
1. PRÆSENTATION AF PRODUKT OG
DIMENSIONER
2. ADVARSLER.
3. INSTALLATION OG FORBEREDELSE TIL BRUG
4. BRUG AF DIT KOMFUR
5. RENSNING OG VEDLIGEHOLDELSE
6. REPARATION OG TRANSPORT
7. GARANTI
8. AUTORISEREDE SERVICEVÆRKSTEDER
1
Page 5

DEL 1: PRÆSENTATION AF PRODUKT OG DIMENSIONER
Komponent oversigt :
kogezone
indicator
1- Betjeningspanel
2- Håndtag
3- Magasinskuffe
4- Justerbare ben
5- Ovnlåge
6- Bradepande
7- Bageplade
8- Rist
9- Ovnlys
10- Glaskeramisk kogeplade
11- Dobbelt zone
12- Restvarmeviser
13- Ø14,5 kogezone
14- Ø 18,0 kogezone
2
Page 6

DEL 2: ADVARSLER
husholdningsbrug
SØRG FOR AT EFTERLEVE ALLE SIKKERHEDSANVISNINGER OG LÆSE
MANUALEN, FØR DU BRUGER APPARATET
* Dette apparat er kun designet til uprofessionel, hjemmebrug.
* Efterse apparatet nøje for skader, når du har pakket det ud. Hvis der er defekter
på apparatet, skal du ikke bruge det og i stedet med det samme kontakte autoriserede
reparatører. Da materialerne, der bruges i indpakningen ( nylon, clips, flamingopap,
. osv. ) kan være skadelige for børn, bør de samles sammen og fjernes med det
samme.
* Apparatet skal sættes op af en autoriseret tekniker, før det bruges.
Producenten/importøren
er ikke ansvarlig for skader, der kan opstå af forkert placering/installation.
* Før du tilslutter apparatet til strømmen, skal du nøje kontrollere, om den stemmer
overens med de egenskaber, der er defineret på pakken og/eller typeskiltet
på apparatet.
* Sammenlign standarderne fra din el-leverandør med de tekniske informationer på
typeskiltet, før du sætter strøm til apparatet.
* Hvis du ikke skal bruge apparatet i lang tid, skal strømmen tages fra. Hold
hovedafbryderen på Fra.
* Tilførselsledningen må aldrig skiftes af kunden. Hvis den på nogen måde beskadiges,
skal du venligst kontakte en autoriseret reparatør.
* Før du skifter ovnlampen, skal du slå strømmen fra.
* Sluk for apparatet, før du renser eller vedligeholder det. Du kan gøre det, når
hovedafbryderen er slukket eller stikket er taget ud af stikkontakten.
* Visse dele af apparatet kan være varme i lang tid, derfor skal du vente, før du rører
ved dele, der bliver udsat for varme.
3
Page 7

Hold ikke brændbare materialer tæt på apparatet, når det er tændt.
* Hold øje med ledninger fra andre elektriske apparater tæt på komfuret, så de ikke
rører varme punkter.
* Sørg for at knapperne står på "0, når apparatet ikke bruges.
* Denne manual er lavet, så den passer til mere end en model. Dit apparat kan
mangle nogle af de funktioner, der forklares i manualen. Hold øje med de udtryk, der
er nummererede, når du læser manualen.
* Hold børn væk fra komfuret.
* Hvis der er synlige sprækker i de keramiske overflader på komfuret, skal det straks
slukkes for at undgå elektrisk stød.
* Under brug bliver apparatet varmt. Sørg for, at du ikke rører varmeelementerne
inden i ovnen.
* Under grilning skal ovndøren være lukket.
* Brug ikke damprensning til at rense kogepladerne og selve ovnen.
* Hvis komfuret placeres på en sokkel, skal der sørges for, at det ikke kan falde ned.
FOR AT SØRGE FOR SIKKERHEDEN OG EFFEKTIVITETEN ANBEFALER VI, AT
DU ALTID BRUGER ORIGINALE RESERVEDELE OG KUN BRUGER
AUTORISEREDE TEKNIKERE TIL REPARATIONER.
4
Page 8

DEL 3: OPSÆTNING OG FORBEREDELSE TIL BRUG
Dette moderne, funktionelle og praktiske komfur, der er produceret med de bedste dele
og materialer, vil på alle måder leve op til dine krav. For at sikre effektiv brug, og at
du undgår problemer i fremtiden skal du læse denne manual. De følgende informationer
er de krævede retningsliner for korrekt installation og vedligeholdelse. Det skal læses
af teknikeren, der skal installere apparatet.
Kontakt en autoriseret tekniker for opsætning af dit komfur.
3. 1 INSTALLATION AF KOMFURET
* Der er visse faktorer, der skal holdes øje med, når du installerer dit komfur. Sørg for,
at der holdes øje med nedenstående forslag for at undgå problemer og/eller farlige
situationer, der kan opstå deraf.
* Sørg for, at komfuret ikke placeres ved siden af et køle- eller fryseskab.
Det er nødvendigt med mindst 2 cm fri plads mellem komfuret og væggen for luftcirkulation.
* Bordplader og skabe tæt på komfuret skal være i stand til at tåle temperaturer højere end
50°C over stuetemperatur.
* Hvis køkkenskabe er højere end overkanten af komfuret, skal de stå mindst 11 cm fra
siden af komfuret.
* Minimumsafstanden mellem kogepladerne og hylder og emhætter skal være mindste
660mm fra kogepladen.
Er der ingen emhætte, skal afstanden være mindst 700 mm til overskabe.
5
Page 9

3. 2 JUSTERING AF FØDDERNE
32
* I forsyningskredsen skal der installers en 32 A polafbryder med forsinkelse og en
kontaktåbning på mindst 3,0 mm.
Dit komfur står på 4 justerbare fødder. Da fødderne justeres lavt, er det nødvendigt
at kontrollere, om de er jævne, inden komfuret installeres. De kan justeres ved at dreje
fødderne med uret, hvis det er nødvendigt. Apparatet kan løftes 15 mm med fødderne.
Hvis fødderne justeres korrekt, må apparatet ikke flyttes ved at trække i det, kun ved
at løfte komfuret. Det er nødvendigt at trække ovnskuffen ud for at justere fødderne.
Fødderne kan justeres fra indersiden.
3.3 STRØMFORBINDELSE OG SIKKERHED
Når strømmen tilsluttes, skal nedenstående instruktioner følges.
* Komfuret skal installeres af en autoriseret installatør. Garantien bortfalder, hvis
komfuret er blevet installeret forkert.
Komfuret skal ekstrabeskyttes (jordforbindes) jf. stærkstrømsreglementet.
Producenten/importøren kan ikke gøres ansvarlig for skader opstået pga. manglende
eller beskadiget jordforbindelse.
* Tilførselsledningen må ikke røre overfladen af apparatet. Brug aldrig en
forlængerledning. Fare for overophedning
* Hvis tilførselsledningen bliver beskadiget, skal du kontakte en autoriseret tekniker.
Kablet skal udskiftes af en autoriseret tekniker.
* Tilsluttes strømmen forkert, kan det beskadige apparatet. Garantien bortfalder, hvis
komfuret er fejlmonteret.
* Apparatet tilsluttes 400V 3N i spænding. Hvis
strømnettet afviger fra de angivne værdier, skal du øjeblikkeligt kontakte vores
autoriserede teknikere.
Elektriske kabler må ikke røre varme dele af apparatet. Elektriske kabler må ikke røre
bagsiden af apparatet. Ellers kan de elektriske kabler beskadiges. Dette kan føre
til kortslutninger.
* Der skal installeres en sikring i HFI-relæet med en kontaktflade på mindst 3,0 mm
på 16 A.
6
Page 10

* Dette apparat er leveret med en fast forbindelse til elforsyningen.
2N~
2N~
2N~
Tilkoblingen skal udføres af en autoriseret installatør.
3. 4. GENERELLE ADVARSLER OG SIKKERHEDSANVISNINGER
* Dette apparat er produceret i overensstemmelse med de relaterede
sikkerhedsanvisninger, der er forbundne med elektriske apparater. Reparation og
vedligeholdelse skal udføres af autoriserede teknikere.
Installation og reparation, der ikke følger reglerne, kan sætte dig selv i fare.
* Overflader på ovnen varmes op under brug. Indersiden af ovnen, varmeelementer
og damp, der kommer ud af den, er meget varmt. Selv hvis apparatet er slukket, vil
disse dele være varme i lang tid. Rør ikke disse varme overflader. Hold børn fra
apparatet.
* Forlad ikke apparatet, når der bruges faste eller flydende fedtstoffer. De kan bryde i
brand under ekstrem varme. Hæld aldrig vand på flammer fra brændende olie. Dæk
panden med et låg for at kvæle de flammerne.
*Temperaturknapperne skal drejes, før apparatet tænder.
Ellers fungerer apparatet ikke.
* Læg ikke tunge eller brændbare genstande (nylon, plastikposer, papir, stof ... osv) i
skuffen.
* Sluk for strømmen, når apparatet ikke bruges.
* Apparatet må kun opbevares og benyttes i et opvarmet lokale.
3 x 4 mm 220V~
3 x 4 mm 230V~
3 x 4 mm 240V~
²
²
²
3
2
5 x 1.5 mm 380V~,3N²
5 x 1.5 mm 400V~,3N~
5 x 1.5 mm 415V~,3N~
²
²
7
2
1
~
4 x 2.5 mm 380V~,3N²
4 x 2.5 mm 400V~,3N~
4 x 2.5 mm 415V~,3N~
²
²
~
Page 11
DEL 4: BRUG AF DIT KOMFUR
FVC 66 D1 TRIO / FC 6090 K / FSK 06 TR
4. 1 DIT KOMFURS GENERELLE FREMTONING OG TEKNISKE
EGENSKABER
HKK66
NEDERSTEVARMEELEMENT
ØVERSTE VARMEELEMENT
GRILL
TURBOELEMENT
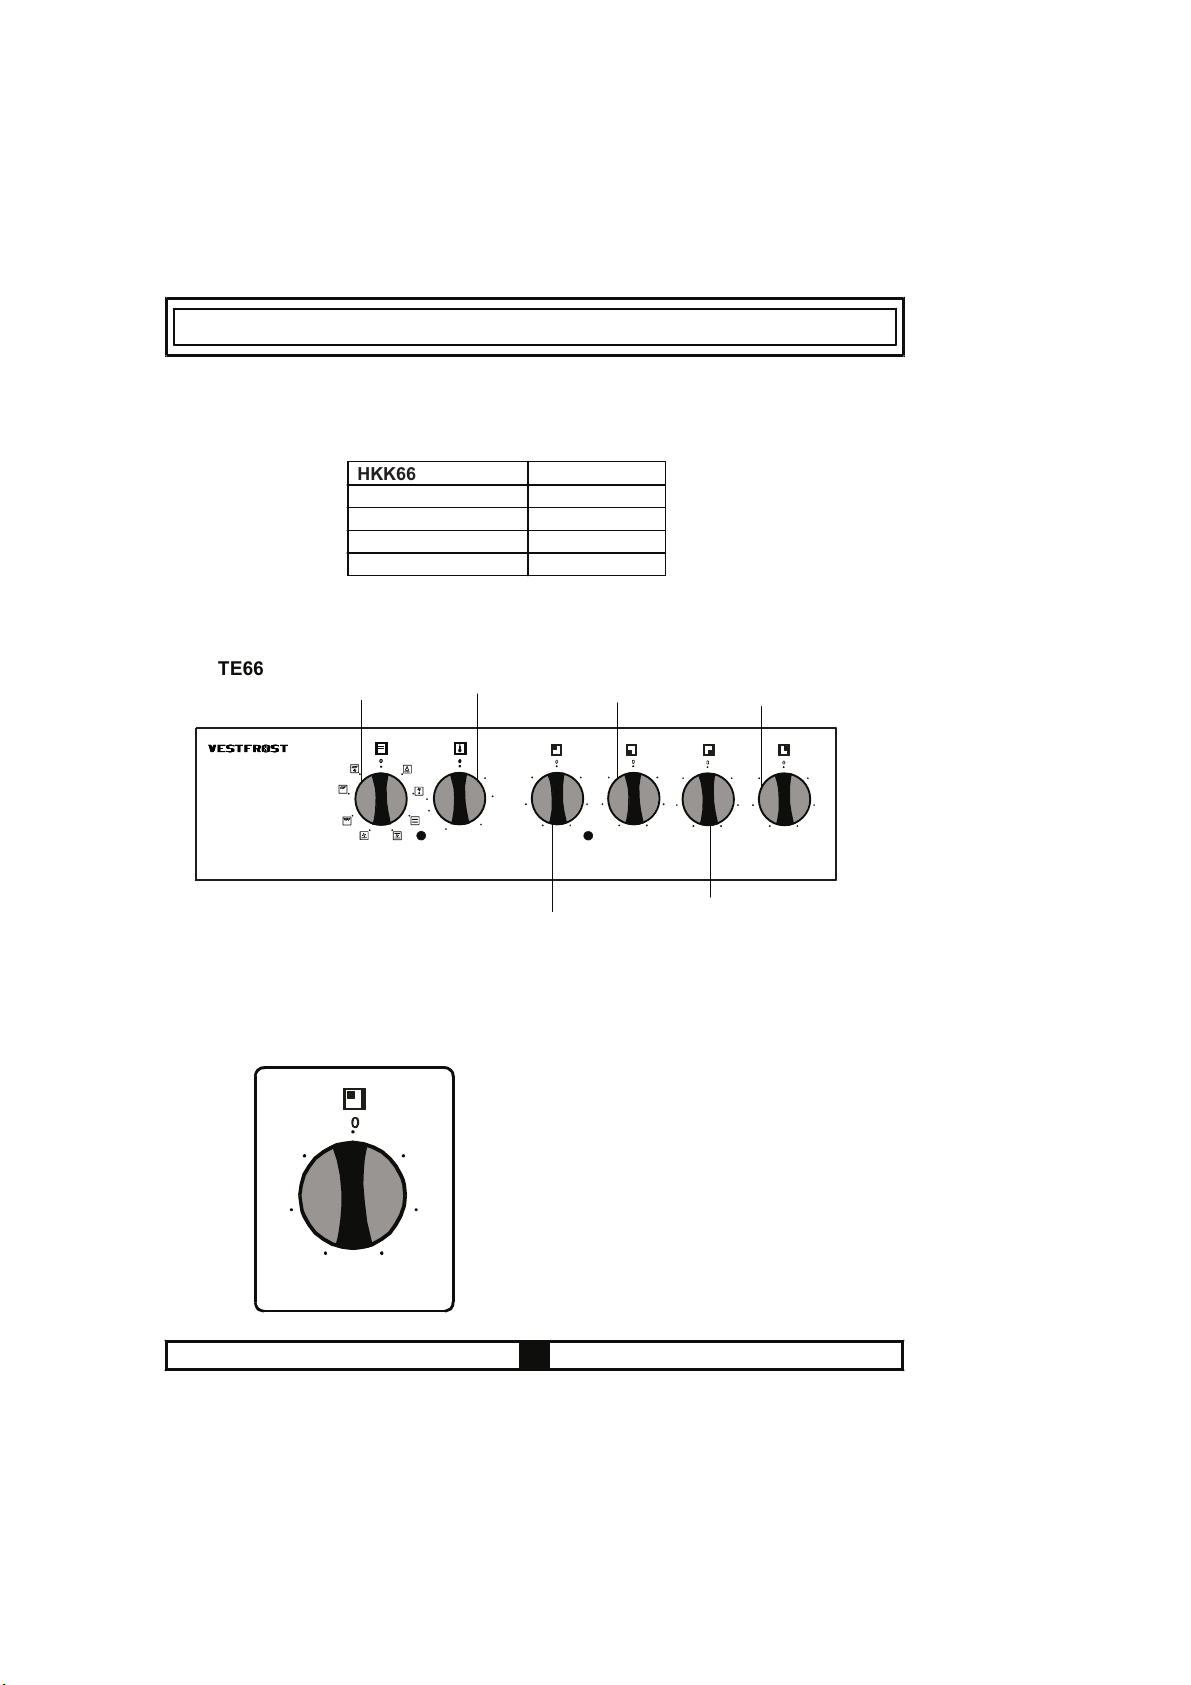
4. 2 PRÆSENTATION AF KONTROLPANELET OG DETS
FUNKTIONER
TE66
200°
Ovntermostat
Afbryder
150°
Ovnfunktion
Afbryder
Max
250°
50°
100°
1100 WATT
1200 WATT
2000 WATT
2000 WATT
1
6
2
4
3
Venstre fron telement
1
2
5
4
3
Højre bage lement
1
6
2
5
3
1
6
2
5
4
3
6
5
4
Venstre bagelement
4. 3 BRUG AF KOGEPLADER
De elektriske kogeplader styres med 7 gradmærkede knapper.
0 står for slukket. Funktionerne for de sidste 6 grader er vist
nedenunder.
1..Simre
6
5
4
3
Keramisk kogeplade
2-3..Lav varme
1
4-5-6..Tilberedning stegning
og kogning
2
8
Højre frontelement
Page 12
Den øverste del af kogepladerne er dækket af et beskyttende materiale, der er
(Kun på nogle modeller)
(Kun på nogle modeller)
varmeresistent. Sæt den elektriske kogeplade på "3" og lad så pladen være tændt i 5
minutter for at brænde, og på den måde hærde det beskyttende lag ved
førstegangsbrug.
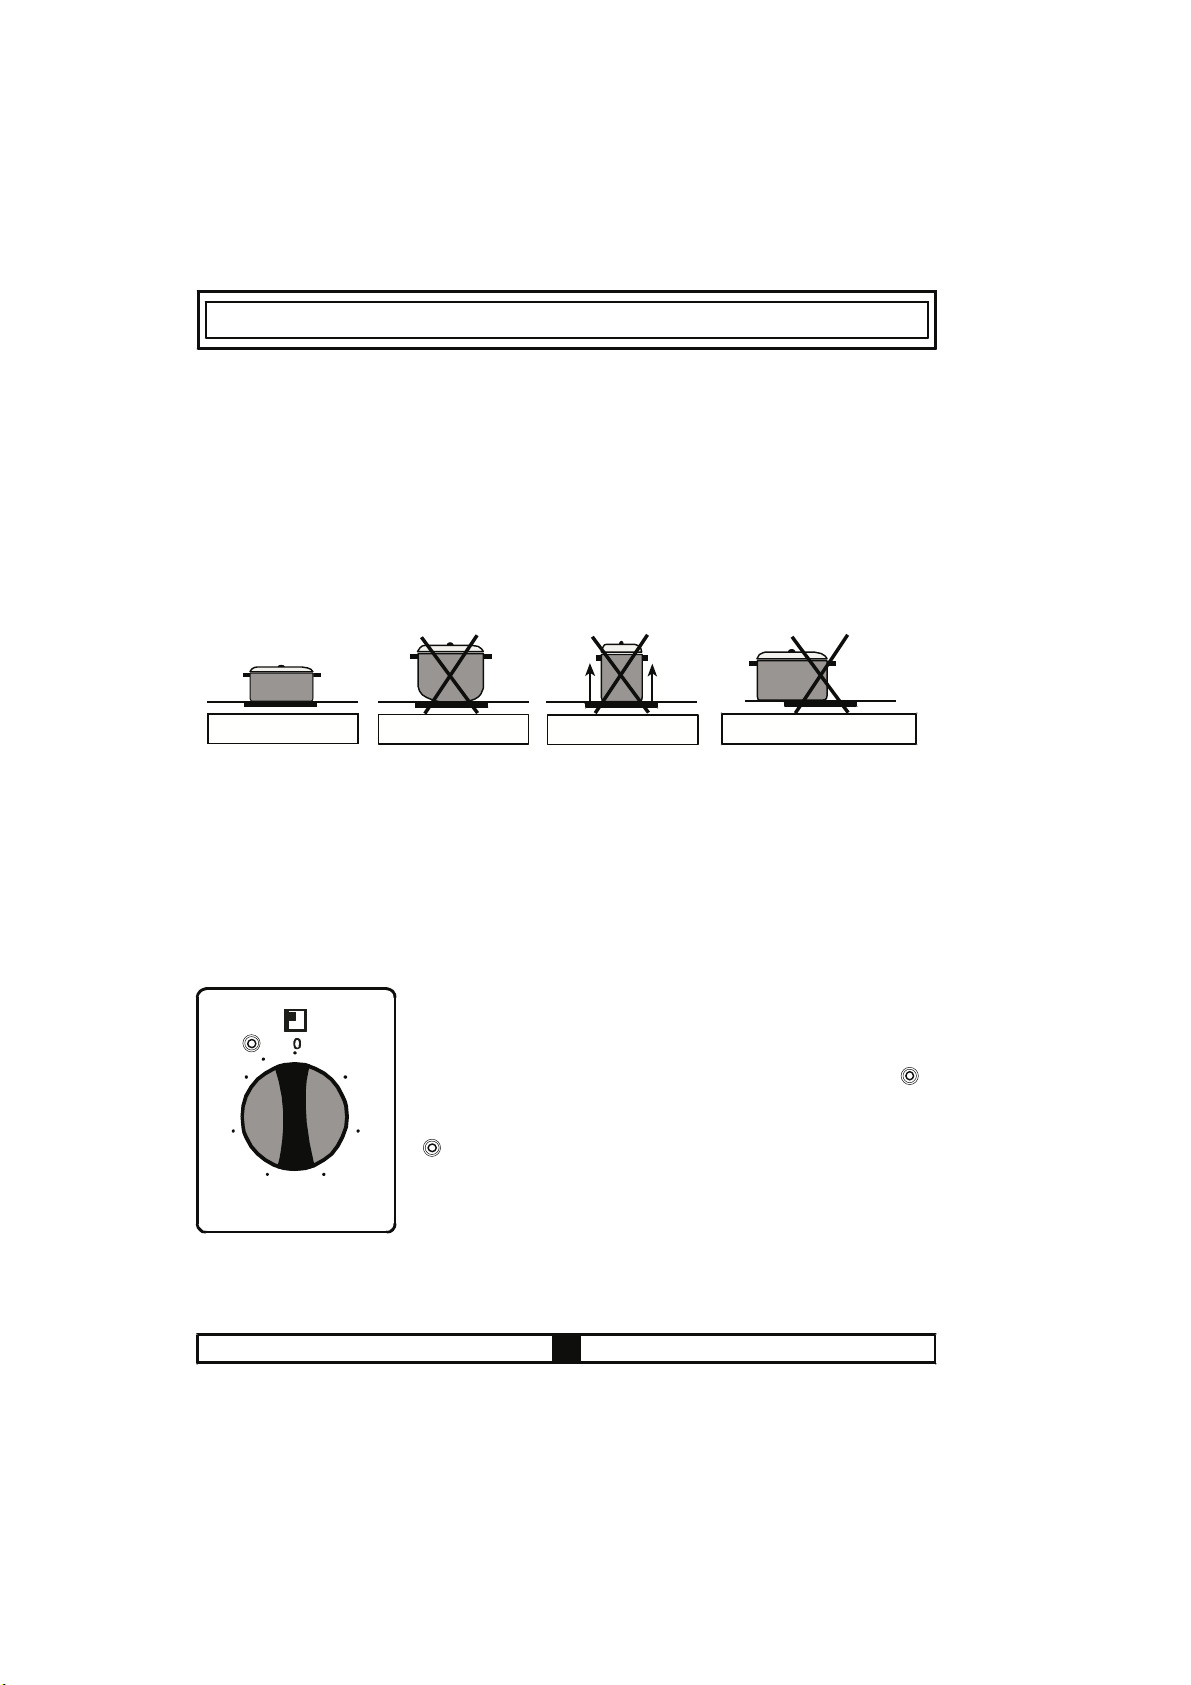
Når der bruges elektriske kogeplader, er det nødvendigt, at holde øje med at brugte
pander har en glat bund. Hvis der bruges pander med passende størrelse og glatte
bunde, kan du få mest ud af din kogeplade. Det anbefales ikke, at bruge små pander
på den store zone, da dette vil forårsage varmetab og medføre, at der spildes energi.
RIGTIGT
FORKERT
rund pandebund
FORKERT
lille diameter på pandebunden
FORKERT
panden står ikke lige
Sørg for, at kogepladen står på "0", når du ikke bruger den. Rør aldrig kogepladen
efter brug, da den vil være varm i et stykke tid. Børn bør ikke være i nærheden af den.
Rens den elektriske kogplade med en våd klud efter brug. Hvis pladen er ekstremt
snavset, kan den renses med vand og rengøringsmiddel.
Opvarm pladen i et par minutter for at tørre den efter rengøring.
Dobbelt- eller ovale plade
6
5
4
3
Den dobbelte eller ovale zone kan varmes op i to positioner. Hvis
1
den store diameter skal varmes op, skal knappen sættes til .
Både den store og lille del af pladen vil så varmes op. Hvis den
ovale del af kogepladen skal varmes op, skal knappen stå på
2
. Både den ovale og den runde del vil så bruges.
9
Page 13

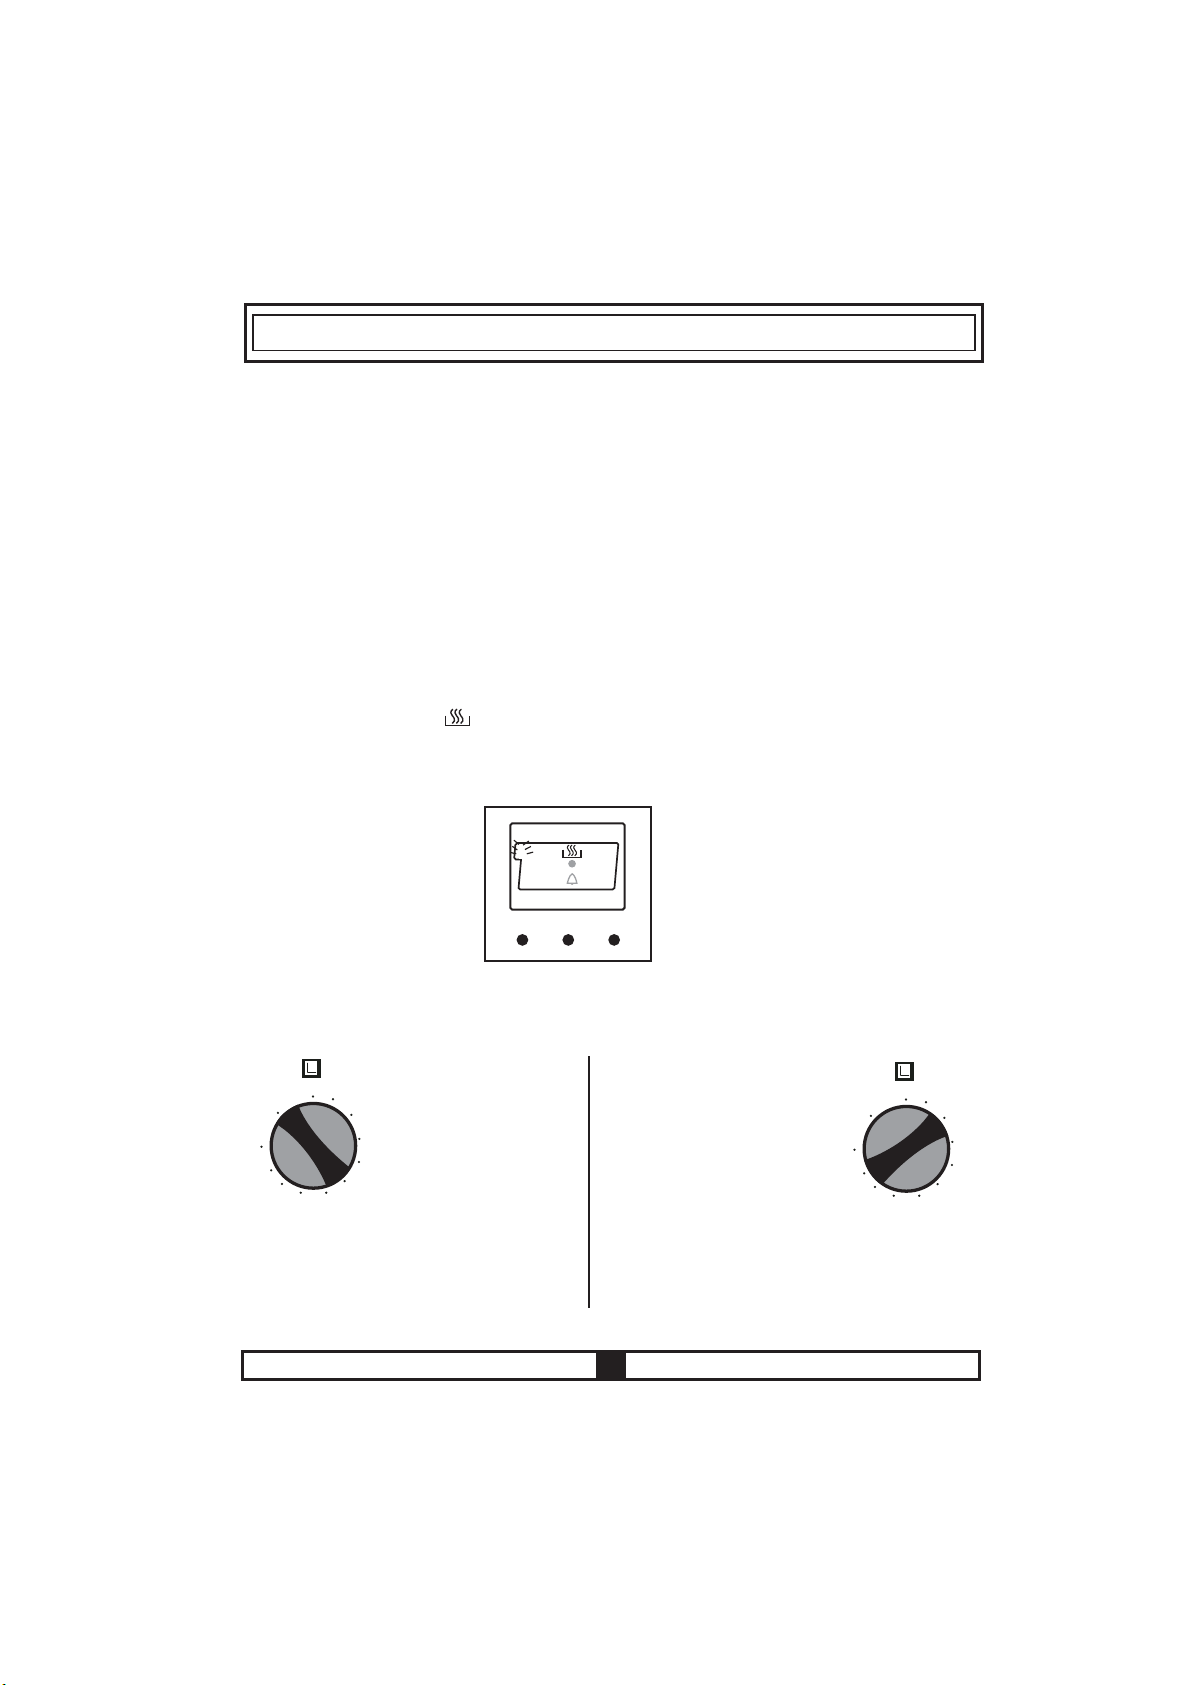
4.4 BRUG AF OVNDELEN
4. 4. 1 Brug af funktionsknapper
Denne knap lader dig vælge blandt ovnens funktioner. Funktionerne og deres
indstillinger vises i følgende tabel. Der er også detaljerede beskrivelser af deres
funktioner i de næste sider.
Din ovnlampe vil lyse.
Din ovnlampe, den røde advarselslampe og blæseren starter.
Bruges til at optø frossen mad.
Din ovns termostat, advarselslamperne og varmeelementerne
starter.
Din ovns termostat, advarselslamperne og varmeelementerne
starter.
Din ovns termostat, advarselslamperne, blæser, og
grillelementet starter.
Din ovns termostat, lamper og laveste elementer starter.
Din ovns termostat, advarselslamper og laveste varmeelement
starter.
10
Page 14

Optøning
Du kan starte optøningsprocessen ved at sætte den frosne mad i ovnen og dreje
knappen til dette tegn. Dette program koger ikke maden, det optør den bare på
meget kort tid. Placer maden, der skal optøs, på den tredje ovnribbe fra bunden på
en ovnrist. Placer en bakke nederst i ovnen for at opsamle det vand, der kommer fra
optøningen.
Nederste Øverste elementer
Denne opvarmning, der er den traditionelle metode, spreder varmen ligeligt i den
øverste og nederste del af ovnen og sørger for, at toppen og bunden af din ret får lige
meget varme.
Det anbefales, at der forvarmes i 10 minutter. Lad maden, der skal lægges i et ildfast fad,
stege i den anbefalede periode. Nederste-øverste element anbefales til at bage kager,
lasagne, pizza og tærter.
Når tilberedningen er færdig, skal du slukke på ovnknappen, temperaturvælgeren og
afbryde tidsprogrammet. Tag den tilberedte mad ud af ovnen, stil den et sikkert sted
og åbn ovndøren og sørg for, at ovnen køles helt ned. Da ovnen på det tidspunkt er
varm, skal du undgå at røre ved den og holde børn væk fra den.
Blæser og Nederste Øverste element (varmluft)
Den varme luft fra nederste og øverste element spredes i ovnen med blæseren.
Temperaturvælgeren skal justeres til det antal grader, der anbefales til retten. Drej
ovnknappen til denne funktions symbol og indstil tilberedningstiden til den, der anbefales
til retten, og forvarm ovnen i ti minutter. Maden, der skal ligge i et ildfast fad, stilles ind
i ovnen og tilberedes. Generelt er dette den bedste måde at bage kager på. Hver del
af retten vil blive kogt lige meget i denne funktion. Det er en god måde at tilberede
mad i et enkelt fad.
Når tilberedningen er færdig, skal der slukkes for ovnknappen og temperaturvælgeren.
Afbryd ovnens timer og tag den tilberedte mad ud af ovnen og stil den et sikkert sted.
Åbn ovnens dør og lad den køle af. Kom ikke for tæt på, før den er kølet af og hold
børn væk.
11
Page 15

Grill
Forvarm ovnen i 5 minutter. Placer maden på risten og anbring risten på en af de
øverste ribber. Placer bradepanden under risten. På den måde opsamles alt fedt og
saft i bradepaden. Ovnen bliver meget varm under grillning - derfor bør børn holdes
på sikker afstand. Under grillning skal ovndøren være lukket.
Advarsel: Under grillning må temperaturvægleren maks. sættes på 190
Nederste element
Med denne funktion spredes varmen fra nederste element. Denne funktion er god til
at opvarme maden i stedet for at tilberede den.
Nederste element og blæser
Med denne funktion spredes varmen fra nederste element og blæseren. Denne funktion
kan bruges til at opvarme maden på kort tid.
ºC.
4. 4. 2 Tilbehør brugt i ovnen
Du kan bruge glasfade, kageforme, specielle ovnfade der passer til at blive brugt i
ovnen, hvilket du kan forsikre dig om hos forhandleren, ud over de bradepander, grillriste
Der blev leveret med din ovn. Læg mærke til de informationer, der blev
givet fra producentens side. Hvis der bruges små skåle, skal de placeres på risten så
de står på midten. De følgende informationer skal følges for emaljerede skåle.
Hvis maden ikke dækker ovnfadet helt, hvis den tages fra en dybfryser eller hvis fadet
bruges til at opsamle madsafter der flyder fra grillmad, kan der ses ændringer i formen
på skålen på grund af de høje temperaturer under tilberedningen.
Fadet vil vende tilbage til sin gamle form, når det er kølet ned igen. .Dette er en normal
fysisk reaktion, der opstår under varmeoverførsler.
Lad ikke fade eller skåle af glas stå i kulden, efter de er brugt i ovnen. De må ikke stilles
på kolde eller våde underlag. Stil dem enten på et viskestykke eller en bordskåner, så
de køles langsomt ned. Ellers kan glasset gå itu.
Hvis du
opsamle
Brug 4. og 5. , når du griller, og olier
fast
vil bruge den store grillrist, skal du stille en pande på en af de lavere fade for at
olien. Hæld en smule vand i for at gøre panden nem at gøre rent.
15
grillristen.
på
ribbe
grillristen
så dine ingredienser ikke sidder
.
12
Page 16

DEL 5 : RENSNING OG VEDLIGEHOLDELSE AF DIT KOMFUR
Brug en glasskraber, til at fjerne madrester. Sukkerindeholdende madvarer skal
Glasskraber skal altid
5. 1 RENSNING
Sørg for, at alle knapper er slukkede og at dit apparat er kølet af, før du renser dit
komfur. Tag strømmen fra apparatet.
Kontroller om dine rengøringsmidler er passende og anbefalede af producenten, før
du bruger dem på Brug ikke kaustisk rensemidler, slibemiddel, ståluld eller
hårde genstande, da de kan beskadige overflader. Hvis der er væsker på din ovn
under opvarmning, kan emaljen blive beskadiget. Overflydende væsker skal derfor
straks fjernes.
Rensning af indersiden af ovnen
Sørg for, at ovnen er frakoblet strømnettet, før den renses.
Indersiden af den emaljerede ovn renses bedst, når den er varm. Tør ovnen af med
en blød klud, der er dyppet i sæbevand efter hver brug. Bagefter skal du tørre den
af med en fugtig klud en gang til og derefter tørre den. Det kan være nødvendigt med
et flydende rensemiddel en gang imellem for at sørge for en komplet rengøring. Brug
ikke pulver eller tørre rengøringsmidler.
komfuret.
Rengøring af
For at rense ovndøren på din ovn, skal du bruge vinduesrens. Bagefter skal det vaskes
af og tørres med en tør klud. Glasset kan trækkes ud, når det skal gøres rent som
beskrevet i følgende instruktion.
* Åbn døren.
* Træk metalstangen gennem hullerne som vist på billedet
* Udfør denne proces for begge hængsler.
* Løft let op i døren, og træk blidt udad. Døren vil nu kunne tages ud.
* Placer det nu igen i hængslerne og sæt stængerne i for at fastgøre det. Rens ikke
ovndøren, mens glaspanelerne er varme. Hvis du gør det, kan glaspanelerne
gå itu. Hvis der opstår problemer, skal du kontakte en autoriseret tekniker.
ovndøren
Rensning af en keramisk kogeplade
Før du starter rengøringen, skal den keramiske kogeplade køle ned. Sørg for, at
rensematerialet ikke indeholder partikler, der kan ridse glasset. Brug creme og
flydende rensemidler. Keramiske overflader skal renses med koldt vand og tørres
af med en blød klud, så der ikke er nogen rengøringsmidler tilbage. Brug paletten,
der kom med produktet, til at fjerne madrester. Sukkerindeholdende madvarer skal
fjernes lige efter, de er spildt, og før glasset køler af. Rengøringsredskaber af stål kan
skade keramisk glas. Er der støv på overfladen, skal det fjernes med en våd klud.
Skifter den keramiske overflade farve, har det ikke betydning for den keramiske
overflades holdbarhed og funktionalitet. Farveændringer er resultat af, at rester ikke
fjernes, erosion på grund af gryder og pander og at der ikke bruges korrekte
rengøringsmidler og ikke på grund af ændringer i materialet. Rensepaletten skal altid
bruges, før der påføres kemikalier. Med denne kan du fjerne selv det mindste skidt fra
overfladen.
13
Page 17

Materialer der er svære at rense, sådan som flydende plastik, olie og
Glasskraberen er farlig, da er udstyret med
et barberblad
sukkerrester kan let fjernes med kniven. Paletten er farlig, da den er udstyret med en
knivsæg og skal derfor holdes utilgængelig for børn. Pas på at du ikke skraber
silikonekittet på siderne af glasset væk med paletten.
5.2 VEDLIGEHOLDELSE
Sådan skiftes ovnlampen
Pæren skal være 230 V, 25 Watt,
skiftes.
Rengøring af ovndør
1
Latch
blokering
2
3
Support
forsænket
Type E14. Ovnen skal være afkølet, før pæren
For at fjerne ovndøren:
•
Åbn døren helt (1)
•
Flyt tappen ved dør hængslet som vist på
billedet (2)
•
Luk døren næsten helt i (3) og fjern døren
ved at trække den mod dig selv.
NB! For at montere døren igen, følg denne
vejledning i modsat rækkefølge
!
Kontroller, at døren efter påmontering
sidder korrekt og helt fast.
14
Page 18

DEL 6: REPARATION OG TRANSPORT
6,1 Krav før du kontakter en reparatør
Hvis ovnen ikke fungerer;
Ovnen kan være sluttet fra, eller en sikring kan være sprunget.
Hvis ovnen ikke opvarmes;
Temperaturen er muligvis ikke justeret på ovnens temperaturknap. Hvis der ikke er lys
i den indvendige lampe;
Kontroller, om der er sat strøm til.
Du skal kontrollere, om lamperne er defekte. Hvis de er defekte, kan du skifte dem
ved at følge guiden.
Tilberedning (Hvis den øverste og nederste del ikke varmer lige meget) ;
Kontroller placeringen af pander, kogeperioder og temperaturværdier ud fra manualen.
Har du problemer ud over disse, skal du ringe til en
autoriseret tekniker.
15
Page 19

Dette symbol på apparatet eller dets emballage viser, at det ikke må behandles som
husholdningsaffald. Det skal i stedet aeveres på den lokale genbrugsplads for el-
apparater og elektronik. Ved at sørge for korrekt bortskaffelse af dette apparat kan man
hjælpe til at undgå potentielle negative følgevirkninger for miljø og mennesker, som ellers kunne udløses, hvis affaldshåndteringen af dette apparat var mangelfuld. Nærmere
oplysninger om recirkulering af dette apparat fås ved kontakt til kommunens afdeling for
teknik og miljø, renovationsselskabet eller den butik, hvor apparatet blev købt.
Page 20

OPERATING AND INSTALLATION
FVC 66 D1 TRIO
FC 6090 K
FSK 06 TR
INSTRUCTIONS OF ELECTRICAL
FREESTANDING
OVEN
Page 21

Dear Customer,
We take offering quality products more than your expectation as
a goal, offers you the products produced in modern facilities
carefully and particularly tested for quality.
This manual is prepared in order to help you to use your
appliance that is manufactured by the most recent technology,
with confidence and maximum efficiency.
Before using your appliance, carefully read this guide that
includes the basic information for right and safe installation,
maintenance and use and contact to the nearest Authorized
Service for mounting of your product.
Page 22

CONTENTS :
1. PRESENTATION AND SIZES OF PRODUCT
2. WARNINGS
3. INSTALLATION AND PREPARATIONS FOR USE
4. USE OF YOUR OVEN
5. CLEANING AND MAINTENANCE
6. SERVICE AND TRANSPORT
1
Page 23

PART 1 : PRESENTATION AND SIZES OF PRODUCT
2
3
9
13
8
7
1011
12
4
Part of List:
1- Vitroceramic Cooktop
2- Control Panel
3- Child Lock
4- Oven Door Handle
5- Drawer Cover
6- Supply Leg
7- Oven Door
8- Oven Tray
9- Wire Grid
10-Front Resistance
11-Fan Store
12-Oven Lamp
13-Highlight elements
5
6
Model
TE 66
TE 56
Size(cm.)
60X60X85 / 60X60X90
50X60X85 / 50X60X90
2
Page 24

PART 2 : WARNINGS
TAKE ALL IMPORTANT SECURITY MEASURES AND READ THE MANUAL
COMPLETELY BEFORE USING THE APPLIANCE
This appliance has been designed for non-professionel, domestic use only.
Surely control whether there is any damage after you unpacked the appliance.
If there is any defect; do not use the appliance and immediately contact to the
authorized maintenance service. As the materials used for package ( nylon, stapler,
strafoam. etc. ) may cause harmful effects to children, they should be collected and
removed immediately.
The appliance must be set up by an authorized technician and put into use. The
producer is not responsible for any damage that might be caused by defective
placement.
Before connecting your appliance to the electric , carefully control
whether it is appropriate for the features determined on the package and/or data
plate on the appliance.
Compare the features of the electricity organization with the technical information
on the presentation label before plugging the appliance in.
The feeding cable must never be changed by the customer. When it is damaged
by any reason, please contact to your authorized service.
Before changing the ovens lamp, plug it off.
Turn the appliance off before the operations such as cleaning or maintenance.
You can do it after plugging it off or turning the main switches off
Some parts of appliance may hold its heat for a long time, it is required to wait for
it to cool before touching onto the points that are exposed to the heat directly.
This appliance is not intended for use by persons(including children) with reduced
physical, sensory and mental capabilities, or lack of experience and knowledge, unless
they have been given supervision or instruction concerning use of the appliance by
a person responsible for their safety.
Children should be supervised to ensure that they do not play with the appliance.
3
Page 25

Do not keep flammable materials close while the appliance is operating.
Pay attention to the cables of the other electrical devices operating near the
appliance, so as not to touch to hot points.
Pay attention the switches to be 0, when the appliance does not operate.
The glass covers that some models have may crack when they are exposed to
extreme heat. Do not cover the glass cover without being sure that the cooker is off
and cooled completely.
This manual is prepared for more than one model in common. Your appliance may
not have some of the features that is explained in manual. Pay attention to the
expressions that have figures, while you are reading the operating manual.
Keep children away from the oven.
In case that cracks are visible and ceramic surfaces of the oven is to switch off
immediately to prevent electrical shocks.
During the use the appliance gets hot. Take special care to prevent touching of
heating elements inside oven cavity.
During grilling mode the oven door should be closed.
Do not use steam cleaners for cleaning the cooking hobs and oven cavity.
Before opening the lid covering the hotplates, take care that no liquids are on the
top of the lid. The lid is to closed not earlier than hobs have been cooled down.
Take care that the lid is in correct position under operation.
In case that highlight-halogen heaters are installed as hob elements do not stare
into the light.
In case that the oven will be placed on a socket steps must be resorted to prevent
falling down of the oven from the socket.
FOR EFFICIENCY AND SECURITY OF APPLIANCE, WE RECOMMEND YOU ALWAYS TO
USE THE ORIGINAL SPARE PARTS AND TO CALL ONLY OUR AUTHORIZED SERVICES
WHEN IN CASE OF A NEED.
4
Page 26

PART3 : INSTALLATION AND PREPARATION FOR USE
This modern, functional and practical oven, that was manufactured with the most
quality parts and materials, will meet your needs in every respect. You must surely
read this manual in order not to have any problem in future and to be able to have
successfull results. The following information are the required rules for right
installation and service processes. It must be read especially by the technician who
will install the appliance.
Contact to Authorized Service for mounting of your oven.
3. 1 INSTALLATION OF OVEN
There are some factors that must be paid attention to while installing your oven.
Surely pay attention to our below suggestions in order to be able to prevent any
problems and/or dangerous situations that may occur later.
It can be placed close to other furniture on condition that in the area where the oven
is set up, the furnitures height must not exceed the height of the cooker panel.
Pay attention not to place it near the refrigerator, there must be no flammable or
in flammable materials such as curtain, waterproof cloth etc. that will begin to burn
quickly, while selecting place for oven.
It is required there must be at least 2 cm blank space between the back cover of
oven and wall for air circulation.
The furniture close to oven must be manufactured resistant to heat more than
50 C° of the room temperature.
If the kitchen furniture are higher than the pan which the ovens cookers are on,
it must be at least 11 cm away from the ovens side.
The minimum heights from the ovens pan and wall cupboards and paddle boxes
with fan over the oven, are shown as below. Thus, the paddle box must be at
minimum 650 mm height from the cooker pan.
If there is no paddle box, this height must not be less than 700 mm.
5
Page 27

3. 2 ADJUSTMENT OF FEET
Your oven stands on 4 adjustable feet. As the feet are adjusted in low location, it is
required to control whether it is balanced before installing the oven. You can make
this adjustment as turning the feet clockwise if required. It is possible to raise the
appliance maximum 15 mm via the feet.
If the feet are adjusted appropriately, it is required not to move the appliance by
dragging, otherwise it is required to place it by lifting it up. It is required to bring the
ovens drawer out to adjust the appliances feet. The feet can be adjusted from inside
via the small change.
3.3 ELECTRIC CONNECTION AND SECURITY
During the electric connection, surely follow the instructions below.
The earthing cable must be connected to the terminal. You have to ensure the
cable with insulation to be connected to the power source during the connection of
cable. If there is not any appropriate earthed electric outlet in accordance with
regulations in the place where the appliance will be installed, immediately contact to
our authorized service.
The earthed electric outlet must be close to the appliance. Surely do not use the
extension cord.
The feeding cable must not touch to the hot surface of the product.
In case the feeding cable is damaged, surely contact to Qualified Service. The
cable must be changed by the authorized service.
The wrong electric connection may damage your appliance. Such damage is not
in guarantee extent.
The appliance is adjusted as appropriate for 220-240 Volts and 400V 3N Volts
of electricity. If the network electricity is different than this informed value, immediately
contact to our authorized service.
The electric cable must not touch to the hot parts of appliance. The electric cable
must not touch the back part of the appliance. Otherwise the electric cable of
appliance may be damaged. And this situation may cause short circuit.
The producer firm declares that it has no responsibility against any kind of damages
and losses that emanate from the following security norms.
There is to install an all pole disconnector inside the supply circuit with a contact
opening of at least 3.0mm rated 32A and delay functioning type.
6
Page 28

The appliance is provided for fixed connection to the power supply. The connection
2N~
2N~
2N~
of the appliance to an electrical source must be done by authorized technician.
3. 4 GENERAL WARNINGS AND MEASURES
Your appliance is produced in accordance with the related security instructions
connected with electrical appliance. The maintenance and repair works must be
made just by the authorized service technician who is trained by the producer firm.
The installation and repair works whitout following rules may endanger you.
Its outside surfaces heat while your appliance operates. The interior surfaces of
oven, components that ensures the heat and steam that goes out are quite hot. Even
if the appliance is turned off, these parts hold its heat for a specific time. Do not touch
onto the hot surfaces. Keep children away.
Do not leave the cooker while cooking with solid or liquid oils. There may be flaming
up on condition of extreme heating. Never pour water to the flames occuring from oil.
Cover the saucepan or frypan with its cover in order to choke the flame that was
occured in this case and turn the cooker off.
The oven and heat adjustment switches must be adjusted and ovens clock must
be programmed for cooking in your oven. Otherwise the oven does not operate.
Do not leave anything on it when the door or drawer of oven is open. You may
unbalance your appliance or break the cover.
Do not put heavy things or flammable, burnable goods (nylon, plastic bag, paper,
cloth etc.) into the lower drawer.
Plug it off when you do not use the appliance and keep the gas valve off.
Protect your appliance against atmospheric effects. Do not leave it to effects
such as sun, rain, snow, powder etc.
3
2
3 x 4 mm 220V~
²
3 x 4 mm 230V~
²
3 x 4 mm 240V~
²
* This appliance must be earthed.
* For this connection a power lead of wire type
H05V V -F should be used.
5 x 1.5 mm 380V~,3N²
5 x 1.5 mm 400V~,3N~
5 x 1.5 mm 415V~,3N~
²
²
~
7
2
1
4 x 2.5 mm 380V~,3N²
4 x 2.5 mm 400V~,3N~
4 x 2.5 mm 415V~,3N~
²
²
~
Page 29

PART 4 : USE OF YOUR OVEN
4. 1 GENERAL APPEARENCE AND TECHNICAL FEATURES OF YOUR OVEN
TE 56
LOWER HEATER
UPPER HEATER
GRILL
TURBO HEATER
1000 WATT
1000 WATT
1600 WATT
2000 WATT
TE 66
LOWER HEATER
UPPER HEATER
GRILL
TURBO HEATER
1100 WATT
1200 WATT
2000 WATT
2000 WATT
4. 2 PRESENTATION AND FEATURES OF THE CONTROL PANELS
TE 56/66
Timer
8888
Mode
Oven Function
Switch
Max
250
Oven Thermostat
Switch
50
150
200
1
100
2
3
Left Back Heater
6
5
4
Left Front Heater
1
2
4
3
1
6
2
5
3
Right Back Heater
1
6
2
5
4
Right Front Heater
4
3
6
5
4. 3 USE OF HOTPLATES AND VITROCERAN COOKERS
The electrical cooker is commanded by 7 graded switches. 0 of the grades is off location. The
use fields in response to other 6 grades are below.
1
2
3
Hotplates
1..........Keeping hot location
2-3......Heating locations at low heat
4-5-6..Cooking - roasting and boiling
6
5
4
6
5
4
1
locations
2
3
Vitroceramic Cooker
8
Page 30

The upper part of hotplates is covered by a protective material resistant to heat. Turn
(Only on some models)
(Only on some models)
the switch of the electrical cooker to 3 and then operate the cooker for 5 minutes
in order to burn and so to toughen the protective layer at first use.
During use of electrical cookers, it is required to pay attention to the used saucepans
to have smooth bases. If appropriate sized and smooth based saucepans are used,
you can get the most efficiency from your cooker. It is not suggested to use the little
size saucepans on the big size cooker, because this will cause heat loss and so energy
will be wasted.
RIGHT
WRONG
circular saucepan base
WRONG
small saucepan diameter
saucepans base had not settled
WRONG
Surely control that your cooker is off, the control switch is at 0 location after cooking.
Also never touch it as the cooker will be hot for a speific time after it was turned off.
Do not let children to come close to it.
Clean the electrical cooker with a wet cloth after using the electrical cooker. If there
is excessively getting dirty situation, you can clean it with water with detergent rather
well.
Heat for a few minutes for the upper part to dry after cleaning. If you will not use its
upper part for a while, ensure to occur a thin oil layer as oiling with machine oil.
Dual or Oval Vitroceramic Cooker
Dual or vitroceramic cookers can heat in two different position. For
6
5
4
3
operating the big diameter of dual cooker turn the switch to
1
. Both big and small diameter of the cooker will operate.
For operating the oval part of the oval cooker, turn the switch
to . Both oval and round parts will operate.
2
9
Page 31

4.4 USE OF OVEN PART
4. 4. 1 Use of Electronical Programming Clock
Adjustment of Day Hour
A symbol will start to flash after it is connected to the electrical resource.
Press (+) and (-) keys at the same time. It is also possible to adjust (to increase or
to reduce ) the time by pressing to these keys.
A
MODE
-
+
Alarm / Time Setup
This function can be used as time set up and alarm when wished. Mode key must
be pressed until led indicator lamp will start to light. The wished period interval is
adjusted via + and - keys. The wished time remains on screen after it was adjusted
and sign that flashed in the past remains fixed. It is possiple to make time set up
between 0-23.59 hours. At the end of cooking period an alarm is heard and
symbol flashes. You can press any key to stop the alarm.
Programming as Determining the Cooking Period
This function is used to adjust to cook at wished period interval.
To adjust the cooking period, Mode key is pressed until Dur indicator lamp
will start to flash. The wished cooking period is adjusted by using + and - keys.
Once the time is adjusted, it is registered automatically in 5 seconds following the
adjustment and A and symbols start to light continuously. The screen returns
to the current time. An alarm (sound) is heard when the cooking period ended and
A and symbols start to flash. Press onto any switch stops the signal and the
lamp to flash.
It is possible to adjust cooking period between 0-10 hours.
A
-
du
MODE
r
+
10
Page 32
Programming as determining the Finish Time
This function is used to adjust finishtime of the cooking period. To adjust the finish
time of cooking Mode key is pressed until End indicator lamp will start to flash.
The wished finish time is adjusted by using + and - keys. When the finish time
is reached an alarm is heard and you can press any kay to stop the alarm.
Programming as determining the Cooking Period and Finish Time
This function is used to adjust the cooking period by using of automatically cooking
function.
Both cooking period and ending time have to be adjusted to adjust the ending of
cooking period. The cooking period is adjusted as determined above.
Mode key was pressed until End indicator lamp will flash in order to adjust the
ending time. + and - keys must be used at the end of wished cooking period.
Once the time is adjusted , it is registered automatically in 5 seconds following the
adjustment and A and symbols starts to light continuously. The screen returns to the
current time. An alarm sound is heard at the end of the time and A symbol starts to
flash. Pressing any switch stops the signal and lamp to flash.
4.4.2 Use of Mechanical Timer
Manual Operation
0
M
100
90
80
70
When you set the timer
10
knob to M position as
20
seen in the illustration
30
on left side, the oven
40
can be operated
50
continuously. The oven
60
can never be operated,
when the timer knob is
in 0 position.
A
-
En
d
MODE
+
Operation with time set
Turn the timer knob in
clockwise direction in
order to set time between
0-100 minutes as seen
in figure on right side.
When the adjusted time
ends, oven is turned off
and a single warning
sound is heard.
11
0
M
100
90
80
10
20
30
40
50
60
70
Page 33

4. 4. 3 Use of Oven Function Switches
This switch allows you to select the oven functions. The functions and their grades
are shown at the following table. Also, the detailed instructions and their uses will
also be explained in details in the next pages.
Your ovens lamp starts to operating.
Your ovens lamp, red warning lamp and fan start to operating.
It performs the function of defrosting your frozen food.
Your ovens thermostat and warning lamps and lower and upper heaters
start operating.
Your ovens thermostat and warning lamps and turbo heater, fan are put into
use.
Your ovens thermostat and warning lamps and fan, upper and lower
heaters start operating.
Your ovens thermostat and warning lamps and grill heater and chicken turning
function start operating.
Your ovens thermostat and warning lamps and upper heater, grill heater and
chicken turning functions start operating.
Your ovens thermostat and warning lamps and upper heater, grill heater and
chicken turning and fan functions start operating.
Your ovens thermostat and lamps, lower heater operate
Your ovens thermostat and warning lamps, turbo heater, lower heater and
fan start operating.
Your ovensthermostat and warning lamps,lower heater and start operating.
12
Page 34

Ice Melter Function ( Defrost )
You can start the defrosting process by placing the frozen food into your oven and
turning the switch onto the determined sign. This is a program that does not cook the
food, just helps to defrost them in a very short time. Place the food that will be
defrosted on the third shelf support from the bottom, on a wire shelf. Place a tray into
the bottom of the oven in order to collect the water that occurs because of defrosting.
Lower - Upper Heater Function ( Static Cooking )
At this cooking that is defined as the traditional method, the heat that is spreaded
from the lower and upper heating elements into your oven equally, ensures the foods
buttom and top to be cooked equally.
It is recommended to make pre heating for 10 minutes. Leave the food that was put into
the available cooking dish to be cooked in recommended period case. The Lower-Upper
Heater location is the function that is preferred to cook cake, sponge cake, flan,
spaghetti in oven, lasagna, pizza.
At the end of cooking process, turn the ovens switch and heat set up switch off and
cancel the time program. Take the cooked food from the oven, put onto a safe place
and open the ovens door and ensure the oven is cool completely. As the oven will be
hot at that moment, stay away from the oven and keep your children
away from the oven.
Fan and Lower - Upper Heater Function ( Static Cooking with Fan)
The location where the air comes from lower and upper heating elements is distributed
into the oven via the fan motor and fanner.
The heat adjsutment switch is adjusted to the degree that is recommended at the
cooking table. Turn the ovens switch as it will show the symbol of this function and the
ovens time is adjusted to the recommended time for cooking, the oven is pre heated
for 10 minutes. The food that had been put into the available cooking dish is placed
into the oven and then cooked. In general, this location is a location where a very
nice results are taken for cooking of pastries. Every part of the food will be cooked
equally at this location. It is appropriate for cooking of single tray.
At the end of cooking, turn off the ovens switch and heat adjustment switch. Cancel
the ovens time program and take the cooked food from oven and leave it on a safe
place. Open your ovens lid and leave it to cool. Do not come close to it until it cools
and keep children away.
13
Page 35

Turbo Fan Function
Turbo fan function spreads the ovens heat equally. The food on all shelves will be
cooked equally during the use of this function.
Top of the oven will not be hotter than the bottom of it. Adjust the heat adjustment
switch of your oven to the wished degree, also turn the function switch as it will show
Turbo function symbol. Place your food that had been put into the available cooking
dishes into the oven after pre heating of 10 minutes. This function is appropriate for
cooking more than one dish.
If you have two trays of food that you will cook in your oven; you must use that heat
for your oven, heat of which of the heats that are appropriate for your food while
adjusting the cooking heat. Cooking two trays of food requires additional cooking
period according to the single tray cooking. In general, food in two trays are not cooked
at the same time. So, take the tray that you observed that is cooked, from the oven,
go on cooking for the other tray of food. As there will be heat transfer between two
trays during the cooking of two trays of food, the cooking quality will be lower than
the single tray. While cooking double trays, you can get a better cooking result by
changing theplaces and ways of trays if needed. The processes that will be applied
at the end of cooking, are same for all the functions.Open your ovens cover and leave
it to cool after you put your trays in oven onto a safe place.
Turbo Fan and Lower heater Function
Turbo fan and lower heater function is an ideal function to cook pizza. The lower
heater ensures the pizza paste to be cooked while Turbo fan spreads the heat of
oven equally. Adjust the heat adjustment switch of your oven to the wished degree,
also turn the function switch as it will show this functions sign and adjust the ovens
time to the offered time for cooking and pre heat the oven for 10 minutes. This function
is appropriate for cooking of one dish.
At the end of cooking process, turn off the ovens switch and heat set up switch.
Cancel the ovens time program and take the cooked food from oven and leave onto
a safe place. Open your ovens door and leave it to cool. Do not come close to the
oven until it cools and keep children away.
Warning: Max. set of thermostat 1900C
Grill and chicken Turning Function
This function is used to grill and to turn chicken, cooked food on a skewer.
To make turning, use the turning skewer. To grill, place the food onto the grill, also
the grill onto the shelf at toppest level. You can start to grill after placing the oven tray
onto the 3rd Shelf. The tray that is placed onto the 3rd Shelf will ensure the collection
of oils that drop from food.
14
Page 36

Turn your ovens heat set up switch as it will show the sign of this function. Place
your food into the oven after pre heating of 5 minutes.
At the end of cooking, as in all other cooking processes; turn off the ovens switch
and heat set up switch. Cancel the ovens time program and take the cooked food from
oven and leave onto a safe place. Do not come close to the oven until it will cool and
keep children away.
Warning: Max. set of thermostat 1900C
Upper heater, Grill and Roast Chicken Function
This function is used to grill rapidly and to roast chicken, cooked food on a skewer.
To make roasting, use the roasting skewer. To grill, place the food onto the grill, also
the grill onto the shelf at toppest level. You can start to grill after placing the oven tray
onto the 3rd Shelf. The tray that is placed onto the 3rd Shelf will ensure collection of
oils that drop from food.
Turn your ovens heat set up switch as it will show the sign of this function. Place your
food into the oven after pre heating of 5 minutes.
At the end of cooking process, as in all other cooking processes; turn off the ovens
switch and heat set up switch. Cancel the ovens time program and take the cooked
food from oven and leave onto a safe place. Do not come close to the oven until it
cools and keep children away.
Warning: Max. set of thermostat 190
0
C
Grill, Chicken Roasting and Fan Function
In this function, grill and upper heater and the fan that ensures to roast
perfectly, operate together and cook. It is also used to grill, to roast chicken and
cooked food on a skewer.
To make roasting; use the roasting skewer. To grill, place the food onto the grill, also
the grill onto the shelf at the toppest level. You can start to grill after placing the oven
tray onto the 3rd Shelf. The tray that is placed onto the 3rd Shelf will ensure collection
of oils that drop from food.
Turn your ovens heat set up switch as it will show the sign of this function. Place your
food into the oven after pre heating of 5 minutes.
At the end of cooking process, as in all other cooking processes; turn off the ovens
switch and heat set up switch. Cancel the ovens time program and take the cooked
food from oven and leave onto a safe place. Do not come close to the oven until it
cools and keep children away.
Warning: Max. set of thermostat 190
0
C
15
Page 37

Lower Heater Function
At this cooking the best is spreaded from the lower heating element. Lower
heating function is appropriate for heating the food instead of cooking.
Lower Heater and Fan Function
At this cooking, the heat is spreaded from the lower heating element and fan
motor. This function can be used to heat the food equally in a short time.
4. 4. 4 Accessories Used in Oven
You can use glass dishes, cake molds, special oven trays that are appropriate for use
in oven, that you are able to assure in market, apart from the oven trays and grill wire
chicken roasting skewer that are given together with your oven. Pay attention to the
information related to the subject that were given by the manufacturer firm.
In case small size dishes are used, place the dish onto the grill wire, as it will
completely be on the middle part of the wire. The following information must also be
followed for the enameled dishes.
If the food that will be cooked does not cover the oven tray completely, if the food is
taken from the deep freezer or the tray is being used for collection of foods juices that
flow during grilling, the form changes can be observed in tray because of the high
heat that occur during cooking or roasting.
The tray will return to its old form only when the tray cooled after cooking. This is a
normal physical event that occurs during heat transfer.
Do not leave this tray or dish in cold environment right away after cooking in glass tray
or dish. Do not put onto the cold and wet grounds. Place on a dry kitchen cloth or dish
cross, ensure it to cools slowly. Otherwise the glass tray or dish may be broken.
If you will grill in your oven; we recommend you to use the grill that was given in tray
together with product. ( If your product includes this material ) So, the oils that spatter
and flow, will not dirty the inside of oven. If you will use the big wire grill; put a tray onto
one of the lower shelves for oils not to be collected. Also put some water into it for
cleaning easiness.
Use 4th and 5th shelves while grilling and oil the grill for the ingredients that you will
grill not to stick to the grill.
16
Page 38

PART 5 : CLEANING AND MAINTENANCE OF YOUR OVEN
5. 1 CLEANING
Be sure that all control switches are off and your appliance cooled before cleaning
your oven. Plug off the appliance.
Control whether they are appropriate and recommended by the manufacturer before
using the cleaning materials on your oven. As they may damage the surfaces, do not
use caustic creams, abrasive cleaning powders, thick wire wool or hard tools. In case
the liquids that overflows around your oven burn, the enameled place may be
damaged. Immediately clean the overflew liquids.
Cleaning of Inside of Your Oven
Surely plug off the oven before starting cleaning.
The inside of enameled oven is cleaned in the best way when the oven is warm.
Wipe the oven with a soft cloth that had been hemmed in soapy water after each use.
Later wipe it with a wet cloth once more and then dry it. It may be required to use a
liquid cleaning material from time to time and make a complete cleaning. Do not clean
with dry and powder cleansers.
17
Page 39

Removal of oven door
18
1
To remove the oven door;
• Open the oven door(1).
• Open the saddle bracket up to end position(2).
• Close the door till it almost reaches to the full
closed position as shown in 3 figure and
rd
remove the door by pulling it towards yourself.
Saddle
bracket
2
3
Recessed
form
NOTE: To re-assemble the door follow the opposite
rules of removal.
!
Please pay attention that the recessed forms
should be positioned properly on the hinge
counterparts as shown on 2 figure.
nd
Page 40

Cleaning of Your Ovens Cover
19
In order to be able to clean the cover of your oven from inside and outside, use a glass
cleaner. Then rinse, dry it with a dry cloth. The cover can be pulled out for cleaning as shown
in the following figure.
* Open the cover completely.
* Pass the metal pin through the holes as shown on picture
* Do this process for both hinges.
* Lift up the cover slightly, pull towards the outside smoothly. The cover will completely
come out.
* Again place it into hinge holes while pinning the cover to its place.
Do not clean the ovens cover while the glass panels are hot. In case this measurement
is not taken, the glass panel may brake down. Contact to Authorized Service when
any problem occured.
Cleaning Vitroceramic Cooker
Before starting cleaning wait for Vitroceramic cooker completely cool down. Be sure that
cleaning material does not contain any particles which may cause to scratch glass.Use cream
or liquid detergent. Vitroceramic surface must be cleaned with cold water and dried with soft
cloth in a way that no cleaning material may be left. Use pallet provided with your product
for cleaning food or residues. Sweet type food must be cleaned right after they are spilled
before glass cools down. Steel cleaning material may damage Vitroceramic glass. Dust on
the surface must be cleaned with wet cloth. Color change on ceramic surfaces does not effect
functional structure and durability of Vitroceramic.
Color change is caused by not cleaning the residues, erosion due to casseroles and using
not appropriate cleaning materials and is not due to material change. Cleaning pallet must
always be used before applying chemicals. With this pallet you can clean even the smallest
dirt on the surface. Materials that are hard to clean like liquified plastic, oil and sweety materials
can be cleaned with pallet easily. Your pallet is dangerous because it is equipped with razor
therefore it must be kept away from chidren. Be careful not to scratch silicon adhesive placed
on the edges of the glass while using pallet.
5.2 MAINTENENCE
Change of Oven Lamp
The change of oven lamp must be done by authorized technician. The rating the ampoule
should be 230V, 25Watt, Type E14 before changing the lamp,the oven should be plugged
off and it should be cool.
18
Page 41

PART 6 : SERVICE AND TRANSPORT
20
6,1 Requirements Before Contacting to Service
If the oven does not operate;
The oven may be plugged off, there has been a blow-out. On models fitted with a
timer, time may not be regulated.
If the oven does not heat;
The heat may be not adjusted with ovens heater control switch.
If the interior lighting lamp does not light;
The electricity must be controlled.
It must be controlled whether the lamps are defective. If they are defective, you can
change them as following the guide.
Cooking ( if lower-upper part does not cook equally ) ;
Control the shelf locations, cooking period and heat values according to the manual.
Except these, if you still have any problem with your product, please call to the
Authorized Service.
6,2 Information Related to Transport
If you need any transport;
Keep the original case of product and carry it with its original case when needed to
be carried. Follow the transport signs on case.
Tape the cooker on upper parts, hats and heads and saucepan carriers to the
cooking panels.
Place a paper between the upper cover and cooking panel, cover the upper cover,
then tape it to the side surfaces of oven.
Tape cardboard or paper onto the front cover on interior glass of oven as it will be
suitable to the trays, for the wire grill and trays in your oven not to damage to the
ovens cover during transport.
Also tape the ovens covers to the side walls.
If it does not have the original case;
Take measure for the external surfaces (glass and painted surfaces) of oven against
possible blows.
19
Page 42

52040782 11/11 R002
The symbol on the product or on its packaging indicates that
this product may not be treated as household waste. Instead it shall
be handed over to the applicable collection point for the recycling
of electrical and electronic equipment. By ensuring this product is
disposed of correctly, you will help prevent potential negative
consequences for the environment and human health, which could
otherwise be caused by inappropriate waste handling of this
product. For more detailed information about recycling of this
product, please contact your local city office, your household
waste disposal service or the shop where you purchased the
product.
 Loading...