

Page 1
VKG 511-570-571-581 FKG 311-370-371
NL Gebruiksaanwijzing
ES Instrucciones para el uso
IT Manuale d’uso
RUS Instructions for use
GB Instructions for use
DE Bedienungsanleitung
FR Mode d’emploi
DK Brugsanvisning
Page 2

2
GB
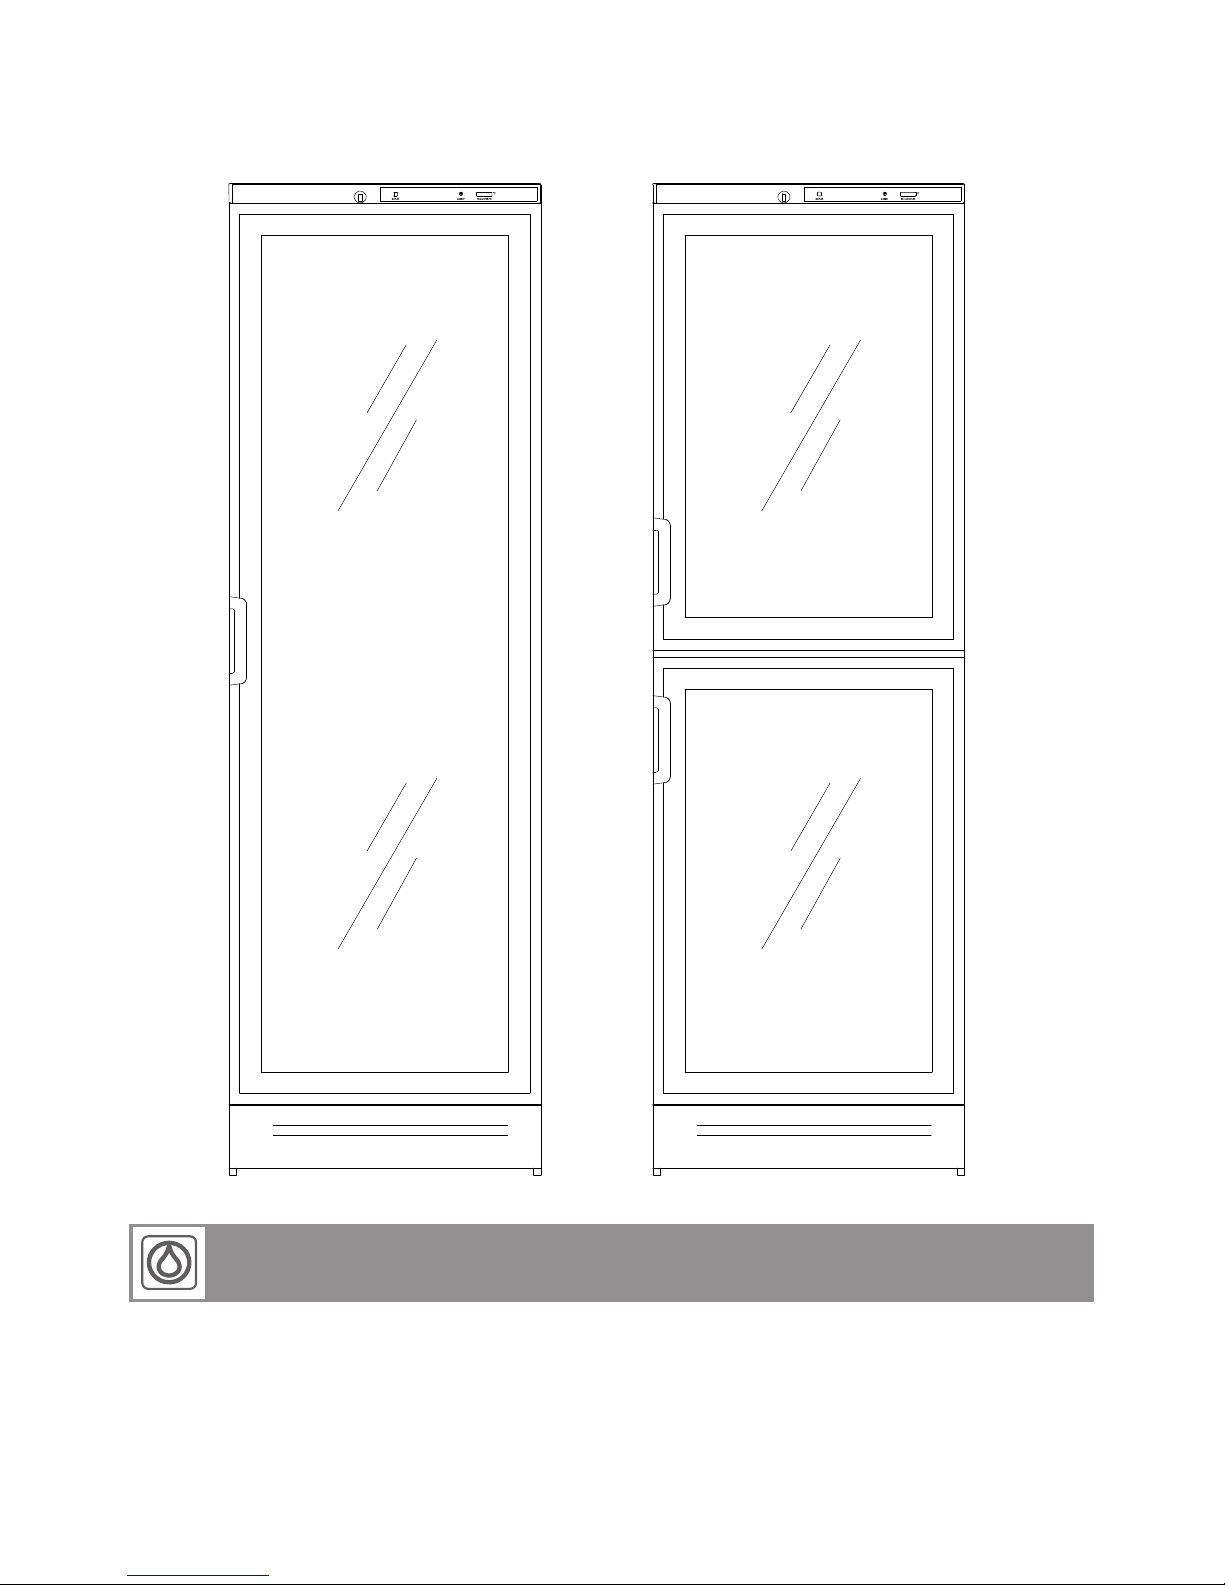
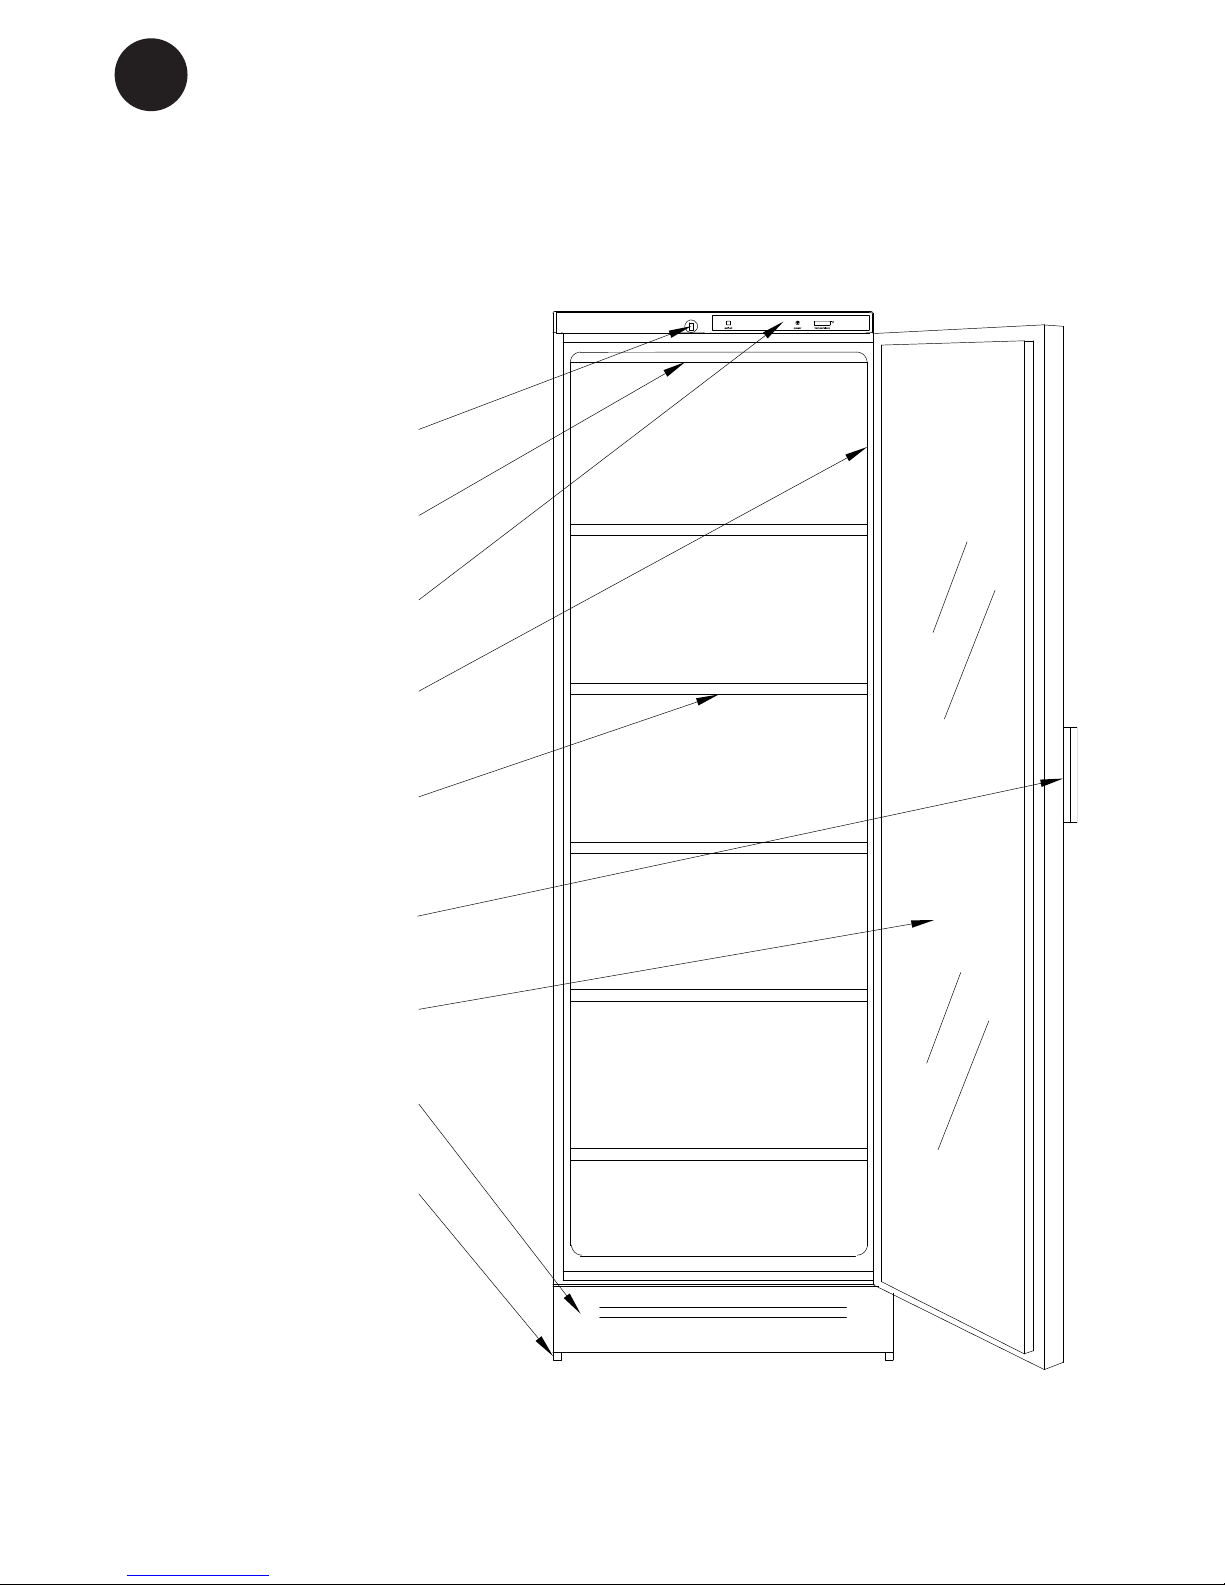
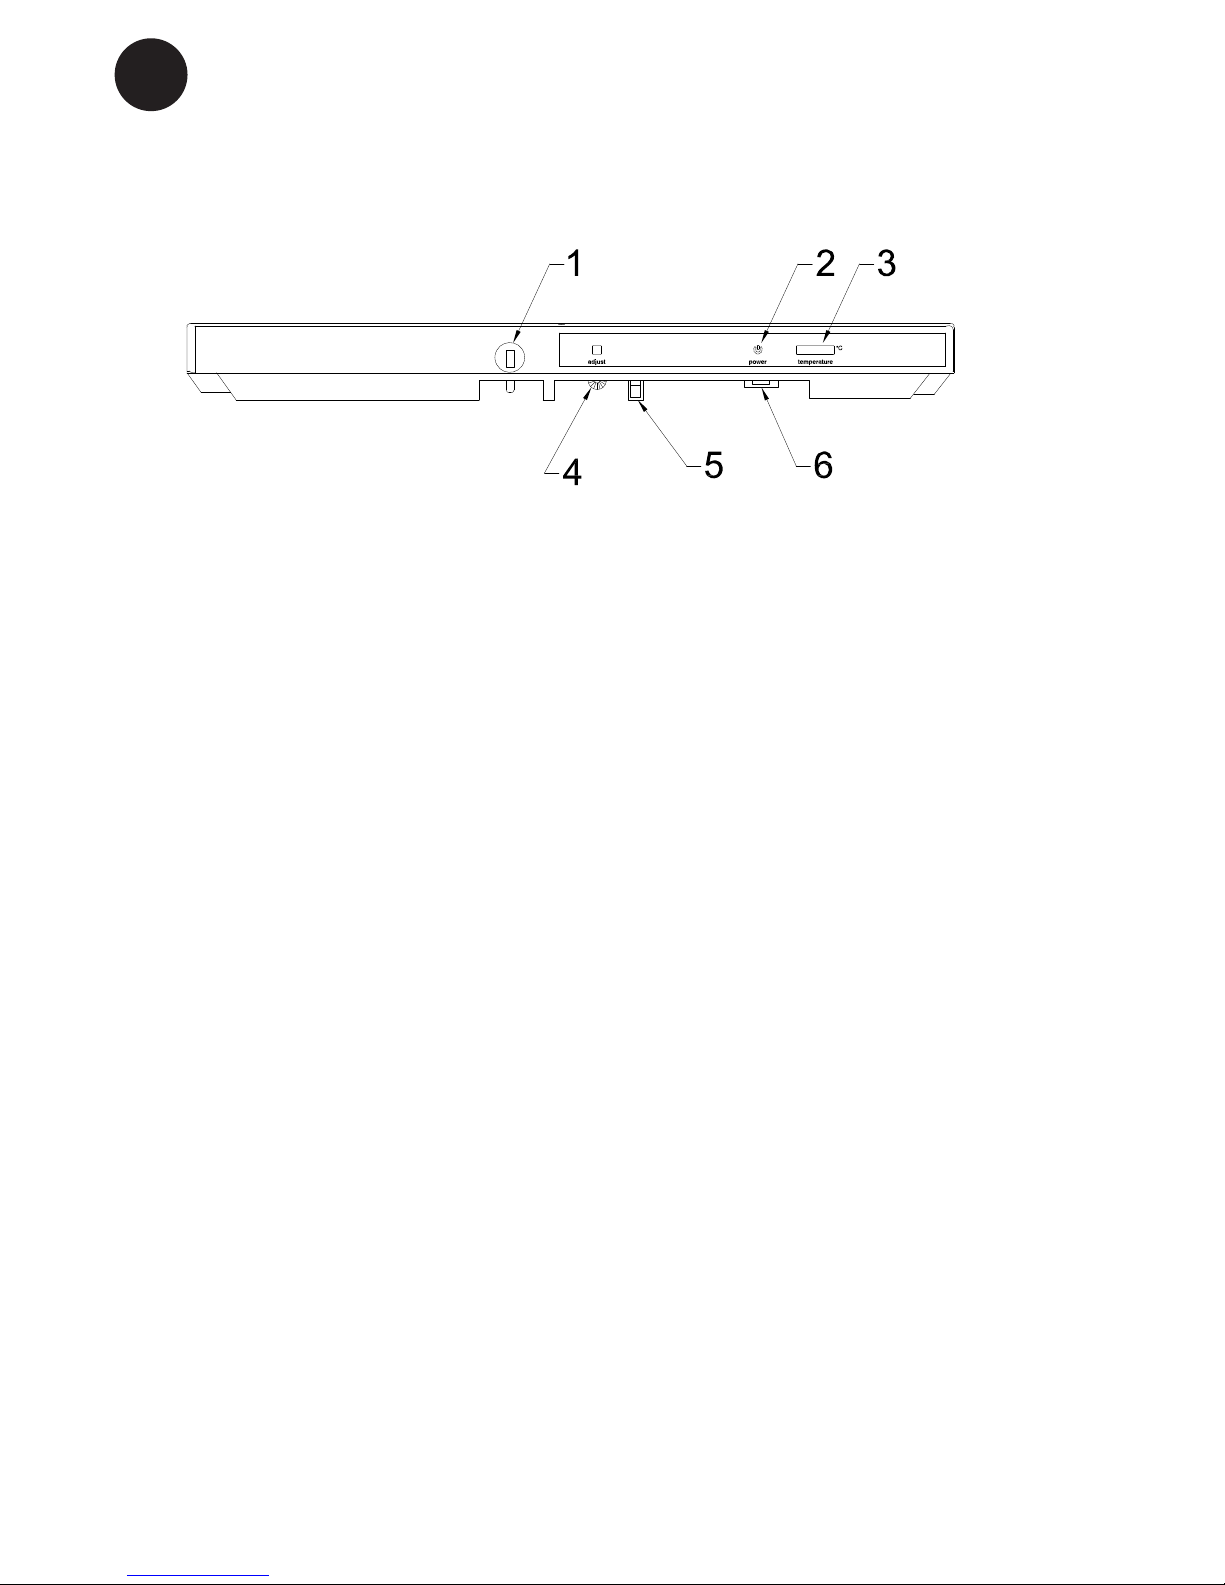
Get to know your wine or bottle cooler:
Lock
Top lighting
Control panel
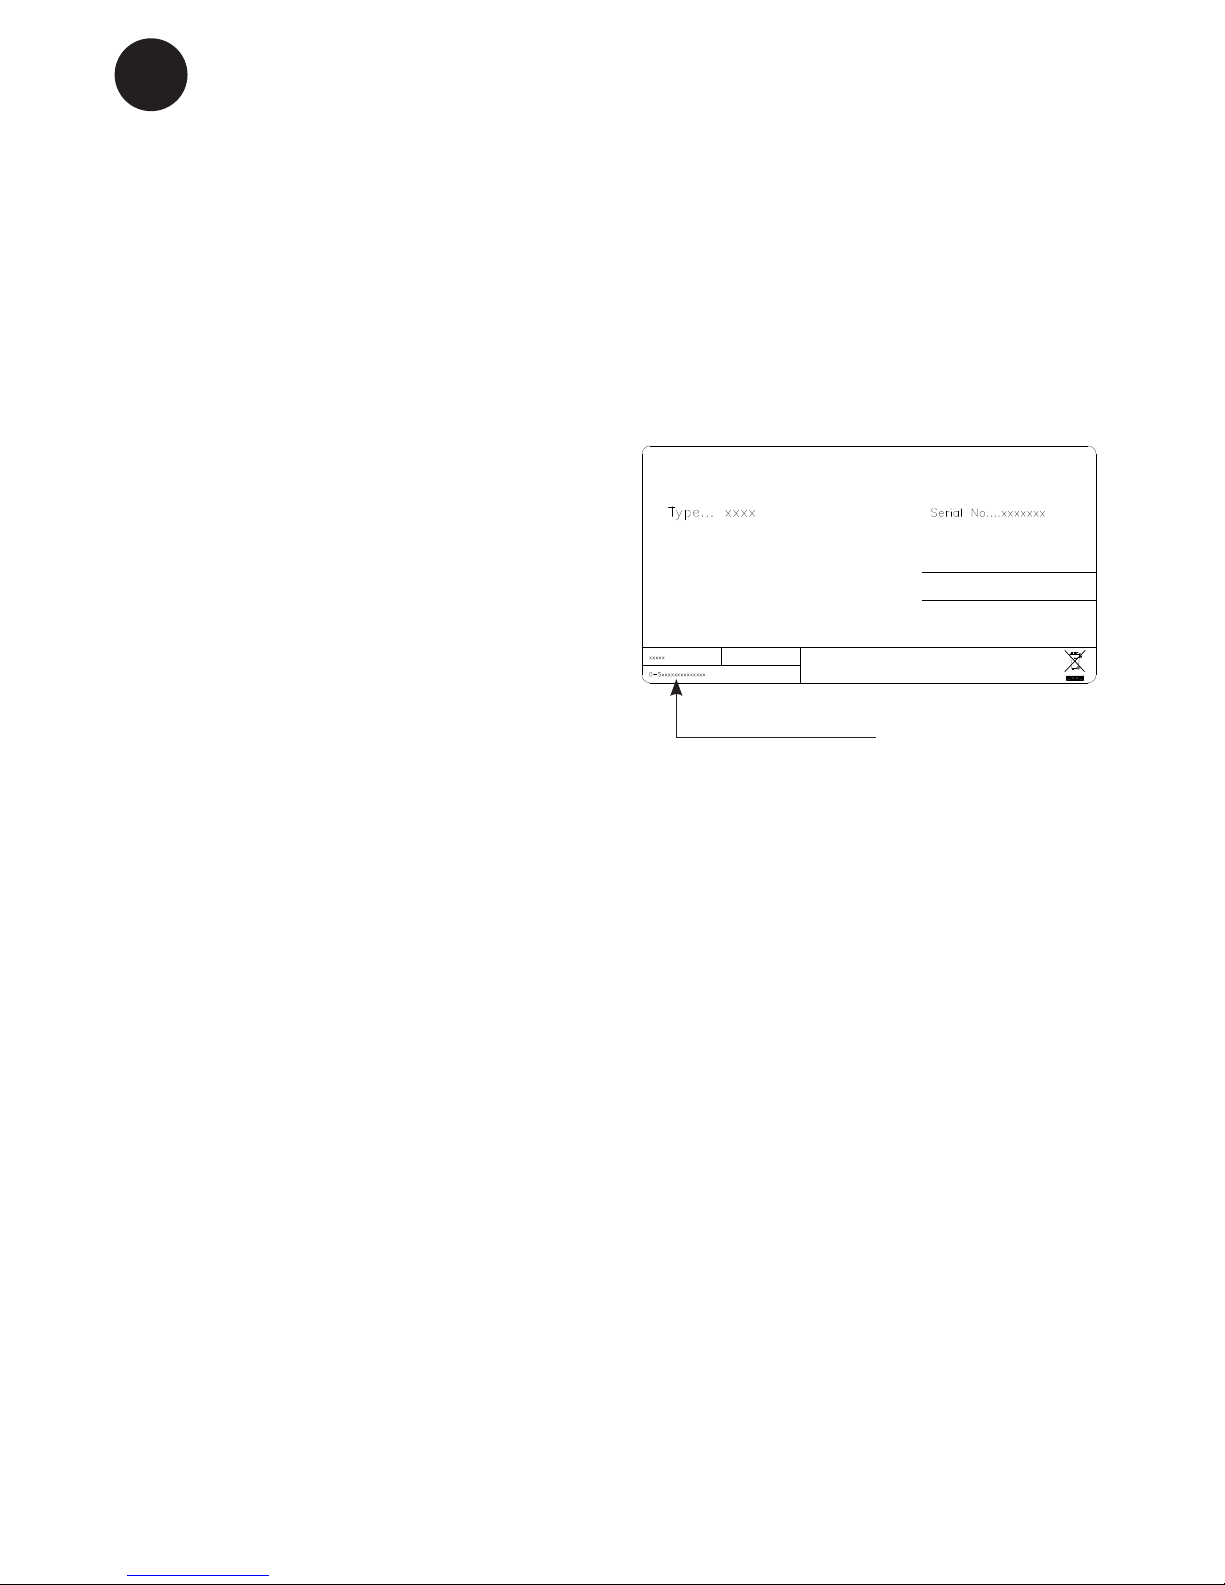
Rating plate
Shelf
Door handle
Glass door
Kick plate
Adjustable feet
Page 3

3
GB
In case this appliance contains hydrocarbon refrigerant please refer to guidelines
listed below.
As the appliance contains a ammable
refrigerant, it is essential to ensure that the
refrigerant pipes are not damaged.
Standard EN378 species that the room in
which you install your appliance must have
a volume of 1m³ per 8 g of hydrocarbon
refrigerant used in the appliances. This is
to avoid the formation of ammable gas/
air mixtures in the room where the appliance is located in the event of a leak in the
refrigerant circuit. The quantity of the refrigerant used in your appliance is indicated on
the rating plate.
WARNING: Keep ventilation openings in
the appliance’s cabinet or in
the built-in structure clear of
obstruction
WARNING: Do not use other mechanical
devices or other means to ac-
celerate the defrosting process
than those recommended by
the manufacturer
WARNING: Do not damage the refrigerant
system
WARNING: Do not use electrical appli-
ances inside the refrigerated
storage compartment, unless
they are of a type recommended by the manufacturer
WARNING: Do not expose the appliance
to rain
WARNING: This appliance is not intended
for use by young children or
inrm persons unless they have
been adequately supervised by
a responsible person to ensure
that they can use the appliance
safely. Young children should be
supervised to ensure that they
do not play with the appliance
● Always keep the keys in a separate place
and out of reach of children
● Before servicing or cleaning the appli-
ance, unplug the appliance from the
mains or disconnect the electrical power
supply
● If the supply cord is damaged, it must be
replaced by the manufacturer, its service
agent, or similarly qualied persons in
order to avoid a hazard
● Relevant for Australia: Supply cord
tted with a plug complies with AS/NZS
3112.
● Frost formation on the interior evaporator
wall and upper parts is a natural phenomenon. Therefore, the appliance should
be defrosted during normal cleaning or
maintenance
● Directions for replacing the illuminating
lamps are to be included in the instruction
● Please note that changes to the appli-
ance construction will cancel all warranty
and product liability
● WINE COOLER - VKG: This appliance
is intended to be used exclusively for the
storage of wine
CLASS 1 LED PRODUCT
Warning.
Page 4

4
GB
Contents
Get to know ............................................2
Warning ..................................................3
Before starting the appliance .................. 4
Maintenance ........................................... 4
Has the appliance stopped working?......5
Technical data.........................................5
Installation ..............................................5
Control panel ..........................................6
Reversing the door .................................7
Ajustment of the door .............................9
Mounting of lock. ....................................9
Warranty, spare parts ...........................10
Disposal ................................................ 11
Switch off the appliance and pull out the
plug when cleaning the cabinet.
Only use an unscented detergent when
clea ning the cabinet inside.
You may remove the top panel and wash it
when cleaning the cabinet inside.
The kick panel can be removed to faciliate a
vacuum-cleaning of the oor.
To make the cooling system work at its
optimum it is necessary from time to time
to clean the wire condensator and the compressor at the back of the cabinet by means
of a brush or a vacuum cleaner. Remember
to clean the drain.
Maintenance
Check that the cabinet is undamaged.
Please report any damage immediately to
your dealer. Wash the cabinet and inner
lining with a mild unscented detergent and
wipe it dry. Do not use abrasive scouring
powder, steel wool or similar.
Before starting the
appliance
Page 5

5
GB
Before calling a repairman, check that
● The plug is properly plugged into the wall
socket.
● The fuse is intact.
● The power has not been cut off.
● All controls are correctly set.
● Switch off the cabinet for 15 minutes (for
instance at the thermostat). Switch it on
again and after 5 minutes check whether
frost has formed on the evaporator.
● Do not open the cabinet unnecessaryly.
Has the appliance
stopped working?
Installation.
See drawings - page A - C.
Install the cabinet in a dry place and so that
it is not exposed to direct sunlight or any
other sour ce of heat.
Place the cabinet in a level position. This is
easily achieved by adjusting the adjustable
feet at the front edge of the base.
The cabinet may not rest against a wall on
its hinged side. When placing the cabinet
on a carpet or on a wooden oor you should
adjust it once more after some time as the
cabinet might settle in soft foundati ons.
If you want to build the appliance into a
cupboard you must consider 3 factors:
1. There must be space above the appliance in order to make the cooling system
work satisfactorily.
2. When the door is opened the appliance
takes up more room in the width and
therefore the door must either be placed
outside the cupboard or there must be
a space of at least 1,5 cm at the hinge
side.
3. The distance to the wall at the hinge side
must be of a sufcient size.
.
Furthermore it is possible to build together
two appeliance. If one of these is a wine
cabinet please observe a min. distance of
25mm between the cabinet in order to keep
cooling performance intact.
It is safest to place the earthed wall socket
abo ve the appliance and at least 2.0 m
above the oor. Any local installation rules
for appliances of this kind must be observed.
Technical data.
This device complies with relevant EU
directives including Low Voltage Directive
2006/95 EEC. and Electromagnetic Compatibility Directive 2004/108/EC
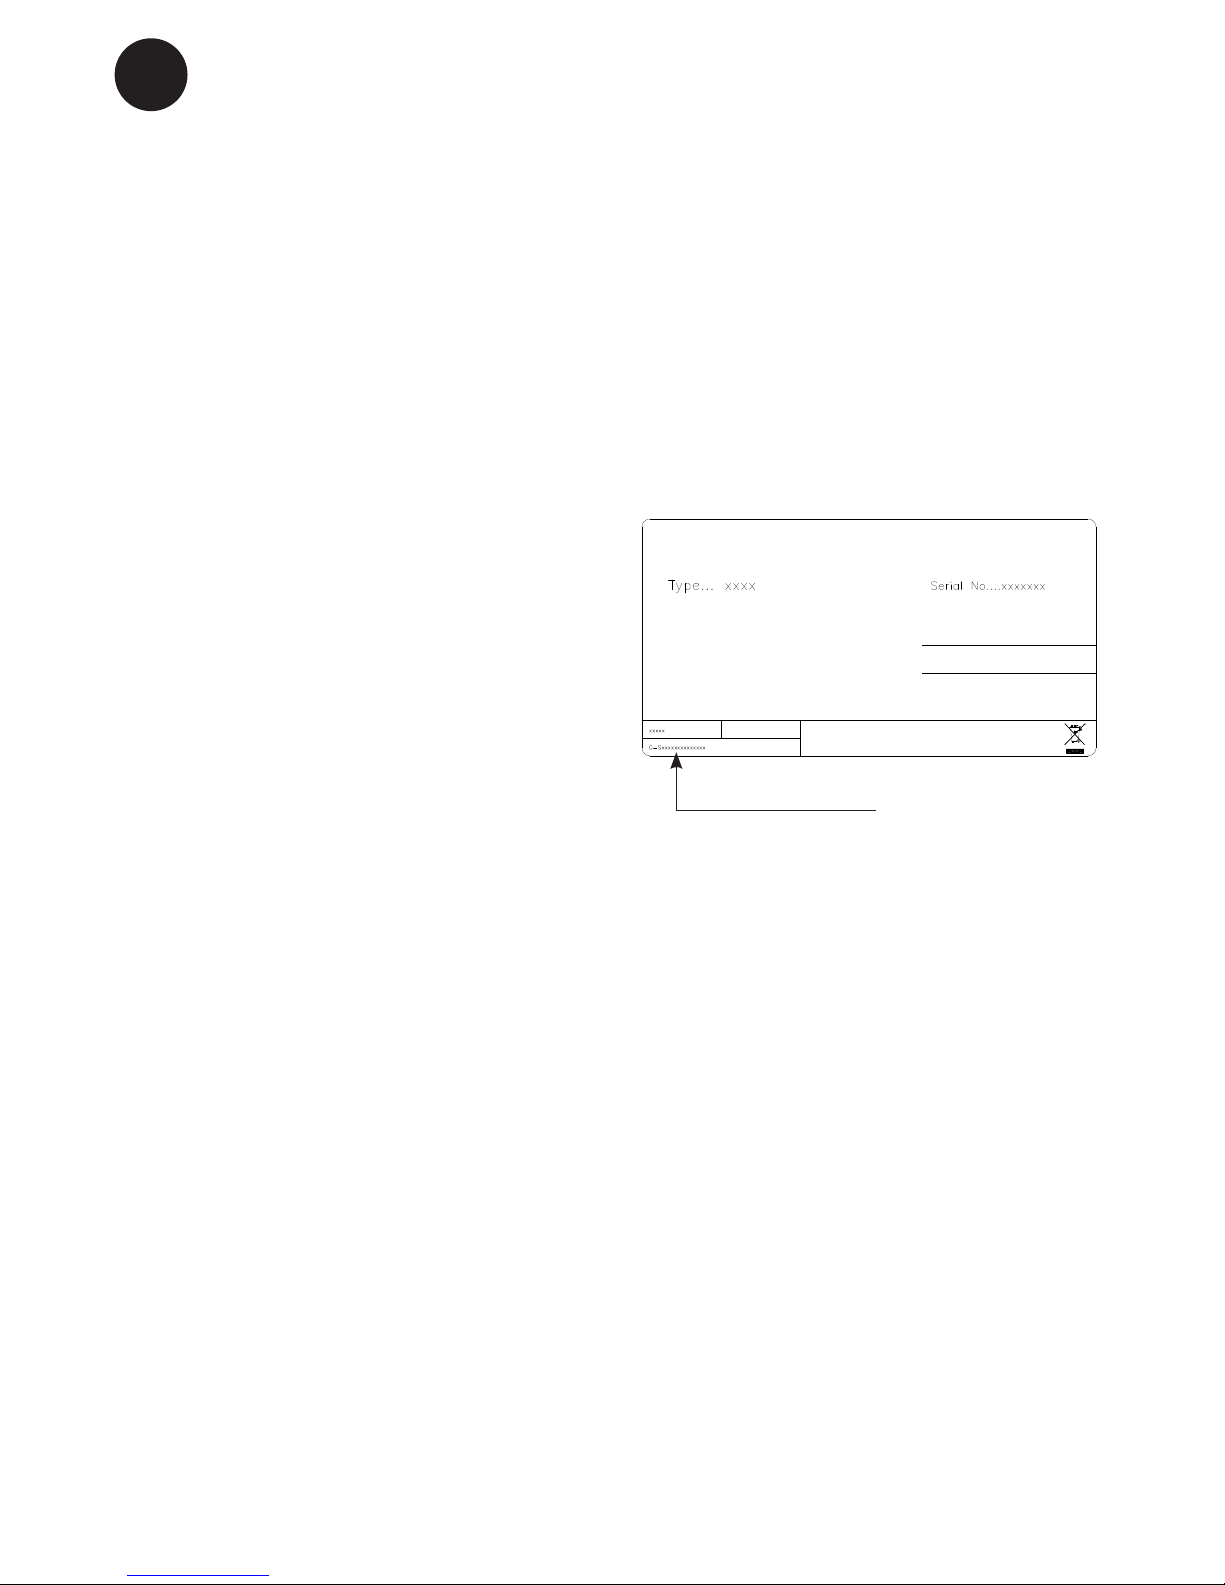
The rating plate provides various technical information as well as type and serial
number.
Page 6
6
GB
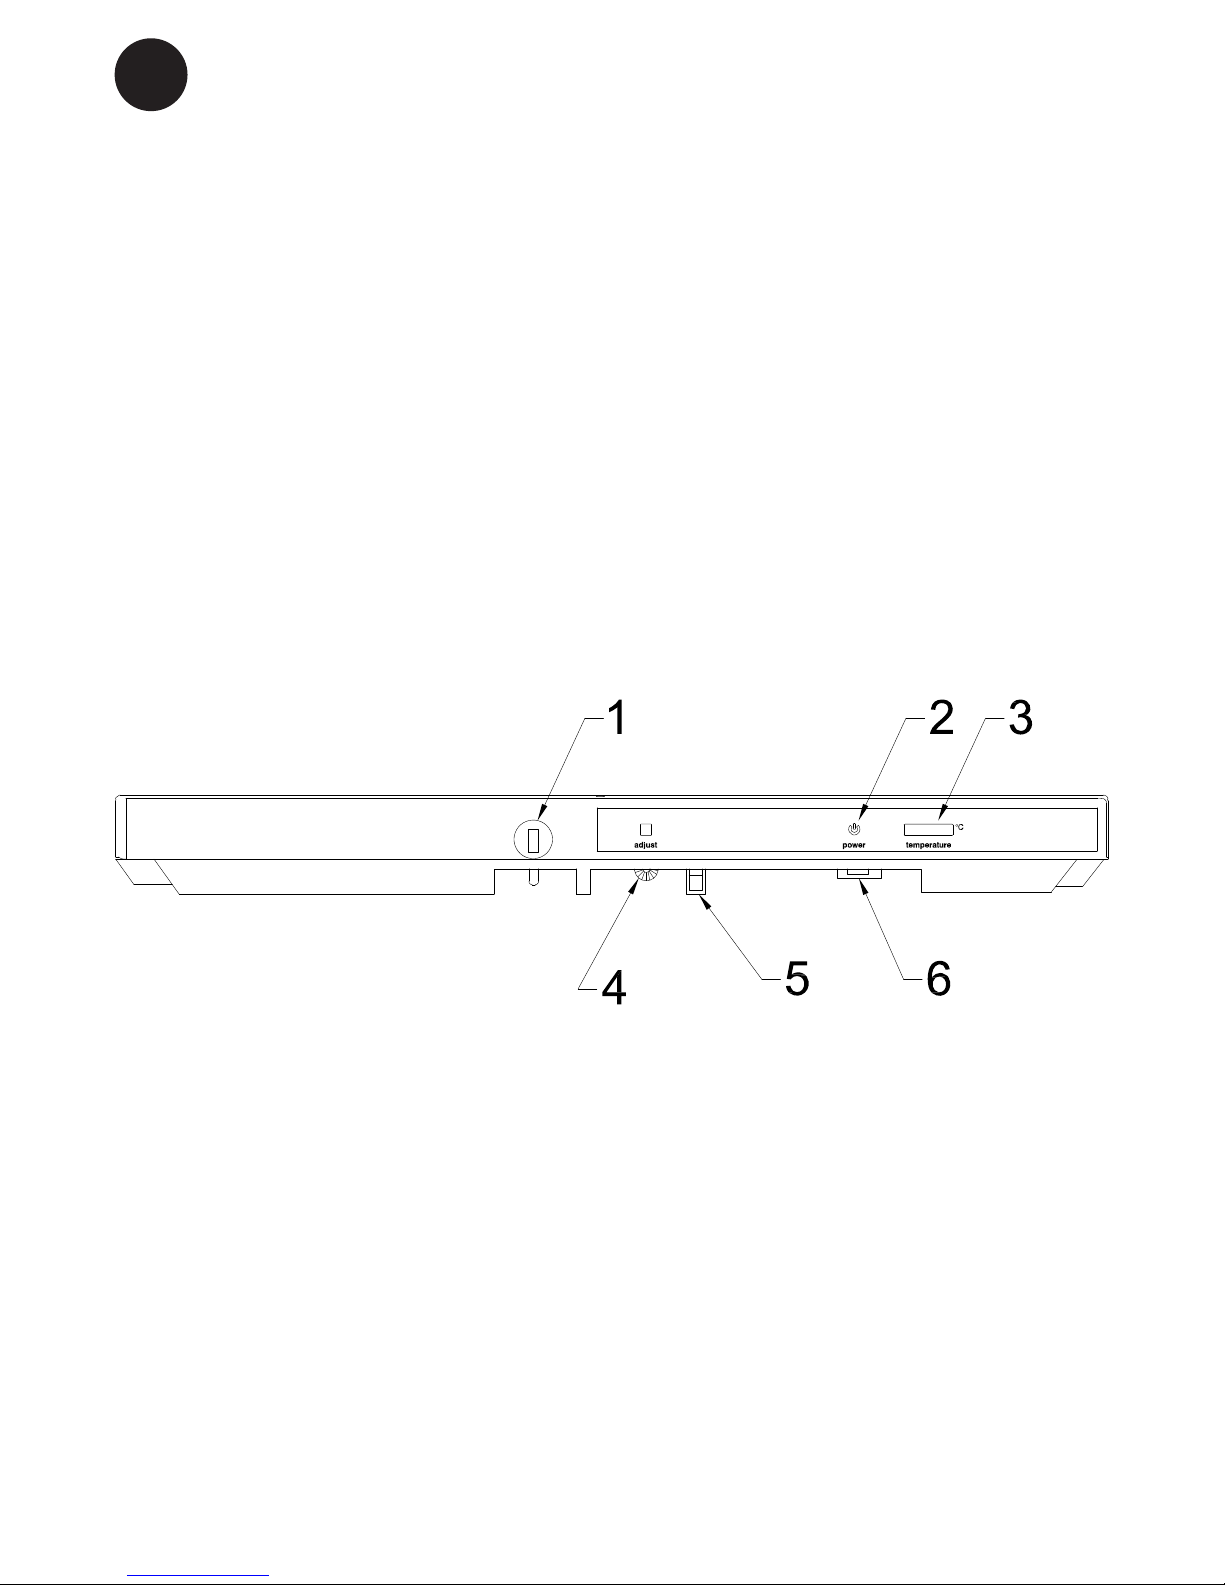
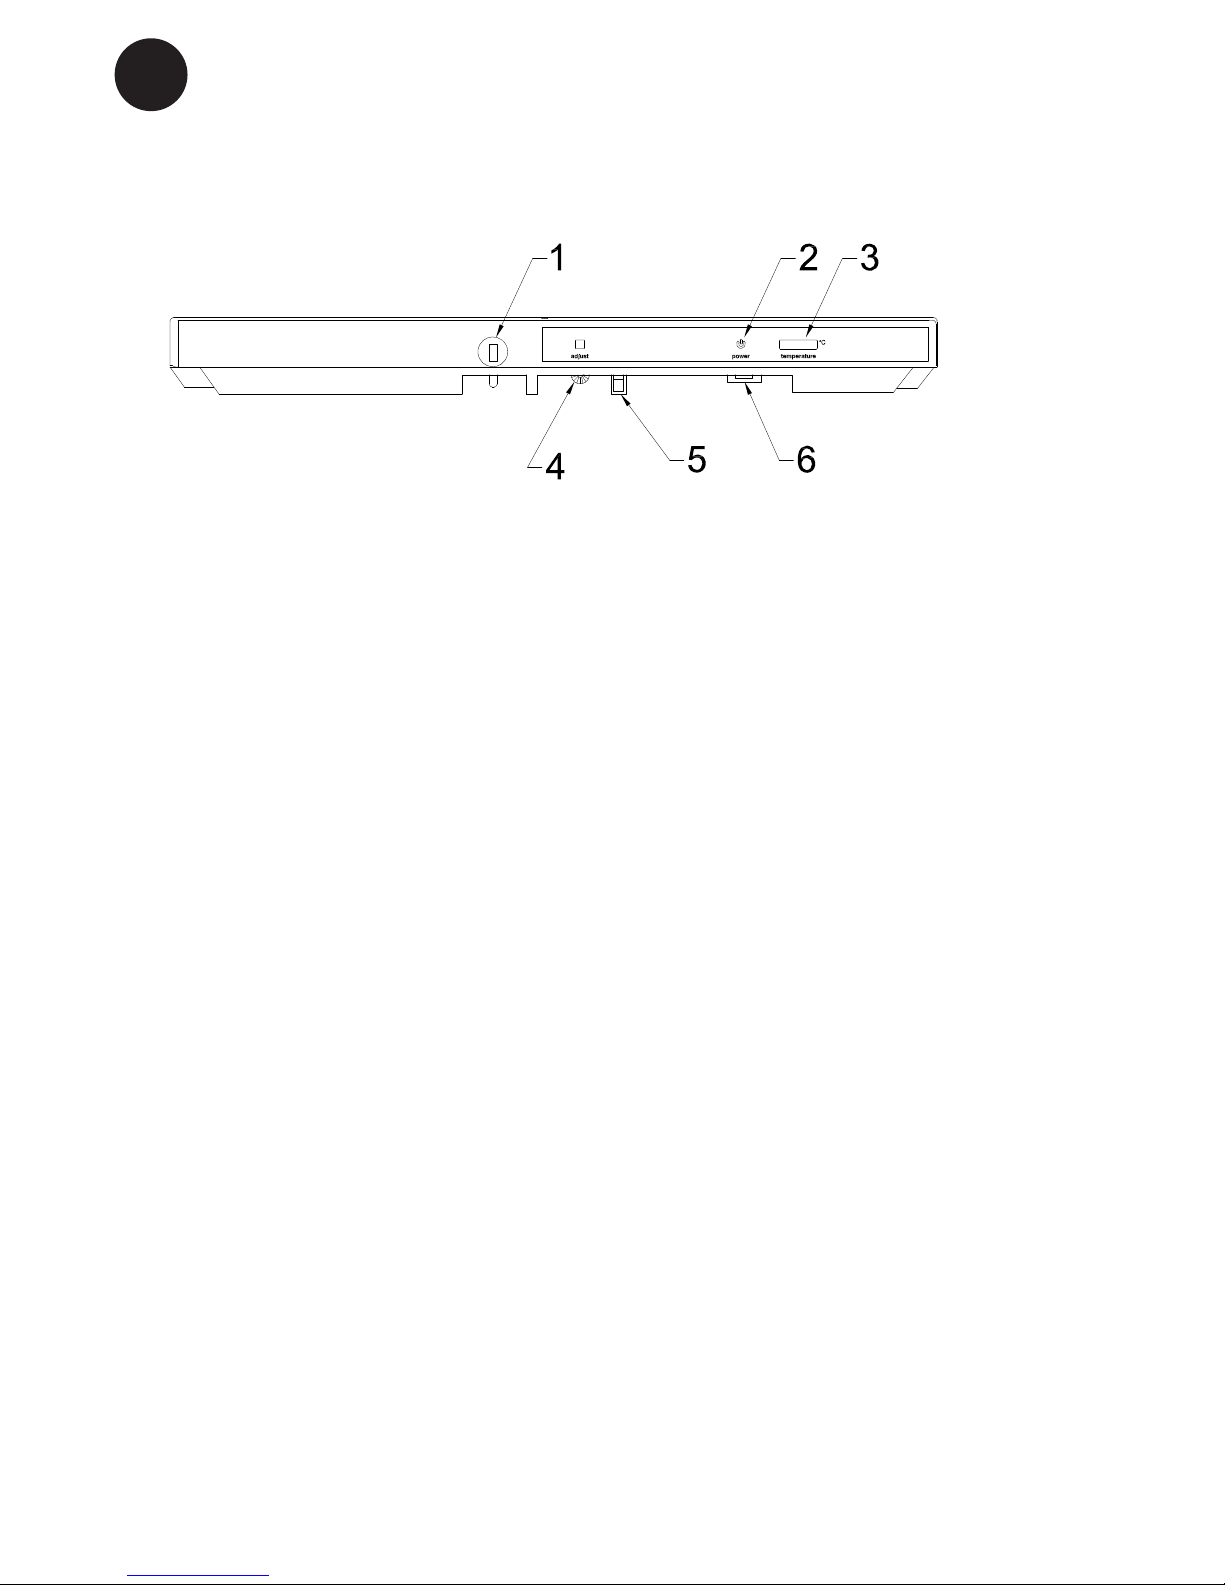
Control panel.
During a storm the electricity supply might
be cut off.
You should be aware of this when installing
the appliance in weekend cottages or else-
where where you would not immediately
observe that the power has been cut off.
Construction and details in the accessories
are subject to alter ation without previous
notice.
Connect the appliance to the socket outlet.
A green light indicates that the appliance
has been switched on.
The thermostat knob is adjustable from 0
(stop) to 7 (coldest). Find the position of
the therm ostat which gives you the desired
temperature. Start at position 4.
1. Lock (Not all Appliances has lock in top,)
2. Green light indicating power on
3. Thermometer
4. Thermostat button.
5. Door switch for internal fan
6. Light switch
The switch (6) on the top right of the control
panel is for turning the top lighting on and
off.
Page 7

7
GB
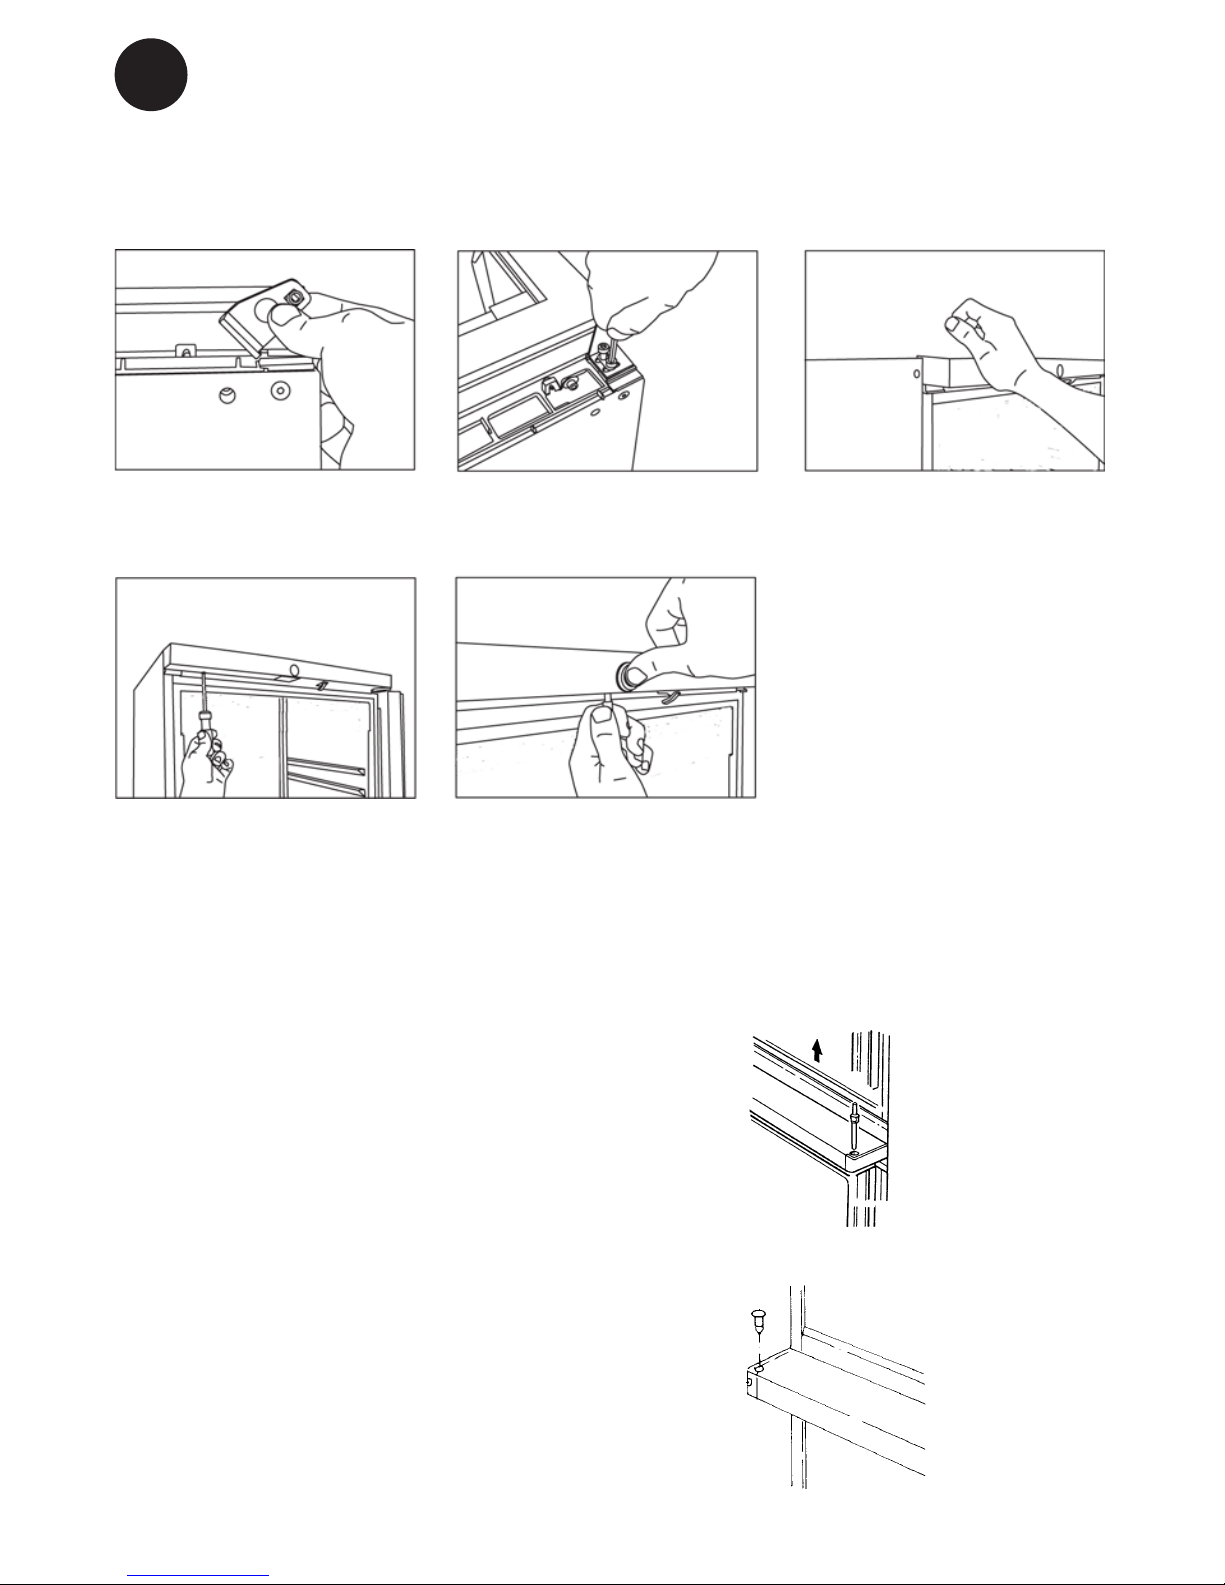
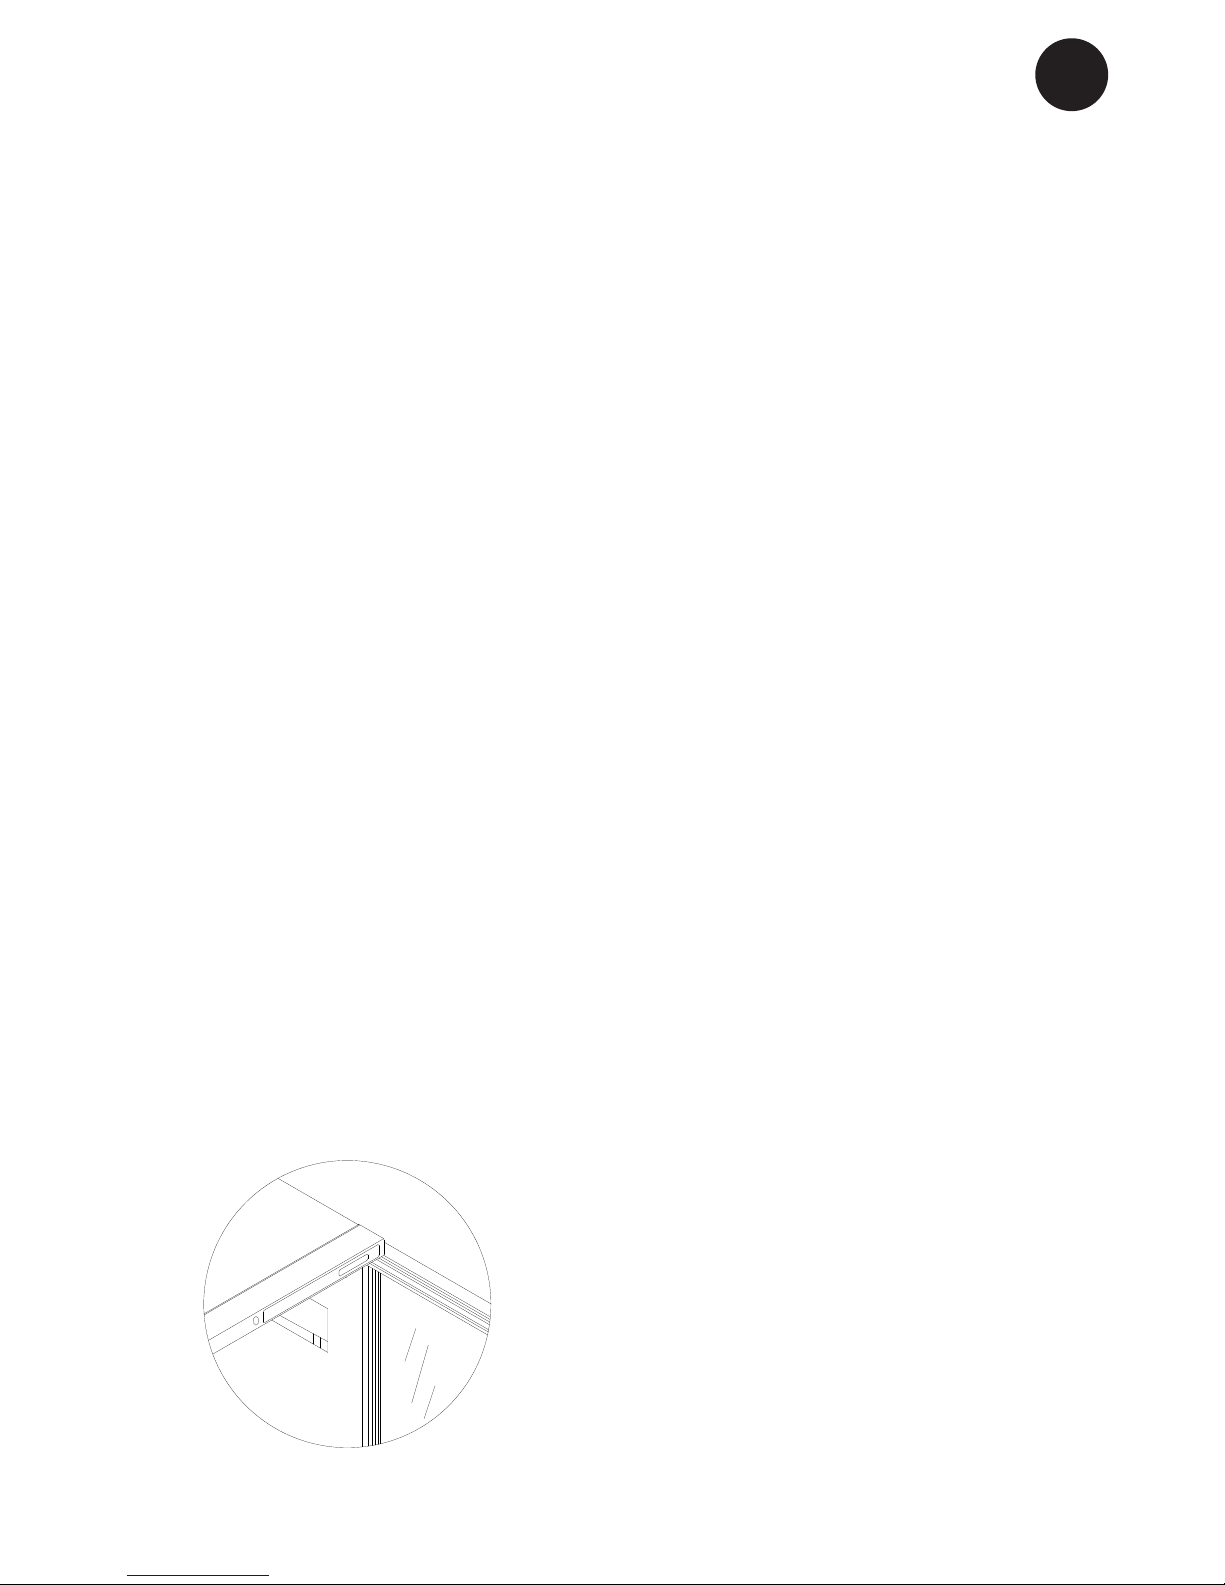
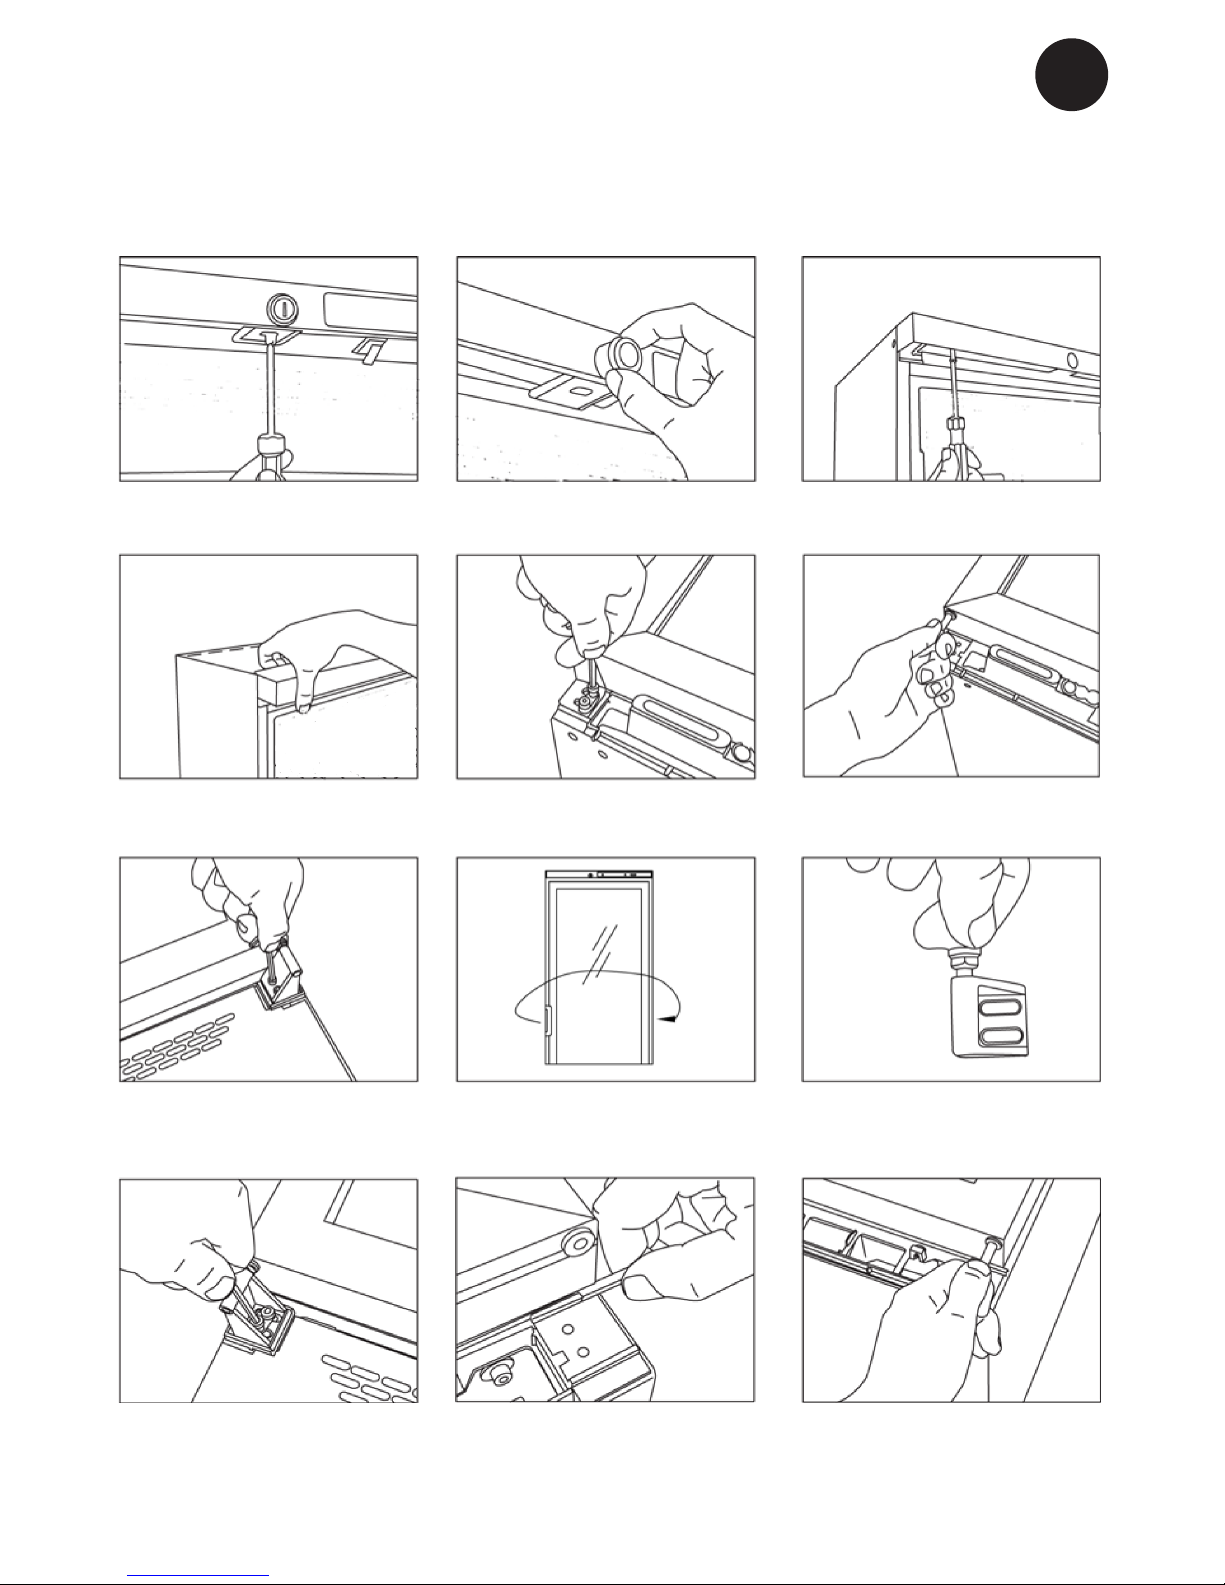
1. Remove the lock pin using a
at-headed screwdriver.
2. Remove the lock housing.
3. Loosen the top panel. Do not
remove the screws, just loosen
them.
4. Tilt the top panel forwards to
remove it (it is secured in tree
places)
5. Lay the appliance on its back
and remove the upper hinge,
using the hex key.
6. Pull the torsion spring out
of the door together with the
hinge.
7. Remove the bottom hinge
using the hex key.
8. Move the door handle to the
opposite side.
9. Move the hinge pin to the opposite side of the bottom hinge.
10. Ret the bottom hinge on
the opposite side.
11. Move the palstic door guard
to the opposite side.
12. Insert the hinge pin and
tosion spring into the the top of
the door on the opposite side.
Reversing the door.
(Not all appliance have lock.)
Page 8
8
GB
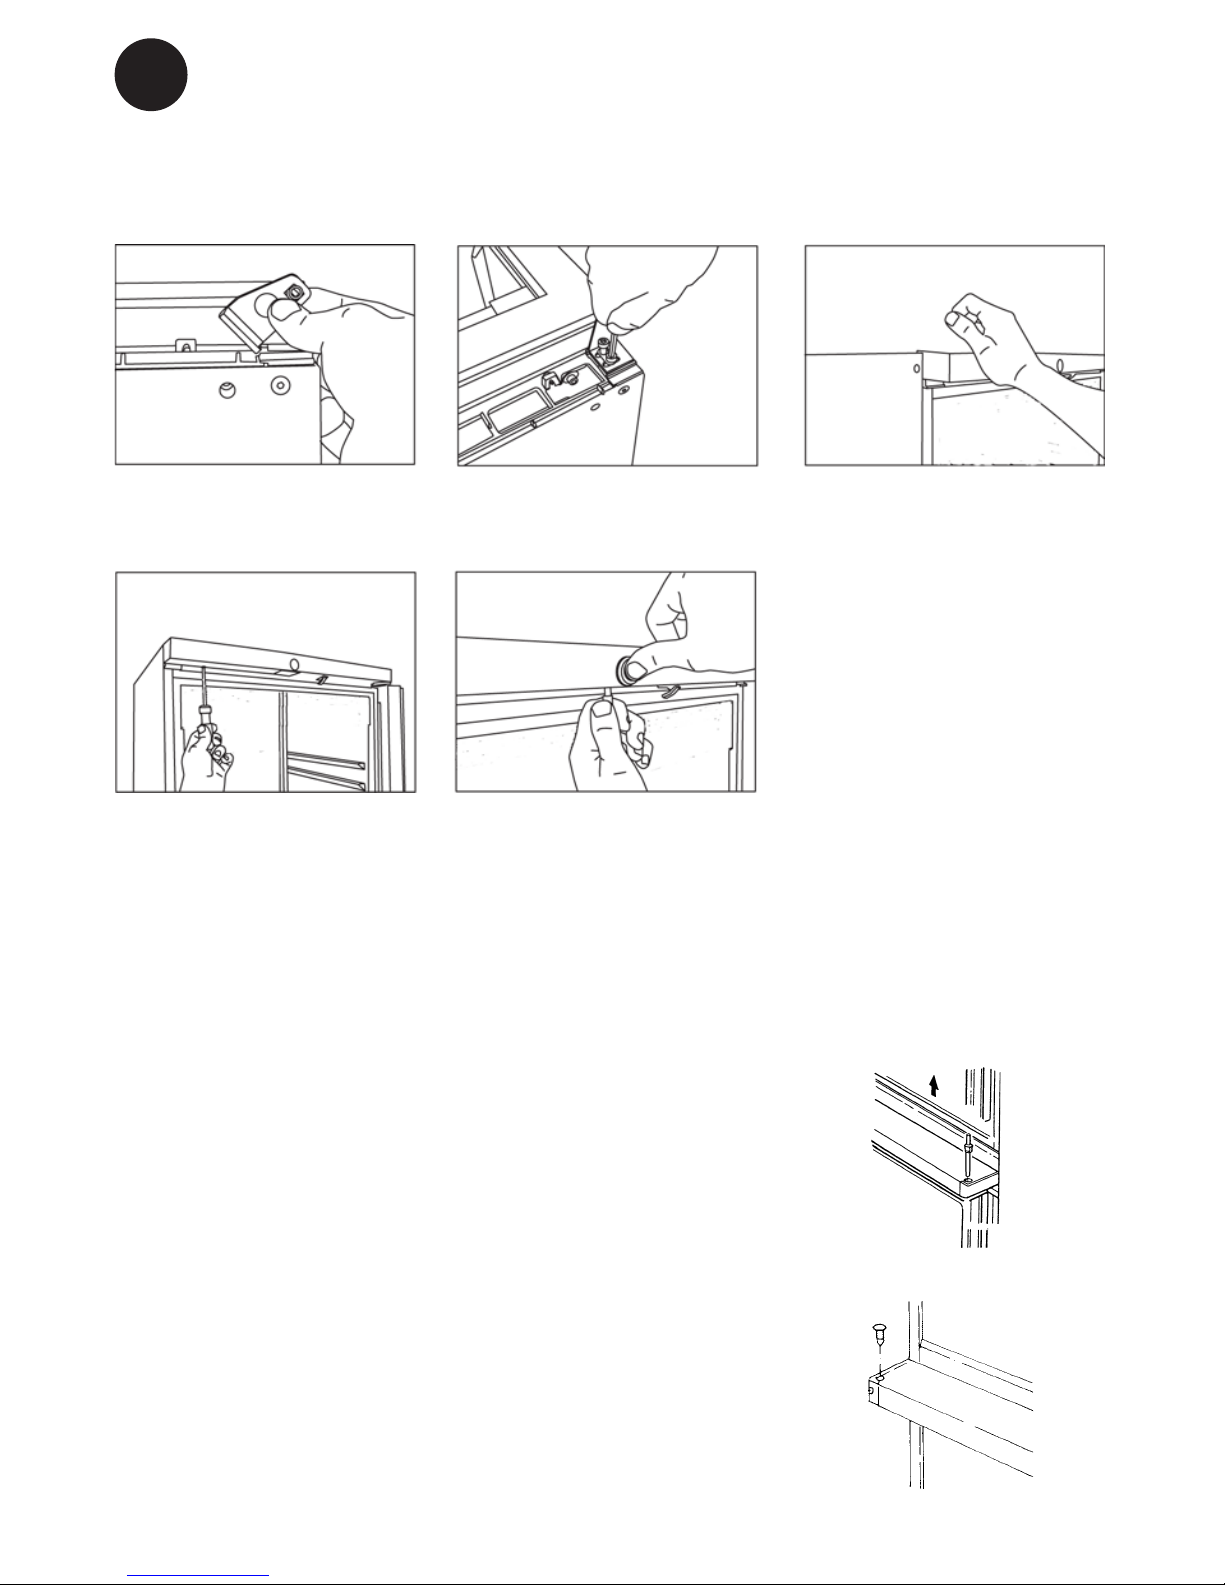
14. Secure the top hinge in
position.
15. Raise the appliance into
uppight possion. Click the top
panel into place (it is secured in
three places.)
16. Retighten the top panel
screws using a screwdriver.
17. Ret the lock housing and
lock pin.
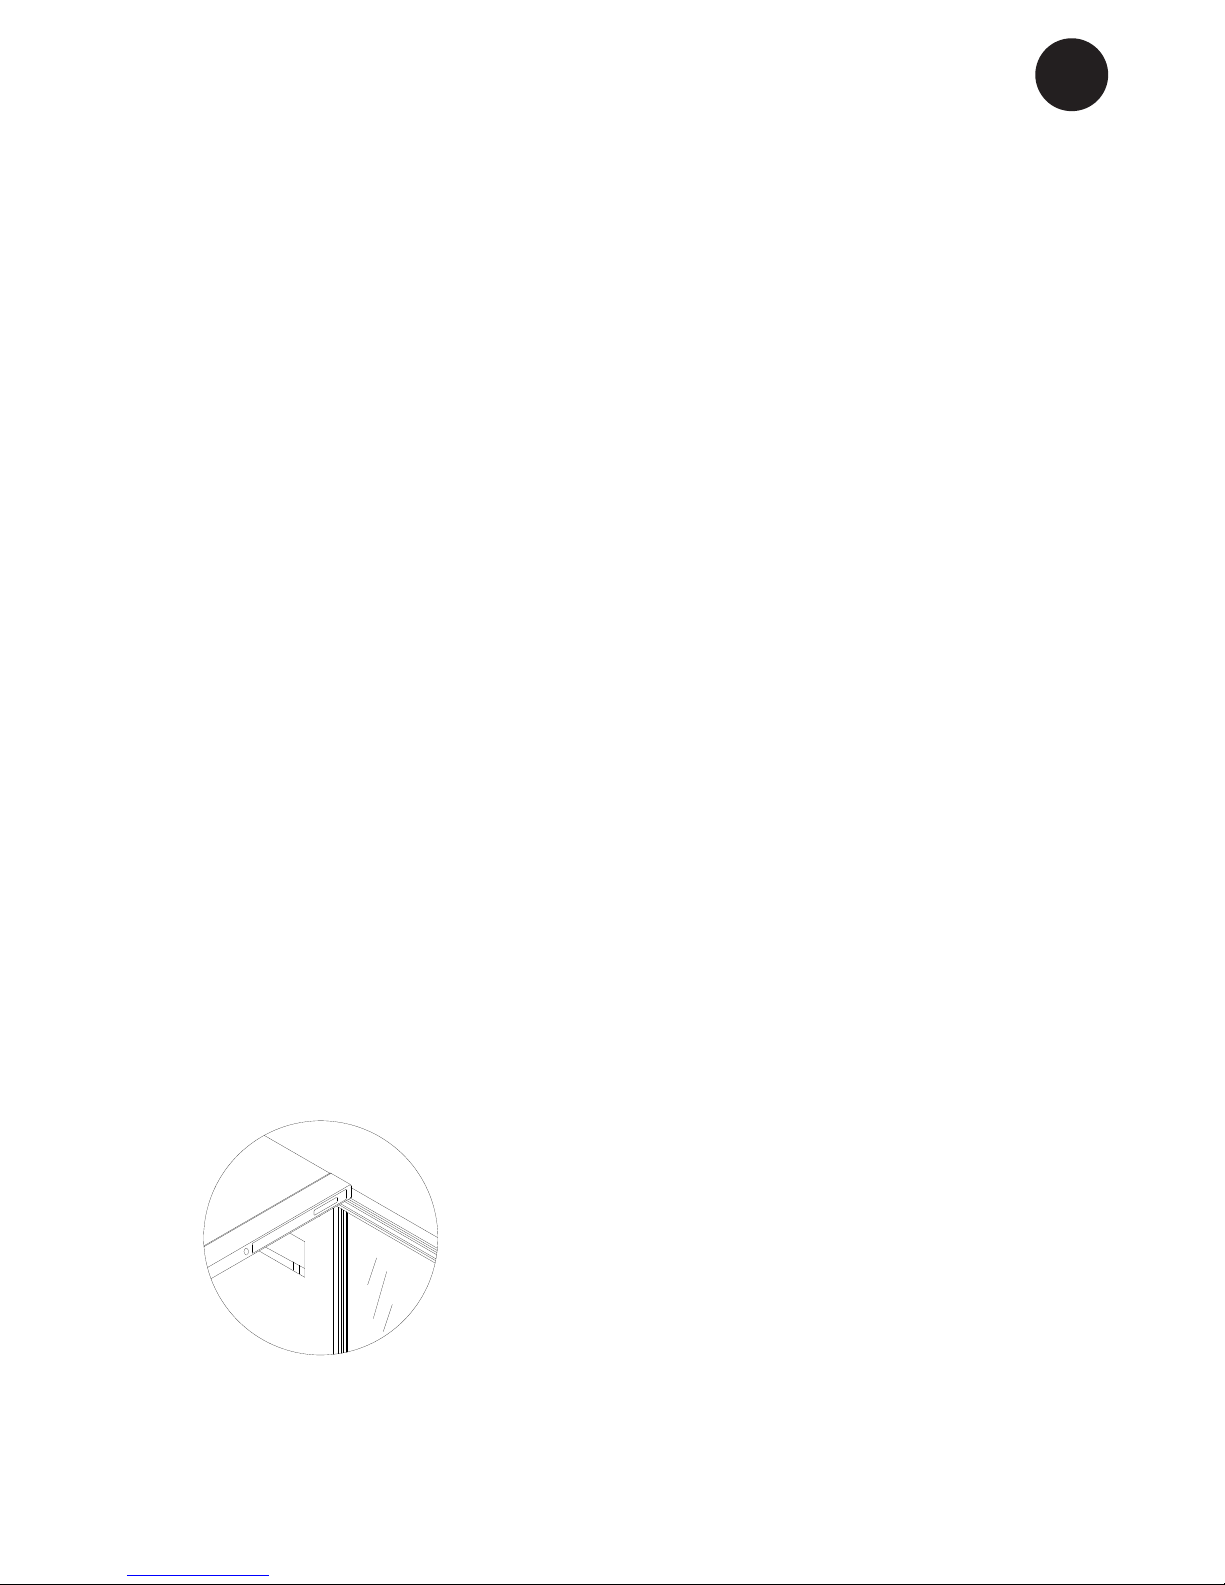
18. After reversing the door, it is important to check that the sealing strip provides a tight seal
all the way round. If it does not, carefully heat the strip all the way round using a hair dryer.
Then ease the strip outwards slightly so that it forms a tight seal against the cabinet. Be careful not to heat the strip so much that it melts!
● Dismount the middle hing pin and
bushing.
● Dismount the door
● Cover for hinge hole is dismount-
ed an remounted in opposite site.
Reversing the door for
appliance with 2 doors.
13. Fit the left-side top hinge (available as extra). Tighten the tosion
spring approx. 1/2 turn (anticlockwise
on left side, clockwise on rigth.)
Page 9
9
GB
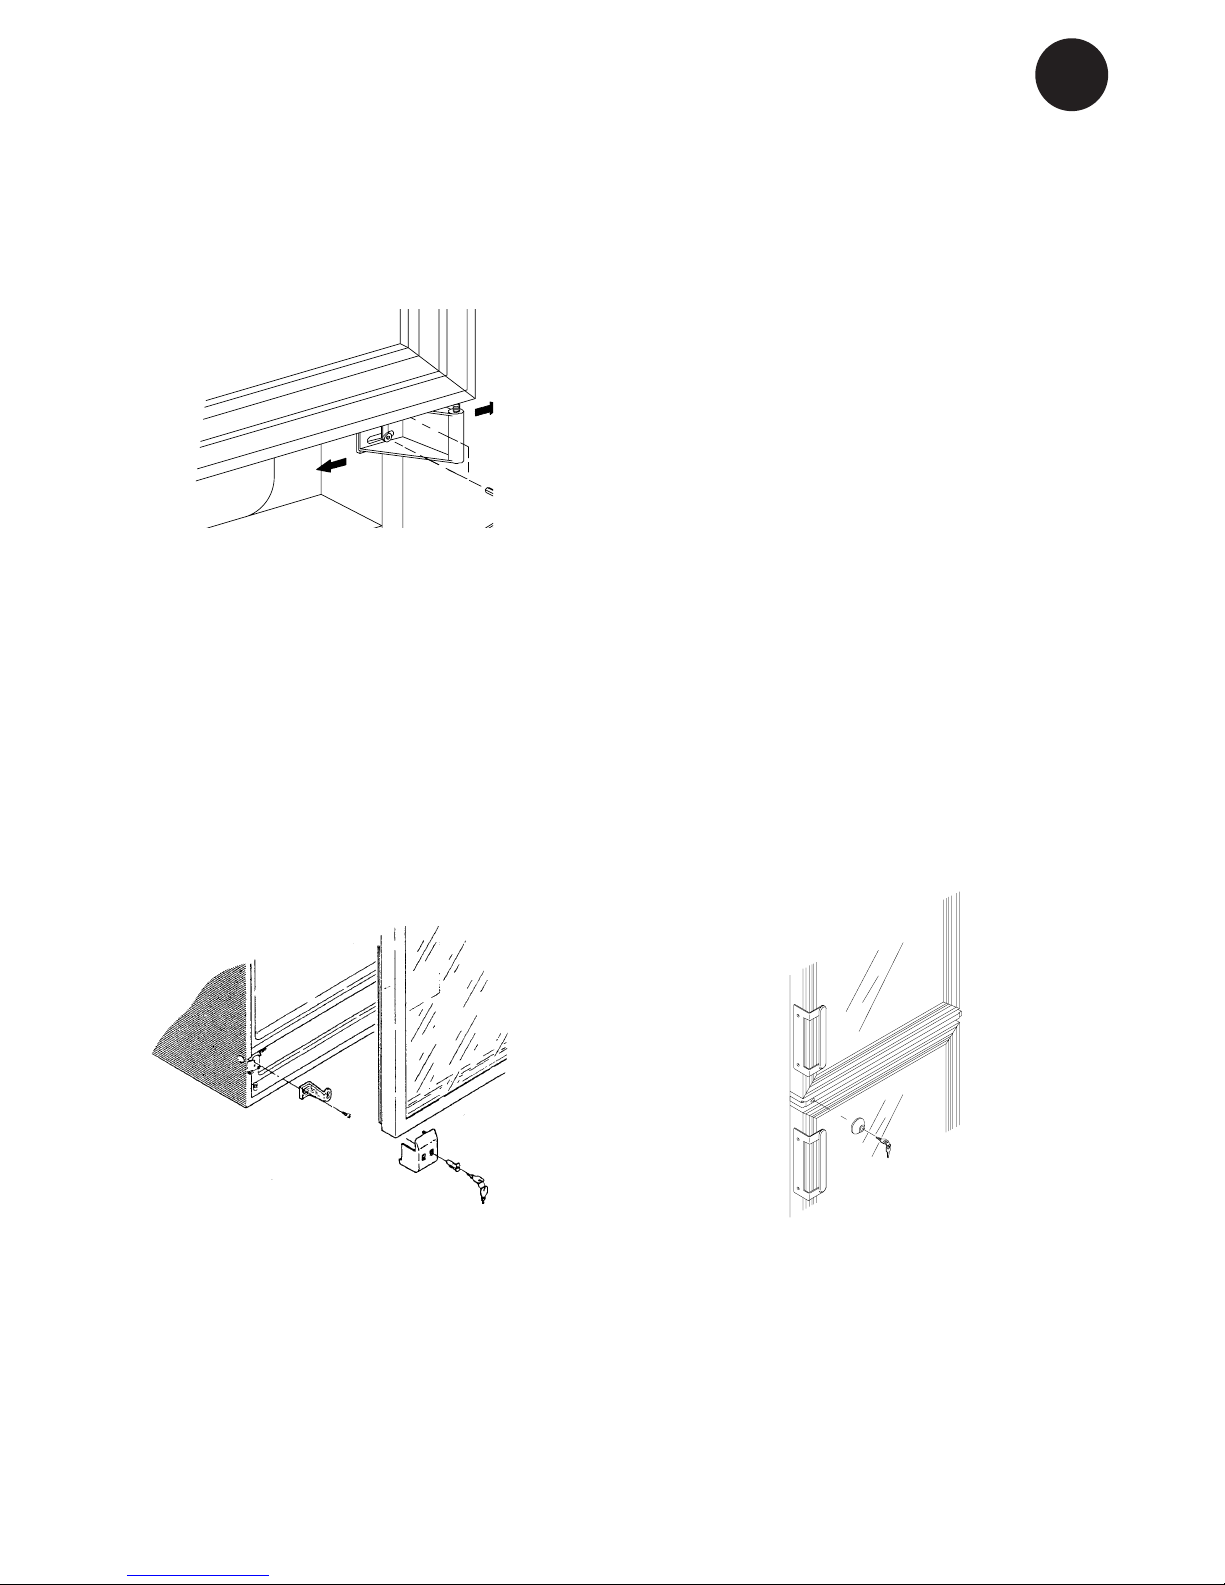
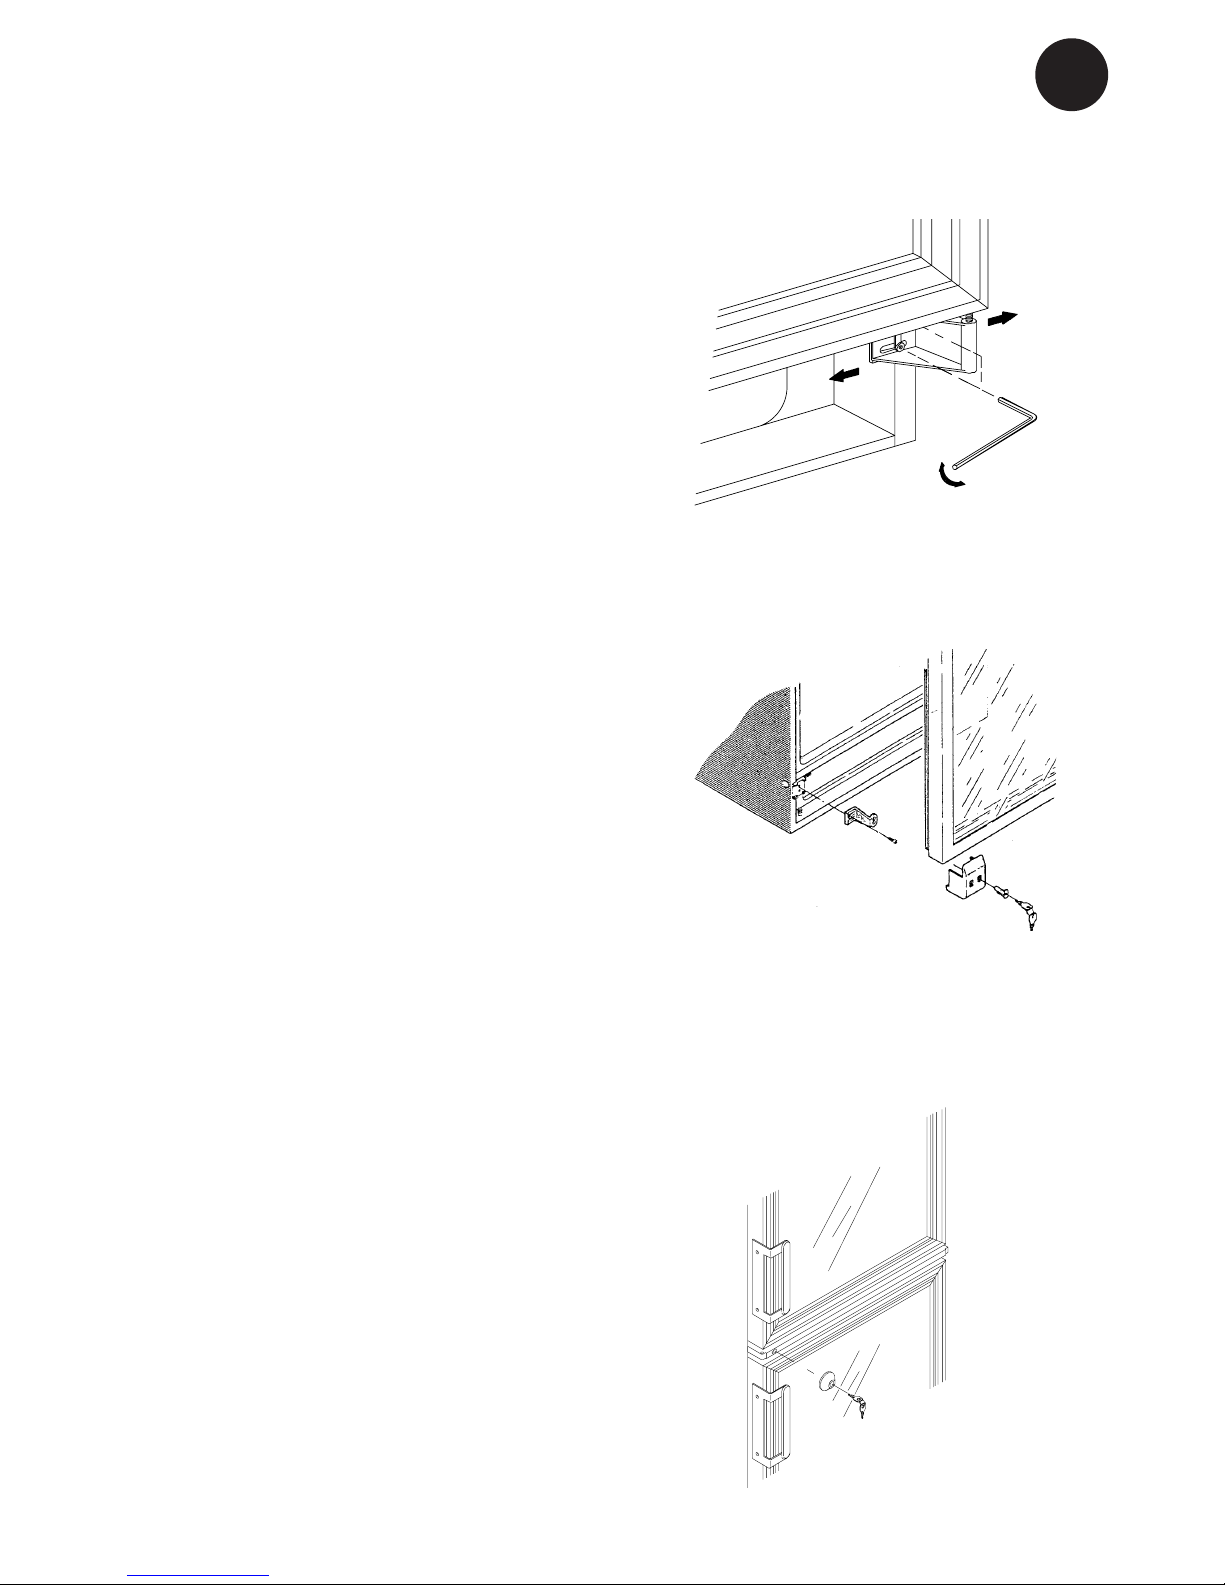
Mounting of lock for
appliance with 1 door.
(Optional extra.)
Adjustment of the door.
Mounting of lock for
appliance with 2 doors.
(Optional extra.)
Page 10
10
GB
Warranty, spare parts and service.
Warranty disclaimer
Faults and damage caused directly or
indirectly by incorrect operation, misuse,
insufcient maintenance, incorrect building,
installation or mains connection. Fire, accident, lightening, voltage variation or other
electrical interference, including defective
fuses or faults in mains installations.
Repairs performed by others than approved
service centres and any other faults and
damage that the manufacturer can sub-
stantiate are caused by reasons other than
manufacturing or material faults are not
covered by the warranty.
Please note that changes to the construction of the appliance or changes to the
component equipment of the appliance will
invalidate warranty and product liability, and
the appliance cannot be used lawfully. The
approval stated on rating plate will also be
invalidated.
Transport damage discovered by the buyer
is primarily a matter to be settled between
the buyer and the distributor, i.e. the dis-
tributor must ensure that such complaints
are resolved to the buyer’s satisfaction.
Before calling for technical assistance,
please check whether you are able to rectify
the fault yourself. If your request for assistance is unwarranted, e.g. if the appliance
has failed as a result of a blown fuse or
incorrect operation, you will be charged
the costs incurred by your call for technical
assistance.
Spare parts
When ordering spare parts, please state
the type, serial and product numbers of
your appliance. This information is given on
the rating plate. The rating plate contains
various technical information, including type
and serial numbers.
Product number.
Page 11
11
GB
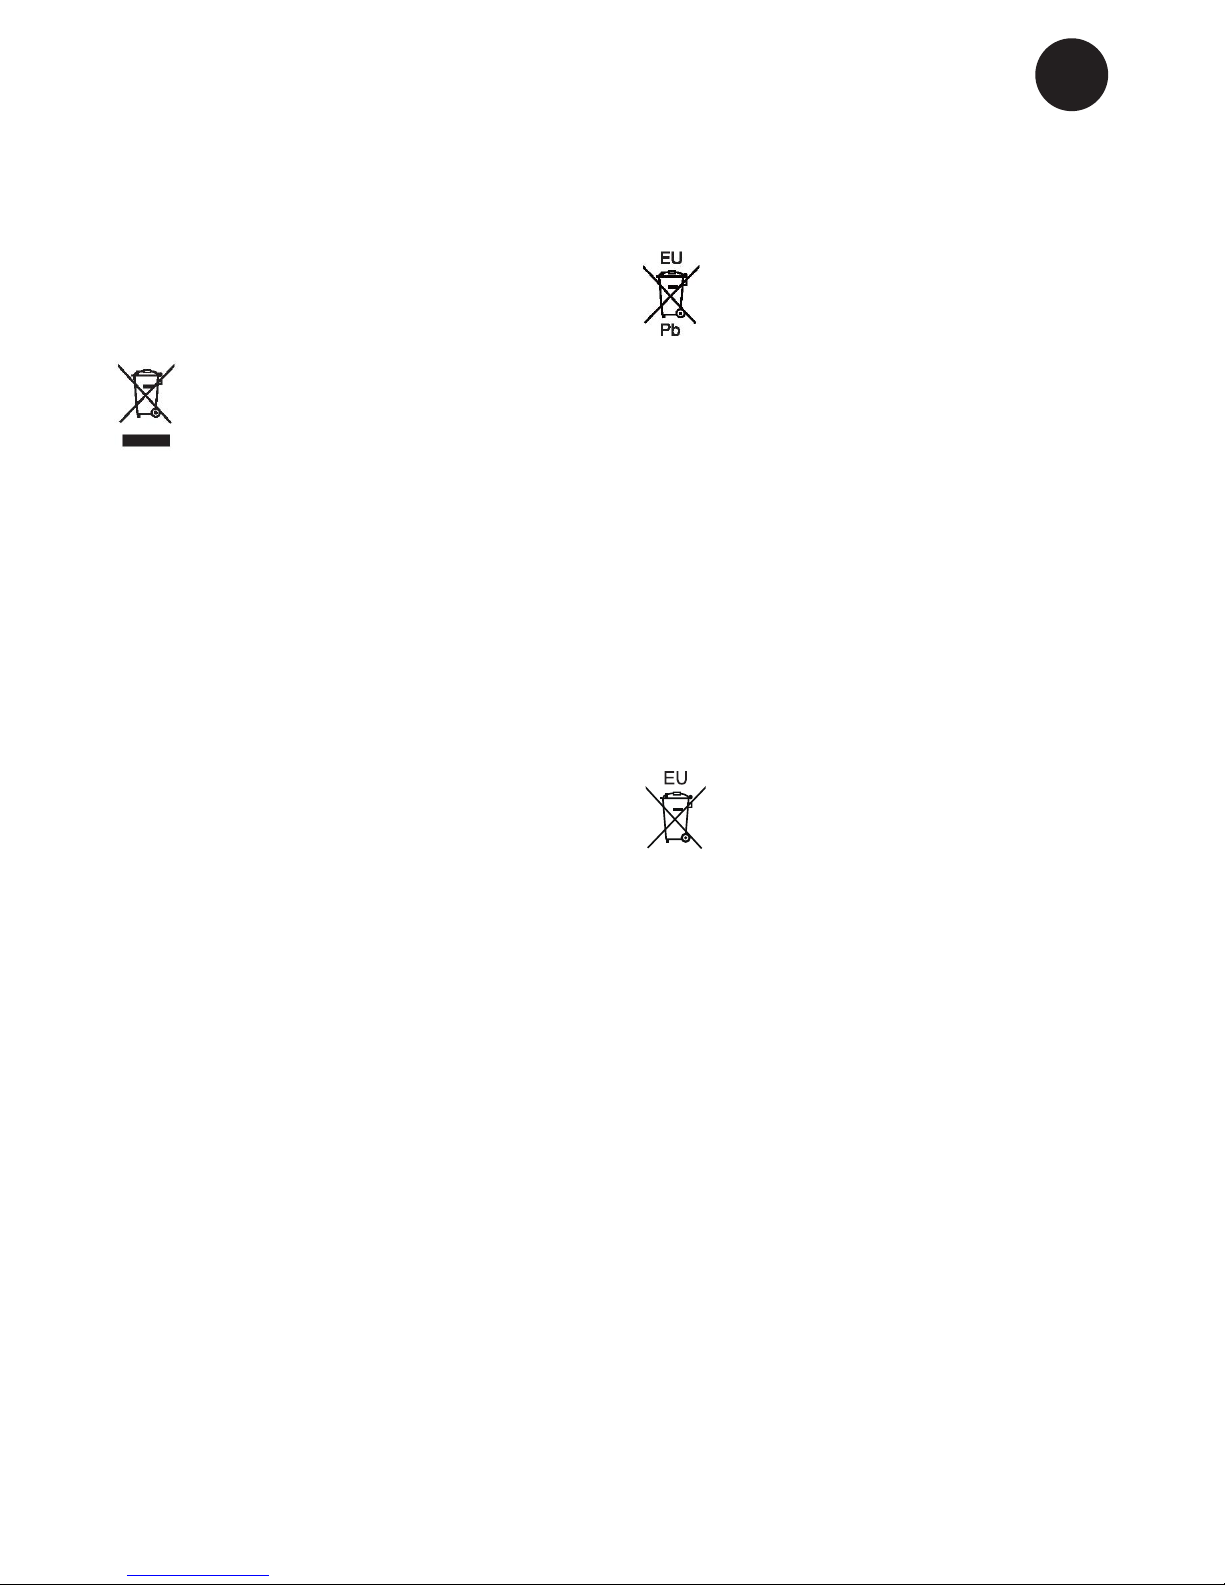
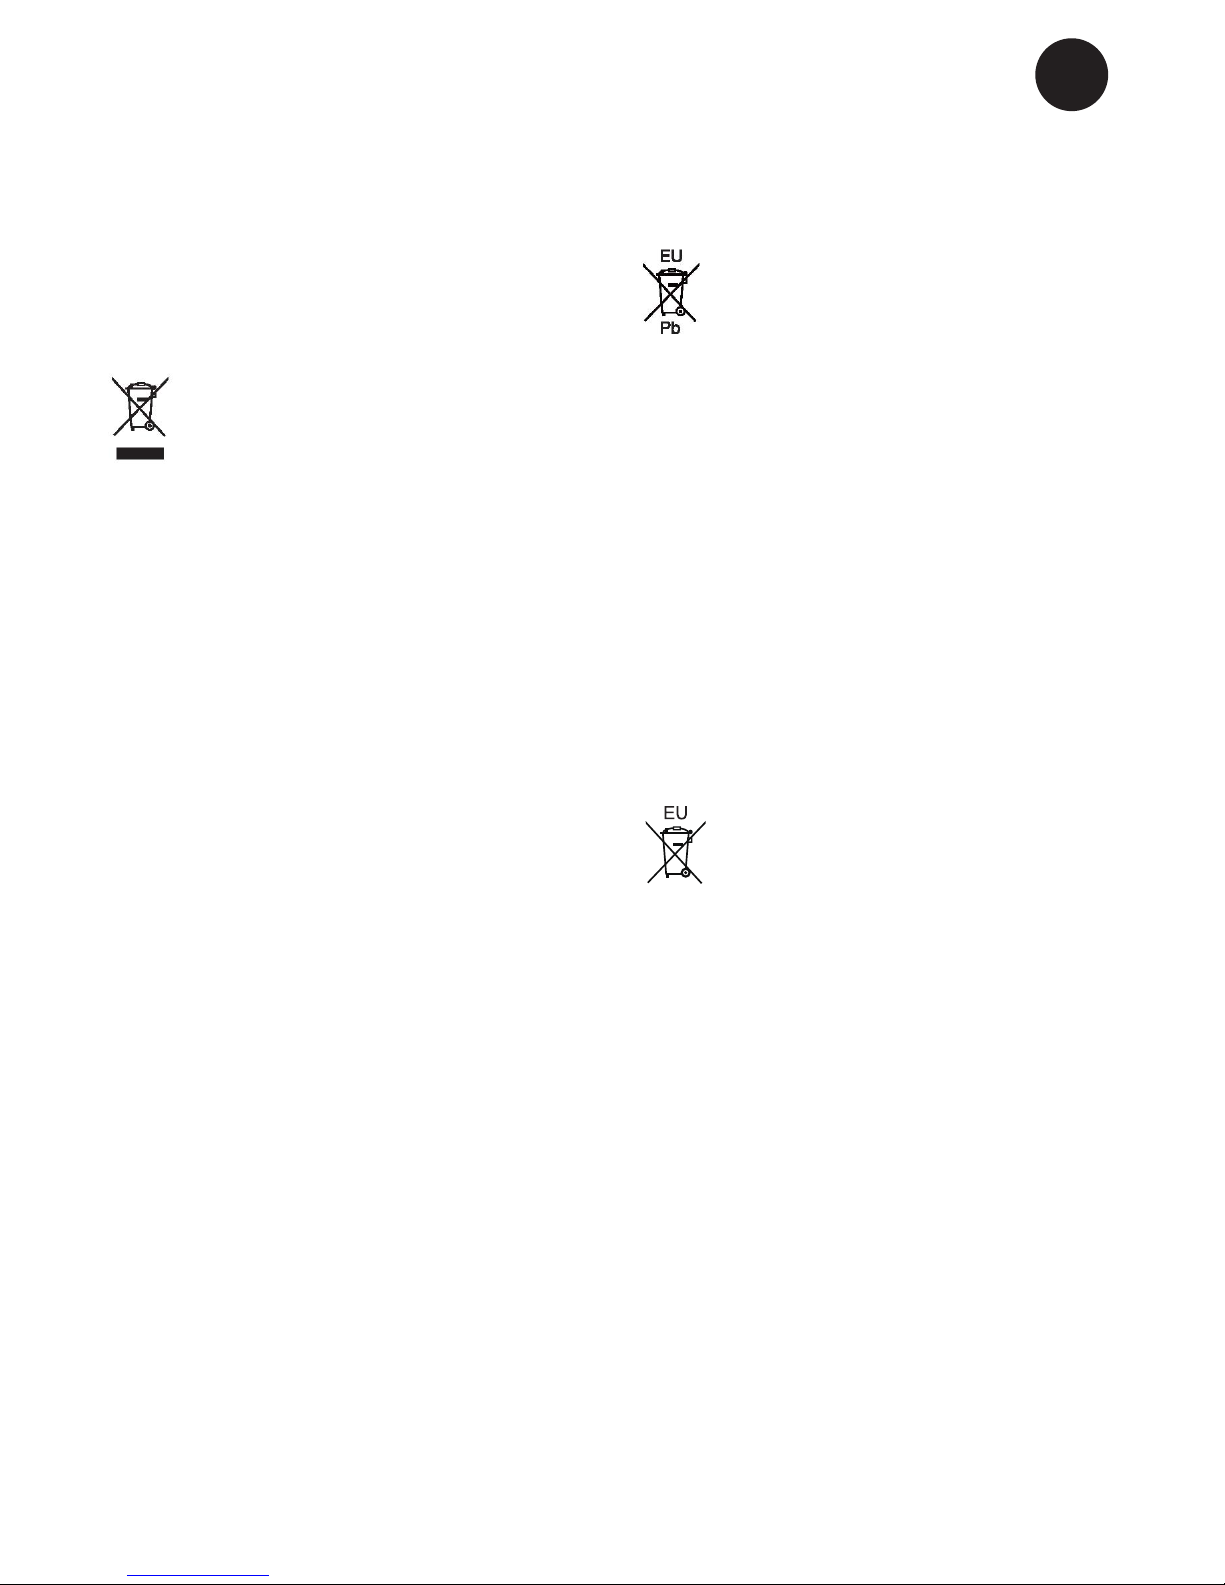
Disposal
Information for Users on Collection
and Disposal of Old Equipment and
used Batteries
These symbols on the products,
packaging, and/or accompanying
documents mean that used electri-
cal and electronic products and
batteries should not be mixed with
general household waste. For proper
treatment, recovery and recycling
of old products and used batteries,
please take them to applicable collection points, in accordance with your
national legislation and the Directives
2002/96/EC and 2006/66/EC.
By disposing of these products and
batteries correctly, you will help to
save valuable resources and prevent
any potential negative effects on
human health and the environment
which could otherwise arise from
inappropriate waste handling.
For more information about collection and recycling of old products and
batteries, please contact your local
municipality, your waste disposal
service or the point of sale where you
purchased the items.
Penalties may be applicable for incor-
rect disposal of this waste, in accordance with national legislation.
For business users in the European Union.
If you wish to discard electrical and
electronic equipment, please contact
your dealer or supplier for further
information.
[Information on Disposal in other
Countries outside the European
Union]
These symbols are only valid in the
European Union. If you wish to discard this product, please contact your
local authorities or dealer and ask for
the correct method of disposal.
Note for the battery symbol (bottom two symbol examples):
This symbol might be used in combination with a chemical symbol. In this
case it complies with the requirement
set by the Directive for the chemical
involved.
Page 12
2
DE
Justierbar Fuß
Zeheaussparung
Glastür
Griff
Fach
Typenschild
Bedienungspanel
Toplicht
Beginnen Sie, Ihre Wein- oder Flaschenkühler zu
kennen:
Schloss
Page 13

3
DE
ausreichend von einer verantwortlichen Person überprüft ist,
dass sie das Gerät vertretbar
verwenden können. Kleine
Kinder müssen beaufsichtigt
werden, um sicherzustellen,
dass sie nicht mit dem Gerät
spielen. Der Schlüssel ist an
einer separaten Stelle und
unzugänglich für Kinder aufzubewahren.
● Vor Reparatur oder Reinigung des Gerä-
tes den Netzstecker von der Steckdose
ziehen.
● Wenn die Anschlussleitung beschädigt
ist, muss sie nur vom Hersteller, dem
Serviceagent des Herstellers oder einem
anderen Fachmann ausgewechselt werden, um Gefahr zu vermeiden.
● Bildung von Reif auf der inneren Verdampferplatte und den obersten Teile
ist normal. In Verbindung mit Reinigung
oder Wartung muss das Gerät deshalb
entfrostet werden.
● Seien Sie bitte darauf aufmerksam, dass
Änderungen der Konstruktion dieses Ge-
rätes zur Folge haben, dass die Garantie
und Produktenhaftung erlöschen.
● WEINKÜHLER - VKG: Dieses Gerät ist
ausschließlich zur Lagerung von Wein
bestimmt
CLASS 1 LED PRODUCT
Falls dieses Gerät Kohlenwasserstoff-Kältemittel enthält, sehen Sie bitte die untenstehenden Richtlinien.
Da ein brennbares Gas als Kältemittel in
diesem Gerät dient, ist es wichtig sicherzustellen, dass kein Teil des Kühlkreislaufs
oder der Röhren beschädigt ist.
Der Standard EN378 speziziert, dass der
Raum, in dem das Gerät installiert wird, ein
Volumen von 1m³ pro 8 g Kohlenwasser
stoff-Kältemittel, das im Gerät verwendet ist, haben soll. Dies ist zu beachten,
um die Bildung von leicht entzündlichen
Gasgemischen in dem Raum, wo das Gerät
installiert ist, zu vermeiden, falls eine Un-
dichtigkeit des Kuhlkreislaufs entsteht. Die
Menge von Kältemittel im Gerät ist auf dem
Typenschild angegeben.
WARNUNG: Decken Sie die Lüftungsöffnun-
gen im Kabinett am Gerätes
oder am Einbaumodul nicht ab.
WARNUNG: Verwenden Sie keine anderen
mechanischen Geräte oder
Hilfsmittel um den Entfrostungsprozess zu beschleunigen, als die Geräte, die vom
Hersteller empfohlen sind.
WARNUNG: Beschädigen Sie nicht den
Kühlkreislauf.
WARNUNG: Verwenden Sie keine elektri-
schen Geräte im Gerät, es sei
denn, dass die Geräte vom
Hersteller empfohlen sind.
WARNUNG: Das Gerät nicht dem Regen
aussetzen.
WARNUNG: Das Gerät ist nicht für den
Gebrauch durch kleine Kinder
bestimmt, es sei denn, dass es
Warnung.
Page 14

4
DE
Beginnen Sie ihre Kühler zu kennen ..... 2
Warnung ................................................ 3
Erstmalige Inbetriebnahme.................... 4
Wartung ................................................. 4
Betriebsstörungen ................................. 5
Technische Daten .................................. 5
Aufstellen ............................................... 5
Bedienungspaneel ................................ 6
Wechsel des Türanschlags ................... 7
Justierung der Tür. .................................9
Montierung vom Schloß......................... 9
Reklamation und Service..................... 10
Entsorgung .......................................... 11
Inhaltsverzeichnis. Erstmalige
Inbetriebnahme.
Wartung.
Während des Reinigens das Gerät abschal-
ten und Netzstecker ziehen.
Zur Innenreinigung sollte nicht parfumiertes
Geschirrspülmittel verwendet werden. Dabei eventuell obere Abdeckung abneh men
und ebenfalls reinigen.
Die Bodenabdeckung kann abmontiert
wer den, wonach die Unterlage mit einem
Staub sau ger entstaubt werden kann.
Damit das Kühlsystem optimal funktionieren kann, müssen Sie von Zeit zu Zeit den
Draht kondensator und den Kompressor auf
der Schrankrückseite mit einer Bürste oder
einem Staubsauger reinigen.
Gerät auf eventuelle Transportschäden
untersuchen. Beschädigtes Gerät nicht in
Betrieb nehmen, im Zweifel beim Lieferanten rückfragen. Schrank und Türen außen
und innen mit mildem, nicht parfumiertem
Geschirrspülmittel reinigen und abtrocknen.
Keine scheuernden Mittel, Stahlwolle oder
dergleichen verwenden.
Page 15
5
DE
Bevor Sie sich an den Kundendienst wenden, kontrollieren Sie bitte folgendes:
● ob der Stecker richtig in der Steckdose
sitzt,
● ob die Sicherung durchgebrannt ist,
● ob der Strom ausgefallen ist,
● ob das Bedienfeld korrekt eingestellt ist,
● Stellen Sie das Gerät eventuell am Ther-
mostat ab. Schalten Sie nach15 Minuten
wieder ein und kontrollieren Sie nach
weiteren 5 Minuten, ob sich am Verdampfer Reif gebildet hat.
● Den Schrank nicht unnötigerweise öffnen.
Betriebsstörungen. Aufstellen.
Siehe Skizzen Seite A - C.
Das Gerät an einem trockenen Platz aufstellen und zwar so, daß es nicht direkter
Sonnenbestrahlung oder einer anderen
Wärmequelle ausgesetzt wird.
Das Gerät waagerecht aufstellen, was durch
die höhenverstellbaren Vorderfüße leicht
zu errei chen ist. Das Gerät darf mit der
Türanschlagse ite nicht an einer Mauer an-
liegen. Falls der Schrank auf einem Teppich
oder auf einem Holzfußboden aufgestellt
wird, sollte die Höhe nach einer gewissen
Zeit wieder eingestellt werden, da solches
Material meistens etwas nachgibt.
Wenn das Gerät in einen Schrank o.dgl.
eingebaut werden soll, müssen 3 Fakto ren
berücksichtigt werden:
1. Über dem Gerät muß für einen passenden Luftspalt gesorgt werden, damit das
Kühlsystem zufriedenstellend funktionieren
kann.
2. Wenn die Tür geöffnet wird, ist das Gerät
faktisch breiter. Das heißt, daß entweder die
Tür außerhalb eines Einbau schran kes sein
muß, oder an der Scharnier seite ein Abstand
zur Schrank wand von mindestens 1,5 cm
sein muß.
3. Zwischen dem Gerät und der Wand u.dgl.
muß in der Scharnierseite ein passender
Abstand sein.
Es besteht die Möglichkeit zwei Schränke
zusammen zu bauen.
Ist einer der beiden ein Weinkühler so ist zu
beachten, dass ein Abstand von min. 25mm
zwischen den beiden Schränken bestehen
muss um das Kühlsystem sicherzustellen.
Die Einbaumaße gehen aus den Skizzen
herv or. Bei Gewitter kann es zu Stromausfall kom men. Kontrollieren She danach die
korrekte Funktionweise
Technische Daten.
Dieses Gerät entspricht den einschlägigen
EU-Richtlinien einschließlich:
Niederspannungsrichtinie 2006/95/EEC
Elektromagnetische Kompatibilitätsrichtlinie
2004/108/EC
Das Typenschild, das sich im Gerät bendet, enthält verschiedene technische
Angaben sowie Typen- und Seriennummer.
Page 16
6
DE
1. Schloss.
(Nicht alle Modelle haben ein Schloss )
2. Netzkontrolleuchte (grün).
3. Thermometer.
4. Thermostatknopf.
5. Türschalter für inneren Ventilator.
6. Lichtschalter.
Bedienungspanel.
Schließen Sie das Gerät an eine Steckdose
an.
Der Thermostatschalter ist von 0 (abgeschaltet) bis 7 (maximale Kälte) einstellbar.
Probieren Sie verschiedene Thermosta-
teinstellungen aus, bis Sie die gewünschte
Temperatur erreichen. Bei Pos. 4 anfangen.
Page 17
7
DE
1. Entfernen Sie die Sperre mit
einem Schraubenzieher.
2. Entfernen Sie das Schloss.
3. Lösen Sie die obere Gehäuseleiste. Entfernen Sie nicht die
Schrauben, nur lösen.
4. Neigen Sie die Oberseite nach
vorne, um die Gehäuseleiste zu entfernen.(an drei Positionen gesichert)
5. Legen Sie das Gerät auf den Rücken
und entfernen Sie das obere Scharnier
mit einem Sechskantschlüssel.
6. Ziehen Sie die Torsionsfeder
zusammen mit dem Scharnier aus
der tür.
7. Entfernen Sie das untere Schar-
nier mit einem Sechskantschlüssel.
8. Montieren Sie dan Türgriff auf der
gegenüberliegenden Seite.
9. Montieren Sie den Scharnierstift
auf der gegenüberliegenden Seite
des unteren Scharnieres.
10. Montieren Sie das Scharnier auf
der gegenüberliegenden Seite
11.Montieren Sie die Plastiktürsicherung an der gegenüberliegenden
Seite.
12. Stecken Sie den Scharnierstift
und die Torsionsfeder auf der gegenüberliegenden Seite in die obere
Seite der Tür.
Wechsel des Türanschlages.
(Nicht alle Modelle haben ein Schloss in der oberen Gehäuseleiste)
Page 18
8
DE
13. Befestigen Sie das mitgelieferte
linksseitige obere Scharnier. Spannen Sie
die Drehfeder ca. 1/2 Umdrehung (im Uhrzeigensinn auf der rechten Seite, entgegen
dem Uhrzeigersinn auf der linken Seite)
14. Das obere Scharnier wieder
festschrauben.
15. Stellen Sie das Gerät wieder
aufrecht. Klicken Sie die obere
Gehäuseleiste wieder ein. (sie ist an
drei Stellen gesichert)
17. Schlüsselstift und Schloss
wieder einbauen.
18. Nach dem Umbau der Tür ist es wichtig zu überprüfen, ob das Dichtband sicher ringsherum abschliesst. Ist dies
nicht der Fall, bitte das Dichtband mit einem Haartrocker erwärmen. Dann das Dichtband leicht nach ziehen, so dass
es wieder einen sicheren Abschluss zum Gehäuse ergibt. Achten Sie darauf, nicht zu stark zu erwärmen, sodass der
Dichtru+ing schmilzt.
● Zapfen und Buchsen an der mittleren
Querleiste abmontieren.
● Untere Tür abmontieren..
● Blindstopfen an der Querlieste auf der
anderen Seite montieren.
Bitte bemerken!
Seitenanschlagwechsel - Gerät mit zwei Türen
16. Die beiden Schrauben für
die obere Gehäuseleiste wieder
festziehen.
Page 19
9
DE
Justierung der Tür.
Montierung vom Schloss (mit einer Tür.)
(Sonderzubehör)
Montierung vom Schlss (mit zwei Türen.)
(Sonderzubehör)
Page 20
10
DE
Ersatzteile
Bitte bei der Ersatzteilbestellung Typ- und
Seriennummer sowie Produktnummer angeben. Diese Angaben nden Sie auf dem
Typenschild an der Geräterückseite.
Das Typenschild enthält verschiedene
technische Angaben, u.a. auch Typ- und
Seriennummer. Denken Sie daran! Stets
nur autorisierte Handwerker zu beauftra-
gen, wenn ein Teil repariert oder ausge-
wechselt werden muss!
Der Lieferant haftet nicht für Fehler oder
Schäden, die direkt oder indirekt durch
Fehlbedienung, Missbrauch, mangelhafte
Wartung, fehlerhaften Einbau, fehlerhafte
Aufstellung oder fehlerhaften Anschluss
sowie Feuer, Unfall, Blitzschlag, Spannungsänderungen oder andere elektrische
Störungen – wie z.B. defekte Sicherungen
oder Fehler in der Netzinstallation – sowie
von anderen als den von dem Lieferanten
vorgeschriebenen Reparaturbetrieben
ausgeführten Reparaturen verursacht
wurden, und allgemein nicht für Fehler und
Schäden, die der Lieferant nachweislich
auf andere Ursachen als Fabrikations- und
Materialfehler zurückführen kann. Diese
Fehler oder Schäden fallen nicht unter das
Reklamationsrecht.
Transportschäden, die der Anwender fest-
stellt, sind primär eine Sache zwischen ihm
und dem Händler, d.h. der Händler hat den
Anwender zufrieden zu stellen.
Bevor Sie den Kundendienst rufen, prüfen
Sie bitte, ob Sie den Fehler selbst beheben
können (siehe Fehlersuche). Ist Ihr Hilfeverlangen unberechtigt, beispielsweise weil
das Versagen des Geräts auf eine defekte
Sicherung oder Fehlbedienung zurück zu
führen ist, gehen die Kosten für den Servicebesuch zu Ihren Lasten.
Reklamation, Ersatzteile und Service.
Product number.
Page 21
11
DE
Entsorgung.
Benutzerinformation zur Sammlung und
Entsorgung von veralteten Geräten und
benutzten Batterien.
Diese Symbole auf den Produkten,
Verpackungen und/oder Begleitdokumenten bedeuten, dass benutz-
te elektrische und elektronische
Produkte und Batterien nicht in den
allgemeinen Hausmüll gegeben werden sollen. Bitte bringen Sie diese
alten Produkte und Batterien zur
Behandlung, Aufarbeitung bzw. zum
Recycling gemäß IhrerLandesgesetzgebung und den Richtlinien 2002/96/
EG und 2006/66/EG zu Ihren zuständigen Sammelpunkten.
Indem Sie diese Produkte und Batterien ordnungsgemäß entsorgen, helfen Sie dabei, wertvolle Ressourcen
zu schützen und eventuelle negative
Auswirkungen auf die menschliche
Gesundheit und die Umwelt zu vermeiden, die anderenfalls durch eine
unsachgemäße Abfallbehandlung
auftreten können.
Wenn Sie ausführlichere Informationen zur Sammlung und zum Recy-
cling alter Produkte und Batterien
wünschen, wenden Sie sich bitte an
Ihre örtlichen Verwaltungsbehörden,
Ihren Abfallentsorgungsdienstleister
oder an die Verkaufseinrichtung, in
der Sie die Gegenstände gekauft
haben.
Gemäß Landesvorschriften können
wegen nicht ordnungsgemäßer
Entsorgung dieses Abfalls Strafgelder
verhängt werden.
Für geschäftliche Nutzer in der
Europäischen Union.
Wenn Sie elektrische oder elektro-
nische Geräte entsorgen möchten,
wenden Sie sich wegen genauerer
Informationen bitte an Ihren Händler
oder Lieferanten.
[Informationen zur Entsorgung in
Ländern außerhalb der Europäischen Union]
Diese Symbole gelten nur innerhalb
der Europäischen Union. Bitte treten
Sie mit Ihrer Gemeindeverwaltung
oder Ihrem Händler in Kontakt,
wenn Sie dieses Produkt entsorgen
möchten, und fragen Sie nach einer
Entsorgungsmöglichkeit.
Hinweis zum Batteriesymbol (unten zwei Symbolbeispiele):
Dieses Symbol kann in Kombination mit einem chemischen symbol
verwendet werden. In diesem Fall
erfüllt es die Anforderungen derjenigen Richtlinie, die für die betreffende
Chemikalie erlassen wurde.
Page 22

2
FR
Finissez par connaître votre refridisseur de vin ou
de bouteille :
Serrure
Lumière supérieure
Panneau de commande
Dactylographiez le plat
Ëtagère
Poignée de porte
Porte en verre
Cavité d’orteil
Pieds réglablest
Page 23

3
FR
exposé à la pluie.
AVERTISSEMENT: Cet appareil n’est pas
conçu pour une utilisation
par de jeunes enfants ou
des personnes handica-
pées sauf si elles sont
sous la surveillance dún
adulte responsable. Les
enfants ne doivent pas
jouer avec l’appareil.
● Conserver les clés dans un endroit hors
de portée des enfants.
● Avant de faire l’entretien ou le nettoyage
de l’appareil, débranchez-le de son
alimentation.
● Si le l d’alimentation est endommagé,
il doit être remplacé par le fabricant, des
représentants ou des professionnels
agrees an d’éviter les dangers.
● La formation de givre sur les parois
intérieures de l’évaporateur et les parties
supérieures est un phénomène naturel et
normal. Retirez le givre avec un chiffon
sec.
● Prenez note que toute modication de
l’appareil annulera toutes les garanties et
la responsabilité du fabricant.
● REFROIDISSEURS Á VIN - VKG:
Cet appareil est destiné uniquement au
stockage du vin
Produit équipé de diodes class 1,
sans danger pour les yeux.
Puisque l’appareil contient un réfrigérant
inammable, il est essentiel de s’assurer
que les conduits du uide réfrigérant ne
sont pas endommagés. La norme EN378
précise que la pièce dans laquelle vous
installez votre appareil doit posséder un
volume de 1 m³ par 8 g de réfrigérant avec
des hydrocarbures utilisés dans l’appareil
an d’éviter la formation de mélanges gaz/
air inammables dans la pièce où l’appareil
est installé dans le cas où il y aurait une
fuite dans le circuit du réfrigérant. La quantité de réfrigérant utilisée dans votre appareil
est indiquée sur la plaque signalétique.
AVERTISSEMENT: Gardez les ouvertures de
ventilation sur le boîtier
de l’appareil, ou sur la
structure incorporée,
libres de toute obstruction.
AVERTISSEMENT: Ne pas utiliser d’appareils
mécaniques ou autres
moyens pour accélérer la
décongélation sauf ce qui
est recommandé par le
fabricant.
AVERTISSEMENT: Ne pas endommager le
système de réfrigération.
AVERTISSEMENT: Ne pas utiliser d´appareils
électriques à l’intérieur
du compartiment de
stockage sauf s’ils sont
recommandéspar le fabricant.
AVERTISSEMENT: L’appareil ne doit pas être
Avertissement.
Page 24

4
FR
Index.
Finissez par connaître votre
refroidisseur. ........................................... 2
Avant d’utiliser le congélateur. ................ 3
Mise en marche - première fois .............. 4
Entretien ................................................. 4
En cas de panne..................................... 5
Caractéristiques techniques ................... 5
Installation .............................................. 5
Panneau de commande. ........................ 6
Inversion de la porte. .............................. 7
Ajustage de la porte................................ 9
Montage de surrure pour.. ...................... 9
Garantie -service .................................. 10
Mise au rebut .........................................11
Mise en marche premiere fois.
Vérier si l’armoire est en bon état. Les
dé-gâts survenus en cours de transport
de vron t immédiatement être signalés au
dépo si taire.
Laver les parois extérieures de l’armoire
et les portes avec un produit à vaisselle
doux et non parfumé, puis essuyer. Ne pas
utiliser de déca pants risquant de faire des
rayures, de laine d’acier, etc.
Entretien.
Le nettoyage des parois intérieures doit être
effectué à l’aide d’un produit à vaisselle non
parfumé.
Retirer éventuellement le panneau supérieur et le laver en même temps que les
parois intérieu res.
Mettre l’armoire hors circuit pendant le
net to ya ge et la débrancher. Le panneau
infé rieur peut s’enlever, ce qui permet de
passer l’aspi rateur en-dessous. Page B.
Ne pas oublier de nettoyer le bac d’écoulement.
Page 25
5
FR
En cas de panne.
Avant de faire venir un réparateur, vérier:
● Que la che est bien enfoncée.
● Que le fusible est intact.
● Qu’il n’y a pas de coupure de courant.
● Que le tableau de commande est conve-
nablement réglé.
● Ne pas ouvrir l’armoire plus que néces-
saire.
Caracteristiques
techniques.
Page A - C
L’armoire doit être placée dans un endroit
sec et de manière à ne pas être exposée
aux ray ons du soleil ou à tout autre source
de chaleur.
Lors de la mise en place, l’armoire doit être
d’aplomb, ce qui s’obtient aisément grâce
aux pieds réglables à l’avant du socle.
L’armoire ne doit pas être appuyé contre un
mur du côté charnières.
S’il est installé sur un tapis ou un plancher
en bois, il convient de s’assurer au bout de
que lque temps qu’il est toujours de niveau,
car il y a risque de tassement sur une
assise molle.
Pour montage encastré congélateur à bouteilles/cave à vin dans une armoire il faut
prendre 2 facteurs en considération (Page
A+B):
1.Il faut qu’il y ait un espace sufsant audessus, en arrière et au côté de l’appareil.
2.Il faut qu’il y ait un espace sufsant entre
l’appareil et le mur et similaires au côté de
charnière.
La prise murale avec mise à la terre doit
être placée au-dessus de l’armoire, à 2,0 m
du sol.
Les prescriptions locales éventuelles relatives à l’installation de réfrigérateurs doivent
être observées.
En cas d’orage, il peut y avoir des coupures de courant: Tenir compte de ce fait,
si l’appareil est installé autre endroit où une
coupure de courant ne sera pas immédiatement constatée. Tous droits de modication
de la construction et des détails des équipements sont réservés sans avis préalable.
Installation.
Ce dispositif est conforme aux directives de
l’U.E. le concernant, y compris la Directive
2006/95/CEE sur la Basse Tension et la
Directive 2004/108/CE sur la Compatibilité
Electromagnétique.
La plaque signalétique placée à l’intérieur
comporte divers renseigne ments techniques ainsi que le numéro de modèle et de
série.
Page 26
6
FR
Panneau de commande.
Raccorder l’appareil à la prise. Un voyant
vert s’allume pour indiquer que l’appareil a
été mis sous tension.
Le bouton du thermostat est réglable de 0
(arrêt) à 7 (froid maximum). Trouver la position du thermostat qui donne la température
désirée. Commencer à la position 4.
1. Serrure (la serrure n’existe pas sur tous
les appareils).
2. Voyant vert indiquant que l’appareil est
sous tension.
3. Thermomètre.
4. Bouton du thermostat.
5. Interrupteur de porte contrôlant le ventilateur intérieur.
6. Interrupteur d’éclairage.
L’interrupteur (6) à droite sur le dessus du
panneau de commande permet d’allumer/
éteindre l’éclairage de ce même panneau.
Page 27

7
FR
1. Ôter la gâche à l’aide d’un
tournevis plat.
2. Ôter le cylindre. 3. Dévisser le panneau du
dessus. Ne pas ôter les vis, les
desserrer simplement.
4. Basculer le panneau de des-
sus vers l’avant pour le retirer
(il est xé en trois endroits).
5. Coucher l’appareil sur le dos
et ôter la charnière supérieure
à l’aide d’une clé hexagonale.
6. Par une traction, faire sortir de
la porte le ressort de torsion en
même temps que la charnière.
7. Ôter la charnière inférieure à
l’aide d’une clé hexagonale.
8. Faire passer la poignée du
côté opposé.
9. Faire passer la cheville de
charnière sur le côté opposé de
la charnière inférieure.
10. Fixer la charnière inférieure
du côté opposé.
11. Déplacer la barre de
retenue en plastique sur le côté
opposé.
12. Insérer la cheville de charnière
et le ressort de torsion dans le des-
sus de la porte, du côté opposé.
Inversion de la porte.
(La serrure n’existe pas sur tous les appareils)
Page 28

8
FR
14. Mettre
en place la
charnière
supérieure.
15. Remettre l’appareil debout.
Replacer (jusqu’au clic) le
panneau supérieur (xé en trois
endroits).
16. Resserrer les vis du panneau à l’aide d’un tournevis.
17. Replacer le cylindre et la
gâche.
18. Après avoir inversé la porte, il est important de s’assurer que le joint d’étanchéité est bien isolant sur
tout le pourtour. Si ce n’est pas le cas, chauffer le joint avec précaution sur toute sa longueur à l’aide d’un
sèche-cheveux. Etirer ensuite doucement le joint vers l’extérieur pour qu’il assure une bonne étanchéité
contre le cabinet. En chauffant le joint, attention de ne pas le faire fondre!
● Démonter la cheville de charnière
du milieu et la bague.
● Démonter la porte.
● Le cache-charnière se démonte
pour être remonté du côté opposé.
Inversion de porte sur un
appareil double porte.
13. Installer la charnière jointe pour le côté gauche du panneau de dessus. (disponible en extra) .Serrer le ressort de
tension d’environ ½ tour (sens contraire des aiguilles d’une
montre sur côté gauche, sens des aiguilles sur côté droit).
Page 29

9
FR
Ajustage de la porto.
Montage de surrure pour. (portes une)
(Équipement asupplémentaire.)
Montage de surrure pour. (deux portes)
(Équipement asupplémentaire.)
Page 30

10
FR
cette personne qui devra régler les frais
entraînés par cette intervention.
Pièces de rechange
Lors de la commande de pièces de
rechange, indiquer le type, numéro de
produit et de production de l´appareil. Ces
renseignements se trouvent sur la plaque
signalétique au dos de l’appareil. La plaque
signalétique renferme plusieurs informations techniques, dont les numéros de type
et de série.
TOUJOURS faire appel à des services
agréés en cas de réparation ou de
remplacement !
Les pannes ou les dommages dûs directement ou indirectement à une utilisation incorrecte ou fautive, un entretien insufsant,
un encastrement, une mise en place ou un
raccordement incorrect, un incendie, un accident, un impact de foudre, des variations
de tension et tout autre dysfonctionnement
électrique dû par exemple à des fusibles ou
disjoncteurs défectueux, ou à des défauts
du réseau d’alimentation électrique ne sont
pas couverts par la garantie. Dans le cas de
réparations effectuées par des personnes
autres que les réparateurs agréés par le
fournisseur, et en termes généraux l’ensemble des pannes et dommages dont le
fournisseur peut prouver qu’ils sont dûs à
d’autres causes que des erreurs ou défauts
de fabrication et de matériaux et qui, par
conséquent, ne sont pas couverts par la
garantie.
Veuillez noter que lorsqu´ une intervention
dans la construction ou d’une modication
des composants de l’appareil a été faite, la
garantie et la responsabilité du fournisseur
cesse, et l’appareil ne peut pas être utilisé
légitimement. L’autorisation gurant sur la
plaque signalétique ne sera plus valable.
Les dommages dûs au transport et constatés chez le client sont à régler entre le
client et le revendeur, ce qui signie que
ce-dernier doit s’assurer de la satisfaction
du client.
Avant de faire appel au service aprèsvente, toujours contrôler les points énumérés dans la liste de recherche des pannes
(voir ce point). Dans le cas où la cause
de l’intervention demandée ressort de la
responsabilité de la personne ayant fait
appel au service après-vente, par exemple
si la panne de l’appareil est due à un fusible
grillé ou à une mauvaise utilisation, c’est
Garantie, pièces de rechange et service après-vente.
Numéro de produit.
Page 31

11
FR
Mise au rebut.
Avis aux utilisateurs concernant la
collecte et l’élimination des piles et des
appareils électriques et électroniques
usagés.
Apposé sur le produit lui-même, sur
son emballage, ou gurant dans la
documentation qui l’accompagne, ce
pictogramme indique que les piles et
appareils électriques et électroniques
usagés doivent être séparés des ordures ménagères. An de permettre
le traitement, la valorisation et le
recyclage adéquats des piles et des
appareils usagés, veuillez les porter
à l’un des points de collecte prévus,
conformément à la législation nationale en vigueur ainsi qu’aux directives 2002/96/CE et 2006/66/CE.
En éliminant piles et appareils
usagés conformément à la réglementation en vigueur, vous contribuez à
prévenir le gaspillage de ressources
précieuses ainsi qu’à protéger la
santé humaine et l’environnement
contre les effets potentiellement nocifs d’une manipulation inappropriée
des déchets.
Pour de plus amples renseignements
sur la collecte et le recyclage des
piles et appareils usagés, veuillez
vous renseigner auprès de votre
mairie, du service municipal d’enlèvement des déchets ou du point
de vente où vous avez acheté les
articles concernés.
Le non-respect de la réglementation
relative à l’élimination des déchets
est passible d’une peine d’amende.
Pour les utilisateurs professionnels au sein de l’Union européenne
Si vous souhaitez vous défaire de
pièces d’équipement électrique ou
électronique, veuillez vous renseigner directement auprès de votre
détaillant ou de votre fournisseur.
[Information relative à l’élimination
des déchets dans les pays extérieurs à l’Union européenne]
Ce pictogramme n’est valide qu’à
l’intérieur de l’Union européenne.
Pour supprimer ce produit, contactez
les autorités locales ou votre revendeur an de connaître la procédure
d’élimination à suivre.
Note relative au pictogramme à
apposer sur les piles (voir les 2
exemples ci-contre)
Le pictogramme représentant une
poubelle sur roues barrée d’une croix
est conforme à la réglementation. Si
ce pictogramme est combiné avec un
symbole chimique, il remplit également les exigences posées par la
Directive relative au produit chimique
concerné.
Page 32

2
DK
Lær din vin- eller askekøler at kende :
Lås
Lys
Kontrolpanel
Typeskilt
Hylde
Håndtag
Glasdør
Fodspark
Justerbar fødder
Page 33

3
DK
Advarsel
Såfremt apparatet indeholder kulbrintekølemiddel, henvises til nedenstående retnings-
linier.
Da kølemidlet, som anvendes i apparatet,
er en brændbar gasart, er det vigtigt at
sikre, at kølekredsløb og rør ikke er beskadigede.
Standard EN378 angiver, at rummet hvor
apparatet installeres skal have en volumen
på 1 m³ pr. 8 g kulbrinte kølemiddel, der
er brugt i apparatet. Dette er for at undgå
dannelse af brandfarlige gas-/luftblandinger
i rummet, hvis der skulle opstå en utæthed
i kølekredsløbet. Mængden af kølemiddel i
apparatet er angivet på typeskiltet.
ADVARSEL: Lad ventilationsåbninger, i ap-
paratets kabinet og i eventuelt indbygningsmodul, være
utildækkede.
ADVARSEL: Anvend ikke mekaniske appa-
rater eller andre hjælpemidler
til at fremskynde afrimningsprocessen, udover dem som
er anbefalet af fabrikanten.
ADVARSEL: Anvend ikke elektriske appara-
ter inden i apparatet, medmindre de er af en type som er
anbefalet af fabrikanten.
ADVARSEL: Apparatet må ikke udsættes
for regn.
ADVARSEL: Dette apparat er ikke bereg-
net til at blive anvendt af små
børn, medmindre det er blevet
tilstrækkeligt kontrolleret af en
ansvarlig person, sådan at apparatet kan anvendes forsvar-
ligt. Små børn skal være under
opsyn for at sikre at de ikke
leger med apparatet.
● Opbevar altid nøgler et separat sted
utilgængeligt for børn.
● Træk stikket ud af stikkontakten før repa-
ration eller rengøring af apparatet.
● Hvis netledningen er beskadiget, skal den
udskiftes af producenten, producentens
serviceagent eller anden fagmand for at
undgå fare.
● Dannelse af rim på den indvendige
fordamperplade og de øverste dele er
normalt. Apparatet skal derfor afrimes
i forbindelse med almindelig rengøring
eller vedligeholdelse.
● Såfrem der ndes en lyskilde i apparatet, fremgår udskiftning af belysningen i
brugsanvisningen.
● Vær opmærksom på at ændringer i apparatets konstruktion vil medføre, at al
garanti og produktansvar bortfalder.
● VINKØLER - VKG: Apparatet er udeluk-
kende beregnet til opbevaring af vin.
CLASS 1 LED PRODUCT
Page 34

4
DK
Lær din vin- eller askekøler at kende.....2
Advarsel...................................................3
Igangsætning første gang........................4
Vedligeholdelse .......................................4
Hvis apparatet ikke virker ........................5
Tekniske data...........................................5
Installation ...............................................5
Kontrolpanel ............................................6
Ændring af håndtagsside.........................7
Justering af dør........................................9
Montering af lås (ekstra) ..........................9
Reklamation og service .........................10
Bortskaffelse .......................................... 11
Indholdsfortegnelse: Igangssættelse første
gang.
Undersøg skabet for evt. transportskader.
Transportskader bedes meddelt forhandleren omgående.
Åben døren og fjern beskyttelsesemnet
der er monteret øverst på indersiden af
glasdøren.
Afvask skab og døre ud- og indvendig med
mildt uparfumeret opvaskemiddel og aftør
det. Benyt ikke ridsende skuremidler, ståluld
el. Iign.
Vedligeholdelse.
Under rengøring afbrydes apparatet, og
stikket tages ud. Bundpanelet kan aftages,
hvorefter underlaget kan støvsuges.
Indvendig rengøring bør foretages med
uparfumeret opvaskemiddel.
Tag evt. toppanelet af og vask det samtidig
med indvendig rengøring.
For at kølesystemet kan fungere optimalt
må trådkondensator og kompressor på skabets bagside fra tid til anden rengøres med
børste eller støvsuger.
Husk også at rengøre aøbsrenden.
Page 35

5
DK
Hvis apparatet ikke
virker.
Før De tilkalder service, undersøg da følgende:
● At stikket sidder rigtigt i stikdåsen.
● At strømmen ikke er afbrudt af f.eks.
HFI -relæ.
● At betjeningspanelet er korrekt indstillet.
● Sluk for skabet i 15 min. Tænd igen og
efter yderligere 5 min. Se da efter om der
er rimdannelser på fordamperen.
● Åben ikke unødvendigt for skabet.
Tekniske data.
Installation.
Se skitserne side A - C.
Apparatet skal anbringes på et tørt sted og
således, at det ikke udsættes for direkte sol
eller anden varme.
VIGTIGT - Skabet skal stå lige ved opstillingen, hvilket let reguleres ved hjælp af de
stilbare fød der i soklens forkant. Skabet må
ikke hvile mod en mur i hængselsiden.
Hvis skabet bliver anbragt på et tæppe eller
et trægulv, bør skabet justeres igen efter et
stykke tid, da der er mulighed for sætning i
blødt underlag.
Hvis askekøleren skal bygges ind i et skab
el. lign., er man nød til at tage hensyn til 3
faktorer (se side A+B):
1. Der skal være en passende luftsprække
over askekøleren, for at kølesystemet
kan fungere tilfredsstillende.
2. Når døren åbnes fylder askekøleren,
reelt mere i bredden, således at døren
enten skal være placeret uden for skabet,
eller skabet skal have mindst 1,5 cm luft
til den side hvor døren er hængslet.
3. Afstanden til vægge o.lign. i hængselsiden skal have en passende størrelse.
Desuden kan skabet sammenbygges med
et andet skab.
Når det drejer sig om vinkøleren, skal der
være en afstand på 25 mm, hvis den an-
bringes op ad et andet apparat.
Stikkontakten med jord anbringes bedst
oven over apparatet 2,0 m over gulvet.
Eventuelle lokale forskrifter for installation
af apparatet skal overholdes.
Dette apparat overholder bestemmelserne i
relevante EU Direktiver herunder Lavspændings Direktivet 2006/95/EØF og Elektromagnetisk kompatibilitet 2004/108/EF
Typeskiltet som er placeret inde i apparatet,
indeholder forskellige tekniske opIysninger
samt type- og serienummer.
Page 36

6
DK
Kontrolpanel.
Tilslut apparatet til strømforsyningen. Det
grønne lys indikerer at apperatet er tændt.
Termostatknappen kan justeres fra 0
varmest til 7 (koldest) Find den position på
termostaten som giver den ønskede temperatur. Start ved 4.
1. Lås. (ikke alle apparater har lås i top)
2. Grøn lys indikerer at der er strøm på.
3. Termometer
4. Termostat knap.
5. Kontakt for indvendig ventilator.
6. Tænd/sluk kontakt til lyset.
Under tordenvejr kan der opstå strømafbrydelse. Vær opmærksom på dette forhold,
når ska bet opstilles i sommerhuse eller
andre steder, hvor man ikke umiddelbart vil
bemærke en afbrydelse af strømmen.
Page 37

7
DK
1. Fjern låsestiften med en
skruetrækker.
2. Træk låsehuset ud.
3.Toppanelet løsnes. Fjern ikke
skruerne, de skal kun løsnes.
4. Tip toppanelet fremad og
fjern den. (det er sikret tre
steder)
5. Læg apparatet ned på ryggen og fjern tophængslet.
6. Træk torsionsfjederen ud af
døren sammen med hængselstappen.
7. Fjern det nederste hængsel. 8. Flyt håndtaget over på den
anden side.
9. Flyt dørtappen til hængslet
på den anden side.
10. Fastgør bundhængslet på
den anden side.
11. Flyt plast dørbeskytteren til
den anden side.
12. Monter torsionsfjederen
sammen med hængselstappen
i den anden side.
Ændring af håndtagsside på døren.
(Ikke alle apparater har lås.)
Page 38

8
DK
13. Monter det medfølgende venstre
tophængsel. (Ekstra tilbehør) Stram
torsionsfjedren = mod uret på venstre side, med uret på højre side.
14. Fastgør tophængslet i
modsatte side.
15. Rejs apparatet op igen. Klik
toppanelet på plads (det skal
sikret på tre steder)
16. Fastgør toppanelet igen
med en skruetrækker.
17. låsehus og låsestift. monte-
res igen.
18. Efter håndtagssiden er blevet ændret, er det vigtigt at sikre at tætningslisten sidder korrekt hele vejen
rundt på døren. Gør den ikke det, kan tætningslisten varmes op med en hårdtørrer og let formes på
plads igen. OBS: Vær forsigtig ikke at varme så meget at tætningslisten smelter.
● Midterbrotappen og bøsningen afmonte-
res.
● Underdøren afmonteres.
● Blændproppen for midterbro presses op
og monteres i modsatte side.
OBS:
Ændring af håndtagsside på 2 dørs skabe.
Page 39

9
DK
Montering af lås på 1 dørs skabe.
(Ekstra tilbehør.)
Justering af døren.
Montering af lås på 2 dørs skabe.
(Ekstra tilbehør.)
Page 40

10
DK
Reklamation, reservedele og service
Reklamationsretten
Såfremt der konstateres fejl ved produktet,
kan De over for leverandøren gøre brug af
reklamationsretten ifølge gældende lovgiv-
ning. Producenten skal for egen regning
afhjælpe fabrikations- og materialefejl, der
konstateres ved apparatets normale brug
under forudsætning af, at apparatet er købt
som fabriksnyt i Danmark. For Grønland og
Færøerne gælder særlige bestemmelser.
Såfremt det skønnes nødvendigt at apparatet indsendes til værksted, sker indsendelse
og returnering for producentens regning og
risiko.
Der er ikke dækning for fejl eller skader
direkte eller indirekte opstået ved fejlbetjening, misbrug, mangelfuld vedligeholdelse,
forkert indbygning, opstilling eller tilslutning.
Det samme gælder for brand, ulykke, lynnedslag, spændingsvariationer eller andre
elektriske forstyrrelser som f.eks. defekte
sikringer eller fejl i forsyningsnettets elektriske installationer.
Reparationer udført af andre end de anviste
reparatører, og i det hele taget fejl og
skader, som leverandøren kan godtgøre
skyldes andre årsager end fabrikations- og
materialefejl, er ikke omfattet af reklamationsretten.
Vær opmærksom på, at ved indgreb i
apparatets opbygning, og ved ændring af
apparatets komponentbestykning bortfalder
garanti og produktansvar og apparatet kan
ikke lovligt anvendes. Godkendelse anført
på mærkeskilt er ligeledes ugyldig.
Transportskader, der konstateres hos for-
brugeren, er primært en sag mellem forbruger og forhandler, dvs. forhandler må drage
omsorg for, at forbrugeren stilles tilfreds.
Inden du tilkalder serviceassistance, bedes
du kontrollere de fejlmuligheder, du selv kan
afhjælpe. (Se brugsanvisningen)
Såfremt dit krav om afhjælpning er uberettiget, eksempelvis hvis apparatets
svigt skyldes en sprunget sikring eller en
fejlbetjening, må du selv betale de omkostninger, der er forbundet med at have tilkaldt
serviceassistance.
Reservedele
Angiv venligst type- og serienummer samt
produkt nummer, når du bestiller reserve-
dele
Disse oplysninger nder du på typeskiltet.
Typeskiltet indeholder forskellige tekniske
oplysninger, samt type- og serienummer.
Husk altid at bruge autoriserede håndværkere, hvis der er noget der skal repareres
eller udskiftes!
Produkt nr.
Page 41

11
DK
Bortskaffelse.
Brugerinformation om indsamling og
bortskaffelse af elktronikskrot og brugte
batterier
Disse symboler på produkter, emballage og/eller ledsagedokumenter
betyder, at brugte elektriske og
elektroniske produkter og batterier
ikke må smides ud som almindeligt
husholdningsaffald. Sådanne gamle
produkter og batterier skal indleveres
til behandling, genvinding resp. recy-
cling i henhold til gældende nationale
bestemmelser samt direktiverne
2002/96/EF og 2006/66/EF.
Ved at bortskaffe sådanne produkter
og batterier på korrekt vis hjælper
du med til at beskytte værdifulde
ressourcer og imødegå de negative
påvirkninger af det menneskelige
helbred og miljøet, som vil kunne
være følgen af usagkyndig affaldsbe-
handling.
Ønsker du mere udførlig information
om indsamling og recycling af gamle
produkter og batterier, kan du hen-
vende dig til din kommune, deponeringsselskabet eller stedet, hvor du
har købt produkterne.
Usagkyndig bortskaffelse af elektro-
nikskrot og batterier kan eventuelt
udløse bødeforlæg.
For kommercielle brugere i Den
Europæiske Union
Når du ønsker at kassere elektriske
eller elektroniske apparater, bedes du
henvende dig til din forhandler eller
leverandør for nærmere information.
[Information om bortskaffelse i
lande uden for Den Europæiske
Union]
Disse symboler gælder kun inden
for Den Europæiske Union. Hvis du
ønsker at afhænde dette produkt,
skal du rette henvendelse til de lokale
myndigheder eller din forhandler. Her
kan du få oplysninger om, hvordan
du bedst kommer af med produktet.
Information om batterisymbol (to
eksempler nedenfor):
Dette symbol kan optræde sammen
med et kemisk symbol. I så fald opfylder det kravene for det direktiv, som
er blevet fastlagt for det pågældende
kemikalie.
Page 42

2
NL
Uw koeler leren kennen
Slot
Verlichting
Bedieningspaneel
Typeplaatje
Plateau
Deurgreep
Glazen deur
Voetlijst
Afstelbare voetjes
Page 43

3
NL
Waarschuwing
Indien dit toestel koudemiddel met koolwaterstof bevat, dient u onderstaande richtlijnen door te nemen.
Aangezien het toestel ontvlambaar koudemiddel bevat, is het van het allergrootste
belang dat de koudemiddelbuizen niet
beschadigen.
Norm EN378 stelt dat de ruimte waarin u
uw toestel plaatst, een volume heeft van
1 m3 per 8 g koolwaterstof koudemiddel
dat in het toestel wordt gebruikt. De reden
hiervoor is te voorkomen dat er in de ruimte
waar het toestel is geplaatst bij een lekkage
in het koelcircuit ontvlambare gas-/luchtmengsels worden gevormd. De hoeveelheid
koudemiddel die in uw toestel aanwezig is,
staat aangegeven op het typeplaatje.
WAARSCHUWING: Hou de ventilatieope-
ningen in de kast van
het toestel of in de
ingebouwde structuur
vrij van obstakels.
WAARSCHUWING: Gebruik geen an-
dere mechanische
instrumenten of
andere middelen om
het ontdooiproces te
versnellen dan die door
de producent worden
aanbevolen.
WAARSCHUWING: Beschadig het koelsys-
teem niet.
WAARSCHUWING: Gebruik geen elektri-
sche toestellen in de
vriesruimte, tenzij het
type door de producent
wordt aanbevolen.
WAARSCHUWING: Stel het toestel niet
aan regen bloot.
WAARSCHUWING: Het is niet de bedoeling
dat jonge kinderen of
zwakke personen dit
toestel gebruiken, ten-
zij een verantwoordelijk
persoon toezicht houdt
en er voor kan zorgen
dat ze het toestel veilig
kunnen gebruiken. Er
moet toezicht gehouden worden op jonge
kinderen zodat zij niet
met het toestel spelen.
● Bewaar de sleutels altijd op een af-
zonderlijke plek en buiten bereik van
kinderen.
● Haal de stekker uit het stopcontact of
schakel de stroom naar het toestel uit
voordat u servicewerkzaamheden uitvoert
of het toestel schoonmaakt.
● Als de stroomkabel is beschadigd, moet
hij door de producent, haar service-agent
of gelijksoortig gekwaliceerde personen
vervangen worden om gevaar te voorkomen.
● Belangrijk voor Australië: Een stroomkabel met stekker die beantwoordt aan AS/
NZS 3112.
● Rijpvorming op de verdamperwand
en het bovengedeelte is een natuurlijk
verschijnsel. Het toestel moet dan ook
ontdooid worden tijdens de gebruikelijke
schoonmaak- of onderhoudsbeurt.
● Let erop dat wijzigingen aan constructie van het toestel ertoe leiden dat elke
garantie en productaansprakelijkheid zal
vervallen.
Wijnkoeler VKG: Dit apparaat is uitsluitend
bedoeld voor het bewaren van wijn
Page 44

4
NL
Controleer bij de ontvangst dat de kast niet
beschadigd is. Transportbeschadigingen
moeten aan de handelaar gemeld worden
voordat de koelkast in gebruik genomen
wordt.
Verwijder de verpakking. Maak de kast van
binnen met een sopje van lauw water en
een zacht afwasmiddel schoon. Met schoon
water nawassen en grondig afdrogen Ge-
bruik een zachte doek.
Als het met apparaat is digitale thermometer Zie pagina C en D
Voordat u begint
Onderhoud
De plint kan worden verwijderd om reiniging
van de vloer met een stofzuiger mogelijk te
maken.
Gebruik alleen een ongeparfumeerd oplosmiddel wanneer u de binnenkant van het
apparaat reinigt.
U kunt het panel aan de bovenzijde verwijderen en reinigen wanneer u de binnenkant
reinigt.
Schakel het toestel uit en verwijder de
stekker uit het stopcontact wanneer u de
opbergruimte reinigt.
Om het koelsysteem zo optimaal mogelijk
te laten werken, is het nodig om de bedrade
condensator en de compressor aan de
achterzijde van tijd tot tijd te reinigen met
een borstel of stofzuiger. Vergeet niet de
afvoerkraan te reinigen.
Inhoud
Uw koeler leren kennen ...........................2
Waarschuwing .........................................3
Onderhoud...............................................4
Voordat u begint ......................................4
Is het toestel gestopt met werken? ..........5
Technische gegevens ..............................5
De vriezer ontdooien ...............................5
Bedienpaneel...........................................6
De deur omdraaien ..................................7
Aanpassing van de deur ..........................9
Montage van vergrendeling .....................9
Garantie, reserveonderdelen .................10
Verschroten ...........................................11
Page 45

5
NL
Technische gegevens
Dit toestel beantwoordt aan de toepasselijke EU richtlijnen, waaronder de laagspan-
ningsrichtlijn 2006/95/EEG en de EMCrichtlijn 2004/108/EG.
Op het typeplaatje staat een aantal techni-
sche gegevens en het type- en serienummer.
Controleer voor u een monteur belt dat de
stekker zich goed in het wandstopcontact
bevindt.
● De zekering is intact.
● De stroom is niet uitgevallen.
● Alle bedienapparatuur is juist ingesteld.
● Schakel het kabinet 15 minuten uit (bij-
voorbeeld bij de thermostaat). Schakel de
stroom in en controleer na 5 minuten of
zich ijs op de verdamper heeft afgezet.
● Open het kabinet niet onnodig.
Is het toestel gestopt
met werken?
De goederen en luchtvochtigheid vormen
geleidelijk vorst en ijs in de vriezer. Een
dunne laag vorst of ijs beïnvloedt het
functioneren van de vriezer niet, maar hoe
dikker de laag wordt, hoe hoger het ener-
gieverbruik is. Een beetje losse vorst kan
met een plastic of houten krabber worden
verwijderd. (Gebruik nooit een mes of ander
scherp gereedschap; dit kan de verdamper
beschadigen). Wanneer de vorst en het ijs
ongeveer 4-5 mm dik is, dient de vriezer te
worden ontdooid. Doe dit als volgt:
1. Schakel het apparaat uit door de thermo-
staatknop op nul te draaien.
2. Trek de tuit aan de onderzijde van de
vriezer uit en plaats er een kom onder.
3. Verwijder het voedsel. Plaats het in de
koelkast of verpak het in kranten om het
zo koel mogelijk te bewaren.
4. Plaats een kom met heet (niet kokend)
water in de vriezer.
5. Reinig de vriezer, wanneer het ijs is
gesmolten, met water en een beetje
schoonmaakmiddel. Droog de vriezer
met een zachte doek.
6. Stel de thermostaatknop opnieuw in.
Druk de vriesknop in wanneer er veel
voedsel in de vriezer geplaatst moet
worden.
7. Plaats het voedsel weer in de vriezer
wanneer de temperatuur in de vriezer
-18°C is. U kunt dit zien op de thermometer in de vriezer. Het duurt ongeveer een
uur tot deze temperatuur bereikt is.
8. Schakel de vriesknop uit.
De vriezer ontdooien
Pagina A-B
Page 46

6
NL
Bedienpaneel
Sluit het toestel aan op het stopcontact.
Een groen lampje geeft aan dat het toestel
is ingeschakeld.
De thermostaatknop is verstelbaar van 0
(stop) tot 7 (koudst). Zoek de stand op de
thermostaat die de gewenste temperatuur
geeft. Begin bij stand 4.
1. Vergrendelen (Niet alle toestellen hebben
een vergrendeling aan de bovenzijde).
2. Het groene lampje geeft aan dat de
stroom aan is.
3. Thermometer.
4. Thermostaatknop.
5. Deurschakelaar voor interne ventilator.
6. Lichtschakelaar.
De schakelaar (6) op de rechter bovenzijde
van het bedienpaneel wordt gebruikt om de
verlichting aan en uit te schakelen.
Page 47

7
NL
2.Verwijder de behuizing van
de vergrendeling.
2. Draai het bovenste paneel
los. Verwijder de schroeven niet
maar draai ze alleen los.
4.Trek het bovenste panel naar
voren om het te verwijderen (het is
op drie plaatsen vastgezet)
5. Leg het toestel op zijn zijkant
en verwijder het bovenste scharnier met een inbussleutel.
6. Trek de torsieveer uit de deur
en doe dit tegelijkertijd met het
scharnier.
7.Verwijder het onderste schar-
nier met een inbussleutel.
8. Verplaats de handgreep van
de deur naar de tegenoverliggende zijde.
9. Verplaats de scharnierpen naar
de tegenoverliggende zijde van
het onderste scharnier.
10. Plaats het onderste schar-
nier op de tegenoverliggende
zijde.
11. Verplaats de plastic deurbe-
scherming naar de tegenoverliggende zijde.
12. Plaats de scharnierpen en
torsieveer in de bovenzijde van de
deur, aan de tegenoverliggende
zijde.
De deur omdraaien
(Niet alle toestellen hebben een vergrendeling)
1. Verwijder de vergren lingspen
met een platte schroevendraaier.
Page 48

8
NL
13. Plaats het linker bovenste scharnier (als
extra onderdeel aanwezig). Draai de torsieveer ongeveer ½ slag aan (links tegen de
klok in, rechts met de klok mee).
14. Zorg dat het bovenste
scharnier zich op zijn plaats
bevindt.
15. Zet het toestel rechtop.
Klik het bovenste panel op
zijn plaats (het zit op drie
plaatsen vast geklemd).
16. Draai de schroeven van het
bovenste paneel vast met een
schroevendraaier.
17. Plaats de behuizing en pin
van de vergrendeling.
18. Na het omdraaien van de deur is het belangrijk om te controleren of de afdichtstrip een
geode afdichting rondom de deur bidet. Is dit niet het geval, verwarm de strip dan zorgvuldig
met een föhn. Trek de strip vervolgens langzaam naar buiten zodat het een geode afsluiting
van het kabinet vormt. Maak de strip niet zo heet dat deze smelt!
● Ontmantel de middelste scharnierpen en behuizing.
● Ontmantel de deur.
● De kap voor het scharniert wordt
ontmanteld en aan de tegenoverliggende zijde terug geplaatst.
De deur omkeren voor
toestellen met twee
deuren
Page 49

9
NL
Aanpassing van de deur
Montage van vergrendeling
(Voor apparaten met 1 deur)
(Optioneel)
Montage van vergrendeling
(Voor apparaten met 2 deur)
(Optioneel)
Page 50

10
NL
Garantie, reserveonderdelen en service
Uitsluiting van garantie.
Fouten en schade die direct of indirect wor-
den veroorzaakt door verkeerde bediening,
misbruik, onvoldoende onderhoud, onjuiste
gebouw, installatie of stroomaansluiting.
Brand, ongelukken, bliksem, netspanningsschommelingen of andere elektrische
storingen, waaronder doorgeslagen zekeringen of fouten in de netvoeding vallen niet
onder de garantie.
Reparaties die worden uitgevoerd door
andere dan goedgekeurde servicecentra
en fouten en schaden waarvan de producent kan bewijzen dat zij zijn ontstaan om
andere redenen dan productie- of materialenfouten vallen niet onder de garantie.
Let erop dat wijzigingen aan de constructie
van het toestel of wijzigingen aan compo-
nenten die in het toestel worden gebruikt,
ertoe zullen leiden dat de garantie en de
productaansprakelijkheid vervallen en dat
het toestel niet in overeenstemming met de
wet te gebruiken is. De op het typeplaatje
vermelde goedkeuring zal hierdoor ook
ongeldig worden.
Transportschaden die worden ontdekt door
de koper, zullen in de eerste instantie moeten worden geregeld tussen de koper en
distributeur, d.w.z. dat de distributeur ervoor
dient te zorgen dat dergelijke klachten naar
tevredenheid van de klant worden opgelost.
Voordat u technische hulp inroept, wordt u
verzocht te controleren of u de fout zelf kunt
verhelpen. Indien uw verzoek om hulp ongegrond is, d.w.z. dat het toestel niet werkte
vanwege een doorgeslagen zekering of een
foutieve bediening, zullen de kosten die ontstaan zijn door uw verzoek om technische
bijstand aan u in rekening worden gebracht.
Reserveonderdelen
Wanneer u reserveonderdelen bestelt,
wordt u verzocht de type-, serie- en producnummers van uw toestel te vermelden.
Deze informatie vindt u op het typeplaatje.
Het typeplaatje bevat verschillende technische gegevens, waaronder het type- en
serienummer.
Producnummers
Page 51

11
NL
Verschroten
Informatie voor gebruikers betreffende
het verzamelen en verwijderen van oude
uitrustingen en lege batterijen.
Deze symbolen op de producten,
verpakkingen, en/of begeleidende
documenten betekenen dat gebruikte
elektrische en elektronische produc-
ten en batterijen niet met het algemene huishoudelijke afval gemengd
mogen worden.Voor een correcte
behandeling, recuperatie en recycla-
ge van oude producten en lege batterijen moeten zij naar de bevoegde
verzamelpunten gebracht worden in
overeenstemming met uw nationale
wetgeving en de Richtlijnen 2002/96/
EC en 2006/66/EC.
Door deze producten en batterijen
correct te verwijderen draagt u uw
steentje bij tot het beschermen van
waardevolle middelen en tot de
preventie van potentiële negatieve
effecten op de gezondheid van de
mens en op het milieu die anders
door een onvakkundige afvalverwerking zouden kunnen ontstaan.
Voor meer informatie over het
verzamelen en recycleren van oude
producten en batterijen, gelieve
contact op te nemen met uw plaatselijke gemeente, uw afvalverwijde-
ringsdiensten of de winkel waar u de
goederen gekocht hebt.
Voor een niet-correcte verwijdering
van dit afval kunnen boetes opgelegd
worden in overeenstemming met de
nationale wetgeving.
Voor zakengebruikers in de Europese Unie
Indien u elektrische en elektronische
uitrusting wilt vewijderen, neem dan
contact op met uw dealer voor meer
informatie.
[Informatie over de verwijdering in
andere landen buiten de Europese
Unie]
Deze symbolen zijn enkel geldig in
de Europese Unie. Neem wanneer
u dit product wilt weggooien, contact
op met de lokale overheid of uw
leverancier en vraag wat de juisteverwijderingsmethode is.
Opmerking over het batterijensymbool:
Dit symbool kan gebruikt worden
in verbinding met een chemisch
symbool. In dat geval wordt de eis,
vastgelegd door de Richtlijn voor
de betrokken chemische producten
vervuld.
Page 52

2
ES
Conozca su refrigerador de vino o botellas:
Cerradura
Luz
Panel de mandos
Placa conocida
Estante
Manija
Puerta
Retroceso plate
Pies ajustables
Page 53

3
ES
● ADVERTENCIA: No se debe exponer el
aparato a la lluvia
● ADVERTENCIA: No deben usar este apa-
rato niños pequeños ni
personas débiles, salvo
en caso de que estén
vigilados por una perso-
na responsable que se
ocupe de que lo utilicen
sin peligro. Debería
vigilarse a los niños pequeños para asegurarse
de que no jueguen con
el aparato.
● Mantenga siempre las llaves en lugar
separado y fuera del alcance de los niños
● Antes de realizar el servicio o limpieza
del aparato, desenchúfelo de la corriente
o desconecte la fuente de alimentación
eléctrica
● Si se ha dañado el cable de alimentación
eléctrica, éste deberá ser reemplazado
por el fabricante, su técnico de servicio o
personal de una formación equivalente,
para evitar peligros
● La formación de escarcha sobre la pared
del evaporador interno y las partes superiores es un fenómeno natural. Por tanto,
debería descongelarse el aparato durante
la limpieza o el servicio de mantenimiento
normales
● Por favor, tenga en cuenta que los
cambios en la construcción del aparato
cancelarán todo tipo de garantías y res-
ponsabilidad del producto.
● REFRIGERADOR DE VINO - VKG:
Aparato destinado a utilizarse exclusivamente para la conservación de vinos
CLASS 1 LED PRODUCT
En caso de que el aparato contenga refrige-
rante de hidrocarburos, por favor, consulte
la lista de directrices que gura más abajo.
Puesto que el aparato contiene un refrige-
rante inamable, es esencial asegurarse de
que no esté dañada la tubería de refrigeración.
La Norma EN378 establece que el local en
el que Ud. instale su aparato deberá tener
un volumen de 1m³ por 8 g de refrigerante
de hidrocarburos usado en los aparatos. El
objetivo es evitar la formación de mezclas
de aire/gas inamable en el local donde
esté situado el aparato, en caso de un
escape en el circuito del refrigerante. La
cantidad de refrigerante usado en su aparato se indica en la placa de datos.
● ADVERTENCIA: Mantenga las aberturas
de ventilación de la caja
del aparato o de la estructura integrada libres
de obstrucciones
● ADVERTENCIA: No utilice dispositivos
mecánicos ni otros
medios para acelerar el
proceso de desconge-
lación que no sean los
recomendados por el
fabricante
● ADVERTENCIA: No dañe el sistema del
refrigerante
● ADVERTENCIA: No utilice aparatos
eléctricos dentro del
compartimento de
almacenamiento de
alimentos del aparato,
a menos que sean del
tipo recomendado por el
fabricante
Advertencia.
Page 54

4
ES
Indice.
Puesta en marcha por
primera vez
Asegúrese de que el armario no ha sido
daña do durante el transporte.
De no estar ven perfectas condiciones,
comu níqueselo inmediatamente al distribui-
dor.
Lavar el armario y la puerta por fuera y por
den tro con agua y jabón neutro no perfumado. Séquelo bien. No utilice estro pajos
metálicos ni sustancias abrasivas.
Mantenimiento
La limpieza interior se debe efectuar con
jabón neutro no perfumado.
El panel superior se debe desmontar y
limpiar periódicamente. Durante la limpieza,
se debe apagar y desenchufar el aparato.
El panel infe rior se puede desmontar, para
facilitar la limpieza del suelo.
Para asegurar el funcionamiento óptimo del sistema de refrigeración, limpiar
periódicamen te con cepillo o aspiradora el
condensador de alambre y el compresor.
No se olvide de limpiar el desagüe.
Conozca su refrigerador. ........................ 2
Advertencia............................................. 3
Puesta en marcha por primera vez ........ 4
Mantenimiento ........................................ 4
Si algo no funciona. ................................ 5
Dato tecnicos .......................................... 5
Instalacion. ............................................. 5
Panel de mandos.................................... 6
Cambio de lado de la manija en la
puerta. .................................................... 7
Ajuste de la puerta.................................. 9
Montaje de cerradura para armarios ...... 9
Garantía, repuestos y servicio .............. 10
Elininación de electrodomésticos ..........11
Page 55

5
ES
Si algo no funciona.
Antes de llamar al Servicio Técnico, compruebe que:
● La clavija esté correctamente enchufada.
● El fusible esté intacto.
● No esté desconectada la corriente.
● Los mandos estén correctamente ajus-
tados.
● Apague el aparato, p.ej. mediante el ter-
mostato, durante 15 min. Vuelva a ponerlo en marcha y controle, pasados 5 min.,
si se forma escarcha en el evaporador.
● No abra el armario si no es necesario.
Datos tecnicos.
Instalacion.
Ver página A - C
Instale el aparato en un lugar seco y de
forma que no esté expuesto a los rayos
directos del sol o a cualquier otra fuente de
calor.
IMPORTANTE: El aparato tiene que
nivel ar se. Esto se consigue fácilmente
regulando las patas ajustables en la parte
frontal del zócalo. El aparato no debe estar
apoyado contra la pared en el lado de las
bisagras.
Si el aparato es instalado sobre moqueta o
suelo de madera, debe ser de nuevo ajustado después de un tiempo, ya que puede
desnive l arse al ser un suelo blando.
Si se desea que el refrigerador de botellas
esté empotrado en un armario o algo similar, hay que considerar tres factores:
1. Para que el sistema de refrigeración funcione satisfactoriamente, tiene que haber
un hueco adecuado encima del refrigerador de botellas para la ventilación.
2. Al abrir la puerta, el refrigerador ocupa
más sitio, por lo cual se debe colocar la
puerta fuera del armario o debe haber un
hueco de 1,5 cm como mínimo en el lado
de las bisagras.
3. Entre el aparato y la pared debe haber
una distancia adecuada en el lado de las
bisagras.
Además, el armario puede ser adosado con
otro armario.
El enchufe con toma de tierra debe ser
colo - ca do encima del aparato, a 2 m sobre
el suelo.
Se deben cumplir las eventuales normas
loca les sobre la instalación de este aparato.
Durante las tormentas puede producirse un
cor te del suministro eléctrico. Debe tener
Este aparato cumple con las directivas UE
relevantes, incluso Directiva de Bajo Voltaje
2006/95/CEE y Directiva de Compatibilidad
Electromagnética 2004/108/CE.
La placa de características, situada en el
inte rior del aparato, contiene algunos datos
técnicos, además del número de tipo y
serie. del número de tipo y serie.
Page 56

6
ES
esto en cuenta al instalar el aparato en
casas de vera neo o otros lugares donde no
pueda detectar inmediatamente el corte de
suministro.
Se reserva el derecho de modicar la construc ción y equipos del aparato, sin previo
aviso.
Panel de mandos.
Conecte el aparato a la red eléctrica. La luz
verde indica que el aparato está encendido.
Puede graduarse el botón del termostato de
0 (calor máx.) a 7 (frío máx.). Encuentre la
posición del termostato que le proporcione
la temperatura deseada. Empiece en 4.
1. Cerrojo (no todos los aparatos tienen
cerrojo en la parte superior).
2. La luz verde indica que hay corriente
eléctrica.
3. Termómetro.
4. Botón del termostato.
5. Interruptor para el ventilador interno.
6. Interruptor de encendido/apagado de la
luz.
Page 57

7
ES
1. Extraiga la clavija de retención con un destornillador.
2. Saque la caja de la cerradura.
3. Aoje el panel superior. No
saque los tornillos, limítese a
aojarlos.
4. Haga bascular hacia adelante
el panel superior y extráigalo. (tiene tres puntos de sujeción)
5. Coloque el aparato sobre
la parte posterior y quite la
bisagra superior.
6. Saque el muelle de torsión
de la puerta junto con la clavija
de bisagra.
7. Quite la bisagra inferior.
8. Cambie de lado la manija.
9. Cambie de lado la clavija de
puerta para la bisagra.
10. Sujete la bisagra inferior en
el lado opuesto.
11. Cambie de lado el tope de
puerta de plástico.
12. Monte el muelle de torsión
junto con la clavija de bisagra
en el lado opuesto.
Cambio de lado de la manija en la puerta.
(No todos los aparatos llevan cerrojo)
Page 58

8
ES
14. Fije la
bisagra
superior
en el lado
opuesto.
15. Levante de nuevo el aparato. Inserte a presión el panel
superior (tiene tres puntos de
sujeción).
16. Sujete de nuevo el panel
superior con un destornillador.
17. Monte de nuevo la caja
de la cerradura y la clavija de
retención.
18. Después de haber cambiado de lado la manija, es importante asegurarse de que el burlete de sellado
ajuste bien en todo el perímetro de la puerta. De no ser así, puede calentarse el burlete con un secador
de pelo para que vuelva a su posición original. AVISO: Tenga cuidado de no calentar excesivamente el
burlete, ya que puede derretirse.
● Desmonte la clavija y el collar del puente
central.
● Desmonte la puerta inferior.
● Desmonte por presión el tapón ciego
del puente central y móntelo en el lado
opuesto.
AVISO:
Cambio de lado de manija en aparatos
de 2 puertas.
13. Monte la bisagra superior izquierda suministrada. (disponible como extra) Tense el muelle
de torsión = en dirección contrarreloj en el lado
izquierdo, en la del reloj en el lado derecho.
Page 59

9
ES
Montaje de cerradura
para armarios. (Una
puerta.)
(Extras opcionales.)
Ajuste de la puerta.
Montaje de cerradura
para armarios. (Dos
puertas.)
(Extras opcionales.)
Page 60

10
ES
Repuestos.
Al hacer pedidos de repuestos, le sugeri-
mos indicar el tipo y los números de serie
y de producto del electrodoméstico. Esta
información aparece en la placa de identicación del fabricante colocada en la parte
trasera del electrodoméstico. La placa del
fabricante contiene diversa información técnica, incluido el tipo de aparato y el número
de serie.
Exclusiones de la Garantía.
Fallos y daños causados directa o indirecta-
mente por uso erróneo o indebido, mantenimiento insuciente, integración o instalación erróneos o conexiones eléctricas
defectuosas. Incendio, accidente, rayos,
variaciones de voltaje u otras interferencias
eléctricas, incluidos fusibles defectuosos
o fallos en las instalaciones de suministro
eléctrico.
La Garantía no cubre reparaciones realizadas por centros de servicio distintos de los
autorizados, ni aquellos fallos y daños que
el fabricante demuestre que se deben a
causas distintas a defectos de fabricación o
de materiales.
Por favor, tenga en cuenta que los cambios
en la construcción del aparato o en sus
componentes cancelarán esta Garantía y
la responsabilidad de producto, y no podrá
utilizarse el aparato legalmente. También
quedará cancelada la autorización concedida en la placa de datos de servicio.
Los daños ocurridos durante el transpor-
te y descubiertos por el comprador son
principalmente un asunto a resolver entre
el comprador y el distribuidor, es decir, que
el distribuidor debe asegurarse de que
se resuelvan las quejas a satisfacción del
comprador.
Antes de llamar solicitando asistencia técnica, por favor intente resolver el fallo Ud.
mismo (vea Localización de Fallos). Si su
solicitud de asistencia técnica es injusticada, por ejemplo, si el electrodoméstico
ha fallado como resultado de un fusible
fundido o por un uso erróneo, deberá abonar los costes incurridos con su llamada de
solicitud de asistencia técnica.
Garantía, repuestos y servicio.
Números de producto
Page 61

11
ES
Eliminación de electrodomésticos.
Información para Usuarios sobre la
Recolección y Eliminación de aparatos
viejos y baterías usadas.
Estos símbolos en los productos,
embalajes y/o documentos adjuntos,
signican que los aparatos eléctricos
y electrónicos y las baterías no deberían ser mezclados con los desechos
domésticos. Para el tratamiento apropiado, la recuperación y el reciclado
de aparatos viejos y baterías usadas,
por favor, observe las normas de recolección aplicables, de acuerdo a su
legislación nacional y a las Directivas
2002/96/CE y 2006/66/CE.
Al desechar estos aparatos y ba-
terías correctamente, Usted estará
ayudando a preservar recursos valiosos y a prevenir cualquier potencial
efecto negativo sobre la salud de la
humanidad y el medio ambiente que,
de lo contrario, podría surgir de un
manejo inapropiado de los residuos.
Para mayor información sobre la recolección y el reciclado de aparatos
y baterías viejos, por favor, contacte
a su comunidad local, su servicio de
eliminación de residuos o al comercio
donde adquirió estos aparatos. Podrán aplicarse penas por la eliminación incorrecta de estos residuos, de
acuerdo a la legislación nacional.
Para usuarios empresariales en la
Unión Europea
Si usted desea descartar aparatos
eléctricos y electrónicos, por favor
contacte a su distribuidor o proveedor a n de obtener mayor información.
[Informacion sobre la Eliminación
en otros Países fuera de la Unión
Europea]
Estos símbolos sólo son válidos
dentro de la Unión Europea. Si desea
desechar este producto, póngase en
contacto con las autoridades locales
o con su distribuidor para que lein-
formen sobre el método correcto de
eliminación.
Nota sobre el símbolo de la bateria
(abajo, dos ejemplos de símbolos):
Este símbolo puede ser usado en
combinación con un símbolo químico. En este caso, el mismo cumple
con los requerimientos establecidos
por la Directiva para los químicos
involucrados
Page 62

2
IT
Impara a conoscere il tuo frigorifero per vini o
bottiglie:
Serratura
Luce superiore
Quadro di controllo
Targhetta
Mensola
Maniglia de portello
Portello de ventro
Incavo della punta
Piedi registrabili
Page 63

3
IT
Nel caso in cui quest’apparecchio contenga refrigerante a base di idrocarburi si
rimanda alle linee di condotta elencate più
sotto.
Se l’apparecchio contiene un refrigerante
inammabile, è essenziale accertarsi che i
tubi del refrigerante non risultino danneggiati.
Poiché l’apparecchio contiene una sostanza
refrigerante inammabile, è indispensabile
assicurarsi che non si verichino danni alle
tubazioni del refrigerante.
Lo standard EN378 stabilisce che il locale
in cui verrà installato l’apparecchio deve
avere un volume di almeno 1m³ per ogni 8
g di refrigerante a base di idrocarburi utilizzato negli apparecchi, in modo da prevenire la formazione di miscele inammabili
di gas ed aria nel locale in cui è collocato
l’apparecchio in caso di perdite al circuito
del refrigerante. La quantità di refrigerante
utilizzata nel vostro apparecchio è indicata
sulla targhetta dei dati tecnici.
ATTENZIONE: evitare l’ostruzione delle
aperture per la ventilazione
sull’involucro dell’apparec-
chio o sulla struttura interna.
ATTENZIONE: non utilizzare attrezzature
meccaniche o mezzi per
accelerare il processo di
sbrinamento diversi da quelli
raccomandati dal fabbri-
cante.
ATTENZIONE: non provocare danni al
sistema del refrigerante.
ATTENZIONE: non utilizzare apparecchia-
ture elettriche all’interno
dello scomparto frigorifero,
a meno che siano di tipo
omologato dal fabbricante.
ATTENZIONE: evitare di esporre l’apparec-
chio alla pioggia.
ATTENZIONE: questo apparecchio non è
concepito per essere utilizzato da bambini o persone
inabili, a meno che siano
adeguatamente sorvegliati
da una persona responsabile che si assicuri che
siano in grado di utilizzare
l’apparecchio senza pericoli.
Sorvegliare i bambini piccoli
in modo da assicurarsi che
non giochino con l’apparecchio.
● Tenere sempre le chiavi in un luogo diver-
so e fuori dalla portata dei bambini.
● Prima di sottoporre l’apparecchio ad
operazioni di manutenzione o di pulizia,
togliere la spina dalla presa di corrente o
staccare l’alimentazione elettrica.
● In caso di danni al cordone di alimentazione, la sostituzione di quest’ultimo deve
sempre essere effettuata dal fabbricante,
da un suo addetto alla manutenzione
o da simile personale qualicato onde
evitare situazioni di pericolo.
● Per l’Australia: Il cordone di alimentazione munito di spina è conforme alla norma
AS/NZS 3112.
● La formazione di brina sulle parti superiori e sulla parete interna dell’evaporatore
è un fenomeno naturale, e pertanto si
raccomanda di sbrinare l’apparecchio
durante le normali operazioni di pulizia e
di manutenzione.
● Le istruzioni devono contenere una
descrizione delle modalità di sostituzione
delle lampadine.
● FRIGORIFERO PER VINI - VKG:
Apparecchio destinato esclusivamente
alla conservazione di vino.
Attenzione.
Page 64

4
IT
Impara a conoscere il tuo frigorifero .........2
Attenzione.................................................3
Prima de utilizzare l’apprecchio ................4
Manutenzione ...........................................4
L’apparecchio ha smesso di funzionare. ..5
Dati tecnice ...............................................5
Installazione..............................................5
Pannello di comando ................................6
Invensione del portollo..............................7
Sostituendo la striscia di luce ...................9
Adattamento della porta. ..........................9
Garanzia,parti di ricambio e assistenza. 10
Smaltimento............................................11
Indici. Prima de utilizzare
l’apprecchio
Controllare che l’armadio non sia danneggiato.
Vi preghiamo di riferire qualsiasi danno immediatamente al vostro rivenditore. Lavate
l’armadio all’esterno ed all’interno con un
detergente delicato ed inodore, ed asciuga-
telo sfregando. Non usare polveri abrasive,
paglietta metallica o simili prodotti.
Manutenzione
Spegnere l’apparecchio ed estrarre la
spina mentre si lava l’armadio. Utilizzare
solo detergenti inodori per la pulizia interna
dell’apparecchio. Mentre si pulisce l’interno
dell’armadio si può togliere il pannello superiore per lavarlo.
Lo zoccolo può essere rimosso per facilitare
la pulizia del pavimento con un aspirapolvere. Per ottenere il migliore funzionamento
del refrigeratore è necessario pulire di tanto
in tanto il condensatore ed il compresso-
re sul retro dell’apparecchio usando una
spazzola od un aspirapolvere. Ricordarsi di
pulire il tubo di scarico.
CLASS 1 LED PRODUCT
Page 65

5
IT
Dati tecnici
Installazione
Vedere i disegni - pag. A - C
Installare l’armadio in luogo asciutto ed in
modo da non essere esposto direttamente
alla luce del sole o ad altra sorgente di
calore.
Livellare l’armadio regolando i piedini anteriori. L’armadio non deve venire a contatto
col muro sul lato dove si trovano i cardini
della porta. Quando si piazza l’armadio
su un tappeto o su un pavimento di legno,
esso deve essere livellato nuovamente
dopo qualche tempo poichè nel frattempo
l’armadio può assestarsi sul sottofondo
poco rigido.
Se desiderate installare l’apparecchio all’in-
terno di un mobile, si devono considerare 3
fattori:
1. Vi deve essere spazio sopra l’apparecchio perchè il sistema di refrigerazione
possa funzionare in modo soddisfacente.
2. Quando si apre la porta, l’apparecchio
occupa più spazio in larghezza e perciò
la porta deve essere posta fuori dal mobile oppure vi deve essere almeno 1,5 cm
d’aria sul lato del cardine.
3. La distanza dal muro sul lato del cardine
deve essere sufciente per permettere
l’apertura della porta.
Si possono inoltre montare insieme due
armadi.
E’ buona norma di sicurezza collegare al
muro la messa a terra almeno 2 ,0 m al di
sopra del pavimento. Devono essere inoltre
osservate tutte le regoli locali valevoli per
questo tipo di installazione.
Durante i temporali la corrente elettrica può
essere interrotta.
Prima di chiamare un tecnico, controllare
che:
● La spina sia bene inserita nella presa a
muro.
● Il fusibile sia intatto.
● La corrente non sia venuta a mancare.
● Tutti i comandi siano in posizione corret-
ta.
● Spegnere l’apparecchio per 15 minuti
(agendo ad esempio sul termostato).
Poi accenderlo di nuovo e dopo 5 minuti
controllare se l’evaporatore è brinato.
● Non aprire l’armadio quando non è ne-
cessario.
L’apparecchio ha
smesso di funzionare ?
Questo apparecchio è conforme alle pertinenti direttive UE, ivi comprese la Direttiva
Bassa Tensione 2006/95/CEE e la Direttiva
2004/108/CE relativa alla compatibilità
elettromagnetica
La targhetta ssata all’interno dell’apparecchio, fornisce diverse informazioni tecniche
nonchè tipo e numero di serie.
Page 66

6
IT
Dovreste tenerne conto quando si deve
installare l’apparecchio in bungalow di ne
settimana od in altri luoghi dove non si ha
la possibilità di scoprire immediatamente
che l’energia elettrica è stata interrotta. Non
osservando i precedenti avvertimenti, l’ap-
parecchio e gli accessori potrebbero essere
danneggiati in modo imprevedibile.
Pannello di comando
Collegare l’apparecchio alla rete elettrica.
La spia verde indica che l’apparecchio è
acceso.
La manopola del termostato può essere
regolata da 0 (meno freddo) a 7 (freddo
massimo). Regolare il termostato nella posizione che consente di ottenere la temperatura desiderata. Iniziare dal numero 4.
1. Dispositivo di chiusura (Non tutti gli apparecchi hanno il dispositivo di chiusura
in alto).
2. La spia verde indica la presenza di
corrente.
3. Termometro.
4. Manopola del termostato.
5. Interruttore del ventilatore interno.
6. Interruttore acceso/spento per la luce.
Page 67

7
IT
1. Togliere il perno di chiusura
mediante un cacciavite.
2. Estrarre il dispositivo di
chiusura.
3. Allentare il pannello supe-
riore. Allentare le viti senza
toglierle.
4. Inclinare in avanti il pannello
superiore e toglierlo. (è ssato
in tre punti)
5. Appoggiare l’apparecchio
sulla sua parte posteriore e
togliere la cerniera superiore.
6. Estrarre la molla di torsione
dalla porta insieme al perno
della cerniera.
7. Togliere la cerniera inferiore.
8. Spostare sull’altro lato la
maniglia.
9. Spostare sull’altro lato il perno della cerniera della porta.
10. Fissare la cerniera di fondo
sull’altro lato.
11. Spostare sull’altro lato la
protezione in plastica della
porta.
12. Montare la molla di torsione
insieme al perno della cerniera
sull’altro lato.
Spostamento sull’altro lato della maniglia della
porta
(Non tutti gli apparecchi hanno il dispositivo di chiusura)
Page 68

8
IT
14. Fissare
la cerniera
superiore
sul lato
opposto.
15. Risollevare l’apparecchio.
Far scattare al proprio posto il
pannello superiore (va bloccato
in tre punti).
16. Fissare nuovamente il
pannello superiore mediante un
cacciavite.
17. Rimontare il dispositivo di
chiusura e il relativo perno.
18. Dopo aver spostato la maniglia sull’altro lato, assicurarsi che la striscia di tenuta faccia ben presa
su tutto il percorso attorno alla porta. Se non fosse così, la striscia potrà essere facilmente risagomata
nella propria posizione dopo averla riscaldata con un asciugacapelli. NOTA BENE: Fare attenzione a non
riscaldare così tanto la striscia da farla fondere!
● Smontare il perno e la boccola sul ponte
centrale.
● Smontare la porta inferiore.
● Inserire a pressione il tappo di chiusura e
montarlo sul lato opposto.
NOTA BENE:
Spostamento sull’altro lato della maniglia
nei frigoriferi a 2 porte.
13. Montare la cerniera superiore sinistra fornita
assieme all’apparecchio. (disponibile come extra).
Serrare la molla di torsione = in senso antiorario sul
lato sinistro, in senso orario su quello destro.
Page 69

9
IT
Montagen do fecho em
aparelhos só com uma
porta.
(Opcionais extras.)
Adattamento della porta
Montagen do fecho em
aparelhos só com due
porta.
(Opcionais extras.)
Page 70

10
IT
Limitazioni della garanzia
Difetti e danni direttamente o indirettamente provocati da una gestione non corretta,
usi impropri, manutenzione insufciente,
montaggio, installazione o connessioni principali non corretti, fuoco, incidenti, fulmini,
variazioni di tensione o altre interferenze di
natura elettrica, ivi compresi fusibili difettosi
o guasti nelle installazioni principali, riparazioni eseguite da persone che non siano
i tecnici dei centri di servizio omologati,
nonché qualsiasi altro guasto e danno che il
fabbricante possa comprovare sia dovuto a
cause diverse da difetti di fabbricazione o di
materiale, non sono coperti dalla garanzia.
Si tenga presente che in caso di manomis-
sioni nella struttura dell’apparecchio o di
modiche alla componentistica dello stesso,
la garanzia e la responsabilità per danno
dai prodotti decadono, e l’apparecchio non
può essere utilizzato nel rispetto delle leggi.
Allo stesso modo, l’omologazione indicata
sulla targhetta risulterà invalidata.
I danni dovuti al trasporto scoperti dall’acquirente sono principalmente una questione
che va risolta tra l’acquirente ed il distributore, vale a dire che il distributore deve
assicurare che tali reclami vengano risolti in
modo soddisfacente per il cliente.
Prima di richiedere l’assistenza tecnica, Vi
invitiamo a controllare se non siate in grado
di risolvere il problema Voi stessi (vedi:
Ricerca guasti). Facciamo presente che in
caso di richieste di assistenza ingiusticate,
ad esempio se l’apparecchio non funziona a
causa di un fusibile bruciato o una gestione
non corretta, i costi dovuti alla Sua chiamata Le verranno addebitati.
Parti di ricambio
Quando si devono ordinare delle parti di
ricambio, indicare i numeri di prodotto e il
tipo, di serie e di produzione del Suo apparecchio. Queste informazioni sono riportate
sulla targhetta all’interno dell’armadio. La
targhetta contiene diverse informazioni di
carattere tecnico, ivi compresi i numeri di
tipo e di serie.
Nota: Quando il Suo apparecchio dev’essere riparato o sostituito, si rivolga sempre a
centri di assistenza autorizzati!
Garanzia, parti di ricambio e assistenza.
Numeri di prodotto
Page 71

11
IT
Smaltimento.
Informazioni per gli utenti sulla raccolta
e l’eliminazione di vecchie apparecchiture e batterie usate.
Questi simboli sui prodotti, sull’imballaggio, e/o sulle documentazioni
o manuali accompagnanti i prodotti
indicano che i prodotti elettrici, elet-
tronici e le batterie usate non devono
essere buttati nei riuti domestici
generici. Per un trattamento adeguato, recupero e riciclaggio di vecchi
prodotti e batterie usate, vi preghiamo di portarli negli appositi punti di
raccolta, secondo la legislazione vigente nel vostro Paese e le Direttive
2002/96/EC e 2006/66/EC.
Smaltendo correttamente questi
prodotti e le batterie, contribuirete a
salvare importanti risorse e ad evitare
i potenziali effetti negativi sulla salute
umana e sull’ambiente che altrimenti
potrebbero vericarsi in seguito ad un
trattamento inappropriato dei riuti.
Per ulteriori informazioni sulla raccolta e sul riciclaggio di vecchi prodotti
e batterie, vi preghiamo di contattare
il vostro comune, i vostri operatori
per lo smaltimento dei riuti o il punto
vendita dove avete acquistato gli
articoli.
Sono previste e potrebbero essere
applicate sanzioni qualora questi
riuti non siano stati smaltiti in modo
corretto ed in accordo con la legisla-
zione nazionale.
Per utenti commerciali nell’Unione
Europea
Se desiderate eliminare apparecchiature elettriche ed elettroniche,
vi preghiamo di contattare il vostro
commerciante od il fornitore per maggiori informazioni.
[Informazioni sullo smaltimento
riuti in altri Paesi fuori dall’Unione Europea]
Questi simboli sono validi solo all’interno dell’Unione Europea. Qualora
si desideri smaltire questo prodotto,
contattare le autorità locali o il rivenditore e chiedere informazioni sul
metodo corretto di smaltimento.
Nota per il simbolo delle batterie
(esempio con simbolo chimico
riportato sotto il simbolo principale):
Questo simbolo può essere usato
in combinazione con un simbolo
chimico; in questo caso è conforme
ai requisiti indicati dalla Direttiva per il
prodotto chimico in questione.
Page 72

2
RUS
Замок
Свет
Пульт управления
TЕХНИЧЕСКИЕ
ХAРAКTЕРИСTИКИ
Полка
Ручка
Дверь
Гнездо пальца ноги
Регулируемые ноги
Ознакомьтесь со своим холодильником для
вина:
Page 73

3
RUS
Меры предосторожности.
Если это изделие содержит углеводородный хладагент, соблюдайте указания,
приведенные ниже.
Поскольку данное изделие содержит
горючий хладагент, важно не допускать
повреждения трубопроводов хладагента.
Стандартом EN378 регламентируется,
что помещение, в котором вы устанавливаете изделие, должно иметь объем
1 м³ на 8 г углеводородного хладагента,
используемого в устройстве. Это требование имеет своей целью избежать образования горючей газо-воздушной смеси
в помещении, где находится изделие, в
случае нарушения герметичности контура хладагента. Количество хладагента,
используемого в вашем изделии, указано
на табличке с паспортными данными.
ОСТОРОЖНО:Следите за тем, чтобы
вентиляционные отверстия в шкафу изделия или
встроенной конструкции
оставались открытыми
ОСТОРОЖНО:Для ускорения процесса
размораживания не разрешается использовать
никаких механических
предметов или других
средств, кроме рекомендованных изготовителем
ОСТОРОЖНО:Оберегайте контур хлада-
гента от повреждений
ОСТОРОЖНО:Не используйте электри-
ческие приборы внутри
охлаждаемого отсека хранения, исключая устройства рекомендованного
изготовителем типа
ОСТОРОЖНО: Не оставляйте изделие
под дождем
ОСТОРОЖНО:Данное изделие не рас-
считано на использование
детьми или немощными
людьми, если только за
ними нет надлежащего
контроля со стороны ответственного лица, позволяющего обеспечить
безопасное использование.
Необходимо присматривать за детьми для того,
чтобы они не играли с
изделием
● Храните ключи в отдельном месте, недоступном для детей
● Прежде чем приступать к техническому обслуживанию или мойке изделия,
выньте вилку шнура питания изделия
из сетевой розетки или отключите источник электропитания
● В случае повреждения шнура питания
изготовитель, его сервисный агент
или иные квалифицированные лица
должны заменить его во избежание
опасности
● Замечание для Австралии: Шнур
питания имеет вилку по стандарту AS/
NZS 3112.
● Образование инея на внутренней
стенке испарителя и верхних частях
явля обычной мойки или технического
обслуживания
● Указания по замене перегоревших
ламп должны быть включены в инструкцию
● Следует иметь в виду, что внесение
Page 74

4
RUS
СОДЕРЖAНИЕ:
УХОД
ПОДКЛЮЧЕНИЕ
Нeобходимо провeрить оборудовaниe нa
нaличиe поврeждeний, нaнeсённых во
врeмя трaнспортировки. При
обнaружeнии тaких поврeждeний слeдуeт
нeмeдлeнно сообщить о них постaвщику.
Пeрeд нaчaлом эксплуaтaции вымыть
оборудовaниe внутри и снaружи слaбым
моющим рaствором бeз зaпaхa и зaтeм
нaсухо вытeрeть. Зaпрeщaeтся
употрeблять чистящиe порошки,
мeтaлличeскиe щётки и.т.д. Подключeниe
к источнику питaния: см. рaздeл 5.
Для мытья оборудовaния изнутри
слeдуeт
примeнять только моющee срeдство бeз
зaпaхa. При мытьe внутрeннeй обшивки
шкaфa можно тaкжe снять и вeрхнюю
пaнeль.
В процeссe чистки нeобходимо
отключить оборудовaниe и вынуть вилку
из розeтки. Можно тaкжe снять и
нижнюю пaнeль и пропылeсосить пол
под шкaфом.
С цeлью обeспeчeния оптимaльной
рaботы систeмы охлaждeния нeобходимо
врeмя от врeмeни прочищaть щёткой или
пылeсосом проволочный кондeнсaтор,
рaсположeнный в зaднeй стeнкe
холодильного шкaфa.
Нe зaбывaйтe прочищaть сток для воды.
Ознакомьтесь со своим холодильником
для вина ................................................2
Меры предосторожности. ..................... 3
ПОДКЛЮЧЕНИЕ ...................................4
УХОД ...................................................... 4
ВОЗМОЖНЫЕ
НЕИСПРAВНОСTИ ............................... 5
TЕХНИЧЕСКИЕ
ХAРAКTЕРИСTИКИ ..............................5
УСTAНОВКA ..........................................5
Панель управления. .............................6
Изменение стороны подвеса двери.. ..7
УСTAНОВКA ДВЕРИ. ........................... 9
Монтaж зaмкa в однодвeрном
холодильникe. .......................................9
Гарантия, запасные
части и сервис. ....................................10
Утилизация .......................................... 11
CLASS 1 LED PRODUCT
изменений в конструкцию изделия приводит к полному аннулированию гарантии и обязательств производителя
Page 75

5
RUS
ВОЗМОЖНЫЕ
НЕИСПРAВНОСTИ
Пeрeд вызовом мaстeрa провeрить
слeдующee:
● Вилкa прaвильно встaвлeнa в розeтку
● Прeдохрaнитeль нe пeрeгорeл
● Всe кнопки нa пaнeли устaновлeны
● прaвильно
● Отключить кaмeру нa 15 минут, зaтeм
● включить eё сновa и чeрeз 5 минут
● провeрить, обрaзовaлся ли инeй нa
● испaритeлe.
● Нe открывaть кaмeру бeз
● нeобходимости.
TЕХНИЧЕСКИЕ
ХAРAКTЕРИСTИКИ
УСTAНОВКA
.См. рис. нa стр. A - C Оборудовaниe
слeдуeт устaнaвливaть в сухом мeстe,
нe подвeржeнном воздeйствию прямых
солнeчных лучeй или других источников
тeплa.
ВНИМAНИЕ: Оборудовaниe должно
стоять ровно. Это достигaeтся при помощи рeгулируeмых опор, aсположeнных
в пeрeднeй чaсти основaния. Кaмeрa
нe должнa прислоняться к стeнe стороной, гдe рaсположeны пeтли. При
устaновкe оборудовaния нa коврe или
нa дeрeвянном полу eго слeдуeт врeмя
от врeмeни вырaвнивaть, тaк кaк оно
осeдaeт нa мягком основaнии.
Если шкaф для бутылок монтируeтся
в другой шкaф или оборудовaниe, то
нeобходимо обрaтить внимaниe нa
слeдующиe 3 момeнтa:
1. Для обeспeчeния оптимaльной рaботы
систeмы охлaждeния нaдо остaвить
свободноe прострaнство нaд холодильником
2. С открытой двeрцeй шкaф
зaнимaeт большe мeстa в ширину. Поэтому eобходимо, чтобы
двeрь нe соприкaсaлaсь с двeрью
оборудовaния, кудa вмонтировaн холодильный шкaф, либо мeжду боковой
стeнкой оборудовaния и стороной холодильного шкaфa, гдe рaсположeны
пeтли, было рaсстояниe нe мeнee 1,5
см
3. Нeобходимо обeспeчить рaсстояниe
мeжду стeнкой холодильникa, гдe
рaсположeны пeтли, и стeной Кромe
того, холодильный шкaф для бутылок
возможно состaвлять с другим шкaфом
Настоящее устройство отвечает требованиям соответствующих директив ЕС,
включая Директиву по низковольтовым
устройствам 2006/95 EG и Директиву
по электромагнитной совместимости
2004/108ЕЭК
Page 76

6
RUS
В цeлях бeзопaсности розeткa с
зaзeмлeниeм должнa нaходиться нa
высотe 2,0 м от полa и нaд холодильником. Нeобходимо соблюдaть всe
трeбовaния, кaсaющиeся устaновки
тaкого оборудовaния в дaнном рeгионe.
Устaнaвливaя кaмeру чa дaчe или в другом мeстe, слeдуeт принять во внимaниe,
что во врeмя грозы можeт отключиться
элeктроэнeргия. Конструкция дeтaлeй
кaмeры можeт быть видоизмeнeнa бeз
прeдвaритeльного увeдомлeния.
Панель управления.
Подключите устройство к сети питания.
Зеленый индикатор показывает, что изделие подключено к электросети.
Переключатель термостата может регулироваться от 0 (самая высокая температура) до 7 (самая низкая). Найдите на
термостате положение, обеспечивающее
нужную температуру. Начните с 4.
1. Замок (не все устройства имеют замок
в верхней части).
2. Зеленый свет индикатора означает
подключение к электросети.
3. Термометр.
4. Кнопка термостата.
5. Включатель внутреннего вентилятора.
6. Включатель/Выключатель лампы.
Page 77

7
RUS
1. Удалите фиксатор замка с
помощью отвертки.
2. Извлеките корпус замка.
3. Ослабьте верхнюю панель.
Не удаляйте винты. Их следует только ослабить.
4. Наклоните верхнюю панель
вперед и снимите ее (она закреплена в трех местах).
5. Положите аппарат на
заднюю стенку и снимите
верхнюю петлю.
6. Извлеките торсионную
пружину из двери вместе со
штырем петли.
7. Снимите нижнюю петлю.
8. Переставьте ручку двери
на противоположную сторону.
9. Переставьте штырь на
петлю с противоположной
стороны.
10. Закрепите нижнюю петлю
с противоположной стороны.
11. Переместите пластиковую
защиту двери на противоположную сторону.
12. Установите торсионную пружину вместе со штырем петли на
противоположной стороне.
Изменение стороны подвеса двери.
(не все устройства имеют замок)
Page 78

8
RUS
13. Установите левую петлю, входящую в комплект поставки. Затяните торсионную пружину
против часовой стрелки, если она с левой стороны, или по часовой стрелке, если она с правой.
14. Закрепите
верхнюю петлю на
противоположной
стороне.
15. Верните аппарат в вертикальное положение. Защелкните верхнюю панель (она
должна быть зафиксирована в
трех местах).
16. Закрепите верхнюю
панель с помощью отвертки.
17. Снова установите корпус
и фиксатор замка.
18. После изменения стороны подвеса важно обеспечить правильную установку уплотнительной
прокладки по всему периметру двери. Если плотное прилегание не достигнуто, можно разогреть
прокладку с помощью фена и установить ее на место. Внимание: Избегайте излишнего нагревания
уплотнительной прокладки так, т.к. она может расплавиться.
Page 79

9
RUS
УСTAНОВКA ДВЕРИ.
● Отвинтите штырь и крепление средней
петли.
● Снимите нижнюю дверь.
● Установите заглушку для средней пет-
ли с противоположной стороны.
Внимание:
Изменение подвеса двери
на холодильниках с 2 дверями.
Монтaж зaмкa
в однодвeрном
холодильникe
(2 двери)
(Опционное экстра.)
Монтaж зaмкa
в однодвeрном
холодильникe. (одна
дверь)
(Опционное экстра)
Page 80

10
RUS
Отказ от гарантийных обязательств
Поломки и повреждения, обусловленные
напрямую или косвенно несоблюдением
правил эксплуатации, использованием не
по назначению, неудовлетворительным
техническим обслуживанием, неправильным механическим или электрическим
монтажом. Пожары, аварии, удары молнии, перепады напряжения или другие
электрические нарушения, включая
дефектные плавкие предохранители или
неисправности питающей сети.
Следует иметь в виду, что внесение
изменений в конструкцию изделия или
комплектацию изделия ведет к аннулированию гарантии и ликвидации ответственности за качество изделия, а само
изделие нельзя будет эксплуатировать
законно. Сертификация, указанная на
табличке с паспортными данными, также
станет недействительной.
Гарантия, запасные
части и сервис.
Вопросы, связанные с транспортными
повреждениями, обнаруженными покупателем, как правило, решаются между
покупателем и дистрибьютором, т.е.
дистрибьютор обязан удовлетворить претензии покупателя.
Прежде чем обращаться к специалистам
за оказанием технической помощи, выясните, не можете ли вы устранить неисправность самостоятельно. Если на ваше
обращение за оказанием помощи гарантия не распространяется, например, если
изделие вышло из строя в результате
перегорания плавкого предохранителя
или нарушения правил эксплуатации,
вам будет выставлен счет, исходя из расходов на оказание технической помощи.
Запасные части
При заказе запасных частей укажите
тип, Продукт и заводской номера вашего
изделия . Эта информация приведена
на табличке с паспортными данными
на задней стенке изделия. Табличка с
паспортными данными содержит различную техническую информацию, включая
тип и серийные номера.
Примечание: При необходимости ремонта или замены вашего изделия обращайтесь только в официальные сервисные
центры!
Продукт номера
Page 81

11
RUS
Утилизация.
Информация по обращению с отходами для стран,
не входящих в Европейский Союз
Действие данных символов распространяется только на
Европейский Союз.
Если Вы собираетесь выбросить данный продукт,
узнайте в местных органах власти или у дилера, как
следует поступать с отходами такого типа.
Page 82

A
Page 83

B
Макс 36 кг
Max. 36 kg
Max. 85 kg.
Макс 85 кг
Page 84

91.93.151-03
UK Reserving the right to alter specications without prior notice.
DE Recht auf Änderungen vorbehalten.
FR Nous nous réservons le droit d’apporter toutes modications à nos produits
DK Ret til ændringer forbeholdes
NL Recht tot wijzigingen voorbehouden
ES La empresa se reserva el derecho a efectuar modicaciones
IT Si riserva il diritto di modicare le speciche
RUS Сохраняем за собой право на внесения изменений в технические
характеристики без предварительного уведомления.
 Loading...