

Page 1
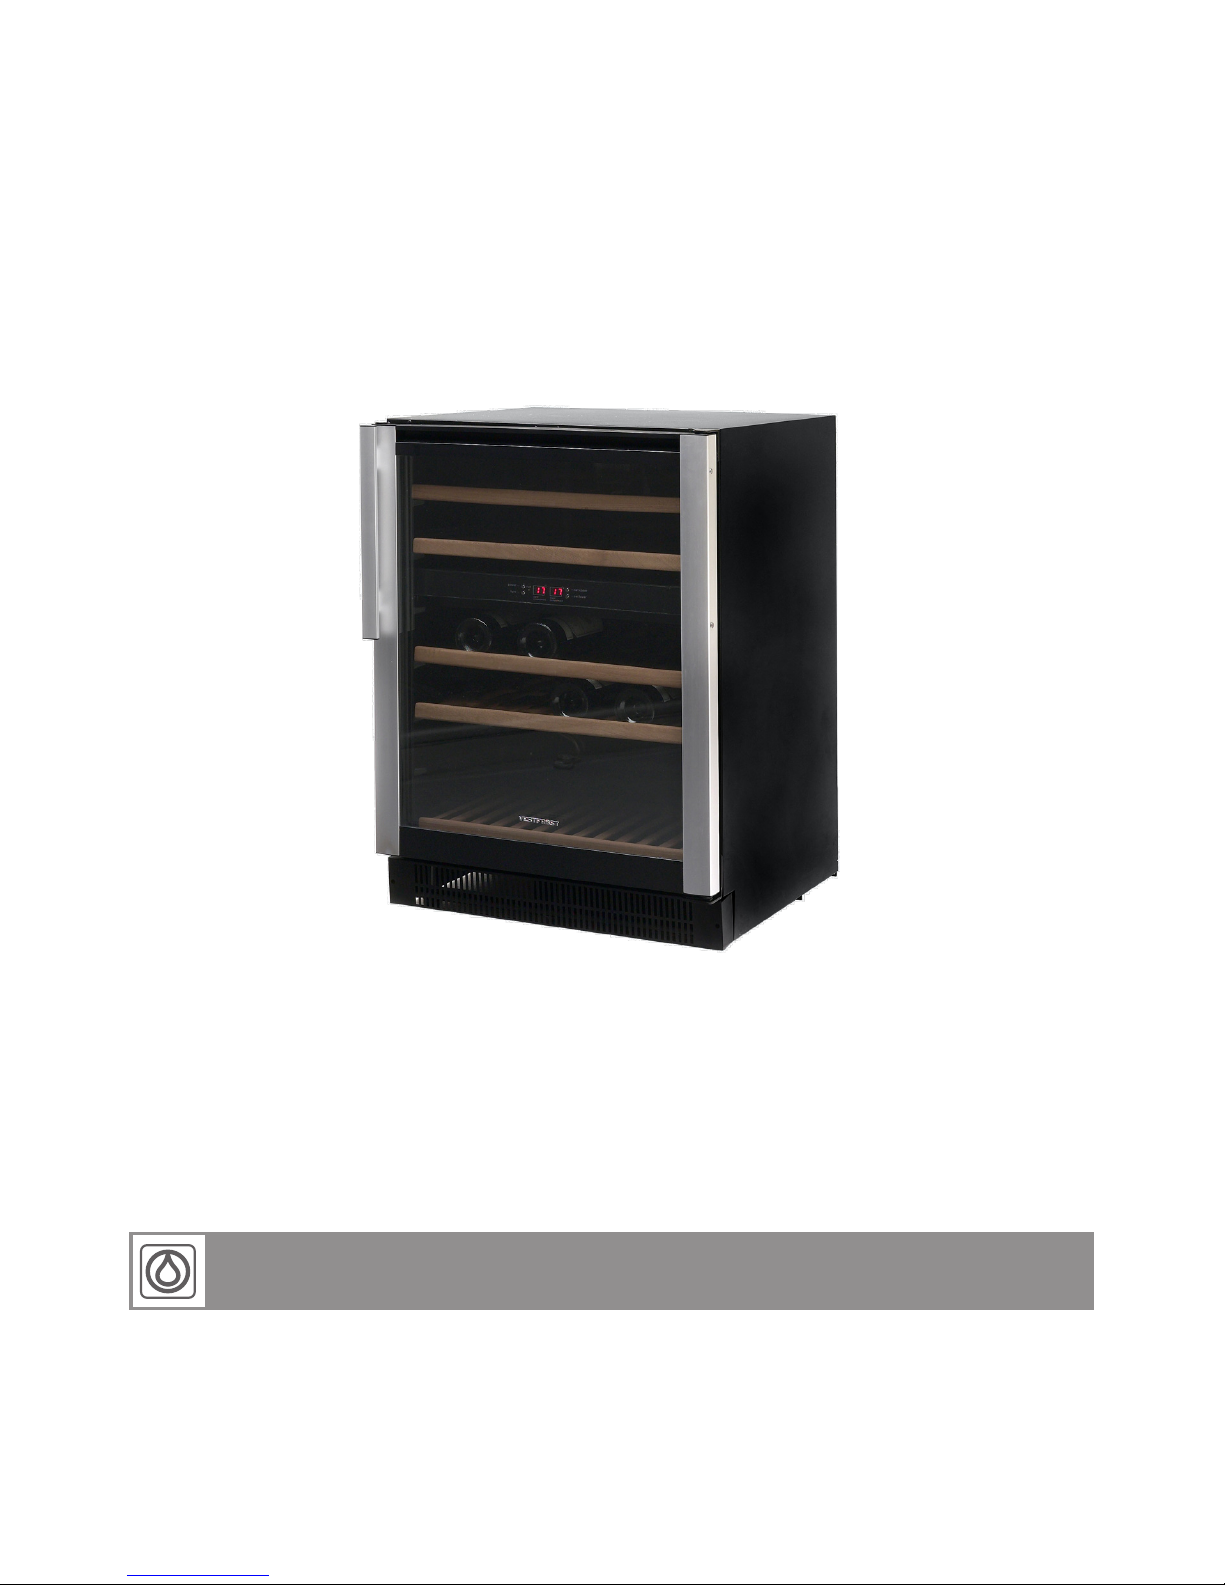
Compact Wine cabinets
GB Instructionsforuse
DE Bedienungsanleitung
FR Moded’emploi
DK Brugsanvisning
Page 2

2
GB
In case this appliance contains hydrocarbon refrigerant please refer to guidelines
listed below.
As the appliance contains a ammable
refrigerant, it is essential to ensure that the
refrigerant pipes are not damaged.
Standard EN378 species that the room in
which you install your appliance must have
a volume of 1m³ per 8 g of hydrocarbon
refrigerant used in the appliances. This is
to avoid the formation of ammable gas/
air mixtures in the room where the appliance is located in the event of a leak in the
refrigerant circuit. The quantity of the refrigerant used in your appliance is indicated on
the rating plate.
WARNING: Keep ventilation openings in
the appliance’s cabinet or in
the built-in structure clear of
obstruction
WARNING: Do not use other mechanical
devices or other means to ac-
celerate the defrosting process
than those recommended by
the manufacturer
WARNING: Do not damage the refrigerant
system
WARNING: Do not use electricalappli-
ances inside the refrigerated
storage compartment, unless
they are of a type recommended by the manufacturer
WARNING: Do not expose the appliance
to rain
WARNING: This appliance is not intended
for use by young children or
inrm persons unless they have
been adequately supervised by
a responsible person to ensure
that they can use the appliance
safely. Young children should
be supervised to ensure that
they do not play with the appliance
● Always keep the keys in a separate place
and out of reach of children
● Before servicing or cleaning the appliance, unplug the appliance from the
mains or disconnect the electrical power
supply
● If the supply cord is damaged, it must be
replaced by the manufacturer, its service
agent, or similarly qualied persons in
order to avoid a hazard
● RelevantforAustralia: Supply cord
tted with a plug complies with AS/NZS
3112.
● Frost formation on the interior evaporator
wall and upper parts is a natural phenomenon. Therefore, the appliance should
be defrosted during normal cleaning or
maintenance
● Please note that changes to the appliance construction will cancel all warranty
and product liability
● This appliance is intended to be used
exclusively for the storage of wine
Warning.
Page 3

3
GB
Before operating your new appliance,
please read the following instructions carefully as they contain important information
on safety, installation, operation and maintenance. Keep the instructions for future
reference. On receipt, check to ensure that
the appliance has not been damaged during transport. Transport damage should be
reported to the local distributor before the
wine cooler is put into use.
Remove the packaging. Clean the inside of
the cabinet using warm water with a mild
detergent. Rinse with clean water and dry
thoroughly (see cleaning instructions). Use
a soft cloth. If the appliance has been laid
down during transport, or if it has been
stored in cold surroundings (colder than
+5°C), it must stabilise in an upright position
for at least one hour before being switched
on.
Warning ..................................................2
Before use ..............................................3
Technical data.........................................3
Get to know your wine cooler. ................4
Installation and start-up ..........................4
Change of hinge side...........................6-7
Operation and function ........................8-9
Defrosting,
cleaning and maintenance....................10
Removing the shelves ..........................10
Fault nding .......................................... 11
Warranty, spare parts and service ........12
Disposal ................................................13
Thankyou for purchasing your new
wine cooler. Please note that these instructions apply to all wine coolers in the Compact wine range. Illustrations and ttings
may therefore not necessarily correspond
exactly to your model.
Contents Beforeuse.
Technicaldata.
This device complies with relevant EU
directives including Low Voltage Directive
2006/95 EEC. and Electromagnetic Compatibility Directive 2004/108/EC
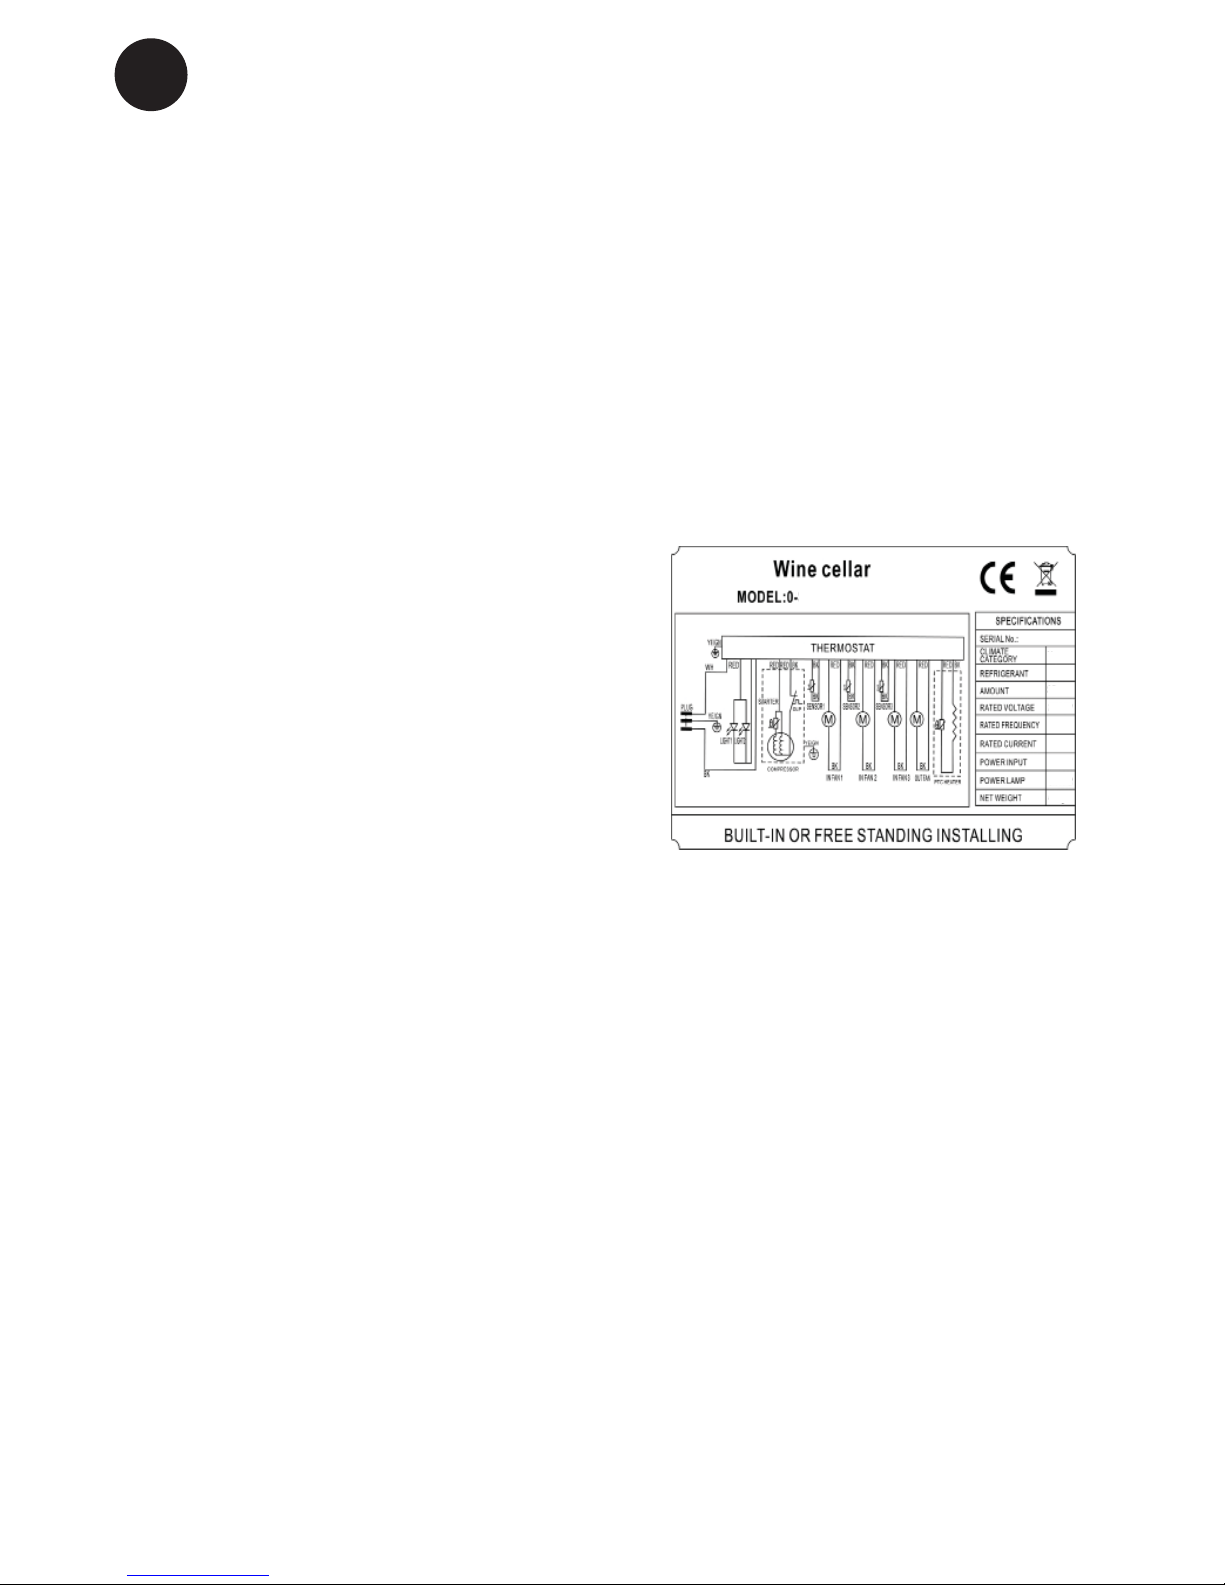
The rating plate provides various technical information as well as type and serial
number.
Page 4
4
GB
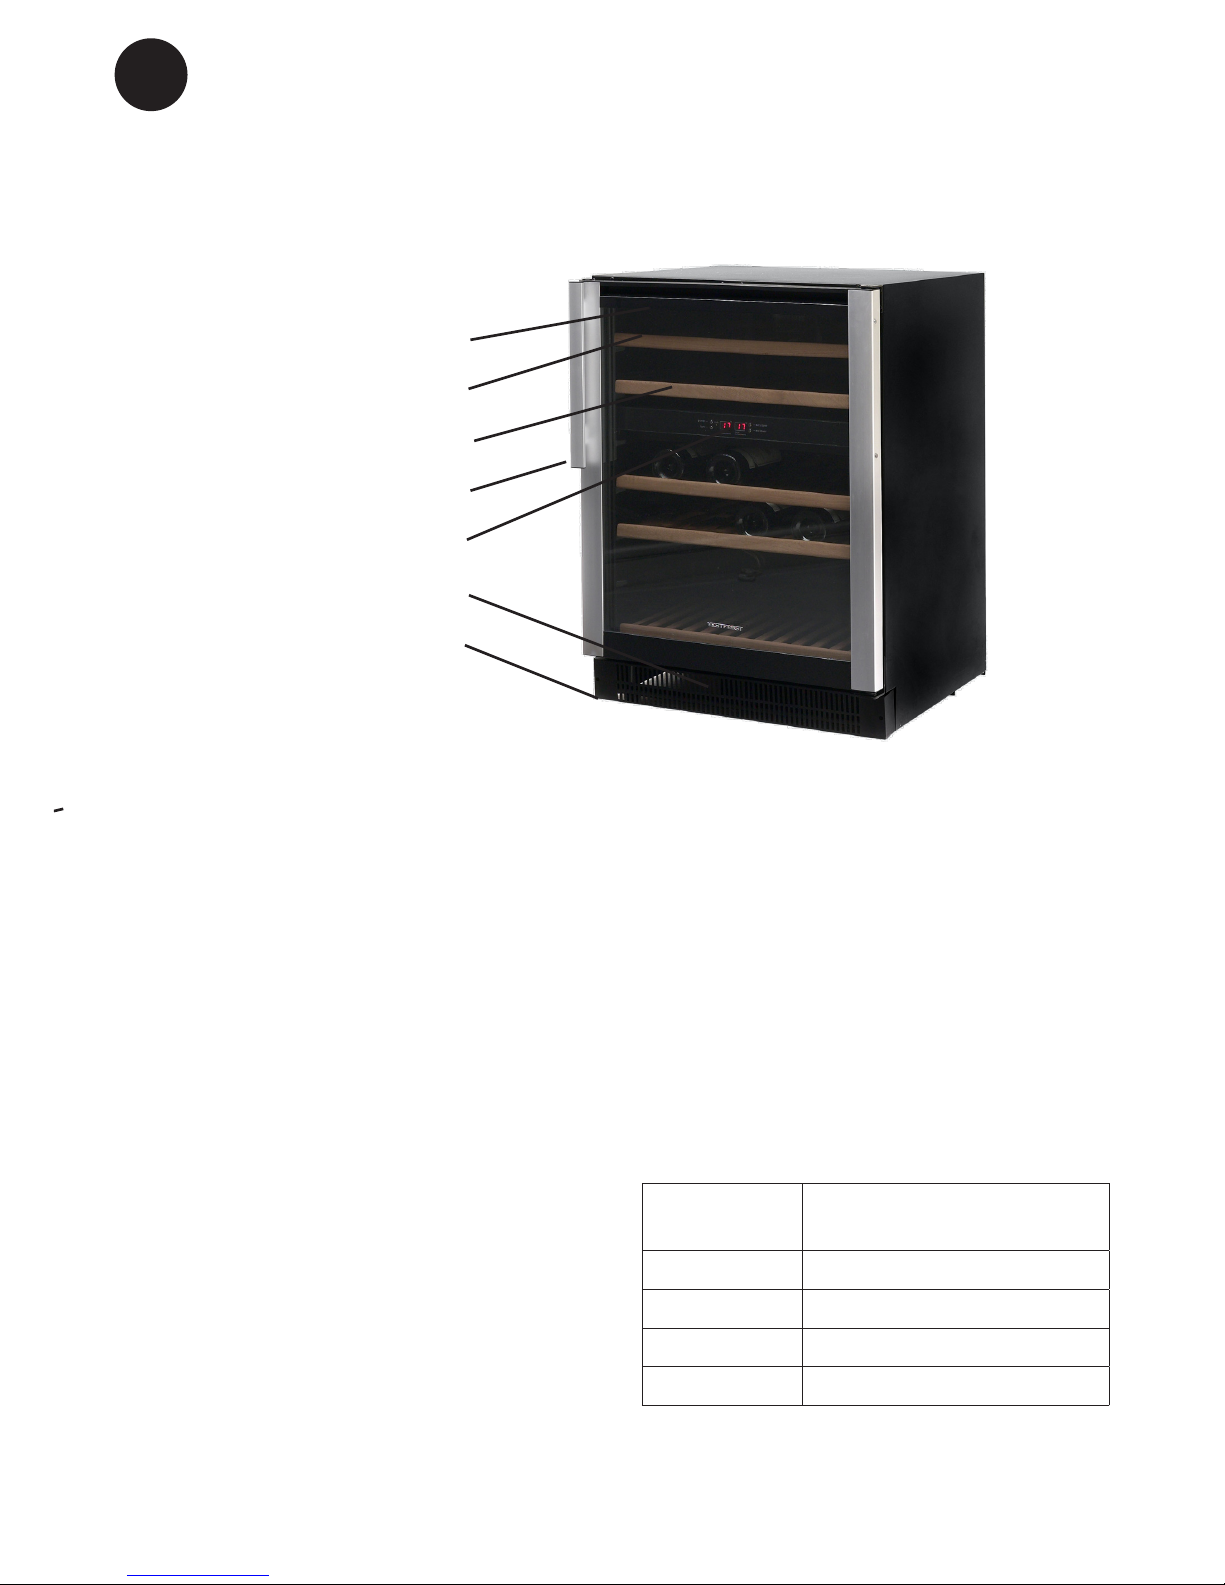
Rating plate (on the back)
Lighting
Identication plate
Wooden shelf
Door handle
Control panel
Kick plate
Adjustable feet
Gettoknowyourwinecooler.
g.1
Installationandstart-up.
Placement
For safety and operational reasons, the appliance must not be installed outdoors.
The appliance should be placed on a level
surface in a dry, well ventilated room (max.
75% relative air humidity). Never place the
appliance close to sources of heat such as
cookers or radiators, and avoid placing it in
direct sunlight.
Roomtemperature
The climate class is stated on the rating
plate (see g. 1 on page 3 and g. 11 on
page 12). This species the optimum room
temperature.
Climate
class
Optimumroomtemperature
SN +10 ºC to +32 ºC
N +16 ºC to +32 ºC
ST +18 ºC to +38 ºC
T +18 ºC to +43 ºC
Page 5
5
GB
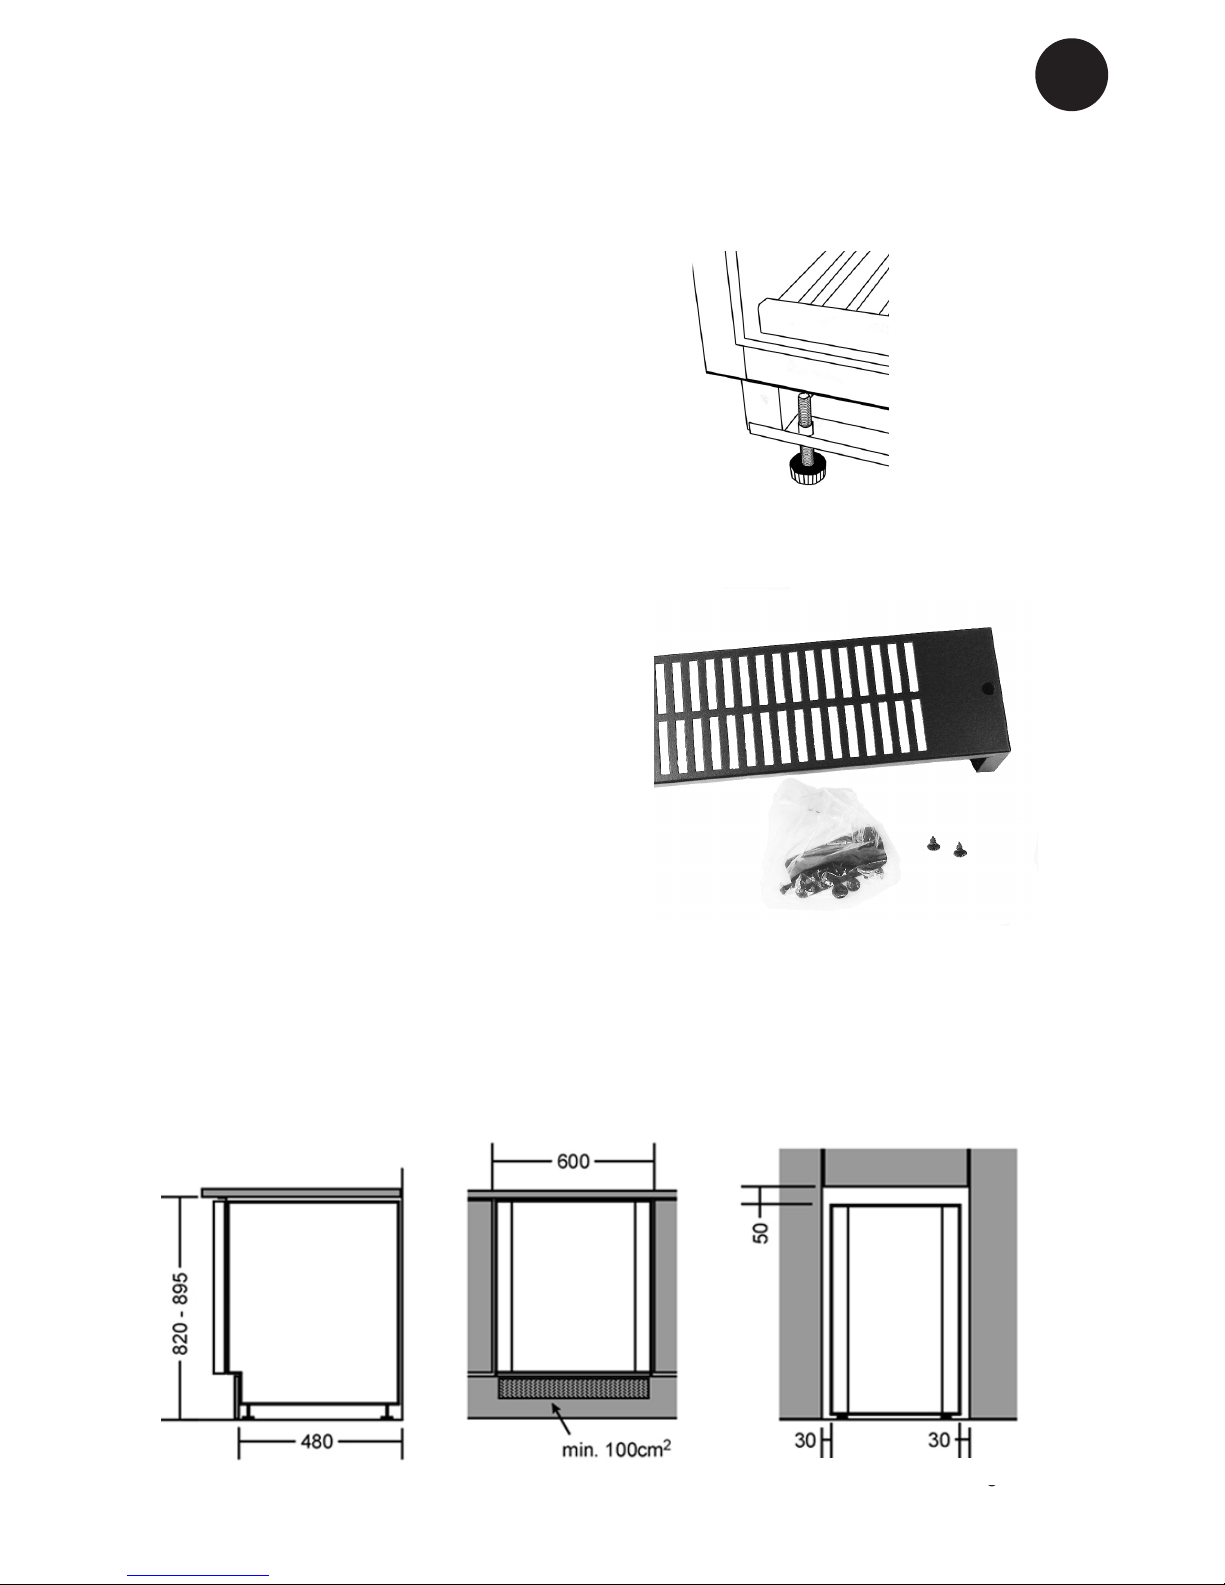
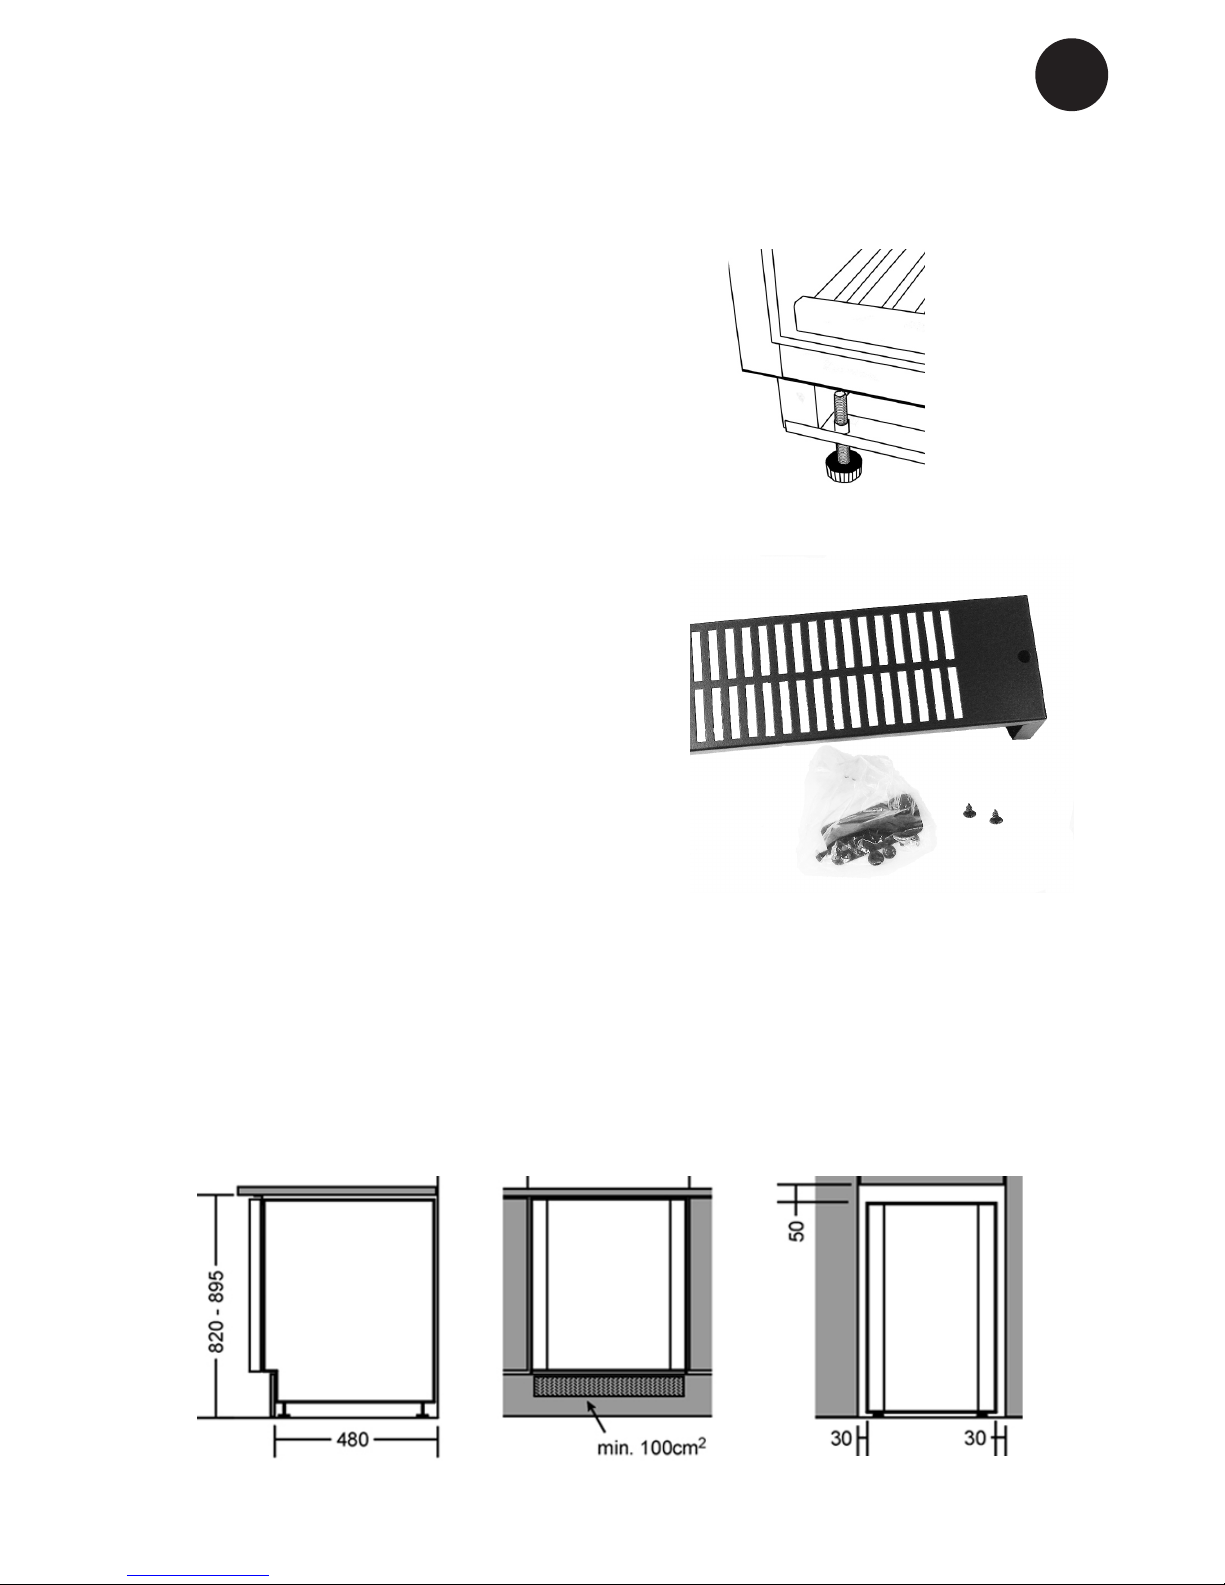
Installation
The surface on which the appliance is to be
placed must be level. Do not use a frame
or similar. It is important that the appliance
be absolutely level. It can be levelled by
screwing the adjustable feet at the front of
the appliance up or down (g. 2).
Use a spirit level to check that the appliance
is absolutely level sideways.
Build-in
W32 is only for free-standing, and suf-
cient free air around the appliance must be
ensured. (g. 4)
The appliances W45andW38 can be
installed as built-in units in kitchen elements
or be placed free-standing (g. 3).
At built-in condition ensure sufcient airow
through the kitchen base in front of the
appliance. The total cross section of the
opening must be as described in g. 3, and
individual air duct clearance must be at
least 5 mm.
Along with your new cabinet is a replaceable kick plate which can be xed with the
two screws. These two screws are located
in the accessories bag, see gure 2_1
g. 2_1
g. 3
g. 4
g. 3
g. 4
If needed there is a kit in the accessories
bag, see gure 2_1, for xing the cabinet up
against a table top.
g. 2
Page 6
6
GB
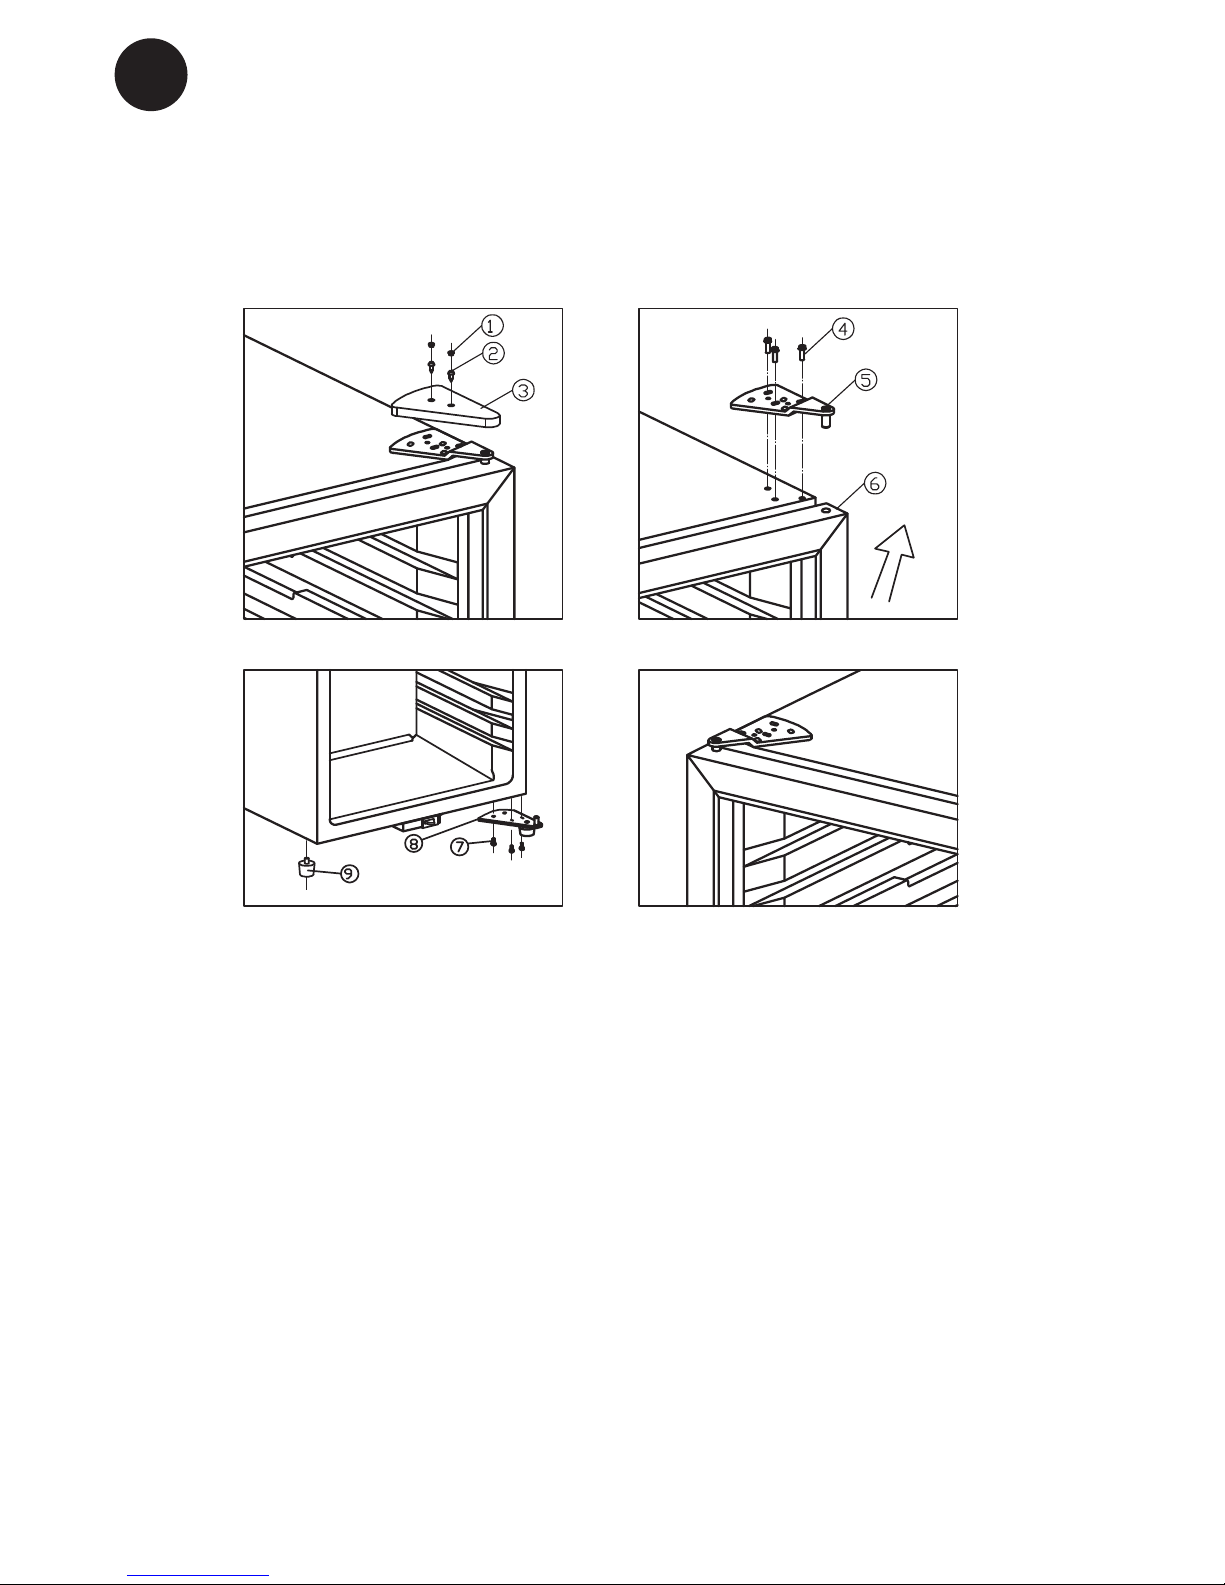
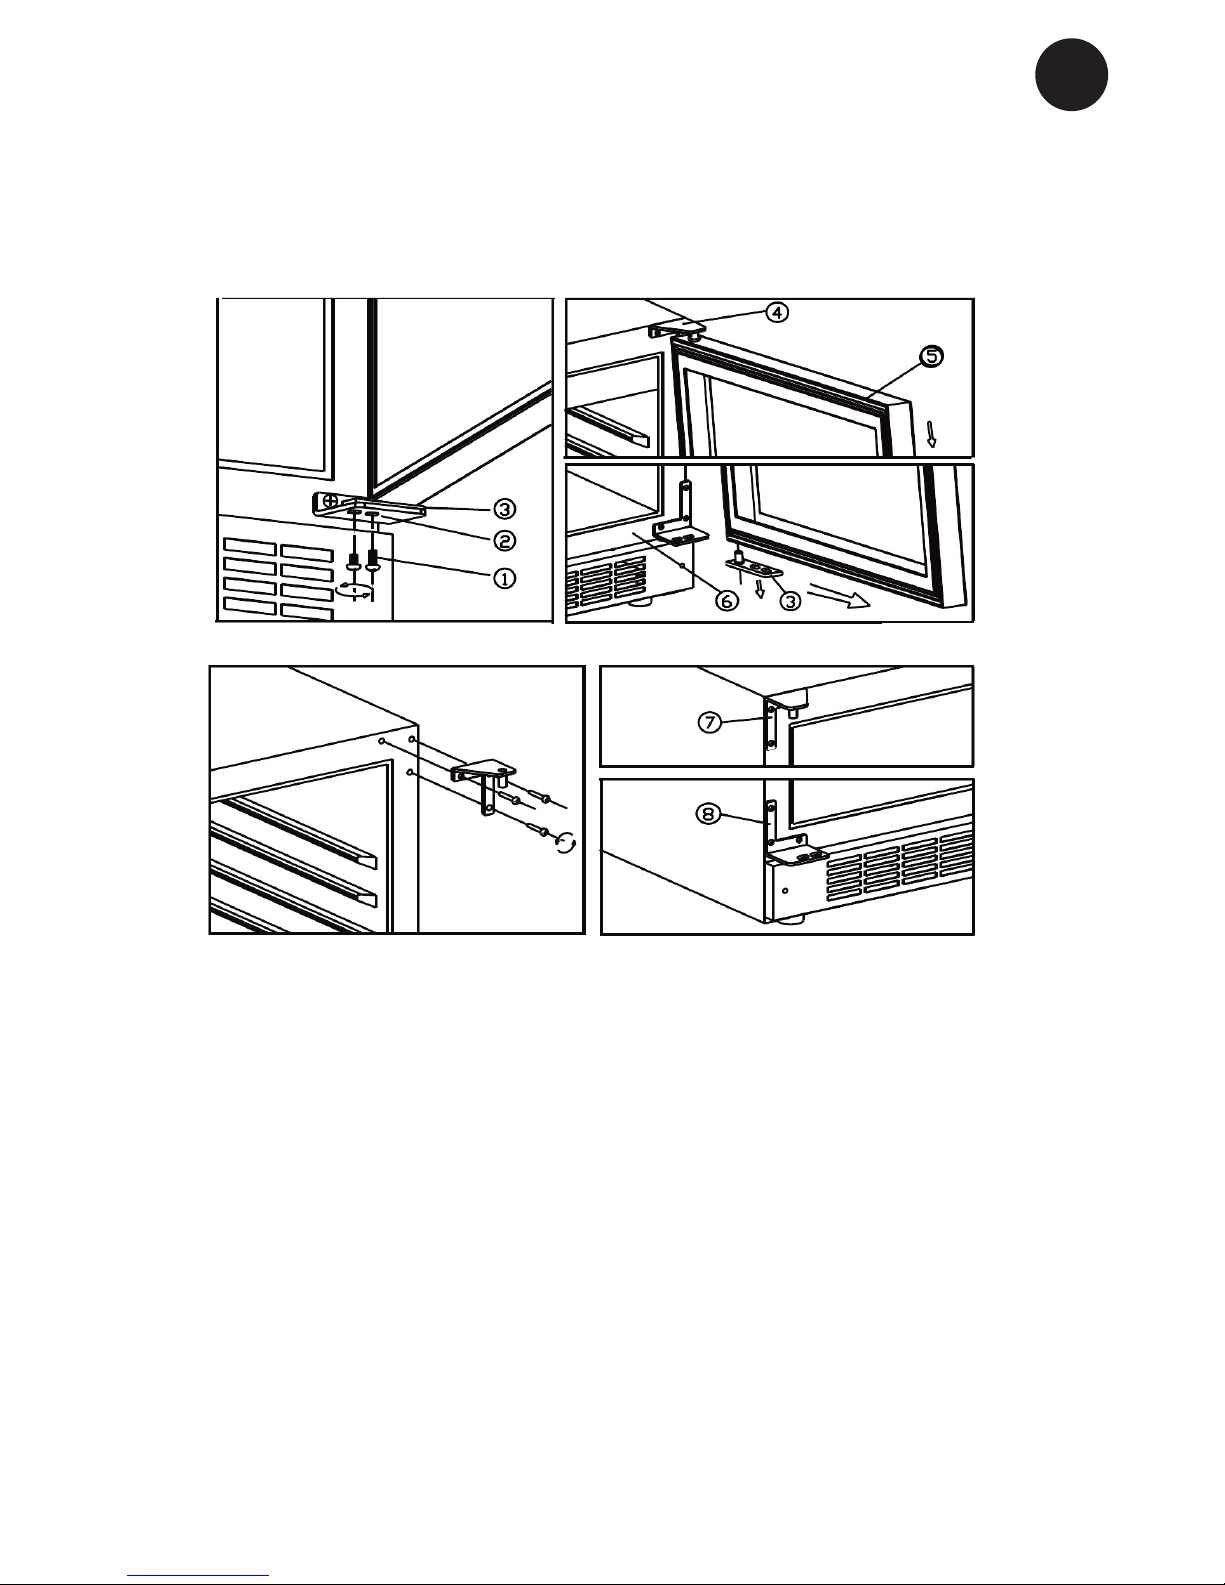
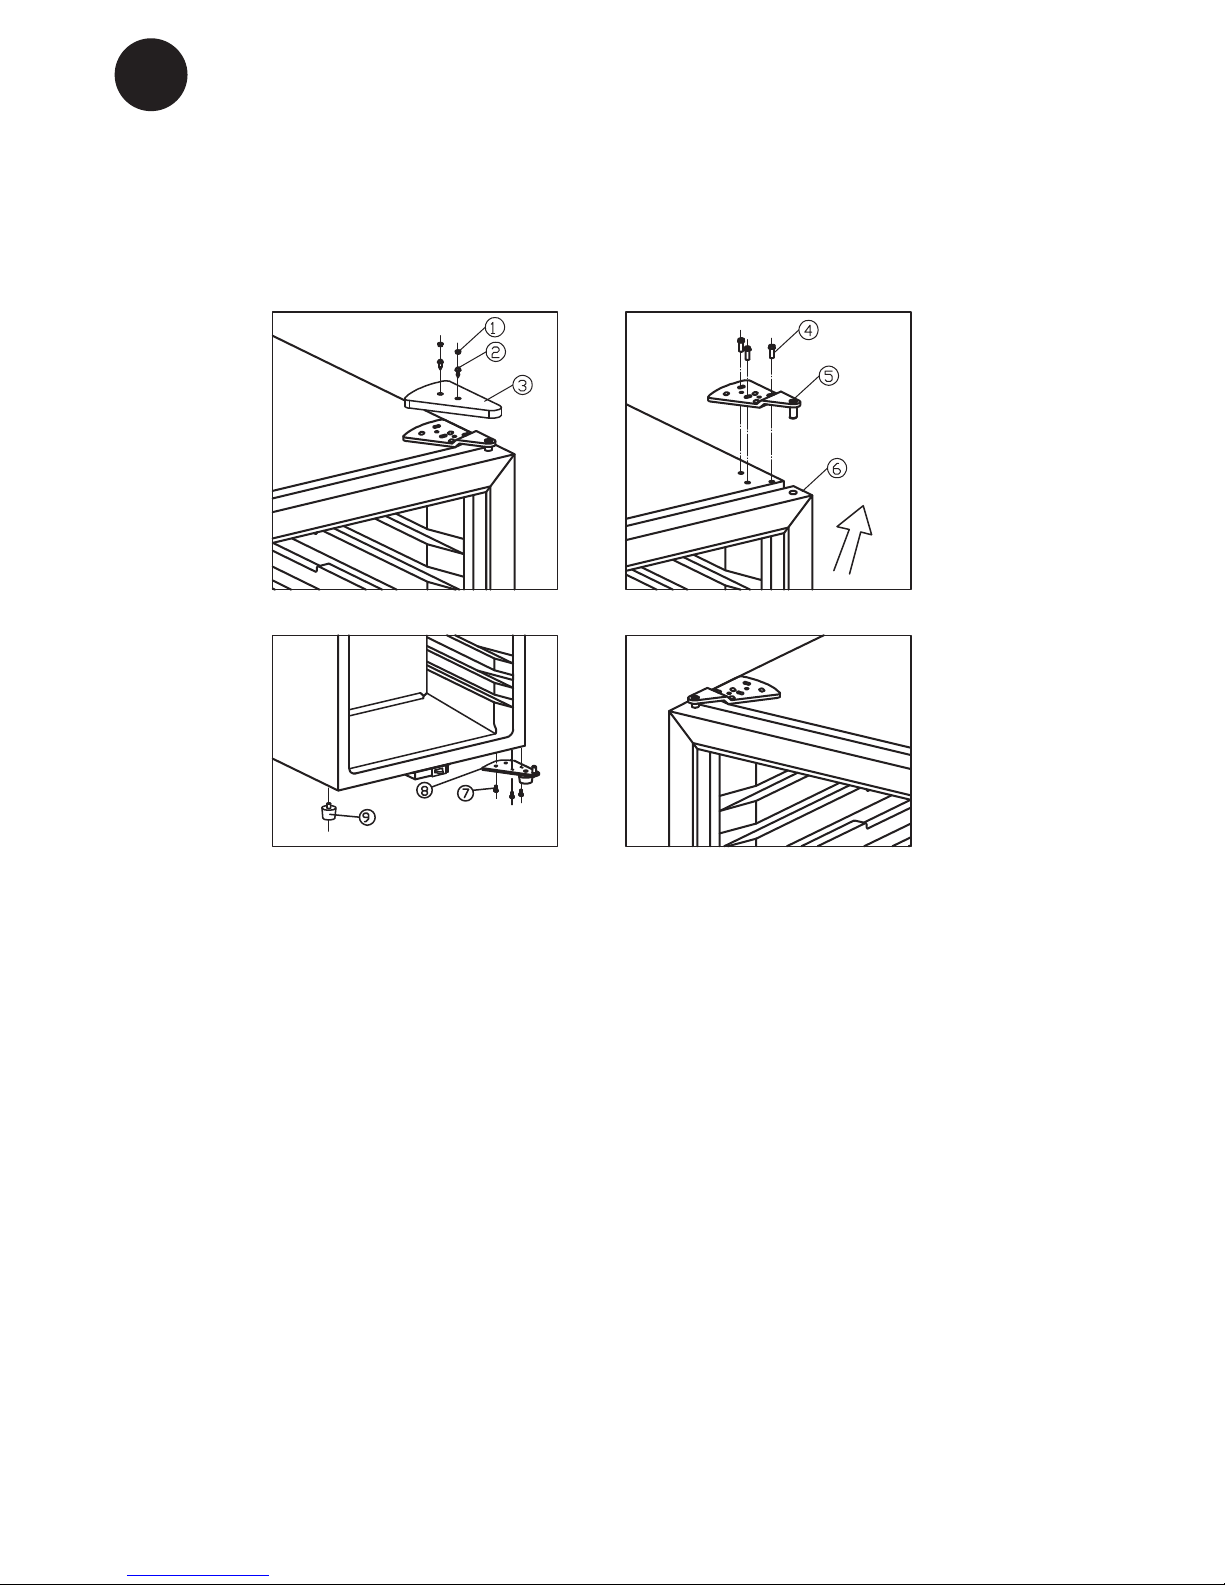
The door can be changed from right-hinged to left-hinged and vice versa as follows:
Changeofhingeside-W32.
1. Rubber cover 2. Screw 3. Decorative cover 4 & 7 .Screw
5. Top hinge module 6.Door 8.Lower hinge module-Left 9.Cabinet’s leg long
● Pull out the screw covers and unscrew
the decorative cover. See g.5.1
● While holding the door rmly, loosen and
remove the top hinge, lift up and remove
the door. See g.5.2
● Unscrew the lower hinge(8)
● Remove the long cabinet leg (9) on the
left side, and shift it to the right end side.
See g.5.3
● Install the lower hinge and tie it with the
bolts.
● Install the door on the axe of lower hinge
(8) the same way it was removed, screw
back the top hinge on the left.
● Fix back the decorative cover and rubber
cover.
Abb. 5.3 Abb. 5.4
Abb. 5.1 Abb. 5.2
Page 7
7
GB
The door can be changed from right-hinged to left-hinged and vice versa as follows:
Changeofhingeside-W45.
1) Screw 2) Bottom hinge, right 3) Door pin 4) Top hinge, right 5) Door
6) Cabinet 7) Top hinge, left 8) Bottom hinge, left
● Ensure that the cabinet is not connected
to the mains and place the cabinet on the
back
● Dismount the screws (1) SUPPORT THE
DOOR! See g. 6.1
● Dismount the door by pulling it forwards
and free from the top hinge. See g. 6.2
● Dismount the right top hinge and save it
for later use. See g. 6.3
● Mount the left top and bottom hinge enclosed (7 + 8). See g. 6.4
● Remount the door pin previously dismounted (3) in the bottom hinge
● Mount the door in the top hinge (7)
towards the door pin (3), tighten the door
pin (1)
● Lift up the cabinet again and wait 1 hour
before connecting it to the mains to avoid
oil in the cooling system
g. 6.1
g. 6.4g. 6.3
g. 6.2
Page 8
8
GB
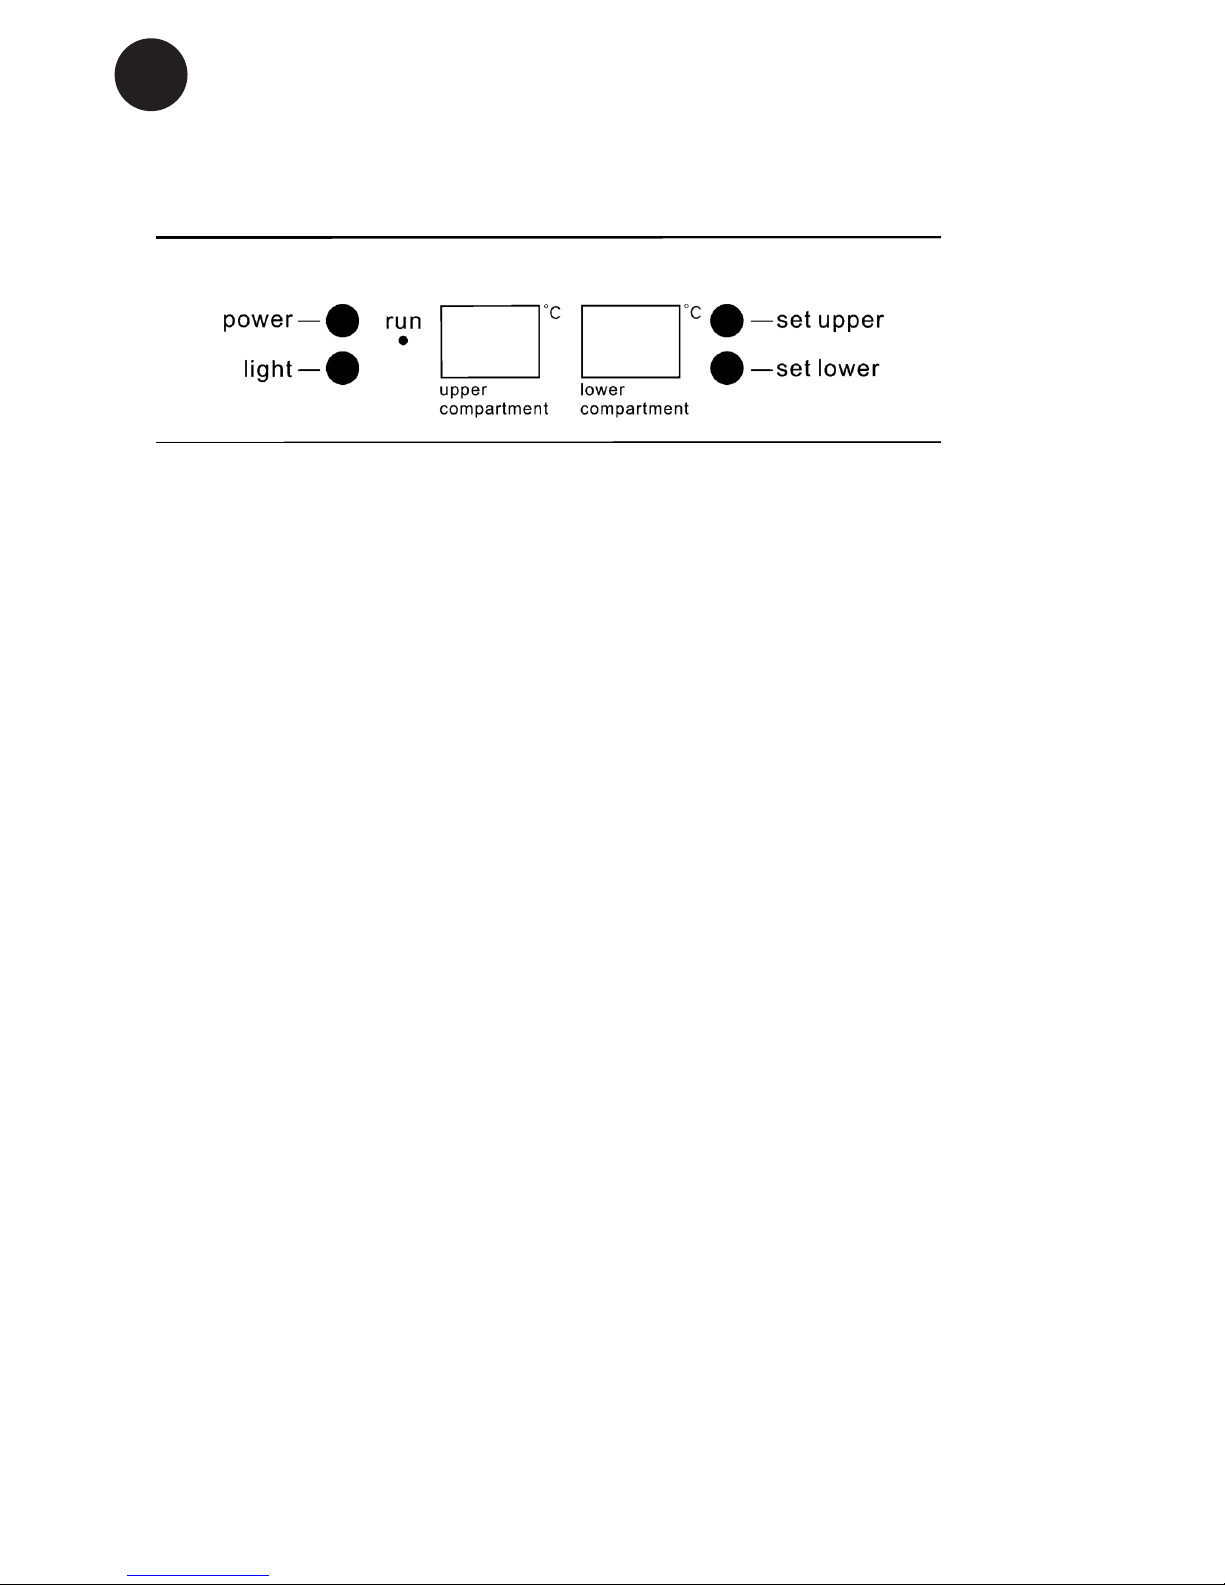
Electroniccontrol
The electronic control ensures that the set
temperatures are maintained in the cabinet
compartments. This is accomplished by
complex control of the refrigerating system,
the heating element, and the fan. Following
any power failure, the temperature setting is
reverted to factory defaults:
Upper compartment: 6°C
Lower compartment: 12°C
The electronic controls have the following
functions:
● Temperature setting
● Temperature display
● Automatic defrosting
● High and low temperature alarm
● Light on/off
● Cabinet on/off (push and hold for 3 secs)
Temperaturedisplay
The display shows the actual temperature
in the compartments. The temperature
display has a built-in lter that simulates the
actual temperature in the bottles. The displayed temperature is therefore not affected
by transient uctuations in air temperature.
Temperaturesetting
The temperature is set by using the two
buttons on the control panel. By pushing
a temperature button, the display changes
from actual temperature to set value. By
pushing the button repeatedly, the set value
scrolls through the available temperature
span.
The temperature in the upper compartment
is adjustable from 5-10 °C. The temperature
in the lower compartment is adjustable from
10-18 °C.
Temperaturealarm
If the temperature has deviated 3°C from
the chosen set value for at least 1 hour,
the display ashes and Lo / actual respectively Hi / actual temperature are alternately
shown.
It is recommended that wine be served at a
temperature which is a couple of degrees
lower than the desired drinking temperature
as the wine will be warmed slightly when it
is poured into the glass.
OperationandfunctionW32andW45
g. 7
Page 9

9
GB
Electroniccontrol
The electronic control ensures that the set
temperatures are maintained in the cabinet
compartments. This is accomplished by
complex control of the refrigerating system,
the heating element, and the fan. Following
any power failure, the temperature setting is
reverted to factory defaults:
Left compartment: 7°C
Right compartment: 12°C
The electronic controls have the following
functions:
● Temperature setting
● Temperature display
● Automatic defrosting
● High and low temperature alarm
● Light on/off
● Cabinet on/off (push and hold for 3 secs)
Temperaturedisplay
The display shows the actual temperature
in the compartments. The temperature
display has a built-in lter that simulates the
actual temperature in the bottles. The displayed temperature is therefore not affected
by transient uctuations in air temperature.
Temperaturesetting
The temperature is set using the two buttons on the control panel. When pushing
a temperature button, the display changes
from actual temperature to set value. After
this, it is possible to change the set value.
Up = temperature up
Down = temperature down
The temperature in both compartments is
adjustable from 5-18 degree Celcius.
The new set value is automatically stored
after 5 seconds of inactivity and the display
switches back and shows the actual temperature again.
Temperaturealarm
If the temperature has deviated 3°C from
the chosen set value for at least 1 hour,
the display ashes and Lo / actual respectively Hi / actual temperature are alternately
shown.
It is recommended that wine be served at a
temperature which is a couple of degrees
lower than the desired drinking temperature
as the wine will be warmed slightly when it
is poured into the glass.
OperationandfunctionW38.
Page 10
10
GB
Automaticdefrosting
The wine cooler is defrosted automatically.
Defrost water runs through a pipe and is
collected in a tray above the compressor
where the heat generated by the compressor causes it to evaporate.
Cleaning
Before cleaning the appliance, unplug it
from the main supply. The cabinet is best
cleaned using warm water (max. 65°C) with
a little mild detergent. Never use cleaning
agents that scour. Use a soft cloth. Rinse
with clean water and dry thoroughly. Never
use sharp or pointed implements. Avoid unnecessary cleaning of the wooden shelves,
as these are made of untreated natural
material. Cleaning agents may discolour the
shelves.
The sealing strip around the door must be
cleaned regularly to prevent discolouration
and prolong service life. Use clean water.
After cleaning the sealing strip, check that it
continues to provide a tight seal.
Dust collecting on the condenser underneath the cabinet, on the compressor and
in the compressor compartment is best
removed using a vacuum cleaner.
Defrosting,cleaning,andmaintenance.
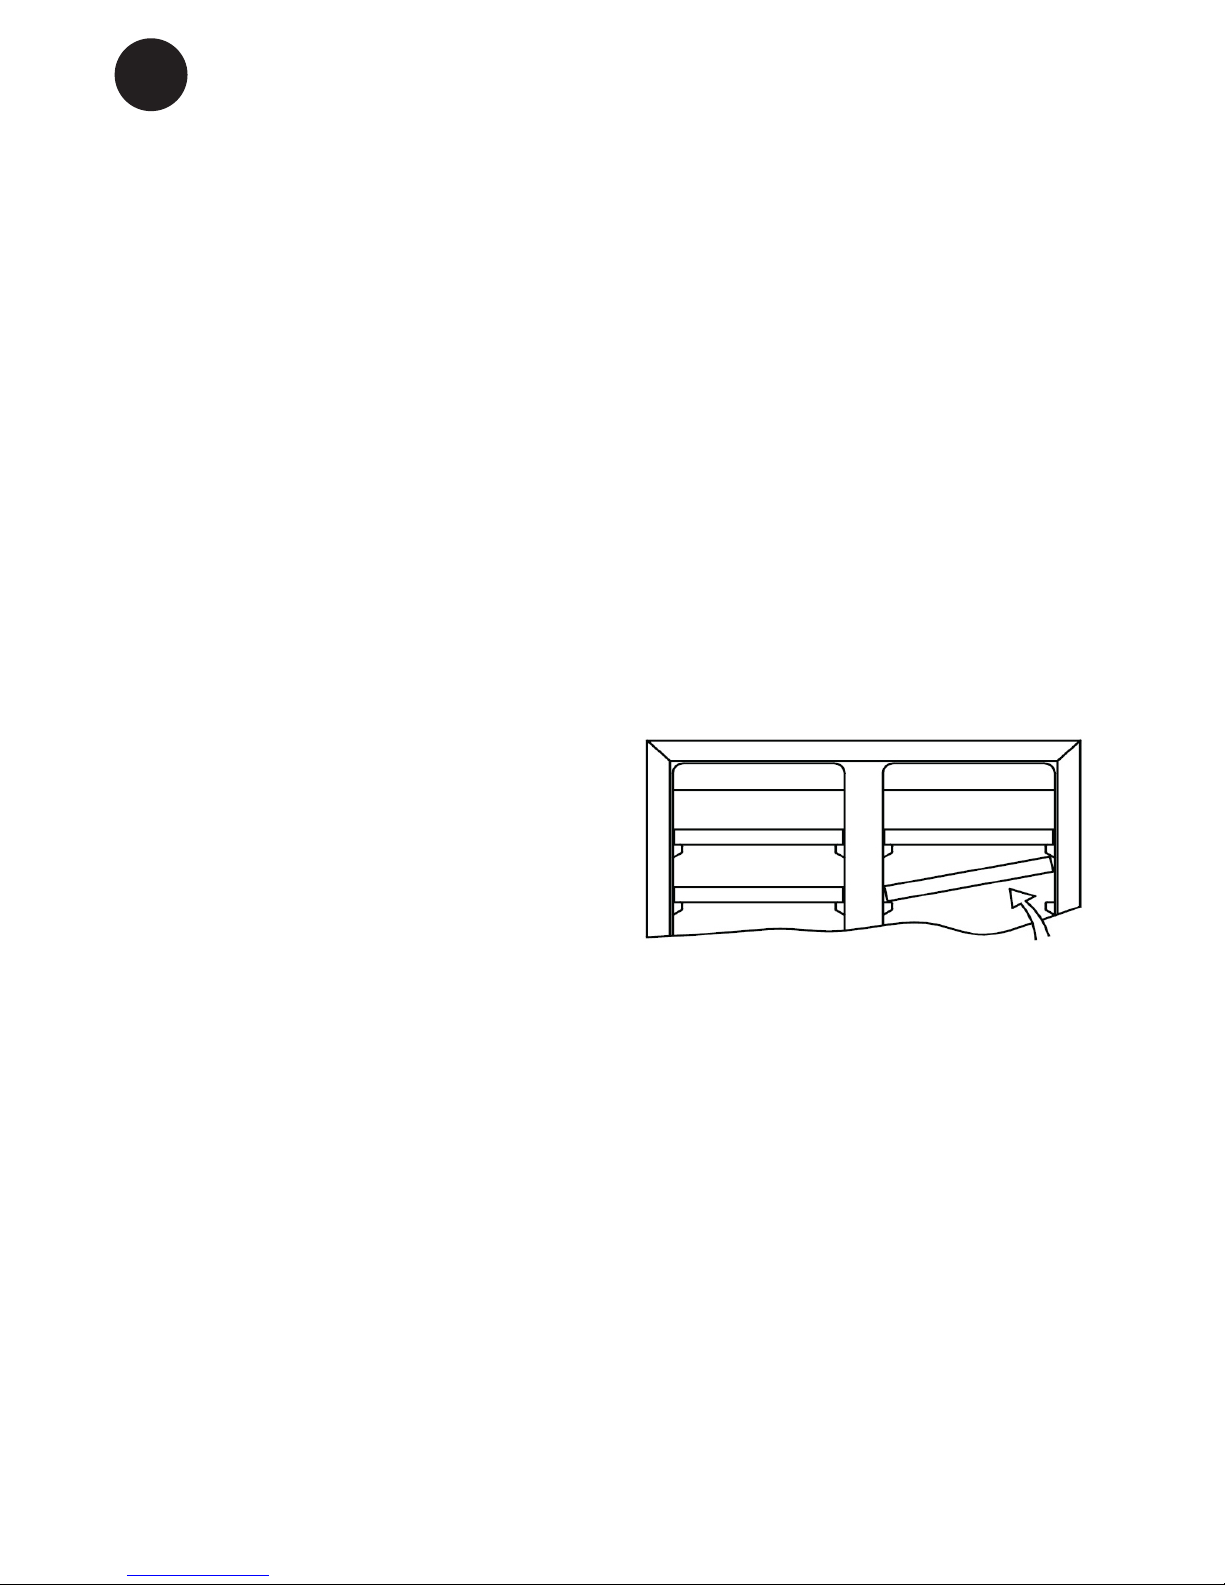
Removingtheshelves
Push the shelf all the way back and tip it. It
is now possible to remove the shelf.
Replacingthelighting
Light-emitting diodes designed to last the
entire service life of the appliance are
used. If it, however, becomes necessary
to replace the light source, please call for
service.
CLASS1LEDPRODUCT
Page 11

11
GB
Faultnding.
Fault Possiblecause Remedy
The appliance is not
running
The appliance is switched off.
Power failure; the fuse is blown;
the appliance is not plugged in
correctly.
Press the on/off switch.
Check that power is connected.
Reset the fuse.
Water collects in
the bottom of the
cabinet.
The defrost water pipe is
blocked.
Clean the defrost water channel
and the drain hole on the rear
wall of the cabinet.
Vibration or
bothersome noise.
The appliance is not level.
The appliance is resting against
other kitchen elements.
Containers or bottles inside the
cabinet are rattling against one
another.
Level the appliance using a spirit
level.
Move the appliance away from
the kitchen elements or appliances it is in contact with.
Move containers and/or bottles
apart.
Compressor runs
continuously.
High room temperature. Ensure adequate ventilation.
Page 12
12
GB
Warranty,sparepartsandservice.
Warrantydisclaimer
Faults and damage caused directly or
indirectly by incorrect operation, misuse,
insufcient maintenance, incorrect building,
installation or mains connection. Fire, accident, lightening, voltage variation or other
electrical interference, including defective
fuses or faults in mains installations are not
covered by the warranty.
Repairs performed by others than approved
service centres and any other faults and
damage that the manufacturer can substantiate are caused by reasons other than
manufacturing or material faults are not
covered by the warranty.
Please note that changes to the construction of the appliance or changes to the
component equipment of the appliance will
invalidate warranty and product liability, and
the appliance cannot be used lawfully. The
approval stated on rating plate will also be
invalidated.
Transport damage discovered by the buyer
is primarily a matter to be settled between
the buyer and the distributor, i.e. the distributor must ensure that such complaints
are resolved to the buyer’s satisfaction.
Before calling for technical assistance,
please check whether you are able to rectify
the fault yourself. (see the fault nding list)
If your request for assistance is unwarranted, e.g. if the appliance has failed as a
result of a blown fuse or incorrect operation,
you will be charged the costs incurred by
your call for technical assistance.
Spareparts
When ordering spare parts, please state
the type, serial and production numbers of
your appliance. This information is given on
the rating plate. The rating plate contains
various technical information, including type
and serial numbers.
Note: Always use approved service centres
when your appliance is to be repaired or
replaced!
g. 11
Page 13
13
GB
Disposal
Information for Users on Collection
and Disposal of Old Equipment and
used Batteries
These symbols on the products,
packaging, and/or accompanying
documents mean that used electrical and electronic products and
batteries should not be mixed with
general household waste. For proper
treatment, recovery and recycling
of old products and used batteries,
please take them to applicable collection points, in accordance with your
national legislation and the Directives
2002/96/EC and 2006/66/EC.
By disposing of these products and
batteries correctly, you will help to
save valuable resources and prevent
any potential negative effects on
human health and the environment
which could otherwise arise from
inappropriate waste handling.
For more information about collection and recycling of old products and
batteries, please contact your local
municipality, your waste disposal
service or the point of sale where you
purchased the items.
Penalties may be applicable for incorrect disposal of this waste, in accordance with national legislation.
ForbusinessusersintheEuropeanUnion.
If you wish to discard electrical and
electronic equipment, please contact
your dealer or supplier for further
information.
[InformationonDisposalinother
CountriesoutsidetheEuropean
Union]
These symbols are only valid in the
European Union. If you wish to discard this product, please contact your
local authorities or dealer and ask for
the correct method of disposal.
Noteforthebatterysymbol(bottomtwosymbolexamples):
This symbol might be used in combination with a chemical symbol. In this
case it complies with the requirement
set by the Directive for the chemical
involved.
Page 14

2
DE
WARNUNG: Das Gerät ist nicht für den
Gebrauch durch kleine Kinder
bestimmt, es sei denn, dass
es ausreichend von einer verantwortlichen Person überprüft
ist, dass sie das Gerät vertretbar verwenden können. Kleine
Kinder müssen beaufsichtigt
werden, um sicherzustellen,
dass sie nicht mit dem Gerät
spielen. Der Schlüssel ist an
einer separaten Stelle und
unzugänglich für Kinder aufzubewahren.
● Vor Reparatur oder Reinigung des Gerätes den Netzstecker von der Steckdose
ziehen.
● Wenn die Anschlussleitung beschädigt
ist, muss sie nur vom Hersteller, dem
Serviceagent des Herstellers oder einem
anderen Fachmann ausgewechselt werden, um Gefahr zu vermeiden.
● Bildung von Reif auf der inneren Verdampferplatte und den obersten Teile
ist normal. In Verbindung mit Reinigung
oder Wartung muss das Gerät deshalb
entfrostet werden.
● Beachten Sie bitte, dass Änderungen der
Konstruktion dieses Gerätes zur Folge
haben, dass die Garantie und Produktenhaftung erlöschen.
● Dieses Gerät ist ausschließlich zur Lagerung von Wein bestimmt
Falls dieses Gerät Kohlenwasserstoff-Kältemittel enthält, sehen Sie bitte die untenstehenden Richtlinien.
Da ein brennbares Gas als Kältemittel in
diesem Gerät dient, ist es wichtig sicherzustellen, dass kein Teil des Kühlkreislaufs
oder der Röhren beschädigt ist.
Der Standard EN378 speziziert, dass der
Raum, in dem das Gerät installiert wird, ein
Volumen von 1m³ pro 8 g Kohlenwasser
stoff-Kältemittel, das im Gerät verwendet ist, haben soll. Dies ist zu beachten,
um die Bildung von leicht entzündlichen
Gasgemischen in dem Raum, wo das Gerät
installiert ist, zu vermeiden, falls eine Undichtigkeit des Kuhlkreislaufs entsteht. Die
Menge von Kältemittel im Gerät ist auf dem
Typenschild angegeben.
WARNUNG: Decken Sie die Lüftungs-
öffnungen im Kabinett am
Gerätes oder am Einbaumodul
nicht ab.
WARNUNG: Verwenden Sie keine anderen
mechanischen Geräte oder
Hilfsmittel um den Entfrostungsprozess zu beschleunigen, als die Geräte, die vom
Hersteller empfohlen sind.
WARNUNG: Beschädigen Sie nicht den
Kühlkreislauf.
WARNUNG: Verwenden Sie keine elektri-
schen Geräte im Gerät, es sei
denn, dass die Geräte vom
Hersteller empfohlen sind.
WARNUNG: Das Gerät nicht dem Regen
aussetzen.
Warnung.
Page 15

3
DE
Warning ..................................................2
Vor dem Gebrauch. ................................3
Technische Daten ...................................3
Lernen Sie Ihren Kühlschrank kennen. ..4
Inbetriebnahme und Installation .............4
Wendbare Tür ......................................6-7
Bedienung und Funktionn....................8-9
Abtauen, Reinigung und Wartung ........10
Fächer abmontieren .............................10
Fehlersuche .......................................... 11
Reklamation,
Ersatzteile und Service ......................... 12
Entsorgung ...........................................13
VielenDank für Ihre Wahl dieses Weinkühlschranks. Beachten Sie bitte, dass die Bedienungsanleitung für alle Weinkühlschränke der Compact Weinserie gilt. Darum
entsprechen Abbildungen und Ausstattung
nicht in jedem Fall genau Ihrem Gerät.
Inhalt.
Vor dem Gebrauch Ihres neuen Geräts sollten Sie diese Bedienungsanleitung gründlich lesen. Sie enthält wichtige Informationen zu Sicherheit, Installation, Betrieb und
Wartung. Bewahren Sie die Bedienungsanleitung auf. Sie könnten sie zu einem
späteren Zeitpunkt eventuell benötigen.
Kontrollieren Sie das Gerät sofort bei
Lieferung auf eventuelle Beschädigungen.
Transportschäden sind dem Händler zu
melden, bevor das Gerät in Gebrauch
genommen wird. Verpackung entfernen.
Das Schrankinnere mit lauwarmem Wasser
und etwas mildem Spülmittel reinigen. Mit
klarem Wasser nachwischen und gründlich
trocknen (siehe “Reinigung”). Verwenden
Sie ein weiches Tuch.
Falls das Gerät liegend transportiert wurde
oder einer Temperatur von weniger als +5
°C ausgesetzt war, muss es vor dem Einschalten mindestens eine Stunde lang bei
höherer Außentemperatur aufrecht stehen.
VordemGebrauch.
TechnischeDaten.
Dieses Gerät entspricht den einschlägigen
EU-Richtlinien einschließlich:
Niederspannungsrichtinie 2006/95/EEC
Elektromagnetische Kompatibilitätsrichtlinie
2004/108/EC
Das Typenschild, das sich im Gerät bendet, enthält verschiedene technische
Angaben sowie Typen- und Seriennummer.
Page 16

4
DE
Typenschild (auf der Rückseite)
Beleuchtung
Identikationsschild
Holzfach
Türgriff
Bedienungselemente
Fußleiste
Einstellbare Füße
LernenSieIhrenWeinschrankkennen.
InbetriebnahmeundInstallation.
Aufstellort
Aus Sicherheits- und betriebstechnischen
Gründen darf das Gerät nicht im Freien
aufgestellt werden.
Stellen Sie den Schrank auf einen ebenen
Untergrund in einem trockenen, gut belüfteten Raum (max. 75 % relative Luftfeuchtigkeit). Stellen Sie den Schrank nicht in
unmittelbarer Nähe von Wärmequellen wie
Herden oder Heizkörpern auf, und vermeiden Sie direkte Sonneneinstrahlung oder
Wärme von anderen Wärmequellen.
Raumtemperatur
Die Klimaklasse nden Sie auf dem Typenschild (siehe Abb. 1 Seite 3 und Abb. 11
Seite 12). Sie gibt an, innerhalb welcher
Raumtemperaturbereiche der Kühlschrank
optimal arbeitet.
Klimaklasse ZulässigeRaumtem-
peratur
SN +10 ºC bis +32 ºC
N +16 ºC bis +32 ºC
ST +18 ºC bis +38 ºC
T +18 ºC bis +43 ºC
Abb.1
Page 17

5
DE
Installation
Die Unterlage zum Aufstellen des Schranks
muss eben sein. Verwenden Sie keinen
Rahmen o.ä. Es ist wichtig, dass das Gerät
ganz waagerecht steht. Der Schrank kann
durch Drehen der einstellbaren Füße vorne
ausgerichtet werden (siehe Abb. 2).
Prüfen Sie mit einer Wasserwaage nach, ob
der Schrank waagerecht steht.
Einbau
Der Schrank W32 kann nur frei stehen. Erforderliche Belüftung über und unter sowie
seitlich vom Schrank ist sicherszustellen
(Abb. 4).
Die Schränke W45undW38 können in ein
Küchenelement eingebaut werden oder frei
stehen (Abb. 3). Beim Einbau ist genügende Luftströmung durch den Küchensockel
vor dem Gerät sicherzustellen. Das totale
Areal der Luftöffnungen ist wie in Abb. 3
sicherzustellen. Die einzelne Luftöffnung
muss mindestents 5 mm sein.
Das mitgelieferte Gitter kann mit den mitgelieferten Schrauben (lose im Aussenbeutel)
als Sockelleiste montiert werden.
Die bei gelegte Fußleiste soll nicht montiert
werden, wenn das Gerät hinter dem Küchensockel eingebaut werden soll.
g. 3
g. 4
Wenn gewünscht kann das Gerät mit dem
Inhalt des Beutels ( Abb.. 2_1) an der Arbeitsplatte befestigt werden.
Abb. 4Abb. 3
Abb. 2_1
Abb. 2
Page 18
6
DE
Die Tür kann folgendermaßen von rechts angeschlagen auf links angeschlagen und umgekehrt umgebaut werden:
WendbareTürW32.
Abb. 5.1 Abb. 5.2
Abb. 5.3 Abb. 5.4
1) Gummipfropfen 2) Schraube 3) Scharnierabdeckung 4+7) Schraube 5) Oberes Scharnier
6) Tür 7) Unteres Schanier 8) Gehäusefuss, lang
● Die Schrauben und die Scharnierabdeckung entfernen. Siehe Abb. 5.1
● Während Sie die Tür festhalten das obere
Scharnier abmontieren und die Tür hochheben. Abb. 5.2
● Das untere Scharnier abmontieren.(8)
● Entferne den langen Gehäusefuss auf
der linken Seite und montiere ihn rechts.
Abb. 5.3
● Montiere das untere Scharnier an der
linken Seite.
● Setze die Tür auf das untere Scharnier
und montiere das obere Scharnier auf
der linken Seite. Abb. 5.4
● Montiere die Scharnierabdeckung und
die Gummipfropfen.
Page 19

7
DE
Die Tür kann folgendermaßen von rechts angeschlagen auf links angeschlagen und umgekehrt
umgebaut werden:
WendbareTürW45.
● Sicherstellen, daß der Schrank nicht an
den Strom angeschloßen ist und den
Schrank auf den Rücken legen
● Die Schrauben abmontieren (1) TÜR
UNTERSTÜTZEN! Siehe Abb. 6.1
● Die Tür hervorziehen und vom oberen
Scharnier abmontieren. Siehe Abb. 6.2
● Das rechte, obere Scharnier abmontieren
und für späteren Gebrauch aufbewahren.
Siehe Abb. 6.3
● Das beigelegte, linke, obere und untere
Scharnier montieren (7 + 8). Siehe Abb.
6.4
● Den früher abmontierten Türzapfen (3) in
das untere Scharnier einsetzen
Abb. 6.1
Abb. 6.2
Abb. 6.3 Abb. 6.4
1) Schraube 2) Unteres Scharnier, rechts 3) Türzapfen 4) Oberes Scharnier, rechts 5) Tür
6) Gehäuse 7) Oberes Scharnier, links 8) Unteres Scharnier, links
● Die Tür im oberen Scharnier (7) und
gegen den Türzapfen montieren (3), den
Türzapfen festschrauben (1)
● Den Schrank wieder aufstellen und 1
Stunde warten, bevor Sie Strom anschließen, um Öl im Kühlsystem zu vermeiden
Page 20

8
DE
ElektronischeSteuerung
Die elektronische Steuerung sorgt dafür,
dass die eingestellte Temperatur in den
Fächern eingehalten wird. Dies wird durch
eine ausgeklügelte Steuerung von Kälteanlage, Heizelement und Lüfter erreicht.
Bei einem eventuellen Netzausfall wird die
eingestellte Temperatur auf Werkseinstellung zurückgesetzt:
Obere Abteilung: 6°C
Untere Abteilung: 12°C
Die elektronische Steuerung hat folgende
Funktionen:
● Temperatureinstellung
● Temperaturanzeige
● Automatisches Abtauen
● Alarm bei hoher und niedriger Temperatur
● Licht Ein-/Ausschalter
● Schrank Ein-/Ausschalter (Die Taste 3
Sekunden betätigen)
Temperatur-Anzeige
Am Display wird die aktuelle Temperatur
in den Fächern angezeigt. Die Temperaturanzeige ist mit einem eingebauten Filter
ausgestattet, das die aktuelle Flaschentemperatur simuliert, weshalb die Anzeige nicht
auf kurzzeitige Änderungen der Lufttemperatur reagiert.
Temperatureinstellung
Die Schranktemperaturen werden mit
den beiden Tasten auf der elektronischen
Steuerung eingestellt. Durch Betätigen der
Temperaturtaste, wechselt das Display
zwischen den aktuellen Istwert und den
Sollwert. Durch wiederholte Betätigung der
Taste wird durch die Sollwerten innerhalb
des verfügbaren Temperaturbereichs
gerollt.
Die Temperatur der oberen Abteilung kann
zwischen 5 und 10 Grad Celcius eingestellt
werden.
Die Temperatur der unteren Abteilung kann
zwischen 10 und 18 Grad Celcius eingestellt werden.
Temperaturalarm
Weicht die Temperatur 3°C vom gewählten
Sollwert für mindestens eine Stunde ab,
wird Lo/aktuelle Temperatur beziehungsweise Hi/aktuelle Temperatur abwechselnd und
blinkend angezeigt.
Es empehlt sich, die Weine ein paar Grade
kälter als die gewünschte Trinktemperatur
zu servieren, da sich der Wein beim Einschenken ins Glas etwas erwärmt.
BedienungundFunktionW32undW45.
Abb. 7
Page 21

9
DE
ElektronischeSteuerung
Die elektronische Steuerung sorgt dafür,
dass die eingestellte Temperatur in den
Fächern eingehalten wird. Dies wird durch
eine ausgeklügelte Steuerung von Kälteanlage, Heizelement und Lüfter erreicht.
Bei einem eventuellen Netzausfall wird die
eingestellte Temperatur auf Werkseinstellung zurückgesetzt:
Linke Abteilung: 7°C
Rechte Abteilung: 12°C
Die elektronische Steuerung hat folgende
Funktionen:
● Temperatureinstellung
● Temperaturanzeige
● Automatisches Abtauen
● Alarm bei hoher und niedriger Temperatur
● Licht Ein-/Ausschalter
● Schrank Ein-/Ausschalter (Die Taste 3
Sekunden betätigen)
Temperatur-Anzeige
Am Display wird die aktuelle Temperatur
in den Fächern angezeigt. Die
Temperaturanzeige ist mit einem
eingebauten Filter ausgestattet, das die
aktuelle Flaschentemperatur simuliert,
weshalb die Anzeige nicht auf kurzzeitige
Änderungen der Lufttemperatur reagiert.
Temperatureinstellung
Die Schranktemperaturen werden mit
den beiden Tasten auf der elektronischen
Steuerung eingestellt. Durch Betätigen der
Temperaturtaste, wechselt das Display
zwischen den aktuellen Istwert und den
Sollwert. Danach kann die eingestellte Temperatur geändert werden.
UP = wärmer
DOWN = kälter
Die Temperatur der beiden Abteilungen
kann zwischen 5 und 18 Grad Celcius eingestellt werden. Nach 5 Sekunden Inaktivität wird die neue eingestellte Temperatur
automatisch gelagert, und das Display
wechselt auf aktuelle Istwert zurück.
Temperaturalarm
Weicht die Temperatur 3°C vom gewählten
Sollwert für mindestens eine Stunde ab,
wird Lo/aktuelle Temperatur beziehungsweise Hi/aktuelle Temperatur abwechselnd und
blinkend angezeigt.
Es empehlt sich, die Weine ein paar Grade
kälter als die gewünschte Trinktemperatur
zu servieren, da sich der Wein beim Einschenken ins Glas etwas erwärmt.
BedienungundFunktionW38.
Abb. 8
Page 22

10
DE
AutomatischesAbtauen
Der Weinschrank wird automatisch abgetaut. Das Tauwasser läuft durch ein
Rohr in die Tauwasserschale, die sich auf
dem Kompressor bendet. Das Wasser
verdampft durch die Betriebswärme des
Kompressors.
Reinigung
Zum Reinigen des Schrankinnern den
Netzstecker von der Steckdose ziehen.
Eine Mischung aus warmem Wasser
und Spülmittel (max. 65 °C) ist dazu am
besten geeignet. Verwenden Sie keine
Reinigungsmittel, die Kratzer verursachen
können. Verwenden Sie ein weiches Tuch.
Mit klarem Wasser nachwischen und gut
abtrocknen. Niemals scharfkantige oder
spitze Gegenstände verwenden. Vermeiden
Sie unnötiges Waschen der Holzfächer, als
sie von unverarbeiteteten Naturmaterialien
hergestellt sind. Reinigungsmittel kann die
Fächer verfärben.
Die Türdichtungsleiste muss regelmäßig gereinigt werden, um Verfärbungen
zu vermeiden und lange Haltbarkeit zu
gewährleisten. Klares Wasser verwenden.
Nach der Reinigung der Türdichtungsleiste
prüfen, ob sie dicht schließt.
Vom Verüssiger unter dem Schrank,
Kompressor und Kompressorraum den
Staub am besten mit einem Staubsauger
entfernen.
Abtauen,ReinigungundWartung.
Fächerausnehmen
Das Fach ganz zurück schieben und kippen.
Das Fach kann jetzt herausgezogen werden.
AustauschderBeleuchtung
Lichtdioden, die dafür dimensioniert sind,
die ganze Lebensdauer des Geräts zu
bestehen, werden angewendet. Wird es
trotzdem notwendig, die Lichtquelle auszuwechseln, bitte Service hinzuziehen.
CLASS1LEDPRODUCT
Page 23

11
DE
Fehlersuche.
Fehler MöglicheUrsache Abhilfe
Der Schrank reagiert nicht.
Der Schrank ist abgeschaltet.
Stromausfall; Sicherung hat angesprochen; Netzstecker ist nicht
richtig eingesteckt.
Ein-/Ausschalter betätigen.
Prüfen, ob der Strom angeschlossen ist. Die Sicherung
muss intakt/eingeschaltet sein.
Es läuft Wasser
auf den Boden des
Kühlschranks.
Das Tauwasserabussrohr ist
verstopft.
Tauwasserrinne und Abussloch
in der Rückwand reinigen.
Vibrationen
oder störende
Geräusche.
Der Schrank steht schief.
Der Schrank berührt andere
Küchenelemente.
Behälter oder Flaschen im
Schrank berühren sich.
Schrank mit einer Wasserwaage
ausrichten.
Schrank von den Küchenelementen oder Geräten abrücken, die
er berührt.
Für Abstände zwischen Flaschen
und/oder Behältern sorgen.
Der Kompressor
läuft ständig.
Hohe Raumtemperatur. Für gute Belüftung sorgen.
Page 24

12
DE
Reklamation,ErsatzteileundService.
Abb. 11
Ersatzteile
Bitte bei der Ersatzteilbestellung Typ- und
Seriennummer sowie Produktionsnummer
angeben. Diese Angaben nden Sie auf
dem Typenschild.
Das Typenschild enthält verschiedene technische Angaben, u.a. auch Typ- und Seriennummer. Denken Sie daran! Stets nur
autorisierte Handwerker zu beauftragen,
wenn ein Teil repariert oder ausgewechselt
werden muss!
Der Lieferant haftet nicht für Fehler oder
Schäden, die direkt oder indirekt durch
Fehlbedienung, Missbrauch, mangelhafte
Wartung, fehlerhaften Einbau, fehlerhafte
Aufstellung oder fehlerhaften Anschluss
sowie Feuer, Unfall, Blitzschlag, Spannungsänderungen oder andere elektrische
Störungen – wie z.B. defekte Sicherungen
oder Fehler in der Netzinstallation – sowie
von anderen als den von dem Lieferanten
vorgeschriebenen
Reparaturbetrieben ausgeführten Reparaturen verursacht wurden, und allgemein
nicht für Fehler und Schäden, die der Lieferant nachweislich auf andere Ursachen als
Fabrikations- und Materialfehler zurückführen kann. Diese Fehler oder Schäden fallen
nicht unter das Reklamationsrecht.
Transportschäden, die der Anwender feststellt, sind primär eine Sache zwischen ihm
und dem Händler, d.h. der Händler hat den
Anwender zufrieden zu stellen.
Bevor Sie den Kundendienst rufen, prüfen
Sie bitte, ob Sie den Fehler selbst beheben
können (siehe Fehlersuche). Ist Ihr Hilfeverlangen unberechtigt, beispielsweise weil
das Versagen des Geräts auf eine defekte
Sicherung oder Fehlbedienung zurück zu
führen ist, gehen die Kosten für den Servicebesuch zu Ihren Lasten.
Reklamation,ErsatzteileundService.
g. 11
Page 25

13
DE
Entsorgung.
Benutzerinformation zur Sammlung und
Entsorgung von veralteten Geräten und
benutzten Batterien.
Diese Symbole auf den Produkten,
Verpackungen und/oder Begleitdokumenten bedeuten, dass benutzte elektrische und elektronische
Produkte und Batterien nicht in den
allgemeinen Hausmüll gegeben werden sollen. Bitte bringen Sie diese
alten Produkte und Batterien zur
Behandlung, Aufarbeitung bzw. zum
Recycling gemäß IhrerLandesgesetzgebung und den Richtlinien 2002/96/
EG und 2006/66/EG zu Ihren zuständigen Sammelpunkten.
Indem Sie diese Produkte und Batterien ordnungsgemäß entsorgen, helfen Sie dabei, wertvolle Ressourcen
zu schützen und eventuelle negative
Auswirkungen auf die menschliche
Gesundheit und die Umwelt zu vermeiden, die anderenfalls durch eine
unsachgemäße Abfallbehandlung
auftreten können.
Wenn Sie ausführlichere Informationen zur Sammlung und zum Recycling alter Produkte und Batterien
wünschen, wenden Sie sich bitte an
Ihre örtlichen Verwaltungsbehörden,
Ihren Abfallentsorgungsdienstleister
oder an die Verkaufseinrichtung, in
der Sie die Gegenstände gekauft
haben.
Gemäß Landesvorschriften können
wegen nicht ordnungsgemäßer
Entsorgung dieses Abfalls Strafgelder
verhängt werden.
FürgeschäftlicheNutzerinder
EuropäischenUnion.
Wenn Sie elektrische oder elektronische Geräte entsorgen möchten,
wenden Sie sich wegen genauerer
Informationen bitte an Ihren Händler
oder Lieferanten.
[InformationenzurEntsorgungin
LändernaußerhalbderEuropäischenUnion]
Diese Symbole gelten nur innerhalb
der Europäischen Union. Bitte treten
Sie mit Ihrer Gemeindeverwaltung
oder Ihrem Händler in Kontakt,
wenn Sie dieses Produkt entsorgen
möchten, und fragen Sie nach einer
Entsorgungsmöglichkeit.
HinweiszumBatteriesymbol(untenzweiSymbolbeispiele):
Dieses Symbol kann in Kombination mit einem chemischen symbol
verwendet werden. In diesem Fall
erfüllt es die Anforderungen derjenigen Richtlinie, die für die betreffende
Chemikalie erlassen wurde.
Page 26

2
FR
AVERTISSEMENT: Cet appareil n’est pas
conçu pour une utilisation
par de jeunes enfants ou
des personnes handicapées sauf si elles sont
sous la surveillance d’un
adulte responsable. Les
enfants ne doivent pas
jouer avec l’appareil.
● Conserver les clés dans un endroit hors
de portée des enfants.
● Avant de faire l’entretien ou le nettoyage
de l’appareil, débranchez-le de son
alimentation.
● Si le câble d’alimentation est endommagé, il doit être remplacé par le fabricant,
des représentants ou des professionnels
agréés an d’éviter les dangers.
● La formation de givre sur les parois
intérieures de l’évaporateur et les parties
supérieures est un phénomène naturel et
normal. Retirez le givre avec un chiffon
sec.
● Prenez note que toute modication de
l’appareil annulera toutes les garanties et
la responsabilité du fabricant.
● Cet appareil est destiné uniquement au
stockage du vin
Puisque l’appareil contient un réfrigérant
Inammable, il est essentiel de s’assurer
que les conduits du uide réfrigérant ne
sont pas endommagés. La norme EN378
précise que la pièce dans laquelle vous
installez votre appareil doit posséder un
volume de 1 m³ par 8 g de réfrigérant avec
des hydrocarbures utilisés dans l’appareil
an d’éviter la formation de mélanges gaz/
air inammable dans la pièce où l’appareil
est installé dans le cas où il y aurait une
fuite dans le circuit réfrigérant. La quantité
de réfrigérant utilisée dans votre appareil
est indiquée sur la plaque signalétique.
AVERTISSEMENT:Gardez les orices de
ventilation, situés sur la
carrosserie de l’appareil
ou autour de l’appareil,
libres de toute obstruction
AVERTISSEMENT: Ne pas utiliser d’appareils
mécaniques ou autres
moyens pour accélérer la
décongélation sauf ce qui
est recommandé par le
fabricant.
AVERTISSEMENT: Ne pas endommager le
système de réfrigération.
AVERTISSEMENT: Ne pas utiliser d´appareils
électriques à l’intérieur
du compartiment de
stockage sauf s’ils sont
reconnandés par le fabricant.
AVERTISSEMENT: L’appareil ne doit pas être
exposé à la pluie.
Avertissement.
Page 27

3
FR
Caracteristiques
techniques
Ce dispositif est conforme aux directives de
l’U.E. le concernant, y compris la Directive
2006/95/CEE sur la Basse Tension et la
Directive 2004/108/CE sur la Compatibilité
Electromagnétique.
La plaque signalétique placée à l’intérieur
comporte divers renseigne ments techniques ainsi que le numéro de modèle et de
série.
Avertissement ......................................... 2
Avant la mise en service ......................... 3
Caracteristiques techniques ...................3
Présentation de votre refroidisseur de
bouteille.. ................................................4
Installation et mise en service. ...............4
Inversion du sens d’ouverture de
la porte.................................................5-6
Utilisation et fonctionnement ...............8-9
Dégivrage, nettoyage et entretien ........10
Retrait des clayettes ............................10
Recherche de pannes .......................... 11
Garantie, pièces de rechange et service
aprés-vente...........................................12
Mise au rebut. ....................................... 13
Nousvousremercions d’avoir acheté
cette cave à vin. Veuillez noter que ce mode
d’emploi est valable pour toutes les caves
à vin de la gamme Compact. En conséquence, les illustrations et raccordements
peuvent ne pas correspondre exactement à
votre modèle.
Contents
Avant de mettre en service votre nouvel
appareil, lisez attentivement les instructions
suivantes : elles contiennent des informations importantes sur la sécurité, l’installation, le fonctionnnement et l’entretien de
votre appareil. Conservez ce mode d’emploi
pour pouvoir vous y reporter ultérieurement.
A la réception, vériez que l’appareil n’a
pas été endommagé pendant son transport.
Tout dommage survenu pendant le transport doit être signalé au distributeur local
avant la mise en service de la cave à vin.
Enlevez l’emballage. Nettoyez l’intérieur de
l’appareil avec un mélange d’eau chaude
et de détergent doux. Rincez à l’eau claire
et séchez soigneusement (voir les instructions de nettoyage). Utilisez un chiffon
doux. Si l’appareil a été couché pendant
son transport, ou s’il a été stocké au froid
(température inférieure à +5 °C), placez-le
en position verticale pendant au moins une
heure avant sa mise en service.
Avantlamiseenservice
Page 28

4
FR
Plaque signalétique (au dos)
Eclairage
Plaque d’identication
Clayette en bois
Poignée de porte
Panneau de commande
Plaque de poussée
Pieds réglables
Présentationdevotrecaveàvin.
g.1
Installationetmiseenservice.
Miseenplace
Pour des raisons de sécurité et de fonctionnement, l’appareil ne doit pas être installé à
l’extérieur.
Placez l’appareil sur une surface plane,
dans une pièce sèche et bien ventilée (max.
75 % d’humidité atmosphérique relative).
Ne placez jamais l’appareil à proximité de
sources de chaleur telles que cuisinières
ou radiateurs, et évitez de le placer à la
lumière directe du soleil.
Températureambiante
La classe climatique gure sur la plaque signalétique (voir g. 1 page 3 et g. 11 page
12). Elle indique la température ambiante
optimale.
Classe
climatique
Températureambiante
optimale
SN +10 ºC à +32 ºC
N +16 ºC à +32 ºC
ST +18 ºC à +38 ºC
T +18 ºC à +43 ºC
Page 29
5
FR
Installation
La surface sur laquelle l’appareil est posé
doit être plane. N’utilisez pas de cadre ou
autre. Il est important que l’appareil soit
parfaitement à niveau. A cette n, tournez
les pieds réglables situés à l’avant de
l’appareil dans un sens ou dans l’autre (g.
2). A l’aide d’un niveau à bulle, vériez que
l’appareil est parfaitement à niveau.
Encastrement
Le modèle W32 ne peut pas être encastré.
Veillez à ce que l’air circule librement autour
de l’appareil. (g. 4)
Les modèles W45etW38 peuvent être
encastrés dans un élément de cuisine ou
bien installés comme unités indépendantes
(g. 3). Si l’appareil est encastré, assurezvous que l’air circule librement au niveau
de la plinthe posée devant l’appareil. La
supercie totale de l’ouverture doit être
comme décrite en g. 3, et l’ouverture de
chaque conduite d’air doit être de 5 mm au
minimum.
Le cache-socle ci-joint se monte à l’aide
des deux vis détachées dans le sac extérieur (g. 2_1).
Le cache-socle ne doit pas être montée, si
l’appareil est encastré derrière une plinthe.
g. 2_1
g. 3
g. 4
g. 3 g. 4
Sur désir, le contenu du sac (g. 2_1) peut
être utilisé pour xer l’appareil à un dessus
de table.
g. 2
Page 30

6
FR
La porte peut s’ouvrir aussi bien à droite qu’à gauche ;
pour modier son sens d’ouverture, procédez comme suit :
Inversiondusensd’ouverturedelaporte-W32
1) Bouchon de caoutchouc 2) Vis 3) Cache-charnière 4 +7) Vis 5) Charnière supérieure 6)
Porte 7) Vis 8) Pied d’armoire
● Retirez les couvercles de vis et dévissez
le couvercle décoratif. Voir g. 5.1
● En retenant fermement la porte, relâchez
et enlevez la charnière du haut, soulevez
et retirez la porte. Voir g. 5.2
● Dévissez la charnière du bas (8)
● Retirer la longue patte du cabinet (9) du
côté gauche et faites là passer du côté
droit. Voir g. 5.3
Abb. 5.3 Abb. 5.4
Abb. 5.1 Abb. 5.2
● Installez la charnière du bas et xez là à
l’aide des boulons.
● Installez la porte sur l’axe de la charnière
du bas (8) de la même façon dont elle a
été enlevée, vissez la charnière du haut
sur le côté droit.
● Re-xez le couvercle décoratif et le couvercle de caoutchouc.
Page 31

7
FR
La porte peut s’ouvrir aussi bien à droite qu’à gauche ;
pour modier son sens d’ouverture, procédez comme suit
Inversiondusensd’ouverturedelaporte-W45
● Vériez que l’appareil n’est pas branché
à l’alimentation secteur et placez-le sur
le dos.
● Démontez les vis (1). SOUTENEZ LA
PORTE ! Voir g. 6.1.
● Démontez la porte en tirant vers l’avant à
l’opposé de la charnière supérieure. Voir
g. 6.2.
● Démontez la charnière supérieure droite
et conservez-la. Voir g. 6.3.
● Montez les charnières supérieure et
inférieure gauches (7 + 8) fournies. Voir
g. 6.4.
1) Vis 2) Charnière inférieure droite 3) Axe de porte 4) Charnière supérieure droite 5) Porte 6)
Armoire 7) Charnière supérieure gauche 8) Charnière inférieure gauche
● Remontez l’axe de porte précédemment
démonté (3) dans la charnière inférieure.
● Montez la porte dans la charnière supérieure vers (7) l’axe de porte (3), serrez
l’axe de porte (1).
● Relevez l’armoire et attendez 1 heure
avant de la brancher à l’alimentation secteur pour éviter la présence d’huile dans
le circuit de refroidissement.
g. 6.1
g. 6.4g. 6.3
g. 6.2
Page 32

8
FR
Commandeélectronique
La commande électronique permet de
maintenir constantes les températures
programmées dans les compartiments de
l’appareil. Cela est rendu possible grâce
à un système perfectionné qui commande
le circuit de réfrigération, l’élément chauffant et le ventilateur. Après une panne de
courant, la température revient à la valeur
programmée par défaut en usine :
Compartiment supérieur : 6°C
Compartiment inférieur : 12°C
Les commandes électroniques permettent
de réaliser les fonctions suivantes :
● Réglage de la température
● Afchage de la température
● Dégivrage automatique
● Alarme de température haute/basse
● Marche/Arrêt de l’éclairage
● Mise sous/hors tension de la cave à vin
(maintenir enfoncé pendant 3 s)
Afchagedelatempérature
L’écran afche la température dans les
compartiments. L’indicateur de température dispose d’un ltre intégré qui simule
la température immédiate à l’intérieur des
bouteilles. C’est pourquoi la température
afchée n’est pas affectée par les brèves
variations de la température de l’air.
Réglagedelatempérature
Les deux boutons du panneau de commande permettent de régler la température.
En appuyant sur un bouton de température,
l’afchage passe de la température immédiate à la température programmée. En
appuyant de manière répétée sur le bouton,
la valeur programmée déle sur la plage
des températures disponibles.
La température du compartiment supérieur peut être réglée entre 5 et 10 degrés
Celsius. La température du compartiment
inférieur peut être réglée entre 10 et 18
degrés Celsius.
Alarmedetempérature
Si la température s’est écartée 3°C de la
valeur programmée pendant plus d’une
heure, l’écran clignote et indique alternativement Lo / temp. réelle et Hi / température
réelle.
Il est recommandé de servir le vin à une
température inférieure de 2 degrés à la
température de dégustation voulue car il
se réchauffe légèrement lorsqu’il est versé
dans le verre.
UtilisationetfonctionnementW32etW45.
g. 7
Page 33

9
FR
Commandeélectronique
La commande électronique permet de
maintenir constantes les températures
programmées dans les compartiments de
l’appareil. Cela est rendu possible grâce
à un système perfectionné qui commande
le circuit de réfrigération, l’élément chauffant et le ventilateur. Après une panne de
courant, la température revient à la valeur
programmée par défaut en usine :
Compartiment gauche : 7 °C
Compartiment droit : 12 °C
Les commandes électroniques permettent
de réaliser les fonctions suivantes :
● Réglage de la température
● Afchage de la température
● Dégivrage automatique
● Alarme de température haute/basse
● Marche/Arrêt de l’éclairage
● Mise sous/hors tension de la cave à vin
(maintenir enfoncé pendant 3 s)
Afchagedelatempérature
L’écran afche la température dans les
compartiments. L’indicateur de température dispose d’un ltre intégré qui simule
la température immédiate à l’intérieur des
bouteilles. C’est pourquoi la température
afchée n’est pas affectée par les brèves
variations de la température de l’air.
Réglagedelatempérature
Les deux boutons du panneau de commande permettent de régler la température.
En appuyant sur un bouton de température, l’afchage passe de la température
immédiate à la température programmée.
Ensuite, il est possible de changer la valeur
programmée.
UP = augmentation de la température
DOWN = réduction de la température
Dans les deux compartiments, la température peut être réglée entre 5 et 18 degrés
Celcius.
La nouvelle valeur programmée est automatiquement enregistrée après 5 secondes
d’inactivité, et l’écran afche à nouveau la
température immédiate.
Alarmedetempérature
Si la température s’est écartée 3°C de la
valeur programmée pendant plus d’une
heure, l’écran clignote et indique alternativement Lo / température réelle et Hi /
température réelle.
Il est recommandé de servir le vin à une
température inférieure de 2 degrés à la
température de dégustation voulue car il
se réchauffe légèrement lorsqu’il est versé
dans le verre.
UtilisationetfonctionnementW38.
g. 8
Page 34

10
FR
Dégivrageautomatique
Le dégivrage de la cave à vin est
automatique. L’eau de dégivrage s’écoule
par un tuyau et elle est recueillie dans un
bac situé au-dessus du compresseur. Elle
s’évapore ensuite sous l’action de la chaleur dégagée par le compresseur.
Nettoyage
Avant de nettoyer l’appareil, débranchez-le
de son alimentation secteur. Les meilleurs
résultats sont obtenus en utilisant un mélange d’eau chaude (max. 65 °C) et d’une
faible quantité de détergent doux. N’utilisez
jamais de produits de nettoyage abrasifs.
Utilisez un chiffon doux. Rincez à l’eau
claire et séchez soigneusement. N’utilisez
jamais d’instruments pointus ou tranchants.
Evitez tout nettoyage inutile des clayettes
en bois, car elles sont réalisées dans un
matériau naturel non traité. Les produits de
nettoyage peuvent décolorer les clayettes.
Le joint d’étanchéité de la porte doit être
régulièrement nettoyé pour éviter qu’il ne se
décolore et pour prolonger sa durée de vie.
Utilisez de l’eau claire. Après avoir nettoyé
le joint d’étanchéité de la porte, vériez qu’il
joue toujours son rôle.
Utilisez un aspirateur pour enlever la poussière accumulée sur le condensateur situé
sous la cave à vin, sur le compresseur et
dans le compartiment du compresseur.
Dégivrage,nettoyageetentretien.
Remplacementdel’éclairage
Des diodes électroluminescentes conçues
pour durer aussi longtemps que l’appareil
équipent ce dernier. S’il s’avère cependant
nécessaire de les changer, veuillez contacter le service après-vente
Produit équipé de diodes class 1, sans
danger pour les yeux.
Retraitdesclayettes
Poussez la clayette jusqu’au bout et inclinez-la. Il est maintenant possible de retirer
la clayette.
Page 35

11
FR
Recherchedepannes
Problème Causepossible Correction
L’appareil ne fonctionne pas+
L’appareil est hors tension.
Panne de courant ; le fusible
a sauté ; l’appareil n’est pas
correctement branché.
Appuyez sur l’interrupteur
marche/arrêt.
Vériez qu’il est connecté à
l’alimentation secteur. Vériez le
fusible.
De l’eau s’écoule
dans le fond de la
cave à vin.
Le tuyau d’évacuation de l’eau
de dégivrage est bouché.
Nettoyez la goulotte d’eau de
dégivrage et l’orice de vidange
dans la paroi arrière de l’armoire.
Vibrations et bruits
gênants.
L’appareil n’est pas de niveau.
L’appareil touche d’autres
éléments de cuisine.
Des récipients ou des bouteilles
se touchent dans l’appareil.
Mettez l’appareil de niveau
(utilisez un niveau à bulle d’air).
Écartez l’appareil des éléments
de cuisine ou des appareils qu’il
touche.
Séparez les bouteilles ou les
récipients qui s’entrechoquent.
Le compresseur
tourne sans
interruption.
Température ambiante élevée. Vériez que la ventilation est
appropriée.
Page 36

12
FR
g. 11
si la panne de l’appareil est due à un fusible
grillé ou à une mauvaise utilisation, c’est
cette personne qui devra régler les frais
entraînés par cette intervention.
Piècesderechange
Lors de la commande de pièces de
rechange, indiquer le type, numéro de
produit et de production de l´appareil. Ces
renseignements se trouvent sur la plaque
signalétique au dos de l’appareil. La plaque
signalétique renferme plusieurs informations techniques, dont les numéros de type
et de série.
TOUJOURS faire appel à des services
agréés en cas de réparation ou de
remplacement !
Les pannes ou les dommages dûs directement ou indirectement à une utilisation incorrecte ou fautive, un entretien insufsant,
un encastrement, une mise en place ou un
raccordement incorrect, un incendie, un accident, un impact de foudre, des variations
de tension et tout autre dysfonctionnement
électrique dû par exemple à des fusibles ou
disjoncteurs défectueux, ou à des défauts
du réseau d’alimentation électrique ne sont
pas couverts par la garantie. Dans le cas de
réparations effectuées par des personnes
autres que les réparateurs agréés par le
fournisseur, et en termes généraux l’ensemble des pannes et dommages dont le
fournisseur peut prouver qu’ils sont dûs à
d’autres causes que des erreurs ou défauts
de fabrication et de matériaux et qui, par
conséquent, ne sont pas couverts par la
garantie.
Veuillez noter que lorsqu´ une intervention
dans la construction ou d’une modication
des composants de l’appareil a été faite, la
garantie et la responsabilité du fournisseur
cesse, et l’appareil ne peut pas être utilisé
légitimement. L’autorisation gurant sur la
plaque signalétique ne sera plus valable.
Les dommages dûs au transport et constatés chez le client sont à régler entre le
client et le revendeur, ce qui signie que
ce-dernier doit s’assurer de la satisfaction
du client.
Avant de faire appel au service aprèsvente, toujours contrôler les points énumérés dans la liste de recherche des pannes
(voir ce point). Dans le cas où la cause
de l’intervention demandée ressort de la
responsabilité de la personne ayant fait
appel au service après-vente, par exemple
Garantie,piècesderechangeetserviceaprès-vente.
g. 11
Page 37

13
FR
Miseaurebut.
Avis aux utilisateurs concernant la
collecte et l’élimination des piles et des
appareils électriques et électroniques
usagés.
Apposé sur le produit lui-même, sur
son emballage, ou gurant dans la
documentation qui l’accompagne, ce
pictogramme indique que les piles et
appareils électriques et électroniques
usagés doivent être séparés des ordures ménagères. An de permettre
le traitement, la valorisation et le
recyclage adéquats des piles et des
appareils usagés, veuillez les porter
à l’un des points de collecte prévus,
conformément à la législation nationale en vigueur ainsi qu’aux directives 2002/96/CE et 2006/66/CE.
En éliminant piles et appareils
usagés conformément à la réglementation en vigueur, vous contribuez à
prévenir le gaspillage de ressources
précieuses ainsi qu’à protéger la
santé humaine et l’environnement
contre les effets potentiellement nocifs d’une manipulation inappropriée
des déchets.
Pour de plus amples renseignements
sur la collecte et le recyclage des
piles et appareils usagés, veuillez
vous renseigner auprès de votre
mairie, du service municipal d’enlèvement des déchets ou du point
de vente où vous avez acheté les
articles concernés.
Le non-respect de la réglementation
relative à l’élimination des déchets
est passible d’une peine d’amende.
Pourlesutilisateursprofessionnelsauseindel’Unioneuropéenne
Si vous souhaitez vous défaire de
pièces d’équipement électrique ou
électronique, veuillez vous renseigner directement auprès de votre
détaillant ou de votre fournisseur.
[Informationrelativeàl’élimination
desdéchetsdanslespaysextérieursàl’Unioneuropéenne]
Ce pictogramme n’est valide qu’à
l’intérieur de l’Union européenne.
Pour supprimer ce produit, contactez
les autorités locales ou votre revendeur an de connaître la procédure
d’élimination à suivre.
Noterelativeaupictogrammeà
apposersurlespiles(voirles2
exemplesci-contre)
Le pictogramme représentant une
poubelle sur roues barrée d’une croix
est conforme à la réglementation. Si
ce pictogramme est combiné avec un
symbole chimique, il remplit également les exigences posées par la
Directive relative au produit chimique
concerné.
Page 38

1
DK
Advarsel.
Såfremt apparatet indeholder kulbrintekølemiddel, henvises til nedenstående retningslinier.
Da kølemidlet, som anvendes i apparatet,
er en brændbar gasart, er det vigtigt at
sikre, at kølekredsløb og rør ikke er beskadigede.
Standard EN378 angiver, at rummet hvor
apparatet installeres skal have en volumen
på 1 m³ pr. 8 g kulbrinte kølemiddel, der
er brugt i apparatet. Dette er for at undgå
dannelse af brandfarlige gas-/luftblandinger
i rummet, hvis der skulle opstå en utæthed
i kølekredsløbet. Mængden af kølemiddel i
apparatet er angivet på typeskiltet.
ADVARSEL: Lad ventilationsåbninger, i ap-
paratets kabinet og i eventuelt
indbygningsmodul, være
utildækkede.
ADVARSEL: Anvend ikke mekaniske appa-
rater eller andre hjælpemidler
til at fremskynde afrimningsprocessen, udover dem som
er anbefalet af fabrikanten.
ADVARSEL: Anvend ikke elektriske appa-
rater inden i apparatet, medmindre de er af en type som
er anbefalet af fabrikanten.
ADVARSEL: Apparatet må ikke udsættes
for regn.
ADVARSEL: Dette apparat er ikke bereg-
net til at blive anvendt af små
børn, medmindre det er blevet
tilstrækkeligt kontrolleret af
en ansvarlig person, sådan at
apparatet kan anvendes forsvarligt. Små børn skal være
under opsyn for at sikre at de
ikke leger med apparatet.
● Opbevar altid nøgler et separat sted
utilgængeligt for børn.
● Træk stikket ud af stikkontakten før reparation eller rengøring af apparatet.
● Hvis netledningen er beskadiget, skal den
udskiftes af producenten, producentens
serviceagent eller anden fagmand for at
undgå fare.
● Dannelse af rim på den indvendige
fordamperplade og de øverste dele er
normalt. Apparatet skal derfor afrimes
i forbindelse med almindelig rengøring
eller vedligeholdelse.
● Såfrem der ndes en lyskilde i apparatet, fremgår udskiftning af belysningen i
brugsanvisningen.
● Vær opmærksom på at ændringer i apparatets konstruktion vil medføre, at al
garanti og produktansvar bortfalder.
● Apparatet er udelukkende beregnet til
opbevaring af vin.
Page 39

2
DK
Tekniskedata.
Dette apparat overholder bestemmelserne i
relevante EU Direktiver herunder Lavspændings Direktivet 2006/95/EØF og Elektromagnetisk kompatibilitet 2004/108/EF
Typeskiltet som er placeret inde i apparatet,
indeholder forskellige tekniske opIysninger
samt type- og serienummer.
Inden du anvender dit nye apparat bør du
læse brugsanvisningen grundigt. Brugsanvisningen indeholder vigtige informationer
vedrørende sikkerhed, intallation, drift og
vedligeholdelse. Gem brugsanvisningen.
Du kan få brug for den på et senere tidspunkt.
Kontroller at skabet ikke er beskadiget ved
modtagelsen. Transportskader skal anmeldes til forhandleren inden køleskabet tages
i brug.
Fjern emballagen. Rengør skabet indvendigt med lunken vand tilsat et mildt opvaskemiddel. Afvask med rent vand og tør
grundigt af (se rengøring). Brug en blød
klud.
Hvis skabet har ligget ned under transport
eller det er blevet opbevaret i kolde omgivelser (koldere end +5 ºC) skal apparatet
stå op i minimum en time inden ibrugtagning.
Inden brug ..............................................2
Tekniske data..........................................2
Lær vinskabet at kende ..........................3
Ibrugtagning og installation.....................3
Omhængsling af dør ............................... 5
Betjening og funktion ..............................7
Afrimning, rengøring og
vedligeholdelse ....................................... 6
Udtagning af hylder ................................8
Fejlndingsliste .....................................10
Reklamation, reservedele og
service ..................................................10
Bortskaffelse ......................................... 13
Takfordi du valgte et nyt vinkøleskab. Be-
mærk at brugsanvisningen gælder for alle
vinkøleskabe i Compact serien. Illustrationer og udstyr svarer derfor ikke nødvendigvis helt til din model.
Indhold. Indenbrug.
Page 40

3
DK
Typeskilt (på bagside)
Belysning
Identikationsskilt
Træhylde
Betjeningspanel
Dørhåndtag
Fodspark
Justerbare fødder
Lærvinskabetatkende
g.1
Ibrugtagningoginstallation
Placering
Af sikkerhedsmæssige og driftsmæssige
grunde må apparatet ikke placeres udendørs.
Stil skabet på et plant underlag i et tørt
og godt ventileret rum (max. 75% relativ
luftfugtighed). Anbring ikke skabet tæt på
varmekilder såsom komfur eller radiator og
undgå at det udsættes for direkte sollys eller varme fra anden varmkilde.
Rumtemperaturen
Klimaklassen står på typeskiltet (se g.
1 side 3 og g. 11 side 12). Den angiver
indenfor hvilke rumtemperaturer kølekabet
kører optimalt.
Klimaklasse Tilladtrumtemperatur
SN +10 ºC til +32 ºC
N +16 ºC til +32 ºC
ST +18 ºC til +38 ºC
T +18 ºC til +43 ºC
Page 41

4
DK
g. 2_1
Installation
Underlaget hvorpå skabet opstilles skal
være plant. Brug ikke en ramme eller
lignende.
Det er vigtigt, at skabet står helt lige. Man
kan justere skabet ved at dreje de justerbare fødder i fronten op eller ned (se gur
2). Kontroller med et vaterpas, at skabet
står lige.
Indbygning
W32 kan kun være fritstående og der skal
sikres, at der er tilstrækkelig luft omkring
skabet (gur 4).
Skabene W45ogW38 kan bygges ind i et
køkkenelement eller stå frit (gur 3). Ved
indbygning af skabet skal det sikres, at der
er tilstrækkelig luftgennemgang i køkkensoklen foran apparatet. Det samlede areal
af lufthullerne skal være som beskrevet på
gur 3, og den enkelte luftspalte skal have
en åbning på mindst 5 mm.
Det medfølgende fodspark kan monteres
med de to medfølgende skruer som ligger
løse i yderposen. Se g 2_1
OBS: Fodsparket ikke skal monteres, hvis
apparatet indbygges bag en køkkensokkel.
g. 3
g. 4
g. 3
g. 4
Hvis det ønskes kan indholdet i posen som
ses på g 2_1, bruges til at fastgøre skabet
op mod en bordplade.
g. 2
Page 42

5
DK
Døren kan ændres fra højrehængt til venstrehængt og omvendt på følgende måde:
OmhængslingafdørW32
g. 5.1 g. 5.2
g. 5.3 g. 5.4
1) Gummiprop 2) Skrue 3) Hængselsafdækning 4+7) Skrue 5) Top hængsel 6) Dør
7) Skrue 8) Kabinetfod
● Fjern gummipropperne og hængsel
afdækningen. Se g.5.1
● Mens du støtter døren, løses og fjernes
tophængsel og døren løftes af. See
g.5.2
● Afmonter bundhængslet (8)
● Afmonter den høje kabinetsfod (9) fra
venstre side og monter den igen i modsat
side. See g.5.3
● Monter bundhængslet med skruerne
● Monter døren på bundhængslet (8) på
samme måde som den blev fjernet og
monter tophængslet igen. Se g.5.4
● Monter hængselafdækningen og propperne.
Page 43

6
DK
Døren kan ændres fra højrehængt til venstrehængt og omvendt på følgende måde:
OmhængslingafdørW45
1) Skrue 2) Bundhængsel, højre 3) Dørtap 4) Tophængsel, højre 5) Dør 6) Kabinet
7) Tophængsel, venstre 8) Bundhængsel, venstre
● Sørg for kabinettet ikke er tilsluttet strøm
og læg skabet på ryggen
● Afmonter skruerne (1) STØT DØREN! Se
g. 6.1
● Afmonter døren ved at trække døren frem
og fri af tophængslet. Se g. 6.2
● Afmonter højre tophængsel og gem for
evt. senere brug. Se g. 6.3
● Monter vedlagte venstre top- og bundhængsel (7 + 8). Se g. 6.4
● Isæt den tidligere afmonterede dørtap (3)
i bundhængslet
● Monter døren op i tophængslet (7) og ind
på dørtappen (3), fastskru dørtappen (1)
● Stil kabinettet op igen og vent 1 time
inden der tilsluttes strøm for at undgå olie
i kølesystemet
g. 6.1
g. 6.4g. 6.3
g. 6.2
Page 44

7
DK
Elektroniskstyring
Den elektroniske styring sørger for at
skabet holder de indstillede temperaturer i
afdelingerne. Dette opnås ved en avanceret
styring af kølesystem, varmelegeme og
ventilator.
Efter en eventuel strømafbrydelse nulstilles
temperaturen til fabriksindstillingen, som er:
Øverst: 6°C
Nederst: 12°C
Den elektroniske styring har følgende
funktioner:
● •Temperaturindstilling
● •Temperaturangivelse
● •Automatisk afrimning
● •Alarm ved høj og lav temperatur
● •Lys tænd/sluk
● •Enhed tænd/sluk (tryk og hold 3 sek)
Temperatur-udlæsning
Displayet viser den aktuelle temperatur i
skabet. Temperaturvisningen har indbygget
et lter som simulerer den aktuelle temperatur i askerne. Derfor reagerer udvisningen
ikke på kortvarige variationer i lufttemperaturen.
Temperaturindstilling
Temperaturerne i afdelingerne indstilles
med de to setknapper på den elektroniske
styring. Når der trykkes på knappen ændres
displayet fra den aktuelle temperatur til den
indstillede temperatur.
Hvis der trykkes på knappen gentagne
gange rulles gennem temperaturintervallet
for indstillet temperatur.
Øverste afdeling kan justeres mellem 5 til
10 grader Celsius.
Nederste afdeling kan justeres mellem 10 til
18 grader Celsius.
Temperaturalarm
Hvis temperaturen har afveget 3°C fra den
valgte indstillede værdi i mindst 1 time vises
henholdsvis Lo/aktuel temperatur og Hi/
aktuel temperatur skiftevis, blinkende.
Det anbefales at servere vinene et par
grader koldere end den ønskede drikketemperatur, da vinen ved skænkning i glasset
hurtigt bliver varmet en anelse op.
BetjeningogfunktionW32ogW45
g. 7
Page 45

8
DK
Elektroniskstyring
Den elektroniske styring sørger for at
skabet holder de indstillede temperaturer i
afdelingerne. Dette opnås ved en avanceret
styring af kølesystem, varmelegeme og
ventilator.
Efter en eventuel strømafbrydelse nulstilles
temperaturen til fabriksindstillingen, som er:
Venstre afdeling 7°C
Højre afdeling 12°C
Den elektroniske styring har følgende
funktioner:
● Temperaturindstilling
● Temperaturangivelse
● •Automatisk afrimning
● •Alarm ved høj og lav temperatur
● •Lys tænd/sluk
● •Enhed tænd/sluk (tryk og hold 3 sek)
Temperatur-udlæsning
Displayet viser den aktuelle temperatur i
skabet. Temperaturvisningen har indbygget
et lter som simulerer den aktuelle temperatur i askerne, derfor reagerer udvisningen
ikke på kortvarige variationer i lufttemperaturen.
Temperaturindstilling
Temperaturerne i afdelingerne indstilles
med de to knapper på den elektroniske
styring. Når der trykkes på knappen ændres
displayet fra den aktuelle temperatur til den
indstillede temperatur. Herefter kan setpunktet ændres for indstillet temperatur:
Up = varmere, Down = koldere.
Begge afdelinger kan justeres mellem 5 til
18 grader Celsius.
Det nye setpunkt lagres automatisk efter
5 sekunders inaktivitet, og displayet skifter
tilbage til at vise aktuel temperatur.
Temperaturalarm
Hvis temperaturen har afveget 3°C fra den
valgte indstillede værdi i mindst 1 time vises
henholdsvis Lo/aktuel temperatur og Hi/
aktuel temperatur skiftevis, blinkende.
Det anbefales at servere vinene et par
grader koldere end den ønskede drikketemperatur, da vinen ved skænkning i glasset
hurtigt bliver varmet en anelse op.
BetjeningogfunktionW38
g. 8
Page 46

9
DK
Automatiskafrimningafvinskabet
Afrimning af vinskabet sker automatisk.
Smeltevandet løber gennem et rør ned til
tøvandsskålen der sidder ved kompressoren. Vandet fordamper på grund af varmen
fra kompressoren.
Rengøring
Før rengøring påbegyndes skal stikproppen
fjernes fra stikkontakten. Skabet rengøres
bedst med en opløsning af lunkent vand
tilsat lidt opvaskemiddel (max. 65 ºC). Anvend ikke rengøringsmidler der kan ridse.
Brug en blød klud. Vask efter med rent
vand og tør grundigt af. Brug aldrig skarpe
eller spidse genstande. Undgå unødig vask
af træhylderne, da disse er af ubehandlet
naturmateriale, og derfor kan misfarves af
rengøringsmidler.
Tætningslisten rundt ved døren kræver
jævnlig rengøring for at undgå misfarvning
og sikre lang holdbarhed. Brug rent vand.
Efter rengøring af dørens tætningsliste bør
du kontrollere om den fortsat slutter tæt.
På kondensatoren under kabinettet, på
kompressoren og i kompressorrummet fjernes støvet bedst med en støvsuger.
Afrimning,rengøringogvedligeholdelse
Udtagningafhylder
Hylden skubbes helt i bund, og vippes
skråt. Hylden kan nu trækkes ud.
Udskiftningaflys
Der anvendes lysdioder som er dimensioneret til at holde hele produktets levetid.
Skulle det alligevel blive nødvendigt at
skifte lyskilden, så tilkald service.
CLASS 1 LED PRODUKT
Page 47

10
DK
Fejlndningsliste
Fejl Muligårsag Afhjælpning
Skabet virker ikke Skabet er slukket.
Strømsvigt; sikringen er slået fra;
netstikket er ikke sat rigtigt i.
Tryk på tænd/sluk knappen.
Kontrollér om strømmen er tilsluttet. Sikringen skal være slået til.
Der løber vand i
bunden af køleskabet.
Tøvandsaøbsrøret er tilstoppet. Rens tøvandsrenden og aøbs-
hullet i bagvæggen.
Vibrationer eller
generende støj.
Skabet står skævt.
Skabet hviler op mod andre køkkenelementer.
Beholdere eller asker berører
hinanden i skabet.
Indstil skabet med et vaterpas.
Ryk skabet væk fra køkkenelementerne eller apparater, som
står umiddelbart op ad skabet.
Sørg for afstand mellem asker
og/eller beholdere.
Kompressor kører
konstant.
Høj rumtemperatur. Sørg for god ventilation.
Page 48

11
DK
Reklamation,reservedeleogservice
Reklamationsretten
Såfremt der konstateres fejl ved produktet,
kan De over for leverandøren gøre brug af
reklamationsretten ifølge gældende lovgivning. Producenten skal for egen regning
afhjælpe fabrikations- og materialefejl, der
konstateres ved apparatets normale brug
under forudsætning af, at apparatet er købt
som fabriksnyt i Danmark. For Grønland og
Færøerne gælder særlige bestemmelser.
Såfremt det skønnes nødvendigt at apparatet indsendes til værksted, sker indsendelse
og returnering for producentens regning og
risiko.
Der er ikke dækning for fejl eller skader
direkte eller indirekte opstået ved fejlbetjening, misbrug, mangelfuld vedligeholdelse,
forkert indbygning, opstilling eller tilslutning.
Det samme gælder for brand, ulykke, lynnedslag, spændingsvariationer eller andre
elektriske forstyrrelser som f.eks. defekte
sikringer eller fejl i forsyningsnettets elektriske installationer.
Reparationer udført af andre end de anviste
reparatører, og i det hele taget fejl og
skader, som leverandøren kan godtgøre
skyldes andre årsager end fabrikations- og
materialefejl, er ikke omfattet af reklamationsretten.
Vær opmærksom på, at ved indgreb i
apparatets opbygning, og ved ændring af
apparatets komponentbestykning bortfalder
garanti og produktansvar og apparatet kan
ikke lovligt anvendes. Godkendelse anført
på mærkeskilt er ligeledes ugyldig.
Transportskader, der konstateres hos forbrugeren, er primært en sag mellem forbruger og forhandler, dvs. forhandler må drage
omsorg for, at forbrugeren stilles tilfreds.
Inden du tilkalder serviceassistance, bedes
du kontrollere de fejlmuligheder, du selv kan
afhjælpe. (Se fejlndingslisten)
Såfremt dit krav om afhjælpning er uberettiget, eksempelvis hvis apparatets
svigt skyldes en sprunget sikring eller en
fejlbetjening, må du selv betale de omkostninger, der er forbundet med at have tilkaldt
serviceassistance.
Reservedele
Angiv venligst type- og serienummer samt
prod. nummer, når du bestiller reservedele.
Disse oplysninger nder du på typeskiltet.
Typeskiltet indeholder forskellige tekniske
oplysninger, samt type- og serienummer.
Husk altid at bruge autoriserede håndværkere, hvis der er noget der skal repareres
eller udskiftes!
g. 11
Page 49

12
DK
Bortskaffelse.
Brugerinformation om indsamling og
bortskaffelse af elktronikskrot og brugte
batterier
Disse symboler på produkter, emballage og/eller ledsagedokumenter
betyder, at brugte elektriske og
elektroniske produkter og batterier
ikke må smides ud som almindeligt
husholdningsaffald. Sådanne gamle
produkter og batterier skal indleveres
til behandling, genvinding resp. recycling i henhold til gældende nationale
bestemmelser samt direktiverne
2002/96/EF og 2006/66/EF.
Ved at bortskaffe sådanne produkter
og batterier på korrekt vis hjælper
du med til at beskytte værdifulde
ressourcer og imødegå de negative
påvirkninger af det menneskelige
helbred og miljøet, som vil kunne
være følgen af usagkyndig affaldsbehandling.
Ønsker du mere udførlig information
om indsamling og recycling af gamle
produkter og batterier, kan du henvende dig til din kommune, deponeringsselskabet eller stedet, hvor du
har købt produkterne.
Usagkyndig bortskaffelse af elektronikskrot og batterier kan eventuelt
udløse bødeforlæg.
ForkommerciellebrugereiDen
EuropæiskeUnion
Når du ønsker at kassere elektriske
eller elektroniske apparater, bedes du
henvende dig til din forhandler eller
leverandør for nærmere information.
[Informationombortskaffelsei
landeudenforDenEuropæiske
Union]
Disse symboler gælder kun inden
for Den Europæiske Union. Hvis du
ønsker at afhænde dette produkt,
skal du rette henvendelse til de lokale
myndigheder eller din forhandler. Her
kan du få oplysninger om, hvordan
du bedst kommer af med produktet.
Informationombatterisymbol(to
eksemplernedenfor):
Dette symbol kan optræde sammen
med et kemisk symbol. I så fald opfylder det kravene for det direktiv, som
er blevet fastlagt for det pågældende
kemikalie.
Page 50

Page 51

Page 52

0-9193104-04
GB Reserving the right to alter specications without prior notice.
DE Recht auf Änderungen vorbehalten.
FR Nous nous réservons le droit d’apporter toutes modications à nos produits
DK Ret til ændringer forbeholdes
 Loading...