


HANDMADE IN ENGLAND
C O N S T E L L A T I O N X
U S E R G U I D E V E R S I O N 1 . 0

Contents
Contents
Introduct ion
Your Constellation phone 5
Help and support 5
Safety 6
Safety 6
Your pho ne 7
Package contents 7
Features and keys 7
Antenna locations 8
Headset 9
Change the volume 9
Getting started 10
Insert the SIM card or memory card 10
Charge the phone 11
Switch the phone on or off 12
Start-up process 13
Use your phone when it is locked 14
Explore 15
About the home screen 15
Status and notification bar 15
Status and notification icons 16
Do Not Disturbmode 17
Notifications 17
Clockwidget 17
Back,home and recent apps 18
Add widgets to the home screen 18
Favourites tray 19
Quick settings 19
Sharing your Constellation 19
Voice actions 20
Apps 21
About apps 21
Recommended Apps 21
Google Play™ 21
Apps precautionaryadvice
Update apps 22
Manage and restore apps 22
22
Close apps
Uninstall apps 23
5
Vertu Services 24
About Vertu Services 24
Text entry 25
Keyboardentry 25
Predictivetext 25
Gesture typing 26
Dictionaries 26
Change the keyboardlanguage 26
Calls 27
About calls 27
Make and answer calls 27
Call recent number 28
Call using Speed Dial 28
Listen to your voicemail 28
Divert callsto another number 28
Make a conferencecall 29
Contacts 30
About contacts 30
Call, text or email contacts 30
Add contacts 31
Join contacts 31
Edit or delete a contact 31
Save a number from a callor message 31
Markcontacts as favourites 32
Personalise contacts 32
Transfer contacts 32
Messaging and email 34
About messaging 34
Send and read messages 34
Instant messages 34
Manage messages 34
Set up your email 35
Music 36
About music 36
Adding songs or albums to Play Music
Play music 37
Maps and navigation 39
22
36
© 2017 Vertu Corporation Limited. All rights reserved. 2

Contents
Google Maps™ 39
Personalising your phone 40
Widgets 40
Shortcuts 40
Ringtones 40
Wallpapers 40
Assign sounds to actions 41
Displaysettings 41
Pulse notification light 41
Auto-rotate 42
Screen lock 42
Protect your phone with a fingerprint 42
Date and time settings 42
Language and input options 42
Social networks 43
Add an account 43
Delete an account 43
Synchronise contacts 43
Managing accounts 44
Configure syncoptions 44
Delete accounts 44
Backup and restore accounts 44
Browser 45
About the web browser 45
Connect to the internet 45
Add a bookmark 46
Privacy and security 46
Downloads 46
Camera 47
About camera 47
Take and share photos 48
Record and share a video 48
Gallery 50
About Gallery 50
View and edit photos and videos 50
Share photos and videos 50
Assign contact images and wallpaper
50
Take a screenshot 50
Office tools 51
Clock
51
Calculator 51
Calendar 51
Connectivity 53
Restrictions 53
Wi-Fi 53
Bluetooth 53
Location services 54
Set your phone to syncwith your
computer 54
Copy between the phone and a PC 55
Tethering and portable hotspot 55
NFC 55
Phon e management 56
System update 56
Free up phone memory 56
Optimise data usage 56
Data roaming settings 57
Backup and restore your phone 57
Set your phone to lockautomatically 57
Change your PIN code 57
Access codes 57
Master reset 58
Boot validation 58
FAQs 59
Questions 59
How can I extend the battery life of
myphone? 60
Do I need a Google™ account to use
myphone? 61
How can I reduce my data costs,
especiallywhen abroad? 61
How do I transfermusic from my
computer to my phone? 61
How can I listen to my iTunes music
libraryon my phone? 62
How do I setup an email account on
myphone?
62
How do I transfercontactsto my phone? 63
How do I set my musicas ringtone? 63
© 2017 Vertu Corporation Limited. All rights reserved. 3

Contents
How do I change the font size on
myphone? 63
How do I checkif I have the latest
software updates on myphone? 63
Why have I got no connectivity? 63
Why is my internal storage less than
advertised? 64
How do I protectmy phone from
unauthorised use? 64
How do I find the IMEI number of
myphone? 64
How can I clear the log of my calls or
thelist of people I have contacted
frequently? 64
Why does my phone get warm? 64
How do I set a photo as my wallpaper? 64
Can IstilluseGoogle Mapsif I do not
have a data connection? 65
Accessories 66
Battery charger 66
Data cable 67
Wired stereo headset 67
Specifications 68
Specifications 68
Care of your phone 70
General care 70
Embroidery 70
Exoticleathers 71
Leather 71
Non-precious metals 71
Precious metals 71
Precious stones 72
Sapphire and ceramics 72
Safety and warranty 73
Safety text 73
Additional care and maintenance 77
Manufacturer'sLimited Warranty 78
Software application noticesfor
thephone
Environmental 83
Export and controls 83
81
Copyright and trademark notices
SAR (SpecificAbsorption Rate) notice VM-08 85
Declaration of Conformity 87
84
© 2017 Vertu Corporation Limited. All rights reserved. 4

Introduction
Introduction
Your Constellation phone
Thisuser guide is intended to provide you with detailson how to use the prominent features on your
Constellation.
To accessthe exclusive privileges and benefits such as Vertu Concierge, Vertu Life and Vertu Setup, you
must register your phone.
The pictures used in this user guide are provided for illustration purposes only. They may differ from the
exact appearance of your Constellation.
Help and support
To find out more about using your phone:
l Contact Vertu Customer Service by either pressing the Vertu key or through the Vertu Certaintyapp.
l Refer to the user guide on your phone from the Vertu Certaintyapp, or on the Vertu website at
http://www.vertu.com/gb/en/product-support/user-guides-and-downloads/.
l Use the setup wizardsavailable on the phone to help you with things such as registration, or to
create an email account.
Compliance information
You can find compliance information on a label that is located in the SIM compartment. For instructionson
accessing the SIM compartment, see "Insert the SIM cardor memory card" on page 10. The information
displayed includes the IMEI number and product name. To view all of the compliance information for your
Constellation, select Regulatory Info. from the Quicksettings. To access Quicksettings, use two fingers
to swipe down from the top of the screen.
© 2017 Vertu Corporation Limited. All rights reserved. 5
Safety
Safety
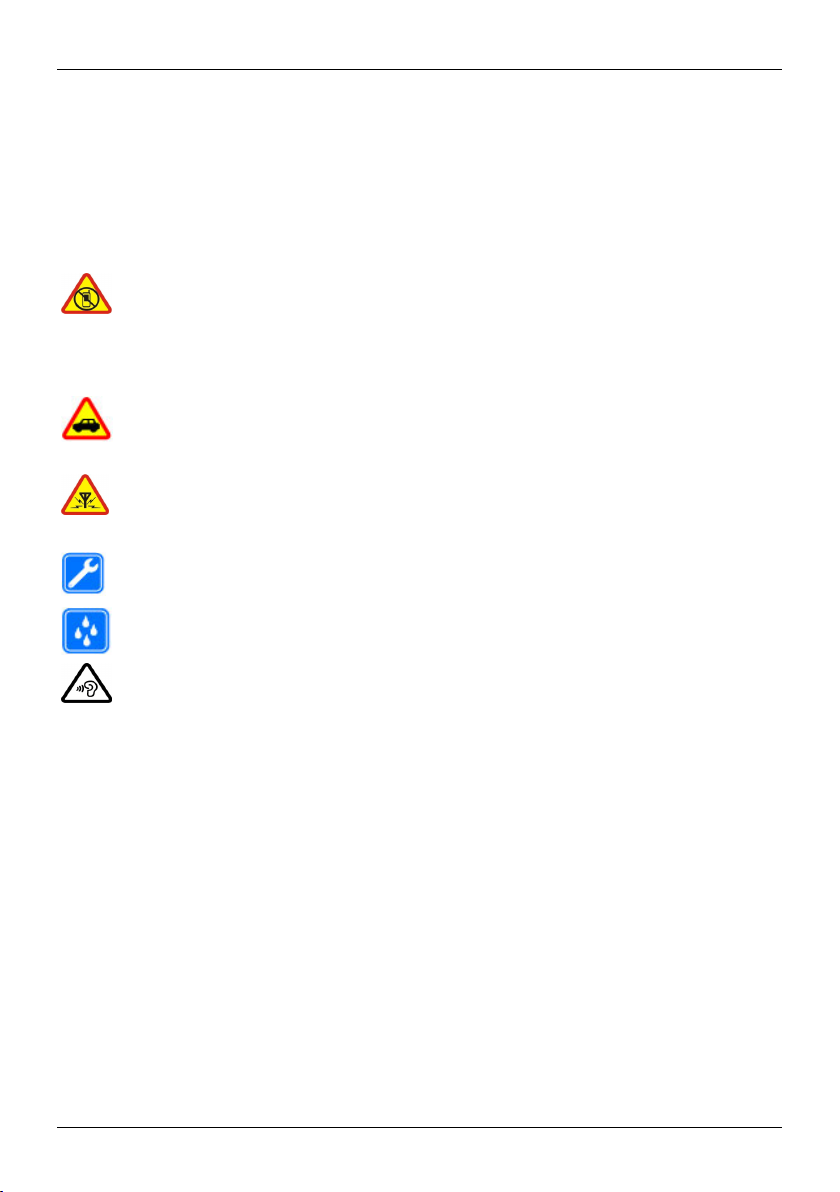
Safety
Read these simple guidelines. Not following them may be dangerous or illegal. Read the complete user
guide for further information.
Switch off in restricted areas
Switch the device off when mobile phone use is not allowed or when it may cause
interference or danger, for example, in aircraft, in hospitalsor near medical
equipment, fuel, chemicals, or blasting areas. Obey all instructions in restricted
areas.
Road safety comes f irst
Obey all locallaws. Always keep your hands free to operate the vehicle while
driving. Your first consideration while driving should be road safety.
Interference
Allwirelessdevices may be susceptibleto interference, which could affect
performance.
Qualified service
Onlyqualified personnel may install or repairthis product.
Keep your device dry
Your device is not water-resistant. Keep it dry.
Protect your hearing
To prevent possible hearing damage, do not listen at high volume levels for long
periods. Exercise caution when holding your device near your ear while the
loudspeakerisin use.
© 2017 Vertu Corporation Limited. All rights reserved. 6
1
2
3
4
5
6
7
8
9
10
Your phone
Your phone
Package contents
l Constellation phone
l Wall charger (AC-32V) with regional plugs
l USB cable 1200mm (VC-02)
l V Collection Wired Headset, Type WH-5V
l Polishing cloth
l Collateral pack, including Quick Start Guide, Warranty and Authenticity Card
The package contents may varyslightly in accordance with the materials used in your particularphone and
with regional regulations.
Features and keys
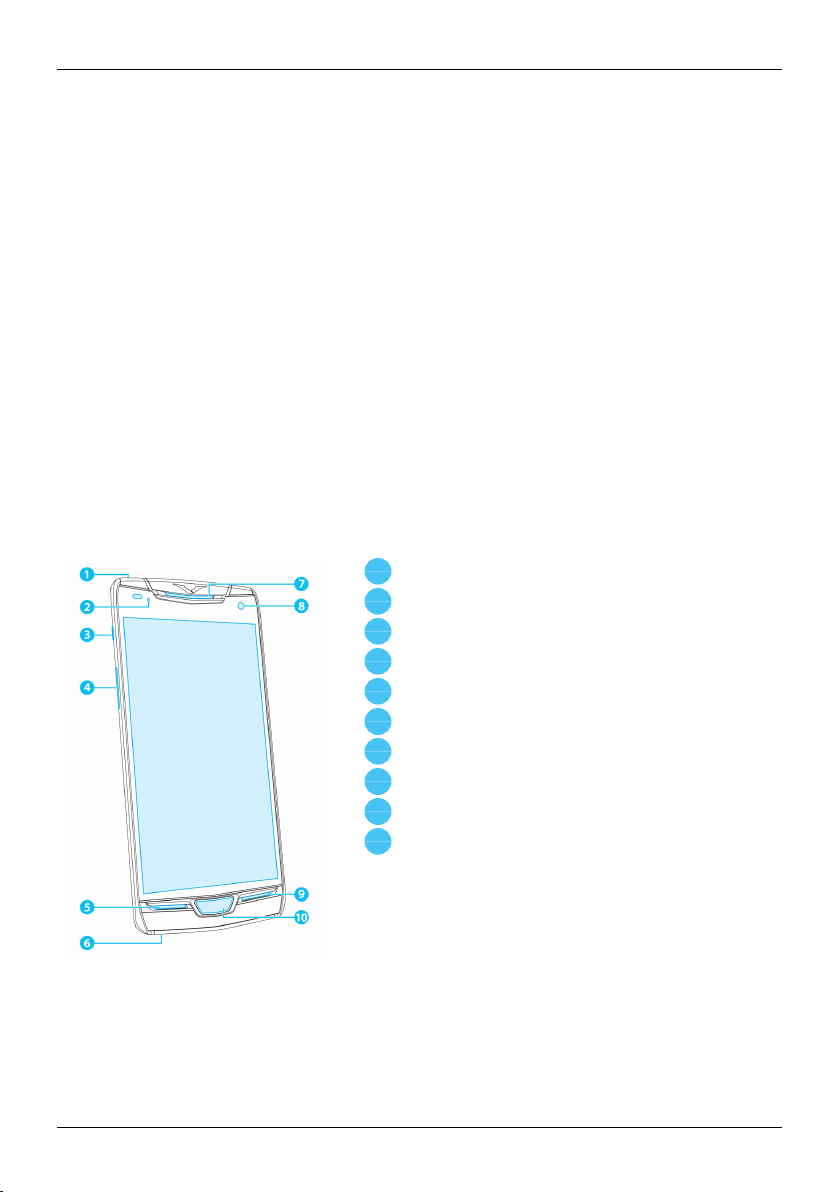
Front
Headset connector
Notificationlight
Vertu key
SIM tray
Microphone
USB Type-C connector
Earpiece speaker
Front camera
Loudspeaker
Fingerprint sensor
© 2017 Vertu Corporation Limited. All rights reserved. 7

1
2
3
4
5
Your phone
Back
Volume up key
Volume down key
Power key/screen lock
Main camera
Twin LED flash
Antenna locations
Avoidtouching the antenna areas while the antennas are in use. Contact with antennas affects the
communication quality and may reduce battery life due to higher power levelsduring operation.
© 2017 Vertu Corporation Limited. All rights reserved. 8
Your phone
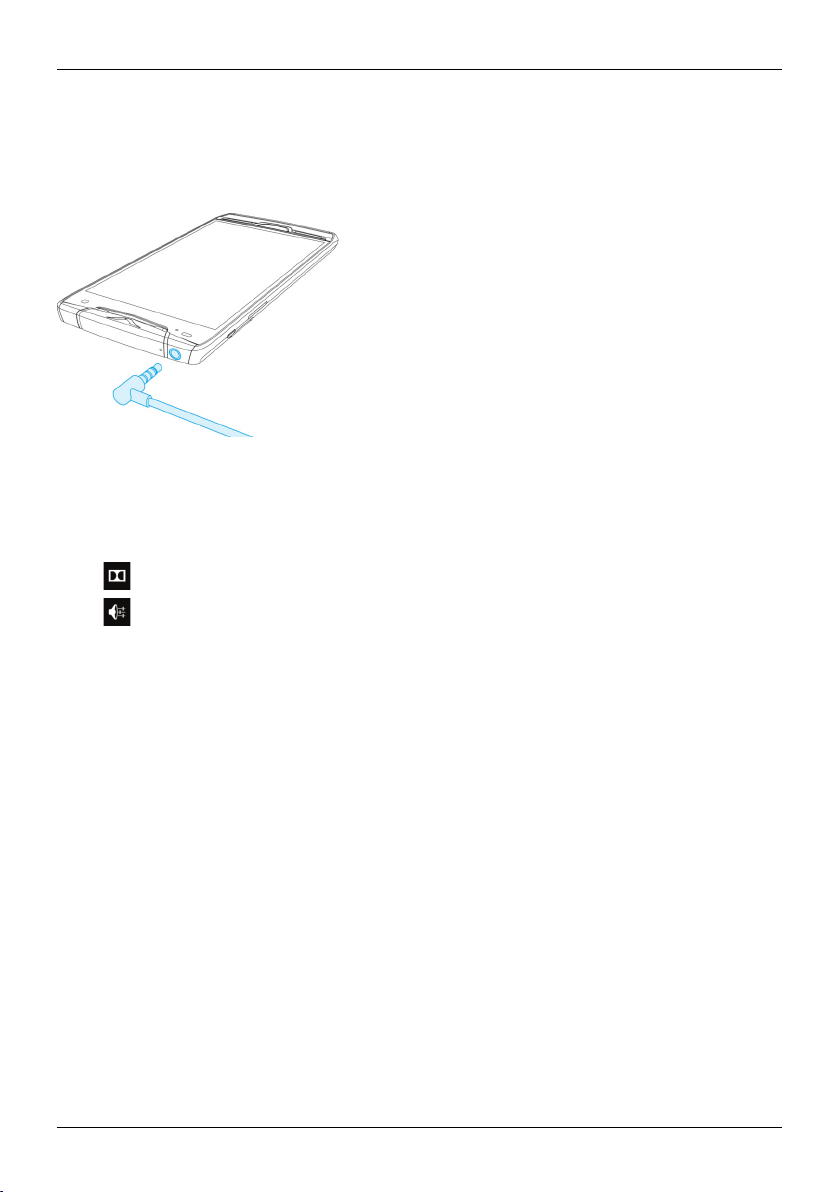
Headset
Use the headset provided to connect to your phone. Alternatively, you can connect any compatible
headsets.
Change the volume
Pressthe volume keys to change the volume during a call. When you are not on a call, pressthe volume
keysto change the ringtone volume.
Touch
Touch for quick accessto adjust Ringtone, Music and Alarm volumes.
© 2017 Vertu Corporation Limited. All rights reserved. 9
to selectDolby profiles.
!
Getting started
Getting started
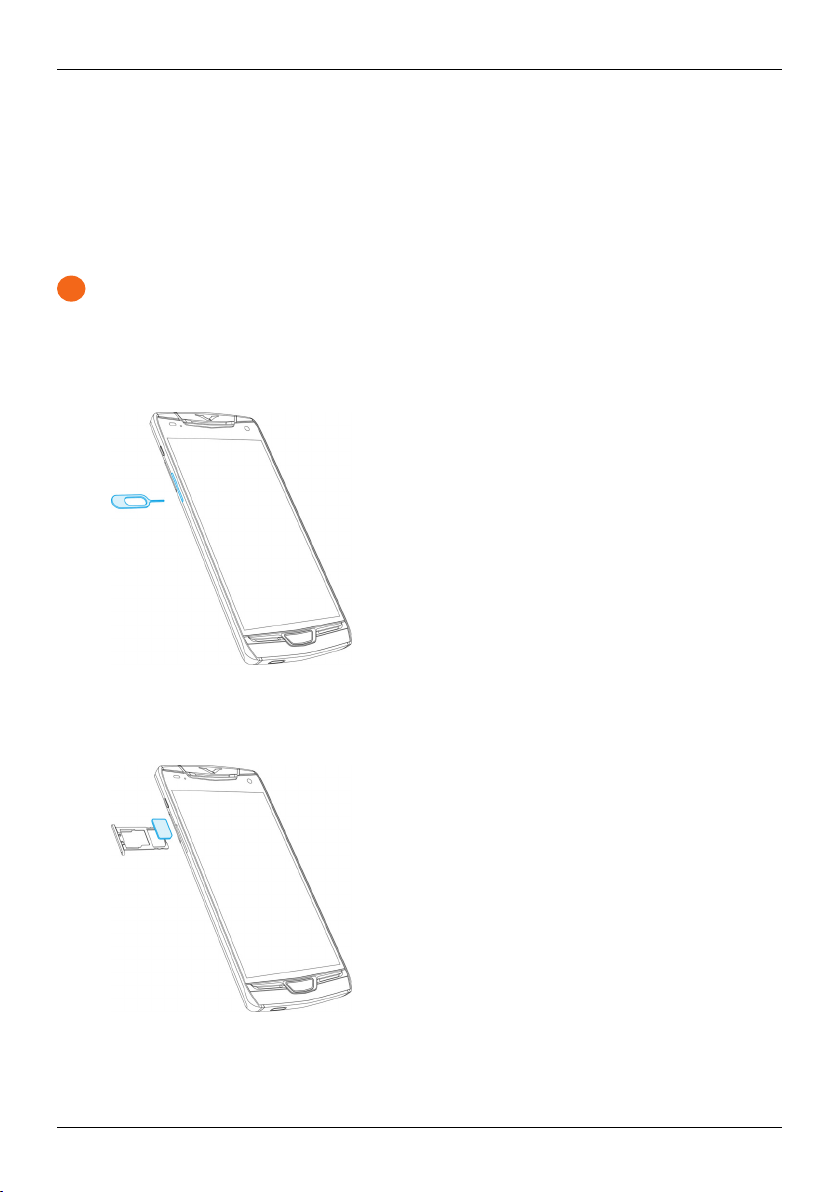
Insert the SIM card or memory card
Your Constellation phone is dual-SIM compatible. The SIM tray in your phone can hold up to two nanoSIM
cards, or one nanoSIM card and one microSD memory card.
Important: Do not insert another type of SIM card or memory cardinto your phone, as it will not be
compatibleand may damage the cavity.
To insert a SIM cardor memory card into your phone:
1.
Insert the suppliedSIM ejector tool into the hole on the SIM tray. Gently push the tool until the SIM
tray pops out of your phone.
2. Pullthe SIM tray fullyout of your phone.
3.
Place the nanoSIM card, with the metal contact facing down, in the first compartment of the SIM
tray.
© 2017 Vertu Corporation Limited. All rights reserved. 10
!
Getting started
4. If you want to insert a microSD memory card or another nanoSIM card, place it in the second
compartment of the SIM tray. Ensure the metal contact is facing down.
5. Carefully insert the SIM tray into your phone until it clicks into place.
Tip: If you insert two nanoSIM cards into your phone, you can choose how to use them. For
example, you can use SIM1 for calls and messaging, and SIM2 for mobile data. To choose
settings for your nanoSIM cards, touch
Apps> Settings>SIM settings.
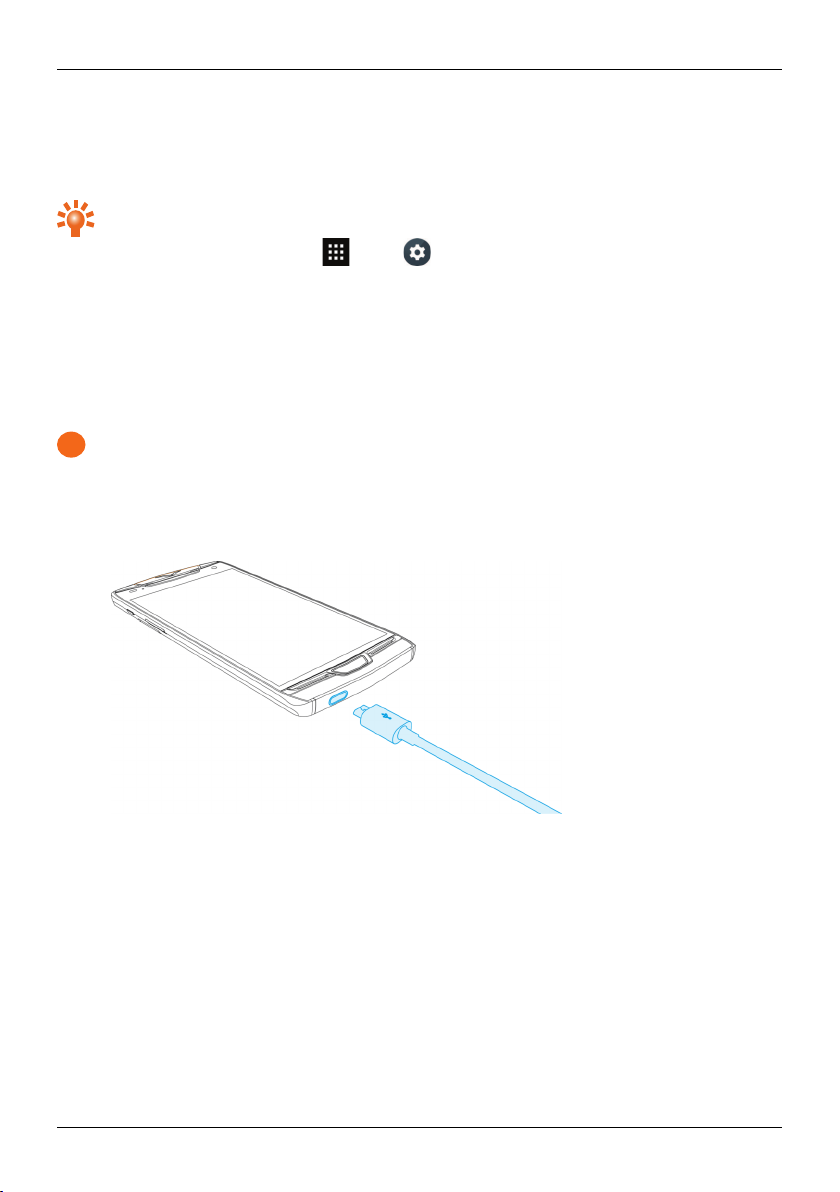
Charge the phone
The internal battery needs activating prior to first use, and it is recommended to charge the battery at this
point as it may not have been supplied with a fullcharge. Connect the supplied USB data cable into the
charging port at the bottom of the phone. Then connect the other end of the cable to the USB port on your
Vertu mains charger.
Important: Use only chargers, cables and accessories supplied by Vertu.
If the phone indicates a low charge, do the following:
1.
Connect the supplied wall charger to the wall outlet and then insert the USB connectorinto your
phone.
2. When the battery is fullycharged, disconnectthe charger from the phone and then from the wall
outlet.
Note:
l You can use the phone while it is charging.
l If the battery is completelydischarged, it may take several minutes before the charging indicatoris
displayed or before you can make any calls.
l The phone cannot be activated using the Vertu WirelessCharging Pad.
© 2017 Vertu Corporation Limited. All rights reserved. 11
Getting started
Other ways to charge the battery
You can also charge your phone by connecting it to your computer using the USB cable, or by placing it on
the optional Vertu WirelessCharging Pad.
Note: Your phone charges quickerwhen connected to the wall charger.
Battery Saver mode
If the batteryis running low and you are unable to charge your Constellation, you can use the Battery Saver
feature. Thisextends battery life by limiting your device's power consumption. Your phone's performanceis
reducedwhen Battery Saver is switched on, and email and other apps may not update until you open
them.
To enable Battery Saver, swipe down with two fingers on any screen and touch Battery saver.
When Battery Saver is enabled, displays on the status bar. Battery Saver automatically turns off when
you charge the phone.
You can also set up your Constellation to automaticallyswitch on Battery Saver when the battery charge
dropsbelow 15% or 5%. To enable automatic BatterySaver, touch Apps> Settin gs>Battery
saver>Turn on autom atically.
Switch the phone on or off
Switch on: Press and hold the Power key untilthe phone vibrates.
Switch off: Pressand hold the Power key, and then touch Power off.
Note: Always remember to power off your phone before removing and inserting a SIM card. Thisaction will
ensure that your network connectivity is restored.
In the unlikely event that your phone stops responding, reboot it. To reboot, press and hold the Power and
Volume Down keys,at the same time, until the phone vibrates.Thistakes approximately 10 seconds.
© 2017 Vertu Corporation Limited. All rights reserved. 12

Getting started
Start-up process
1 Wi-Fi setup and Google registration
To connect to Wi-Fi and register with Google:
1. Press and hold the Power key for a few seconds until you feel your phone vibrate.
2. Choose your preferred language.
3. Select a Wi-Fi network from the displayed list. You can choose to Skipthis step.
4.
Enter the wirelesspassword when prompted, and then touch CONNECT . If you can see a Wi-Fi
symbolon the top line of your display, the password is accepted.
Note: If you are using domesticWi-Fi, the password is usually found on the back of the router.
5.
If you have an existing Android device, choose whether to import your current setup.
Note:If you have been using an Androiddevice with NFC capability, you can use Tap & Go to
import your previous setup onto your new Constellation. Simply turn on NFC on your Android
device then touch the backs of both phones together until you hear an alert tone. Once the alert
has sounded follow the instructionson your Android to allow the Bluetooth data transfer.
6. Sign in to your Google account, or create a new account if you do not have one.
7. Checkwhich Google services are enabled. You can disable any services you do not need.
8. If required, add another email account to your phone.
9. Choose how to protect your phone. You can set up fingerprint recognition, or use a PIN, pattern or
password.
10. If you saved your previous Android setup to your Google account, choose whether to import your
data and apps.
ThiscompletesWi-Fi setup and Google registration.
2 Vertu registration
If you are a new Vertu customer you will be asked to create a Vertu account. If you already own a Vertu
phone you can simplylog in to your existing account with your Vertu username and password.
Completing Vertu registration will give you accessto unique privilegesand benefits relevant to you.
Tip: Forquickaccessto the range of exclusive services, press the Vertu key.
3 Recommended Apps
Formore on the apps that Vertu recommend, see "Recommended Apps" on page21.
4 Transfer contacts
Transfer contacts to your phone with your Gmail™ account, your SIM card or your iCloud account.
Forinformation on transferring contacts, see "Transfer contacts" on page32.
© 2017 Vertu Corporation Limited. All rights reserved. 13

Getting started
Use your phone when it is locked
To unlock the screen, pressthe Power key, touch
You can lockthe screen either by pressing the Power key or by simply leaving the screen to time out.
Formore information on different screen lock types, see "Screen lock" on page42.
and slideupwards.
© 2017 Vertu Corporation Limited. All rights reserved. 14
1
2
3
4
5
Explore
Explore
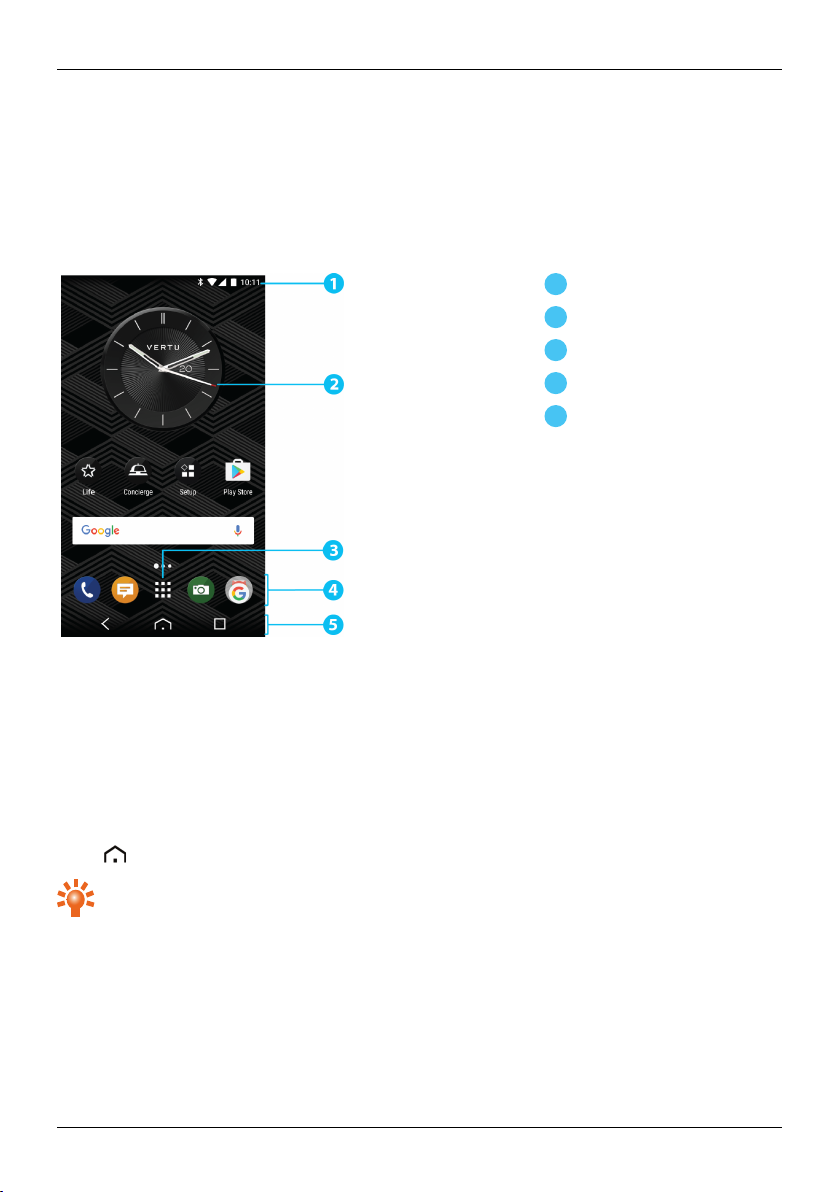
About the home screen
The home screen acts as a gateway to the functionson your phone while also providing you with all the
latest information:
Status and notification bar
Widget
Apps menu
Favourites tray
Back, Home and Recent
Apps
Status and notification bar
Status information, such as time, network signal strength and battery level indicator, is displayed at the top
right of the screen.
Any notifications, such as new messages or calendar appointments, are displayedin the top left of the
screen. To see your notifications, touch the bar and drag down. Touch a notification to open it.
Touch
© 2017 Vertu Corporation Limited. All rights reserved. 15
Home to close the status notification bar.
Tip: Flick the notification left or right to clear it from the list.
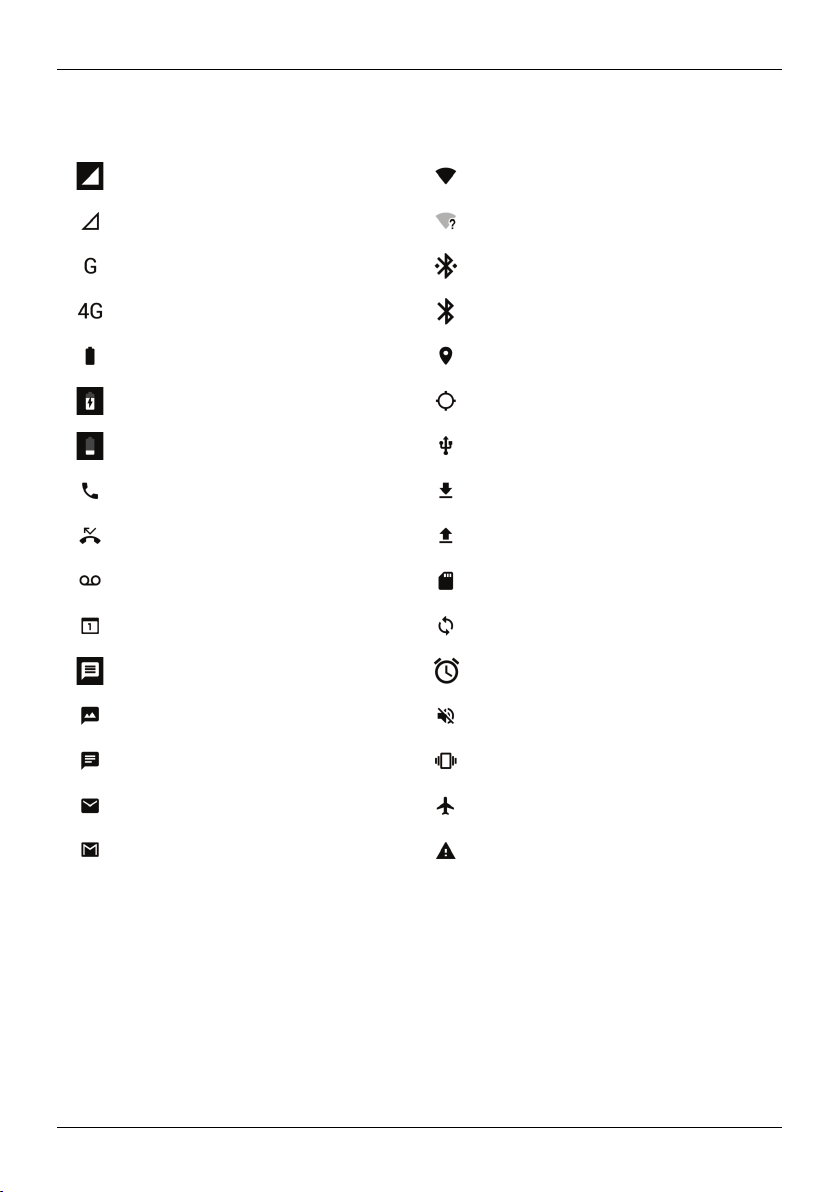
Status and notification icons
Network ( full signal) Wi-Fi connected
No network Wi-Fiavailable
GPRS data connection Bluetooth™ connected
4G+ (fastest data) Bluetooth™on
Battery (full charge) GPS (location found)
Battery (charging) GPS ( searching)
Battery (empty) USB connected
Active call Downloading
Missed call Uploading
New voicemail SD card
Calendar reminder Background data sync
Explore
New SMS Alarm set
New MMS Silent
New chat Vibrate
New email Aeroplane mode on
New Gmail Warning
© 2017 Vertu Corporation Limited. All rights reserved. 16
Explore
Do Not Disturb mode
If you do not want to be interrupted by your phone, you can use Do Not Disturb mode to avoid unwanted
calls, hide message notificationsand silence Calendar alerts.
To change settings for Do Not Disturb mode, touch
Apps> Settings>Soun d &
Notification>Do not disturb. You can choose the types of interruptions to allow, and set up rulesto
activate Do Not Disturb mode automatically.
To activate Do Not Disturbmode, swipe down with two fingers on any screen and touch Do not disturb.
Notifications
When your phone is locked, notificationsof received messages, missed callsor event alertsdisplay on
thescreen.
To dismissthe notifications, swipe them to the side.
If you want to hide notifications on a locked screen, touch Apps> Setting s>Sound &
Notification>When device is locked.
Clock widget
The clockwidget on the home screen displays the following information:
l Analogue clockwith a digital date indicator
l Alarms set for the next 12 hours
l Free and busy periods, taken from the calendar, around the clock bezel
l Local time. If you are roaming, the clock displaysboth the local time and the time at your home
location.
l Periods of silence for when you do not want to be disturbed by notifications. These periods appear as
a red rim on the clockwidget.
l Periods of priority for when you only want to be disturbed by priority notifications. These periods
appear as a grey rim on the clock widget.
To set an alarm, touch the centre of the clock.
To display an appointment, touch the edge of the clock and then touch the pop-up to open the
appointment. To clearthe appointment, touch the screen.
© 2017 Vertu Corporation Limited. All rights reserved. 17
1
2
3
Explore
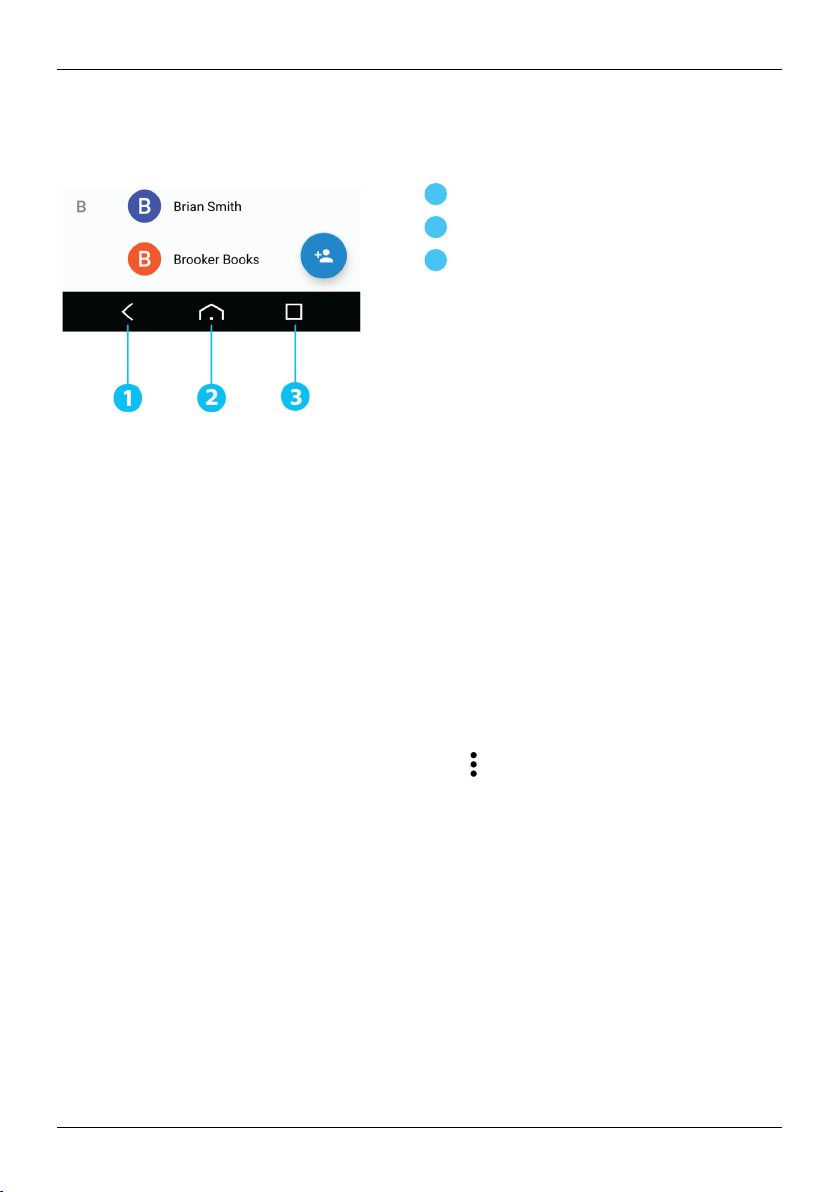
Back, home and recent apps
You can use the three icons on the bottom of your screen to navigate between screens and apps.
Back
Home
Recent apps
Touch Back to go backto your previous screen.
Touch Home to move an app to the background and return to the home screen. Touch and hold Home to
go to the search screen.
Touch Recent apps to view a list of the apps that you have used most recently.
Add widgets to the home screen
Widgetsare apps that providelive content such as news, weather forecastsand messages.
To add widgets to the home screen:
1. Touch and hold an empty spot on the home screen and touch WIDGETS.
2. To selecta widget, touch and hold it, and then drag it to the home screen.
To see the widget menu options, open the widget and touch
To resize certain widgets, such as Calendar, touch and hold the widget and then release it. The widget is
then highlighted and you can drag it to the size required.
Note: Downloaded apps from Google Play™ may automaticallydownload other associated widgets.
Tocheckyour widgets, touch and hold an empty spot on the home screen and touch WIDGETS.
© 2017 Vertu Corporation Limited. All rights reserved. 18
.
Explore
Favourites tray
The favourites tray appears at the bottom of the home screen. Use it to access your favourite apps quickly.
To remove an app from the favouritestray, touch and hold the app then drag to Remove at the top of
thescreen.
To add an app to the favourites tray, touch
tray.
Apps. Touch and hold the app, and drag it to thefavourites
Quick settings
Quick settings is a convenient settings menu that you can accessat any time on your Constellation, even
when the phone is locked. Using quick settings, you can access Wi-Fi settings, Aeroplane mode, main
device Settings and more.
To accessQuicksettings,swipe down with two fingerson any screen.
Tip: Touch Flashlight to switch on the camera flash and use it as a flashlight. Touch it again
toswitchit off.
Sharing your Constellation
You can easilyshare your Constellation with others without revealing your personal information by using
the Multiple User feature. Simply swipe down from the locked display, touch the
and then select Add guest. Under this profile, the SMS Message function will be disabled and the Guest
willnot be able to access your messages, contacts, photos, installed applicationsor Vertu Services. The
voice callfunction is disabledbut can be enabled if you so choose.
To revert back to your own user profile, simply follow the same steps and select your personalprofile.
Tip: You can choose to enable or disable the phone functionality in the Guest profilebyswitching
to your own profile and selecting MORE SETTINGS>Guest
>Turn on phone calls.
on the top-right corner
Warning: Disabling the phone functionalitywillprevent outgoing calls but incoming callscan still be
received.
If the Constellation is to be shared on a longer term basis, we recommend you use the Add User profile.
Thiswillprompt the phone setup sequence to provision the new user’s accounts. If you choose, phone call
and SMS Message functionscan be enabled.
© 2017 Vertu Corporation Limited. All rights reserved. 19

Explore
Voice actions
With voice actions you can set an alarm, call friends, and more just by speaking clearly into your phone.
l
Voice dialling: on the home screen, touch
phone number.
l
Voice commands: on the home screen, touch
Calendar".
and then say “Call” and then a contact name or
and then say a command, such as "Open
© 2017 Vertu Corporation Limited. All rights reserved. 20
Apps
!
About apps
Your Constellation gives you accessto a wide range of useful apps.
Apps
To accessyour apps, touch
To close the apps screen, touch
To view your most recently used apps, touch
Apps from the home screen. Scroll up and down to see all your apps.
Home.
Recent apps.
Recommended Apps
> > >Recommended Apps
Recommended Apps provides you with a single,trusted destination where you can quickly and simply
browse and install the apps you use every day. The selection of apps displayedhas been chosen based on
your country, ensuring that they are relevant to you.
Google Play™
> >
The Google Play Store app willhelp you with just about anything.
Scroll to the app you want to install, and then touch Install (if the app is free) or touch the priceto buy.
Once installed, the new app is displayed in the apps screen.
To view a list of your downloaded apps, touch
apps is displayed, and these apps are available to download again.
Important: Choose your apps carefully from trusted sites, or you can rely on Vertu Recommended
Apps.
Your application purchases are tied to your Google account and can be installed an unlimited amount of
times on any device. So, for example, if you remove 'My Favourite Game' to save memory,you can reinstall
it at a later date with no charge by simply visiting My Apps. For more information on My Apps, see "Manage
and restoreapps" on page22. You can also re-installapps from the My Android™ Apps section of
play.google.com.
Apps> Settings>Apps. A list of your downloaded
© 2017 Vertu Corporation Limited. All rights reserved. 21
Apps
Apps precautionary advice
To protect your phone from the threat of spyware, phishing, or viruses, it is important that you choose your
apps carefully.For Vertu-recommended securityapps, see "Recommended Apps" on page 21.
l Some apps drain your phone of phone memory and battery more than others. If you find that an app
is draining your phone, simplyuninstall it.
l Before you get Android apps on Google Play™, checkthe ratings and comments. If you aren't
convinced by the legitimacy of an app, don't installit.
l Some apps may contain inappropriate content for children.
Update apps
If you receive an over-the-airnotification of an update on your phone for a Google Play™ app, you can
follow the instructionsto download and install the update software or you can opt to dismiss the
notification.
The Allow automatic updating setting is often activated by default when you install an app. To change
this setting, touch
Apps> Play Store> >Settings>Auto- update apps.
Tip: To conserve data usage and only update your apps over Wi-Fi, touch Apps>
Play Store> >Settings>Auto- update apps>Auto-update over Wi-Fi on ly.
Manage and restore apps
To manage your apps, touch Apps> Settings>Apps.
Touch an app to see its details (such as accesspermissionsand file size), and then touch to select options
such as force the app to stop, uninstall, or cleardata.
To restore apps that you have previouslyinstalled from Google Play Store, touch Apps>Play Store>
>My apps. A list of your downloaded apps is displayed,and these apps are available to download
again.
Close apps
To close an app, touch
Many of your apps will continue to run in the background after you have closed them. To quicklyopen
recently used apps, touch
Tip: To remove an app from this list,flick it left or right.
© 2017 Vertu Corporation Limited. All rights reserved. 22
Home.
Recent apps.

Uninstall apps
To delete an app, touch
Apps
Apps> Settings>Apps>app name>Uninstall.
© 2017 Vertu Corporation Limited. All rights reserved. 23

Vertu Services
Vertu Services
About Vertu Services
Your unique Vertu experience starts with registration. Once you have successfully registered your phone
you are able to access the privileges and benefits by pressing the Vertu Key.
Vertu Concierge
Concierge offers 24-hour worldwide assistance, recommendations and prioritybookings.They facilitate
your every request, from finding the perfectgift to accessing 'money-can't-buy' events, experiences and
everything in between. Your Concierge willfulfil every request using theirunique expertiseand inside
knowledge.
It's simple to stay in touch with a choice of live chat, email or telephone, depending on your personal
communication preference. And so you're always up to date, you can find your requests at the touch of
abutton.
Note: Vertu Concierge requiresa subscription. For more details, contact Vertu Customer Service.
Vertu Life
Vertu Life offersaccess to a world of opportunity with privileged accessto curated experiencesand global
events, hand-picked for the discerning taste of Vertu users.
Enjoy privileged access to a private members club in Hong Kong, ticketsfor the Champions League final or
an invitation to join the stars at the Academy Awards, all dynamicallydelivered through your handset.
Vertu Setup
Vertu Setup provides peace of mind for your Vertu and your data, delivering a host of integrated security
features and servicesthrough our expert partners and best-in-class technology.
Vertu Setup also includes:
l The abilityto lock, wipe, find and ring your Vertu phone at any time via the Lost Phone service. This
servicedoes not require set up and is activated once you have registered your Vertu phone. In the
event of losing your Vertu phone, simplylog in to your account on vertu.com from another device.
l Vertu Sync whichallows iCloud users to easily synchronise theiriCloud contactsand calendar with
their Vertu phone. See "Transfercontacts" on page 32 for more details.
* For partner services and duration please see the specification for your phone.
Vertu Support
Our renowned Vertu Customer Service is always availableshould you require any assistance with your
Vertu. Call or email Vertu Customer Service from within the Vertu Support app, or browse the phone user
guide and FAQsdirectlyon your phone. With our Remote Assist technology we can support you
immediatelywherever you are to keep you and your Vertu going.
© 2017 Vertu Corporation Limited. All rights reserved. 24
1
2
3
4
5
6
Text entry
Text entry
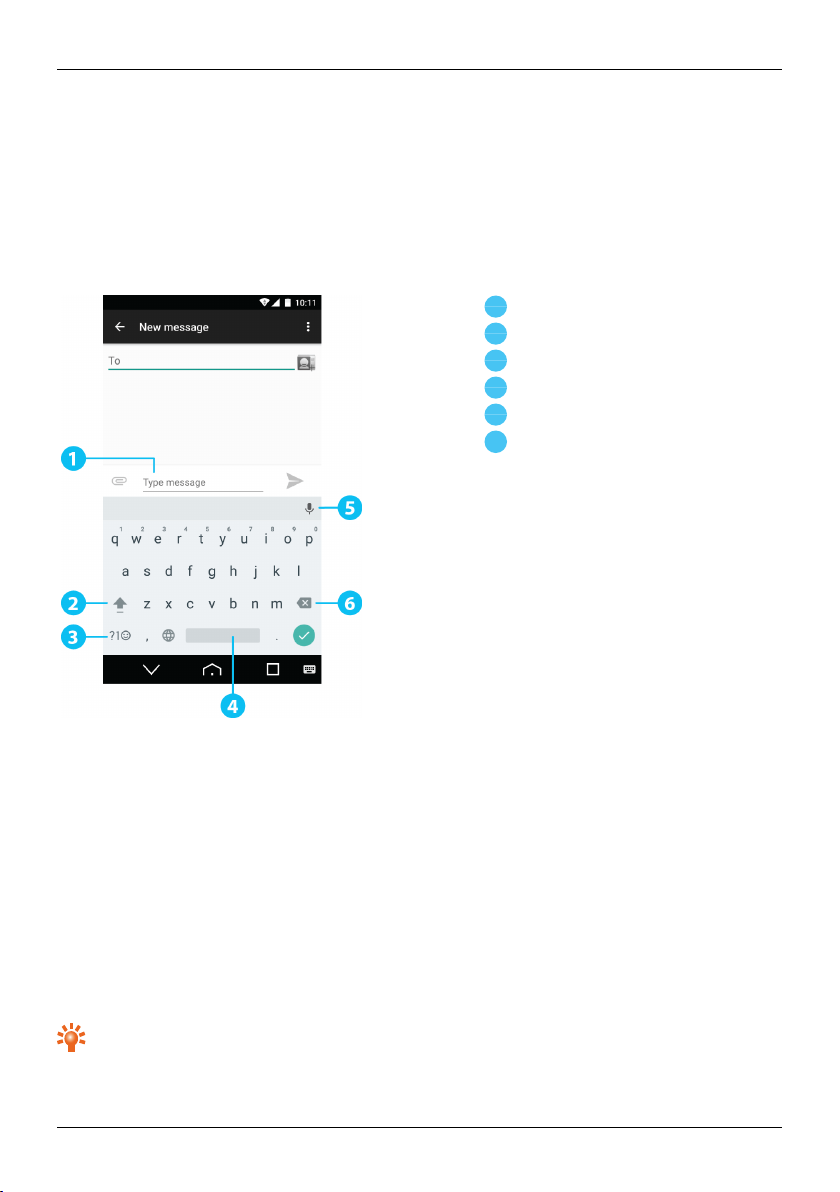
Keyboard entry
To open the touch screen keyboard, touch a text entry box. To enter text, touch the letters on the keyboard.
The keyboard is displayed in your country'snative text input format, for example, QWERTY, in both portrait
and landscape modes.
Text box
Shift
Keyboard for numbers and symbols
Space
Speech-to-text dictation
Delete
Cut, copy and paste text
Touch and hold a section of text to select it. Tabs appear, marking the boundariesof the selection. Drag
these tabs to reduce or increase the selection. To cut or copy the text, touch CUT or COPY. To paste the
text, touch the point where you wish to insertit, and then touchPASTE.
Predictive text
Predictive text input is based on a built-in dictionaryto which you can add new words. It is not available in all
languages, and is active by default. As you start typing a word, your phone suggests possible words for you
to choose. When the correct word is displayed, touch the word. If the word is not in the dictionary,the
phone suggests an alternative word from the dictionary. To add a new word to the dictionary, touch the
word you have typed.
Tip: To see a menu of punctuation marks, touch and hold the full stop key.
© 2017 Vertu Corporation Limited. All rights reserved. 25
Text entry
Gesture typing
Formany languages, your phone lets you spell out words by sliding a finger tip acrossthe keyboard. As you
move between keys, your movements are traced by a blue trail acrossthe keyboard and the word you have
spelt out appears in the middle of the stripabove the keyboard. To end a word and insert a space, lift your
finger. The phone automatically inserts spaces between words.
Dictionaries
To view your dictionaries, touch
Touch + to add words to your dictionary.
Apps> Settings>Language & input>Personal dictionary.
Change the keyboard language
To change the language on your keyboard, touch Apps> Settings>Language & input and
select another option from Keyboard & in put methods.
Note: The keyboard options available willchange depending on your language selection.
If you change the keyboard language and you want to be able to use spellcheck for the new language, you
must installan additional keyboard dictionary. Under Keybo ard & input methods, touch Google
Keyboard>Dictionary>Add- on dictionaries>a listed dictionaryoption.
© 2017 Vertu Corporation Limited. All rights reserved. 26
Calls
1
2
3
4
5
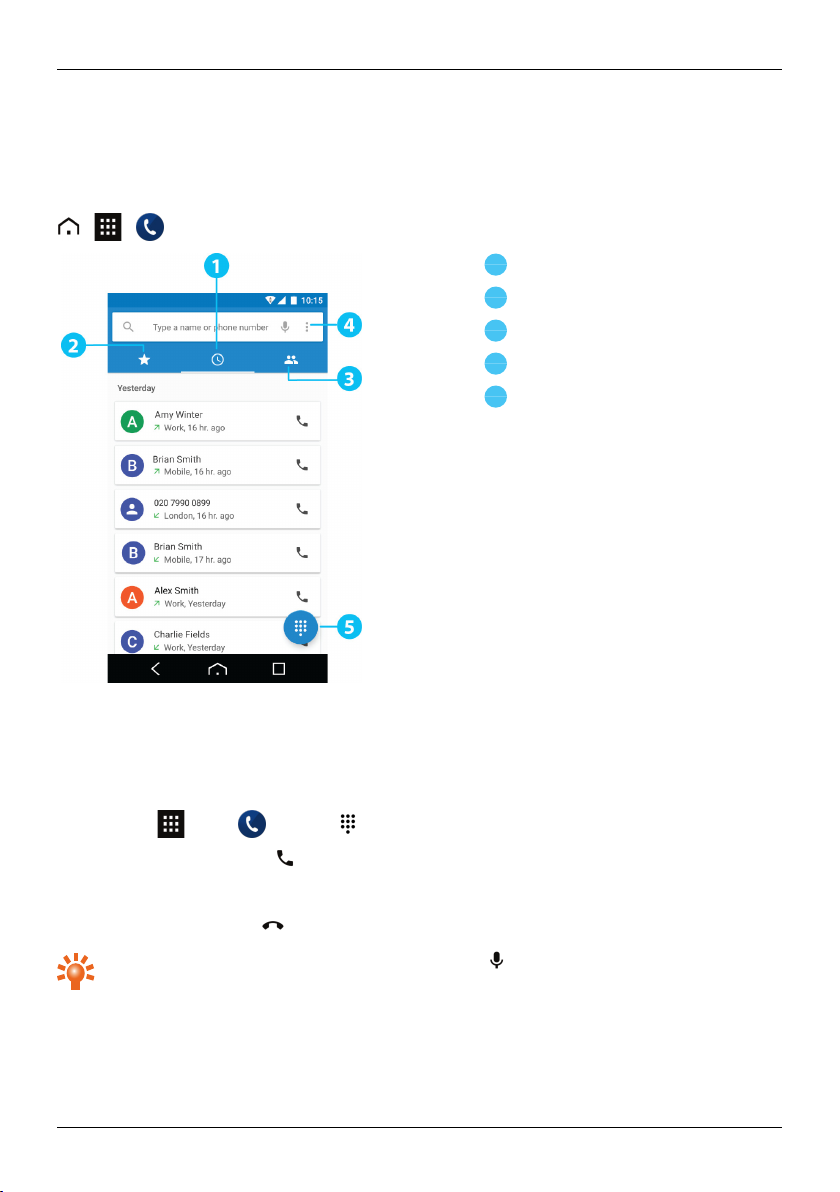
About calls
> >
Calls
Recent calls
Speed dial your favourite contacts
All contacts
Optionsmenu
Dialler
Make and answer calls
To make a call:
1.
Touch
2.
To make the call, touch
Note: To enter the + character, used for internationalcalls, touch and hold 0.
3.
To end the call, touch
Tip: To voice dial a contact from the home page, touch and say a contact name.
© 2017 Vertu Corporation Limited. All rights reserved. 27
Apps> Phon e> dial pad and enter the phone number on the dial pad.
.
.

To answer a call, touch and drag to .
l
To send an incoming callto your voicemail, touch
l
To send an automated text message to the caller, touch
and drag to .
, drag to , and then select an
appropriate message.
l To silence an incoming call, press the Power key or Volume keys.
Call recent number
The call log displaysinformation about the callsyou have made and received.Thismakes it easy to call
someone again if they are not answering. Simplyaccess the calllog and quickly retrieve the number.
To call back a recent caller:
Calls
1.
From the home screen, touch
Phon e> .
2. Select the person you want to call back.
3.
Touch
To clear the call history list, touch
.
>Call h istory> >Clear call log.
Call using Speed Dial
Speed Dial enables you to quicklycallfavourite or frequently called contacts. To use Speed Dial:
1.
From the home screen, touch
Phon e> .
2. Select a contact to call.
To clear the list of frequently called contacts, display the list, touch
>Clear frequents.
Listen to your voicemail
You can divert your incoming calls to your voicemail( networkservice). Also,people can leave you a
message, for example, when you have not answered the call.
To listen to your voicemailmessages, from the home screen touch Phone, and then touch and hold 1
on the dial pad.
Divert calls to another number
If you cannot answer your calls, you can divertincoming callsto another phone number.
From the home screen, touch
Phon e> >Settin gs>Calling accounts. Choose a SIM card and
then touch GSM call settings>Call f orwarding.
© 2017 Vertu Corporation Limited. All rights reserved. 28

Calls
Severaldiverting options, such as When busy and When unanswered can be active at the same time.
Note: Call divert is a networkservice. For details, contact your service provider.
Make a conference call
To start a conference call:
1. Callthe first number.
2.
After the callconnects, touch
3. Dialthe next number, or select it from contactsor favourites.
4.
When the next number answers, touch
Note: Conference calls are a network service. For details, contact your service provider.
>Add call.
>Merge calls.
© 2017 Vertu Corporation Limited. All rights reserved. 29

1
2
3
4
5
Contacts
Contacts
About contacts
With contacts, you can save and organise your friends'phone numbers, addressesand other contact
information.
> >
Favourites
Search
Options
All contacts
Add a contact
Call, text or email contacts
> >
To call a contact, touch the contact and then touch the phone number.
To text a contact, touch the contact and then touch
To email a contact, touch the contact and then touch the email address.
© 2017 Vertu Corporation Limited. All rights reserved. 30
.

Contacts
Add contacts
> > >
1.
Select an account to back up your contact.
Note: If you have not set up an account, like a Google or email account, your contact is only saved
to your phone memory.
2.
Enter the contact details, and then touch
Tip: Backing up your new contact to an account willalso sync it to that account.
.
Join contacts
If you have two or more contacts for the same person, maybe a Gmail contact that is also stored on your
phone, you can join them.
Touch
want to join.
Apps> Contacts>contact name> > >Merge, and then touch the contact that you
Edit or delete a contact
To edit a contact, touch Apps> Cont acts>contact name> .
To delete a contact, touch Apps> Contacts>contact name> > >Delete.
Save a number from a call or message
When you receive a callor a message from a personwhose phone number is not yet saved in the contacts
list, you can save the number in a new or existing contact list entry.
To save a number from a receivedcall:
1.
From the home screen, touch
2. Touch the callentry.
3.
Touch
To save a number from a receivedmessage:
1.
From the home screen, touch
2. Touch the message to open it.
3.
Touch
4. Touch Add to People.
.
.
Phon e> .
Apps> Messaging.
© 2017 Vertu Corporation Limited. All rights reserved. 31

Mark contacts as favourites
!
You can find and callimportant contactsmore quickly if you mark them as favourites.
Contacts
l
To mark a contact as a favourite, touch
name> . The star changes to white. To remove a contact from your favourites, touch the white
star.
l
To view the list of your favourites, touch
Apps> Contacts>ALL CONTA CTS>Contact
Apps> Contacts>FA VOURITES.
Personalise contacts
Set unique photos and ringtones for your contacts.
> >
To add a photo, touch the contact> then touch the photo area.
To add a ringtone, touch the contact> > >Set ringtone.
Transfer contacts
You can transfer contacts to your Constellation by using your Gmail™, your SIM cardor your iCloud
account.
Gmail™
You can transfer your contacts to a Comma Separated Values ( .csv) text file. After you have imported this
file into your Gmail account, it willautomaticallysyncwith your phone (if you have already set up a Gmail™
account).
1. Export the contactson your previous phone to a .csv file. Forinformation on how to do this, refer to
the user documentation supplied with your previous phone.
2. Log into your Gmail™ account on your PC and clickContacts>Import Contacts.
3. ClickBrowse and select the .csvfile that you created.
4. ClickImport Contacts.
Important: Syncing your contacts with your Gmail™ account means that your contactswill always
be backed up.
SIM card
Fordetails on exporting contacts stored on your old phone to your SIM card, refer to the user
documentation suppliedwith your previous phone.
Then, to import these contacts stored on your SIM card to your Constellation, touch Apps>
Contacts> >Import/Export>Import all SIM con tacts.
© 2017 Vertu Corporation Limited. All rights reserved. 32

Contacts
Note: Transferring contactswith your SIM card may result in data for some contactsbeing lost.
iCloud
If you have an iCloud account, you can easilysynchronise your iCloud contacts and calendar with your
Constellation.
When you set up your phone for the first time, you have the opportunity to set up the Vertu Sync service.
Alternatively, the Vertu Sync application is preloaded onto your phone and can be found in the application
menu grid.
To use the service, simplyenter your Apple ID and follow the instructionson screen. In some casesyou
may need to generate an application-specific password for the service to work.
1. Go to
2. Select Manage your Apple ID and sign in.
3. Select Password and Security.
4. ClickGenerate an App-Specific Password and follow the steps on screen.
5. Enter the app-specific password into the password field of the Vertu Sync application.
https://appleid.apple.com/account/home.
© 2017 Vertu Corporation Limited. All rights reserved. 33

Messaging and email
Messaging and email
About messaging
> >
You can send and receive various kinds of messages:
l Text messages
l Multimedia messagesthat contain photos, videos or audio
Send and read messages
> > >
To send a message:
1.
Enter the recipient.
Note: To send the message to multiple recipients, add more than one contact in the To field.
2.
Type your message. Touch
3.
Touch
To open a text message and the previous conversation, touch it.
To reply to a text message, open it and enter your response in the text box at the bottom, and then
touch
.
to send your message.
to Add subject.
Instant messages
> >
To send and receive instant messages, you can use Google Hangouts™.
Manage messages
> >
To delete a message, touch and hold to select it, and then touch the trash can at the bottom.
To change your messaging options, touch Apps> Messaging> >Settings.
© 2017 Vertu Corporation Limited. All rights reserved. 34

Set up your email
From the home screen, touch
account types:
Messaging and email
Apps> Settings>Accounts. You can now set up one of three
l
Select
Add account>Exchange to set up your businessaccountsrunning on Microsoft™
Exchange server.
l
l
Select
Select
Add account>Google to set up your Gmailaccount.
Add account>Personal if you are using any other email provider.
Enter your username and password when prompted.
Note: You may be prompted to enter your domain name and server name. Contact your IT administrator
for details.
When your email accounts are set up, you can accessthem by touching
Email or Gmail. If you
have set up two or more email accounts, you can switchbetween accountsby touching and then
selecting the requiredemail account.
To read and reply to messages,touch Apps> Email.
l
To compose a new message, touch
l To read a message, simply touch it from the inbox.
l
To reply all or forward the email, touch
. Enter your message and then touch to send the email.
.
If Auto-syncdata has been disabled, simply flickdownwards from the email inbox displayto manually
refresh the synchronisation.
Tip: When you have a new email, will appear in the status bar.
© 2017 Vertu Corporation Limited. All rights reserved. 35

Music
Music
About music
> >
Google Play Musiclets you listen to your current musiccollection and to buy additional musicthrough
Google Play Store.
The Music Manager desktop application provides a simple way for you to put your musiccollection into the
cloud, unlocking the potential of the Play Music service. The application scans your computer for music
files,including filesin your iTunes® library, and makes any discovered tracks and albums available to you in
Play Music. If your collection can be matched to musicin Google Play Store, the tracksdo not even need to
be uploaded, saving you data transfer time.
Once your musicis in the cloud, you can access it from any computer connected to Google.com or from any
Androidphone or tablet that has the Play Music app installed.
When you first listen to a track with Play Music on your Constellation, the song is cached on the phone. So,
over time your favourites are automatically made availablefor offline listening, such as when you are
travelling on an aeroplane.
Note: The MusicManager application and musicpurchasesfrom Google Play Storeare only available in
certain markets.
Supported file types
Your Constellation will play the following audio file formats: AAC, AAC+, MP3, MP4, WAV, M4A, OGGand
WMA.
Adding songs or albums to Play Music
You have two options for listening to music on your phone. You can listen to music files that you store on
your phone, or you can listen to musicin your online libraryin the Play Music cloud.
To add your music to the Google Play Music cloud
1. Sign up for your Google Play™ music library: To get started, sign up for Google Play™ and
download MusicManager, a desktop application that lets you upload your collection from your
iTunesmusic library, or any music folder on your computer, to the cloud.
2. Upload your collection: Sign in to Music Manager and choose where you keep your music.
MusicManager then starts uploading automatically. When you add new music to your computer,
MusicManager can automaticallyadd it to your library too. Music Manager even adds your iTunes
playlists and ratings so you can start listening to your favourites right away.
3. Access your music on the web and your phone: After you have set up your Play Music
musiclibrary, you can accessit on your Constellation, on any Androidphone or tablet or on the
web. Sign in and all your music is ready to be played.
© 2017 Vertu Corporation Limited. All rights reserved. 36

Music
To add your music to your Constellation phone only
To load music on your computer and then load it on your phone, you need the following:
l AMicrosoft™ Windows™ computer or Apple Macintosh™ computer
l AUSB data cable
Note: When you connect your phone for firsttime, your computer may prompt you that drivers are being
installed. Complete the driverinstallation before you continue with the following steps.
1.
Connect the USB cable from your phone's USB connector to a USB connection on your computer.
2.
Drag the status bar down and touch
3.
On your computer, navigate to the removable disk showing your phone and open the Internal
. Make sure the Transfer files (MTP) check box is ticked.
Storage.
4.
Drag and drop files between your computer and the 'Music'folder.
5. When you have finished, disconnect the USB cable.
To buy new music through your Constellation phone
To buy new albums or tracksfrom your phone, follow these steps:
1. Go to the Google Play Store application.
2. Touch the ‘Music’ shortcut.
3. Follow the instructionsin the app to make your choiceand to complete the purchase.
Play music
Touch a song or playlist to start playing music.
Music player controls
l
Play or pause: touch
l
Select the previous or the next song: touch
l Fast forward or rewind:touch and hold the progress bar, and then drag forwards or backwards.
l
Turn shuffle on or off: touch
l
Repeat all on or off: touch .
l Adjust the volume: press the volume keyson the side of the phone.
l Goto the musichome screen: press Back
or .
or .
.
.
l
Add a song to playlist: while the song is playing, touch
l
Delete a song: in the musiclibrary, touch
next to the song you wish to remove, and then touch
>Add to playlist>playlist name.
Delete.
© 2017 Vertu Corporation Limited. All rights reserved. 37

Playlists
Music
To add a song from the musiclibraryto a playlist, touch
existing playlist or touch New playlist.
and then touch Add to playlist. Choose an
Hide the music player
Touch Home
You can continue to work with other apps while your musicisplaying.
When you see in the status and notifications bar, a song is playing. Flickdown to see details. Touch the
song to return to the musiccontrols.
. Your musicwill continue to play and you will see in the status and notifications bar.
Turn off the music
Touch
.
© 2017 Vertu Corporation Limited. All rights reserved. 38

Maps and navigation
Maps and navigation
Google Maps™
Google Maps is a Google service offering powerful, user-friendlymapping technology and local business
information, including business locations,contact information, and driving directions.
> >
You can save data from Google Maps to your phone so that a map is available for use offline. Thisfeature
is useful when you do not have a data connection, and it can also reduce your data transmission costs.
To save a map to your phone, view an area in Google Maps and touch
bottom and touch SAVE A NEW OFFLINE MAP. If you wish to adjust the selected area, you can pinch
the map to zoom in or zoom out. Touch Save to download the map data.
Tip: Blocks of map data can be up to 100MB. So Vertu recommendsthat you connect to a Wi-Fi
network before you download.
Forhelp with Google Maps™, touch
You can use Google's navigation service from the Google Maps app. Thisis an internet-connected GPS
navigation system with voiceguidance. Simplytouch and input your location details.
>Help.
>Your places, scrollto the
© 2017 Vertu Corporation Limited. All rights reserved. 39

Personalising your phone
Widgets
To add widgets to the home screen:
1. Touch and hold an empty spot on the home screen and touch WIDGETS.
2. To selecta widget, touch and hold it, and then drag it to a home screen panel.
Personalising your phone
To customise a widget, touch it to open it, and touch
.
Shortcuts
To add shortcuts to the home screen, touch App, touch and hold an app, and then drag it to a spot on
the home screen panels.
To create a shortcut folder, drag one shortcut on top of another. To add more shortcuts to the folder, drag
them onto the folder icon. If you wish to name the folder,touch it and enter a name at the bottom.
l To move shortcuts or shortcut folders, touch and hold them, and then drag to a new location.
l To remove shortcuts or shortcut foldersfrom the home screen, touch and hold them, and then drag
to Remove at the top of the screen.
You can also drag shortcutsor shortcut foldersin or out of the favouritestray for instant access from the
home screen.
Ringtones
You can adjust your ringtone for incoming calls or for notifications, such as a text message or email:
Touch Apps> Settings>Soun d & Notification.
To activate the ring and vibrate option, touch Apps> Settings>Sound & Notif ication>Also
vibrate for calls.
Wallpapers
To set a new wallpaper for the home screen, touch and hold an empty spot on the home screen, and then
touch WA LLPAPERS.
© 2017 Vertu Corporation Limited. All rights reserved. 40

Assign sounds to actions
l
To set sounds for touches on the dial pad, touch
Notification>Other sounds>Dial pad tones.
Personalising your phone
Apps> Settings>Soun d &
l
To set screen locking sounds when you lock or unlockthe screen, touch
Settings>Soun d & Notification>Oth er sounds>Screen locking sounds.
Apps>
Display settings
Option Setting
Set the brightness of the screen
Set the font size for menus and settings
From the home screen, touch
Settings>Display>Brightness level.
From the home screen, touch
Settings>Display>Fo nt size.
Apps>
Apps>
Pulse notification light
The pulse notification light constantlyupdates you on the status of the phone.
Colour of the light Phone status
Steady green Batteryfull.
Flashing green Battery charging.
Steady red Battery low but charging.
Flashing red Battery low and not charging. For example, if the phone is plugged into a PC,
Flashing blue Call, text message or email received.
but there is not enough current to charge the phone.
© 2017 Vertu Corporation Limited. All rights reserved. 41

Auto-rotate
To set whether the screen rotates automatically in certain apps, touch
Display>When device is rotated.
Tip: You can accessthe auto-rotate feature quickly by dragging down from the top of the display
with two fingers.
Screen lock
You can make the touchscreen lock when it goes to sleep.
Personalising your phone
Apps> Settings>
There are severaldifferent lock options. Touch
Apps> Settings>Security>Screen lock, and
then select the lock type:
l Swipe: drag upwards to unlock.
l Pattern: draw a pattern to unlock.
l PIN: enter a PIN code to unlock.
l Password: enter a password to unlock.
Note: Certain corporate email accounts make use of a specific lock that may disable the lockoptions
listedabove.
Protect your phone with a fingerprint
Your Constellation has a fingerprint sensor. You can use your fingerprint to protect your phone, authorise
payments and sign into supported apps.
To set up fingerprint recognition, touch Apps> Settings>Security>Fingerprint .
Date and time settings
To set date, time, time zone, and time formats, touch Apps> Settings>Date & time.
To automatically use the network date and time, touch Auto date & time or Auto-time zon e.
Language and input options
To set your menu language and region, touch Apps> Settin gs>Langu age &
input>Language.
© 2017 Vertu Corporation Limited. All rights reserved. 42

Socialnetworks
Social networks
Add an account
With the Browseryou can keep up to date with your social networking accounts on sites like Facebook™,
Twitter™ and Google+™. If you don’t have accounts, go to their websites to set them up. Most social
networking accounts offer dedicated apps that can be installed on your Constellationfrom Google Play™.
To download a social networking app, from the home screen touch
To sign in to your socialnetworking account, enter your username or email addressand password.
The social networking accountsare third-partyservices and not provided by Vertu. Check the privacy
settings of the social networking accounts to control what information you are sharing. Familiarise yourself
with the terms of use and the privacypractices of any socialnetworking accounts you use.
Apps> Play Store.
Delete an account
To delete a social networking account from the phone, touch Apps>touch and hold a social
networking app and drag it to Un install.
Synchronise contacts
When you sign in to a social networking account on your phone, you may be prompted to syncaccount
contacts, pictures and status with your Contacts app. You can accept or decline this request. To change
your sync settings at any time, touch Apps> Settings>Accounts>account name.
© 2017 Vertu Corporation Limited. All rights reserved. 43

Managing accounts
Managing accounts
Configure sync options
Automatic synchronisation of the accounts is set by default. To disable it, touch
Settings>Accounts> >Auto-sync data.
Disabling auto-syncdata will conserve data and battery usage, but you willneed to sync each account
manually to update latest information. To perform a manual sync,just flick downwardsfrom within the
email inbox of the account.
Delete accounts
To delete an account, touch Apps> Settings>Accounts, select the account and then touch
the account name, touch >Remove account.
Backup and restore accounts
To backup and restore your accounts, from the home screen touch Apps> Settin gs>Backup&
reset>Auto -restore. Check that the Auto-restore box is tickedto ensure that backed up settings and
data are restored when you reinstallan app.
Note: To backup application data, Wi-Fi passwords and other settings to Google serversmake sure that
the Back u p m y data box isticked.
Apps>
© 2017 Vertu Corporation Limited. All rights reserved. 44

Browser
1
2
3
4
About the web browser
To browse the web with your Constellation, you must have either a cellular or Wi-Fi data connection.
> >
Browser
Home
URL bar
Tabs
Browseroptions, such as bookmarksand browsersettings
To browse to a website, touch the web addressbar, enter a web address and then touch
Connect to the internet
Your phone uses the cellular mobile phone network (over the air) or a Wi-Fi connection to access the
internet.
Note: Check your data plan with your service provider. You may be charged to accessthe internet and to
download data over the air.
To use a Wi-Fi network for faster internet access, drag downwards from the top of the home screen with
two fingers. Touch the Wi-Fi networks available notification to select a preferred network. See "Wi-Fi"
on page53.
© 2017 Vertu Corporation Limited. All rights reserved. 45
.

Browser
To close your browser,touch Home .
Note: If you cannot connect to the internet, contact your service provider.
Add a bookmark
If you visit the same websitesregularly, add them to your bookmarks, so that you can easily accessthem.
To save a website as a bookmark, touch
To view your bookmarked websites, touch >Bookmarks.
> .
Privacy and security
To make changes to your privacy and securitysettings, from the home screen touch Apps> >
>Settings>Privacy.
To empty the cache and other browsing data, touch >Settings>Privacy>Clear browsing data.
Downloads
To download files in your browser, touch and hold a link or picture, and then touch Save image or Save
link.
To see the files you have downloaded, from the home screen touch Apps> Downloads. Touch
an item to open it, and then select the app that you want to use.
© 2017 Vertu Corporation Limited. All rights reserved. 46

1
2
3
4
5
6
7
8
9
Camera
Camera
About camera
You can use your Constellation to take photos or record videos. You can then view or edit the photos and
videos, share them on the internet, or send them to compatible devices.
> >
Change camera settings
Change flash settings
Turn HDR mode on or off
Turn the timer on or off
Turn Night mode on or off, to take photos in dark
conditions
Switch between back and front cameras
Change camera mode, for example, choose
manual camera settings or take a panoramic
photo
View recent photos and videos
Start recording video
Capture a photo
Note: The location of the icons will vary depending on the orientation of your phone. The appearance will
varydepending on your current choice of photo type and camera settings.
© 2017 Vertu Corporation Limited. All rights reserved. 47

Take and share photos
To take a photo:
Camera
1.
From the home screen, touch
Note: Touch the screen to change the focus location.
2.
Touch
You can use Manual mode to choose advanced settings for the camera, such as the shutter speed and
white balance. To use Manual mode, flick the camera mode to MANUAL. To hide options when the
camera is in Manual mode, touch
To take a wide panoramicphoto:
1.
From the home screen, touch
2.
Flick the camera mode to PANO, then touch
3.
Move your phone slowly acrossthe scene you want to capture.
As you move your phone, the camera automatically captures multiple shots.
4.
To stop capturing shots, touch
To share a photo:
1.
From the home screen, touch
2.
Touch the photo, touch
or socialmedia.
Tip: To share a photo immediately after capture, touch the small image of the previous photo.
Thescreen shows a "film strip" of your recent photos and videos. Flick right or left to move between
photos. Touch to see the sharing options. To return to the live camera view, select the
to take your photo.
Apps> Camera.
.
Apps> Camera.
.
. Your phone joins the shots together to make one large photo.
Apps> Gallery.
and then choose how you want to share, for example by email, SMS
Backoption.
Record and share a video
Besidestaking photos with your phone, you can also capture videos.
To take a video:
1.
From the home screen, touch Apps> Camera.
2.
To start recording, touch
Note: When recording a video, you do not have to touch the screen to set a focus location. The phone will
auto-focusto the centre of the frame while you capture the video.
© 2017 Vertu Corporation Limited. All rights reserved. 48
. To stop recording, touch . Your phone then stores the video.

To take a slow motion video:
Camera
1.
From the home screen, touch
Apps> Camera.
2. Flick the camera mode to SLO-MO.
3.
To start recording, touch
. To stop recording, touch .
To share a video:
1.
From the home screen, touch
2.
Touch the video, touch
or socialmedia.
Apps> Gallery.
and then choose how you want to share, for example by email, SMS
Tip: To share a video immediatelyafter capture, touch the small image of the previous video.
Thescreen shows a "film strip" of your recent photos and videos. Flick right or left to move between
videos. Touch
to see the sharing options. To return to the live camera view, select the Back option.
© 2017 Vertu Corporation Limited. All rights reserved. 49

Gallery
Gallery
About Gallery
> >
With Galleryyou can watch the videos you have recorded or browse through the photos you have taken.
View and edit photos and videos
> > >photo or video
Just touch a photo or video to view it.
Tip: To zoom in and out, quickly touch the screen twice.
To edit a photo, touch
To trim a video, touch . To edit a video, touch .
.
Share photos and videos
Share a photo or video:
1.
From the home screen, touch
2. Touch the photo or video, touch
SMS or socialmedia.
You can copy photos and videos between your phone and PC. See "Copy between the phone and a PC"
on page55 for details.
Apps> Gallery.
and then choose how you want to share, for example by email,
Assign contact images and wallpaper
Add a photo for a specificcontact, or set your favourite photo as your background image.
> > >photo
Touch a photo, and then touch >Set as...>Contact photo or Wallpaper.
Take a screenshot
To take a screenshot, press and hold the power key and volume down key at the same time.
To see the screenshot, touch
Apps> Gallery>Screenshot.
© 2017 Vertu Corporation Limited. All rights reserved. 50

Office tools
Clock
> >
You can use Clock as an alarm clock, a timer, or a stop watch.
Office tools
To view a list of your current alarms, touch
To add an alarm touch and then enter alarm details.
Touch to change the sound or other settings for an alarm. To change settings that affect all your
alarms, touch >Settin gs.
When an alarm sounds, drag to the right to turn the alarm off or to the left to delay the alarm for ten
minutes.
. To activate an alarm, drag the toggle to the right.
Calculator
> >
Your calculatorhas two views: basicand advanced. To change your views, swipe the green bar to the left.
Calendar
> >
With the Calendar app you can automaticallysee calendar events from your Google™ account.
You can view your calendar in different ways: touch the date, and then touch Day, Week, Month, or
Agenda to change the view. Touch an event to see more details.
Tip: To add a calendar widget to the home screen, touch WIDGETS, touch and hold Calendar,
and drag it to the home screen.
To add an event, touch
>New event. Enter the event details and touch DONE.
To delete an event, touch it to open it, and then touch the trash can .
To see multiple calendars, touch >Calendars to display. Select the check boxes next to the calendars
you want to see.
To sync your calendar,touch >Calendars to display. Select the check box next to your calendar and
touch Calendars to syn c>OK.
© 2017 Vertu Corporation Limited. All rights reserved. 51

Office tools
To change your calendar reminder tone, touch >Settin gs>General settings>NOTIFICAT IONS &
REMINDERS.
Note: You will need to have added an account for each calendar that is shown.
© 2017 Vertu Corporation Limited. All rights reserved. 52

!
Connectivity
Connectivity
Restrictions
Important: There may be restrictions on the use of Wi-Fiand Bluetooth technology in some
countries. For more information, contact your local authorities.
Wi-Fi
> > >Wi-Fi
With Wi-Fi connectivity, you can connect to a Wi-Fi network for a fasterinternet connection to browse the
web or to stream musicand videos.
Connect to a Wi-Fi network
To connect to a new Wi-Fi network:
1.
Touch
2.
Drag the toggle to the right to turn on.
If Wi-Fi is alreadyon and if Wi-Fi networksare available, the Wi-Fi indicator
status bar. Drag down the status bar and touch the Wi-Fi to select and connect to a network.
3.
Touch a network in the list, and then touch CONNECT. You may need to enter Network SSID,
Security, and Password details. For these details, contact the network administrator.
When your phone has connected, the Wi-Fi indicator
Tip: If you are using a domesticWi-Fi connection, the security information can often be found on
your Wi-Fi router.
Apps> Settings>Wi-Fi.
is shown in the
is shown in the status bar.
Bluetooth
> > >Bluetooth
With Bluetooth connectivity, you can make a wireless connection to other compatible devices, such as
phones, computers, headsets, and car kits. You can use the connection to send items from your phone,
transferfilesfrom your compatible PC, and print fileswith a compatible printer.
Connect a Bluetooth device
To connect with a new Bluetooth device, you need to pair your phone with it.
1. Make sure that the Bluetooth device you are going to pair with is in discoverable mode. Fordetails,
see the user guide of the device.
© 2017 Vertu Corporation Limited. All rights reserved. 53

2.
Touch
3.
Drag the toggle to the right to turn on and scan.
4.
Touch a device to connect. You may need to touch OK or to enter the device passkey to connect.
Fordetails, see the user guide of the device.
Apps> Settings>Bluetooth.
Connectivity
When your phone has connected, the Bluetooth indicator
The Constellationhas been equipped to support accessorieswith Qualcomm®aptX™ audio capabilities.
Tip: Switch Bluetooth off when not in use to conserve battery power.
Warning: Obey all locallaws. Always keep your hands free to operate the vehicle while driving.
Your first considerationwhile driving should be road safety.
is shown in the status bar.
Change your device name
You can change the name of your device.
1.
Touch
2.
Touch
3. Enter new name and touch RENAME.
Apps> Settings>Bluetooth.
>Rename this device.
Location services
> > >Location
Certain apps use location information from sourcessuch as GPS, Wi-Fi and mobile networks to determine
your approximate location.
Set your phone to sync with your computer
Note: When you connect your phone for firsttime, your computer may prompt you that drivers are being
installed. Complete the driverinstallation.
1.
Connect the USB cable from your phone's USB connector to a USB connection on your computer.
2.
Drag the status bar down and touch
pho tos (PTP) check box is selected.
3.
Follow the prompts on your computer to sync your digitalmedia files.
When the sync has finished, disconnect the USB cable.
© 2017 Vertu Corporation Limited. All rights reserved. 54
. Make sure the Transfer files (MTP) or Transfer

Connectivity
Copy between the phone and a PC
Note: When you connect your phone for firsttime, your computer may prompt you that drivers are being
installed. Complete the driverinstallation.
1.
Connect the USB cable from your phone's USB connector to a USB connection on your computer.
2.
Drag the status bar down and touch
selected.
3.
On your computer, navigate to the removable disk showing your phone and open the Internal
Storage.
4.
Drag and drop files between your computer and the phone Internal Storage folders, such as
'Music', 'Pictures' or 'Movies'.
5. When you have finished, disconnect the USB cable.
. Make sure the Transfer files (MTP) check box is
Tethering and portable hotspot
You can 'tether' your phone to your computer, via a USB cable or a Wi-Fi or Bluetooth connection, so that
the computer can share the phone's internet connection.
NFC
Near Field Communication (NFC) allows you to beam information (such as contacts, photos and browser
pages) by bringing your phone close to another NFC-capable device (typicallyback to back).
From the home screen, touch
right. Touch Apps> Settings>More>Android Beam, drag the toggle to the right to turn on.
To beam information:
1. Go to the screen that shows the item you want to beam, such as a photo.
2.
Bring your phone and the other device close together (backto back).
3. When you see Touch to Beam, touch your phone's screen.
Apps> Settings>More>NFC and make sure the toggle is to the
Secure payment
The NFC feature in your Constellation is based on a Host Card Emulation (HCE) scheme. Thismeans that
you can use your phone for cashlessand secure payments.
© 2017 Vertu Corporation Limited. All rights reserved. 55

Phone management
Phone management
System update
If you receive an over-the-airnotification of a system update on your phone, you can follow the instructions
to download and install the update software or you can opt to dismissthe notification.
To check for updates on your phone, touch
Update.
Apps> Settings>About phone>System
Free up phone memory
Your photos, videos, and other filesare automaticallystored in your phone’sinternal memory.
Note: The total available internal memory is shared between system, application and user information
files.
To see the space available in your phone’s internal memory, from the home screen touch Apps>
Settings>Storage & USB.
To free up space on your phone's internal memory, remove unwanted files. Touch a storage category such
as Pictures, videos, touch and hold a folderor file, and then touch >Delete.
Optimise data usage
You can monitor the amount of data uploaded and downloaded by your phone, and you can set a limit on
your monthlydata usage.
Note: Data usage information is provided to help you manage your usage. Your service provider might not
measure data usage in the same way so check your data charges with your service provider.
> > >Data usage
To set a data usage warning level, touch the current warning on the graph and adjust accordingly.You will
receive a notification when the set level is reached.
To set a data usage limit, touch Set mobile data lim it, drag the toggle to the right and then drag the right
side of the red bar up or down. You willreceive a notification when the set levelis reached and your mobile
data will be turned off automatically.
© 2017 Vertu Corporation Limited. All rights reserved. 56

Phone management
Data roaming settings
To change your data roaming settings, from the home screen touch
More>Mobile networks>Data roaming.
Note: You may incur significant chargesif you use data roaming. Check the data roaming conditions with
your service provider.
Apps> Settings>
Back up and restore your phone
To back up your application data, Wi-Fipasswordsand other settings to Google servers, touch Apps>
Settings>Backup& reset.
Use Google Drive™ to back up your music, photos, videosand documents, touch Apps>Google
Drive> >My Drive.
Use your Gmail™ account to back up your contacts, emails and calendars. To set your Google sync
settings, touch Apps> Settings>Accounts>select your Google account.
Set your phone to lock automatically
To set your phone to lock automatically, touch Apps> Settings>Security>Screen lock>lock
type>Automatically lock. Then select how long after sleep mode you want to lock your phone.
Note: Thisfeature does not apply to the Swipe lockoption.
Change your PIN code
To set your PIN code, from the home screen touch Apps> Settings>Security>Screen
lock>PIN. Enter your numerical PIN and then confirm it.
You will be prompted to enter the PIN to unlockyour phone.
Access codes
PIN code (4-8 digits)
The PIN code protectsyour SIM against unauthorised use or is required to access some features. You can
set your phone to ask for the PIN code when you switch it on. If you enter the code incorrectly three times in
a row, you need to unblock the code with the PUK code. To change your PIN code, see "Change your PIN
code" on page57.
PUK or PUK2 code (8 digits)
The PUK or PUK2 codes are requiredto unblock a PIN or PIN2 code. For PUK or PUK2 details,contact
your service provider.
© 2017 Vertu Corporation Limited. All rights reserved. 57

Phone management
IMEI number (15 digits)
The IMEI number is used to identify validphones in the network.Thisnumber can also be used to block a
stolen phone. You may be required to give this number to Vertu Customer Service. To see your IMEI
number, from the home screen touch Apps> Settin gs>About phone>Status>IMEI
information.
Lock code (security code - minimum of 4 digits)
A lockcode helps you protectyour phone against unauthorised use. You can set your phone to ask for the
lockcode that you define. Keep the code secret and in a safe place separate from your phone. If you forget
the code and your phone is locked, your phone will require service. Additional charges may apply, and all
the personal data in your phone may be deleted.
Master reset
A master reset returnsyour phone to the factory settings and erases all the data from the phone.
Toperforma master reset, from the home screen touch Apps> Settings>Backup&
reset>Factory data reset.
Warning: You may want to back up your data before performing a master reset.
Device protection
Your Constellation has FactoryReset Protection, which keeps your data safe when your phone is lost or
stolen. After you perform a master reset, you need to enter your Vertu account and/or Google account
detailsto use your phone.
Note: If you intend to give your phone to a new owner, then before you perform a master reset, touch
Apps> Settings>Accounts and remove your accounts.
Boot validation
Each time your phone is booted, the phone software is tested for authenticity.Most of the time this is
successful.However, two possible issueswith authentication may occur.These are explained below.
Your device software has been unlockedfor modification.
The authenticityof your device software cannot be verified.
If you receive either of these notifications and are unsure about what to do, contact Vertu Customer
Service for assistance.
© 2017 Vertu Corporation Limited. All rights reserved. 58

FAQs
Questions
How can I extend the battery life of myphone? 60
Do I need a Google™ account to use myphone? 61
How can I reduce my data costs, especially when abroad? 61
How do I transfermusic from my computer to my phone? 61
How can I listen to my iTunes music library on my phone? 62
How do I setup an email account on myphone? 62
How do I transfercontactsto my phone? 63
How do I set my musicas ringtone? 63
How do I change the font size on myphone? 63
How do I checkif I have the latest software updates on myphone? 63
Why have I got no connectivity? 63
Why is my internal storage less than advertised? 64
How do I protectmy phone from unauthorised use? 64
How do I find the IMEI number of myphone? 64
How can I clear the log of my calls or thelist of people I have contacted frequently? 64
Why does my phone get warm? 64
How do I set a photo as my wallpaper? 64
Can IstilluseGoogle Mapsif I do not have a data connection? 65
FAQs
© 2017 Vertu Corporation Limited. All rights reserved. 59

FAQs
How can I extend the battery life of myphone?
The notification light constantly updates you on the status of your phone.
Colour of the light Phon e status
Steady green Battery full
Flashing green Battery charging
Steady red Battery low but charging
Flashing red Batterylow and not charging. Forexample, if the phone is plugged into a
Flashing blue Call, text message or email received
You can extend the life of the battery by adjusting your phone's settings to manage features that are heavy
consumersof battery charge:
l
Reduce the brightness of your screen or use the automatic brightnessoption. Touch
Settings>Display>Brightness level.
l
Turn off background data transfers. Touch
the Mobile data toggle to the left to turn off.
l
Turn off the connectivityoptions for Wi-Fi and Bluetooth™. To quickly adjust the settings, drag down
the notification bar with two fingers and then touch any active connectivity option you wish to turn off.
l Reduce how often your phone checksfor new emails in your mailbox.Open your emailapp and
touch
l Wheneverpossible, use Wi-Fi rather than cellularservices for mobile data.
l Limit your use of widgets that dynamicallyupdated their content. Remove widgets that you do not
>Settings>an account name>Sync frequency>a frequencyoption.
need or use.
l Set the BatterySaver features to turn on automatically when the phone is at 15% battery.
Touch Apps> Settings>Battery Saver. This extends battery life by limiting your device's
power consumption. Your phone's performance is reducedwhen Battery Saver is switched on, and
email and other apps may not update until you open them. Batterysaver automatically turns off
when you charge the phone.
PC, but there is not enough current to charge the phone.
Apps>
Apps> Settings>Data usage and then drag
© 2017 Vertu Corporation Limited. All rights reserved. 60

FAQs
Do I need a Google™ account to use myphone?
You'll stillbe able to perform basicfunctionson your phone without a Google account, likecalling or text
messaging, but a Google account is highly recommended as it will give you access to Google Play™ and
other Google apps.
How can I reduce my data costs, especially when abroad?
You can disable mobile data by touching
toggle to the left next to Mobile data. Confirm OK when you are prompted.
You can set a limit on the amount of data you are able to use. Touch Home > > >Data usage.
To set a data usage warning level, touch the current warning on the graph and adjust accordingly. You will
receive a notification when the set level is reached.
To set a data usage limit, touch Set mobile data lim it, drag the toggle to the right and then drag the right
side of the red bar up or down. You willreceive a notification when the set levelis reached and your mobile
data will be automatically turned off.
Note: Data usage information is provided to help you manage your usage. The way your service provider
measures data may not be the same so check your data charges with your serviceprovider.
You can disable data roaming. Touch Home > > >More>Mobile networks>Data
roaming.
Apps> Settings>Data usage and then dragging the
How do I transfer music from my computer to my phone?
When you connect your phone to your computer for the first time, your computer may prompt you that
driversare being installed. It is important that you install these drivers on your computer.
1.
Connect the USB cable from your phone's USB connector to a USB connection on your computer.
2.
Drag the status bar down and touch
selected.
3.
On your computer, navigate to the removable disk showing your phone and open the Internal
Storage.
4.
Drag and drop files between your computer and the 'Music'folder.
5. When you have finished, disconnect the USB cable.
Tip: If you drag and drop folders of music, such as a folder for an artist containing multiple album
folders, this organisation willbe replicated on your phone.
. Make sure the Transfer files (MTP) check box is
© 2017 Vertu Corporation Limited. All rights reserved. 61

FAQs
How can I listen to my iTunes music library on my phone?
One easy way is to use MusicManager, a desktop application that puts your musiccollection into the cloud,
unlocking the potential of the Play Musicservice. The applicationscans your computer for musicfiles,
including files in your iTunes®library, and makes any discovered tracksand albums available to you in Play
Music. If your collection can be matched to music in Google Play Store, the tracks do not even need to be
uploaded, saving you data transfer time. When you add new musicto your computer, MusicManager can
automaticallyadd it to your library too. MusicManager even adds your iTunesplaylists and ratings so you
can start listening to your favouritesright away.
Once your musicis in the cloud, you can access it from any computer connected to Google.com or from any
Androidphone or tablet that has the Play Music app installed.
When you first listen to a track with Play Music on your phone, the song is cached on the phone. So, over
time your favourites are automatically made available for offline listening, such as when you are travelling
on an aeroplane.
Note: The MusicManager application and musicpurchasesfrom Google Play Storeare only available in
certain markets.
To add your music to the Google Play Musiccloud
1. Sign up for your Google Play™ music library: To get started, sign up for Google Play™ and
download MusicManager.
2. Upload your collection: Sign in to Music Manager and choose where you keep your music.
MusicManager then starts uploading automatically.
3. Access your music on the web and your phone: After you have set up your Play Music
musiclibrary, you can accessit on your Constellation, on any Androidphone or tablet or on the
web. Sign in and all your music is ready to be played.
How do I setup an email account on myphone?
You can set up a number of different email accountson your phone: corporate email, Gmail or personal
email accounts.
To set up these accounts, touch
Exchange for email accounts on Microsoft™ Exchange server, Google for your Gmail accountsor
Personal for your personal email accounts.
© 2017 Vertu Corporation Limited. All rights reserved. 62
Apps> Settings>Accounts>Add accou nt. Select

!
FAQs
How do I transfer contacts to my phone?
To transfer contacts to your Constellation with your Gmail™ account you must first export the contacts on
your old phone to a Comma Separated Values (.csv) file. Once this file is imported in to your Gmail account
it willautomaticallysyncwith your phone (provided that you have alreadyset up a Gmail account).
1. Export the contactson your previous phone to a .csv file. Forinformation on how to do this, please
referto the userdocumentation supplied with your previous phone.
2. Log into your Gmail account on your PC and click 'Contacts'>'Import Contacts'.
3. Click'Browse' and select the .csvfile that you created.
4. Click'Import Contacts'.
Important: Syncing your contacts with your Gmail account means that your contacts willalways be
backed up.
How do I set my music as ringtone?
Using your computer, you need to copy the song over to the 'Ringtones' folder on your Constellation:
1.
Connect the USB cable from your phone's USB connector to a USB connection on your computer.
2.
Drag the status bar down and touch
selected.
3.
On your computer, navigate to the removable disk showing your phone and open the Internal
Storage.
4.
Drag and drop the song file between your computer and the 'Ringtones' folder.
5. When you have finished, disconnect the USB cable.
6.
Touch
Apps> Settings>Soun d & Notification>Phone ringt one>song>OK.
. Make sure the Transfer files (MTP) check box is
How do I change the font size on myphone?
To change the font size, touch
Apps> Settings>Display>Fo nt size.
How do I check if I have the latest software updates on myphone?
To check if your Constellationphone has the latest software, touch Apps> Settin gs>About
pho ne>System Update.
Why have I got no connectivity?
If you lose network connection, check your network signal strength in the top right corner of your screen. Itis
possible that you are in an area with poor network coverage. If this problem persists contact your service
provider.
When your phone has a strong network connection, the network ( full signal) indicator
status bar.
is shown in the
© 2017 Vertu Corporation Limited. All rights reserved. 63

FAQs
If you lose your Wi-Fi connection, check the Wi-Fi status indicator at the top of your screen for the
connection strength. You may be out of range. To scan for Wi-Fi networks, touch
Settings>Wi-Fi. Drag the toggle to the right to turn on. Touch a networkin the list, and then touch
CONNECT. You may need to enter Network SSID, Security, and Password details. For these details,
contact the network administrator.
When your phone has connected, the Wi-Fi indicator is shown in the status bar.
Tip: If you are using a domesticWi-Fi connection, the security information can often be found on
your Wi-Fi router.
Apps>
Why is my internal storage less than advertised?
Thismay be due to the size of the system fileson your phone, or the number of apps you have
downloaded. For a graphical representation of the storage details, touch
Storage & USB.
Apps> Settings>
How do I protect my phone from unauthorised use?
You can choose from a number of different lock options to protect your Constellation. To selecta locktype,
touch Apps> Settings>Security>Screen lock and select from Swipe, Pattern, PIN or
Password.
If you're using a corporate email account it may make use of a specificlock.
How do I find the IMEI number of myphone?
The IMEI number is used to identify validphones in the network.Thisnumber can also be used to block a
stolen phone. You may be required to give this number to Vertu Customer Service. To see your IMEI
number, from the home screen touch Apps> Settin gs>About phone>Status>IMEI
information.
How can I clear the log of my calls or thelist of people I have contacted frequently?
To clear the call log, from the home screen, touch
>Clear call log.
Apps> Phon e> > >Call history>
Why does my phone get warm?
Your Constellation may occasionallyget warm when it is used for an extended period, being charged, or
has been exposed to extreme heat. In these instances you should power off your phone (press and hold
the Power key, and then touch Power of f) for a few minutes.
How do I set a photo as my wallpaper?
To set a new wallpaper for the home screen, touch and hold an empty spot on the home screen, and then
touch WA LLPAPERS.
© 2017 Vertu Corporation Limited. All rights reserved. 64

FAQs
Can Istill useGoogle Mapsif I do not have a data connection?
You can save data from Google Maps to your phone so that a map is available for use offline. Thisfeature
is useful when you do not have a data connection, and it can also reduce your data transmission costs.
To save a map to your phone, view an area in Google Maps and touch >Your places, scroll to the
bottom and touch SAVE A NEW OFFLINE MAP. If you wish to adjust the selected area, you can pinch
the map to zoom in or zoom out. Touch SAVE to download the map data.
Tip: Blocks of map data can be up to 100MB. So Vertu recommendsthat you connect to a Wi-Fi
network before you download.
© 2017 Vertu Corporation Limited. All rights reserved. 65

Accessories
Accessories
Battery charger
The wall charger supplied with your phone should be suitable for your region. However, you should always
checkthat the electrical rating of the AC outlet is appropriate for the charger before you attempt to plug it in.
The batteryfor your Constellation requires charging at regularintervals. The batterydoes not have to be
completelydischarged before you can charge it.
Other charging options
You can also charge the battery by using:
l Acompatible PC (this method also provides data connectivity)
l The VERTU Wireless Charging Pad or a wirelesschargerthat conforms to the Qi standard.
© 2017 Vertu Corporation Limited. All rights reserved. 66

Accessories
Data cable
The USB data cable enables you to transfer data between your Constellation phone and a compatible
computer.
Note: A USB cable, 1200mm (VC-02), is supplied.
1.
Connect the USB data cable to the USB connectorof your Constellation. Make sure the cable is
inserted correctly, with the USB symbol facing up.
2.
Connect the cable to a USB port of the computer. The phone starts charging, and a number of
USB connection modes are available. Drag the status and notification bar down to selectfrom the
following options:
Transfer files (MTP) — to transfer media files between your phone and a PC.
Transfer pho tos (PTP) — to transfer photos, and any other file types not supported by Transf er
files (MTP), between your phone and a PC.
Wired stereo headset
Your Constellation phone is suppliedwith a wired stereo headset, which includesa microphone and
integrated volume controls.Connect this to the headset connector on the phone.
© 2017 Vertu Corporation Limited. All rights reserved. 67

Specifications
Specifications
Dimensions
l Length: 161.5mm
l Width: 77mm
l Depth: 10mm
l Weight: 241g
Services
l Vertu Concierge, Vertu Life, Vertu Setup and Vertu Support
In-box
l CONSTELLATION X phone
l Wall charger (AC-32V) with regional plug heads
l USB data cable 1200mm (VC-02)
l V wired headset
l Polishing cloth
l Collateral pack, including Quick Start Guide, Warranty and AuthenticityCard
Specifications
Operating system
l Android™6.0, Marshmallow
Hardware characteristics
l Qualcomm® Snapdragon™ with Multi-core64-bit processor
l 5.5inch, WQHD, high-contrast, bright and vibrant display
l 12MP main camera with PDAF and twin LED flash
l 4MP front camera
l 128GB of internal memory
l External memory available
l High-fidelity stereo17mmx 11mm loudspeakerswith Dolby®Digital Plus support
l A-GPS and compass
l Gyro and accelerometerfor orientation and game play
© 2017 Vertu Corporation Limited. All rights reserved. 68

Battery
l Internal 3220mAh Li-ion (minimum 3200mAh)
l Talk time: Up to 19 hours (WCDMA)
l Stand-by: Up to 450 hours
Connectivity
l Dual nanoSIM card support
l Quadband GSM 850/900/1800/1900 MHz
l CDMA Bands BC0, BC1 (CDMA 1xEvDo)
l LTE TDD Bands 38, 39, 40, 41
l LTE FDD Bands 1, 2, 3, 4, 5, 7, 8, 12, 13, 17, 19, 20, 25, 26, 28, 29 and 30
l Pentaband WCDMA I, II, IV, V, VIII
l TD-SCDMA Bands 34, 39
l DC-HSPA+ Release 8, Cat24, 42Mb/s Downlink, Cat6 5.76Mb/s Uplink
l LTE-A FDD/TDD Release 11 Cat6,300Mb/sDownlink, 50Mb/sUplink
l 2x2MIMO Dual-band WLAN 802.11 a, b, g, n, ac
l Wi-Fi hotspot (tethering & portable hotspot)
l Qualcomm®aptX™ audio
l USB3.1, Bluetooth, NFC & 3.5mm AV
l Qi and PMA compatiblewirelesscharging
Specifications
Operating temperature
l Maximum operating temperature: 45°C
l Maximum charging temperature: 40°C
Applications
l
Google Mobile services, including Google Play™, Gmail, Google Chrome, Google+, Google Maps,
Google Drive cloudstorage, YouTube™ and other services.
l
Browser, Calculator,Calendar, Camera, Clock, Downloads, Email, Gallery, Messaging, Movie
Studio, Contacts, Phone and Settings.
© 2017 Vertu Corporation Limited. All rights reserved. 69

Care of your phone
Care of your phone
General care
If your Constellation phone or any of the accessories are not working as they should, contact your Vertu
dealer.
l Always use your Constellation in the documented manner. Incorrect usage may affect performance.
l Do not attempt to open or disassemble your Constellation phone. The only part you everneed to
open is the SIM door. Your Constellation phone should only be serviced by Vertu-authorised
personnel.
l Do not mishandle or abuse your Constellation phone.
l Use only Vertu-approved accessories.
l The suppliedchargeris only intended for use with your Constellation phone. Do not use them with
any other device, as thiscould result in permanent damage to the phone, battery, or charger.
l Keep your Constellation phone and all parts and accessories out of the reach of small children and
pets.
l Do not allow your Constellation phone or accessories to come into contact with liquids or moisture, or
dust and dirt.
l Do not expose your Constellation phone to extreme temperatures as these may cause the battery to
stop working temporarily. Performance is particularlylimited in temperatures wellbelow freezing.
l Do not apply paint or other similar substances to your Constellation phone.
l Only use a soft, clean cloth to clean your Constellation phone. Do not use chemicals, detergents,
abrasive substances, or any liquids. Use a cotton swab to clean the camera lens.
l Do not insert any sharp objects into any of the audio ports.
Embroidery
Vertu recommends that you avoid the following:
l Direct exposure to strong light, heat and humidity
l Contact with items and substances that may stain or scratch the surfaces
If your Constellation phone gets wet, it isessential that you dry it as soon as possible with a soft, absorbent
cloth.
© 2017 Vertu Corporation Limited. All rights reserved. 70

Care of your phone
Exotic leathers
Vertu recommends that you occasionally wipe the exotic leather in the direction of the scales with a slightly
damp soft cloth, avoiding excessive pressure.
l If your phone accidentally gets wet, it is essential that you dry it as soon as possible with a soft,
absorbent cloth.
l Direct exposure to strong light, heat and humidityshould be avoided, as well as contact with items
and substances that may stain or scratch the surfaces.
l Vertu recommends that you store your handset in a pouch when not in use.
Leather
Each piece of leather used by Vertu's craftsmen is unique. The natural markings present in the hide should
be considered part of the individuality of fine leather. All leather can be damaged and should be treated
with care.
Avoidthe following:
l Exposure to water and high humidity
l Dropping, rubbing or knocking on hard surfaces
l Exposure to extreme temperatures
l Contact with oily substances, make-up and solvents
Non-precious metals
Vertu metals are finished to a high standard and care needs to be taken to maintain theirappearance.
Avoidthe following:
l Contact with chemicalssuch as solvents, alkaline and acidsolutions, cola-based drinks and
exposureto salt water. Wipe with a clean, soft cloth as soon as possible if contact occurs.
l Contact with sharp objects
l Dropping or knocking against hard surfaces
l Metalpolishes
Precious metals
Precious metals, such as gold and platinum, have a much softer composite and extra care must be taken
when handling a Vertu product containing these materials.
© 2017 Vertu Corporation Limited. All rights reserved. 71

Care of your phone
Precious stones
Precious stones are extremelyhard and durable, but can be damaged if handled inappropriately. For
example, they can be broken, or their settings could be damaged by a sharp impact on a hard surface,
causing the stone to become loose or fall out.
Care should also be taken to avoid contact with other jewellery such as diamond rings and diamond
earrings as they can cause abrasion and chipping of the stone or the setting. Reasonable care should be
taken to not catch the setting with threads that may bend the setting and loosen the stones.
We recommend that your Vertu phone is kept in a Vertu leather case when not being used, particularly
when placed in handbags and other luggage.
If the stones appear to become dull from use, the productcan be lightlypolished using the Vertu microfibre
polishing cloth.
Sapphire and ceramics
Sapphire and ceramicsare very hard materials but are also brittle and can be scratched by hardermaterials
or objects. They can also be damaged if dropped.
Avoidthe following:
l Contact with other hard materials such as diamond jewellery, nail files,abrasives and mineral crystals
l Dropping or knocking the product on hard surfaces
l Repeated rubbing against hard surfaces
© 2017 Vertu Corporation Limited. All rights reserved. 72

Safety and warranty
Safety and warranty
Safety text
The sales package may contain severaldifferent products and parts(hereafter known collectively as the
“Product”), for example a phone with various chargers. The following simpleguidelinesare intended to
coverall productsand parts. Not following the guidelinesmay result in risks to personal safety or data,
damage to the Product, or in non-compliance with legal requirements.
Medical considerations
The operation of radio transmitting equipment, including wirelessphones, may interferewith the function of
inadequately protected medicaldevices. Consult a physician or the manufacturersof the medical devices
to determine whether they are adequately shieldedfrom external RF (Radio Frequency) energy.
Manufacturersof medical devicesrecommend a minimum separation of 15.3 centimetres (6 inches)
between a wireless device and an implanted medicaldevice, such as a pacemakeror implanted
cardioverter defibrillator. Persons who have such devices should also:
l Not carrythe phone in a breast pocket.
l Holdthe phone to the ear opposite the medicaldevice.
l Turn the phone off if there is any reason to suspect interference.
l Follow the manufacturer’sinstructionsfor the implanted medicaldevice.
If you have any questions about using your wirelessdevice with an implanted medical device, consult your
health care provider.
To prevent possible hearing damage, do not listen at high volume levels f or
long periods. When you use the headset, your ability to hear outside soun ds
may be affected. Do not use the headset where it can endang er your safety.
Listen to the headset at a moderate level, and do not hold the device near your
ear when the loudspeaker is in use.
HAC Hearing Aid Compatibility (HAC) for digital handsets
Your phone complieswith FCC (Federal Communications Commission) rules governing hearing aid
compatibility. Some wirelessdevices may interfere with some hearing aids. For full hearing aid
compatibility, you should turn off the Bluetooth connectivity.
FCC’s wirelesshearing aid compatibility rules ensure that consumerswith hearing loss are able to access
wireless communications services through a wide selection of handsets without experiencing disabling
radiofrequency (RF) interference or other technical obstacles.
To define and measure the hearing aid compatibility of handsets, FCC references ANSI C63.19 2007
version and 2011 version; ANSI C63.19 standard specifiestesting procedures for determining the M-rating
and T-rating of the digital handsets.
© 2017 Vertu Corporation Limited. All rights reserved. 73

Safety and warranty
A handset is considered hearing aid-compatible for acoustic coupling if it meets a rating of M3 or M4, under
the ANSI C63.19. A handset is considered hearing aid-compatible for inductive coupling if it meets a rating
of T3 or T4, under ANSI C63.19. (Not all hearing-aids have telecoil inside.) This device was tested
according to ANSI C63.19 2011 version, and this meets the M4/T3 rating.
Thisphone has been tested and rated for use with hearing aids for some of the wireless technologies that it
uses. However, there may be some newer wireless technologies used in this phone that have not been
tested yet for use with hearingaids. It is important to try the different featuresof this phone thoroughly and
in different locations,using your hearing aid or cochlearimplant, to determine if you hear any interfering
noise. Consult your service provideror Vertu Customer Service for information on hearing aid compatibility.
If you have questions about return or exchange policies, consult Vertu Customer Service.
Switch off the phone in restricted or dangerous areas
Switch the phone off when mobile phone use is not allowed or when it may cause interferenceor danger,
for example near medical equipment, fuel, chemicals, or blasting areas.
Aeroplane profile when travelling
Unless specifically requested to turn the phone off, you can select the Aeroplane (offline) profile, which
means that you cannot make or receive any calls, or use other features that require cellularnetwork
coverage, Wi-Fi or Bluetooth. You can, however, stillmake emergency calls.
Use in vehicles
Radio signalsmay affect improperly installed or inadequately shielded electronic systemsin motor vehicles
such as electronic fuel injection, electronicanti-lockbraking, electronic speed control,and air bag systems.
Formore information, check with the manufacturer of your vehicle or its equipment.
Onlyqualified personnel should install the phone in a vehicle. Faulty installation or service may be
dangerous and may invalidate your warranty. Check regularly that allwirelessdevice equipment in your
vehicle is mounted and operating properly.Do not store or carry flammable liquids, gases, or explosive
materials, in the same compartment as the phone, its parts, or accessories. Remember that airbags inflate
with great force, so do not place your phone or accessoriesin the air bag deployment area.
Keep the product away from children
Keep your Product and all parts and accessories out of the reach of small children and pets. Failure to do
this may endanger them and invalidate your Warranty.
Road safety comes first
Obey all locallaws. Always keep your hands free to operate your vehicle while driving. Your first
consideration should be road safety.
Qualified service
Onlyqualified personnel may install or repairthe Product.
© 2017 Vertu Corporation Limited. All rights reserved. 74

Safety and warranty
Batteries, chargers and other accessories
If the Product has an internal battery, this is intended to be rechargeable and non removable, being
intended for use when supplied with power from the Vertu Mains charger(AC-32V), or from a suitable
computer. Do not attempt to remove the battery, as you may damage it.
The fullperformance of a new battery is achieved only after two or three complete charge and discharge
cycles. The battery in a device can be charged and discharged hundreds of times, but it will eventually wear
out. When you believe that the performance of the devicehas deteriorated (for example, when the talk and
standby times on the phone are noticeablyshorterthan normal), replace the battery if it is removable, or, if it
is non-removable, take the associated device to the nearest authorised service facility.
Use the battery only fo r its in tended purpose.
Never use any charger or battery that is damaged.
Use on ly Vertu-approved batteries, and recharge yo ur battery only with Vertu approved
chargers desig nated for the device.
Use of an unapproved battery or charger may result in a risk of fire, explosion, leakage, or
oth er hazard. Do not connect other, incompatible devices to the chargers.
When your charger is not in use, unplug it from the electrical plug and the device. Do not
leave a fully charged battery conn ected to a charger, as overcharging may shorten the
battery’s lifetime.
Do not dismantle, cut, open, crush, bend, deform, puncture, or shred cells or batteries. In the event of a
battery leak, do not allow the liquid to come in contact with the skin or eyes. In the event of such a leak,
flush your skinor eyes immediately with water, or seek medical help.
Do not modify, remanufacture, attempt to insert foreign objects into the battery, or immerse or expose it to
water or other liquids.Improper battery use may result in a fire, explosion, or other hazard. If the device or
battery is dropped, especially on a hard surface, and you believe that the battery has been damaged, take
it to the nearest service facility for inspection before continuing to use it. If the phone battery has not been
used for a long time, then, in orderto begin charging it again, you may need to connect the charger, and
then disconnect and reconnect it. If the battery is completely discharged, it may take severalminutes
before the charging indicatorappears on the display or before any callscan be made.
Keep your device dry
Your Product is not fullywater-resistant, so keep it dry.
SIM card
The Constellationhas been designed for use with a nanoSIM card. All other SIM cardsare not supported.
The use of an incom patible SIM card may damage the card or the phon e, and may corrupt
data stored on the card.
© 2017 Vertu Corporation Limited. All rights reserved. 75

Safety and warranty
IMEI number and compliance number
To find the IMEI number, dial the sequence *#06# into the phone. The unique 15- digit IMEI code of your
phone is instantly displayed. Write it down and keep it in a safe place so that you can find it if your phone is
misplaced or stolen. You can also find the IMEI number by checking the compliancelabel (refer to the
phone’s reference manual to locate this label).
WLAN
Use encryption to increase the security of your WLAN connection.
Headset connector
Do not connect productsthat create an output signal as this may cause damage to the phone. Do not
connect any voltage sourceto the headset connector. If you connect an external device or headset, other
than those approved by Vertu, pay specialattention to volume levels.
Camera flash
Keep a safe distance when using the flash in the camera. Do not use the flash on people or animals when
they are at close range. Do not cover the flash while taking a picture.
Protect your phone from harmful content
Your phone may be exposed to viruses and other harmful content. Take the following precautions:
l Be cautious when opening messages. They may contain malicious software or otherwise be harmful
to your phone or computer.
l Be cautious when accepting connectivity requests, browsing the internet, or downloading content.
l Do not accept Bluetooth connections from sources that you do not trust.
l Only install and use services and software from sourcesthat you trust and that offer adequate
security and protection.
l Installanti-virusand other security software on your phone and any connected computer. Only use
one anti-virus application at a time (using more may affect the performance and operation of the
phone and/or computer).
l If you access pre-installedbookmarksand linksto third party internet sites, take the appropriate
precautions. Vertu does not endorse or assume liabilityfor such sites.
Bluetooth hidden mode
Operatingthe phone when Bluetooth Visibility is set to Hidden is a safer way to avoid malicious software.
Alternatively, switch off the Bluetooth function completely(this does not affect other functionson the
phone).
Magnetic fields
Keep your phone away from magnets or magnetic fields.
© 2017 Vertu Corporation Limited. All rights reserved. 76

Safety and warranty
Antennae
Avoidtouching the antennae unnecessarily while they are transmitting or receiving. Contact with the
antennae affects the communication quality and may cause a higher power level during operation and
reduce battery life.
Backups
To keep your important data safe, store it in at least two separate places, such as on your phone and on
your PC.
It is particularly important to carry out a backup prior to repair or replacement of the
Product because con tent and data may be lost during these operations.
Digital rights management (DRM)
When using the phone, you are required to obey all laws and respect localcustoms,privacy and the
legitimate rights of others,including copyrights. Copyright protection may prevent you from copying,
modifying, or transferring images, music, and other content.
Additional care and maintenance
The Product in the sales package contains one or more sophisticated electronicdevices. Vertu therefore
strongly encouragesyou to familiarise yourself with the instructionsprovided with and for these devices.
To help protect your Warrantycoverage, you should observe both the preceding “SAFETYTEXT” and the
following:
l Always use your Product in the documented manner.
l YourProduct contains high precision displays, camera lenses and other such parts, so handle them
with great care to avoid scratching or otherwise damaging them.
l Do not attempt to remove any fixed internal battery or memory card.
l Keep the Product free of dust and dirt.
l Do not expose the Productto extreme temperatures, as these may cause the batteryto stop working
temporarily. Performance is particularlylimited in temperatures well below freezing.
l Do not mishandle or abuse the Product.
l Do not paint the Product.
l Only use a soft, clean cloth to clean your Product.Do not use chemicals, detergents, abrasive
substances, or any liquids. Use a cotton swab to clean the phone’s camera lens.
Specific phone care
l Avoid scratching the phone screen. Never use a pen, pencil, or other sharp object, on it.
l In order to protect the ceramicsand sapphire, do not drop, knock,or rub your phone on or against
hard surfaces. In particular, avoid contact with hard materials such as diamond jewellery, nail files,
abrasives, and mineralcrystals.
© 2017 Vertu Corporation Limited. All rights reserved. 77

Safety and warranty
l All leather can be damaged and should be treated with care. Therefore, in addition to the avoidance
of extreme temperatures or water and high humidity, avoid contact with oilysubstances, make-up,
and solvents.
l Do not allow the metals on the phone to come into contact with sharp objects, metal polishes, and
chemicals such as solvents, alkaline and acid solutions, cola-based drinks, and salt water. If contact
occurs, wipe the surface with a clean, soft cloth as soon as possible.
Manufacturer's Limited Warranty
This Limited Warranty replaces all other Vertu warranties and liabilities, whether oral,
written, (non-mandatory) statutory, contractual, in tort or otherwise, in cluding , without
limitation , and where permitted by applicable law, any implied conditions, warranties or
oth er terms as to satisfactory qu ality or fitness for pu rpose. However, this Limited Warranty
shall neither exclu de nor limit: i) an y of your legal (statutory) rights under the applicable
natio nal laws; or ii) any of yo ur rights against the seller of the Product.
Vertu warrantsto you, the Purchaser of the Product, that, during the warrantyperiod, Vertu, or a Vertuauthorised service company, will, in a commercially reasonable time, remedy defects in materials, design
and workmanship free of charge, by repairing or, should Vertu in its discretion deem it necessary, replacing
the Product in accordance with this Limited Warranty (unlessotherwise required by law).
Warranty periods
The Warranty starts at the time of the original purchase of the Product by the first end user. Different
individual products and parts within the overallProduct may be covered by different Warranty periods. The
different possibleWarrantyperiodsare:
a.
Twenty-four (24) months for the mobile phone and all technicalaccessories limited to: batteries,
headsets, speakers, chargers, chargercables and data cables
b.
Twelve (12) months for all leather cases
c.
Twelve (12) months for all other products not listed above
As far as your national laws permit, the particular Warranty period willnot be extended or renewed, or
otherwise affected due to subsequent resale, Vertu-authorised repair, or replacement of the Product.
However, any part repaired or product replaced during the Warrantyperiod will be warranted from any
defect for 12 months from the date of repair, or for the remainder of the original Warranty period, whichever
is the longer.
How to get warranty service
If you wish to make a claim under this Limited Warranty, please return your Product, or the affected part (if it
is not the entire Product), to a Vertu-authorised service company. For further detailson how to make a
claim, you can contact a Vertu call centre (national or premium rates may apply). (Information about Vertuauthorised service companies and callcentres can be found in the sales package, or on local Vertu web
pages, where available.)
© 2017 Vertu Corporation Limited. All rights reserved. 78

Safety and warranty
Any claim under this Limited Warranty is subject to you notifying Vertu, or a Vertu authorised service
company, of the alleged defect within a reasonable time of it having come to your attention, and in any
event no later than the expirydate of the Warranty period.
When making a claim under this Limited Warranty, you will be required to provide: a) the affected Product
(or the affected part); and b) the original proof of purchase, clearlyindicating the name and addressof the
seller, the date and place of purchase, the Product type, and the IMEI or other serial number.
What is not covered?
1. This Limited Warranty does not coveruser manuals or any third party software, settings, content,
data or links, whether included or downloaded in the Product, whether included during installation,
assembly, shipping or at any other time in the delivery chain or otherwiseand in any way acquired
by you. By using such a third party application, you acknowledge that the application is provided as
is. Vertu does not warrant that any Vertu software will workin combination with any hardware or
software provided by a third party, that the operation of any software willbe uninterrupted or errorfree, or that any defectsin the software are correctable or willbe corrected.
2. A third party/independent operator providesthe SIM card and cellular and/or other network or
system on which the Product operates. Therefore, Vertu will not accept responsibility under this
Limited Warranty for the operation, availability, coverage, services or range of the cellularor other
network or system. Before Vertu or a Vertu-authorised service company can repair or replace the
Product, the operator may need to unlockany SIM-lockor other lock that may have been added to
lockthe Product to a specific network or operator. In such situations, please first ask the operator to
unlockyour Product.
3. This Limited Warranty does not cover: a) normal wear and tear (including, without limitation, wear
and tear of camera lenses, batteries or displays); b) defects caused by rough handling (including,
without limitation, defects caused by sharp items, by bending, compressing or dropping, etc.); c)
defects or damage caused by misuseof the Product, including use that is contrary to the
instructionsprovided by Vertu (for example, as set out in the Product’s user guide), and/or d) other
acts beyond the reasonable controlof Vertu.
4. This Limited Warranty does not coverdefects or alleged defects caused by the fact that the Product
was used with, or connected to, any product, accessory, software and/or service not
manufactured, or supplied by Vertu, or was used other than for its intended purpose. Defects can
be caused by virusesfrom your, or from a thirdparty’s, unauthorised accessto services, other
accounts,computer systems or networks. Such unauthorisedaccesscan take place through
hacking, password mining or through a varietyof other means.
5. This Limited Warranty does not coverdefects caused by the fact that the battery has been shortcircuited, or by the fact that the seals of the battery enclosure or the cellsare broken or show
evidenceof tampering, or by the fact that the battery has been used in equipment other than that
for which it has been specified. ThisLimited Warranty is not enforceable if the Product has been
opened, modified or repaired by anyone other than an authorised service centre, if it is repaired
using unauthorisedspare parts, or if the Product’s serialnumber, the mobile accessory date code,
or the IMEI number, has been removed, erased, defaced, altered or are illegible in any way. This
shallbe determined by the sole discretion of Vertu.
© 2017 Vertu Corporation Limited. All rights reserved. 79

Safety and warranty
6. This Limited Warranty is not enforceable if the Product has been exposed to moisture, to extreme
thermal or environmental conditions (or to rapid changes in such conditions), to corrosion,
oxidation,spillage of food or liquid, or to influence from chemicalproducts.
Limitations of Vertu's liability
ThisLimited Warranty is your sole and exclusive recourse against Vertu, and the only and exclusive liability
of Vertu in respect of defects in your Product.
To the extent permitted by applicable law(s), Vertu does not assume any liabilityfor loss of or damage to or
corruption of data, for any loss of profit,loss of use or functionalityof the Product, loss of business, lossof
contracts, loss of revenues or of anticipated savings, increasedcostsor expenses or for any indirect lossor
damage, consequential loss or damage, or special loss or damage. To the extent permitted by applicable
law(s), Vertu´s liability shall be limited to the purchase value of the Product. The above limitations shall not
apply in cases of gross negligence or intentional misconduct of Vertu, or in case of death or personal injury
resulting from Vertu’s proven negligence.
Other important warranty notices
The availability of products, features, applications, and services may vary by region. Formore information,
contact your nearest Vertu-branded store or Vertu-authorisedservice company.
Allwirelessdevices may be susceptibleto interference, which could affect performance.
Vertu is not responsible for any radio or TV interference caused by unauthorised
modifications to this equipment. Such modifications could void your autho rity to operate
the equipment.
Reverse engineering of software in the Product is prohibited to the extent permitted by applicable law.
Insofar as this document contains any limitations on Vertu’s representations, warranties, damages and
liabilities, such limitationsshall likewise limit any representations,warranties, damages and liabilities of
Vertu’slicensors.
Vertu, in a manner consistent with the provisions of section “Limitations of Vertu’s liability” above, shall not
under any circumstances be liable, either expressly or by implication, for any damages or lossesof any kind
whatsoever resulting from loss of, damage to, or corruption of, content or data during repairor replacement
of the Product.
Allparts of the Product or other equipment that Vertu has replaced shall become the property of Vertu. If
the Product is found not to be covered by the terms and conditions of this Limited Warranty, Vertu and its
authorised service companies reserve the right to charge a handling fee.
When repairing or replacing the Product, Vertu may use products or parts that are new, equivalent to new,
or reconditioned.The Product may contain country-specificelements, including software. If the Product has
been re-exported from its original destination country to another country, the Product may contain some
country-specific elements that are not considered to be a defect under thisLimited Warranty.
© 2017 Vertu Corporation Limited. All rights reserved. 80

Safety and warranty
Software application notices for thephone
The Vertu services on the phone require a data connection to send up-to-date information to your Vertu
phone. If the connection cannot be made, these features willbe unavailable or will have reduced
functionality. You will need to contact your network service provider for information on the availability of
data connectivity when in your home network and when roaming onto other networks.
Some applications on the phone, including those listed above, may connect to the internet automatically.
To prevent this, select the appropriate Connectivity settings on the phone and/or disable the services when
roaming.
Before installing updates on the phone, ensure that the phone can connect to the internet, and that the
phone battery has enough power (or connect the charger before starting the update).
If you installa software update, you cannot use the phone, even to make emergencycalls, until the
installation has been completed and the devicerestarted.
Service or software upgrades may reset timerson the phone.
The existence of a certificate considerably reduces the risksinvolved in remote connections and software
installation. To benefit from increasedsecurity, certificates must be used correctly, and they must be
authentic or trusted. Certificates have a restricted lifetime. If they are expired or invalid,checkthat the
current date and time in your device are correct. Before changing any certificate settings, you must trust the
owner of the certificate and be sure that the certificate belongs to the listed owner.
Network support is required to indicate that a sent message has been received or read. However, this
information may not always be reliable.
Onlycompatible devicescan receive and display multimedia messages.
If the item you inserted in a multimedia message is too large for the network,the phone may automatically
reduce the size.
Messages may look different on different devices.
If your phone is able to provide over-the-air synchronisation with Microsoft Exchange ActiveSync-enabled
servers, the provision of this service does not grant you, and nor do you receive, any rights under any
Microsoft intellectualpropertywith respectto any serversoftware, or serverdevice,that is accessed using
the phone, or with respect to the use of Microsoft Exchange ActiveSync outside of the phone.
Using voice tags may be difficult in a noisy environment or during an emergency, so you
should not rely solely upon voice dialling in every circumst ance.
A cache is a memory location that is used to store data temporarilyon the phone. If you have accessed, or
have tried to access,confidentialinformation or a secure service requiring passwords, clear the cache after
each use.
© 2017 Vertu Corporation Limited. All rights reserved. 81

Safety and warranty
The input methods and languages supported by handwriting recognition vary by region and may not be
available for all languages.
The availability and quality of GPS signals may be affected by your location, satellite positions, buildings,
natural obstacles, weather conditions and adjustments to GPS satellites made by the United States
government. GPS signals may not be available inside buildings or underground. Do not use GPS for
precise location measurement, and never rely solely on the location information provided by GPS and
cellular networks.
Coordinate information may not be available in all regions.
Location information can be attached to an image or a video clip if location coordinates can be determined
via network and GPS.
If you share an image or a video clip whichhas location information attached, the location information may
be visible to othersthat view the image or the video clip. You can deactivate such geotagging in the camera
settings.
Some location content is generated by third partiesand not by Vertu. Some of this content may be
inaccurate and subject to local availability.
Almost all digitalcartography is inaccurate and incomplete to some extent. Never rely solely on the
cartography that you download for use in thisdevice.
The social networking servicesare third party services and are not provided by Vertu. They may not be
available in all countries.
Check the privacysettings of the social networkingservice you are using as you may be sharing your
location and information with a large group of people. The terms of use apply to sharing information on that
service,and you should familiarise yourself with both the terms of use and the privacy practices of the
service.
DRM-protected content comes with an associated license that defines your rights to use the content.
Some licenses may be connected to a specificSIM card, and the protected content can be accessed only if
the SIM card is inserted in the phone.
WLAN and Bluetooth restrictions
There may be restrictionson the use of WLANs and Bluetooth technologyin some countries. For more
information, contact your local authorities.
© 2017 Vertu Corporation Limited. All rights reserved. 82

Safety and warranty
Environmental
ROHS Statement
ThisProduct does not contain any of the following substances,in accordance with EU RoHS ( Reductionof
Hazardous Substances) Directive 2011/65/EU:
l Lead
l Hexavalent Chromium
l Mercury
l Polybrominated Biphenyls (PBB)
l Cadmium
l Polybrominated Diphenyl Ethers (PBDE)
Nickel
The surfaces of Vertu devicesdo not contain nickelin the platings. Depending on the model and variant of
the device, surfacesmay contain stainless steel or other alloys.
EU recycling notice
Vertu complies with European Community requirements for the recycling of Waste Electrical
& ElectronicEquipment (WEEE). Such complianceis indicated by the additionof the
crossed-out wheeled-bin symbol to the Product where appropriate. Thissymbolindicates
that the Product was put onto the market after the WEEE legislation was implemented, and
that the consumer should not dispose of the Product as normal household waste or unsorted
municipalwaste, but that it should be appropriatelyrecycled. Background information on the
European WEEE directive is available from
http://ec.europa.eu/environment/waste/weee/index_en.htm.
If you want Vertu to recycle your Product at the end of its life, please either return it to the point from which
you purchased it ( if known), or return it to Vertu’sheadquarters. Alternatively, should you purchase a
replacement Product from another supplier, the new supplieris obliged to take back the original Product
and recycle it appropriately.
Never dispose of your phone's battery in a f ire, because it may explode.
Export and controls
The Product may contain commodities, technologyor software subject to exportlaws and regulations from
the US and other countries. Diversion contraryto law is prohibited.
© 2017 Vertu Corporation Limited. All rights reserved. 83

Safety and warranty
Copyright and trademark notices
Copyright © Vertu 2011-2017. All rights reserved.
Vertu and the V logo are registered trademarks. Other product and company names mentioned herein
may be trademarksor registered trademarksof their respective owners.
Vertu operates a policyof continuous development. Therefore, Vertu reservesthe right to make changes
and improvements to any of the productsdescribed in this document without priornotice.
Google, Google Play™, Android and other marks are trademarks of Google Inc.
The Android robot is reproduced or modified from work created and shared by Google and used according
to terms described in the Creative Commons 3.0 Attribution License.
ThisProduct is licensed under the MPEG-4 Visual Patent Portfolio License (i) for personal and noncommercial use in connection with information that has been encoded in compliance with the MPEG-4
Visual Standard by a consumer engaged in a personaland non-commercial activity; and (ii) for use in
connection with MPEG-4 video providedby a licensed video provider. No license is granted or shall be
implied for any other use.
Additional information, including that related to promotional, internal, and commercialuses, may be
obtained from MPEG LA, LLC. See
Manufactured under license from Dolby Laboratories. Dolby, Dolby Audio, and the double-D symbol are
trademarksof Dolby Laboratories.
http://www.mpegla.com.
Qualcomm aptX is a product of Qualcomm Technologies International, Ltd.
Qualcomm is a trademark of Qualcomm Incorporated, registered in the United
States and other countries, used with permission. aptX is a trademark of Qualcomm
Technologies International, Ltd., registered in the United States and other
countries, used with permission.
Thisproductuses Assertive Displaytechnology by ApicalLimited
The Bluetooth word mark and logos are owned by the Bluetooth SIG, Inc. and any use of such marks by
Vertu is under license.
The availability of particular products,features, applications, and services may vary by region. For more
information, contact your nearest Vertu retailstore.
© 2017 Vertu Corporation Limited. All rights reserved. 84

Safety and warranty
SAR (Specific Absorption Rate) notice - VM-08
YOUR VERTU PHONE (MODEL: CONSTELLATION X, TYPE: VM-08,
FCC ID: P7QVM-08) MEETS GUIDELINES FOR EXPOSURE TO RADIO WAVES
Your phone is a radio transmitterand receiver. It isdesigned to not exceed the limits for exposure to radio
waves recommended by international guidelines. These guidelines were developed by the independent
scientificorganization ICNIRP, and include safety marginsdesigned to assure the protection of all persons,
regardlessof age and health.
The exposure guidelinesfor mobile devicesemploy a unit of measurement known as the Specific
Absorption Rate, or SAR. The SAR limit stated in the ICNIRP guidelines is 2.0Watts/kilogram (W/kg),
averaged over ten grams of tissue. Tests for SAR are conducted using standard operating positions, with
the device transmitting at its highest certified power level in all tested frequencybands. The actual SAR
levelof an operating device can be below the maximum value because the device is designed to use only
the power requiredto reach the network. That amount changes depending on a number of factors, such as
how close you are to a network base station. The highest SAR value under the ICNIRP guidelines for use
of the device at the ear is 0.991W/kg. This phone meets RF exposure guidelines when used either in the
normal use position against the ear or when positioned at least 5mm (3/16 inch) away from the body.
When a carrycase, belt clip or holder is used for body-worn operation, it should not contain metal, and
should position the phone at the above-stated distance away from your body.
In order to transmit data files or messages, this devicerequiresa good quality connection to the network.In
some cases,transmission of data filesor messages may be delayed until such a connection is available.
Ensure that the above separation distance instructionsare followed until the transmission is completed.
Use of phone accessories and enhancements may result in different SAR values. SAR values may vary
depending on national reporting and testing requirements and the network band. Additional SAR
information may be provided under Product information at
www.vertu.com.
USA and Canada
Your phone is also designed to meet the requirements for exposure to radio waves established by the
FederalCommunications Commission (USA) and Innovation, Science and Economic Development
Canada. These requirements set a SAR limit of 1.6W/kg, averaged over one gram of tissue. The FCC/IC
highest SAR values reported under this standard during Product certification for use at the head is
1.13W/kg,and when properly worn on the body ( 10 mm, 3/8 inch gap) is 1.19W/kg.
Carrythis device at least 10mm away from your body to ensure RFexposurelevel compliant or lower to the
reportedlevel. To support body-worn operation, choose the belt clips or holsters, which do not contain
metalliccomponents, to maintain a separation of 10mm between this device and your body.
Your phone may cause TV or radio interference (for example, when using the phone in close proximity to
receiving equipment). The FCC or IndustryCanada can require you to stop using your phone if such
interference cannot be eliminated. If you require assistance, contact Vertu Customer Service. TheProduct,
or Products,complywith Part15 of the FCC rules.
© 2017 Vertu Corporation Limited. All rights reserved. 85

Safety and warranty
Operationis subject to the following two conditions: (i) the Product(s) may not cause harmful interference,
and (ii) the Product(s) must accept any interference received, including interference that may cause
undesiredoperation. Any changes or modifications not expressly approvedby Vertu could void the user’s
authority to operate this equipment.
Thisequipment has been tested and found to comply with the limits for a ClassBdigital device, pursuant to
part15 of the FCCRules. These limits are designed to provide reasonable protection against harmful
interference in a residential installation. This equipment generates, uses and can radiate radio frequency
energy and, if not installed and used in accordance with the instructions, may cause harmful interference to
radiocommunications.However, there is no guarantee that interference will not occurin a particular
installation. If this equipment does cause harmful interferenceto radio or television reception, which can be
determined by turning the equipment off and on, the user is encouraged to try to correctthe interference by
one or more of the following measures:
l Reorient or relocate the receiving antenna.
l Increase the separation between the equipment and receiver.
l Connect the equipment into an outlet on a circuit different from that to which the receiver is
connected.
l Consult the dealer or an experienced radio/TV technician for help.
ThisClass B digital apparatus complieswith Canada ICES-3(B)/NMB-3(B).
The device could automaticallydiscontinue transmission in case of absence of information to transmit or of
operational failure. Note that this is not intended to prohibit the transmission of control or signalling
information or the use of repetitive codes where required by the technology.
l The device for the band 5150-5250MHz is only for indoor usage to reduce potential for harmful
interference to co-channel mobile satellite systems.
l The maximum antenna gain permitted (for devices in the bands 5250-5350MHz and
5470-5725MHz) to complywith the limit on equivalent isotropically radiated power (EIRP).
l The maximum antenna gain permitted (for devices in the band 5725-5850MHz) to comply with the
EIRP limits specified for point-to-point and non point-to-point operation as appropriate.
In addition, high-power radarsare allocated as primaryusers(meaning that they have priority) of the band
5250-5350MHz, and these radars could cause interference and/or damage to licence-exempt LAN
devices.
© 2017 Vertu Corporation Limited. All rights reserved. 86

Safety and warranty
ISED Canada Notice
RSS-Gen 8.4
Thisdevice complies with Innovation, Science and Economic Development Canada license-exempt RSS
standard(s). Operation is subject to the following two conditions:
1. This device may not cause interference, and;
2. This device must accept any interference, including interference that may cause undesired
operation of the device.
IC: 4299A-VM08
ISED Canada Radiation Exposu re Statement
ThisEUT is compliance with SAR for general population/uncontrolled exposure limits in RSS-102 and had
been tested in accordance with the measurement methods and proceduresspecified in IEEE1528 and
IEC62209. This equipment should be installed and operated with minimum distance 1.0cm between the
radiatorand your body. This device and its antenna(s) must not be co-located or operating in conjunction
with any other antenna or transmitter.
Declaration of Conformity
Model: CONSTELLATION X
We hereby declare the above named product is in conformity with the essentialrequirements of Directive
2014/53/EU. A copyof the Declaration of Conformity can be found at http://www.vertu.com.
The above named product operates in the FrequencyBands with maximum Powers as shown below:
Mode Ba nd Uplink (MHz) Downlink (MH z) Power Class Powe r
GSM 850 824 - 849 869- 894 4 (32.5dBm) 1800mW
900 880 - 915 925- 960 4 (32.5dBm) 1800mW
1800 1710 - 1785 1805 - 1880 1 (29.5dBm) 900 mW
1900 1850 - 1910 1930 - 1990 1 (29.5dBm) 900 mW
WCDM A I 1920 - 1980 2110 - 2170 3 (23dBm) 200 mW
II 1850 - 1910 1930 - 1990 3 (23dBm) 200 mW
IV 1710 - 1755 2110- 2155 3 (23dBm) 200 mW
V 824 - 849 869 - 894 3 ( 23dBm) 200m W
VIII 880 - 915 925- 960 3 (23dBm) 200 mW
TD-SCDM A 34 2010 - 2025 2010 - 2025 2 (23dBm) 200 mW
39 1880 - 1920 1880 - 1920 2 (23dBm) 200 mW
CDMA BC0 824- 849 869 - 894 3 ( 24 dBm) 260 mW
BC1 1850 - 1910 1930 - 1990 2 (24 d Bm) 260 mW
© 2017 Vertu Corporation Limited. All rights reserved. 87

Safety and warranty
Mode Ba nd Uplink (MHz) Downlink (MH z) Power Class Powe r
LTE-FDD 1 1920 - 1980 2110- 2170 3 (23 d Bm) 200 mW
2 1850 - 1910 1930 - 1990 3 (23 dBm) 200m W
3 1710 - 1785 1805 - 1880 3 (23 dBm) 200m W
4 1710 - 1755 2110 - 2155 3 (23 dBm) 200m W
5 824 - 849 869- 894 3 (23 dBm) 200m W
7 2500 - 2570 2620 - 2690 3 (23 dBm) 200m W
8 880 - 915 925- 960 3 (23 dBm) 200m W
12 699- 716 729 - 746 3 (23 dBm) 200 mW
13 777- 787 746 - 756 3 (23 dBm) 200 mW
17 704- 716 734 - 746 3 (23 dBm) 200 mW
19 830- 845 875 - 890 3 (23 dBm) 200 mW
20 832- 862 791 - 821 3 (23 dBm) 200 mW
25 1850 - 1915 1930 - 1995 3 (23 dBm) 200m W
26 814- 849 859 - 894 3 (23 dBm) 200 mW
28 703- 748 758 - 803 3 (23 dBm) 200 mW
29 RX Only 717 - 728 RX Only R X Only
30 2305 - 2315 2350 - 2360 3 (23 dBm) 200m W
LTE-TDD 38 2570 - 2620 2570 - 2620 3 (23 d Bm) 200 mW
39 1880 - 1920 1880 - 1920 3 (23 dBm) 200m W
40 2300 - 2400 2300 - 2400 3 (23 dBm) 200m W
41 2496 - 2690 2496 - 2690 3 (23 dBm) 200m W
BT 2.4GHz 2402- 2480 2402- 2480 1 (8dBm) 7 mW
WLAN 2.4GHz 2412 - 2472 2412 - 2472 <21 dBm 125 mW
5GHz 5180 - 5825 5180- 5825 <17 dBm 50 mW
GNSS GPS NA 1575.42 N A NA
GLONASS NA 1597- 1606 NA NA
Beidou NA 1561.098 NA NA
Galileo NA 1575.42 NA NA
NFC 13.56M Hz 13.56 13.56 <100 mW <100 mW
Qi 200kHz NA 110kHz - 205kHz NA <10 mW
Vertu Corporation Limited, Beacon Hill Road, Church Crookham, Hampshire GU528DY.
© 2017 Vertu Corporation Limited. All rights reserved. 88
 Loading...