


HANDMADE IN ENGLAND
S I G N A T U R E T O U C H
U S E R G U I D E V E R S I O N 1 . 0

Contents
Contents
Introduc tion 5
Your Signature Touch phone 5
Help and support 5
Safety 6
Safety 6
Your phone 7
Package contents 7
Features and keys 7
Antenna locations 8
Headset 9
Change the volume 9
Getti ng started 10
Insert the SIM card 10
Access external memory card 11
Charge the phone 12
Switch the phone on or off 13
Start-up pr ocess 13
Use your phone when itis locked 15
Explore 16
About the home screen 16
Status and notification bar 16
Status and notification icons 17
Interruptions and priority mode 18
Notifications 18
Clockwidget 18
Back, home and recent apps 19
Add widgets to the home screen 19
Favourites tray 19
Quick settings 20
Sharing your Signature T ouch 20
Voiceactions 20
Apps 21
About apps 21
Recommended Apps 21
Google Play™ 21
Apps precautionary advice 22
Update apps 22
Manage and restore apps 22
Close apps 22
Uninstallapps 23
Vertu Servic es 24
About Vertu Services 24
Text entr y 26
Keyboard entry 26
Predictive text 26
Gesture typing 27
Dictionaries 27
Change the keyboard language 27
Calls 28
About calls 28
Make and answer calls 28
Call recent number 29
Call using Speed Dial 29
Listen to your voicemail 29
Divert callsto another number 29
Make a conference call 30
Contacts 31
About contacts 31
Call, text or emailcontacts 31
Add contacts 32
Join contacts 32
Edit or delete a contact 32
Save a number from a call or message 32
Mark contactsas favourites 33
Personalise contacts 33
Transfer contacts 33
Mess aging and email 35
About messaging 35
Send and read messages 35
Send a message to a group 35
Instant messages 35
Manage messages 36
Set up your email 36
Musi c 37
About music 37
Adding songs or albumsto PlayMusic 37
© 2015 Vertu Corporation Limited. Allrights reserved. 2

Contents
Playmusic 38
Maps and navigati on 40
Google Maps™ 40
Personalisi ng y our phone 41
Widgets 41
Shortcuts 41
Ringtones 41
Wallpapers 41
Assign sounds to actions 42
Displaysettings 42
Pulsenotification light 42
Auto-rotate 43
Screen lock 43
Date and time settings 43
Language and input options 43
Social networks 44
Add an account 44
Delete an account 44
Synchronisecontacts 44
Managing accounts 45
Configure sync options 45
Delete accounts 45
Backup and restore accounts 45
Brows er 46
About the web browser 46
Connect to the internet 46
Add a bookmark 47
Privacyand security 47
Downloads 47
Camera 48
About camera 48
Take and share photos 49
Camera settings 49
Record and share a video 49
Video settings 50
Gal ler y 51
About Gallery 51
View and edit photos and videos 51
Share photos and videos 51
View an album 51
Create a folder 52
Assign contact images and wallpaper 52
Take a screenshot 52
Offi ce tools 53
Clock 53
Calculator 53
Calendar 53
Connectiv ity 55
Wi-Fi 55
Bluetooth 55
Location services 56
Set your phone to sync with your
computer 56
Copy between the phone and a PC 57
Tethering and portable hotspot 57
NFC 57
Phone management 58
System update 58
Free up phone memory 58
Optimise data usage 58
Data roaming settings 59
Back up and r estore your phone 59
Set your phone to lock automatically 59
Change your PIN code 59
Access codes 59
Master reset 60
Boot validation 60
FAQs 61
Questions 61
How can I extend the battery life of
myphone? 62
Do I need a Google™ account to use
myphone? 63
How can I reduce my data costs,
especiallywhen abroad? 63
How do I transfer musicfrom my
computer to my phone? 63
How can I listen to my iTunes music
library on my phone? 64
© 2015 Vertu Corporation Limited. Allrights reserved. 3

Contents
How do I setup an emailaccount on
myphone? 64
How do I transfer contactsto my phone? 64
How do I set my music as ringtone? 65
How do I change the font size on
myphone? 65
How do I check if I have the latest
software updates on myphone? 65
Why have I got no connectivity? 65
Why is my internal storage less than
advertised? 66
How do I protect my phone from
unauthorised use? 66
How do I find the IMEI number of
myphone? 66
How can I clear the log of my callsor
thelist of people I have contacted
frequently? 66
Why does my phone get warm? 66
How do I set a photo as my wallpaper? 66
Can Istill useGoogle MapsifI do not
have a data connection? 66
Access ori es 68
Battery charger 68
Data cable 69
Wired stereo headset 69
Specific ations 70
Specifications 70
Care of your phone 72
General care 72
Embroidery 72
Exoticleathers 73
Leather 73
Non-precious metals 73
Precious metals 73
Precious stones 74
Sapphire and ceramics 74
Safety and warranty 75
Safety text 75
Additionalcare and maintenance 79
Manufacturer's Limited Warranty 80
Software applicationnoticesfor
thephone 83
Environmental 85
Export and controls 86
Copyright and trademark notices 86
SAR (Specific Absorption Rate) notice -
VM-03 87
Declaration of Conformity 88
© 2015 Vertu Corporation Limited. Allrights reserved. 4

Introduction
Introduction
Your Signature Touch phone
This user guide isintended to provideyou with details on how to use the prominent features on your
Signature Touch.
To accessthe exclusive privilegesand benefitssuch as Vertu Life, Vertu Concierge, and Vertu Certainty,
you must register your phone.
The pictures used in this user guide are provided for illustration purposes only. T hey may differ from the
exact appearance of your Signature Touch.
Help and support
To find out more about using your phone:
l Contact Vertu Customer Service by either pr essingthe Vertu key or through the Vertu Certainty
app.
l Refer to the user guide on your phone from the Vertu Certainty app, or on the Vertu website at
http://www.vertu.com/gb/en/product-support/user-guides-and-downloads/.
l Use the setup wizards available on the phone to help you with things such as registration, or to
create an emailaccount.
Compliance information
You can find compliance information on a metal plate that is located inthe SIM compartment. For
instructionson accessing the SIM compartment, see "Insert the SIM card" on page 10. The information
displayed includes the IMEI number, serial number, product name and 2D barcode.
© 2015 Vertu Corporation Limited. Allrights reserved. 5

Safety
Safety
Safety
Read these simple guidelines. Not following them may be dangerous or illegal. Read the complete user
guide for further information.
Switc h off in restric ted areas
Switch the deviceoff when mobilephone use is not allowed or when it may cause
interference or danger, for example, in aircraft, in hospitals or near medical
equipment, fuel, chemicals, or blasting areas. Obey allinstructions in restricted
areas.
Road safety comes first
Obey all local laws. Always keep your hands free to operate the vehiclewhile
driving. Your first consideration while driving should be road safety.
Interference
Allwirelessdevicesmay be susceptible to interference, which could affect
performance.
Qual ifi ed servi ce
Onlyqualified per sonnel may install or repair this product.
Keep y our device dry
Your device is not water-resistant. Keep it dry.
Protect your hearing
To prevent possible hearing damage, do not listen at high volume levelsfor long
periods. Exercise caution when holding your device near your ear while the
loudspeaker is in use.
© 2015 Vertu Corporation Limited. Allrights reserved. 6
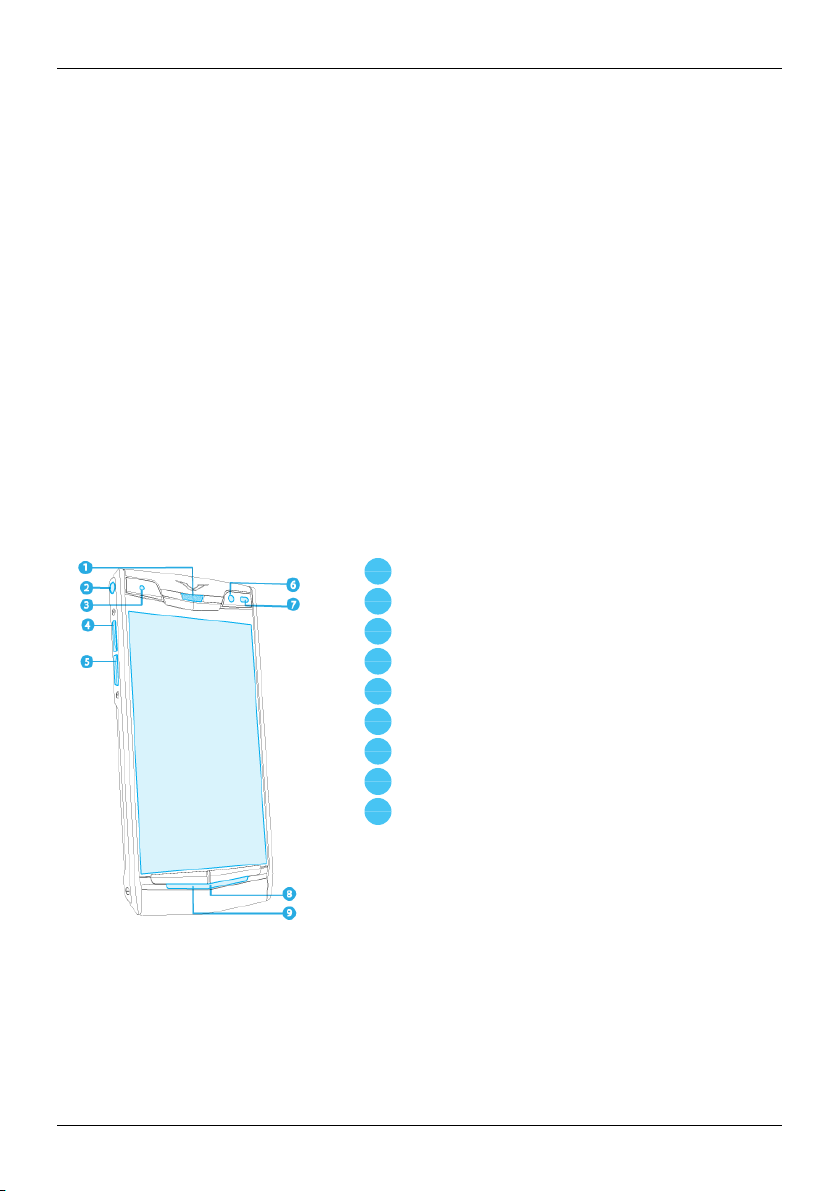
1
2
3
4
5
6
7
8
9
Your phone
Your phone
Package contents
l Signature Touch phone
l Wallcharger (AC-32V) with regional plugs
l MicroUSB cable 1200mm (CA-225DV)
l V Collection Wired Headset, Type WH-4V/WH-5V
l Polishing cloth
l Collateral pack, including QuickStart Guide, Warranty and Authenticity Card
The package contents may vary slightlyin accordance with the materialsused in your par ticular phone
and with regional regulations.
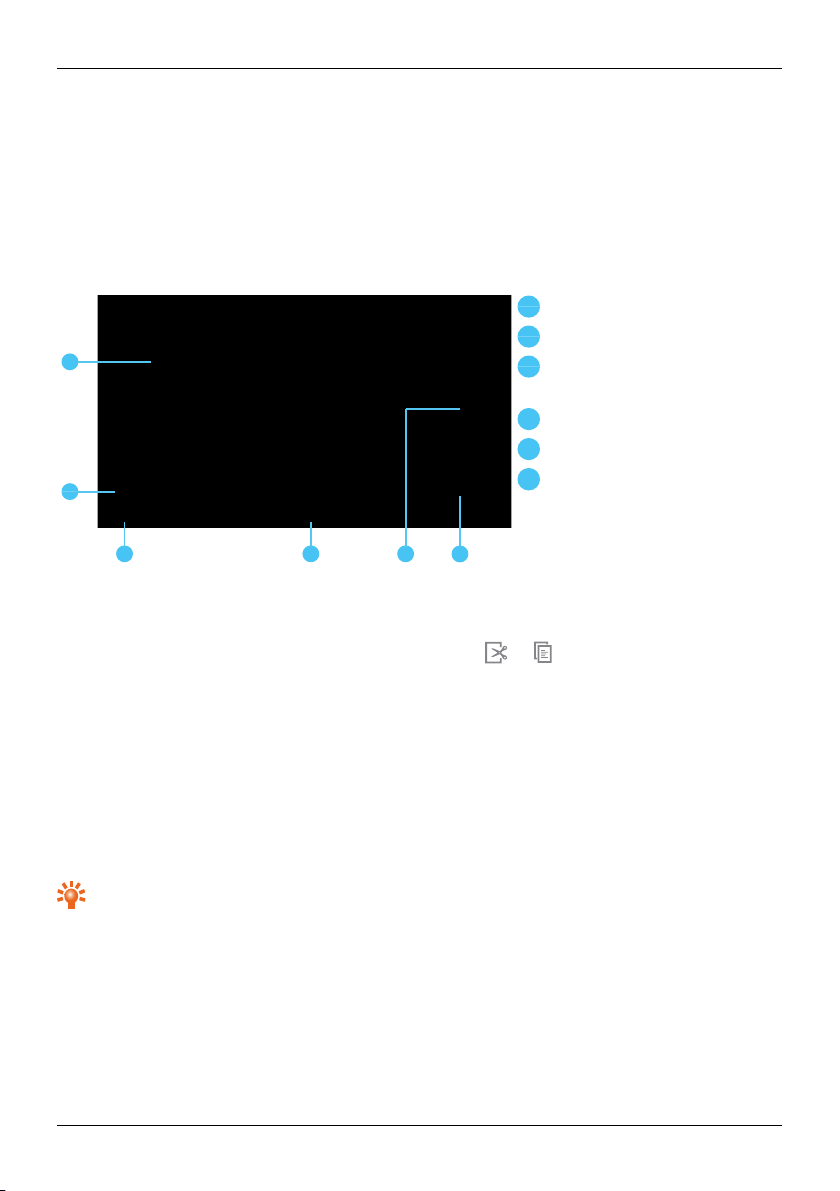
Features and keys
Front
Earpiecespeaker
Headset connector
Notification light
Volume up key
Volume down key
Front camera
Ambient light sensor
Microphone
Loudspeaker (stereo)
© 2015 Vertu Corporation Limited. Allrights reserved. 7
1
2
3
4
5
6
7
8
9
Your phone
Back
LED flash
MicroUSB connector
Vertu key
Power key/screen lock
NanoSIMdoor
Noise-cancelling microphone
MicroSDcard door
Main camera
Quarter turn
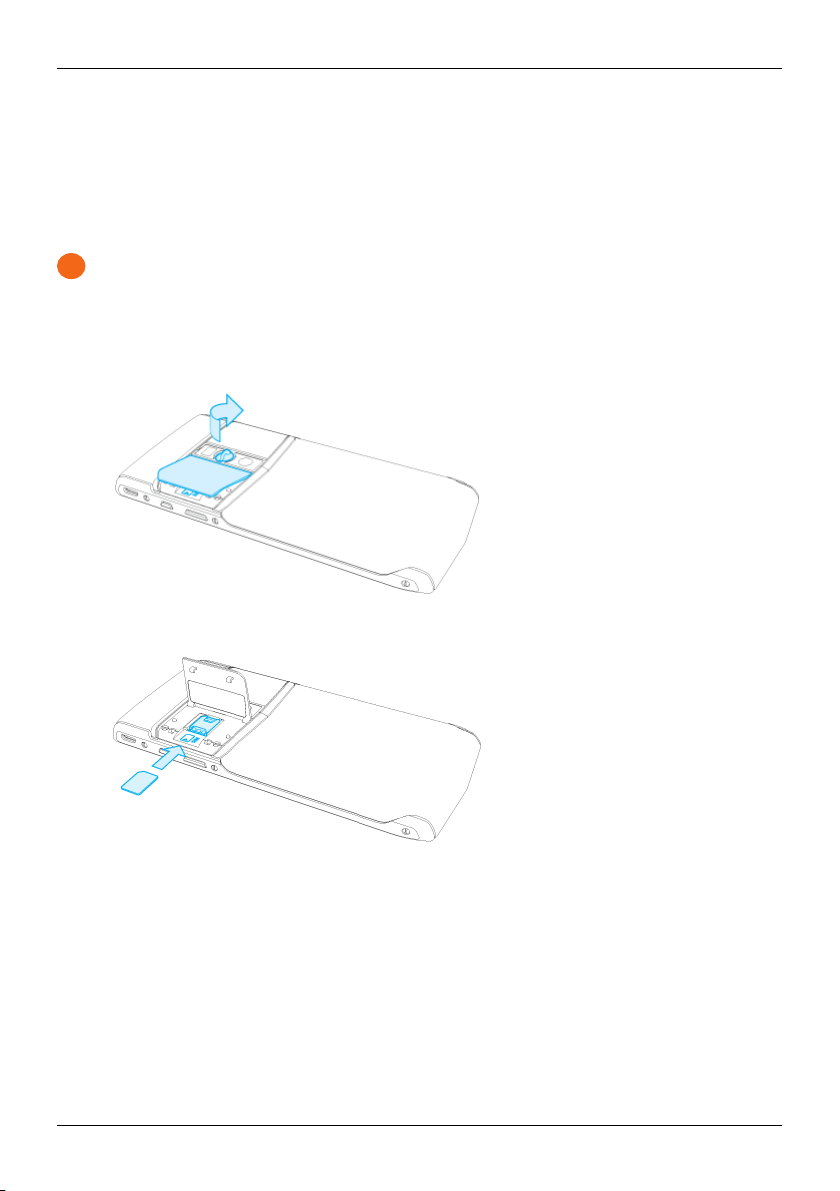
Antenna locations
Avoidtouching the antenna areas while the antennas are in use. Contact with antennas affectsthe
communication quality and may reduce battery life due to higher power levelsduring operation.
© 2015 Vertu Corporation Limited. Allrights reserved. 8

Your phone
Headset
Use the headset provided to connect to your phone. Alternatively, you can connect any compatible
headsets.
Change the volume
Press the volume keys to change the volume during a call. When you ar e not on a call, press the volume
keysto change the ringtone volume.
Touch to select Dolby profiles.
Touch for quickaccess to adjust Ringtone, Call Music and Alarm volumes.
© 2015 Vertu Corporation Limited. Allrights reserved. 9
Getting started
!
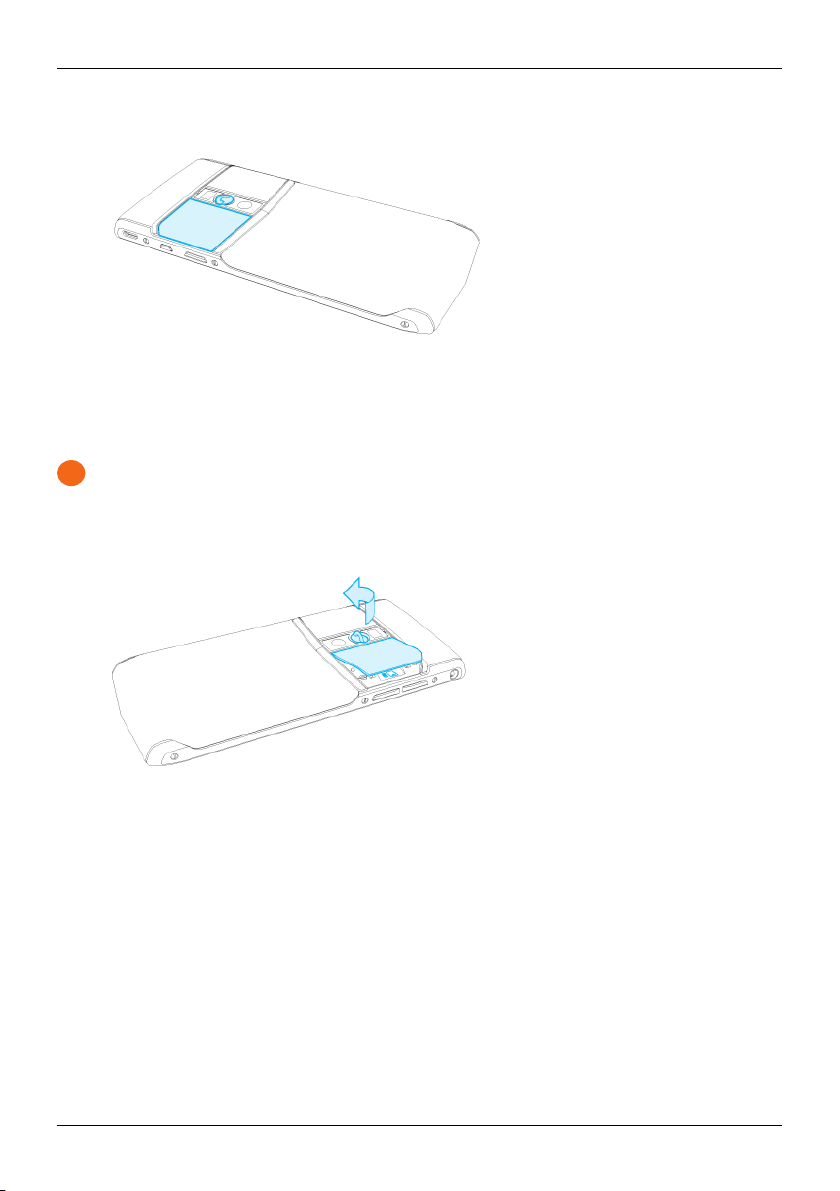
Insert the SIM card
Your Signature Touch phone isequipped to work with a nanoSIM card.
Important: Do not attempt to insert another type of SIM as this will not be compatible and may
damage the cavity.
To avoid damaging the SIM card or your phone, follow these steps carefully:
1.
The back plate ismade up of two doors. To access the nanoSIM cavity, pull out the quarter turn
and rotate it clockwise. Thisopens the door on the left.
Getting started
2.
Slide your nanoSIM into the cavity.
© 2015 Vertu Corporation Limited. Allrights reserved. 10
3.
!
Finally, close the door making sure it clicks into place.
Access external memory card
You can expand the memory capacity of your phone using a removable microSD card.
Important: Do not attempt to insert another type of memory card as this willnot be compatible and
may damage the cavity.
To avoid damaging the microSD card or your phone, follow these steps carefully:
1.
Rotate the quarter turn anti-clockwise untilthe right door opens.
Getting started
2.
Slide the microSD card into or out of the cavity.
© 2015 Vertu Corporation Limited. Allrights reserved. 11

!
Getting started
3.
Finally, close the door making sure it clicks into place.
Charge the phone
The internal battery needs activating prior to first use, and it is recommended to charge the battery at this
point as it may not have been supplied with a full charge. Connect the supplied USB data cableinto the
charging port on the side of the phone. Then connect the other end of the cable to the USB port on your
Vertu mains charger.
Important: Use only chargers, cables and accessories supplied by Vertu.
If the phone indicates a low charge, do the following:
1.
Connect the supplied wallcharger to the wall outlet and then insert the microUSB connector into
your phone.
2. When the battery is fullycharged, disconnect the charger from the phone and then from the wall
outlet.
Note:
l You can use the phone whileit is charging.
l If the battery is completely discharged, it may take several minutesbefore the charging indicator is
displayed or befor e you can make any calls.
l The phone cannot be activated using the Vertu Wireless Powerpack.
© 2015 Vertu Corporation Limited. Allrights reserved. 12
Getting started
Other ways to charge the battery
You can also charge your phone by connecting it to your computer using the USB cable, or by placingit on
the optionalVertu WirelessCharging Pad.
Note: Your phone charges quicker when connected to the wallcharger.
Battery Saver mode
If the battery is r unning low and you ar e unable to charge your Signature Touch, you can use the Battery
Saver feature. This extends battery life by limiting your device'spower consumption. Your phone's
performance is reduced when Battery Saver is switched on, and email and other apps may not update
until you open them.
To enable Battery Saver, touch Apps> Settings >Battery> >Battery Saver .
When Battery Saver is enabled, displayson the status bar. Battery Saver automaticallyturns off when
you charge the phone.
You can also set up your Signature Touch to automatically switch on Battery Saver when the battery
charge drops below 15% or 5%. To enable automatic Battery Saver, touch Apps> Settings >
Battery> >Battery Saver>Turn on automatical ly .
Switch the phone on or off
Switc h on: Press and hold the Power key untilthe phone vibrates.
Switc h off: Press and hold the Power key, and then touch Power off.
In the unlikelyevent that your phone stops responding, reboot it. T o reboot, press and hold the Power
and Volume Down keys, at the same time, until the phone vibrates. Thistakes approximately 10 seconds.
Note: Alwaysremember to power off your phone before removing and inserting a SIM card. This action
willensure that your network connectivity is restored.
Start-up process
1 Wi-Fi setup and G oogle registration
To connect to Wi-Fi and r egister with Google:
1. Pressand hold the Power key for a few seconds until you feel your phone vibrate.
2. Scroll to your preferred language and touch the arrow.
3. Select a Wi-Fi network from the displayed list.You can choose to Skip this step.
© 2015 Vertu Corporation Limited. Allrights reserved. 13

Getting started
4.
Enter the wirelesspassword when prompted, and then touch CONNECT. If you can see a Wi-Fi
symbolon the top line of your display, the password isaccepted.
Note: If you are using domesticWi-F i, the password is usuallyfound on the back of the router.
5.
Touch Next to continue.
Note:If you have been using an Android device with NFC capability, you can use Tap & Go to
import your previoussetup onto your new Signature Touch. Simply turn on NFC on your Android
device then touch the backs of both phones together untilyou hear an alert tone. Once the alert
has sounded follow the instructions on your Android to allow the Bluetooth data transfer.
6. Sign in to your Google account, or create a new account if you do not have one.
7. Enter the preferred payment options for your Google account, when prompted. This enables you
to make purchasesfrom Google Play™. If you do not want to do this now, touch Remind Me Later.
8.
If you saved your previousAndroid setup, you can import this setup to your Signature Touch. You
can do this either by using a previouslybacked up Google account, or by using the Tap & Go
feature if your Android device has NFC capability.
9. Checkwhich Google services are enabled. You can disableany services you do not need.
10. Touch Next to continue.
11. Choose whether or not to accept Google Now. This is a customised information feed to help you
plan your day.
This completes Wi-F i setup and Google registration.
2 Vertu registration
If you are a new Vertu customer you willbe asked to create a Vertu account. If you already own a Vertu
phone you can simply log in to your existing account with your Vertu username and password.
Completing Vertu registration will give you access to unique privileges and benefits relevant to you.
Tip: For quickaccess to the range of exclusive services, press the Vertu key.
3 Recommended Apps
For more on the apps that Vertu recommend, see "Recommended Apps" on page21.
4 Transfer contacts
Transfer contactsto your phone with your Gmail™ account, your SIM card or your iCloud account.
For information on transferring contacts, see "Transfer contacts" on page33.
© 2015 Vertu Corporation Limited. Allrights reserved. 14

Getting started
Use your phone when it is locked
To unlockthe screen, press the Power key,touch and slide upwards.
You can lockthe screen either by pressing the Power keyor by simply leaving the screen to time out.
For more information on different screen lock types, see "Screen lock" on page43.
© 2015 Vertu Corporation Limited. Allrights reserved. 15

1
2
3
4
5
Explore
Explore
About the home screen
The home screen actsas a gateway to the functions on your phone while also providing you with allthe
latest information:
Statusand notification bar
Widget
Appsmenu
Favourites tray
Back, Home and Recent
Apps
Status and notification bar
Status information, such as time, network signal strength and battery level indicator, isdisplayed at the top
right of the screen.
Any notifications, such as new messages or calendar appointments, are displayed in the top left of the
screen. T o see your notifications, touch the bar and drag down. Touch a notification to open it.
You can also quickly control your Wi-Fi, Bluetooth, GPS, mobile data, USB connectivity and display
options from the status and notification bar.
Touch Home to close the status notification bar.
Tip: Flick the notification left or right to clear it from the list.
© 2015 Vertu Corporation Limited. Allrights reserved. 16
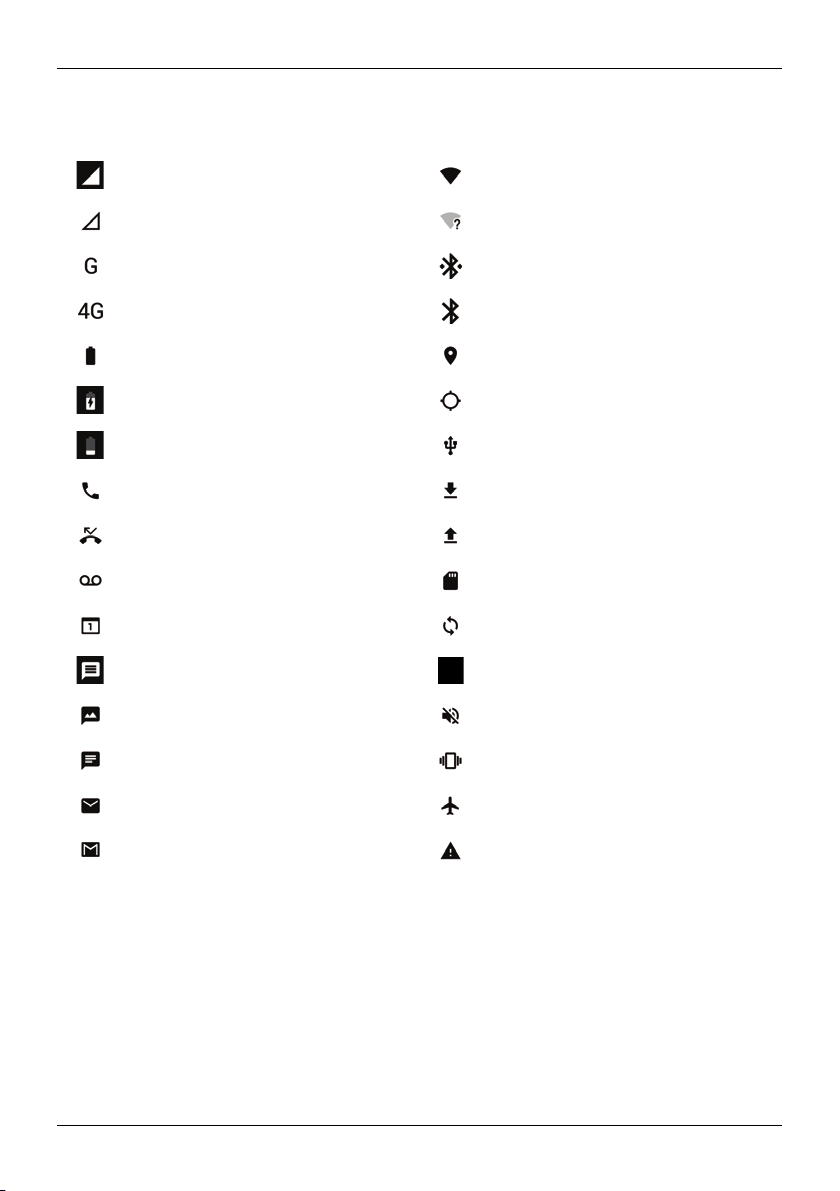
Status and notification icons
Network (fullsignal) Wi-Fi connected
No network Wi-Fi available
GPRS data connection Bluetooth™ connected
H+ (fastest data) Bluetooth™on
Battery (full charge) GPS(location found)
Battery (charging) GPS (searching)
Battery (empty) USB connected
Active call Downloading
Missed call Uploading
New voicemail SD card
Calendar reminder Background data sync
Explore
New SMS Alarm set
New MMS Silent
New chat Vibrate
New email Aeroplane mode on
New Gmail Warning
© 2015 Vertu Corporation Limited. Allrights reserved. 17
Explore
Interruptions and priority mode
If you are in a business meeting or do not want to be interrupted by your phone, you can use the Priority
Mode feature to screen unwanted calls, hide message notifications and silence Calendar alerts.
To set up your Priority Mode profile, touch Apps> Settings >Sound & noti fic ation>
Interruptions . You can now selectwhich interruption types you want to allow, or turn off allinterruption
types.
Tip: To activate PriorityMode, press the volume key and touch Priority.
Notifications
When your phone is locked, notificationsof r eceived messages, missed callsor event alerts displayon
thescreen.
To dismiss the notifications, swipe them to the side.
If you want to hide notificationson a locked screen, touch Apps> Settings>Sound &
notifi cation>When device is locked.
Clock widget
The clockwidget on the home screen displaysthe following information:
l Analogue clock with a digital date indicator
l Alarms set for the next 12 hours
l Free and busy periods, taken from the calendar, around the clockbezel
l Local time. If you are roaming, the clockdisplays both the local time and the time at your home
location.
l Periods of silence for when you do not want to be disturbed by notifications. T hese periods appear
as a red rim on the clock widget.
l Periods of priority for when you only want to be disturbed by priority notifications. These periods
appear as a grey rim on the clockwidget.
To set an alarm, touch the centre of the clock.
To display an appointment, touch the edge of the clock and then touch the pop-up to open the
appointment. To clear the appointment, touch the screen.
© 2015 Vertu Corporation Limited. Allrights reserved. 18

1 32
1
2
3
Explore
Back, home and recent apps
You can use the thr ee icons on the bottom of your screen to navigate between screens and apps.
Back
Home
Recent apps
Touch Backto go back to your previous screen.
Touch Home to move an app to the background and return to the home screen. Touch and hold Home to
go to the search screen.
Touch Recent apps to view a list of the apps that you have used most r ecently.
Add widgets to the home screen
Widgets are apps that provide live content suchas news, weather forecasts and messages.
To add widgets to the home screen:
1. Touch and hold an empty spot on the home screen and touch WIDG ETS.
2. To select a widget, touch and hold it, and then drag it to the home screen.
To see the widget menu options, open the widget and touch .
To resize certain widgets, such asCalendar, touch and hold the widget and then release it. The widget is
then highlighted and you can drag it to the size required.
Note: Downloaded apps from Google Play™may automaticallydownload other associated widgets.
Tocheckyour widgets, touch and hold an empty spot on the home screen and touch WIDGETS.
Favourites tray
The favourites tray appears at the bottom of the home screen. Use it to accessyour favourite apps
quickly.
To remove an app from the favourites tray, touch and hold the app then dr ag to Remove at the top of
thescreen.
© 2015 Vertu Corporation Limited. Allrights reserved. 19

Explore
To add an app to the favourites tray, touch Apps. Touch and hold the app, and drag it to
thefavouritestray.
Quick settings
Quick settings is a convenient settings menu that you can accessat any time on your Signature Touch,
even when the phone is locked. Using quicksettings, you can accessWi-Fi settings, Aeroplane mode,
main device Settings and more.
To accessQuick settings, swipe down with two fingers on any screen.
Tip: Touch Torch to switch on the camera flash and use it as a flashlight. Touch it again
toswitchitoff.
Sharing your Signature Touch
You can easilyshare your Signature Touch with others without revealing your per sonal information by
using the Multiple User feature. Simplyswipe down from the locked display,touch the on the top-right
corner and then select Add guest. Under this profile, the SMS Message function will be disabled and the
Guest will not be able to access your messages, contacts, photos or installed applications. T he voice call
function is disabled but can be enabled if you so choose.
To revert back to your own user profile, simplyfollow the same stepsand select your personal profile.
Tip: You can choose to enable or disable the phone functionality in the Guest profile byswitching
to your own profile and selecting MO RE SETTINGS>Guest >Allow phone calls.
Warning: Disabling the phone functionality willprevent outgoing callsbut incoming callscan stillbe
received.
If the Signature Touch is to be shared on a longer term basis, we recommend you use the Add User
profile. This willprompt the phone setup sequence to provision the new user’s accounts. If you choose,
phone calland SMS Message functions can be enabled.
Voice actions
With voice actions you can set an alarm, call friends, and more just by speaking clearly into your phone.
l
Voice diall ing: on the home screen, touch and then say “Call” and then a contact name or
phone number.
l
Voice c ommands : on the home screen, touch and then say a command, such as "Open
Calendar".
© 2015 Vertu Corporation Limited. Allrights reserved. 20
!
Apps
Apps
About apps
Your Signature Touch gives you access to a wide range of useful apps.
To accessyour apps, touch Apps from the home screen. F lick left or right to see allyour apps.
To close the apps screen, touch Home.
To view your most recently used apps, touch Recent apps.
Recommended Apps
> >
Recommended Apps providesyou with a single, tr usted destination where you can quicklyand simply
browse and install the apps you use every day. The selection of apps displayed has been chosen based
on your country, ensuring that they ar e relevant to you.
Google Play™
> >
The Google Play Store app will help you with justabout anything.
Scrollto the app you want to install, and then touch Install (if the app is free) or touch the price to buy.
Once installed, the new app is displayed in the apps screen.
To view a list of your downloaded apps, touch Apps> Setti ngs>Apps. A list of your downloaded
apps is displayed, and these apps are available to download again.
Important: Choose your apps carefullyfrom trusted sites, or you can rely on Vertu Recommended
Apps.
Your application purchasesare tied to your Google account and can be installed an unlimited amount of
times on any device. So, for example, if you remove 'My Favourite Game' to save memory, you can
reinstallit at a later date with no charge by simplyvisiting My Apps. For more information on My Apps, see
"Manage and restore apps" on page22. You can also re-installapps from the My Android™ Apps section
of play.google.com.
© 2015 Vertu Corporation Limited. Allrights reserved. 21

Apps precautionary advice
To protect your phone from the threat of spyware, phishing, or viruses, it isimportant that you choose
your apps carefully.F or Vertu-recommended security apps, see "Recommended Apps" on page 21.
l Some apps drain your phone of phone memory and battery more than others. If you find that an
app isdraining your phone, simplyuninstall it.
l Before you get Android apps on Google Play™, check the ratings and comments. If you aren't
convinced by the legitimacyof an app, don't install it.
l Some apps may contain inappropriate content for children.
Update apps
If you receive an over-the-air notification of an update on your phone for a Google Play™ app, you can
follow the instructionsto download and installthe update software or you can opt to dismissthe
notification.
The Allow automatic updating setting is often activated by default when you installan app. To change
this setting, touch Apps> Play Stor e> >Settings >Auto-update apps.
Tip: To conserve data usage and only update your apps over Wi-Fi, touch Apps >
Play Store> >Settings >Auto-update apps>Auto-update over Wi-Fi only.
Apps
Manage and restore apps
To manage your apps, touch Apps> Settings>Apps>All.
Touch an app to see itsdetails(such as access permissionsand file size), and then touch to select options
such as force the app to stop, uninstall,or clear data.
To restore apps that you have previously installed from Google Play Store, touch Apps>Play Store>
>My apps. A listof your downloaded apps is displayed, and these apps are available to download
again.
Close apps
To close an app, touch Home .
Many of your apps will continue to run in the background after you have closed them. T o quicklyopen
recently used apps, touch Recent apps .
Tip: To remove apps from this list , flickleft or right.
© 2015 Vertu Corporation Limited. Allrights reserved. 22

Uninstall apps
To delete an app, touch Apps> Settings >Apps>app name>Uninstall.
Apps
© 2015 Vertu Corporation Limited. Allrights reserved. 23

Vertu Services
Vertu Services
About Vertu Services
Your unique Vertu experience starts with registration. Once you have successfullyregistered your phone
you are able to access the privileges and benefits by pressing the Vertu Key.
Vertu Concierge
Concierge offers 24-hour wor ldwide assistance,recommendationsand priority bookings. They facilitate
your every request, from findingthe perfect gift to accessing 'money-can't-buy' events, experiencesand
everything in between. Your Concierge willfulfil every request using their unique expertise and inside
knowledge.
It's simple to stay in touch with a choice of livechat, emailor telephone, depending on your personal
communication preference. And so you're always up to date, you can find your requests at the touch of
abutton.
Vertu Life
Life offers access to a world of opportunity with privileged access to curated experiencesand global
events, hand-picked for the discerning taste of Vertu users.
Enjoyprivileged access to a private members club in Hong Kong, tickets for the Champions League final
or an invitation to join the stars at the Academy Awards, alldynamicallydelivered through your handset.
Concierge isintegrated into Life, meaning that any of the content which interests you can be activated
quicklyand simply.
Vertu Certainty
Certaintyprovides peace of mind for your Vertu and your data, delivering a host of integrated security
features and services through our expert partners and best-in-class technology.
Our renowned Vertu Customer Serviceis always available should you require any assistance with your
Vertu. Call or email Vertu Customer Servicefrom within the Vertu Certainty application, or browse the
phone user guide and FAQs directly on your phone. With our Remote Assist technologywe can support
you immediately wher ever you are to keep you and your Vertu going.
Vertu Certaintyalso includes:
l GlobalWi-Fi connectivitypowered by iPass, the world'sleading Wi-Fi network, with unlimited data
usage to over 15 million Wi-Fi hotspots around the world*.
l The ability to lock, wipe, find and ring your Vertu phone at any time via the Lost Phone service. This
service does not require set up and is activated once you have registered your Vertu phone. In the
event of losing your Vertu phone, simply log in to your account on vertu.com from another device.
© 2015 Vertu Corporation Limited. Allrights reserved. 24

Vertu Services
l Vertu Sync which allows iCloud users to easilysynchronise their iCloud contacts and calendar with
their Vertu phone (See "Transfer contacts" on page 33 for further details).
* For partner services and duration please see the specification for your phone.
© 2015 Vertu Corporation Limited. Allrights reserved. 25
51234
6
1
2
3
4
5
6
Text entry
Text entry
Keyboard entry
To open the touch screen keyboard, touch a text entry box. To enter text, touch the letters on the
keyboard. The keyboard is displayed in your country's native text input format, for example, QWERTY, in
both portrait and landscape modes.
Text box
Shift
Keyboard for numbers and
symbols
Space
Speech-to-text dictation
Delete
Cut, copy and paste text
Touch and hold a section of text to select it. Tabs appear, marking the boundaries of the selection. Dr ag
these tabs to reduce or increase the selection, and then touch or to cut or copy.To paste the text,
touch the point where you wishto insert it, and touch the tab that appears. Then touchPaste.
Predictive text
Predictive text input isbased on a built-indictionary to which you can add new words. It is not available in
alllanguages, and is active by default. As you start typing a word, your phone suggests possiblewords for
you to choose. When the correct wor d isdisplayed, touch the word. If the word isnot in the dictionary, the
phone suggestsan alternative word fr om the dictionary. To add a new word to the dictionary, touch the
word you have typed.
Tip: To see a menu of punctuation marks, touch and hold the full stop key.
© 2015 Vertu Corporation Limited. Allrights reserved. 26

Text entry
Gesture typing
For many languages, your phone lets you spellout words by sliding a finger tip across the keyboard. As
you move between keys, your movements ar e traced by a blue trailacross the keyboard and the word
you have spelt out appears in the middle of the strip above the keyboard. To end a word and insert a
space, lift your finger. The phone automatically inserts spaces between words.
Dictionaries
To view your dictionaries,touch Apps> Setti ngs>Language & input>Personal dictionary .
Touch + to add words to your dictionary.
Change the keyboard language
To change the language on your keyboard, touch Apps> Settings >Language & i nput and
select another option fr om Keyboard & input methods.
Note: The keyboard options available will change depending on your language selection.
If you change the keyboard language and you want to be able to use spellcheckfor the new language,
you must install an additionalkeyboard dictionary. Under Keyboard & input methods, touch G oogle
Keyboar d>Text cor rec tion>Add-on dictionaries >a listed dictionary option>Install.
© 2015 Vertu Corporation Limited. Allrights reserved. 27

Calls
2
5
3
4
1
1
2
3
4
5
About calls
> >
Calls
Recent calls
Speed dial your favourite contacts
Allcontacts
Options menu
Dialer
Make and answer calls
To make a call:
1.
Touch Apps> Phone> dialpad and enter the phone number on the dial pad.
2.
To make the call, touch .
Note: To enter the + character, used for international calls,touch and hold 0.
3.
To end the call, touch .
Tip: To voice dial a contact from the home page, touch and say “Call” followed by a contact
name.
© 2015 Vertu Corporation Limited. Allrights reserved. 28

To answer a call, touch and drag to .
l
To send an incoming call to your voicemail,touch and drag to .
l
To send an automated text message to the caller, touch , drag to , and then select an
appropriate message.
l To silence an incoming call,press the Power key or Volume keys.
Call recent number
The calllog displaysinformation about the callsyou have made and received. This makesit easy to call
someone again if they are not answering. Simply accessthe call log and quicklyretrieve the number.
To callback a recent caller:
1.
From the home screen, touch Phone>RECENTS.
2. Select the person you want to call back.
3. Touch CALL BACK.
To clear the call history list, touch >Call History> >Clear call log.
Call using Speed Dial
Speed Dialenables you to quicklycall favourite or frequently called contacts. To use Speed Dial:
Calls
1.
From the home screen, touch Phone>SPEED DIAL.
2. Select a contact to call.
To clear the list of frequently called contacts, display the list, touch >Clear frequents.
Listen to your voicemail
You can divert your incoming calls to your voicemail( network service). Also, people can leave you a
message, for example, when you have not answered the call.
To listen to your voicemail messages, from the home screen touch Phone, and then touch and hold 1
on the dial pad.
Divert calls to another number
If you cannot answer your calls,you can divert incoming calls to another phone number.
From the home screen, touch Phone> >Settings>Call Settings>Call forwardi ng.
© 2015 Vertu Corporation Limited. Allrights reserved. 29

Calls
Several diverting options, such as Forward when busy and Forward when unanswered can be active at
the same time.
Note: Call divert isa network service. F or details, contact your service provider.
Make a conference call
To start a conference call:
1. Callthe first number.
2.
After the call connects, touch .
3. Dialthe next number, or select it from contactsor favourites.
4. When the next number answers, touch Mer ge c alls.
Note: Conference callsare a network service. F or details, contact your service provider.
© 2015 Vertu Corporation Limited. Allrights reserved. 30

1
2
3
4
5
Contacts
Contacts
About contacts
With contacts, you can save and organise your friends' phone numbers, addresses and other contact
information.
> >
Favourites
Allcontacts
Search
Options menu
Add a contact
Call, text or email contacts
> >
To calla contact, touch the contact and then touch the phone number.
To text a contact, touch the contact and then touch .
To email a contact, touch the contactand then touch the email address.
© 2015 Vertu Corporation Limited. Allrights reserved. 31

Contacts
Add contacts
> > >
1.
Select an account to back up your contact.
Note: If you have not set up an account, like a Google or email account, your contactis only saved
to your phone memory.
2.
Enter the contact details, and then touch .
Tip: Backing up your new contact to an account willalso sync it to that account.
Join contacts
If you have two or more contactsfor the same person, maybe a Gmailcontact that is also stored on your
phone, you can join them.
Touch Apps> Contac ts>contact name> > >Join, and then touch the contact that you
want to join.
Edit or delete a contact
To edit a contact, touch Apps> Contac ts>contact name> .
To delete a contact, touch Apps> Contacts>contact name> > >Delete.
Save a number from a call or message
When you receive a callor a message from a person whose phone number is not yet saved inthe
contacts list, you can save the number in a new or existing contact list entry.
To save a number from a received call:
1.
From the home screen, touch Phone>RECENTS.
2. Touch icon next to the call entry.
3.
Touch .
To save a number from a received message:
1.
From the home screen, touch Apps> Messaging.
2. Touch the message to open it.
3.
Touch .
4. Touch Add to People.
© 2015 Vertu Corporation Limited. Allrights reserved. 32

!
Contacts
Mark contacts as favourites
You can find and call important contacts more quicklyif you mark them as favourites.
l
To mark a contact as a favourite, touch Apps> Contacts>ALL CO NTACTS>Contact
name> . The star changes to white. T o remove a contact from your favourites, touch the white
star.
l
To view the list of your favourites, touch Apps> Contacts>FAVOURITES.
Personalise contacts
Set unique photos and ringtones for your contacts.
> >
To add a photo, touch the contact> then touch the photo area.
To add a ringtone, touch the contact> > >Set ringtone.
Transfer contacts
You can transfer contacts to your Signature Touch by using your Gmail™, your SIM card or your iCloud
account.
Gmail™
You can transfer your contacts to a Comma Separated Values (.csv) text file. After you have imported this
fileinto your Gmail account, itwillautomatically sync with your phone (if you have already set up a Gmail™
account).
1. Export the contactson your previousphone to a .csv file. For information on how to do this, refer
to the user documentation supplied with your previous phone.
2. Log into your Gmail™account on your PC and clickContacts>Import Contacts.
3. ClickBrows e and select the .csv file that you created.
4. ClickImport Contacts.
Important: Syncing your contacts with your Gmail™ account means that your contacts willalways be
backed up.
SIM card
For details on exporting contactsstored on your old phone to your SIM card, refer to the user
documentation supplied with your previous phone.
© 2015 Vertu Corporation Limited. Allrights reserved. 33

Contacts
Then, to import these contacts stored on your SIM card to your Signature Touch, touch Apps>
Contacts> >Import/export>Import from SIM c ard.
Note: Transferring contactswith your SIM card may result in data for some contacts being lost.
iCloud
If you have an iCloud account, you can easilysynchronise your iCloud contactsand calendar with your
Signature Touch.
When you set up your phone for the first time, you have the opportunity to set up the Vertu Sync service.
Alternatively, the Vertu Sync applicationis preloaded onto your phone and can be found in the application
menu grid.
To use the service, simplyenter your Apple ID and follow the instructionson screen. In some cases you
may need to generate an application-specificpassword for the service to work.
1. Goto https://appleid.apple.com/account/home.
2. Select Manage your Apple ID and sign in.
3. Select Password and Sec uri ty.
4. ClickGenerate an App-Specific Pass word and follow the stepson screen.
5. Enter the app-specific password into the password field of the Vertu Sync application.
© 2015 Vertu Corporation Limited. Allrights reserved. 34

Messaging and email
Messaging and email
About messaging
> >
You can send and receive variouskindsof messages:
l Text messages
l Multimediamessages that contain photos, videosor audio
Send and read messages
> > >
To send a message:
1.
Enter the recipient and then type your message. Touch to Add subject.
Note: To send the message to multiple recipients, add more than one contact inthe To field.
2.
Touch to send your message.
To open a text message and the previous conversation, touch it.
To reply to a text message, open it and enter your response inthe text box at the bottom, and then
touch .
Send a message to a group
> > >
To send a message:
1.
Enter the recipientsand then type your message.
Note: You need to add each person to send a message to a group.
2.
Touch to send your message.
Instant messages
> >
To send and receiveinstant messages, you can use Google Hangouts™.
© 2015 Vertu Corporation Limited. Allrights reserved. 35

Messaging and email
Manage messages
> >
To delete a message, touch and hold to select it, and then touch the trash can at the bottom.
To change your messaging options,touch Apps> Messaging> >Settings.
Set up your email
From the home screen, touch Apps > Settings>Accounts. You can now set up one of three
account types:
l
Select Add account>Exchange to set up your business accounts running on Microsoft™
Exchange server.
l Select Google to set up your Gmail account.
l
Select Add account>Personal if you are using any other email provider.
Enter your username and password when prompted.
Note: You may be prompted to enter your domain name and server name. Contact your IT administrator
for details.
When your emailaccountsare set up, you can access them by touching Email or Gmail. If you
have set up two or more emailaccounts, you can switch between accounts by touching and then
selecting the required emailaccount.
To read and reply to messages, touch Apps > Email.
l
To compose a new message, touch . Enter your message and then touch to send the
email.
l To read a message, simplytouch it from the inbox.
l
To reply all or forward the email, touch .
If Auto-syncdata has been disabled, simplyflickdownwards from the emailinbox displayto manually
refresh the synchronisation.
Tip: When you have a new email, willappear in the status bar.
© 2015 Vertu Corporation Limited. Allrights reserved. 36

Music
Music
About music
> >
Google Play Music lets you listen to your current music collection and to buy additional music through
Google Play Store.
The MusicManager desktop application provides a simple way for you to put your music collection into the
cloud, unlocking the potentialof the Play Musicservice. The application scans your computer for music
files, including filesin your iTunes® library, and makes any discovered tracksand albums available to you
in Play Music. If your collection can be matched to music in GooglePlayStore, the tracks do not even need
to be uploaded, saving you data transfer time.
Once your musicis in the cloud, you can access it from any computer connected to Google.com or from
any Android phone or tablet that has the PlayMusicapp installed.
When you first listen to a track with PlayMusicon your Signature Touch, the song iscached on the phone.
So, over time your favourites are automaticallymade available for offline listening, such as when you are
travelling on an aeroplane.
Note: The MusicManager application and musicpurchases from GooglePlayStoreare only available in
certain markets.
Supported f ile types
Your Signature Touch willplay the following audio file formats: AAC, AAC+, MP3, MP4, WAV, M4A,
OGGand WMA.
Adding songs or albums to Play Music
You have two options for listening to musicon your phone. You can listen to music filesthat you store on
your phone, or you can listen to musicin your online library in the Play Music cloud.
To add your music to the Google Play Music cloud
1. Sign up for your Google Play ™ mus ic library: To get started, signup for Google Play™and
download MusicManager, a desktop application that lets you upload your collection fr om your
iTunes music library, or any music folder on your computer, to the cloud.
2. Upload your c ollection: Sign in to Music Manager and choose where you keep your music.
MusicManager then starts uploading automatically.When you add new musicto your computer ,
MusicManager can automaticallyadd it to your library too. Music Manager even adds your iTunes
playlists and ratings so you can start listening to your favourites right away.
© 2015 Vertu Corporation Limited. Allrights reserved. 37

Music
3. Acces s your music on the web and your phone: After you have set up your PlayMusicmusic
library, you can access it on your Signature Touch, on any Android phone or tablet or on the web.
Sign in and all your music is ready to be played.
To add your music to your Signat ure Touch phone only
To load music on your computer and then load it on your phone, you need the following:
l A Microsoft™ Windows™computer or Apple Macintosh™ computer
l A USB data cable
Note: When you connect your phone for first time, your computer may prompt you that drivers are being
installed. Complete the driver installation before you continue with the following steps.
1.
Connect the microUSB cable from your phone's microUSB connector to a USB connection on
your computer.
2. Drag the statusbar down and touch Connected as a medi a device. Make sure the Media
devi ce (MTP) checkbox is ticked.
3.
On your computer, navigate to the removable disk showing your phone and open the Internal
Storage.
4.
Drag and drop filesbetween your computer and the 'Music' folder.
5. When you have finished, disconnect the USB cable.
To buy new music through your Signature T ouch phone
To buy new albums or tracks from your phone, follow these steps:
1. Goto the Google PlayStore application.
2. Touch the ‘Music’ shortcut.
3. Follow the instructionsin the app to make your choice and to complete the purchase.
Play music
Touch a song or playlist to start playing music.
Music player controls
l
Playor pause: touch or .
l
Select the previous or the next song: touch or .
l Fast forward or rewind:touch and hold the progr ess bar, and then drag forwards or backwards.
l
Turn shuffle on or off: touch .
l
Repeat all on or off: touch .
l Adjust the volume: pressthe volume keys on the sideof the phone.
© 2015 Vertu Corporation Limited. Allrights reserved. 38

Music
l
Go to the musichome screen: press Back .
l
Add a song to playlist: while the song is playing, touch >Add to play li st>playlist name.
l
Delete a song: in the music library, touch next to the song you wish to remove, and then touch
Delete.
Playlists
To add a song from the musiclibrary to a playlist, touch and then touch Add to pl aylist. Choose an
existing playlist or touch New playlist.
Hide the music player
Touch Home . Your music will continue to play and you willsee in the status and notificationsbar.
You can continue to work with other apps whileyour musicisplaying.
When you see in the statusand notificationsbar, a song is playing. Flick down to see details. Touch
the song to return to the music controls.
Turn off t he music
Touch .
© 2015 Vertu Corporation Limited. Allrights reserved. 39

Maps and navigation
Maps and navigation
Google Maps™
Google Maps isa Google service offering powerful, user-friendlymapping technology and local business
information, including businesslocations, contact information, and driving directions.
> >
You can save data from Google Maps to your phone so that a map is available for use offline. This feature
isuseful when you do not have a data connection, and it can also reduce your data transmissioncosts.
To save a map to your phone, view an ar ea in Google Maps and touch >Your places, scroll to the
bottom and touch SAVE A NEW O FFLINE MAP. If you wish to adjust the selected area, you can pinch
the map to zoom in or zoom out. Touch Sav e to download the map data.
Tip: Blocksof map data can be up to 100MB. So Vertu recommends that you connect to a Wi-Fi
network before you download.
For help with Google Maps™, touch >Help.
You can use Google's navigation service from the Google Maps app. Thisisan internet-connected GPS
navigationsystem with voice guidance. Simply touch and input your location details.
© 2015 Vertu Corporation Limited. Allrights reserved. 40

Personalising your phone
Personalising your phone
Widgets
To add widgets to the home screen:
1. Touch and hold an empty spot on the home screen and touch WIDG ETS.
2. Touch and hold the widget, and then drag it to one of the home screen panels.
To customise a widget, touch it to open it, and touch .
Shortcuts
To add shortcuts to the home screen, touch Apps, touch and hold an app, and then drag it to a spot
on the home screen panels.
To create a shortcut folder, drag one shortcut on top of another. To add more shortcuts to the folder,
drag them onto the folder icon. If you wish to name the folder, touch it and enter a name at the bottom.
l To move shortcuts or shortcut folders, touch and hold them, and then drag to a new location.
l To remove shortcuts or shortcut folders from the home screen, touch and hold them, and then dr ag
to Remove at the top of the screen.
You can also drag shortcuts or shortcut folders in or out of the favourites tr ay for instant access from the
home screen.
Ringtones
You can adjust your ringtone for incoming callsor for notifications, such as a text message or email:
Touch Apps> Settings>Sound & noti fic ation.
To activate the ring and vibrate option, touch Apps> Settings>Sound & noti fication>Also
vibrate for call s.
Wallpapers
To set a new wallpaper for the home screen, touch and hold an empty spot on the home screen, and then
touch WALLPAPERS.
© 2015 Vertu Corporation Limited. Allrights reserved. 41

Personalising your phone
Assign sounds to actions
l
To set sounds for touches on the dialpad, touch Apps> Settings >Sound & notification>
Other s ounds>Dial pad tones .
l
To set screen locking sounds when you lock or unlock the screen, touch Apps> Settings >
Sound & notification>Other s ounds>Screen lock ing sounds.
Display settings
Opti on Setting
Set the brightness of the screen
Set the font size for menus and settings
From the home screen, touch Apps>
Settings >Display>Brightness lev el.
From the home screen, touch Apps>
Settings >Display>Font si ze.
Pulse notification light
The pulse notification light constantlyupdates you on the status of the phone.
Colour of the li ght Phone s tatus
Steady green Batter y full.
Flashing green Battery charging.
Steady red Battery low but charging.
Flashing red Battery low and not charging. For example, if the phone is plugged into a PC,
Flashing blue Call, text message or email received.
but there isnot enough current to charge the phone.
© 2015 Vertu Corporation Limited. Allrights reserved. 42

Personalising your phone
Auto-rotate
To set whether the screen rotates automaticallyin certain apps, touch Apps> Settings >
Dis play>When device is rotated.
Tip: You can access the auto-rotate feature quickly by dr agging down from the top of the display
with two fingers.
Screen lock
You can make the touchscreen lockwhen it goes to sleep. This is recommended to protect your phone in
case it becomes misplaced or stolen.
There are several different lockoptions. Touch Apps> Settings>Security>Screen lock, and
then select the lock type:
l Swipe: drag to the right to unlock.
l Pattern: draw a pattern to unlock.
l PIN: enter a PIN code to unlock.
l Pass word: enter a password to unlock.
Note: Certain corporate emailaccountsmake use of a specificlock that may disable the lock options
listedabove.
Date and time settings
To set date, time, time zone, and time formats, touch Apps> Settings >Date & ti me.
To automatically use the network date and time, touch Automatic date & ti me or Automatic time zone.
Language and input options
To set your menu language and region, touch Apps> Settings >Language & input>Language.
© 2015 Vertu Corporation Limited. Allrights reserved. 43

Socialnetworks
Social networks
Add an account
With the Browser you can keep up to date with your socialnetworking accounts on sites like Facebook™,
Twitter™ and Google+™.If you don’t have accounts, go to their websitesto set them up. Most social
networking accounts offer dedicated apps that can be installed on your Signature T ouch from Google
Play™.
To download a social networ king app, from the home screen touch Apps> Play Store.
To sign in to your socialnetworking account, enter your username or emailaddress and password.
The socialnetworking accountsare third-party services and not provided by Vertu. Check the privacy
settingsof the social networking accounts to control what information you are sharing. F amiliarise
yourself with the terms of use and the pr ivacypr acticesof any social networking accounts you use.
Delete an account
To delete a socialnetworking account from the phone, touch Apps>touch and hold a social
networking app and drag it to Uninstall .
Synchronise contacts
When you sign in to a socialnetworking account on your phone, you may be prompted to sync account
contacts, pictures and status with your Contac ts app. You can accept or decline this request. To change
your syncsettings at any time, touch Apps> Settings>account name.
© 2015 Vertu Corporation Limited. Allrights reserved. 44

Managing accounts
Managing accounts
Configure sync options
Automatic synchronisation of the accounts is set by default. To disable it, touch Apps> Setti ngs>
Accounts> >Auto-sync data.
Disabling auto-sync data willconserve data and battery usage, but you willneed to sync each account
manuallyto update latest information. To perform a manual sync, just flickdownwar ds from within the
email inbox of the account.
Delete accounts
To delete an account, touch Apps> Settings >Acc ounts, select the account and then touch the
account name, touch >Remove ac count.
Backup and restore accounts
To backup and restore your accounts, fr om the home screen touch Apps> Settings >Backup&
reset>Automatic restore. Check that the Automatic restore box is ticked to ensure that backedup
settingsand data are restored when you reinstall an app.
Note: To backup application data, Wi-Fi passwords and other settings to Google servers make sure that
the Back up my data box isticked.
© 2015 Vertu Corporation Limited. Allrights reserved. 45

1
2
Browser
Browser
About the web browser
To browse the web with your Signature Touch, you must have either a cellular or Wi-Fi data connection.
> >
URL bar.
Browser options, such as bookmarksand browser settings.
To browse to a website, touch the web address bar, enter a web address and then touch .
Connect to the internet
Your phone uses the cellular mobile phone network (over the air) or a Wi-F i connection to accessthe
internet.
Note: Check your data plan with your service provider. You may be charged to accessthe internet and to
download data over the air.
To use a Wi-Fi network for faster internet access, drag downwards from the top of the home screen with
two fingers. Touch the Wi-Fi networks available notification to select a preferred network. See "Wi-F i"
on page55.
© 2015 Vertu Corporation Limited. Allrights reserved. 46

Browser
To close your browser, touch Home .
Note: If you cannot connect to the internet, contactyour service pr ovider.
Add a bookmark
If you visit the same websitesregularly, add them to your bookmarks, so that you can easily accessthem.
To save a website as a bookmark, touch > .
To view your bookmarked websites, touch >Bookmark s.
Privacy and security
To make changes to your pr ivacyand security settings, from the home screen touch Apps> >
>Settings >Privacy.
To empty the cache, touch >Settings>Priv acy>CLEAR BRO WSING DATA>Cache.
Downloads
To download files in your browser, touch and hold a link or picture, and then touch Save image or Save
link.
To see the files you have downloaded, from the home screen touch Apps> Downloads. Touch
an item to open it, and then select the app that you want to use.
© 2015 Vertu Corporation Limited. Allrights reserved. 47

1
2
3
4
5
6
7
Camera
Camera
About camera
You can use your Signature Touch to take photos or record videos. You can then view or edit the photos
and videos, share them on the internet, or send them to compatible devices.
> >
Touch for shooting modes, including Panorama
Switch between backand front cameras
Touch for Flash options
Touch to show options for settings
Start recording video
Capture a photo
Touch to see previous photographs
Note: The location of the icons will vary depending on the orientation of your phone. The appearance will
vary depending on your current choice of photo type and camera settings.
© 2015 Vertu Corporation Limited. Allrights reserved. 48

Camera
Take and share photos
To take a photo:
1.
From the home screen, touch Apps> Camera.
Note: Touch the screen to change the focus location. A white square shows your new focus
location, and the square will turn from white to green when the camera has finished refocusing.
2.
Touch to take your photo.
To take a wide panoramic photo, touch the icon in the top right of the screen, which is by default >
> . Move the phone slowly across the scene you want to take. The camera auto-captures
multiple shots as you move the camera and joinsthem together to make one large photo.
Share a photo:
1.
From the home screen, touch Apps> Gal lery.
2.
Touch the photo, touch and then choose how you want to share, for example by email, SMS
or social media.
Tip: To share a photo immediatelyafter capture, touch the small image of the previousphoto.
Thescreen shows a "filmstrip" of your recent photos and videos. Flick right or left to move
between photos.
Touch to see the sharing options.To return to the livecamera view, select the Back option.
Camera settings
To see the options, touch settings icon .
Record and share a video
Besidestaking photos with your phone, you can also capture videos.
To take a video:
1.
From the home screen, touch Apps> Camera.
2.
To start recording, touch . To stop recording, touch .Your phone then stores the video.
Note: When recording a video, you do not have to touch the screen to set a focus location. The phone will
auto-focus to the centre of the frame while you capture the video.
© 2015 Vertu Corporation Limited. Allrights reserved. 49

Camera
Share a video:
1.
From the home screen, touch Apps> Gal lery.
2.
Touch the video, touch and then choose how you want to share, for example by email, SMS
or social media.
Tip: To share a video immediately after capture, touch the smallimage of the previous video.
Thescreen shows a "filmstrip" of your recent photos and videos. Flick right or left to move
between videos.
Touch to see the sharing options.To retur n to the live camera view, select the Back option.
Video settings
To see the options, touch the settingssymbol, then select the video tab and finallytouch the option you
wish to change.
© 2015 Vertu Corporation Limited. Allrights reserved. 50

Gallery
Gallery
About Gallery
> >
With Gallery you can watch the videos you have recorded or browse through the photos you have taken.
To manage your media files more effectively, organise them into albumsor folders.
View and edit photos and videos
> > >photo or video
Just touch a photo or video to view it.
Tip: To zoom in and out, quickly touch the screen twice.
Touch and then select an option: Delete, Sl ideshow, Edit, Rotate l eft, Rotate right, Crop, Set pi cture
as, or Detai ls .
The Edit option letsyou change various photo settings, such asB/W, Crop, Saturation or an artistic
picture border.
Note: For videos, you can Delete, Trim, Mute or show Details.
Share photos and videos
Share a photo or video:
1.
From the home screen, touch Apps> G allery.
2.
Touch the photo or video, touch and then choosehow you want to share, for example by
email, SMS or socialmedia.
You can copy photos and videos between your phone and PC. See "Copy between the phone and a PC"
on page57for details.
View an album
You can view all your photos and videos, or you can arrange your photos and videos by album.
> >
Allyour photos and videos are shown in Albums. Touch an album and then touch >Group by and select
an option from Locations, Ti me, Contacts or Tags to show how the album isdisplayed.
© 2015 Vertu Corporation Limited. Allrights reserved. 51

Create a folder
To organise your photos and videosyou can create your own folders.
1. Connect your phone to your PC with the USB cable.
2. View your phone’s internal storage on your PC, and then browse to the 'Pictures' folder and
create new folders.
3. Drag your photos and videosinto the folders.
Assign contact images and wallpaper
Add a photo for a specificcontact, or set your favourite photo as your background image.
> > >photo
Touch a photo, and then touch >Set picture as >Contact photo or Wall paper.
Take a screenshot
To take a screenshot, press and hold the power key and volume down key at the same time.
To see the screenshot, touch Apps> Gallery>Screenshot.
Gallery
© 2015 Vertu Corporation Limited. Allrights reserved. 52

Office tools
Office tools
Clock
> >
You can use Clockas an alarm clock, a timer, or a stop watch.
To view a list of your current alarms, touch . To activate an alarm, dr ag the toggle to the right.
To add an alarm touch and then enter alarm details.
Touch to change the sound or other settingsfor an alarm. T o change settings that affect all your
alarms, touch >Settings .
When an alarm sounds, drag to the right to turn the alarm off or to the left to delay the alarm for ten
minutes.
Calculator
> >
Your calculator has two views: basic and advanced. To change your views, swipe the green bar to the left.
Calendar
> >
With the Calendar app you can automatically see calendar events from your Google™ account.
You can view your calendar in different ways: touch the date, and then touch Day , Week, Month, or
Agenda to change the view. Touch an event to see more details.
Tip: To add a calendar widget to the home screen, touch WIDG ETS, touch and hold Calendar,
and drag it to the home screen.
To add an event, touch >New event. Enter the event detailsand touch DO NE.
To delete an event, touch it to open it, and then touch the trash can .
To see multiple calendars, touch >Calendars to display. Select the check boxes next to the calendars
you want to see.
To syncyour calendar, touch >Calendars to display. Select the check box next to your calendar and
touch Calendar s to sy nc>OK.
© 2015 Vertu Corporation Limited. Allrights reserved. 53

Office tools
To change your calendar reminder tone, touch >Settings>General settings>NOTIFICATIONS &
REMINDERS.
Note: You will need to have added an account for each calendar that is shown.
© 2015 Vertu Corporation Limited. Allrights reserved. 54

!
Connectivity
Connectivity
Important: There may be restrictions on the use of WLANs and Bluetooth technology in some
countries. For more information, contact your localauthorities.
Wi-Fi
> > >Wi-Fi
With Wi-Fi connectivity, you can connect to a Wi-Fi network for a faster internet connection to browse the
web or to stream music and videos.
Connect t o a Wi-Fi network
To connect to a new Wi-Fi network:
1.
Touch Apps> Settings>Wi-Fi.
2.
Drag the toggle to the right to turn on.
If Wi-Fi is already on and if Wi-Fi networks are available, the Wi-Fi indicator isshown in the
status bar. Drag down the status bar and touch the Wi-Fi to select and connect to a network.
3.
Touch a network in the list, and then touch CONNECT. You may need to enter Network SSID,
Security, and Pas sword details.For these details,contact the network administrator.
When your phone has connected, the Wi-Fi indicator isshown in the statusbar.
Tip: If you are using a domesticWi-Fi connection, the security information can often be found on
your Wi-Fi router.
Bluetooth
> > >Bluetooth
With Bluetooth connectivity, you can make a wireless connection to other compatible devices,such as
phones, computers, headsets, and car kits. You can use the connection to send itemsfrom your phone,
transfer files from your compatible PC, and print files with a compatibleprinter.
Connect a Bluetooth device
To connect with a new Bluetooth device, you need to pair your phone with it.
1. Make sure that the Bluetooth device you are going to pair with is in discoverable mode.
Fordetails, see the user guide of the device.
2.
Touch Apps> Settings>Bluetooth.
3.
Drag the toggle to the right to turn on and scan.
© 2015 Vertu Corporation Limited. Allrights reserved. 55

4.
Touch a device to connect. You may need to touch OK or to enter the device passkey to connect.
Fordetails, see the user guide of the device.
When your phone has connected, the Bluetooth indicator isshown in the statusbar.
The Signature Touchhas been equipped to support accessorieswith aptX® capabilities.
Tip: Switch Bluetooth off when not in use to conserve battery power.
Warning: Obeyalllocallaws. Always keep your hands free to operate the vehicle while driving.
Your first consideration whiledriving should be road safety.
Change your device name
You can change the name of your device.
1.
Touch Apps> Settings>Bluetooth.
2.
Touch >Rename this devi ce.
3. Enter new name and touch RENAME.
Location services
> > >Locati on
Connectivity
Certain apps use location information from sources such as GPS, Wi-Fi and mobile networks to
determine your approximate location.
Set your phone to sync with your computer
Note: When you connect your phone for first time, your computer may prompt you that drivers are being
installed. Complete the driver installation.
1.
Connect the microUSB cable from your phone's microUSB connector to a USB connection on
your computer.
2. Drag the statusbar down and touch Connected as a medi a device. Make sure the Media
devi ce (MTP) or Camera (PTP) check box is selected.
3.
Follow the prompts on your computer to syncyour digitalmedia files.
When the sync has finished, disconnect the USB cable.
© 2015 Vertu Corporation Limited. Allrights reserved. 56

Connectivity
Copy between the phone and a PC
Note: When you connect your phone for first time, your computer may prompt you that drivers are being
installed. Complete the driver installation.
1.
Connect the microUSB cable from your phone's microUSB connector to a USB connection on
your computer.
2. Drag the statusbar down and touch Connected as a medi a device. Make sure the Media
devi ce (MTP) checkbox is selected.
3.
On your computer, navigate to the removable disk showing your phone and open the Internal
Storage.
4.
Drag and drop filesbetween your computer and the phone Internal Storage folders, such as
'Music', 'Pictures' or 'Movies'.
5. When you have finished, disconnect the USB cable.
Tethering and portable hotspot
You can 'tether' your phone to your computer, via a USB cable or a Wi-Fi or Bluetooth connection, so that
the computer can share the phone's internet connection.
NFC
Near Field Communication (NFC) allows you to beam information (such as contacts, photos and browser
pages) by bringing your phone close to another NFC-capable device (typically back to back).
From the home screen, touch Apps> Settings >More>NFC and make sure the toggle is to the
right. Touch Apps> Settings >More>Android Beam, drag the toggle to the right to turn on.
To beam information:
1. Goto the screen that shows the item you want to beam, such as a photo.
2.
Bring your phone and the other device close together (back to back).
3. When you see Touch to Beam, touch your phone's screen.
Secure payment
The NFC feature in your Signature Touch isbased on a Host Card Emulation (HCE) scheme.
Thismeans that you can use your phone for cashlessand secure payments.
© 2015 Vertu Corporation Limited. Allrights reserved. 57

Phone management
Phone management
System update
If you receive an over-the-air notification of a system update on your phone, you can follow the
instructionsto download and installthe update software or you can opt to dismissthe notification.
To checkfor updates on your phone, touch Apps> Settings >About phone>System Update.
Free up phone memory
Your photos, videos, and other files are automaticallystored in your phone’s internal memory.
Note: The total available internal memory isshared between system, application and user information
files.
To see the space available in your phone’s internal memory, from the home screen touch Apps>
Settings >Storage.
To free up space on your phone's internal memory, remove unwanted files. Touch a storage category
such as Pictures, videos, touch and hold a folder or file, and then touch >Delete.
Optimise data usage
You can monitor the amount of data uploaded and downloaded by your phone, and you can set a limit on
your monthly data usage.
Note: Data usage information is pr ovided to help you manage your usage. Your service provider might
not measure data usage in the same way so check your data charges with your service provider.
> > >Data us age
To set a data usage warning level, touch the current warning on the graph and adjustaccordingly.You will
receive a notification when the set levelisreached.
To set a data usage limit, touch Set mobile data l imit, drag the toggle to the right and then drag the right
side of the red bar up or down. You will receive a notification when the set levelisreached and your mobile
data willbe turned off automatically.
© 2015 Vertu Corporation Limited. Allrights reserved. 58

Phone management
Data roaming settings
To change your data roaming settings, from the home screen touch Apps> Settings>More>
Mobil e network s>Data roaming.
Note: You may incur significant charges if you use data roaming. Check the data roaming conditions with
your service provider.
Back up and restore your phone
To back up your application data, Wi-Fi passwords and other settings to Google servers, touch
Apps> Settings>Backup& res et.
Use Google Drive™ to back up your music, photos, videos and documents, touch Apps>
Google Dri ve> >My Dri ve.
Use your Gmail™ account to back up your contacts, emails and calendars. To set your Google sync
settings,touch Apps> Settings>select your Google account.
Set your phone to lock automatically
To set your phone to lockautomatically, touch Apps > Setti ngs>Security>Screen lock>
locktype>Automatically lock. Then select how long after sleep mode you want to lock your phone.
Note: This feature does not apply to the Swipe lock option.
Change your PIN code
To set your PIN code, from the home screen touch Apps> Setti ngs>Security>Screen lock >
PIN. Enter your numericalPIN and then confirm it.
You willbe prompted to enter the PIN to unlock your phone.
Access codes
PIN code(4-8 digits)
The PIN code protects your SIM against unauthorised use or is required to access some features. You
can set your phone to ask for the PIN code when you switch it on. If you enter the code incorrectly three
times in a row, you need to unblockthe code with the PUK code. To change your PIN code, see "Change
your PIN code" on page59.
© 2015 Vertu Corporation Limited. Allrights reserved. 59

Phone management
PUK or PUK2 code(8 digits)
The PUK or PUK2 codes are required to unblocka PIN or PIN2 code. For PUK or PUK2 details, contact
your service provider.
IMEI number(15 digits)
The IMEI number is used to identify valid phones in the network. Thisnumber can also be used to block a
stolen phone. You may be required to give this number to Vertu Customer Service. To see your IMEI
number, from the home screen touch Apps> Settings >About phone>Status>IMEI
information.
Lock code (security code - minimum of 4 digits)
A lock code helps you protect your phone against unauthorised use. You can set your phone to ask for the
lockcode that you define. Keep the code secret and in a safe place separate from your phone. If you
forget the code and your phone is locked, your phone willrequire service. Additional charges may apply,
and allthe personal data in your phone may be deleted.
Master reset
A master r eset returns your phone to the factory settingsand erases all the data from the phone.
Toperform a master reset, from the home screen touch Apps> Setti ngs>Backup& reset>
Factory data reset.
Warning: You may want to backup your data before performing a master reset.
Note: Before opting for a master r eset, ifyou or someone else intends to log in with another Google
account remove the existing Google account. To remove an account, touch Apps> Settings>
Accounts>Googl e>your account name> >Remove account.
If you intend to go on using the existing Google account, you will be prompted to log into it after the master
reset iscomplete and the phone has rebooted.
Boot validation
Each time your phone is booted, the phone software istested for authenticity. Most of the time this is
successful. However, two possible issues with authentication may occur. These are explained below.
Your device software has been unlocked for modification.
The authenticityof your device softwar e cannot be verified.
If you receive either of these notificationsand are unsure about what to do, contact Vertu Customer
Service for assistance.
© 2015 Vertu Corporation Limited. Allrights reserved. 60

FAQs
Questions
How can I extend the battery life of myphone? 62
Do I need a Google™ account to use myphone? 63
How can I reduce my data costs, especially when abroad? 63
How do I transfer musicfrom my computer to my phone? 63
How can I listen to my iTunes musiclibrary on my phone? 64
How do I setup an emailaccount on myphone? 64
How do I transfer contactsto my phone? 64
How do I set my music as ringtone? 65
How do I change the font size on myphone? 65
How do I check if I have the latest software updates on myphone? 65
Why have I got no connectivity? 65
Why is my internal storage less than advertised? 66
How do I protect my phone from unauthorised use? 66
How do I find the IMEI number of myphone? 66
How can I clear the log of my callsor thelist of people I have contacted frequently? 66
Why does my phone get warm? 66
How do I set a photo as my wallpaper? 66
Can Istill useGoogle MapsifI do not have a data connection? 66
FAQs
© 2015 Vertu Corporation Limited. Allrights reserved. 61

How can I extend the battery life of myphone?
The notification light constantly updates you on the status of your phone.
Colour of the li ght Phone status
Steady green Battery full
Flashing green Battery charging
Steady red Battery low but charging
Flashing red Battery low and not charging. For example, if the phone is plugged into a
Flashing blue Call, text message or emailreceived
You can extend the life of the battery by adjusting your phone's settingsto manage features that are
heavy consumers of battery charge:
l
Reduce the br ightness of your screen or use the automaticbrightness option. Touch Apps>
Settings >Display>Brightness lev el.
l
Turn off background data transfers. Touch Apps> Settings>Data us age and then drag
the Mobile data toggle to the left to turn off.
l
Turn off the connectivity options for Wi-Fi and Bluetooth™. To quicklyadjustthe settings, dr ag down
the notification bar with two fingers and then touch any active connectivity option you wish to turn
off.
l Reduce how often your phone checks for new emails in your mailbox. Open your emailapp and
touch >Settings >an account name>Sync frequency>a frequency option.
l Whenever possible, use Wi-Fi rather than cellular services for mobile data.
l Limit your use of widgets that dynamicallyupdated their content. Remove widgets that you do not
need or use.
l Set the Batter y Saver features to turn on automatically when the phone isat 15% battery. Touch
Apps> Settings>Battery Saver. This extends battery life by limiting your device's power
consumption. Your phone's performance is reduced when Battery Saver is switched on, and email
and other apps may not update untilyou open them. Battery saver automaticallyturns off when you
charge the phone.
PC, but there isnot enough current to charge the phone.
FAQs
© 2015 Vertu Corporation Limited. Allrights reserved. 62

FAQs
Do I need a Google™ account to use myphone?
You'llstill be able to perform basicfunctionson your phone without a Googleaccount, like calling or text
messaging, but a Google account ishighly recommended as it will give you accessto Google Play™ and
other Google apps.
How can I reduce my data costs, especially when abroad?
You can disable mobile data by touching Apps> Settings>Data usage and then dragging the
toggle to the left next to Mobile data. Confirm OK when you are prompted.
You can set a limit on the amount of data you are able to use. T ouch Home > > >Data usage.
To set a data usage warning level, touch the current warning on the graph and adjustaccordingly. You
willreceive a notification when the set level is reached.
To set a data usage limit, touch Set mobile data l imit, drag the toggle to the right and then drag the right
side of the red bar up or down. You will receive a notification when the set levelisreached and your mobile
data willbe automaticallytur ned off.
Note: Data usage information is pr ovided to help you manage your usage. The way your service provider
measures data may not be the same so check your data charges with your service provider.
You can disable data roaming. Touch Home > > >More>Mobile networks>Data roaming.
How do I transfer music from my computer t o my phone?
When you connect your phone to your computer for the first time, your computer may prompt you that
drivers ar e being installed. It is important that you installthese drivers on your computer.
1.
Connect the microUSB cable from your phone's microUSB connector to a USB connection on
your computer.
2. Drag the statusbar down and touch Connected as a medi a device. Make sure the Media
devi ce (MTP) checkbox is selected.
3.
On your computer, navigate to the removable disk showing your phone and open the Internal
Storage.
4.
Drag and drop filesbetween your computer and the 'Music' folder.
5. When you have finished, disconnect the USB cable.
Tip: If you drag and drop folders of music, such as a folder for an artist containing multiple album
folders, thisorganisation will be replicated on your phone.
© 2015 Vertu Corporation Limited. Allrights reserved. 63

FAQs
How can I listen to my iTunes music library on my phone?
One easy way is to use Music Manager, a desktopapplication that puts your musiccollection into the
cloud, unlocking the potentialof the Play Musicservice. The application scans your computer for music
files, including filesin your iTunes® library, and makes any discovered tracksand albums available to you
in Play Music. If your collection can be matched to music in GooglePlayStore, the tracks do not even need
to be uploaded, saving you data transfer time. When you add new music to your computer, Music
Manager can automaticallyadd it to your library too. MusicManager even adds your iTunes playlists and
ratings so you can start listening to your favourites right away.
Once your musicis in the cloud, you can access it from any computer connected to Google.com or from
any Android phone or tablet that has the PlayMusicapp installed.
When you first listen to a track with PlayMusicon your phone, the song iscached on the phone. So, over
time your favourites are automaticallymade available for offline listening, such as when you are travelling
on an aeroplane.
Note: The MusicManager application and musicpurchases from GooglePlayStoreare only available in
certain markets.
To add your music to the Google Play Music cloud
1. Sign up for your Google Play ™ mus ic library: To get started, signup for Google Play™and
download MusicManager.
2. Upload your c ollection: Sign in to Music Manager and choose where you keep your music.
MusicManager then starts uploading automatically.
3. Acces s your music on the web and your phone: After you have set up your PlayMusicmusic
library, you can access it on your Signature Touch, on any Android phone or tablet or on the web.
Sign in and all your music is ready to be played.
How do I setup an email account on myphone?
You can set up a number of different email accounts on your phone: corporate email, Gmail or per sonal
email accounts.
To set up these accounts,touch Apps> Setti ngs>Accounts>Add account. Select Ex change
for email accounts on Microsoft™ Exchange server, Google for your Gmail accounts or Personal for your
personal emailaccounts.
How do I transfer contacts to my phone?
To transfer contacts to your Signature Touch with your Gmail™account you must first export the contacts
on your old phone to a Comma Separated Values (.csv) file. Once thisfileis imported in to your Gmail
account it willautomaticallysyncwith your phone (provided that you have already set up a Gmailaccount).
1. Export the contactson your previousphone to a .csv file. For information on how to do this, please
refer to the user documentation supplied with your previous phone.
2. Log into your Gmail account on your PC and click'Contacts'>'Import Contacts'.
© 2015 Vertu Corporation Limited. Allrights reserved. 64

!
FAQs
3. Click'Browse' and select the .csvfile that you created.
4. Click'Import Contacts'.
Important: Syncing your contacts with your Gmailaccount means that your contacts will always be
backed up.
How do I set my music as ringtone?
Using your computer, you need to copy the song over to the 'Ringtones' folder on your Signature Touch:
1.
Connect the microUSB cable from your phone's microUSB connector to a USB connection on
your computer.
2. Drag the statusbar down and touch Connected as a medi a device. Make sure the Media
devi ce (MTP) checkbox is selected.
3.
On your computer, navigate to the removable disk showing your phone and open the Internal
Storage.
4.
Drag and drop the song file between your computer and the 'Ringtones' folder.
5. When you have finished, disconnect the USB cable.
6.
Touch Apps> Settings>Sound & notification>Phone ri ngtone>song>OK.
How do I change the f ont size on myphone?
To change the font size, touch Apps> Settings >Display>Font si ze.
How do I check if I have t he latest software updates on myphone?
To checkif your Signature Touch phone has the latest software, touch Apps> Settings >About
phone>System Update.
Why have I got no connectivity?
If you lose network connection, checkyour network signal strength in the top right corner of your screen.
Itis possible that you are in an area with poor network coverage. If thisproblem persistscontact your
service provider.
When your phone has a strong network connection, the network (fullsignal) indicator isshown in the
status bar.
If you lose your Wi-Fi connection, checkthe Wi-Fi status indicator at the top of your screen for the
connection strength. You may be out of r ange. To scan for Wi-Fi networks, touch Apps>
Settings >Wi-Fi . Drag the toggle to the right to turn on. Touch a network in the list, and then touch
CONNECT. You may need to enter Network SSID, Securi ty, and Pas sword details.For these details,
contact the network administrator.
© 2015 Vertu Corporation Limited. Allrights reserved. 65

FAQs
When your phone has connected, the Wi-Fi indicator isshown in the statusbar.
Tip: If you are using a domesticWi-Fi connection, the security information can often be found on
your Wi-Fi router.
Why is my internal storage less t han advertised?
This may be due to the size of the system files on your phone, or the number of apps you have
downloaded. For a graphical representation of the storage details, touch Apps> Settings >
Storage.
How do I protect my phone from unauthorised use?
You can choose from a number of different lock options to protect your Signature Touch. To selecta lock
type, touch Apps> Settings >Security>Screen lock and select from Swipe, Pattern, PIN or
Pass word.
If you're using a corporate email account it may make use of a specificlock.
How do I find the I MEI number of myphone?
The IMEI number is used to identify valid phones in the network. Thisnumber can also be used to block a
stolen phone. You may be required to give this number to Vertu Customer Service. To see your IMEI
number, from the home screen touch Apps> Settings >About phone>Status>IMEI
information.
How can I clear the log of my calls or thelist of people I have contacted f requent ly?
To clear the call log, fr om the home screen, touch Apps> Phone>RECENTS> >Call
His tory> >Clear call log.
Why does my phone get warm?
Your Signature Touch may occasionallyget warm when it is used for an extended period, being charged,
or has been exposed to extreme heat. In these instancesyou should power off your phone (press and
hold the Power key, and then touch Power off) for a few minutes.
How do I set a photo as my wallpaper?
To set a photo you've taken as your new wallpaper, touch and hold an empty spot on one of your home
screen panels,then touch WALLPAPERS and then touch Pic k image and select a photo.
Can Istill useGoogle Mapsif I do not have a data connection?
You can save data from Google Maps to your phone so that a map is available for use offline. This feature
isuseful when you do not have a data connection, and it can also reduce your data transmissioncosts.
© 2015 Vertu Corporation Limited. Allrights reserved. 66

FAQs
To save a map to your phone, view an ar ea in Google Maps and touch >Your places, scroll to the
bottom and touch SAVE A NEW O FFLINE MAP. If you wish to adjust the selected area, you can pinch
the map to zoom in or zoom out. Touch SAVE to download the map data.
Tip: Blocksof map data can be up to 100MB. So Vertu recommends that you connect to a Wi-Fi
network before you download.
© 2015 Vertu Corporation Limited. Allrights reserved. 67

Accessories
Accessories
Battery charger
The wall charger supplied with your phone should be suitable for your region. However, you should
always check that the electricalrating of the AC outlet isappropriate for the charger before you attempt to
plug it in.
The battery for your Signature Touch requires charging at regular intervals. The battery does not have to
be completely discharged before you can charge it.
Other charging options
You can also charge the battery by using:
l A compatible PC (thismethod also provides data connectivity)
l The VERTU Wireless Charging Pad or a wireless charger that conforms to the Qi standard.
© 2015 Vertu Corporation Limited. Allrights reserved. 68

Accessories
Data cable
The USB data cable enables you to transfer data between your Signature T ouch phone and a compatible
computer.
Note: A microUSB cable, 1200mm (CA-225DV), issupplied.
1.
Connect the USB data cable to the microUSB connector of your Signature Touch. Make sure the
cable is inserted correctly, with the USB symbol facing up.
2.
Connect the cable to a USB port of the computer. The phone starts charging, and a number of
USB connection modes are available. Drag the status and notification bar down to select fr om the
following options:
Media dev ic e ( MTP) — to transfer media files between your phone and a PC.
Camera (PTP) — to transfer photos, and any other file typesnot supported by Media dev ic e
(MTP), between your phone and a PC.
Wired stereo headset
Your Signature Touch phone issupplied with a wired stereo headset, which includesa microphone and
integrated volume controls. Connect this to the headset connector on the phone.
© 2015 Vertu Corporation Limited. Allrights reserved. 69

Specifications
Specifications
Dimensions
l Length: 155mm
l Width: 74mm
l Depth: 10.8mm
l Weight: 225g - 236g (depending on phone variant)
Services
l Vertu Concierge, Vertu Life, and Vertu Certainty.
In-box
l Signature Touch phone
l Wallcharger (AC-32V) with two regional plug heads
l MicroUSB data cable 1200mm (CA-225DV)
l V wired headset
l Polishing cloth
l Collateral pack, including QuickStart Guide, Warranty and Authenticity Card
Specifications
Operating system
l Android™5.1, Lollipop
Hardware characteristics
l Qualcomm® Snapdragon™ with Octa-core 64-bit processor
l 5.2inch,1080 high-definition, high-contrast, bright and vibrant display
l 21MP main camera with AF and twin LED flash
l 2.1 MP HD front camera
l 64GB of internal memory
l External memory available
l High-fidelitystereo 13mmx18mm loudspeakers with Dolby®Digital Plus support
l A-GPS and compass
l Gyro and accelerometer for orientation and game play
© 2015 Vertu Corporation Limited. Allrights reserved. 70

Battery
l Internal 3160mAh Li-ion (minimum 3080mAh)
l Talk time: Up to 21 hours (WCDMA)
l Stand-by: Up to 520 hours
Connectivity
l Quadband GSM 850/900/1800/1900 MHz
l WCDMA Bands I, II, IV, V, VIII
l DC and HSPA+ Release 8, Cat24, 42Mb/s downlink, Cat6 5.76Mb/s uplink
l TD-SCDMA Bands 34 & 39
l LTE Bands TDD: 38, 39, 40 & 41 (including support for China Mobile)
l LTE Bands FDD: 1-5, 7, 8, 13, 17, 20, 25, 28 & 29
l LTE Release 10, Cat6, 300Mbps
l LTE-A FDD Cat6, 300Mb/s downlink, 50Mb/s uplink
l Dual-band WLAN 802.11 a, b, g, n, ac includingWAPI for PRC
l Support for Circuit-Switch Fallback
l Micro-AB_USB system connector with USB2 On-The-Go support
l 3.5mm audio socket (No OMTP support)
l Bluetooth v4.1 + LE
l CSR aptX® high quality encoded audio support
l NFC with Host Card Emulation
l Wi-Fi hotspot (tethering and portable hotspot)
Specifications
Applications
l
Google Mobile services, including Google Play™, Gmail, Google Chrome, Google+, Google Maps,
Google Drive cloud storage, YouTube™ and other services.
l
Browser, Calculator, Calendar, Camera, Clock, Downloads, Email, Gallery, Messaging,
Movie Studio, Contacts, Phone and Settings.
© 2015 Vertu Corporation Limited. Allrights reserved. 71

Care of your phone
Care of your phone
General care
If your Signature Touch phone or any of the accessoriesare not working as they should,contact your
Vertu dealer.
l Alwaysuse your Signature Touch in the documented manner. Incorrect usage may affect
performance.
l Do not attempt to open or disassemble your Signature Touch phone. The only part you ever need
to open is the SIM door. Your Signature Touch phone should onlybe serviced by Vertu-authorised
personnel.
l Do not mishandle or abuse your Signature Touch phone.
l Use onlyVertu-approved accessories.
l The supplied charger is are onlyintended for use with your Signature Touch phone. Do not use
them with any other device, as thiscould result in permanent damage to the phone, battery, or
charger.
l Keep your Signature Touch phone and all parts and accessoriesout of the reach of smallchildren
and pets.
l Do not allow your Signature Touch phone or accessoriesto come into contact with liquidsor
moisture, or dust and dirt.
l Do not exposeyour Signature Touch phone to extreme temperatures as these may cause the
battery to stop working temporarily.Performance is particularlylimited in temperatures wellbelow
freezing.
l Do not applypaint or other similar substances to your Signature Touch phone.
l Onlyuse a soft, clean cloth to clean your Signature Touch phone. Do not use chemicals,
detergents, abrasive substances, or any liquids. Use a cotton swab to clean the camera lens.
l Do not insert any sharp objects into any of the audio ports.
Embroidery
Vertu recommends that you avoid the following:
l Direct exposure to strong light, heat and humidity
l Contact with items and substances that may stain or scratch the surfaces
If your Signature Touch phone gets wet, it is essential that you dry it as soon as possiblewith a soft,
absorbent cloth.
© 2015 Vertu Corporation Limited. Allrights reserved. 72

Care of your phone
Exotic leathers
Vertu recommends that you occasionallywipe the exotic leather in the direction of the scales with a slightly
damp soft cloth, avoiding excessive pressure.
l If your phone accidentallygets wet, it is essential that you dry it as soon as possible with a soft,
absorbent cloth.
l Direct exposure to strong light, heat and humidityshould be avoided, as wellas contact with items
and substances that may stain or scratch the surfaces.
l Vertu recommends that you store your handset in a pouch when not in use.
Leather
Each piece of leather used by Vertu's craftsmen is unique. The natural markings present in the hide
should be considered part of the individualityof fine leather. Allleather can be damaged and should be
treated with care.
Avoidthe following:
l Exposure to water and high humidity
l Dropping, rubbing or knocking on hard surfaces
l Exposure to extreme temperatures
l Contact with oily substances, make-up and solvents
Non-precious metals
Vertu metals are finished to a high standard and care needs to be taken to maintain their appearance.
Avoidthe following:
l Contact with chemicalssuch as solvents, alkaline and acid solutions, cola-based dr inksand
exposure to salt water. Wipe with a clean, soft cloth as soon as possible if contact occurs.
l Contact with sharp objects
l Dropping or knockingagainst hard surfaces
l Metal polishes
Precious metals
Precious metals, such as gold and platinum, have a much softer composite and extra care must be taken
when handling a Vertu product containing these materials.
© 2015 Vertu Corporation Limited. Allrights reserved. 73

Care of your phone
Precious stones
Precious stones are extremely hard and durable, but can be damaged if handled inappropriately. For
example, they can be broken, or their settingscould be damaged by a sharp impact on a hard surface,
causing the stone to become loose or fallout.
Care should also be taken to avoid contactwith other jewellery such as diamond rings and diamond
earringsas they can cause abrasion and chipping of the stone or the setting. Reasonable care should be
taken to not catch the setting with threads that may bend the setting and loosen the stones.
We r ecommend that your Vertu phone is kept in a Vertu leather case when not being used, particularly
when placed in handbags and other luggage.
If the stones appear to become dull from use, the product can be lightlypolished using the Vertu
microfibre polishing cloth.
Sapphire and ceramics
Sapphire and ceramicsare very hard materials but are also brittle and can be scratched by harder
materials or objects. They can also be damaged if dropped.
Avoidthe following:
l Contact with other hard materials such as diamond jewellery, nailfiles, abrasives and mineral
crystals
l Dropping or knockingthe product on hard surfaces
l Repeated rubbing against hard surfaces
© 2015 Vertu Corporation Limited. Allrights reserved. 74

Safety and warranty
Safety and warranty
Safety text
The salespackage may contain several different products and parts (hereafter known collectivelyas the
“Product”), for example a phone with various chargers. The following simple guidelinesare intended to
cover all products and parts. Not following the guidelinesmay result in risks to personal safetyor data,
damage to the Product, or in non-compliance with legalrequirements.
Medical considerations
The operation of radio transmitting equipment, including wireless phones, may interfere with the function
of inadequatelyprotected medicaldevices. Consulta physician or the manufacturers of the medical
devices to determine whether they are adequately shielded from external RF (Radio Frequency) energy.
Manufacturers of medical devicesrecommend a minimum separation of 15.3 centimetres (6 inches)
between a wirelessdevice and an implanted medicaldevice, such as a pacemaker or implanted
cardioverter defibrillator. Persons who have such devices should also:
l Not carry the phone in a breast pocket.
l Hold the phone to the ear opposite the medical device.
l Turn the phone off if there isany reason to suspect interference.
l Follow the manufacturer’s instructions for the implanted medical device.
If you have any questions about using your wireless device with an implanted medicaldevice, consult your
health care provider.
To prev ent poss ible heari ng damage, do not li sten at high volume levels for long
periods. When you use the heads et, y our abi lity to hear outs ide sounds may be
affected. Do not use the headset where it can endanger y our safety. Listen to the
headset at a moderate lev el, and do not hold the devic e near y our ear when the
louds peaker is in use.
HAC Hearing Aid Compat ibility (HAC) for digital handsets
Your phone complies with FCC (Federal Communications Commission) rules governing hearing aid
compatibility. Some wireless devices may interfere with some hearing aids. For full hearing aid
compatibility, you should turn off the Bluetooth connectivity.
FCC’swireless hearing aid compatibility rulesensure that consumers with hearing loss are able to access
wireless communicationsservices through a wide selection of handsetswithout experiencing disabling
radio frequency (RF) interference or other technicalobstacles.
To define and measure the hearing aid compatibilityof handsets, FCC referencesANSI C63.19 2007
version and 2011 version; ANSI C63.19 standard specifies testing procedures for determining the
M-rating and T-rating of the digital handsets.
© 2015 Vertu Corporation Limited. Allrights reserved. 75

Safety and warranty
A handset is considered hearing aid-compatiblefor acousticcoupling if it meets a rating of M3 or M4,
under the ANSI C63.19. A handset is considered hearing aid-compatible for inductive coupling if it meets
a rating of T3 or T4, under ANSI C63.19. (Not all hearing-aidshave telecoilinside.) This device was
tested according to ANSI C63.19 2011 version, and this meets the M3/T4 rating.
This phone has been tested and rated for use with hearing aidsfor some of the wireless technologies that
it uses. However, there may be some newer wirelesstechnologies used in this phone that have not been
tested yet for use with hearing aids. It is important to try the different features of thisphone thoroughly and
in different locations, using your hearing aid or cochlear implant, to determine if you hear any interfering
noise. Consult your service provider or Vertu Customer Service for information on hearing aid
compatibility. If you have questions about return or exchange policies, consult Vertu Customer Service.
Switch off the phone in restricted or dangerous areas
Switch the phone off when mobile phone use is not allowed or when it may cause interference or danger,
for example near medical equipment, fuel, chemicals, or blasting areas.
Aeroplane profile when travelling
Unless specificallyrequested to turn the phone off, you can select the Aeroplane (offline) profile, which
means that you cannot make or receive any calls, or use other features that require cellular network
coverage, Wi-Fi or Bluetooth. You can, however, stillmake emergency calls.
Use in vehicles
Radio signalsmay affect improperly installed or inadequately shielded electronic systems in motor
vehiclessuch as electronic fuel injection, electronic anti-lock braking, electronic speed control, and air bag
systems. For more information, checkwith the manufacturer of your vehicleor its equipment.
Onlyqualified per sonnel should installthe phone in a vehicle. Faultyinstallation or service may be
dangerous and may invalidate your warranty. Check regularlythat allwirelessdevice equipment in your
vehicle is mounted and operating properly. Do not store or carry flammable liquids,gases, or explosive
materials, in the same compartment as the phone, its parts, or accessories. Remember that air bags
inflate with great force, so do not placeyour phone or accessories in the air bag deployment area.
Keep the product away from children
Keep your Product and all parts and accessories out of the reach of small children and pets. Failure to do
this may endanger them and invalidate your Warranty.
Road safet y comes first
Obey all local laws. Always keep your hands free to operate your vehicle while driving. Your first
consideration should be road safety.
Qualified service
Onlyqualified per sonnel may install or repair the Product.
© 2015 Vertu Corporation Limited. Allrights reserved. 76

Safety and warranty
Batteries, chargers and other accessories
If the Product has an internal battery, this is intended to be rechargeable and non removable, being
intended for use when supplied with power from the Vertu Mainscharger (AC-32V), or from a suitable
computer. Do not attempt to remove the battery, as you may damage it.
The full performance of a new battery is achieved only after two or three complete charge and discharge
cycles.The battery in a device can be charged and discharged hundreds of times,but it willeventually
wear out. When you believe that the performance of the device has deteriorated (for example, when the
talk and standby times on the phone are noticeablyshorter than normal), replace the battery if it is
removable, or, if it is non-removable, take the associated device to the nearest authorised service facility.
Use the battery only for its intended purpose.
Never use any c harger or battery that is damaged.
Use only Vertu-approv ed batteri es, and rec harge your battery only with Vertu approved chargers
desi gnated for the device.
Use of an unapproved battery or c harger may res ult in a risk of fi re, explos ion, leakage, or other
hazar d. Do not connect other, incompatible dev ic es to the chargers.
When y our charger is not in use, unplug it from the electrical plug and the devi ce. Do not leav e a
fully charged battery connected to a c harger, as over charging may shorten the battery’s lifetime.
Do not dismantle, cut, open, crush, bend, deform, puncture, or shred cells or batteries.In the event of a
battery leak, do not allow the liquid to come in contact with the skin or eyes. In the event of such a leak,
flush your skin or eyesimmediatelywith water, or seek medical help.
Do not modify,remanufacture, attempt to insert foreign objectsinto the battery, or immerse or expose it
to water or other liquids. Improper battery use may result in a fire, explosion, or other hazard. If the device
or battery isdropped, especially on a hard surface, and you believe that the battery has been damaged,
take it to the nearest service facilityfor inspection before continuing to use it. If the phone battery has not
been used for a long time, then, in order to begin charging it again, you may need to connect the charger,
and then disconnect and reconnect it. If the battery iscompletely discharged, it may take several minutes
before the charging indicator appears on the display or before any calls can be made.
Keep your device dry
Your Product isnot fully water-resistant, so keep it dry.
SIM card
The Signature Touch has been designed for use with a nanoSIM card. All other SIM cards are not
supported.
The use of an i ncompatibl e SIM card may damage the card or the phone, and may corrupt data
stored on the card.
IMEI number and compliance number
To find the IMEI number, dial the sequence *#06# into the phone. The unique 15-digitIMEI code of your
phone isinstantly displayed. Write it down and keep it in a safe place so that you can find it if your phone is
© 2015 Vertu Corporation Limited. Allrights reserved. 77

Safety and warranty
misplaced or stolen. You can also find the IMEI number by checking the compliance label (refer to the
phone’s reference manual to locate this label).
WLAN
Use encryption to increase the security of your WLAN connection.
Headset connector
Do not connectproducts that create an output signal as thismay cause damage to the phone. Do not
connect any voltage source to the headset connector. If you connect an external device or headset, other
than those approved by Vertu, pay special attention to volume levels.
Camera flash
Keep a safe distance when using the flash in the camera. Do not use the flashon people or animals when
they are at close range. Do not cover the flashwhile taking a picture.
Protect your phone from harmful content
Your phone may be exposed to viruses and other harmful content. Take the following precautions:
l Be cautious when opening messages. They may contain malicioussoftware or otherwise be
harmful to your phone or computer .
l Be cautious when accepting connectivityrequests, browsing the internet, or downloading content.
l Do not accept Bluetooth connectionsfrom sources that you do not trust.
l Onlyinstall and use services and software from sources that you trust and that offer adequate
securityand protection.
l Installanti-virus and other security software on your phone and any connected computer. Onlyuse
one anti-virus application at a time (using more may affect the performance and operation of the
phone and/or computer).
l If you accesspre-installed bookmarks and linksto third party internet sites, take the appropriate
precautions. Vertu does not endorse or assume liabilityfor such sites.
Bluetooth hidden mode
Operating the phone when Bluetooth Visibilityisset to Hidden isa safer way to avoid malicious software.
Alternatively, switch off the Bluetooth function completely(this does not affect other functions on the
phone).
Magnetic fields
Keep your phone away from magnets or magneticfields.
Antennae
Avoidtouching the antennae unnecessarilywhile they are transmitting or receiving. Contact with the
antennae affects the communication qualityand may cause a higher power level during oper ation and
reduce battery life.
© 2015 Vertu Corporation Limited. Allrights reserved. 78

Safety and warranty
Backups
To keep your important data safe, store it in at least two separate places, such as on your phone and on
your PC.
It is particularly i mportant to carry out a backup prior to repair or replac ement of the Product
because content and data may be lost duri ng these operations .
Digital rights management (DRM)
When using the phone, you are required to obey alllaws and respect local customs, privacy and the
legitimate rights of others, including copyrights. Copyright protection may prevent you from copying,
modifying, or transferring images,music,and other content.
Additional care and maintenance
The Product in the salespackage contains one or more sophisticated electronic devices.Vertu therefore
strongly encourages you to familiariseyourself with the instructionsprovided with and for these devices.
To help protect your Warranty coverage, you should observe both the pr eceding “SAFETY TEXT” and
the following:
l Alwaysuse your Product in the documented manner .
l Your Product containshigh precision displays, camera lenses and other such par ts, so handle them
with great care to avoid scratching or otherwise damaging them.
l Do not attempt to remove any fixed internal battery or memory card.
l Keep the Product free of dust and dirt.
l Do not exposethe Product to extreme temperatures, as these may cause the battery to stop
working temporarily. Performance isparticularlylimited in temperatures wellbelow freezing.
l Do not mishandle or abuse the Product.
l Do not paint the Product.
l Onlyuse a soft, clean cloth to clean your Product. Do not use chemicals, detergents, abr asive
substances, or any liquids. Use a cotton swab to clean the phone’s camera lens.
Specific phone care
l Avoidscratching the phone screen. Never use a pen, pencil, or other sharp object,on it.
l In order to protect the ceramicsand sapphire, do not drop, knock, or rub your phone on or against
hard surfaces. In particular, avoidcontact with hard materials such as diamond jewellery, nail files,
abrasives, and mineral crystals.
l Allleather can be damaged and should be treated with care. T herefore, in addition to the
avoidance of extreme temperatur es or water and high humidity, avoid contact with oily substances,
make-up, and solvents.
© 2015 Vertu Corporation Limited. Allrights reserved. 79

Safety and warranty
l Do not allow the metalson the phone to come into contact with sharp objects, metal polishes, and
chemicals such as solvents, alkaline and acid solutions, cola-based drinks,and salt water. If contact
occurs, wipe the surface with a clean, soft cloth as soon as possible.
Manufacturer's Limited Warranty
This Limited Warranty replaces all other Vertu war ranti es and liabilities , whether oral , written,
(non-mandatory) statutory , contr actual, in tort or otherwise, inc luding, without l imitation, and
where permitted by applicabl e l aw, any impli ed c onditions , warranties or other terms as to
sati sfactory quality or fi tness for purpose. However, thi s Limited Warr anty s hall neither exclude
nor li mit: i) any of y our legal (s tatutory) rights under the applicable national laws; or ii) any of y our
rights against the seller of the Produc t.
Vertu warr ants to you, the Purchaser of the Product, that, during the warranty period, Vertu, or a Vertuauthorised service company, will, in a commerciallyreasonable time, remedy defects in materials, design
and workmanship free of charge, by repairing or, should Vertu in its discretion deem it necessary,
replacing the Product in accordance with this Limited Warranty (unless otherwise required by law).
Warranty periods
The Warranty starts at the time of the originalpurchase of the Product by the first end user. Different
individualproducts and par ts withinthe overallProduct may be covered by different Warranty periods.
The different possible Warranty periods are:
a.
Twenty-four (24) months for the mobile phone and all technicalaccessories limited to: batteries,
headsets, speakers, chargers, charger cables and data cables
b.
Twelve (12) months for allleather cases
c.
Twelve (12) months for allother productsnot listed above
As far as your nationallaws permit, the particular Warranty period willnot be extended or renewed, or
otherwise affected due to subsequent resale, Vertu-authorised repair, or replacement of the Product.
However, any part repaired or product r eplaced during the Warranty period will be warranted from any
defect for 12 months from the date of repair, or for the remainder of the originalWarranty period,
whichever is the longer.
How to get warranty service
If you wish to make a claim under thisLimited Warranty, please return your Product, or the affected par t
(if itis not the entire Product), to a Vertu-authorised service company. For further detailson how to make
a claim, you can contact a Vertu call centre (nationalor premium rates may apply). (Information about
Vertu-authorised service companies and call centres can be found in the sales package, or on local Vertu
web pages, where available.)
Any claim under this Limited Warranty is subject to you notifying Vertu, or a Vertu authorised service
company, of the alleged defect within a reasonable time of it having come to your attention, and in any
event no later than the expiry date of the Warranty period.
© 2015 Vertu Corporation Limited. Allrights reserved. 80

Safety and warranty
When making a claim under this Limited Warranty, you will be required to provide: a) the affected Product
(or the affected part); and b) the original proof of purchase, clearly indicating the name and address of the
seller, the date and place of purchase, the Product type, and the IMEI or other serial number.
What is not covered?
1. ThisLimited Warranty does not cover user manualsor any third party software, settings, content,
data or links, whether included or downloaded in the Product, whether included during
installation, assembly, shipping or at any other time in the delivery chain or otherwise and in any
way acquired by you. By using such a third party application, you acknowledge that the application
isprovided as is. Vertu does not warrant that any Vertu software willwork in combination with any
hardware or software provided by a third party, that the operation of any software willbe
uninterrupted or error-free, or that any defects in the software are correctable or willbe
corrected.
2. A third party/independent operator pr ovides the SIM card and cellular and/or other network or
system on whichthe Product operates. Therefore, Vertu willnot accept responsibility under this
Limited Warranty for the operation, availability, coverage, services or range of the cellular or other
network or system. Before Ver tu or a Vertu-author ised service company can repair or replace the
Product, the operator may need to unlock any SIM-lock or other lock that may have been added
to lock the Product to a specific network or operator. In such situations,please first askthe
operator to unlock your Product.
3. ThisLimited Warranty does not cover: a) normal wear and tear (including, without limitation, wear
and tear of camera lenses, batter ies or displays); b) defects caused by rough handling (including,
without limitation, defects caused by sharp items, by bending, compressing or dropping, etc.);
c) defectsor damage caused by misuse of the Product, including use that is contrary to the
instructionsprovided by Vertu (for example, as set out in the Product’suser guide), and/or
d) other acts beyond the reasonable control of Vertu.
4. ThisLimited Warranty does not cover defectsor alleged defects causedby the fact that the
Product was used with, or connected to, any product, accessory, software and/or service not
manufactured, or supplied by Vertu, or was used other than for its intended purpose. Defects can
be caused by viruses from your, or from a third par ty’s,unauthorised access to services, other
accounts, computer systemsor networks. Such unauthorised access can take place through
hacking, password mining or through a varietyof other means.
5. ThisLimited Warranty does not cover defectscaused by the fact that the battery has been shortcircuited, or by the fact that the sealsof the battery enclosure or the cells are broken or show
evidenceof tampering, or by the fact that the battery has been used in equipment other than that
for which it has been specified. T his Limited Warranty isnot enforceable if the Product has been
opened, modified or repaired by anyone other than an authorised service centre, if it is repaired
using unauthorised spare parts, or if the Product’s serial number, the mobile accessory date
code, or the IMEI number, has been removed, erased, defaced, altered or are illegible in any
way. This shallbe determined by the sole discretion of Vertu.
6. ThisLimited Warranty isnot enforceable if the Product has been exposed to moisture, to extreme
thermal or environmental conditions (or to rapid changes in such conditions), to corrosion,
oxidation, spillage of food or liquid, or to influence from chemical products.
© 2015 Vertu Corporation Limited. Allrights reserved. 81

Safety and warranty
Limit ations of Vertu's liability
This Limited Warranty isyour sole and exclusive recourse against Vertu, and the onlyand exclusive
liability of Vertu in respect of defects in your Product.
To the extent permitted by applicable law(s), Vertu does not assume any liability for loss of or damage to
or corruption of data, for any loss of profit, loss of use or functionalityof the Product, loss of business, loss
of contracts, lossof revenues or of anticipated savings, increased costs or expenses or for any indirect
lossor damage, consequentiallossor damage, or special lossor damage. To the extent permitted by
applicable law(s), Vertu´s liability shallbe limited to the purchase value of the Product. The above
limitationsshallnot applyin cases of gross negligence or intentional misconduct of Vertu, or in case of
death or personal injury resultingfrom Vertu’s proven negligence.
Other important warrant y notices
The availability of products, features, applications, and services may vary by region. For more
information, contact your nearest Vertu-branded store or Vertu-authorised service company.
Allwirelessdevicesmay be susceptible to interference, which could affect performance.
Vertu is not responsible for any r adio or TV interference caused by unauthorised modific ations to
this equipment. Such modifications could void your authority to operate the equipment.
Reverse engineering of software in the Product is prohibited to the extent permitted by applicable law.
Insofar as this document contains any limitationson Vertu’s representations, warranties, damages and
liabilities,such limitations shall likewise limit any representations, warranties,damages and liabilitiesof
Vertu’s licensors.
Vertu, in a manner consistent with the provisions of section “Limitations of Vertu’s liability” above, shallnot
under any circumstancesbe liable, either expresslyor by implication, for any damages or lossesof any
kind whatsoever resulting from loss of, damage to, or corruption of, content or data during repair or
replacement of the Product.
Allparts of the Product or other equipment that Vertu has replaced shall become the property of Vertu. If
the Product is found not to be covered by the terms and conditions of thisLimited Warranty, Vertu and its
authorised service companies reserve the right to charge a handlingfee.
When repairing or replacing the Product, Vertu may use products or parts that are new, equivalent to
new, or reconditioned.The Product may contain country-specific elements, including software. If the
Product has been re-exported from its original destination country to another country, the Product may
contain some country-specific elements that are not considered to be a defect under this Limited
Warranty.
© 2015 Vertu Corporation Limited. Allrights reserved. 82

Safety and warranty
Software application notices for thephone
The serviceson the phone, for example Vertu Life, Vertu Certainty and Recommended Apps require a
data connection to send up-to-date information to your Vertu phone. If the connection cannot be made,
these features will be unavailable or will have reduced functionality.You will need to contact your network
service provider for information on the availability of data connectivity when in your home network and
when roaming onto other networks.
Some applicationson the phone, including those listed above, may connect to the internet automatically.
To prevent this, select the appropriate Connectivitysettingson the phone and/or disable the services
when roaming.
Before installingupdates on the phone, ensure that the phone can connect to the internet, and that the
phone battery has enough power ( or connect the charger before starting the update) .
If you installa software update, you cannot use the phone, even to make emergency calls,until the
installation has been completed and the device restarted.
Service or software upgrades may reset timers on the phone.
The existence of a certificate considerably reduces the risksinvolved in r emote connectionsand software
installation. To benefit from increased security, certificates must be used correctly, and they must be
authentic or trusted. Certificateshave a restricted lifetime. If they are expired or invalid, check that the
current date and time in your device are correct. Before changing any certificate settings, you must trust
the owner of the certificate and be sure that the certificate belongsto the listed owner.
Network support is r equired to indicate that a sent message has been received or read. However, this
information may not always be reliable.
You cannot use the voice recorder during a data call or when a GPRS/3G connection isopen.
Onlycompatibledevices can receive and display multimedia messages.
If the item you inserted in a multimedia message istoo large for the network, the phone may automatically
reduce the size.
Messages may lookdifferent in different devices.
If your phone is able to provide over-the-air synchronisation with Microsoft Exchange ActiveSync-enabled
servers, the provision of this service does not grant you, and nor do you receive, any rights under any
Microsoft intellectualproperty with respect to any server software, or server device, that is accessed using
the phone, or with respect to the use of Microsoft Exchange ActiveSyncoutside of the phone.
When entering contactsor editingvoice commands, do not use very short or similar names for different
contacts or commands.
Using voi ce tags may be difficult in a noisy environment or during an emergency, so y ou s hould
not rely sol ely upon voi ce dialling in every c ircumstanc e.
© 2015 Vertu Corporation Limited. Allrights reserved. 83

Safety and warranty
A cache isa memory location that is used to store data temporarily on the phone. If you have accessed, or
have tried to access,confidentialinformation or a secure service requiring passwords, clear the cache
after each use.
The input methods and languages supported by handwr iting recognition vary by region and may not be
available for all languages.
The availability and qualityof GPSsignals may be affected by your location, satellite positions, buildings,
natural obstacles, weather conditions and adjustments to GPS satellitesmade by the United States
government. GPS signalsmay not be available inside buildingsor underground. Do not use GPS for
precise location measurement, and never relysolely on the location information provided by GPS and
cellular networks.
Coordinate information may not be available in allregions.
Location information can be attached to an image or a video clip if location coordinates can be determined
via network and GPS.
If you share an image or a video clip which has location information attached, the location information may
be visible to others that view the image or the video clip.You can deactivate such geotagging in the
camera settings.
Some location content is generated by third parties and not by Vertu. Some of this content may be
inaccurate and subject to local availability.
Almost all digitalcartography is inaccurate and incomplete to some extent. Never r ely solelyon the
cartography that you download for use in thisdevice.
The socialnetworking services are third party services and are not provided by Vertu. They may not be
available in allcountries.
Check the privacy settings of the socialnetworking service you are using as you may be sharing your
location and information with a large group of people. The terms of use applyto sharing information on
that service, and you shouldfamiliarise yourself with both the terms of use and the privacypracticesof the
service.
DRM-protected content comeswith an associated license that definesyour rights to use the content.
Some licensesmay be connected to a specificSIM card, and the protected content can be accessed only
if the SIM card is inserted in the phone.
WLAN and Bluetooth restrict ions
There may be restrictions on the use of WLANs and Bluetooth technologyin some countries. For more
information, contact your localauthorities.
© 2015 Vertu Corporation Limited. Allrights reserved. 84

Safety and warranty
Passive near field communication device
Your phone may contain a PassiveNear Field Communication device. Thisdevice enablesVertu to verify
the authenticity of the phone ifit is presented at a Vertu-branded store or Vertu-authorised service
company.
Environmental
ROHS Statement
This Product does not contain any of the following substances, in accordance with EU RoHS (Reduction
of Hazardous Substances) Directive 2011/65/EU:
l Lead
l Hexavalent Chromium
l Mercury
l Polybrominated Biphenyls (PBB)
l Cadmium
l Polybrominated DiphenylEthers (PBDE)
Nickel
The surfaces of Vertu devicesdo not contain nickelin the platings. Depending on the model and variant of
the device, surfacesmay contain stainlesssteel or other alloys.
EU recycling notice
Vertu complies with European Communityrequirements for the recycling of Waste
Electrical & Electronic Equipment (WEEE). Such compliance is indicated by the additionof
the crossed-out wheeled-bin symbol to the Product where appropriate. T his symbol
indicates that the Product was put onto the market after the WEEE legislation was
implemented, and that the consumer should not dispose of the Product as normal
household waste or unsorted municipalwaste, but that it should be appropriatelyrecycled.
Background information on the European WEEE directive is available from
http://ec.europa.eu/environment/waste/weee/index_en.htm.
If you want Vertu to recycle your Product at the end of its life, please either return it to the point from which
you purchased it (if known), or return it to Vertu’s headquarters. Alternatively, should you purchase a
replacement Product from another supplier, the new supplier is obliged to take back the original Product
and recycle it appropriately.
Never dis pose of a dev ice that has an internal batter y fitted, in a fire, because the i nternal battery
may explode.
© 2015 Vertu Corporation Limited. Allrights reserved. 85

Safety and warranty
Export and controls
The Product may contain commodities, technology or software subject to export laws and regulations
from the US and other countries. Diversion contrary to law isprohibited.
Copyright and trademark notices
Copyright © Vertu 2011-2015. All rights r eserved.
Vertu and the V logo are registered trademarks. Other product and company names mentioned herein
may be trademarks or registered trademarksof their respective owners.
Vertu operates a policyof continuous development. Therefore, Vertu reservesthe right to make changes
and improvements to any of the products described in thisdocument without prior notice.
Google, Google Play™, Android and other marks are trademarks of Google Inc.
The Android robot is reproduced or modified from work created and shared by Google and used
according to terms described in the Creative Commons 3.0 Attribution License.
This Product is licensed under the MPEG-4 Visual Patent Portfolio License (i) for personal and noncommercial use in connection with information that has been encoded in compliance with the MPEG-4
VisualStandard by a consumer engaged in a personal and non-commercial activity; and (ii) for use in
connection with MPEG-4 video provided by a licensed video provider. No license is granted or shallbe
implied for any other use.
Additionalinformation, including that related to promotional, internal, and commercial uses, may be
obtained from MPEG LA, LLC. See http://www.mpegla.com.
Dolby and the double-D symbolare trademarks of Dolby Laboratories.Manufactured under licence from
Dolby Laboratories.
©2015 CSR plc and its group companies. The aptX® mark and the aptX logo are
trademar ks of CSR plc or one of itsgroup companies and maybe registered in one
or more jurisdictions.
This product uses Assertive Display technology by Apical Limited
The Bluetooth word mark and logos are owned by the Bluetooth SIG, Inc. and any use of such marks by
Vertu isunder license.
The availability of particular products, features, applications, and services may vary by region. For more
information, contact your nearest Vertu retail store.
© 2015 Vertu Corporation Limited. Allrights reserved. 86

Safety and warranty
SAR (Specific Absorption Rate) notice - VM-03
YOUR VERTU PHONE (MODEL: Signature T ouch, TYPE: VM-03, FCC ID: P7QVM-03)
MEETS GUIDELINES F OR EXPO SURE TO RADIO WAVES
Your phone isa radio transmitter and receiver. It isdesigned to not exceed the limits for exposure to radio
waves recommended by international guidelines. These guidelines were developed by the independent
scientificorganization ICNIRP, and include safety margins designed to assure the protection of all
persons, regardless of age and health.
The exposure guidelines for mobile devices employ a unit of measurement known as the Specific
Absorption Rate, or SAR. The SAR limit stated in the ICNIRP guidelines is 2.0Watts/kilogram (W/kg),
averaged over ten grams of tissue. Tests for SAR are conducted using standard operating positions, with
the device transmitting at its highest certified power level in alltested frequency bands. The actual SAR
levelof an operating device can be below the maximum value because the device is designed to use only
the power required to reach the network. That amount changes depending on a number of factors, such
as how close you are to a network base station. T he highest SAR value under the ICNIRP guidelines for
use of the device at the ear is 0.354W/kg. Thisphone meets RF exposure guidelines when used either in
the normal use position against the ear or when positioned at least 10mm (3/8 inch) away from the body.
When a carry case, belt clip or holder is used for body-worn operation, it should not contain metal, and
should position the phone at the above-stated distance away from your body.
In order to transmit data files or messages, thisdevice requires a good quality connection to the network.
In some cases, transmissionof data files or messages may be delayed until such a connection is available.
Ensure that the above separation distanceinstructionsare followed until the transmission is completed.
Use of phone accessories and enhancements may result in different SAR values. SAR values may vary
depending on national reporting and testing requirements and the network band. AdditionalSAR
information may be provided under Product information at www.vertu.com.
USA and Canada
Your phone isalso designed to meet the requirements for exposure to radio waves established by the
Federal Communications Commission (USA) and Industry Canada. These requirements set a SAR limit
of 1.6W/kg, averaged over one gram of tissue. The FCC/IC highestSAR values reported under this
standard during Product certification for use at the head is 0.77W/kg and when properlyworn on the
body (10mm gap) are 0.98W/kg and 0.96W/kg.
Your phone may cause TV or radio interference (for example, when using the phone in close proximity to
receiving equipment). The FCC or Industry Canada can require you to stop using your phone if such
interference cannot be eliminated. If you require assistance, contact Vertu Customer Service.
TheProduct, or Products,complywith Part15 of the FCC rules.
© 2015 Vertu Corporation Limited. Allrights reserved. 87

Safety and warranty
Operation issubject to the following two conditions: (i) the Product(s) may not cause harmful interference,
and (ii) the Product(s) must accept any interference received, including interference that may cause
undesired operation. Any changes or modificationsnot expressly approved by Vertu couldvoid the user’s
authority to operate thisequipment.
This ClassB digitalapparatus complieswith Canada ICES-3(B)/NMB-3(B).
The devicecould automaticallydiscontinue transmission in case of absence of information to transmitor
of operational failure. Note that thisisnot intended to prohibit the transmission of control or signalling
information or the use of repetitive codes where required by the technology.
l The devicefor the band 5150-5250MHz is onlyfor indoor usage to reduce potential for harmful
interference to co-channel mobile satellite systems.
l The maximum antenna gain permitted (for devices in the bands 5250-5350MHz and
5470-5725MHz) to comply with the limit on equivalent isotropically radiated power (EIRP).
l The maximum antenna gain permitted (for devices in the band 5725-5850MHz) to comply with the
EIRP limitsspecified for point-to-point and non point-to-point operation as appropriate.
In addition, high-power radars ar e allocated as primary users (meaning that they have priority) of the
band 5250-5350MHz, and these radars could cause interference and/or damage to licence-exempt LAN
devices.
Declaration of Conformity
We, Vertu, declare under our sole responsibility that the following are in conformity
with the provision of Council Directive 1999/5/EC: Model VERTUSignature
Touch, type VM-03; Model Vertu V Collection Wired Headset type WH-5V; and
USB data cable, type CA-225DV. A copy of the Declaration of Conformity can be
found at http://www.vertu.com.
Vertu Corporation Limited, Beacon Hill Road, Church Crookham, Hampshire GU528DY.
© 2015 Vertu Corporation Limited. Allrights reserved. 88
 Loading...