


V E R T U
Ti
User Guide Version 1.0

Contents
Contents
Introduct ion 5
Your VERTU Ti phone 5
Help and support 5
Safety 6
Safety 6
Your phone 7
Package contents 7
Features and keys 8
Back, home and menu keys 9
Antenna locations 9
Headset 9
Change the volume 10
Getting started 11
Insert the SIM card 11
Charge the phone 12
Switch the phone on or off 13
Touch screen actions 14
Start-up process 15
Use your phone when it is locked 16
Explore 17
About the home screen 17
Status and notification bar 17
Status and notification icons 18
Clock widget 19
Add widgets to the home screen 19
Favourites tray 19
Flight mode 20
Voice actions 20
Apps 21
About Apps 21
Recommended apps 21
Google Play™ Store 21
Apps precautionary advice 21
Update apps 22
Manage and restore apps 22
Close apps 22
Uninstall apps 22
Vertu Services 23
Vertu Services 23
Text entry 25
Keyboard entry 25
Predictive text 26
Dictionaries 26
Change the keyboard language 26
Calls 27
About calls 27
Make and answer calls 28
Call the last number dialled 29
Quickly call your favourites 29
Listen to your voicemail 29
Divert calls to another number 29
Make a conference call 30
Silence an incoming call 30
Voice dialling 30
Contacts 31
About contacts 31
Call, text or email contacts 32
Add contacts 33
Join contacts 33
Edit or delete a contact 33
Save a number from a call or message 33
Personalise contacts 34
Add a contact group 34
Transfer contacts 34
Messaging and email 36
About messaging 36
Send and read messages 36
Send a message to a group 36
Instant messages 37
Manage messages 37
Email setup 37
Corporate email setup 37
Google mail setup 37
Personal email setup 38
Music 39
About music 39
Get music 39
© 2012 Vertu Corporation Limited. All rights reserved. 2

Contents
Set up music 40
Play music 40
Maps and navigation 42
Google Maps™ 42
Google Maps™ Navigation 42
Personalisin g your phone 43
Widgets 43
Shortcuts 43
Ringtones 43
Wallpapers 44
Assign sounds to actions 44
Display settings 44
Auto-rotate 44
Screen lock 44
Date and time 45
Language and region settings 45
Social networks 46
Add an account 46
Delete an account 46
Synchronise contacts 46
Managin g acco un ts 47
Configure sync options 47
Add and delete accounts 47
Backup and restore accounts 47
Browser 48
About the web browser 48
Browse the web 49
Connect to the internet 49
Add a bookmark 49
Widget feeds 49
Privacy and security 49
Downloads 50
Camera 51
About camera 51
Take and share photos 52
Panoramic view 53
Camera settings 53
Record and share a video 53
Video settings 54
Gallery 55
About gallery 55
View and edit photos and videos 55
Share photos and videos 55
View an album 55
Create a folder 56
Assign contact images and wallpaper 56
Take a screen shot 56
Office t ools 57
Clock 57
Calculator 57
Calendar 57
Connectivity 58
Wi-Fi 58
Bluetooth 58
Set your phone to sync with your
computer 59
Copy between the phone and a PC 60
NFC 60
Phone management 61
Free up phone memory 61
Optimise data usage 61
Data roaming settings 61
Back up and restore phone 62
Set your phone to lock automatically 62
Change your PIN code 62
Access codes 62
Master reset 63
Find your lost phone 63
Tips and tricks 64
General tips 64
Extend battery life 64
FAQ's 65
FAQs 65
Accessories 67
Battery charger 67
Data cable 67
Vehicle charger 68
Vertu Portable Power 69
© 2012 Vertu Corporation Limited. All rights reserved. 3

Wired stereo headset 71
Specifications 72
Specifications 72
Care of your pho ne 75
General care 75
Embroidery 75
Exotic leathers 75
Leather 76
Non-precious metals 76
Precious metals 76
Precious stones 77
Sapphire and ceramics 77
Safety and warranty 78
Safety text 78
Additional care and maintenance 82
Manufacturer's Limited Warranty 83
Software application notices for the
phone 86
Certificates and Licences 88
Environmental 88
Export and controls 89
Copyright and trademark notices 89
SAR (Specific Absorption Rate) notice RM828V 90
Contents
© 2012 Vertu Corporation Limited. All rights reserved. 4

Introduction
Introduction
Your VERTU Ti phone
This user guide is intended to provide you with details on how to use the prominent features on your
VERTU Ti.
To access the exclusive privileges and benefits such as Vertu Life, Vertu Concierge and Vertu Certainty,
you must register your phone.
The pictures used in this user guide are provided for illustration purposes only. They may differ from those
on your actual version of the VERTU Ti.
Help and support
To find out more about using your VERTU Ti phone:
l
Contact Vertu Customer Service by either pressing the Vertu key or through the Vertu Certainty app.
l
Refer to the user guide on your phone from the Vertu Certainty app, or the full reference manual on
the Vertu website at http://www.vertu.com/help-and-support/user-guides-and-downloads.aspx.
l
Use the setup wizards available on your VERTU Ti phone to help you with registration to create an
email account.
© 2012 Vertu Corporation Limited. All rights reserved. 5
Safety
Safety
Safety
Read these simple guidelines. Not following them may be dangerous or illegal. Read the complete user
guide for further information.
Switch off in restricted areas
Switch the device off when mobile phone use is not allowed or when it may cause
interference or danger, for example, in aircraft, in hospitals or near medical
equipment, fuel, chemicals, or blasting areas. Obey all instructions in restricted
areas.
Road safety comes first
Obey all local laws. Always keep your hands free to operate the vehicle while
driving. Your first consideration while driving should be road safety.
Interference
All wireless devices may be susceptible to interference, which could affect
performance.
Qualified service
Only qualified personnel may install or repair this product.
Keep your device dry
Your device is not water-resistant. Keep it dry.
Protect your hearing
To prevent possible hearing damage, do not listen at high volume levels for long
periods. Exercise caution when holding your device near your ear while the
loudspeaker is in use.
© 2012 Vertu Corporation Limited. All rights reserved. 6

Your phone
Your phone
Package contents
l
VERTU Ti phone
l
Leather phone slip case
l
Wired stereo headset (WH-3V)
l
Wall charger (AC-31) with regional plug heads
l
Vertu Portable Power pack (DC-15V)
l
Car charger (DC-30V)
l
Two microUSB cables 1200 mm (CA-209DV)
l
MicroUSB cable 250 mm (CA-210DV)
l
Polishing cloth
l
Micro and nanoSIM adapters
l
User collateral pack
The package contents may vary slightly in accordance with the materials used in your particular phone and
with regional regulations.
© 2012 Vertu Corporation Limited. All rights reserved. 7
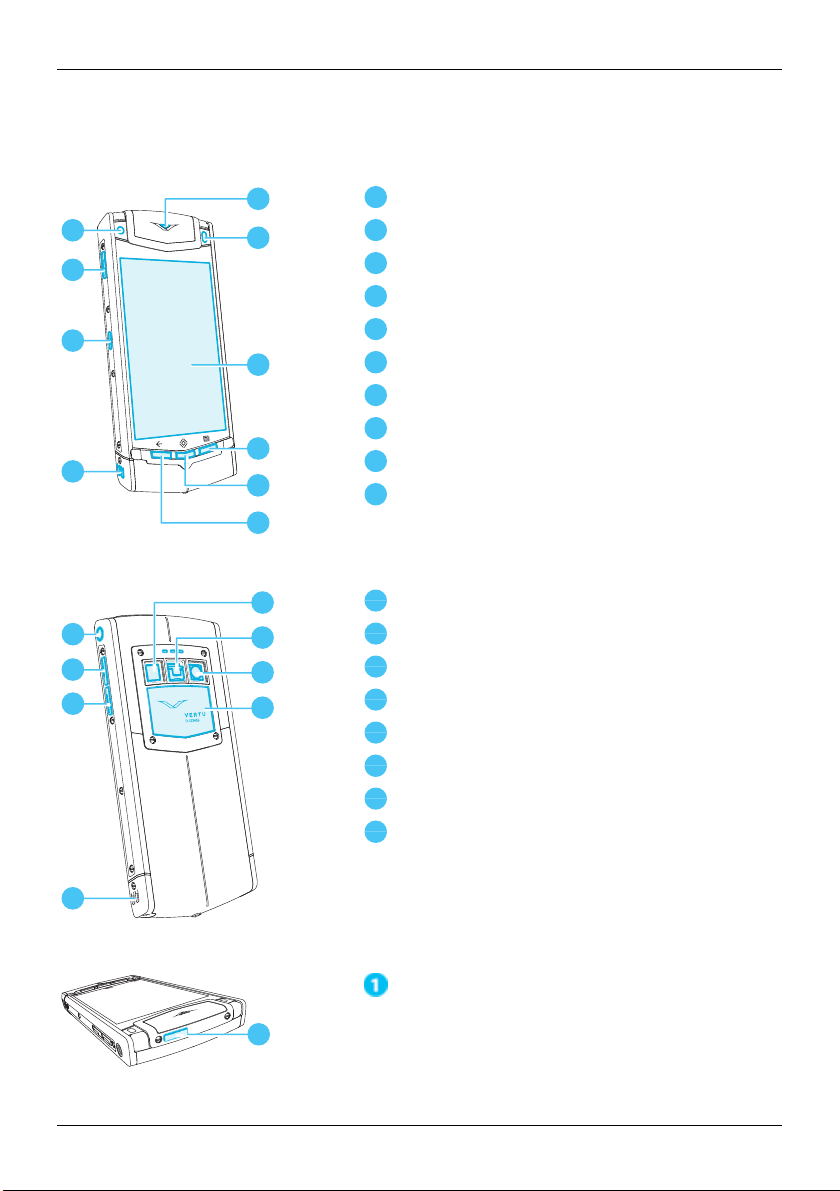
Features and keys
1
6
5
7
8
9
10
2
3
4
1
2
3
4
5
6
7
8
9
10
1
5
6
7
8
2
3
4
1
2
3
4
5
6
7
8
1
Front
Back
Top
Your phone
Front camera lens
Vertu key
Charging/connectivity port
Loudspeaker (stereo)
Pulse indicator
Ambient light sensor
Display
Menu key
Home key
Back key
Headset connector
Volume up key
Volume down key
Loudspeaker (stereo)
Flash lens
Back cover release latch
Rear camera lens
Back cover
Power key
© 2012 Vertu Corporation Limited. All rights reserved. 8
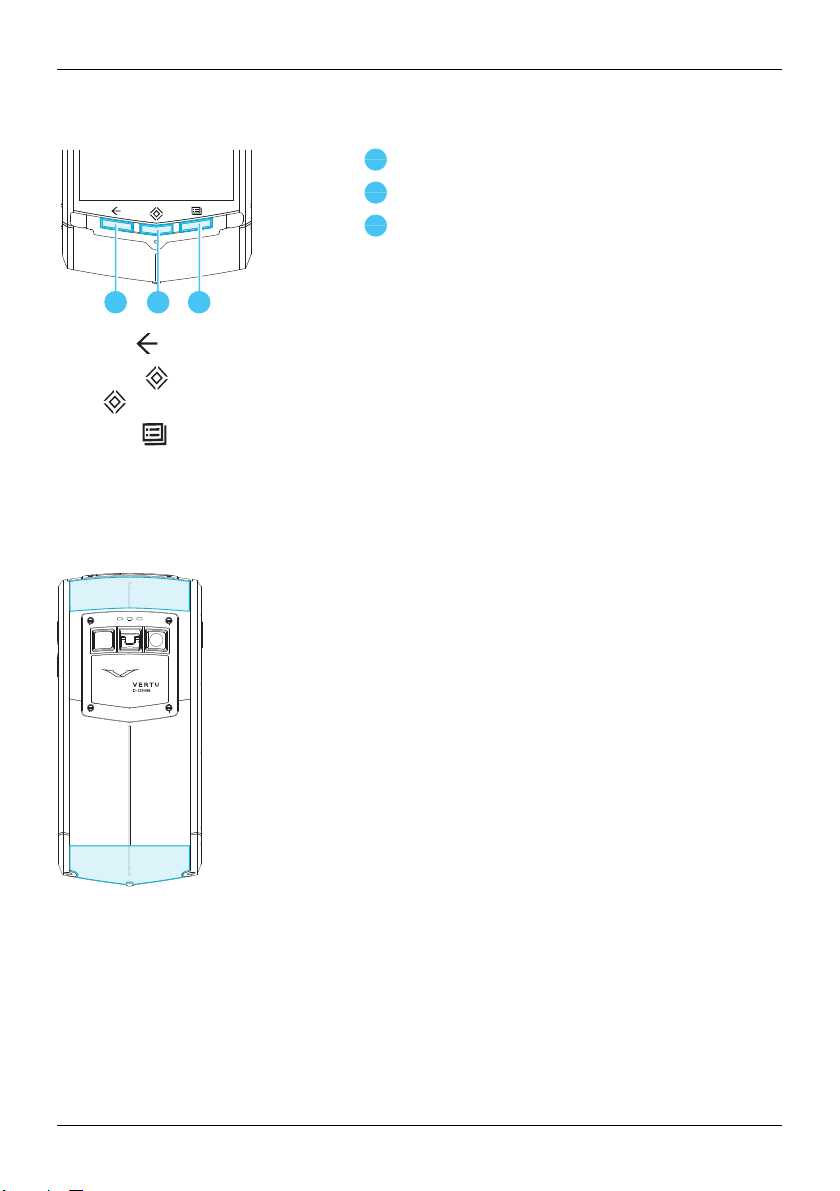
1
3
2
1
2
3
Your phone
Back, home and menu keys
Back key
Home key
Menu key
Press Back to go back to your previous screen.
Press Home to close an app and return to the home screen. From the home screen, press and hold
Home to see a list of recent apps.
Press Menu to open the options of the app you are currently using.
Antenna locations
Avoid touching the antenna areas while the antennas are in use. Contact with antennas affects the
communication quality and may reduce battery life due to higher power levels during operation.
Headset
Use the headset provided with your VERTU Ti phone to connect to your phone. Alternatively, you can
connect any compatible headsets.
© 2012 Vertu Corporation Limited. All rights reserved. 9

Change the volume
Press the volume keys to change the volume of your ringtone or adjust the volume during a call.
Also use the volume keys to adjust the media volume while listening to music or watching videos.
Your phone
© 2012 Vertu Corporation Limited. All rights reserved. 10
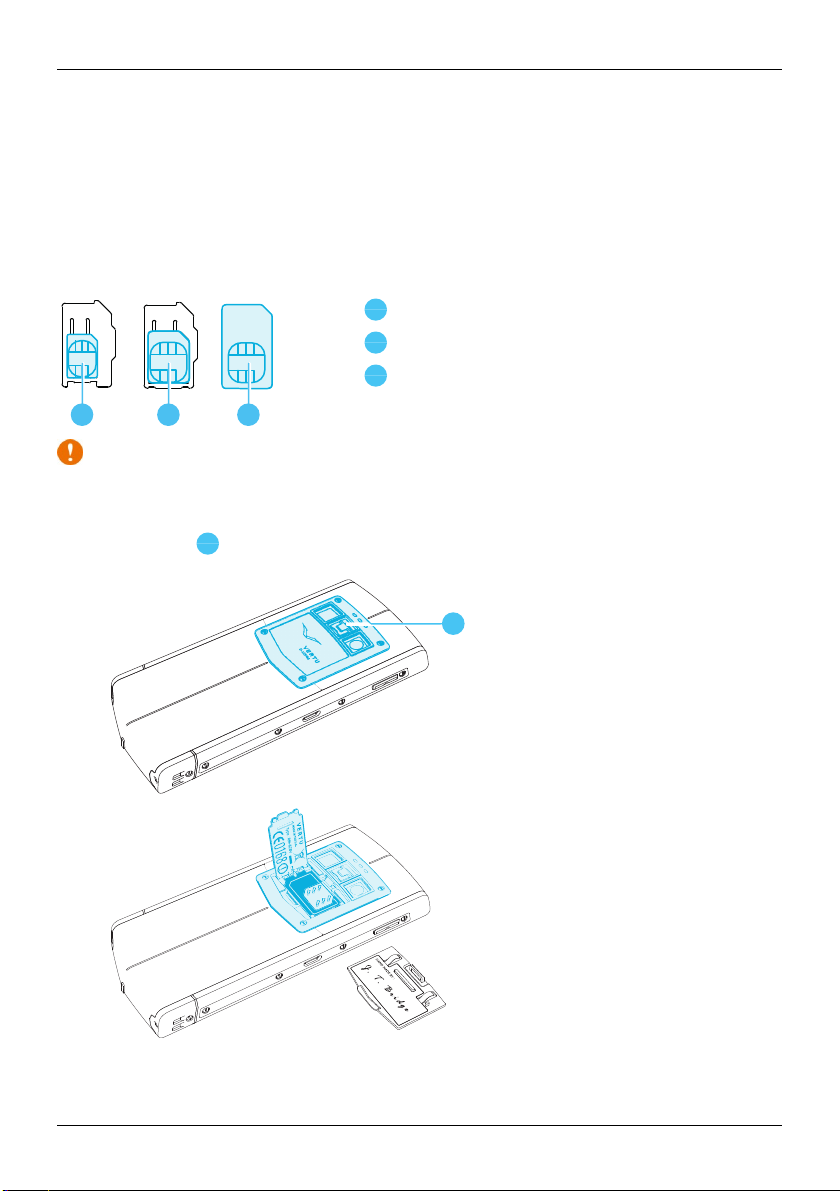
1
2
3
1
2
3
1
Getting started
Getting started
Insert the SIM card
Your VERTU Ti phone is designed to be used with a standard SIM card or, through the use of a special
adapter, with a microSIM or a nanoSIM card. Your sales pack contains two adaptors to convert a microSIM
card or a NanoSIM card into a SIM.
NanoSIM card (shown in the provided adapter)
MicroSIM card (shown in the provided adapter)
SIM card
Important: Use of incompatible nanoSIM, microSIM or SIM cards may damage the card or your
phone, and may corrupt data stored on the card.
To avoid damaging the SIM card or your phone, follow these steps carefully:
1.
Lift the latch 1 and push the mechanism up to release the back cover.
© 2012 Vertu Corporation Limited. All rights reserved. 11

Getting started
2.
Open the SIM door and insert your SIM, as shown.
Note: Always remember to power off your phone before removing and inserting a SIM card. This
action will ensure that your network connectivity is restored.
3.
Close the SIM door and lock into place.
4. Replace the back cover.
Charge the phone
The internal battery needs before first use. Connect the supplied USB data cable into the charging port on
the side of the phone. Then connect the other end of the cable to the USB port on your Vertu mains
charger.
Important: Use only chargers, cables and accessories supplied by Vertu.
If the phone indicates a low charge, do the following:
1. Connect the supplied wall charger to the wall outlet and then to the micro-USB connector on your
VERTU Ti phone.
© 2012 Vertu Corporation Limited. All rights reserved. 12

Getting started
2. When the battery is fully charged, disconnect the charger from the phone and then from the wall
outlet.
Note:
l
You can use the phone while it is charging.
l
If the battery is completely discharged, it may take several minutes before the charging indicator is
displayed or before you can make any calls.
Tip: You can also charge your VERTU Ti phone using the VERTU Portable Power pack and the
vehicle charger, supplied in the sales box.
Charge the battery using the VERTU Portable Power pack
To charge the VERTU Portable Power pack connect the USB data cable supplied into the charging port on
the base. Then connect the other end of the cable to the USB port on your Vertu mains charger.
Once the VERTU Portable Power pack is charged, you can connect it to your phone to charge the phone
while you are on the move.
[Image]
Charge the battery over USB
You can also charge your phone by connecting it to your computer using the USB cable.
Note: Your phone charges quicker when connected to the wall charger.
Extend battery life
For tips on how to extend battery life, see "Extend battery life" on page 64.
Switch the phone on or off
Switch on: Press and hold the power key until the phone vibrates.
Switch off: Press and hold the power key, and then touch Power off.
© 2012 Vertu Corporation Limited. All rights reserved. 13
Getting started
In the unlikely event that your phone stops responding, reboot it.To reboot, press and hold the Power and
Volume Down keys, at the same time, until the phone vibrates.
Note: Always remember to power off your phone before removing and inserting a SIM card. This action will
ensure that your network connectivity is restored.
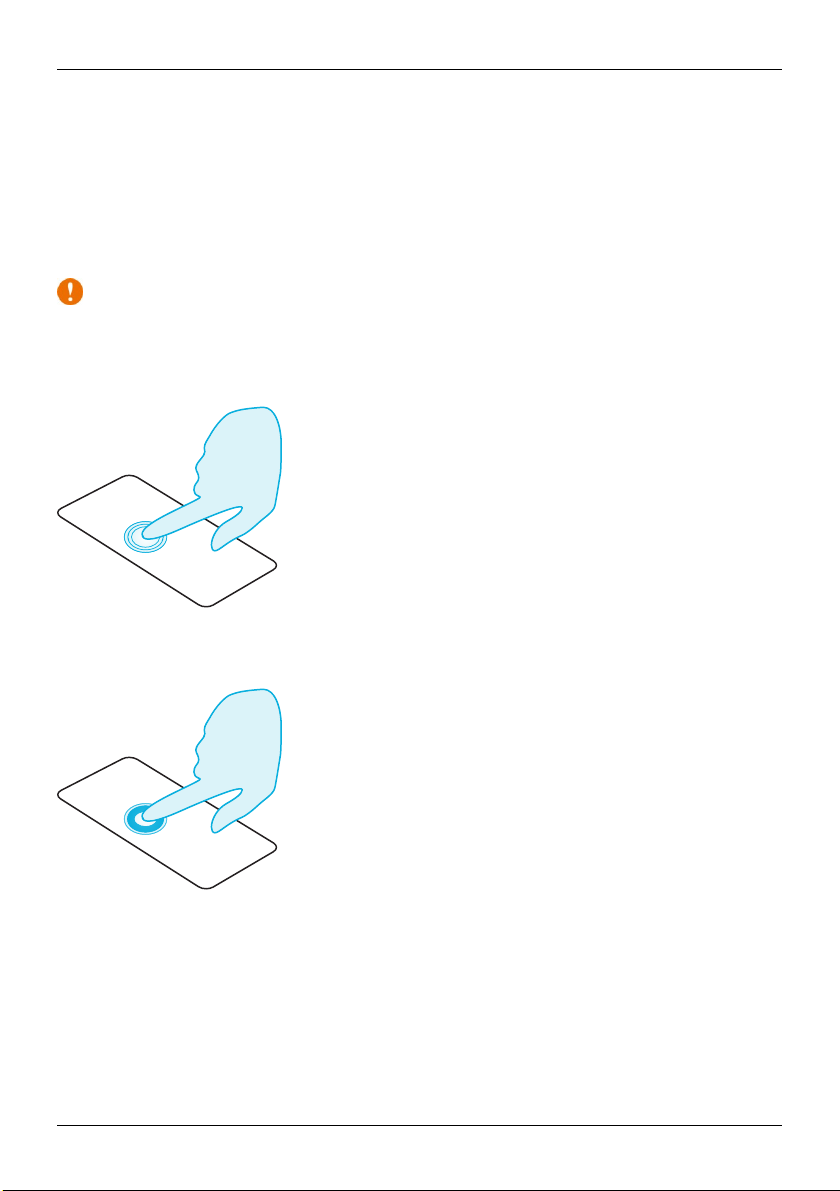
Touch screen actions
Important: Avoid scratching the touch screen. Never use a pen, pencil, or other sharp object on the
touch screen.
Touch
To select an item on the screen, touch it.
Touch and hold
To select an item and the actions associated with it, touch and hold.
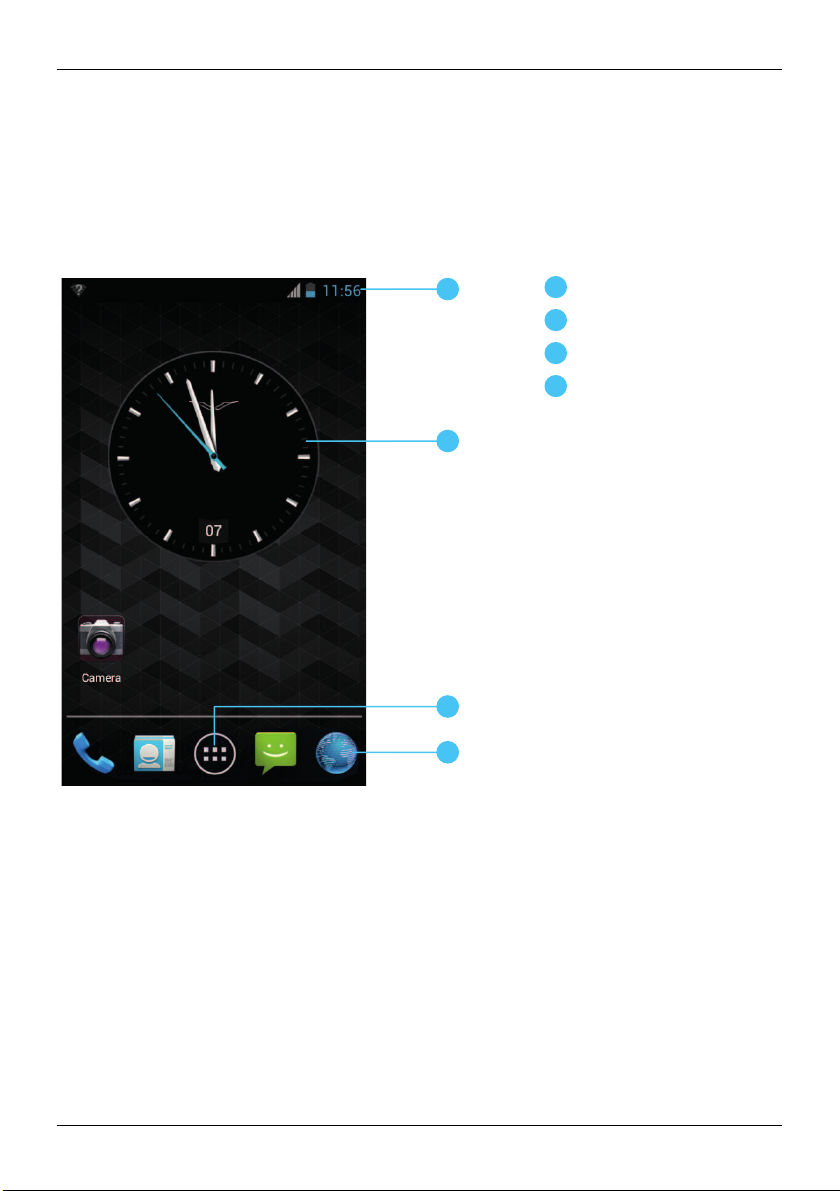
Drag
Touch and hold the item, and then slide your finger across the screen.
© 2012 Vertu Corporation Limited. All rights reserved. 14

Getting started
Flick
Scroll quickly between views or through lists.
Pinch or double-touch
Place two fingers on an item, such as a photo or web page, and then slide your fingers apart to zoom in or
together to zoom out.
Or, simply double touch the item to zoom in or out.
Start-up process
Step 1: Google registration
If you do not already have a Google™ account, you will be prompted to create one during the registration
process. This is highly recommended as a Google account will give you access to the Google Play™ Store
and other web-based Google Mobile™ services.
Once you've logged in, all your Gmail™ contacts are synced to your VERTU Ti phone, ready for use.
© 2012 Vertu Corporation Limited. All rights reserved. 15

Getting started
Gmail provides the primary means for backing up the contacts, emails and calendars associated with your
account.
Step 2: VERTU registration
If you are a new Vertucustomer you will be asked to create a Vertu account. If you already own a Vertu
phone you can simply log in to your exiting account with your Vertu username and password.
Completing Vertu registration will give you access to unique privileges and benefits relevant to you.
Tip: For quick access to the range of exclusive services, press the Vertu key.
Step 3: Recommended apps
For more on the apps that Vertu recommend, see See "Recommended apps" on page 21.
Step 4: Transfer contacts
Transfer contacts to your VERTU Ti phone with your SIM card or with your Gmail™ account.
For information on transferring contacts, see "Transfer contacts" on page 34.
Use your phone when it is locked
To unlock the screen, press the Menu key or the Power key and then touch and drag to .
You can lock the screen either by pressing the Power key or by simply leaving the screen to time out.
© 2012 Vertu Corporation Limited. All rights reserved. 16
1
3
2
4
1
2
3
4
Explore
Explore
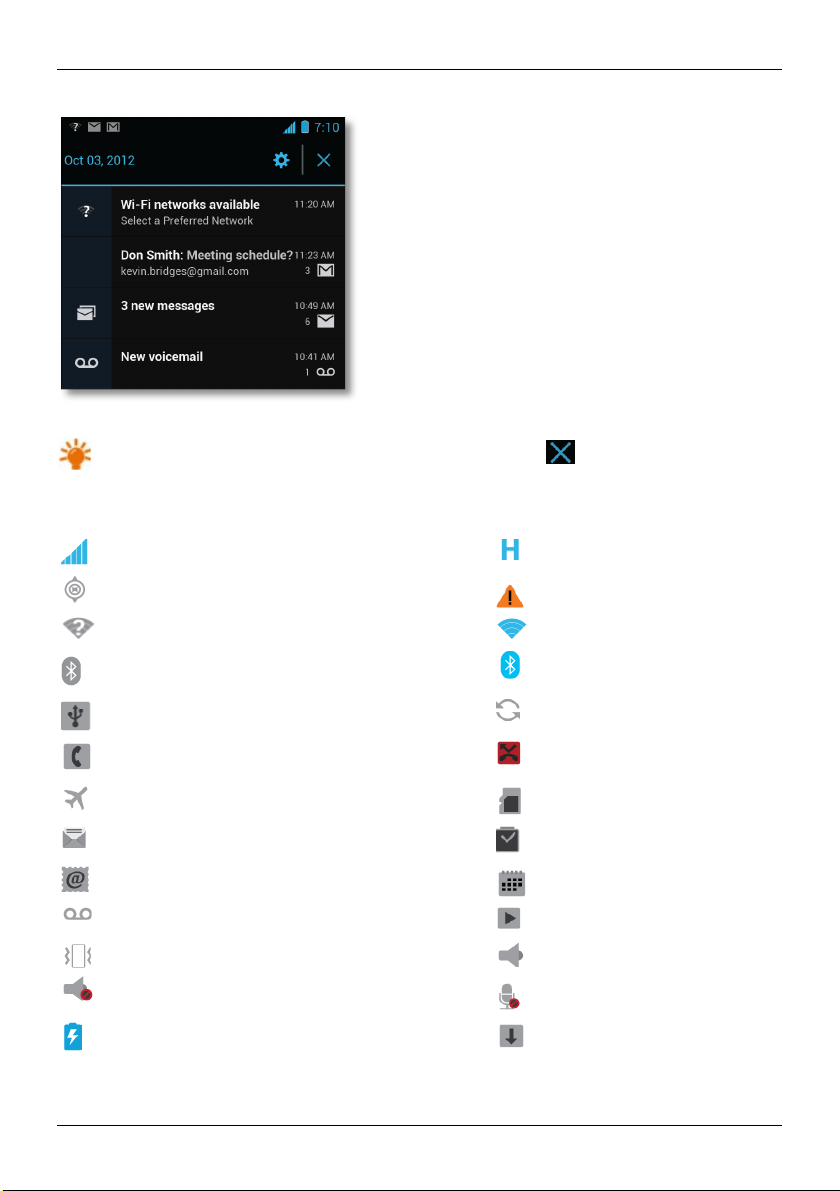
About the home screen
The home screen acts as a gateway to the functions on your VERTU Ti phone while also providing you with
all the latest information:
Status and notification bar
Widget
Apps menu
Favourites tray
Note: Your home screen may look a little different.
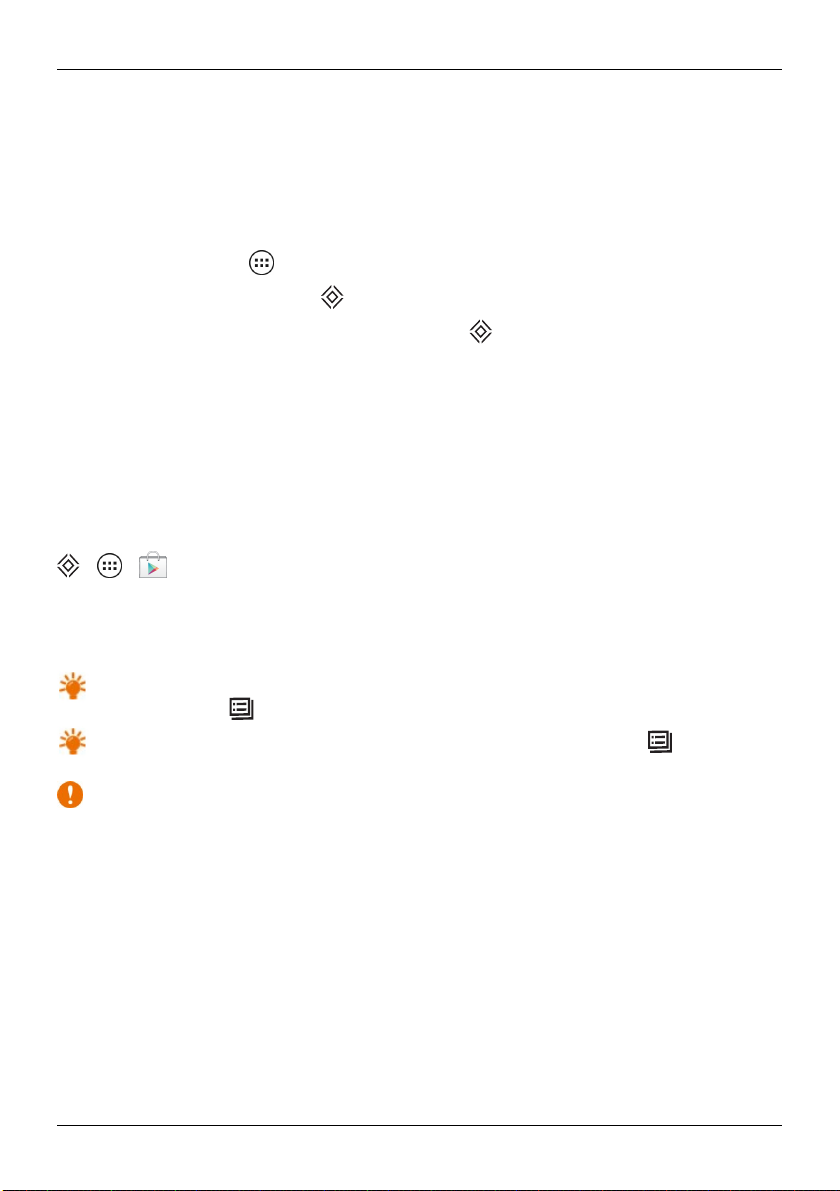
Status and notification bar
Status information, such as time, network signal strength and battery level indicator, is displayed at the top
right of the screen.
Any notifications, such as new messages or calendar appointments, are displayed in the top left of the
screen. To see your notifications, touch the bar and drag down. Touch a notification to open it.
© 2012 Vertu Corporation Limited. All rights reserved. 17
Tip: Flick the notification left or right to clear it from the list. Touch to clear all notifications.
Status and notification icons
network (full signal) H+ (fastest data)
GPS active warning
Explore
Wi-Fi in range Wi-Fi connected
Bluetooth™ on Bluetooth connected
USB connected background data sync
active call missed call
airplane mode microSD card
new text message alarm set
new email calendar event reminder
new voicemail music player active
vibrate speakerphone on
sound off call muted
battery (charging) downloading
© 2012 Vertu Corporation Limited. All rights reserved. 18

Explore
battery (full charge)
Clock widget
The clock widget on the home screen displays the following information:
l
Time and date in either analogue or digital format
l
Alarms set for the next 12 hours (analogue display only)
l
Free and busy periods taken from the Calendar, around the clock bezel (analogue display only)
l
Local time. If you are roaming, the clock displays both the local time and the time at your home
location.
To set an alarm, touch the centre of the clock.
To display an appointment, touch the appropriate quadrant of the clock, and then touch the pop-up to
open the appointment. To clear the appointment, touch the screen.
Add widgets to the home screen
Widgets are apps that provide live content such as news, weather forecasts and messages.
To add widgets to the home screen:
1.
Touch Apps and touch WIDGETS at the top of the screen.
2. Flick left to view all widgets.
3. To select a widget, touch and hold it, and then drag it to the home screen.
To see the widget menu options, open the widget and press Menu .
To resize certain widgets, such as Calendar, touch and hold the widget until you feel a vibration. Then
drag it to the size required.
Note: Downloaded apps from the Google Play™ Store may automatically download other associated
widgets. To check your widgets, touch Apps and then touch WIDGETS.
Favourites tray
The favourites tray appears at the bottom of the home screen. Use it to access your favourite apps quickly.
To remove an app from the favourites tray, touch and hold the app then drag to Remove at the top of the
screen.
Note: You cannot remove the Apps shortcut from the favourites tray.
© 2012 Vertu Corporation Limited. All rights reserved. 19

Explore
To add an app to the favourites tray, touch Apps . Touch and hold the app, and drag it to the favourites
tray.
Flight mode
To turn off all the wireless connections on your phone, press and hold the Power key > Airplane m ode.
Tip: Flight mode helps to conserve battery power.
Voice actions
With voice actions you can set an alarm, call friends, and more just by speaking clearly into your phone.
l
Voice dialling: touch Apps > Voice Dialler, and then say “Call” and then a contact name or
phone number.
l
Voice commands: touch Apps > Voice Dialler, and then say a command from the list
shown, such as "Open Calendar".
l
Text entry: touch a text entry field to open the touch screen keypad. Touch and then say what
you want to type, for example "Hi Andy".
© 2012 Vertu Corporation Limited. All rights reserved. 20
Apps
Apps
About Apps
Your VERTU Ti phone gives you access to a wide range of useful apps.
To access your apps, touch Apps from the home screen. Flick left or right to see all your apps.
To close the apps screen, press Home .
To view your most recently used apps, press and hold Home .
Recommended apps
Recommended apps provides you with a single, trusted destination where you can quickly and simply
browse and install the applications you use every day. The selection of applications displayed has been
chosen based on your country, ensuring that they are relevant to you.
Google Play™ Store
> >
Google Play™ Store has an app to help you with just about anything.
Scroll to the app you want to install, and then touch Install (if the app is free) or touch the price to buy.
Once installed, the new app is displayed in the apps screen.
Tip: To view a list of your downloaded apps, your Play Store settings, your Play Store wishlist, and
more, press Menu .
Tip: To conserve data usage and only update your apps over Wi-Fi, press Menu > Settings >
Update over Wi-Fi only.
Important: Choose your apps carefully from trusted sites, or you can rely on Vertu-recommended
apps. See "Apps precautionary advice" on page 21 and "Recommended apps" page 21.
Your application purchases are tied to your Google Account and can be installed an unlimited amount of
times on any device. So, for example, if you remove "My Favorite Game" to save memory, you can reinstall
it at a later date with no charge by simply visiting My Apps. You can also re-install apps from the My Android
Apps section of play.google.com.
Apps precautionary advice
To protect your phone from the threat of spyware, phishing, or viruses, it is important that you choose your
apps carefully. For Vertu-recommended security apps, see "Recommended apps" on page 21.
© 2012 Vertu Corporation Limited. All rights reserved. 21
Apps
l
Some apps drain your phone of phone memory and battery more than others. If you find that an app
is draining your phone, simply uninstall it. For more information, see "Uninstall apps" on page 22.
l
Before you install an app in Play Store, check the ratings and comments. If you aren't convinced by
the legitimacy of an app, don't install it.
l
Some apps may contain inappropriate content for children.
Update apps
If you receive an over- the-air notification of an update on your phone, you can follow the instructions to
download and install the update software or you can opt to dismiss the notification.
To check for updates on your phone, touch Apps > Settings > About phone > System
updates.
Manage and restore apps
To manage your apps, touch Apps > Settings > Apps > All.
Touch an app to see its details (such as access permissions and file size), and then touch to select options
such as force the app to stop, uninstall, or clear data.
To restore apps that you have previously installed from Google Play Store, touch Apps > Play Store
and then press Menu > My Apps. A list of your downloaded apps is displayed, and these apps are
available to download again.
Close apps
To close an app, press Home .
Tip: To view apps that you have recently closed, press and hold Home . To remove apps from
this list, flick left or right.
Uninstall apps
To delete an app, touch Apps > Settings > Apps > app name > Uninstall.
© 2012 Vertu Corporation Limited. All rights reserved. 22

Vertu Services
Vertu Services
Vertu Services
Your unique Vertu experience starts with registration. Once you have successfully registered your phone
you are able to access the privileges and benefits by pressing the Vertu key.
Vertu Life
Delivers exclusive access to curated experiences, trusted recommendations and specially selected
features.
Included within Vertu Life is:
l
Privileges (formerly Vertu Select Opportunities)
l
City brief
l
Access (formerly Private Members Clubs)
l
Articles (formerly Vertu Select Articles)
Vertu Concierge is heavily integrated into the Life app, meaning that any of the content which interests you
can be activated quickly and simply.
You can also manage your Concierge Requests (formerly Concierge Live) directly within the Life app.
Vertu Concierge provides expert assistance designed to meet your every need, 24/7 via voice, email or
Live Chat.
More than ever before the content delivered to you within the Life app will be tailored to your interests.
Within the app you can adjust your profile, including your interests, and this directly affects the content
which you see when you visit Vertu Life.
Vertu Life also includes two full screen widgets which are preloaded on the two left hand home screens on
VERTU Ti. These beautiful picture frames provide location aware and interest aware previews of the latest
Vertu Life content.
Vertu Certainty
The concept for Vertu Certainty is to protect you, your phone and your data.
The Certainty app is divided into three sections.
The first section caters for your personal security needs with the support of our partnership with the
Protector Services Group. You can explore the unique service offering from PSG, have access to up-todate country based security alerts, and directly request a call-back from a PSG expert to discuss your own
security needs.
© 2012 Vertu Corporation Limited. All rights reserved. 23

Vertu Services
The second section is about the phone. Here you can read the online user guide, including FAQs and
information on how to care for the phone, or there is quick access to call or email Vertu Customer Service
for any additional support.
Once you have called Vertu Customer Service, and provided that Vertu has your consent, the Remote
Assist Service enables the Technical Support Team to access your VERTU Ti remotely. The service is
intended to assist you if you have problems setting up or using your phone. Please contact Vertu Customer
Service if you wish to use the service.
You can also see the status of your warranty and any Certainty repairs you might have. Some VERTU Ti
models include one complimentary outside-of-warranty Certainty repair which can be used during the first
12 months following purchase. You must register your phone to be eligible for the Certainty repair.
The final section of the Certainty app is about protecting your data. Here the application shows, in a
graphical representation, how much of the internal data storage you are using, and equally how much of
your Google Drive™ cloud data storage you are using. There is also a quick link to launch the Google Drive
cloud data application. Finally there is a link to our Recommended Apps section to support you with other
data protection issues, such as anti-virus and malware, remote lock/track and wipe, and various elements
of data backup.
© 2012 Vertu Corporation Limited. All rights reserved. 24
Text entry
Text entry
Keyboard entry
To open the touch screen keyboard touch a text entry box. To enter text, touch the letters on the keyboard.
The keyboard is displayed in your country's native text input format, for example, QWERTY, in both portrait
and landscape modes.
Tip: You may find it easier to use the keyboard in landscape mode.
Tip: To select text, touch and hold text to select it. Tabs mark the boundaries of the selected
text. Drag the tabs to select the text you want.
Touch icons at the top of the screen to Cut or Copy selected text. In a landscape display, touch Edit > Cut
or Copy.
Cut, copy and paste text
Touch and hold the text to select it. Tabs mark the boundaries of the selected text. Drag the tabs to select
the text you want then touch icons at the top of the screen to cut, copy or paste the selected text. In a
landscape display, touch Edit to view options.
© 2012 Vertu Corporation Limited. All rights reserved. 25
Text entry
Predictive text
Predictive text input is based on a built-in dictionary to which you can add new words. It is not available in all
languages, and is active by default. When you start typing a word, your phone suggests possible words as
you type. When the correct word is displayed, touch the word. If the word is not in the dictionary, the phone
suggests an alternative word from the dictionary. To add a new word to the dictionary, touch the word you
have typed.
Dictionaries
To view your dictionaries touch Apps > Settings > Langu age & input > Personal
dictionaries.
Touch + to add words to your dictionary.
Change the keyboard language
To change the language on your keyboard, touch Apps > Settin gs > Language & input >
Language.
© 2012 Vertu Corporation Limited. All rights reserved. 26
Calls
2
1
5
3
4
About calls
> >
Calls
© 2012 Vertu Corporation Limited. All rights reserved. 27
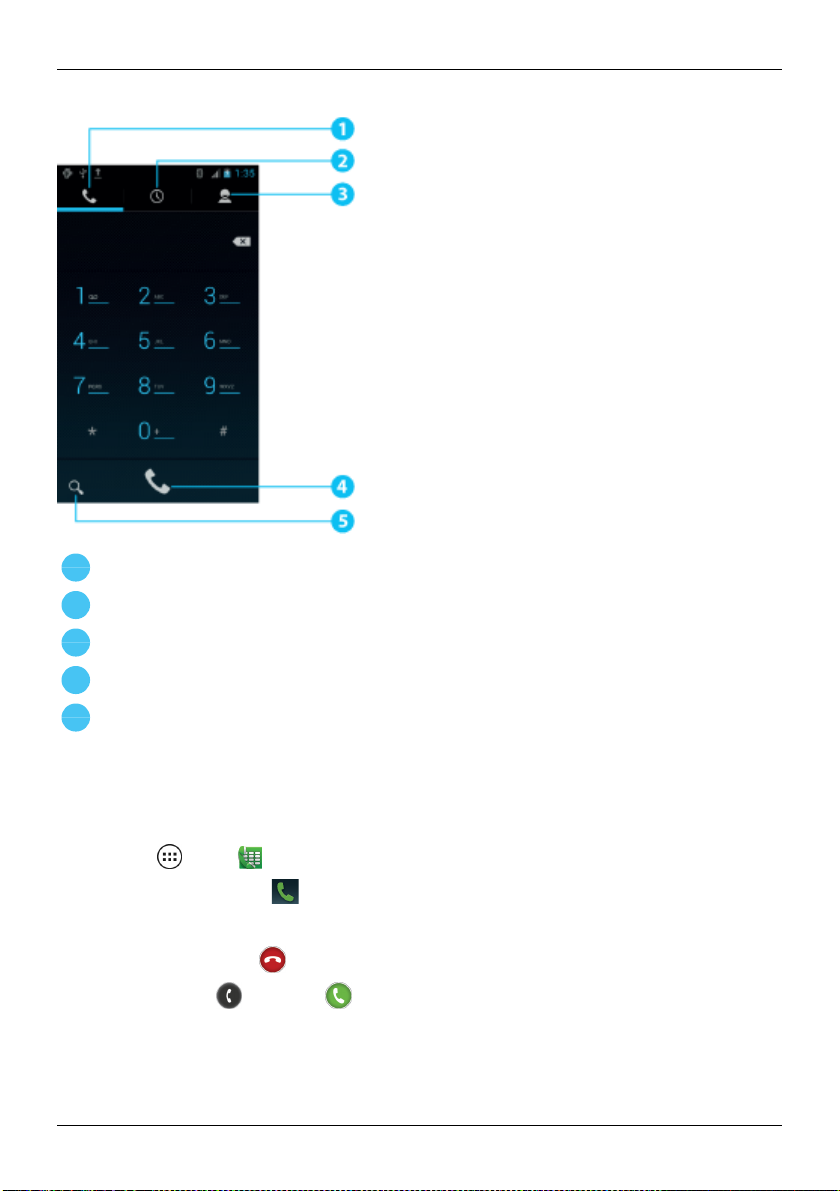
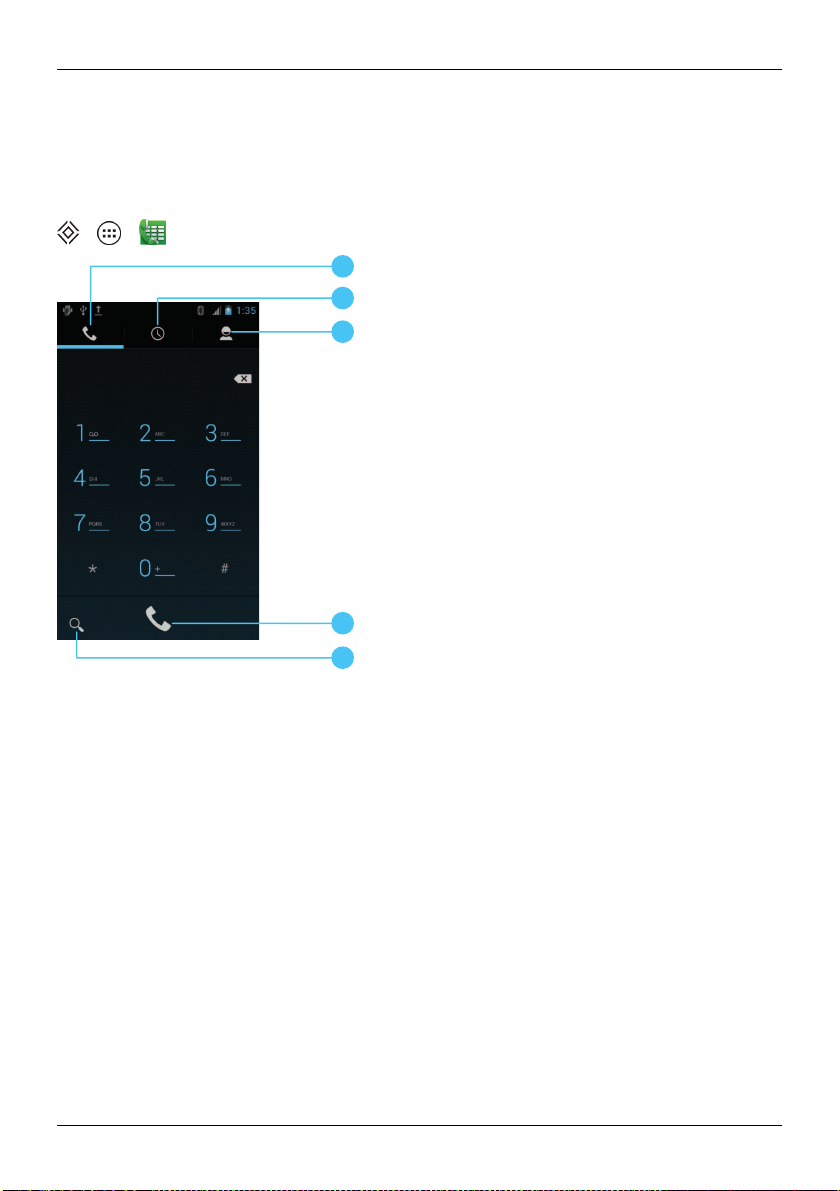
1
Dialler
2
3
4
5
Recent calls
Calls
Contacts
Call
Search
Make and answer calls
To make a call:
1.
Touch Apps > Phone and enter the phone number on the dial pad.
2.
To make the call, touch .
Note: To enter the + character, used for international calls, touch and hold 0.
3.
To end the call, touch .
To answer a call, touch and drag to .
© 2012 Vertu Corporation Limited. All rights reserved. 28

l
To send an incoming call to your voicemail, touch and drag to .
l
To send an automated text message to the caller, touch , drag to then select an appropriate
message.
Call the last number dialled
The call log displays information about the calls you have made and received. This makes it easy to call
someone again if they are not answering. Simply access the call log and quickly retrieve the number.
From the home screen, touch Phone > :
l
To call a number, touch next to the contact.
l
To see call details, touch the contact.
l
To search the recent calls list, touch .
l
To clear the list, press Menu > Clear call log.
Quickly call your favourites
To quickly call your most frequently called contacts, from the home screen touch People > .
l
To call, text, email, or view contact information, touch the contact.
Calls
l
To edit, share, delete, or set a ringtone for a contact, touch the contact and then press Menu .
Listen to your voicemail
You can divert your incoming calls to your voicemail (network service).
People can leave you a message, for example, when you have not answered the call.
To listen to your voicemail messages, from the home screen touch Phone, and then touch and hold 1
on the dial pad.
Divert calls to another number
If you cannot answer your calls, you can divert incoming calls to another phone number.
From the home screen, touch Phone > Menu > Settin gs > Call forwarding.
Several diverting options, such as Forward when busy and Forward when u nanswered can be active
at the same time.
Note: Call divert is a network service. For details, contact your service provider.
© 2012 Vertu Corporation Limited. All rights reserved. 29

Make a conference call
To start a conference call:
1. Call the first number.
2. After the call connects, touch Add call [Icon].
3. Dial the next number, or select it from contacts or favourites.
4. When the next number answers, touch Merge calls.
Note: Conference calls are a network service. For details, contact your service provider.
Silence an incoming call
To silence an incoming call, press the Power key or Volume keys.
Voice dialling
To voice dial a contact, touch Apps > Voice Dialler and say “Call” followed by a contact name.
Calls
© 2012 Vertu Corporation Limited. All rights reserved. 30

2
1
5
3
4
Contacts
Contacts
About contacts
With contacts, you can save and organise your friends' phone numbers, addresses, and other contact
information.
> >
© 2012 Vertu Corporation Limited. All rights reserved. 31

1
Groups
2
3
4
5
2
3
4
5
People
Contacts
Favourites
Add contact
Search
Groups
People
Favourites
Add contact
Search
Call, text or email contacts
> >
To call a contact, touch the contact then touch the phone number.
© 2012 Vertu Corporation Limited. All rights reserved. 32

Contacts
To text a contact, touch the contact then touch .
To email a contact, touch the contact then touch the email address.
Add contacts
> > >
1.
Select an account to back up your contact.
Note: If you have not set up an account, like a Google or Email account, your contact is only saved
to your phone memory.
2. Enter the contact details, and then touch DONE.
Tip: Backing up your new contact to an account will also sync it to that account.
Join contacts
If you have two or more contacts for the same person, maybe a Gmail contact that is also stored on your
phone, you can join them.
Touch Apps > People > contact name > Menu > Edit > Menu > Join , and then touch the
contact that you want to join.
Edit or delete a contact
To edit or delete a contact, touch Apps > People > contact name > Menu > Edit or Delete.
Save a number from a call or message
When you receive a call or a message from a person whose phone number is not yet saved in the contacts
list, you can save the number in a new or existing contact list entry.
To save a number from a received call:
1.
From the home screen, touch Phone > .
2.
Touch the call entry, and then touch .
3. Touch CREATE NEW CONTACT then enter the contact details.
4. Touch DONE.
To save a number from a received message:
© 2012 Vertu Corporation Limited. All rights reserved. 33

Contacts
1.
From the home screen, touch Apps > Messaging.
2.
Touch the message entry, and then press Menu > Add to People.
3. Touch CREATE NEW CONTACT then enter the contact details.
4. Touch DONE.
Personalise contacts
Set unique photos and ringtones for your contacts.
> >
To add a photo, touch the contact > Menu > Edit > .
To add a ringtone, touch the contact > Menu > Set rington e.
Add a contact group
When you have created contact groups, you can send a message to several people at the same time. For
example, you can assign the members of your family to one group.
To add a new group:
1.
Touch Apps > People > > .
2. Enter the group name and then enter the names of the contacts you wish to add.
3. Touch DONE.
Tip: To edit or delete a contact group, touch Apps > People > group name > Menu >
Edit or Delete.
Transfer contacts
Transfer contacts to your VERTU Ti phone with your SIM card or with your Gmail™ account.
SIM card
For details on exporting contacts stored on your old phone to your SIM card, please refer to the user
documentation supplied with your previous phone.
Then, to import these contacts stored on your SIM card to your VERTU Ti phone, touch Apps >
People > Menu > Import/export > Import from SIM card.
© 2012 Vertu Corporation Limited. All rights reserved. 34

Contacts
Gmail
If your old phone does not support SIM card transfer, you can transfer your contacts to a Comma
Separated Values (.csv) file. Once this file is imported in to your Gmail account it will automatically sync with
your VERTU Ti phone (provided you have already set up a Gmail account).
1. Export the contacts on your previous phone to a .csv file. For information on how to do this, please
refer to the user documentation supplied with your previous phone.
2. Log into your Gmail account on your PC and click Con tacts > Import Contacts.
3. Click Browse and select the .csv file that you created.
4. Click Import Co ntacts.
Important: Syncing your contacts with your Gmail account means that your contacts will always be
backed up.
© 2012 Vertu Corporation Limited. All rights reserved. 35

Messaging and email
About messaging
> >
You can send and receive various kinds of messages:
• Text messages
• Multimedia messages that contain photos, videos or audio
• Instant messages.
Send and read messages
> > >
> > >
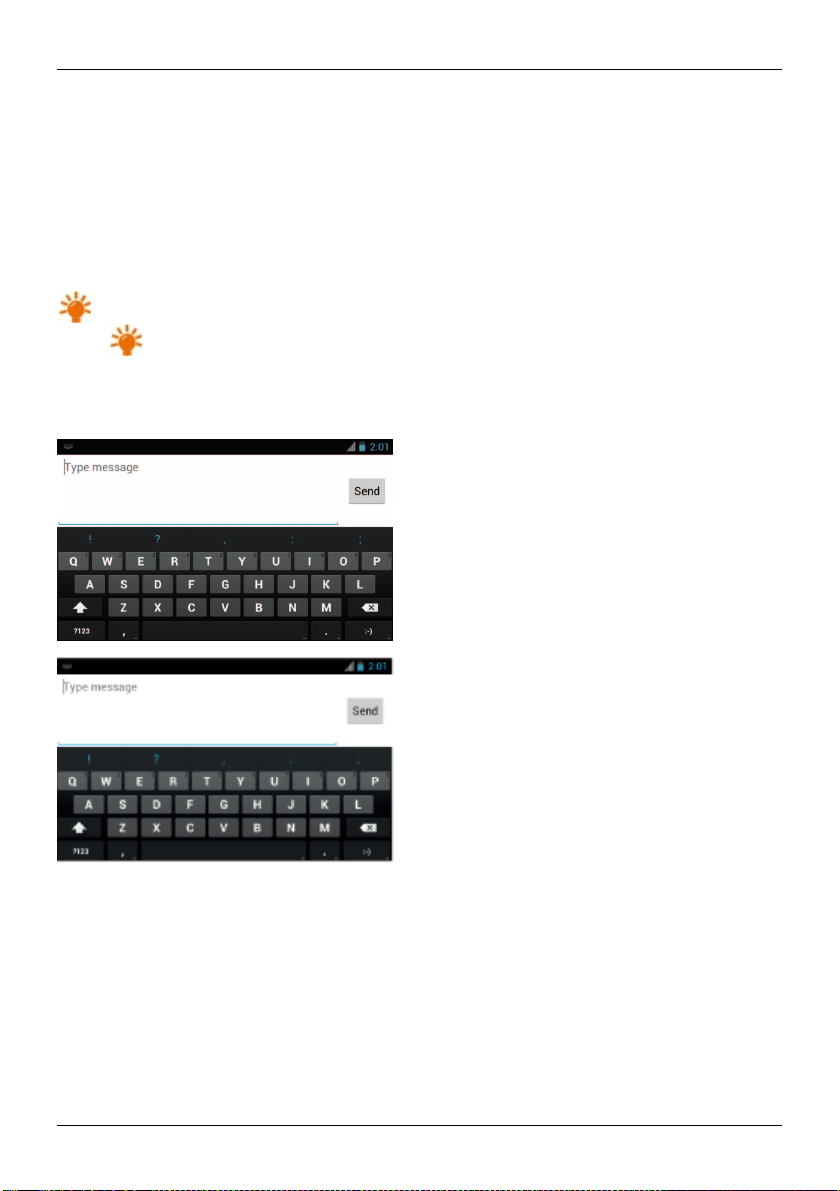
To send a message:
1.
Enter the recipient and then type your message. Press Menu to Insert smiley or Add
subject.
Note: To send the message to multiple recipients, add more than one contact in the To field.
Messaging and email
2.
Touch to send your message.
To open a text message and the previous conversation, touch it.
To reply to a text message, open it and enter your response in the text box at the bottom, and then touch
.
Send a message to a group
> > >
To send a message:
1.
Enter the recipients and then type your message.
Note: You need to add each person to send a message to a group.
2.
Touch to send your message.
© 2012 Vertu Corporation Limited. All rights reserved. 36

Messaging and email
Instant messages
To send and receive instant messages, you can use Google Talk™.
> >
Manage messages
> >
To delete a message, touch and hold to select it, and then touch the trash can at the bottom.
To change your messaging options, touch Apps > Messaging > Menu > Settings.
Email setup
Your VERTU Ti allows you to set up multiple email accounts. This gives you mobile access to the mail,
calendar, contacts, and tasks on your accounts.
Corporate email setup
From the home screen, touch Apps > Sett ings > Accounts & sync > ADD A CCOUNT. Select
Corporate for Microsoft™ Exchange server work email accounts. Enter details from your IT administrator.
Tip: You need to enter your username and password. You may be prompted to enter your domain
and server names. Contact your IT administrator for details.
To read and reply to messages on your email accounts, touch Apps > Email.
l
To compose a new message, touch [Icon].
l
To read a message touch it from the inbox.
l
To manually refresh your mailbox, touch [Icon].
l
To view different folders within your mailbox, touch [Icon].
Tip: When you have new email will appear in the status bar.
Press Menu > and select your account to see options, such as Signatu re, Sync Email
and Remove accoun t.
Google mail setup
From the home screen, touch Apps Settin gs > Accounts & sync > ADD ACCOUNT. Select
Google for your Gmail accounts. For account details, contact Gmail.
© 2012 Vertu Corporation Limited. All rights reserved. 37

Messaging and email
To read and reply to messages on your Gmail accounts, touch Apps > Gmail.
To view different labels within your mailbox, like Drafts and Sent items, touch [Icon] > Label name.
To delete, move to another label, mark as unread or mark as important, touch an hold the item within the
label.
Personal email setup
From the home screen, touch Apps > Settings > Accounts & sync > ADD ACCOUNT. Select
Email for your personal email accounts. For account details, contact the account provider.
To read and reply to messages on your email accounts, touch Apps > Email.
© 2012 Vertu Corporation Limited. All rights reserved. 38

Music
About music
> >
Music
Get music
Note: When you connect your phone for first time, your computer may prompt you that drivers are being
installed. Complete the driver installation.
1.
Connect the micro USB cable from your phone's Micro-USB connector to a USB connection on
your computer.
2.
From the home screen, check that appears in the status bar.
3. Drag the status bar down and touch Connected as a media device. Make sure the Media
device (MTP) check box is ticked.
4.
On your computer, navigate to the removable disk showing your phone and open the Internal
Storage.
© 2012 Vertu Corporation Limited. All rights reserved. 39

5.
Drag and drop files between your computer and "Music" folder.
6. When you have finished, disconnect the USB cable.
Set up music
To load music on your computer and then load it on your phone, you need:
l
Microsoft™ Windows™ computer or Apple Macintosh™ computer.
l
USB data cable.
Your VERTU Ti phone will play the following audio file formats:
Play music
Touch a song or playlist to start playing music.
[Screen]
Music player controls
Music
l
Play/pause: touch / .
l
Select previous/next song: touch / .
l
Fast forward/rewind: touch and hold the progress bar, and then drag forwards or backwards.
l
Shuffle on/off: touch .
l
Repeat all/off: touch .
l
Adjust volume: press side volume keys.
l
Manage sound effects: press Menu > Sound effects.
© 2012 Vertu Corporation Limited. All rights reserved. 40

Music
l
Go to the music home screen: touch in the top left corner of the screen.
l
Add song to playlist: touch > song title > playlist name.
l
Delete song: touch and hold the song in the music library, and then touch Delete.
Playlists
To add a song from the music library to a playlist, touch and hold the song, and then touch Add to
playlist. Choose an existing playlist or touch New playlist.
Hide the music player
Touch the Home key. Your music will continue to play and you will see in the status and notifications
bar. You can continue to work with other apps while your music is playing.
When you see in the status and notifications bar, a song is playing. Flick down to see details. Touch the
song to return to the music controls.
To return to the music player, flick the status and notifications bar down and touch the song.
Turn off the music
Touch .
© 2012 Vertu Corporation Limited. All rights reserved. 41

Maps and navigation
Maps and navigation
Google Maps™
Google Maps™ is a Go ogle service offering powerful, user-friendly mapping technology and local
business information, including business locations, contact information, and driving directions.
> >
For help with Google Maps™, press Menu > More > Help.
Tip: To see nearby listings for restaurants, cafes and more, touch Maps > Places in the top left
corner of the screen.
Google Maps™ Navigation
Google Maps™ Navigation is an internet-connected GPS navigation system with voice guidance.
> >
Follow the prompts to speak or type your destination.
For help with Google Maps™ Navigation, go to www.google.com/mobile/navigation.
© 2012 Vertu Corporation Limited. All rights reserved. 42

Personalising your phone
Personalising your phone
Widgets
To add widgets to the home screen:
1.
Touch Apps > WIDGETS.
Note: Flick left to view more widgets.
2. Touch and hold a widget, and then drag it to one of the home screen panels.
To download more widgets, see "Google Play™ Store" on page 21.
To customise a widget, touch it (to open it), and then press Menu .
Shortcuts
To add shortcuts to the home screen, touch Apps, touch and hold an app, and then drag it to a spot on
the home screen panels.
To create a shortcut folder, drag one shortcut on top of another. To add more shortcuts to the folder, drag
them onto the folder icon. You can also name the folder - simply touch it and enter a name at the bottom.
l
To move shortcuts or shortcut folders, touch and hold them, and then drag to a new location.
l
To remove shortcuts or shortcut folders from the home screen, touch and hold them, and then drag
to Remove at the top of the screen.
You can also drag shortcuts or shortcut folders in or out of the favourites tray for instant access from the
home screen.
Ringtones
To adjust your ringtone, touch Apps > Settin gs > Sound > Phone ringtone or Default
notification (the sound you hear when you receive a notification, such as a text message or email).
l
To activate the ring and vibrate option, touch > Apps > Settings > Sound > Vibrate and
ring.
l
To silence your phone and activate vibrate only, touch Apps > Settings > Sound > Silent
mode > Vibrate.
l
To silence your phone, touch Apps > Settings > Sou nd > Silent mode > Mute.
Tip: To quickly change your sound settings, press and hold the Power key, and then select a sound
setting.
© 2012 Vertu Corporation Limited. All rights reserved. 43

Personalising your phone
Wallpapers
To set a new wallpaper for the home screen, touch and hold an empty spot on the home screen, and then
select a wallpaper from Gallery, Live Wallpaper or Wallpaper.
Assign sounds to actions
l
To set sounds for touches on the dial pad, touch > Apps > Settings > Sound > Dial-pad
tou ch ton es.
l
To set volume for ringtones, notifications, media, and alarms, touch Apps > Settings >
Sound > Volumes.
l
To hear when you lock or unlock the screen, touch Apps > Settings > Sound > Screen
lock sounds.
l
To set sounds for screen selections, touch Apps > Settings > Sound > Tou ch sounds.
Display settings
l
To set the brightness of the screen, from the home screen touch Apps > Settings >
Display > Bright ness.
l
To set the font size for menus and settings, from the home screen touch Apps > Settings >
Display > Font size.
l
To turn on or off the Pulse notification light (flashes in the ear piece when you receive a
notification, such as a text message or email), from the home screen touch Apps > Settings
> Display > Pulse notification light.
Auto-rotate
To set whether the screen rotates automatically in certain apps, touch Apps > Settings > Display
> Auto-rotate screen.
Screen lock
You can make the touchscreen lock when it goes to sleep.
This is recommended to protect your phone, if misplaced or stolen.
There are a number of different lock options. Touch Apps > Settings > Security > Screen lock,
and then select the lock type:
l
Slide: drag to the right to unlock.
l
Face Unlock: look at your phone to unlock.
© 2012 Vertu Corporation Limited. All rights reserved. 44

Personalising your phone
l
Pattern: draw a pattern to unlock.
l
PIN: enter a PIN code to unlock.
l
Password: enter a password to unlock.
Note: Certain corporate email accounts make use of a specific lock which may disable the lock options
listed above.
Date and time
To set date, time, time zone, and time formats, touch Apps > Settings > Date & time.
To automatically use the network date and time, touch Autom atic date & time or Automatic
timezone.
Language and region settings
To set your menu language and region, touch Apps > Settings > Language & input >
Language.
© 2012 Vertu Corporation Limited. All rights reserved. 45

Socialnetworks
Social networks
Add an account
With the Browser you can keep up to date with your social networking accounts on sites like Facebook™,
Twitter™ and Google+. If you don’t have accounts, go to their websites to set them up. Most social
networking accounts offer dedicated apps that can be installed on your VERTU Ti from the Go ogle
Play™ Store.
To download a social networking app, from the home screen touch Apps > Play Store.
To sign in to your social networking account, enter your username or email address and password.
The social networking accounts are third-party services and not provided by Vertu. Check the privacy
settings of the social networking accounts to control what information you are sharing. Familiarise yourself
with the terms of use and the privacy practices of any social networking accounts you use.
Delete an account
To delete a social networking account, touch Apps > Setting s > Accounts & sync > Menu >
Remove account.
To remove a social networking app from the home screen, touch and hold to select it, and then drag it to
Remove at the top of the screen.
Go to the social networking account website to delete an account.
Synchronise contacts
When you sign in to a social networking account on your VER TU Ti, you may be prompted to sync account
contacts, pictures, and status with your People app. You can accept or decline this request. To change
your sync settings at any time, touch Apps > Settin gs > Accounts & sync > Account name.
© 2012 Vertu Corporation Limited. All rights reserved. 46

Managing accounts
Managing accounts
Configure sync options
To sync your accounts, from the home screen touch Apps > Settings > Accounts & sync >
Account > Menu > Sync now.
To configure your sync options for an account, touch the account and then tick the boxes you want to sync,
for example Sync Calendar, Sync Contacts or Sync Gmail. Leave the tick box empty for options you
do not want to sync.
Add and delete accounts
To add accounts, from the home screen touch Apps > Settings > Accounts & sync > ADD
ACCOUNT. Some default accounts are shown, for example Corporate, Email and Google. Touch an
account to add it. Enter your user name and password, and then follow the prompts to set up your account.
To delete an account, touch the account name > Menu > Remove account.
Backup and restore accounts
To backup and restore your accounts, from the home screen touch Apps > Settings > Backup &
reset > Automatic restore. Check that the Automatic restore box is ticked. This will ensure that when
you reinstall an app the backed up settings and data are restored.
Note: To backup application, Wi-Fi passwords and other settings to Google servers make sure that the
Back up my data box is ticked.
© 2012 Vertu Corporation Limited. All rights reserved. 47

Browser
1
2
3
About the web browser
You can use your VERTU Ti to browser the internet.
To browse the web, you must have an internet access and be connected to a network.
Note: Your phone will prompt you to choose a default browser. Choose the standard browser or
Chrome.
> >
Browser
Browser options.
Open browser tabs, or open a new tab.
Touch a link to select it. Touch and hold for more options.
Tip: To zoom in or out, touch the screen twice.
© 2012 Vertu Corporation Limited. All rights reserved. 48

Browser
Browse the web
To browse the web, from the home screen touch Apps > Browser.
To refresh a website, press Menu > Refresh.
Tip: Check your data plan with your service provider, to save data costs, you can use Wi-Fi to
connect to the internet.
To go to a website, touch the web address bar, enter a web address, and then touch Go.
Connect to the internet
Your phone uses the cellular mobile phone network (over the air) or a Wi-Fi connection to access the
internet.
Note: Check your data plan with your service provider, you may be charged to access the internet and to
download data over the air.
To use a Wi-Fi network for faster internet access, touch the status bar at the top of the home screen and
drag it down. Touch the Wi-Fi networks available notification to select a preferred network. See "Wi-Fi"
on page 58.
To close your browser, touch Home .
Note: If you cannot connect to the internet, contact your service provider.
Add a bookmark
If you visit the same websites regularly add them to your bookmarks, so that you can easily access them.
To save a website as a bookmark, press Menu > Save to boo kmarks.
To view your bookmarked websites, press Menu > Bookmarks.
Widget feeds
Using widget feeds, also known as media feeds, you no longer have to visit your favourite websites
regularly to find out what is going on. Instead, you can get links to the latest content automatically.
From the home screen, touch Apps > WIDGETS. Touch and hold the News & Weather widget to add
it to the home screen.
Privacy and security
To make changes your privacy and security settings, from the home screen touch Apps >
Browser > Menu
© 2012 Vertu Corporation Limited. All rights reserved. 49

Browser
> Settings > Privacy and security.
To empty the cache touch Menu > Settings > Privacy and security > Clear cache.
Downloads
To download files in your browser, touch and hold a link or picture, and then touch Save image or Save
link.
To see the files you have downloaded, from the home screen touch Apps > Downlo ads. Touch
an item to open it. Touch the tick box to select an item, and then touch the trash can to delete it.
© 2012 Vertu Corporation Limited. All rights reserved. 50

2
5 6
3
4
1
1
2
3
4
5
6
Camera
Camera
About camera
You can use your VERTU Ti to take photos or record videos. You can then view or edit the photos and
videos, share them on the internet, or send them to compatible devices.
> >
Front or back camera
Last photo or video
Capture
Zoom
Camera or video settings
Camera, video recorder or panoramic mode
© 2012 Vertu Corporation Limited. All rights reserved. 51

Front or back camera
2
3
4
5
6
Last photo or video
Capture
Zoom
Camera or video settings
Camera
Camera, video recorder or panoramic mode
Note: The location of the icons will vary depending on the orientation of your phone.
Take and share photos
To take a photo:
1.
From the home screen, touch Apps > Camera.
Note: Touch the screen to change focus location (a green auto-focus box is displayed).
2.
Touch to take your photo. Your phone stores the photo and shows a thumbnail image in the
corner of the screen.
Do not move the phone before the photo is saved and displayed as a thumbnail. Photos and videos are
automatically saved to the internal fixed memory.
Share a photo:
© 2012 Vertu Corporation Limited. All rights reserved. 52

Camera
1.
From the home screen, touch Apps > Gallery.
2.
Touch the photo,touch and then choose how you want to share Blueto oth, Picasa,
Messaging, Google Drive, Google+, or Gmail[icons].
Tip: To share a photo immediately after capture, touch the thumbnail image and the sharing
options are shown below the photo.
Panoramic view
In the viewfinder, touch > to take a wide panoramic photo. Move the phone slowly across the
image you want to take. The camera auto-captures multiple shots as you move the camera and joins them
together to make one large photo.
Camera settings
Touch in the corner of the viewfinder to adjust your camera settings.
Option Settin g
Camera settings
SCN Scene mode Set the type of photo you want to take: Auto, Action, Night, Sunset, or
[icon] Exposure Select an exposure setting.
[icon] White balance Set to A uto, Incandescent, Daylight, Fluorescent, or Clou dy.
[icon] Flash mode Set Flash to Auto , On or Off.
Set Store location to ON to record the location of a photo or video
automatically.
Set Picture size to: QVGA, VGA, 1.3M pixels, 2M pixels, 3M pixels,
5M pixels or 8M pixels.
Party.
Record and share a video
Besides taking photos with your phone, you can also capture videos.
To take a video:
1.
From the home screen, touch Apps > Camera.
Note: To switch from photo mode to video mode, touch .
© 2012 Vertu Corporation Limited. All rights reserved. 53

Camera
2.
To start recording touch . To stop recording touch . Your phone stores the video, and shows
a thumbnail image in the corner of the screen.
Note: Touching the screen to focus location is not required for video capture. The phone will auto-focus to
the centre of the frame while you capture the video.
Share a video:
1.
From the home screen, touch Apps > Gallery.
2.
Touch the video, touch and then choose how you want to share Bluetooth, Picasa,
Messaging, Google+, YouTube, or Gmail[icons].
Tip: To share a video immediately after capture, touch the thumbnail image and the sharing
options are shown below the video.
Video settings
Touch in the corner of the viewfinder to adjust video settings.
Option Setting
Camera settings
1080p Video quality Set to SD 480p, HD 720p, or SD 480p.
[icon] Time lapse interval Set a time lapse interval, such as five seconds.
icon] Effects Add SILLY FACES or BACKGROUND.
[icon] White balance Set to Auto, Incandescent , Daylight, Fluorescent, or Cloudy.
[icon] Flash mode Set to On or Off.
© 2012 Vertu Corporation Limited. All rights reserved. 54
Set Store location to ON to record the location of a photo or video
automatically.

Gallery
Gallery
About gallery
> >
With Gallery you can watch the videos you have recorded, or browse through the photos you have taken.
To manage your media files more effectively organise them into albums or folders.
View and edit photos and videos
> > > photo or video
Just touch a photo or video to view it.
Tip: To zoom in and out quickly, touch the screen twice.
Press Menu then select an option: Delete, Slideshow, Edit, Rotate left, Rotate right, Crop,
Details or Set picture as.
The Edit option lets you change various photo settings, such as Highlights , Film Grain, B&W and Red
Eye.
Note: For videos you can only Delete or show Details.
Share photos and videos
Share a photo or video:
1.
From the home screen, touch Apps > Gallery.
2.
Touch the photo or video, touch and then choose how you want to share B luetooth, Picasa,
Messaging, Google Drive, Google+, Gmail, or YouTube[icons].
You can copy photos and videos between your phone and PC. See "Copy between the phone and a PC"
on page 60 for details.
View an album
You can view all your photos and videos, or arrange photos and videos by album.
> >
All your photos and videos are shown in Album s. Touch an album and then, press Menu > Group by
and then select an option from Locations, Times, People, or Tags to show how the album is displayed.
© 2012 Vertu Corporation Limited. All rights reserved. 55

Create a folder
To organise your photos and videos you can create your own folders.
1. Connect your phone to your PC with the USB cable.
2. View your phone’s internal storage on your PC, and then browse to the "Pictures" folder and create
new folders.
3. Drag your photos and videos into the folders.
Assign contact images and wallpaper
Add a photo for a specific contact, or set your favourite photo as your background image.
> > > photo
Touch a photo, and then press Menu > Set picture as > Contact photo, or Wallpaper.
Take a screen shot
To take a screen shot press and hold the Power key and Volume Down key at the same time.
To see the screen shot, touch Apps > Gallery > Screenshots.
Gallery
© 2012 Vertu Corporation Limited. All rights reserved. 56

Office tools
Office tools
Clock
> >
Touch Set alarm and then the check box next to an alarm to set it. When an alarm sounds, select
Dismiss to turn it off or touch Snooze to delay for ten minutes.
To add an alarm touch + and then enter alarm details.
To change your alarm sound, snooze delay, or other settings, press Menu > Settings.
Calculator
> >
Your calculator has two views: basic and advanced. To change your views, press Menu > Advanced
panel or Basic panel.
Tip: Swipe left or right to switch between the basic and advanced panels.
To clear your history, press Menu > Clear history.
Calendar
> >
With the calendar app you can automatically see calendar events from your Google™ account.
You can view your calendar in different ways: Touch the date, and then touch Day, Week, Month , or
Agenda to change the view. Touch an event to see more details.
Tip: To add a calendar widget to the home screen, touch Apps > WIDGETS, touch and hold
Calendar, and drag it to the home screen.
To add an event, press Menu > New event. Enter the event details and touch DONE.
To delete an event, touch it to open it, and then touch the trash can .
To see multiple calendars,press Menu > Calendars to be displayed. Select the tick boxes next to
the calendars you want to see, touch Calendars to be synced > OK.
To sync your calendar, press Menu > Calendars to be displayed. Select the tick box next to your
calendar and touch Calendars to be synced > OK.
Note: You will need to have added an account for each calendar that is shown.
© 2012 Vertu Corporation Limited. All rights reserved. 57

Connectivity
Connectivity
Warning: There may be restrictions on the use of WLANs and Bluetooth technology in some countries.
For more information, contact your local authorities.
Wi-Fi
> > > Wi-Fi
With Wi-Fi connectivity, you can connect to a Wi-Fi network for a faster internet connection to browse the
web, stream music and videos.
To turn Wi-Fi on, touch OFF and drag it to the right.
To turn Wi-Fi off touch ON and drag it to the left.
Connect to a Wi-Fi network
To connect to a new Wi-Fi network:
1.
Touch > Settin gs > Wi-Fi.
2.
Touch OFF and drag it to the right to turn on and touch SCAN.
If Wi-Fi is already on, and Wi-Fi networks are available, the Wi-Fi indicator is shown in the
status bar. Drag down the status bar and touch the Wi-Fi networks to select and connect to a
network.
3. Touch a network in the list, and then touch Con nect. You may need to enter Network SSID,
Security, and Password details. For these details, contact the network administrator.
4.
When connected the Wi-Fi indicator is shown in the status bar.
Note: Using a Wi-Fi connection is highly recommended as it reduces cellular data consumption.
Bluetooth
> > > Blueto oth
With Bluetooth connectivity, you can make a wireless connection to other compatible devices, such as
phones, computers, headsets, and car kits. You can use the connection to send items from your phone,
transfer files from your compatible PC, and print files with a compatible printer.
To turn Bluetooth on, touch OFF and drag it to the right.
To turn Bluetooth off touch ON and drag it to the left.
Connect a Bluetooth device
To connect with a new Bluetooth device, you need to pair with it.
© 2012 Vertu Corporation Limited. All rights reserved. 58

Connectivity
1. Make sure that the Bluetooth device you are going to pair with is in discoverable mode. For details,
see the user guide of the device.
2.
Touch > Settings > Bluetooth.
3.
Touch OFF and drag it to the right to turn on and scan. If Bluetooth is already on, touch SEARCH
FOR DEVICES.
4. Touch a device to connect. You may need to touch OK, or enter the device passkey to connect. For
details, see the user guide of the device.
5.
When connected the Bluetooth indicator is shown in the status bar.
Tip: Switch Bluetooth off when not in use to conserve battery power.
Warning: Obey all local laws. Always keep your hands free to operate the vehicle while driving.
Your first consideration while driving should be road safety.
Change your device name
You can change the name of your device.
1.
Touch > Settings > Bluetooth.
2.
Press Menu > Rename phone.
3. Enter new name and touch Rename.
Visible mode
To make your phone visible to other devices:
1.
Touch > Settings > Bluetooth.
2.
Touch your device name to make your phone visible for 2 minutes.
To change how long your phone is visible press Menu > Visibility timeout.
Set your phone to sync with your computer
Note: When you connect your phone for first time, your computer may prompt you that drivers are being
installed. Complete the driver installation.
1.
Connect the microUSB cable from your phone's microUSB connector to a USB connection on your
computer.
2.
From the home screen, check that appears in the status bar.
3. Drag the status bar down and touch Connected as a media device. Make sure the Media
device (MTP) or Camera (PTP) check box is ticked.
© 2012 Vertu Corporation Limited. All rights reserved. 59

Connectivity
4.
Follow the prompts on your computer to sync your digital media files.
When the sync has finished, disconnect the USB cable.
Note: Always use the Vertu microUSB cable, supplied with your phone.
Copy between the phone and a PC
Note: When you connect your phone for first time, your computer may prompt you that drivers are being
installed. Complete the driver installation.
1.
Connect the microUSB cable from your phone's microUSB connector to a USB connection on your
computer.
2.
From the home screen, check that appears in the status bar.
3. Drag the status bar down and touch Connected as a media device. Make sure the Media
device (MTP) check box is ticked.
4.
On your computer, navigate to the removable disk showing your phone and open the Internal
Storage.
5.
Drag and drop files between your computer and the phone Internal Storage folders, such as
"Music", "Pictures" or "Movies".
6. When you have finished, disconnect the USB cable.
NFC
Near Field Communication allows you to beam information (such as contacts, photos and browser pages)
by bringing your phone close to another NFC-capable device (typically back to back).
From the home screen, touch Apps > Settings > More... > NFC and make sure the check box is
ticked. Touch Apps > Settings > More... > Android Beam, touch OFF and drag it to the right.
To beam information:
1. Go to the screen that shows what you want to beam, such as a photo.
2.
Bring your phone and the other device close together (back to back).
3. When you see Touch to Beam, touch your phone's screen.
See "Recommended apps" on page 21 for details of other apps that use NFC.
Secure payment
The NFC feature in your VERTU Ti phone is SIM-based secure element compliant. This means that you
can use your phone for cashless, secure payments, provided that you have a suitable SIM card.
Contact your bank, credit card or network provider for more details about secure SIM cards.
© 2012 Vertu Corporation Limited. All rights reserved. 60

Phone management
Phone management
Free up phone memory
Your photos, videos, and other files are automatically stored in your phone’s internal memory.
Note: The total available internal memory is shared between system, application and user information
files.
To see the space available in your phone’s internal memory, from the home screen touch Apps >
Settings > Storage.
To free up space on your phone's internal memory remove unwanted files. Touch a storage category such
as Pictures, videos, touch and hold a folder or file, and then touch the trash can .
Tip: View your phone memory and cloud memory usage with the Vertu Certainty app. See "Vertu
Services" on page 23 for more information.
Optimise data usage
You can monitor the amount of data uploaded and downloaded by your phone, and you can set a limit on
your monthly data usage.
Note: Data usage information is provided to help you manage your usage. The way your service provider
measures data may not be measured in the same way so check your data charges with your service
provider.
> > > Data usage
To set a data usage warning drag the right side of the orange bar up/down to set your data warning level.
You will be sent a notification when the level set is reached.
To set a data usage limit, touch Set mobile data limit and then drag the right side of the red bar up or
down to set the data usage limit. You will be sent a notification when the level set is reached and your
mobile data will be automatically turned off.
Data roaming settings
To change your data roaming settings, from the home screen touch Apps > Settin gs > More... >
Mobile networks > Data roaming.
Note: You may incur significant data roaming charges, please check with your service provider.
© 2012 Vertu Corporation Limited. All rights reserved. 61

Phone management
Back up and restore phone
To backup your application data, Wi-Fi passwords and other settings, to Google servers touch Apps >
Settings > Backup & reset >.
To back up your Google account, touch Apps > Settings > Backup & reset > Backup
account.
To automatically restore your app settings and data when you reinstall an app, touch Apps >
Settings > Backup & reset > Automatic restore.
Set your phone to lock automatically
To set your phone to lock automatically, touch Apps > Settings > Security > Screen lock >
Lock type > Automatically lock. Then select how long after sleep mode you want to lock your phone.
Change your PIN code
To set your PIN code, from the home screen touch Apps > Settin gs > Security > Screen lock >
PIN. Enter your numerical PIN and then confirm it.
You will be prompted to enter the PIN to unlock your phone.
Access codes
PIN code (4-8 digits)
The PIN code protects your SIM against unauthorised use or is required to access some features. You can
set your phone to ask for the PIN code when you switch it on. If you enter the code incorrectly three times in
a row, you need to unblock the code with the PUK code. To change your PIN code, see "Change your PIN
code" on page 62.
PUK or PUK2 code (8 digits)
The PUK or PUK2 codes are required to unblock a PIN or PIN2 code. For PUK or PUK2 details, contact
your service provider.
IMEI number (15 digits)
The IMEI number is used to identify valid phones in the network. This number can also be used to block a
stolen phones. You may be required to give this number to Vertu Care services. To see your IMEI number,
from the home screen touch Apps > Settings > About phone > Status > IMEI.
Lock code (security code - minimum of 4 digits)
This helps you protect your phone against unauthorised use. You can set your phone to ask for the lock
code that you define. Keep the code secret and in a safe place, separate from your phone. If you forget the
© 2012 Vertu Corporation Limited. All rights reserved. 62

Phone management
code and your phone is locked, your phone will require service. Additional charges may apply, and all the
personal data in your phone may be deleted.
Master reset
To perform a master reset which returns your phone to the factory settings and erases all the data on the
phone, from the home screen touch Apps > Settings > Backup & reset > Factory data reset.
Warning: As all the data on your phone will be deleted, you may want to back up your data before
performing a master reset.
Find your lost phone
See "Recommended apps" on page 21 for a recommendation on apps that help to remotely lock, wipe or
find your phone.
© 2012 Vertu Corporation Limited. All rights reserved. 63

Tipsand tricks
Tips and tricks
General tips
l
To quickly view your most recently used apps, press and hold Menu .
l
To see recently dialled numbers, touch Phone > .
l
The pulse indicator constantly updates you on the status of your phone: white light = standby, blue
light = missed events, red light = mute or low battery and the green light = charging.
l
To edit the shortcuts in your favourites tray (bottom of the home screen), touch and hold a shortcut,
and then drag it in or out.
l
To put your phone in sleep mode, press the Power key. To wake your phone, press either the Power
key or Home .
l
To set when the screen goes to sleep after a period of inactivity, touch Apps > Settings >
Display > Sleep.
l
To quickly turn flight mode on or off, press and hold the Power key > Airplane mode.
l
l
To quickly access the phone settings from the home screen, press Menu > System settings.
Cut or Copy selected text
Touch icons at the top of the screen to Cut or Copy selected text. In a landscape display, touch Edit > Cut
or Copy.
Paste cut or copied text at cursor location Touch the Paste icon at the top of the screen. In a landscape
display, touch Edit > Paste.
Extend battery life
l
To turn off background data transfers, touch Apps > Settings > Data usage > Off.
l
To turn off Bluetooth™, touch Apps > Settings, and then drag the Bluetooth power switch
left.
l
To turn off Wi-Fi power, touch Apps > Settings, and then drag the Wi-Fi power switch left.
l
To reduce how often your phone checks for new emails in your mailbox, from within your email app
press Menu > Settings > Mailbox check frequency > time period.
l
To reduce screen brightness, touch Apps > Settings > Display > Brightness.
© 2012 Vertu Corporation Limited. All rights reserved. 64

FAQ's
FAQ's
FAQs
Do I need a Google account to use my phone?
You'll still be able to perform most of the functions on your phone without a Google account, like calling or
text messaging, but a Google account is highly recommended as it will give you access to the Google
Play™ Store and other web-based Google Mobile™ services.
How can I extend the battery life of my phone?
There are a number of ways you can maximise the battery life on your VERTU Ti phone:
l
Turn off background data transfers by touching Apps > Settings > Data usage > Off.
l
Turn off Bluetooth™ by touching Apps > Settings, and then dragging the Bluetooth power
switch left.
l
Turn off Wi-Fi power by touching Apps > Settings, and then drag the Wi-Fi power switch
left.
l
Reduce how often your phone checks for new emails in your mailbox, from within your email app
press Menu > Settings > Mailbox check frequency > time period.
l
Reduce the brightness of your screen by touching Apps > Settings > Display >
Brightness.
How can I reduce my data costs, especially when abroad?
You can disable mobile data by touching Apps > Settings, and then dragging the mobile data
power switch left.
How do I transfer music from my computer to my phone?
How do I setup an email account on my phone?
You can set up a number of different email accounts on your VERTU Ti phone: corporate email, Gmail or
personal email accounts.
To set up these accounts, touch Apps > Settings > Accounts & syn c > ADD ACCOUNT. Select
Corporate for Microsoft™ Exchange server work email accounts, Google for your Gmail accounts or
Email for your personal email accounts.
© 2012 Vertu Corporation Limited. All rights reserved. 65

FAQ's
How do I transfer contacts to my phone?
How do I transfer photos from my phone to my computer?
Firstly, connect the microUSB cable from your phone's microUSB connector to a USB connection on your
computer. The first time you do this your computer may prompt you that drivers are being installed.
Then, from the home screen, drag the status bar down and touch Connected as a media device. Make
sure the Media device (MTP) check box is ticked. Lastly, drag and drop files between the phone 'Music'
folder and your computer.
When you've finished, disconnect the USB cable.
How do I set my music as ringtone?
How do I change the font size on my phone?
How do I check if I have the latest software updates on my phone?
Why have I got no connectivity?
Why is my internal storage less than advertised?
How do I protect my phone from unauthorised use?
How do I find the IMEI number of my phone?
To find the IMEI number quickly, dial the sequence *#06# into your VERTU Ti phone. The unique 15-digit
IMEI code of your phone is instantly displayed. Write it down and keep it in a safe place so that you can find
it if your phone is misplaced or stolen.
You may need your IMEI number when you contact Vertu or your service provider.
Why does my phone get warm?
During extended operation, your VERTU Ti phone may feel warm. In most cases, this is normal. If you
suspect it is not working properly, take it to the nearest authorised service facility.
How do I know how much storage I have on my phone?
To view how much storage is available for use, touch Apps > Settings > Storage. The available
storage is shown in the internal phone storage section.
How do I set a photo as my wallpaper?
To set a photo you've taken as your new wallpaper, touch and hold an empty spot on one of your home
screen panels, then touch Gallery and select the photo. Depending on the size, you may be required to
crop the photo.
© 2012 Vertu Corporation Limited. All rights reserved. 66

Accessories
Accessories
Battery charger
The wall charger supplied with your VERTU Ti phone should be appropriate for your region. However, you
should always check that the electrical rating of the AC outlet is appropriate for the charger before you
attempt to plug it in.
The battery for your VERTU Ti phone requires charging at regular intervals. The battery does not have to be
completely discharged before you can charge it.
For information on how to charge your phone, see "Charge the phone" on page 12.
Other charging options
You can also charge the battery by using:
l
A compatible PC (this method also provides data connectivity).
l
Vertu Portable Power (see "Vertu Portable Power" on page 69)
l
Vehicle charger (see "Vehicle charger" on page 68)
Data cable
The USB data cable enables you to transfer data between your VERTU Ti phone and a compatible
computer.
© 2012 Vertu Corporation Limited. All rights reserved. 67

Accessories
Note: Three microUSB cables are supplied with your VERTU Ti phone: two microUSB cables 1200mm
(CA-209DV) and one microUSB cable 250mm (CA-210DV).
You can also use your phone as a modem for a PC to connect to the internet.
1. Connect the USB data cable to the micro USB connector of your VERTU Ti phone. Make sure the
cable is inserted correctly, with the USB symbol facing up.
2. Connect the cable to a USB port of the computer. The phone starts charging, and a number of
USB connection modes are available. Select from the following:
PC Suite — for use with PC Suite on a PC.
Mass storage — to transfer files between your phone and a PC using the standard file management
software.
Media transfer — to transfer audio or video files between yourVERTU Ti phone and a PC using the
standard music or video handling software.
Conn. PC to net — to use the phone as a modem for your PC, and connect to the internet.
When a mode is selected, it is shown as Active.
When mass storage mode is selected, you are not able to see or run applications that you have installed on
the internal memory card.
Vehicle charger
You can use your vehicle charger to charge your VERTU Ti phone battery quickly and safely from a
standard 12 or 24 volt (DC) vehicle cigarette lighter outlet.
1. Connect the microUSB cable to the microUSB connector of your VERTU Ti phone. Make sure the
cable is inserted correctly, with the USB symbol facing up.
© 2012 Vertu Corporation Limited. All rights reserved. 68

Accessories
2.
Connect the other end of the microUSB cable to the vehicle charger. Then, connect the vehicle
charger to the powered cigarette lighter outlet
The green indicator light illuminates to show that the charger is connected to the power outlet. A
confirmation message is displayed if your VERTU Ti phone is switched on. Some cigarette lighter
sockets are only powered when the vehicle ignition is switched on. The vibrating alert is disabled
while the charger is connected to your VERTU Ti phone.
3.
When the battery is fully charged, the battery charge indicator stops flashing. Disconnect the
microUSB cable from your VERTU Ti phone, the vehicle charger, and then from the cigarette
lighter outlet.
Only use the vehicle charger specifically designed for use with your VERTU Ti phone.
Never attempt to use a vehicle charger if it has been damaged.
The time taken to charge your battery depends on its existing charge. You can use your VERTU Ti phone
normally while it is charging, although this will increase the time to charge.
Vertu Portable Power
Your Vertu Portable Power pack allows you to charge the batteries in two compatible devices
simultaneously when you have no access to an external power source.
You can do the following either separately or simultaneously:
© 2012 Vertu Corporation Limited. All rights reserved. 69

Accessories
l
Charge your VERTU Ti phone using the integrated USB cable (up to one full charge).
l
Charge a compatible accessory, such as a Vertu Bluetooth headset, using the auxiliary USB power
output (up to one full charge).
l
Recharge your Vertu Portable Power pack.
Charge your VERTU portable power
1. Connect the USB cable provided between the charging port on the base of your Vertu Portable
Power pack and your power source (this can be the Vertu charger (AC-31) supplied with your
phone, or a compatible computer). When charging begins, successive charging indicator lights are
illuminated. Once all five lights are illuminated, your Vertu Portable Power pack is fully charged.
2. Disconnect your Vertu Portable Power pack from the power source.
Your Vertu Portable Power pack switches off automatically if no charging takes place for 10 seconds, or if it
automatically becomes discharged.
Use Vertu Portable Power to charge your VERTU Ti phone
1. To switch on your Vertu Portable Power pack, press and hold the Power button until the charging
indicator lights are illuminated.
2. Using the cable management lever, release the integrated USB cable.
3. Connect the USB cable to the microUSB connector on your VERTU Ti phone.
4. When charging is complete, disconnect your phone from the pack and re-house the cable.
To ensure optimum signal performance of your VERTU Ti phone, do not place your Vertu Portable Power
pack against your phone during calls.
© 2012 Vertu Corporation Limited. All rights reserved. 70

Accessories
Use Vertu Portable Power to charge a compatible accessory
1. Switch on your Vertu Portable Power. Press and hold the Power button until the charging indicator
lights are illuminated.
2. Connect the cable supplied with your accessory to the auxiliary USB power output on your Vertu
Portable Power pack.
3. When charging is complete, disconnect the accessory from the Vertu Portable Power pack.
In the unlikely event that the connected accessories draw excessive power from your Vertu Portable Power
pack, charging is suspended and the indicator lights flash. Disconnect the accessories and press the
Power button to reset your Vertu Portable Power pack.
Note: The surface of this device does not contain nickel in the platings. The surface of this device contains
stainless steel.
Wired stereo headset
Your VERTU Ti phone is supplied with a wired stereo headset, which includes a microphone. Connect this
to the headset connector of your VERTU Ti phone.
All the volume and music controls, and call handling functions, are contained within your VERTU Ti phone.
If you use the headset with a device other than your VERTU Ti phone, the 3.5 mm adaptor (supplied) may
be required.
© 2012 Vertu Corporation Limited. All rights reserved. 71

Specifications
Specifications
Dimensions
l
Volume: 199.5 cc
l
Weight: 181–201 g
l
Length: 130.4 mm
l
Width: 58.9 mm
l
Thickness: 12.8 mm
Power management
l
Rechargeable 1300 mAh Li-ion internal battery.
Operation times are dependent on the SIM card, network settings, and usage.
Connectivity
l
Quadband GSM 850/900/1800/1900 MHz
l
WCDMA Bands I, II, IV, V, VIII
Specifications
l
DC-HSPA+, Cat24, 42 Mb/s downlink, Cat6 5.76 Mb/s uplink
l
WLAN 802.11 a,b,g, n, inc WAPI for PRC
l
Micro USB system connector
l
3.5 mm audio socket
l
Bluetooth v4 + LE
l
NFC + SIM based secure element
l
WiFi hotspot (tethering and portable hotspot)
Hardware characteristics
l
3.7 inch WVGA landscape, brilliant, high-contrast display
l
8 MP main camera with AF and twin LED flash
l
2 MP Skype-compliant front camera
l
64 GB of internal memory
© 2012 Vertu Corporation Limited. All rights reserved. 72

l
A-GPS and Compass
l
Gyro and accelerometer for orientation and game play
Key features
l
Android ICS operating system
l
Personal, business, and Vertu mail, and Mail for Exchange compatibility with one
l
Auto synchronisation of Contacts and Calendar
l
Office attachment viewers: Quickoffice and Acrobat Reader
l
Blogging and social networking clients
l
Web browser
l
Widgets support
l
J2ME MIDP 2.0 support
l
Navigation with pre-loaded world maps
l
Audio/video player
l
FM radio
l
Dual Time Zone Location-Aware automatic clock
Specifications
l
Photo and video editors
l
Swype predictive text input
Accessories
l
Calf leather slip case
l
WH-3V V STEREO wired headset (right angled)
l
DC-15V portable power charger
l
AC-31 charger with three regional plug heads and charging cable
l
x2 CA-209DV (1200 mm) microUSB data cable
l
CA-210DV (250 mm) microUSB data cable
l
DC-30V car charger
l
Collateral pack, including Quick Start Guide, Warranty Booklet, Authenticity Card and Website
Information Card
© 2012 Vertu Corporation Limited. All rights reserved. 73

l
Polishing cloth
l
MicroSIM and nanoSIM card adaptors
Specifications
© 2012 Vertu Corporation Limited. All rights reserved. 74

Care of your phone
Care of your phone
General care
If your VERTU Ti phone, or any of the accessories are not working as they should, contact your Vertu
dealer.
l
Always use your Vertu VERTU Ti in the documented manner. Incorrect usage may affect
performance.
l
Do not attempt to open or disassemble your VERTU Ti phone. The only part you ever need to open
is the SIM door. Your VERTU Ti phone should only be serviced by Vertuauthorised personnel.
l
Do not mishandle or abuse your VERTU Ti phone.
l
Use only Vertu approved accessories.
l
The supplied chargers are only intended for use with your VERTU Ti phone. Do not use them with
any other device, as this could result in permanent damage to the phone, battery, or charger.
l
Keep your VERTU Ti phone and all parts and accessories out of the reach of small children and pets.
l
Do not allow your VERTU Ti phone or accessories to come into contact with liquids or moisture, or
dust and dirt.
l
Do not expose your VERTU Ti phone to extreme temperatures, as these may cause the battery to
stop working temporarily. Performance is particularly limited in temperatures well below freezing.
l
Do not apply paint or other similar substances to your VERTU Ti phone.
l
Only use a soft, clean cloth to clean your VERTU Ti phone. Do not use chemicals, detergents,
abrasive substances, or any liquids. Use a cotton swab to clean the camera lens.
Embroidery
Vertu recommends that you avoid the following:
l
Direct exposure to strong light, heat and humidity
l
Contact with items and substances that may stain or scratch the surfaces
If your VERTU Ti phone gets wet, it is essential that you dry it as soon as possible with a soft, absorbent
cloth.
Exotic leathers
Vertu recommends that you occasionally wipe the exotic leather in the direction of the scales with a slightly
damp soft cloth, avoiding excessive pressure.
© 2012 Vertu Corporation Limited. All rights reserved. 75

Care of your phone
l
If your phone accidentally gets wet, it is essential that you dry it as soon as possible with a soft,
absorbent cloth.
l
Direct exposure to strong light, heat and humidity should be avoided, as well as contact with items
and substances that may stain or scratch the surfaces.
l
Vertu recommends that you store your handset in the pouch provided when not in use.
Leather
Each piece of leather used by Vertu's craftsmen is unique. The natural markings present in the hide should
be considered part of the individuality of fine leather. All leather can be damaged and should be treated
with care.
Avoid the following:
l
Exposure to water and high humidity
l
Dropping, rubbing or knocking on hard surfaces
l
Exposure to extreme temperatures
l
Contact with oily substances, make-up and solvents
Non-precious metals
Vertu metals are finished to a high standard and care needs to be taken to maintain their appearance.
Avoid the following:
l
Contact with chemicals such as solvents, alkaline and acid solutions, cola-based drinks and
exposure to salt water. Wipe with a clean, soft cloth as soon as possible if contact occurs
l
Contact with sharp objects.
l
Dropping or knocking against hard surfaces
l
Metal polishes
Precious metals
Precious metals, such as gold and platinum, have a much softer composite and extra care must be taken
when handling a Vertu product containing these materials.
© 2012 Vertu Corporation Limited. All rights reserved. 76

Care of your phone
Precious stones
Precious stones are extremely hard and durable, but can be damaged if handled inappropriately. For
example, they can be broken, or their settings could be damaged, by a sharp impact on a hard surface,
causing the stone to become loose or fall out.
Care should also be taken to avoid contact with other jewellery such as diamond rings and diamond
earrings as they can cause abrasion and chipping of the stone or the setting. Reasonable care should be
taken to not catch the setting with threads which may bend the setting and loosen the stones.
We recommend that your Vertu phone is kept in a Vertu leather case when not being used, particularly
when placed in handbags and other luggage.
If the stones appear to become dull from use, the product can be lightly polished using the Vertu microfibre
polishing cloth.
Sapphire and ceramics
Sapphire and ceramics are very hard materials but are also brittle and can be scratched by harder materials
or objects. They can also be damaged if dropped.
Avoid the following:
l
Contact with other hard materials such as diamond jewellery, nail files, abrasives and mineral crystals
l
Dropping or knocking the product on hard surfaces
l
Repeated rubbing against hard surfaces
© 2012 Vertu Corporation Limited. All rights reserved. 77

Safety and warranty
Safety and warranty
Safety text
The sales package may contain several different products and parts (hereafter known collectively as the
“Product”), for example a phone with various chargers. The following simple guidelines are intended to
cover all products and parts. Not following the guidelines may result in risks to personal safety or data,
damage to the Product, or in non-compliance with legal requirements.
Medical considerations
The operation of radio transmitting equipment, including wireless phones, may interfere with the function of
inadequately protected medical devices. Consult a physician or the manufacturers of the medical devices
to determine whether they are adequately shielded from external RF (Radio Frequency) energy.
Manufacturers of medical devices recommend a minimum separation of 15.3 centimetres (6 inches)
between a wireless device and an implanted medical device, such as a pacemaker or implanted
cardioverter defibrillator. Persons who have such devices should also:
l
Not carry the phone in a breast pocket.
l
Hold the phone to the ear opposite the medical device.
l
Turn the phone off if there is any reason to suspect interference.
l
Follow the manufacturer’s instructions for the implanted medical device.
If you have any questions about using your wireless device with an implanted medical device, consult your
health care provider.
To prevent possible hearing damage, do not listen at high volume levels fo r
long periods. Wh en yo u u se th e headset, your ability to hear outside sounds
may be affected. Do not use the headset where it can endanger your safety.
Listen to the headset at a mo derate level, and do not hold the device near you r
ear when th e loudspeaker is in use.
HAC Hearing Aid Compatibility (HAC) for digital handsets
Your phone complies with FCC (Federal Communications Commission) rules governing hearing aid
compatibility. Some wireless devices may interfere with some hearing aids. For full hearing aid
compatibility, you should turn off the Bluetooth connectivity.
FCC’s wireless hearing aid compatibility rules ensure that consumers with hearing loss are able to access
wireless communications services through a wide selection of handsets without experiencing disabling
radio frequency (RF) interference or other technical obstacles.
© 2012 Vertu Corporation Limited. All rights reserved. 78

Safety and warranty
To define and measure the hearing aid compatibility of handsets, FCC references ANSI C63.19 2007
version and 2011 version; ANSI C63.19 standard specifies testing procedures for determining the M-rating
and T-rating of the digital handsets.
A handset is considered hearing aid-compatible for acoustic coupling if it meets a rating of M3 or M4, under
the ANSI C63.19.A handset is considered hearing aid-compatible for inductive coupling if it meets a rating
of T3 or T4, under ANSI C63.19. (Not all hearing-aids have telecoil inside.) This device was tested
according to ANSI C63.19 2007 version, and this meets the M3 rating.
This phone has been tested and rated for use with hearing aids for some of the wireless technologies that it
uses. However, there may be some newer wireless technologies used in this phone that have not been
tested yet for use with hearing aids. It is important to try the different features of this phone thoroughly and
in different locations, using your hearing aid or cochlear implant, to determine if you hear any interfering
noise. Consult your service provider or Vertu Customer Service for information on hearing aid compatibility.
If you have questions about return or exchange policies, consult Vertu Customer Service.
Switch off the phone in restricted or dangerous areas
Switch the phone off when mobile phone use is not allowed or when it may cause interference or danger,
for example near medical equipment, fuel, chemicals, or blasting areas.
Flight profile when travelling
Unless specifically requested to turn the phone off, you can select the Flight (offline) profile, which means
that you cannot make or receive any calls, or use other features that require cellular network coverage. You
can, however, still make emergency calls.
Use in vehicles
Radio signals may affect improperly installed or inadequately shielded electronic systems in motor vehicles
such as electronic fuel injection, electronic anti-lock braking, electronic speed control, and air bag systems.
For more information, check with the manufacturer of your vehicle or its equipment.
Only qualified personnel should install the phone in a vehicle. Faulty installation or service may be
dangerous and may invalidate your warranty. Check regularly that all wireless device equipment in your
vehicle is mounted and operating properly. Do not store or carry flammable liquids, gases, or explosive
materials, in the same compartment as the phone, its parts, or accessories. Remember that air bags inflate
with great force, so do not place your phone or accessories in the air bag deployment area.
Keep the product away from children
Keep your Product and all parts and accessories out of the reach of small children and pets. Failure to do
this may endanger them and invalidate your Warranty.
Road safety comes first
Obey all local laws. Always keep your hands free to operate your vehicle while driving. Your first
consideration should be road safety.
© 2012 Vertu Corporation Limited. All rights reserved. 79

Safety and warranty
Qualified service
Only qualified personnel may install or repair the Product.
Batteries, chargers and other accessories
If the Product has an internal battery, this is intended to be rechargeable and non removable, being
intended for use when supplied with power from the Vertu Mains charger (AC-31), or from a suitable
computer. Do not attempt to remove the battery, as you may damage it.
The full performance of a new battery is achieved only after two or three complete charge and discharge
cycles. The battery in a device can be charged and discharged hundreds of times, but it will eventually wear
out. When you believe that the performance of the device has deteriorated (for example, when the talk and
standby times on the phone are noticeably shorter than normal), replace the battery if it is removable, or, if it
is non-removable, take the associated device to the nearest authorised service facility. If the Vertu Portable
Power is supplied as or with the Product, this switches off automatically if no charging takes place for
approximately 10 seconds, or if it automatically becomes discharged. If the devices connected to the
Portable Power should ever draw excessive power from it, charging is suspended and the LEDs flash. In
this event, disconnect the devices and press the power button to reset the Vertu Portable Power.
Use th e battery on ly for its intended purpose.
Never use any charger or battery that is damaged.
Use on ly Vertu-approved batteries, and recharge your batt ery only with Vertu approved
chargers designated for the device.
Use of an unapproved battery or charger may result in a risk of fire, explosion, leakage, or
oth er hazard. Do not connect other, incompatible devices to the chargers.
When your ch arger is not in use, un plug it from the electrical plug and the device. Do not
leave a fully charged battery con nected to a charger, as overcharging may shorten the
battery’s lifetime.
Do not dismantle, cut, open, crush, bend, deform, puncture, or shred cells or batteries. In the event of a
battery leak, do not allow the liquid to come in contact with the skin or eyes. In the event of such a leak,
flush your skin or eyes immediately with water, or seek medical help.
Do not modify, remanufacture, attempt to insert foreign objects into the battery, or immerse or expose it to
water or other liquids. Improper battery use may result in a fire, explosion, or other hazard. If the device or
battery is dropped, especially on a hard surface, and you believe that the battery has been damaged, take
it to the nearest service facility for inspection before continuing to use it. If the phone battery has not been
used for a long time, then, in order to begin charging it again, you may need to connect the charger, and
then disconnect and reconnect it. If the battery is completely discharged, it may take several minutes
before the charging indicator appears on the display or before any calls can be made.
Keep your device dry
Your Product is not fully water-resistant, so keep it dry.
© 2012 Vertu Corporation Limited. All rights reserved. 80

Safety and warranty
SIM card
Do not use a mini-UICC SIM card, also known as a micro-SIM card, a micro-SIM card with an adapter, or a
SIM card that has a mini-UICC cutout. The use of an incompatible SIM card may damage the card or the
phone, and may corrupt data stored on the card.
IMEI number and compliance number
To find the IMEI number, dial the sequence *#06# into the phone. The unique 15-digit IMEI code of your
phone is instantly displayed. Write it down and keep it in a safe place so that you can find it if your phone is
misplaced or stolen. You can also find the IMEI number by checking the compliance label (refer to the
phone’s reference manual to locate this label).
WLAN
Use encryption to increase the security of your WLAN connection.
AV connector
Do not connect products that create an output signal as this may cause damage to the phone. Do not
connect any voltage source to the AV connector. If you connect an external device or headset, other than
those approved by Vertu, pay special attention to volume levels.
Camera flash
Keep a safe distance when using the flash in the camera. Do not use the flash on people or animals when
they are at close range. Do not cover the flash while taking a picture.
Protect your phone from harmful content
Your phone may be exposed to viruses and other harmful content. Take the following precautions:
l
Be cautious when opening messages. They may contain malicious software or otherwise be harmful
to your phone or computer.
l
Be cautious when accepting connectivity requests, browsing the internet, or downloading content.
l
Do not accept Bluetooth connections from sources that you do not trust.
l
Only install and use services and software from sources that you trust and that offer adequate
security and protection.
l
Install anti-virus and other security software on your phone and any connected computer. Only use
one anti-virus application at a time (using more may affect the performance and operation of the
phone and/or computer).
l
If you access pre-installed bookmarks and links to third party internet sites, take the appropriate
precautions. Vertu does not endorse or assume liability for such sites.
Bluetooth hidden mode
Operating the phone when Bluetooth Visibility is set to Hidden is a safer way to avoid malicious software.
Alternatively, switch off the Bluetooth function completely (this does not affect other functions on the
© 2012 Vertu Corporation Limited. All rights reserved. 81

Safety and warranty
phone).
Magnetic fields
Keep your phone away from magnets or magnetic fields.
Antennae
Avoid touching the antennae unnecessarily while they are transmitting or receiving. Contact with the
antennae affects the communication quality and may cause a higher power level during operation and
reduce battery life. To ensure optimum signal performance of your phone, you are advised not to place the
Vertu Portable Power against it during calls.
Backups
To keep your important data safe, store it in at least two separate places, such as on your phone and on
your PC.
It is particularly im portant to carry out a backu p prior to repair or replacement of the
Product because content and data may be lost du ring these operations.
Digital rights management (DRM)
When using the phone, you are required to obey all laws and respect local customs, privacy and the
legitimate rights of others, including copyrights. Copyright protection may prevent you from copying,
modifying, or transferring images, music, and other content.
Additional care and maintenance
The Product in the sales package contains one or more sophisticated electronic devices. Vertu therefore
strongly encourages you to familiarise yourself with the instructions provided with and for these devices.
To help protect your Warranty coverage, you should observe both the preceding “SAFETY TEXT” and the
following:
l
Always use your Product in the documented manner.
l
Your Product contains high precision displays, camera lenses and other such parts, so handle them
with great care to avoid scratching or otherwise damaging them.
l
Do not attempt to remove any fixed internal battery or memory card.
l
Keep the Product free of dust and dirt.
l
Do not expose the Product to extreme temperatures, as these may cause the battery to stop working
temporarily. Performance is particularly limited in temperatures well below freezing.
l
Do not mishandle or abuse the Product.
l
Do not paint the Product.
© 2012 Vertu Corporation Limited. All rights reserved. 82

Safety and warranty
l
Only use a soft, clean cloth to clean your Product. Do not use chemicals, detergents, abrasive
substances, or any liquids. Use a cotton swab to clean the phone’s camera lens.
Specific phone care
l
Avoid scratching the phone screen. Never use a pen, pencil, or other sharp object, on it.
l
In order to protect the ceramics and sapphire, do not drop, knock, or rub your phone on or against
hard surfaces. In particular, avoid contact with hard materials such as diamond jewellery, nail files,
abrasives, and mineral crystals.
l
All leather can be damaged and should be treated with care. Therefore, in addition to the avoidance
of extreme temperatures or water and high humidity, avoid contact with oily substances, make-up,
and solvents.
l
Do not allow the metals on the phone to come into contact with sharp objects, metal polishes, and
chemicals such as solvents, alkaline and acid solutions, cola-based drinks, and salt water. If contact
occurs, wipe the surface with a clean, soft cloth as soon as possible.
Manufacturer's Limited Warranty
This Limited Warranty replaces all other Vertu warranties and liabilities, whether oral,
written, (n on-mandatory) statutory, cont ractual, in tort or otherwise, inclu ding, withou t
limitation, and where permitted by applicable law, any implied conditions, warranties or
oth er terms as to satisfactory quality or fitness fo r purpose. However, this Limited
Warranty shall neither exclude nor limit: i) any of your legal (statutory) rights under the
applicable national laws; or ii) any of your right s again st the seller of the Product
Vertu warrants to you, the Purchaser of the Product, that, during the warranty period, Vertu, or a Vertuauthorised service company, will, in a commercially reasonable time, remedy defects in materials, design
and workmanship free of charge, by repairing or, should Vertu in its discretion deem it necessary, replacing
the Product in accordance with this Limited Warranty (unless otherwise required by law).
.
Warranty periods
The Warranty starts at the time of the original purchase of the Product by the first end user. Different
individual products and parts within the overall Product may be covered by different Warranty periods. The
different possible Warranty periods are:
a. Twenty-four (24) months for the mobile phone, and any fixed battery inside it.
b. Twelve (12) months for all batteries other than those listed at a) (whether they are included as
replaceable items in the mobile phone sales package, fixed inside an accessory, or sold
separately).
c. Twelve (12) months for all other accessories not listed above.
As far as your national laws permit, the particular Warranty period will not be extended or renewed, or
otherwise affected due to subsequent resale, Vertu-authorised repair, or replacement of the Product.
However, any part repaired or product replaced during the Warranty period will be warranted from any
© 2012 Vertu Corporation Limited. All rights reserved. 83

Safety and warranty
defect for 12 months from the date of repair, or for the remainder of the original Warranty period, whichever
is the longer.
How to get warranty service
If you wish to make a claim under this Limited Warranty, please return your Product, or the affected part (if it
is not the entire Product), to a Vertu-authorised service company. For further details on how to make a
claim, you can contact a Vertu call centre (national or premium rates may apply). (Information about Vertuauthorised service companies and call centres can be found in the sales package, or on local Vertu web
pages, where available.)
Any claim under this Limited Warranty is subject to you notifying Vertu, or a Vertu authorised service
company, of the alleged defect within a reasonable time of it having come to your attention, and in any
event no later than the expiry date of the Warranty period.
When making a claim under this Limited Warranty, you will be required to provide: a) the affected Product
(or the affected part); and b) the original proof of purchase, clearly indicating the name and address of the
seller, the date and place of purchase, the Product type, and the IMEI or other serial number.
What is not covered?
1. This Limited Warranty does not cover user manuals or any third party software, settings, content,
data or links, whether included or downloaded in the Product, whether included during installation,
assembly, shipping or at any other time in the delivery chain or otherwise and in any way acquired
by you. By using such a third party application, you acknowledge that the application is provided as
is. Vertu does not warrant that any Vertu software will work in combination with any hardware or
software provided by a third party, that the operation of any software will be uninterrupted or errorfree, or that any defects in the software are correctable or will be corrected.
2. A third party/independent operator provides the SIM card and cellular and/or other network or
system on which the Product operates. Therefore, Vertu will not accept responsibility under this
Limited Warranty for the operation, availability, coverage, services or range of the cellular or other
network or system. Before Vertu or a Vertu-authorised service company can repair or replace the
Product, the operator may need to unlock any SIM-lock or other lock that may have been added to
lock the Product to a specific network or operator. In such situations, please first ask the operator to
unlock your Product.
3. This Limited Warranty does not cover: a) normal wear and tear (including, without limitation, wear
and tear of camera lenses, batteries or displays); b) defects caused by rough handling (including,
without limitation, defects caused by sharp items, by bending, compressing or dropping, etc.); c)
defects or damage caused by misuse of the Product, including use that is contrary to the
instructions provided by Vertu ( for example, as set out in the Product’s user guide), and/or d) other
acts beyond the reasonable control of Vertu.
4. This Limited Warranty does not cover defects or alleged defects caused by the fact that the Product
was used with, or connected to, any product, accessory, software and/or service not
manufactured, or supplied by Vertu, or was used other than for its intended purpose. Defects can
be caused by viruses from your, or from a third party’s, unauthorised access to services, other
accounts, computer systems or networks. Such unauthorised access can take place through
hacking, password mining or through a variety of other means.
© 2012 Vertu Corporation Limited. All rights reserved. 84

Safety and warranty
5. This Limited Warranty does not cover defects caused by the fact that the battery has been shortcircuited, or by the fact that the seals of the battery enclosure or the cells are broken or show
evidence of tampering, or by the fact that the battery has been used in equipment other than that
for which it has been specified. This Limited Warranty is not enforceable if the Product has been
opened, modified or repaired by anyone other than an authorised service centre, if it is repaired
using unauthorised spare parts, or if the Product’s serial number, the mobile accessory date code,
or the IMEI number, has been removed, erased, defaced, altered or are illegible in any way. This
shall be determined by the sole discretion of Vertu.
6. This Limited Warranty is not enforceable if the Product has been exposed to moisture, to extreme
thermal or environmental conditions ( or to rapid changes in such conditions), to corrosion,
oxidation, spillage of food or liquid, or to influence from chemical products.
Limitations of Vertu's liability
This Limited Warranty is your sole and exclusive recourse against Vertu, and the only and exclusive liability
of Vertu in respect of defects in your Product.
To the extent permitted by applicable law(s), Vertu does not assume any liability for loss of or damage to or
corruption of data, for any loss of profit, loss of use or functionality of the Product, loss of business, loss of
contracts, loss of revenues or of anticipated savings, increased costs or expenses or for any indirect loss or
damage, consequential loss or damage, or special loss or damage. To the extent permitted by applicable
law(s), Vertu´s liability shall be limited to the purchase value of the Product. The above limitations shall not
apply in cases of gross negligence or intentional misconduct of Vertu, or in case of death or personal injury
resulting from Vertu’s proven negligence.
Other important warranty notices
The availability of products, features, applications, and services may vary by region. For more information,
contact your nearest Vertu-branded store or Vertu-authorised service company.
All wireless devices may be susceptible to interference, which could affect performance.
Vertu is not responsible for any radio or TV interference caused by unauthorised
modification s to this equipm ent. Such modifications could void your authority to operate
the equipment.
Reverse engineering of software in the Product is prohibited to the extent permitted by applicable law.
Insofar as this document contains any limitations on Vertu’s representations, warranties, damages and
liabilities, such limitations shall likewise limit any representations, warranties, damages and liabilities of
Vertu’s licensors.
Vertu, in a manner consistent with the provisions of section “Limitations of Vertu’s liability” above, shall not
under any circumstances be liable, either expressly or by implication, for any damages or losses of any kind
whatsoever resulting from loss of, damage to, or corruption of, content or data during repair or replacement
of the Product.
© 2012 Vertu Corporation Limited. All rights reserved. 85

Safety and warranty
All parts of the Product or other equipment that Vertu has replaced shall become the property of Vertu. If
the Product is found not to be covered by the terms and conditions of this Limited Warranty, Vertu and its
authorised service companies reserve the right to charge a handling fee.
When repairing or replacing the Product, Vertu may use products or parts that are new, equivalent to new,
or reconditioned.The Product may contain country- specific elements, including software. If the Product has
been re-exported from its original destination country to another country, the Product may contain some
country-specific elements that are not considered to be a defect under this Limited Warranty.
Software application notices for the phone
The services on the phone, for example Vertu Select, Vertu City Brief, Accurate Time and Dual-Time Zone,
require a data connection to send up-to-date information to your Vertu phone. If the connection cannot be
made, these features will be unavailable. You will need to contact your network service provider for
information on the availability of data connectivity when in your home network and when roaming onto
other networks.
Some applications on the phone, including those listed above, may connect to the internet automatically.
To prevent this, select the appropriate Connectivity settings on the phone and/or disable the services when
roaming.
Before installing updates on the phone, ensure that the phone can connect to the internet, and that the
phone battery has enough power (or connect the charger before starting the update).
If you install a software update, you cannot use the phone, even to make emergency calls, until the
installation has been completed and the device restarted.
Service or software upgrades may reset timers on the phone.
The existence of a certificate considerably reduces the risks involved in remote connections and software
installation. To benefit from increased security, certificates must be used correctly, and they must be
authentic or trusted. Certificates have a restricted lifetime. If they are expired or invalid, check that the
current date and time in your device are correct. Before changing any certificate settings, you must trust the
owner of the certificate and be sure that the certificate belongs to the listed owner.
Network support is required to indicate that a sent message has been received or read. However, this
information may not always be reliable.
You cannot use the voice recorder during a data call or when a GPRS/3G connection is open.
To listen to the radio, you need to attach a compatible headset to the phone. The headset acts as an
antenna.
Only compatible devices can receive and display multimedia messages.
If the item you inserted in a multimedia message is too large for the network, the phone may automatically
reduce the size.
Messages may look different in different devices.
© 2012 Vertu Corporation Limited. All rights reserved. 86

Safety and warranty
If your phone is able to provide over-the-air synchronisation with Microsoft Exchange ActiveSync-enabled
servers, the provision of this service does not grant you, and nor do you receive, any rights under any
Microsoft intellectual property with respect to any server software, or server device, that is accessed using
the phone, or with respect to the use of Microsoft Exchange ActiveSync outside of the phone.
When entering contacts or editing voice commands, do not use very short or similar names for different
contacts or commands.
Using voice tags may be difficult in a noisy environment or during an emergency, so yo u
should not rely solely upon voice dialling in every circumstance.
A cache is a memory location that is used to store data temporarily on the phone. If you have accessed, or
have tried to access, confidential information or a secure service requiring passwords, clear the cache after
each use.
The input methods and languages supported by handwriting recognition vary by region and may not be
available for all languages.
The availability and quality of GPS signals may be affected by your location, satellite positions, buildings,
natural obstacles, weather conditions and adjustments to GPS satellites made by the United States
government. GPS signals may not be available inside buildings or underground. Do not use GPS for
precise location measurement, and never rely solely on the location information provided by GPS and
cellular networks.
Coordinate information may not be available in all regions.
Location information can be attached to an image or a video clip if location coordinates can be determined
via network and GPS. If you share an image or a video clip which has location information attached, the
location information may be visible to others that view the image or the video clip. You can deactivate such
geotagging in the camera settings.
Some location content is generated by third parties and not by Vertu. Some of this content may be
inaccurate and subject to local availability.
Almost all digital cartography is inaccurate and incomplete to some extent. Never rely solely on the
cartography that you download for use in this device.
The social networking services are third party services and are not provided by Vertu. They may not be
available in all countries. Check the privacy settings of the social networking service you are using as you
may be sharing your location and information with a large group of people. The terms of use apply to
sharing information on that service, and you should familiarise yourself with both the terms of use and the
privacy practices of the service.
DRM-protected content comes with an associated license that defines your rights to use the content.
Some licenses may be connected to a specific SIM card, and the protected content can be accessed only if
the SIM card is inserted in the phone.
© 2012 Vertu Corporation Limited. All rights reserved. 87

E321072 Y
3TDM
Safety and warranty
WLAN and Bluetooth restrictions
There may be restrictions on the use of WLANs and Bluetooth technology in some countries. For more
information, contact your local authorities.
Passive near field communication device
Your phone may contain a Passive Near Field Communication device. This device enables Vertu to verify
the authenticity of the phone if it is presented at a Vertu-branded store or Vertu-authorised service
company.
Certificates and Licences
The Vertu Portable Power is an UL-approved accessory.
The phone includes RSA BSAFE cryptographic or security protocol software from RSA
Security.
The phone uses Java™.
Java™ and all Java-based marks are trademarks or registered trademarks of Sun
Microsystems, Inc
The Bluetooth word mark and logos are owned by the Bluetooth SIG, Inc. and any use of such marks by
Vertu is under license.
Environmental
ROHS Statement
This Product does not contain any of the following substances, in accordance with EU RoHS (Reduction of
Hazardous Substances) Directive 2002/95/EC:
l
Lead
l
Hexavalent Chromium
l
Mercury
l
Polybrominated Biphenyls (PBB)
l
Cadmium
l
Polybrominated Diphenyl Ethers (PBDE)
© 2012 Vertu Corporation Limited. All rights reserved. 88

Safety and warranty
Nickel
The surface of this device does not contain nickel in the platings. The surface of this device contains
stainless steel.
EU recycling notice
Vertu complies with European Community requirements for the recycling of Waste Electrical
& Electronic Equipment (WEEE). Such compliance is indicated by the addition of the
crossed-out wheeled-bin symbol to the Product where appropriate. This symbol indicates
that the Product was put onto the market after the WEEE legislation was implemented, and
that the consumer should not dispose of the Product as normal household waste or unsorted
municipal waste, but that it should be appropriately recycled. Background information on the
European WEEE directive is available from
http://ec.europa.eu/environment/waste/weee/index_en.htm
If you want Vertu to recycle your Product at the end of its life, please either return it to the point from which
you purchased it (if known), or return it to Vertu’s headquarters. Alternatively, should you purchase a
replacement Product from another supplier, the new supplier is obliged to take back the original Product
and recycle it appropriately.
Never dispose of a device that has an internal battery fitted, in a fire, because the internal
battery may explode.
.
Export and controls
The Product may contain commodities, technology or software subject to export laws and regulations from
the US and other countries. Diversion contrary to law is prohibited.
Copyright and trademark notices
Copyright © Vertu 2011-2012. All rights reserved.
Vertu and the V logo are registered trademarks. Other product and company names mentioned herein
may be trademarks or registered trademarks of their respective owners.
Vertu operates a policy of continuous development. Therefore, Vertu reserves the right to make changes
and improvements to any of the products described in this document without prior notice.
Portions of the Nokia Maps software are © 1996-2012 The FreeType Project. All rights reserved.
This Product is licensed under the MPEG-4 Visual Patent Portfolio License (i) for personal and noncommercial use in connection with information that has been encoded in compliance with the MPEG-4
Visual Standard by a consumer engaged in a personal and non-commercial activity; and (ii) for use in
connection with MPEG-4 video provided by a licensed video provider. No license is granted or shall be
implied for any other use.
© 2012 Vertu Corporation Limited. All rights reserved. 89

Safety and warranty
Additional information, including that related to promotional, internal, and commercial uses, may be
obtained from MPEG LA, LLC. See http://www.mpegla.com.
If your phone has the Swype™ text input method, Swype™ and the Swype logos are trademarks of
Swype, Inc. © 2009-2012 Swype, Inc. All rights reserved.
The availability of particular products, features, applications, and services may vary by region. For more
information, contact Vertu Concierge.
SAR (Specific Absorption Rate) notice - RM828V
YOUR VERTU PHONE (MODEL: VERTU Ti, TYPE: RM-828V, FCC ID: P7QRM-828V)
MEETS GUIDELINES FOR EXPOSURE TO RADIO WAVES
Your phone is a radio transmitter and receiver. It is designed to not exceed the limits for exposure to radio
waves recommended by international guidelines. These guidelines were developed by the independent
scientific organization ICNIRP, and include safety margins designed to assure the protection of all persons,
regardless of age and health.
The exposure guidelines for mobile devices employ a unit of measurement known as the Specific
Absorption Rate, or SAR. The SAR limit stated in the ICNIRP guidelines is 2.0 Watts/kilogram (W/kg),
averaged over ten grams of tissue. Tests for SAR are conducted using standard operating positions, with
the device transmitting at its highest certified power level in all tested frequency bands. The actual SAR
level of an operating device can be below the maximum value because the device is designed to use only
the power required to reach the network. That amount changes depending on a number of factors, such as
how close you are to a network base station. The highest SAR value under the ICNIRP guidelines for use
of the device at the ear is 0.585 W/kg. This phone meets RF exposure guidelines when used either in the
normal use position against the ear or when positioned at least 15 mm (5/8 inch) away from the body.
When a carry case, belt clip or holder is used for body-worn operation, it should not contain metal, and
should position the phone at the above-stated distance away from your body.
In order to transmit data files or messages, this device requires a good quality connection to the network. In
some cases, transmission of data files or messages may be delayed until such a connection is available.
Ensure that the above separation distance instructions are followed until the transmission is completed.
Use of phone accessories and enhancements may result in different SAR values. SAR values may vary
depending on national reporting and testing requirements and the network band. Additional SAR
information may be provided under Product information at www.vertu.com.
USA and Canada
Your phone is also designed to meet the requirements for exposure to radio waves established by the
Federal Communications Commission (USA) and Industry Canada. These requirements set a SAR limit of
1.6 W/kg, averaged over one gram of tissue. The highest SAR value reported under this standard during
Product certification for use at the head is 0.83 W/kg, and when properly worn on the body (10 mm gap) is
1.38 W/kg.
© 2012 Vertu Corporation Limited. All rights reserved. 90

VERTU Ti
RM-828V
Safety and warranty
Your phone may cause TV or radio interference (for example, when using the phone in close proximity to
receiving equipment). The FCC or Industry Canada can require you to stop using your phone if such
interference cannot be eliminated. If you require assistance, contact Vertu Concierge. The Product(s)
complies with Part 15 of the FCC rules.
Operation is subject to the following two conditions: (i) the Product(s) may not cause harmful interference,
and (ii) the Product(s) must accept any interference received, including interference that may cause
undesired operation. Any changes or modifications not expressly approved by Vertu could void the user’s
authority to operate this equipment.
This Class B digital apparatus complies with Canada ICES-003.
Declaration of Conformity
We, Vertu, declare under our sole responsibility that the following are in conformity
with the provision of Council Directive 1999/5/EC: Model VERTU Ti, type RM828V; Model Vertu V Collection Wired Headset HS-3V; Model Vertu Portable
Power, type DC-15V; and USB data cable, types CA-209DV and CA-210DV. A
copy of the Declaration of Conformity can be found at
http://www.vertu.com
.
© 2012 Vertu Corporation Limited. All rights reserved. 91

 Loading...