

Vertu RM-582V User Manual

Constellation Quest 3
Contents
Vertu package contents 3
Reference Manual 3
Networks 3
Using your Vertu phone 4
Set up your device 7
Vertu Startup Wizard 10
User interface 11
Home Key 16
My Key 17
Dedicated keys 17
Menu 19
Making a call 21
Log 22
Calendar 22
Email 23
Contacts 26
Messaging 26
Web browser 27
Maps 28
Camera 29
Vertu Services 30
Network destinations 31
User Assistance 32
SD card 32
Connecting to a PC 32
Vertu Wired Headset 3 3
Maintenance and Safety 33
Health and safety information 34
About your phone 36
Battery 37
Manufacturer’s limited warranty 37
SAR Notice – RM-582V 39
FCC/Industry Canada notice 40
Declaration of conformity 41
Export controls 41
Notices 41
Licenses 41
EU recycling notice 42
3

Constellation Quest
Constellation Quest is an extension to the Vertu Constellation product
family, bringing you an elegant Vertu phone with classical styling and a
timeless feel.
Constellation Quest is an easy to use smartphone offering extensive email
capabilities for both business and personal use. It contains a first class
web browser with easy navigation, high resolution display and with
immediate access to information services. Your calendar, contacts and
tasks can be synchronised across multiple devices, ensuring all your data
is kept up to date. Constellation Quest contains a powerful mapping
application that provides you with navigating and positioning capabilities.
In essence, Constellation Quest is a powerful up to date smartphone,
which comes with the benefits of Vertu’s services such as Concierge,
Technical Support, City Brief, Vertu Select and your own @Vertu.Me email
together with personal information storage.
Vertu package contents
• 1 Constellation Quest phone
• 2 x Battery: BP-4LV (Li-lon)
• 1 32 GB micro SD Memory Card
• Micro USB wall charger (Multi-region) - AC31
• 2 x Micro USB - USB data cables (one each for data connection and
charger) - CA101V
• AV cable - CA-163V
• 1 V Collection wired stereo headset
• User documentation pack
• Polishing cloth
The package contents may vary slightly in accordance with regional
regulations.
Reference Manual
Throughout this guide we mention the Reference Manual which contains
detailed information about your Vertu phone’s functionality. There is an
electronic copy on the SD card supplied with your Vertu phone. There is
also a copy of the guide on the website which you can look at.
Networks
To use your Vertu phone you must subscribe to a service from a wireless
service provider. Your service provider will be able to tell you about the
services that are available and the charges that apply.
This wireless phone is approved for use on WCDMA Bands I, II, V, VI,
EGSM 900, GSM 850/1800/1900 networks.
Conventions used in this guide
WARNI NG : Indicates important information relating to safety.
IMPORTANT: Indicates important information not relating to
safety.
NOTE: Indicates a point to be aware of when using your Vertu
phone.
TIP: Indicates a point to be aware of when using your Vertu
phone.
Menu
Represents text that appears on your Vertu phone’s display, for
example, “From the Home screen, select Menu”.
4

Using your Vertu phone
To start using your Vertu phone as quickly as possible, please read through
the following.
Charger
The charger supplied with your phone should be appropriate for your
region. However, you should always check that the electrical rating of the
AC outlet is appropriate for the charger before you attempt to plug it in.
WARNING: Never attempt to use a charger if it has been
damaged. Contact Vertu Technical Support to obtain a
replacement.
Battery
WARNI NG : Never dispose of batteries in a fire.
Always dispose of batteries according to local regulations.
Please recycle when possible. Do not dispose of batteries as a
household waste.
The full performance of a new battery is achieved only after two or three
complete charge and discharge cycles. The battery can be charged and
discharged hundreds of times but it will eventually wear out. If you notice
that the talk and stand-by times are much shorter than normal, you may
need a new battery. Contact Technical Support to obtain a Vertu approved
battery.
Charging the battery
The battery for your Vertu phone is rechargeable and requires charging at
regular intervals.
WARNING: Only use the approved charger and battery
designed specifically for your phone.
If your phone is not charging, try the following:
• Disconnect the charger from the AC outlet.
• Check that the electrical rating of the AC outlet is compatible with your
charger.
• Verify that the AC outlet has power and that it is switched on. For
example, in many hotel rooms, AC outlets are used for lighting and may
be switched on and off from remote locations in the room.
• Wait for at least 10 seconds and then reconnect the charger to the AC
outlet.
• Use another nearby AC outlet that you know is providing power.
• If charging still fails, contact Vertu Technical Support for further
assistance.
Charging and discharging
When not charging, do not leave your Vertu phone connected to a charger.
The battery does not have to be completely discharged before you can
recharge it. Overcharging the battery may shorten its lifetime. If left
unused, a fully charged battery will lose its charge over time. Temperature
extremes can affect the ability of your battery to charge.
5
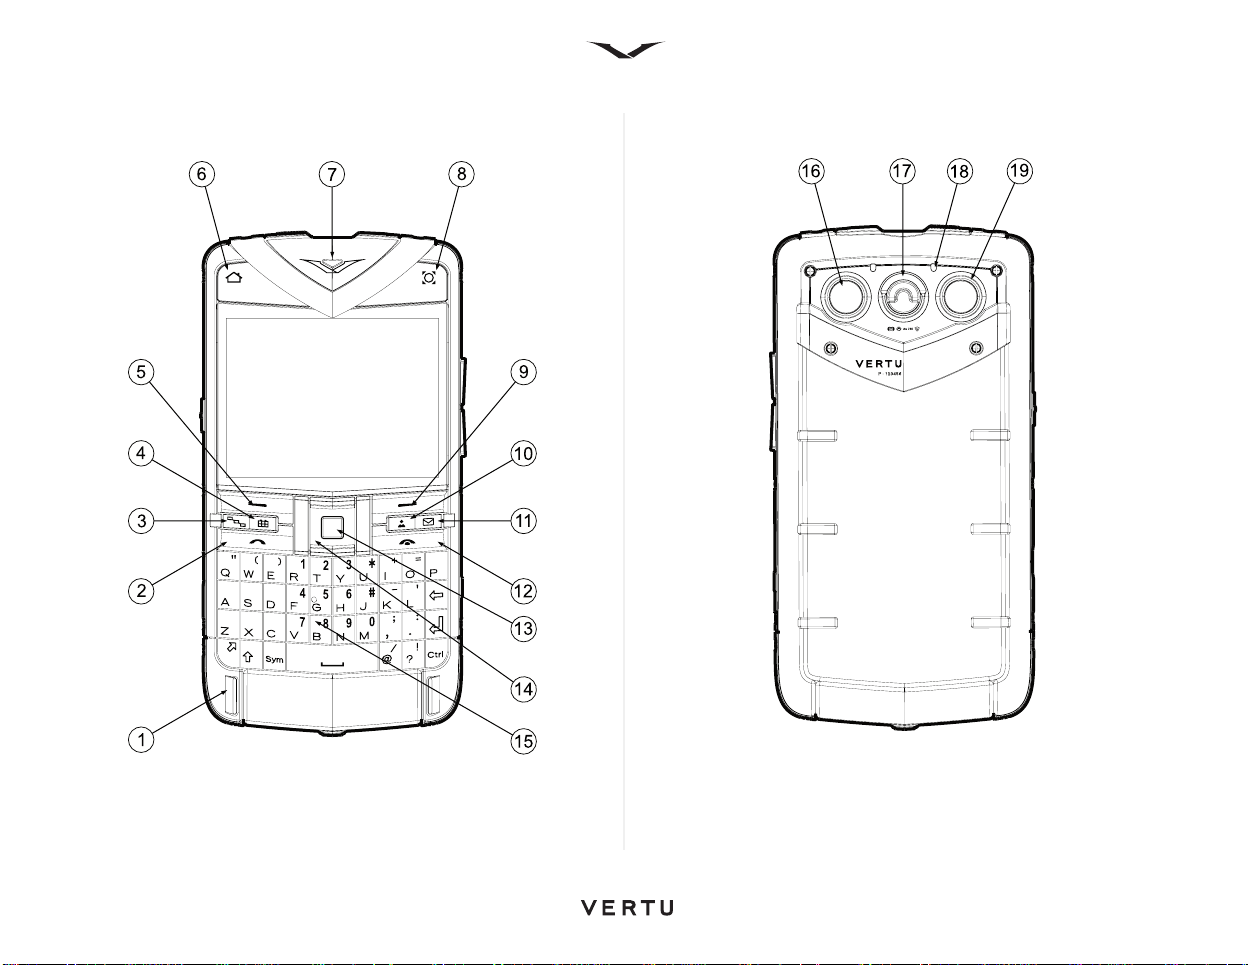
Vertu phone layout - front Vertu phone layout - back
6
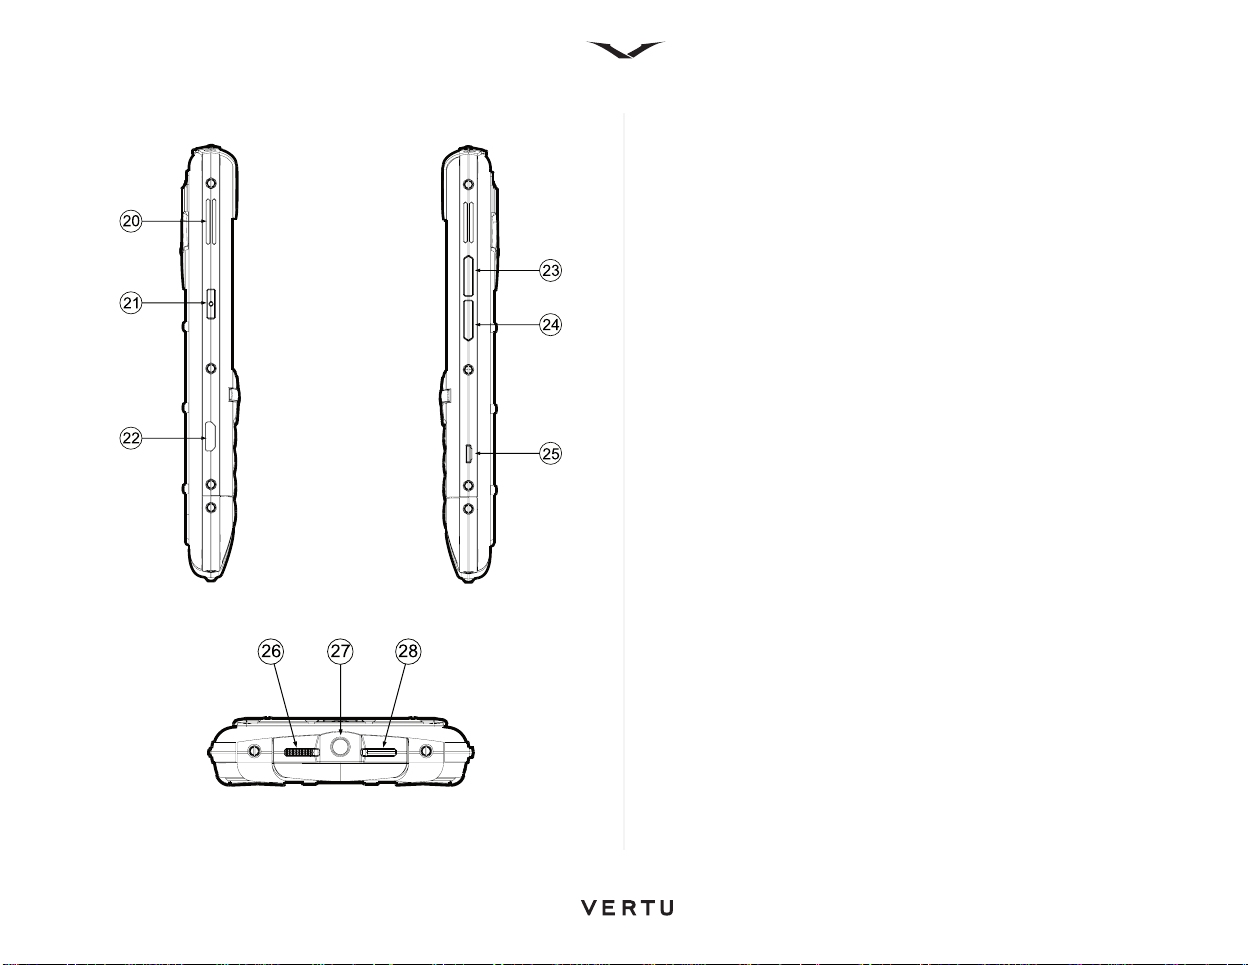
Vertu phone - left and right view
Top view
Keys
Label No. Keys
1Microphone
2Call key
3Menu
4Calendar
5Left Select key
6Home key
7Earpiece
8My Key
9 Right Select key
10 Contacts
11 Email
12 End key
13 Middle Select key
14 Scroll keys (four way)
15 QWERTY keyboard
16 Camera
17 D-ring release for back cover
18 Secondary microphone
19 Flash / Torch
20 Loudspeaker
21 Vertu Concierge key
22 USB port
23 Volume increase
24 Volume decrease
25 Strap attachment point
26 Keypad lock
27 3.5 mm audio socket
28 Power key
7
Set up your device
Inserting the SIM card and battery
WARNI NG : Always switch the phone off and disconnect the
charger before touching the battery.
WARNI NG : Keep SIM card out of reach of small children.
IMPORTANT: The SIM card and its contacts are easily
damaged. Be careful when handling, inserting or removing the
SIM card.
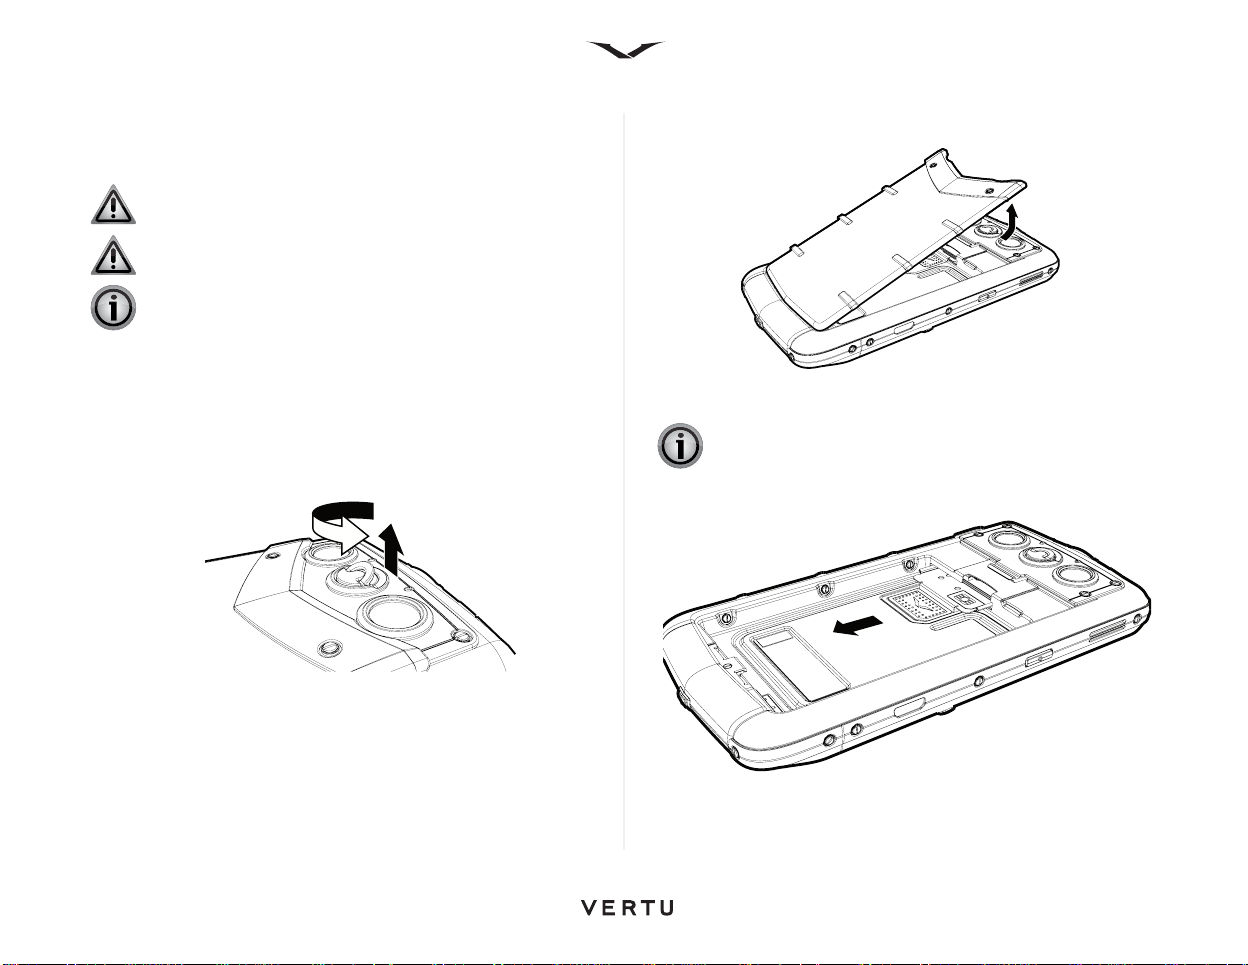
Removing the back cover
With the back of the Vertu phone facing you, lift the D-ring with your finger
nail.
Hold the D-ring between your thumb and forefinger and turn it anticlockwise a quarter of a turn until the cover pops open.
Gently lift off the back cover as shown.
Inserting the SIM card
IMPORTANT: Always switch the phone off before inserting or
removing the USIM/SIM card.
Slide the SIM card tray backwards.
8

Insert the SIM card into the SIM card tray, ensuring that the bevelled corner
is located at the bottom right and the gold contact area is facing upwards.
Slide the SIM card holder back into the body of the phone until it is fully
inserted.
Inserting the memory card
IMPORTANT: Always switch the phone off before inserting or
removing a memory card.
Insert the memory card into the slot just above the SIM card tray, ensuring
that the gold contacts are facing downwards. Avoid touching the contacts
of the memory card.
Push the card completely so that it locks into position. To retrieve the
memory card, push the card further into the slot, it will unlock and slide out
to make it easy to remove.
9
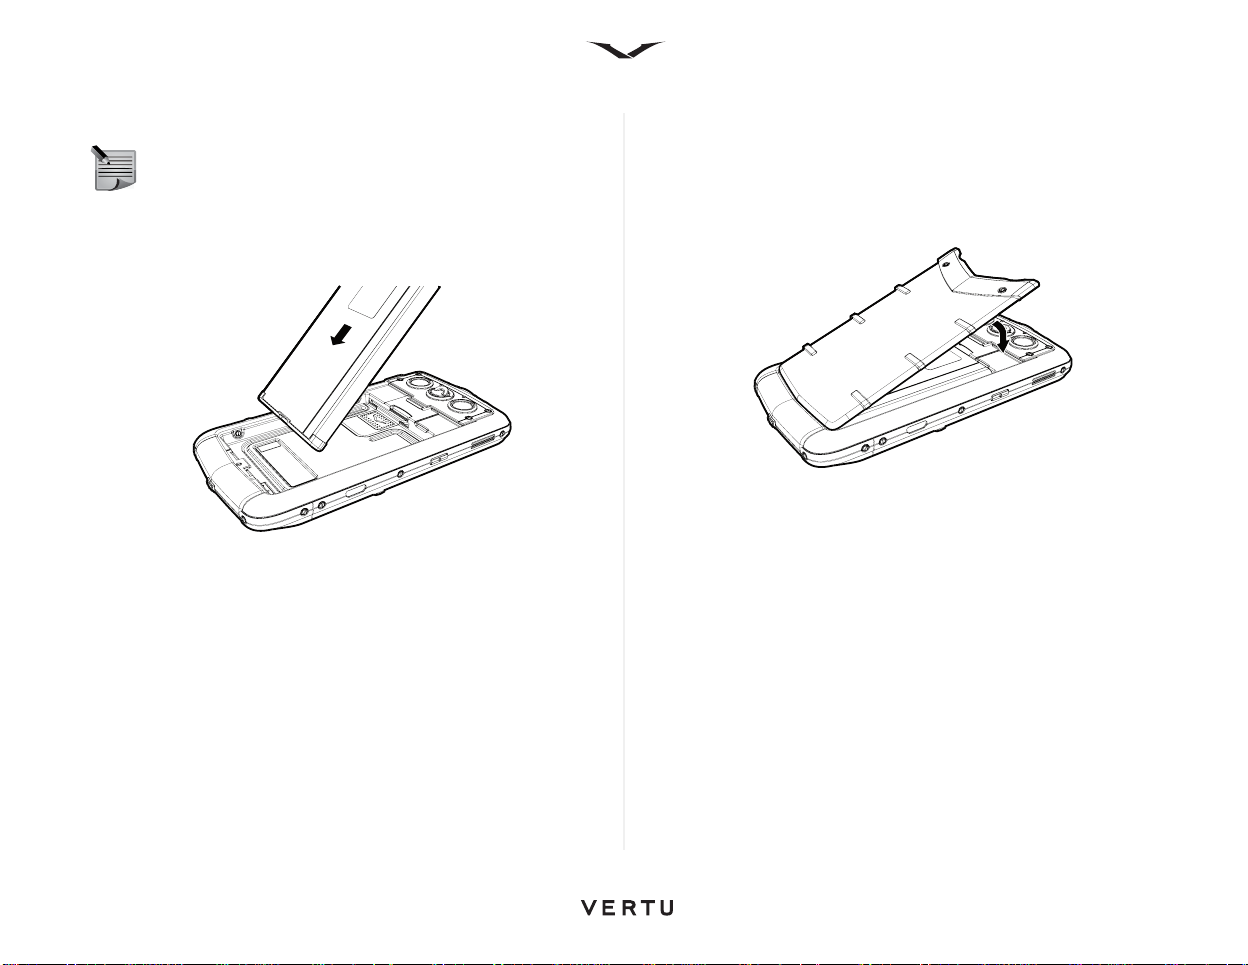
Inserting the battery
NOTE: Ensure that the SIM and memory cards are seated
correctly before replacing the battery.
Locate the battery with the three terminals facing downwards. Position the
battery so that the battery contacts align with the contacts present in the
phone compartment, and place the battery in the housing.
Replacing the back cover
Place the two tabs at the base of the back cover in their corresponding
slots in the body of the phone.
Lower the back cover into position and press gently until it clicks into place.
The cover should close tightly using only light pressure.
10
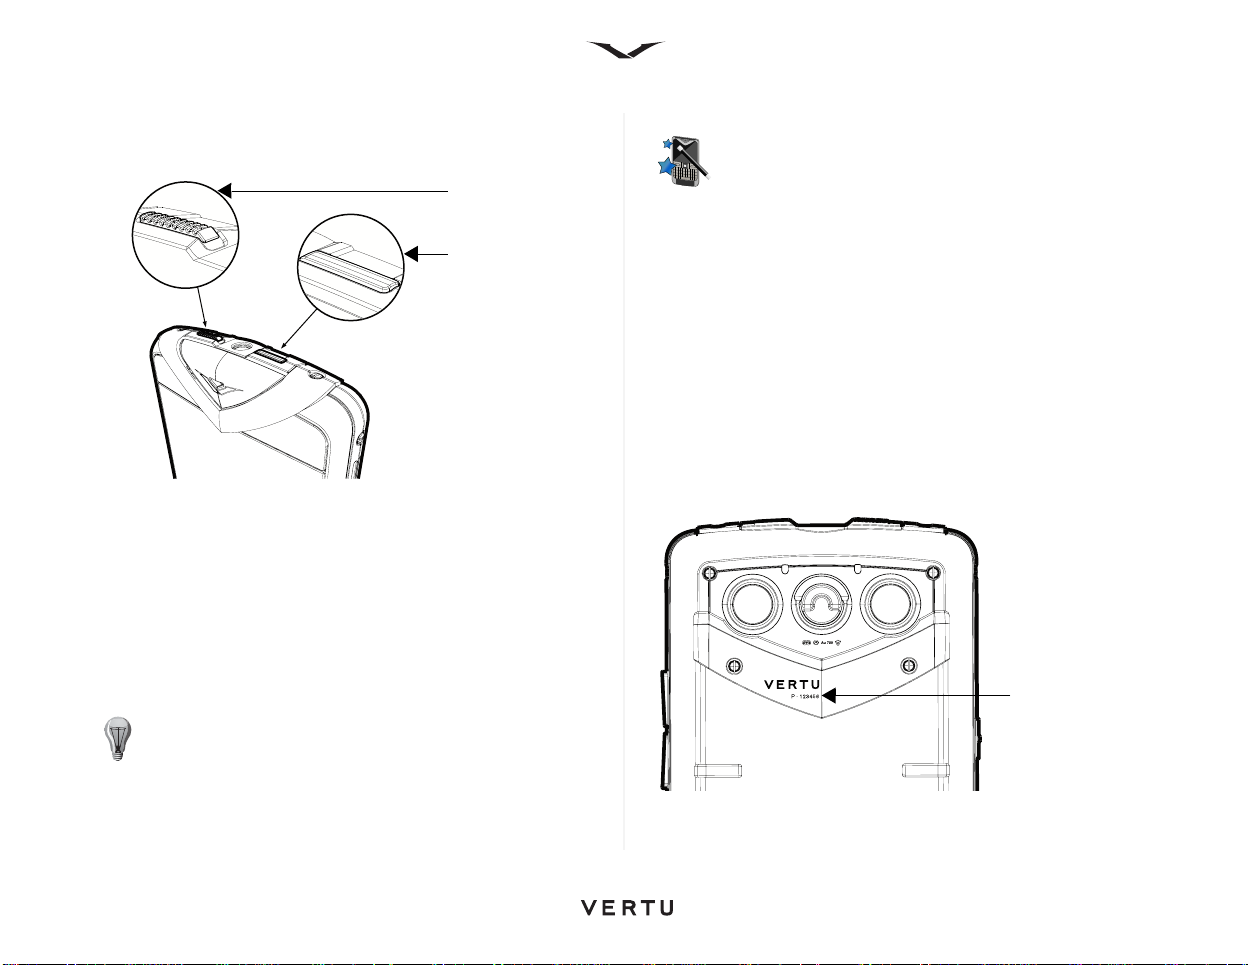
Switching your Vertu phone on and locking the keypad
Keypad Lock
Power Key
Serial Number
Press and hold the Power key (shown below) to switch on your Vertu
phone.
The battery may need charging when you first receive your Vertu phone.
Use the micro USB cable to connect to the charger or PC to place the
phone on charge.
You can lock the keypad on your Vertu phone to prevent the keys being
operated accidentally.
The keypad lock (shown above), slides to lock the keypad. Slide it again to
free the keypad lock.
When the keypad is locked, a key icon appears at the bottom of the display
along with the term Unlock displayed on the screen. When you receive an
incoming call, the keypad lock is automatically suspended. When the call
is ended, the keypad returns to the locked state.
TIP: You can also lock the keypad by pressing the Left Select
key, followed by the Right Select key.
Vertu S tartup Wizard
Setting up your phone
When your Vertu phone is switched on for the first time, you are taken
through a few simple steps to set up your phone. Prior to the setup, you
must insert a valid SIM in your Constellation Quest, and be in a location
with cellular data connectivity.
You will first be asked to accept the Terms and Conditions. This will
automatically enable the phone to use the core features of your
Constellation Quest.
You will then be asked to register the product, which is essential for
enabling the extensive and free services offered on your Constellation
Quest. If you are already a Registered Customer, you will need to enter
your username and password. If not, registration is quick as all you need is
to enter a few details. To complete the registration, you will need to enter
the Serial Number of your Constellation Quest which can be found on the
battery cover at the back of the phone.
11
The Email Wizard is now launched to enable you to configure the email
2
3
4
5
6
1
accounts that you wish to use on the phone.
If subsequently you want to re-apply any settings, this can be done by
running the Sett. wizard located in Menu > Ctrl. Panel.
Setting up your email accounts
Your email accounts are normally set up once the registration process is
complete using the E-mail setup wizard. However, if you do not wish to set
your email account at this time, it can be done later. The E-mail setup
wizard appears in the Information area of the Home screen, if no email
account is setup during startup.
The wizard helps you set up your Vertu.Me account, your corporate email
account or your personal accounts. You can have multiple personal
accounts. When setting up an account, you need to enter your username
and password.
You can choose to syncronise your contacts, calendar and tasks on your
phone with either your corporate account or with your Vertu.Me account.
Refer to Email, page 24, for more information.
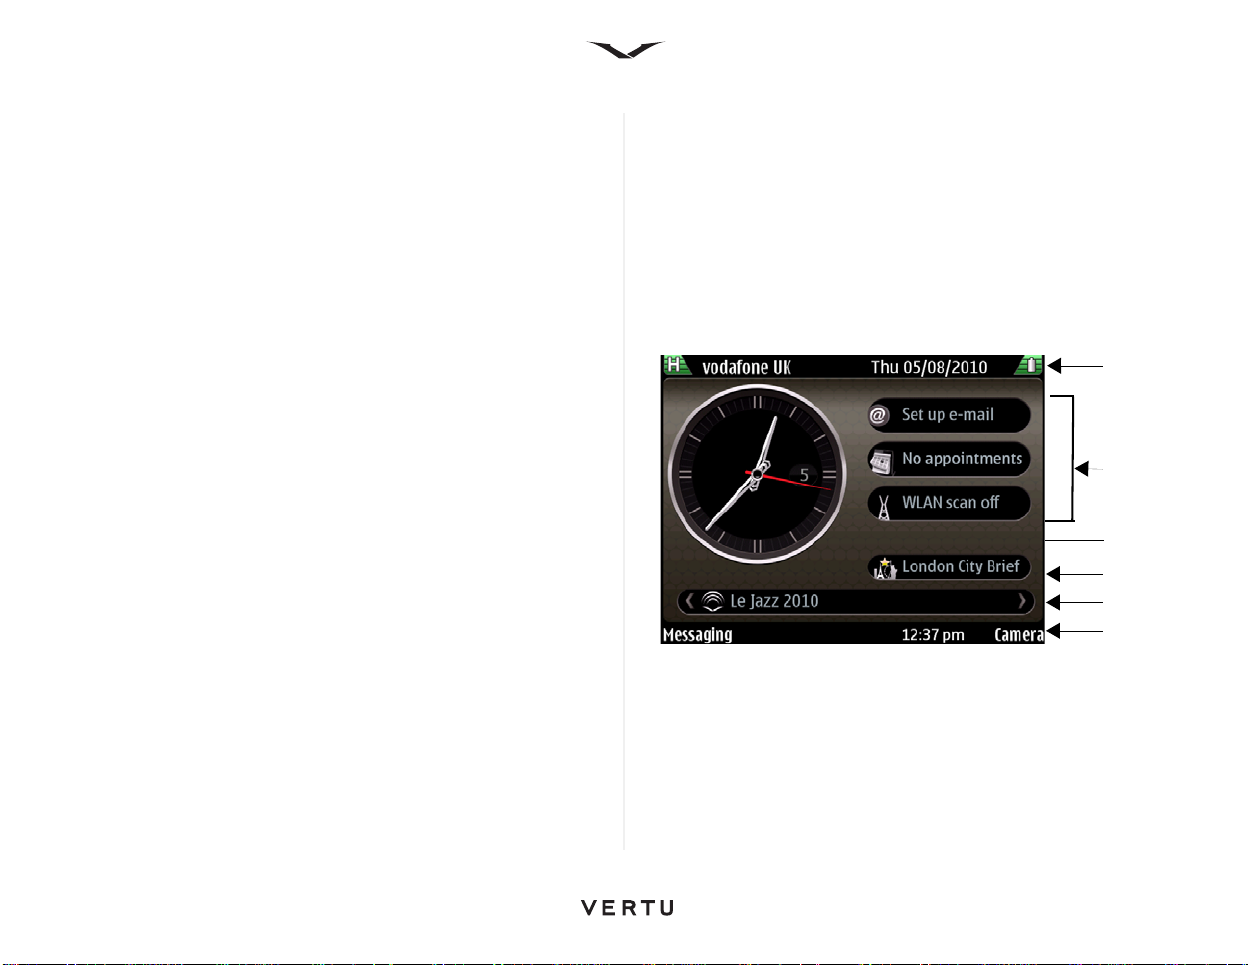
User interface
The Home screen displays a Clock, an Information area, a Dynamic zone,
and web feeds in the Notification zone.
Icons and indicators display in the status bars providing information about
the status of your Vertu phone.
Use the scroll keys to move the focus around the Home screen.
Press the Middle Select key when the focus is on a feature that you wish to
open.
Home screen
The Home screen contains the following areas:
1. Top status bar
2. Information area
3. Clock
4. Dynamic Information area
5. Notification zone
6. Lower status bar
12

Top status bar
Displays signals, data connectivity and battery status icons along with the
date.
Signal indicator icons
Indicator Explanation
Four level signal indicator, currently showing the signal at full
strength, which displays in green.
Signal strength adequate, showing half level displayed in
green.
Signal strength is Low, which displays in orange.
Displays when there is no signal or the phone is operating in
offline mode, or no SIM is present in the phone. This warning
is displayed in red.
Data connectivity icons
Indicator Explanation
GPRS (General Packet Radio Service) system is part of the
GSM mobile phone standard.
EGPRS data connection available. Enhanced GPRS.
EGPRS is similar to GPRS, but it enables faster connection
3G data connection is available. 3rd generation mobile
communications is a digital system for mobile
communications which provides increased bandwidth.
HSDPA data communication is available. HSDPA (HighSpeed Downlink Packet Access) is an enhanced version of
3G.
3G data communication is active.
Battery indicator icons
Indicator Explanation
Battery is fully charged, displayed in green.
Battery is low, which is indicated in orange.
Critical state where battery is about to run out. The red
symbol displays without bars.
Battery is charging, but the battery state is low and is
displayed in green.
Battery is on charge, and is now full and is displayed in
green. The charger can be disconnected.
Power saver mode active, shown by the moon icon with two
tone blue symbol. (Press the Power key and select Activate
power saving).
3G data communication is available.
3G data communication is suspended.
13
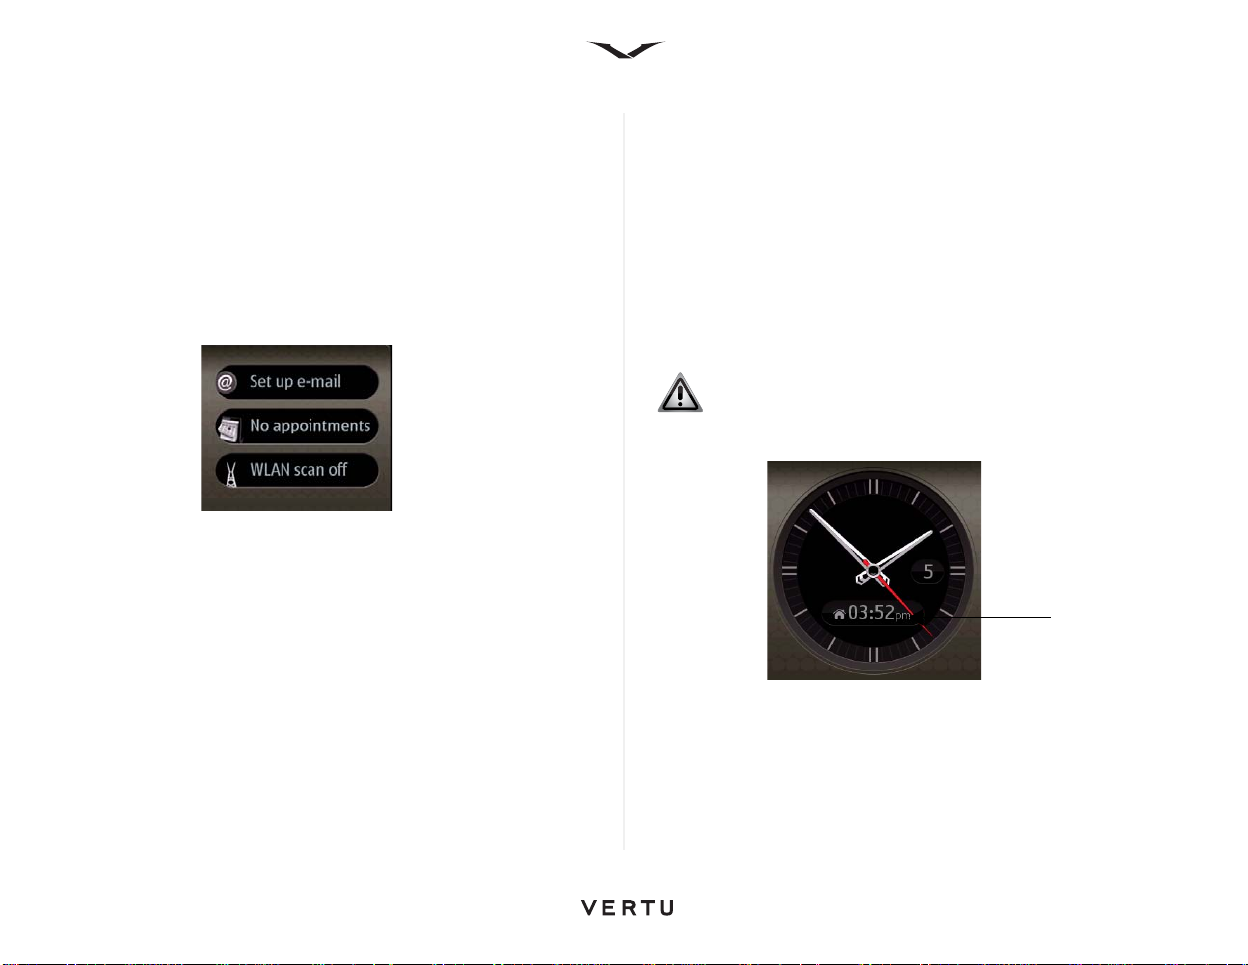
Information area
Home time
By default the following three items display in the Information area.
• The Set up e-mail wizard displays when the phone is first started.
• WLAN scan off displays. This function provides access to the WLAN
application which enables you to search for WLAN networks.
• Calendar displays with the message ‘No appointments’ when your
phone is first set up.
If you have set up at least two email accounts, the top two information
areas display notifications from these email accounts.
The third information area displays calendar appointments. The title of the
next appointment is shown.
There are a number of applications that can be displayed in the Information
area. You can choose which applications you would like to display as
follows:
1. Select Menu > Ctrl. Panel > Settings > General > Personalisation >
Standby mode > Mode settings > Home screen applications.
2. Check or uncheck the applications you want to display from the list.
3. The applications that you have selected for display do so following the
hierarchy shown in the Home screen applications menu.
Clock
The Clock has the following features:
• Displays time and date in either analogue or digital format.
• Displays alarms set within 12 hours ahead (analogue display only).
• Displays free and busy periods taken from the Calendar, around the
clock bezel (analogue display only)
• Maintains time accurately, using the automatic time feature.
• Displays the local time and the time in your home location when you are
not in your home region.
Scroll left or right to highlight the clock, and then press the middle select
key to open the clock application.
WARNI NG : The date and time are normally set by the
automatic time feature and should not be tampered with.
Analogue Clock, showing local time and home time (digital).
14
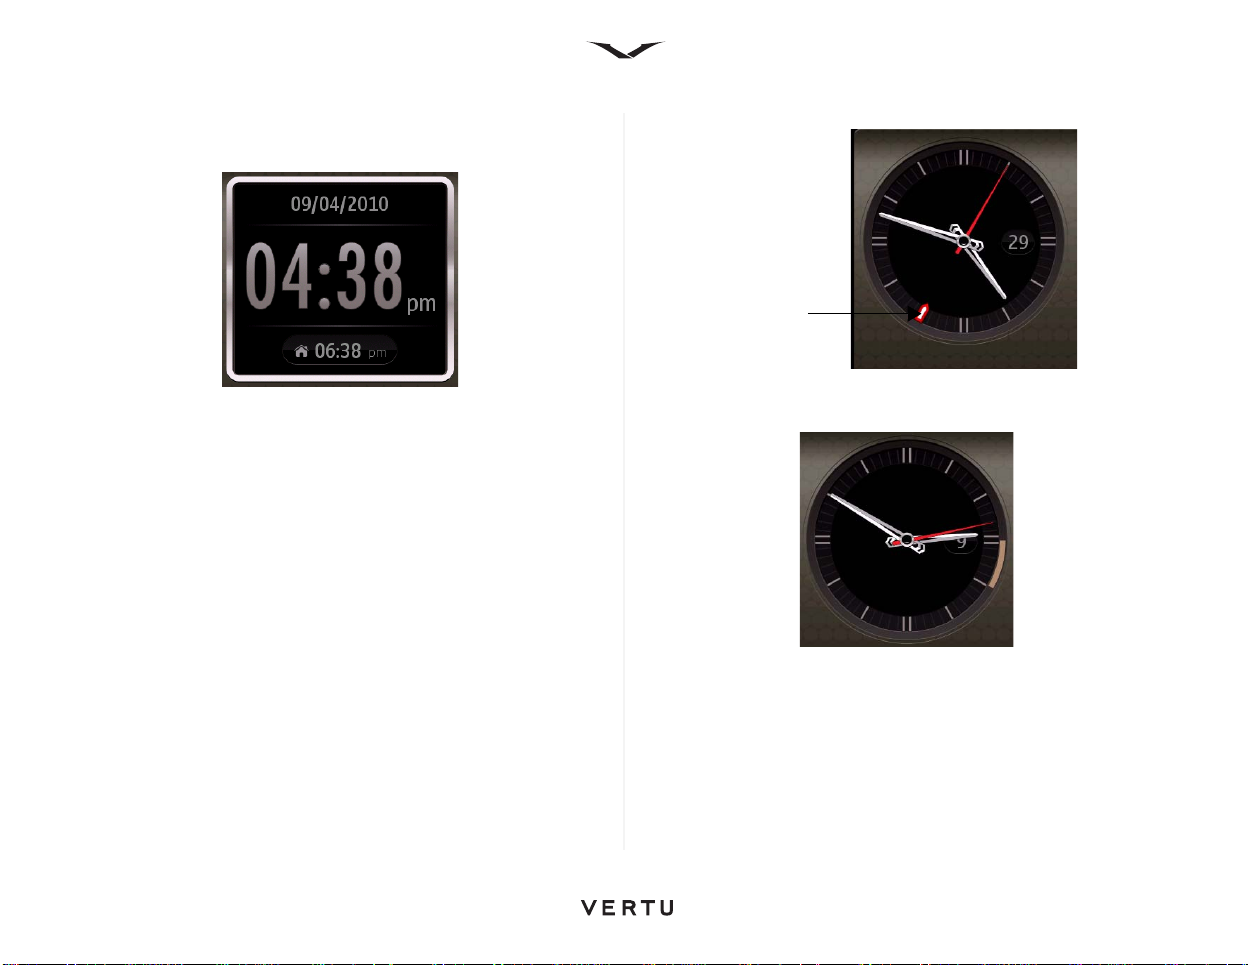
Digital Clock showing local time in the large digits and home time in small
Alarm
digits
Analogue Clock showing alarm at 7 o’clock
Alarms and appointments
The Clock, Alarm and the World Clock are all accessed via the clock, from
the Home screen. To access the clock, use the scroll keys and press the
Middle Select key.
To set the alarm
1. Select Options > New alarm.
2. Scroll to Alarm time and select the time for the alarm.
3. Scroll to Description, and change the alarm text if required.
4. Press Done, and the alarm is saved. Set additional alarms if required.
The display shows when the next alarm is due to activate.
If you want to reset an alarm, click on the options and select Reset alarm.
Press Done when you have completed.
Any meetings or appointments set, are displayed in the analogue clock as
shown, see Calendar on page 23 for more information.
Analogue Clock showing busy from 3 to 4 o'clock
15
 Loading...