

Vertu Constellation T, RM-681V, P7QRM-681V Reference Manual

Reference Manual Version 3

2Contents
Contents
Safety..................................................5
Introduction .......................................6
Overview..............................................6
Help and support .................................6
Care of your phone ..............................7
Keys and parts.....................................8
Get started ...................................... 11
Package contents ..............................11
Insert or remove the SIM card............11
Lock or unlock the keys and screen...13
Charging ............................................13
Set up your phone..............................16
Transfer content from your old phone
.....................................................17
Touchscreen actions .........................18
Change the volume of a call, song, or
video.............................................20
Antenna locations ..............................21
Attach a lanyard.................................21
Headset .............................................21
Switch the phone on or off .................22
If your phone stops responding..........22
Vertu services................................. 23
Vertu City Brief...................................23
Vertu Select .......................................23
Vertu Concierge.................................24
Contact Vertu Concierge ...................24
Contact Vertu Technical Support .......25
Vertu Fortress ....................................25
Remote Assist ...................................25
Vertu Concierge Live .........................25
Home screen................................... 27
Interactive home screen elements .....27
Menu key and soft keys .....................29
Clock .................................................30
Use the calendar................................32
Modify a home screen .......................34
Write text ...........................................36
Display indicators ..............................41
Set the notification light to blink for
missed calls or messages.............42
Flashlight ...........................................42
Use your phone offline .......................42
Search in your phone and on the
internet .........................................43
Personalisation............................... 44
Profiles...............................................44
Calls................................................. 46
Call a phone number..........................46
Search for a contact........................... 46
Call a contact .....................................46
Reject a call .......................................47
Mute a call .........................................47
Answer a waiting call .........................48
Make a conference call......................48
Call the numbers you use the most.... 49
Make calls over the internet ...............49
Call the last dialled number................50
Record a phone conversation............50
Turn to silence ...................................50
View your missed calls.......................51
Call your voice mailbox .....................51
Divert calls to your voice mailbox or
another phone number .................52
Prevent the making or receipt of calls
.....................................................52
Allow calls only to certain numbers ....53
Contacts .......................................... 54
About Contacts ..................................54
Save phone numbers and mail
addresses.....................................54
Save a number from a received call or
message.......................................54
Contact your most important people
quickly ..........................................55
© 2012 Vertu. All rights reserved.

Contents 3
Add a picture for a contact .................55
Set a ringtone for a contact................55
Send your contact information using
My Card........................................56
Create a contact group ......................56
Send a message to a group of people
.....................................................56
Copy contacts from the SIM card to
your phone....................................57
Office Communicator.........................57
Messaging....................................... 59
About Messaging...............................59
Send a message................................59
Send a message to a contact.............59
Send an audio message ....................60
Read a received message .................60
View a conversation...........................61
Listen to a text message ....................61
Change language ..............................62
Mail .................................................. 63
About Mail..........................................63
Set up a mailbox ................................63
Set up a Mail for Exchange mailbox...64
Synchronise your mailbox..................65
Read mail ..........................................66
Send a mail........................................66
Open mail from a home screen..........67
Calendar.......................................... 68
About the calendar.............................68
Browse your calendar entries in
different views...............................68
Add a task to your to-do list................68
Add a calendar entry..........................68
Send a meeting request.....................69
Remember a birthday ........................69
Use separate calendars for work and
free time........................................70
Add the location to a calendar entry...70
Connectivity.................................... 72
Define how your phone connects to
the internet....................................72
Wi-Fi .................................................73
Bluetooth ...........................................74
USB data cable..................................76
Close a network connection...............77
Internet ............................................ 79
About the web browser ......................79
Browse the web .................................79
Add a bookmark ................................80
Subscribe to a web feed ....................80
Social networks.............................. 81
About Social ......................................81
See your friends' status updates in
one view .......................................81
Post your status to social networking
services ........................................82
Link your online friends to their
contact information .......................82
See your friends' status updates on
the home screen...........................82
Upload a picture or video to a service
.....................................................82
Share your location in your status
update ..........................................83
Contact a friend from a social
networking service........................83
Add an event to your phone calendar
.....................................................84
Camera ............................................ 85
About the camera ..............................85
Take a picture ....................................85
Save location information to your
pictures and videos.......................86
Picture and video tips ........................86
Record a video ..................................87
Send a picture....................................87
Your pictures and videos .............. 89
© 2012 Vertu. All rights reserved.

4Contents
About Gallery.....................................89
View pictures and videos ...................89
Edit the pictures you have taken ........90
Organise your pictures.......................90
Share a picture or video from Gallery
.....................................................91
Copy your pictures or videos between
your phone and computer.............91
Video editor .......................................91
Print a picture you have taken............92
Videos and TV................................. 94
Videos ...............................................94
Music and audio ............................. 96
Music player ......................................96
Protected content ..............................98
Record sounds ..................................98
FM radio ............................................98
Maps .............................................. 100
About Maps apps.............................100
Navigate to your destination ............100
Find and view locations ...................104
Save and share places ....................108
Report incorrect map information.....110
Office ............................................. 112
Quickoffice.......................................112
Read PDF documents .....................112
Use the calculator ............................112
Write notes ......................................113
Translate words from one language to
another .......................................113
Open or create zip files ....................114
Phone management ..................... 115
Keep your phone software and
applications up to date................115
Vertu Fortress ..................................116
Manage files ....................................119
Increase available memory so you
can add more content.................120
Manage applications........................120
Synchronise content ........................121
Copy contacts or pictures between
phones........................................122
Protect your phone ..........................122
Install PC Suite on your PC ..............123
Accessories .................................. 125
Charge the battery ...........................125
About Vertu Portable Power DC-15V
...................................................126
Use Vertu Portable Power DC-15V ..126
Use the vehicle charger ...................127
Use the data cable...........................128
Wired stereo headset.......................129
Common accessory settings............129
Troubleshooting........................... 131
If your phone stops responding........131
Restore original settings ..................131
What to do when the memory is full?
...................................................131
Message indicator blinking ..............131
A contact appears twice in the
contacts list.................................132
Unreadable characters while
browsing the web........................132
Remove all content and restore
settings .......................................132
Examine your phone's compliance
label............................................132
Specifications............................... 135
Protect the environment.............. 137
Save energy.....................................137
Recycle............................................137
Product and safety information.. 138
Index .............................................. 146
© 2012 Vertu. All rights reserved.
Safety 5
Safety
Read these simple guidelines. Not following them may be dangerous or illegal. Read
the complete user guide for further information.
SWITCH OFF IN RESTRICTED AREAS
Switch the device off when mobile phone use is not allowed or when it may
cause interference or danger, for example, in aircraft, in hospitals or near
medical equipment, fuel, chemicals, or blasting areas. Obey all instructions
in restricted areas.
ROAD SAFETY COMES FIRST
Obey all local laws. Always keep your hands free to operate the vehicle while
driving. Your first consideration while driving should be road safety.
INTERFERENCE
All wireless devices may be susceptible to interference, which could affect
performance.
QUALIFIED SERVICE
Only qualified personnel may install or repair this product.
KEEP YOUR DEVICE DRY
Your device is not water-resistant. Keep it dry.
PROTECT YOUR HEARING
To prevent possible hearing damage, do not listen at high volume levels for
long periods. Exercise caution when holding your device near your ear while
the loudspeaker is in use.
© 2012 Vertu. All rights reserved.

6Introduction
Introduction
Overview
This user guide is intended to provide you with full details on how to use the prominent
features on your Vertu Constellation.
When you set up the phone, it is recommended that you complete registration,
because you can then activate all Vertu's services, including the additional home
screens Vertu Select and City Brief.
The pictures used in this user guide are provided for illustration purposes only. They
may differ from those on your actual version of the Vertu Constellation.
Tip: To access Vertu services, select > Vertu.
Help and support
To find out more about using your Vertu Constellation:
• Contact Vertu Technical Support using the Concierge key and select either Call
Technical Support or Email Technical Support.
• Refer to the user guide on your phone or to the full reference manual on the Vertu
website.
• Use the setup wizards available on your Vertu Constellation that can help you with
registration and mail account creation. Select > Vertu > Registration.
© 2012 Vertu. All rights reserved.

Introduction 7
Care of your phone
If your Vertu Constellation, or any of the accessories, are not working as they should,
contact your Vertu dealer.
General care
• Always use your Vertu Constellation in the documented manner. Incorrect usage
may affect performance.
• Do not attempt to open or disassemble your Vertu Constellation. The only part you
ever need to open is the SIM door. Your Vertu Constellation should only be
serviced by Vertu authorised personnel.
• Do not mishandle or abuse your Vertu Constellation.
• Use only Vertu approved accessories.
• The supplied chargers are only intended for use with your Vertu Constellation. Do
not use them with any other device, as this could result in permanent damage to
the phone, battery, or charger.
• Keep your Vertu Constellation and all parts and accessories out of the reach of
small children and pets.
• Do not allow your Vertu Constellation or accessories to come into contact with
liquids or moisture, or dust and dirt.
• Do not expose your Vertu Constellation to extreme temperatures, as these may
cause the battery to stop working temporarily. Performance is particularly limited
in temperatures well below freezing.
• Do not apply paint or other similar substances to your Vertu Constellation.
• Only use a soft, clean cloth to clean your Vertu Constellation. Do not use
chemicals, detergents, abrasive substances, or any liquids. Use a cotton swab to
clean the camera lens.
Interference
• If interference affects the performance of your Vertu Constellation, move away
from the source of the interference.
Battery
• Your Vertu Constellation has an internal, non-removable battery. Do not attempt
to take it out of the phone. You should not leave it connected to the charger and
power source for longer than is necessary.
Materials
Your Vertu Constellation has been crafted from some of the finest materials, and care
needs to be taken to keep it in good condition.
• Do not drop, knock, or rub your Vertu Constellation on or against hard surfaces.
© 2012 Vertu. All rights reserved.

8Introduction
• Ceramics and sapphire are very hard materials, but are also brittle and can be
scratched by harder materials or objects. They can also be damaged if dropped.
Therefore, avoid contact with hard materials such as diamond jewellery, nail files,
abrasives, and mineral crystals.
• All leather can be damaged and should be treated with care. Therefore, avoid
exposing your Vertu Constellation to extreme temperatures or water and high
humidity, and avoid contact with oily substances, make-up, and solvents.
• Vertu metals are finished to a high standard, and care needs to be taken to
maintain their appearance. Therefore, you should avoid contact with sharp
objects, metal polishes, and chemicals such as solvents, alkaline and acid
solutions, cola-based drinks, and salt water. If contact occurs, wipe the surface
with a clean, soft cloth as soon as possible.
Keys and parts
Top
1Power key
2AV connector
3 Ambient light sensor
© 2012 Vertu. All rights reserved.
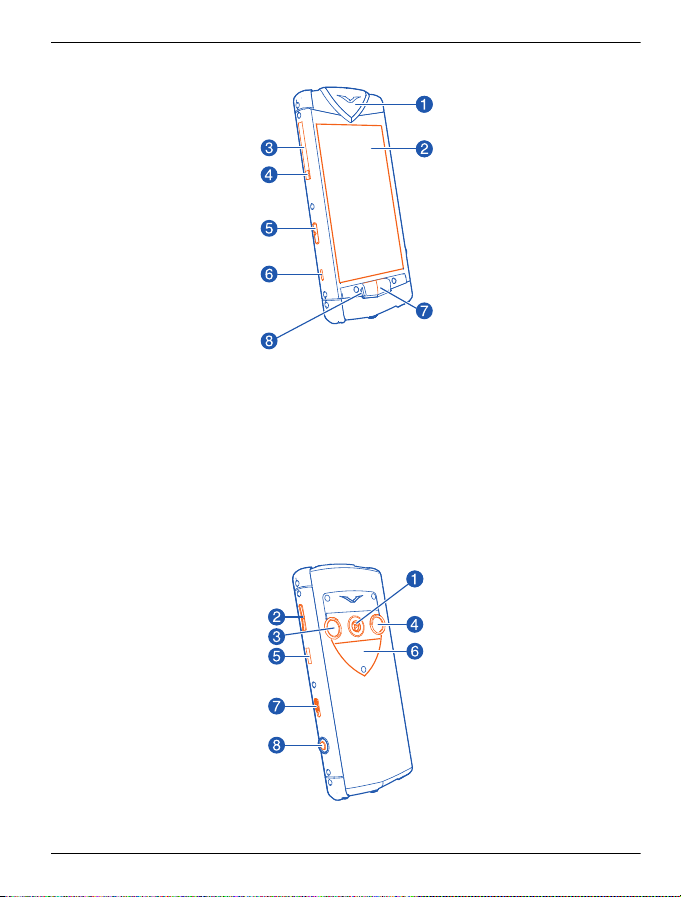
Front
1 Pillow
2Display
3SIM door
4 SIM door hinge
5Concierge key
6Lanyard hook
7Menu key
8 Notification light
Back
Introduction 9
1Loudspeaker
© 2012 Vertu. All rights reserved.

10 Introduction
2Volume keys
3 Camera lens
4 Camera flash
5Micro-USB connector
6 Backplate showing the Vertu serial number
7 Key lock switch
8 Camera key
© 2012 Vertu. All rights reserved.

Get started 11
Get started
Package contents
• Vertu Constellation phone
• Leather phone pouch
• Wired stereo headset
• Wall charger (AC-31) with regional plugs
• Vertu Portable Power (DC-15V)
• Vertu vehicle charger (DC-7V)
• Micro-USB cable x 2
•AV cable
• Polishing cloth
• User collateral
The package contents may vary slightly in accordance with the materials used in your
particular phone and with regional regulations.
Insert or remove the SIM card
Important: This device is designed to be used with a standard SIM card (see
figure) only. Use of incompatible SIM cards may damage the card or the device, and
may corrupt data stored on the card. Please consult your mobile operator for the use
of a SIM card that has a mini-UICC cutout.
Follow the instructions carefully, to avoid damaging the SIM card or your Vertu
Constellation.
Do not attach any stickers to your SIM card.
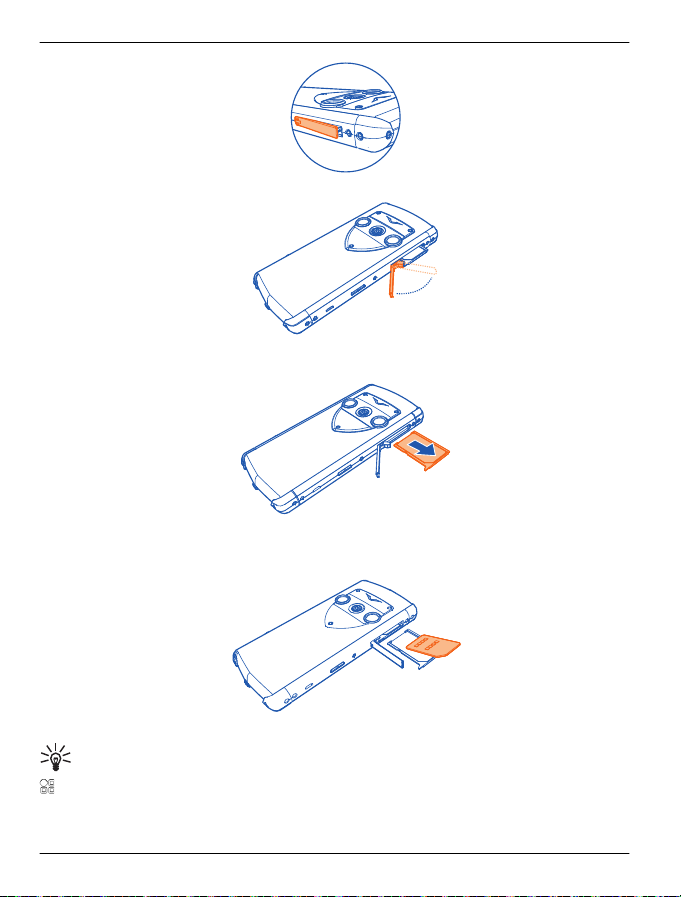
Insert the SIM card
1 Switch the phone off.
2 Pull the SIM door outwards from the top of the phone.
Tip: You might want to use your fingernail to do this.
© 2012 Vertu. All rights reserved.
12 Get started
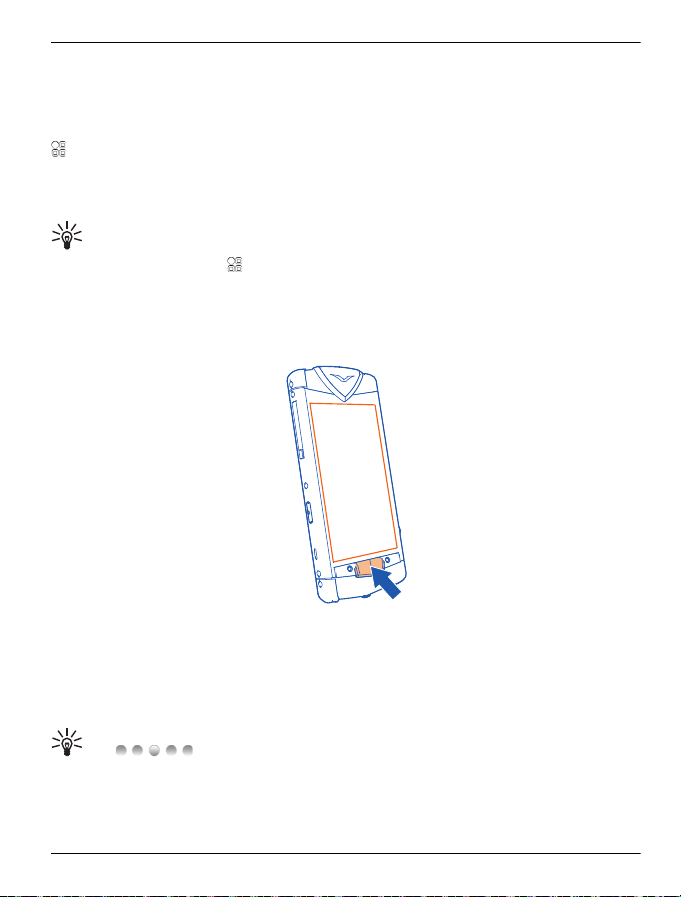
3 Fully extend the door.
4 The SIM drawer automatically slides part way out of the phone. Remove the SIM
drawer.
5 Insert the SIM card, with the contact area facing up (when the phone is looked at
from the back), into the exposed recess of the SIM drawer. Align the card with the
slanted corners of the recess.
6 Fully re-insert the drawer, and close the door.
Tip: If you need to activate and set a PIN code (4-8 digits) for the SIM card, select
> Settings and Phone > Phone management > Security settings > Phone and
SIM card.
© 2012 Vertu. All rights reserved.
Get started 13
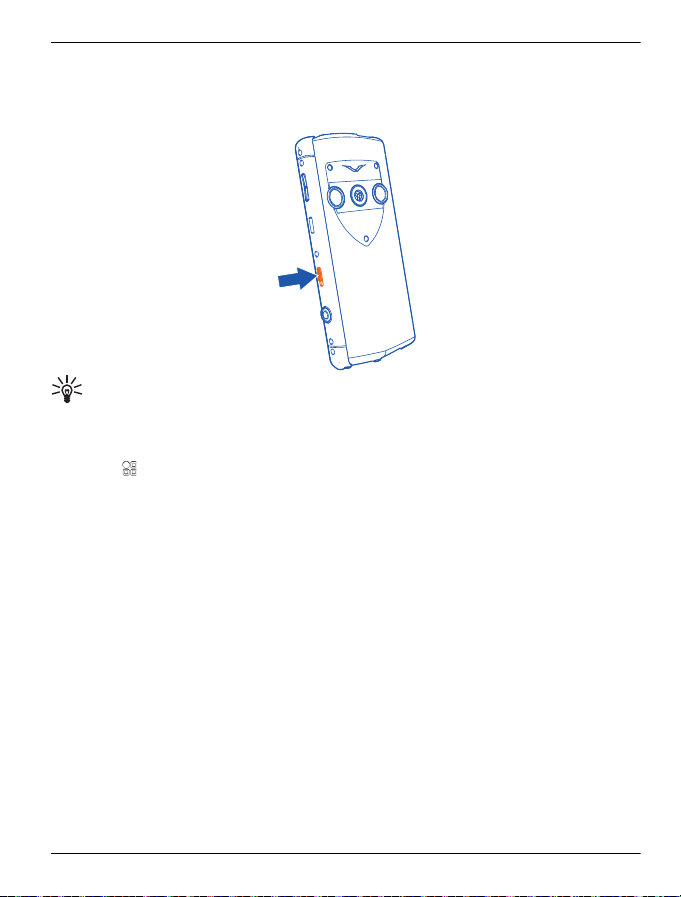
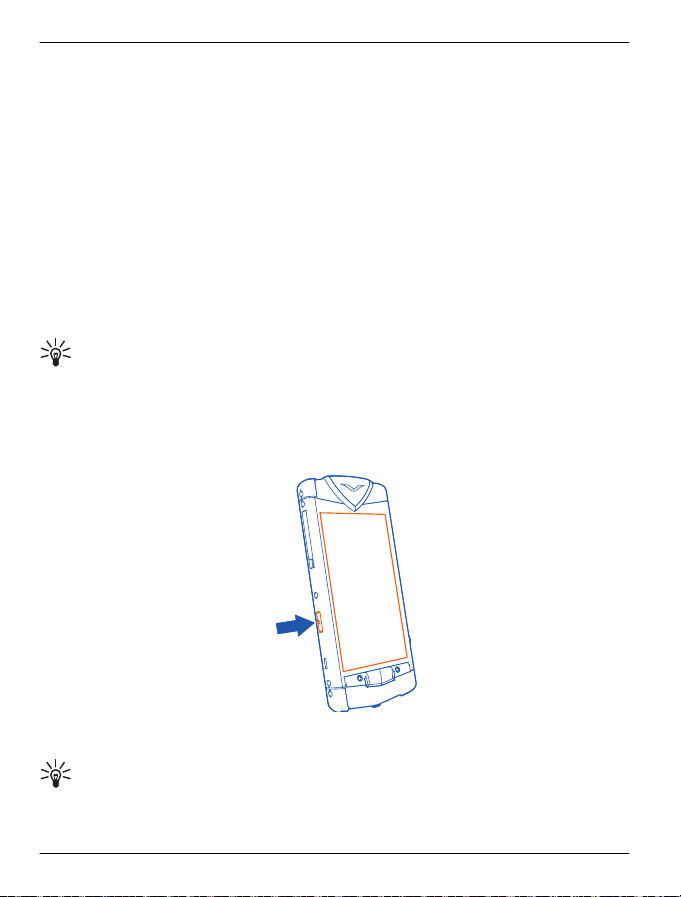
Lock or unlock the keys and screen
To avoid accidentally making a call, you can lock the keys and screen of your phone.
Slide the key lock switch.
Tip: Alternatively, you can press the power key, and select Lock screen and
keys or Unlock.
Set the keys and screen to lock automatically
1 Select
2 Define the length of time after which the keys and screen are locked automatically.
> Settings and Phone > Display > Screen/keylock time-out.
Charging
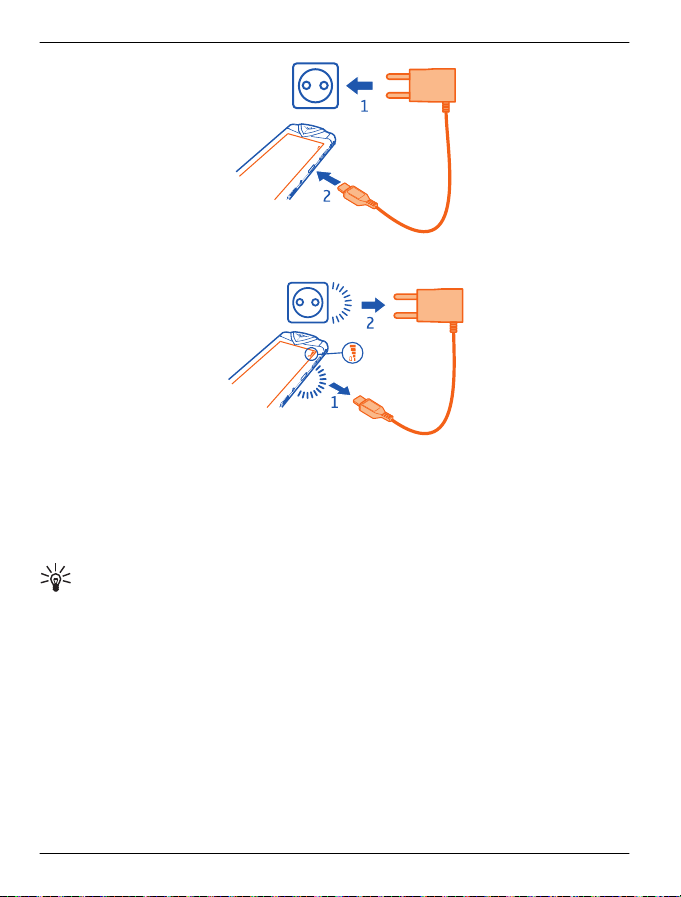
Charge the battery
Your battery has been partially charged at the factory, but you may need to recharge
it before you can switch on your phone for the first time. if you use the wall charger,
the phone will take about an hour and a half to charge from new.
If the phone indicates a low charge, do the following:
1 Connect the supplied wall charger to the wall outlet, and then to the micro-USB
connector on your Vertu Constellation.
© 2012 Vertu. All rights reserved.
14 Get started
2 When the battery is full, disconnect the charger from the phone, and then from the
wall outlet.
You do not need to charge the battery for a specific length of time. However, if you use
the wall charger with a phone that has a low charge, it may take up to two hours for it
to charge fully.
You can use the phone while it is charging.
If the battery is completely discharged, it may take several minutes before the charging
indicator is displayed or before any calls can be made.
Tip: You can also charge your Vertu Constellation using the Vertu Portable Power
and the Vertu vehicle charger, supplied in the sales box.
Charge the battery over USB
You can use the USB cable to connect your Vertu Constellation to your computer.
You can use your phone while it is charging. For example, if it is connected to your
computer, you can synchronise your phone.
Charging over USB can take longer to start and you may not be able to use the device
immediately.
Do not use a non-powered USB hub.
Your device charges more quickly when connected to the wall charger.
© 2012 Vertu. All rights reserved.

Get started 15
Prolong battery life
There are steps you can take to reduce the power consumption of your phone.
• Always charge the battery fully.
•Activate power saving mode.
Activate power saving mode
Press the power key, and select Activate power saving. To deactivate power saving
mode, press the power key, and select Deactivate power saving.
Close the applications you are not using
Press and hold the menu key, swipe until the desired application is displayed, and
select
Sounds, themes, and effects
• Mute unnecessary tones, such as key tones.
• Use wired headphones, rather than the loudspeaker.
• Change the length of the time-out period after which the device display switches
Set the length of the time-out period
Select
Network use
• If you are listening to music or otherwise using your device, but do not want to
• Set your phone to check for new mail less frequently.
• Use a Wi-Fi connection to connect to the internet, rather than a packet data (GPRS
Set your phone to use only the 3G or GSM network
Swipe down from the notification area, and select the mobile network and Network
mode > GSM.
Deactivate Bluetooth when not needed
Swipe down from the notification area, and select
Stop your device scanning for available Wi-Fi's
Swipe down from the notification area, and select
Establish a packet data (3G or GPRS) connection only when needed
To close the mobile data connection, swipe down from the notification area, and select
.
off.
> Settings and Phone > Display > Light time-out.
make or receive calls, activate the Offline profile.
or 3G) connection.
.
.
.
© 2012 Vertu. All rights reserved.

16 Get started
Set up your phone
About registration
Vertu aims to provide you with the best possible user experience. To enable us to do
this, you are strongly advised to register your Vertu Constellation and activate the
services when prompted. Once you do this, you get:
• Full access to Vertu’s range of personalised services, including Concierge and
Vertu Technical Support.
• Additional home screens, including Vertu Select, that offers content individually
tailored to your passions, and City Brief, that changes as you travel.
• An @vertu.me mail account that you can access at mail.vertu.me.
• Access to Vertu Fortress.
Tip: To view the personalised services to which you have access following
registration, select > Vertu. You also then have access to options that allow you to
rerun the registration application and the setup wizard at any time.
Register your Vertu phone
Normally your Vertu Constellation is registered during the setup process, but you can
also register later using any of the following methods:
• Select > Vertu and Registration.
• Select Call Concierge using the dedicated key.
• Register at www.vertu.me.
• Select any of the Vertu services on the phone.
Initial setup
1 Before you switch on your Vertu Constellation, make sure that you have inserted a
valid, active SIM card, and that you are in a location with cellular data connectivity.
2 Start up your Vertu Constellation, and launch the setup wizard.
3 The setup wizard takes you through the registration process. Once you have
entered your details, opted to activate the services, and accepted the terms and
conditions, the Vertu services are immediately available.
If you declined to activate the Vertu services, you can still use the phone. To gain
access to the services later on, go through the registration process again and opt
to activate the services.
If you are already a registered customer, enter your username and password.
4 You are automatically taken through mail setup following the registration process.
© 2012 Vertu. All rights reserved.

Get started 17
Mail setup
The final part of setup allows you to create mailboxes from a list of mail service
providers, including @vertu.me if you have registered.
Select a mail service provider, and enter the requested details. The mailbox is
automatically displayed in a Mail widget on the home screen provided space is
available. This widget gives you quick access to the most recent mails. To go to the
inbox, select the title bar.
For each subsequent mailbox that you create, you need to add a Mail widget for it on
the home screen of your choice. Note that you can choose either a single line Mail
widget or a three line Mail widget.
Tip: To add a new mailbox into an existing three line Mail widget, select on
the top right of the widget. Select Create new mailbox, and follow the displayed
instructions. The new mailbox replaces the previous mailbox inside the widget.
Your Vertu Constellation has full compatibility with Microsoft Exchange Server,
allowing you to configure one of your mail accounts as a Mail for Exchange mailbox.
This gives you mobile access to the mail, calendar, contacts, and tasks on the account,
with the option to keep content fully synchronised.
You are asked during mail setup whether you want your corporate account to be used
as your Mail for Exchange mailbox. If you decide against this, a list of alternative mail
providers is displayed. If you select Vertu.Me from this list, your @vertu.me account
is used as your Mail for Exchange mailbox. Alternatively, you can select Other, enter
the mail address and password, and, if the associated provider is compatible, select
Exchange ActiveSync instead of POP/IMAP.
You can add further mailboxes as required. For each subsequent mailbox that you
create, you need to add a mail widget to the customisable home screen of your choice.
Setup wizard
If you wish to change your registration details, or modify any of the settings on your
Vertu Constellation, you can run the setup wizard again.
To access the setup wizard, select
> Vertu > Registration.
Transfer content from your old phone
You can use the Phone switch application to copy contacts, calendar entries, and
pictures from your previous compatible phone to your Vertu Constellation.
Select
You can also use PC Suite to transfer pictures, sound clips, and other media files, as
follows:
> Settings and Connectivity > Data transfer > Phone switch.
© 2012 Vertu. All rights reserved.

18 Get started
1 Transfer the required content from your old phone to your PC or Mac using a USB
connection.
2Install PC Suite on your PC or Mac.
3 Make sure that PC Suite locates the required content on your PC or Mac.
4 Select
5 Transfer the files from PC Suite on your PC or Mac to your Vertu Constellation.
You can use a USB connection or Bluetooth.
You can also transfer files in the opposite direction when you want to back up the
new files that you create on your Vertu Constellation.
If you do not want to use PC Suite to transfer files to and from your PC, and would
rather do it manually, use Mass storage mode. Your Vertu Constellation is then seen
as an external drive on the PC or Mac.
When Mass storage mode is selected, you are not able to see or run applications that
you have installed on the internal memory card.
> Settings and Connectivity > USB > PC Suite.
Touchscreen actions
To interact with the user interface, tap or tap and hold the touchscreen.
Open an application or other screen element
Tap the application or element.
Access functions quickly
Tap and hold the item. A pop-up menu with available options opens. For example, to
send a picture or delete an alarm, tap and hold the picture or alarm, and from the popup menu, select the appropriate option.
Drag an item
Tap and hold the item, and slide your finger across the screen. The item follows your
finger.
© 2012 Vertu. All rights reserved.

Get started 19
You can drag items on the home screen or in the main menu, when you have activated
editing mode.
Swipe
Place a finger on the screen, and steadily slide your finger in the desired direction.
For example, when you are viewing a picture, to view the next picture, swipe left.
Scroll in a list or menu
Place your finger on the screen, slide it quickly up or down the screen, and then lift
your finger. The content of the screen scrolls with the speed and direction it had at the
moment of release. To select an item from a scrolling list and to stop the movement,
tap the item.
Zoom in
Place two fingers on an item, such as a picture or web page, and slide your fingers
apart.
© 2012 Vertu. All rights reserved.
20 Get started
Zoom out
Place two fingers on the item, and slide your fingers together.
Tip: You can also tap the item twice to zoom in and out from the default zoom
setting.
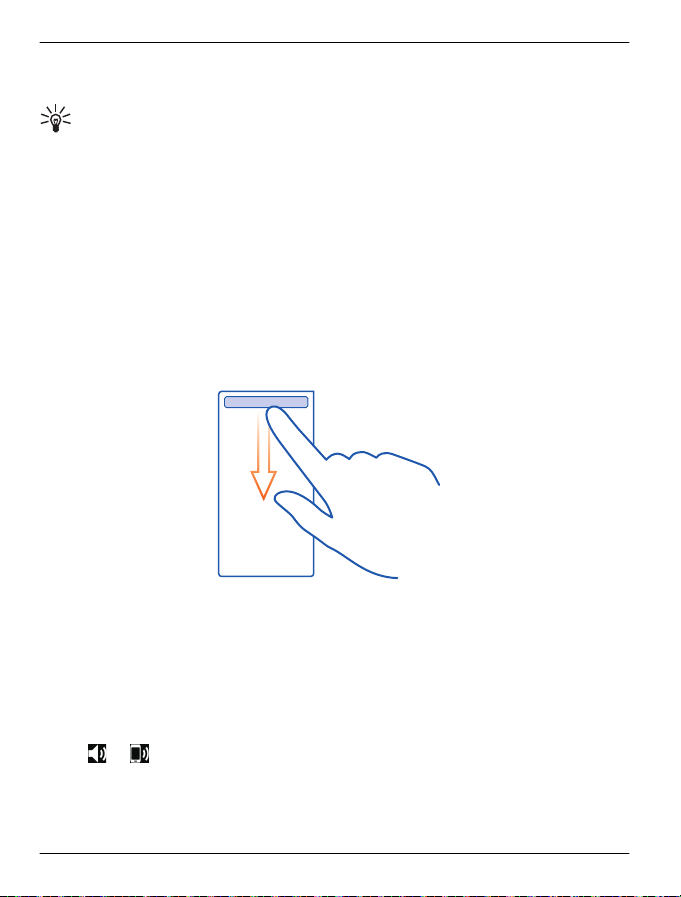
Notification area
From the notification area, you can quickly access key settings such as closing an
internet connection or silencing your phone directly from the status menu. The
notification area is not available when you are in a full screen application, such as
Maps.
• View notifications of missed calls or unread messages
•Silence your phone
• Modify the connectivity settings
• View available Wi-Fi connections, and connect to a Wi-Fi network
• Manage Bluetooth connections
Simply swipe down from the notification area.
Change the volume of a call, song, or video
Use the volume keys.
You can adjust the volume during a call or when an application is active.
The built-in loudspeaker allows you to speak and listen from a short distance without
having to hold the phone to your ear.
Activate or deactivate the loudspeaker during a call
Select
© 2012 Vertu. All rights reserved.
or .
Get started 21
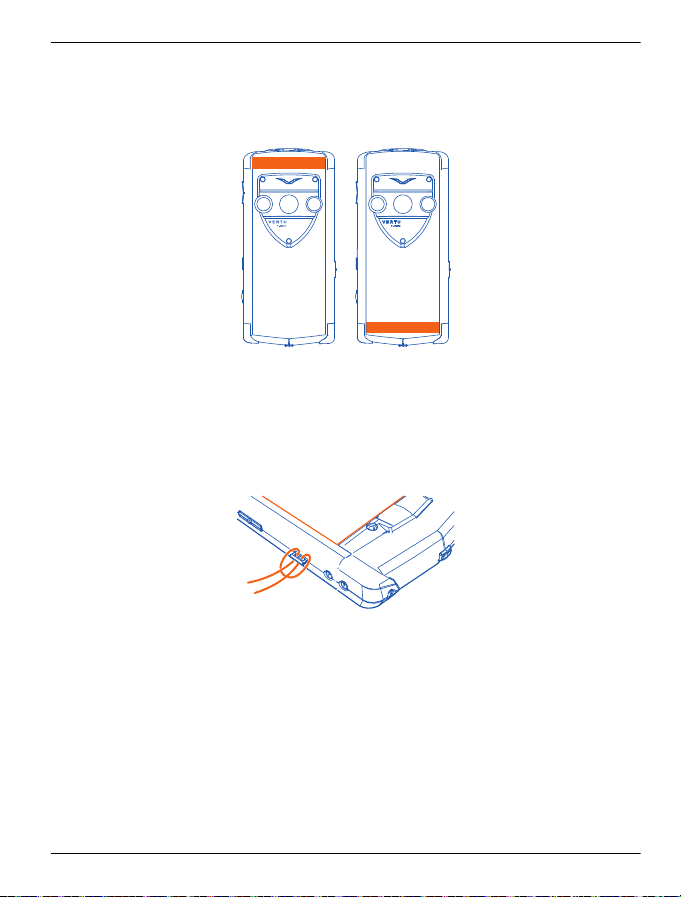
Antenna locations
Avoid touching the antenna area while the antenna is in use. Contact with antennas
affects the communication quality and may reduce battery life due to higher power
level during operation.
The antenna area is highlighted.
Attach a lanyard
A lanyard is an accessory that is available separately.
Pull out the lanyard hook from the side of the phone using your fingernail, and thread
the lanyard through the hook.
Headset
You can connect a compatible headset or compatible headphones to your phone.
© 2012 Vertu. All rights reserved.

22 Get started
Switch the phone on or off
Switch on
Press and hold the power key until the phone vibrates.
Switch off
Press and hold the power key.
If your phone stops responding
Press and hold down the power key for about 8 seconds, until the phone vibrates and
switches off.
Switch the phone back on if necessary.
No content, such as contacts or messages, is deleted.
© 2012 Vertu. All rights reserved.

Vertu services 23
Vertu services
Vertu City Brief
City Brief is made up of a series of independently written and uniquely sourced guides
to more than 200 key cities around the world. It is available in a variety of languages,
including English, Italian, German, French, Russian, the relevant Chinese variants,
and Arabic.
City Brief is available on your Vertu Constellation as an additional home screen, once
you have registered the phone.
The City Brief notification widget is activated on the default home screen to let you
know whenever a new City Brief is available for the locati on to which you have travelled.
The content of the City Brief home screen changes as you travel, with the relevant
guide being presented to you when you arrive at a particular destination, offering
suggestions on where to eat, drink and visit during your stay.
City Brief is integrated with Concierge, so you can make phone or mail bookings
through Concierge when you see things that are of interest.
City Brief is updated regularly, so you can always be confident the information is
accurate and relevant. New destinations are added on a regular basis.
Tip: To change the language in which City Brief is displayed, go to the bottom of
any of the articles and select the Preferences option.
Tip: To deactivate City Brief, select > Settings and Vertu Settings.
Vertu Select
Vertu Select delivers original articles selected to inspire, inform, and entertain you,
based on your region, preferences, and passions. It is available in a variety of
languages, including English, Italian, German, French, Russian, the relevant Chinese
variants, and Arabic.
Written by selected experts, Vertu Select is available on your Vertu Constellation as
an additional home screen, once you have registered your Vertu Constellation. The
content is often linked to exclusive offers accessed through Concierge.
Tip: To change the language in which Vertu Select is displayed, go to the bottom
of any of the articles and select the Preferences option.
Tip: To deactivate Vertu Select, select > Settings and Vertu Settings.
© 2012 Vertu. All rights reserved.
24 Vertu services
Vertu Concierge
Concierge is a lifestyle assistance service, available globally 24/7 in your preferred
language.
Your Vertu Constellation comes with 12 months complimentary access to this service,
once you have registered your phone.
Concierge provides you with access to Vertu Technical Support, which is also
available 24/7.
Your Concierge experience begins with a personalised call, designed to:
• Introduce you to the service.
• Understand your needs.
• Record your preferences.
This makes sure that your relationship with Concierge is a rich and rewarding one,
satisfying your needs, and providing you with unique opportunities.
Tip: Concierge Live allows you to monitor the progress of your Concierge
requests.
Contact Vertu Concierge
1 Press the Concierge key on the left side of your phone.
2 Select Call Concierge or Email Concierge.
Tip: If you are unable to contact Vertu Concierge using your dedicated button,
please call Vertu Technical Support for assistance in resolving this.
© 2012 Vertu. All rights reserved.

Vertu services 25
Contact Vertu Technical Support
If you require technical help using your Vertu Constellation, contact Vertu Technical
Support using the Concierge key. Vertu Technical Support is available 24 hours a day,
7 days a week.
1 Press the Concierge key.
2 Select either Call Technical Support or Email Technical Support.
Tip: If you are unable to contact Technical Support using the Concierge key, call
+441252867500. For local numbers, go to www.vertu.com.
Vertu Fortress
Vertu Fortress is a synchronisation service that allows you to transfer photos, videos,
contacts and calender items between your Vertu phone and a cloud-based server,
and also between the server and your PC/MAC (contacts and calender only on MAC),
providing you with a back up facility for the photos and videos on your phone. You must
however first register with Vertu.Me (www.vertu.me.)
By default the files are synchronised manually on both the phone and PC (or MAC),
but synchronisation can be set to automatic if required, giving you total control.
The data that has been transferred to Vertu Fortress can be viewed and managed on
the web portal at www.vertu.me.
The Vertu Constellation phone comes with 12 months complimentary use of the Vertu
Fortress synchronisation service.
The media files are encrypted during transmission using HTTPS (Hypertext Transfer
Protocol Secure). Data is stored using the 256-bit AES (Advanced Encryption
Standard).
Vertu Fortress runs under all currently supported Windows Operating Systems, up to
and including Windows 7.
Remote Assist
Provided that Vertu has your consent, the Remote Assist service enables Vertu's
Technical Support team to access your Vertu Constellation remotely.
The service is intended to assist you if you have problems setting up or using your
phone.
Please contact Technical Support if you wish to use the service.
Vertu Concierge Live
Vertu Concierge Live allows you to monitor the status of your current requests with
Concierge. You can also call Concierge direct from the Concierge Live screen.
© 2012 Vertu. All rights reserved.

26 Vertu services
To find out the status of your Concierge requests, press the Concierge key, and select
Concierge Live.
© 2012 Vertu. All rights reserved.

Home screen 27
Home screen
Interactive home screen elements
About the default home screen
The default home screen acts as a gateway to the functions on your Vertu
Constellation:
• The other home screens. There are two home screens on one side of the default
home screen that are dedicated to Vertu Select and City Brief. On the other side,
there is one home screen that provides access to the initial mailbox and a row of
shortcuts to Vertu's specially curated applications; and another home screen that
provides access to the application quick launch widget. These two home screens
are customisable so that you can add the applications and shortcuts that you use
the most.
You can also add a sixth, blank, home screen that is fully customisable.
When you are travelling, and wish to avoid roaming charges, to deactivate Vertu
Select or City Brief, select
• The three most commonly used profiles – Silent, Offline and General. To change
the profile, select the profile icon in the top left of the default view, and select a
different profile. If Silent is selected, you can choose a time interval for the phone
to be silent before it reverts to the previous profile.
• Four shortcuts at the bottom of the screen (and at the bottom of the two
customisable screens) that give you access to Contacts, Calendar, Messaging,
and Web.
• Status menu is available from the notification area at the top of the screen by
swiping down to open it. This shows the status of a number of key functions plus
notifications of new mail, new messages, and missed calls. Drag the panel up to
close.
The default home screen has an interactive clock that automatically detects your
current time and availability, and provides access to your alarms and appointments.
If you are away from your regular time zone, the time at home is also shown on the
clock face, in digital format. Your current appointments are indicated by the arcs
around the clock, and your current alarms are indicated by red markers.
> Settings and Vertu Settings.
Tip: When you select a quadrant on the clock that contains one or more
appointments, the appointments are displayed in a pop-up window. Select the required
appointment to access the calendar.
The menu key for the selection of other functions is situated centrally just below the
display.
To access the options relevant to your current screen, select
© 2012 Vertu. All rights reserved.
.

28 Home screen
To open the dialler, select .
Portrait or landscape orientation
The phone automatically orientates to display in either landscape or portrait mode
according to the way in which the phone is being held. When you rotate the phone,
the screen automatically adjusts to suit the orientation.
Switch between home screens
Swipe left or right.
indicates your current home screen. Press the dots to return to the default
home screen.
Switch between open applications
You can see which applications and tasks are open in the background, and switch
between them.
Press and hold the menu key to open the task switcher, swipe left or right, and select
the desired application.
Applications running in the background increase the demand on battery power and
use memory. To close an application that you are not using, select
.
Tip: To close all open applications, select and hold the task switcher, and from
the pop-up menu, select Close all.
Notifications
There are a number of means by which your Vertu Constellation notifies you of missed
events.
Status menu — Swipe down from the notification area to open the status menu which
shows events such as available Wi-Fi's, missed calls, and new messages.
© 2012 Vertu. All rights reserved.
Home screen 29
Notification pop-up — A Notification pop-up is displayed on the home screen to show
missed calls, messages, voice mail, and calendar events.
Notification light — This light on the left of the menu key flashes blue when you have
a missed call or a new message. To define the events for which the light flashes, select
> Settings and Phone > Notification lights > Notification light.
The notification light flashes red when your battery needs recharging. The light flashes
green when the battery is charging, and turns a steady green once charging is
complete.
Tip: You can set the notification light to become a breathing light when the phone
is not being used. Select > Settings and Phone > Notification lights > Standby
breathing light > On.
Menu key and soft keys
The menu key is the physical key situated centrally just below the display.
Press the menu key to access the main menu, or to return to the default home screen
from an application.
Press and hold the menu key to view which applications are open.
Context-sensitive icons are located above the menu key. They display context options
relating only to the current screen. Select the relevant soft key icon to open a menu or
perform an action.
Tip: above the menu key indicates the number of home screens, up
to a maximum of six. The highlighted dot indicates the current home screen. Press the
dots to return to the default home screen.
© 2012 Vertu. All rights reserved.

30 Home screen
Clock
Analogue and digital clock
The clock, displayed on the default home screen, does the following:
• Displays time and date in either analogue or digital format, selectable using the
relevant widget.
• Displays alarms set for the next 12 hours (analogue display only).
• Displays free and busy periods taken from the Calendar, around the clock bezel
(analogue display only).
• Maintains time using the automatic time feature.
• Displays the local time or, if you are roaming, displays both the local time and the
time in your home location.
Work with the clock as follows:
• To set an alarm, tap the centre of the clock.
• To display an appointment preview pop-up, tap the appropriate quadrant of the
clock. Tap the pop-up to open the appointment.
• To remove the appointment pop-up, tap the screen again.
Switch between analogue and digital display
1 On the default home screen, select the clock.
2 In the Clock panel, tap the image of the clock to toggle the display between digital
and analogue format.
3
Select
selected format.
View calendar appointments
The calendar entries for each day are indicated by arcs around the edges of the
analogue clock on the default home screen.
To view or amend the entries, tap the relevant quadrant on the clock, and then tap the
individual entries on the resultant pop-up.
Set an alarm
Alarms are set from the clock. Alarms can be repeated daily, weekly, or on workdays,
or not repeated. A number of alarms can be set.
Once an alarm has been set, it is indicated by a red marker on the analogue clock.
1 On the default home screen, select the centre of the clock.
2
Select
3 Set the time for the alarm.
to return to the default home screen, which now shows the clock in the
.
© 2012 Vertu. All rights reserved.
 Loading...