

Vertu Constellation RM-389V User Manual

WEB
English
50
To view the list of the user certificates downloaded into your Vertu
phone:
From the Home screen, press Menu » Settings » Security »
User certificates.
Digital signature
You can make digital signatures with your Vertu phone if your SIM
card has a security module. Using the digital signature can be the
same as signing your name to a paper bill, contract, or other
document.
To make a digital signature:
1. Select a link on a page, for example, the title of the book you want to
buy and its price. The text to sign, which may include the amount and
date, is shown.
2. Check that the header text is Read and that the digital signature
icon is shown.
3. If the digital signature icon does not appear, there is a security breach
and you should not enter any personal data, for example your signing
PIN.
4. To sign the text, read all of the text first, and press Sign.
5. The text may not fit within a single screen. Therefore, make sure to
scroll through and read all of the text before signing.
6. Select the user certificate you want to use. Use the NUMBER keys
to enter the signing PIN (see
“PIN code” on page 13), and select
OK. The digital signature icon disappears, and the service may
display a confirmation of your purchase.
This icon is displayed during a secure browsing session
This icon is displayed during an unsecured browsing
session
VERTU SERVICES
English
51
11 VERTU SERVICES
Vertu services contains software and services available only to
Vertu owners.
Your Vertu phone comes with12 month’s complimentary Vertu
Select and City Brief services and 5 year’s complimentary Travel
service. You will need to register with Vertu to enjoy these
complimentary services.
To use Vertu services:
1. Go to www.verturegistration.com.
2. Register your Vertu phone or login (if you have previously registered).
3. Use the menu on the website to select your choice of services.
You must also have valid Internet settings on your Vertu phone and
there must be GPRS network coverage in your current location.
Depending on which service provider you use, your Vertu phone
might already have Internet settings installed. If you cannot connect
to the Internet, please contact Vertu Concierge or visit
www.vertu.com and download your settings.
Your service provider will charge you for the amount of data
transferred by GPRS so please check their tariff first.
Vertu Select
An exclusive service available only to Vertu owners where you can
access:
> Online information and exclusive downloads such as additional
games, applications, Vertu themes and Vertu ringing tones.
> Links to the best web pages available on the mobile internet.
City Brief
Where possible, City Brief channel provides RSS Feeds
information about your destination, the moment you arrive.
Vertu Fortress
Vertu Fortress enables you to wirelessly transmit important
information from your Vertu phone to a high security data storage
facility. You can back up all contact information, calendar details
and tasks in this way.
When you have synchronised your data with the secure server, you
can update it from our website and, if necessary, transfer it to
another phone you have registered.
Travel
The travel application WorldMate® provides access to the
following information:
> Global weather conditions, forecasts and updates for over
250 cities worldwide.
> Currency conversion with online access to exchange rates for
more than 160 currencies worldwide.
> Real-time flight information including delays, gate and terminal
information for over 75 of the world’s leading airlines.
In order to download the latest flight, currency and weather
information, you must be subscribed to the Travel application
service.
Navigating the screens
Use the NAVIGATION key and the CENTRE SELECT key to move
between screens and also move between fields on a screen.
Updating flight, weather and currency
information
Press the Options SELECTION key to display a menu.
Select the Update ... option to open a GPRS connection and
download latest information to your Vertu phone.
Changing settings
Press the Options SELECTION key to update settings, change
city, and change settings.
Settings include time format, date format, temperature scale and
the space character (decimal point).
Weather
This screen displays five-day weather forecasts. If the weather
information is no longer current and you want to update it, press the
Options SELECTION key and select Update weather.
Currency
This screen displays three different currencies and enables you to
convert sums of money between them. Press the
Options
SELECTION key to select a new currency.
Currency rates fluctuate daily. To obtain current currency rates,
press the
Options SELECTION key and select Update rates.
Flight status
This screen enables you to search for the latest flight information for
over 75 leading airlines. You can see current information on
schedules, gates, terminals, delays and aircraft type.
Select an Airline, Flight number and Date, and then press Get
flight status
.
Queries you have previously made are stored for reuse in the
Recent Queries list.
WorldMate® is provided by MobiMate®.
Important: Use only services that you trust and that offer
adequate security and protection against harmful software.
VERTU SERVICES
English
52
Set up manual roaming
If you travel to a region covered by a different network operator, and
you are unable to download the latest Vertu Services information,
you need to select a network operator that has a GPRS roaming
agreement with your home network.
To do this select Menu » Settings » Phone » Operator
selection »
Manual.
Your Vertu phone will display all the locally available networks. For
information on configuring the Vertu Select, Vertu Fortress and
Travel applications, GPRS coverage and roaming agreements,
please contact Vertu Concierge.
Vertu Concierge
Vertu Concierge is an exclusive service for people who believe that
quality matters. Our aim is to bring you only the very best, whether it
be music, art, travel or food.
Vertu Concierge provides you with a highly personalised range of
services including:
> Lifestyle services such as restaurant recommendations and
reservations, travel assistance, and tickets for theatre shows,
concerts or sporting events.
> Solving everyday practical problems such as finding a
reputable plumber or tracking down a gift.
> Assistance with using your Vertu phone.
When you connect to Vertu Concierge, you can speak directly to a
team of Lifestyle Managers who are available 24 hours a day, 7 days
a week to offer personalised assistance.
Calling Vertu Concierge
Alternatively you can press Menu » Vertu Services » Vertu
Concierge
.
If you are unable to reach Vertu Concierge using the CONCIERGE
key, call +448707375535.
Not all network operators have GPRS roaming agreements with
other network operators.
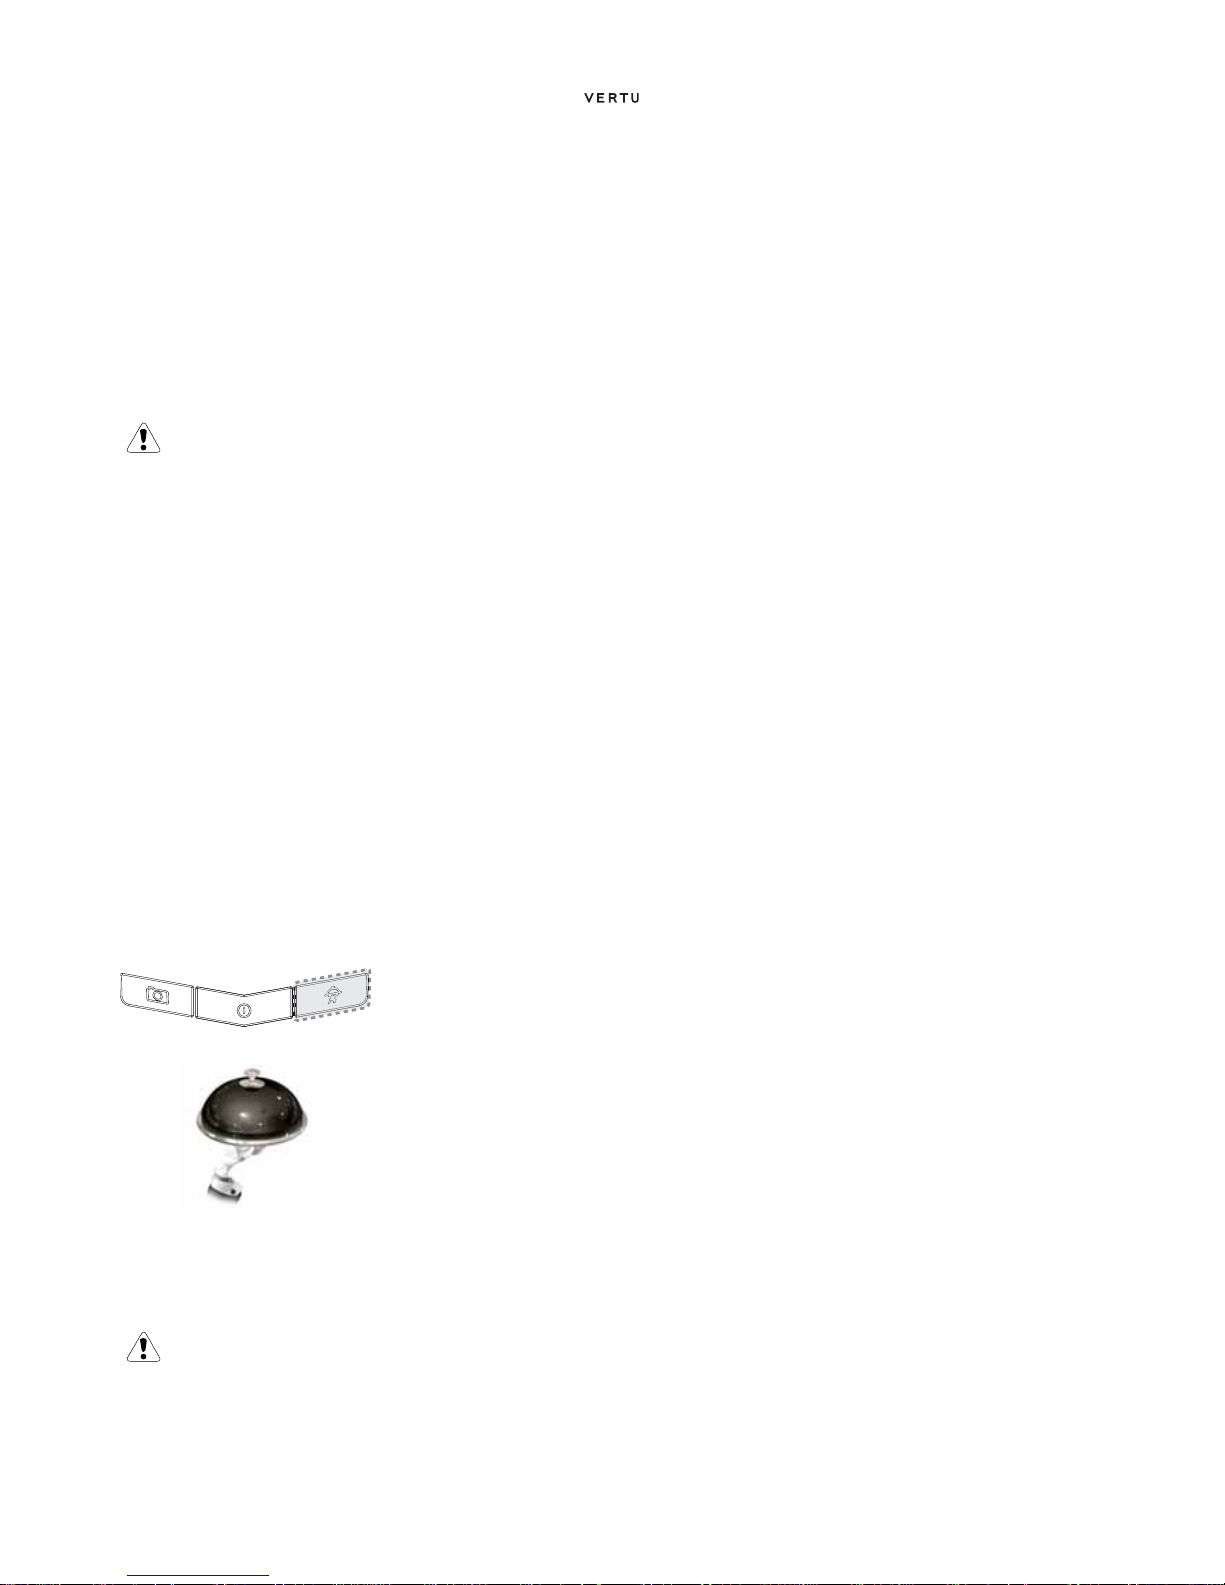
The CONCIERGE key is
located at the bottom of the
keypad of your Vertu phone
as shown in this illustration.
Press the CONCIERGE key
to display the Concierge
screen.
Press Call or the SEND key
to call Vertu Concierge
You must have network coverage to call Vertu Concierge.

NAVIGATE
English
53
12 NAVIGATE
Your Vertu phone comes with maps loaded on the memory card.
You can browse maps for different cities and countries, search for
addresses and points of interest, plan routes from one location to
another, save locations as landmarks, and send them to compatible
phones.
Almost all digital cartography is inaccurate and incomplete to some
extent. Never rely solely on the cartography that you download for
use in this phone.
Select Menu » Navigate and select from the available options.
Last mapto display the last map you have used.
Find address to open a form where you can input address or post
code details.
Saved locations to use the details of a location that you
bookmarked previously.
Recent locations to display the most recent maps you have been
looking at.
Current GPS position to display your current position on a map.
Plan route to provide directions for your journey. You need to
enter the Starting point and the Destination. This provides the map
only. If you want voice guidance this is purchased separately (see
below).
Extra services to purchase voice guided navigation.
Settings to display General settings, Network settings and
Routing settings.
> General settings displays unit of Measure for the map, Points
of Interest displays types of places to view, Lights enables you
to select from the following options: Automatic, On for
Navigation and Always On, and Voice Guidance lets you
select which language you require.
> Network settings - Allow network usage, Yes, In home, No or
Ask when opening. If you allow network usage you can get
faster and better search results.
> Routing settings. this is where you select the type of route, for
example whether to use motorways or not.
There are several settings options available once you have found a
location:
Details to display details about the location
Use location to plan a route to or from the location
Current GPS position pinpoints your location on the map. You
must be outside to use this function.
Plan route to to find the way from a place of your choice to the
destination on the map
Plan route from to find the way from the destination on the map
to a place of your choice.
Navigate to to find the way from your current GPS position to a
place of your choice. You have to be outside to use this function.
Settings to display General settings, Network settings and
Routing settings.
> General settings displays unit of measure for the map, points
of interest, light settings and which language you want.
> Network settings enables you to select if or when to allow
network usage. If you allow network usage you can get faster
and better search results.
> Routing settings is where you select the type of route, for
example whether to use motorways, or to take a shorter route
or a faster route.
Download maps
Your phone contains pre-installed maps on the memory card. You
can download a new set of maps from the Internet using the Map
Loader application. There is a link to download the Map Loader on
the CD-ROM.
Select Menu » Navigate to do an initial configuration.
To change the selection of maps on your memory card, use the Map
Loader to delete all maps on the memory card and download a new
selection to ensure that all maps are from the same release.
Downloading maps may involve the transmission of large amounts
of data through your service provider’s network. Contact your
service provider for information about data transmission charges.
Maps and GPS
You can use the Global Positioning System (GPS) to support the
Navigate application. You can find out your location or measure
distances and plot co-ordinates.
Once the internal GPS receiver in your phone locates a satellite
signal, it may take several minutes for the phone to display the
current location. Subsequent connections should be faster, but if
you have not used GPS for several days, or are very far away from
the last place you used it, it may take several minutes to detect and
display your location.
You can upgrade to a full voice-guided navigation which requires a
regional licence.
To purchase a navigation service with voice guidance, select Menu
»
Navigate » Extra services » Purchase navigation and
follow the instructions.
To use navigation with voice guidance you must allow the maps
application to use a network connection.

NAVIGATE
English
54

CAMERA
English
55
13 CAMERA
Camera
Your Vertu phone incorporates a 3 Megapixel camera with integral
LED flash.
There is a powerful 8x digital zoom which together with the 16
million colour HVGA screen produces crisp, high quality images.
You can take photos and record video clips with the camera, send
them by message to your friends, or save them in the
Gallery, from
where they can be transferred to your computer.
The camera produces pictures in jpg format and you can shoot still
images or video images using the camera application.
Across the top of the screen you can see some indicator icons. The
value for these can be changed in the
Settings menu. You can
also see the number of images remaining in the top-right hand
corner of the viewfinder. The number of images remaining depends
on the chosen resolution and quality settings. Higher resolution and
quality settings result in larger file sizes and fewer images. File sizes
may also vary due to the image compression process.
Taking a photo
To take a photo using your Vertu phone:
1. From the Home screen press the CAMERA button or select
Menu » Camera
2. To zoom in or out press the 4-WAY SCROLL key up or down.
3. To take an image, press the CAMERA button or use the
CENTRE SELECT key to select
Capture. The phone saves
the images in the memory.
4. Once you have captured an image, press Options and choose
from one of the following:
New image to take new picture
Send to send to contact
View images to display other images
Rename to rename image from default name
Use image to set image as wallpaper, attach as contact image,
create new contact and attach, set as group image
Zoom to enlarge an image. Scroll up, down, left and right to move
around the image
Set contrast. Scroll left and right to adjust the image contrast
settings
Edit image to insert text, images, frames, clipart etc.
Print to print image to attached compatible printer
Details to view image details
Deleting a photo
To delete a photo immediately after taking it:
Press the CENTRE SELECT key to delete the photo.
To delete a photo from the gallery:
1. From the Home screen, select Menu » Gallery and the storage
location of the photo.
2. Open the file or view the preview
3. Press Options » Delete to delete the photo.
Camera options
To change the camera settings:
1. Start the camera using one of the above methods.
2. Press Options and select from the following options:
View images to view any stored photos
Video recorder takes a video instead of a photo
Settings to access the following options:
Image/video storage determines where the image is to be
stored. The choices are phone memory (
Gallery Images
folder), media card or a specific folder in the
Gallery.
Default title to have the phone automatically assign a title to
the image. Select
My title and use the NUMBER keys to rename
the default title
Image quality is the compression ratio which affects the
image file size. Choose from
High (large file), Normal or Basic
(smaller file)
Image size to select the pixel size of the captured image.
Choose from options ranging from 2408x1536 (largest) to
160x120 (smallest)
Image preview time to select a preview time to display the
taken images. During the preview time, select
Back to take
another image or
Send to send the image as a Multimedia
message.
Camera & vid. sounds to turn the camera sounds on or off.
Flash to turn flash on and off
Self-timer to set the camera to capture an image automatically
after a preset number of seconds
Image sequence on to capture a sequence of pictures in one
go
Brightness enables you to increase or decrease the brightness of
the screen
Effects to add special effects to your captured image. Apply one of
the following settings:
Normal - default setting for colour images
Greyscale - use for black & white images
Sepia - use to give images an aged effect
Negative - use to reverse the colours
White balance to select a white balance function best suited to
the light conditions at the time of shooting select one of the following
options:
Auto - adjusts white balance automatically and reproduces
natural colours
Daylight - use when taking pictures outside
Tungsten - use when taking pictures under electric lighting
Fluorescent - use when taking pictures under fluorescent light
Warning! When checking the flash, make sure to hold the
phone facing away and pointing down.

CAMERA
English
56
Landscape format changes the orientation of the viewing
screen.
Video recorder
Recording a video
You can record video clips in 3gp format. Available recording time
depends on the video clip length and quality settings.
The length and file size of the clips may vary depending on the
selected quality and available memory.
Record a video clip
To record a video clip:
1. From the Home screen press the CAMERA button or select Menu
» Camera or Menu » Additions » Video recorder.
2. To zoom in or out move the 4-WAY SCROLL key up or down.
3. To pause the recording, select Pause to resume the recording,
select
Continue.
4. To stop the recording, select Stop.
5. By default the recording is saved in the Video clips folder in the
Gallery.
Using a video clip
When you have recorded a video clip you can perform the following
actions on it:
1. Press Options and select from the following:
View images to view any stored video clips
Use video clip to set as incoming call video or set as contact
video
Delete to delete the highlighted video clip
Send to send the video clip to a contact
Rename to rename the video clip from the default name
Details to view the file details
Type of view to view the files in a list or a grid format
Sort to specify which order to show the files in.
Video options
To change the video settings:
1. Select video mode using one of the above methods.
2. Press Options and select from the following options:
View videos to view any stored video clips
Camera changes back to the camera mode
Settings to access the following options:
Image/video storage determines where the video is to be
stored. The choices are phone memory (
Gallery Video clips
folder), media card or a specific folder in the
Gallery.
Default title to have the phone automatically assign a title to
the image. Select
My title and use the NUMBER keys to rename
the default title
Video clip length on For MMS message setting means
that the file size is limited to fit into a Multimedia message.
Maximum available setting means all available memory is
used. Available memory depends on where the video clip is stored
Video clip quality sets the compression ratio. Choose from
High (large file), Normal or Basic (smaller file)
Video resolution to select the pixel size of the captured video.
Choose from options ranging from 640x480 (largest file size) to
128x96 (smallest file size)
Image quality is the compression ratio which affects the
image file size. Choose from
High (large file), Normal or Basic
(smaller file)
Video preview to play back the video as soon as you stop
recording.
Camera & vid. sounds to turn the camera sounds on or off.
Mute to view the video clip without recorded sound
Brightness enables you to increase or decrease the brightness of
the screen
Effects to add special effects to your captured image. Apply one of
the following settings:
Normal - default setting for colour images
Greyscale - use for black & white images
Sepia - use to give images an aged effect
Negative - use to reverse the colours
White balance to select a white balance function best suited to
the light conditions at the time of shooting select one of the following
options:
Auto - adjusts white balance automatically and reproduces
natural colours
Daylight - use when taking pictures outside
Tungsten - use when taking pictures under electric lighting
Fluorescent - use when taking pictures under fluorescent light
Landscape format changes the orientation of the viewing
screen.

GALLERY
English
57
14 GALLERY
Gallery
You can save images, video clips, graphics, ringing tones and
recordings to folders in the gallery, and add new folders to the ones
already there. You can download images and tones using MMS,
mobile Internet sites, or Vertu PC Suite. Your phone contains two
types of memory: phone memory and the memory card. Files can be
stored on either memory, but there is much more storage space
available on the memory card.
Your Vertu phone supports a digital rights management system to
protect content that you have acquired. A piece of content, for
example a ringing tone, can be protected and associated with
certain usage rules, for example, the number of usage times or a
certain usage period. The rules are defined in the content activation
key that can be delivered with the content or separately, depending
on the service provider. You may be able to update these activation
keys. Always check the delivery terms of any content and activation
key before acquiring them, as they may be subject to a fee.
Digital rights management
Copyright protection may prevent some images, ringing tones, and
other content from being copied, modified, transferred, or
forwarded.
Digital rights management (DRM) is copyright protection, designed
to prevent modification and to limit distribution of protected files.
When you download protected files, such as sound, video, themes,
or ringing tones to your phone, the files are free, but locked. You pay
for the key to activate the file, and the activation key is automatically
sent to your phone when you download the file.
To view the permissions for a protected file:
> Scroll to the file, and select Options » Activation keys. For
example, you can see how many times you can view a video
or how many days you have left for listening to a song.
To extend the permissions for a file:
Scroll to the file, select Options, and the corresponding option for
the file type, such as
Activate theme.
You can send certain types of protected files to your friends, and
they can buy their own activation keys.
If your device has OMA DRM protected content, the only way to
back up both the activation keys and the content is to use PC suite.
Other transfer methods may not transfer the activation keys which
need to be restored with the content for you to be able to continue
the use of OMA DRM protected content after the device memory is
formatted. You may also need to restore the activation keys in case
the files on your device get corrupted.
Copyright protections may prevent some images, music (including
ringing tones), and other content from being copied, modified,
transferred or forwarded.
This phone supports OMA DRM 1.0 and 2.0
Your Vertu phone has a limited memory for storing files in the
Gallery. This memory is not shared with other functions, for example
contacts. If the phone displays a message that the memory is full,
delete some existing files before proceeding.
Folders
To browse the folders in your Vertu phone:
1. From the Home screen, press Menu » Gallery.
A list of folders is displayed
<Memory card NO NAME>
Images
Video clips
Music files
Themes
Graphics
Tones
Recordings
Received files
These are preset in the phone. Other user-defined folders may also
be shown.
2. Scroll to a folder, and press Open to view the folders and files it
contains.
3. Or, press Options to see a list of the actions you can perform on
the folder:
Downloads to view downloads stored on your Vertu phone.
Choose from Graphic, Tone, Video, Theme or Music downloads.
Delete folder to delete a folder you have created. You cannot
delete a preset folder.
Move folder to move the selected folder into another folder. After
selecting
Move folder, scroll to another folder, and then press
Options. With Move folder highlighted, press Select. You
cannot move a preset folder.
Copy folder to copy your folder to another folder. You cannot
copy a preset folder.
Rename folder to rename a folder you have created. You cannot
rename a preset folder.
Details to show the name, size and date of creation of the selected
folder.
Type of view to determine how the content of the folder will be
displayed, either
List with details, List or Grid.
Sort to sort the contents of the selected folder By name, By
date
, By format, or By size.
Add folder to create a new sub folder for your files.
Memory status to examine how the memory in your Vertu phone
is being used and how much you have left.
Search to enter a filename or part of a filename to search for in this
folder.
Mark to select a folder.
Mark all to select all folders.
 Loading...