

Page 1

REFERENCE MANUAL
Page 2

GETTING STARTED . . . . . . . . . . . . . . . 1
REGISTER YOUR VERTU PHONE . . . . . . . . . . . . . . . 1
VERTU PACKAGE CONTENTS . . . . . . . . . . . . . . . . . 1
CD-ROM . . . . . . . . . . . . . . . . . . . . . . . . . . . . . . . . 1
NETWORKS . . . . . . . . . . . . . . . . . . . . . . . . . . . . . . 1
CONVENTIONS USED IN THIS GUIDE . . . . . . . . . . . . 1
GLOSSARY . . . . . . . . . . . . . . . . . . . . . . . . . . . . . . 1
YOUR VERTU PHONE - FRONT VI EW . . . . . . . . . . . . 2
YOUR VERTU PHONE - BACK VI EW . . . . . . . . . . . . . 2
YOUR VERTU PHONE - SIDE VIEW 1 . . . . . . . . . . . . 3
YOUR VERTU PHONE - SIDE VIEW 2 . . . . . . . . . . . . 3
OUTER DISPLAY . . . . . . . . . . . . . . . . . . . . . . . . . . 4
INSERTING THE SIM AND MEMORY CA RD . . . . . . . . 5
THE SETUP WIZARD . . . . . . . . . . . . . . . . . . . . . . . 6
USING YOUR VERTU PHONE . . . . . . . . . . . . . . . . . . 6
ICONS AND INDICATORS . . . . . . . . . . . . . . . . . . . . 7
GLOWING LIGHT . . . . . . . . . . . . . . . . . . . . . . . . . . 8
PROTECTING YOUR VERTU PHONE . . . . . . . . . . . . . 8
THE MAIN MENU . . . . . . . . . . . . . . . . . . . . . . . . . . 8
PERSONALISING YOUR VERTU PHONE . . . . . . . . . . 9
LOCATION BASED FEATURES . . . . . . . . . . . . . . . . . 11
THE MEDIA PLAYER . . . . . . . . . . . . . . . . . . . . . . . . 11
CD-ROM . . . . . . . . . . . . . . . . . . . . . . . . . . . . . . . . 11
CARE AND MAINTENANCE . . . . . . . . . . . . . . . . . . . 12
SPECIFICATIONS . . . . . . . . . . . . . . . . . . . . . . . . . . 12
SECURITY . . . . . . . . . . . . . . . . . . . . . . 13
PIN CODE . . . . . . . . . . . . . . . . . . . . . . . . . . . . . . . 13
PIN2 CODE . . . . . . . . . . . . . . . . . . . . . . . . . . . . . . 13
SECURITY CODE . . . . . . . . . . . . . . . . . . . . . . . . . . 13
SECURITY LEVEL . . . . . . . . . . . . . . . . . . . . . . . . . . 14
SECURITY MODULE . . . . . . . . . . . . . . . . . . . . . . . . 14
CALL BARRING . . . . . . . . . . . . . . . . . . . . . . . . . . . 14
BARRING PASSWORD . . . . . . . . . . . . . . . . . . . . . . 14
FIXED DIALLING . . . . . . . . . . . . . . . . . . . . . . . . . . 15
CLOSED USER GROUP . . . . . . . . . . . . . . . . . . . . . . 15
AUTHORITY CERTIFICATES & USER CERTIFICATES . 15
MESSAGES . . . . . . . . . . . . . . . . . . . . . 16
MULTIMEDIA MESSAG ES . . . . . . . . . . . . . . . . . . . . 20
AUDIO MESSAGES . . . . . . . . . . . . . . . . . . . . . . . . . 22
VIDEO MESSAGES . . . . . . . . . . . . . . . . . . . . . . . . . 23
E-MAIL . . . . . . . . . . . . . . . . . . . . . . . . . . . . . . . . . 23
IMS (INSTANT MESSAGING) . . . . . . . . . . . . . . . . . . 23
VOICE MESSAGES . . . . . . . . . . . . . . . . . . . . . . . . . 23
INFO MESSAGES . . . . . . . . . . . . . . . . . . . . . . . . . . 24
SERVICE MESSAGES . . . . . . . . . . . . . . . . . . . . . . . 24
BLUETOOTH MESSAGES . . . . . . . . . . . . . . . . . . . . 24
SERVICE COMMANDS . . . . . . . . . . . . . . . . . . . . . . . 24
CONTACTS . . . . . . . . . . . . . . . . . . . . . 25
CONTACTS MEMORY . . . . . . . . . . . . . . . . . . . . . . . 25
ADDING CONTACTS . . . . . . . . . . . . . . . . . . . . . . . . 26
ACCESSING CONTACTS . . . . . . . . . . . . . . . . . . . . . 26
DELETING CONTACTS . . . . . . . . . . . . . . . . . . . . . . 26
CONTACT NUMBER AND TEXT TYPES . . . . . . . . . . . 27
CONTACTS MENU . . . . . . . . . . . . . . . . . . . . . . . . . 28
GROUPS . . . . . . . . . . . . . . . . . . . . . . . . . . . . . . . . 29
OPTIONS ON CONTACT NUMBERS . . . . . . . . . . . . . 30
CALL HISTORY. . . . . . . . . . . . . . . . . . .32
THE CALL HISTORY . . . . . . . . . . . . . . . . . . . . . . . . 32
VIEWING THE CALL HISTORY . . . . . . . . . . . . . . . . . 32
VIEWING MISSED CALLS . . . . . . . . . . . . . . . . . . . . 32
VIEWING RECEIVED CALLS . . . . . . . . . . . . . . . . . . 32
VIEWING DIALLED NUMBERS . . . . . . . . . . . . . . . . . 32
VIEWING MESSAGE RECIPIENTS . . . . . . . . . . . . . . 32
CLEARING LOG LISTS . . . . . . . . . . . . . . . . . . . . . . 32
VIEWING CALL DURATION . . . . . . . . . . . . . . . . . . . 32
VIEWING THE PACKET DATA COUNTER . . . . . . . . . 32
VIEWING THE DATA TIMER . . . . . . . . . . . . . . . . . . 33
VIEWING THE MESSAGE LOG . . . . . . . . . . . . . . . . . 33
VIEWING THE POSITIONING LOG . . . . . . . . . . . . . . 33
VIEWING THE SYNC LOG . . . . . . . . . . . . . . . . . . . . 33
SETTINGS. . . . . . . . . . . . . . . . . . . . . . .34
DATE AND TIME . . . . . . . . . . . . . . . . . . . . . . . . . . 34
PROFILES . . . . . . . . . . . . . . . . . . . . . . . . . . . . . . 34
TONES . . . . . . . . . . . . . . . . . . . . . . . . . . . . . . . . . 35
DISPLAY . . . . . . . . . . . . . . . . . . . . . . . . . . . . . . . . 35
MY SHORTCUTS . . . . . . . . . . . . . . . . . . . . . . . . . . 36
CONNECTIVITY . . . . . . . . . . . . . . . . . . . . . . . . . . . 36
CALL SETTINGS . . . . . . . . . . . . . . . . . . . . . . . . . . 37
PHONE SETTINGS . . . . . . . . . . . . . . . . . . . . . . . . . 38
CONFIGURATION . . . . . . . . . . . . . . . . . . . . . . . . . 40
SECURITY . . . . . . . . . . . . . . . . . . . . . . . . . . . . . . 40
WORKSHOP RESET . . . . . . . . . . . . . . . . . . . . . . . . 40
SYNC AND BACKUP . . . . . . . . . . . . . . . . . . . . . . . . 40
ADDITIONS . . . . . . . . . . . . . . . . . . . . . .42
GAMES . . . . . . . . . . . . . . . . . . . . . . . . . . . . . . . . . 42
CALCULATOR . . . . . . . . . . . . . . . . . . . . . . . . . . . . 42
MEDIA PLAYER . . . . . . . . . . . . . . . . . . . . . . . . . . . 42
EQUALISER . . . . . . . . . . . . . . . . . . . . . . . . . . . . . 43
VIDEO RECORDER . . . . . . . . . . . . . . . . . . . . . . . . 43
VOICE RECORDER . . . . . . . . . . . . . . . . . . . . . . . . 43
NOTES . . . . . . . . . . . . . . . . . . . . . . . . . . . . . . . . . 44
COLLECTION . . . . . . . . . . . . . . . . . . . . . . . . . . . . 44
STOPWATCH . . . . . . . . . . . . . . . . . . . . . . . . . . . . 44
CALENDAR . . . . . . . . . . . . . . . . . . . . . .45
CALENDAR . . . . . . . . . . . . . . . . . . . . . . . . . . . . . . 45
CALENDAR NOTES . . . . . . . . . . . . . . . . . . . . . . . . 45
TO-DO LIST . . . . . . . . . . . . . . . . . . . . . . . . . . . . . 46
ALARM CLOCK . . . . . . . . . . . . . . . . . . .47
SETTING THE ALARM . . . . . . . . . . . . . . . . . . . . . . 47
WEB. . . . . . . . . . . . . . . . . . . . . . . . . . . .48
AUTOMATICALLY SETTING UP WEB BROWSING . . . 48
MANUALLY SETTING UP WEB BROWSING . . . . . . . . 48
VERTU MOBILE . . . . . . . . . . . . . . . . . . . . . . . . . . . 48
GO TO ADDRESS . . . . . . . . . . . . . . . . . . . . . . . . . 48
BROWSE PAGES . . . . . . . . . . . . . . . . . . . . . . . . . . 48
SETTINGS . . . . . . . . . . . . . . . . . . . . . . . . . . . . . . 48
English
Page 3

CLEAR THE CACHE . . . . . . . . . . . . . . . . . . . . . . . . 49
VERTU SERVICES. . . . . . . . . . . . . . . . 51
VERTU SELECT . . . . . . . . . . . . . . . . . . . . . . . . . . . 51
CITY BRIEF . . . . . . . . . . . . . . . . . . . . . . . . . . . . . . 51
VERTU FORTRESS . . . . . . . . . . . . . . . . . . . . . . . . . 51
TRAVEL . . . . . . . . . . . . . . . . . . . . . . . . . . . . . . . . 51
SET UP MANUAL ROAMING . . . . . . . . . . . . . . . . . . . 52
VERTU CONCIERGE . . . . . . . . . . . . . . . . . . . . . . . . 52
NAVIGATE . . . . . . . . . . . . . . . . . . . . . . 53
CAMERA. . . . . . . . . . . . . . . . . . . . . . . . 55
CAMERA . . . . . . . . . . . . . . . . . . . . . . . . . . . . . . . . 55
VIDEO RECORDER . . . . . . . . . . . . . . . . . . . . . . . . . 56
GALLERY . . . . . . . . . . . . . . . . . . . . . . . 57
GALLERY . . . . . . . . . . . . . . . . . . . . . . . . . . . . . . . 57
DIGITAL RIGHTS MANAGEMENT . . . . . . . . . . . . . . . 57
ACCESSORIES . . . . . . . . . . . . . . . . . . 59
WALL CHARGER . . . . . . . . . . . . . . . . . . . . . . . . . . 59
BATTERY . . . . . . . . . . . . . . . . . . . . . . . . . . . . . . . 59
DATA CABLE . . . . . . . . . . . . . . . . . . . . . . . . . . . . . 60
English
Page 4

GETTING STARTED
1 GETTING STARTED
Register your Vertu phone
Vertu aims to provide you with the very best service possib le.
To enable us to do this, please register your Vertu phone by using
the Menu option
Register in the Vertu Services menu, or by
visiting www.verturegistration.com, or by cal ling Ve rtu Conci erge
using the dedicated key on your phone.
Vertu package contents
1 Vertu Constellation phone RM-389V
1 Battery
Wall charger (comprising wall charger plug & da ta cabl e)
1
plus international adaptors
1 8GB micro SD memory card (fitted in phone)
1 Authenticity card
1 Constellation guide
1 Warranty and safety information
1 CD-ROM
1 Data cable
The package contents may vary slightly in accordance w ith regional
regulations.
CD-ROM
The CD-ROM provided with your Vertu phone contains the
following items:
> An option to register your Vertu phone.
> Vertu PC Suite (for PC only)
> iSync Plug-in (for Macintosh only)
> An electronic version of the Reference Manual
> A link to set up multimedia messaging (MMS) and Internet
> A link to download the Map Loader application.
For more information please see “CD-ROM” on page 11.
Networks
To use the phone you must have service from a wireless service
provider. Many of the features require special net work feat ures.
These features are not available on all networks; other netwo rks
may require that you make specific arrangements with your service
provider before you can use the network services. Your service
provider can give you instructions and explain what char ges will
apply.
The wireless device described in th is guide is appro ved for use o n
EGSM 900 MHz, GSM 850/1800/1900 MHz, and WCDMA
Band I, II, V and VI.
Contact your service provider for more information about networks.
Conventions used in this guide
Menu
Represents text that appears on your Vertu phone’s
display, for example, “From the Home screen, press
Menu”.
SEND Represents a Vertu phone key, for example, “Press the
SEND key to make the call”.
Important information relating to safety.
Represents useful information or a quick way to access or
operate a feature.
Represents points to be aware of when using your
Vertu phone.
Glossary
4-WAY
SCROLL key
CENTRE
SELECT key
NUMBER keys The keys that are used to enter text or
Default Initial product setting as supplied by Vert u
SIM card Subscriber Identity Module. This is a small card
Service provider The provider of your SIM card and all
Network service A feature which is made available at the
Home screen The screen that appears on the inner display
PIN number A Personal Identification Number that allows
Move the cursor up, down, left and right by
pressing on the key edges.
Press this key to select an item.
numbers.
when the phone leaves our workshop.
supplied by your service provider to insert i nto
your Vertu phone for a network connection.
associated network services.
discretion of your service provider.
when your Vertu phone is switched on, with
Menu displayed at the bottom. The screen
that displays when you repeatedly press the
END key.
only authorised access to your Vertu phone
and SIM card. We strongly recommend that
you set these up when you receive your new
Vertu phone and SIM card.
English
1
Page 5
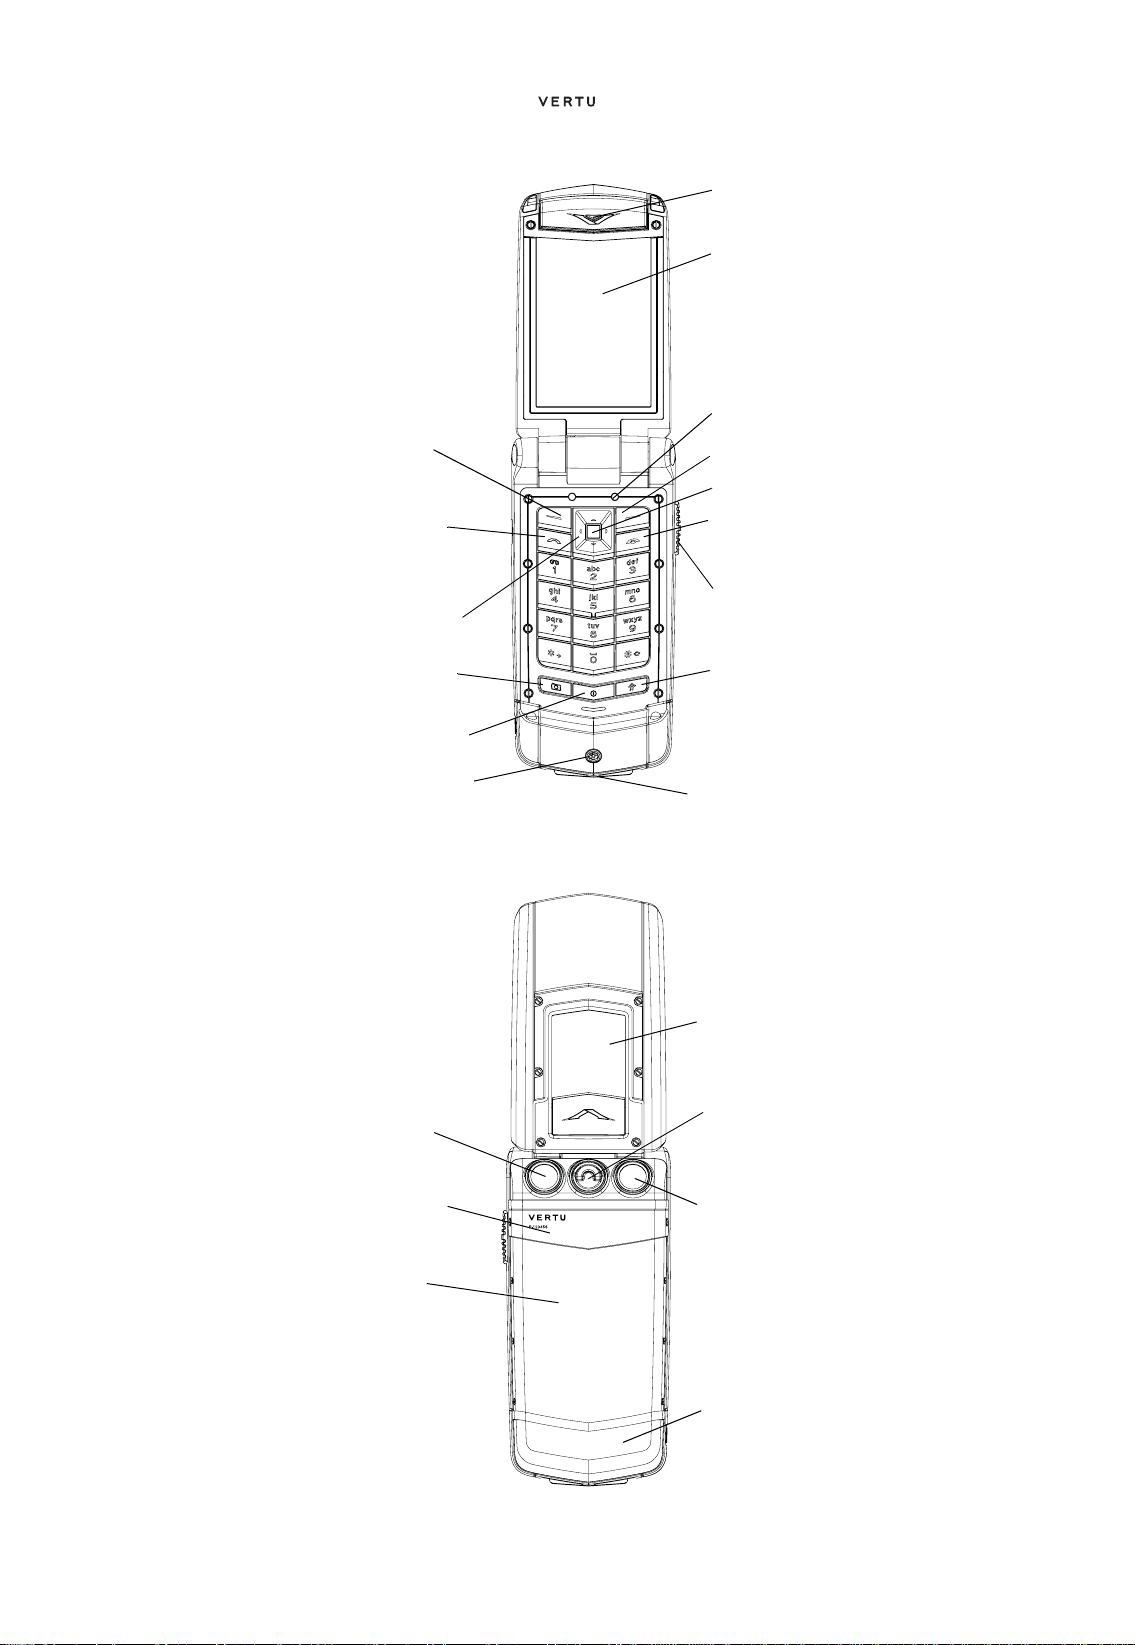
Your Vertu phone - fro nt view
GETTING STARTED
Earpiece
Inner displa y
Light sensor
Left selection
key
Send key
4-way scroll
key
Camera key Concierge key
Power key
Glowing light
Your Vertu phone - back view
Right selection
key
Centre select
key
End key
Sliding key
(controls call
volume)
Speaker port
Outer dis pl a y
Twin LED flash
Serial number
Battery cover
Battery cover
release D-ring
Camera
Antenna area
English
2
Page 6
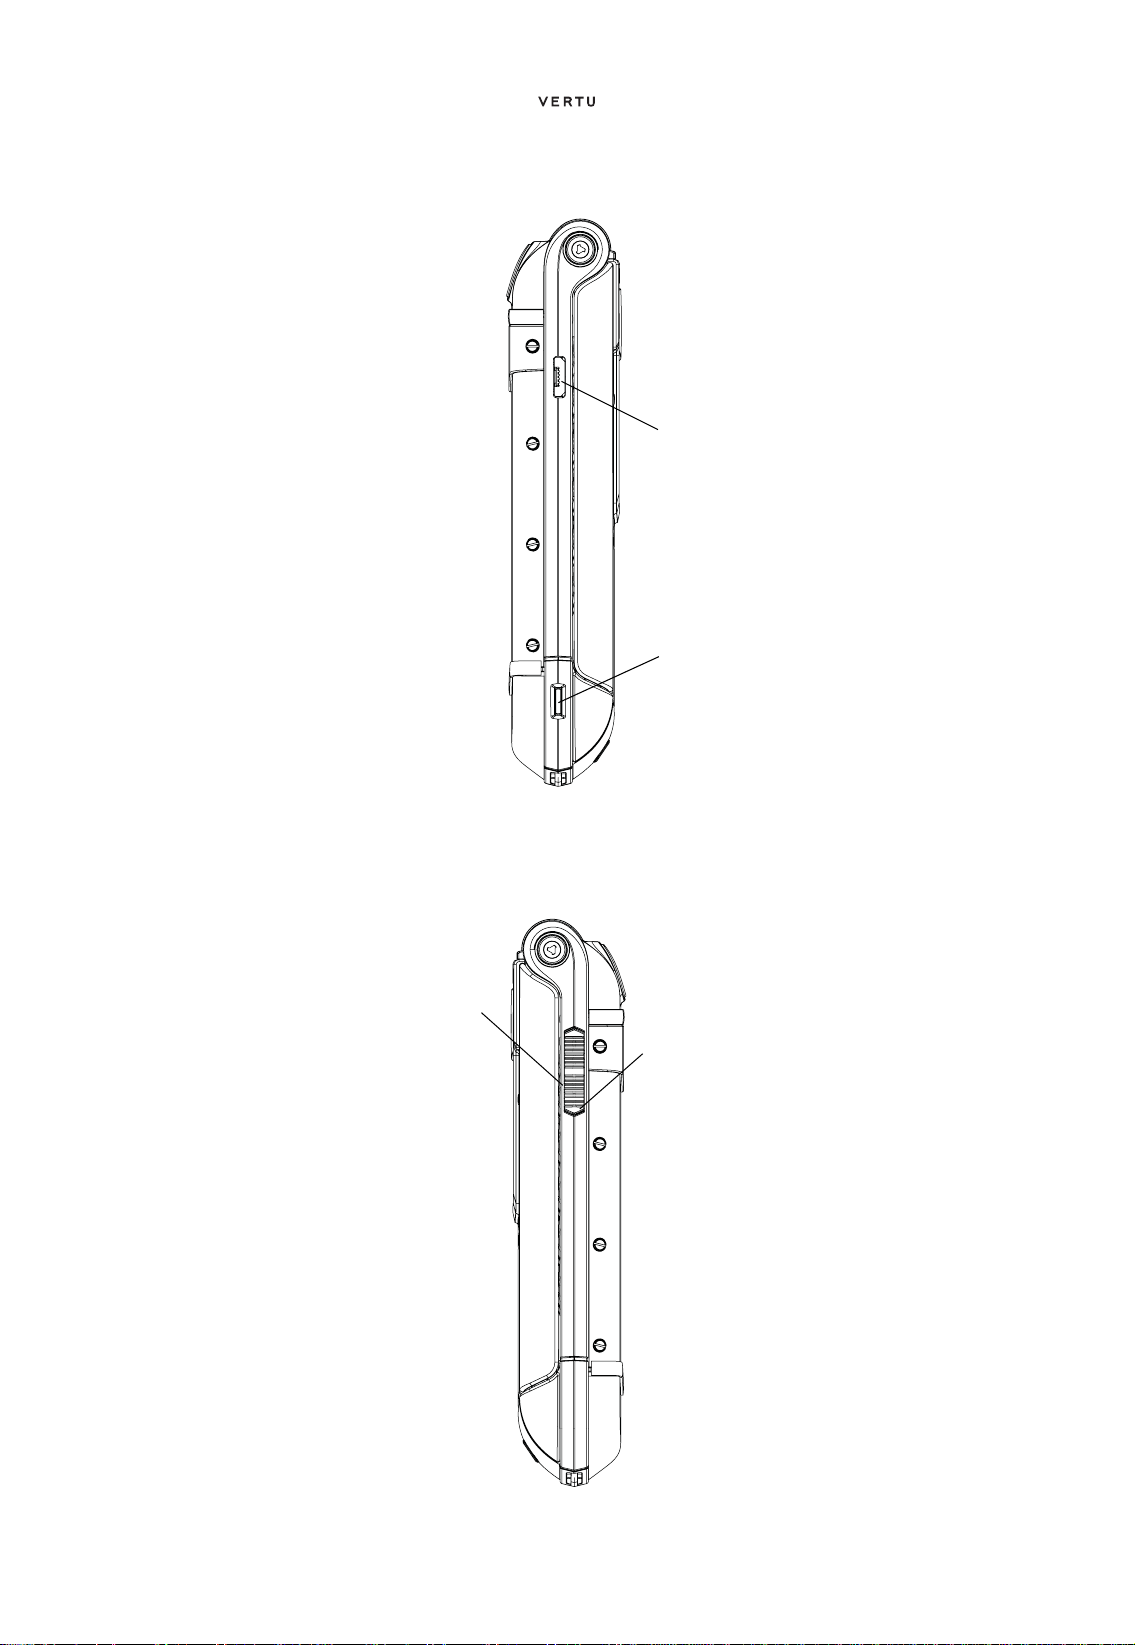
Your Vertu phone - side view 1
GETTING STARTED
Micro-USB
connector for
charging and
data transfer
Charm
attachment
point
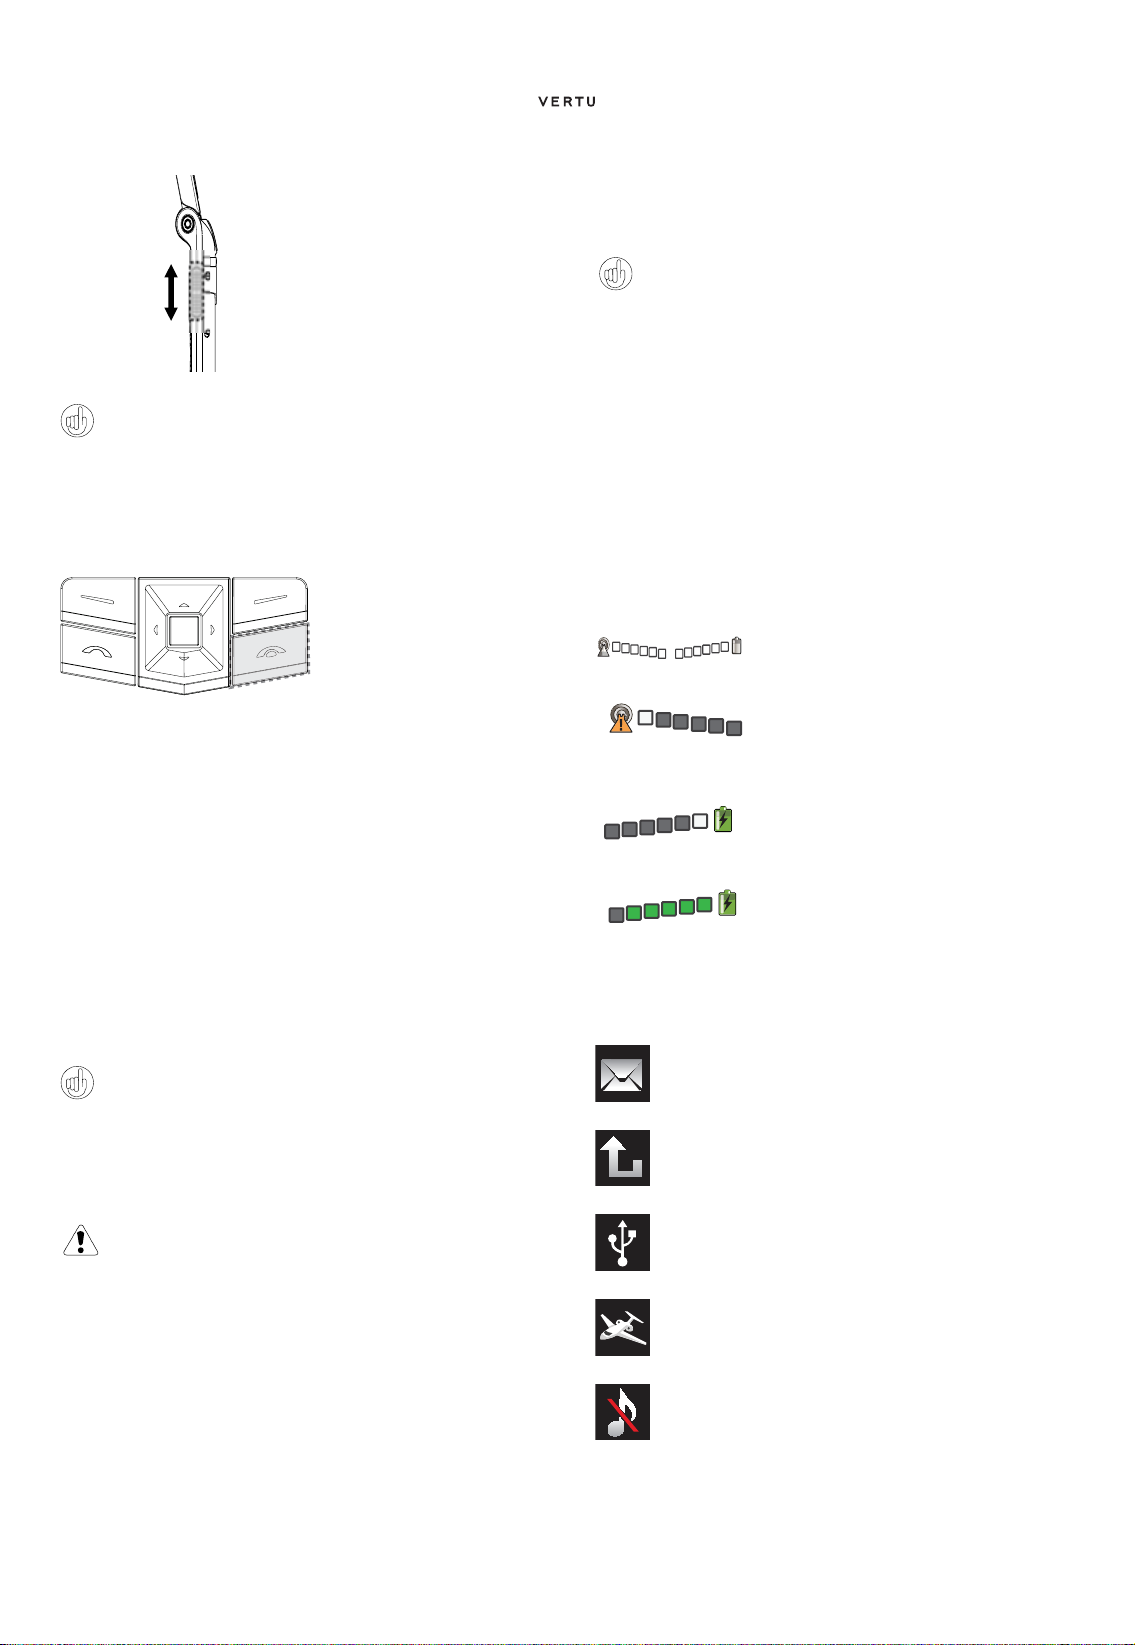
Your Vertu phone - side view 2
When the phone is
closed, pus h the
sliding key up to
illuminate the outer
display screen.
Push the the sliding
key down to open the
phone.
English
3
Page 7
GETTING STARTED
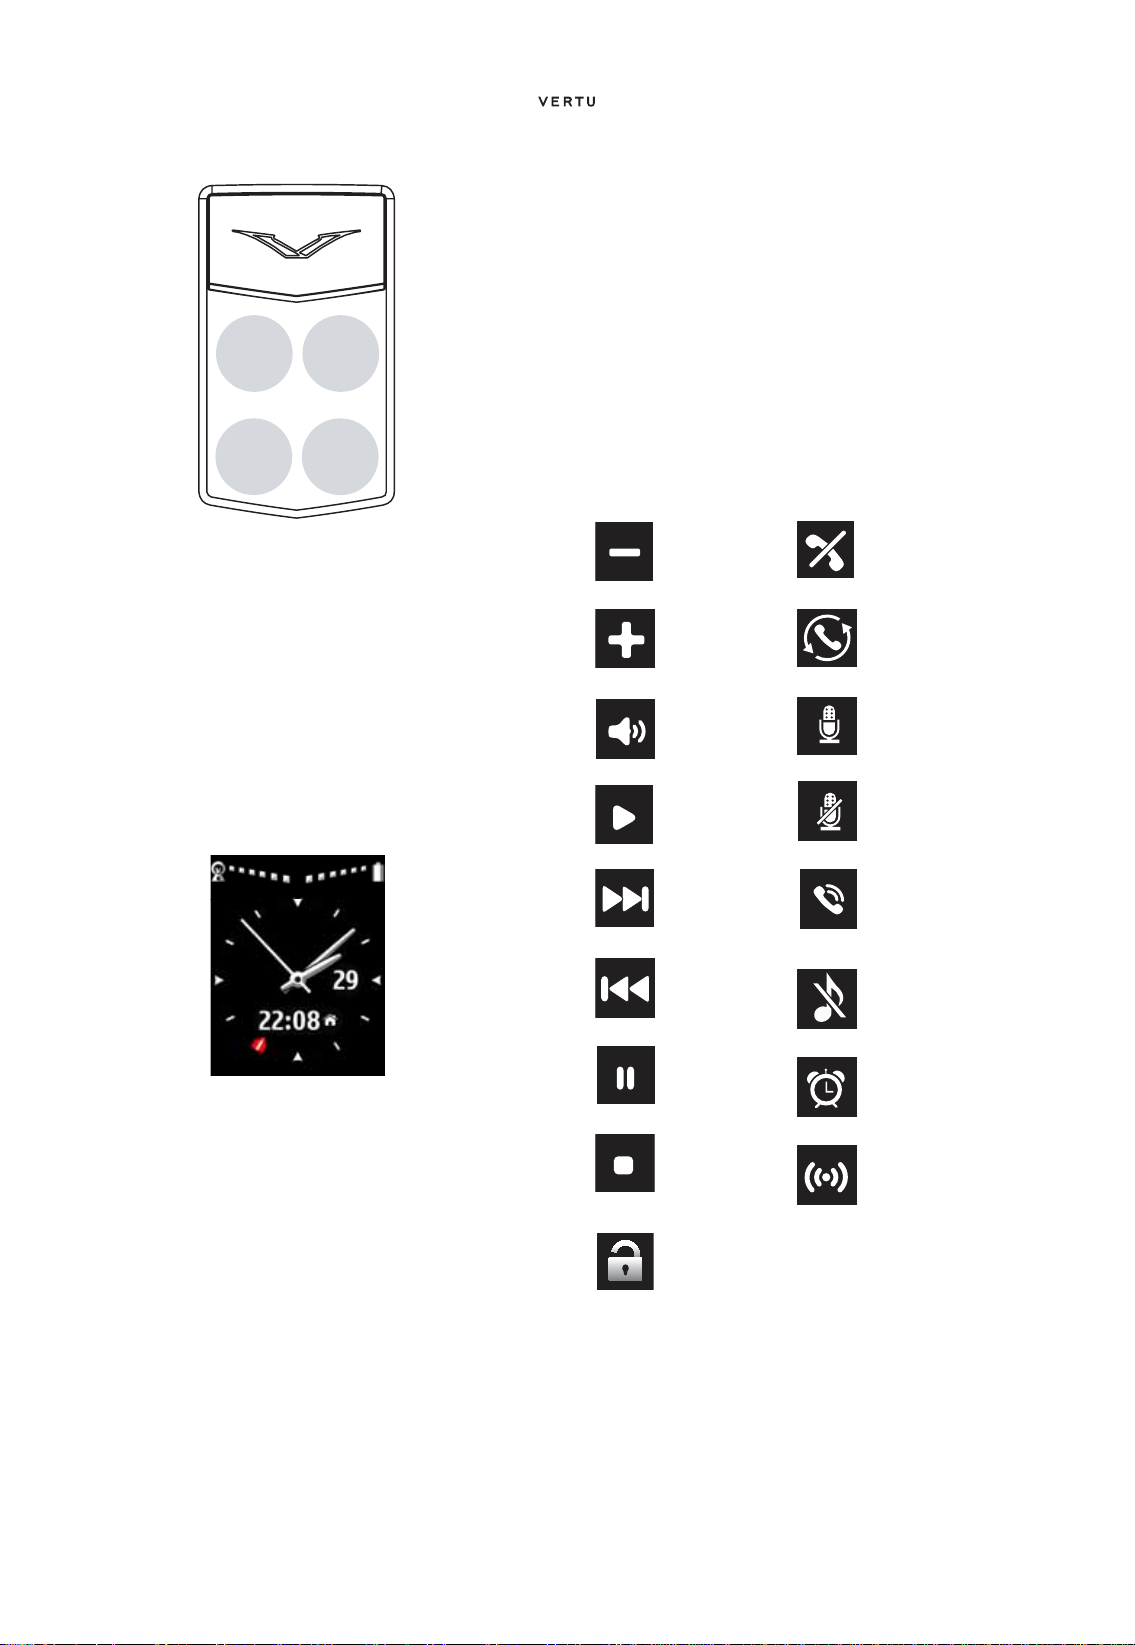
Outer display
The outer display is touch-sensitive in the four areas indi cat ed
above and provides quick access to some useful functions.
In order to prolong battery lif e, the display fades out after a few
seconds. To reactivate the display, gently shake t he phone, double
tap on the phone or push the sliding key up and the display comes
back to life.
The outer display is controll ed by a n accelerometer that gives you a
small reaction when you touch it. The alarm clock also uses this
feature to silence the alarm.
The various icons and indicators that you will see on the outer
display are described in more detail on
page 7.
Answering calls with a headset
Calls can be answered from the ou ter display with the phone closed
while you are using a headset. To end the call, double-tap t o reactivate the display and press the End call icon.
Music player
The music player can be controlled (but not started) by touching t he
icons on th e ou ter displa y .
Alarm clock
The alarm clock can be snoozed or stopped by touching the outer
display.
You can also activate the snooze by turning the phone over (see
page 47 for more details).
Outer display buttons
Reduce volume End or reject call
Increase v ol um e Switch between
calls
Adjust volume Mute on
Play Mute off
Accurate time
Accurate time is controlled by an atomic clock, which is the most
accurate timekeeping device in the world, locat ed in the Ve rtu high
security bunker. If you are travelling and you have set the cl ock up
appropriately with the Setup Wizard, the larger analo gue clock
shows the local time and the smaller digi tal clock shows the ti me at
your home location.
Accurate time automatically adjust s whenever you cross a time zone
and also knows when to add daylight saving time.
If you prefer to set the date and time manually, select Dual Fixed
Zone to display the time at two locations of your own choice.
Rejecting calls
Calls can be rejected from the outer display by first push ing the
sliding key up (to activate the display) and then pressing the Reject
icon.
Next Accept cal l
Previous Silence
Pause Alarm
Stop (music
player and alarm
clock)
Unlock
Snooze
English
4
Page 8

GETTING STARTED
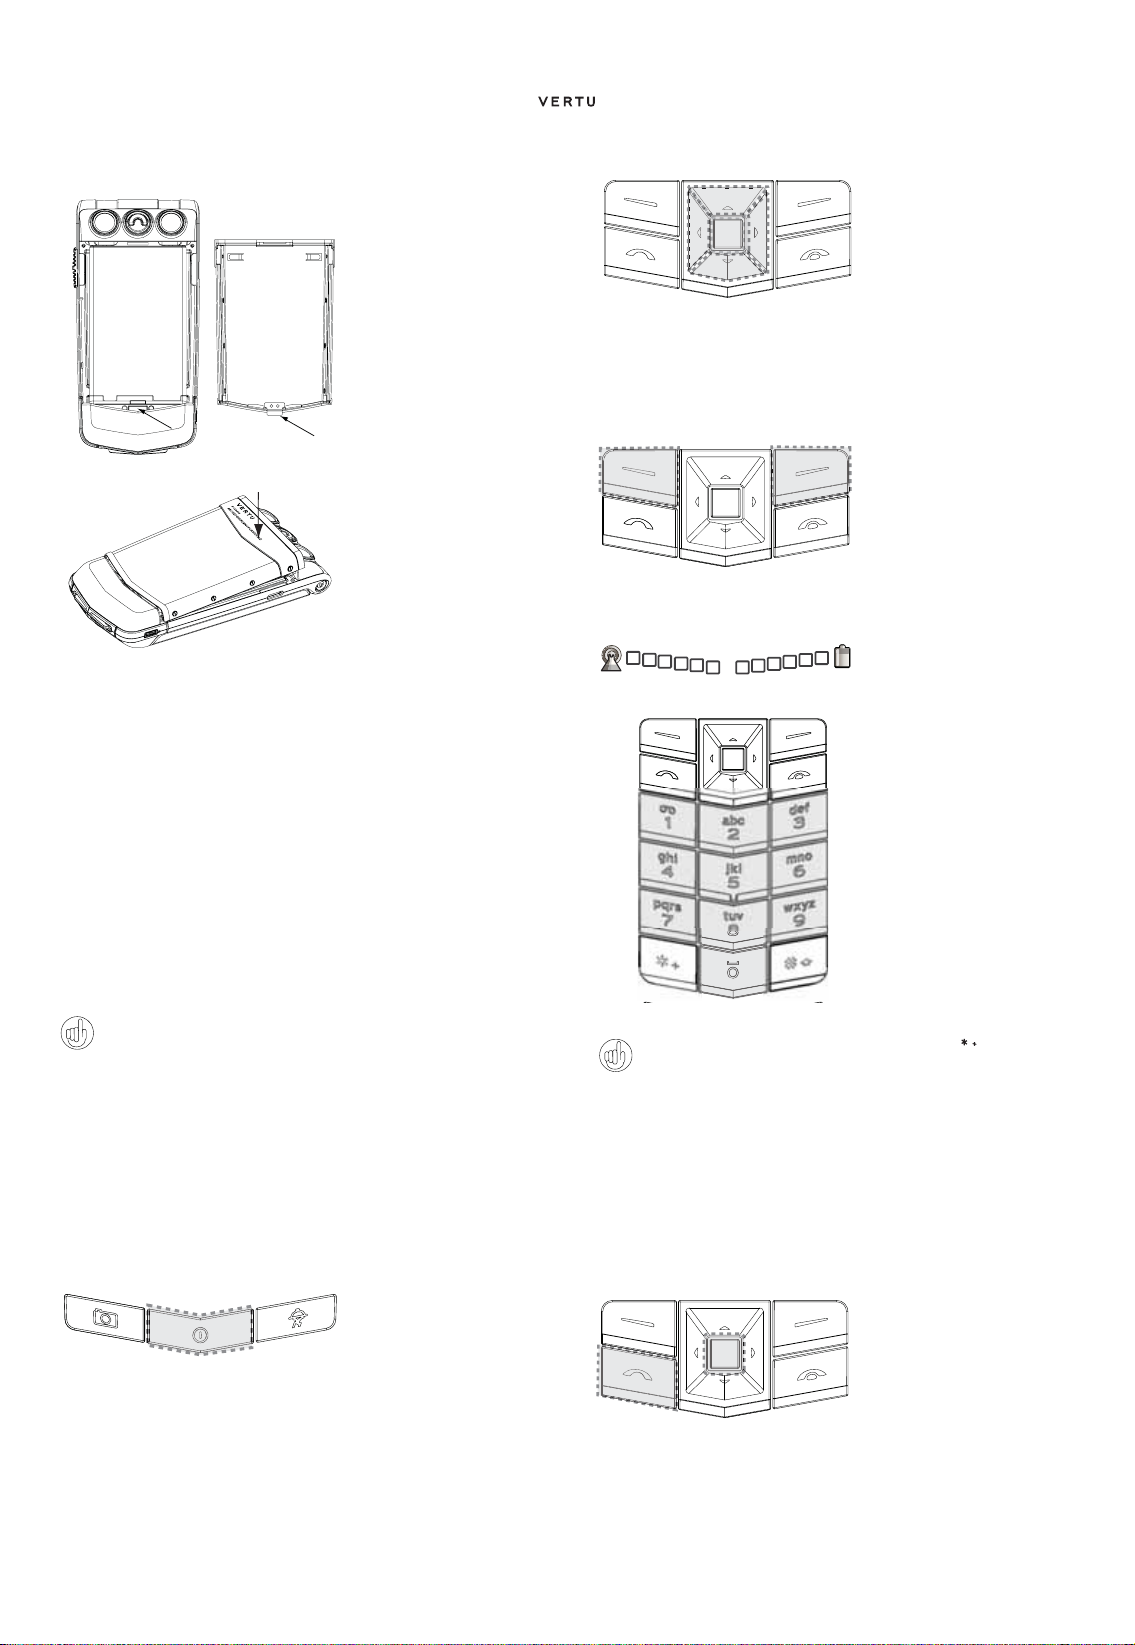
Inserting the SIM and memory car d
Always switch the phone off and disconnect the
charger before touching the battery.
To insert the SIM and memory card you have to first remove the
battery cover and the battery to reveal the SIM and memory card
compartments.
Remove the battery cover
With the back of the Vertu
phone facin g y o u, lift the
top half of the battery
cover release D-ring with
your finger nail .
Hold it between you r
thumb and forefinger and
turn anticlockwise until
the back cover pops
open.
Raise the ba t ter y cov er
2
1
Remove the battery
slightly (1) and then move
the cover gently towards
the top of the phone (2).
Be careful when handling, inserting or removing the SIM card .
T o open the SIM door,
apply light pressure, and
slide to the left. Move the
door into a vertical
position.
Place the SIM on the SIM
contacts, alig ning the
slanted corners and
ensuring that the SIM is
seated prop erly.
Lay the SIM door on top
of the SIM card, apply
light pressure and slide to
the right until it locks into
place.
Insert the memory card
Be careful when handling, inserting or removing the me mory card.
T o open t he memory card
holder (1), apply li ght
pressure, a n d s l id e to th e
left. Move t he ca r d ho l de r
into a vertical position.
Place the memory card in
the card holder, aligning it
with the diagram on the
card holder.
Lay the card hol der on top
of the contacts, apply
light pressure and slide to
the right until it locks into
place.
Using a fingernail raise the
battery out of the battery
compartment (1).
Remove the battery from
the battery compartment
(2).
Insert the SI M card
Always switch the phone off before inserting or
removing the USIM/SIM card.
Keep SIM cards out of the reach of small children.
The SIM card and its contacts are easily damaged.
Replace the battery
English
5
Insert the battery at an
angle (1) so that the
battery contacts align with
the contacts in the battery
compartment.
Lower the battery into the
battery compartment (2)
and ensure that the
battery is seated correctly
before replacing the
battery cover.
Page 9
GETTING STARTED
Replace the battery cover
1
The Setup Wizard
To replace the battery
cover, carefully insert the
internal clip(1) on the
inside of the ba tter y cover
into the slot below the
battery (2).
Lower the battery cover
into position (1) until it
clicks in t o p lac e. The
cover should close tightly
using only light pressure.
4-way scroll key and centre select key
The 4-WAY SCROLL key
(1) enables you to move the
cursor up, down, left and
right around the inner display.
The CENTRE SELECT key
(2) enables you to select a
highlighted option or select
the middle option at the
bottom of the screen.
Selection keys
The SELECTION keys
enable you to select the
options displayed at the
bottom of the inner display,
directly above the keys.
Making a call
Check that you have a good
signal and the battery is
charged.
When you switch on your Vertu phone for the first time you will be
guided through certain setup options by the Vertu Setup Wiz ard.
This enables you to quickly and easily set up the follo wing functions:
> Accurate date and time
> Home location
> Navigation keys
> Font size for all screens
> Bluetooth name
> Phone registration
During the Setup Wizard you will be asked to give permission
for automatic network connections, and whether you accept the
related data charges. If you do, your Vertu phone will
automatically adjust to regional time variations and will also
receive locally customised Vertu Feeds where available.
Using your Vertu phone
To help you start using your Vertu phone as quickly as possible,
please read the following information careful ly.
Switching your Vertu phone on and off
Press and hold the
POWER key to switch
your Vertu phone on or
off.
The battery may not be fully charged when you first receive your
Vertu phone. If a
switch on your Vertu phone please see
page 59 for more information.
Battery low message is displayed when you first
“Charging the battery” on
Use the NUMBER keys
(shaded) to enter the
telephone number you want
to call.
Press the SEND key (1) to
begin your call.
When calling international numbers, press the key twice to
display a + sign.
Answering a call
When you receive an incoming call, a ringing tone is played and a
call message is displayed. Your Vertu phone will also vibrate i f you
have set a vibrating alert.
If the phone is closed, simply open it to answer a call. Push the
sliding key down to open the phone.
You can also
Press the SEND key to
answer an incoming call or
press the CENTRE
SELECT key when you see
Answer on the screen.
English
6
Page 10
GETTING STARTED
Adjusting listening volume
To change the earpiece
volume while you are in a
call, move the sliding key up
or down.
While in a call, you can use the speaker phone for a hands-free
call. Use the SELECTION keys to press Loudsp . to switch to
speaker phone.
Ending a c all
Simply close the phone to end a call.
Your can also
Press the END key to end a
call.
Rejecting a call
Push the sliding key up (to activate the display) and then press the
Reject icon, or press the END key.
> Enter the emergency number, for e xample 000, 08, 110 , 112, 118,
119, 911, *911, 999, *999 or ot her official emergency number .
> Press the SEND key.
Emergency numbers vary by location and those listed above
may not be supported by your current network.
If certain features are in use, you may first need to turn those
features off before you can make an emergency call. For more
information consult your local service provider.
When making an emergency call, remember to give all the
necessary information as accurately as possible.
Remember that your phone may be the only means of
communication at the scene of an accident – do not end the call
until given permission to do so.
Icons and indicators
Icons and indicators on the inner and outer screens show the
current status of your Vertu phone.
These icons shows a strong signal and a
fully charged battery.
This icon shows that the signal strength is
weak. T o obtain a stronger signal move to an
area clear of o bstru ctio ns that m ay blo ck the
signal.
Sending a text message
> Using the 4-WAY SCROLL key and the CENTRE SELECT key
go to:
Menu » Messages » Create messa ge
> Enter the recipient’s number.
> Scroll to the mess age fi eld.
> Enter the message.
> Press the CENTRE SELECT ke y t o s en d th e mess a g e.
While composing a message:
Press the * key to show symbols
Press and hold the # key to change language
Press the # key to toggle between upper and lower case.
Making an emergency call
Your Vertu phone, like any wireless phone, operates using
radio signals, wireless and landline networks as well as
user-programmed functions. Because of this, connections
in all conditions cannot be guaranteed. Therefore, you
should never rely solely upon any wireless phone for
essential communications, for example medical
emergencies.
> If the phone is not on, switch it on. Some networks requir e that a
valid SIM card is properly inserted in the phone.
> Press the END key as many times as necessary to return to the
Home screen.
This icon shows that the battery charge level
is low and y ou ne ed t o re charge you r Vert u
phone soon.
This icon is displayed while your battery is
recharging. The dots c hange to white as t he
battery is charged.
Status icons are displayed below the batt ery char ge an d signal
strength indicators. The most commonly displayed ic ons are:
You have received one or mor e te xt messages.
You hav e m i ss ed a c a l l.
A USB lead is connected.
The Flight profile is selected. You can use functions of the
phone that do n ot r e qu i r e a ne tw ork connecti o n.
The Silent profile is selected. Audible alerts are disabled
and there is no ringing tone when you receive a call.
English
7
Page 11

GETTING STARTED
Bluetooth is switched on.
A bluetoot h he ads et i s co n ne ct ed .
Accurate time may not be available.
Glowing light
The glowing light flashes at different rat es to indica te the status of
your Vertu phone.
> In stand-by mode the light flashes slowly.
> If you have missed a call or received a message the light
flashes quickly.
> When you are charging your Vertu phone from the mains or
through your computer the light will be on permanently.
Protecting your Vertu phone
Enter *#06# from the Home screen to find the IMEI serial
number. Make a note of your IMEI serial number and keep it in
a safe place.
Setting a PI N code
We recommend that you use a PIN code to prevent unauthorised
use of your Vertu phone and SIM card.
> Using the 4-WAY SCROLL key and the CENTRE SELECT key
go to:
Menu » Settings » Security » PIN code request » On
The main menu
The main menu displays all the top level menu categories, fro m
which you can access all the functions of your Vertu phone.
Contacts menu
> Names
> Add new
> Settings
> Groups
> Speed dials
> My numbers
> Service numbers
> Del. all cont acts
> Move contacts
> Copy contacts
Call history menu
> All calls
> Missed calls
> Received calls
> Dialled numbers
> Msg. recipients
> Clear log lists
> Call duration
> Data counter
> Data timer
> Message log
> Positio ning
> Sync log
Settings menu
> Date and time
> Profiles
> Themes
> Tones
> Display
> My shortcuts
> Connectivity
> Call
> Phone
> Accessories
> Configuratio n
> Security
> Works hop r eset
> Sync and backup
> Setup wizard
Additions menu
Messages menu
> Create message
> Inbox
> E-mail
> Drafts
> Outbox
> Sent items
> Saved items
> Delivery reports
> Voice messages
> Info messages
> IMs
> Serv. commands
> Delete messages
> Message settings
> Games
> Calculator
> Media player
> Equaliser
> Video rec order
> Voice reco rder
> Notes
> Collection
> Stopwatch
Calendar menu
See Chapter 8
English
8
Page 12
GETTING STARTED
Alarm clock menu
See Chapter 9
Web menu
> Vert u M ob il e
> Home
> Bookmarks
> Go to address
> Last web addr.
> Web settings
> Clear the cache
Vertu Services menu
> Vert u S el ec t
> City Brief
> Travel
> Vert u F or tre ss
> Vert u C on ci erg e
> Register
Navigate menu
> Last map
> Find address
> Saved location
> Recent locations
> Current GP S position
> Plan route
> Extra services
> Settings
You can also use also voice commands to activate menu functions
on your Vertu phone. Please see
“Voice dialling” on page 11 for
more information.
Changing how the menu is displa yed
> Go to:
Menu » Options » Main menu view
> Select one of the following options:
> List to display the main menu icons one at a time.
> Grid to display all the main menu icons on one screen. You
can move the icons around the grid to have the options you
use the most in your favourite positions.
Personalising your Vertu phone
Using Go to shortcuts
You can set up the Go to menu so that i t automatica lly customi ses
itself to your needs.
There are two ways to use t he Go to shortcuts in your Vertu phone.
> Auto sorting on dynamically displays the top four most
frequently used and the two last used functions, and also a link
Tones directory.
to the
> Auto sorting off allows you to pick and choose which menu
options you want to see on the
To turn on automatic sorting press Go to » Options » Auto
sorting on
To turn on manual sorting press Go to » Options » Auto
sorting off
Go to list .
Camera menu
See Chapter 9
Gallery menu
> Images
> Video clips
> Music files
> Themes
> Graphics
> Tones
> Recordings
> Received files
Opening the menu
From the Home screen, press the CENTRE SELECT key to open
Menu and display the main categories. Use the 4-WAY
the
SCROLL key to move through the menus.
Navigating through the menus
When navigating through the menus, press Back to return to the
previous menu without saving changes. Press
Home screen from the top-level menu.
Press the END key to return to the Home screen from any menu without
saving chang
es.
Exit to return to the
Creating manual Go to shortcuts
To customise the options available on the Go to list, display the list
as above and select
that you want to display on the
Options » Select options. Pick the options
Go to list.
You can also set up the 4-WAY SCROLL key t o access shortcuts.
On the Home screen press and hold one of the SCROLL keys and
select an option to associate with the key.
Using the Go to menu
To use the Go to shortcuts, fro m the Home screen, press the Go
SELECTION key .
to
Use the 4-WAY SCROLL key and the CENTRE SELECT key to
select the desired shortcut.
Some of the most useful Go to shortcuts are:
> Toggle Bluetooth on and off
> Operator select (to select a network operator with a GPRS
roaming agreement with your home network operator).
English
9
Page 13

GETTING STARTED
Shortcuts
The 4-WAY SCROLL key is pre-progr ammed wi th some popula r
menu options. When your Vertu phone leaves our workshop the
options are:
Up - (reserved for Vertu Feeds)
Down - Names
Left - Create message
Right - Calendar
To change these to your favo urit e m enu options go to Menu »
Settings » My shortcuts
Them es
Your Vertu phone comes with various themes containing differ ent
colour schemes and wallpapers to use as display backgrounds.
Changing the theme
> Select Menu » Settings » Themes or use the Go to
shortcut.
> Select a theme from those available.
> Select Apply to change the theme.
If you select a personal wallpaper (see page 35) this will replace the
theme wallpaper.
If you are using Accurate time, the travel wallpaper wil l repla ce the
theme wallpaper.
Profiles
Your Vertu phone has several different profiles that ena ble you to
change the ringing tone, ringing volume and vibr ating al ert al l at
once. Profiles can be timed, for example you can set the Silent
profile while you attend a meeting and, if you have set it, the
General profile will resume after the meeting.
Flight mode
Flight mode allows you to deactivate all radio frequenc y functions
but still have access to offline games, the calendar and phone
numbers.
> Select Menu » Settings » Profiles » Flight » Activate
Use flight mode in radio sensitive environments , for exampl e on
board aircraft or in hospitals.
To make an emergency call in fligh t m o de , ma k e the call as
normal and answer Yes when asked Exit flight profile?
To deactivate flight mode, select any other profi le.
To change profiles quickly, briefly press the POWER key.
Press and hold the # key to toggle between Silent and
General profiles.
Changing ringing tones
Your Vertu phone comes with various special ringing tones. You
can also download ringing tones in AAC, MP3 and MIDI formats.
Changing the ringing tone
> Select Menu » Settings » Tones or use the Go to shortcut.
> Scroll slowly through the ringing tones list. When you hear a ringing
tone that you would like to use, press
Select.
Setting an alarm
Your Vertu phone has a simple to use alarm clock.
> Select Menu » Alarm clock or use the Go to shortcut.
Enter the time on the screen, and press the Options SELECTION
key to set snooze and repeat features.
A red alarm indicator is displayed on the face of the clock, showing
the time that the alarm is set for.
To turn the alarm clock off, press Menu » Alarm clock » Turn
alarm off
.» .
Even if the phone is switched off, the alarm will sound at the
specified time. Please remember this if you are in a restricted
area.
To activate the snooze function turn the phone onto its front . If the
phone was already on its front when the alarm sounded, turn it
through 360 degrees and place it on its front again.
Taking photos
You can take photos and record video clips with the camera and
send them by message to your fr iends, o r save the m in the m emory,
from where they can be transferred to your computer.
1. To start the camera press the CAME RA button.
2. To zoom in and out move the 4-WAY SCROLL key up or
down.
3. Press the CAME RA button or press Capture to take the
photo.
Taking videos
1. Start the camera as above and then press the right 4-WAY
SCROLL key to select the video icon.
2. To zoom in and out move the 4-WAY SCROLL key up or
down.
3. Select Record or press and hold the CAMERA button. To
pause the recording, select
select
Continue. To stop the recording, select Stop.
Pause; to resume the recording,
Using Bluetooth
Bluetooth technology enables you to easily share images and video
clips, and take advantage of wireless connectivity by using a
compatible Bluetooth headset. You first need to pair wi th the o ther
device which should be within 10m of your Vertu phone.
The full Bluetooth menu is located in Menu » Settings »
Connectivity.
English
10
Page 14

GETTING STARTED
Using the options on these menus you ca n turn Bluet ooth on, m ake
your phone discoverable, search for active devices and pair your
phone with other Bluetooth devices, for example your Bl uetoot h
headset.
Switch off Bluetooth if it’s not being used, to maximise battery
performance.
Use the Go to menu to toggle Bluetooth on and off.
Adding a new contact
To quickly add a new contact, enter the number on the Home
screen and then press the CENTRE SELECT key. Enter the
contact name and Save the contact.
Voice dialling
Your Vertu phone can access menu options and dial contacts using
voice commands.
> Press and hold the r igh t SELECTION key on the Home screen or
press and hold the down volume key.
> Say clearly the name of the contact or menu option you want to
access.
> Select the o pt i o n y o u req ui re f r o m th e displayed li st . I f y o u do n’t
make a selection within 5 seconds, the option at the top of the list
will be automati call y sele cte d.
Travel wallpapers
When you travel to other time zones and you have selected
accurate time, the wallpaper of the inner display change s to reflect
the country that you have travelled to.
If you would prefer to use another image for your wallpa per and you
want to turn travel wallpapers off, see
page 35.
The media player
Your Vertu phone includes a media player for listening to music
tracks, recordings or other MP3, MP4, AAC, eAAC+ or Windows
Media Player sound files that you have transferred to your Vertu
phone. Music files can be received via Bluetooth, MMS or using the
File Manager in Vertu PC Suite.
To open the media player scroll to Menu » Additions » Media
player
.
Music files that you transfer to your Vertu phone are automati call y
added to the list of songs in the media player.
When you have started the media player and have a track playing,
you can use the controls on the outer display. See page
information.
Press the Stop button on the outer dis play or pre ss and h old the
END key to stop the media play er.
4 for more
Browsing the Web
Only download and use files from sources that offer
adequate security and protection against harmful software.
You can access mobile Internet services with the Web browser on
your Vertu phone. You can view pages that use wireless markup
language (WML) or extensible hypertext markup language
(XHTML).
Depending on which service provider you use, your Vertu phone
might already have Internet settings install ed so you might be abl e
to browse the Internet straight away. If you cannot connect to the
Internet, please contact Vertu Concierge or visit www.vert u.com
and download your settings.
To open the Web browser select Menu » Web or press and hold
the 0 key.
Location based features
Your Vertu phone contains some useful new features to enhance
your travelling experience.
Accurate time
When you travel to another time zone and you have selected
accurate time, the larger analogue clock shows the local time and
the smaller digital clock shows the time at your home locatio n.
If you have set an alarm it will adjust to the local time.
City Brief
Where possible, City Brief provides Vertu Feeds information
about your destination, the moment you arrive.
CD-ROM
The Vertu CD-ROM works on a compatible computer with a
CD-ROM drive, with Microsoft® Windows® 2000, Microsoft®
Windows® XP or Microsoft® V ista® installed. You need at least
250 MB of free disk space and administrator rights to the PC.
The Vertu CD-ROM works on a Macintosh computer with Mac
OS
X 10.4.6 (or later) and iSync 2.2 (or later) installed.
Connecting to a computer
You can connect your Vertu phone to a computer with either a Vertu
micro-USB data cable (CA-101V) or Bluetooth.
Ver tu PC Sui te
Vertu PC Suite includes the following applications to extend the
functionality of your Vertu phone:
> Backup > Contacts
> Synchronise > Messages
> Connect to the Internet > Image store
> Install applications > Multimedia player
> File manager > Transfer music
Installing Vertu PC Suite
> Insert your Vertu CD-ROM into the PC’s CD-ROM drive.
> Click on the INSTALL NOW button.
> Follow the on - sc r ee n in st ru ct i ons t o c omp l et e th e in st al la t i on.
English
11
Page 15

GETTING STARTED
Installing the iSync plug-in
> Insert your Vertu CD-ROM into the Macintosh’s CD-ROM drive.
> On the desktop, double-click the VERTU icon.
> When the finder window opens, double-click the Vertu.osx icon.
> Click on the INSTALL NOW button.
> Follow t he on -s creen instruc t io n s to co mp le t e t h e i ns tal l a ti on.
Viewing the electronic Reference Manual
> Start the CD-ROM as described above.
> Click on the LAUNCH PDF button.
Setting up MM S, browsing and the Travel application
> Start the CD-ROM as described above.
> Click on the ORDER SETTINGS button.
> Your computer must be connected to the Internet to set these up.
Registering your Vertu phone
> Start the CD-ROM as described above.
> Click on the REGISTER PHONE button.
Metal
Vertu metals are finished to a high standard and care needs to be
taken to maintain their appearance.
Avoid the following:
> Contact with chemicals such as solvents, alkaline and acid
solutions, cola-based drinks and exposure to salt water. Wipe
with a clean, soft cloth as soon as possible if contact occurs.
> Contact with sharp objects.
> Dropping or knocking against hard surfaces.
> Metal polishes.
Specifications
Volume 74 cc
Weight 175 g
Length 100 mm
Width 48 mm
Thickness 18 mm
> Your computer must be connected to the Internet to register your
Vertu phone.
Care and maintenance
Your Vertu products have been crafted from some of the finest
materials and care should be taken to keep them in good condition.
Damage caused to your Vertu phone by failing to observe
these care instructions is not covered by the warranty.
Ceramics and sapphire
Ceramics and sapphire are very hard materials but are also brittle
and can be scratched by harder materials or obj ects. They ca n also
be damaged if dropped.
Avoid the following:
> Contact with other hard materials such as diamond jewellery,
nail files, abrasives, and mineral crystals.
> Dropping or knocking the product on hard surfaces.
> Repeated rubbing against hard surfaces.
Leath er
All Vertu leather products are made by expert cr aftsmen. Each
leather hide is unique and has natural markings which should be
considered part of the individuality of fi ne leather. All l eather can be
damaged and should be treated with care.
Avoid the following:
> Exposure to water and high humidity.
> Dropping, rubbing or knocking on hard surfaces.
> Exposure to extreme temperatures.
> Contact with oily substances, make-up and solvents.
English
12
Page 16

SECURITY
2 SECURITY
Your Vertu phone has a number of security features that help to
prevent:
> Unauthorised use of your Vertu phone when your SIM card is
inserted
> Unauthorised use of your Vertu phone if a different SIM card
is inserted
> Unauthorised use of your SIM ca rd in another phone.
PIN code
The (4 to 8 digit) PIN (Personal Identification Number) code helps
protect your SIM card against unauthorised use. When the PIN
code function is active, you need to key in the PIN code each time
you switch on your Vertu phone. If you used your SIM card in
another phone previously, the code will be the same.
The default setting for the PIN code function is defined by you r
service provider. Some service providers do not all ow you to disable
the PIN code request.
The SIM card becomes blocked if you key in an incorrect PIN
code three times in succession. You will need to contact your
service provider for the PUK (PIN Unblocking) code.
Key in the PUK code if you have blocked your SIM card .
PUK codes cannot be changed. If you key in an incorrect
PUK code 10 times in succession your SIM card becomes
permanently blocked.
To turn the PIN code on and off:
1. From the Home screen, press Menu » Settings » Security »
PIN co de request.
2. Press Select to change the setting.
3. Scroll to On to enable the PIN code request or Off to disable it and
then press
4. Key in your PIN code and then press OK.
A confirmation message is displayed.
To change your PIN code:
1. From the Home screen, press Menu » Settings » Security »
Access codes » Change PIN code.
2. When prompted, enter your current PIN code and then pr ess OK.
3. When prompted, enter your new PIN code and then press OK.
4. Enter your new PIN code again to verify and then press OK.
A confirmation message is displayed.
Select.
PIN2 code
The PIN2 code is used to protect the advanced user functions of
your SIM card for example fixed dialling lists. Your PIN2 code must
not be the same as your PIN code.
To change your PIN2 code:
1. From the Home screen, press Menu » Settings » Security »
Access codes » Change PI N2 code.
2. When prompted, enter your current PIN2 code and then press OK.
3. When prompted, enter your new PIN2 code and then press OK.
4. Enter your new PIN2 code again to verify and then press OK.
A confirmation message is disp layed.
The PIN2 protected features of your SIM card will become blocked
if you incorrectly enter your PIN2 code a number of times, normally
after three consecutive attempts. You will need to contact your
service provider to obtain a PIN2 Unblock (PUK2) code to unblock
your PIN2 and restore your SIM card’s full functionality.
Security code
The security code helps protect your Vertu phone from
unauthorised use. The first time you access this feature you will
need to choose a code (between 5 - 10 digits long). You will need
to key in this security code before you can do the following:
> Switch on the phone when a new SIM card is inserted (if you
have set up security)
> Erase all entries in your contacts list
> Restore the default settings
> Change the security lev e l.
If you key in an incorrect security code five times in
succession, your Vertu phone will not accept the correct
security code for the next five minutes. Within that five
minutes, your Vertu phone will show an error when you
attempt to key in the security code, even if it is correct.
To change the security code:
1. From the Home screen, press Menu » Settings » Security »
Access codes » Change security code.
2. When prompted, enter your current security co de and then pres s
OK.
3. When prompted, enter your new security code and then pr ess OK.
4. Enter your new security code again to verify and the n press OK.
A confirmation message is disp layed.
Make a careful note of your new security code, ensure you keep it
secret and in a safe place.
English
13
Page 17

SECURITY
Locking the keypad
You can lock the keypad on your Vertu phone to prevent
accidentally dialling any numbers.
From the Home screen, press Menu followed by the * key (at the
bottom left of the keypad) within two seconds. A confir mati on
message is displayed.
When the keypad is locked, a key icon appears below the signal
strength indicator.
You can still make calls to the emergency numbers when the
keypad is locked.
When you receive an incoming call the keypad l ock is automati cally
suspended. When the call is ended, the keypad returns to the
locked state.
Unlocking the keypad
Press Unlock fol lowed by the SPECIAL FUNCTION key within
two seconds. A confirmation message is displayed.
Security level
The security level function allows you to specify when you are
required to key in the security code. The security code hel ps protect
your Vertu phone against unauthorised use.
To change the security level:
1. From the Home screen, press Menu » Settings » Security »
Security level.
2. Scroll to one of the following three options and then pre ss Select:
Press None to disable the se curity code a nd allow any SIM to be
used in the phone
Press Memory to allo w any SIM to be used in the ph one but you
need to enter the security code wh en you try to acces s your Vertu
phone’s directory after a different SIM card has been insert ed
Press Phone to require that the security co de is entered w hen you
switch on the phone after anot her SIM card has been inse rted
3. When prompted, enter your security code and then pre ss OK.
If you change the security l evel, the numbe rs in your recent ca lls list
are erased.
Security module
When available on your SIM, the security module improves security
services for applications requiring a browser connection, and allows
you to use a digital signature. The security module may contain
certificates as well as private and public keys. T he certif icates a re
saved in the security module by the service provider. The securit y
module is not supplied by Vertu.
To view or change the security module settings:
From the Home screen, press Menu » Settings » Security »
Security module sett.
Call barring
Call barring is a network service that allows you to restrict the
incoming and outgoing calls that you make and receive. Contact
your service provider for more informati on abo ut usi ng thi s f unction.
When outgoing calls are barred, calls may be possible to the
emergency number programmed into your Vertu phone.
You need to key in the barring password to set up the call barring
service. To obtain the barring password, contact your serv ice
provider.
To enable or disable call barring:
1. From the Home screen, press Menu » Settings » Security »
Call barring servi ce.
2. Select Video calls, Voice calls or All call types
3. Scroll to one of the following five options and the n press Select:
Press Outgoing calls to bar all outgoing ca lls
Press International c alls to bar all international calls
Press Intl. except to home to bar all internat ional calls wi th the
exception of calls made to your home coun try (defined by your
service provider) if abroad
Press Incoming calls to bar all incoming calls
Press Incoming if abroad to bar all incoming call s when you are
abroad
4. Scroll to Activate to enable the bar, Cancel to disable it, or
Check status to view the statu s of the cu rrent bar and t hen press
Select.
5. If you are enabling or disabling a bar, you must en ter your barring
password when prompted and th en press
A confirmation message is disp layed.
To cancel call barrings:
1. Select Cancel all barrings to cancel all call bars.
2. Enter your barring password when prompted and then p ress OK.
OK.
Barring password
The call barring password is used to li mit acc ess to the c all ba rri ng
service. To obtain the barring password, contact your serv ice
provider.
To change your barring password:
1. From the Home screen, press Menu » Settings » Security »
Access codes » Change barring pass.
2. When prompted, enter your current barring passw ord and then
OK.
press
English
14
Page 18

SECURITY
3. When prompted, enter your new barring password and then press
OK.
4. Enter your new barring password again to verify a nd then press OK.
A confirmation message is displayed.
Fixed dialling
Fixed dialling is a network service that allows you to restrict
outgoing calls to only the numbers you specify in a fixed dialling list.
Contact your service provider for m ore i nformation about using this
function.
When fixed dialling is enabled, it may still be possib le to call the
emergency number programmed into your Vertu phone, f or example
000, 08, 110, 112, 118, 119, 911, *911, 999, *999 or other official
emergency number.
You will need to key in the PIN2 code to save and edit
numbers in the fixed dialling list or to call numbers not in the
list. The PIN2 cod e is supplied with some SIM cards. For
more information contact your service provider.
To enable or disable fixed dialling:
1. From the Home screen, press Menu » Settings » Security »
Fixed diallin g.
2. Scroll to On to restrict calls to the fixed dialling l ist, Off to di sable
fixed dialling, or
dialling list and then pr ess
If you are using fixed di alling fo r the first time, it is recommended t hat
your select Number list to add number s to your list bef ore enablin g
fixed dialling. You will re ceive two warning m essages.
3. When prompted, enter your PIN2 code and then press OK.
4. Either enter your number manually and then pre ss OK, or press
Search to select a name from yo ur contacts lis t and then pr ess
Select.
5. If you entered a number manually, enter a name for the number and
then press
6. A confirmation message is displayed and you are retur ned to the
fixed dialling list . Add additi onal numbers to your list in t he same way.
Press Back when yo u have completed your list.
7. Scroll to On to enable fixed dialling.
Number list to view the number s in your fixed
Select.
OK.
Closed user group
The closed user group is a network service that allows you to
specify a group of people you can call and who can call you.
Contact your service provider fo r mor e i nformatio n about using this
function.
When outgoing calls are limited to closed user groups, calls may be
possible to the emergency number programmed into your Vert u
phone, for example 000, 08, 110, 112, 118, 119, 911, *911, 999,
*999 or other official emergency number.
To enable or disable a closed user group:
1. From the Home screen, press Menu » Settings » Security »
Closed user group.
2. Scroll to On to enable the closed user g roup, Off to disable it, or
Default to specify that the peop le included i n the group, w hich you
have agreed with the service pr ovider, can call you and you can call
them and then press Select.
3. If you are enabling a closed user group, enter t he group number
when prompted and then press
OK. A confirmation message is
displayed.
Authority certificates & user certificates
For information about A uthority cert ificates and User
certific ates
page 48.
downloaded onto your Vertu phone. See “WEB” on
When fixed dialling is on, GPRS connections are not possible
except while sending text messages over a GPRS
connection. In this case, the recipient’s phone number and
the message centre number must be included in the fixed
dialling list. You cannot access SIM memory manually (view
or copy numbers on the SIM card) while fixed dialling is
active.
To modify your fixed dialling list:
1. From the Home screen, press Menu » Settings » Security »
Fixed diallin g » Number list.
2. When prompted, enter your PIN2 code and then press OK.
3. Scroll to one of the following options and then press Select:
Press View number to view the number for an en try
Press Add to add a number to yo ur fixed diall ing list
Press Edit to edit the selected entr y
Press Delete to delete t he selected ent ry
Press Delete all to delete entri es in the list.
English
15
Page 19
MESSAGES
3 MESSAGES
Your Vertu phone provides extensive messaging functionalit y to
allow you to send and receive messages of many types, where
supported by your service provider.
Because delivery of messages can fail, you should n ot re ly
upon them for essential communications.
Text messages
Text messages (also known as SMS) are basic messages
containing only text, of up to 160 characters. Your Vertu phone
supports the sending of te xt messag es be yond the lim it for a singl e
message. Longer messages are sent as two or more messages.
Your service provider may charge accordingly. This is the most
common form of messaging, is compatible with the wi dest range of
phones and is available in most countries.
Multimedia messages
Multimedia messages allow pictures, videos and audio files to be
sent in addition to text in the body of the message. MMS is
supported by most modern phones however the recipient must
have a correctly configured phone to be able to receive the
message.
Flash Messages
Flash messages are text messages th at are instantly di splayed upon
receipt. Flash messages are not automatically saved.
Audio messages
You can use the multimedia message service t o create and send an
audio message. Multimedia messaging service must be activated
before you can use audio messages.
E-mail messages
E-mail messages can be sent to and received from other devices,
for example PCs. E-mail messages can b e received by so me mobile
phones, provided the recipient has a correctly co nfigured pho ne.
IMs
With Instant Messaging chat you can send short, simple text
messages to online users. You have to subscribe to a service and
register with the IM service you want to use. You should check the
availability of these services, pricing, and instructions with your
service provider.
Voice messages
Voice messages are stored by your network operator. If your
network operator provides a voice message service, people calli ng
you may have the option to record a message for you if your Vertu
phone is turned off, or if you do not answer your phone.
Info messages
You can receive messages on various topics from your service
provider (network service). For more informati on, conta ct your
service provider.
Text entry
You can enter text using traditional or predictive t ext input . When
using traditional text input, press the NUMBER key s repeatedly until
the desired character appears. In pred ictive text input you can enter
a letter with a single keypress.
When you enter text, the icon will appear at the top of the inner
display if predictive text input is turned on (see “Predictive text
input” on page 16). If traditional text input is enabled the icon will
be displayed.
One of the following icons will appear next to the text input icon to
signify which character case is enabled:
Indicates upper case is used in edit ing
Indicates mixed case is used in edi ting
Indicates lower case is used in edi ting
To scroll through the character case options, press the # key
repeatedly.
To change between letter mode a nd n umber mode, pr ess an d hold
the # key and select the appropriate mode.
Traditional text input
Press a NUMBER key, 1 to 9, repeatedl y until the desired character
appears. Not all characters available under a number key are printed
on the key. The characters available depend on the se lected writing
language. See
“Language settings” on page 38.
If the next letter you want is located on the same key as the present
one, wait until the cursor appears, or briefly press the 4-WAY
SCROLL key and enter the lett er.
The most common punctuation marks and special characters are
available under the 1 key. For more characters, press *.
Predictive text input
To turn predictive text on or to revert to traditiona l text in put:
1. With the cursor in the Text: field, press Options.
2. Select Prediction options.
3. Select On for predictive text or select Off to turn predictive text off.
To quickly set predictive text input to On or Off when writing
text, press and hold
Prediction on or Prediction off.
Options or press and hold # and select
English
16
Page 20

MESSAGES
Using predictive text input
Predictive text input allows you to write text qu ickly usi ng the phone
NUMBER keys and a built- in dict ion ary.
Start writing a word using the NUMBER keys. Although the key has
a number of letters associated with it, press each key only once for
one letter. The phone displays * or the letter if it separately has a
meaning as a word. The entered letters are displayed underlin ed.
To insert a special character or smiley, press and hold *, or press
Options » Insert symbol » Character or Smiley. Scroll to a
character or smiley, and press
Use.
To accept the suggested word, press the zero NUMBER key to
add a space.
If the ? character is displayed after the word, the word you i ntended
to write is not in the dictionary. To add the word to the dictiona ry ,
press Spell. Complete the word (traditional text input is used), and
Save.
press
To write a compound word, enter the first part of the word, and
scroll forward to confirm it. Write the next part of the w ord, and
confirm the word.
Numeric input
Numeric input is the standard method used whenever number entry
is required, for example, when dialling a phone number. Press the
key with the corresponding number to enter it.
When using a text input feature, for example sending a text
message, you can switch to numeric input (for entering tel epho ne
numbers for instance) using a single key press:
1. With the cursor in the Text: field, press and hold t he # key until the
menu is displayed.
2. With Number mode highlighted, pr ess Select.
3. Use the NUMBER keys to enter the num bers you requir e.
4. Press and hold the # key again to return to the previous text ent ry
mode.
If you only need to enter a single number, press and hold that
number
key and the single number will be entered into your
message.
Special character input
Most common special characters, for example, punctuation marks,
can be inserted by pressing the 1 NUMBER key. Other special
characters can be inserted in your text at any ti me using the s pecial
characters input mode:
1. With the cursor in the Text: field, press the * key (or press and hold
if predictive text input is On) until th e special chara cter menu is
displayed.
2. Scroll to the required special character and pr ess Use.
Special characters take up more space tha n basic characte rs and if
there are special characters in your message, the indicator may not
show the message length correctly. Befo re the message is sent, t he
device tells you if the message exceeds the maximum length
allowed for one message. You can cancel sending by selecting
Cancel or you can save the message in the inbox.
Setting the font size for messages
Your Vertu phone supports different font sizes for view ing your
messages. Your font size setting affects both messages being
composed and messages received, but does not affect how the
recipient views the message.
To set the font size for your messages, contacts, display and web
pages:
1. From the Home screen, press Menu » Settings » Display »
Font siz e.
2. Scroll to Small font, Normal font or Large font and then
press
OK.
A message confirms that the font size has been updated.
Groups
If you frequently send messages to a fixed group of recipi ents, you
can define a group to simplify the process.
When you send a message to a group the phone automatically
sends the message separately to each recipient in the list. Sending
a message using a group will incur charges for each r ecipient in the
list. See
“Groups” on page 29.
Undelivered messages
If you send a message and it f ai ls t o be deliv ere d, yo ur Ver t u ph one
behaves in different ways depending on the type of message sent.
Some ser vic e pr ovide rs do not allow inte r natio n a l sending or
receiving of text messages. For more information contact your
service provider.
Single recipient messages
If a message you have sent to a single n umber fails, your screen w ill
display
Message sending failed. Check details.
1. Press OK.
2. The unsent message will appear in your Outbox.
3. With the message highlighted, either press Open to read the
message or press
Select:
press
Retry sending resends the message to the original reci pient
Delete removes the message fr om the Outbox
Send copy sends the message to an alternativ e number
Edit enables you to modi fy the message or the recipient ’s number
Move moves the message into an alt ernative fol der
Use detail makes use of any numbers, e-m ail addres ses or Web
addresses from the current message when creatin g new messages
or contacts
Copy as template saves the message as a template for use
when composing future messages
Message details displa ys message dat a for exampl e the time
and date when sent
New message opens a new message
Mark marks the message for future deletion
Mark all marks all messages for future deletion if the Outbox
contains more than one message.
Options, scroll to one of the opti ons and then
English
17
Page 21

MESSAGES
Group messages
If a message cannot be sent to one or more of the recipients in a
group, a new group will be added to the list with the name
Undelivered.
To view the undelivered message(s) options:
1. From the Home screen, press Menu » Contacts » Groups »
Undelivered » Options.
2. Scroll to one of the options and then press Select:
Resend to list resends the message to the recipients on the
undelivered list
View list displays the list of recipien ts to whom the mess age
sending failed
Delete list removes the undelivered list from y our V ertu p hone
View message displays the failed message.
Message folders
All text and multimedia messages stored in your Vertu phone are
organised in folders. In addition to the default folder s, you can
create new folders to organise your messages.
To browse your message folders:
1. From the Home screen, press Menu » Messages.
2. Scroll to one of the following folders and then pres s Select:
Inbox - Messages are automatically stored in this folder wh en they
arrive and, by defaul t, after t hey have been rea d
Drafts - Contains messages cre ated by you and saved fo r sending
at a later da te
Outbox - Messages that you ha ve queued for sending but are yet to
be sent are saved in this folder
Sent items - Messages that you have sent are auto matically
stored in this folder
Saved items - Default location for messages that have been rea d
and saved. This is also where the T emplates folder can be foun d (see
below)
To create a new personal folder in Saved items:
1. Select Menu » Messages » Saved items » Options » Add
.
folder
2. Use the NUMBER keys to enter a name for t he new folder.
3. Press OK.
Erasing multiple text and multimedia messages
You can erase all of the text and multimedia messages from any of
the standard or personal folders, or from all of the f older s at once.
To delete multiple messages:
1. From the Home screen, press Menu » Messages » Delete
messages
.
2. Scroll to one of the options and then press Select:
By message enables you to navigate into folders and delete
individual messages
By folder enables you to dele te all messages in a sele cted folder
All messages deletes al l messages curr ently stored on t he
phone. You will be given the opport unity to save unr ead messages
before deleting.
3. Confirm the deletion when prompted. You cannot recover deleted
messages.
Te x t m e s s ag e s
Standard text messages can be up to 160 basic characters in
length. Linked messages can be used to create larger messages.
Linked messages
Your Vertu phone can send and receive long text messages (up to
1000 basic characters). Long text messages are automatically split
into multiple messages and sent as a series. The series of
messages is then linked by a compatible phone when received and
displayed as a single SMS message. For this feature to work
properly, the receiving phone must also support linked messages.
While you write a message, the number of available characters and
the current part number of linked message (for example, 904/1) is
shown in the top right corner of the display.
While receiving linked messages, you can start reading the fir st part
before the phone has received the entire message. While viewing
the message, you may see * some text missing * on the display.
This is normal, and the mes sage content will be updated a s soon as
the missing sequence arrives.
Messages can be moved to this and other personal folders on
your Vertu phone (see
messages” on page 20).
“Reading and replying to text
To rename or delete a personal folder:
1. Select Menu » Messages » Saved items.
2. Scroll to the personal folder you want to rename or delete.
3. Press Options.
To rename the folder, scroll t o Rename folder and then press
Select. Use the NUMBER keys to rena me the folder and t hen
OK.
press
To delete the folder press Delete folder » Yes to confirm the
action.
English
18
Page 22

MESSAGES
Message settings
When you write or reply to a text message, your Vertu phone use s a
sending profile that defines how the phone will handle the message
sending interaction with your service provi der. For most ser vi ce
providers you will not need to modify these settings as the
necessary information will be obtained from your SIM card
automatically. Depending on your SIM card, you may be able to
store more than one set of message profiles.
To edit the message settings:
1. From the Home screen, press Menu » Messages » Message
settings
2. Scroll to one of the options and then press Select:
Request reports requests that the network sends you deli very
reports for your messages. These a re stored in
Delivery reports
Message centres enables you to examine, modify and ad d the
details of the m essage c entr e(s), used fo r send ing t ext messa ges.
You should obtain this number fr om your service pr ovider
Msg. centre in use ena bles you to select which message centr e
should be used by your Vertu phone to send text messages
Message validity enables you to define ho w long the netwo rk
attempts to send your messages befor e it gives up
Messages sent via enables you to select the message type as
Te xt, Paging or Fax. Your service provi der may have limite d
support for different message types
Use packet data determines wheth er or not GPRS is the
preferred SMS bearer
Character support and t hen select Full ensures all cha racters
are sent as viewed or select
for example accents may be convert ed to other cha racters
Rep. via same centre allows the recipie nt of your messag e to
send you a reply using your messa ge centre (networ k service).
Message overwrite
When the message memory is full, your Vertu phone cannot sen d or
receive any new messages. To avoid this, you can set your phone to
automatically replace the oldest messages in the Sent item s folder
when new ones arrive or are sent.
To enable automatic overwrite in Sent items:
1. From the Home screen, press Menu » Messages » Message
settings
Ye s.
2. From the General settings menu, press Overwrite sent
items
» Text me s sag es.
Messages »
Reduced where char acters with marks
» General settings » Save sent messages »
» Allowed.
Writing and sending text messages
A flashing message icon on the Home screen indicates
that the message memory is full. Before you can receive or
send any more text messages you must erase some of your
existing text messages or move them to a personal folder.
The Create message option allows you to write and send text
messages.
To write a new message:
1. From the Home screen, press Menu » Messages » Create
message
2. Use the NUMB ER keys to enter the recipi ent’s phone number in t he
To : field.
3. Alternatively, to retrieve a phone number f rom Contacts sele ct Add
followed by:
Press <Favourite> to defi ne easily avai lable messa ge recipients
or groups when sending message s
Press Recently used to send a message to a recentl y used
number
Press Call register to access contacts fr om t he Call l og
Press Contacts to send a message to number in your Contacts list
Press Contact groups to send a message to multiple recipients
saved as a group in your Con tacts list . See
4. Scroll down and use the NUMBER keys to write the message in the
Te xt: field.
5. Press Options in the Text field while cr eating a message t o display
the following options:
Send to send the message immediately
Insert enabl es you to insert mu ltimedia cont ent as an attachment
Add recipient to add another person to the recipien t list
Add subject to add a subject field to the message
Clear field deletes the text that has been ent ered into the
message field
Insert contact detail select s a name from your Contacts list
and insert it into the message body
Insert symbol dis plays all the a vailable sym bols and smileys you
can use in the me ssage
Editing optio ns to cut, copy or paste text.
Writing language selects one of the alternative languages stored
on your Vertu phone to compose your m essage
Prediction op tions configures predictive text ent ry see
“Predictive text input ” on page 16 for more information about
Predictive text
Change msg. type to change to email, flash or audio message.
Change to multim. to change text message to mul timedia
message
Save message saves the message in your Saved messages
folder
.
“Groups” on page 29.
This operation can be repeated to add a number of recipients
for the text message.
English
19
Page 23

MESSAGES
Sending optio ns enables various settings when send ing the
message:
Message priority can be set to Normal, High or Low
Delivery report enables you to request a delivery report for
this and all other text messages
Save sent me ssage enables you to save a copy of the
message in the Sent items folder
Message validity enables you to s elect the length of time that
the network attempts to deli ver your message
Message sent via enables you to send the message via
Text, Paging or Fax
Exit editor leaves the text entry environment (you will be asked if
you want to save any incomplete messages).
6. Once the message is complete, press Send.
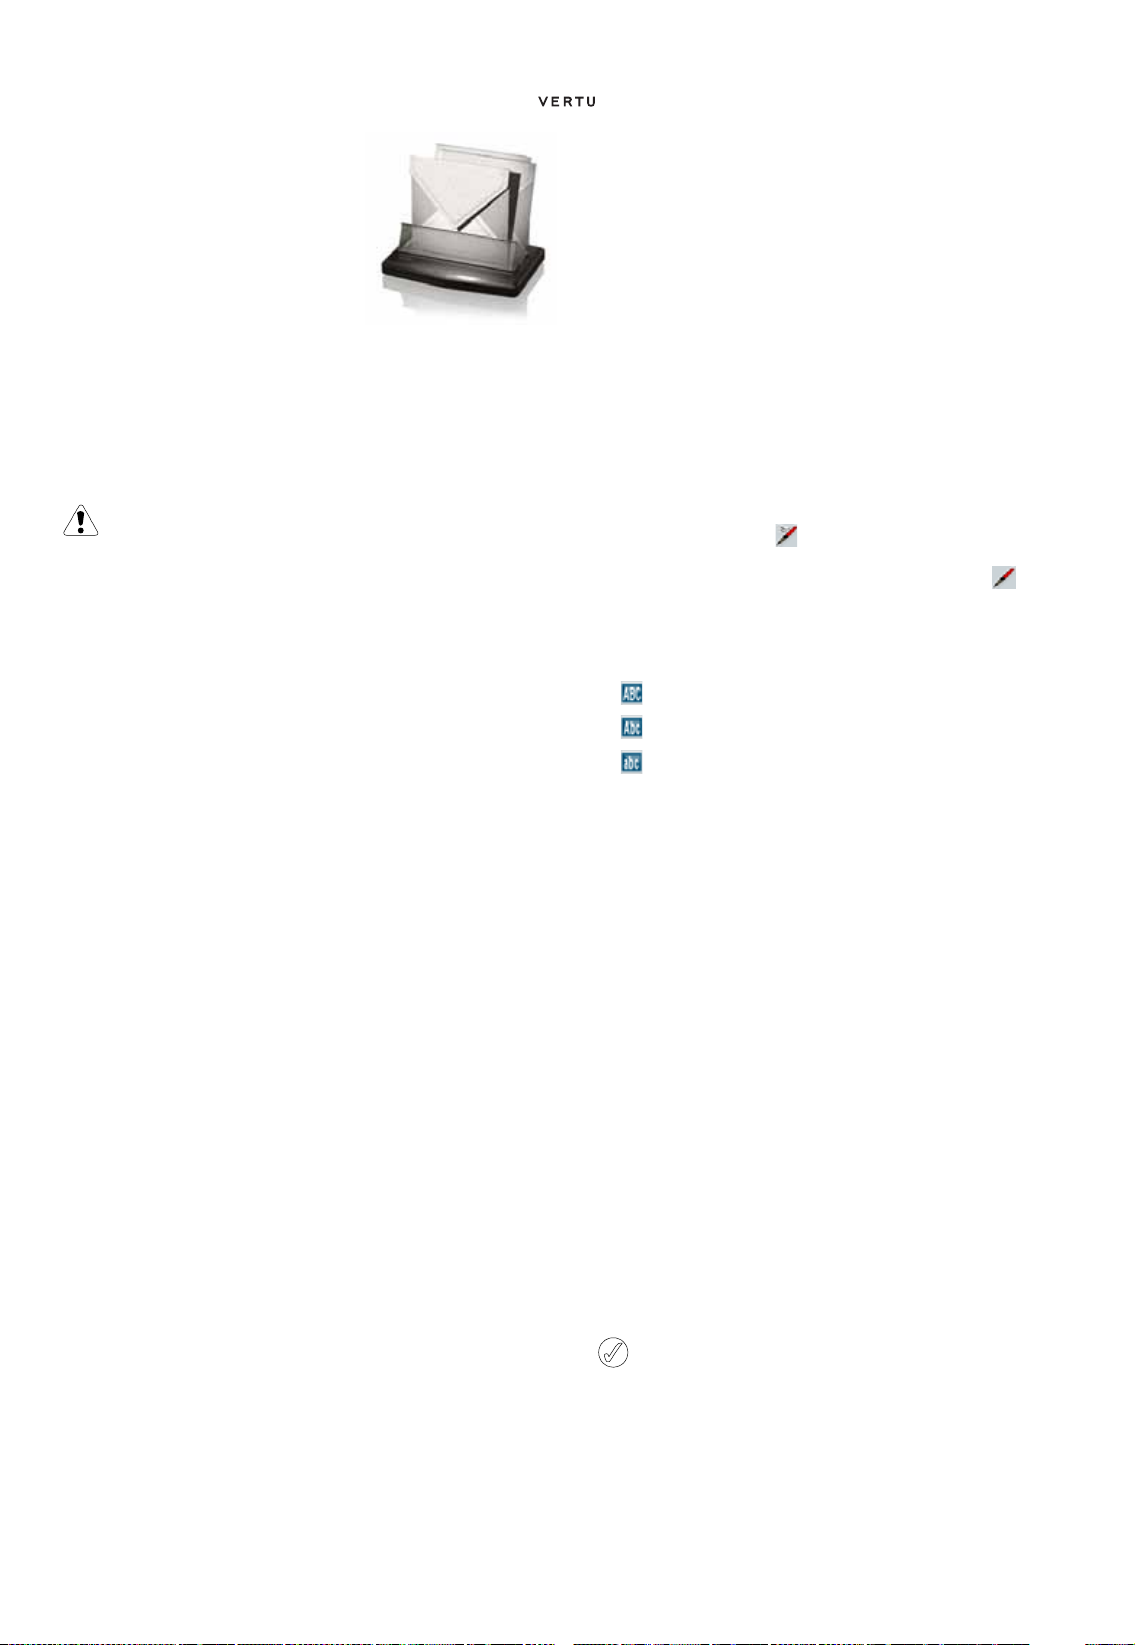
Reading and replying to text messages
When you receive a message, you will receive an information note
on the outer display.
A message icon will appear on the display and will remain on
the display until you read the message.
By default there is also an audible message alert.
1. Open the fold and press Show to open the message.
2. To ignore the message and view it later, press Exit.
If your Vertu phone memory is full, you may have to delete
messages from your Inbox or Outbox before you can send or
receive further messages.
To read a stored message:
1. From the Home screen, press Menu » Messages » Inbox.
2. The most recently received message will be highlight ed. Scroll to the
message you want to read a nd pr ess
To view the list of available options while reading a message:
1. Press Options.
2. Scroll to the required option and the n press Select:
Reply to reply to the message
Reply as to reply and change t he type of message to be sent
Delete removes the message you a re viewing from yo ur Vertu
phone
Call to call the send er of the message
Use detail makes use of any numbers, e-m ail addre sses or Web
addresses from the current message
Forward sends the message to another r ecipient of your choosing
Edit enables you to edi t the messag e before sendin g or saving
Move enables you to move the mes sage to another sel ected folde r
Copy to Calendar creates a remin der note in the calendar
Copy as temp late saves the message as a template for use
when compos ing f utur e mes sages
Message details dis plays the sender ’s name and phone
number, the message centre used , and the date an d time sent.
To reply to a message being read:
1. With the message open, press Reply.
2. The To: field displays th e sender’s number . The type of messa ge
defaults to the same type as yo u have open.
Open.
Refer to the T ex t me s s ag e, mu l t im e di a me ss a ge , Fl as h message
and Audio message sections of this guide to complete and send
your reply.
Multimedia messages
A multimedia message (MMS) can contain text, sound, video and
pictures. Your Vertu phone supports multimedia messages that are
up to 600 KB. If the maximum size is exceeded, the phone may not
be able to receive the message. Dependi ng upon your network, you
may receive a message that includes an Internet address where you
can go to view the multimedia message. Pictures are scaled to fit
the display area of the phone. Your Vertu phone has a multimedia
message viewer for playing messages and an Inbox for storing a ll
saved messages.
Copyright protections may prevent some images, ringing tones, and
other content from being copied, modified, transfer red, or
forwarded.
Multimedia messaging functions can only be used if
supported by your service provider. For availability and a
subscription to the multimedia messaging service, contact
your service provider. Only compatible devices can receive
and display multimedia messages.
Multimedia messaging supports a wide ra nge of standards for each
of the following formats:
> Picture: J P EG, GI F, animated GIF, WBMP, BMP, and PNG
> Sound: SP-MIDI, AMR audio, MP3 and AAC
> Video: clips in H.263 format with SubQCIF image size and
AMR audio
If a received message contains unsupported attachment s, these
may be replaced with a message.
You cannot receive multimedia messages if you have a call in
progress, a Java application running, or an active browsing session.
If you are sent a multimedia message while you are on a call of any
type, receipt will be delayed until your Vert u phone becomes free.
MMS settings
Depending on which service provider you use, your Vertu phone
might already have MMS settings installed. If you encounter any
difficulties, please contact Vertu Concierge o r visit ww w.vertu. com
and download your set ti n gs.
MM S configuration settings
To update your configuration settings:
1. From the Home screen, press Menu » Messages » Message
settings
» Configuration.
2. Select one of the available options.
Message settings
In addition to your connection settings, there a re sever al other
settings that control your multimedia messaging functio ns. To
modify these settings:
1. From the Home screen, press Menu » Messages » Message
settings
2. Scroll to one of the options and then press Select:
» Multimedia messa ges » Configuratio n sett.
» Multimedia messages.
English
20
Page 24

MESSAGES
Request reports will inform you of message delivery
Allow read report lets you choose wh ether you want to be
informed when your message has been deli vered to the r ecipient
and also if the recipient has read the message o r deleted it without
reading
MMS creation mode If you select Guided, the phone informs
you if you try to send a message that may not be supported b y the
recipient. If y ou s elect Restricted, the phone prevent s you from
sending messages that may not be supported . To include content in
your messages without notifi cations, selec t Free.
Image size in MMS enab les you to define t he maximum size of
an image used in an MMS. Your Vertu phone auto matical ly resizes
the image if neces sary
Default slide timing will enable you to set the de fault time in
mm:ss forma t that each slide (equ ivale nt of a page) in an MM S is
displayed on the screen
MMS reception enables you manually or automatic ally receive
multimedia messages or allow only messages in your home network,
or disallow them completely.
Allow adverts enables or disa bles t he a utomatic rec eption of
multimedia advertisements
Configurat ion sett. will enabl e you to define the MMS
connection parameters. See
“MMS configuration setti ngs” on
page 20.
Writing and sending multimedia messages
You can create multimedia messages with one or more attachments
up to the maximum 600KB message size. When creating your
multimedia message, the current remaining space is shown on the
top line just under the status line.
Unlike text messages, multimedia messages can be formed of
multiple pages, known as slides. You can control how long each
slide is displayed. Each slide can contain up to 1000 basic text
characters (less for complex languages) one image, and one sound
clip.
To write and send a multimedia message:
1. From the Home screen, press Menu » Messages » Create
message
2. Press Options in the Text field whil e creating a messa ge to display
the following opti ons:
Send enables you to send the completed messa ge (see above)
Insert enables you to insert a file as an attach ment
Add recipient to add another person to the recipient list
Add subject to a dd a subject field to the messa ge
Clear field deletes the text that has been enter ed into the
message field
Insert contact det ail selects a name from your Contacts list
and insert it into the me ssage body
Insert symbo l displays all the available sym bols and smileys you
can use in the message
Editing options to cut, copy or paste text .
Writing language selects one of the alterna tive languages sto red
on your Vertu pho ne to compose your m essage
Prediction options configures predictive text entry see
“Predictive text i nput” on page 16 for more information about
Predictive text
.
Slide options
Slide timing enables you to set the time int erval betwe en the
slides. Use the NUMBER keys to enter the time interval a nd then
press OK
Change msg. type to change to email, flash or audio message.
Change to text msg to change multimedia message to text
message
Save message saves the message in your Saved messages
folder
Sending opti ons enables various settings when send ing the
message:
Message priority can be set to Normal, High or Low
Request reports enables you to request a delivery and read
report
Save sent message enables you to save a copy of the
message in the Sent items folder
Message validity enables you to select the length of time that
the network attempts to deliv er your message
Message sent via enables you to send the message via
Text, Paging or Fax
Exit editor leaves the tex t entry envi ronment (you wil l be asked i f
you want to save any incomplete message).
3. Use the NUMB ER keys to enter the recipi ent’s phone number in t he
To : field.
4. Alternatively, to retrieve a phone number f rom Contacts pr ess Add
followed by:
Press <Favourite> to defi ne easily avai lable messa ge recipients
or groups when sending message s
Recently used to send a message to a recen tly used number
Call register to access contacts from the call log
Contacts to send a message to a number in your Conta cts list
Contact groups to send a message to multiple recipients sav ed
as a group in your Contac ts list
This operation can be repeated to add a number of recipients
for the multimedia message.
.
5. Press the Send key. The message is sent.
It takes the network longer to send a multimedia message than to
send a text message. While the multimedia message is being sent,
an animated indicator is displayed on the status line, but you can
carry on using your Vertu phone as normal. If t here is an interrup tion
while the message is being sent, the network tr ies to resend i t a few
times. If this fails, the message remains in the
you can try to resend it later. Check your
Outbox folder and
Outbox folder for unsent
messages.
After sending a message, your Vertu phone displays a
confirmation message. This is an indication that the message
has been sent by your Vertu phone to the message centre.
This is not an indication that the message has been received
at the intended destination.
For more information about multimedia messaging, contact your
service provider.
Reading and replying to multimedia messages
When you receive a multimedia message, you will receive an
information note and an envelope icon will appear on the status line.
By default there is also an audible ale rt .
English
21
Page 25

MESSAGES
To read a new multimedia message as soon as it is received press
Show.
To ignore the message and view it later, press Exit.
If you have unread messages in your Inbox, the envelope icon
will remain on the Home screen.
To read a stored message:
1. From the Home screen, press Menu » Messages » Inbox.
2. The most recently received message will be highlight ed. Scroll to the
message you want to read a nd t hen p ress
Select.
3. To view the whole message, including any attachments, press Play.
4. To view just the files in the presentation or the at tachments, pr ess
Options and select one of the foll owing:
Objects enables you to examine file s attached to the message
Reply sends a repl y to the message sende r
Reply to all sends a reply t o all recipi ents of the origi nal message
Delete removes the message you a re viewing from yo ur Vertu
phone
Use detail enables you to use any numbers, e-mail addresse s or
Web addresses from the current message when you crea te a new
message or contact
Forward sends the message to another r ecipient of your choosing
Edit enables you to edi t the messag e before sendin g or saving
Move moves the message to anothe r folder
Copy as temp late enables you to save the message as a
template for future messages
Message details dis plays the sender ’s name and phone
number, the message centre used , and the date an d time sent.
5. Scroll to Objects and then press Select.
6. Scroll to the relevant object type and then pres s Select.
To reply to a multimedia message:
1. With the message open, press Options.
2. Scroll to Reply to reply to the sender or Reply to all to send a
reply to all recipients o f the original message a nd then press
Select.
3. To send the message, press Send.
Audio messages
You can use the multimedia message service to cr eate and send an
audio message. Multimedia messaging service must be activated
before you can use audio messages. See “MMS settings” on
page 20.
Creating and sending audio messages
1. From the Home screen, press Menu » Messages » Create
message
2. The recorder opens (see “Voice recorder” on pa ge 43 for more
information). Press Select to start recording th e Audio messag e.
3. Press Select again to stop the recording.
4. Press Options while creating an audio message to select from the
following features:
Send sends the completed message
Preview enables you to listen to how the message wil l sound to the
recipient
Change msg. type enabl es you to change the type of messag e
being created
Sending opti ons enables you to select from the following
options when sendi ng th e mess age:
Save message saves the message in your Saved messages
folder
Add subject enables you to include a subject for your message
Exit editor closes the text ent ry environ ment (you will be asked if
you want to save any incomplete message).
5. Use the NUMB ER keys to enter the recipi ent’s phone number in t he
To : field.
6. Alternatively, to retrieve a phone number f rom Contacts sele ct Add
followed by one of the following :
Press <Favourite> to defi ne easily avai lable messa ge recipients
or groups when sending message s
Recently used sends a message to a recentl y used number
Press Call register to access contacts fr om t he Call l og
Contacts enables you to send a message to a number in your
Contacts list
Contact groups enables you to send a message to multiple
recipients saved as a group in your Co ntacts list.
7. Scroll to the Message: field and pre ss Play to preview th e
message.
8. Press Send.
» Audio m essage .
Message prioritydetermines the priority level. Choose from
High, Normal or Low
Delivery report determine s whether the net work sends you
delivery reports for your messages
Save sent message determines whether or not the phone
saves the message in the Sent items fold er once it is sent
English
22
Page 26

MESSAGES
Receiving and listening to audio messages
When you receive an audio message, you will receive an information
note, and the message icon
there is also an audible message alert.
1. Open the fold and press Play.
2. To ignore the message and view it later, press Exit.
If you have unread messages in your Inbox, the envelope icon
will remain on the Home screen.
To listen to a stored audio message:
From the Home screen, press Menu » Messages » Inbox » Play.
appears on the display. By default
Video messages
You can make and receive video messages with your Vertu phone.
You can write, send, and read e-mails with your Vertu phone. Your
phone supports POP3 and IMAP4 e-mail servers.
E-mail settings
To manually enter your connection set tings or to modif y your current
settings:
1. From the Home screen, press Menu » Messages » Message
settings
2. Scroll to each of the options and modify the paramet ers with the
information supplied by your service provi der and/or e-mail provid er.
Writing and sending e-mail messages
You can create e-mail messages and also attach images and vide o
clips. You can write your e-mail message before connecting to the
e-mail service; or connect to the service first , then write and send
your e-mail.
To write and send an e-mail message:
1. From the Home screen, press Menu » Messages » Create
message
2. Press Options » Change msg. type. » E-mail message.
3. Follow the instructions for composing a text message.
4. To send the e-mail message, select Send.
5. If more than one e-mail account is defined, select t he account fro m
which you want to send the e-mail.
6. To edit or continue writing your e-mail later, select Exit » Yes. The
e-mail is saved in
» E-mail messages » Edit mailboxes » Add.
Due to the complexity of entering all of the settings manually,
it is strongly recommended that you use the order ettings link
from your CD-ROM to take you directly to the appropriate
page on the Vertu website to obtain the settings for your Vertu
phone.
.
Drafts.
After sending a message, your Vertu phone may display
Message Sent. This is an indication that the message has
been sent by your Vertu phone. This is not an indication that
the message has been received at the intended destination.
1. From the Home screen, press Menu » Messages » E-mail.
2. If more than one e-mail account is defined, select th e account fro m
which you want to download the e-mail.
3. The e-mail application connects, synchronise s and displays e- mails.
4. To open an e-mail, highlight a header and pres s Open.
Replying to e-mail
Exercise caution when opening messages. E-mail
messages may contain malicious software or otherwise
be harmful to your Vertu phone or your computer.
To reply to e- m ail:
1. To reply to an e-mail, open it as above, and then select Options »
Reply.
2. Write the reply and then press Send.
Deleting e-mail messages
You can delete e-mails one-by -one or mark a group for deletion al l at
once.
To delete one e-mail message:
1. From the Home screen, press Menu » Messages » E-mail. The
e-mail application is st arted.
2. Highlight an e-mail and press Options » Delete.
3. Select from From phone to delet e e-mails fro m your Vertu ph one
only. Deleting an e-mail from your phone does not delete it f rom
the e-mail server.
4. Select Also from server to delete e-mails from your Vertu phone
and also from the e-mail serv er.
To delete more than one e-mail message:
1. From the Home screen, press Menu » Messages » E-mail. The
e-mail application is st arted.
2. Press Options » Mark or Mark all.
3. Mark the e-mail or e-mails for deletion.
Press Options » Delete marked. The marke d mes sage s wil l be
deleted from your Vert u phone.
IMs (Instant Messaging)
With IMa (Instant Messaging) you can send short, simple text
messages to online users. You have to subscribe to a service and
register with the IM service you want to use. For more informati on
contact your service provider.
IMs support DRM2.
To log in to IMs:
1. From the Home screen, press Menu » Messages » IMs.
2. Select from the foll owin g op tion s:
Login - to log in to IMs
Saved conversations to access your stored message
conversations.
Voice messages
Downloading and reading e-mail
To download your e-mail messages:
The voice mailbox is a network service and you may need to
subscribe to it. For more information and for your voice mailbox
number, contact your service provider.
English
23
Page 27

MESSAGES
To call your voice mailbox:
From the Home screen, press Menu » Messages » Voic e
messages
key on the number keypad.
To enter, search for or edit your voice mailbox number:
From the Home screen, press Menu » Messages » Voic e
messages
» Listen to voice msgs. Or, press and hold the 1
The first time you access your voice mailbox, you may be
required to enter a voice mailbox number, depending on your
operator.
» Voice mailbox no.
Info messages
With the Info messages network service, you can receive messages
on various topics from your service provider.
To check availability, topics, and the relevant to pic numbers,
contact your service provider.
Service messages
Your Vertu phone is able to receive service messages (pushed
messages) sent by your service provider. Service messages are
notifications (for example, news headlines), and they may contain a
text message or an address of a service.
When you receive a service message:
1. Press Show to display the message.
2. Or, press Exit to save the message to your inbox.
Service message settings
To update service message settings:
1. From the Home screen, press Menu » Messages » Message
settings
2. Scroll to one of the following options and then pre ss Select:
Service messag es » On or Off to set whether you want to
receive service messages
Message filt er » On to set the phone to receive ser vice
messages only from content author s approved by the se rvice
provider
Autom. connection » On to set the phone to automatica lly
activate the browser from th e stand-by mode whe n the phone has
received a service message. I f you select
the browser only after you select
received a service message.
» Service messages.
Off, the phone activates
Retrieve when the phone has
Bluetooth messages
Business cards, notes and messages sent by Bluetooth are
available in the Messages inbox.
Service commands
Use the service commands editor to enter and send service
requests (also known as USSD commands) to your service
provider. Contact your service provider for information about service
commands.
To send a service command:
1. From the Home screen, press Menu » Messages » Serv.
commands
2. Use the NUMBER keys to enter a service request, f or example an
activation command for a spec ific network ser vice and pre ss
.
Send.
English
24
Page 28

CONTACTS
4 CONTACTS
Your Vertu phone Contacts list has capacity for up to 2,000 entries.
Contacts memory
Contact names and numbers can be stored in the phone memory or
on the SIM card, or both.
Phone memory
Each contact can contain up to five numbers and five text items, for
example a postal address, an e-mail address, an image and a
specific ring tone.
If you use the phone memory you can store more data and access
more functions, for example voice tags, than i f you use the SIM card
memory.
SI M card memory
Contacts stored on your SIM card have one associated number.
The number of contacts and the length of na mes and number s tha t
you can store on your SIM card is determined by your service
provider.
Selecting the memory type
Certain features, for example business cards a nd multi ple num bers
associated with a contact, are only available w hen using the phone
memory. If you plan to make frequent use of these features, we
recommend that you set your Vertu phone to use the phone
memory. If you plan to transfer yo ur SIM card from your Vertu phone
to other phones, we recommend that you set your Vertu phone to
use the SIM card memory.
To select a memory type:
1. From the Home screen, press Menu » Contacts » Settings »
Memory in use.
2. Scroll to one of the following options and then press Select:
Phone and SI M to save new contacts to the phone and displ ay
contacts from the phone and SIM
Phone to save and displ ay phone conta cts
SIM card to save and display SIM card contacts.
A message confirms which memory you have selected.
If you change the SIM card in yo ur Vertu phone, the memory
type is automatically reset to phone.
Copying between memories
The copying feature allows you to copy names and numbers
between the phone memory and the SIM card memory.
1. From the Home screen, press Menu » Contacts » Copy
contacts
2. Scroll to one of the following options and then pre ss Select:
From SI M to phon e to copy all information from the SIM card
memory to your Vertu phone memory
From phone to S IM to copy the name and the number from your
Vertu phone memory to the SIM car d memory.
3. Press Yes to confirm your actio n, or press No to canc el.
.
If you are copying from phone memory to SIM card memory
and your Vertu phone memory contains more entries than
your SIM ca rd can store, some of the entries will not be
copied.
Move between memories
The move feature enables you to move contact names and numbers
from the phone to the SIM card memory and vice versa.
1. From the Home screen, press Menu » Contacts » Move
contacts
2. Scroll to one of the following options and then pre ss Select:
From SI M to phon e to move all information from the SIM card
memory to your Vertu phone memory. Th e informatio n is no longer
held on your SIM card
From phone to SI M to move the name and the number from
your Vertu phone memory to the SIM card memory. The information
is no longer held in your Vertu pho ne memory
3. Press Yes to confirm your actio n, or press No to canc el.
.
Copying individual numbers
You can also copy individual d irectory num bers betwe en the ph one
memory and SIM card memory directly from the contacts list.
To copy individual numbers:
1. From the Home screen, press Menu » Contacts » Names.
2. If the contact name is not visible, press the first letter of the co ntact
name. The first name starting with that lett er is highlig hted. Scrol l to
the desired name and press Details.
3. Press Options » Copy number.
4. Select Keep origina l and then press Select to kee p the
contacts in both memories.
5. Or select Move original and then press Select to delete the
original information.
A message confirms that the number has been copied.
English
25
Page 29

CONTACTS
Check memory st atus
You can check your Vertu phone's memory to see how much
information is stored and how much free space is available.
To check the memory status:
1. From the Home screen, press Menu » Contacts » Settings »
Memory status.
2. Scroll to either Phone or SIM card a nd then press Select.
If Phone is selected the phone's contact fre e memory and used
memory is displayed as a per centage of the av ailable memo ry
If SIM card is sel ected the absol ute number of free contacts and
contacts in use for the SIM car d is display ed.
3. Press Back to exit the screen.
SIM card memory capacity is defined by your SIM card, not
by your Vertu phone. For more information contact your
service provider.
Adding contacts
To add a contact:
1. From the Home screen, press Menu » Contacts » Add new.
2. Press Select and then use the NUMBER keys to enter the
contact’s first name. Scr oll down to the ne xt field.
3. Use the NUMBER keys to enter the co ntact’s last na me. Scroll
down to the next field.
4. Use the NUMBER keys to enter the mobi le phone number . Scroll
down to the next field.
5. Use the NUMBER keys to enter the ho me phone number. Scrol l
down to the next field.
6. Use the NUMBER keys to enter the email address. Scro ll down to
the next field.
7. Scroll right or left to open the image gallery and select an image to
associate with this contact .
8. Select Save to confirm your entry, or press Cancel.
A message confirms which memory you have saved the contact
details to.
B: Go to command
If your contacts is one of the most used functions on your phone,
Names is displayed in the Go to shortcut menu (see “My
shortcuts” on page 36). You can use the left SELECTION key to
open the shortcut menu and display your contacts list:
1. From the Home screen, press Go to » Names.
2. Key in the first letter of the contact name.
3. The first name starting with that lett er is highli ghted.
4. Scroll to the desired name.
C: Selection key
If your right SELECTION key has been configured as Names (see
“My shortcuts” on page 36) you can use the following method to
display your contacts list:
1. From the Home screen, press the right SELECTION ke y.
2. Key in the first letter of the contact name.
3. The first name starting with that lett er is highli ghted.
4. Scroll to the desired name.
The following instructions use Method A to access your
contact name list however, the other methods can be used if
your
SELECTION keys have been configured correctly.
Deleting contacts
To delete a contact:
1. Select your contact name as in “Accessing contacts”.
2. Press Options » Delete» Delete contact.
3. Press Yes to confirm deletion.
A message confirms which contact you have deleted.
Accessing contacts
There are several ways to access a contact, giving you flexibility to
use your Vertu phone in the way that suits you best.
A: Follow menu path
1. From the Home screen, press Menu » Contacts » Names.
2. Key in the first letter of the contact name.
3. The first name starting with that letter is hi ghlighted .
4. Scroll to the desired name.
English
26
Page 30

CONTACTS
Contact number and text types
The first number added to a contact is automaticall y set as the
default number. When you select a contact to call or send a
message to, this default number is always used.
You can store different numbers for each contact from the following
types:
> General
> Work
> Mobile
> Home
> Fax
You can also store multimedia infor mation, E-mail address and Web
address..
A contact can have duplicate number and text types, for
example two mobile numbers or two e-mail addresses.
Multimedia information Tone, Image and Video can be stored.
Personal information, for example , Postal address, Company, User
ID, Job title, Birthday, Formal name, Nickname, Note can be
included.
Adding informatio n to a contact
You can add phone numbers or text items to a contact.
To add a number to a contact:
1. Select your contact name as in “Accessing contacts”.
2. With the contact name highlighted, press Details.
3. Press Options.
4. Scroll to Add detail and press Select.
5. Scroll to Number and press Select.
6. Scroll to the type of number you want to add and then press Select.
7. Key in the phone number.
8. Press Next until the Save option a ppear s. Pr ess Save to confirm
the number, or press
to confirm.
A message confirms that the details have been saved to the phone
memory.
Alternatively,
1. Enter the telephone number and press Save.
2. Press Options.
3. Press Add to contact.
4. Scroll to the required contact and press Add.
5. Scroll to the type of number you want to add and then press Select.
A message confirms that the details have been saved to the phone
memory.
Options and scroll to Save. Press Select
To add a text it em to a contact:
1. Select your contact name as in “Accessing contacts”.
2. With the contact name highlighted, press Details.
3. Press Options.
4. Scroll to Add detail and then press Select.
5. Scroll to the type of text you want to add, for example, Web address
or Nickname , and th en pres s
Select.
6. Key in the text and press Next until t he Save option appears. Press
Save to confirm the number, or pr ess Options and scroll to
Save. Press Select to confirm.
A message confirms that the details have been saved to the phone
memory.
Changing the default number
The first number you add to a contact is automatically set as the
default number. If more than one number is added to an entry, for
example if the contact has a mobile phone number and an office
number, you can change the default number.
To change the default number:
1. Select your contact name as in “Accessing contacts”.
2. Press Details.
3. Scroll to the number to set as the default and pres s Options.
4. Scroll to Set as default and then press Select.
A message confirms that the default number has been set.
Setting the cont acts view
Your Vertu phone can display your contacts in several different
ways:
Normal name list displays five contacts at a time
Name and number displays one contact with the d efault number
Name and image displays one cont act with an asso ciated
image.
To set the type of view:
1. From the Home screen, press Menu » Contacts » Settings »
Contacts view.
2. Scroll to the required view and then press Select.
A message confirms that the contacts view has been selected.
Setting the name display
To select whether the contact’s first or last name is displ ayed first :
1. From the Home screen, press Menu » Contacts » Settings »
Name display.
2. Scroll to the required view and then press Select.
A message confirms that the contacts view has been updated.
Setting the font size for the list of contacts
To set the font size for your messages, contacts and web pages:
1. From the Home screen, press Menu » Settings » Display »
Font siz e.
2. Scroll to Small font, Normal font or Large font and then
OK.
press
A message confirms that the font size has been updated.
English
27
Page 31

CONTACTS
Contacts menu
You can use the options in the contacts menu to make a call, send
a text message and send a business ca rd to anyone wh ose contact
information you have saved. Your phone automatically adds voice
tags to your contacts, and you can also assign numbers to the
speed dial list.
Searching and calling
To search for an entry and call the default number:
1. Select your contact name as in “Accessing contacts”.
2. Scroll to the required name and press the SEND key.
To search for an entry and call a number other than the defaul t
number (using the phone memory only):
1. Select your contact name as in “Accessing contacts” and press
Details.
2. Scroll to the required number.
3. Press the SEND key or press Call to make the call.
Text messages
When you have a contact open, you can send them a text message
without returning to the main menu.
Sending text messages
To send a text message:
1. Select your contact name as in “Accessing contacts” and press
Details.
2. Scroll to the required number and press Options.
3. Scroll to Send message and then press Select.
4. With Message highlighted, press Select.
5. Key in the message and press Send.
1. Scroll to Via Blueto oth and then press Select.
2. Scroll to the recipient’s device on the lis t and then press Select. A
message confirms that the busine ss card has been sent.
The phone memory can store additional contact information
for example a person’s work and mobile phone numbers and
an e-mail address.
Receiving business cards
When you receive a business card a message appears on t he outer
display. An audible alert sounds if your Vertu phone is set up f or
audible alerts.
When you open the phone a message tells you there is a business
card.
To display a received business card:
Press Show to display the business card.
To save a business card to your directory:
Press Save. A message confirms that you have sav ed the business
card.
To discard a business card without saving it:
Press Exit then press Yes to confirm. A messag e confirms th at you
have discarded the busines s card.
Speed dialling
The Contacts menu enables you to compile a speed dial list very
quickly. You can have up to eight numbers saved in your speed dial
list. To dial a number, simply press and hold one of the NUMBER
keys.
Speed dialling key number 1 is reserved for the voice
mailbox.
Business cards
The business card function allows you to send and receive conta ct
information, via text message, multimedia or Bluet ooth. This function
can be used with both the phone memory and the SIM card
memory, although the SIM card memory only allows you to send the
default number.
Sending business cards
To send a business card:
1. Select your contact name as in “Accessing contacts” and press
Details.
2. Press Options » Send business card.
3. Select the transmission method you want to use:
To send by multimedia message:
1. Scroll to Via multimedia and then press Select.
2. Refer to “Writing and sending multimedia messages” on page 21 to
complete and send your multimedi a message.
To send by text message:
1. Scroll to Via t ext me ssage and then press Select.
2. Refer to “Writing and sending text messages” on page 19 to
complete and send your text message .
To send by Bluetooth:
English
28
Page 32

CONTACTS
Adding numbers to the speed dial list
To add a number to the speed dial list from within a contact:
1. Select your contact name as in “Accessing contacts” and press
Details.
2. Scroll to the required number and press Options.
3. Scroll to Speed dial and then press Select.
4. Scroll to an empty speed dial key, or one that you want to overwrit e
(see below).
5. With the desired key highlighted, press Assign.
A message confirms which speed dial number key has been
assigned.
To add a number to the speed dial list using the speed dial menu:
This method can add contact details and assign a speed dial
number key at the same time.
1. From the Home screen, press Menu » Contacts » Speed
.
dials
2. Scroll to the desired speed dial key an d press Assign.
3. Key in the Phone number: or press Search t o select it from the
Contacts list and then press
OK.
4. Enter the First name: if creating a new contact.
5. Enter the Last name: of the contact.
6. Scroll to Save and press Select.
A message confirms which memory the contact has been saved to,
followed by a message that confirms which speed dial number key
has been assigned.
Changing speed dial numbers
To change speed dial numbers from within a contact:
1. Select your contact name as in “Accessing contacts” and press
Details.
2. Scroll to the required number and press Options.
3. Scroll to Speed dial and then press Select.
4. A message confirms that a speed dial already exi sts for the con tact.
5. Scroll to the desired speed dial key an d press Assign.
A message confirms which speed dial number key has been
assigned.
To change speed dial numbers using the speed dial menu:
1. From the Home screen, press Menu » Contacts » Speed
.
dials
2. Scroll to the desired speed dial and press Options.
3. Scroll to Chan ge and then press Select.
4. Enter the new Phone number: by keying it in or by pressing
Search and then selec ting an ex isting number.
5. Enter the First name: if creating a new contact and then pr ess
Next.
6. Enter the contact Last name: then press Next.
7. Scroll to Save and press Select.
A message confirms which memory the contact has been saved to,
and which speed dial number key has been assigned.
Deleting speed dial numbers
To delete speed dial numbers using the speed dial menu:
1. From the Home screen, press Menu » Contacts » Speed
.
dials
2. Scroll to the desired speed dial and press Options.
3. Scroll to Delete and then press Select.
4. Press Yes to confirm.
A message confirms which speed dial number key has been
deleted.
Voi ce t ag s
Your Vertu phone can make a call to a contact using a voice tag.
Voice tags are automatically added to all contacts. Your Vertu phone
can store up to 2000 voice tags.
Very short names do not work well for voice tags. Use longer
unique names, for example “Vertu Concierge Service.”
Using voice tags
To make a voice tag call:
1. Press and hold the down the right SELECTION key.
2. Speak the voice tag clearly into the microphone.
3. A list of possible matches is displayed briefly givi ng you a chance t o
scroll to the correct one or
Quit if it is not on the list.
4. After about 2 seconds your phone will automatically dia l the number.
Playing voice tags
To play a voice tag from within a contact:
1. Select your contact name as in “Accessing contacts” and p ress
Details.
2. Scroll to the contact name within the detail s and press Options.
3. Scroll to Pl ay voice tag and then press Select.
The voice tag is played.
Groups
Use groups to associate a contact name to a group. The group
name appears on the display when a member of a group calls you.
You can assign a different ringing tone to each group for easy
recognition of incoming calls.
Viewing groups
To view grou ps :
From the Home screen, press Menu » Contacts » Groups.
The Groups are displayed.
Creating a group
To create a contact group:
1. From the Home screen, press Menu » Contacts » Groups.
2. Press Add. If you have existing groups liste d, press Options and
then
Add new group.
3. Add a Group name.
4. Add a Group image and tone (if required).
5. Press Save.
A message confirms that the group has been added.
English
29
Page 33

CONTACTS
Adding contacts to a group
To open a group and link contacts to it:
1. From the Home screen, press Menu » Contacts » Groups.
2. Scroll to the desired group and press View.
3. Press Add to display your contacts list.
4. Scroll to the desired name and the n press Select. Repeat for each
contact to be added t o t he gro up.
A message confirms that the contact has been added to the group.
Editing group names
To edit group names:
1. From the Home screen, press Menu » Contacts » Groups.
2. With the group name to be edited highlighted, pres s Options.
3. With Group details highligh ted, press Select.
4. With Group name highlighted, press Select.
5. Key in the new name for the group and then press OK.
A message confirms that the group has been renamed.
Deleting contacts from a group
To delete contacts from a group:
1. From the Home screen, press Menu » Contacts » Groups.
2. Scroll to the desired group and press View.
3. Scroll through the group members to the desired conta ct and press
Options.
4. With Remove member highlighted, pres s Select.
5. Press Yes to confirm.
A message confirms that the contact has been removed from the
group.
Adding group details to a contact
To open a contact and add group details:
1. Select your contact name as in “Accessing contacts” and press
Details.
2. Press Options.
3. Scroll to Add to group and then press Select.
4. Scroll to the desired group and then press Select.
A message confirms that the contact has been added to the group.
Deleting group details from a contact
To delete group details from a contact:
1. Select your contact name as in “Accessing contacts” and press
Details.
2. Scroll to the group name and press Options.
3. Scroll to Rem ove from group and then press Select.
4. Press Yes to confirm.
A message confirms that the contact has been removed from the
group.
Setting group ringing tones
All groups initially have a default ringing tone. To set a distin ctive
ringing tone for each group:
1. From the Home screen, press Menu » Contacts » Groups.
2. Scroll to the desired group and press Options » Group details.
3. Scroll to G roup tone:.
4. Press Options » Change tone and sele ct your ringing tone from
Default / Open Gallery / Tone downloads.
5. Press Save.
A message confirms that the group ringi ng tone ha s been select ed.
The default ringing tone for the caller groups is the ringing
tone set up in the profiles menu.
Options on contact numbers
Add detail
Scroll to one of the following categories and press Select to add
more details:
> Number
> Internet
> Multimedia
> Person al info
Voice call
Press Select to call the contact.
Send message
Select a type of message and then press Select. See the chapter
“MESSAGES” on page 16 for further inst ruc tions on sending
messages.
Add image
Press Select to open the Gallery and se lect an image. See “Adding
contacts” on page 26.
Edit
1. Scroll to Ed it and then press Select.
2. Press Clear as many times as necessary to del ete the numbe r to
the left of the cursor.
3. Key in the new number.
4. Press Save to save the new number.
Delete
1. Scroll to Delete and then press Select.
2. Scroll to either Delete number to remove the number but retain
the other contact details o r
contact details and then pr ess
3. Press Yes to confirm the delet ion.
Delete contact to remove all of the
Select.
Set as default
Highlight a number in the list and press Set as default. A
message confirms that number has been set as default.
English
30
Page 34

Change type
Allows you to redefine the number type as General, Mobile,
Home, Office or Fax. Press Select and a message will be
displayed to confirm the change.
Copy number
1. Select Keep origin al or Move original.
2. Press Select.
3. A message confirms that the number has been copied.
Send business card
Select a transmission method and then press Select. See
“Business cards” on page 28 for fur ther instr uct ions on sendi ng
business cards.
Add to group
Press Select to add the contact to a group . “Add ing conta cts to a
group” on page 30.
Use number
This makes a copy of the selected number allowing you to save it
under a new contact record.
Press Save and then use the NUMBER keys to enter a name for
the new contact.
CONTACTS
Speed dial
Select a speed dial key and press Assign. A message confirms
which speed dial key has been assigned.
English
31
Page 35

CALL HISTORY
5 CALL HISTORY
The Call history feature allows you to view information about calls
that you have missed, received and made. You can also view
information (volume of data / session duratio n) for pack et data
transfer and number of messages se nt and received ( both SMS and
Multimedia).
The call history
The call history stores information about your most recent missed,
received, and dialled calls . When the list is fu ll, th e most r ecent call
replaces the oldest.
To ensure that the call history is able to store your received and
missed call information, your service provider must support call er
ID, and it must be enabl ed. If the calle r’s numbe r is not available, for
example if the caller withheld their number or the net work did not
transmit the number, No number appears in the calls list.
The call history can only store information about calls that a re
actually received by your Vertu phone. I f you do no t have a signal o r
if your calls are blocked, any incoming calls will not be stored.
Viewing the call history
To view recent call information:
1. From the Home screen, press Menu » Call history » All calls.
2. The calls will be listed in chronological orde r.
Viewing missed calls
To view details of calls that have been missed:
From the Home screen, press Menu » Call history » Missed
calls
.
Viewing received calls
To view details of calls that have been successfully received by your
Vertu phone:
From the Home screen, press Menu » Call history » Received
calls
.
Viewing dialled numbers
To view details of numbers that have been dialled from your Vertu
phone:
From the Home screen, press Menu » Call history » Dialled
numbers
.
Viewing message recipients
To view details of contacts to whom messages have been sent:
From the Home screen, press Menu » Call history » Msg.
recipi ents
.
Clearing log lists
To clear information from your Vertu phone’s log
1. From the Home screen, press Menu » Call history » Clear log
.
lists
2. Scroll to one of the options and then press Select:
This operation will take immediate effect without requiring
confirmation. Once log lists have been cleared the information
cannot be recovered.
All call lists removes all information from your Vertu phone log
Missed ca lls removes details from the Missed calls log
Received c alls removes details from the Received calls log
Dialled numbers removes details from the Dialled numbers log
Message recipients removes details from the Messag e
recipients log.
Viewing call duration
To view information about the duration of calls made and rec eived
by your Vertu phone:
1. From the Home screen, press Menu » Call history » Call
duration
2. The following information will be available for examination:
Last call shows the length o f the last call r egardless of type
Received c alls shows the total combined duration of all receiv ed
calls
Dialled c alls shows the total combined duration of all di alled calls
All calls shows the total combined duration of all calls to and from
your Vertu phone
3. Clear ti mers it will be necessary to enter you r security code t o
complete this operat ion. See
.
“SECURITY” on page 13.
Viewing the packet data counter
To view approximate information about the volume of data sent and
received:
1. From the Home screen, press Menu » Call history » Data
counter
2. The following information will be available for examination:
Sent in last session is the amount of data in bytes, sent in the
last transmission
Received in las t sess. is the amount of data in bytes, r eceived
in the last transmission
All sent data is the total amount of data in bytes, sent in all
transmissions
All received dat a is the total amount of data in bytes, received in
all transmissions
.
English
32
Page 36

3. Clear c ounters resets all of the counters. It will be nec essary to
enter your security code to comple te this operat ion. See
“SECURITY” on page 13.
Viewing the data timer
To view approximate information about the duration of sessions over
GPRS:
1. From the Home screen, press Menu » Call history » Data
.
timer
2. The following information will be available:
Duration of last se ss. shows the length of time spent on the
last session
Duration of all sess. shows the combined length of time spent
on all sessions
3. Clear ti mers resets all of the timers. It wil l be necessary t o enter
your security code to c omplete this operat ion. See
page 13.
“SECURITY” on
Viewing the message log
To view details of messages that have been sent and received by
your Vertu phone:
1. From the Home screen, press Menu » Call history » Message
.
log
2. The following information will be available:
Sent text messages shows number of text messages and par ts
sent
Sent MM S msgs. shows number of multimedia messa ges sent
Sent e-mails shows number of email messages sent
Received text msgs. shows number of text messages and
parts received
Received MMS msgs. shows number of multimedi a messages
received
Downloaded e-mails shows number of dow nloaded messages
to My mailbox.
3. Clea r all counters it will be necessary to enter your security
code to complete this operati on. See
“SECURITY” on page 13.
CALL HISTORY
Viewing the positioning log
This displays a list of the GPS fixes you have made.
From the Home screen, press Menu » Call history » Position ing.
Viewing the sync log
Sync log shows statistics on data you have transferred while
synchronising your Vertu phone.
To view the sync log, from the Home scr een , pres s Menu » Call
history
» Sync log.
English
33
Page 37

SETTINGS
6 SETTINGS
The Settings menu enables you to control the core functionality of
your Vertu phone. You can define personalised themes, configure
the inner display, adjust th e ti me and dat e set tings, set up per sonal
shortcuts, configure various connectivit y preferenc es, modify call
and phone settings, set up security featu res and restore your factory
default settings.
Refer to “SECURITY” on page 13 for more information about the
security settings.
Date and time
Time management
This where you can customise the dual time clock settings. The dual
time clock is available when you are travelling. The larger a nalogue
clock shows the local time and the smaller digital clock shows the
home time.
Date and time settin gs
This enables you to manually set the date and time in the home
location. You can only do this if
1. From the Home screen, press Menu » Settings » Date and
time
» Date & time settings
2. Scroll to one of the following options and then pre ss Select to
customise the time settings:
Date: enables you to us e the NUMBER keys to set the date on the
phone
Time: enables you to use the NUMB ER keys to set the time on the
clock
3. Scroll down and select Save to confirm your settings.
Accurate time is not selected.
Date and time format
To adjust the date format:
1. From the Home screen, press Menu » Settings » Date and
time
» Date and time for mat » Date.
2. Scroll to one of the following options and then pre ss Select to
customise the time settings:
Date format sets how the da te will be di splayed
Date separator s ets whet her spaces, dots or s lashes are used.
To adjust th e ti me f o rm at :
1. From the Home screen, press Menu » Settings » Date and
time
» Date and time for mat » Time.
Time fo rmat enables you to set the time in 24-hour or 12- hour
format
Select a time source
1. From the Home screen, press Menu » Settings » Date and
time
» Time management » Clock mode
2. Scroll to one of the following options and then press Select to
customise the time source:
Accurate displays dual time when you are tr avelling. Set up the
home location as below and the tr avel clock di splays automati cally.
Single fixed zone (only available for manual set- up) enables you
to select a location for the large clock.
Dual fixed zone (only available for m anual set-up) enables you to
select a location for the s mall clock.
Select a home location
From the Home screen, press Menu » Settings » Date and
time
» Time management » Home location
This enables you to set up a home location for manual and
automatic time keeping.
Select an alternate location
From the Home screen, press Menu » Settings » Date and time »
Time management » Alternate location
This enables you to set up a second location for manual time
keeping.
Profiles
Profiles are an easy way to control the most common groups of
settings, for example audible and vibr at ing al er ts. Acti vati ng an
alternative profile changes all the associated sett ings.
Profiles define how your Vertu phone r eacts when you re ceive a call
or a message, how your NUMBER keys sound when you press a
key, and more.
Activating a profile
You can change your profile at any time to ensure that your Vertu
phone’s alerts are appropriate to your surrounding s.
Timed profiles can be used to prevent missed calls. For example,
you attend an event that requi res your Ve rtu phone be set to
before the event starts, but you forget to return it to
long after the event. During this time, you might miss several cal ls
because the ringing tone is silent. The Flight profile cannot be
timed.
With the timed profile feature, you can set a profile to expir e aft er
any length of time up to 24 hours. When the timed profile expires,
your Vertu phone automatically returns to the orig inal pr ofil e.
To change your current profile from the Home screen:
1. Press the power key once briefly.
2. Scroll to the desired profile an d then press Select.
To change your current profile using the menus:
1. From the Home screen, press Menu » Settings » Profiles.
2. Scroll to the desired profile an d then press Select.
3. With Ac tivate highlighted, press Select.
Silent
General until
English
34
Page 38

SETTINGS
To set a time limit for the selected profile:
1. From the Home screen, press Menu » Settings » Profiles.
2. Scroll to the desired profile and then press Select.
3. Scroll to Tim ed and then press Select.
4. Use the NUMBER keys or scroll to enter the ti me you want your new
profile selection to en d and then press
OK.
Personalising a profile
You can customise the default profiles to adju st your Vertu pho ne’s
characteristics so they best suit your own p references and situation.
For the silent profile, you can only change the vibra te sett ing.
To personalise a standard profile:
1. From the Home screen, press Menu » Settings » Profiles.
2. Scroll to the profile that you want to customise and then press
Select.
3. Scroll to Per sonal ise and then press Select.
4. Scroll to one of the following options and then press Select to
customise the profile:
Incoming call alert: selects how the phone notifies you of an
incoming call, the availa ble options are:
Ringing plays the ri nging tone
Ascending makes the volume of the ringing tone in crease the
longer the call is unanswered
Ring once plays only o ne cycle of the rin ging tone
Beep once plays a single beep
Off causes no ringing tone fo r an incoming call
Ringing tone: enables you to select the ringing tone for incoming
calls
Ringing volume: set s the volume of your r inging tone
(use + and -)
Incoming ca ll vide o: uses a video as a ringing tone f or received
calls
Vibrating alert: turns the vibrating alert On or Off
Message alert tone: selects the tone for rece ived messages
E-mail alert tone: selects the tone for rec eived e-mails
IM alert tone: selects the tone for received instant messag es
Keypad tones: sets the volume of your keypad tones (use + and
-)
Application tones: turns the tones for applications On or Off
Alert for: to define which caller groups you want your Vert u phone
to alert you for whe n you recei ve a call f rom someon e belonging to a
specified group
If you receive a call from someone wh o is not includ ed in a specifie d
caller group, an information note appears on the display, but your
Vertu phone remains silent. See “Groups” o n page 29 for more
information.
Profile name: enables you to rename the selected profile (al l of
the preset profiles can be renamed except fo r
NUMBER keys to enter the new name .
Press Save when you have made your changes .
General). Use the
Themes
A theme defines the image that is used as a background on all of
your Vertu phone menus.
To select a theme:
1. From the Home screen, press Menu » Settings » Themes.
2. Scroll to the desired theme and press Apply.
3. Press Options at any time while scrolling through the themes to
display the following options:
Details displays name, file size and creation date information
Type of view displays how the folder s and files appea r on the
screen
Sort enables you to select the or der in which file s and folders a re
displayed (by name, date, format or size).
Tones
The tones settings menu allows you to perso nalise the tone setting s
of the selected active profile on your Vertu phone.
To personalise the tone settings:
1. From the Home screen, press Menu » Settings » Tones.
2. Scroll to the tone type that you want to custo mise and then pr ess
Change.
3. Select a ringing tone from the list.
Display
To personalise your Vertu phone’s inner display and other features:
1. From the Home screen, press Menu » Settings » Display.
2. Scroll to one of the following options and then pre ss Select:
Glowing light controls whether the light a t the bottom of t he
phone is
Wallpaper enables you to select a background image for the inner
display. You can either use a theme wall paper or sele ct another
image. You can also turn the travel wallp aper on or off .
Home screen font col. lets you change the fon t colour of the
date and time in the Home screen. T his is displayed only if
display
Notific ati on details lets you select to show or hid e details, such
as contact information in both missed call and message receive d
notifications.
Font siz eselect Small font, Normal font or Large font.
Cell info d isplay displays the local area code on the Home
screen.
Clock display controls whether the clock on the in ner display is
shown or not. You may prefer to see your wal lpaper grap hic without
the clock being there.
Vertu feeds enables you to switch t he Vertu feeds on or o ff on the
Home screen.
On or Off
> When the phone is in stand-by mode, the light flashes
slowly
> When the phone is in stand-by mode with a missed call
or text message, the light flashes quickly
> When the phone is in stand-by mode and charging the
light remains on constantly
Clock
iis Off (see below)
English
35
Page 39

SETTINGS
My shortcuts
With personal shortcuts you get quick access from the Home
screen to frequently used functions of your Vertu phone.
If the left SELECTION key is Go to, select Go to » Options and
select from the following options to personalise your
Select options - to add or to remove a function
Organise - to rearrange the fun ctions on your p ersonal shortc ut
list.
Auto sorting on - dynamically displ ays the menu options you u se
most often at the top of the li st
The auto sorting feature must be disabled for you to use the
Select options and Organise functions.
Go to menu:
Left s elect ion ke y
To select a function for the left SELECTION key:
1. From the Home screen, press Menu » Settings » My
shortcuts
2. Scroll to the desired function and then press Select.
» Left selection key .
Right selection key
To select a function for the right SELECTION key:
1. From the Home screen, press Menu » Settings » My
shortcuts
2. Scroll to the desired function and then press Select.
» Right selection key.
4-way scroll key
To select functions for the 4-way scroll key:
1. From the Home screen, press Menu » Settings » My
shortcuts
2. Select the key to be changed. Please note that the UP key is
reserved for Vertu feeds but can be changed.
3. Press Change.
4. Scroll to the required shortcut from the list a nd press Select.
» Navigation key.
Connectivity
You can connect your Vertu phone to a compatible device using
Bluetooth wireless technology or a USB data cabl e (CA-101V)
connection. You can also define the settings for intern et dial-up
connections.
Bluetooth wireless technology
Your Vertu phone is compliant with Bluetooth Specification 2.0.
You can use Bluetooth car kits, perform data transfer and use your
Vertu phone as a modem.
Bluetooth driver compatibility information is available in the
Vertu PC Suite help.
To ensure interoperability between other devic es suppo rting
Bluetooth technology, use Vertu approved enhancements for this
model. Check with the manufacturers of other devices to determine
their compatibility with this device.
There may be restrictions on using Bluetooth technolo gy in some
locations. Check with your local authorities or service pr ovider .
Features using Bluetooth technology, or all owing such feat ures to
run in the background while using other features, increa se the
demand on battery power and reduce the battery life.
Bluetooth technology allows you to connect the phone to a
compatible Bluetooth device within 10 meters (32 feet). Since
devices using Bluetooth technology communicate using radio
waves, your Vertu phone and the other de vices do not need to be i n
direct line-of-sight, although the co nnecti on can be subjec t to
interference from obstructions for example walls or fr om other
electronic devices.
Bluetooth settings
To define how your Vertu phone is recognised by other Bluetooth
devices:
1. From the Home screen, press Menu » Settings » Connectivity
» Bluetooth.
2. Scroll to one of the options and then press Select:
Bluetooth en ables you to swit ch your bluetoo th connectio n on
and off
Conn. to audio access. enables you to connect your ph one
with an audio accessory and the dev ice that yo u want to connect
Paired devices ena bles you to a dd a new Bluetoot h device and
view existing devices already paired with you r phone
Active devices checks w hich Bluetoo th connection is currently
active
My phone’s visibility enables you to oper ate the phone in
hidden mode to avoid malicious sof tware
My phone’s name enables you to define the name that you want
your Vertu phone to be recognised by on the network.
Do not accept Bluetooth connectivity from sour ce s you do
not trust. Alternatively, switch off the Bluetooth function.
This will not affect other functions of your Vertu phone.
Bluetooth wireless connection
To make a Bluetooth wireless connection:
1. From the Home screen, press Menu » Settings » Connectivity
» Bluetooth.
2. Scroll to Pa ired devices and press Select.
3. Select a device from the list of available devices or scroll to Add
new device
Your Vertu phone will autom atically tu rn Bluetoo th on if necessar y
and search for available device s.
4. Scroll to the device to connect to and press Add.
5. Enter a passcode if necessary and press OK.
A message is displayed when the devi ce is connect ed successfully
and the paired device is added to the
To check which Bluetooth connection is currently active, scroll to
Active device s and then press Select.
Select Options to access available opti ons depending on the sta tus of
the device and the Bluetoo th connectio n.
and press Select.
Paired devices list.
GPS
This is where you can set up a connection to another GPS device
that you want to use, and set preferences for Internet Assist ed
GPS.
English
36
Page 40

SETTINGS
USB data c able
You can use the micro-USB data cable to t ransfer data between t he
phone and a compatible computer or a printer supporti ng
PictBridge. You can also use the micro-USB data cable with Vert u
PC suite.
To change the USB mode, select Menu » Settings »
Connectivity » USB data ca ble.
To connect your phone using the micro-USB data cable:
1. Connect the data cable. A message appea rs on the display Select
USB mode:
2. Select from the following options:
PC Suite - to use the p hone to intera ct with appli cations on a
computer that has Vertu PC suit e installed.
Printing & media - to use the pho ne with a PictBr idge
compatible printer, o r to connect the phone t o a PC to synchron ise it
with Windows Media Player.
Data storage - to conn ect to a compute r that does not h ave Vertu
software and use the phone as da ta storage.
Ask on conn.. - to reconfi rm every t ime you connect a USB cabl e.
Internet connectivity
With your Vertu phone you can take advantage of HSPA (3.5G) and
WCDMA (3G) packet data services to surf the internet and
download and upload files. You will also find that MMS messaging,
e-mail and computer dial-up are faster using these servic es.
For availability and subscription to dat a services contact yo ur
service provider or network operator.
Using your Vertu phone as a modem, you can connect your PC to
the internet even if you cannot connect using your regular ethe rne t
connection.
1. Install Vertu PC Suite (supplied on the CD-ROM) on your computer .
2. Connect your Vertu phone to your computer using Bluetoot h or a
micro-USB cable.
3. Open Vertu PC Suite and click on Connect to the Inter net. The One
Touch Access application will get you co nnected to the I nternet.
Call settings
You can personalise the way your Vertu phone behaves during a
call by using the call settings.
Call divert
The call divert feature redirects your incoming vo ice and video calls
to another number, for example your voice mailbox number.
When a call is diverted your Vertu phone does not give any
indication of an incoming call. The cal l di vert f eatur e i s mana ged by
your service operator and is not phone specific. The call dive rt
feature may remain active even if your SIM card is not currently i n a
phone.
To manage your call divert settings:
1. From the Home screen, press Menu » Settings » Call » Call
.
divert
2. Scroll to one of the divert options:
All voice calls forward s all calls to the number you speci fy
If busy forwards all calls w hen y ou are in a call
If not answered for wards all call s to another number when you
do not answer. You can also set a delay be fore forwardi ng takes
place
If out of reach forwards all ca lls when your Vertu p hone is turned
off or out of the coverage area
If not available f orwards all calls when you do no t answer, your
Vertu phone is busy or turned off, or out of the cover age area. You
can also set a delay before forwarding takes place
No call diverts cancels all call diversio ns.
Cancelling all call diversions may affect your ability to receive
voice mail messages. Some service providers may not allow
cancelling of all diversions. Contact your service provider for
specific details.
3. Press Select:
Activate sets up the divert. Us e the NUMBER keys to enter the
divert number or select a co ntact and the n press
Cancel cancel s the divert
Check status displays the current st atus of the diver t. A
OK
progress indicator appears, f ollowed by an inf ormatio n note
indicating whether the dive rt is active a nd to which number .
Open fold to answer
This function enables you to answer an incoming call by
opening the fold.
To change the fold open to answer setting:
1. From the Home screen, press Menu » Settings » Call » Answ.
if fold opened
.
2. Select On or Off and then press OK.
Anykey answer
Anykey answer allows you to answer an incoming call by briefly
pressing any key except the PO WER key, SELEC TION and END
keys.
To change the anykey answer setting:
1. From the Home screen, press Menu » Settings » Call » Anykey
answer
.
2. Select On to enable Anykey answer, or Off to disable it and then
press
OK.
Automatic redial
Occasionally, your network may experience heavy traffic, or the
called party is busy and you might not be able to make a call. With
automatic redial activated, your Vertu phone redi als the numb er up
to 10 times, and notifies you once the network is available.
To change the automatic redial setting:
1. From the Home screen, press Menu » Settings » Call »
Automatic redi al.
2. Select On to enable automatic redial, or Off to disa ble it and t hen
OK.
press
Voice clarity
This feature enhances speech intelligibility especi al ly in noisy
environments.
To change the voice clarity setting:
1. From the Home screen, press Menu » Settings » Call » Voi ce
.
clarity
English
37
Page 41

SETTINGS
2. Select Active to enable voice clarity, or Inactive to disable it and
then press
OK.
Speed dialling
Single key speed dialling enables you to quickly dial a number by
pressing and holding a single ke y.
To activate the speed dialling feature:
1. From the Home screen, press Menu » Settings » Call » Speed
dialling
2. Select On to enable speed diall ing, or Off t o disa ble it and then
press
To change the speed dial settings for your contacts, see “Speed
dialling” on page 28.
.
OK.
Call waiting
Call waiting notifies you of an incoming call w hile you a re in anot her
call. You can accept, reject, or ignore the incoming call. Contact
your service provider for more details.
To change the call waiting setting:
1. From the Home screen, press Menu » Settings » Call » Ca ll
waiting
2. Scroll to one of the options and then press Select:
Activate enables call waiting
Cancel cancels call waiting
Check status displays w hether the o ption is active a nd for whic h
type of call.
To use the call waiting feature:
1. When you have a call in progress and you receive an incoming call,
you will hear an audible alert and the displa y indicates that a nother
call is waiting. Press the SEND key to answer the cal l. The person
you were speaking to is put on hold. Call waiting may not wor k
correctly if If busy is set.
2. Press the SEND key to swap between the calls. A confir mation
message is displayed. The pe rson on hold becomes the active cal l,
and the other person i s put on hold.
3. Press the END key to end the active call. A confirmation message is
displayed and the other call be comes active.
4. Press Options then scroll to End all calls and then press
Select to end all ca lls.
.
Send my caller I D
Shows your phone number to the person you are calling.
To change the caller ID setting:
1. From the Home screen, press Menu » Settings » Call » Send
my caller I D
2. Select Yes to enable caller ID, No to disable it, or Set by
network
then press
.
to use the setting agreed wit h your service pr ovider and
OK.
Phone settings
You can personalise the following options on your Vertu phone
using this menu.
Language settings
1. From the Home screen, press Menu » Settings » Phone »
Language setti ngs.
2. Scroll to one of the options and then press Select.
Phone language enables you to set the display language of your
Vertu phone. If you select
language according t o the inf ormation on the SIM card
SIM language enables you to select the USIM card language
Memory status
1. From the Home screen, press Menu » Settings » Phone »
Memory status.
2. Scr ol l th ro ug h th e o pt i on s t o s e e how much of your Vertu phone’s
memory is bei ng used to st or e media, messages and
applications and how much free space is available.
Automatic keyguard
To set the ke ys of your Vertu phone to lock automatically after a
preset time delay when the phone is in the stand-by mode and no
function of the phone has been used:
1. From the Home screen, press Menu » Settings » Phone »
Automatic keyguard.
2. Select On, and use the NUMBER keys to enter the time delay.
When the keyguard is on, calls still may be possible to the
official emergency number programmed into your device.
Automatic, the phone sel ects the
Call duration display
This displays the call duration during each call.
To change the display setting:
From the Home screen, press Menu » Settings » Call » Call
duration disp lay
Select On or Off and then press OK.
.
Summary after call
Your Vertu phone can display the time spent on a call.
To change the call summary setting:
1. From the Home screen, press Menu » Settings » Call »
Summary after c all.
2. Select On to enable summary after ca ll, or Off to disable it and then
press
OK.
Security keyguard
To set your Vertu phone to ask for the security code when you
unlock the keyguard:
1. From the Home screen, press Menu » Settings » Phone »
Security keyguard.
2. Enter your Security code (see “Security code” o n page 13) and
select On.
Voice recognition
You can call contacts and carry out phone functions by speaking a
voice command.
Voice commands are language-dependent. Select Menu »
Settings » Phone » Voic e recognition » Recognition lang.
and your language before using voice commands.
From the Home screen, press Menu » Settings » Phone » Voi ce
recogn itio n
recognition of your phone to your voice.
English
38
» Voice recog. training to train the voice
Page 42

SETTINGS
To activate a voice command for a function:
1. From the Home screen, press Menu » Settings » Phone »
Voice recognition » Voice comm ands.
2. Select a feature and a subsequent function.
To activate a deactivated voice tag, select Add.
To play the activated voice command, select Play.
To manage the voice commands, scroll to a function, and select
Options and from the following:
Edit to rename the voic e command
Remove to deacti vate t he vo ice command
Add all to activate a ll voice commands
Restore all to dea ctivate voice commands for all fu nctions in the
voice commands list
To use voice commands, see “Voice dialling” on page 11.
Flight query
You can deactivate all radio frequency functionality and stil l have
access to offline games, calendar and phone numbers. Use Fl ight
mode in areas sensitive to radio emission, on board aircraft and in
hospitals.
Your Vertu phone will ask if you wish to sw itch to F light mode whe n
you switch the phone on. To activate or deactivate Flight mode
query:
1. From the Home screen, press Menu » Settings » Phone »
Flight query.
2. Scroll to On or Off and then press Select.
In Flight mode you can make an emergency call. Enter the
emergency number, press the CALL key and select
Yes when
asked if you want to exit the Flight mode profile. The phone attempts
to make the emergency call and then automatically reverts to
General profile when the call has ended.
To manually activate or deactivate Flight mode profile:
1. From the Home screen, press Menu » Settings » Profiles »
Flight » Activate or Personalise.
To deactivate the Flight mode, select any other profi le.
Phone updates
Enables you to update your phone’s software if there is an update
available.
1. From the Home screen, press Menu » Settings » Phone »
Phone updates.
2. Select one of the following options:
Current softw. deta ils displays the softw are version i n your
phone
Downl. phone so ftw. enables new phone software to be
downloaded
Install soft w. update enables newl y down load ed sof tware to
be installed on your phone
Software update provider displays your software update
provider
Automatic SW update check enables your phone to
automatically check for updates
months
or Never.
Every month, Every 3
Network mode
Enables you to switch between 3G and GSM networks and dual
mode - 3G+GSM.
You can disabl e 3G from the Go to menu to maximise battery
performance. 3G enables faster data downloading and is a
necessity if you are roaming in Japan.
To change the network mode:
1. From the Home screen press Menu » Settings » Phone »
Network mode.
2. Choose from 3G+GSM, GSM or 3Gand press OK.
Operator selection
This is useful when you are travelling and need to select a new
network operator. You can select one manually or your Vertu phone
will select one automatically. See “Set up manual roaming” on
page 52.
To change your operator selection setting:
1. From the Home screen, press Menu » Settings » Phone »
Operator selection.
2. Scroll to one of the options and then press Select:
Manual displays all the locally av ailabl e networks . Select the
one you want to use.
Automatic selects the defa ult network for the area you are in.
Start-up tone
To select whether or not your Vertu phone plays a tone when the
phone is switched on:
1. From the Home screen, press Menu » Settings » Phone »
Start-u p tone.
2. Select On or Off and then press OK.
SIM services
Your SIM card may provide additional services. You can access th is
menu only if it is supported by your SIM card. The name and
contents of the menu depend on the available services.
For availability and information on using SIM car d services, conta ct
your SIM card vendor. This may be the service provider, network
operator, or other vendor.
To set the phone to show you the confirmation messages sent
between your Vertu phone and the network when you are using the
SIM services:
1. From the Home screen, press Menu » Settings » Phone »
Confirm SIM actions.
2. With Yes highlighted, press Select.
This option is shown only if supported by your SIM card.
Accessing these services may i nvolve sending messages or
making a phone call for which you may be charged.
Accessories
This menu is shown only if the phone is or ha s been connected to a
compatible mobile accessory, such as a charger or headset.
1. From the Home screen, press Menu » Settings » Accessories.
2. Scroll to one of the options and then press Select (availabl e
options will depend upon the acce ssory selecte d):
English
39
Page 43

SETTINGS
Default profile enables you to select the profi le that you want t o
be automatically activa ted when you connect t o the select ed
accessory
Automatic answer set s the phone to a nswer an incoming ca ll
automatically after 5 seco nds. If Incomi ng call aler t is set to
once
or Off, automatic answer is off
Lights sets t he lights permanent ly On or select Automatic to set
Beep
the lights on for 15 seconds after a key pre ss.
Configuration
You can configure your Vertu phone with settings that are required
for certain services to function correctly. These ser vices inc lude
multimedia messaging, synchronisation, e-mail, streaming a nd
browser. Use the Order Settings link from your CD-ROM to take
you directly to the appropriate page on the Vertu web site to obtain
the settings for your phone.
1. From the Home screen, press Menu » Settings »
Configurat ion.
2. Scroll to one of the options and then press Select:
Web config. settings only the configurations that support the
browsing service are shown. Select a service provider, Defa ult, or
Personal configuration for browsing.
Default config. sett. displays the service pr oviders saved in the
phone. Scroll to a service prov ider, and sel ect
Details to view the
applications that the co nfiguration se ttings of this service pr ovider
support. To set the configur ation sett ings of that ser vice provid er as
default settings, pres s
configuration settings, se lect
Activ. def. in all apps. activates the default configuration
Options » Set as def ault. To delete
Delete.
settings for support ed applicati ons
Preferred access pt. displays the sa ved access point s. Scroll
to an access point and pre ss
press
Select t o view the name of the servic e provider , data bearer ,
Options. With Details highlighted,
and packet data access point or GSM dial-up number for t hat
access point
Connect to support downloads the configurat ion setting s from
your service provider if thi s is supporte d by the servi ce provider
Perso nal co nfig . se tt. enables you to add new personal
accounts for various services, an d to activate or delete them. To add
a new personal account if you have not added any, sel ect Add,
otherwise, press
Select. Select the required servic e type and then pr ess Select.
Options and with Add new highlighted, press
Use the NUMBER keys to enter each of the required parameter s.
The parameters differ acco rding to t he selected servi ce type. T o
delete or activate a personal account, select it, press
select either
Delete or Activate and then press Select.
Due to the complexity of entering all of the settings manually,
it is strongly recommended that you use the order settings
link from your CD-ROM to take you directly to the appropriate
page on the Vertu website to obtain the settings for your Vertu
phone.
Options,
Security
Your Vertu phone includes security options for the phone, SIM card,
memory and c al l s.
When security features that restrict calls are in use (such as
call barring, closed user group, and fixed dialling) calls are
still possible to the official emergency number programmed
into your device.
To configure your security settings:
1. From the Home screen, press Menu » Settings » Security.
2. Scroll to one of the following options and then pre ss Select:
PIN co de request lets you select whether a code is req uired
when switching on your phone. The SIM card may requir e that the
code is always asked for
Call barring service restricts incoming calls and outgo ing calls.
A barring password is required
Closed user group specifies a group of people you can call and
who can call you
Security level sets the security code whenever a new SIM card
is inserted into the phone
Access codes changes the security codes that protect the ph one
and memory. Change either the
Change PIN code, Change PI N2 code or the Change
barring pass.
Code in use selects whether the PIN code is active
PIN2 code request selects whether the PIN2 code is required
Create security code,
when using a specific phone fea ture which is protected by the PIN2
code. Some SIM cards do not allow the code reque st to be turned
off
Authority certific ates displays the list of authority certificates
downloaded into your p hone
User certific ates displays the list of user certific ates
downloaded into your p hone
Security module sett. See “Security module” on page 14.
Workshop reset
To restore your Vertu phone’s original settings:
1. From the Home screen, press Menu » Settings » Works h op
reset
» Restore settings only
2. Use the NUMBER keys to enter the security code.
Data you have entered or downloaded, for example names
and phone numbers saved in Contacts, are not deleted.
To restore all your Vertu phone’s original setti ngs and delete user
data, e.g. phonebook entries:
1. From the Home screen, press Menu » Settings » Works h op
reset
» Restore all.
Use the NUMBER keys to enter the security code.
Sync and backup
To synchronise or backup your Vertu phone data with another
device:
Select Menu » Settings » Sync and backup an d from the
following options.
Phone switch to synchronise or copy selected data bet ween
your phone and another phone usi ng Bluetoot h
Create backup to create a backup of selected data
Restore backup to select a backup file and restore it to t he
phone. Select Options » Details for information about the
selected backup file
Data transfer to synchron ise or copy select ed data betwe en
your phone and another device, PC or network server (network
service).
English
40
Page 44

Data transfer
Synchronise your calendar, contacts data, and notes with another
compatible device, for example a compatible PC, or a remote
Internet server (network service).
Your Vertu phone allows data transfer with a compatible PC or
another compatible device when using the phone without a SIM
card. Note that when you use the phone without a SIM card, some
functions appear dimmed in the menus and cannot be used.
Synchronising with a remote Internet server is not possible w ithout
a SIM card.
Data transfer with a compatible device
Bluetooth wireless technology can be used for synchronisation. The
other device should be in the stand-by mode.
To start data transfer:
1. From the Home screen, press Menu » Settings » Sync and
backup
2. Scroll to the required entry in the Partner list (other than Server
sync
According to the settings, the selected data is copied or
synchronised. The other device also must be activated for receiving
data.
» Data transfer.
or PC synchronisation) and then press Select.
SETTINGS
Synchronise from a compatible PC
Before you synchronise data from calendar, notes , and contac ts
with a PC, you must install the Vertu PC Suite software on a
compatible PC. Use Bluetooth wireless technology, or a USB data
cable for the synchronisation, and star t the synchronisation fr om the
PC.
Synchronise from a server
To use a remote Internet server, you must subscribe to a
synchronisation service, e.g. V ertu Fortress (see
“Vertu Fortress” on
page 51). For more information and the settings required for this
service, contact your service provider. You may receive the settings
as a configuration message.
If you have saved data on the remote Internet server, to synchro nise
your Vertu phone, start the synchronisation from your phone:
1. From the Home screen, press Menu » Settings » Sync and
backup
» Data transfer » S erver sync.
2. Depending on the settings, select Initialising
synchronisation
or Initialising copy.
Synchronising for the first time or after an interrupt ed
synchronisation may take up to 30 minutes to complete, if the
contacts or calendar are full.
English
41
Page 45

ADDITIONS
7 ADDITIONS
Your Vertu phone has a multimedia player with which you can view,
play, and download files, such as images, audio, video, and
animated images. You can also view compatible streaming videos
from a network server (network service).
Games
Your Vertu phone contains games and applications.
To launch a game:
1. From the Home screen, press Menu » Additions » Games.
2. Scroll to the desired game, and press Open.
To download an applicatio n:
Your phone supports J2ME Java applications. Make sure that the
application is compatible with your phone before downloading it.
Only install and use applications and other software from
sources that offer adequate security and protection
against harmful software.
You can download new Java applications and games using the
Vertu Application Installer from Vertu PC Suite. You can also
download and install applications over-t he-air .
For the availability of differ e nt services, pricing, and tariffs,
contact your service provider.
Your device may have some bookmarks loaded for sites not
affiliated with Vertu. Vertu does not warrant or endorse these
sites. If you choose to access them, you should take the same
precautions, for security or content, as you would with any
Internet site.
Calculator
The calculator in your Vertu phone adds, subtracts, mult ipli es,
divides, calculates the square and the square roo t.
To perform a calculation:
1. From the Home screen, press Menu » Additions » Calculator.
2. When 0 is displayed, enter the first number in the cal culation.
Press # to enter a decimal point.
Press * to display more functions.
Media player
Your Vertu phone includes a media player for listening to music
tracks, recordings or other MP3, MP4, AAC, eAAC+ or Windows
Media.
With the media player you can download, view, and play compatible
audio and video files in a variety of formats.
Your Vertu phone can play music tracks, recordings or other MP3 or
AAC sound files that you have transferred to the phone with the
Audio Manager application (part of Vertu PC Suite), BT or USB
cable or web.
Music files stored in a fold er in the phone memory or on th e memory
card, will automatically be detecte d and added to the defa ult t rack
list.
Playing the music tracks
To play the music tracks:
1. From the Home screen, press Menu » Additions » Media
.
player
Warning! Listen to music at a moderate level. Continuous
exposure to high volume may damage your hearing.
2. Scroll to one of the following options to find the tra ck you want to
listen to:
All songs lists all song s stored on your ph one
Playlists shows all playli sts you have creat ed and stored on yo ur
phone
Artists lists the songs by artist na me
Albums lists the songs by al bum title
Genres lists the songs by genre typ e
Videos lists all video files st ored on your phone.
3. Press Open to open the file. Press Play to star t the track.
4. Use the following commands to control the media player:
Press the centre sel ect key to play or pause
Move the 4-way scroll key up to open the media pl ayer menu
and scroll up
Move the 4-way scroll key down to open the media player
menu and scroll down
Move the 4-way scroll key left to go to previous track
Move the 4-way scroll key right to go to next track
5. Press Options to access the media player options ( see “Media
player settings,” bel ow).
6. Press the END key to close the media pl ayer.
To stop the media player, press the STOP key.
If music is still playing after you exit the media player, you can stop
the media player by pressing and holding the END key.
When you open the media player menu, t he de tai ls of t he fir st tra ck
on the default track list are shown.
3. Use the 4-way scrollkey to select the func tion you want to
perform.
4. Enter the second number.
5. Press the = sign to display the result.
To start a new calculation select Clear.
English
42
Page 46

ADDITIONS
Media player settings
To change the media player settings:
1. From the Home screen, press Menu » Additions » Media
.
player
2. Press Options from the media player menu and scroll to one of the
following:
Downloads to access t racks from t he f ollowing opt ions:
Bookmarks to open the web bookmarks
Go to addressto enter the address of a mobile Internet service
and then press
Streaming settings to set the connection set tings for the
media service. Contact your service provider for information about
connection settings. Yo u may receive the st reaming se ttings as a
connection settings mess age from the Vertu web site for yo ur
service provider.
Update library to update your music library with your latest
downloads
Music libr. details to view data on the number of songs stored
on your phone, memory used and last updated date.
3. Press Options while a track is playing and select one of the
following:
Go to Media menu to return to the main media play er menu
Now playing to show details of the current track
Settings to access the foll owing featur es:
Equaliser to select from Normal, Pop, Jazz, Classical or
Set %N and Set %N for your own custom settings while the
track is playing
Shuffle to play a random choice of you r stored track s
Repeat to rep eat a t rack
Downloads to access t racks via the web
Mute audio to mute the current track
Web page to access a Web page associated with the currently
played track. Dimmed if no Web page is av ailabl e
Play via Bluetooth connects to a Bluetooth audio a ccessory
OK
Equaliser
You can control the sound quality when using the music player by
amplifying or diminishing frequency bands.
Change equaliser settings
To change the equaliser settings:
1. From the Home screen, press Menu » Additions » Equaliser.
2. Scroll to an equaliser set and press Activate. Choose from
Normal, Pop, Jazz, Classical or Set %N and Set %N for
your own custom settings.
A message confirms your equaliser setting.
View equaliser settings
To view equaliser settings:
1. From the Home screen, press Menu » Additions » Equaliser.
2. Scroll to an equaliser set and press Options.
3. Scroll to View and press Select.
Edit equaliser settings
To edit equaliser settings:
1. From the Home screen, press Menu » Additions » Equ aliser.
2. Scroll to an equaliser set and press Options.
3. Scroll to Ed it and press Select.
4. Scroll up or down to adjust each equaliser channel.
5. Scroll left or right to change channels.
6. Press Save to save your changes. A message appears to conf irm
your new settings.
Press Activate to select your ne w equaliser set. A message confirms
your equaliser setting.
Not all settings can be edited.
Rename equaliser settings
To rename equaliser settings:
1. From the Home screen, press Menu » Additions » Equ aliser.
2. Scroll to an equaliser set and press Options.
3. Scroll to R ename and press Select.
4. Use the NUMBER keys to enter a new name.
Press OK to confirm your changes. A message confirms your new
equaliser set name.
Not all settings can be edited.
Video recorder
See “Video recorder” on page 56.
Voice recorder
You can record speech or an active call, and save the recordings i n
the gallery. This is useful, for example, when recording a name and
phone number to write down later.
Record sound
To make a voice recording:
1. From the Home screen, press Menu » Additions » Vo i ce
recorde r
2. To start the recording, with the RECORD button highlighted, press
Select a nd then record your message.
3. To stop the recording, with the STOP button highlighted, press
Select. The recordi ng is saved in the Recordings folder of the
Media memory by default.
Record a phone call
To record a phone call:
1. During a call, press Options.
2. Scroll to Record and then press Select. While the call is bein g
recorded, all parties to the ca ll can hear a beeping sound ever y five
seconds.
3. To stop recording, with the STOP button highlig hted, press Select.
The recording is saved in the Recording s folder of the g allery.
When recording a call, hold the phone in t he normal position near to
your ear.
.
English
43
Page 47

ADDITIONS
Voice recorder options
Immediately before or after a r ecording, pr ess Option s to view the
following:
Play l ast record ed to listen to the latest recording
Send last recorded to attach the recording to a Multimedia or Audio
message or to send via Bluetoo th
Recordings list to see the list of recordings in Gallery
Select memory to choose recording file destinatio n. Choose
from
Media memory or Other folder.
Notes
You can write yourself notes as reminders, but these are not
associated with the calendar and do not alert you wit h an alarm.
Creating notes
To create a note:
1. From the Home screen, press Menu » Additions » Notes.
2. Press Add.
3. Use the NUMBER keys to write the note and press Save.
A message confirms that the note is saved.
Viewing notes
To view a note:
1. From the Home screen, press Menu » Additions » Notes.
2. Scroll to the note you want to view and press View.
Editing notes
To edit a note:
1. From the Home screen, press Menu » Additions » Notes.
2. Scroll to the note you want to edit and press View » Edit.
3. Use the NUMBER keys to make the requi red changes to th e note
and press
Save.
A message confirms that the note is being sent.
Deleting notes
You can delete notes one at a time or all at once.
To delete one note:
1. From the Home screen, press Menu » Additions » Note s.
2. Scroll to the required note and press Options » Delete.
3. Press Yes to confirm deletion.
4. A message confirms that the note has been deleted.
To delete all notes:
1. From the Home screen, press Menu » Additions » Note s »
Options » Delete all notes.
2. Press Yes to confirm deletion.
A message confirms that all of the notes have been deleted.
Collection
Preloaded Java applications are available here. Appli catio ns
downloaded from third-party sites are also stored here.
Stopwatch
You can measure time, take intermediate times, or take lap times
using the Stopwatch.
To open the stopwatch:
From the Home screen, press Menu » Additions » Stopwatch
Select from the following options:
Split timing - to take intermediate times. Use the Options key to
save, view and delete split times.
Lap timing - to take lap times. Use the Options key to save, view
and delete lap times.
Sending notes
You can send a note to another phone using Bluetooth or the
messaging service or convert it to a message.
To send a note as a text message:
1. From the Home screen, press Menu » Additions » Notes.
2. Scroll to the required note and press Options.
3. Press Send note » Send as message.
4. Press OK to send the note.
A message confirms that the note is being sent.
To send a note using Bluetooth:
1. From the Home screen, press Menu » Additions » Notes.
2. Scroll to the required note and press Options.
3. Press Send note » Via Blue toot h.
4. Highlight the device you want to send the note to, a nd then pres s
Select.
English
44
Page 48

CALENDAR
8 CALENDAR
Calendar
Your Vertu phone has a calendar where you can add notes about
meetings, calls, birthdays, memos and reminders. You can also
create a To-do list and check your memory status from the Options
menu.
Opening the calendar
To open the calendar:
1. From the Home screen, press Menu » Calendar.
2. The current month is displayed, with today highl ighted. Press the 4-
WAY SCROLL key to move to different dates.
When there is a note associated with a date, the date will be
highlighted.
Calendar settings
On the Settings menu you can change the following
characteristics of the calendar:
> Date & time settings
> Select the Default view
> Select the day that Week starts on
> Select a Calendar tone
> Select how often to Auto-dele te notes
Date and time settings
To adjust the date and time settings if you are not using the
Accurate time settings:
1. From the Home screen, press Menu » Calendar
2. Press Options and scroll down to Settings.
3. Press Select and Date & time settings.
4. Scroll to one of the following options and then press Select to
customise the time settings:
Date: enables you to u se the NUMBER keys to set the date on the
phone
Time: enables you to use the NUMBER keys to set the time on the
clock
Time zon e: enables you to set the valid offset fr om GMT
Daylight saving: enable s you to select be tween Winterti me or
Summertime (+1 or +2 hours) daylight saving periods.
5. Scroll down and select Save to confirm your setti ngs.
Selecting the default view
You can configure the calendar on your Vertu phone to default to
month view or week view.
To set the default view:
1. From the Home screen, press Menu » C alendar » Options »
Settings » Default view.
2. Highlight the required view and then press Select.
A message confirms which default view has been selected.
Selecting when the week starts
The calendar can display the week s tart ing o n Satur day, Sunday o r
Monday.
To select a day that the week starts on:
1. From the Home screen, press Menu » C alendar » Options »
Settings » Wee k s t art s o n.
2. Highlight the required day and then press Select.
A message confirms which day the week starts on.
Selecting a calendar tone
To select a tone for the calendar:
1. From the Home screen, press Menu » C alendar » Options »
Settings » Calendar tone.
2. Select Standard for standard tone or Open Gallery to choose
from a tone stor ed in the Gallery fold ers.
3. Press Select to confirm the new s etting s.
Calendar Notes
Notes enables you to make a note associated to a date and time.
To make a note:
1. From the Home screen, press Menu » C alendar.
2. Scroll to the date you want to make a note for.
3. Press Options » Make a note.
4. Select from the foll owin g op tion s:
Reminder - enables you to use the NUMBER keys to enter a title
for the reminder and set an al arm.
Meeting - enables you to use the NUMBER keys to enter details
about a meeting: su bject, location, start and finish date and times and
set an alarm
Call - enables you to use the NUMBER keys to enter details about
a phone call: phone number, name and time deta ils and set an alarm
Birthday - enable s you to use the NUMBER keys to enter details
about a birthday: name, year of birth, and set an alarm
Anniversary - enables you to use the NUMBER keys to enter
details about an anniversary: name, occasion, date, year and set an
alarm
Memo - enables you to use the NUMBER keys to enter detail s
about a memo: subject, start date, end date and set an alarm
English
45
Page 49

CALENDAR
Viewing notes
If there are notes for a day, the date will be highli ght ed. You can
view notes for a particular day or for the whole week.
To view the notes for a day:
1. From the Home screen, press Menu » Calendar.
2. With the required day highlig hted, press View.
3. The notes for that day will be displayed.
Viewing notes for a week
To view notes for a week:
1. From the Home screen, press Menu » Calendar.
2. Scroll to a day in the week of interest.
3. Press Options » Week view.
4. The week is displayed showing any notes.
Editing notes
To edit a note:
1. From the Home screen, press Menu » Calendar.
2. With the required day highlig hted, press View. The notes for that
day will be displayed.
3. Press Options » Edit to open the note for editing.
4. Edit the details as required and press Save.
Moving notes
You can move a note to a different date and time.
To move a note:
1. From the Home screen, press Menu » Calendar.
2. With the required day highlig hted, press View.
3. Press Options » Move.
4. Enter a new date and time and the n press OK.
5. Set an alarm if required and then press OK.
A message confirms that the note has been moved.
Sending a note
To send a note using the calendar:
1. From the Home screen, press Menu » Calendar.
2. With the required day highlig hted, press View.
3. Press Options » Se nd note » Vi a cal end ar.
4. Key in the phone number or press Search to use the Contacts
list.
5. Press OK to send the note.
Copying notes
You can copy a note to another date and time.
To copy a note:
1. From the Home screen, press Menu » Calendar.
2. With the required day highlig hted, press View.
3. Press Options » Copy.
4. Key in the new date and then press OK.
5. Key in the new time and then press OK.
A message confirms that the note has been copied.
Auto-de l et in g no t e s
Your Vertu phone can delete notes automatically. Notes can be
deleted after one day, one week or one month.
To auto-delete notes:
1. From the Home screen, press Menu » C alendar » Options »
Settings » Auto-delete notes.
2. Highlight the required frequency, or Never and then press Select.
A message confirms whether auto-delete is activated or not.
To-do list
The To-do list enables you to create notes for tasks you have to do.
You can send a to-do note to another phone as a text message, or
as a multimedia message or by Bluetooth. You can also save a to-do
note to the calendar.
Opening the to-do list
To open the to-do list:
From the Home screen, press Menu » Calendar » Options » Go
to to-do list
Any to-do notes will be displayed.
Creating a to-do list
To create a to-do list:
1. From the Home screen, press Menu » C alendar » Options »
Go to to-do list.
2. Press Add.
3. Use the NUMBER keys to enter Subject: details.
4. Select High, Medium or Low priority using the left and ri ght 4-
WAY SCROLL keys. The priorit y determines w here the to-do not e
will be displayed in your list of to-do notes. High priority notes are
displayed at the top of the list , whilst l ow priority note s are displa yed
at the bottom of the list.
5. Use the NUMBER keys to enter the due date and time an d set an
alarm if re quired .
6. Then select Save.
A message confirms that the To-do note is saved.
To change the priority, view the to-do note and select the dea dli ne
option. You can also mark notes as done, edit and delete them.
Deleting a to-do list
To delete a to-do list
1. From the Home screen, press Menu » C alendar » Options »
Go to to-do list.
2. Scroll to the desired to-do note and pres s Options.
3. Scroll to Delete or Delete all notes and then press Select.
4. Press Yes to confirm.
A message confirms the deletion.
.
If you mark your to-do notes as completed when you have
finished your tasks, you can select Delete done not es to
delete all the completed to-do notes at once.
English
46
Page 50

ALARM CLOCK
9 ALARM CLOCK
Your Vertu phone contains a simple to use alarm clock.
If you are using the accurate time clock feature, when you are
travelling the phone automatically adjusts to th e local ti me and any
preset alarms sound at the usu al time w herever you are. You do not
need to reset your alarm clock at your destination.
The alarm will sound even if your Vertu phone is switched off.
Setting the alarm
To set the alarm:
1. From the Home screen, press Menu » Alarm clock.
2. Use the NUMBER keys to enter the tim e you want the alar m to
sound.
3. Press Options and use the 4-way scroll key to set the alarm
details.
Alarm use the 4-w ay sc rol l key to toggle the alarm on and off.
Alarm time: displays t he time the alar m is set for and can onl y be
changed as above
Repeat: use the 4-way scroll key to t oggle the re peat feat ure on
and off. Setting the repeat featu re to
sound every day at the specifi ed time
Repeat days: press Options an d Change to select the days
on which you want the alarm to repeat. This o ption is o nly available if
Repeat: is switched On
Alarm tone: use the 4-way scroll key to selec t an al arm to ne
Standard is the default alarm tone
Open Gallery enables you to select a tone from the gallery files
on your Vertu phone
Tone downloads enables you to select and downl oad a tone
from the website
Snooze time-o ut: use the NUMBER keys to enter the snooze
time-out in minutes
4. Select Save when complete.
A message confirms that the alarm is on, and a red m arker is visi ble
on the clock at the alarm time.
On means that the alarm will
Cancelling the alarm
To cancel the alarm:
1. From the Home screen, press Menu » Alarm clock » Turn
alarm off
.
A message confirms that the alarm has been turned off..
Tur ning off the alarm
To turn off a ringing alarm:
1. When the alarm sounds press the stop icon on the outer displa y.
2. If your Vertu phone is switched off when the alarm soun ds, a
message asks if you want to switch the phone on. Press
switch the phone on or press
Do not press Yes when wireless phone use is prohibited or
when it may cause interference or danger.
No to leave the phone switched off.
Ye s to
Activating the snooze function
To activate the snooze function:
1. When the alarm sounds turn the phone over onto its front. If the
phone is already on its front, rotate it through 360 degrees.
2. The alarm will sound again after th e Snooze time-out dura tion defined
when setting the alarm.
3. If you leave the alarm ringing, it wil l ring for approximately one minute
and then go into snooze mode.
English
47
Page 51

WEB
10 WEB
You can access various Web services on your Vertu phone.
Important: Use only services that you trust and that offer
adequate security and protection against harmful software.
Check the availability of these services, prici ng, tari ffs, and
instructions with your service provider.
Automatically setting up Web browsing
Depending on which service provider you use, your Vertu phone
might already have Web settings installed so you might be a ble to
browse the Web straight away. If you cannot connect to the Web,
please contact Vertu Concierge or visit www.vertu.com on your
computer and download your settings.
Important: Use only services that you trust and that offer
adequate security and protection against harmful software.
Check the availability of these services, prici ng, tari ffs, and
instructions with your service provider.
Manually setting up Web browsing
First, ensure that the correct configuratio n settin gs of the service
that you want to use are activated.
To select the settings for connecting to the service:
1. From the Home screen, press Menu » Web » Web settings »
Configurat ion sett.
Only the configuration s that support the browsing service are shown.
Select a service provider or Default for browsing .
2. Scroll to Account and highlight a browsing service account
contained in the active conf igurati on settings and then press
Select.
Vertu Mobile
Vertu Mobile is Vertu’s presence on the Mobile Internet , tailored for
handsets and carefully designed for being accesse d on the go.
To open Vertu mobile:
From the Home screen, press Menu » We b » Ver tu M ob il e.
The following options are available:
> Discover contains the latest Vertu news
> Where to buy enables you to find an authorised Vertu retailer
wherever you are in the world
> About Vertu contains information about Vertu
> Recommend us enables you to enter a friends mobile phone
number and they will receive a text message providing a link to
Vertu Mobile.
Go to address
To enter a web page address:
1. From the Home screen, press Menu » Web » Go to address.
2. Use the NUMBER keys to enter the service URL.
Browse pages
While you are browsing the Internet, the function of the p hone keys
may vary. Follow the text labels on the phone display and see below
for more information.
is shown on the top left of the display during browsing. If you
are on a 3G network you can call and browse at the same time.
However on other networks if you receive a call or a text message
while browsing, indicates that the Inter net connect ion is
suspended while you receive the call or text message. When the
call or text message ends, your Vertu phone reconnects the
browsing session.
Browse with phone keys
To browse through the page, scroll in any direction.
To select a highlighted item, press the CALL ke y, o r pre s s Select.
To enter letters and numbers, press the NUMBER keys. To enter
special characters, press *.
Options while browsing
Press Options to open a new list of options for browsing:
Press Home to return to y our st art page
Press Bookmarks to access the list of bookmarks
Press Go to address to enter a specif ic web page a ddress
Press Add bookmark to save the page as a bookmark
Press Navigation to view browsing history, downloads or to
reload the current page
Press This page to show the list of options for the active page
Press Tools to show a list of other options
Press Settings to view or change browsing settings. See
“Settings” on page 48.
Press Quit to disconnect fr om a service.
The servic e pr ov i d er ma y al so of f e r ot h e r o pt i on s.
Receive a bookmark
When you have received an address that is sent as a bookmark, the
message
bookmark is saved automatically to
press
1 bookmark received is displayed. The received
Received file s. To view it,
Show and select Bookmarks.
Settings
Appearance settings
1. From the Home screen, press Menu » Web » We b se tt in gs .
2. Scroll to Display and then press Select.
3. Scroll to one of the following options and then pre ss Select:
English
48
Page 52

WEB
Press Show images and No to hide pictures on the page. Thi s
can speed up the browsing of pa ges that contai n a lot of pic tures
Press Show page title and No to hide the p age title on the page.
This saves screen space.
Minimap zooms out while you ar e scrolling t o enable you to
navigate the web more easily. If you select
Off, while scrolling the
pages are displayed in ful l size view.
Press WML text wrapping an d On to set the text to continue on
the next line on the display. If you select
Off, the text is abbreviated
Scroll to General and press Select.
4. Backstep. opens hi st. enables you to open the visual hist ory
when you go back a page.
Press Auto-fill and Enable to enable your Vertu phon e to
complete fields for you
Press Unicode (UTF-8) addr. and On to set the phone to send
a URL as a UTF-8 encoding. You may need this sett ing when you
access a Web page created in forei gn language
Press Content encoding to select t he encoding for the br owser
page content
Press JavaScript and Enable to enable the Java scripts.
Setting the font size for web pages
To set the font size for your messages, contacts and web pages:
1. From the Home screen, press Menu » Settings » Display »
Font size .
2. Scroll to Sma ll font, Normal font or Large font and then
press
OK.
A message confirms that the font size has been updated.
Security settings
Cookies
Cookies are parcels of information used by Web servers to
differentiate a user and thei r preferences when navigating a website
or services such as online shopping. Cookies are saved in the
cache memory of your Vertu phone. Cookies are saved until you
clear the cache memory.
To allow or prevent the phone fr om receiving cookie s, while browsing:
1. From the Home screen, press Menu » Web » Web settings »
Security » Cookies.
2. Select Allow or Reject.
Unsecure content
To set an alert when a secure page cont ains an uns ecure i tem.
1. From the Home screen, press Menu » Web » Web settings »
Security » Alert for unsec. mode.
2. Press Yes to set the phone to al ert when a secur e page contain s an
unsecure item.
These alerts do not guarante e a secure conne ction.
Scripts over secure connection
You can select whether to allow the running of scripts from a secure
page. The phone supports WML scripts.
From the Home screen, press Menu » We b » Web settings »
Security » WMLscript » Allow or Reject.
Downloading sett. enables you to allow or di sallow soft ware and
configuration updates in the home network .
Configuratio n sett. only the configurations that support the
browsing service are shown. Select a service provider or def ault for
browsing.
Clear the cache
A cache is a memory location that is used to store data tem porarily.
If you have tried to access or have accessed confidential
information requiring passwords, empty the cache after ea ch use.
The information or services you have accessed is stored in the
cache.
To empty the cache:
From the Home screen, press Menu » Web » Clear the cache.
Browser security
Security features may be required for some services, for example
online banking or shopping. For such connections you need
security certificates and possibly a security module, which may be
available on your SIM card. For more information, contact your
service provider.
Security module
The security module improves security services for applicatio ns
requiring a browser connection, and allows you to use a digi tal
signature. The security module may contain certifica tes as well as
private and public keys. The certificates are saved in th e security
module by the service provider.
To view or change the security module settings:
From the Home screen, press Menu » Settings » Security »
Security module settings.
Certificates
Important: Even if the use of certificates makes the risks
involved in remote connections and software installation
considerably smalle r, they must be us e d cor r ec tly in o rde r to
benefit from increased security.
The existence of a certificate does not offer any protection b y itself;
the certificate manager must contain correct , authent ic, or tr uste d
certificates for increased security to be a vailabl e.
Before changing any certificate settings, you must make sure th at
you really trust the owner of the certificate and that the certif icate
really belongs to the listed owner.
There are two kinds of certificates:
> server certificates
> user certificates.
You may receive these certificates from your service pr ovi der. User
certificates may also be saved in the securit y module by the servi ce
provider.
English
49
Page 53

To view the list of the user certificates downloaded into your Vertu
phone:
From the Home screen, press Menu » Settings » Security »
User certificates.
This icon is displayed during a secure browsing session
This icon is displayed during an unsecured browsing
session
Digital signature
You can make digital signatures with your Vertu phone if your SIM
card has a security module. Using the digital sig nature can be the
same as signing your name to a paper bill, contract, or other
document.
To make a digital signature:
1. Select a link on a page, for example, the title of t he book you want to
buy and its price. The text to sign, which may include the amount and
date, is shown.
2. Check that the header text is Read and that the digit al signatur e
icon is shown.
3. If the digital signature icon does no t appear, there is a securi ty breach
and you should not enter any personal data, for example your signing
PIN.
4. To sign the text, read all of the text first, and press Sign.
5. The text may not fit within a single screen. Theref ore, make sure to
scroll through and read all of the text before signing.
6. Select the user certificate you want to use. Use the NUMBER keys
to enter the signing PIN (see
OK. The digital signature icon disappear s, and the serv ice may
“PIN code” on page 13), and select
display a confirmation of your pu rchase.
WEB
English
50
Page 54

VERTU SERVICES
11 VERTU SERVICES
Vertu services contains software and services avai lable onl y to
Vertu owners.
Important: Use only services that you trust and that offer
adequate security and protection against harmful software.
Your Vertu phone comes with12 month’s complimentary Vertu
Select and City Brief services and 5 year’s complimentary Travel
service. You will need to register with Vertu to enjoy these
complimentary services.
To use Vertu services:
1. Go to www.verturegistration.com.
2. Register your Vertu phone or login (if yo u have pr eviously r egistered) .
3. Use the menu on the website to select your choice of serv ices.
You must also have valid Internet setting s on your Ve rtu pho ne and
there must be GPRS network coverage in your current location.
Depending on which service provider you use, your Vertu phone
might already have Internet settings installed. If you cannot connect
to the Internet, please contact Vertu Concierg e or visit
www.vertu.com and download your settings.
Your service provider will charge you for the amount of data
transferred by GPRS so please check their tariff first.
Vertu Select
An exclusive service available only to Vertu owners where you can
access:
> Online information and exclusive downloads such as addit ional
games, applications, Vertu themes and Vertu ringing tones.
> Links to the best web pages available on the mobile internet.
Travel
The travel application WorldMate® provides access to the
following information:
> Global weather conditions, forecasts and updates for over
250 cities worldwide.
> Currency conversion with online access to exchange rates for
more than 160 currencies worldwide.
> Real-time flight information includi ng delays, gate and t erminal
information for over 75 of the world’s leading airlines.
In order to download the latest flight, currenc y and weathe r
information, you must be subscribed to the Travel application
service.
Navigating the screens
Use the NAVIGATION key and the CENTRE SELECT key to move
between screens and also move between fields on a screen.
Updating flight, weather and currency information
Press the Options SELECTION key to display a menu.
Select the Update ... option to open a GPRS connection and
download latest information to your Vertu phone.
Changing settings
Press the Options SELECTION key to update settings, change
city, and change settings.
Settings include time format, date format, temperatur e scal e and
the space character (decimal point).
Weather
This screen displays five-day weather forecasts. If the w eather
information is no longer current a nd you want to update i t, press t he
Options SELECTION key and select Update weather.
Currency
This screen displays three different currencies a nd enables yo u to
convert sums of money between them. Press the
SELECTION key to select a new currenc y.
Currency rates fluctuate daily. To obtain current currency rates,
press the
Options SELECTION key and select Update rates.
Options
City Brief
Where possible, City Brief channel provides RSS Feeds
information about your destination, the moment you arrive.
Vertu Fortress
Vertu Fortress enables you to wirelessly transmit important
information from your Vertu phone to a high security data stora ge
facility. You can back up all contact information, calendar details
and tasks in this way.
When you have synchronised your data with the secur e server , you
can update it from our website and, if necessary, tra nsfer it to
another phone you have registered.
Flight st atus
This screen enables you to search for the latest flight informati on for
over 75 leading airlines. You can see current information on
schedules, gates, terminals, delays and aircraft type.
Select an Airline, Flight num ber and Date, and then press Get
flight st atus
Queries you have previously made are stored for reuse in the
Recent Queries list.
WorldMate® is provided by MobiMate®.
English
51
.
Page 55

Set up manual roaming
If you travel to a region cover ed by a differen t network operator, and
you are unable to download the latest Vertu Services informati on,
you need to select a network operator that has a GPRS roaming
agreement with your home network.
To do this select Menu » Settings » Phone » Operator
selection »
Manual.
Your Vertu phone will display all the locally available networks. For
information on configuring the Vertu Select, Ve rtu Fortr ess and
Travel applications, GPRS coverage and roaming agreements,
please contact Vertu Concierge.
Not all network operators have GPRS roaming agreements with
other network operators.
Vertu Concierge
Vertu Concierge is an exclusive service for people who believe that
quality matters. Our aim is to bring you only the very best, wheth er it
be music, art, travel or food.
Vertu Concierge provides you with a highly per sonal ised rang e of
services including:
> Lifestyle services such as restaurant recommendations and
reservations, travel assistance, and tickets for theatre shows,
concerts or sporting events.
VERTU SERVICES
> Solving everyday practical problems such as finding a
reputable plumber or tracking down a gift.
> Assistance with using your Vertu phone.
When you connect to Vertu Concierge, you can speak directly to a
team of Lifestyle Managers who are available 24 hours a day, 7 days
a week to offer personalised assistance.
Calling Vertu Concierge
The CONCIERGE key is
located at the bottom of the
keypad of your Vertu phone
as shown in this illustration.
Press the CONCIERGE key
to display the Concierge
screen.
Press Call or the SEND key
to call Vertu Concierge
Alternatively you can press Menu » Vertu Services » Vert u
Concierge
If you are unable to reach Vertu Conci erge usi ng t he CONCIERGE
key, call +448707375535.
.
You must have network coverage to call Vertu Concierge.
English
52
Page 56

NAVIGATE
12 NAVIGATE
Your Vertu phone comes with maps loaded on the memory card.
You can browse maps for different cities and countries, search f or
addresses and points of interest, plan rout es from one locati on to
another, save locations as l andmarks, and sen d them t o compatibl e
phones.
Almost all digital cartography is in accurate and i ncomplete to some
extent. Never rely solely on the cartography that you download for
use in this phone.
Select Menu » Navigate and select from the available options.
Last mapto display the last map you have used.
Find address to open a form where you can i nput address or post
code details.
Saved locations to use the details of a location that you
bookmarked previously.
Recent locations to display the most recent maps you have been
looking at.
Current GPS position to display your current position on a map.
Plan route to provide directions for your journey. You need to
enter the Starting point and the Destinati on. This pr ovides the m ap
only. If you want voice guidance this is purchased separatel y (see
below).
Extra services to purchase voice guided navigation.
Settings to display General settings, Network settings and
Routing settings.
> General settings displays unit of Measure for the map, Points
of Interest displays types of p lac es t o view, Lights enables you
to select from the following options: Automatic, On for
Navigation and Always On, and Voice Guidance lets you
select which language you require.
> Network settings - Allow network usage, Yes, In home, No or
Ask when opening. If you allow network usage you can get
faster and better search results.
> Routing settings. this is where you select the type of route, for
example whether to use motorways or not.
Plan route to to find the way from a place of your choice to the
destination on the map
Plan route from to find the way from the destination on the map
to a place of your choice.
Navigate to to find the way from your current GPS posit ion to a
place of your choice. You have to be outside to use this function.
Settings to display General settings, Network settings and
Routing settings.
> General settings displays unit of measure for the map, points
of interest, light settings and which language you want.
> Network settings enables you to select if or when to allow
network usage. If you allow network usage you can get faster
and better search results.
> Routing settings is where you select the type of route, for
example whether to use motorways, or to take a shorter route
or a faster route.
Download maps
Your phone contains pre-installed maps on the memory card. You
can download a new set of maps from the Internet using the Map
Loader application. There is a link to download the Map Loader on
the CD-ROM.
Select Menu » Navigate to do an i nitial co nfigura tion.
To change the selection of maps on your memory card, use the Map
Loader to delete all maps on the me mory card a nd download a new
selection to ensure that all maps are from the same release.
Downloading maps may involve the transmission of large amounts
of data through your service provider’s network . Contact yo ur
service provider for information about data tr ansmissi on charges.
Maps and GPS
You can use the Global Positioning System (GPS) to support the
Navigate application. You can find out your location or measure
distances and plot co-ordinates.
Once the internal GPS receiver in your phone locates a satellite
signal, it may take several minutes for the phone to display the
current location. Subsequent connections should be faster, but if
you have not used GPS for several days, or are very far away from
the last place you used it, it may ta ke sever al min utes t o detect and
display your location.
You can upgrade to a full voice-guided navigation which re quires a
regional licence.
To purchase a navigation service w ith voice guidance, selec t Menu
»
Navigate » Extra services » Purchase navigation and
follow the instructions.
To use navigation with voice guidance you must allow the maps
application to use a network connection.
There are several settings options available once you have fo und a
location:
Details to display details about the location
Use location to plan a route to or from the location
Current GP S position pinpoints your location on the map. You
must be outside to use this function.
English
53
Page 57

NAVIGATE
English
54
Page 58

CAMERA
13 CAMERA
Camera
Your Vertu phone incorporates a 3 Megapixel camera with integral
LED flash.
Warning! When checking the flash, make sure to hold the
phone facing away and pointing down.
There is a powerful 8x digital zoom which together with the 16
million colour HVGA screen produces crisp, high quality images.
You can take photos and record video clips with the camera, send
them by message to your friends, or save t hem in the
where they can be transferred to your computer.
The camera produces pictures in jpg format a nd you can shoo t sti ll
images or video images using the camera application.
Across the top of the screen you can see some indicator icons. The
value for these can be changed in the
Settings menu. You can
also see the number of images remaining in the top-righ t hand
corner of the viewfinder . T he nu mber of images r emaini ng d epends
on the chosen resolution and quality settings. H igher resolutio n and
quality settings result in larger file s izes and fewer images. File siz es
may also vary due to the image compression process.
Taking a photo
To take a photo using your Vertu phone:
1. From the Home screen press the CAMERA button or select
Menu » Camera
2. To zoom in or ou t pr ess t he 4-WAY SCROLL key up or down.
3. To take an image, press the CAMERA button or use the
CENTRE SELECT key to select
the images in the memory.
4. Once you have captured an image, press Options and choo se
from one of the foll owi ng:
New image to take new picture
Send to send to contact
View images to display other ima ges
Rename to rename image from default na me
Use image to set image as wallpaper, attach as contact image,
create new contact and attach , set as gro up image
Zoom to enlarge an image. Scroll up, down, le ft and righ t to move
around the image
Set contrast. Scroll left and right to adjust the image co ntrast
settings
Edit image to inse rt text, images, frames, clipart et c.
Print to pri nt image to att ached compatible pr inter
Details to view image details
Capture. The phone saves
Gallery, from
Deleting a photo
To delete a photo immediately after taking it:
Press the CENTRE SELECT key to delete the photo.
To delete a photo from the gallery:
1. From the Home screen, select Menu » Gallery and the storage
location of the photo.
2. Open the file or view t he pre view
3. Press Options » Delete to delete the photo.
Camera options
To change the camera settings:
1. Start the camera using one of the above methods.
2. Press Options and select f rom t he fo llow in g opti ons :
View images to view any stored photos
Video recorder takes a video instead of a photo
Settings to access the followi ng options:
Image/video storag e determines where the image is to be
stored. The choi ces ar e ph one memo ry (
folder), media card or a specific folder in the
Default title to ha ve the phone automat ically assig n a title to
the image. Select
My title and use the NUMBER keys to rename
the default title
Image quality is the compression ratio which aff ects the
image file size. Choose from
High (large file), Normal or Basic
(smaller file)
Image size to select the pixel size of the captur ed image.
Choose from options ranging from 2408x1536 (largest) to
160x120 (smallest)
Image preview time to s el ec t a preview time to display the
taken images. During the preview time, select
another i ma ge or
Send to send the image as a Multimedia
message.
Camera & vid. sounds to turn the camera sounds on or off .
Flash to turn flash on and off
Self-timer to set the camera to capture an image automat ically
after a preset number of secon ds
Image sequence on to capture a sequence of pictures in one
go
Brightness enables you to increase or decr ease the brightness of
the screen
Effects t o add special effe cts to your captur ed image. Apply o ne of
the following settings:
Normal - default sett ing for colour im ages
Greyscale - use for black & white i mages
Sepia - use to give images an a ged effect
Negative - use to reverse t he colours
White balance to select a white balance func tion best suite d to
the light conditions at the time of shoo ting select one of the following
options :
Auto - adjusts white balance a utomatical ly and reprodu ces
natural colours
Daylight - use when taking pict ures outside
Tungsten - use when tak ing picture s under elect ric ligh ting
Fluorescent - use when taking pictures und er fluoresc ent ligh t
Gallery Images
Gallery.
Back to take
English
55
Page 59

CAMERA
Landscape format changes the orientation of the viewing
screen.
Video recorder
Recording a video
You can record video clips in 3gp format. Available recording t ime
depends on the video clip length and qual ity set tings .
The length and file size of the clips may vary depending on the
selected quality and available memory.
Record a video clip
To record a video clip:
1. From the Home screen press the CAMERA button o r se le ct Menu
» Camera or Menu » Additions » Video recorde r.
2. To zoom in or ou t mov e the 4-WAY SCROLL key up or down.
3. To pause the recording, select Pause t o re sume t he r ecordi ng,
Continue.
select
4. To stop the recording, select Stop.
5. By default the recording is saved in the Video clips folder in the
Gallery.
Using a video clip
When you have recorded a video clip you can perfor m the following
actions on it:
1. Press Options and select from the foll owing:
View images to view any stored video clips
Use video clip to set as incoming call video or set as contact
video
Delete to delete the hig hlighted vi deo clip
Send to send the video clip to a contact
Rename to rename the video clip from the default name
Details to view the file details
Type of view to view the files in a list or a grid format
Sort to specify which order to show the file s in.
Video resolution to select the pixel size of the capture d video.
Choose from options ranging from 640x480 (largest file si ze) to
128x96 (smallest file size)
Image quality is the compression ratio which aff ects the
image file size. Choose from
High (large file), Normal or Basic
(smaller file)
Video preview to play back the video as soon as you stop
recording.
Camera & vid. sounds to turn the camera sounds on or off .
Mute to view the video clip wi thout recor ded sound
Brightness enables you to increase or decr ease the brightness of
the screen
Effects t o add special effe cts to your captur ed image. Apply o ne of
the following settings:
Normal - default sett ing for colour im ages
Greyscale - use for black & white i mages
Sepia - use to give images an a ged effect
Negative - use to reverse t he colours
White balance to select a white balance func tion best suite d to
the light conditions at the time of shoo ting select one of the following
options :
Auto - adjusts white balance a utomatical ly and reprodu ces
natural colours
Daylight - use when taking pict ures outside
Tungsten - use when tak ing picture s under elect ric ligh ting
Fluorescent - use when taking pictures und er fluoresc ent ligh t
Landscape format changes the orientation of the viewing
screen.
Video options
To change the video settings:
1. Select video mode using one of the above methods.
2. Press Options and select from the foll owing opti ons:
View vide os to view any stored video clips
Camera changes back to the camera mode
Settings to access the following options :
Image/video sto rage determines where the video is t o be
stored. The choices are phone m emory (
folder), media card or a sp ecific folder in the
Default title to ha ve the phone aut omatically assi gn a title to
the image. Select
My title and u se the NUMBER keys to rename
the default title
Video clip lengt h on For MM S message setting means
that the file size is limit ed to fit int o a Multimedia messag e.
Maximum available setting means all available memory is
used. Available memory dep ends on where the video cl ip is stored
Video clip qua lity sets the compression ratio. Choose from
High (large file), Normal or Basic (smaller file )
Gallery Vide o cl ips
Gallery.
English
56
Page 60

GALLERY
14 GALLERY
Gallery
You can save images, video clips, graphics, ringing tones and
recordings to folders in the galle ry, and add new folder s to the ones
already there. You can download images and tones using MMS,
mobile Internet sites, or Vertu PC Suite. Your phone contains two
types of memo ry: phon e memory and the memo ry card . Files c an be
stored on either memory, but there is much more storage space
available on the memory card.
Your Vertu phone supports a digital rights management system to
protect content that you have acquired. A piece of content, for
example a ringing tone, can be protected and associ ated with
certain usage rules, for example, the number of usage times or a
certain usage period. The rules are defined in the content activ ation
key that can be delivered with the content or separately, depending
on the service provider. You may be able to update these activatio n
keys. Always check the delivery terms of any content and activation
key before acquiring them, as they may be subject to a fee.
Digital rights management
Copyright protection may prevent some images, ringin g tones, and
other content from being copied, modified, transfer red, or
forwarded.
Digital rights management (DRM) is copyright protection, designed
to prevent modification and to limit di str ibut ion of prote cted f ile s.
When you download protected files, such as sound, video, themes,
or ringing tones to your pho ne, the files ar e free, but locked. You pay
for the key to activate the f ile, an d the activa tion key is automaticall y
sent to your phone when you download the file.
To view the permissions for a protected file:
> Scroll to the file, and select Options » Activation keys. For
example, you ca n se e how many times you can view a vide o
or how many days you ha ve le ft for listening to a song.
To extend the permissions for a file:
Scroll to the file, select Options, and the corresponding opti on for
the file type, such as
You can send certain types of protected files to your friends, and
they can buy their own activation keys.
If your device has OMA DRM protected content, the only way to
back up both the activation keys and the content is to use PC suite.
Other transfer methods may not transfer the activation keys which
need to be restored with the content for you to be able to conti nue
the use of OMA DRM protected content after the devi ce memory is
formatted. You may also need to rest ore the acti vat ion k eys in case
the files on your device get corrupted.
Activate th eme.
Copyright protections may prevent some images, music (includin g
ringing tones), and other content from being co pied, modif ie d,
transferred or forwarded.
This phone supports OMA DRM 1.0 and 2.0
Your Vertu phone has a limited memory for storing files in the
Gallery. This memory is not shared wi th other functio ns, for example
contacts. If the phone displays a message that the memory is full,
delete some existing files before proceeding.
Folder s
To browse the folders in your Vertu phone:
1. From the Home screen, press Menu » Gallery.
A list of folders is displayed
<Memory card NO NAME>
Images
Video clips
Music files
Themes
Graphics
Tones
Recordings
Received files
These are preset in the phone. Oth er user-defin ed folders may also
be shown.
2. Scroll to a folder, and press Open to view the folders and f iles it
contains.
3. Or, press Options to see a list of the actions you can perform on
the folder:
Downloads to view downloads stored on your Vertu phone.
Choose from Graphic, Tone, Video , T heme or Music downl oads.
Delete folder to delete a folder yo u have created. You cannot
delete a preset folder.
Move folder to move the selecte d folder int o another f older. Af ter
selecting
Options. With Move folder highlighted, press Select. You
cannot move a preset folder.
Copy folder to copy your folder to another f older. You cannot
copy a preset folder.
Rename folder to rename a folder you have created. You cannot
rename a preset folder.
Details to show the name, size and d ate of creation of th e selected
folder.
Type of view to determine how the cont ent of the fold er will be
displayed, either
Sort to sort th e contents of the selected fold er By name, By
date
Add folder to crea te a new sub folde r for your file s.
Memory status to examine how the memory in your Ver tu phone
is being used and how much you have lef t.
Search to enter a filename or part of a fil ename to sear ch for in thi s
folder.
Mark to select a folder.
Mark all to select all folders.
Move folder, scro ll to another folder, and t hen press
List with details, List or Grid.
, By format, or By s ize.
English
57
Page 61

GALLERY
Files
To use the files in your folders:
1. From the Home screen, press Menu » Gallery.
2. Scroll to the folder you require and then press Open.
3. Scroll through the sub folders to locate the file item you want to use,
and press
4. Or, press Options to see a list of actions that can be performed on
the file (these will be depend ent upon the ty pe of file you have
selected):
Downloads to view downlo ads stored on your Ve rtu phone.
Choose from Graphic, Tone, Vide o, Theme or Musi c downloads.
Use or Apply to activate the file
Delete to remove the file from your Vertu phone
Send to send the selected file a s a multimedia message. Th is option
is unavailable if the select ed file is cop yrighted
Move to move the selected file into another f older
Copy to copy the selected f ile to another folder, while leaving a copy
in its current folder als o
Rename to rename the selecte d file
Print to pri nt file. Send t he file to a comp atible pri nter via a data
cable or Bluet ooth c onnectio n
Details to show the name, siz e, and date of creation o f the selected
file
Type of view to change the way the fil es are displayed . Choose
from
Sort to change the order in which the f iles are disp layed. Choose
from
Open in sequence to view a series of files in listed order.
Add folder to add a new folder
Memory status to view the current memory status. Choose f rom
Phone memo ry or M edi a memor y. T he memo ry st atu s det ails how
much memory is being used by each app lication
Search to enter a file name or part of a fil ename to search f or in thi s
folder
Mark to select a file
Mark all to select all file s in the folder
Open.
List with details, List or Grid
By name, By date, By format or By size
To remove the password, selectOptions » Delete password.
Check memory consumption
To check the memory consumption of different data gro ups and the
available memory to install new software on your memory card,
select the memory card as before and press Options » Details
Memory card options
Format the memory card
Please be aware that when you format a memory card, all data on
the card is permanently lost.
From the Home screen press Menu » Gallery » <Memory card NO
NAME>
When formatting is complete, enter a name for the memory card.
Lock the memory card
Set a password (maximum 8 characters) to lock your memory card
against unauthorised use.
From the Home screen press Menu » Gallery » <Memory card NO
NAME>
The password is stored in your phone, and you do not have to enter
it again while you are using the memory card on the same phone. If
you want to use the memory card in another device you w ill need to
enter the password.
» Options » Format media mem.
» Options » Set password
English
58
Page 62

ACCESSORIES
15 ACCESSORIES
The following accessories are provided with your Vert u phone:
> Wall charger (comprises wall charger plug and data cable)
> Battery
> Data cable
For more information about accessories approved f or use with your
Vertu phone, please contact Vertu Concierge or refer to
www.vertu.com.
Keep all parts out of reach of small children.
Use only batteries, chargers and accessories approved by
Vertu for use with this particular phone model. The use of
any other types may invalidate any approval or warranty
applying to the phone and may be dangerous.
Maximising battery performance
Certain functions in your Vertu phone can be switched off if not in
use, to help maximise your battery performance, for example
Bluetooth.
Charging and dischargin g
Unplug the charger from the AC outlet and your Vertu pho ne when
not in use. Do not leave your Vertu phone connected to a charger.
The battery does not have to be completely discharged before you
can recharge it.
lifetime
. If left unused, a fully charged batter y will lose it s charge
Continuously charging the batter y may shorten it s
over time. Temperature extremes can affect the ability of your
battery to charge.
Use chargers indoors.
Battery care and safety
Use the battery only for its intended purpose. Never use any charger
or battery that is damaged.
Leaving the battery in hot or cold places, such as in a closed car in
summer or winter conditions, will reduce t he capacity and lifetime of
the battery. Always try to keep the batter y between 15°C and 25°C
(59°F and 77°F). If your battery is very hot or extremely cold, your
Vertu phone may not work temporarily, even if the battery is full y
charged. Battery performance is particula rly lim ited i n temperatures
well below free zin g.
If the battery is removed from your Vertu phone for longer than
an hour, you may need to reset the time and date.
Wall charger
The wall charger supplied with your Vertu phone should be
appropriate for your region. However, you should always chec k that
the electrical rating of the AC outlet is appr opri ate for the charg er
before you attempt to plug it in.
Never attempt to use a damaged charger. Cont act Vertu
Concierge to obtain a replacement.
Battery
Never dispose of batteries in a fire.
Always dispose of batteries according to local regulations.
Please recycle when possible. Do not dispose of batteries
as household waste.
Important: Battery talk and standby times are estimates
only and depend on signal strength, network conditio ns,
features used, battery age and condition, tempera tures to
which battery is exposed, use in digital mode, and many
other factors. The amount of time a device is used for calls
will affect its standby time. Likewise, the amount of time that
the device is turned on and in the standby mode will affect
its talk time.
Charging the battery
The battery for your Vertu phone is rechargeable and requir es
charging a t regular intervals.
Only use the approved charger and battery designed
specifically for your Vertu phone.
Insert the micro-USB
charger connector into
your Vertu phone as
shown. Please ensure that
the connect o r i s in se r t ed
correctly, with the
connector s y mb ol
uppermost. C onn ec t the
charger body to a powered
AC outlet.
After a few seconds, the battery indicator animat es and a
confirmation message is displayed if your Vertu phone is switched
on. The charging time will var y with dif ferent p ower sources a nd we
recommend the Vertu wall charger should always be used.
If the battery has not b ee n u s e d for some time, yo u ma y n e e d t o
recondition it by charging it. Although the c harging i ndicat or
appears on the display after a few se conds, i t may take f rom
several minutes to an hour before you can make a call .
The full performance of a new battery is achieved onl y after two or
three complete charge and discharge cycles. The battery can be
charged and discharged hundreds of times but it will eventual ly
wear out. If you notice that the talk and stand-by times are much
shorter than normal, you may need a new battery. Contact Vertu
Concierge to obtain a Vertu approved battery.
English
59
Page 63

Always charge the battery until i t i s f ully c harged . When the b at tery
is fully charged, the battery charge indicator stops animating and, if
your Vertu phone is switched on, a Phone is fully charged,
please unplug the charger
confirmation message is briefly
displayed.
If your Vertu phone is not charging, try the follo wing:
> Disconnect the charger from the A C outlet.
> Check tha t t he el e ct r i cal r at i ng o f th e AC outlet is compatibl e w i t h
your charger.
> Verify that the A C out let has p ower and that it is swit c hed on. For
example, in many hotel rooms, AC outlets are used for lighting and
may be switched on and off from remote l ocations in t he room.
> Wait for at least 10 seconds and t he n r ec o nn ec t th e charger to the
AC outlet.
> Use another nearby AC outlet that you know is provi ding power.
> If charg i ng s ti l l fa i ls , c ontac t Vertu Concierge f o r f u rt he r ad vi ce .
Data cable
ACCESSORIES
The micro-USB data cable transfers data between your Vertu phone
and a compatible computer, for example when you are using Vertu
PC Suite, and between your Vertu phone and a compatible printer
supporting PictBridge.
Attaching the data cable to the phone connector
Carefully insert the microUSB end of the data c able
into the pho n e con ne ct o r.
Please ensure th a t t he
connector i s inserted
correctly, with the connec t or
symbol uppermost.
Attaching the data cable to the computer
Insert the USB end of the
data cable into the
computer’s USB connector.
English
60
 Loading...