

Page 1
Liebert
®
APM
User Manual – 30 - 150kW, Single Module and Parallel System
AC Power
For Business-Critical Continuity®
Page 2
This Manual Involves The Following Parts, Components and Software.
Part Part Number Remark
LIEBERT APM UPS APMxxxyabcd00
Modular Battey Cabinet
Battery Module
Battery temperature sensor (for external battery) APMA0UFXBTS
Parallel or Dual Bus control cable (5, 10, and 15m) APMxxMCABLE
SNMP Card
RS485 Card
Relay card
APMMOBACAB
APMBATMODF
IS-WEBLB
IS-485L
IS-RELAY
xxx; y, a, b, c, d according to
ratings/options
Classified according to length (m),
xx = {05,10,15}
Safety Precautions
This manual contains information concerning the installation and operation of Emerson LIEBERT APM UPS .
Please carefully read this manual prior to installation.
The LIEBERT APM UPS cannot be put into operation until it is commissioned by engineers approved by the
manufacturer (or its agent).. Not doing so could result in personnel safety risk, equipment malfunction and
invalidation of warranty.
The UPS has been designed for commercial or industrial use only, and is not intended for use in any life support
application.
This is a CLASS A Uninterruptible Power Supply (UPS) product. In a domestic environment, this product may
cause radio interference, in which case, the user may be required to take additional measures.
Conformity and standards
This product complies with CE2006/95/EC (low voltage safety) and 2004/108/EC (EMC), and EMC standards of Australia
and New Zealand (C-Tick), and the following UPS product standards:
*IEC62040-1 General and safety requirements for UPS
*IEC/EN62040-2 EMC requirements CLASS A
For more details, refer to Chapter 9 .
Continued compliance requires installation in accordance with these instructions and the use of manufacturer approved
accessories only.
WARNING: high earth leakage current
Earth connection is critical before connecting the input supply (include both utility supply and battery).
"Earth leakage current introduced by the UPS, in any configuration from 30kW to 150kW, exceeds 3.5 mA and is less than
1000 mA and complies with the requirements of IEC/EN 62040-1 / IEC/EN 60950-1" Transient and steady-state earth
leakage currents, which may occur when starting the equipment, should be taken into account when selecting instantaneous
RCCB or RCD devices.
Residual Current Circuit Breakers ( RCCBs) must be selected sensitive to DC unidirectional pulses (class A) and insensitive
to transient current pulses.
Note also that the earth leakage currents of the load will be carried by this RCCB or RCD.
This equipment must be earthed in accordance with local electrical authority codes of practice.
WARNING: backfeeding protection
This system has a control signal available for use with an automatic device, externally located, to protect against
backfeeding voltage through the mains Static Bypass circuit.If this protection is not used with the switchgear that is used to
isolate the bypass circuit, a label must be added to the switchgear to advise service personnel that the circuit is connected to
a UPS system.
The text has the following meaning or is equivalent to: Risk of Voltage Backfeed: Before working on this circuit, Isolate
Uninterruptible Power System (UPS), then check for Hazardous Voltage between all terminals including the protective earth.
Page 3
Components that can be maintained by user
All the equipment maintenance and servicing procedures involving internal access need special tools and should be carried
out only by trained personnel.The components that can only be accessed by opening the protective cover with tools cannot
be maintained by user.
This UPS full complies with “IEC62040-1 General and safety requirements for UPS”. Dangerous voltages are present within
the battery box. However, the risk of contact with these high voltages is minimized for non-service personnel.Since the
component with dangerous voltage can only be touched by opening the protective cover with a tool, the possibility of
touching high voltage component is minimized.No risk exists to any personnel when operating the equipment in the normal
manner, following the recommended operating procedures in this manual.
Battery voltage higher than 400Vdc
All the battery maintenance and servicing procedures involving internal access need special tools or keys and should be
carried out only by trained personnel.
SPECIAL CARE SHOULD BE TAKEN WHEN WORKING WITH THE BATTERIES ASSOCIATED WITH THIS EQUIPMENT.
WHEN CONNECTED TOGETHER, THE BATTERY TERMINAL VOLTAGE WILL EXCEED 400Vdc AND IS POTENTIALLY
LEATHAL.
Battery manufacturers supply details of the necessary precautions to be observed when working on, or in the vicinity of, a
large bank of battery cells. These precautions should be followed implicitly at all times. Particular attention should be paid to
the recommendations concerning local environmental conditions and the provision of protective clothing, first aid and
fire-fighting facilities.
Page 4

Page 5

Contents
Chapter 1 Installation of UPS Rack Unit.............................................................................................................................. 6
1.1 Introduction ........................................................................................................................................................... 6
1.2 Initial Checking...................................................................................................................................................... 6
1.3 Location ................................................................................................................................................................ 6
1.3.1 UPS Location............................................................................................................................................. 6
1.3.2 External Battery Room............................................................................................................................... 7
1.3.3 Storing ....................................................................................................................................................... 7
1.4 Positioning ............................................................................................................................................................ 7
1.4.1 System Cabinet ......................................................................................................................................... 8
1.4.2 Mooving The Cabinets............................................................................................................................... 8
1.4.3 Transporting The Cabinets ........................................................................................................................ 8
1.4.4 Clearances Required For Operating .......................................................................................................... 8
1.4.5 Front Access.............................................................................................................................................. 8
1.4.6 Final Positioning ........................................................................................................................................ 8
1.4.7 Installation Of Adjustable Feet................................................................................................................... 8
1.4.8 UPS Composition ...................................................................................................................................... 9
1.4.9 Installing Power Modules and Battery Modules ......................................................................................... 9
1.4.10 Cable Entry............................................................................................................................................ 11
1.5 External Protective Devices ................................................................................................................................ 12
1.5.1 Rectifier And Bypass Input Supply Of The UPS ...................................................................................... 12
1.5.2 External Battery ....................................................................................................................................... 12
1.5.3 UPS Output ............................................................................................................................................. 13
1.6 Power Cables...................................................................................................................................................... 13
1.6.1 Cable Connections .................................................................................................................................. 14
1.7 Control Cabling And Communication .................................................................................................................. 15
1.7.1 Input and Output Interfaces ..................................................................................................................... 15
1.7.2 Back Feed Protection Interface (J5) ........................................................................................................ 15
1.7.3 External Battery Circuit Breaker Interface (J6) ........................................................................................ 16
1.7.4 Other input Interface (J7)......................................................................................................................... 16
1.7.5 Battery temperature sensor Interface (J8) ............................................................................................... 17
1.7.6 Internal and External Maintenance Bypass Interface (J9) ....................................................................... 18
1.7.7 EPO Input Port (J10) ............................................................................................................................... 18
1.7.8 Other Interfaces....................................................................................................................................... 19
Chapter 2 Battery Installation ............................................................................................................................................ 20
2.1 General Recommendations ................................................................................................................................ 20
2.2 LIEBERT APM Battery typologies....................................................................................................................... 21
2.3 Safety.................................................................................................................................................................. 21
Page 6

2.3.1 Modular Battery Cabinet. ......................................................................................................................... 21
2.3.2 Battery Installation ................................................................................................................................... 22
2.4 Battery maintenance ........................................................................................................................................... 23
Chapter 3 Installation Of a Parallel USP Rack System ..................................................................................................... 24
3.1 Overview............................................................................................................................................................. 24
3.2 UPS Rack Systems In Parallel System ............................................................................................................... 24
3.2.1 Installation Of Cabinet ............................................................................................................................. 24
3.2.2 External Protective Devices..................................................................................................................... 25
3.2.3 Power Cables .......................................................................................................................................... 25
3.2.4 Control Cables......................................................................................................................................... 25
3.3 Dual-Bus System ................................................................................................................................................ 26
3.3.1 Installation ............................................................................................................................................... 26
3.3.2 External Protective Devices..................................................................................................................... 26
3.3.3 Power Cables .......................................................................................................................................... 26
3.3.4 Control Cables......................................................................................................................................... 26
Chapter 4 Installation Drawing .......................................................................................................................................... 28
4.1 Internal Battery Module....................................................................................................................................... 35
4.1.1 Appearance Of Internal Battery Module................................................................................................... 35
Chapter 5 Operations........................................................................................................................................................ 37
5.1 Introduction ......................................................................................................................................................... 37
5.1.1 Split-Bypass Input.................................................................................................................................... 38
5.1.2 Static Transfer Switch.............................................................................................................................. 38
5.2 1+N Parallel System ........................................................................................................................................... 38
5.2.1 Features Of Parallel System.................................................................................................................... 38
5.2.2 Parallel Requirements Of UPS Rack Systems ........................................................................................ 39
5.3 Operating Mode .................................................................................................................................................. 40
5.3.1 Normal Mode ........................................................................................................................................... 40
5.3.2 Battery Mode ........................................................................................................................................... 40
5.3.3 Auto-Restart Mode .................................................................................................................................. 41
5.3.4 Bypass Mode........................................................................................................................................... 41
5.3.5 Black Start Mode ..................................................................................................................................... 41
5.3.6 Maintenance Mode (Manual Bypass) ...................................................................................................... 41
5.3.7 Parallel Redundancy Mode (System Expansion)..................................................................................... 41
5.3.1 Sleep Mode ............................................................................................................................................. 41
5.3.2 OFF Mode ............................................................................................................................................... 42
5.4 Battery Management—Set During Commissioning............................................................................................. 42
5.4.1 Normal Function ...................................................................................................................................... 42
5.4.2 Advanced Functions (Software Settings Performed By The Commissioning Engineer) .......................... 42
5.5 Battery Protection (Settings By Commissioning Engineer) ................................................................................. 42
Page 7

Chapter 6 Operating Instructions ...................................................................................................................................... 44
6.1 Introduction ......................................................................................................................................................... 44
6.1.1 Power Switches ....................................................................................................................................... 44
6.2 UPS Startup ........................................................................................................................................................ 44
6.2.1 Start-Up Procedure.................................................................................................................................. 44
6.2.2 Procedures For Switching Between Operation Modes ............................................................................ 45
6.3 Battery Start ........................................................................................................................................................ 45
6.4 Procedure For Switching The UPS Into A Maintenance Bypass From Normal Mode......................................... 46
6.5 Procedure For Completely Powering Down A UPS ............................................................................................ 46
6.6 EPO Procedure................................................................................................................................................... 46
6.7 Auto Start............................................................................................................................................................ 47
6.8 UPS Reset Procedure......................................................................................................................................... 47
6.9 UPS Power Walk in feature ................................................................................................................................ 47
6.10 Operation Instruction For Power Module Maintenance ..................................................................................... 48
6.11 Language Selection .......................................................................................................................................... 49
6.12 Changing The Current Date And Time.............................................................................................................. 49
6.13 Control Password.............................................................................................................................................. 50
Chapter 7 Operator Control And Display Panel................................................................................................................. 51
7.1 Introduction ......................................................................................................................................................... 51
7.1.1 Mimic Current Path.................................................................................................................................. 51
7.1.2 Audible Alarm (Buzzer)............................................................................................................................ 52
7.1.3 Functional Keys ....................................................................................................................................... 52
7.1.4 LCD And Menu Buttons ........................................................................................................................... 52
7.1.5 Primary Screen........................................................................................................................................ 53
7.1.6 Default Screen......................................................................................................................................... 54
7.2 Selecting Language ............................................................................................................................................ 54
7.3 Changing The Current Date And Time................................................................................................................ 54
7.4 Control Password................................................................................................................................................ 54
7.5 Detailed Description of Menu Items .................................................................................................................... 55
7.6 UPS Event And Alarm List .................................................................................................................................. 57
7.7 Prompt Window................................................................................................................................................... 60
Chapter 8 Optional Parts................................................................................................................................................... 61
8.1 Battery Ground Fault Detection Set .................................................................................................................... 61
8.2 Replacing Dust Filters......................................................................................................................................... 62
Chapter 9 Product Specifications ...................................................................................................................................... 63
9.1 CONFORMITY AND STANDARDS .................................................................................................................... 63
9.2 PRODUCT SPECIFICATIONS ........................................................................................................................... 63
Appendix 1 Information for the protection of the Environment........................................................................................... 67
Page 8

Table of figures
Fig. 1-1: UPS Structure .............................................................................................................................. 9
Fig. 1-2: Installing Power Modules ........................................................................................................... 10
Fig. 1-3: The symbols of RCCB ............................................................................................................... 12
Fig. 1-4: Bypass Module (include Interfaces of dry contact and parallel signal board X2) ................... 15
Fig. 1-5: Input dry contact interface.......................................................................................................... 17
Fig. 1-6: Connections of output dry relay contacts................................................................................... 16
Fig. 1-7: Connections of EPO .................................................................................................................. 18
Fig. 1-8: A single battery temperature sensor and monitoring board.........Error! Bookmark not defined.
Fig. 2-1: Battery Box Back........................................................................................................................ 21
Fig. 3-1: Circuit ram of emergency power off........................................................................................... 24
Fig. 3-2: Connection of parallel control cables of 2 UPS rack systems................................................... 25
Fig. 3-3: Connection of parallel control cables of 4 UPS rack systems................................................... 25
Fig. 3-4: Typical dual bus system (with static bypass switch LBS).......................................................... 26
Fig. 3-5: Typical dual bus system (with LBS) consisting of two 1+1 parallel system............................... 27
Fig. 4-1: Signal Wiring Diagram ............................................................................................................... 28
Fig. 4-2: External Battery Connections .................................................................................................... 29
Fig. 4-3: 150kVA UPS module system, front view whit open door and back view without doors............ 30
Fig. 4-4: Modular Battery Cabinet: front view with open door and back view without doors................... 30
Fig. 4-5: UPS External dimensions.......................................................................................................... 31
Fig. 4-6: Battery Cabinet External dimensions ........................................................................................ 31
Fig. 4-7: UPS and BC bottom view show the position of casters and fixing holes.................................. 32
Fig. 4-8: UPS and BC bottom view show the cable entry area................................................................ 32
Fig. 4-9: UPS and BC top view with open doors...................................................................................... 33
Fig. 4-10: AC and DC Connection............................................................................................................ 33
Fig. 4-11: UPS AC And DC Connection details........................................................................................ 33
Fig. 4-12: MBC DC Connection details .................................................................................................... 34
Fig. 4-13: Power Module .......................................................................................................................... 34
Fig. 4-14: Static Bypass Module............................................................................................................... 35
Fig. 4-15: Battery Module......................................................................................................................... 36
Fig. 5-1: Single unit block diagram........................................................................................................... 37
Fig. 5-2 Recommended upgrade sequence............................................................................................. 39
Fig. 6-1: Location of battery start button .................................................................................................. 45
Fig. 7-1: UPS operator control and display panel .................................................................................... 51
Fig. 7-2: Sections of the LCD and menu buttons..................................................................................... 53
Fig. 7-3: Menu tree structure.................................................................................................................... 55
Fig. 8-1: Wiring of battery ground fault detection set ............................................................................... 61
Fig. 8-2: Replacing Air Filters ................................................................................................................... 62
Page 9

Table Of Tables
Tab. 1-1: UPS configuration list.................................................................................................................. 9
Tab. 1-2: DIP switch setting method......................................................................................................... 10
Tab. 1-3 Maximum steady state AC and DC Current............................................................................... 13
Tab. 1-4: Distances from floor to connection points................................................................................. 14
Tab. 1-5: Description of dry contact input port ......................................................................................... 17
Tab. 1-6: External battery circuit breaker interface.................................................................................. 16
Tab. 1-7: External maintenance bypass cabinet Interface....................................................................... 18
Tab. 1-8: Relay dry contact output port.................................................................................................... 16
Tab. 1-9: EPO input dry contact relay ...................................................................................................... 18
Tab. 6-1 UPS Operating mode................................................................................................................. 44
Tab. 7-1: Descriptions of UPS operator control and display panel .......................................................... 51
Tab. 7-2: Status description of rectifier indicator (1)................................................................................. 51
Tab. 7-3: Status description of bypass indicator (2)................................................................................. 52
Tab. 7-4: Status description of bypass indicator (3)................................................................................. 52
Tab. 7-5: Status description of inverter indicator (4) ................................................................................ 52
Tab. 7-6: Status description of load indicator (5)...................................................................................... 52
Tab. 7-7: Status description of status (alarm) indicator (6) ...................................................................... 52
Tab. 7-8: Audible alarms descriptions ...................................................................................................... 52
Tab. 7-9: Functional keys Description...................................................................................................... 52
Tab. 7-10: Icons of functional keys and the meanings............................................................................. 53
Tab. 7-11: UPS information window Items description............................................................................. 55
Tab. 7-12: UPS menu and data window Item description........................................................................ 57
Tab. 7-13: UPS event log ......................................................................................................................... 60
Tab. 7-14: Prompt window and meanings................................................................................................ 60
Tab. 8-1: Dry contact fault alarm signal is available for remote monitoring............................................. 61
Tab. 9-1: Compliance with European, international standards ................................................................ 63
Tab. 9-2: Environmental parameters ........................................................................................................ 63
Tab. 9-3: AC/AC Efficiency, Loss and Air Exchange ................................................................................ 63
Tab. 9-4: UPS mechanical characteristics ............................................................................................... 64
Tab. 9-5: Rectifier AC input (Utility) .......................................................................................................... 64
Tab. 9-6: Intermediate DC circuit.............................................................................................................. 65
Tab. 9-7: Inverter output to critical load.................................................................................................... 65
Tab. 9-8: Bypass input.............................................................................................................................. 66
Page 10
Chapter 1 Installation of UPS Rack Unit
1.1 Introduction
This chapter introduces the relevant requirements for positioning and cabling of the LIEBERT APM UPS Rack
System and related equipment.
Because each site has its requirements, it is not the aim of this chapter to provide step-by-step installation
instructions, but to act as a guide for the general procedures and practices that should be observed by the installing
engineer.
Do not apply electrical power to the UPS equipment before the commissioning engineer arrives at installation site.
The UPS should be installed by a qualified engineer in accordance with the information contained in this chapter. All the
equipment not referred to in this manual is shipped with details of its own mechanical and electrical installation information.
The standard LIEBERT APM UPS system of Emerson can be connected to TN, TT and IT AC distribution system (IEC60364-3)
of 3-phase 4-wire, and a 3-wire to 4-wire conversion transformer is provided as an optional part.If the system is connected to IT AC
distribution system, its input needs to be fitted with a 4-pole circuit breaker in accordance with relevant IT system standard.
Chapter 1 Installation Of UPS Rack System 6
Warning: installation can only be done by authorized engineers
Note: 3-Phase 4-Wire Input Power is required
SPECIAL CARE SHOULD BE TAKEN WHEN WORKING WITH THE BATTERIES ASSOCIATED WITH THIS EQUIPMENT.
When connecting the battery, the battery terminal voltage will exceed 400Vdc and is potentially lethal.
Eye protection should be worn to prevent injury from accidental electrical arcs.
Remove rings, watches and all metal objects.
Only use tools with insulated handles.
Wear rubber gloves.
If a battery leaks electrolyte, or is otherwise physically damaged, it must be replaced, stored in a container resistant to sulfuric acid
and disposed of in accordance with local regulations.
If electrolyte comes into contact with the skin, the affected area should be washed immediately with water.
1.2 Initial Checking
Perform the following checking operations prior to the UPS installation.
1. Visually examine if there is any damage inside and outside the UPS rack and battery equipment due to the
transportation. Report any such damage to the shipper immediately.
2. Verify the product label and confirm the correctness of the equipment. The equipment label is attached on the back
of front door. The UPS model, capacity and main parameters are marked on the label.
1.3 Location
1.3.1 UPS Location
WARNING: battery hazards
The UPS is intended for indoor installation and should be located in a cool, dry and clean environment with adequate
ventilation to keep the environmental parameters within the specified operating range (see Tab. 9-2).
Page 11
The LIEBERT APM series UPS uses forced convection cooling by internal fans. Cooling air enters the module
through ventilation grills located at the front part of the cabinet and exhausted through grills located in the rear part of
the cabinet. Please do not block the ventilation holes.
If necessary, a system of extractor fans should be installed to aid cooling-air flow. An air filter should be used when
the UPS is to operate in a dirty environment and should be regularly cleaned to maintain airflow.
The cooling capacity of air conditioner should be selected according to the power loss data of UPS specified in Tab.
9-3: Normal mode (VFI SS 111 double-conversion UPS)
Note: The UPS should be installed on a cement surface or other surface that is not combustible.
1.3.2 External Battery Room
The battery will generate some amount of hydrogen and oxygen at the end of charging, so the fresh air volume of the
battery installation environment must meet EN50272-2001 requirements.
The ambient temperature of the battery must be stable. Ambient temperature is a major factor in determining the
battery capacity and life. The nominal operating temperature of battery is 20°C. Operating above this temperature will
reduce the battery life, and operation below this temperature will reduce the battery capacity. If the average operating
temperature of battery is increased from 20ºC to 30ºC, then the service life of the battery will be reduced by 50%. If
the operating temperature of the battery is above 40ºC, then the battery service life will be decreased in exponent
rate. In a normal installation, the battery temperature is maintained between 15°C and 25°C. Keep batteries away
from heat sources or air outlets.
If external batteries are to be used, the battery circuit breakers (or fuses) must be mounted as close as possible to
the batteries, and the connecting cables should be as short as possible.
Chapter 2 Battery installation 7
1.3.3 Storing
Should the equipment not be installed immediately, it must be stored in a room so as to protect it Protection from
excessive humidity and heat sources (see Tab. 9-2).The battery needs to be stored in dry and cool place with good
ventilation. The most suitable storage temperature is 20 ºC to 25ºC.
Should the UPS remains unpowered for a prolonged period of time while the battery are connected, the batteryes may deeply
discharge and being so permanently damaged .In such cases it is therefore reccomented to leave the battery circuit breaker(s)
open. During storage in any case, periodically charge the battery according to the battery user manuals.
1.4 Positioning
When the equipment has been finally positioned, ensure the UPS will remain stationary and stable. To prolong the
service life, the choosen installation site must guarantee:
Space for easy operation on the UPS
Sufficient air to dispel the heat produced by the UPS
Protection from atmospheric agents
Protection from excessive humidity and heat sources
Protection against dust
Compliancy to the local fire prevention requirements
An operating environment temperature within +20°C to +25°C. The batteries are at maximum efficiency in this
temperature range (for information about the battery storage and transportation as well as the environment,
refer toTable 8-2 )
Preventing battery deep discharge
LIEBERT APM UPS Module And Parallel System 30kVA~150kVA User Manual
Page 12

1.4.1 System Cabinet
A UPS system can comprise an UPS rack system, external battery cabinet, depending on the specific system
requirement.
All the UPS system cabinets used in the same installation site are of the same height and should be positioned
side-by-side to achieve an aesthetically appealing effect.
Refer to Chapter 7 Installation Drawing for the positioning of UPS cabinet.
1.4.2 Mooving The Cabinets
Ensure that any lifting equipment used in moving the UPS cabinet has sufficient lifting capacity.
The UPS is fitted with castors – take care to prevent movement when unbolting the equipment from its shipping pallet. Ensure
adequate personnel and lifting aids are available when removing the shipping pallet.
Ensure that the UPS weight is within the weight loading capacity range of any hoisting equipment. See Tab. 1-1 for
UPS weight.
UPS and optional cabinets can be handled by means of a fork lift or similar equipment. The UPS cabinet can also be
moved by its castors when moving in a short distance.
Note: Care must be taken when handling units fitted with batteries. Keep such moves to a minimum.
Chapter 1 Installation Of UPS Rack System 8
Warning
1.4.3 Transporting The Cabinets
Note :
The unit can be shipped whit 1, 2 or 3 power modules installed but not with 4 or 5 ( to be ship separate), and cannot
be with any battery modules installed
1.4.4 Clearances Required For Operating
As LIEBERT APM series UPS has no ventilation grills at either sides, no clearances are required for the sides.
To enable routine tightening of power terminations within the UPS, it is recommended that clearance around the front
of the equipment should be sufficient to enable free passage of personnel with the doors fully opened. It is important
to leave a distance of 350mm in the rear side of the rack to permit adequate circulation of air coming out of the unit.
If the UPS make use of internal modular battery sufficient clearing shall be given at the back site to allow personnel to
operate the battery circuit breakers (~ 600mm)
1.4.5 Front Access
The component layout of the UPS rack system supports front access and repairing the UPS, thus reducing the space
requirement for side and rear access.
1.4.6 Final Positioning
When the equipment has been finally positioned, ensure the adjustable feet are set so that the UPS will remain
stationary and stable.
1.4.7 Installation Of Adjustable Feet
Installation diagrams in Chapter 4 of this manual identify the location of the holes in the base plate through which
the equipment can be bolted to the floor. If the UPS is to be located on a raised floor, it should be mounted on a
pedestal suitably designed to accept the UPS point loading (more than 1000 kg). Refer to the bottom view in Fig. 4-7
to design this pedestal and stable.
Page 13
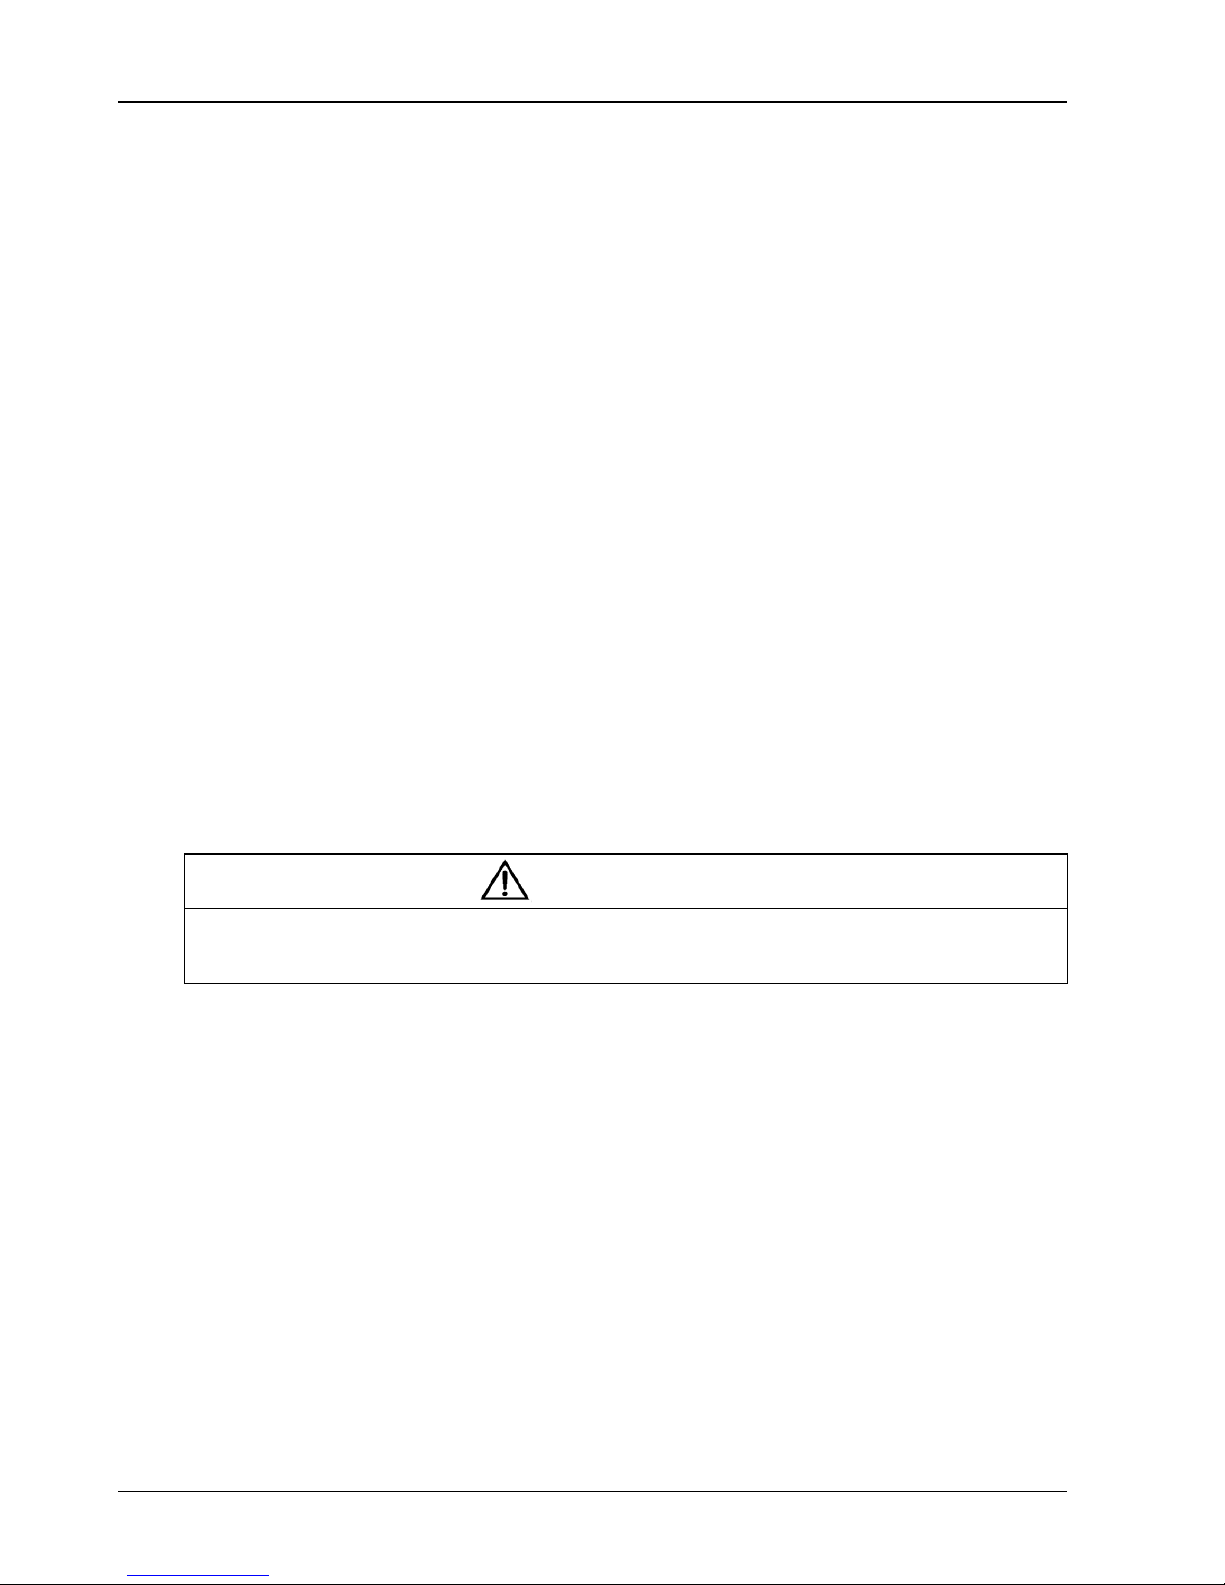
1.4.8 UPS Composition
The UPS structure is shown in Fig. 1-1 The UPS configuration is provided in Tab. 1-1
Chapter 2 Battery installation 9
Fig. 1-1: UPS Structure
Item
1 System Display 1 Requisite, factpry installed
2 Maintenance Bypass 1 Requisite, factpry installed
3 Static Bypass module 1 Requisite, factory installed
4 Power module 1 ≤n ≤5 Requisite, factory installed if n≤3; 4th and 5th module installed at site
5 Battery module 0 ~ 10-n Optional, installed at site
Component Quantity Remarks
Tab. 1-1: UPS configuration list
1.4.9 Installing Power Modules and Battery Modules
The number and possible installation positions of the Power Modules and Battery Modules may vary according to
the chosen factory configuration. Thanks to the different mounting depth it’s not possible to install a power module
instead of a battery module and vice versa.
Please install the power modules and Battery modules from bottom to top, so as to avoid cabinet toppling due to high
gravity center.
LIEBERT APM UPS Module And Parallel System 30kVA~150kVA User Manual
Page 14
Chapter 1 Installation Of UPS Rack System 10
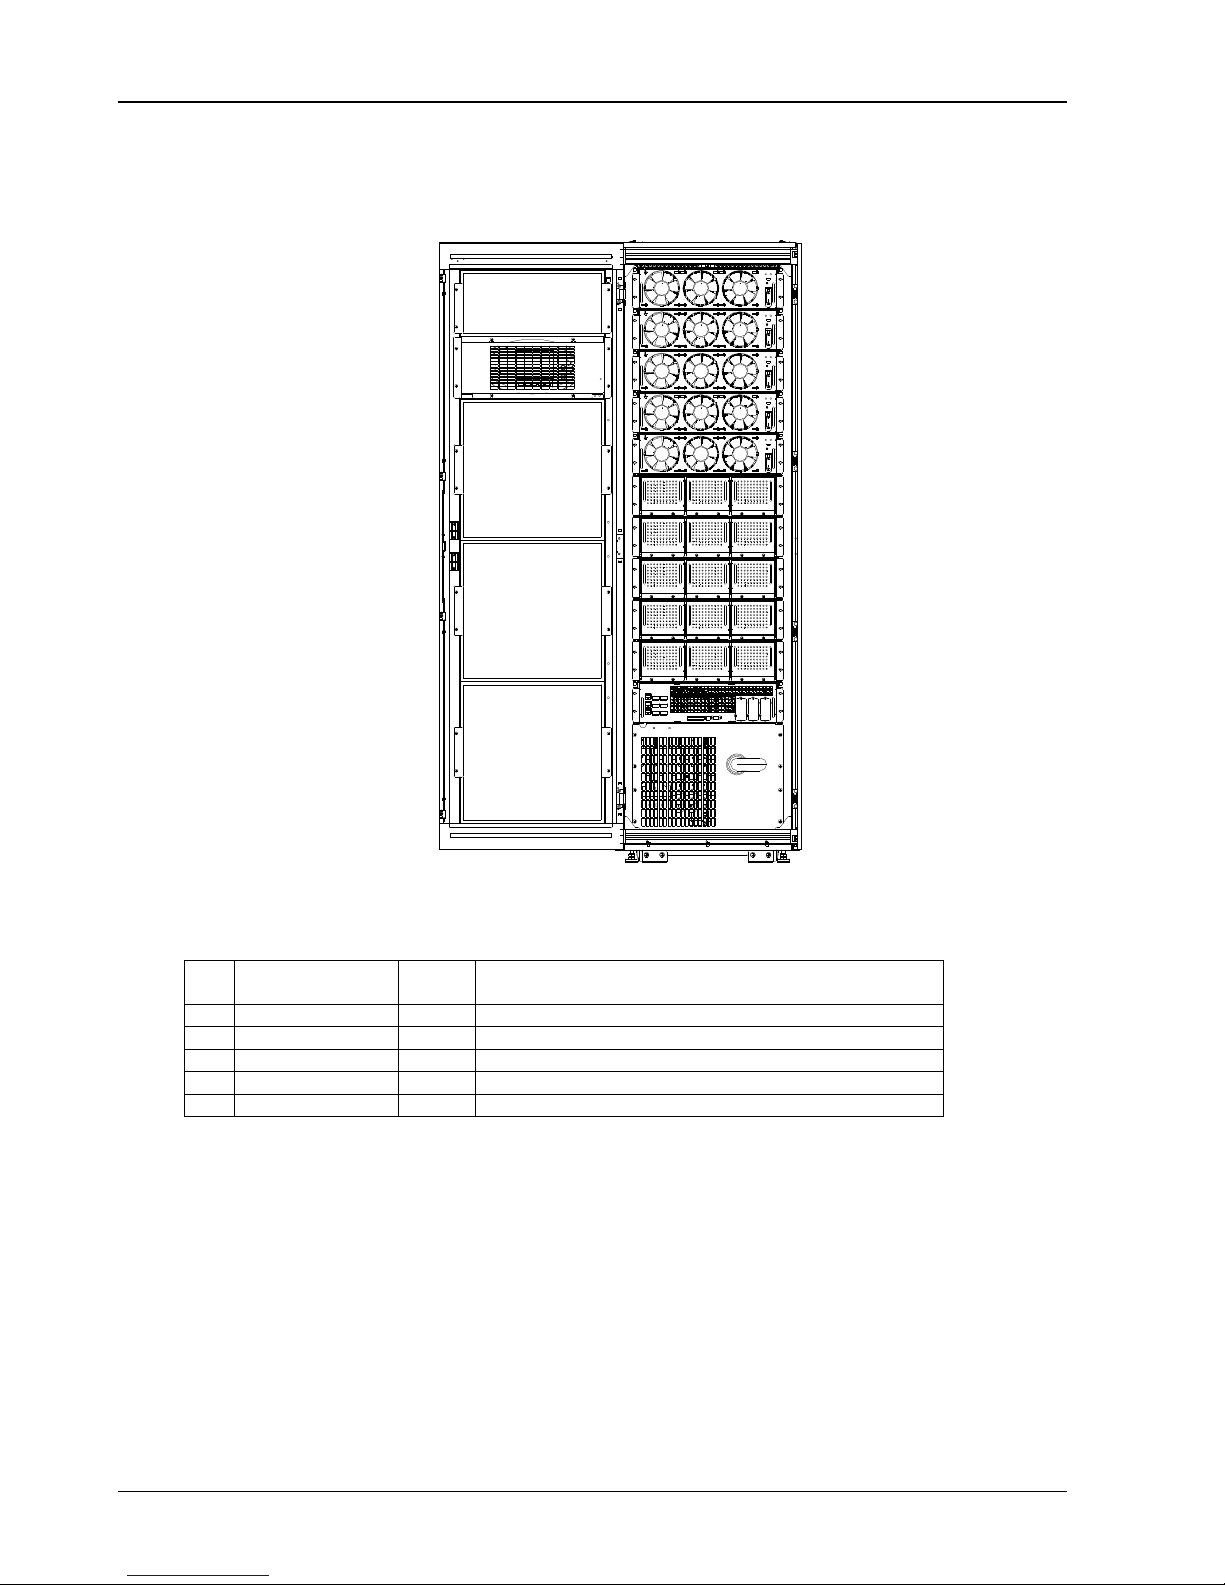
Installation procedures of power modules
When installing power modules always work from the lower available space upwards to prevent raising the center of
gravity.
1. Use the DIP switch on the front panel of the module to set the module address. The setting range is from 1 to 5.
The module address should be exclusive. The setting method is shown in Tab. 1-2
Bit 1 Bit 2 Bit 3 Bit 4 Bit 5
1 0 0 0 0
0 1 0 0 0
1 1 0 0 0
0 0 1 0 0
1 0 1 0 0
Module address
1
2
3
4
5
Tab. 1-2: DIP switch setting method
2. Place the ready switch on the front panel of the module to the up position (i.e., in unready state).
3. Insert the module in the installation position, and push it into the cabinet.
4. Secure the module to the cabinet through the fixing holes on both sides of the front panel of the module.
5. Place the ready switch to the down position (i.e., in ready state).
DSP switch
Ready switch
Fig. 1-2: Installing Power Modules
Fixing holes
DETAIL A
Page 15

Installation procedures of Battery Modules
When installing battery modules always work from the lower available space upwards to prevent raising the center of
gravity.
1. Open the front door
2. Insert the module in the installation position, and push it into the cabinet.
3. Secure the module to the cabinet trough the fixing holes on both side of the front panel of the module
1.4.10 Cable Entry
Cables can enter the LIEBERT APM series UPS rack system and battery cabinet from below. Cable entry is made
possible through a blanking plate fitted at the bottom of the equipment. The recommended installation practice is to
install glands to prevent foreign material or vermin entering the cabinet.
Chapter 2 Battery installation 11
LIEBERT APM UPS Module And Parallel System 30kVA~150kVA User Manual
Page 16
1.5 External Protective Devices
For safety concerns, it is necessary to install external circuit breakers or other protective devices for the input AC
supply of the UPS system. This section provides generic practical information for qualified installation engineers. The
installation engineers should have the knowledge of the regulatory wiring standards, and of the equipment to be
installed.
1.5.1 Rectifier And Bypass Input Supply Of The UPS
Over currents
Install suitable protective devices in the distribution unit of the incoming mains supply, considering the power cable
current-carrying capacity and overload capacity of the system (see Tab. 9-7).
Generally it is recommended a magnetic circuit breaker with IEC60947-2 tripping curve C (normal) rated at the 125%
of the current listed in Tab. 9-7.
Split bypass: In case a split bypass is used, separate protective devices should be installed for the rectifier input and
bypass input in the incoming mains distribution panel.
The rectifier input and bypass input must use the same neutral line.
Chapter 1 Installation Of UPS Rack System 12
Note
Note
For IT power network system, 4-pole protective device must be installed on the external input distribution and external output
distribution of the UPS.
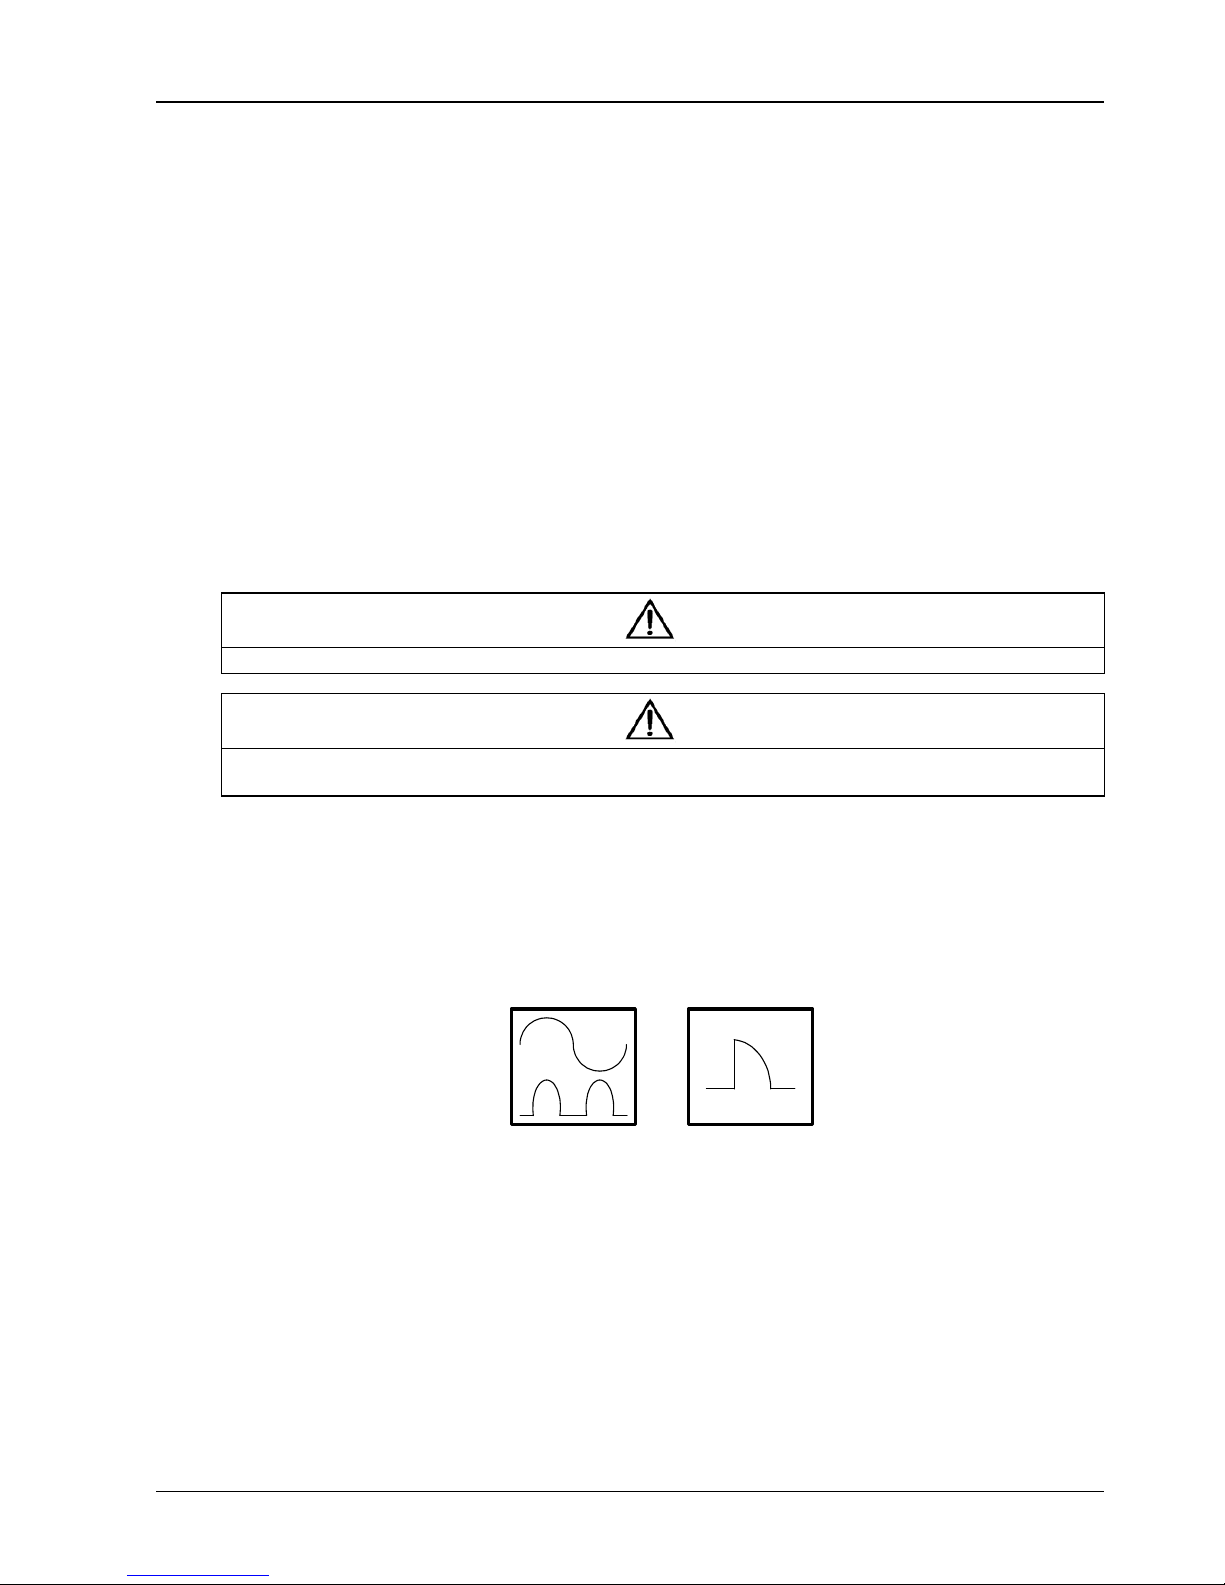
Protection against earth faults (RCD devices):
The RCD device installed upstream of the input supply should be:
Sensitive to DC unidirectional pulses (class A) in the network
Insensitive to transient current pulses
Have an average sensitivity that is adjustable between 0.3A and 1A.
Fig. 1-3: The symbols of RCCB
When using the RCD in the split bypass system or parallel system, the RCD should be installed in the upstream of
the input distribution to avoid wrong alarm.
The residual current introduced by RFI filter in the UPS is between 3.5mA and 1000mA. It is recommended to confirm
the sensitivity of each RCD of upstream input distribution and downstream distribution (to load).
1.5.2 External Battery
The DC compatible circuit breaker provides over current protection for UPS system and battery, which is provided by
the external battery cabinet. See Appendix A for a selection guide
Page 17

1.5.3 UPS Output
power
In the eventuality that an external distribution panel is used for load distribution, the selection of protective devices
must provide discrimination with those that are used at the input to the UPS (see Tab. 9-7).
1.6 Power Cables
Design the cables according to the descriptions in this section and local regulatory wiring standards, and the
environmental conditions (temperature and physical support media) should be taken into consideration. Refer to
IEC60950-1 Table 3B Cabling.
FAILURE TO FOLLOW ADEQUATE EARTHING PROCEDURES CAN RESULT IN EMI, ELECTRIC SHOCK HAZARD, OR RISK
OF FIRE, SHOULD AN EARTH FAULT OCCUR.
Mains input current at full
UPS
(kVA)
150
120
90
60
30
Note:
1. Input current of common input configurations of rectifier and bypass
2. Take special care when determining the size of the output and bypass neutral cable, as the current circulating on
the neutral cable may be greater than nominal current in the case of non-linear loads, which is usually 1.732 times of
rated currents..
3. Add 7 A per each redundant Power Module
The earth cable connecting the UPS to the main ground system must follow the most direct route possible. The earth
conductor should be sized according to the fault rating, cable lengths, type of protection, etc. According to
AS/IEC60950-1, the cross section area of the conductor is 80mm2 (150kVA).
When sizing battery cables, a maximum volt drop of 4Vdc. is permissible at the current ratings given in Tab. 1-3. The
load equipment is connected to a distribution network of individually protected busbars fed by the UPS output rather
than connected directly to the UPS. In parallel multi-module systems, the output cable of each ups rack unit should
be kept at equal length between the output of the ups rack output terminals and the parallel distribution busbar to
avoid affecting the shared current. When laying the power cables, do not form coils, so as to avoid the formation of
electromagnetic interference.
See Chapter 4 Installation Drawing for the positions of wiring terminals.
load and battery
charging
380V 400V 415V 380V 400V 415V
278 264 254 228 217 209 526 493 394
222 211 204 183 174 167 421 394 316
167 159 153 137 130 126 316 296 237
111 106 102 92 87 84 211 197 158
56 53 51 46 44 42 106 99 79
1. 2 .3
Warning
Rated current (A) Busbar stud size
Output current at
full load2
Battery discharging current at E.O.D
=1.67V , no overload
30
Batt/string
32
batt/string
Tab. 1-3 Maximum steady state AC and DC Current
Chapter 2 Battery installation 13
40
batt/string
Input /Output/
Bypass cables
Diameter of
Bolt
hole (mm)
M8
External
Battery
Cable
(bolt)
8 M8 5
Torque
(Nm)
FAILURE TO FOLLOW ADEQUATE EARTHING PROCEDURES CAN RESULT IN EMI, ELECTRIC SHOCK HAZARD OR RISK
OF FIRE, SHOULD AN EARTH FAULT OCCUR.
LIEBERT APM UPS Module And Parallel System 30kVA~150kVA User Manual
Warning
Page 18
Rectifier AC input bus 203
Bypass AC input bus 203
UPS AC output 200
Battery input bus 256
Auxiliary cables: Connected to monitoring board (U2) 1850
1.6.1 Cable Connections
The operations described in this section must be performed by authorized electricians or qualified technical personnel.. If you have
any difficulties, do not hesitate to contact our Customer Service & Support department at the address given at the beginning of this
manual.
After the equipment has been finally positioned and secured, refer to Chapter 4 Installation Drawing to connect the
power cables as described in the following procedures:
1. Verify that all the external input distribution switches of the UPS are completely opened and the UPS internal
maintenance bypass switch is opened. Attach necessary warning signs to these switches to prevent unauthorized
operation.
2. Open the doors of the UPS, remove the front protective cover and then the power connection buses are visible.
3. Connect the protective earth and any necessary grounding cables to the enclosure of the cabinet at the bottom
part of the UPS rack (close to the cabinet side where the output connection terminal strips are located).The cabinet
for the UPS must be connected to the user’s ground connection.
Note: The grounding cable and neutral cable must be connected in accordance with local and national codes
practice.
Chapter 1 Installation Of UPS Rack System 14
UPS 150kVA UPS minimum distance to floor(mm)
Tab. 1-4: Distances from floor to connection points
Note
Referring to
Fig. 4-11
, Identify and make power connections for incoming cables according to one of the procedures below,
depending on the type of installation:
Common Input Connections
4. For common bypass and rectifier inputs, connect the AC input supply cables to the UPS input terminals
(mA-mB-mC-mN) ensuring correct phase rotation. Tighten M6 bolts to 5 Nm.
Split Bypass Connections
5. If a 'split-bypass' configuration is used, connect the AC input supply cables to the rectifier input terminals
(mA-mB-mC-mN) and the AC bypass supply cables to the bypass input terminals (bA-bB-bC-bN) ensuring correct
phase rotation. Tighten M6 bolts to 5 Nm
Note: For split Bypass operation ensure that the busbars between Bypass and Rectifier inputs are removed. The
neutral line of bypass input must be connected to that of the rectifier input.
Frequency Converter Mode
If the frequency converter configuration is used, connect the AC input cables to the rectifier input terminals
(mA-mB-mC-mN) ensuring correct phase rotation. Tighten M6 bolt to 5Nm, M8 bolt to13Nm and M10 bolt 26Nm.
No need to connect the bypass input cables to bypass input terminals (bA-bB-bC-bN).
Note: For the frequency converter operation mode, ensure that the busbars between Bypass and Rectifier inputs are
removed.
Page 19
Output System Connections
Intellislot 2
6. Connect the system output cables between the UPS output busbars (oA-oB-oC-N) and the critical load ensure
correct phase rotation. Tighten M6 Bolt to 5 Nm
If the load equipment will not be ready to accept power on the arrival of the commissioning engineer, then ensure that the system
output cables are safely isolated at their ends.
7. Re-install all the protective covers.
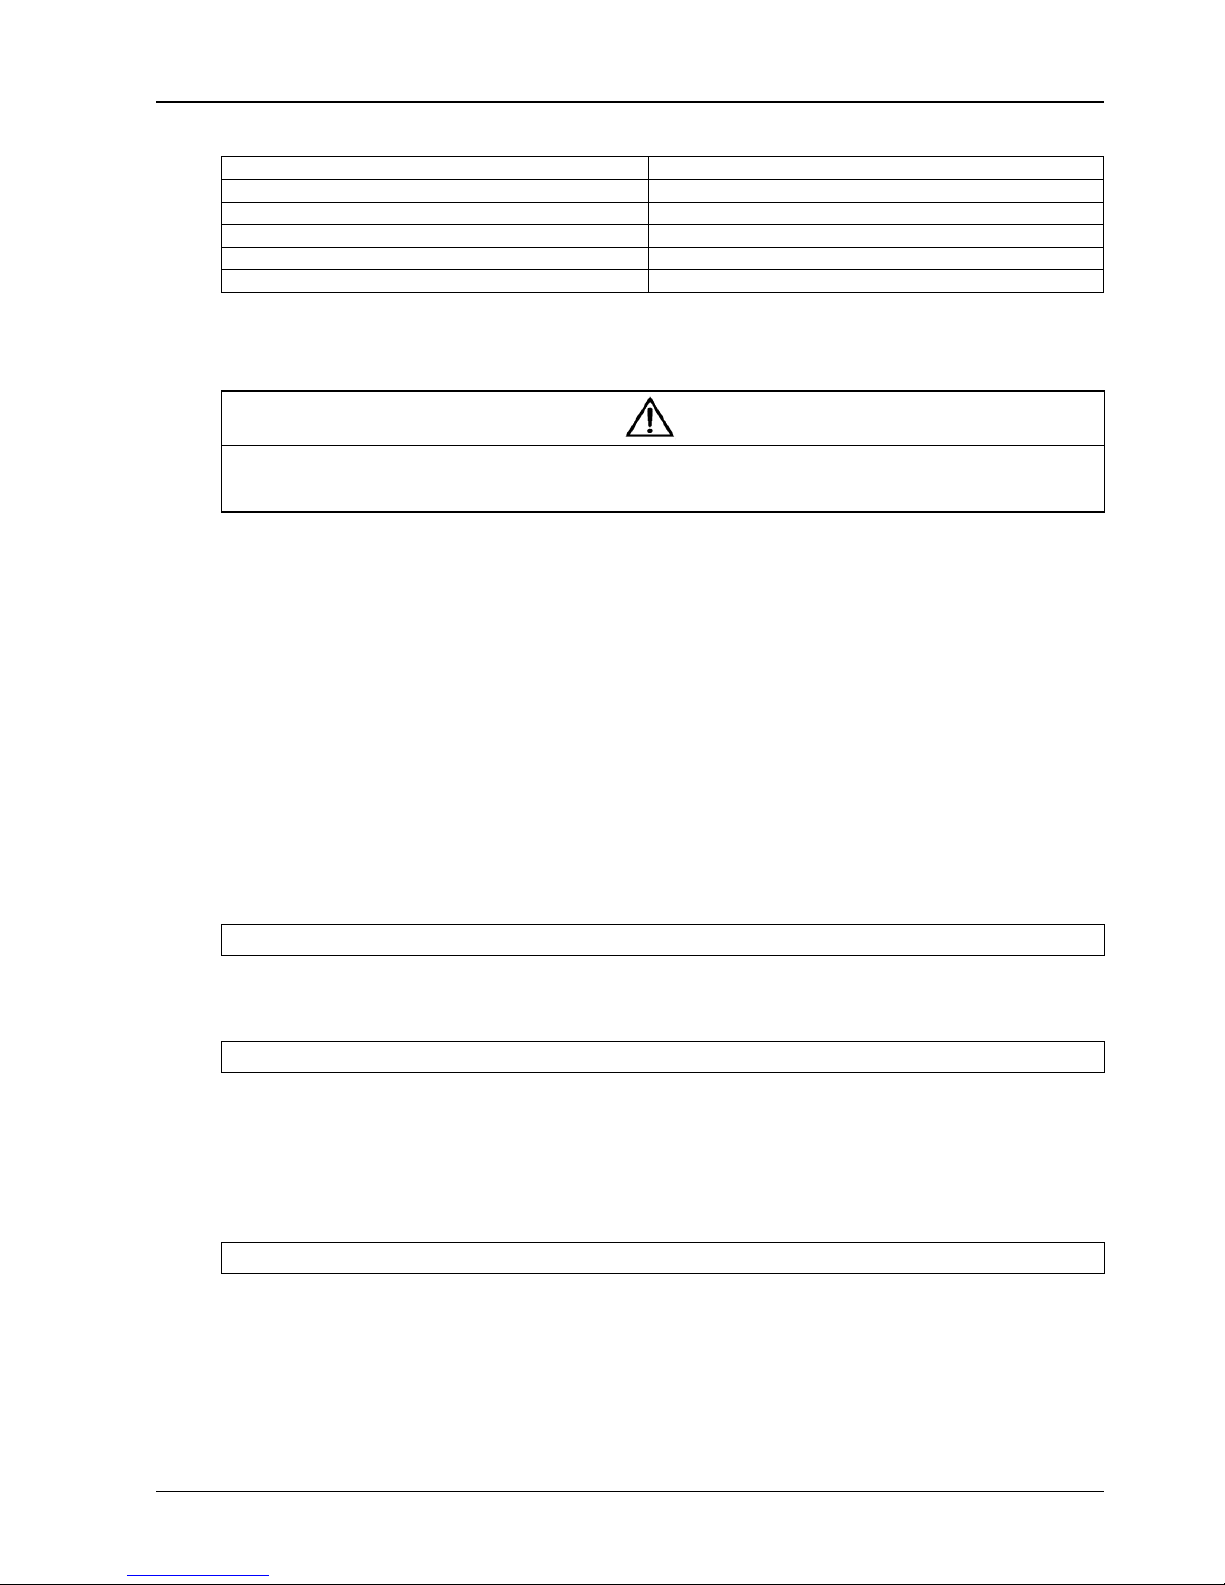
1.7 Control Cabling And Communication
1.7.1 Input and Output Interfaces
According to the specific needs of the field, the UPS may need auxiliary connection to realize the management of the
battery system (including external battery switch ad battery temperature sensor), communicate with PC, provide
alarm signal to external device, or realize remote EPO. These functions are realized through the UPS dry contact
located on the bypass module. The following interfaces are provided:
Back Feed Protection interface
External Battery Circuit Breaker interface
Battery ground fault detection
Battery temperature detection interface
Maintenance Bypass interface
Emergency Power Off interface
Service communication interface (for parameter setting and host monitoring)
Intellislots(TM) intelligent card interface
J8 J5
Chapter 2 Battery installation 15
Warning
J6
J9
J10 J7
Fig. 1-4: Bypass Module (include Interfaces of dry contact and parallel signal board X2)
All auxiliary cables must be double insulated twisted cables with cross sectional area of 0.5mm2 ~ 1.5mm2 for maximum connection
length between 25m and 50m and must be routed separately from power cable
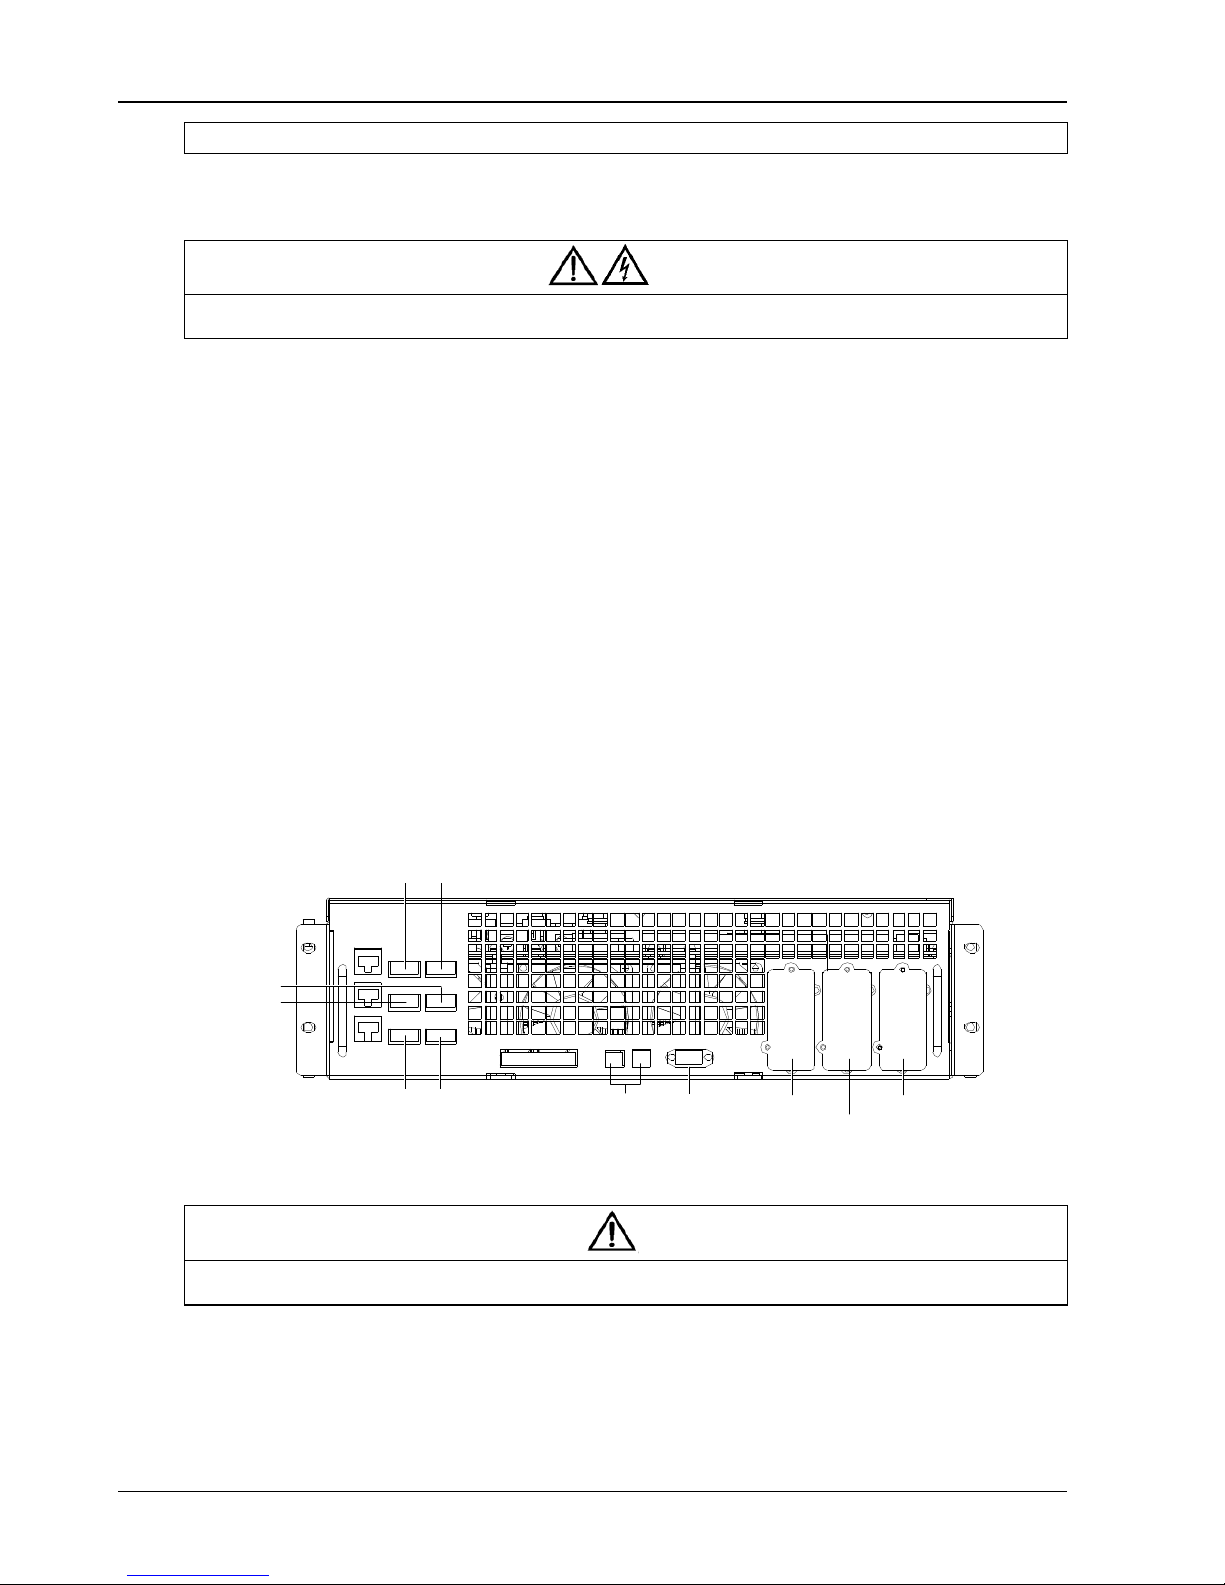
1.7.2 Back Feed Protection Interface (J5)
J5 is the backfeed protection interface, providing two relay output dry contact signals available to use with an
automatic device, externally located, to protect against back-feeding voltage thought the static bypass circuit.
LIEBERT APM UPS Module And Parallel System 30kVA~150kVA User Manual
1 2
Note
RS232 Intellislot 1RS485
Intellislot 3
Page 20
J5
Fig. 1-5
: Connections of output dry relay contacts
Position Name Meaning
J5.2 BFP_O Bypass backfeed protection - relay normally open.Closed when bypass SCR is shorted.
J5.3 BFP_S Bypass backfeed protection - common
J5.4 BFP_C Bypass backfeed protection - relay normally closed.Opened when bypass SCR is shorted.
Tab. 1-5: Relay dry contact output port
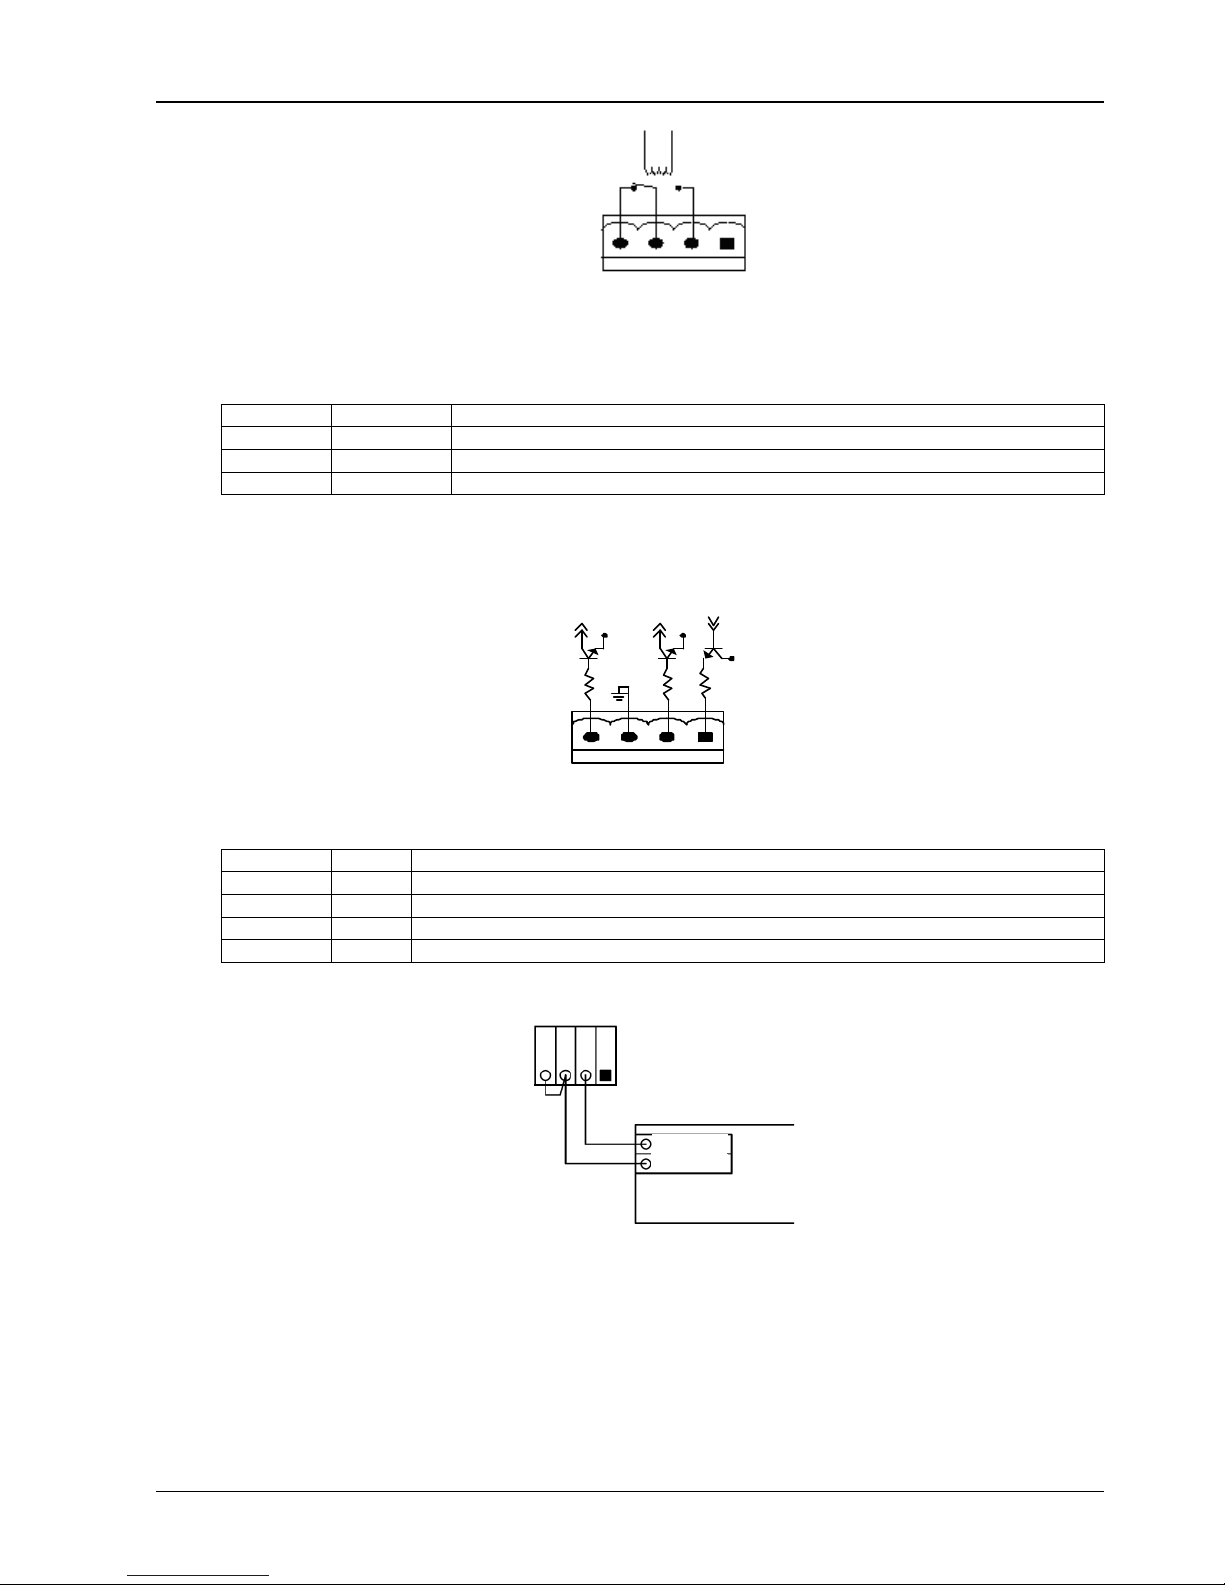
1.7.3 External Battery Circuit Breaker Interface (J6)
12V
Chapter 1 Installation Of UPS Rack System 16
BFP_S
BFP_C
12V
BFP_O
12V
J6
OL
FB
GND
DRV
Fig. 1-6: External BCB interface
Position Name Descriptions
J6.1 DRV BCB drive signal (Hig = BCB can be closed)
J6.2 FB BCB contact status (Closed = BCB is closed)
J6.3 GND Power supply GND
J6.4 OL BCB online-Input (normally open): This pin is closed to gnd when BCB interface signal is connected
Tab. 1-6: External battery circuit breaker interface
J10
J6
FB
OL
DRV
GND
Aux-N.O.
Aux_N.O.
Aux_N.O.
Aux-N.O.
BCB
BCB
电池开关
Fig. 1-7: Connection of BCB interface
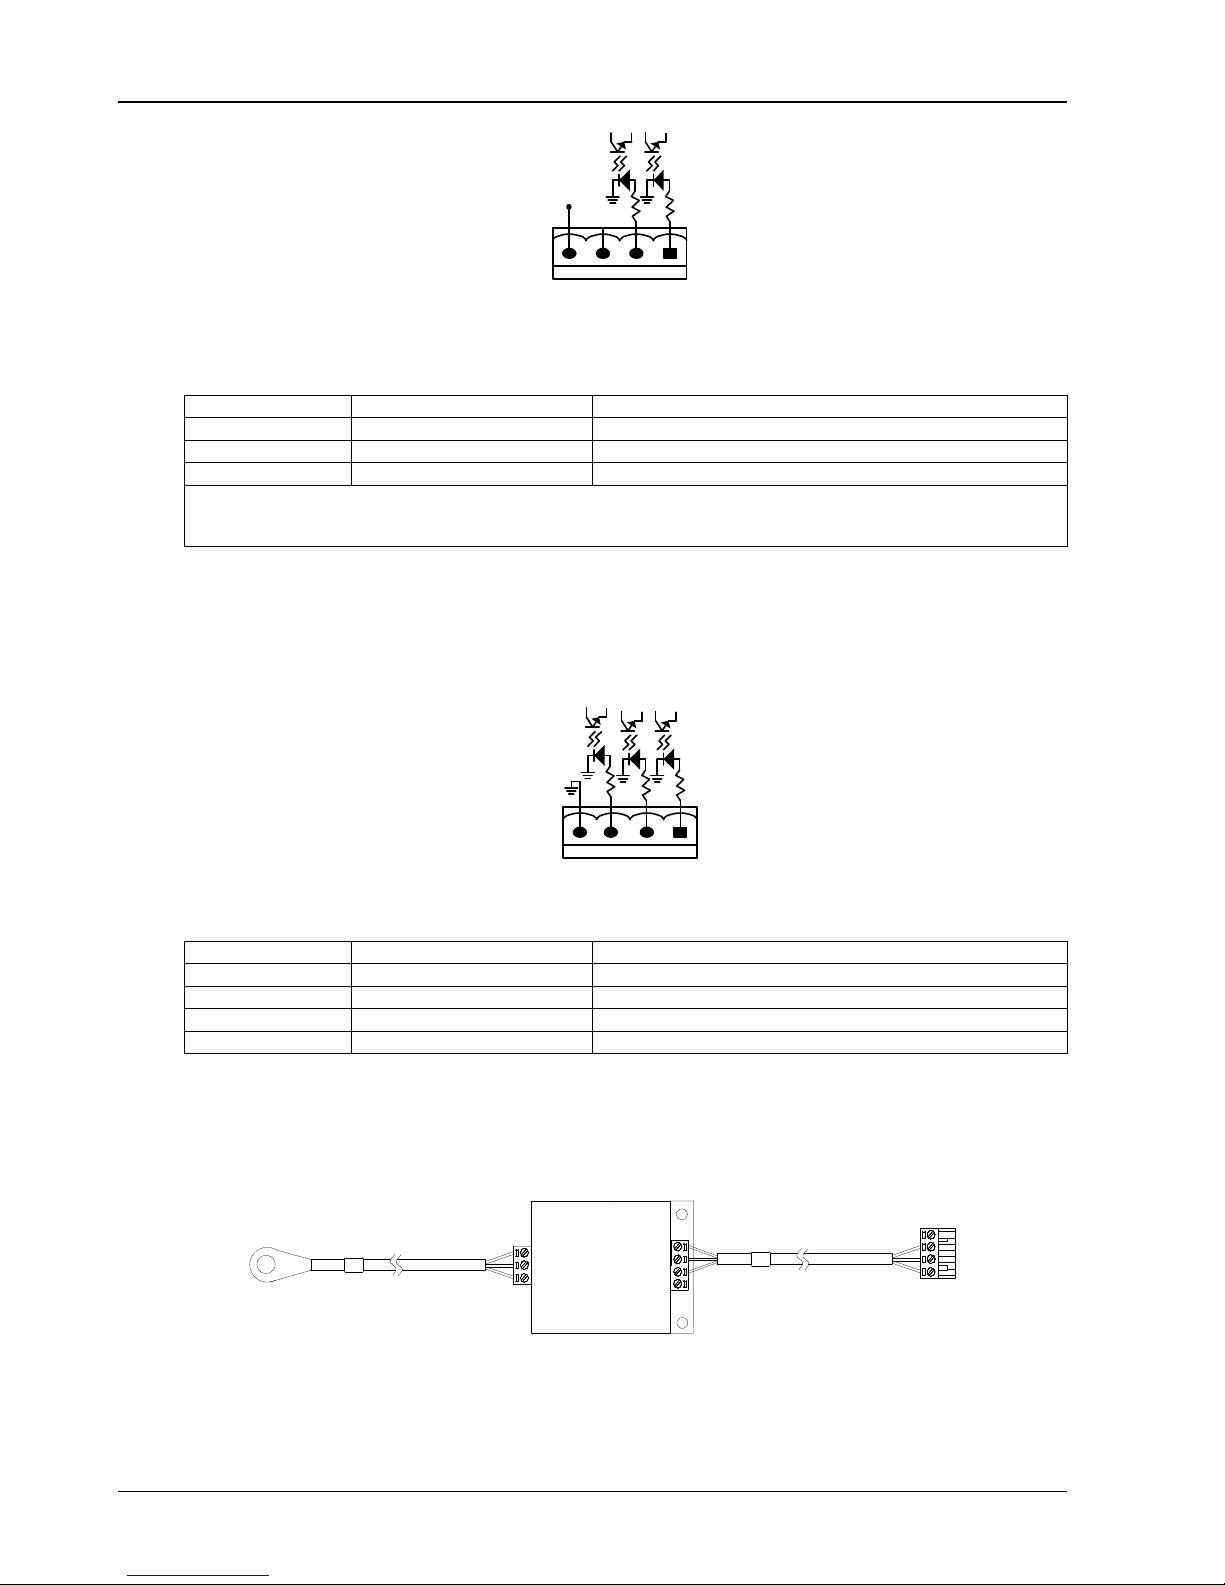
1.7.4 Other input Interface (J7)
Input dry contacts for environment detection and battery ground fault detection are provided by interface J7
Page 21
Chapter 2 Battery installation 17
J
12V
J7
Fig. 1-8:
Position Name Meaning
J7.1 ENV3 Environmental alam detection (normally closed)
J7.2
J74 +12V +12V power supply
Note:
1. Must be configured by configuration software before becoming active.
2. Activating this feature turns the battery charger off
BtG
1,2
Tab. 1-7: Description of dry contact input port
1.7.5 Battery temperature sensor Interface (J8)
The input dry contact port J8 is ment to be connected to the battery temperature sensor (TMP-2) provided as an
option with the UPS. The connection of the battery temperature sensor is shown in Figure 1-12.
12V
Battery Input interface
J8
BIG
GND
Battery short to ground detection
ENV
GND
Position Name Meaning
J8.1 TMP_BAT_IN
J8.2 +12V_A +12V power supply
J8.3 TMP_BAT_OUT External battery temperature detection
J8.4 GND_A Power supply GND
+12V
BAT-OUT
Internal battery temperature detection
BAT-IN
The external battery temperature sensor (option) is composed of a temperature probe and a temperature
transmission board, as shown in Error! Reference source not found.. The battery temperature sensor is connected
to the UPS monitoring board. When it is connected to the UPS, UPS will automatically detect the device and make
compensate according to the temperature of battery.
To battery sensing point
TMP-2
4
3
2
1
To J8 on UPS bypass module
1
2
3
4
Fig. 1-9 Battery temperature sensor
Q1:+12V, GND, BAT-IN are for internal battery temperature sensor.
Q2:+12, GND, BAT-OUT are for external battery temperature sensor,
LIEBERT APM UPS Module And Parallel System 30kVA~150kVA User Manual
Page 22

Q3: Battery temperature sensor must be purchased separately; the part number of the battery temperature sensor is
at the beginning of this document.
Q4: J8 port is used to connect internal battery temperature sensor and external battery temperature sensor.
1.7.6 Internal and External Maintenance Bypass Interface (J9)
J9
Chapter 1 Installation Of UPS Rack System 18
Position Name Meaning
J9.1 EXT_ Q3 External Maintenance Bypass input switch status [Normally Closed]
J9.2 IN__S Internal Maintenance Bypass switch status [Normally Closed]
J9.3 EXT _OUT External Maintenance Bypass output switch status [Normally Closed]
J9.4 GND Power supply GND
Note 1: These contacts cannot be active unless they are set via software.
1.7.7 EPO Input Port (J10)
The UPS has an Emergency Power OFF (EPO) function. This function can be activated by pressing a button on the
control panel of the UPS or through a remote contact provided by the user. The EPO pushbutton is protected by a
hinged plastic cover.
As shown in Fig. 1-10 J10 is the input interface for remote EPO. The EPO is triggered when shorting pin 3 and pin 4
of J10, or opening pin 1 and pin 2.
If external emergency stop functionality is required, it is connected via the reserved terminals of pin 1 and pin 2 or pin
3 and pin 4 of J10. The external emergency stop interface needs to use shielded cables to connect to the normally
open/closed' remote stop switch between these two pins (refer to Fig. 1-4, and Tab. 1-9). If this interface is not used,
then pin 3 and pin 4 of J10 must be open, or pin 1 and pin 2 of J10 must be connected.
Position Name Meaning
J10.1 EPO_NC EPO is activated when it is disconnected from J10.2
J10.2 EPO_NC EPO is activated when it is disconnected from J10.1
J10.3 EPO_NO EPO is activated when it is short circuited with J10.4
J10.4 EPO_NO EPO is activated when it is short circuited with J10.3
GND
IN_S
EXT-S
CAB-S
CAB-S
EXT_OUT
EXT_Q3
Tab. 1-8: External maintenance bypass cabinet Interface
+12V
J10
+12V
+12V
EPO_NC
Fig. 1-10
EPO_NO
: Connections of EPO
Tab. 1-9: EPO input dry contact relay
Page 23

The emergency stop action within the UPS shuts down the rectifier, inverter and static bypass. However, it does not internally
disconnect the mains input power supply. To disconnect ALL power to the UPS, open the upstream input circuit breaker(s) when
the EPO is activated.
The normally closed EPO contacts of pin 1 and pin 2 of J10 are shorted before the UPS is delivered.
All auxiliary cables must be double insulated twisted cables with cross sectional area of 0.5mm2 ~ 1.5mm2 for a maximum
connection length between 25m and 50m.
1.7.8 Other Interfaces
J2 and J3: Parallel connection port, is used for interacting parallel control signals between two UPS racks.
J4: LBS interface, used to synchronize outputs of two UPS rack module systems
Serial port RS232-2: A debug and maintenance port used for providing serial communication data and authorizing the
commissioning and maintenance engineers.
Intellislot (TM) card interface: LIEBERT APM series UPS provides SNMP card communication interface that is used
for installing site communication optional Intellislot (TM) card.
Chapter 2 Battery installation 19
Note
LIEBERT APM UPS Module And Parallel System 30kVA~150kVA User Manual
Page 24

Chapter 2 Battery Installation
rounded, if inadvertently grounded, remove source from ground. Contact
2.1 General Recommendations
Take special care when operating the batteries of the LIEBERT APM UPS system. When all the battery cells
are connected, the battery voltage can exceed 400Vdc, which is potentially lethal.
The precautions for battery installation, use and maintenance are to be provided by the batteryes manufacturers. The precautions
in this section include the key issues that must be considered during the installation design, which may be adjusted according to
the specific local situations.
The battery shall be installed and stored in a clean, cool and dry environment.
•
Do not install the battery in a sealed battery chamber or sealed room. The battery room ventilation shall at least meet
•
the requirement of EN50272-2001. Otherwise, battery bulging, fire and even human injury may be caused.
The battery shall be installed far away from the heating source (e.g. transformer). Do not use or store the battery in the
•
place near the heating source or burn the battery or place it into fire. Otherwise, battery leakage, bulging, fire or
explosion may be caused.
Batteries shall be placed in such a manner that two bare live parts with the potential difference of more than 150V shall
•
not be contacted at the same time. If it is unavoidable, insulated terminal cover and insulated cables shall be used for
connection.
If external batteries are to be used, the battery circuit breakers (or fuses) must be mounted as close as possible to the
•
batteries, and the connecting cables should be as short as possible..
Chapter 1 Installation Of UPS Rack System 20
Note
Battery Room Design
Battery Handling
When connecting the battery, follow the precautions for high-voltage operation
Before accepting and using the battery, check the appearance the battery. If the package is damaged, or the battery
•
terminal is dirty, corroded or rusted or the shell is broken, deformed or has leakage, replace it with new product.
Otherwise, battery capacity reduction, electric leakage or fire may be caused.
o
Before operating the battery, remove the finger ring, watch, necklace, bracelet and any other metal objects
o
Wear rubber gloves and boots.
o
Eye protection should be worn to prevent injury from accidental electrical arcs.
o
Only use tools (e.g. wrench) with insulated handles.
o
Do not lay tools or metal parts on top of batteries.
o
Disconnect the charging source prior to connecting or disconnecting battery terminals.
o
Determine if battery is inadvertently g
With any part of a grounded battery can result in electrical shock. The likelihood of such shock can be reduced
Such grounds are removed during installation and maintenance.
The batteryes is very heavy. Please handle and lift the battery with proper method to prevent any human injury or
•
damage to the battery terminal.
Do not decompose, modify or damage the battery. Otherwise, battery short circuit, leakage or even human injury may
•
be caused.
The battery contains sulfuric acid. In normal operation, all the sulfuric acid is attached to the separation board and plate
•
in the battery. However, when the battery case is broken, the acid will leak from the battery.Therefore, be sure to wear a
pair of protective glasses, rubber gloves and skirt when operating the battery. Otherwise, you may become blind if acid
enters your eyes and your skin may be damaged by the acid.
At the end of battery life, the battery may have internal short circuit, drain of electrolytic and erosion of positive/negative
•
plates.If this condition continues, the battery may have temperature out of control, swell or leak. Be sure to replace the
battery before these phenomena happen.
If a battery leaks electrolyte, or is otherwise physically damaged, it must be replaced, stored in a container resistant to
•
sulfuric acid and disposed of in accordance with local regulations.
If electrolyte comes into contact with the skin, the affected area should be washed immediately with water.
•
Page 25

2.2 LIEBERT APM Battery typologies
According to the requested configuration LIEBERT APM UPS may need internal and/or external batteries
Liebert APM can utilize two different battery typologies:
• Modular: consisting of a number of battery boxes each containing 10 batteries that cannot be accessed w/o
removing a protective cover, installed in the UPS and / or in a dedicated Modular Battery Cabinet, (MBC)
that allows to extend the runtime as long as the systems or it’s requirements grown adding additional battery
modules on-the-fly by means of touch free blind mate connectors.
• Traditional: consisting of one of more strings of battery blocks installed on shelves in a locked cabinet or
dedicated battery room
• The battery modules, regardless if they are mounted internally to the UPS or in the MBC, make
uses of strings of 30 batteries.
• The Traditional external battery cabinet can make use of each even number of battery per string
between 30 and 40.
• The default factory setting, if the unit is ordered w/o internal battery is 40.
• The cabinet is only for valve regulated maintenance-free lead-acid battery.
Chapter 2 Battery installation 21
Note
CAUTION: -The lead acid battery may cause chemistry hazard
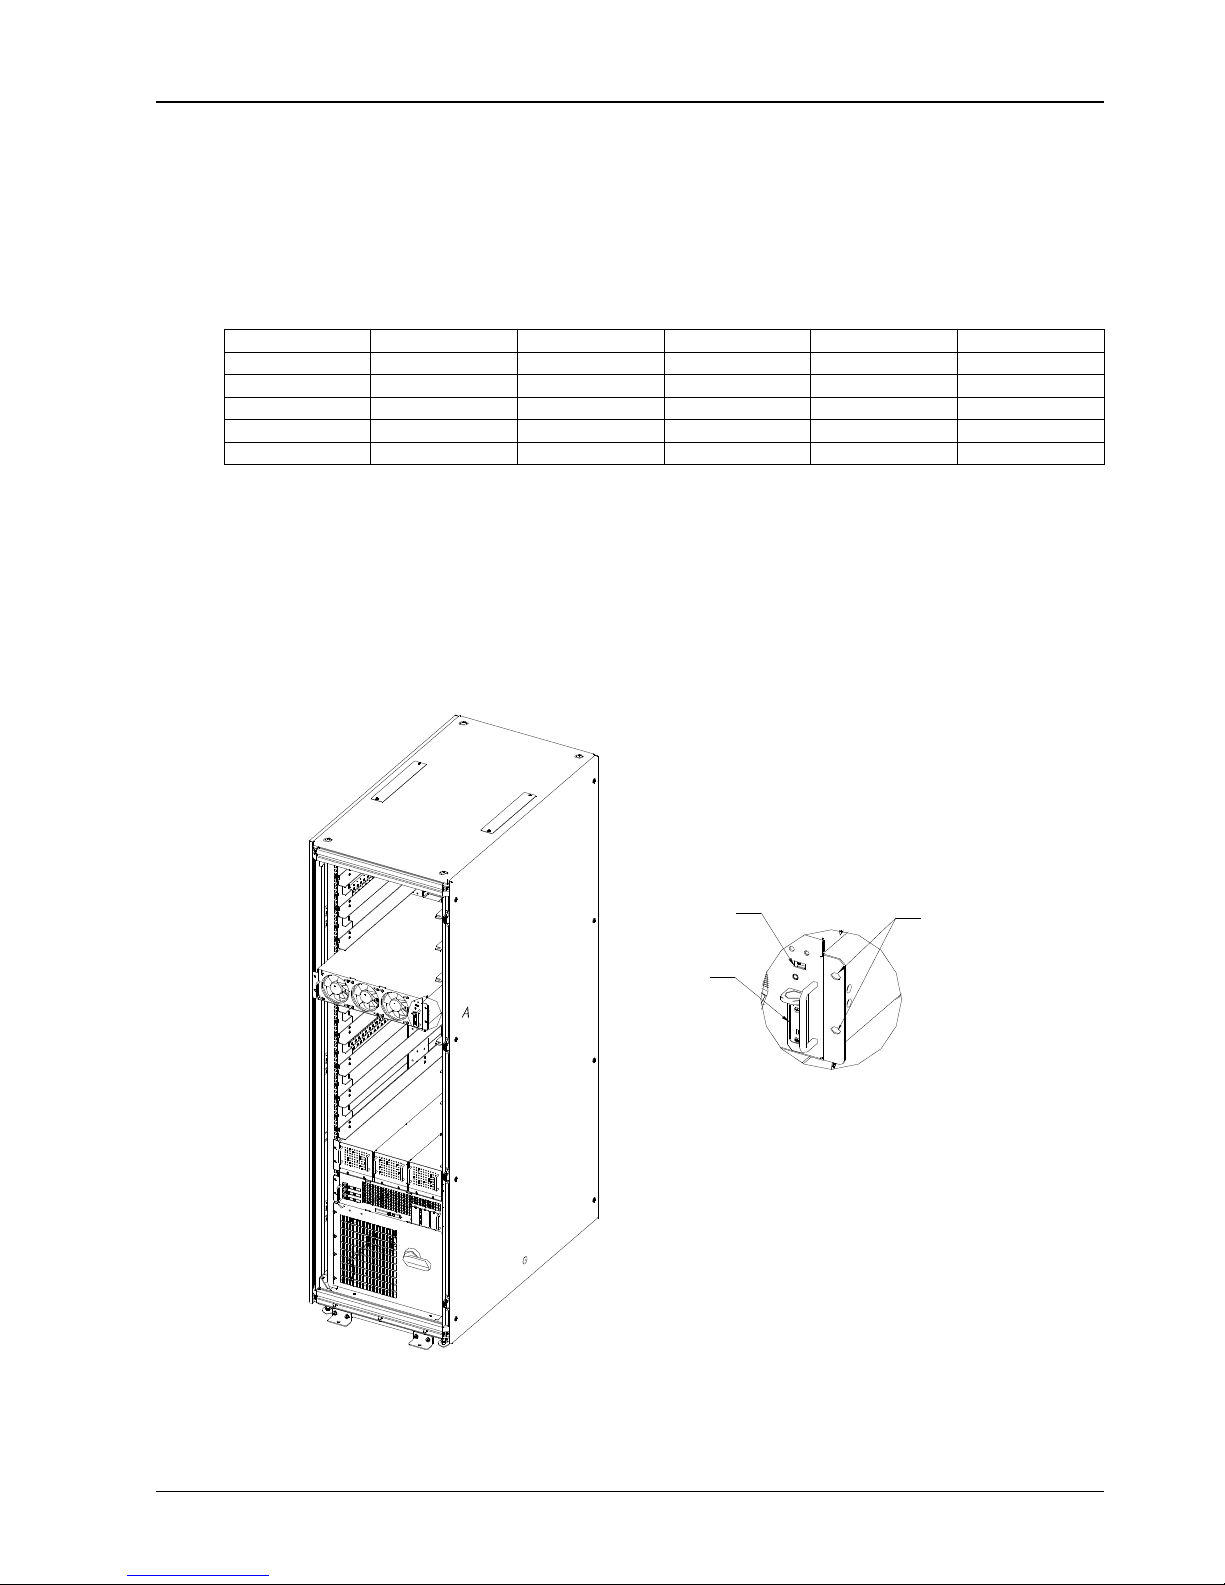
2.3 Safety
2.3.1 Modular Battery Cabinet.
• When handling the battery modules please refer to the label on it on how to operate
• Please use insulated glove to move battery modules.
• Do not to OPEN the battery boxes.
• Voltage between points 1 and 2 ( Fig. 2-1) may exceed 150V DC, so they must not be touched
and the cover shall be kept on when not installed
CAUTION: The lead acid battery may cause chemistry hazard
Warning
LIEBERT APM UPS Module And Parallel System 30kVA~150kVA User Manual
Fig. 2-1:
Battery Box Back
Page 26

Battery boxes should be stored in a cool place with the protective cover on . Hot and humid place will cause damage
to Battery boxes.
2.3.2 Battery Installation
Only the qualified engineers are allowed to install and maintain mounted in a traditional battery cabinet or shelf. To
ensure safety, install the external battery in a locked cabinet or dedicated battery room accessible just to service
qualified personnel
Please note that number of cells set via software must be consistent with the actual number of cells.
A minimum space of 10mm must be reserved on all vertical sides of the battery block to permit free air movement
around the cells.
A certain clearance should be reserved between the top of the cells and the underside of the shelf above as this is
necessary for monitoring and servicing the cells.
When installing the batteries always work from the bottom shelf upwards to prevent raising the center of gravity.
Install the batteries reliably and avoid vibration and mechanical bumping.
The bending radius of cable should be more than 10D, where "D" is the outer diameter of cable.
When connecting the cable, do not cross the battery cables and do not bind the battery cables together
The battery connection must be firm and reliable. After the connection, all the connections between the wiring
terminals and the batteries must be corrected to meet the torque requirement provided in the specifications and user
manuals of the battery manufacturers.
Each battery terminal should be insulated after its connection has been made.
Check if the battery is unexpectedly grounded. If the battery is unexpectedly grounded, remove the earth power
supply. Contacting any part of the grounded earth may be subject to electric shock
Measure the battery voltage, and carry out battery voltage calibration after the UPS is started.
Chapter 1 Installation Of UPS Rack System 22
When using a traditional battery solution, always comply with the following precautions:
Disconnect the charging power before connecting or disconnecting the cable of the battery terminals.
•
Do not connect the cables between the UPS battery terminals and the batteries before getting the approval from the
•
commissioning engineer.
When connecting the cables between the battery terminals and the circuit breaker, always connect the circuit breaker end of
•
the cable first.
Be sure to connect the positive/negative terminals of the batteries to those of the circuit breakers and those of the circuit
•
beakers to those of the UPS respectively with reference to the markings of positive/negative terminals. Reverse connection of
battery polarities will result in explosion, fire accident, the damage of batteries and UPS, and human injury.
The battery connecting terminal shall not subject to any external force, such as the pulling force or twisting force of the cable.
•
Otherwise, the internal connection of the battery may be damaged, and in severe case, the battery may catch fire.
Do not connect power until the total voltage of the battery string is verified correct through measurement.
•
Do not connect any conductor between the positive and negative terminals of the battery.
•
Do not close the battery circuit breakers before getting the approval from the commissioning engineer.
•
WARNING: Battery connections
Page 27

2.4 Battery maintenance
For the battery maintenance and precautions, please refer to IEEE-Std-1188-2005 and the relevant manuals provided
by the battery manufacturers.
Check to ensure that all the safety devices are in place and function normally. Check if the battery management parameter
•
setting is normal particularly.
Measure and record the air temperature in the battery room.
•
Check if the battery terminals are damaged or have the symptom of heating, and if the shell or cover is damaged.
•
Please fasten every bolt on the terminal according to the fastening torque specified in the table below .
•
After 1-2 months of service, recheck to make sure that each screw has been fastened according to the specified torque.
•
Otherwise there is risk of fire.
CAUTION: Use the battery with the same capacity and type, if battery is replaced by an incorrect type, it can cause explosion.
•
CAUTION: Dispose of used battery according to the local instructions
•
Chapter 2 Battery installation 23
Battery Mainenance Note
LIEBERT APM UPS Module And Parallel System 30kVA~150kVA User Manual
Page 28

24 Chapter 2 Installation Of UPS Rack System And Parallel System
Chapter 3 Installation Of a Parallel USP Rack System
3.1 Overview
The single or parallel system should be installed according to the installation procedures of the UPS rack module
system and the requirements in this Chapter.
For single UPS rack system installation the EPO button on the front panel of the UPS rack controls the emergency
stop of UPS modules and bypass static switch and also supports remote emergency power off function that can be
used to shut down the UPS rack remotely.
Note
1. The remote EPO switch must provide normally open or normally closed dry contact signals.
2. Normally closed EPO-J10 terminals: Pin 1 and pin 2 have been connected in factory and located on the parallel signal board X2.
J10:3
:3
J10:4
:4
UPS 1
UPS dry contact and
parallel signal board X2
Fig. 3-1
: Circuit ram of emergency power off
3.2 UPS Rack Systems In Parallel System
The basic installation procedures of parallel system are the same like those of the UPS rack module system. In this
section only the installation procedures related to the parallel system are introduced.
3.2.1 Installation Of Cabinet
To make the maintenance and system test easier, an external maintenance bypass is recommended in the
installation.
J10:3
J10:4:3:4
UPS1
UPS 2
J10:3
J10:4:3:4
UPS dry contact and
parallel signal board X2
UPS dry contact and
parallel signal board X2
1
Page 29

3.2.2 External Protective Devices
Refer to Chapter 1 par. 1.6
3.2.3 Power Cables
The power cable connection of the parallel system is similar to that of the single UPS rack system. If the bypass input
and rectifier input share the same neutral terminal and if an RCD protective device is installed at the input, then the
RCD device must be installed before the input cables are connected to the neutral terminal.
Note: The length and specification of the power cables of each UPS module should be the same, including the
bypass input cables and UPS output cables, so that the load sharing effect can be achieved in bypass mode.
3.2.4 Control Cables
Refer to Chapter 1 1.7
Parallel control cable
The parallel control cable has THREE types in terms of length: 5m, 10m, and 15m. All the parallel cables are
designed to be shielded and double insulated, and are intended to be connected between the UPS racks to form a
loop as shown below. The parallel signal board X2 is installed at the front of the static switch power module. This
close loop connection ensures the reliability of the parallel system control. Refer to Fig. 3-2 and to Fig. 3-3
Chapter 2 Installation Of UPS Rack System And Parallel System 25
Fig. 3-2:
Fig. 3-3:
Connection of parallel control cables of 2 UPS rack systems
Connection of parallel control cables of 4 UPS rack systems
LIEBERT APM UPS Module And Parallel System 30kVA~150kVA User Manual
Page 30

26 Chapter 2 Installation Of UPS Rack System And Parallel System
Note: in Fig. 3-3, X2 is the dry contact and parallel signal board
3.3 Dual-Bus System
3.3.1 Installation
The dual bus system (DBS) consists of two independent UPS rack module systems and each UPS system consists
of one or more UPS power modules and a bypass power module. The dual bus system is configured for high
availability and is suitable for powering the load with dual inputs. If the load is single-input load, the static transfer
switch and LBS control is recommended to maintain both UPS outputs synchronized for uninterrupted transfers.
Please install the system according to the installation descriptions for different system configurations.
All the UPS rack modules should be installed side by side, and the cables should be connected according to the
following descriptions.
The LBS control synchronizes makes the outputs of two UPS rack modules (or parallel systems) synchronized. One
system is set as the master unit and the other system is set as slave unit. The LBS enables the load to have two
independent UPS sources.
Input rectifier
UPS1 UPS 6 UPS1 UPS 6
UPS1 UPS UPS1 UPS
parallel
control
cable
Fig. 3-4:
3.3.2 External Protective Devices
Refer to Chapter 1 Installation
3.3.3 Power Cables
The power cable connection of the parallel system is similar to that of the UPS module system. If the bypass input
and rectifier input share the same neutral terminal, and if an RCD protective device is installed at the input, then the
RCD device must be installed before the input cables are connected to the neutral terminal. Refer to Chapter 1
Installation. Notes: keep bypass currents balanced on bypass mode.
Bypass
Input rectifier Input rectifier
LBS
LBS
STS
Connect to load
Typical dual bus system (with static bypass switch LBS)
parallel
control
cable
Bypass
Input rectifier
3.3.4 Control Cables
For LIEBERT APM to LIEBERT APM dual-bus system, use the optional LBS cables to connect any two digital LBS
interfaces of the two paralleled UPS systems, as shown in Fig. 3-5.
Page 31

Chapter 2 Installation Of UPS Rack System And Parallel System 27
Rack module
system UPS 1
Dry contact and paral lel
signal board
Rack module
system UPS 2
Dry contact and parall el
signal board
X2
J2
J3
J4
X2
J2
J3
J4
Rack module
system UPS 3
Dry contact and paral lel
signal board
Rack module
system UPS n
Dry contact and paralle l
signal board
X2
J2
J3
J4
X2
J2
J3
J4
Fig. 3-5:
Typical dual bus system (with LBS) consisting of two 1+1 parallel system
LIEBERT APM UPS Module And Parallel System 30kVA~150kVA User Manual
Page 32

28 Chapter 3 Installation Drawing
Chapter 4 Installation Drawing
Fig. 4-1:
Signal Wiring Diagram
Page 33

Chapter 3 Installation Drawing 29
• Externa BCB interface UHW242C2
– J6.1 DRV: BCB: Drive signal
– J6.2 FB: BCB: Contact status
– J6.3 GND: Ground
– J6.4 OLBCB: Online-Input (normally open): This pin is active when BCB interface signal is connected.
• BCB control board UHW242C2
– Control and feedback X102 to J6, Bypass Module
– External battery temperature, X108 to J8, Bypass Module
– Battery +/- supply to X101
– UV coil and auxiliary to X100
– Battery temperature sensors X103, X104, X105, X106
Fig. 4-2:
External Battery Connections
LIEBERT APM UPS Module And Parallel System 30kVA~150kVA User Manual
Page 34

30 Chapter 3 Installation Drawing
1
1. Blanking plate
5. battery module CB
1.
1
power module
2. Battery module
3. Bypass module
4. Power input/output
5. Battery Module CB
2
5
3
4
Fig. 4-3:
150kVA UPS module system, front view whit open door and back view without doors
2. battery module
3. battery input
2
4
3
Fig. 4-4:
Modular Battery Cabinet: front view with open door and back view without doors
Page 35

Chapter 3 Installation Drawing 31
1996
600
Fig. 4-5:
110
0
UPS External dimensions
1996
600
LIEBERT APM UPS Module And Parallel System 30kVA~150kVA User Manual
Fig. 4-6:
0
110
Battery Cabinet External dimensions
Page 36

32 Chapter 3 Installation Drawing
16
12
485
340
396
DETAIL A
847
985
1081
Fig. 4-7
: UPS and BC bottom view show the position of casters and fixing holes
460
Fig. 4-8
: UPS and BC bottom view show the cable entry area
80
Page 37

Chapter 3 Installation Drawing 33
Fig. 4-9
: UPS and BC top view with open doors
mNmCm BmA
mN
BAT+ BATNBAT-
PE
bA bB bC
Fig. 4-10:
AC and DC Connection
oN
oA
oB oC
25
M8(all)
286
256
238
203
183
200
LIEBERT APM UPS Module And Parallel System 30kVA~150kVA User Manual
40
40
40
40 45
Fig. 4-11: UPS AC And DC Connection details
42
45
Page 38

34 Chapter 3 Installation Drawing
M8
269
183
40
M10
25
80 80
Fig. 4-12: MBC DC Connection details
Auxiliary power board M3
SCR
Rectifier fan
Fig. 4-13:
DSP control and
detecting board U1
Main power board M1
Power Module
Page 39

Chapter 3 Installation Drawing 35
1
.
SCR
Rectifier fan
Main power board M4
Bypass DSP board U3
Auxiliary power board M3
Dry contact and parallel
signal board X2
Fig. 4-14
Notes for installing bypass power modules:
1. When installing the modules, install the modules from bottom to top. When removing the modules, remove the
modules from top to bottom. The purpose is to maintain the stable center of gravity.
2. When inserting the module, ensure that the “Ready” switch is in unready status.
3. After inserting the module, tighten all the screws before closing the ready switch.
4. When removing the modules, turn off the ready switch first, remove the screws and then remove the modules.
5. Wait for 5 minutes before inserting the removed modules.
: Static Bypass Module
Intellislots
Monitoring transfer
board X1
4.1 Internal Battery Module
4.1.1 Appearance Of Internal Battery Module
Battery Box
2. Battery Boxes Terminals
3. Battery Module Terminals
4. Circuit Breaker
5. Battery Tray
LIEBERT APM UPS Module And Parallel System 30kVA~150kVA User Manual
Page 40

36 Chapter 3 Installation Drawing
Fig. 4-15:
Battery Module
According to the selected configuration, the LIEBERT APM can house from none to 9 battery modules connected in
parallel.
Each Modular Battery Cabinet can house additional 10 modules of battery
Each module is made of 3 battery boxes and a battery tray. Each battery box contains ten 9AH/12V batteries and
each battery tray has one 50A DC current limiting circuit breaker. The maximum discharging current of each layer of
battery is 45A. Over charging current will trip the circuit breaker and the monitoring unit will display the alarm.
Note
When using modular battery it is important to install at least 2 battery module per each power module installed.Not doing that will
result in the CB tripping before the battery reaches the EOD.
Note
Battery housed in the external Modular Battery Cabinet must be of the same kind of the internal ones.
Page 41

The components that can only be accessed by opening the protective cover with tools cannot be operated by user.
STS Module
#1 Power Module
Inv Rect
Bat
BCB
BCB
Battery Modules
Bat
Rect Inv
Only qualified service personnel are authorised to remove such covers.
5.1 Introduction
The LIEBERT APM UPS provides the critical load (such as communication and data processing equipment) with high
quality uninterruptible AC power. The power from the LIEBERT APM UPS is free from voltage and frequency
variations and disturbances (interruption and spike) experienced at the Mains AC input supply.
This is achieved through high frequency double conversion power pulse width modulation (PWM) associated with full
digital signal processing control (DSP), which features high reliability and convenience for use.
As shown in Fig. 5-1, the AC input mains source is supplied at UPS input and converted into a DC source. This DC
source feeds the Inverter that converts the DC source into a clean and input independent AC source. The battery
powers the load through the inverter in case of an AC input mains power failure. The utility source can also power the
load through the static bypass.
When the UPS needs maintenance or repair, the load can be transferred to maintenance bypass without interruption
and the power module and bypass module can be removed for maintenance.
Chapter 4 Operations 37
Chapter 5 Operations
Warning: Hazardous mains voltage and/or battery voltage present behind the protective cover
mA
mB
mC
mN
Bat+
Bat N
Bat -
Maintenance Switch
bA
bB
bC
bN
Optional
Inductors
Charger
oA
oB
oC
oN
Charger
#5 Power Module
LIEBERT APM UPS Module And Parallel System 30kVA~150kVA User Manual
Fig. 5-1:
Single unit block diagram
Page 42

38 Chapter 4 Operations
5.1.1 Split-Bypass Input
Fig. 5-1 illustrates the Liebert APM in what is known as the split-bypass configuration, i.e. the bypass uses a
separate AC source. In this configuration, the static bypass and maintenance bypass share the same independent
bypass power supply and connect to the power supply through a separate switch. Where a separate power source is
not available, the bypass and rectifier input supply connections are linked : the dotted lines represents the link
between
There is one manual bypass (maintenance bypass) for entire UPS Rack System.
mA-mB-mC-mN and bA-bB-bC-bN (see fig
5.1.2 Static Transfer Switch
The circuit blocks labeled Static Switch in Fig. 4-1 contain electronically controlled switching circuits that enable the
critical load to be connected to either the inverter output or to a bypass power source via the static bypass line.
During normal system operation the load is connected to the inverter; but in the event of a UPS overload or inverter
failure, the load is automatically transferred to the static bypass line.
To provide a clean (seamless) load transfer between the inverter output and static bypass line, the inverter output and
bypass supply must be fully synchronized during normal operating conditions. This is achieved through the inverter
control electronics, which makes the inverter frequency track that of the static bypass supply, provided that the
bypass remains within an acceptable frequency window.
A manually controlled maintenance bypass supply is incorporated into the UPS design. It enables the critical load to
be powered from the utility (bypass) supply while the UPS is shut down for routine maintenance.
Fig. 4-10
). The unit is shipped with the links installed
When the UPS is operating in bypass mode or on maintenance bypass, the connected electrical load is not protected from
power failures or surges and sags.
5.2 1+N Parallel System
Several “single unit” UPS Rack Systems may constitute a “1+N” system, where up to four single units operate
together for the purpose of providing additional power or reliability or both. The load is equally shared between any
paralleled UPSs.
In addition, 1+N groups may be configured as “distributed redundant” systems. Each UPS Rack System has
independent outputs that nevertheless are synchronized through a Load Bus Synchronizer (LBS) so that critical loads
can be seamlessly transferred from one UPS Rack System or Parallel System to another.
See 4.3 Operating Mode for more information.
5.2.1 Features Of Parallel System
1. The hardware and firmware of single UPS Rack System units is completely compatible with the requirements of a
parallel system. Parallel configuration can be achieved merely through settings in configuration software and
connecting the parallel control signal cables. The parameters settings for the UPS Rack Systems in parallel system
shall be consistent. .
2. Parallel control cables are connected in a ring, providing both performance and redundancy. Dual-bus control
cables are connected between any two UPS modules of each bus. The intelligent paralleling logic provides the user
with maximum flexibility. For example, shutting down or starting up UPS modules in a parallel system can be done in
any sequence. Transfers between Normal and Bypass modes of operation are synchronized and self–recovering e.g.
following overloads and their clearance.
3. The total load of the parallel system can be queried from each module’s LCD.
Note
Page 43

5.2.2 Parallel Requirements Of UPS Rack Systems
Required
A group of paralleled UPS Rack Systems behave as if it were one large UPS with the advantage of presenting higher
reliability and/or higher total output power.
The following requirements apply:
1. All UPS Rack Systems must be connected to the same bypass source (i.e: must be in phase and have the same
neutral reference)
2. The bypass and the main input sources of each UPD rack unit must be referenced to the same neutral potential.
3. Any RCD (Residual Current detecting device), if installed, must be of an appropriate setting and located upstream
of the common neutral bonding point. Alternatively, the device must monitor the protective earth currents of the
system. Refer to the High Leakage Current Warning in the first part of this manual.
4. The outputs of all UPS Rack Systems must be connected to a common output bus.
5. The maximum recommended unbalance between the numbers of power modules in different racks is 3/5.
In order to comply to the above points even in a faulty condition, the following upgrade sequence is proposed.
30kW 60kW 90kW
120kW 150kW 180kW
Chapter 4 Operations 39
240kW 270kW 300kW
330kW 360kW 390kW
420kW 450kW 480kW
Redundant
Fig. 5-2 Recommended upgrade sequence
LIEBERT APM UPS Module And Parallel System 30kVA~150kVA User Manual
Page 44

40 Chapter 4 Operations
6. In the assumption that 95sqmm AC cable is used, current sharing inductors (optional) are needed whenever one of
the following conditions is not satisfied:
• Max power per UPS rack Unit: 120kW
• The paralleling cables are connected to circuit breakers/fuses of the same rating and type
• Being L
input distribution breaker upstream the UPS to the downstream distribution breaker upstream the load
o for 2+0 APM in Parallel connected:
o for 3+0 APM in Parallel
o for 4+0 APM in Parallel
Note: if the max number of future parallel unit is unknown it is suggested to follow the rule
max
and L
the maximum and minimum length of the connecting cables, measured from the
min
L
> 5.5 m ; L
min
L
> 8 m ; L
min
L
>
10 m
min
L
>
10 m
min
; L
; L
max
max
max
max
< 2* L
< 1.64* L
<
1.5*
<
1.5*
- 5.5 m
min
min
L
min
L
min
- 5.1 m
- 5 m
- 5 m
solation transformers are requested for applications where sources do not share the same neutral reference or where the neutral
is not available.
5.3 Operating Mode
The LIEBERT APM UPS is an on-line, double-conversion, reverse-transfer UPS that permits operation in these
modes:
Normal mode
Battery Mode
Auto-restart mode
Bypass mode
Black start mode
Maintenance mode (manual bypass)
Parallel redundancy mode
Sleep Mode
5.3.1 Normal Mode
The UPS inverter power modules continuously supplies the critical AC load. The rectifier/charger derives power from
the AC mains input source and supplies DC power to the inverter while simultaneously FLOAT or BOOST charging its
associated backup battery.
Note
5.3.2 Battery Mode
Upon failure of the AC mains input power; the inverter power modules, which obtains power from the battery, supplies
the critical AC load. There is no interruption in power to the critical load upon failure. After restoration of the AC mains
input power, the “Normal Mode” operation will continue automatically without the necessity of user intervention.
Page 45

5.3.3 Auto-Restart Mode
The battery may become exhausted following an extended AC mains failure. The inverter shuts down when the
battery reaches the End of Discharge voltage (EOD). The UPS may be programmed to “Auto Recovery after EOD”
after a delay time if the AC mains recovers. This mode and any delay time are programmed by the commissioning
engineer.
5.3.4 Bypass Mode
If the inverter overload capacity is exceeded under normal mode, or if the inverter becomes unavailable for any
reason, the static transfer switch will perform a transfer of the load from the inverter to the bypass source, with no
interruption in power to the critical AC load. If the inverter is asynchronous with the bypass, the static switch will
perform a transfer of the load from the inverter to the bypass with interruption in power to load. This is to avoid large
cross currents due to the paralleling of unsynchronized AC sources. This interruption is programmable but typically
set to be less than 3/4 of an electrical cycle, e.g., less than 15ms (50Hz) or less than 12.5ms (60Hz).
5.3.5 Black Start Mode
If the there is no utility input and you want that UPS passes from the OFF mode to the Battery Mode you have to
push the button in front of any one of the UPS Rack module, and then push “Inverter On ” button to start the inverter.
5.3.6 Maintenance Mode (Manual Bypass)
A manual bypass switch is available to ensure continuity of supply to the critical load when the UPS becomes
unavailable e.g. during a maintenance procedure. This manual bypass switch is fitted in all UPS Rack System and
rated for full load of one UPS Rack
Chapter 4 Operations 41
5.3.7 Parallel Redundancy Mode (System Expansion)
For higher capacity or higher reliability or both, the outputs of several UPS modules can be programmed for direct
parallel: a built-in parallel controller in each UPS ensures automatic load sharing. A parallel system can be composed
of up to four UPS Rack Systems.
5.3.1 Sleep Mode
To improve system efficiency, when system capacity is high and the load is light you can decide to automatically shut
down a number of power modules according to load level: if then the load increases, dormant modules are
automatically started
To ensure that each module has equal chances of being selected as dormant and of dormancy duration, and that the
life cycle of each module is consistent, the polling dormancy policy is adopted for the modules. The dormancy
duration of each module can be set from 1 to 1000 days. When the dormancy duration of a module is reached, the
module automatically starts, and the next module enters into the sleep mode.
If a system is configured to have X redundant power modules, the number of dormant modules is such that in any
case, X module more than the ones required to sustain the load are not dormant .
It takes about one minute for the rectifiers and inverters of the dormant modules to start and share the load. During
this period, the system may be overloaded and switch to bypass mode, so it is recommended to enable the sleep
mode just when it is known that load changes slowly (e.g. by system upgrade) and not dramatically (e.g. by sudden
changes of workload). Two dormancy parameters are available at the background: Intelligent UPS Dormancy
Function and Module Dormancy Time.
Prerequisites for Enabling the Sleep Mode
To enter into sleep mode, the following prerequisites must be met:
The function of monitoring and setting dormancy is enabled.
The rectifier runs on the main channel without faults. The battery is almost fully charged.
The inverter does not report any fault or alarm.
The power supply for the bypass is available. The bypass voltage and SCR are normal.
LIEBERT APM UPS Module And Parallel System 30kVA~150kVA User Manual
Page 46

42 Chapter 4 Operations
This mode needs restricted module ID:
5 MODULE: ID SET 1, 2,3,4,5
4 MODULE: ID SET 1,2,3,4
3 MODULE: ID SET 1,2,3
2 MODULE: ID SET 1,2
5.3.2 OFF Mode
In the OFF mode the unit is supplied from input and/or bypass and/or battery, but all the power components in the
rectifier, inverter, static switch are off. Only the display and the logic boards are working.
5.4 Battery Management—Set During Commissioning
5.4.1 Normal Function
1. Constant current boost charging
Current can be set up.
2. Constant voltage boost charging
Voltage of boost charging can be set as required by the type of battery.
For Valve Regulated Lead Acid (VRLA) batteries, maximum boost charge voltage should not exceed 2.4V / cell.
3. Float Charge
Voltage of float charging can be set as required by the type of battery.
For VRLA, float charge voltage should be between 2.2V to 2.3V.
4. Float Charge Temperature Compensation (optional)
A coefficient of temperature compensation can be set as required by the type of battery.
5. End of discharge (EOD) protection
If the battery voltage is lower than the EOD, the battery converter will shut down and the battery is isolated to avoid
further battery discharge. EOD is adjustable from 1.6V to 1.75V per cell (VRLA).
6. Battery Low Warning Time
It is adjustable between 3 and 60 minutes. The default is 5 minutes.
5.4.2 Advanced Functions (Software Settings Performed By The Commissioning Engineer)
Battery self-test and self-service
At periodic intervals, 20% of the rated capacity of the battery will be discharged automatically, and the actual load
must exceed 20% of the rated UPS (kVA) capacity. If the load is less than 20%, auto-discharge cannot be executed.
The periodic interval can be set from 30 to 360 days. The battery self-test can be disabled.
Conditions: Battery at float charge for at least 5 hours, load equal to 20~100% of rated UPS capacity
Trigger—Manually through the command of Battery Maintenance Test in LCD panel or automatically
Battery self-test interval: 30~360 days (default setting is 60 days)
5.5 Battery Protection (Settings By Commissioning Engineer)
Battery Low Pre-warning
The battery undervoltage pre-warning occurs before the end of discharge. After this pre-warning, the battery should
have the capacity for 3 remaining minutes discharging with full load. The time is user configured from 3 to 60 minutes.
End of discharge (EOD) protection
If the battery voltage is lower than the EOD, the battery converter will be shut down. EOD is adjustable from 1.6V to
1.75V per cell (VRLA).
Page 47

Chapter 4 Operations 43
Battery Disconnect Devices Alarm
The alarm occurs when the battery disconnect device disconnects.
The external battery connects to the UPS through the external battery circuit breaker. The circuit breaker is manually
closed and tripped by the UPS control circuit.
LIEBERT APM UPS Module And Parallel System 30kVA~150kVA User Manual
Page 48

44 Chapter 5 Operating Instructions
Chapter 6 Operating Instructions
Warning: Hazardous mains voltage and/or battery voltage present behind the protective cover
The components that can only be accessed by opening the protective cover with tools cannot be operated by user.
Only qualified service personnel are authorised to remove such covers.
6.1 Introduction
The LIEBERT APM UPS operates in the following 3 modes listed in Tab.
operating procedures under each operating mode, including transfer between operating modes, UPS setting and
procedures for turning on/off inverter.
Operating mode Descriptions
Normal mode NORMAL UPS powers the load
Bypass mode BYPASS
Maintenance Mode MAINT
Note:
1. Refer to Chapter 7 Operator Control And Display Panel, for all the user operating keys and LED displays.
2. The audible alarm may annunciate at various points in these procedures. It can be cancelled at any time by
pressing the ‘SILENCE ON/OFF’ push-button.
3. The UPS function can be set via maintenance software. However, the setting and commissioning must be done by
maintenance engineers trained by Emerson.
6.1.1 Power Switches
The UPS rack system only has a maintenance bypass isolating switch, and all the other transfers are processed
automatically by internal control logics.
6-1
. This section describes various kinds of
The load power supply is provided by the static bypass.This mode can be regarded as a
temporary transition mode between the normal mode and maintenance bypass mode, or a
temporary abnormal operating status
UPS Shuts down, the load is connects to the mains vie Maintenance bypass. NOTE: in this
mode the load is not protected against abnormal mains
Tab. 6-1 UPS Operating mode
6.2 UPS Startup
Do not start the UPS until the installation is completed, the system has been commissioned by authorized personnel
and the external power isolators are closed.
6.2.1 Start-Up Procedure
This procedure must be followed when turning on the UPS from a fully powered down condition.
The operating procedures are as follows:
1. Open the external power switch. Open the UPS door, connect the power supply cables and ensure the correct
phase rotation.
During this procedure the UPS output terminals are live.
If any load equipment is connected to the UPS output terminals please check with the load user that it is safe to apply power:If the
load is not ready to receive power then ensure that it is safely isolated from the UPS output terminals.
Warning
Page 49

Chapter 5 Operating Instructions 45
2. Close the external circuit breakers and connect the mains power.
The LCD starts up at this time. The Rectifier indicator flashes during the startup of rectifier. The rectifier enters normal
operation state, and after about 30s, the rectifier indicator goes steady green. After initialization, the bypass static
switch closes. The UPS Mimic LEDs will indicate as following:
LED Status
Rectifier indicator Green
Battery indicator Off
Bypass indicator Green
Inverter indicator Off
Load indicator Green
Status indicator Amber
3. Press INVERTER ON button for two seconds.
The inverter indicator flashes during the startup of inverter. After the inverter is ready, the UPS transfers from bypass
to inverter, the bypass indicator turns off, and the inverter and load indicators turn on.
The UPS is in normal mode. The UPS Mimic LEDs will indicate as following:
LED Status
Rectifier indicator Green
Battery indicator Off
Bypass indicator Off
Inverter indicatorchp888 Green
Output indicator Green
Status indicator Green
6.2.2
Procedures For Switching Between Operation Modes
Switch from normal mode to bypass mode
Press “inverter off” button to switch to bypass mode.
In bypass mode, the load is directly fed by the mains power instead of the pure AC power from the inverter.
Switch from bypass mode to normal mode
Press “inverter on” button in bypass mode. After the inverter enters normal operation, the UPS transfers to normal
mode.
6.3 Battery Start
You can also use cold start mode with battery to start LIEBERT APM UPS from battery (charged) mode.
1. Verify that the battery is properly connected.
2. Press the battery start button (see Fig. 6-1) on the front panel of any power module.
At this point, the LCD displays the start screen, and the battery indicator flashes green. It stops flashing and becomes
solid green about 30 seconds after the rectifiers enter normal operation.
3. Press and hole the INVERTER ON key for two seconds, and the UPS operates in battery mode.
Note
LIEBERT APM UPS Module And Parallel System 30kVA~150kVA User Manual
Fig. 6-1:
Battery start button
Location of battery start button
Page 50

46 Chapter 5 Operating Instructions
6.4 Procedure For Switching The UPS Into A Maintenance Bypass From
Normal Mode
This procedure can transfer the load from the UPS inverter output to the maintenance bypass supply, but the
precondition is that the UPS is in normal mode before the transfer.
Caution
Before making this operation, read messages on display to be sure that bypass supply is regular and the inverter is synchronous
with it, so as not to risk a short interruption in powering the load.
1. Press the INVERTER OFF switch on the right side of the operator control panel for longer than two seconds (if
system is a interrupt transfer, there is a prompt to alarm and you must confirm the interrupt transfer). The UPS Mimic
indicator Inverter ON will extinguish and also the Status Indicator (6) will turn amber and will be accompanied by an
audible alarm. The load transfers to static bypass, and the inverter shuts down.
Note
Pressing the Alarm Silence ON/OFF button cancels the audible alarm but leaves the warning message displayed until the alarm
condition is rectified.
2. Open the UPS door, close the maintenance bypass switch on the right bottom of the unit from OFF to ON position.
The load power supply is provided by the manual maintenance bypass.
Warning
If you need to maintain the module, wait for 10 minutes to let the DC bus capacitor fully discharge before removing corresponding
module.
When the maintenance bypass switch is on position of ON, some part of the UPS circuit still has hazardous voltage. Therefore,
only qualified person can maintain the UPS.
Caution
When the UPS is in maintenance bypass mode, the load is not protected against abnormal mains supply.
6.5 Procedure For Completely Powering Down A UPS
If you need to power down the UPS completely, follow the procedures in section 6.3 to transfer the UPS from normal
mode to maintenance bypass mode.
If you need to isolate the UPS from the AC power supply, you should open the external input power supply isolation
first (if the rectifier and bypass use different power supply, you need to open these two input isolation respectively).
Warning
Shut down the maintenance power supply to avoid human injury.
6.6 EPO Procedure
The EPO button is designed to switch off the UPS in emergency conditions (e.g., fire, flood, etc.).To achieve this, just
press the EPO button, and the system will turn off the rectifier, inverter and stop powering the load immediately
(including the inverter and bypass), and the battery stops charging or discharging.
If the input utility is present, the UPS control circuit will remain active; however, the output will be turned off. To
completely isolate the UPS, you need to open the external mains input supply to the UPS rack.
Page 51

6.7 Auto Start
Commonly, the UPS rack is start up on static bypass. When the mains power fails, the UPS draws power from the
battery system to supply the load until the battery voltage reaches the end of discharge (EOD) voltage, and the UPS
will shut down.
The UPS will automatically restart and enable output power:
After the mains power is restored
If the Auto Recovery after EOD Enabling feature is enabled
After auto start delay (default setting is 10 minutes), The UPS charges the battery during the auto restart delay
to avoid the power failure risk to the load due to the second time of mains power failure
If the auto start function is not set in the UPS, the user can press Fault Clear to manually start the UPS.
6.8 UPS Reset Procedure
After using EPO to shut down the UPS, or after the UPS is shut down due to inverter over temperature, or overload,
or battery over voltage or too many switching times (BYP: XFER COUNT BLOCK), and after clearing all the faults
according to the prompt information displayed in screen, carry out this procedure to restore the UPS to normal
operation.
After confirming that the fault is cleared, perform the following procedures:
1. Press FAULT CLEAR to reset the EPO status.
2. Press INVERTER ON button on the right side of the operator and control panel for longer than 2s.
Chapter 5 Operating Instructions 47
The rectifier will be turned on automatically when the overtemprature fault disappears at 5 minutes after the disappearance of
overtemprature signals.
After pressing the EPO button, if the UPS mains input has been disconnected, the UPS is completely powered down.
When the mains input is restored, the EPO condition will be cleared and the UPS system will enable static bypass
mode to restore the output.
If the maintenance bypass isolatingswitch is put to ON and the UPS has mains input, then the UPS output is emergised.
The UPS module needs 10 minutes to discharge to safe voltage, do not operate on the UPS during this time.
6.9 UPS Power Walk in feature
The UPS rack units has so called “Power walk-in” function to control power modules from battery to mains one by
one to decrease load impact on generator. The rectifiers of modules start one by one in programmable time duration.
This time duration is programmable via Paramset from 5 to 30 seconds. There is also Power walk-in delay timer,
which delay start of Power walk-in function from 1 to 5 second. This feature is appreciated especially in parallel
connection of UPS rack units. Example of Power walk-in function and Power walk-in delay timer is on the Figure 12.1
Note
Warning
LIEBERT APM UPS Module And Parallel System 30kVA~150kVA User Manual
Page 52

48 Chapter 5 Operating Instructions
Figure 12.1: Example of Power walk-in function and Power walk-in delay timer
Note: From the UPS rack unit point of view, there is no information, if the UPS rack unit is supplied by utility or by
genset. Power walk-in function and Power walk-in delay timer will be applied after each switching from battery mode
to normal mode.
6.10 Operation Instruction For Power Module Maintenance
Only a trained user can perform the following procedures
Maintenance guidance for power modules
If the system is normal mode and the bypass is normal:
1. If the UPS does not contain any redundant module, press inverter off button on the front panel to manually power
off the inverter and the UPS transfers to bypass.
2. Disconnect the Ready switch of the main power module that needs maintenance or repair.
3. Loosen the screws of the main power module and remove the module after 2 minutes.
Note
Note: To ensure the safety, be sure to use a multimeter to measure the DC bus capacitor voltage and ensure the voltage is below
60V before operation.
Page 53

Chapter 5 Operating Instructions 49
4. After finishing the maintenance of the main power module, confirm that the ID of the main power module is
different from that of other power modules in operation, and it is within 1 to 5. If they are the same, adjust to different
address bit.
5. Insert the main power module (the inserting interval for each module is longer than 10s), confirm that the Ready
switch of the main power module is in DISCONNECT status, and then tighten the screws at the two sides of the
power module.
6. Wait for 2 minutes, and then connect the Ready switch of the main power module. The power module will
automatically join the system operation.
Maintenance guidance for bypass power module
Note
The bypass power module cannot be maintained in battery mode.
If the system is normal mode and the bypass is normal:
1. Manually shut down the inverter, and the UPS transfers to bypass. Close the maintenance bypass switch and the
UPS transfer to maintenance bypass mode.
2. Press EPO button to ensure the battery current is 0. Open the battery circuit breaker or disconnect battery
terminals.
3. Disconnect the ready switch of each power module and remove all the power modules.
4. Remove the bypass power module that need maintenance or repair, wait for 5 minutes before servicing the bypass
power module.
5. After finishing the maintenance of the bypass module, insert the module. Wait for 2 minutes;
6) Press “fault clear” button; if the bypass indicator in the mimic panel turns steady green, it indicates that the bypass
works normally.
7. Insert the previously removed power modules confirm that the Ready switch of the power modules is in
DISCONNECT status, and then tighten the screws at the two sides of the power modules.
8. Connect the ready switch of all power modules (ensure at least 10s of interval for each module), let each module
enter ready status.
9. Turn off the maintenance bypass switch, and the system transfers to bypass.
10. Manually power on the inverter, and the UPS transfers to inverter.
6.11 Language Selection
The LCD menus and data display are available in 12 languages: Chinese, Dutch, English, French, German, Italian,
Japanese, Polish, Portuguese, Russian, Spanish and Swedish.
Perform the following procedure to select a language needed:
1. In main menu, press F1 (transfer window) to move the cursor to the first row of the menu in the LCD screen.
2. Press F2 (move left) or F3 (move right) to select the Language menu.
3. Press F1 (transfer window) to move the cursor to the UPS data window in LCD screen.
4. Press F2 (move up) and F3 (move down) to select the language needed.
5. Press F4 (confirm) to validate the selection.
6. Press F1 (ESC) repetitively to return to main menu. At this time, all the words in the LCD will be displayed in the
selected language.
6.12 Changing The Current Date And Time
To change the system date and time:
1. In main menu, press F1 (transfer window) to move the cursor to the first row of the menu in the LCD screen.
2. Press F2 (move left) or F3 (move right) to select the Function Setting menu.
LIEBERT APM UPS Module And Parallel System 30kVA~150kVA User Manual
Page 54

50 Chapter 5 Operating Instructions
3. Press F1 (transfer window) to move the cursor to the UPS data window in LCD screen.
4. Press F2 (move up) and F3 (move down) to select the Date and Time setting, and then press F4 (confirm).
5. Move the cursor to the display row of date and time, and press F4 (confirm).
6. Press F2 (move up) and F3 (move down) to validate the current date and time.
7. Press F4 (confirm) to validate the setting and press F1 (ESC) to return to the main menu.
6.13 Control Password
The system is password protected to limit the operator’s operating and control authorities. You can only operate and
test the UPS and battery after entering correct password.
Page 55

Chapter 7 Operator Control And Display Panel
7.1 Introduction
The operator control and display panel is located on the front panel of the UPS. Through this LCD panel, the operator
can operate and control the UPS, and check all measured parameters, UPS and battery status and event and alarm
logs. The operator control panel is divided into three functional areas from left to right: mimic current path, LCD
display & menu keys, and control and operation keys
Chapter 6 Operator Control And Display Panel 51
.
Mimic power flow chart
3
1
4 5
2
6
STATUS
7
LCD display with menu keys
Liebert NX 2008 - 10-31 12 :30 :36
单机在线 NXr 150 kVA
150 kVA -3X3
主路输入
主路输入主路输入
相电压(V)
相电流(A)
相电压
相电压 (V )
相电压相电压
频率(Hz)
相电流
相电流 (A )
相电流相电流
线电压(V)
频率
频率 (Hz)
频率频率
线电压
线电压 (V )
功率因数
线电压线电压
功率因数
功率因数
功率因数功率因数
主路空开闭 合
主路空开闭 合 01 - 12
主路空开闭 合主路空开闭 合
手动开机
手动开机
手动开机手动开机
主路逆变供 电
主路逆变供 电 01 - 22
主路逆变供 电主路逆变供 电
F1 F2 F4 HELP
F1 F2 F 3 F4
单机在线
单机在线 正常
单机在线单机在线
旁路输入
旁路输入主路输入
旁路输入旁路输入
A(AB) B(BC) C(CA)
A(A B)
220 220 220
20.5 20.5 20.5
220
50.1 50.1 50.1
20. 5
380 380 380
50. 1
380
0.99 0.99 0.99
0. 99
交流输出
F3
B(B C )
220
20 .5
50 .1
380
0. 99
16:21:17
交流输出
交流输出
交流输出交流输出
C(C A)
220
20.5
50.1
380
0. 99
正常
正常正常
F
5
?
Control keys
INVERTER OFF
SILENCE ON/OFF
INVERTER ON
EPO
FAULT CLEAR
Fig. 7-1:
UPS operator control and display panel
Part No. Function Key Function
1 Rectifier indicator EPO EPO button
2 Battery indicator INVERTER ON Inverter start button
3 Bypass indicator INVERTER OFF Inverter shutdown button
4 Inverter indicator FAULT CLEAR Fault reset button
5 Output indicator SILENCE ON/OFF Audible alarm silencing button
6 Status indicator F1 ~ F4, HELP LCD menu soft keys
7 Buzzer
Tab. 7-1:
Descriptions of UPS operator control and display panel
7.1.1 Mimic Current Path
The LEDs shown on the mini current path represent the various UPS power paths and show the current UPS
operating status.
Steady Green Load on Rectifier
Flashing Green Utility Normal, but rectifier not operating
Steady Red Rectifier fault
Off Rectifier has no fault, and utility abnormal
LIEBERT APM UPS Module And Parallel System 30kVA~150kVA User Manual
Tab. 7-2: Status description of rectifier indicator (1)
Page 56

52 Chapter 6 Operator Control And Display Panel
Steady Green Battery powers the load
Flashing Green Battery pre-warn
Steady Red
Off Battery and converter have no fault, and battery is charging
Battery or battery converter abnormal (Battery Failure, No Battery, Battery Reverse, battery converter
fault, battery converter over temperature, battery converter over current)
Tab. 7-3:
Status description of bypass indicator (2)
Steady Green Bypass powers the load
Steady Red Bypass out of normal range, or static bypass switch fails
Off Bypass Normal
Tab. 7-4:
Status description of bypass indicator (3)
Steady Green Inverter powers the load
Flashing Green Inverter ON, during soft start, synchronization or standby (ECO mode)
Steady Red Inverter fail
Off Inverter normal, but off
Tab. 7-5: Status description of inverter indicator (4)
Green UPS output ON, and no overload
Red UPS output ON, but overload
Off UPS has no output
Tab. 7-6: Status description of load indicator (5)
Steady Green UPS is working normally
Steady Yellow UPS has general alarm (for example: AC fault)
Steady Red UPS has serious fault (for example: fuse or hardware fault)
Tab. 7-7:
Status description of status (alarm) indicator (6)
7.1.2 Audible Alarm (Buzzer)
Short single click The sound can be heard when any button is pressed
1 sec click with a 1 sec interval when system has general alarm (for example: AC fault), this audible alarm can be heard
Continuous alarm
7.1.3 Functional Keys
EPO switch To cut off the load powerTo shut down the rectifier, inverter, static bypass and battery
Inverter ON Used to start the inverter
Inverter shutdown button
Fault reset button Press this key to restart the UPS after the fault is cleared
Alarm mute button Used to silence the alarm, and re-pressing the button will sound the buzzer again
7.1.4 LCD And Menu Buttons
The LCD display is a 320 × 240 dots graphic display that is friendly to user. The LCD can display alarm information in
real time. 1024 historical records can be stored and retrieved for reference and diagnosis.
Through the graphic LCD display and a user-friendly menu-driven operator system, the user can easily browse the
parameters for input, output, load and batteries and the current UPS status and warnings are always put forward
automatically for quick reference. The versions of rectifier firmware, inverter firmware, bypass firmware and internal
monitor firmware can be displayed on the LCD.
When system has serious faults (for example: fuse or hardware fault), this audible alarm
can be heard
Tab. 7-8: Audible alarms descriptions
Used to
Tab.
shut down
7-9
the inverter
: Functional keys Description
Page 57

Chapter 6 Operator Control And Display Panel 53
F2 F3 F4 F5
UPS system windows
UPS
menu
windows
Five menu buttons are used for selecting the menu to be displayed.
7.1.5 Primary Screen
After the UPS starts and finishes self-test, the primary screen appears, as shown in Fig. 7-2 The primary screen is
divided into four windows: system information window, data window, menu window and keypad window.
The functions of the menu keys F1 ~ F5 for the current screen are shown by self-explanatory icons in the keypad
window as appropriate. From any menu on the primary screen, pressing the F1 key returns to the Output menu.
Button
Function 1
Function 2
Tab. 7-10: Icons of functional keys and the meanings
F1
Home
ESC
Exit
Move left Move right Confirm
Move up Move down
UPS data windows
Softkey functions
Fig. 7-2:
Sections of the LCD and menu buttons
LIEBERT APM UPS Module And Parallel System 30kVA~150kVA User Manual
Page 58

54 Chapter 6 Operator Control And Display Panel
7.1.6 Default Screen
During UPS operation, if there is no alarm within two minutes, the default screen will appear, as shown in Fig. 7-2
After a short delay, the LCD backlight will turn off. Pressing any menu keys (F1 ~ F5) restores the default screen.
7.2 Selecting Language
The LCD menu and data display is available in 10 languages: Chinese, English, French, German, Italian, Polish,
Portuguese, Russian, Spanish and Swedish.
Use the following procedures to select the language:
1. On the Output menu screen, press the F3 (left) or F4 (right) key to select the Language menu.
2. Press the F5 (enter) key to move the cursor to the data window of the screen.
3. Press the F3 (up) or F4 (down) key to select the desired language.
4. Press the F5 (enter) key to confirm.
5. Press the F2 (ESC) key repeatedly to return to the Output menu. At this point, the LCD displays in the selected
language.
LIEBERT NX
1# Liebert NXr 150KVA 10:07:55
150kVA-3X3 并机系统
F1
Fig. 7-3 Default screen
2008-10- 30 12:30:36
Parallel system1(#)
并机系统(1#) 正常
并机系统并机系统
Press any key to return to
按任意键返回主
the main menu
菜单
F3 F4
Normal
正常
正常正常
F5F2
7.3 Changing The Current Date And Time
Use the following procedures to change the system date and time:
1. On the Output menu screen, press the F3 (left) or F4 (right) key to select the Settings menu.
2. Press the F5 (enter) key to move the cursor to the data window of the screen.
3. Press the F3 (up) or F4 (down) key to select the Date & time item, and then press the F5 (enter) key to confirm.
4. Press the F3 (up) or F4 (down) key to the row displaying the date and time, and press the F5 (enter) key to
confirm.
5. Use the F3 (up) or F4 (down) key to input the current date and time.
6. Press the F5 (enter) key to confirm, and press the F2 (ESC) key to return to the Output menu.
7.4 Control Password
Password protection is used to limit the control functions accessible to the operator. The default password is ‘123456’.
This password provides access to UPS and battery test functions.
Page 59

7.5 Detailed Description of Menu Items
(Language selection)
Battery
C )
Baud rate of serial port 3
Phase current (V)
Load
Battery current (A)
º
Battery in float charging
Phase current (V)
Frequency (Hz)
PF
Active power (kW)
Reactive powe
r (kVAR)
Reactive power (kVAR)
Battery maintenance test
Efficiency
Chapter 6 Operator Control And Display Panel 55
Main
Phase voltage (A)
Frequency (Hz)
Line voltage (V)
PF
Records
(History Records)
Bypass
Line voltage (V)
Language
Output
Phase current (V)
Phase voltage (A)
Frequency (Hz)
Line voltage (V)
Setting
LCD contrast setting
Date format setting
Date and time setting
Baud rate of serial port 1
Baud rate of serial port 2
UPS address
Comm. mode setting
Call back times
Call back number 1
Call back number 2
Call back number 3
Control password setting
Apparent power (kVA)
Load %
Crest factor
Fig. 7-4:
Command
Battery capacity test
System test
End test
Menu tree structure
The LCD menu tree shown in Fig. 7-4 is described in details below.
System
Apparent power (kVA)
Active power (kW)
Single UPS system has
no parallel system data
Load %
Eff. Curve
Battery voltage (V)
Battery temperature (
Remaining time (Min)
Battery capacity (%)
Battery in boost charging
Battery not connected
Runtime
UPS Runtime
Byp. runtime
Events
(Current events log)
Versions
UPS model
Monitor Version
Rect. Version
Inv. Version
Byp. Version
UPS System window
Display basic information of UPS, including current time, date, UPS name, configuration and status. This window
displays the UPS basic information and is not necessary for the user to operate. The information of this window is
given in the following table.
Display contents Meanings
Liebert APM UPS Name
10:07:55 Current Time (format: 24 hours, hour, minute, second)
1# Unit 1
(Status)
Normal, alarm and fault
Normal: UPS in normal condition
Alarm: UPS has general alarm, such as AC input fault
Fault: UPS fuse or hardware fault
Tab. 7-11: UPS information window Items description
UPS menu and data window
Use left key or right key to select UPS menu and data window.
Menu name Menu item Meanings
L-N Voltage (V) The Phase Voltage
L-N Curent (A) The Phase Current
Main
Bypass
Frequency (Hz) The Frequency
L-L Voltage (V) The line-line Voltage
PF Power factor
L-N Voltage (V) The Phase Voltage
Frequency (Hz) The line-line Voltage
L-L Voltage (V) The line-line Voltage
LIEBERT APM UPS Module And Parallel System 30kVA~150kVA User Manual
Page 60

56 Chapter 6 Operator Control And Display Panel
Menu name Menu item Meanings
L-N Voltage (V) The Phase Voltage
L-N Curent (A) The Phase Current
Output
Load
System
Battery
Events (Current Events Log) Display all current log
Records (History Records) Display all history records
Language (Language option) 10 languages can be selected
Settings
Commands
Eff.Curve
Runtime
Version
Frequency (Hz) The output frequency
L-L Voltage (V) The line-line Voltage
PF Power Factor
Sout (kVA) Apparent Power of this UPS Rack Load
Pout (kW) Active Power of this UPS Rack Load
Qout (kVAR) Reactive Power of this UPS Rack Load
Load (%) The percent of the rating load of this UPS Rack Load
CF Output Current Crest Factor of this UPS Rack Load
Sout (kVA) Apparent Power of this UPS parallel system Load
Pout (kW) Active Power of this UPS parallel system Load
Qout (kVAR) Reactive Power of this UPS parallel system Load
Single Unit, No Parallel
System Data
Battery Voltage (V) Battery bus voltage
Battery Current (A) Battery bus current
Battery Temp. (°C) Internal battery temperature
Remaining Time (Min.) Remaining battery backup time
Battery Capacity Percentage of batery life when compared to a new battery
Batt. Boost Charging Battery is boost charging
Batt. Float Charging
Battery Disconnected Battery is not connected
Display Contrast Adjust LCD Display Contrast
Date Format Set YYYY MM DD, DD MM YYYY and MM DD YYYY formats can be selected
Date & Time Date/Time Set
Comm1 baud rate Communication baud rate setting of Intellislot 1
Comm2 baud rate Communication baud rate setting of Intellislot 2
Comm3 baud rate Communication baud rate setting of Intellislot 3
UPS address This setting is applicable to RS485 communication mode.
Communication Mode Communication Mode
Callback Times Reserved
Phone No.1 Reserved
Phone No.2 Reserved
Phone No.3 Reserved
Command Password User can modify the command password
Battery Maintenance
Test
Battery Capacity Test
System Test
Stop Testing Manually Stop the test including maintenance test, capacity test and system test
Forced boost charging Manually start the boost charging
Stop forced boost
charging
Load Level % Current load level in %
Efficiency Current efficiency
UPS Runtime Total time the UPS has run from inverter since last reset
Bypass Runtime Total time the UPS has run from Bypass since last reset
UPS model Provide UPS model information, for example: 400V~60Hz
Monitor version Monitor Board firmware Version
Rectifier Version Rectifier Firmware Version
When UPS is configured as a single unit, there is only module load, no system
load
Battery is
This test will lead to the battery being partly discharged to activate battery, at the
same time, the approximate battery capacity will be obtained.The load must be
between 20% and 80%
This test will lead to the battery being partly discharged to activate battery, at the
same time, the accurate battery capacity will be obtained.The load must be
between 20% and 80%
This is the self test of UPS.
The user activates this function, after 5 seconds, a pop-up window will appear to
show the customer the result of this diagnosis
Manually stop the boost charging
float
charging
Page 61

Menu name Menu item Meanings
Inverter Version Inverter Firmware Version
Bypass Version Bypass Firmware Version
Tab. 7-12: UPS menu and data window Item description
Current record window
This window records the current event that leads to the current operating mode of UPS, but does not record the short
status that has been ceased.
Use F1, Up key and Down key to scroll through the events.
Refer to History Record window for the menu and data window for a complete history record.
7.6 UPS Event And Alarm List
The follow table gives the complete list of all the UPS events displayed by history record window and current record
window, which have been described in 6.1.5 Detailed Description Of Menu Items.
UPS event Meanings
Comm. Fail The communication between internal monitor and power module or bypass module
The CAN bus communication between different UPS’s within a parallel system fails.
Parallel Comm. Fail
Battery Overtemp. The Battery temperature is over limit.Check battery temperature and ventilation
Ambient Overtemp. The Ambient temperature is over limit.Check UPS room ventilation
Battery Life End Battery is aged. (Reserved )
Battery Replaced Battery should be replaced due to failure in battery test
Battery Low Pre-warning
Battery End of Discharge
Mains Volt. Abnormal
Mains Undervoltage Mains Voltage is undervoltage with derated load.Check the input line-to-line voltage of rectifier
Mains Freq. Abnormal
Rectifier fault The rectifier has fault and results in rectifier shutdown and battery discharging
Rectifier Overtemp.
Batt. Charger Fail Battery charger over voltage
Control Power 1 Fail Control Power 1 fails or is lost while UPS is operating
Mains Phase Reversed Input phase sequence is reversed
Rectifier Over Current Rectifier Over Current
Soft Start Fail Rectifier could not start due to low DC bus voltage
Bypass Unable to Trace
Bypass Abnormal
1. Check if some UPS module in the parallel system has not been powered on, if so, power on the
UPS module and check if the alarm ceases.
2. Press FAULT CLEAR key
Before the end of discharging, battery under-voltage pre-warning should occur.After this pre-warning,
battery should have the capacity for 3 minutes discharging with full load.The time is user configured
from 3 to 60 minutes.Please shut down the load in time
Inverter turned off due to low battery voltage.Check the mains power failure status and recover the
mains power in time
Mains Voltage exceeds the upper or lower limit and results in rectifier shutdown.Check the input
phase voltage of rectifier
Mains frequency is out of limit range and results in rectifier shutdown.Check the input voltage and
frequency of rectifier
The temperature of the heatsink is too high to keep the rectifier running. The UPS can recover from
this fault automatically.Check the environment and ventilation
This alarm is triggered by an inverter software routine when the amplitude or frequency of bypass
voltage is beyond the normal range.The amplitude is ±10% of rated value.
The alarm will automatically reset if the bypass voltage becomes normal.
1. First check and confirm if the bypass voltage and frequency displayed on the LCD are within the
setting range. Note that the rated voltage and frequency are respectively specified by “Output
Voltage” and “Output Frequency”.
2. If the displayed voltage is abnormal, measure the actual bypass voltage and frequency.If the
measurement is abnormal, check the external power supply
This alarm is triggered by an inverter software routine when the amplitude or frequency of bypass
voltage exceeds the limit.The amplitude is ±10% of rated value.The alarm will automatically reset if
the bypass voltage becomes normal.
First check if relevant alarm exists, such as “bypass circuit breaker open”, “reverse bypass phase
rotation” and “input neutral line fault”.If there is any relevant alarm, first clear this alarm. 1. Then
check and confirm if the bypass voltage and frequency displayed on the LCD are within the setting
Chapter 6 Operator Control And Display Panel 57
LIEBERT APM UPS Module And Parallel System 30kVA~150kVA User Manual
Page 62

58 Chapter 6 Operator Control And Display Panel
UPS event Meanings
range. Note that the rated voltage and frequency are respectively specified by “Output Voltage” and
“Output Frequency”. 2. If the displayed voltage is abnormal, measure the actual bypass voltage and
frequency.If the measurement is abnormal, check the external bypass power supply.If the alarm
occurs frequently, use the configuration software to increase the bypass high limit set point according
to the user’s suggestions
This alarm is triggered by an inverter software routine when the inverter and bypass waveforms are
misaligned by more than 6 degrees of phase angle.The amplitude is ±10% of rated value.The alarm
will automatically reset if the alarm condition ceases.
Inverter Asynchronous
Inverter fail The inverter output voltage is abnormal and the load transfers to bypass
Inverter Overtemp.
Fan fault At least one of the cooling fans fails
Inverter Relay Fail
Bypass STS Fail
Operation Invalid This alarm is triggered when an invalid operation occurs
Output Fuse Fail At least one of the output fuses is blown.The inverter shuts down and the load transfers to bypass
Unit Over load
System Over load
Unit Over load Timeout
Byp. Abnormal Shutdown The voltage of both the bypass and inverter is abnormal.The load power is interrupted
Inverter Over Current The inverter has over currents
Bypass Phase Reversed
Load Impact Transfer
Transfer Time-out The load is on bypass because the output overload transfer and re-transfer is fixed to the set times
1. First check if “Bypass Unable to Trace” or “Bypass Abnormal” alarm exists.If the alarm exists, first
clear the alarm.
2. Check if the bypass voltage waveform is normal. If the bypass voltage waveform has severe
distortion, please ask the user to confirm this and find a solution
The temperature of the inverter heat sink is too high to keep inverter running.This alarm is triggered
by the signal from the temperature monitoring device mounted on the inverter heatsink.The UPS
recovers automatically after the over temperature signal disappears and after 5 minutes delay.
If over temperature exists, check:
1. Whether the ambient temperature is too high.
2. Whether the ventilation channel is blocked.
3. Whether fan fault happens
4. Whether inverter overload time is out
At least one of the static switches on the inverter side is open or short circuit.This fault is locked until
power off
At least one of the static switches on the bypass side is open or short circuit.This fault is locked until
power off
This alarm appears when the load rises above 105% of nominal rating.The alarm automatically resets
once the overload condition is removed.
1. Check which phase has overload through the load (%) displayed in LCD so as to confirm if this
alarm is true.
2. If this alarm is true, measure the actual output current to confirm if the displayed value is correct.
Disconnect non-critical load.In parallel system, this alarm will be triggered if the load is severely
imbalanced
This alarm appears when the total load rises above 105% of the nominal rating of the UPSs.The
alarm automatically resets once the overload condition is removed. Check which phase has overload
through the load (%) displayed in LCD so as to confirm if this alarm is true. If this alarm is true,
measure the actual output current to confirm if the displayed value is correct.
Disconnect non-critical load.In parallel system, this alarm will be triggered if the load is severely
imbalanced
The UPS overload status continues and the overload times out.
Note:
1.
The highest loaded phase will indicate overload timing-out first.
2. When the timer is active, then the alarm “unit over load” should also be active as the load is above
nominal.
3. When the time has expired, the inverter Static Switch is opened and the load transferred to bypass.
The inverter shuts down and will restart after 10 seconds.
4. If the load decreases to lower than 95%, after 5 minutes, the system will transfer back to inverter
mode.Check the load (%) displayed in LCD so as to confirm if this alarm is true.If LCD displays that
overload happens, then check the actual load and confirm if the UPS has over load before alarm
happens
Bypass Phase Rotation is Reversed.Under normal condition, Phase B lags behind phase A by 120
degree and phase C lags behind phase B by 120 degrees.
Check if the bypass input phase rotation is correct.Correct the wrong phase rotation
The system transfers to bypass as a result of load impact. The UPS can recover automatically.Start
the load according to sequences to reduce the load impact to inverter
Page 63

Chapter 6 Operator Control And Display Panel 59
UPS event Meanings
during the current hour.The system can recover automatically and will transfer back to the inverter
with 1 hour
Load Sharing Fault UPSs working within a parallel system are not sharing the load current correctly
DC Bus Abnormal Shut down inverter due to abnormal DC bus voltage.The load transfers to bypass
System Transfer
DC Bus Over Voltage
Bypass Over Current Bypass current is above 135% of the rated current.The UPS alarms but has no action
LBS Active
Mains Neutral Lost The mains neutral wire is lost or not detected
Protocol version clash Protocol version between monitor unit and DSP unit is not compatible
Battery ground fault Battery ground fault from dry contact signal
Manual Turn On Turn on the inverter manually by pressing the button on the front panel
Manual Turn Off Turn off the inverter manually by pressing the button on the front panel
EPO Press EPO button on the front panel or receive the external EPO command
Interrupted Transfer
Confirm
Transfer Cancel
Unit Risk Off Confirm
Parallel System Risk Off
Confirm
Fault Reset Press the FAULT CLEAR (Fault Reset) button on the LCD panel
Alarm Silence Press SILENCE ON/OFF (alarm silence) key on the panel
Turn On Fail
Audible Alarm Reset Press FAULT CLEAR or SILENCE ON/OFF button on the LCD panel
Bypass Mode UPS in Bypass Mode
Normal Mode UPS in Normal Mode
Battery Mode UPS in Battery Mode
Source share mode Inverter is supplied by battery and rectifier at the same time
UPS Shutdown UPS Shutdown, output power-down
Generator Connected
BCB Open BCB status (opened)
BCB Close BCB status (closed)
Batt. Float Charging Battery Status (Float Charging)
Batt. Boost Charging Battery Status (Boost Charging)
Battery Discharging Battery Status (Battery is discharging)
Battery Period Testing Battery is in periodic self-testing (20% capacity discharging)
Batt. Capacity Testing Battery is in capacity self-testing (100% capacity discharging)
Battery Maintenance
Testing
UPS System Testing
Inverter in Setting Inverter starts up and is in synchronization
Rectifier in Setting Rectifier starts up and is in synchronization
Fan fault in maintenance
bypass cabinet
External input isolating
transformer over
temperature
External output isolating
transformer over
temperature
Battery room environment Check the battery room environment
The whole paralleled UPS system transfer to bypass at the same time when one of them needs to
transfer to bypass. This message will appear on the UPS with passive transfer to bypass
Rectifier, inverter and battery converter were shutdown because DC bus voltage is too high.Check if
the rectifier has any fault.If no, check if overload has happened.Restart the inverter after the fault is
cleared
The LBS setting is active.It means the UPS is acting as an LBS master or slave in a dual bus
configuration
User press ENT key to cut the power the load and transfer the load to bypass according to the
prompt information
User press CANCEL key to cut the power the load and transfer the load to bypass according to the
prompt information
User press ENT key to shut down the UPS module in parallel system according to the prompt
information
User press ENT key to shut down the parallel system according to the prompt information
Fail to turn on the inverter manually.The reason may be the operation is invalid (the maintenance
bypass circuit breaker is closed) or the DC bus or rectifier is not ready
Generator is connected and a signal is sent to UPS.You can start the source share mode according
to UPS setting
Battery is in capacity self-testing (20% capacity discharging)
UPS System is self testing
Fan fault in maintenance bypass cabinet
External input isolating transformer over temperature
External output isolating transformer over temperature
LIEBERT APM UPS Module And Parallel System 30kVA~150kVA User Manual
Page 64

60 Chapter 6 Operator Control And Display Panel
UPS event Meanings
abnormal
Battery Reverse Reconnect battery and check battery wiring
Battery Unavailable Check battery and battery connections
AutoTurn On
Rectifier Online
Upgrading
Inverter Online Upgrading Upgrade the inverter software online
Monitor Online Upgrading Upgrade the monitoring software online
LBS abnormal LBS abnormal
DSP software fault The inverter software and rectifier software does not belong one same model of UPS
UPS shutdown due to battery discharging, and inverter starts up automatically when mains power
recovers
Upgrade the rectifier software online
7.7 Prompt Window
When the system is operating, it will pop up a prompt window when the system warns the user of some event or asks
the user to confirm some operation.
Prompt Window Meanings
Transfer with interrupt, please confirm or
cancel
The load is too high to be transferred with
interrupt
This Operation Leads to Output Shutdown,
Confirm or Cancel
This operation leads to inverter overload,
confirm or cancel
Turn on more UPS to carry current load
Battery will be depleted, confirm
System self test finished - everything is ok. No action required
System self test finished - Please check the
current warnings.
Enter control password Required for Battery or UPS test (default: 12345)
Battery Self Test aborted, condition not met
Battery Refresh Charge aborted, condition
not met
Tab.
Inverter and Bypass supplies are not synchronized and any load transfer between
the supplies will cause a brief load interruption
The total load must be less than the capacity of one unit to allow a parallel system
to perform an interrupted transfer from bypass to inverter
No alternative supply is available and any Inverter Off operation will cause the load
to be de-energised.Wait for User to Confirm or Cancel
Turning off this inverter will lead to the overload of remaining inverter(s) in a
parallel system.Wait for User to Confirm or Cancel
The number of paralleled inverters already turned on is insufficient to carry the
existing load.User needs to turn on more UPS modules
Battery Capacity test discharges the battery 100% and UPS will shut down.The
system will prompt to ask the User to confirm.Cancel to end the battery
discharging, and return to Normal mode
Check “Current Records” window
Battery self-test condition is not enough.User should check whether battery is in
boost charging state and whether load level is greater than 20 percent
When the user performs forced boost charging, but the boost charging condition is
not satisfied, such as no battery, charger has failed, etc., the system prompts this
message
7-14
: Prompt window and meanings
Tab. 7-13:
UPS event log
Page 65

Chapter 8 Optional Parts
This chapter introduces the optional parts of LIEBERT APM UPS. The optional parts should be installed before the
UPS installation.
8.1 Battery Ground Fault Detection Set
In addition to any residual current device mounted externally and upstream the UPS or when optional isolation
transformers are fitted to the UPS, an optional residual battery current device can be fitted to detect leakage current
so as to ensure the normal operation of the system. Residual current range monitored: 30mA ~ 3000mA
Power supply: 230Vac (L-N)
When a battery ground fault is detected, an alarm will appear on the UPS display panel.
An additional Dry contact fault Alarm signal is available for remote monitoring:
Terminal Name Definition
21 Common
22 NC
24 NO
Tab. 8-1: Dry contact fault alarm signal is available for remote monitoring
Battery Ground Fault Detection – can be programmed as Alarm or Pre-Alarm
Chapter 9 Product Specifications
The Battery ground fault detection set contains one CT (current transformer) and one DC sensitive residual current
monitor. The connection of this set for UPS is illustrated as follows:
Current transformer
Battery
Batt_+
Batt_N
Batt_-
Maintenance socket
Output neutral line
Output hot line
A1
A2
Battery grounding fault
W1-A358
K1
K2 I2 I2
detection device
B470(AC230)
11
14
Battery circuit
breaker or contactor
Monitoring
board-U2
4
+12V
IN DRY-X3
2
BtG
UPS
Fig. 8-1:
Wiring of battery ground fault detection set
LIEBERT APM UPS Module And Parallel System 30kVA~150kVA User Manual
Page 66

62 Chapter 9 Product Specifications
8.2 Replacing Dust Filters
Installing the two dust filters in the LIEBERT APM UPS requires only a Phillips screwdriver. Each filter is held in place
by a bracket on either side of each filter. To replace each filter:
1. Open the UPS front door and locate the filters on the back side of the front door (see Fig. 8-2).
2. Remove one bracket and loosen the screw on the second bracket. The second bracket need not be removed
3. Remove the dust filter to be replaced.
4. Insert the clean filter.
5. Reinstall the bracket, tightening the screw securely.
6. Tighten the screw on the second bracket.
1. Air Filter
1
Fig. 8-2:
Replacing Air Filters
Page 67

Chapter 9 Product Specifications
9.1 CONFORMITY AND STANDARDS
The UPS has been designed to conform to the following European and international standards:
Standards and Directives:
Item Normative reference
Low Voltage Directive
General and safety requirements for UPS
used in operator access areas
Electromagnetic compatibility (EMC)
requirements for UPS
Tab. 9-1: Compliance with European, international standards
The above mentioned product standards incorporate relevant compliance clauses with generic IEC and EN standards
for safety (IEC/EN/AS60950), electromagnetic emission and immunity (IEC/EN/ AS61000 series) and construction
(IEC/EN/AS60146 series and 60529). The APM output dynamic performances conforms the IEC62040-3 Class 3.
2006/95/EC with the Amendment Directive 93/68/EEC Directive for
electromagnetic compatibility 2004/108/EC
IEC/EN 62040-1 incorporating requirements of IEC/EN 60950-1
IEC/EN 62040-2: Immunity category C2, Emission category C2
Chapter 9 Product Specifications
9.2 PRODUCT SPECIFICATIONS
Item Unit 30kW 90kW 150kW
Acoustic noise level at 1 meter
full load
Acoustic noise level at 1 meter
half load
Altitude of Operation m
Relative Humidity - 0 to 95% non condensing
Operating Temperature °C 0 to 40°C *; Note: Battery life is halved for every 10°C increase above 20°C
UPS Storage-Transport
Temperature
Recommended Battery Storage
Temperature
• Conditions apply
AC/AC Efficiency Unit Data
Rated Power kVA 30~150
Normal mode ¹ (dual conversion)
Battery Mode
Normal Mode kW 1.2 2.4 3.6 4.8 6
No Load kW 0.6 1.2 1.8 2.4 3
Maximum forced air cooling (front
intake, rear exhaust)
$
Rated Power kVA 30 60 90 120 150
1) 400Vac input and output, battery fully charged, full-rated linear load.
2) Inverter Efficiency (DC/AC), battery at nominal voltage 432VDC and full-rated linear load
dB <53dBA <58dBA <62dBA
dB <52dBA <56dBA <58dBA
°C -20~70
°C -20°C to 30°C (20°C for optimum battery storage)
Tab. 9-2:
% 96
% 96
L/sec 48 96 144 192 239
Tab. 9-3: AC/AC Efficiency, Loss and Air Exchange
≤
1000m above sea level, derate power by 1% per 100m between 1000m
and 2000m
Environmental parameters
Heat Losses & Air Exchange
LIEBERT APM UPS Module And Parallel System 30kVA~150kVA User Manual
Page 68

64 Chapter 9 Product Specifications
Dimensions,
Number of Modules kVA 1 2 3 4 5
Weight, without battery modules kg 280 315 350 385 420
Power Module dimensions mm 440×132(3U)×650
Power Module weight kg 35
Battery Module dimensions mm 440×132(3U)×877
Battery Module weight kg 95
Battery Box dimensions mm 140×132(3U)×810
Battery Box weight kg 29
Modular Battery Cabinet dimension mm 600×1100×1996
Modular Battery Cabinet weight kg 250
Color N/A ZP7021
Protection Degree
W×D×H
IEC (60529)
mm 600×1100×1996
N/A IP20 (finger-proof with front doors open or closed)
Tab. 9-4: UPS mechanical characteristics
Rated Power, kVA Unit 30kW 60kW 90kW 120kW 150kW
Rated AC Input Voltage1 Vac
Input voltage range2 Vac 305V~477V, 304V~228V (output derating lower than 70%)
Frequency2 Hz 50/60Hz (range: 40Hz to 70Hz)
Power Factor kW/kVA, full load (half load) 0.99 (0.98)
Input power
Input current
THD THDI % < 4
kVA rated3 (
Amps rated3 (
maximum
maximum
4) 5
Tab.
Tab. 9999----5555::::
Tab. Tab.
4) 6
1. Rectifier operates at any of the rated supply voltages and frequencies without further adjustment.
2. At 305V input mains, the UPS maintains the specified output voltage at rated load without discharging a previously
charged battery.
3. EN 62040-3 / 50091-3: at rated load and input voltage 400V, battery charged
4. EN 62040-3 / 50091-3: at rated load and input voltage 400V,
5. Add 4.5kVA per each redundant module
6. Add 7A per each redundant module
Intermediate DC circuit
Rated Power, kVA Unit 30~150
Battery bus voltage Vdc
Quantity of
lead-acid cells
Float Voltage V/cell (VRLA)
Temperature
compensation
Ripple Voltage % V float
Ripple Current ~ C
Boost charge
Voltage
Nominal 216=[36x6cell (12V)blocks]
Maximum 240=[40x6cell (12V)blocks]
Minimum 180=[30x6cell (12V)blocks]
mV/C° - 3.0 (selectable 0 to – 5.0 around 25°C or 30°C or inhibit)
10
VRLA
Nominal: 432V (VRLA Float charge is 540V) 36 jars of 12V VRLA
2.25 V/cell (selectable from 2.2 –2.3V/cell),
- float-boost current trigger 0.050
Boost Control -
- boost-float current trigger 0.010 C10 (selectable 0.005-0.025)
380/400/415 V(three-phase and sharing neutral with the bypass
input)
33(37) 65 (74) 97(111) 129 (147) 161 (183)
47 (53) 93 (106) 139 (159) 185 (211) 231 (264)
Rectifier AC input (Utility)
battery charging at maximum rated power.
Range: 400V ~ 616V
Constant current and constant
voltage charge mode
≤
1
≤
5
2.35 V/cell (selectable from 2.30-2.40V/cell)
Constant current and constant voltage charge mode
24 hr safety time-out (selectable 8-30 hr)
boost charge mode inhibit also selectable
C
(selectable 0.030-0.070)
10
Page 69

Chapter 9 Product Specifications
1.63 V/cell (selectable from 1.60-1.750V/cell)
End Of Discharge V/cell (VRLA)
Battery Charge V/cell
# of Modules 1 2 3 4 5
Battery Charging
Power1 Max Current
(Adjustable) 2
Battery Charging
Power (kW)
Max Charging
Current A
4.5 9 13.5 18 22.5
11 22 33 44 55
Tab. 9-6:
Auto Inverse EOD voltage x discharge current mode
(The end of discharge voltage increases at low discharge currents)
2.4 V/cell (selectable from 2.3-2.4V/cell)
Constant current and constant voltage charge mode
Programmable auto trigger or inhibit of boost mode
Intermediate DC circuit
1. At low input voltage the UPS recharge capability increases with load decrease (up to the maximum capacity
indicated).
2. Maximum currents listed are for end of discharge voltage of 1.67 V/cell for 240 cells.
Rated Power, kVA kVA 30~150
Rated Power, kW kW 30~150 (Same kW as that of kVA)
Rated AC Voltage1 Vac 380/400/415 V(three-phase four-wire and sharing neutral with the bypass input)
Frequency2 Hz 50/60
<105% load, 60min
Overload capacity %
Fault Current %
Non linear load
capability3
Neutral current capability % 170%
Steady state voltage
stability
Transient voltage
response4
THD % < 1 (linear load), <4.0 (non linear load3)
Synchronisation Window
Max change rate of
synch frequency
% 100%
% ± 1 (balanced load)
% ±5
Hz/ s 0.2Hz/sec
141RMS Ampere each module short current limitation for 200msec,
Rated frequency ± 2 Hz (selectable ± 0.5 to ± 3Hz)
105%~125% load, 10min
125%~150% load, 1min
>150% load, 200ms
310%:
then inverter is turned off.
Tab. 9-7: Inverter output to critical load
1. Factory set to 400V – 380 or 415V selectable by commissioning engineer.
2. Factory set to 50Hz; 60 Hz selectable by commissioning engineer
. Frequency converter operation also selectable.
3. EN50091-3 (1.4.58) crest factor: 3:1
4. IEC62040-3/ EN 50091-3 also for 0-100-0% load transient. Transient recovery time: return to within 5% of steady
state output voltage within half a cycle.
Rated Power, kVA Unit 30~150
Rated AC Voltage1 Vac
Rated
current
Overload % 115% load, long term at 30° ambient temperature
i2 t A2 S 405000 @25°; 320000@130°
Suggested Upstream
protection, bypass line
Current rating of
neutral cable
380V
400V
415V
A 225
A 215
A 205
N/A
A 1.7×In
380/400/415Vthree-phase four-wire, sharing neutral with the rectifier input and providing
neutral reference to the output
Thermomagnetic circuit-breaker, rated up to 125% of nominal output current. IEC 60947-2
curve C.
LIEBERT APM UPS Module And Parallel System 30kVA~150kVA User Manual
Page 70

66 Chapter 9 Product Specifications
Frequency2 Hz 50/60
Transfer time (between
Bypass and Inverter)
Bypass voltage
tolerance
Bypass frequency
tolerance
Synchronisation Window
1. Factory set to 400V, 380 or 415V selectable by commissioning engineer.
2. Factory set to 50Hz; 60 Hz selectable by commissioning engineer
ms
%Vac
% ±10 or ±20, default ±10
Hz Rated frequency ± 2 Hz (selectable ± 0.5 to ± 3Hz)
Synchronous transfer: (< 2ms
Asynchronous transfer (default): 15 ms (50 Hz), 13.3 ms (60 Hz)
or 40, 60, 80, 100 ms selectable
Upper limit: +10, +15 or +20, default +15
Lower limit –10, -20, -30 or -40, default: -20 (delay time to accept steady bypass voltage: 10
sec)
Tab. 9-8: Bypass input
.
Page 71

Appendix 2 Hazardous Substances Or Elements Announcement 67
Appendix 1 Information for the protection of the Environment
This unit makes use of components dangerous for the environment (electronic cards, electronic components and
batteries). The components removed must be taken to specialized collection and disposal centers.
In case of complete unit dismantling, this operation shall be carried out by specialized personnel and the unit must be
taken to centers specialized in collection and disposal of dangerous substances.
Part name
Hex copper stud ×
PCBA ×
AC capacitor ×
DC capacitor ×
Fan ×
Cables ×
LCD × ×
Sensors ×
Large-medium power
magnetic components
circuit breaker / rotating
switch
Semiconductors ×
Battery (when
applicable)
Insulation monitoring
device (when
applicable)
○
: Means the content of the hazardous substances in all the average quality materials of the part is within the limits specified in
SJ/T-11363-2006
×: Means the content of the hazardous substances in at least one of the average quality materials of the part is outside the limits
specified in SJ/T11363-2006
Emerson Network Power Co., Ltd. has been committed to the design and manufacturing of environment-friendly products. It will
reduce and eventually eliminate the harzardous substances in the products through unremitting efforts in research.However,
limited by the current technical level, the following parts still contain hazardous substances due to the lack of reliable substitute or
mature solution:
1. All solders in the products contain lead
2. Copper alloy contains lead
3. Backlight bulb contains Mercury
4. The ceramic materials of the ceramic capacitor, the copper terminals and copper leads of metallic film capacity
5. The glass of resistor contains lead.
6. The glass of LCD contains lead, and the backlight lamp contains
7. The lead in the battery is determined by the battery feature and technical levels.
8. The insulation monitoring device contains
About Environment Protection Period: The Environment Protection Period of the product is marked on the product. Under normal
working conditions and normal use of the products observing relevant safety precautions, the hazardous substances in the product
will not seriously affect the environment, human safety or property in the Environment Protection Period starting from the
manufacturing date.
Lead Mercury Cadmium Chrome PBB PBDE
Pb Hg Cd Cr6+ PBB PBDE
×
×
×
×
Hazardous Substances or Elements Announcement
○
○
○
○
○
○
○
○
○
○
○
○
lead and PBDE.
○
○
○
○
○
○
○
○
○
○
○
○
○
Mercury.
○
○
○
○
○
○
○
○
○
○
○
○
○
○
○
○
○
○
○
○
○
○
○
○
○
○
×
contain lead.
○
○
○
○
○
○
○
○
○
○
○
○
LIEBERT APM UPS Module And Parallel System 30kVA~150kVA User Manual
Page 72

About battery: The battery life is dependent on the ambient temperature and charging / discharging times. The battery life will be
shortened if the battery is used under high temperature or in deep discharging status.Refer to product manual for details.
If a battery has leakage or is damaged, it must be replaced, stored in a container resistant to sulfuric acid and disposed of in
accordance with local regulations.
The waste lead-acid battery is a kind of hazardous waste and is one of the major contaminants controlled by government.
Therefore, its storage, transportation, use and disposal must comply with the national or local regulations and laws about the
disposal of hazardous waste and waste batteries or other standards.
According to the national laws, the waste lead-acid battery should be recycled and reused, and it is prohibited to dispose of the
batteries in other ways except recycling. Throwing away the waste lead-acid batteries at will or other improper disposal methods
will cause severe environment pollution, and the person who does this will bear the corresponding legal responsibilities.
As a lead-acid battery supplier, Emerson Network Power Co., Ltd. has set up a service network and a recycling system for waste
batteries so as to help the customers to dispose of the waste batteries properly. Please obtain the recycling system of Emerson
Network Power Co., Ltd. from the local Emerson office or nearest Emerson office. If the customer does not accept this requirement
or does not use the waste batteries recycling system set up by Emerson Network Power Co., Ltd., Emerson Network Power Co.,
Ltd. will not bear any responsibility due to improper disposal of the waste batteries.
NOTICE TO EUROPEAN UNION CUSTOMERS: DISPOSAL OF OLD APPLIANCES
This product has been supplied from an environmentally aware manufacturer that
complies with the Waste Electrical and Electronic Equipment (WEEE) Directive
2002/96/CE.
The “crossed-out wheelie bin” symbol at right is placed on this product to encourage
you to recycle wherever possible. Please be environmentally responsible and recycle
this product through your recycling facility at its end of life. Do not dispose of this
product as unsorted municipal waste. Follow local municipal waste ordinances for
proper disposal provisions to reduce the environmental impact of waste electrical and
electronic equipment (WEEE).
For information regarding the scrapping of this equipment please contact your closest Emerson Representative
.
Page 73

.
F.Ortigas Jr Road, Ortigas Center
While every precaution has been taken to ensure
the accuracy
without notice
Ref.: SL
-
54321_REV_3.6
Emerson Network Power
Emerson
Network
Power
.com
Ensuring The High Availability
Of Mission-Critical Data And Applications.
Emerson Network Power, the global leader in enabling business-critical
continuity, ensures network resiliency and adaptability through
a family of technologies – including Liebert power and cooling
technologies – that protect and support business-critical systems.
Liebert Solutions employ an adaptive architecture that responds
to changes in criticality, density and capacity. Enterprises benefit
from greater IT system availability operational flexibility and
reduced capital equipment and operating costs
And completeness of this literature, Liebert Corporation assumes no
responsibility and disclaims all liability for damages resulting from use of
this information or for any error or omission.
©2010 Liebert Corporation
All right reserved throughout the world. Specifications subjected to change
® Liebert is a registered mark of Liebert Corporation
All names referred to are trademarks
or registered trademarks of theirs respective owners
Technical Support / Service
Web Site
www.liebert.com
Monitoring
liebert.monitoring@emerson.com
800-222-5877
Outside North America:+00800 1155 4499
Single-Phase UPS & Server Cabinets
Liebert.upstech@emerson.com
800-222-5877
Outside North America:+00800 1155 4499
Three-Phase UPS & Power Systems
800-543-2378
Outside North America +1 614 -841-6598
Environmental Systems
800-543-2778
Outside the United States +1 614 -888-0246
Locations
United States
1050 Dearborn Drive
P.O. Box 29186
Columbus Ohio 43229
United States
Europe
Via Leonardo Da Vinci 16/18
Zona Industriale Tognana
35028 Piove Di Sacco (PD) Italy
Tel.: +39 049 9719111
Fax: +39 049 5841 257
Asia
29/F, The Orient Square Building
Pasig City 1605
Philippines
Tel.: +63 2 687 6615
Fax: +63 2 730 9572
The global Leader in enabling Business-Critical Continuity.
AC Power
Connectivity
DC Power
Business Critical continuity, Emerson network power and Emerson Network Power Logo are trademarks and services marks of Emerson Electric Co.
©2010 Emerson Electric Co.
Embedded Computing
Embedded Power
Monitoring
Outside Plants
Power Switches & Controls
Precision Cooling
Racks & Integrated Cabinets
Services
Surge Protection
 Loading...