

Vertiv KMMLED156 Installer/user Manual

KMMLED156 Rack Mount 15.6" Console Tray
for Dell EMC
Installer/User Guide

The information contained in this document is subject to change without notice
and may not be suitable for all applications. While every precaution has been
taken to ensure the accuracy and completeness of this document, Vertiv
assumes no responsibility and disclaims all liability for damages resulting from
use of this information or for any errors or omissions. Refer to other local
practices or building codes as applicable for the correct methods, tools, and
materials to be used in performing procedures not specifically described in this
document.
The products covered by this instruction manual are manufactured and/or sold
by Vertiv. This document is the property of Vertiv and contains confidential
and proprietary information owned by Vertiv. Any copying, use or disclosure of
it without the written permission of Vertiv is strictly prohibited.
Names of companies and products are trademarks or registered trademarks of
the respective companies. Any questions regarding usage of trademark names
should be directed to the original manufacturer.
Technical Support Site
If you encounter any installation or operational issues with your product, check the pertinent section of this
manual to see if the issue can be resolved by following outlined procedures. For additional assistance, visit
https://www.VertivCo.com/en-us/support/.
Vertiv | KMMLED 156 Rack Mount 15.6" Console Tray for Dell EMC Installer/Us er Guide

TABLE OF CONTENTS
1 Overview 1
1.1 Safety Precautions 1
1.2 General 1
2 Installation 3
2.1 Installing the Slide Rails in a Standard EIARack 3
2.2 Installing the KMMLED156 Console Tray Assembly 7
2.3 Securing the Cable Management Arm (CMA) 9
2.4 Connecting the KMMLED156 Assembly 10
3 Operating the Console 13
3.1 Using the OSD Menus and Submenus 13
3.2 OSD Menu Options 14
4 Appendices 17
Appendix A: Technical Specifications 17
Appendix B: USB2.0 Speed Chart 18
Appendix C: KMMLED156 Console Tray Assembly Maintenance 19
Appendix D: Vertiv™ KVM Switch Bracket Kit (DRMK-81) 24
Vertiv | KMMLED156 Rack Mount 15.6" Console Tray for Dell EMC Installer/User Guide | i

Vertiv | KMMLED156 Rack Mount 15.6" Console Tray for Dell EMC Installer/User Guide | ii

1 OVERVIEW
The Vertiv™ KMMLED156 local rack access system provides keyboard, monitor and mouse functionality within a 1U rack
space. This system includes the KMMLED156 console and slide tray assembly and a separate slide rail kit. The two
provided video cables are the VGA cable (installed) and the replacement DisplayPort cable. A customer-provided DVI
cable can also be used.
Features include:
• Modular KMM console designed for easy system installation and console service
• VGA, DisplayPort and DVI video inputs
• Removable USB keyboard for quick exchange or replacement
• Tool free start to finish for standard installations
• Dual USB 2.0-compliant passthrough ports
NOTE: Separating the KMMLED156 console from the slide tray can make it easier to position and install the slide tray
into the rack-mounted slide rails. See for instructions to remove the KMMLED156 console from the slide tray.
NOTE: The slide rail kit (DRMK-82), is included with the KMMLED156 console tray. If it is necessary to install the slide
rails on your rack, see Installing the Slide Rails in a Standard EIARack on page 3 and Replacing the slide rail
assemblies on page 23.
NOTE: The console assembly is configured with a VGA video cable. If you plan to use a DisplayPort video monitor
source, you must replace the VGA cable with the provided DisplayPort cable or a customer-supplied DVI cable before
you install the console assembly into the rack-mounted slide rails. See Replacing the video cable on page 23.
NOTE: KVM switch bracket kit (DRMK-81) is available to install certain Dell EMC branded KVM appliances within the
same 1U rack mount space as the KMMLED156 console tray. The slide rail kit (DRMK-82), included with the
KMMLED156 console tray, is compatible with the Vertiv™ KVM switch bracket kit. See Vertiv™ KVM Switch Bracket Kit
(DRMK-81) on page 24 for installation instructions.
1.1 Safety Precautions
Use the following safety guidelines to help ensure your own personal safety and to help protect your system and working
environment from potential damage.
WARNING! The power supplies in your system may produce high voltages and energy hazards, which can
cause bodily harm. Only trained service technicians are authorized to remove the covers and access any of
the components inside the system.
This document pertains only to the KMMLED156Rack Mount 15.6" Console Tray for Dell EMC. You should also read and
follow the additional safety instructions in the following user guides:
• KMMLED156 Rack Mount 15.6" Console Tray for Dell EMC Quick Installation Guide
• Safety, Environmental and Regulatory Guide
1.2 General
Review and observe the following safety instructions:
• Observe and follow service markings.
Vertiv | KMMLED156 Rack Mount 15.6" Console Tray for Dell EMC Installer/User Guide | 1

• Do not service any product except as explained in your system documentation.
• Opening or removing covers that are marked with the triangular symbol with a lightning bolt may expose you
to electrical shock.
• Components inside these compartments should be serviced only by a trained service technician.
• Do not attempt to open this product unless you have proper service documentation.
• If any of the following conditions occur, unplug the product from the electrical outlet and replace the part or
contact your trained service provider:
• The power cable, extension cable, or plug is damaged.
• An object has fallen into the product.
• The product has been exposed to water.
• The product has been dropped or damaged.
• The product does not operate correctly when you follow the operating instructions.
• Keep your system away from radiators and heat sources.
• Do not spill food or liquids on your system components, and never operate the product in a wet environment. If
the system gets wet, see the appropriate section in your troubleshooting guide or contact Technical Support.
• Use the product only with approved equipment.
• Allow the product to cool before removing covers or touching internal components.
• Operate the product only from the type of external power source indicated on the electrical ratings label. If you
are not sure of the type of power source required, consult your service provider or local power company.
NOTE: To help avoid damaging your system, be sure the voltage selection switch (if provided) on the power supply is
set for the voltage that most closely matches the AC power available in your location. Also be sure that all devices are
electrically rated to operate.
• Be sure that your monitor and attached devices are electrically rated to operate with the power available in
your location.
• Use only power cables provided with this product.
• To help prevent electric shock, plug the system and peripheral power cables into properly grounded electrical
outlets. These cables are equipped with three-prong plugs to help ensure proper grounding. Do not use
adaptor plugs or remove the grounding prong from a cable.
• Observe extension cable and power strip ratings. Make sure the total ampere rating of all products plugged
into the power strip does not exceed 80 percent of the ampere ratings limit for the power strip.
• To help protect your system from sudden, transient increases and decreases in electrical power, use a surge
suppressor, line conditioner or uninterruptible power supply (UPS).
• Position the system cables and power cables carefully. Route the cables so that they cannot be stepped on or
tripped over. Be sure that nothing rests on any cables.
• Do not modify the power cables or plugs. Consult a licensed electrician or your power company for site
modifications. Always follow your local/national wiring rules.
Vertiv | KMMLED156 Rack Mount 15.6" Console Tray for Dell EMC Installer/User Guide | 2

2 INSTALLATION
The provided slide rails must be installed prior to installing the KMMLED156 console assembly.
CAUTION: If you are installing more than one unit concurrently, keep the outer slides matched with the inner
slides that are mounted on the slide tray. Rails and slide trays that ship together must be paired together.
Mismatched pairs may result in damage to the slide rail assemblies, slide tray or rack cabinet.
2.1 Installing the Slide Rails in a Standard EIARack
The slide rail assemblies are marked L for the left rail assembly and R for the right rail assembly. The front of both
assemblies are marked FRONT to ensure proper installation in the rack.
The slide rail mounting mechanism has two spring-loaded pins at each end of the rail assembly that retract. The pins fit 1032 threaded holes or EIA-standard square- or round-hole racks. The spring-loaded pins self-adjust to adapt to the rack rail
holes.
NOTE: Each set of spring-loaded sleeves is equipped with release tabs to pull and disengage the slide rail assembly.
To install the slide rail assemblies into a rack:
1. Align the two back spring-loaded pins of the slide rail assembly with the corresponding holes on the rack and
pull to secure.
2. Extend the rail assembly to the appropriate length of the rack.
3. Align the two front spring-loaded pins of the slide rail assembly with the corresponding holes on the rack and
push to secure.
NOTE: The release tabs click to indicate the pins are fully engaged.
4. Repeat the steps for the rail on the opposite side of the rack.
Vertiv | KMMLED156 Rack Mount 15.6" Console Tray for Dell EMC Installer/User Guide | 3
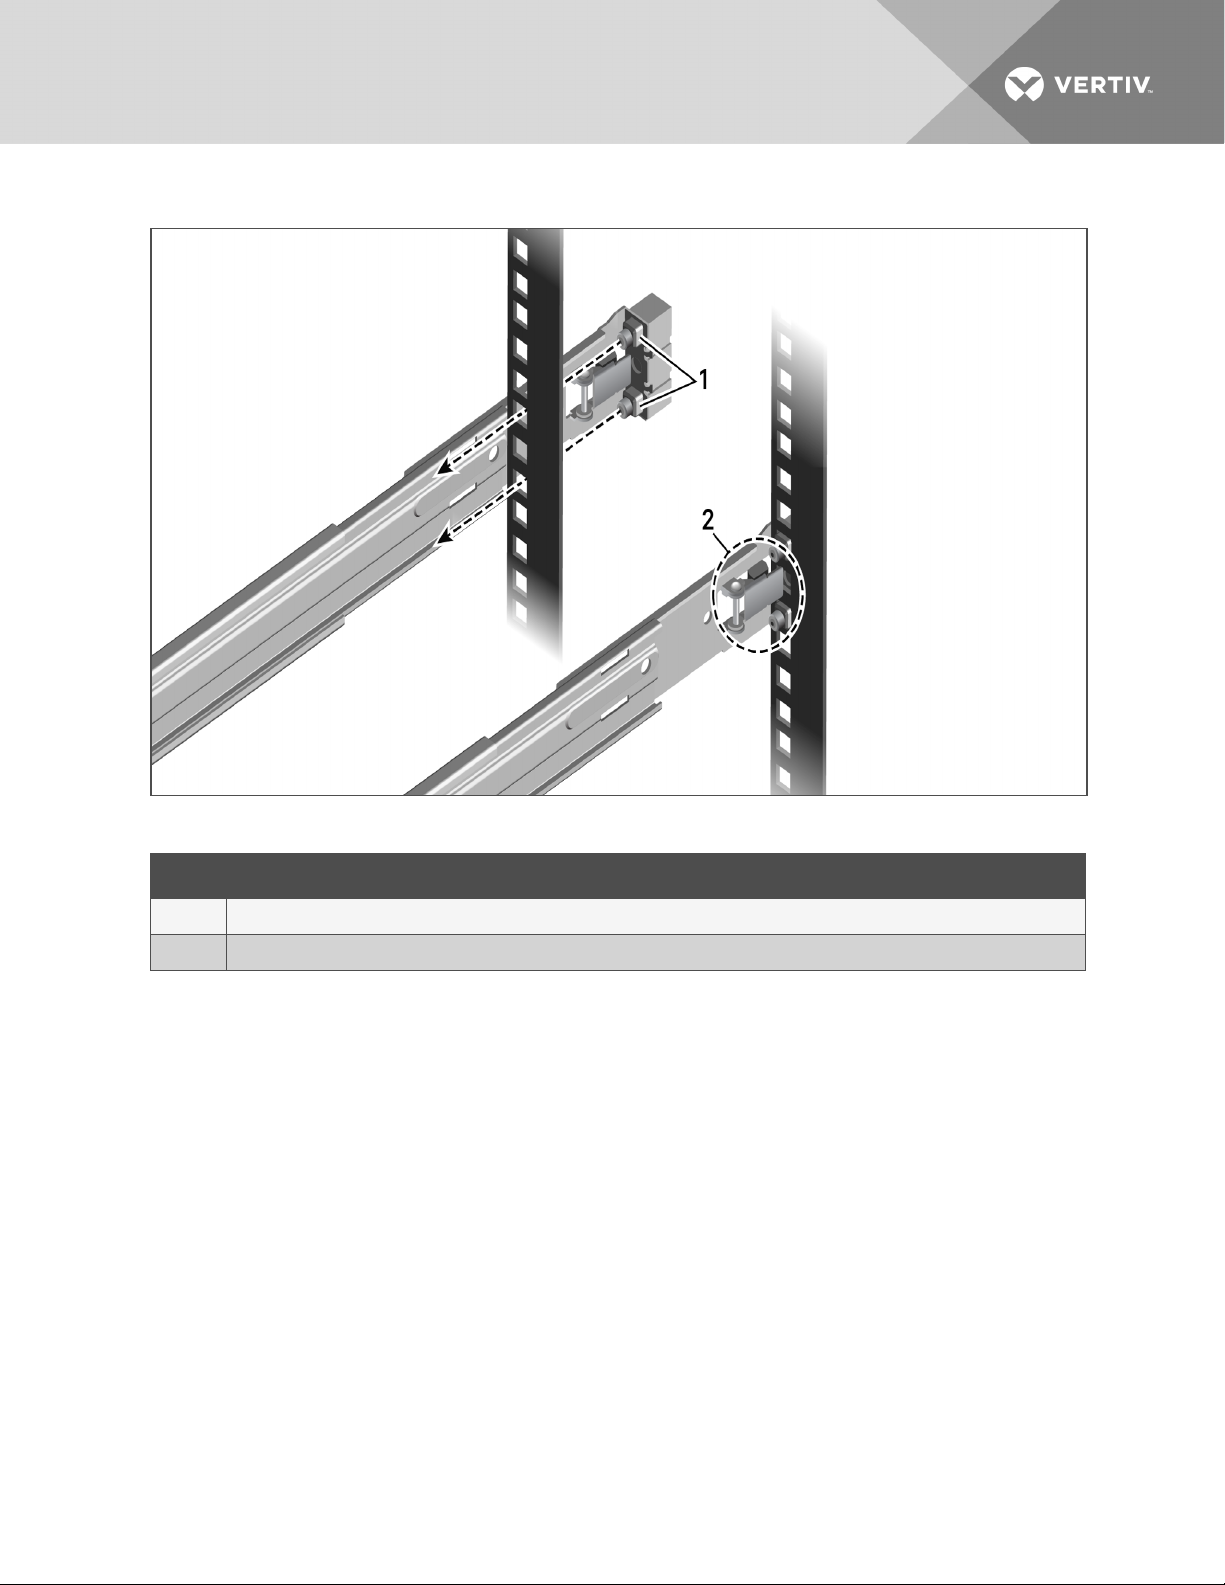
Figure 2.1 Slide Rail Assembly Installation (Square-hole Configuration Shown)
Table 2.1 Slide Rail Assembly Components
ITEM DESC RIPTION
1 Spring-loaded pins
2 Release tab
Vertiv | KMMLED156 Rack Mount 15.6" Console Tray for Dell EMC Installer/User Guide | 4
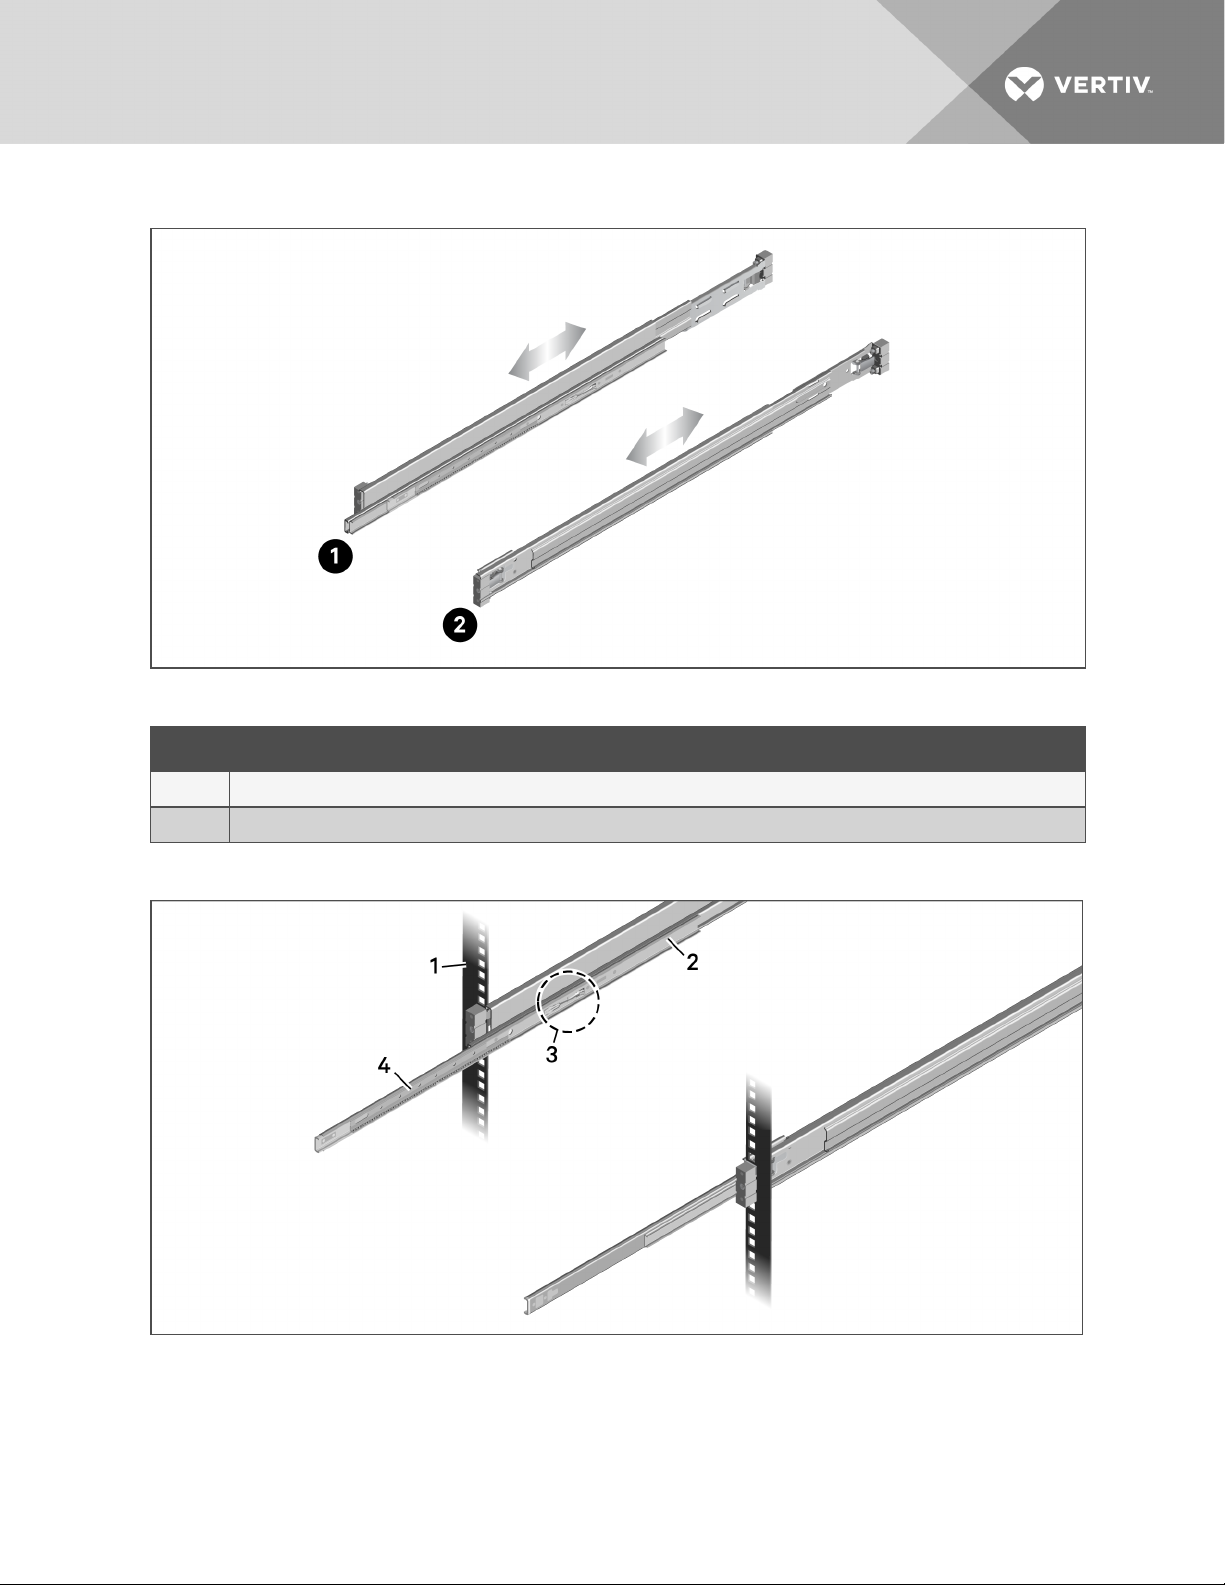
Figure 2.2 Extending the Left and Right Rail Assemblies
Table 2.2 Slide Rail Assemblies
ITEM DESC RIPTION
1 Left slide rail assembly
2 Right slide rail assembly
Figure 2.3 Outer Slide Rail Extension
Vertiv | KMMLED156 Rack Mount 15.6" Console Tray for Dell EMC Installer/User Guide | 5
 Loading...