

Page 1

One Talk T46G and
T46GW IP desk
phone user guide
www.onetalk.com
T46G and T46GW IP desk phone user guide
Page 2

Contents
Welcome ...................................................................................................................................................................................................................................4
Initial setup ............................................................................................................................................................................................................................ 4
Connect to broadband and power. ..................................................................................................................................................................... 4
Wi-Fi connectivity (optional) .................................................................................................................................................................................... 4
Startup and initialization .............................................................................................................................................................................................. 4
View E911 address. ......................................................................................................................................................................................................... 4
Getting to know your desk phone ................................................................................................................................................................ 5
Hardware components ................................................................................................................................................................................................ 5
Navigating the display ................................................................................................................................................................................................... 6
LED light status ...................................................................................................................................................................................................................7
Indicators and notifications on LCD display .................................................................................................................................................7
Customize your desk phone. .............................................................................................................................................................................8
Basic settings ...................................................................................................................................................................................................................... 8
Language preferences ................................................................................................................................................................................................. 8
Time, date and time zone settings ...................................................................................................................................................................... 8
Display settings ..................................................................................................................................................................................................................9
Backlight .................................................................................................................................................................................................................................. 9
Sound settings ..................................................................................................................................................................................................................10
Bluetooth headset setup ............................................................................................................................................................................................ 11
Line keys ............................................................................................................................................................................................................................... 12
Voice Mail setup .............................................................................................................................................................................................................. 13
Basic call features ...................................................................................................................................................................................................... 13
Make and receive calls............................................................................................................................................................................................... 13
Manage multiple lines. ................................................................................................................................................................................................ 13
Ignore a call. ....................................................................................................................................................................................................................... 13
End a call. ............................................................................................................................................................................................................................. 13
Hold a call. ............................................................................................................................................................................................................................ 13
Mute/unmute. .................................................................................................................................................................................................................... 13
Redial. ...................................................................................................................................................................................................................................... 13
Advanced call features ...........................................................................................................................................................................................14
One Talk feature access codes .......................................................................................................................................................................... 14
Block a call. ......................................................................................................................................................................................................................... 14
On e Ta lk—T46G and T46GW des k phone user gui de 2
PREVIOUS | CONTENTS | NEXT
Page 3

Contents
Bridge Line .......................................................................................................................................................................................................................... 15
Call Barge ............................................................................................................................................................................................................................. 15
Call Forwarding ................................................................................................................................................................................................................ 16
Call Move .............................................................................................................................................................................................................................. 16
Caller Line ID Block ...................................................................................................................................................................................................... 16
Conference Calling ........................................................................................................................................................................................................17
Do Not Disturb ...................................................................................................................................................................................................................17
Remote Group Pickup ..................................................................................................................................................................................................17
Call History ........................................................................................................................................................................................................................... 18
Contact management .............................................................................................................................................................................................. 18
Local Directory ................................................................................................................................................................................................................. 18
Groups .................................................................................................................................................................................................................................... 21
System status, troubleshooting and
other settings ................................................................................................................................................................................................................... 22
Check phone status. ................................................................................................................................................................................................... 22
Reboot phone or reset it to factory settings. ........................................................................................................................................... 23
Specifications ...................................................................................................................................................................................................................24
Features ..................................................................................................................................................................................................................................24
Accessibility features ..................................................................................................................................................................................................25
Compatible accessories ...................................................................................................................................................................................... 26
Important customer information ................................................................................................................................................................27
WEEE warning .................................................................................................................................................................................................................. 27
Customer feedback ......................................................................................................................................................................................................27
GNU GPL information .................................................................................................................................................................................................27
Copyright ..............................................................................................................................................................................................................................27
Warranty ................................................................................................................................................................................................................................27
Important 911 emergency response information ....................................................................................................................................27
Declaration of conformity ....................................................................................................................................................................................... 28
Important safety precautions ...............................................................................................................................................................................28
Danger–electric shock and fire .......................................................................................................................................................................... 28
T46 desk phone navigation guide ............................................................................................................................................................. 29
On e Ta lk—T46G and T46GW des k phone user gui de 3
PREVIOUS | CONTENTS | NEXT
Page 4
Welcome
The Verizon T46G and T46GW IP desk phones are
stationary Voice-over-IP (VoIP) business phones that
support One Talk
programmable line buttons. They come with a 4.3-inch
color display and 10 multipurpose line key buttons. The
T46G supports optional Wi-Fi for wireless connection
and Bluetooth® for hands-free calling. The T46GW
ships with the Wi-Fi adapter included.
Most importantly, both models support the Verizon One
Talk service. So, wherever you are—at your desk or on
the move—you never have to miss a call.
SM
from Verizon features with up to 22
Initial setup
If your T46G desk phone is not already connected and
set up for using the Verizon One Talk service, please
verify the following with your system administrator
before proceeding:
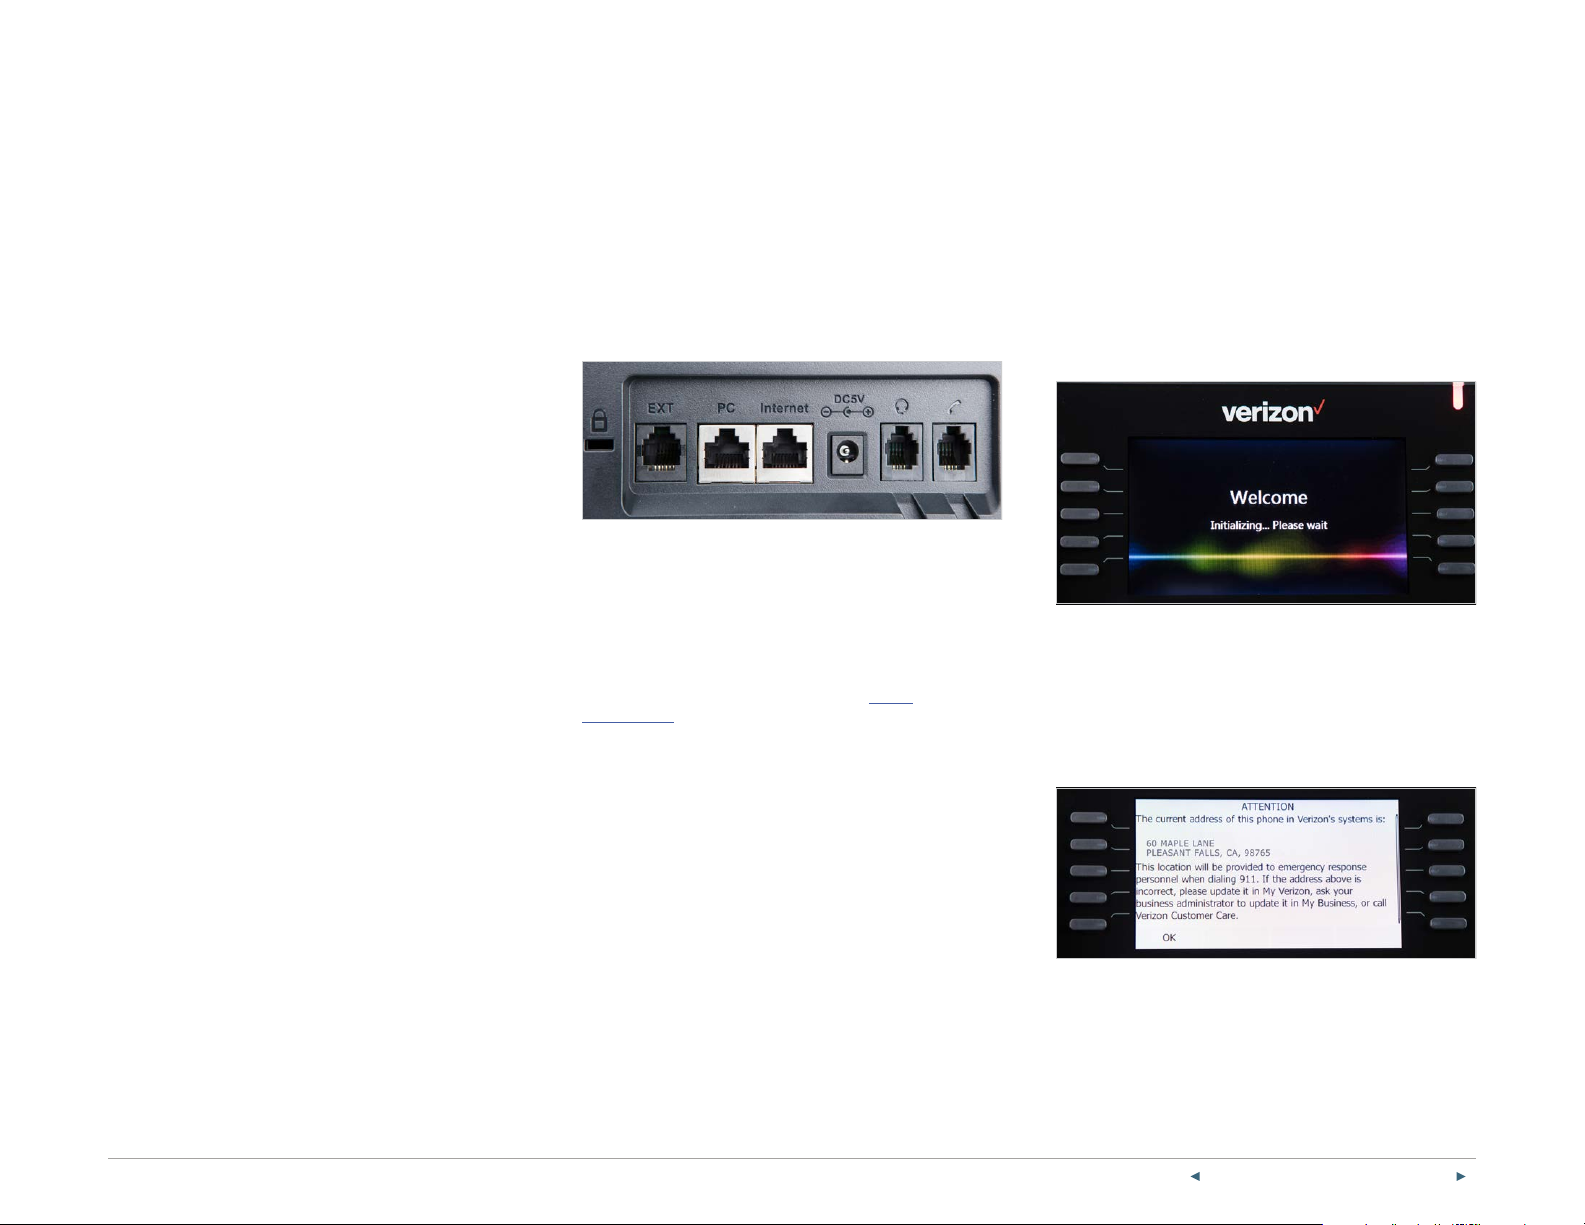
Connect to broadband and power.
Power
You have two options for broadband and power
connections. Your system administrator will advise you
on which one to use.
Network
Connect the included standard Ethernet cable (or other
standard Ethernet cable) between the internet port on
the phone and the port on the wall or on your Power
over Ethernet (PoE)-capable switch/hub device.
Startup and initialization
When your One Talk phone is connected to the
network and powered on, it will automatically start the
initialization process. The phone will attempt to contact
a Dynamic Host Configuration Protocol (DHCP) server
in your network to obtain valid IPv4 network settings by
default. After connecting, the power light will start as a
steady red light, then blink and turn o when
initialization is complete.
After startup, and confirming the 911 address, the
phone will be ready for use.
1. You have a One Talk number.
2. Your user information has been updated in the One
Talk Admin portal with your 911 address and email
address.
3. Your phone number has been included in any
business group features.
4. Preferred options for broadband and power
connections.
Wi-Fi connectivity (optional)
As an alternative to wired Ethernet connection,
the T46G desk phone can also connect to the
network wirelessly with the optional WF40 Wi-Fi
USB dongle. The T46GW ships with a Wi-Fi adapter
already installed.
For setup instructions, please refer to Wi-Fi
connectivity in the “Basic settings” section of this
user guide.
View E911 address.
Emergency 911 (E911) is a location technology that
enables emergency responders to know the
geographical location of a caller dialing 911.
To view your 911 address, press the 911 Address line
key to the right of the LCD screen.
PREVIOUS | CONTENTS | NEXT
4On e Ta lk—T46G and T46GW des k phone user gui de
Page 5
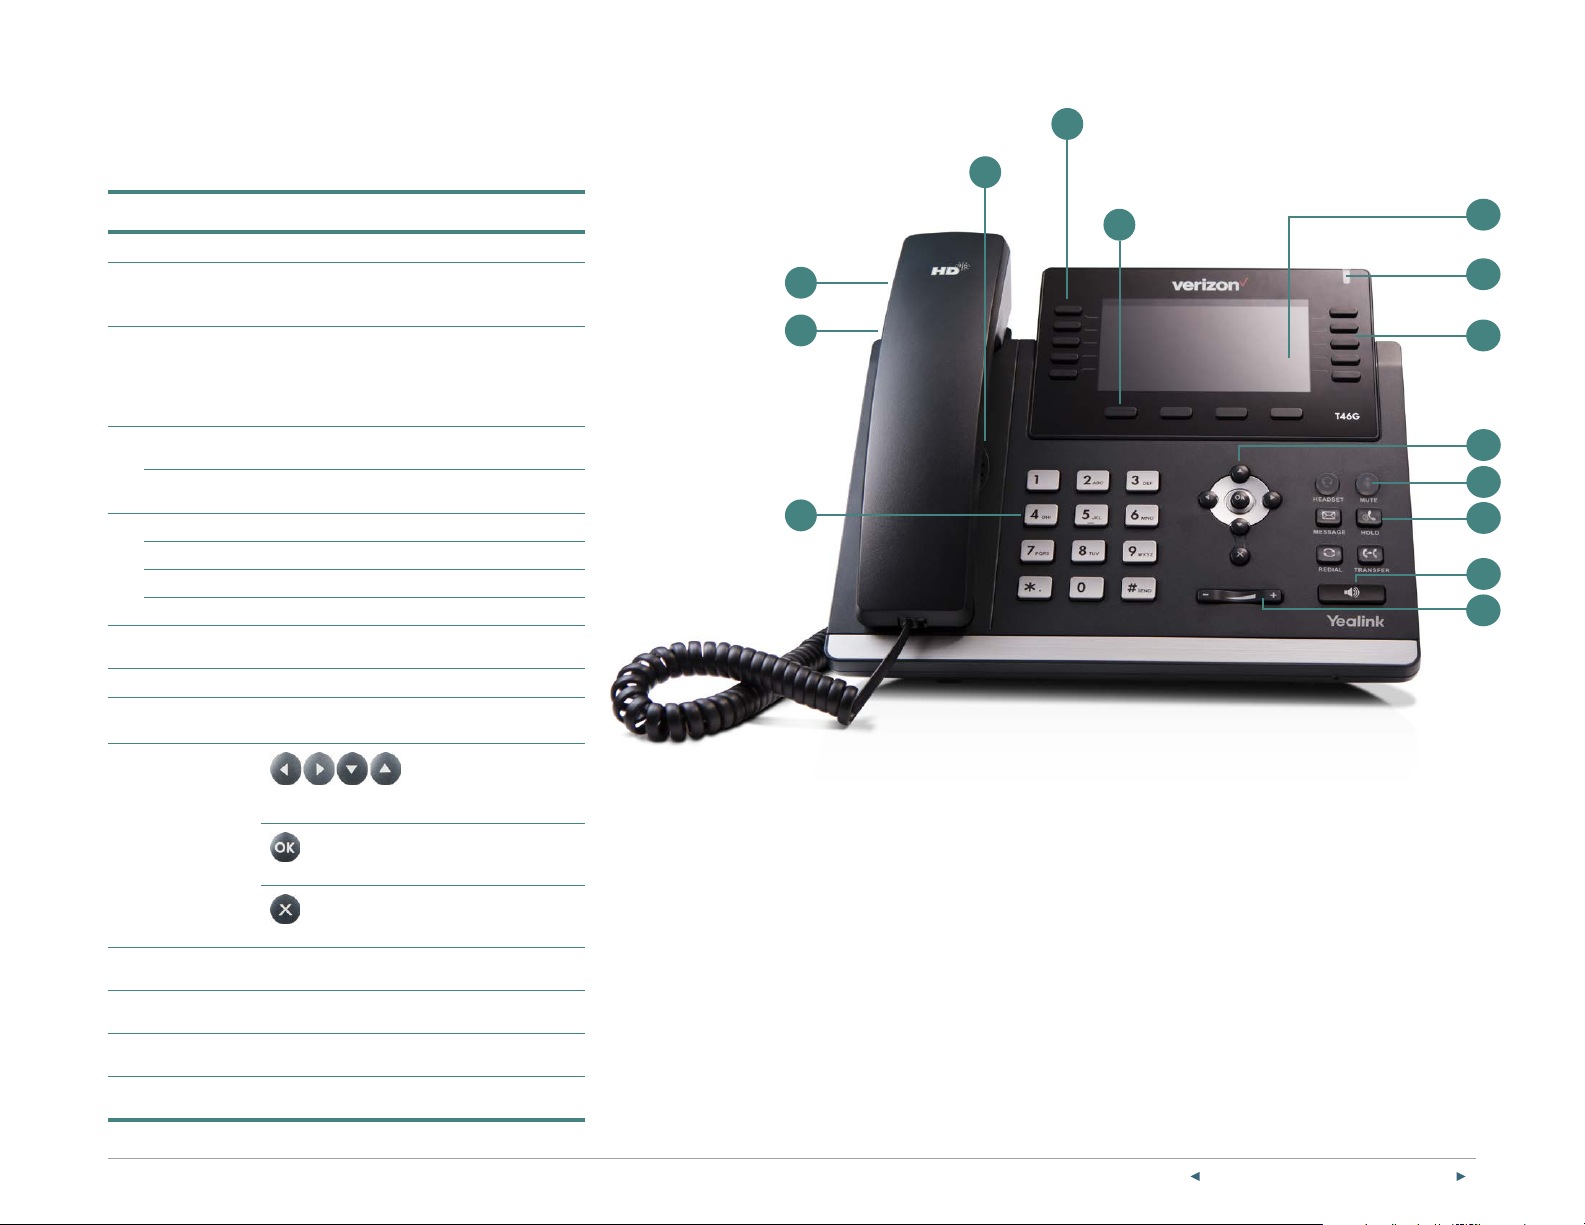
Getting to know your desk phone
Hardware components
3
11
Item Description
1 LCD screen Main display
Power indicator
2
LED
3 Line keys
Headset key
4
Mute key
Message key Access Voice Mail system and messages.
Hold key Place and resume calls on hold.
5
Redial key Redial last or previously dialed numbers.
Transfer key Transfer a call to another party.
Speakerphone
6
key
7 Volume key Adjust call and ringer volume.
8
Keypad
Indicates phone power and status:
• Fast flash—incoming call
• Slow flash—new Voice Mail message
Configurable keys enable you to:
• Select a phone line to place a call.
• Speed dial a favorite contact.
• Answer incoming calls.
• Monitor a shared line.
Enable/disable headset mode and
indicates status.
Mute/unmute microphone and
indicates status.
Enable/disable speakerphone and
indicates status.
Alphanumeric interface for dialing numbers
or entering information
Allows you to scroll through the
displayed information
13
12
8
10
1
2
3
9
4
5
6
7
9
Control pad
10 Feature keys
11 Speaker Provides hands-free speakerphone audio output
12 Hookswitch tab
13 Hookswitch
Confirms actions or answers incoming calls
Cancels actions or rejects incoming calls
Context-sensitive keys to navigate and take
action depending upon the screen you are on
Secures the handset in the cradle when phone
is mounted vertically
Connects/disconnects phone line when handset
is removed/replaced in the handset cradle
PREVIOUS | CONTENTS | NEXT
5On e Ta lk—T46G and T46GW des k phone user gui de
Page 6
Navigating the display
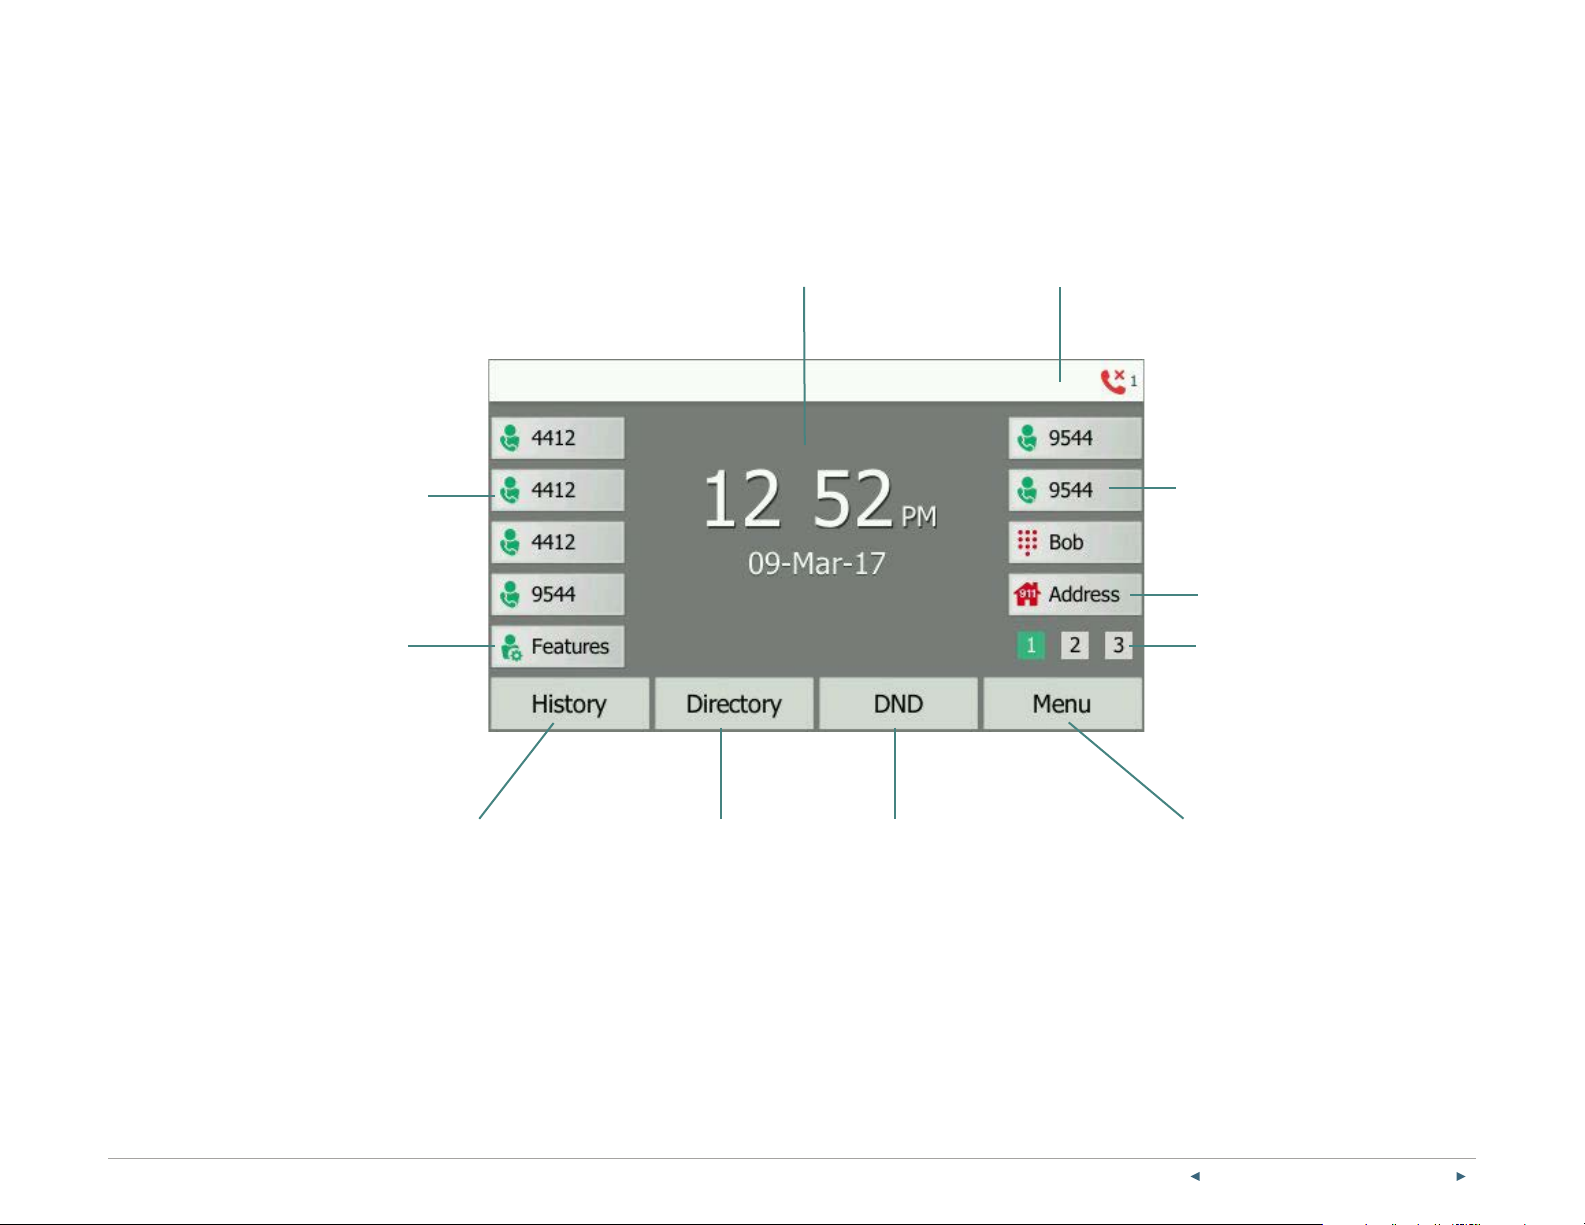
The Idle screen is the primary screen for accessing all
other menus and features on the T46G LCD display.
The phone will automatically return to this screen after
60 seconds of inactivity.
Main window Status bar
Line key labels
Feature settings
• Call Forward
• Anonymous Call Rejection
• Forward to Voice Mail
• Start Log Capture
Call History
• All calls
• Missed calls
• Placed calls
• Received calls
• Forwarded calls
Local Directory
• All contacts
• Groups
• Blacklist
Do Not Disturb
Line key labels
911 address
Toggle between
pages
Main menu
• Basic settings
• Advanced settings
• Status
• Directory
• History
• Message
PREVIOUS | CONTENTS | NEXT
6On e Ta lk—T46G and T46GW des k phone user gui de
Page 7
LED light status
Power indicator LED
LED status
What it means
indicator
Solid red The phone is initializing.
Fast flashing red
Slow flashing red
Off
The phone is ringing or
downloading configuration files.
You have received a new
Voice Mail message.
The phone is not in use or
powered off.
Line key LED (configured as a phone line)
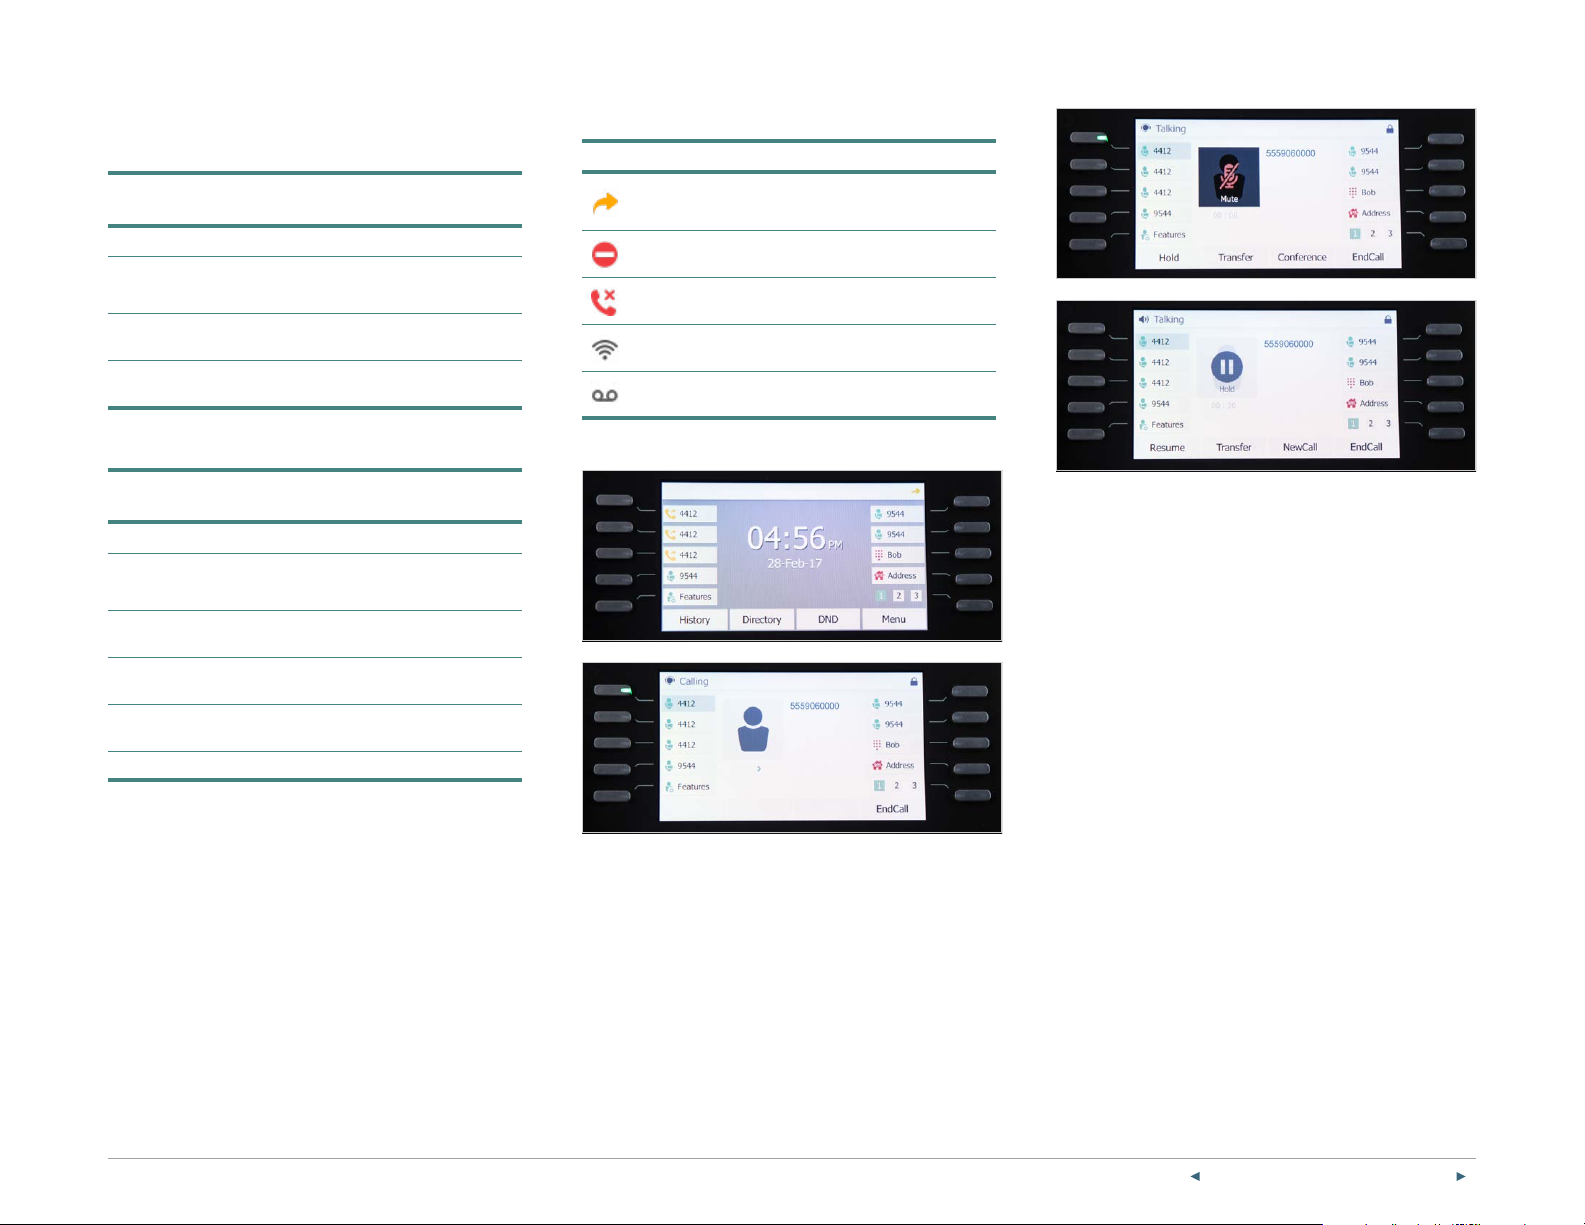
Indicators and notifications on LCD display
Icon What it means
Call Forward enabled; receiving
incoming call on that line
Do Not Disturb (DND) is enabled.
Missed call
Wi-Fi enabled
New Voice Mail message
LED status
What it means
indicator
Solid green The line is busy.
Fast flashing green Receiving incoming call on that line
Slow flashing green
Slow flashing red
Solid red Line in use on another device
Off The line is inactive.
Line placed on hold from
this device
Line placed on hold from
another device
PREVIOUS | CONTENTS | NEXT
7On e Ta lk—T46G and T46GW des k phone user gui de
Page 8
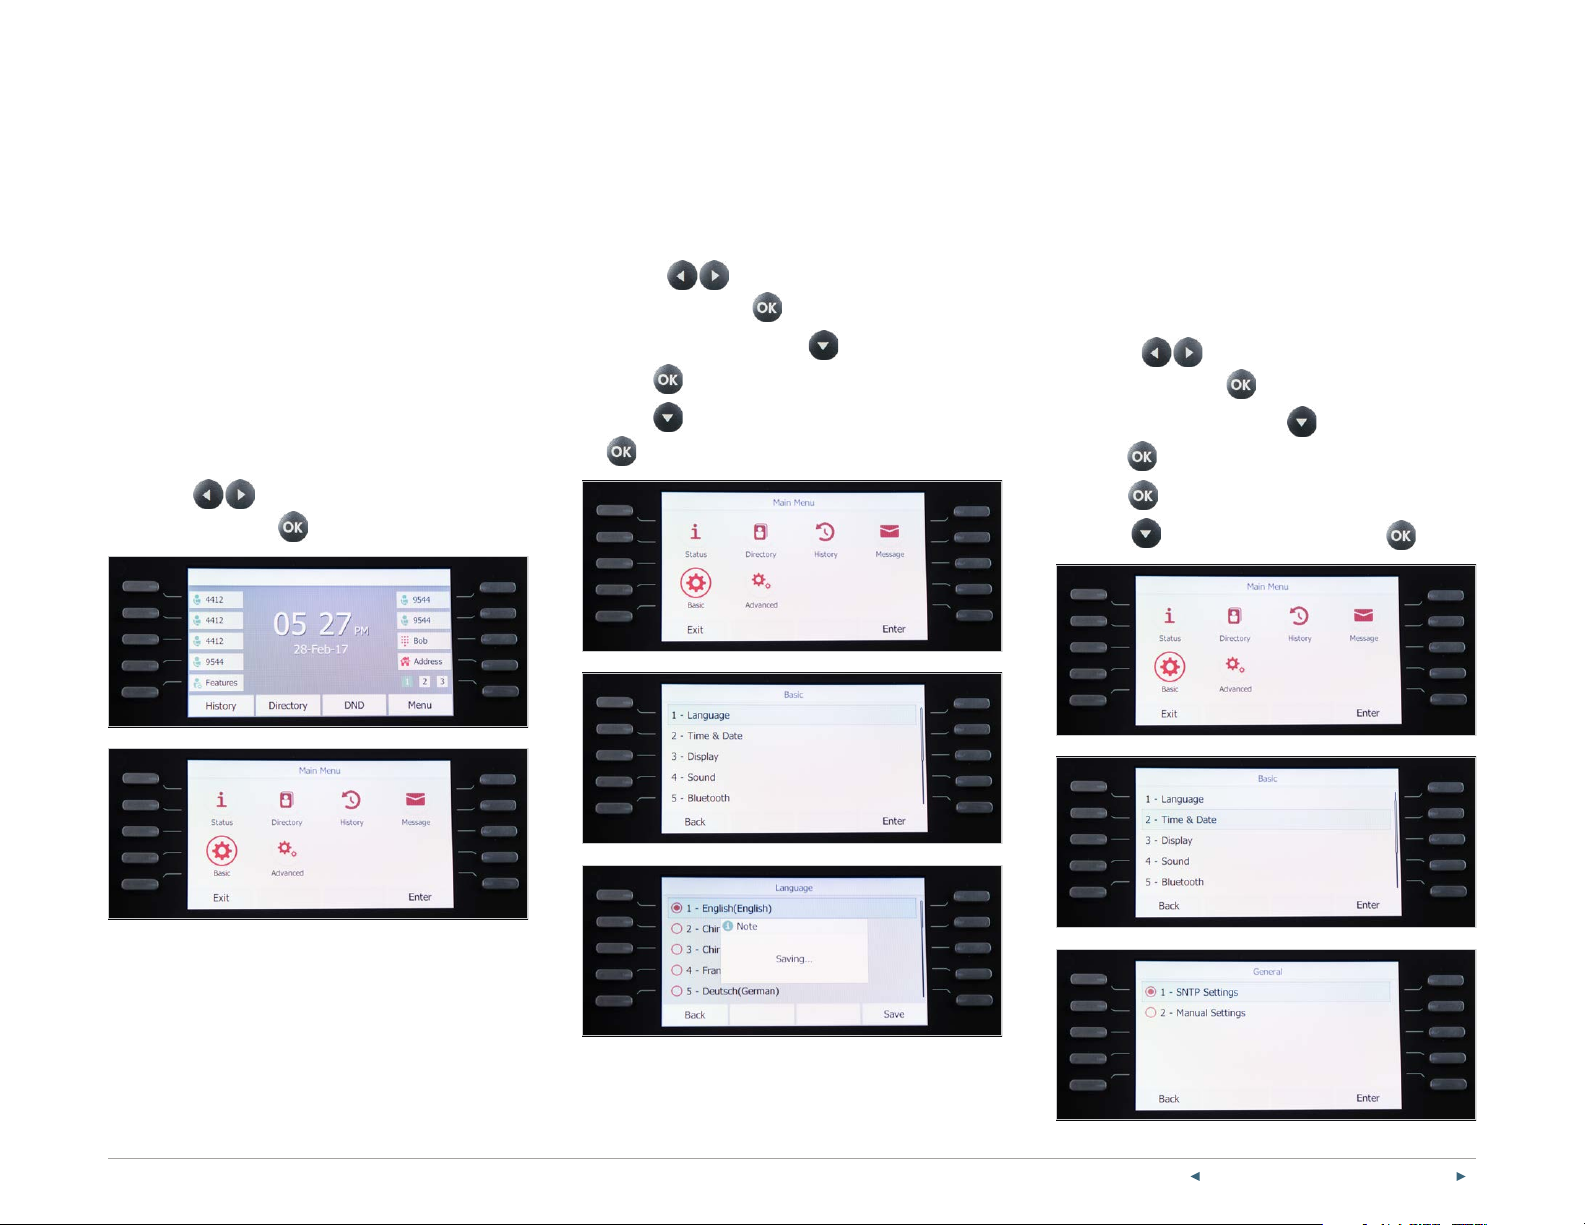
Customize your desk phone.
Basic settings
Setup and preference options for the following can be
found in the Basic settings screen:
• Language preferences
• Time and date
• Display settings
• Ringtone and key tone sound settings
• Bluetooth headset setup
• Wi-Fi connectivity
To access Basic settings:
1. Press the Menu soft key while the phone is idle.
Language preferences
The default language of the phone’s user interface
is English.
To change language of phone user interface:
1. Press the Menu soft key while the phone is idle.
2. Use the
settings and press
3. From Basic settings, scroll
press
4. Scroll
to select.
arrow keys to navigate to Basic
to select.
to Language and
to select.
to your preferred language and press
Time, date and time zone settings
Time and date are displayed in the middle of the status
bar. You can configure your time zone to synchronize
with the address that your system administrator used
when setting up One Talk for your location. You can
also set your preferred format for displaying time and
date in the Time & Date settings screen.
Configure time zone to synchronize with 911 address:
1. Press the Menu soft key while the phone is idle.
2. Use the
settings and press
3. From Basic settings, scroll
press
arrow keys to navigate to Basic
to select.
to Time & Date and
to select.
2. Use the
settings and press
arrow keys to navigate to Basic
to select.
4. Press
5. Scroll
to select General.
to SNTP settings and select .
PREVIOUS | CONTENTS | NEXT
8On e Ta lk—T46G and T46GW des k phone user gui de
Page 9
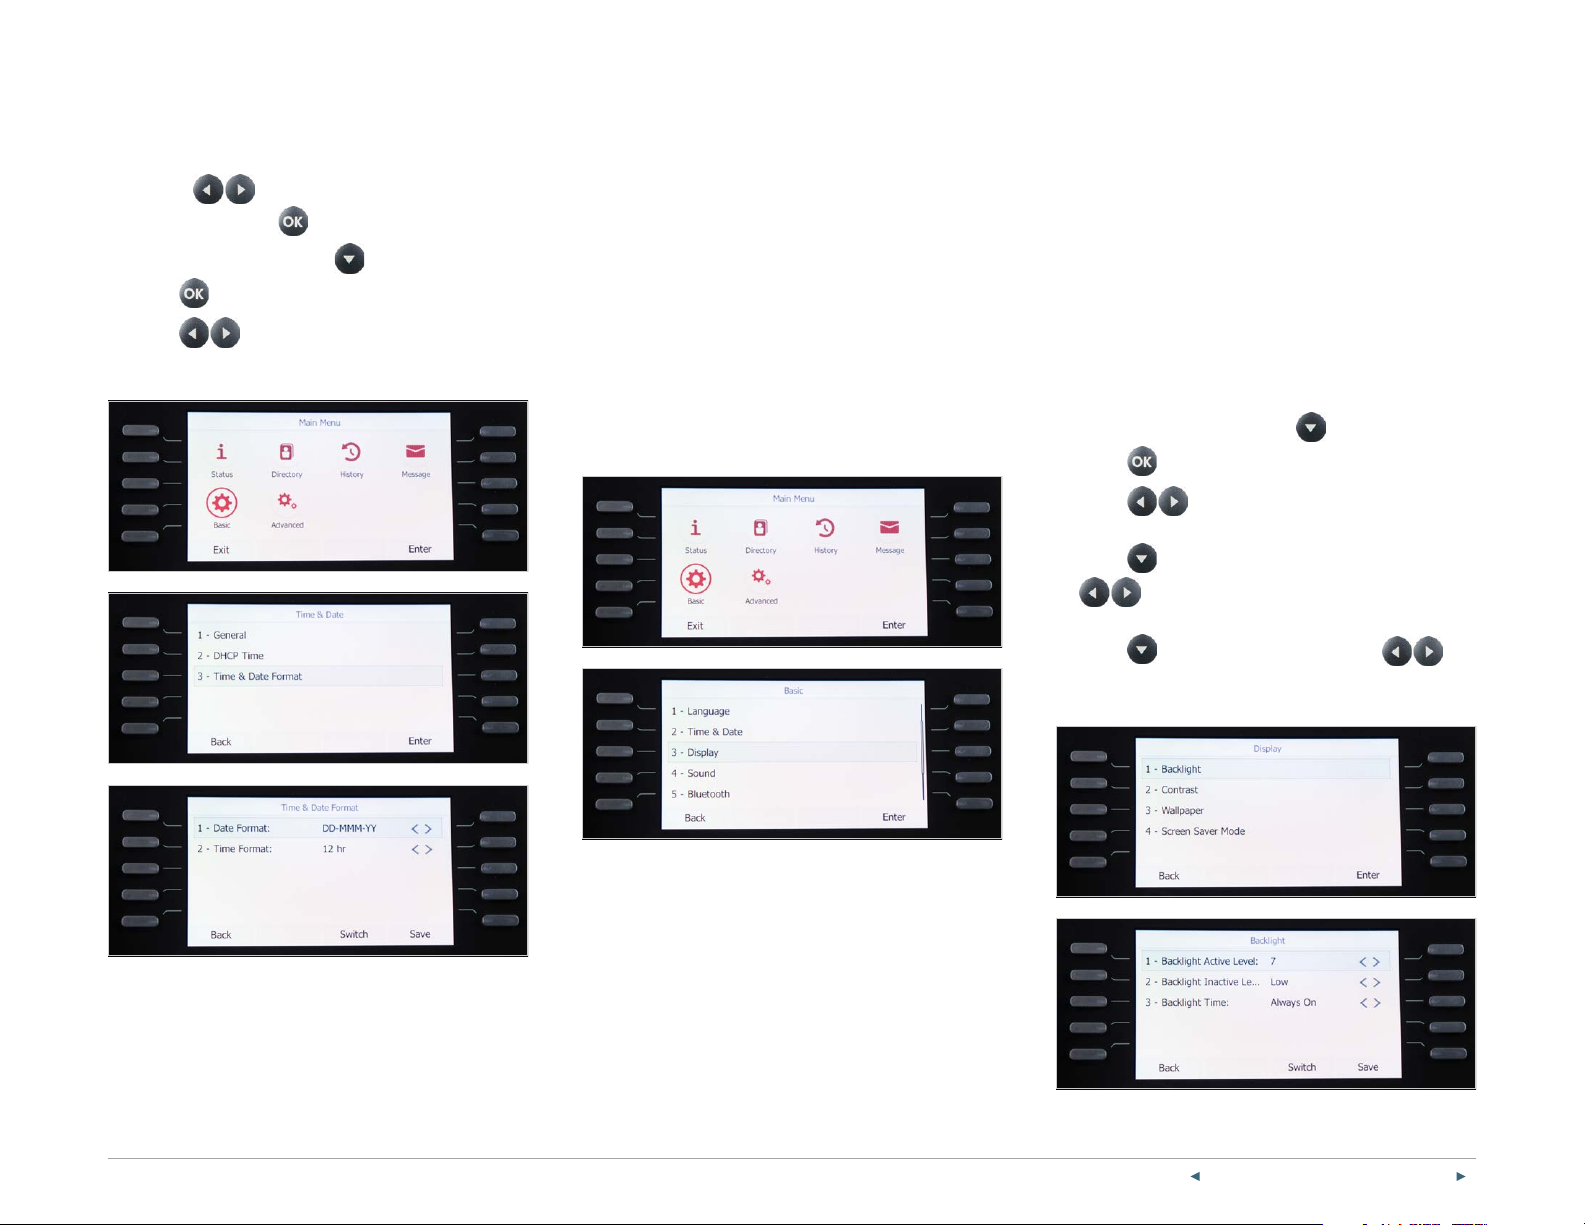
Set time and date format preferences:
1. Press the Menu soft key while the phone is idle.
2. Use the
settings and press
3. From Basic settings, scroll
press
4. Scroll
time formats and press the Save soft key to accept
the changes.
arrow keys to navigate to Basic
to select.
to Time & Date and
to select.
to select your preferred date and
Display settings
There are four options for personalizing the LCD
display of your T46G desk phone. Select Menu > Basic
> Display to navigate to the Display settings screen.
• Backlight. Set the brightness of your LCD display.
• Contrast. Personalize the sharpness of your
LCD screen.
• Wallpaper. Change the background color of your
LCD screen.
• Screen saver mode. Configure your screen to
automatically dim or display time and date after the
phone has been inactive for a predetermined amount
of time. You can stop the screen saver and return to
the idle screen at any time pressing any
key on the phone.
Backlight
There are two options for setting backlight
preferences:
Backlight Active Level – sets the brightness of the LCD
screen when the phone is active. Brightness levels go
from 1 to 10, with 10 being the brightest setting.
Backlight Inactive Level – enables low-light mode when
the phone is inactive for a designated period. You can
configure the amount of time the phone must be
inactive before switching to low-light mode. You can
also turn o the backlight completely when inactive.
Configure backlight settings:
1. From Display settings, scroll
press
to select.
to Backlight and
2. Scroll
preferred screen brightness.
3. Scroll
desired value.
4. Scroll
the Switch soft key to select the desired value.
5. Press the Save soft key to accept the changes.
Backlight Active Level to your
to Backlight Inactive Level, then use
or the Switch soft key to select the
to Backlight Time, then use or
PREVIOUS | CONTENTS | NEXT
9On e Ta lk—T46G and T46GW des k phone user gui de
Page 10

Contrast settings:
1. From Display settings, scroll
press
2. Scroll
to select.
or use the Switch soft key to
to Contrast and
increase or decrease the desired contrast.
3. Press the Save soft key to accept the changes.
Wallpaper settings:
Screen saver mode
Configure your screen saver:
1. From Display settings, scroll
Mode and press
2. Scroll
to select.
or use the Switch soft key to view
to Screen Saver
options and press the Save soft key to select.
Sound settings
Sound settings is where you can configure ringtones
and key tones (keypad tones). Selecting a dierent
ringtone than those of your neighbors can help
distinguish your phone from other incoming calls.
Key tones provide audible cues when pressing
conference buttons.
Select Menu > Basic > Sound to navigate to the Sound
settings screen.
1. From Display settings, scroll
press
2. Scroll
wallpaper options and press the Save soft key
to select.
or use the Switch soft key to view
to Wallpaper and
to select.
PREVIOUS | CONTENTS | NEXT
10On e Tal k—T4 6G and T46GW desk phon e user guide
Page 11

Ringtones:
1. From Sound settings, scroll
press
to select.
to Ringtones and
2. Highlight the line you wish to change the ringtone for
or select Common to change the ringtone for all
lines. Press Enter or
3. Use
to preview ringtone options and press
to make your selection.
the Save soft key to select.
Key tones:
1. From Sound settings, scroll
press
2. Use
to select.
or the Switch soft key to enable or
to Ke y To n e and
disable Key Tones and press the Save soft key to
accept the changes.
Call volume
To adjust call volume, press
Key while on an active call.
Volume
Ringer volume
To adjust the ringer volume, press
Volume Key when the phone is inactive.
Bluetooth headset setup
Your T46G desk phone supports wireless headsets
with the optional BT40 Bluetooth USB Stick. Before you
enable Bluetooth, make sure the BT40 is properly
connected to the USB port on the back of the phone.
Pair your Bluetooth headset:
1. From Basic settings, scroll
press
2. Use
to select.
or the Switch soft key to enable or
disable Bluetooth and press the Save soft key to
accept the changes.
The T46G desk phone will list paired devices. If you
have not previously paired your headset, press the
Scan soft key and follow the pairing instructions that
came with your Bluetooth device.
The LCD screen will display
when enabled.
to Bluetooth and
Bluetooth icon
PREVIOUS | CONTENTS | NEXT
11On e Ta lk—T46G and T46GW desk ph one user guide
Page 12

Wi-Fi connectivity
Before setting up a wireless broadband connection,
please make sure the One Talk desk phone is
connected to its power adapter and that no Ethernet
cable—either for wired Ethernet or PoE—is connected.
Insert the WF40 Wi-Fi USB dongle into the USB port in
the back of the phone. You should see the Wi-Fi signal
indicator appear in the notification bar.
1. From Basic settings, scroll
to select.
2. Use
disable Wi-Fi and press the Save soft key to accept
the changes.
The T46G desk phone will automatically scan for
nearby Wi-Fi networks. Select the network you wish to
connect to and enter your Wi-Fi password if required.
or the Switch soft key to enable or
to Wi-Fi and press
Line keys
Your T46G comes with 22 configurable line keys.
You can use them to create one-button speed dials for
frequently dialed numbers. To view all lines, press the
1
2 3
Pages key on the idle screen to toggle to
additional line key pages.
Configure line keys for speed dial:
1. Press and hold an unused line key (for about five
2. Use
3. Scroll
4. Press the Save soft key to accept your changes.
seconds).
or the Switch soft key to scroll
through the type of line keys available until you
locate Speed Dial.
to complete each of the
following fields:
• Account ID: Select the phone line/number that will
dial out.
• Label: Enter the name you would like displayed on
the line key label.
• Value: Enter the phone number you would like this
line key to dial.
You can now use this line key to speed dial
this contact.
PREVIOUS | CONTENTS | NEXT
12On e Tal k—T4 6G and T46GW desk phon e user guide
Page 13

Access additional line keys:
1
To access additional line keys, press the
Pages key (last line key on the right of the screen) to
toggle between pages.
2 3
Voice Mail setup
To set up your Voice Mail:
1. Press
voice prompts.
2. Select your preferred language.
3. Create your four-digit passcode.
4. Record your name at the voice prompt.
5. Select a greeting, either personalized or standard.
See Voice Mail for more information.
Message button and follow the
Basic call features
Make and receive calls.
Calls can be made using the handset, speakerphone, or
through a connected headset.
Using the handset:
To place a call, pick up the handset, enter the phone
number via the keypad and press the Send soft key.
To answer a call, simply pick up the handset.
Using the speakerphone:
With the handset on hook, press
incoming call, or enter a phone number and press Send
to make a hands-free speakerphone call.
to answer an
Using a headset:
With the headset connected, press
incoming call, or enter a phone number and press Send
to make a hands-free call.
Note: During a call, you can alternate between these
methods by pressing the Headset or Speakerphone
keys, or by picking up the handset. Headset mode
requires a connected headset.
From your Call History:
1. Press the History soft key when the phone is idle.
2. Scroll
entry. You can also filter your view by navigating
or Forwarded Calls.
3. Press the OK soft key to dial the number.
From the Local Directory:
1. Press the Directory soft key when the phone is idle.
2. Scroll
entry. You can also filter your view by navigating
or Forwarded Calls.
3. Press the OK soft key to dial the number.
All Calls to highlight the desired
Missed Calls, Placed Calls, Received Calls
All Calls to highlight the desired
Missed Calls, Placed Calls, Received Calls
to answer an
Manage multiple lines.
The telephone number assigned to your desk phone
gives you three dierent lines to place and receive calls.
Each line is represented by a line key with your One
Talk number. You can use these lines to simultaneously
hold three separate conversations or conference in up
to six participants.
Ignore a call.
Press Ignore during an incoming call when you wish to
trigger the Call Forwarding options you configured for
Call Forward Busy or Call Forward No Answer.
End a call.
To end a call, press End Call.
Hold a call.
To place a call on hold, press or the Hold soft key
during an active call.
To resume the call, do one of the following:
One call on hold:
Press
Multiple calls on hold:
Press the desired line key.
or the Resume soft key.
Mute/unmute.
Press to mute or un-mute the microphone during
a call.
Redial.
Press twice while the phone is idle to dial out to
the last number dialed.
To view a longer list of placed calls, press
to scroll to the desired number. Press
again or the OK soft key to place your call.
and use
Receiving incoming calls while the line is in use:
Press the line key with the flashing red indicator to
answer the call. You can also press Hold to place the
current call on hold. Then you can:
• Press Answer to pick up the incoming caller.
• Press Ignore to trigger your Call Forward Busy and
Call Forward No Answer configuration.
PREVIOUS | CONTENTS | NEXT
13On e Tal k—T4 6G and T46GW desk phon e user guide
Page 14

Advanced call features
Enable Anonymous Call Rejection:
Blacklist a contact from your directory:
One Talk feature access codes
Feature Feature access code
Anonymous Call
Rejection
Caller Line ID Block **67 then dial
Direct Transfer to
Voice Mail
Remote Group
Pickup
**77 to enable
**87 to disable
Transfer > **55 > dial extension >
Direct
**98
For the complete list of quick access codes, check out
our One Talk feature access codes FAQ.
Block a call.
There are two ways to block incoming calls from ringing
your phone:
1. Anonymous Call Rejection blocks incoming calls
that restrict the display of their outgoing caller
ID information.
2. Blacklist allows you to specify contact names and
Call History numbers from which you do not wish to
receive calls.
1. Press the Features line key while the phone is idle.
2. Scroll
to Anonymous Call Rejection and press
to select.
3. Use
to make your selection.
to highlight ON or OFF and press
Note: You can also turn Anonymous Call Rejection on
by dialing **77. To turn the feature o, dial **87.
1. Press the Directory soft key while the phone is idle.
2. Locate the contact you wish to blacklist by
selecting All Contacts or the Group to which the
contact belongs.
3. Use
the Options sof t key.
to navigate to the contact and press
4. Select Add to Blacklist.
PREVIOUS | CONTENTS | NEXT
14On e Ta lk—T46G and T46GW desk ph one user guide
Page 15

Blacklist a contact from your Call History:
1. Press the History soft key while the phone is idle.
2. Use
blacklist and press the Options soft key.
3. Select Add to Blacklist.
to navigate to the number you wish to
Remove a contact from a blacklist:
1. Press the Menu soft key while the phone is idle.
2. Press the Directory soft key, then press Blacklist.
3. Scroll
unblock and press Options.
4. Select Add to Contacts and press OK to accept
the change.
to highlight the contact you wish to
Bridge Line
The One Talk Bridge Line feature lets you use your own
desk phone to receive and place calls on behalf of
other phone numbers. Incoming calls to those
telephone numbers will ring on your desk phone. You
can also use those other numbers to place calls directly
from your own desk phone.
Configure another phone number to your desk phone:
Your organization’s One Talk service administrator can
configure bridged devices by logging into the My
Business Verizon One Talk Admin Portal.
Monitoring and answering calls for a bridged number:
1. When a call is made to a shared line, it will appear on
your screen.
2. Press the appropriate line key to answer the call.
The monitored phone’s status display will now show
that the line is busy.
Once a call is answered on a bridged line, you will have
access to the same features that are available on your
own desk phone line.
Call Barge
Any bridged line or other device that shares a number
with you can use the Call Barge feature to join a
call in progress. Call Barge is especially useful
for admins when it is urgent that a manager be
reached immediately.
Before you can use Call Barge, your service
administrator must configure the barge function in the
One Talk Admin Portal.
Barge in on a call to your One Talk number or
bridged line:
1. Press and hold the line key* in use for approximately
five seconds.
2. Press the Barge soft key to barge in on the
active call.
*The line key indicator will light steady green when the
line is busy (on an active call).
PREVIOUS | CONTENTS | NEXT
15On e Tal k—T4 6G and T46GW desk phon e user guide
Page 16

Barge-In warning tone:
One Talk can be configured to notify you when
another user barges in on a call. For more information,
refer to the User Portal Guide or contact your
systems administrator.
Call Forwarding
This feature allows incoming calls to automatically ring
another phone number or to be sent directly to Voice
Mail, depending on your preferences. The following
options are available:
Call Forward Always
Forwards all calls made to your One Talk phone number
to an alternative phone number. Calls can be forwarded
to any domestic U.S. and 800 number.
Call Forward Busy
Forward to Voice Mail:
1. Press the Features line key while the phone is idle.
2. Select Forward to Voicemail and press to select.
Call Move
When you share your One Talk number with other
devices, you can move an active call between any of
these devices without disconnecting. You may share
your One Talk number with up to five dierent devices,
including mobile phones and tablets.
Move a call:
To move a call from your desk phone to mobile device,
simply place the call on hold by pressing the Hold
soft key. You may then continue the conversation by
retrieving the call from your mobile device.
Retrieve a call from your desk phone:
If you placed a call on hold from another One Talk
device, the line key on your desk phone will flash red.
Press the line key to pick up the call and continue
your conversation.
Forwards calls to an alternative number when your One
Talk number is busy. Calls can be forwarded to any
domestic U.S. and 800 number.
Call Forward No Answer
Forwards calls to an alternative phone number when
there is no answer at your One Talk number.
Call Forward to Voice Mail
Automatically forwards calls made to your One Talk
phone number to your Voice Mail box, where callers
can leave a voice message.
To configure Call Forwarding:
1. Press the Features soft key while the phone is idle.
2. Select Call Forward and press
3. Use
forwarding option and press
one option can be enabled at a time.)
4. Use
disable the feature, then scroll
and enter the number to which you wish to forward
calls. Press the Save soft key to accept the changes.
to navigate to your preferred
or the Switch soft key to enable or
to select.
to select. (Only
to Forward to:
Caller Line ID Block
You can opt to place outgoing calls anonymously by
pressing **67 prior to dialing. This will prevent your
phone number or any other Caller ID information from
appearing on the recipient’s display.
PREVIOUS | CONTENTS | NEXT
16On e Tal k—T4 6G and T46GW desk phon e user guide
Page 17

Conference Calling
One Talk 6-way Conferencing enables you to have up
to six dierent parties participating in a single
conference call. During an active call, follow these
instructions to add and merge up to four more lines to
your conference.
To start a conference call:
1. Press the Hold soft key during an active call, then
press New Line.
2. Enter the number of the second party, then press
the Send soft key.
3. After the second party answers, press the
Conference soft key. All parties are now joined
in the conference.
4. Repeat steps 1 to 3 to hold up to a 6-way
Conference Call.
Do Not Disturb
When enabled, Do Not Disturb (DND) will reject all
incoming calls automatically. Depending on how you
configure other devices that share your One Talk
number, the call may ring on another device or be
forwarded to Voice Mail.
Enable or disable Do Not Disturb:
1. Press the DND soft key to enable or disable
the feature.
2. Your desk phone will not ring while the screen
displays DND.
Consultative Transfer:
Consultative Transfer allows you to dial and speak to
the person before you transfer the call.
1. Press
call. This will place the call on hold.
2. Enter the 10-digit phone number or extension you
want to transfer to and press the Consult soft key.
When the second party answers, advise them of
the transfer.
3. Press
to complete.
Direct Transfer:
Direct Transfer enables you to immediately transfer an
active call. This feature will make it appear that the
current caller directly dialed the second caller.
or the Transfer soft key during an active
or the Transfer soft key
Remote Group Pickup
One Talk helps ensure that calls are answered by
associating lines with groups (Inside Sales, for
example). If your administrator has assigned your line to
a specific group, Remote Group Pickup enables you to
remotely pick up a group member’s ringing line from
your own desk phone.
Dial **98 from your desk phone to remotely pick up a
group member’s ringing line.
Transferring calls
You may transfer an active call to any other phone
number, regardless of service provider (it does not have
to be a One Talk number). There are three transfer
options: Consultative Transfer, Direct Transfer, and
Direct Transfer to Voice Mail.
1. Press
call. This will place the call on hold.
2. Enter the 10-digit phone number or extension you
want to transfer to and press the Direct soft key to
complete the transfer.
Direct Transfer to Voice Mail:
Direct Transfer to Voice Mail enables you to transfer a
call to someone else’s Voice Mail.
1. Press
call. This will place the call on hold.
2. Press **55 then enter the 10-digit phone number or
extension you want to transfer to.
3. Press the Direct soft key to complete the transfer.
or the Transfer soft key during an active
or the Transfer soft key during an active
PREVIOUS | CONTENTS | NEXT
17On e Ta lk—T46G and T46GW desk ph one user guide
Page 18

Call History
For all other options, including:
Contact management
Call History maintains a list of all calls that were missed,
placed, received and forwarded. You can view and
delete call records, place a call, blacklist a contact,
or add a contact to your Local Directory from the Call
History screen.
View Call History:
1. Press the History soft key while the phone is idle.
2. Scroll
entry. You can also filter your view by navigating
or Forwarded Calls.
Call a contact from Call History:
3. Follow steps 1 and 2 above, then press the OK soft
key to dial the contact.
Delete an individual call record:
4. Follow steps 1 and 2 above, then press the Delete
soft key.
All Calls to highlight the desired
Missed Calls, Placed Calls, Received Calls
• Add to Local Directory
• Blacklist the contact
• View details
• Delete all call records
5. Follow steps 1 and 2 above, then press the Options
soft key.
6. Scroll
then press OK to accept the change.
to highlight the desired option,
Local Directory
The built-in phone directory can store the names and
phone numbers of your contacts. You can store up to
1,000 contacts and 48 groups in your phone’s Local
Directory. You can add new groups and contacts; edit,
delete or search for a contact; blacklist a number; move
contacts between groups; or dial a contact number
directly from the Local Directory.
Add a contact:
1. Press the Directory soft key when the phone is idle.
2. Scroll
select OK.
3. Press the Add soft key to add a contact.
4. Using the keypad, enter a unique contact name in
the Name field and contact numbers in the
corresponding fields.
5. Press the Save soft key to accept your changes.
to the desired directory group and
On e Ta lk—T46G and T46GW des k phone user gui de
PREVIOUS | CONTENTS | NEXT
18
Page 19

Search the directory for a contact:
Edit contact information:
1. Press the Directory soft key, then press
All Contacts.
2. Press the Search soft key and use the key pad to
enter the contact’s name or phone number. Contacts
whose name or number matches will appear on the
screen as you type.
Tip: If you know which group a contact belongs to,
tap the group, then scroll to find the contact you’re
looking for.
1. Press the Directory soft key, then press All
Contacts or the Group to which the contact
belongs.
2. Scroll
to highlight the contact you wish
to edit.
3. Press the Options soft key and select Detail from
the prompt list.
4. Edit the contact information using
to select
the desired contact fields you wish to change.
5. Press the Save soft key to accept the changes.
On e Ta lk—T46G and T46GW des k phone user gui de
PREVIOUS | CONTENTS | NEXT
19
Page 20

Delete a contact:
Blacklist a contact from your directory:
Remove contact from Blacklist:
1. Press the Directory soft key when the phone is idle,
and then press All Contacts or the Group to which
the contact belongs.
2. Scroll
to highlight the contact you wish
to delete.
3. Press the Options soft key and select Delete from
the prompt list.
4. Press the OK soft key when the LCD screen
prompts, Delete selected item?
1. Press the Directory soft key while the phone is idle.
2. Locate the contact you wish to blacklist by
selecting All Contacts or the Group to which the
contact belongs.
3. Use
to navigate to the contact and press
the Options sof t key.
4. Select Add to Blacklist.
1. Press the Menu soft key while the phone is idle.
2. Press the Directory soft key, then press Blacklist.
3. Scroll
to highlight the contact you wish to
unblock and press Options.
4. Select Add to Contacts and press OK to accept
the change.
On e Ta lk—T46G and T46GW des k phone user gui de
PREVIOUS | CONTENTS | NEXT
20
Page 21

Assign a contact to a group:
Delete a group:
Edit a group:
1. Press the Directory soft key, then press
All Contacts or the Group to which the
contact belongs.
2. Scroll
to highlight the contact you wish
to edit.
3. Press the Options soft key and select Detail from
the prompt list.
4. Scroll
to Group field and to select
the desired group.
5. Press the Save soft key to accept the changes.
Groups
Groups are a great way to organize large lists of
contacts. You can even assign each group its own
distinctive ringtone.
You can create and delete groups, edit group names,
add contacts and move contacts to dierent groups.
New groups appear on the left side of your screen
under Local Directory.
Create a group:
1. Press the Directory sof t key.
2. Press Add Group, and enter a group name using
the keypad .
3. If you would like to assign a unique ringtone to this
group, scroll to Assign Ringtone.
4. Press Add to accept your changes.
1. Press the Directory sof t key.
2. Scroll
to the group you wish to delete and
press Options.
3. Select Delete from the prompt list and press OK to
confirm or Cancel to cancel deletion.
1. Press the Directory sof t key.
2. Scroll
to the group you wish to rename and
press Options.
3. Press Detail and make your desired changes to the
name or ringtone using the keypad.
4. Press Save to accept the changes.
On e Ta lk—T46G and T46GW des k phone user gui de
PREVIOUS | CONTENTS | NEXT
21
Page 22

Move a contact to a dierent group:
Retrieve new Voice Mail messages:
1. Press the Directory soft key, then press All
Contacts or the Group to which the contact
belongs.
2. Scroll
move. Press the Options soft key, then select Detail
from the prompt list.
3. Scroll
the desired group.
4. Press the Save soft key to accept the change.
to highlight the contact you wish to
to Group field and to select
Voice Mail
Your T46G desk phone will notify you when you have
new Voice Mail messages with an onscreen message
and blinking red power light indicator.
1. Press
desk phone.
2. When prompted, enter your PIN followed by the
# key.
3. After you listen to your message, you can:
• Press 7 to erase.
• Press 8 to reply.
• Press 9 to save.
4. After all your messages have been played, you can:
• Press 1 to replay messages.
• Press 2 to send a message.
• Press 4 for personal options.
Set up Voice Mail:
1. Press
voice prompts.
2. Select your preferred language.
3. Create your four-digit passcode.
4. Record your name at the voice prompt.
5. Select a greeting, either personalized or standard.
Message button on the
Message button and follow the
System status, troubleshooting and other settings
On e Ta lk—T46G and T46GW des k phone user gui de
Check phone status.
The Status screen is where you will find general
information about your network, phone and account,
including MAC address, IP address, product ID,
hardware and firmware versions, and more.
To check status:
1. Press the Menu soft key while the phone is idle.
2. Use the
Status settings and press
3. The screen will display your IP address, MAC
address and firmware number. For more information,
scroll
soft key.
to More and press or the Enter
PREVIOUS | CONTENTS | NEXT
arrow keys to navigate to
to select.
22
Page 23

4. Scroll to Network, Phone or Accounts and
select
for additional status information:
• Network: IPv4 and MAC address
• Phone: hardware, firmware, version and
product ID
• Accounts: phone number associated with account
Reboot phone or reset it to factory settings.
Rebooting the phone or returning it to factory settings
often resolves issues that could not be solved through
other troubleshooting methods. Resetting the phone to
factory settings is also used to delete personal
information and contacts from returned devices so they
can be easily reassigned.
These are advanced settings for administrators only
and require an admin password.
Navigate to the Advanced settings screen:
1. Press the Menu soft key to open the Menu screen.
Reboot your phone:
1. From Advanced settings, scroll
Reboot and press
2. Scroll
soft key.
to Reboot and press or the Enter
to select.
3. Press the OK soft key to confirm.
to Reset &
2. Use the
Advanced settings and press
keys to navigate to
to select.
3. Enter administrator password and press the OK soft
key to confirm.
PREVIOUS | CONTENTS | NEXT
23On e Tal k—T4 6G and T46GW desk phon e user guide
Page 24

Reset your phone to factory settings:
1. From Advanced settings, scroll
Reboot and press
2. Select Reset to factory settings and press
the Enter soft key.
3. Scroll
4. Press OK soft key to confirm.
press the Save soft key to select.
to your desired reset option and
to select.
to Reset &
or
Specifications
• Dual-port Gigabit Ethernet
• Supports IPv4 and IPv6
• 4.3” 480 x 272 pixel color display with backlight
• Dimensions: 2.1 H x 9.7 W x 4.0 D
• Mode: all digital
• Color: black
• Number of contacts: 1,000
• Built-in USB port for optional BT40 Bluetooth USB
Stick (for hands-free Bluetooth headset)
• Paper label-free design
• PoE (802.3af) class support
• Supports expansion modules
• Stand with two adjustable angles
Features
Accessibility
• 6-way Conference Call support
• Multi-language
Bluetooth
• Bluetooth headset support with built-in USB port
(requires USB adapter)
Technology
• Dual-port Gigabit Ethernet
• IP assignment: static/DHCP/PPPoE
• IPv6
• OpenVPN, IEEE 802.1X
• PoE (802.3af) class support
• Supports bridging that allows T41P, T46G, T46GW
and T49G to monitor incoming calls
• Yealink Optima HD voice
Applications and software
• One Talk compatible
Display and input
• Dual-color (red or green) illuminated LEDs
• Illuminated mute, headset, hands-free
speakerphone keys
Music and audio
• Speakerphone
Product
• Set date/time manually or automatically
Tools
• Caller ID with Name
Form Factor
• 1 x USB2.0 port
• 1xRJ9 (4P4C) handset port
• 1xRJ9 (4P4C) headset port
• Desk phone
• Integrated stand with two adjustable angles
• Message Waiting Indicator (MWI)
• Power over Ethernet (IEEE 802.3af ), class 0
• Wall mountable
Network
• Advanced calling (HD voice)
PREVIOUS | CONTENTS | NEXT
24On e Ta lk—T46G and T46GW desk p hone user guid e
Page 25

Accessibility features
For hearing-impaired users
Feature Description
Adjustable
ringtone and
volume
Adjustable call
volume
Visual
notifications
Electronic
hookswitch
support
Headset memory
mode
Hearing-aid
compatible (HAC)
handsets
TTY support
Visual Message
Waiting Indicator
(MWI)
Choice of a variety of ringtones.
Volume of the ringer can also be
changed to suit needs.
While on a call, raise or lower the
volume of the voice on the far end and
of other phone sounds heard.
Indicators on the phone screen, such
as flashing bars or icons, indicate
when calls are incoming or outgoing,
or if a call is active or held. Indicators
can also indicate phone status and if
certain features are activated.
When using a headset that supports
electronic hookswitch (EHS), controls
on the headset can answer and end
calls. In addition, call volume can be
controlled and calls may be able to be
muted from the headset.
Headset can be set up to take all calls.
The standard handset of Yealink
phone isn't fully compatible with HAC.
If customers have HAC requirement,
Verizon can ship the additional
handset to replace only the current
standard handset of the phone.
Yealink phones support commercial
TTY devices (for example, Ultratec
Superprint).
• An indicator light on the phone
indicates that new messages are
waiting. Icons on the phone screen
also indicate that the phone has new
messages.
• At launch, Voice Mail Indicator
always shows “1”. See Known Issues
for more information.
For vision-impaired and blind users
Feature Description
Adjustable
backlight settings
Tactile five-key
with raised
bumps
Large keys
Physical line keys
Variety of feature
keys to press
Tactilediscernible
number, feature
and navigation
keys
Illuminated
feature keys
Change the backlight setting of the
screen by adjusting backlight settings.
The five-key has bumps that let user
easily discern the position of other
keys on the keypad.
Large keys on the phone console
enable easy access to phone features
and functions.
Yealink phones have physical line keys
to answer and end calls.
Many features on Yealink phones are
accessible by pressing feature keys
on the phone console.
Keys on the phone console are easily
discernible by their size and shape.
Many feature keys are illuminated
when activated, providing alerts when
a feature is enabled.
For mobility-impaired users
Feature Description
Yealink phones can auto-answer calls,
so users don’t have to lift a handset,
Auto-answer
Dedicated
headset jack that
enables the
auto-answer
function
Touch screen
Built-in
speakerphone
Adjustable phone
stand
push a button, or tap a key to answer
a call. If this feature is enabled, phone
will automatically answer incoming
calls using the speakerphone.
Headset can be set up to take all calls.
Certain Yealink phones have large
touch screens to tap, swipe and press
to perform phone functions and
activate features.
A built-in speakerphone allows users
to use the phone without having to
use a handset or headset.
Yealink phones have adjustable
stands, so the phone can sit at a
comfortable angle on the desktop.
On e Ta lk—T46G and T46GW des k phone user gui de
PREVIOUS | CONTENTS | NEXT
25
Page 26

Compatible accessories
EXP40 EXP40 Button Expansion Module
WF40 WF40 Wi-Fi USB Stick
BT40 BT40 Bluetooth USB Stick
EHS36
T46GWMB T46G Wall Mount Bracket
EXP40WMB EXP40 Wall Mount Bracket
PS5V2000 T46G Power Supply
CORD Replacement Handset Cord
T46GHS T46G Replacement Handset
EHS36 IP Phone Wireless Headset
Adapter
Visit the Verizon Wireless website for a list of
compatible headsets from popular manufacturers.
On e Ta lk—T46G and T46GW des k phone user gui de
PREVIOUS | CONTENTS | NEXT
26
Page 27

Important customer information
To avoid electric shock, use caution when connecting
cables. For example, do not connect safety extra-low
voltage (SELV) circuits to telephone-network voltage
(TNV) circuits. LAN ports contain SELV circuits, and
WAN ports contain TNV circuits. Some LAN and WAN
ports both use RJ-45 connectors.
To avoid electric shock, do not operate the product or
connect or disconnect cables during electrical storms.
To avoid electric shock, do not use this product in or
near water.
To reduce the risk of fire or overheating, keep this
product in well-ventilated areas, away from radiators
or other heat sources. Do not block cooling vents.
The plug-socket combination must be accessible
at all times because it serves as the main powerdisconnecting device.
Use only the manufacturer-provided AC adaptor
approved for use with this product. Use of another
AC adaptor may cause a fire or explosion.
This product relies on short-circuit (overcurrent)
protection installed in your home or oce. Ensure that
a fuse or circuit breaker no larger than 120 VAC, 15A
U.S. is used on the phase conductors (all current
carrying conductors).
Unplug this product from the wall outlet and refer
servicing to qualified service personnel under the
following conditions:
1. When the power cord or plug is damaged or frayed.
2. If liquid has been spilled into the product.
3. If the product has been exposed to rain or water.
4. If the product does not operate normally when
the operating instructions are followed. Adjust only
those controls that are covered by the operating
instructions, since improper adjustment of other
controls may result in damage and will often require
extensive work by a qualified technician to restore
the product to normal condition.
WEEE warning
To avoid the potential eects on the environment and
human health as a result of the presence of hazardous
substances in electrical and electronic equipment,
end users of electrical and electronic equipment
should understand the meaning of the crossed-out
wheeled bin symbol. Do not dispose of WEEE as
unsorted municipal waste and have to collect such
WEEE separately.
Customer feedback
We are striving to improve our documentation quality,
and we appreciate your feedback. Email your opinions
and comments to DocsFeedback@yealink.com.
GNU GPL information
Yealink SIP VP-T49G IP phone firmware contains
third-party software under the GNU General Public
License (GPL). Yealink uses software under the specific
terms of the GPL. Please refer to the GPL for the exact
terms and conditions of the license.
The original GPL license, source code of components
licensed under GPL and used in Yealink products can
be downloaded online: http://www.yealink.com/
GPLOpenSource.
Copyright
Copyright © 2016 YEALINK NETWORK
TECHNOLOGY CO., LTD.
Copyright © 2016 Yealink Network Technology CO.,
LTD. All rights reserved. No parts of this publication
may be reproduced or transmitted in any form or by any
means, electronic or mechanical, photocopying,
recording, or otherwise, for any purpose, without the
express written permission of Yealink Network
Technology CO., LTD. Under the law, reproducing
includes translating into another language or format.
When this publication is made available on media,
Yealink Network Technology CO., LTD. gives its
consent to downloading and printing copies of the
content provided in this file only for private use but not
for redistribution. No parts of this publication may be
subject to alteration, modification or commercial use.
Yealink Network Technology CO., LTD. will not be liable
for any damages arising from use of an illegally
modified or altered publication.
Warranty
The specifications and information regarding the
products in this guide are subject to change
without notice. All statements, information, and
recommendations in this guide are believed to be
accurate and presented without warranty of any kind,
express or implied. Users must take full responsibility
for their application of products.
Yealink Network Technology CO., LTD. makes no
warranty of any kind with regard to this guide,
including, but not limited to, the implied warranties of
merchantability and fitness for a particular purpose.
Yealink Network Technology CO., LTD. shall not be
liable for errors contained herein nor for incidental
or consequential damages in connection with the
furnishing, performance, or use of this guide.
Important 911 emergency response information
If you call 911, emergency service responders will be
sent to the registered location you provided when you
provisioned this phone. An incorrect address could
result in incorrect routing of 911 calls and dispatch of
emergency personnel to the wrong location, so please
contact us if your registered location is not accurate.
Data and voice functionality (including the ability to
make and receive 911 calls) will not be available during
a power outage, broadband connection failure or other
service disruption. Neither Verizon Wireless nor any of
its aliates shall be liable for any service outage and/or
inability to access emergency service personnel, nor
shall Verizon Wireless or any of its aliates be
responsible for the acts or omissions of emergency
response center personnel.
On e Ta lk—T46G and T46GW des k phone user gui de
PREVIOUS | CONTENTS | NEXT
27
Page 28

Declaration of conformity
Hereby, Yealink Network Technology CO., LTD.
declares that this phone is in conformity with the
essential requirements and other relevant provisions of
the CE, FCC. You can find the CE and FCC information
from the label on the back of the IP phone.
CE mark warning
This device is marked with the CE mark in compliance
with R&TTE Directive 1999/5/EC.
Part 15 FCC Rules
Any changes or modifications not expressly approved
by the party responsible for compliance could void the
user’s authority to operate the equipment.
This device is compliant with Part 15 of the FCC Rules.
Operation is subject to the following two conditions:
1. This device may not cause harmful interference.
2. This device must accept any interference
received, including interference that may cause
undesired operation.
Class B digital device or peripheral
Note: This equipment has been tested and found to
comply with the limits for a Class B digital device,
pursuant to Part 15 of the FCC Rules. These limits are
designed to provide reasonable protection against
harmful interference in a residential installation. This
equipment generates, uses and can radiate radio
frequency energy and, if not installed and used in
accordance with the instructions, may cause harmful
interference to radio communications. However, there
is no guarantee that interference will not occur in a
particular installation. If this equipment does cause
harmful interference to radio or television reception,
which can be determined by turning the equipment o
and on, the user is encouraged to try to correct the
interference by one or more of the following measures:
1. Reorient or relocate the receiving antenna.
2. Increase the separation between the equipment
and receiver.
3. Connect the equipment into an outlet on a
circuit dierent from that to which the receiver
is connected.
4. Consult the dealer or an experienced radio/TV
technician for help.
Important safety precautions
Please read the following important safety notices and
instructions before installing or using the product.
• A DANGER warning refers to situations that could
cause bodily injury.
• A CAUTION warning refers to situations that could
result in equipment malfunction or damage.
1. Follow all warnings and instructions marked on
the product.
2. Unplug this product from the wall outlet
before cleaning.
Do not use liquid cleaners or aerosol cleaners.
Use an antistatic cleaning pad for cleaning.
3. Do not use this product near water.
4. Do not place this product on an unstable cart,
stand or table. If the product falls, it could be
seriously damaged.
5. This product should be operated using the type of
power indicated on the marking label. If you are not
sure of the type of power available, consult your
dealer or local power company.
6. Do not allow anything to rest on the power cord.
Do not locate this product where people will walk on
the cord.
7. Never push objects of any kind into this product
through cabinet slots as they may touch dangerous
voltage points or short-out parts that could result in
a fire or electric shock.
8. Never spill liquid of any kind into or onto the product.
9. Do not attempt to service this product yourself, as
opening or removing covers may expose you to
dangerous voltage points or other risks.
10. Refer all questions regarding servicing of this
product to qualified service personnel.
Danger–electric shock and fire
Electric current from power, telephone and
communication cables is hazardous, and could
result in electric shock and/or fire.
Learn more.
For more information, visit
www.onetalk.com
On e Ta lk—T46G and T46GW des k phone user gui de
PREVIOUS | CONTENTS | NEXT
28
Page 29

T46 desk phone navigation guide
(soft key menu A)
This navigation guide shows the hierarchy of
screens for the Soft Key menu. You can refer to this
diagram for a visual representation of the fl ow of the
soft key screens and as a reference guide when you
need to locate specifi c menu items.
T46 desk phone navigation guide
History
All; Missed; Placed; Received; Forward
Number/Name Date/Time
Back Delete Option Send
Options
Detail
Call Detail
Name
Number
Time
Line
Duration
Back Edit OK
Add to Contacts
Add to Blacklist
Delete All
Cancel OK
Add to Contact
Name
Work Number
Mobile Number
Other Number
Account
Ring
Group <>
Photo
Back ABC Save
Delete
Idle Screen
History
Directory
DND
Menu
Add Group
Enter Name/Ring
Back ABC Delete Save
Enter Name/Number
Back ABC Delete
Search Result
Name/Number
Back Add Options OK
Add to Blacklist
Cancel OK
Search
Options
Detail
Delete
Directory—All Contacts
All Contacts Group
Back Add Group Search Enter
Enter
All Contact/Group
Contact/Number
Back Add Options OK
Add to Contact
Name
Work Number
Mobile Number
Other Number
Account
Ring
Group <>
Photo
Back ABC Add Delete
Option
Detail
Delete
Delete All
Add to Blacklist
Cancel OK
PREVIOUS | CONTENTS | NEXT
29On e Tal k—T4 6G and T46GW desk phon e user guide
Page 30

T46 desk phone navigation guide
(soft key menu B)
This navigation guide shows the hierarchy of
screens for the Soft Key menu. You can refer to this
diagram for a visual representation of the fl ow of the
soft key screens and as a reference guide when you
need to locate specifi c menu items.
Basic Settings
Language
Time & Date
Display
Sound
Bluetooth®
Wi-Fi
Back Search Enter
Wi-Fi
ON/OFF
Wireless Status
Bluetooth
ON/OFF
Sound
Ringtone
Key Tone
Wireless Status
Profi le Name
Signal Strength
MAC Address
Security Mode
Encryption Type
Transmit Rate
Frequency
SSID
Channel
QoS
Language
Select
Time & Date
General
DHCP
Time & Date
Idle Screen
History
Directory
DND
Menu
Display
Backlight
Contrast
Wallpaper
Screen Saver Mode
Menu
Status
Directory
History
Messages
Basic Settings
Advanced Settings
Exit Enter
Network
WAN Port
VLAN
802.1x Settings
LLDP
Back Enter
EAP-PEAP/MSCHAP
EAP-TTL/EAP-MSCHAPv2
EAP-EAP/GTC
VPN
CDP
NAT
802.1x Mode
Disable
EAP-MDS
EAP-TLS
Identify
Advanced Settings
Network
Reset & Reboot
Back Enter
IPv4/6 Mode
DHCP VLAN
WAN Port
IPv4
IPv6
VLAN
WAN Port
PC Port
VPN Active
ON/OFF
Network
IPv4
IPv6
IP Mode
MAC
Status
IPv4
IPv6
MAC
Firmware
More
Back
More
Network
Phone
Accounts
Back
Accounts
Line 1
Line 2–16
Phone
Product Name
Hardware
Firmware
Confi g Version
Prod ID
MAC
Device Cert
One Talk–capable desk phone must be purchased from Verizon to suppor t some of these features. Features available on select phones. Activation of the One Talk feature and broadband connection is required.
Network details & coverage maps at vz w.com . © 2017 Verizon. UG0420317
PREVIOUS | CONTENTS
30On e Tal k—T4 6G and T46GW desk phon e user guide
 Loading...