

Page 1
Store ‘n’ Play
MP3 PLAYER
USER MANUAL VM-399
Page 2

Regulatory Information:
Declaration of Conformity
Model VM-399
This device complies with part 15 of FCC rules. Operation is subject to the following
two conditions:
(1) This device may not cause harmful interference, and
(2) This device must accept any interference received, including interference that may cause
undesired operation.
FCC Notice:
This equipment has been tested and found to comply with the limits for a Class B digital
device, pursuant to part 15 of the FCC Rules. These limits are designed to provide reasonable
protection against harmful interference in a residential installation. This equipment generates,
uses, and can radiate radio frequency energy and, if not installed and used in accordance with
the instructions, may cause harmful interference to radio communications. However, there is no
guarantee that interference will not occur in a particular installation. If this equipment does cause
harmful interference to radio and television reception, which can be determined by turning the
equipment off and on, the user is encouraged to try to correct the interference by one or more of
the following measures:
-Reorient or relocate the receiving antenna.
-Increase the separation between the equipment and receiver.
-Connect the equipment into an outlet on a circuit different from that to which the receiver is
connected.
-Consult the dealer or an experienced radio/ TV technician for help.
CE Notice:
If the product suddenly has no response or power off, it may be caused by electrostatic discharge.
If this circumstance, please follow the procedures below for recovery:
- Switch off the unit, if the unit has no response.
- Turn on the unit again
For Customers in Europe
This product conforms to the following European Directives:
89/336/EEC (EMC Directive)
This product complies with EN55022/A1:2000 and EN 55024/A1:2001 for use in the following
areas: residential, commercial and light industrial
1
Page 3

Contents
Handling Precaution ......................................................................................................................3
Product Features ............................................................................................................................4
Package Contents ...........................................................................................................................5
Product Drawing & Function Keys ..............................................................................................6
Description of LCD display ...........................................................................................................7
Operation Instructions of Function Buttons ...............................................................................8
Connecting to the Computer .......................................................................................................10
Basic Functions.............................................................................................................................12
- Power on/off ................................................................................................................................12
- Volume setting .............................................................................................................................12
- Mode switch ................................................................................................................................13
- Lock function ............................................................................................................................... 13
- Play music .................................................................................................................................... 13
- FM radio ......................................................................................................................................14
- Record function ...........................................................................................................................15
Additional Functions ...................................................................................................................16
- A-B repeat ....................................................................................................................................16
- EQ setting ....................................................................................................................................16
- Repeat mode ................................................................................................................................16
- Encoding rate setting ...................................................................................................................16
- File management .......................................................................................................................... 17
Firmware Upgrade .......................................................................................................................18
System Setting ..............................................................................................................................19
- Interface language ........................................................................................................................ 19
- Auto shut off preset ......................................................................................................................19
- Timing shut off ............................................................................................................................19
- Backlight time .............................................................................................................................. 19
- Contrast ........................................................................................................................................ 20
- Scroll speed .................................................................................................................................. 20
- Default setting .............................................................................................................................. 20
- About (this device) .......................................................................................................................20
Main Menu Tree Diagram ...........................................................................................................21
Trouble Shooting ..........................................................................................................................22
Specifi cations ................................................................................................................................23
Technical Support & Warranty ..................................................................................................24
2
Page 4

Handling Precaution
Before using this device, please carefully read and understand the safety instructions listed below.
1. Read carefully all the attached user’s materials, and fully understand the operation guide and
warnings of this device.
2. Check if the contents in the packaging of the device are consistent to the packing list.
3. When it is left unused for a long period of time, the battery should be removed. If liquid
leakage from the battery is detected and the device works abnormally, please do not dismantle
the device for cleaning, this may lead to damage to the device. In irreparable cases, please
contact Verbatim technical support. Verbatim shall take no liability for damages resulting from
battery liquid leakage and resulting damage.
4. This device is a hi-tech electronic product, which should be kept away from heat, cold and
moisture when being used. Special care should be taken to observe the following points:
a) The device should not be exposed to strong sunlight, and should be kept away from
heat sources.
b) Avoid using the device outdoor at low temperature for a long period of time.
c) The device should not be placed in the environment of extra-humidity; Care should be
taken so that water and other liquids are not spilled onto the device. If it happens, the device
should be switched off immediately.
d) The device should not be used in dusty environments.
e) Do not clean the device with any type of detergent containing chemical elements or other
solutions in order to avoid damage from corrosion or moisture. If necessary, please clean
using a soft cloth.
5. Do not use the device in strong magnetic fi eld, strong electric charge or electromagnetic
interference environment in order to prevent data from being lost.
6. Do not subject the device to drops or hard impacts which may lead to damage.
7. The device should be opened under no circumstances. The manufacturer takes no liability for
damages resulting from unauthorized tampering.
3
Page 5

Product Features
- 1GB on board memory
- Supports WMA and MP3 fi le formats
- Bit rates supported 32kbps - 320kbps constant & variable
- Windows Media DRM 9 & DRM 10 support
- 2 Colour OLED Display
- ID3 Tag: Song title and Artist
- Digital FM tuner with up to 30 preset channels
- FM recording
- Voice recorder with built in microphone
- 2 x earphone jack
- 6 EQ modes: Normal, Rock Jazz, Pop, Classic & Bass
- 5 Play modes: Normal, Repeat, Repeat all, Shuffl e, & Repeat Shuffl e
- Preset Sleep timings
- USB connection via supplied cable
- USB2.0 High-speed data transfer
- Compatible with USB1.1 & USB2.0 ports
- 1 x AAA battery
- Battery Life up to 15 hours
4
Page 6

Package Contents
1. Store ‘n’ Play MP3 Player VM-399
2. Stereo Earphones
3. Mini USB Cable
4. AAA Batttery
5. Carry Strap
6. Quick Start Guide
7. CD Containing Win 98SE Driver and User Manuals
5
Page 7
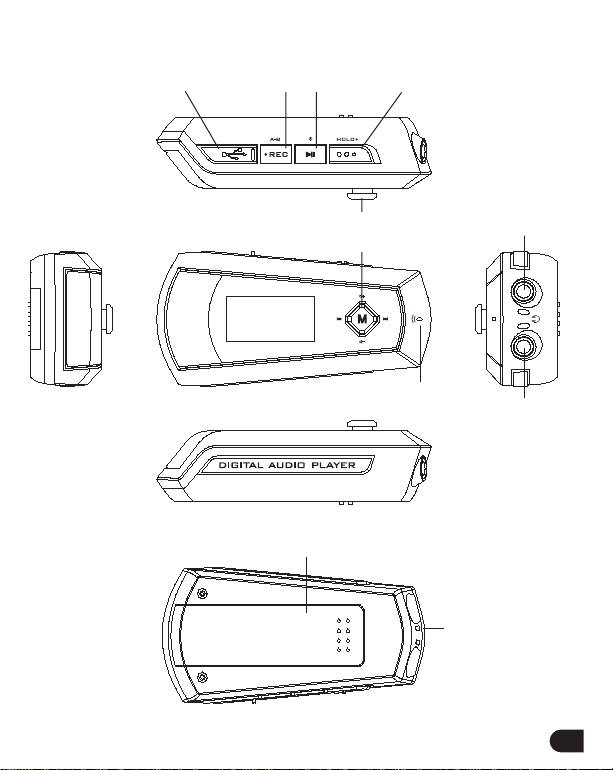
Product Drawing & Function Keys
Mini USB Jack Record Button Play Button Key Lock
5-way key-
up, down, left, right menu
Battery Compartment
Earphone Jack 1
MIC
Earphone Jack 2
Lanyard
6
Page 8
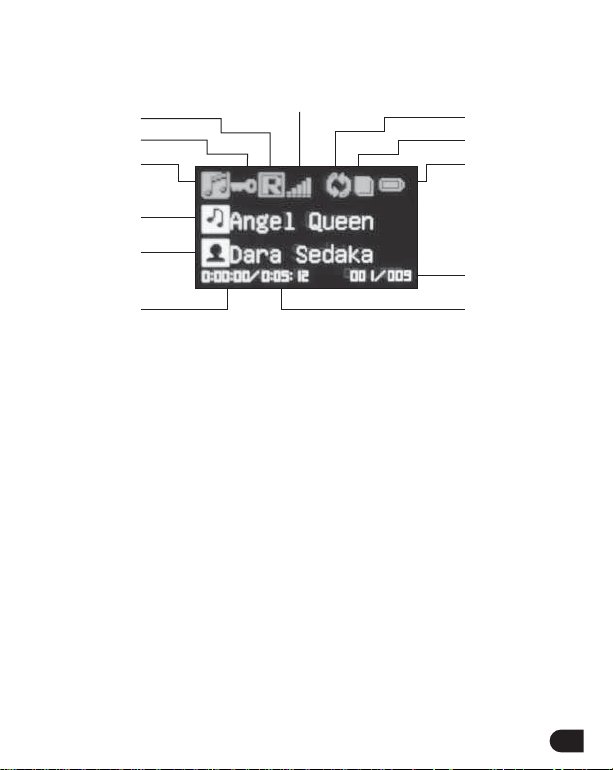
Description of LCD Display
Equaliser
Key lock
Mode
Song name
Album Information
Elapse time
Volume indicator
Play mode
Play status
Power indicator
Track information
Total time of the song
7
Page 9

Operation Instructions of Function Buttons
Short press ----- press a button for less than one second
Long press ----- press a button for more than one second
Function Buttons Status Button
Power on Long Power off
Power off Short Power on
Stop/Pause Short Play fi les
Play Short Pause
Pause Long Scan fast forward
Stop Long Continuously next track
Stop/Pause Short Move to the next track
Play Long Scan fast forward
Play Short Move to the next track
Menu Short Enter sub menu
FM
(normal radio mode)
FM
(normal radio mode)
FM
(preset radio mode)
Pause Long Fast search backwards
Stop Long Continuously previous
Stop/Pause Short Move to the previous track
Play Long Fast search backwards
Play (after fi rst 5 sec
play back)
Press Mode
Long Scan broadcasting
Short Scan forward with
Short Continuously selecting
Short Move to the beginning of
Functions
frequency from low to high
0.05MHz as a unit
preset broadcasting stations
track
the current fi les
8
Page 10

Operation Instructions of Function Buttons
Function Buttons Status Button
Press Mode
Play (within 5 sec after
Short Move to the last fi le
play start
Menu Short Enter the previous stage
FM
Long Scan broadcasting
(normal radio mode)
FM
Short Scan forward with
(normal radio mode)
FM
Short Continuously selecting
(preset radio mode)
Stop/Pause/Play/FM Long Volume up continuously
Stop/Pause/Play/FM Short Volume up
Menu Short Move to the previous
Stop/Pause/Play/FM Long Volume down continuously
Stop/Pause/Play/FM Short Volume down
Menu Short Move to the next
Stop/Pause/Play Long Go to the mode select menu
M
Stop/Pause/Play Short Get into setting menu
Menu Short Confi rm the selection
Stop/Pause/FM Short Start recording
REC
Play Short A-B repeat
Record Short Stop recording
Sleep/Stop/Pause/Play/Record
Sleep/Stop/Pause/Play/Record
On
Off
Functions
menu
frequency from low to high
0.05MHz as a unit
preset broadcasting stations
menu item
menu item
Function buttons idle
Function buttons resume
9
Page 11

Connecting to the computer
Connect the player to the PC with the provided USB cable.
Computer system requirement
1. Microsoft Windows 98SE/Me/2000/XP
2. CD-ROM drive
3. Pentium CPU above 233MHz
4. With RAM memory above 32MB (if the operating system is Windows XP, the RAM should
be above 64MB)
5. Hard disk space should be above 20MB
6. Port should be USB 1.1 or above
7. Connecting to internet (necessary only when the software needs to be fi rmware upgraded)
10
Page 12

File Upload and Download
After the device is connected to the computer for uploading / downloading, no special operation
other than simple “drag-drop” is needed.
1. Connect the player with your computer by the included USB cable.
2. Double click “my computer” in Windows, you will fi nd a new icon “removable disk”, which
represents your player.
3. Drag your fi les to “removable disk”.
4. After the transfer is completed, disconnect your player.
5. Now you are ready to play music.
Disconnecting the Player from the PC
To disconnect the player from the USB port click the ‘Safely Remove Hardware’ icon in the
Windows task bar.
From the pop up message / option click on ‘Safely Remove USB Mass Storage Device’.
When the ‘Safe to Remove Hardware’ message pops up you can disconnect the MP3 player.
11
Page 13

Basic Functions
Power on/ off
Power on
Press “play/pause” button to start device.
Start fi gure
The following is the interface when powered on:
Shut off
1. Long press “play” button, the device will be shut off, as the progress bar displayed below.
2. When the progress bar is full, the device will shut off automatically.
3. If releasing the “play” button before the progress bar is full, the device will resume to the former
status. Designed this way, the device will not be shut off accidentally.
Volume setting
Adjust the volume by using “VOL+” and “VOL-” on the main device.
1. Press the button briefl y to adjust the volume section by section; long press on the button to
adjust the volume continuously.
12
Page 14

Basic Function
Mode switch
This device has three working modes: music mode, FM mode and voice mode.
Press “M” to enter “mode selection” item, press “vol+” button or “vol-” button to select desired
mode among “music mode”, “FM” and “voice mode” ,or select “return” to keep the original mode,
press “M” button again to enter that mode.
Lock function
When switching on “HOLD” lock button, all the functions cannot be operated. Switch on the
device when it is shut off , “locked” will be displayed. When it is playing, there will be an icon of
“locked” on the upper left of screen.
Play music
Play/pause
The device will enter music mode or voice mode when it is normally started, press “ ” button to
begin playing when it is playing, press “ ” button to pause playing;The fi le is in STOP status
when the device is normally started.
1. Select play fi le
1) When it is pause/stop, short press “ ” button or “ ” button to select fi les in the
music bank.
2) When it is playing, short press “ ” button briefl y to play the next fi le, while press “ ”
button within 5 seconds to play the previous fi le, and after 5 seconds to play the current fi les
from the beginning.
2. Fast forward/fast backward
Press “ ” button or “ ” button for more than one second to begin fast forward or fast
backward.
13
Page 15

Basic Function
FM radio
Important:
Only when earphone is plugged in earphone jack 1,can the FM radio be received.
Normal FM mode
In normal FM mode, you can scan broadcasting station automatically or manually. There are
“mode, auto scan, frequency preset, frequency save, record sensitive, frequency selection,
system setting and return” are available.
Menu under normal FM mode
Mode: Switch working mode
Auto scan: scan all the frequency automatically
Frequency preset: switch to frequency preset mode
Frequency save: save the current radio frequency
Sensitivity: set the sensitivity of auto scan
Frequency selection: switch between common frequency and campus frequency
Setting: get into the system setting menu. Please refer to “system setting” part in this manual
for details.
Preset FM mode
You can select a FM program from the pre-saved ones in preset FM mode. “mode selection,
auto scan, normal mode, channel deleting, sensitivity , frequency selection, system setting and
return” are available.
Menu in preset FM mode
Mode selection: switch working mode
Auto scan: scan all the frequency automatically
Normal mode: switch to normal FM mode
Channel deleting: deleted the saved FM channel
Sensitivity: set the sensitivity of auto scan
Frequency selection: switch between common frequency and campus frequency
Setting: get into the system setting menu. Please refer to “system setting” part in this manual
for details.
14
Page 16

Basic Function
Broadcast auto scan
In preset FM mode, press “M” button enter menu, and select “auto scan”, the digital player will
start to scan broadcasting stations in all the frequencies, and the scanned broadcasting stations
will be automatically stored in preset channels.
Record Function
FM record
In FM mode,the programs from FM station can be recorded in MP3 format.
1) Press “Rec” button to begin recording
2) Press “Rec” button again to stop recording
3) Press “ ” button to pause the recording
Recorded fi les are stored as default fi les FXXX.MP3, XXX begins with 001
Voice record
In voice mode, it can record voice via built-in Mic for a long time.
1) Press “Rec” button to begin recording
2) Press “Rec” button again to stop recording
3) Press “ ” to pause recording
4) Recorded fi les are stored as default fi les VXXX.WAV, XXX begins with 001
Play record
All the voice fi les (ADPCM format)recorded by built-in Mic will be saved in the menu of
“voice mode”, FM fi les will be saved in the menu of “music mode”. The operation of which is the
same with play operation in “music mode” and “voice mode”.
15
Page 17

Additional Functions
A B repeat
When music fi le or voice fi le is being played, press REC/A-B button to set the start (point A) for
repetition, and press REC/A-B button again to set the ending point (point B), the device will start
A-B repeat. Press REC/A-B button again to end A-B repeat, and continue playing the current fi le.
EQ setting
Select the playing EQ. “normal, rock, jazz, pop, classic, bass” are available.
You can also select “return” to keep the original settings.
Play mode
The play modes of digital player are “normal, repeat one, repeat all, shuffl e, random shuffl e and
return”. You can select “return” to keep the original setting.
Normal: play all the music with the by turns.
Repeat one: repeat playing the current music fi le
Repeat all: repeat playing all the music fi les by turns
Shuffl e: randomly play one of all the music fi les
Random shuffl ed: select one music fi le from all, and repeat playing it
Return: keep the current selected play mode
Encoding rate setting
Setting the Encoding rate of MP3 fi les when MP3 is encoded while recording.”48Kbps, 96Kbps,
128Kbps”are available. You can also select “return” to keep the original settings.
16
Page 18

Additional Functions
File management
Delete
1. Press “M” button to enter function menu, select “delete fi les” function.
2. Press “M” button to enable delete function;
3. Search the needless fi les by using “ ” or “ ” button, and select “yes” to delete the fi le;
select “no” to return to the menu. Or press “REC” button to return to play interface.
4.When the message “fi le deleted” is display , press “REC” button to return to main menu.
Note:
Read-only fi les in the player cannot be deleted, “delete failure” will be displayed when they are
being deleted.
17
Page 19

Firmware upgrade
Firmware upgrade fi le and upgrade procedures are available from the below website.
www.verbatim-europe.com or www.verbatim.com
You are recommended to check the availability of new fi rmware release version to perform
upgrade periodically to enhance the performance of the player.
Notes:
1) Disconnection during fi rmware upgrading may cause failure to the device.
2) Do not change the fi le name or extension of the upgraded fi les.
18
Page 20

System Setting
System setting selection menu
In all working modes, the following system settings can be conducted “Interface language, auto
shut of f, timing shut off, backlight time, contrast, scroll speed, default setting, about and return”
OSD language
Set the operation interface display language. “English, France, Spanish, Portuguese, German,
Italy” are available. You can also select “return” to keep the original settings.
Auto shut off
Use to set the auto shut off time for digital player. When the idle time of the player reaches the
preset shut off time, the digital player will shut off automatically to save energy. The auto shut of
choices are “off, 1 minute, 2 minutes, 3 minutes, 5 minutes”. You can also select “return” to keep
the original settings.
Timing shut off
Preset auto shut of f time. When the time runs out, the device will shut off automatically. “Off, 15,
30, 60, 90”minutes are available. You can also select “return” to keep the original settings.
Note:
Voice mode do not support character scroll function.
Backlight time
It is used to set the time of OLED backlight after each operation, “10 seconds, 30 seconds,
60 seconds, permanent” are available. You can also select “return” to keep the original settings.
Note:
1. When the player is running out of power , the backlight will become dimmer. The battery
should be replaced to make it resume the normal status.
2. When record is underway, the screen will switch to half-bright automatically.
19
Page 21

System Setting
Contrast
It is used to set the contrast of OLED,totally 10 grades:”1,2,3,4,5,6,7,8,9,10”are available.
You can also select “return” to keep the original settings.
Scroll speed
If the length of character string is too long to be displayed by OLED, OLED will scroll disp laying
the character string. The speed of scroll can be selected among “off, slow, normal, and fast. You
can also select “exit” to keep the original settings.
Default setting
If “yes” is selected, the digital player will resume to system default setting; if “no” is selected, the
digital player will keep the current setting.
About (this device)
Used to display the version information, capacity and remaining capacity of this device.
20
Page 22

Main Menu Tree Diagram
Mode selection
EQmode
Play mode
MENU
Deleting files
Recording
Bit Rate
System setting
Music mode
Voice mode
FM mode
Normal
Repeat one
Repeat all
Shuffle
Random shuffle
48kbps
96kbps
128kbps
OSD language
Auto shut off
Tining off
Backlight time
Contrast
Scroll speed
Default setting
About
Normal
Rock
Jazz
Pop
Classic
Bass
21
Page 23

Trouble Shooting
1. The device refuses to work or OLED does not display.
• Check if there is enough batttery power
• Check if the polarities of batery are correct
2. The device does not respond to button press
• Check the “hold” button is in “on” position. If it is in “off” position, button press does
not work
3. It cannot play MP3 fi les
• Check if there is an MP3 fi le in the RAM memory
• Check if the player s in music mode
4. It cannot play voice fi les
• Check if there is a voice fi le in the RAM memory
• Check if the player is in voice mode
5. A-B repeat fails
• This function only works when a music or voice fi le is being played
6. After device is connected to the computer, there is not a player icon on the computer
• Make sure that the drive program has been correctly installed, and the player is powered
on. Connect USB jack corerectly to the computer. Make sure that the device has been
correctly installed by checking the “device manager” of the computer.
7. How to resume the default value of the player
• Select “resume defaut setting” in the system of the device and select “yes” to resume
the default value.
22
Page 24

Specifi cation
Dimensions (L x W x H) 74 x 35 x 18.6 mm
Net Weight 35.5g (battery not included)
Internal memory capacity 1GB
Power supply One alkaline battery 1.5V AAA
PC interface Mini USB (USB 2.0)
FM 88-108mhz, auto/manual scan, 30 channels are preset
Play MP3, WMA , support VBR
Digital recording format
Build-in Mic Capacitive Mic
Signal-to-noise ratio 85dB
Range of sound frequency 100Hz - 20Hz
Battery life About 12 hours
EQ mode Normal, Rock, Jazz, Classic, Pop, Bass
Play mode Normal, Repeat one, Repeat all, Shuffl e, Random shuffl e
ADPCM (32kpbs),
MP3 (48kbps, 96kbps, 128kbps, encoding rate available)
Note:
The above mentioned specifi cations of digital audio player are subject to change for the purpose of
performance upgrading without notice.
23
Page 25

Technical Suppport
Europe: For technical support in Europe e-mail
drivesupport@verbatim-europe.com or call 00 800 3883 2222 in the following countries: Austria,
Belgium, Denmark, Finland, France, Germany, Hungary, Italy, Luxembourg, Monaco, Netherlands, Norway, Poland, Portugal, Republic of Ireland, Spain, Sweden and Switzerland.
All other countries call +353 61 226586
US/Canada: For technical support in the U.S. and Canada email
techsupport@verbatim.com or call 800-538-8589
Verbatim Limited Warranty:
Verbatim Corporation warrants this product to be free from defects in material and
workmanship for a period of 1 year from date of purchase (a period of 2 years applies in countries
in the European Union). This warranty excludes batteries. If this product is found to be defective
within the warranty period, it will be replaced at no cost to you. You may return it with your
original cash register receipt to the place of purchase or contact Verbatim.
In the U.S and Canada, call 800-538-8589 or email techsupport@verbatim.com
In the following European counties Austria, Belgium, Denmark, Finland, France, Germany,
Hungary, Italy, Luxembourg, Monaco, Netherlands, Norway, Poland, Portugal, Republic of
Ireland, Spain, Sweden and Switzerland call 00 800 3883 2222. All other European countries call
+353 61 226586. You can email drivesupport@verbatim-europe.com.
Product replacement is your sole remedy under this warranty, and this warranty does not apply to
normal wear or to damage resulting from abnormal use, misuse, abuse, neglect or accident or to
any incompatibility or poor performance due to the specifi c computer software or hardware used.
VERBATIM WILL NOT BE LIABLE FOR DATA LOSS OR ANY INCIDENTAL,
CONSEQUENTIAL OR SPECIAL DAMAGES, HOWEVER CAUSED, FOR BREACH OF
WARRANTIES OR OTHERWISE. This warranty gives you specifi c legal rights and you may also
have other rights which vary from state to state or country to country.
NOTE:
Verbatim Corporation may at any time revise the content of this user guide without further notice.
24
 Loading...